New York Mysteries 1: Secrets of the Mafia – An adventure game with object search and puzzles, in which you will plunge into a mystical investigation of mafia secrets with daring journalist Laura James. New York, 1955. The city has become dangerous, with the mob looking to take over. But something much more dangerous has recently emerged. In recent days, five mob bosses have disappeared under unclear circumstances. A strange green substance and a butterfly are the only clues found at the scene of the disappearance. But that’s not what has citizens scared. Children started disappearing in the town, and before they disappeared they all drew the same butterfly. This forced both detectives and journalists to start investigating. Go through a lot of stunning locations, solve and a variety of puzzles. If you are stuck and do not know how to pass any of the locations, on our site you can watch the walkthrough of the game New York Mysteries 1: Secrets of the Mafia, and save the missing people.
New York Mysteries 1: Secrets of the Mafia – Walkthrough
Here you can see the full walkthrough of New York Mysteries 1: Secrets of the Mafia, namely the main story and the bonus chapter.
The Museum
I received a phone-call from a man named Bishop. He said that he has information about events connected to the disappearance of the children and mafia bosses. Bishop asked me to meet him in the museum. When I approached the museum, I saw police cars driving away from the main entrance. It seems something has happened in there. I have to find a way inside and get more information. I hope I get a good article out of this.
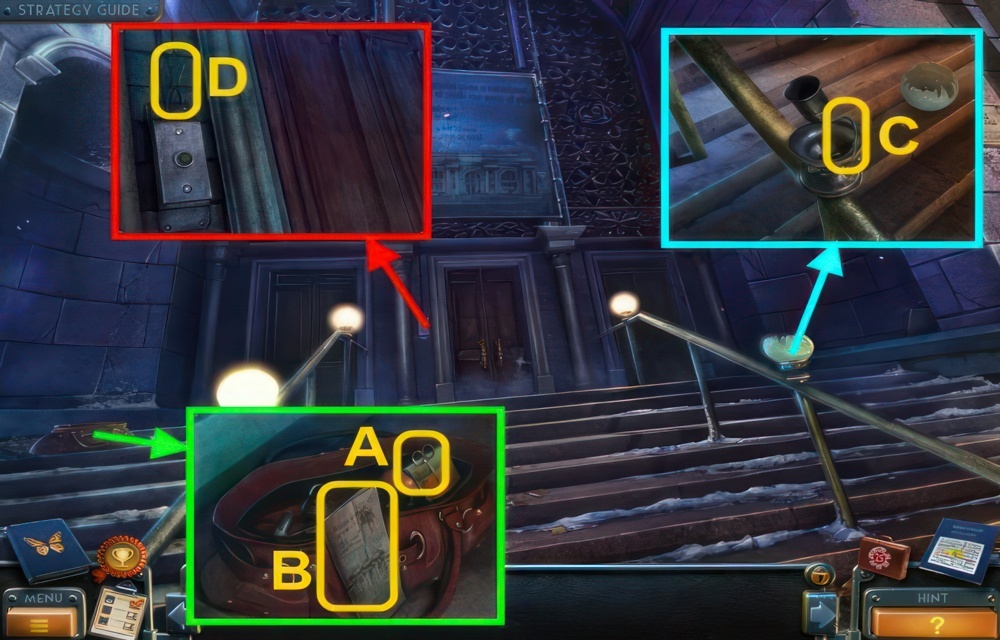
- Take the SCISSORS (A).
- Open the brochure (B).
- Move the lamp, Use the SCISSORS to take the WIRE (C).
- Place the WIRE on the doorbell (D), press the button.
- Go forward.
The scene of the disappearance
I inspected the scene of the crime. There was a strange liquid here, some swamp moss, and leaves. If you believe the rumors, the same was found in the previous cases, and a butterfly was also found. The children disappeared without a trace, shortly after drawing exactly the same butterfly.
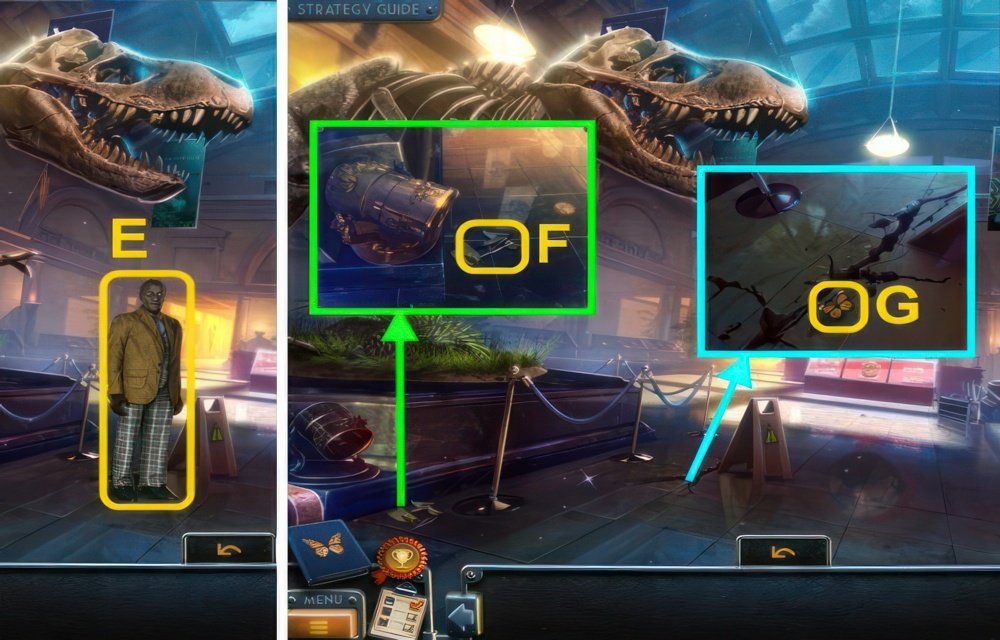
- Talk to the Mr. Bishop (E).
- Move the light, take the TWEEZERS (F).
- Use the TWEEZERS on the crack, take the BUTTERFLY (G).
- Go forward.

- Open the door (H).
- Go forward.
- Talk to the security guard (I).
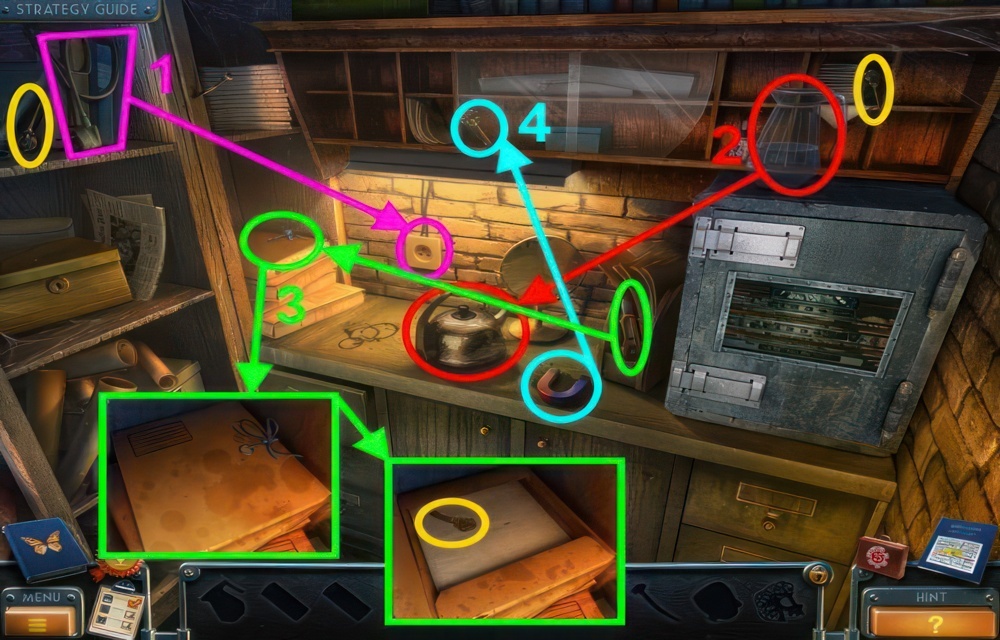
- Walkthrough puzzle (1-4).
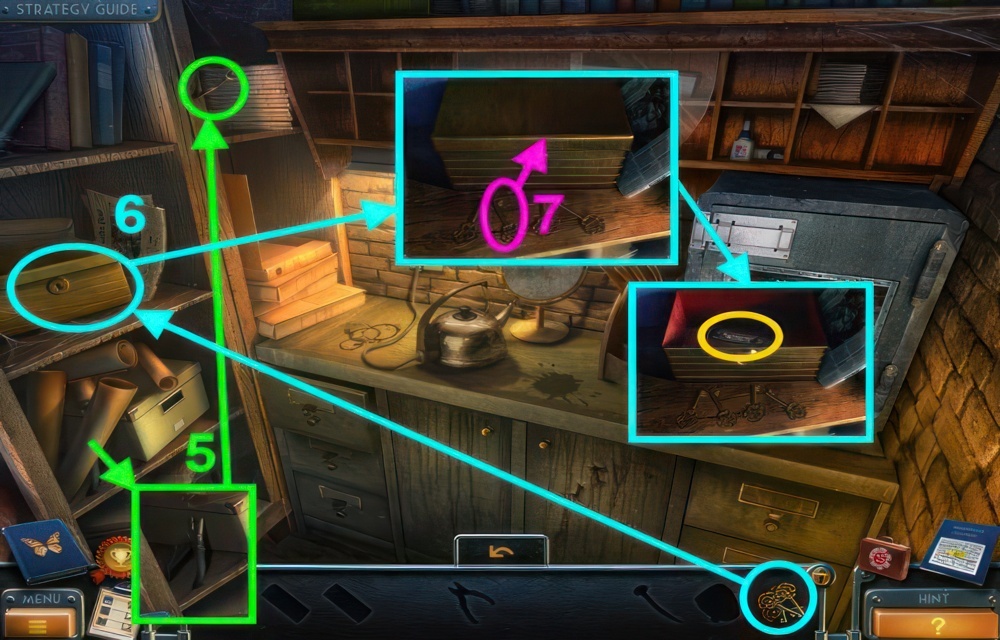
- Continued walkthrough puzzle (5-7).
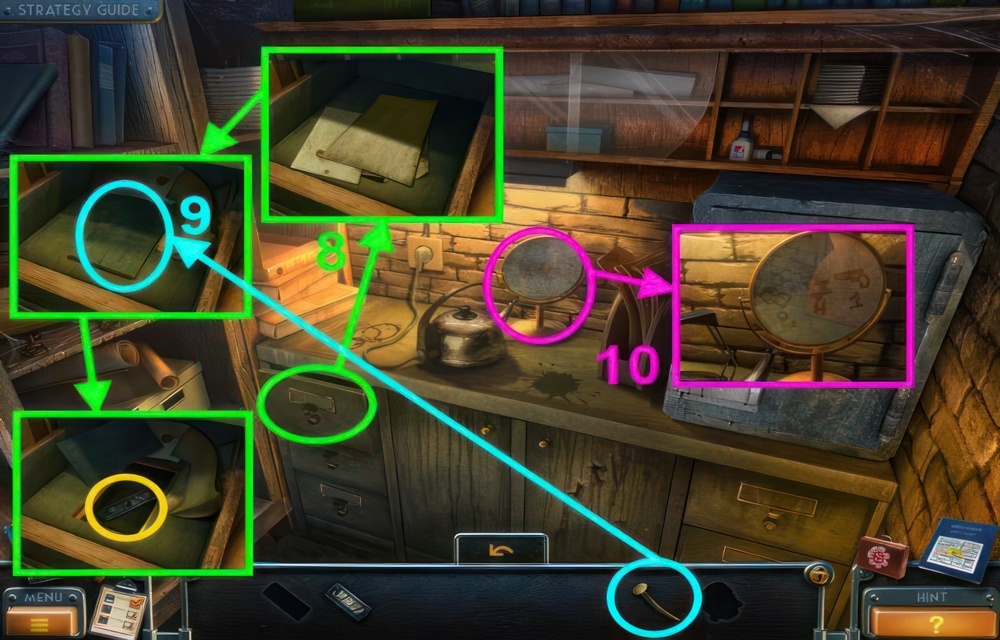
- Continued walkthrough puzzle (8-10).
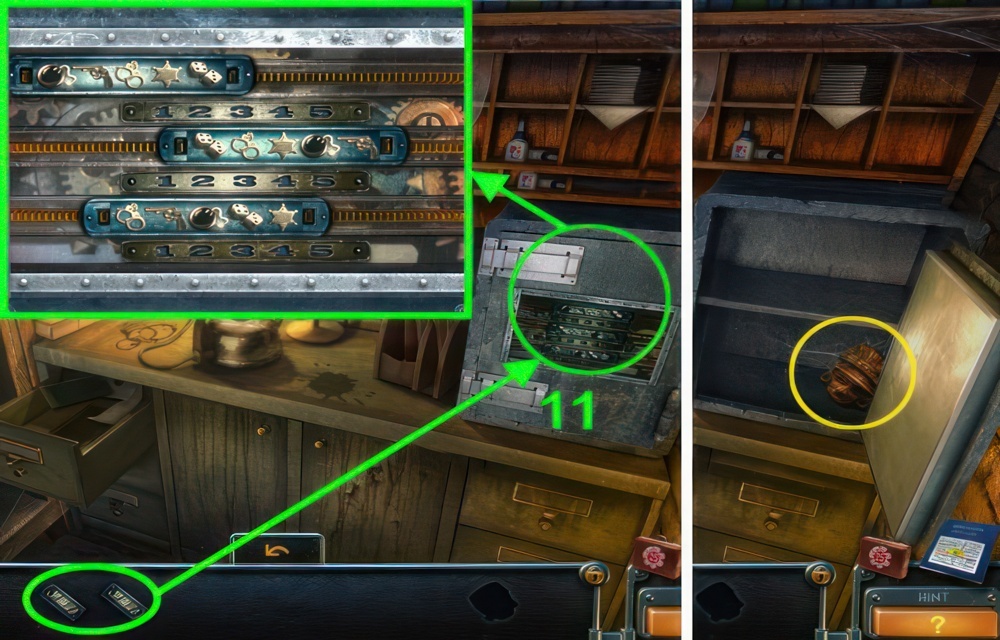
- You need to arrange the plates in certain positions. You should have seen a clue earlier.
- Continued walkthrough puzzle (11).
- You receive the MASK.
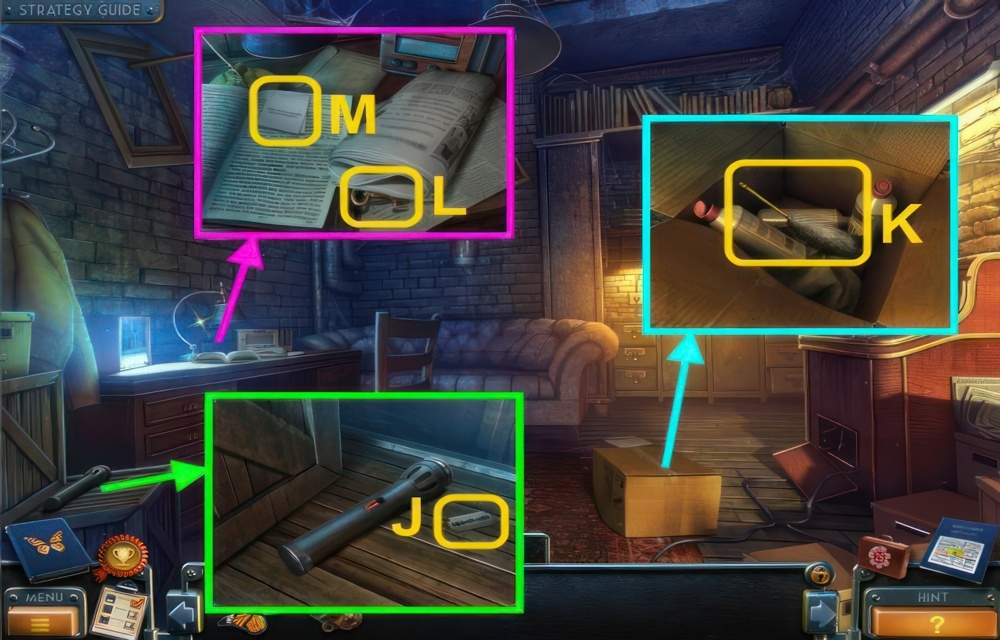
- Take the RAZOR-BLADE (J).
- Use the RAZOR-BLADE on the box, take the BRUSH (K).
- Open the newspaper, take the KEY (L).
- Examine the note (M).
- Go down.
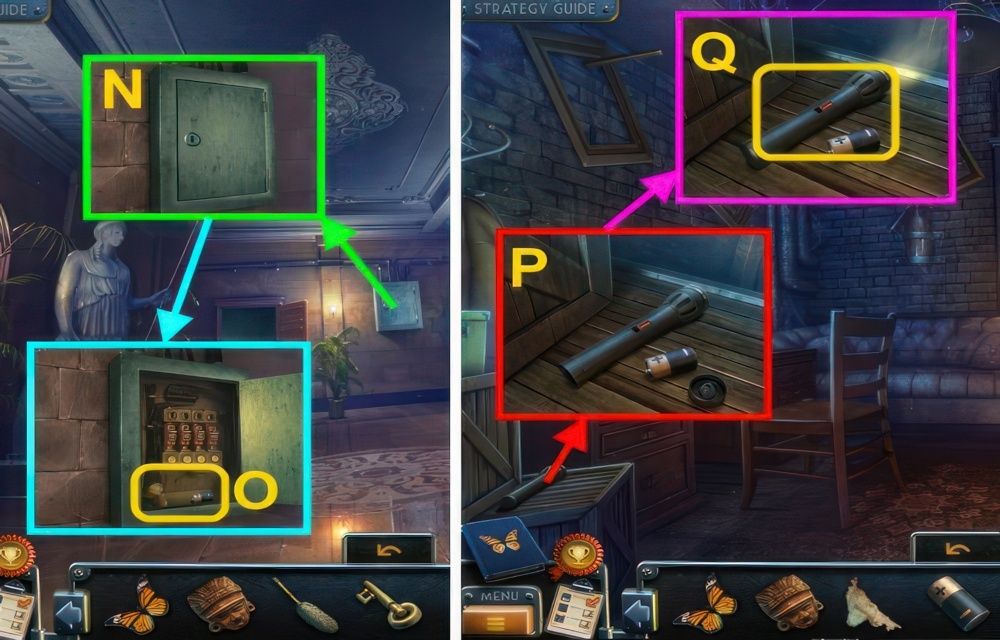
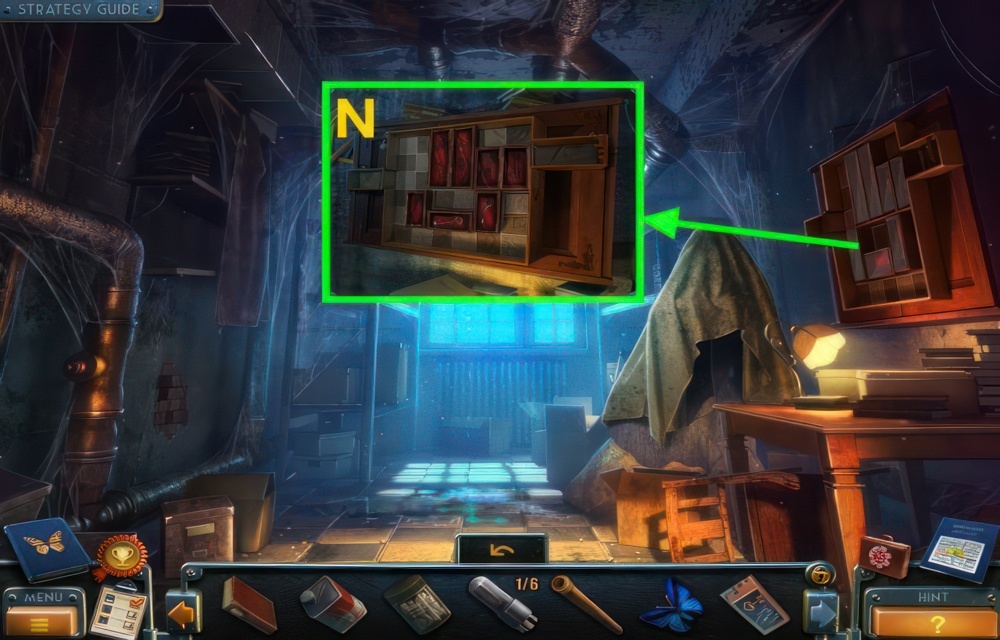
- Use the KEY on the box (N).
- Use the BRUSH on the cobwebs, take the SCRAP OF PAPER and BATTERY (O).
- Go forward.
- Open the flashlight (P).
- Place the BATTERY in the flashlight.
- Place the cap on the back, take the FLASHLIGHT (Q).
- Go down.
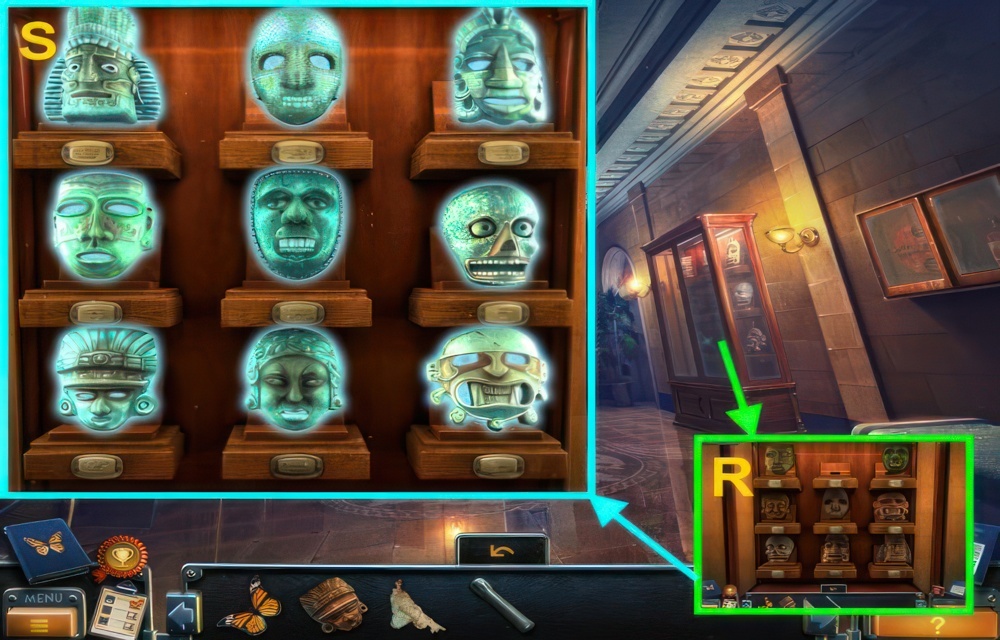
- Open the cabinet, place the MASK on the stand for a puzzle (R).
- Arrange the masks in a certain order. You should have seen a clue earlier.
- Walkthrough (S).
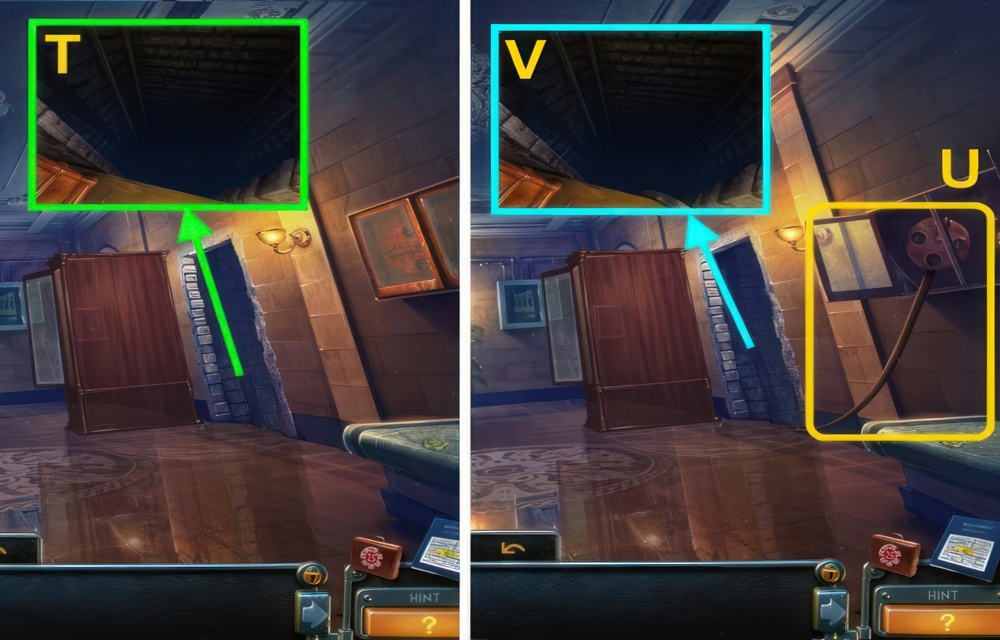
- Examine the opening (T).
- Open the fire hose box, move the hose 3 times (U).
- Use the FLASHLIGHT on the opening (V).
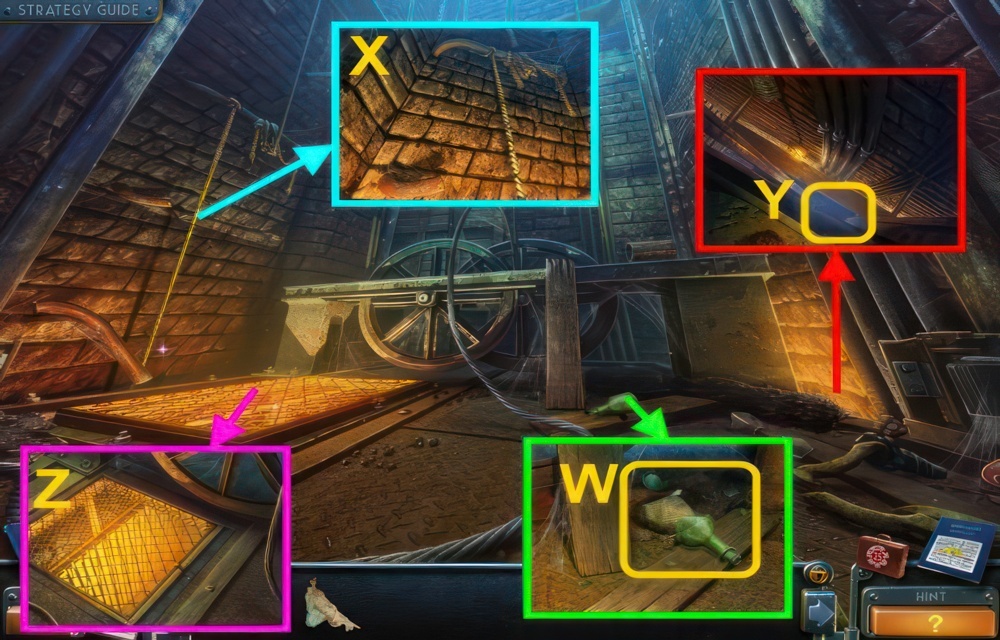
- Break the bottle on the rock, take the BROKEN BOTTLE (W).
- Use the BROKEN BOTTLE on the rope (X), you receive the LASSO.
- Use the LASSO to take the CROWBAR (Y).
- Use the CROWBAR to open the grate (Z).
- Go down.
The Vault
I found a secret passage in the museum which opened out onto a lift. I think this is how the culprits escaped. I went through a secret passage in the museum and ended up in some catacombs with many tunnels. I need to go further and find out where these tunnels lead.

- Take the PICK (A).
- Take the COGWHEEL (B).
- Take the SYDNEY OPERA HOUSE FIGURINE (C).
- Place the COGWHEEL on the mechanism (D), turn the crank.
- Go forward.
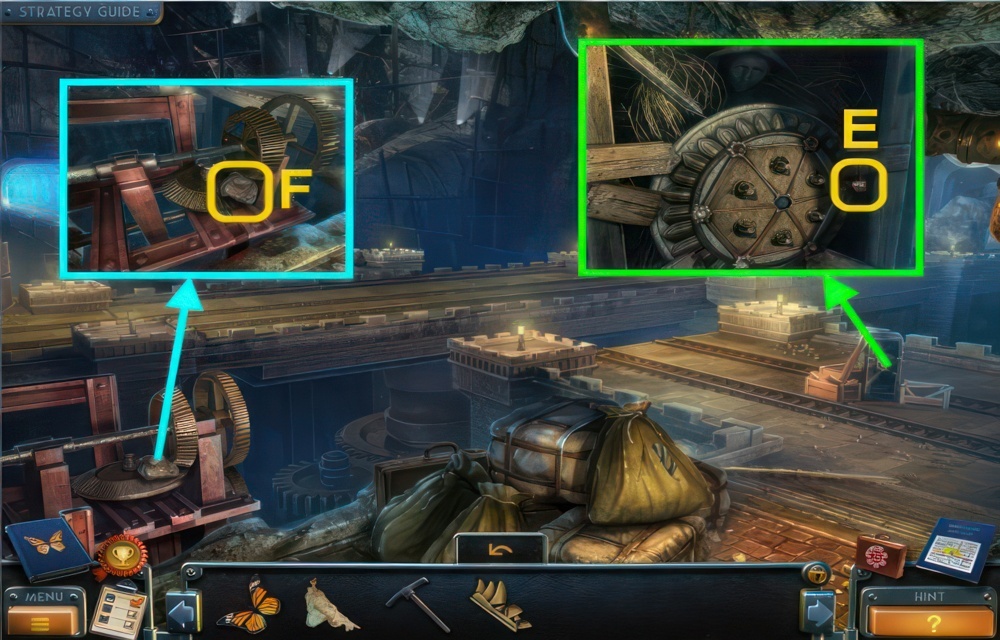
- Take the MODEL SHIP (E).
- Use the PICK on the stone (F).
- Go left.
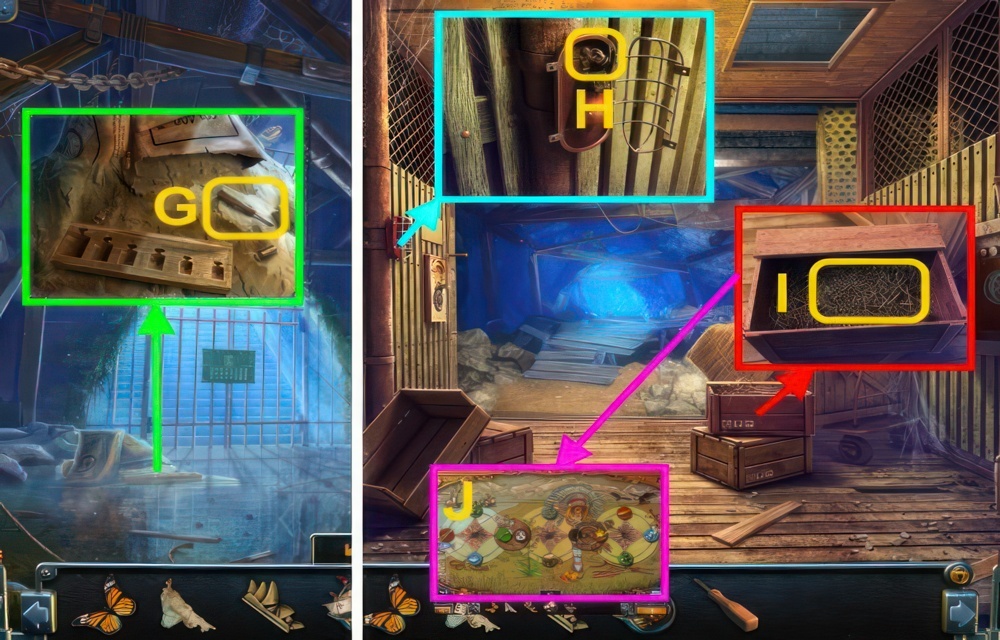
- Take the SCREWDRIVER (G).
- Go down ×2.
- Use the SCREWDRIVER on the grate, take the FIGURINE (H).
- Move the straw (I).
- Place the MODEL SHIP on the board for a puzzle (J).
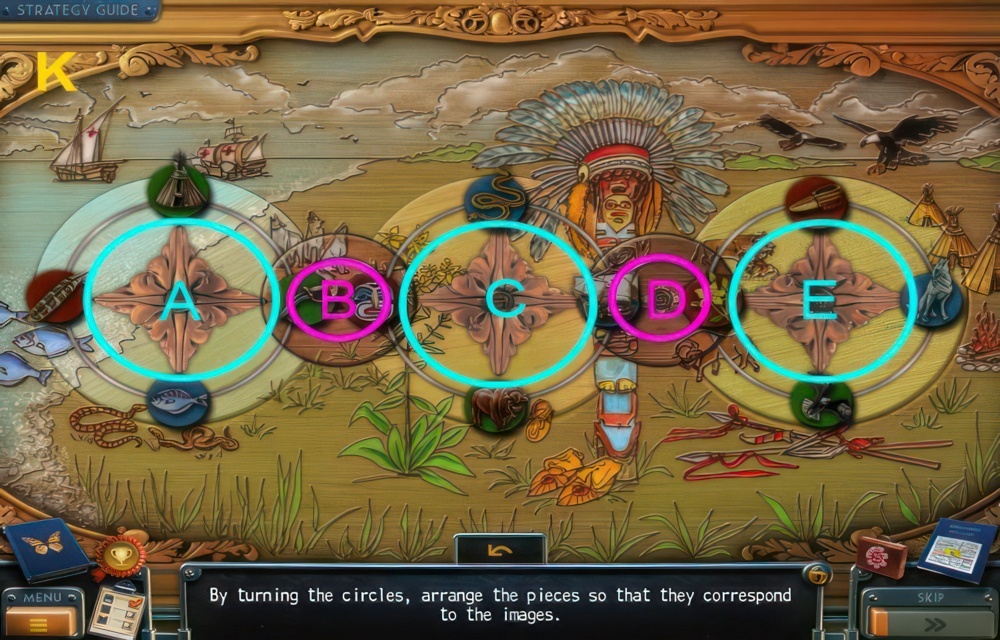
- By turning the circles, arrange the pieces so that they correspond to the images.
- Walkthrough (K): C×2, A×2, B, A, E×2, D, C×2, B, A, C.
- B, A×3, E×2, C×2, D, C×2, E×2, D, C, E×3.
- D, C×3, D, E, D, E×3, D, E, D, E, D, E×3, D, E×3.
The Children
I hope everything is OK with the children and that they’re alive. I need to find them.
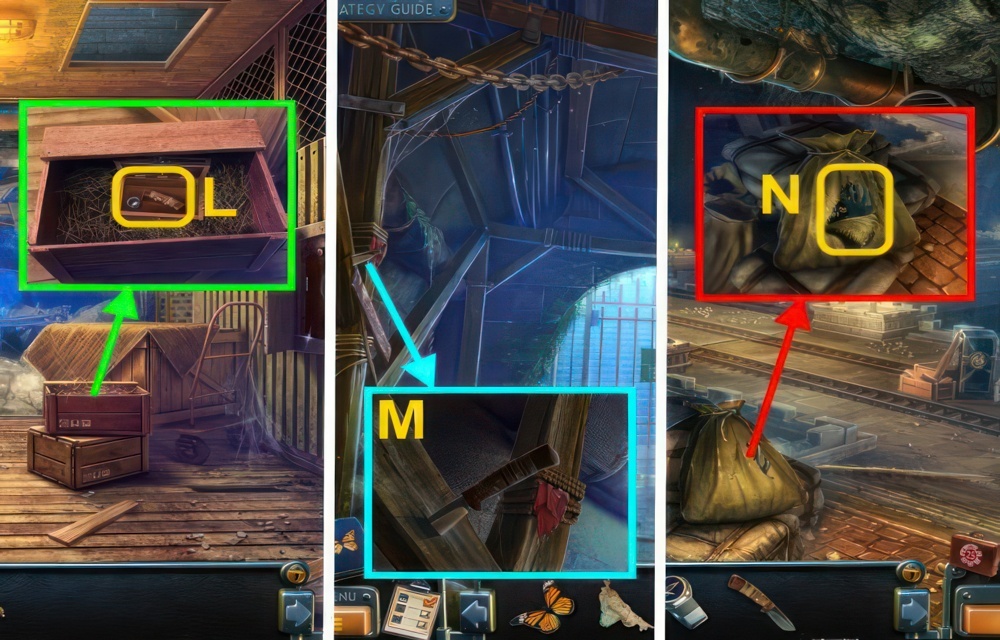
- Take the KNIFE HANDLE and SIGNET RING (L).
- Go to the Stairs.
- Use the KNIFE HANDLE on the blade, take the KNIFE (M).
- Go down.
- Use the KNIFE on the sack, take the RUBBER GLOVE (N).
- Go left.
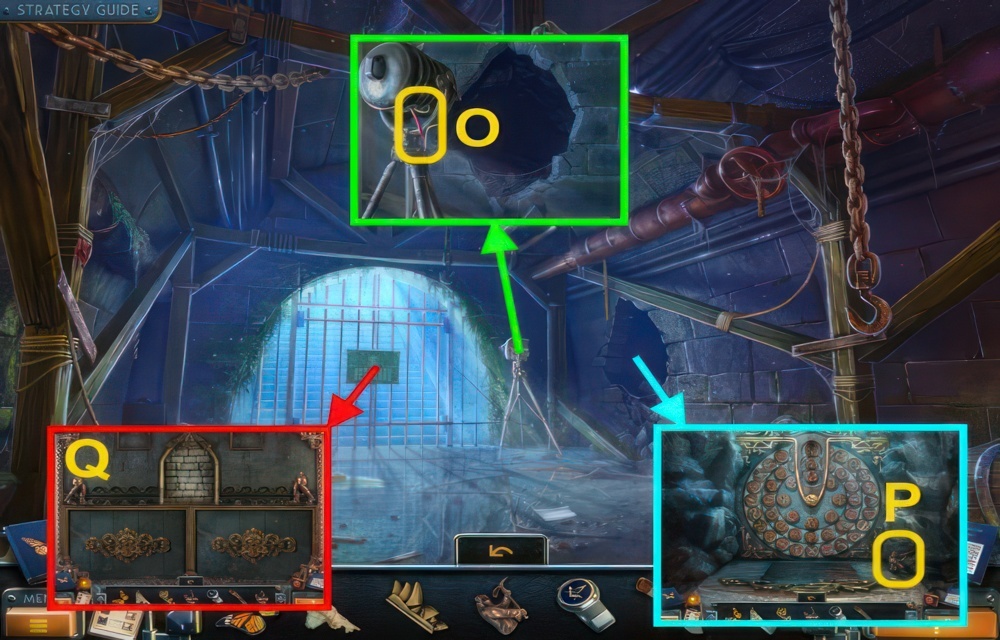
- Use the RUBBER GLOVE on the wires (O).
- Take the FIGURINE (P).
- Place the 2 FIGURINES on the gate for a puzzle (Q).
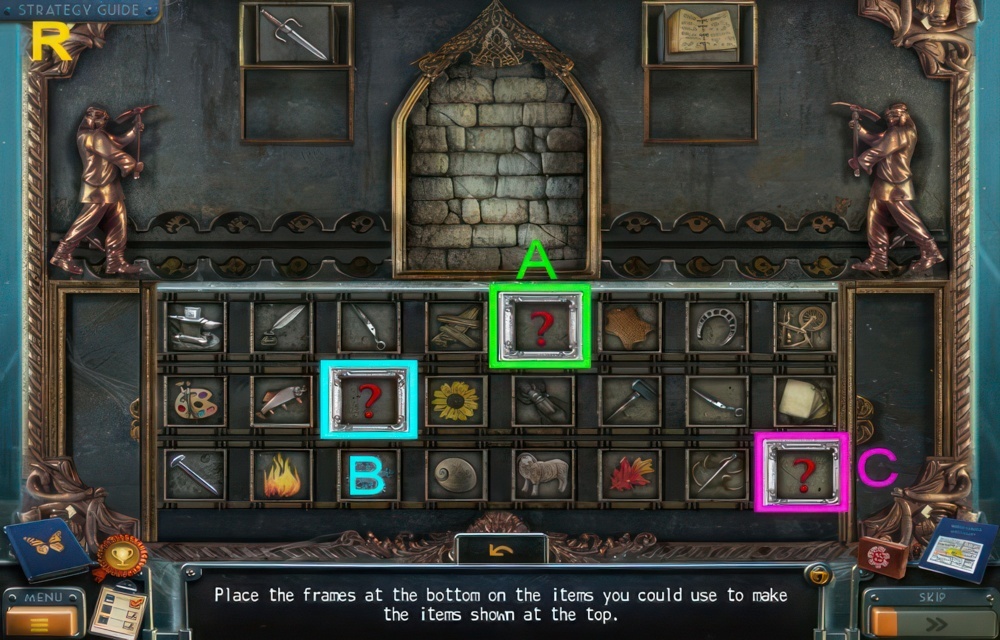
- Place the frames at the bottom on the items you could use to make the items shown at the top.
- Walkthrough (R): A ← ×4, B → ×3, C ← ×6, A → ×2, B →, C ←, A →, B ←, A ← ×2, B → ×2.
- C → ×6, A → ×6, B ← ×5, C ← ×2, A ← ×2, C → ×2, A ←, B ← ×2, C →.
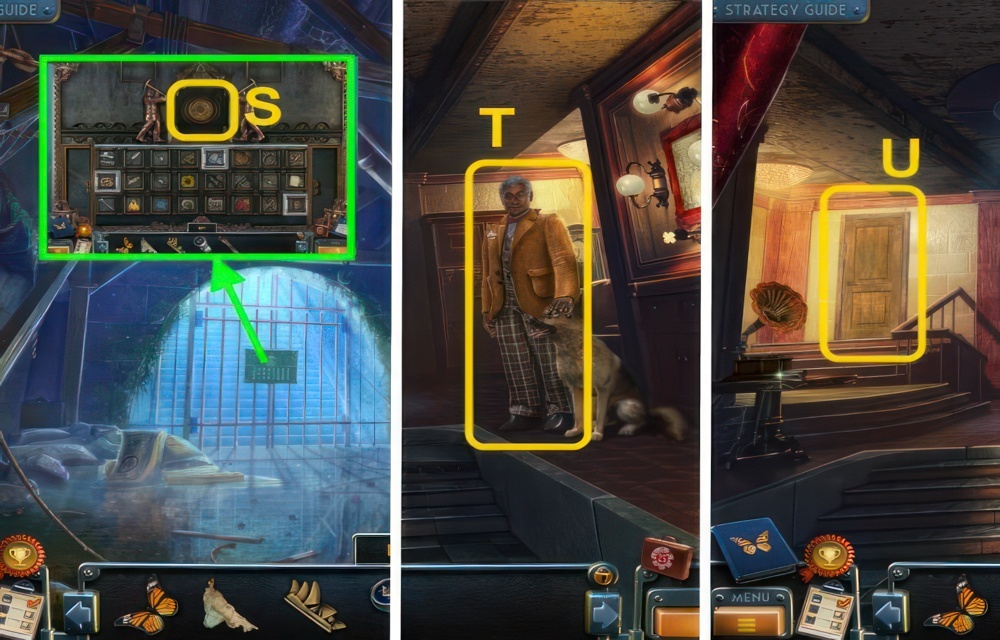
- Use the SIGNET RING on the symbol (S).
- Go forward.
- Talk to the man (T), you receive the EMPTY BEAKER.
- Open the door (U), walk through it.
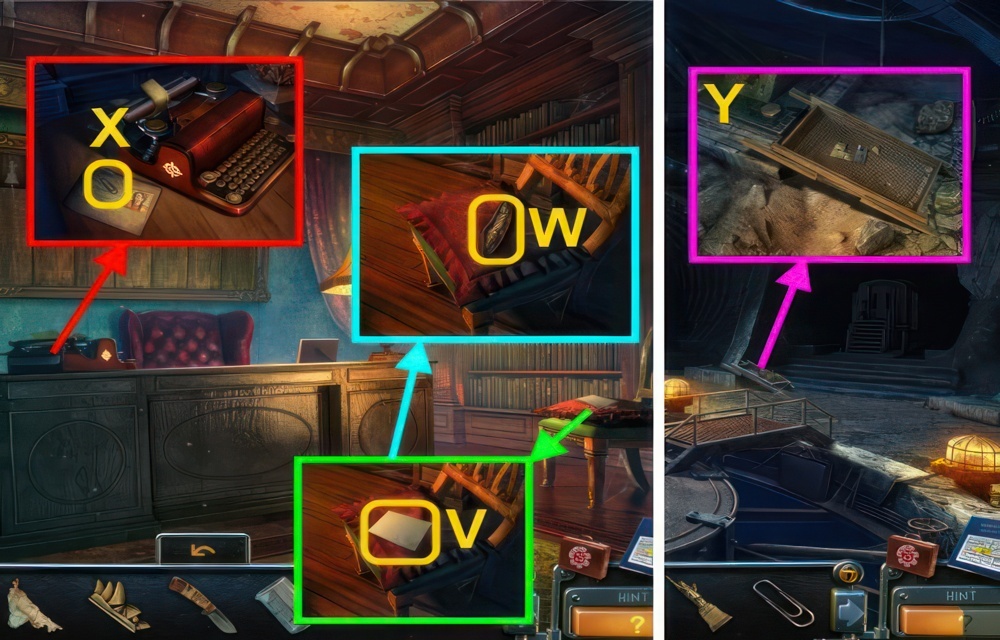
- Take the PAPER (V).
- Use the KNIFE on the cushion, take the STATUE OF LIBERTY FIGURINE (W).
- Take the PAPERCLIP (X), examine the file.
- Go to the Wagons.
- Move the rocks, take the GREAT WALL OF CHINA FIGURINE and SIEVE (Y).
- Go down ×2.
The Liquid
Mr. Bishop needs a sample of the liquid from the scene of the crime to analyze it in his laboratory. I need to get back to the museum.
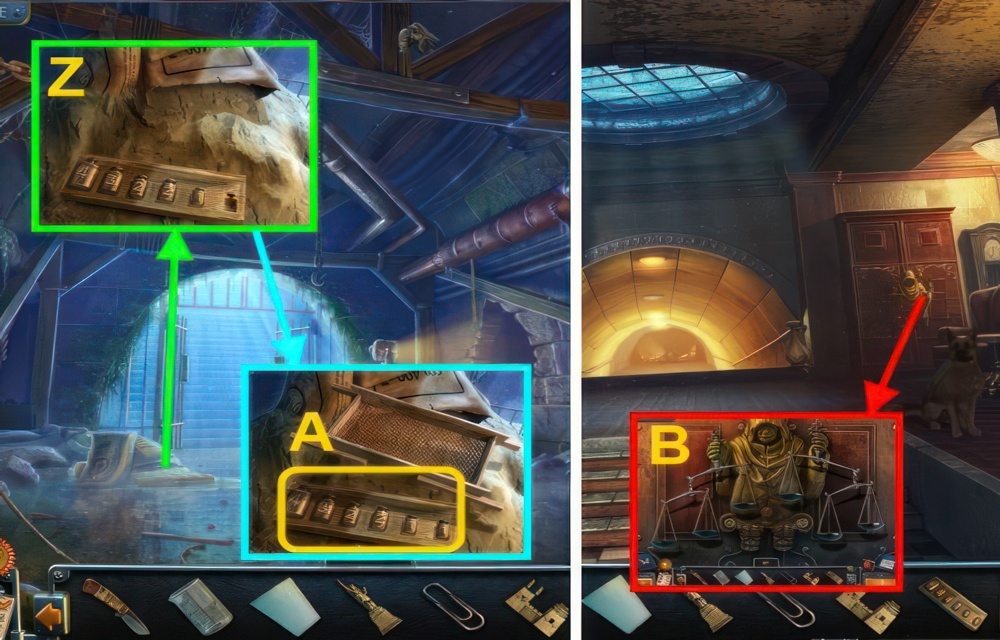
- Place the weights in the stand (Z), Use the SIEVE on the sand.
- Place the weight in the stand, take the WEIGHTS (A).
- Go forward.
- Place the WEIGHTS on the door for a puzzle (B).
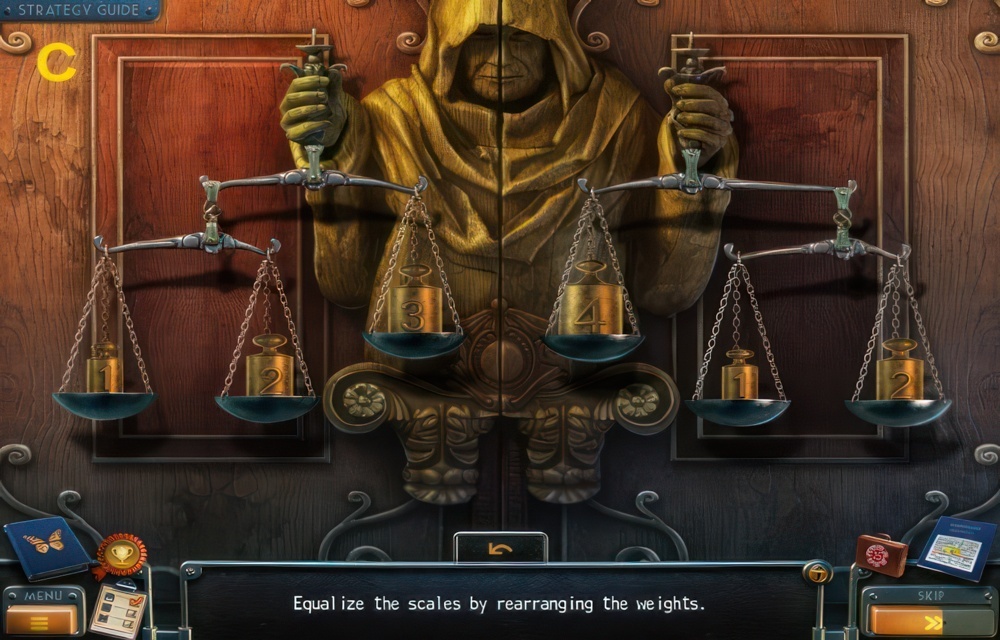
- Equalize the scales by rearranging the weights.
- Walkthrough (C).
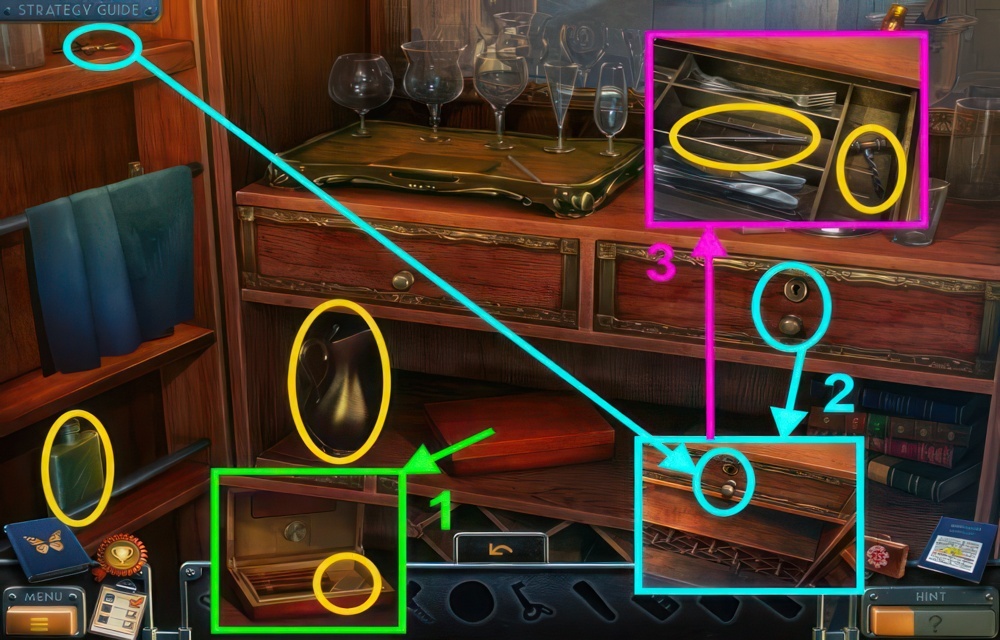
- Walkthrough puzzle (1-3).
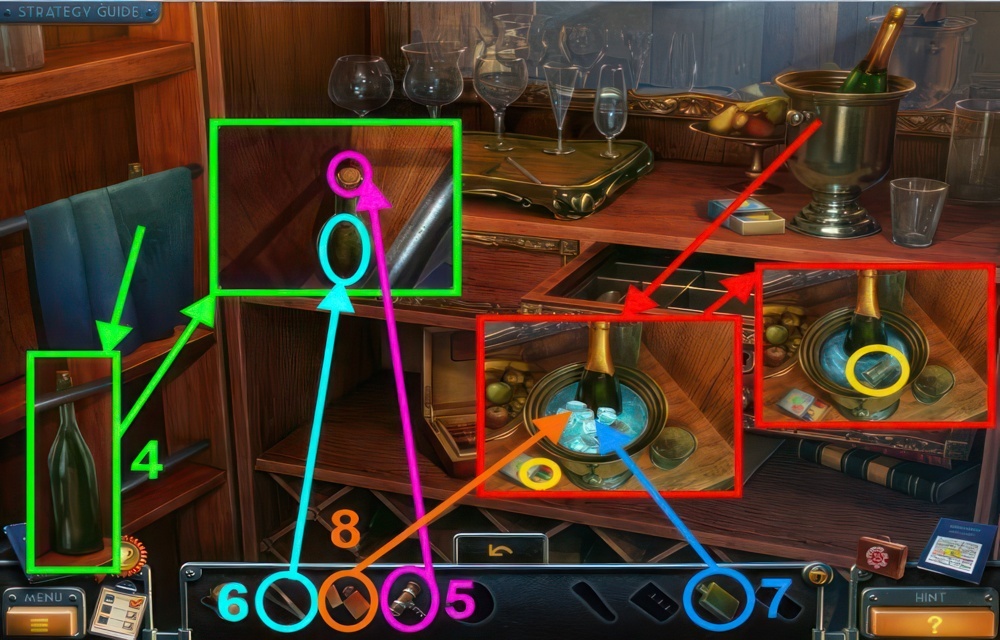
- Continued walkthrough puzzle (4-8).
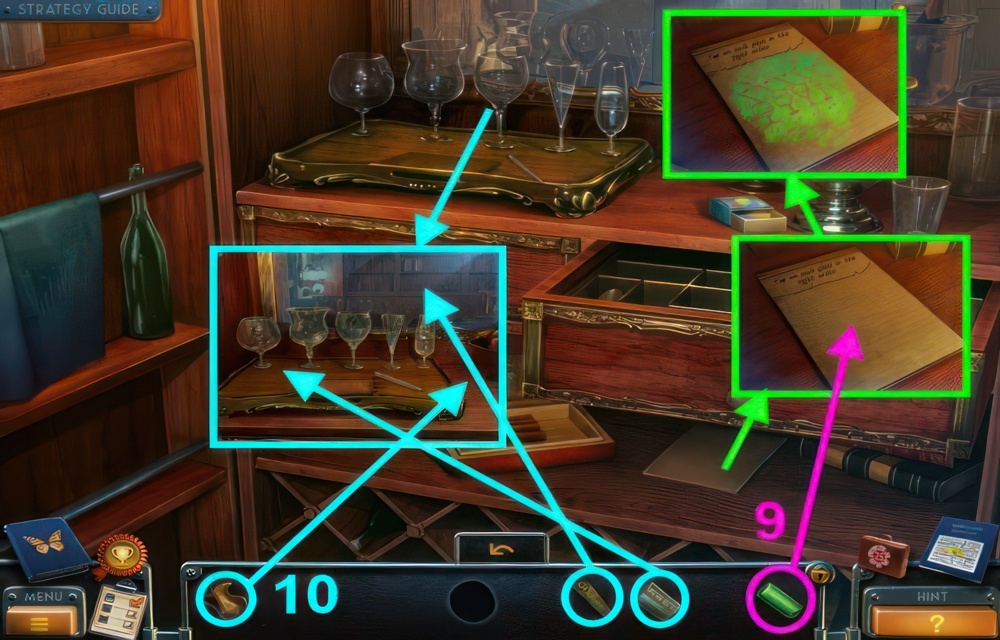
- Continued walkthrough puzzle (9-10).
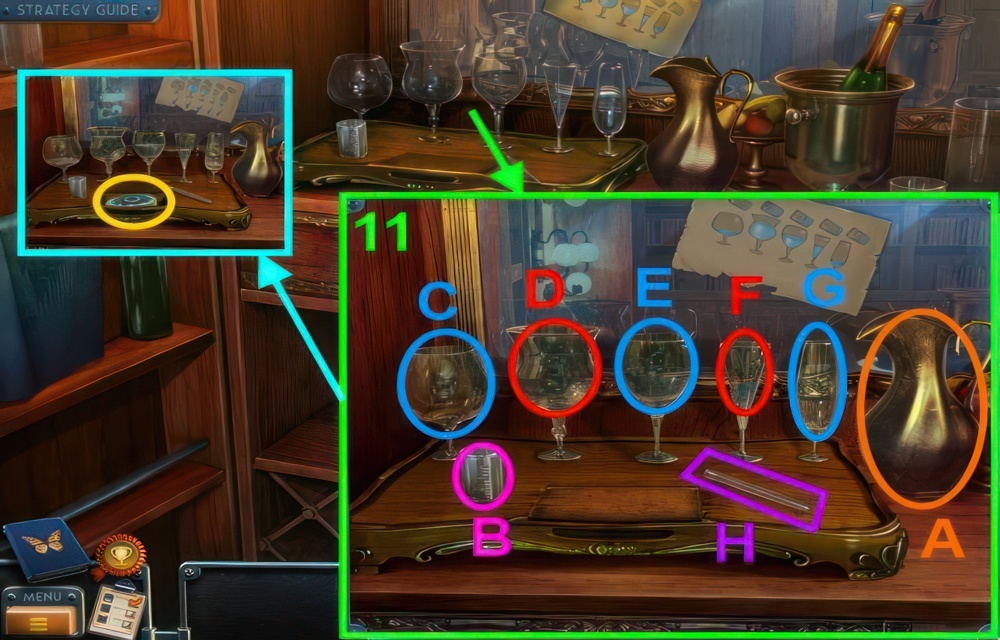
- Continued walkthrough puzzle (11).
- Pour a certain amount of water into each glass and strike each glass in a specific order. You should have seen clues before.
- Walkthrough (11): A-B, B-C, A-B ×3, B-D, A-B ×2, B-E, A-B, B-F, A-B, B-G, H-G, E, C, F, D.
- You receive the PART.
- Go to the Lift.
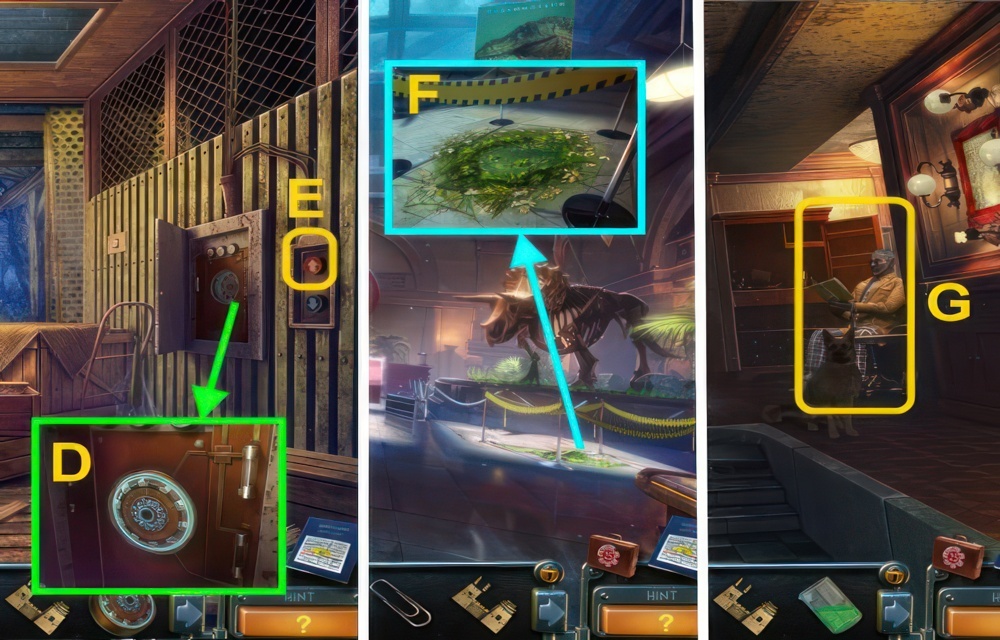
- Place the PART in the slot (D).
- Press the button (E).
- Go forward, then down.
- Use the EMPTY BEAKER on the puddle to receive the BEAKER OF LIQUID (F).
- Go to the Hall.
- Give the BEAKER OF LIQUID to Bishop (G), you receive the PUNCHED CARD.
- Go forward.
An Arranged Disappearance
We’ve learned that one of the mafia bosses arranged his own disappearance. I have to find him. Perhaps he knows something.
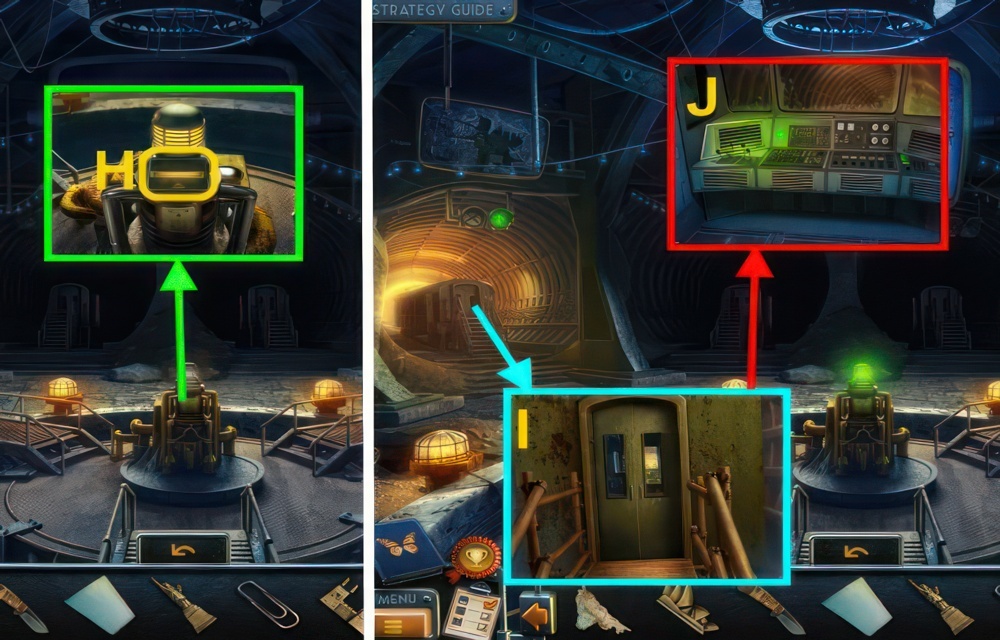
- Place the PUNCHED CARD in the device (H).
- Open the door (I).
- Press the controls (J).
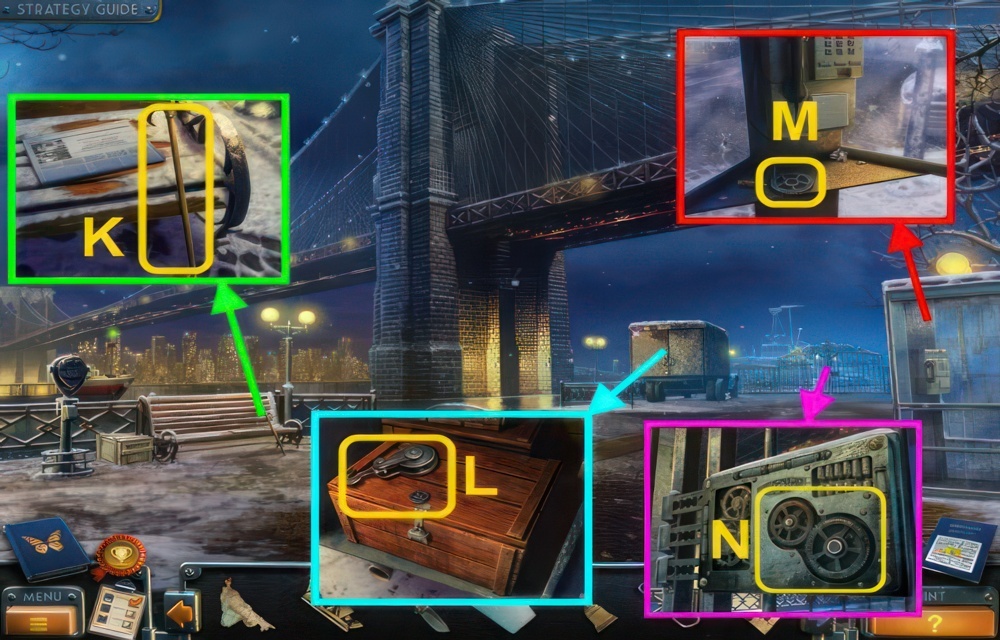
- Take the CANE (K).
- Use the PAPERCLIP on the lock.
- Take the HOOK and COGWHEEL (L).
- Open the telephone booth, take the COGWHEEL (M).
- Place the 2 COGWHEELS on the gate (N), turn them.
- Go forward.
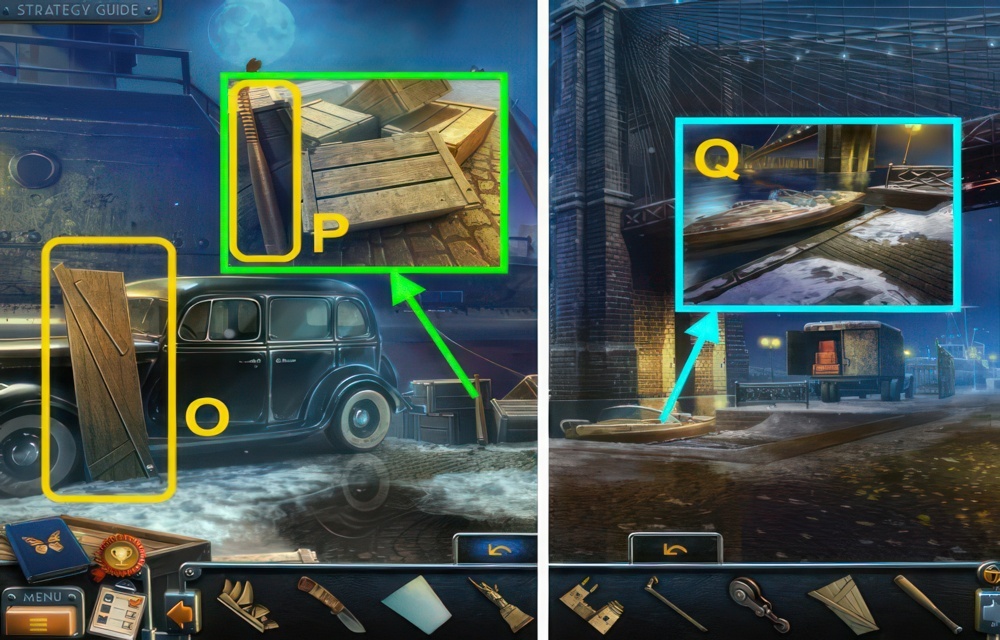
- Take the BOARD (O).
- Take the BASEBALL BAT (P).
- Go down.
- Use the BOARD on the boat (Q).
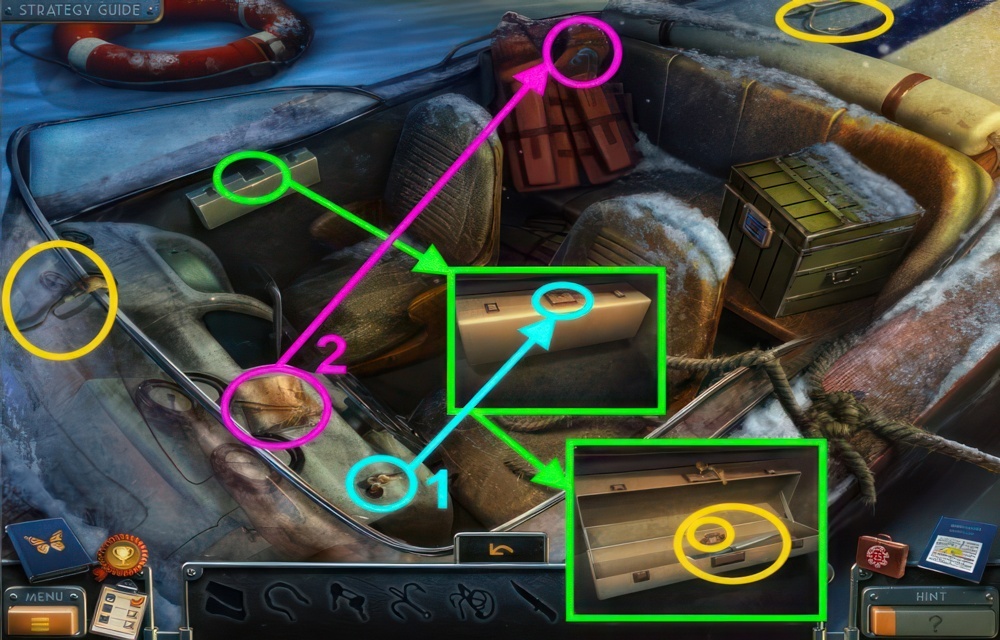
- Walkthrough puzzle (1-2).
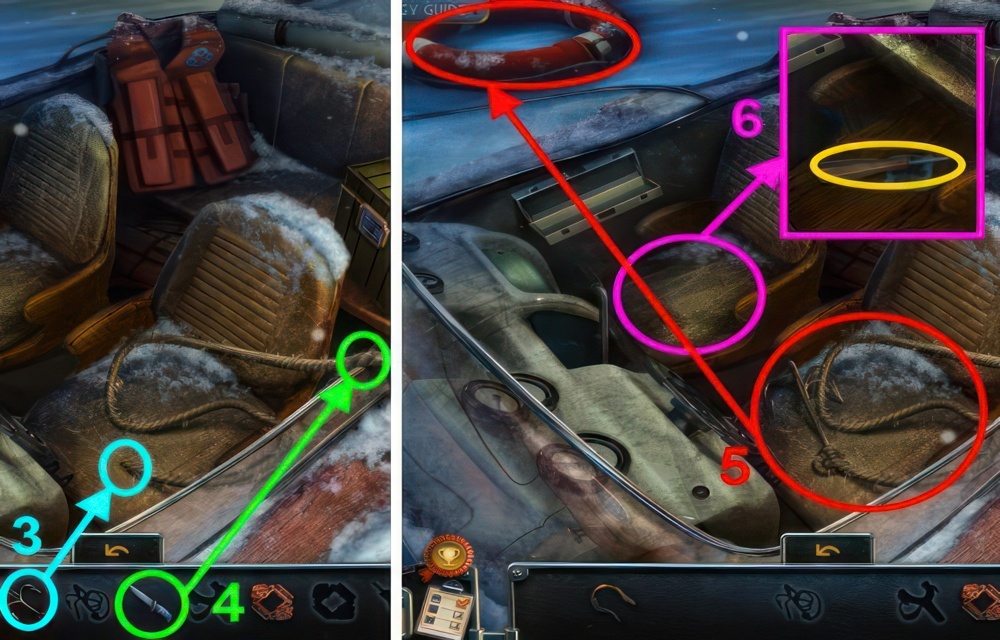
- Continued walkthrough puzzle (3-6).
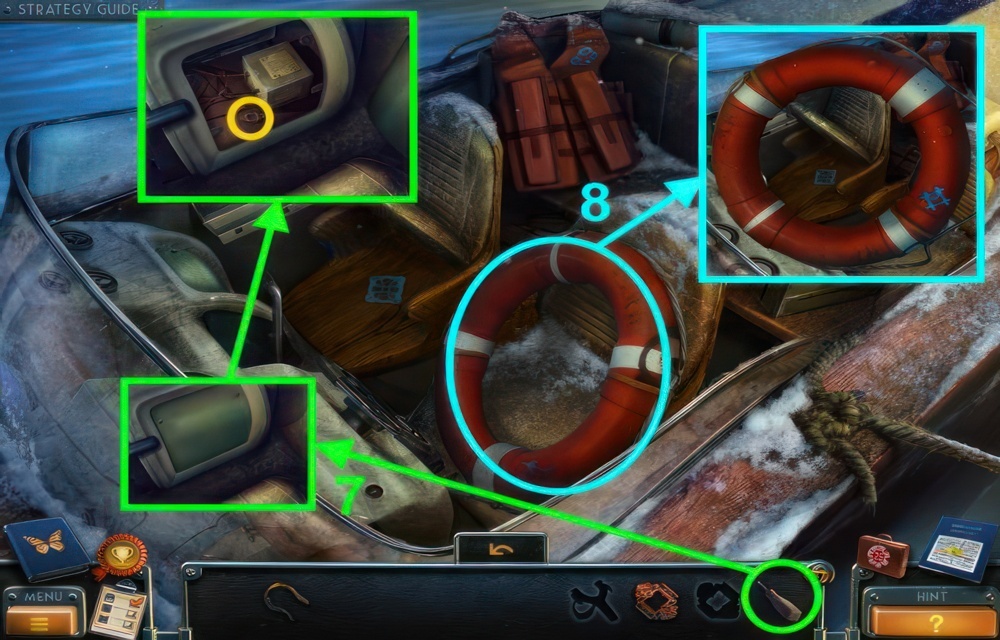
- Continued walkthrough puzzle (7-8).
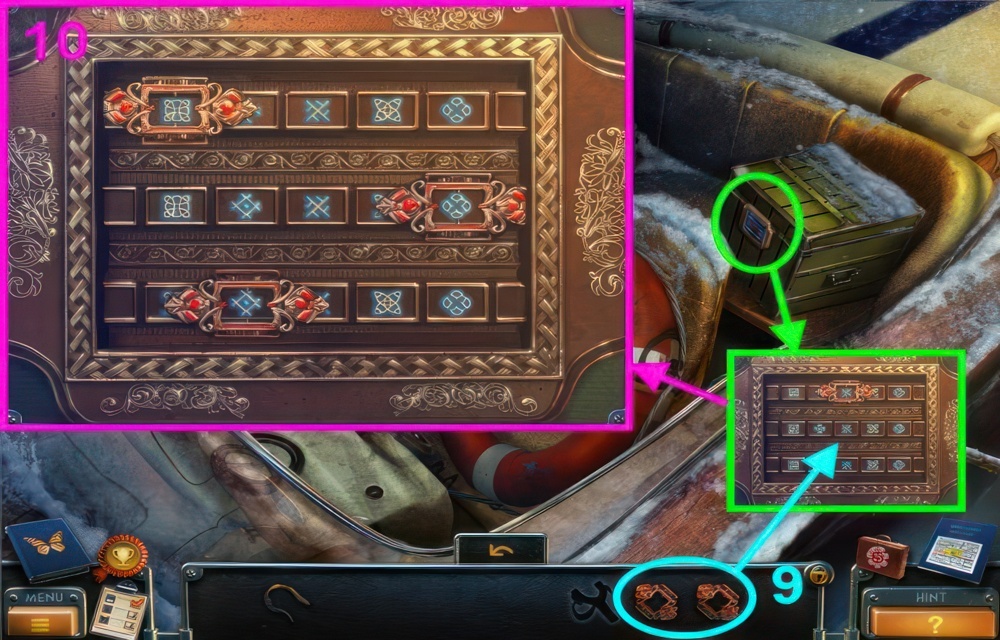
- Rearrange the frames to place them on the right symbols. You should have seen a clue earlier.
- Continued walkthrough puzzle (9-10).
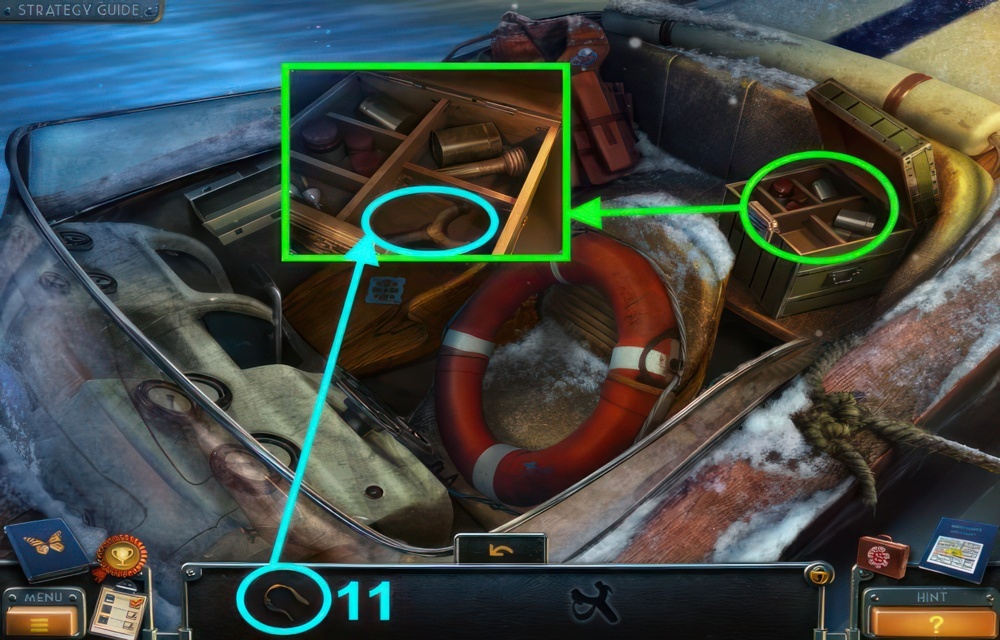
- Continued walkthrough puzzle (11).
- You receive the SLINGSHOT.
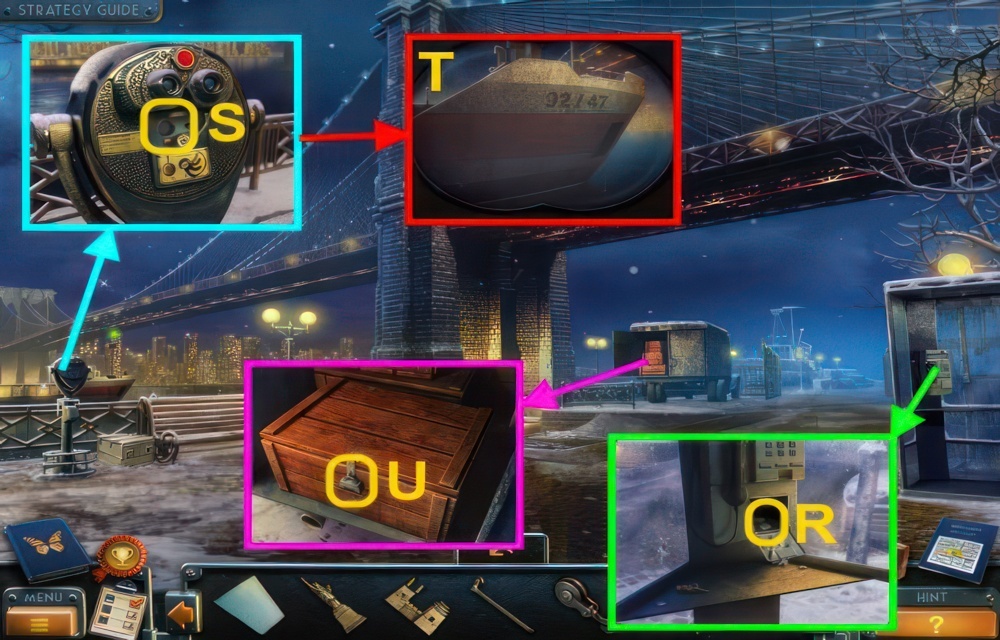
- Use the BASEBALL BAT on the phone booth, take the COIN (R).
- Use the COIN on the binoculars (S).
- View the ship (T).
- Examine the lock for a puzzle (U).
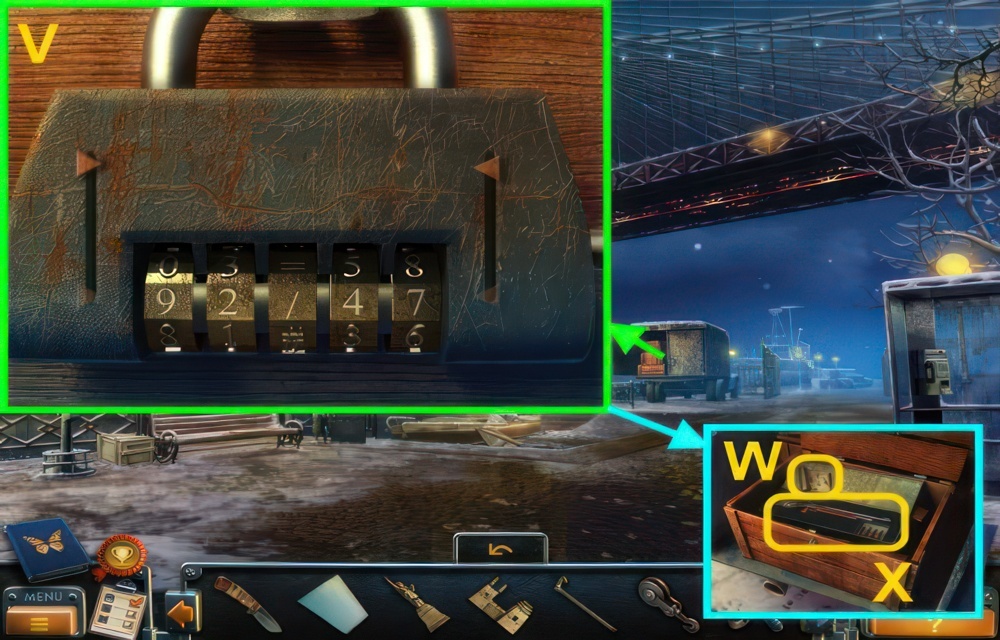
- You need to input the correct code.
- Walkthrough (V).
- View the note (W).
- Take the TRANQUILIZER RIFLE (X).
- Go forward.
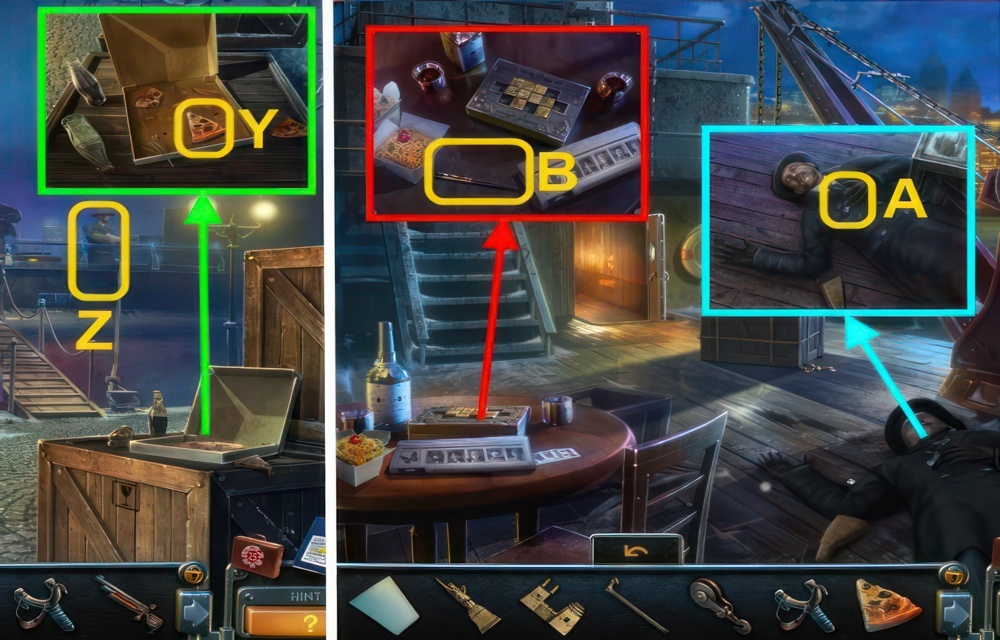
- Take the SLICE OF PIZZA (Y).
- Use the TRANQUILIZER RIFLE on the guard (Z).
- Go forward.
- Take the CAR KEY (A).
- Read the newspaper, take the CHOPSTICKS (B).
- Go down.
The Fog
A strange fog, the same fog witnessed at the scene of the crime, has been seen on the bank of the Hudson. I have to go there and check it out.
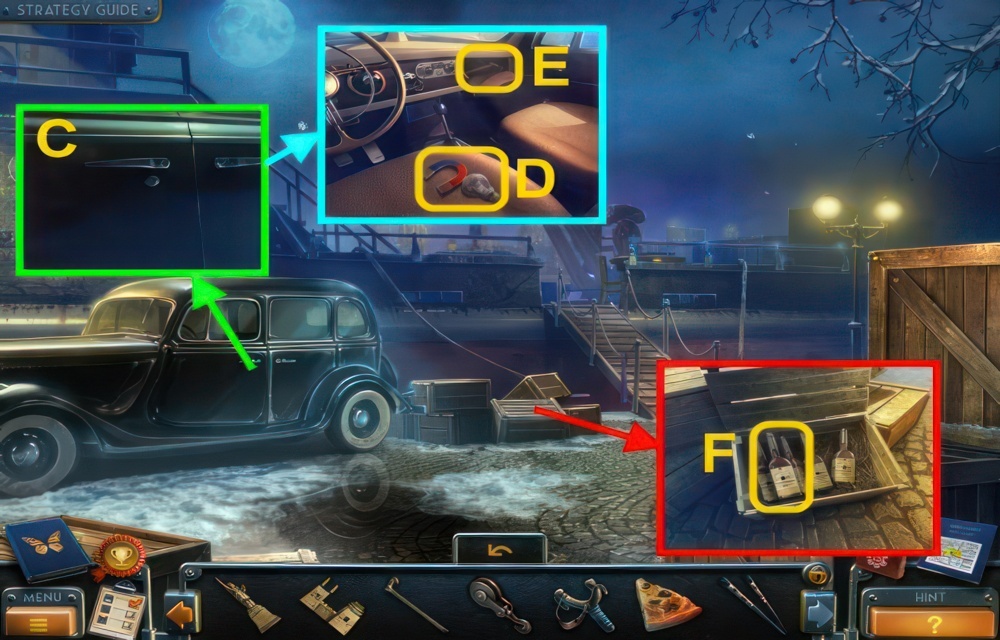
- Use the CAR KEY on the car (C).
- Take the LIGHTBULB and MAGNET (D).
- Open the glove compartment, take the HAMMER (E).
- Use the HAMMER on the crate, take the BOTTLE OF LIQUOR (F).
- Go forward.
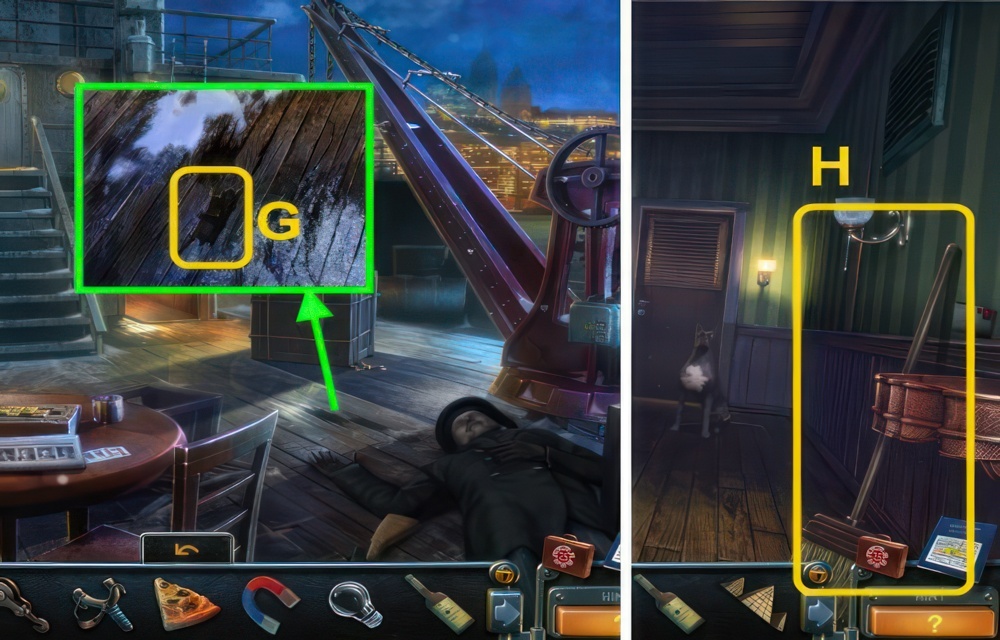
- Use the magnet on the hole (G), you receive the EGYPTIAN PYRAMIDS FIGURINE.
- Go forward.
- Take the BROOM (H).
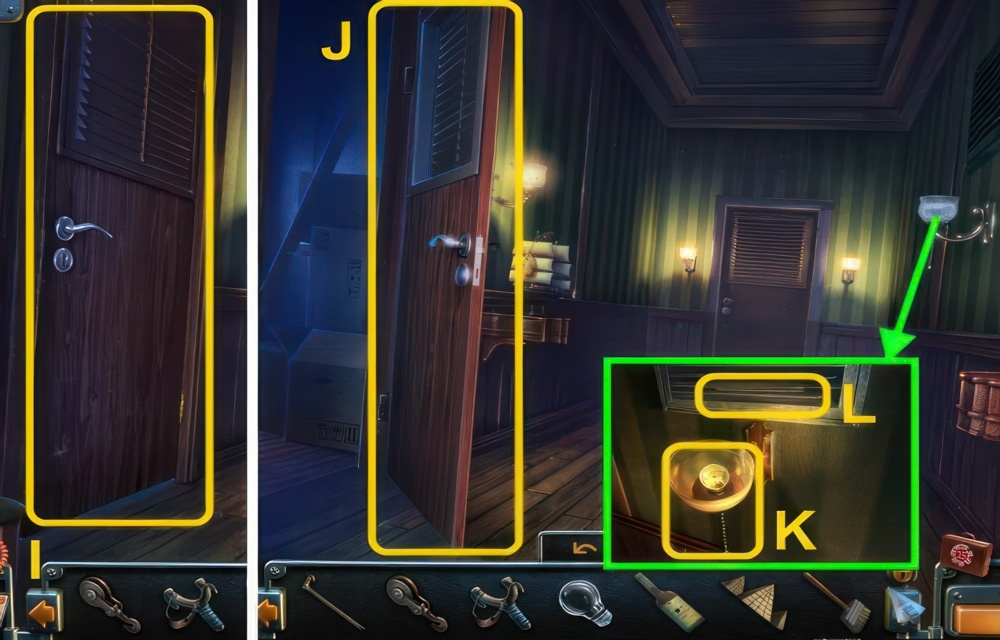
- Open the door (I), put the SLICE OF PIZZA in the room.
- Close the door (J).
- Place the LIGHT BULB in the lamp, pull the cord (K).
- Use the CHOPSTICKS to view the note (L).
- Go down.
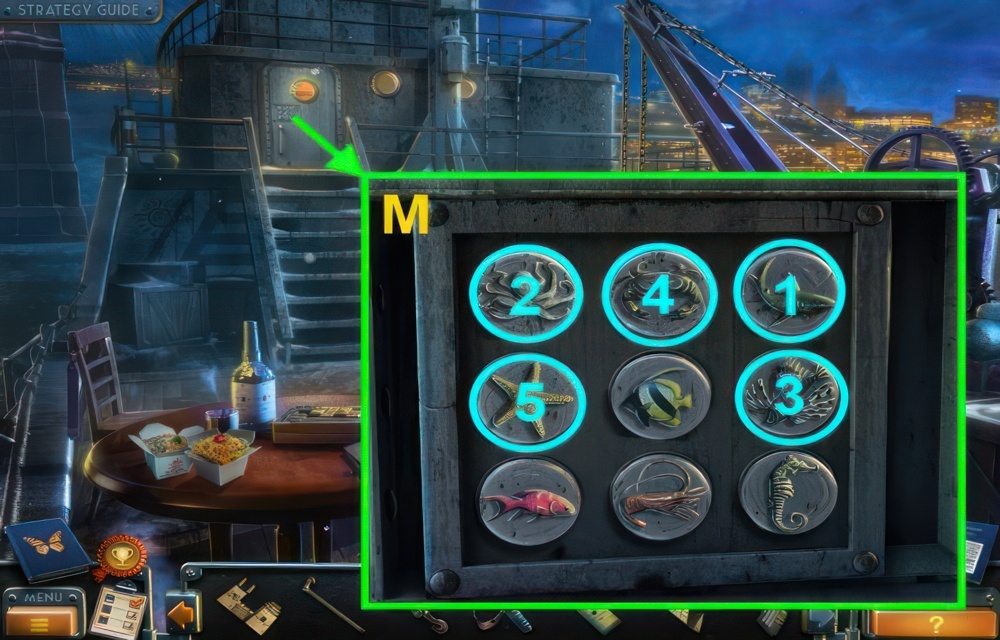
- Examine the door for a puzzle.
- Press the buttons in the right order.
- Walkthrough (M).
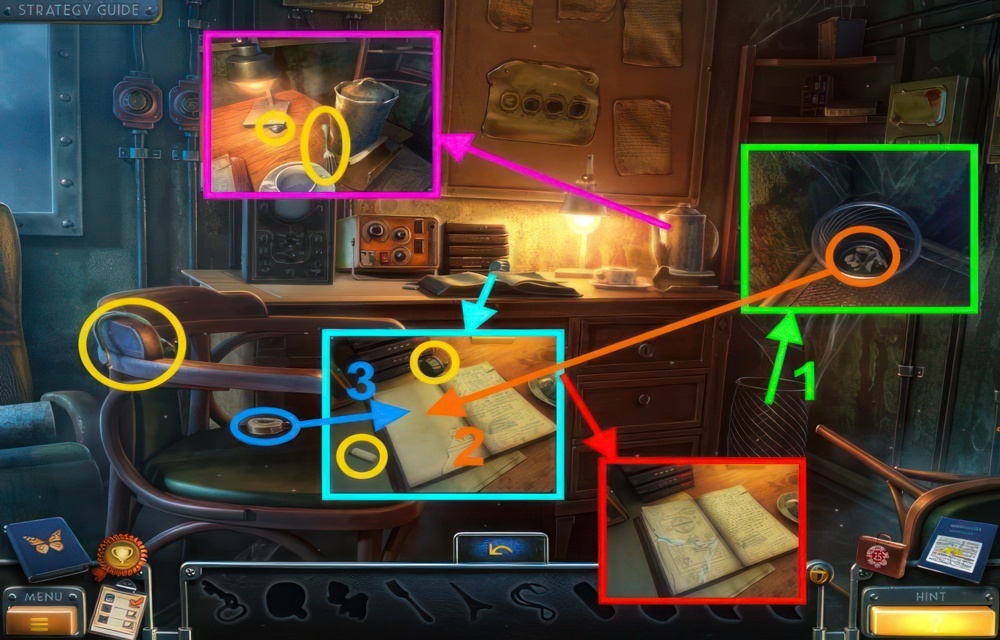
- Walkthrough puzzle (1-3).
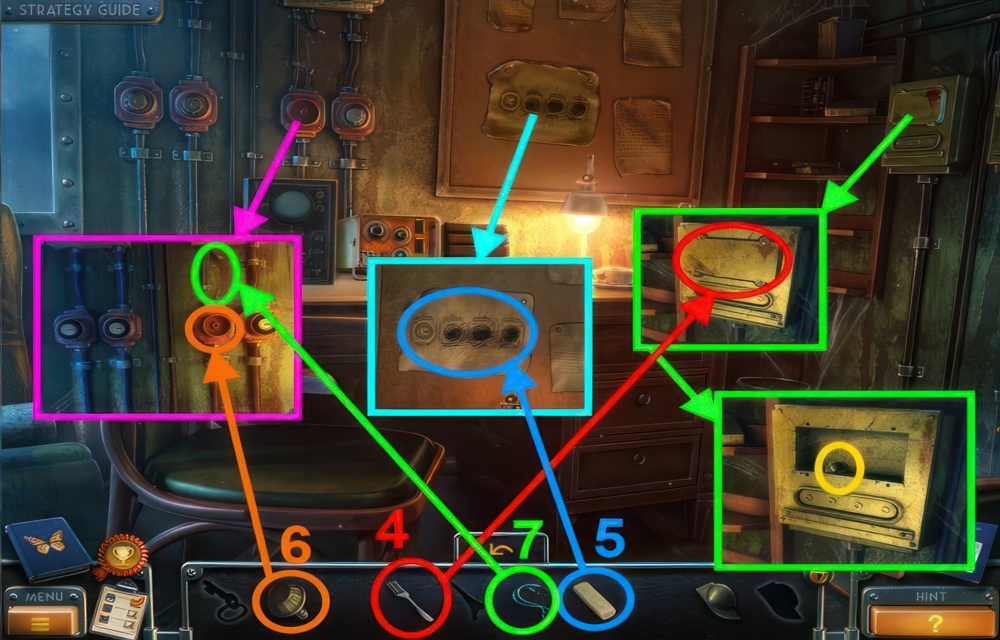
- Continued walkthrough puzzle (4-7).

- Continued walkthrough puzzle (8-9).
- You need to turn the switches to the correct positions.
- Walkthrough (8): B×2, C×3, D×3.

- Continued walkthrough puzzle (10-11).
- The line of the oscilloscope needs to be made level.
- To do this, you need to set all the switches in a certain position.
- Walkthrough (10): B×2, C, A.
- Go through the top door.
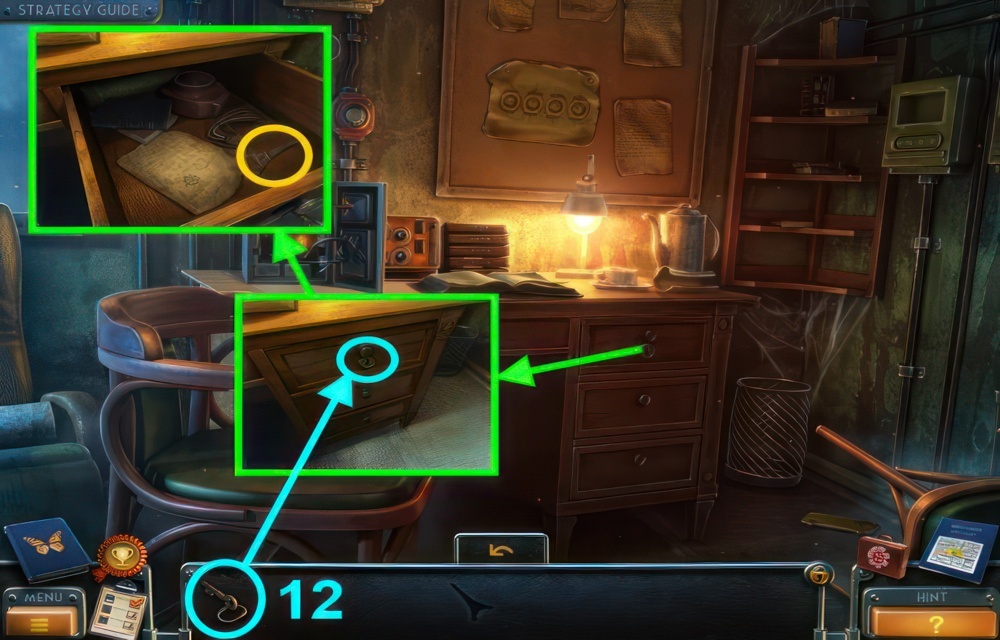
- Continued walkthrough puzzle (12).
- You receive the EIFFEL TOWER FIGURINE.
Tom Laurence
The mafia bosses are being kidnapped by a ghost of a brother of the Order – Tom Laurence. I have to tell Bishop about this.
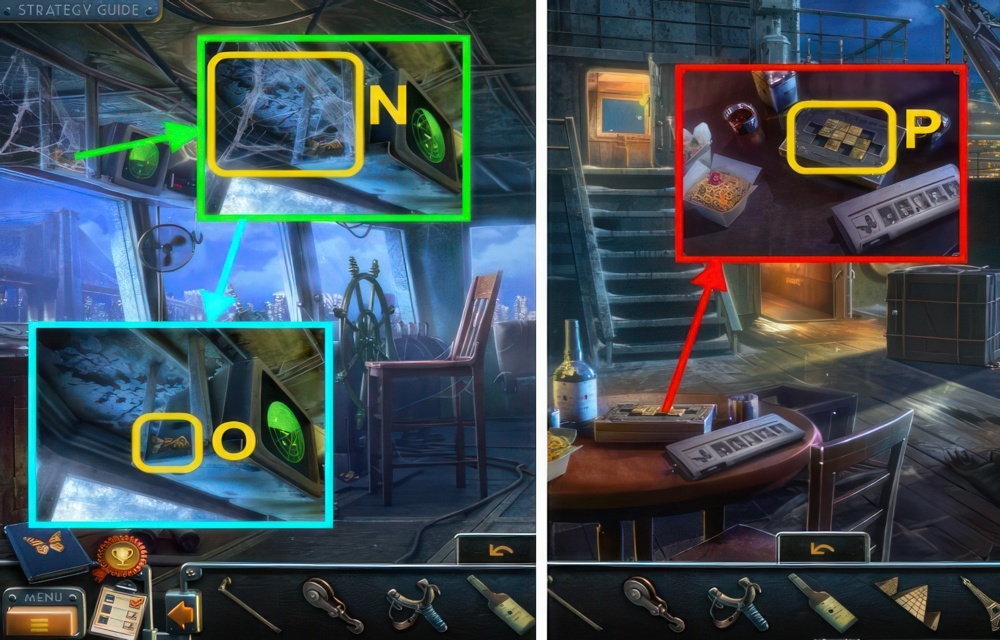
- Use the BROOM on the web (N).
- Take the MOSAIC PIECES (O).
- Go down.
- Place the MOSAIC PIECES on the box for a puzzle (P).
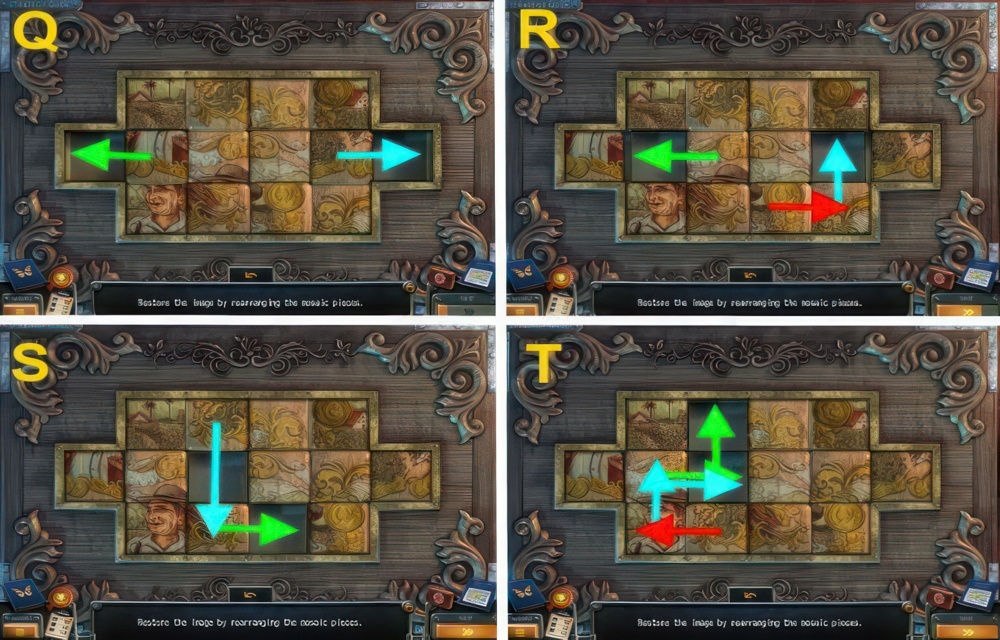
- Restore the image by rearranging the mosaic pieces.
- Walkthrough (Q-T).
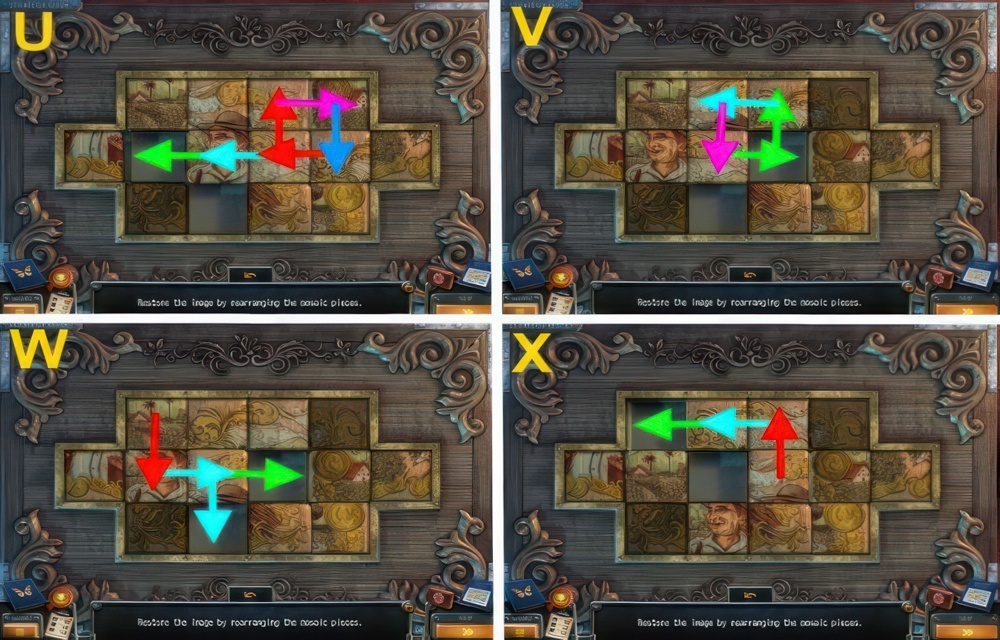
- Continued walkthrough (U-X).
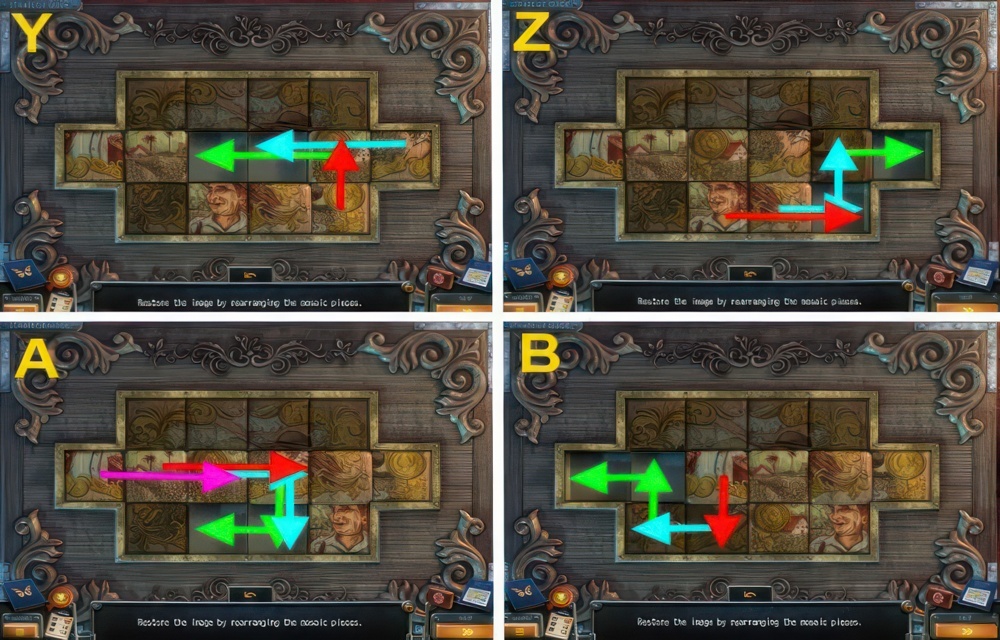
- Continued walkthrough (Y-B).
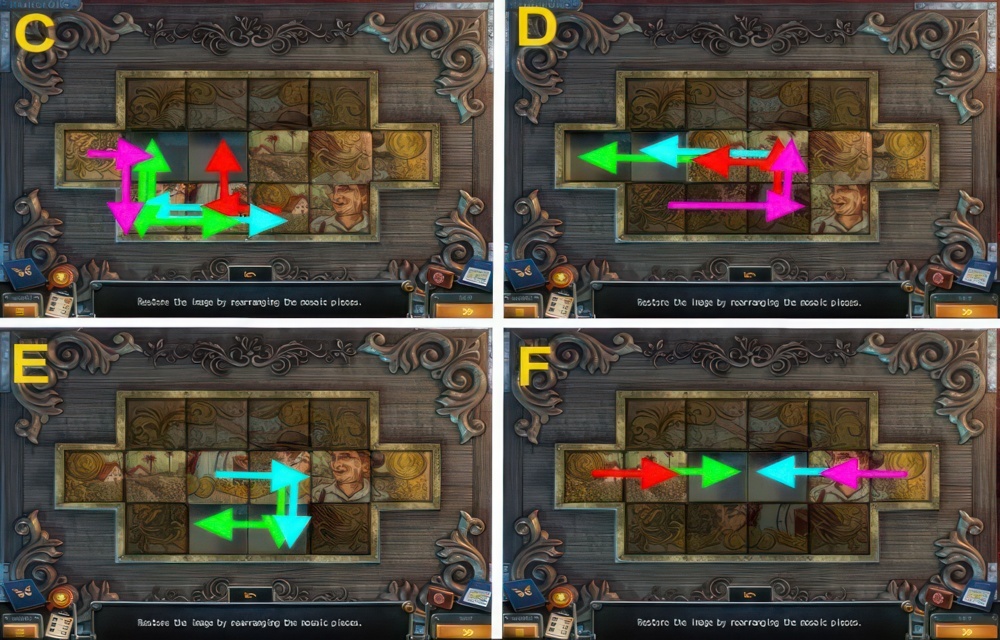
- Continued walkthrough (C-F).

- Continued walkthrough (H-G).
- Take the KREMLIN FIGURINE (H).
- Go to the Stairs.
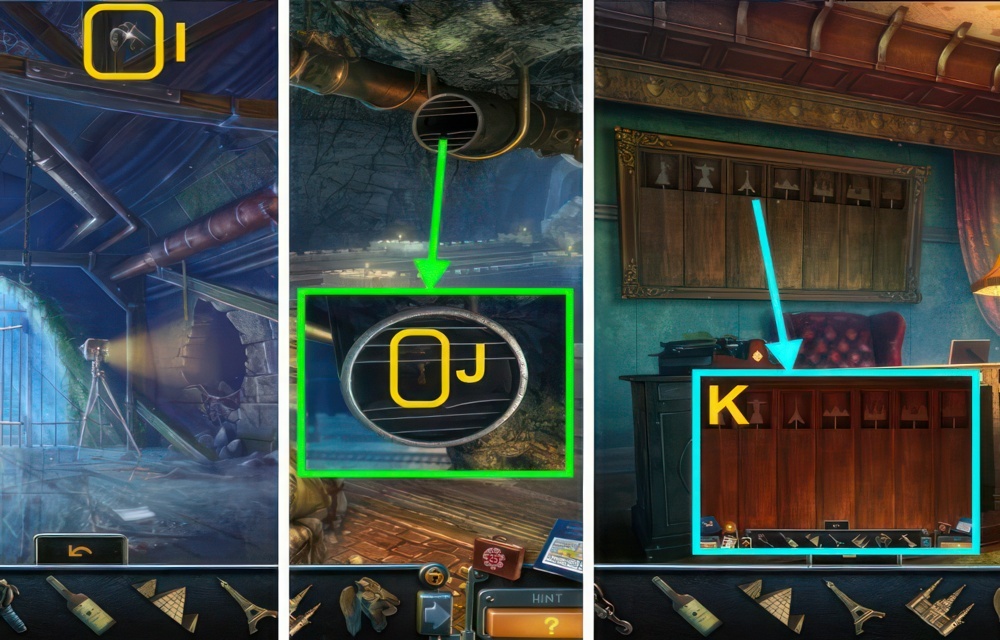
- Use the SLINGSHOT on the beam (I), you receive the FIGURINE.
- Go down.
- Use the CANE on the pipe to receive the CHRIST THE REDEEMER FIGURINE (J).
- Go to the Study.
- Place the SYDNEY OPRA HOUSE FIGURINE, STATUE OF LIBERTY FIGURINE, GREAT WALL OF CHINA FIGURINE, EGYPTIAN PYRAMIDS FIGURINE, EIFFEL TOWER FIGURINE, KREMLIN FIGURINE, and CHRIST THE REDEEMER FIGURINE on the stand for a puzzle (K).
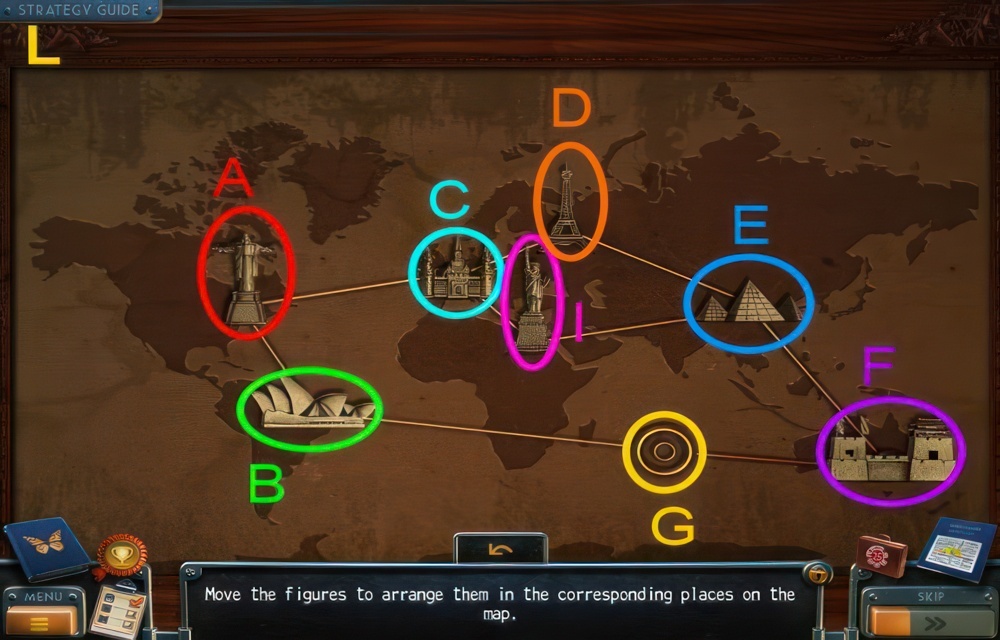
- Move the figures to arrange them in the corresponding places on the map.
- Walkthrough (L): F, E, D, C, I, E, F, G, B, A, C, I, E, F, G.
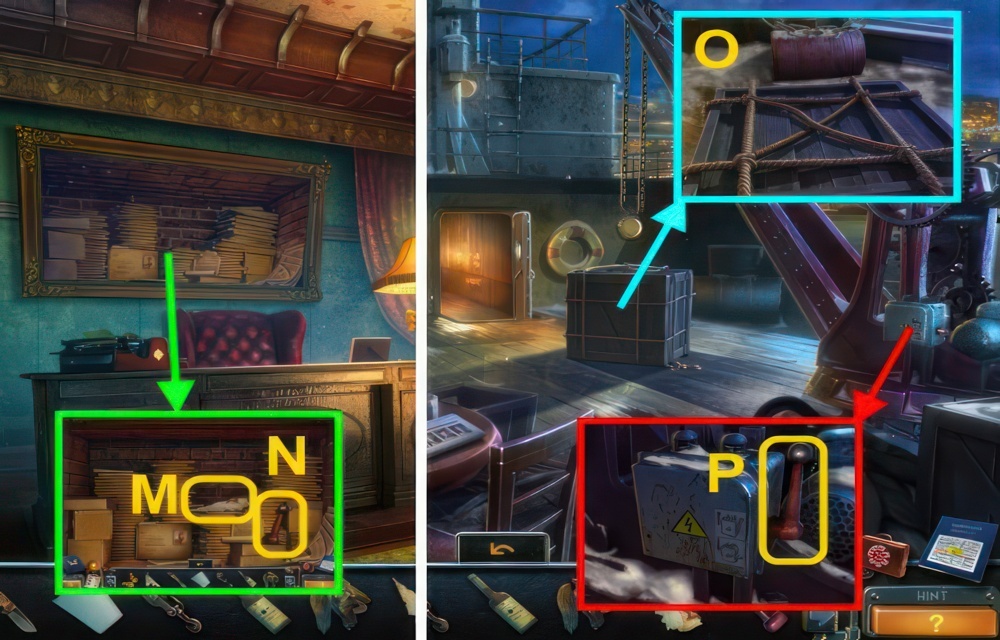
- Take the SCRAP OF PAPER (M) and LEVER (N).
- Examine the note and file.
- Go to the Deck.
- Use the HOOK on the rope (O).
- Use the LEVER on the crane (P).
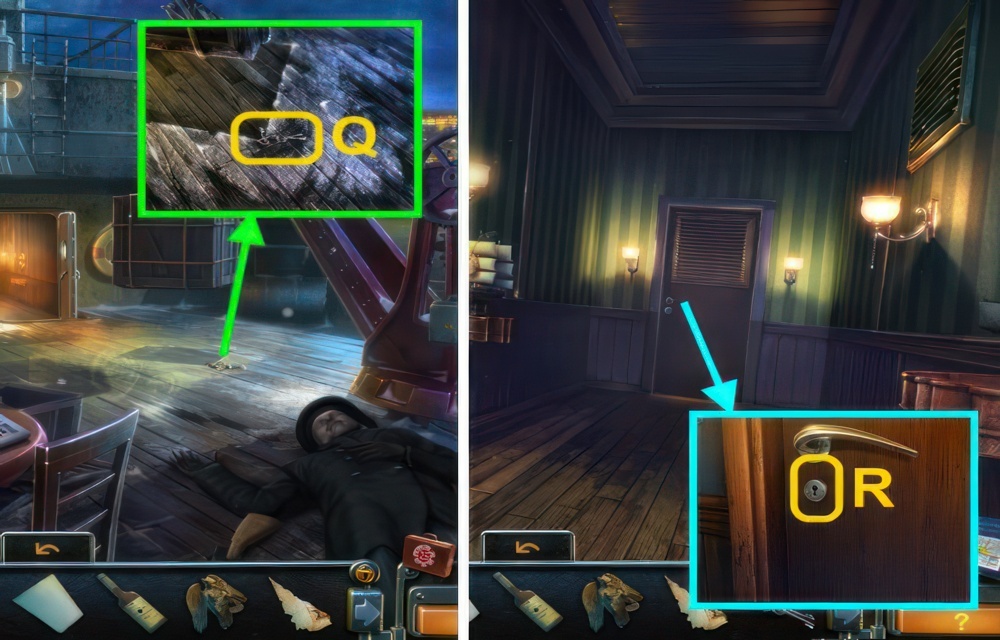
- Take the BUNCH OF KEYS (Q).
- Go to the Ship’s Passageway.
- Use the BUNCH OF KEYS on the door (R).
- Go forward.
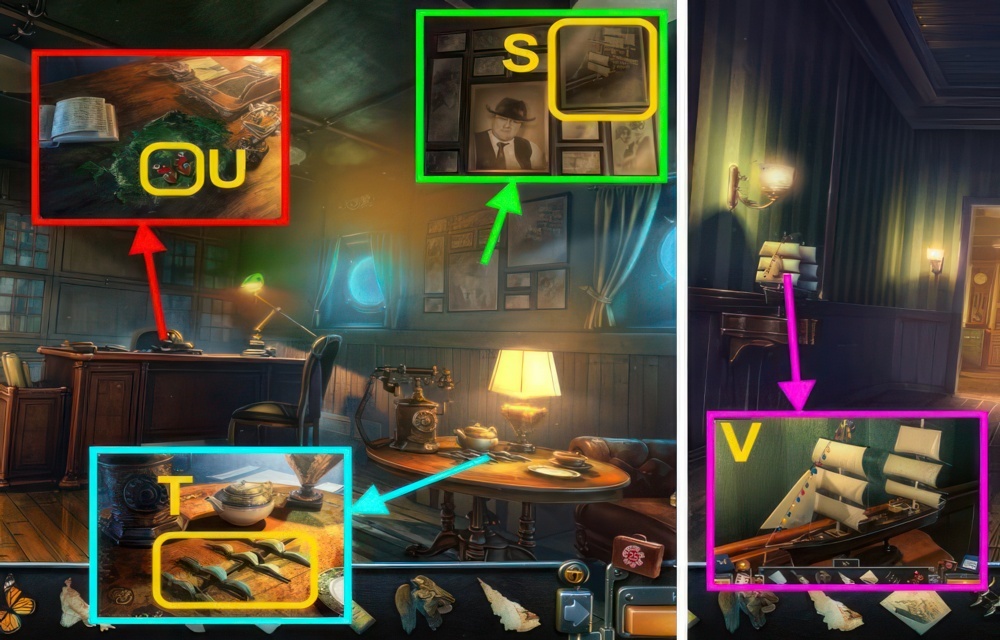
- Take the PICTURE OF SHIP (S).
- Take the MAST (T).
- Take the BUTTERFLY (U).
- Go down.
- Place the MAST on the ship, use the PICTURE OF SHIP for a puzzle (V).
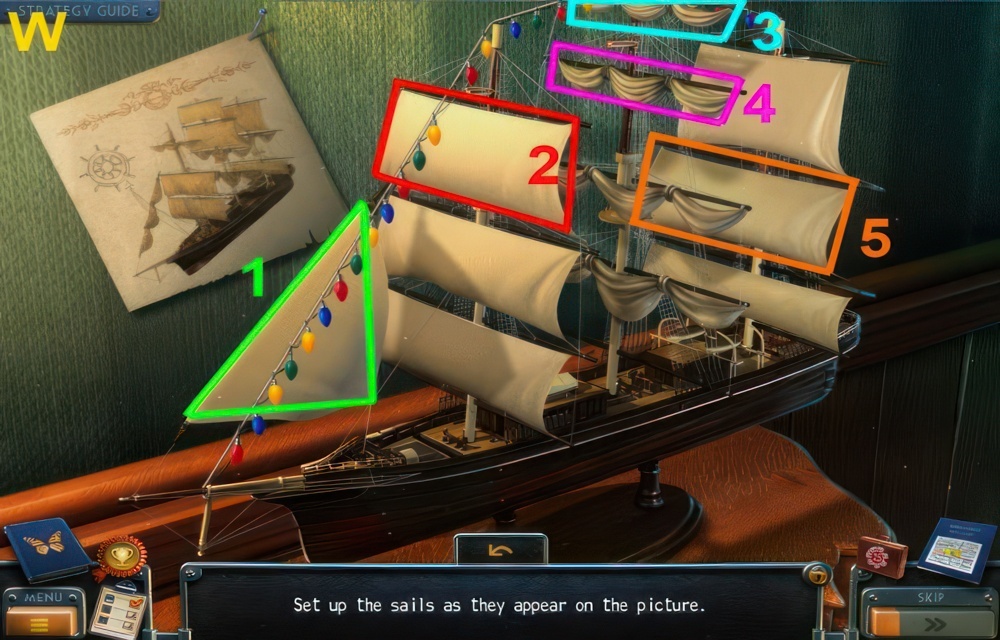
- Set up the sails as they appear on the picture.
- Walkthrough (W): 1-5.
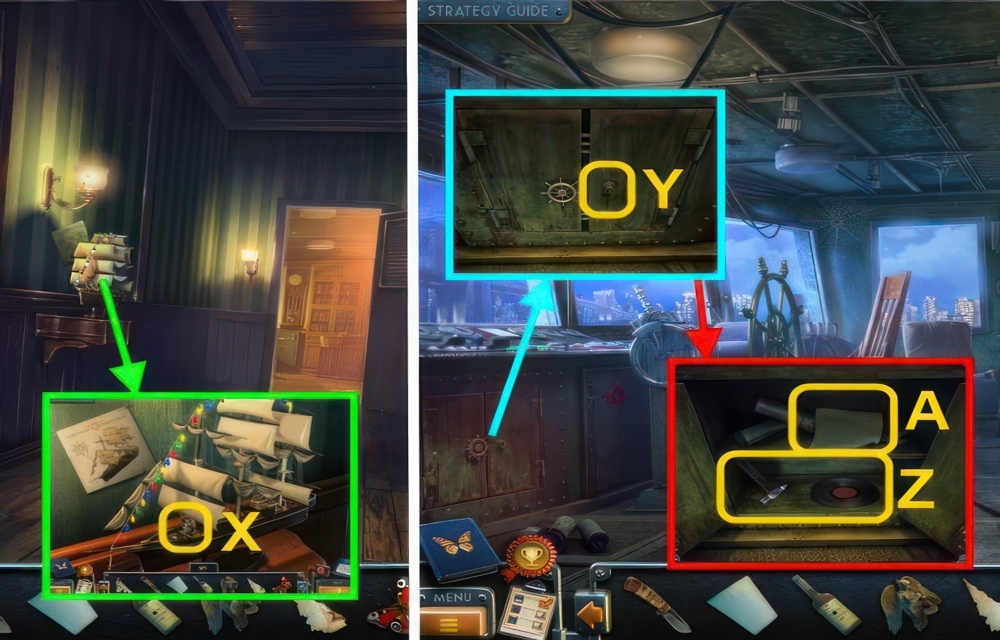
- Take the SHIP’S WHEEL (X).
- Go to the Bridge.
- Place the SHIP’S WHEEL on the door (Y), turn the wheels.
- Take the RECORD and HAMMER (Z).
- Read the note (A).
- Go to the Hall.

- Talk to Bishop (B), you receive the PUNCHED CARD.
- Place the RECORD on the record player (C), turn the handle.
- Take the CRYSTAL (D).
- Go forward.
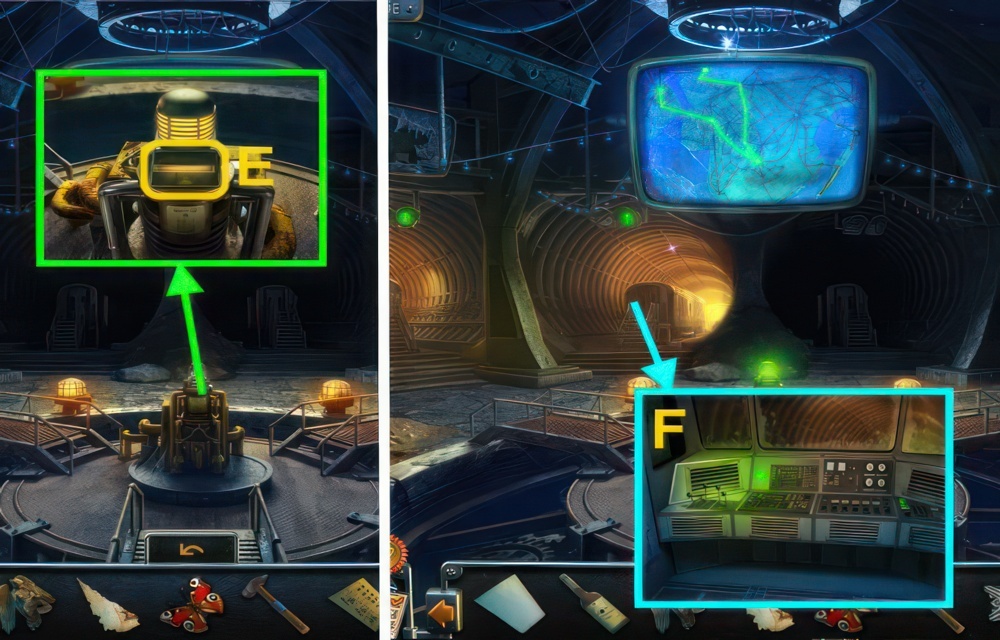
- Use the PUNCHED CARD on the device (E).
- Open the door, press the controls (F).
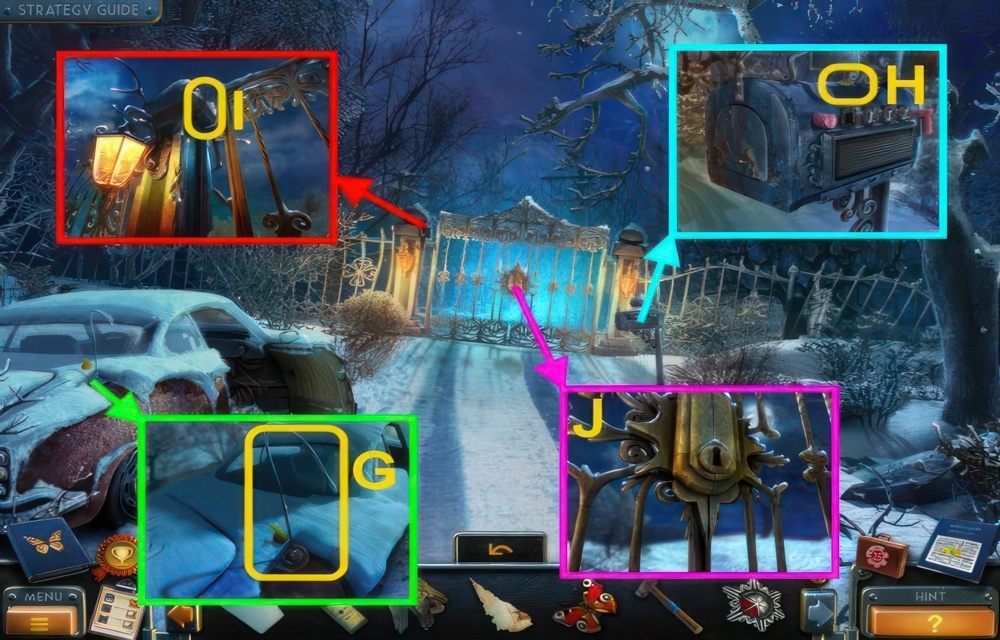
- Take the ANTENNA and FISH 1/6 (G).
- Take the FISH 2/6 (H).
- Use the ANTENNA to take the KEY (I).
- Use the KEY on the lock (J).
- Go forward ×2.
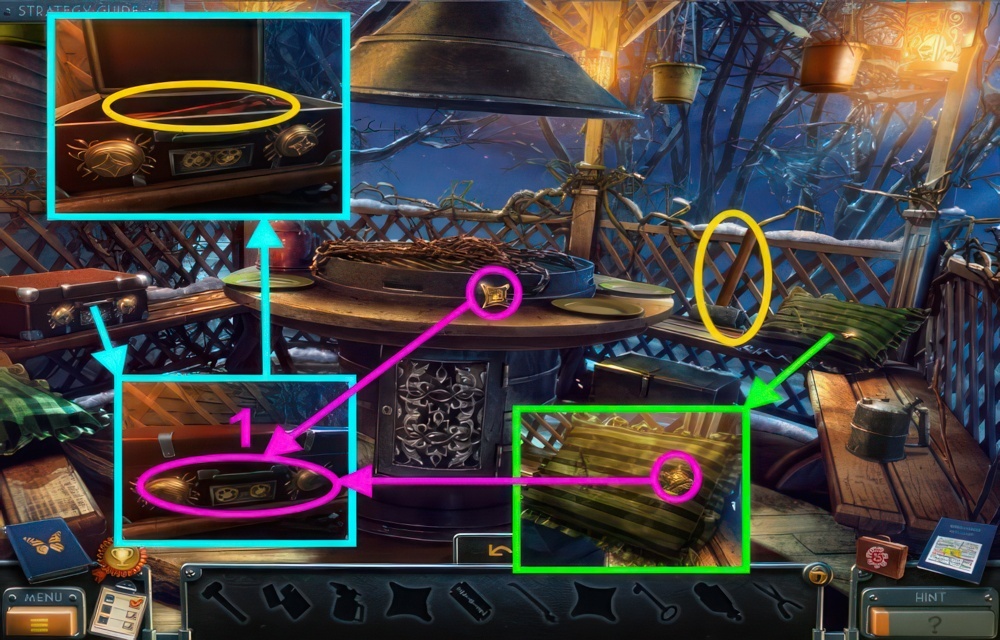
- Walkthrough puzzle (1).
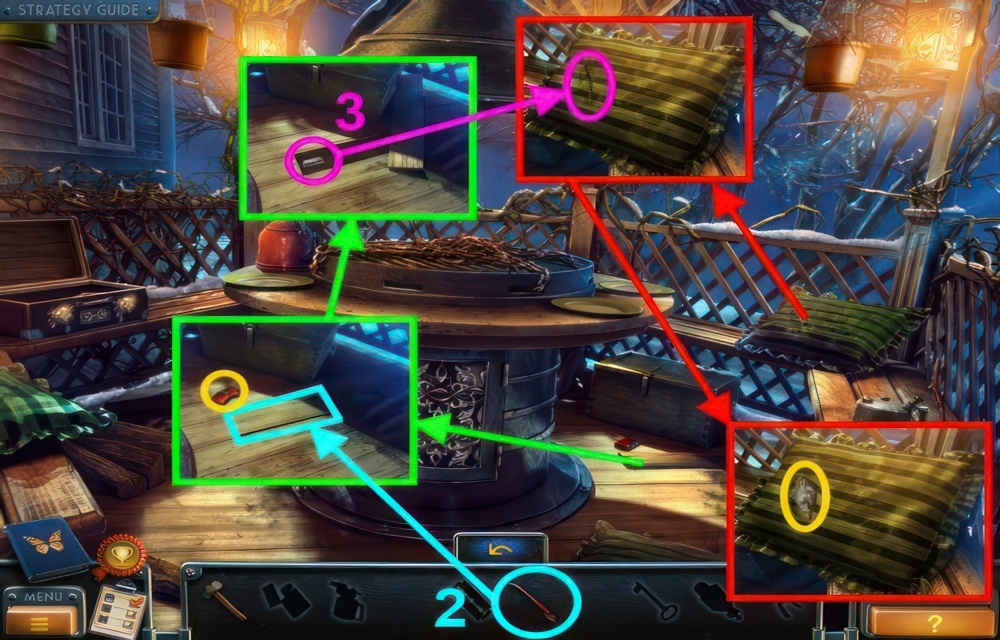
- Continued walkthrough puzzle (2-3).
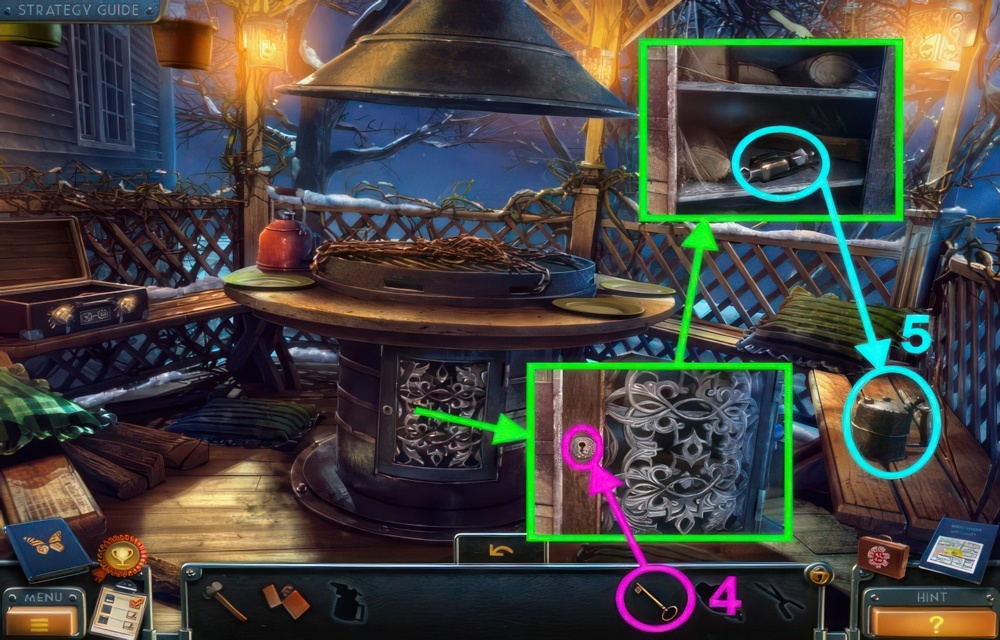
- Continued walkthrough puzzle (4-5).
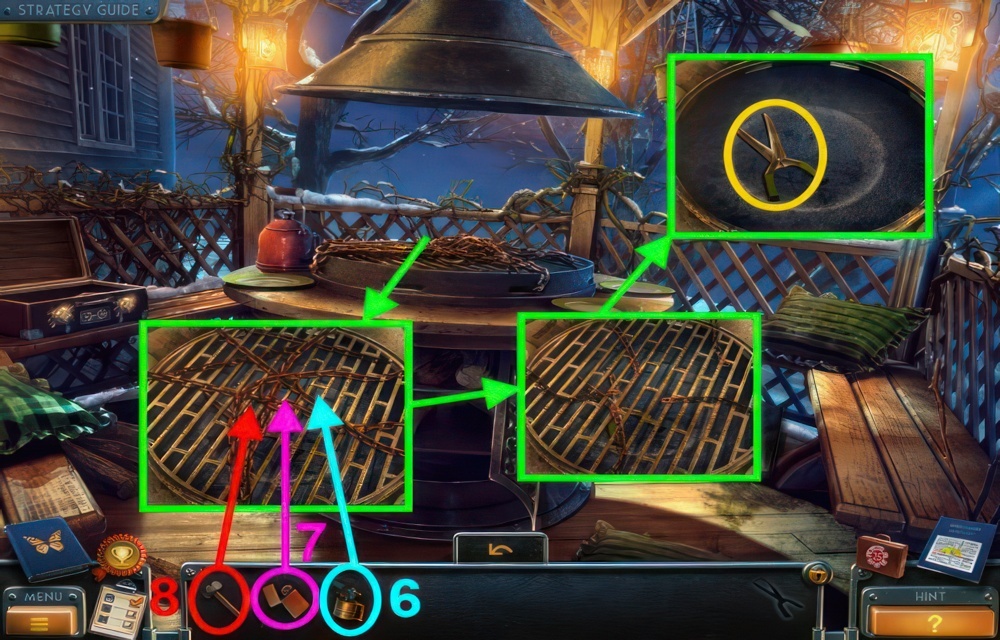
- Continued walkthrough puzzle (6-8).
- You receive the PRUNING SCISSORS.
- Go down.
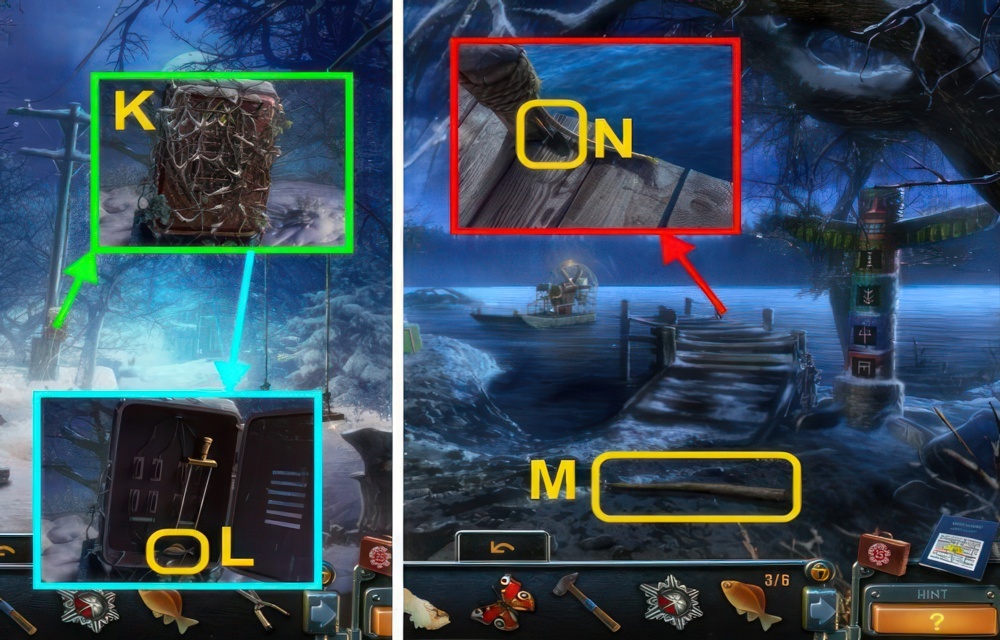
- Use the PRUNING SCISSORS on the branches (K).
- Open the box, take the FISH 3/6 (L).
- Go forward ×2.
- Take the POST (M).
- Take the TROWEL (N).
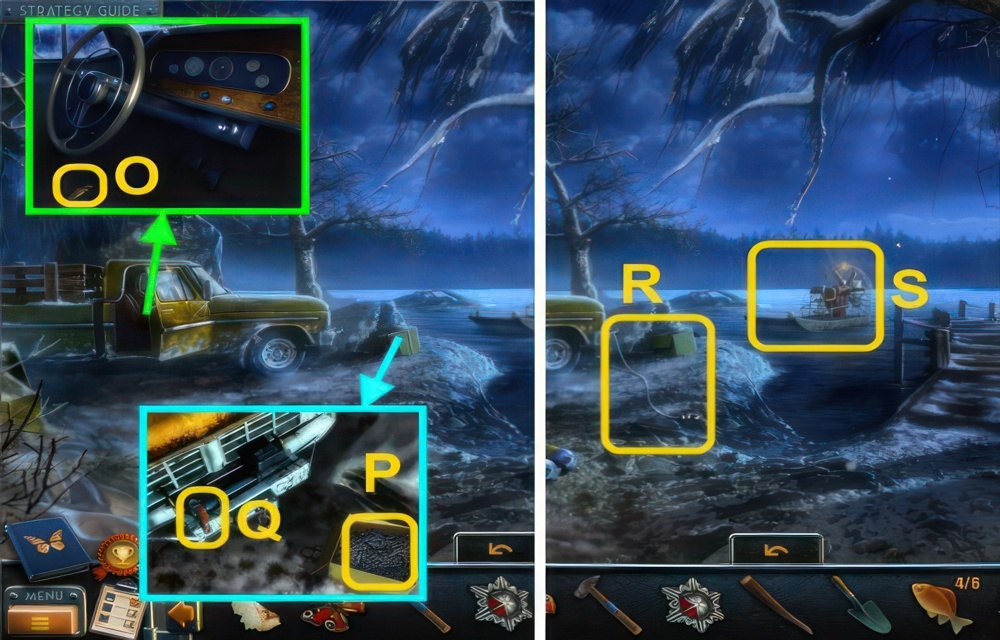
- Take the FISH 4/6 (O).
- Use the KNIFE on the box, take the NAILS (P).
- Pull the lever (Q).
- Attach the cable (R) to the boat (S).
- Go down.
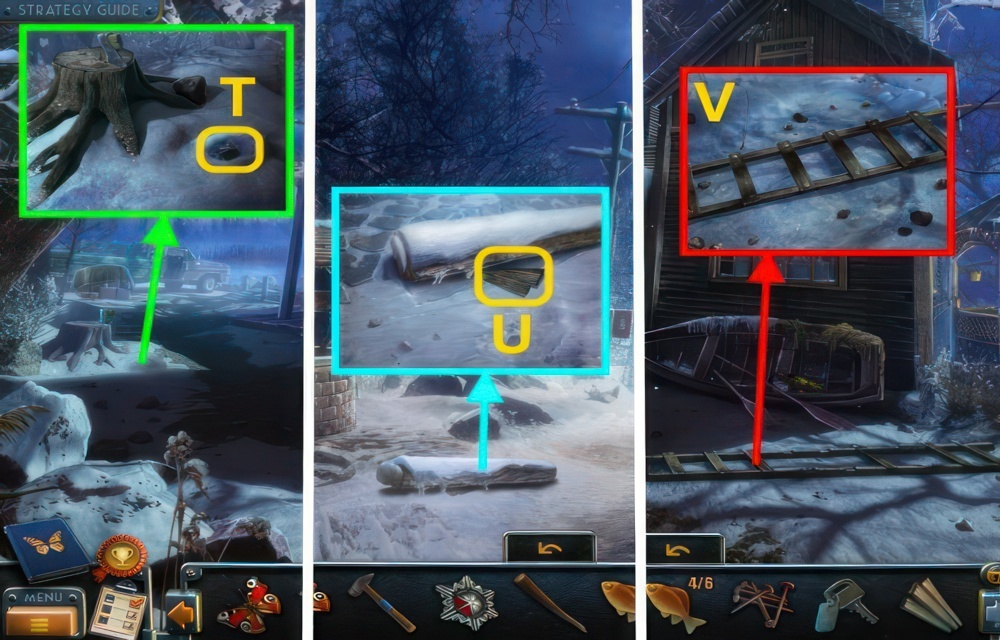
- Use the TROWEL on the snow, take the KEY (T).
- Go down.
- Use the POST on the log, take the STEPS (U).
- Go forward.
- Use the STEPS, NAILS, and HAMMER on the ladder (V), take the LADDER.
- Go forward.
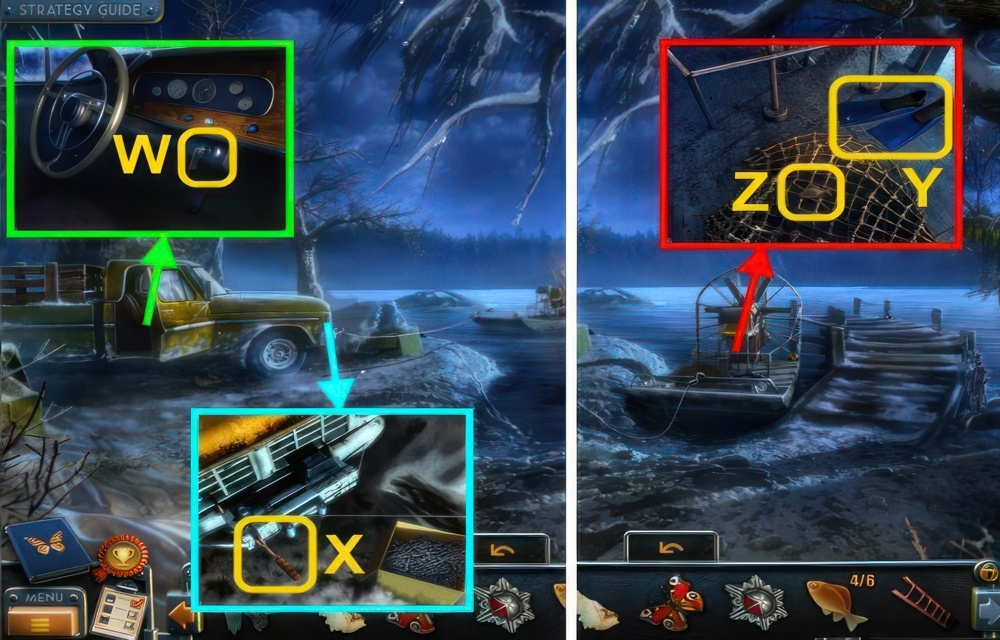
- Use the KEY on the car (W).
- Pull the lever (X).
- Take the SWIMFINS (Y).
- Use the KNIFE on the net, take the FISH 5/6 (Z).
- Go down ×3.
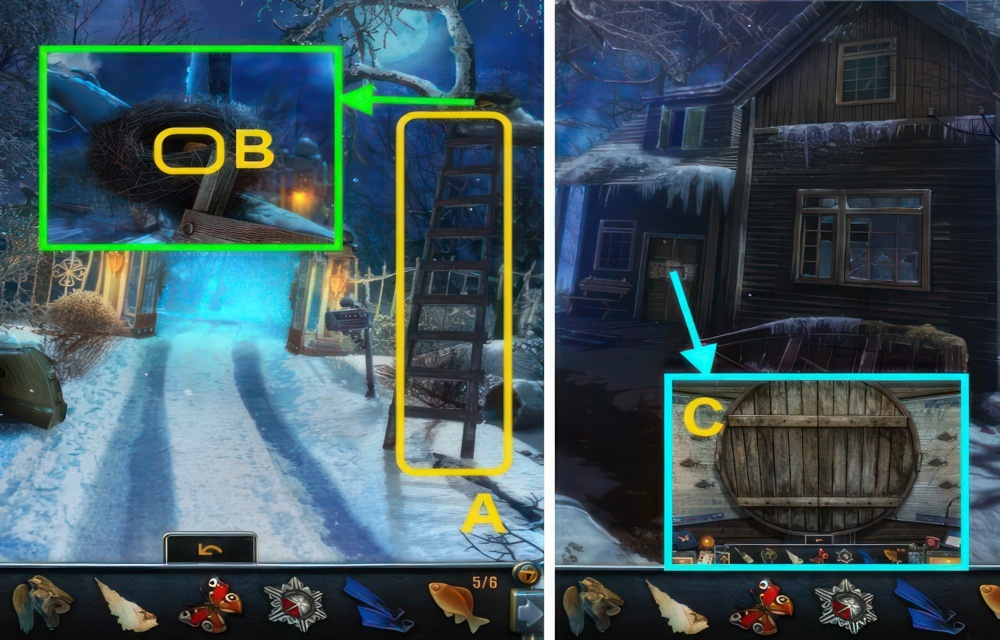
- Place the LADDER under the tree (A).
- Take the FISH 6/6 (B).
- Go forward ×2.
- Place the FISH on the door for a puzzle (C).
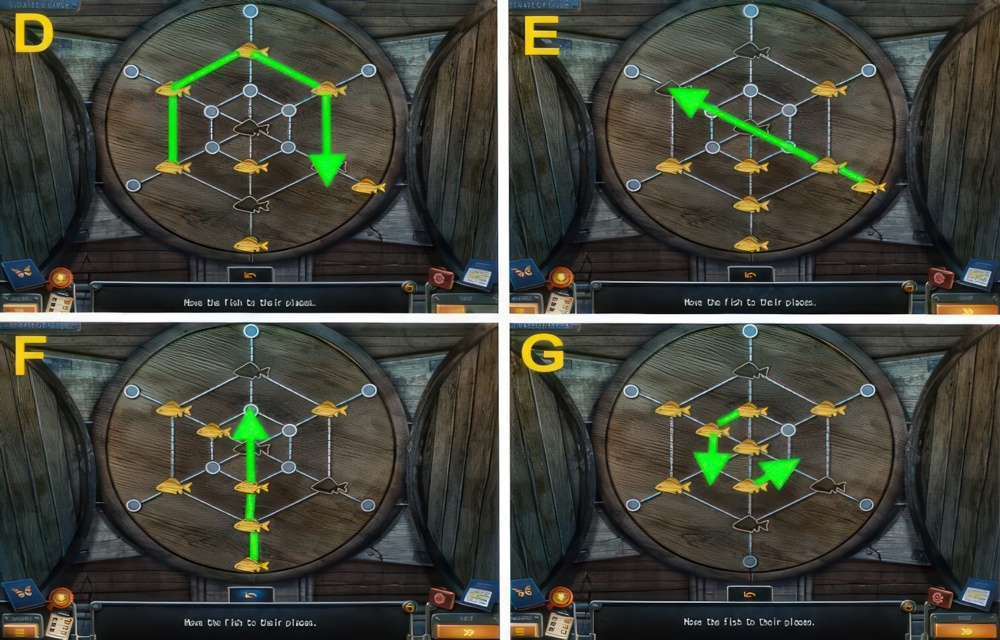
- Move the fish to their places.
- Walkthrough (D-G).
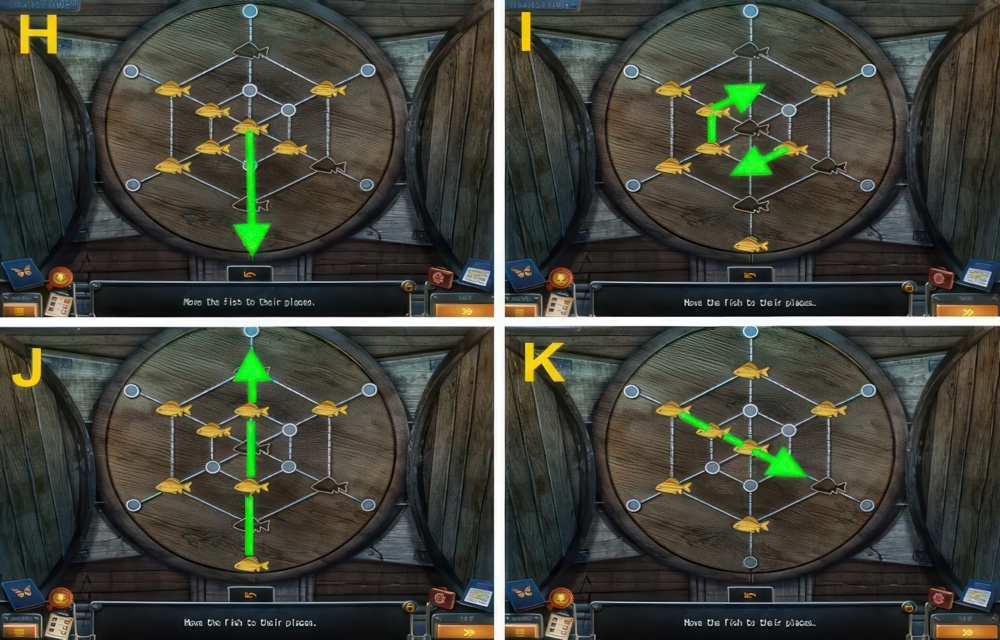
- Continued walkthrough (H-K).
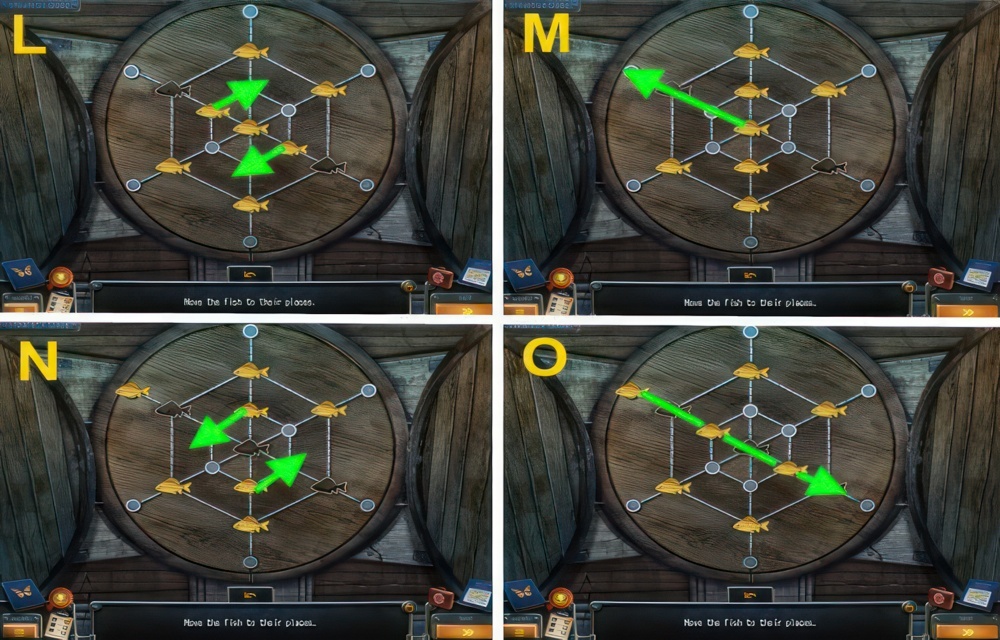
- Continued walkthrough (L-O).
- Go through the door.
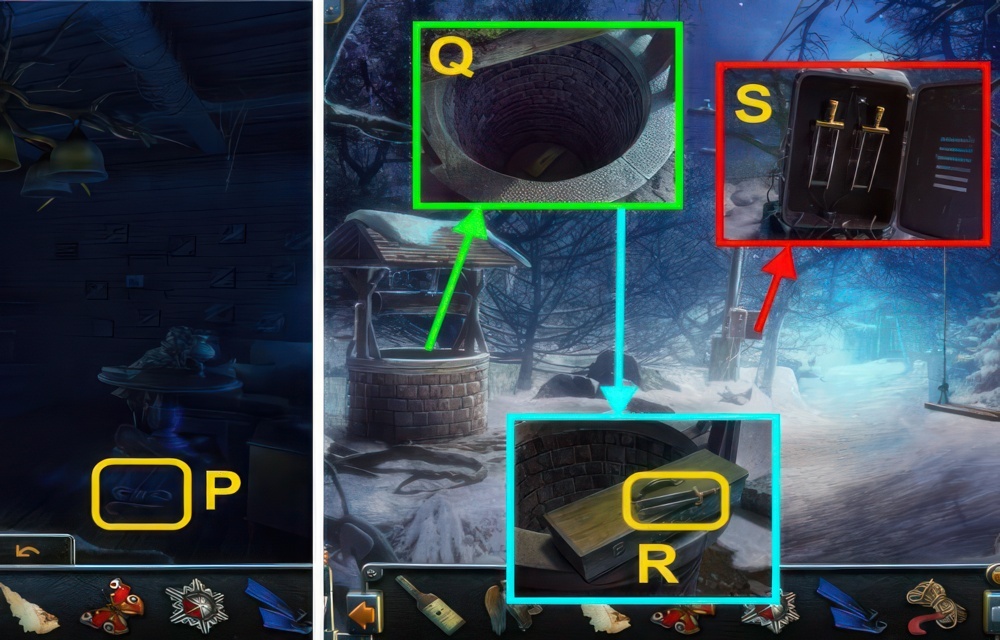
- Take the ROPE WITH HOOK (P).
- Go down ×2.
- Use the ROPE WITH HOOK on the well (Q).
- Take the KNIFE SWITCH (R).
- Place the KNIFE SWITCH in the box (S), flip the switches.
- Go forward, then into the house.
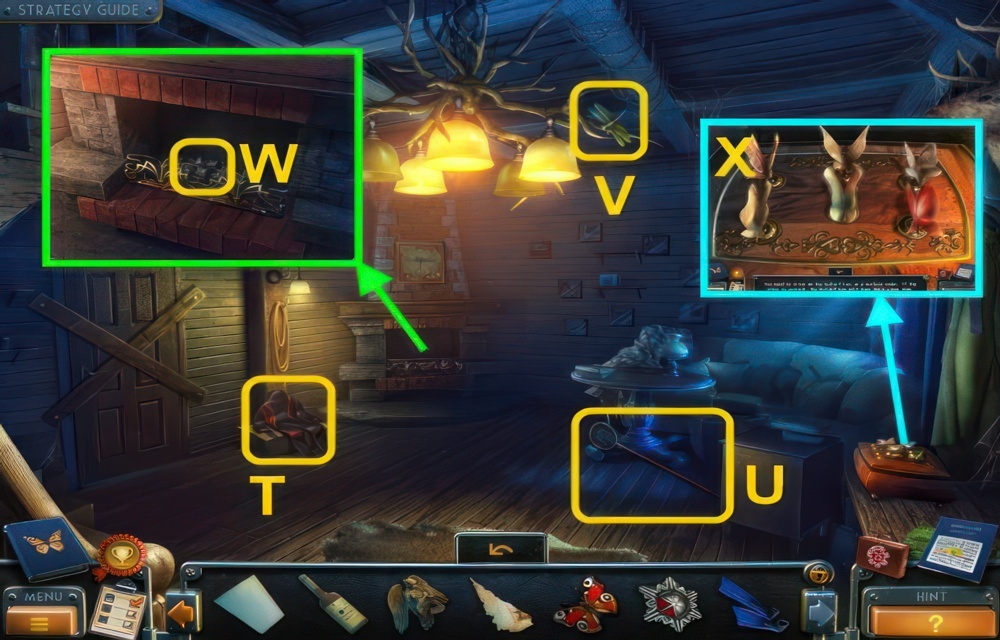
- Take the WETSUIT (T).
- Use the net (U) to get the DRAGONFLY (V).
- Take the PIECE OF COAL (W).
- Examine the box for a puzzle (X).
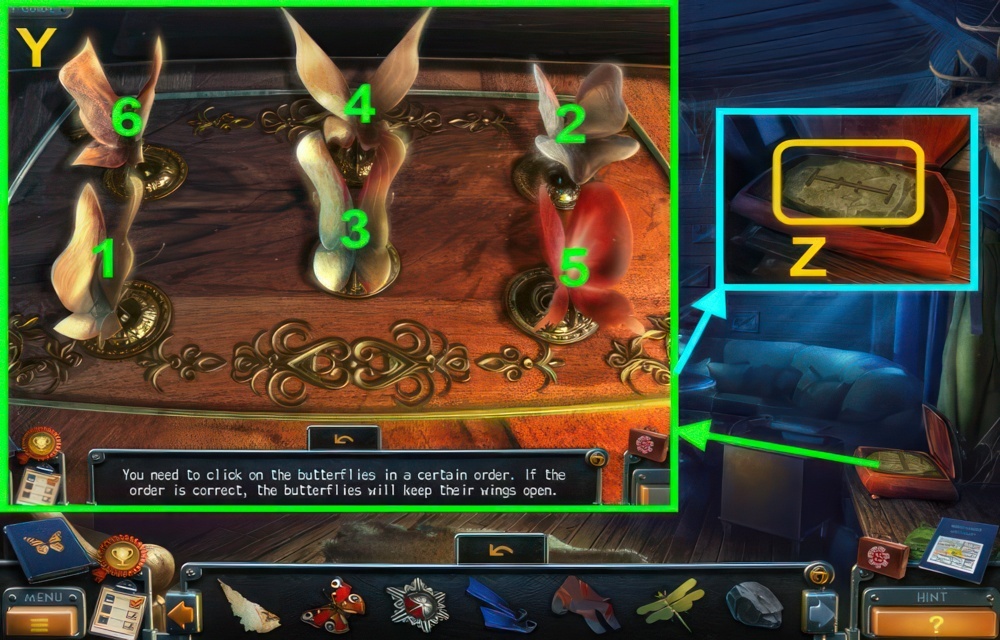
- You need to click on the butterflies in a certain order.
- If the order is correct, the butterflies will keep their wings open.
- Walkthrough (Y).
- Take the RUNE (Z).
- Go down ×2.
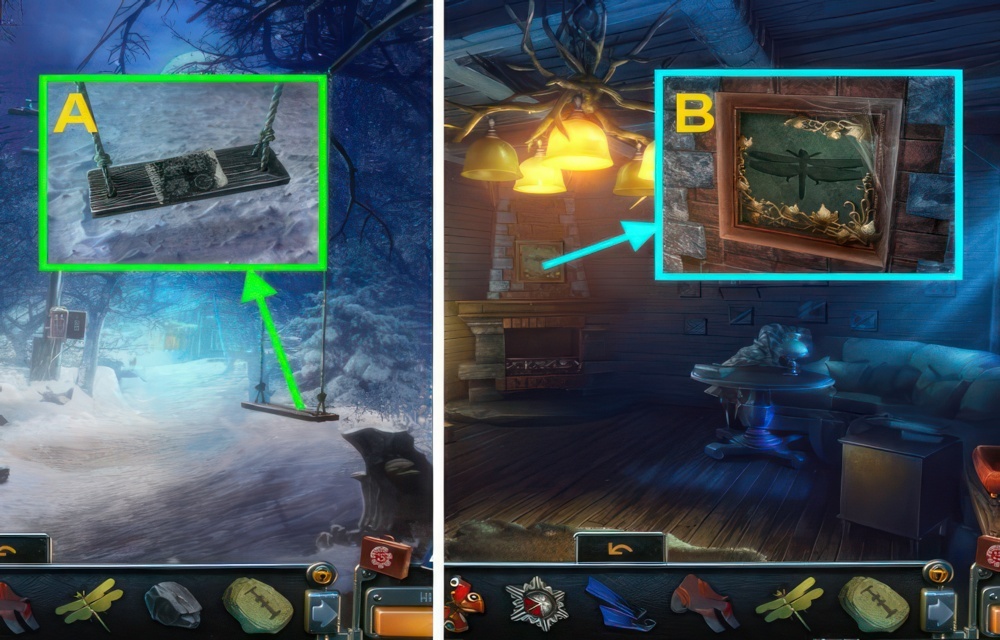
- Place the PAPER on the swing, use the PIECE OF COAL on the paper (A).
- Go forward, then into the house.
- Place the DRAGONFLY in the frame for a puzzle (B).
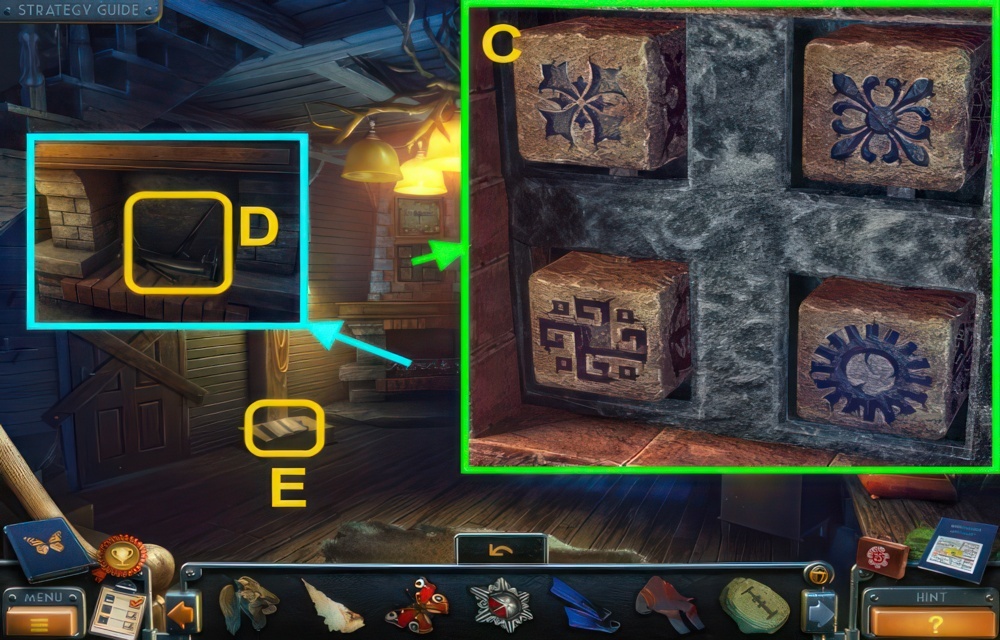
- Rotate the cubes with certain symbols on the outside.
Walkthrough (C). - Take the SPEAR GUN and AXE HANDLE (D).
- Examine the book (E).
- Go down.
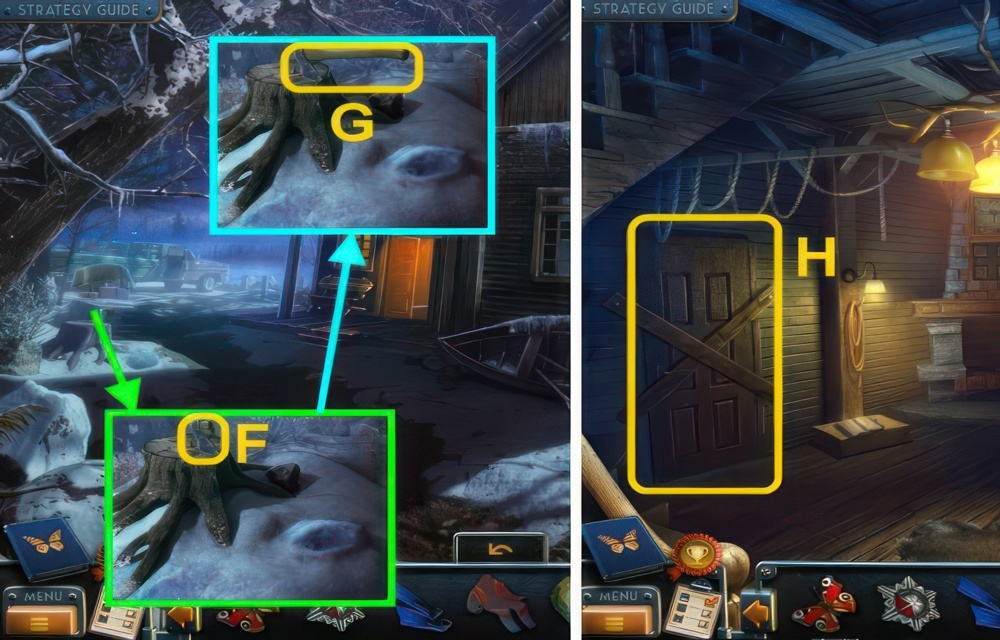
- Remove the wood (F).
- Use the AXE HANDLE on the blade, take the AXE (G).
- Go into the house.
- Use the AXE on the door (H).
- Go left.
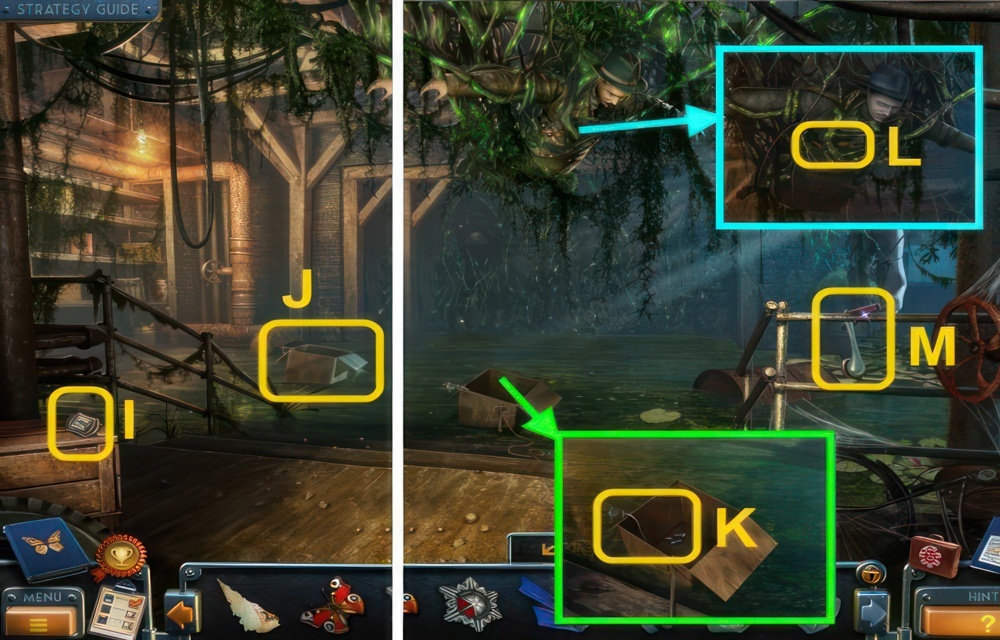
- Take the LETTERBOX PLATE (I).
- Use the SPEAR GUN on the box (J).
- Take the CHIPS and ELECTRIC WIRE (K).
- Take the WRENCH (L).
- Take the HANDLE (M).
- Go down ×2.
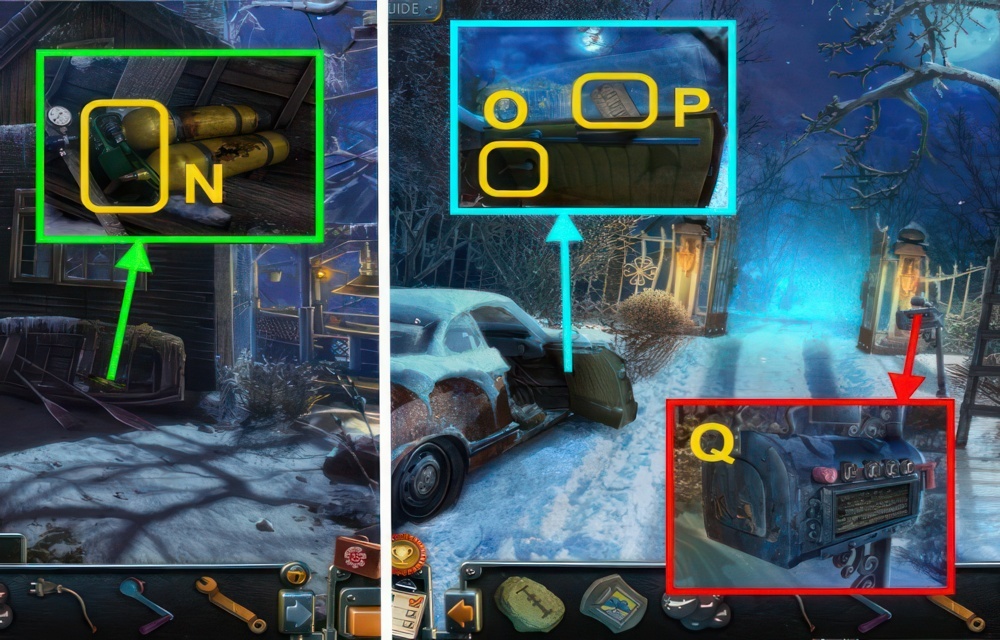
- Use the WRENCH on the oxygen tank, take the TUBE (N).
- Go down ×2.
- Try to take the paper, use the HANDLE on the door (O).
- Take the PAPER WITH DIAGRAM (P).
- Place the LETTERBOX PLATE on the mailbox (Q), examine the mailbox for a puzzle.
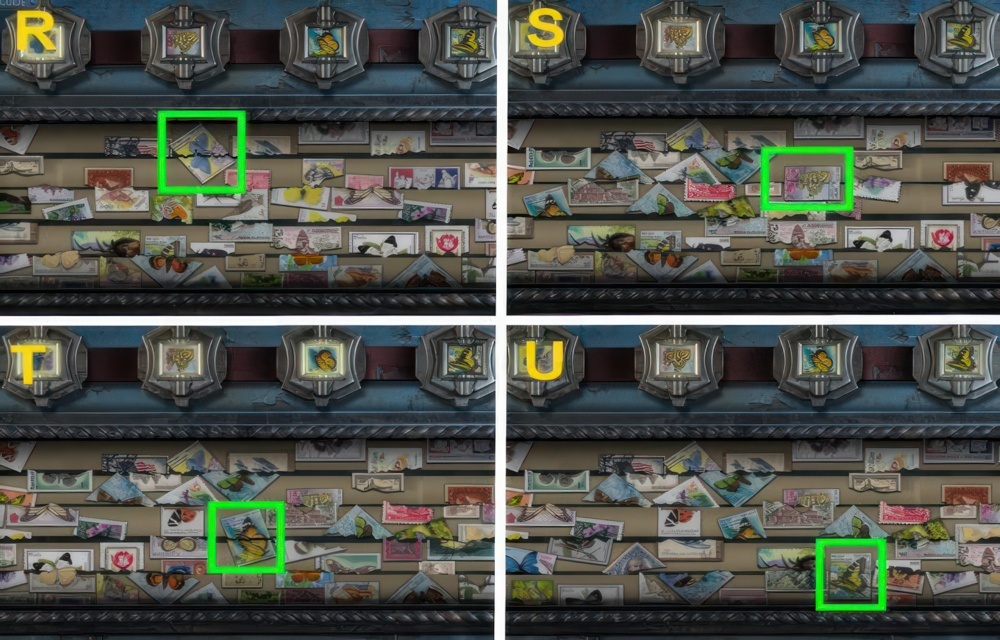
- Drag the rows to set them up to display the postage stamps shown above.
Walkthrough (R-U).
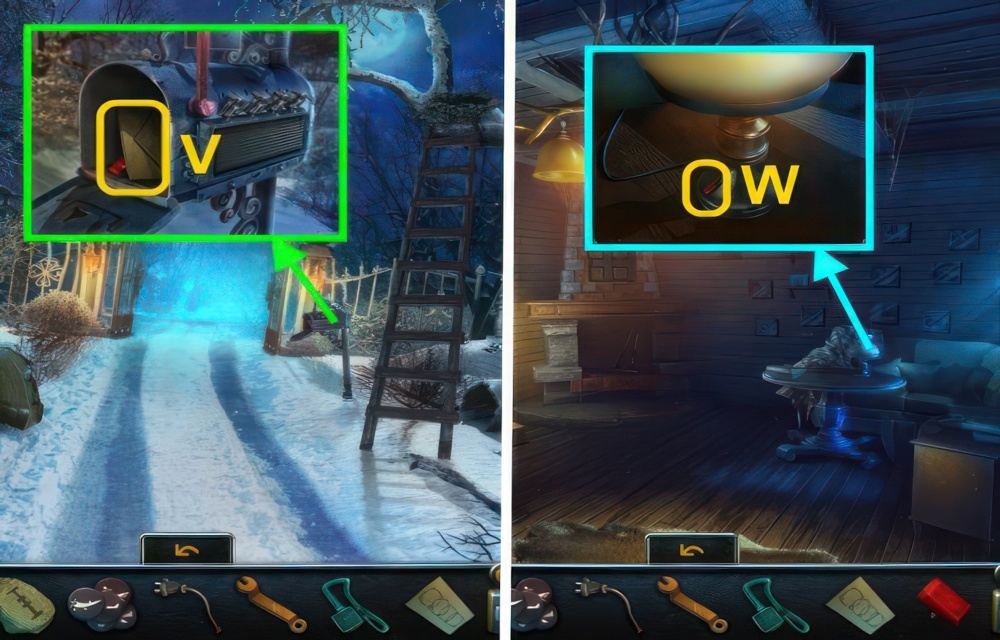
- Read the letter, take the SWITCH (V).
- Go forward ×2, go into the house.
- Place the SWITCH on the lamp (W), flip it.
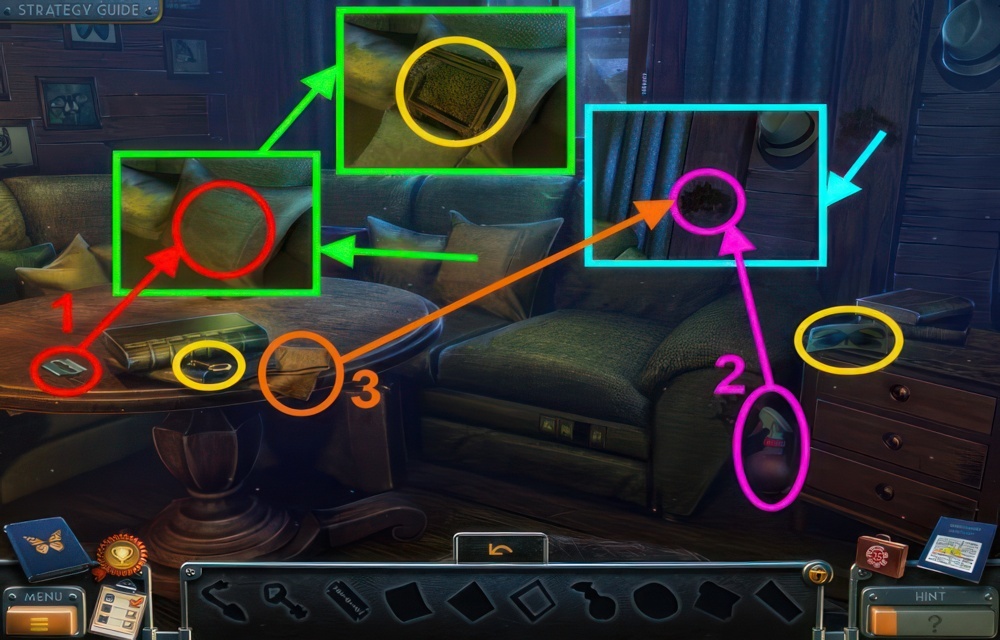
- Walkthrough puzzle (1-3).
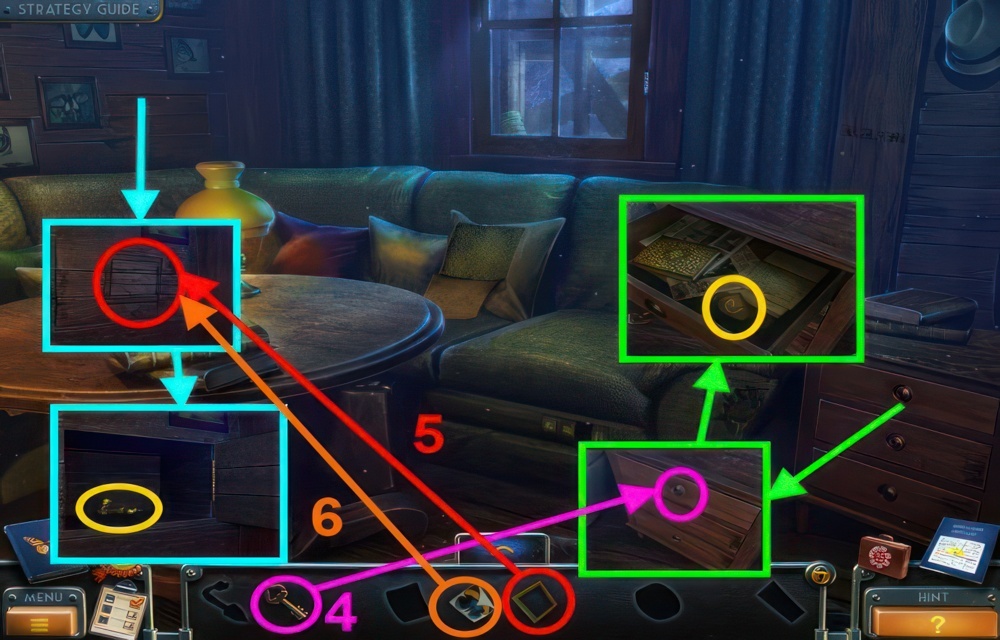
- Continued walkthrough puzzle (4-6).
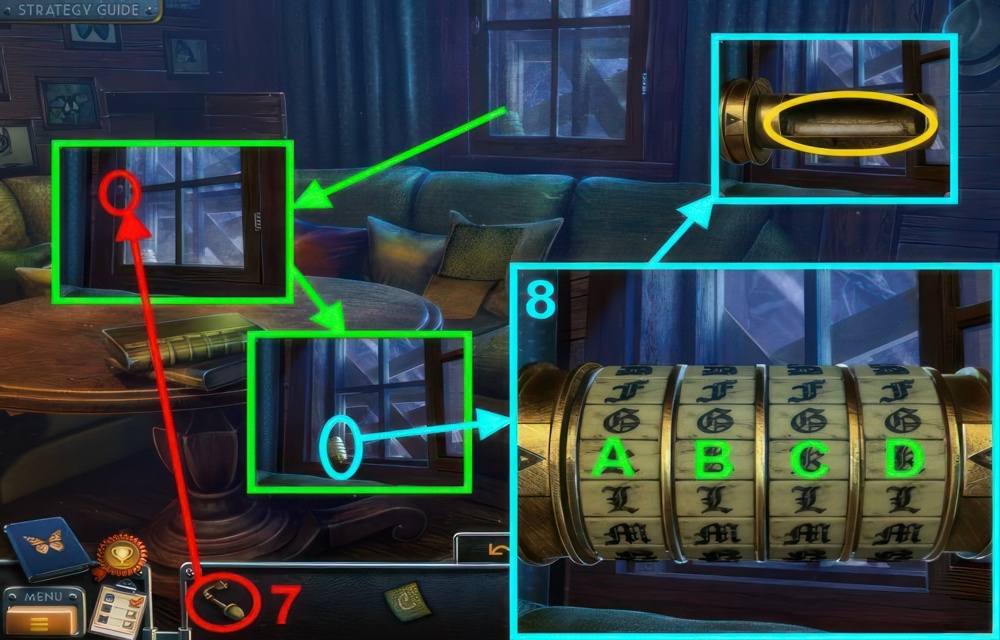
- Continued walkthrough puzzle (7-8).
Turn the rings to line up the right symbols. You saw a clue earlier. - Walkthrough (8): A×11, B×6, C×7, D×16.
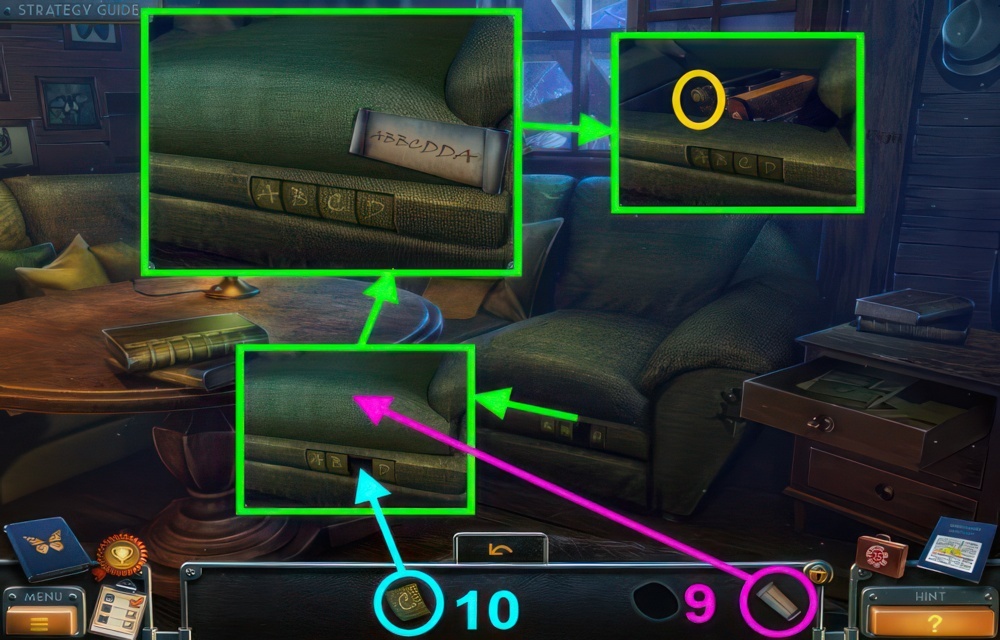
- Press the buttons in the right order.
- Continued walkthrough puzzle (9-10).
- You receive the TYPEWRITER PART.
- Go to the Study.
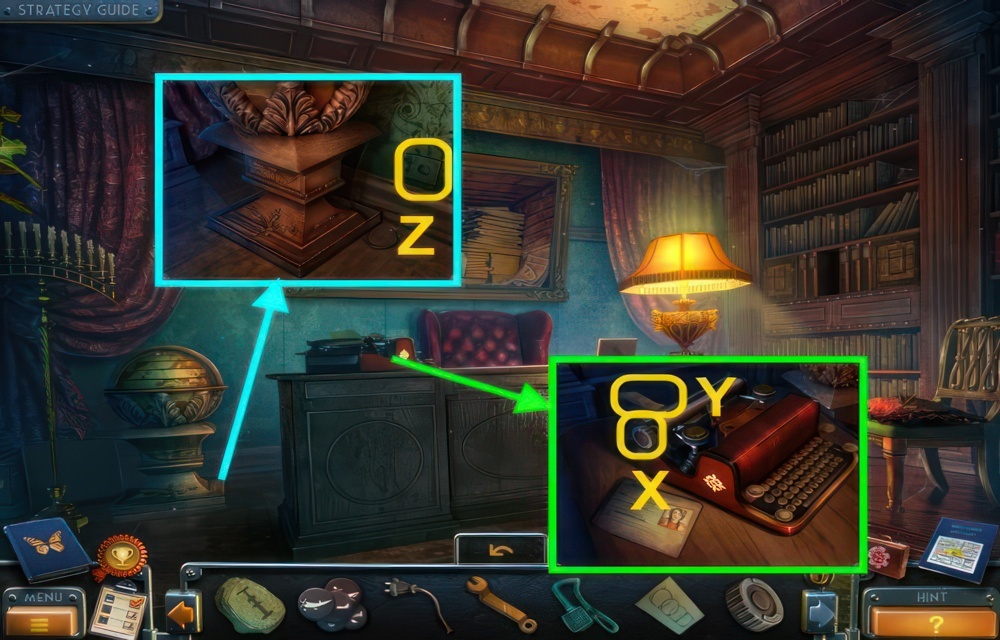
- Use the TYPEWRITER PART on the typewriter (X), turn it.
- Take the SCRAP OF PAPER (Y).
- Use the ELECTRIC WIRE on the socket (Z).
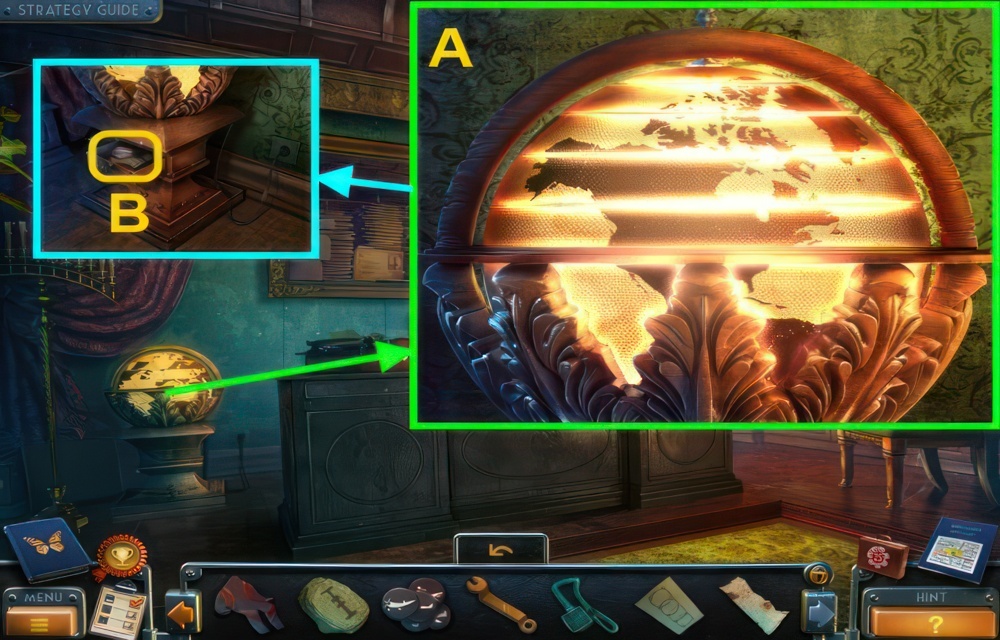
- Examine the globe for a puzzle.
- Restore the image by turning the sectors.
- Walkthrough (A).
- Take the SCRAP OF PAPER and BULB (B).
- Go to the Vault.

- Place the CRYSTAL on the panel for a puzzle (C).
- Arrange the rubies to cause three beams of light to fall on each of them.
- Walkthrough (D): A, F, B, A, D, C, C, B.
- Take the LIGHT BULB and SCRAP OF PAPER (E).
- Go down.
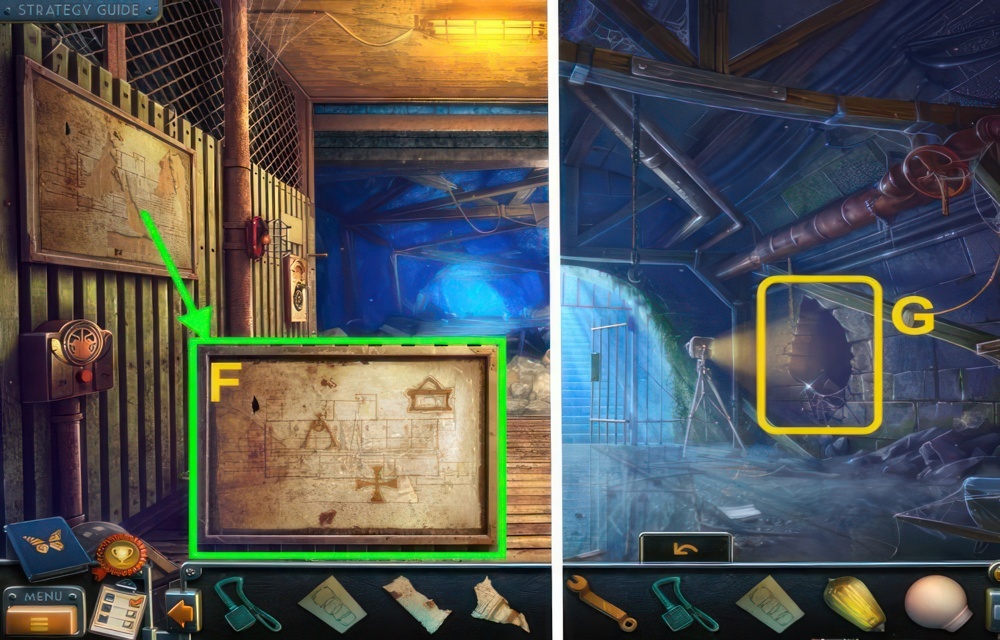
- Place the 5 SCRAPS OF PAPER on the map (F).
- Go forward, then left.
- Examine the hole for a puzzle (G).
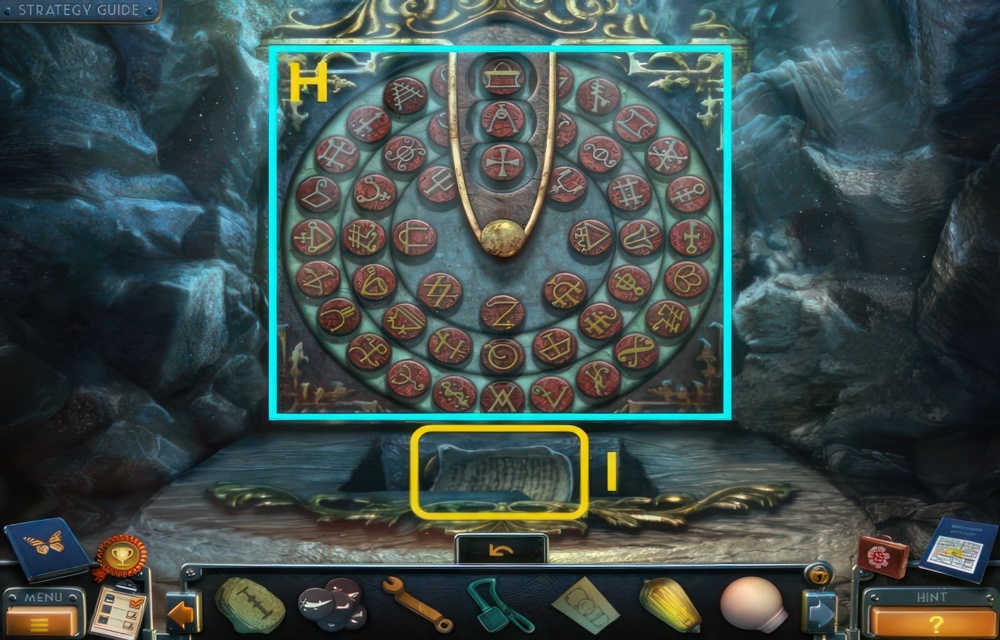
- Turn the disks to place certain symbols in the frame at the top.
- Walkthrough (H).
- Read the note, take the CHIPS (I).
- Go to At the Well.
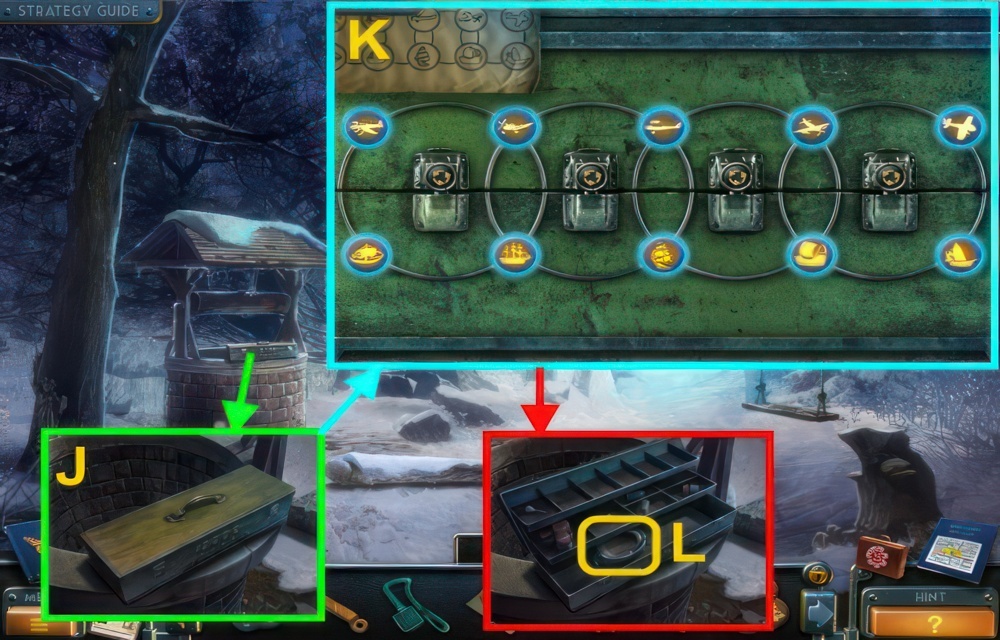
- Place the two sets of CHIPS and PAPER WITH DIAGRAM on the box for a puzzle (J).
- Press the buttons to rearrange the pieces in the order shown on the diagram.
- Walkthrough (K).
- Take the MASK (L).
- Go forward ×2.
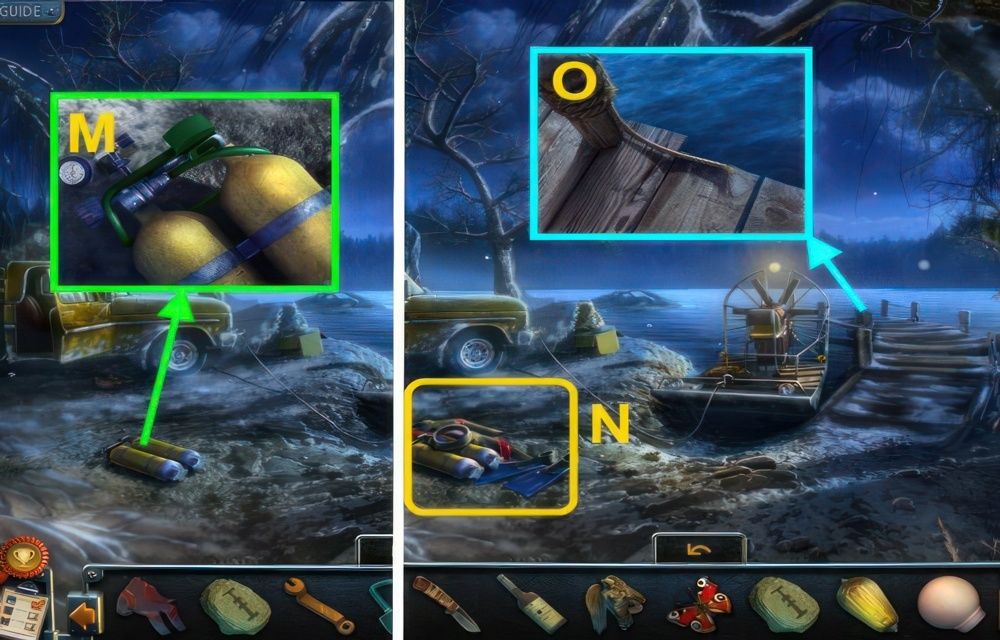
- Use the wrench on the tank, remove the broken tube.
- Place the TUBE on the tank, use the WRENCH (M).
- Place the SWIMFINS, WETSUIT, and MASK with the oxygen tank, take the DIVING SUIT (N).
- Use the DIVING SUIT on the water (O).
The Office
In life, Tom worked in a university, and his office is still there. I need to check it out; maybe I’ll find some kind of explanation for the ghost’s actions there.
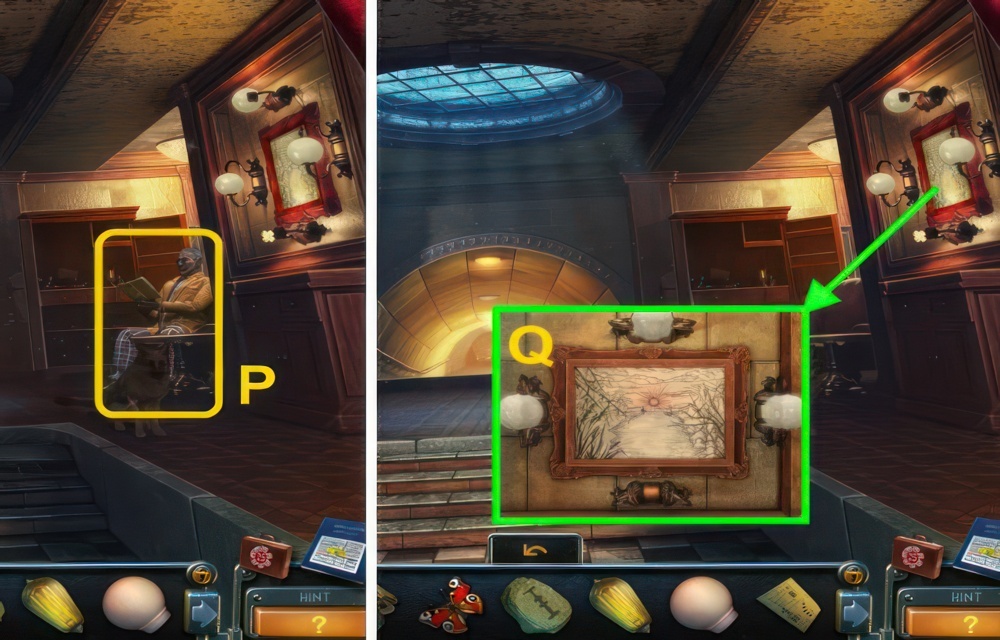
- Talk to Bishop (P).
- You receive the PUNCHED CARD.
- Place the LIGHT BULB under the frame for a puzzle (Q).
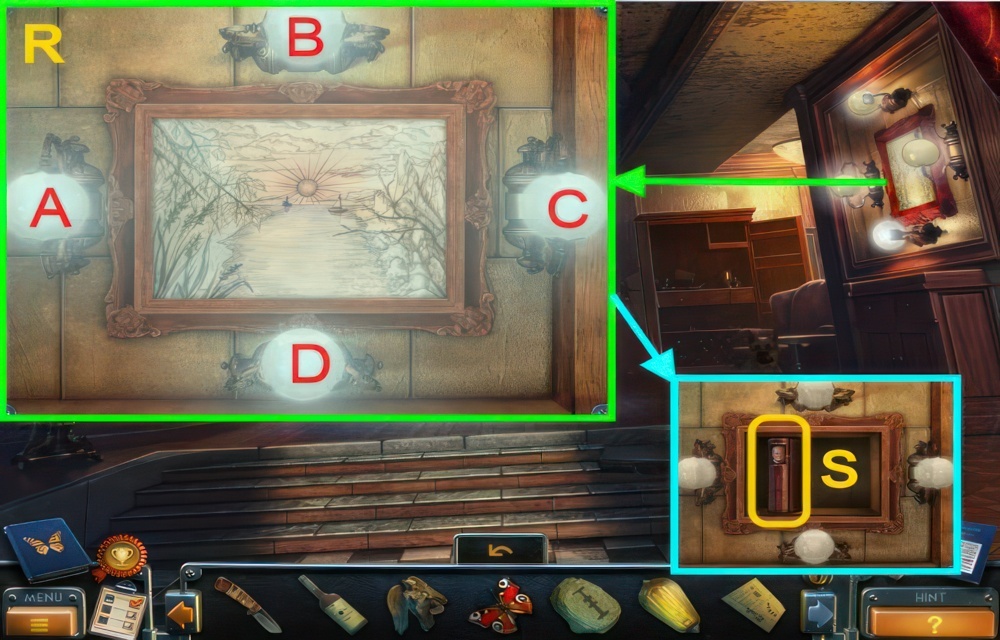
- Click on the lamps to change their color.
- The picture needs to be lit up in the right colors.
- Walkthrough (R): A×5, B×3, C, D×4.
- Take the BOOK (S).
- Go forward.
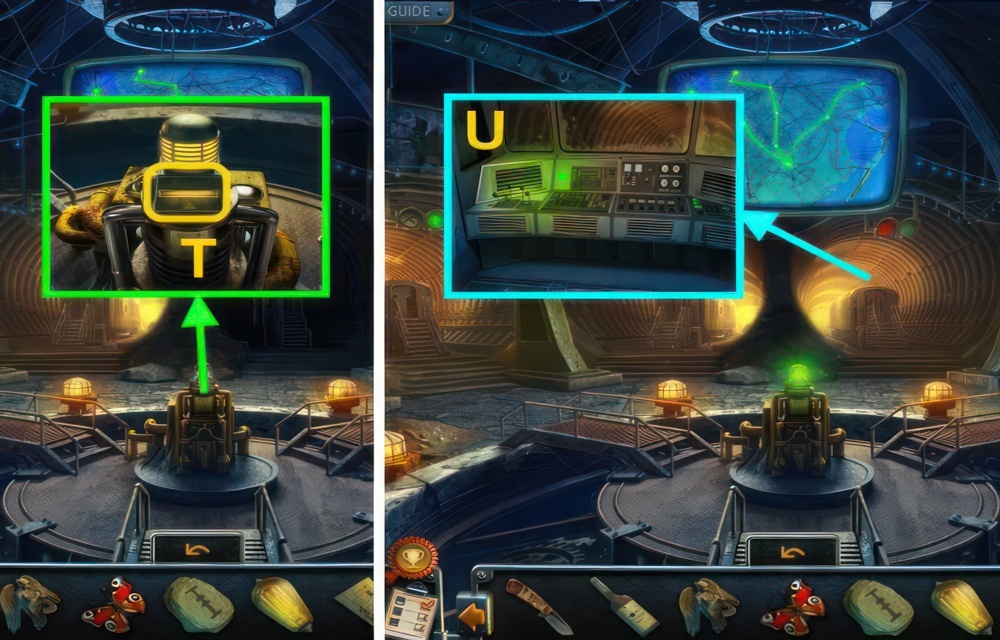
- Use the PUNCHED CARD on the device (T).
- Open the door, press the controls (U).
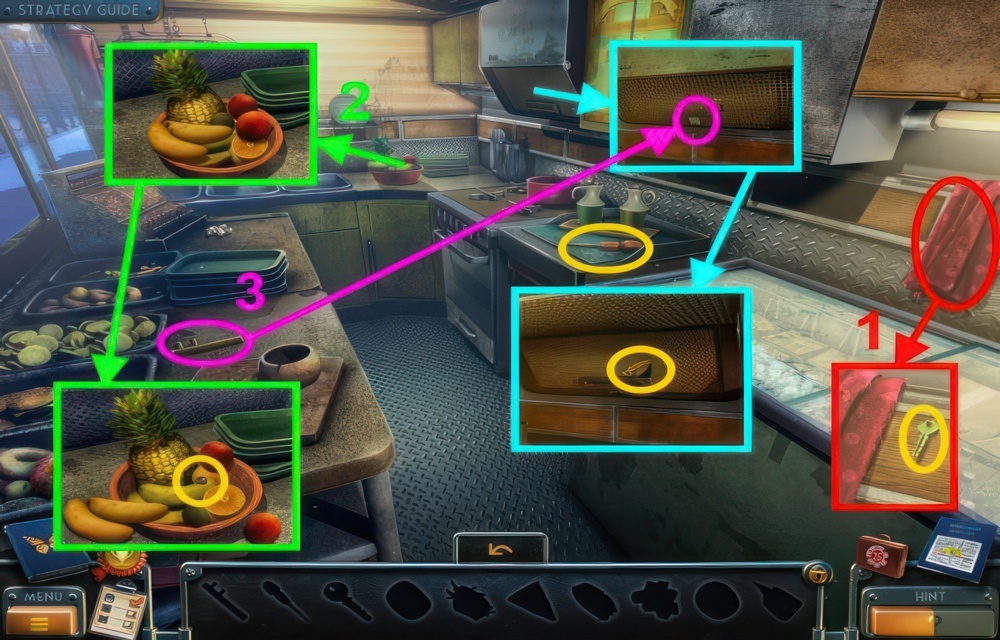
- Walkthrough puzzle (1-3).
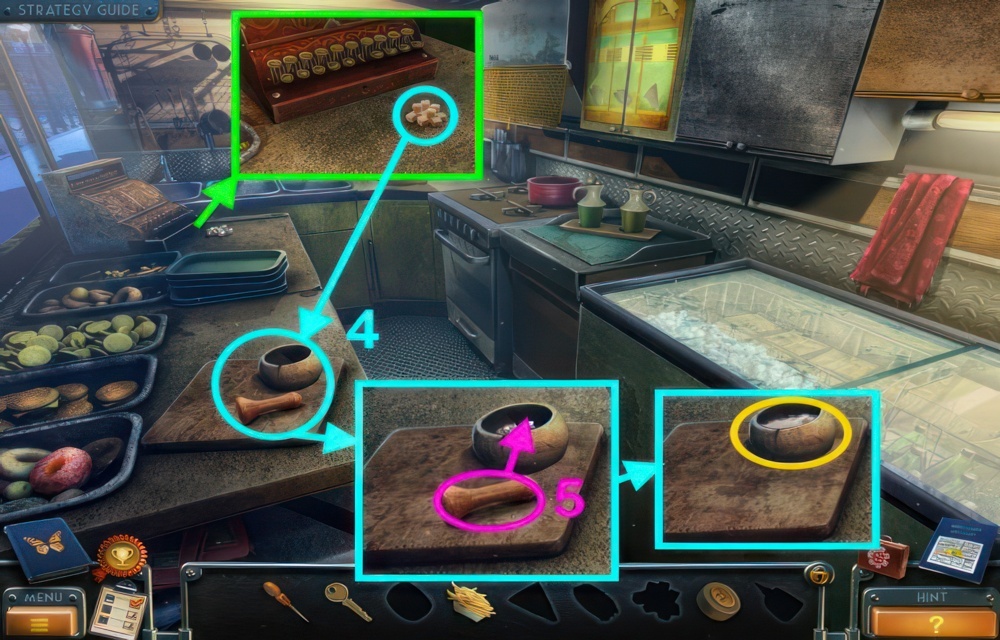
- Continued walkthrough puzzle (4-5).
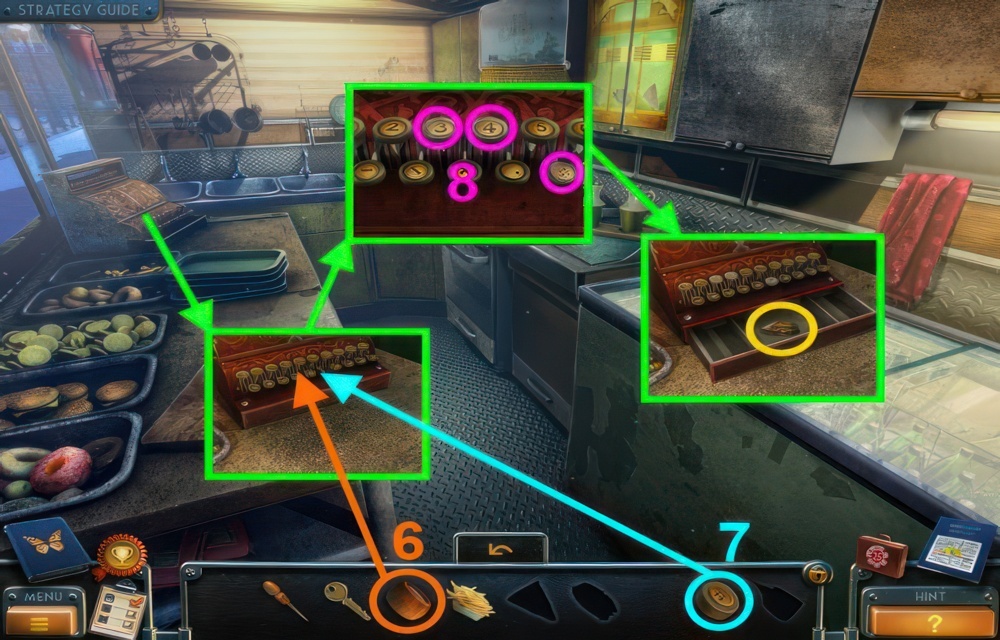
- Continued walkthrough puzzle (6-8).
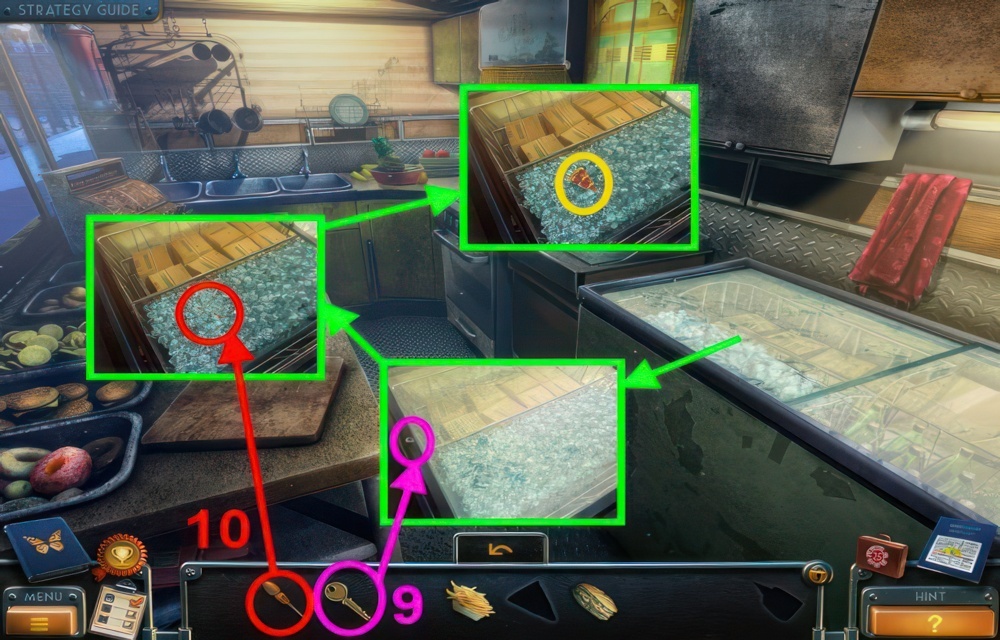
- Continued walkthrough puzzle (9-10).
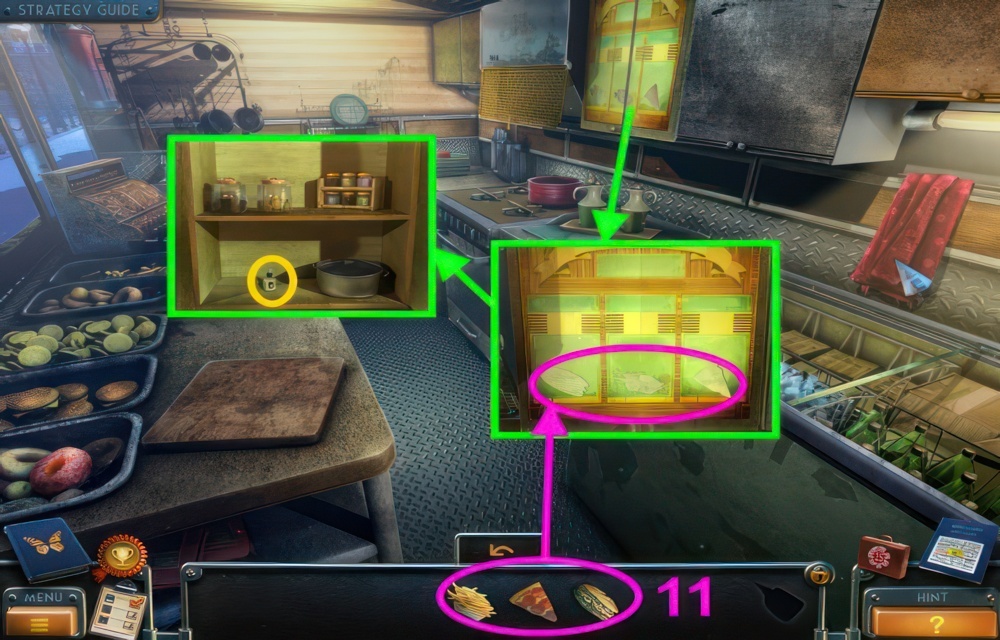
- Continued walkthrough puzzle (11).
- You receive the GLUE.
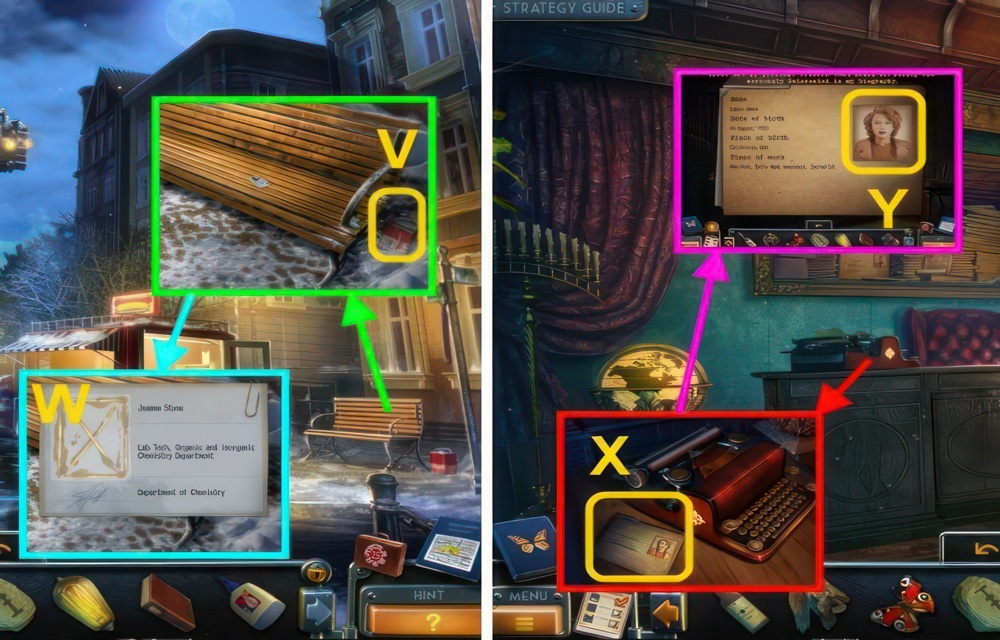
- Take the GAS CAN (V).
- Examine the paper, remove the picture.
- Use the GLUE on the paper (W).
- Go to the Study.
- Examine the file (X), take the PHOTO (Y).
- Go to the Street.
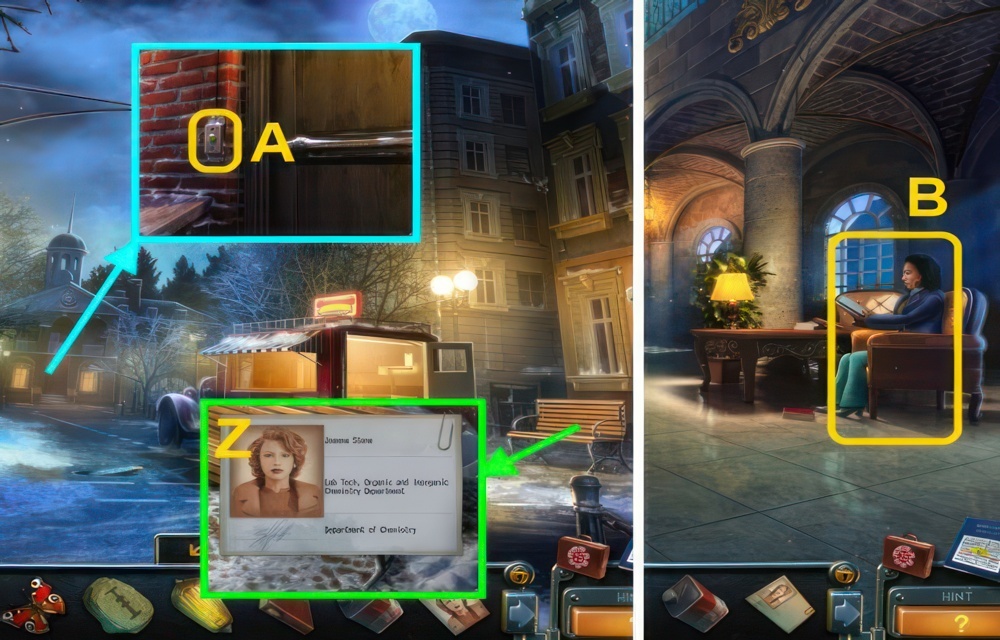
- Place the PHOTO on the paper to receive the PASSCARD (Z).
- Press the button (A).
- Go forward.
- Talk to the woman (B).
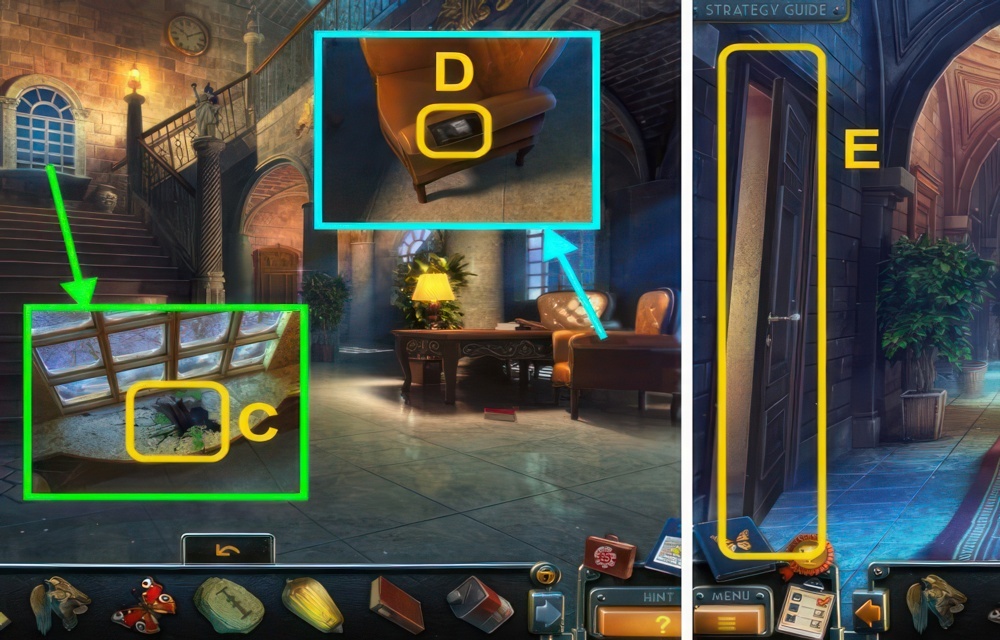
- Pour the BOTTLE OF LIQUOR on the paint (C).
- Use the KNIFE on the chair, take the TABLETS (D).
- Go up the stairs.
- Open the door (E).
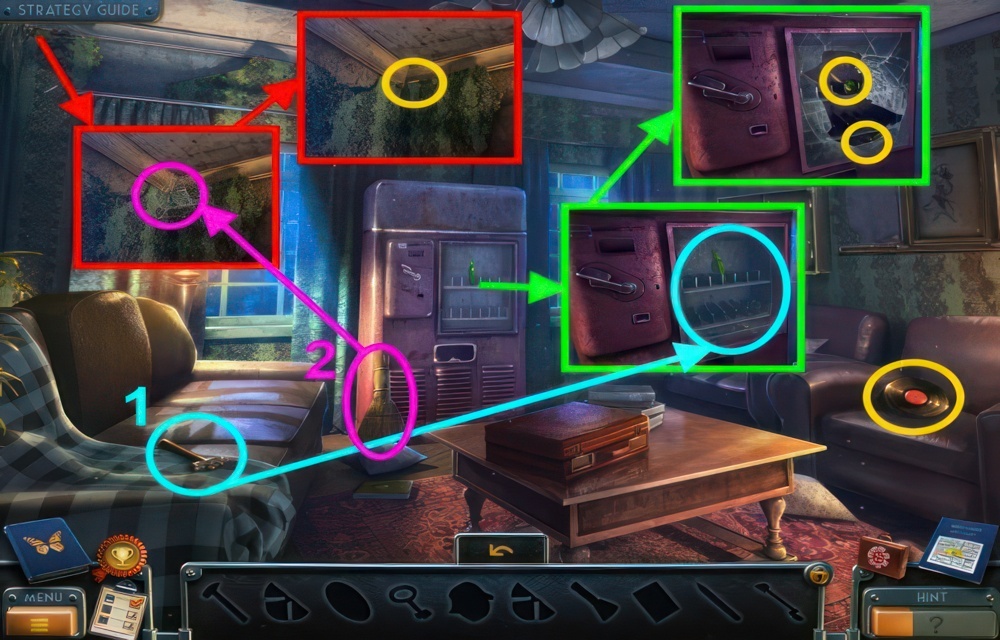
- Walkthrough puzzle (1-2).
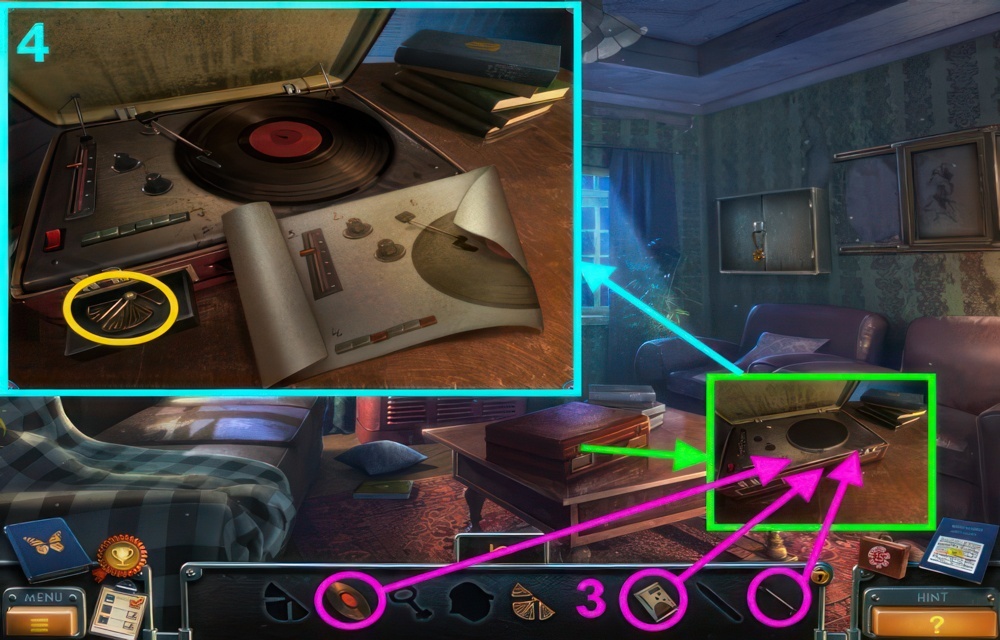
- Configure the switches as shown on the picture.
- Continued walkthrough puzzle (3-4).
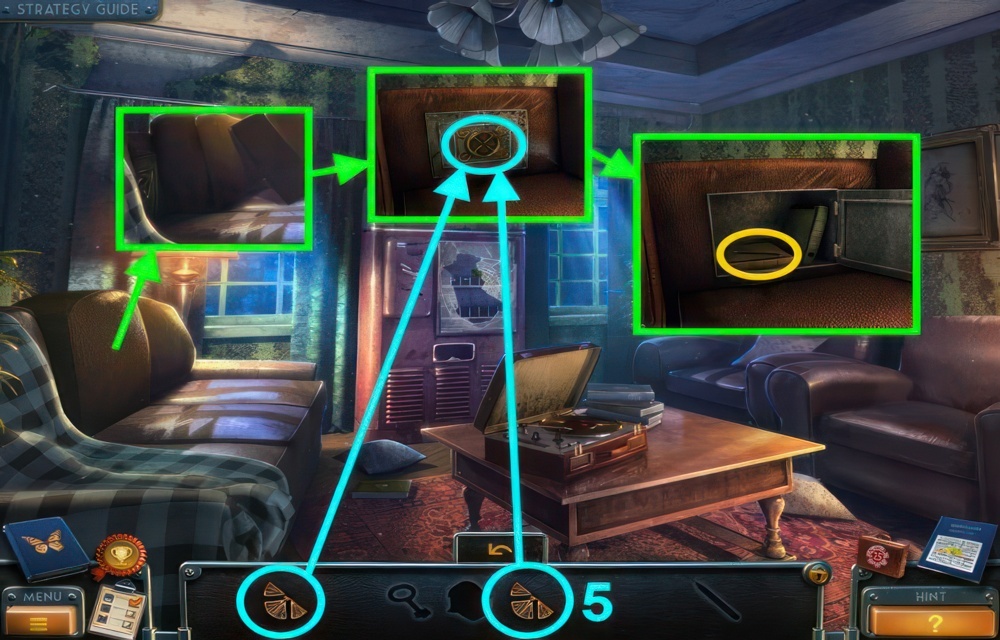
- Continued walkthrough puzzle (5).
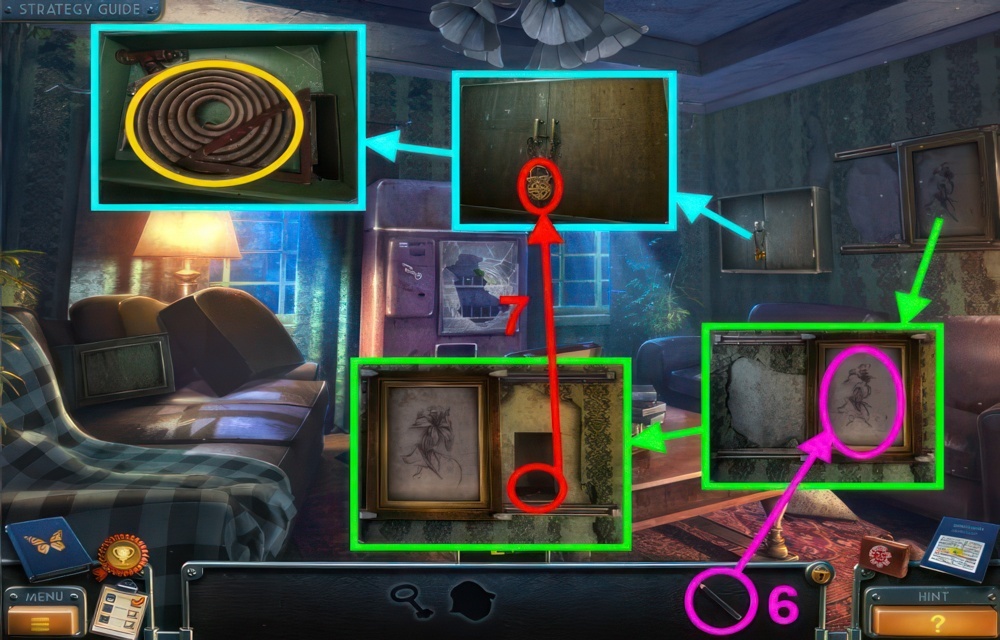
- Continued walkthrough puzzle (6-7).
- You receive the FIRE HOSE.
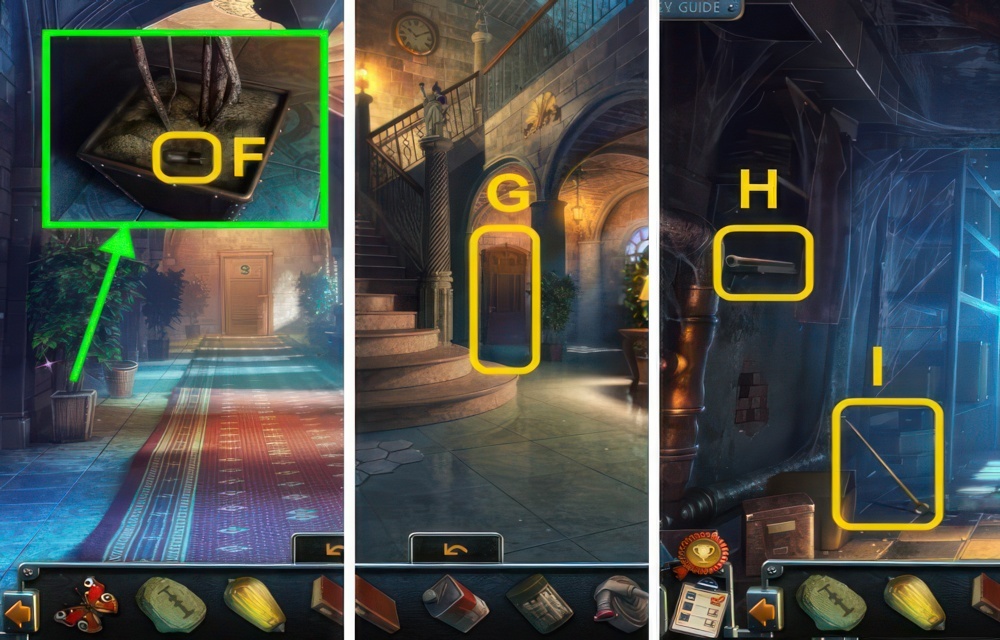
- Move the dirt, take the LIGHTBULB 1/6 (F).
- Go down.
- Open the door (G), walk through it.
- Take the PIPE (H).
- Take the BOAT HOOK (I).
- Go down ×2.
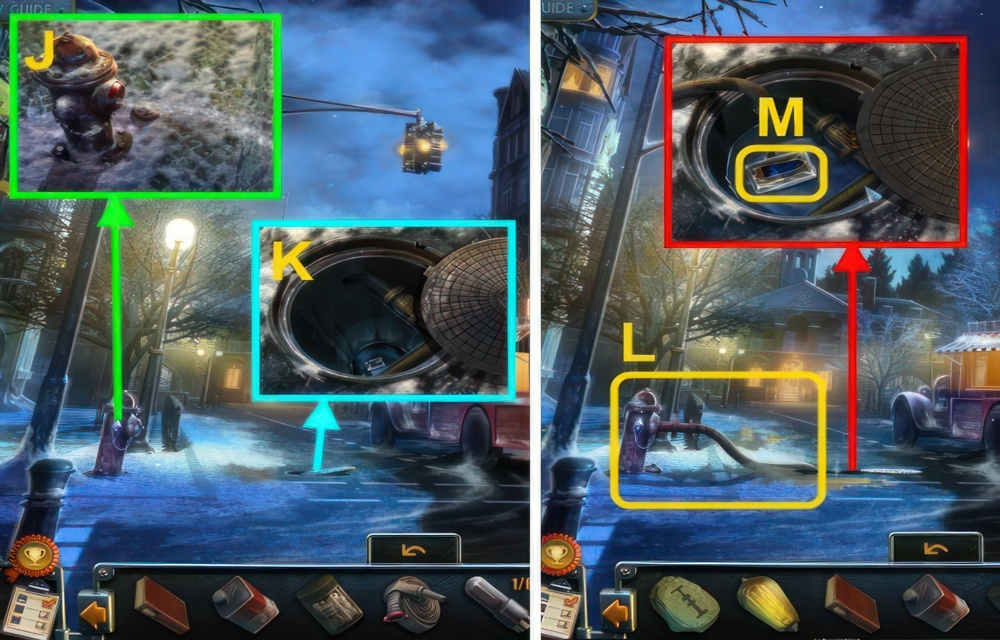
- Open the fire hydrant (J), place the FIRE HOSE on it.
- Use the BOAT HOOK on the manhole (K).
- Put the hose in the manhole (L).
- Use the KNIFE on the package, take the BUTTERFLY and BLOCK (M).
- Go to the Back Room.
Dirty Laundry
If I can convince the ghost that all the mafiosi will be brought to justice, he might let them go and tell me about the children.
- Place the BLOCK on the cabinet for a puzzle (N).
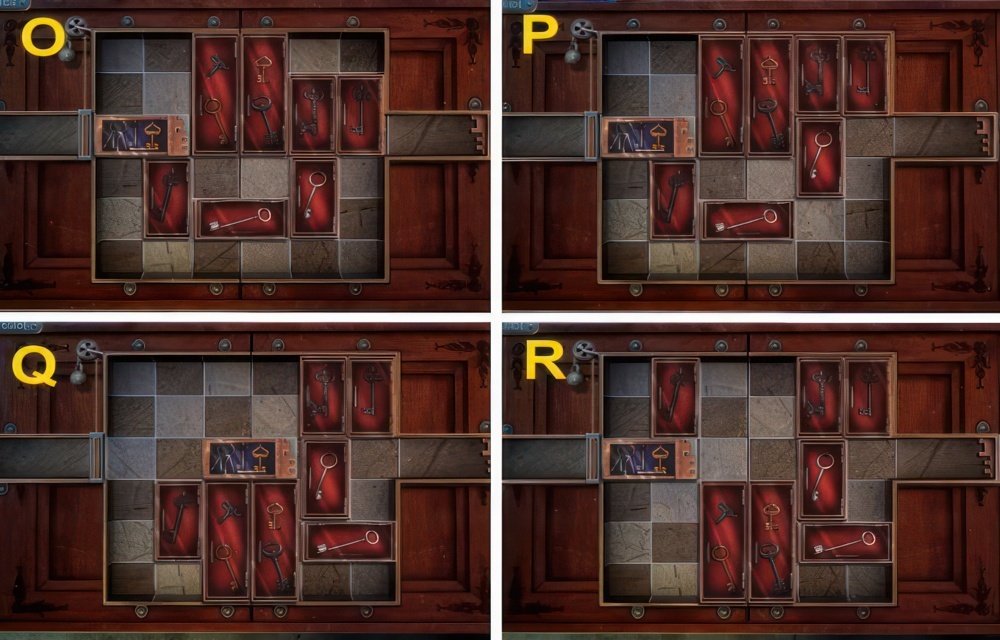
- Get the block from the left-hand recess into the right-hand recess by moving the other blocks.
- Walkthrough (O-R).
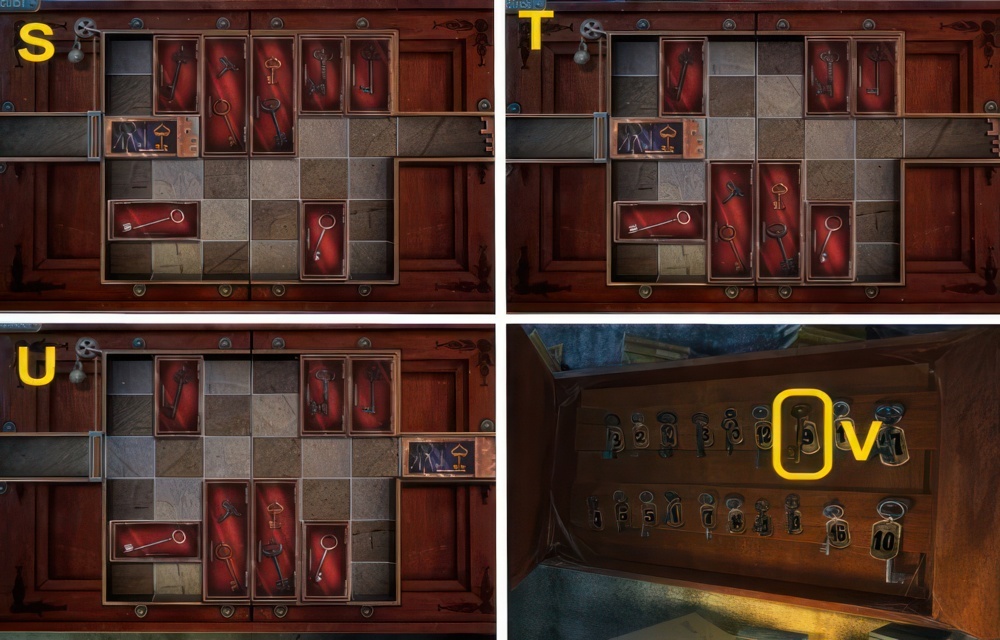
- Continued walkthrough (S-U).
- Take the KEY (V).
- Go to the Corridor.
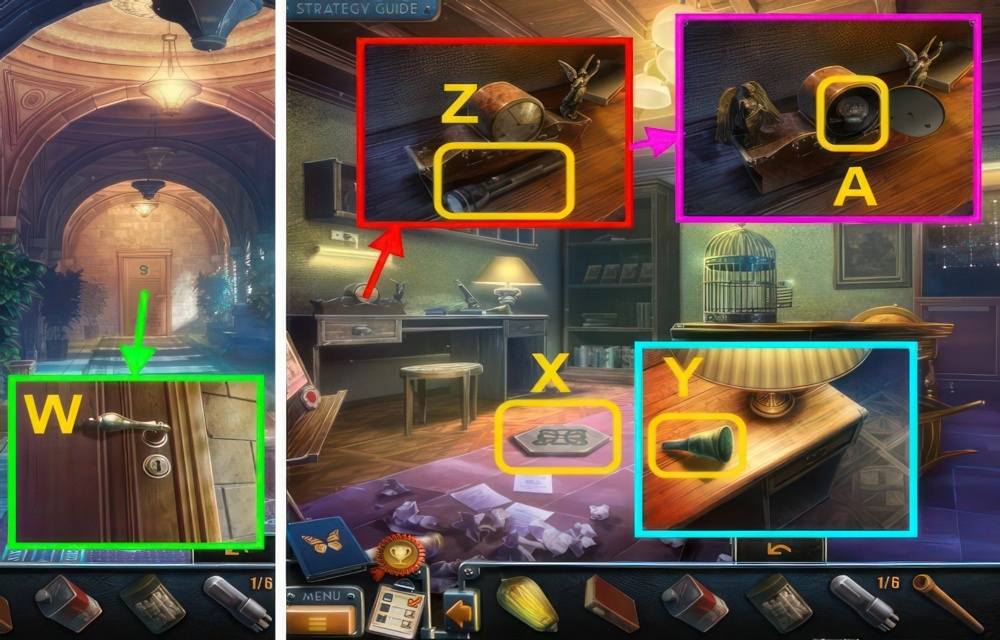
- Use the KEY on the door (W).
- Go forward.
- Take the FLOORPLATE (X).
- Take the FUNNEL (Y).
- Take the FLASHLIGHT (Z).
- Place the FIGURINE on the clock, take the LIGHT BULB 2/6 and MEDALLION (A).
- Go down.
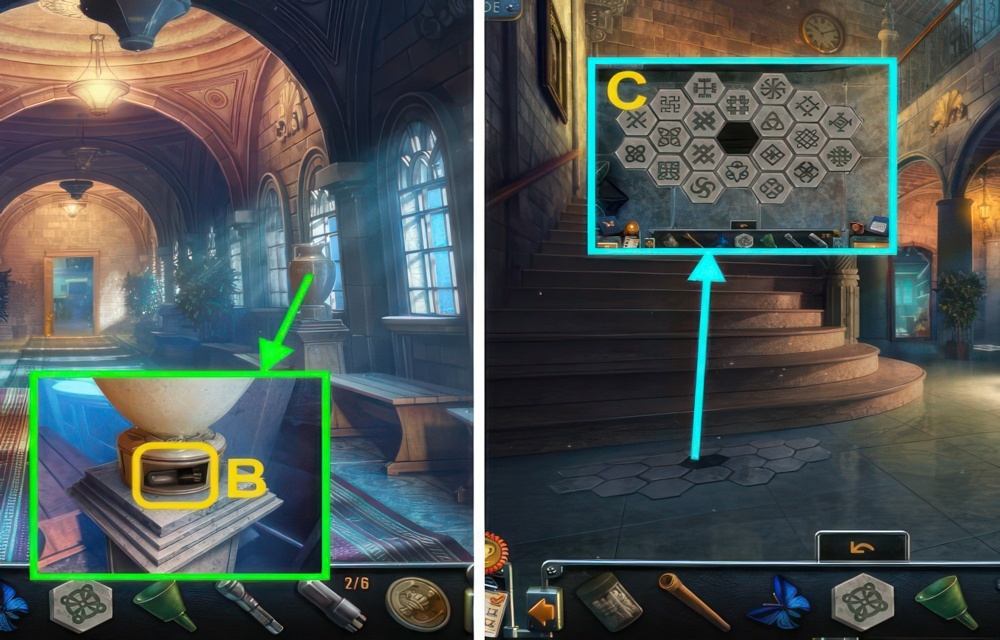
- Place the MEDALLION on the vase, take the LIGHT BULB 3/6 (B).
- Go down.
- Place the FLOORPLATE on the floor for a puzzle (C).
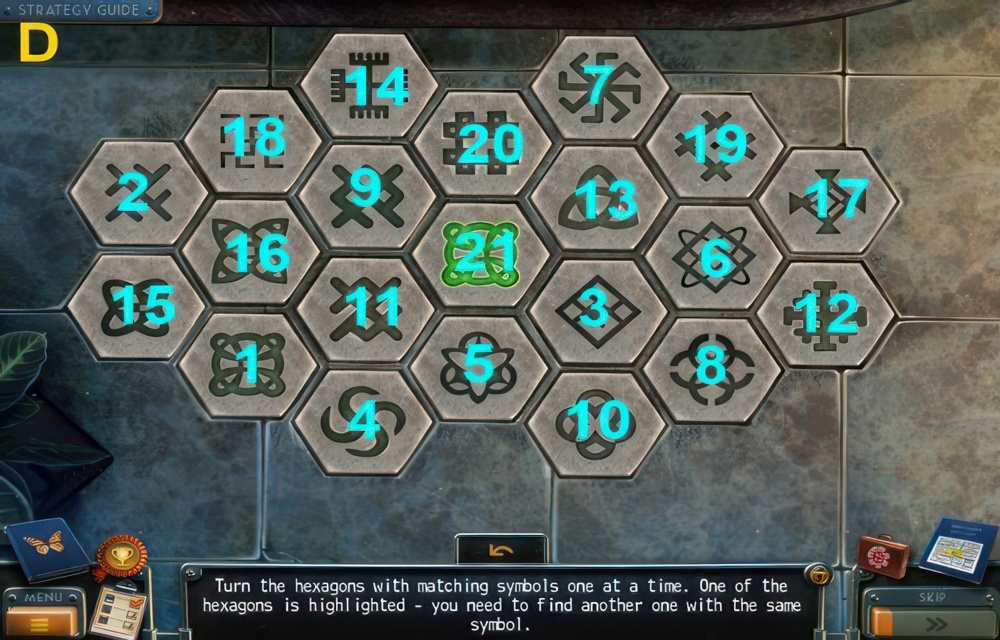
- Turn the hexagons with matching symbols one at a time.
- One of the hexagons is highlighted – you need to find another one with the same symbol.
- Walkthrough (D): 1-21.
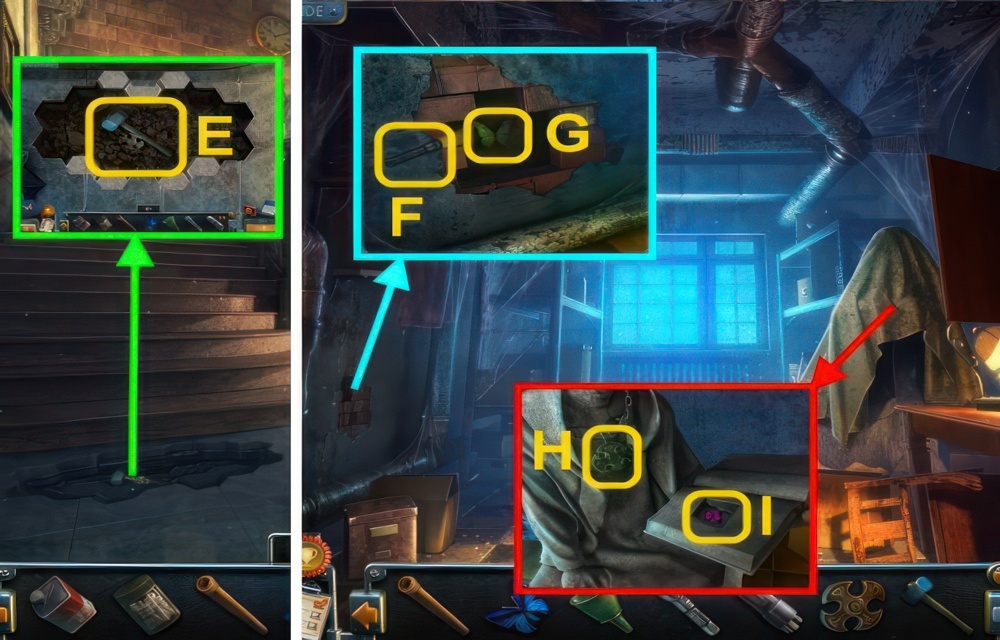
- Take the MEDALLION and MALLET (E).
- Go to the Back Room.
- Use the FLASHLIGHT on the wall (F), use the MALLET.
- Take the BUTTERFLY (G).
- Remove the tarp.
- Place the MEDALLION on the statue (H).
- Take the BUTTERFLY (I).
- Go to the OFFICE.
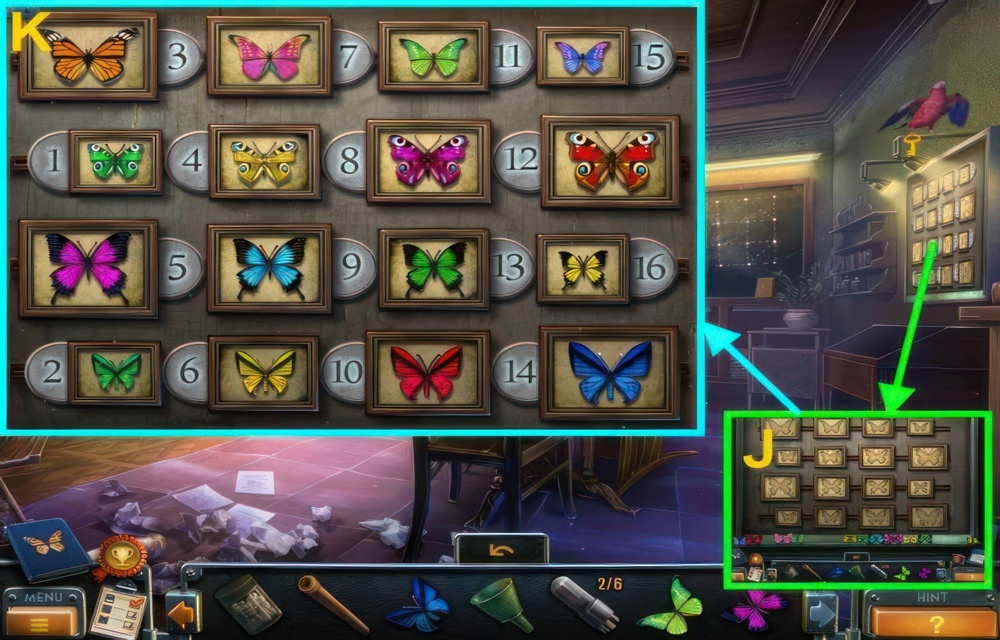
- Place the 5 BUTTERFLIES on the wall for a puzzle (J).
- Place the butterflies in the frames according to their shape and size.
- Walkthrough (K).
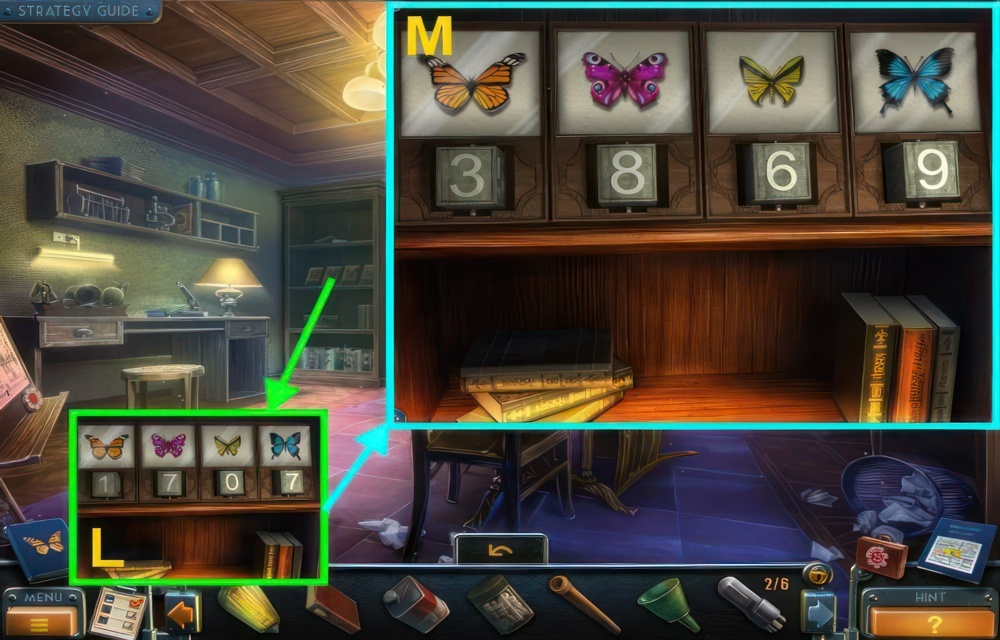
- Examine the bookshelf for a puzzle (L).
- There should be a certain number next to each butterfly.
- Walkthrough (M).
- Open the door, walk forward.
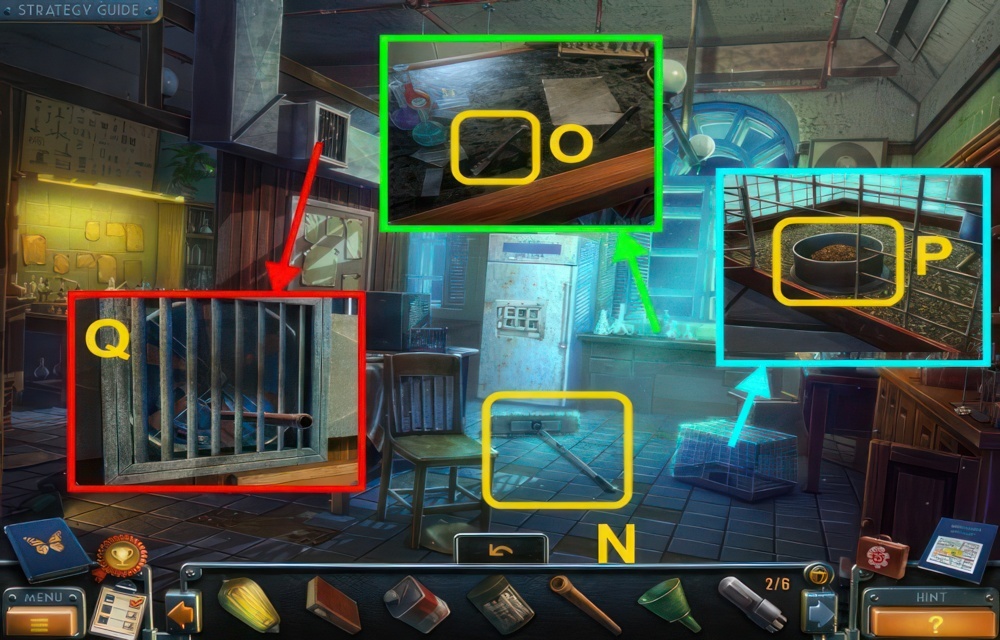
- Take the MOP (N).
- Take the GLASS CUTTER (O).
- Take the GRAIN (P).
- Use the PIPE on the fan (Q).
- Remove the grate, take the VALVE and LIGHT BULB 4/6.
- Go down.
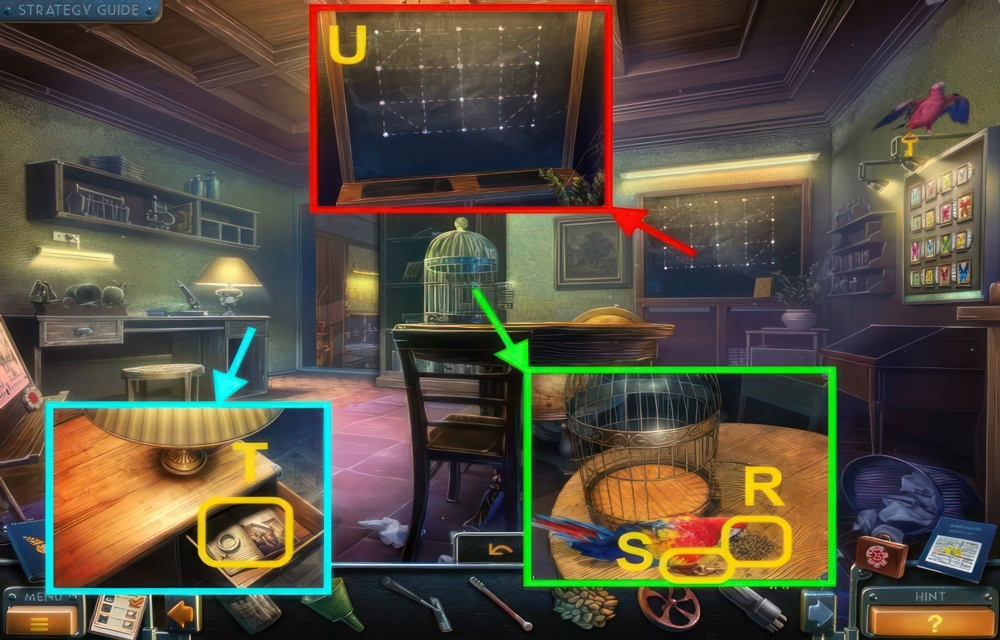
- Place the GRAIN by the cage (R).
- Take the KEY (S).
- Use the KEY on the drawer, take the TAPE and CHALK (T).
- Use the CHALK on the board for a puzzle (U).
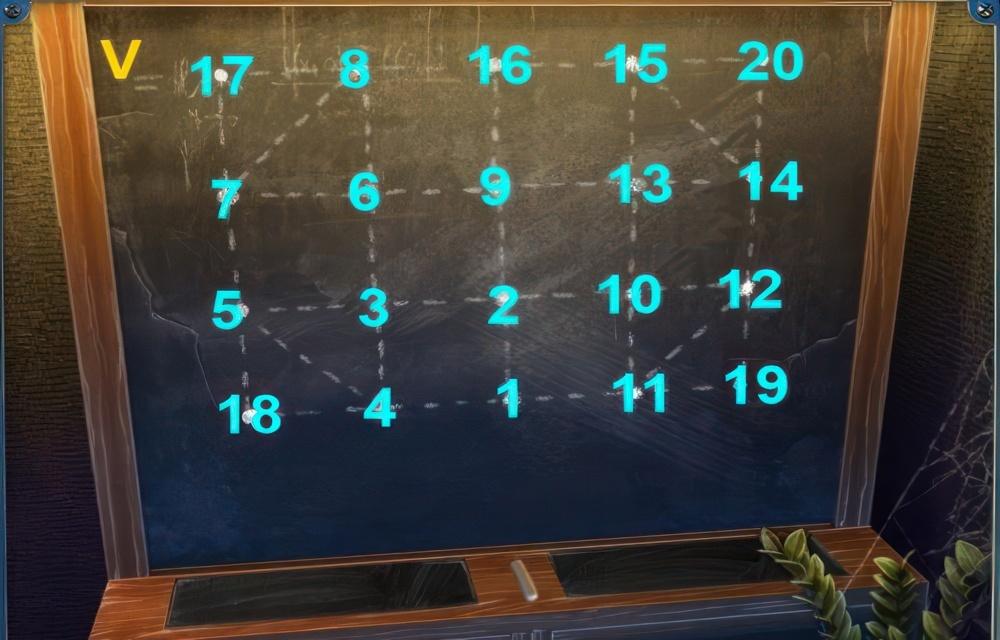
- The chalk needs to be drawn along each line without being removed from the blackboard and without traversing the same line twice.
- Walkthrough (V): 1, 2, 3, 4, 5, 3, 6, 7, 8, 6, 9, 2, 10, 11, 12, 10, 13.
- 14, 15, 13, 9, 16, 8, 17, 7, 5, 18, 4, 1, 11, 19, 12, 14, 20, 15, 16.
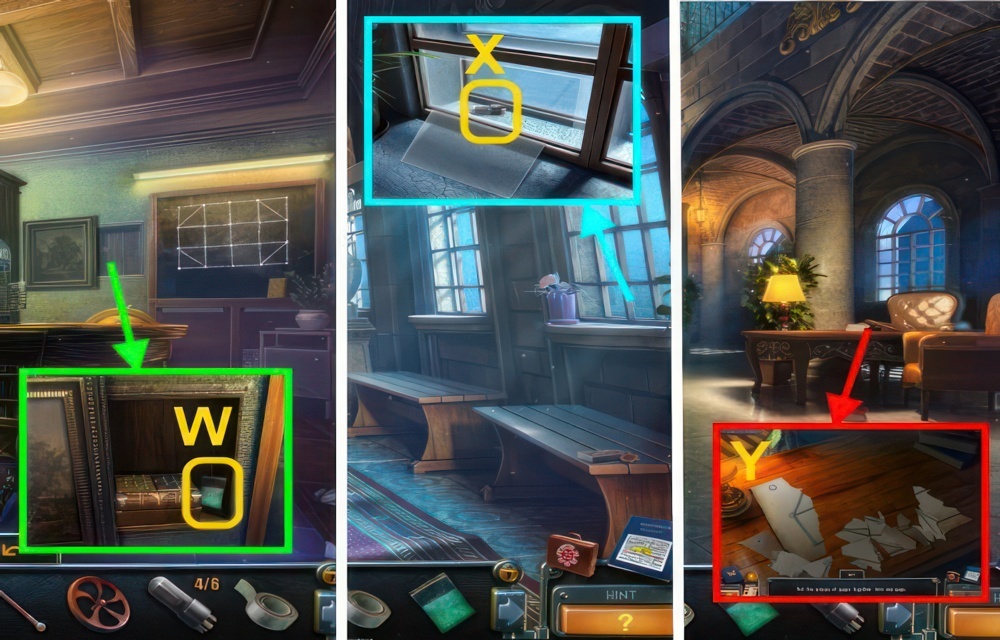
- Take the POWDER (W).
- Go down.
- Use the GLASS CUTTER on the window, take the LIGHT BULB 5/6 (X).
- Go down.
- Examine the table for a puzzle (Y).
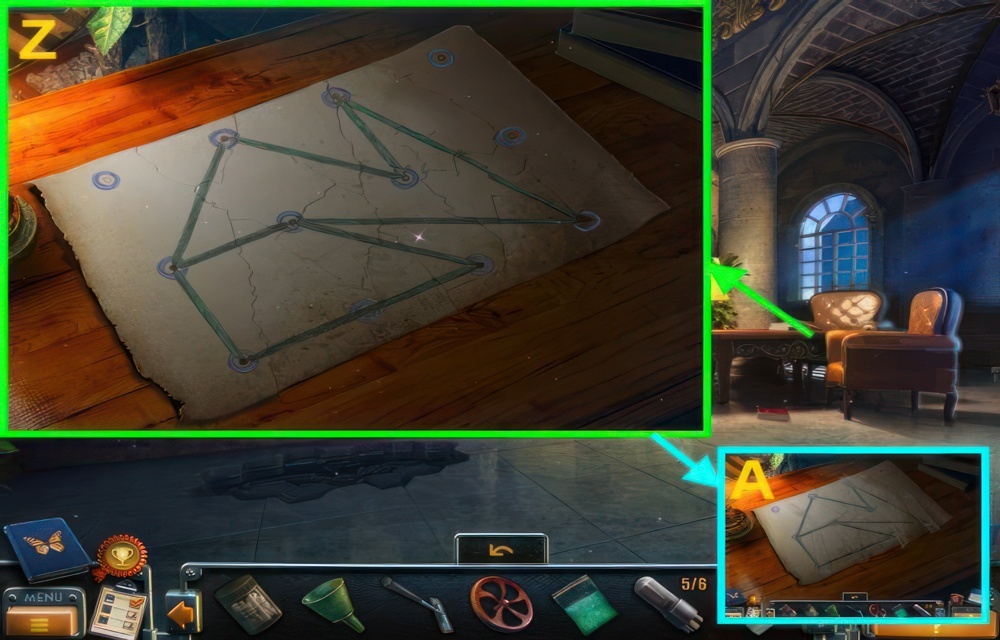
- Put the pieces of paper together into one page.
- Walkthrough (Z).
- Use the TAPE on the paper, take the TAPED DIAGRAM (A).
- Go through the door to the Back Room.
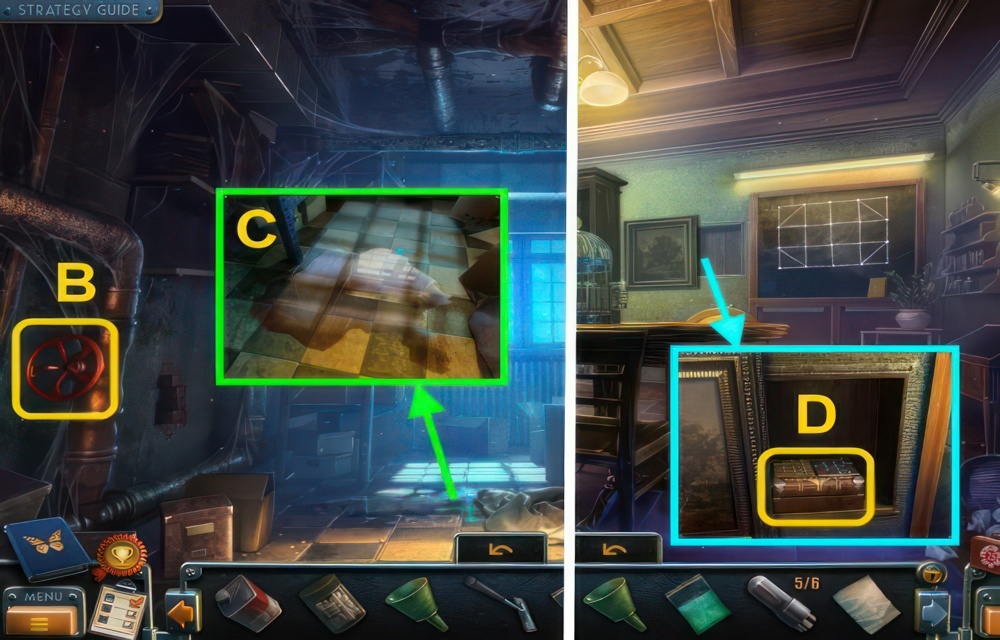
- Place the VALVE on the pipe (B), turn it.
- Use the MOP on the puddle (C).
- Go to the Office.
- Examine the box for a puzzle (D).
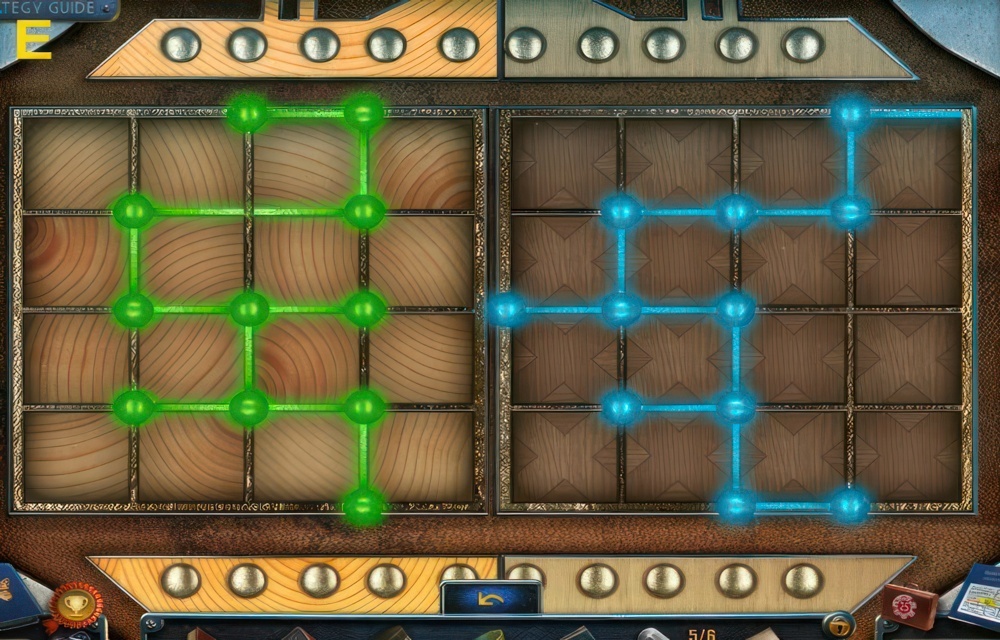
- Turn the movable parts to create the right symbols.
- Walkthrough (E).

- Take the RUNE (F).
- Go forward.
- Place the TAPED DIAGRAM on the fridge for a puzzle (G).
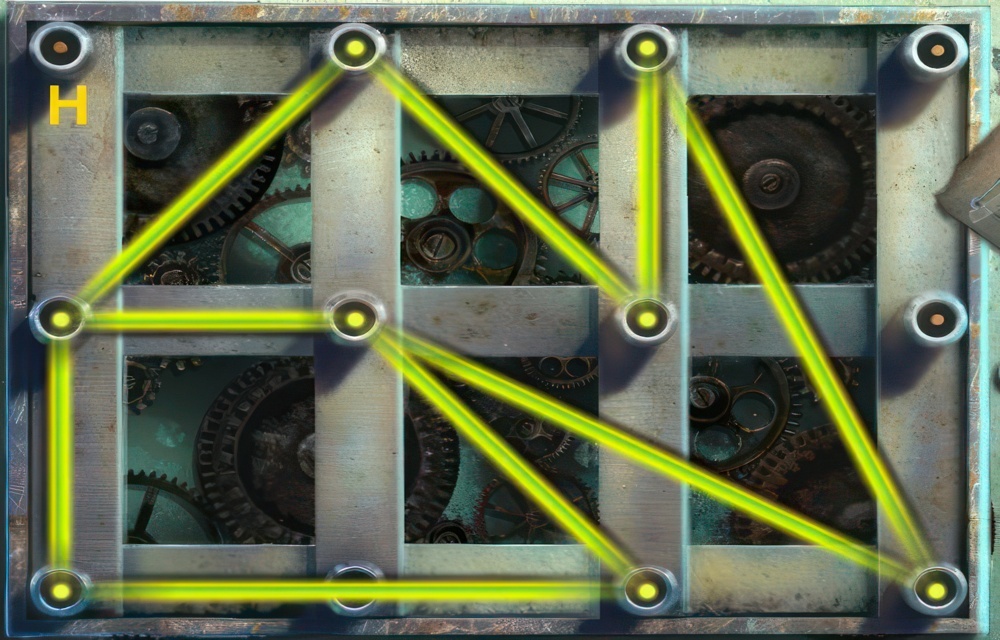
- Place the wires in the positions shown on the diagram.
- Walkthrough (H).
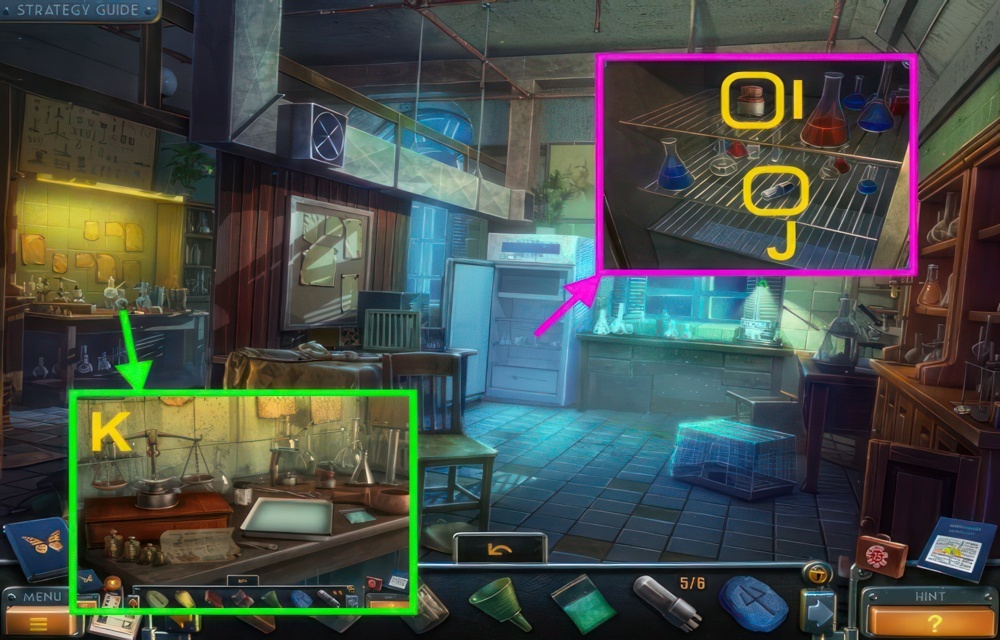
- Take the FIXING AGENT (I) and LIGHT BULB 6/6 (J).
- Place the TABLETS, POWDER, and FIXING AGENT on the table (K).
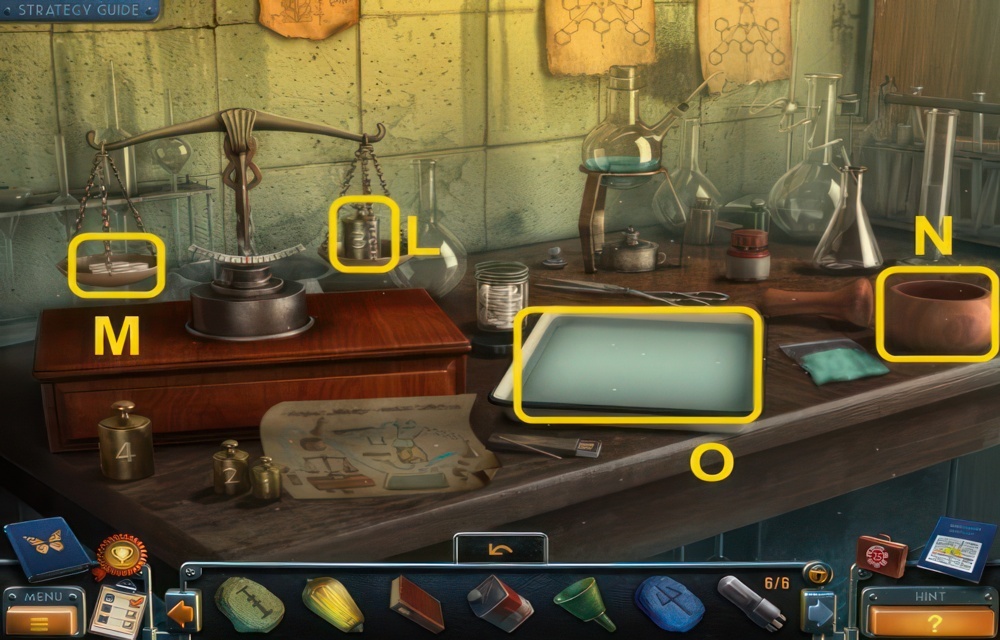
- Put the weight on the scale (L).
- Measure out the tablets (M).
- Place the tablets in the bowl and crush them (N).
- Put them in the solution (O).
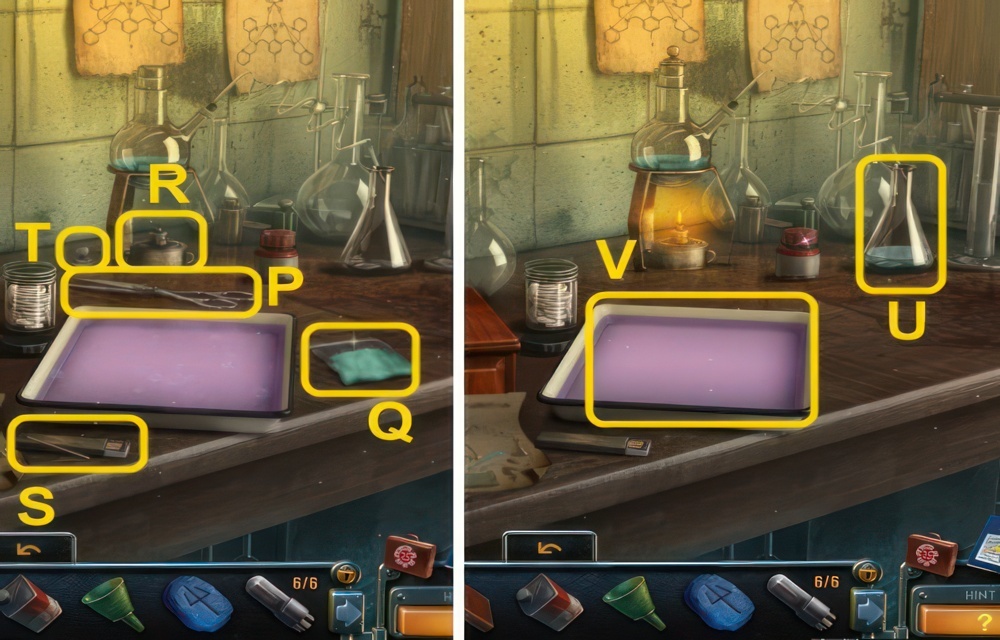
- Use the scissors (P) on the powder (Q).
- Light the burner (R) with the match (S).
- Place the cap on the beaker (T).
- Pour the liquid (U) into the solution (V).
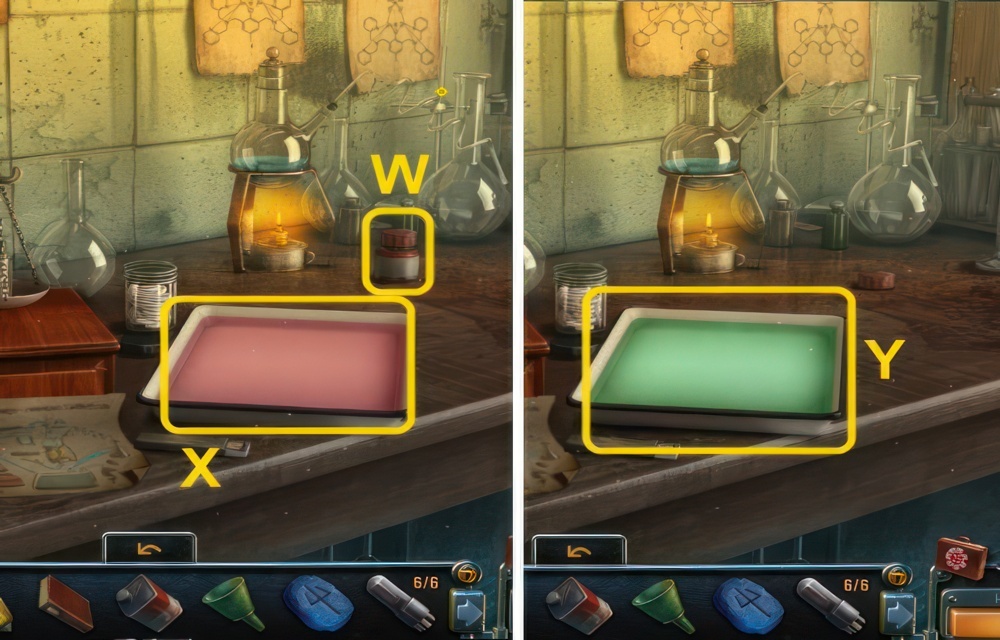
- Remove the cap from the fixing agent (W).
- Pour it into the solution (X).
- Take the DEVELOPER (Y).

- Try to write on the paper (Z).
- Place the DEVELOPER on the counter, place the paper in it (A).
- Remove the cloth, place the LIGHT BULBS on the stand for a puzzle (B).
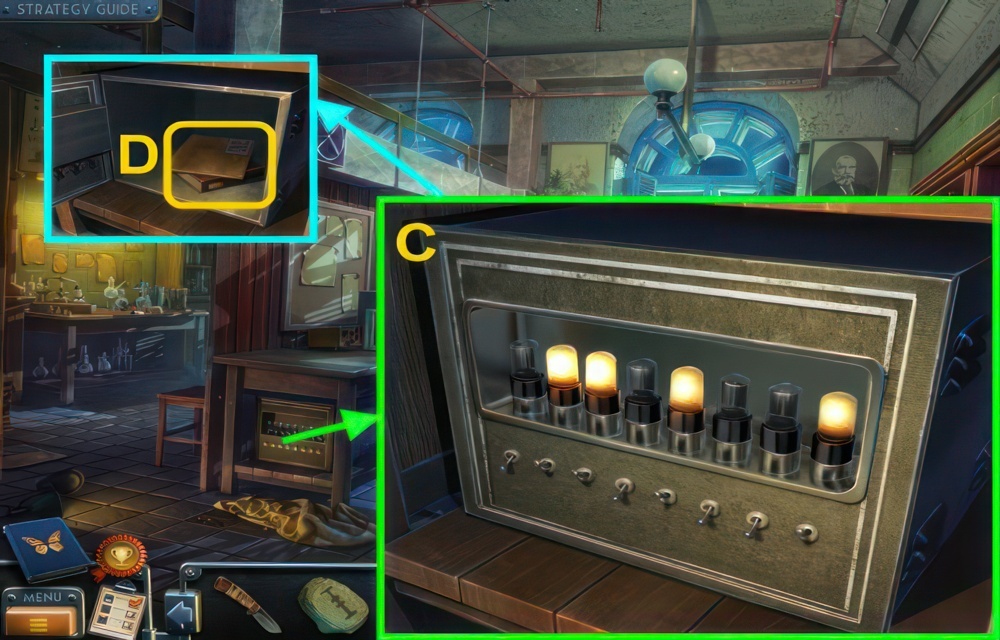
- Only some of the lamps need to be turned on.
- Walkthrough (C).
- Read the file, take the BOOK (D).
- Go to the Study.
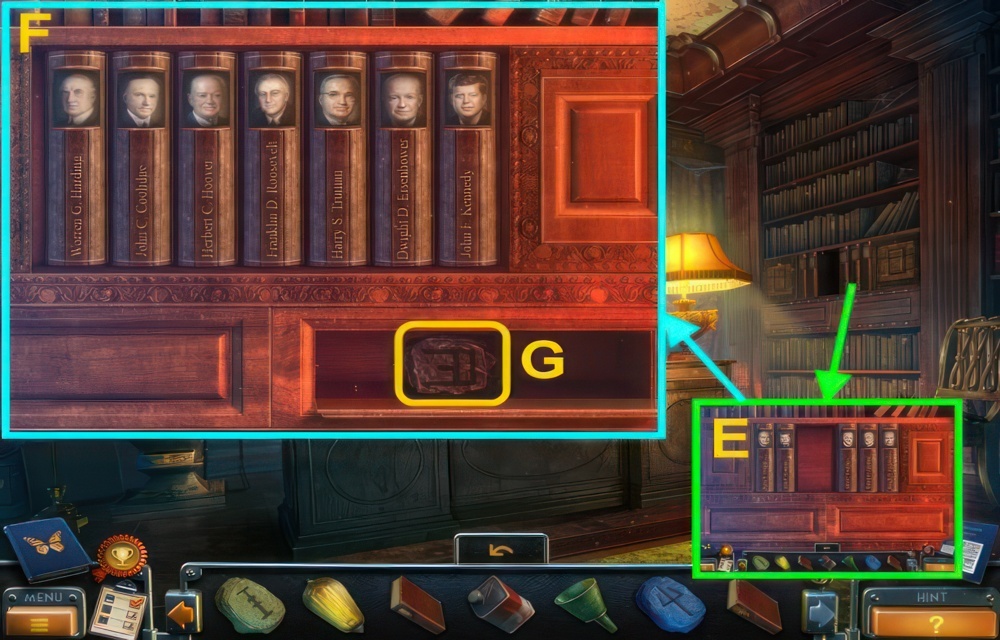
- Place the 2 BOOKS on the shelf for a puzzle (E).
- Rearrange the books in chronological order.
- Walkthrough (F).
- Take the RUNE (G).
- Go to the Guard’s Room.
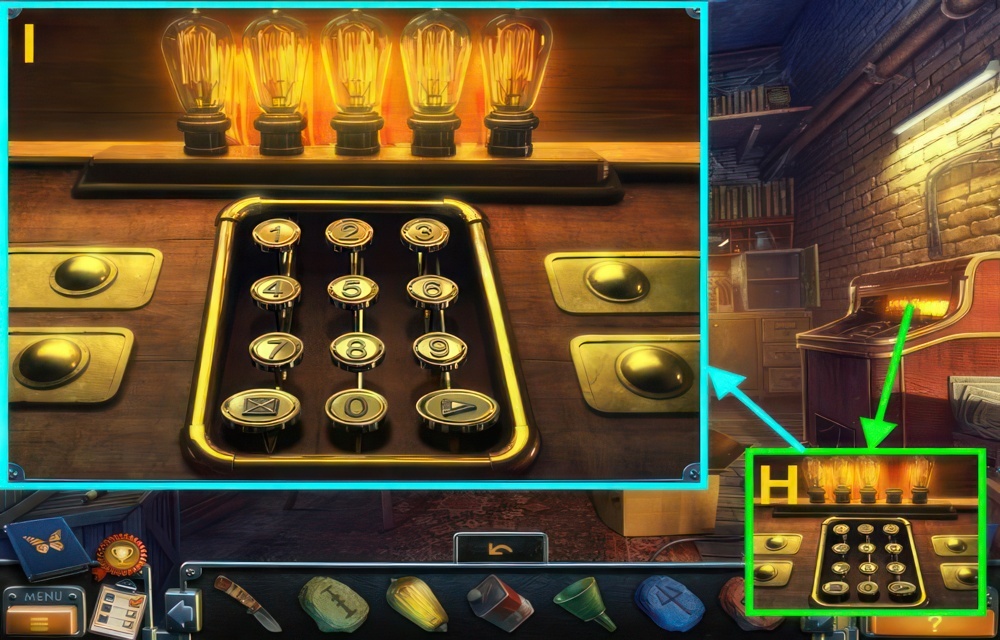
- Place the BULB on the stand for a puzzle (H).
- You need to input a code to deactivate the museum alarm system.
- Walkthrough (I): 1, 5, 0, 8, 2, Play.
- Go down ×2.
Freedom
The ghost let the mafiosi go, but he doesn’t know anything about the children. I need to inspect the basement where the bosses are being held. Maybe I can find some links there.
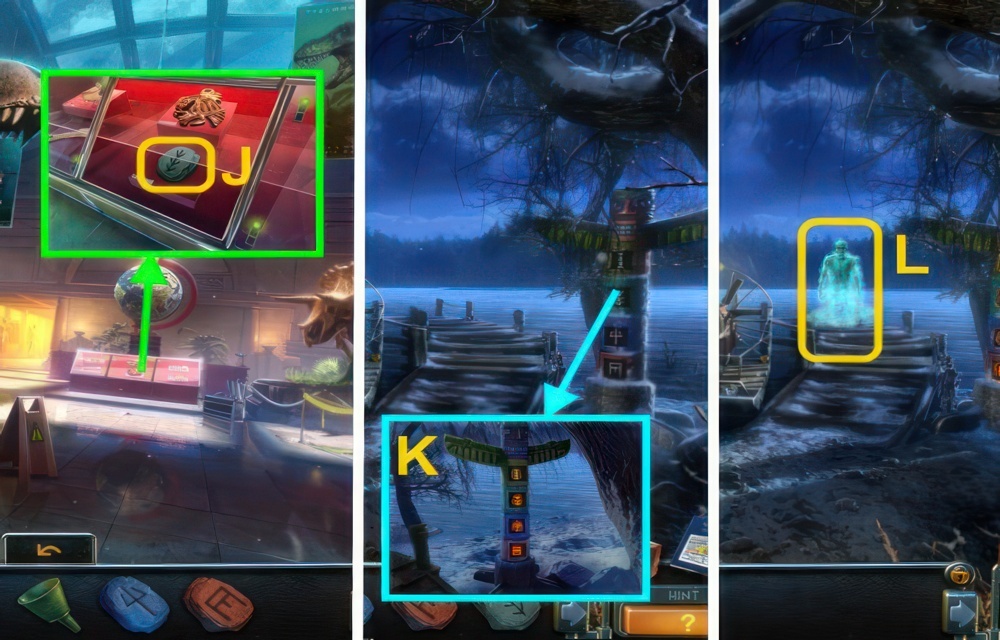
- Open the case, take the RUNE (J).
- Go to the Bank.
- Place the 4 RUNES on the totem pole (K).
- Talk to the ghost (L).
- Go to the Basement.
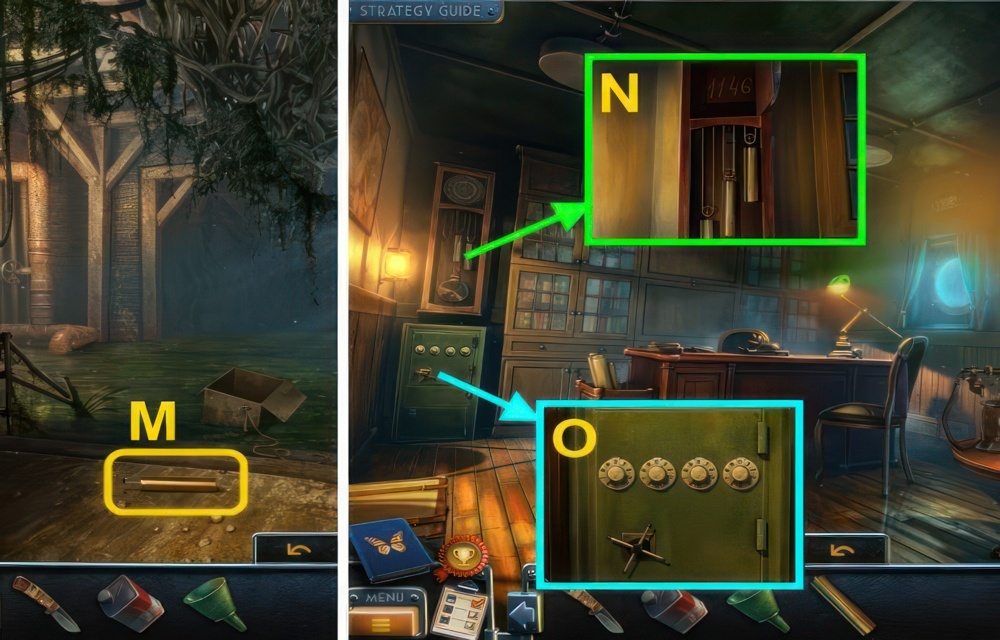
- Take the GOLD WEIGHT FROM CLOCK (M).
- Go to the Cabin.
- Place the GOLD WEIGHT FROM CLOCK on the clock (N).
- Examine the safe for a puzzle (O).
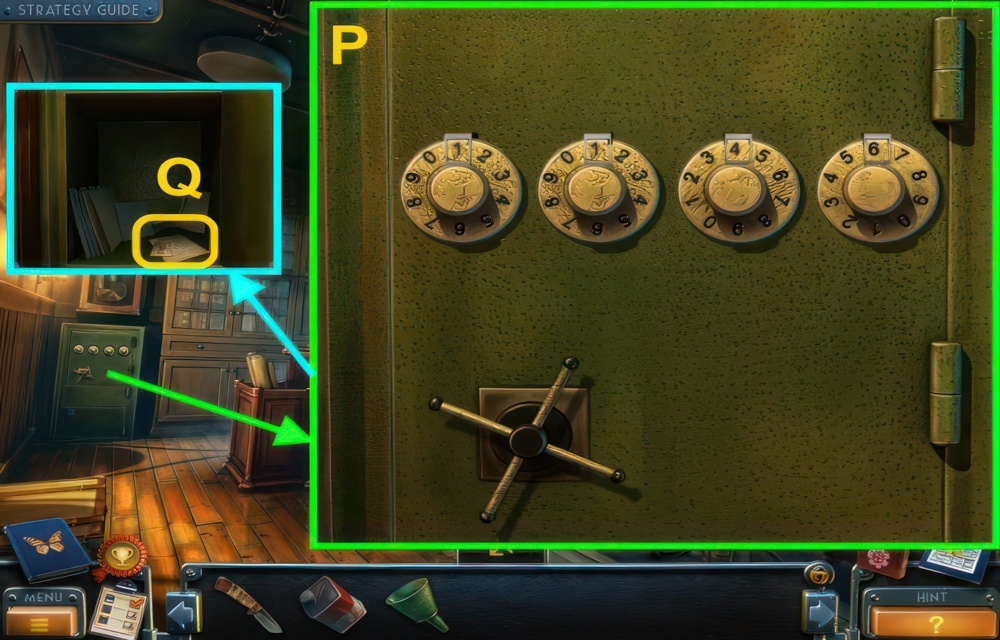
- You need to input the correct code.
- Walkthrough (P).
- Open the safe.
- Take the JOKER, read the note (Q).
- Go to the Hall.
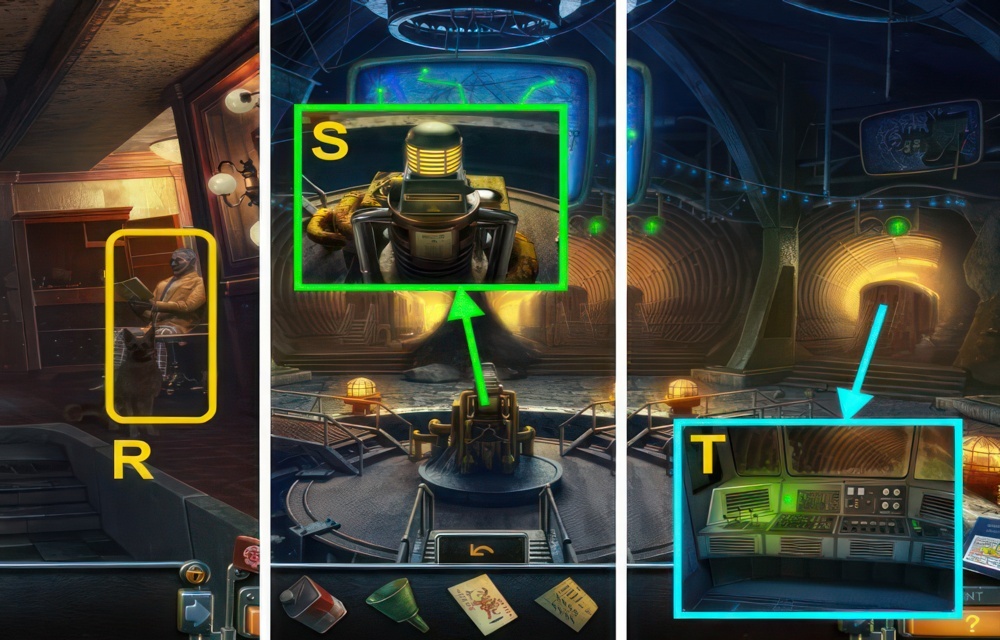
- Talk to Bishop (R), you receive the PUNCHED CARD.
- Go forward.
- Use the PUNCHED CARD on the device (S).
- Open the door, press the controls (T).
The Port
The mafia’s papers mentioned a “place at the port”. Maybe that’s where the kidnapped children are being held.
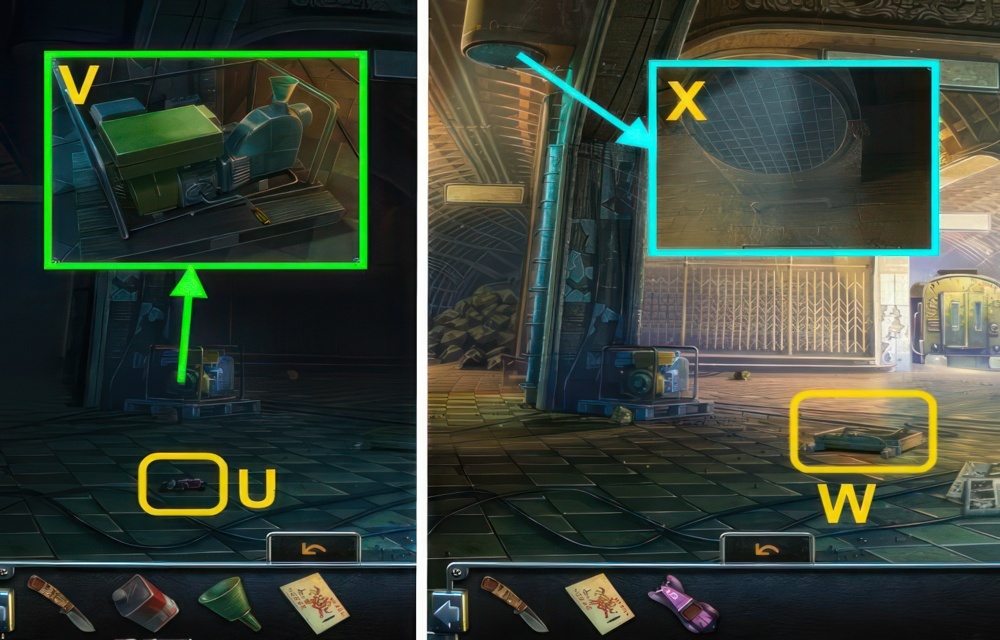
- Take the CAR (U).
- Place the FUNNEL on the generator (V), use the GAS CAN.
- Turn the crank.
- Take the BASKET (W).
- Use the BASKET on the rope grate (X).
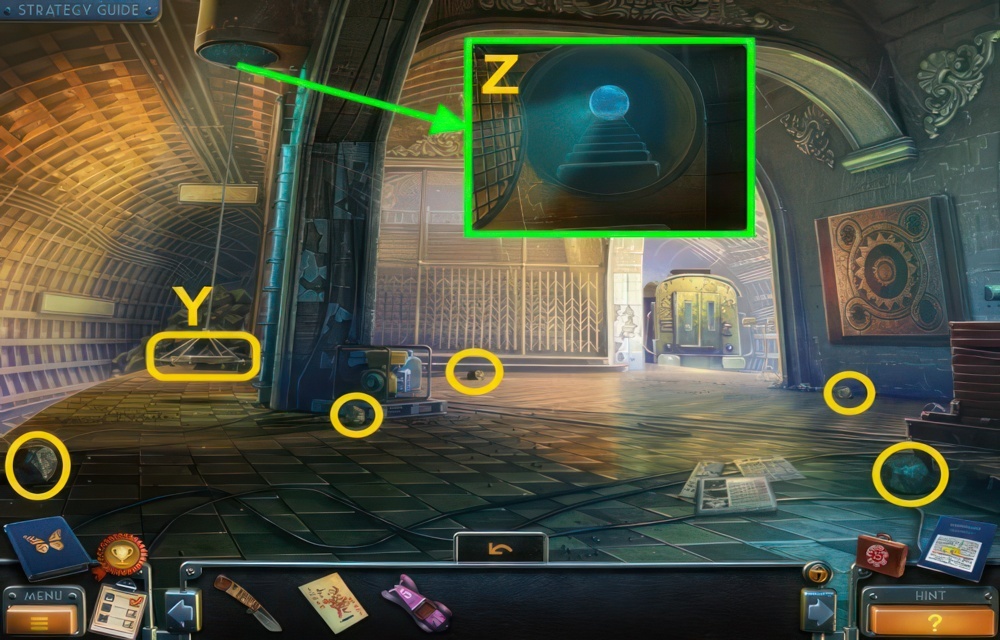
- Place the stones in the basket (Y).
- Go up the ladder (Z).
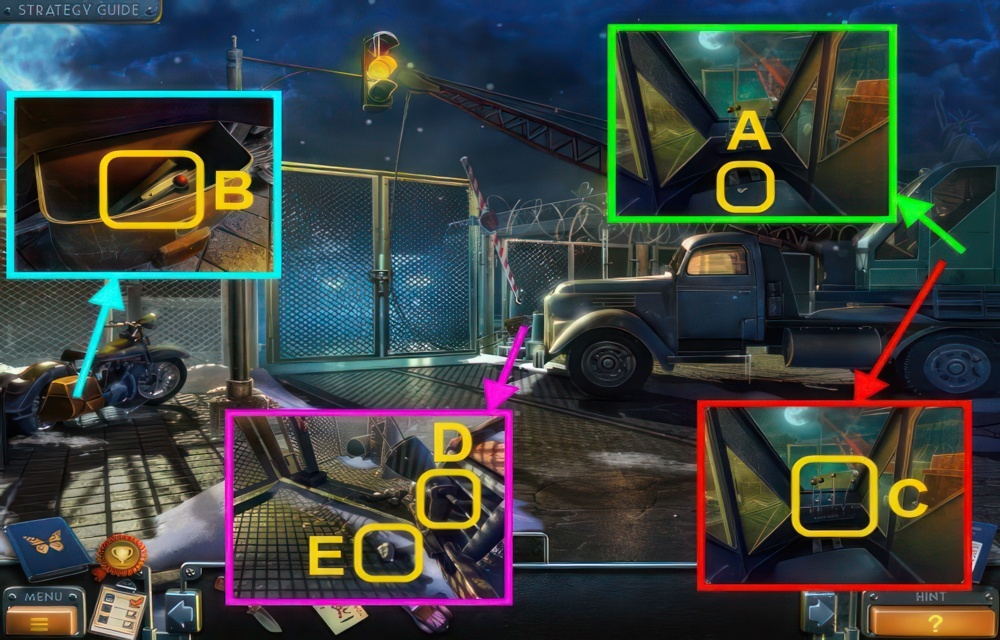
- Take the KEY (A).
- Use the KEY on the bag, take the LEVER and CHISEL (B).
- Place the LEVER on the controls, pull it (C).
- Place the CHISEL on the hook (D).
- Hit it with the stone (E).
- Go forward.
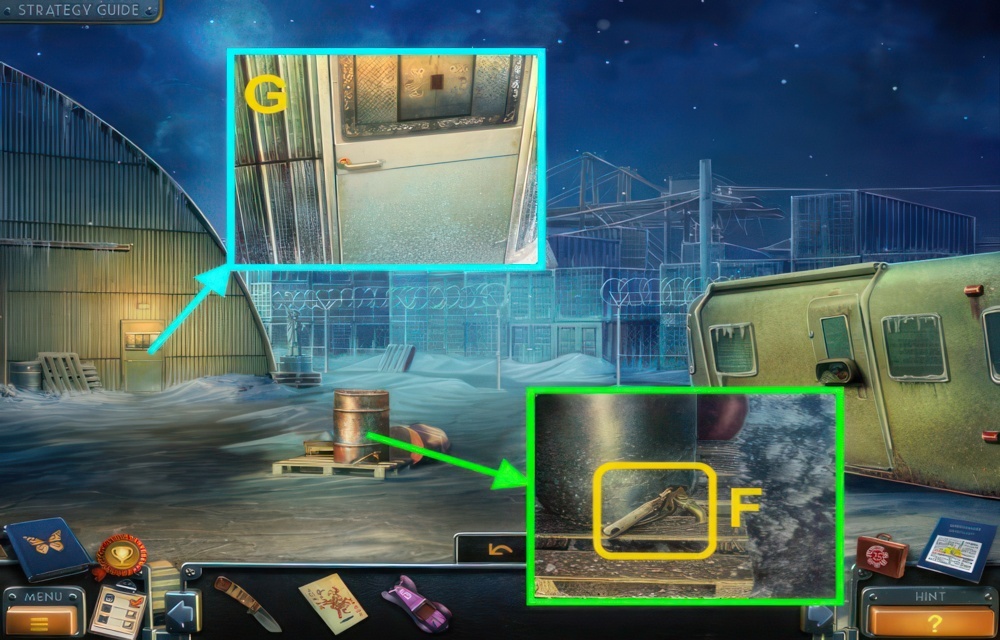
- Take the CAN OPENER (F).
- Place the JOKER on the door for a puzzle (G).
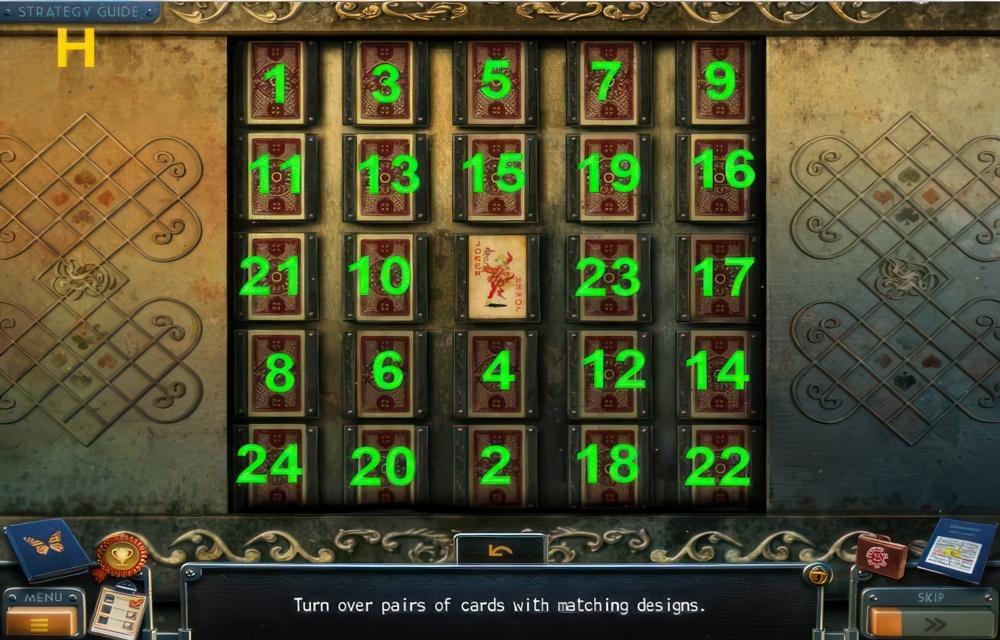
- Turn over pairs of cards with matching designs.
- Walkthrough (H).
- Go through the door.
Bishop
Bishop called me. He was agitated and asked me to come see him. I need to meet with him as soon as possible.
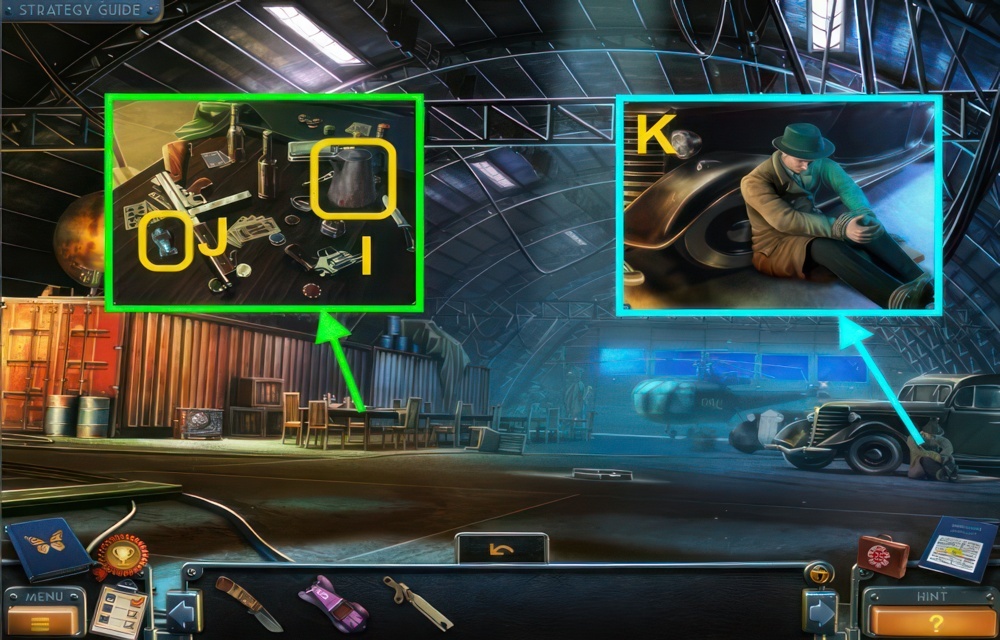
- Take the EMPTY KETTLE (I) and CAR (J).
- Use the KNIFE on the ropes (K).
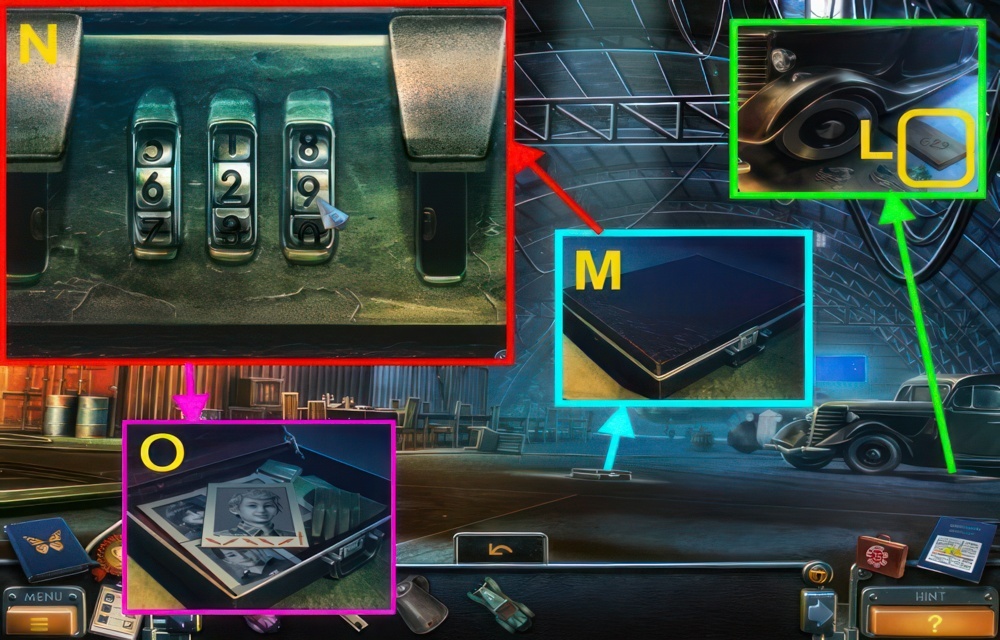
- Note the plank (L).
- Examine the briefcase for a puzzle (M).
- You need to input the code.
- Walkthrough (N).
- Examine the briefcase (O).
- Go down, then right.
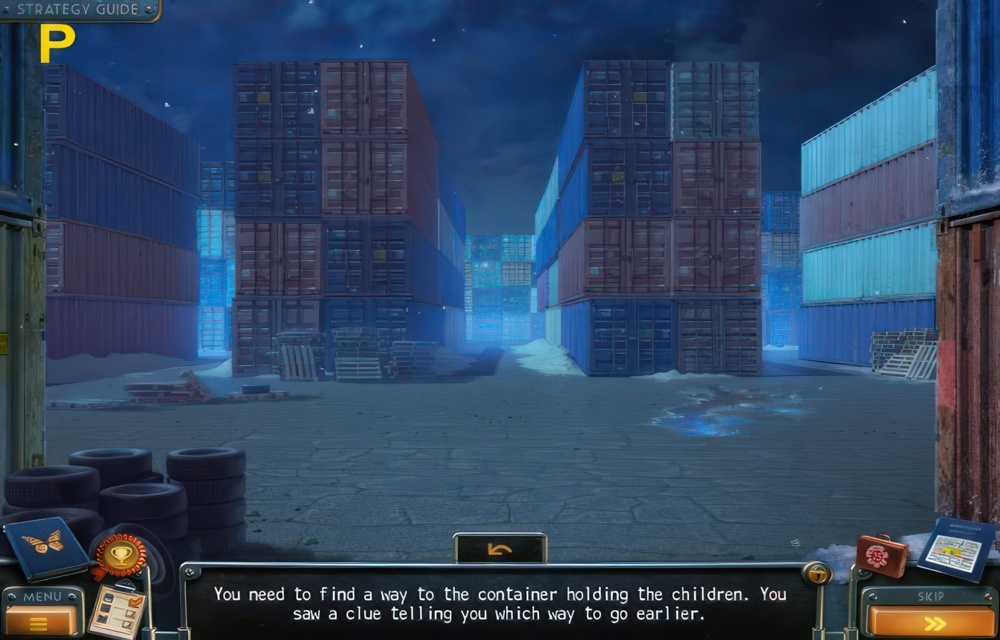
- Play the puzzle.
- You need to find a way to the container holding the children.
- You saw a clue telling you which way to go earlier.
- Walkthrough (P): ←, →, ←, ←, →, center.
An Antidote
Bishop has been infected with poisonous spores. There’s an antidote in the underground city. I have to find it and save Bishop.
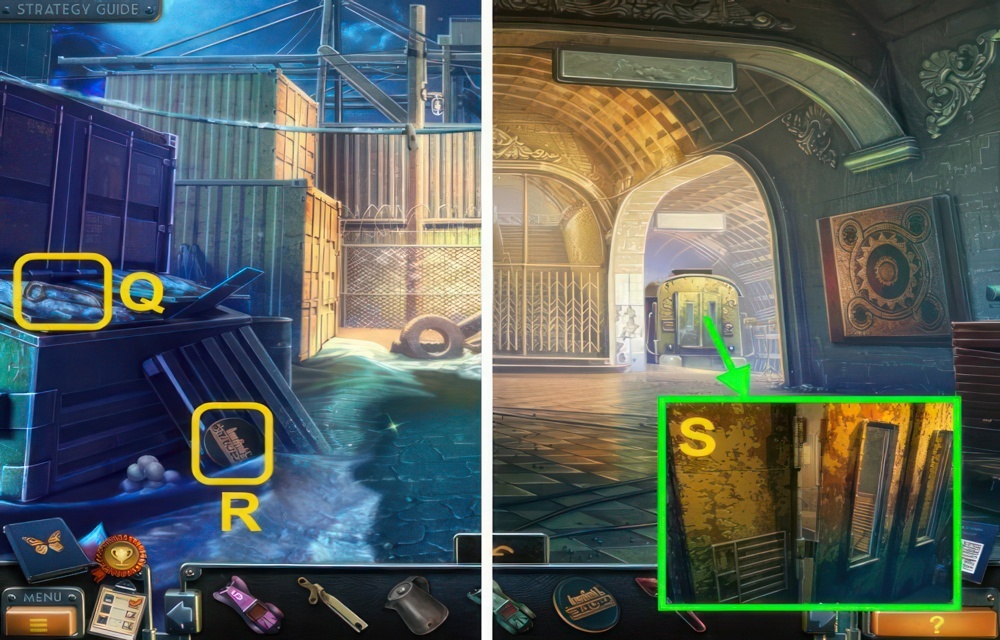
- Take the KNIFE (Q) and MOSAIC PIECE (R).
- Go to the Abandoned Station.
- Use the KNIFE on the door (S).

- Walkthrough puzzle (1-3).
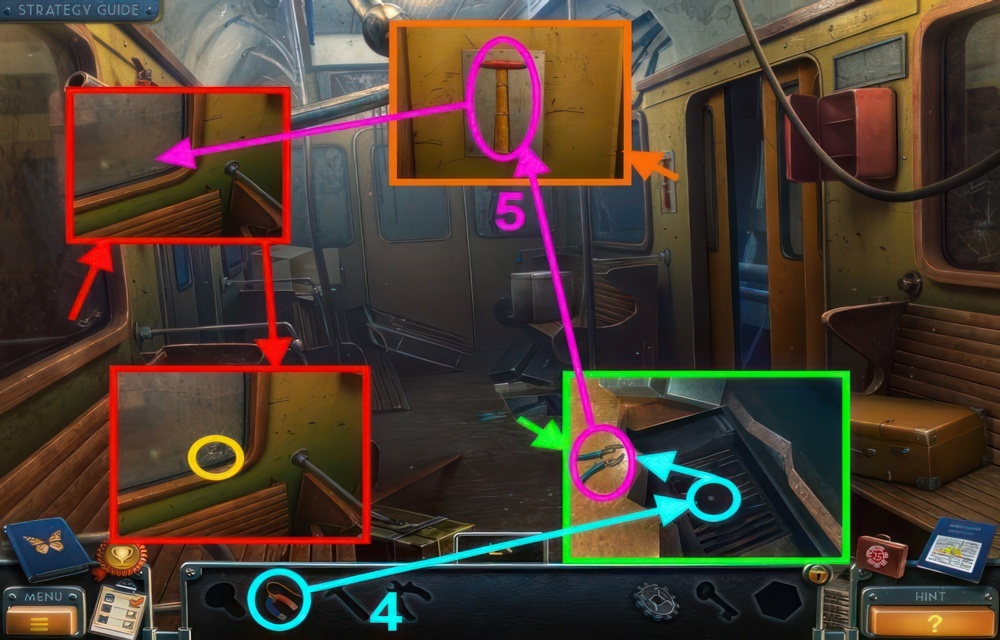
- Continued walkthrough puzzle (4-5).
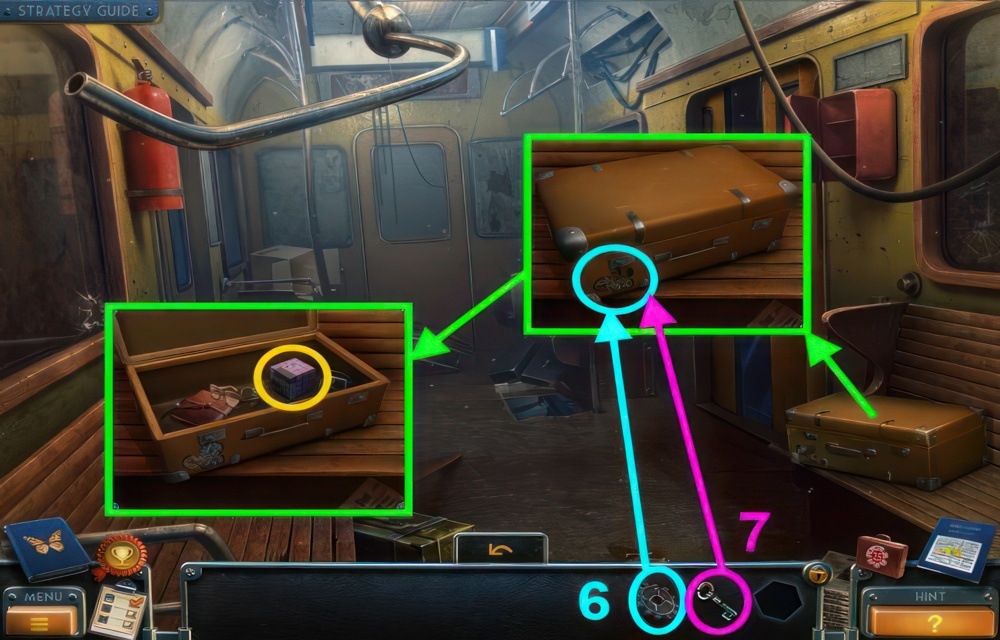
- Continued walkthrough puzzle (6-7).
- You receive the CUBE.
The Meeting Hall
I need to find the big hall the old guard told me about. There could be a clue to the location of the antidote there.
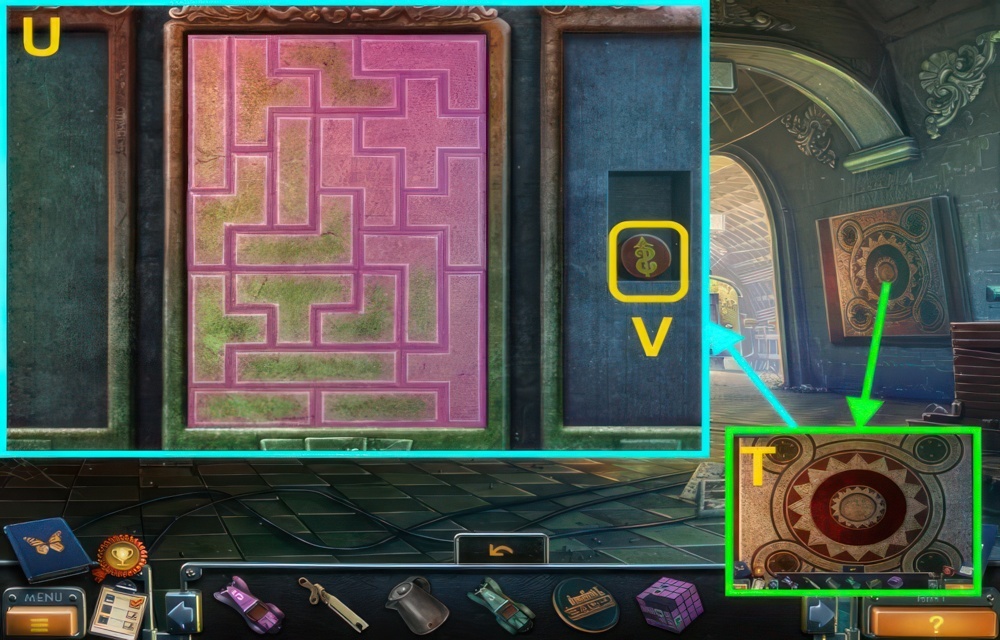
- Place the MOSAIC PIECE on the mosaic for a puzzle (T).
- Arrange all the mosaic pieces in the central zone.
- Pay attention to the color of the pieces: green at the bottom, red at the top.
- Walkthrough (U).
- Take the COIN (V).
- Go to the Port.
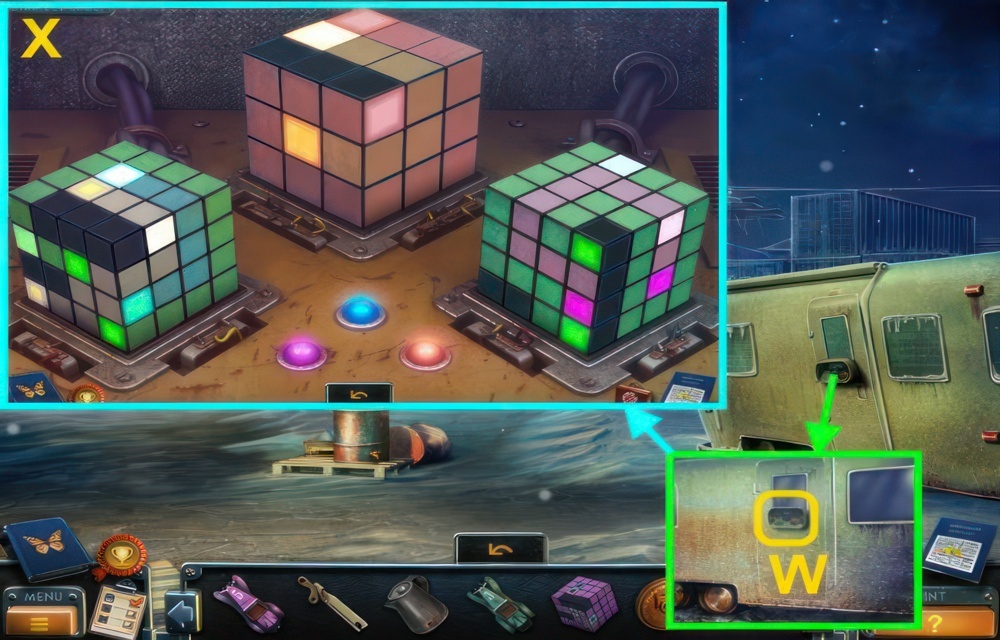
- Place the CUBE on the stand for a puzzle (W).
- Link up the squares by color on each cube.
- The trajectories of the links must not cross.
- Walkthrough (X).
- Enter the trailer.
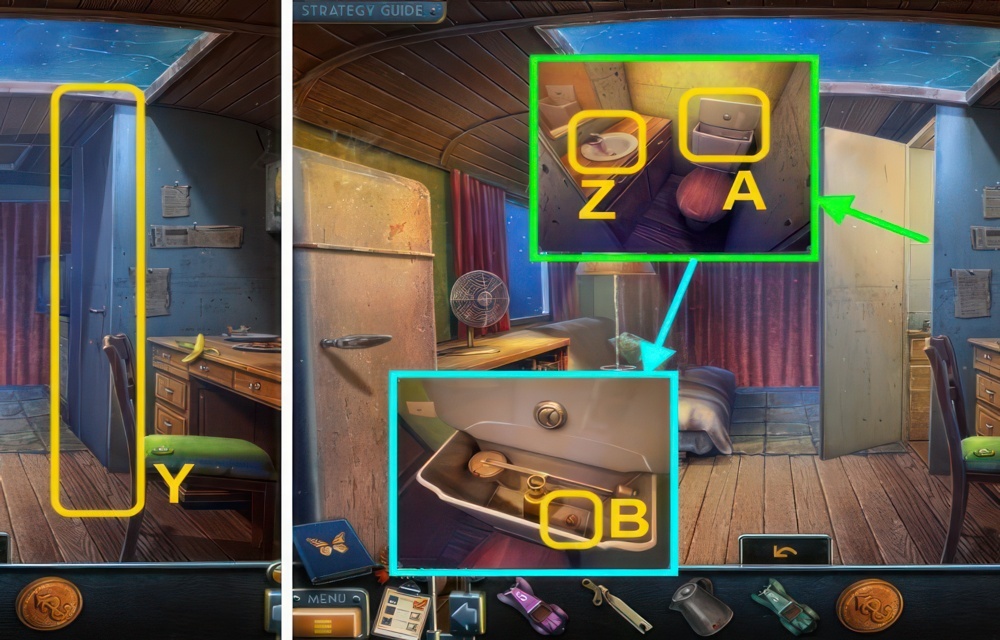
- Open the door (Y).
- Use the KETTLE on the sink to receive the KETTLE WITH WATER (Z).
- Open the tank (A).
- Take the COIN (B).
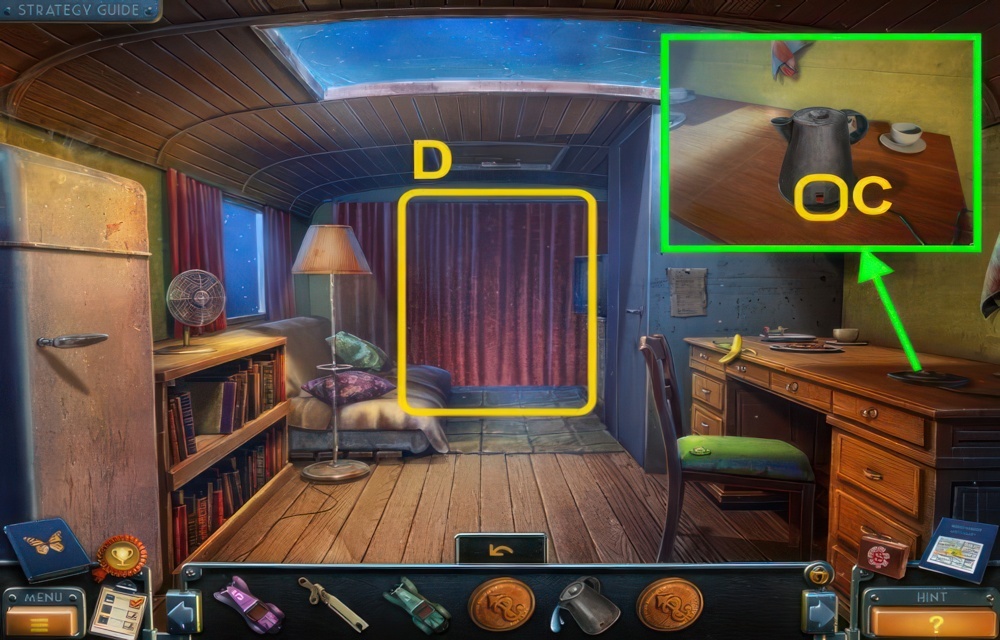
- Place the KETTLE WITH WATER on the burner, press the button (C).
- Take the KETTLE WITH HOT WATER.
- Open the curtain (D).
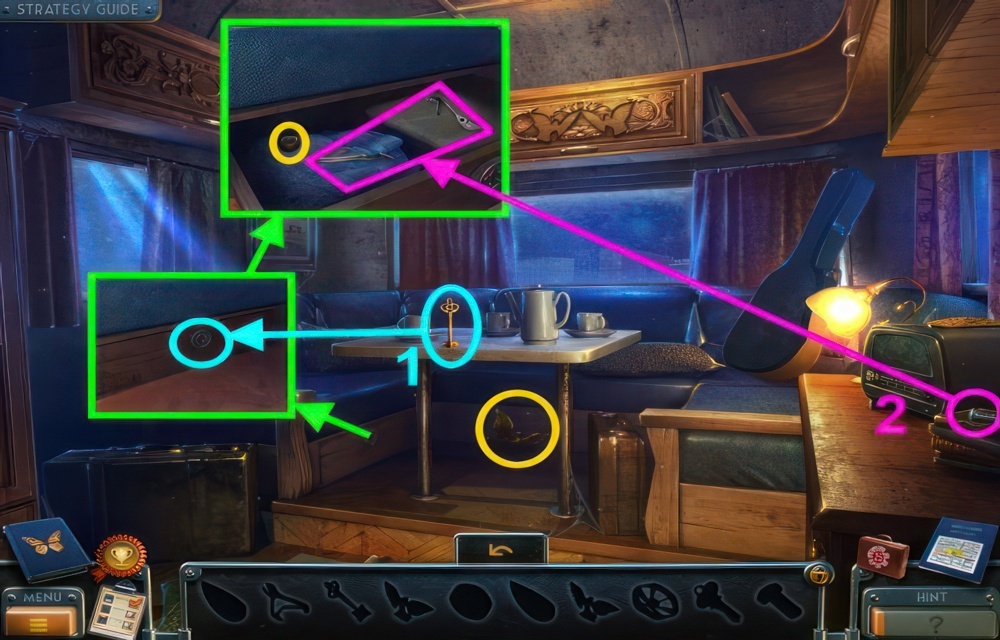
- Walkthrough puzzle (1-2).
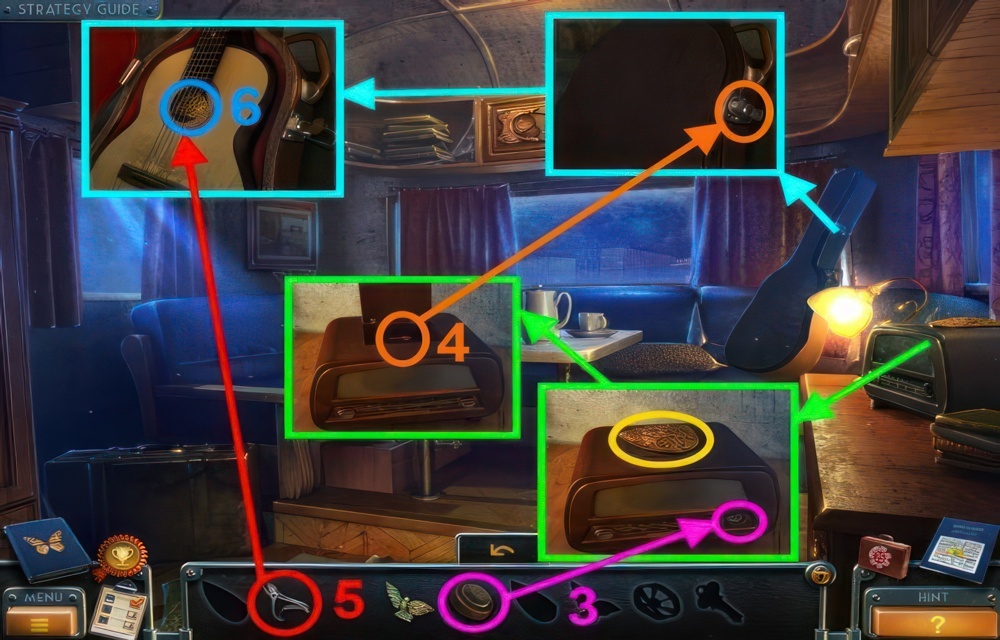
- Continued walkthrough puzzle (3-6).
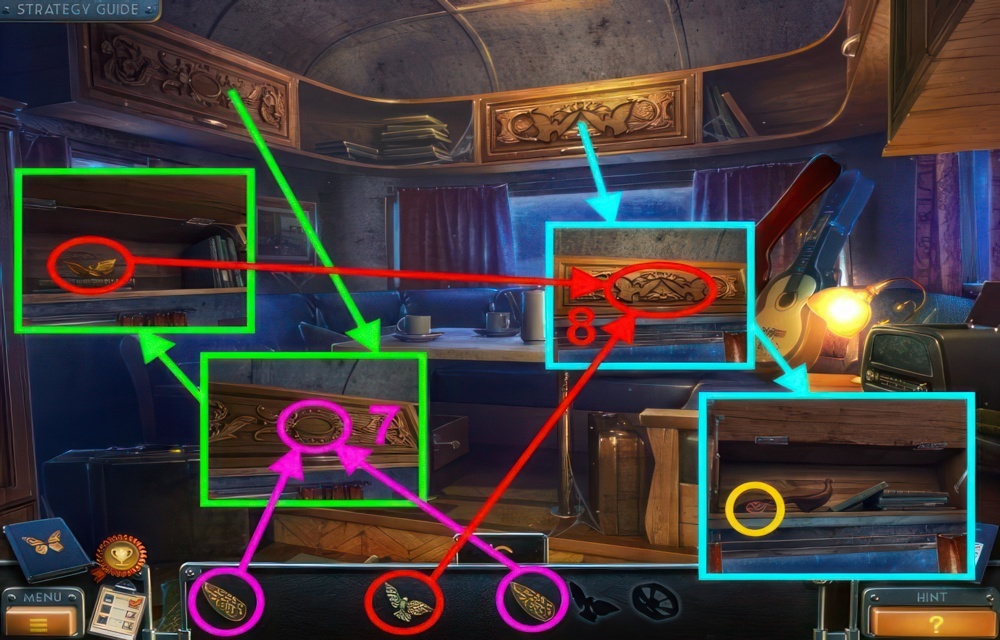
- Continued walkthrough puzzle (7-8).
- You receive the VALVE.
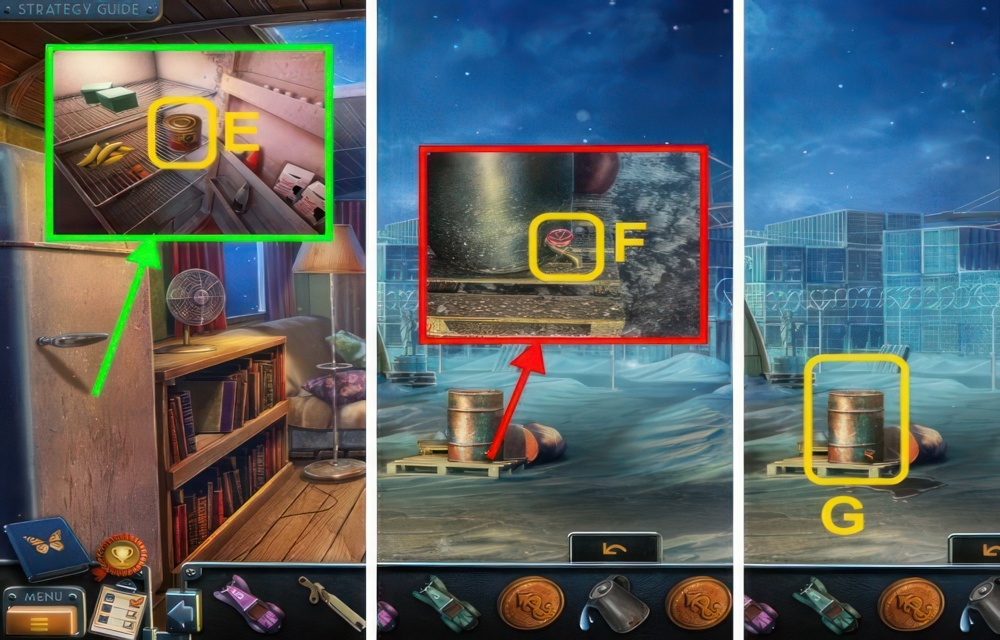
- Open the fridge, use the CAN OPENER on the can (E).
- Take the DOG FOOD.
- Go down.
- Use the VALVE on the faucet (F).
- Take the BARREL (G).
- Go to the Hangar.

- Place the BARREL by the ladder (H).
- Take the TIRE JACK (I).
- Go down.
- Use the TIRE JACK on the trailer, take the CHAIN (J).
- Go to the Children in Container.
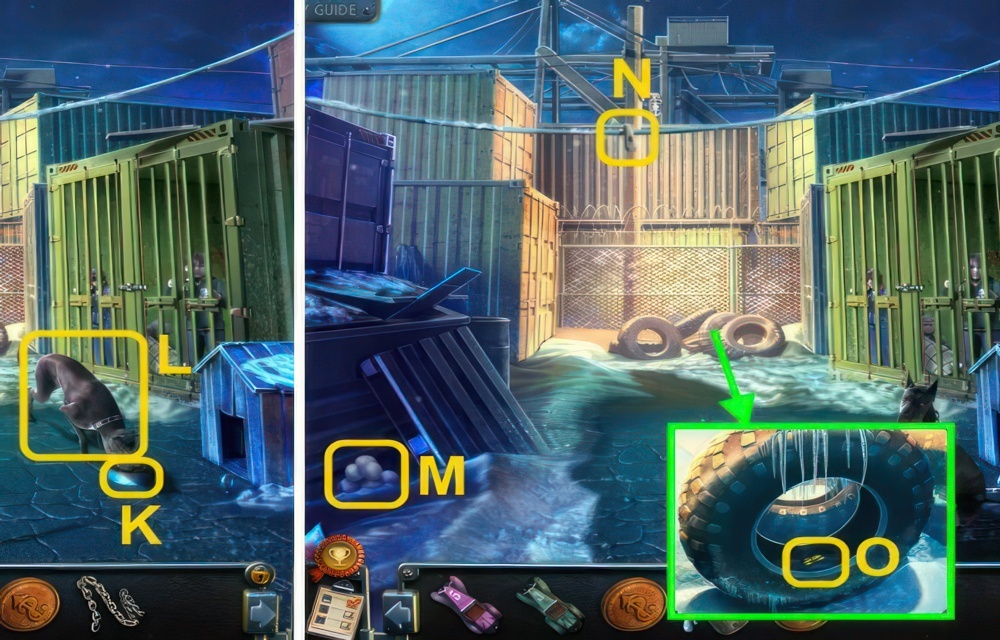
- Put the DOG FOOD in the bowl (K).
- Use the CHAIN on the dog (L).
- Throw the rocks (M) at the handle (N), take the HANDLE.
- Pour the KETTLE WITH HOT WATER on the ice, take the CAR (O).
- Go to Outside the Port.
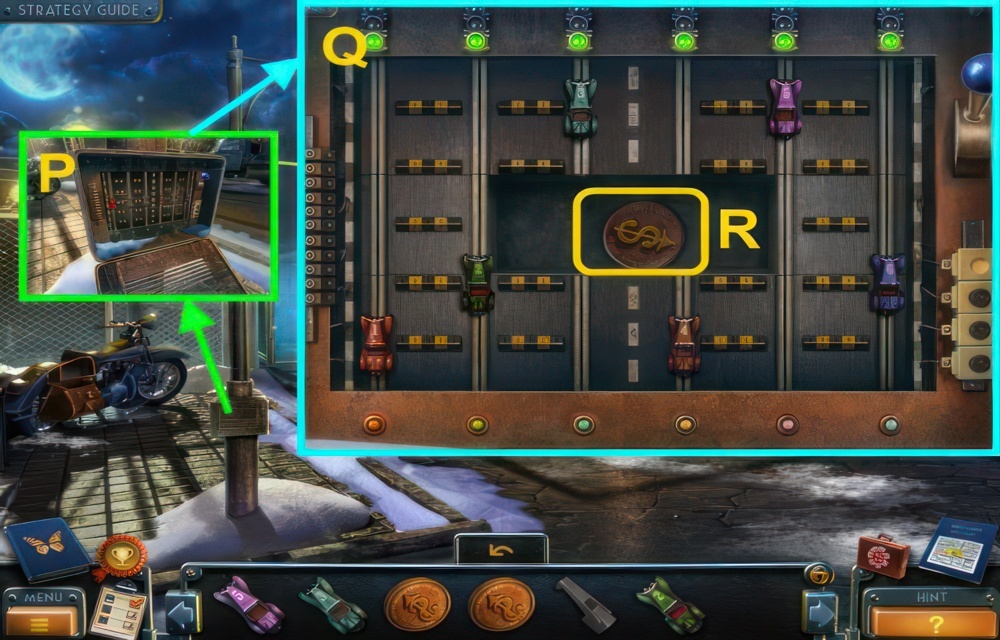
- Open the box, place the 3 CARS on the stand for a puzzle (P).
- When you press the lever, the signal lights will show green if the car is in the right position, yellow if it’s next to the right position, and red if it’s in another position.
- Arrange the cars in the right positions.
- Walkthrough (Q).
- Take the COIN (R).
- Go to the Trailer.
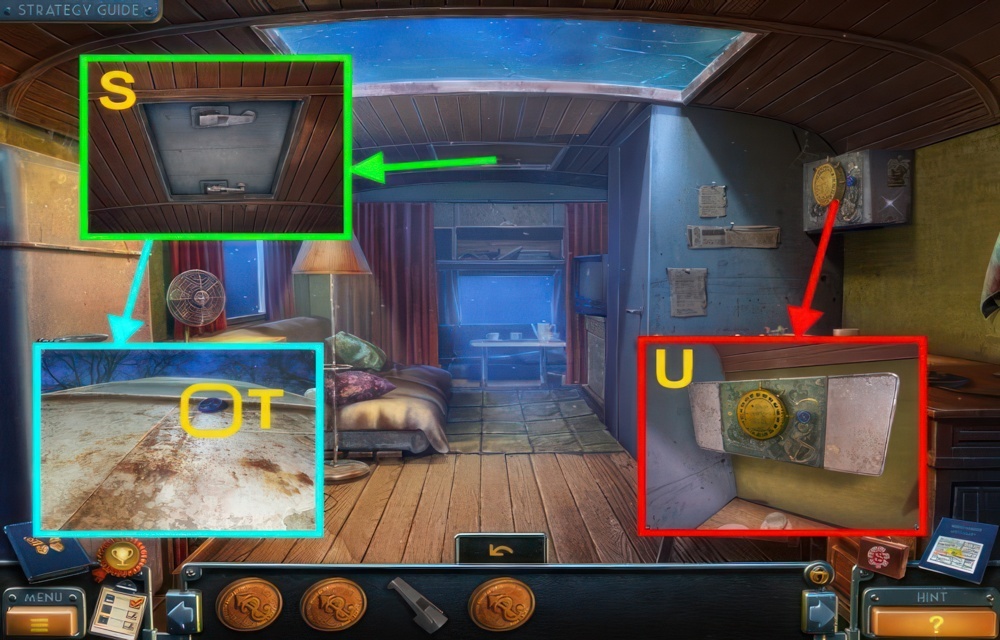
- Place the HANDLE on the hatch (S), turn the handles.
- Take the VALVE (T).
- Place the VALVE on the cupboard for a puzzle (U).
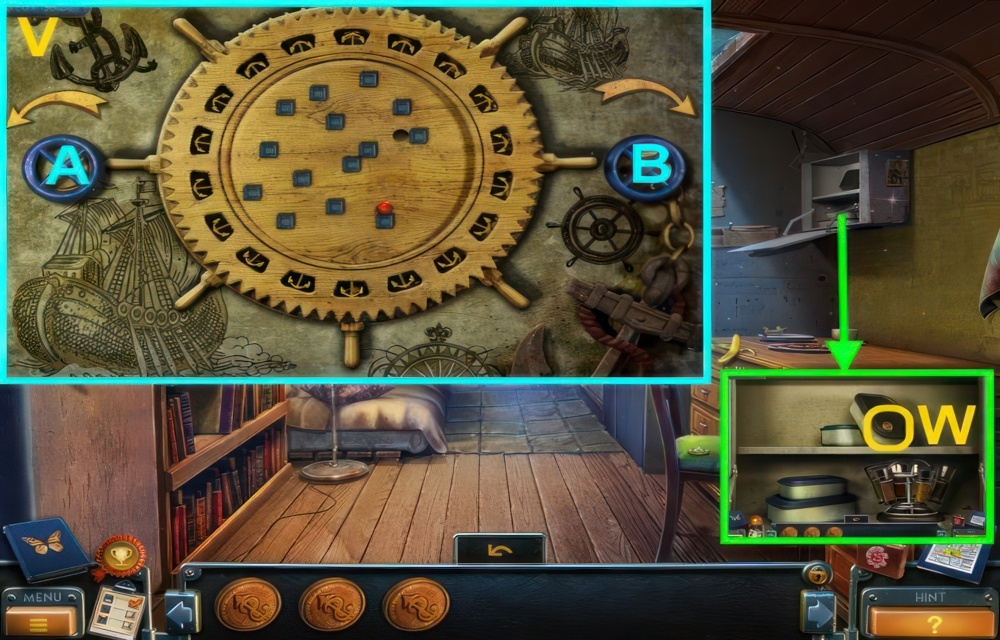
- Turn the wheel to make the ball fall into the hollow.
- Walkthrough (V): A×2, B, A, B×4, A.
- Take the COIN (W).
- Go to the Hangar.
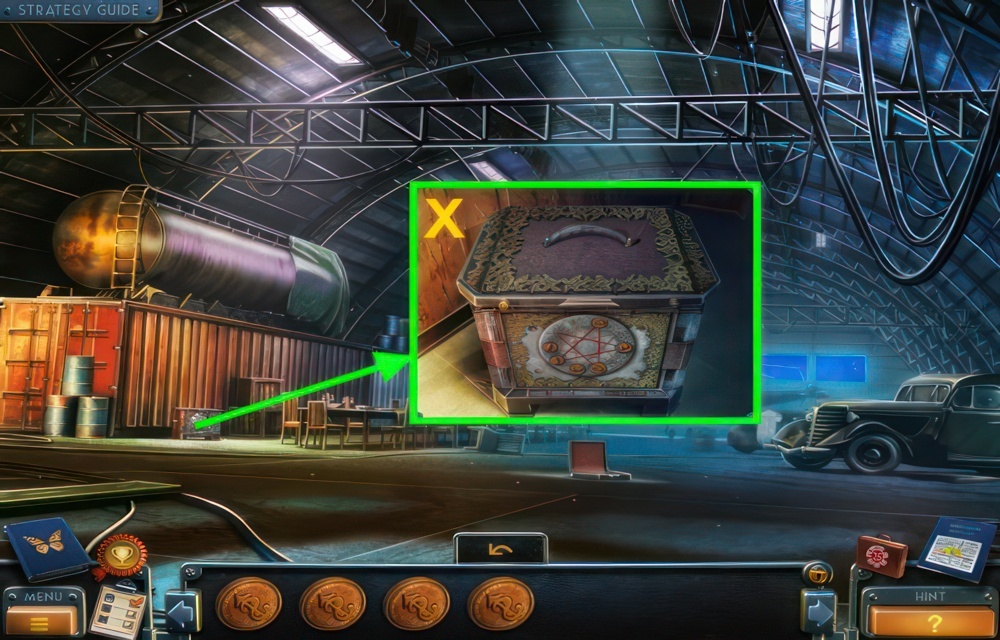
- Place the 4 COINS on the box for a puzzle (X).
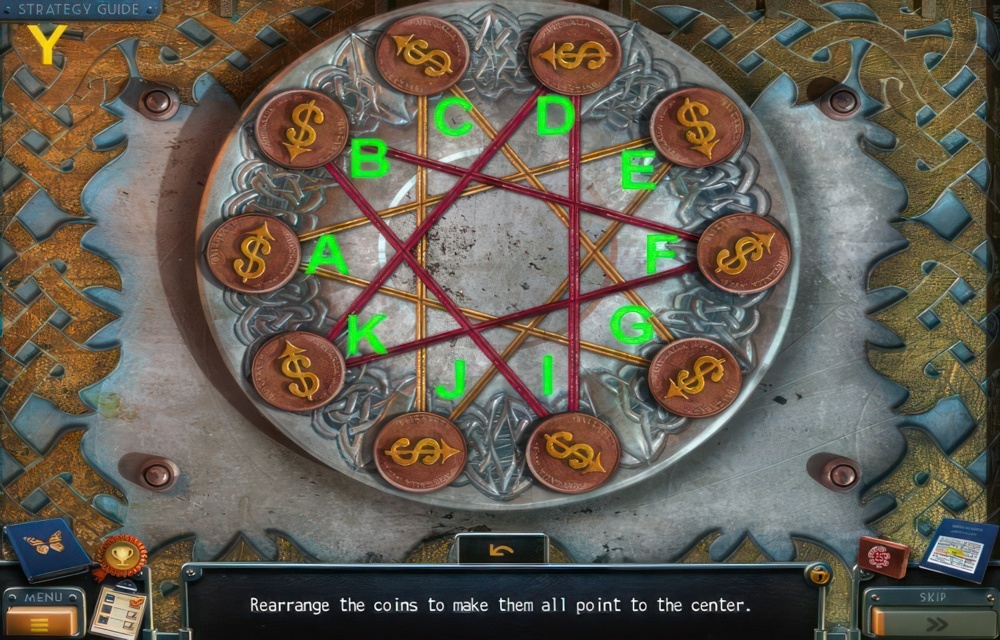
- Rearrange the coins to make them all point to the center.
- Walkthrough (Y): B-I, I-D, K-F, F-B, I-B, F-B, A-E, E-J, C-G, A-E, C-J, J-E, C-J.
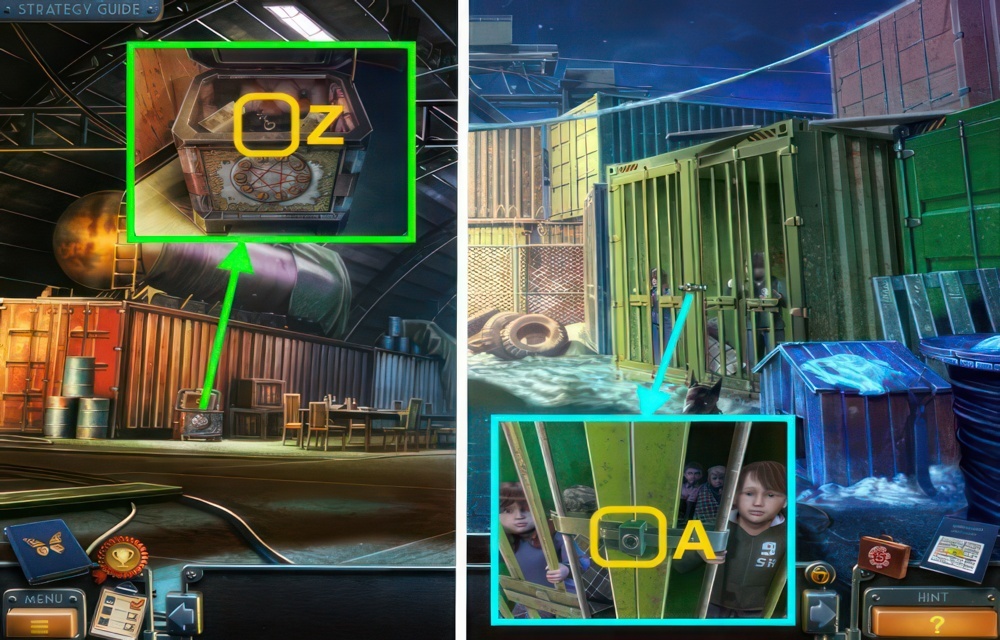
- Take the KEY (Z).
- Go to the Children in Container.
- Use the KEY on the door (A).
- Walkthrough Bonus Chapter, at the link below.


