
New York Mysteries 3: The Lantern of Souls – An adventure game about a new mystical investigation of a journalist. The passage of this unusual case takes place in the late 1950s in New York City. This new chapter in the cold-blooded saga tells how the brutal murder of a wealthy lawyer’s widow occurred. Laura James, a reporter for the Daily News, has been investigating a routine murder case, but a search of the dead woman’s home yields an unexpected result. The roots of the case seem to be buried somewhere in the history of war. You have to be brave enough to take risks on a cold night full of terror. Danger beckons the heroine at every turn. If you can not pass any of the puzzles or do not know where the items are, on our site you can watch the walkthrough of the game New York Mysteries 3: The Lantern of Souls, and save the whole world from the impending disaster.
New York Mysteries 3: The Lantern of Souls – Walkthrough
Here you can see the full walkthrough of New York Mysteries 3: The Lantern of Souls game, namely for all chapters, including bonus chapter, in pictures.
Order’s tasks
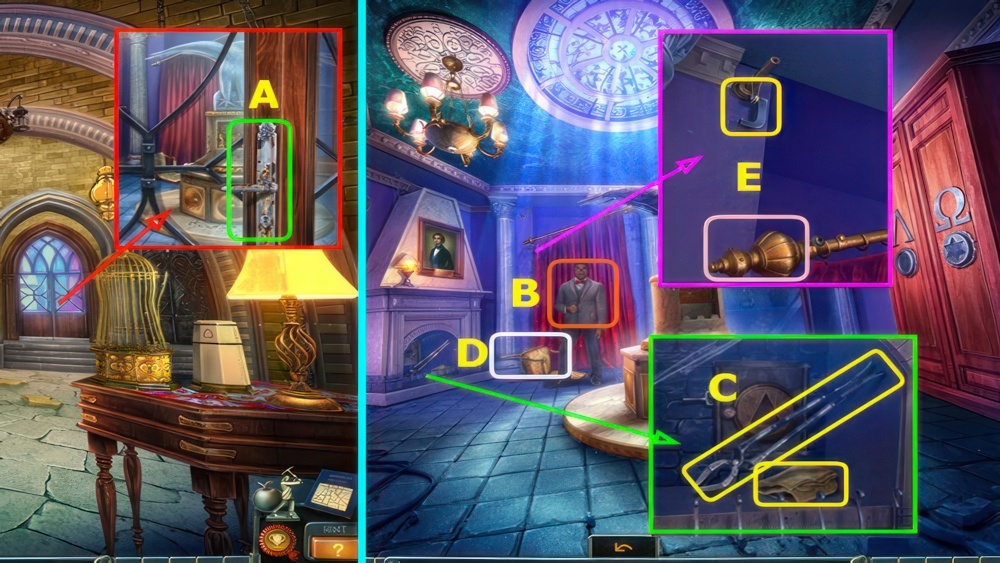
The White Stone Order assigned me to visit the suburban mansion of a well-known lawyer, Thomas Martell, where the extremely brutal murder of his widow, Carrie Martell, had taken place. The police still don’t know why anyone wanted to kill that poor woman. How the murderer managed to get inside their very well-guarded house also remains a mystery.
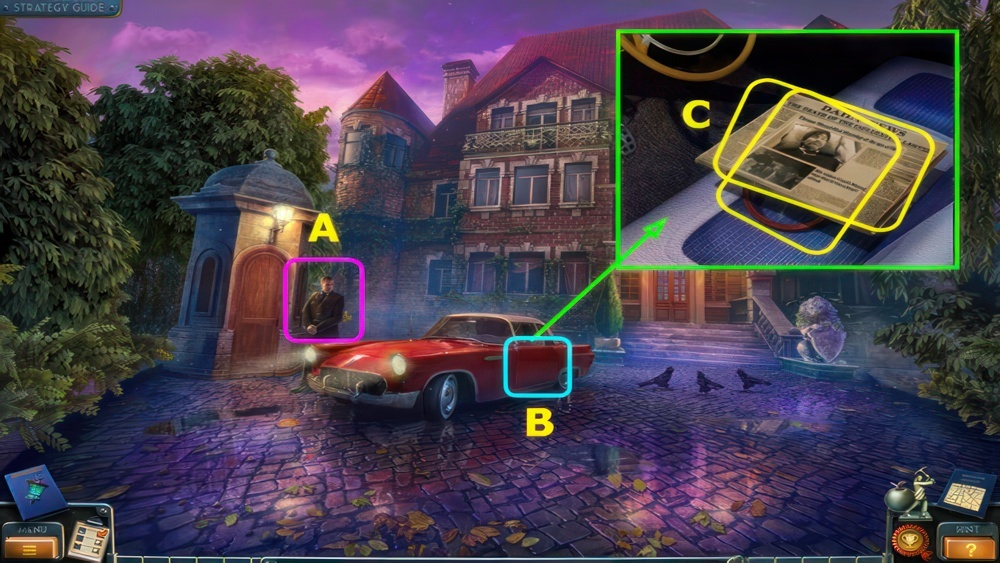
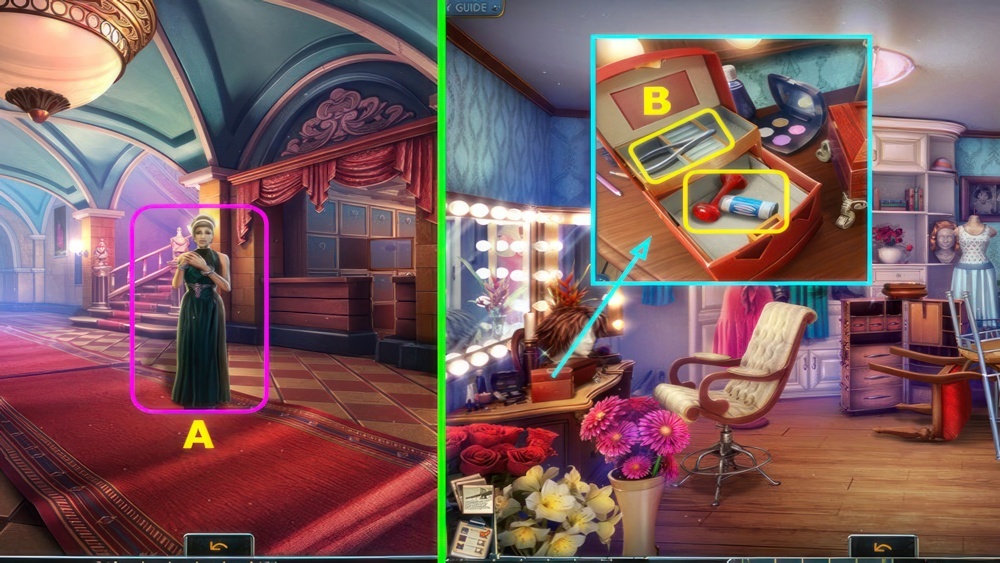
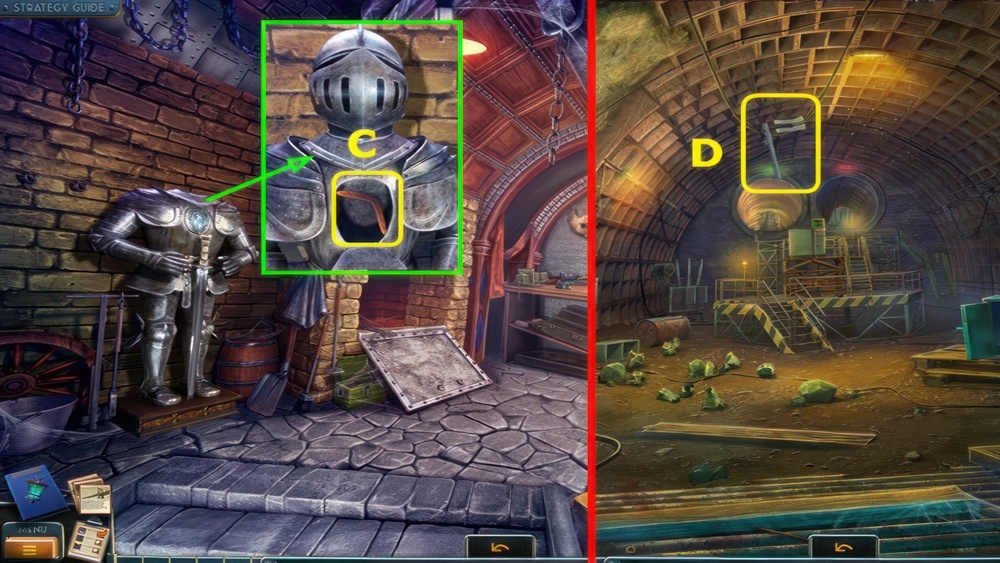
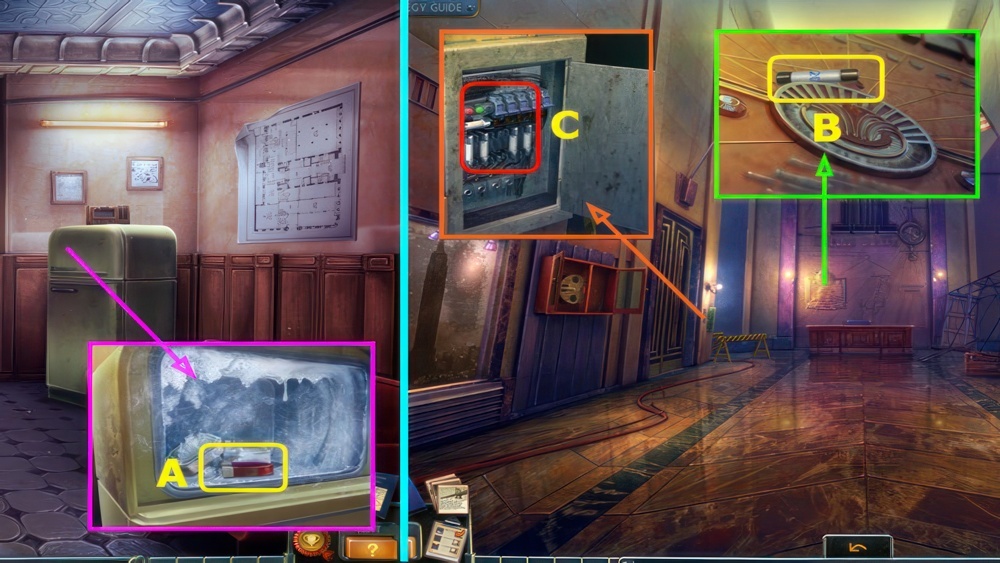
- Talk to the Security Guard (A).
- Open the car door (B).
- Take the NEWSPAPER and BAG (C).
- Open the bag.
- Take the POWDER and PRESS PASS.
Press pass
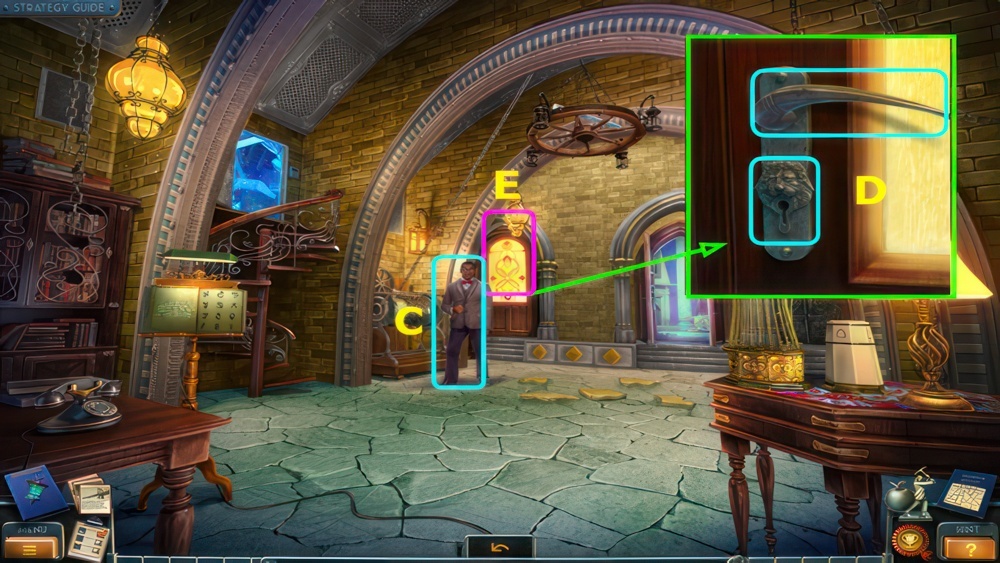
I have to show my press pass to the security guard if I want to get to the crime scene.

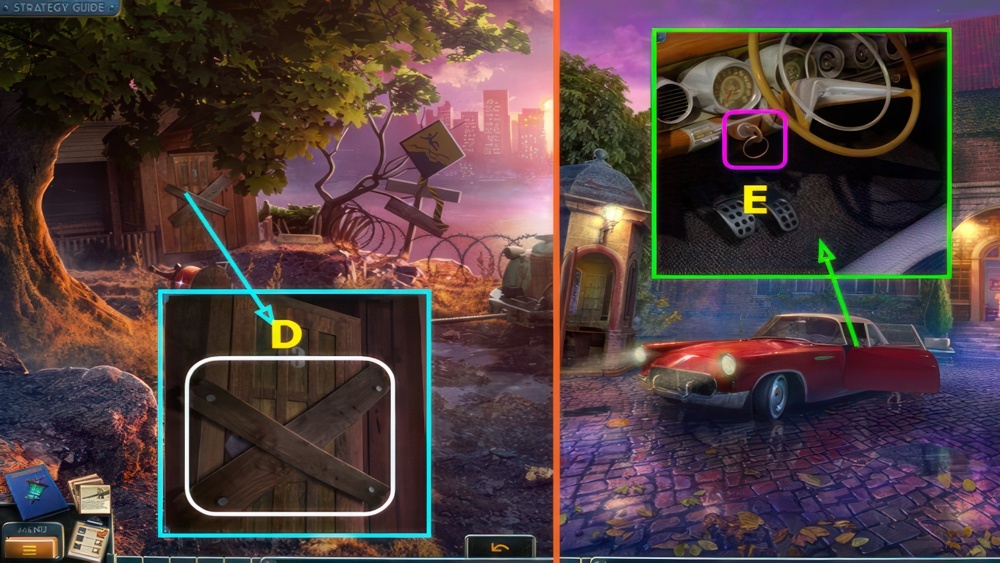
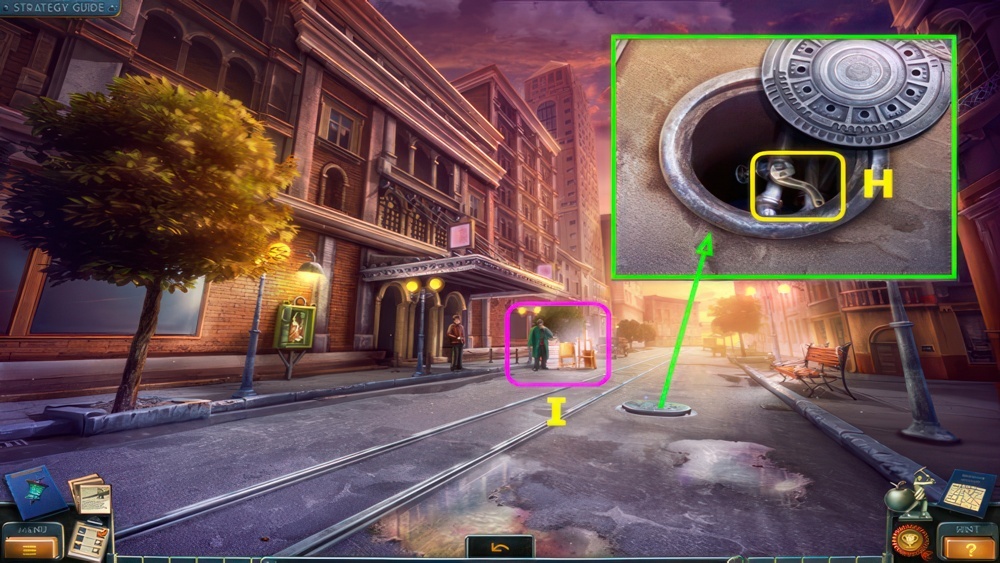
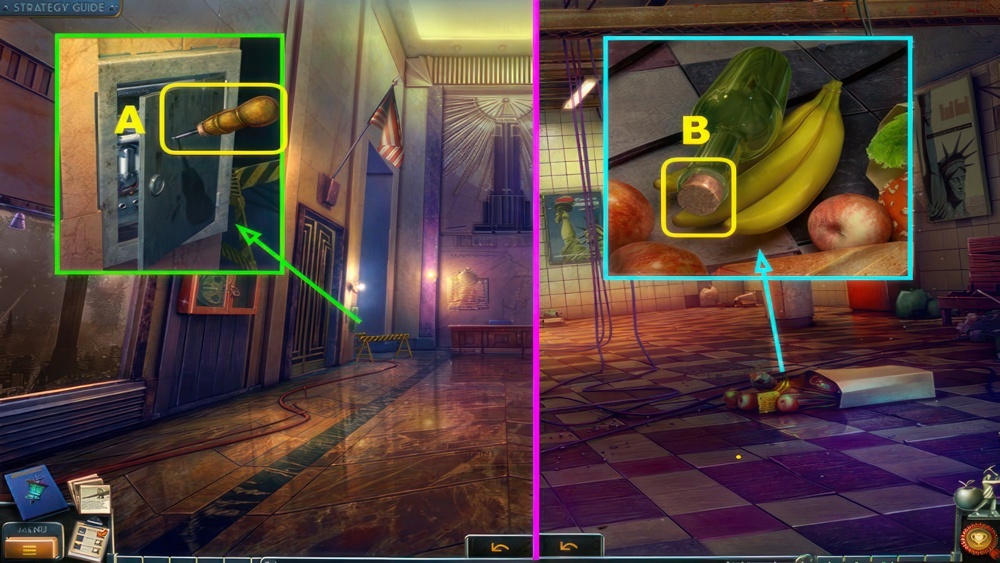
- Use the PRESS PASS, receive the KEY (D).
- Use the KEY, turn the handle (E).
- Go forward.
Evidence
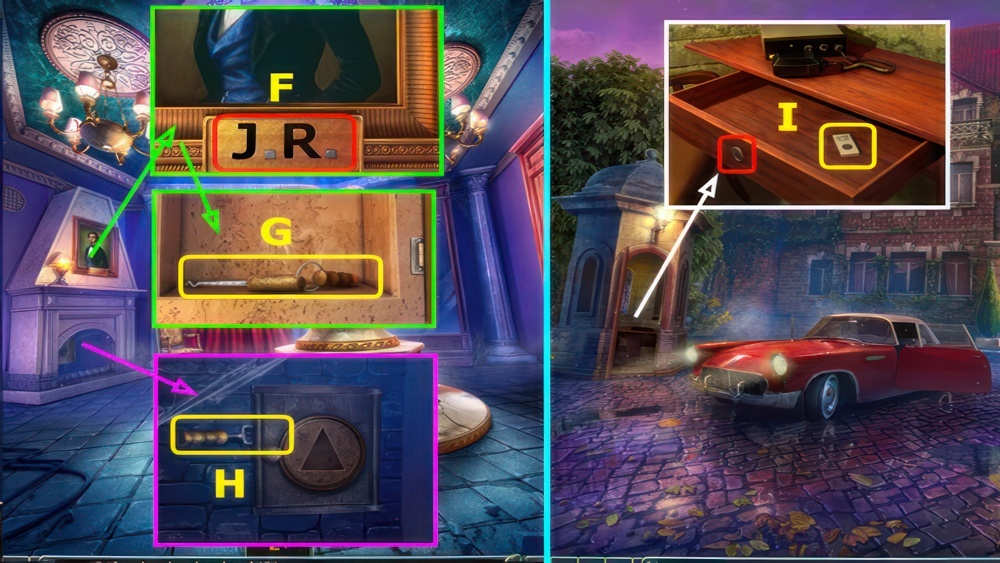
In the blood puddle in the living-room I found a tie pin. The same pin Thomas Martell was wearing when he was buried. It remains unclear how the pin got into the living-room. Also, the whereabouts of the widow’s body remain unknown. There are no signs of anyone having dragged the body from the living-room, though.
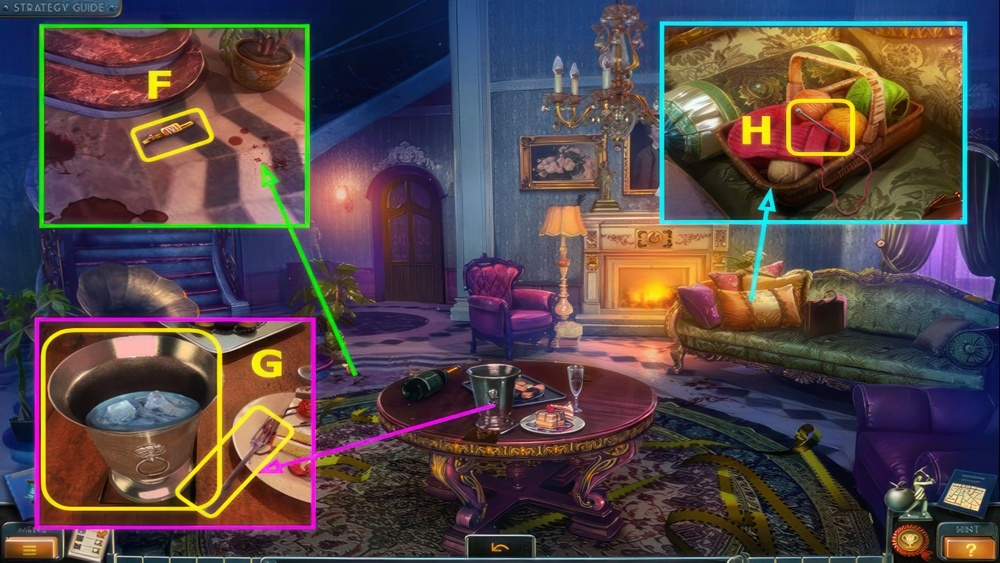
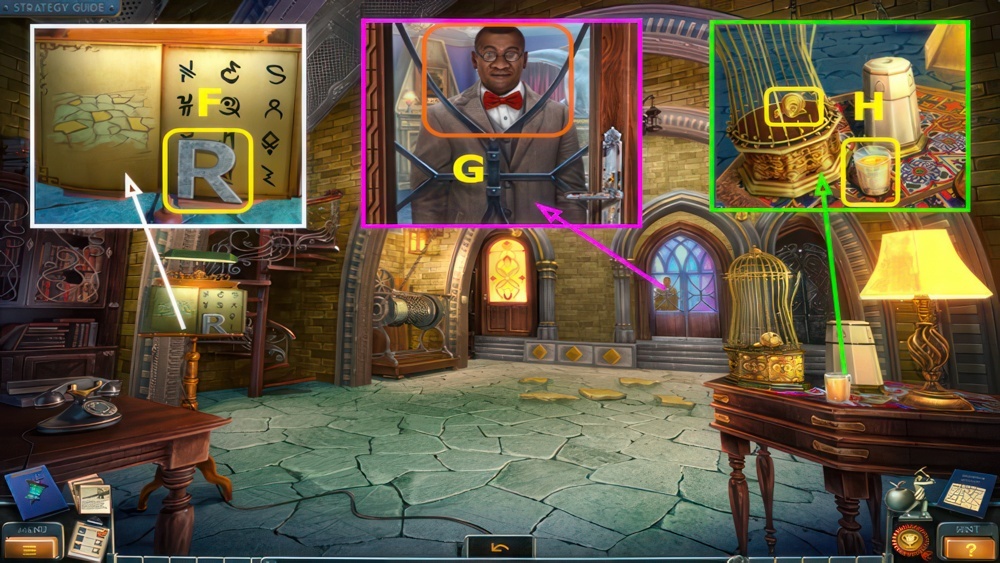
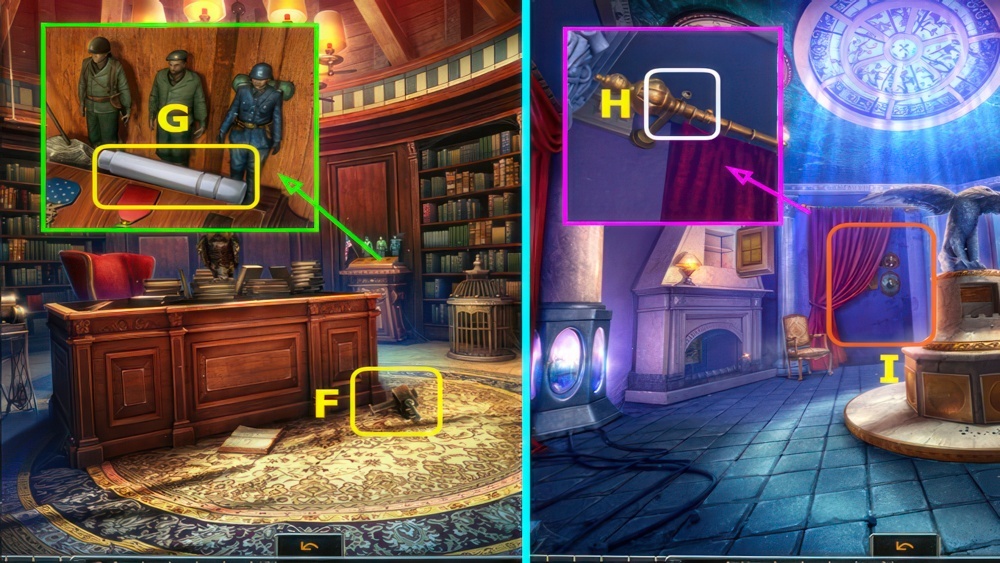
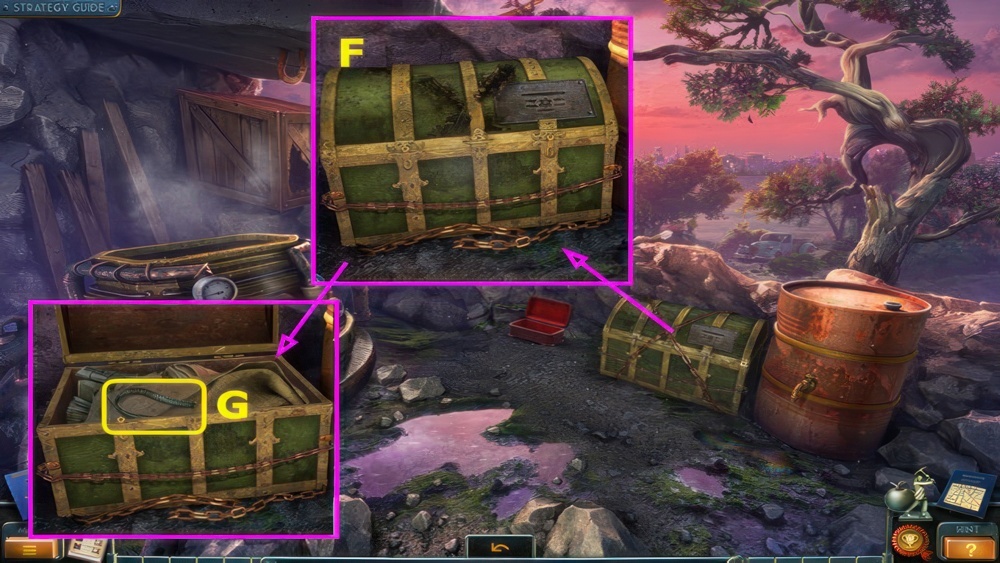
- Take the TIE PIN (F).
- Unfold the TIE PIN.
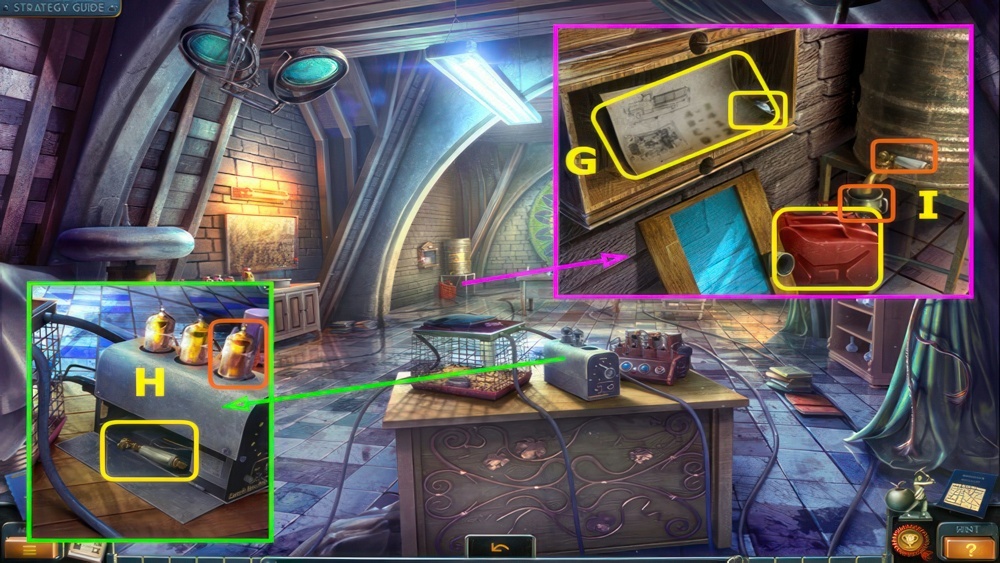
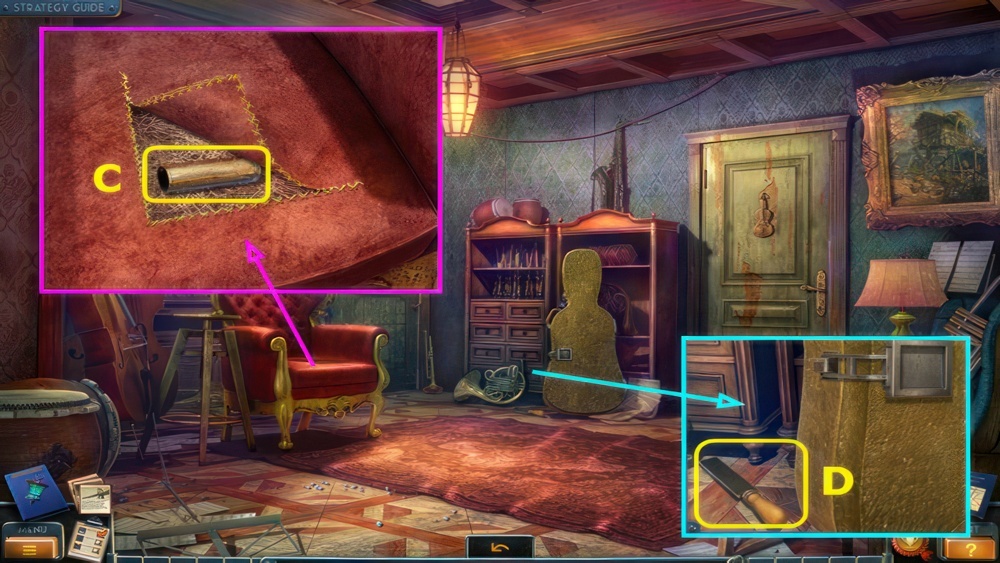
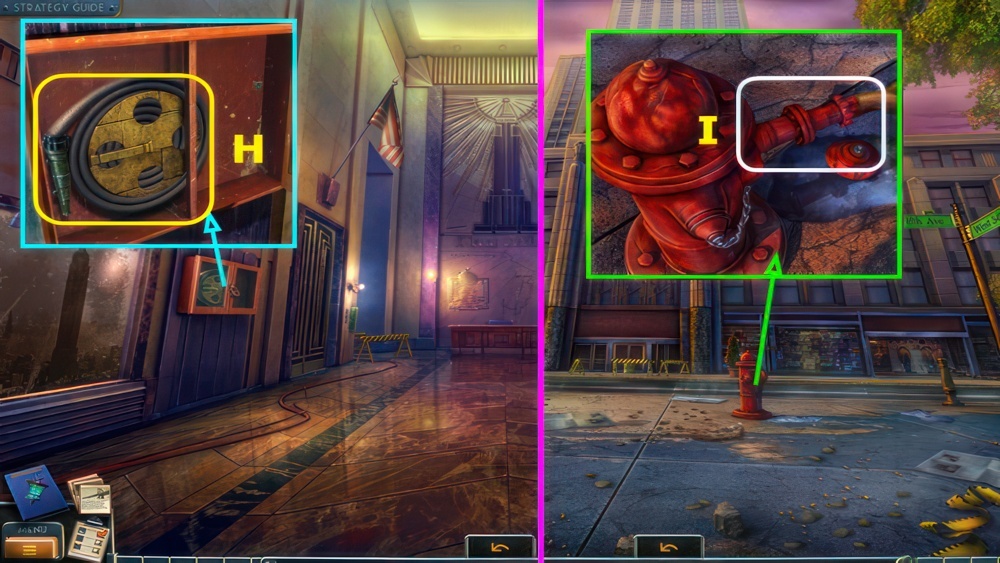
- Take the BUCKET OF ICE and FORK (G).
- Move the four pillows, take the NEEDLE (H).
- Use the BUCKET OF ICE, take the MEDALLION (I).
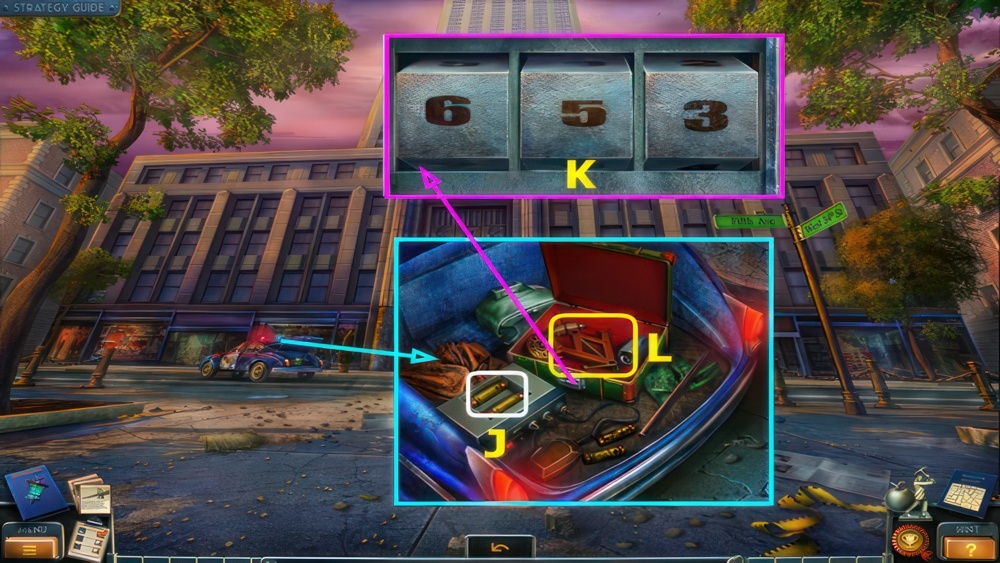
- Place the NEWSPAPER (J).
- Use the NEEDLE (H).
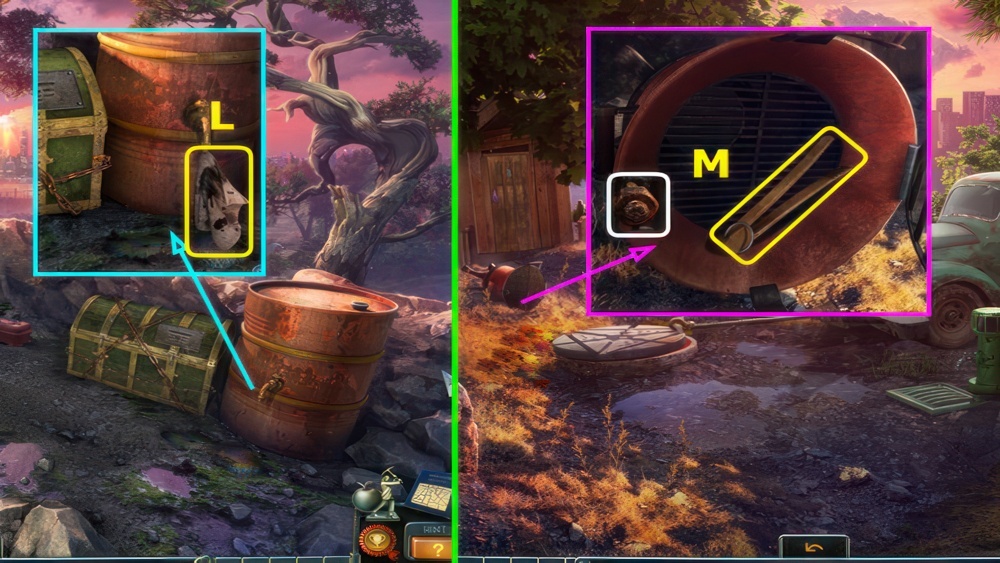
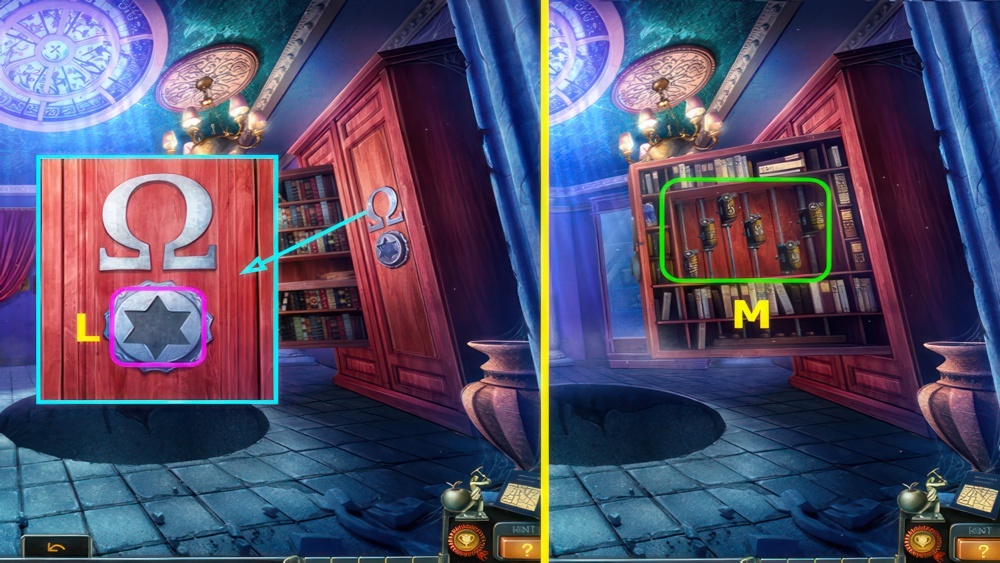
- Select the newspaper, take the KEY (L).
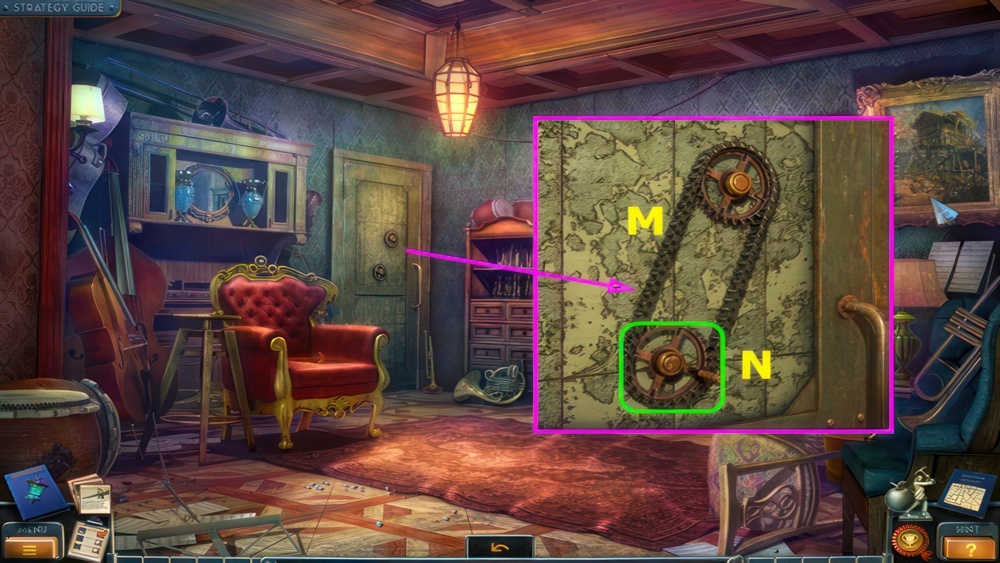
- Use the KEY (M).
- Go forward.

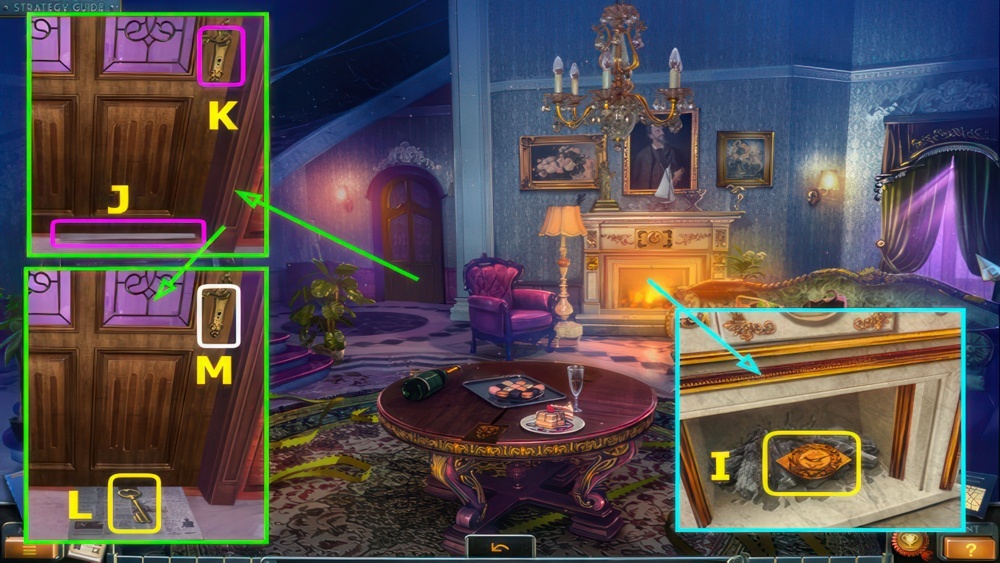
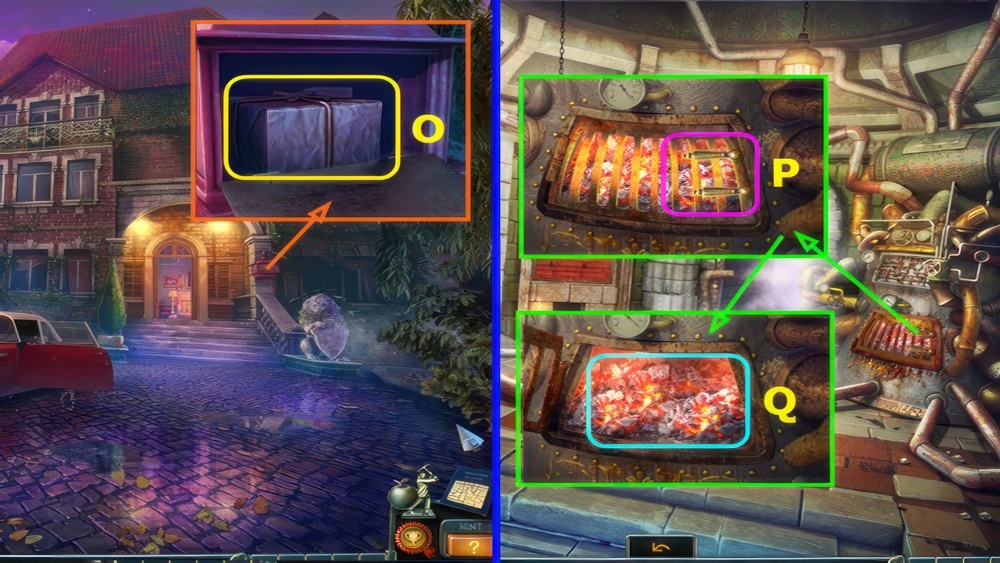
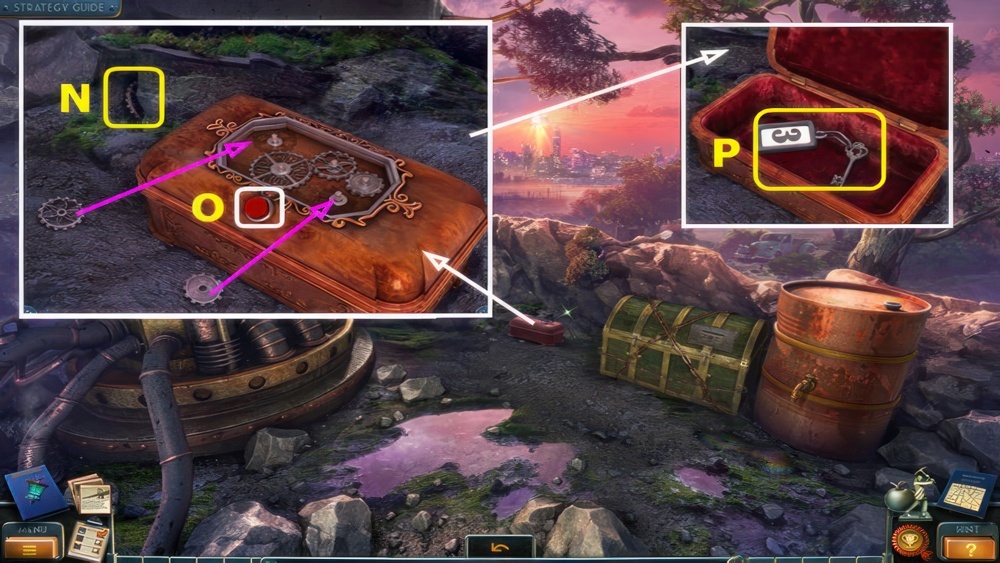
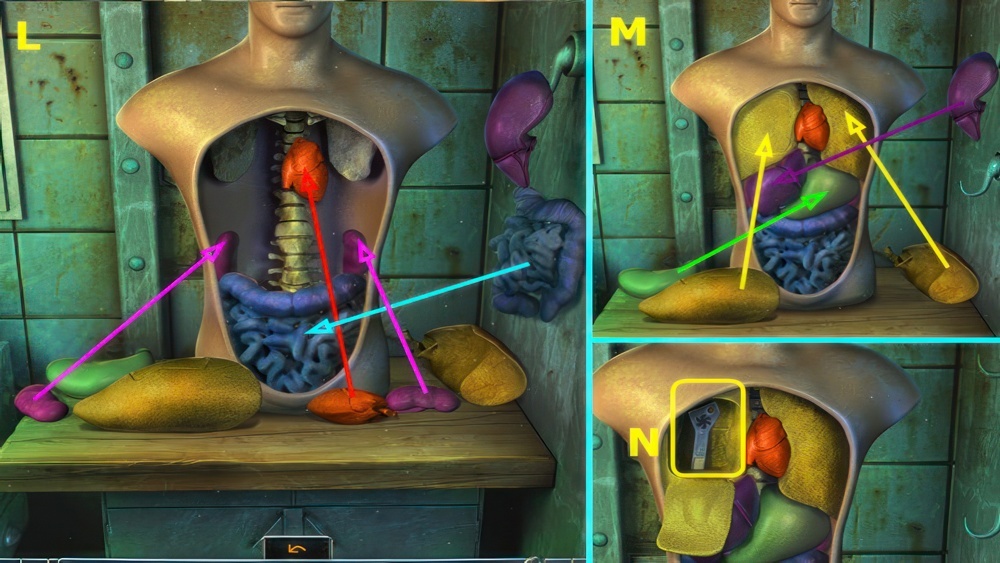
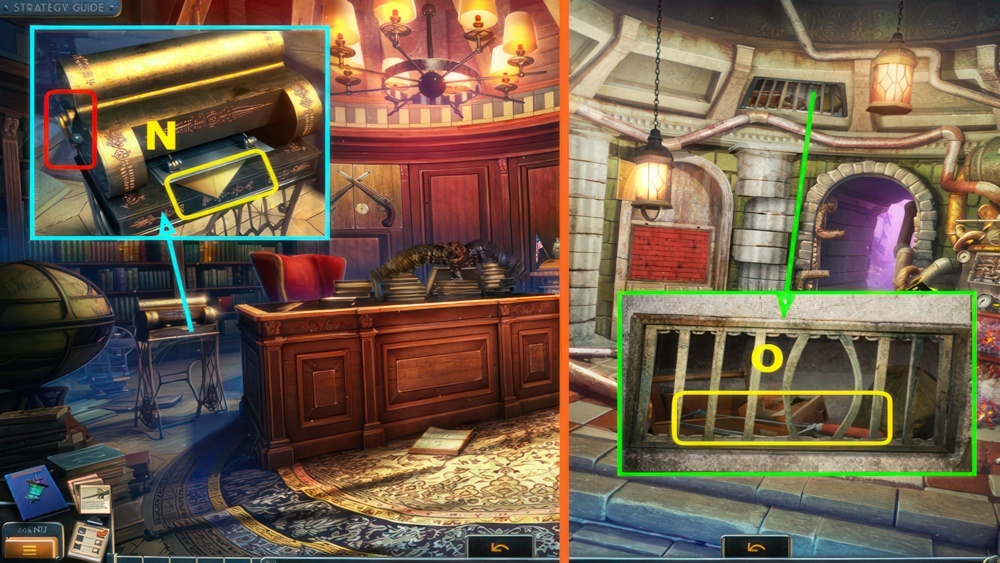
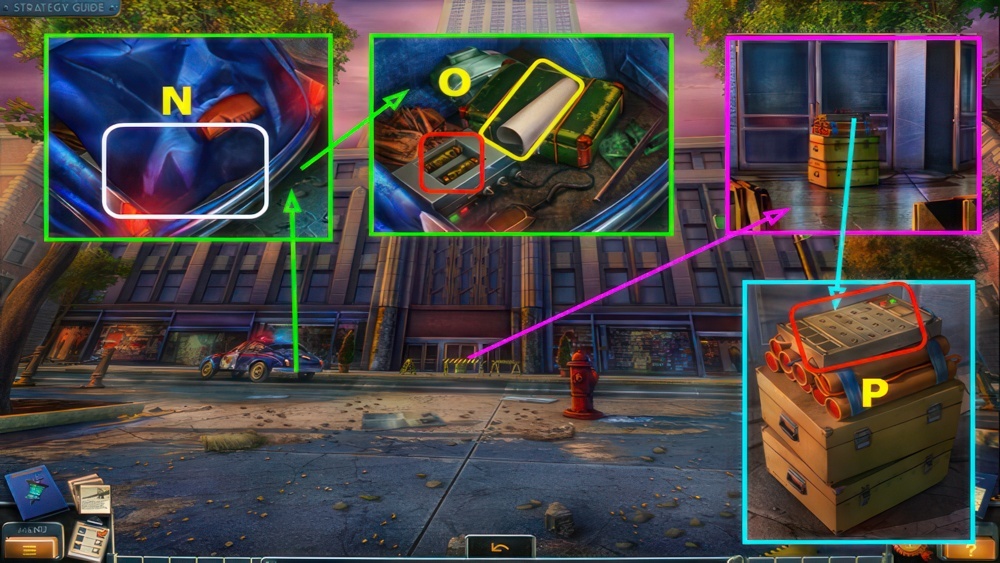
- Take THOMAS’S DIARY and the ZIPPER, open the case and take the GAVEL (N).
- Combine THOMAS’S DIARY and MEDALLION, take the HINT.
- Take the BROKEN STAPLER (O).
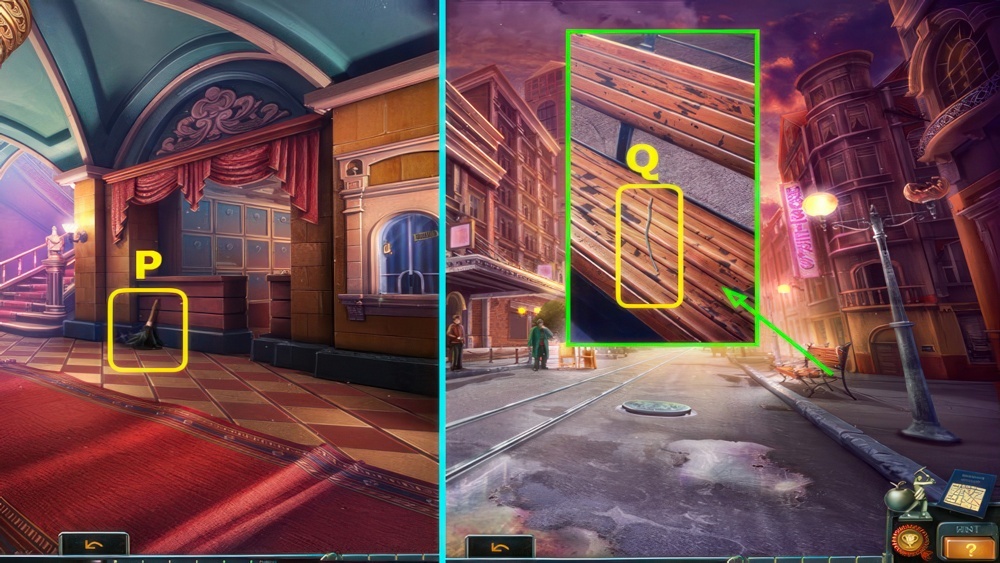
- Press the panel, select (P).

- Place the HINT (Q).
- Rotate the arrow to set the correct sequence.
- Walkthrough: 5, 7, 3, 5, 3, 3.

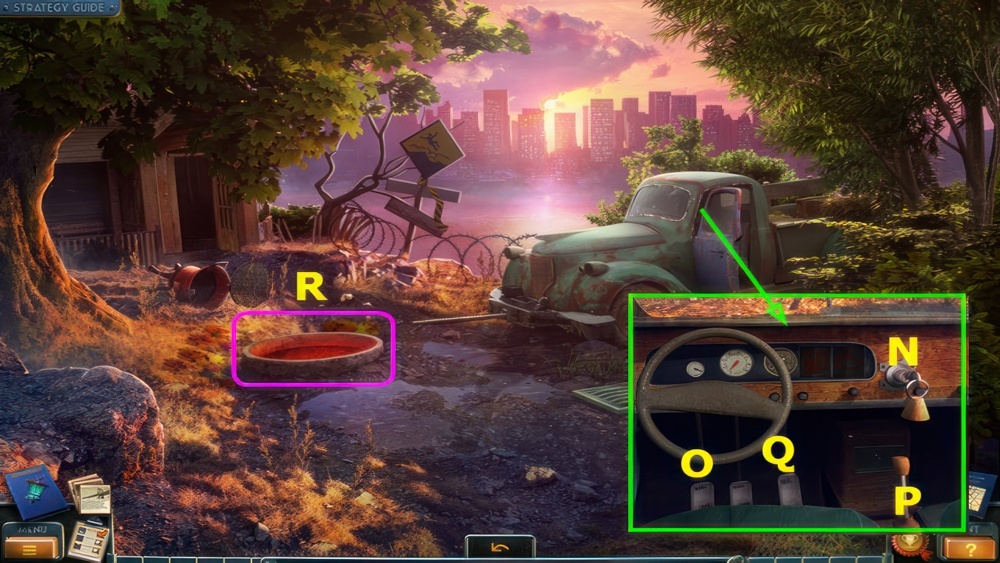
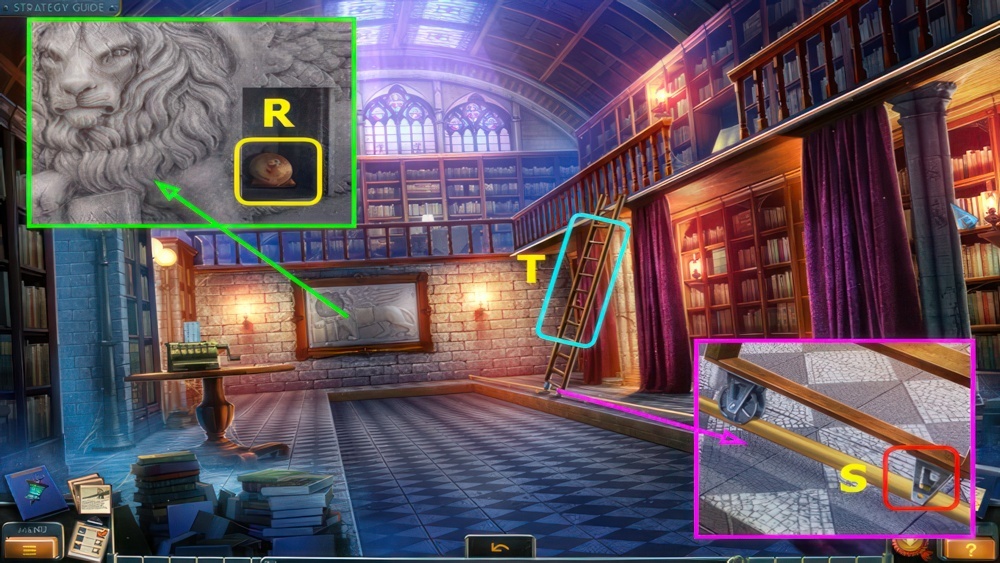
- Take the BOTTLE (R).
- Use the GAVEL on the BOTTLE, take the SHEET OF PAPER.
- Use the SHEET OF PAPER (S).
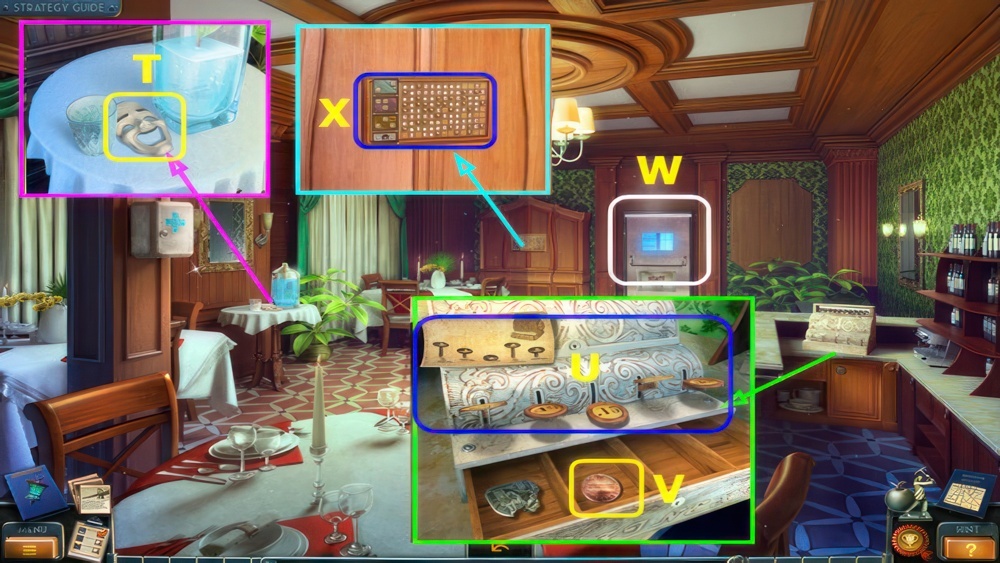
- Select the painting (T).
- Go down.

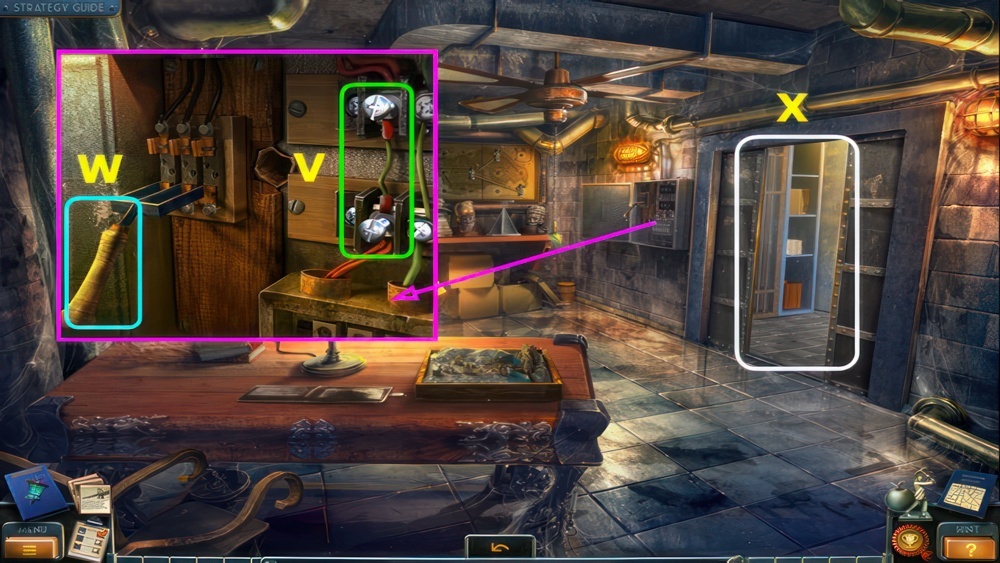
- Use the ZIPPER, take the GLUE, UMBRELLA, and KEY (U).
- Extend the UMBRELLA.
- Go down.
- Use the KEY (V).

- Take the FLASHLIGHT and SHOVEL (W).
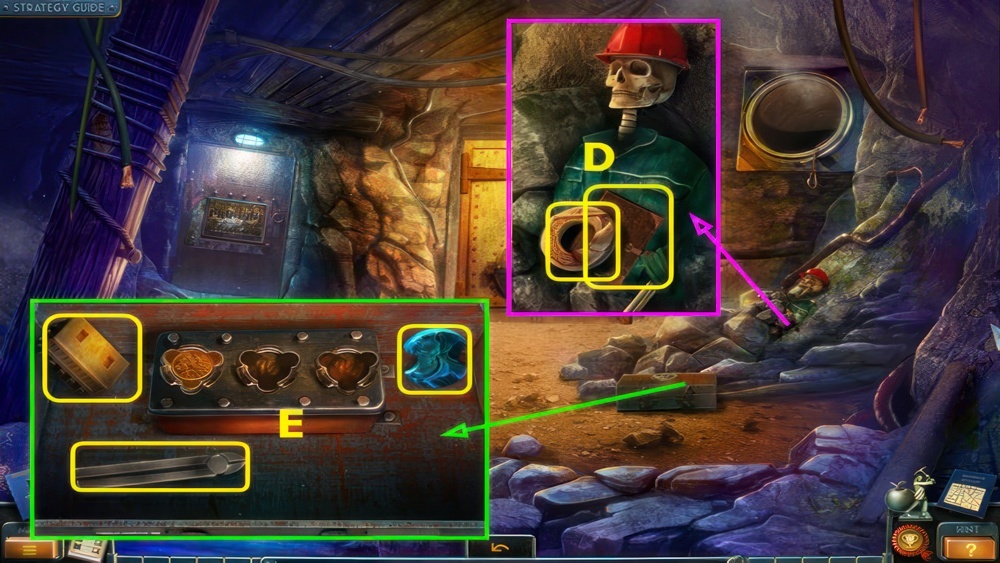
- Use the SHOVEL, take the FIRE SYMBOL (X).
- Go forward.
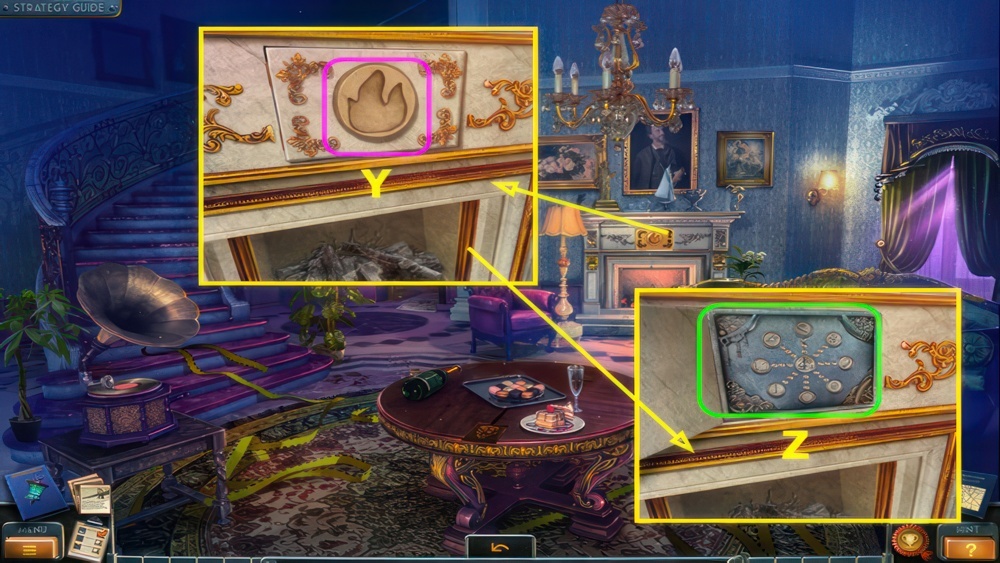
- Place the FIRE SYMBOL (Y).
- Select (Z).
Broken figurine
From Thomas Martell’s diary I learnt that his relationship with his wife was far from perfect. It seems Carrie Martell was a real hot-head. During one of their quarrels, she busted an angel statuette from the niche in the closet. Thomas writes that he hid the pieces in a secret place. I think I should find them. Strange symbols were drawn near the note, and this may be the key to finding the hidden pieces.
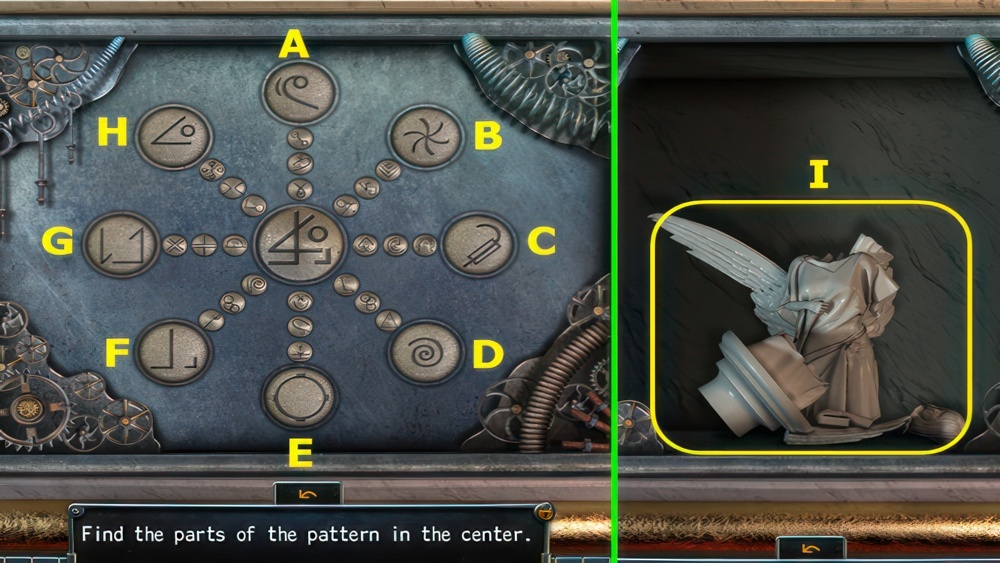
- Find the parts of the pattern in the center.
- Walkthrough: HF, DG, BE, AC, HG, AF, CE, BD, GH, AE, DF, BC, AG, CE, BH, DF.
- Take the FIGURINE PARTS (I).
- Combine the FIGURINE PARTS and GLUE, restore the ANGEL STATUE.
- Go forward.

- Place the ANGEL STATUE (J).
- Use the FLASHLIGHT (K).
- Select (L).
- Go forward.
Pulling down the blockage
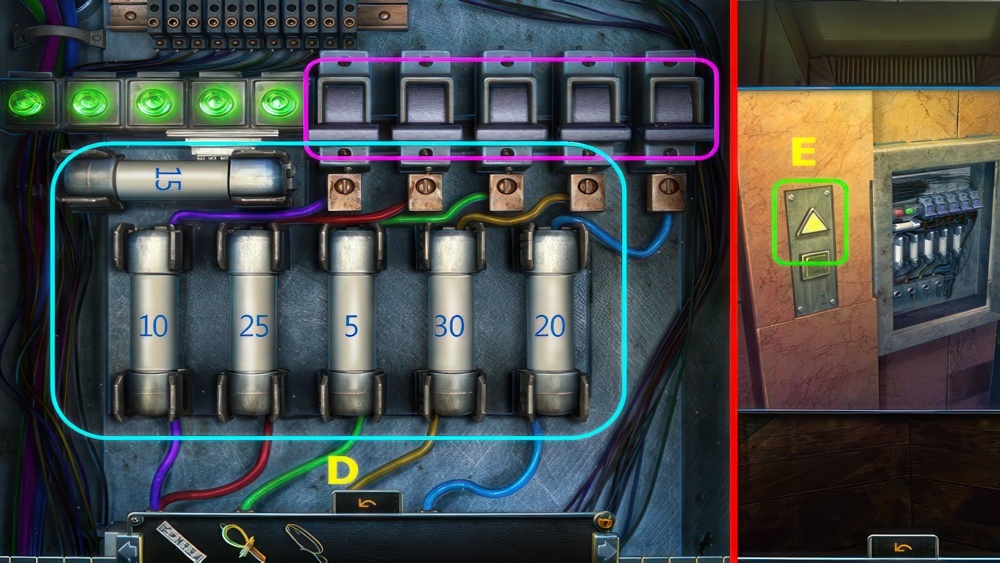
Finally, some progress in this crazy case. In Thomas’s study I found a secret passage to the boiler room, where I saw a man hiding in the clouds of hot steam. Seemed as though he didn’t feel any discomfort. I’d sure as hell burn myself, if I did that. So, I need to find a way to cool down the overheated boiler and follow the stranger.

- Use the UMBRELLA and TIE PIN, take the HANDLE (N).
- Use the FORK, remove the grate (O).
- Take the MATCHES (P).
- Select (Q).
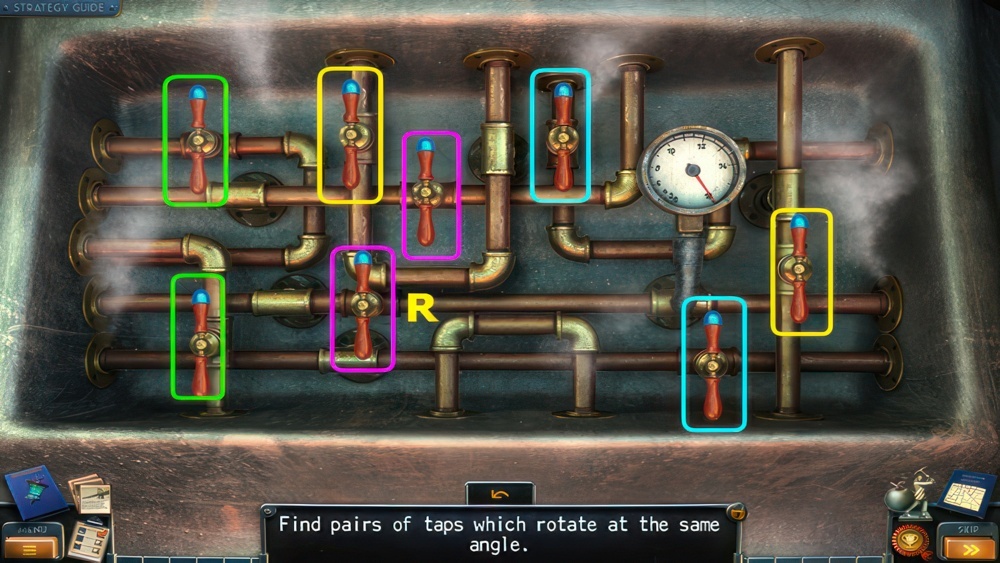
- Place the HANDLE (R).
- Find pairs of taps which rotate at the same angle.
- Walkthrough: Select the pairs 🟩, 🟨, 🟪, 🟦.
- Go left.

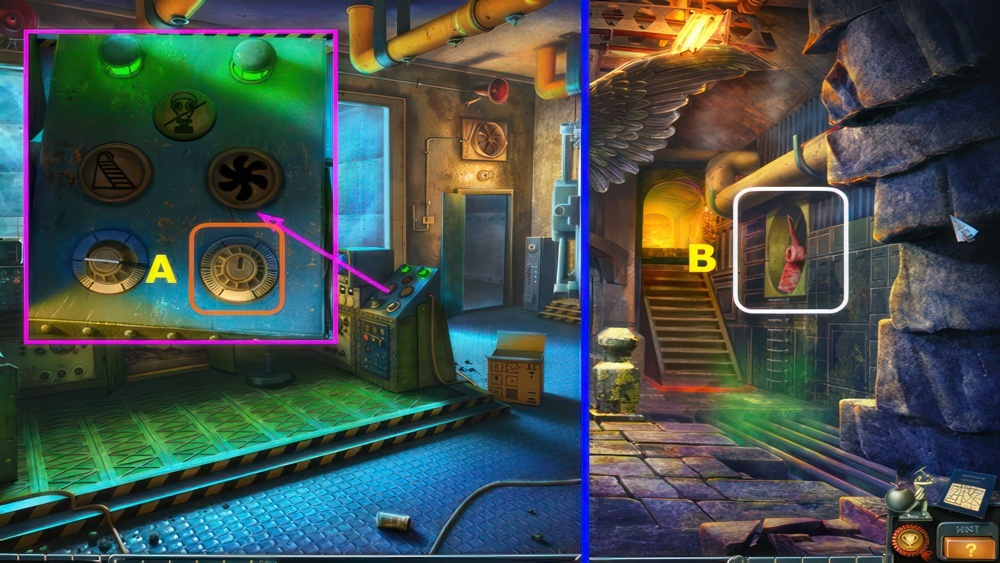
- Select (A).
- Take the CANDLE (B).
- Select (C).
- Take the ROPE and TWIG (D).
- Go down.

- Use the TWIG, take the AXE and SHOVEL (E).
- Place the CANDLE, use the MATCHES (F).
- Select (G).
- Take the SCALES SYMBOL and SCISSORS (H).
- Go down.
Chase
I’m pursuing a mysterious stranger.

- Place the SCALES SYMBOL, take the STAMP RING and JEWELRY MAGNIFIER (I).
- Use the SCISSORS, take the MAILBOX KEY and look at the images (J).
- Go down.

- Select the arm (K).
- Walkthrough: Re-arrange the image’s pieces (L).
- Take the 1/3 COG (M).
- Use the SCISSORS, take the MITTEN (N).
- Go down.
- Use the MAILBOX KEY, take the PARCEL (O).
- Open the PARCEL, use the STAMP RING and take the 1/3 EAGLE FIGURINE.
- Go forward thrice.
- Use the MITTEN (P).
- Use the SHOVEL (Q).
- Go left.
Return to HQ
I have to get back to HQ quickly. Bishop should know about Thomas and the rest.

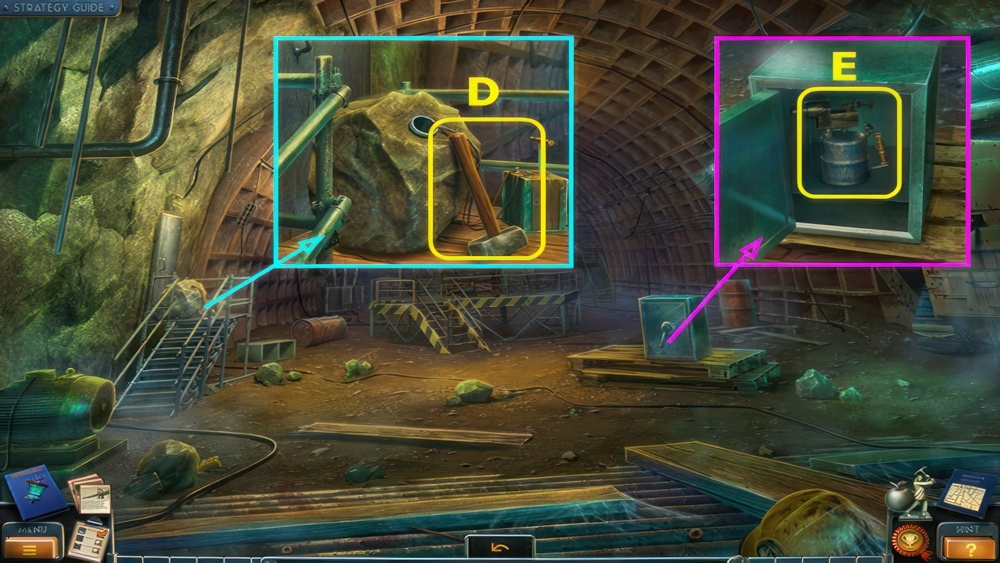
- Use the AXE, take the HAMMER and HOOK (R).
- Combine the HOOK and ROPE to make the HOOK AND ROPE.
- Use the HOOK AND ROPE (S).
- Select (T).
- Use the SHOVEL (U).
- Go down and forward.
Mysterious well
After we climbed down through the well at the cottage on the cliff, Will and I turned up in some strangely equipped grotto. Now, the fact that ‘Zombie Martell’ came to this cliff doesn’t seem so strange.
- Select (A).
- Move the leaves, take the 2/3 COG and STICK (B).
- Select (C).
- Use the HAMMER (D).
- Go to the Mansion Entrance.
- Select (E).
Help Bishop
After returning to our new HQ I found Professor Bishop in quite a difficult situation. He was trapped by a rusty, ancient handle. I must find Wills’ lab. He’s a young scientist who was admitted to the Order after he proved himself on the electro-maniac case. I hope Will can find a way to get rid of the rust and release the Professor.
- Take the LETTER R (F).
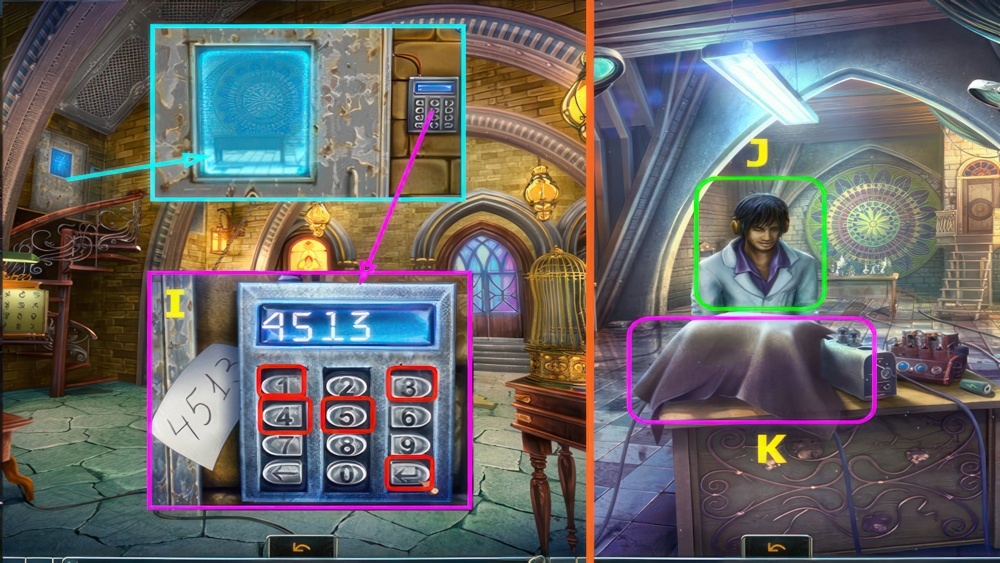
- Talk to Bishop, earn the CODE (G).
- Take the GOLD MOUSE and GLASS OF JUICE (H).
- Use the hint to enter the correct code.
- Place the CODE, press 4, 5, 1, 3, ⏎ (I).
- Go left.
- Talk to Will (J).
- Remove the cover (K).
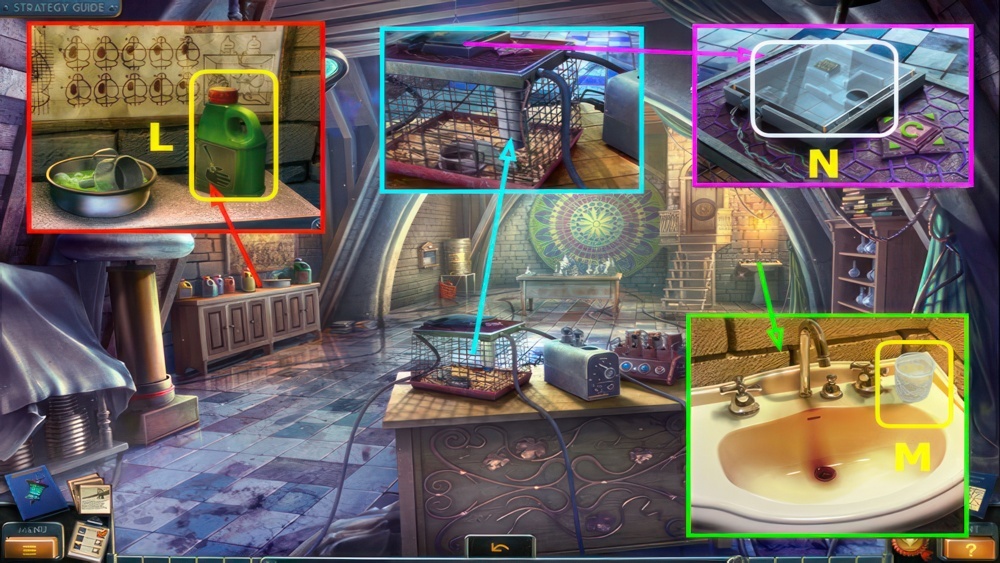
- Take the ALKALI (L).
- Use the GLASS OF JUICE, select the glass to take the GLASS OF WATER (M).
- Select (N).
Anti-rust agent
Prepare an anti-rust agent and fix the handle.
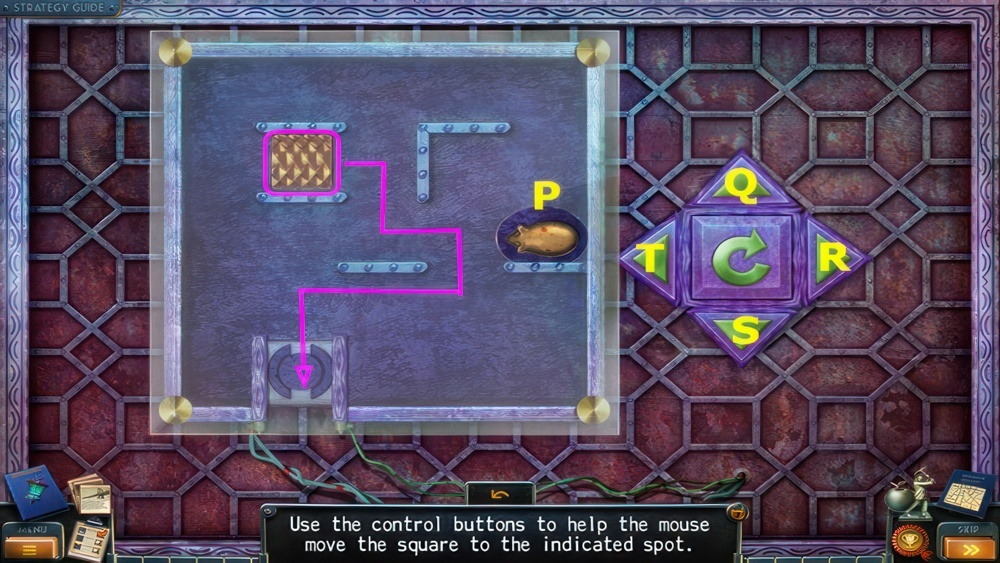
- Place the GOLD MOUSE (P).
- Use the control buttons to help the mouse move the square to the indicated spot.
- Walkthrough: T×4-Q-R-T-Q-R×2-S-T×2-S-R×2-Q×2-R×2-S.
- T-S-T×2-S-R-S-R×2-Q-T×2-R-Q-T×2-S.

- Take the RAT (A).
- Place the RAT (B).
- Play the puzzle, earn the CATALYST (C).
- Select (D).

- Read the instructions (F).
- Place the GLASS OF WATER (H) and CATALYST (I).
- Place the ALKALI (G) and remove the cap.
- Use (J) on (G), use (J) on (H).
- Use (H) on (K), place (L) on (K).
- Use (I) on (M).
- Use (N) on (O), use (O) on (M).
- Place (P) on (M), use (Q) on (R).
- Use (S) on (T), take the RUST REMOVER.
- Go down.
Walking dead stories
Find what caused Thomas to rise from the dead.
- Use the RUST REMOVER, open the door (A).
- Go forward.
- Talk to Bishop (B).
- Take the FIREPLACE TONGS and RAG (C).
- Stand up the chair (D).
- Take the LETTER J, select the curtain rod (E).
- Place the LETTER J and LETTER R (F).
- Take the BUNCH OF LOCKPICKS (G).
- Separate the BUNCH OF LOCKPICKS to find the LOCKPICK and SCREWDRIVER HANDLE.
- Use the SCREWDRIVER HANDLE, take the FORKED SCREWDRIVER (H).
- Go down twice.
- Use the LOCKPICK, take the REMOTE CONTROL (I).
- Go forward twice.

- Use the REMOTE CONTROL, take the SHAPE KEY (J).
- Go forward.
- Place and select the SHAPE KEY (K).
- Go left.
- Use the RAG to make the OILY RAG (L).
- Go down and forward.
- Use the OILY RAG, remove the bolt and take the WOODEN TONGS (M).
- Go down and left.
- Use the WOODEN TONGS to take the 3/3 COG (N).
- Place the 3 COGS, add the 2 cogs on the ground, press the button (O).
- Take the KEY (P).
- Go down and forward.

- Use the KEY (Q).
- Play the puzzle, earn the VALVE (R).
- Place and select the VALVE, take the CAR KEY (S).

- Open the door (A).
- Try the CAR KEY (B).
- Open the hood (C).
- Remove the cap (D).
- Go to the Lab.

- Use the FIREPLACE TONGS to take the DIRTY FUNNEL (E).
- Place the DIRTY FUNNEL to make the FUNNEL (F).
- Use the FORKED SCREWDRIVER, take the ENGINE CHART and VACUUM DIODE (G).
- Place the VACUUM DIODE, take the TAP HANDLE (H).
- Place the FUNNEL and TAP HANDLE, select the tap handle and take the JERRY-CAN (I).
- Go to the Cliff.

- Use the JERRY-CAN (J).
- Select (K).

- Place the ENGINE CHART (L).
- Connect the wires as shown in the schematic.
- Walkthrough (M).
- Select N-O-P-O-Q.
- Enter (R).
Hole
We came across the skeleton of a speleologist. It seems the poor guy fell from a height. Next to him we found a diary, in which he describes discovering this grotto while searching for rare minerals. In his notes, he claims that the wide opening high in the grotto wall is in fact a labyrinthine vent shaft which leads to a bunker, where behind a round metal door there is a monster. Since all the other doors are locked we have no other choice but to find a way to get into the bunker through the vent shaft.

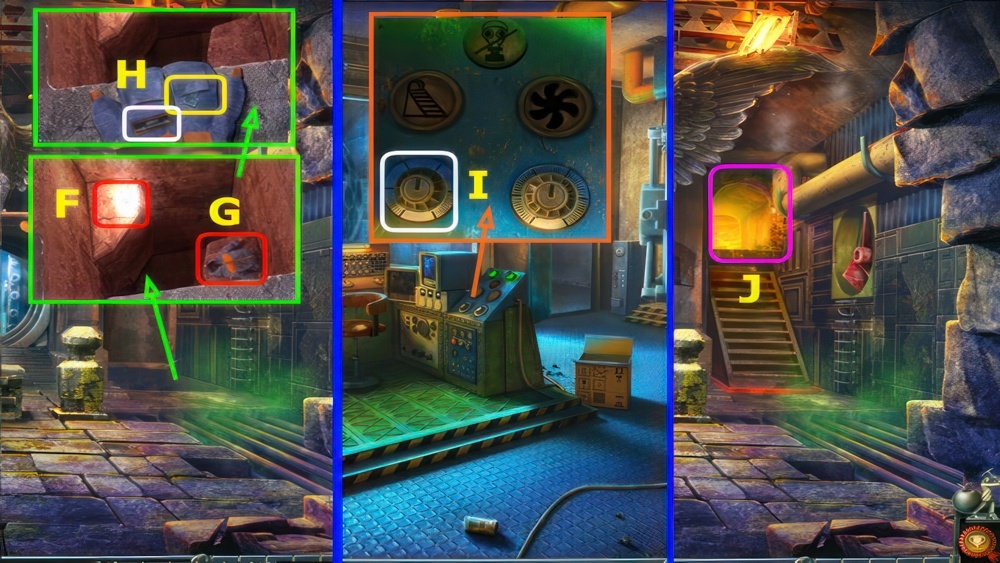
- Take the LAMP (A).
- Take the PICK-AXE (B).
- Use the PICK-AXE to take the BLUE MINERAL (C).
- Move the rocks and arm, take the FANCY DISC and SPELEOLOGIST’S DIARY (D).
- Read the SPELEOLOGIST’S DIARY, take the CHART.
- Place the FANCY DISC and open the case, take the BATTERY PACK, 1/2 STONE DETAIL, and CUTTERS (E).
- Combine the LAMP and BATTERY PACK to make the UV LAMP.
- Combine the CHART and UV LAMP, take the VENT SYSTEM CHART.
- Go down.

- Use the CUTTERS to take the BARBED WIRE (F).
- Combine the STICK and BARBED WIRE to make the HOMEMADE BRUSH.
- Enter the manhole.
- Use the HOMEMADE BRUSH, select the panel (G).

- Arrange the details so that they match the shapes of the cut-outs beneath them.
- Swap the pieces as shown (H).
- Pieces in the correct position will drop down.

- Play the puzzle, earn the LADDER (I).
- Place the LADDER (J).
- Select (K).
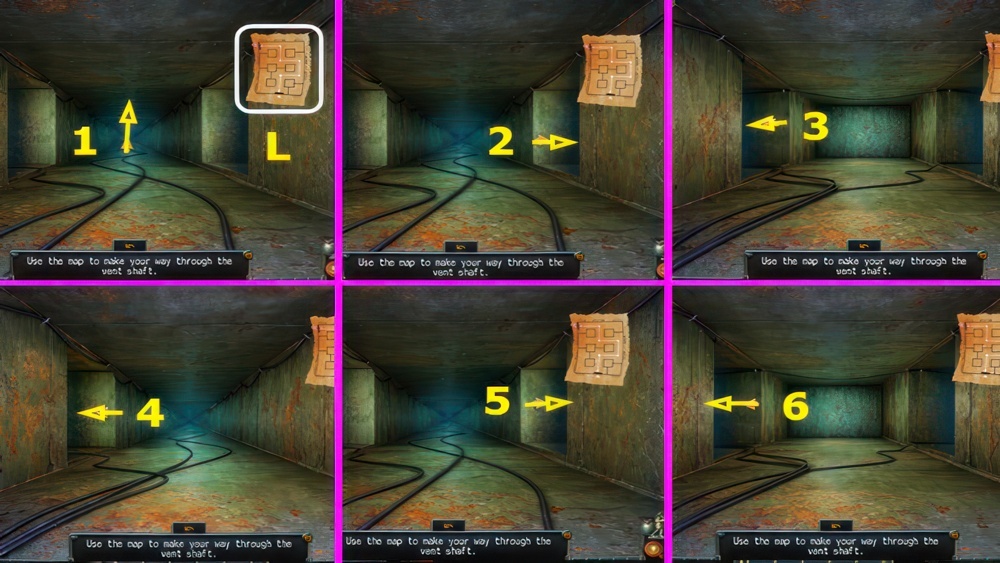
- Place the VENT SYSTEM CHART (L).
- Use the map to make your way through the vent shaft.
- Walkthrough (1-6): Go ↑ , → , ← , ← , → , ←.
The lord of the bunker
Learn who is raising the dead and how they’re doing it.
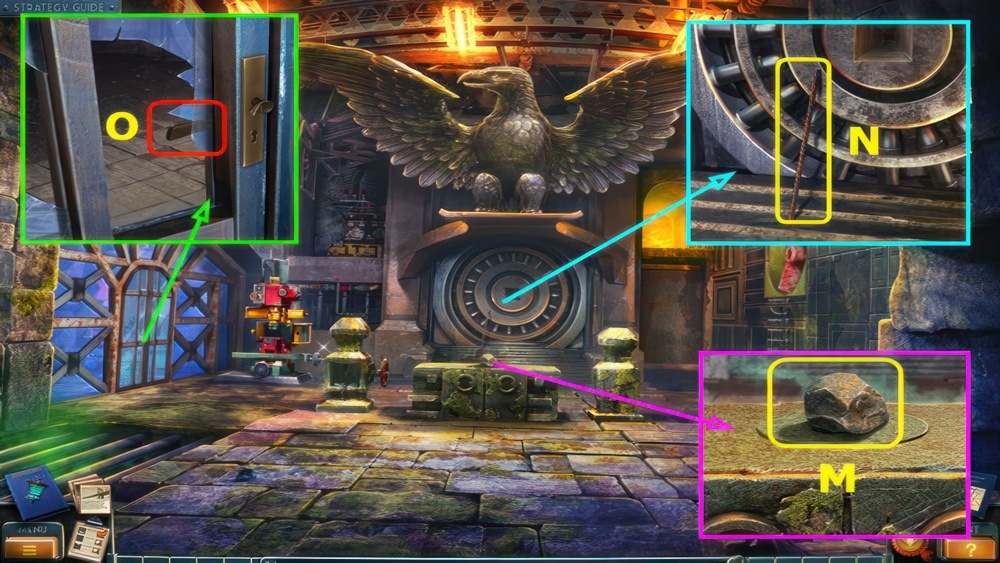
- Take the STONE (M).
- Take the REBAR (N).
- Use the STONE and turn the handle (O).
- Go left.

- Use the REBAR, take the RUBBER GLOVE (P).
- Take the POT (Q).
- Use the POWDER and PICK-AXE, take the 1-3/4 YELLOW CRYSTALS (R).
- Go down.
Metal doors
Discover what’s hiding behind the door.

- Place the BLUE MINERAL (A).
- Use the RUBBER GLOVE (B).
- Place the POT (C).
- Select the crushed mineral (D), take the BLUE POWDER.
- Select (E).
- Go left.

- Place the BLUE POWDER, close the lid, and select the switch (F).
- Talk to Will (G).
- Take the PIECE OF ARMORED GLASS and STONE FLOWER (H).
- Place the STONE FLOWER, take the 2/2 STONE DETAIL (I).
- Go down.

- Place the 2 STONE DETAILS, take the PYRAMID (J).
- Place the PYRAMID (K).
Prisoner
The creature in captivity was a reaper. It asked me for help. The unknown man stole the reaper’s lantern and now he has the power to raise the dead. We have to stop him before it’s too late.

- You gain the POCKET WATCH.
- Use the PIECE OF ARMORED GLASS and open the box, Take the GAS MASK and FLARE GUN (L).
- Take the DOOR HANDLE and select the button (M).
- Talk to the Reaper (N).
- Go right and left.

- Place and select the DOOR HANDLE (O).
- Go forward.
- Remove the blanket (P).
Road to the surface
Switch off the ventilation and leave the bunker.
- Take the KNOB (Q).
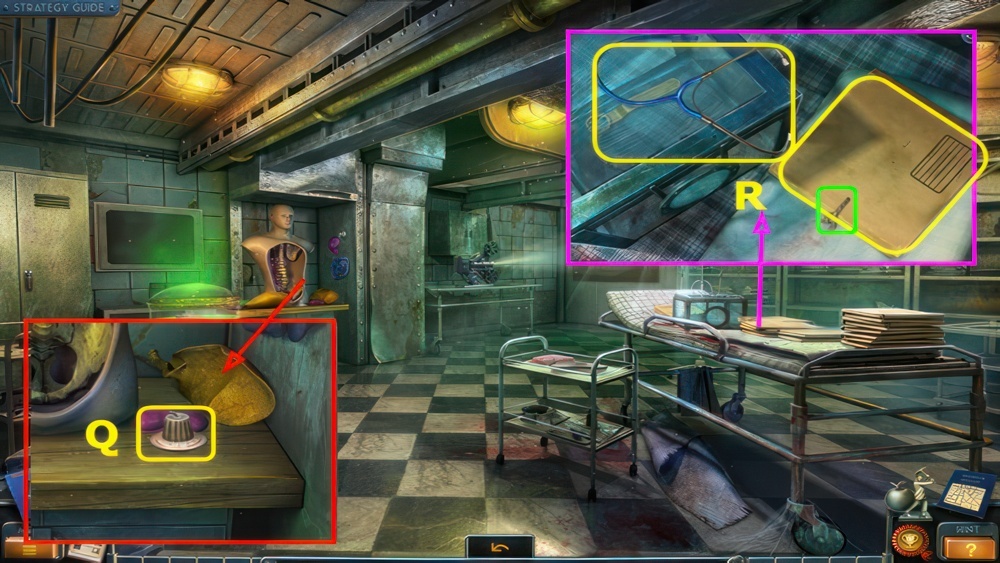
- Use the PIECE OF ARMORED GLASS and take the FOLDER, take the 1/2 STETHOSCOPE PART (R).
- Read the FOLDER, take the SURGICAL CLAMP.
- Go down.
Find Will
Look for Will in the bunker.

- Use the SURGICAL CLAMP to take the TOKEN (S).
- Use the TOKEN and select the door (T).
- Play the puzzle, earn the KEY (U).
- Go down and forward.

- Use the KEY, take the ROPE AND HOOK (A).
- Place the KNOB, select ×5 (B).
- Rotate the knobs to fix the picture on the TV screen.
- Walkthrough (🟦): C×3, D×2.
- Take the SCREWDRIVER (E).
- Go right.
- Use the FLARE GUN (F).
- use the ROPE AND HOOK (G).
- Take the KEY and read the tag (H).
- Go forward.
- Use the KEY (I).
- Go right, enter the new opening (J).

- Open the wallet, take the ID CARD (K).
- Select (L).
- Take the SOLDIER FIGURINE (M).
- Open the panel and select (N).
- Use the SCREWDRIVER and take the SCREWS (O).
- Select (P).

- Use the green arrows to move the soldier to the opposite river bank.
- Place the SOLDIER FIGURINE (Q).
- Move the soldier on the indicated path (R).
- Take the KEY and SPRING (S).
- Combine the BROKEN STAPLER and SPRING to make the STAPLER.
- Go to the Infirmary.
Clues
Give the ID to Professor Bishop.

- Use the STAPLER (T).
- Use the SCREWDRIVER, take the TERMINAL CONNECTOR (U).
- Go to the Office.
- Place the TERMINAL CONNECTOR and the SCREWS, use the SCREWDRIVER (V).
- Flip the switch (W).
- Go right (X).

- Talk to Will (A).
- Use the KEY, take the HANDCUFFS (B).
- Move the rocks, take the 1/2 COINS (C).
- Go down twice.

- Place the HANDCUFFS, select the valve (D).
- Take the OIL CAN (E).
- Go to the Prison Cell.
- Use the OIL CAN (F).
- You earn the MECHANICAL ARM.
- Go to the Infirmary.

- Use the MECHANICAL ARM to take the FAUCET HANDLE (G).
- Place and select the FAUCET HANDLE (H).
- Open the lid, take the PLASTIC HEART (I).
- Select (J).
- Place the PLASTIC HEART.
- Place the pieces as indicated by the arrows (L-M).
- Take the KEY (N).
- Go to the Control Center.
- Use the KEY (A).
- Go right.
- Enter the airshaft (B).
- Go to the Hall.
- Give the ID CARD, earn the KEY (C).
- Use the KEY and turn the handle (D).
- Enter Bishop’s Office (E).
Question the witnesses
Will and I managed to get out of this horrible bunker and to the Order’s HQ. The clues I’ve got all point to the opera. I have to get as much intel on Hardstein and his plans as possible, while Will goes to his home to see if he can find any new clues.
- Take the JACK (F).
- Take the 1/2 HANDLE (G).
- Go to the Hall of Fame.
- Use the SCREWDRIVER (H).
- Open the curtain and select (I).
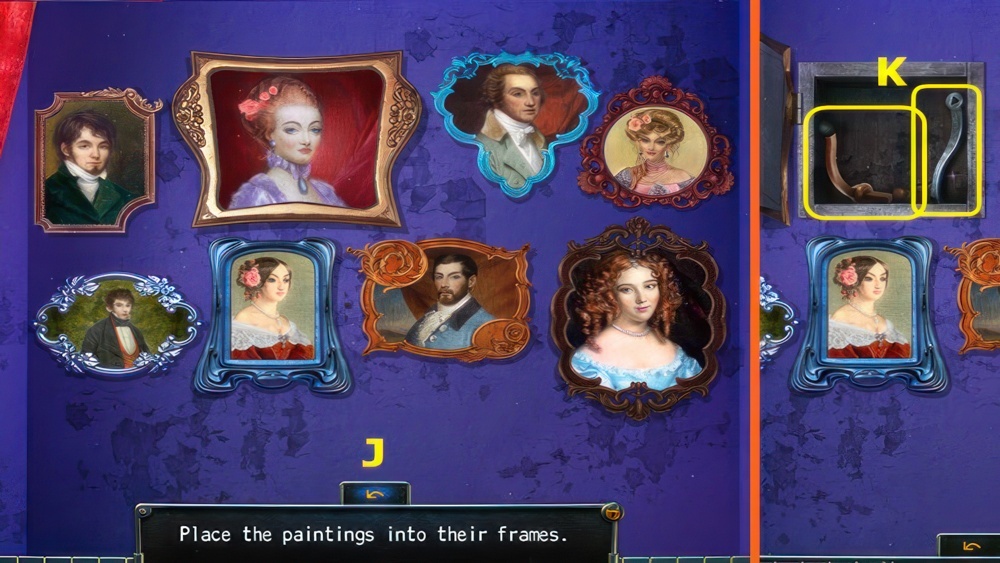
- Place the paintings into their frames.
- Swap the paintings as shown (J).
- Take the LEVER and WINCH HANDLE (K).
- Go down.

- Place and select the WINCH HANDLE (L).
- Take the 2/2 HANDLE (M).
- Enter Bishop’s Office.
- Place and select the LEVER, open the envelope and take the PUNCHCARD (N).
- Go to the Secret Passage.
- Use the JACK, take the SAW (O).
- Go down thrice.

- Use the SAW, take the METAL GRAPES (P).
- Go forward.
- Place and select the METAL GRAPES, take the 2/2 STETHOSCOPE PART and 2/2 COINS (Q).
- Combine the 2 STETHOSCOPE PARTS to make the STETHOSCOPE.
- Go forward.
- Place the STETHOSCOPE (R).

- Enter the code. If the number entered is correct the slider will go forward, and if it is incorrect, it will move backward.
- Walkthrough (S): to 9-3-0-6-8-2-1.
- Press (T).
- Take the 2/3 EAGLE FIGURINE (U).
- Go to the Bunker Entrance.

- Place the 2 COINS, take the 3/3 EAGLE FIGURINE (A).
- Go to the Hall of Fame.
- Place the 3 EAGLE FIGURINES (B).
- Enter the manhole (C).
- Take the SLEDGEHAMMER (D).
- Place and select the 2 HANDLES, take the WELDING LAMP (E).
- Go to the Rock Ledge.
- Use the WELDING LAMP and SLEDGEHAMMER, open the chest (F).
- Take the CHAIN (G).
- Go to the Subway Tunnel.

- Place the CHAIN and close the cover (H).
- Use the PUNCHCARD (I).
- Open the door and select the lever (J).

- Talk to the Ticket Taker (K).
- Take the CANE (L).
- Talk to Henri (M).
- Use the CANE to take the TICKET (N).
- Give the TICKET to the Ticket Taker (K).
- Go left.
- Take the DUST BRUSH (P).
- Go down.
- Use the DUST BRUSH, take the THIN WIRE (Q).
- Bend the THIN WIRE to make the HOOK.
- Go left.

- Use the HOOK to take the KEY (R).
- Use the KEY, take the CODE and UNIFORM (S).
- Go forward.
- Take the 1/2 MASK (T).
- Arrange the cash register buttons correctly using the hint.
- Place the CODE, push the buttons as indicated (U).
- Take the 1/2 PENNY (V).
- Open the door and select to play the puzzle, you earn the PATTERN (W).
- Select (X).

- Use the patterns to remove all of the glasses.
- Place the PATTERN (A), use the pattern on the marked positions.
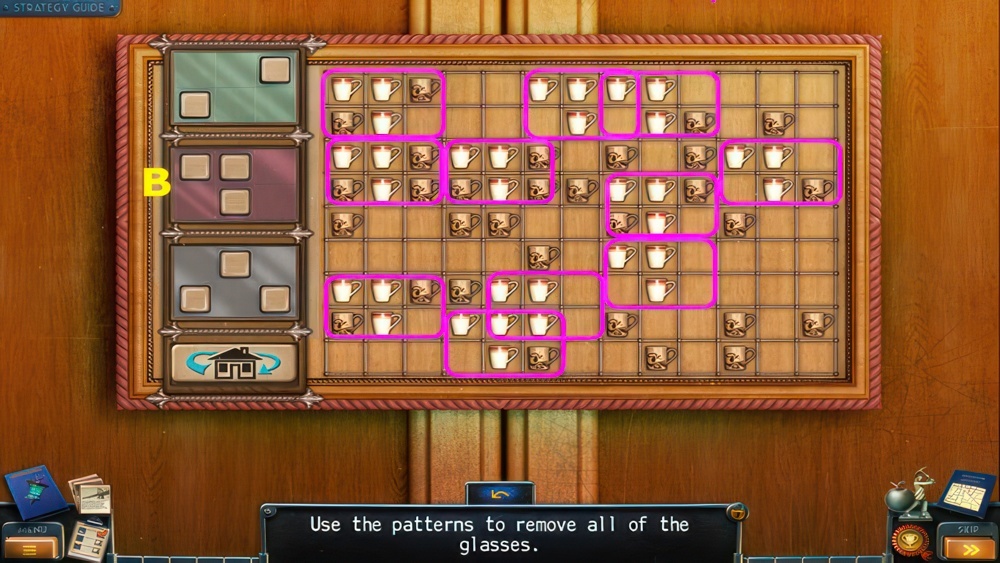
- Walkthrough (B).
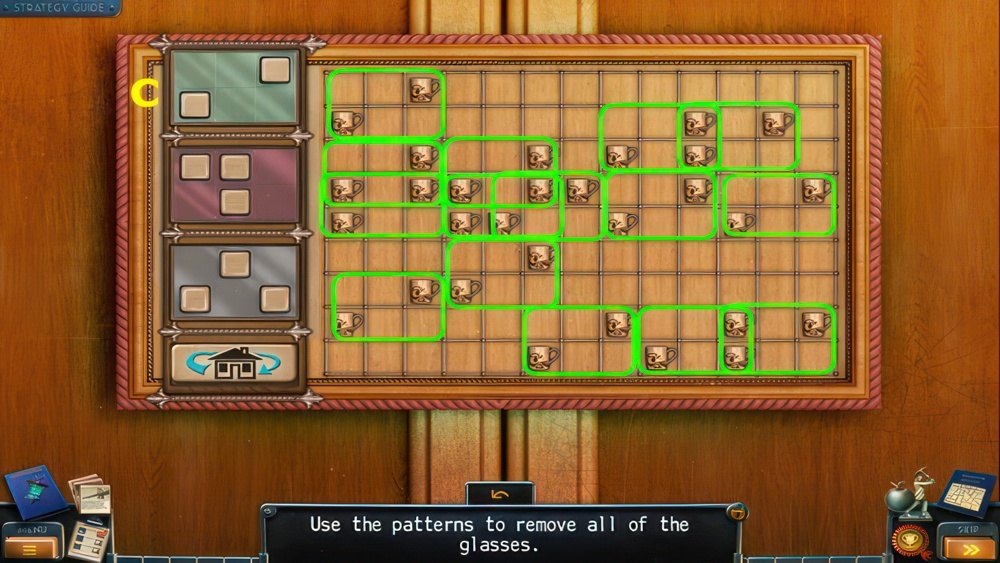
- Walkthrough (C).
Pain killers
I met a girl in the dressing room. She has a terrible migraine and is unable to talk to me. I need to find some medicine for her. She might know something important.

- Move the cups, take the BELL (D).
- Go down.
- Place the BELL (E).
- Enter Backstage (F).

- Take the SUCTION CUP HOOK (G).
- Knock on the door, talk to the Singer (H).
- Take the HANDLE (I).
- Go down twice.

- Place and select the HANDLE, take the SOLVENT (J).
- Go to Backstage.
- Use the SOLVENT, take the KEY (K).
- Go to the Buffet.

- Place and select the SUCTION CUP HOOK, take the FLOUR SACK and SIPHON (L).
- Use the KEY and open the kit, take the PAINKILLERS and KNIFE (M).
- Place the SIPHON (N).
- Select the glass (O).
- Use it on the bottle (P).
- Place the PAINKILLERS in the glass, take the PAINKILLERS (O).
- Go Backstage.

- Use the PAINKILLERS (R).
- Move the chairs and open the door (S).
- Play the puzzle, earn the DRESS (T).
- Go down twice.
- Give the DRESS, earn the JEWELRY (A).
- Go the the Make-up Room.
- Place the JEWELRY, take the WIRE CUTTERS and AIR HORN (B).
- Go down.

- Use the WIRE CUTTERS, take the GAFF and ADAPTER (C).
- Open the door and walk right.
- Place the ADAPTER, select the plug (D).

- Place the levers correctly to lower the lightning model.
- Remove the empty sack and place the FLOUR SACK (E).
- Set the levers as shown (F).
- Take the PAINTER’S SET (G).
- Go down thrice.
- Use the GAFF, take the WRENCH (H).
- Use the PAINTER’S SET (I).
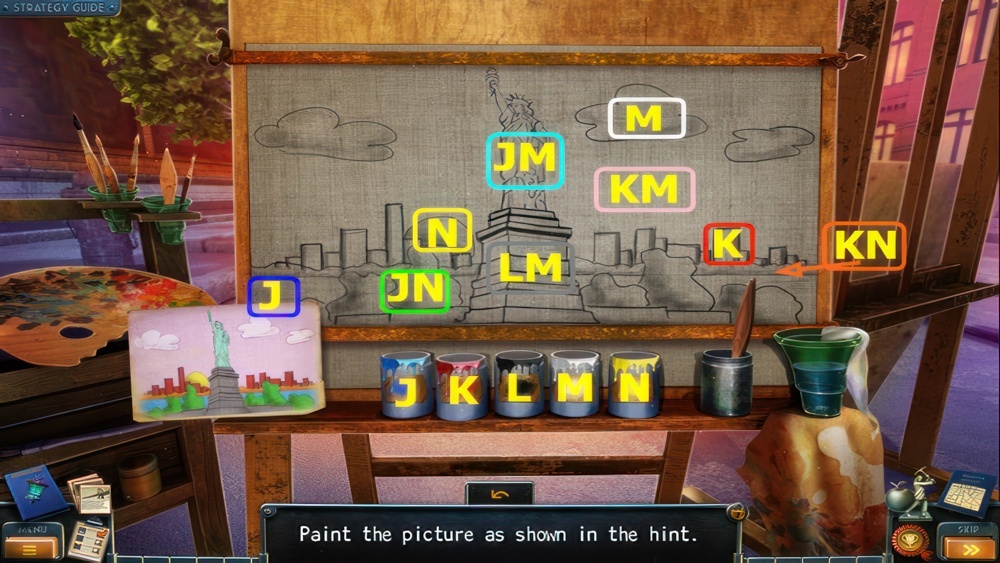
- Paint the picture as shown in the hint.
- Use the color combinations of paints on the picture (J-N).
- You earn the 2/2 MASK.
- Go to the Make-up Room.
Tuner’s room
The girl in the theatre is literally the prima donna, and she confirmed that Hardstein works there. He was into some kind of sonic experiments. Looks like he started here, only to move to the bunker later on. The girl asked me to bring her a dress. I only hope she’ll tell me more when I do.

- Select (Q).
- Place the masks into the corresponding sockets.
- Place the 2 MASKS, swap the masks to the shown positions (R).
- Take the PIECE OF PATTERN (S).
- Go down and right.

- Place the PIECE OF PATTERN, open the crate, and take the WOODEN SWORD (A).
- Go down.
- Use the WOODEN SWORD and open the door (B).
- Go left.
- Use the KNIFE, take the MUSIC BOX DRUM (C).
- Take the FILE (D).
- Go down and forward.

- Open the lid and place the MUSIC BOX DRUM, take the FRAGMENT and 2/2 PENNY (E).
- Go down twice.
- Use the 2 CENTS, select the button and lever.
- Take the SOUVENIR (F).
- Go to Tuner’s Room.

- Place and select the FRAGMENT, take the WHEEL (G).
- Go down and right.
- Place the WHEEL.
- Move the wheelbarrow and open the door (H).
- Go left.

- Use the WRENCH, take the CHAIN (I).
- Move the 2 boxes to (J).
- Take the GLASS CUTTER and BRICK (K).
- Go to Tuner’s Room.
- Place the CHAIN (M).
- Turn the wheel (N).

- Place the SOUVENIR, take the KEY (O).
- Use the BRICK to take the DECORATIVE TILE (P).
- Place the POCKET WATCH, take the SYMBOLS (Q).
- Go down.

- Use the KEY and turn the handle (R).
- Play the puzzle, earn the VIOLIN (S).
- Go left.
- Place the VIOLIN (T).
- Take the 1/3 REAPER FIGURINE (U).
- Go to the Back Courtyard.

- Place and select the DECORATIVE TILE, take the 2/3 REAPER FIGURINE (A).
- Go to the Hall of Fame.
- Use the GLASS CUTTER, take the HELMET (B).
- Go to Bishop’s Office.

- Use the AIR HORN (C).
- Take the RULER (D).
- Select (E).
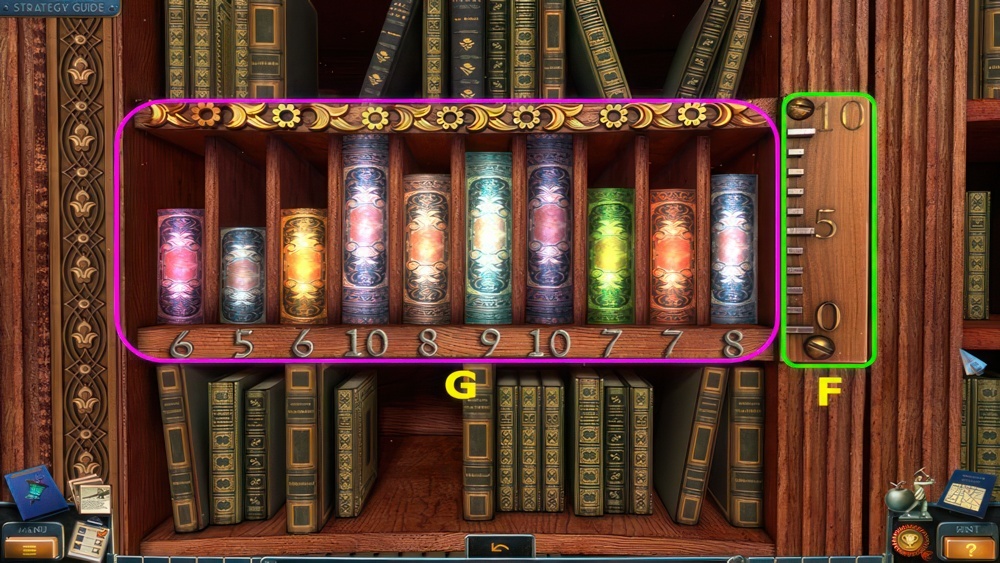
- Arrange the books according to the hint.
- Use the ruler to measure the books.
- Place the RULER (F).
- Walkthrough (G).
- Go right.

- Take the PATTERN (H).
- Go to the Prison Cell.
- Use the FILE, move the lever (I).
- Play the puzzle, earn the SAFE HANDLE (J).
- Go to the Bunker Entrance.

- Place and turn the SAFE HANDLE (K).
- Take the 1/2 TANK and 3/3 REAPER FIGURINE (L).
- Read the clipboard (M).
- Go to the Office.
- Select (N).

- Place the 3 REAPER FIGURINES.
- Move all the reapers to one of the sides and with their lines not crossing.
- Walkthrough (O).
- Take the TELESCOPE LENS and read the diary (P).
- Go to the Secret Room.
Search results
The device on top of the Empire State Building, the one Hardstein was building, is finished. I have to return to HQ quickly and tell Will.
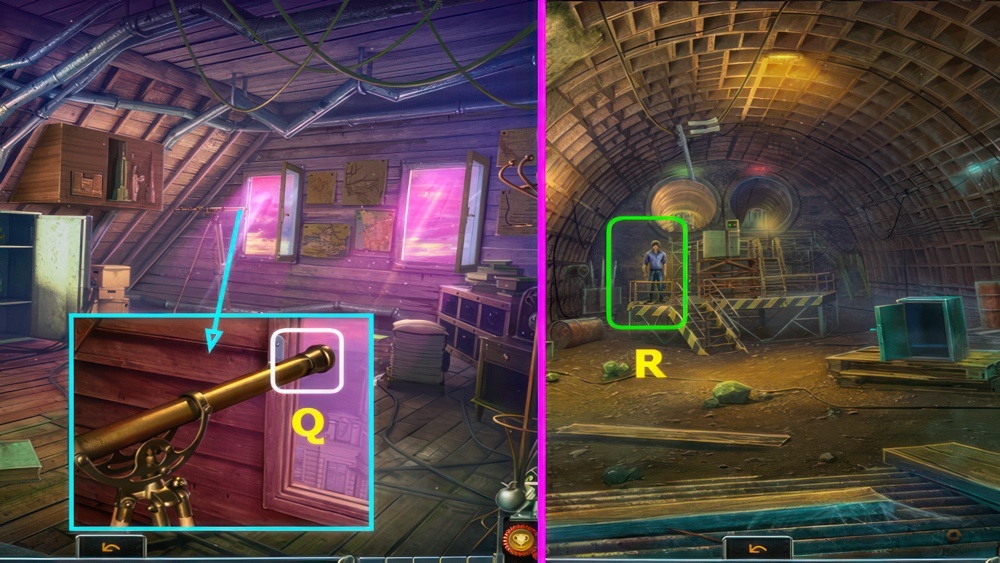
- Place and select the TELESCOPE LENS (Q).
- Go to the Subway Tunnel.
- Talk to Will, earn the KEY (R).
- Go to the Office.

- Use the KEY, take the MEDAL (S).
- Go to Bishop’s Office.
- Place the MEDAL, take the KEY (T).
- Use the KEY, take the POWDER SACK (U).
- Go to the Subway Tunnel.
Weapon
Will told me that the city center is swarming with zombies. We have to create a weapon capable of using the cryo-substance I found. Then we will return to the Empire State Building to end this madness.

- Use the POWDER SACK and push the plunger (A).
- Go left.
- Take the WHEEL and LAMBDA SYMBOL (B).
- Place the HELMET, take the BOOMERANG (C).
- Go down.
- Use the BOOMERANG to take the EXPANDER (D).
- Go down.

- Place the LAMBDA SYMBOL (E).
- Select (F).

- Walkthrough (G-J).

- Continued walkthrough (K-L).
- Take the 4/4 YELLOW CRYSTAL (M).
- Go down.

- Place the 4 YELLOW CRYSTALS (N).
- Select the lever (O).

- Place the PATTERN (J).
- Use the hint to press the tiles in the correct order.
- Walkthrough 1-4, take the OMEGA SYMBOL (K).
- Go forward.
- Place the OMEGA SYMBOL (L).
- Select (M).

- Move the books so that the sum of all numbers in the row equals the number on the right.
- Walkthrough (N).
- Take the 1/2 ACTIVATION KEY and read the note (O).
- Go to the Arsenal.

- Use the EXPANDER, take the TOWER (P).
- Go down thrice.
- Place the TOWER, take the STONE LION HEAD (Q).
- Go to the Archives.
- Place the STONE LION HEAD, take the MEDALLION (R).
- Place the WHEEL (S).
- Select (T).
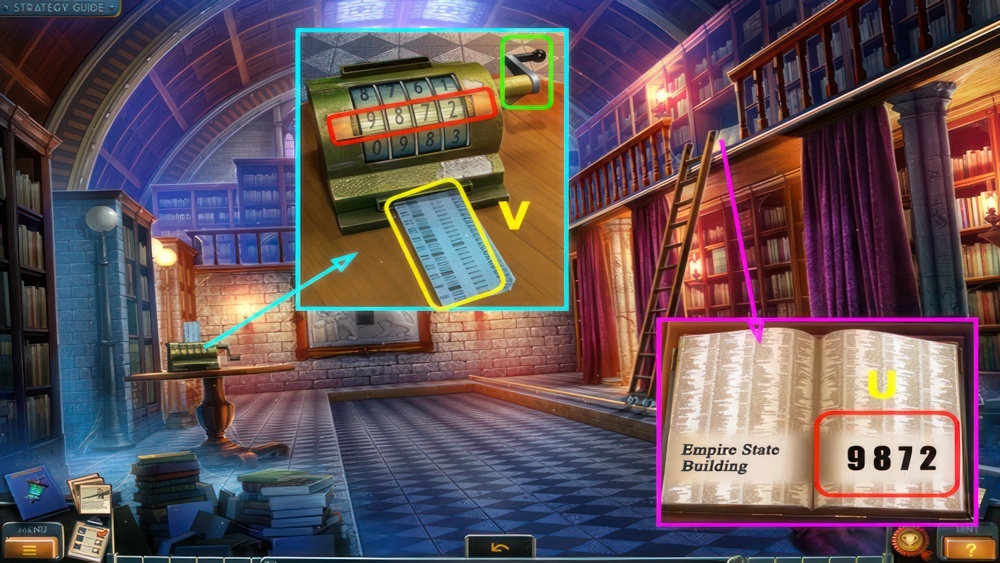
- Use the JEWELRY MAGNIFIER (U).
- Enter the correct code.
- Enter 9872, pull the lever, and take the PUNCHCARD (V).
- Go to the Hall of Fame.

- Place the MEDALLION, take the 2/2 TANK (A).
- Go to the Arsenal.
- Place the 2 TANKS, select and take the WEAPON (B).
- Go down.
Road to the Empire State Building
Get to the Empire State Building.

- Use the PUNCH CARD (C).
- Open the doors and select the lever (D).

- Place the pipe (E) in the doors (F).
- Go right.
- Take the PLIERS and BOLT CUTTERS (G).
- Go down.
- Use the PLIERS, take the WEAPON (H).
- Go right.

- Use the WEAPON (I).
- Use the BOLT CUTTERS (J).
- Go forward.
- Take the WRENCH (K).
- Go down.

- Use the WRENCH, take the FIRE EXTINGUISHER (L).
- Go down.
- Use the FIRE EXTINGUISHER, take the CROWBAR (M).
- Go right and forward.
Observation deck
Go up to the Empire State Building observation deck.
- Use the CROWBAR (N).
- Take the PATTERN and remove the batteries (O).
- Select (P).

- Place the PATTERN (Q).
- Connect the openings with wires, using the hint.
- Walkthrough (R).
- Go forward.
- Take the PIERCING TOOL (A).
- Go down twice.
- Use the PIERCING TOOL to take the CORK (B).
- Go down.

- Use the CORK, take the RUBBER BOOTS and BELT (C).
- Go right and forward twice.
- Use the RUBBER BOOTS (D).
- Go right.

- Take the LASSO and use the BOLT CUTTERS, open the doors (E).
- Play the puzzle, earn the KEY (F).
- Move the items, take the ELECTRIC PROD (G).
- Open the ELECTRIC PROD, take the BATTERIES.
- Go down.
- Use the KEY, open the case, and take the FIRE HOSE (H).
- Go down.
- Select the hydrant and add the FIRE HOSE (I).
- Place the BATTERIES (J).
- Enter 6-5-3 (K).
- Take the JACK (L).
- Go down.

- Use the JACK (M).
- Select and open, take the COFFEE MACHINE HANDLE (N).
- Place and select the COFFEE MACHINE HANDLE (O).
- Select (P), take the HOT COFFEE (Q).
- Go to the Security Room.
- Open the freezer and use the HOT COFFEE, take the MAGNET (A).
- Combine the ELECTRIC PROD, MAGNET, and BELT to make the MAGNET ON A STICK.
- Go down.
- Use the MAGNET ON A STICK to take the FUSE (B).
- Open the panel and select (C).
- Place the FUSE.
- Set the correct order.
- Use the switches to test the fuses.
- Swap the fuses as shown, flip the switches (D).
- Press the button (E).
- Go left.
Amplifier
We got into a horrible wreck in the tunnel. I’m still not sure how we managed to survive. We have to get to the surface as soon as we can before something else falls on our heads.

- Use the LASSO (F).
- Go down twice.
- Select (G).
- Earn the 2/2 ACTIVATION KEY.
- Go to the Observation Deck.
- Place the 2 ACTIVATION KEYS (H).
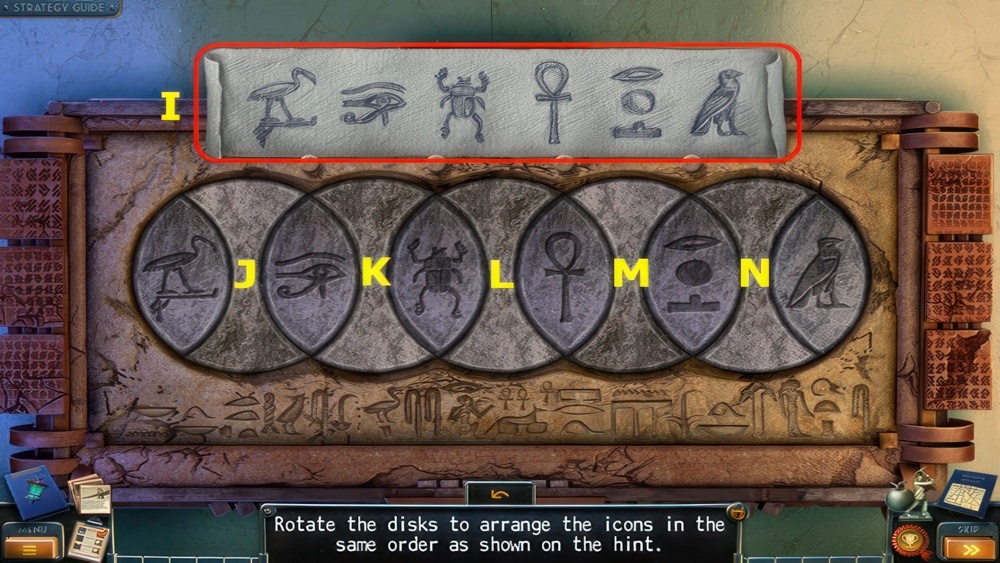
- Place the SYMBOLS (I).
- Rotate the disks to arrange the icons in the same order as shown on the picture.
- Walkthrough: M-L-K-J-M-L-K-N-M-N.
- Walkthrough Bonus Chapter, at the link below.


