Paranormal Files 12: Fatal Flaw – Returning home after another investigation promised Rick Rogers some peace, but his vacation was interrupted by strange events. The phone rings: Professor Chris Stynes is on the line, clearly in a panic. He claims he’s being haunted by the ghost of a colleague, Lillian Foster. The problem is that Lillian has recently died. Rick immediately goes to Corigal College, where the incident took place. The professor tells him that he saw Lillian’s ghost at his window, the ghostly silhouette tried to grab him and then shattered the glass. Rick realizes: in front of him is not just a restless spirit, but something much more dangerous. As he explores Chris’s office and the scene of the attack, he begins to reconstruct the chain of events. What connected Lillian and the professor. Why exactly he was the target. The investigation leads Rick to an ancient Aztec artifact, the crest that Lillian studied before she died. It may have opened the door to the spirit world and caused her death. It’s up to you to find out what power lies within it. And whether you can stop the ghost before it gets its way. Analyze Lillian’s actions, collect all the clues and find out what secret binds her to the professor. It’s up to you to prevent an impending ritual and stop the consequences of a dangerous discovery. Rick Rogers is not used to being afraid of ghosts, but this time he will have to face a spirit that is not just looking for peace, it pursues its goal at any cost. If you can not pass any of the puzzles or do not know where the items are, on our site you can watch the walkthrough of the game Paranormal Files 12: Fatal Flaw, and uncover the truth about Lillian’s death.
Paranormal Files 12: Fatal Flaw – Walkthrough
Here you can see full walkthrough of Paranormal Files 12: Fatal Flaw game, namely for all chapters, including bonus chapter, in pictures.

- Select (A), talk on PHONE, take PHONE and NAME STICKER.
- Use NAME STICKER (B).
- Play puzzle, use PHONE, take PHONE WITH MAP (C).

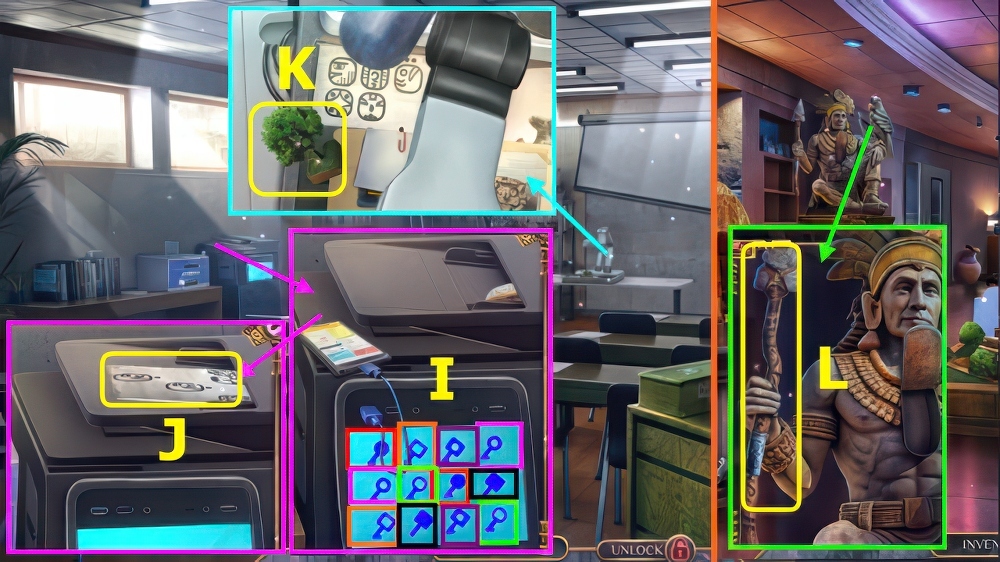
- Take RICK’S DIARY (D).
- Take COMPRESSED AIR (E).
- Use COMPRESSED AIR, take CLOCK HAND and PF INLAY (F).
- Place CLOCK HAND, take BLUE ZIRCON and SCALE WEIGHT (G).

- Take AMETHYST (H), open door.
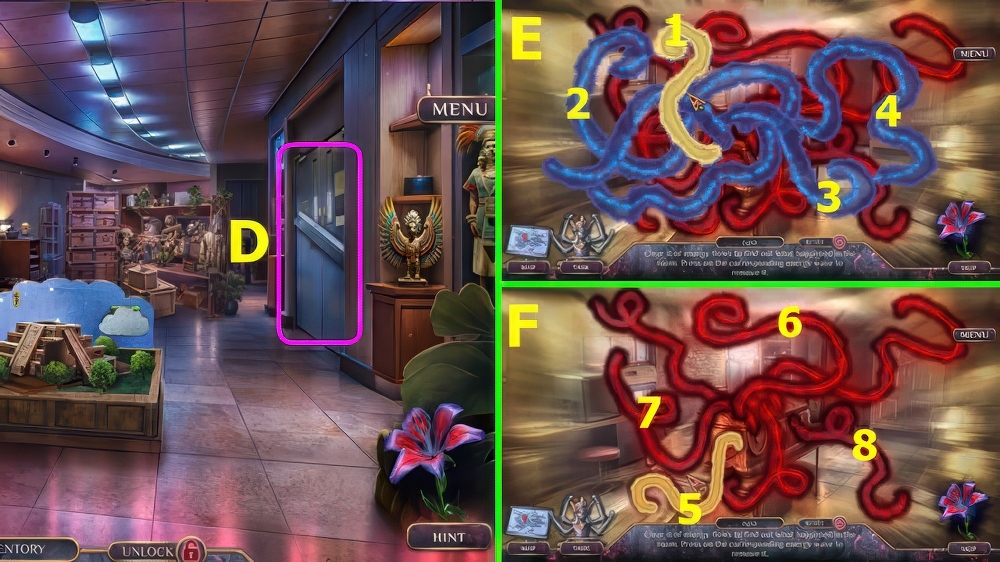
- PF INLAY, BLUE ZIRCON and AMETHYST on RICK’S DIARY, play puzzle, take GHOST NOTE and SCALE CHAIN.
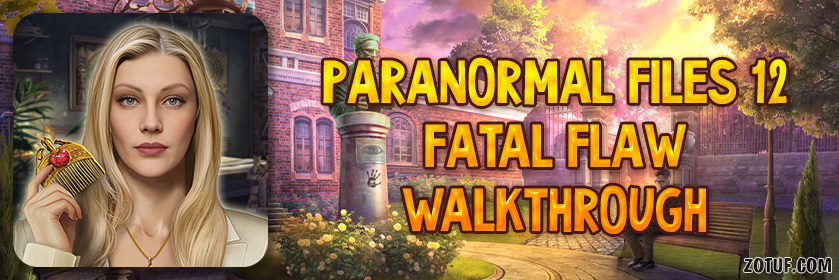
- Place SCALE CHAIN and SCALE WEIGHT (I), solution, take TIRE IRON and CAR KEY.
- Use CAR KEY and PHONE WITH MAP (J), PHONE returns to inventory.

- Take VISITOR’S PASS (L).
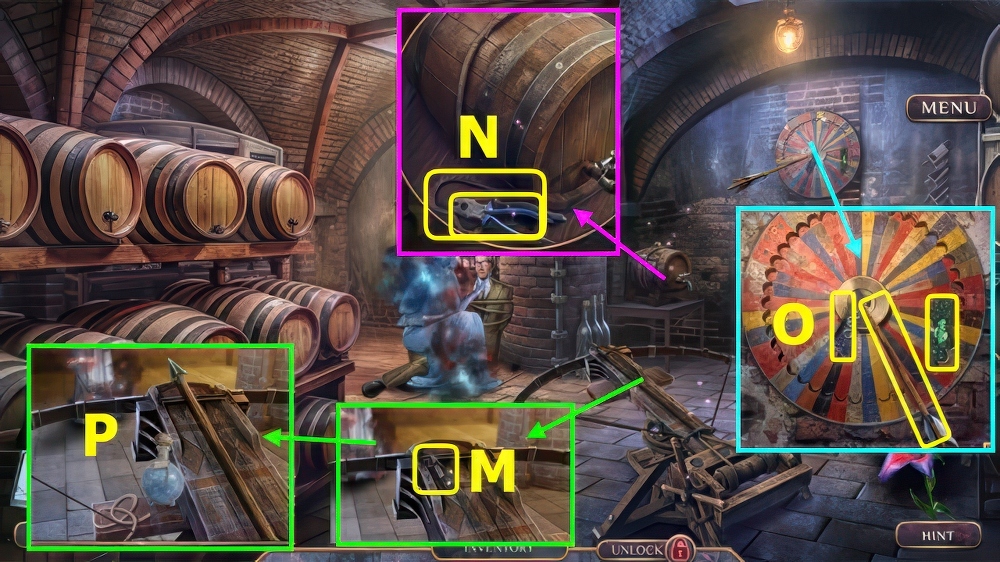
- Use GHOST NOTE (M).
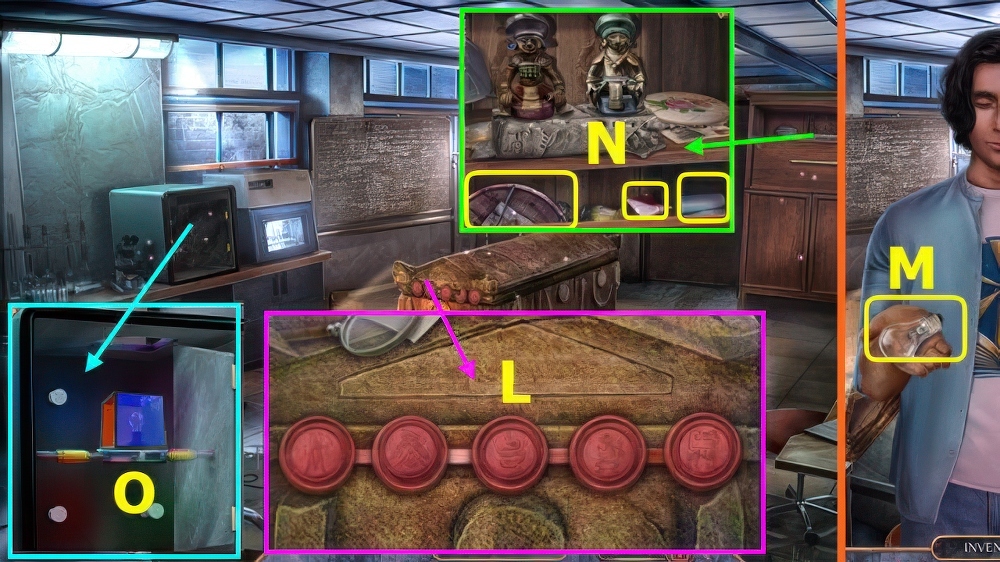
- Select the differences (N).

- Solution (O).

- Take PLANTER DISC (P).
- Take 1/3 CODE BUTTON, use TIRE IRON, take LOLLIPOP and STONE LILY (Q).
- Select leaves, use PHONE, earn PHONE WITH PHOTO (R).
- Take ADHESIVE TAPE (S).

- Use LOLLIPOP, earn 2/3 CODE BUTTON and FLOWERPOT DRAWING (A).
- Use STONE LILY, PLANTER DISC, and FLOWERPOT DRAWING, solution (B), take 1/2 SIGNPLATE PIECE and 3/3 CODE BUTTON (C).
- Take BROKEN BELT, place VISITOR’S PASS and CODE BUTTON, select 1-4 (D).
- Go left (E).

- Take LOCKPICK (F).
- Use LOCKPICK, take GRATE HOOK, PICKAXE KEY, and POWDER BRUSH (G).
- Use PICKAXE KEY (H), play puzzle, take ANCIENT MORTAR.
- Walk down.

- Use GRATE HOOK, take SOUVENIR MAGNET (I).
- SOUVENIR MAGNET and ADHESIVE TAPE on BROKEN BELT, take BELT WITH MAGNET.
- Use BELT WITH MAGNET (J).
- Read note, take MINI WINDMILL and PIECE OF CHALK (K).
- Walk left.

- Place MINI WINDMILL, solution (L).
- Arrange items as shown, take THUMBTACK and OVAL STONE (M).
- OVAL STONE, POWDER BRUSH, and PIECE OF CHALK on ANCIENT MORTAR, take MORTAR WITH POWDER.
- Use MORTAR WITH POWDER (N).
- Walk left (O).

- Select, take QUIPU PENDANT and RING BOX (A).
- Take AZTEC NECKLACE, look at photo (B).
- Place AZTEC NECKLACE, take SUITCASE FOR EVIDENCE (C).
- Take SCARF, place QUIPU PENDANT and THUMBTACK (D).
- Play puzzle (E), earn 2/2 SIGNPLATE PIECE.
- Walk down.

- Place SIGNPLATE PIECE, take CLOCKWORK HANDLE and GOLDEN FEATHER (F).
- Use CLOCKWORK HANDLE, take LILIAN’S BRACELET and BICYCLE PEDAL (G).
- Go left.
- Use BICYCLE PEDAL, take ADAPTER FOR MONITOR (H).

- Use ADAPTOR FOR MONITOR, take PEARL (I).
- Place GOLDEN FEATHER, take LACROSSE GLOVE (J).
- Place PEARL, take PHOTO OF CHRIS from book (K).
- Walk down 2x.

- Give PHOTO OF CHRIS (L).
- Solution (M-N-O).
- Take NAPKIN WITH KISS (P).
- Use LACROSSE GLOVE, take PIECE OF DRESS (Q).
- Open SUITCASE FOR EVIDENCE, add PHONE WITH PHOTO, LILIAN’S BRACELET, NAPKIN WITH KISS, and PIECE OF DRESS.

- Restore items 1-11 (R-S-T-U).
- Remove tray in SUITCASE FOR EVIDENCE, take HEXAGON KEY, SPEAR TIP, and PHONE.
- Walk left.

- Use SPEAR TIP (A).
- Use PHONE (B).
- Use HEXAGON KEY, take 1st BOOKEND and MINI MONUMENT.
- Use ADHESIVE TAPE, earn PHONE and SNAKE WITH OPAL (C).

- Take 2nd BOOKEND, place SNAKE WITH OPAL (D).
- Take 1/3 MURAL PIECE (E).
- Place 1st BOOKEND and 2nd BOOKEND, restore the books (F), earn VINTAGE PHOTO ALBUM.
- Walk down.

- Place MINI MONUMENT, take GOLD NOSE RING and MEDALLION BASE (G).
- Walk left.
- Place GOLD NOSE RING, take LILY KEY and SILVER FISH (H).
- SILVER FISH on VINTAGE PHOTO ALBUM, turn page, take CEREMONIAL KNIFE.
- Use CEREMONIAL KNIFE, take IRON RING (I).
- Walk down, go forward.

- Select PHONE to talk, select again to take PHONE WITH INSTRUCTIONS (J).
- Place IRON RING, take PELICAN WING and COIN (K).
- Use COIN (L).
- Play puzzle, earn TICKET TO CEMETERY (M).
- Walk down 2x.

- Use TICKET TO CEMETERY (N).
- Go forward (O).
- Take HAMMER (P).
- Take 2/3 MURAL PIECE, use HAMMER, take SILVER PELICAN (Q).
- SILVER PELICAN and PELICAN WING on MEDALLION BASE, take PELICAN MEDALLION.
- Place PELICAN MEDALLION (R).
- Go forward.

- Take 3/3 MURAL PIECE (A).
- Place MURAL PIECE, solution (B), tale 1/4 COLORED GLASS and FLEUR-DE-LIS (C).

- Place FLEUR-DE-LIS and PHONE WITH INSTRUCTIONS, select 1-5 (D), earn PHONE.
- Use CEREMONIAL KNIFE, take TOOLBOX HANDLE (E).
- Place TOOLBOX HANDLE, take STONE ARROWS (F).

- Place STONE ARROWS, restore bottom section, move arrows to bottom section (G).
- Go forward.
- Select (H).

- Take 1/2 MINI WHEEL (I).
- Take PLASTIC BOOKMARK (J).
- Take ARMOR PLATE (K).
- Use ARMOR PLATE, take POE HEAD (L).
- Go forward.

- Take WHEEL SPOKE (M).
- Take DATE PLATE (N).
- Walk down.

- Place POE HEAD and DATE PLATE, solution (O).
- Take SMALL CARABINER and SUCTION CUP (P).
- Use SUCTION CUP, take LANCELOT’S COLLAR (Q).
- Select WHEEL SPOKE, add LANCELOT’S COLLAR and SMALL CARABINER, take OPENING TOOL.
- Go forward.

- Use OPENING TOOL, drag to handle (R).
- Take 2/2 MINI WHEEL (S).
- Place MINI WHEEL, take STRONG MAGNET (T).
- Use STRONG MAGNET and PLASTIC BOOKMARK (U).
- Go left.

- Select, use SCARF (A).
- Play puzzle (B), earn MODEL IDOL.
- Take TOP OF TEMPLE (C).

- Take HEADPIECE (D).
- Place HEADPIECE, take 1/3 ACRYLIC TOOTH and MODEL FIRE (E).
- Place TOP OF TEMPLE, MODEL FIRE, and MODEL IDOL (F), take LETTER OPENER and COPPER CLAW.
- Walk down 2x.

- Use LETTER OPENER (G), select, play puzzle, earn DOG FIGURINE.
- Place DOG FIGURINE, take MINI ANCHOR (H).
- Go left.
- Use MINI ANCHOR, take COPPER BEAK and MAN’S CLUTCH (I).
- Go left.

- Place COPPER BEAK and COPPER CLAW, take HAIRPIN and FRAMED PHOTO (J).
- HAIRPIN on MAN’S CLUTCH, take LOCK PART and CHICHEN ITZA SYMBOL.
- Place CHICHEN ITZA SYMBOL (K).
- Go right (L).
- Use FRAMED PHOTO (M).

- This mini-game is randomly generated.
- Use defense (N) on strong attack (O), use dodge (P) on quick attack (Q), use heal (R) to restore your health.
- Using defense on quick attack will harm Lilian (S), but also take health from you (T).
- You earn LILIAN’S NOTEBOOK and DOOR KNOB.

- Solution A-B-C, take PHONE WITH NOTES.
- Use LOCK PART and DOOR KNOB (D).
- Go left.

- Take HELMET VISOR (E).
- Take 2/3 ACRYLIC TOOTH (F), place LILIAN’S NOTEBOOK.
- Walk down 3x.
- Place HELMET VISOR (G), earn INK BLOTTER and SMALL WIRE.
- Place and select INK BLOTTER, take PRINTER CARTRIDGE and REMOTE CONTROL (H).
- Go left 3x.
- Use PRINTER CARTRIDGE, PHONE WITH NOTES, and SMALL WIRE, select pairs (I).
- You earn STONE FINGER and PHONE, take AURTHUR’S NOTES (J).
- Use ARTHUR’S NOTES, take MINI BUSH (K).
- Walk down.
- Place STONE FINGER, take ANCIENT SPEAR (L).
- Go left.

- Use ANCIENT SPEAR, select (M).
- Use REMOTE CONTROL (N), play puzzle, take COMB INSTRUCTION and MAGNETIC KEY.
- Use MAGNETIC KEY, take PLASTIC SLIDER (O).
- Place and select PLASTIC SLIDER, take MODEL STAIRS and LEATHER CASE (P).
- Walk down.

- Place MODEL STAIRS and MINI BUSH, take ORCHID KEY and PRIESTESS FIGURINE (A).
- ORCHID KEY and LILY KEY on LEATHER CASE, take MAGNIFIER, COPPER STAMP, and CS MONOGRAM.
- Walk down.
- Place CS MONOGRAM, take JUDGE’S GAVEL and INK PAD (B).
- Use JUDGE’S GAVEL, take FIRE AXE and BOTTLE OF WATER (C).
- Go left.
- Use FIRE AXE (D), select doors.
- Select 1-8 (E-F).

- Take SKETCHBOOK SHEET (G).
- SKETCHBOOK SHEET and COPPER STAMP on INK PAD, take NOTE ABOUT SEALS.
- Take BROKEN LIGHT PANEL (H).
- Take 3/3 ACRYLIC TOOTH (I).
- Walk down and left.

- Place ACRYLIC TOOTH, take SUN MEDALLION (J).
- Walk down.
- Place SUN MEDALLION, take 2/4 COLORED GLASS and PART OF SEAL (K).
- Go right.
- Place MAGNIFIER, PART OF SEAL, and NOTE ABOUT SEALS, solution (L), earn BATTERY, PRIEST FIGURINE, and 3/4 COLORED GLASS.
- Take BULB (M).
- Place PRIESTESS FIGURINE and PRIEST FIGURINE, take 4/4 COLORED GLASS, BANDAGE and ANCIENT SHIELD (N).
- BULB and COLORED GLASS on BROKEN LIGHT PANEL, take LIGHT BOX.
- Place LIGHT BOX (O), play puzzle.
- Go forward.

- Use ANCIENT SHIELD (P).
- Talk (Q), take ENGAGEMENT RING and GREEN CROSS.
- Take WOODEN PLANK (R).
- Select and open RING BOX, add ENGAGEMENT RING and BATTERY, take BOX WITH RING.
- Use GREEN CROSS, take PAINKILLER (S).

- Use PAINKILLER, BOTTLE OF WATER, WOODEN PLANK, and BANDAGE (A).
- Talk (B), take LILIAN’S ADDRESS and LASER POINTER (C).
- Walk down 3x.
- Use LILIAN’S ADDRESS (D).

- Solution (E).

- Take LEMON SODA (F).
- Take HAMMER KEYCHAIN (G).
- Use LEMON SODA and HAMMER KEYCHAIN, take WRENCH (H).
- Use WRENCH (I).

- Take 1/2 PLANKS (J).
- Select, take ARTIFICIAL CRYSTAL (K).
- Take 2/2 PLANKS (L).
- Take BROKEN SWING (M).

- Use ARTIFICIAL CRYSTAL and LASER POINTER, select Nx1-Ox3-Px7-Qx6.
- Take METAL HOOK and SOLDERING IRON (R).
- PLANKS and METAL HOOK on BROKEN SWING, take ROPE LADDER.
- Use ROPE LADDER (S).

- Take SHEET OF PAPER (A).
- Read note, take THIN ROD (B).
- Use SHEET OF PAPER and THIN ROD, take BROKEN KEY and HALF A LILY (C).

- Place BOX WITH RING and HALF A LILY (D).
- Play puzzle (E), take OCELOT FIGURINE.
- Place OCELOT FIGURINE, take QUETZAL CREST and KEY TOP (F).
- KEY TOP and SOLDERING IRON on BROKEN KEY, take EXQUISITE KEY.
- Use EXQUISITE KEY (G).
- Go forward.

- Take STONE AMULET (H).
- Take CHIEFTAIN’S BRACELET (I).
- Place CHIEFTAIN’S BRACELET, take STONE WING, use PHONE, earn FLOWER CODE (J).
- Use FLOWER CODE, solution (K), play puzzle, take TAIL FEATHER.
- Walk down 2x.

- Place QUETZAL CREST and TAIL FEATHER, select, take EMERALD HEART and SUN CIRCLE (L).
- Place SUN CIRCLE, take SILVER CORN and STONE HEAD (M).
- STONE HEAD, STONE WING, and EMERALD HEART on STONE AMULET, take MAYAN AMULET.
- Go right, then forward.
- Place MAYAN AMULET (N).

- Solution (O).
- Go forward.

- Take NECKLACE BASE (A).
- Take TURTLE EMBLEM (B).
- Place TURTLE EMBLEM, take MARGAY FIGURINE and MINERAL PAINTS (C).
- Walk down 2x.

- Place MARGAY FIGURINE, take 1/3 OBSIDIAN, PAINTBRUSH, and DECORATIVE TEMPLE (D).
- Place PAINTBRUSH and MINERAL PAINTS, take PANTHER CLAW and GOLDEN CORN (E).
- Go forward 2x.

- Place GOLDEN CORN and SILVER CORN, take DECORATIVE GOD and 2/3 OBSIDIAN (F).
- Place DECORATIVE TEMPLE, DECORATIVE GOD, and PHONE (G).
- Play puzzle, earn WEAKENING POTION RECIPE and BRASS PLAQUE (H).
- Place BRASS PLAQUE, take FRAME ORNAMENT and EAGLE HEAD (I).
- Walk down.

- Place FRAME ORNAMENT, take 3/3 OBSIDIAN and JAGUAR EYE (J).
- EAGLE HEAD, PANTHER CLAW, and OBSIDIAN on NECKLACE BASE, take CHIEFTAIN’S NECKLACE.
- Place CHIEFTAIN’S NECKLACE, earn FLAT CLUB, take SNOWFLAKE SYMBOL (K).
- Use FLAT CLUB (L).
- Go left.

- Take PURPLE GLASS PETALS (N).
- Take RED GLASS PETALS (O).
- Select (P).

- Place PURPLE GLASS PETALS and RED GLASS PETALS, solution (Q).
- Take AGAVE LEAVES and DOOR KNOB (R).

- Use DOOR KNOB (A).
- Take HUMMINGBIRD BUCKLE (B).
- Go forward.
- Place HUMMINGBIRD BUCKLE, take ROASTED ALMONDS And DRAGON LIGHTER (C).

- Use DRAGON LIGHTER, earn BURNING WAX CANDLE, take RITUAL MASK FRAGMENT (D).
- Go right, go forward 2x.
- Place RITUAL MASK FRAGMENT and JAGUAR EYE, take 1/3 MYSTIC SEAL and SHAMAN TAMBOURINE (E).
- Place SHAMAN TAMBOURINE (F), play puzzle, earn FILTER and ICE SCOOP.
- Walk down, go left.
- Open door.

- Use SNOWFLAKE and ICE SCOOP, take TEQUILA and STEEL CONTAINER (@).
- AGAVE LEAVES, ROASTED ALMONDS, and TEQUILA on WEAKENING POTION RECIPE, take INGREDIENTS.
- Place INGREDIENTS (G).
- Play puzzle, earn MURKY DECOCTION (H).
- Use FILTER and MURKY DECOCTION, select (I).

- Take POTION and BASEMENT SEAL (J).
- Place BASEMENT SEAL (K).
- Enter Basement (L).
- Select, take SHARP ARROWHEAD (M).
- Use SHARP ARROWHEAD, take ROPE PIECE and PLIERS (N).
- Use PLIERS, earn ANCIENT ARROW, take 2/3 MYSTIC SEAL and 3/3 MYSTIC SEAL (O).
- Place ANCIENT ARROW, ROPE PIECE, and POTION (P).

- Click on the red (A) and yellow (B) circles to keep them from entering the center frame (C).
- Allow the green (D) circles to enter the center frame until the gauge (E) fills.
- This mini-game is randomly generated.

- Fill the grid with more of your icons to beat Lilian.
- This mini-game is randomly generated.
- Select a piece to move, select one of the highlighted spaces (F).
- A space adjacent will duplicate your icon, two spaces away will move it.
- Moving your icon next to Lilian’s will convert her icons to yours.
- When the board is full, the goal is to have more spaces occupied (G).
- You earn CURSED COMB.

- STEEL CONTAINER, MYSTIC SEAL, CURSED COMB, and BURNING WAX CANDLE on COMB INSTRUCTION, select 1-6 (H), select container.
- Walkthrough Bonus Chapter, at the link below.


