
Paranormal Files 9: Silent Willow – The game walkthrough begins with the fact that it’s been almost 14 years since Rick Rogers went missing, but your PF agency team hasn’t given up hope of finding him. It’s only in the last year that the team has had some clues about Rick. After a meeting on the island, Rachel is confident they’ll be able to find him. Gabriel is ready to work without rest just to find his lost friend. An unexpected call from Michael Zink provides a new clue that leads the team to the creepy Silent Willow Psychiatric Hospital. In the creepy mental hospital, the team will face a new danger. If you can not pass any of the puzzles or do not know where the items are, on our site you can watch the walkthrough of the game Paranormal Files 9: Silent Willow, and find a friend of the team.
Paranormal Files 9: Silent Willow – Walkthrough
Here you can see full walkthrough of Paranormal Files 9: Silent Willow game, namely for all chapters, including bonus chapter, in pictures.

- Talk (A).
- Take FILE CABINET NOTE (B).

- Take STAPLE REMOVER (C).
- Use STAPLE REMOVER (D).

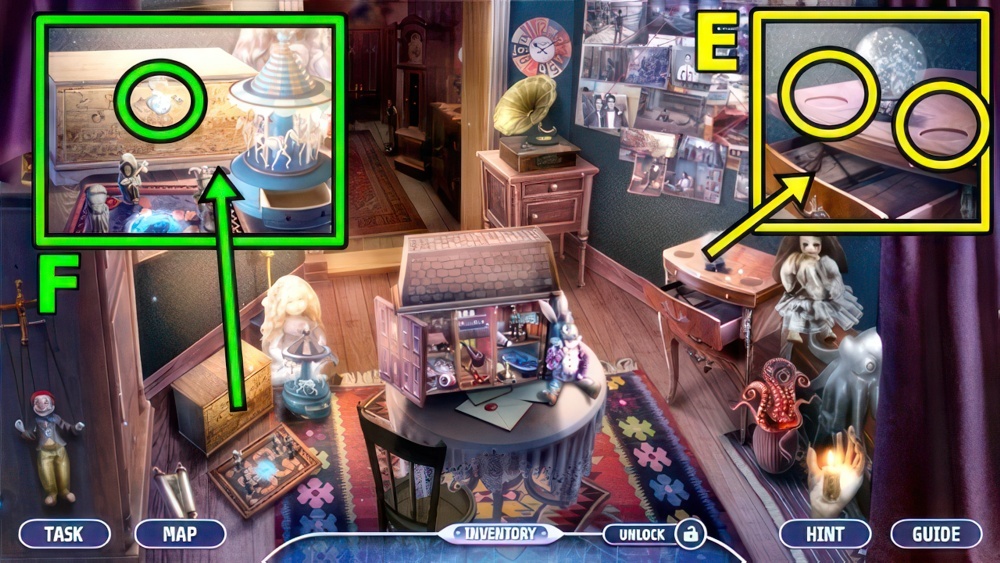
- Find items (E).
- Take GABRIEL FIGURINE and RACHEL’S MEDALLION.
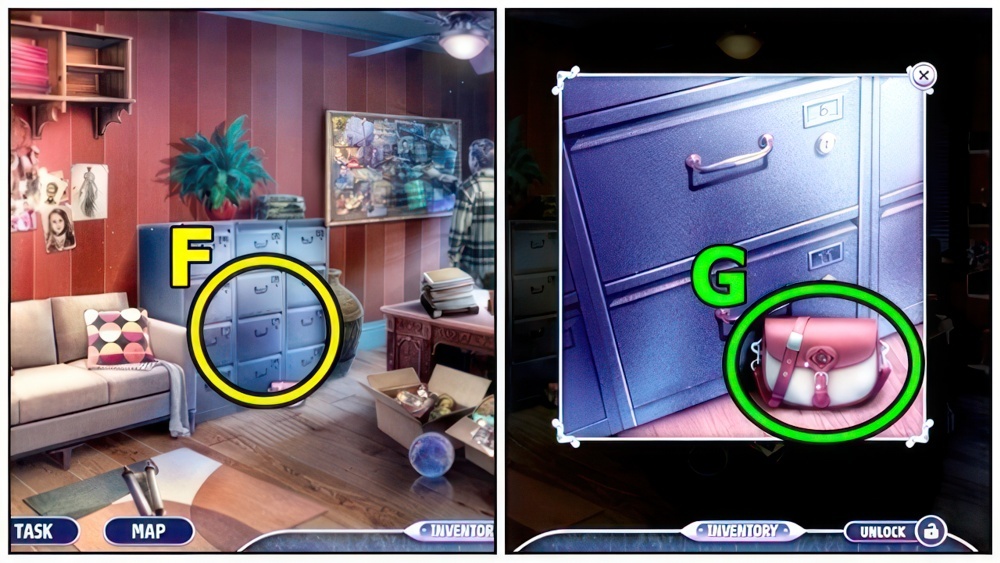
- Use FILE CABINET NOTE (F).
- Take RACHEL’S PURSE (G).

- Take BROOCH PIN (H).
- RACHEL’S MEDALLION on RACHEL’S PURSE, read, take RACHEL FIGURINE and BOX HINT.
- Add BOX HINT (I) and BROOCH PIN, press dots.
- Take RICK FIGURINE and CASE FILES 1/3.
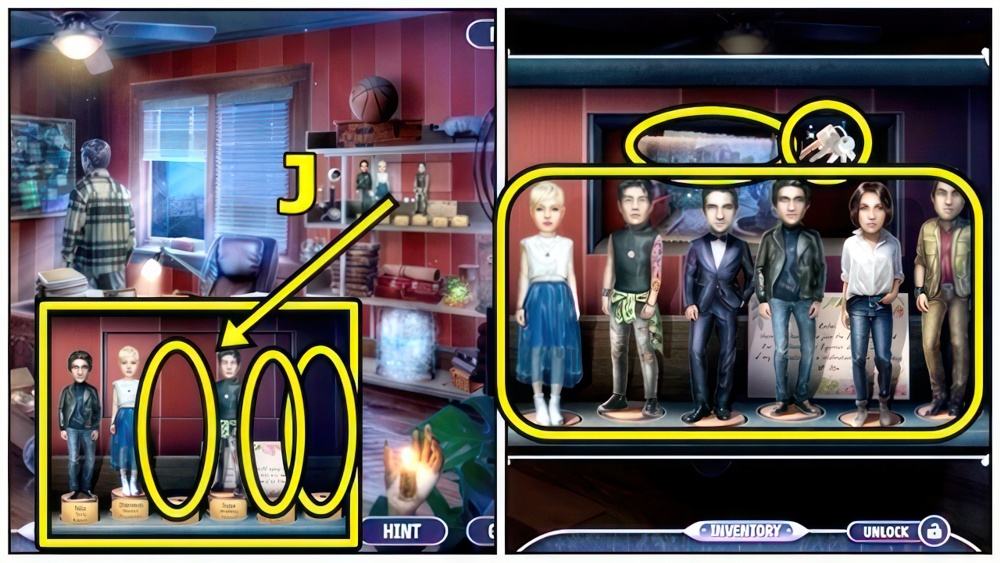
- Add GABRIEL FIGURINE (J), RACHEL FIGURINE and RICK FIGURINE.
- Rearrange figurines, take FILE CABINET KEY and CASE FILES 2/3.

- Use FILE CABINET KEY (K), select folders, take BROKEN PRUNERS and CASE FILES 3/3.
- Add CASE FILES (L).
- Play puzzle (M), receive SHOP PHOTO.

- Answer (N), talk, examine.

- Examine (O).
- Add clues (P), examine.
- Take LIGHTER (Q).
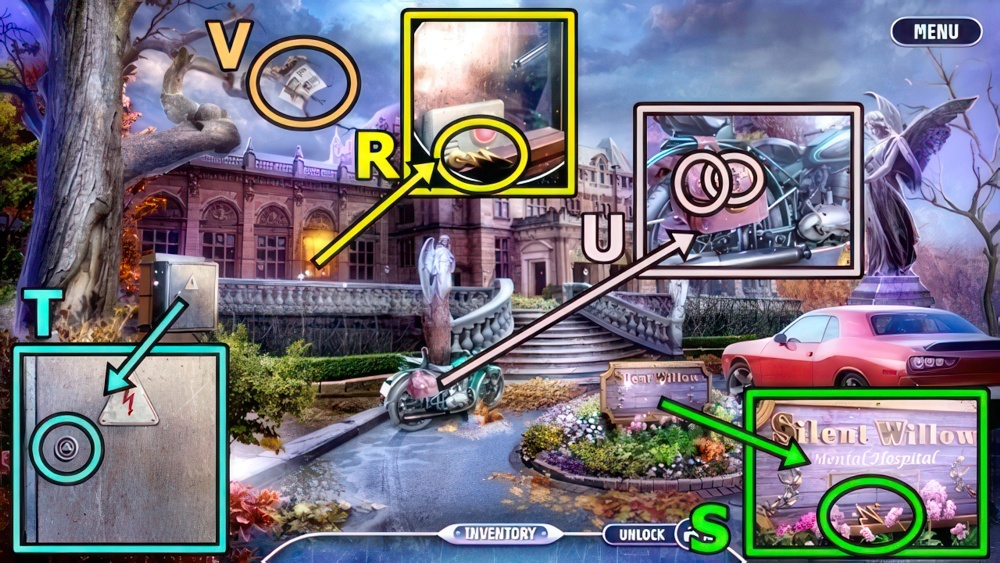
- Take POWER HANDLE (R).
- Take PULSE AMULET (S).
- Add POWER HANDLE (T), take HEART AMULET and SPRING.
- Add PULSE AMULET (U) and HEART AMULET, take GLASS CUTTER and EXTENDABLE CANE.
- Use EXTENDABLE CANE (V).
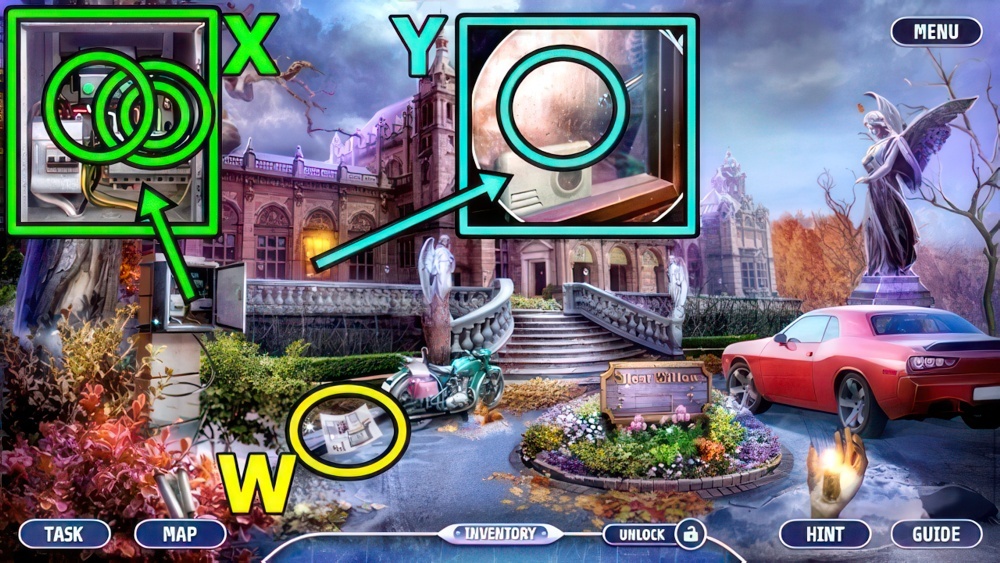
- Take ELECTRICIAN’S NOTES (W).
- Add LIGHTER (X) and ELECTRICIAN’S NOTES.
- Burn green wire.
- Use GLASS CUTTER (Y).
- Enter Staff Room.

- Take PRUNERS PART (Z).
- Take PENCIL (A).
- Use PENCIL (B).

- Move tokens to the middle positions that are associated with the displayed diagnosis in the center.
- Select two adjacent tokens to swap them. Use the arrows to rotate the outer tokens.
- Tokens light up when placed correctly.
- Walkthrough (C): E-H-F-H-A-C-D-(H×5)-B.
- Walkthrough (D): D-E-H-F-(H×6)-A-(H×4)-B-(H×5)-C.
- Walkthrough (E): B-H-C-F-(H×5)-A-D-(H×2)-E.
- Take PLASTIC LUNG (F) and SYRINGE.
- Move down.

- Use SYRINGE (G), receive OIL.
- PRUNERS PART, OIL and SPRING on BROKEN PRUNERS, take PRUNERS.
- Use PRUNERS (H), take PLASTIC BRAIN HALF and POWDER COMPACT.
- Enter Staff Room.
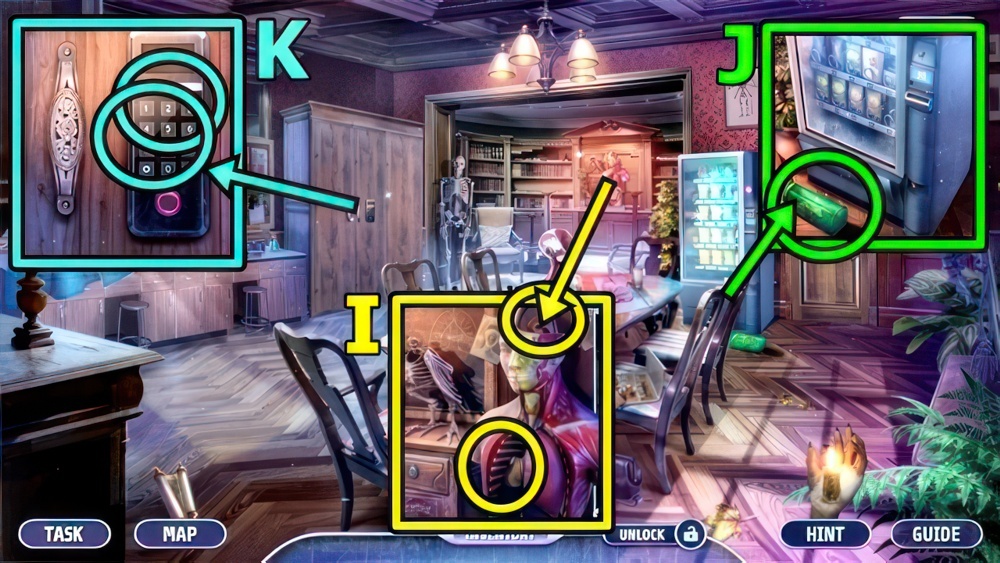
- Add PLASTIC LUNG (I) and PLASTIC BRAIN HALF, take BRUSH and BUTTON.
- Take RAT TRAP (J).
- Add POWDER COMPACT (K) and BRUSH, press 2-6-7-0.

- Play puzzle (L).
- Go to Hospital Lobby.
- Take TRAP LEVER (M).
- TRAP LEVER on RAT TRAP, take RAT and DOLLARS 1/3.
- Use RAT (N).

- Take HAMMER (O).
- Use HAMMER (P), take RAVEN SKULL and DOLLARS 2/3.
- Move down.
- Add RAVEN SKULL (Q), take DOLLARS 3/3 and BROKEN UV LAMP.
- Add BUTTON (R) and DOLLARS.
- Take LETTER S and NUTS.
- Move down.
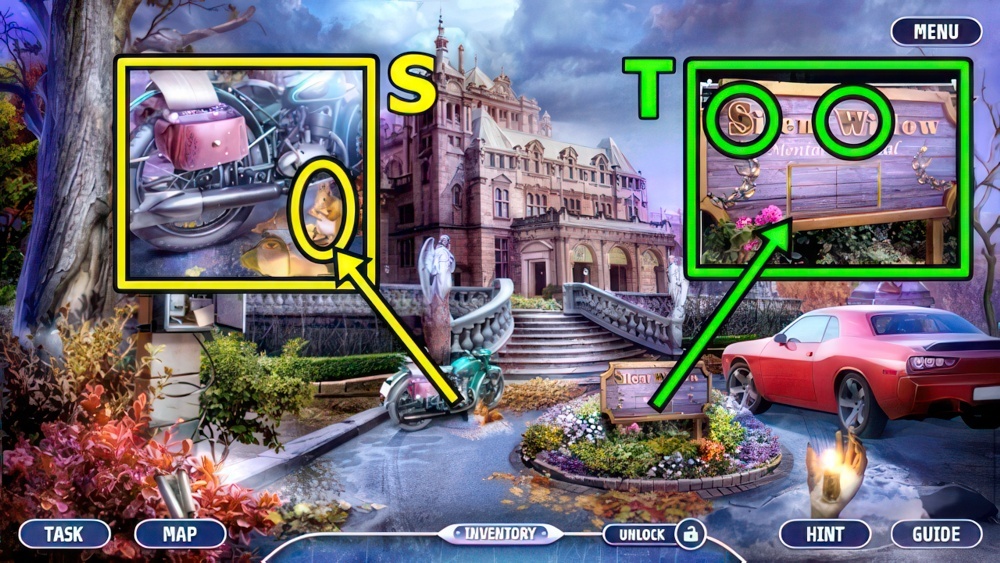
- Offer NUTS (S), take LETTER W and GLOVES.
- Add LETTER S (T) and LETTER W, take UV BULB, TAPE and BROKEN STATUETTE.
- Return to Hospital Lobby.

- Add TAPE (U) and GLOVES.
- Select Michael.
- Take ROOM NUMBER.
- Examine, select.
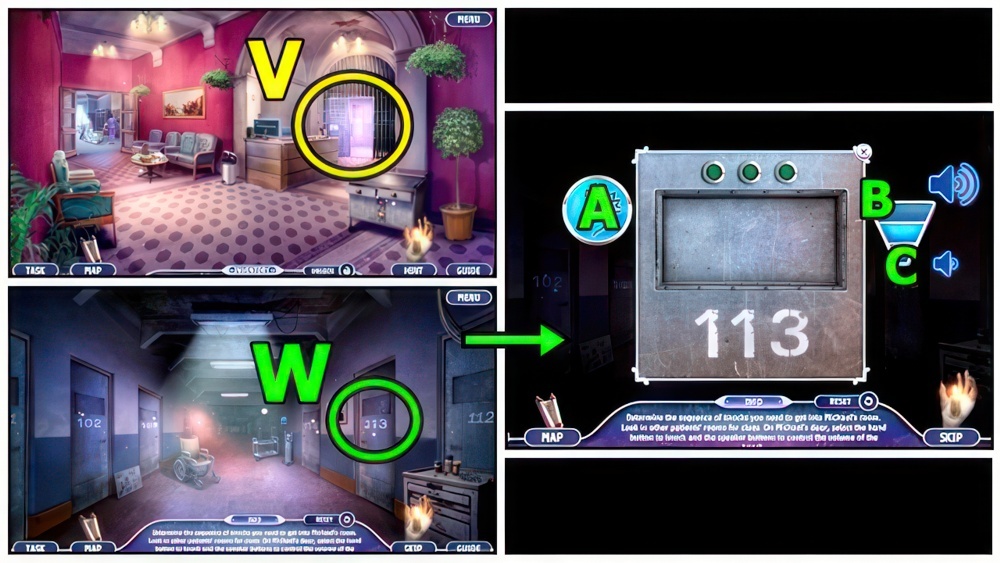
- Use ROOM NUMBER (V).
- Determine the sequence of knocks you need to get into Michael’s room.
- Look in other patients’ rooms for clues.
- On Michael’s door, select the hand button to knock and the speaker buttons to control the volume of the knock.
- Walkthrough (W): A×3-B-A-C-A×2.
- Enter Michael’s Room.

- Take METAL SPOON (X).
- Use METAL SPOON (Y), take BATTERY and STATUETTE HEAD.
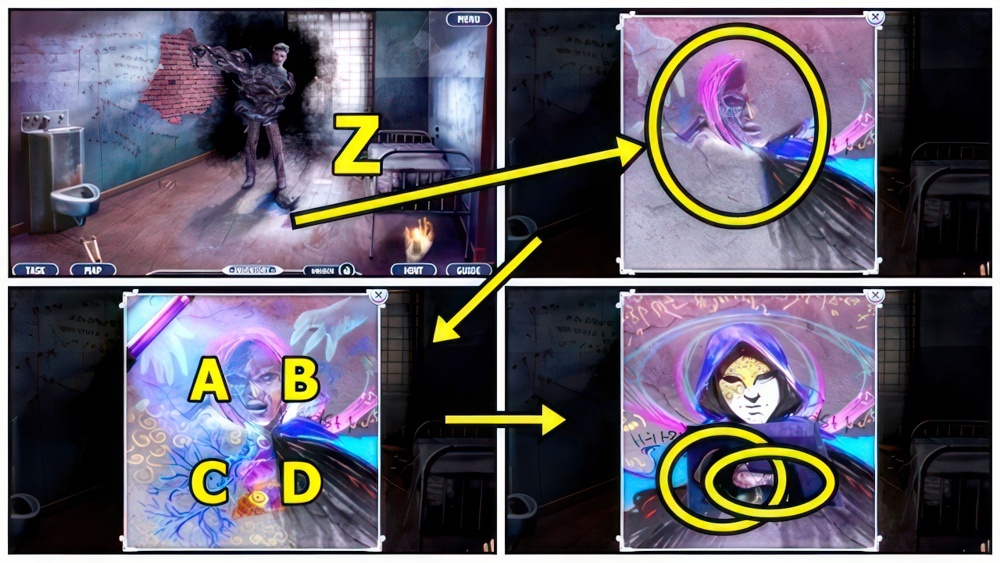
- BATTERY and UV BULB on BROKEN UV LAMP, take UV LAMP.
- Use UV LAMP (Z), A-B×2-C.
- Take STATUETTE ARM and MEDALLION OF BANISHING.

- Use MEDALLION OF BANISHING (A), find runes.

- Find runes (B).
- Give SHOP PHOTO (C).
- Take ATOM SIGN (D) and GLUE.
- Move down.

- STATUETTE HEAD, STATUETTE ARM and GLUE on BROKEN STATUETTE, take STATUETTE.
- Add STATUETTE (E), take RUNE STONES 1/4 and DANGER SIGN.
- Add DANGER SIGN (F) and ATOM SIGN, take FUNNEL and ACID.
- Return to Michael’s Room.
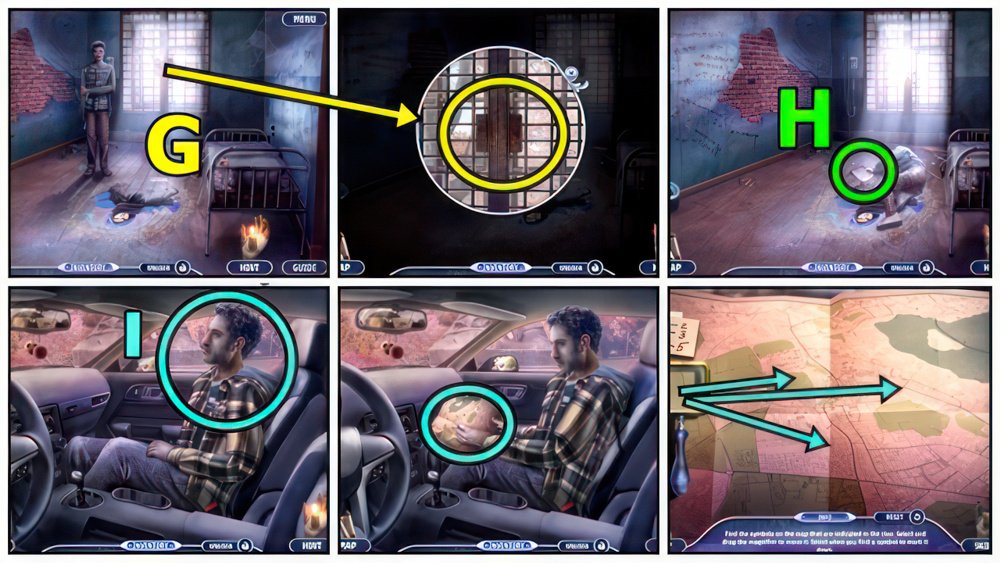
- Use ACID (G).
- Take MYSTERIOUS CONTRACT (H).
- Show MYSTERIOUS CONTRACT (I), select.
- Walkthrough.

- Find the symbols on the map that are indicated in the clue.
- Select and drag the magnifier to move it.
- Select when you find a symbol to mark it down.
- Draw the correct radius around each symbol according to the clue.
- Select a symbol and the correct number on the tool to draw the radius around it.
- Walkthrough (J).

- Take CASKET (K).
- Read (L), take ANGEL HALO.
- Take CABINET KEY (M).

- Insert CABINET KEY (N).
- Take DEMONIC HORNS and PHOENIX FEATHER.
- ANGEL HALO and DEMONIC HORNS on CASKET, take INCENSE and OBSIDIAN.
- Add INCENSE (O), take RUNE STONES 2/4 and LIT INCENSE.

- Use LIT INCENSE (P), take ICE FLOWER and GRIFFIN EGG.
- Add FUNNEL (Q), PHOENIX FEATHER, OBSIDIAN and ICE FLOWER.

- Follow the instructions to make a potion. Select items to use them.
- Walkthrough (R): (A-C)-(F-E-D)-(E-D-F)-D.
- Walkthrough (S): H×2-G.
- B-C.
- Take TRANSFORMATION POTION.
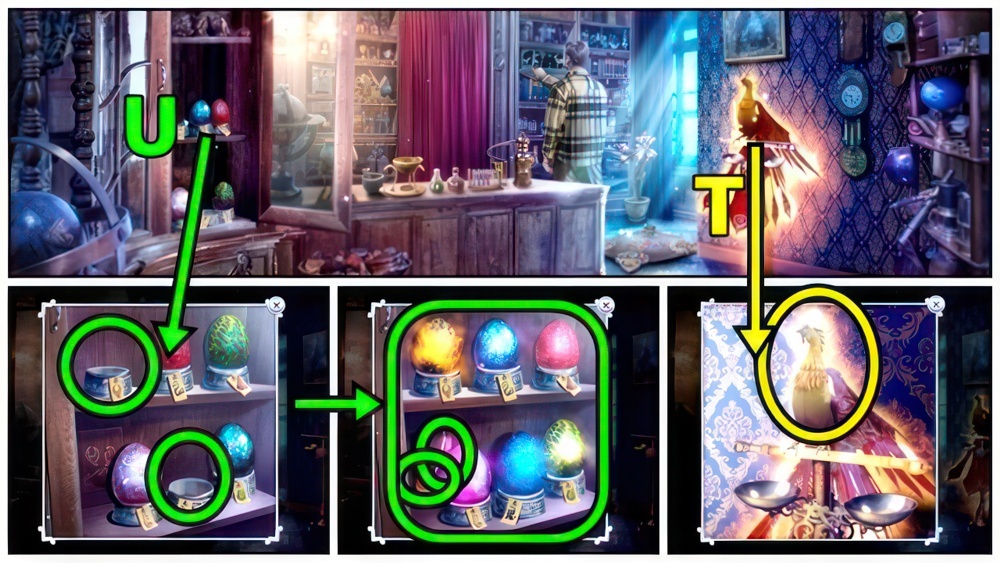
- Use TRANSFORMATION POTION (T).
- Take PHOENIX EGG and SNOW GLOBE.
- Add PHOENIX EGG (U) and GRIFFIN EGG, rearrange eggs, take RUNE STONES 3/4 and TONGS.

- Use TONGS (V), receive RUNE STONES 4/4 and SIGNET RING.
- Add RUNE STONES (W).

- Play puzzle (X), take RICK’S WALLET.
- Find differences (Y).

- Take DRAWER HANDLE (Z).
- Add DRAWER HANDLE (A), take SCREWDRIVER and WANDERER FIGURINE.
- Give SCREWDRIVER (B).

- Take JESTER FIGURINE (C).
- Take BROKEN BOAT (D).
- Add WANDERER FIGURINE and JESTER FIGURINE, take BOAT PARTS 1/4 and DOLLHOUSE KEY.

- Add SIGNET RING (E) and DOLLHOUSE KEY, find items, take RR MONOGRAM and BOAT PARTS 2/4.
- RR MONOGRAM on RICK’S WALLET, examine, take SMALL MIRROR and COIN.

- Add SMALL MIRRROR (F).
- Move forward.
- Take LEVER (G).
- Take TUNING FORK (H).
- Use TUNING FORK (I).
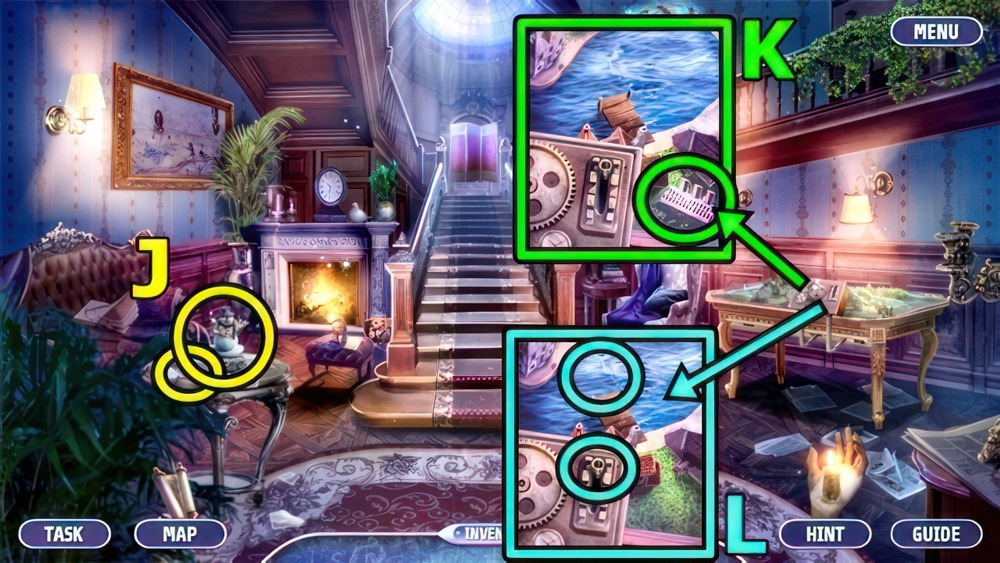
- Take GLOBE BASE (J) and BOAT PARTS 3/4.
- Take BOAT PARTS 4/4 (K).
- BOAT PARTS on BROKEN BOAT, take TOY BOAT.
- Add LEVER (L) and TOY BOAT.
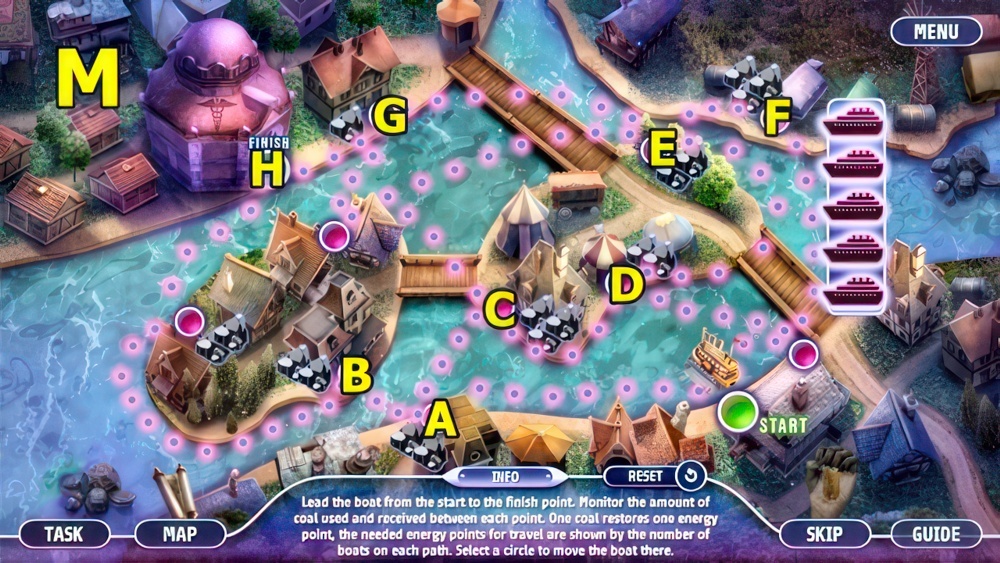
- Lead the boat from the start to the finish point.
- Monitor the amount of coal used and received between each point.
- One coal restores one energy point, the needed energy points for travel are shown by the number of boats on each path.
- Select a circle to move the boat there.
- Walkthrough (M): A-B-A-C-D-E-F-E-G-H.

- Take MECHANISM PART (N) and PENDULUM.
- Select (O).

- Move (P).
- Take CAROUSEL ROOF (Q).
- Move down.

- Add CAROUSEL ROOF (R), take TRIANGLE TILE and MONOCLE.
- Add MONOCLE (S), take FIREPLACE TILES 1/3 and POKER.
- Move forward.

- Use POKER (T), receive GEAR and JUG.
- Add MECHANISM PART (U), TRIANGLE TILE and GEAR.
- Correctly adjoin all the lines.
- Select a triangle part and then press the left button to rotate it.
- Press the right button to move the triangles around.
- Walkthrough (V): C-E×2-F×2-A-E×2-B-E.
- Move forward.

- Take CLOCK WEIGHT (W).
- Add CLOCK WEIGHT (X), take DECORATIVE SNOWFLAKES and FIREPLACE TILES 2/3.
- Take TILES CLUE (Y).
- Take KATANA (Z).
- Use JUG, receive WATER.
- Move down.

- Use KATANA (A), take FIREPLACE TILES 3/3 and GLYCEROL.
- Add FIREPLACE TILES (B) and TILES CLUE.
- Press A-B-C-D, take PENTAGRAM AMULET and BROKEN RAVEN.
- Move forward.

- Add PENTAGRAM AMULET (C).
- Play puzzle (D), receive GLASS GLOBE.
- Return to Hidden Room.
- GLASS GLOBE, DECORATIVE SNOWFLAKES, WATER and GLYCEROL on GLOBE BASE, take SNOW GLOBE.
- Add SNOW GLOBES (E), take RAVEN HEAD and AWL.
- Use AWL (F), take WINDING KEY and DIVINATION DUST.
- Return to Study.
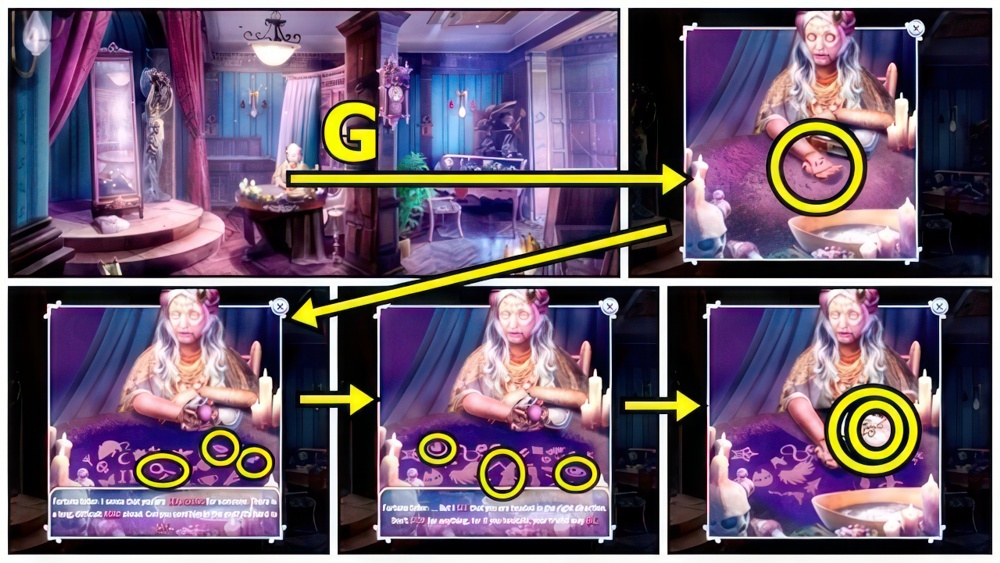
- Add DIVINATION DUST (G), find symbols, take CLOCK HAND and TAPE RECORDER.

- Add CLOCK HAND (H), take DIAL and RAVEN WING.
- RAVEN HEAD, RAVEN WING and WINDING KEY on BROKEN RAVEN, take MECHANICAL RAVEN.
- Use MECHANICAL RAVEN (I).
- Go to Attic.
- Examine (J).

- Combine two colors to create a new color to match the color of the puppet’s glowing elements and eyes.
- To combine colors choose one color and then press the plus button to choose a second color.
- Walkthrough (K): (C-E-H)-(A-E-H)-(B-E-C)-(C-E-G)-(A-E-F).

- Read (L), take BATTERY.
- Take FILE (M).
- Take PLAY BUTTON (N).
- Use FILE (O).
- Move items, take KNIGHT FIGURINE and TAPE REEL.
- Return to Main Hall.
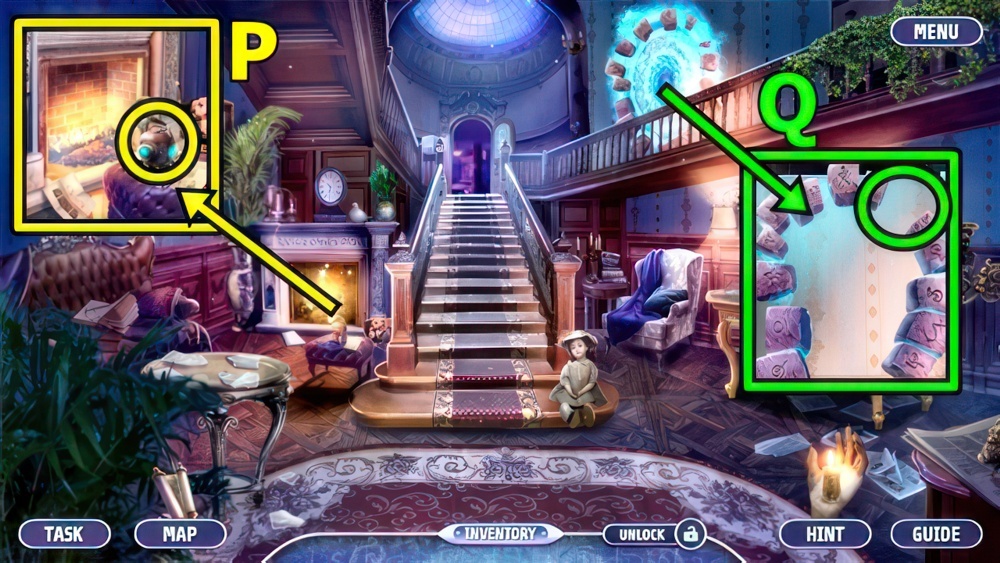
- TAPE REEL, DIAL, PLAY BUTTON and BATTERY on TAPE RECORDER, take RECORDER WITH TAPE.
- Add RECORDER WITH TAPE (P), take PORTAL STONE and TAROT CARDS 1/4.
- Add PORTAL STONE (Q).
- Enter Workshop.

- Take GLASS TULIP (R).
- Take INTRICATE BOX (S).
- Read (T), take SPREADER.
- Use SPREADER (U), take TAROT CARDS 2/4 and PRINCESS FIGURINE.
- Return to Study.

- Add KNIGHT FIGURINE (V) and PRINCESS FIGURINE.
- Examine (W).

- Choose which objects to give to the knight, so each helps him with a specific task.
- Select and drag an object to a place above the knight to create the order in which the items will be used in the performance.
- When you are ready, press the lever in the center to start the performance.
- Walkthrough (X).

- Take PROJECTOR WHEEL (Y) and LETTER OPENER.
- Use LETTER OPENER (Z), take GLASS DAISY and TAROT CARDS 3/4.
- Go to Attic.

- Add GLASS DAISY (A) and GLASS TULIP, take TAPE and HERBICIDE.
- Use HERBICIDE (B), take MYSTERIOUS MEDALLION and MASK.
- Return to Workshop.

- Add MASK (C), take TAROT CARDS 4/4 and PROJECTOR LENS.
- Add PROJECTOR WHEEL (D), PROJECTOR LENS and TAPE.
- Play puzzle (E), receive TAROT CLUE.
- Return to Attic.

- Add TAROT CARDS (F) and TAROT CLUE, reassemble cards, open, take TOOLSET.

- Add TOOLSET (G), take PUPPET ARM and VINTAGE BRACELET.
- Return to Workshop.
- Add VINTAGE BRACELET (H), take GLOWING TEST TUBE and RITUAL CANDLE.
- Add PUPPET ARM (I), TOOLSET and GLOWING TEST TUBE.

- Follow the instructions to make the control device.
- Walkthrough (J): (A-C)-(B-C).
- Take CONTROL DEVICE (K).
- Return to Attic.

- Use CONTROL DEVICE (L), take MIRROR SHARDS 1/2 and FRAMED PICTURE.
- Add FRAMED PICTURE (M), take BUNCH OF KEYS.
- Move down.

- BUNCH OF KEYS on INTRICATE BOX (N), match keys, examine, take MIRROR SHARDS 2/2 and WATCH WITH ENGRAVING.

- Add MYSTERIOUS MEDALLION (O) and MIRROR SHARDS.
- Play puzzle (P).

- Take RITUAL CANDLE (Q).
- Take PUPPET ARM (R).
- Add RITUAL CANDLE, receive LIT CANDLE.
- Add LIT CANDLE (S), take STAINED-GLASS PARTS 2/3 and PUPPET HEAD.

- Take BROKEN POWER DRILL (T).
- Add PUPPET HEAD and PUPPET ARM, take MAGNIFIER and STAINED-GLASS PARTS 3/3.
- Add STAINED-GLASS PARTS (U).

- Restore the stained glass by placing the missing pieces where they belong.
- Select the arrows to change the current scene.
- Select a stained-glass part to swap it with one in the space on the bottom left corner.
- Walkthrough (V).

- Walkthrough (W).
- Take DRILL PART (X) and OIL.

- Add WATCH WITH ENGRAVING (Y), MAGNIFIER and OIL.
- Arrange magnifiers, get code.
- Take SMALL BOX and BATTERY.
- DRILL PART and BATTERY on BROKEN POWER DRILL, take POWER DRILL.
- Use POWER DRILL (Z).

- Take the objects in the center and arrange them on the shelves so that nothing overlaps, and all the shelves are full.
- Walkthrough (A).
- Move forward.

- Use CONTROL DEVICE (B).
- Take BOX BUTTON (C).
- Take POUCH (D).
- Take MAGIC FAN (E).

- Use MAGIC FAN (F), take CUBE PARTS 1/4 and BOX HINT.
- Move down.
- BOX BUTTON and BOX HINT on SMALL BOX, press A-B-C (G), take CUBE PARTS 2/4 and THREAD WITH NEEDLE.
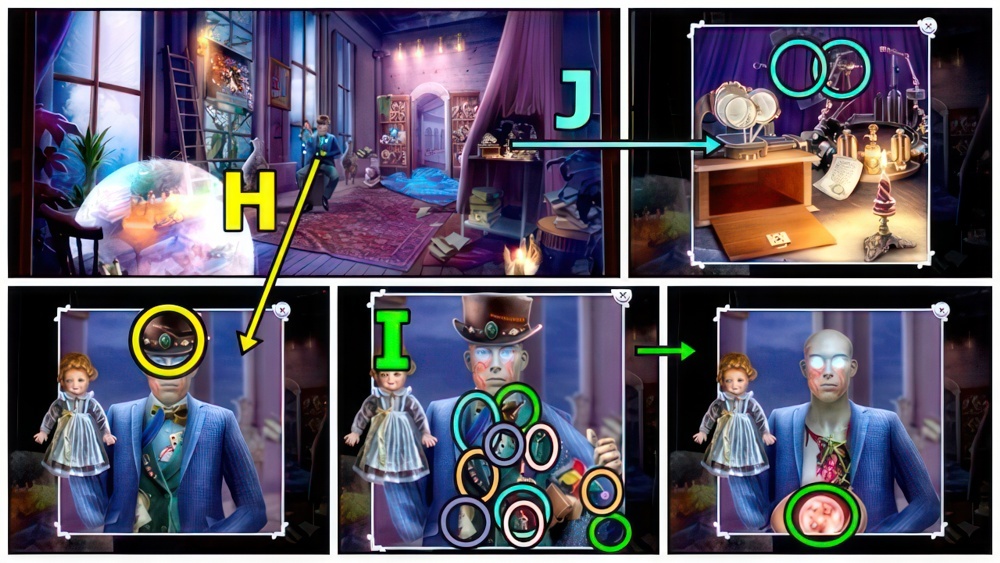
- Use THREAD WITH NEEDLE (H).
- Find pairs (I), take POWER SPHERE.
- Add POWER SPHERE (J) and BROKEN DEVICE, receive DESTRUCTION DEVICE.
- Move forward.
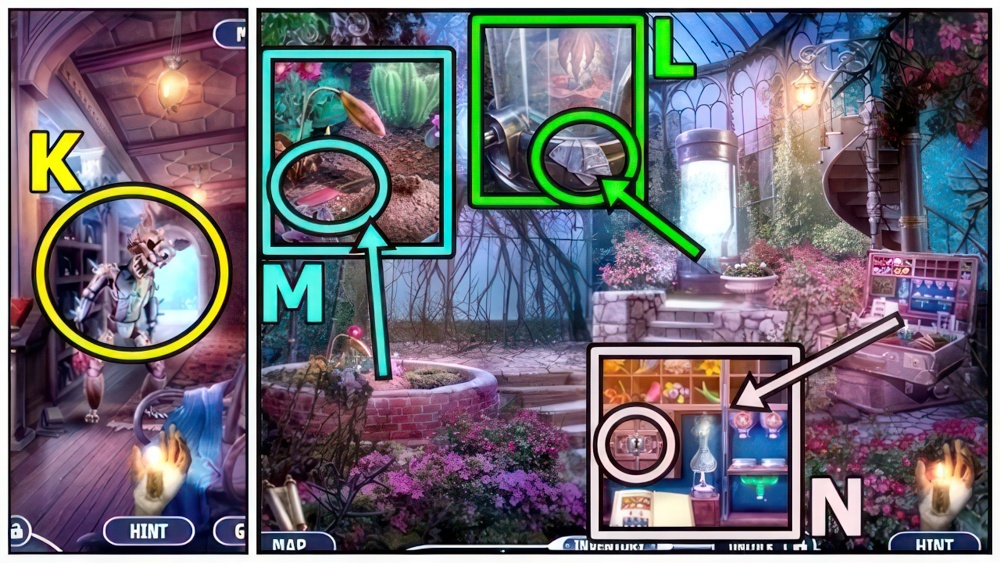
- Use DESTRUCTION DEVICE (K).
- Go to Greenhouse.
- Take HANDKERCHIEF (L).
- Take SHARP QUILL (M).
- SHARP QUILL on POUCH, take CUBE PARTS 3/4 and RUNED KEY.
- Add RUNED KEY (N), read, take CHISEL and HEALING ELIXIR.
- Return to Studio.
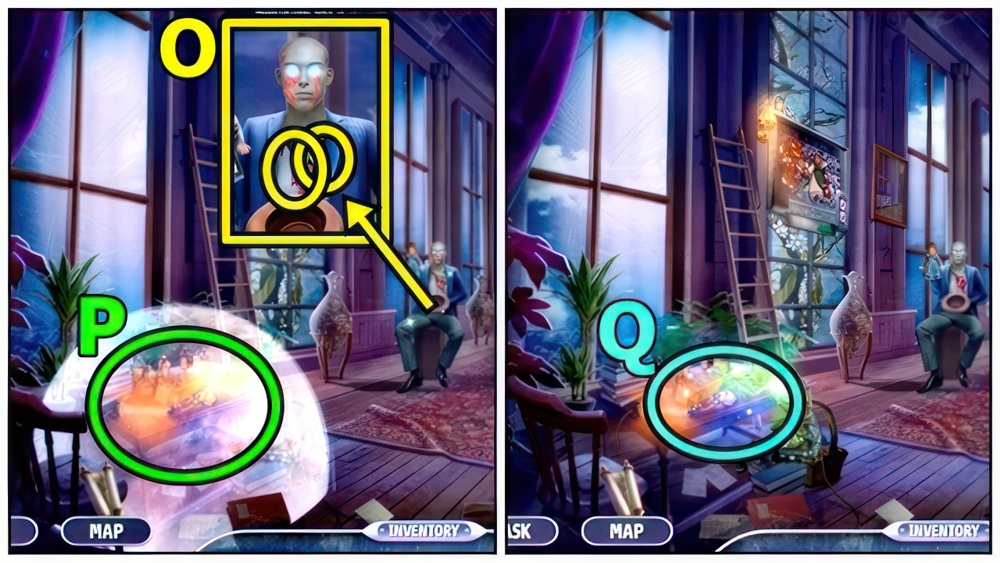
- Add HANDKERCHIEF (O) and HEALING ELIXIR, take BARRIER BREAKER and VALVE.
- Use BARRIER BREAKER (P).
- Play puzzle (Q), take CHALICE and BROKEN GUN.
- Return to Greenhouse.

- Use CHISEL (R), VALVE and CHALICE, receive GHOST FIGURINE and WATER.
- Use WATER (S), take CUBE PARTS 4/4 and GUN TRIGGER.
- Move down.

- Add CUBE PARTS (T), find and place items, take SALESMAN FIGURINE.
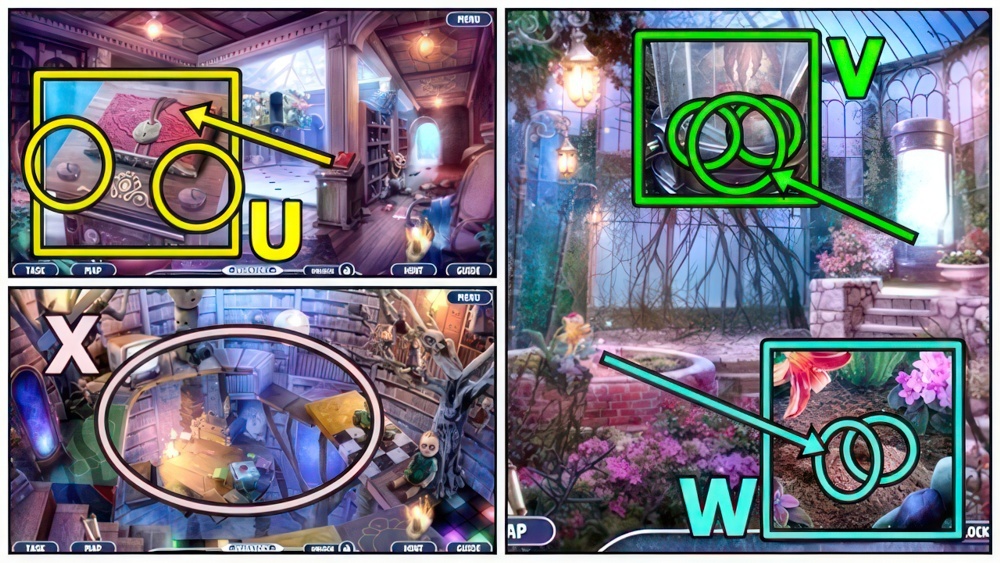
- Add SALESMAN FIGURINE (U) and GHOST FIGURINE, take GROWTH FERTILIZER and GAVEL.
- Enter Greenhouse.
- Use GAVEL (V), take GUN BOLT and MAGIC SEEDS.
- Use GROWTH FERTILIZER (W) and MAGIC SEEDS.
- Examine (X).
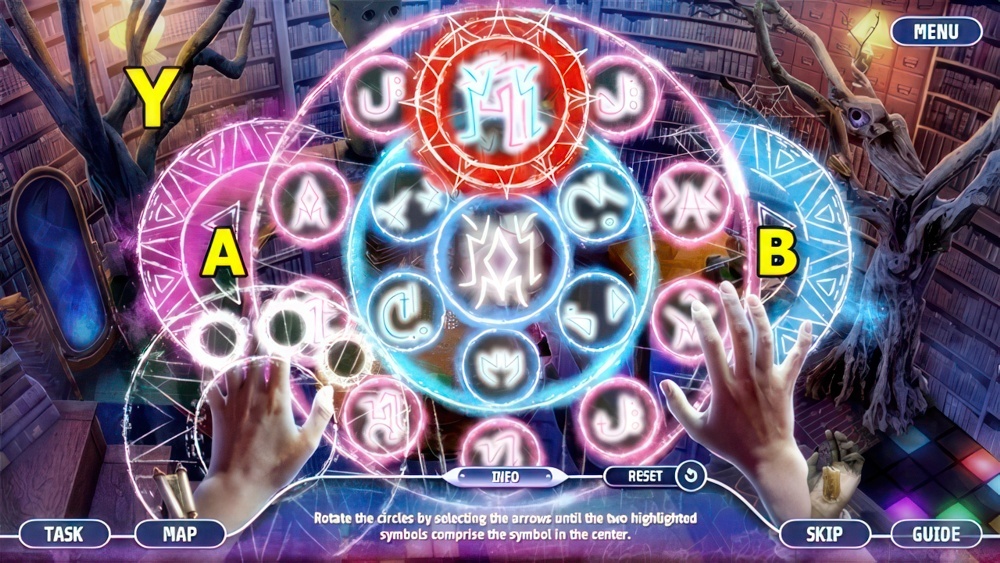
- Rotate the circles by selecting the arrows until the two highlighted symbols comprise the symbol in the center.
- Walkthrough (Y): B×2-A×4-B×4-A×12-B×2-A×8.

- Take SPRING (Z).
- Take WOODEN SWORD (A).
- Take FLAT BOWL (B).
- Add WOODEN SWORD, take DART and BRUSH.
- GUN TRIGGER, GUN BOLT, SPRING and DART on BROKEN GUN, take TOY GUN.
- Use TOY GUN (C).
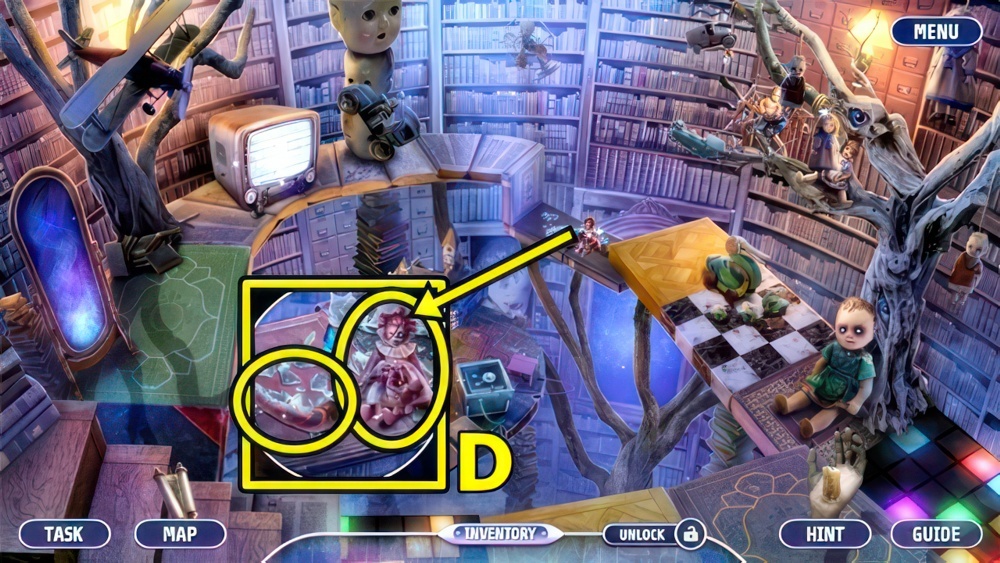
- Take HORN (D) and CREEPY DOLL.
- Return to Atrium.

- Add HORN (E) and BRUSH, take BOOK KEY and SUN AMULET.
- Add BOOK KEY (F).
- Play puzzle (G), take ANTENNA.
- Return to Toy Warehouse.

- Add ANTENNA (H), talk, take CREEPY DOLL and WIRES 1/3.
- Add CREEPY DOLLS (I), take FEATHER DUSTER and TORN PAGE.
- Move down.

- Add FLAT BOWL (J) and TORN PAGE.

- According to the instructions put the flowers in the correct spaces on the right side and press the arrow button to grind them.
- Then press the arrow button to mix the powders together.
- Lastly add all the ingredients in the flask in the correct order.
- Walkthrough (K): (B-A)-D-E-(C-A).
- Take FROST ESSENCE.
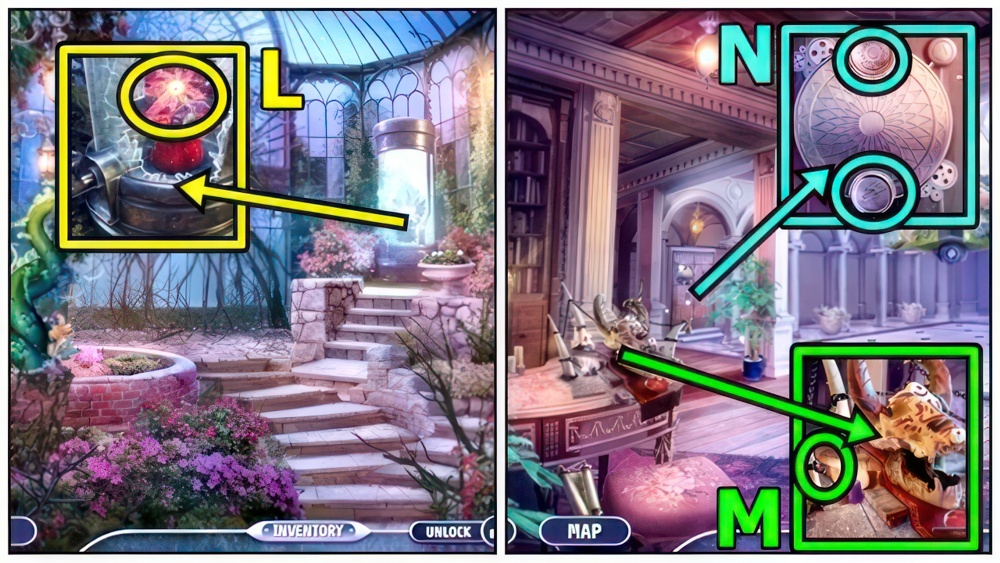
- Use FROST ESSENCE (L), take BELL and TRACK PART.
- Move down.
- Add BELL (M), take LIGHTNING AMULET and WIRES 2/3.
- Add SUN AMULET (N) and LIGHTNING AMULET.
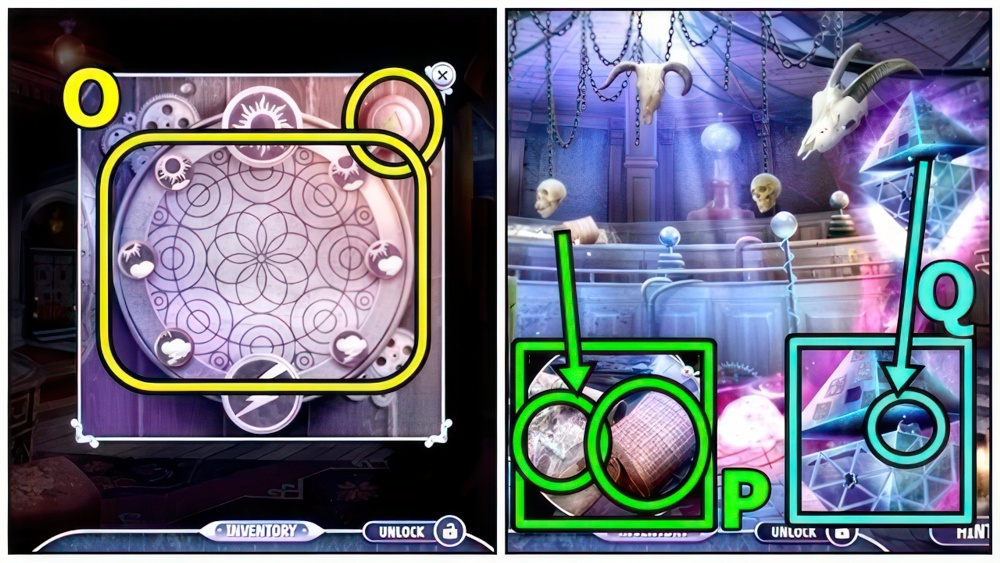
- Walkthrough (O).
- Enter Secret Lab.
- Take TRAP (P).
- Use FEATHER DUSTER, take WIRES 3/3.
- Take TOY TRAIN (Q).
- Return to Toy Warehouse.
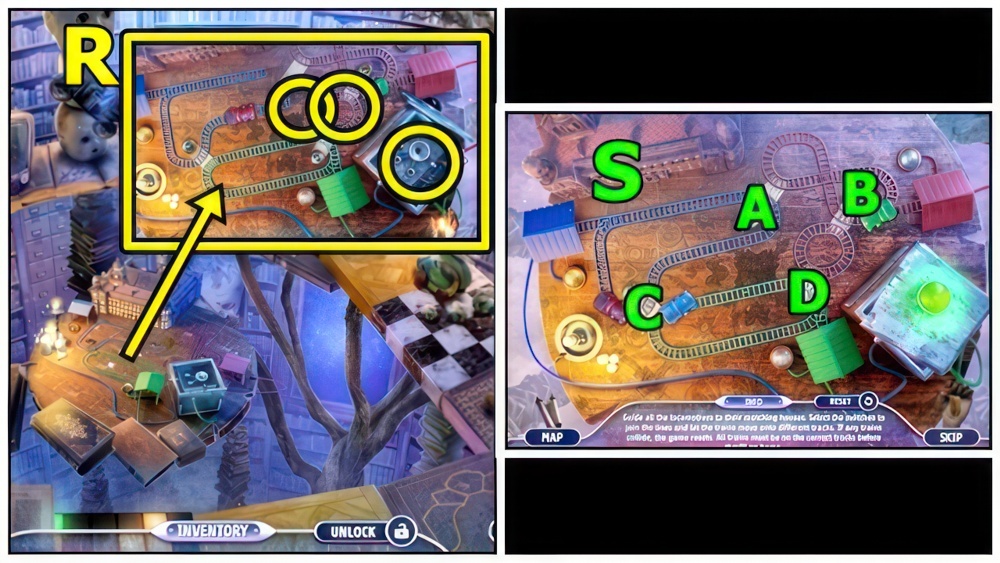
- Add TRACK PART (R), TOY TRAIN and WIRES.
- Guide all the locomotives to their matching houses.
- Select the switches to join the lines and let the trains move onto different tracks.
- If any trains collide, the game resets.
- All trains must be on the correct tracks before they’ll go home.
- Walkthrough (S): B-A-C-D.

- Take SCOOP NET (T) and BROKEN STAFF.
- Use SCOOP NET (U), receive BUTTERFLY.
- Add TRAP (V) and BUTTERFLY.
- Take REMOTE CONTROL and ANCIENT RUNE.
- Return to Secret Lab.

- Use REMOTE CONTROL (W), press II-IV-III-V-I.
- Enter Storeroom.
- Take MAGNET (X).
- Use MAGNET (Y), receive POWER CRYSTALS 1/4, take MAGIC DEVELOPER.
- Move down.
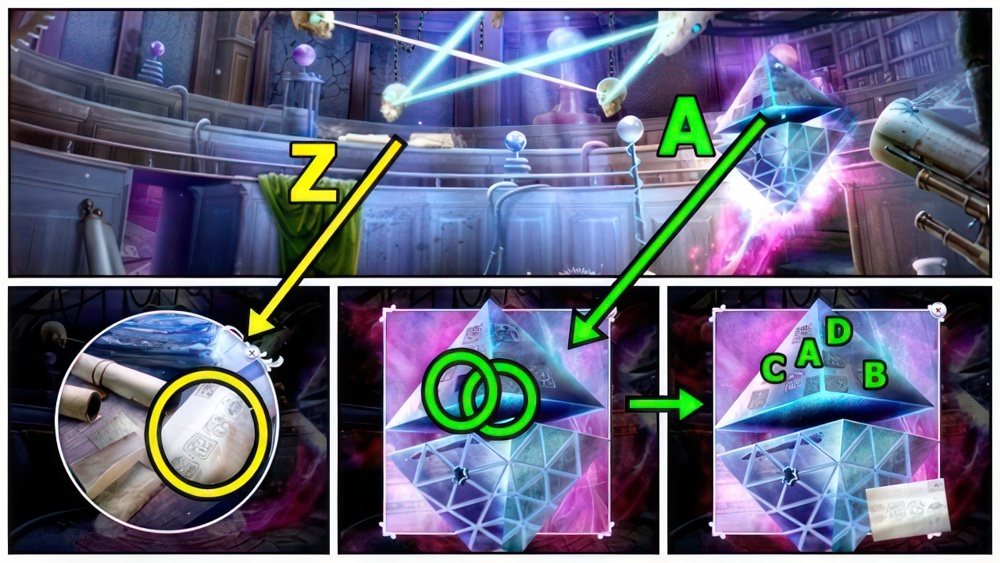
- Add MAGIC DEVELOPER (Z), take SECRET CODE and CURSED MIRROR.
- Add ANCIENT RUNE (A) and SECRET CODE.
- Press A-B-C-D, take CURSED TOTEM and POWER CRYSTALS 2/4.
- Enter Storeroom.

- Add CURSED TOTEM (B) and CURSED MIRROR, take UV FLASHLIGHT and POWER CRYSTALS 3/4.
- Use UV FLASHLIGHT (C), rearrange photos, read, take POWER CRYSTALS 4/4.
- Move down.

- POWER CRYSTALS on BROKEN STAFF, take CONTROL STAFF.
- Add CONTROL STAFF (D).
- Select (E).
- Select ×3 (F).
- Talk (G).
- Walkthrough Bonus Chapter, at the link below.


