
Park Escape: Chapter 8 – While escaping from the pipe-shaped building, Han Qiuyu was captured by a secret organization. Liang Bowen, following the clues, went to 233 Nandan Road to unearth the facts and locate Han Qiuyu.
Park Escape: Chapter 8 – Walkthrough
Here you can watch the complete walkthrough of Chapter 8, in the game Park Escape.
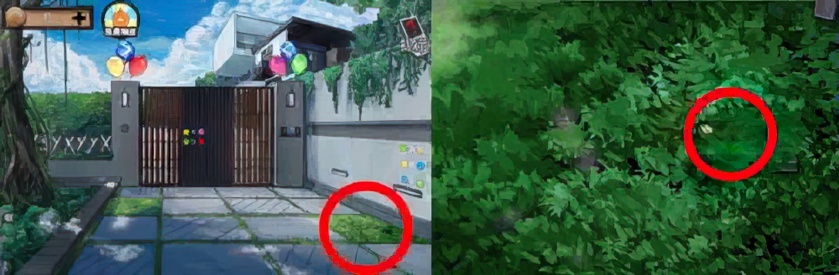
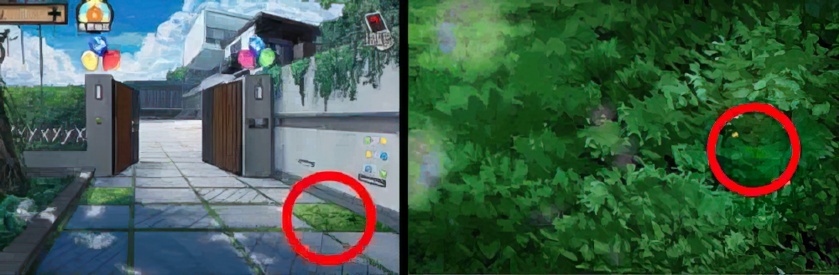
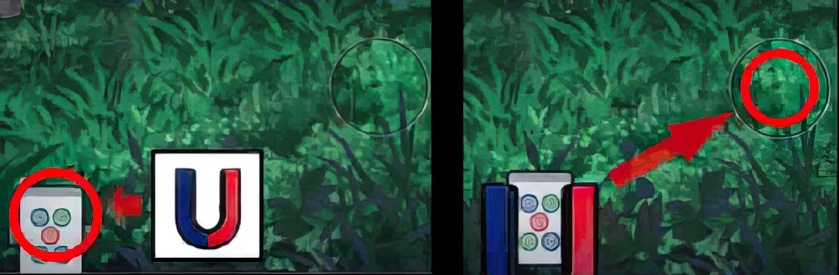
1. Check the grass on the right-side ground, remove the grass to get jade shard.
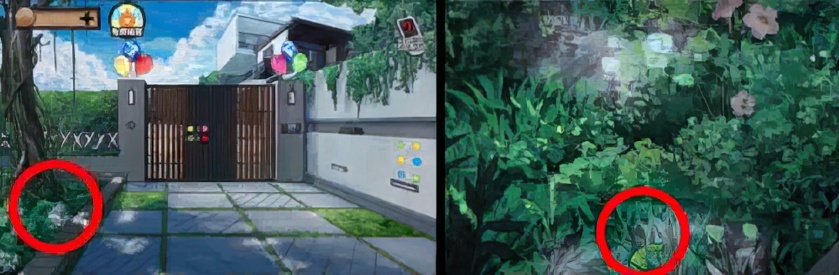
2. Check the left-side grass, get jade shard in the grass.
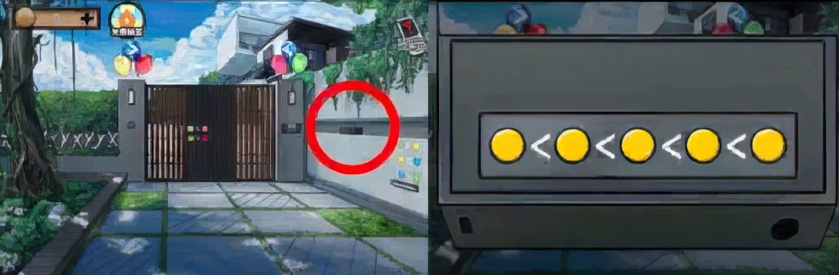
3. Pick up small box on the wall.

4. Check patterns on the gate.

5. Arrange the order of colors on the small box according to patterns on the balloons, gate and the wall to open the box, get jade shards.
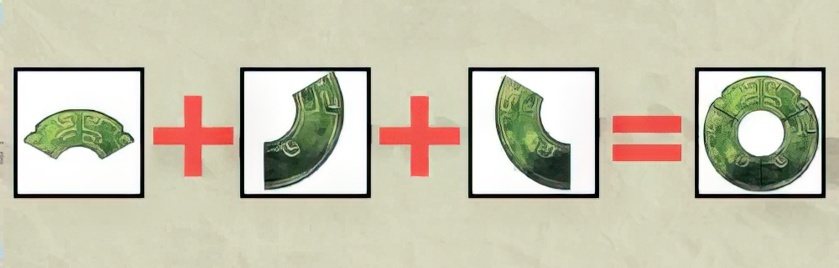
6. Connect the shard.

7. Place complete jade shard on the groove of the left-side stone pillar.
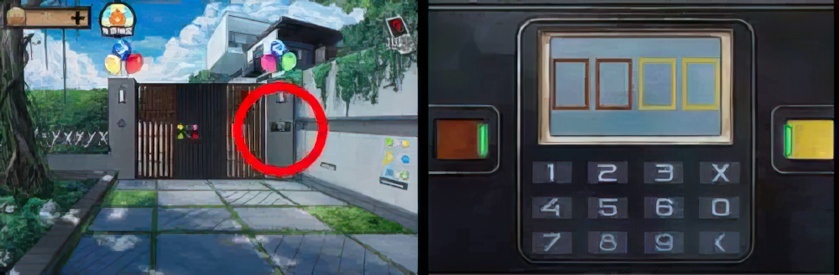
8. Check combination lock on the gate.
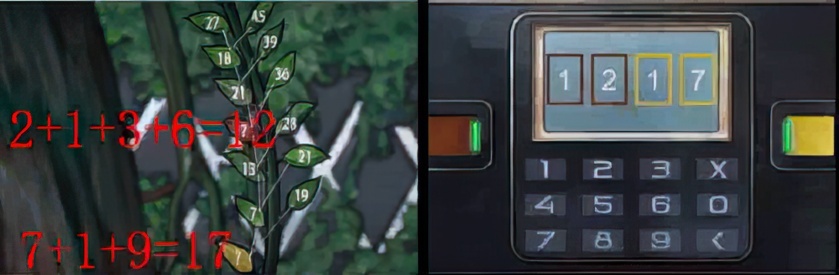
9. Guess the number on brown and yellow leaves according to numbers on the leaves, input password to enter the gate. Password: 1217.
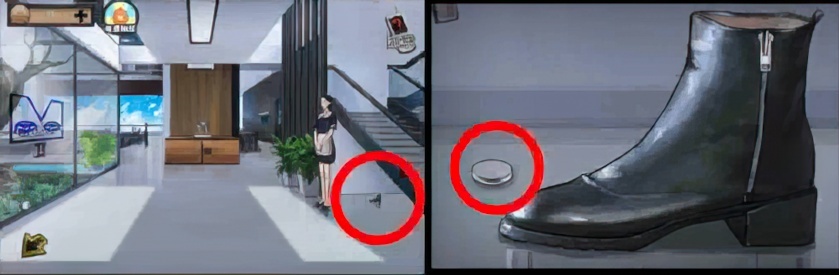
10. Pick up battery beside the boots in the corridor.

11. Unzip boots in the corridor to get bones in it.
12. Take a shard.
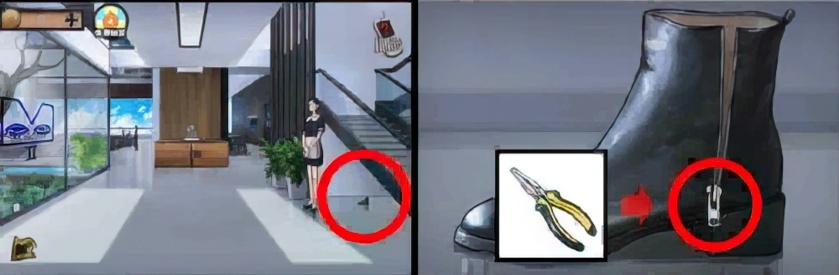
13. Remove the lock from the shoe with pliers.
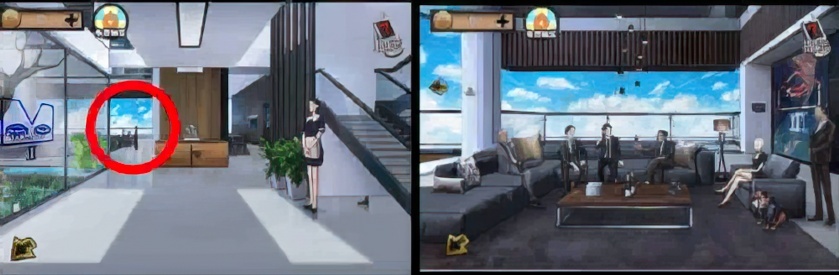
14. Enter the reception hall from the exit on the left side of corridor.
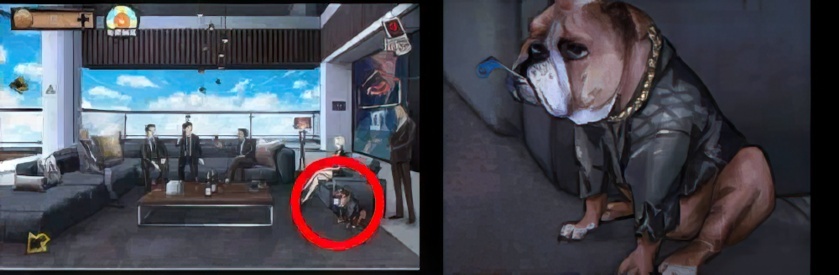
15. Check the dog in the reception hall.

16. Use bone to make the dog spit out the thing in its mouth, pick up “half a wind-up key”.
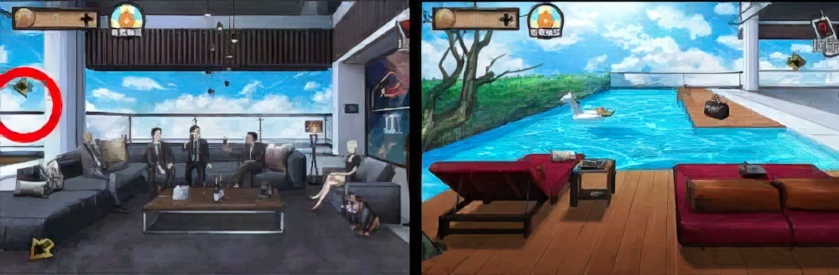
17. Enter the swimming area from the left side of reception hall.
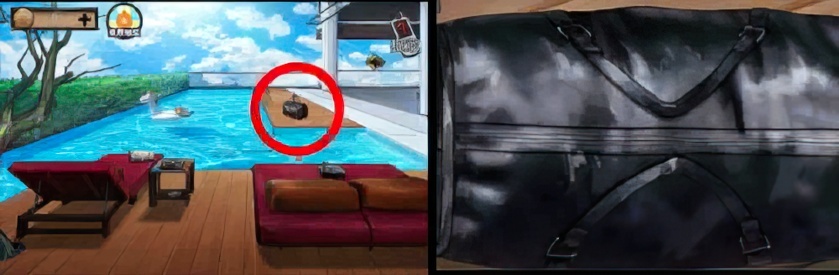
18. Check the bag in the swimming area.

19. Unzip the bag to get toy piano.

20. Pick up joystick in the swimming area.
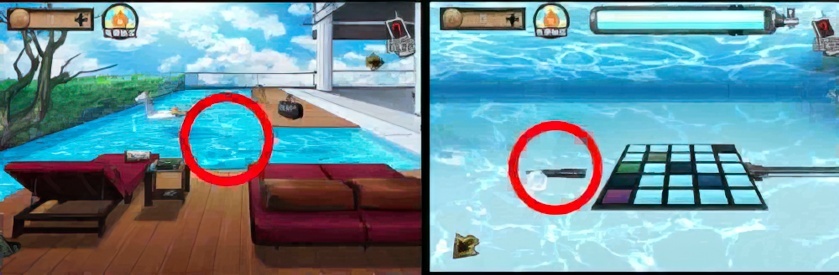
21. Enter the bottom of the pool, pick up screwdriver.
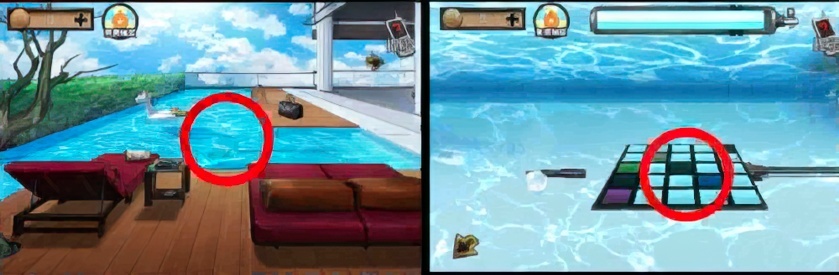
22. Enter the bottom of the pool, check the puzzle.

23. Complete puzzle at the bottom of the pool, open hidden grid on the aisle.
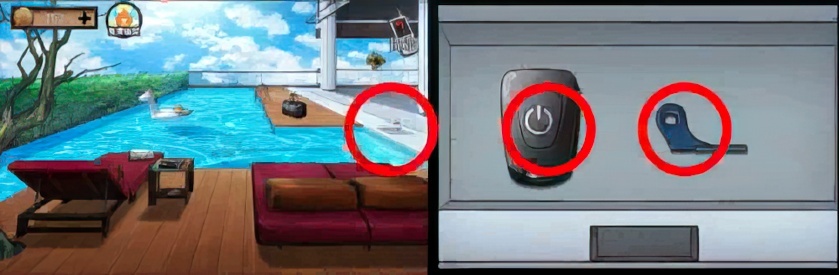
24. Check hidden grid on the aisle of the swimming area, get “infrared remote control without battery” and half a wind-up key.
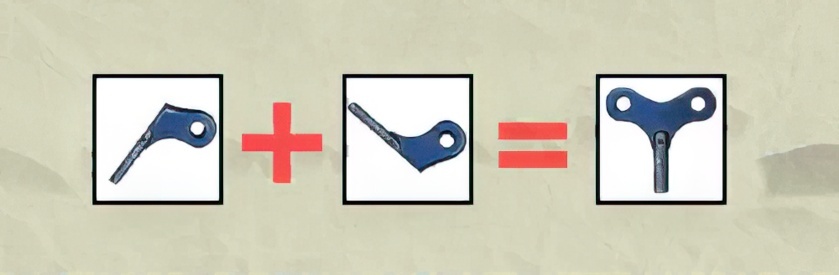
25. Combine 2 “half a wind-up key” into a complete wind-up key.
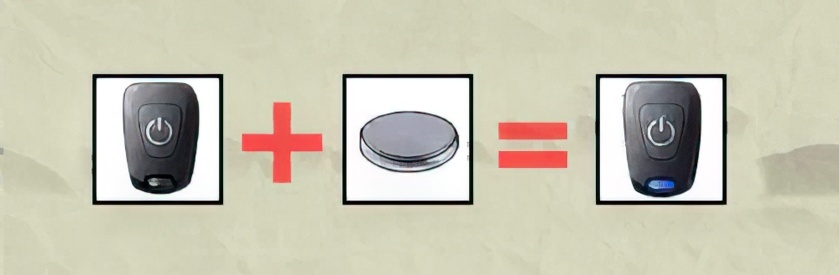
26. Install battery on “infrared remote control without battery”.
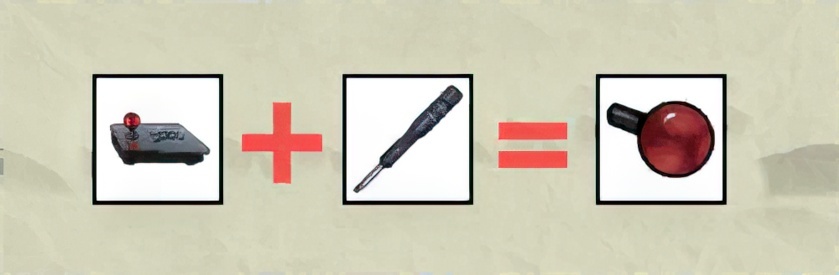
27. Use screwdriver to remove “controller of the joystick”.
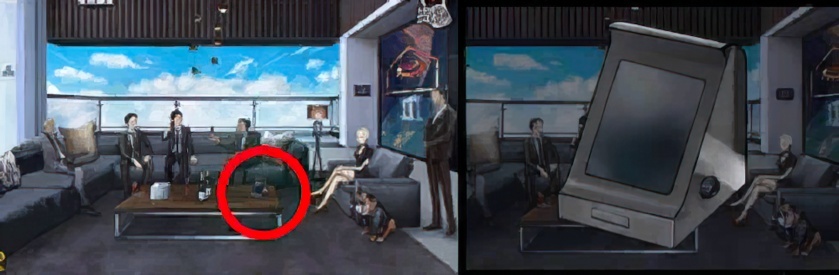
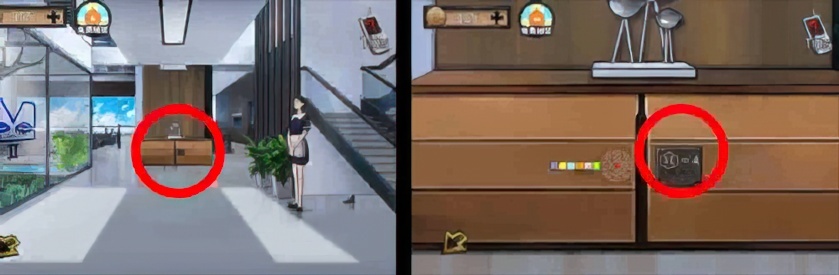
28. Check machine on the table of the reception hall.
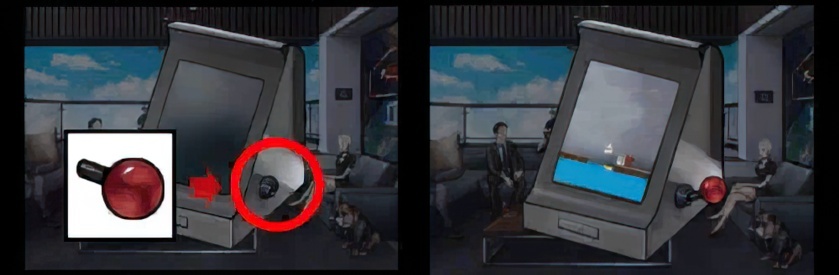
29. Install “controller of the joystick” on machines, pull down controller to start the machine.
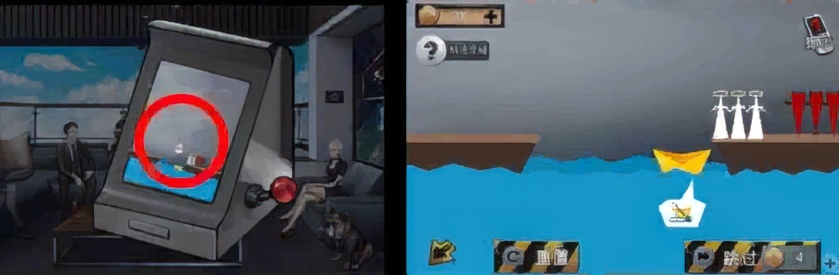
30. Click the screen of the machine on the table of reception hall to start game.

31. Send angles and demons to the other side safely to get the chip.
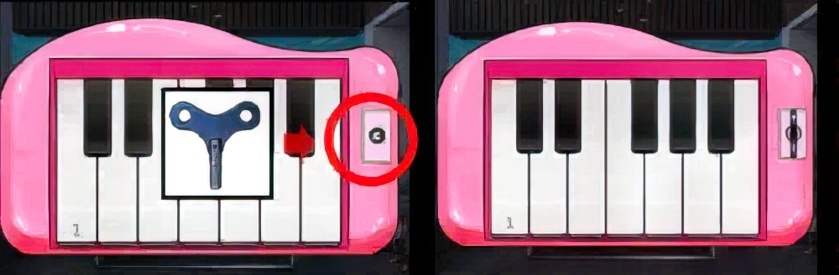
32. Install wind-up key on the hole on the toy piano.
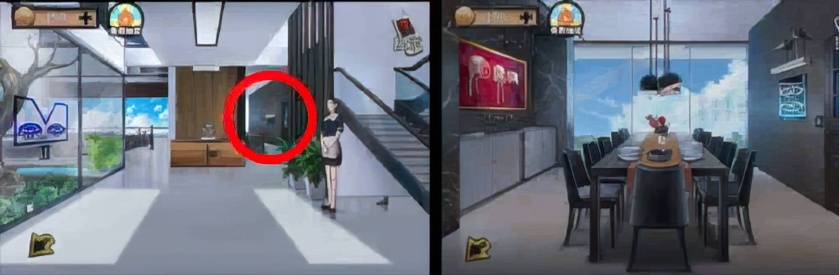
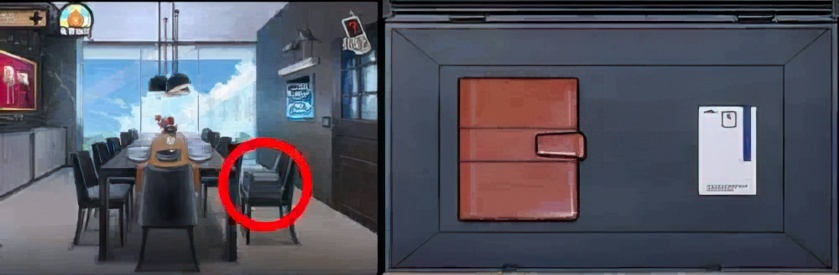
33. Enter the dining room from the exit on the right side of corridor.
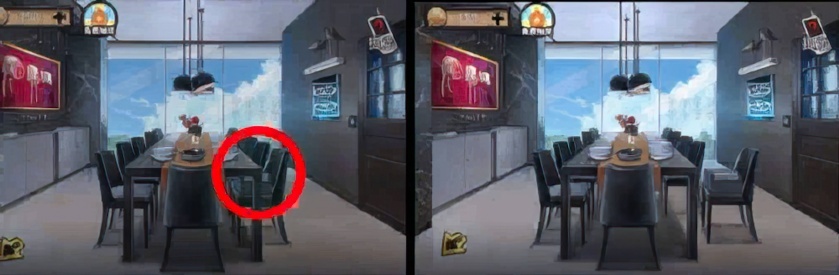
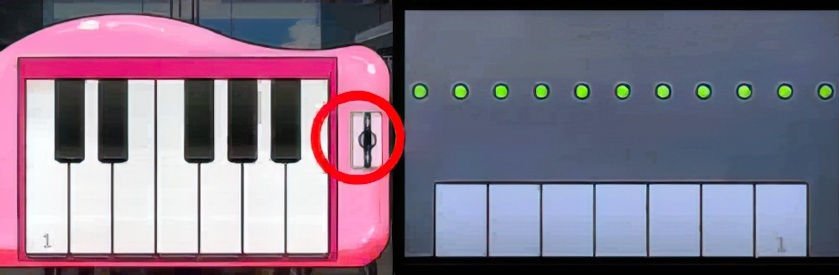
34. Pull out the chair on the right side of dining room.

35. Check box on the chair on the right side of dining room.
36. Wind up the toy piano. Open the box on the chair on the right side of dining room. Note: Sound of keys on the box are opposite to that on the piano.
37. Get diary and room card without chip in the box on the right side of dining room.
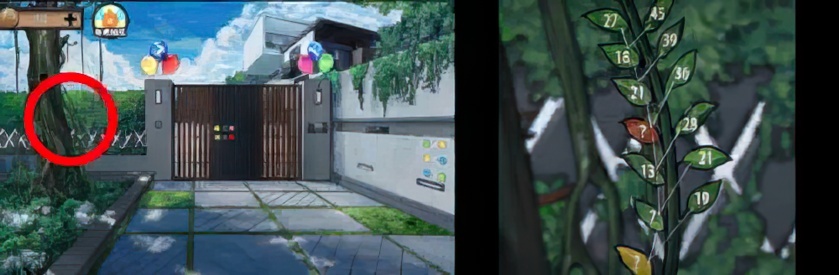
38. Check leaves on the tree.
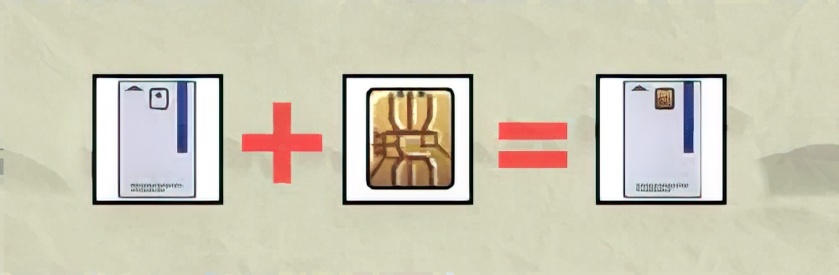
39. Combine chip and “room card without chip” into “room card with chip”.
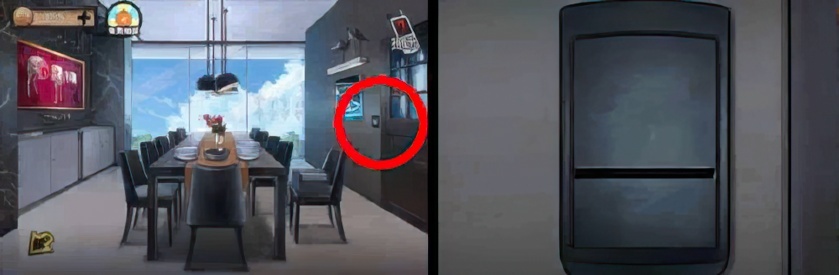
40. Check card reader on the wall of the dining room.

41. Use “room card with chip” on card reader on the wall of the dining room. Enter the kitchen.
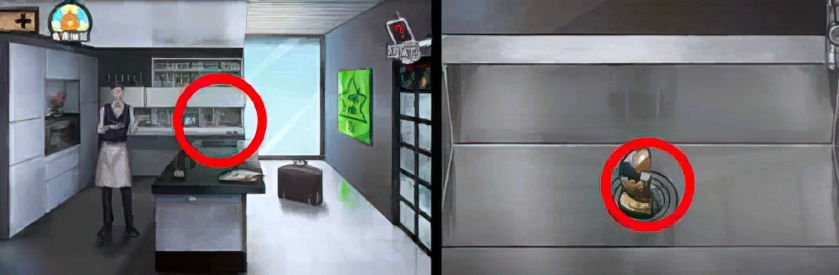
42. Check sink in the kitchen, pick up half door knob.

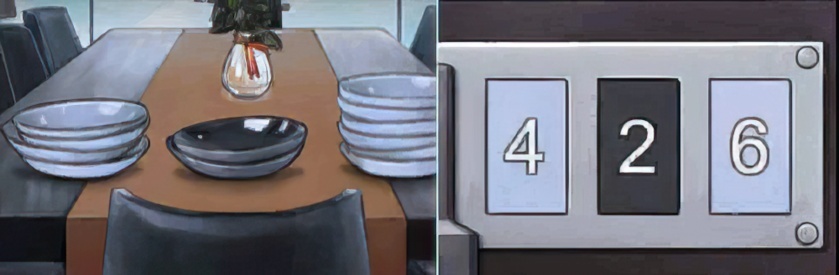
43. Pick up wooden box on the table of kitchen.
44. Complete puzzle on the wooden box, open it to get strong glue.
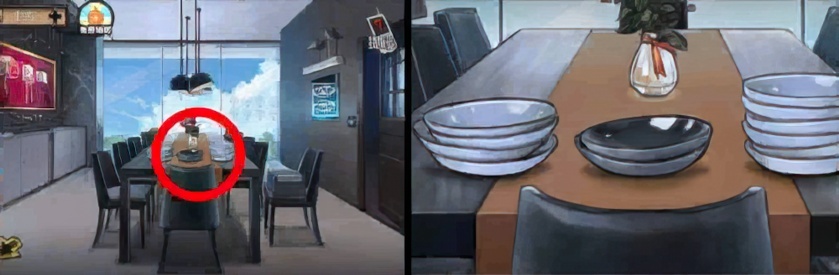
45. Check plates on the table of dining room.

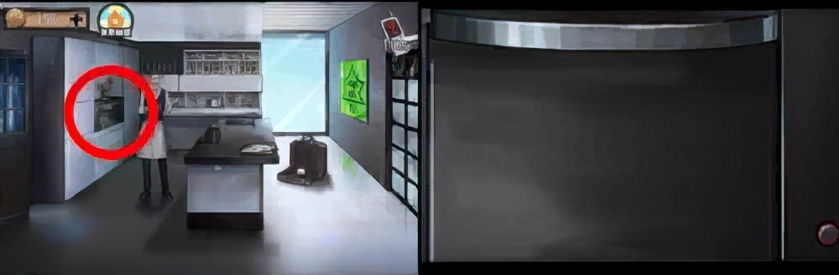
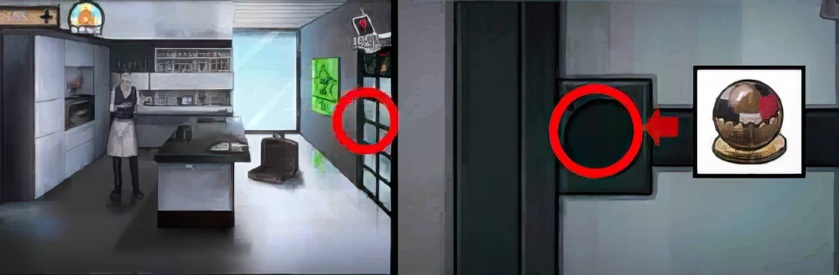
46. Check safe box on the ground of kichen.
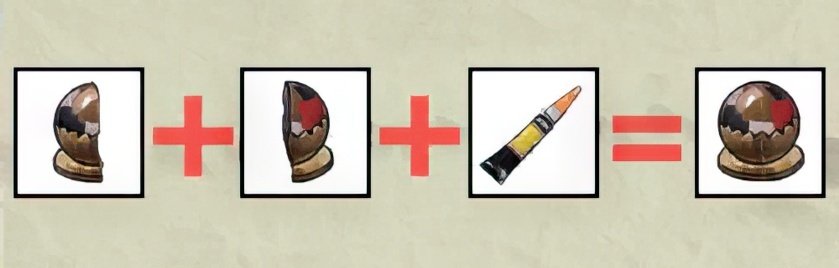
47. Open safe box according to number of plates on the table of dining room to get spherical candle. Password: 426.
48. Check oven on the left side of kitchen.
49. Open the door of oven in the kitchen, put spherical candle into the oven.

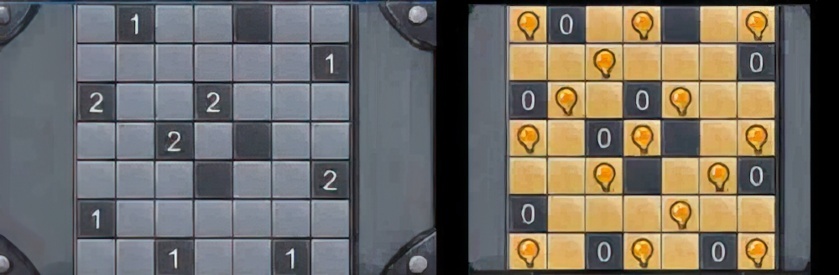
50. Close the door of oven in the kitchen, press the switch to get half key in the spherical candle.
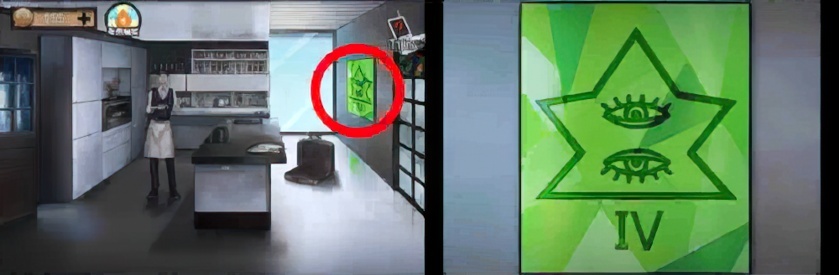
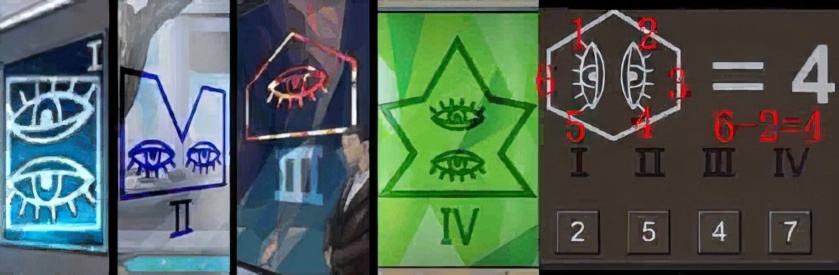
51. Check patterns on the right-side wall of the kitchen.
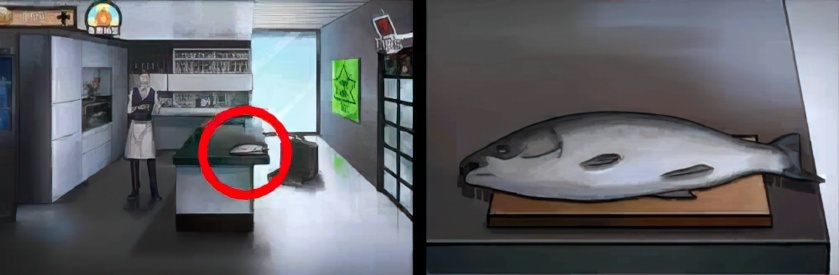
52. Check cabinet in the corridor, check combination lock on the right side of it.
53. Open the right-side door of cabinet in the corridor according to patterns on the wall of dining room, corridor, reception hall and kitchen. Get knife in the cabinet. Password: 2547.
54. Get back to the kitchen, check fish on the table.
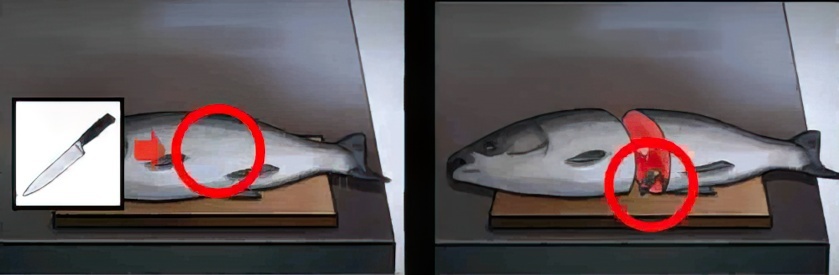
55. Cut the fish on the table in the kitchen with knife to get half key in it.

56. Combine 2 “half key” into a complete key.
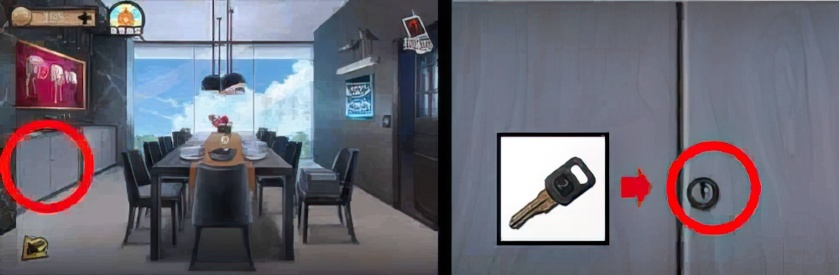
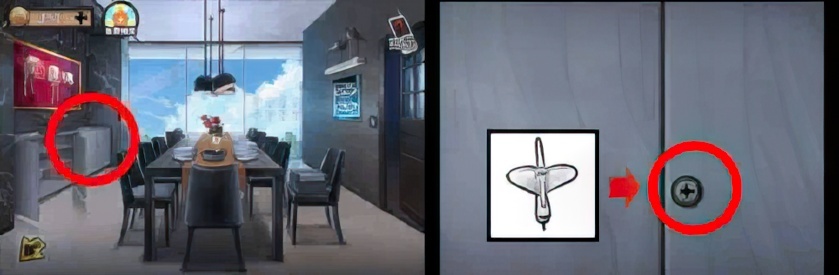
57. Open the left-side cabinet in the dining room with key to get half door knob.
58. Combine 2 “half door knob” and strong glue into complete door knob.
59. Install complete door knob on the door on the right-side door of the kitchen, turn the door knob.
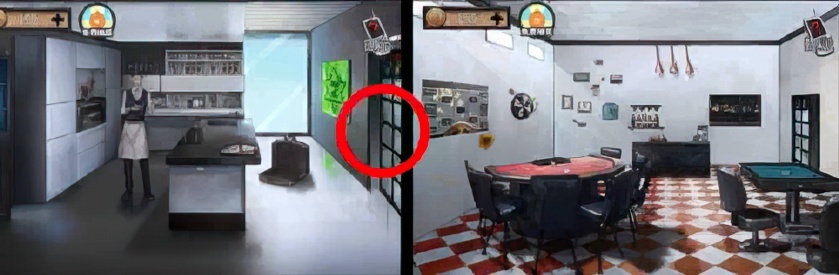
60. Enter gambling hall from the right-side door of the kitchen.
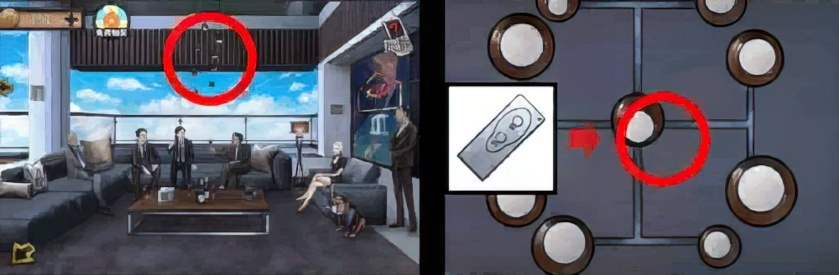
61. Check mahjong table in the gambling hall.
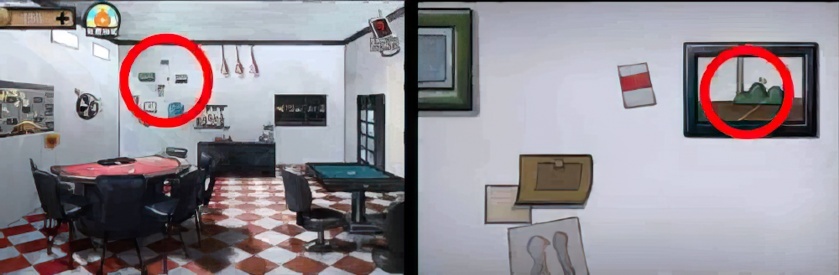
62. Check photo on the wall of gambling hall, turn the frame to get magnet.

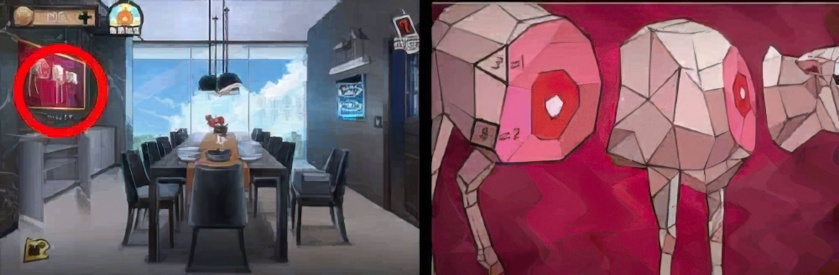
63. Get back to the corridor, check mahjong out side the glass wall.
64. Use magnet to draw mahjong outside the glass wall of the corridor to the hole. Get “five dots”.
65. Check patterns on the left-side wall of the dining room.

66. Check monitor on the right-side wall of the reception hall.
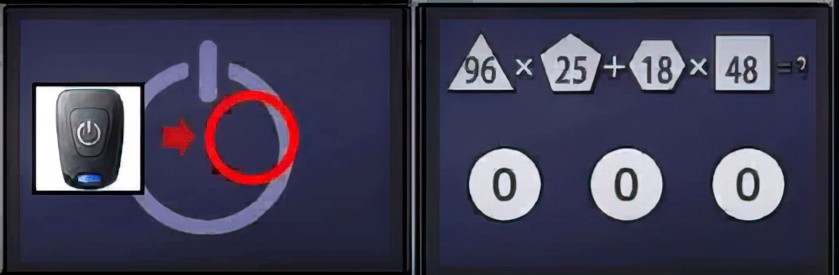
67. Use “infrared remote control with battery” to turn on the monitor on right-side wall of the reception hall.
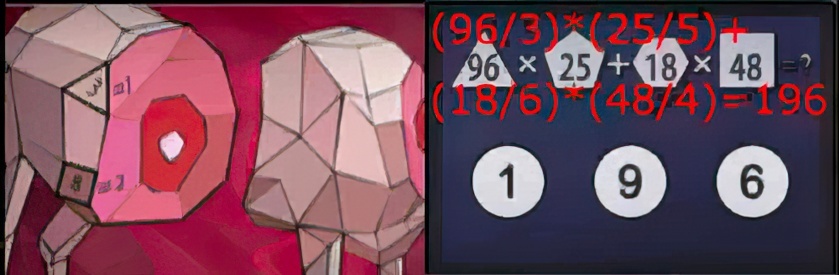
68. Input password on the right-side wall of reception hall according to patterns on the left-side wall of dining room to get envelope. Password: 196.
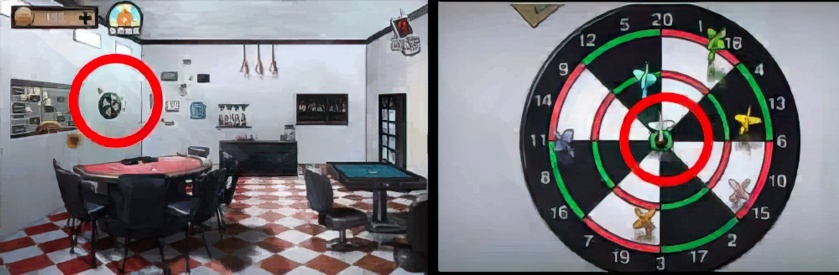
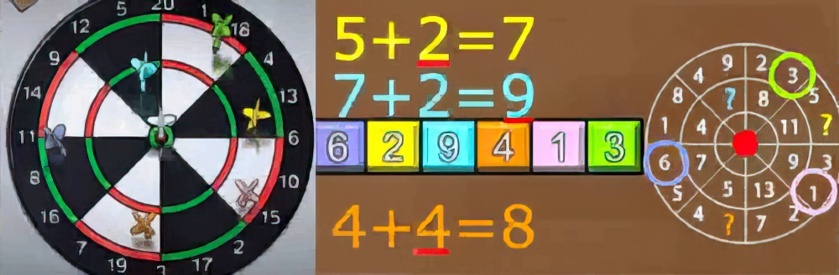
69. Check dart board on the wall of gambling hall, get white dart on it.

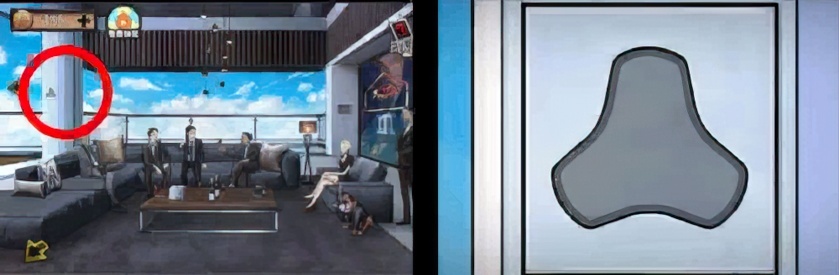
70. Check cabinet in the corridor, check combination lock on the left side of it.
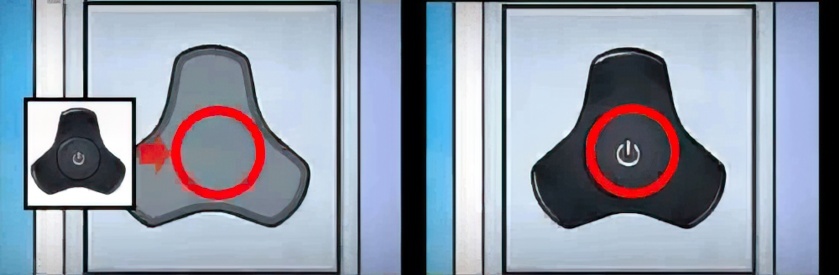
71. Open the left-side door of cabinet in the corridor according to the position of colored darts on the dart board. Get “futuristic button” and remote control of chandelier in the cabinet. Password: 629413.
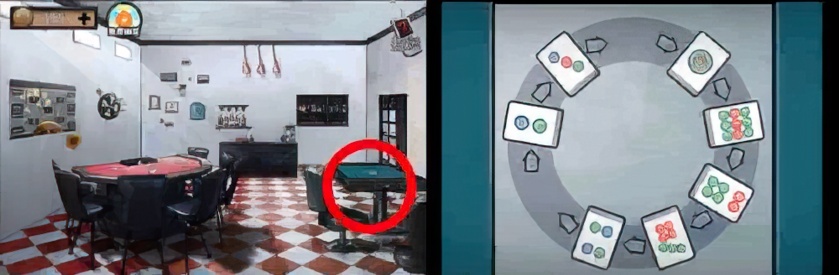
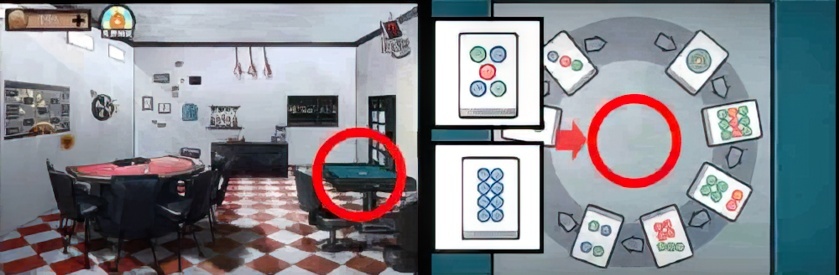
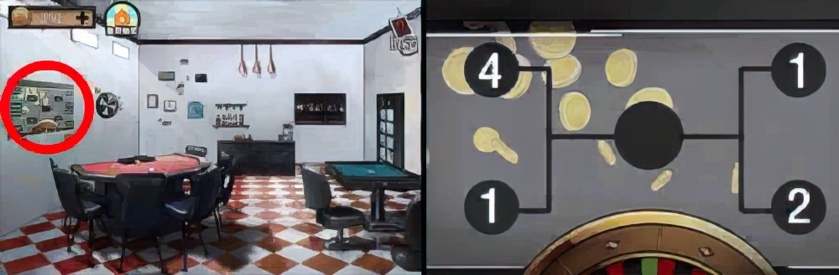
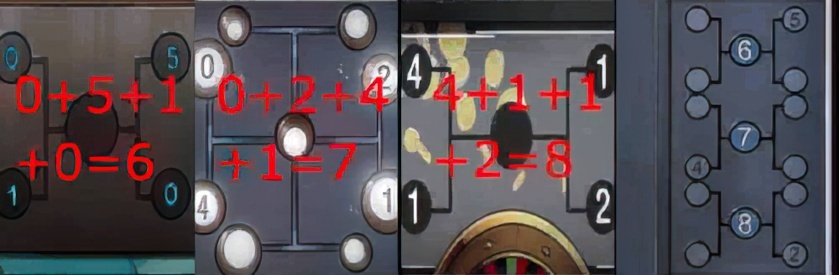
72. Check groove on the pillar of the reception hall.
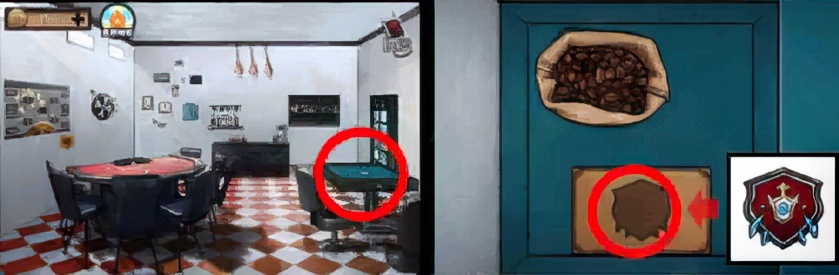
73. Insert “futuristic button” on the groove of the pillar in the reception hall. Press the button to open hidden grid, get “safe box shaped like a book” and “eight dots”in the hidden grid.
74. Put “five dots” and “eight dots” on the puzzle of the mahjong table in the gambling hall, start the puzzle.

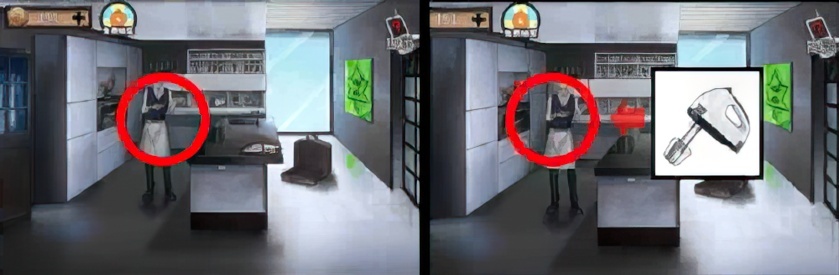
75. Complete puzzle on mahjong table in the gambling hall. Get coffee bean in it.
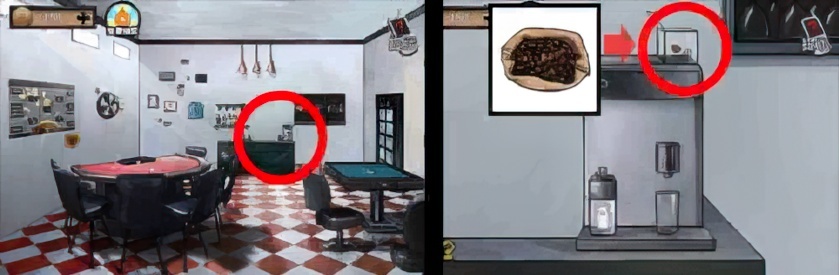
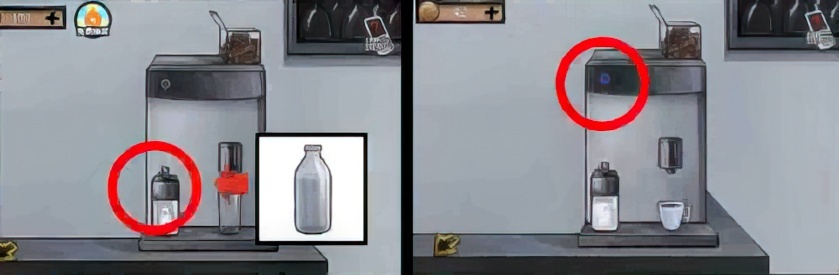
76. Pout coffe bean into the bean container of coffee machine in the gambling hall.
77. Open the right-side cabinet of dining room with white dart, get whisk and “half jetton”.
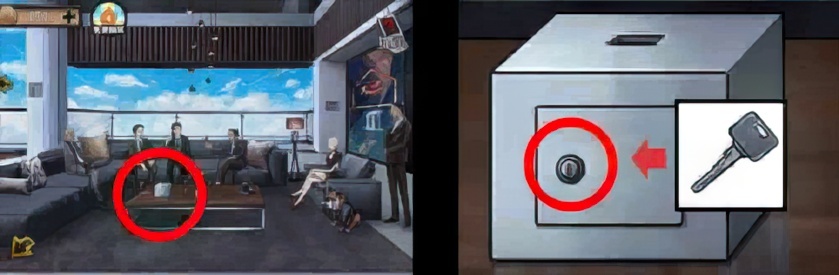
78. Talk to servant in the kitchen. Give the whisk to the servant, get milk.
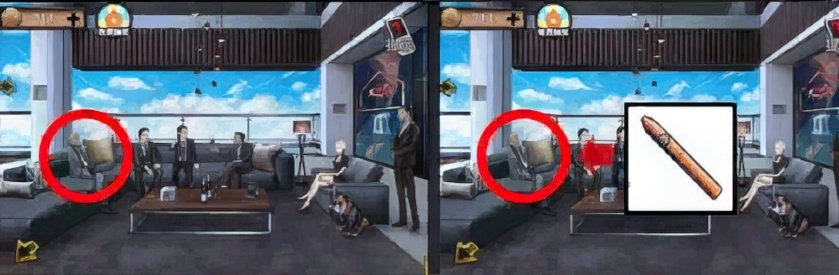
79. Pour milk into milk container of the coffee machine in the gambling hall, start coffee machine. Get a cup of coffee under the coffee machine.
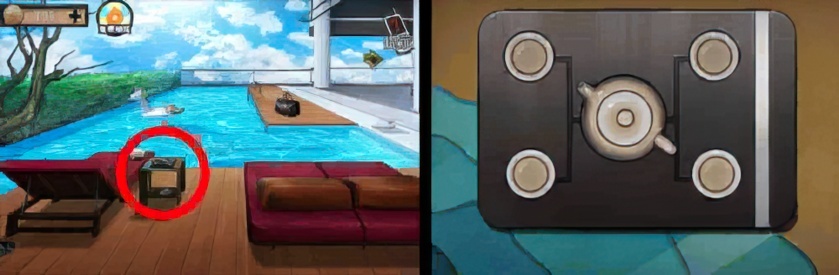
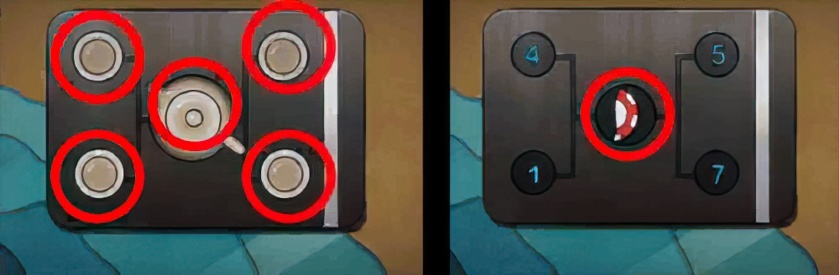
80. Place badge in the groove of the box in the mahjong table in gambling hall, open the box to get a small key.
81. Use key to open the iron box on the table in reception hall, get a cigar.
82. Check tea tray on the table in the swimming area.
83. Move cup and teapot on the tea tray in the swimming area to get “half jetton”.

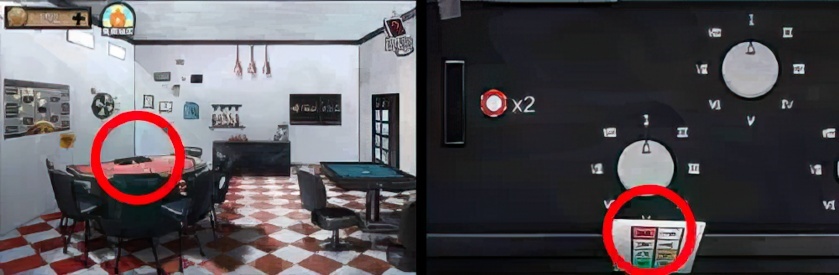
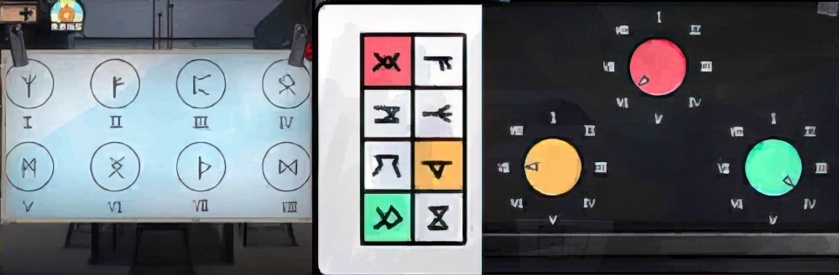
84. Combine 2 “half jetton” and strong glue into complete jetton.
85. Check chandelier in the reception hall, use remote control of chandelier to turn it on.
86. Check schedule chart of game on left-side wall of the gambling hall.
87. Open “safe box shaped like a book” according to numbers, patterns on the tea tray, chandelier and schedule chart. Get paper in the box. Password: 678.
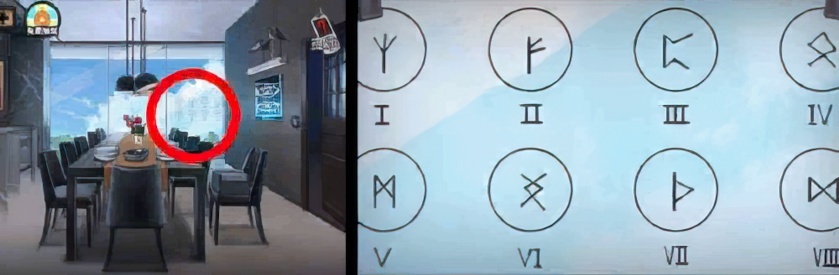
88. Check gambling table in the gambling hall, get card on it.

89. Put 2 jettons into the coin slot of the gambling table, start the puzzle.
90. Check patterns on the glass wall of dining room.
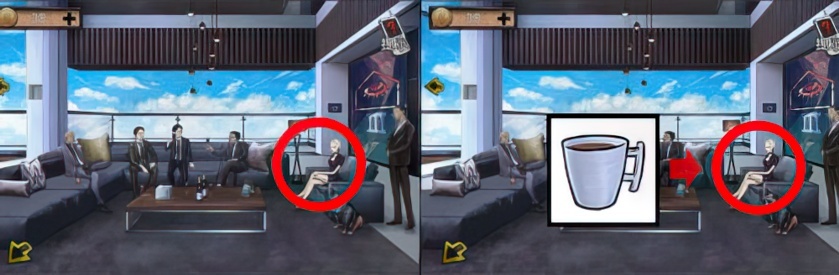
91. Adjust knobs on gambling table to the right place according to patterns on the glass wall of dining room and patterns on the card, get mobile phone.
92. Talk to bald man in the reception hall, give cigar to him, get a jetton.
93. Talk to lady in the reception hall, give coffee to her for a badge.


