
Royal Legends 2: Raised in Exile – The walkthrough of the game begins with the fact that years have passed since the king found out about his son’s betrayal. After the exile of his son, the kingdom found peace, until the king falls victim to a mysterious illness. You have to find out if the former prince has returned to carry out his sinister plans or is it someone from the kingdom. Use magic and save the kingdom. If you are stuck and do not know how to get through one of the locations, on our website you can watch the walkthrough of the game Royal Legends 2: Raised in Exile, and save the king.
Royal Legends 2: Raised in Exile – Walkthrough
Below you can watch the complete walkthrough of the game Royal Legends 2: Raised in Exile, namely the main story and the bonus chapter.

- Take CANE, break key (A).
- Open, take hint glass and CLOTHES BRUSH (B).
- Use CLOTHES BRUSH, take journal, FUEL and HORSESHOE (C).

- Use HORSESHOE, take map and HAIR CLIP (D).
- Use HAIR CLIP, take note, GEAR and EXAMINATION TOOLKIT (E).
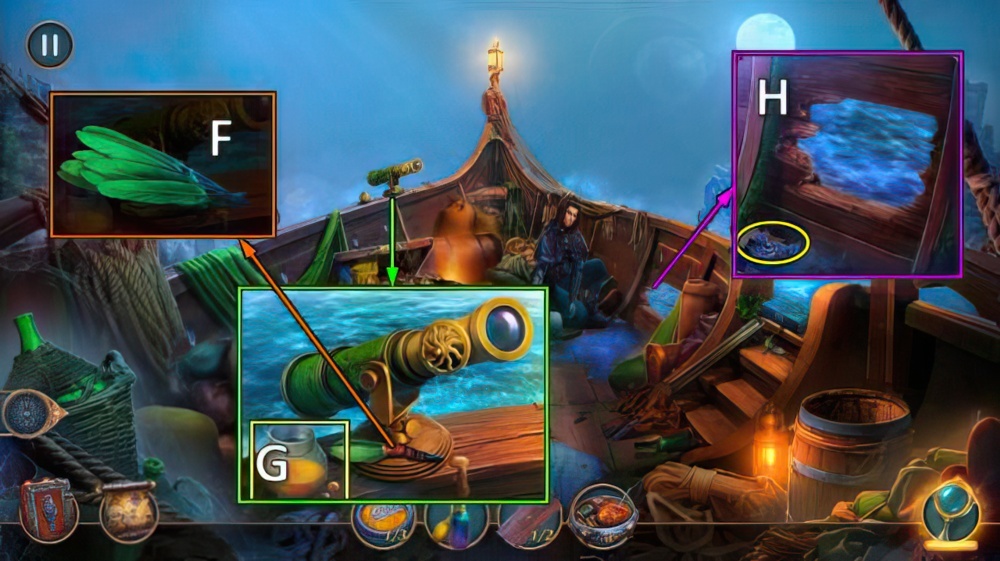
- Place EXAMINATION TOOLKIT (F).

- Play puzzle (G), solution (H).
- Receive MEDICAL REPORT.
- Offer MEDICAL REPORT (I).

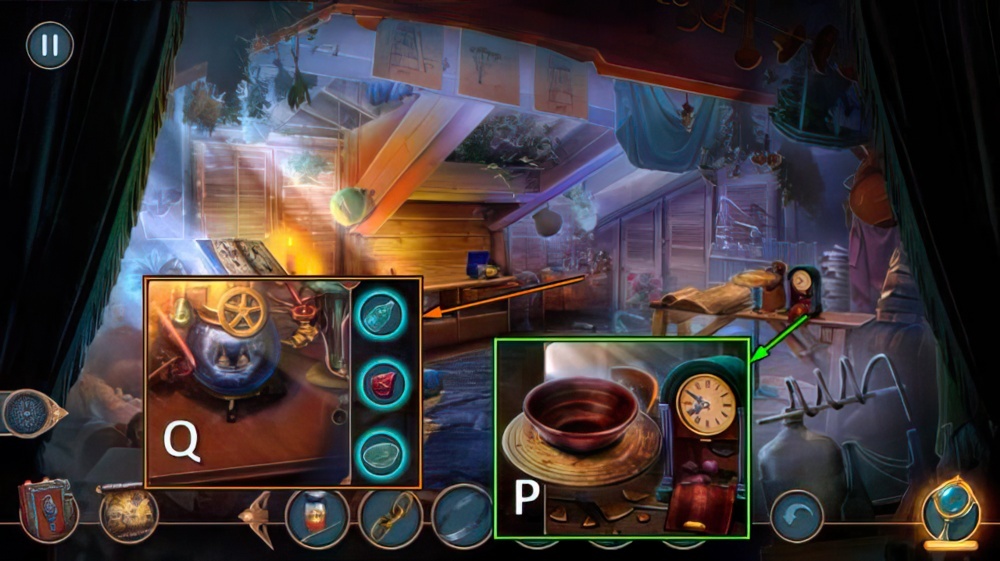
- Take FLASKS 1/3 and TWEEZERS (J).
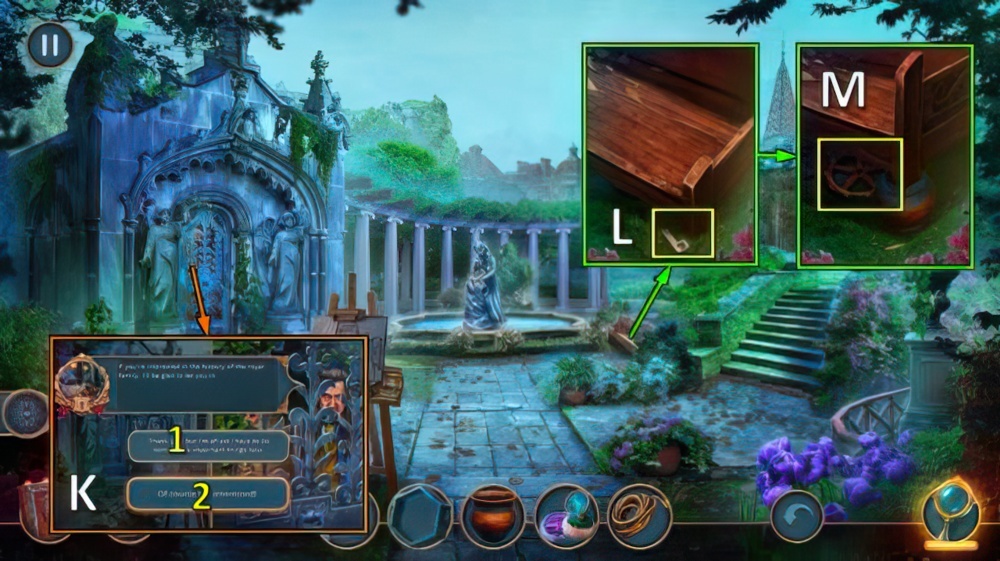
- Take TORCH (K).
- Find sections of PITCHFORK (L).

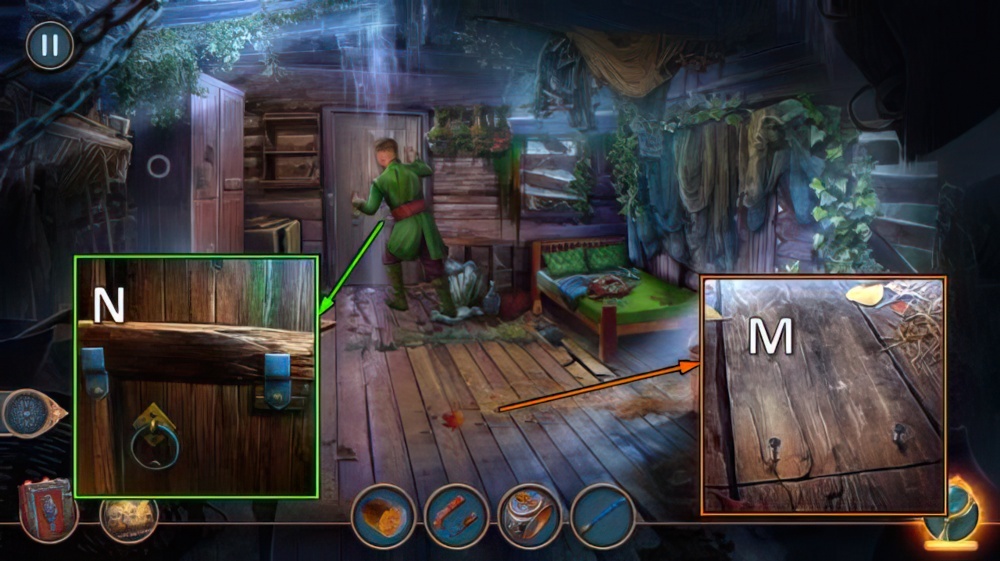
- Open (M).
- Use PITCHFORK (N).
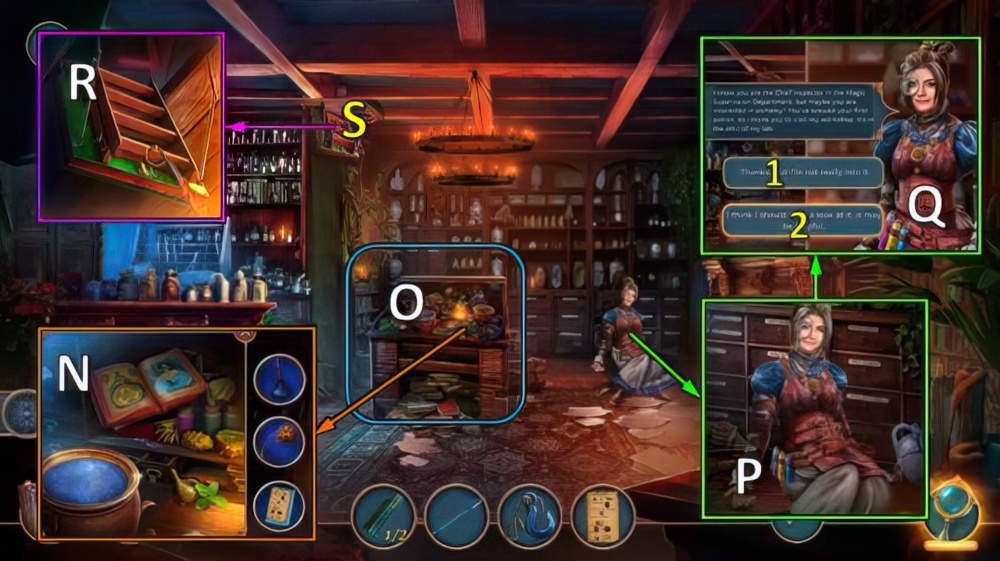
- Take CORKSCREW and FLINT AND STEEL (O).
- FUEL and FLINT AND STEEL on TORCH, receive FLAMING TORCH.
- Use FLAMING TORCH (P).
- Go (Q).

- Talk, select 1 or 2 (R).
- If you’ve selected 1, skip the steps marked below.
- Receive LIBRARY KEY.
- Take FLASKS 2/3, FUSES, HERBICIDE and notes (S).

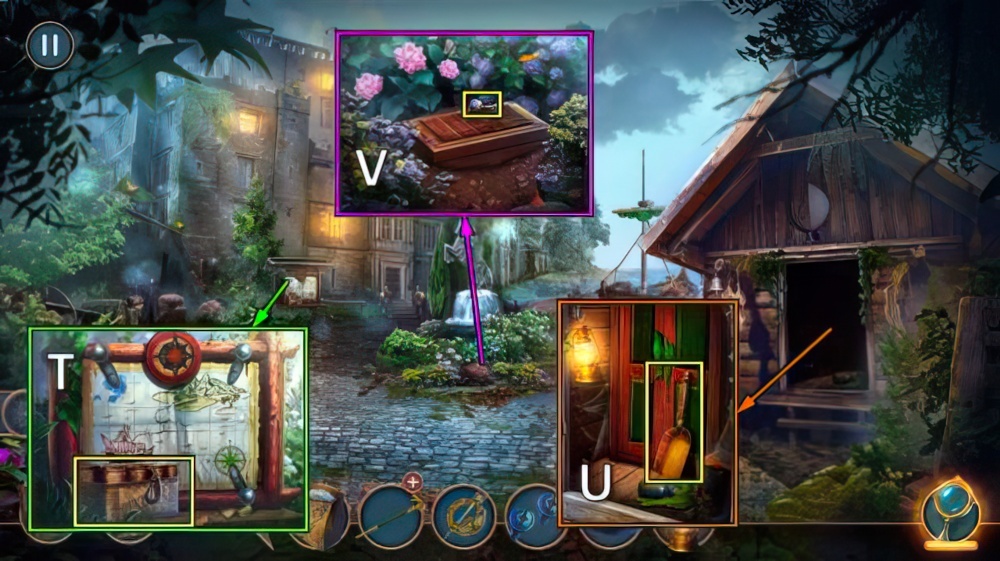
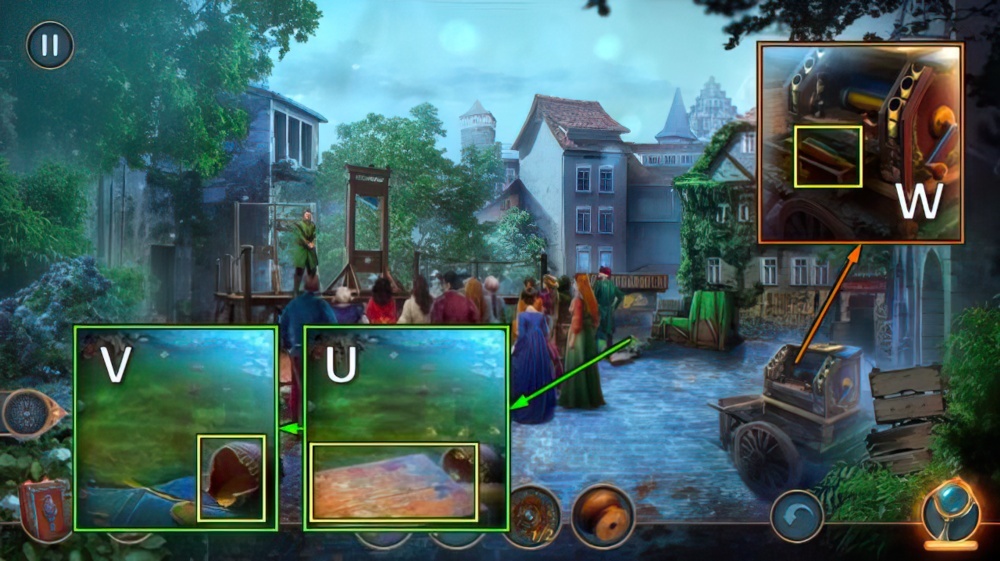
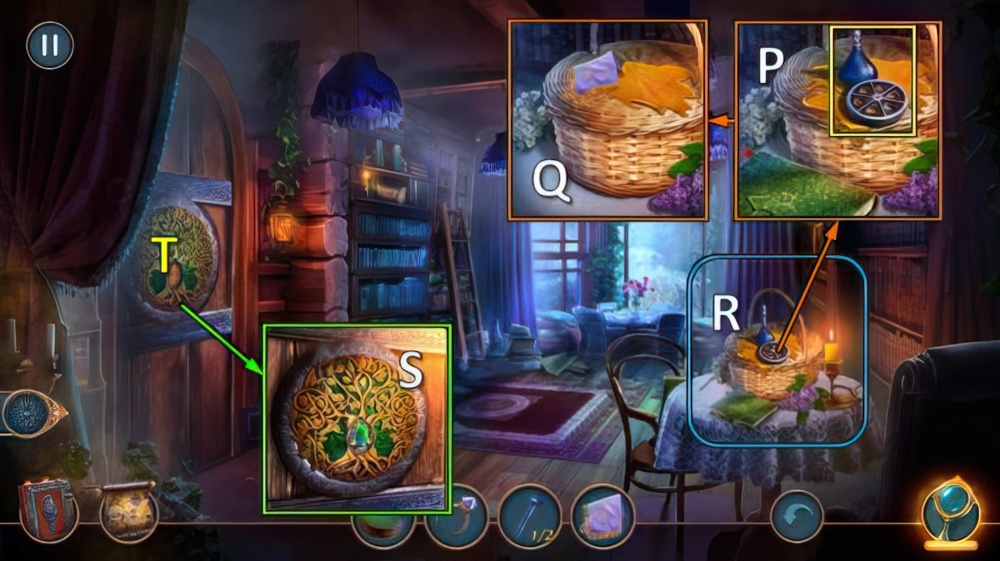
- Use HERBICIDE (T), take SALTPETER and BOOK (U).

- Place BOOK, take CANDLES (V).
- Use CANE, open. Take FLASKS 3/3 and CROSS WRENCH (W).
- Use LIBRARY KEY (X).

- Take DRAWING FRAGMENT (Y).
- Take WHEEL and FLAGS (Z).
- Place FLAGS (A).

- Easy solution (B): 1-2-3.
- Hard solution (B): 2-3-4.

- Take RAVEN AMULET (C).
- Place RAVEN AMULET (D), take FRAME PART (E).
- Walk down.

- Place FRAME PART, take DRAWING FRAGMENT and BOLT (F).
- Go (G).
- Place WHEEL and BOLT (H).
- Take GLUE and STONE (I).
- Go to By Roald’s Hut.

- Place GEAR and nut (J), use CROSS WRENCH (K).
- Easy solution (L): M-Ox4-Nx5.

- Hard solution (P): Q-Rx3-Tx4-Rx2-Sx4.
- Take DOOR KNOCKER (U).

- Use DOOR KNOCKER (V).
- Place STONE (W), take DRAWING FRAGMENT (@).
- Turn winch (X), take PESTLE and BUCKET (Y).
- Use BUCKET, take PIN (Z).
- Take SILVER COIN with TWEEZERS (A).
- Go (B).
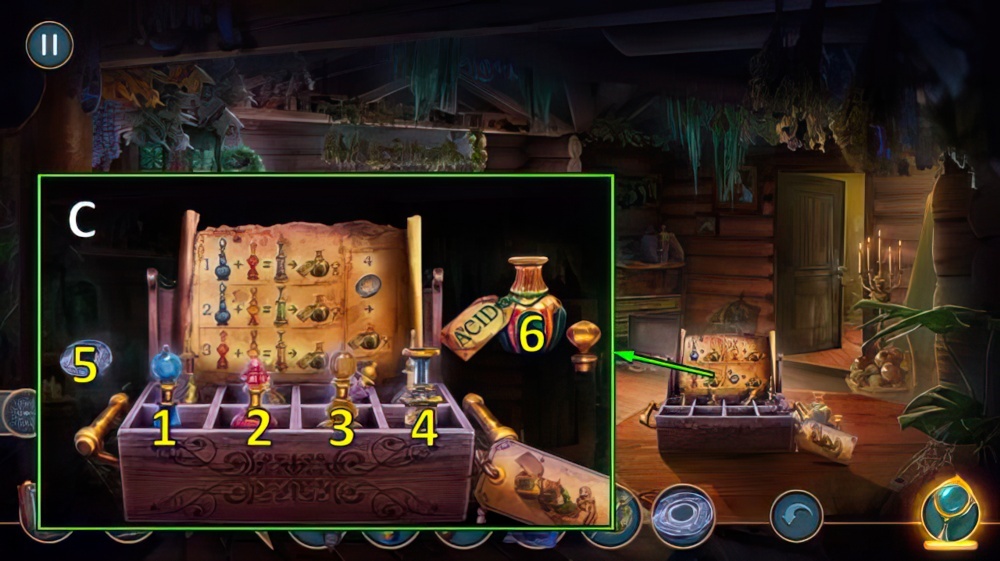
- Place FLASKS and SILVER COIN (C).
- Easy solution: (1-6)-(2-6)-(3-6)-(5-6).
- Hard solution: (1-4)-(2-4)-(4-6)-(1-4)-(3-4)-(4-6)-(2-4)-(3-4)-(4-6)-(5-6).
- Receive ACID.

- Use ACID (D).
- Take SCREWS and HAT (E), use CORKSCREW, take WINE (F).
- Go (G).
- Combine DRAWING FRAGMENT x3, use GLUE. Receive PHOTO.

- Use PHOTO, move books (H).
- Take note and MAGIC POWDER (I).
- Open book, use MAGIC POWDER (J).
- Play puzzle (K).

- Place PESTLE, CANDLES and WINE (L).
- Play puzzle (M).
- Solution (N): Ox3-P-Qx3-R-Qx3-Rx2-Qx3-S-Rx2-S-Rx2-Sx3-Rx2-S.
- Receive LANTERN.
- Take HOOK ON CHAIN and CARDBOARD CYLINDERS (T).
- Place LANTERN, take DUSTPAN (U).
- Use DUSTPAN, take CUFFLINK. Use PIN (V).

- Easy solution (W).
- Hard solution (X).
- Take GUNPOWDER (Y).
- FUSES, SALTPETER and GUNPOWDER on CARDBOARD CYLINDERS, receive DYNAMITE.

- Talk, offer DYNAMITE (Z).
- Easy solution (A).
- Hard solution (B).
- Go (C).

- Take SPONGE and NUTCRACKER (D).
- NUTCRACKER on CANE, receive SWORD-STICK.
- Use SWORD-STICK, take MIRROR (E).
- Use MIRROR (F) and HOOK ON CHAIN (G).
- Go (H).

- Use HAT, take note and MEDAL (I).
- Take PRECIOUS STONES 1/2 and OPENER (J).
- Place chair leg (K), use SCREWS and MEDAL (L).

- Move (M).
- Remove painting (N).
- Play puzzle (O).
- Solution (P): place pieces and turn until fixed in place.
- Receive WARDROBE KEY.
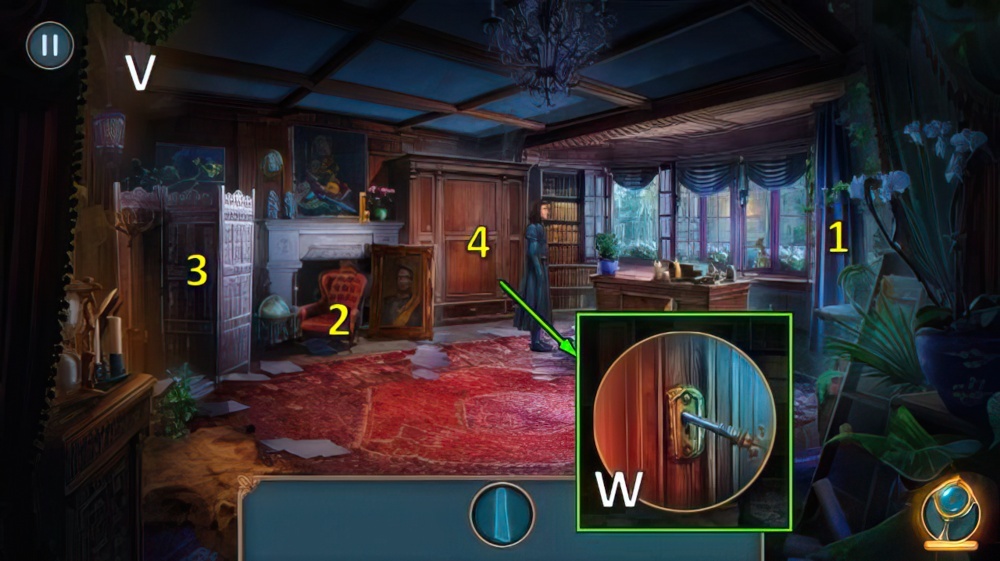
- Select 1-2-3-4 (V).
- Use WARDROBE KEY (W).
- Receive MAGNET.
- Walk down.

- Use MAGNET (X), take BLADE and RIBBON (Y).

- Offer RIBBON (Z).
- Take COAL AND PARCHMENT, move pillow (A).
- Use CUFFLINK, take ALCOHOL (B).
- Walk down.

- Use ALCOHOL and SPONGE, take PADDLES 1/2 and STAR AMULET (C).
- Place STAR AMULET, take NAUTICAL CHART (D).
- Use OPENER, take LONG-NOSE PLIERS and FOLDING RULER (E).
- Go to Andrius’s Study.
- Open FOLDING RULER, receive RULER.
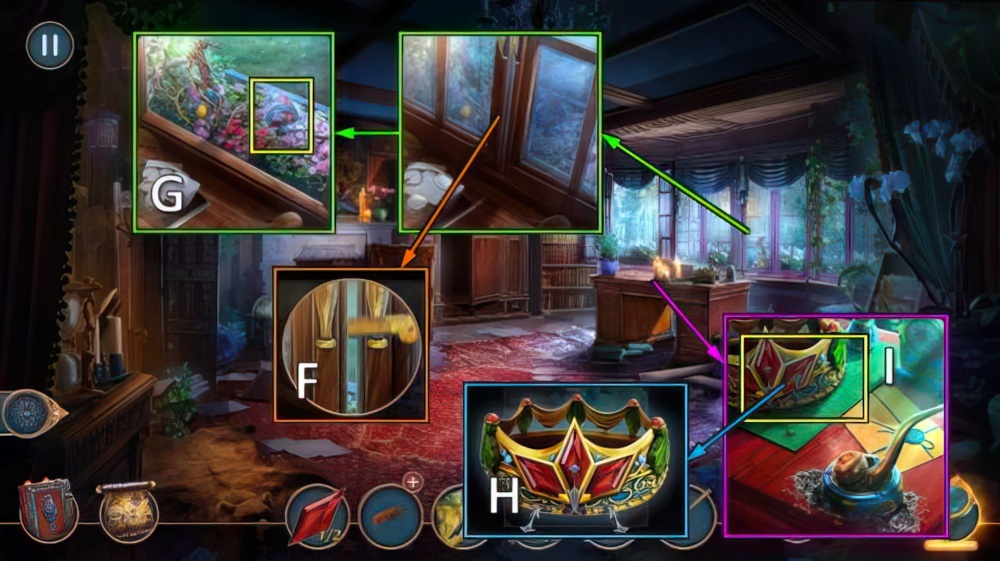
- Use RULER (F), take PRECIOUS STONES 2/2 and WIRE (G).
- Place PRECIOUS STONES, use LONG-NOSE PLIERS (H).
- Take ANDRIUS’S CROWN (I).
- Walk down.

- Place ANDRIUS’S CROWN, take COINS 1/3 and CHESSMEN (J).
- Place CHESSMEN (K).
- Easy solution (L).
- Hard solution (M): O-Nx2.
- Take LEATHER GLOVES (Q).
- Go (R).

- Use LEATHER GLOVES, take PERFUME and WOODEN SUPPORT (S).
- Walk down twice.
- WOODEN SUPPORT and WIRE on BLADE, receive PADDLES 2/2.
- Place NAUTICAL CHART and PADDLES (T).

- Take paddle (U) and hit 1-5.
- Take PLANKS 1/2 (V).
- Open, take LENS (W).

- Replace LENS (X), place COAL AND PARCHMENT (Y).
- Take CODE (Z).
- Place CODE, select 1-2-3-4. Open (A).
- Play puzzle (B), receive SEWING KIT.

- Take note, use SEWING KIT (C).
- Move sack, take SEASHELL, HEAVY STATUETTE and PIPE (D).
- Place PIPE, take PLIERS, PLANKS 2/2 and ROPE (E).
- Place ROPE (F).
- Use feather brush, take RESIN AND BRUSH (G).
- Place PLANKS, nails, HEAVY STATUETTE and RESIN AND BRUSH (H).

- Solution: J-take saw (M)-L-I-use saw (N)-L-take key (O)-Jx2-Ix2-take key (P)-K-L-take flint (Q)-J-K-J-use flint

- (R)-K-J-I-take board (S)-K-L-K-place board (T)-L-take key (U)-place keys (V)-touch book (W).

- Offer bone (X).
- Turn lock (Y).
- Use key (Z).

- Talk (A), receive SLEEPING POTION.
- Use SLEEPING POTION, take BAG (B).
- Open bag, take COINS 1/3, NIPPERS, PERFUME and SEASHELL.
- Take SHACKLE and COINS 2/3 (C).
- Use SEASHELL, take FILE (D).

- Use FILE (E).
- Play puzzle (F), receive STONE.
- Place STONE (G).
- Go (H).

- Take COINS 3/3 (I).
- Offer COINS, take CARROT, RAKE and BELLOWS (J).
- Offer CARROT (K).
- Go (L).

- Use NIPPERS, take COGWHEELS 1/2, HANDLE and MOLD (M).
- Place MOLD and BELLOWS (N).
- Move rod (O), use pliers (P).
- Receive LEVER.
- Place LEVER and SHACKLE (Q).

- Easy solution (R).
- Hard solution (S).
- Go (T).
- Take SKETCHBOOK and BARREL ORGAN ROLLER (U).
- Use PERFUME, take OIL (V).
- Place BARREL ORGAN ROLLER, take TOUGH BRUSH (W).
- Walk down.

- Use OIL and TOUGH BRUSH (X), take WOODEN PEG and WHEEL (Y).
- Place WHEEL (Z).
- Take BROOCH, use RAKE (A).
- Take FORK (B).
- Walk down.

- FORK on SKETCHBOOK, open. Take SKETCH OF EXECUTIONER.
- Place SKETCH OF EXECUTIONER (C).
- Play puzzle (D), receive ROYAL ORDER AMULET.
- Place ROYAL ORDER AMULET, take COGWHEELS 2/2 and MATCHES (E).
- Go to Main Square.

- Place COGWHEELS (F).
- Easy and hard solution: H-G-Hx4-G.
- Take SIGNBOARD (I).

- Place SIGNBOARD (J).
- Take note and FUSE. Place HANDLE, receive CORKSCREW (K).
- Walk down twice.

- Use CORKSCREW, receive CORK (L). Take AXE HANDLE (M).
- Place AXE HANDLE and WOODEN PEG, take DULL AXE (N).
- Go (O).

- Use DULL AXE, receive AXE (P).
- Go right.
- Use AXE (Q).
- Easy solution (R).
- Hard solution (S).
- Receive AXE.

- Take EMPTY LAMP and MAGNET, use BROOCH (T).
- Take FROG FIGURINE (U).
- Place FROG FIGURINE (V).
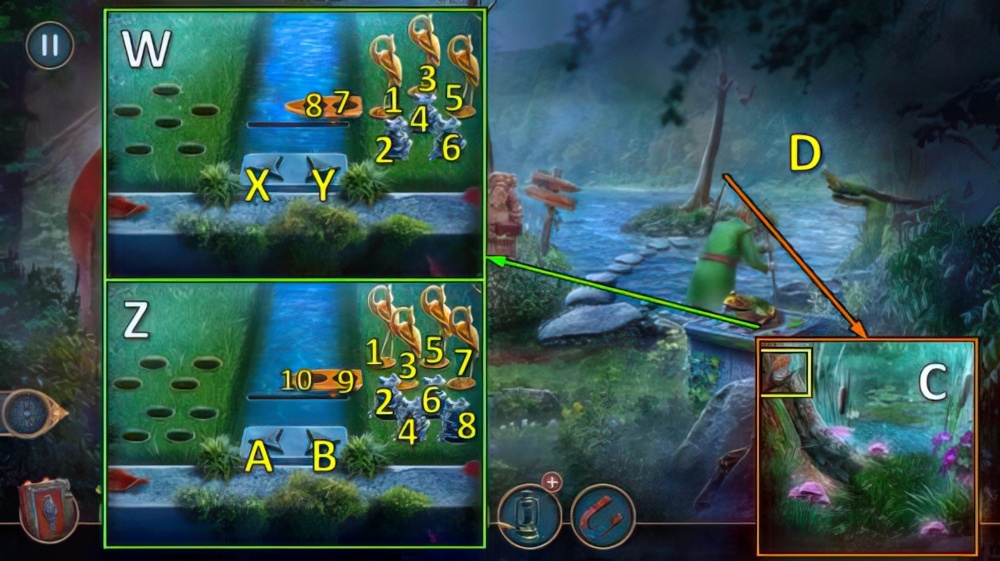
- Easy solution (W): 1-2-X-7-Y-3-X-7-Y-4-X-7-Y-5-X-7-Y-6-X-7-8.
- Hard solution (Z): 1-2-A-9-B-3-A-9-B-4-A-9-B-5-A-9-B-6-A-9-B-7-A-9-B-9-A-9-10.
- Take SIGNET RING, use AXE (C).
- Go (D).

- Take PAINTBRUSH and KEROSENE (E).
- FUSE, MATCHES and KEROSENE on EMPTY LAMP, receive LAMP.
- Place LAMP (F).
- Play puzzle (G), receive PICKAXE.
- Use PICKAXE (H).

- Take note and GEM 1/3, place CORK (I).
- Take BROOM (J).
- Take PEG, use BROOM.
- Take SMALL STEERING WHEEL (K).
- Use MAGNET, take BOTTLE OPENER (L).
- Take PLANK with BOTTLE OPENER (M).
- Place PLANK (N).

- Easy solution (O).
- Hard solution (P).
- Receive SHOVEL.

- Use SHOVEL, take SLINGSHOT (Q).
- Use SLINGSHOT (R).
- Take GEM 2/3. Use PAINTBRUSH (S), receive OWL FIGURINE.
- Walk down.

- Place OWL FIGURINE, take CHISEL (T).
- Place SIGNET RING, take MAST (U).
- Place MAST and SMALL STEERING WHEEL, take TONGS and GEM 3/3 (V).
- Go to Fisherman’s Hut.

- Place GEM (W).
- Play puzzle (X), receive FISHING ROD.
- Take ROPE with FISHING ROD (Y).
- Go (Z).

- Move branches. Place PEG, use rock. Place ROPE (A).
- Take BURDOCK LEAF and WOLF CUB (B).
- Offer WOLF CUB (C), receive JOSEPH’S BAG.
- Offer JOSEPH’S BAG (D), receive KEY.
- Go (E).

- Use KEY (F), take MALLET and WRENCH (G).
- Go to Riverbank.
- Use WRENCH (H).
- Avoid obstacles (I).

- Take SIEVE (J). Use CHISEL and MALLET, take DIAMOND RING and SPRING (K).
- SPRING on TONGS.
- Take SCREWS 1/2 and NECKERCHIEF (L), take CROW FEATHER with TONGS (M).
- Use BURDOCK LEAF and CROW FEATHER, move key (N). Go (O).
- Take note, SMALL WHEEL and VIAL (P).
- Use NECKERCHIEF, open (Q).
- Play puzzle (R), receive GREEN CRYSTAL.
- Place GREEN CRYSTAL (S). Go (T).

- Take HERBS, use DIAMOND RING (U).
- Take WIRE, FAN and note (V).
- Take OLD SHIRT.
- Use FAN, move cloth (W).
- Take WATER (X).
- Use WATER (Y).
- Take WATER CHUTE (Z).
- Walk down twice.

- Place WATER CHUTE (A).
- Easy solution (B).
- Hard solution (C).

- Take PEONY AMULET (D).
- Place PEONY AMULET (E).
- Go (F).

- Take DROPPER (G).
- Use SIEVE, take SEPTUM RING (H).
- Take BOOKS 1/2, place SEPTUM RING (I).
- Take SCREWS 2/2 (J).
- Go to Rane’s House.

- Place SMALL WHEEL and SCREWS (K).
- Take note, HOOK and REVIVING POTION RECIPE (L).
- Go (M).
- Place HERBS, VIAL and REVIVING POTION RECIPE (N).
- Play puzzle (O), receive REVIVING POTION.
- Offer REVIVING POTION (P).
- Select 1 or 2 (Q).
- If you’ve selected 1, skip the steps marked below.
- Receive RANE’S BAG and UMBRELLA.
- Use UMBRELLA (R).
- Go (S).

- Take PACKAGE and CLOCK HANDS (T).
- Take CINNABAR (U).
- Place CLOCK HANDS, take FLASK AMULET (V).

- Place FLASK AMULET (W).
- Play puzzle (X), receive STENCIL.
- Place STENCIL (Y), select 4-1-2-3 (Z).
- Take PINCE-NEZ (Y).
- Go to By Rane’s House.

- CARABINER 1/2 and HAT from RANE’S BAG.
- Take note, use knife (A).
- Place OLD SHIRT, WIRE and HAT, place pumpkin and place hat (B).
- Take SCARECROW (C).
- Place SCARECROW, take GLUE and NET (D).
- Place PINCE-NEZ, take SILVER KEY (D).
- Go (E).

- Use NET, take WEATHERVANE (F).
- Place HOOK and WEATHERVANE, take CHAIN and BOOKS 2/2 (G).
- Go to Rane’s House.

- Place BOOKS, take METAL RIM and SHEET WITH INVISIBLE SYMBOLS (H).
- Go (I).
- Use DROPPER and SHEET WITH INVISIBLE SYMBOLS (J), receive FOREST MAP.
- Go (K).

- Use SILVER KEY (L), take COMB (M).
- Walk down twice.
- Use COMB (N), take BLUE REAGENT and MATCHES (O).
- Go to Workshop.
- MATCHES on PACKAGE, take note and CLAY.
- Place CLAY, take BOWL (P).
- Place CINNABAR, BOWL and BLUE REAGENT (Q).

- Easy solution (R): (1-2)-(3-4)-6-7-8.
- Hard solution (R): (1-2)-(3-4)-5-6-7-8.
- Take any potion (S).
- Go to Backyard.

- Place FOREST MAP (T).
- Easy solution (U).
- Hard solution (V).

- Take RED PAINT and HEXAGONAL RING, place METAL RIM. Find remaining parts of barrel. Take BARREL (W).
- Place BARREL (X).
- Go (Y).

- Take note, MIRROR, FLOWERPOT and HARPSICHORD SUPPORT (Z).
- Use HARPSICHORD SUPPORT (A), take BAS-RELIEF FRAGMENT and CARABINER 2/2 (B).
- Open, place CHAIN and CARABINER. Pull torch (C).
- Go (D).

- Take POWDER and ROPE, place BAS-RELIEF FRAGMENT and GLUE (E).
- Play puzzle (F), receive STONE HARP.
- Place STONE HARP (G), take TAPESTRY (H).
- Place TAPESTRY (I).
- Go (J).
- Talk, select 1 or 2 (K).
- If you’ve selected 1, skip the steps marked below.
- Take HARPSICHORD KEYS 1/2 (L), place FLOWERPOT.
- Take VALVE (M).

- Take SHEET MUSIC (N).
- Place VALVE and HEXAGONAL RING, turn (O).
- Take note, EARRING and BRUSH (P).
- Place RED PAINT and BRUSH (Q).

- Easy solution (R): (1-W)-(2-Z)-(3-Y)-(4-U)-(5-X)-(6-T)-(7-V)-(8-S).
- Hard solution (R): to clean brush, dip in next paint twice, (1-W)-(2-Z)-(3-Y)-(5-X)-(7-V)-(2-3-S)-(2-7-T)-(3-7-U).
- Take PAINTED PEBBLES 1/3 and HOOK ON CHAIN (A).
- Go (B).

- Talk, receive MOSAIC FRAGMENT. Take HEART-SHAPED MOLD and SEASHELL (C).
- Use SEASHELL, place MOSAIC FRAGMENT (D).
- Easy solution (E): (1-2)-(2-5)-(18-15)-(15-16)-(16-11)-(3-4)
- (4-9)-(9-10)-(10-15)-(15-16)-(16-11)-(11-12)-(16-11)-(17-14)
- (14-13)-(13-8)-(8-7)-(3-8)-(8-13)-(15-10)-(10-5)-(10-9)-(9-14)
- (14-13)-(14-9)-(9-10)-(9-14)-(13-14)-(14-9)-(14-13).

- Hard solution (F): (12-11)-(11-6)-(6-5)-(5-2)-(2-1)-(17-18)-(18-23)
- (23-24)-(24-27)-(4-9)-(9-10)-(10-5)-(5-2)-(16-15)-(15-10)-(10-9)-(9-4)-(14-9)-(15-10).
- (12-11)-(20-15)-(15-16)-(16-11)-(11-12)-(16-11)-(8-13)-(13-14)
- (14-19)-(19-20)-(20-25)-(25-26)-(26-21)-(21-22).
- (24-19)-(19-20)-(20-15)-(15-16)-(20-25)-(25-26)-(19-20)-(20-15)
- (18-13)-(13-14)-(14-9)-(9-10)-(10-5)-(10-9)-(9-14)-(14-19)-(19-24)(24-27)-(27-28)-(27-24)-(23-24).
- (14-19)-(13-18)-(18-24)-(3-8)-(8-13)-(13-14)-(17-18)-(18-13)-(13-8)-(8-7)-(18-13)-(13-8)-(8-3)-(8-13)-(13-18)-(18-17).
- Take LITTLE BELL (G).

- Place LITTLE BELL, take TUSK (H).
- Go to Castle Corridors.
- Place MIRROR (I) and HOOK ON CHAIN (J).
- Go (K).

- Use vase (L).
- Place ROPE (M).
- Take note and SHEET OF PAPER (N).
- Place TUSK, take ROSE AMULET (O).

- Take CHARCOAL, place MIRROR (P).
- Solution (Q).
- Take SAFE PART and METAL PIN (R).

- Place METAL PIN (S).
- Take HAIR STICKS (T).
- Place POWDER (U). Solution: Vx2-W-Xx2.
- Open, take HAIRPIN (Y).
- Walk down three times.

- Break key, use HAIRPIN (Z).
- Play puzzle (A), receive LEATHER GLOVES.
- Use LEATHER GLOVES (B), take BUTTERFLY AMULET (C).
- Go (D).

- Place BUTTERFLY AMULET, take HARPSICHORD KEYS 2/2 (E).
- Place HARPSICHORD KEYS and SHEET MUSIC (F).
- Easy and hard solution (G): 2-8-3, 9-5, 4-12-5, 6-11-10-12-7, 2-12-7, 9-5.
- Take PAINTED PEBBLES 2/3 and MAGNET (H).
- Go forward.

- Use MAGNET, take SCARF (I).
- Use EARRING, take RIBBON (J).
- Offer RIBBON (K), take PAINTED PEBBLES 3/3 (L).
- Go (M).

- Place PAINTED PEBBLES, take BLADE (N).
- Use BLADE (O).
- Take NEEDLE AND THREAD (P).
- Move tablecloth, place SHEET OF PAPER and CHARCOAL.
- Take SAFE CODE (Q).
- Go (R).

- Place ROSE AMULET (S), take KING STATUETTE and CORKSCREW (T).
- Go to Andrius’s Chambers.

- Place SAFE CODE and SAFE PART (U).
- Solution: right 20, left 70, left 0, right 40, left 90.
- Receive PEARL NECKLACE.
- Use PEARL NECKLACE (V), take STAINED GLASS FRAGMENT (W).
- Take FLAT TOKEN with HAIR STICKS (X).
- Walk down.

- Move rug, use FLAT TOKEN (Y). Take CANE.
- Use CORKSCREW (Z), take CHISEL (A).
- Walk down twice.

- Place SCARF and CANE, take CHANDELIER and TWO-PRONGED FORK (B).
- Go to Garden.
- Use TWO-PRONGED FORK (C), take WINDING KEY (D).
- Go left.

- KING STATUETTE and CHISEL on HEART-SHAPED MOLD, receive STONE HEART.
- Place STONE HEART (E), take note and PORTRAIT OF ROALD (F).
- Place PORTRAIT OF ROALD (G).
- Play puzzle (H).
- Go to Andrius’s Chambers.

- Use WINDING KEY, take FRAME PART (I).
- Walk down twice.
- Place FRAME PART (J).
- Play puzzle (K), receive MAIN HALL KEY.
- Use MAIN HALL KEY (L).
- Go (M).

- Take RIBBON (N).
- Take SWORD, place NEEDLE AND THREAD and RIBBON (O).
- Take FLINT AND STEEL and NAPKIN (P).
- Use NAPKIN, take STAINED GLASS FRAGMENT 2/2 (Q).

- Place STAINED GLASS FRAGMENT (R).
- Easy solution (S).
- Hard solution (T).
- Take CANDLES (U).

- CANDLES and FLINT AND STEEL on CHANDELIER.
- Open, place CHANDELIER (V).
- Use SWORD (W).

- Easy solution (X): 3-2-1, 1-3-2, 2-3-1.
- Hard solution (Y): 3-4-5-1-2, 5-4-3-2-1, 1-5-3-4-2.
- Select symbols when matching tokens are in green area (Z).
- Walkthrough Bonus Chapter, at the link below.


