Royal Romances Episode 11: The True Queen – The walkthrough of the game begins with the fact that you are healed with the help of dragon magic, the king is unaware of the return of the dragon. You know the castle like no other, so you and your friend Evelyn will have to get inside and get Illeon’s notes on the attack plans. However, you have an advantage over him, the king is unaware of the dragon being controlled by Amelia. She, too, will come to the aid of the forest. If you are stuck and do not know how to get through any of the locations, on our website you can watch the walkthrough of the game Royal Romances 11: The True Queen, and put an end to this conflict.
Royal Romances Episode 11: The True Queen – Walkthrough
Here you can watch the full walkthrough of the game Royal Romances Episode 11: The True Queen, namely the main plot.

- Take BRUSH (R), RUST CLEANER RECIPE and STONE SWAN WING.
- Add STONE SWAN WING (S), take ELABORATE HANDKERCHIEF and CARVED DOOR KEY.
- Insert CARVED DOOR KEY (T).
- Enter.

- Take FEATHER AMULET (U).
- Insert FEATHER AMULET (V).

- Play puzzle (W), take MAGIC SEAL SCROLL.
- Add MAGIC SEAL SCROLL (X). Press runes A-B-C-D.
- Move forward.
- Answer (Y).

- Add ELABORATE HANDKERCHIEF (Z), press flags, take DIAMOND PENDANT.

- Use DIAMOND PENDANT (A), take SHORT ROPE and HARP TUNING KEY.
- Return to In Front of the Castle.
- Take BLACKBERRIES (B).
- Add HARP TUNING KEY (C).

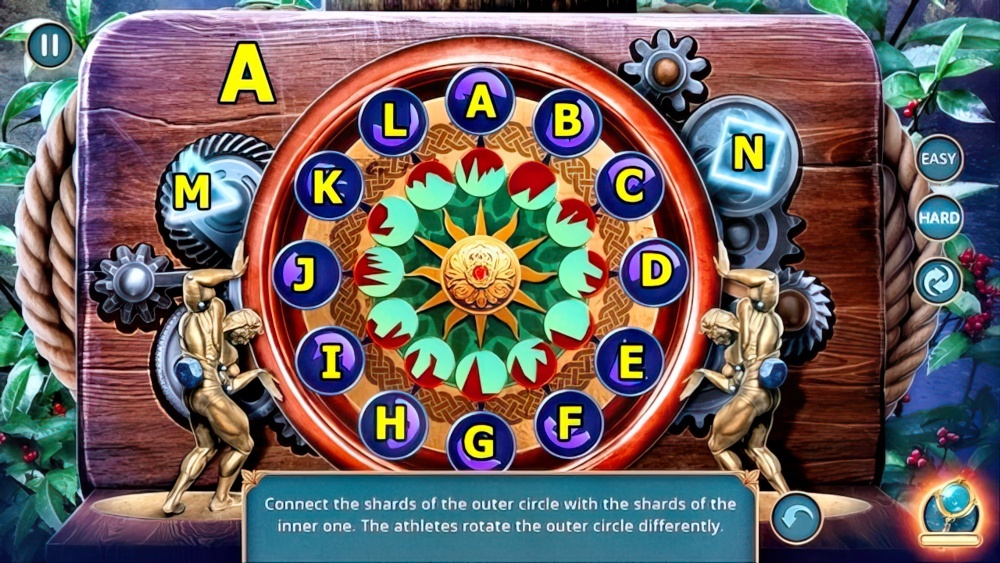
- Solution: (D) Easy: Ax2-C-Hx3-Ex2-Fx3.
- Solution: (E) Hard: Ax2-Cx2-D-Kx3-Fx3-Mx2-H.
- Take QUEEN SYLVANNA’S BARRETTE (F).
- Enter Inside the Castle.
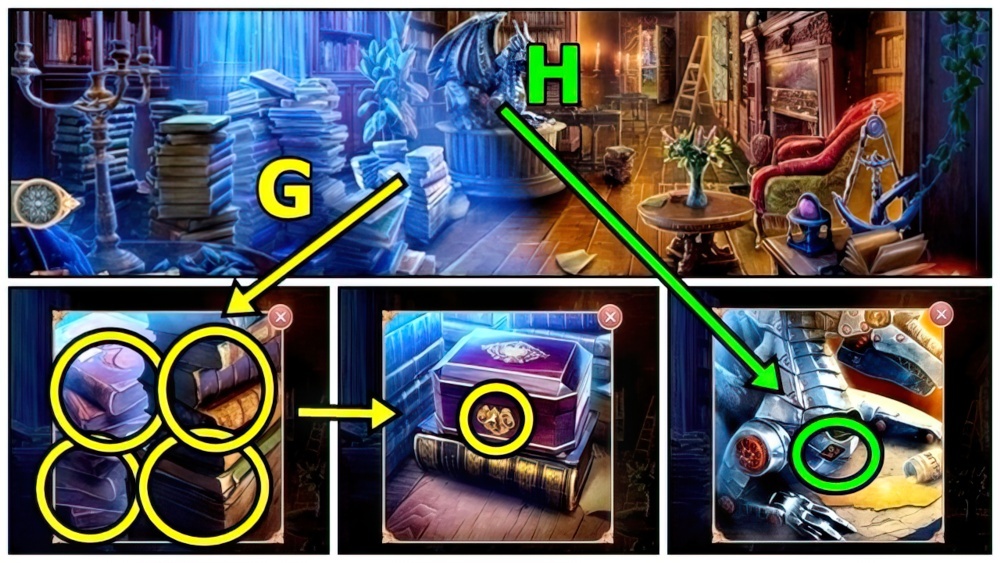
- Move books (G). Use QUEEN SYLVANNA’S BARRETTE, take MECHANISM PART.
- Add MECHANISM PART (H).

- Solution: (I) Easy: When pressing C, rotate it to next pin above. Ax3-C, Ax3-C, Bx5-C, Bx2-C, A-C, Bx2-C, Bx3.
- Solution: (J) Hard: When pressing C, rotate it to next pin above. Bx2-C, Ax2-C, Ax4-C, Bx2-C, Ax2-C, Bx2-C, Ax3.

- Take STRONGMAN PICTURE (K) and POWDER BAG.
- Move forward.
- Remove (L).
- BLACKBERRIES and POWDER BAG in RUST CLEANER RECIPE, receive RUST REMOVER.
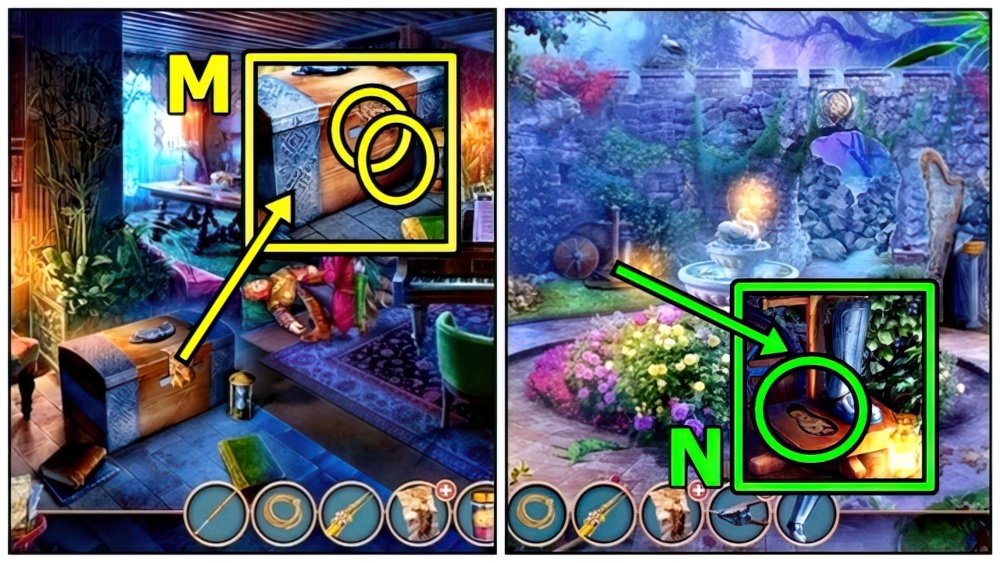
- Add BRUSH (M) and RUST REMOVER. Read, take TORN BELLOWS and GREAVES.
- Return to In Front of the Castle.
- Add GREAVES (N), take PAWN.
- Enter Inside the Castle.

- Use PAWN (O), receive GLUED PAWN.
- Move forward.
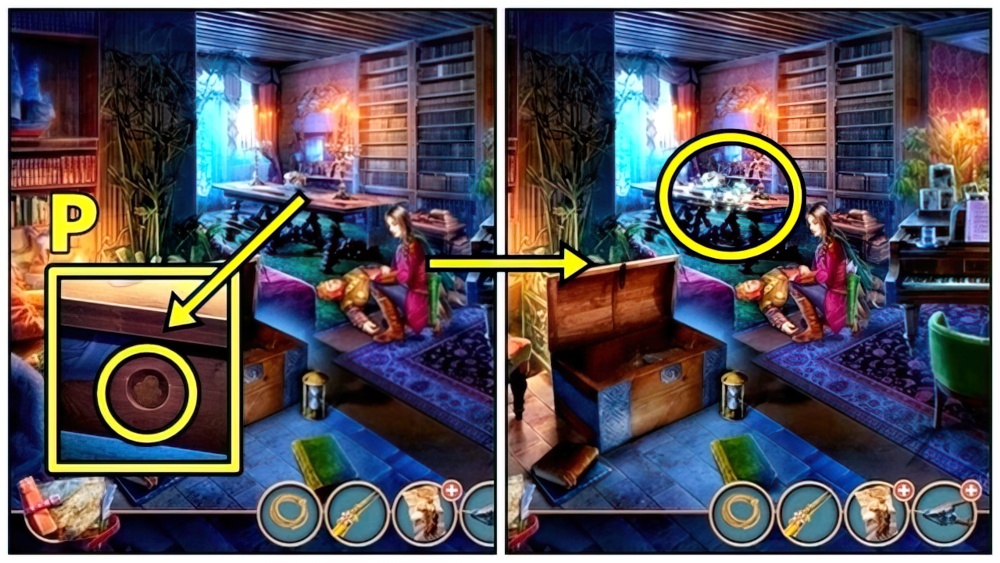
- Use GLUED PAWN (P). Play puzzle.

- Take WILD VINE PART (Q) and GEM.
- Add GEM (R).

- Solution: (S) Easy.
- Solution: (T) Hard.
- Take HOOK (U), FIGURINE PART and VINE PART.

- VINE PART and SHORT ROPE and on WILD VINE PART, receive VINE LASSO.
- Add VINE LASSO (V).
- Go to Rosy Lake.

- Take BROKEN FIGURINE (W) and BENT LEVER.
- Use QUEEN SYLVANNA’S BARRETTE (X), receive FLINT AND STEEL and BOLT.
- FIGURINE PART, BROKEN FIGURINE and BOLT on STRONGMAN PICTURE, receive STRONGMAN FIGURE.
- Add STRONGMAN FIGURE (Y).

- Solution: (Z) Easy N-J-L-N-A-B-Nx2-D-Nx2-C-N-E-N-F-N-I-N-G-N-H-K.
- Solution: (A) Hard N-D-N-F-N-M-I-N-J-L-M-G-M-E-N-H-K-Mx3-A-B-N-C.
- Move forward.

- Answer (B).
- Enter Peter Hogarth’s Study (C).
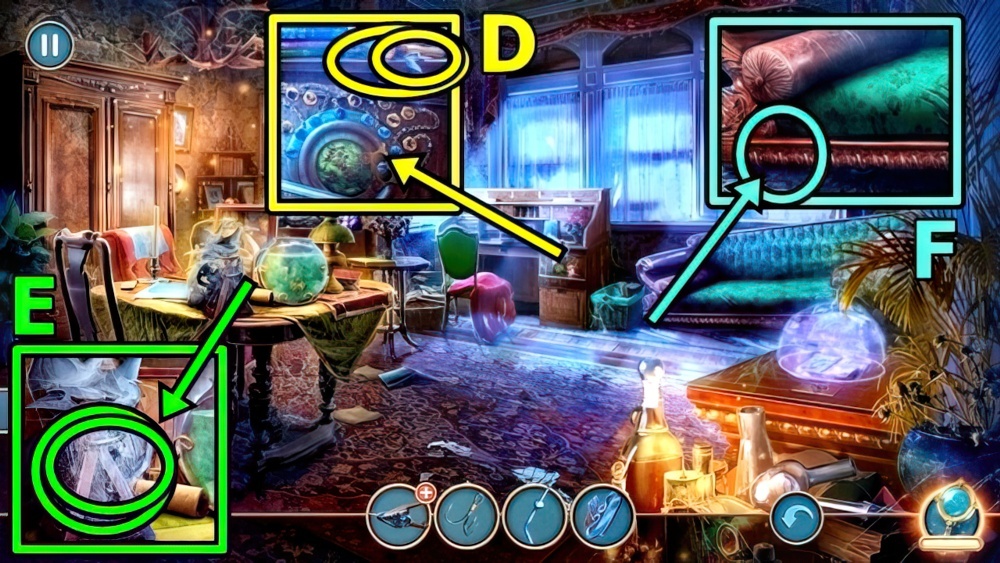
- Take RIBBON (D) and FLUFFY BRUSH.
- Use FLUFFY BRUSH (E), take OLD JACK.
- Add OLD JACK (F), take DOOR KEY.
- Move down.

- Move barrels (G).
- Take SMALL SHOVEL (H) and MUTHOSCOPE COIL.
- Take FIGURINES 1/3 (I). Use DOOR KEY, take UMBRELLA. Use SMALL SHOVEL, take THREAD AND NEEDLE.
- Enter Peter Hogarth’s Study.

- Use UMBRELLA (J), take SCREWDRIVER.
- Use SCREWDRIVER (K).

- Solution: (L) Easy C-Ax4-C-Bx2-C-Bx2-C-Ax2-C-B-C-A-C-B-C-B-C-Ax2-C.
- Solution: (M) Hard C-Ax6-C-Bx2-C-B-C-Bx3-C-A-C-Ax3-C-Bx3-C.
- Take CROCHET HOOK (N).
- Move down.

- THREAD AND NEEDLE on TORN BELLOWS, receive BELLOWS.
- Use FLINT AND STEEL (O) and BELLOWS. Add BENT LEVER, use Hammer. Take LEVER. Use CROCHET HOOK, take MAGNET.
- Enter Peter Hogarth’s Study.

- MAGNET on RIBBON, receive MAGNET ON RIBBON.
- Use MAGNET ON RIBBON (P), receive SMALL DRAGON.
- Add SMALL DRAGON (Q).

- Play puzzle (R).
- Move down.
- Read (S), take BROKEN MUTHOSCOPE and GROWTH ENHANCER. Insert LEVER, take LAMP.
- Return to Dragon Eros’s Altar.
- Add LAMP (T), receive FIREFLY LAMP.
- Use FLINT AND STEEL (U), take FIGURINES 2/3.
- Return to Hut by the Lake.

- Open (V), use FIREFLY LAMP.
- Play puzzle (W), take SILVER COMB.
- Use SILVER COMB (X), read, take ROOT REMEDY.
- Move down.

- Use ROOT REMEDY (Y), take WATER SACK and LINE.
- Take FISHING ROD (Z).
- HOOK and LINE on FISHING ROD.
- Use FISHING ROD (A).

- Solution: (B).
- Take GARLIC (C).
- Move forward.

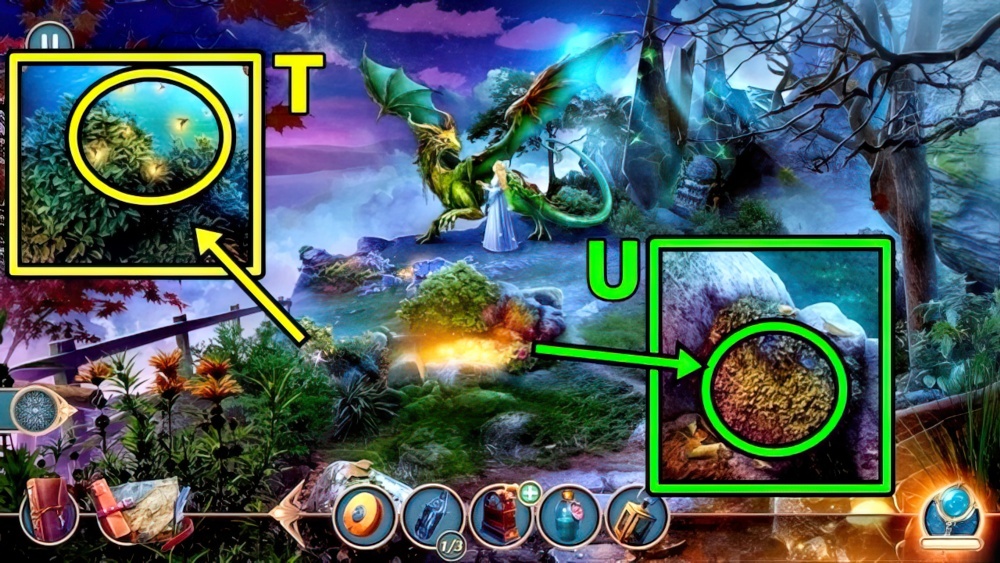
- Use GARLIC (D), take MAGIC RUNES 1/2 and FIGURINES 3/3.
- Return to Dragon Eros’s Altar.
- Add FIGURINES (E).

- Solution: (F) Easy.

- Solution: (G) Hard (A-B)-(A-E)-(B-C)-(F-G)-(G-H)-(D-H)-(F-G)-(G-H)-(F-G).
- Take GEAR (H).
- Go to Rosy Lake.

- Examine (I), add GEAR, add Belt. Turn. Take MAGIC RUNES 2/2 and MUTHOSCOPE HANDLE.
- Move forward.

- MUTHOSCOPE COIL and MUTHOSCOPE HANDLE on BROKEN MUTHOSCOPE. Examine, take DRAGON AMULET.
- Add DRAGON AMULET (J).

- Solution: (K) Easy (B-left)-(E-right)-(J-up)-(E-right)-(G-up)-(C-right)-(H-left)-(S-left)-(R-up)
- (E-right)-(Q-up)-(M-left)-(K-up)-(C-left)-(B-down)-(A-right)-(O-down)
- (S-right)-(H-left)-(G-down)-(K-right)-(V-up)-(M-left)-(I-down)-(K-right)-(M-up).

- Solution: (L) Hard (I-down)-(L-right)-(N-down)-(R-right)-(T-up)-(K-left)-(J-down)-(D-down)
- (K-left)-(J-down)-(N-left)-(F-up)-(E-right)-(A-down)-(F-left)-(B-left)-(C-left)
- (B-down)-(A-right)-(D-down)-(K-left)-(J-down)-(N-left)-(R-up)-(J-right)-(K-up)
- (D-left)-(F-up)-(B-right)-(M-right)-(N-down)-(P-right)-(Q-up)-(M-right)-(N-up)
- (J-right)-(L-right)-(R-left)-(P-up)-(L-right)-(N-up)-(A-right)-(E-right).

- Take NOTES ON DRAGONS (M).
- Return to Dragon Eros’s Altar.
- Offer NOTES ON DRAGONS (N).
- Examine (O).
- Answer (P).

- Use ROOT REMEDY (Q), take STINKING MUSHROOM.
- Use STINKING MUSHROOM (R).

- Play puzzle (S), take MAGIC FLUTE.
- Examine (T). Play MAGIC FLUTE, take MAGICAL SEED.
- Add MAGICAL SEED (U), WATER SACK then GROWTH ENHANCER, take AMARYLLIS FLOWER.
- Read (V), add MAGIC RUNES and AMARYLLIS FLOWER.

- Solution: (W) Easy and Hard (1st level).

- Solution: (X) Hard (2nd level).

- Answer (Y).
Congratulations! You have completed the game Royal Romances Episode 11: The True Queen.


