
Royal Romances Episode 2: Fate of the Woods – The walkthrough of the game begins with the fact that the cruel king is not going to leave attempts to destroy the forest. As the guardian of the forest, it is your duty to protect the home of all forest creatures. Fortunately, you are not alone, enlist the support of your allies and prevent the king from carrying out his sinister plan. If you are stuck and don’t know how to get through one of the locations, on our website you can watch the walkthrough of Royal Romances Episode 2: Fate of the Woods and find out what will happen in the next series.
Royal Romances Episode 2: Fate of the Woods – Walkthrough
Here you can watch the complete walkthrough of Royal Romances Episode 2: Fate of the Woods, namely the main story.
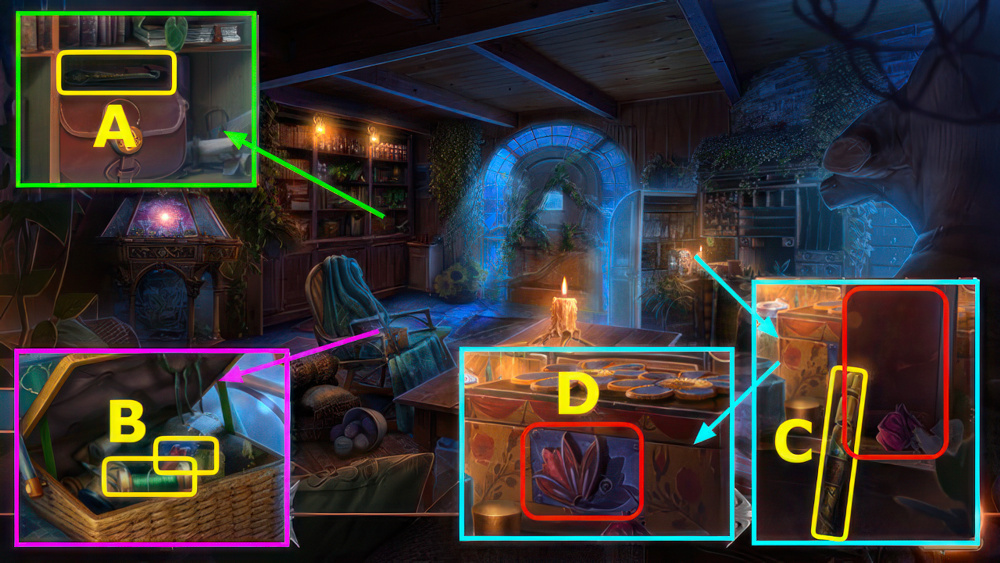
- Take CROCHET HOOK (A).
- Take HARPOON, use CROCHET HOOK.
- Take THREADS and ORNAMENT PART (B).
- Take MAGIC STAFF, read journal (C).
- Place ORNAMENT PART (D).
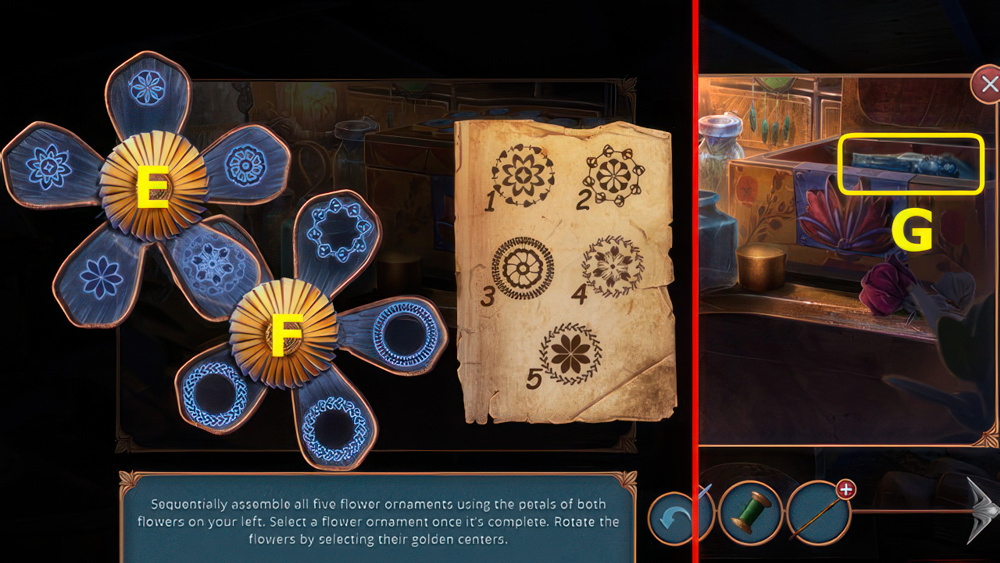
- Solution (Ex4-Fx3)-(F-E)-(F-E)-(E-F)-(F-E).
- Take GUARDIAN FIGURINE (G).
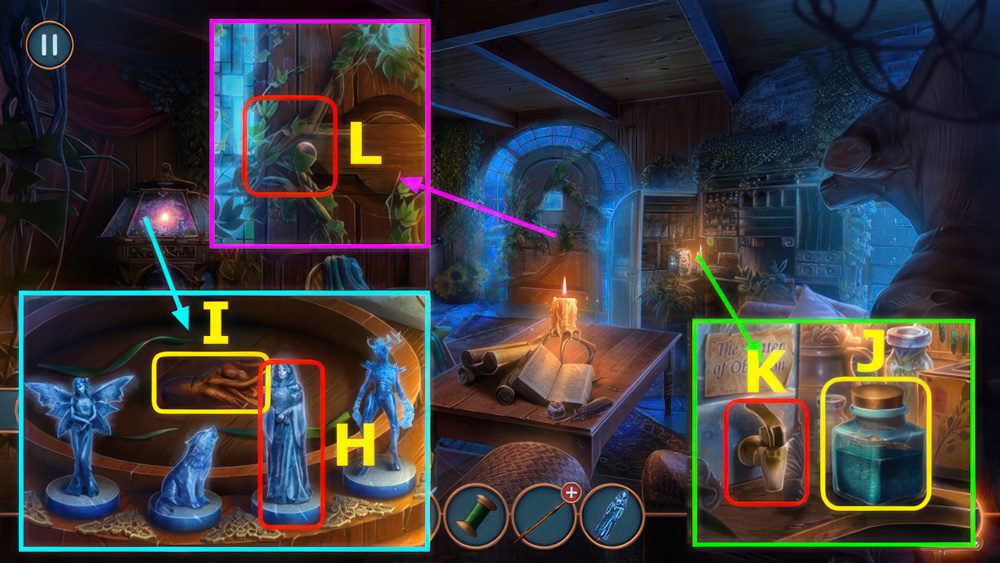
- Read note, place GUARDIAN FIGURINE (H), play puzzle.
- Take ASPHODEL ROOT (I).
- Use (J-K), add ASPHODEL ROOT.
- Take POTION OF WEAKNESS.
- Use POTION OF WEAKNESS (L).
- Go forward.
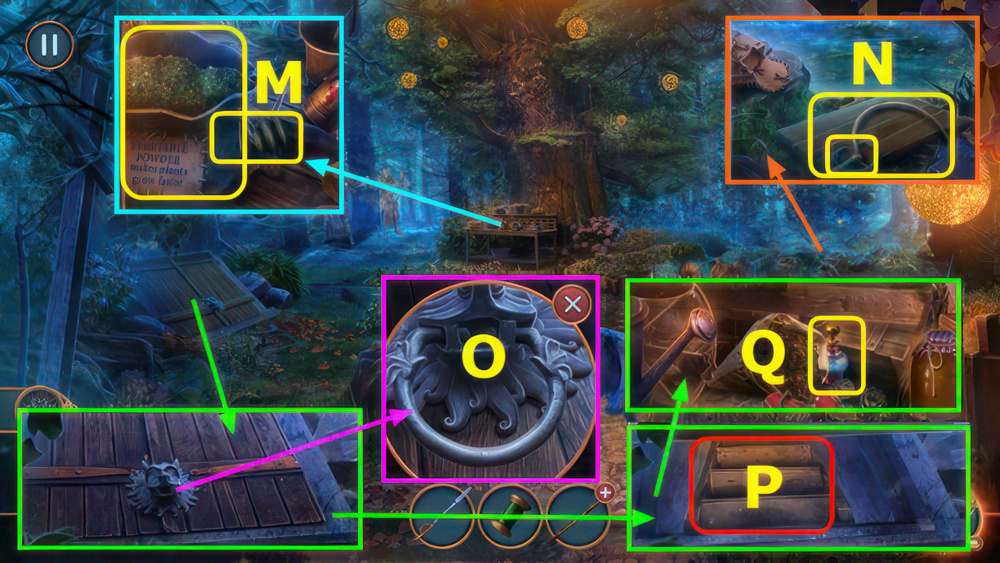
- Take FERTILIZER and DRIED VINE (M).
- Use HARPOON.
- Take BROKEN SCOOP NET and DOOR KNOCKER (N).
- Use DOOR KNOCKER (O).
- Play puzzle (P), take REVEALING POWDER (Q).
- Walk down.
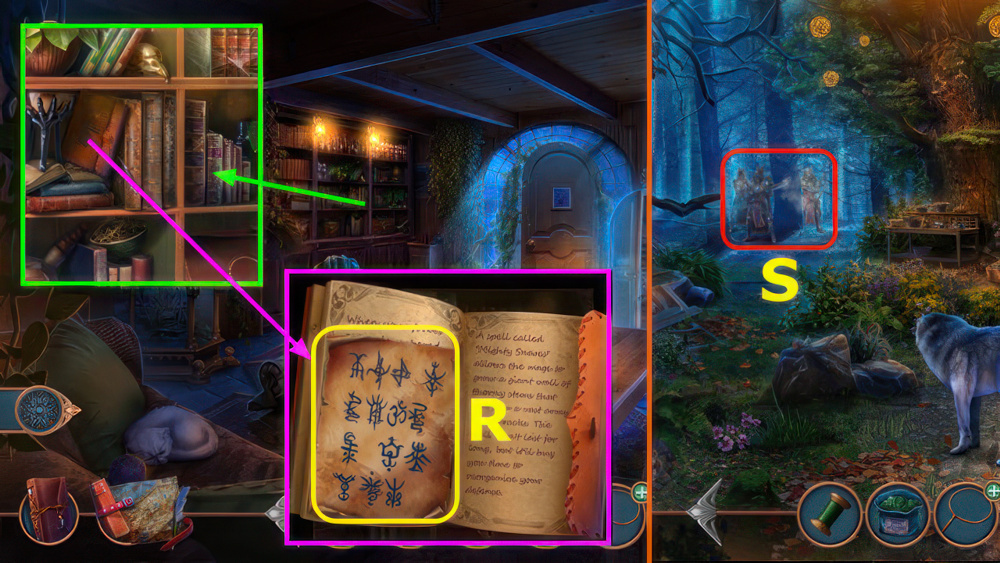
- Open, use REVEALING POWDER, take SPELL (R).
- DRIED VINE and SPELL on MAGIC STAFF, earn ENCHANTED STAFF.
- Go forward.
- Use ENCHANTED STAFF (S).
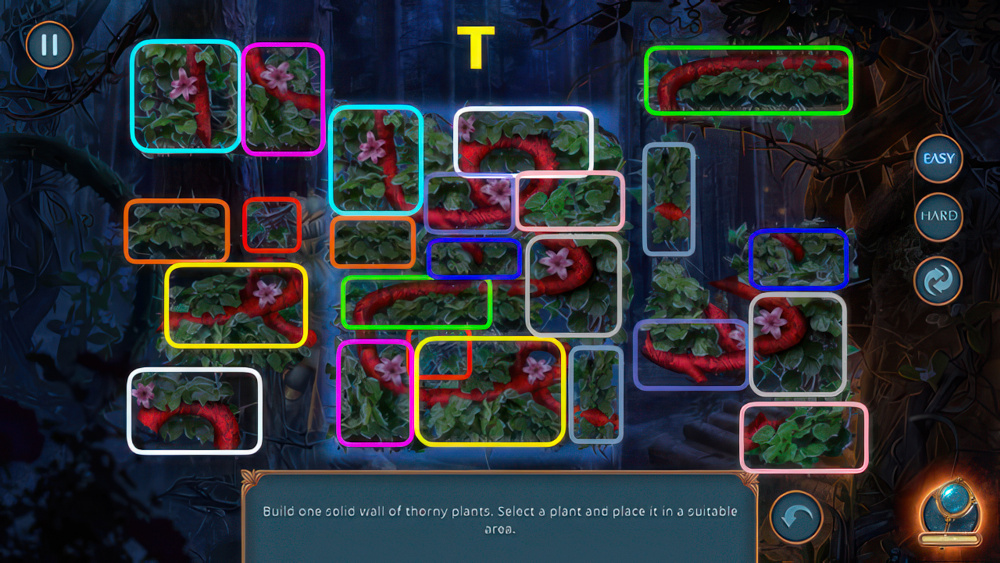
- Solution (T), earn SHELL NECKLACE.
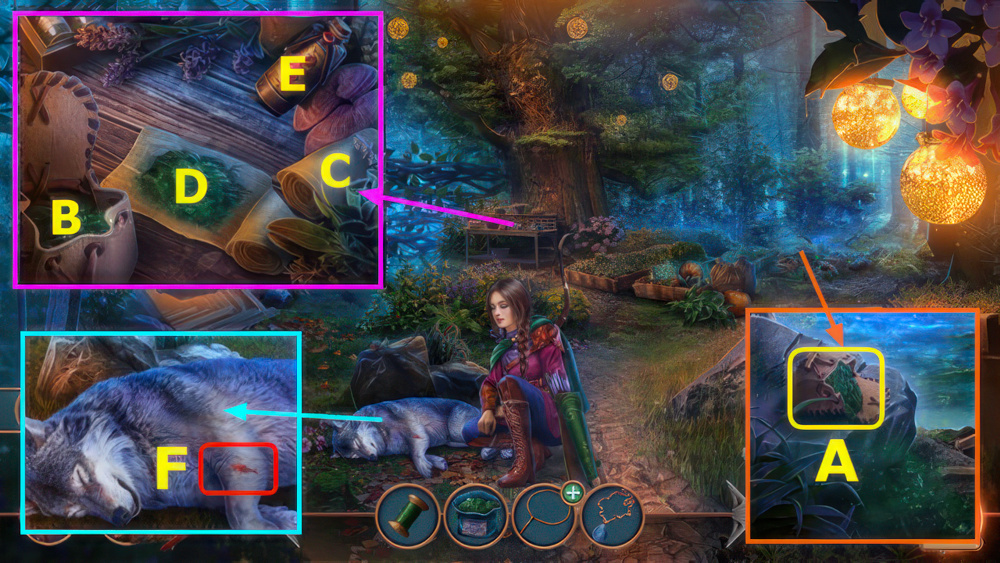
- Use SHELL NECKLACE.
- Take MOSS (A).
- Place MOSS (B).
- Move (C-D)-(B-D)-(E-D), take BANDAGE.
- Use BANDAGE (F), earn POISONED ARROW.
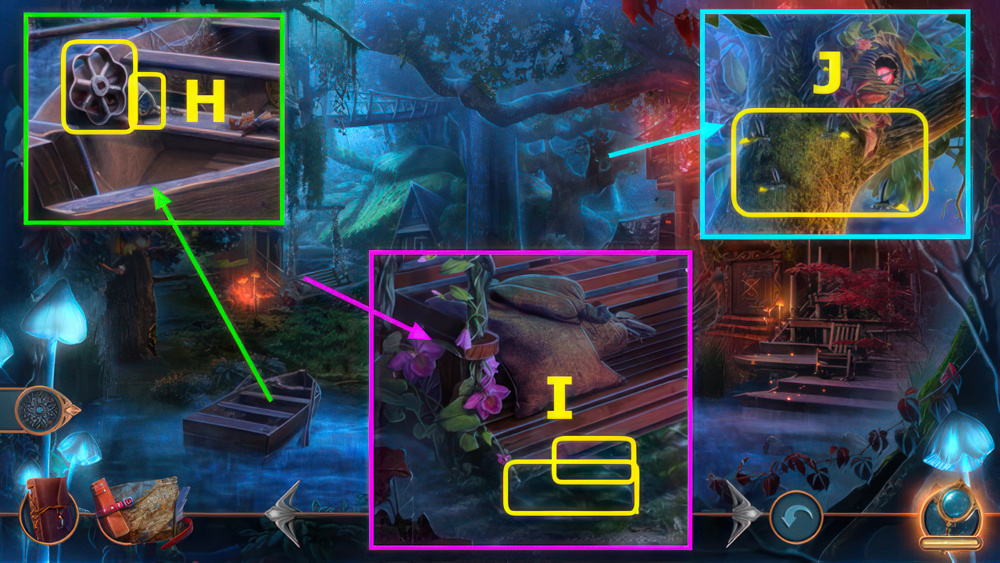
- Take 1/2 VALVES and STUD EARRING (H).
- Use FERTILIZER, take BURDOCK LEAF and LACE NAPKIN (I).
- THREADS and LACE NAPKIN on BROKEN SCOOP NET, earn SCOOP NET.
- Use SCOOP NET, earn FIREFLIES (J).
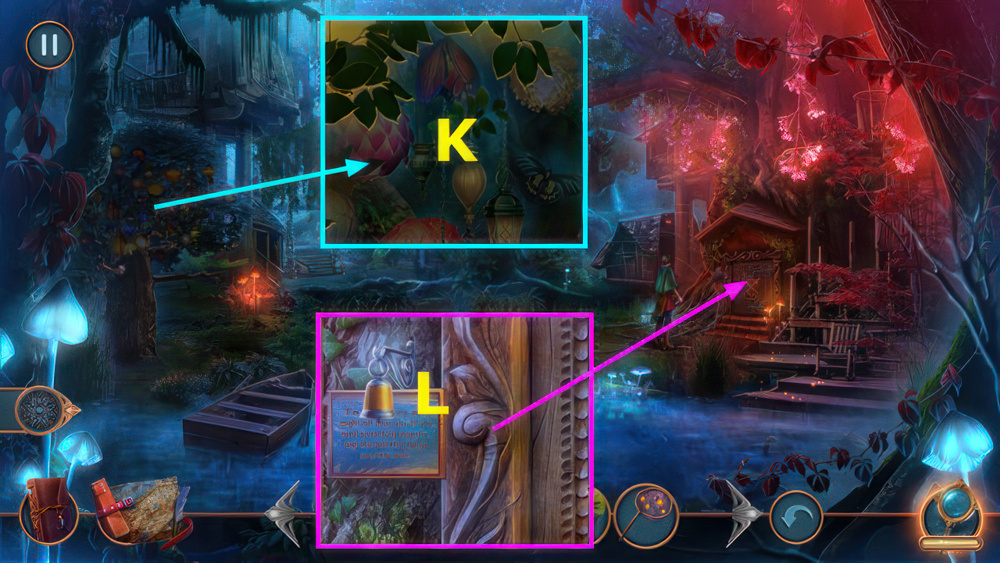
- Use FIREFLIES (K), play puzzle, earn BELL.
- Use BELL (L).
- Go left.
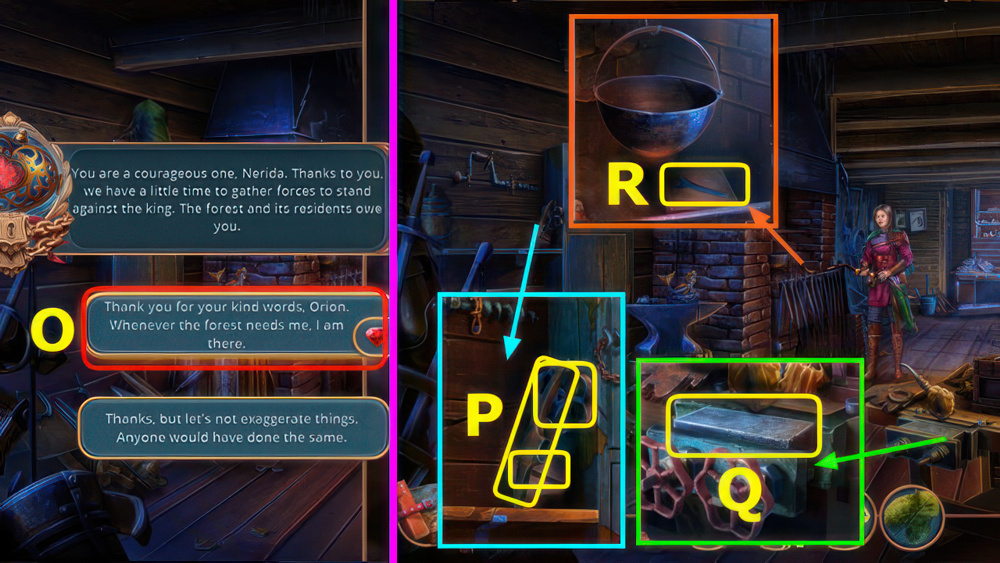
- Select (O).
- Take BROKEN PICKAXE, 2/2 VALVES, and WRENCH MOLD (P).
- Place VALVES, take IRON INGOT (Q).
- Use BURDOCK LEAF, WRENCH MOLD, and IRON INGOT, take WRENCH (R).
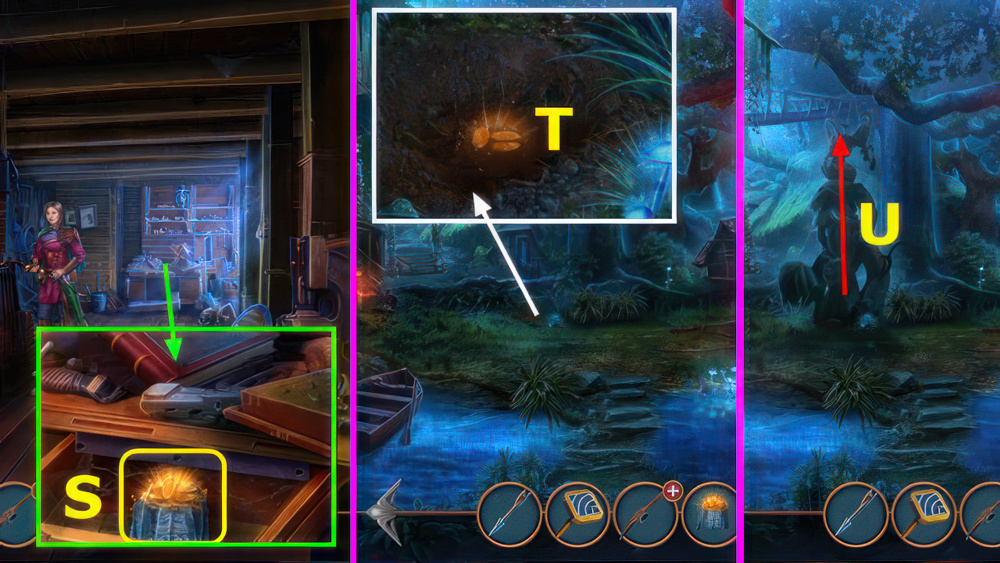
- Use WRENCH, read note, take MAGIC SEEDS (S).
- Walk down.
- Use MAGIC SEEDS (T).
- Go forward (U).
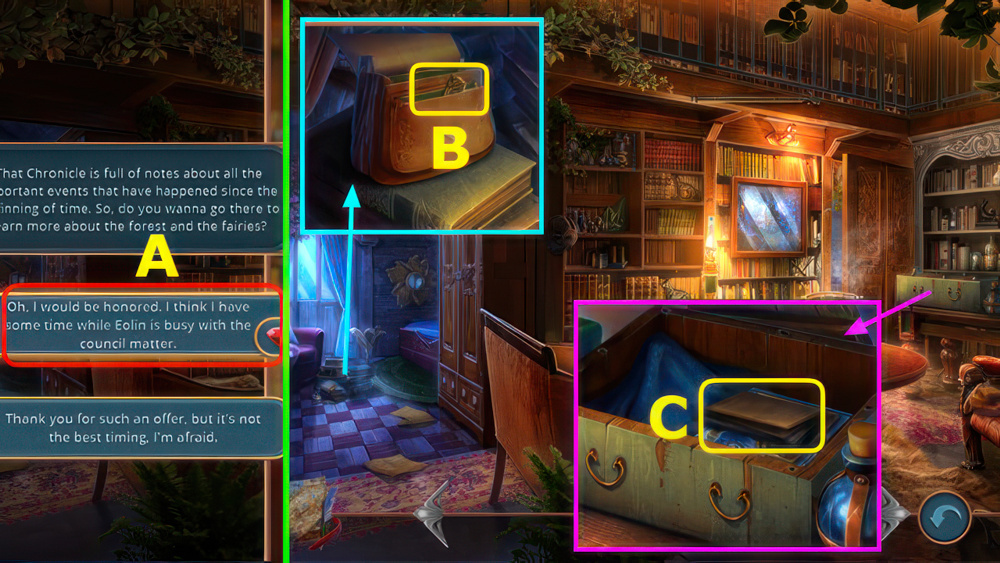
- Select (A).
- Take 1/2 BIRD AMULET.
- Use STUD EARRING, read journal, take HAIRPIN (B).
- Use HAIR PIN, take RIVER MAP (C).
- Walk down.

- Place RIVER MAP (D).
- Easy solution F-Ex3-Fx2-E-G.
- Hard solution Hx3-Ix3-H-J.
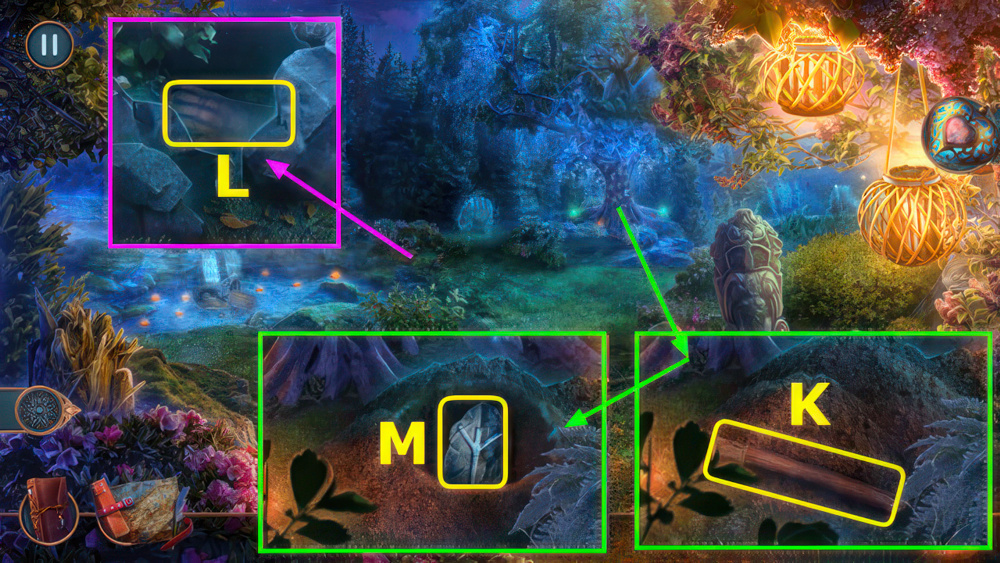
- Take WOODEN STALK (K).
- WOODEN STALK on BROKEN PICKAXE, earn PICKAXE.
- Take PLATE, use PICKAXE, read note, take GLOVE (L).
- Use PLATE, take STONE FRAGMENT PART (M).
- Walk down, right.

- Use GLOVE, take BLADE (N).
- Use BLADE, earn BRACE (O).
- Use BRACE, take MILL BLADES and HOOK (P).
- Place MILL BLADES, take NUT and RESIN (Q).
- Walk down, left.
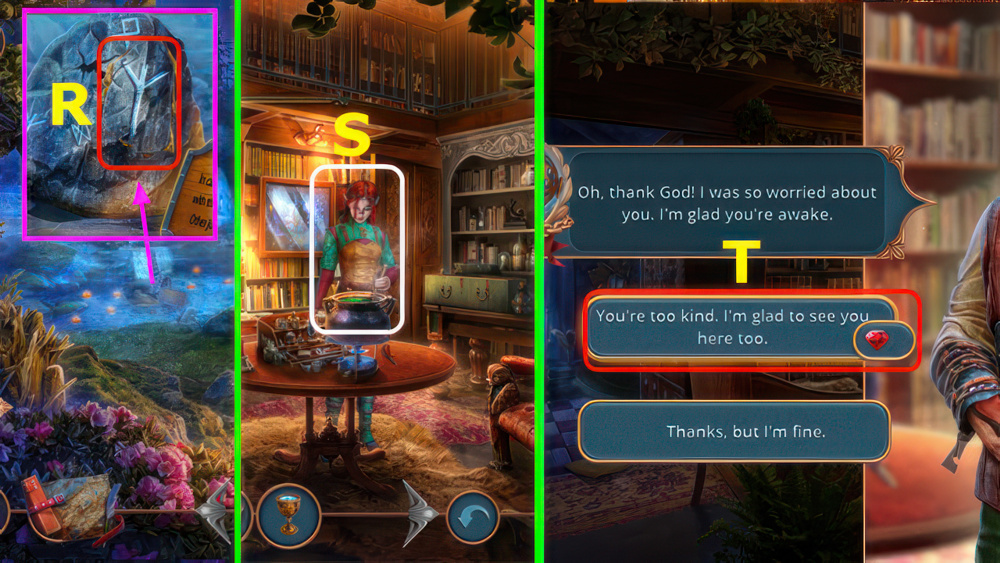
- Place STONE FRAGMENT PART and RESIN (R), play puzzle, earn SACRED WATER.
- Walk down, go forward.
- Use SACRED WATER (S).
- Select (T), earn ROUND LEVER.
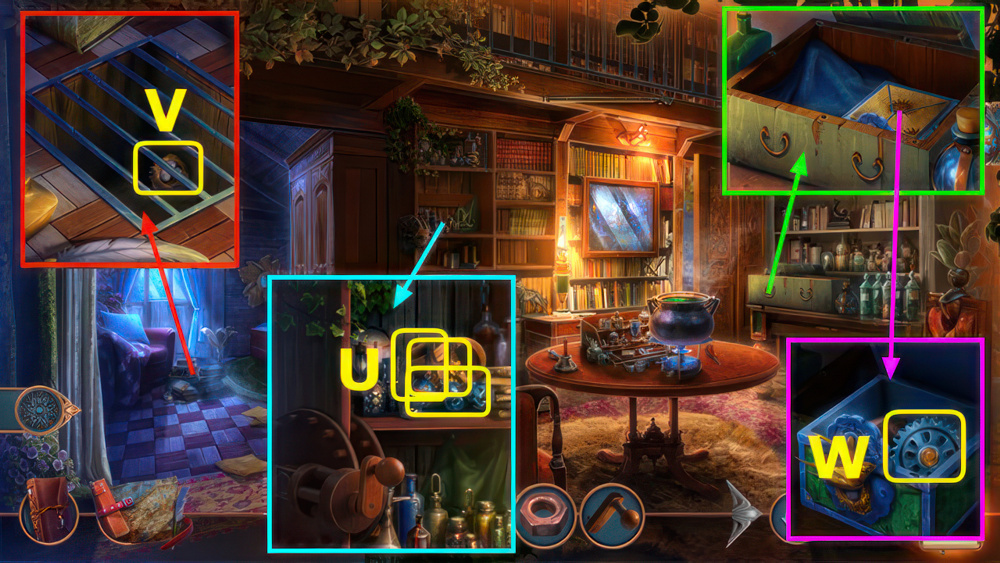
- Use ROUND LEVER.
- Take WEIGHTS, EMPTY MUG, and METAL WIRE (U).
- METAL WIRE on HOOK, earn HOOK ON WIRE.
- Move books, use HOOK ON WIRE, earn 2/2 BIRD AMULET (V).
- Use BIRD AMULET, take GEAR (W).
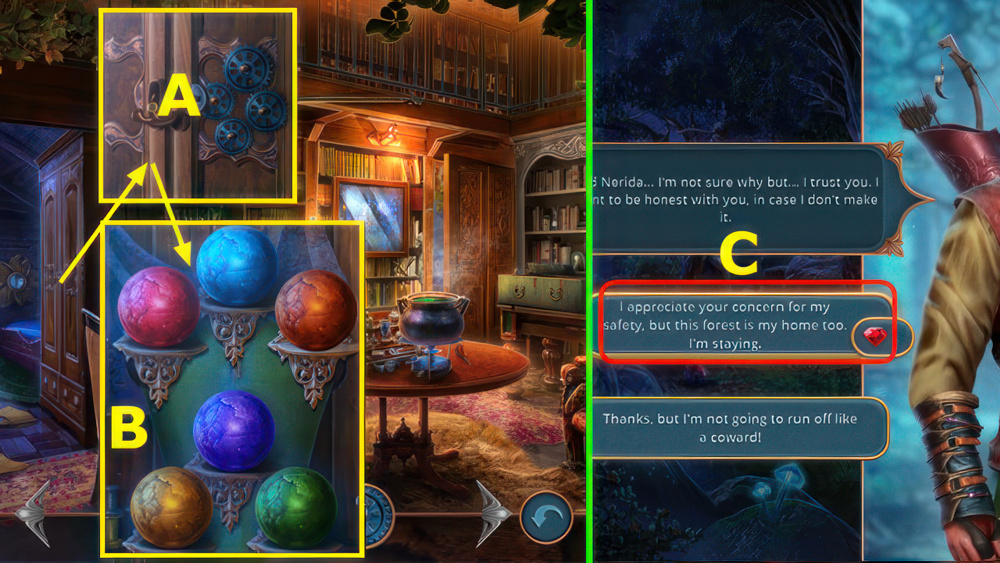
- Place GEAR (A).
- Solution (B), take suit of armor.
- Select (C), earn HEART PENDANT.

- Take TONGS PART and NUT (D).
- Use EMPTY MUG.
- Take STONE OF DESTRUCTION, STONE, and TONGS SECOND PART (E).

- NUT and TONGS SECOND PART on TONGS PART, earn BLACKSMITH TONGS.
- Walk down 2x, go right.
- Use BLACKSMITH TONGS, take HAMMER and HAWSER (F).
- NUT, STONE, and HAWSER on WEIGHTS, earn BOLAS.
- Use HEART PENDANT (G), play puzzle.
- Walk down.
- Use BOLAS (H).
- Take BRUSH and GLOWING FLOWER (I).
- Go left, forward.
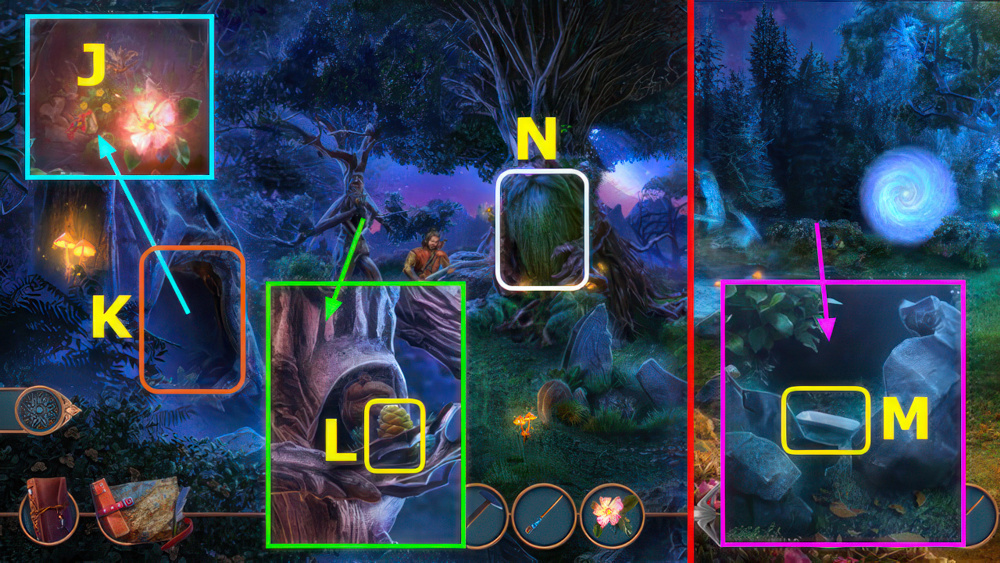
- Use GLOWING FLOWER (J).
- Play puzzle, earn WOODEN HEART (K).
- Place WOODEN HEART, take GOLDEN CONE (L).
- Walk down.
- Use GOLDEN CONE, take PIECE OF CHALK (M).
- Go forward.
- Use PIECE OF CHALK (N), earn KEY ON CHAIN.
- Go forward 2x, walk right.
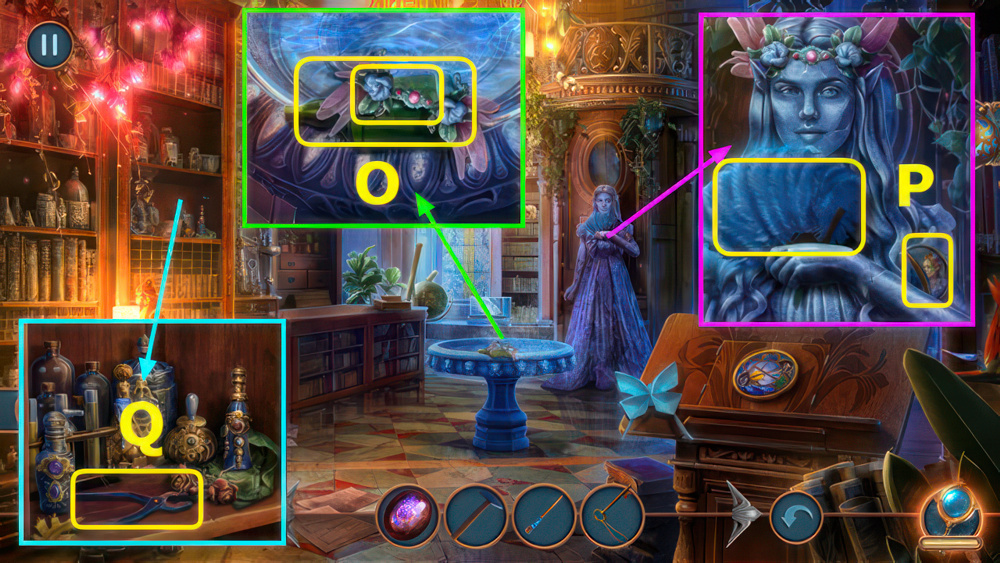
- Take EOLIN’S TIARA and OIL (O).
- Take 1/2 LOCK PARTS, place EOLIN’S TIARA (P), earn FEATHER FAN.
- Read note, use FEATHER FAN, take TWEEZERS (Q).
- Walk down 2x, go right.
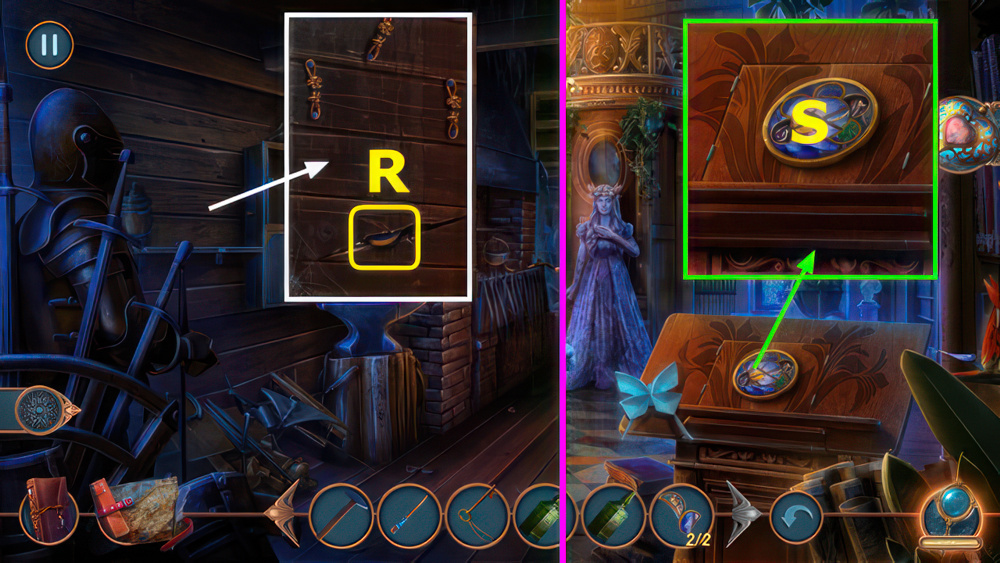
- Use TWEEZERS, earn 2/2 LOCK PARTS (R).
- Walk down, go forward, right.
- Use LOCK PARTS (S).
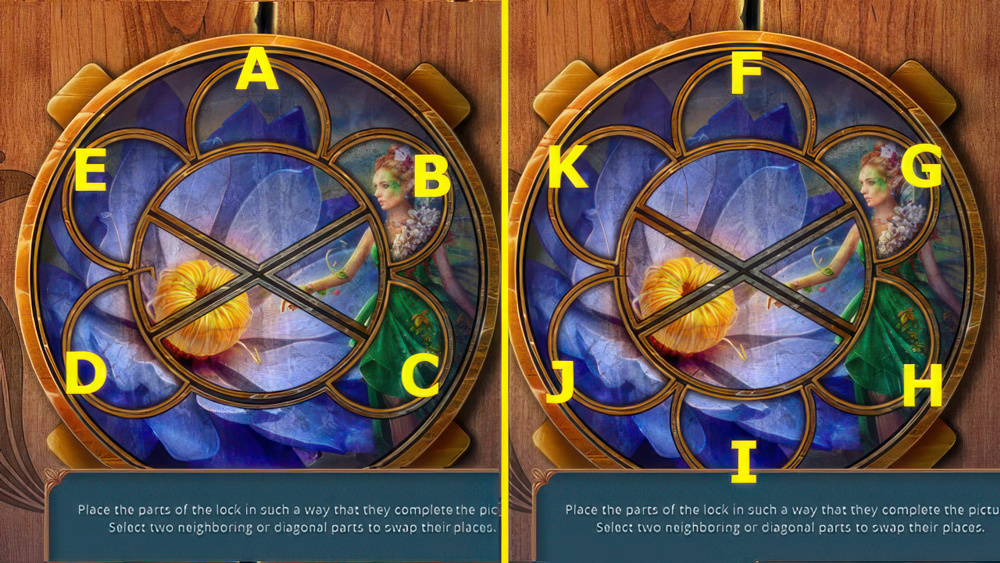
- Easy solution (B-D)-(E-C)-(B-D).
- Hard solution (G-J)-(K-H)-(G-J).

- Take MATCHES (L).
- Walk down 2x, go right.
- Use MATCHES.
- Take TOBACCO PIPE (M).
- Walk down, go forward, right.

- Use OIL and TOBACCO PIPE (N).
- Read note, take RUNE OF MEMORY (O).
- Use RUNE OF MEMORY (P).
- Play puzzle (Q).
- Walk down 4x.

- Use KEY ON CHAIN, read note, take BERTHA’S BRACELET (A).
- Go forward.
- Use HAMMER, STONE OF DESTRUCTION, BRUSH, and BERTHA’S BRACELET, earn BRACELET OF DESTRUCTION (B).
- Use BRACELET OF DESTRUCTION, select (C).
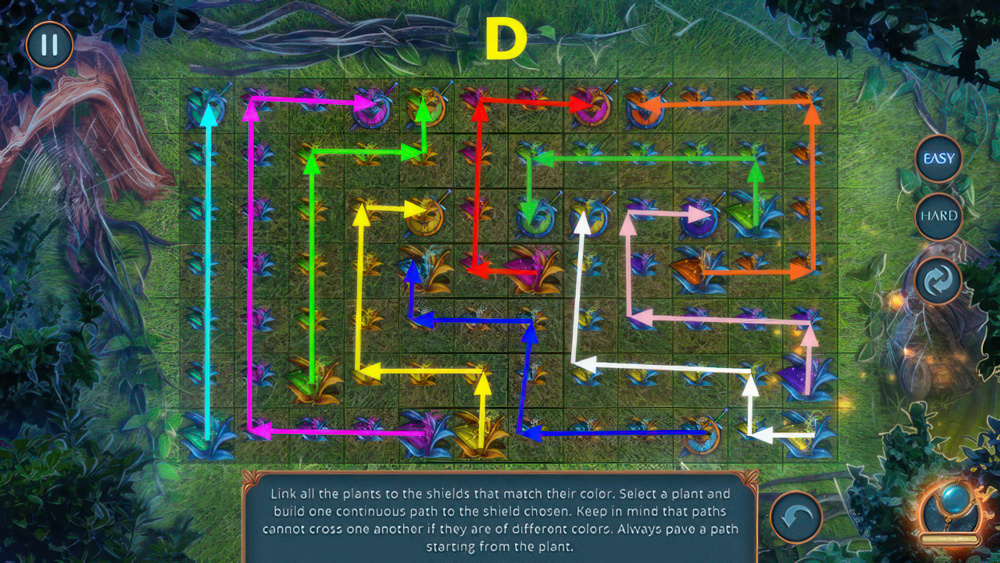
- Easy solution (D).

- Hard solution (E).
Congratulations! You have completed the game Royal Romances Episode 2: Fate of the Woods.


