Secret City 3: The Human Threat (Bonus Chapter) – Takes us back to the origins of the secret city, when magical creatures fought each other. When King Wilhelm invades the kingdom, in search of the Heart of Consent, and the restoration of peace. Below you can watch the walkthrough of the bonus chapter.
Bonus Chapter Walkthrough

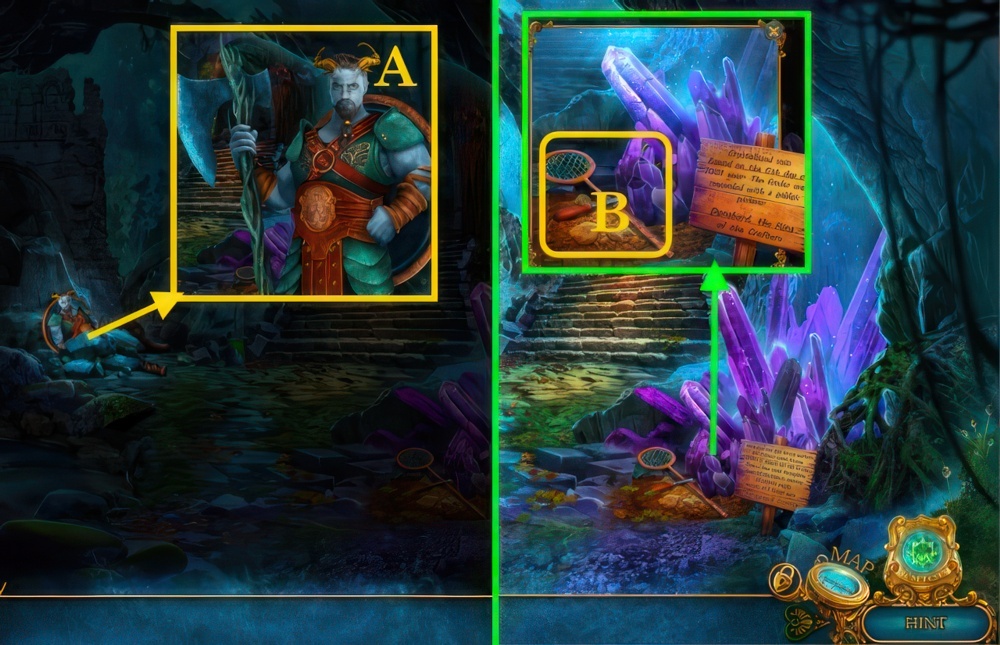
- Speak (A).
- Take CHISEL, SCOOP NET and BARRETTE (B).

- Use BARRETTE (C).
- Complete puzzle (D), receive FIGHTING STAFF.
- Take SCRAPER and PAPER WITH COAL (E).
- Use FIGHTING STAFF (F), speak, receive CAVE MAP.
- View CAVE MAP (G).

- Speak (H), receive DECORATED SHIELD.
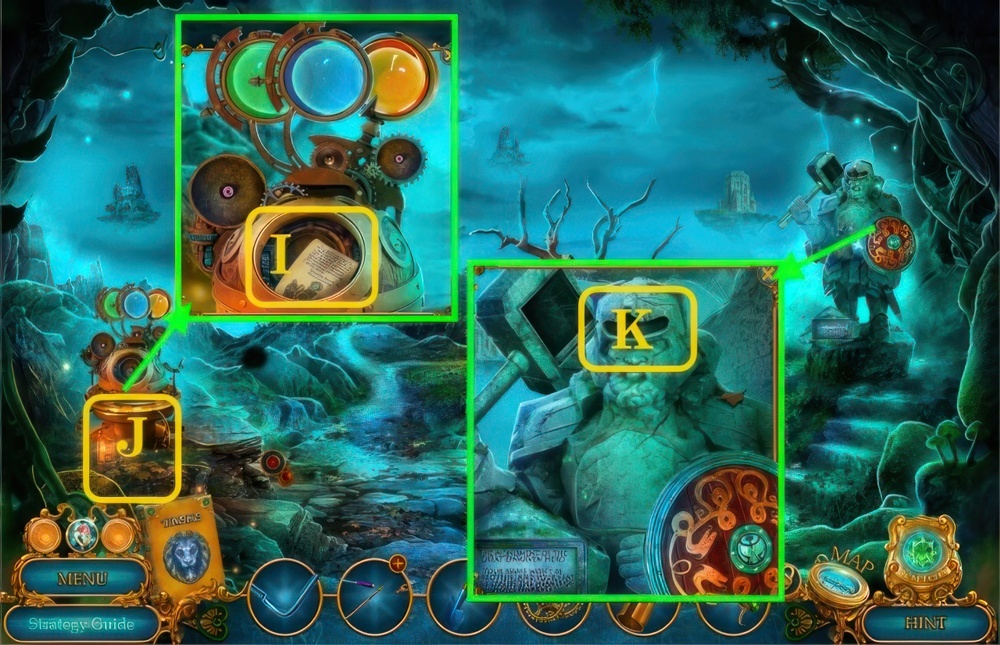
- Take CHEST EMBLEMS 1/4 (I).
- Use SCRAPER (J), find CLIMBING STAKE.
- Use SCOOP NET (K), pick up AWL.
- Take LIT TORCH (L), place DECORATED SHIELD, pick up ACID.

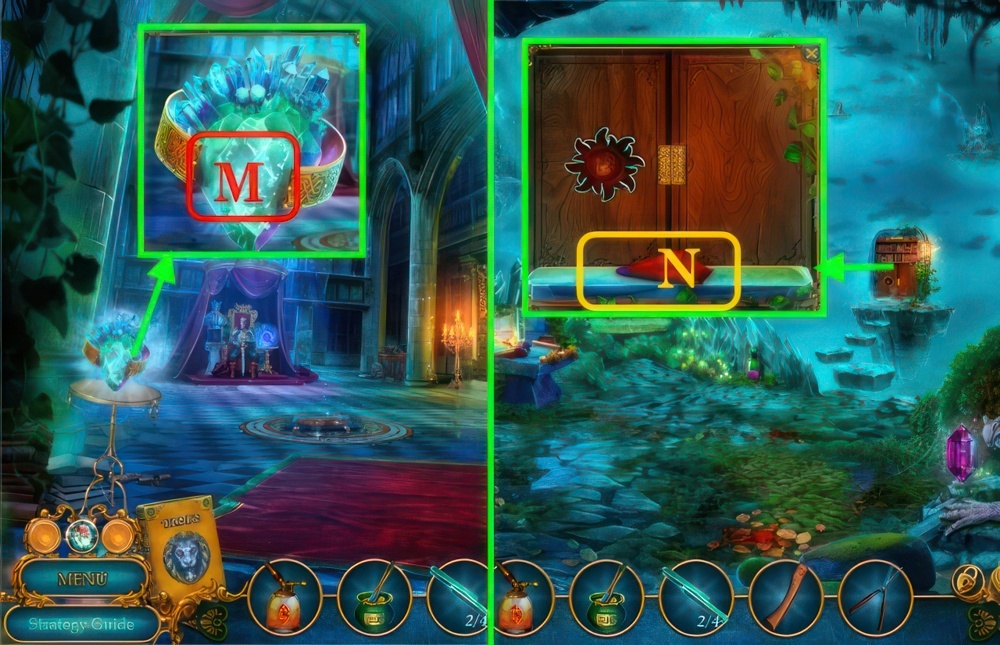
- Use AWL (M), pick up ROPE.
- Pull (N), place CLIMBING STAKE and ROPE.
- Walk forward.

- Pick up RUBY (O).
- Take CHEST EMBLEMS 2/4 (P), place RUBY, pick up GLASS CUTTER.
- Use PAPER WITH COAL (Q), receive RUNIC CODE.

- View RUNIC CODE (R).
- Solution (S).
- Easy: E-A-E-B-E-C-E-D-E-G-Fx2-G-E-Dx2-Ex2-G-Fx2-Gx2-Ex2-Bx3-Fx2-G-Ex2-Gx3.
- E-C-E-D-F-Cx2-E-G-E-A-Fx2-Gx2-Ex2-A-Fx2-C-Ex2-G-Fx2-C-Ex2-G-Fx2-Gx3.
- Hard: F-C-E-Dx2-F-C-E-G-F-Cx2-E-G-F-Gx3-E-Dx2-Fx2-B-Ex2-D-F-G-E-D-Fx2-G-E-C-E.
- Gx2-F-G-F-Bx2-Fx2-Gx2-Ex2-B-E-C-F-G-F-Ax2-Ex2-G-Fx2-A-E-Gx2-F-A-F-D-E-G-E-B.
- F-G-Ex2-C-Fx2-G-Ex2-G-Ex2-G-F-G-Ex2-G.
- Pick up BAS-RELIEF PART.

- Place BAS-RELIEF PART (T), pick up HAMMER.
- Walk down.
- Use GLASS CUTTER (U), find CHEST EMBLEMS 3/4.
- Use LIT TORCH (U), take NOISEMAKER.
- Shake NOISEMAKER (V), pick up RUSTY KNIFE and CHEST EMBLEMS 4/4.
- Walk down.

- Use CHISEL and HAMMER (W), pick up PURPLE SAPPHIRE PENDANT.
- Pour ACID (X), find SPOON.
- Move to Valley.

- Place CHEST EMBLEMS (Y), take TUBE PART and MAGNIFIER.
- Place PURPLE SAPPHIRE PENDANT (Z), pick up BROKEN STAFF.
- Use MAGNIFIER (A).
- Pick up SOLDIER BROOCH (B).

- Speak (C).
- Use SPOON (D), find CLAMP, SMALL SHOVEL and GEARS.
- Place RUSTY KNIFE (E).
- Inspect (F), pick up KNIFE and STAFF HEAD.
- Walk down.

- Use KNIFE (G), take ROPE LADDER.
- Place SOLDIER BROOCH (H), pick up CHISEL.
- Walk down.

- Inspect (I), place GEARS.
- Complete puzzle (J), receive DIADEM.
- Place DIADEM (K), pick up DWARVEN GAUNTLET.
- Walk down.

- Use SMALL SHOVEL (L), take BROKEN TUBE.
- CLAMP and TUBE PART on BROKEN TUBE, receive IMPROVISED CROWBAR.
- Inspect (M), use DWARVEN GAUNTLET, find BRUSH and RUNIC CRYSTAL.
- CHISEL, STAFF HEAD and RUNIC CRYSTAL on BROKEN STAFF, receive DARK STAFF.
- Move to Valley.

- Use DARK STAFF (N), pick up MASK OF EVIL and CHAIN.
- Walk forward.
- Place CHAIN (O).

- Easy solution (P).
- Hard solution (Q).
- Speak (R), receive LAMP OF TRUTH.

- Hang LAMP OF TRUTH (S).
- Walk forward.
- Give MASK OF EVIL (T), speak, receive ENERGY CRYSTAL.

- Use IMPROVISED CROWBAR (U), pick up HACKSAW.
- Pick up TOKEN (V), place ROPE LADDER (W).
- Take GEAR (X).
- Use BRUSH (Y), find FISHING ROD.
- Walk down.

- Place ENERGY CRYSTAL (Z).
- Easy solution (A): E-Dx4-Bx4.
- Hard solution (A): Ax3-B-D-Ax2-Dx2-Bx5-D-Bx4-E-Cx4-A-Dx3-B-D-Ex4-C-Ax4-D-Bx3.
- E-B-Cx4-A-Dx3-B-D-Ex3-C-E-Ax4-D-B-Ex4-C-Ax4-D-Bx2-Ex3-Cx2-Ax3-D-A-Dx4-Ax3-Dx2.
- A-Bx2-E-Cx2-B-E-Ax2-C-Dx3-Bx2-Ex3-Cx2-Ax3-Dx2-Bx3-A-Cx4-D-C-B-Ex5-Cx4-Dx3-E.
- Pick up SECRET KEY.

- Use SECRET KEY (B).
- Enter (C).
- Use HACKSAW (D), speak, receive LOCKPICK.

- Clear (E), receive ASHY FLOWERS 1/4 and BROKEN STETHOSCOPE.
- Use LOCKPICK (F).
- Complete puzzle (G), receive PICKAXE.
- Use PICKAXE (H), take DYNAMITE.
- Pick up ASHY FLOWERS 2/4 (I).
- Use DYNAMITE (J).
- Walk forward.

- Use FISHING ROD (L), pick up SHOVEL, ASHY FLOWERS 3/4 and EMPTY BUCKET.
- Place GEAR (M), find EVIDENCE.
- Use TOKEN (N), pick up TONGS.
- Walk down.

- Use SHOVEL (O), pick up ASHY FLOWERS 4/4.
- Use TONGS (P), find STETHOSCOPE PART and THRONE SPHERE.
- Add ASHY FLOWERS (Q), pick up HATCH KEY and BROKEN BELLOWS.
- Walk forward.

- Place THRONE SPHERE (R), find TRITON FIGURINE.
- Move to Castle Yard.
- Give EVIDENCE (S), receive STETHOSCOPE PART.
- STETHOSCOPE PARTS x2 on BROKEN STETHOSCOPE, receive STETHOSCOPE.
- Move to Quay.

- Use STETHOSCOPE (T).
- Solution (U).
- Easy: B-C-Bx2-A-Bx2-A-Bx3-C-D-C-B-A-B-C-B-A-B.
- Hard: B-C-Bx2-A-Bx2-A-Bx2-A-B-A-B-C-B-Cx2-B-Cx2-Dx2-C.
- D-A-B-A-Dx2-A-D-A-C-B-C-Bx2-C-D-C-B-A-B-C-B-A-B.
- Pick up GOLDEN MEDALLION.

- Place GOLDEN MEDALLION (V), pick up NOZZLE.
- Use EMPTY BUCKET (W), receive HEAVY BUCKET.
- Move to Dwarven Forge.
- Hang HEAVY BUCKET (X), pick up DUSTER.
- Use HATCH KEY (Y), take OIL.
- Walk down.

- Pour OIL (Z), pick up EAGLE EMBLEM.
- Place EAGLE EMBLEM (A), find BONE and SAW.
- Walk forward.

- Use SAW (B), pick up HEAVY INGOT and LEATHER.
- LEATHER and NOZZLE on BROKEN BELLOWS, receive BELLOWS.
- Use BELLOWS (C).
- Complete puzzle (D), receive SUN AMULET.
- Move to Quay.

- Place SUN AMULET (E).
- Solution (F).
- Take BURNER and SMALL TRIDENT.
- SMALL TRIDENT on TRITON FIGURINE, receive MAGIC BUBBLE ARTIFACT.
- Give MAGIC BUBBLE ARTIFACT (G).

- Pick up BRUSH WITH GLUE and CRYSTAL STEPS 1/4 (H).
- Use BONE and HEAVY INGOT (I), pick up AXE HANDLE and CRYSTAL STEPS 2/4.
- Take PRUNERS (J), use DUSTER, find PICTURE FRAGMENT.

- Place PICTURE FRAGMENT (K).
- Solution (L): D-C-D-C-B-Ax2-B-A-D-Ax2.
- Take RING PART.

- Place RING PART (M).
- Walk left.
- Pick up RAG and CRYSTAL STEPS 3/4 (N).

- Use BURNER (O).
- Take CRYSTAL STEPS 4/4, pick up BOOK (P).
- Use BRUSH WITH GLUE (Q), find DIAMOND.
- Place CRYSTAL STEPS (R).
- Walk forward.

- Use PRUNERS (S), find AXE BLADE and RAW MATERIAL.
- Place AXE BLADE and AXE HANDLE (T), receive RUNIC AXE.
- Use RAG (U), take CABINET AMULET.
- Walk down.

- Use CABINET AMULET (V), pick up KNIGHT SCROLL.
- Place BOOK (W), take ENCHANTED HAMMER.
- Walk forward.
- Use RAW MATERIAL and ENCHANTED HAMMER (X), pick up ANVIL RUNE.
- Move to Throne Room.

- Use RUNIC AXE (Y).
- Speak (Z), receive EAGLE WING.
- Place EAGLE WING (A), pick up DRAGON SPIKES 1/4 and LION EMBLEM.

- View KNIGHT SCROLL (B).
- Solution (C).
- Pick up REVEALING QUILL, ACID and DRAGON SPIKES 2/4.
- Pour ACID (D), find DRAGON SPIKES 3/4.
- Walk left.

- Place LION EMBLEM (E).
- Complete puzzle (F), receive CRYSTAL BALL.
- Use REVEALING QUILL (G), pick up BOOK RUNE.
- Place CRYSTAL BALL (H), find DRAGON SPIKES 4/4 and WATER OF LIFE.
- Place DRAGON SPIKES (I), find FISH SCALES.
- Walk forward.

- Pour WATER OF LIFE (J).
- Move (J-K), use DIAMOND, take TREE RUNE.
- Place FISH SCALES (L), pick up WATER RUNE.
- Use ANVIL RUNE, BOOK RUNE, TREE RUNE and WATER RUNE (M).

- Easy solution (N).
- Hard solution (O).
Congratulations! You have completed the game Secret City 3: The Human Threat.


Enjoyed this very much!
Your good knowledge and kindness in playing with all the pieces were very useful. I don’t know what I would have done if I had not encountered such a step like this.