Secret City 5: Mysterious Collection – The walkthrough of the game begins with the fact that your friend disappears while exploring a mysterious collection donated to the museum of secret city artifacts. Naturally, you want to find your friend and make sure he’s okay. When you find him, you realize that his mind is controlled by a dangerous artifact. Your friend’s life hangs in the balance, you have to stop the destruction of the city and save your friend.
Secret City 5: Mysterious Collection – Walkthrough
Below you can watch the full walkthrough of Secret City 5: Mysterious Collection, namely all chapters, including the bonus one.
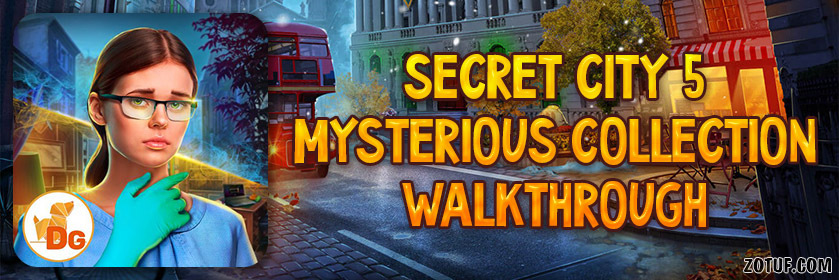
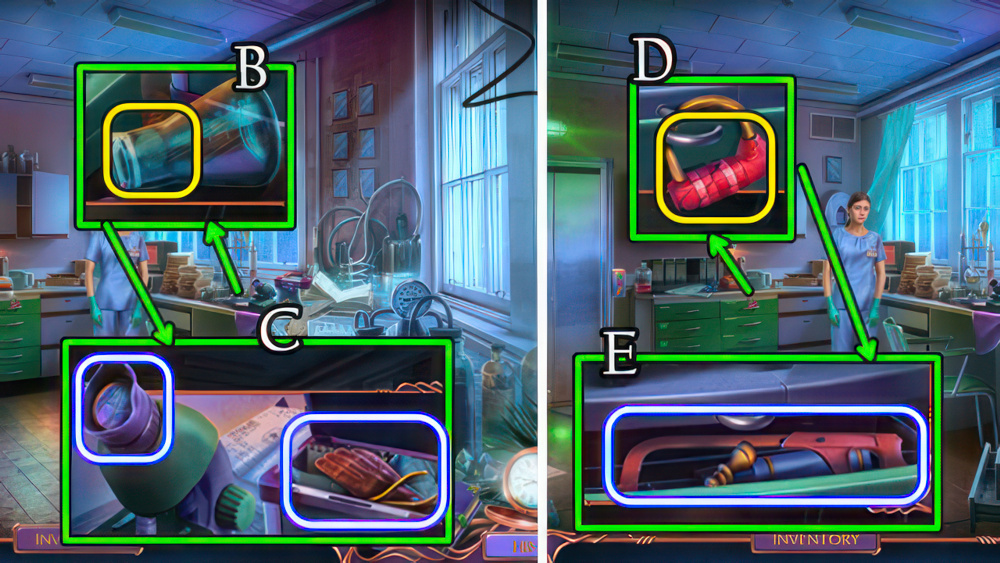
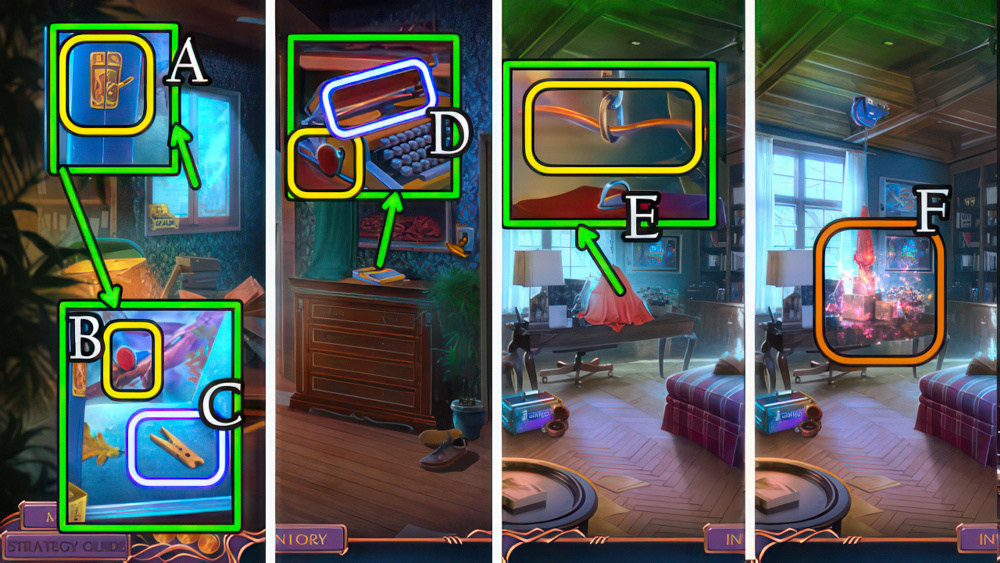
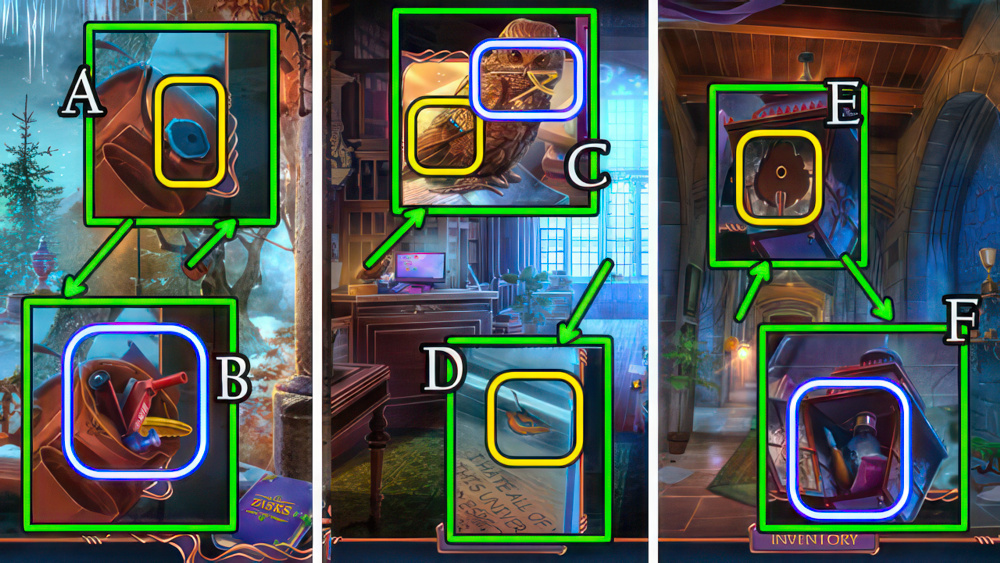
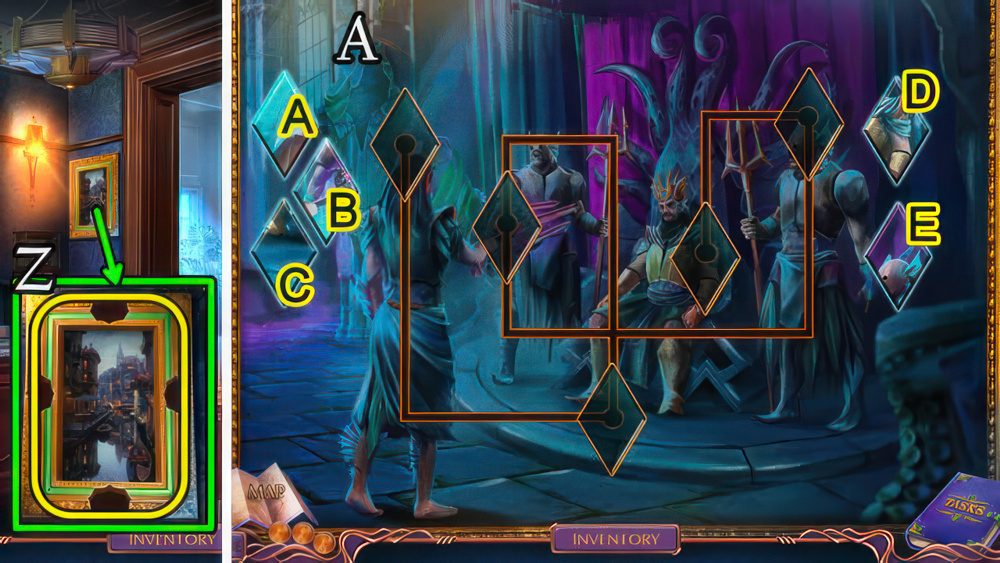
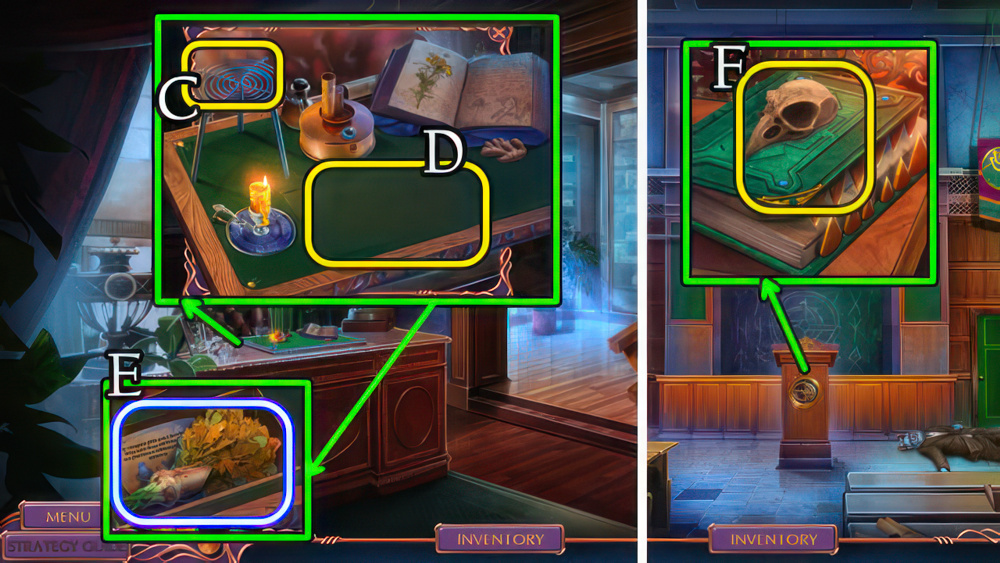
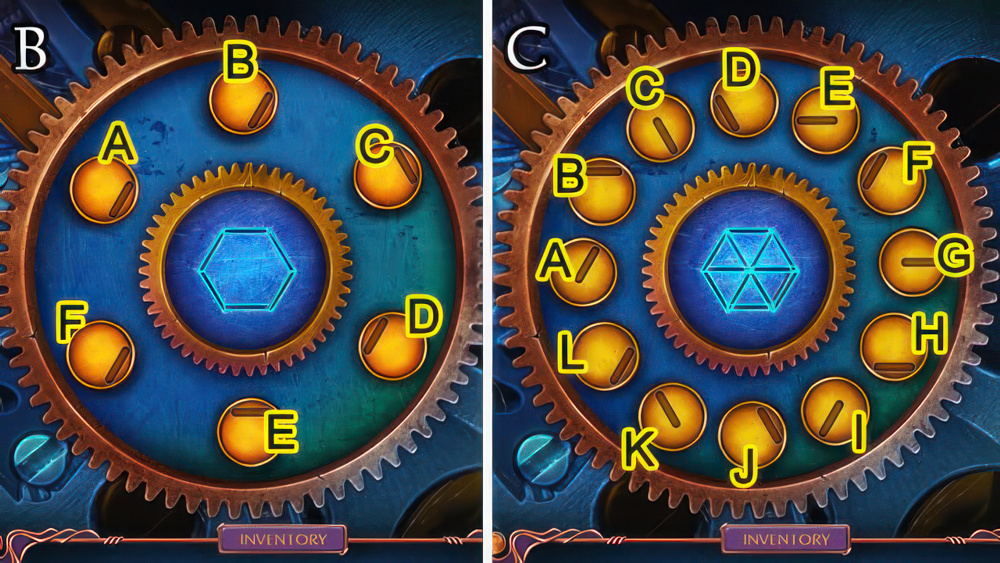
- Open door, take Tasks (A).
- Take Detective’s Cases, INK BLOTTER, BROKEN CUTTERS and FILE (B), TOKEN, HANDCUFFS (C).

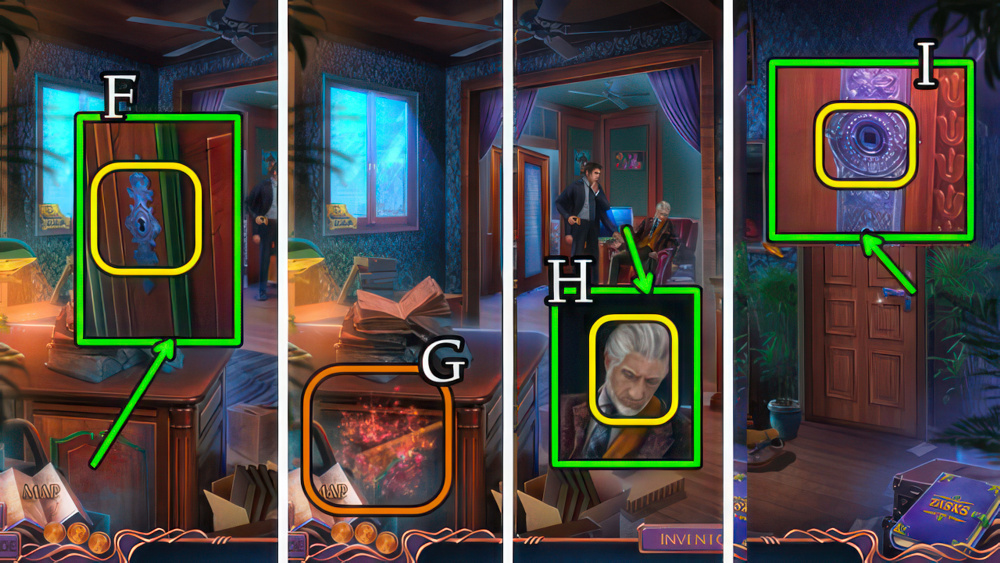
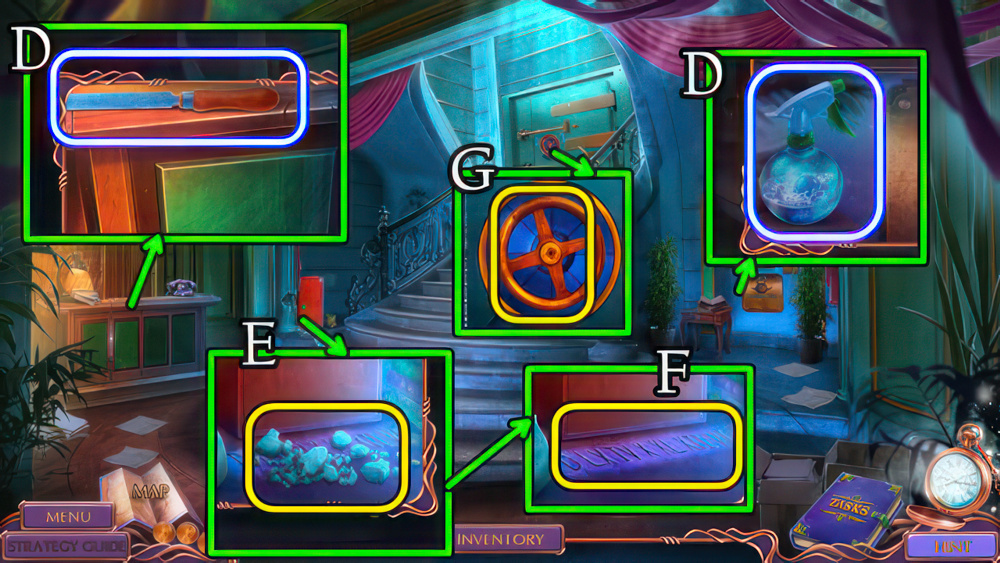
- Use TOKEN (D), take Hint (E), note, FLAG, COMB and KNIFE (F).
- FILE on FLAG for SHARPENED FLAG.
- Use INK BLOTTER, SHARPENED FLAG (G), take TWEEZERS, BOLT (H).
- BOLT on BROKEN CUTTERS for BOLT CUTTERS.
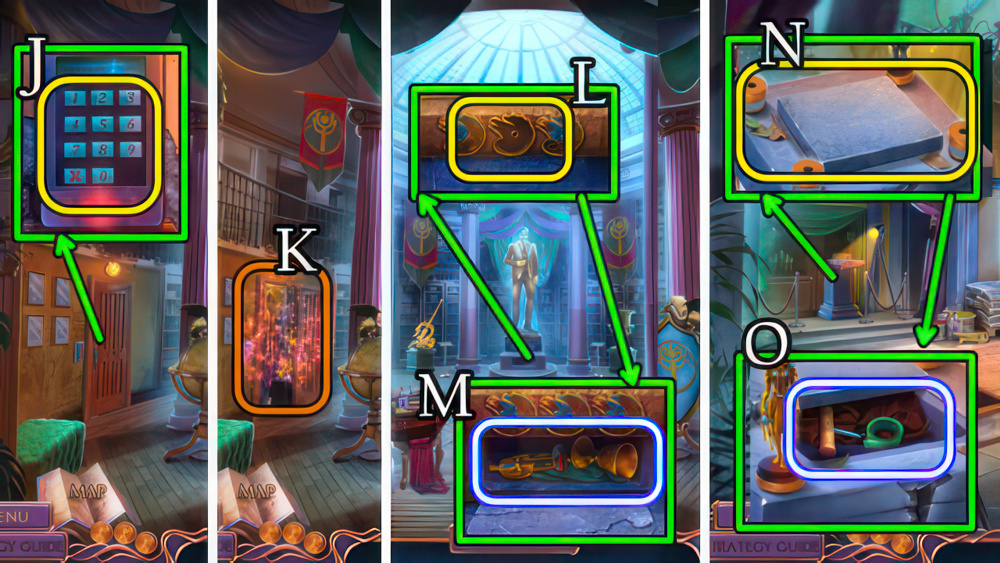
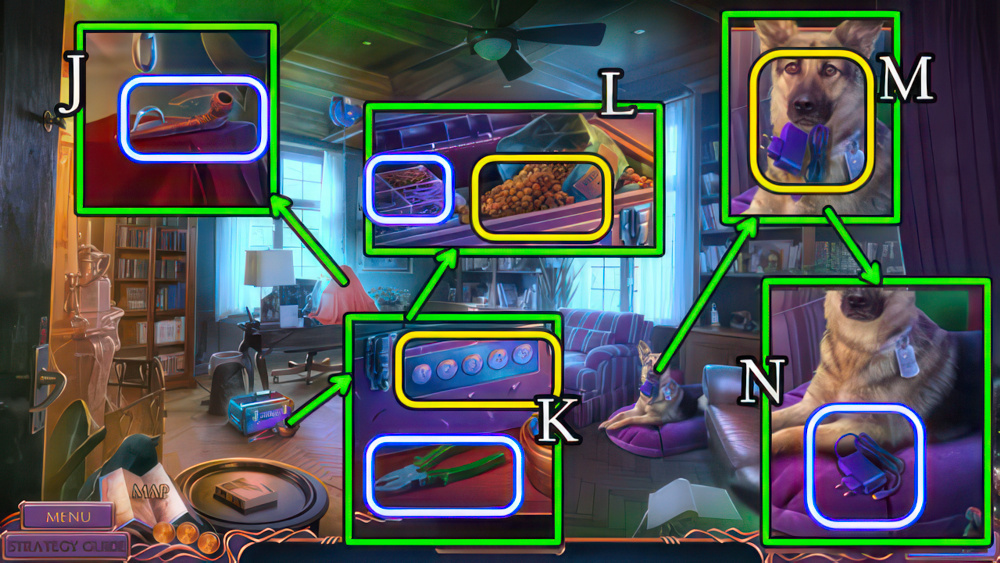
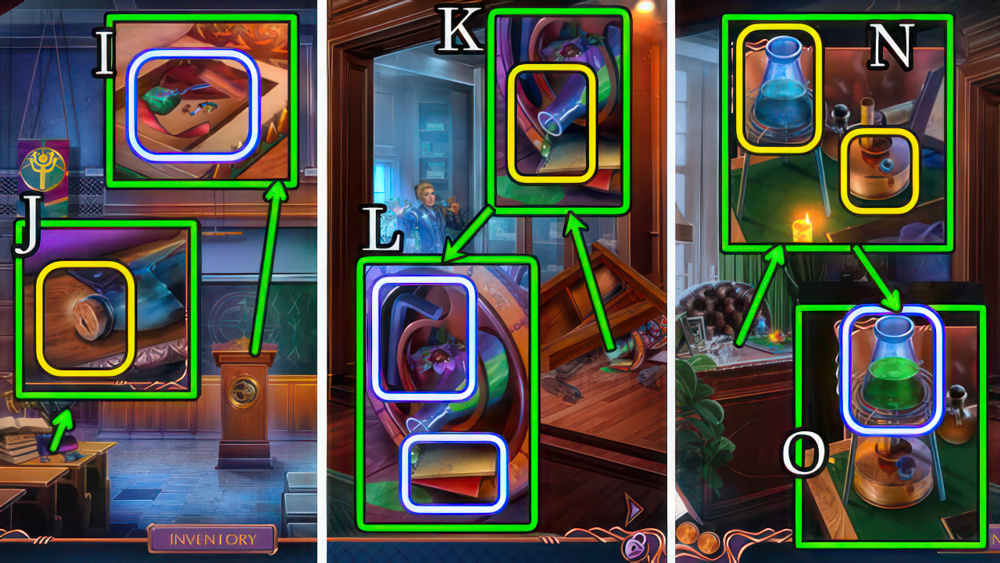
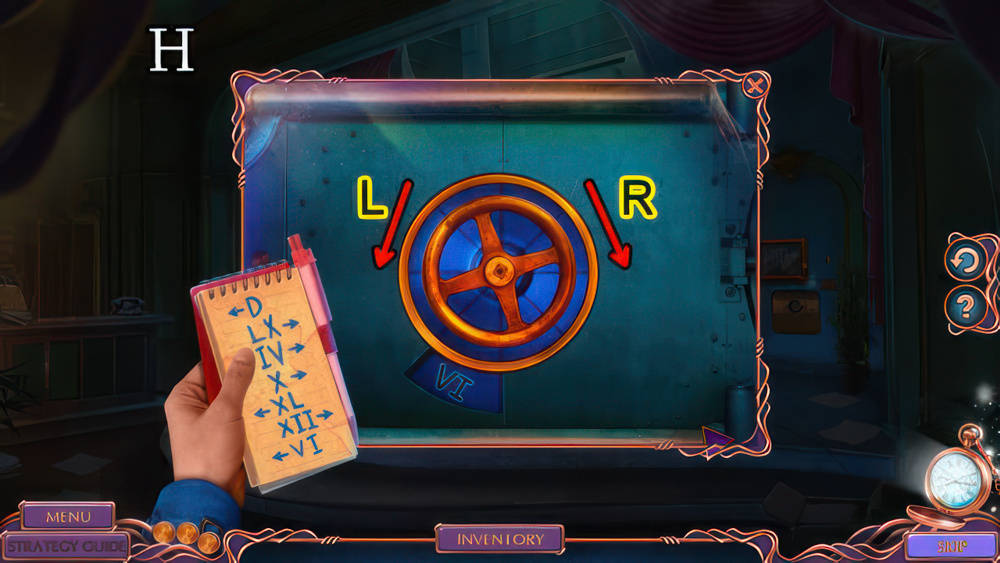
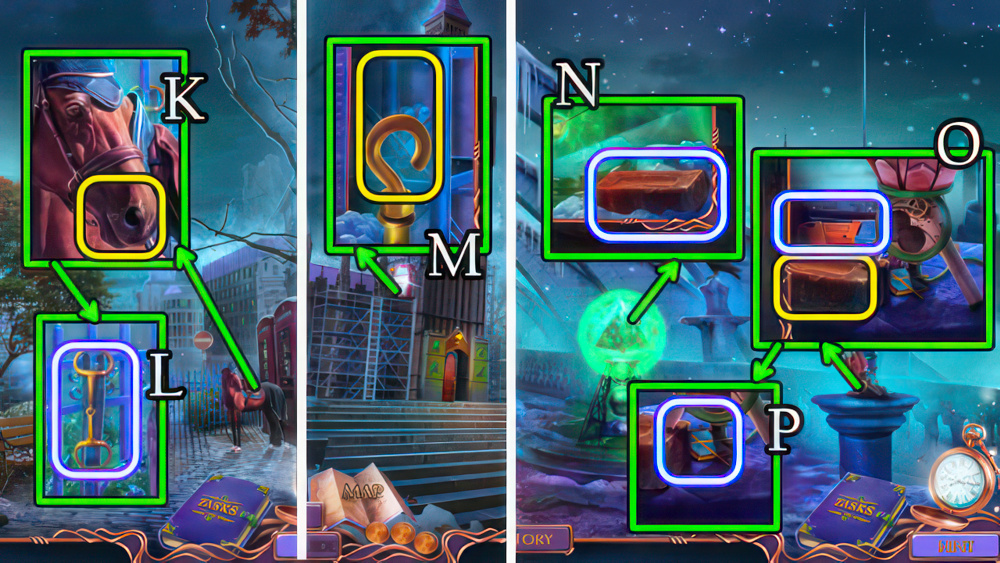
- Take note, use BOLT CUTTERS (I), play puzzle (J), receive SPARE MUSEUM KEY.
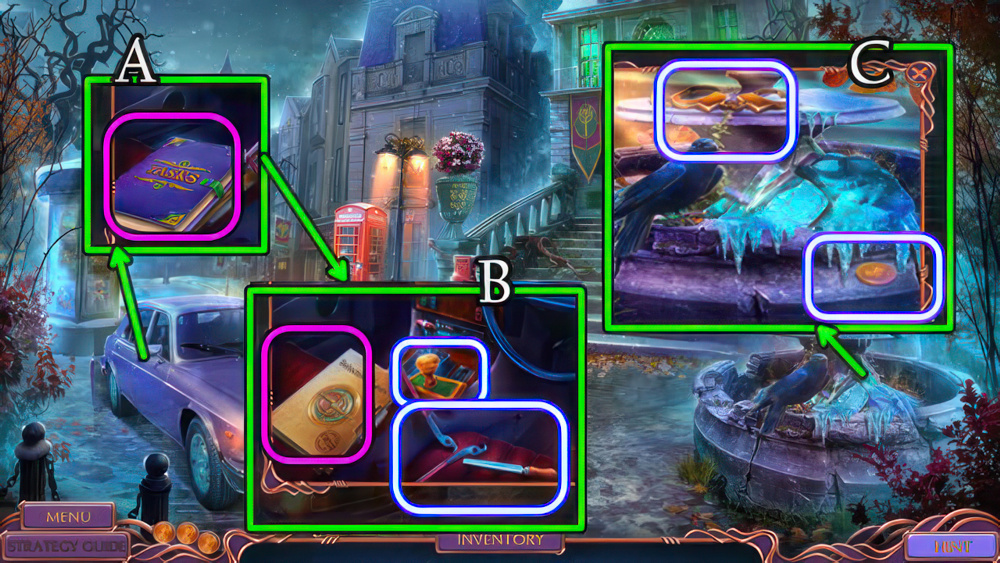
- Use SPARE MUSEUM KEY (K).
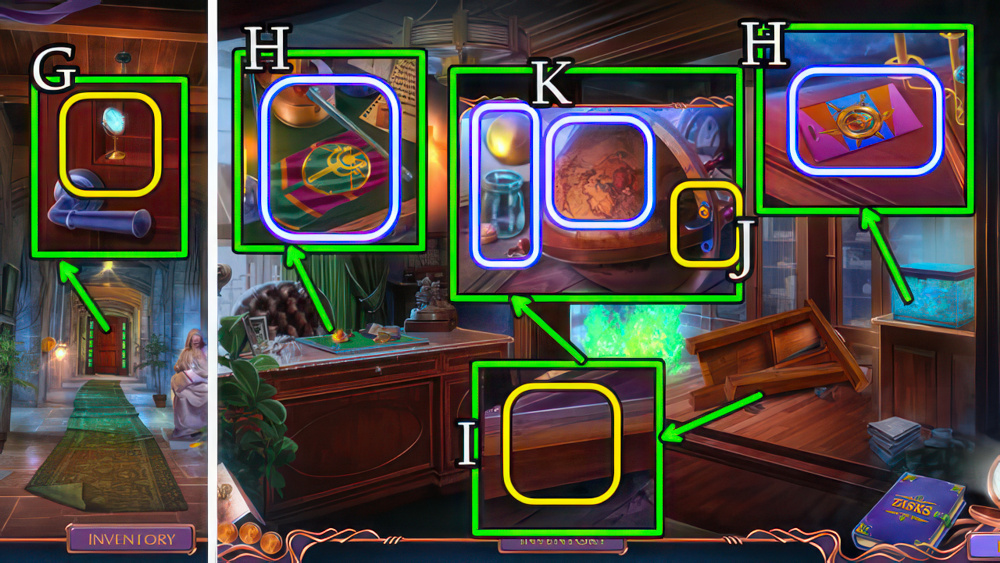
- Go forward.
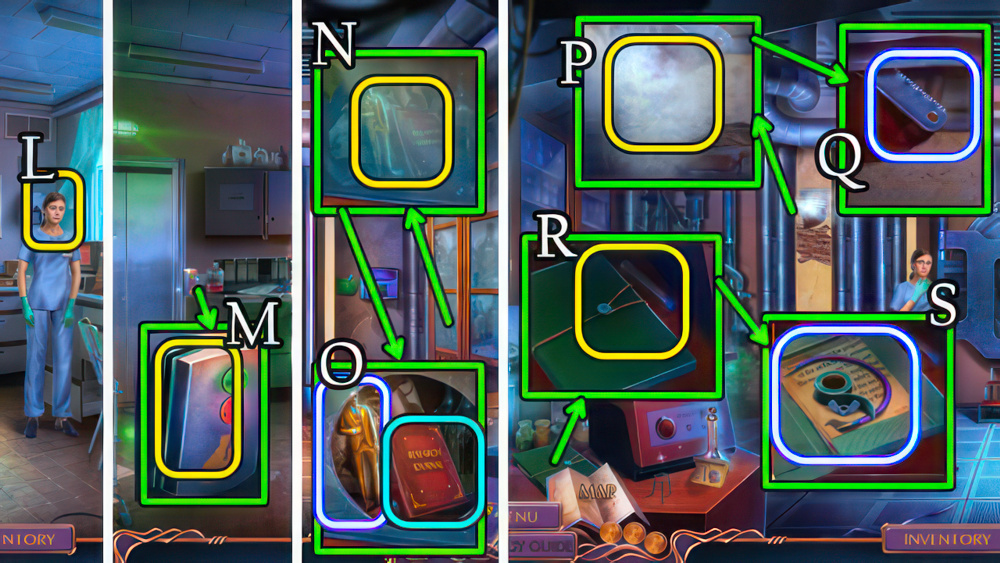
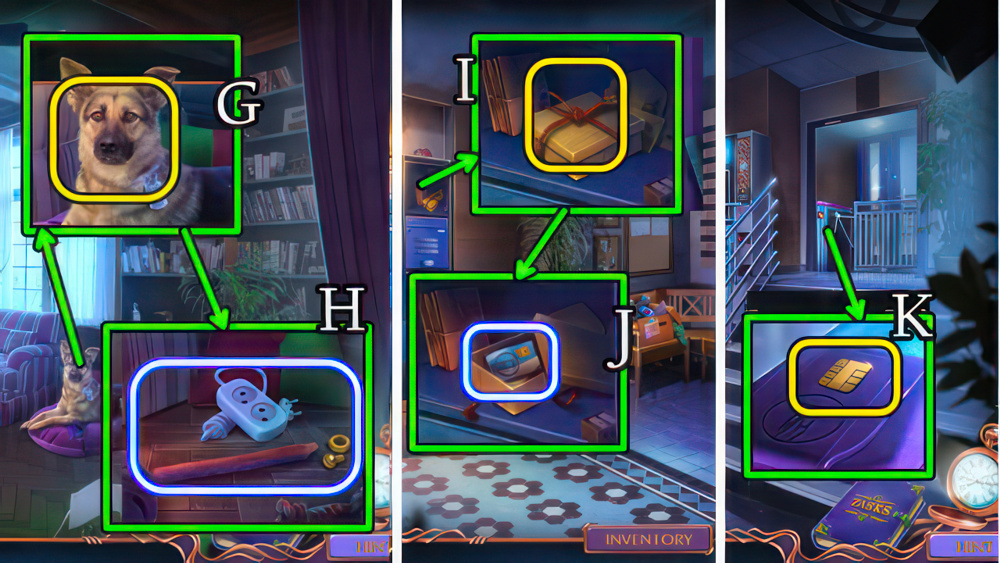
- Select character, use HANDCUFFS (L).
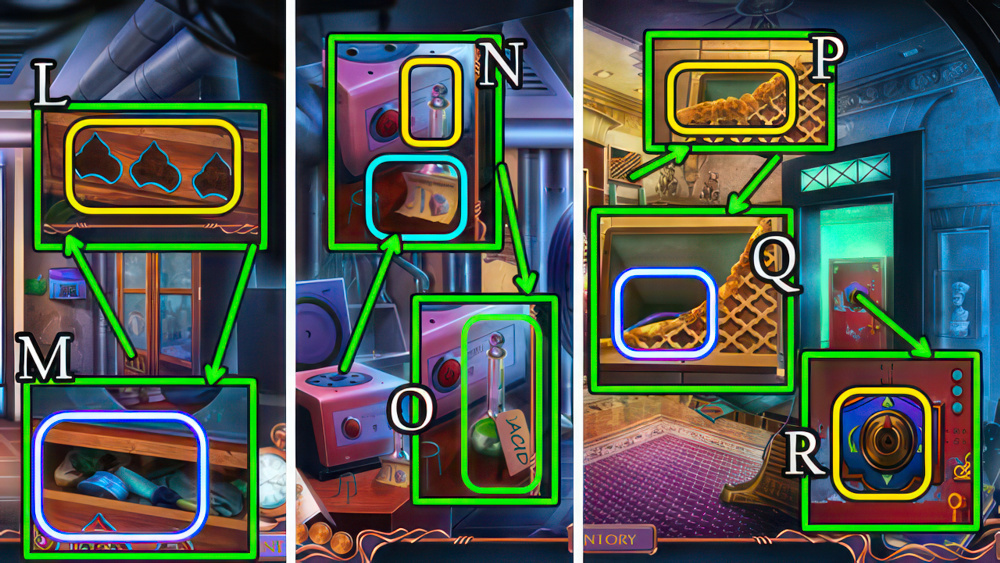
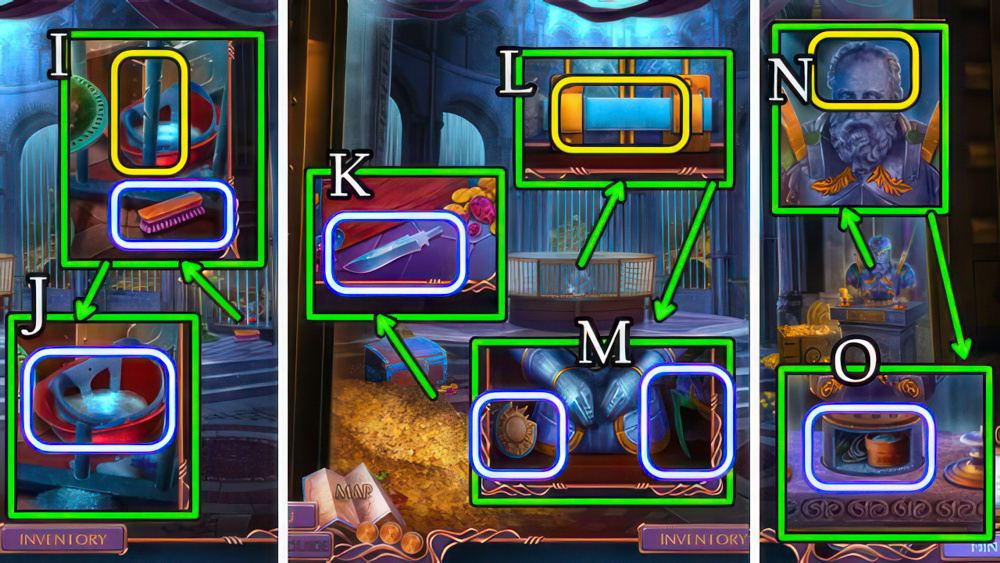
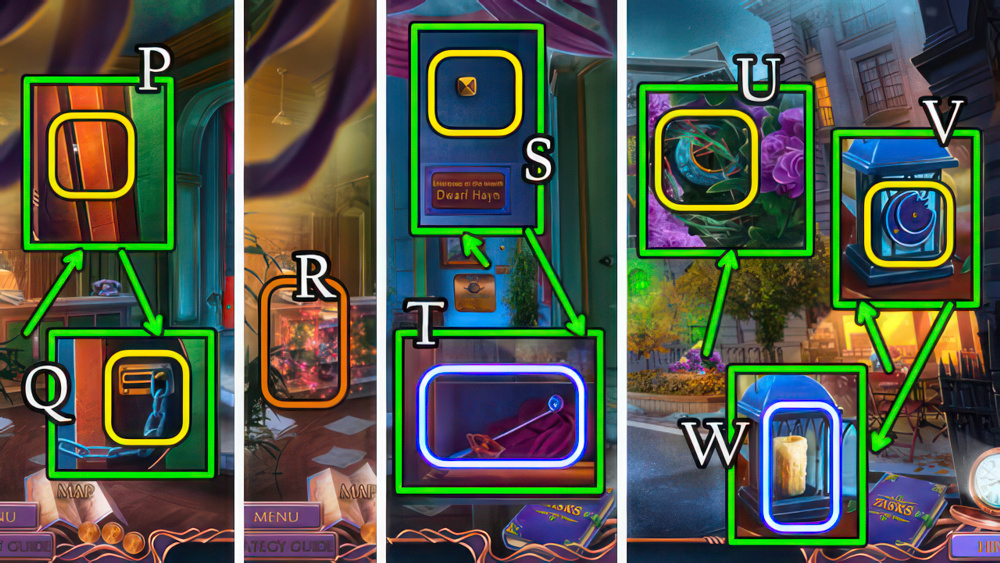
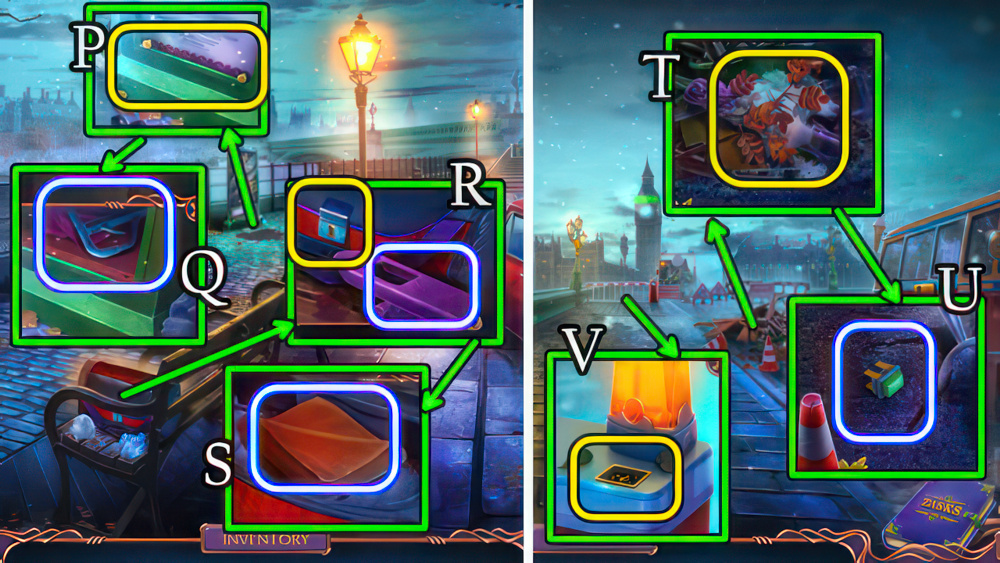
- Use KNIFE (M), take MAGNET (N), 1/3 RINGS and PUNCHED COIN (O).
- Use COMB (P), take BROKEN BULLHORN, 2/3 RINGS and 1/2 GEARS (Q).
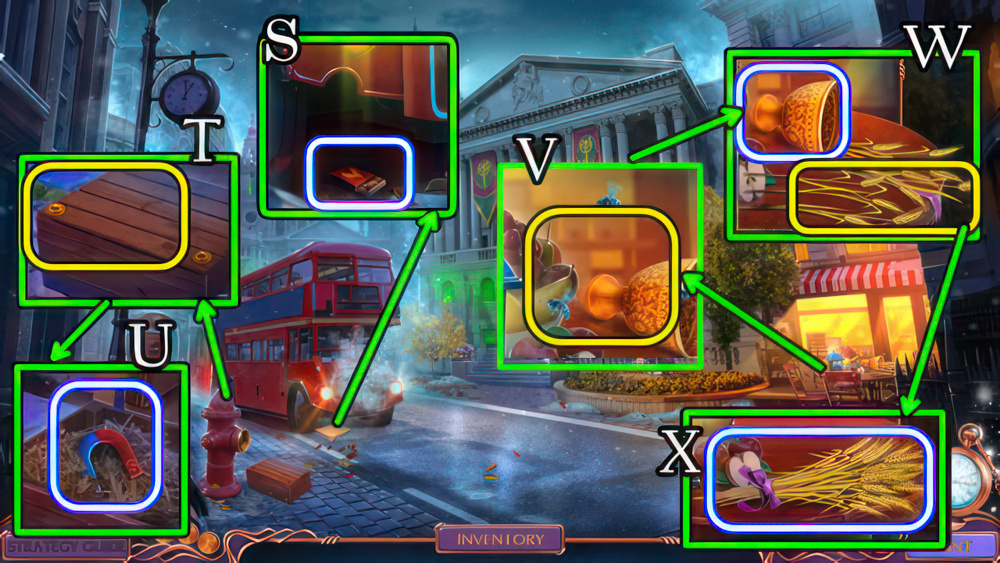
- Take Map (R), use TWEEZERS, receive 3/3 RINGS take book (S).
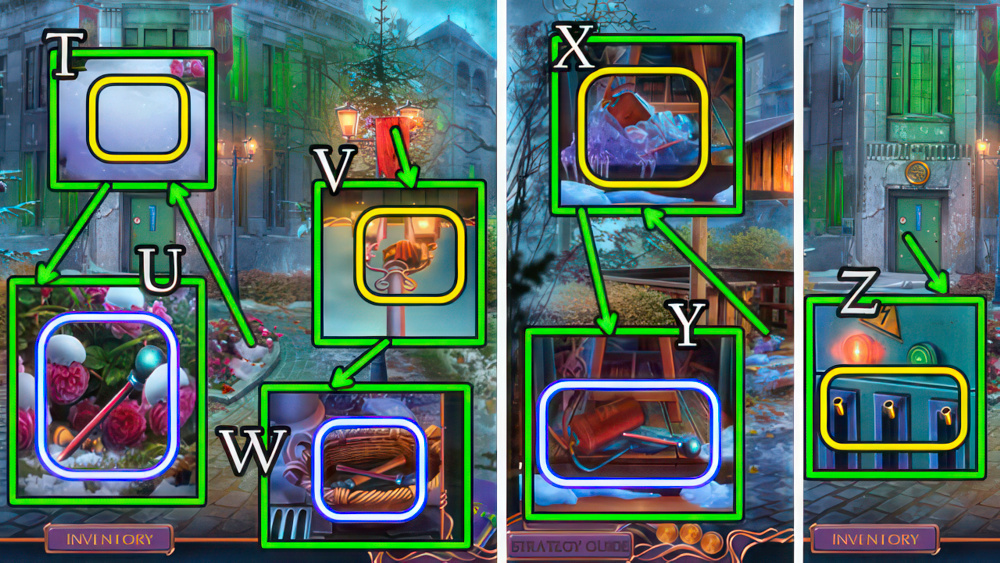
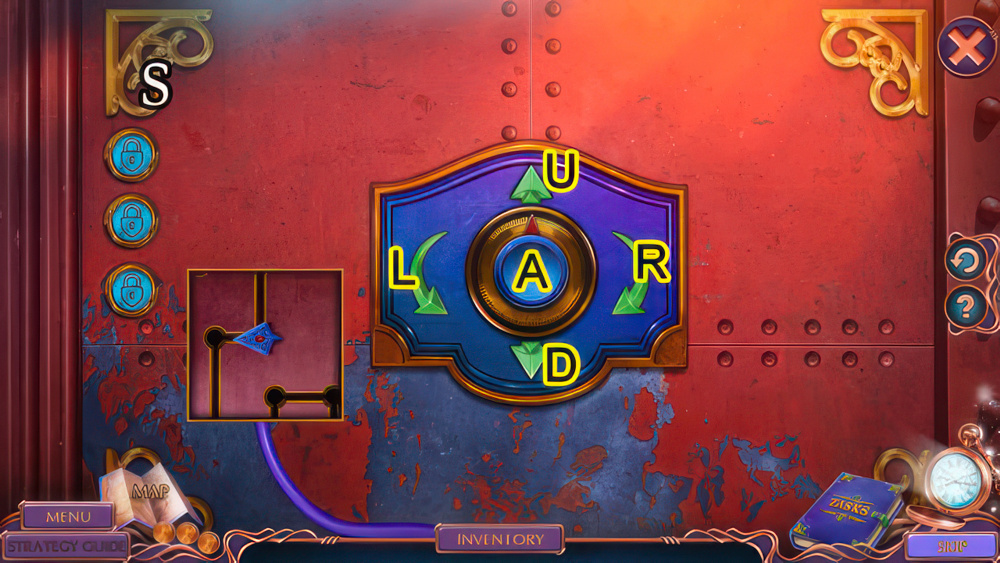
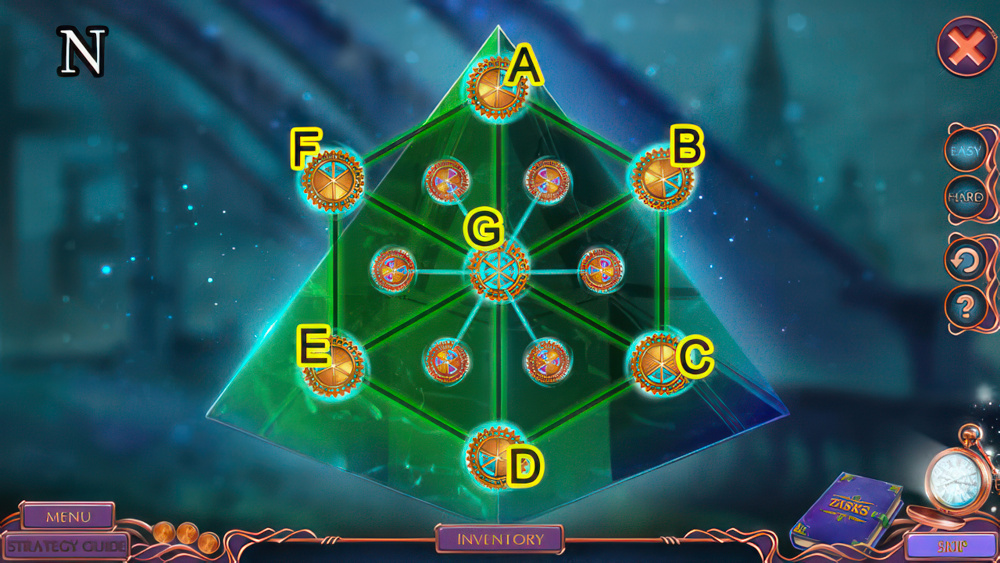
- Use 3/3 RINGS (T).
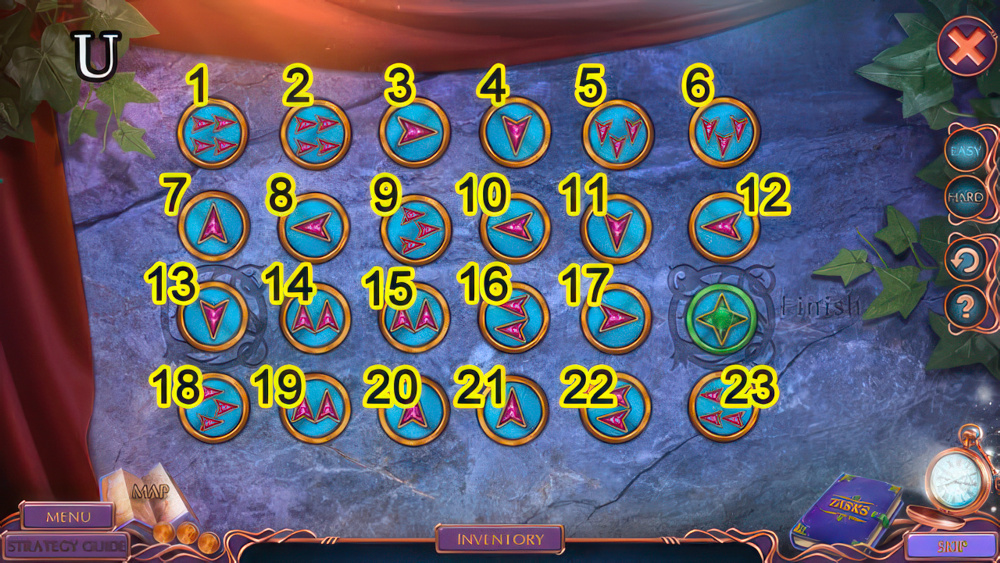
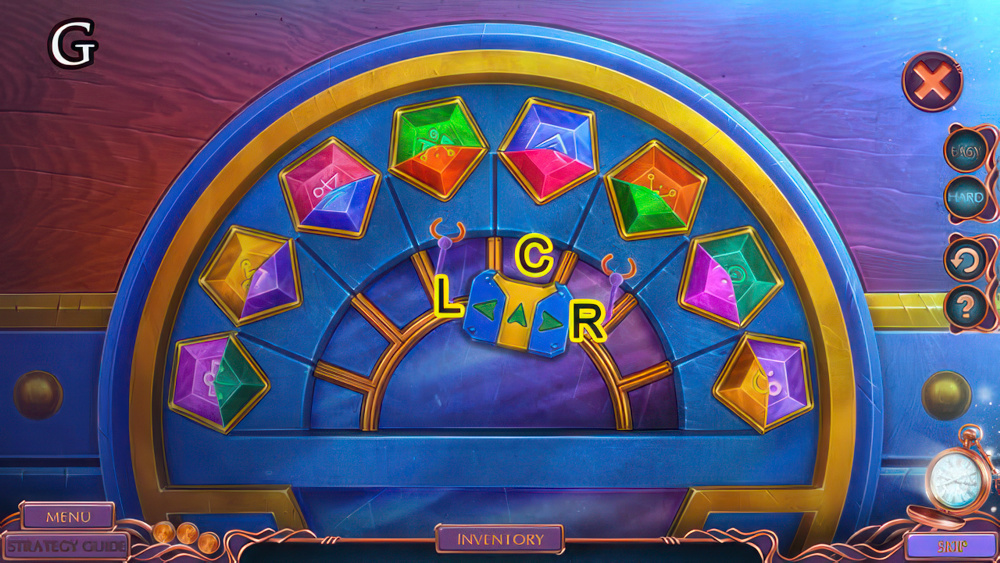
- Easy solution (U).
- 13-18-21-16-14-2-6-23-19-8-7.
- 1-5-22-20-15-3-4-10-9-12-11-17.
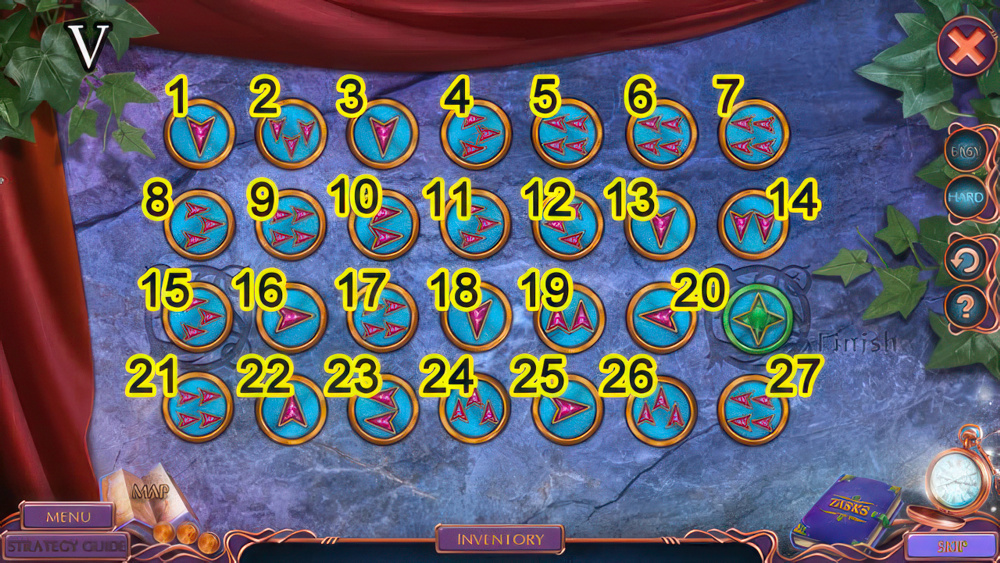
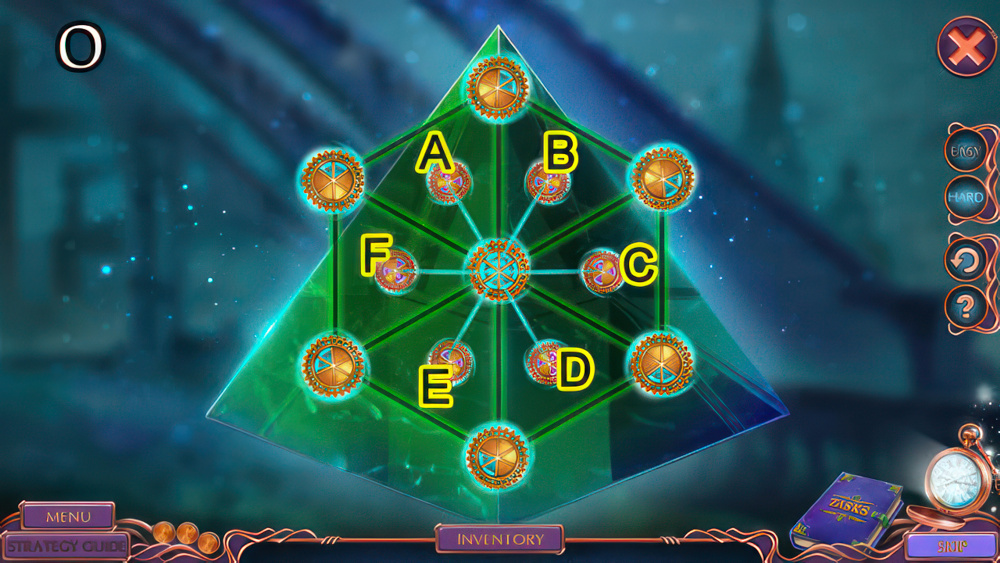
- Hard solution (V).
- 15-18-24-4-7-3-10-12-9-13-20-19-5-1-8.
- 11-14-27-23-21-25-26-6-2-22-16-17.
- Go forward.
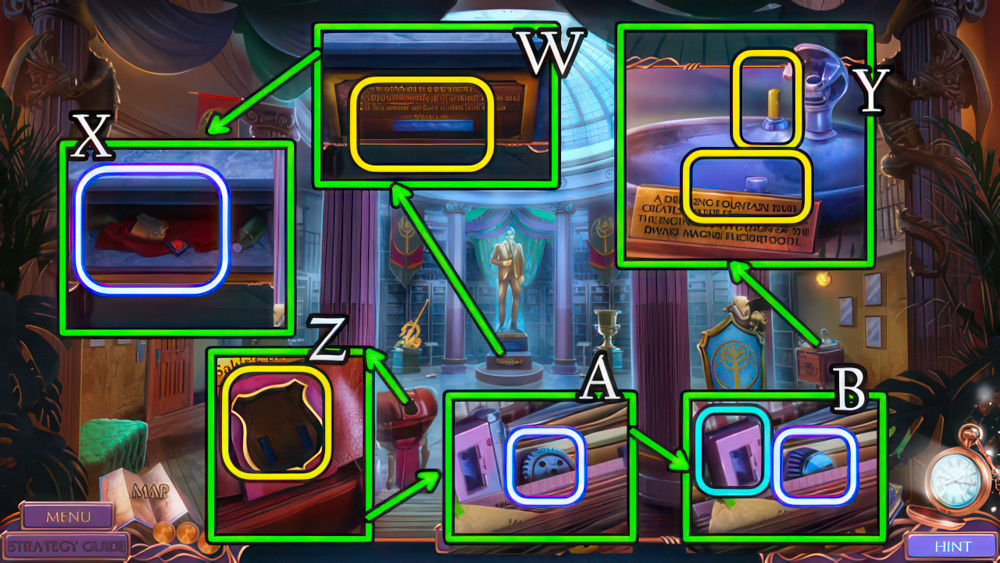
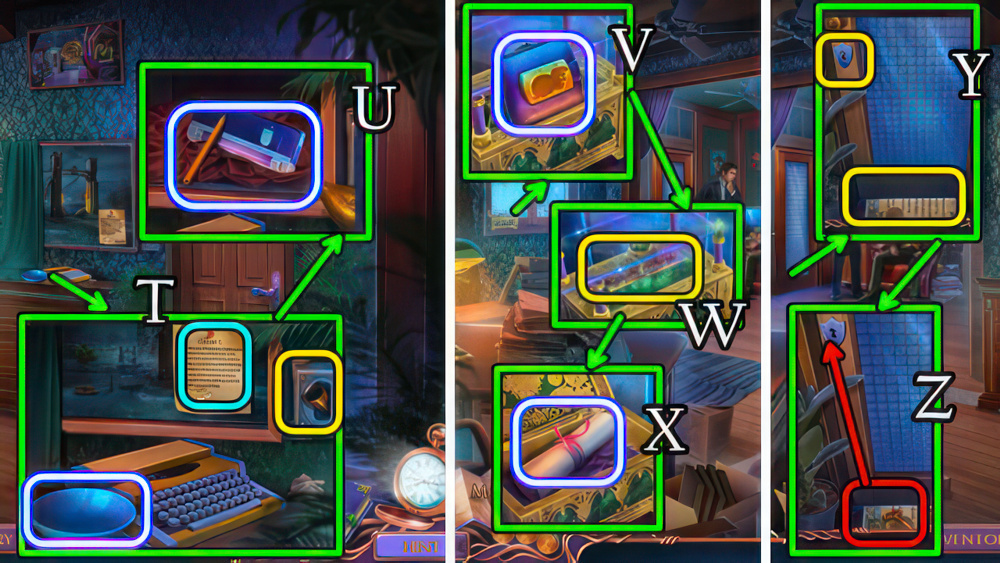
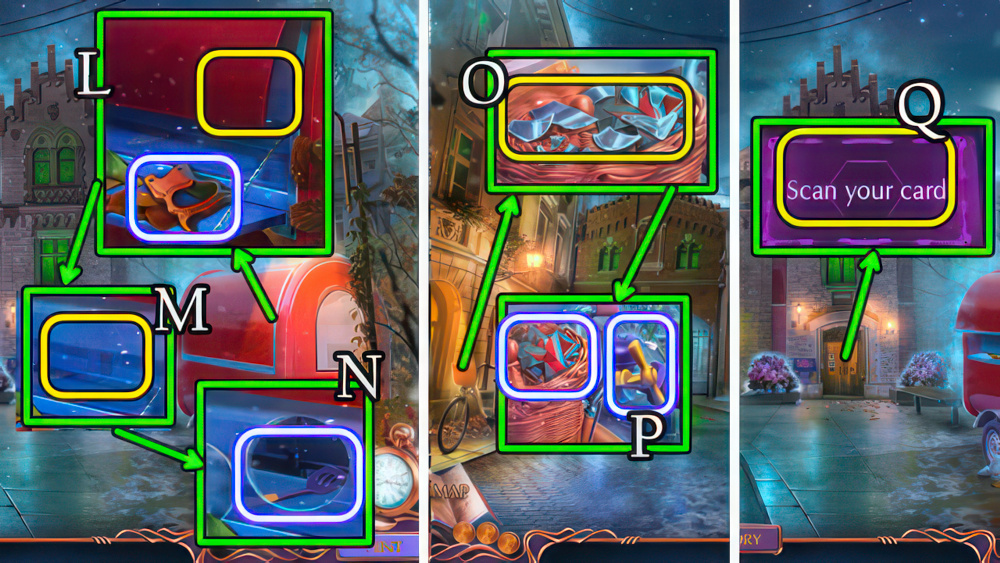
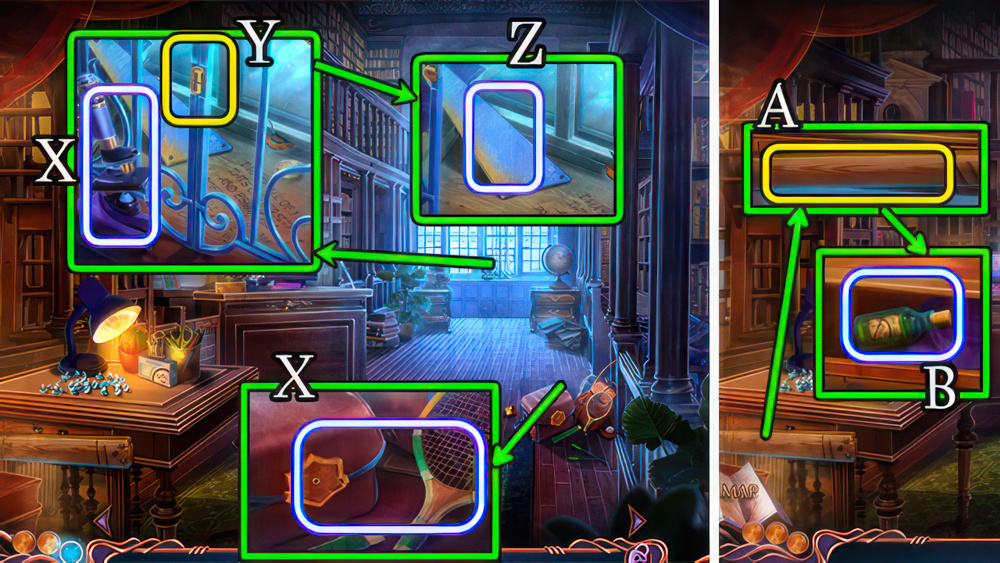
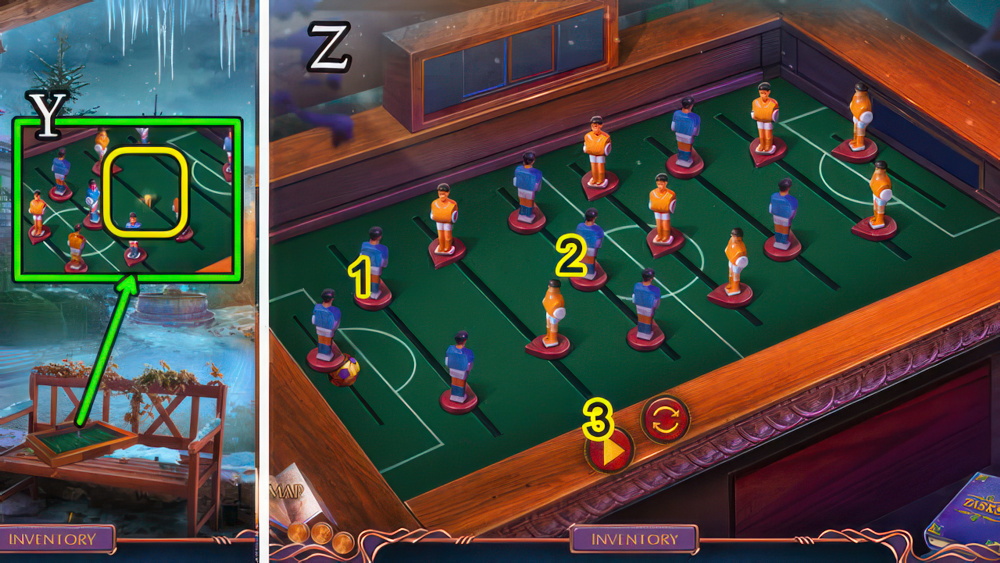
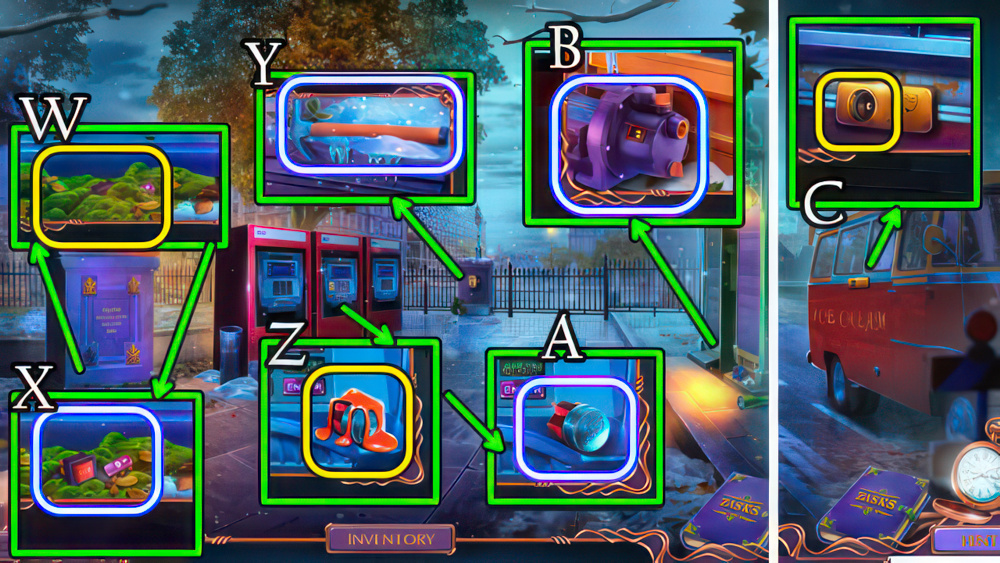
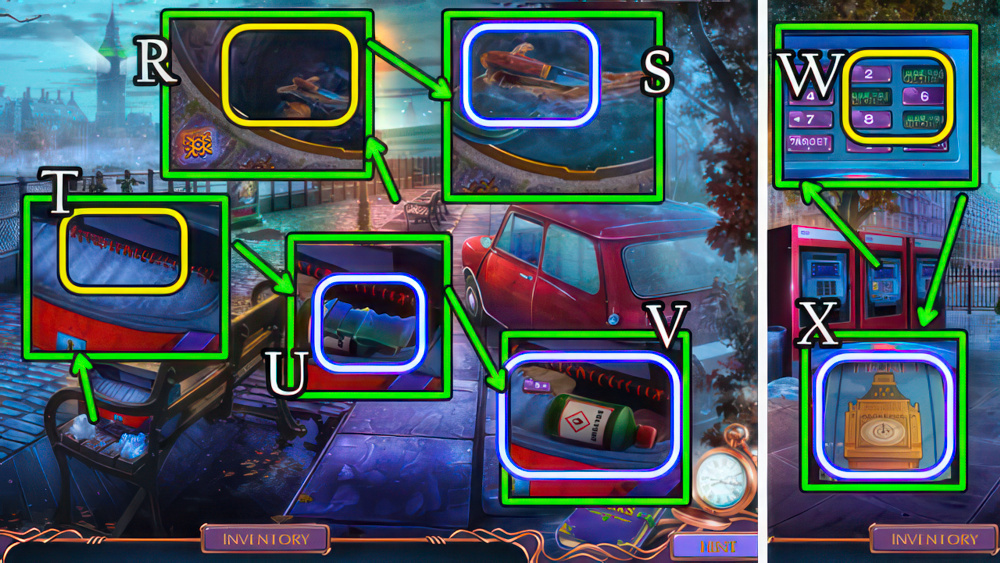
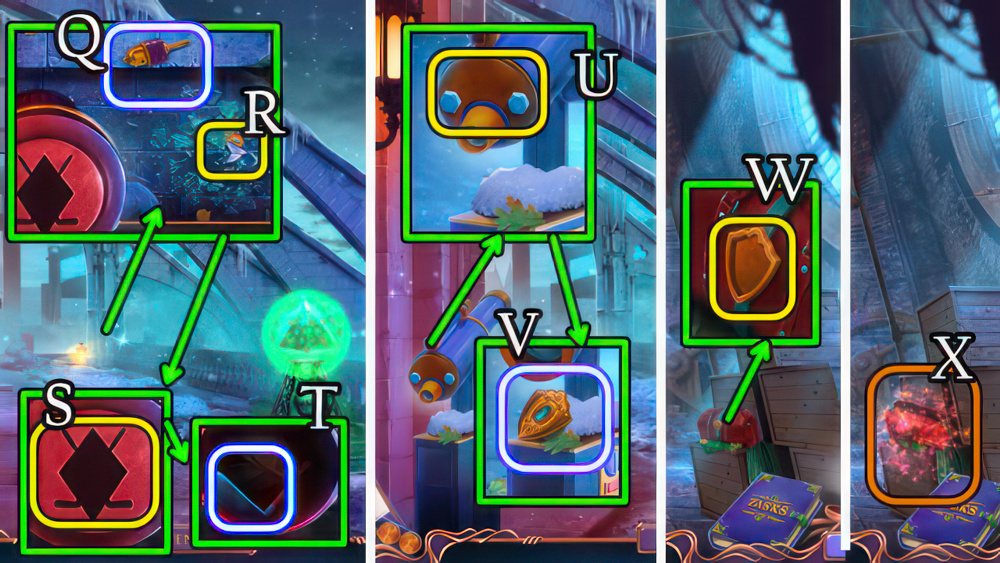
- Use MAGNET (W), take BULLHORN BUTTON, DIRTY BAG INSERT (X).
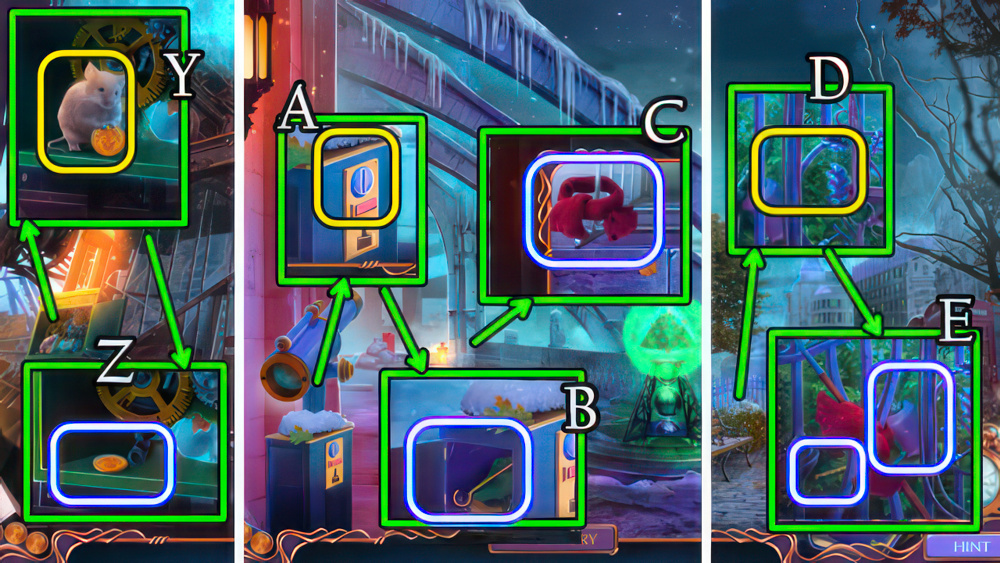
- Use PUNCHED COIN, DIRTY BAG INSERT (Y), receive BAG INSERT.
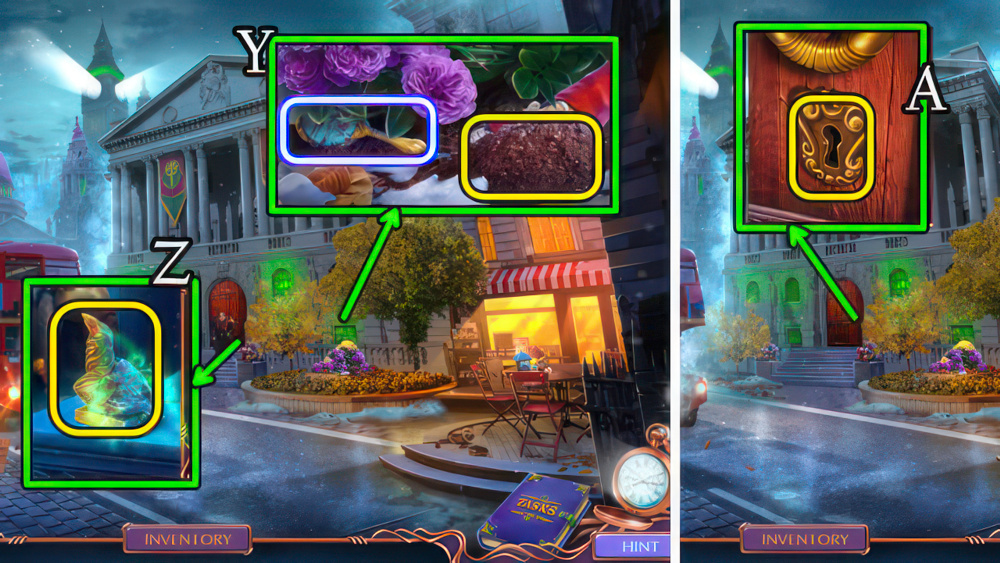
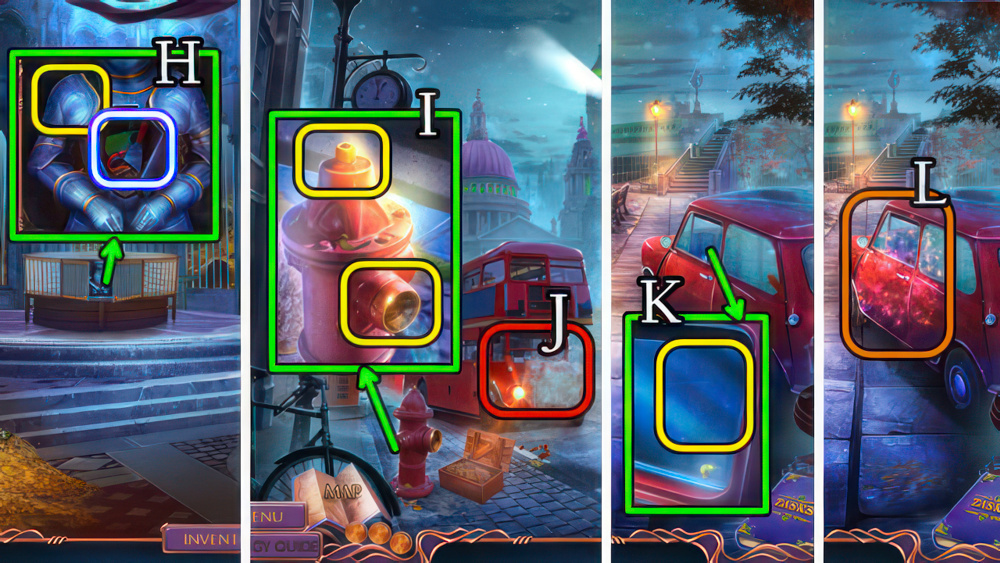
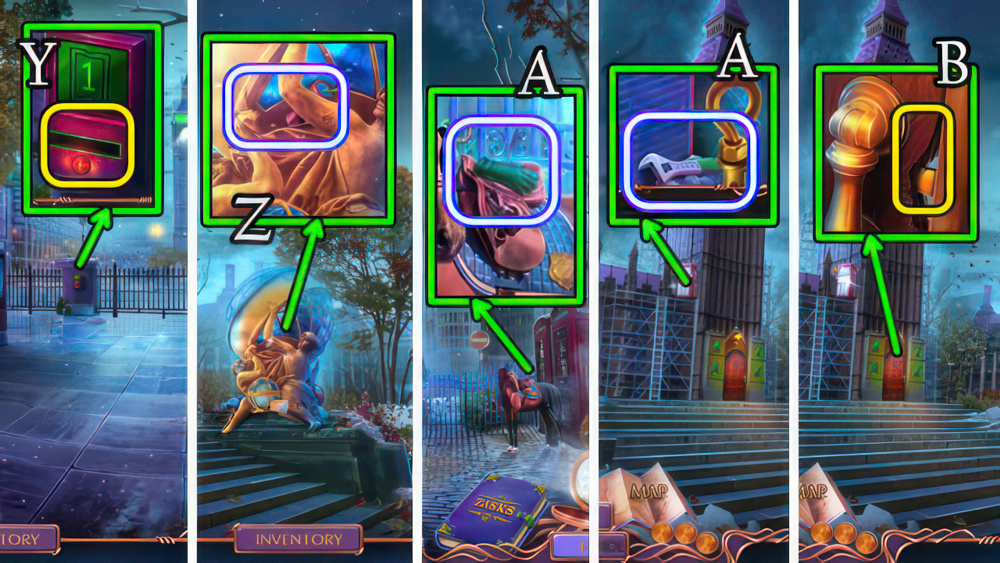
- Use BAG INSERT (Z), take 2/2 GEARS (A), VOLUME KNOB and tape player (B).
- Go down 2x.
- VOLUME KNOB, BULLHORN BUTTON on BROKEN BULLHORN for BULLHORN.
- Use BULLHORN (C), take PEN, SIGNET RING (D).
- Use 2/2 GEARS, take ENVELOPE (E), 1/3 FIGURINES (F).
- Go forward.
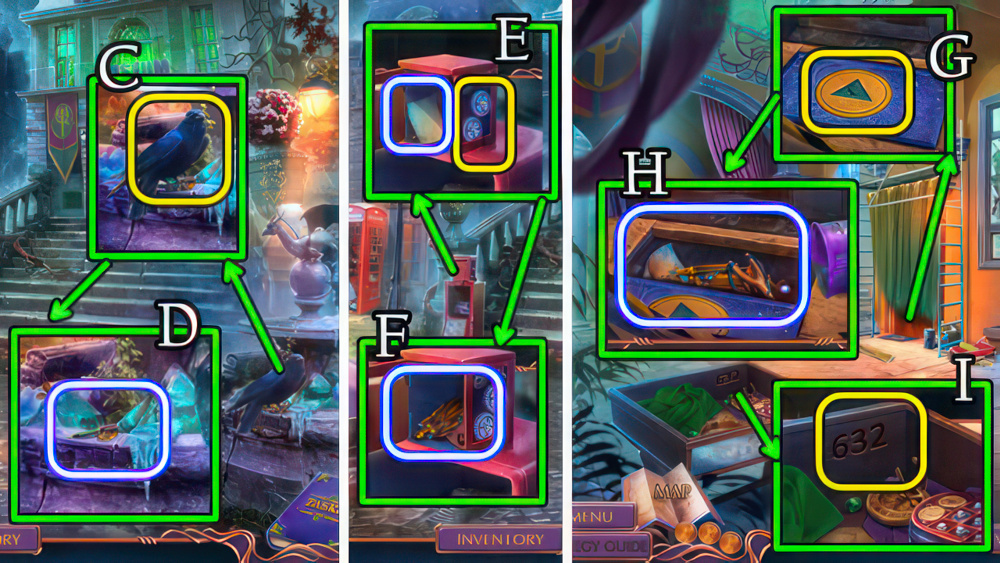
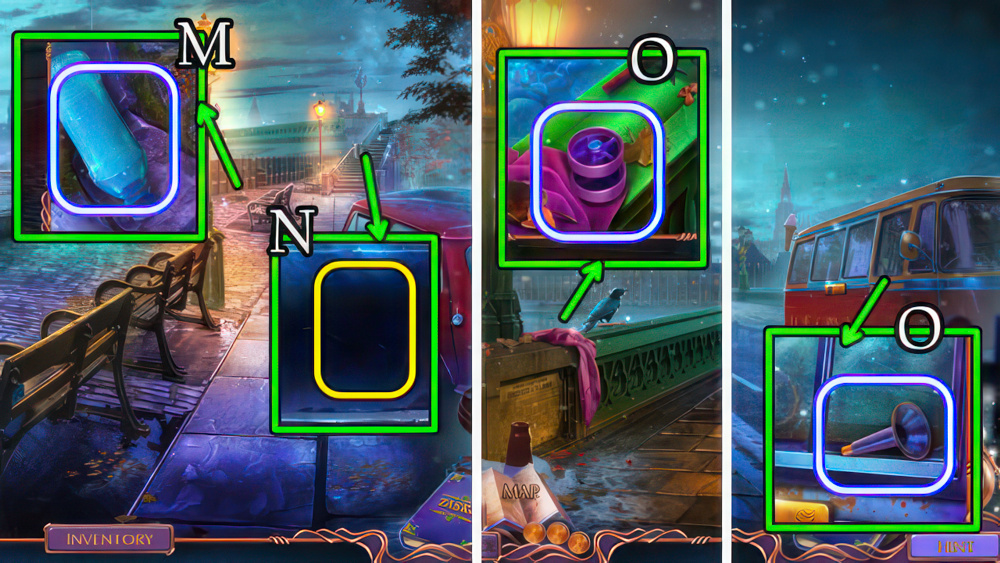
- Use SIGNET RING (G), take SLINGSHOT, 2/3 FIGURINES and HIDDEN ADDRESS (H).
- Use PEN, ENVELOPE (I) for DOOR CODE.
- Go forward.
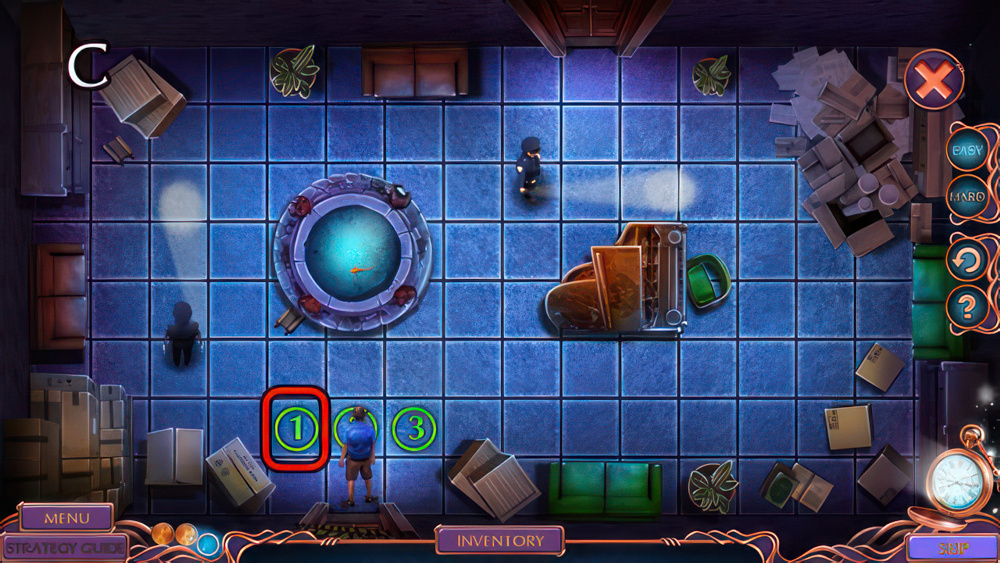
- Use DOOR CODE, select 6-3-2 (J), play puzzle (K), receive RAVEN INSERT.
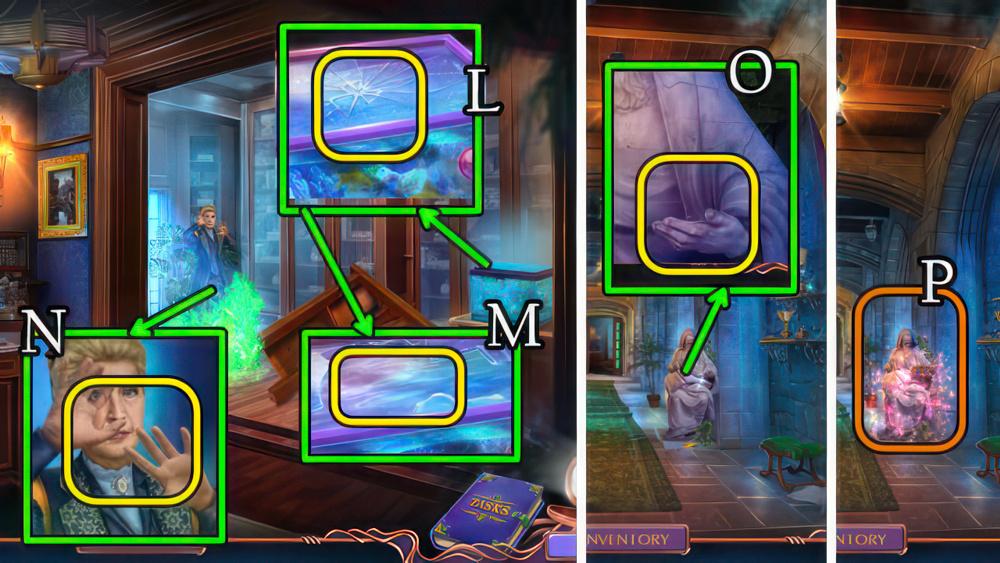
- Use RAVEN INSERT (L), take GOBLET, 3/3 FIGURINES (M).
- Go down.
- Use 3/3 FIGURINES (N), take TAPE, CORKSCREW (O).
- Go forward.

- Use CORKSCREW (P), take HOT WATER, LIGHTER (Q).
- LIGHTER on HIDDEN ADDRESS for LABORATORY ADDRESS.
- Go down 2x.
- Select (R), use LABORATORY ADDRESS (S).
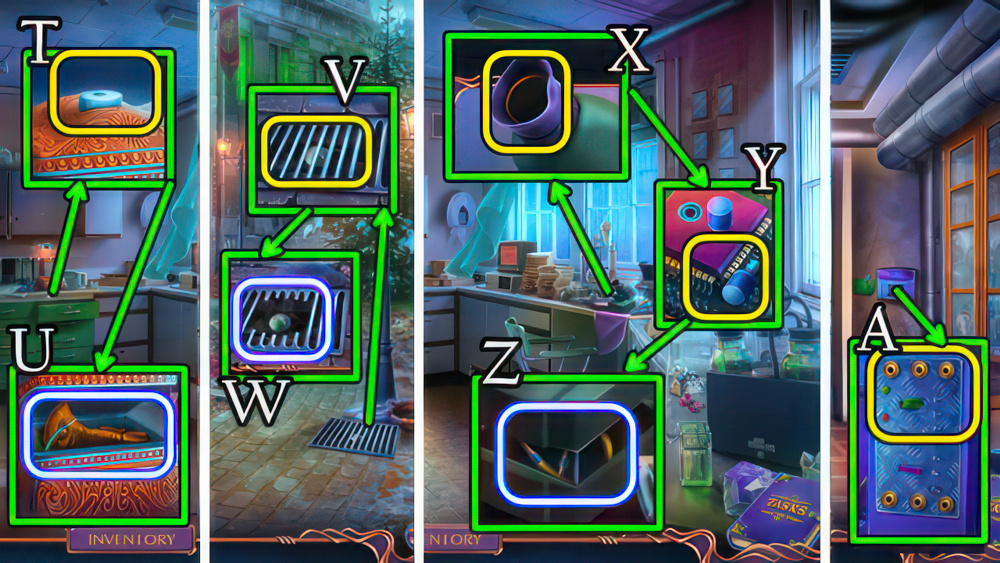
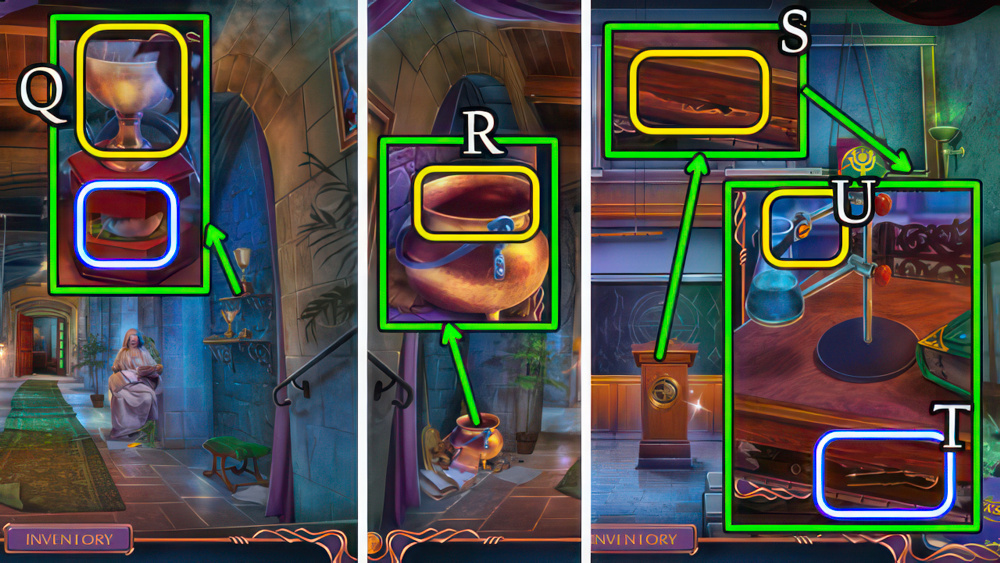
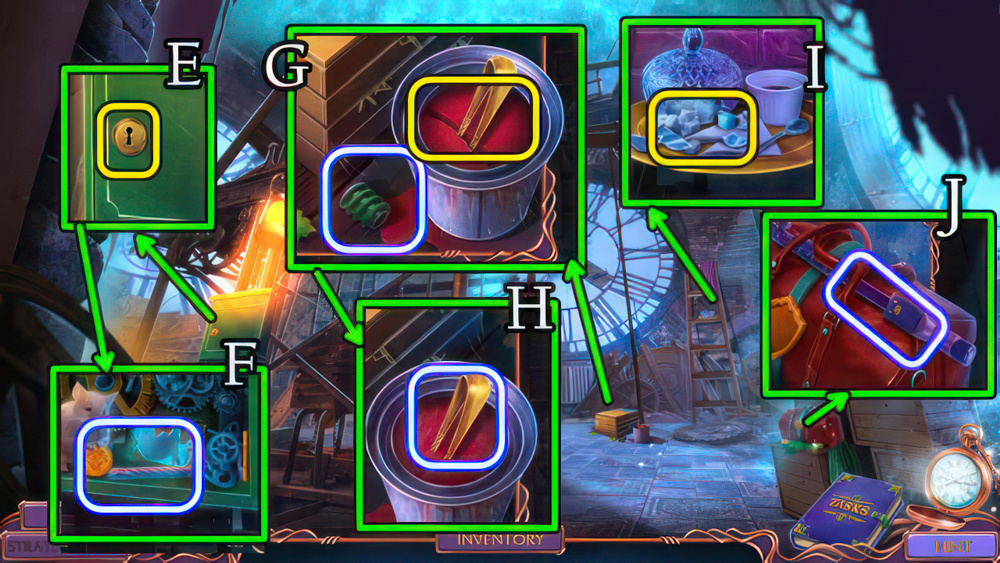
- Use GOBLET (T), take 1/3 LEVERS, 1/2 CHESS PIECES (U).
- Use SLINGSHOT (V), take 2/3 LEVERS, GLASS CUTTER (W).
- Use HOT WATER (X), take 3/3 LEVERS, FIRE EXTINGUISHER (Y).
- Place 3/3 LEVERS (Z).
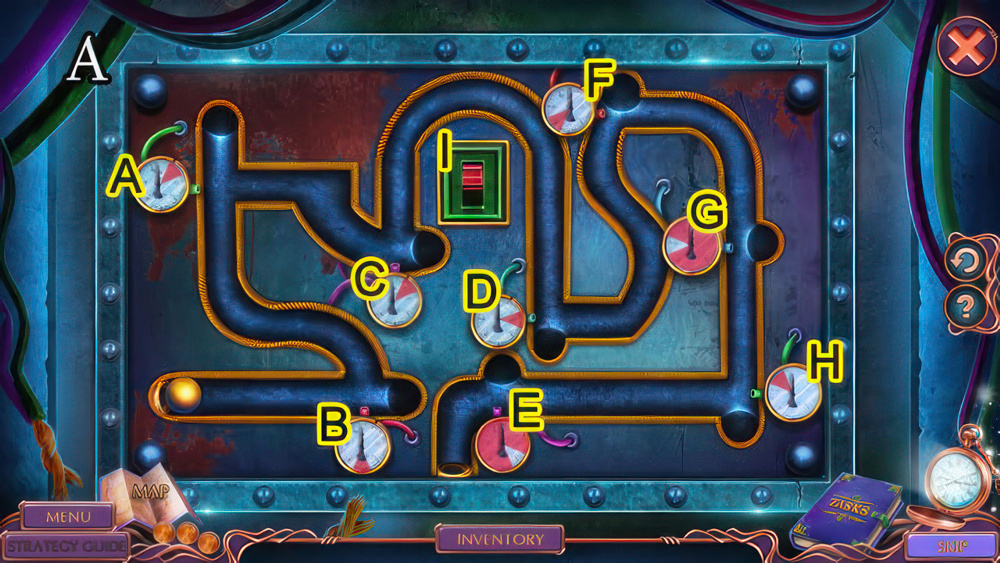
- Solution (A).
- A-Bx5-C-Dx2-Hx8-Ex4-I.
- Go forward.
- Speak to character, use TAPE (B), take NAIL CUTTERS, GLOVE and LENS SHARDS (C).
- Use FIRE EXTINGUISHER (D), take 2/2 CHESS PIECES, DAMAGED HACKSAW (E).
- Go down.

- Use GLOVE (F), take PAPER CLIP (G).
- Use 2/2 CHESS PIECES, take FAN (H) HAIRPIN (I).
- Go forward.
- Use PAPER CLIP, HAIRPIN (J), play puzzle (K), receive ASMA’S GLASSES.
- Give ASMA’S GLASSES (L), speak to character, receive ACCESS CARD.
- Use ACCESS CARD (M).
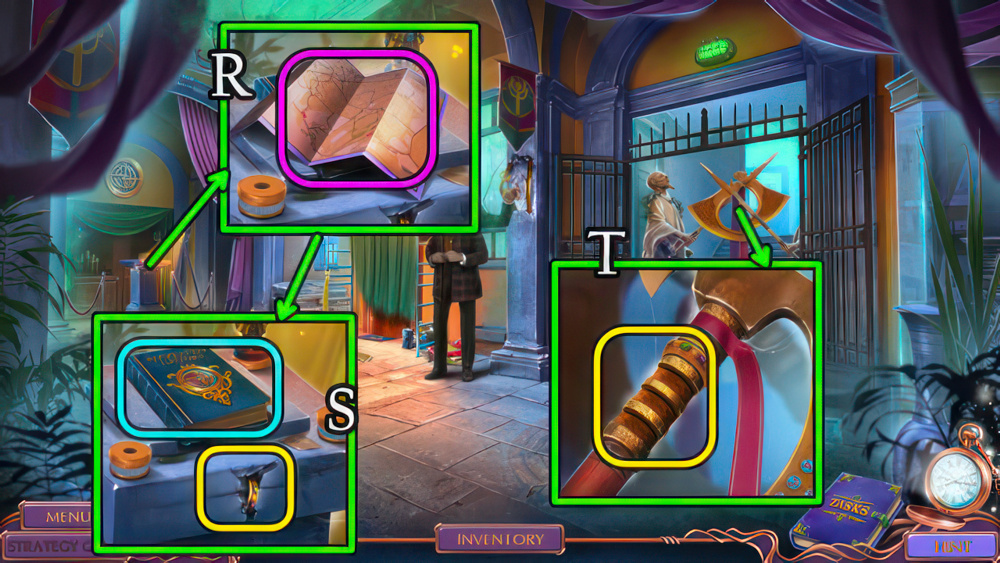
- Use GLASS CUTTER (N), take CASSAN FIGURINE, journal (O).
- Use FAN (P), take SAW BLADE (Q).
- Use NAIL CUTTERS (R), take ELECTRICAL TAPE, WING NUT, 1/3 WIRE and note (S).
- Go down.
- Use CASSAN FIGURINE (T), take CANE HANDLE, 2/3 WIRE (U).
- Go down.
- WING NUT, SAW BLADE on DAMAGED HACKSAW for HACKSAW.
- Use HACKSAW (V), take MICROSCOPE LENS (W).
- Go forward.
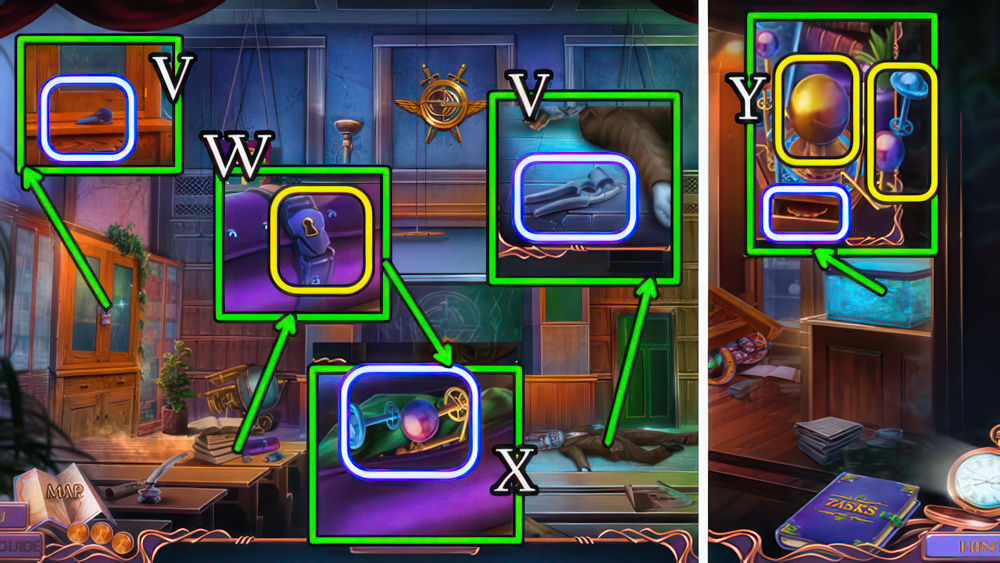
- Use MICROSCOPE LENS (X), select (Y), take 3/3 WIRE (Z).
- Go forward.
- Use 3/3 WIRE (A).
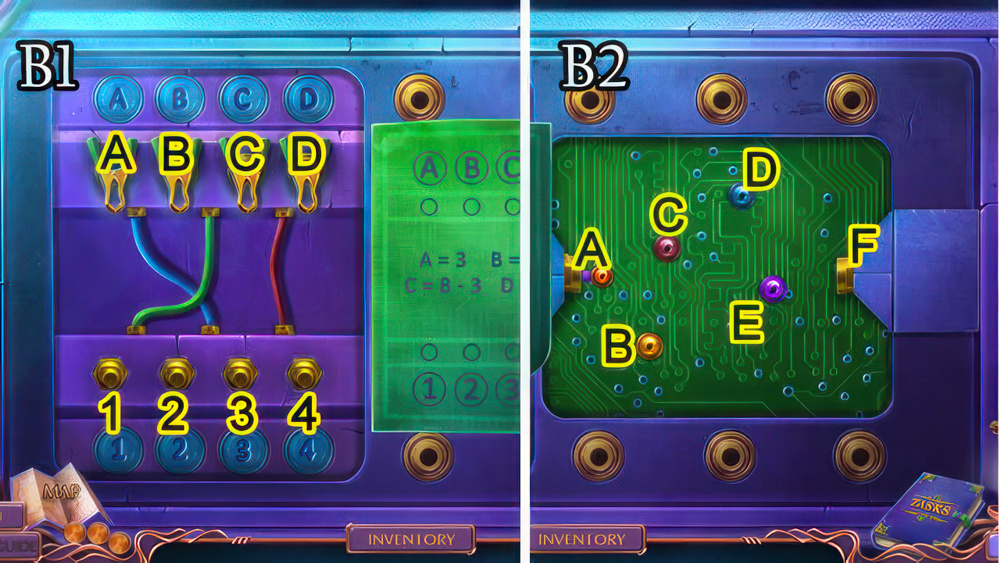
- Solution (B1-B2).
- (A-3)-(B-4)-(C-1)-(D-2), A-B-D-C-E-F.
- Speak to character.
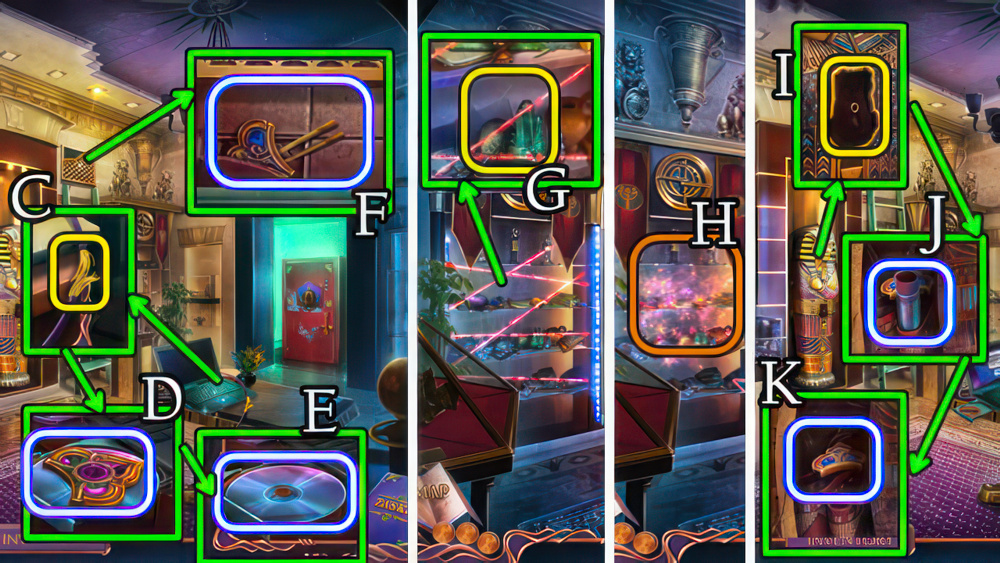
- Use ELECTRICAL TAPE (C), take 1/3 DECORATIVE INLAYS (D), DISC (E).
- Take 2/3 DECORATIVE INLAYS, TONGS (F).
- Use LENS SHARDS (G), play puzzle (H), receive SCARAB.
- Use SCARAB (I), take ACID REAGENT (J), 3/3 DECORATIVE INLAYS (K).
- Go down.
- Use 3/3 DECORATIVE INLAYS (L), take SCRAPER, SAFE DIAL (M).
- Take note, use ACID REAGENT (N), take ACID (O).
- Go forward.
- Use ACID (P), take STETHOSCOPE (Q).
- Take note, use SAFE DIAL, STETHOSCOPE (R).
- Solution (S).
- R-A-L-A-R-A-R-A-L-A-R-A-R-A-L-A-L-A.
- L-A-R-Ax2-R-A-L-A-R-A-L-A-R-A-L-A-R.
- A-L-A-L-A-R-Ax2-L-A-R-A-R-A-R-A.
- R-A-L-Ax2-L-Ax2-R-A-L-A.
- Take pyramid.
- Take note, EMPTY BOWL, use CANE HANDLE (T), take UV LAMP, PENCIL (U).
- Take WALLET (V), use DISC (W), take note, CERTIFICATE (X).
- Use CERTIFICATE, PENCIL (Y), use key (Z).
- Go forward.

- Take BROKEN LADDER (A).
- Use TONGS, take EIGHT (B).
- Take BRUSH, use SCRAPER (C), use EIGHT (D), take HEAVY STATUE, WALLET SHAPE (E).
- Go down.
- WALLET SHAPE on WALLET, take DESK KEY.
- Use DESK KEY (F), play puzzle (G), receive PAINKILLERS.
- Give PAINKILLERS (H), receive DOOR HANDLE.
- Use DOOR HANDLE (I).
- Enter Study.
- Take SMOKING PIPE (J).
- Take PLIERS, use UV LAMP, select 3-2-5 (K), take NAILS, use EMPTY BOWL (L), receive TOBY’S FOOD.
- Give TOBY’S FOOD (M), take CHARGER (N).
- Return to Lobby.
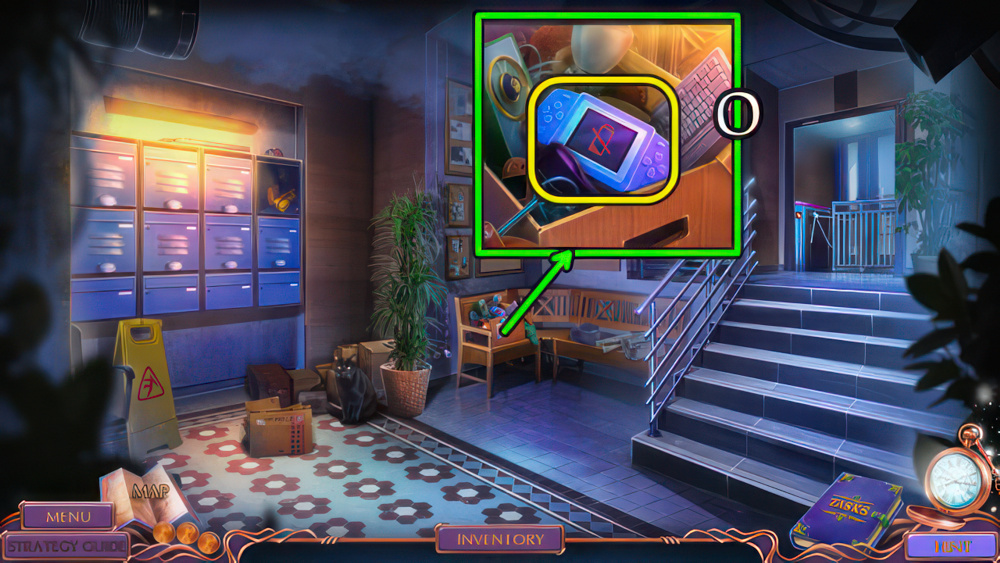
- Use CHARGER (O).

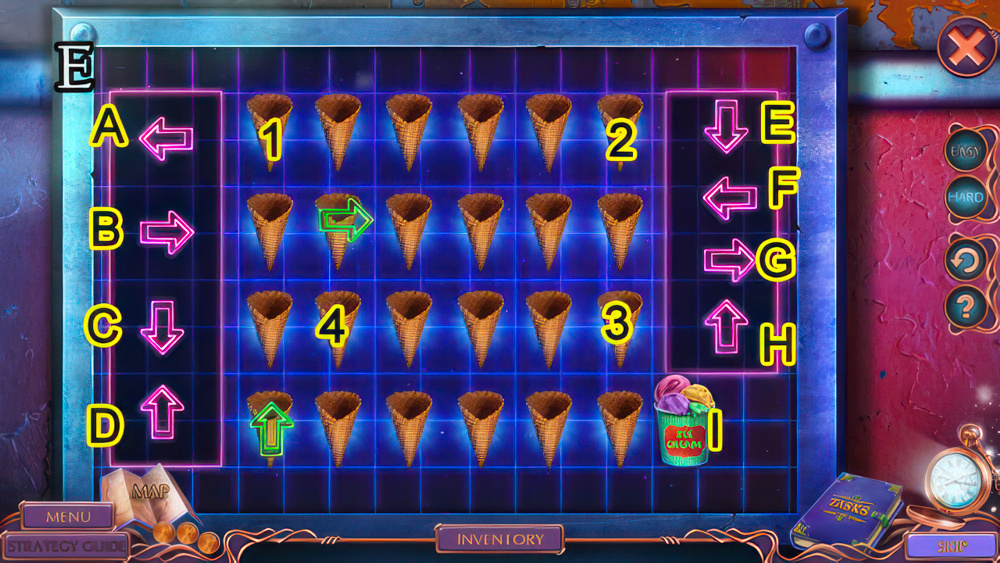
- Easy solution (P1-P3).
- D-L-U-L-U-R-D-L, U-R-D-R-D.
- L-U-R-U-R-D-L-U-R-D-L-U-R.
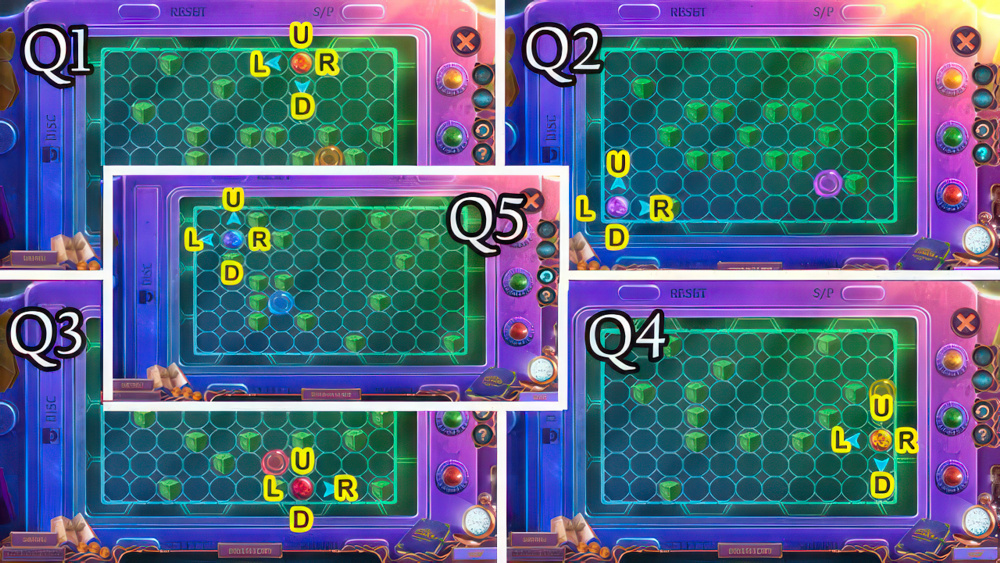
- Hard solution (Q1-Q5).
- L-D-L-D-R-D-R-U-L-U.
- U-R-D-R-D-L-U-R.
- U-R-D-R-D-L-U-R.
- R-U-L-U-L-D-L-D-R-D-R-U-R.
- D-L-U-R-D-R-U-R-D-L-U-R-U-R-D.
- L-D-R-U-R-D-R-U-L-D-L-D-L.
- Receive DRINK COUPON.
- Use DRINK COUPON, select button (R), take HOT WATER (S).
- Return to Study.
- HEAVY STATUETTE, NAILS on BROKEN LADDER for LADDER.
- Use LADDER (T), take 1/2 BRIDE AND GROOM, BROKEN SCISSORS (U), use BRUSH, HOT WATER (V), open, take 2/2 BRIDE AND GROOM, SCISSORS DETAIL (W) and DIAMOND RING (X).
- Use 2/2 BRIDE AND GROOM (Y), take note, OLIVE OIL (Z).
- Go down.
- Use OLIVE OIL (A), SMOKING PIPE (B), receive TYPEWRITER KNOB, take CLOTHESPIN (C).
- Use TYPEWRITER KNOB, take INCOMPLETE CHAIN LINK (D).
- Return to Study.
- Use INCOMPLETE CHAIN LINK, PLIERS (E), play puzzle (F), receive BALL.
- Give BALL (G), select pillow, take EXTENSION CORD, STICK and NUT AND BOLT (H).
- Return to Lobby.
- SCISSORS DETAIL, NUT AND BOLT on BROKEN SCISSORS for SCISSORS.
- Use SCISSORS (I), take KEY CARD, note (J).
- Use KEY CARD (K).
- Go forward.
- Take SAW HANDLE, use STICK (L), DIAMOND RING (M), take SPATULA (N).
- Use SPATULA (O), take LIBRARY CARD, VALVE (P).
- Use LIBRARY CARD (Q).
- Easy solution (R).
- Ex5-Ax3-Bx5-C-Dx3-Fx2-Gx3-H-Ix2.
- Hard solution (S).
- A-Cx3-D-Bx5-Gx5-Ex3-Fx3-Hx2-Ix3-J-Kx2-Lx4.
- Go forward.

- Use CLOTHESPIN (T), take CHIP (U), use EXTENSION CORD (V).
- Solution (W).
- (A-D)-(B-F)-(C-H)-(E-G).
- Take TAPE.
- Take HEAVY MICROSCOPE, BROKEN RACKET (X).
- Use CHIP (Y), take SAW BLADE (Z).
- SAW BLADE on SAW HANDLE for SAW.
- Use SAW (A), open, take WEED-KILLING POTION (B).
- Go down.
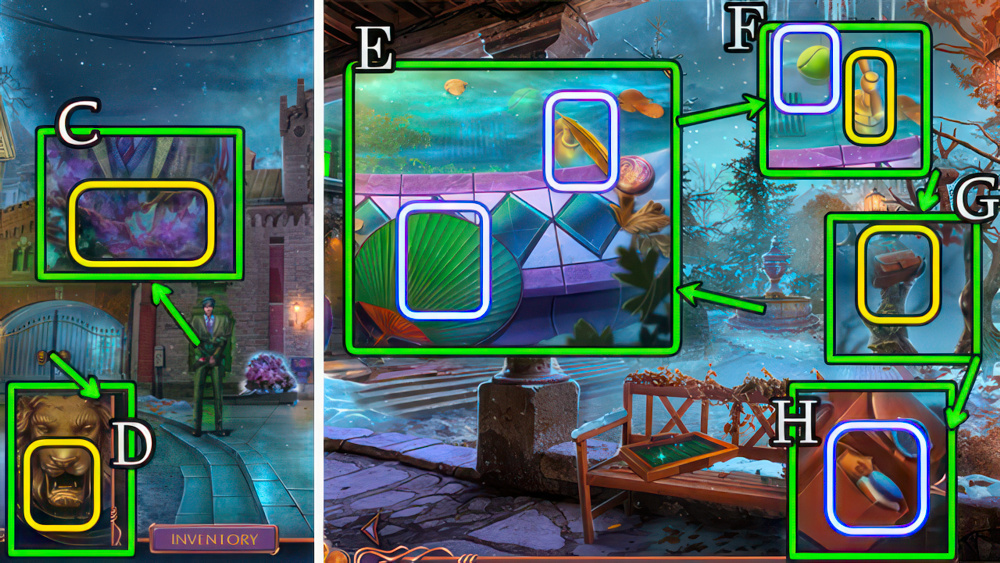
- Use WEED-KILLING POTION (C), speak to character, receive KNOCKER.
- Use KNOCKER (D).
- Enter Secret City University.
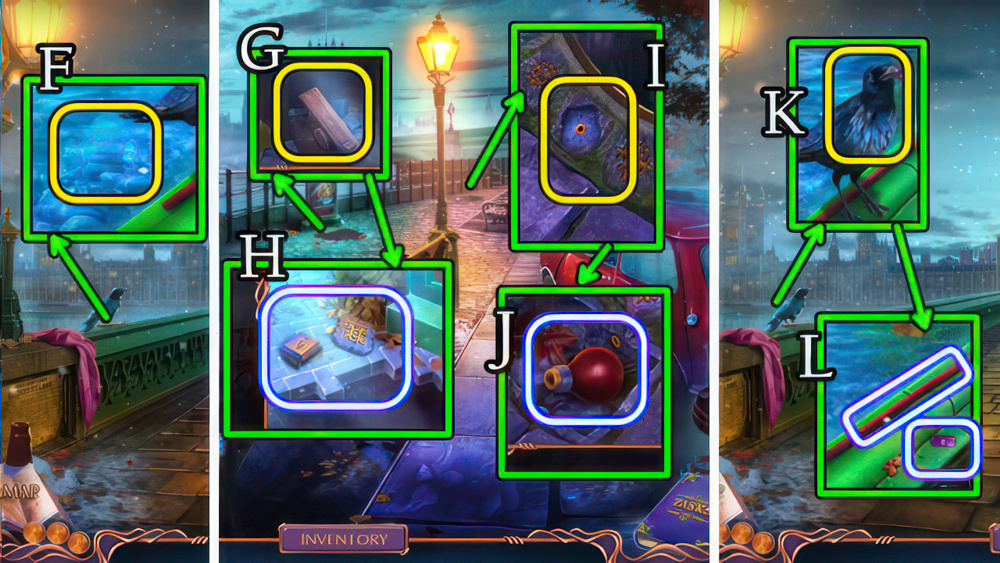
- Take 1/3 OWL FEATHERS, FAN (E).
- Use VALVE, take TENNIS BALL (F).
- TAPE, TENNIS BALL on BROKEN RACKET for RACKET.
- Use RACKET (G), select, take WAX, BAG EMBLEM (H).
- Return to University Library.

- Use BAG EMBLEM (I), play puzzle (J), receive BASEBALL GLOVE.
- Use BASEBALL GLOVE (K), take RULER (L).
- Go down.
- Open basket, use HEAVY MICROSCOPE, RULER (M), take TIED POUCH, CHEF’S HAT (N).
- Use CHEF’S HAT (O), receive TILE.
- Return to Secret City University.
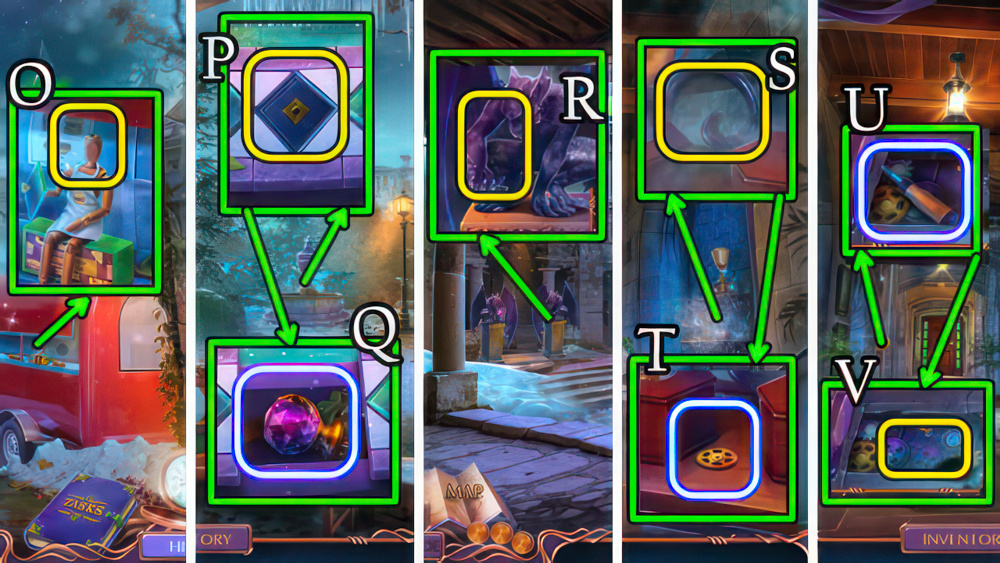
- Place TILE (P), take SPHERE (Q).
- Use SPHERE (R).
- Go forward.
- Use FAN (S), take GEAR (T).
- Take SCREWDRIVER (U), use GEAR, WAX (V).
- Solution (W).
- (A-B)-(A-C)-(C-D)-(D-E)-(D-H)-(F-G)-(G-I)-(H-I).
- Take 2/3 OWL FEATHERS, UTILITY KNIFE.
- Take MIRROR (X).
- Go down.
- UTILITY KNIFE on TIED POUCH, take FOOTBALL PLAYER PIECE.
- Use FOOTBALL PLAYER PIECE (Y).
- Easy and Hard solutions (Z).
- 1-3.
- Take BAG CLASP.
- Use BAG CLASP (A), take WEIGHT, BROKEN JACK and 3/3 OWL FEATHERS (B).
- Return to University Library.
- Use 3/3 OWL FEATHERS, take COMPASS POINTS (C).
- Use COMPASS POINTS (D), receive FIRE INSERT.
- Return to University Hall.
- Use FIRE INSERT (E), take MAGIC MIRROR POWDER, CHISEL (F).
- MAGIC MIRROR POWDER on MIRROR for PROTECTIVE MIRROR.
- Use PROTECTIVE MIRROR (G).
- Take FLAG, note, PASS (H).
- FLAG on BROKEN JACK for JACK.
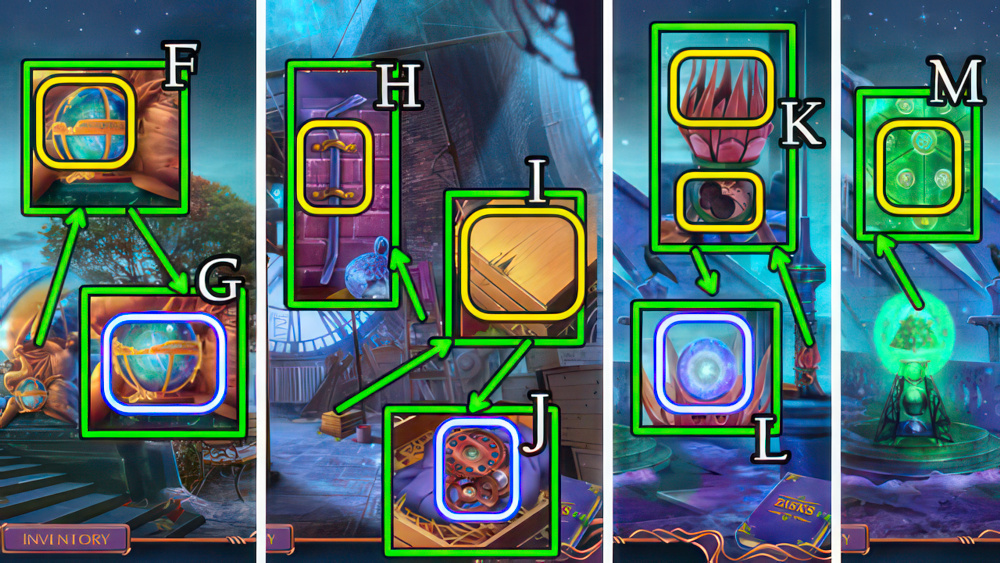
- Use JACK (I), SCREWDRIVER (J), take GLOBE PART, SUN MODEL and EMPTY VIAL AND RECIPE (K).
- Use WEIGHT (L), GLOBE PART (M) for WATER.
- Use WATER (N), speak to character, receive JOANNA’S BOOK.
- Go down.
- Use JOANNA’S BOOK (O), play puzzle (P), receive TROPHY.
- Use TROPHY, take PORTAL MAGIC POWDER (Q).
- Take note, use PORTAL MAGIC POWDER (R).
- Enter Study Room.
- Use CHISEL (S), take HAIRPIN (T), use PASS (U), receive WATER.
- Take BURNER KNOB, GARLIC PRESS (V).
- Use HAIRPIN (W), take SOLAR SYSTEM PART (X).
- Return to Joanna’s Office.
- Use SOLAR SYSTEM PART, SUN MODEL, take FRAME FRAGMENTS (Y).
- Use FRAME FRAGMENTS (Z).
- Easy solution (A).
- B-C-A-E-D.
- Hard solution (B).
- C-E-B-D-A-H-G-F.
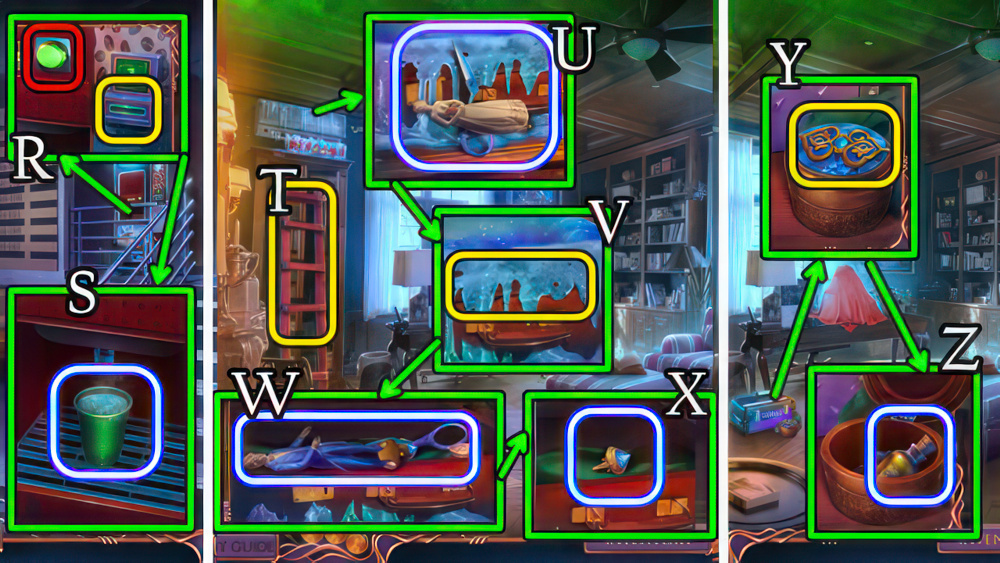
- Take DAGGER.
- Place WATER (C), use DAGGER (D), uncover, take SLEEPING ROOT, DRIED HERBS and note (E).
- Return to Study Room.
- GARLIC PRESS, SLEEPING ROOT on EMPTY VILE AND RECIPE for SLEEPING POTION.
- Use SLEEPING POTION (F).

- Easy solution (G).
- L-O-P-N-M-J-C-F-B-E-H-D.
- Hard solution (H).
- E-B-G-F-J-P-M-O-L-H-K.
- Take note, RIBBON and CORKSCREW (I).
- Use CORKSCREW (J), receive CORK.
- Return to Joanna’s Office.
- Use CORK (K), take NOTEBOOK AND PEN, HEX WRENCH and BELLADONNA FLOWER (L).
- Place BELLADONNA FLOWER, BURNER KNOB (N), take ACID (O).
- Return to Study Room.

- Use ACID (P), play puzzle (Q), receive LIVING WATER.
- Give LIVING WATER (R).
- Take MATCHES (S).
- Use HEX WRENCH (T), take MAGNET (U).
- MATCHES on DRIED HERBS for SMOKING HERBS.
- Use SMOKING HERBS (V), take VASE, use RIBBON (W), take WHEAT (X).
- Take DIRTY MIRROR, use VASE, receive HEAVY GNOME (Y).
- Use HEAVY GNOME (Z), speak to character, receive BANK KEY.
- Use BANK KEY (A).
- Easy solution (B).
- E-C-A-F-D-B.
- Hard solution (C).
- D-F-E-C-I-H-J-L-A-G-K-B.
- Go forward.
- Take DETERGENT, FILE (D).
- Use WHEAT (E), NOTEBOOK AND PEN (F), receive VAULT SYMBOLS.
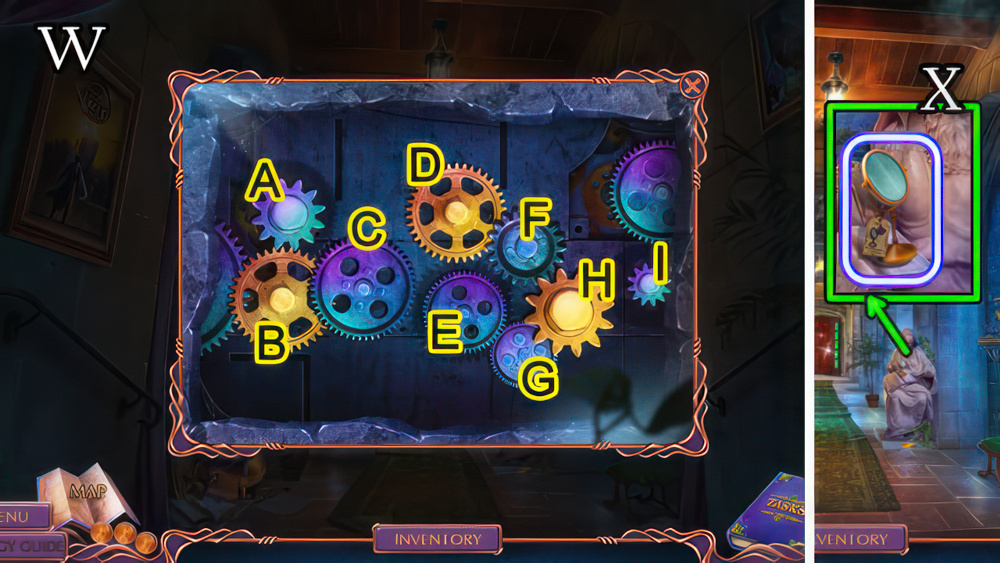
- Use VAULT SYMBOLS (G).
- Solution (H).
- Lx6-R-Rx2-R-Lx7-Rx2-L.
- Go forward.
- Take BRUSH, use FILE (I), take BIKE HELMET WITH WATER (J).
- Take BLADE (K).
- Use MAGNET (L), take 1/2 CELESTIAL INLAY, HELMET (M).
- Use HELMET (N), take GYPSUM, WIRE (O).
- Go down.
- DETERGENT, BRUSH on DIRTY MIRROR for MIRROR.
- Use MIRROR (P), WIRE (Q), play puzzle (R), receive PORTRAIT.
- Place PORTRAIT (S), take HYDRANT HANDLE, ICE CREAM SPOON (T).
- Go down.
- Use ICE CREAM SPOON (U), receive 2/2 CELESTIAL INLAY.
- Place 2/2 CELESTIAL INLAY (V), take CANDLE (W).
- Go forward 2x.

- Use CANDLE (X), receive LIT CANDLE.
- Use LIT CANDLE, take FIREHOSE CABINET HANDLE (Y).
- Go down.
- Use FIREHOSE CABINET HANDLE (Z), take MOLDING FORM, FORK, use BLADE (A), take HOSE (B).
- GYPSUM, MOLDING FORM on BIKE HELMET WITH WATER for SECRET CITY EMBLEM.
- Use SECRET CITY EMBLEM (C), take GEMS, LOCKPICK (D).
- Go forward.

- Use GEMS (E).
- Easy solution (F).
- L-C-Rx2-C-Lx2-C-Lx2-C-Rx6-C-Lx6-C.
- Hard solution (G).
- C-L-C-R-C-Lx2-C-Rx3-C-Lx3-C-R-C-Rx3-C-Lx3-C.
- Lx2-C-Rx4-C-Lx4-C-Rx2-C-L-C-R-C-L-C-Rx3-C-Lx4-C-R-C.
- Take ARMOR PIECE.
- Use ARMOR PIECE, take CLAMP, PUTTY KNIFE and LEASH (H).
- Go down 2x.
- Use HYDRANT HANDLE, HOSE and CLAMP (I), select (J).
- Use LEASH (K), play puzzle (L), receive FOLDING TABLE.
- Take WATER (M).
- Use FOLDING TABLE (N).
- Go forward.
- Take WHEELS, INCOMPLETE HORN (O).
- Go down.
- Use FORK (P), take HAND TRUCK HANDLE (Q).
- Take BROKEN HAND TRUCK, use LOCKPICK (R), take NAPKIN (S).
- Go forward.
- WHEELS, HAND TRUCK HANDLE on BROKEN HAND TRUCK for HAND TRUCK.
- Use HAND TRUCK (T), take BUTTON (U).
- Use BUTTON (V).
- Go forward.
- Use PUTTY KNIFE (W), take 1/3 BUTTONS, SWITCH BUTTON (X).
- Take note, HAMMER (Y).
- Use WATER, NAPKIN (Z), take BELL BUTTON (A).
- Take BROKEN PUMP (B).
- Go down.
- Use BELL BUTTON (C).

- Easy solution (D).
- (B-1)-(D-2)-I.
- Hard solution (E).
- (A-3)-(B-1)-(C-2)-(D-4)-I.
- Take EMPTY BUCKET.
- Use EMPTY BUCKET (F), receive HEAVY STONES.
- Go down.
- Use HEAVY STONES (G), take BATTERY, DECORATIVE ELEMENT (H).
- Use DECORATIVE ELEMENT (I), take RUBBER BULB (J).
- Go forward.
- RUBBER BULB on INCOMPLETE HORN for HORN.
- Use HORN (K), take STICK, 2/3 BUTTONS (L).

- Use HAMMER, STICK (M), receive PIKE.
- Go forward.
- Use PIKE (N), play puzzle (O), receive PEDESTAL PIECE.
- Use PEDESTAL PIECE (P), take UMBRELLA, PUMP HOSE and CUFF LINK (Q).
- Go down 2x.
- SWITCH BUTTON, BATTERY and PUMP HOSE on BROKEN PUMP for WATER PUMP.
- Use WATER PUMP (R), take KNIFE (S).
- Use KNIFE (T), take STUN GUN (U), SOLVENT and 3/3 BUTTONS (V).
- Go forward 2x.
- Use 3/3 BUTTONS (W), select 5-6-7-8-9-5, take TICKET (X).
- Use TICKET (Y).
- Go forward.
- Take note, use UMBRELLA, receive FIRECRACKER (Z).
- Take GLOVE, BROKEN WRENCH (A).
- Use FIRECRACKER, STUN GUN (B).
- Easy solution (C).
- Position as shown, select 1.

- Hard solution (D).
- Position as shown, select 2.
- Go forward.
- Use CUFF LINK (E), take ROPE (F).
- Take WRENCH GEAR, use SOLVENT (G), take TONGS (H).
- Use TONGS (I), receive SUGAR.
- Take INCOMPLETE SELFIE STICK (J).
- Go down.
- Give SUGAR (K), take BIT (L).
- Use ROPE, BIT (M).
- Enter Big Ben Roof.
- Take BRICK (N).
- Use BRICK, take BROKEN DRILL (O), BAG INSERT (P).
- Take DRILL DETAIL (Q), use GLOVE (R), receive WRENCH PART.
- Use BAG INSERT (S), take GOLF CLUB (T).
- WRENCH PART, WRENCH GEAR on BROKEN WRENCH for WRENCH.
- Use WRENCH (U), take DECORATIVE EMBLEM (V).
- Return to Inside Big Ben.
- Use DECORATIVE EMBLEM (W), play puzzle (X), receive VIDEO CAMERA.
- Use VIDEO CAMERA (Y), take COIN (Z).
- Return to Big Ben Roof.
- Use COIN (A), take HOOKED WIRE (B).
- HOOKED WIRE on INCOMPLETE SELFIE STICK for SELFIE STICK WITH HOOK.
- Use SELFIE STICK WITH HOOK (C), receive SCARF.
- Go down.
- Use SCARF, GOLF CLUB (D), take DRILL, BURNER (E).
- Use BURNER (F), take MAGIC SPHERE (G).
- Return to Inside Big Ben.
- DRILL DETAIL, DRILL on BROKEN DRILL for ELECTRIC DRILL.
- Use ELECTRIC DRILL (H), receive CROWBAR.
- Use CROWBAR (I), take GEARS (J).
- Return to Big Ben Roof.
- Use GEARS, MAGIC SPHERE (K), take LIGHTNING BALL (L).
- Use LIGHTNING BALL (M).
- Easy solution (N).
- (C-G)-(G-A)-(D-C)-(C-B)-(G-E)-(G-C)-(G-F)-(G-D).
- Hard solution (O).
- A-D-Cx2-B-D-F-Dx2.
- Walkthrough Bonus Chapter, at the link below.


