
Secrets of Salem 1: Shadow of the Witch – On a rainy day, Dakota received a letter that struck her to the core. After years away from Salem, she finally returns to her hometown, but only to say goodbye to her mother. But instead of farewell, death awaits her. A mysterious killer stalks her in an alley, inflicts fatal wounds and disappears into the darkness. Dakota hears the dying words of her mysterious stalker. And in the next instant, her body falls to the sidewalk. She’s not dead. At least not completely. Waking up in a strange state, she realizes that her soul is no longer bound to her body. While her physical shell lies on the brink of life and death, her spirit finds itself in a world of ghosts. Sebilla, her mother’s friend, comes to the rescue and reveals the truth: Dakota, a witch just like her mother. An attacker is hunting witches all over Salem, and now her only chance of survival is to find him before he gets to the others. But Dakota doesn’t have her body or her former abilities. She can’t walk through walls yet, her magical powers are just beginning to awaken. Together with Sebilla, she must conduct her own investigation before the police get to the scene of the attack. Time is short, but there must be clues left behind that will help uncover the truth. Now her path lies through the ghostly streets of 1950s Salem, filled with the flickering light of signs, the chilling whispers of spells, and the dangers hidden beneath the city’s glitter. Vengeful spirits, secrets of the past, and shadows that lurk in the dark. It’s up to you to help Dakota uncover the killer’s identity, master her powers, and return to life. If you can not pass any of the puzzles or do not know where the items are, on our site you can watch the walkthrough of the game Secrets of Salem 1: Shadow of the Witch, and help Dakota.
Secrets of Salem 1: Shadow of the Witch – Walkthrough
Here you can see the full walkthrough of Secrets of Salem 1: Shadow of the Witch, namely for all chapters, including bonus chapter, in pictures.
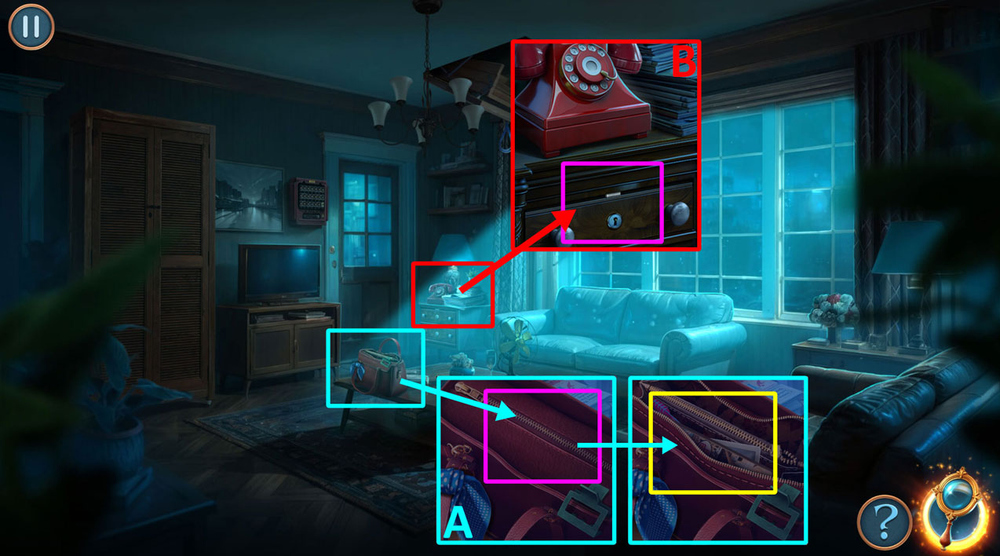
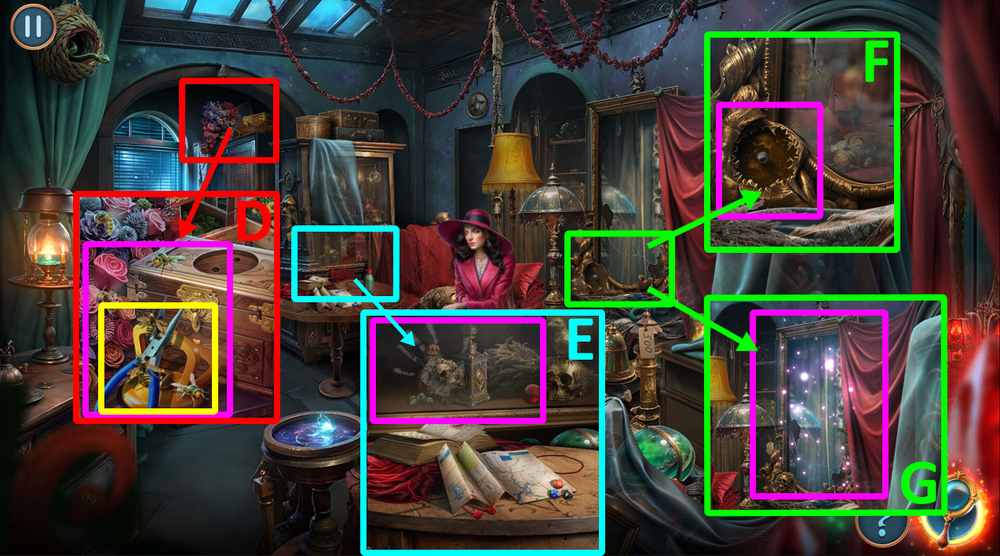
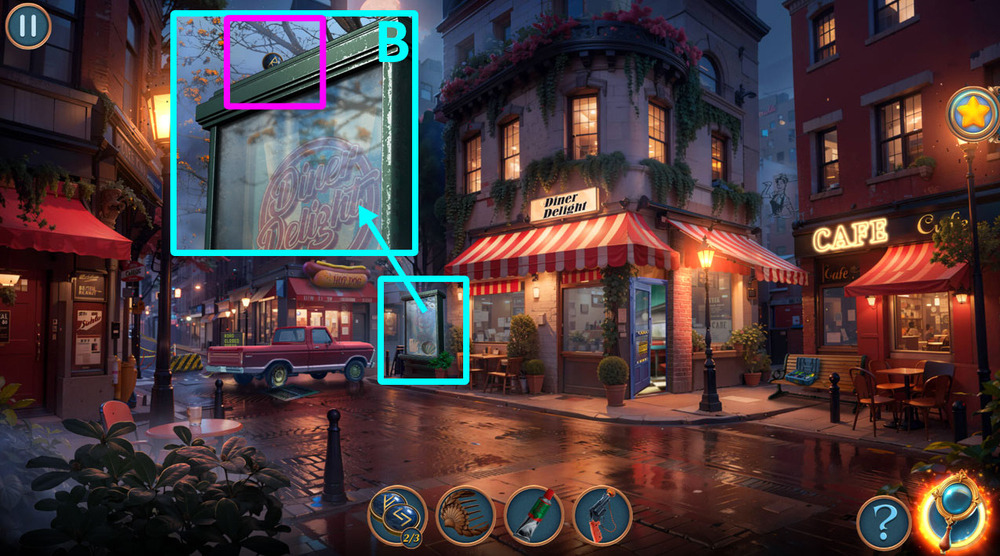
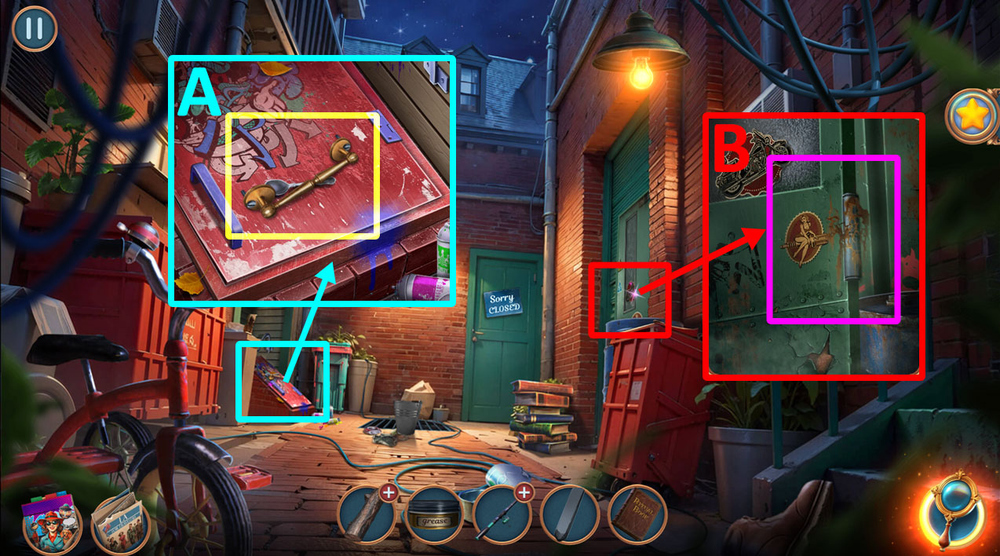
- Click on the bag to unzip it, take the journal, take and examine the picture, take TOOTHBRUSH and HAIRPIN (A).
- Use HAIRPIN on the drawer, take AMMONIA, HEART PARTS 1/3, HEADBAND, and FUSE (B).
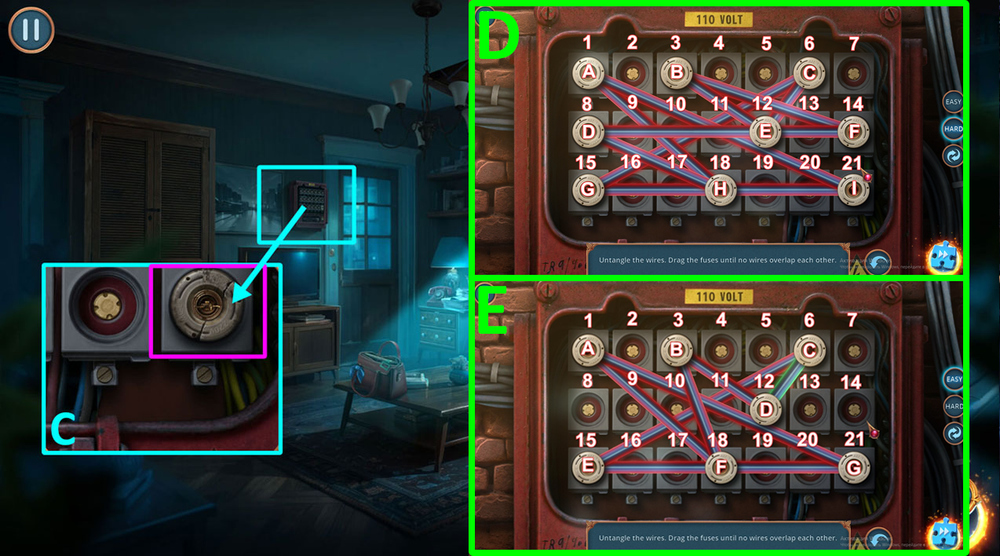
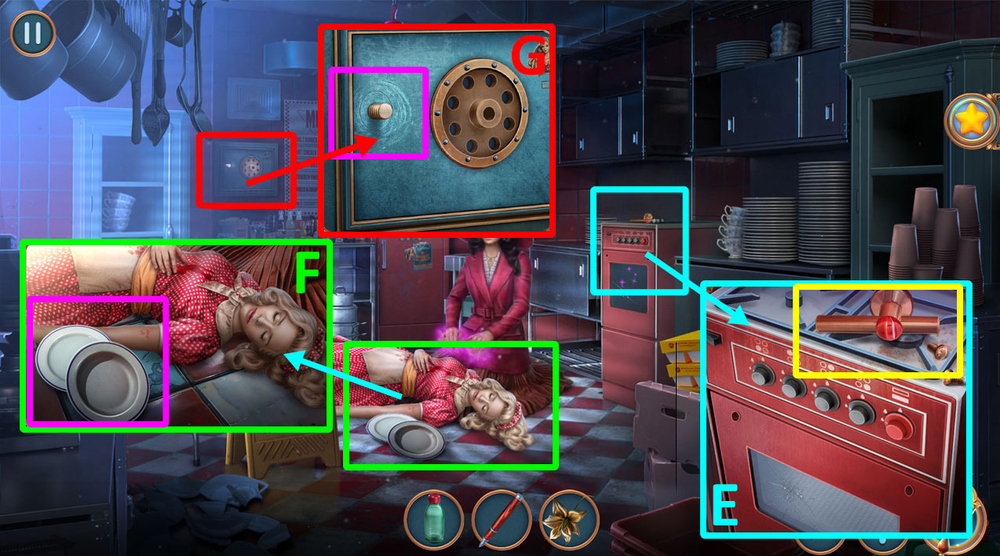
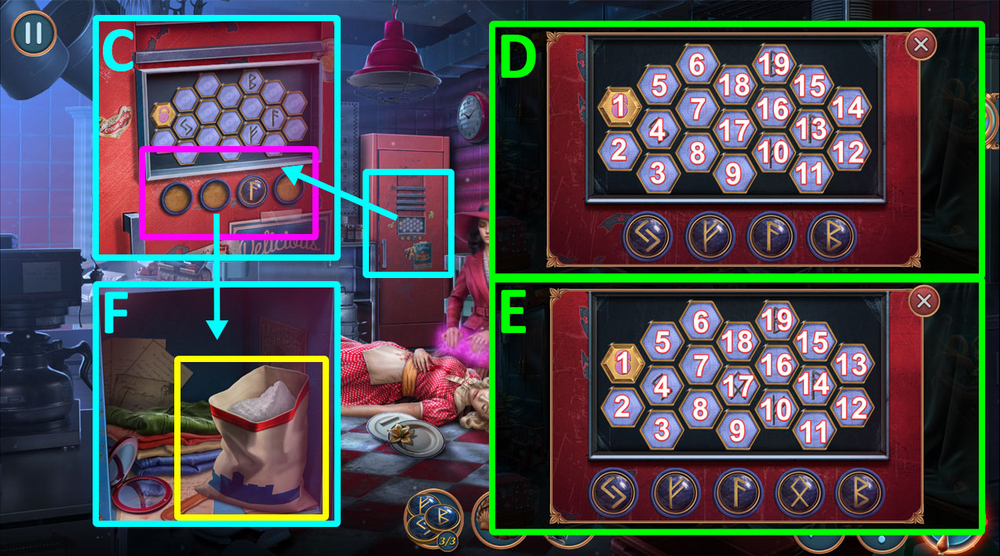
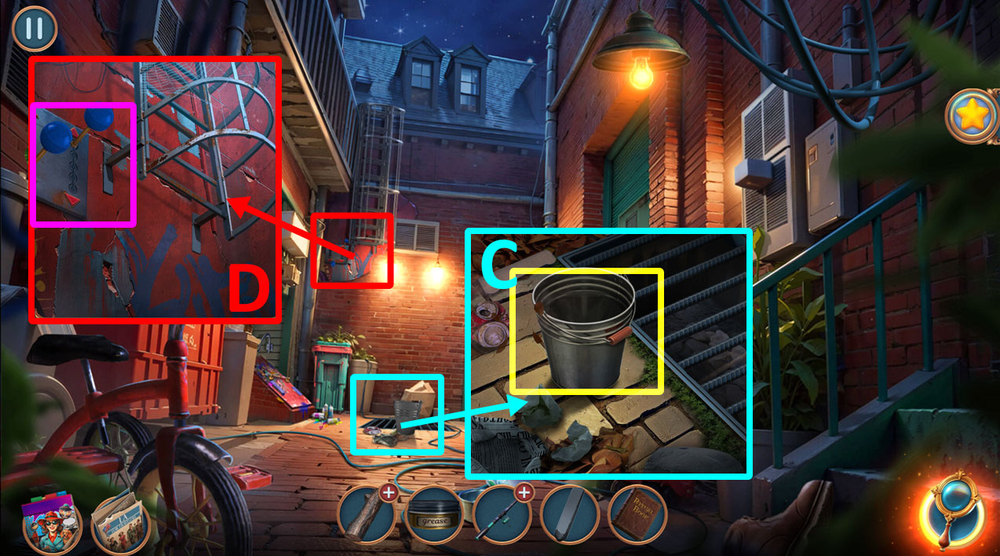
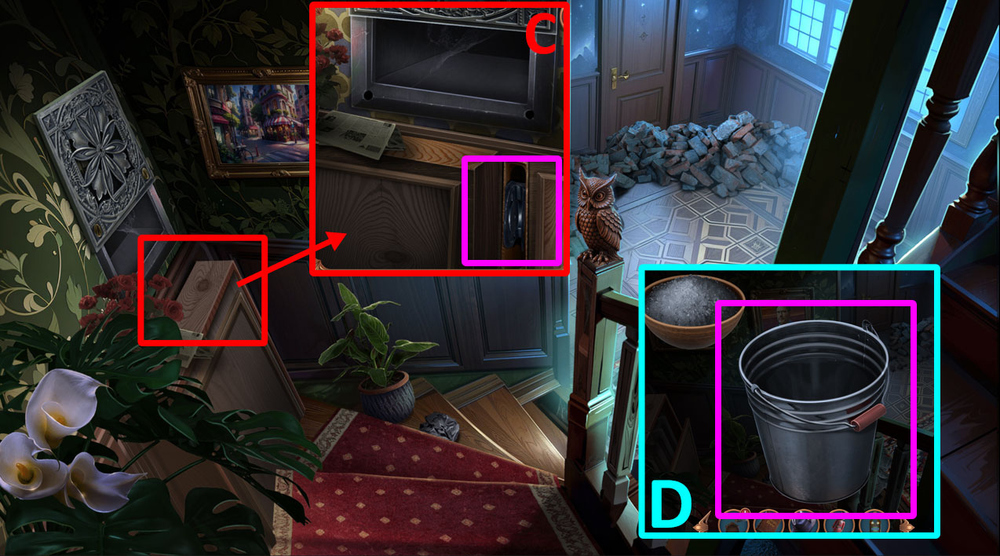
- Use FUSE on the right socket with the broken fuse (C).
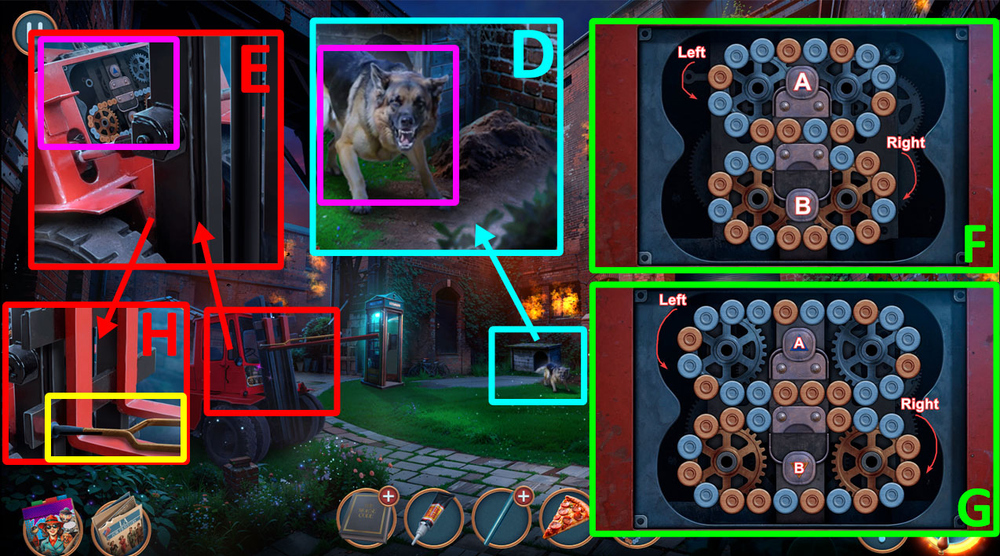
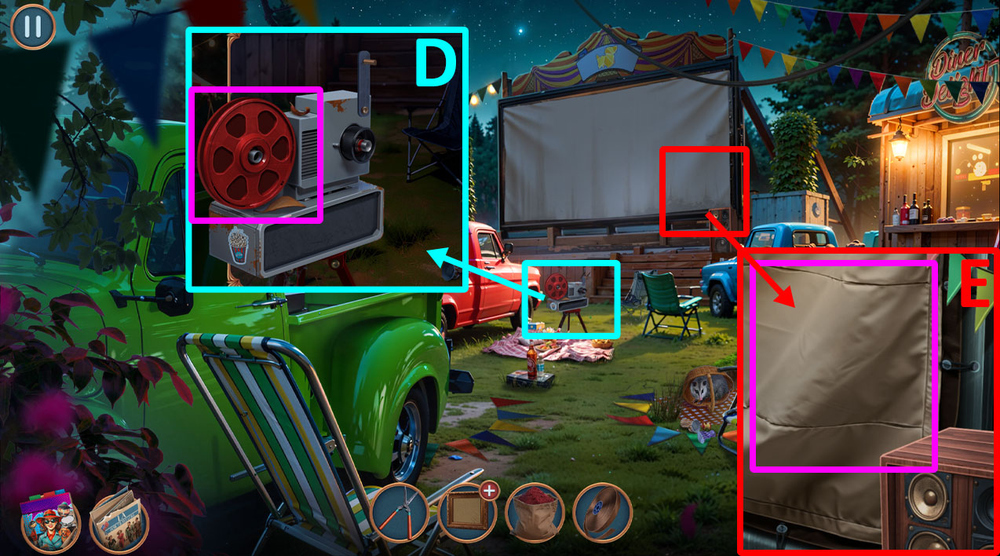
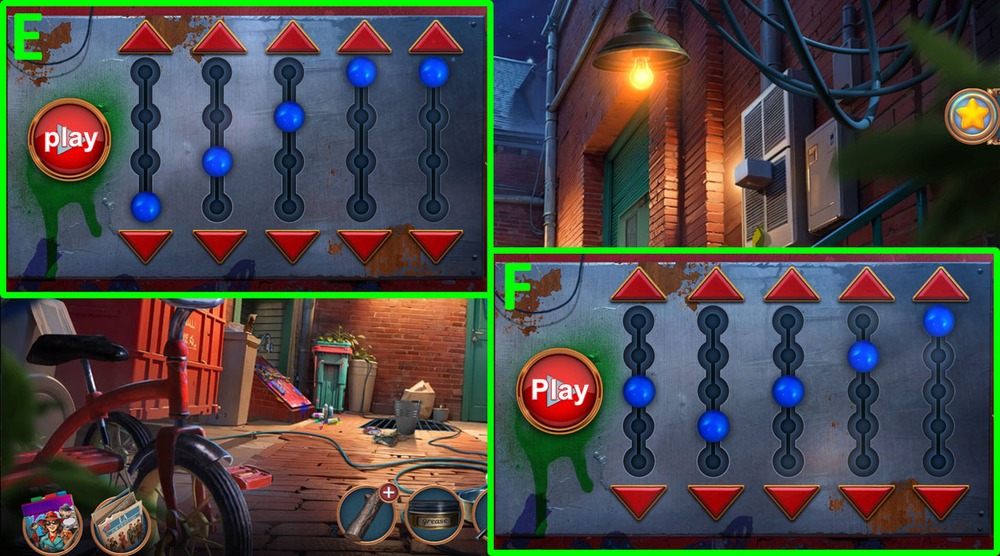
- Easy solution: A-7, F-13, C-11 (D).
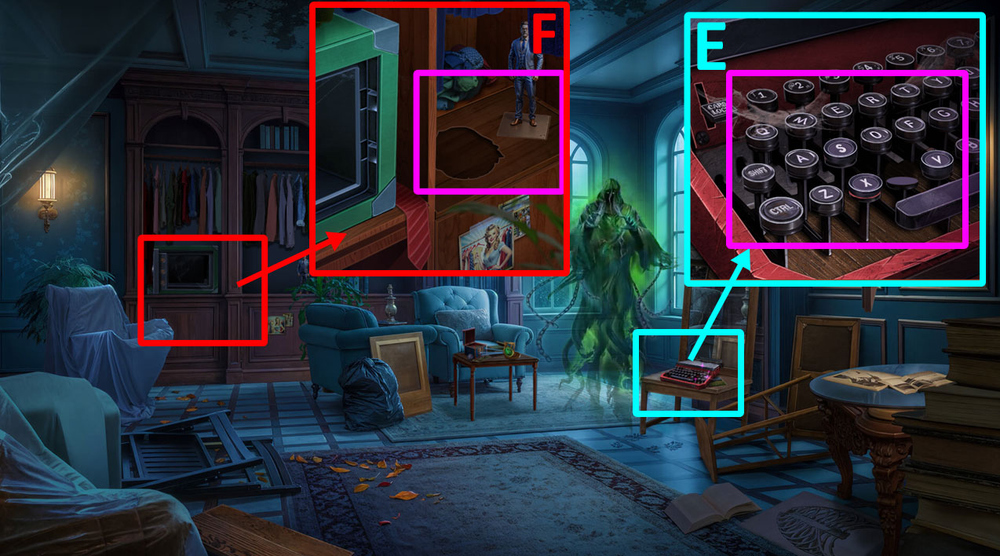
- Hard solution: A-20, F-1, E-4, G-7 (E).

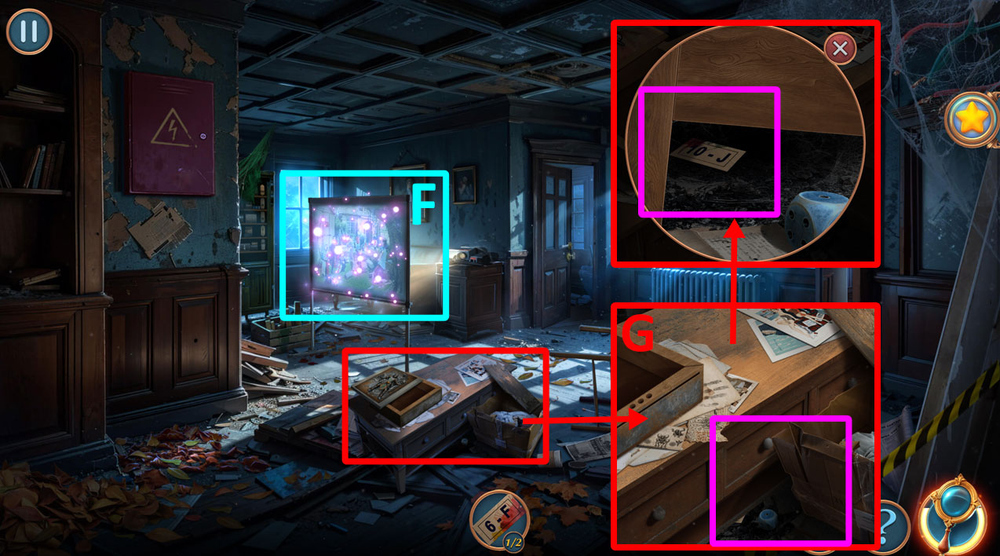
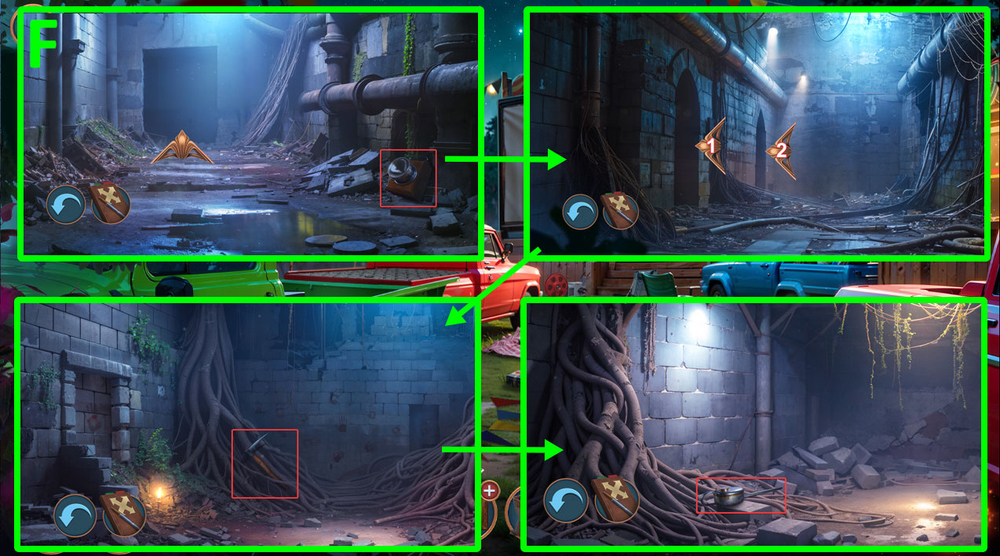
- Click on the phone to answer it (F).
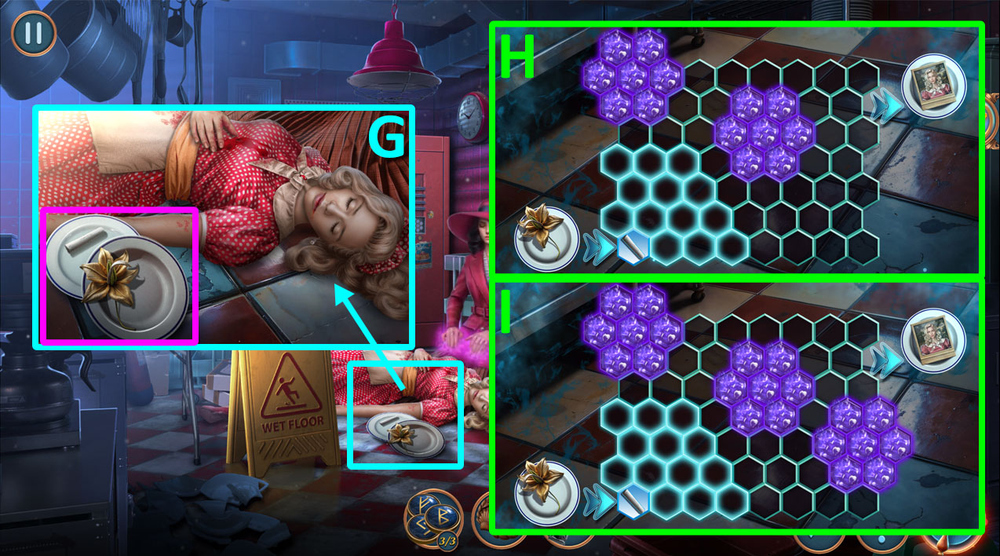
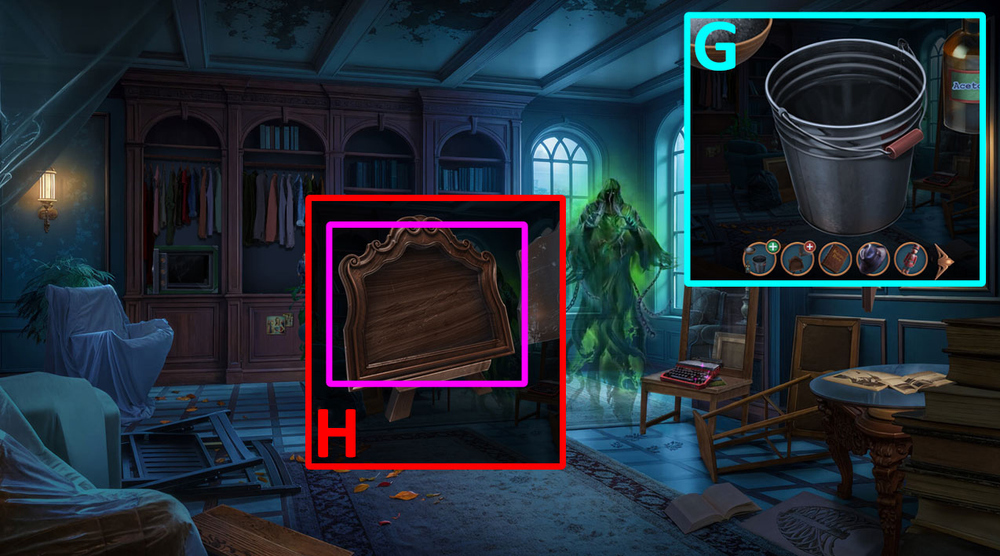
- Click on the closet to hide in it (G).

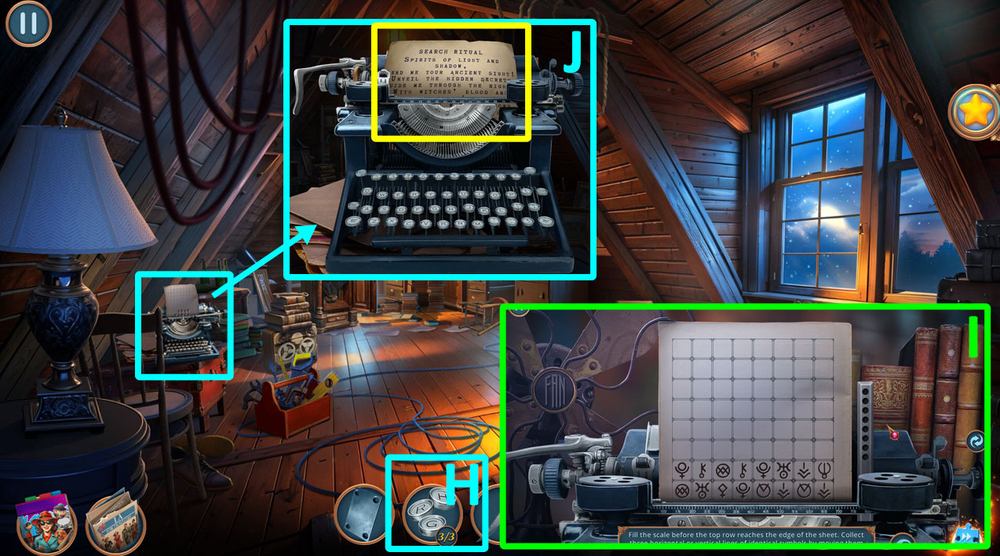
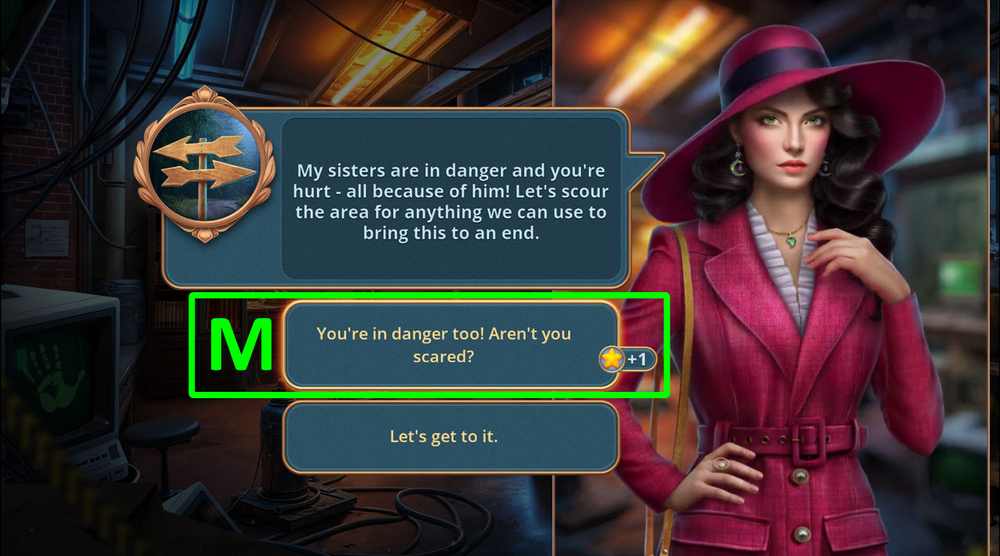
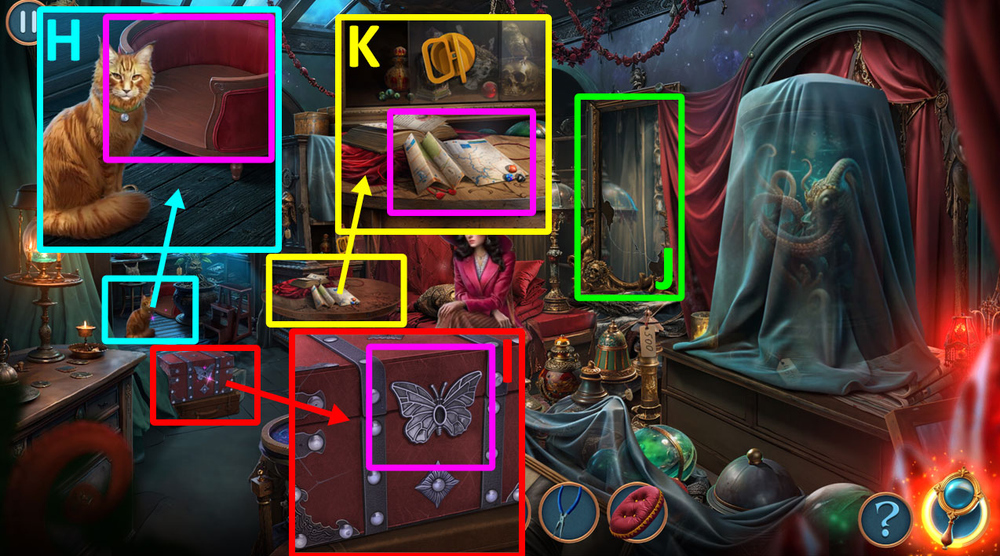
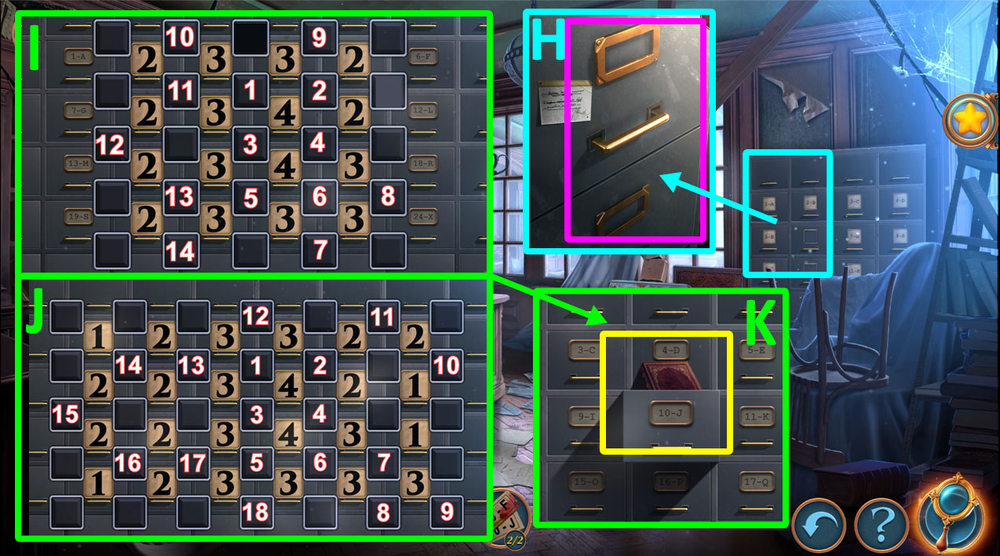
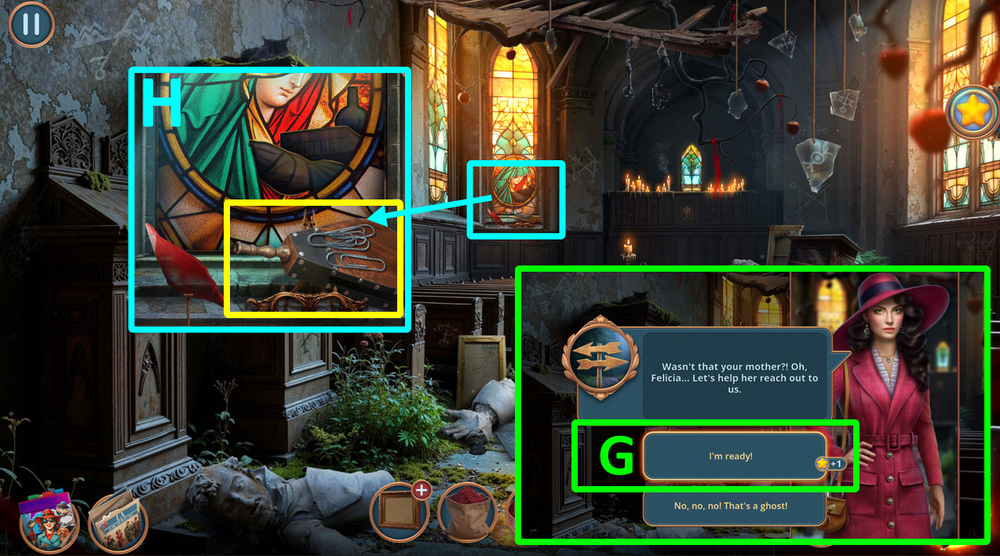
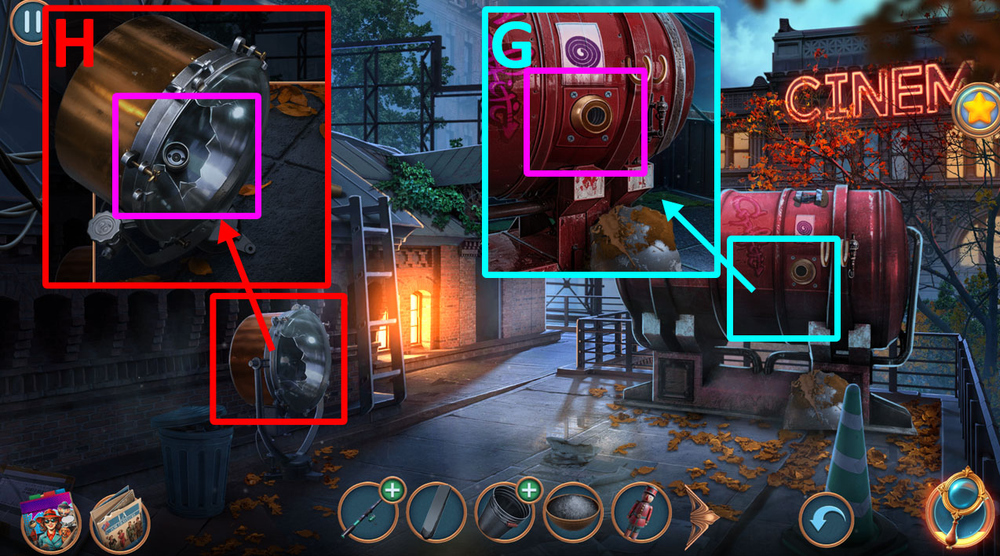
- Talk to Sebille (H).
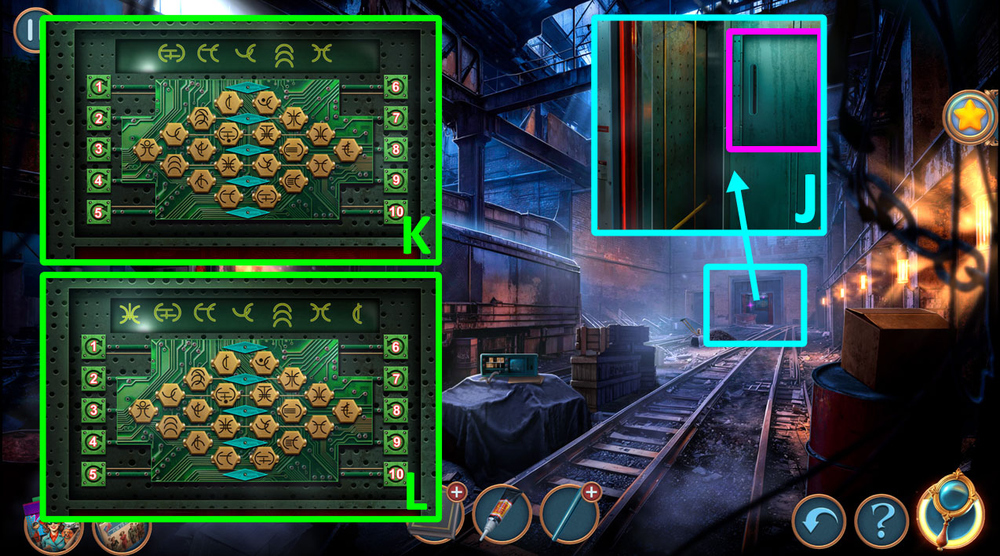
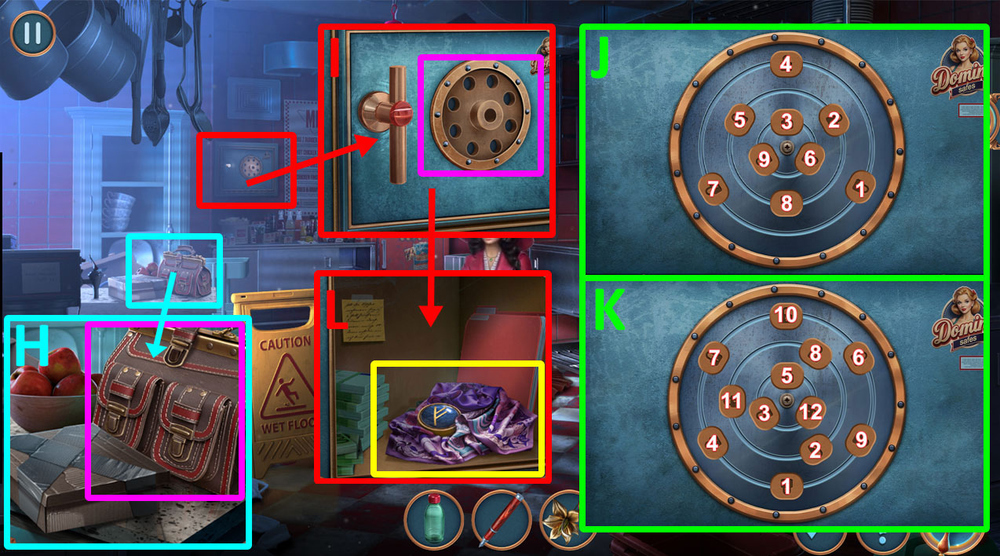
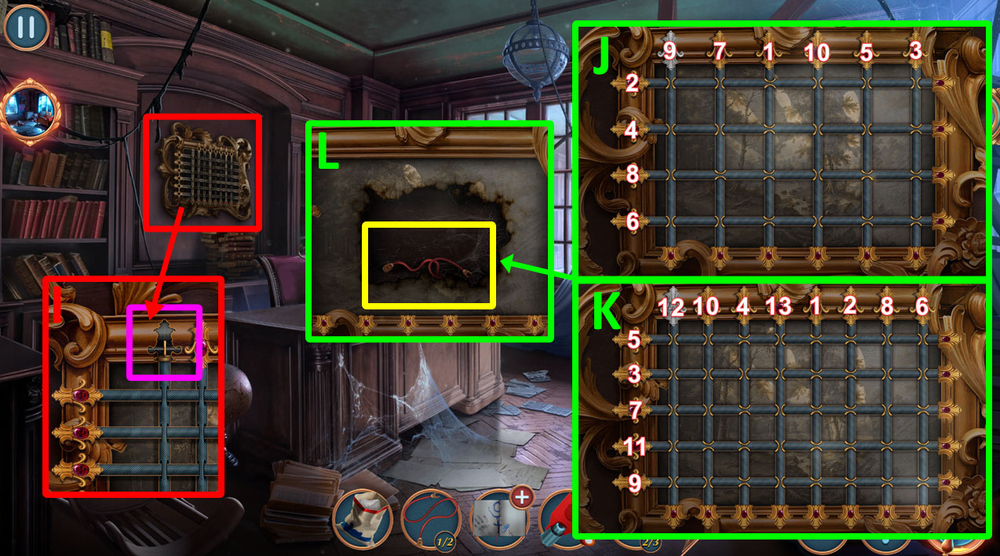
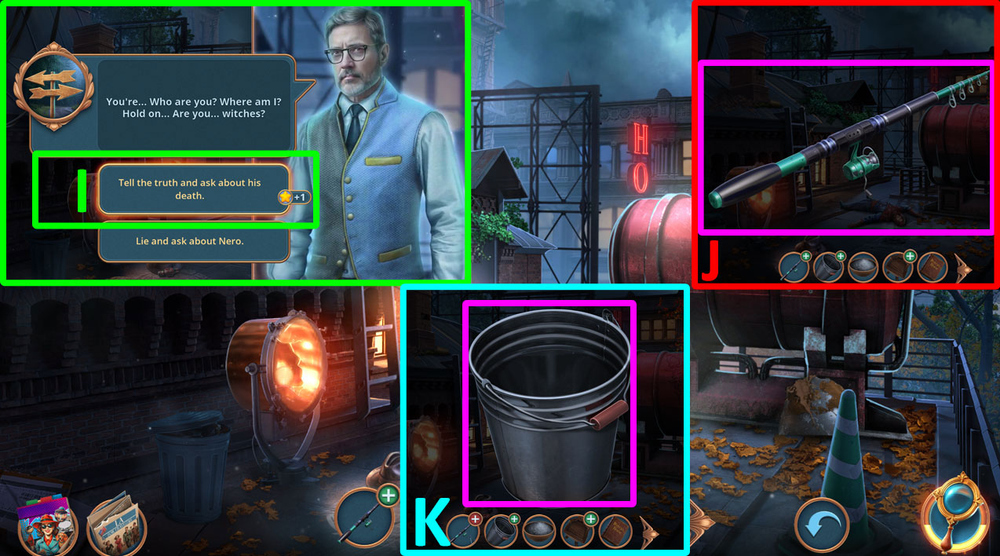
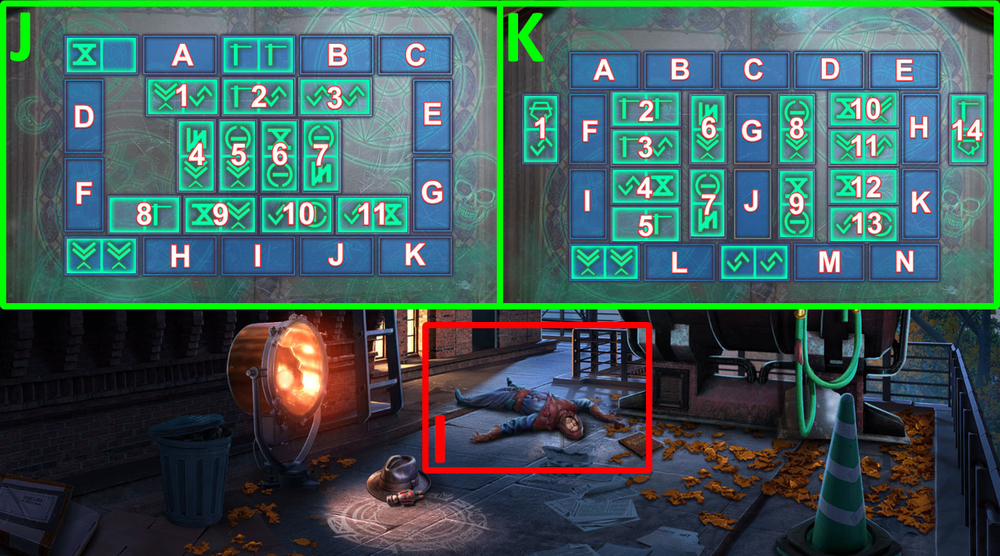
- Solution: Place the puzzle in the correct position (I).
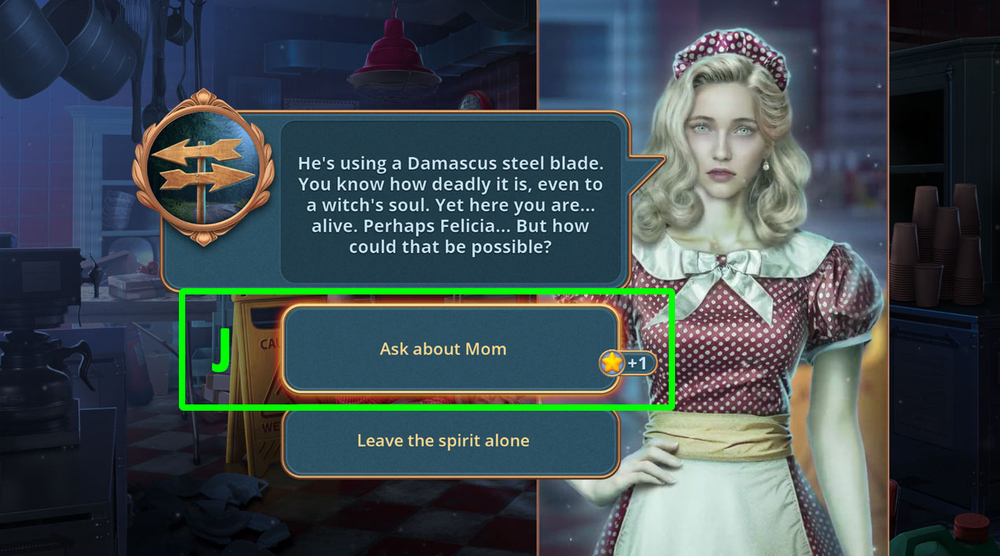
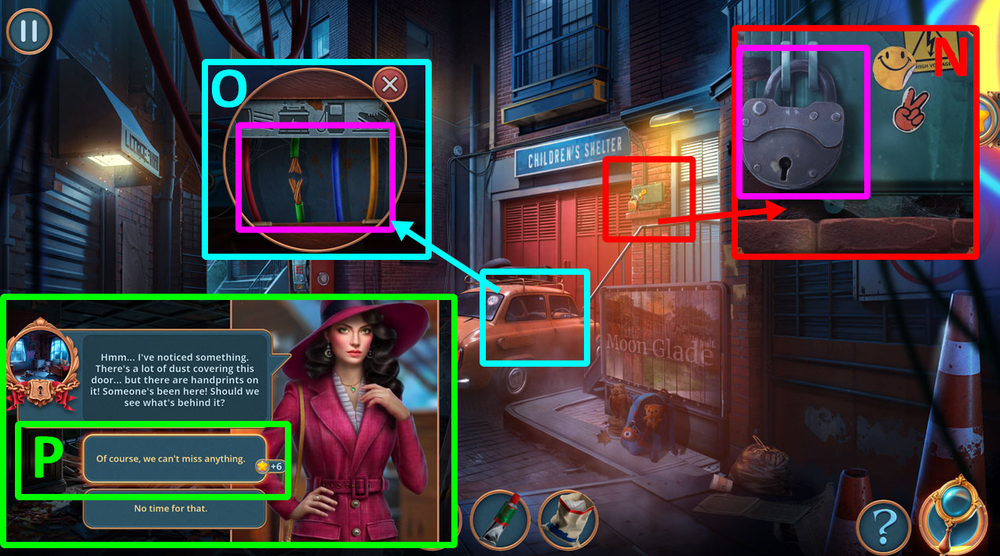
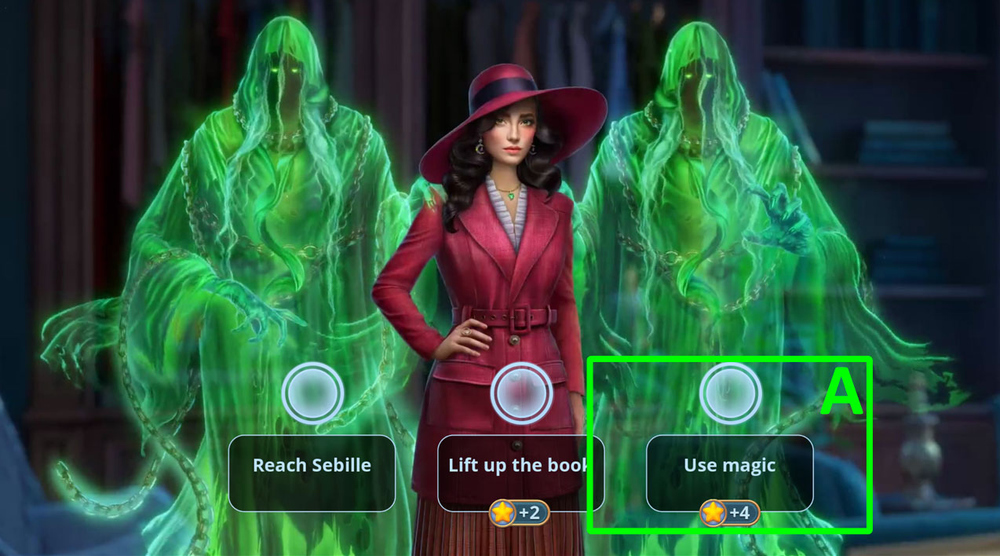
- Select this option (J).
- Go forward.
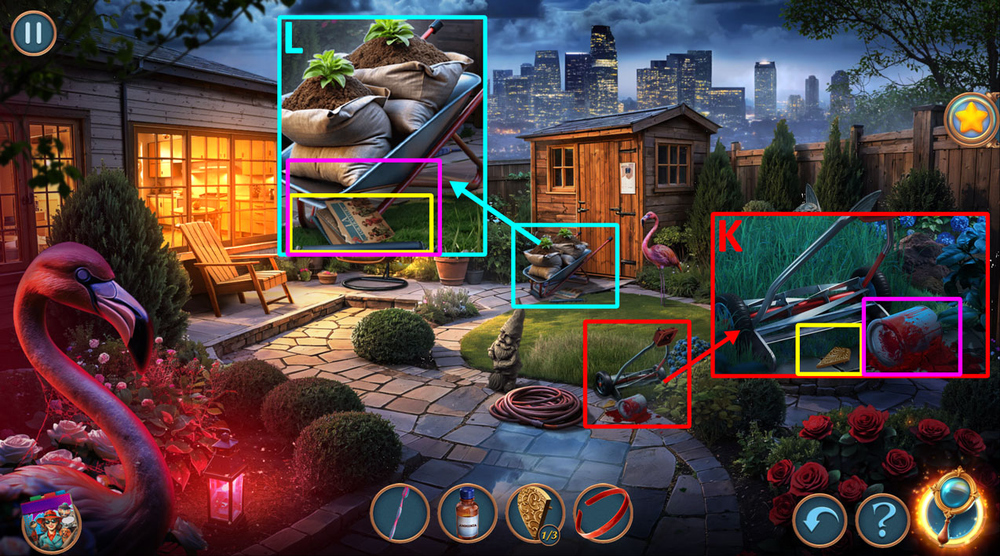
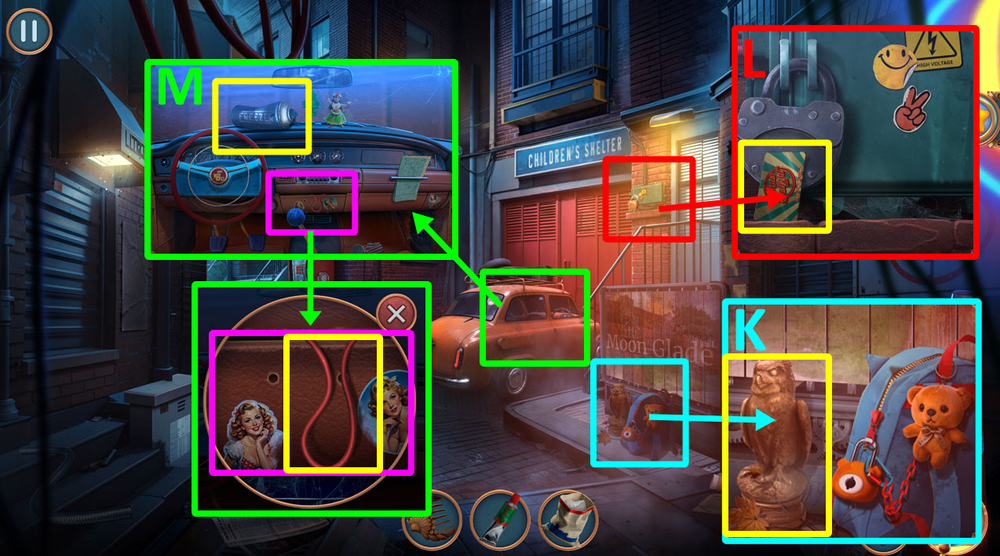
- Use TOOTHBRUSH and AMMONIA on the paint can, earn EMPTY PAINT CAN, take HEART PARTS 2/3 (K).
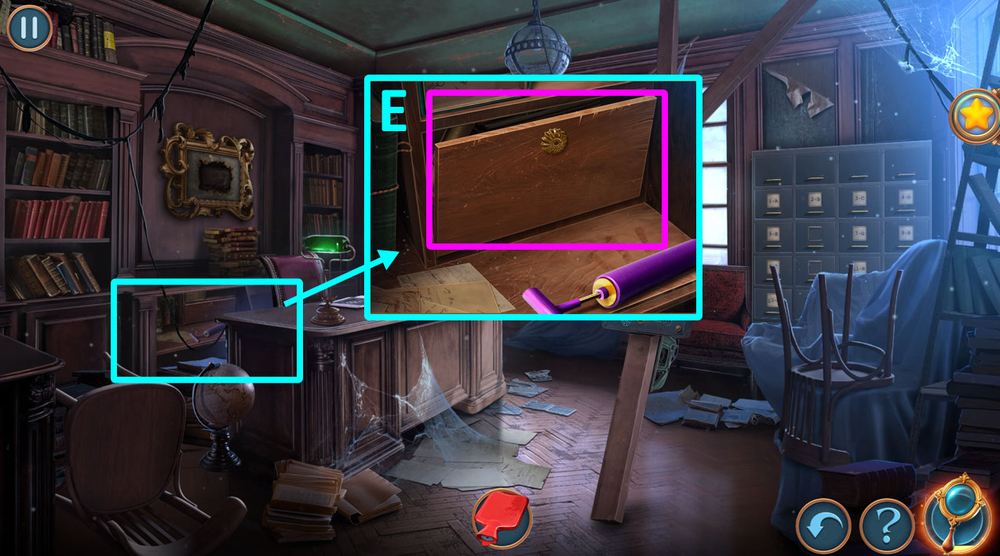
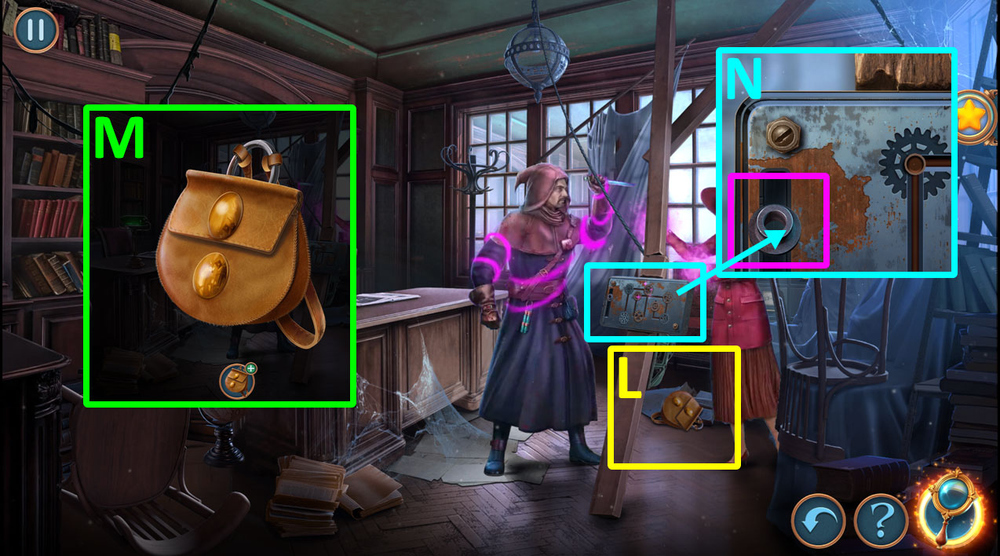
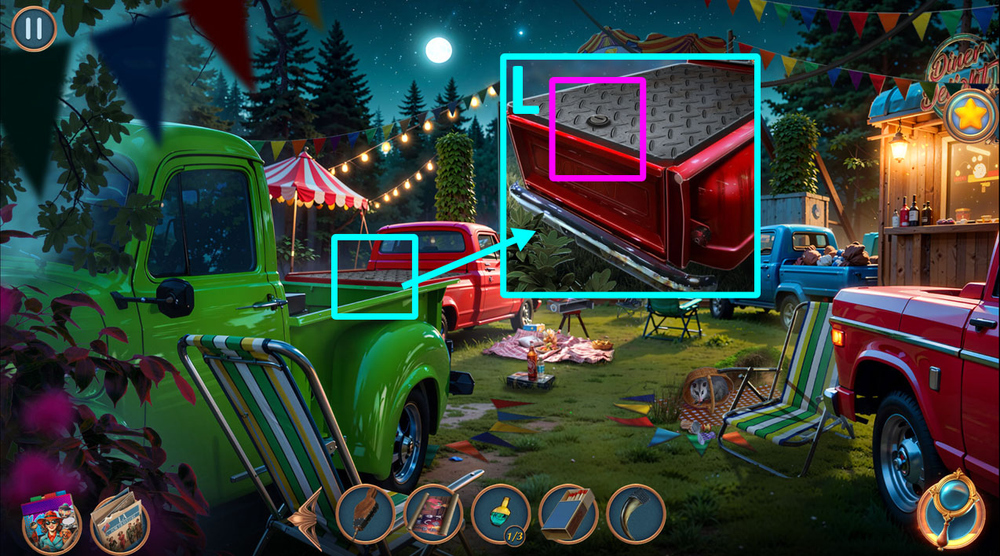
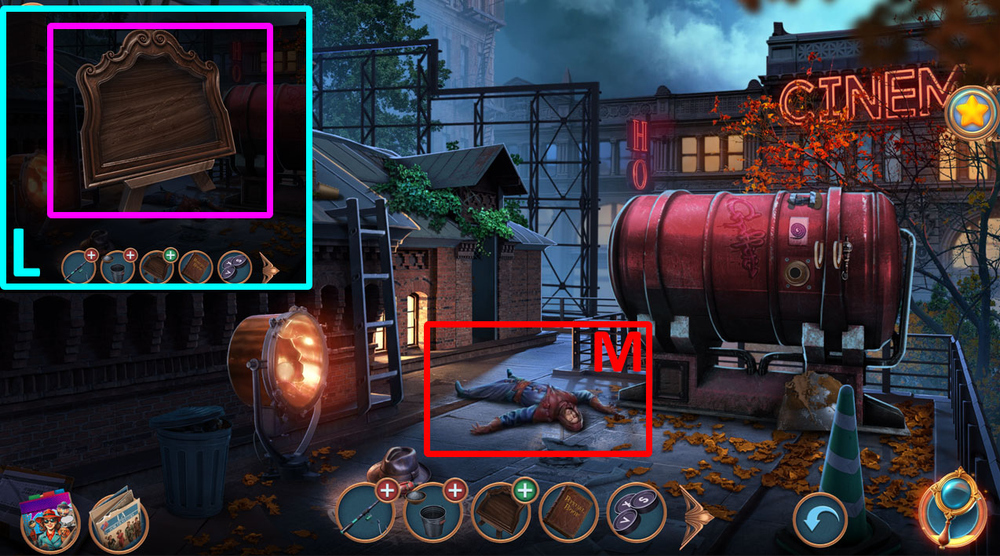
- Take ROLLER, take the map, use EMPTY PAINT CAN on the wheelbarrow, take LONG UMBRELLA (L).
- Go back.
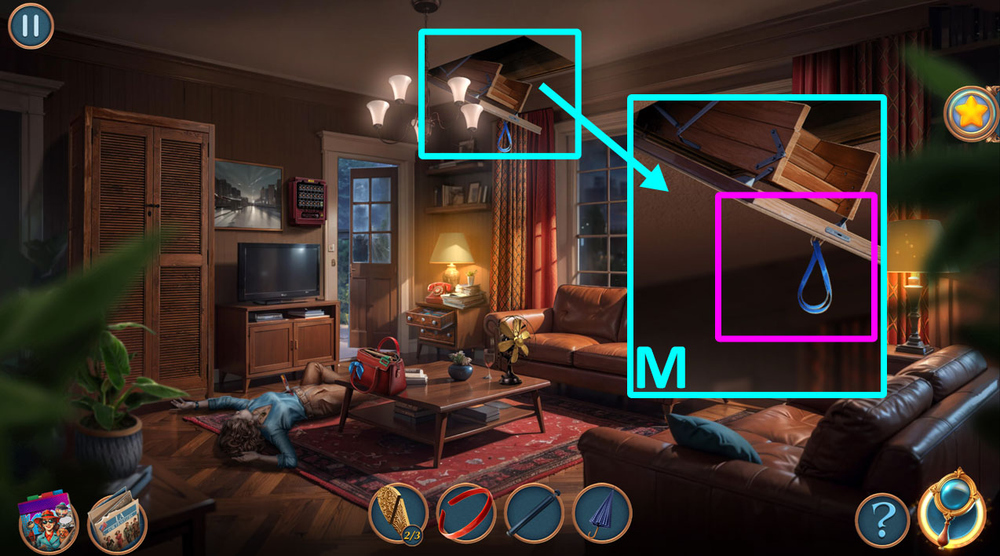
- Use LONG UMBRELLA on the pull-out ladder (M).
- Go to the Attic.
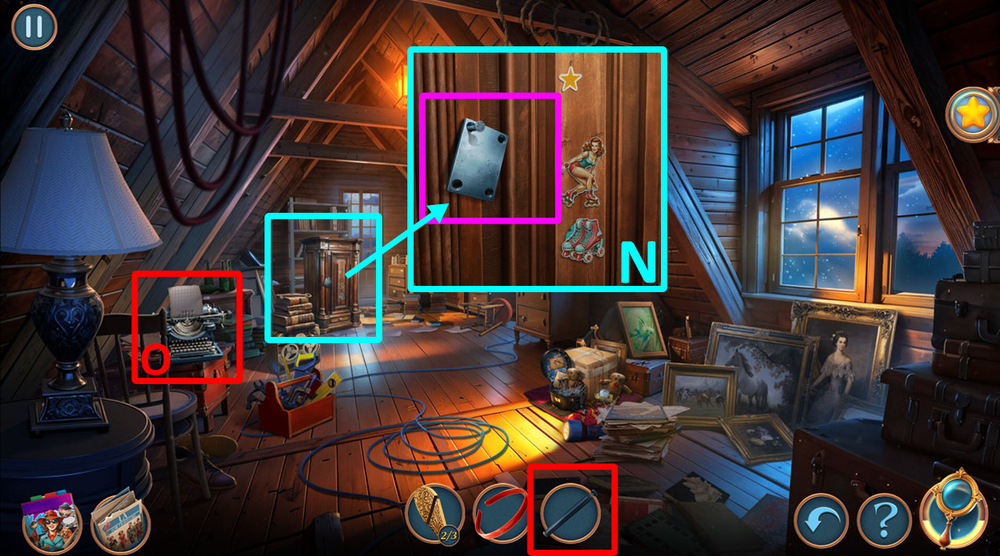
- Take METAL SHEET, use HEADBAND on the nail, take and read the note, take KEYS 1/3 (N).
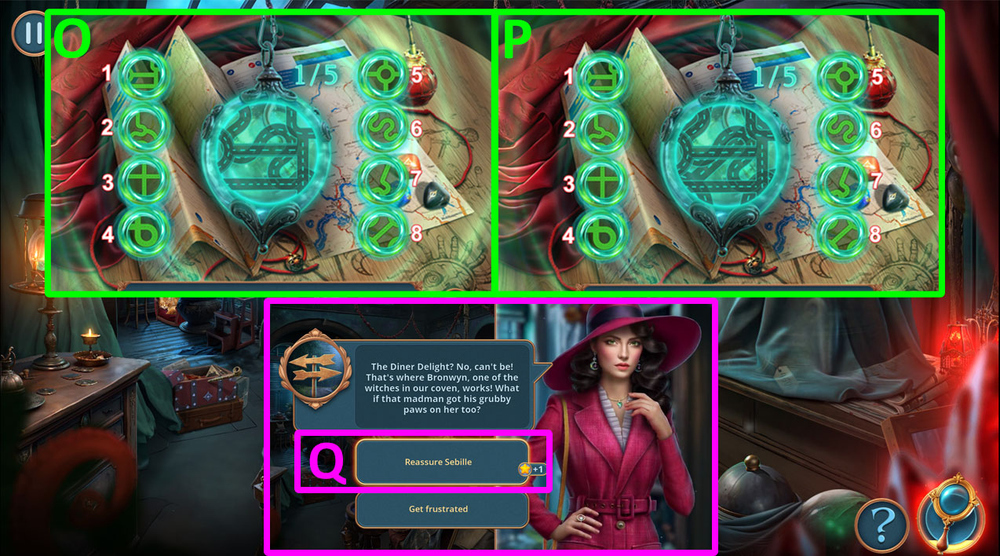
- Use ROLLER on the typewriter (O).
- Go back.
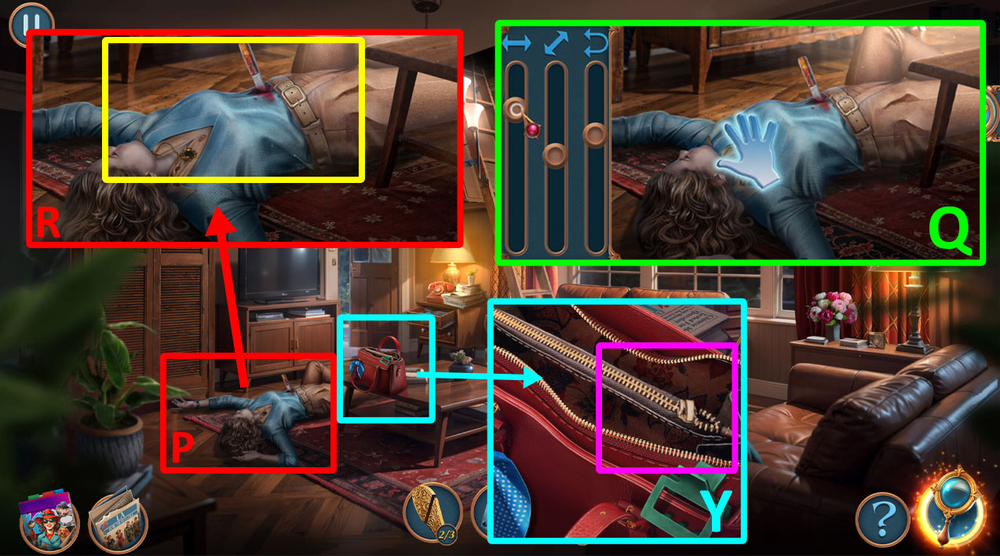
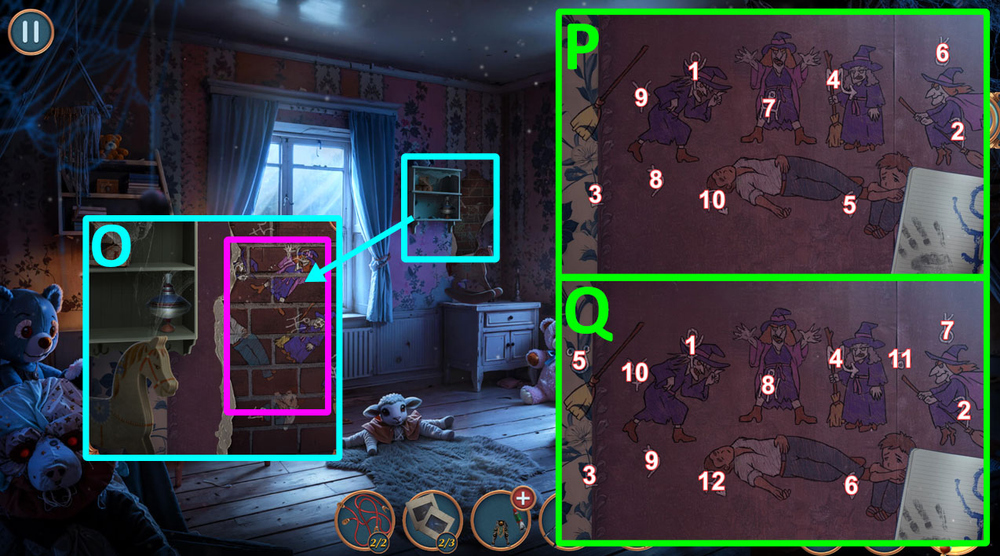
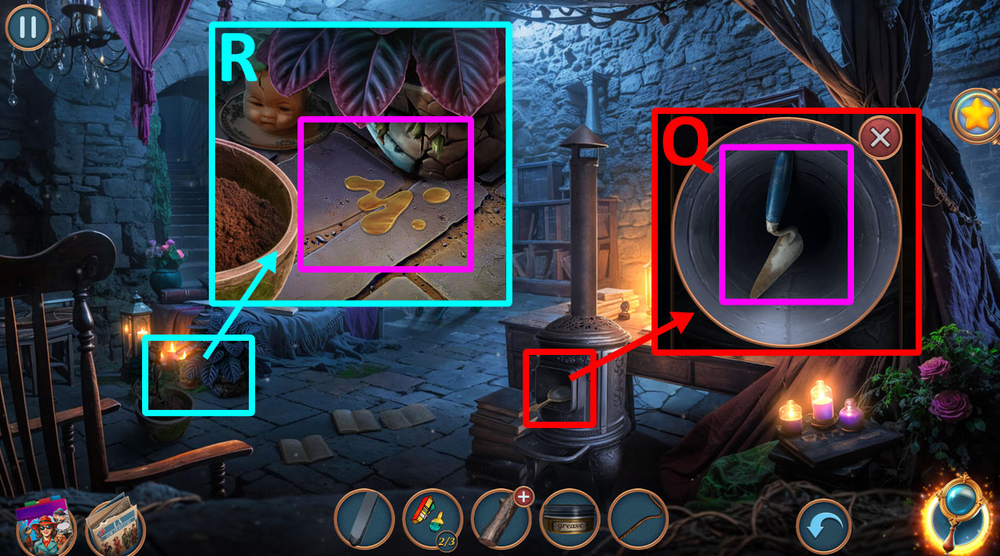
- Click on the body (P).
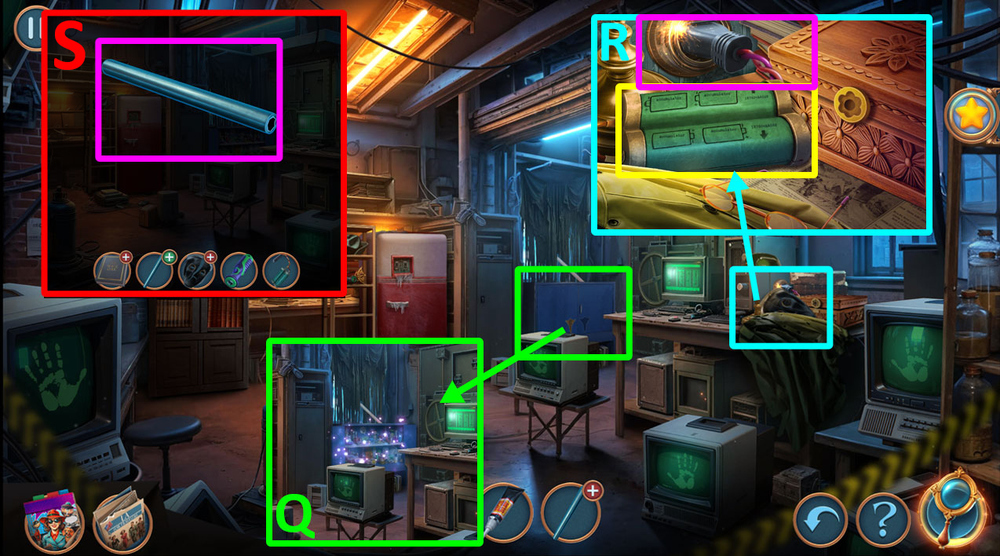
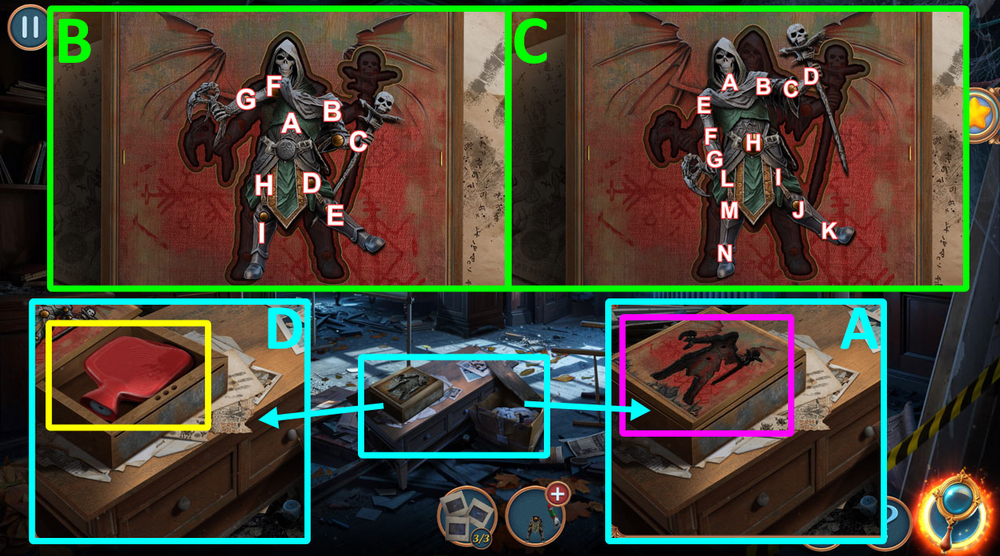
- Solution: See the picture for correct positioning (Q).
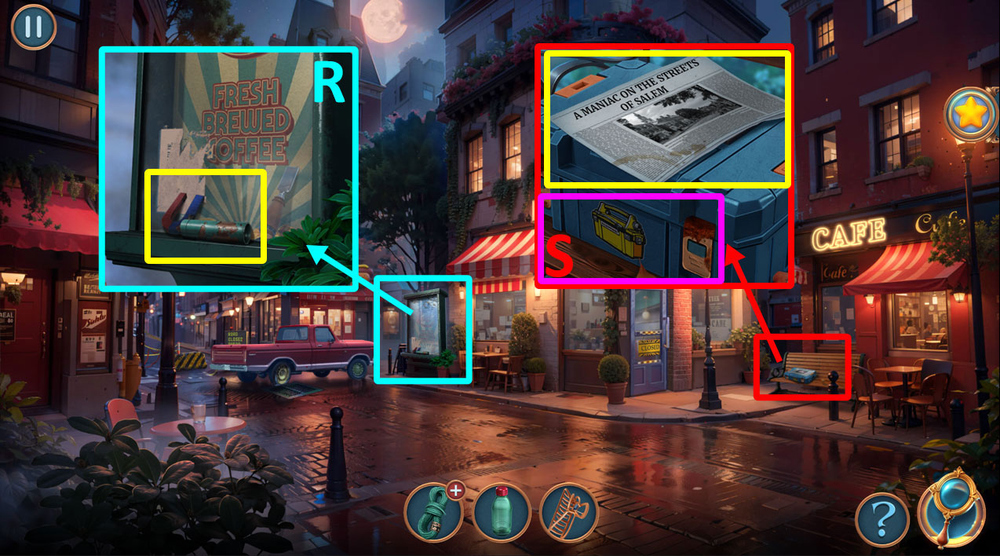
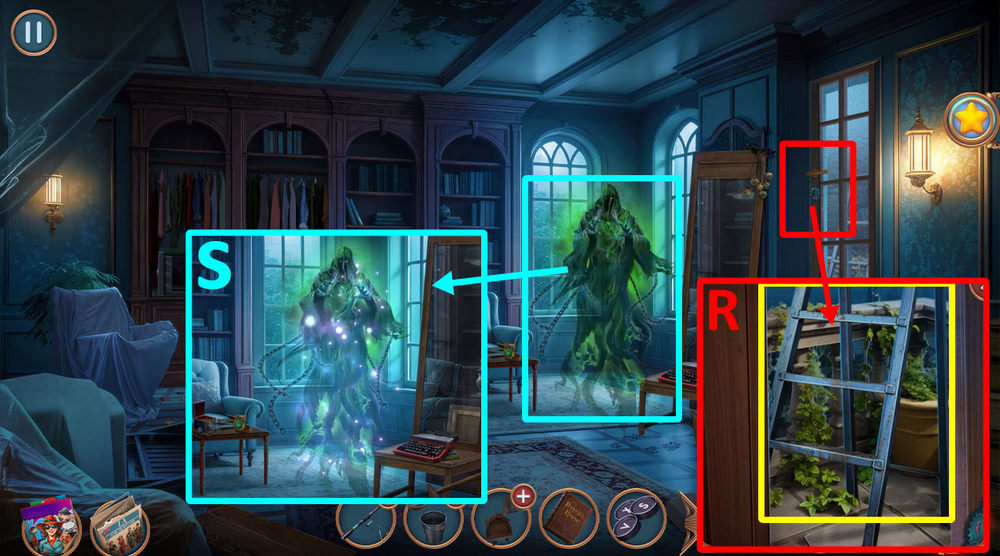
- Take MOTHER’S PENDANT and KILLER’S KNIFE (R).
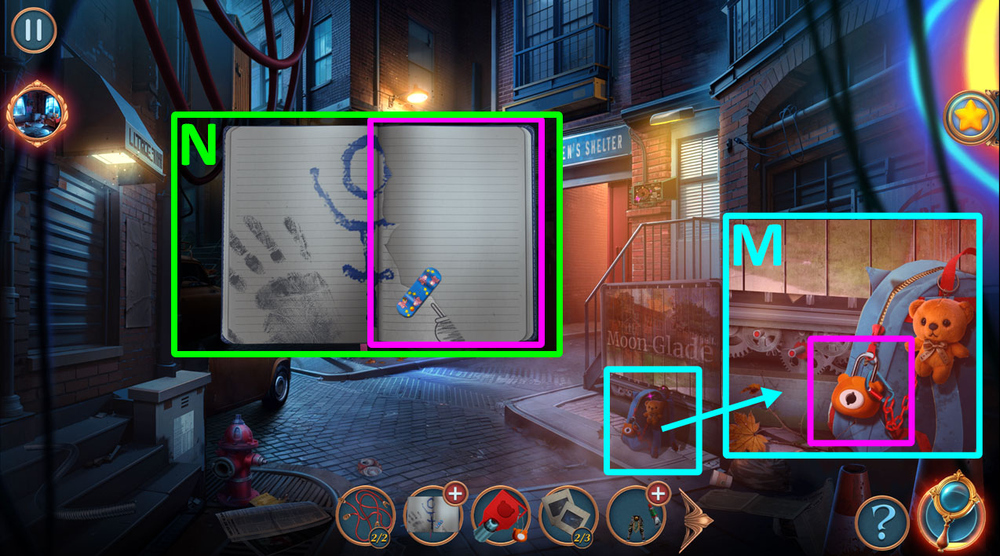
- Use MOM’S BROOCH on the zipper, take MAGNET (Y).
- Go to the Attic.
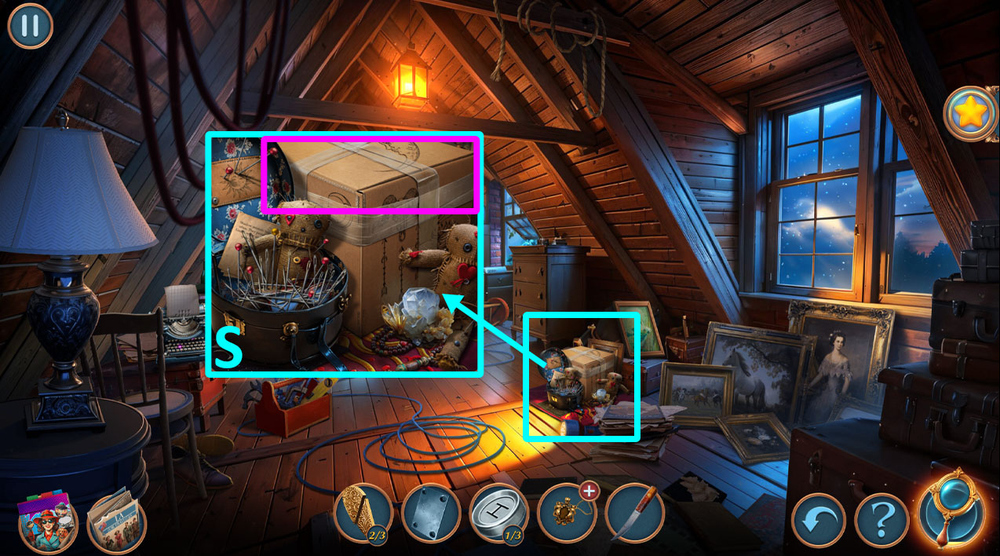
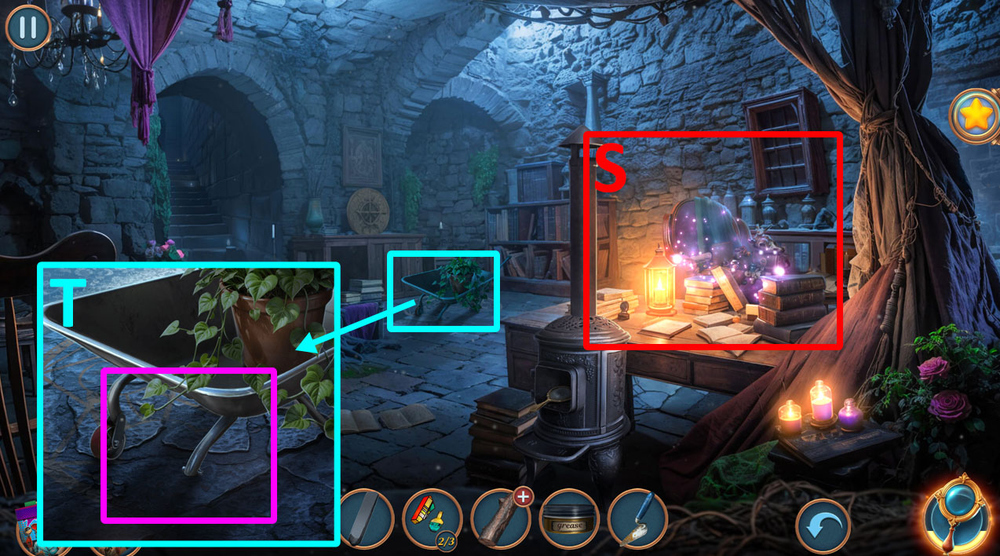
- Use KILLER’S KNIFE on the box, take PUMP and ROTOR (S).
- Go to the Garden near the House.
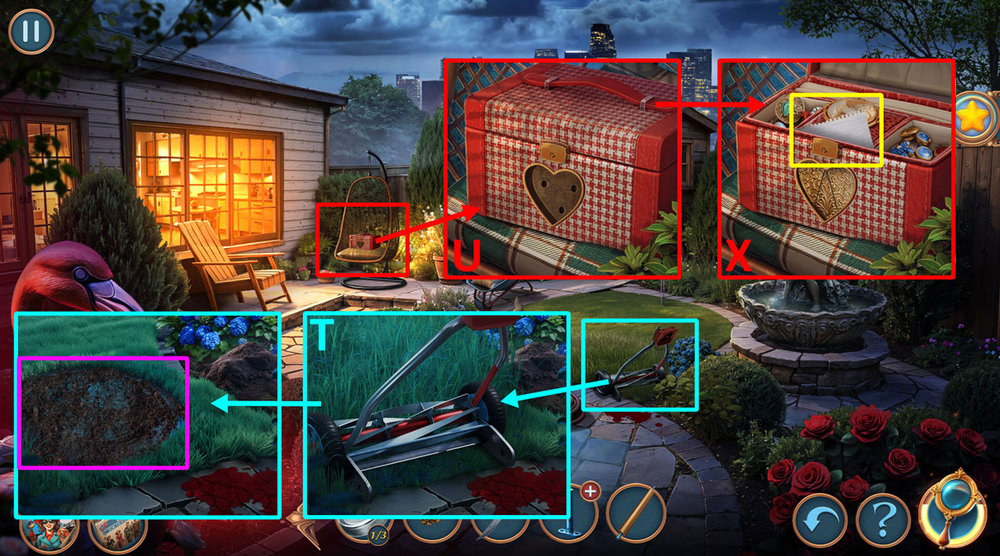
- Use ROTOR on the lawn mower, click on the dirt to get rid of it, click on the lid to open it, take HEART PARTS 3/3 (T).
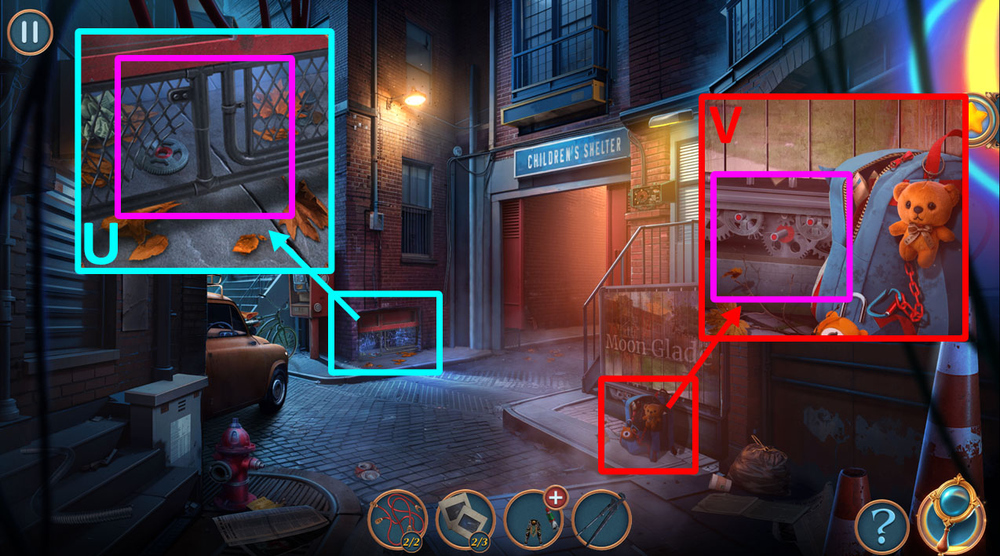
- Use HEART PARTS on the slot (U).
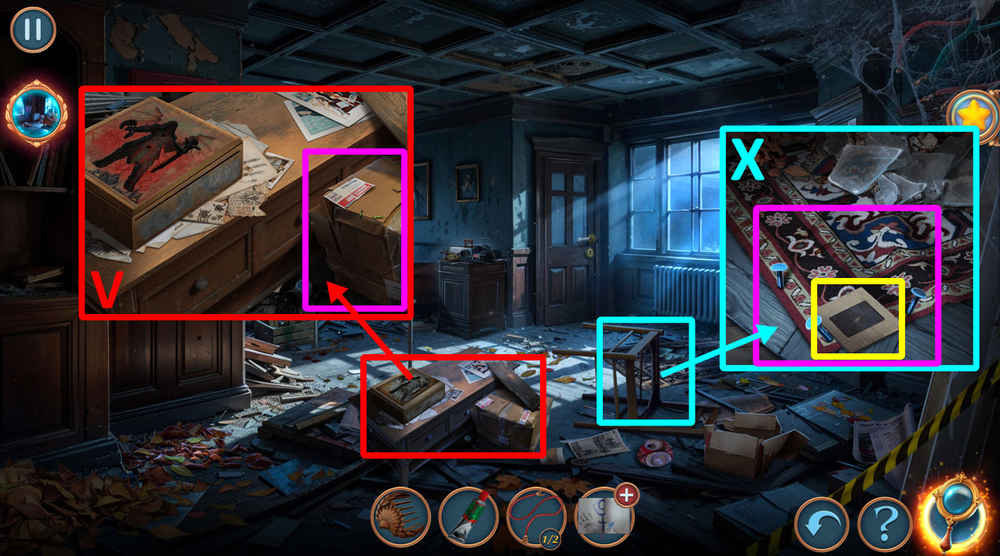
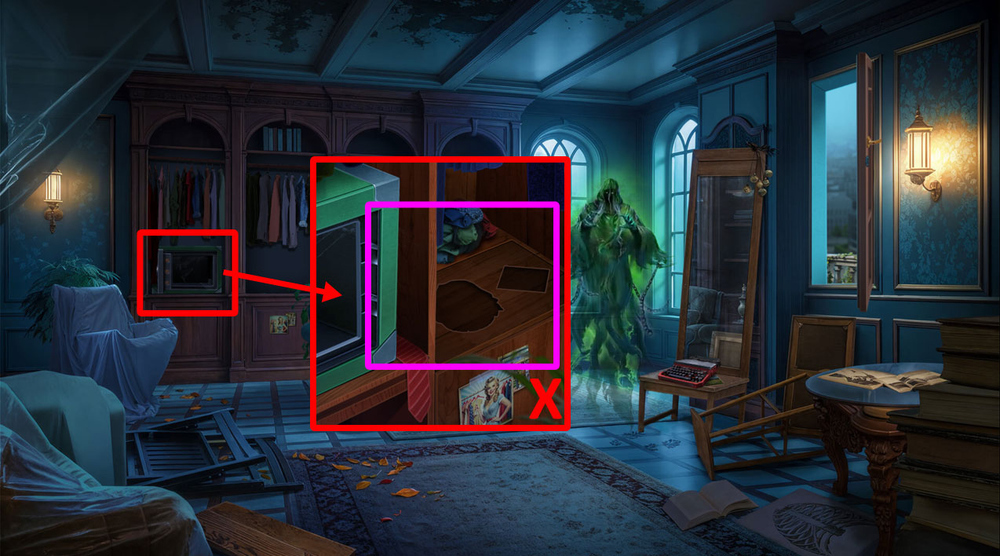
- Take and read the note, take MOM’S BROOCH (X).
- Go back.
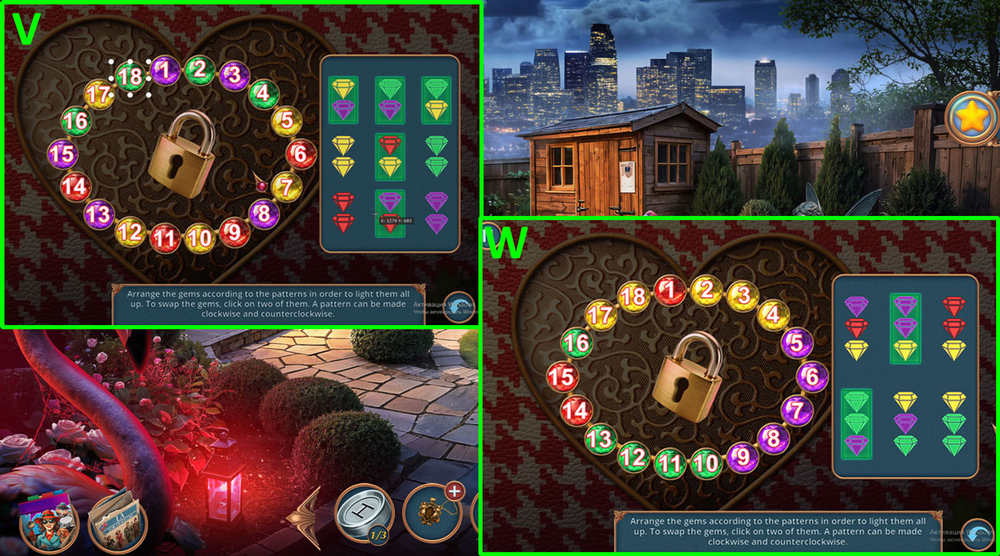
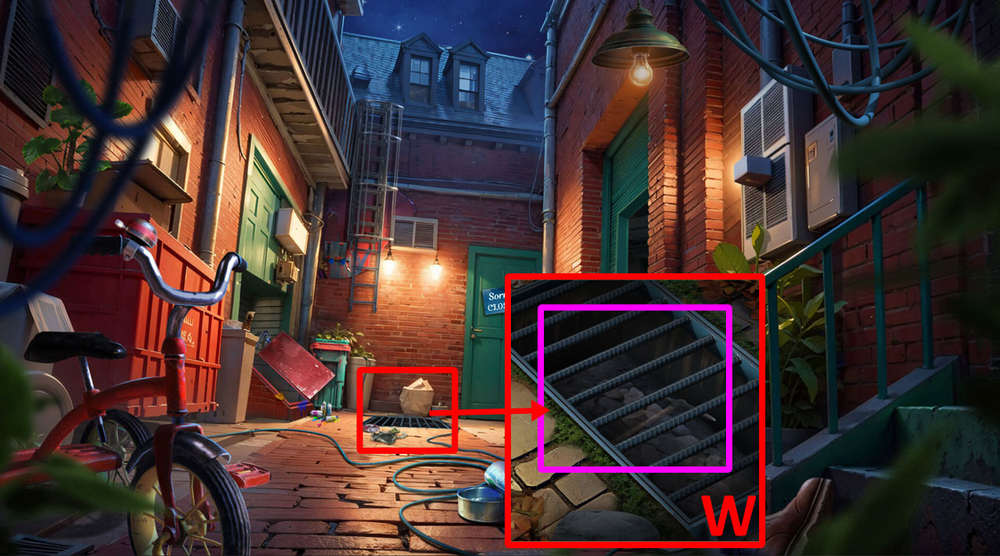
- Easy solution: 4-15, 5-11 (V).
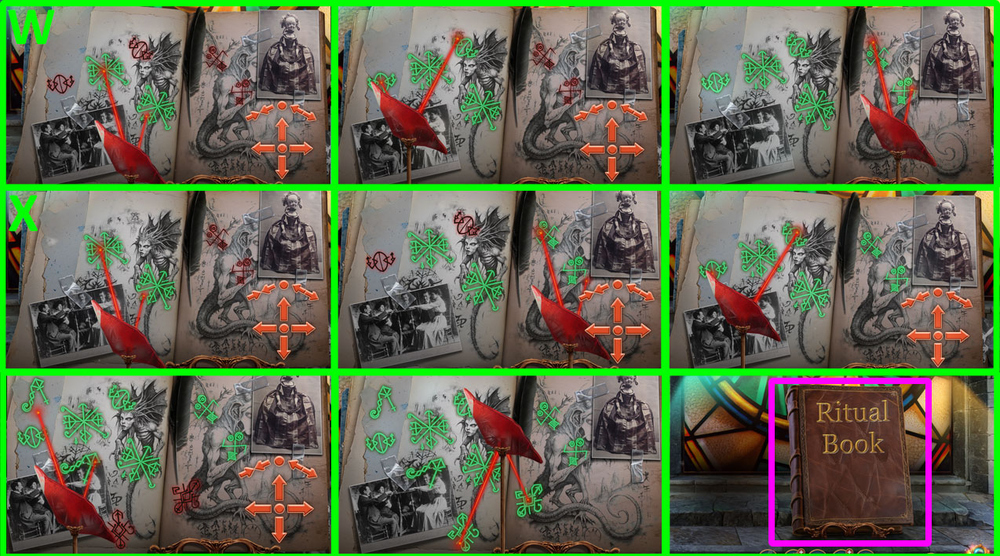
- Hard solution: 8-18, 3-13 (W).
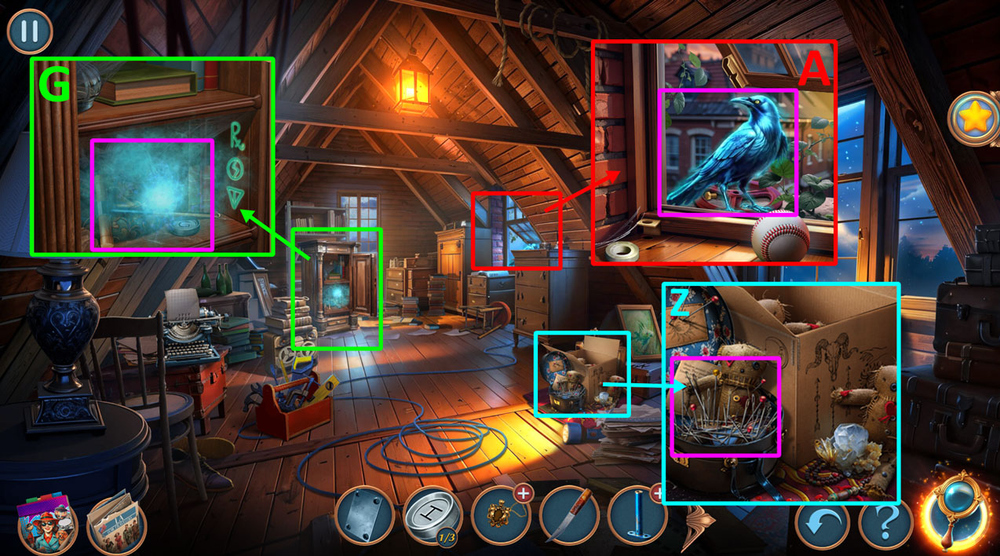
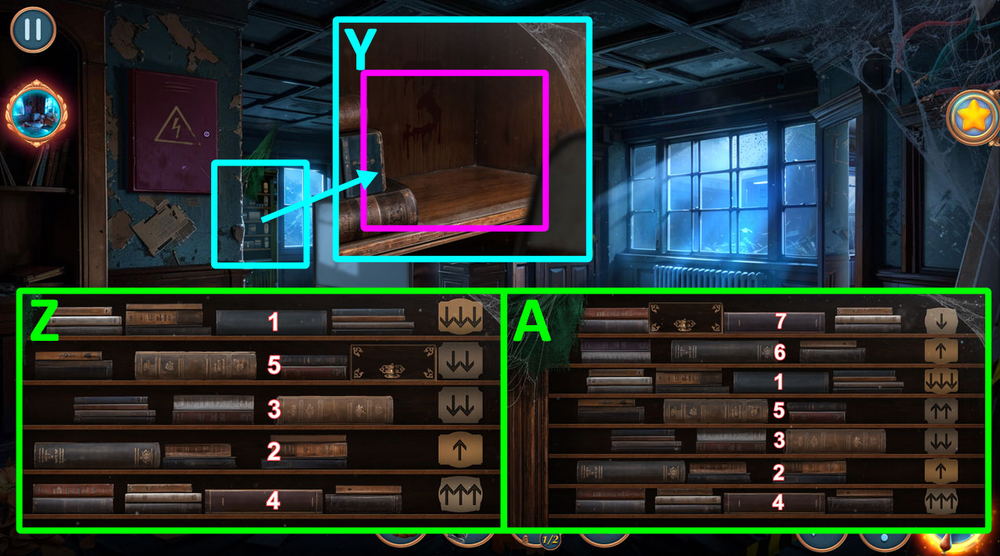
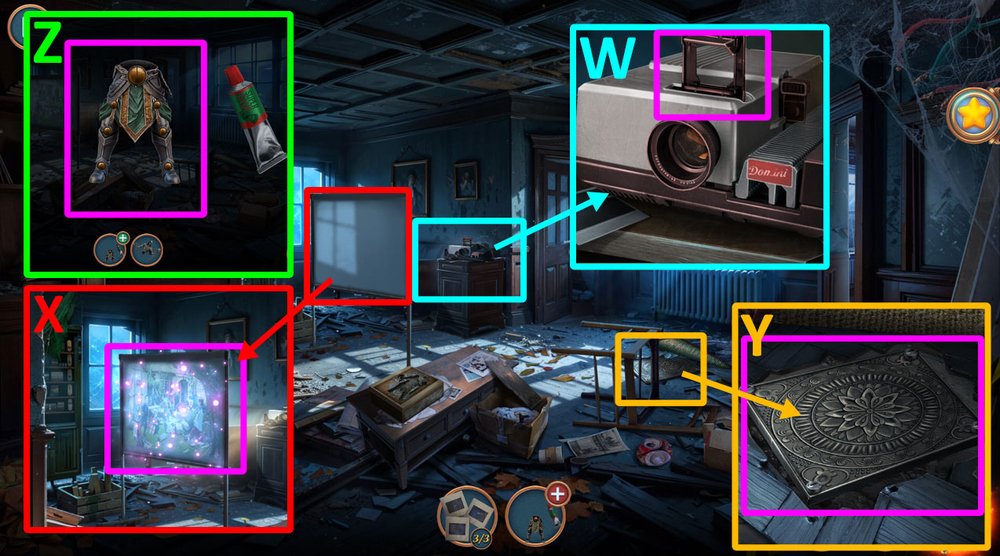
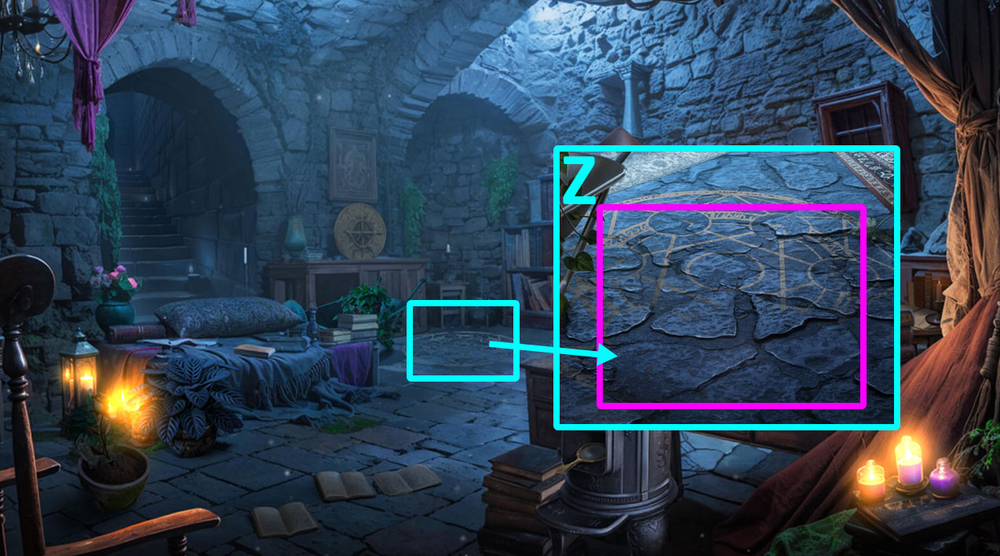
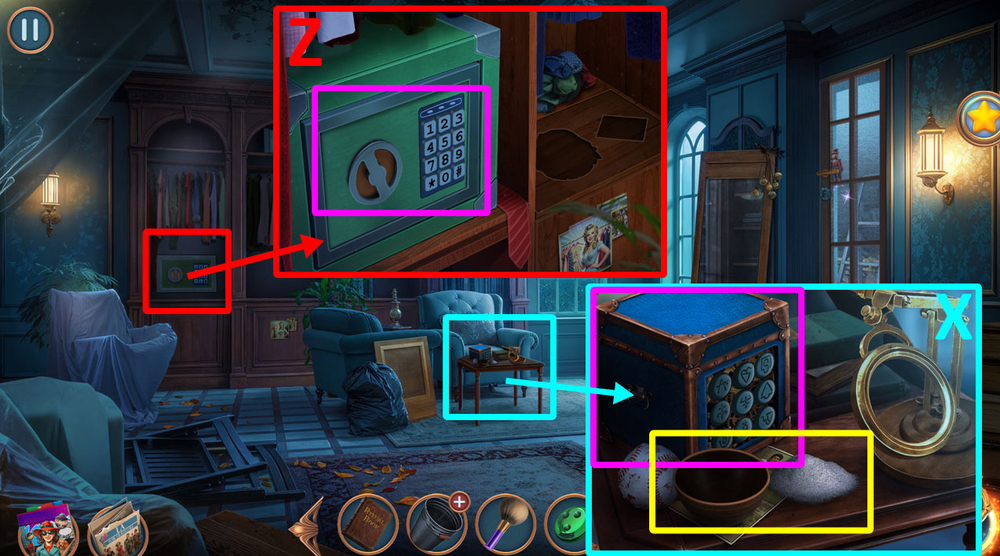
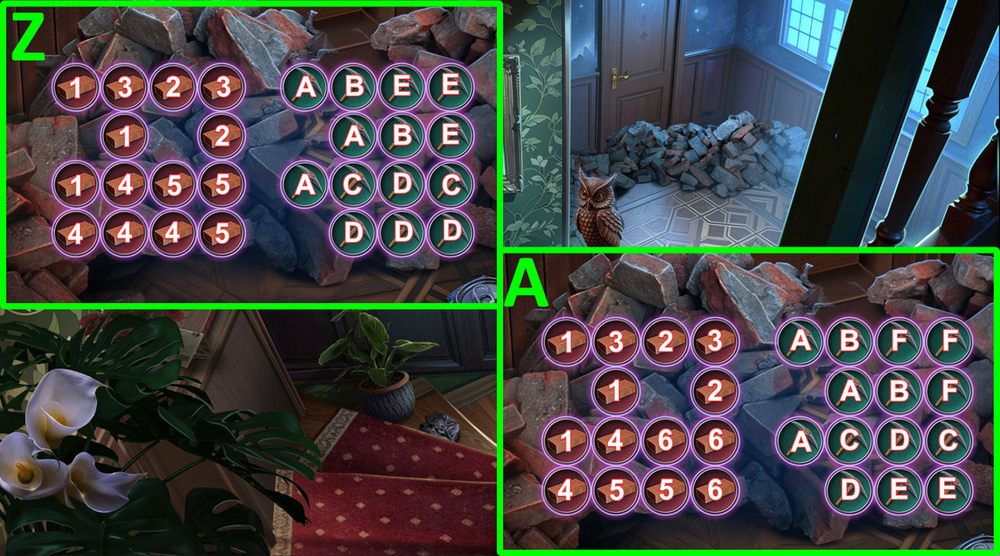
- Use MAGNET on the needles, take and read the note, take MIRROR GLASSES (Z).
- Use MIRROR GLASSES on the crow, take VALVE (A).
- Use FIXED PENDANT on the blue cloud, take GAS HANDLE and KEYS 3/3 (G).
- Go to the Garden near the House.
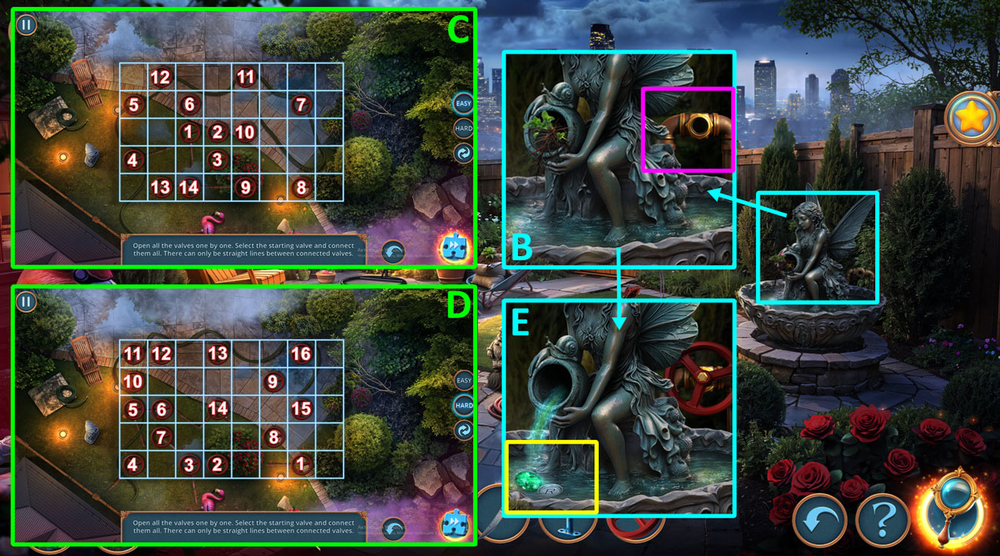
- Use VALVE on the pipe (B).
- Easy solution: Click 1 to 14 in order (C).
- Hard solution: Click 1 to 16 in order (D).
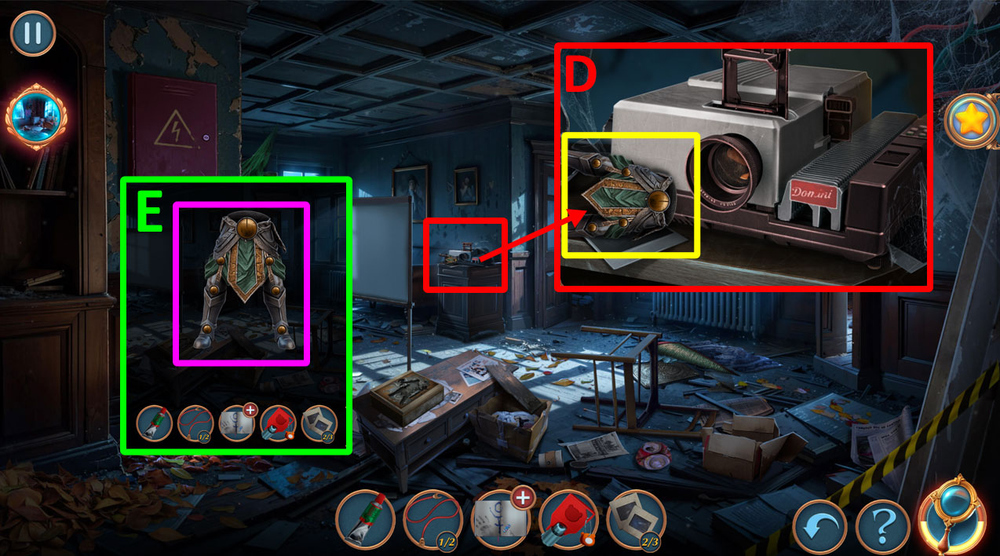
- Take KEYS 2/3 and PENDANT PART (E).
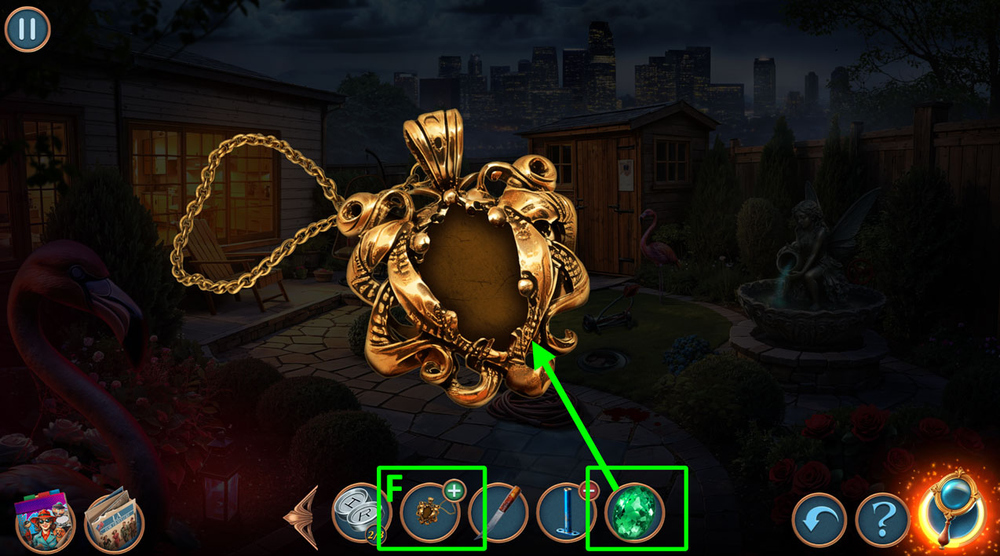
- Use PENDANT PART on MOTHER’S PENDANT, earn FIXED PENDANT (F).
- Go to the Attic.
- Use KEYS on the typewriter (H).
- Solution: Fill the scale before the top row reaches the edge of the sheet.
- Collect three horizontal or vertical lines of identical symbols by moving them around into empty cells (I).
- Take and examine SEARCH RITUAL (J).
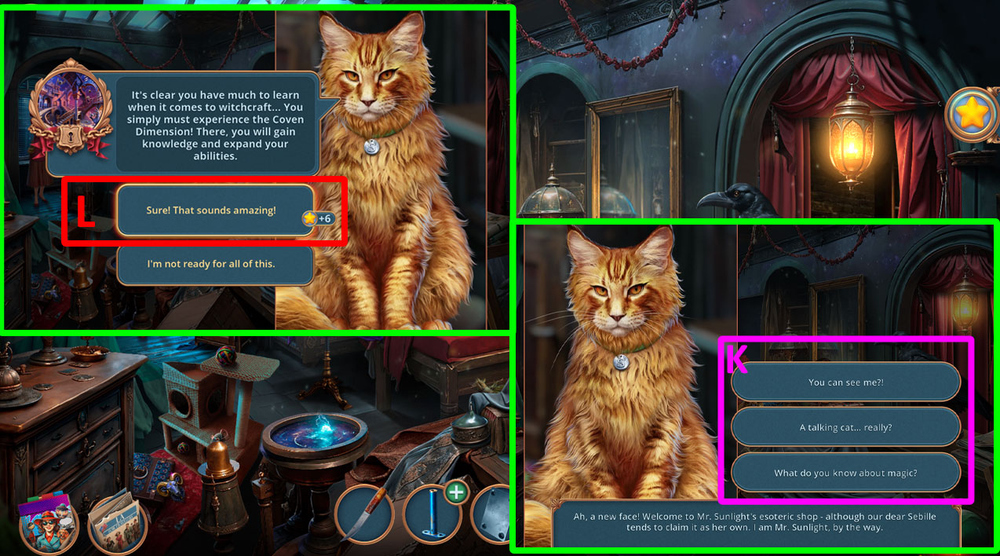
- Select all three lines one by one (K).
- Select this option (L).
- Go forward.
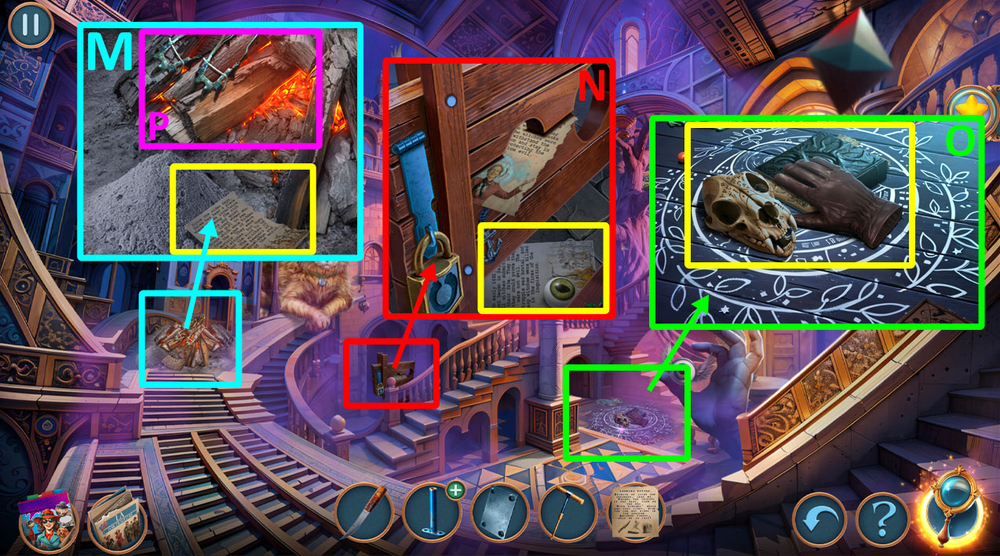
- Take and read HISTORY PAGES 1/3 (M).
- Take CAT EYES 1/2 and HISTORY PAGES 2/3 (N).
- Take GLOVE, SLEEPING SKULL, and HISTORY OF WITCHES (O).
- Use GLOVE on the crampons, earn CRAMPONS (P).

- Use CRAMPONS on the tree, take ELDERBERRY and DUSTER (Q).
- Use GAS HANDLE on PUMP (R).
- Examine HISTORY OF WITCHES, click on the book to open it (S).
- Go back.
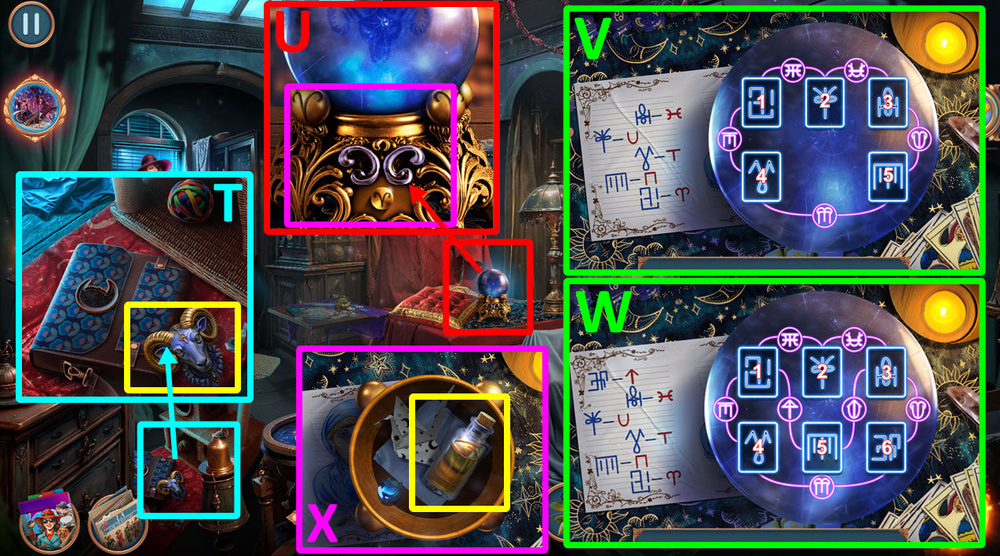
- Take GOLDEN AMULET (T).
- Use GOLDEN AMULET on the crystal ball (U).
- Easy solution: 4-1, 5-4, 3-2 (V).
- Hard solution: 4-1, 5-4, 3-2, 6-5 (W).
- Take FRAGRANCE OIL (X).
- Use FRAGRANCE OIL on the latch, take SCISSORS and FILE, use DUSTER on the spider web, take CAT EYES 2/2 (Y).
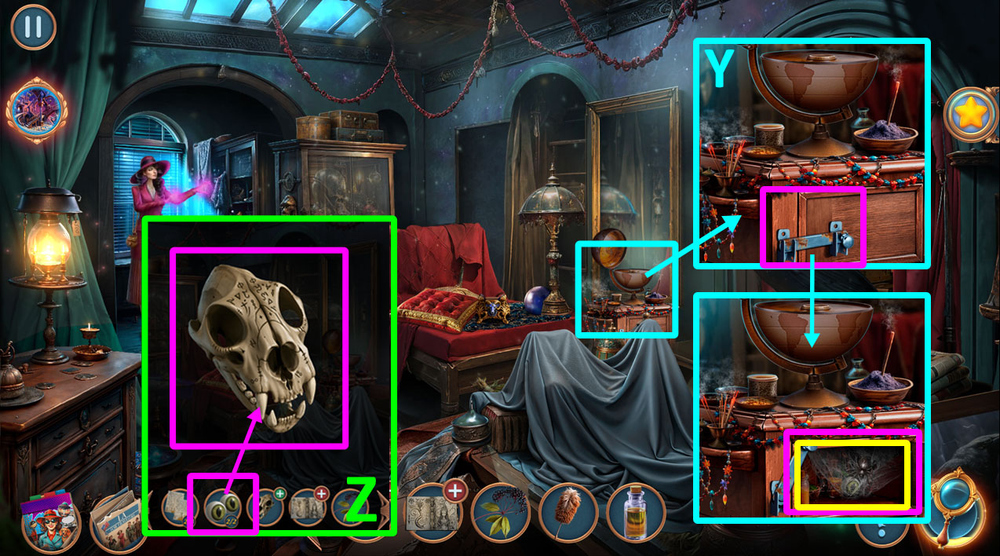
- Use CAT EYES on SLEEPING SKULL, earn SKULL (Z).
- Go forward.

- Use SKULL on the chains, take SHACKLES AMULET (A).
- Use SHACKLES AMULET on the lock, take HISTORY PAGES 3/3 and ANCHOR AMULET (B).
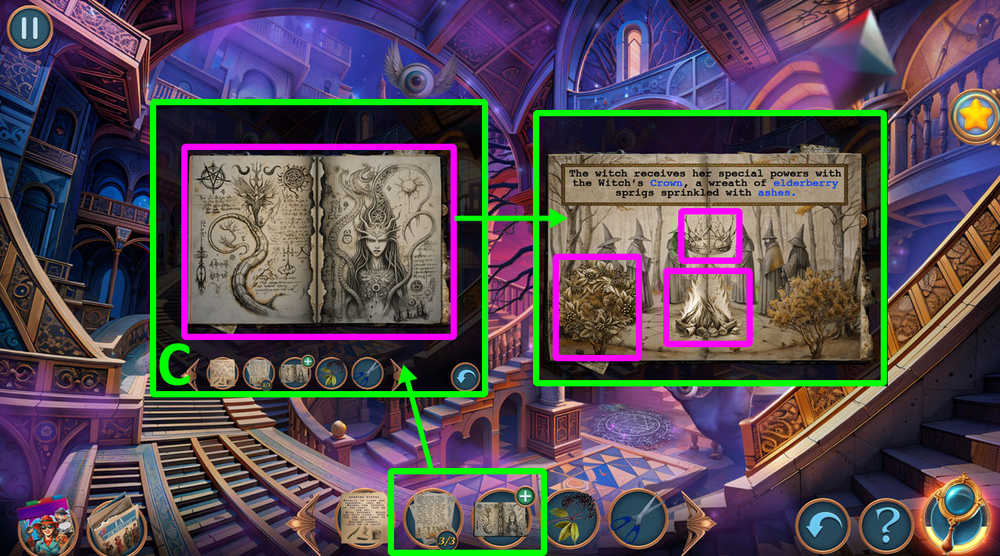
- Use HISTORY PAGES on HISTORY OF WITCHES, click on the objects that match the highlighted words: bonfire, crown, berry bush, earn BOOK OF WITCHES (C).
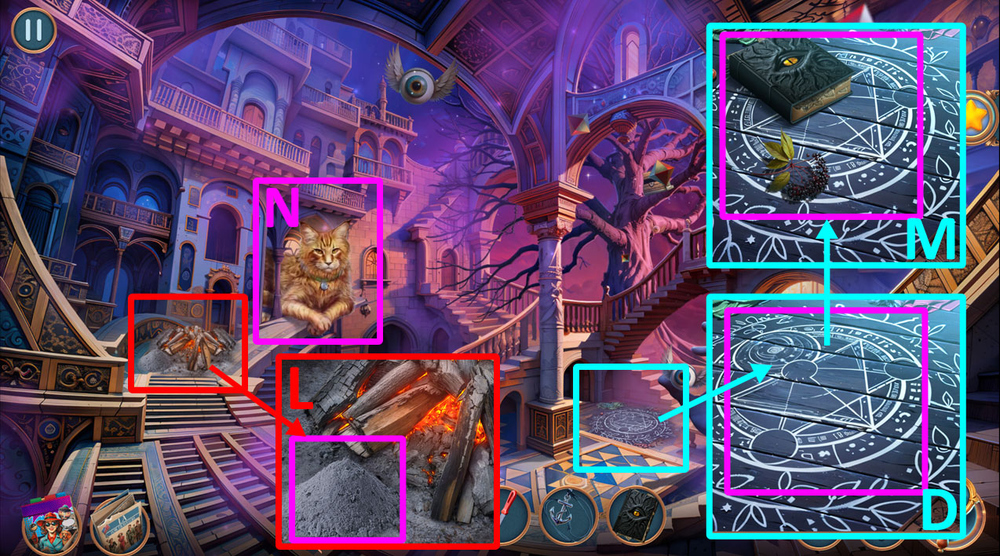
- Use BOOK OF WITCHES and ELDERBERRY on the floor (D).
- Use TEA SPOON on the pile of ash, earn MAGIC ASHES (L).
- Use MAGIC ASHES on the floor, take WITCH’S CROWN (M).
- Give WITCH’S CROWN to the cat (N).
- Go back.
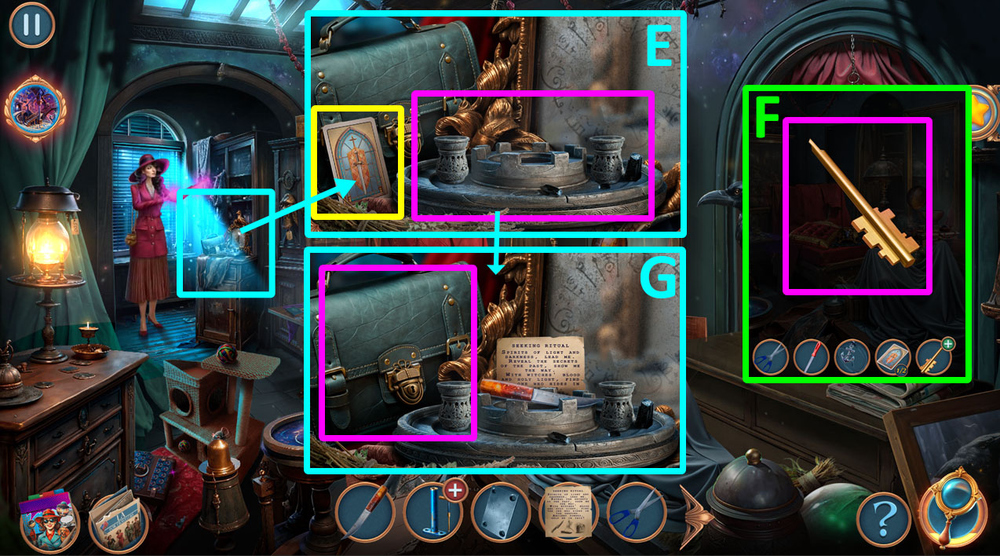
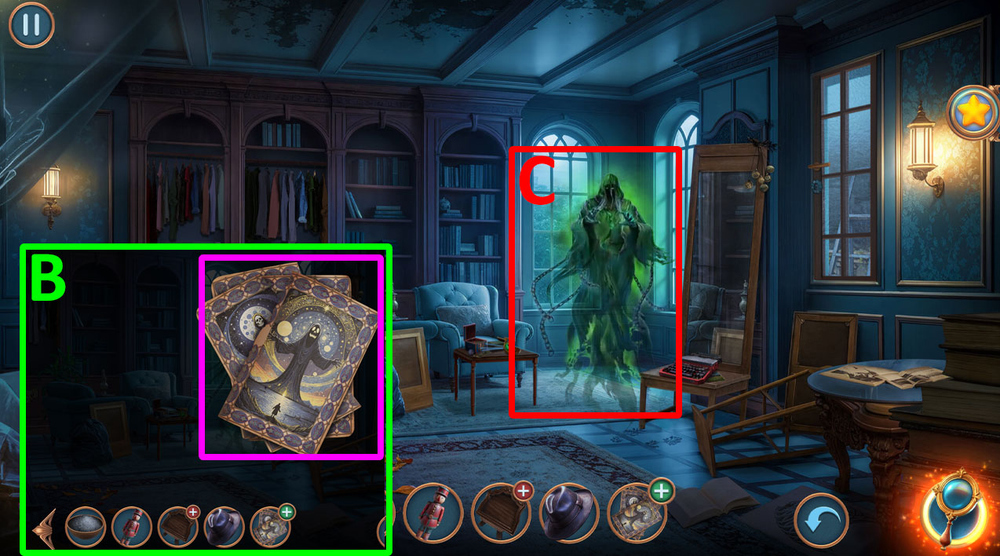
- Use KILLER’S KNIFE and SEARCH RITUAL on the stone pedestal, take CARDS 1/2 and KEY BASE (E).
- Use METAL SHEET and FILE on KEY BASE, earn KEY (F).
- Examine the bag, use KEY on the lock, take CARDS 2/2 (G).
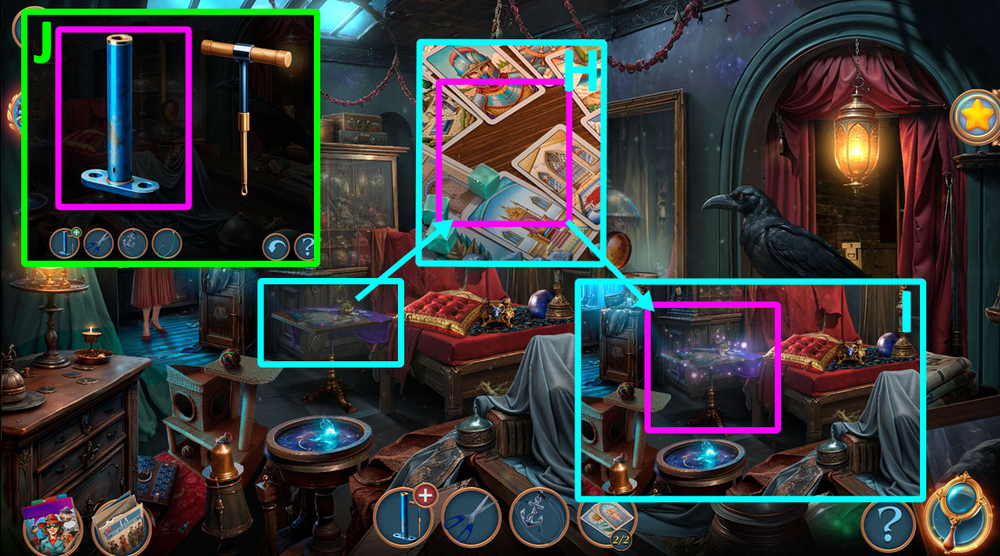
- Use CARDS on the table (H).
- Play puzzle, earn PIPE (I).
- Use PIPE on PUMP, earn PUMP (J).
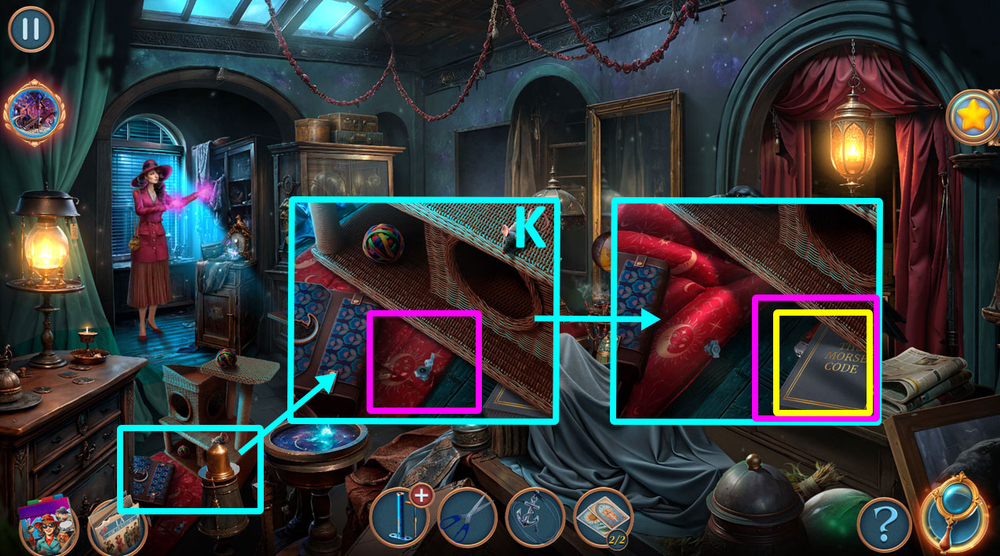
- Use PUMP on the air mattress, take CRYPTOGRAPHY TEXTBOOK and LIGHTER, use ANCHOR PENDANT on the spoon, earn TEA SPOON (K).
- Go forward.
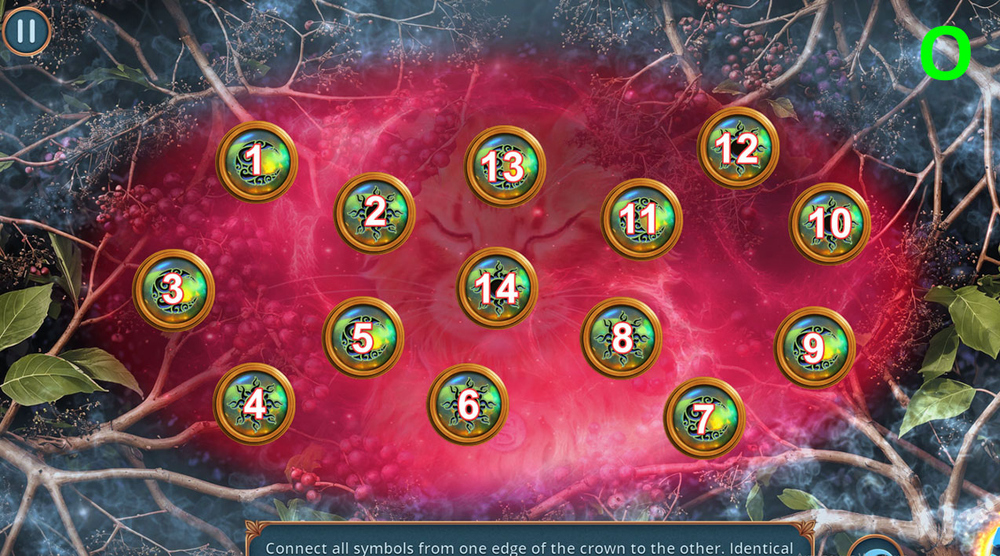
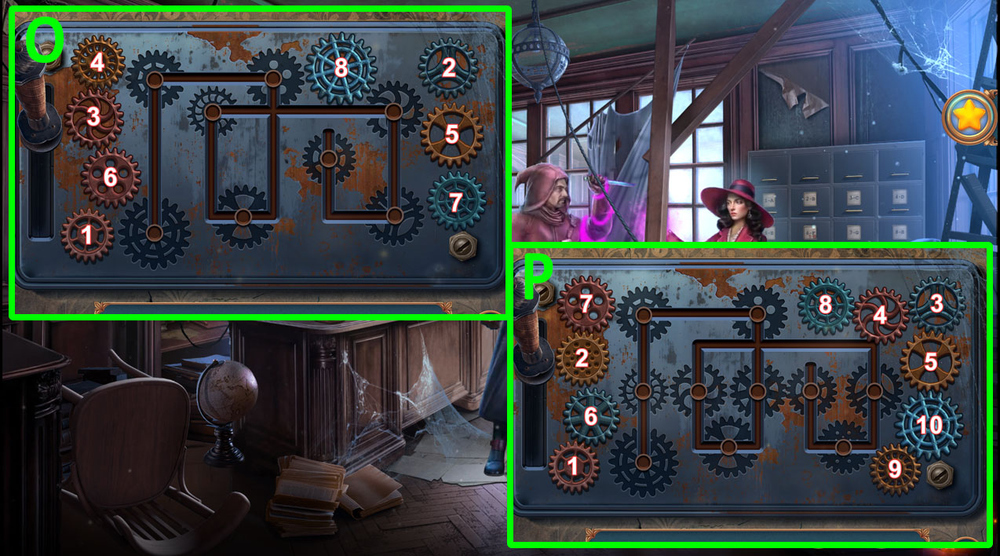
- Solution: Click 1 to 14 in order (O).
- Go back.
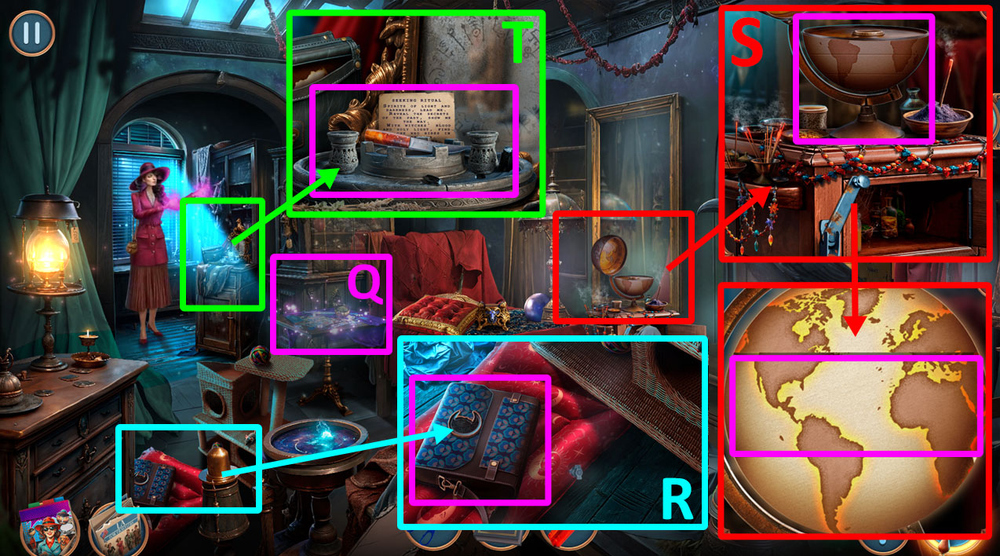
- Play puzzle, earn SEBILLE’S AMULET (Q).
- Use SEBILLE’S AMULET on the bag, take BULB and GLUE (R).
- Use BULB on the globe, click on the globe parts until they line up, take WRENCHES and PALO SANTO INCENSE (S).
- Use LIGHTER and PALO SANTO INCENSE on the stone pedestal (T).
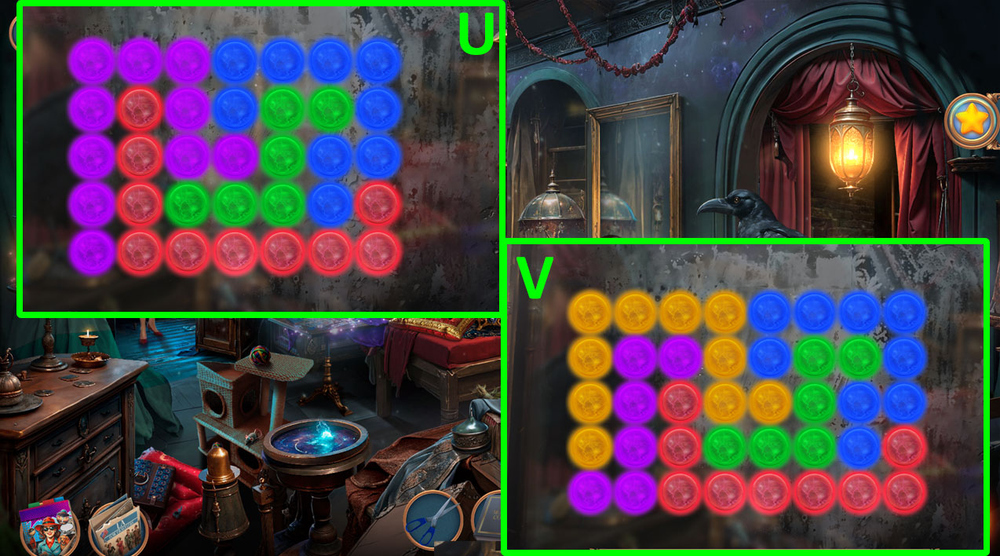
- Easy solution: See the picture for correct positioning (U).
- Hard solution: See the picture for correct positioning (V).
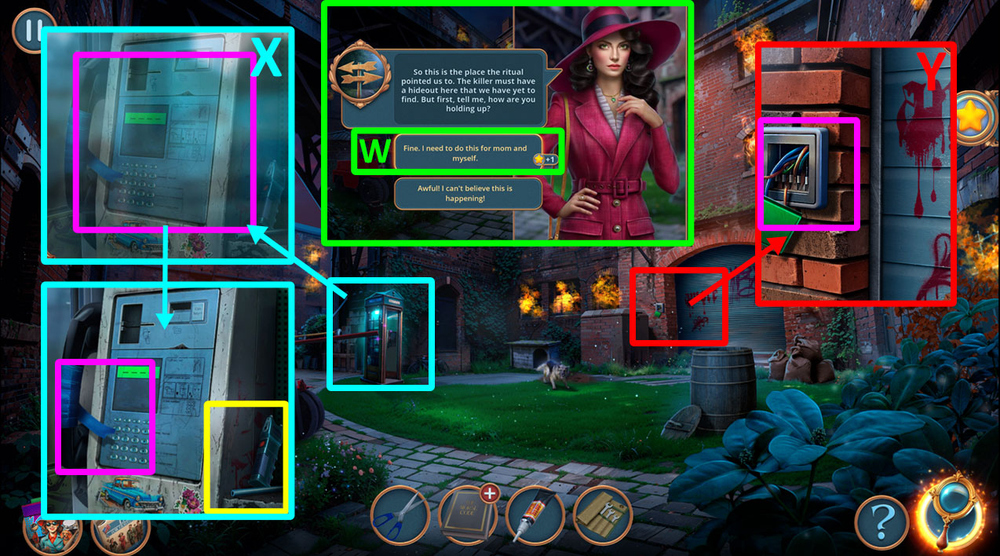
- Select this option (W).
- Click on the old phone, use SCISSORS on the duct tape, earn DUCT TAPE, take SHAFT and TASER (X).
- Use DUCT TAPE on the button, press the button (Y).
- Go forward.
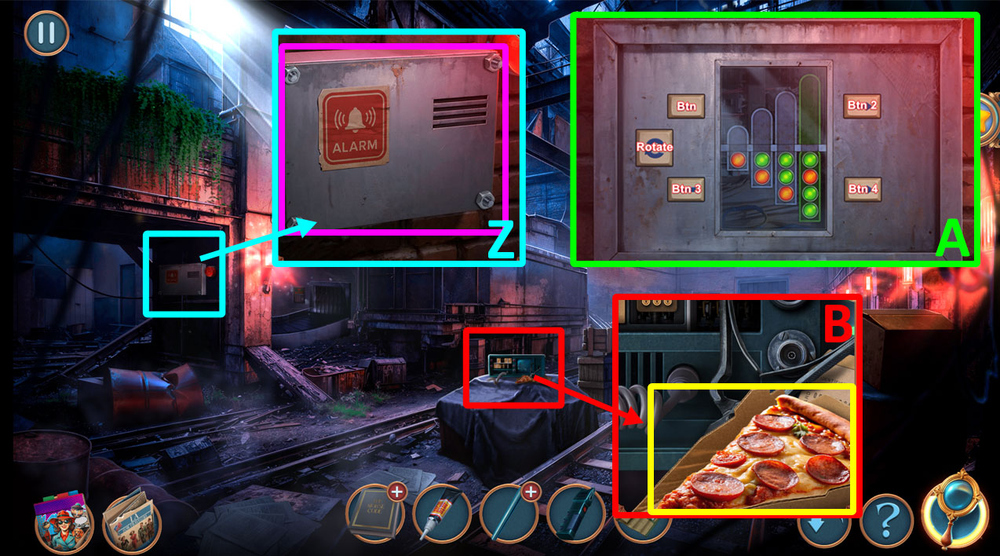
- Use WRENCHES on the screws (Z).
- Solution: Click Btn 2-Rotate-Btn 2-Btn 2-Rotate-Btn-Btn (A).
- Take PIZZA SLICE and BOLT CUTTER (B).
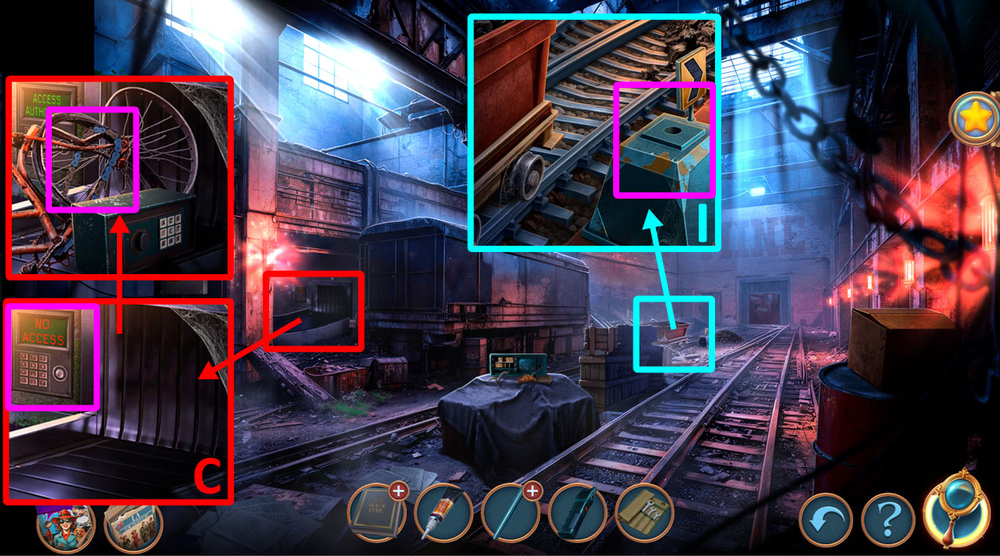
- Use TASER on the panel, use BOLT CUTTER on the chain, earn BICYCLE CHAIN (C).
- Use OLD CRUTCH on the empty socket (I).
- Go back.
- Give PIZZA SLICE to the dog, take GEAR (D).
- Use BICYCLE CHAIN and GEAR on the mechanism (E).
- Easy solution: Place the chain pieces so that the top ring has only blue and the bottom ring has only orange.
- You can rotate the ring.
- Use the arrows to move two chains to another ring (F).
- Hard solution: Place the chain pieces so that the top ring has only blue and the bottom ring has only orange.
- You can rotate the ring.
- Use the arrows to move two chains to another ring (G).
- Take OLD CRUTCH (H).
- Go forward.
- Examine the panel (J).
- Easy solution: 1 stage (4-10) , 2 stage (9-5), 3 stage (4-6), 4 stage ( 5-7), 5 stage (2-10) (K).
- Hard solution: 1 stage (1-9), 2 stage (4-10), 3 stage (5-9), 4 stage (4-6), 5 stage (5-7), 6 stage (2-10), 7 stage (2-6) (L).
- Select this option (M).
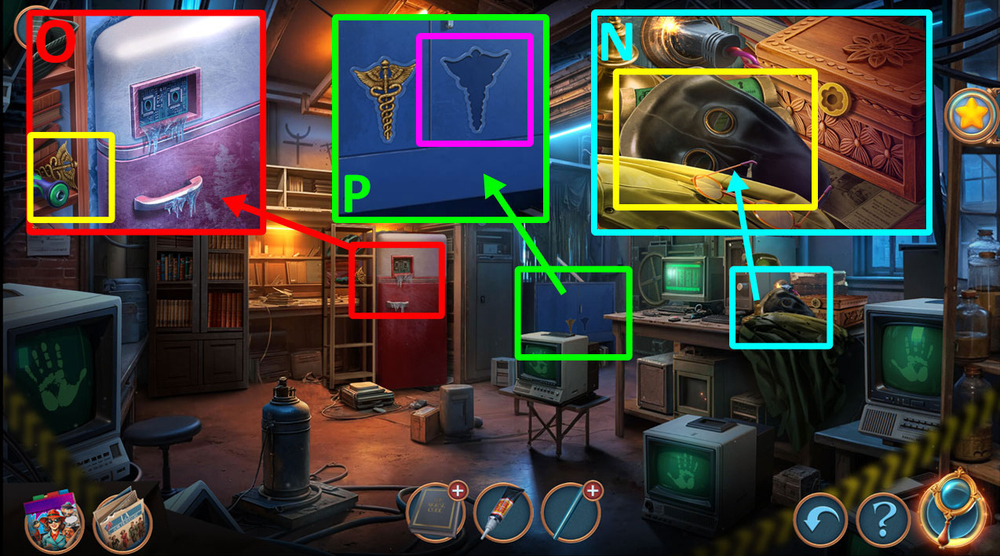
- Take PLAGUE MASK (N).
- Take SCREWDRIVER HANDLE and CADUCEUS (O).
- Use GLUE and CADUCEUS on the slot (P).
- Play puzzle, earn LATEX GLOVE (Q).
- Use LATEX GLOVE on the wire, take BATTERY (R).
- Use SCREWDRIVER HANDLE on SHAFT (S).
- Go back.
- Use BATTERY on the empty slot (T).
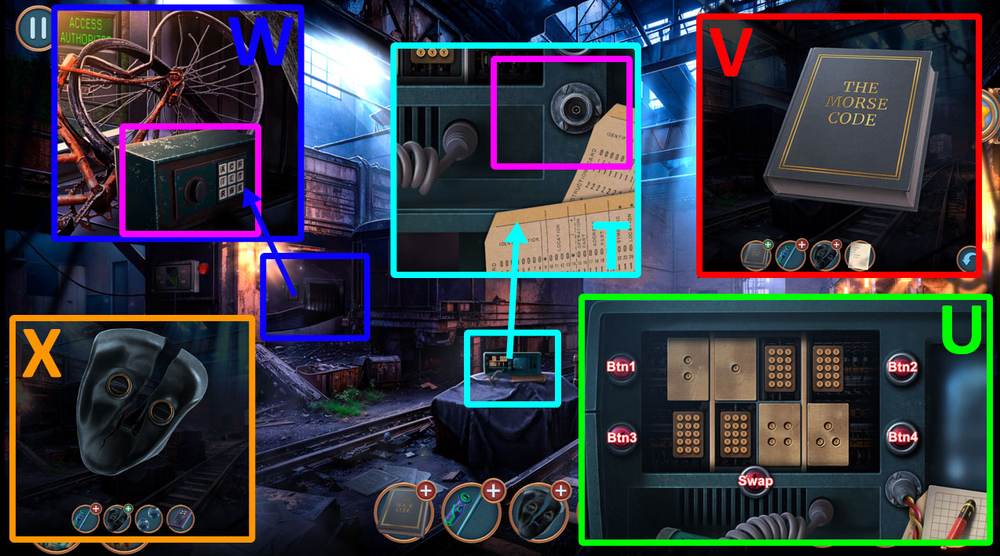
- Solution: Click Btn2-Btn3-Swap-Btn3-Btn2-Swap-Btn1-Btn4-Swap, earn MORSE CODE (U).
- Use MORSE CODE on CRYPTOGRAPHY TEXTBOOK, earn DECIPHERED CODE (V).
- Use DECIPHERED CODE on the safe, take LENSES and HEAT REGULATOR (W).
- Use LENSES on PLAGUE MASK (X).
- Go forward.
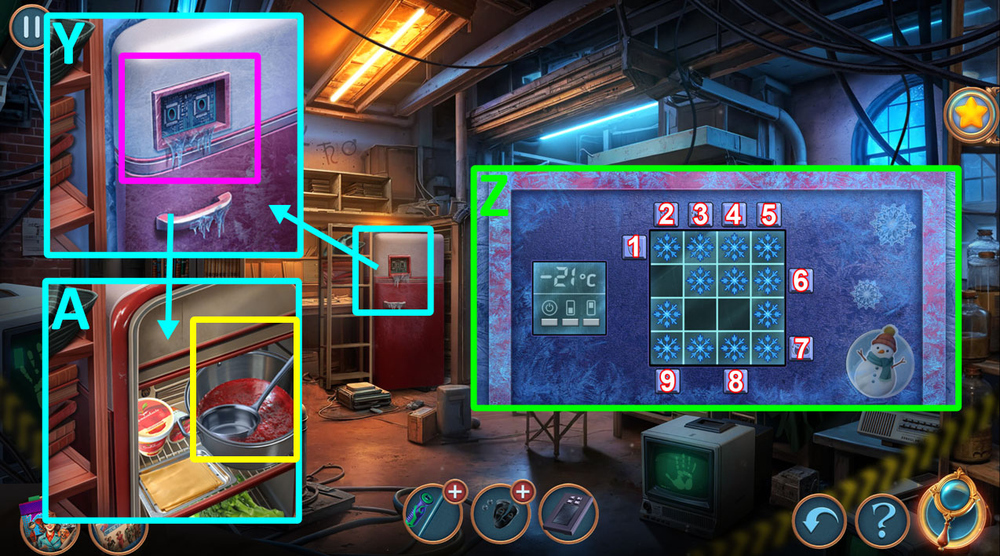
- Use HEAT REGULATOR on the fridge (Y).
- Solution: 2 (1 click), 3 (2 clicks), 1 (1 click), 4 (1 click), 6 (1 click),5 (3 clicks), 8 (1 click), 7 (2 clicks), 9 (1 click) (Z).
- Take LADLE (A).
- Go to the location Near Old Mine.
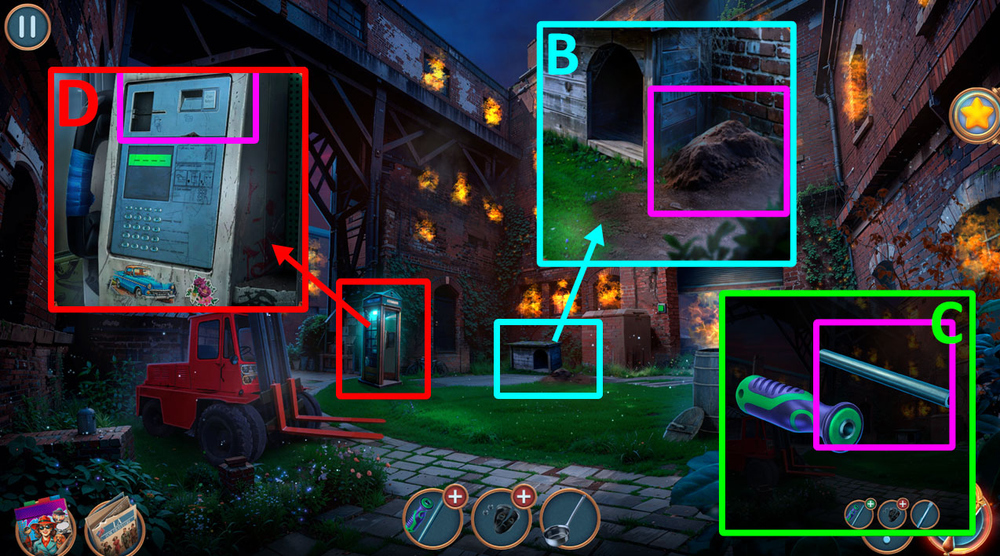
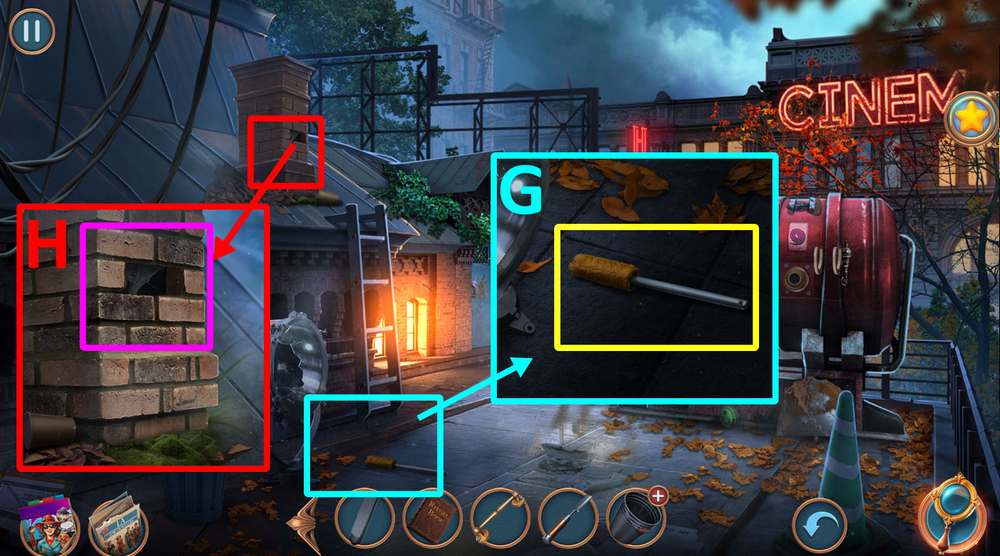
- Use LADLE on the pile of dirt, take SCREWDRIVER TIP (B).
- Use SCREWDRIVER TIP on SHAFT, earn SCREWDRIVER (C).
- Use SCREWDRIVER on the phone, take BOOK RECEIPT (D).
- Go to the Killer’s Hideout.
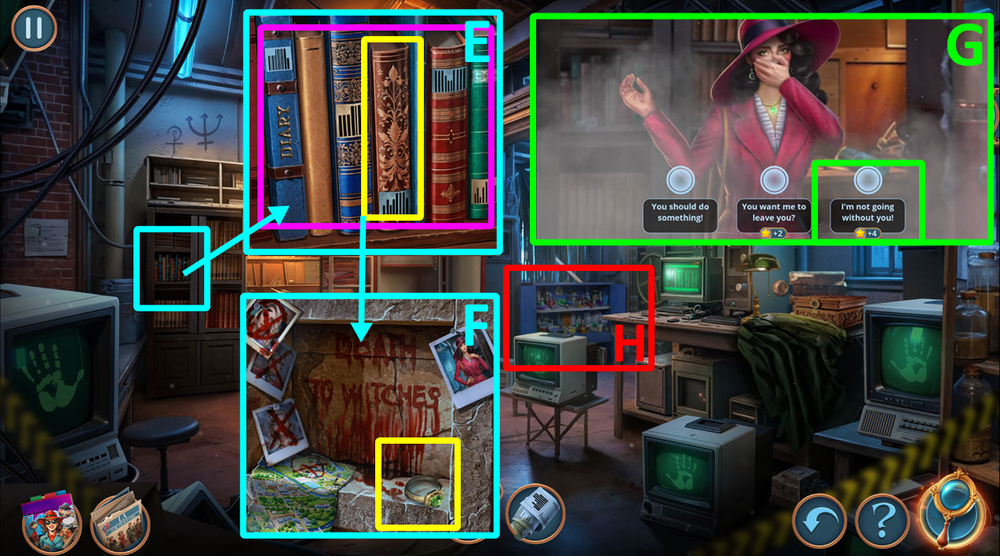
- Use BOOK RECEIPT on the bookshelf, click on the matching book: red with a gold pattern (E).
- Take SIGNET RING (F).
- Select this option (G).
- Play puzzle, earn SOAKED HANDKERCHIEF (H).
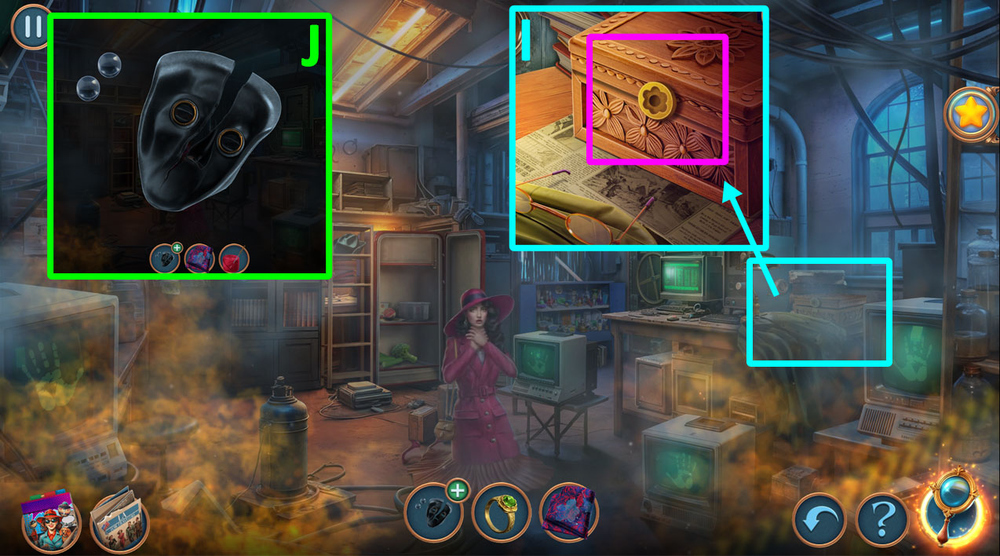
- Use SIGNET RING on the box, take SEWING KIT (I).
- Use SOAKED HANDKERCHIEF and SEWING KIT on PLAGUE MASK, earn DIY RESPIRATOR (J).
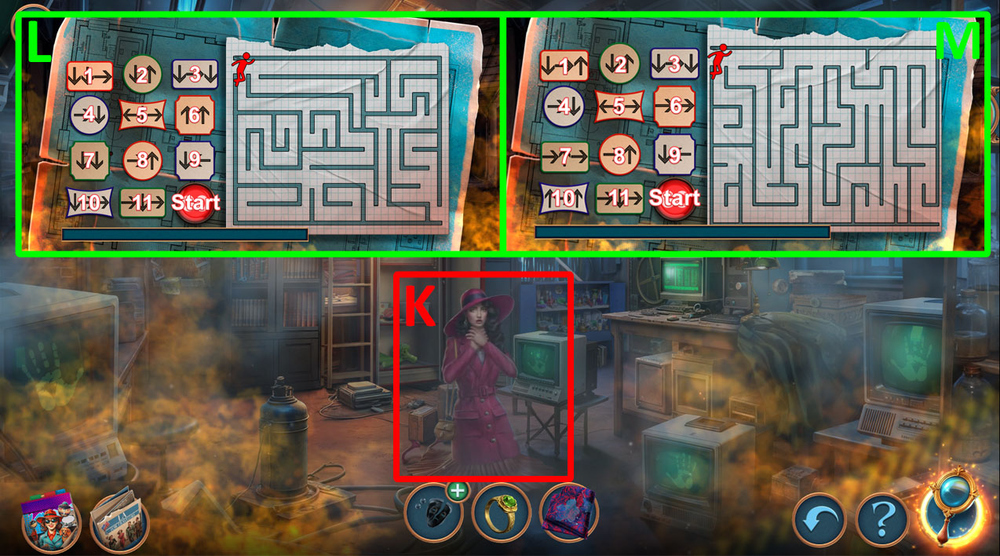
- Give DIY RESPIRATOR to Sebille (K).
- Easy solution: Click 10-3-5-4-8-11-1-Start (L).
- Hard solution: Click 11-1-10-6-4-7-9-5-Start (M).
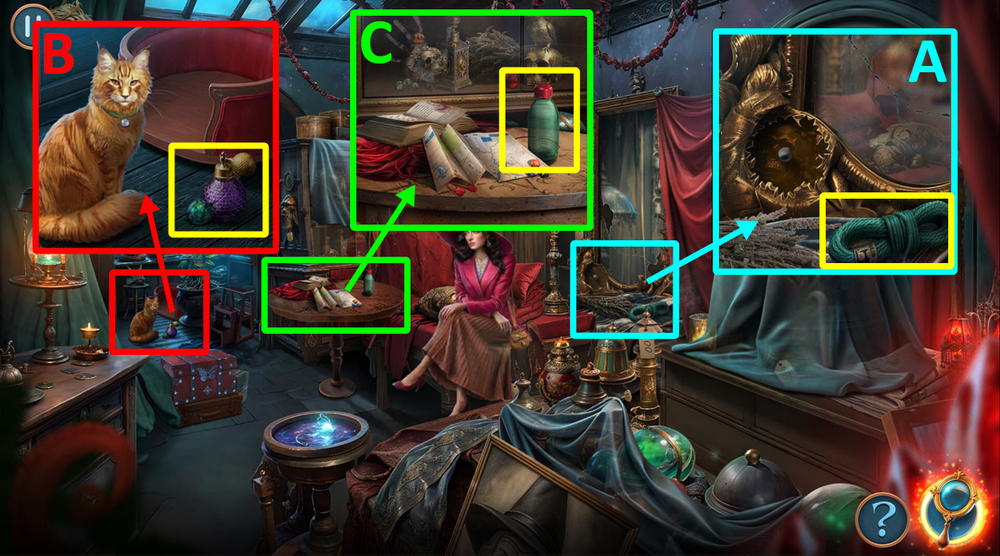
- Take ROPE (A).
- Take CRYSTAL and SEBILLE’S PERFUME (B).
- Take WATER (C).
- Use SEBILLE’S PERFUME on the bees, take PLIERS and SUCTION CUP (D).
- Use SUCTION CUP on the glass door, take SKULL AMULET (E).
- Use SKULL AMULET on the slot (F).
- Play puzzle, earn VELVET CUSHION (G).
- Use VELVET CUSHION on the cat bed, take HAIR CLAW CLIP and SMOKING PIPE (H).
- Use SMOKING PIPE on the chest lock, take BLOOD INK (I).
- Play puzzle, earn CAT FIGURINE (J).
- Use BLOOD INK on the map (K).

- Use CAT FIGURINE on the box, take CHAIN (L).
- Use PLIERS and CHAIN on CRYSTAL, earn CRYSTAL PENDANT (M).
- Use CRYSTAL PENDANT on the map (N).
- Easy solution: 1 stage (1-6), 2 stage (2-4), 3 stage (5-8), 4 stage (3-7), 5 stage (4-6) (O).
- Hard solution: 1 stage (1-6-8), 2 stage (2-4-5), 3 stage (1-5-8), 4 stage (3-6-7), 5 stage (1-4-6) (P).
- Select this option (Q).
- Take PIPE and MAGNET (R).
- Take and read NEWSPAPER, use PIPE on the toolbox (S).
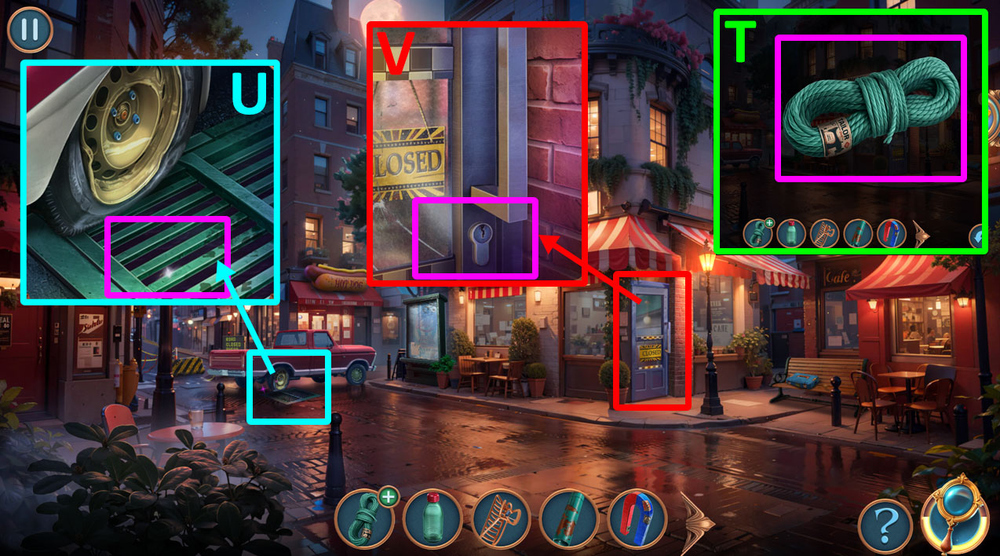
- Use MAGNET on ROPE, earn ROPE AND MAGNET (T).
- Use ROPE AND MAGNET on the grates, earn KEYS (U).
- Use KEYS on the keyhole (V).
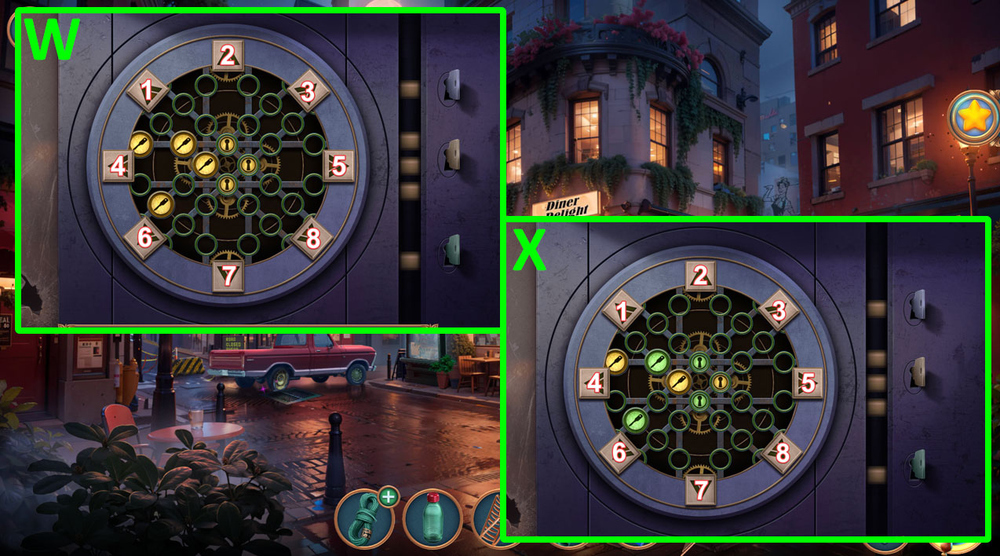
- Easy solution: 3 (3 click), 8 (1 click), 3 (2 click), 5 (3 click), 6 (2 click) (W).
- Hard solution: 8 (1 click), 3 (3 click), 8 (1 click), 5 (2 click), 3 (1 click), 6 (2 click) (X).
- Go forward.
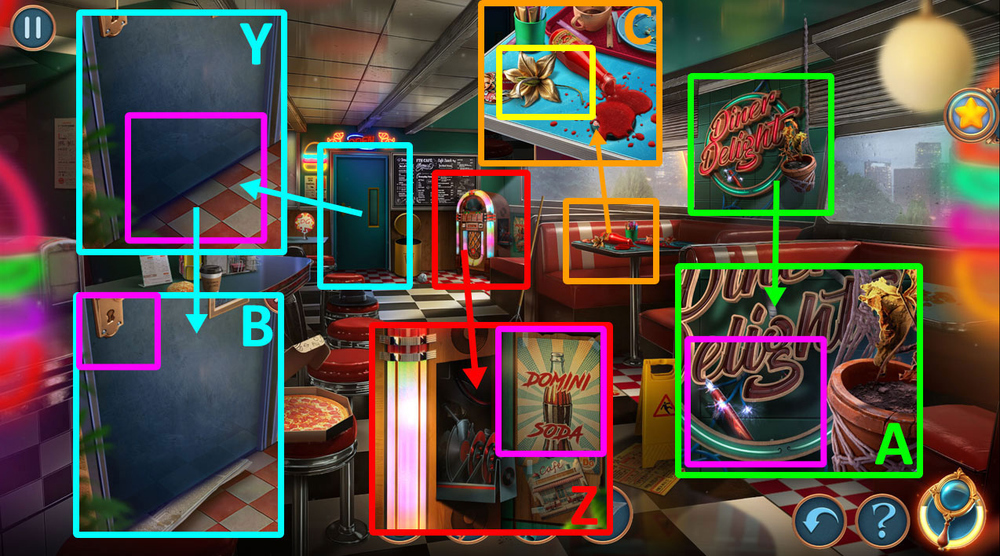
- Use NEWSPAPER on the door (Y).
- Use HAIR CLAW CLIP on the poster, take RUBBER GLOVE (Z).
- Use RUBBER GLOVE on the wire, earn IRON PEN (A).
- Use IRON PEN on the keyhole, earn IRON PEN, take the key and open the door with it (B).
- Take DRIED LILY (C).
- Go forward.
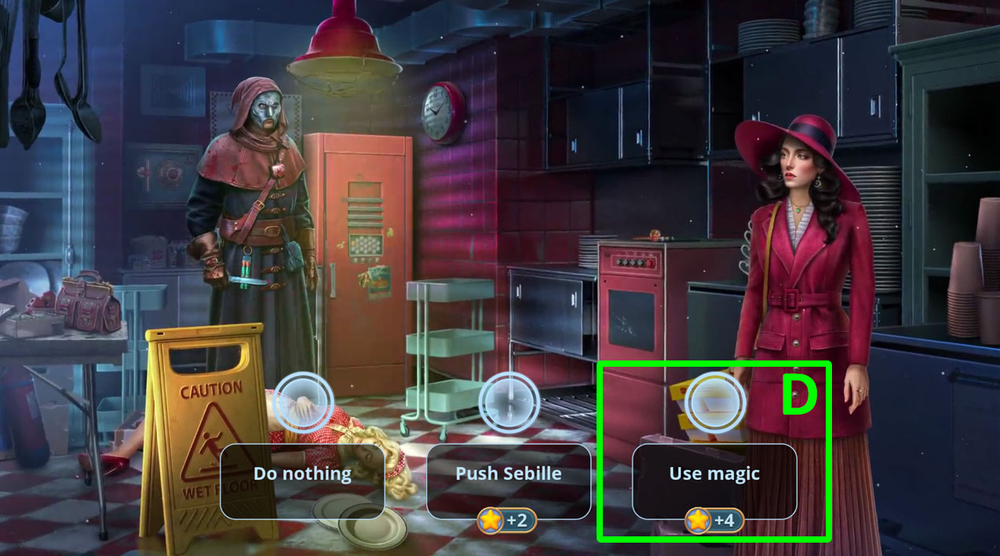
- Select this option (D).
- Take HANDLE (E).
- Use DRIED LILY on the plates (F).
- Use HANDLE on the safe (G).
- Use IRON PEN on the bag, take ROTATING MECHANISM (H).
- Use ROTATING MECHANISM on the safe (I).
- Easy solution: Click (1-2-3), (4-5-6), (7-8-9) (J).
- Hard solution: Click (1-2-3), (4-5-6), (7-8-9), (10-11-12) (K).
- Take BUTTONS 1/3 and SHAWL (L).
- Go back.
- Use SHAWL and WATER on the table, take DINER BADGE (M).
- Use DINER BADGE on the mechanism (N).
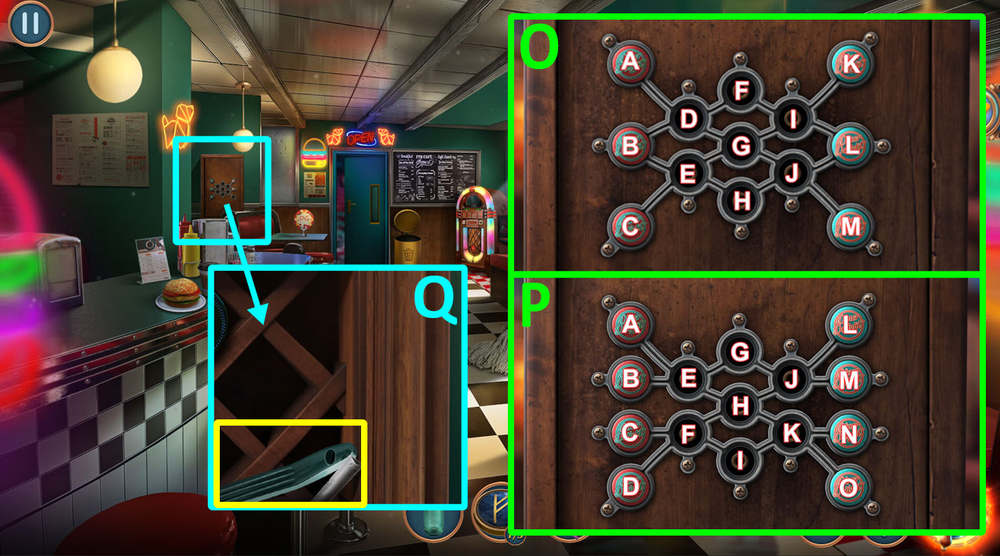
- Easy solution: B-E-H,A-D-B-E,K-I-F-D-A,E-B,H-E,L-I-K,M-J-L-I,E-H-J-M,
- Hard solution: A-E-H-F-I,B-E-H-F,L-J-G-E-A,M-J-G-E-B,F-H-J-L,I-F-H-J-M,
- Take CHALK and HANDLE (Q).
- Go forward.
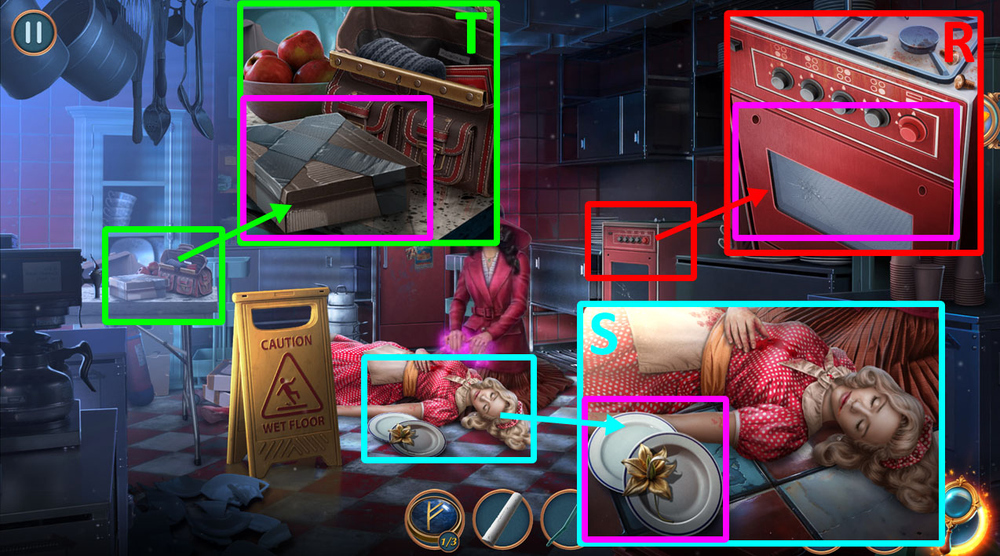
- Use HANDLE on the oven, take BUTTONS 2/3 and SEAM RIPPER (R).
- Use CHALK on the plates (S).
- Use SEAM RIPPER on the box, take DIAMOND RING (T).
- Go to the location Outside the Diner Delight.
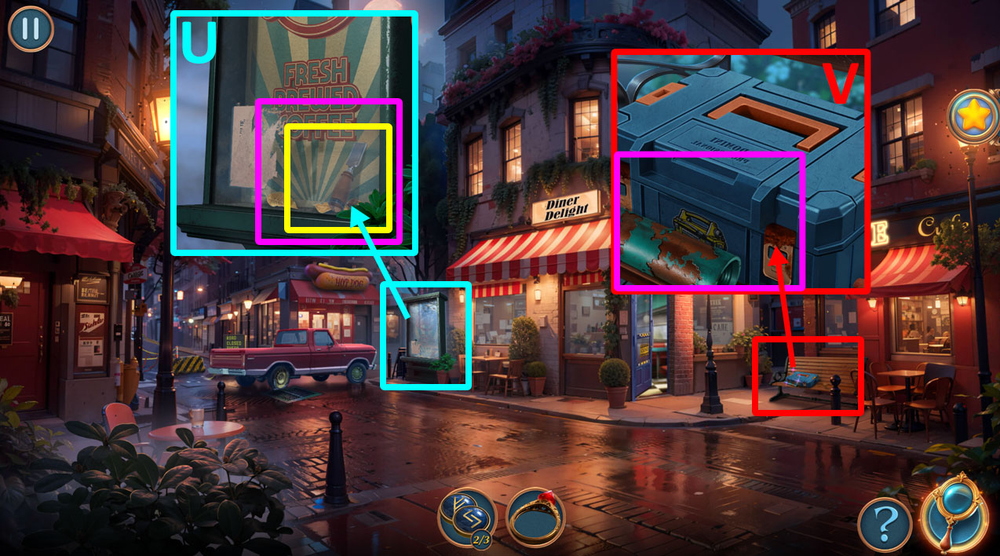
- Use DIAMOND RING on the glass, take CHISEL (U).
- Use CHISEL on the toolbox, take COMB and VINYL RECORD (V).
- Go forward.
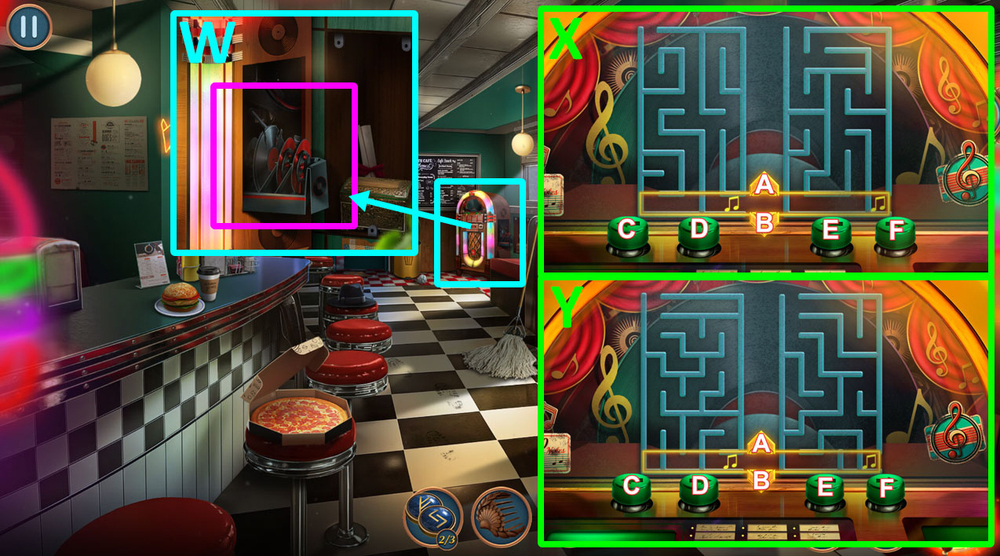
- Use VINYL RECORD on the jukebox (W).
- Easy solution: C (1 click), A (4 click), C (1 click), E (2 click), A (2 click), F (1 click), B (1 click), F (1 click), A (3 click), C (2 click), E (3 click), B (1 click), E (1 click), A (2 click) (X).
- Hard solution: C (1 click), A (1 click), D (1 click), A (1 click), C (2 click), B (2 click), C (1 click), A (2 click), C (1 click), E (1 click), A (2 click), D (1 click), F (1 click), B (1 click), D (1 click), A (1 click), D (1 click), A (1 click), D (1 click), E (2 click), A (2 click), C (1 click), E (2 click), B (1 click), C (1 click), A (1 click), C (2 click), A (2 click) (Y).
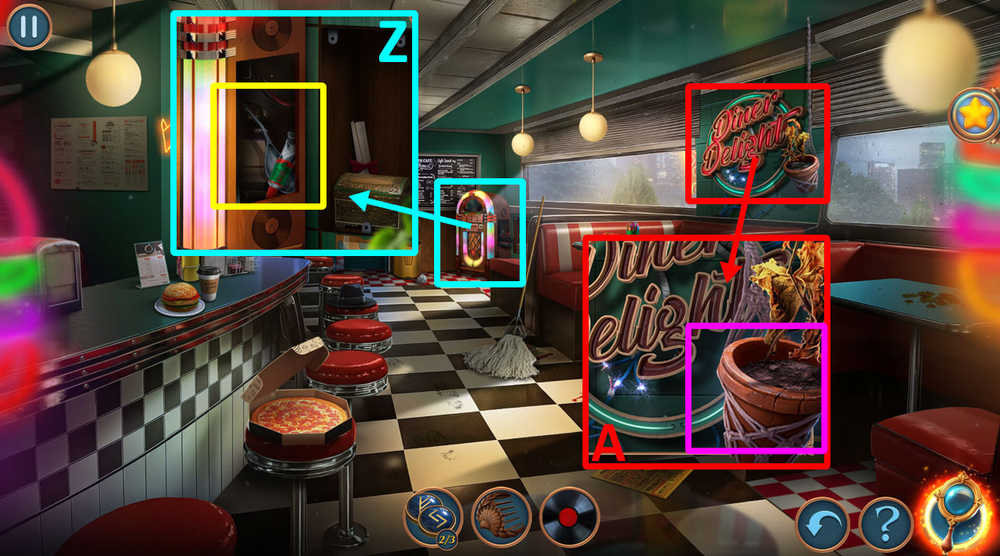
- Take GLUE and SPOON (Z).
- Use SPOON on the flowerpot, take TOY GUN (A).
- Go back.
- Use TOY GUN on the button, earn BUTTON 3/3 (B).
- Go to the Kitchen.
- Use BUTTONS on the empty slots (C).
- Easy solution: Click 1 to 19 in order (D).
- Hard solution: Click 1 to 19 in order (E).
- Take PLASTER and PHOTO OF BRONWYN (F).
- Use PHOTO OF BRONWYN on the plates (G).
- Easy solution: Get the chalk from the lily to the photo, avoiding collision with the dark energy (H).
- Hard solution: Get the chalk from the lily to the photo, avoiding collision with the dark energy (I).
- Select this option (J).
- Take HEAVY STATUETTE (K).
- Take PLASTIC BUSINESS CARD (L).
- Take COOLING SPRAY, examine the compartment behind the gearbox, take WIRES 1/2, use PLASTIC BUSINESS CARD on the compartment (M).
- Use COOLING SPRAY and HEAVY STATUETTE on the lock, take DUCT TAPE (N).
- Examine the compartment behind the gearbox, use DUCT TAPE on the wire (O).
- Go forward.
- Select this option (P).
- Go forward.
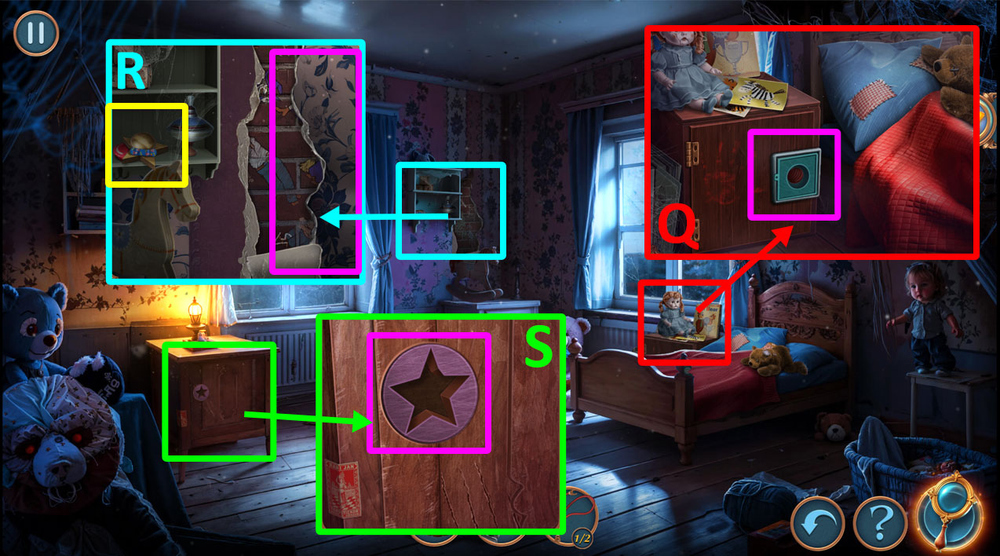
- Click on the small door with the round hole (Q).
- Take BAND-AID, HANDLE, and BUTTON, click on the wallpaper (R).
- Use HANDLE on the slot, take CHILD’S DIARY and SPRING (S).
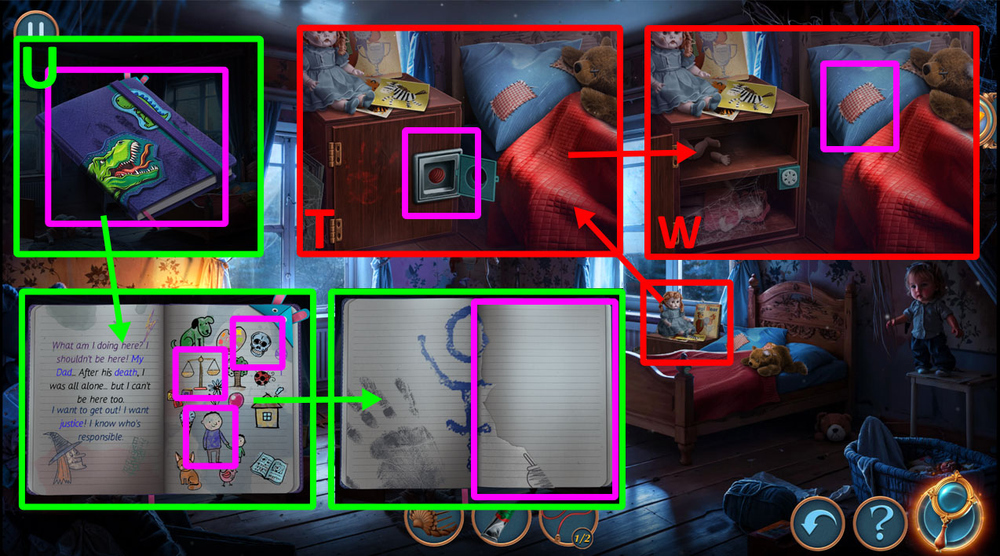
- Use SPRING and BUTTON on the round slot, take STAPLE REMOVER (T).
- Open the CHILD’S DIARY, click on the pictures that match the highlighted words: little man, scales, skull, use BAND-AID on the diary (U).
- Use RAZOR BLADE on the pillow, take KID’S KEY (W).
- Go back.
- Examine the box, use STAPLE REMOVER, take RAZOR BLADE (V).
- Go forward.
- Take SLIDES 1/3, use COMB on the nails, take FAKE BOOK (X).
- Use FAKE BOOK on the shelf (Y).
- Easy solution: Click 1 to 5 in order (Z).
- Hard solution: Click 1 to 7 in order (A).

- Take the book, take SLIDES 2/3 and KEY (B).
- Use KEY on the keyhole (C).
- Take METAL FIGURINE (D).
- Use GLUE on METAL FIGURINE (E).
- Go to the Headmaster’s Office.
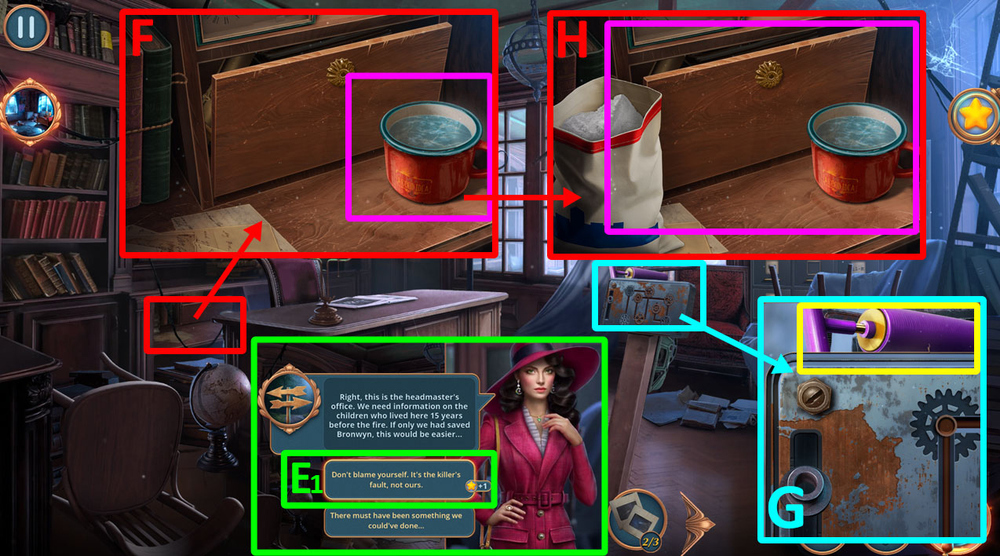
- Select this option (E1).
- Use PLASTER on the water (F).
- Take PUMP, ADJUSTABLE SPANNER, and MOLD (G).
- Use PUMP on the drawer, use MOLD on the water, take PLASTER FRAME PART (H).
- Use PLASTER FRAME PART on the slot (I).
- Easy solution: Click 1 to 10 in order (J).
- Hard solution: Click 1 to 13 in order (K).
- Take WIRES 2/2 (L).
- Go to the Orphanage Gate.
- Use KID’S KEY on the lock, take and read MISSING PAGE (M).
- Use MISSING PAGE on CHILD’S DIARY, earn NERO’S DIARY (N).
- Go to the Locked Room.
- Use NERO’S DIARY on the wall (O).
- Easy solution: Click 1 to 10 in order (P).
- Hard solution: Click 1 to 12 in order (Q).
- Go to the Orphanage Gate.
- Examine the mechanism, use WIRES and ADJUSTABLE SPANNER on it (R).
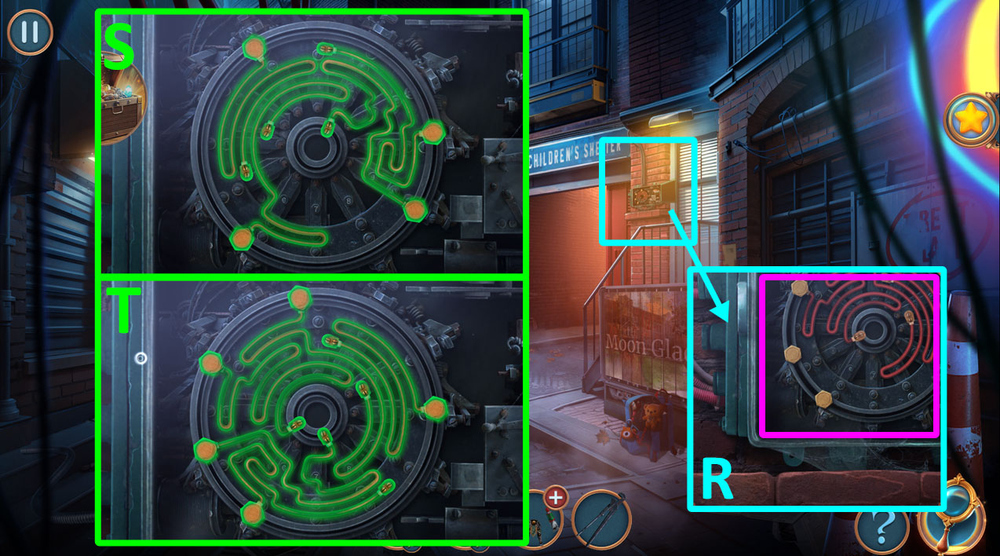
- Easy solution: See the picture for correct positioning (S).
- Hard solution: See the picture for correct positioning (T).
- Click on the fence, take GEAR (U).
- Use GEAR on the mechanism, take SLIDES 3/3 (V).
- Go forward.
- Use SLIDES on the projector (W).
- Play puzzle, earn SHELL BROOCH (X).
- Use SHELL BROOCH on the screws, take FIGURINE PIECE (Y).
- Use FIGURINE PIECE on METAL FIGURINE, earn GLUED FIGURINE (Z).
- Use GLUED FIGURINE on the slot (A).
- Easy solution: A (2 click), B (2 click), C (2 click), F (2 click), G (2 click), D (2 click), E (2 click), H (2 click), I (2 click) (B).
- Hard solution: H (2 click), A (5 click), B (1 click), C (2 click), D (2 click), E (2 click), F (2 click), G (2 click), L (2 click), M (2 click), N (2 click), I (2 click), J (2 click), K (2 click) (C).
- Take WARMER (D).
- Go forward.
- Use WARMER on the drawer, take FILE CABINET LABELS 1/2 (E).
- Go back.
- Play puzzle, earn CURVED LAMP (F).
- Look under the cabinet, use CURVED LAMP under the cabinet, earn FILE CABINET LABELS 2/2 (G).
- Go to the Headmaster’s Office.
- Use FILE CABINET LABELS on the file cabinet (H).
- Easy solution: Click 1 to 14 in order (I).
- Hard solution: Click 1 to 18 in order (J).
- Take and read the book (K).
- Take SEBILLE’S BAG (L).
- Open the bag, take DAGGER (M).
- Use DAGGER on the slot (N).
- Easy solution: Click 1 to 8 in order (O).
- Hard solution: Click 1 to 10 in order (P).

- Take GARDEN SHEARS (A).
- Take PICTURE FRAME (B).
- Take DRY PAINT and FILM (C).
- Use FILM on the projector, take BELT, CHALK, and FLASHLIGHT (D).
- Use FLASHLIGHT and GARDEN SHEARS on the tarp (E).
- Solution: Forward, Take Light, Forward, We use a flashlight on rats, Forward, The first pass we take the pickaxe, back, second pass, we use a pickaxe on a blocked passage, forward, Left, take oil, back, forward, We apply an oil can to the rusted door, forward (F).
- Select this option (G).
- Take PAPER CLIPS and BELLOWS (H).

- Use BELLOWS on the glass shards, examine and take FADED CANVAS and UNLIT TORCH (I).
- Use DRY PAINT on the cauldron, take STAINED GLASS PIECES 1/3 (J).
- Use BELT and UNLIT TORCH on the cage, take MATCHES and BIRD’S CLAW (K).
- Go back.
- Use BIRD’S CLAW on the car (L).

- Easy solution: 1 (5 click), 2 (5 click), 3 (10 click), 4 (3 click), 5 (4 click) (M).
- Hard solution: 1 (5 click), 2 (5 click), 5 (3 click), 4 (1 click), 3 (2 click), 6 (4 click) (N).
- Take RAKE and MOVIE SNACKS.
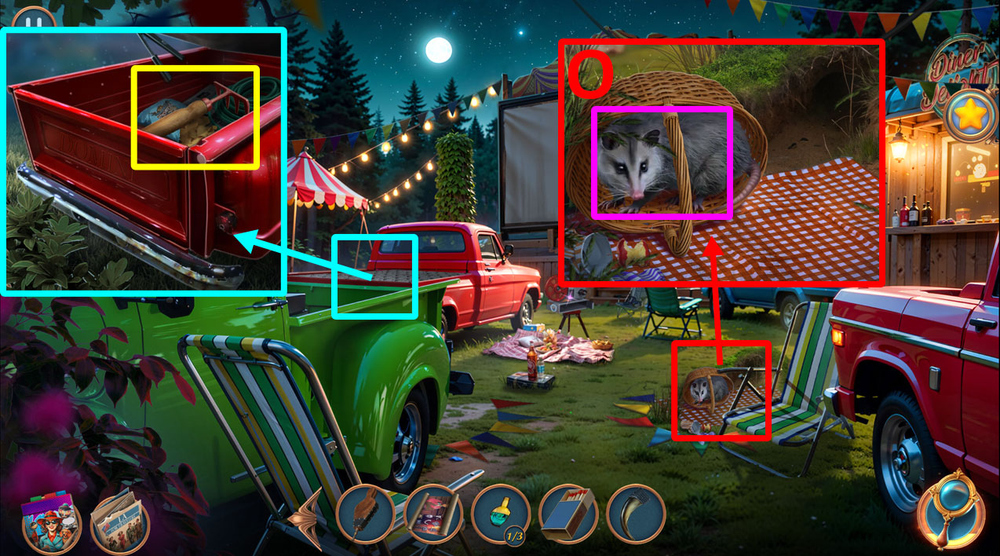
- Use MOVIE SNACKS on the possum, take STAINED GLASS PIECES 2/3 and BOTTLE OF SPIRIT (O).
- Go to the Cathedral.
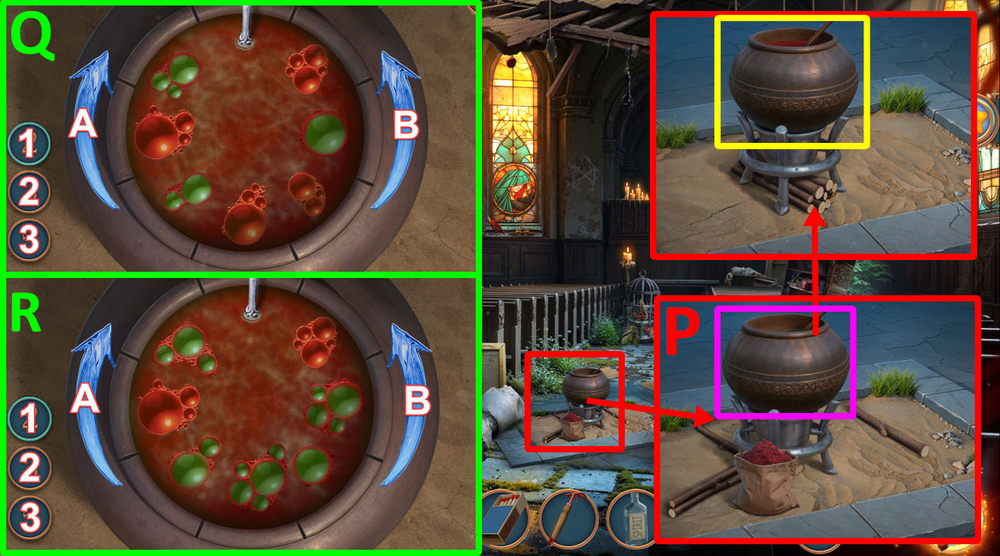
- Use BOTTLE OF SPIRIT on the cauldron, use BELLOWS and MATCHES on the twigs (P).
- Easy solution: Click 1, A, 2, A, 1, A (Q).
- Hard solution: Ckick 2, A, 1, A, A, 2, A, 1, A (R).
- Take PAINTS.
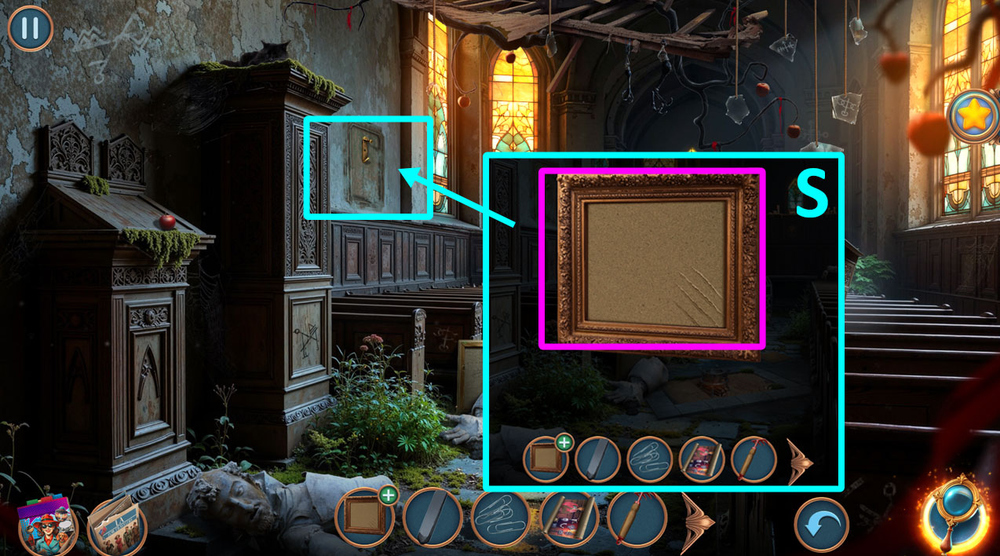
- Use PAPER CLIPS, FADED CANVAS, and PAINTS on PICTURE FRAME, get MOM’S PORTRAIT (S).
- Use MOM’S PORTRAIT on the faded place on the left wall.
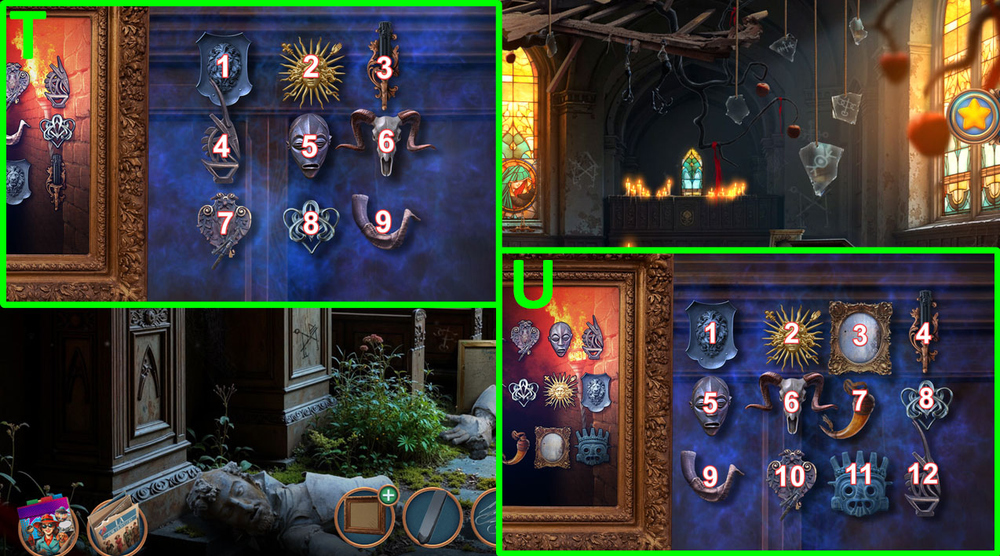
- Easy solution: 1-6, 2-7, 3-4, 4-9, 5-4, 6-8 (T).
- Hard solution: 6-1, 10-2, 5-3, 12-4, 9-5, 8-6, 10-7, 12-9, 11-12 (U).
- Go forward.
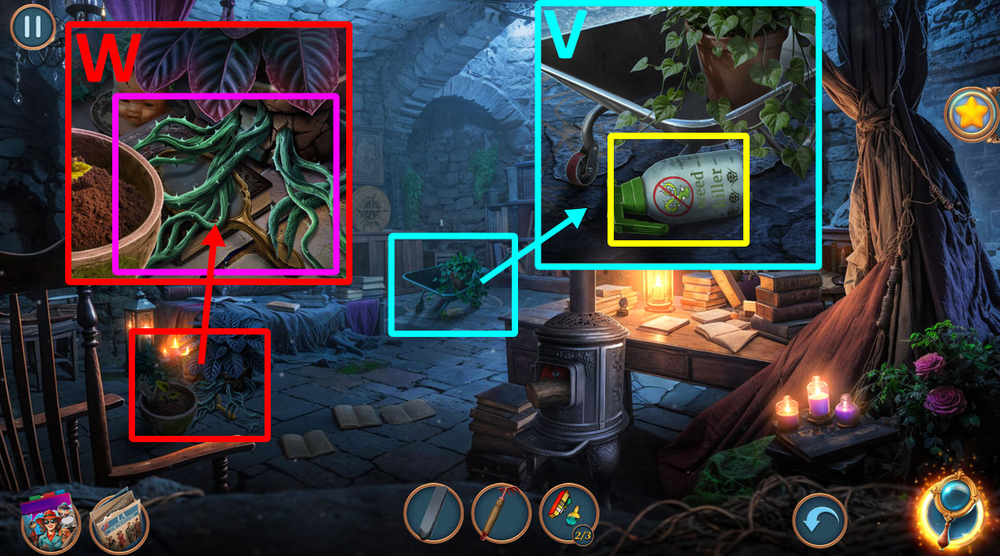
- Take WEED KILLER (V).
- Use WEED KILLER and RAKE on the spiky vines, take MIRROR and ENCRYPTED DIARY (W).
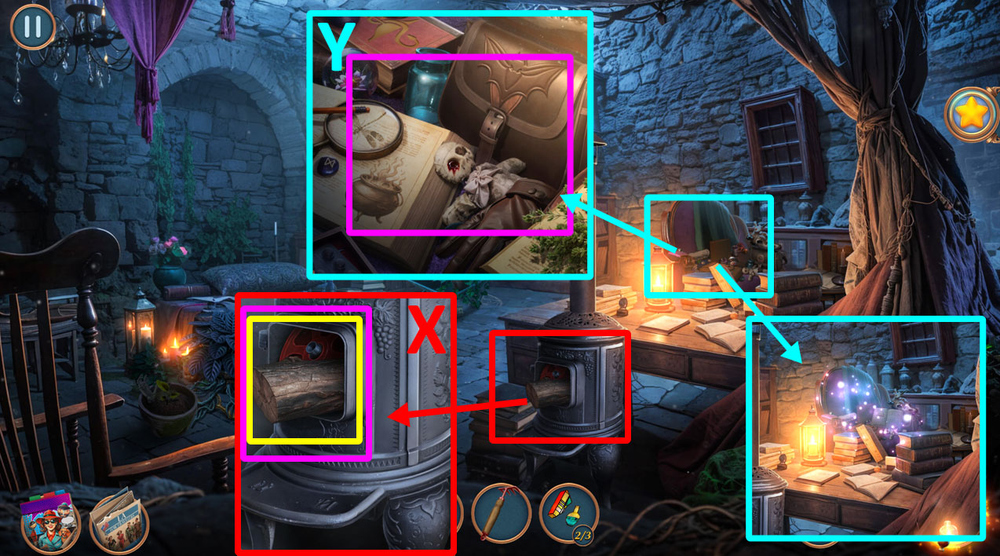
- Take LOG and FILM REEL, use MIRROR on the furnace (X).
- Use ENCRYPTED DIARY on the desk contents, play puzzle, earn BUTTON (Y).

- Select this option (Z).
- Go to the Catacombs.
- Take EMPTY VIAL (A).
- Take RITUAL NEEDLE (B).
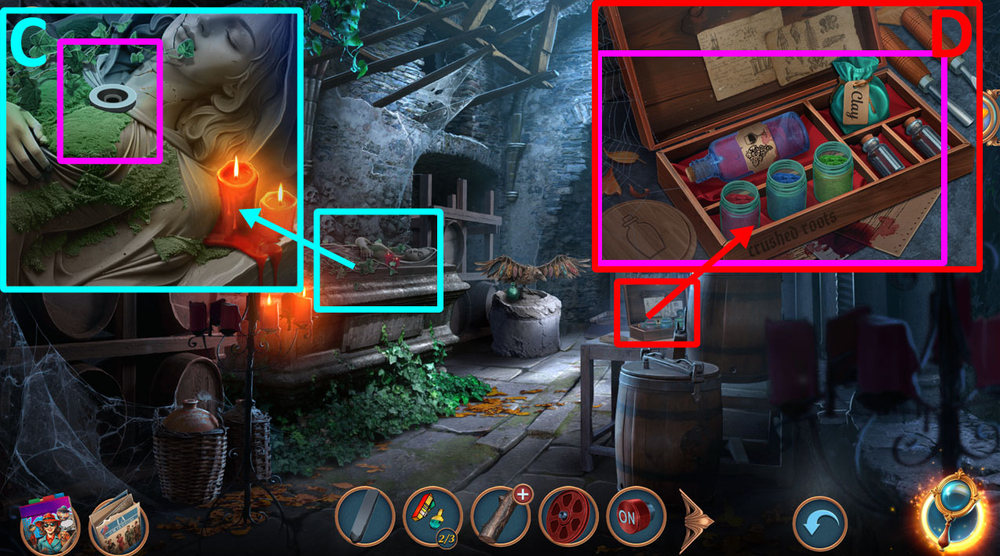
- Use RITUAL NEEDLE on the hole in the casket lid, take BOOKS 1/2 and LOST RECIPE (C).
- Use EMPTY VIAL and LOST RECIPE on the alchemy kit, use the pouch of clay, blue powder, and wine on the empty vial, take GROWTH ELIXIR (D).
- Go back.
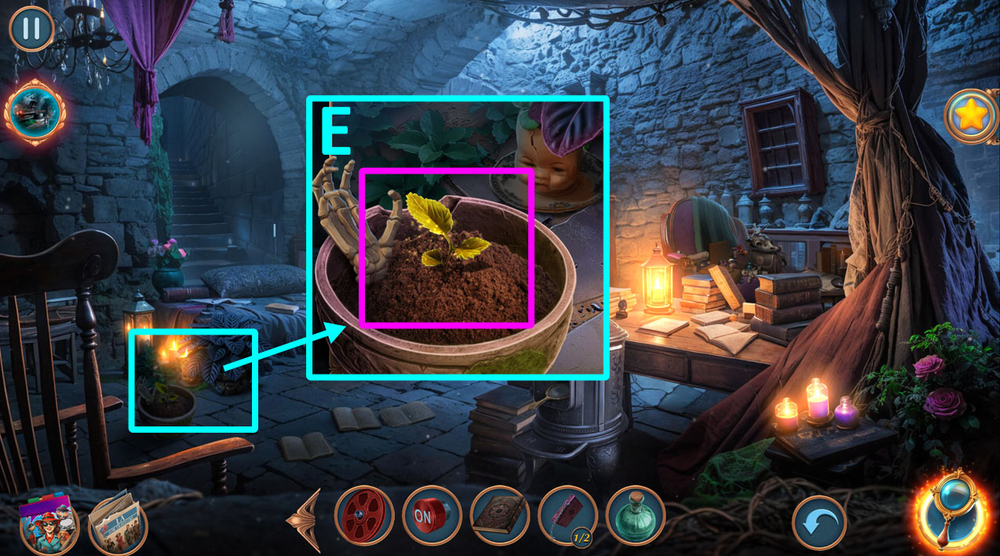
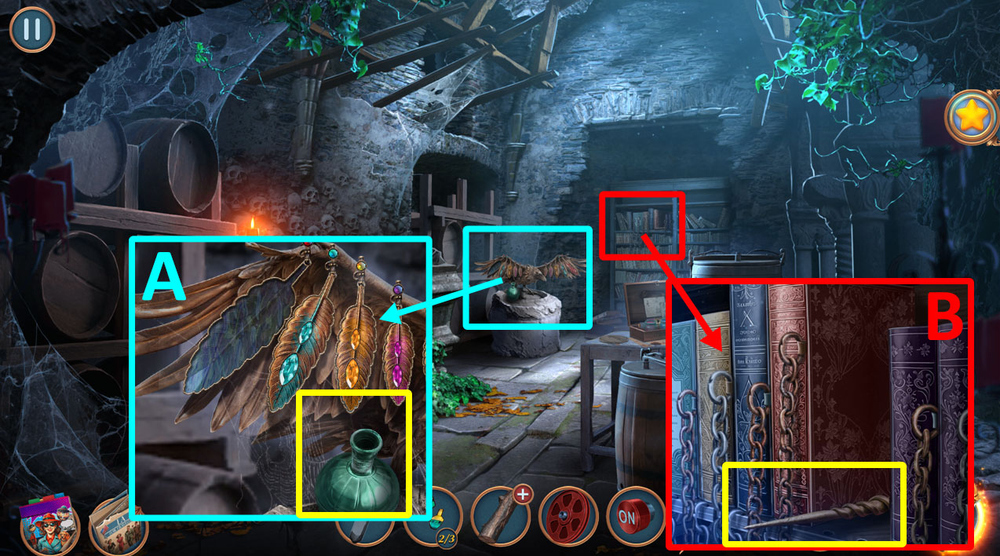
- Use GROWTH ELIXIR on the sprout, take FEATHER (E).
- Go to the Catacombs.

- Use FEATHER on the wing (F).
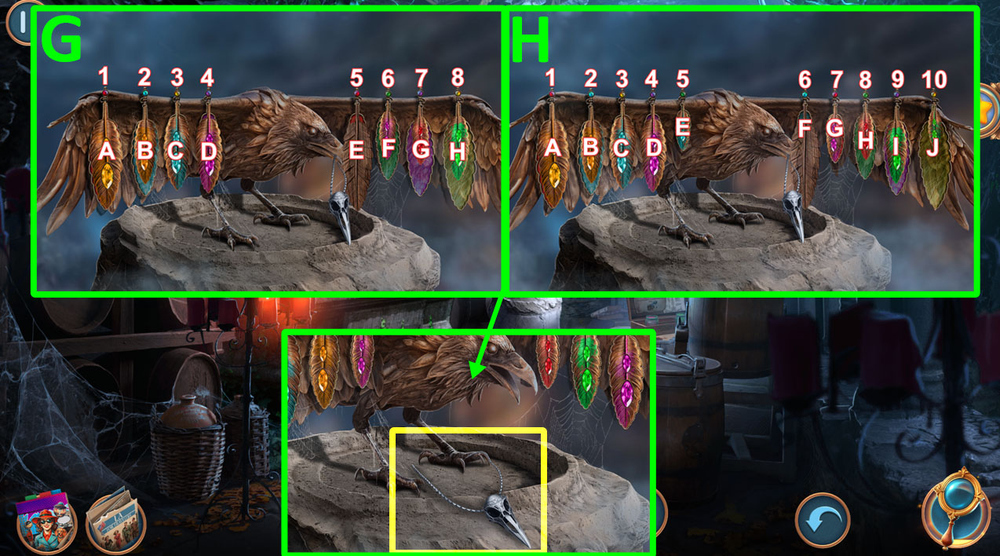
- Easy solution: A-8, A-6, A-4, A-7, A-5, B-3 (G).
- Hard solution: A-10, A-5, A-6, B-3, D-9, D-8, D-7 (H).
- Take FAMILIAR’S LUCKY CHARM.
- Go to the Cinema.
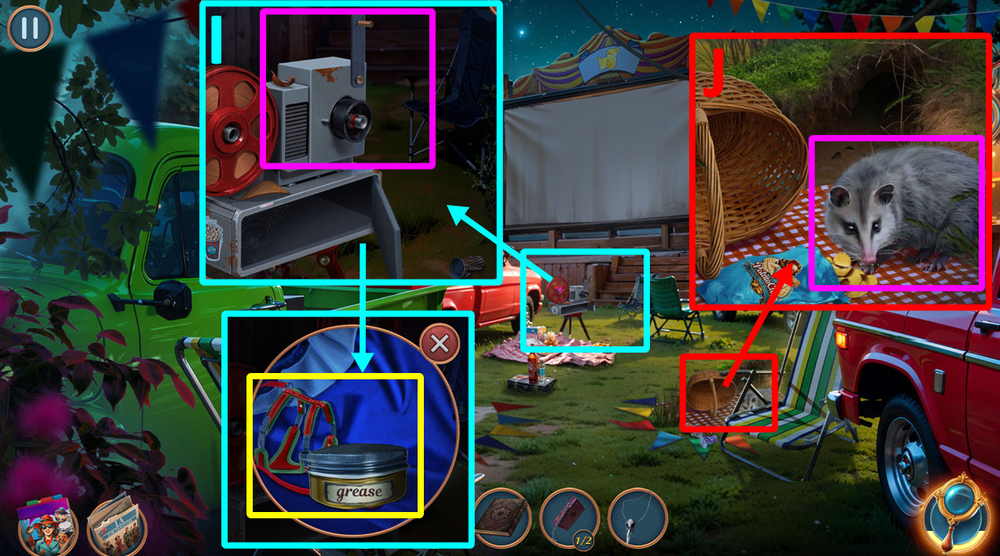
- Use FILM REEL and BUTTON on the projector, take GREASE and LEASH (I).
- Use LEASH on the possum (J).

- Easy solution: Click A-B-C-D-E-A-F-G-B-H-I-J-K-L (K).
- Hard solution: Click A-B-C-D-E-A-F-G-B-H-I-J-K-L-M (L).
- Take FIRE POKER.
- Go to the Cathedral.

- Use ENCRYPTED DIARY on the booksstand (M).
- Use FAMILIAR’S LUCKY CHARM on the jewellery box, take WITCH’S RING (N).
- Go to the Catacombs.
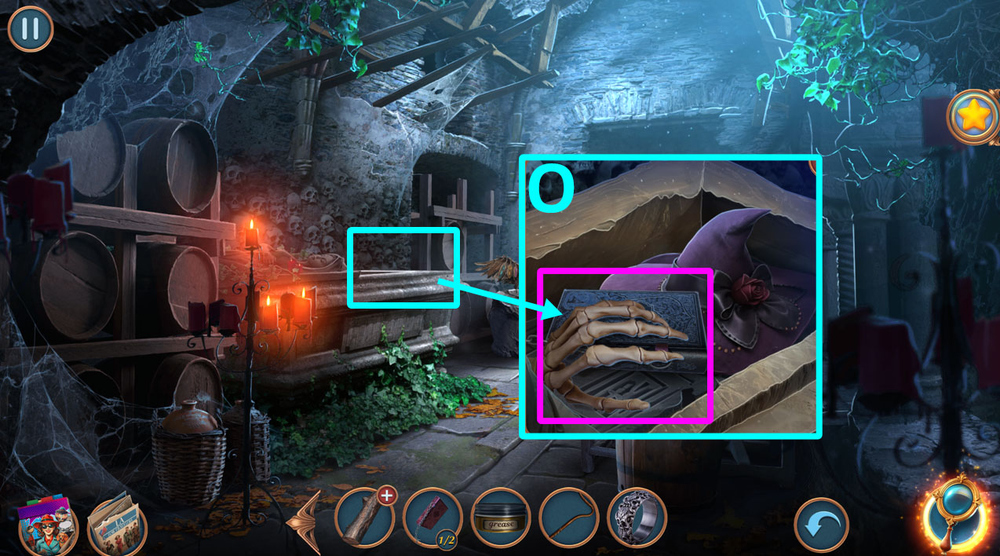
- Use WITCH’S RING on the skeleton hand, take BOOKS 2/2 (O).

- Use BOOKS on the shelf, examine the red book, play puzzle (P).
- Go back.
- Examine the furnace, use FIRE POKER on the item, get TROWEL (Q).
- Use TROWEL on the stain, get STICKY RESIN (R).
- Play puzzle, earn WHEEL (S).
- Use WHEEL on the wheelbarrow, take SWORD HILT (T).
- Go back.

- Use STICKY RESIN and SWORD HILT on the lower shelf, take BROKEN FISHING ROD and STAINED GLASS PIECES 3/3 (U).
- Use STAINED GLASS PIECES on the window (V).
- Easy solution: See the picture for correct positioning (W).
- Hard solution: See the picture for correct positioning (X).
- Take COVEN’S RITUAL BOOK.

- Talk with Sebille, get TELEPORTATION CIRCLE.
- Go forward.
- Use CHALK, COVEN’S RITUAL BOOK, and TELEPORTATION CIRCLE on the ritual circle (Z).
- Go forward.
- Take DOOR HANDLE and SPOON (A).
- Click on the door, use GREASE and SPOON on the hinge, take CHISEL and CANE (B).
- Take EMPTY BUCKET (C).
- Use CANE on the lever (D).
- Easy solution: See the picture for correct positioning and press play (E).
- Hard solution: See the picture for correct positioning and press play (F).
- Go forward.
- Take BRUSH (G).
- Use BRUSH on the chimney, read the note, take BRUSH and COIN (H).

- Take GLASS BUTTON (I).
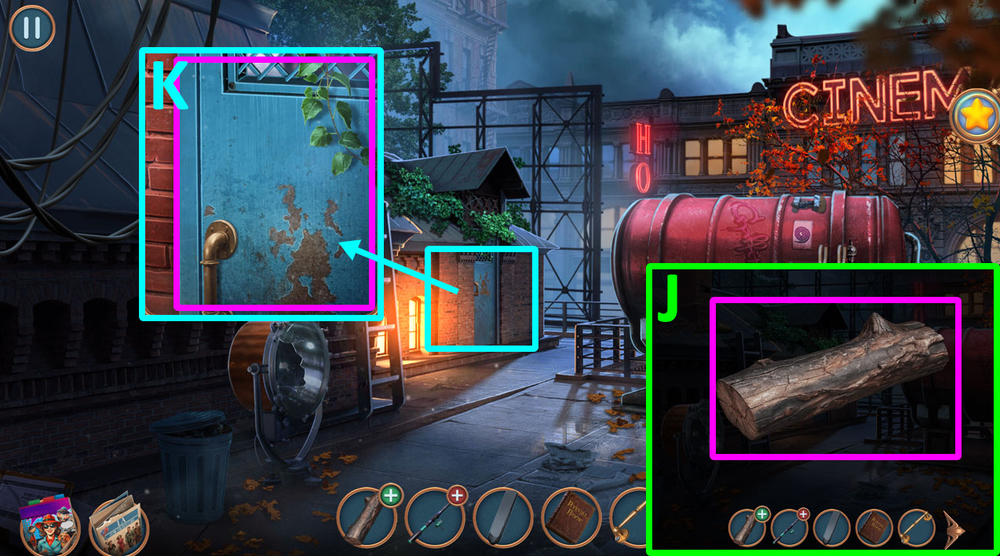
- Use DOOR HANDLE and COIN on LOG, get BATTERING RAM (J)
- Use BATTERING RAM on the door (K).

- Easy solution: 1-A, 2-B, 3-C (L).
- Hard solution: 1-A, 2-B, 3-C (M).
- Go forward.
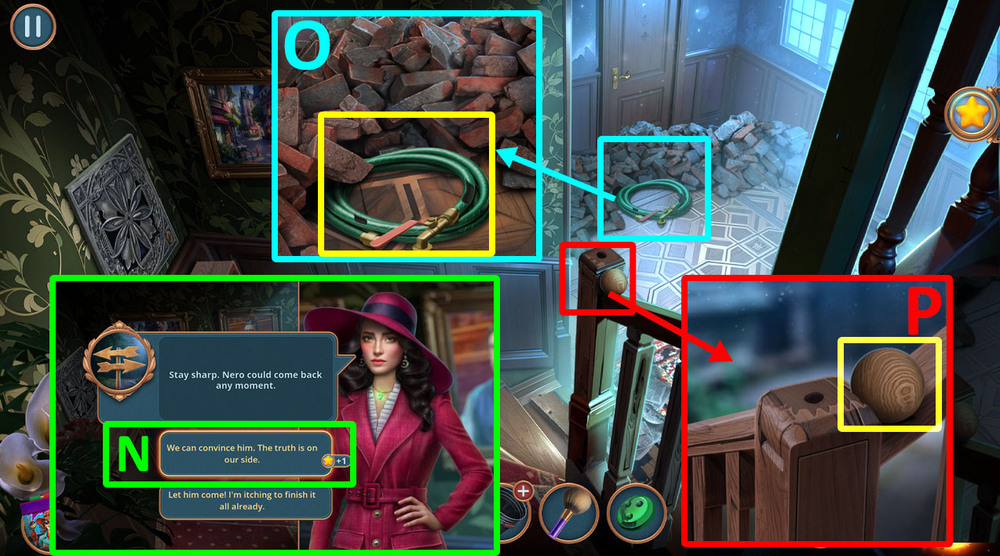
- Select this option (N).
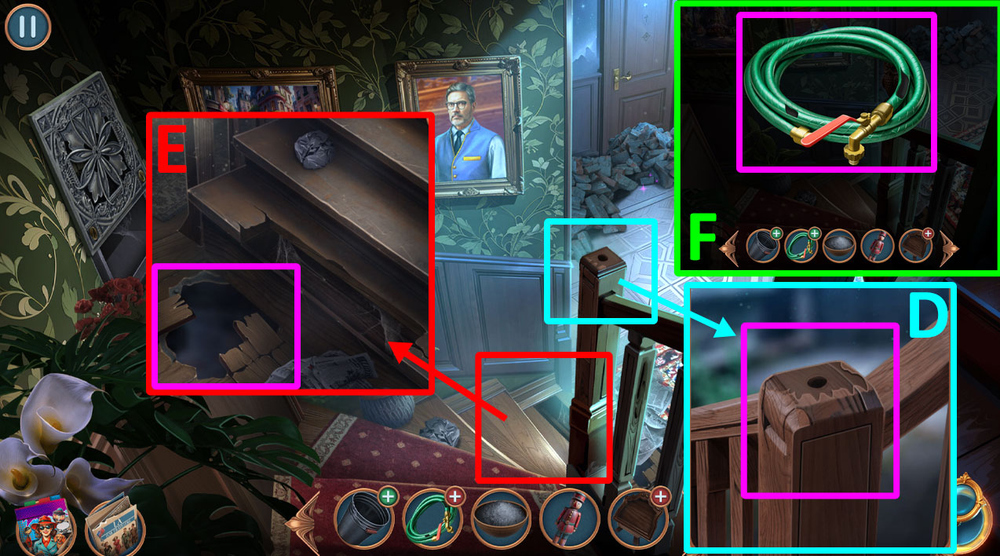
- Take BUSTED HOSE (O).
- Take WOODEN BALL (P).
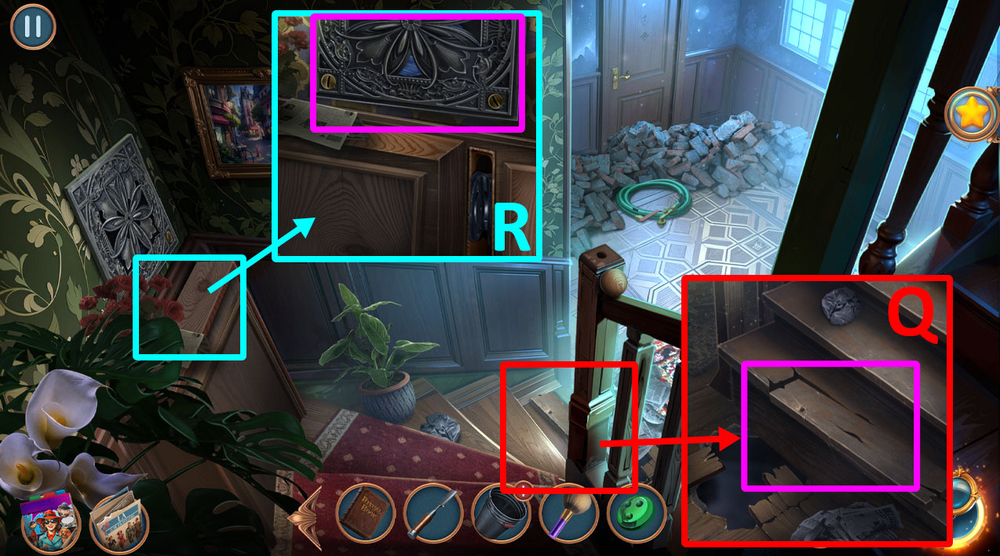
- Use CHISEL and WOODEN BALL on the lower step, take CALIPERS (Q).
- Use CALIPERS on the screws, take TIE (R).
- Go to the Street.

- Use TIE on the hatch (S).
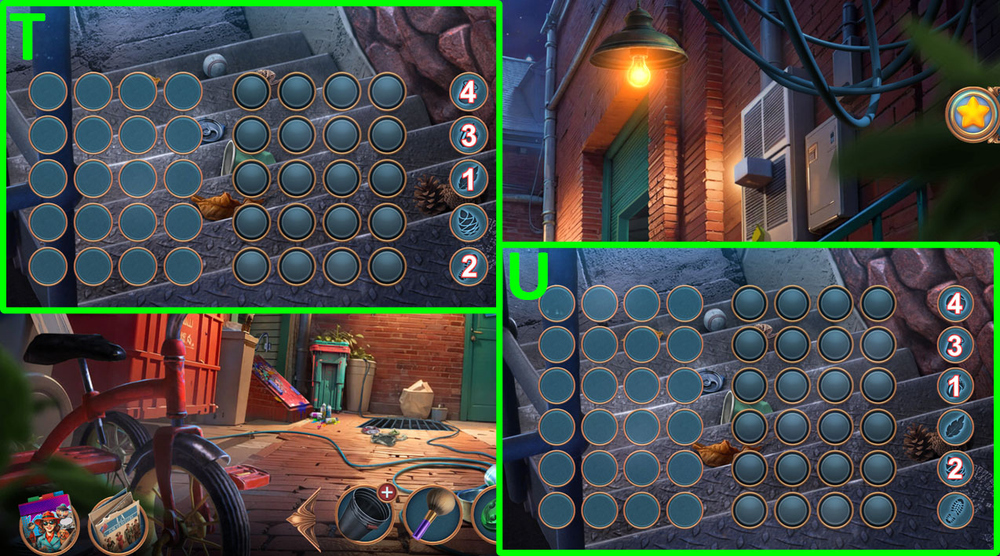
- Easy solution: Click 1 to 4 in order (T).
- Hard solution: Click 1 to 4 in order (U).
- Go forward.

- Take NERO’S TOY (V).
- Take BOX PIECE (W).
- Use GLASS BUTTON and BOX PIECE on the box, take POWDER and SUGAR (X).
- Use BRUSH and POWDER on the safe, enter the code: 642, take MIRROR and EMMETT’S HAT (Z).
- Select this option, get LOST PAGES (A).
- Use COVEN’S RITUAL BOOK on LOST PAGES, get SPELL BOOK (B).
- Use SPELL BOOK on the spirit, play puzzle, earn WOODEN OWL (C).
- Go to the Stairwell.
- Use WOODEN OWL on the hole, take TYPEWRITER KEYS and MAGNET (D).
- Use MAGNET on the hole in the floor, get CLAY and HOOK (E).
- Use CLAY on BUSTED HOSE, get HOSE (F).
- Go back.
- Use HOSE on the cistern, take GLASS and LIGHT BULB (G).
- Use LIGHT BULB on the spotlight, use CHALK, NERO’s TOY, EMMETT’S HAT, and SPELL BOOK on the roof floor (H).

- Easy solution: Get to Emmett’s soul.
- Use the arrows to evade the ghost.
- Each collision with one will cost you one life (I).
- Hard solution: Get to Emmett’s soul.
- Use the arrows to evade the ghost.
- Each collision with one will cost you one life (J).
- Select this option, get EMMETT’S KEY and SPELL BOOK (I).
- Use HOOK on BROKEN FISHING ROD (J).
- Use SUGAR on EMPTY BUCKET (K).
- Use GLASS on MIRROR (L).
- Use SPELL BOOK on Nero (M).
- Go to Bayer’s House.

- Use TYPEWRITER KEYS on the typewriter (N).
- Use EMMETT’S KEY on the keyhole (O).
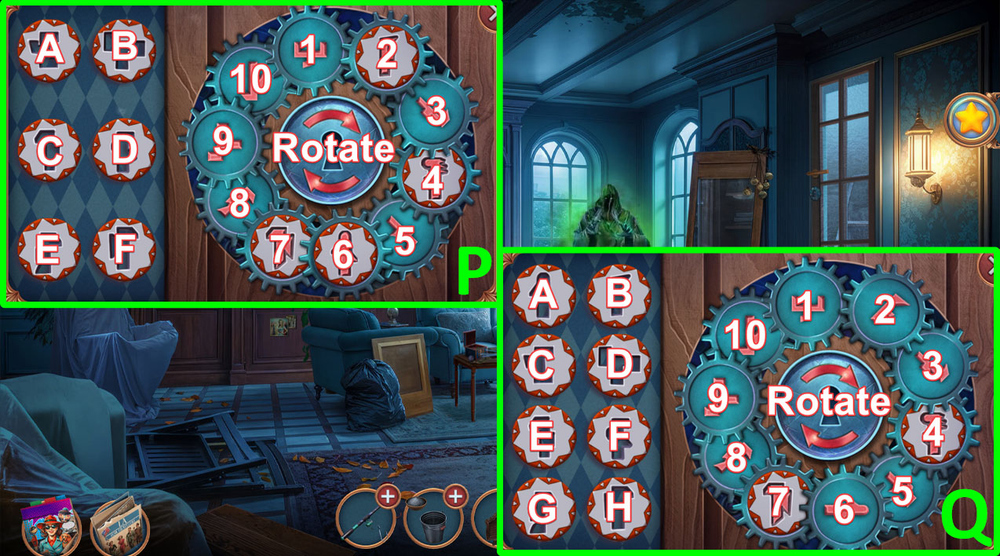
- Easy solution: Rotate, C-1, D-3, Rotate, A-6, B-4, Rotate, E-10, Rotate, F-10 (P).
- Hard solution: Rotate, E-1, F-3, Rotate, C-6, D-4, Rotate, G-10, B-4, Rotate, H-10, Rotate, Rotate, A-1 (Q).
- Take STEPLADDER (R).
- Play puzzle, earn CHIMNEY DRAWING (S).
- Go to the Rooftop.

- Use CHIMNEY DRAWING on the chimney, press on the brick specified in the drawing, take WIRE (T).
- Use STEPLADDER on the cistern, take EMMETT FIGURINE (U).
- Use WIRE on BROKEN FISHING ROD, earn FISHING ROD (V).
- Go back.
- Use FISHING ROD on the grid, earn PICKAXE (W).
- Go to Bayer’s House.
- Use EMMETT FIGURINE on the empty shelf (X).
- Go to the Stairwell.

- Use PICKAXE on the rubble (Y).
- Take LEVER (B).
- Easy solution: A-1, B-2, C-3, D-4, E-5 (Z).
- Hard solution: A-1, B-2, C-3, D-4, E-5, F-6 (A).
- Use LEVER on the metal slot in the wall, take ACETONE and BUTTON TEMPLATE (C).
- Use ACETONE on EMPTY BUCKET (D).
- Go to Bayer’s House.
- Use BUTTON TEMPLATE on the typewriter, press S-X-C-V, take WITCH FIGURINE (E).
- Use WITCH FIGURINE on the empty slot on the shelf, take FLOUR (F).
- Use FLOUR on EMPTY BUCKET, earn GLUE (G).
- Use GLUE on MIRROR, earn ENCHANTED MIRROR (H).
- Go to the Rooftop.
- Use ENCHANTED MIRROR on Nero (I).
- Easy solution: 8-A, 2-B, C-10, E-7, G-4, K-9, J-11, I-3, H-1, D-6, F-5 (J).
- Hard solution: 11-L, 4-M, 10-N, 6-K, 7-H, 13-E, 3-D, 2-C, 14-G, 1-J, 5-B, 12-A, 9-F, 8-I (K).
- Walkthrough Bonus Chapter, at the link below.


