
Strange Investigations 2: Two For Solitaire (Bonus Chapter) – Jack Goldwyn comes to you and offers you a case. His grandfather recently passed away, the key is everything he left him in his will. But he has no idea what it’s for. Grandpa Ralph was a master of riddles and puzzles. So it’s up to you, as a professional, to help him figure out what the key is for.
Bonus Chapter Walkthrough

- Play puzzle (A), receive COLLEGE KEY.
- Talk (A).
- Receive STUDENT CARD.
- Take CANE (B).
- Use CANE, take DRY SPONGE (C).

- Take PUZZLE PIECES 1/3 and EMPTY SPRAYER (D).
- Take PUZZLE PIECES 2/3 and SMALL BUTTON (E).
- Place SMALL BUTTON and EMPTY SPRAYER, take CLEANSER (F).
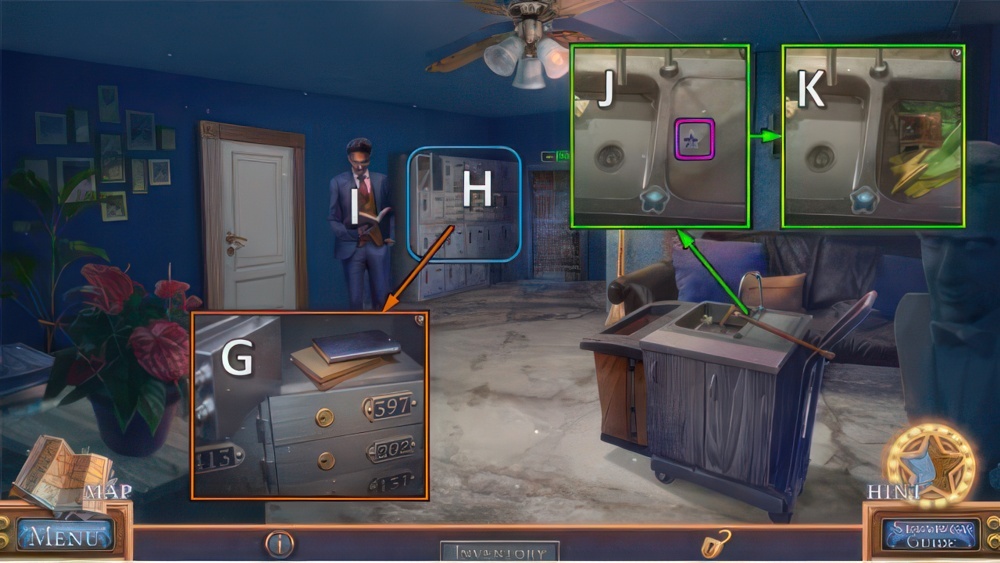
- Use CLEANSER, DRY SPONGE and COLLEGE KEY, open (G).
- Play puzzle (H), receive GRANDPA’S PHOTO.
- Offer GRANDPA’S PHOTO (I), receive IRON HANDLE.
- Place IRON HANDLE (J).
- Take LIGHTNING and PUZZLE PIECES 3/3 (K).

- Place PUZZLE PIECES (L).
- Restore the image.
- Select the arrows to shift the tiles vertically or horizontally.
- Walkthrough (M): 5-7-1-5-4-2-7-8.
- Go (N).

- Take SKULL (O).
- Place SKULL and LIGHTNING (P).
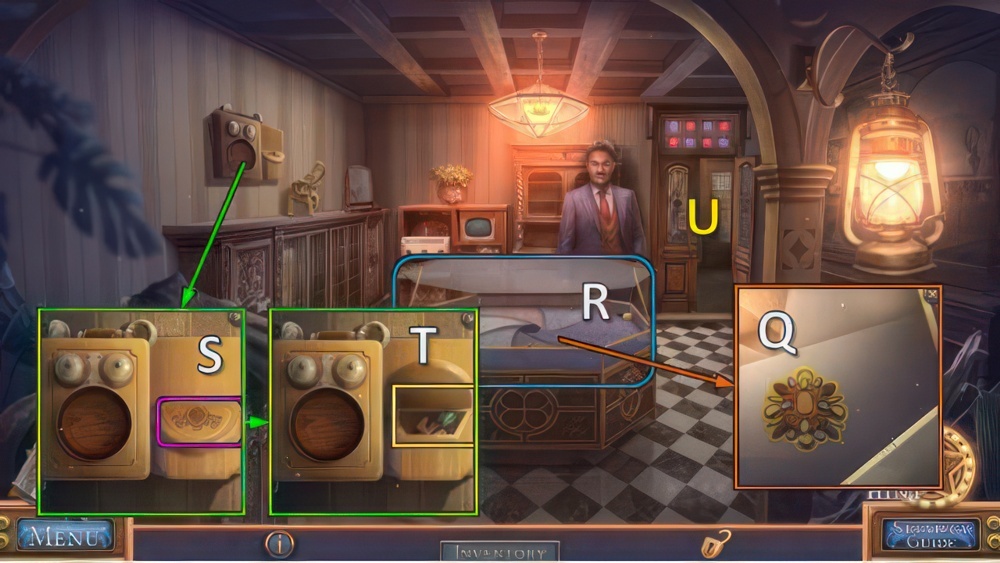
- Take SCREWDRIVER and COLLEGE STAMP (Q).
- Use SCREWDRIVER (R).
- Take SCOOP and CLIPPER HANDLE (S).

- Take BROKEN CLIPPERS, use SCOOP (T).
- Walkthrough (U): 1-2-3-4-5.
- Take SMALL WHEELS 1/2 and OIL (V).
- CLIPPER HANDLE and OIL on BROKEN CLIPPERS, take CLIPPERS.
- Use CLIPPERS, take CONTROL PANEL and GOLDEN LATCH (W).

- Place CONTROL PANEL (X).
- Connect each marble to the matching colored wire.
- Select a marble to slide it into an adjacent empty space
- Walkthrough (Y): 7-5-6-1-2-7-4-5-6-1-2-3-4-5-7.
- 14-10-11-12-13-14-10-9-8-14.
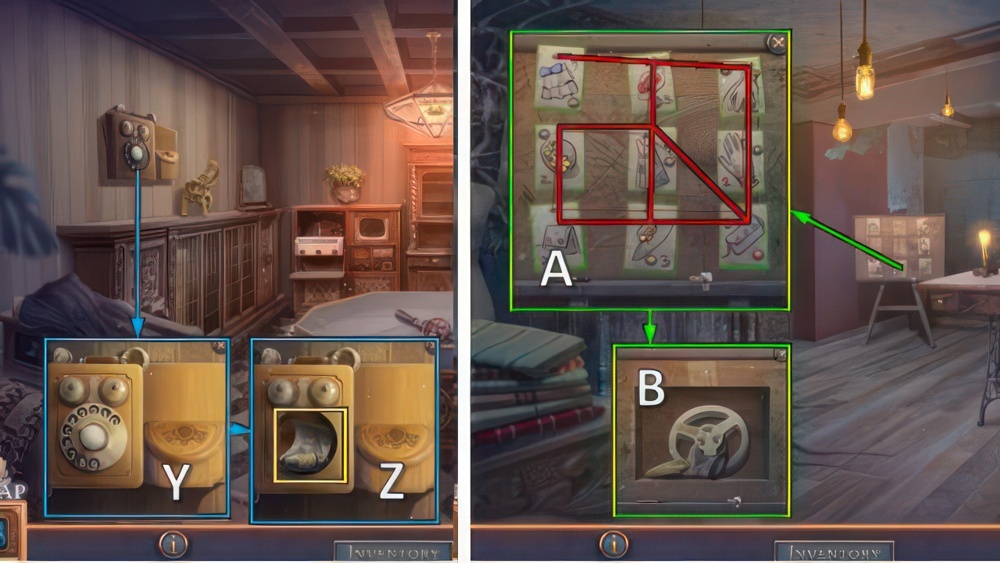
- Take note, BRONZE KNOB and CAMERA LENS (Z).
- Walk down.
- Place BRONZE KNOB (A).
- Go (B).

- Take SCRAPER (C).
- Take ADHESIVE, use SCRAPER.
- Take QUARTER (D).
- Go to College Rooftop.
- Use CAMERA LENS and QUARTER, take DANA’S PHOTO (E).
- Go to Library.

- DANA’S PHOTO, ADHESIVE and COLLEGE STAMP on STUDENT CARD, take STUDENT ID.
- Offer STUDENT ID (F).
- Receive FLASHLIGHT.
- Take SMALL WHEELS 2/2 (G).
- Place SMALL WHEELS (H).
- Take CORKSCREW (I).
- Use CORKSCREW (J).
- Take CAT and UV BULB (K).
- Go to College Rooftop.

- Place CAT, take 9V BATTERIES and TILES 1/3 (L).
- Go to Library.
- Replace UV BULB and 9V BATTERIES on FLASHLIGHT, take UV LIGHT.
- Use UV LIGHT, select book (M).
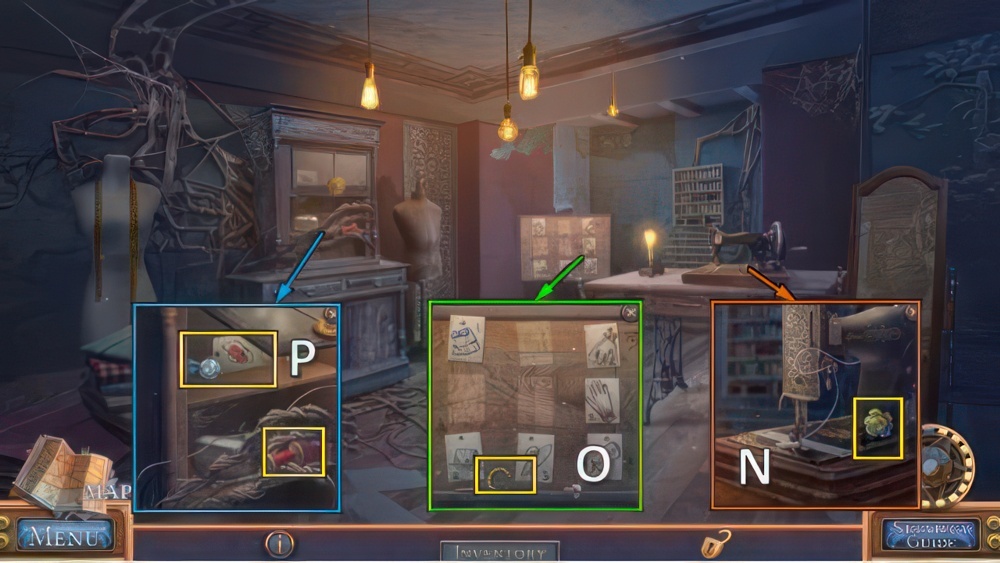
- Take TILES 2/3 and MICROFICHE (N).
- Place and play MICROFICHE for puzzle (O), receive UNDERGROUND MAP.
- Receive PHOTOGRAPHER.
- Go to College Rooftop.

- Place PHOTOGRAPHER (P).
- Take GRAY WOLF and TILES 3/3 (Q).
- Go to Library.
- Place TILES and GOLDEN BEE (R).
- Go (S).

- Take OLD JACK (T).
- Take YELLOW WOLF (U).
- Place GRAY WOLF and YELLOW WOLF (V).
- Take LEVER, POCKETKNIFE and EMPTY CANISTER (W).

- Use POCKETKNIFE (X).
- Take CARABINER and PIN (Y).
- PIN and LEVER on OLD JACK, take JACK.
- Place JACK (Z), find objects.
- Take ACID (A).

- Use ACID, take CHAIN (B).
- Place CHAIN and CARABINER, pull lever (C).
- Use UNDERGROUND MAP (D).

- Navigate the underground.
- At each crossroad, select the exclamation point, then find the runes.
- Walkthrough: find symbols and follow arrows (E).

- Talk, receive RUBBER HOSE (F).
- Take BROKEN LADDER, open (G).
- Place RUBBER HOSE and EMPTY CANISTER, take GAS (H).
- Take HAMMER, open (I).
- Use GAS, start generator (J).

- Use HAMMER, take PLANKS (K).
- Take SKETCHES 1/3 (L).
- PLANKS and HAMMER on BROKEN LADDER, take LADDER.
- Place LADDER, go (M).
- Take GOLDEN ROSE (N).
- Take BRACELET (O).
- Place BRACELET, take THREADS, SILVER ROSE and SKETCHES 2/3 (P).
- Walk down.
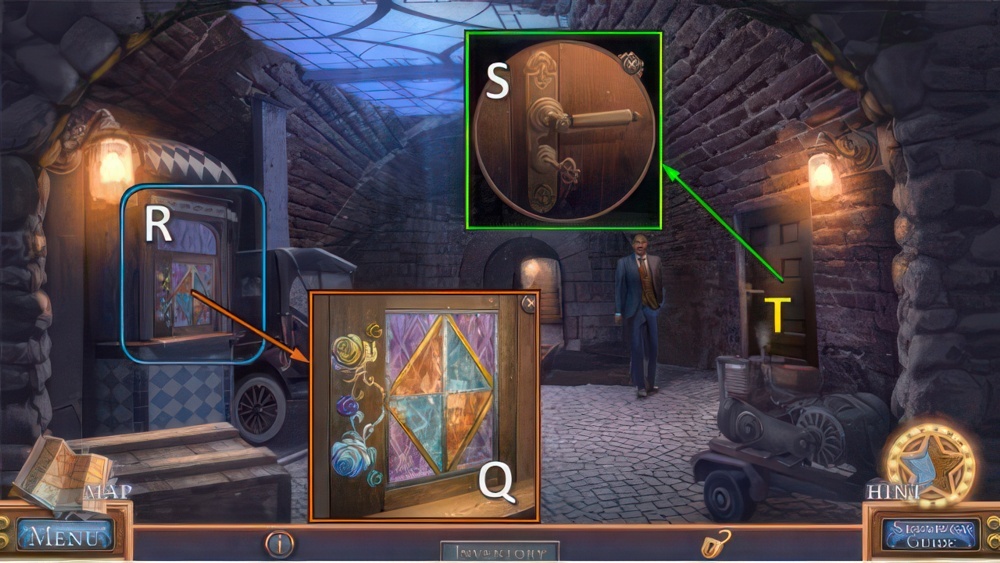
- Place SILVER ROSE and GOLDEN ROSE (Q).
- Play puzzle (R), receive ANTIQUE KEY.
- Use ANTIQUE KEY (S).
- Go (T).

- Take OLD DRILL, use POCKETKNIFE (U).
- Take DIAL and RING (V).
- Use RING (W).
- Take DRILL HANDLE and POWDER (X).
- Place DIAL and POWDER (Y).
- Take DRILL CHUCK and SKETCHES 3/3 (Z).
- Go to Workroom.
- Connect all of the pictures using thread.
- Select two pictures to connect them.
- The number on each picture represents the number of connections it should have.
- Place SKETCHES and THREADS, walkthrough (A).
- Take TORN MITT and EMPTY REEL (B).

- Place TORN MITT, take MITT (C).
- Use MITT (D).
- Take WRENCH and TV SCREEN (E).
- Walk down.
- Use WRENCH, take MOVIE (F).
- Go right.

- Place TV SCREEN, EMPTY REEL and MOVIE for puzzle (G).
- Receive LIGHTER and DRILL BIT.
- Talk (H).
- DRILL BIT, DRILL CHUCK and DRILL HANDLE on OLD DRILL, take DRILL.
- Use DRILL (I).
- Go (J).

- Take EJECT BUTTON and SEALING WAX (K).
- Read note, take BROOCH (L).
- Use SEALING WAX and LIGHTER, take BUTTERFLY (M).

- Place BUTTERFLY (N).
- Take BAT, MANNEQUIN and GEAR (O).
- Place BAT, take HAND and GEM (P).
- Walk down.
- Place BROOCH and GEM (Q).
- Play puzzle (R), receive CREST.
- Place CREST (S).
- Take HAIRPIN and JAW (T).
- Go (U).

- Use HAIRPIN (V).
- Take DRAGON and SAFE HANDLE (W).
- Place GEAR and SAFE HANDLE (X).
- Go (Y).

- Inspect photo, take SHARP SCISSORS (Z).
- Place SHARP SCISSORS and DRAGON (A), select B-B-C.
- Inspect photo, take PLAY BUTTON and TURBAN (D).

- HAND, JAW and TURBAN on MANNEQUIN, take FORTUNE TELLER.
- Place FORTUNE TELLER (E).
- Collect three hourglass cards to win.
- Collect three I matching cards to destroy your opponent’s cards of the same type.
- Collect four matching cards to get an hourglass card.
- Defeat your opponent (F).
- Take AUDIOTAPE (G).
- Read note.
- Place AUDIOTAPE, PLAY BUTTON and EJECT BUTTON (H).
- Push rewind (I), then play (J).
Congratulations! You have completed the game Strange Investigations 2: Two For Solitaire.


