Strange Investigations 3: Secrets Can be Deadly – You will have to solve the mysteries of Camp Seawaves. Dana Strange, an experienced detective, finds herself drawn into a series of mysterious events that began after she rescues her neighbor from an attack. After hearing about the disappearances of camp staff and rumors of a vengeful ghost, Dana takes on the case. One by one the camp staff members disappear under strange circumstances, and they are all connected to the events of the past year. Are they ghosts or an elaborate ruse? You will have to unravel this tangle of mysteries, find out who is behind the series of murders, and save those who remained in danger. In the process of investigation you will need to collect evidence, carefully examine the scene and talk to eyewitnesses. Find answers to key questions: who is hunting the camp staff and why, and what does it have to do with the past? Each mystery solved brings you closer to the shocking truth. If you can not pass any of the puzzles or do not know where the items are, on our site you can watch the walkthrough of the game Strange Investigations 3: Secrets Can be Deadly, and prove that even the most difficult cases are under the power of a true professional.
Strange Investigations 3: Secrets Can be Deadly – Walkthrough
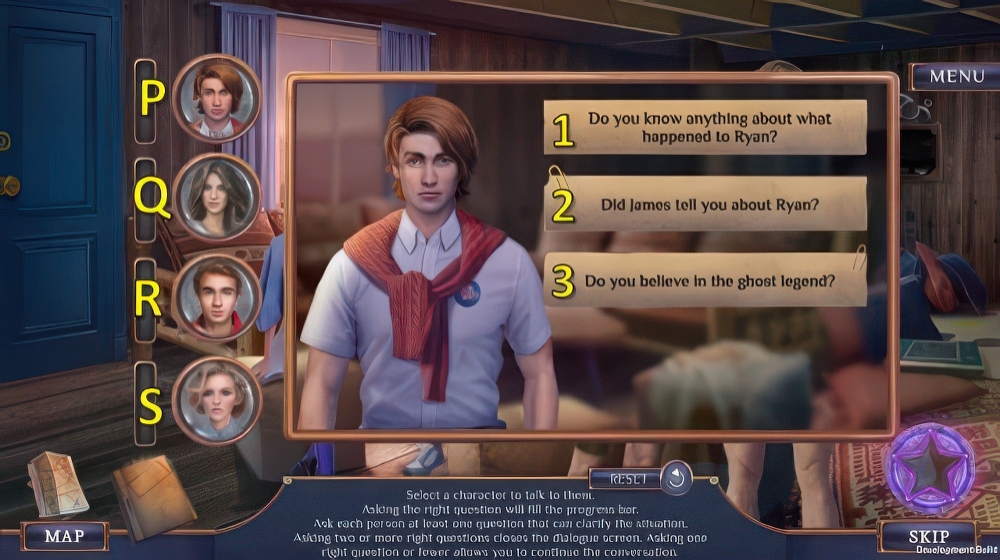
Here you can see the full walkthrough of Strange Investigations 3: Secrets Can be Deadly, including all chapters, including bonus chapter, in pictures.

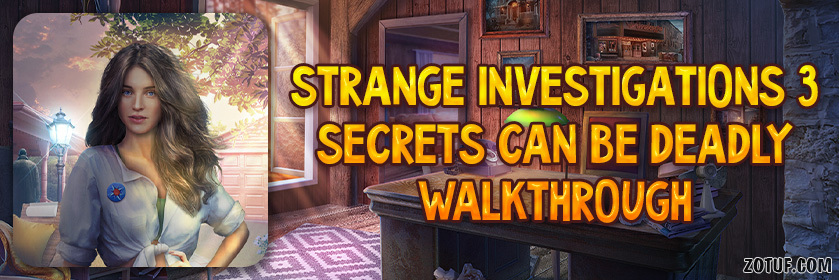
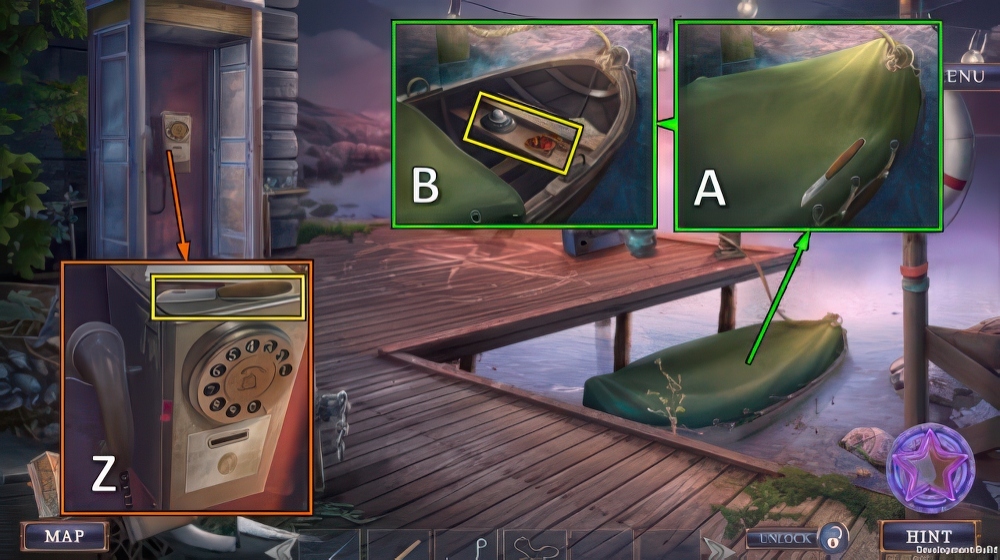
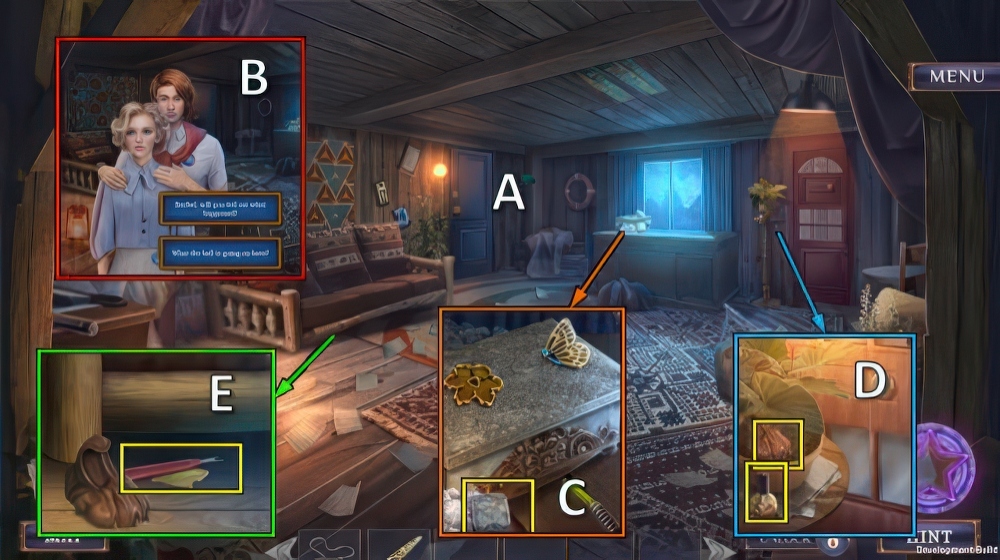
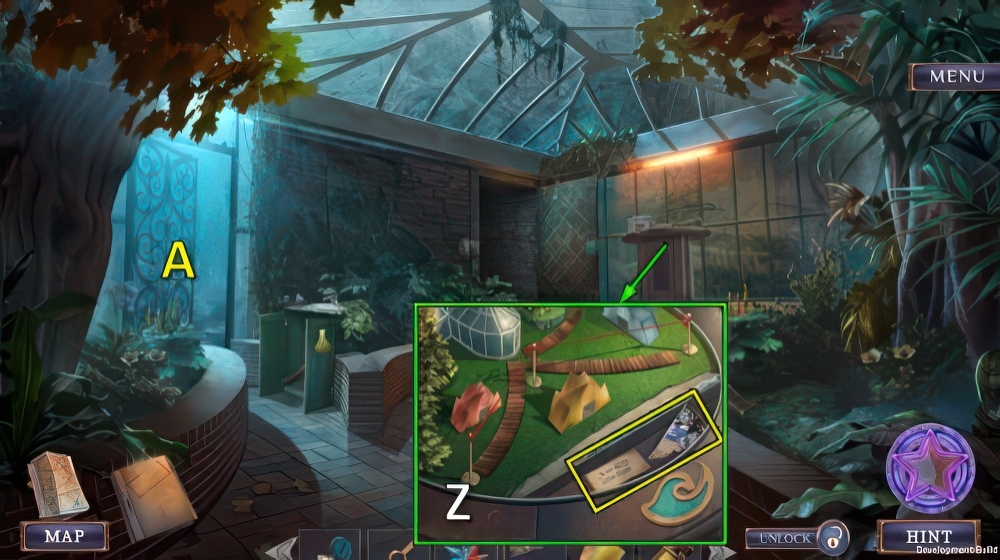
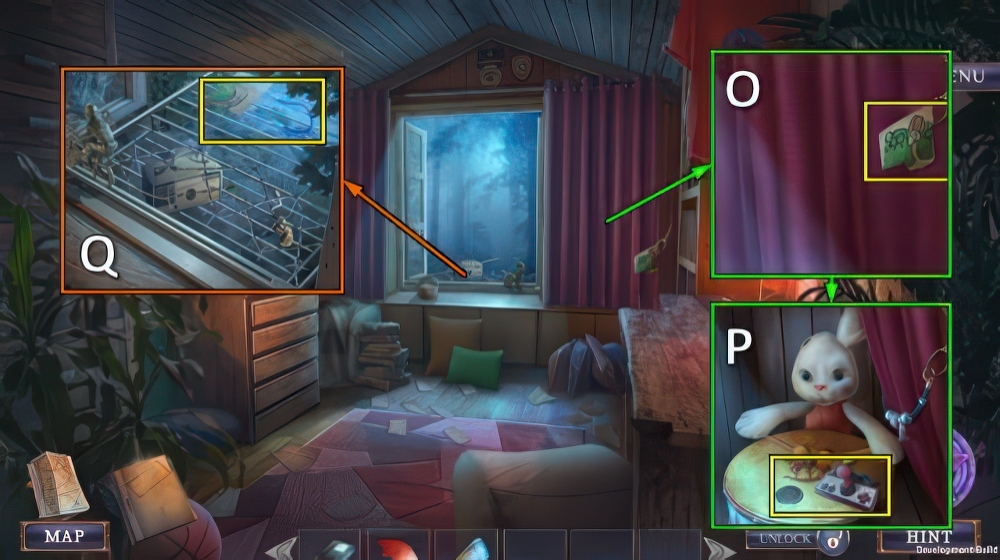
- Take MAIL TOKEN (A).
- Place MAIL TOKEN (B).
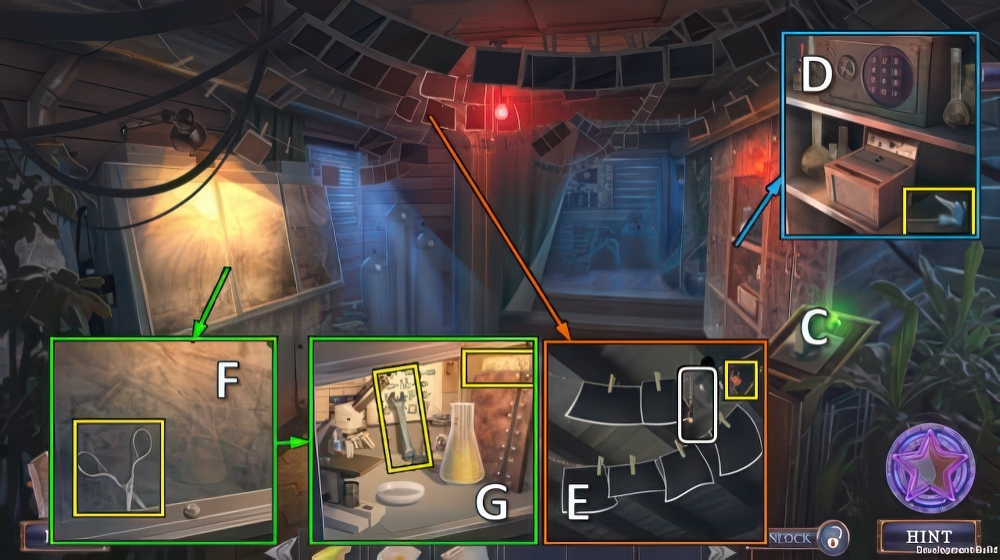
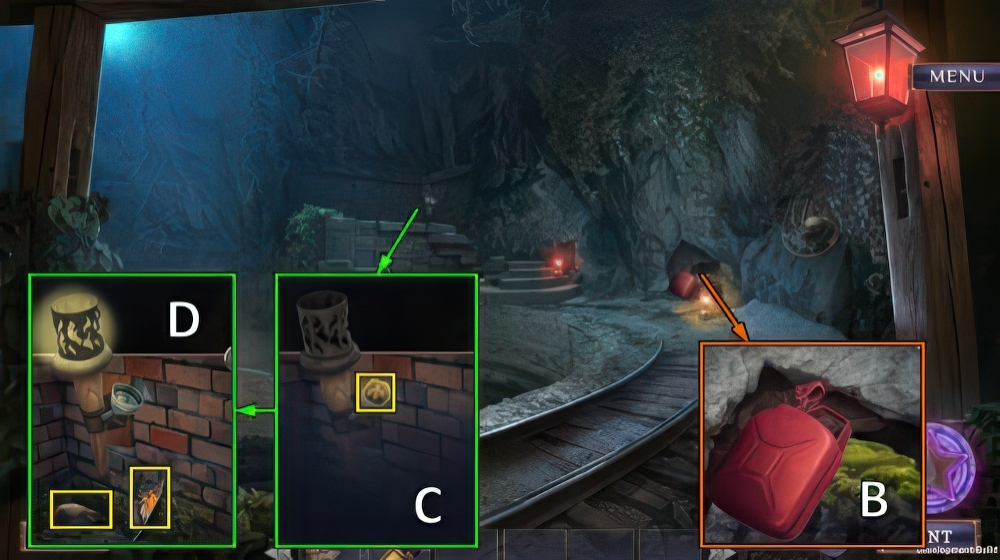
- Take TRUNK KEY (C).
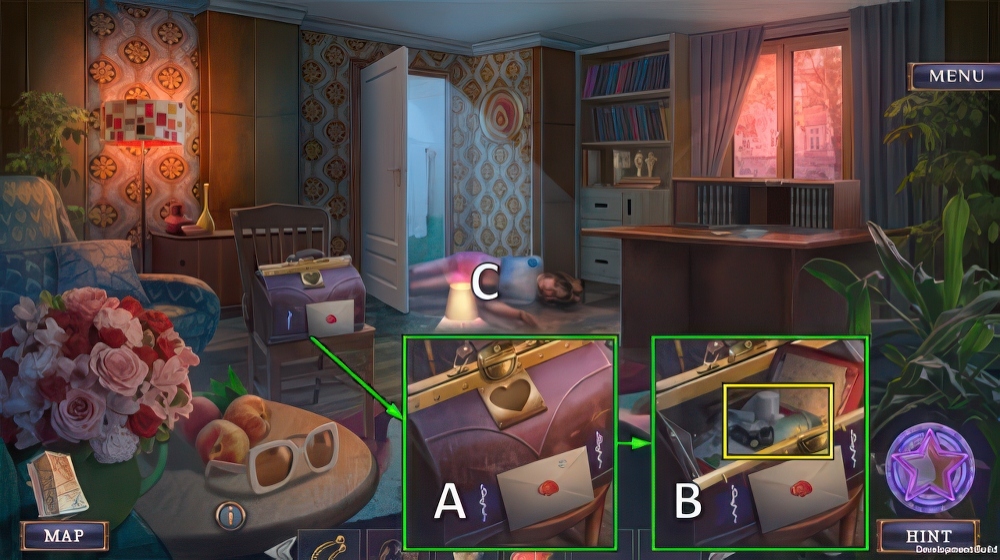
- Use TRUNK KEY, play puzzle (D).
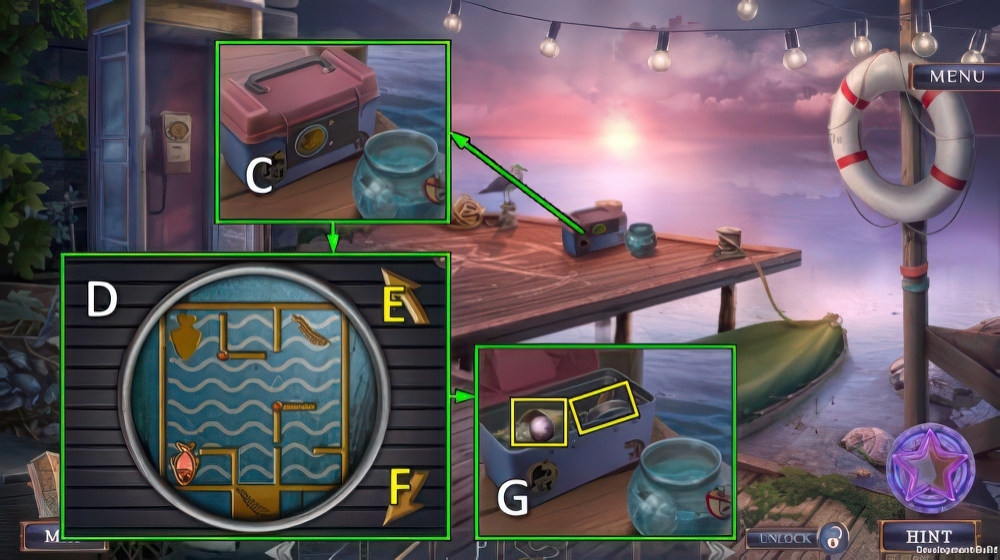
- Receive BOOK OF LEGENDS.

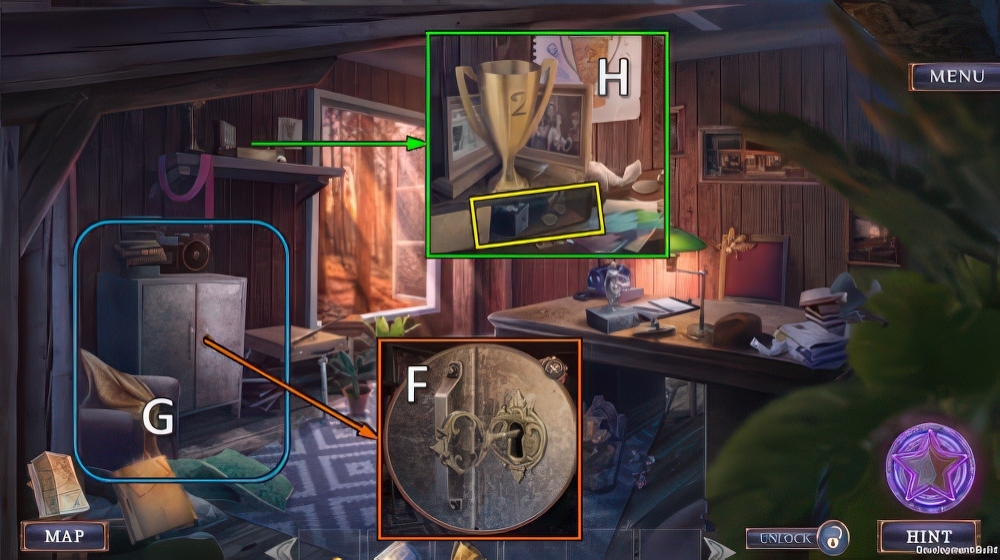
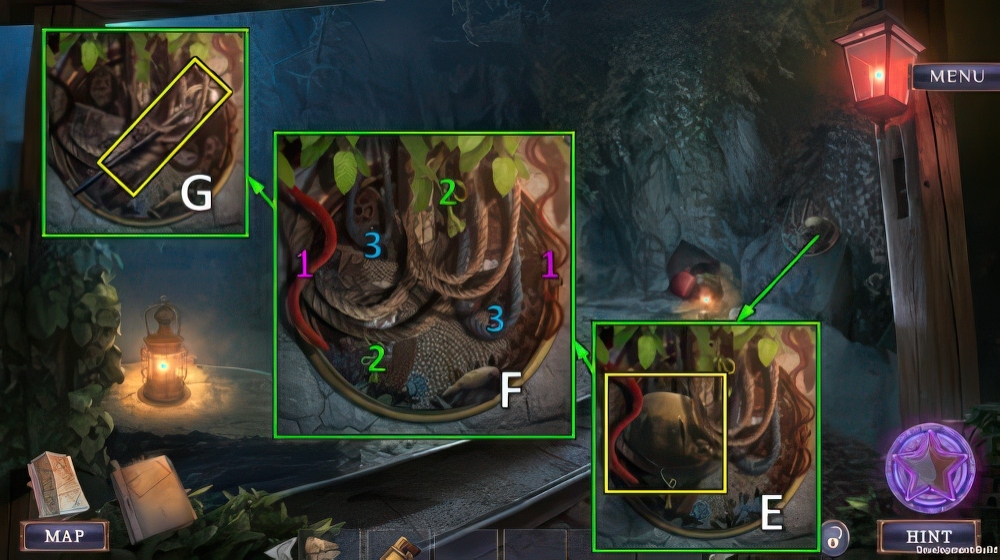
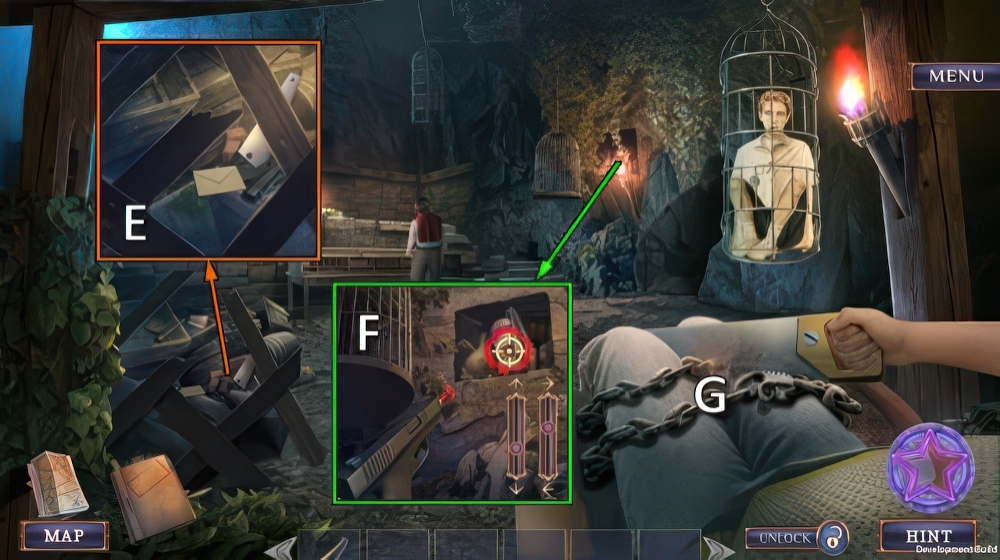
- Take PRUNING SHEARS (E).
- Use PRUNING SHEARS, take WIRE and APIAN CARVING (F).
- Place APIAN CARVING, take CHAIN PIECES 1/3 and MIRROR (G).
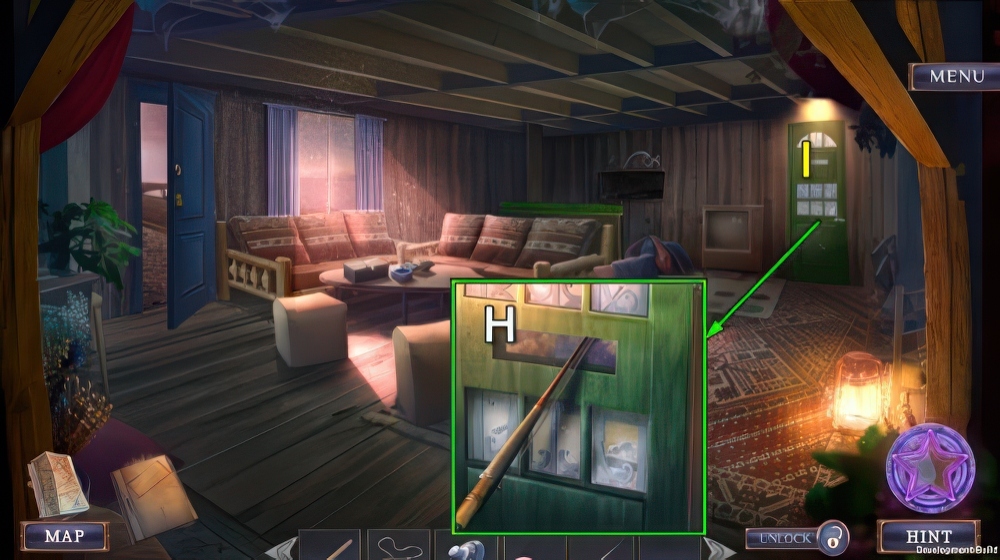
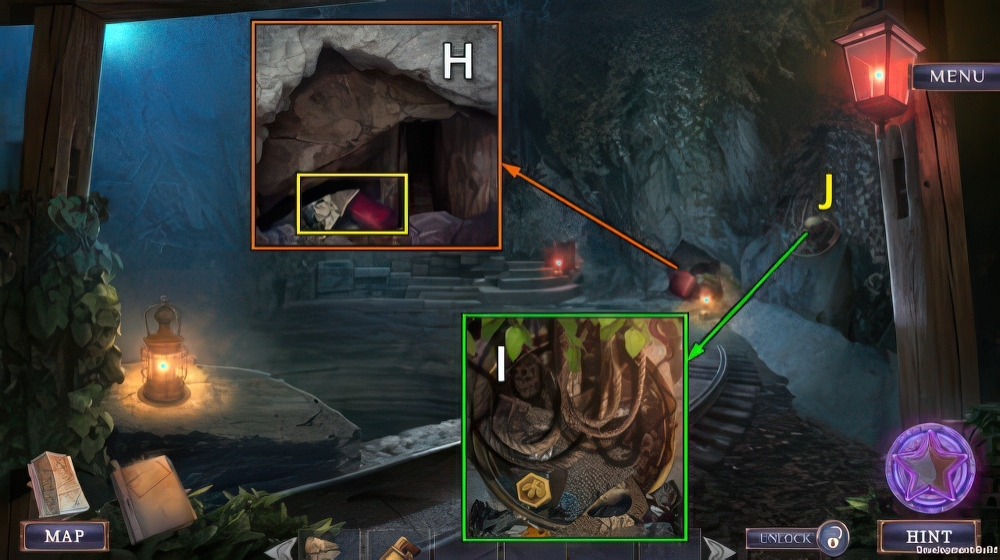
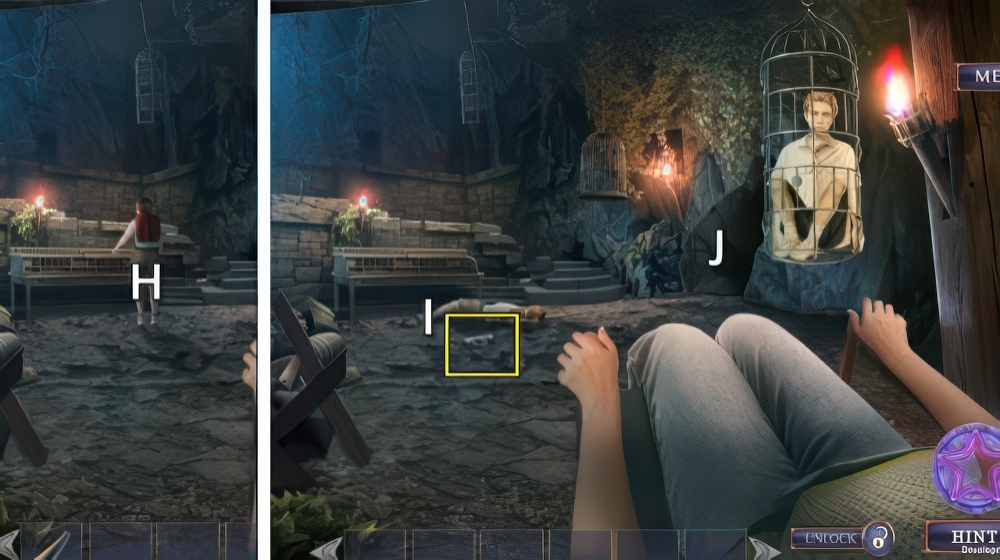
- Use MIRROR and WIRE (H).
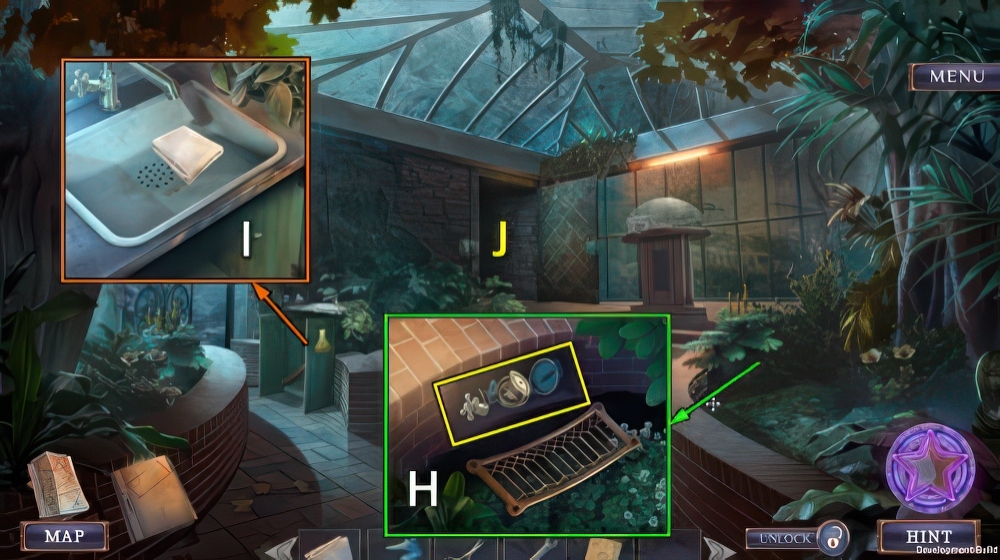
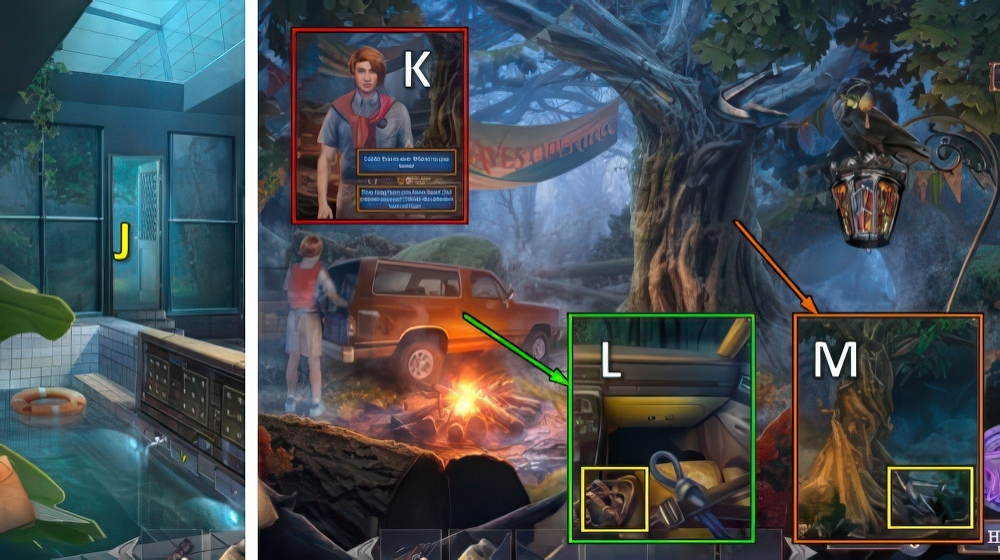
- Go (I).

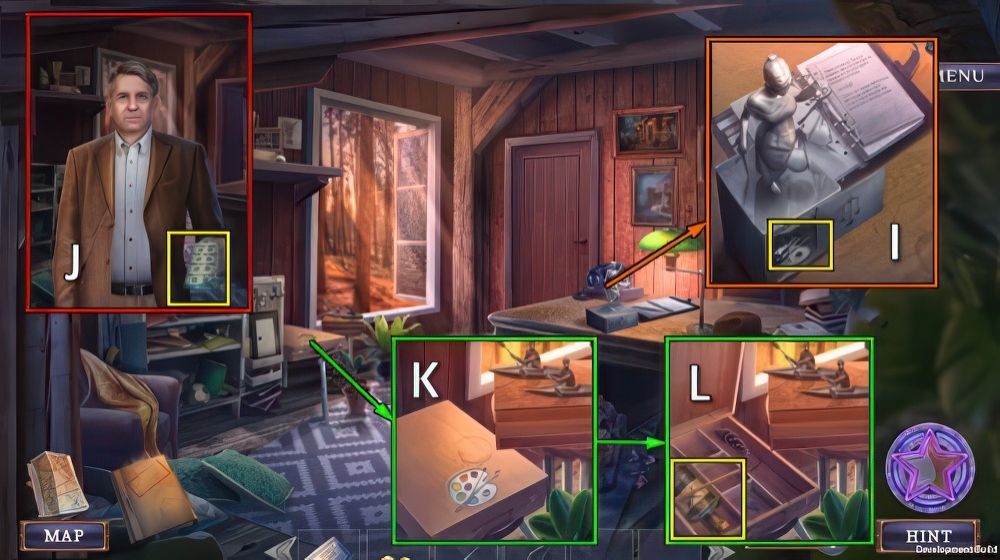
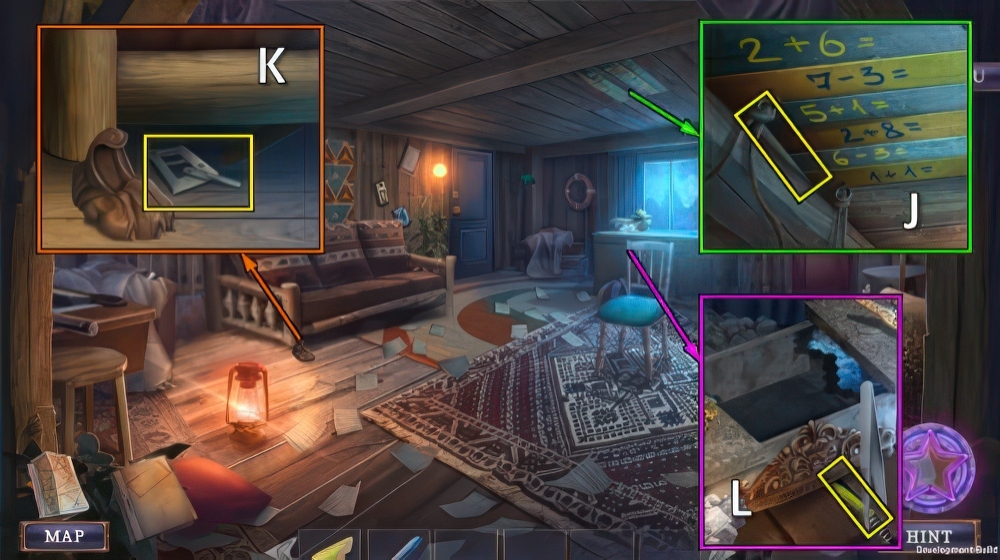
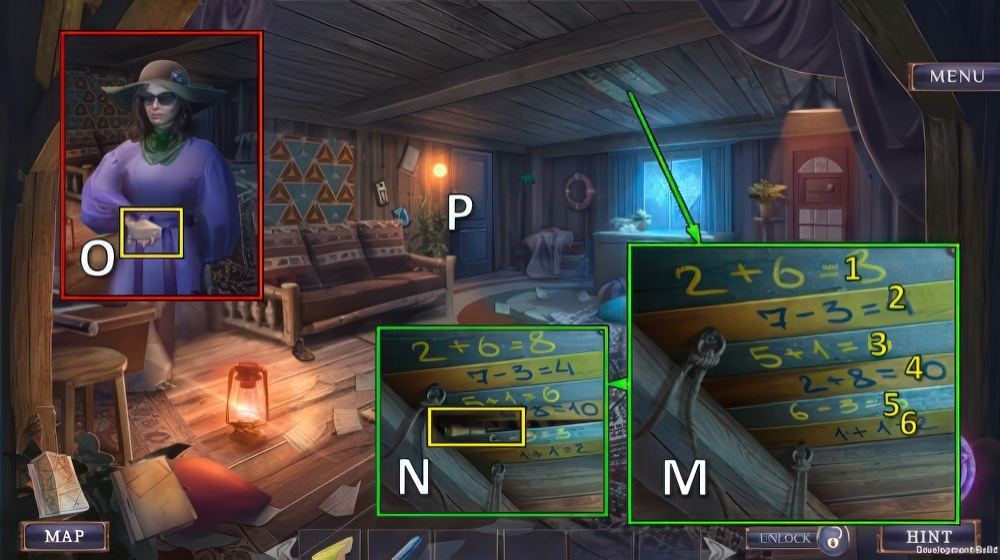
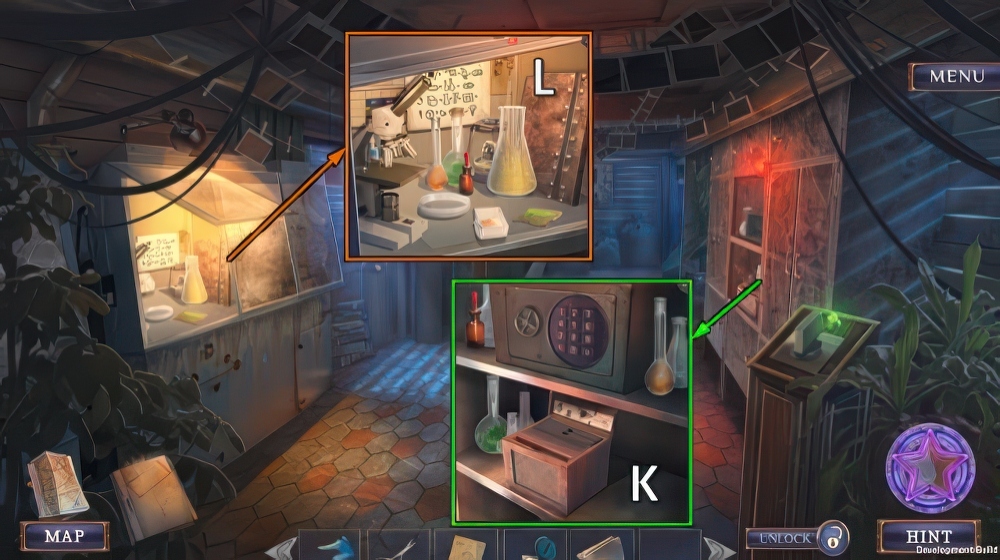
- Take DIAMOND RING (J).
- Place DIAMOND RING (K).
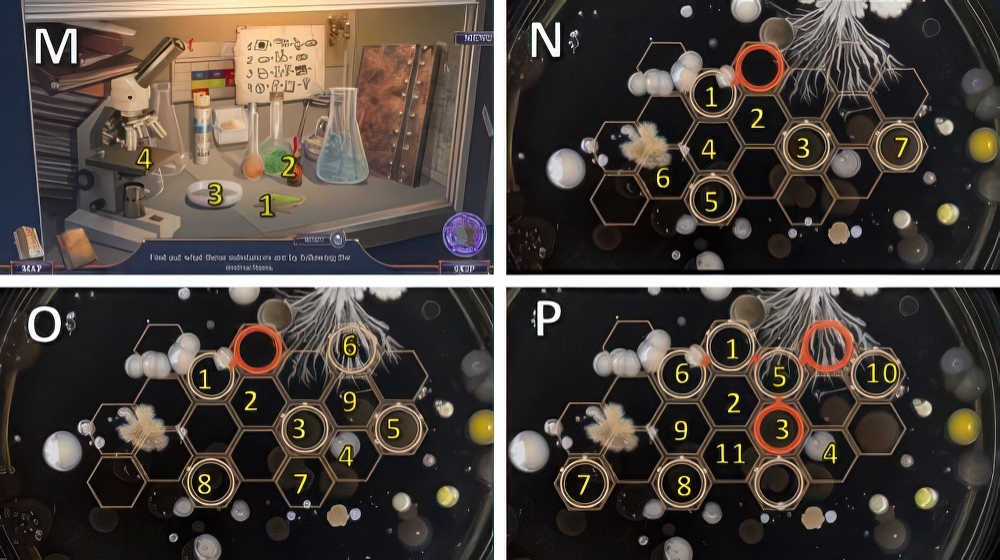
- Solution (L): M-Nx2-Ox2-P-Qx2-Rx2-Sx2-Tx2-Ux2-V.
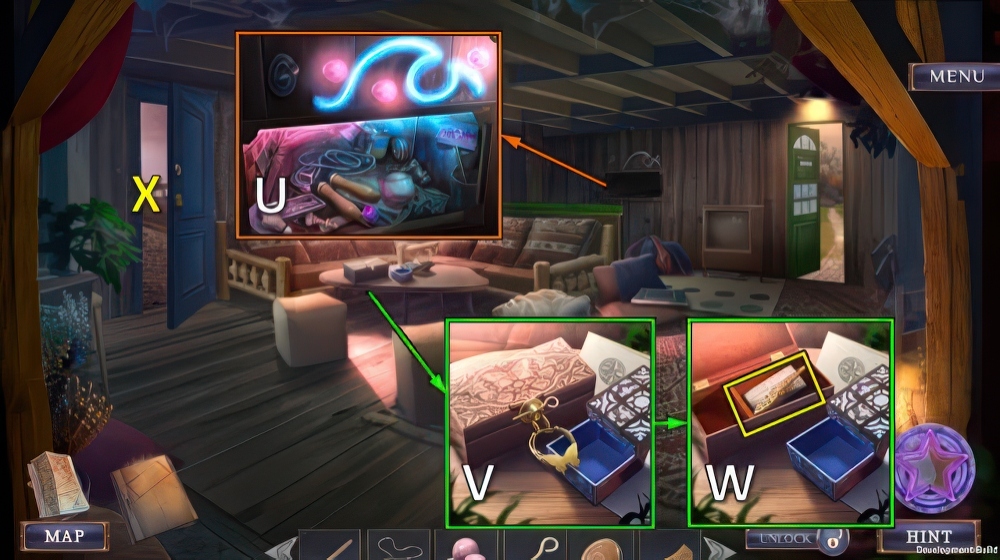
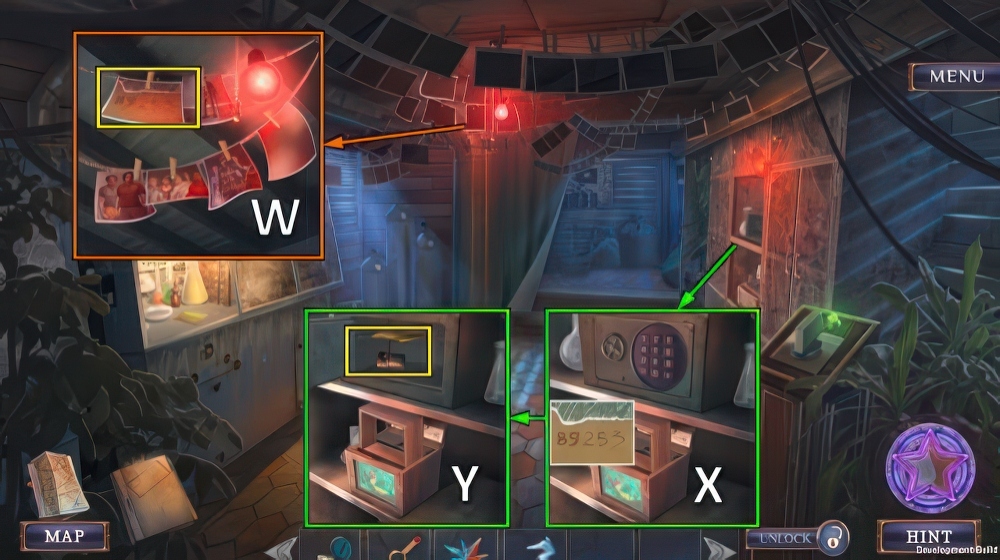
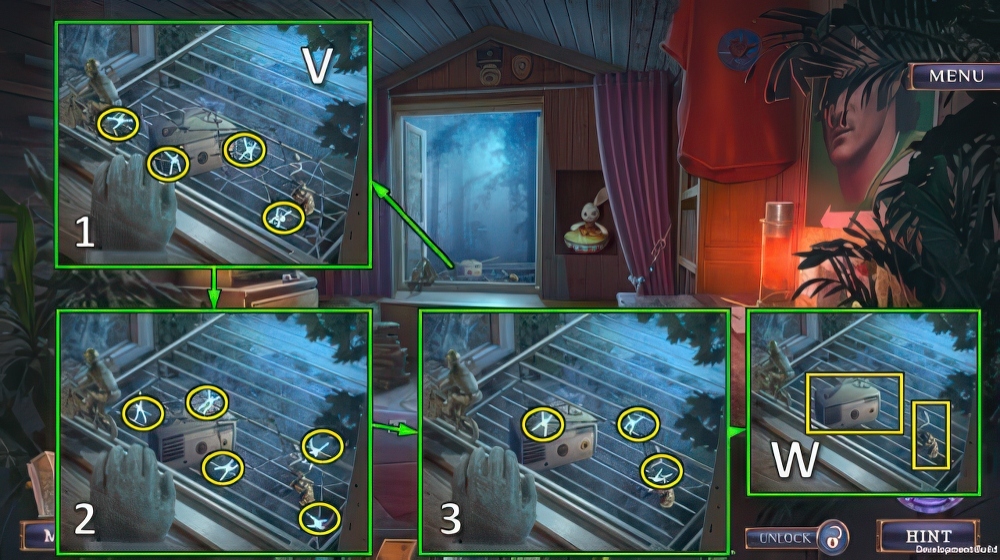
- Take ELECTRICAL TAPE and LIFEGUARD BOOK (W).

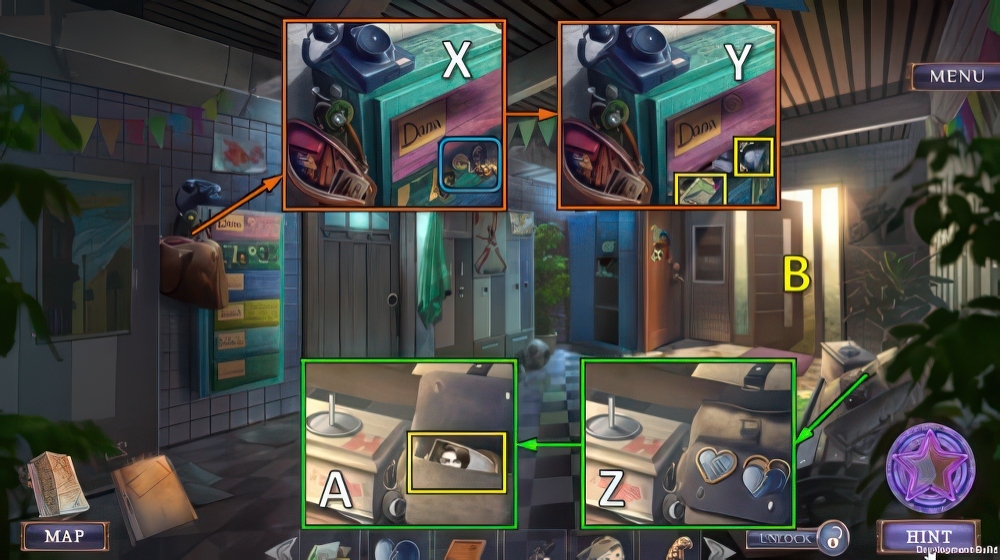
- Take INCOMPLETE MINIATURE, place BOOK OF LEGENDS and LIFEGUARD BOOK (X).
- Take CHAIN PIECES 2/3 and RUBBER GLOVES (Y).
- Use RUBBER GLOVES and ELCTRICAL TAPE, take MINIATURE LAMP and HEART TOKEN (Z).
- Place HEART TOKEN (A).
- Take FIRST-AID KIT (B).
- Use FIRST-AID KIT (C).
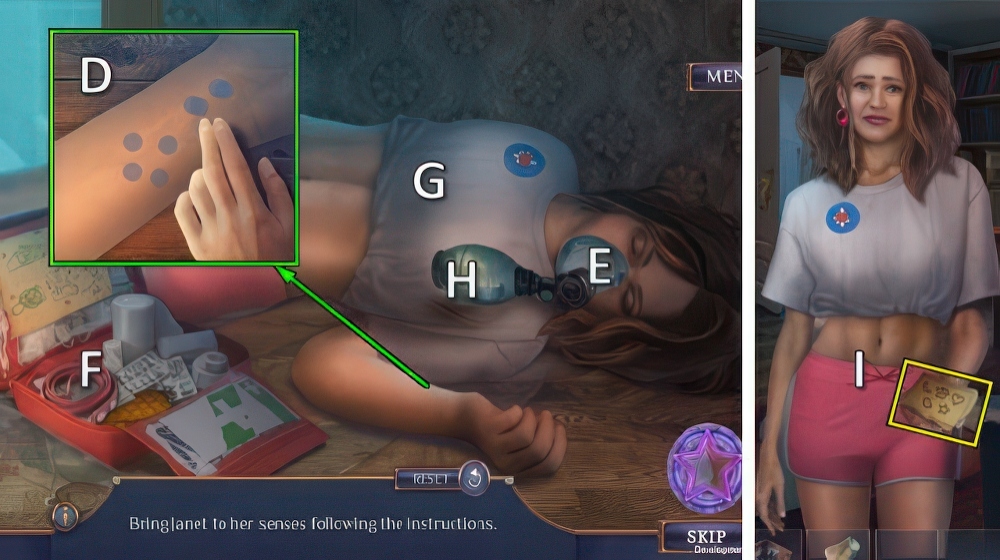
- Match dots (D).
- Touch E.
- F on E.
- Touch G-Hx2-G-Hx2.
- Talk, take SYMBOLS CLUE (I).

- Place SYMBOLS CLUE, select 1-2-3-4-5 (J).
- Take WHEELS and CHAIN PIECES 3/3 (K).
- Place CHAIN PIECES, take FIRST-AID CERTIFICATE and GLUE (L).
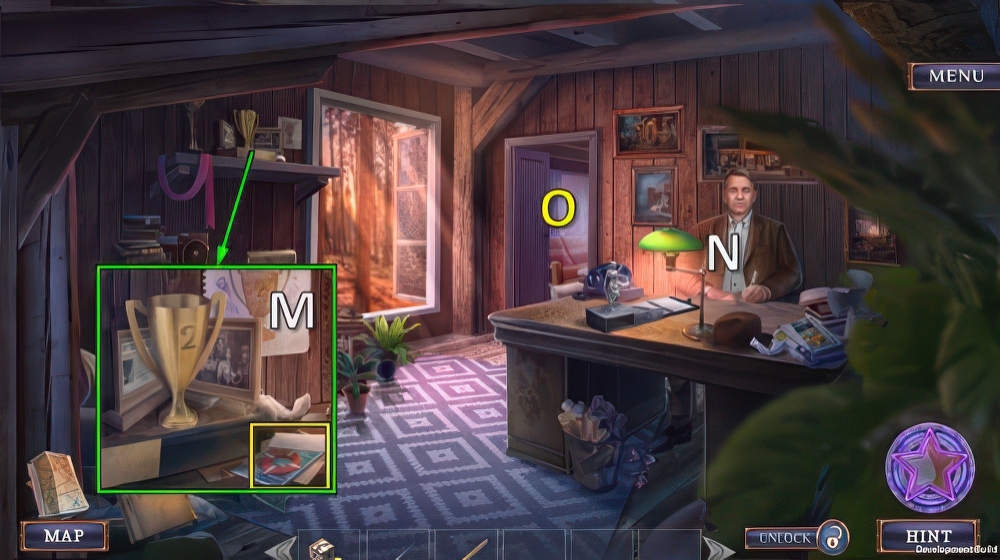
- Go (M).
- WHEELS, GLUE and MINIATURE LAMP on INCOMPLETE MINIATURE, take MINIATURE.
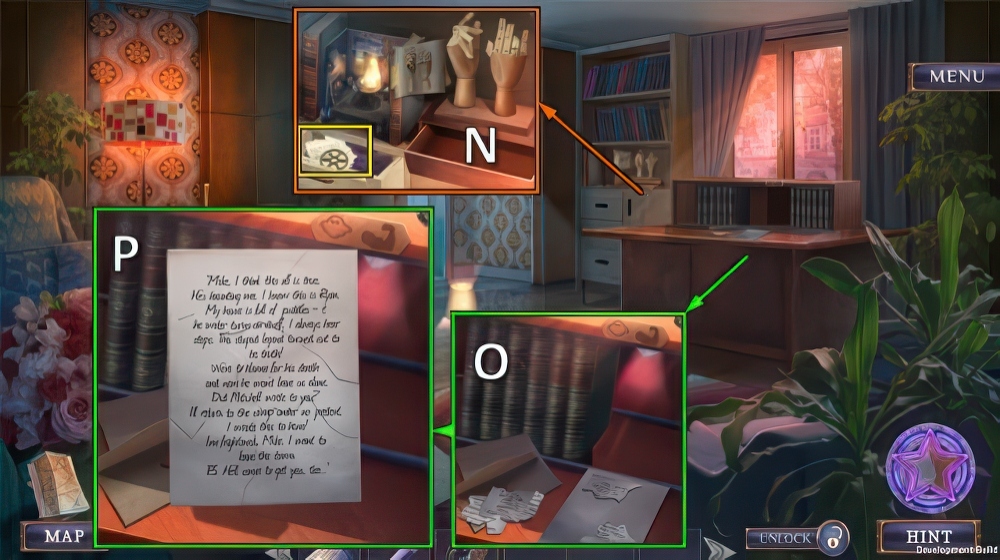
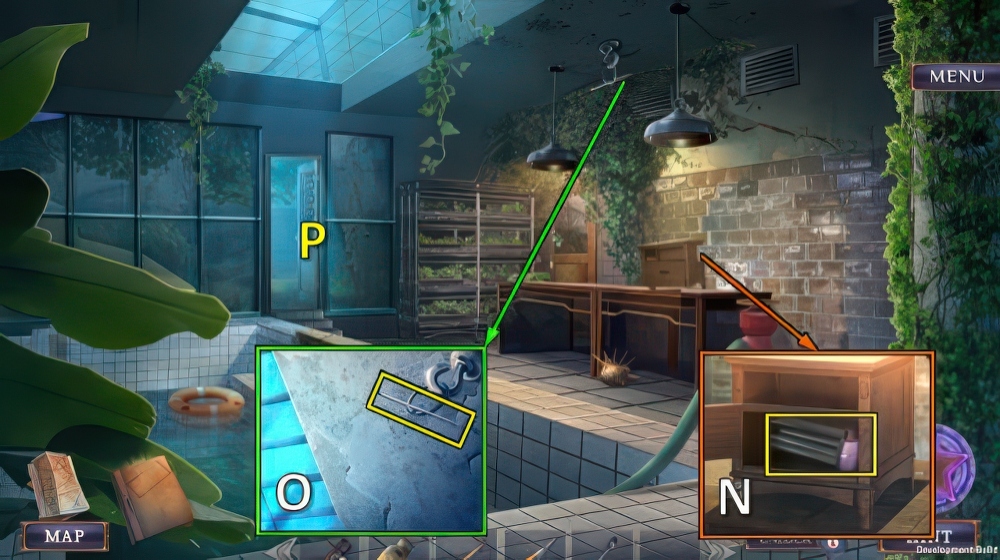
- Place MINIATURE, take GEAR and LETTER FRAGMENTS (N).
- Place LETTER FRAGMENTS and GLUE (O).
- Restore and take JANET’S LETTER (P).
- Walk down.

- Receive case file.
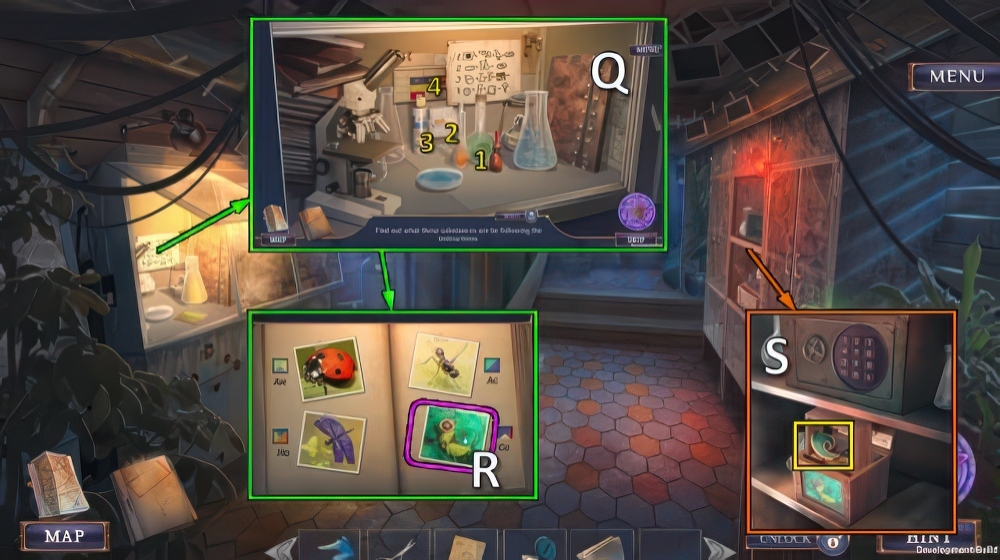
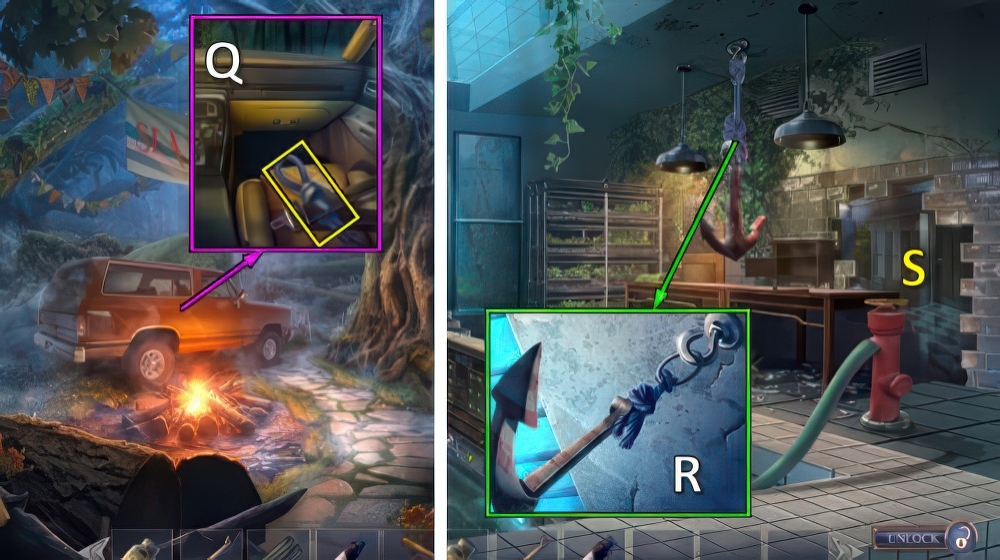
- Place JANET’S LETTER (Q).

- Offer JANET’S LETTER for puzzle (R).
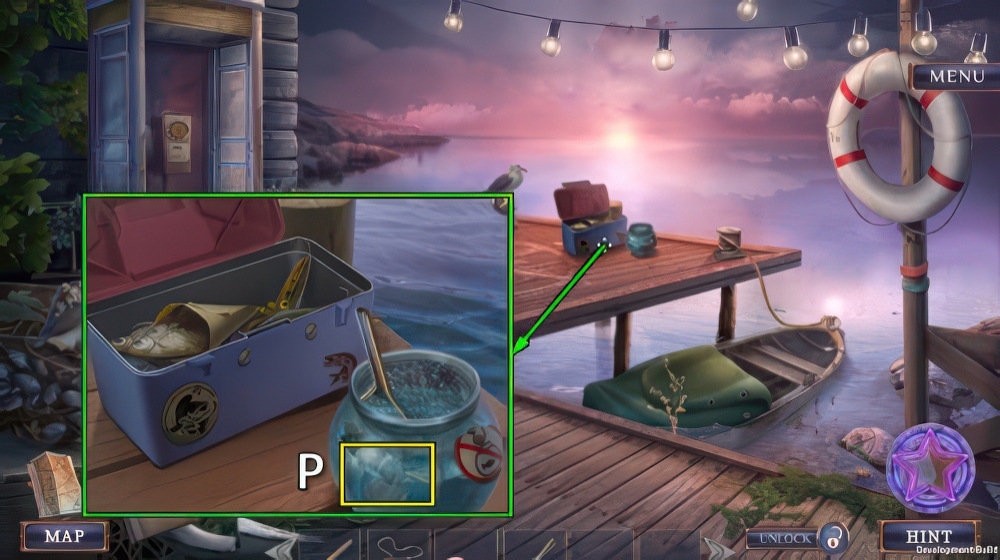
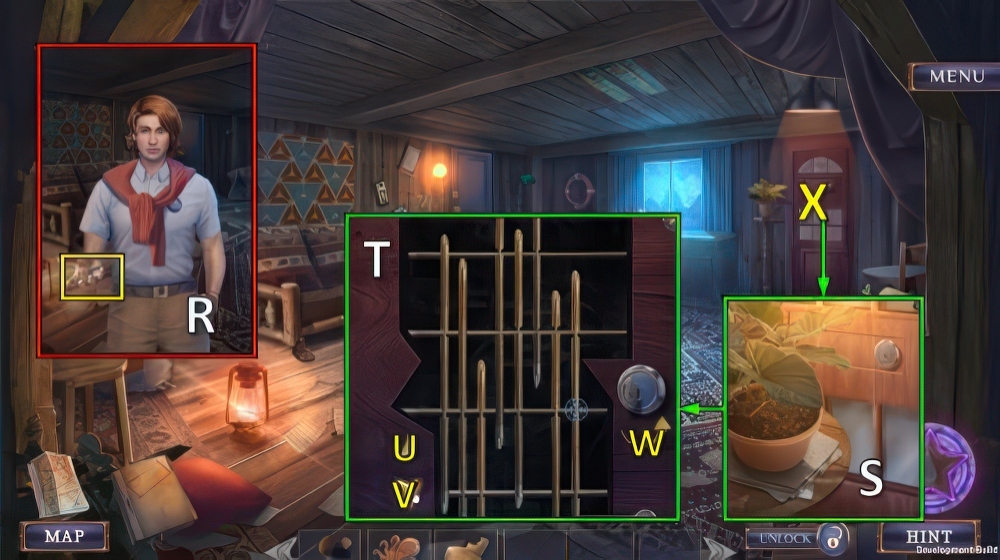
- Take SHOVEL (S).
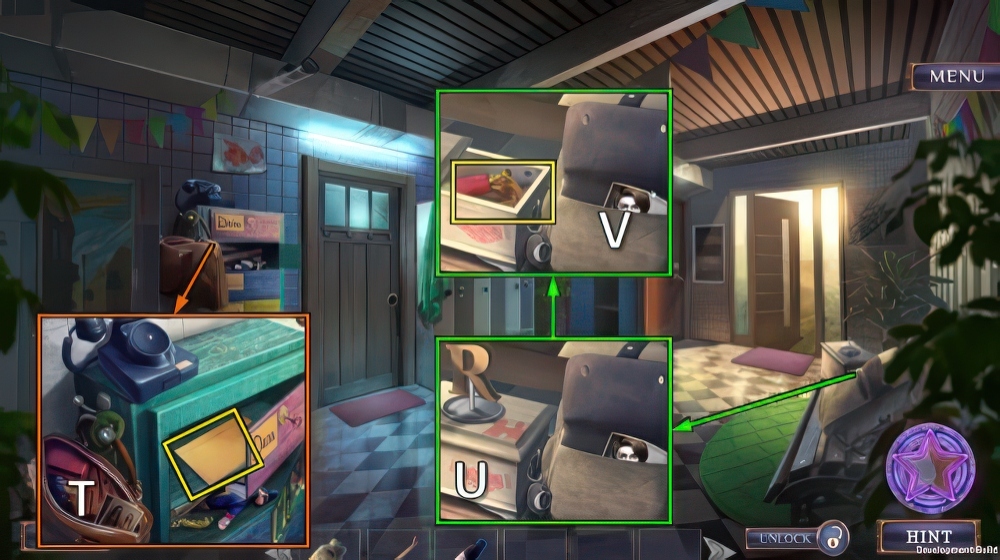
- Take CUBE PARTS 1/4 (T).
- Use SHOVEL, take PHONE INLAY and UNLIT SMOKER (U).
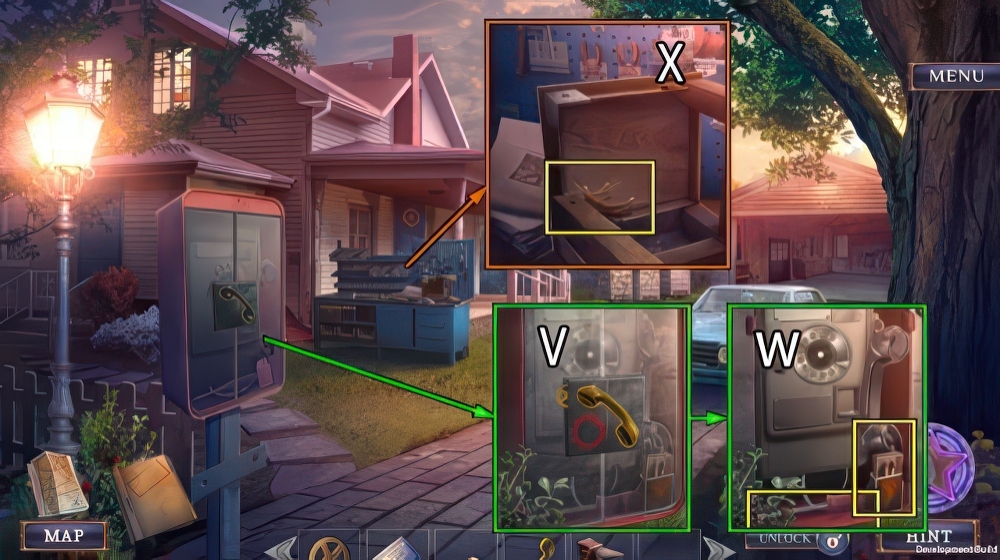
- Place PHONE INLAY and GEAR (V).
- Take MATCHES and SCREWDRIVER (W).
- Use SCREWDRIVER, take WOODEN LEG and DRY GRASS (X).

- DRY GRASS and MATCHES on UNLIT SMOKER, take SMOKER.
- Use SMOKER and WOODEN LEG, take JACK (Y).
- Use JACK, play mini-puzzle (Z).
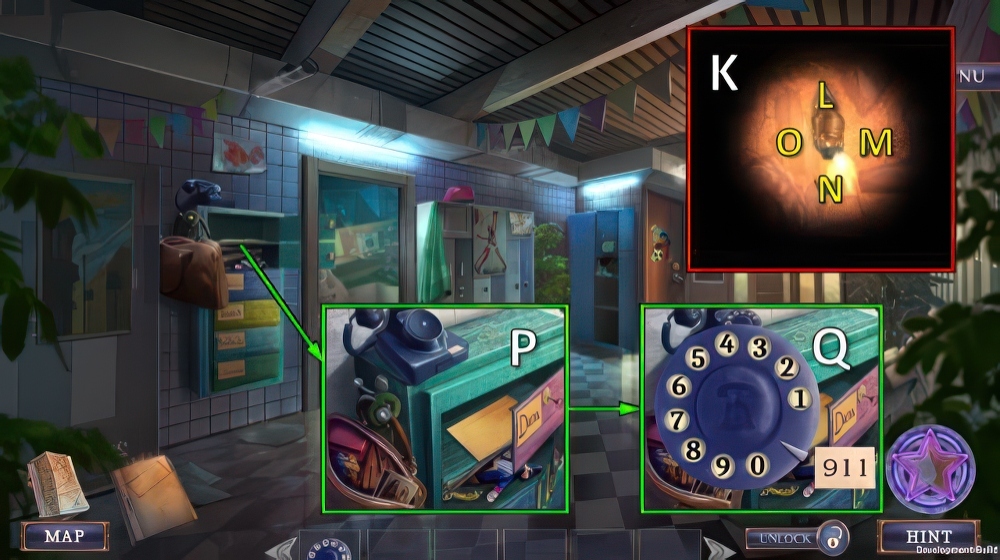
- Receive PHONE BOOK.
- Place PHONE BOOK, dial 555-7932 (A).

- Take TROPHY (B).
- Take ROWING FIGURINE (C).
- Take DISASSEMBLED FISHING ROD (D).
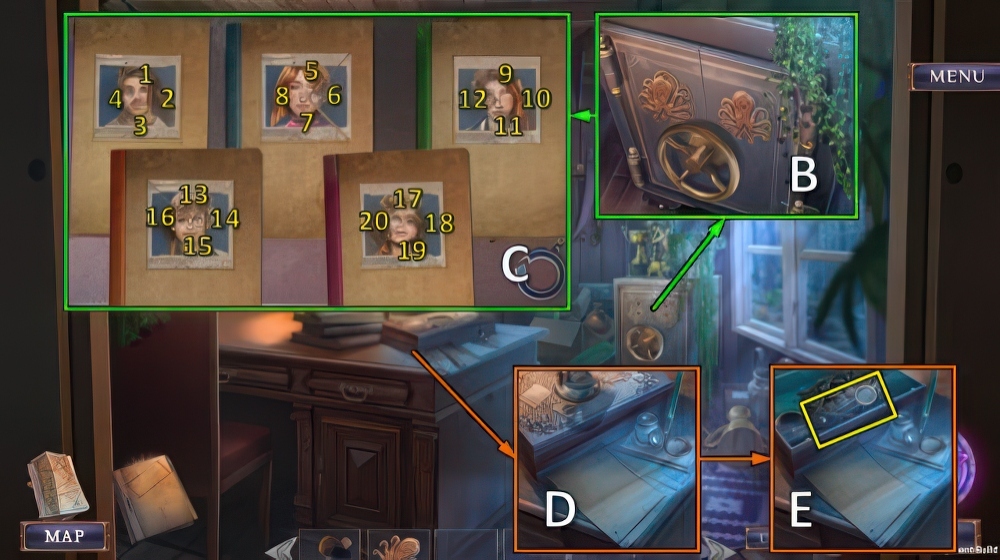
- Place ROWING FIGURINE, take SILVER KEY and NEWSPAPER CLIPPING (E).
- Use SILVER KEY (F).
- Play puzzle (G), receive TEAM PHOTO.
- Place TEAM PHOTO, TROPHY and NEWSPAPER CLIPPING, take CUBE PARTS 2/4 and SCALES OF JUSTICE (H).
- Place SCALES OF JUSTICE, take CUBE PARTS 3/4 and PALETTE AMULET (I).
- Take LIFEGUARD TEST (J).
- Place PALETTE AMULET (K).
- Take PENCIL and SOLVENT (L).
- Use SOLVENT, take CAMP BROCHURE (M).
- PENCIL, FIRST-AID CERTIFICATE and CAMP BROCHURE on LIFEGUARD TEST, take COMPLETED TEST.
- Offer COMPLETED TEST (N).
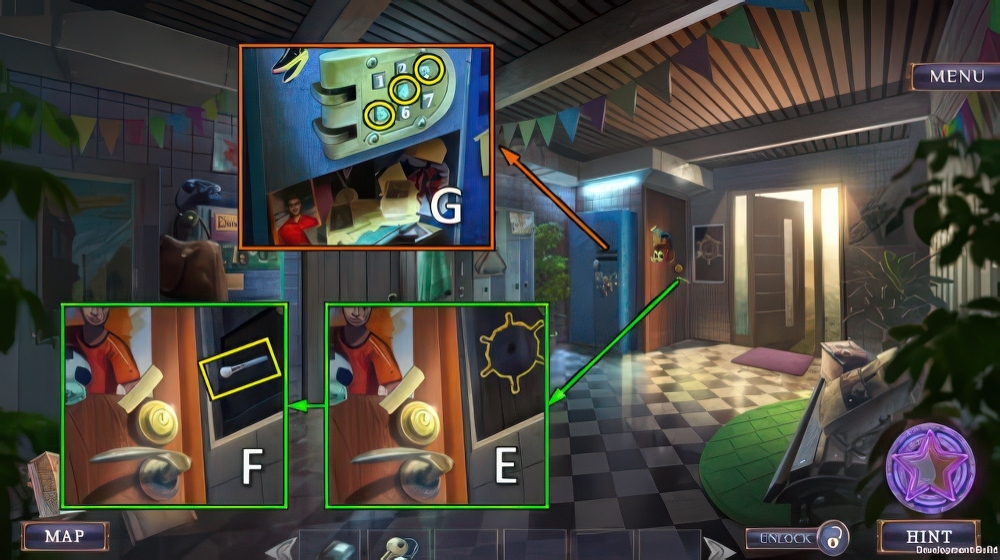
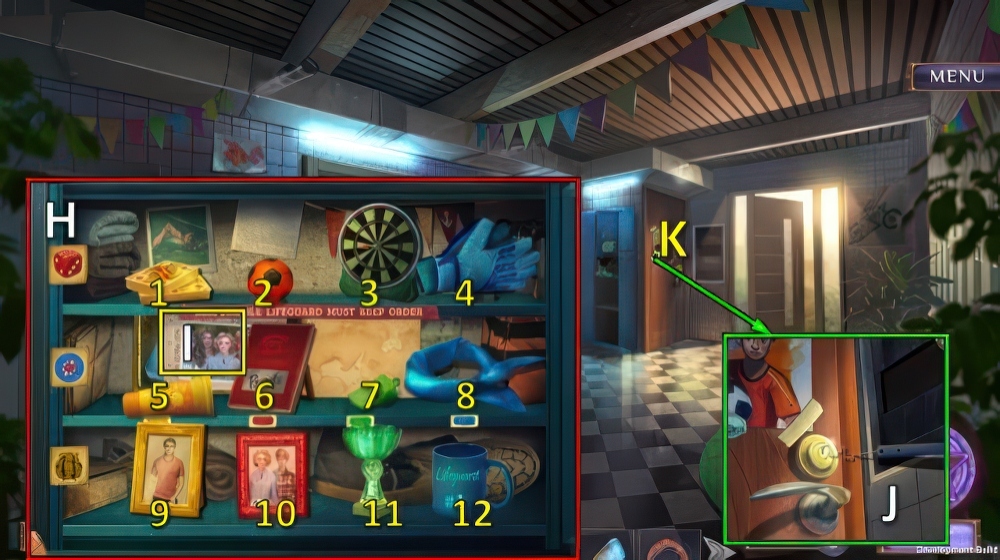
- Go (O).
- Select answer 2-1-2 (P), 2-3-2 (Q), 2-1-3 (R), 1-2-3 (S).

- Take BROKEN POCKET WATCH (T).
- Take CUBE PARTS 4/4 (U).
- Read note, place CUBE PARTS (V).
- Take HOOK and KNOB (W).
- Place KNOB (X).
- Go (Y).
- Read note, take POCKET KNIFE (Z).
- Use POCKET KNIFE (A).
- Take FISH AMULET FISH and COMBINATION LOCK (B).
- Place FISH AMULET (C).
- Solution (D): Ex4-Fx2-E-Fx3-Ex4-F-E.
- Take COLORED BULBS 1/3 and FISHING LINE (G).
- Walk down.
- HOOK and FISHING LINE on DISASSEMBLED FISHING ROD, take FISHING ROD.
- Use FISHING ROD (H).
- Go (I).

- Take CODE (J).
- Place CODE and COMBINATION LOCK, select lock x3 (K).
- Take OARS and OIL (L).
- Go to Pier.

- Place OARS (M).
- Solution (N).
- Receive SCOOP NET and METAL ROD.
- Take hair (O).
- Use SCOOP NET, take COIN and ROTATING HANDLE (P).
- Go to Gym.
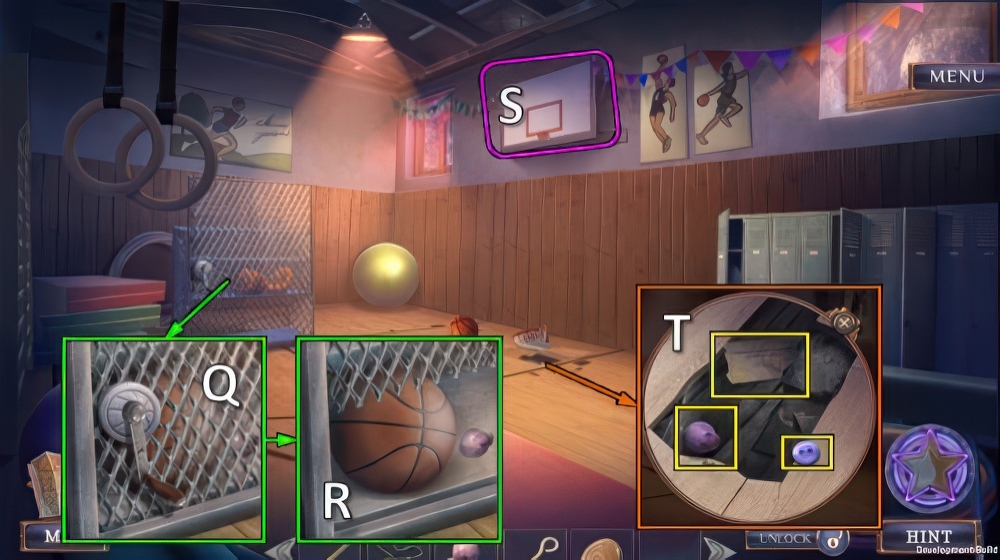
- Use OIL and ROTATING HANDLE (Q).
- Take BASKETBALL and COLORED BULBS 2/3 (R).
- Throw BASKETBALL (S).
- Take button, COLORED BULBS 3/3 and NUMBER FRAGMENT (T).
- Walk down.
- Place COLORED BULBS for mini-puzzle (U), receive RING PULL.
- Place RING PULL and METAL ROD (V).
- Take BUTTERFLY WING and JAMES’S ID CARD (W).
- Go (X).

- PENCIL and JAMES’S ID CARD on NUMBER FRAGMENT, take JAMES’S NUMBER.
- Use COIN and JAMES’S NUMBER (Y).
- Select any dialog (Z).
- Play puzzle (A).
- Select any dialog (B).
- Take ICE CUBE (C).
- Use ICE CUBE, take WOODEN PAW and ALMOND OIL (D).
- Place WOODEN PAW, take SEAM RIPPER and FABRIC WITH SLIME (E).

- Use SEAM RIPPER, take BLUE CHALK and ROTATING MECHANISM (F).
- ALMOND OIL and ROTATING MECHANISM on BROKEN POCKET WATCH, take NAIL and GOLDEN FLOWER.
- Place BUTTERFLY WING and GOLDEN FLOWER for mini-puzzle (G).
- Take PAPERWEIGHT (H).
- Use NAIL and PAPERWEIGHT (I).
- Take RULER (J).
- Use RULER, take TWEEZERS and BROKEN LOCK (K).
- Use TWEEZERS, take SPRINGS 1/3 and YELLOW CHALK (L).
- Place BLUE CHALK and YELLOW CHALK, select 6-5-2-3-1-4 (M).
- Take SPRINGS 2/3 and CAMP MAP (N).
- Take STRANGE POWDER (O).
- Use CAMP MAP for puzzle (P).

- Take FLASK AMULET (Q).
- Place FLASK AMULET (R), take RAKE and SPRINGS 3/3 (S).

- Take KNOB (T).
- SPRINGS and KNOB on BROKEN LOCK, take DOOR LOCK.
- Place DOOR LOCK (U), solution: Vx3-W-Xx4-Yx2-Zx3-A.
- Go (B).
- Take RAG, turn knob (C).
- Open, take TRIGGER SPRAYER (D).
- Pull cord, take SMALL KEY (E).
- Take SCISSORS, use SMALL KEY (F).
- Take WRENCH and DEVELOPING KIT (G).
- Walk down.
- Use RAKE and WRENCH, take BROKEN COMPASS and VALVE (H).
- Place VALVE and RAG, take WET RAG (I).
- Go (J).
- Use WET RAG, take CHEMICAL REAGENTS (K).
- Place CHEMICAL REAGENTS, STRANGE POWDER and FABRIC WITH SLIME (L).
- Solution (M): 1-(2-3)-(2-3)-(2-3)-(3-4).
- Solution (N): (1-2)-(3-4)-(5-6)-(7-5).
- Solution (O): (1-2)-(3-4)-(5-3)-(6-7)-(8-9).
- Solution (P): (1-2)-(3-4)-(5-3)-(6-5)-(7-6)-(8-9)-(10-11).
- Select 1-2-3-4 (Q).
- Select R.
- Receive CATERPILLAR IMAGE and DEVELOPING TABLET.
- Place CATERPILLAR IMAGE, take COMPASS NEEDLE and WAVE TOKEN (S).
- Walk down.

- Place WAVE TOKEN, take EMPTY FLASK and MAGNET (T).
- Use EMPTY FLASK, take FLASK OF WATER (U).
- Go (V).
- DEVELOPING TABLET, FLASK OF WATER and TRIGGER SPRAYER on DEVELOPING KIT, take DEVELOPING SPRAY.
- Use DEVELOPING SPRAY, take IMAGE OF NUMBERS and MOSAIC TILES 1/4 (W).
- Place IMAGE OF NUMBERS, enter 8-9-2-5-3 (X).
- Take ORIGAMI PAPER and LIGHTER (Y).
- Walk down.
- Place SCISSORS and ORIGAMI PAPER, take MOSAIC TILES 2/4 and COORDINATES (Z).
- COMPASS NEEDLE, MAGNET and COORDINATES on BROKEN COMPASS, take COMPASS WITH COORDINATES.
- Use COMPASS WITH COORDINATES (A) and Play puzzle.
- Take GAS CANISTER (B).
- Take BEESWAX, use GAS CANISTER and LIGHTER (C).
- Take MOSAIC TILES 3/4 and SHARP STONE (D).
- Take UNLIT HARD HAT, use SHARP STONE (E).
- Find pairs (F).
- Take ELEGANT CANE (G).
- Use ELEGANT CANE, take MOSAIC TILES 4/4 and RUSTED COIN PURSE (H).
- Place MOSAIC TILES and BEESWAX (I).
- Go (J).

- Talk, take SAFETY PIN (K).
- Take GOOD OCTOPUS AMULET, break zipper (L).
- Use SAFETY PIN, take MALLET and LEMON (M).
- LEMON and SHARP STONE on RUSTED COIN PURSE, take CAVE MAP and DRAGON HEAD.
- Place DRAGON HEAD (N).
- Play puzzle (O), receive CANDLE.
- Walk down.

- Use CANDLE, take BURNING CANDLE (P).
- BURNING CANDLE and CAVE MAP on UNLIT HARD HAT, take HAT AND MAP.
- Use HAT AND MAP (Q).
- Take DIRECTOR’S KEY (R).
- Use DIRECTOR’S KEY (S).
- Solution (T): Vx3-W-Vx9-W-Ux2-W-Vx5-W-Vx2-W-Vx8-W-Vx2-W-V.
- Go (X).

- Take CHISEL (Y).
- Use CHISEL and MALLET, take EVIL OCTOPUS AMULET (Z).
- Take SAND (A).
- Place GOOD OCTOPUS AMULET and EVIL OCTOPUS AMULET (B).
- Solution (C): (2-18-2)-(4-16-4)-(3-7-3)-(5-9-17-13-5)-(7-15-19-11-7)-(8-12-16-8).
- Open files and take VIDEOTAPE and DIRECTOR’S STATUETTE.
- Place DIRECTOR’S STATUETTE (D), take REVEALING LENS and FRAMED PHOTO (E).

- Place FRAMED PHOTO, take INK and COLORFUL STONES 1/3 (F).
- Place INK and SAND, take OFFICE BLUEPRINT (G).
- Use OFFICE BLUEPRINT (H).

- Take MULTITOOL (I).
- Take PORTABLE LAMP (J).
- Take PUZZLE BOX, use MULTITOOL (K).
- Take MINIATURE GOAL and WOODEN STAMP (L).

- Move blanket, take COLORFUL STONES 2/3.
- Place REVEALING LENS and WOODEN STAMP (M).
- Play mini-puzzle, select 1-2-3 (N).
- Take note and SMELLING SALTS (O).

- Use SMELLING SALTS (P).
- Select any dialog (Q).
- Take COLORED STONES 3/3 (R).

- Place COLORED STONES, take CORNICE PART (S).
- Open, take SCRAPER (T).
- Use CORNICE PART, take MINIATURE BALL and PURPLE FILM (U).

- PURPLE FILM and SCRAPER on PORTABLE LAMP, take UV LAMP.
- Use UV LAMP, play puzzle (V).
- Receive MINIATURE PLAYER.
- MINIATURE PLAYER, MINIATURE BALL and MINIATURE GOAL on PUZZLE BOX, take note, LATCH MECHANISM and MIKE’S KEY.
- Use LATCH MECHANISM (W).
- Go (X).

- Take LOCK LUBRICANT (Y).
- Use LOCK LUBRICANT and MIKE’S KEY (Z).
- Read note, take MINIATURE UMBRELLA and BEE PULL (A).

- Use BEE PULL, take LOCK PICKING TOOLS, POWDER and CUTTING PLIERS (B).
- Use CUTTING PLIERS (C), take LOCK MOLD and WHEEL AMULET (D).
- Place WHEEL AMULET (E), take BRUSH (F).
- Use BRUSH and POWDER, select 3-4-5 (G).
- Solution (H): (4-9)-(1-11)-(2-6)-(3-5)-(2-8)-(1-4)-(2-4)-(3-4)-(5-12)-(6-12)-(8-10)-(7-11)-(6-7)-(7-8)-(10-11).
- Take notes, GLASS SCREEN and COIL OF WIRE (I).
- COIL OF WIRE, CUTTING PLIERS and LOCK MOLD on LOCK PICKING TOOLS, take PICKLOCK.
- Use PICKLOCK (J).
- Go (K).

- Take POT OF WATER (L).
- Take MINIATURE DOG (M).
- Place MINIATURE DOG and MINIATURE UMBRELLA, take HEARTBREAK CHARM, WOODEN BASE and VELVET CORD (N).
- Take MAP FRAGMENTS 1/4, place VELVET CORD (O).
- Take JOYSTICK and BICYCLE WHEEL (P).
- Place BICYCLE WHEEL, take MAP FRAGMENTS 2/4 and BLUE WIRE (Q).

- Place VIDEOTAPE, JOYSTICK, BLUE WIRE and GLASS SCREEN (R).
- Play puzzle (S), receive ETERNAL MATCH.
- Place POT OF WATER and ETERNAL MATCH, take MAP FRAGMENTS 3/4 and PLASTIC EAR (T).
- Place PLASTIC EAR, take CHAIN MAIL GLOVE and WAIST BAG (U).
- Use CHAIN MAIL GLOVE (V), solution (1-2-3).
- Take ENGRAVING MACHINE and ROTATING HANDLE (W).
- Walk down.
- Use ROTATING HANDLE (X), take MAP FRAGMENTS 4/4 and FRIENDSHIP CHARM (Y).
- Place FRIENDSHIP CHARM and HEARTBREAK CHARM (Z).
- Take TEMPERATURE KNOB and VALVE (A).
- ENGRAVING MACHINE, MAP FRAGMENTS and TEMPERATURE KNOB on WOODEN BASE, take POOL MAP.
- Use POOL MAP, go (B).

- Take RACHEL’S HAIRPIN (C).
- RACHEL’S HAIRPIN on WAIST BAG, take HOSE.
- Take LUMINOL CONCENTRATE (D), place VALVE and HOSE (E).

- Use hose x3 (F).
- Select any dialog (G).
- Take MAILBOX KEY (H).

- Solution (I).
- Go (J).
- Select any dialog (K).
- Take CLIMBING ATTACHMENTS (L).
- Use CLIMBING ATTACHMENTS, take SCREWDRIVER and ANCHOR (M).
- Walk down.
- Use SCREWDRIVER, take ACETONE and WINDSHIELD COVER (N).
- Take CUTICLE STICK (O).
- Go (P).
- ACETONE and CUTICLE STICK on WAIST BAG, take HYDROGEN PEROXIDE and CORKSCREW.
- Use WINDSHIELD COVER and CORKSCREW, take ROPE (Q).
- Walk down.
- Place ANCHOR and ROPE (R).
- Go (S).
- Use MAILBOX KEY (T).
- Play mini-puzzle, take R FIGURINE.
- Place R FIGURINE (U).
- Take BUGLE and SAW HANDLE (V).
- Go to Forest.

- Use BUGLE, take VINTAGE ATOMIZER (W).
- HYDROGEN PEROXIDE and VINTAGE ATOMIZER on LUMINOL CONCENTRATE, take LUMINOL SOLUTION.
- Use LUMINOL SOLUTION, take DOORKNOB (X).
- Go to Locker Room.
- Place DOORKNOB, play puzzle (Y).

- Select any dialog (Z).
- Take PINCUSHION (A).
- Take SCOOP NET (B).
- Use PINCUSHION (C).
- Select 2-1-4-3 (D).
- Use SCOOP NET, take note, TOY GUN and SAW BLADE (E).
- Use TOY GUN.
- Shoot twice (F).
- Receive RAG WITH CHLOROFORM and SAND DOLLAR.
- SAW BLADE and SAND DOLLAR on SAW HANDLE, take HANDSAW.
- Use HANDSAW (G).
- Use RAG WITH CHLOROFORM (H).
- Take ROTARY DIAL and FLASHLIGHT (I).
- Use FLASHLIGHT (J).
- Solution (K): L-M-L-M-N-M-L-M-N-M-L-M-N-O-N-M-N-O-Nx2-M-L-M-N-M-L.
- Place ROTARY DIAL (P), dial 9-1-1 (Q).
- Walkthrough Bonus Chapter, at the link below.


