The Legacy 1: Forgotten Gates – Adventure game in which you will go through the story in an unknown ancient civilization. A museum exhibit unexpectedly sends a young woman named Diana to a parallel world. Now Diana has to find out where she is, how she got there and whether she is ever going to return home. The young woman encounters a world similar to the Maya civilization, but it is neither the past nor a parallel reality. Diana will face numerous challenges, travel through the valley of an endless river and meet strange people and wonderful animals, solving dozens of different puzzles on her way. A lot of gorgeous locations and beautiful graphics are waiting for you. If you can not pass any of the puzzles or do not know where the items are, on our site you can watch The Legacy 1: Forgotten Gates walkthrough and help the girl to return home.
The Legacy 1: Forgotten Gates – Walkthrough
Here you can see full walkthrough of The Legacy 1: Forgotten Gates game, namely for all chapters, including bonus chapter, in pictures.
Where am I
I was finishing up at the museum when I heard a strange noise. It came from a stone calendar. I came closer. Then something extraordinary started to happen. It was as if a portal opened up inside the stone disc, and some unknown force sucked me inside. In an instant I found myself in some temple, everything was shaking like during an earthquake, large stones fell from the ceiling, and I was lucky not to get hurt. But it looks like the device which brought me here is now broken.
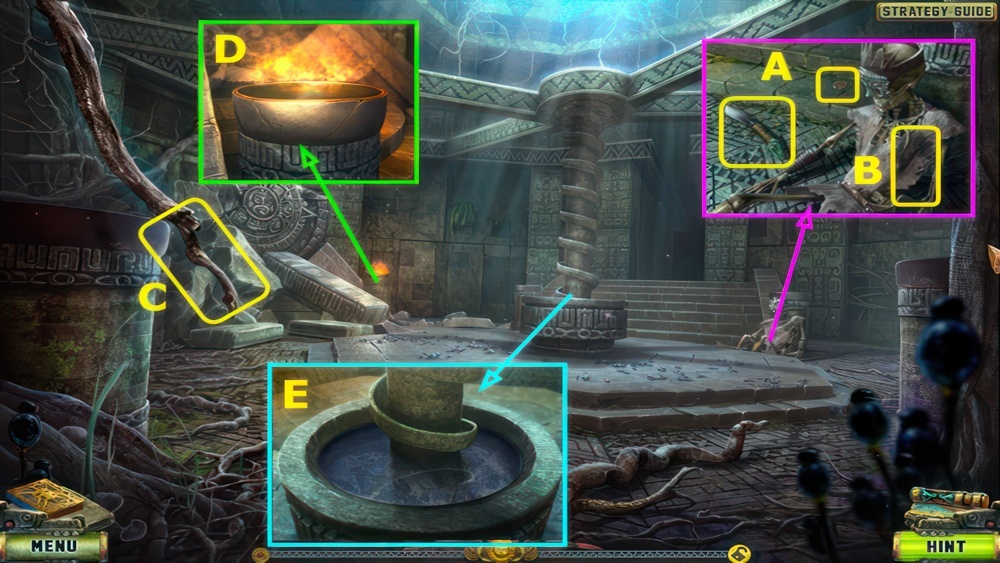
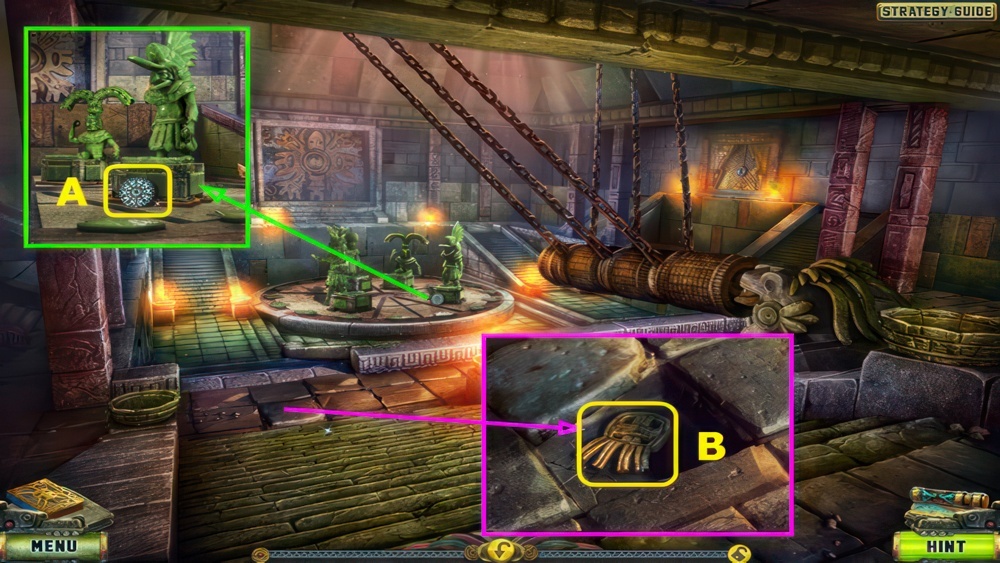
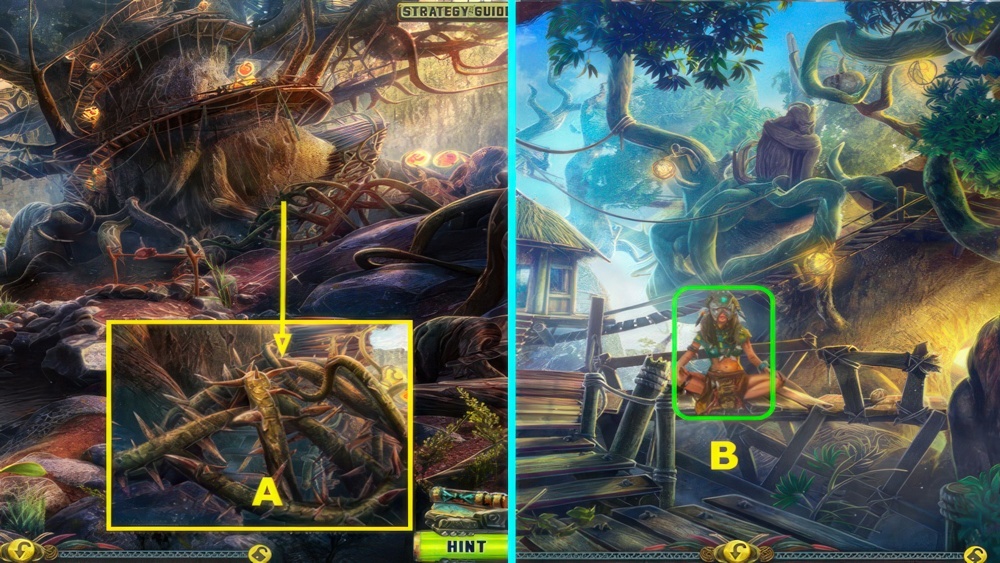
- Take the 1/10 COIN and MACHETE (A).
- Use the MACHETE to take the PIECE OF CLOTH (B).
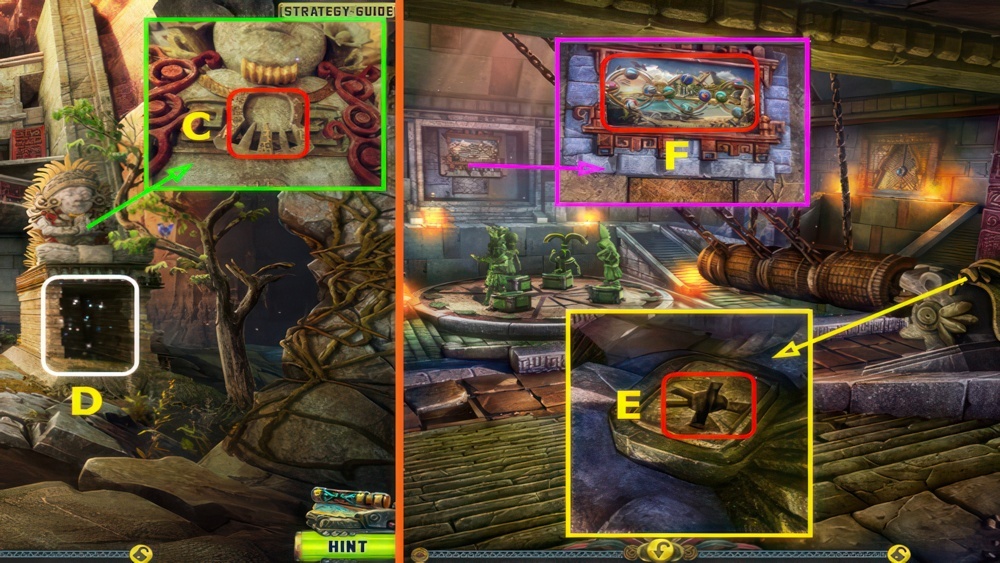
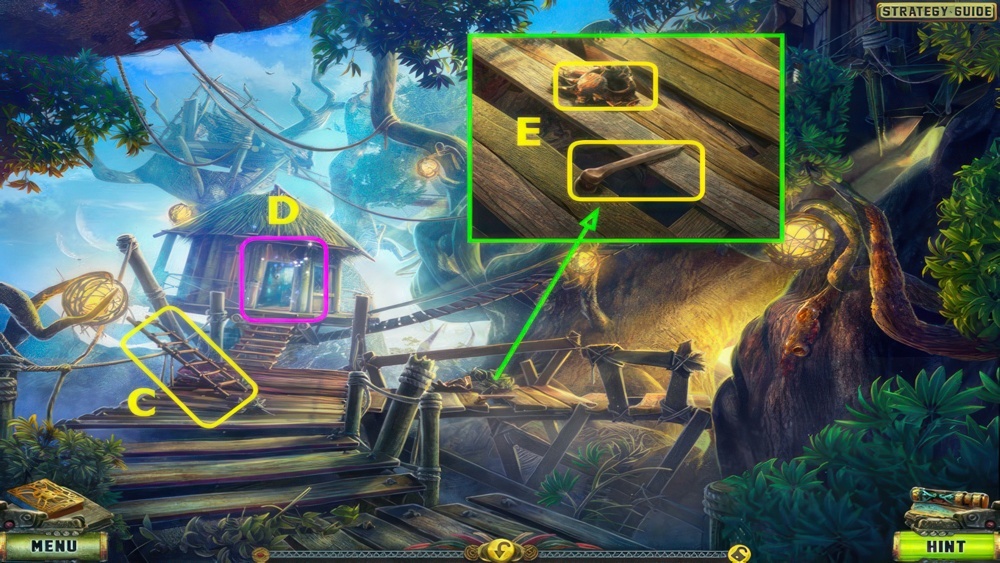
- Use the MACHETE to take the STICK (C).
- Combine the STICK and PIECE OF CLOTH to make a TORCH.
- Use the TORCH to make the BURNING TORCH (D).
- Use the BURNING TORCH (E).
- Go forward.
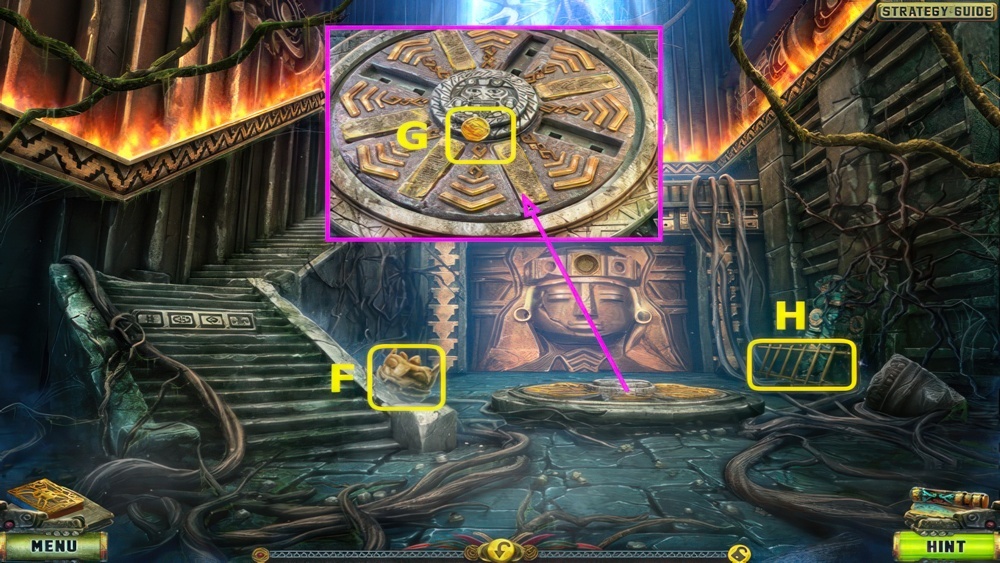
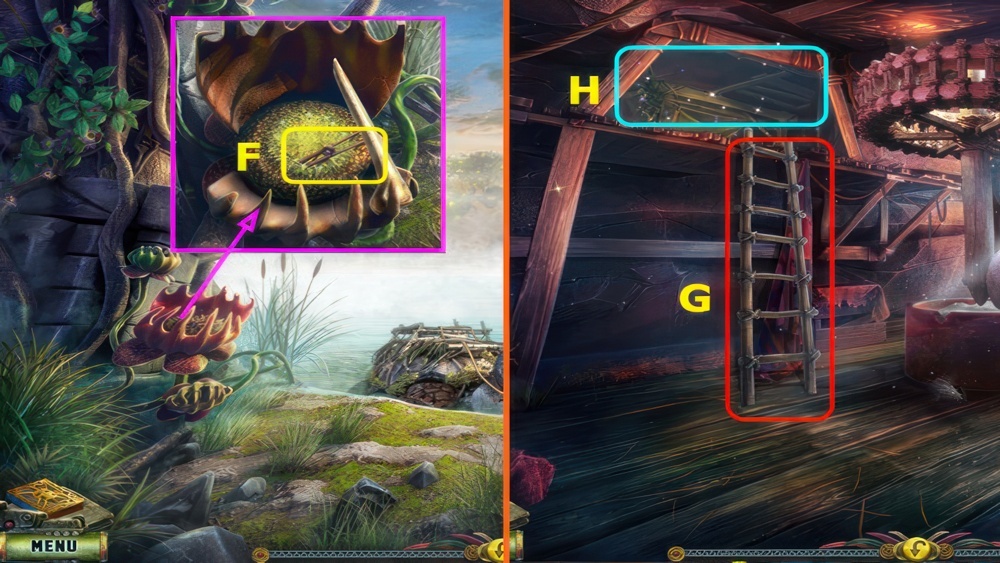
- Take the HEAD (F).
- Take the 2/10 COIN (G).
- Take the LADDER (H).
- Go down.
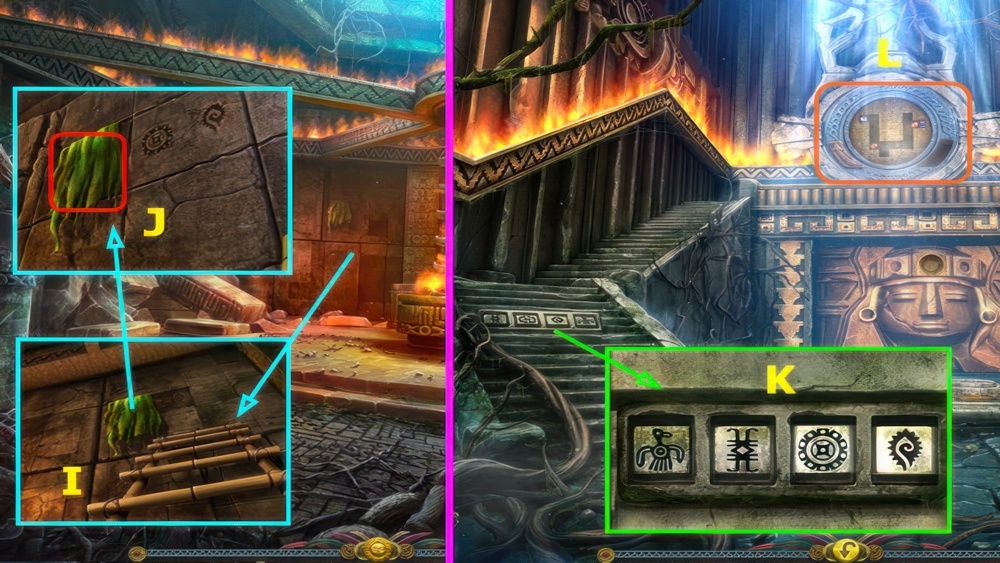
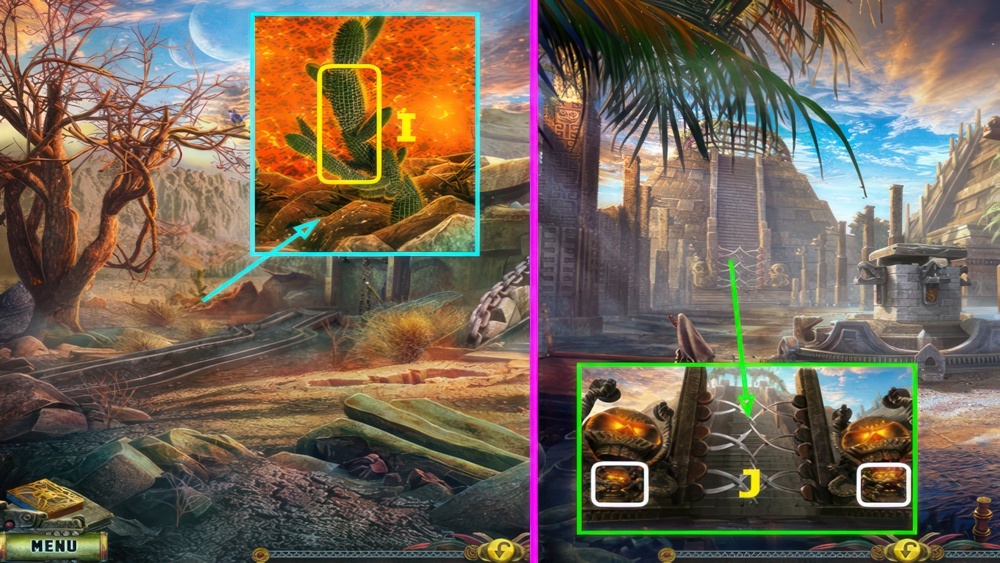
- Place the LADDER (I).
- Remove the cloth and note the symbols (J).
- Go forward.
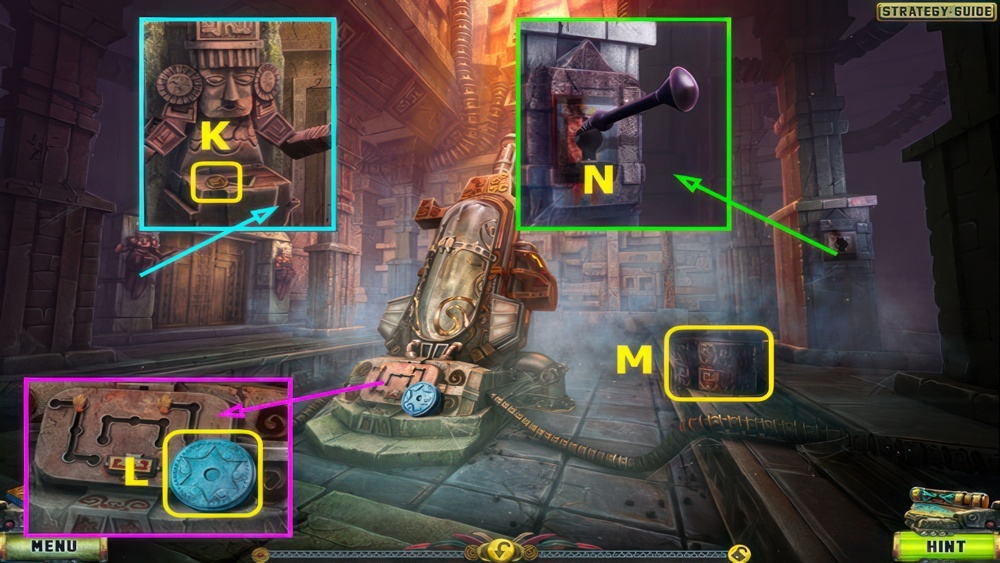
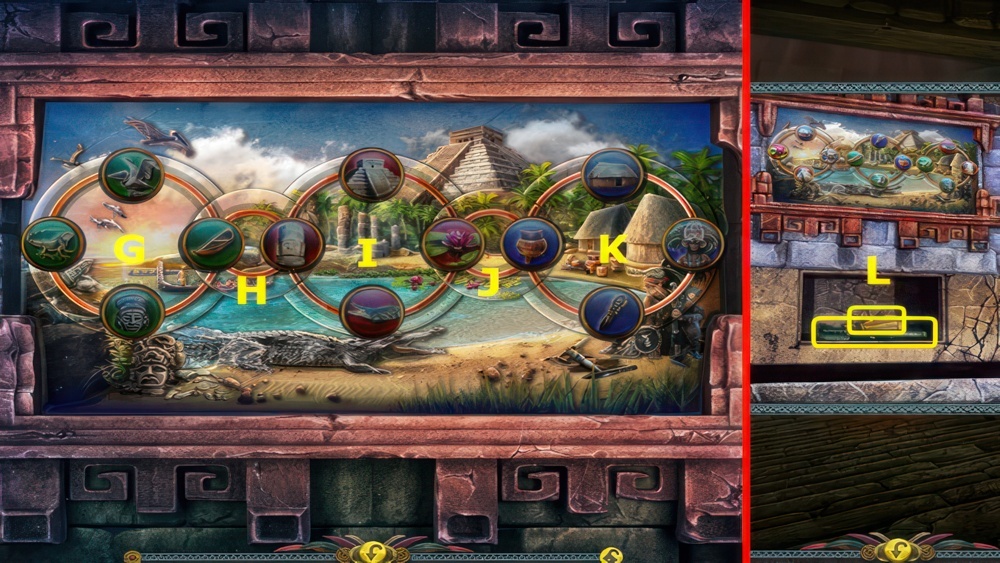
- Arrange the symbols as shown (K), take the FRAGMENT.
- Select (L).
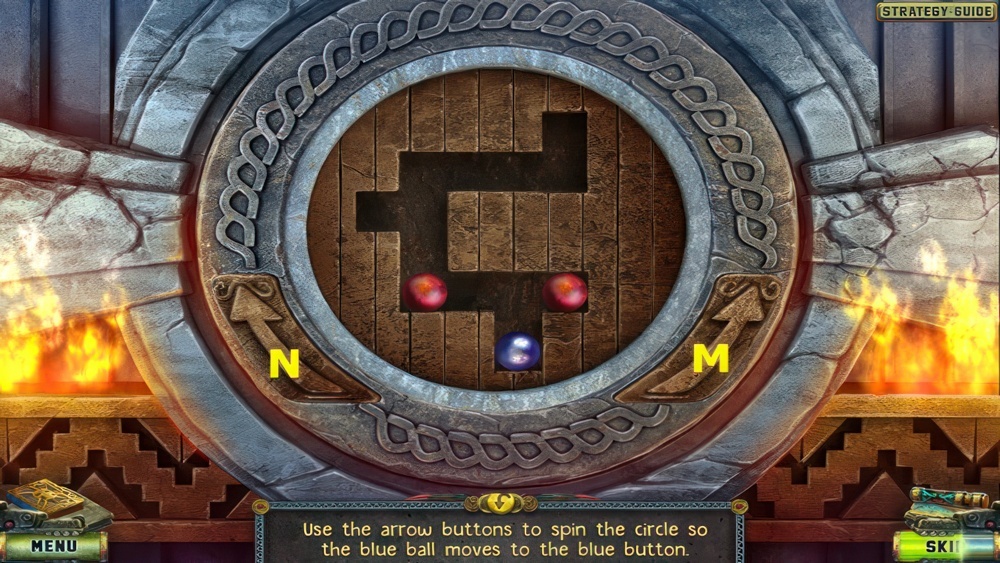
- Place the FRAGMENT (M).
- Use the arrow buttons to spin the circle so the blue ball moves to the blue button.
- Walkthrough: N-M×2-N×3-M-N-M.
- Go forward.
Find the shaman
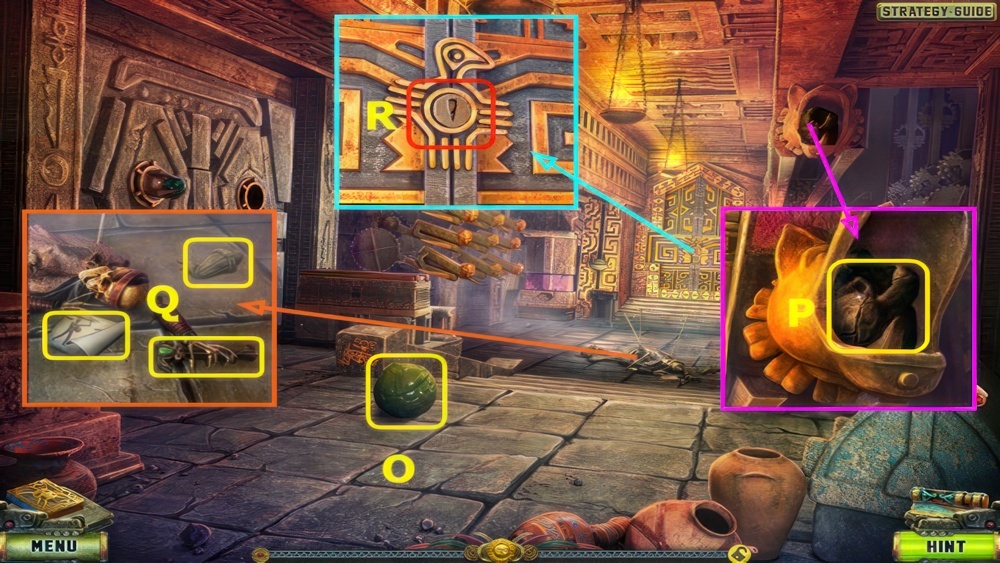
I must find the local shaman. He may be able to help me out. I managed to leave the temple and found myself in a jungle. There I met a boy, who looked quite strange and spoke some rare dialect. I could hardly understand him. I explained to him that I came here through the portal, and he agreed to take me to a shaman. But first he asked me to help him rescue his little pet.
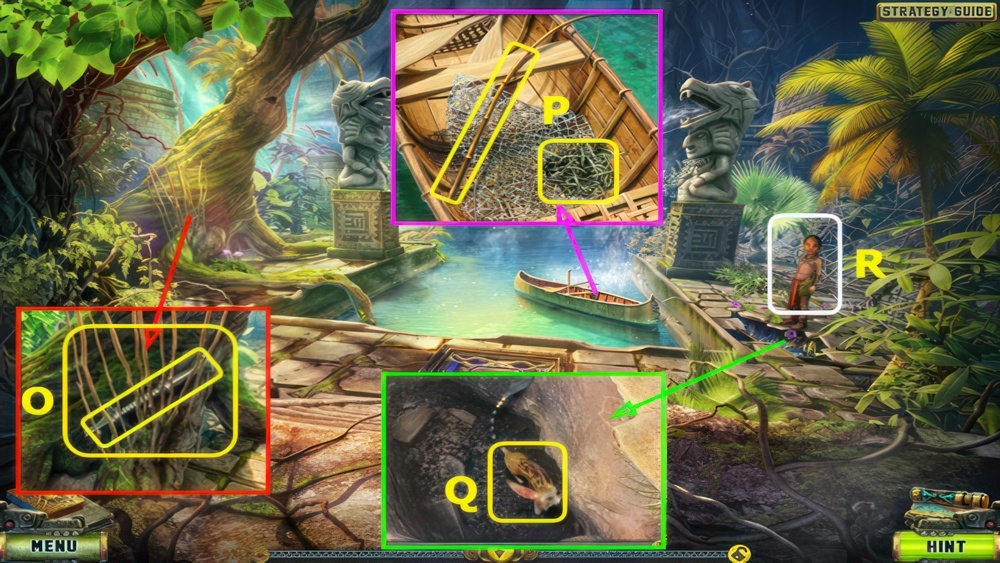
- Talk to the Boy (R).
- Use the MACHETE to take the RODS, take the LEVER (O).
- Take the FISHING ROD and ROPE (P).
- Combine the RODS and ROPE.
- Select the rope, and then select the rods three times.
- Select the ropes to make the BASKET.
- Use the BASKET to take the ANIMAL (Q).
- Give the ANIMAL (R).
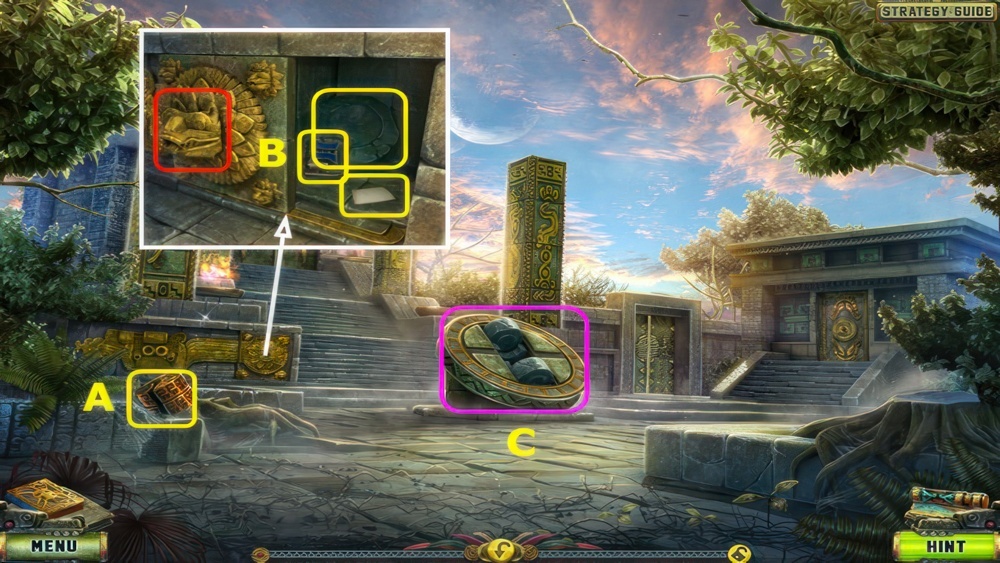
- Take the first WEIGHT (A).
- Place the HEAD, take the FRAGMENT, STONE ROLLER, and CHART (B).
- Select (C).
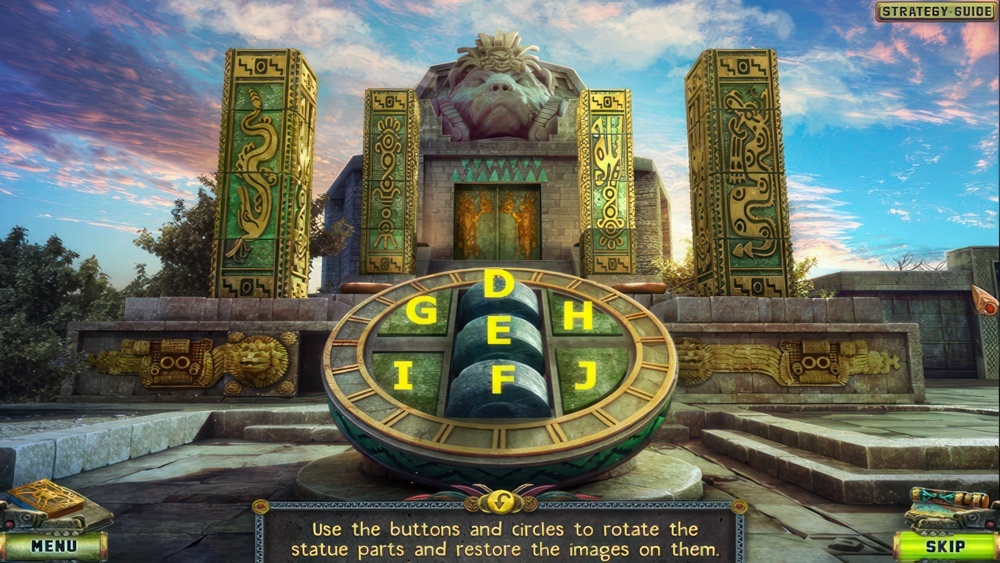
- Place the STONE ROLLER (E).
- Use the buttons and circles to rotate the statue parts and restore the images on them.
- Walkthrough: D×2-F-G-F×2-E×3-D-H-F-D×3-J-F×2-E.
- Go left.
- Take the 3/10 COIN (K).
- Take the KEY (L).
- Take the second WEIGHT (M).
- Place and select the LEVER (N).
- Go down twice.
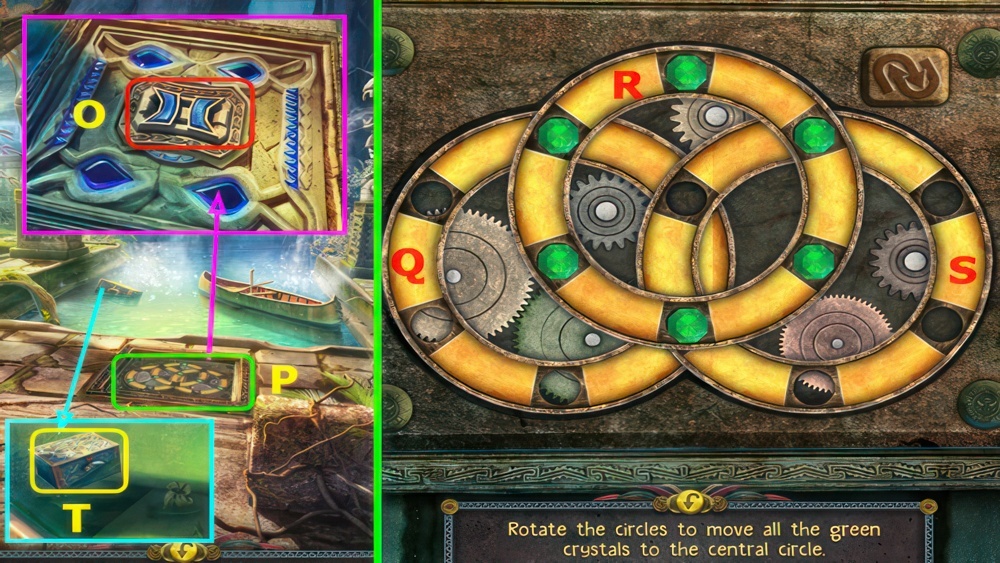
- Place the FRAGMENT (O).
- Select (P).
- Rotate the circles to move all the green crystals to the central circle.
- Clockwise ↻.
- Counterclockwise ↺.
- Walkthrough: Rotate S ↺ one space.
- Rotate R ↻ two spaces.
- Rotate S ↺ one space.
- Rotate Q ↻ two spaces.
- Take the SMALL BOX (T).
- Open the SMALL BOX, take the BOWL OF LAMP.
- Go forward and left.
Wake up the shaman
I helped the boy retrieve the little animal and we went to see the shaman. The boy told me that the shaman is in a manydays’ sleep. I don’t know what that means, but the boy told me that the sleep can be broken because of me. While we traveled I admired the scenery and became more and more convinced that I was in the Amazonian rainforest. But when we left the canyon, I was shocked to discover two moons in the sky. This isn’t our world, or even the past. I must wake up the shaman. Hopefully he can explain what’s going on.
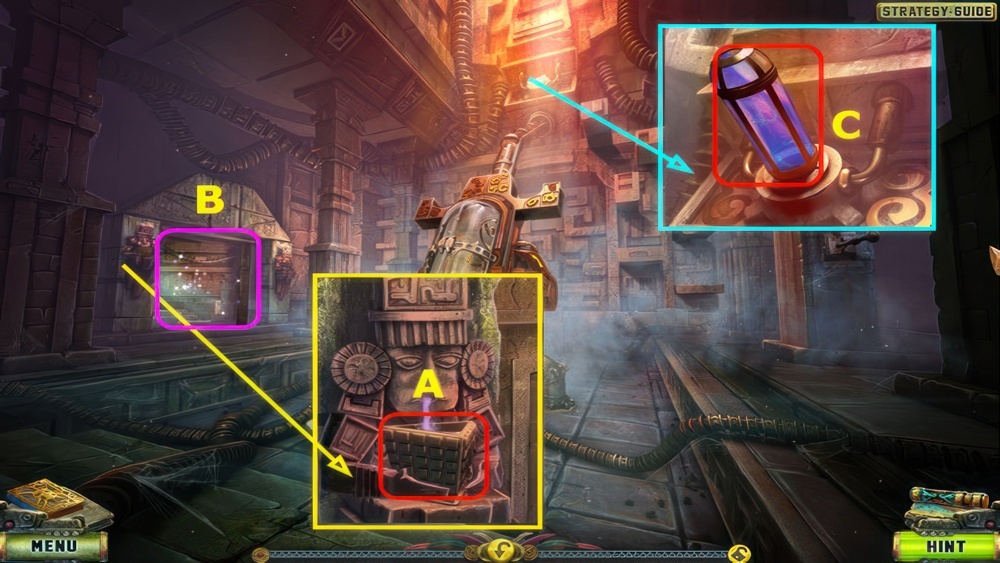
- Place the BOWL OF LAMP (A).
- Play the puzzle, earn the SCROLL (B).
- Open the SCROLL, take the HAND, CAPSULE, and note the symbols.
- Place the CAPSULE (C).
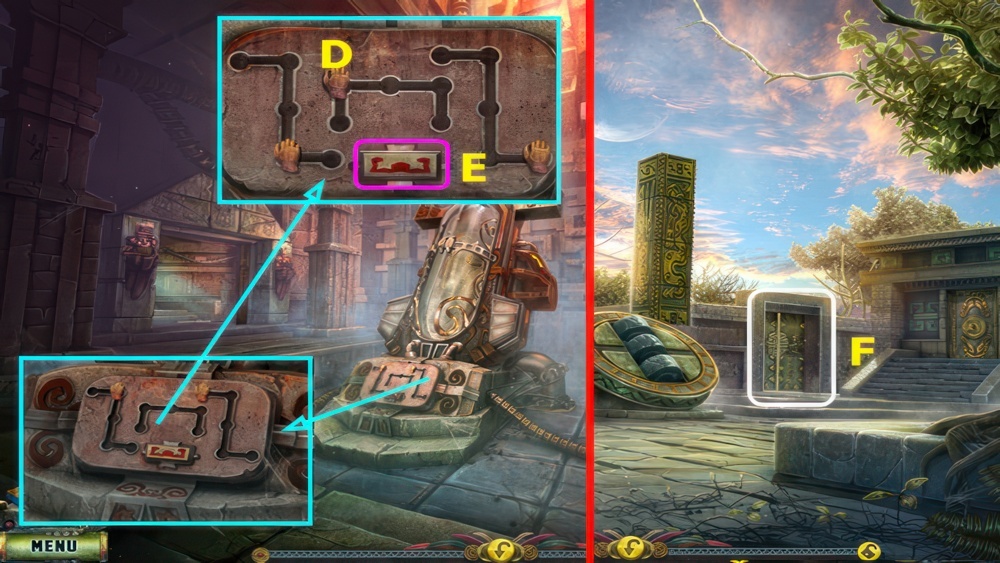
- Place the HAND (D).
- Move the hands to the positions shown, press (E).
- You earn the DISC.
- Go down.
- Select (F).
Find the other gates
I met with the shaman. His name is Shaash and he’s one of the keepers of the temple complex and gates. Shaash told me that I came here through the gates of the worlds. They were sealed for centuries and have only just opened. I came here by pure coincidence. I don’t know why, but the shaman is convinced that I’m in grave danger, and he wants to return me to our world as soon as possible. The gates that brought me here are broken, but there are other portals. Shaash will lead me to them.
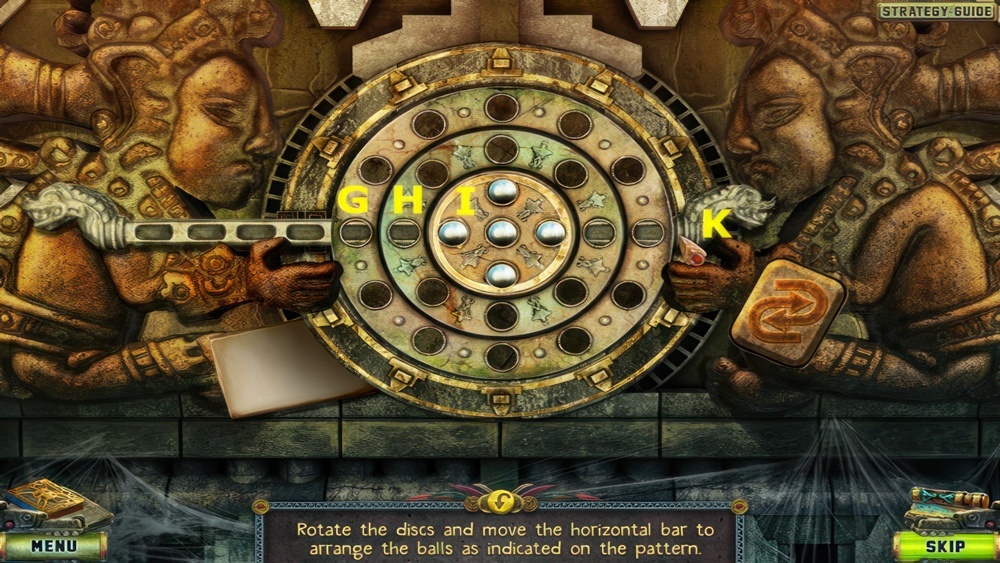
- Place the CHART and DISC on the device.
- Rotate the discs and move the horizontal bar to arrange the balls as indicated on the pattern.
- Clockwise ↻.
- Walkthrough: Rotate H two spaces ↻.
- Slide K right one space.
- Rotate I one space ↻.
- Rotate H four spaces ↻.
- Slide K left three spaces.
- Go forward.
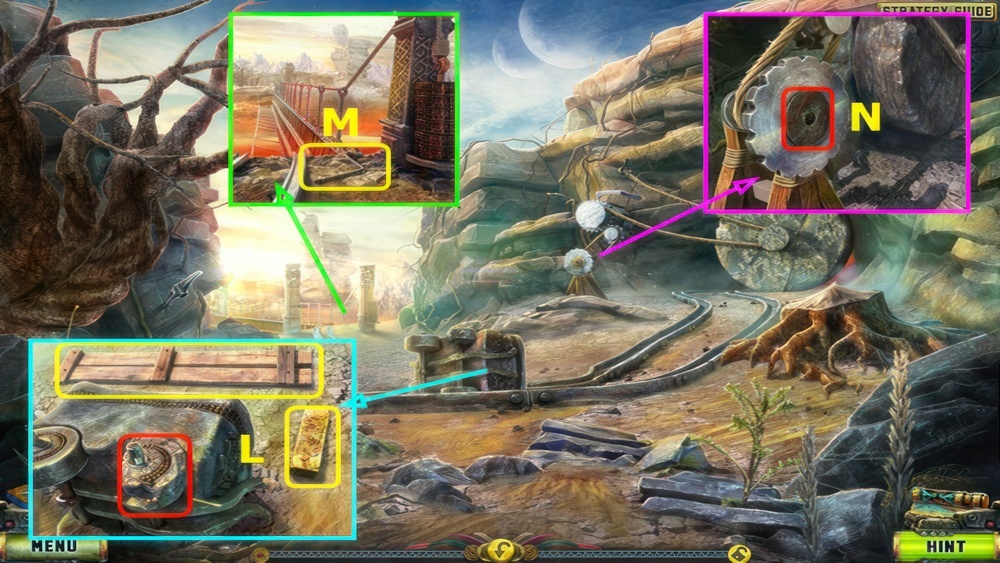
- Take the PLANK and 1/3 STONE BLOCK, remove the broken wheel (L).
- Take the HANDLE (M).
- Place the HANDLE (N).
- Go right.
Activate the drilling machine
Shaash told me we’re on an island surrounded by lava. The other gates which can take me back home are located beyond the island. The only way to leave the island is a drilling machine which can dig an underground tunnel. Unfortunately, it’s broken, and the only person capable of repairing it is its inventor. He lives in a nearby settlement. We need to find him.

- Use the MACHETE to take the HOOK (O).
- Add the HOOK to the FISHING ROD.
- Take the 4/10 COIN (P).
- Place the PLANK and take the 2/3 STONE BLOCK (Q).
- Take the 5/10 COIN and KEY (R).
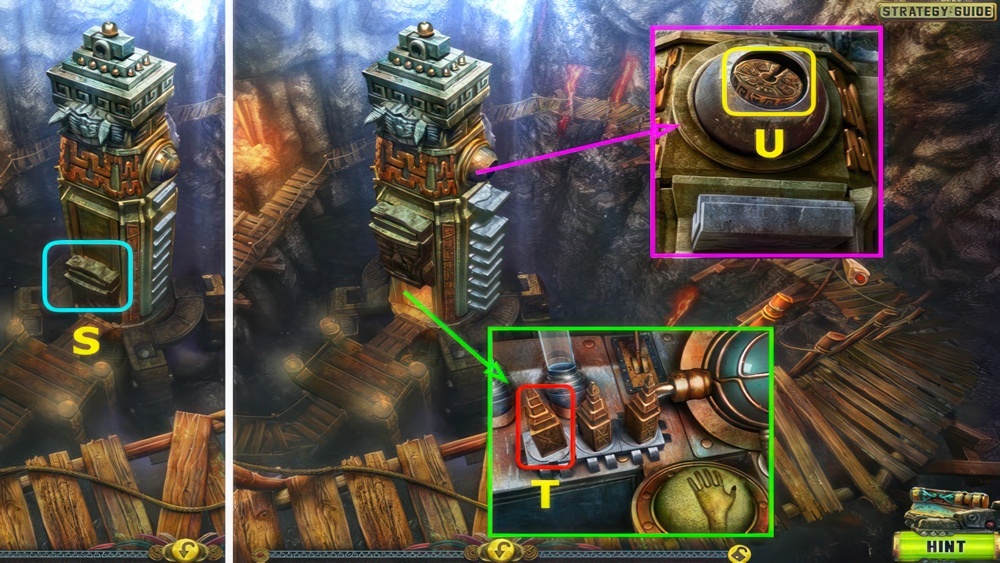
- Select (S).
- Place the KEY (T).
- Select the dome, take the third WEIGHT (U).
- Go down.
Find the engineer
The drilling machine doesn’t work, and only its inventor can start it again.
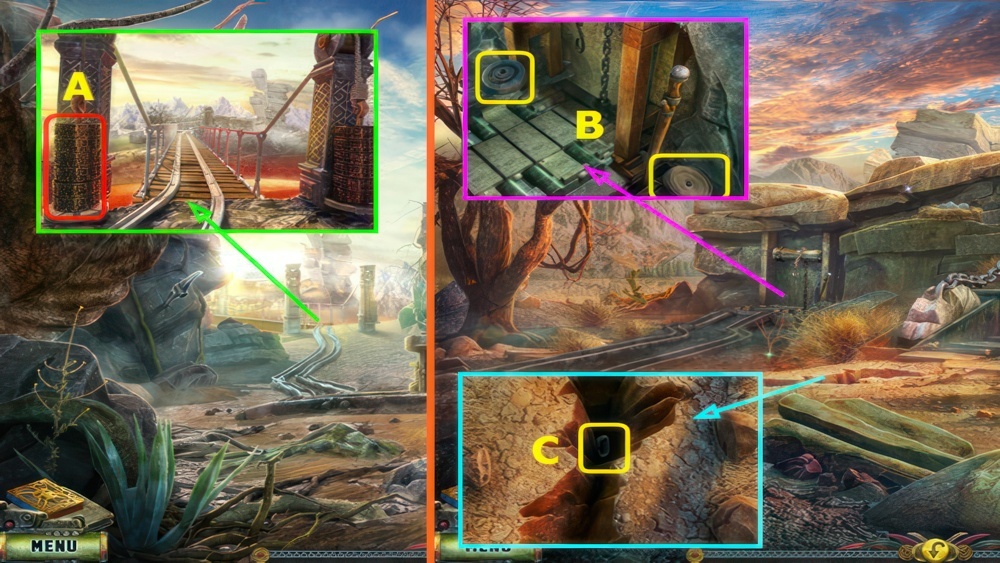
- Place the 3 WEIGHTS (A).
- Go forward.
- Take the WHEEL and COIL OF ROPE (B).
- Use the FISHING ROD to take the CARABINER (C).
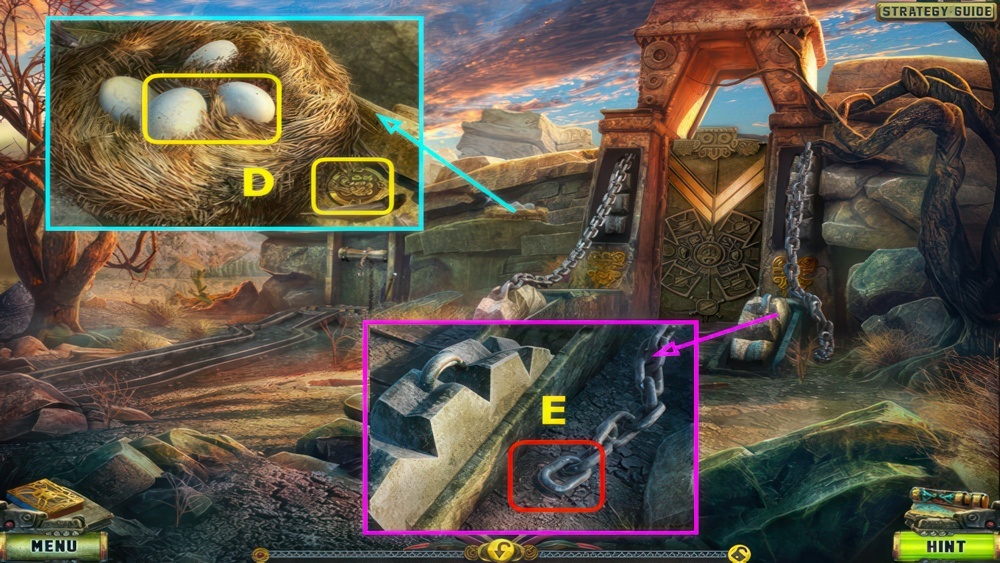
- Take the EGGS and 6/10 COIN (D).
- Use the CARABINER (E).
- Go down.
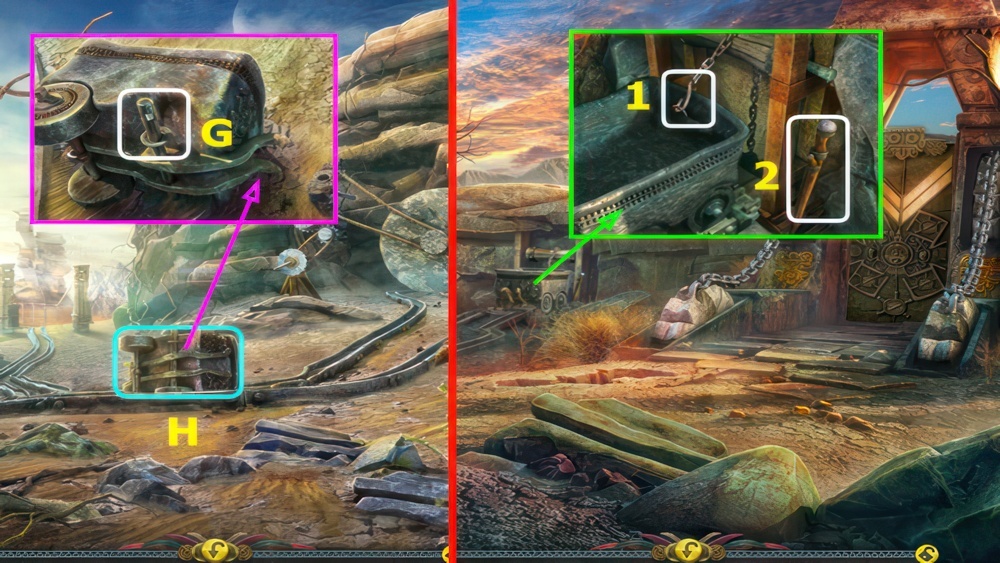
- Place the WHEEL (G).
- Select (H).
- Go forward.
- Select the hook (1) and lever (2).
- Go forward.
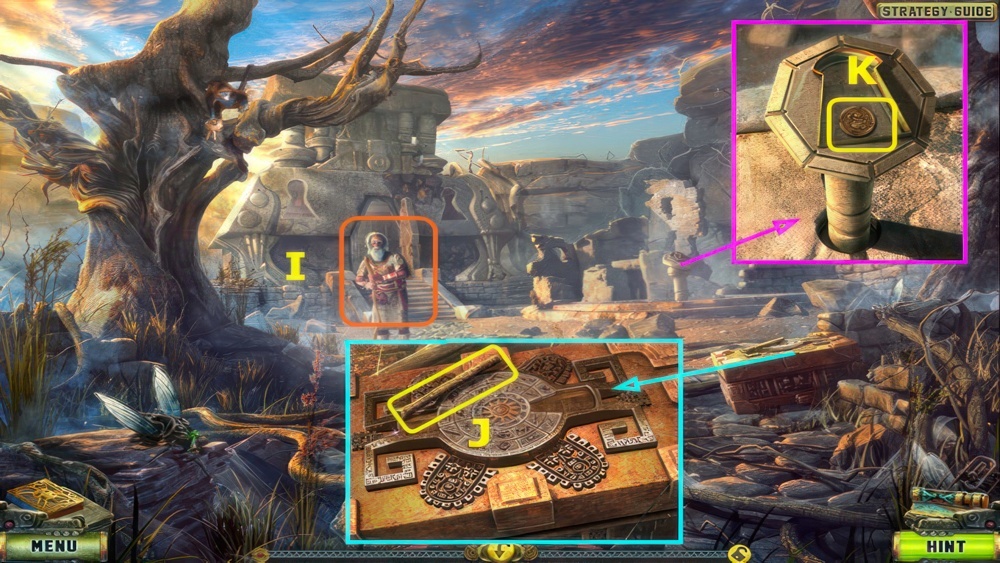
- Speak to the Engineer (I).
- Take the STICK (J).
- Take the 7/10 COIN (K).
- Go forward.
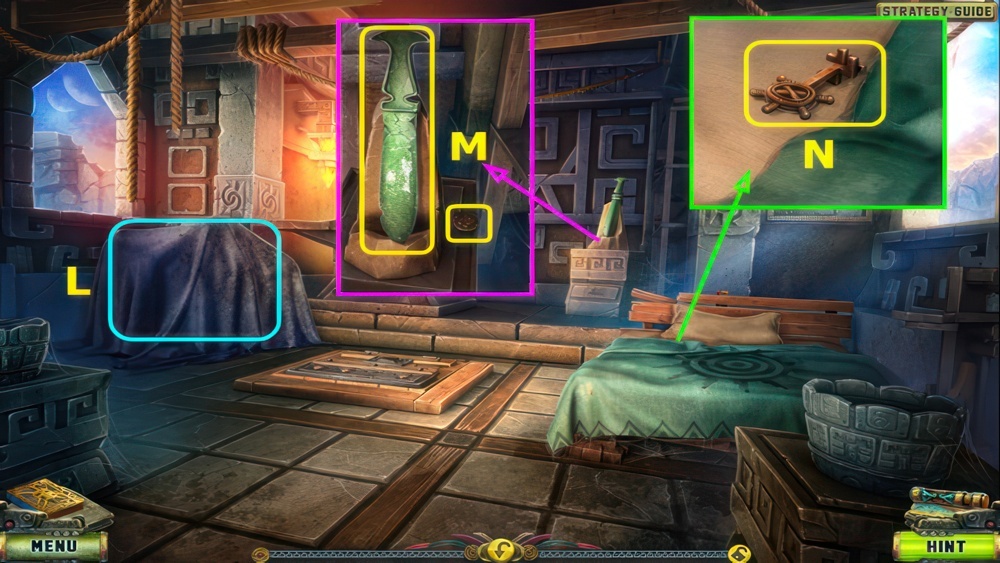
- Select (L).
- Take the NEPHRITE SWORD and 8/10 COIN (M).
- Move the cover and take the KEY (N).
- Go down thrice.
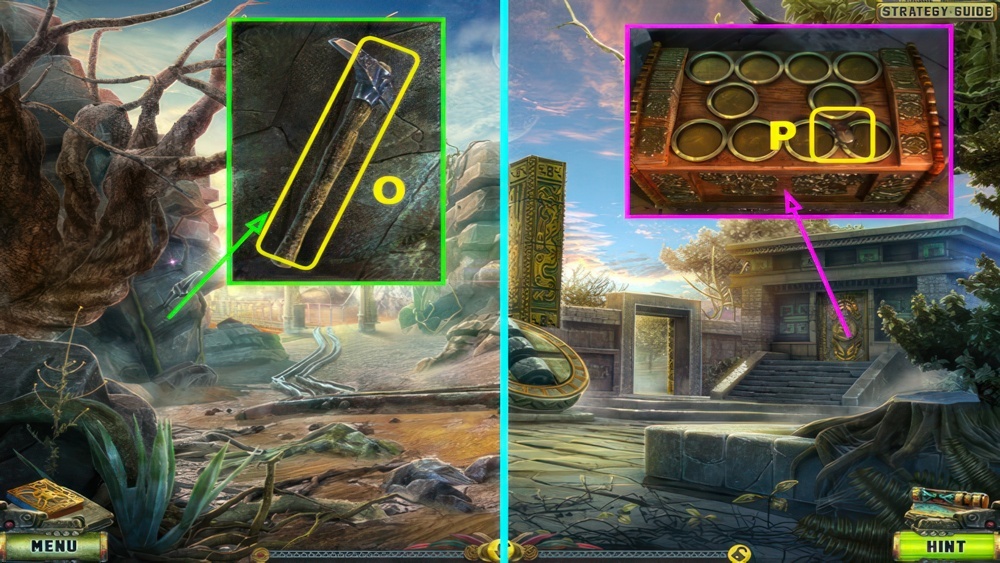
- Place the STICK, take the PICK-AXE (O).
- Go down.
- Use the KEY, select the chest and take the BEETLE FIGURINE (P).
- Go forward and right.
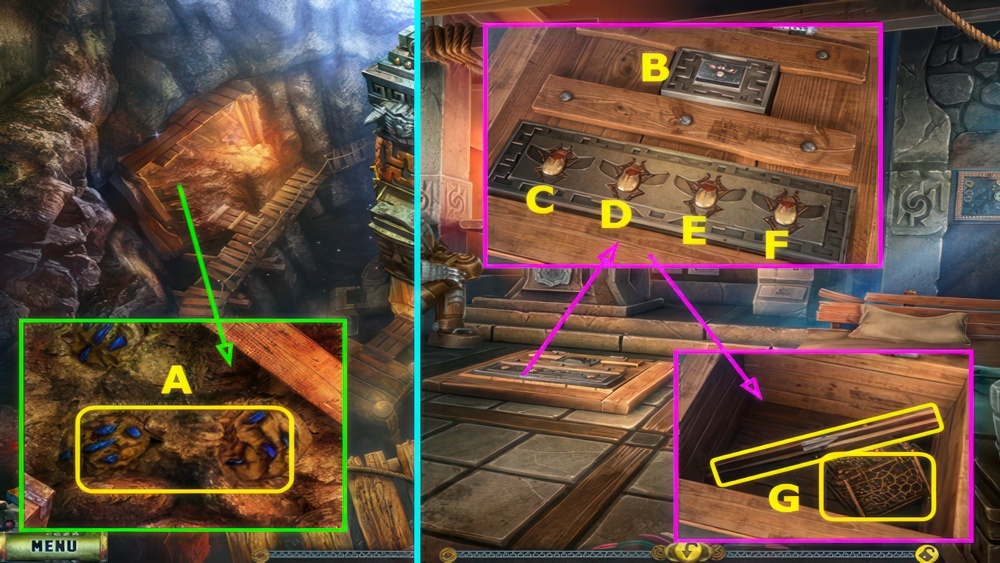
- Use the PICK-AXE to take the CRYSTALS (A).
- Go down, go forward twice.
- Place the BEETLE FIGURINE (E).
- Repeat the pattern by opening and closing the beetles.
- Walkthrough: Press B, select F-C-E-F-C-D-C-F.
- Take the 1/2 CROSSBOW PART, place the EGGS and take the CAGE (G).
- Go down thrice.
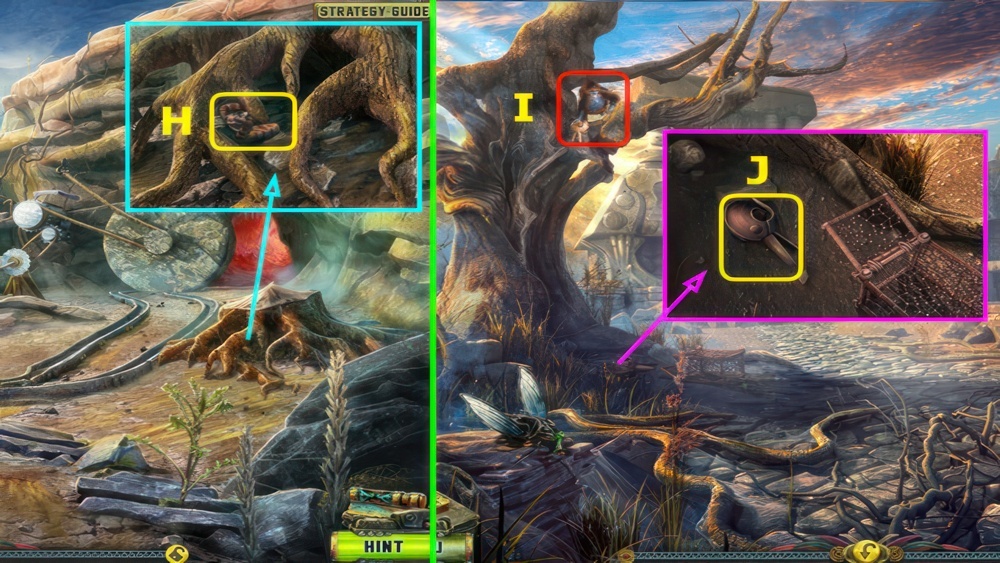
- Use the CAGE to take the CAGE WITH SNAKE (H).
- Go forward twice.
- Use the CAGE WITH SNAKE (I).
- Take the FRAGMENT (J).
- Go forward.
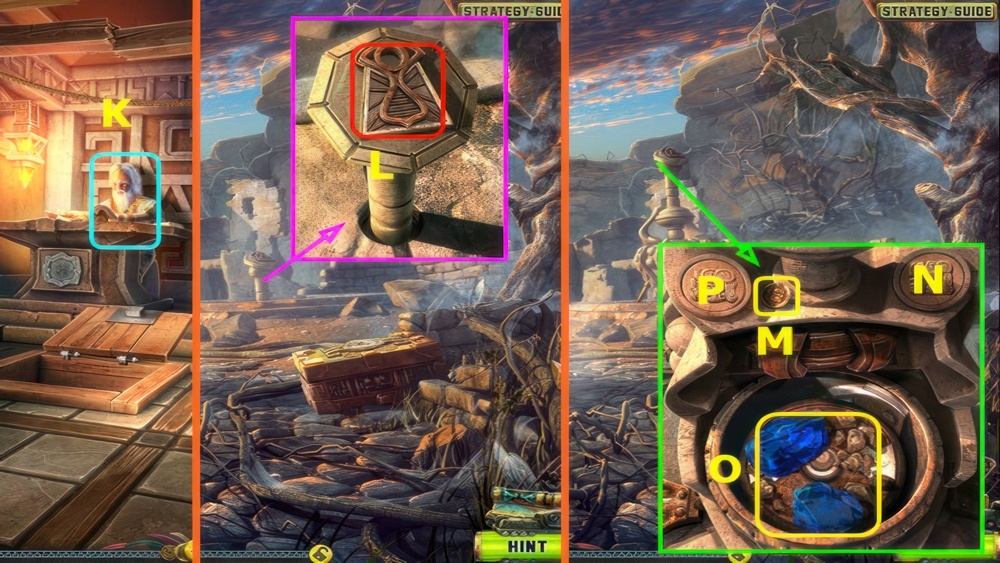
- Give the FRAGMENT, earn the FRAGMENT (K).
- Go down.
- Place the FRAGMENT (L).
- Take the 9/10 COIN (M) and press (N).
- Place the CRYSTALS (O) and press (P).
- Take the CRYSTALS.
- Go down twice, go right.
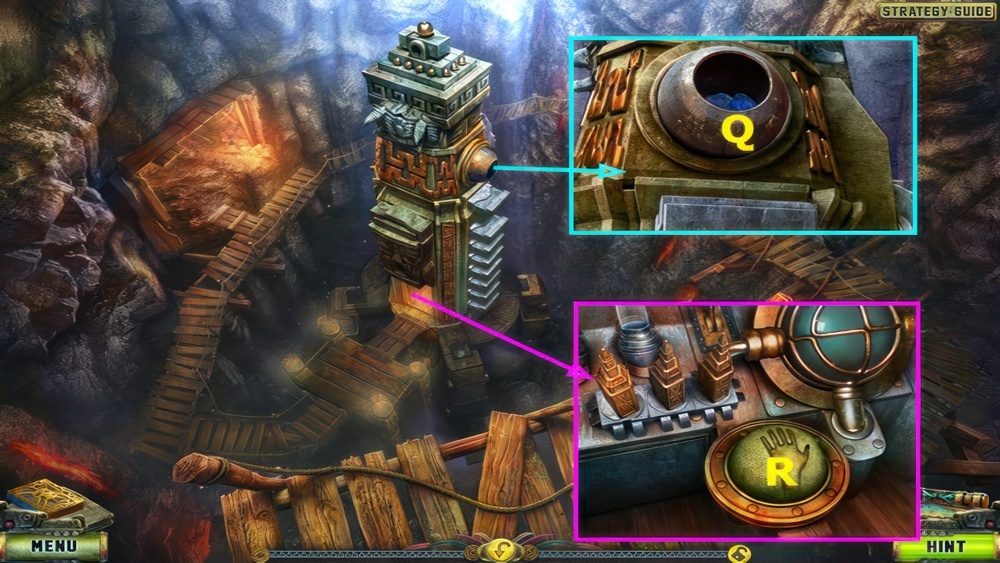
- Place and select the CRYSTALS (Q).
- Select (R).
Get to the Temple of the Sun
The engineer helped us activate the drilling machine. With its help we literally went right through the mountain into the Temple of the Sun. That’s what Shaash called it. In this temple there are gates similar to those that brought me here. The shaman hopes they have also been activated or can be activated somehow. I have to get inside the temple, and then Shaash will attempt to send me back home.
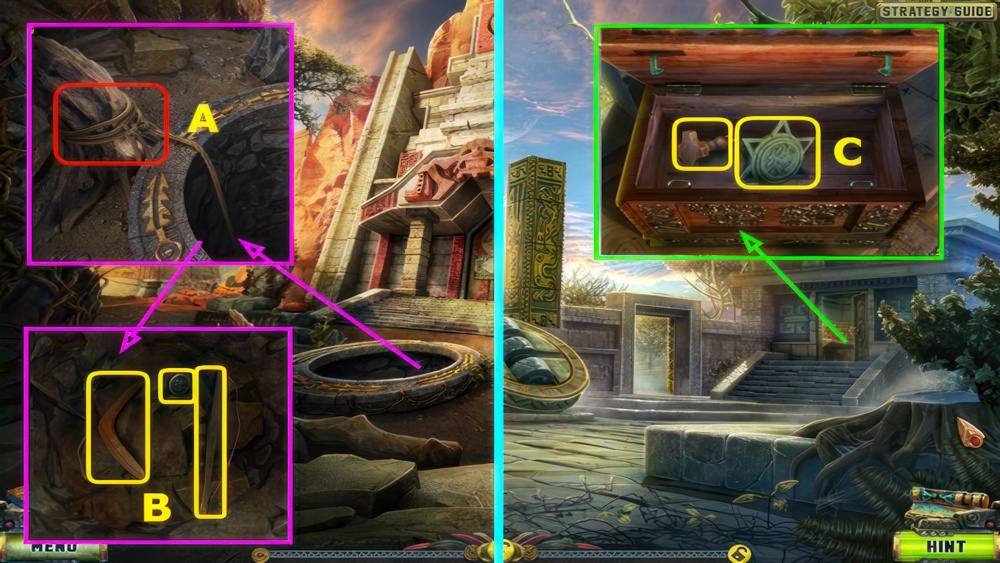
- Place and select the COIL OF ROPE (A).
- Take the BOOMERANG, 10/10 COIN, and 1/2 CROSSBOW PART (B).
- Combine the 2 CROSSBOW PARTS to make the CROSSBOW.
- Go down thrice.
- Select the chest and place the 10 COINS.
- Take the KEY PART and RED PEDESTAL PART (C).
- Add the KEY PART to the KEY.
- Go down twice.
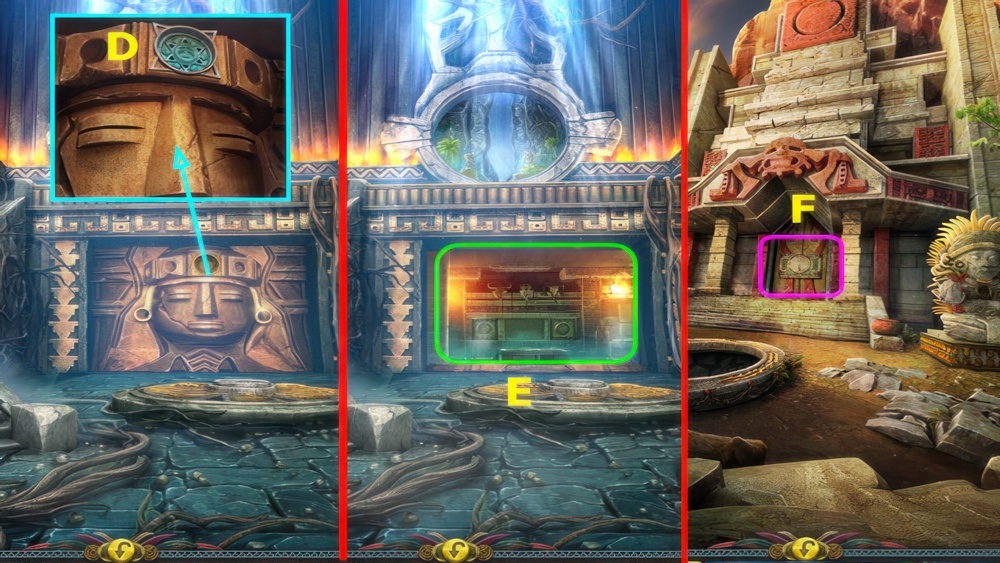
- Place the KEY (D).
- Play the puzzle, earn the CHIP (E).
- Return to the Temple of the Sun Entrance.
- Select (F).
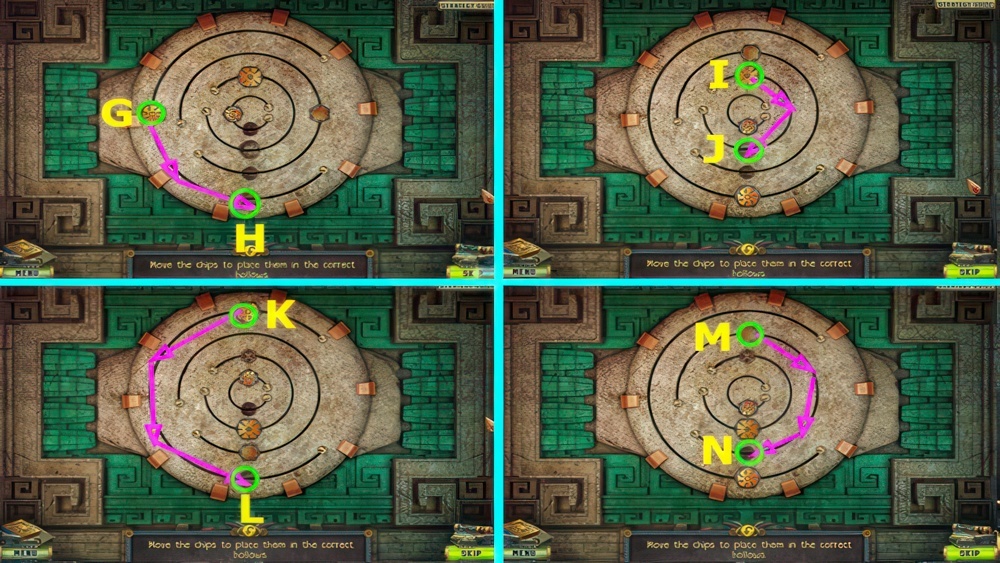
- Place the CHIP on the device.
- Move the chips to place them in the correct hollows.
- Walkthrough: (G-H)-(I-J)-(K-L)-(M-N).
- Go forward.
- Take the GEAR (A).
- Use the MACHETE, take the MEDALLION (B).
- Go down.
- Place the MEDALLION (C).
- Play the puzzle, earn the KEY (D).
- Go forward.
- Place the KEY (E).
- Select (F).
- Arrange the chips to match the images.
- Walkthrough: H-G×2-J-I×2-H-G-K×3-J-I-H-G×2-I-H.
- G×3-I-K×2-J-I-K-J-I-K-J-K×3-J-I-K×2.
- Take the NEPHRITE BATTLE-AXE and BLUE PEDESTAL PART (L).
- Return to the Engineer’s House.
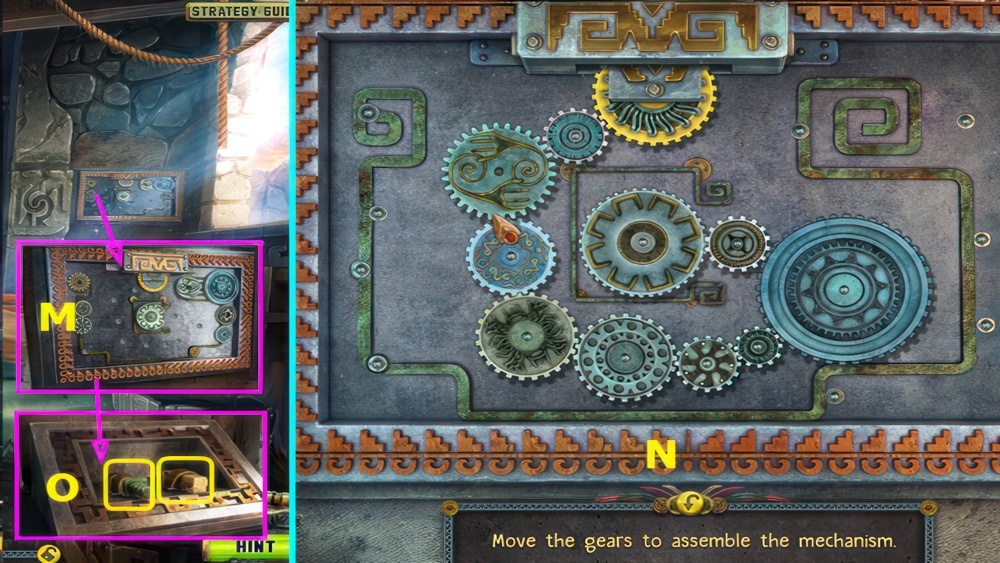
- Place the GEAR (M).
- Move the gears to assemble the mechanism.
- Walkthrough: Restore the gears (N).
- Take the NEPHRITE DAGGER and the 3/3 STONE BLOCK (O).
- Go down ×6.
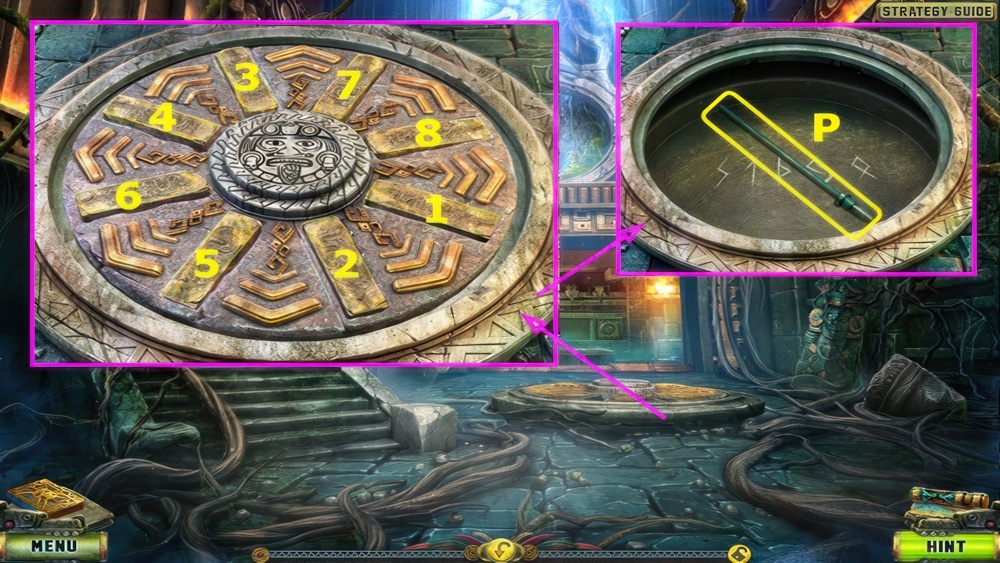
- Press the blocks in the right order.
- If pressed correctly, the blocks remained pressed.
- Otherwise they will rise up again.
- Place the 3 STONE BLOCKS on the device, press 1-8.
- Take the NEPHRITE SPEAR and note the symbols (P).
- Return to the Temple of the Sun.
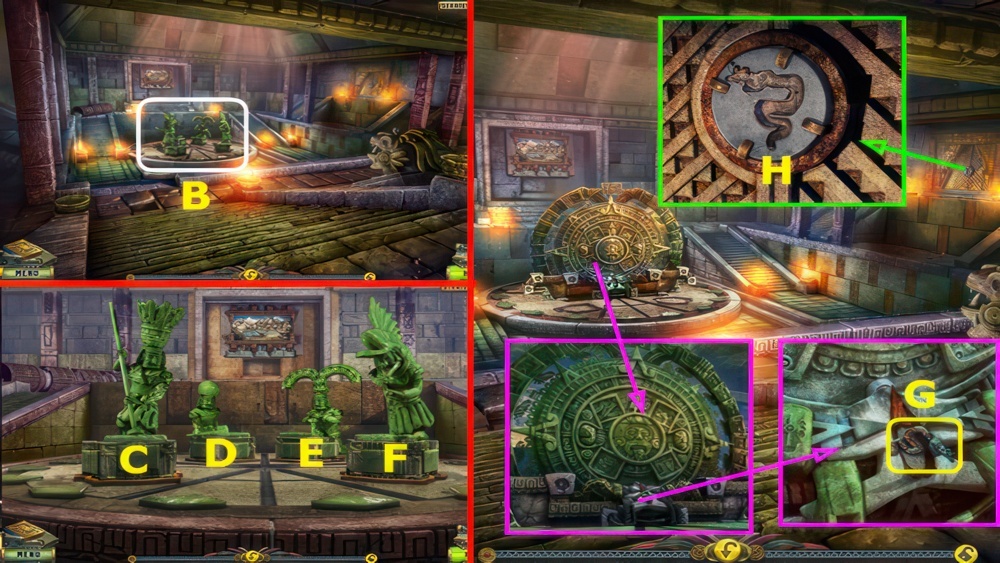
- Select (B).
- Place the NEPHRITE SPEAR (C).
- NEPHRITE BATTLE-AXE (D).
- NEPHRITE DAGGER (E), and the NEPHRITE SWORD (F).
- Take the SNAKE FIGURINE (G).
- Place the SNAKE FIGURINE (H).
- Go right.
Activate the gate
I must activate the gate and tune it to my world so I can return home. I’ll need a special crystal for this, which I have to find.
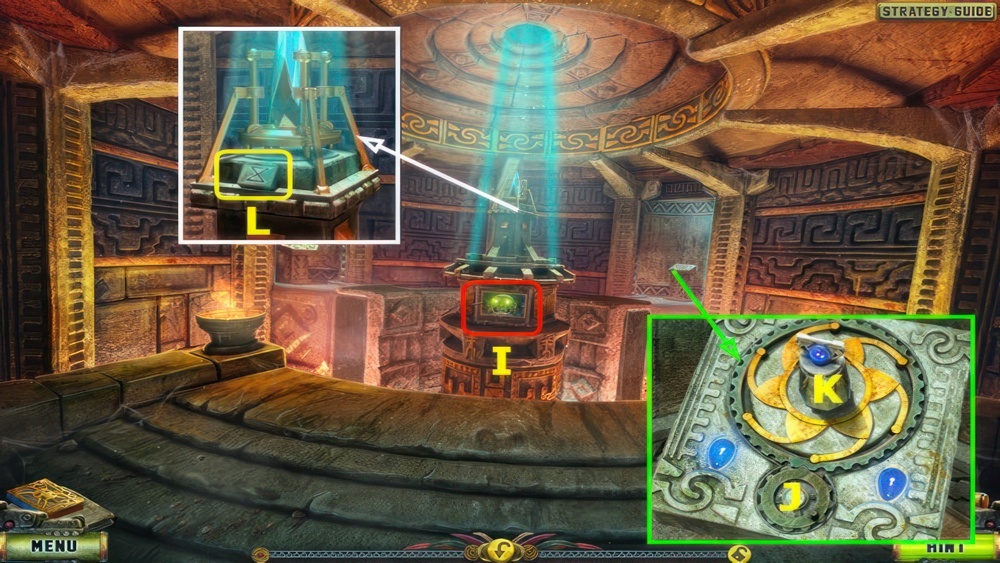
- Use the CROSSBOW (I).
- Select (J).
- Place the BLUE PEDESTAL PART (K).
- Take the RUNE (L).
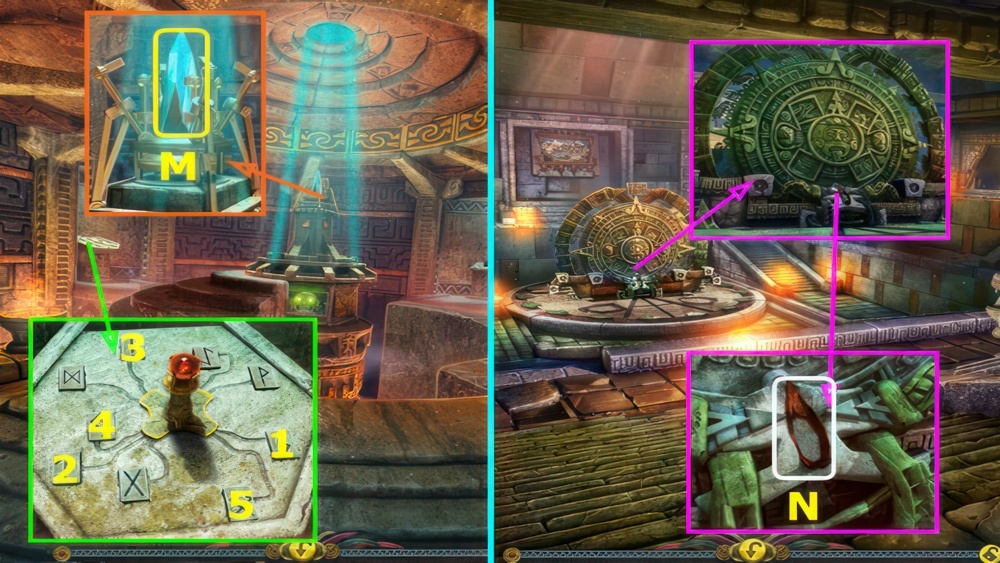
- Press the symbols in the correct order.
- Place the RUNE and the RED PEDESTAL PART, press 1-5.
- Take the CRYSTAL (M).
- Go down.
- Place the CRYSTAL (N).
Leave the temple
The shaman was captured by some Tohunga, and I’m stuck in some strange corridor with no way back. I must find another way out.
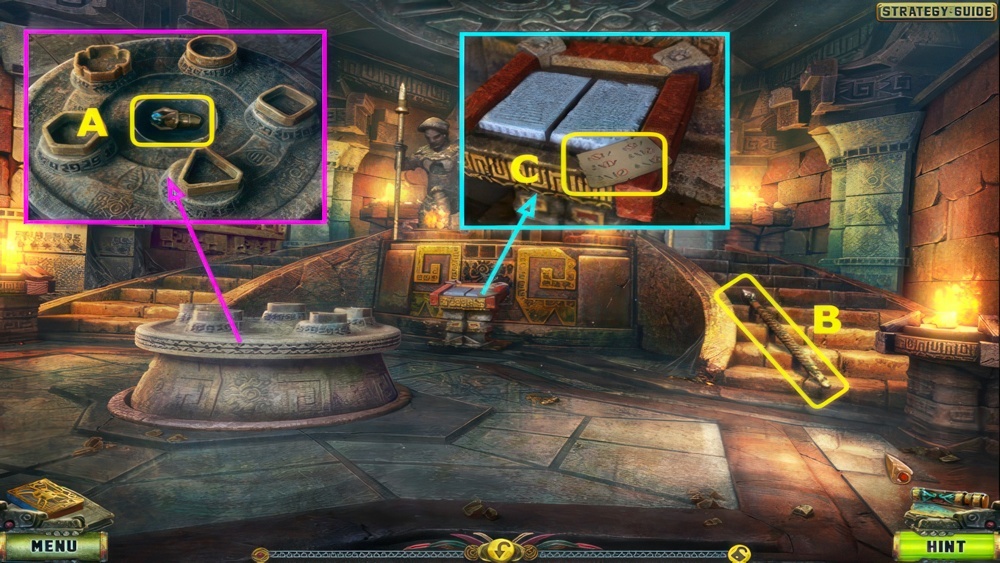
- Take the SPHERE (O).
- Take the first HEART and place the SPHERE (P).
- Take the NOTE and HORN, move the arm and take the KEY (Q).
- Use the KEY (R).
- Go forward.
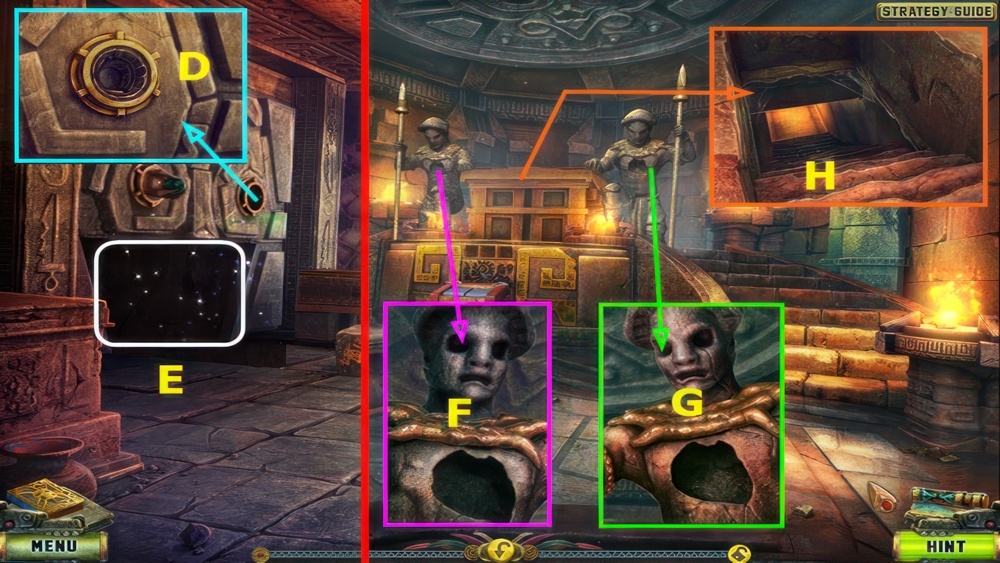
- Take the EYE (A).
- Take the SPEAR (B).
- Take the HINT and read the tablets (C).
- Go down.
Get to the Clouded Pyramids
The Tohunga flew their birds to the Clouded Pyramids and took the shaman with them. I must get there.
- Place the EYE (D).
- Play the puzzle, earn the second HEART (E).
- Go forward.
- Place the first HEART (F).
- Place the second HEART (G).
- Enter the passage (H).
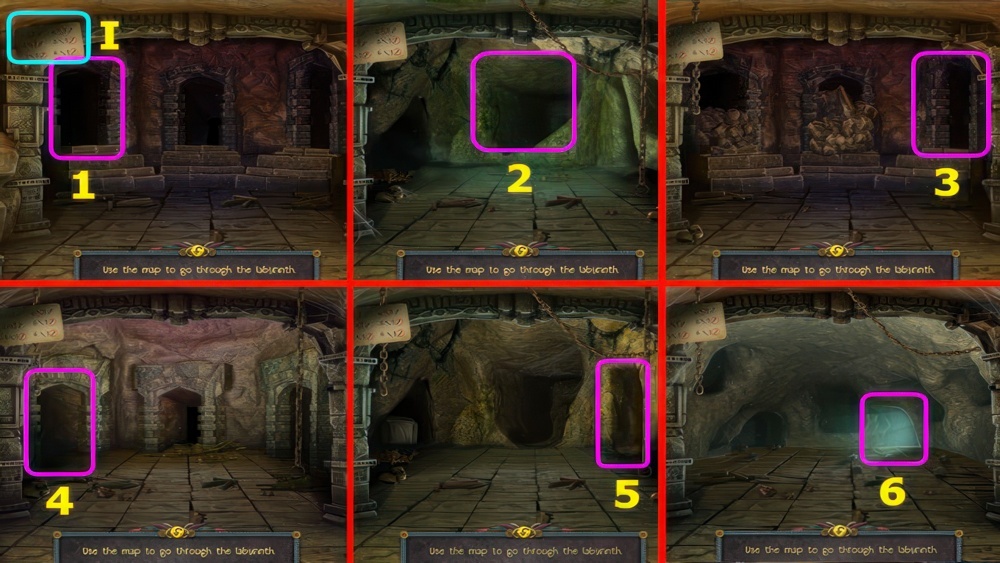
- Place the HINT (I).
- Use the map to go through the labyrinth.
- Walkthrough: 1-6.
Find the raiders
The farmer told me that the raiders are the only ones who can help me get to the Clouded Pyramids. I need to go see them.
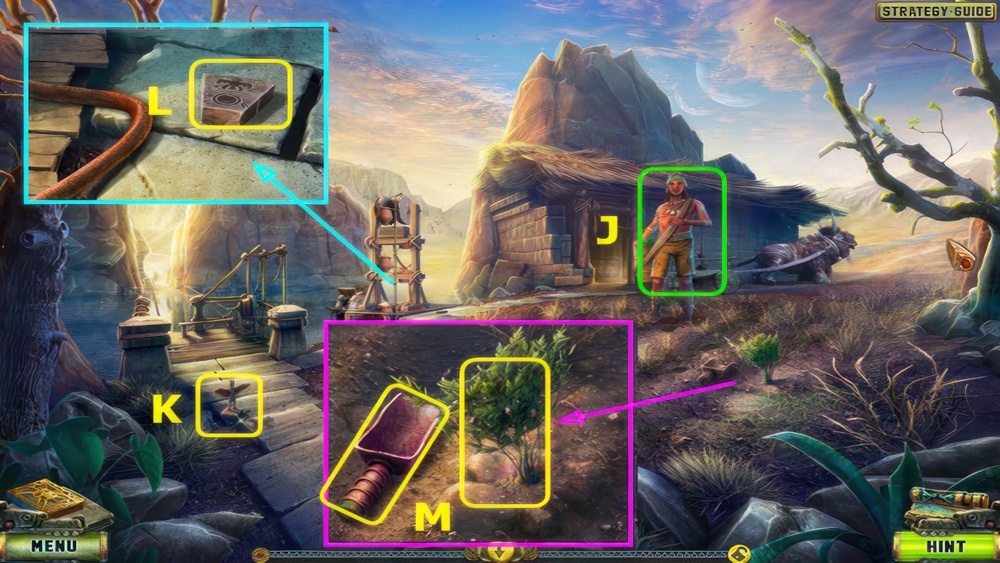
- Talk to the Farmer (J).
- Take the 1/5 FIGURINE (K).
- Take the STONE DISC PART (L).
- Take the LADLE and CARROT (M).
- Go forward.
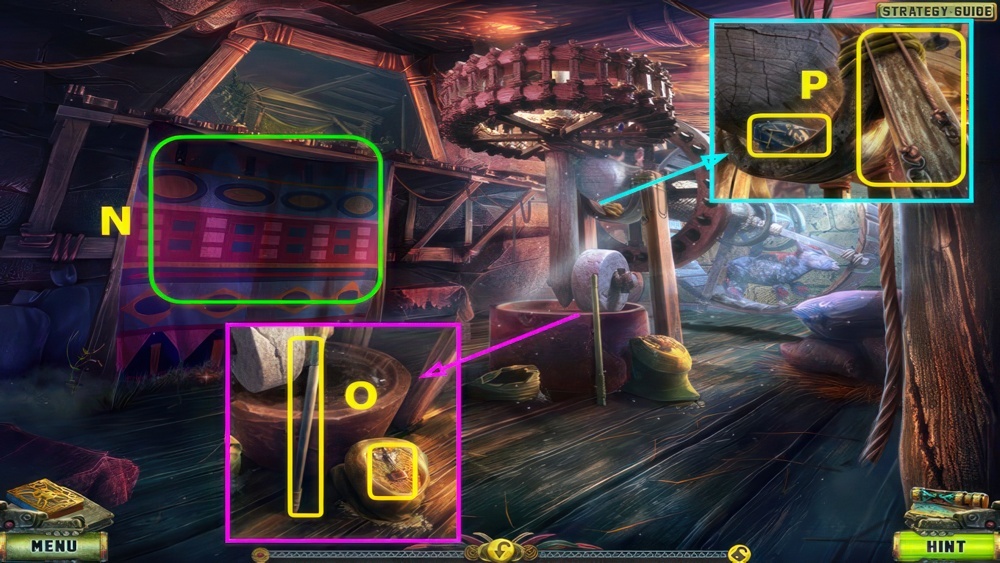
- Select (N).
- Take the STICK, take the 2/5 FIGURINE and use the LADLE on the grain (O).
- Take the REINS, use the SPEAR to take the MAGNETIC STONE (P).
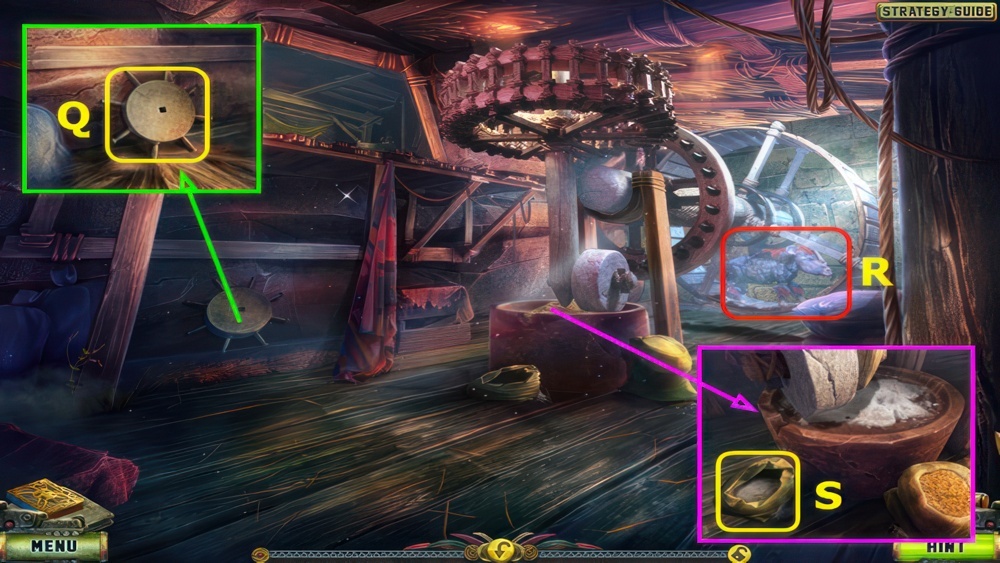
- Take the FLYWHEEL (Q).
- Use the CARROT (R).
- Take the SACK OF FLOUR (S).
- Go down.
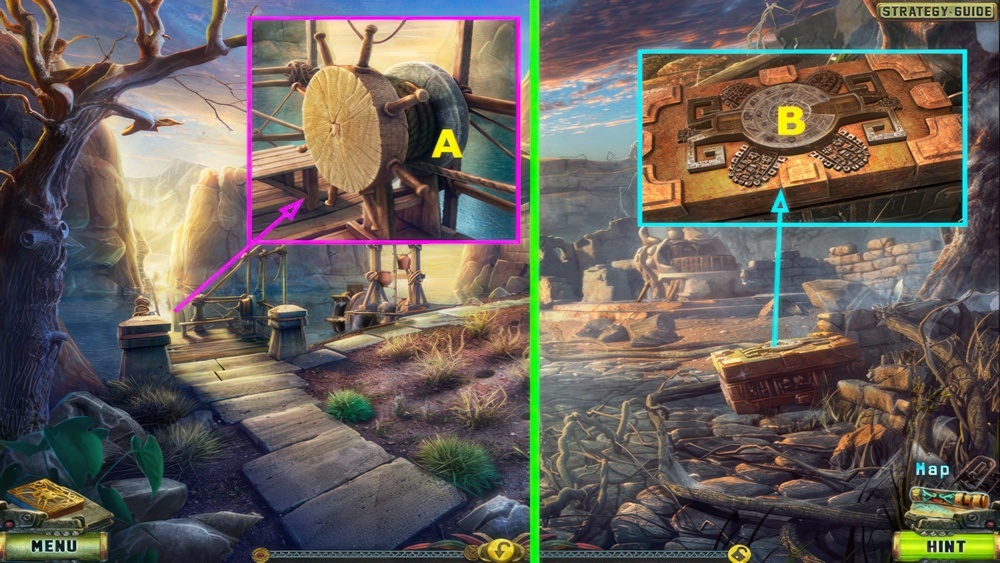
- Place the FLYWHEEL (A).
- Return to the Deserted Village.
- Select (B).
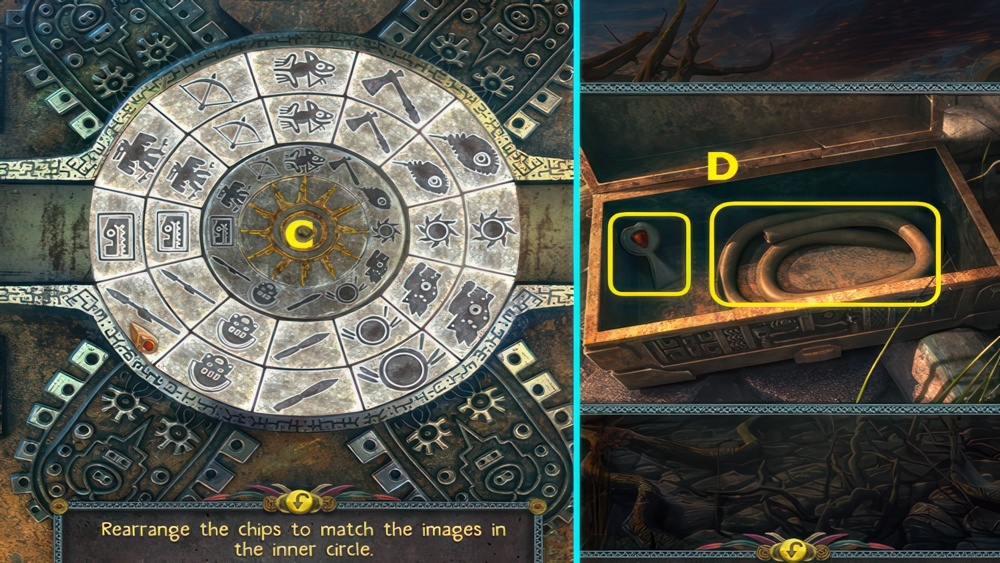
- Place the STONE DISC PART on the device.
- Rearrange the chips to match the images in the inner circle.
- Arrange the inner and outer rings as shown (C).
- Take the KEY and HOSE (D).
- Go forward.
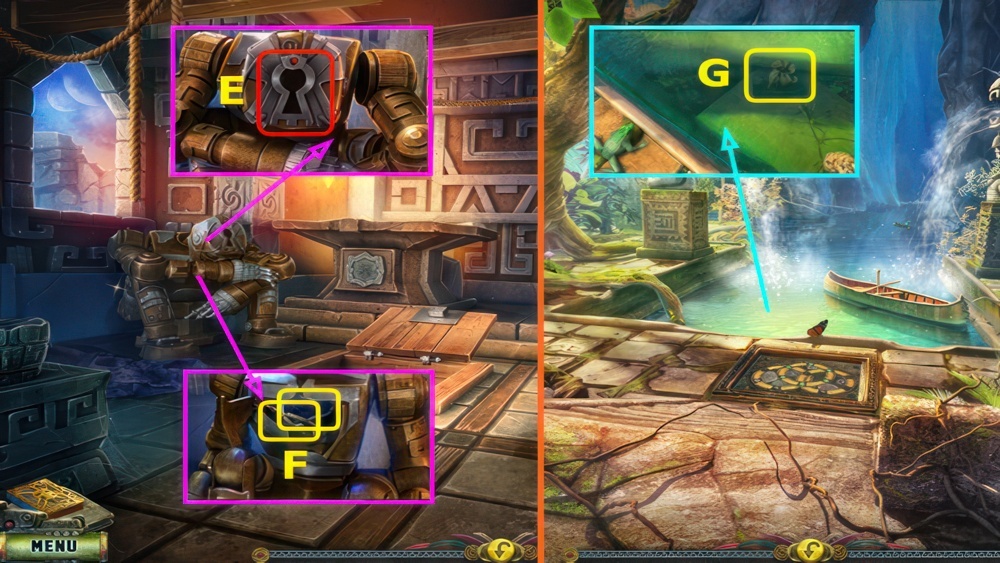
- Place the KEY (E).
- Take the BUTTERFLY NET PART and TONGS (F).
- Combine the STICK and BUTTERFLY NET PART to make the BUTTERFLY NET.
- Go down ×5.
- Use the BUTTERFLY NET to take the SACK (G).
- Open the SACK, take the BAMBOO PIPE and 3/5 FIGURINE.
- Return to the Field.
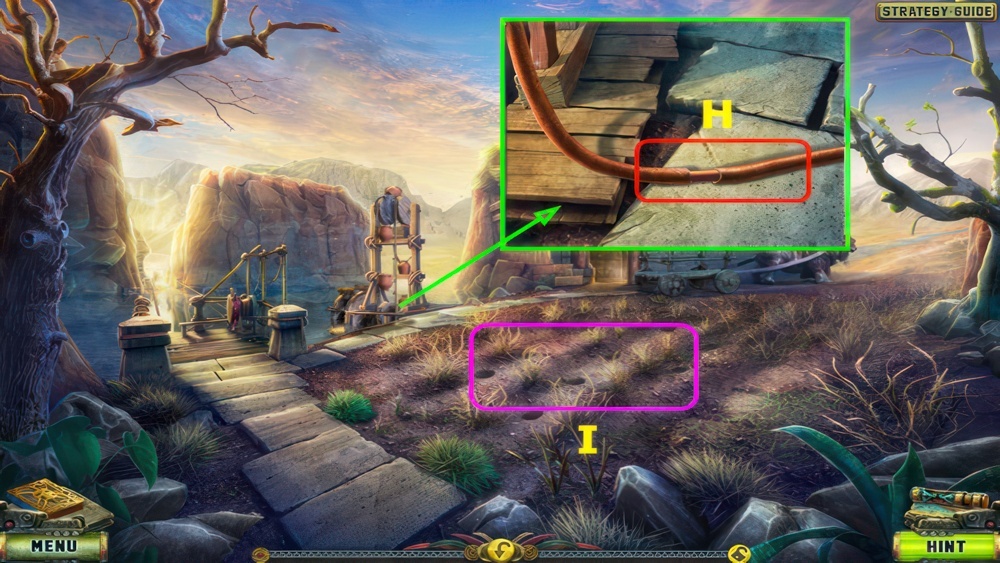
- Place the HOSE and BAMBOO PIPE (H).
- Select (I).
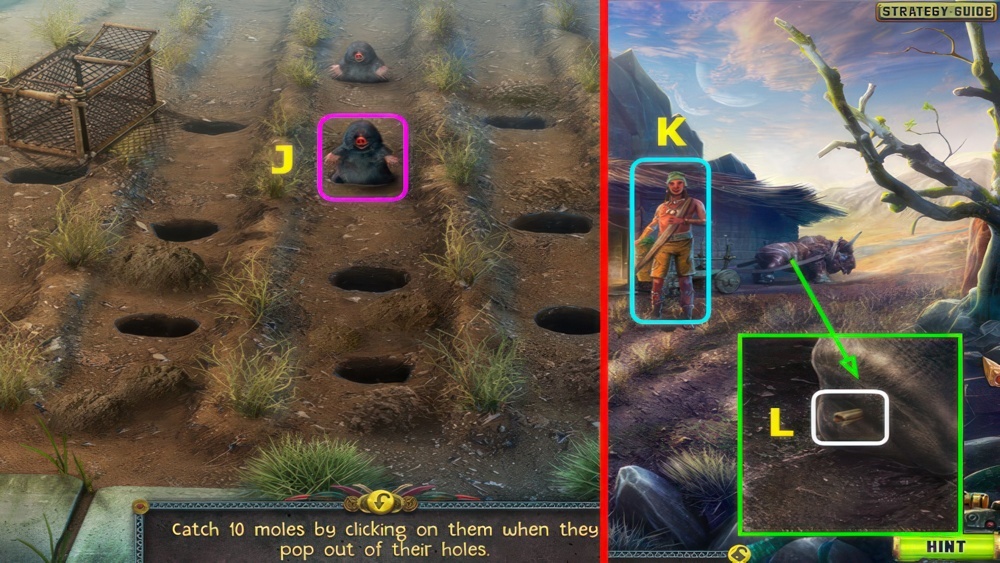
- Catch 10 moles by clicking on them when they pop out of their holes.
- Select 10 moles (J).
- Give the SACK OF FLOUR (K).
- Use the TONGS (L).
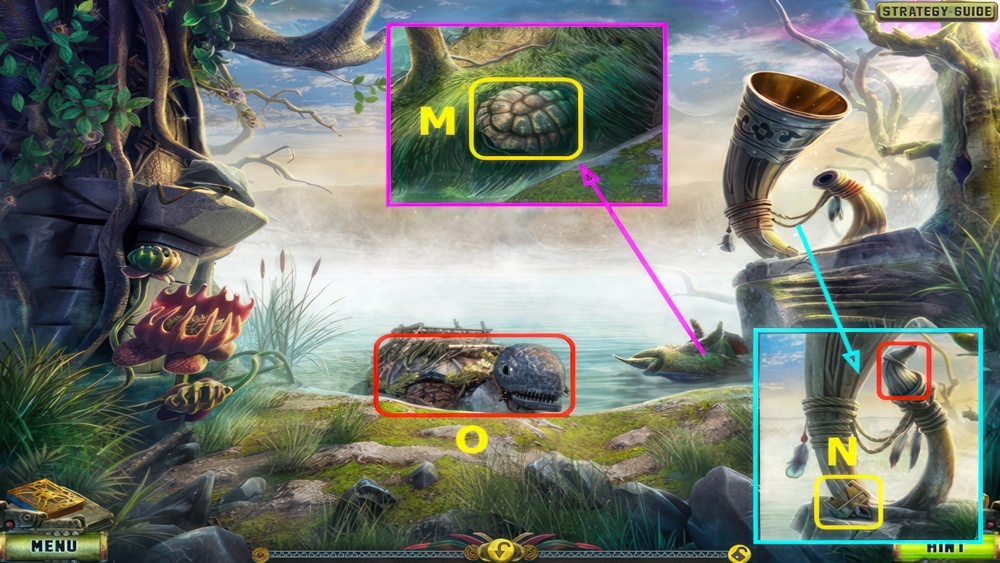
- Use the MACHETE, take the HARD SHELL (M).
- Take the 1/2 KEY PART and place the HORN (N).
- Use the REINS (O).
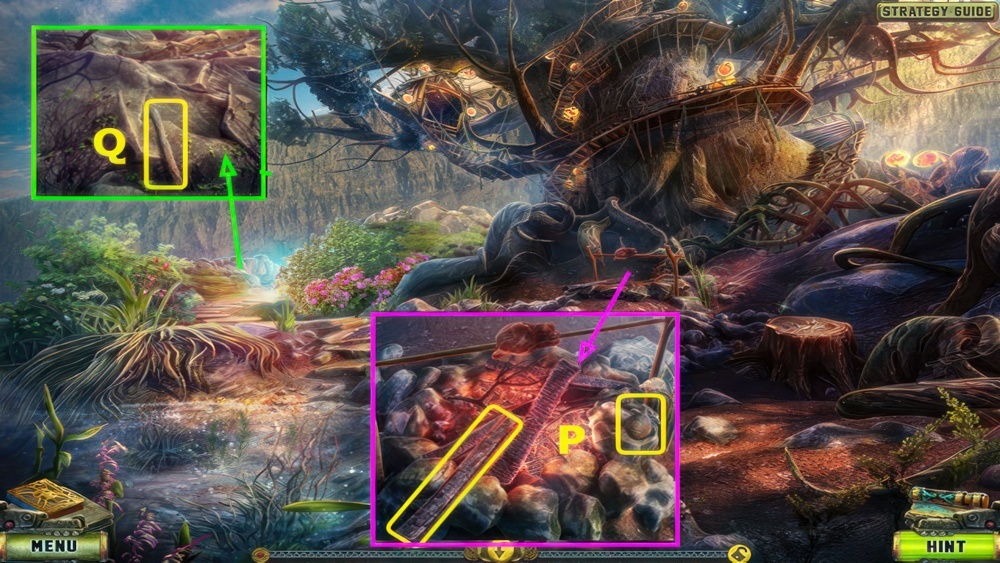
- Take the CLAY FLASK and STICK (P).
- Select the end of the STICK several times to make the BURNING STICK.
- Take the STICK (Q).
- Go down.
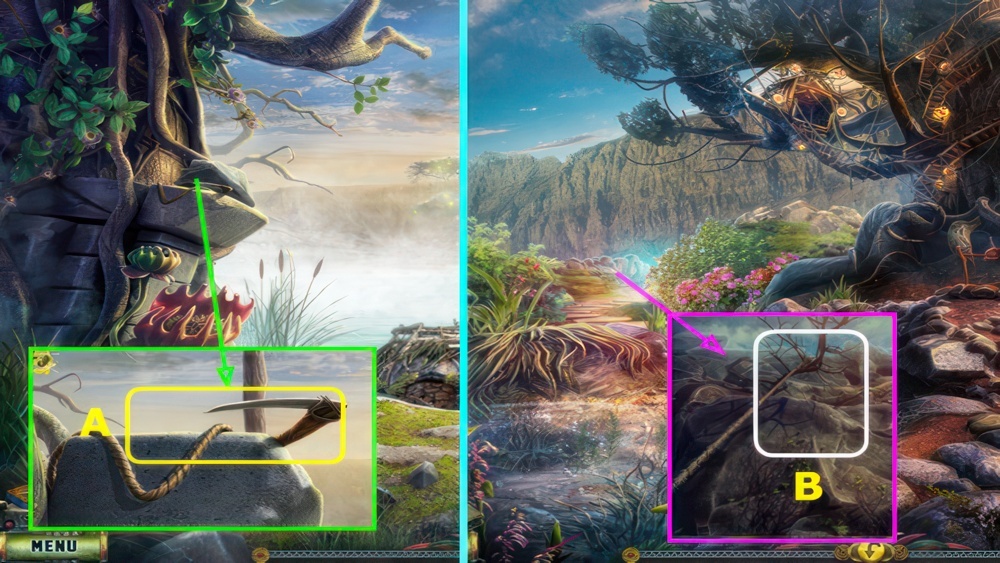
- Use the STICK, take the GRAPPLING HOOK (A).
- Go forward.
- Use the GRAPPLING HOOK (B).
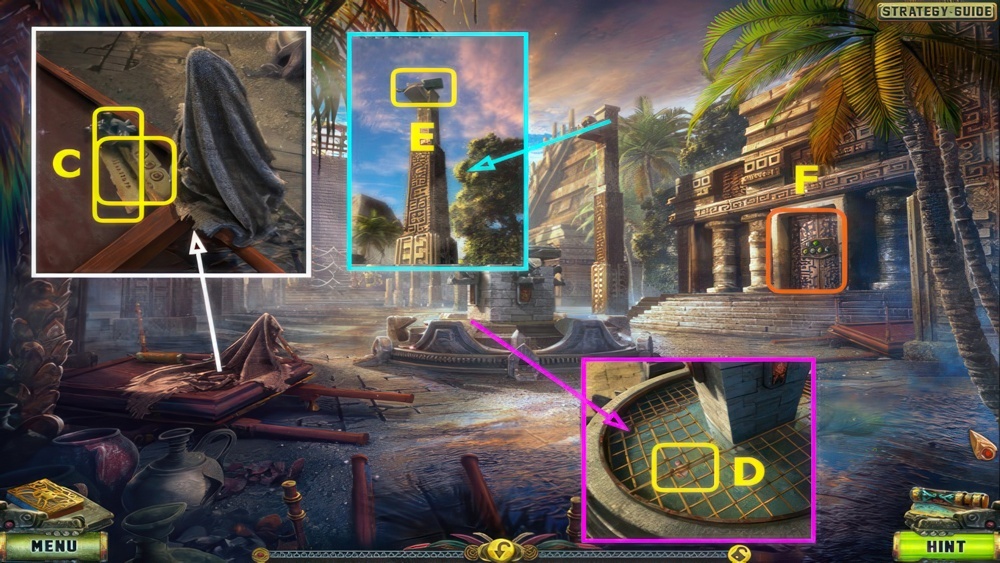
- Move the cloth, take the HINT and MACE (C).
- Use the MAGNETIC STONE to take the FIGURINE PART (D).
- Use the BOOMERANG to take the GARDEN TROWEL (E).
- Select (F).
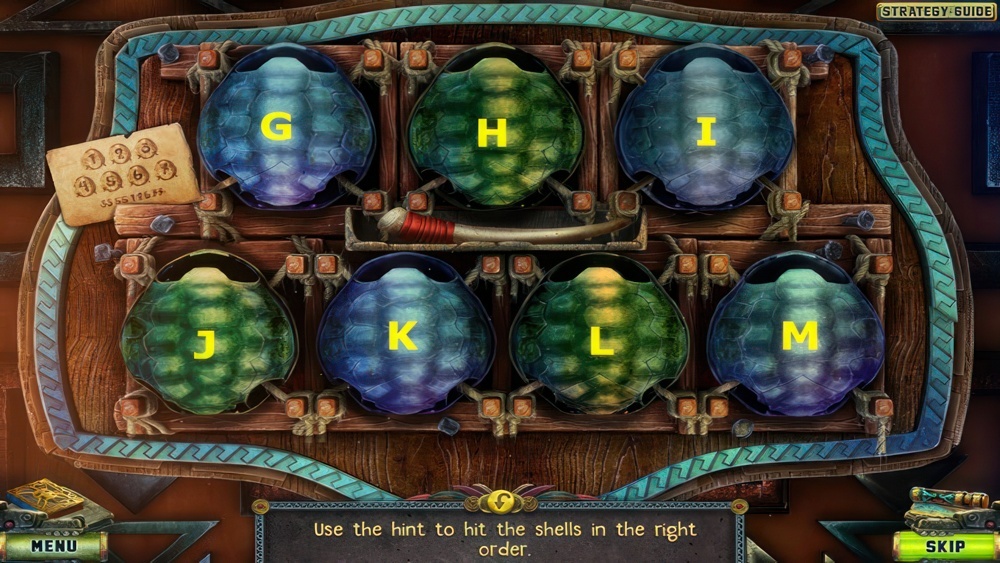
- Place the HARD SHELL and the HINT on the device.
- Use the hint to hit the shells in the right order.
- Walkthrough: I×2-K×2-G-H-L-M×2.
- Go right.
Find the mask of reincarnation
To get to the raiders’ tree, I need a special potion. The merchant offered it to me in exchange for the mask of reincarnation from the tombs. I must find it.
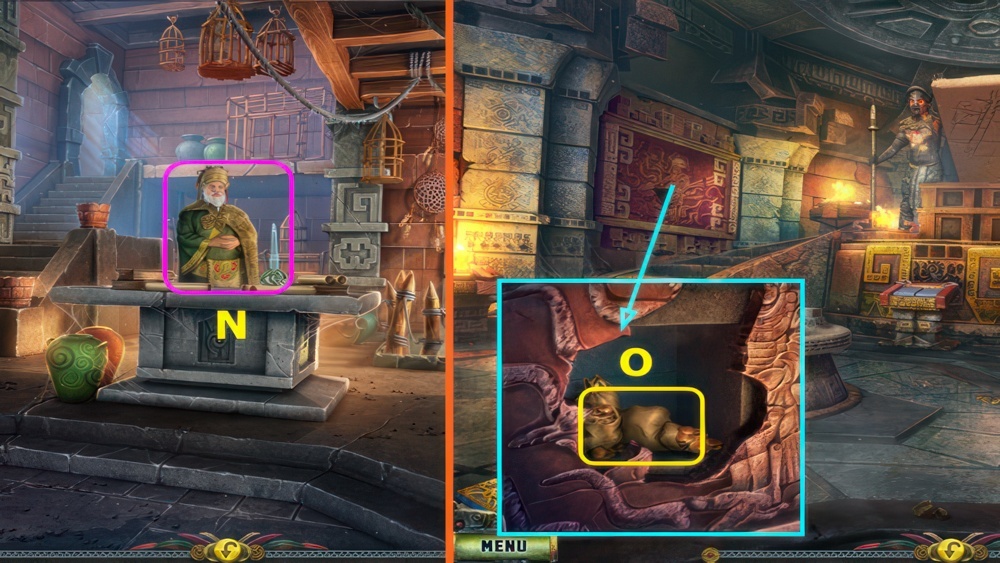
- Talk to the Merchant, earn the 2/2 KEY PART (N).
- Combine the 2 KEY PARTS to make the CACHE KEY.
- Return to the Tomb.
- Use the MACE, take the SACK OF GOLD (O).
- Go down.
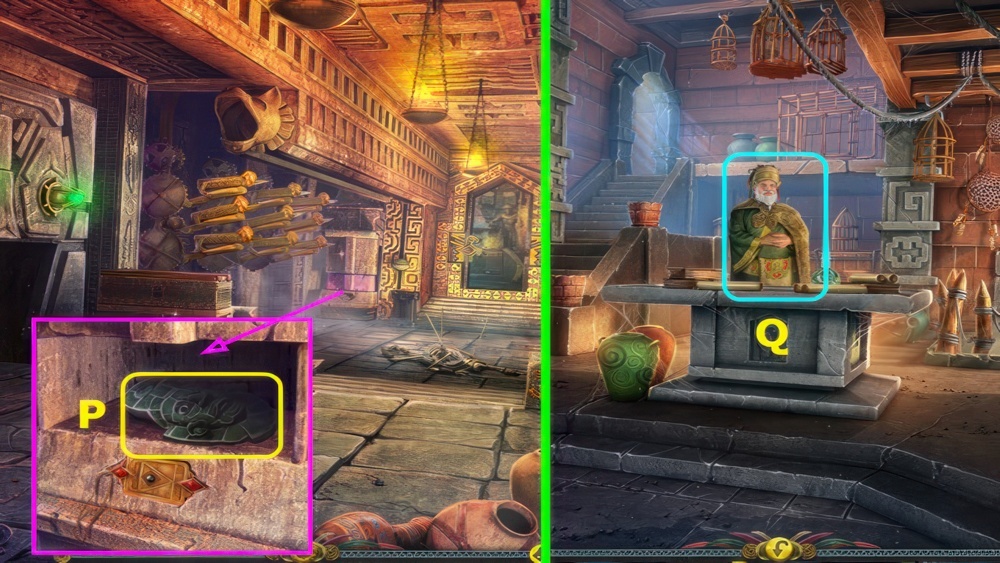
- Place the CACHE KEY, take the MASK OF REINCARNATION (P).
- Return to the Merchant’s Shop.
- Give the MASK OF REINCARNATION, you earn the POTION (Q).
Brew the potion of bonding
In order to fly a harpy I need a special potion called a potion of bonding. I need to prepare it first.
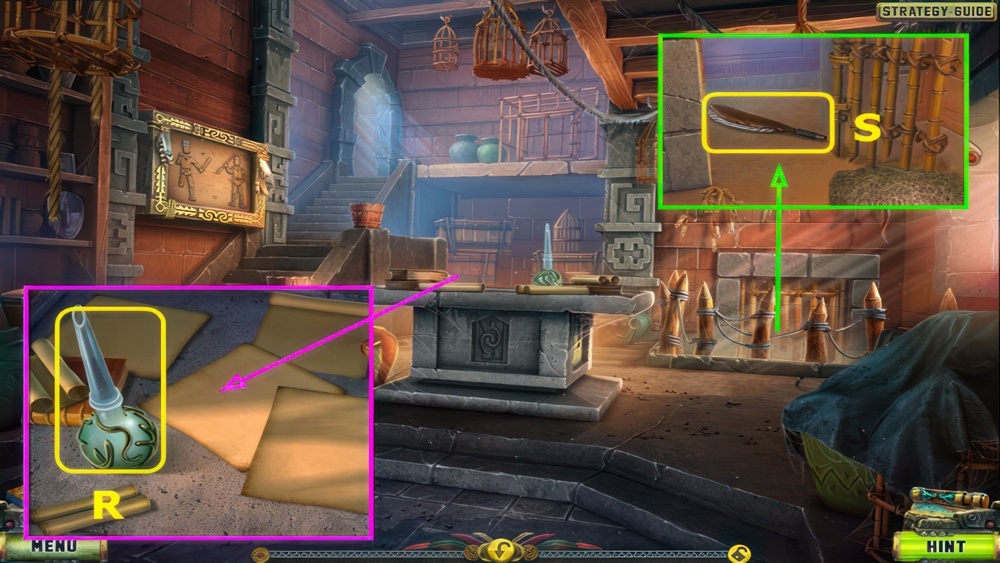
- Take the FLASK (R).
- Use the MACHETE and open the gate, take the BONE SAW (S).
- Go down twice.
- Use the POTION (A).
- Go right.
- Talk to the Raider, give the SACK OF GOLD and earn the POTION OF BONDING RECIPE (B).
- Take the LADDER (C).
- Play the puzzle, earn the 4/5 FIGURINE (D).
- Take the LARGE BONE and the 1/2 SKULL FIGURINE (E).
- Go down twice.
- Place the LARGE BONE and take the TWEEZERS (F).
- Return to the Windmill.
- Place the LADDER (G).
- Play the puzzle, earn the 2/2 SKULL FIGURINE (H).
- Go to the Village Entrance.
- Use the FLASK to take the CACTUS SAP (I).
- Return to the Square.
- Place the 2 SKULL FIGURINES (J).
- Go forward.
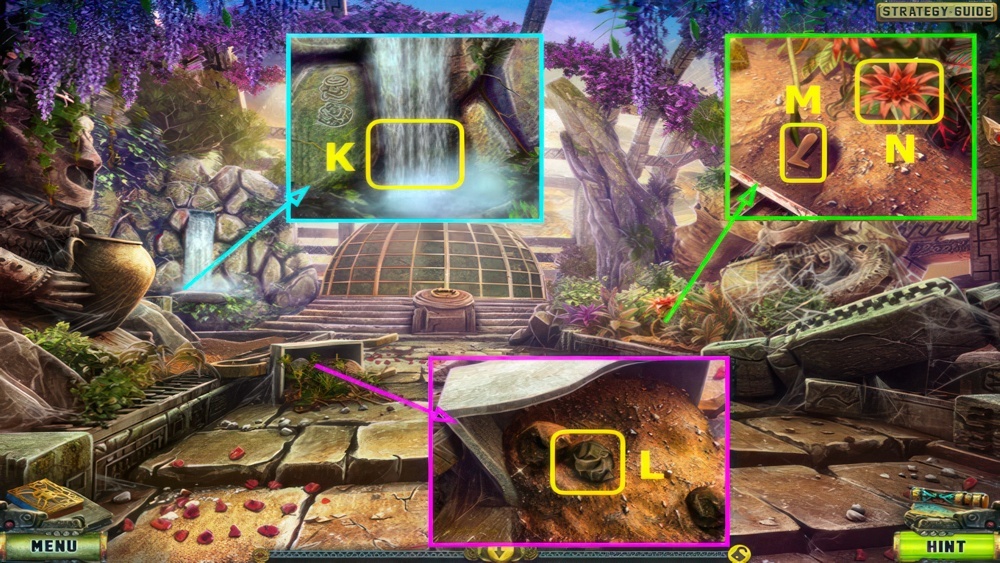
- Use the CLAY FLASK to take the FLASK OF WATER (K).
- Remove the branches twice, take the EMPTY SACK (L).
- Use the GARDEN TROWEL, take the second FIGURINE PART (M).
- Use the MACHETE to take the MAGIC FLOWER (N).
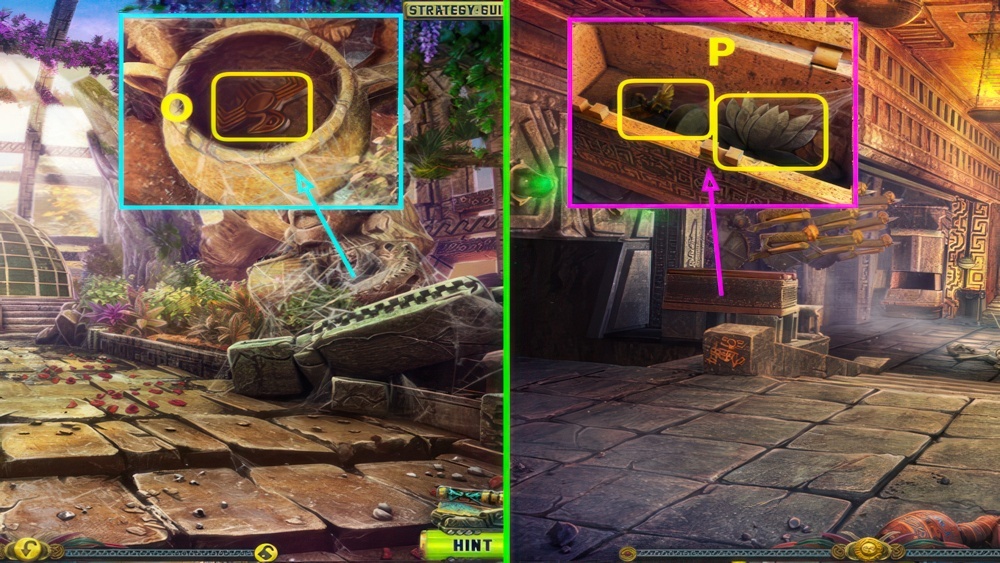
- Use the BURNING STICK, take the BIRD FIGURINE (O).
- Return to Outside the Tomb.
- Place the BIRD FIGURINE, take the 5/5 FIGURINE and the FLOWER FIGURINE (P).
- Go forward.
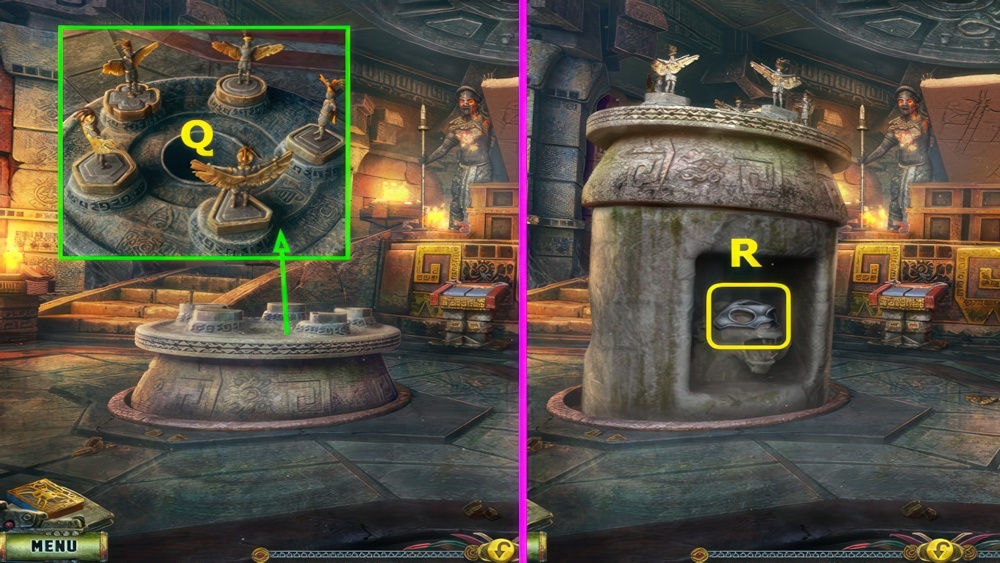
- Place the 5 FIGURINES (Q).
- Take the HARPY HELMET (R).
- Go to the Swamp.
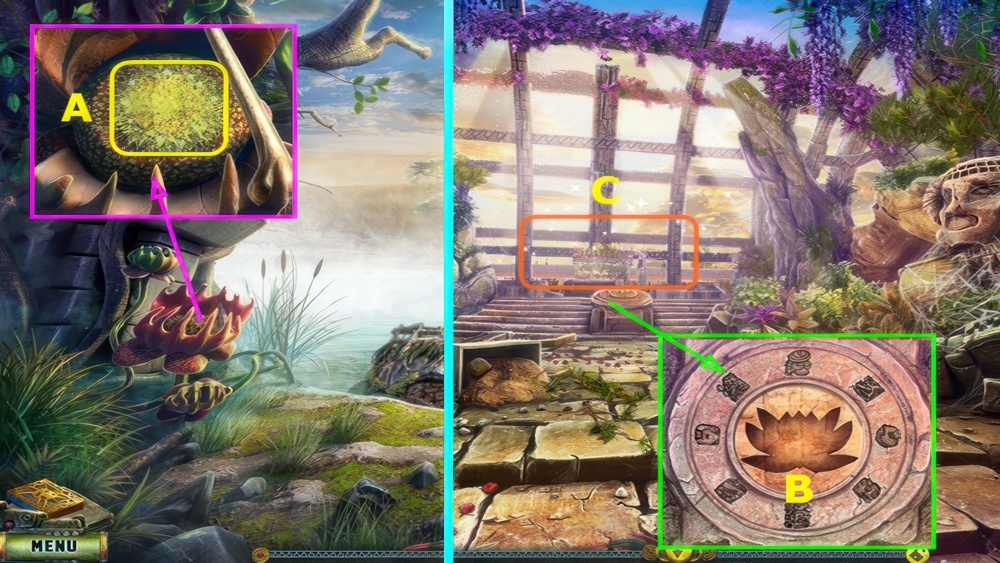
- Use the EMPTY SACK to take the PREDATOR FLOWER POLLEN (A).
- Return to the Garden.
- Place the FLOWER FIGURINE (B).
- Play the puzzle, earn the MAGIC FRUIT (C).
- Go down and right.
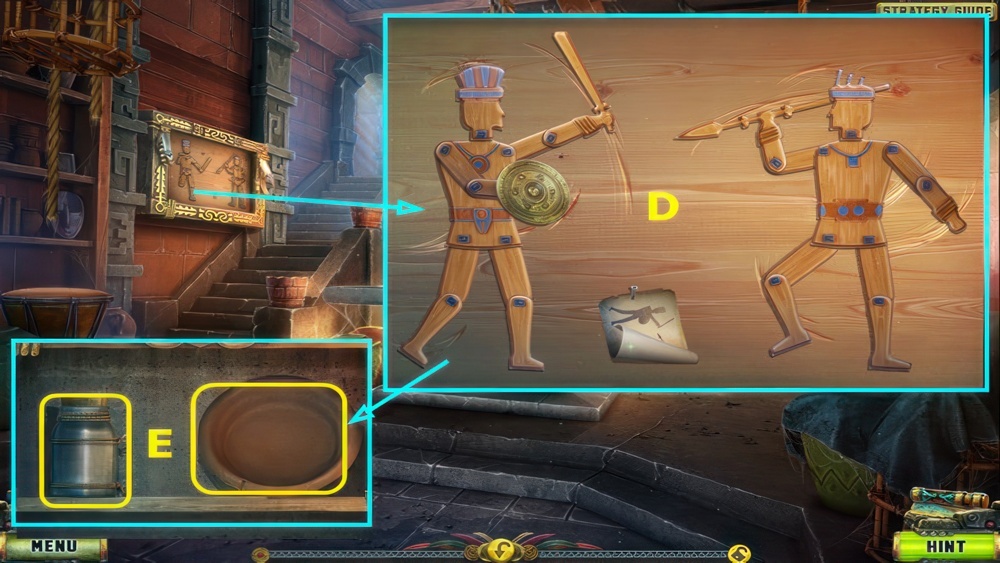
- Arrange the figurine positions as shown on the hint.
- Place the NOTE and 2 FIGURINE PARTS, arrange the figures as shown (D).
- Take the CLAY PLATE and JAR (E).
- Go down twice.
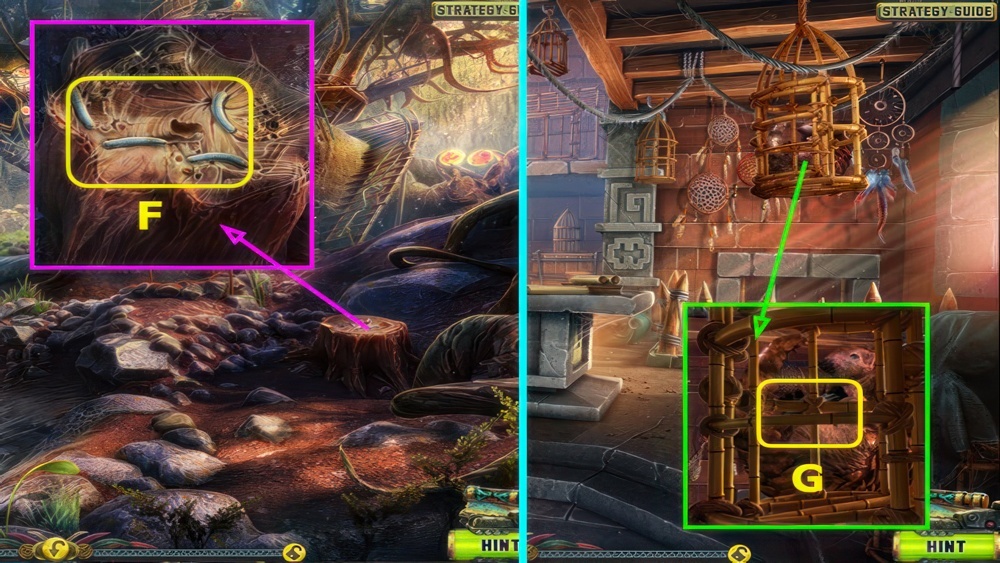
- Use the JAR and TWEEZERS to take the JAR OF INSECTS (F).
- Go forward and right.
- Use the JAR OF INSECTS to earn the SCRAPER (G).
- Go down twice and go right.
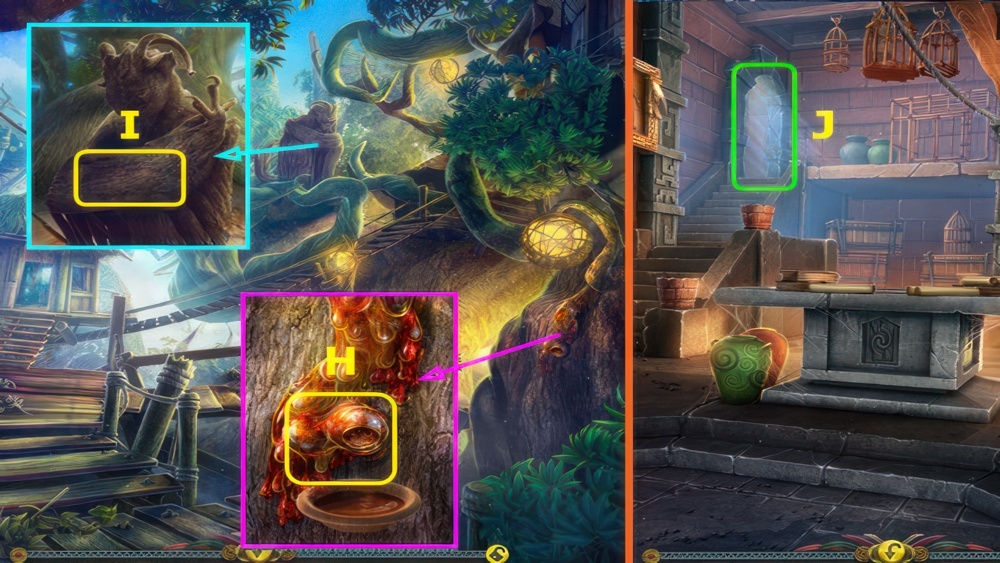
- Use the CLAY PLATE and MACHETE to take the PLATE OF RESIN (H).
- Use the SCRAPER to take the HARPY TREE BARK (I).
- Go down, go forward and right.
- Select (J).
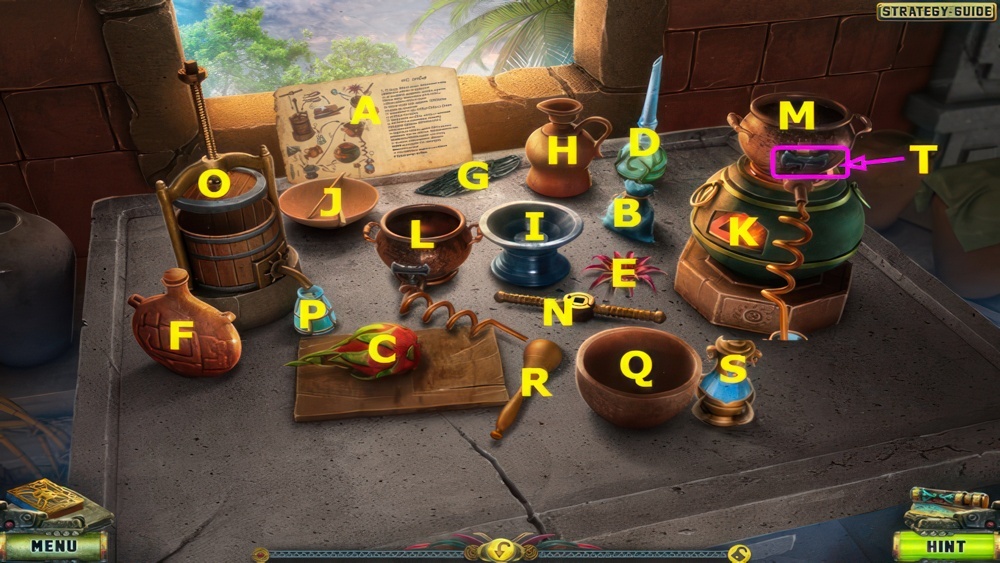
- Place the POTION OF BONDING RECIPE (A).
- PREDATOR FLOWER POLLEN (B).
- MAGIC FRUIT (C).
- CACTUS SAP (D).
- MAGIC FLOWER (E).
- FLASK OF WATER (F).
- HARPY TREE BARK (G).
- Place G and H into I, use J on K.
- Use B on I, place L on K.
- Select and use F on M, use I on M.
- Place N on O.
- Use the MACHETE (C).
- Place C in O and select the handle.
- Use P in M.
- Place E in Q, use R on Q.
- Use D in Q, pour Q into M.
- Select S and T.
- Take the POTION FOR HARPY (S).
- Return to the Harpy Tree.
Find the shaman
Finally I got to the Clouded Pyramids. I need to find the shaman hopefully he’s still alive. And I have to stay out of sight of the Tohunga.
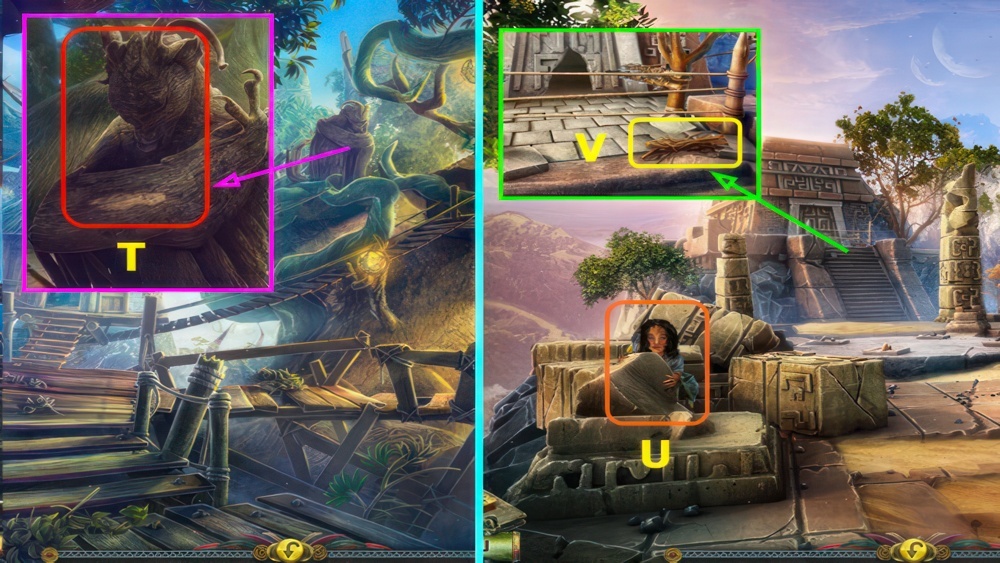
- Use the POTION FOR HARPY (T).
- Talk to the Girl (U).
- Take the BRUSHWOOD (V).
- Go down twice.
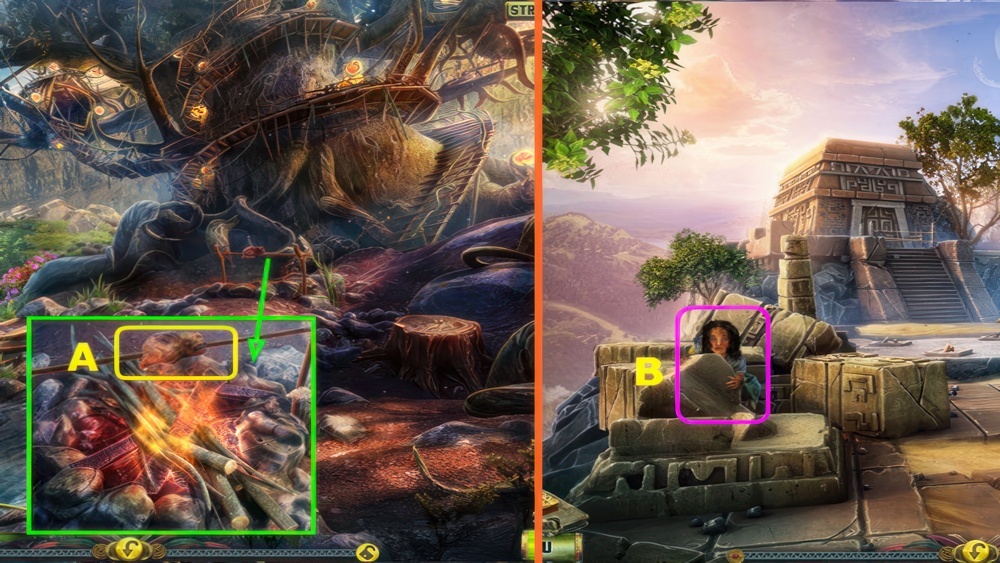
- Use the BRUSHWOOD, take the MEAT (A).
- Go right and forward.
- Give the MEAT (B).
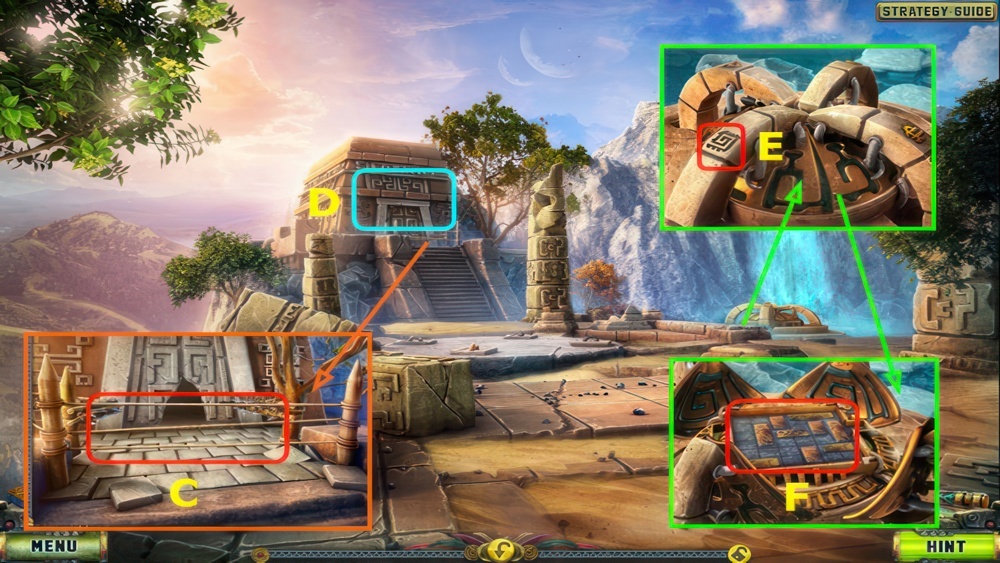
- Use the MACHETE (C).
- Play the puzzle, earn the SYMBOL (D).
- Place the SYMBOL (E), select (F).
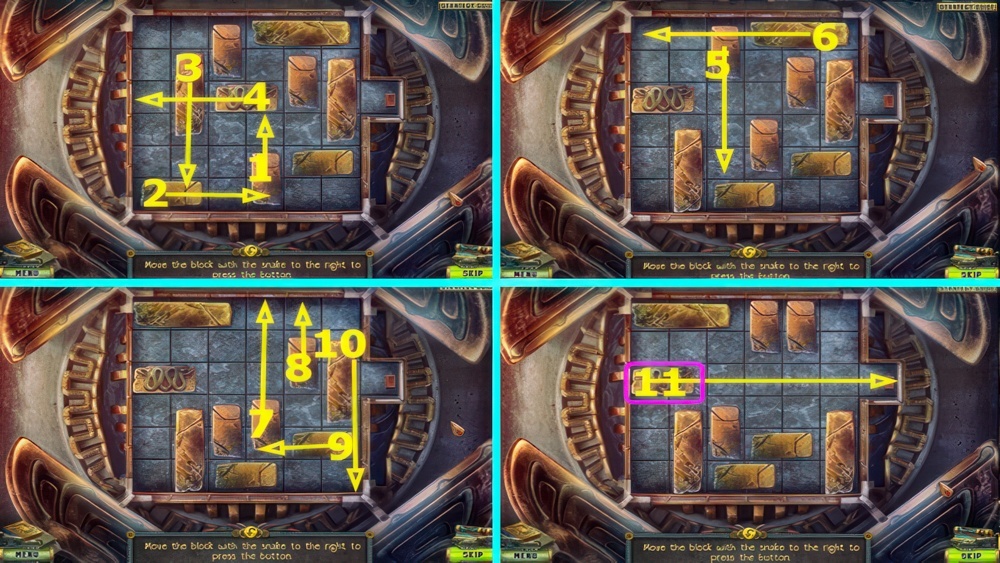
- Move the block with the snake to the right to press the button.
- Walkthrough: Move the steps 1-11.
- Go right.
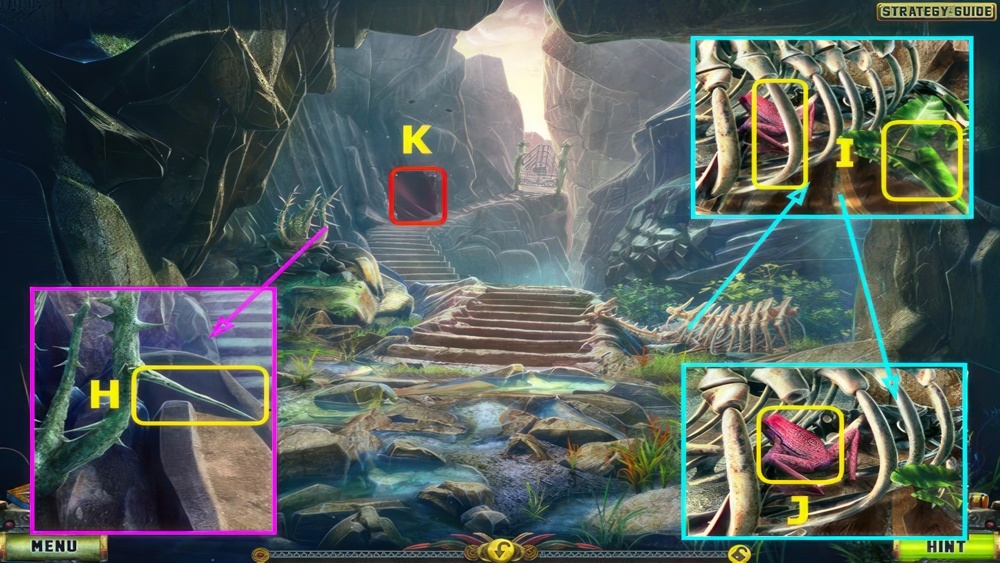
- Take the THORN (H).
- Use the BONE SAW to take the RIB, take the LARGE LEAF (I).
- Use the THORN on the frog (J).
- Combine the LARGE LEAF, PLATE OF RESIN, and THORN to make the PIPE WITH SLEEPING POTION.
- Select (K).
- Go down.
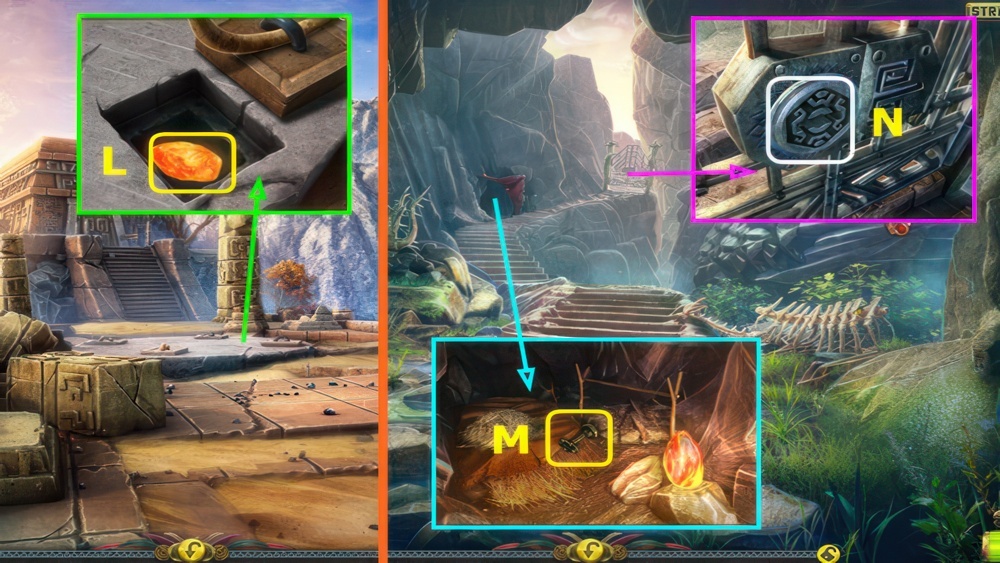
- Use the RIB, take the GLOWING CRYSTAL (L).
- Go right.
- Use the GLOWING CRYSTAL, move the debris twice and take the KEY (M).
- Use the KEY (N).
- Go forward.
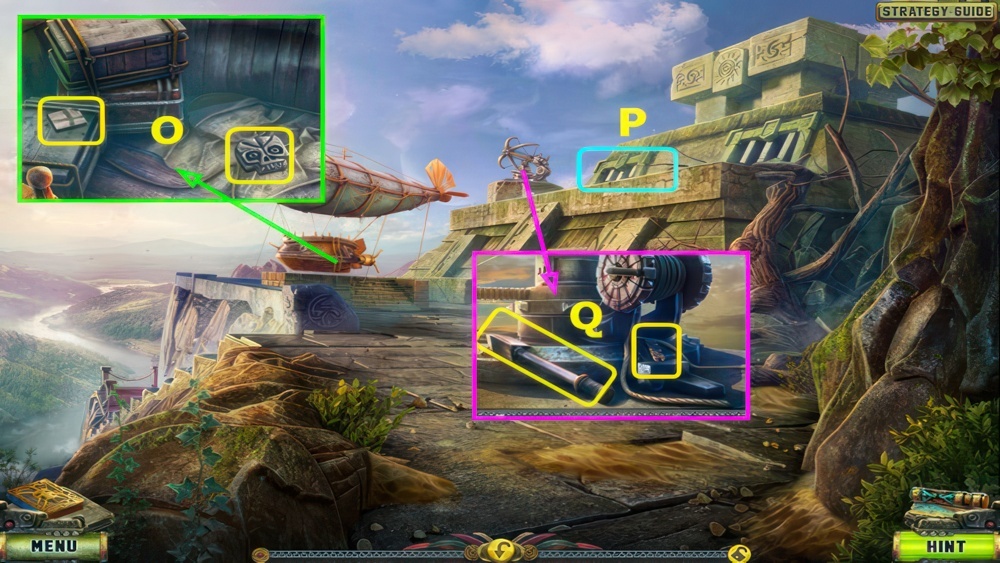
- Take the 1/3 MOSAIC PARTS and BAS-RELIEF PART (O).
- Select (P).
- Take the LEVER and the 1/2 LOCK PART (Q).
- Go left.
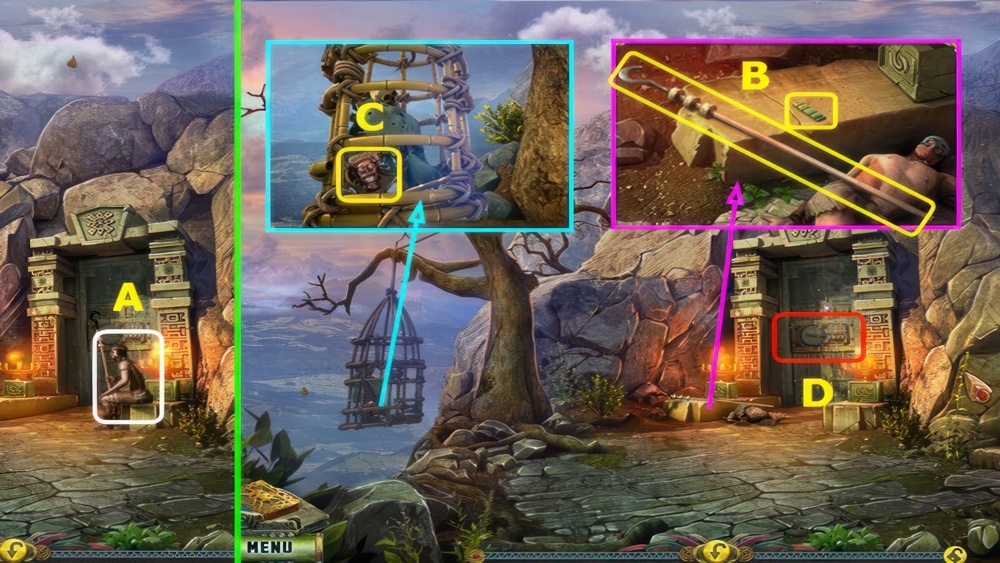
- Use the PIPE WITH SLEEPING POTION (A).
- Take the 2/2 LOCK PART and STICK WITH HOOK (B).
- Use the STICK WITH HOOK, take the 1/2 MASK (C).
- Select (D).
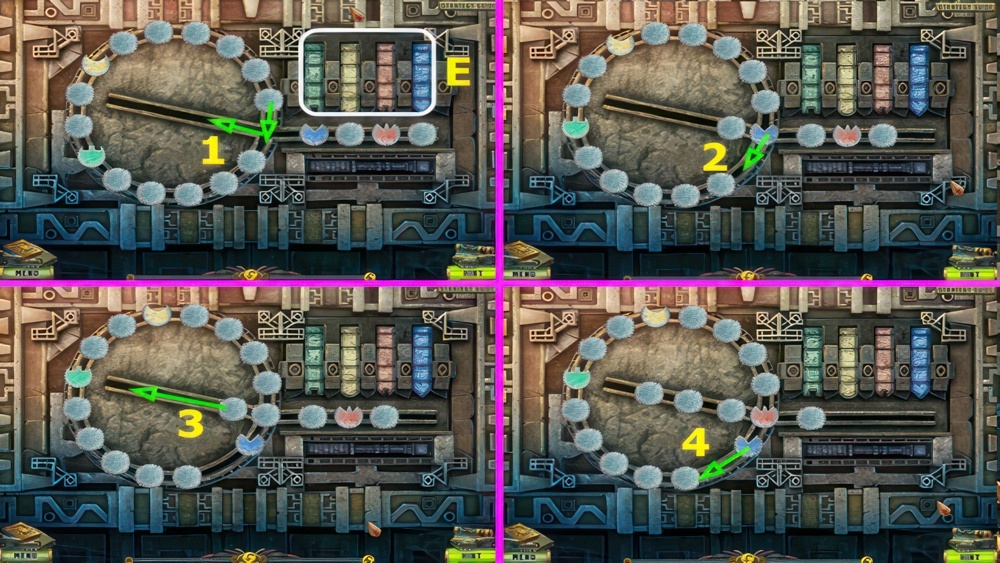
- Place the 2 LOCK PARTS (E).
- Arrange the chips according to color and cut-out shapes under the corresponding planks.
- Slide the pieces as shown 1-4.
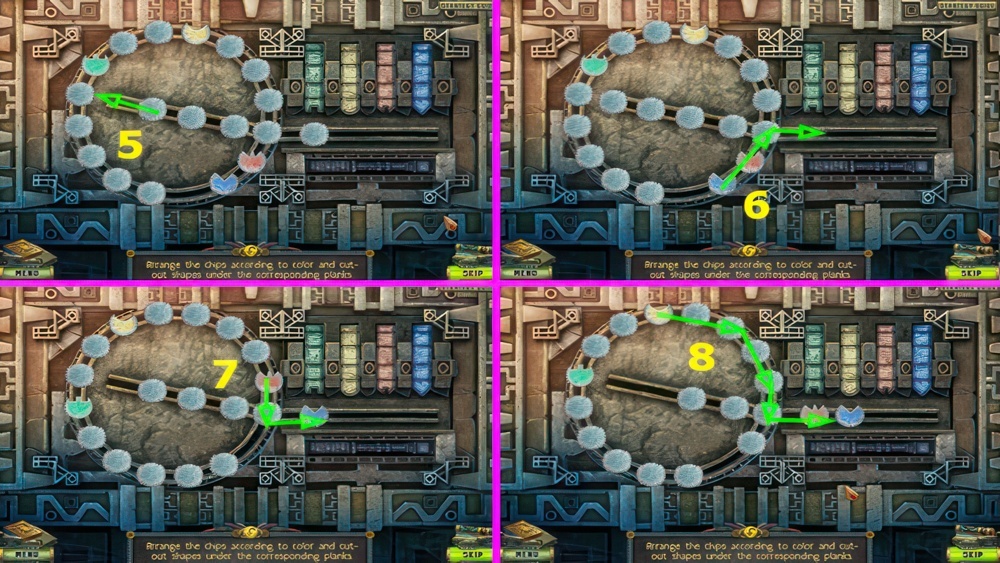
- Continue to move the pieces as shown 5-8.
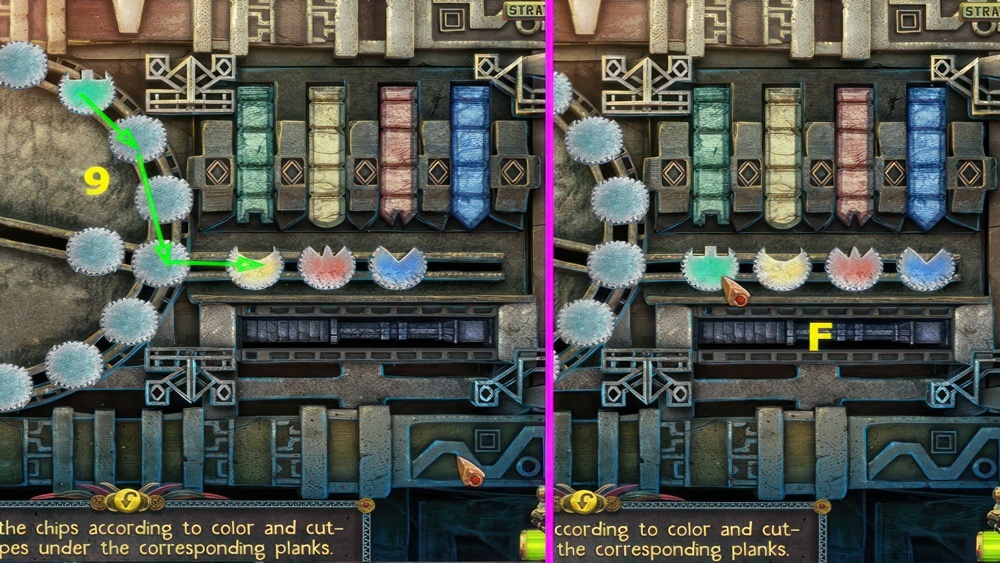
- Continue to move the pieces as shown 9.
- Final solution (F).
- Go forward.
Free the shaman
I released the shaman. He told me that the High Tohunga, Akzar, is planning to use his power to destroy my world and put an end to the prophecy. Akzar has been preparing for this for centuries. Now he’s opening the gate to my world to send through a huge gust of energy capable of destroying my planet. We must stop him at all cost.
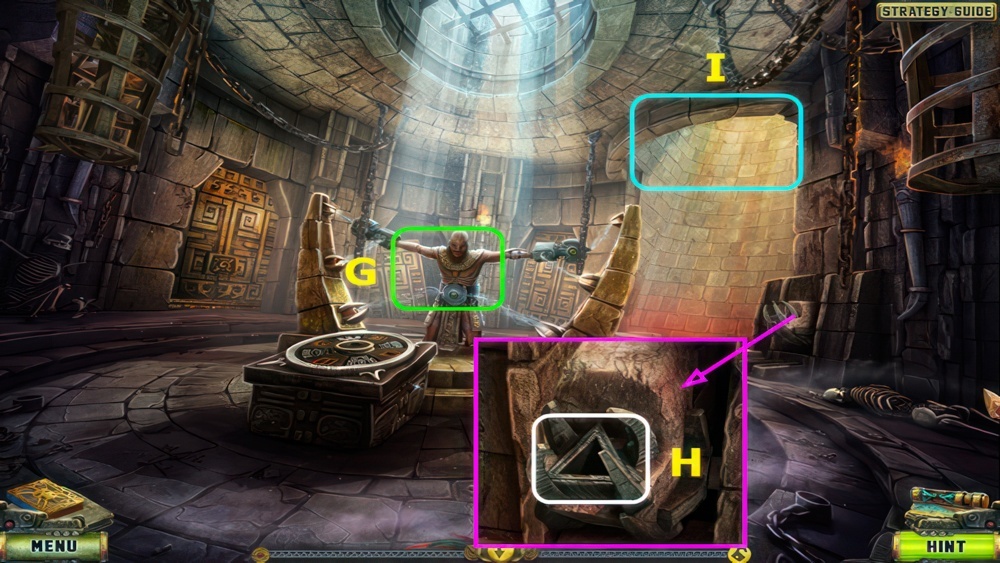
- Talk to the Shaman (G).
- Place the LEVER (H).
- Go up (I).
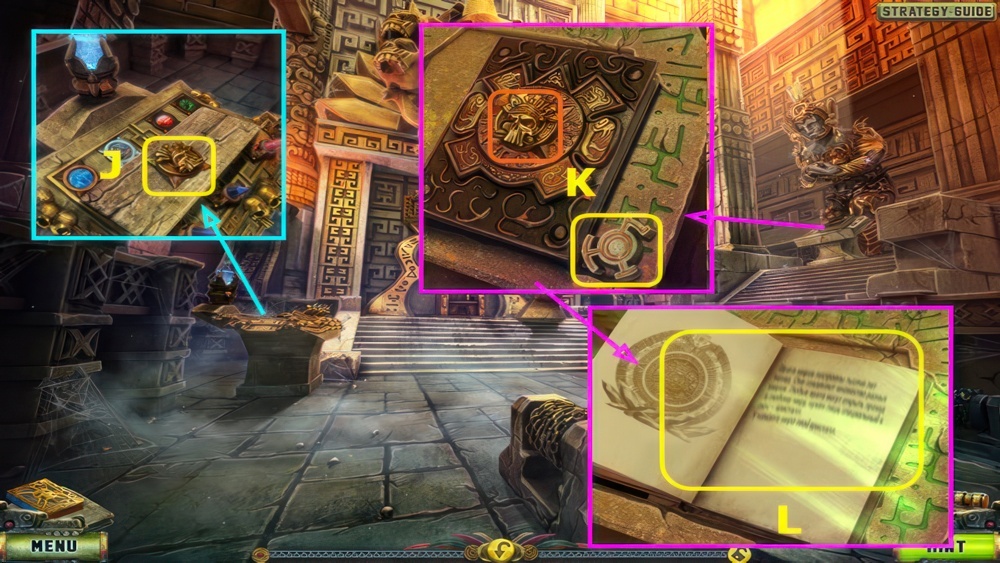
- Take the FIGURINE (J).
- Take the first KEY and place the FIGURINE (K).
- Read the book and take the second KEY (L).
- Go down.
Save the world
The High Tohunga wants to destroy my planet to avert the prophecy. I need to stop him.
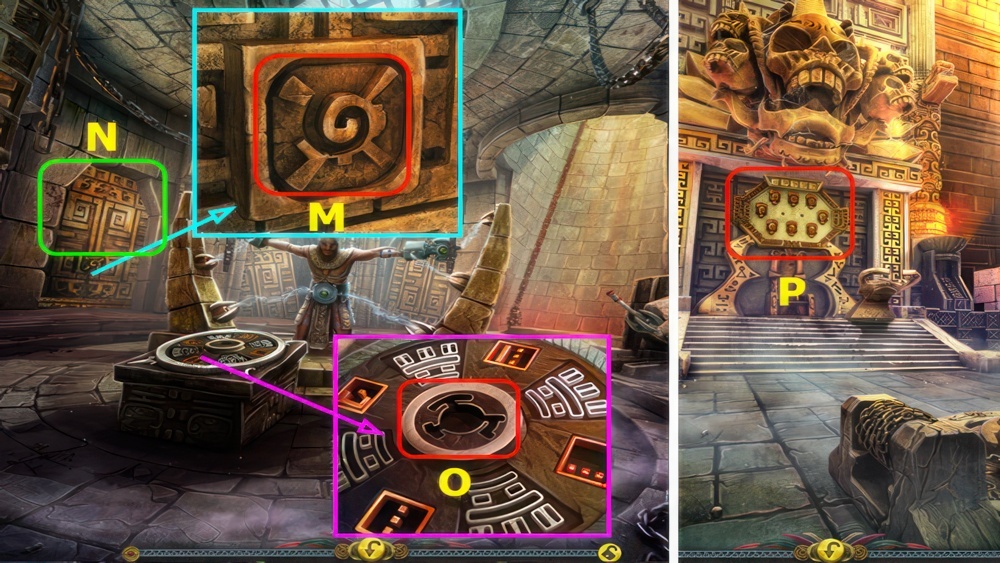
- Place the second KEY (M).
- Play the puzzle, earn the CRYSTAL (N).
- Place the first KEY (O), you earn the 2/2 MASK.
- Go up.
- Select (P).

- Place the 2 MASKS on the board (Q).
- Find pairs of identical images under the masks.
- Select the pairs (color-coded).
- Go forward.
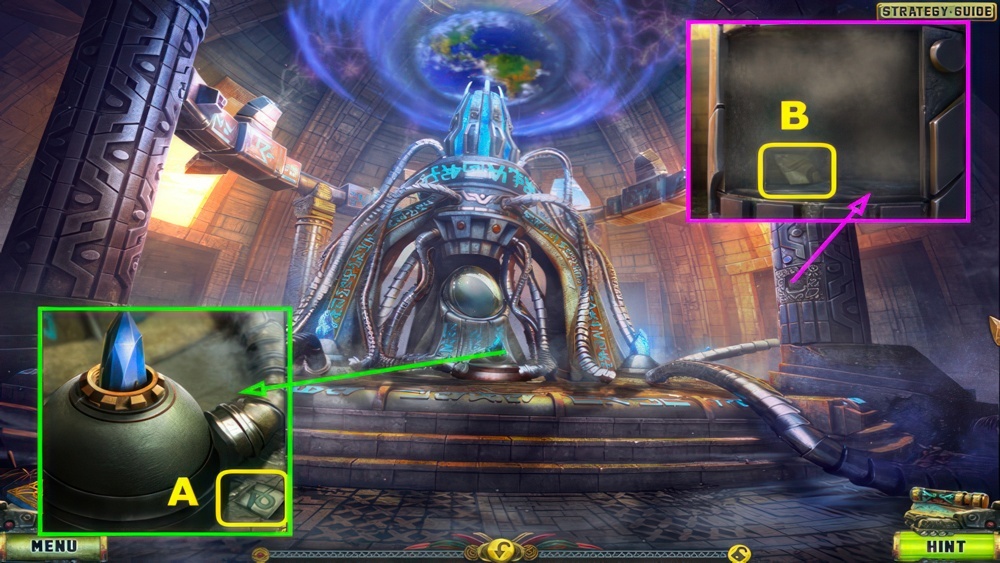
- Take the 2/3 MOSAIC PARTS (A).
- Place the BAS-RELIEF PART, take the 3/3 MOSAIC PARTS (B).
- Go down.
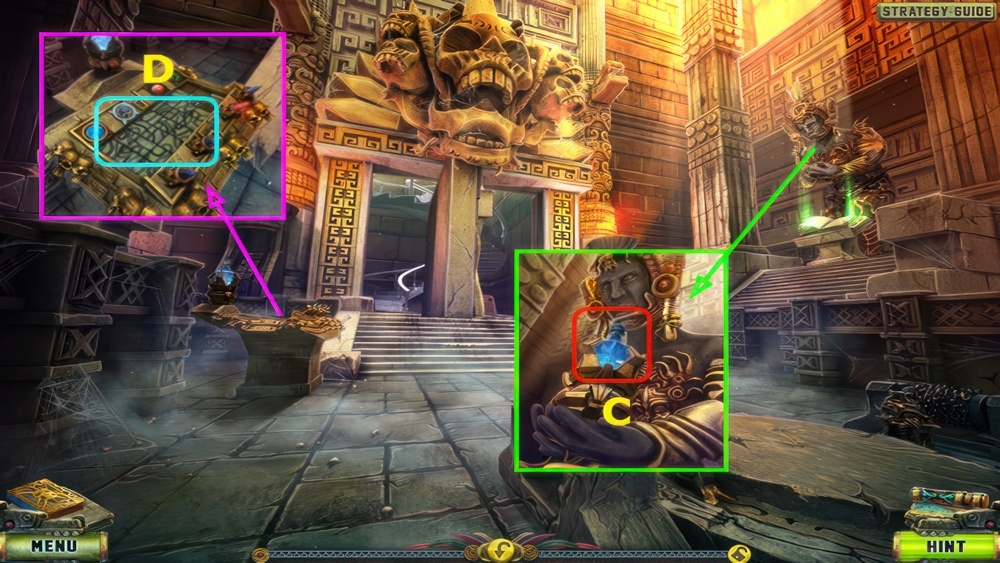
- Place the CRYSTAL (C).
- Select (D).
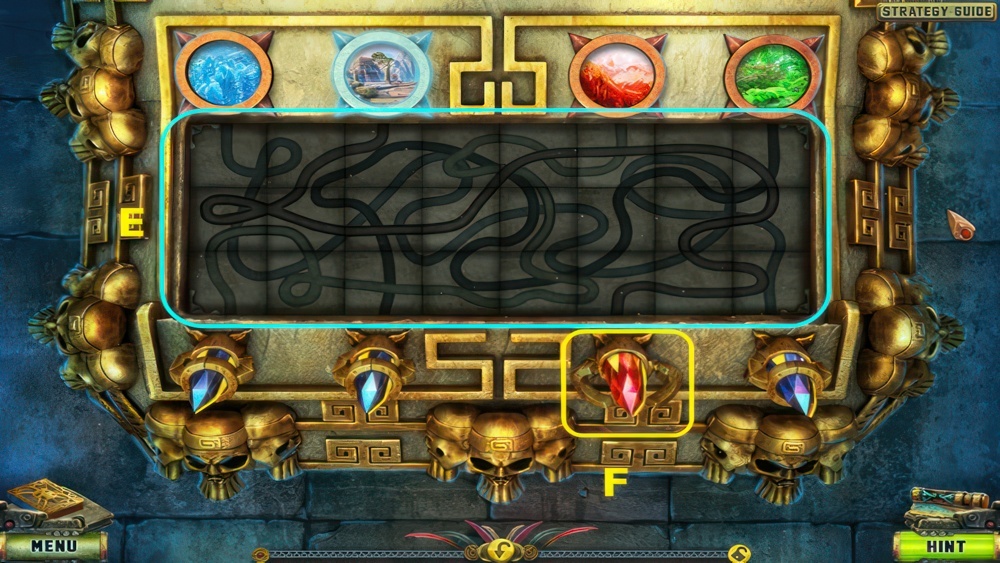
- Place the 3 MOSAIC PARTS on the board.
- Move the pieces to restore the image.
- Restore the image (E).
- Take the CRYSTAL (F).
- Go forward.
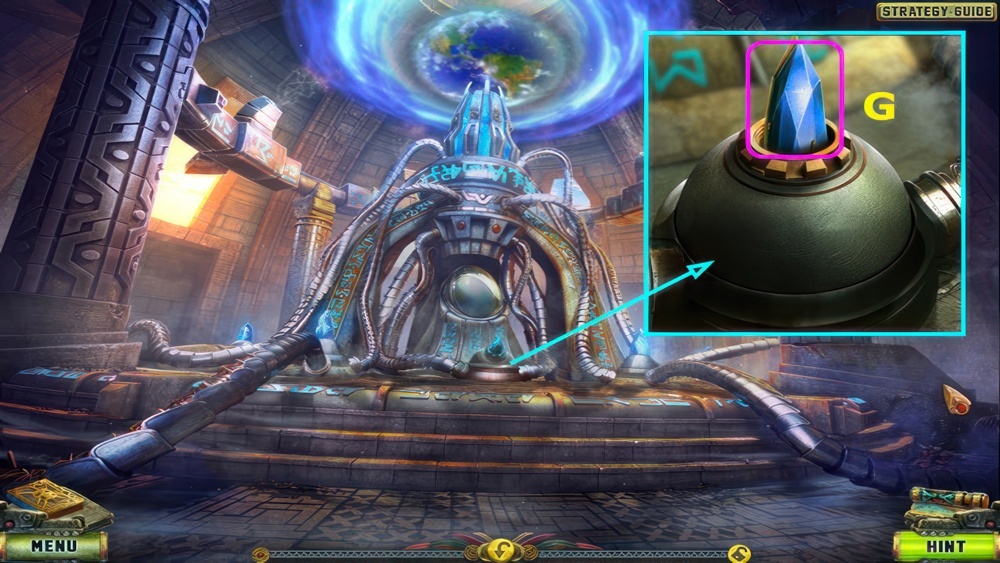
- Use the CRYSTAL (G).
- Walkthrough Bonus Chapter, at the link below.


