The Legacy 2: Prisoner – Adventure game about a young museum employee Diana, who is engaged in history. The story begins with the fact that she saw a silhouette hiding in the distance, runs after the guard taking away the bust of a representative of the Mayan civilization. The chase went completely off the plan, the game takes place in a different world, all paths back are closed. She needs to save the prisoner of the ancient temple, perform a number of dangerous tasks, explore the dungeons, conduct ancient rituals, and get out of the distant world home. If you can not pass any of the puzzles or do not know where the items are, on our site you can watch the walkthrough of the game Urban Legends 3: Ghost of Misty Hill, and save the prisoner of the ancient temple.
The Legacy 2: Prisoner – Walkthrough
Here you can see the full walkthrough of The Legacy 2: Prisoner game, namely for all chapters, including bonus chapter, in pictures.
Examine the exhibit
Director Frederick called me on my day off to tell me there was an incident at the museum. It doesn’t look like a regular burglary, because only one exhibit case was damaged. However, David, the guard, is missing. The problem is that the security cameras only show static. I need to go check and make sure no exhibit items are missing.
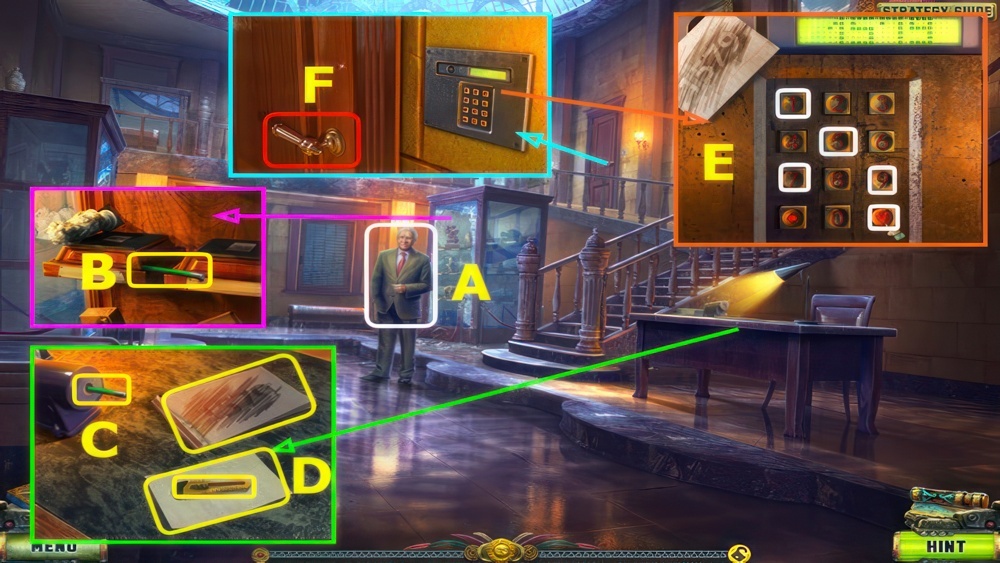
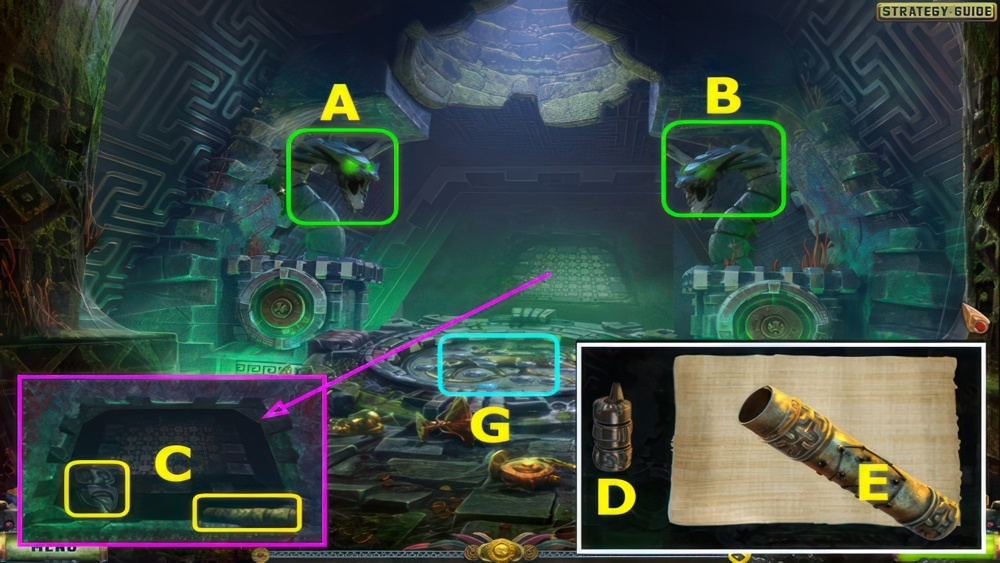
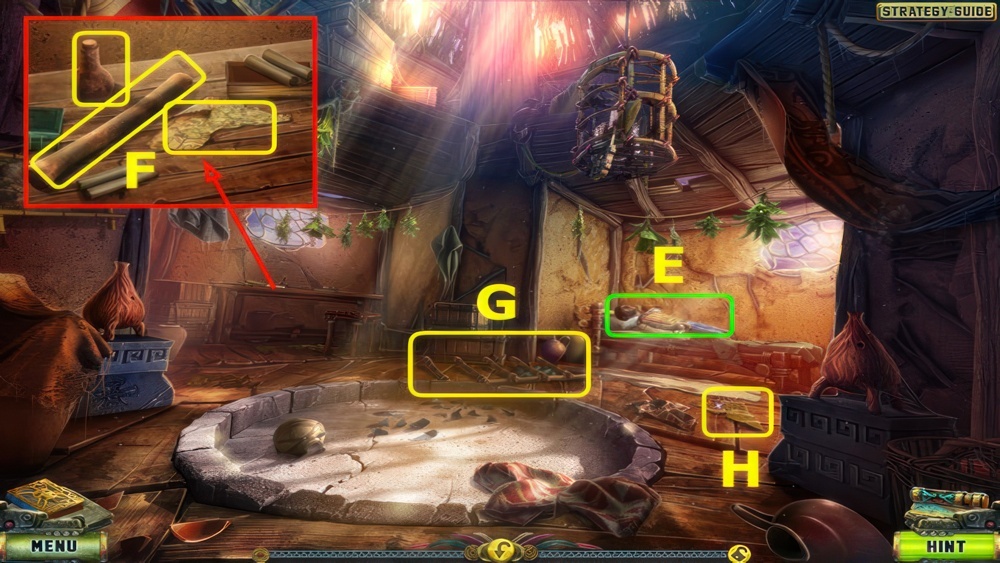
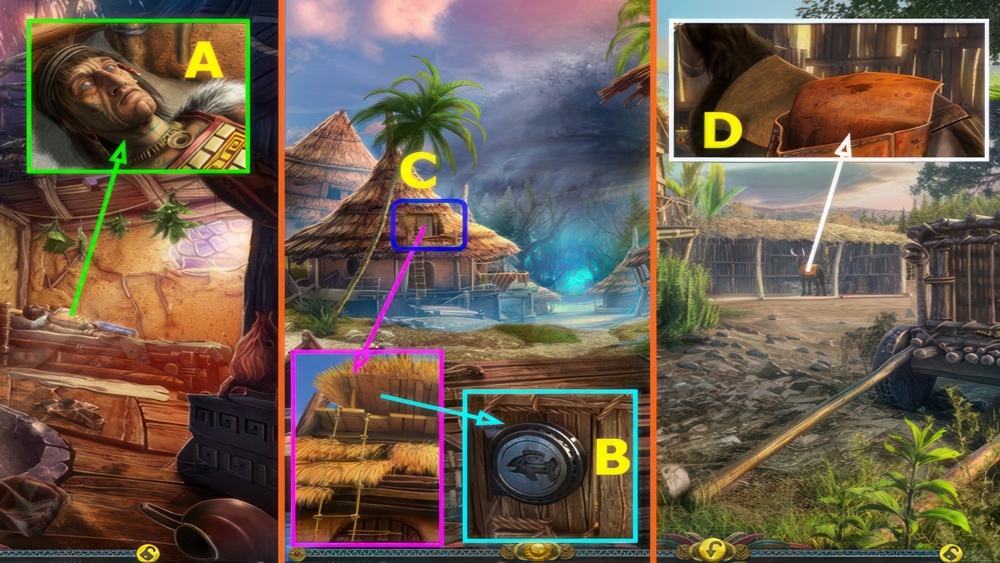
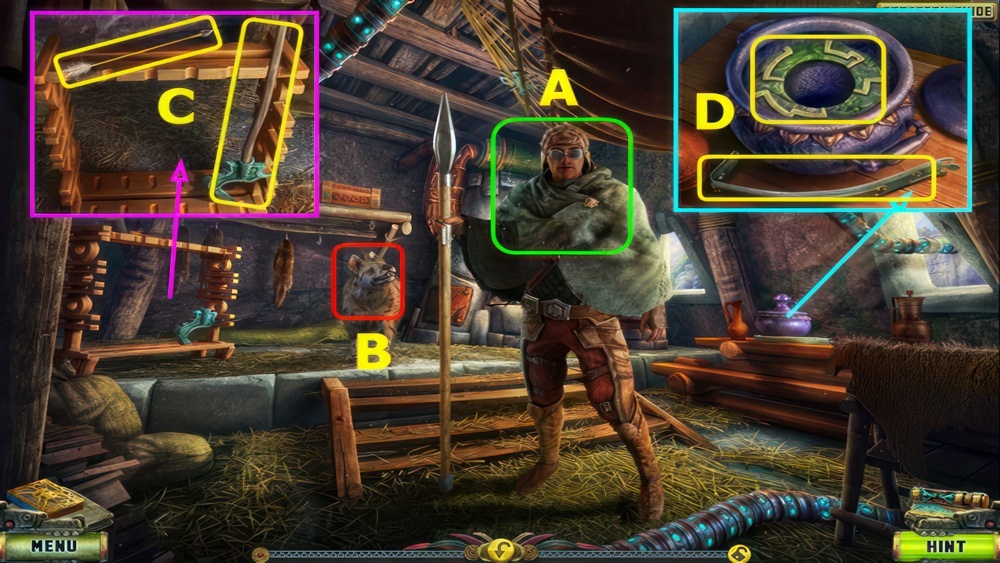
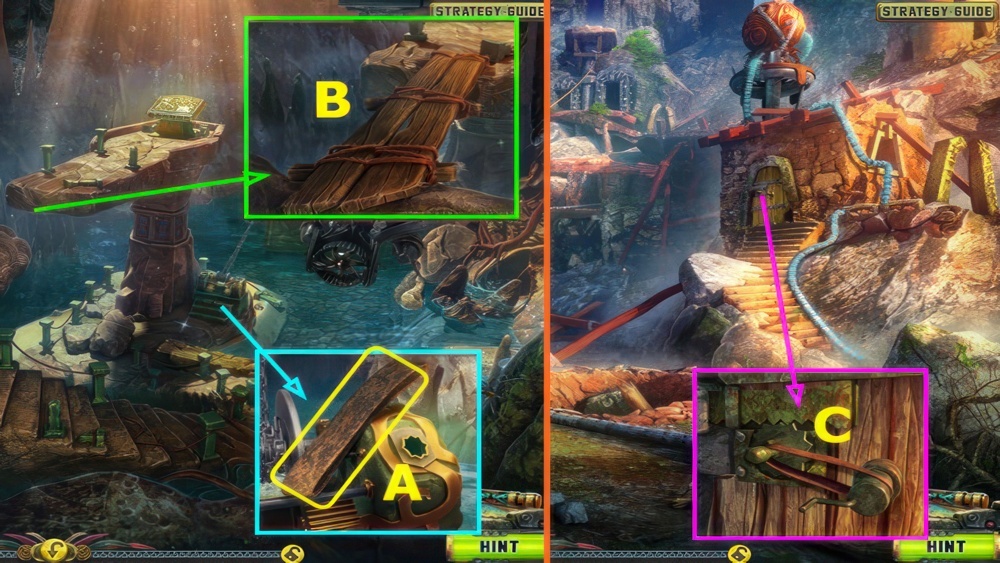
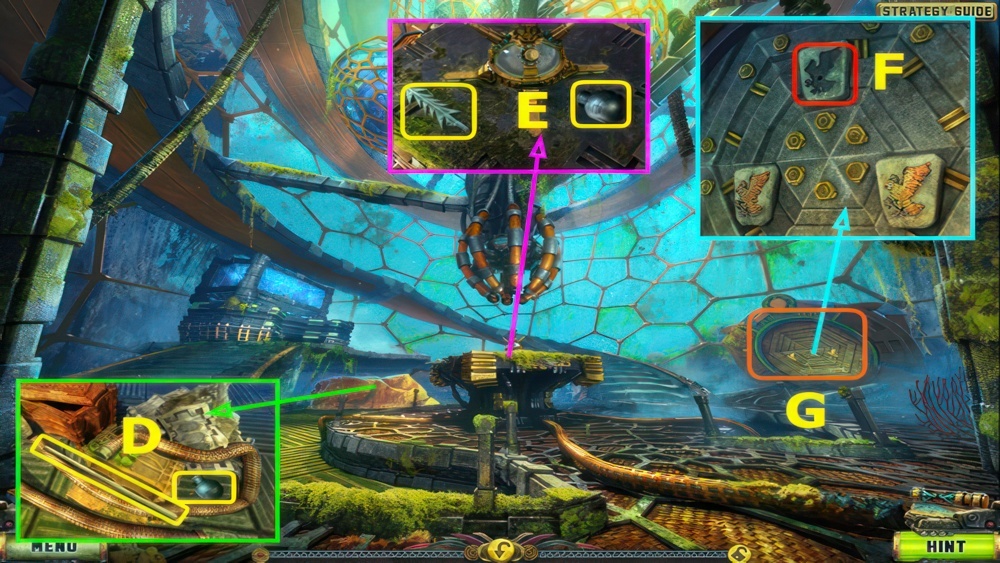
- Talk (A).
- Take UNSHARPENED PENCIL (B).
- Use UNSHARPENED PENCIL, earn PENCIL (C).
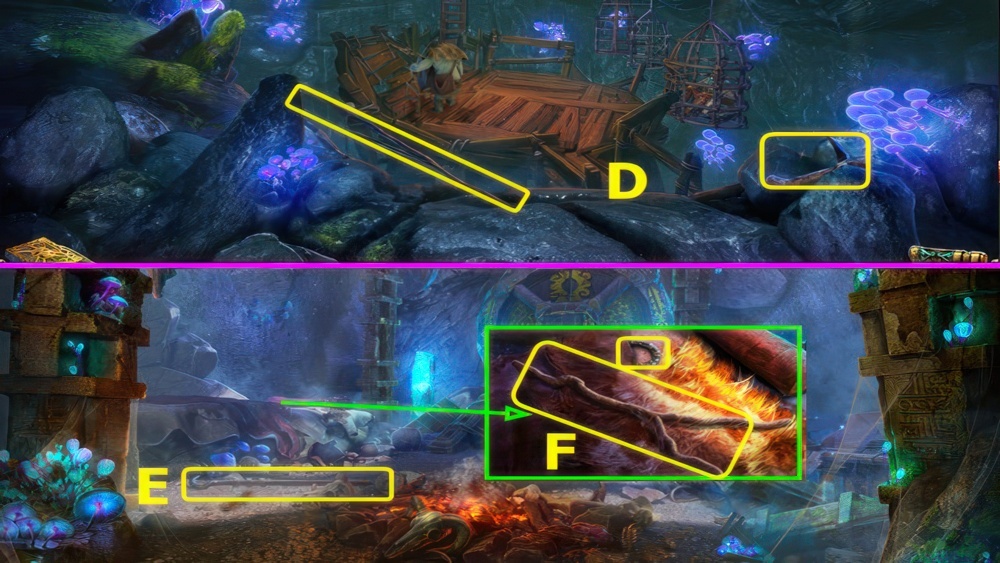
- Use PENCIL, take CODE, KNIFE CASE, and SHEET OF PAPER (D).
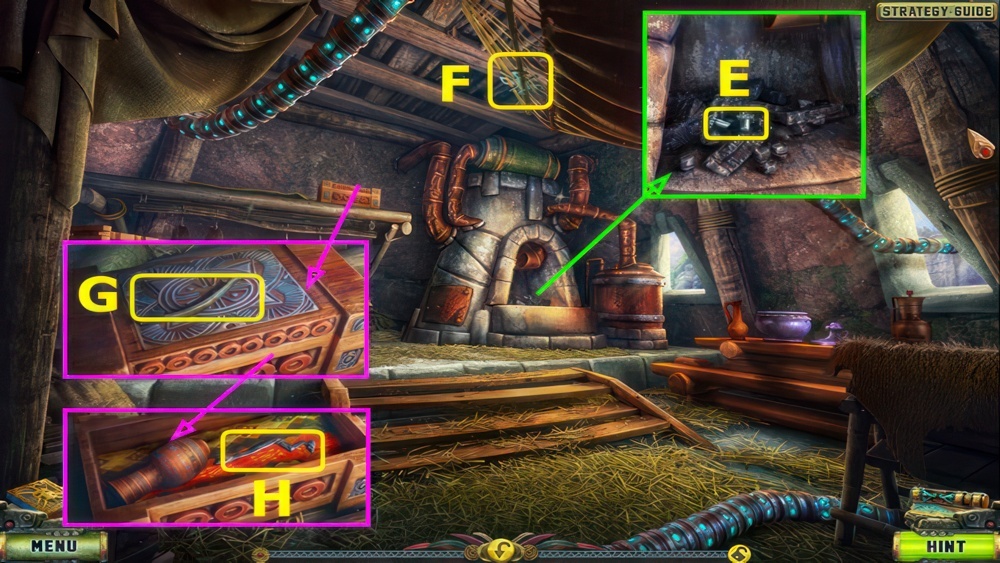
- Use CODE, enter 1, 5, 7, 9, CHECK (E).
- Select (F).
- Go right.
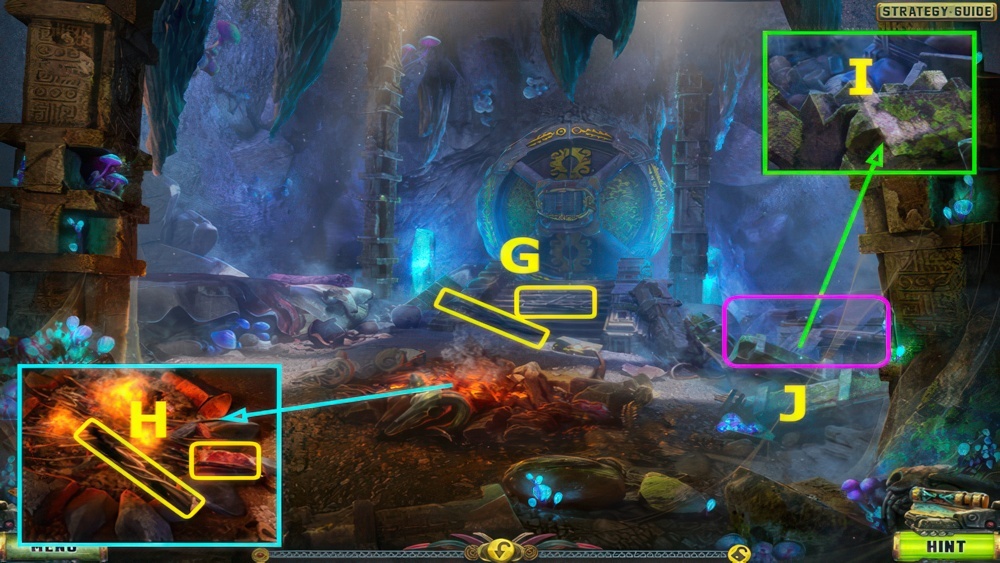
- Place SHEET OF PAPER (G).
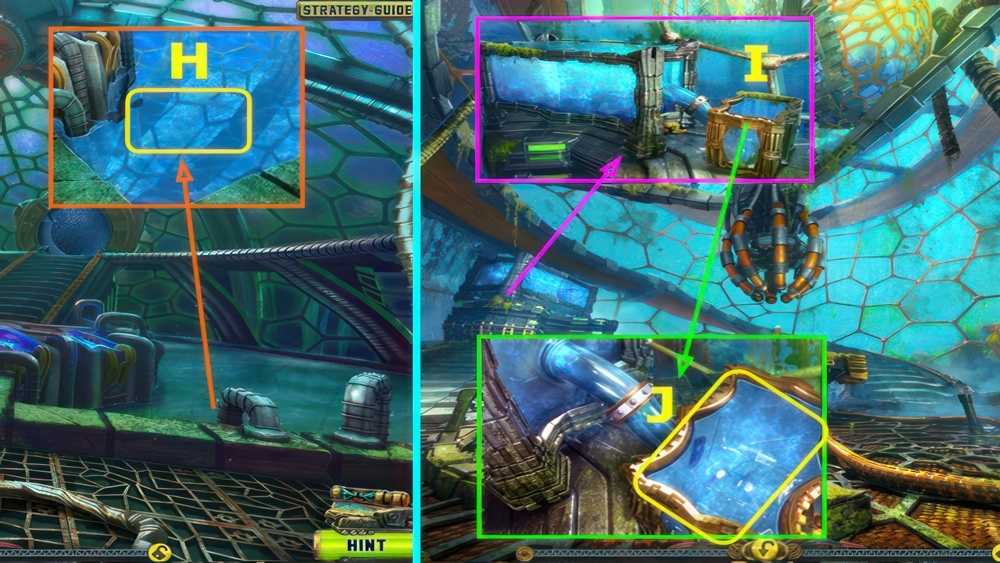
- Take KNIFE BLADE and PAPER CLIP (H).
- KNIFE BLADE in KNIFE CASE, earn KNIFE.
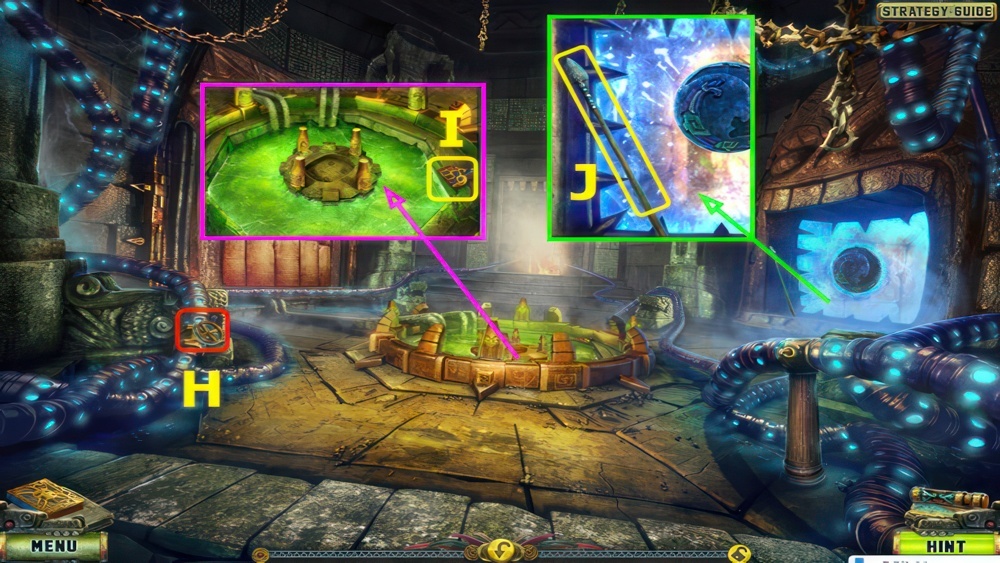
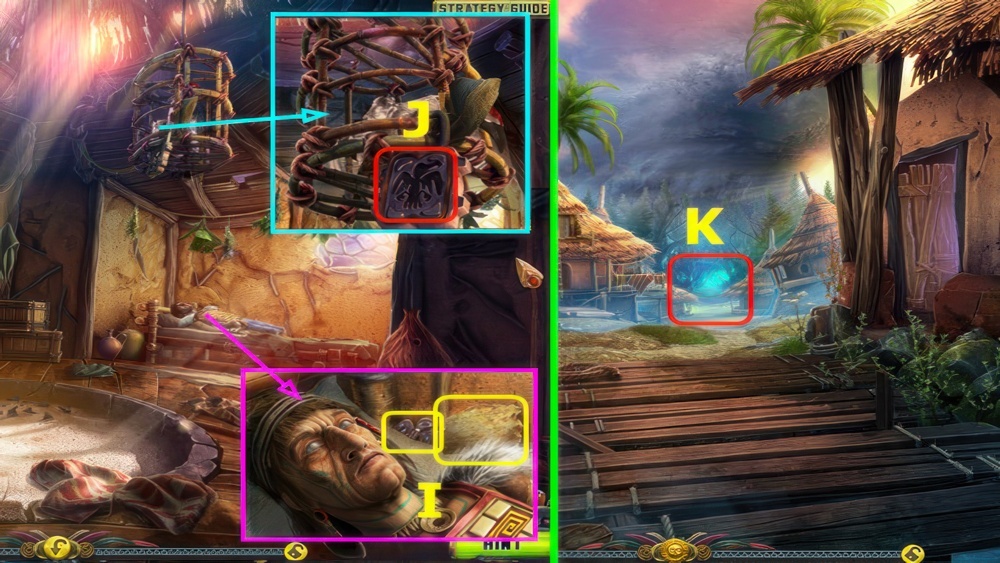
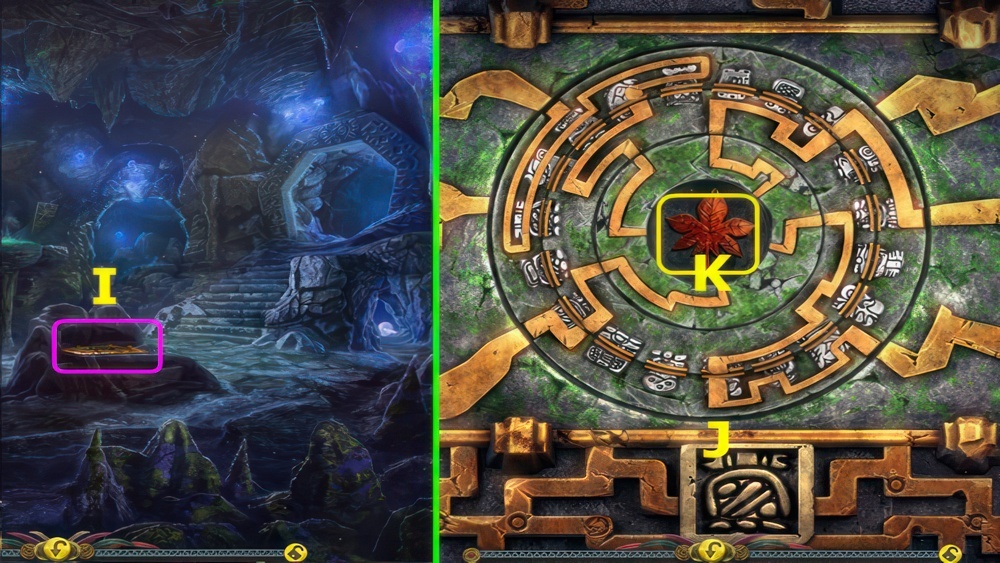
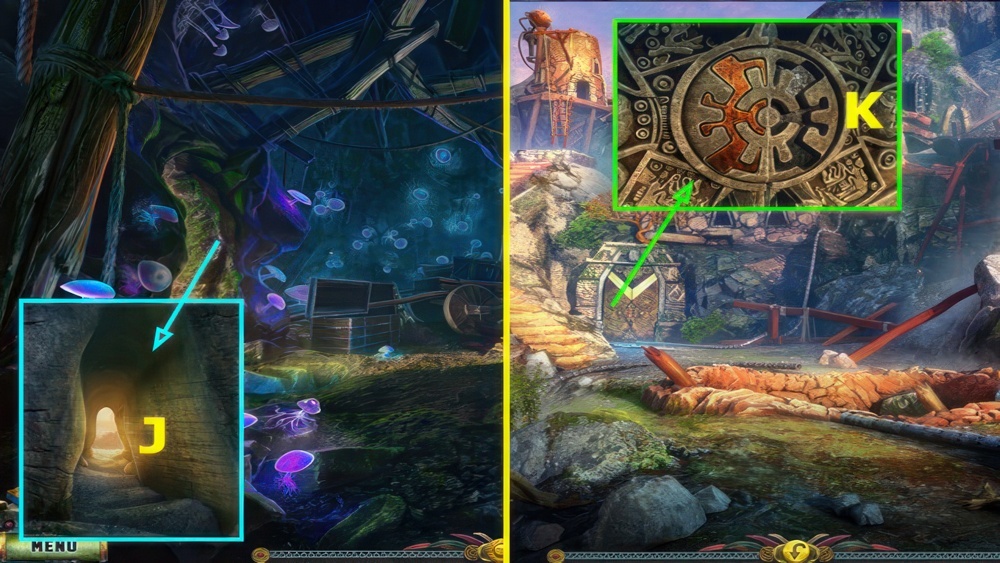
- Select (I).
- Take PHOTO (J).
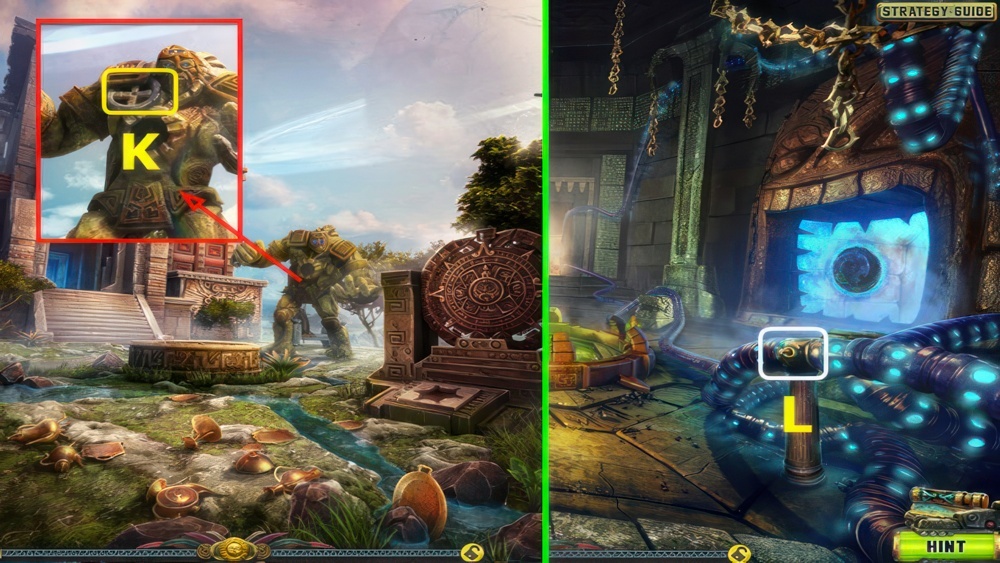
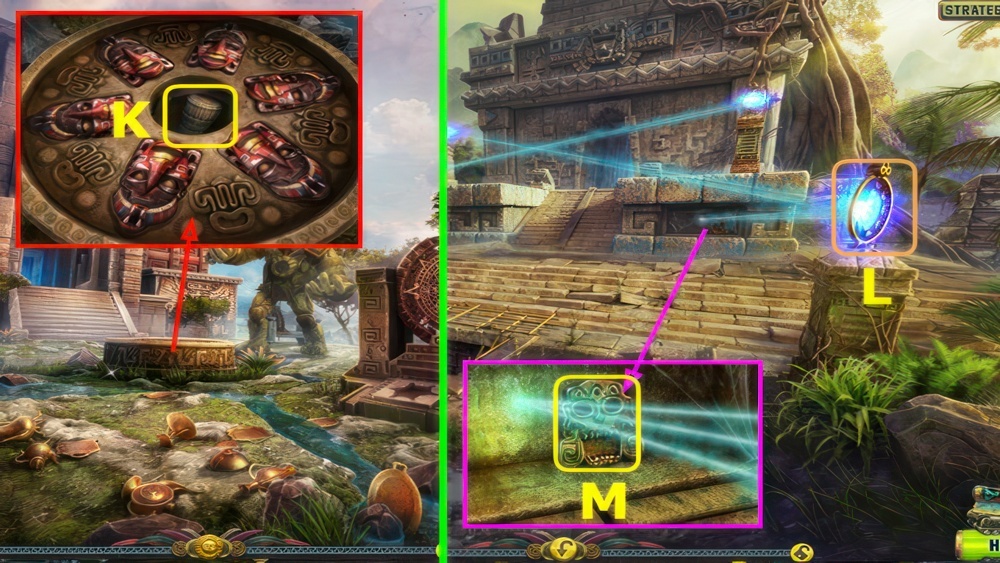
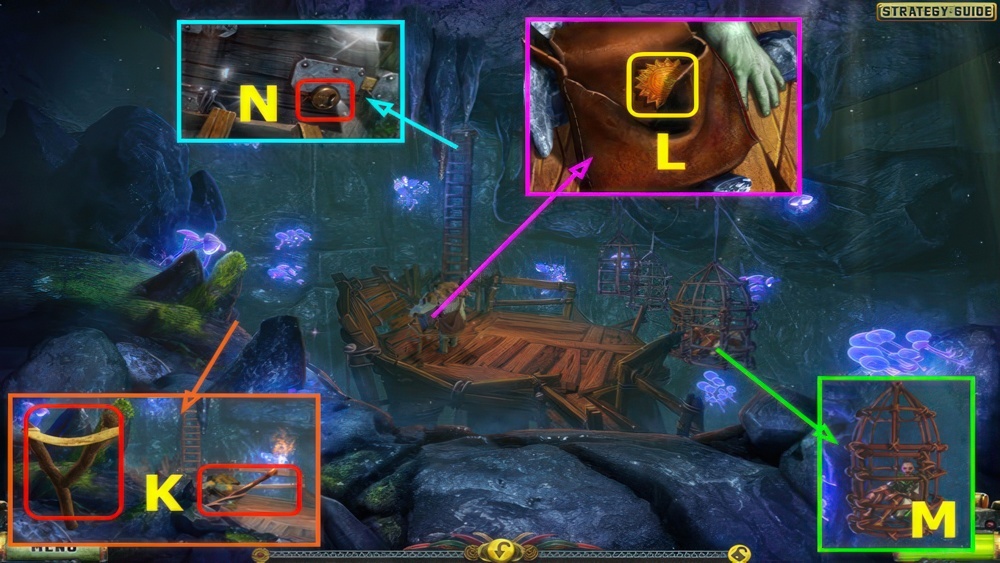
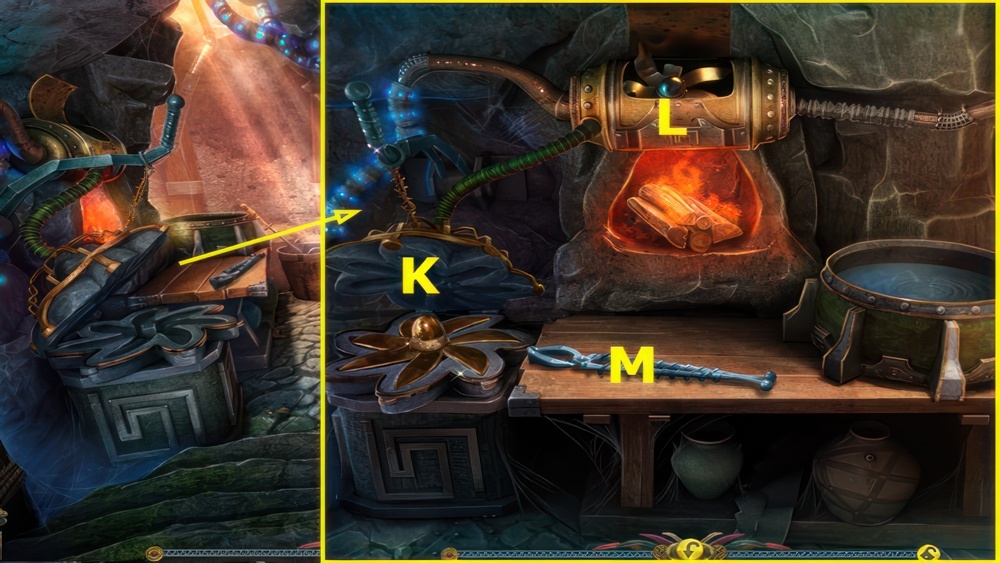
- Read paper, open pocket, and take KEY (K).
- Use KEY, take HAMMER and STRING (L).
- Select PAPER CLIP, add STRING, earn HOOK ON SHOELACE.
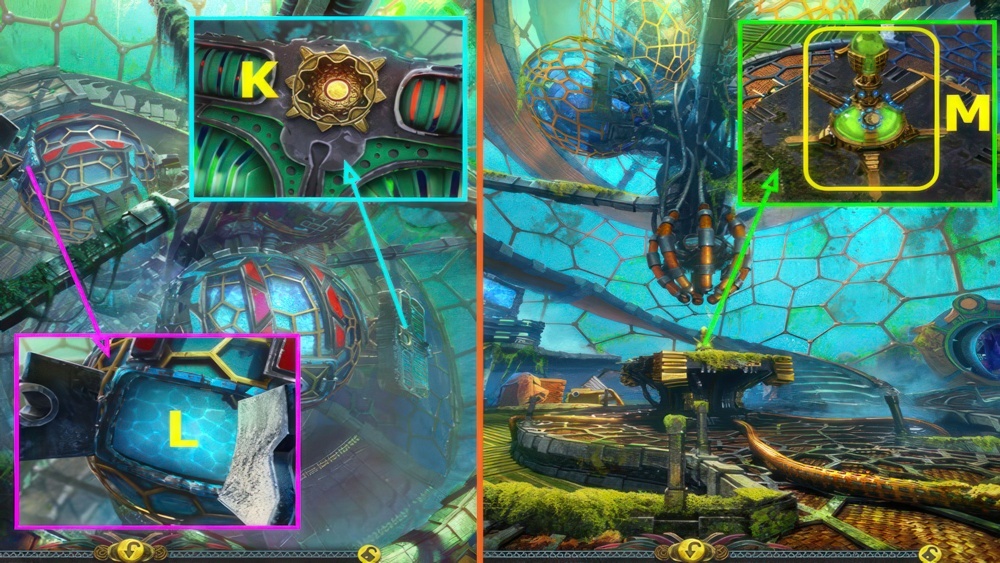
- Go down.
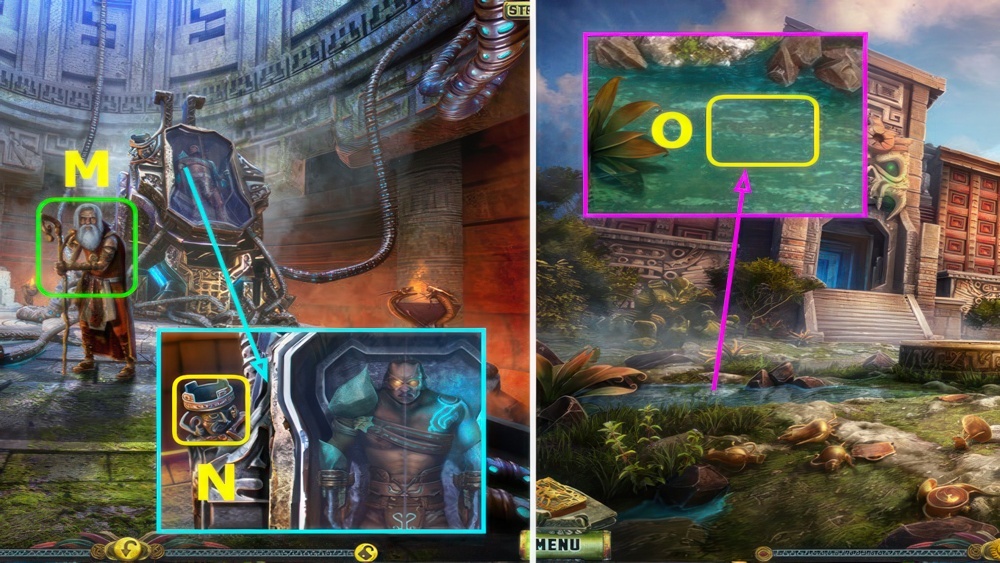
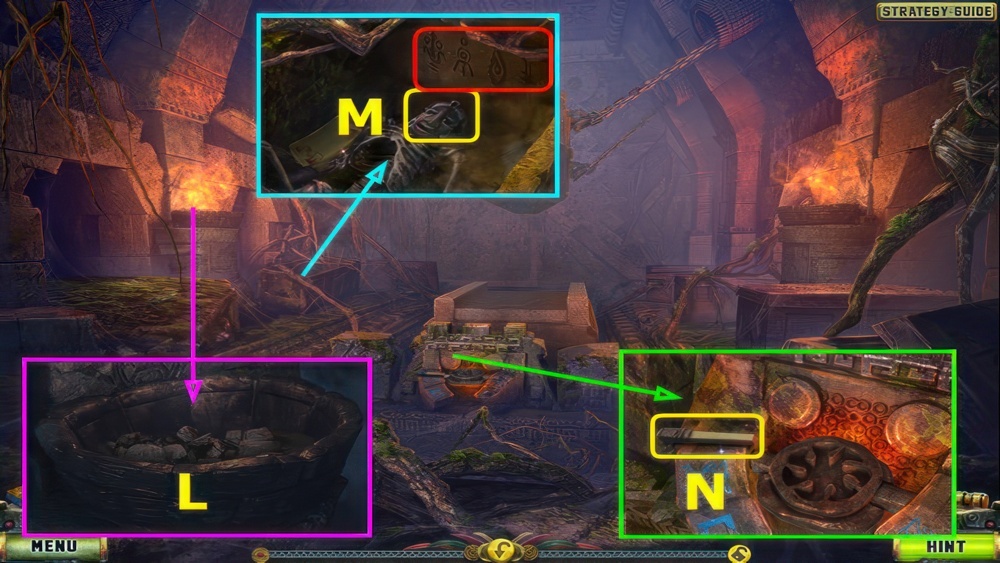
- Select (M).
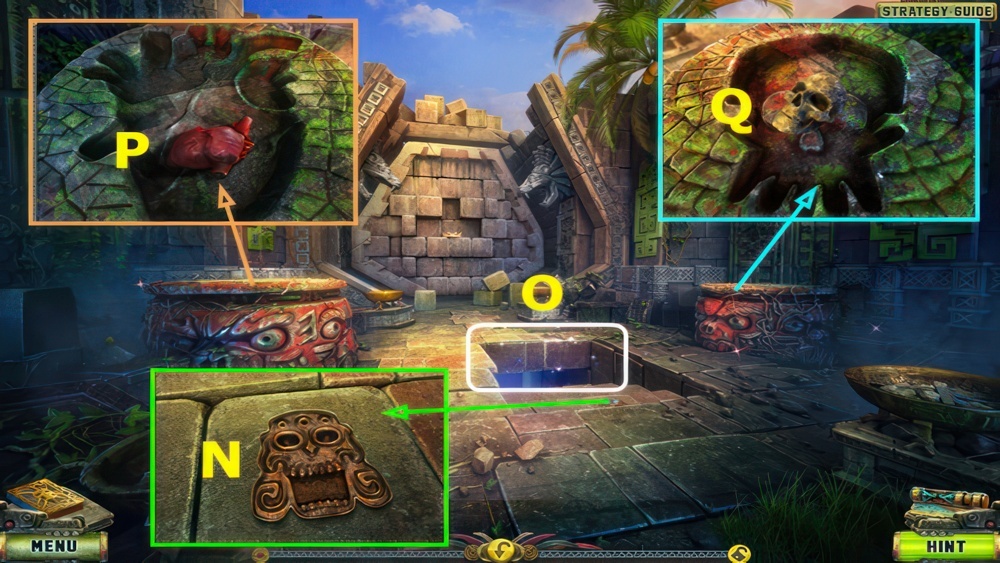
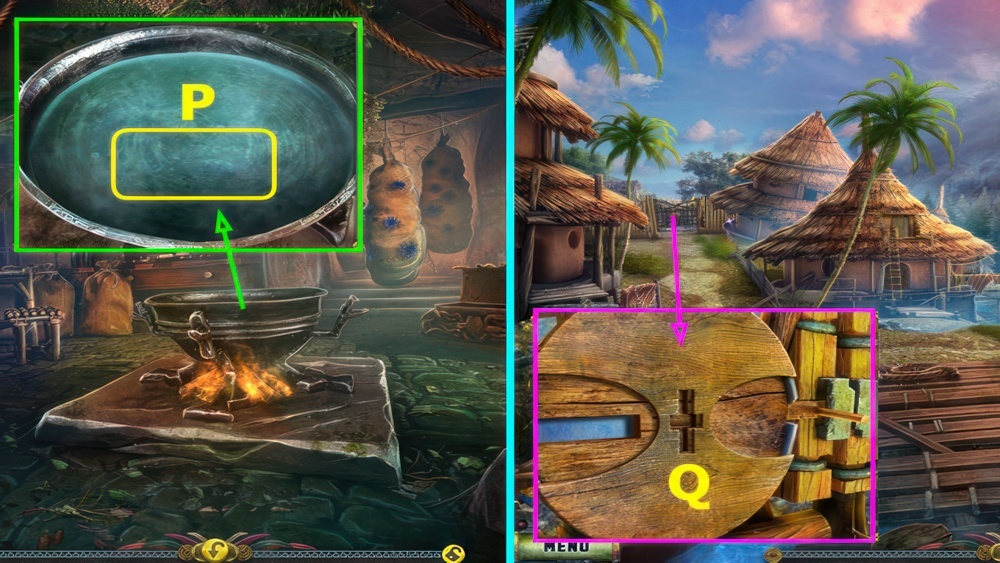
- Use HOOK ON SHOELACE, earn KEY CARD (N).
- Use KEY CARD (O).
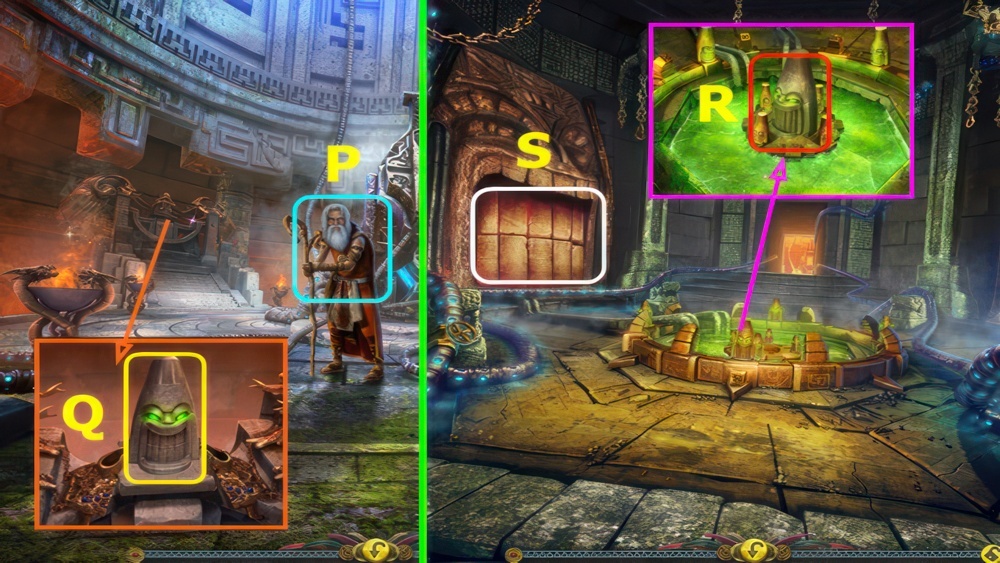
- Take NAVIPAD (P).
- Place PHOTO (Q).
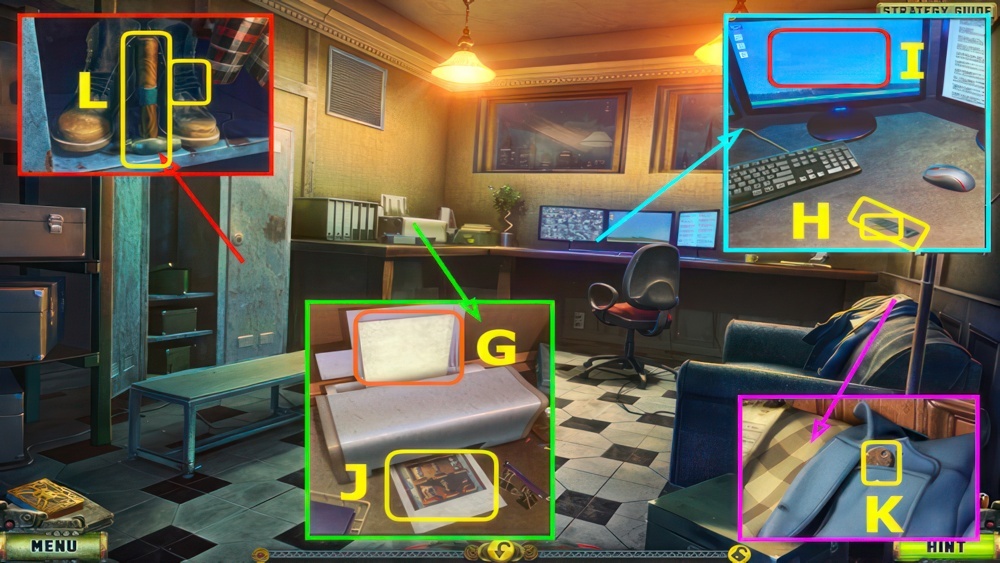
Find the lost exhibit item
I found out we’re missing a golden bust from Guatemala. Luckily, all items on exhibit have a GPS transmitter, so we can trace them using the security navipad. I need to find David’s navipad and check the artifact’s number. If it’s not too far away I’ll be able to find it quickly.
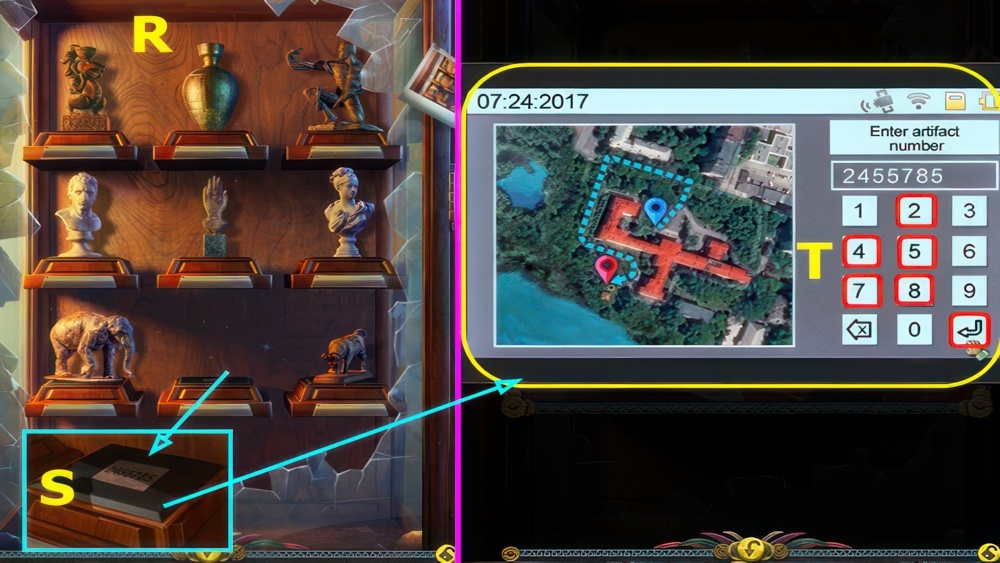
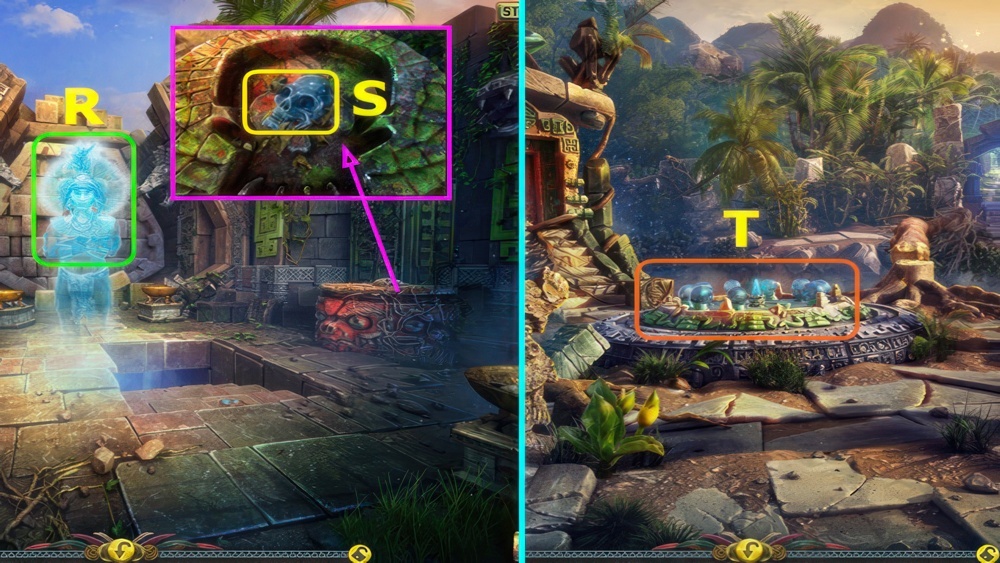
- Put the exhibit items back in place, using the photo as a hint.
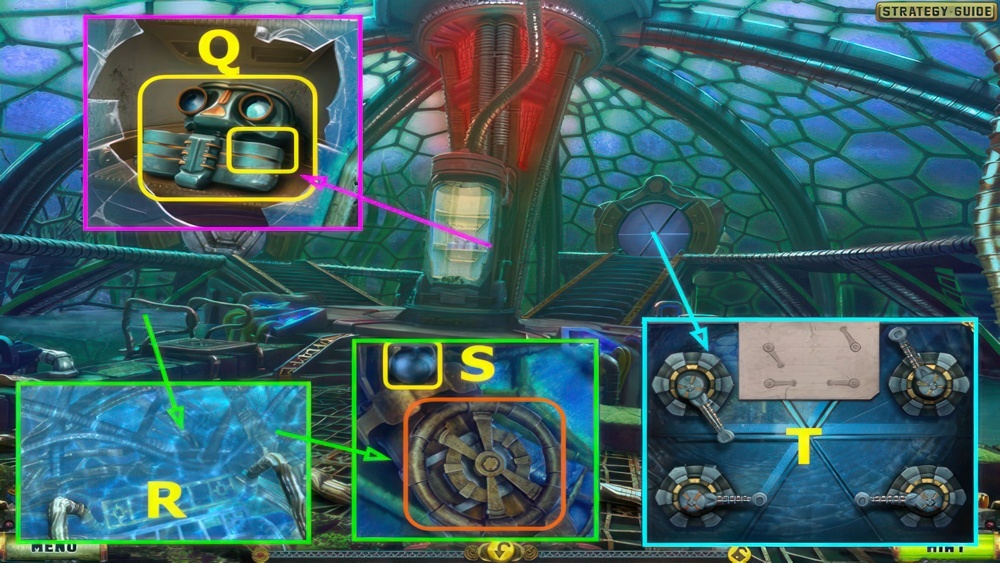
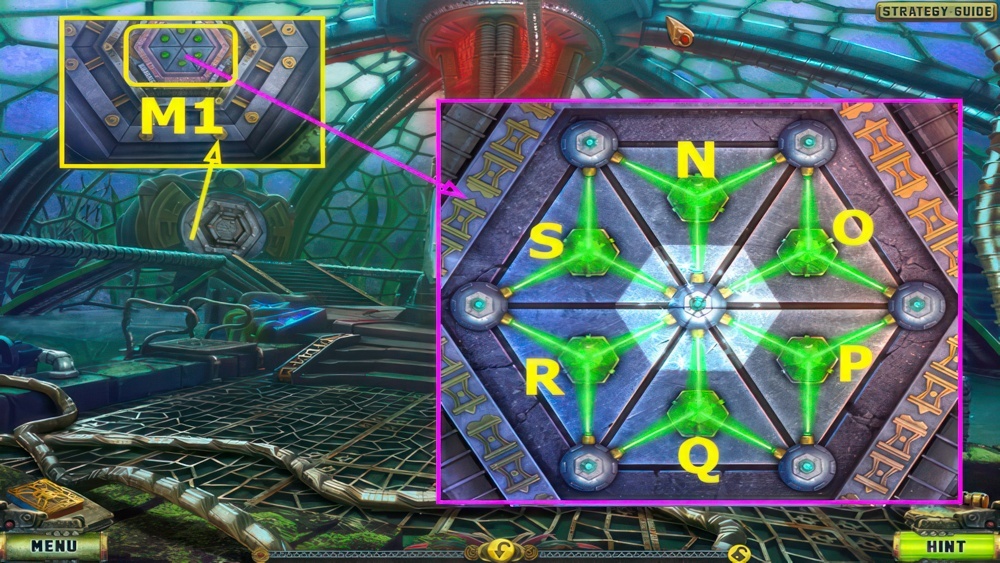
- Walkthrough (R).
- Select, note numbers (S).
- Enter the number of the lost artifact.
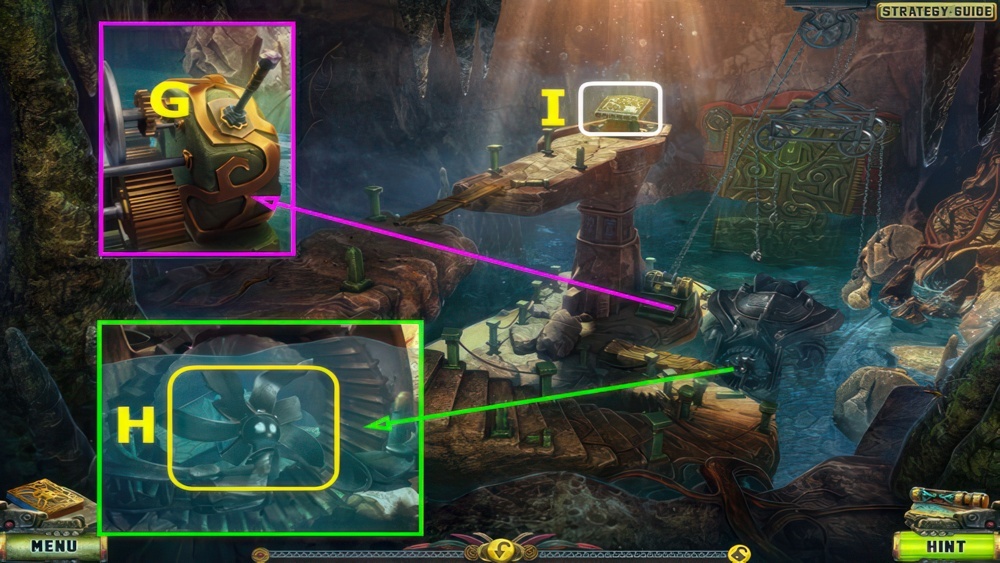
- Select NAVIPAD, press 2, 4, 5, 5, 7, 8, 5, ⏎ (T), take NAVIPAD.
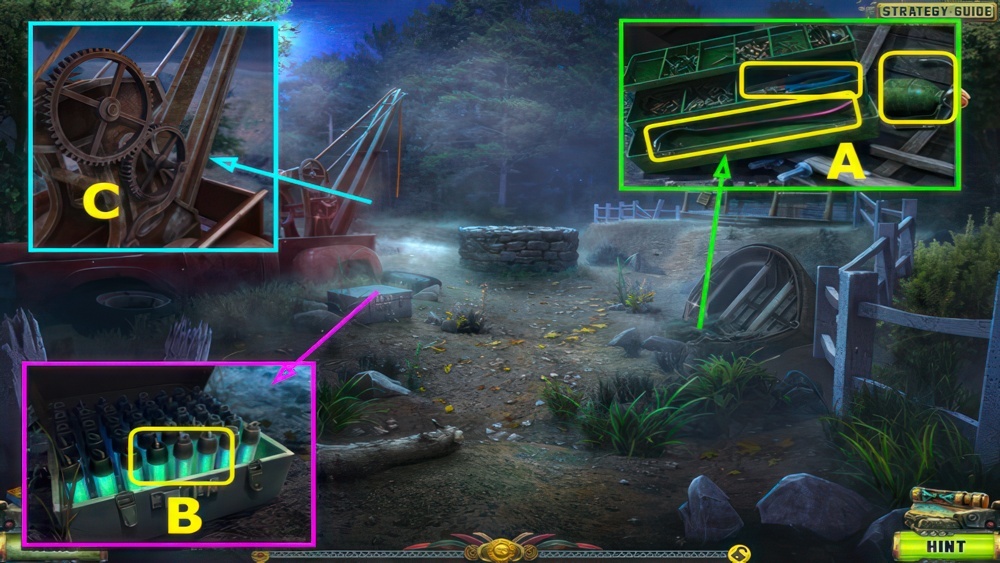
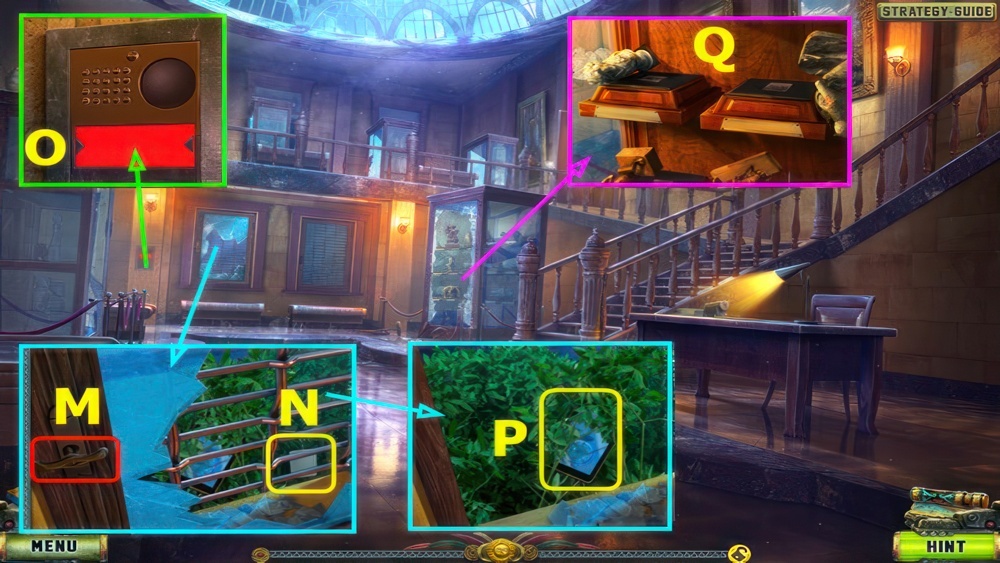
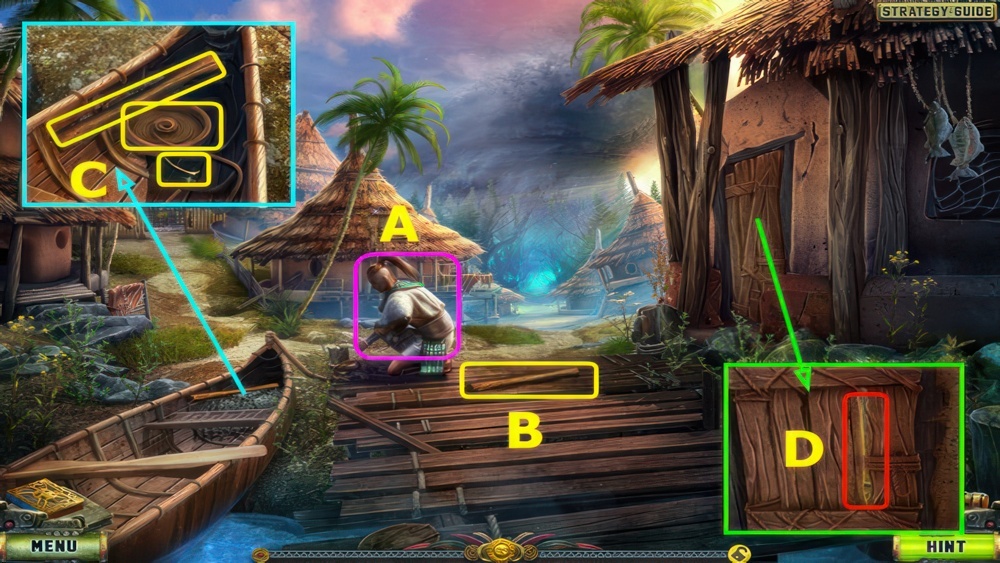
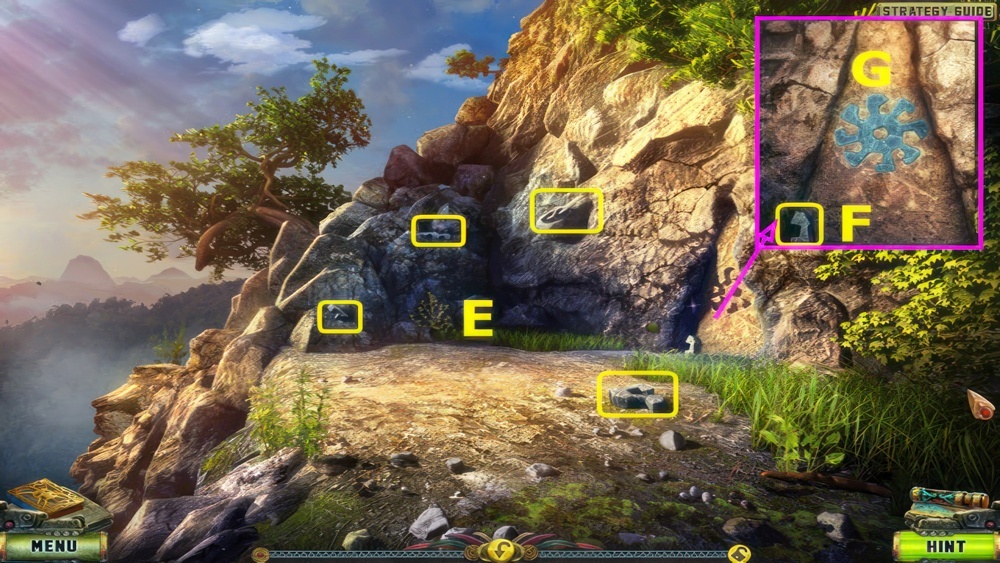
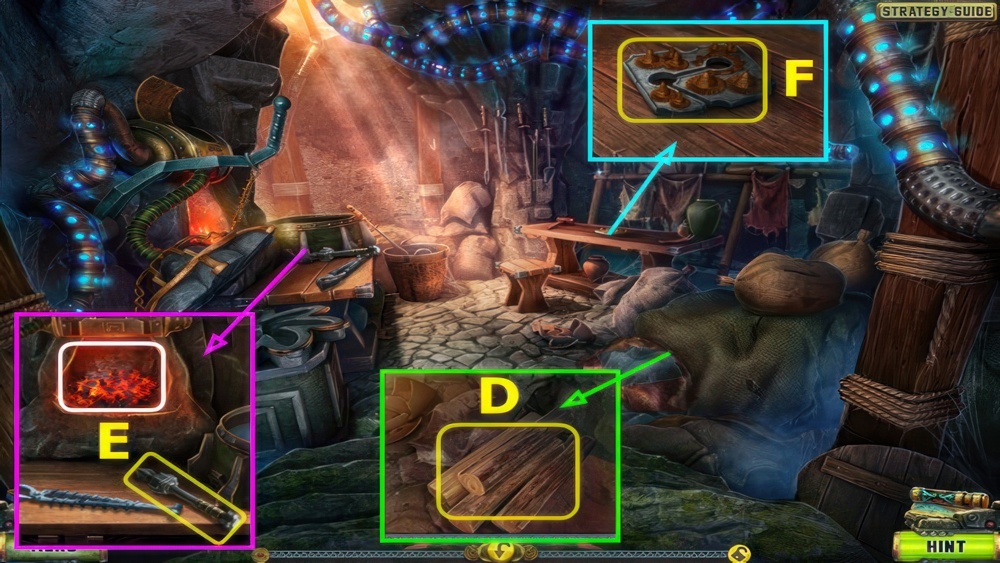
- Remove net, use HAMMER, take PLIERS, CROWBAR, and OIL (A).
- Use PLIERS, take CHEMICAL LANTERN (B).
- Use OIL, select (C).
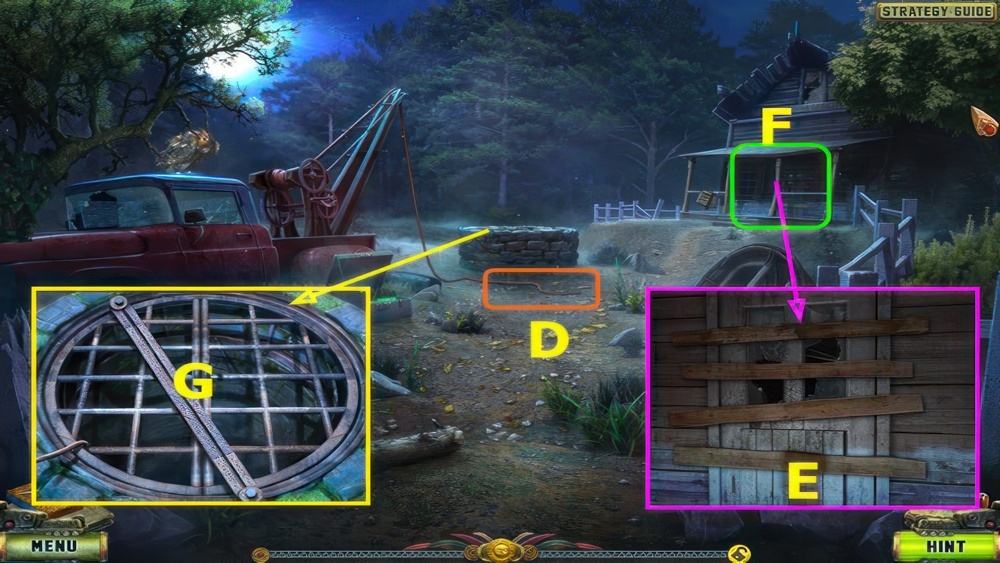
- Select (D).
- Use CROWBAR (E).
- Play puzzle, earn WRENCH (F).
- Use WRENCH, open grate, use CHEMICAL LANTERN (G).
- Enter well.
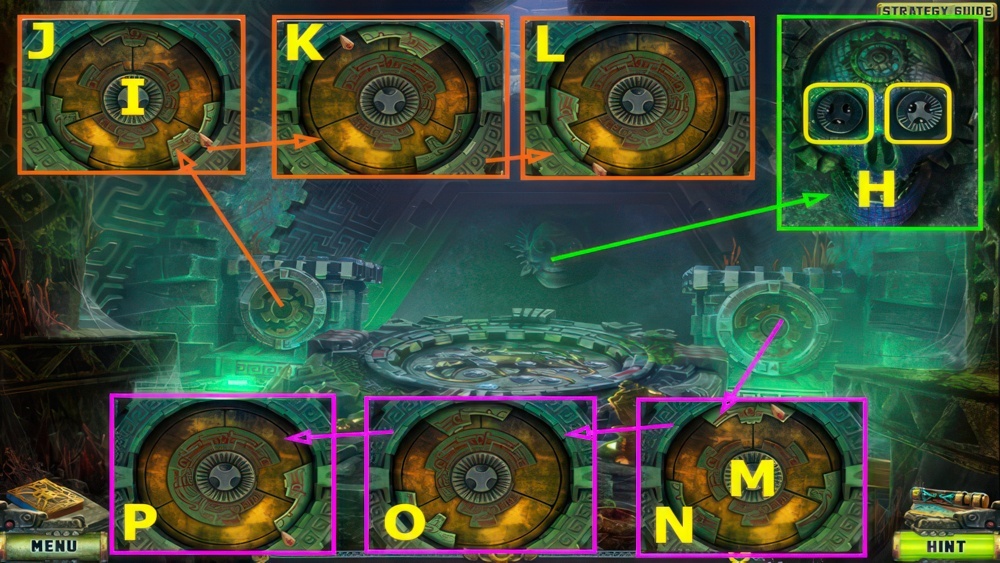
- Take 2 SEALS (H).
- Place 1st SEAL (I).
- Rotate the circle parts so that they match the grooves in the center part.
- Rotate outer ring to J-K-L.
- Place 2nd SEAL (M).
- Rotate outer ring to N-O-P.
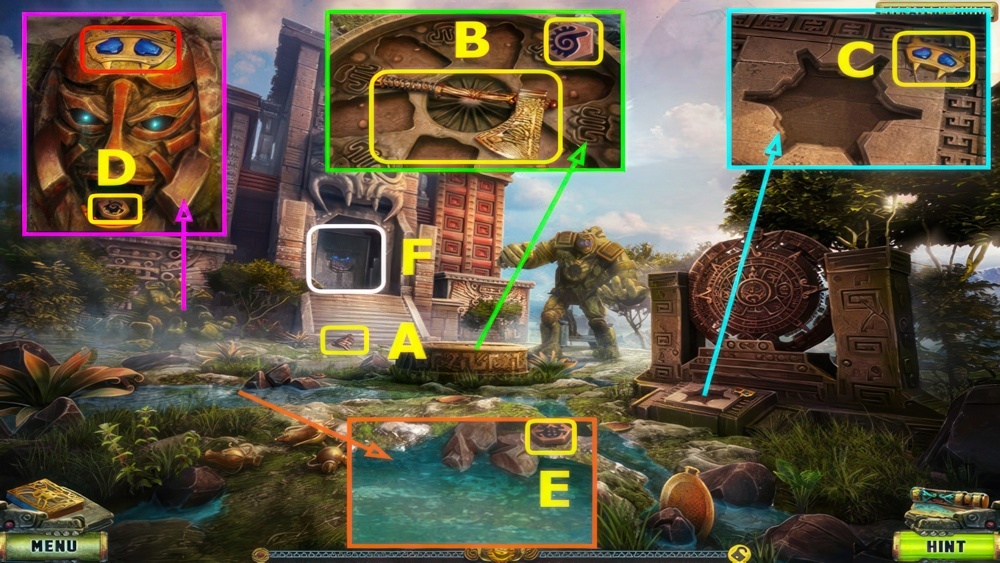
- Select A-B.
- Take MASK and TUBE (C).
- Open TUBE, remove ink, use ink (D) on tube (E), select tube, take CONSTELLATION CHART.
- Select (G).
Get to the surface
I found the artifact near the museum and caught sight of the guard. He was behaving strangely, as if under some outside influence. After he threw the golden bust into the well, the guard ran away into the forest. I must try to get the artifact back first and have a talk with David. Bad luck. The line broke and now I need to find a way out of this well.
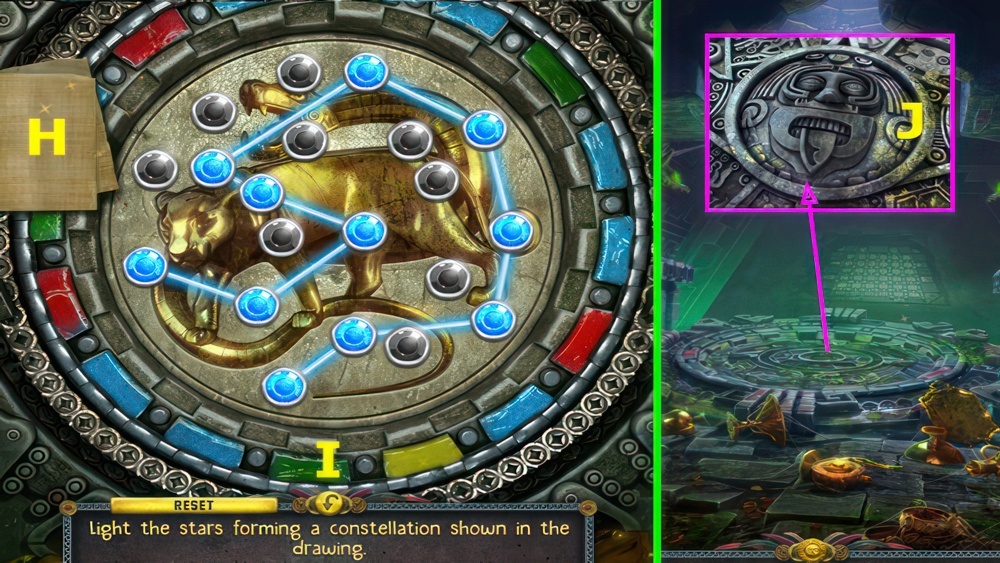
- Place CONSTELLATION CHART (H).
- Light the stars forming a constellation shown in the drawing.
- Check out the hint if needed.
- Walkthrough (I).
- Place MASK (J).
Find help
While trying to climb out of the well with the golden bust I activated an ancient portal and fell into it. The portal closed right behind me. Judging from the strange light in the sky, I think I’ve fallen into another world. This looks like some sort of temple. Hopefully I’ll find some local people who will help me activate the portal to return home.
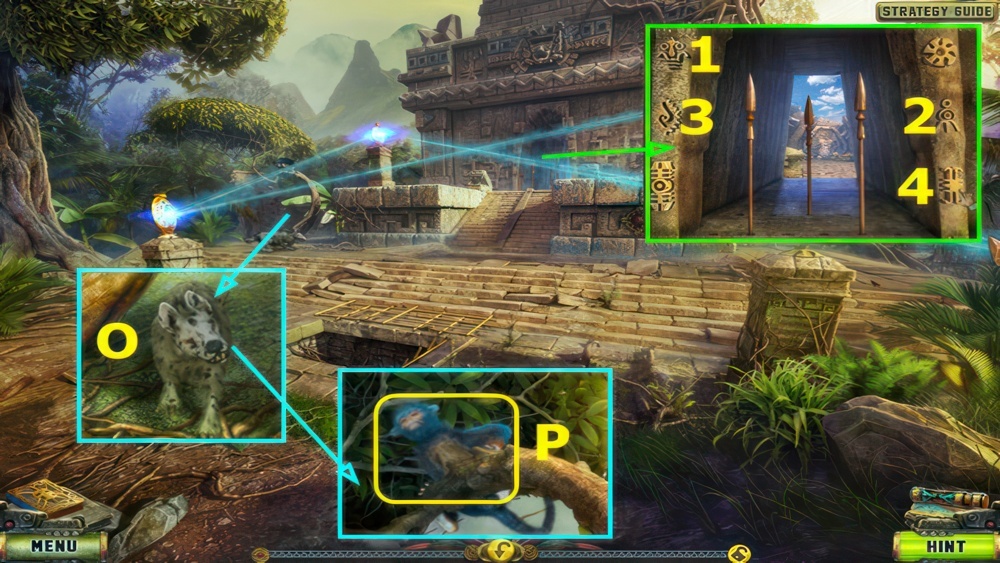
- Take 1/6 MASK (A).
- Take AXE and 1/3 STONE PLATE (B).
- Take DETAIL (C).
- Place DETAIL, take 2/3 STONE PLATE (D).
- Take 3/3 STONE PLATE (E).
- Select (F).
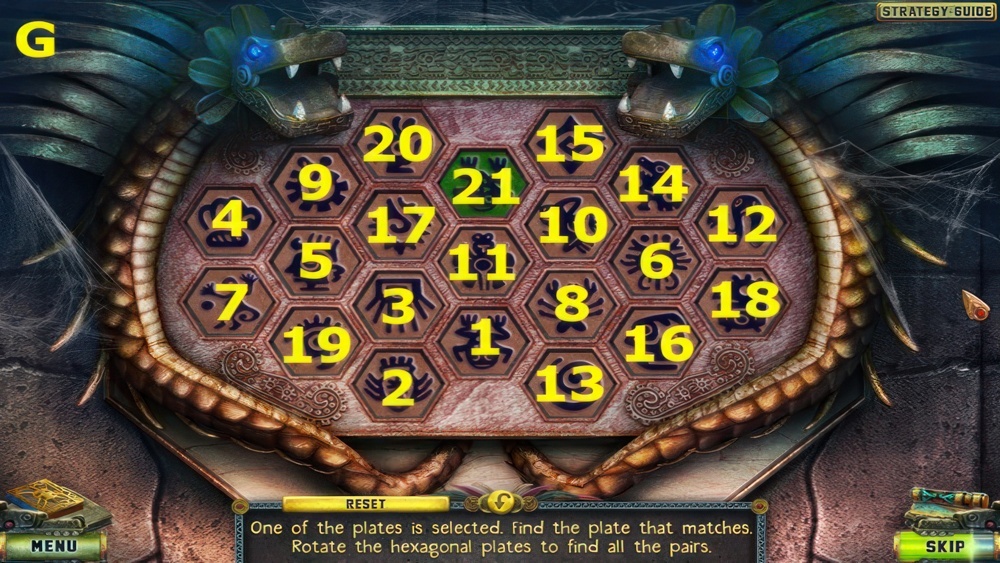
- Place 3 STONE PLATES.
- One of the plates is selected.
- Find the plate that matches.
- Rotate the hexagonal plates to find all the pairs.
- Walkthrough (G): 1-21.
- Go forward.
- Select (H).
- Take 1/2 PEDESTAL PART (I).
- Take SPEAR (J).
- Go down.
- Use SPEAR, take VALVE (K).
- Go forward.
- Use VALVE (L).
- Go forward.
- Talk (M).
- Take GOBLET (N).
- Go down twice.
- Use GOBLET, earn CUP OF WATER (O).
- Go forward twice.
Find the Pink Quartz
Kitron agreed to help me return home. However, to activate the portal I need to find a Pink Quartz in the ancient tombs of the local tribe. The guard told me how to get there, but I’ll have to figure out the rest on my own.
- Give CUP OF WATER, earn 2/2 PEDESTAL PART (P).
- Place 2 PEDESTAL PARTS, take STONE HEAD (Q).
- Go down.
- Place STONE HEAD (R).
- Play puzzle (S).
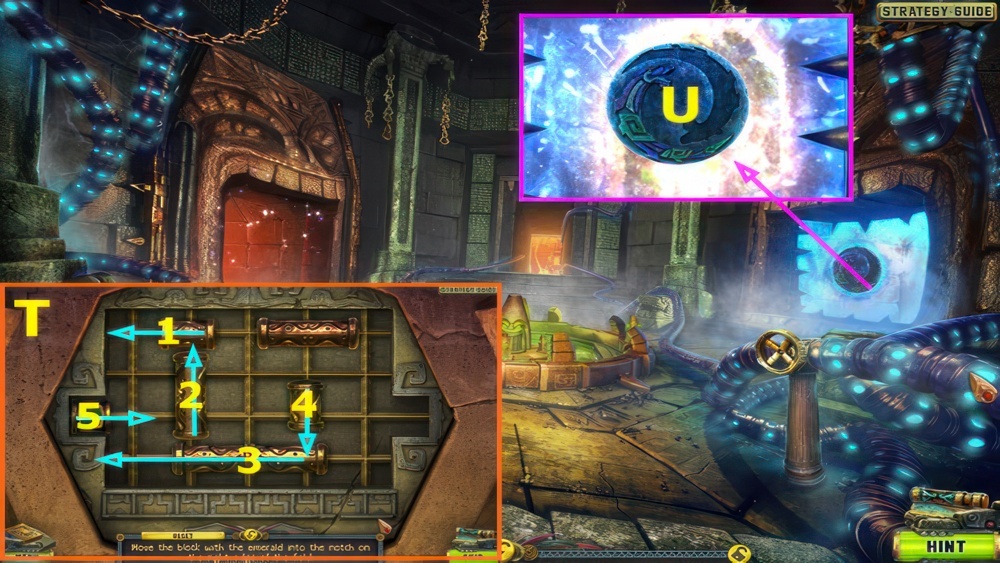
- Move the block with the emerald into the notch on the right edge of the field.
- Walkthrough (T): 1-5.
- Complete the puzzle, earn DRAGON FIGURINE.
- Place DRAGON FIGURINE (U).
- Go right.
Help the wizard’s ghost
When I got to the tomb I met the ghost of a High Wizard. His tribe kept the Pink Quartz. He told me that all his people died in a sudden outbreak of disease, and he wasn’t buried properly. He can have no peace until that happens. I must help that poor ghost, and then he’ll tell me where to look for the Pink Quartz.
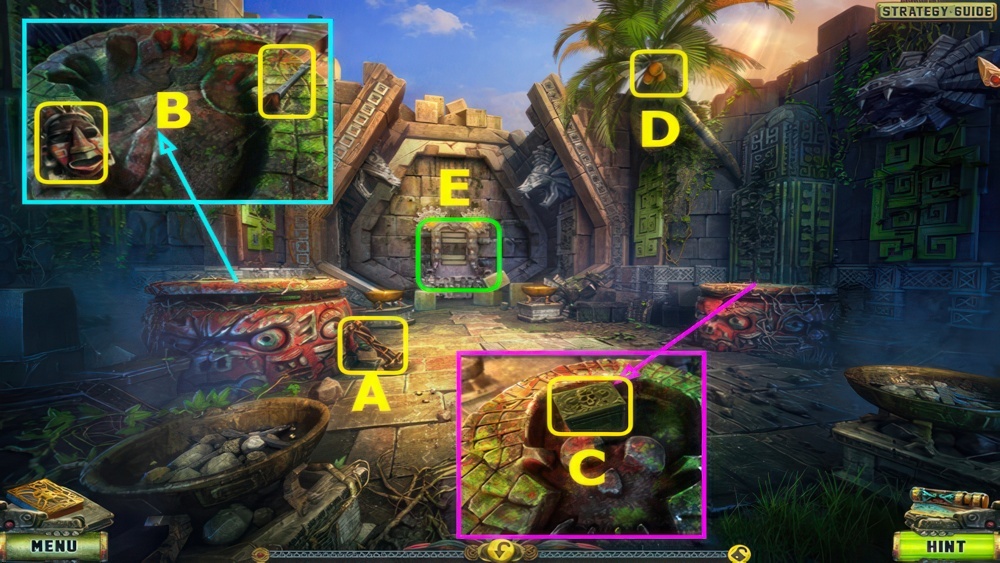
- Talk (A).
- Take MACE HANDLE (B).
- Take 2/6 MASK and STURDY CORD (C).
- Use AXE (D).
- Take FRUIT (E).
- Go right.
- Use KNIFE, select grate (F).
- Take 3/6 MASK and MACE HEAD (G).
- MACE HEAD and STURDY CORD on MACE HANDLE, earn MACE.
- Take UNLIT TORCH (H).
- Select 1-3, take BROKEN LENS (I).
- Go down twice, forward.
- Use UNLIT TORCH, earn TORCH (J).
- Go down, right.
- Use MACE (K).
- Go left.
- Use TORCH (L).
- Read note, remove branch, take 4/6 MASK note symbols (M).
- Take 1/2 DECORATED PLANK (N).
- Go down, right.
- Use TORCH (O).
- Use FRUIT, earn MARMOSET (P).
- Press the symbols in the correct order.
- Walkthrough: 1-4.
- Go forward.
- Take LEVER (A).
- Take 5/6 MASK and STONE KNIFE (B).
- Take STONE BOX (C).
- STONE KNIFE on STONE BOX, take BRASS KNUCKLE KEY.
- Use MARMOSET, earn 2/2 DECORATED PLANK (D).
- Select (E).

- Place 2 DECORATED PLANKS.
- Restore the image by swapping the planks.
- Walkthrough (F).
- Take BLOOD WATER (G).
- Go down twice, left.
- Use LEVER (H).
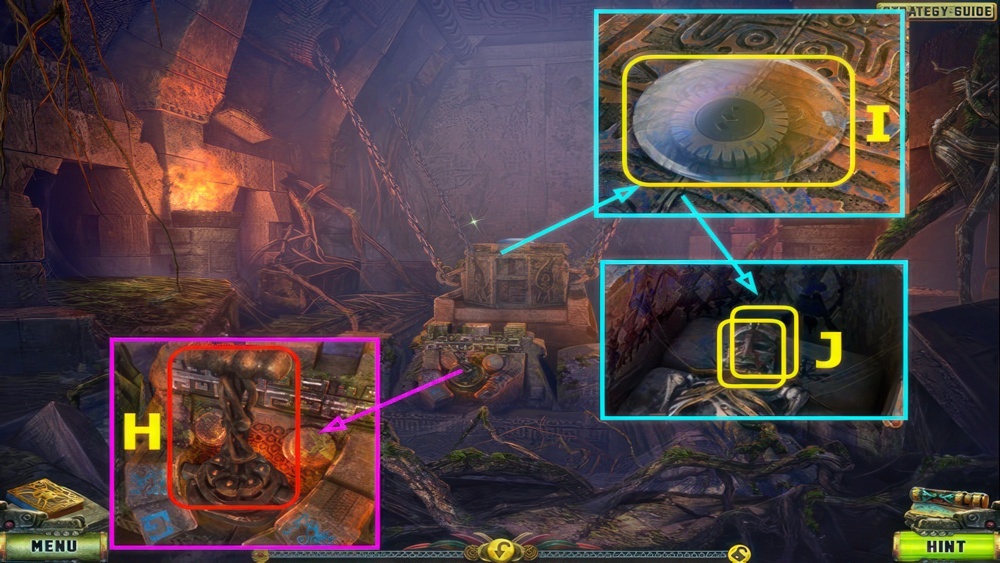
- Take LENS, use BRASS KNUCKLE KEY (I).
- Play puzzle, move all the blocks into the hole.
- When you click an empty cell, the adjacent blocks move one cell away from it.
- If a block is pushed against a wall it can’t be moved, and you’ll have to start over.
- Take 6/6 MASK and SKULL (J).
- LENS on BROKEN LENS, earn LENS.
- Go down thrice.
- Place 6 MASKS, take FIRE POWDER (K).
- Go forward, right twice.
- Place, select LENS (L).
- Take MASK (M).
- Go forward.
- Place MASK (N).
- Play puzzle, earn HEART (O).
- Place HEART and BLOOD WATER (P).
- Place SKULL and FIRE POWDER (Q).
- Talk (R).
- Take CRYSTAL SKULL (S).
- Go down twice.
- Select (T).

- Place CRYSTAL SKULL.
- Swap pairs of skulls connected with lines, moving them so that all the skulls look toward the center of the circle.
- Walkthrough: (A-G)-(G-C)-(D-J)-(J-F)-(F-B).
- (I-E)-(H-D)-(G-A)-(G-C)-(C-I)-(C-G).
- Take PINK QUARTZ (K).
- Go down, forward.
- Give PINK QUARTZ (L).
Talk to the Elder
I brought the Pink Quartz to Kitron, which turned out to be a terrible mistake. Kitron was actually the one who was imprisoned in the temple, and he was feeding on the energy of his nephew, Rhitoris. Trying to get away from Kitron, I almost drowned in the lake. Luckily, a local merchant, Locktor, managed to drag me out of water. The worst thing is that when Kitron absorbs the energy of the Quartz, he will be able to leave the prison. We need to prevent that, and correct my mistake. Locktor says an Elder by the name of Karphoo can help us. We must find him quickly and learn how to stop this evil that’s now growing in strength.
- Talk (A).
- Take 1/3 STAIR (B).
- Take 2/3 STAIR, remove nets, take ROPE and FISH BONE (C).
- Use FISH BONE (D).
- Go right.
- Talk (E).
- Take 3/3 STAIR, EMPTY BOTTLE, and 1/4 PIECES OF A MAP (F).
- Take BROKEN LADDER (G).
- Take 2/4 PIECES OF A MAP (H).
- Take BIRD-SHAPED KEY and 3/4 PIECES OF A MAP (I).
- Place BIRD-SHAPED KEY, earn 4/4 PIECES OF A MAP (J).
- Select 4 PIECES OF A MAP, earn FOREST MAP.
- Go down.
- Select (K).
Find the sorceress’s hut
We found the Elder of the tribe, Karphoo, in a deep trance, and he couldn’t come out of it on his own. Literally from the other side, the Elder told us of a sorceress living deep in the forest, who can help us bring him back to reality.
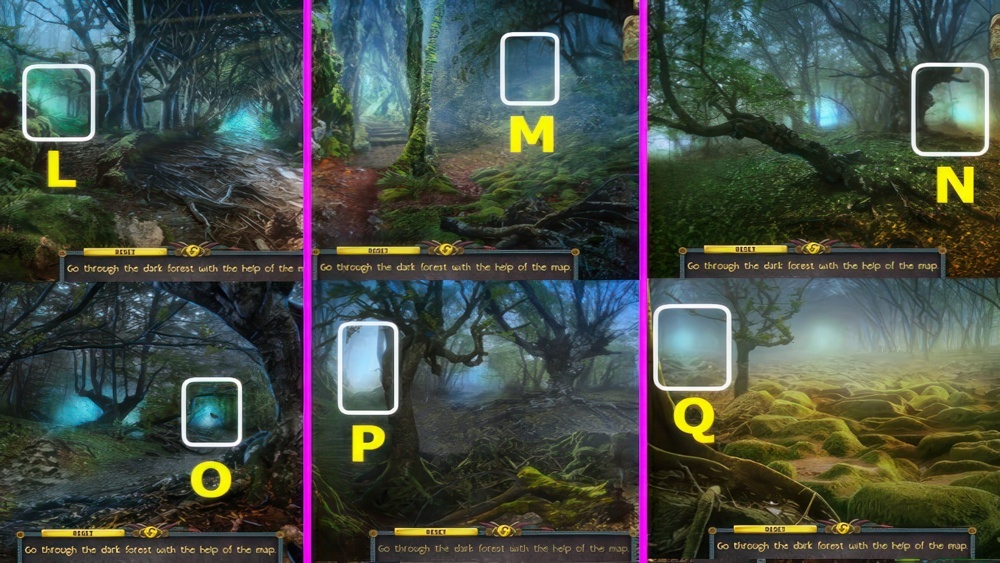
- Use FOREST MAP.
- Go through the dark forest with the help of the map.
- Walkthrough: L, M, N, O, P, Q.
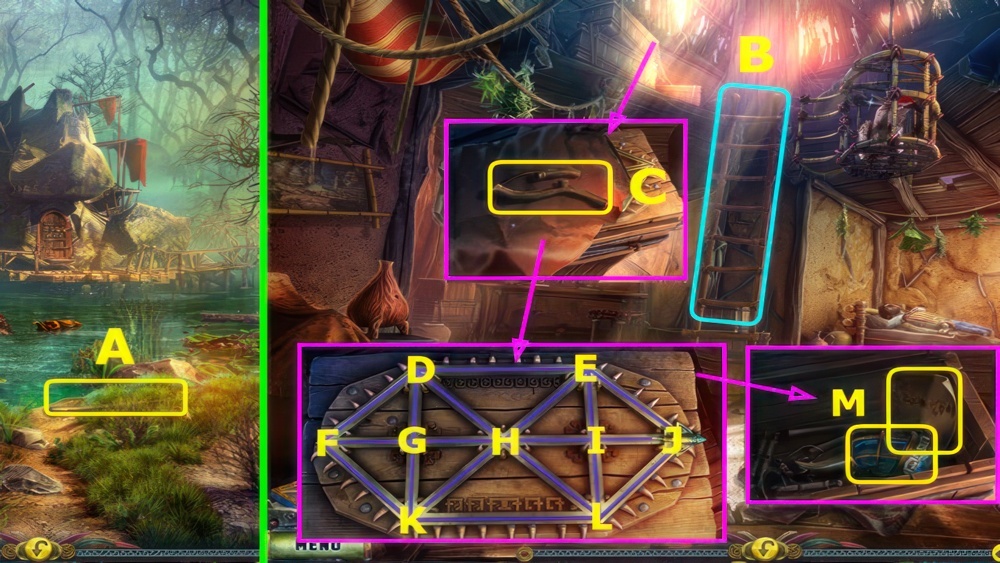
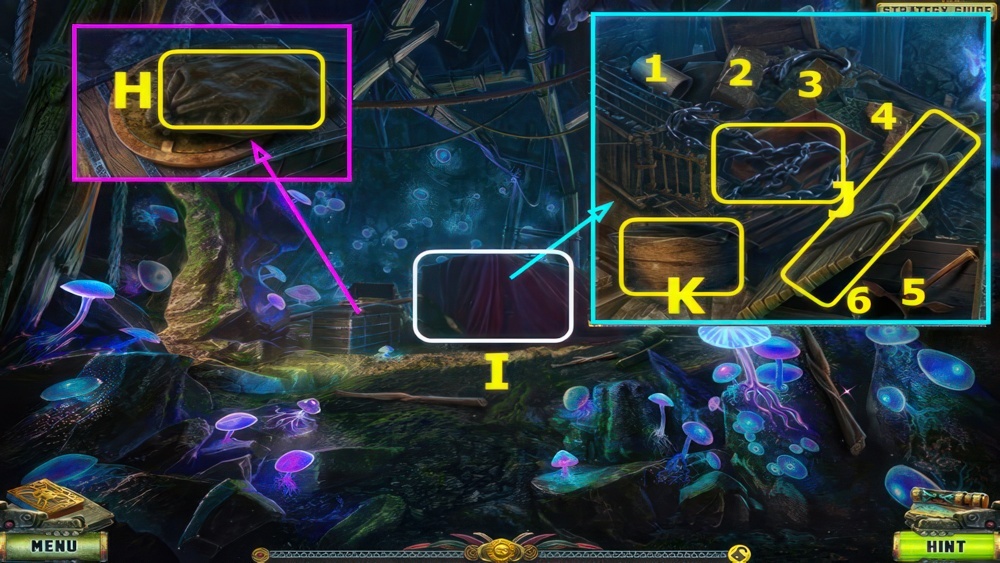
- Take RAIL (A).
- ROPE and KNIFE on BROKEN LADDER, add RAIL and 3 STAIRS, earn LADDER.
- Go down, right.
- Place LADDER (B).
- Take SLINGSHOT, remove cloth and select chest (C).
- Move along all the lines.
- Note that you can only move along each line one time.
- Walkthrough: D, G, F, K, G, H, K, L, H, D, E, H, I, E, J, L, I, J.
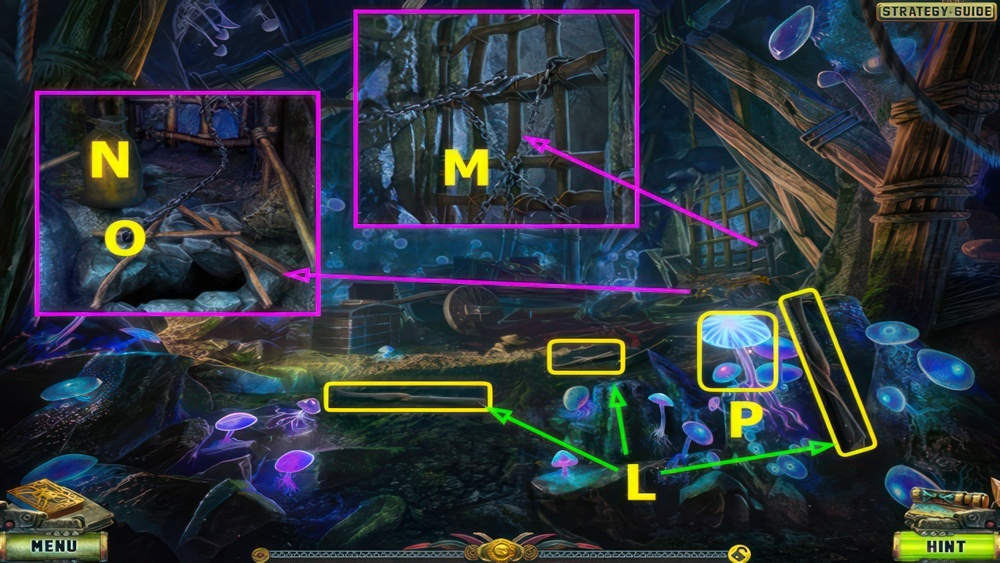
- Take HORN and NOTE (M).
- Go down, forward.
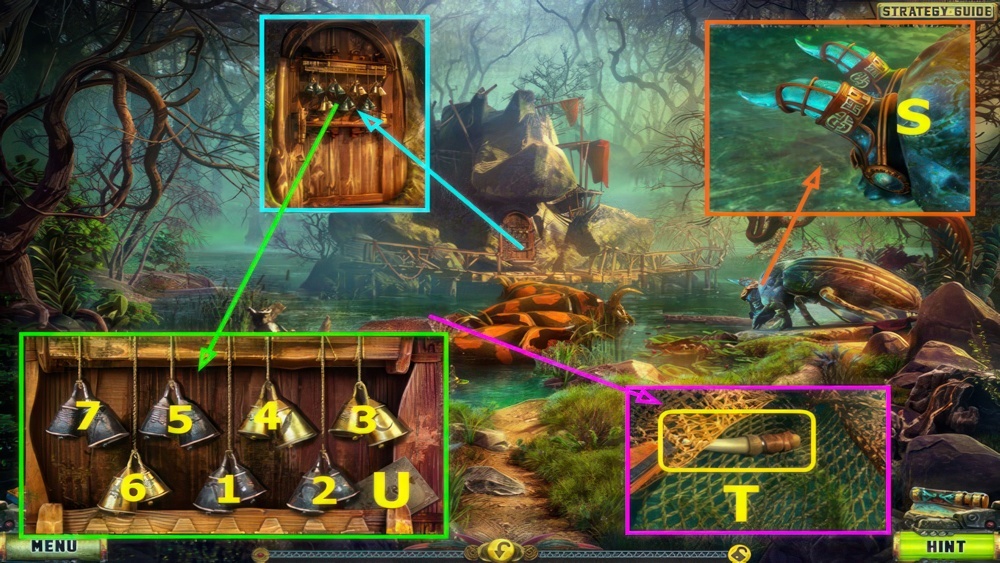
- Place HORN (S).
- Use KNIFE, take HAMMER (T).
- Hit the bells in the correct order.
- Refer to the hint.
- Place NOTE and HAMMER (U).
- Walkthrough: 1-7.
- Go forward.
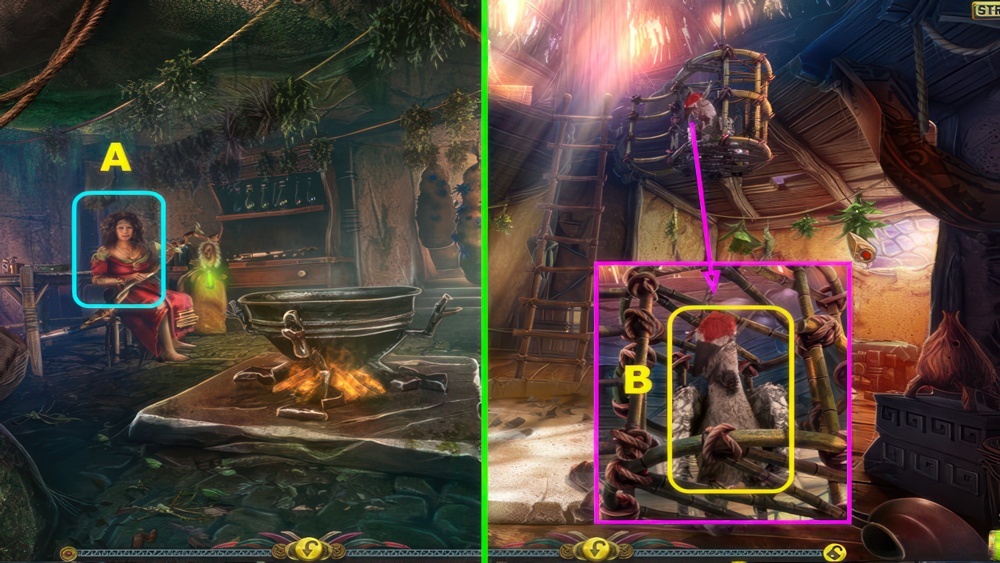
- Talk, earn PROTECTIVE GLOVE (A).
- Go down twice, right.
- Use PROTECTIVE GLOVE, earn BIRD (B).
- Go down, forward twice.
Prepare the potion
The sorceress mentioned a special potion which can bring back the Elder. We just need to make it, following the steps written in an ancient recipe. The sorceress set off hunting. She’s looking for a bat claw we need for the potion.
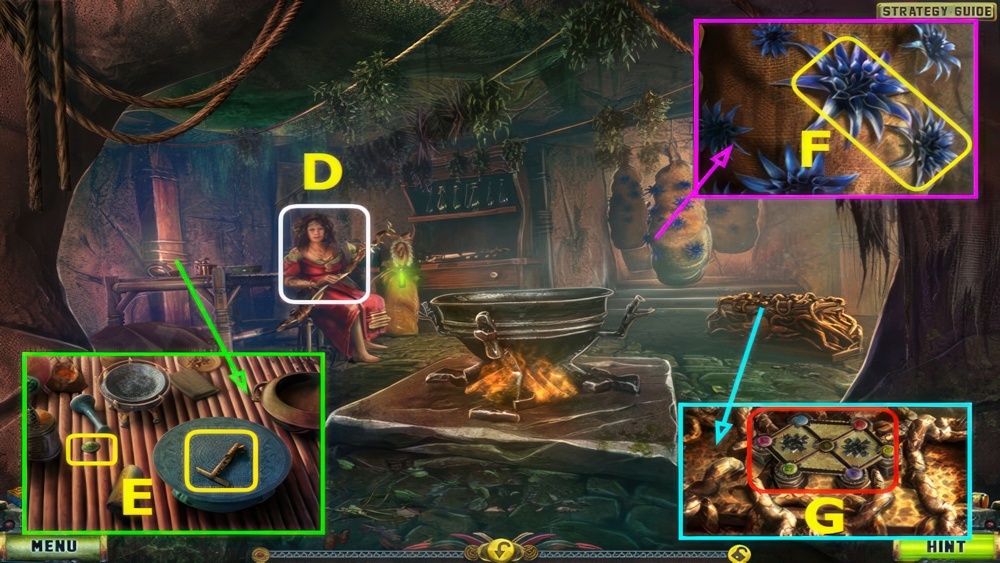
- Give BIRD (D).
- Take YELLOW PART, read recipe and take KEY TO THE GATES (E).
- Use KNIFE, take BLUE FLOWER (F).
- Select (G).
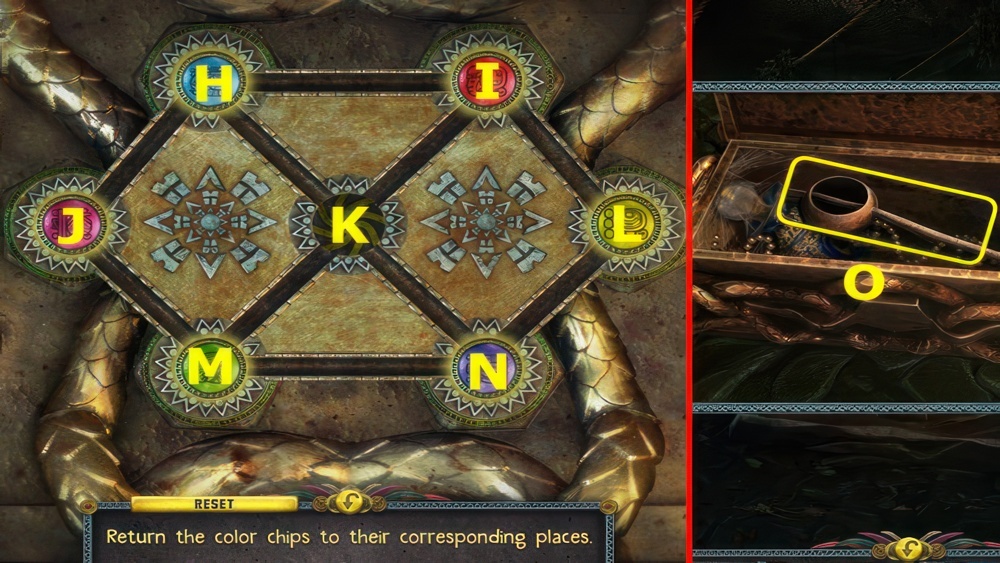
- Place YELLOW PART.
- Return the color chips to their corresponding places.
- Walkthrough: N, L, I, H, J, M, N, L, I, H, K, N, L, I, H, K, I, L, N, K.
- Take LADLE (O).
- Use LADLE, earn FILLED LADLE (P).
- Go down twice.
- Use KEY TO THE GATES (Q).
- Go left.
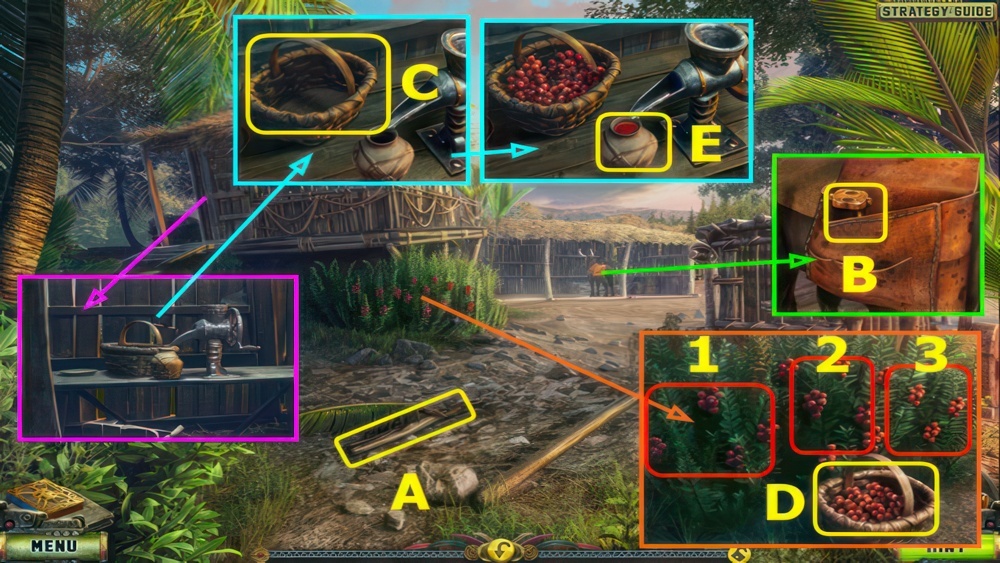
- Take STAVE (A).
- Open pouch, take KEY (B).
- Use KEY, take EMPTY BASKET (C).
- Place EMPTY BASKET.
- Select 1-3, take BASKET WITH BERRIES (D).
- Place and select BASKET WITH BERRIES, take BERRY JUICE (E).
- Go down, forward.
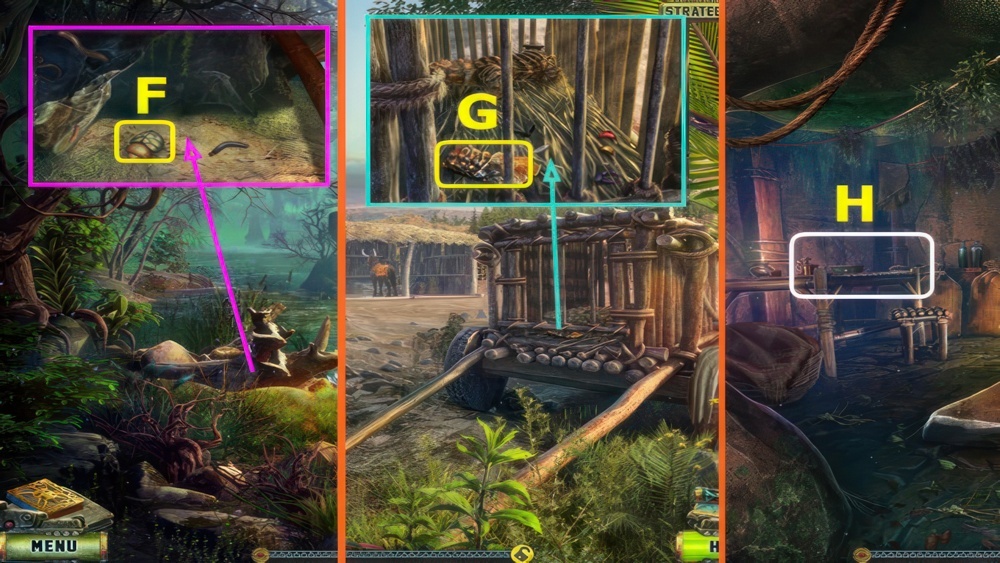
- Use STAVE, take BUG (F).
- Go down, left.
- Use BUG, take SCALE (G).
- Go down, forward twice.
- Select (H).
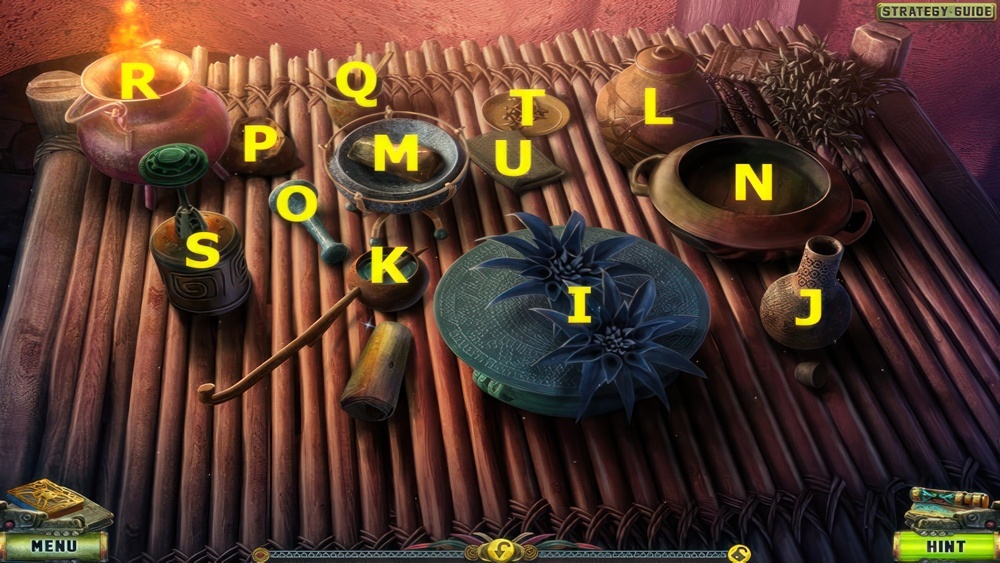
- Place BLUE FLOWER (I), EMPTY BOTTLE (J), FILLED LADLE (K), BERRY JUICE (L), SCALE (M).
- Use KNIFE (I).
- Move (I) to (N).
- Use (O) on (M).
- Use (P) on (M).
- Use (Q) on (R).
- Ignite the sulphur.
- Use (M) on (N).
- Use (K) on (N).
- Open (S), use (T) on (S).
- Close (S), use on (N).
- Use (L) on (N).
- Place (U) on (J).
- Use (N) on (J).
- Take POTION BASIS (J).
- Earn BAT CLAW.
- BAT CLAW in POTION BASIS, earn EVOCATION POTION.
- Go down twice, right.
Find Rocktown
With the Potion of Awakening, we woke up the Elder. He told us a tale of Kitron and Ravou, two brothers, who came to this world as Tohunga conquerors. Both of them were looking for gold to prolong their lives, as they subdued other worlds with their remarkable power. However, something unexpected took place Ravou fell in love with an ordinary woman from this world, and day by day his cruel heart filled with mercy. Eventually that resulted in a conflict between the two brothers, which ended with Ravou dying at his brother’s hand. Kitron then imprisoned Ravou’s son, and has been feeding off his nephew’s life force for years now. If we want to defeat Kitron we must go to Rocktown and find the people who live there. They’re the ones who once managed to imprison evil Kitron in the temple. This is our only chance to correct everything that has happened.
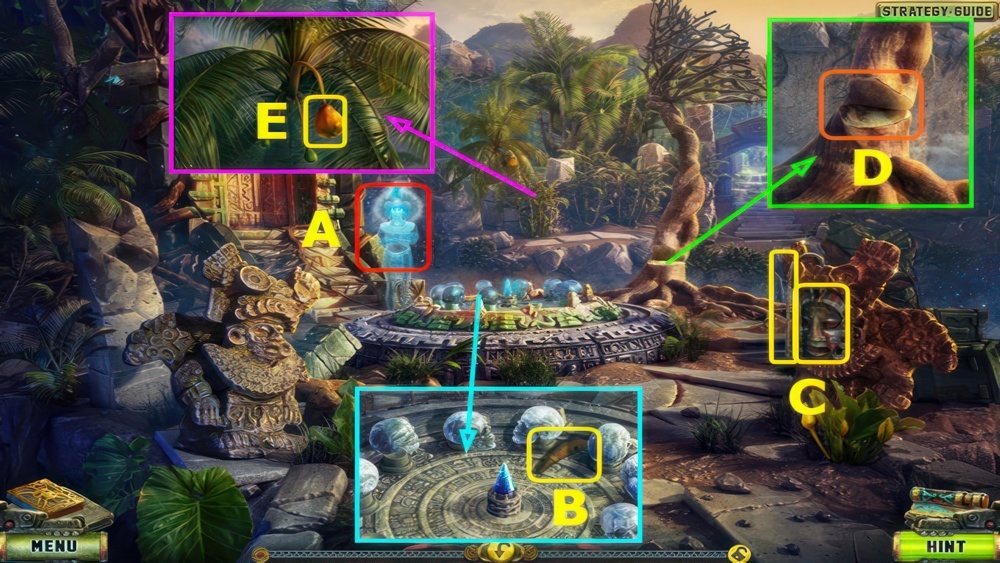
- Use EVOCATION POTION, earn FISH FIGURINE (A).
- Go down.
- Use FISH FIGURINE (B).
- Play puzzle, earn SADDLE (C).
- Go left.
- Place SADDLE (D).
- Take 1-4/5 BAS-RELIEF PARTS (E).
- Take 5/5 BAS-RELIEF PART (F).
- Place 5 BAS-RELIEF PARTS (G).
- Go right.
Find Locktor
When we reached a mountain gorge on the way to Rocktown, we found a rubble of stones, and were immediately attacked by a monstrous golem. Trying to get away, Locktor fell into a trap. I need to find a way to get there and release him.
- Take EMPTY SACK (H).
- Select (I).
- Take CHAIN WITH A HOOK and CART LEDGE (J).
- Place EMPTY SACK, move 1-6 to sack, take LOADED SACK (K).
- Take 1-3/10 BRUSHWOOD (L).
- Place CHAIN WITH HOOK (M).
- Remove debris, place LOADED SACK (N).
- Select (O-N).
- Use KNIFE, earn GLOWING MUSHROOM (P).
- Go right.

- Take 4-7/10 BRUSHWOOD (A).
- Take METAL TRAY, use GLOWING MUSHROOM, take CHEST KEY (B).
- Go down.
- Use CHEST KEY, take SAW, FUSE, and GUNPOWDER (C).
- Go right, left.
- Take 8/10 BRUSHWOOD and PICKAXE (D).
- Go down, right.
- Take HOOK (E).
- Take FORKED CLUB, move fur, take 1/2 DISK (F).
- SAW and SLINGSHOT on FORKED CLUB, take SLINGSHOT.
- Take 9-10/10 BRUSHWOOD (G).
- Use 10 BRUSHWOOD and METAL TRAY, take BURNING BRANCH and MEAT (H).
- Use PICKAXE (I).
- Play puzzle, earn POT (J).
- GUNPOWDER and FUSE in POT, earn BOMB.
- Go down, left.
- Place SLINGSHOT and BURNING BRANCH, use BOMB (K).
- Open pouch, take SUMMER ELEMENT (L).
- Use HOOK and SAW, earn TURNKEY (M).
- Use TURNKEY (N).
- Go forward.
People of Rocktown
Beyond the mountain caves, Locktor and I finally reached Rocktown. But the city looks abandoned. We need to search carefully and find at least one living soul.

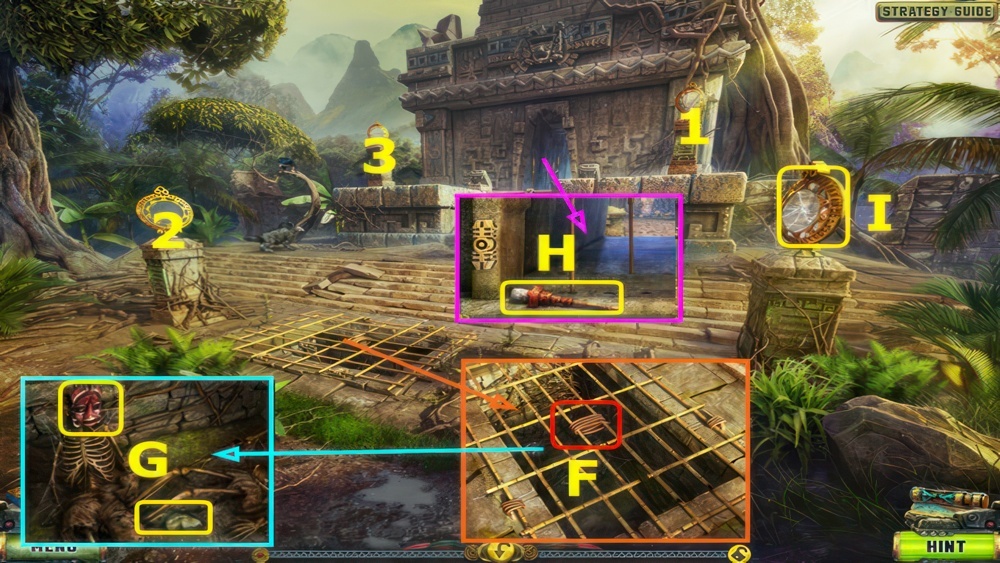
- Take SHAFT (O).
- Take SPRING ELEMENT and BOWSTRING (P).
- Play puzzle, earn CROSSBOW STOCK (Q).
- Take SIGHT (R).
- Use HOOK (S).
- Go left.
- Talk, earn TILE (A).
- Use MEAT (B).
- Use SHAFT, take BATTLE AXE and CROSSBOW BOLT (C).
- Remove lid, take 2/2 DISK and 1/2 LIMB (D).
- Move items, take BOLTS (E).
- Use BATTLE AXE, earn KEY (F).
- Take 2/2 LIMB, Use KEY (G).
- Take TRIGGER (H).
- Go down thrice.
Destroy the golem
While searching the city we came across a local resident. The guard told us that the golem we were running away from was sent by Kitron. It needs to be destroyed before it reaches us. A special Seed of Growth can do away with the rocky monster.
- Select (I).
- Place 2 DISKS.
- Rotate the discs to create a complete pathway.
- Walkthrough (J).
- Take AUTUMN ELEMENT (K).
- Go right.
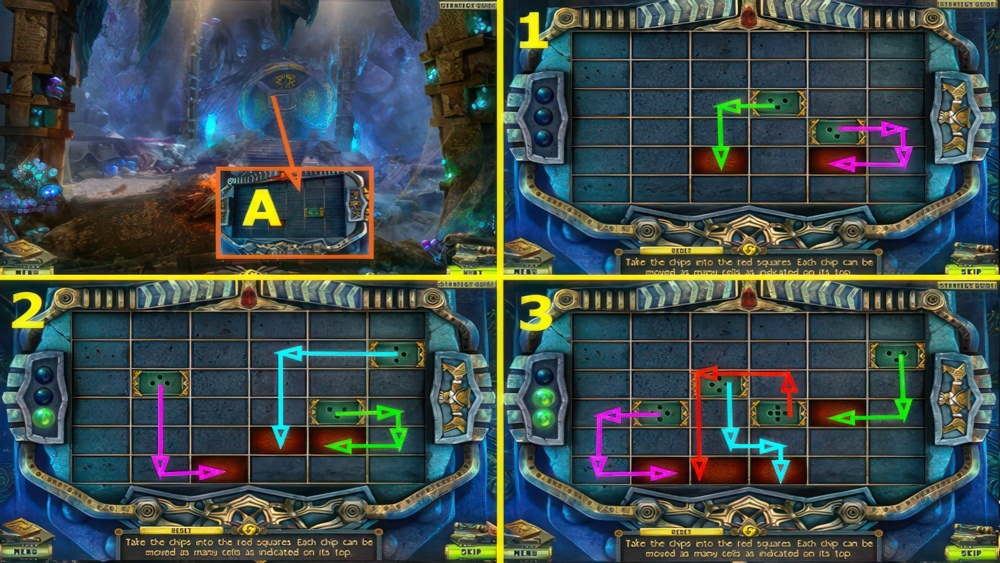
- Select (A).
- Place TILE.
- Move all the chips to a red cell.
- Each chip can be moved as many times as the number of dots on its surface.
- Walkthrough: (1-3).
- Go forward.
- Take WINTER ELEMENT (D).
- Place WINTER ELEMENT (E).
- Place SPRING ELEMENT (F).
- Place SUMMER ELEMENT (G).
- Place AUTUMN ELEMENT (H).
- Select 1-4.
- Take SEED (I).
- CROSSBOW BOLT, TRIGGER, 2 LIMBS, SIGHT, BOLTS, BOWSTRING, and SEED on CROSSBOW STOCK, take LOADED CROSSBOW.
- Go down thrice.
- Use LOADED CROSSBOW, earn SPECIAL KEY (J).
- Go right twice, left, and forward.
- Place SPECIAL KEY (K).
- Go forward.
Search the Underwater City
After we destroyed the golem the guard told us that his people moved to an Underwater City to get away from Kitron. We need to go down there and speak to their leader. She knows how they managed to imprison Kitron before, and how to do it again.
- Take ELASTIC (A).
- Place CART LEDGE (B).
- Go down.
- Use ELASTIC (C).
- Go right.
- Remove cloth, take FIREWOOD (D).
- Take LEVER, place FIREWOOD (E).
- Take PANEL PART (F).
- Go down, forward.
- Place, select LEVER (G).
- Open clamps, take BROKEN PROPELLER (H).
- Select (I).
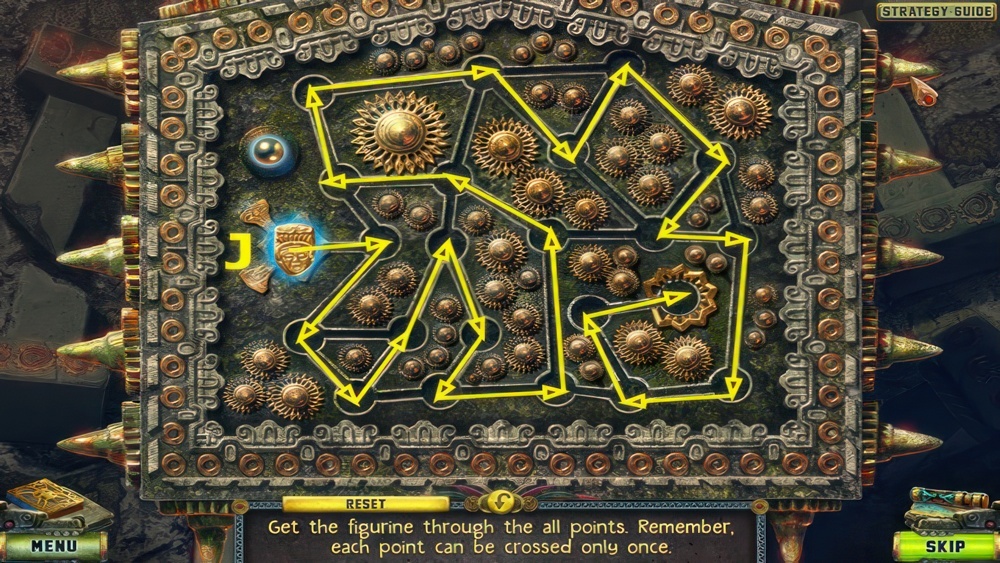
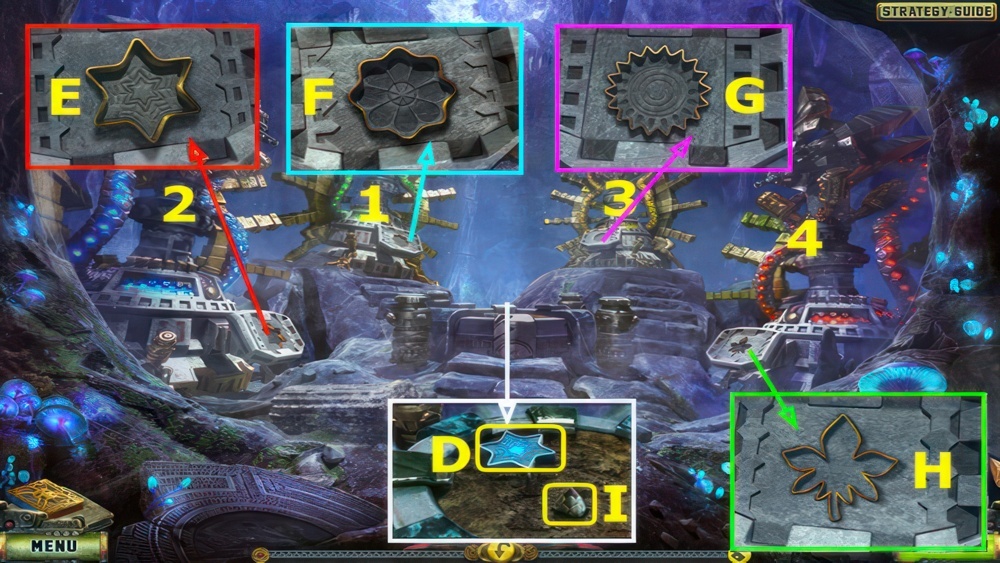
- Place PANEL PART.
- Move the chip through all the points.
- Each point can be crossed only once.
- Walkthrough (J).
- Go down, right.
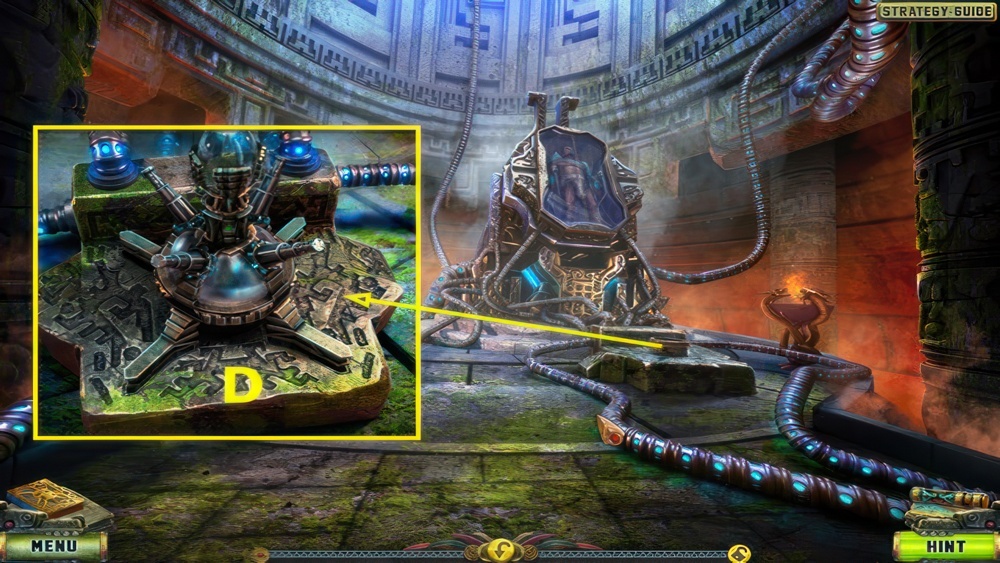
The seal
The Leader told us how her ancestors, using wit and cunning, managed to imprison Kitron and his nephew in an ancient temple, thus putting an end to their long slavery. Now, if we want to defeat Kitron for good, we must charge a special seal and bring back Rhitoris from his long sleep in a sarcophagus. Luckily, the head scientist of these people, Morgius, can tell us how to do it.
- Select (K).
- Place BROKEN PROPELLER, close cover (L).
- Select (K).
- Use (M) on (K).
- Earn PROPELLER.
- Go down, forward.

- Place PROPELLER, select clamps (N).
- Go forward.
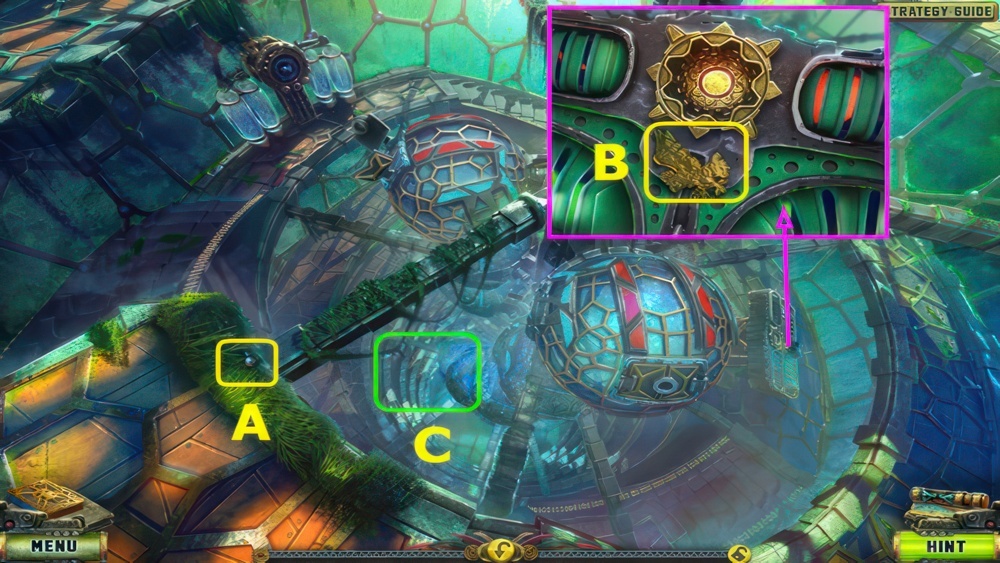
- Take AQUARIUM (O).
- Take COBBLE and SCHEME (P).
- Use COBBLE, take DIVING MASK and 1/6 MOLECULE FIGURINE (Q).
- Use DIVING MASK (R).
- Take 2/6 MOLECULE FIGURINE and select valve (S).
- Place SCHEME, walkthrough (T).
- Go forward.
- Take 3/6 MOLECULE FIGURINE (A).
- Take BIRD FIGURINE (B).
- Go (C).
- Remove cloth, take 4/6 MOLECULE FIGURINE and HARPOON SHAFT (D).
- Take HARPOON SPEARHEAD and 5/6 MOLECULE FIGURINE (E).
- HARPOON SPEARHEAD on HARPOON SHAFT, take FISH SPEAR.
- Place BIRD FIGURINE (F).
- Play puzzle, earn STARTER (G).
- Go down twice.
- Use FISH SPEAR, take BAIT (H).
- Go forward twice.
- Place AQUARIUM (I).
- Use BAIT, take ELECTRICAL PLANKTON (J).
- Go down.
- Place STARTER (K).
- Use ELECTRICAL PLANKTON (L).
- Take SEAL (M).
- Earn 6/6 MOLECULE FIGURINE.
- Place 6 MOLECULE FIGURINES (M1).
- Arrange the chips so that all the crystal rays are connected.
- Walkthrough: O, Q, N, O, P, Q, Q, P, P, O, O.
- Go left.

- Take PLANKS (A).
- Remove cloth, take STEERING WHEEL and ROCK (B).
- Use PLANKS, ROCK.
- Place and select STEERING WHEEL (C).
- Go forward twice.
- Place SEAL (D).
- Walkthrough Bonus Chapter, at the link below.


