
Twin Mind 2: Power of Love – Walkthrough of the game begins with the fact that a young woman is kidnapped in a public place in broad daylight without witnesses. The only detectives who can get on her trail are the twins Randall and Eleanor, famous for their unusual investigative methods. This time they have to catch the kidnapper, whose victim was a young lady. She was seized from a crowded place in front of everyone. Randall is a criminologist, he is a master of logic and scientific research. His sister Eleanor uses intuition and arcane mysticism. They will need your help and skills so that this riddle will not be their last. You will be part of this intricate investigation and help the detectives catch the criminal. If you are stuck and do not know how to get through one of the locations, on our website you can watch the walkthrough of the game Twin Mind 2: The Power of Love, and unravel the mystery in this unforgettable detective story.
Twin Mind 2: Power of Love – Walkthrough
Below you can watch the full walkthrough of Twin Mind 2: Power of Love, namely the main story and the bonus chapter.

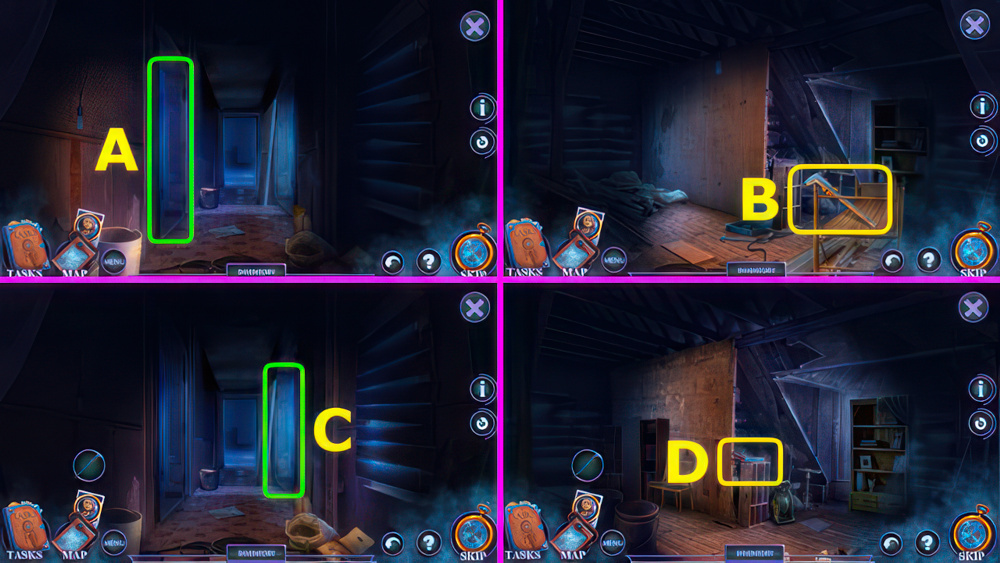
- Take DIAMOND RING and DOOR KEY, open case (A).
- Use DRAWER KEY, read note, take hint watch, S.P.P.D DETECTIVE ID, and KNIFE PART (B).
- Take SHARPENER, open book and move items, take BROKEN KNIFE (C).
- KNIFE PART on BROKEN KNIFE, earn BOX CUTTER.

- Take tasks book and NOTEBOOK (D).
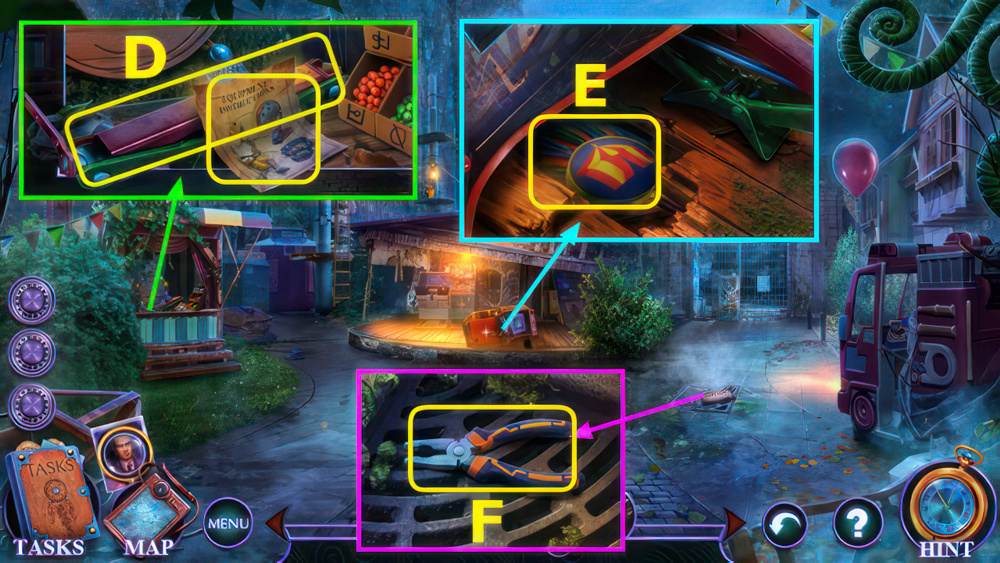
- Use BOX CUTTER, select (E).
- Play puzzle, earn S.P.P.D.
- BADGE (F).
- Place S.P.P.D.
- BADGE, take HEX WRENCH, FINGERPRINTING KIT, and BROKEN PENCIL (G).
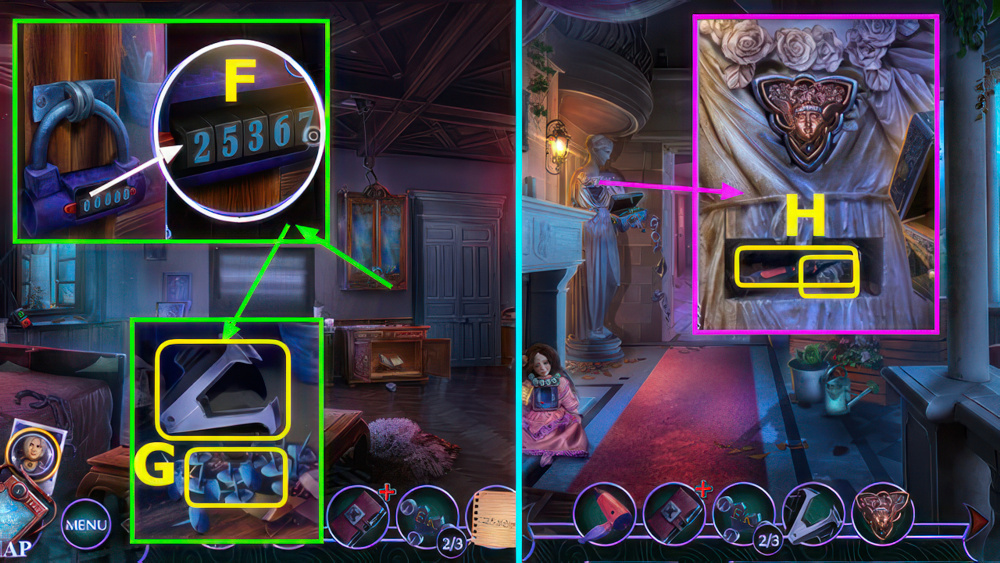
- SHARPENER and BROKEN PENCIL on NOTEBOOK, earn BAG CODE.

- Use the clue to decipher the code.
- One symbol shows its corresponding number.
- Select a reel to change its symbol.
- Use BAG CODE, solution (H).
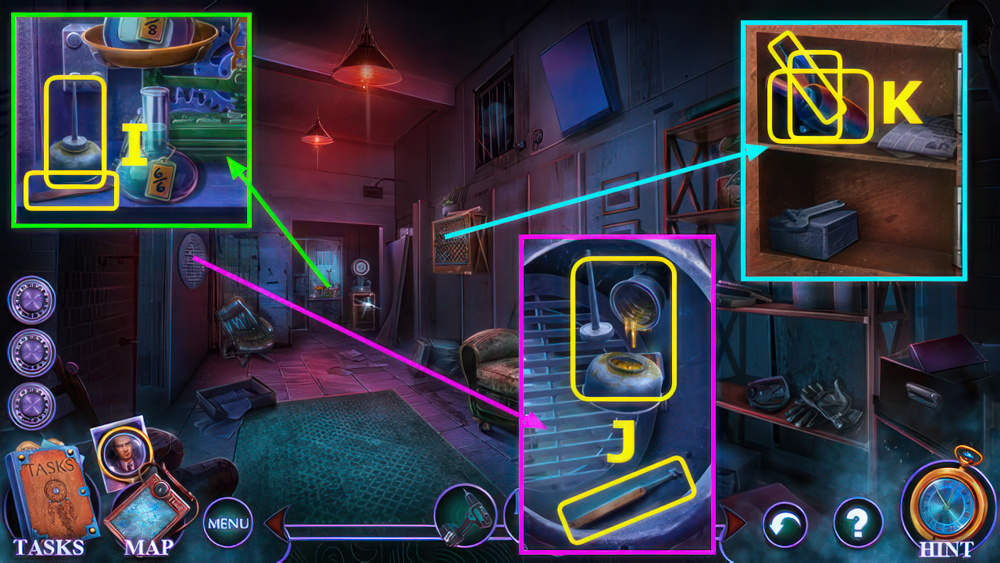
- Select (I), open box, read note and take UV SCANNER (J).
- Place FINGERPRINTING KIT and UV SCANNER, take FORENSICS KIT (K).

- Show S.P.P.D.
- DETECTIVE ID (L).
- Read note, take PLASTIC BAG and BROKEN WIRE CUTTERS (M).
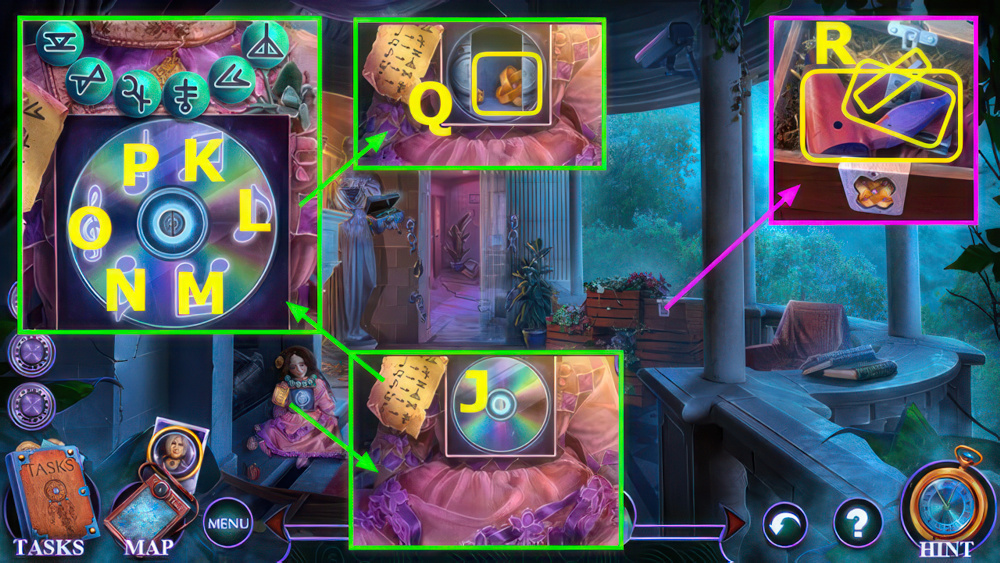
- Use DIAMOND RING, take map, move poster, take BOLT (N).

- Take BROKEN AMULET (O), remove brick and use (P-Q).
- Take CARABINER (R).
- Use CARABINER, select lever, take GLUE and WIRE CUTTERS PART (S).
- WIRE CUTTERS PART and BOLT on BROKEN WIRE CUTTERS, earn WIRE CUTTERS.
- Use WIRE CUTTERS (T).

- Set each value to the corresponding number of capacitors connected to each dial.
- Easy solution (A).
- Hard solution (B).
- Go right.

- Take RAG and AMULET PIECES (C).
- Use FORENSICS KIT and PLASTIC BAG, take BILLIARD BALL and 1/2 CHARGER AND EXTENSION CORD (D).
- Use HEX WRENCH, earn LEVER (E).
- Walk down.

- Use LEVER, take CORK and SNOWFLAKE PARTS (F).
- Assemble the snowflake.
- Select and drag a snowflake part to move it to the desired place.
- AMULET PIECES, SNOWFLAKE PARTS, and GLUE on BROKEN AMULET, solution (G), earn SNOWFLAKE AMULET.
- Place SNOWFLAKE AMULET: take STRAWBERRY and 2/2 CHARGER AND EXTENSION CORD (H).
- Use CHARGER AND EXTENSION CORD, take FINGERPRINT DATABASE (I).
- Go right.

- Use STRAWBERRY and take BATTERY
- Use FORENSICS KIT and FINGERPRINT DATABASE, read planner and photo, take BOBBY PIN (J).
- Use BOBBY PIN (K).
- Take FOLDED CANE and THERMOSTAT (L).

- Use THERMOSTAT (M).
- Play puzzle: earn ICE PICK (N).
- puzzle mini-game, select pairs (O).
- Use BILLIARD BALL and ICEPICK, take recorder (P).

- Take COIN and EMPTY LIGHTER (A).
- Open car door and glove compartment, take S.S.P.D.
- DETECTIVE ID, TAROT CARD, and 1/2 CHOPSTICKS (B).
- Take 2/2 CHOPSTICKS (C).

- Use CHOPSTICKS, earn MAILBOX FLAG (D).
- Use MAILBOX FLAG, read notes, take KNOCKER (E).
- Place KNOCKER (F).
- Select (G).

- Use TAROT CARD, take CORKSCREW and LIGHTER FLUID (H).
- Read newspaper, take GLOVE (I), move (J-K).
- Use CORKSCREW, take SUSAN’S BOX and LIGHTER WHEEL (L).
- Take WICK (M).
- LIGHTER FLUID, LIGHTER WHEEL, and WICK on EMPTY LIGHTER, earn LIGHTER.
- Use LIGHTER (N).
- Go left (A).
- Take WRENCH (B), walk down.
- Go right (C).
- Take SCISSORS (D), walk down.

- Go forward (E).
- Use (F-G), go right (H).
- Take ROLL (I): walk down.
- Go left (J).

- Go right (K).
- Go right (L).
- Use ROLL (M-N), go left (O).
- Use WRENCH (P-Q).

- Take FLOWER FIGURINE, use COIN, take 1/3 SUSAN’S MEDALLION and NAIL CLIPPER (A).
- Use GLOVE, take 2/3 SUSAN’S MEDALLION and LADDER (B).
- Take AXLE AND NUT and LADDER RUNGS (C).
- LADDER RUNGS and NAIL CLIPPER on LADDER, earn STEP LADDER.

- Place STEP LADDER (D).
- Take VALVE (E).
- Walk down 2x.
- Use VALVE, take TONGS, 3/3 SUSAN’S MEDALLION, and 1/4 SHELF DECORATIONS (F).
- SUSAN’S MEDALLION on SUSAN’S BOX, read note, take ARCANE BOOK.
- Go forward.

- Place ARCANE BOOK (G).
- Play puzzle (H).
- Solution (I).
- Select and play tape recorder, take SUSAN’S ENGAGEMENT RING (J).
- Place SUSAN’S ENGAGEMENT RING, take CHAIN and NOTE AMULET (K).
- Go forward.

- Place NOTE AMULET, take MAP, 2/4 SHELF DECORATIONS, and FLAT SCREWDRIVER (L).
- Use FLAT SCREWDRIVER, take SCALES (M).
- Walk down 2x.
- Place FLOWER FIGURINE and SCALES (N).

- Place the same number and sizes of weights in each pan.
- Weights must be stacked from large to small.
- Solution (A-C)-(B-C)-(B-A)-(C-B)-(C-B)-(A-C)-(B-A)-(B-C).
- Hard solution final image (D).

- Take CUP and WHEEL (G).
- Use AXLE AND NUT and WHEEL, take PUMICE and 3/4 SHELF DECORATIONS (H).
- Use CUP, earn WATER (I).
- Go forward.

- Use WATER and TONGS, earn HAIRPIN and 4/4 SHELF DECORATIONS (J).
- Place SHELF DECORATIONS, take OIL and KNIFE (K).
- Use KNIFE (L).
- Select (M).

- Find the matching items.
- Select PAIRS (N), take UMBRELLA.

- Use UMBRELLA, take TWEEZERS and CRYSTAL (O).
- CHAIN and CRYSTAL on MAP, drag crystal to (P), select.

- Take SOLVENT and 1/4 CLOWN’S BRACELETS (A).
- Use CORK, take SCREWS and 2/4 CLOWN’S BRACELETS (B).
- Take 3/4 CLOWN’S BRACELETS (C).

- Use SOLVENT and RAG, take FILE and 4/4 CLOWN’S BRACELETS (D).
- Place CLOWN’S BRACELETS, take SWITCH (E).
- Place SWITCH (F).

- Stop the Ferris wheel.
- Move the blue screws to the golden slots with the violet one using the arrows on the left.
- Easy solution part 1: Ix2-Hx9-I-H-G-Jx9-Gx2-H-I-J-I-Hx8.
- Part 2: Hx3-IG-Jx2-Ix2-Hx9-I-H-G-Jx5-Gx2-Hx2-I-G-Jx2-Ix2-Hx3.
- G-H-I-J-I-H-G-Jx10-G-Jx3-Ix2-H-G-J-G-Hx3-G-H-I-J-I-Hx10.

- Hard solution part 1: M-Lx3-M-L-K-N-K-Lx5-M-L-K.
- Part 2: M-L-M-Lx4-M-L-K-Nx8-K-Nx2-M-Lx9.
- Part 3: Mx2-Lx6-Kx2-Lx2-Mx2-Lx2-M-L-K-Nx3-Kx2-Nx2-Mx2-Lx3.
- K-L-M-N-M-L-K-Nx10-K-Nx3-Mx2-L-K-N-K-Lx3-K-L-M-N-M-Lx10.
- Go left.

- Take LOCKED BOX and INFRARED HEATER (O).
- Use FOLDED CANE, take PIN (P).
- WRENCH PART on BROKEN WRENCH, earn WRENCH.
- PIN on LOCKED BOX, take WIRES.
- Use WIRES, take 1/2 FRAME PIECE, place BATTERY, take BOLT CUTTERS (Q).
- Walk down.

- Use BOLT CUTTERS, take DUSTER (A).
- Use INFRARED HEATER, take TICKET (B).
- Use TICKET (C).
- Go forward.
- Take EQUIPMENT INSTRUCTIONS and SCISSORS JACK (D).
- Use SCISSORS JACK, take 1/2 CLIMBING GLOVES, use FILE and take FAN (E).
- Use FAN, read newspaper, take PLIERS (F).

- Use PLIERS, earn HELMET and CHIP (G).
- Walk down, left.
- Use SCREWS and CHIP (H).
- Select (I).

- There are photos of the same place in the amusement park.
- I guess I shall spot the differences to solve a riddle.
- Select the differences (J).
- Take FLASH (K).

- Use FLASH, take 2/2 CLIMBING GLOVES and 2/2 FRAME PIECE (L).
- Walk down.
- Place FRAME PIECE, take PAINTBALL GUN and CONTROL PANEL (M).
- Place and select CONTROL PANEL, take NET.
- Use DUSTER, take HARNESS (N).
- HELMET, CLIMBING GLOVES, and HARNESS on EQUIPMENT INSTRUCTIONS, earn CLIMBING EQUIPMENT.
- Go forward.

- Use CLIMBING EQUIPMENT (O).
- Open, take PAINTBALLS and 1/2 RING PART (P).
- Place PAINTBALLS and PAINTBALL GUN (Q).

- Color the target using the symbols on the paints and target fragments as a hint.
- Easy solution (R).
- Take MONEY (S).

- Hard solution, select (A-D-E-F)-(B-G)-(A-C-H)-(B-C-I-J)-(B-K)-(Cx2-L-M).
- Walk down, left.

- Use MONEY, take FLASHLIGHT and 2/2 RING PART (O).
- Use RING PART, read note, take PEG and KEYCARD (P).
- Walk down, forward.
- Use KEYCARD (Q).

- Take KNIFE HANDLE and STICK (A).
- Use STICK, take RUBBER GLOVES, use TWEEZERS, take WIRE (B).
- Use OIL, take PIPE WRENCH (C).
- Use KNIFE HANDLE and WIRE, take KNIFE (D).

- Use KNIFE (E).
- Play puzzle, earn SAW (F).
- Use SAW (G).
- Go right.

- Take 1/3 POINTERS and MATCHES, read note (H).
- Use MATCHES, take 2/3 POINTERS (I).
- Use HAIRPIN (J).
- Take BOTTLE OPENER (K).

- Use PUMICE, take CLAMP.
- Use BOTTLE OPENER, take 3/3 POINTERS (L).
- Place POINTERS (M).
- Go forward.

- Take CORK and 1/3 INLAYS (N).
- Use CORK, take RUSTY TELESCOPIC STICK and 2/3 INLAYS (O).
- Use RUBBER GLOVES, take UMBRELLA (P).
- Use UMBRELLA, take BOX (Q).
- Use PIPE WRENCH, take TENT POLES (R).
- Walk down.

- Use TENT POLES (A).
- Move all the tools to the next box.
- You can also rotate them.
- Solution (B).
- Take HAMMER (C).
- Walk down.

- Use HAMMER, earn IRON PLATE (D).
- Use IRON PLATE, take HOSE (E).
- Go right, forward.

- Read note, place CLAMP and HOSE, press button (F).
- Select barrel, take TRANSPARENT TAPE and 3/3 INLAYS (G).
- Place INLAYS, take HORSESHOE MAGNET and THUMB TACK (H).
- THUMB TACK on RUSTY TELESCOPIC STICK, earn TELESCOPIC STICK.
- Walk down.

- Place BOX (I).
- Take BOTTLE OF WATER (J).
- Use TELESCOPIC STICK, earn APPLE (K).
- Give APPLE, take DRAWING (L).
- Go forward.

- Use DRAWING (M).
- Play puzzle, earn GATE KEY (N).
- Place DRAGON STATUETTE, take CLOCK HANDS (P).
- Use GATE KEY (O).
- Go forward.

- Take BANDAGE and HAND PUMP (A).
- Use HAND PUMP, take BUTTON (B).
- Use HORSESHOE MAGNET, take RING SCREW and WRENCH (C).

- Take HOOP (D).
- Use RING SCREW (E)..
- Take TORX SCREWDRIVER (F).
- Use TRANSPARENT TAPE, earn FINGERPRINT (G).
- Use FINGERPRINT, press up (H).
- Go left.

- Read note, take HOOK and SHEARS (I).
- Use BOTTLE OF WATER, take BUCKET.
- Use SHEARS, take AWL (J).
- Use BUCKET, take 1/4 STARS and BADGE (K).
- Place BADGE, take 2/4 STARS and read note.
- Use TORX SCREWDRIVER, earn CIRCUIT BOARD (L).
- Walk down.

- Place CIRCUIT BOARD (A).
- Arrange the parts so that all the connectors are used.
- Select and drag a connector to move it.
- Easy solution (B).
- Hard solution (C).
- Go forward.

- Take ETHAN DOLL and 3/4 STARS (D).
- Use BUTTON and BANDAGE, take BATTERY TERMINAL and read note, take CLOTH (E).
- AWL and CLOTH on HOOP, earn SIEVE.
- Move chair, use SIEVE, earn TOY WEAPON and GEAR (F).
- Use WRENCH and GEAR, take CHAIN and 4/4 STARS (G).
- Walk down, left.

- Place STARS, take EARRING (H).
- CHAIN and EARRING on HOOK, earn HOOK ON CHAIN.
- Use HOOK ON CHAIN, take FAN and DOLL STAND (I).
- TOY WEAPON and DOLL STAND on ETHAN DOLL.
- Walk down, forward.

- Place ETHAN DOLL (J).
- Play puzzle, earn AMULET (K).
- Place AMULET, take FORTUNE-TELLING ITEM and DRAWER HANDLE (L).
- Walk down.

- Use DRAWER HANDLE, take COFFEE and BATTERY (M).
- Use BATTERY TERMINAL and BATTERY, earn CHARGED BATTERY (N).
- Go left.
- Place CHARGED BATTERY, take SCREWDRIVER and ACID (O).
- Use ACID, take FORK and THERMOS (P).
- COFFEE and THERMOS on FORTUNE-TELLING ITEM, earn SYMBOLS.
- Walk down, forward.

- Place SYMBOLS (A).
- Deactivate the bomb by finding the symbols from the cup on the screen.
- Click the arrows to switch the screen.
- Easy solution, select pairs in order 1-5 (B1-B2).

- Hard solution, select set of three in order 1-5 (C1-C2).

- Take IRON TUBE and RAG (D).
- Use RAG, take TWEEZERS (E).
- Use NET, take PLUG (F).
- Use PLUG, take WHEEL (G).
- Use WHEEL and PEG (H).
- Go forward.

- Read note, take RAZOR and RUBBER BOOTS (I).
- Use RUBBER BOOTS (J).
- Take SCRAPER, use IRON TUBE, take ROPE LADDER PART (K).

- Use ROPE LADDER PART (L).
- Select door, use FLASHLIGHT (M).
- Play puzzle, earn INSTANT CAMERA (N).
- Use INSTANT CAMERA, earn PHOTO (O).
- Walk down.

- Use PHOTO, solution (P).
- Go right.
- Use RAZOR, take 1/4 SYMBOL, CHISEL, and BELLOWS (Q).
- Take BROKEN WINCH, use CHISEL (R).
- Take 2/4 SYMBOL, read note, take FISHING NET (S).
- Walk down, forward.

- Use FISHING NET and take HOOK, use SCRAPER, take IRON PIECE (A).
- Use IRON PIECE and BELLOWS, use TWEEZERS and move to trough, earn KEY (B).
- Walk down.
- Use KEY (C).

- Rotate the lock gears so each gear fits into the grooves.
- Select the gear to move it.
- Easy solution (D).
- Hard solution (E).
- Earn CHEST AMULET.
- Go right.

- Use CHEST AMULET, take 3/4 SYMBOLS, GUN, and LIGHTER (F).
- Place GUN, take FIRECRACKER (G).
- Walk down, forward.
- Read note, use FIRECRACKER and LIGHTER, take WIRE SAW (H).
- Use WIRE SAW, take WRENCH and 4/4 SYMBOL (I).
- Walk down.

- Place SYMBOL, take WINCH HANDLE (J).
- HOOK and WINCH HANDLE on BROKEN WINCH, earn MANUAL WINCH.
- Use MANUAL WINCH, open bag, take BLACKCOCK’S FIGURINE and RAKE (K).
- Go right.
- Place BLACKCOCK’S FIGURINE (L).
- Play puzzle, earn STAG HORN (M).
- Place STAG HORN (N).

- Take CORKSCREW and EAR TUBE (N).
- Use CORKSCREW, take DRILL and FIGURINE (O).
- Use FIGURINE, take TUBING and REMOTE CONTROL (P).

- Use WRENCH, take DUCT TAPE (Q).
- TUBING and DUCT TAPE on EAR TUBE, earn STETHOSCOPE.
- Use REMOTE CONTROL, take COMPASSES (R).
- Use STETHOSCOPE (S).

- Select the correct symbols on the left row and use the play button to test a combination.
- Green indicates that the symbol is correctly placed.
- Yellow indicates the right symbol in the wrong place.
- Red means the symbol is wrong.
- Easy solution (A).
- Hard solution (B).
- Go left.

- Take SCREWS and SAND (C).
- Use SAND (D), use RAKE, take OXYGEN TANK (E).
- Use COMPASSES, earn VALVE (F).
- Use OXYGEN TANK, take 1/4 LETTER (G).
- Use VALVE and SCREW, select (H).
- Go forward.
- Take 1/3 LOCKPICK and EMPTY OIL CAN (I).
- Use DRILL, take 2/3 LOCKPICK.
- Use EMPTY OIL CAN, earn FULL OIL CAN (J).
- Use FULL OIL CAN, open door, take AQUARIUM SIPHON, 3/3 LOCKPICK, and 2/4 LETTER (K).
- Walk down 2x.

- Use LOCKPICK, take 3/4 LETTER, AQUARIUM SIPHON INSTRUCTIONS, and GLOVE (L).
- Use GLOVE, take SAPPHIRE and 4/4 LETTER (M).
- Go left.
- Place LETTER (N), play puzzle, earn TEMPERATURE SENSER (O).
- Place TEMPERATURE SENSER, open door, take PIN (P).
- Go forward.

- Use PIN, take ARMCHAIR WHEEL (A).
- Place ARMCHAIR WHEEL, take SCREWDRIVER and note (B).
- Walk down 2x.
- Use SCREWDRIVER, earn AGATE (C).

- Place SAPPHIRE and AGATE, take FLASK and SIPHON HOSE (D).
- SIPHON HOSE and AQUARIUM SIPHON INSTRUCTIONS on AQUARIUM SIPHON.
- Go left.
- Use AQUARIUM SIPHON, take SCISSORS (E).
- Use SCISSORS (F).

- Get rid of the wires by cutting them.
- To cut the chosen wire, just select it.
- Start with the upper wire to cut them further.
- Easy solution 1-5 (G).
- Hard solution 1-7 (H).
- Take FUNNEL.
- Go forward.

- Place FLASK and FUNNEL (I).
- Measure out 8 milliliters of liquid into the largest bottle.
- Select the other bottles to transport liquid between them.
- Each bottle can hold a different amount of liquid.
- Solution (J-K)-(L-J)-(K-L)-(L-J)-(J-K).
- Use (K-M).

- Take MORGENSTERN, note, and CHAIR (N).
- Place CHAIR (O).
- Take WIRE, remove grate.
- Use FAN, take SPATULA (P).
- Use SPATULA, take ANCHOR and BOLTS (Q).

- Use SCREWDRIVER (R).
- Take SWITCH (S).
- Place and select SWITCH, take BROOM.
- Use FORK, take CHAIN WITH HANDLE (T).
- WIRE and CHAIN WITH HANDLE on MORGENSTERN.
- Use MORGENSTERN (U).
- Play puzzle, earn KEY (V).
- Use KEY (W).
- Go left.

- Take MATCHES (A).
- Take REBAR SHEARS, use MATCHES, take PRUNING SHEARS (B).
- Use PRUNING SHEARS, take REBAR SHEARS PART.
- Use ANCHOR, earn EARRING (C).

- Use EARRING (D).
- Take CLOCK HAND and SMALL SCREWDRIVER (E).
- BOLTS, SMALL SCREWDRIVER, and REBAR SHEARS PART on REBAR SHEARS.
- Use REBAR SHEARS, select door (F).
- Use SUITCASE KEY (F).
- Go forward.

- Take PAPER WITH A SHADED CODE and RACK JACK (G).
- Use RACK JACK, take MAGNET.
- Use BROOM, remove cap and take FLASH DRIVE (H).
- Use FLASH DRIVE, take DISK (I).
- Walk down.
- Use DISC (J).
- Select the notes in the correct order using the clue on the left.
- The correct order of symbols is encrypted on the doll’s beads from left to right.
- Easy solution K-M-P-N-O-L.
- Hard solution K-O-L-P-N-M.
- Take AMULET (Q).
- Place AMULET, take HAIRDRYER, WALLET, and PIANO KEY (R).
- Walk down.

- Place PIANO KEY, take WINDING KEY (A).
- Place CLOCK HAND, take 1/3 TOKENS, use WINDING KEY, take AQUARIUM FILTER (B).
- Go left, forward.

- Place AQUARIUM FILTER, take SWITCH (C).
- Place and select SWITCH (D).
- Select 1-3, take 2/3 TOKENS and ERASER (E).
- ERASER on PAPER WITH A SHADED CODE, earn CODE.
- Walk down 2x.
- Take STAPLE REMOVER, use MAGNET, take STATUE PART (G).
- Go left.
- Place STATUE PART, take 3/3 TOKENS and 1/2 LOCKPICKS (H).
- TOKENS on WALLET, take CLOTH and HEAT SHRINK TUBING.
- Go forward.

- Use HEAT SHRINK TUBING and HAIR DRYER (I).
- Play puzzle, earn PASS (J).
- Use PASS (K).
- Go forward.

- Take SPELLBOOK and FILE (A).
- Select mirror, use FILE, take PATRICIA’S HAIRBRUSH, use CLOTH, earn GLASS WRAPPED IN CLOTH (B).
- Use GLASS WRAPPED IN CLOTH, take CHALK.
- Use STAPLE REMOVER, take 2/2 LOCKPICKS (C).

- Remove boards (D).
- Use LOCKPICKS (E).
- Take BAG OF RUNES (F).
- PATRICIA’S HAIRBRUSH, BAG OF RUNES, and CHALK on SPELLBOOK, earn SPIRIT SUMMONING TOOLS.
- Use SPIRIT SUMMONING TOOLS (G).

- Recreate the symbol on the tiles.
- Select a tile and drag across other tiles to recreate the image.
- Easy solution (H).

- Hard solution (I).
- Walkthrough Bonus Chapter, at the link below.


