
Twin Mind 5: The Deathly Trick – Your brother calls you to tell you that the second magician in a week has died during a performance. There are no suspects yet, and it looks like an accident, but illusionist James Bellows, nicknamed Neptune, drowned during a dive trick. The second victim’s name was Ethan Moore, aka the Golden Dragon. He died during a trick in which he freed himself from shackles under the barrel of a crossbow. Magicians, seeking the attention and admiration of the audience, often take risks on stage. Ironically, a magician’s death during a performance causes more press buzz than his worldwide fame. The game unfolds the story of two outstanding magicians, whose deaths attract the attention not only of the audience, but also of detectives. If you can not pass any of the puzzles or do not know where the items are, on our site you can watch the walkthrough of the game Twin Mind 5: The Deathly Trick, and find out what really happened.
Twin Mind 5: The Deathly Trick – Walkthrough
Here you can see the full walkthrough of Twin Mind 5: The Deathly Trick, namely for all chapters, including bonus chapter, in pictures.

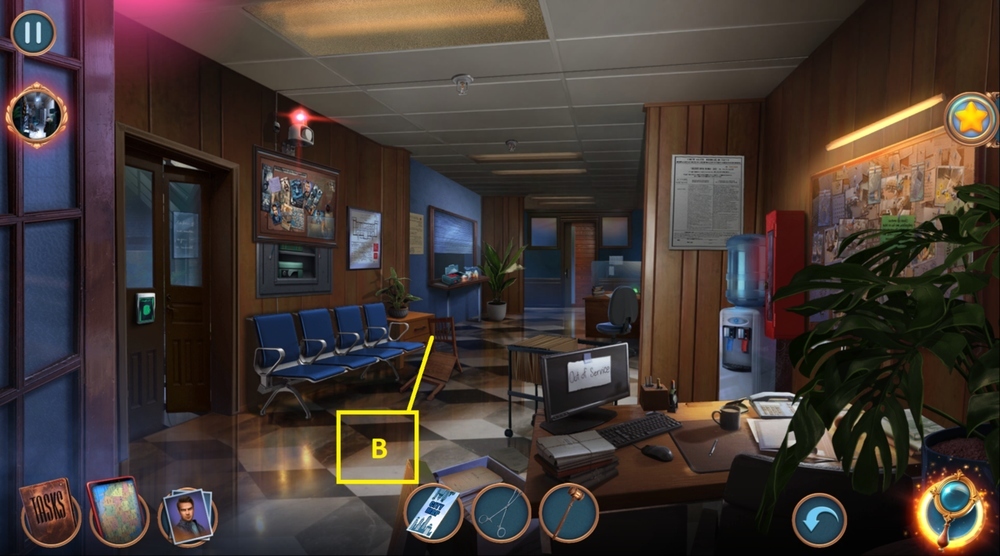
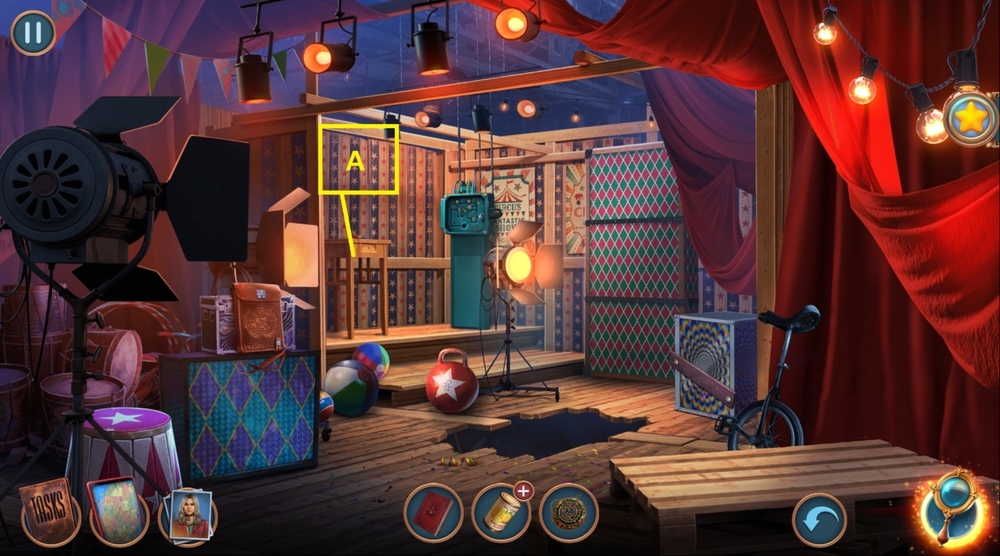
- Take and read note, take MAP and CUP (A).
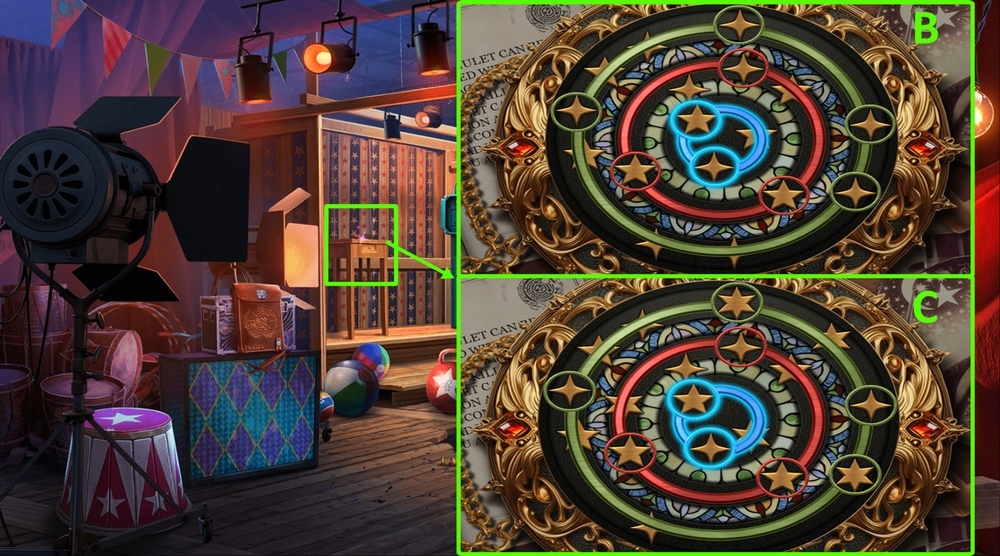
- Take TASKS BOOK and CAMERA, take and read the note, take EVIDENCE NUMBERS, take and read OCCULT ARTS BOOK (B).
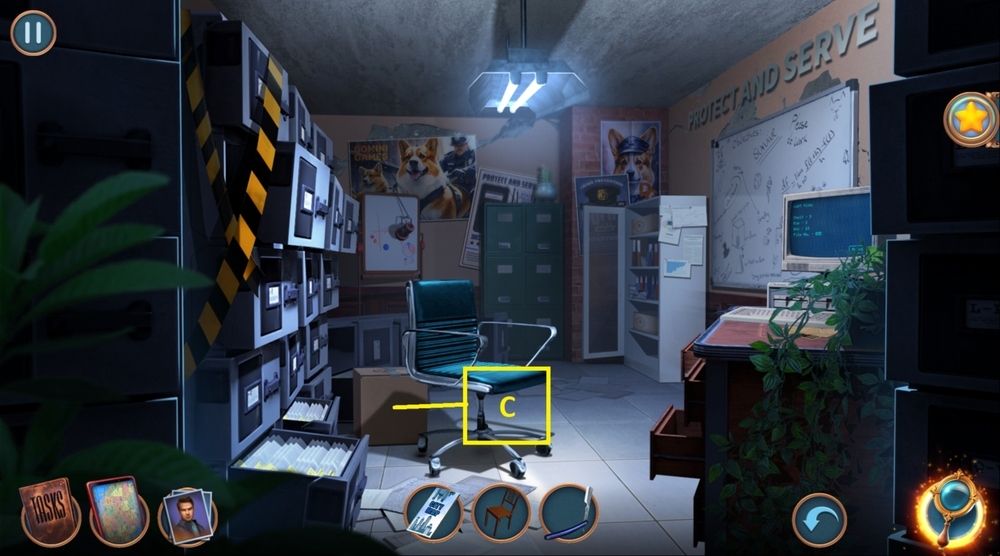
- Take CARDBOARD CYLINDER, use CUP on the sand, take TWEEZERS and KNOCKER (C).
- Use KNOCKER on an iron disk and click on the iron disk until the scale on the left is full (D).

- Take GEMLESS RING and MOTORCYCLE KEYCHAIN (D).
- Use MOTORCYCLE KEYCHAIN on the bag (G).
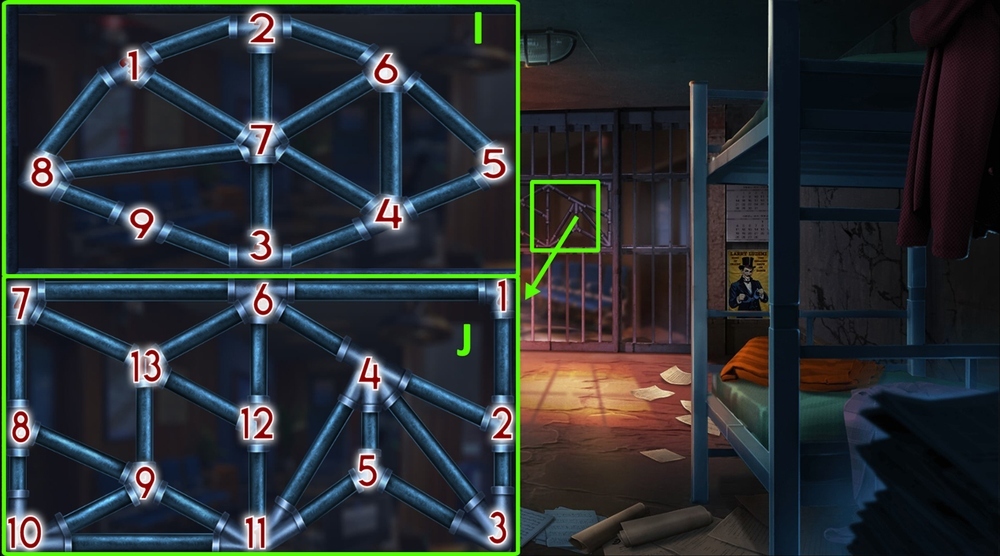
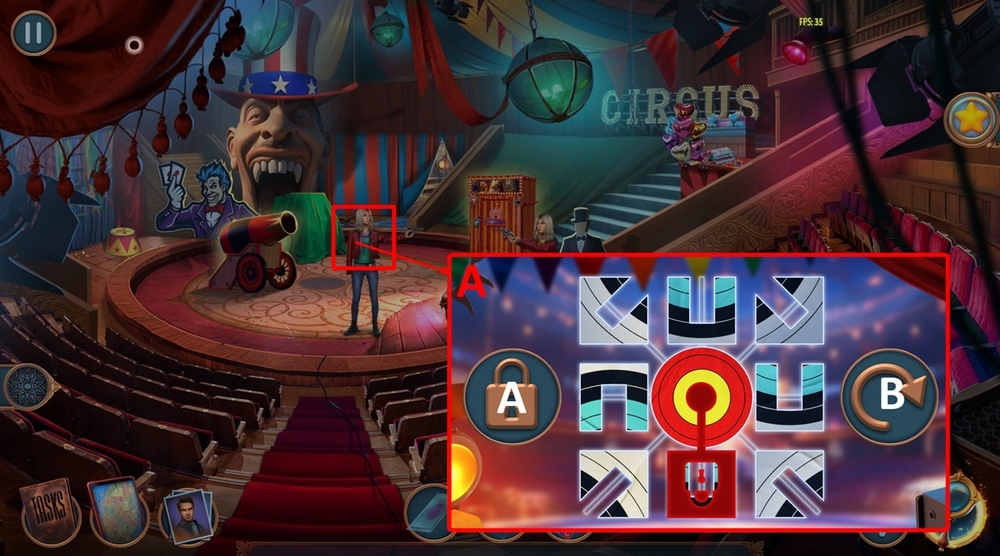
- Play puzzle, earn ELEANOR’S ID (H).
- Use ELEANOR’S ID on the crowd (I).
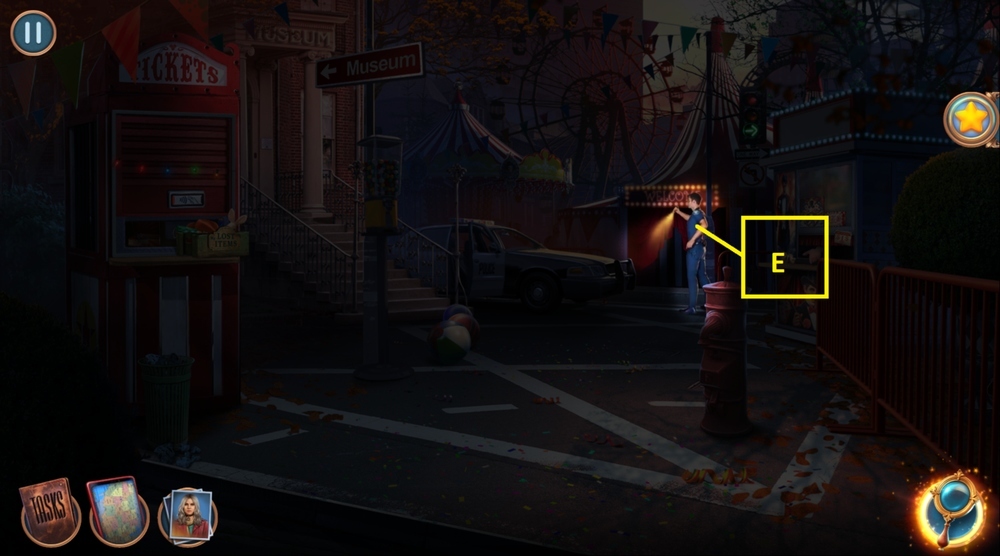
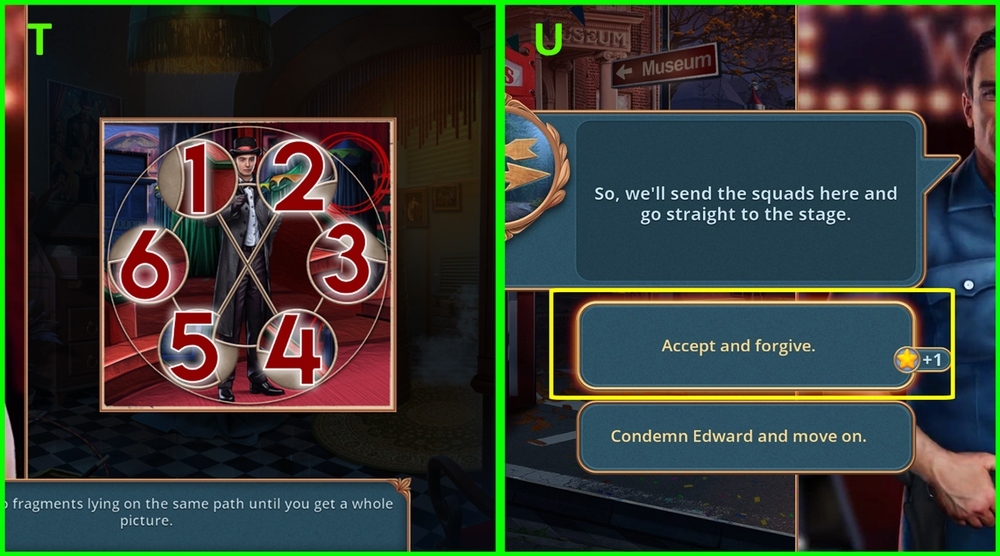
- Go to Crime Scene.

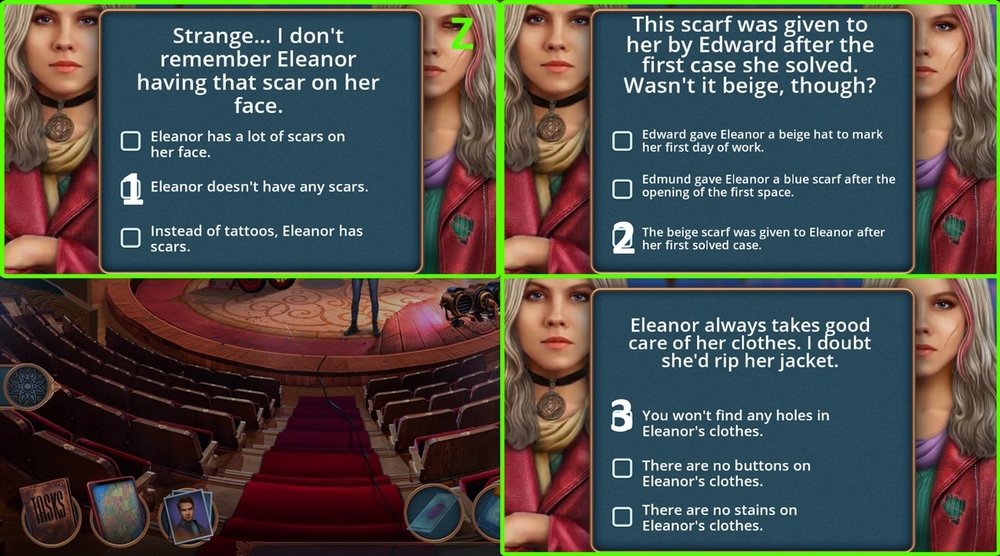
- Talk to Sarah, select the first option (J).
- Talk to Sarah, select the second option (K).
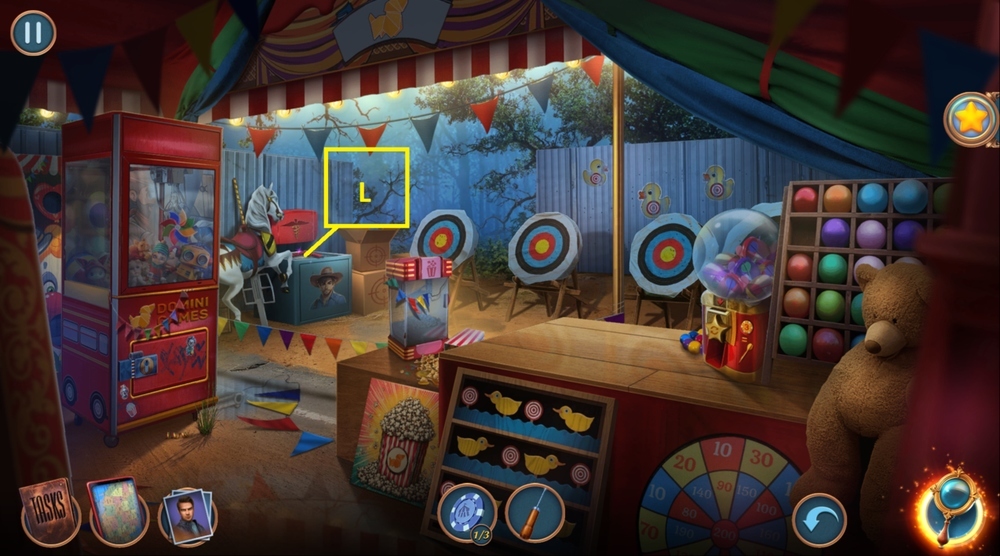
- Talk to Sarah, select the third option (L).
- Talk to Sarah, select the first option (M).
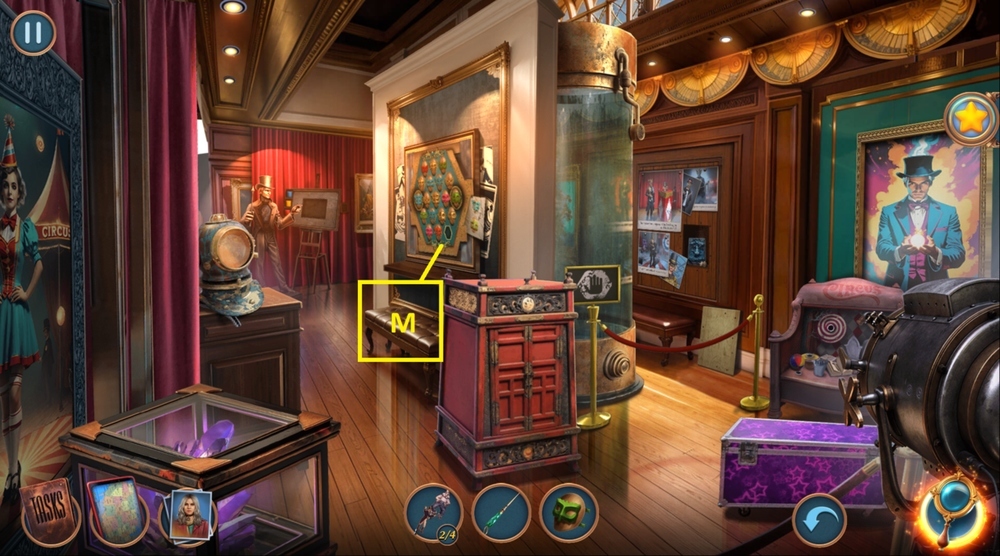
- Go to Magician’s Dressing Room.

- Take and read the note, take ALLEN KEY and RUBY HEART HALF 1/2 (N).
- Take and read the note, use ALLEN KEY on the screws, take CARROT, remove the box cover (O).
- Give the rabbit a CARROT, click on the rabbit, take and read the note, click on CODE LOCKET and take it (P).
- Go back.
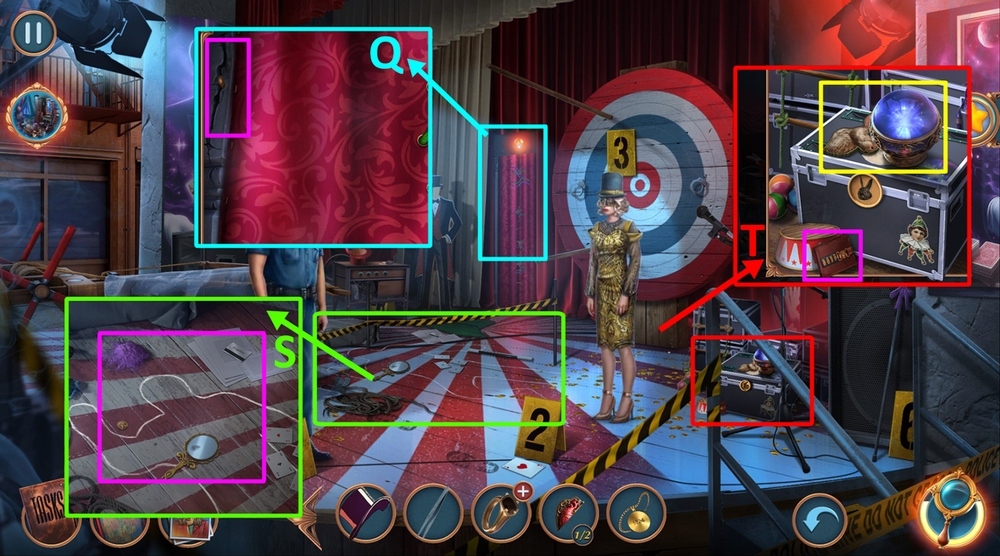
- Click on the hole in the wall, use TWEEZERS on an object in the wall, earn RABBIT HEAD (Q).
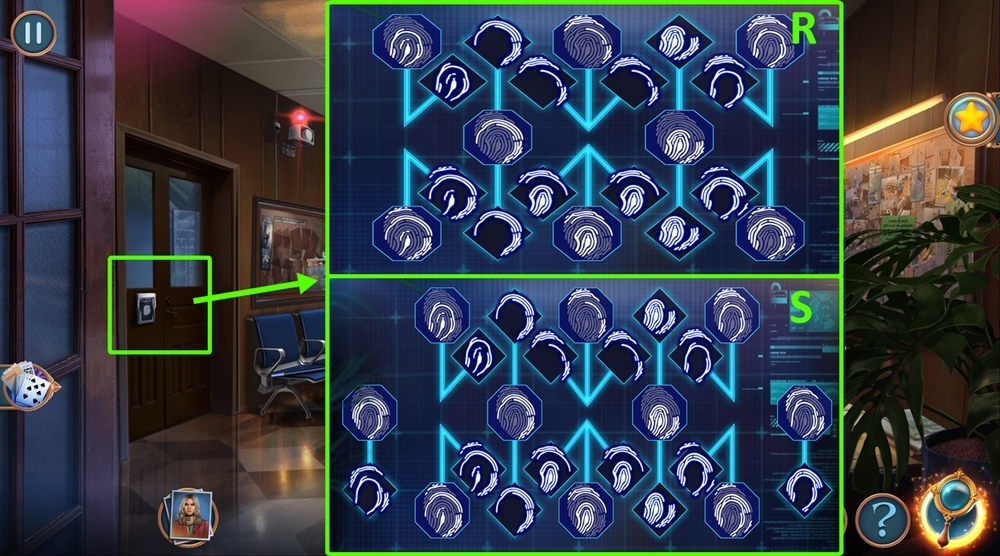
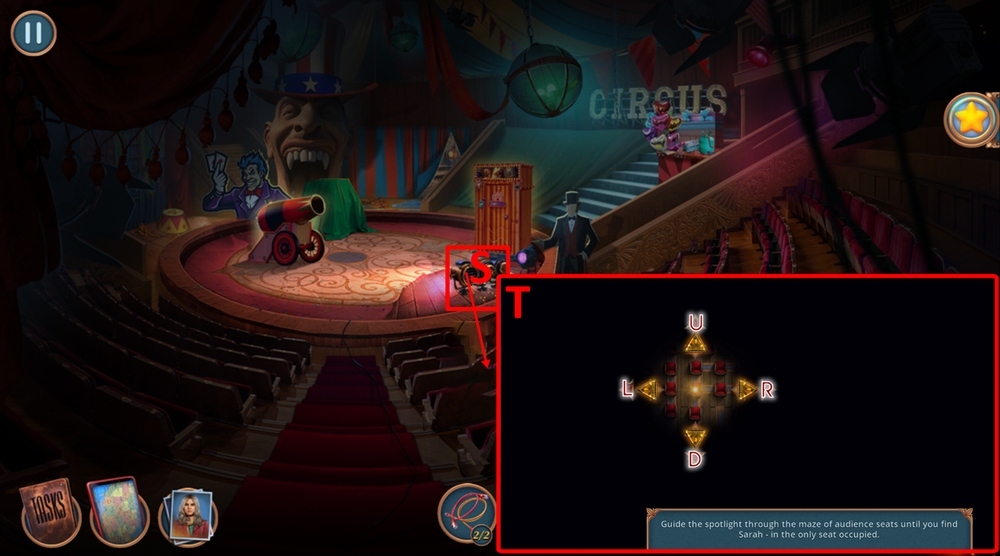
- Use CAMERA and EVIDENCE NUMBERS on the crime scene (S).
- Take CRYSTAL BALL and RABBIT AMULET, click on the code lock, use CODE LOCKET on the code lock, enter the code at the prompt, take RUBY HEART HALF 2/2 (T).
- Go to Magician’s Dressing Room.

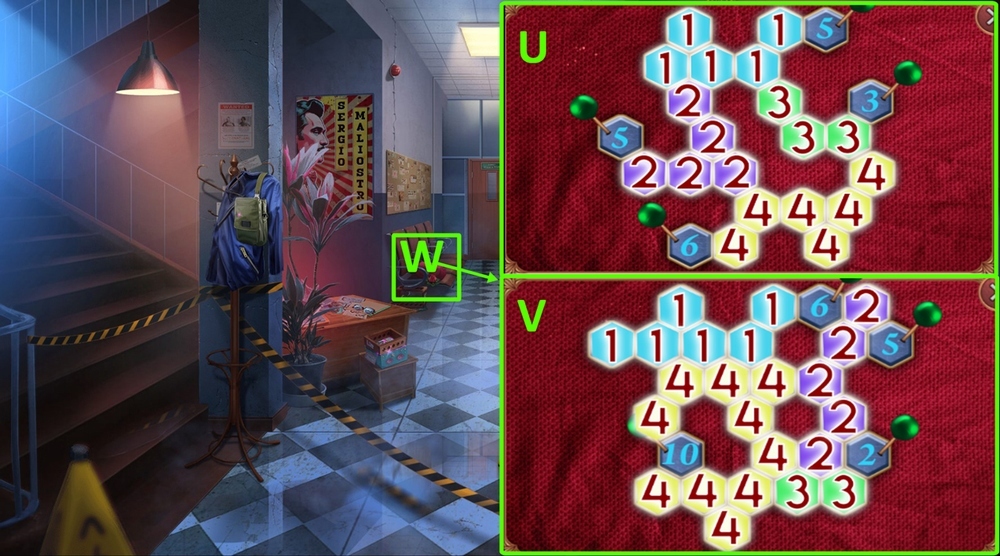
- Use RUBY HEART HALF 2/2 on the door’s slot, click on the note, play puzzle, take ARROW SUCKER (W).
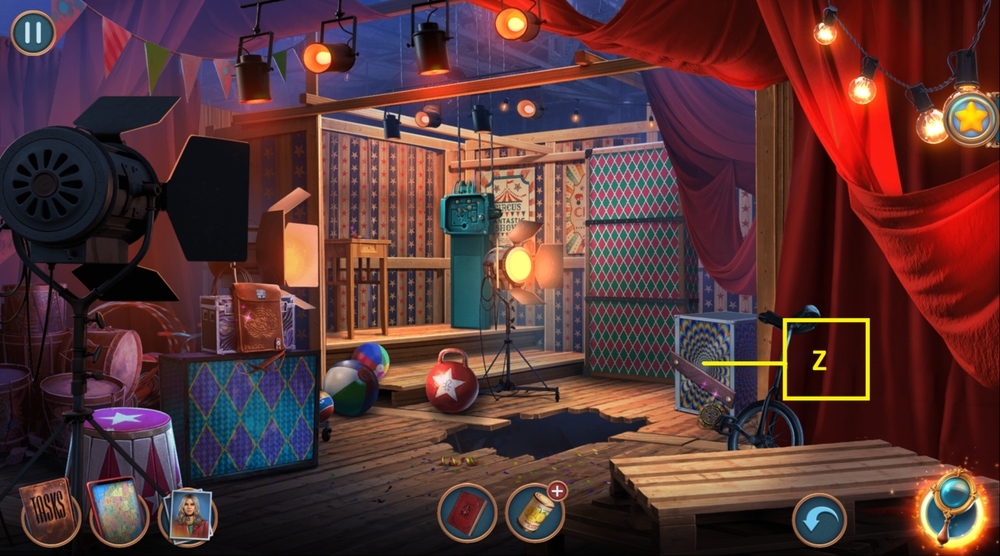
- Use ARROW SUCKER on the mirror, take BOOK PAGE and LEVER (Y).
- Use BOOK PAGE on the box (Z).
- Use RABBIT HEAD on GEMLESS RING, earn RABBIT RING (A).
- Go back.

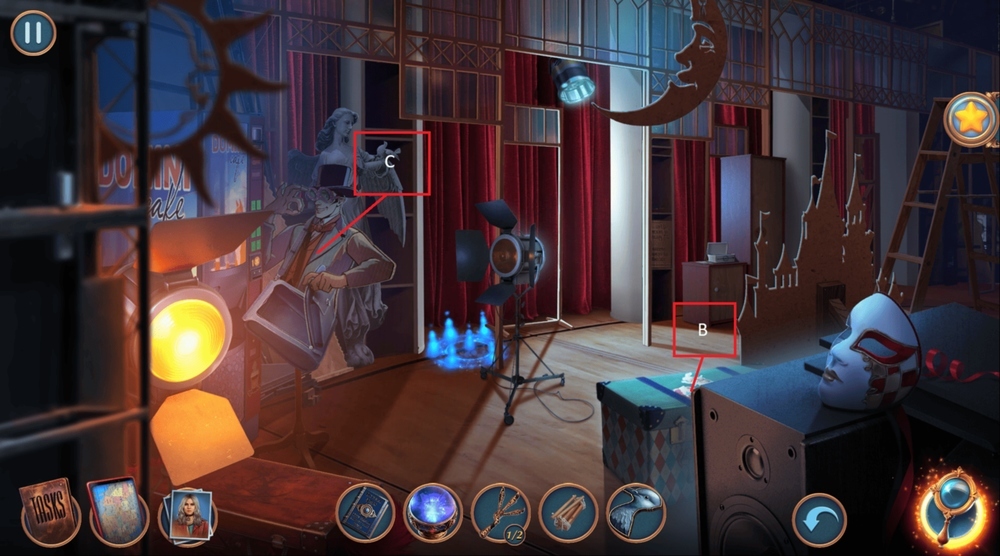
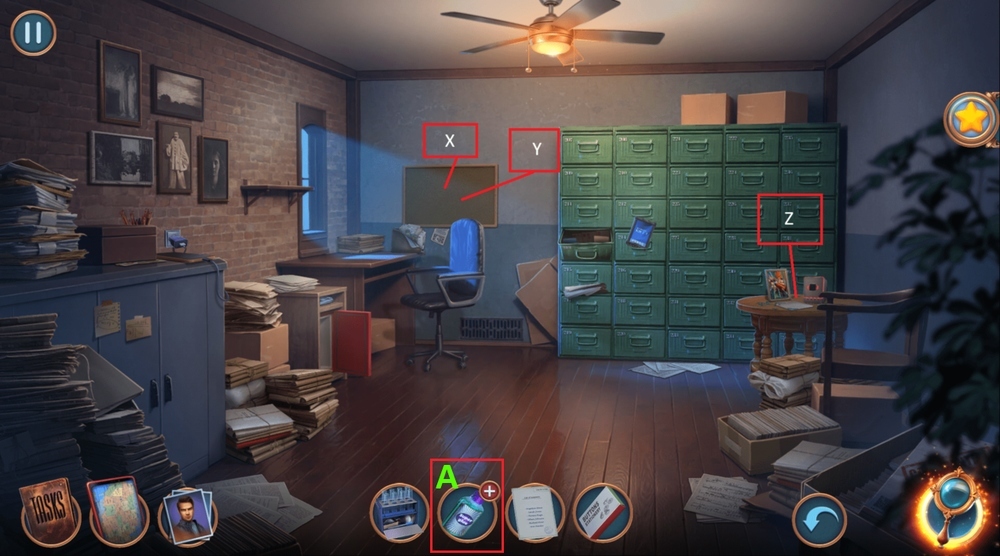
- Use RABBIT RING on the box slot, take and read the note, take MAGNIFYING GLASS (B).
- Use MAGNIFYING GLASS on the crime scene, photograph all the evidence (C).
- Talk to Edward and Claire, earn EDWARD’S KNIFE.
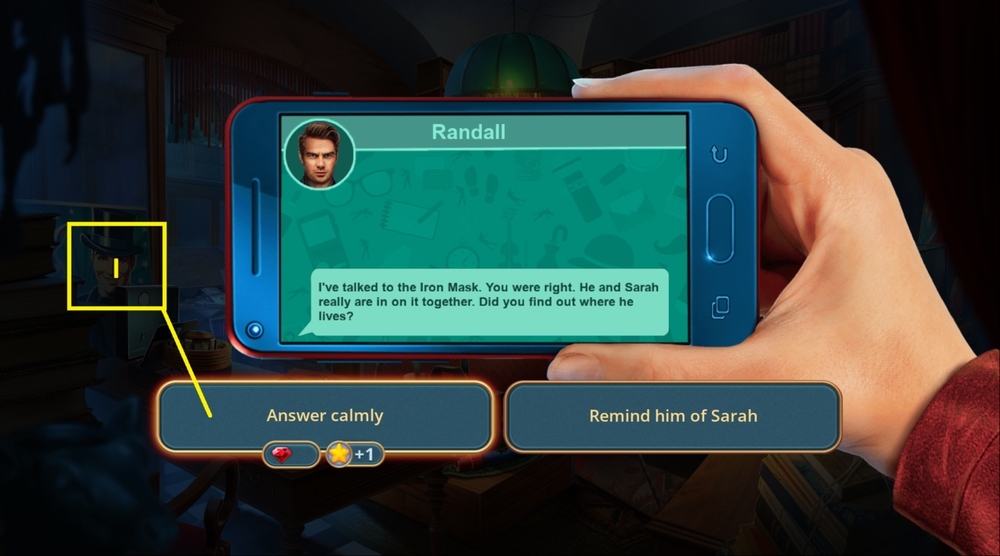
- Write a message to Randall, tap the phone screen.
- Use EDWARD’S KNIFE on the curtain ties (F).

- Easy solution: Cut the ropes as shown in the picture (G).
- Hard solution: Cut the ropes as shown in the picture (H).
- Go back.

- Use LEVER on the mechanism, take MAGIC GLASSES (I).
- Go to Crime Scene and then to Backstage.
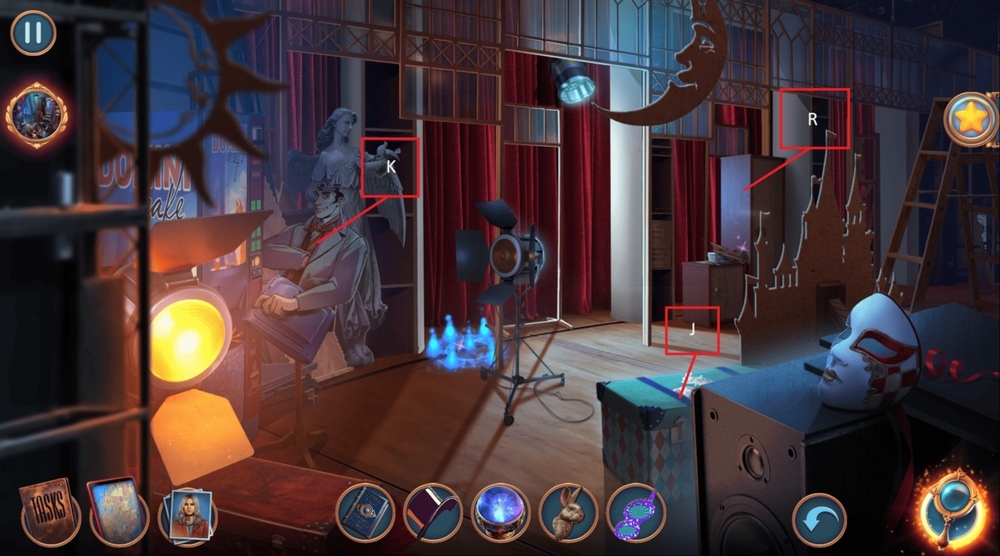
- Use RABBIT AMULET on a slot in the box (J).
- Take BIRD’S FEET 1/2, use CARDBOARD CYLINDER and MAGIC GLASSES on a magician, take RULER and RABBIT KEYCHAIN (K).
- Take ROPE LADDER, click on the box, use RULER on the lock, take and read the note, take AUTO SHARPENER (R).
- Go to Magician’s Dressing Room.
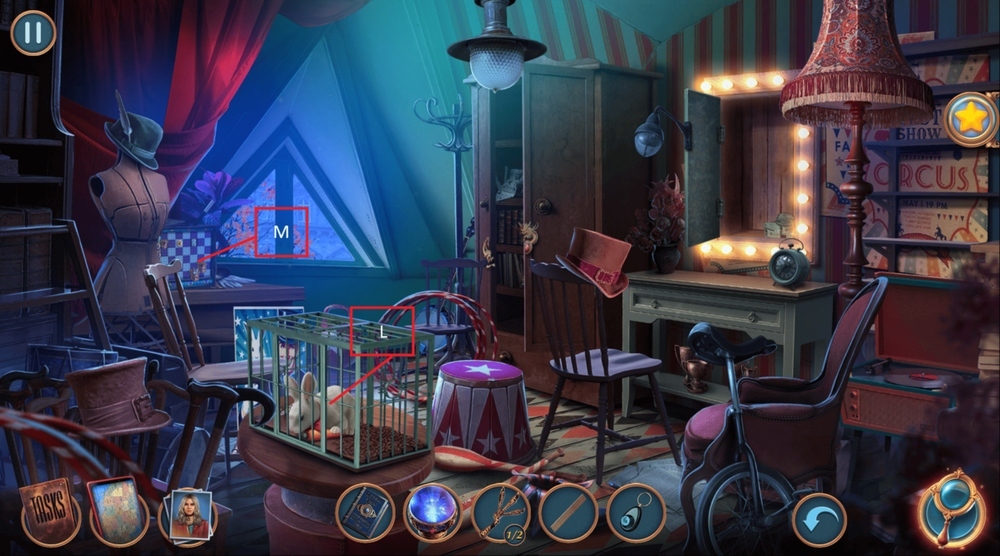
- Use RABBIT KEYCHAIN on the cage, press the button, take RABBIT (L).
- Put RABBIT in the box (M).
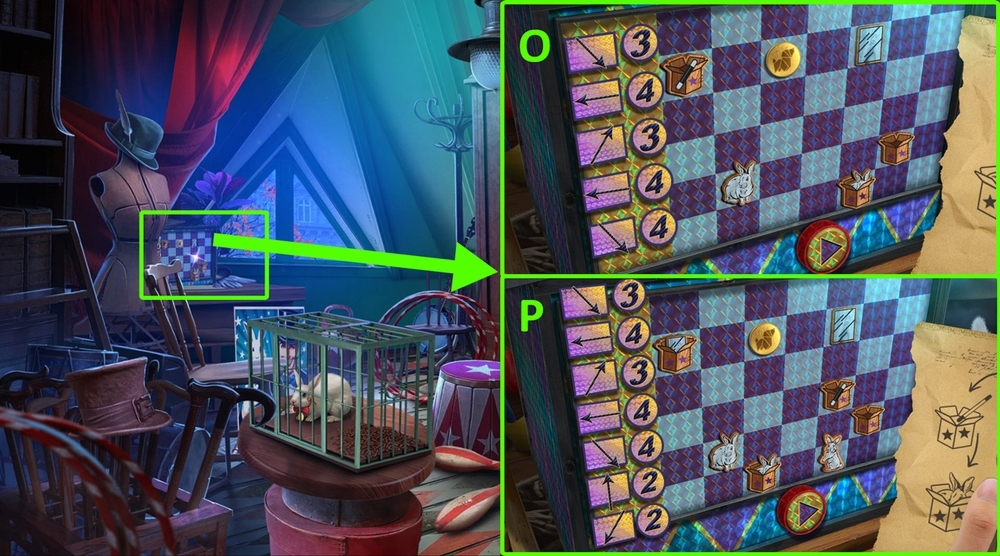
- Easy solution: Arrange as shown in the picture (O).
- Hard solution: Arrange as shown in the picture (P).
- Take and read the note.
- Go to Open Stage.

- Play puzzle, earn ELEANOR’S HAIRBRUSH (S).
- Use ELEANOR’S HAIRBRUSH on the nails, take BLUNT PENCIL (T).
- Use BLUNT PENCIL on AUTO SHARPENER, earn SHARP PENCIL (U).
- Click on the notepad, use SHARP PENCIL on the notepad, take PROPS LIST (V).
- Go to Crime Scene.

- Use PROPS LIST on the box, take MAGIC WAND (W).
- Use MAGIC WAND on the hat (X).

- Easy solution: The desired order is shown in the picture (Y).
- Hard solution: The desired order is shown in the picture (Z).
- Take PIGEON AMULET.
- Go to Backstage.
- Use PIGEON AMULET on the slot, take and read the note, take CANDY CANE and BANKNOTE (B).
- Use BANKNOTE on the coffee machine, take LOCK PICK (C).
- Go to Open Stage.

- Use LOCK PICK on the box (D).
- Easy solution: The correct order is shown in the picture (E).
- Hard solution: The correct order is shown in the picture (F).
- Take BATTERY (D).
- Go to Crime Scene.

- Click on the remote, use BATTERY on the remote.
- Take BIRD’S FEET 2/2 (H).
- Go to Backstage.

- Use BIRD’S FEET 2/2 on the slots, take and read the diary, take ETHAN’S MASK (I).
- Use OCCULT ARTS BOOK, CRYSTAL BALL, and ETHAN’S MASK on the magic circle (J).
- Easy solution: Arrange the symbols as shown in the picture (K).
- Hard solution: Arrange the symbols as shown in the picture (L).

- Talk to Ethan, select the first option (M).

- Talk to Randall, tap on the screen (N).

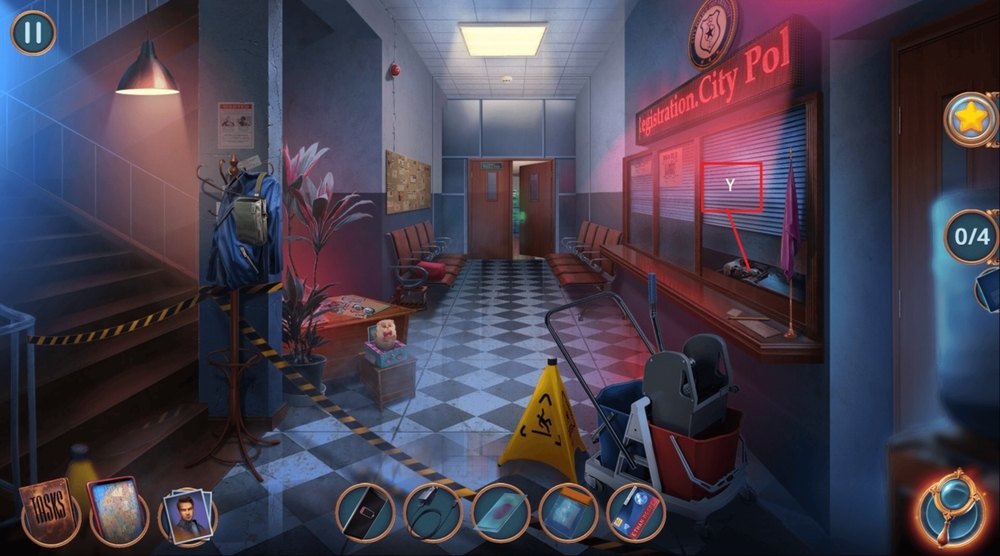
- Open EVIDENCE BAG, take and read the note, take PURPLE POWDER SAMPLE, FINGERPRINTS, and ETHAN’S HEALTH INSURANCE (X).
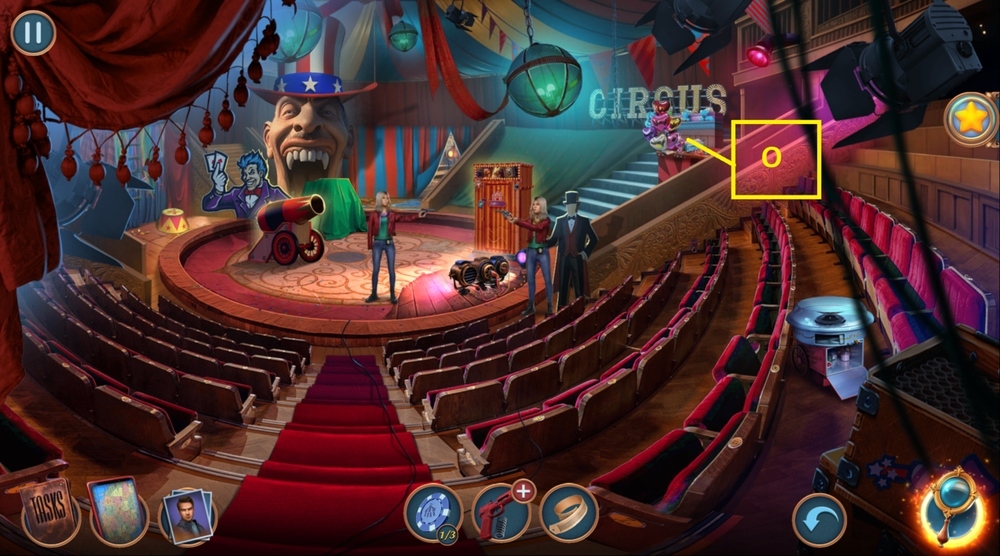
- Click on the panel, open the lid (O).
- Click on the bag, take PHONE CHARGER and MICROSCOPE LENS (P).
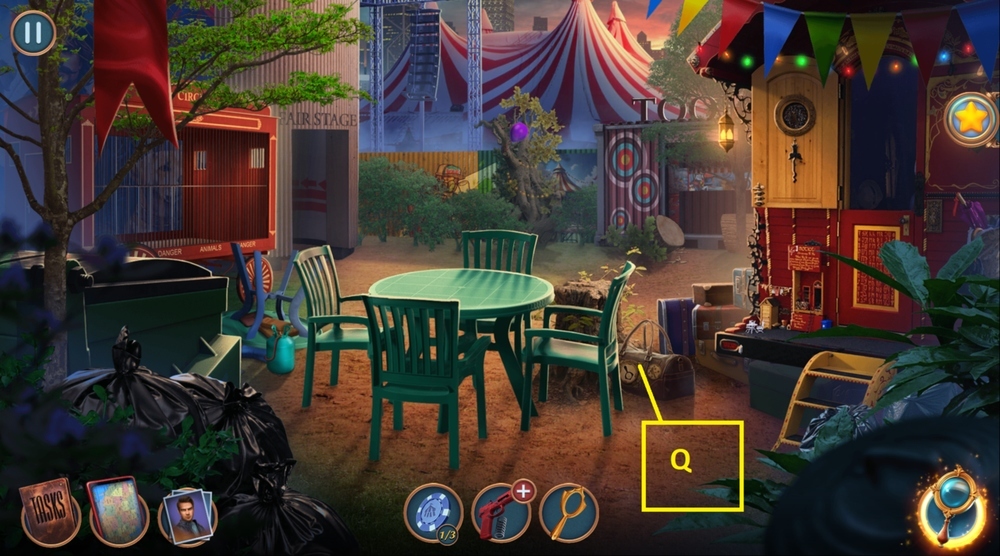
- Put MICROSCOPE LENS near the microscope (Q).
- Take FLASK RACK (R).
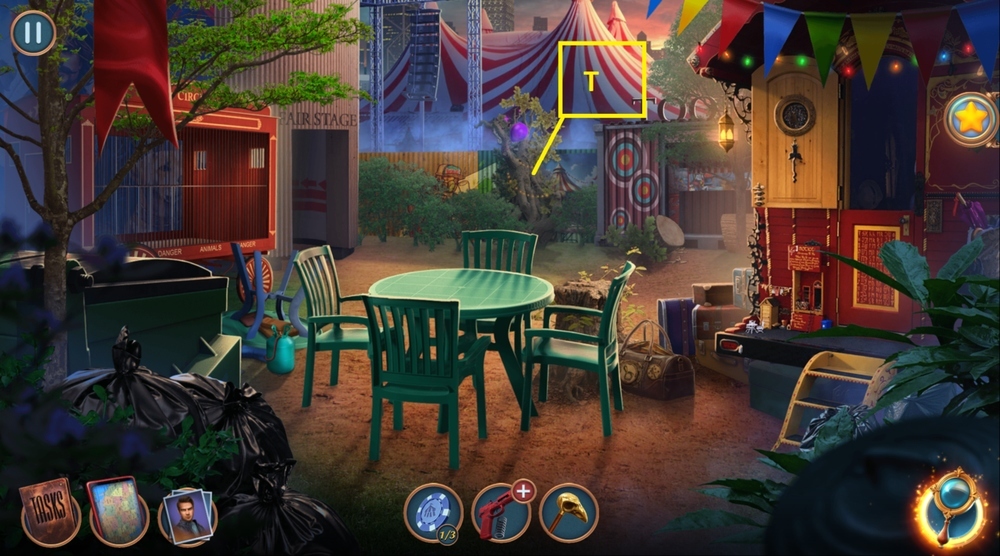
- Use FLASK RACK on the seat, look under the seat, take GEAR (S).
- Use GEAR on the box, take FUSE (T).
- Use FUSE on the panel (U).
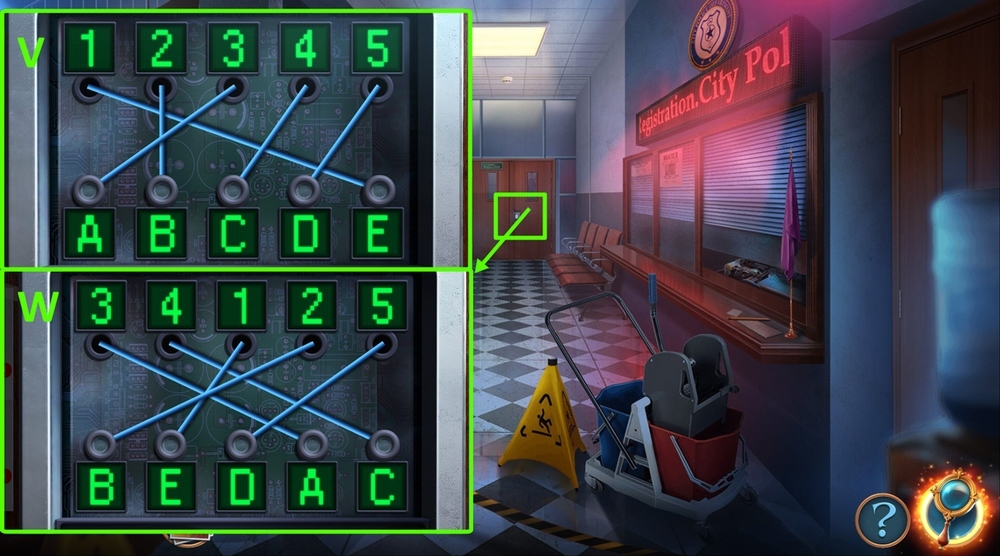
- Easy solution: Connect the wires as 1-E, 2-B, 3-A, 4-C, 5-D (V).
- Hard solution: Connect the wires as 1-E, 2-B, 3-A, 4-C, 5-D (W).
- Use PURPLE POWDER SAMPLE on the microscope.
- Select the green fragments.
- Take and read the EVIDENCE (Y).
- Go to Ranadall’s Office.
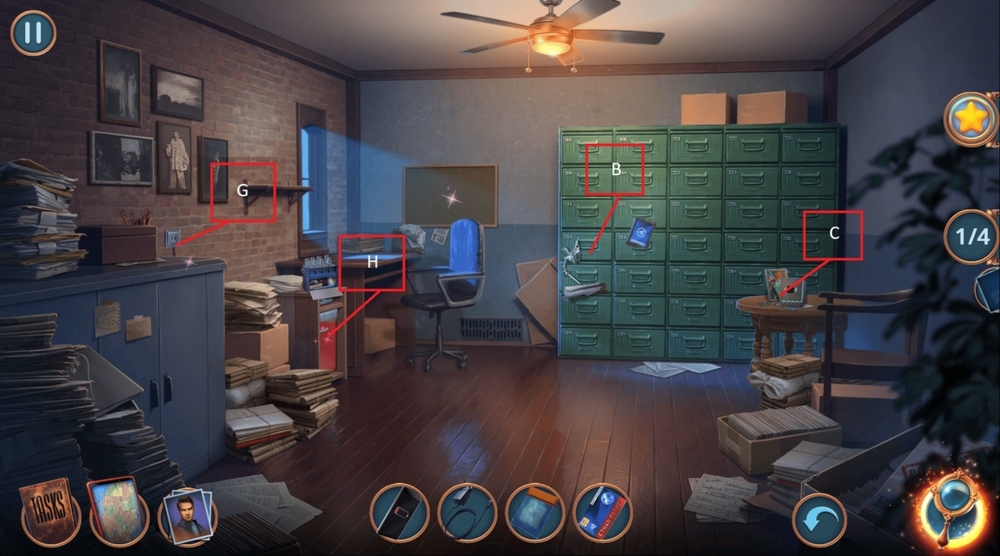
- Take STATUETTE PART, use ETHAN’S HEALTH INSURANCE on the panel, click on box 213, take and read the EVIDENCE, take ETHAN’S FINGERPRINT CARD (B).
- Use FINGERPRINTS and ETHAN’S HEALTH INSURANCE on the panel (C).
- Put DEAD PHONE on the table, use PHONE CHARGER on the phone, click on the phone, take RANDALL’S MEMORY CARD (G).
- Use SALT HEAT PAD on the ice (H).

- Easy solution: Find similar prints (D).
- Hard solution: Find similar prints (E).
- Earn EVIDENCE, take SALT HEAT PAD (F).

- Easy solution: 31-39-32-24-17-25-18-19-26-34-42-35-28-29-30 (I).
- Hard solution: 16-8-9-10-18-17-25-24-31-39-40-41-42-50-51-52-44-43-35-28-29-22-30 (J).
- Take BUTTER, CHEMIST SET, and SUPER GLUE (K).
- Go back.

- Use BUTTER on the zipper, take MAGNET (L).
- Look under the seat, use MAGNET on a stuck object, earn ADAPTER (M).
- Use RANDALL’S MEMORY CARD and ADAPTER on the computer (O).
- Easy solution: U-1, L-4, L-3, R-3, R-2, D-5, R-1, L-1, U-4, D-3 (P).
- Hard solution: U-1, L-4, L-3, R-3, R-2, D-5, R-1, L-1, U-4, D-3 (Q).
- Take EVIDENCE (O).
- Talk to Edward.

- Solution: Arrange the fragments as shown in the picture (S).

- Talk to Edward, select the first option (T).
- Earn PARCEL.

- Put STATUETTE PART near the statuette (S).
- Open PARCEL, take and read the note, take ETHAN’S EMPLOYEES and PAPER FLOWER.
- Use PAPER FLOWER on the bag (T).
- Easy solution: The order of the steps is shown in the picture (U).
- Hard solution: The order of the steps is shown in the picture (V).
- Take PACK OF BUTTONS (W).
- Go to Randall’s Office.
- Use PACK OF BUTTONS on the board (X).
- Play puzzle, earn ELEANOR’S GLOVE (Y).
- Use ELEANOR’S GLOVE on the picture, take AWL, take and examine the photo (Z).
- Use AWL on SUPER GLUE, earn SUPER GLUE (A).
- Go back.

- Use SUPER GLUE on the statuette, take and read the note, take CLOATHING BRUSH and INTERROGATION RECORD (B).
- Go to Randall’s Office.

- Use ETHAN’S EMPLOYEES and INTERROGATION RECORD on the board (C).
- Play puzzle, earn SARAH’S ADDRESS (D).
- Use SARAH’S ADDRESS on the phone (E).

- Write to Eleanor, click on the screen (F).
- Write to Eleanor, select the left option (G).

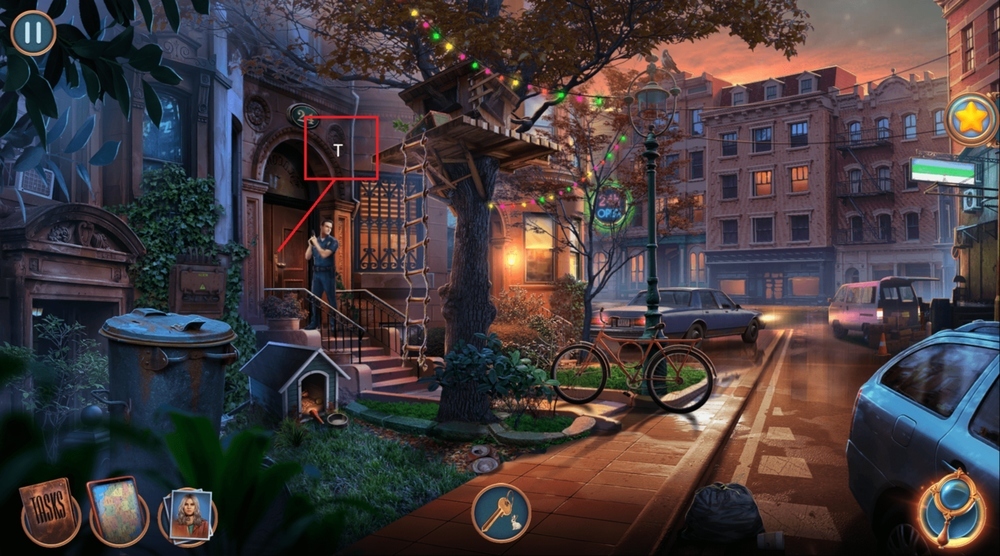
- Use ROPE LADDER on the tree house, examine the house, take BABY CREAM (H).
- Take FLASHLIGHT (I).
- Use BABY CREAM on the box (J).

- Easy and Hard solution: Arrange as shown in the picture (K).
- Take PYRAMID (M).

- Examine the tree house, use CANDY CANE and PYRAMID on the box, take SWITCH (N).
- Use SWITCH on FLASHLIGHT, press the button, earn FLASHLIGHT (O).
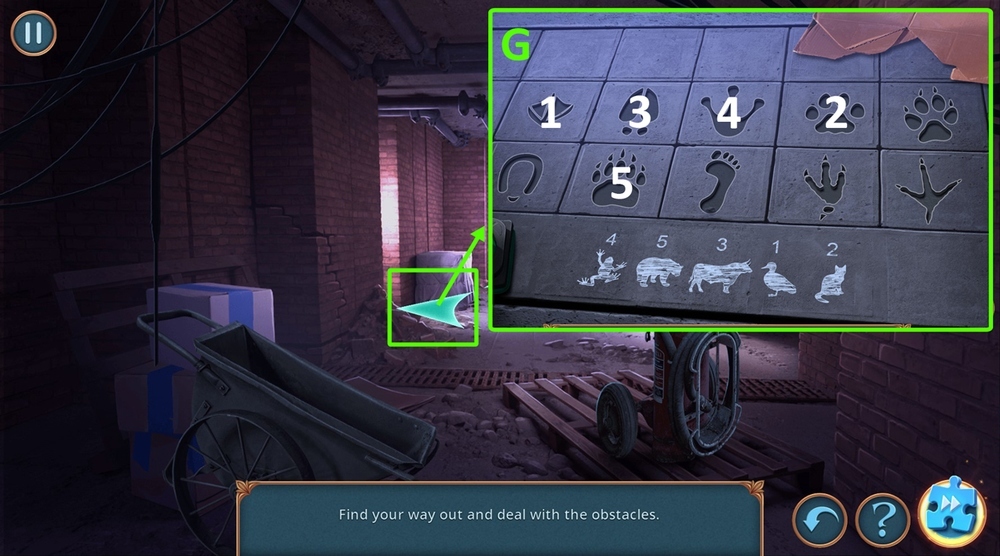
- Use FLASHLIGHT on the dog box (P).

- Easy and Hard solution: The correct keys are shown in the picture (Q).
- Take KEY (S).
- Use KEY on the door lock (T).

- Talk to Randall, select the third option (U).

- Remove the cloth, take the shard, and cut the ropes (V).

- Take SAW HANDLE, use CLOATHING BRUSH and CHEMIST SET on the code lock, take CHEMIST SET, examine the code lock.
- Click on the fingerprint.
- Take CHEMICALS (W).
- Use CHEMIST SET and CHEMICALS on the chains (Z).

- Easy solution: The correct order of composition of substances is shown on the picture (A).
- Hard solution: The correct order of composition of substances is shown on the picture (B).
- Take HAMMER (C).

- Use HAMMER on the boards, take BLADE (D).
- Use BLADE and SUPER GLUE on SAW HANDLE, earn SAW (E).
- Use SAW on the door (F).
- Solution: The correct direction is shown in the picture (G).
- Go left.

- Solution: The correct direction is shown in the picture (H).
- Go right.

- Solution: The correct direction is shown in the picture (I).
- Go forward.

- Go left (J).

- Open RANDALL’S THINGS, take CITY MAP, TALC, FANG AMULET, and RANDALL’S COMB (A).
- Take IRON BRUSH, use RANDALL’S COMB on the board (B).

- Easy solution: Arrange as shown in the picture (C).
- Hard solution: Arrange as shown in the picture (D).
- Take PRISONER’S BELT.

- Use PRISONER’S BELT on the bottle, get CLEANING AGENT (E).
- Use IRON BRUSH and CLEANING AGENT on the table, take METAL BOWL (F).
- Use FANG AMULET and METAL BOWL on the wall, take HACKSAW (G).
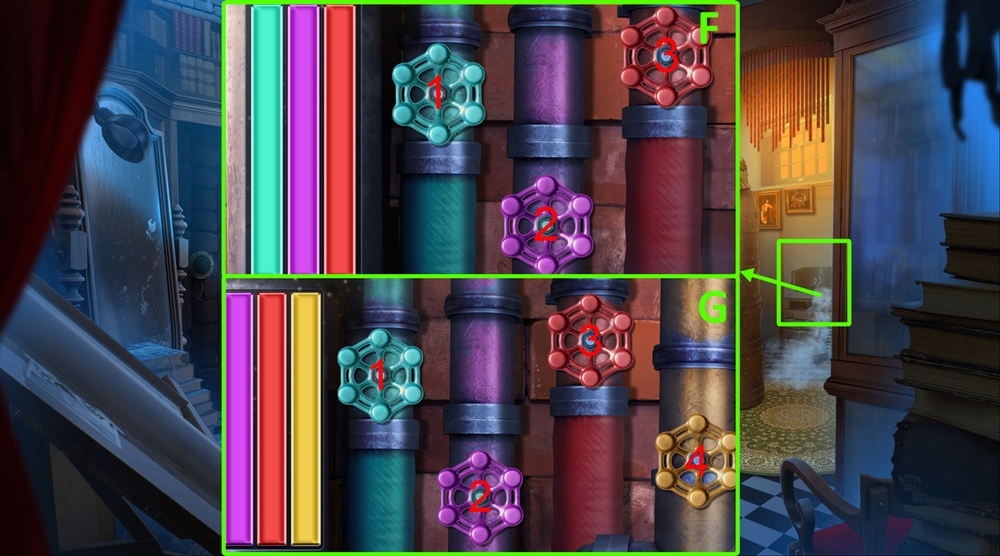
- Use HACKSAW on the pipes (H).
- Easy solution: 1-2-3-4-5-6-7-8-9 (I).
- Hard solution: 1-2-3-4-5-6-7-8-9-10-11-12-13 (J).

- Solution: 1-2-3-4 (K).
- Select this option (L).
- Go forward.

- Read the notes, take HAND HOOK (M).
- Use HAND HOOK on the fire extinguisher cabinet, take FIRE GAFF (N).
- Use FIRE GAFF under the cabinet, take BAG OF SALT and SCOTCH TAPE (O).
- Use CLEANING AGENT on the stain, take LAPTOP PARTS 1/2, use TALC and SCOTCH TAPE on the award, get EDWARD’S PRINT (P).
- Use EDWARD’S PRINT on the panel (Q).
- Easy solution: Arrange as shown in the picture (R).
- Hard solution: Arrange as shown in the picture (S).
- Go forward.

- Take TUBE and MEDICAL PIN (T).
- Use MEDICAL PIN on the window latch, read the note, take ELECTROLYTE and LAPTOP PARTS 2/2 (U).
- Use LAPTOP PARTS on the laptop (V).

- Easy solution: green – 1, orange-2, purple-3, red-4, pink-5, yellow-6 (W).
- Hard solution: green – 1, orange-2, blue-3, purple-4, red-5, pink-6, yellow-7 (X).
- Read the note.

- Select this option, get EDWARD’S HANDKERCHIEF (Y).
- Go back.

- Use EDWARD’S HANDKERCHIEF on the stain, take ELEANOR’S PHOTO, GLASS, and PARROT BOWL, use BAG OF SALT, TUBE, and ELECTROLYTE on the box (Z).

- Use ELEANOR’S PHOTO on the pin board (A).
- Use GLASS on the water dispenser, take HOT WATER (B).
- Use HOT WATER on the box (C).

- Solution: Ax1, Bx3, Cx6, Dx4, E (D).
- Take ACID.
- Go to Edward’s Office.

- Use ACID on the padlock, take FIRST AID KIT and HEX KEY (E).
- Use HEX KEY on the cabinet.
- Play puzzle, earn CASE 2604-N (F).

- Give CASE 2604-N to the person (H).
- Use CADUCEUS on FIRST AID KIT, take SURGICAL HOOK (J).
- Go to Archive.

- Select this option, earn CADUCEUS (I).

- Take SWITCH (K).
- Take UV LAMP (L).
- Use UV LAMP and SWITCH on the lamp, get PASSWORD PART (M).
- Use PASSWORD PART on the computer (N).

- Easy solution: 5×4, 2×4, 7×3, 4×3, Enter (O).
- Hard solution: 5×4, 2×4, 7×3, 4×3, Enter (P).
- Read the note, take FILE NUMBER.

- Use FILE NUMBER on the shelf, find the right file, read the note, take GARDEN SHOVEL (Q).
- Go back.

- Use GARDEN SHOVEL on the earth, take HANDLE (R).
- Go to Archive.

- Use HANDLE on the board, take TAG “IRON MASK – 1076-N” (S).
- Use TAG “IRON MASK – 1076-N” on the shelf, find the right file, examine the file, take SURGICAL TONGS (T).
- Go back.

- Use SURGICAL HOOK on the bag (U).
- Use BIRD FOOD on PARROT BOWL, get BIRD FOOD (X).

- Easy solution: 6-2-5-4-2-3-2-5 (V).
- Hard solution: 2-5-4-6-2-3-2-8 (W).
- Take BIRD FOOD.

- Give BIRD FOOD to the parrot, take RANDALL’S PHOTO (Y).
- Go back.

- Use RANDALL’S PHOTO on the pin board (Z).

- Solution: Arrange as shown in the picture (A).
- Read the note, take GAVEL.
- Use MEDICAL PIN and GAVEL on the chair, take CHAIR, use SURGICAL TONGS on the box, get RAZOR BLADE (B).
- Go to Archive.
- Use RAZOR BLADE on the box, read the paper.
- Play puzzle (C).
- Go back.

- Use CHAIR on the ceiling fan, get RUBBER GLOVE (E).
- Use RUBBER GLOVE on the wires, get RANDALL’S KEYS (F).
- Play puzzle, earn FAIR’S ADDRESS (G).

- Give CITY MAP, RANDALL’S KEYS, and FAIR’S ADDRESS to the person (H).

- Take STONE RABBIT and MAP (I).
- Take LOCK PICKS 1/2 and POLICE STAMP, Use Map on the Amulet (J).
- Take TIGHT BAG and BLOOD TYPE BRACELET, use POLICE STAMP on the paper (K).

- Easy solution: Arrange as shown in the picture (L).
- Hard solution: Arrange as shown in the picture (M).
- Take INTERROGATION WARRANT.

- Use BLOOD TYPE BRACELET on the box, read the note, take PAPER CLIP, take PAINKILLER (N).
- Give INTERROGATION WARRANT and PAINKILLER to the person (O).

- Solution: 1-2-3 (P).

- Select this option (Q).

- Take WATER, use PAPER CLIP on the zipper, take SARAH’S BARRETTE (R).
- Use SARAH’S BARRETTE on the amulet (S).

- Easy solution: 1-2-3-4-5-6-7 (T).
- Hard solution: 1-2-3-4-5-6-7-8-9-10 (U).

- Take BOARDS 1/2, read the note (V).
- Take BROKEN GARDEN RAKE and RED ROSE (W).
- Use BROKEN GARDEN RAKE on the bag, read the note, take LOCK PICKS 2/2 (X).
- Use LOCK PICKS on the keyhole (Y).

- Easy solution: btn6-btn2-btn1 (Z).
- Hard solution: 5-2-btn5-btn5-5-4-7-btn6-btn6-4-5-6 (A).
- Go forward.

- Use STONE RABBIT on the crystal, get OIL CAN and CRYSTAL PIECE, take PAINT BRUSH (B).
- Take IRON ROD, use TIGHT BAG and PAINT BRUSH on the dry glue, get DRY GLUE, move the wallpaper (C).
- Use IRON ROD on the cage, use OIL CAN on the drawer, get BOARDS 2/2 (D).
- Use WATER, DRY GLUE, and BOARDS on the stepladder (E).
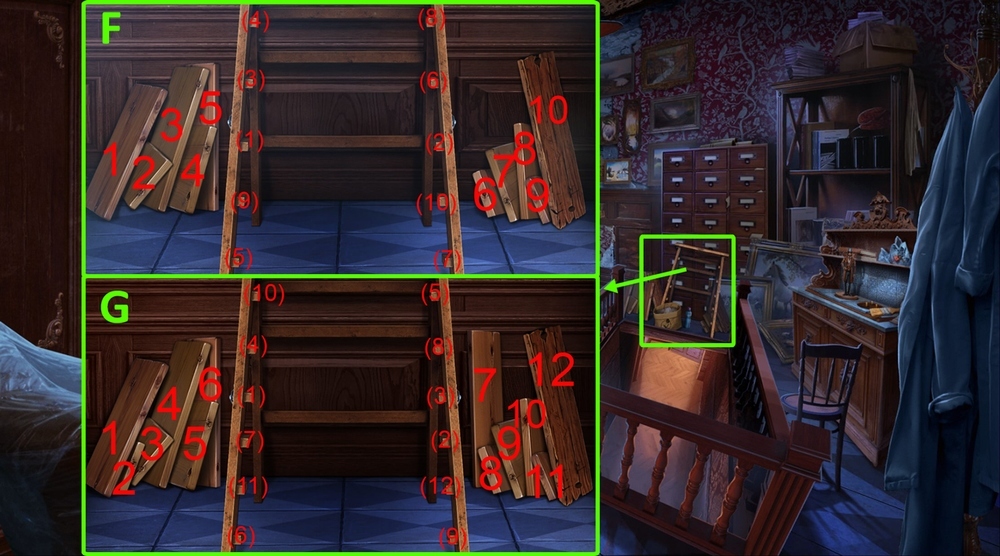
- Easy solution: 1-(1), 2-(2), 3-(3), 4-(4), 5-(5), 6-(6), 7-(7), 8-(8), 9-(9), 10-(10) (F).
- Hard solution: 1-(1), 2-(2), 3-(3), 4-(4), 5-(5), 6-(6), 7-(7), 8-(8), 9-(9), 10-(10), 11-(11), 12-(12) (G).
- Take STEPLADDER.

- Use STEPLADDER on the floor (H).
- Go forward.
- Select this option (I).

- Read the note, use RED ROSE and CRYSTAL PIECE on the dead rose, examine the vision, take BUTTERFLY AMULET (J).
- Use BUTTERFLY AMULET on the box (K).
- Take SCREW and BOLT (L).
- Go back.

- Use BELT on the cage, take RUNES 1/2 and TROWEL (M).
- Use TROWEL on the brick, move the brick, take HOOK ON A ROPE (N).
- Go back.

- Use HOOK ON A ROPE on the cauldron (O).
- Play puzzle, earn CROWN.

- Use CROWN on the frog, take DRAGONFLY AMULET (Q).
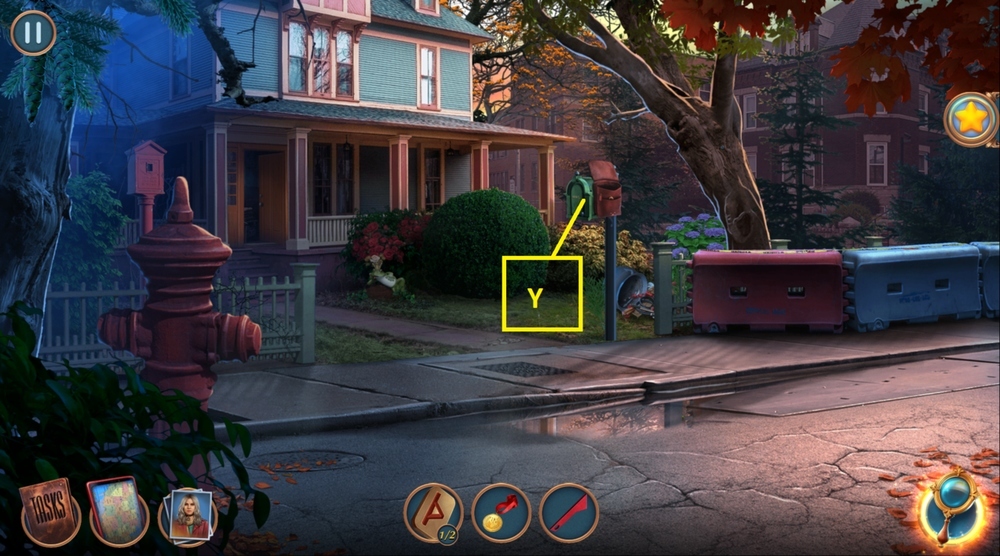
- Use SCREW on the mailbox (R).
- Go to Trick Room.

- Use DRAGONFLY AMULET on the box, take ADHESIVE PLASTER (S).
- Use ADHESIVE PLASTER on the hose, flick the switch on, take TINY KEY (T).

- Use TINY KEY on the double bottom, take SARAH’S STATUE (U).
- Go back.

- Use SARAH’S STATUE on the empty slot, take LIPSTICK and GARDEN SHEARS (V).
- Go to Yard.

- Use GARDEN SHEARS on the rosebush, take SHINY MEDAL (W).
- Play puzzle, earn FLAG (X).
- Use SHINY MEDAL and FLAG on the mailbox, take RUNES 2/2 (Y).
- Go to Trick Room.

- Use LIPSTICK and RUNES on the mirror (Z).
- Easy and Hard solution: 5×3-6-2×2-1×1-9×2-5×3-9-5-6×2-5×2-2-1×2-2-1-5-6-7×6-5×2-6×3-9-14.
- 10×2-12-16-12×2-8×2-4-8×2-12-8×5-12-15-11×3-20-19×3-18-19×3-18-17×2-16-20-19×2-14×2.
- 17×2-18×2-17-18×2-17-18-17×3-18×2-8×2-4×2-8×3-4×2 (A).

- Take CANE (A).
- Take BROKEN DECODER, use CANE on the brick, take WINDOW KEY (B).
- Take IRON MAIDEN PARTS 1/3, use WINDOW KEY on the keyhole, take GLUE and WRENCH SET (C).
- Take IRON MAIDEN PARTS 2/3 (D).

- Use WRENCH SET on the vent (E).
- Easy solution: 1-2-3 (F).
- Hard solution: 1-2-3-4 (G).

- Select this option, get TYLER’S WORDS (H).

- Use TYLER’S WORDS on the intercom (I).
- Go forward.

- Take FLASK, use GLUE on the box (J).
- Take INFLATABLE PILLOW and STATUE PART, read the book, use FLASK on the book (K).

- Use STATUE PART on the box, examine and take ANGELICA’S SCARF, take HANDKERCHIEF (L).
- Use HANDKERCHIEF on the shards, take IRON MAIDEN PARTS 3/3 (M).
- Take INGREDIENTS 1/2 (N).
- Go back.

- Use IRON MAIDEN PARTS on the iron maiden trap (O).

- Easy solution: R-T-Lx2-T-Rx2-T-L-T-Lx5-T-L-T-Rx2-T-R-T-R-T-Rx2-T (P).
- Hard solution: Lx5-T-Rx4-T-Lx3-L-T-R-T-Rx2-T-Lx2-T-Lx2-T-Rx6-T-Lx6-T-R-T-Rx4-T-Lx4-T-Rx2-T-Lx3-T-Rx3-T (R).
- Get SPECIAL JOKER.

- Use SPECIAL JOKER on the drawer (Q).
- Play puzzle, earn INK DEVELOPER.
- Go to Lab.

- Use INK DEVELOPER on the page, take INGREDIENTS LIST (S).
- Use INGREDIENTS LIST on the shelf, find the matching pouches, take INGREDIENTS 2/2 (T).
- Use INGREDIENTS on the book (U).

- Easy solution: Arrange as shown in the picture (V).
- Hard solution: Arrange as shown in the picture (W).
- Take ACID SOLUTION.

- Use ACID SOLUTION on the drain, read the note, take PHOTOCOPIER ROLL (X).
- Use PHOTOCOPIER ROLL on the table (Y).
- Go back.

- Play puzzle, earn MULTI-TOOL (Z).
- Go to Lab.

- Use MULTI-TOOL on the zip tie, get DECODER WHEEL and BOMB BLUEPRINT (A).
- Use DECODER WHEEL on BROKEN DECODER, get DECODER (B).

- Use DECODER on the table (C).
- Easy and hard solution: b-7-14-13-a-6-c-4-a-3-4-c-6-a-13-b-21-a-27-c-19-a-18-b-10-c-22-b-23-a-24-c-31 (D).
- Read the note.
- Click on the person (E).

- Select this option (F).
- Go forward.

- Take MAGICIAN FIGURES 1/4 and MAGICIAN’S PAINTS (G).
- Use MAGICIAN’S PAINTS on the painting (H).

- Easy and Hard solution: Arrange as shown in the picture (I).
- Take MAGICIAN FIGURES 2/4 and ANTI-STAPLER.

- Use ANTI-STAPLER on the stapled board, get EMPLOYEE ID CARD (K).
- Go back.

- Use EMPLOYEE ID CARD on the panel, take MAGICIAN KEYCHAIN and MAGICIAN’S MASK REPLICA (L).
- Go forward.
- Use MAGICIAN’S MASK REPLICA on the puzzle (M).

- Easy solution: Press in order from 1 to 5 (N).
- Hard solution: Press in order from 1 to 8 (O).
- Take MAGICIAN FIGURES 3/4 and COIN.
- Go back.

- Use MAGICIAN KEYCHAIN on the keyhole, take BANKNOTE (P).
- Offer BANKNOTE (Q).
- Play puzzle, earn LIST OF EVENTS.

- Give LIST OF EVENTS to the person (S).
- Solution: follow the instructions (T).
- Select this option (U).
- Go forward.

- Take ENCHANTMENTS AND ILLUSIONS and POCKETKNIFE (U).
- Use COIN on the money receiver, take TOY SUIT, use POCKETKNIFE on the rope, take CANNED PINEAPPLES and GLOVE (V).
- Go to Tricks Museum.

- Use TOY SUIT on the sculpture, get MAGICIAN FIGURES 4/4 (W).
- Use MAGICIAN FIGURES on the chair, play puzzle (X).
- Go to Fair Stage.

- Use GLOVE on the wire (Y).
- Go forward.
- Take INACTIVE AMULET (Z).
- Take GEARS 1/2 and FEATHER, use ENCHANTMENTS AND ILLUSIONS and INACTIVE AMULET on the picture (A).
- Easy solution: Arrange as shown in the picture (B).
- Hard solution: Arrange as shown in the picture (C).
- Get CHARMED AMULET, use CHARMED AMULET on the background.

- Take EDWARD’S BAG KEYS (D).
- Use EDWARD’S BAG KEYS on the bag, take CAN OPENER (E).
- Use CAN OPENER on CANNED PINEAPPLES, get OPEN CAN (F).
- Go back.

- Offer OPEN CAN to the monkey, read the note, take SPOTLIGHT WIRES 1/2 and TWEEZERS (G).
- Use TWEEZERS on the gear, get GEARS 2/2 (H).
- Go to Backstage.

- Use GEARS on the puzzle (I).

- Easy solution: 1-2-3-4-1-2-3-4-5-6-7-8-9-12-13-14 (J).
- Take ROPE.

- Use ROPE on the person (L).

- Select this option (M).
- Go to Circus Entrance.

- Play puzzle, earn DRY MAKE-UP (N).
- Use FEATHER and DRY MAKE-UP on the tablet (O).

- Solution: 2748 (P).
- Take CREDIT CARD.
- Go to Backstage.

- Use CREDIT CARD on the board, take SPOTLIGHT WIRES 2/2 and UMBRELLA (Q).
- Go to Circus Entrance.

- Use UMBRELLA on the window, take SPOTLIGHT CONTROLS (R).
- Go to Fair Stage.
- Use SPOTLIGHT WIRES and SPOTLIGHT CONTROLS on the spotlights, press the button on the remote (S).
- Easy and Hard solution: R-U-U-R-R-R-U-L-L-U-R (T).
- Take PLIERS PART, CHIPS 1/3, and FOX TAIL (V).
- Use INFLATABLE PILLOW under the table (W).
- Use FOX TAIL on the spider web, take AWL and PLIERS HALF (X).
- Take BOLT (Y).
- Use MULTI-TOOL, PLIERS HALF, and BOLT on the PLIERS PART, get PLIERS (Z).

- Use BOMB BLUEPRINT and PLIERS on the bomb (A).

- Easy solution: Arrange as shown in the picture (B).
- Hard solution: Arrange as shown in the picture (C).
- Go forward.

- Use GLUE on the broken valve, take VALVE (D).
- Use PLIERS and VALVE on the tank, take HELIUM TANK (E).
- Go back.

- Use HELIUM TANK under the table, take AXE (F).
- Use AXE on the tree trunk (G).
- Go forward.

- Take UNLOADED GUN (H).
- Take SPRING, use AWL on the keyhole (I).

- Easy solution: Arrange as shown in the picture (J).
- Hard solution: Arrange as shown in the picture (K).
- Take WING PIN.
- Use WING PIN on the cabinet, take FIRST AID KIT (L).
- Go to Fair Stage.

- Use FIRST AID KIT on the person (M).

- Select this option (N).
- Get MUSIC RIBBON.
- Use MUSIC RIBBON on the music box, take MITTEN (O).
- Go to Shooting Gallery.

- Use MITTEN on the popcorn, take MIRROR BROOCH (P).
- Go back.
- Use MIRROR BROOCH on the bag (Q).

- Easy solution: 1-2-3-4-5-6-7-8-9-10-11-12-13-14-15-16 (R).
- Hard solution: 1-2-3-4-5-6-7-8-9-10-11-12-13-14-15-16-17-18-19-20-21-22 (S).
- Take TYLER’S CANE.
- Use TYLER’S CANE on the balloon, take CHIPS 2/3 and SUCTION CUP (T).
- Go to Shooting Gallery.

- Use SUCTION CUP on the glass, take TRANQUILIZER, read the note, take CHIPS 3/3 (U).
- Use CHIPS on the coin receiver, turn the valve three times, take DART (V).
- Use SPRING, TRANQUILIZER, and DART on UNLOADED GUN, get TRANQUILIZER GUN (W).
- Go to Fair Stage.

- Use TRANQUILIZER GUN on the person (X).

- Solution: Select the differences from the images (Y).
- Solution: Select the answers from the images (Z).
- Solution: A, B, B, A, B, A, B, B, B, A, B, B, A, B, A, B, A, B, B (A).
- Walkthrough Bonus Chapter, at the link below.


