
Villa Lakeside – A puzzle game from developer ArtDigic, where gentle waves caress the calm water surface and trees washed by morning dew create a peaceful atmosphere. There are many puzzles waiting for you in the lake mansion. You will have to solve puzzles, search for items and collect clues to get out of here. If you can not pass any of the puzzles or do not know where the items are, on our site you can see the walkthrough of the game Villa Lakeside, get out of the hotel.
Villa Lakeside – Walkthrough
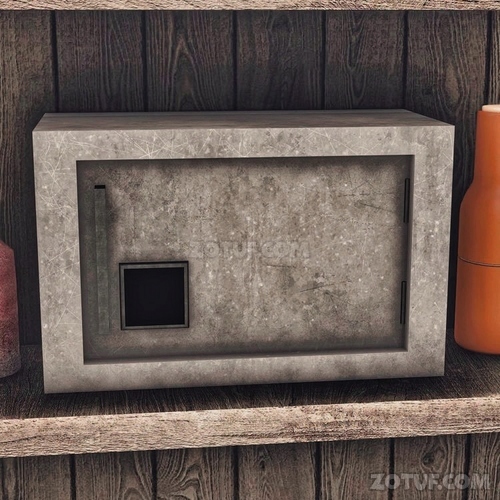
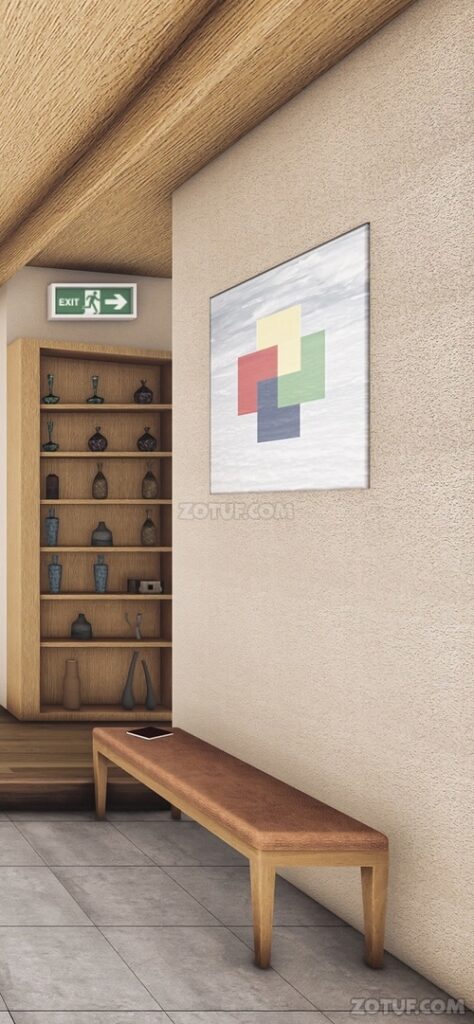
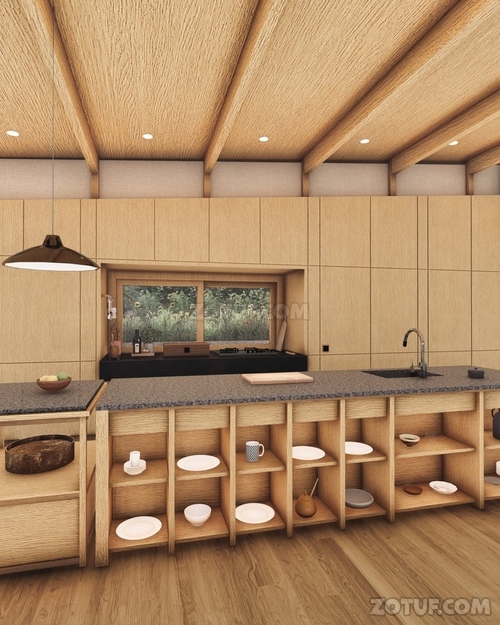
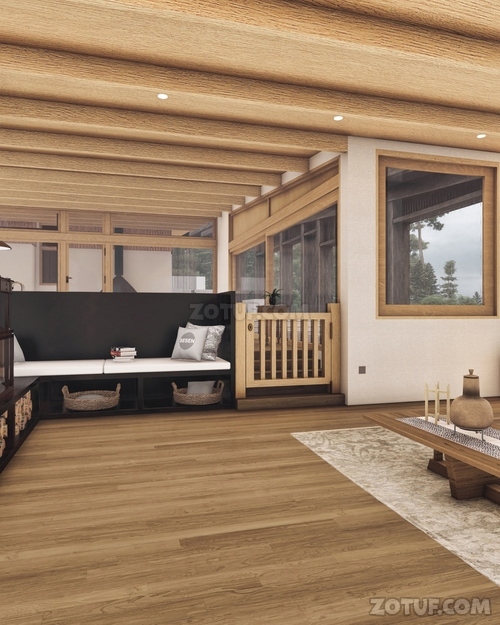
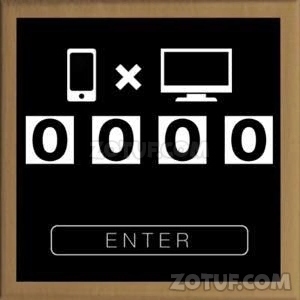
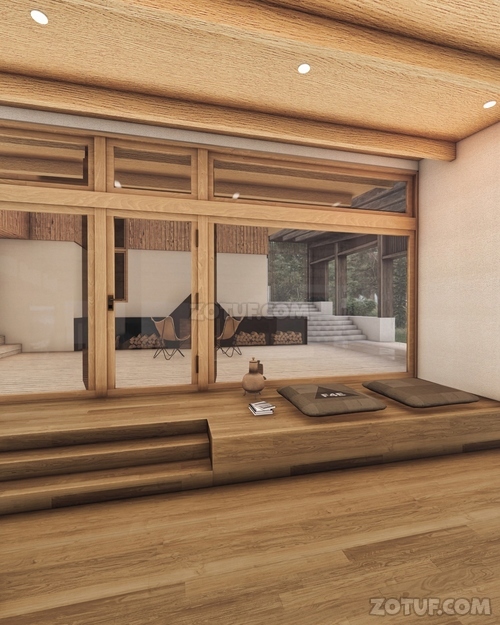
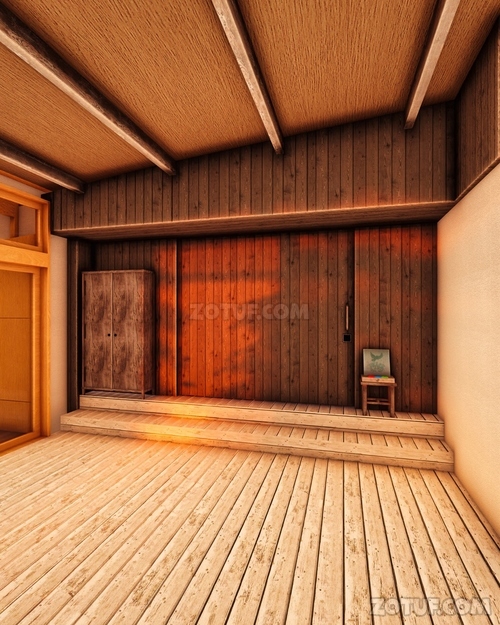
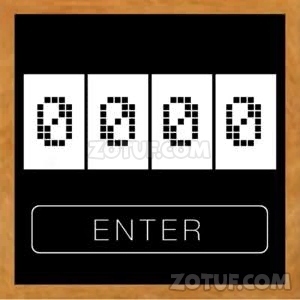
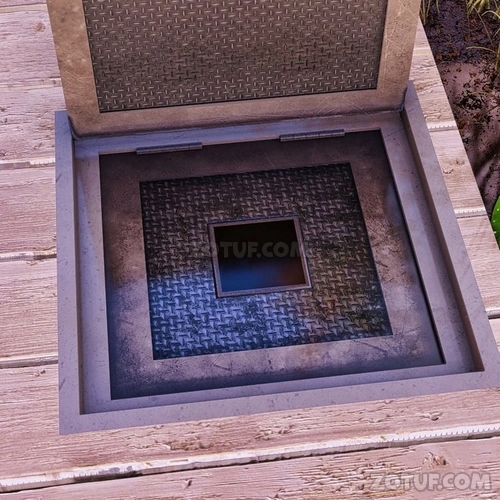
Here you can see the full walkthrough of Villa Lakeside in pictures.
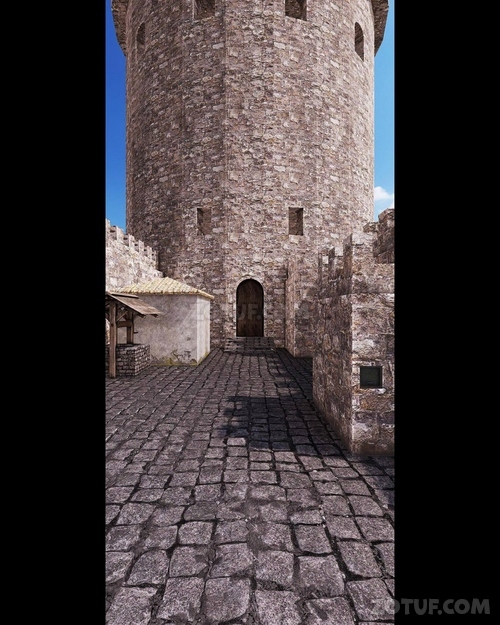
1. Move to this location and check inside the boat.

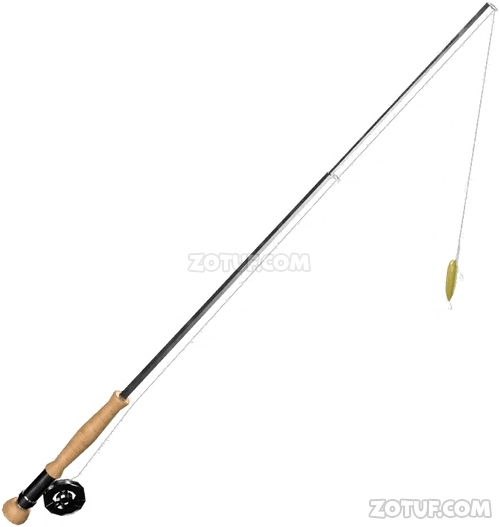
2. Examine the fishing rod.

3. Obtain the fishing rod.

4. Move to this location and inspect the cat on the pier.

5. Confirm the cat wants fish.

6. Inspect the water surface and confirm there are fish.

7. Use the fishing rod.

8. Retrieve the fish.

9. Give the fish to the cat.

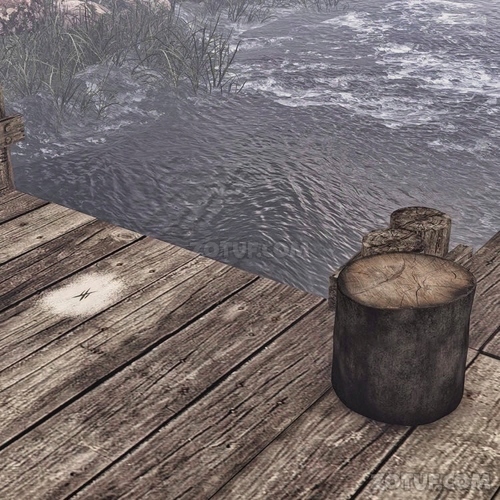
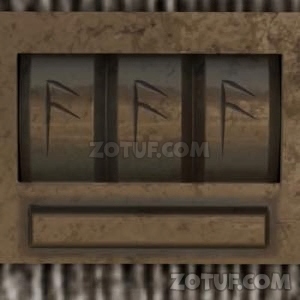
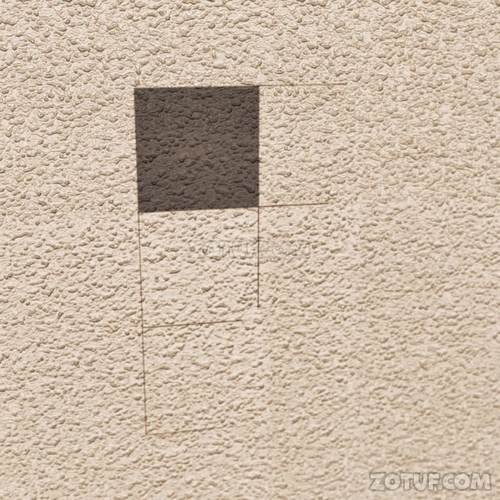
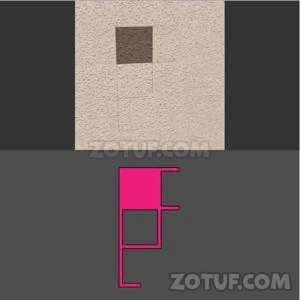
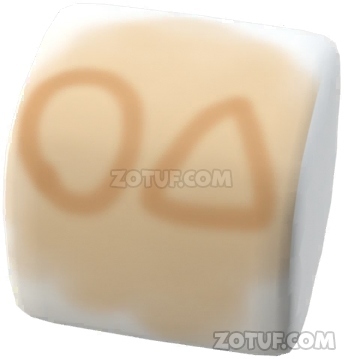
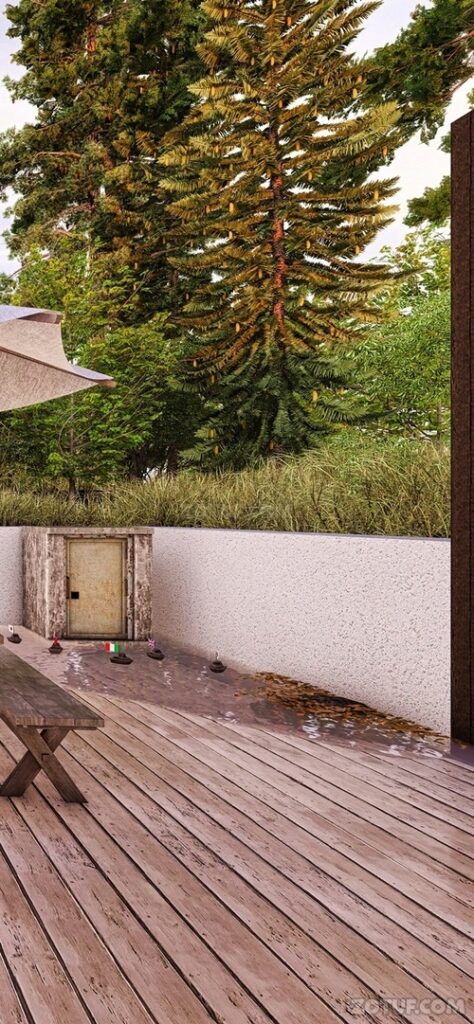
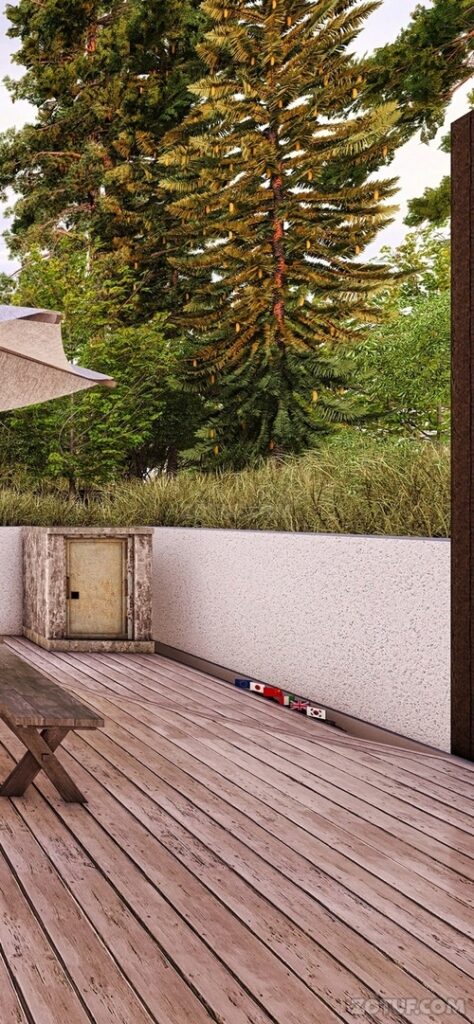
10. Move to this location and investigate the pier.
11. Examine the pier’s board.
12. Note the shape.
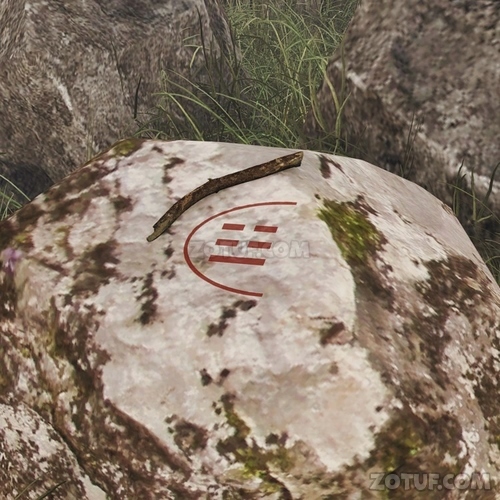
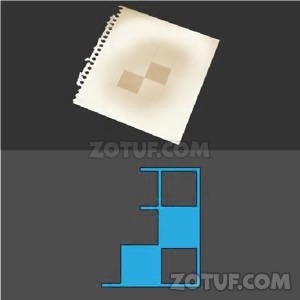
13. Move to this location and inspect the rock on the left side of the screen.
14. Note the shape.

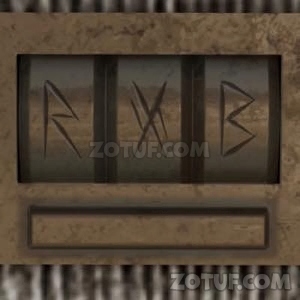
15. Move to this location and examine the board on the left side of the pier.
16. Note the shape.

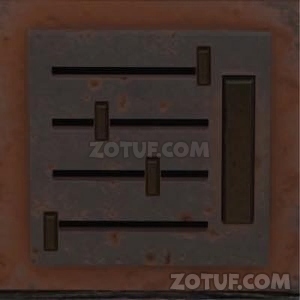
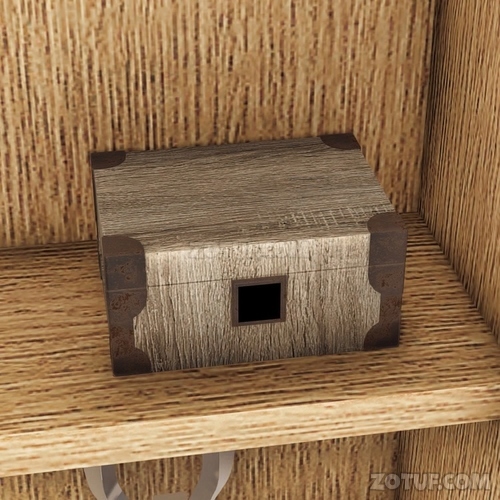
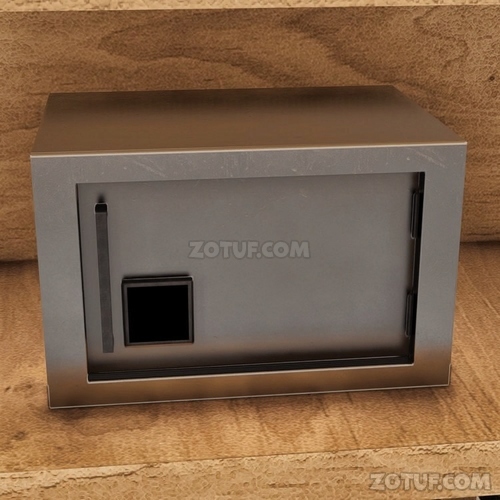
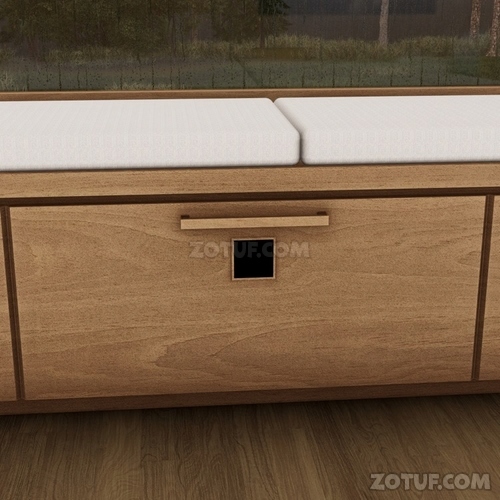
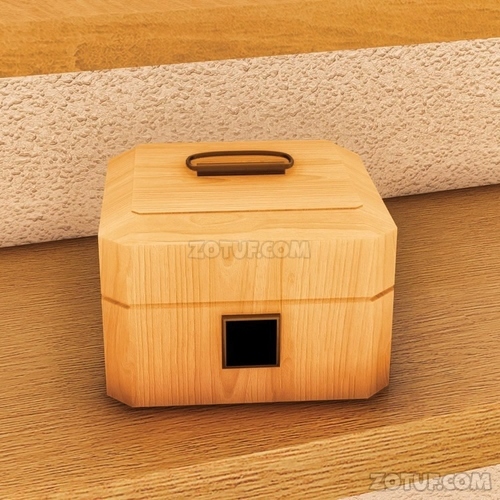
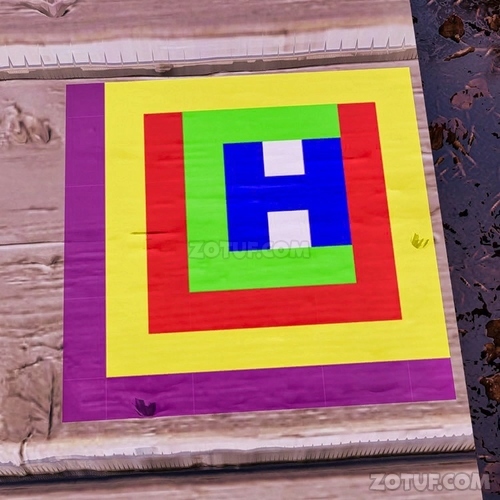
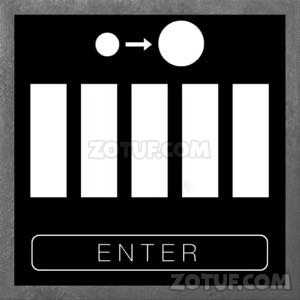
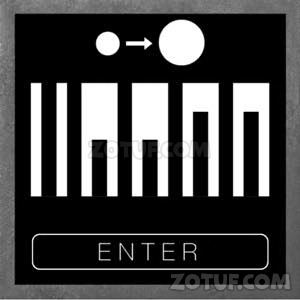
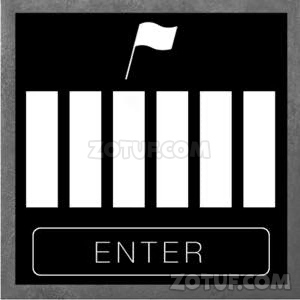
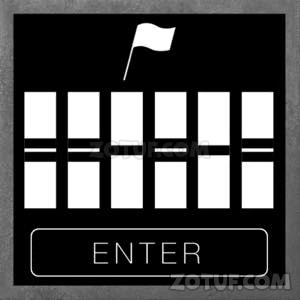
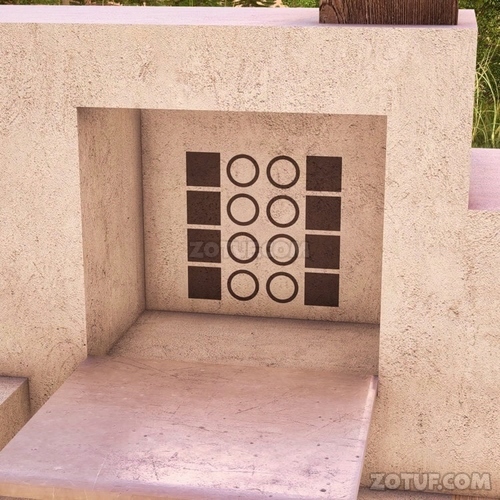
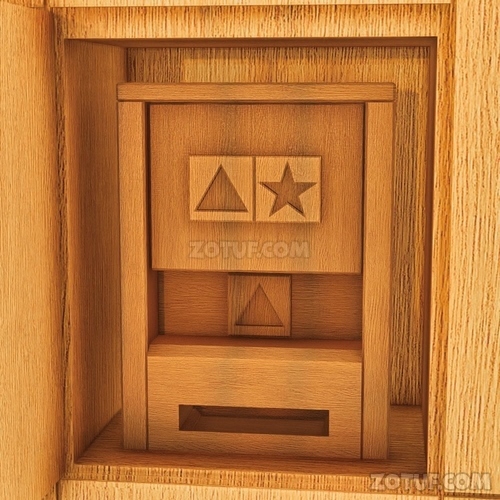
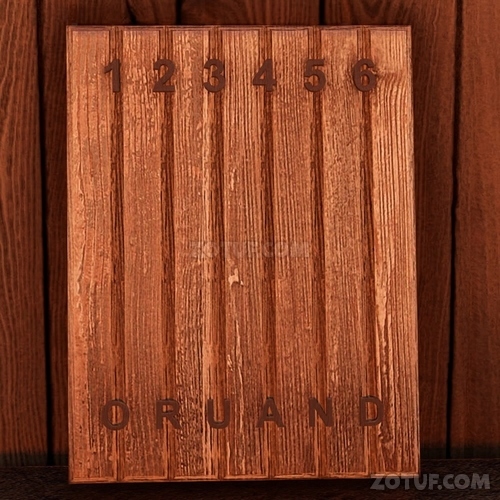
17. Move to this location and check the box on the right side of the screen.

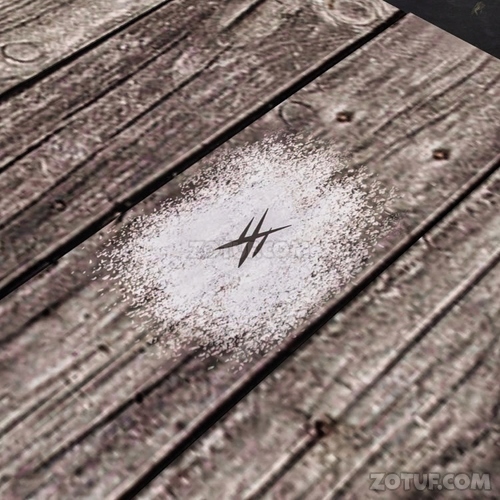
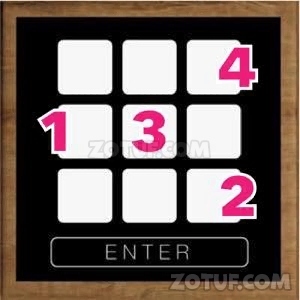
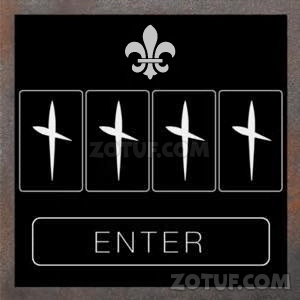
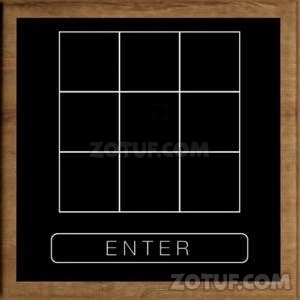
18. Input the hidden shapes in the order they were found on the stage.

19. Obtain the shovel.

20. Move to this location and examine the ground on the left side of the screen.

21. Notice something buried.

22. Use the shovel.

23. Obtain the dirty screwdriver.

24. Move to this location and investigate the upper right area of the boat.

25. Inspect the water surface.

26. Use the dirty screwdriver on the water surface.

27. Clean the screwdriver.

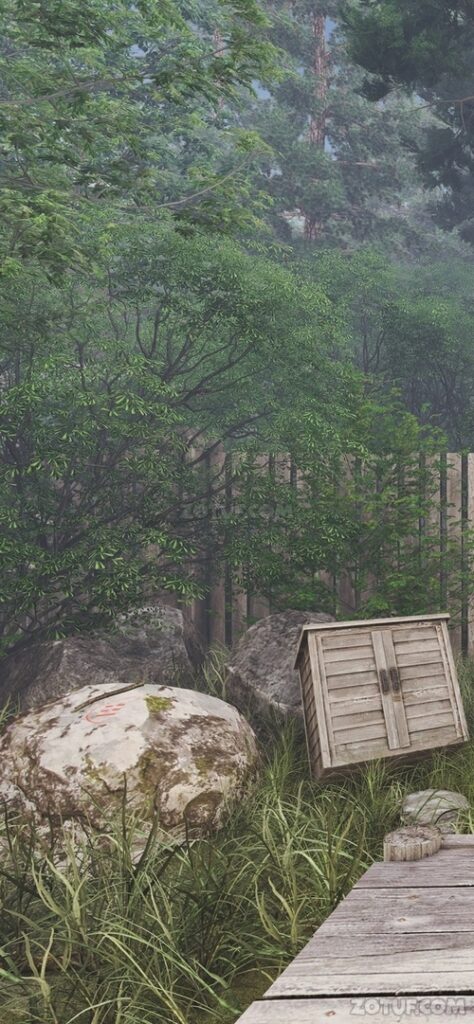
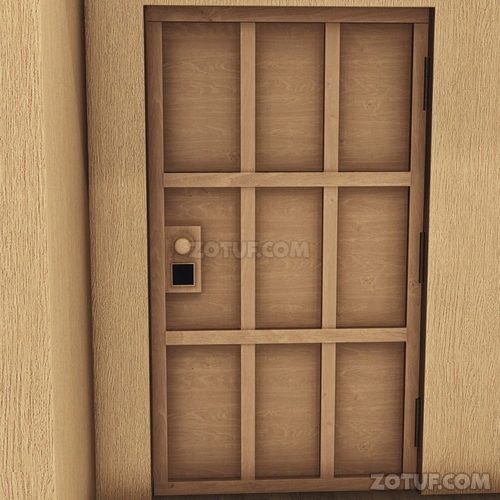
28. Move to this location and examine the door of the shack.


29. Use the screwdriver.

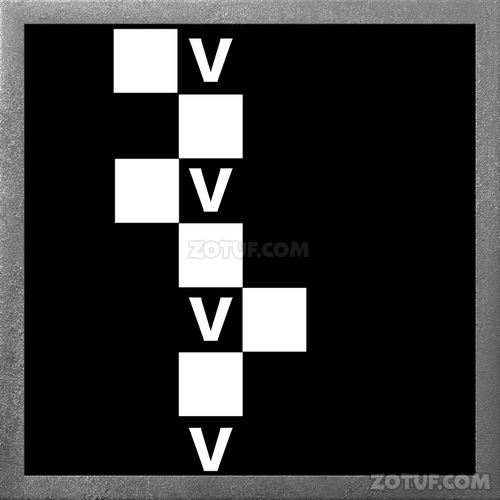
30. Move to this location and inspect the stairs of the pier.
31. Note the position of the stone on the stairs.

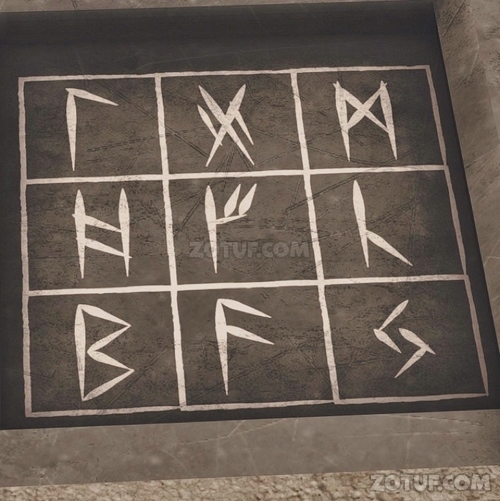
32. Move to this location and check inside the shack.

33. Examine the box.


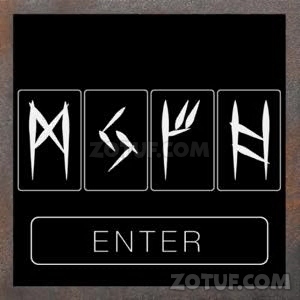
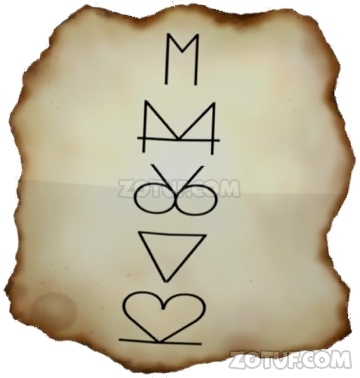
34. Arrange the symbols as follows based on the positions of the stone on the stairs.

35. Obtain the hammer.

36. Move to this location and check inside the shack.

37. See the shapes written on the lid.


38. Move to this location and inspect the rock on the left side of the screen.

39. Note the shape.

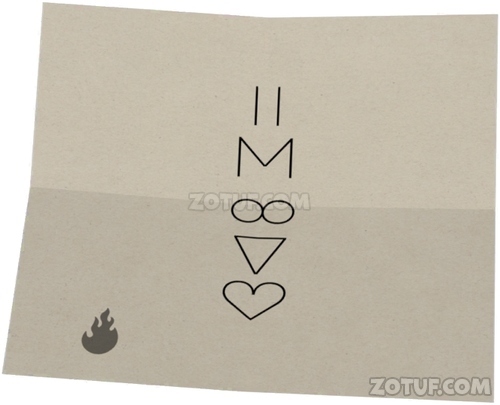
40. Move to this location and examine the gate.

41. Arrange the shapes on the box’s lid and the shape on the rock so that two arcs connect in a circle.


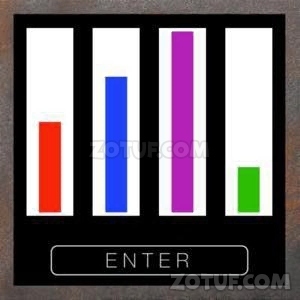
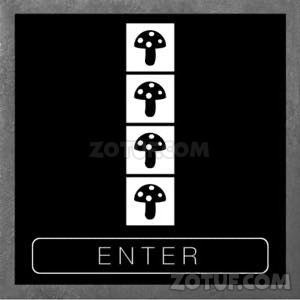
42. Input as follows:

43. Move to this location and move left on the screen.
44. Examine the stump at the bottom left.
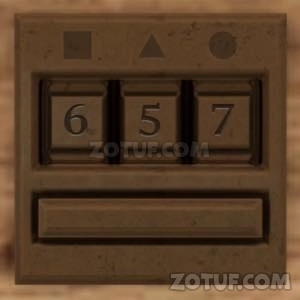
45. Check the number of pinecones.
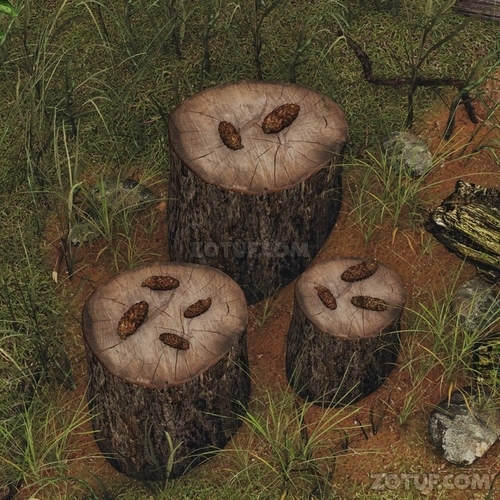
46. Move to this location and move right on the screen.

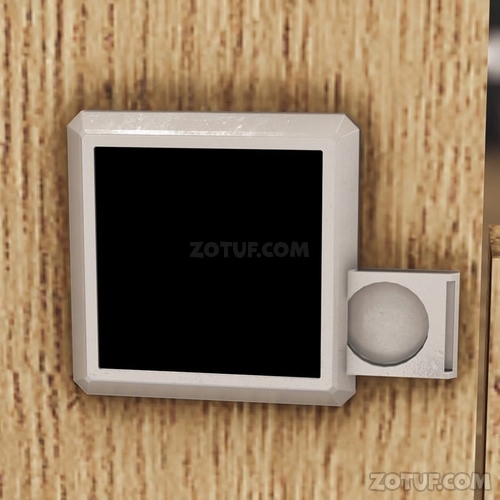
47. Inspect the device on the box.


48. Referencing the number of pinecones and the size of the stump, input as follows:


49. Obtain the crowbar.

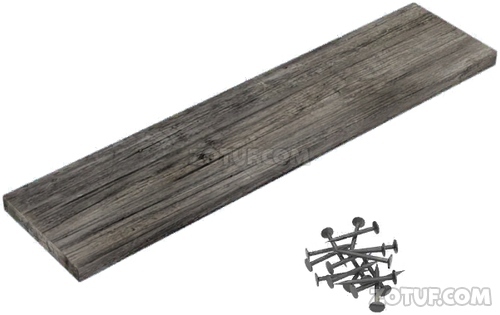
50. Move to this location and inspect the rock on the right side.

51. Use the crowbar.

52. Obtain a plank.

53. Move to this location and examine the wood on the right side of the screen.


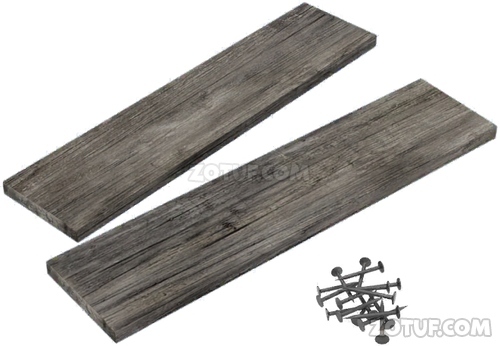
54. Use the crowbar.

55. Obtain a plank and a nail.
56. Combine the single plank with the plank and nail item.


57. Move to this location and investigate the stairs.


58. Use the two planks and nails.

59. Use the hammer.

60. Move to this location and move right on the screen.
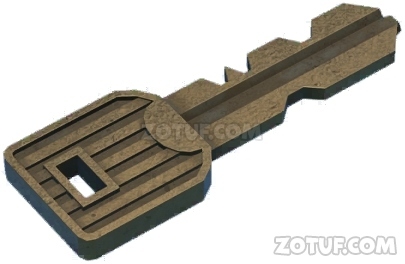
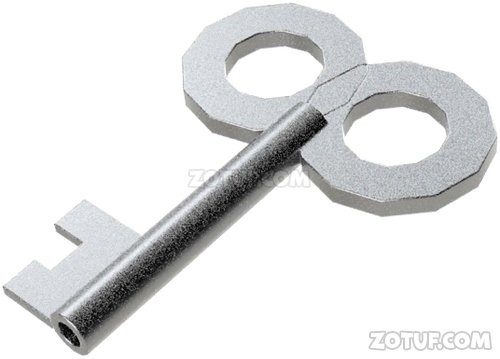
61. Examine the box on the ground.

62. Use the screwdriver.

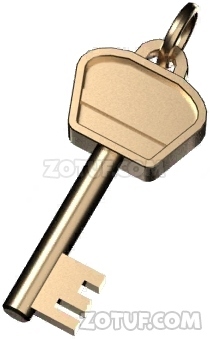
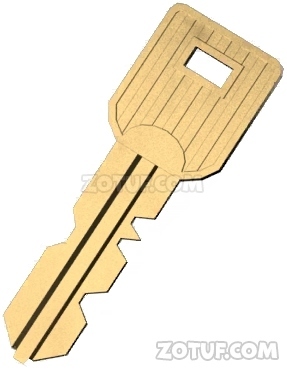
63. Obtain a key.

64. Move to this location and inspect the door.


65. Use the key.

66. Obtain a broom.

67. Move to this location and examine the dried grass hill on the right side of the screen.


68. Use the broom.

69. Clear away the dried grass.

70. Move to this location and move left on the screen.

71. Examine the differently colored part of the stone wall.

72. Use the crowbar.

73. Obtain a note.

74. Examine the note about the item.
75. Check the diagram.

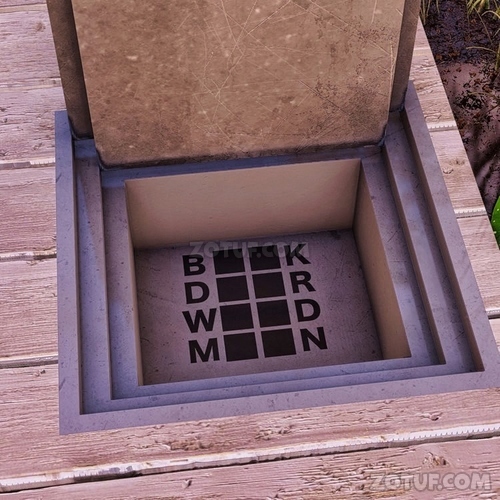
76. Move to this location and examine the door.
77. Investigate inside the door.
78. Examine the device.

79. Input the numbers from the note as follows:

80. Obtain a part.

81. Move to this location

82. Use a part.

83. Check the shape.
84. Move to this location and examine the pillar on the right side of the gate.

85. Note the number.

86. Move to this location and inspect the door.

87. Combine the shapes from the device and the shapes from the note.


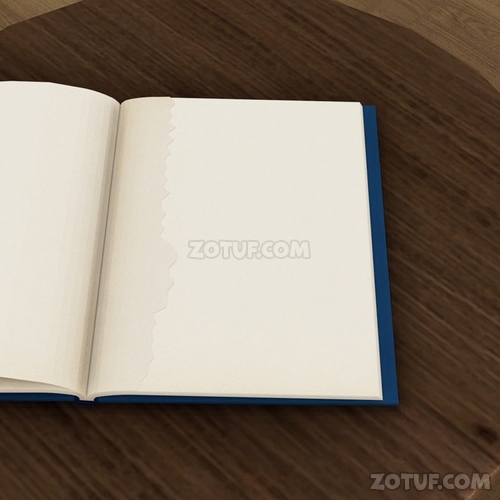
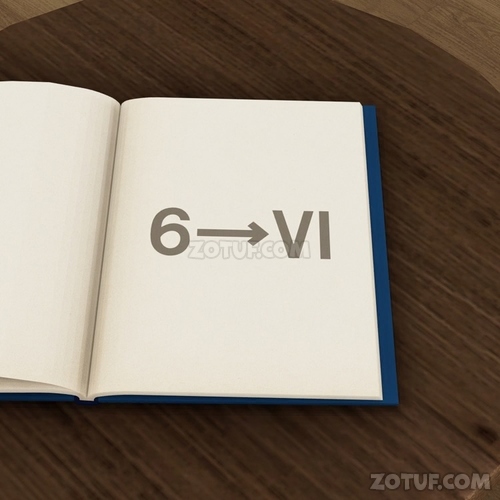
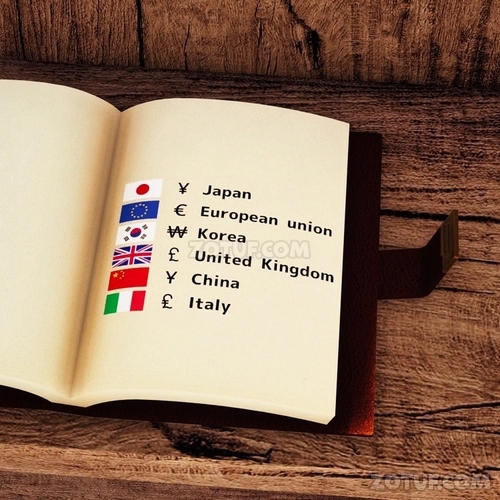
88. Enter the numbers from the gate’s pillars into the device.
89. Input as follows:
90. Move to this location and examine the book on the bench.

91. Check the photo.

92. Move to this location and examine the wall painting.


93. Inspect the device.

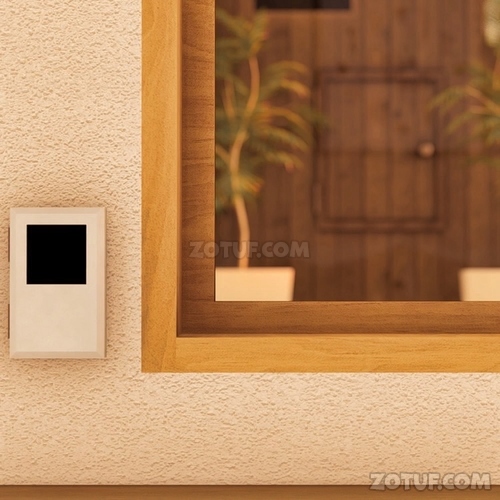
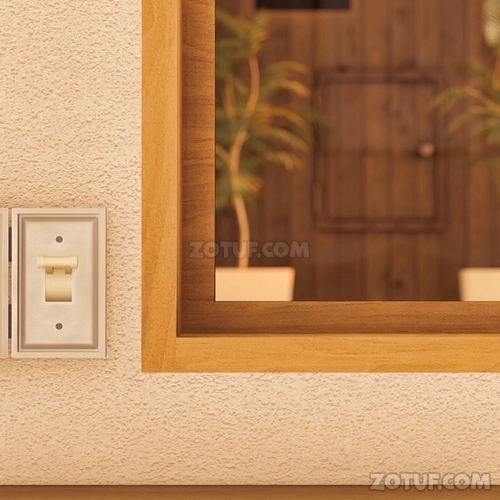
94. Refer to the image in the book and input the following:

95. Obtain cloth.

96. Move to this location and inspect the window.

97. Notice that the window frame is dirty.
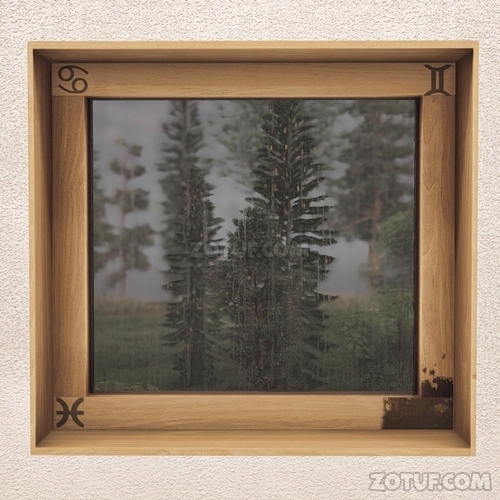
98. Use the cloth.

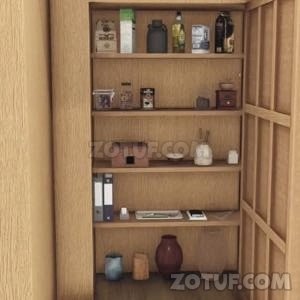
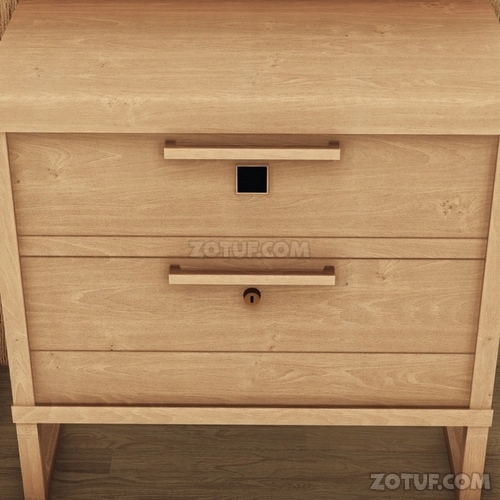
99. Move to this location and examine the window.

100. Confirm the marks on the window frame.
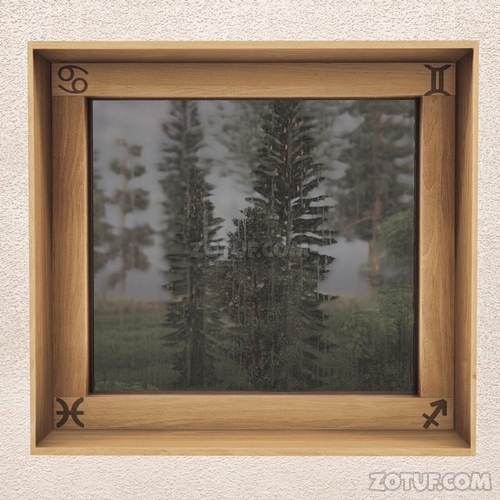
101. Move to this location and inspect the shelf.
102. Examine the device on the shelf.

103. Input the following based on the marks on the window frame:

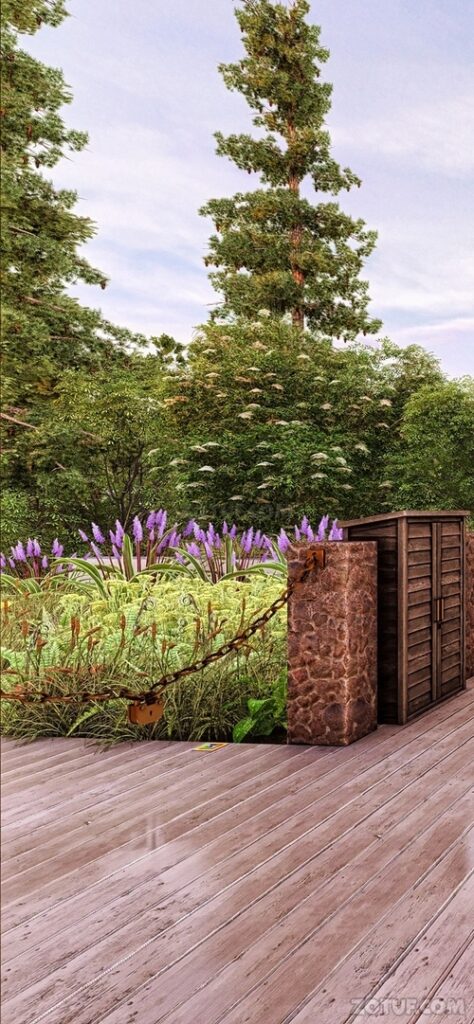
104. Input as follows:

105. Obtain button battery.

106. Move to the fence door on the right side of the screen and examine it.

107. Inspect the device.


108. Upon inspecting the device, you find a slot to insert the battery.
109. Use the button battery.

110. Move to the fence door on the right side of the screen and examine it.

111. Inspect the device.


112. When you consider the color of the vase on the device and observe the arrangement of vases on the shelf, it looks like this:

113. Combining the arrangement of vases on the shelf with the shape of the window frame, it looks like this:


114. Move to this location and examine the wall painting.

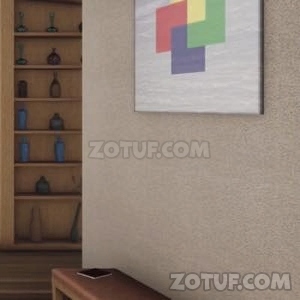
115. Verify the painting.

116. Move to this location and examine the drawer on the left side of the screen under the window

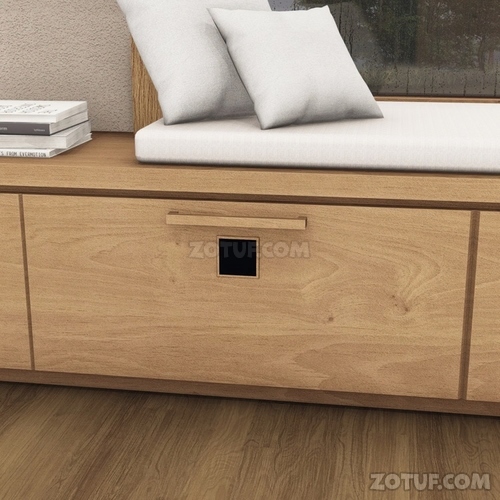
117. When you focus on the squares drawn in the painting, separated by colors, it becomes as follows:


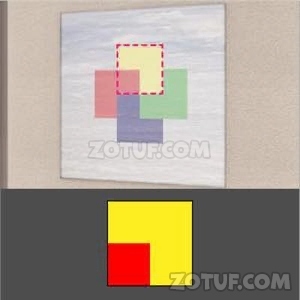


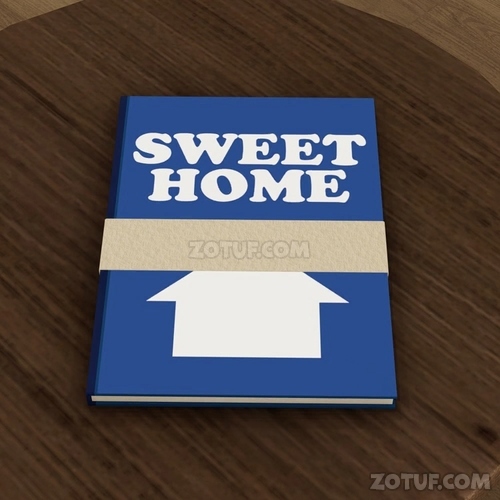
118. Input as follows:

119. Obtain a knife.

120. Move to the round table and examine the top.

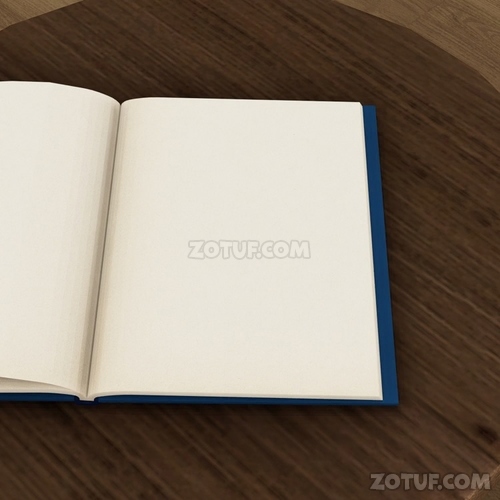
121. Notice a book wrapped in tape.
122. Obtain the knife.

123. Open the book and flip through the pages.
124. Obtain an envelope.

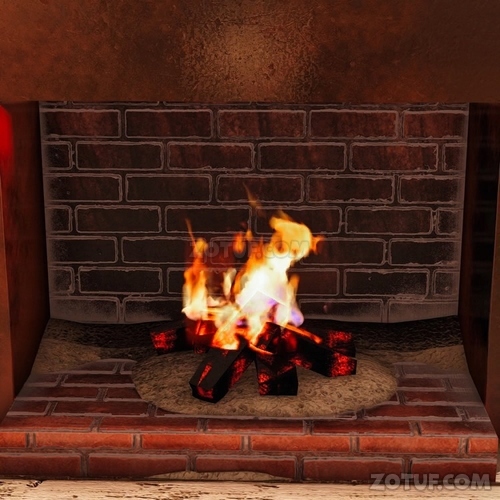
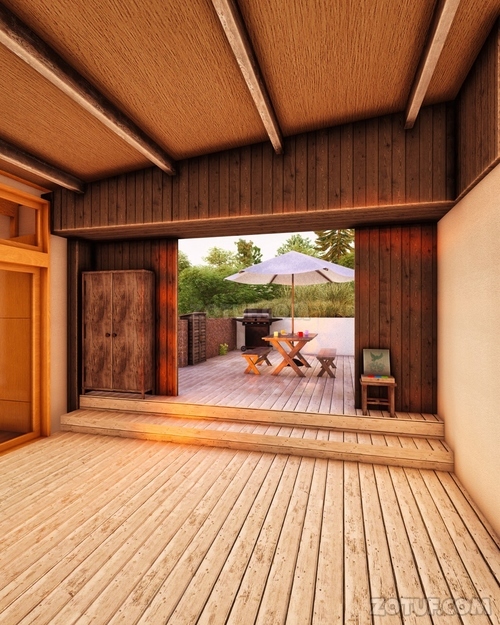
125. Examine the envelope.

126. Obtain paper.

127. Move to the fireplace and examine it.


128. Use the paper.

129. Notice the shapes appearing on the paper.

130. Move to the wall next to the door beside the fence.

131. Observe the shapes.
132. Move to the door and examine it.


133. Combine the shapes drawn on the wall with those on the paper.

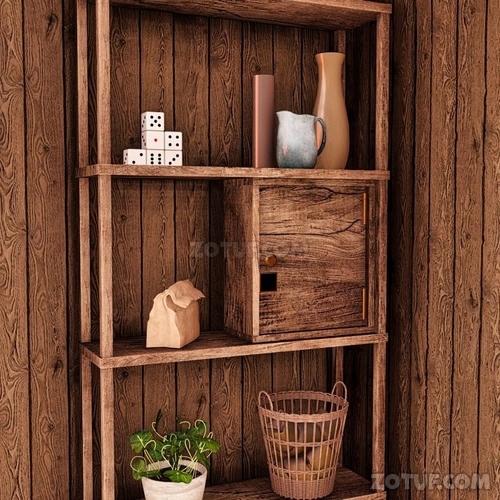
134. Input as follows:

135. Move to the door and examine it.


136. Examine the second shelf from the bottom.


137. Obtain the pencil.

138. Use the knife on the pencil.


139. Sharpen the pencil.

140. Move to this location and examine the book on the round table.

141. Flip the pages and notice a torn page.
142. Use the pencil.

143. Examine the shapes.

144. Move to the door and examine it.

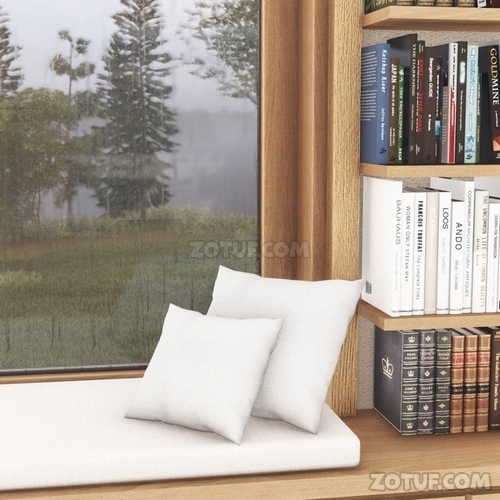
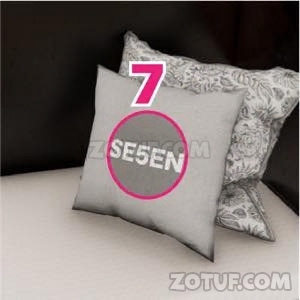
145. Inspect the bottle on the second shelf from the top.

146. Obtain the bottle.

147. Move to the right of the window and examine the cushion.

148. Inspect the cushion.
149. Obtain a rubber band.

150. Use the rubber band on the bottle.


151. Obtain marshmallow.

152. Move to the door and examine it.


153. Inspect the pot in the middle shelf.
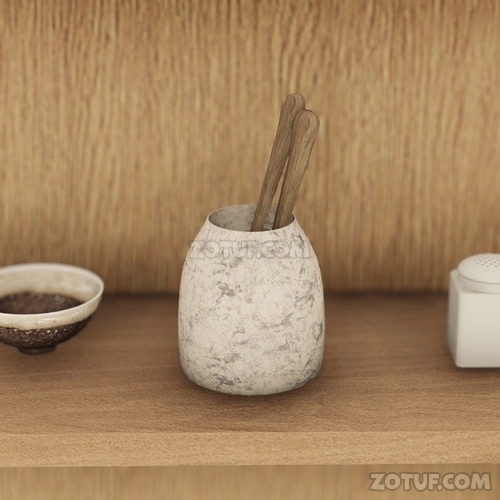
154. Obtain a fork.

155. Combine the marshmallow with the fork.


156. Move to the fireplace and examine it.

157. Use the fork with marshmallow on the fireplace.


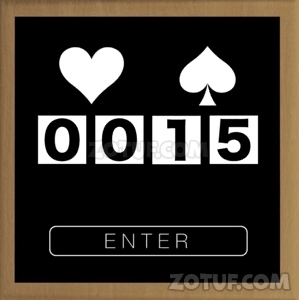
158. Notice the shapes.

159. Move to the door and examine it.
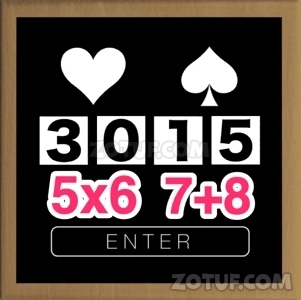
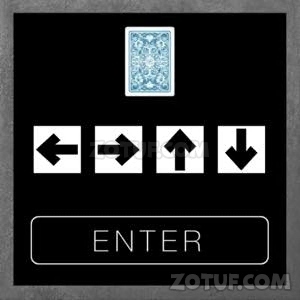
160. Inspect the device on the middle shelf.


161. Refer to the marshmallow shapes. Input as follows: Left button of the device: ●, Right button of the device: ▲, following the order of shapes in the book.


162. Obtain a playing card.

163. Move to the left side of the bench and examine it.

164. Inspect what’s caught between the books.

165. Obtain a card.
166. Move to the shelf in front of the door and examine it.

167. Inspect the device on the top shelf.
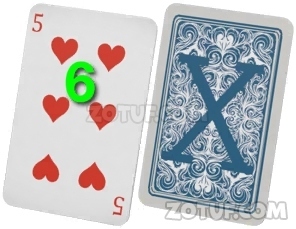
168. Note that the spade card is numbered 7 but has 8 symbols.
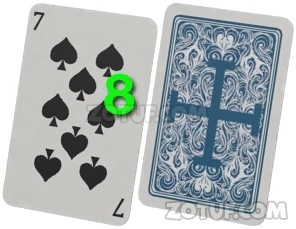
169. It is apparent that the numbers and symbols are calculated using a code on the back.

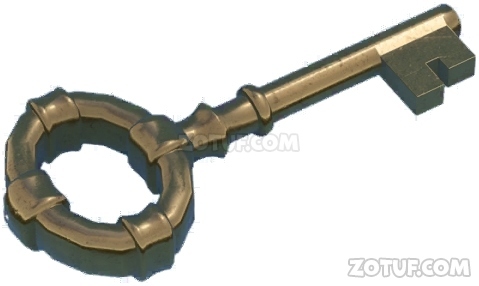
170. Note that the heart card is numbered 5 but has 6 symbols.
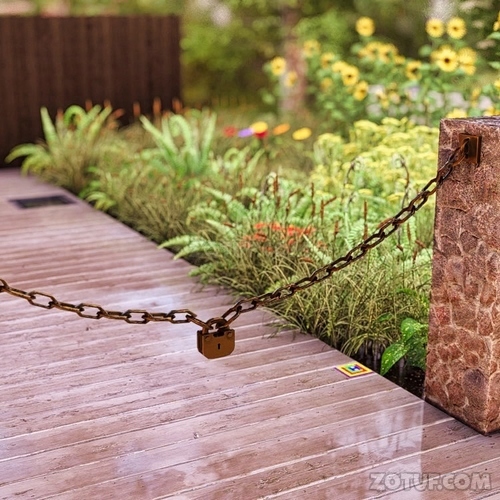
171. Therefore, it becomes as follows
172. Obtain a key.
173. Move to the fence door.


174. Use the key.

175. Move to the right side of the bench and examine it.

176. Examine the apple.

177. Obtain the apple.

178. Move to the counter and examine it.

179. Use the knife on the apple.

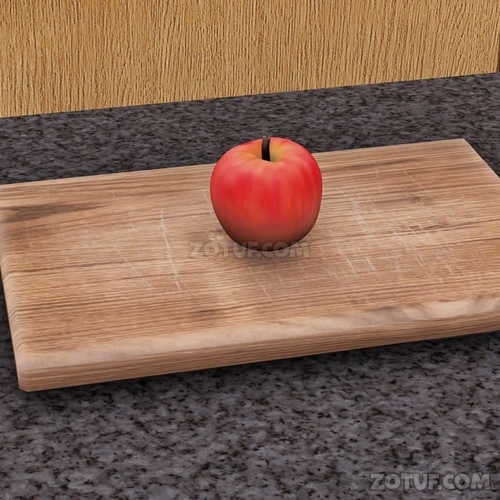
180. Examine the halved apple.

181. Examine the apple that has been cut in half.

182. Obtain a note.
183. Move to the cushion on the right side of the screen.

184. Examine the shapes.
185. Move to the cushion on the left side of the screen.
186. Examine the shapes.

187. Move to the round table and examine it.


188. Examine the shapes.
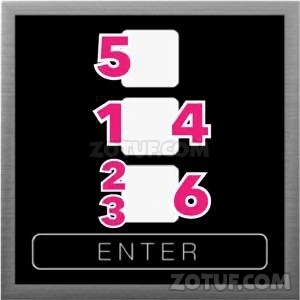
189. Move to the shelf on the right side of the screen.


190. Refer to the shapes in the book to convert the numbers to Roman numerals and read the text written on the cushion.


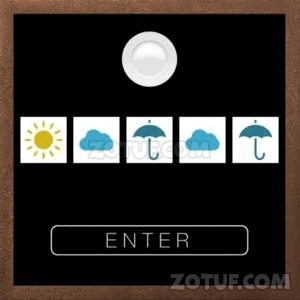
191. Based on the shapes where the letters are written, input as follows:


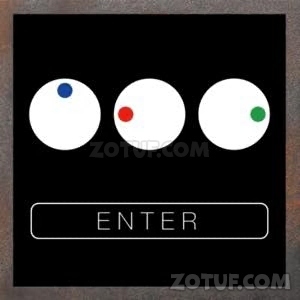
192. Obtain a remote control.

193. Move to the TV and examine it.


194. Use the remote control.

195. Check the weather forecast diagram.

196. Move to the cupboard and examine it.

197. Verify the arrangement of the dishes.
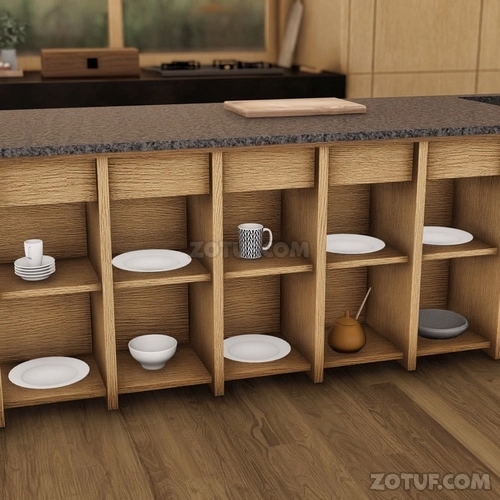
198. Move to the black shelf in the bottom right corner of the screen and examine it.

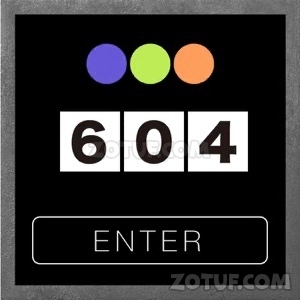
199. Inspect the box-like device.


200. Combine the arrangement of the dishes with the weather forecast diagram, focusing on the position of the plate matching the shape displayed on the device.

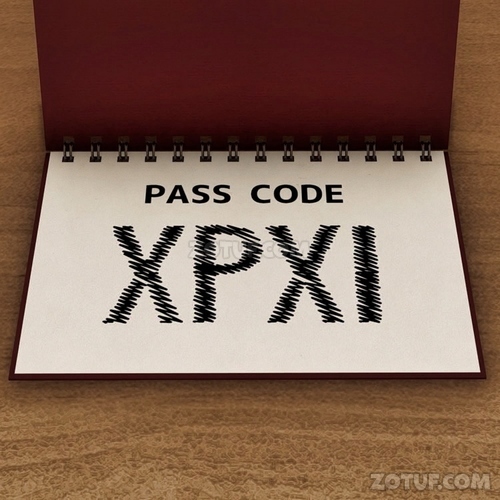
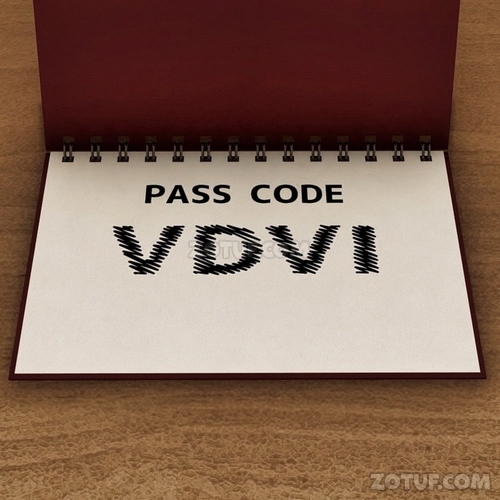
201. Input as follows:
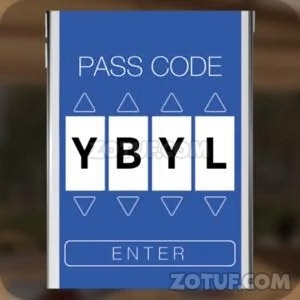
202. Obtain a smartphone.

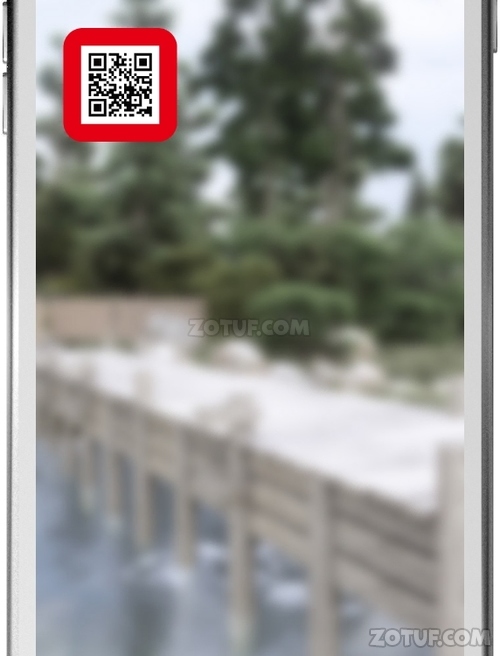
203. Move to the table and examine the sketchbook.


204. Check the passcode.
205. Examine the smartphone.


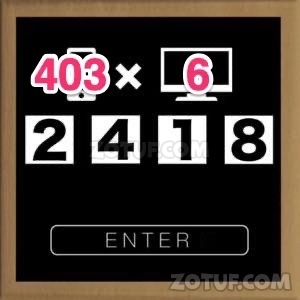
206. Use the smartphone on the sketchbook.


207. Check the text displayed on the screen.

208. Move to the shelf with the device.

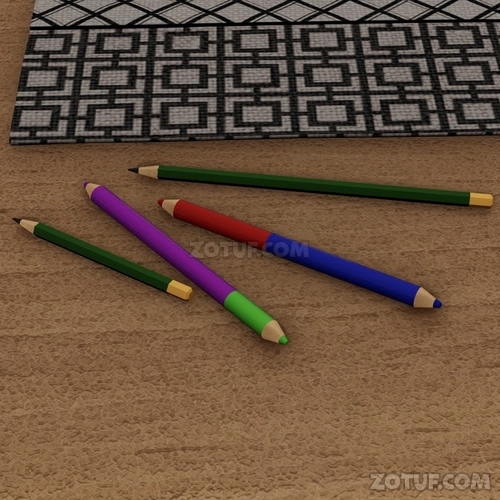
209. Multiply the numbers shown on the smartphone and the TV.


210. Input as follows:
211. Move to the right side of the table and examine it.
212. Check the colors and lengths of the colored pencils.
213. Move to the shelf with the device inside.


214. Input as per the colors and lengths of the colored pencils.

215. Obtain a key.
216. Move to the shelf and examine it.

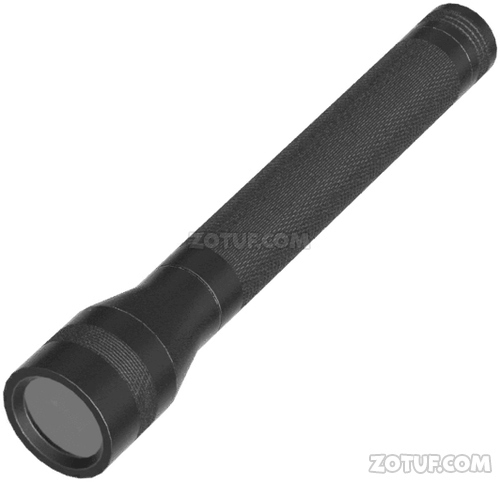
217. Examine the bottom shelf.


218. Use the key.

219. Obtain a flashlight.
220. Examine the flashlight and turn it into a blacklight.


221. Move to this location and examine the frame on the left side.


222. Use the blacklight.

223. Confirm the parts where the color has changed within the text.

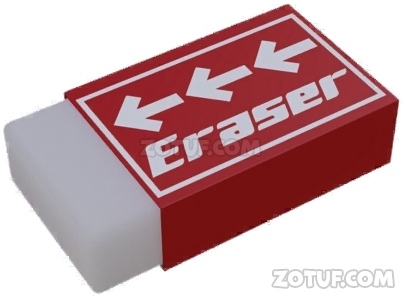
224. Move to the right side of the screen and examine the drawer.


225. Input based on the hidden numbers inside the frame:


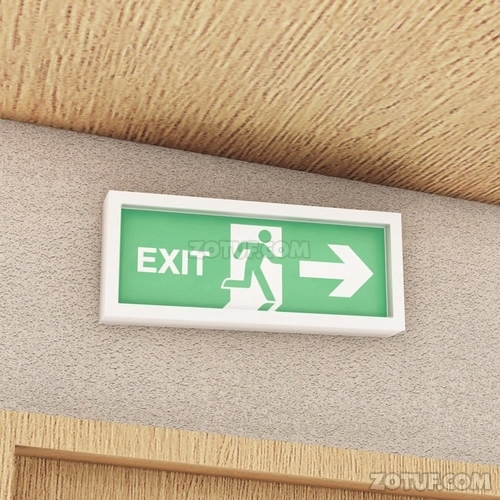
226. Obtain an eraser.
227. Move to this location and examine around the shelf.

228. Check the color of the sign and the direction of the arrow.

229. Move to this location and examine the round table.

230. Examine the color of the book cover and the direction of the arrow.

231. Check the color and direction of the arrow on the eraser package in your inventory.

232. Move to this location and examine around the window.

233. Examine the box.


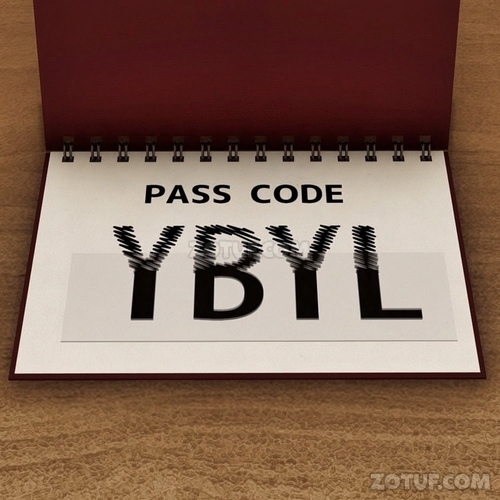
234. Enter the following based on the direction of the arrows written on objects related to the device’s color.


235. Obtain a plate with text.
236. Move to the table and examine the sketchbook.


237. Use the eraser.

238. Check the text.
239. Move to the table and examine the sketchbook.


240. Use the plate with text.

241. Check the text.

242. Examine the smartphone in your inventory.


243. Refer to the text in the sketchbook.
244. Move to this location and examine the book on the bench.


245. Check the 3D code.

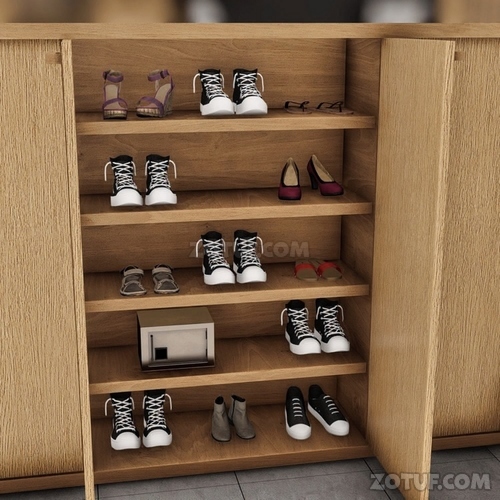
246. Use the smartphone in the image state on the code.

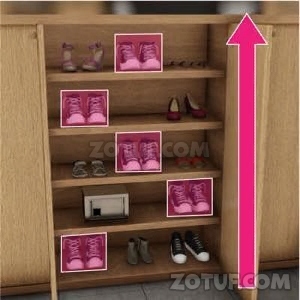
247. Notice the shoe and arrow icons.

248. Move to the shelf.

249. Examine the arrangement of the shoes.
250. Move to the wall to the right of the window.

251. Examine the device.


252. Focus on the shoes with a shape similar to the shoe icon and use the arrow direction as a reference for the position of the shoes.

253. Input as follows:

254. Move to this location and examine the wall to the right of the window.


255. Check the position of the wine bottle.

256. Move to the door and examine it.

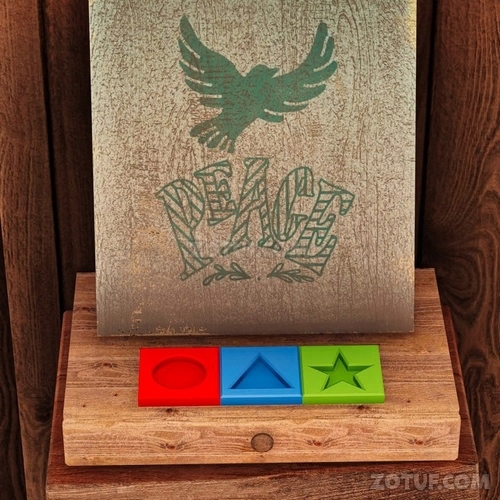
257. Match the position of the wine bottle with the indication on the device.

258. Input as follows:

259. Move to this location and examine the board on the right side of the screen.
260. Pay attention to the direction of the slash in the letters “PEACE.”

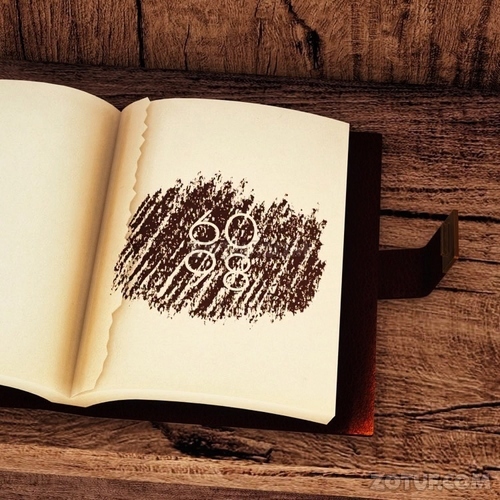
261. Move to this location and examine the device on the right.


262. Use the direction of the slash in the letters “C・A・P・E” written on the board as a reference and input the following:


263. Obtain the memo

264. Examine the memo

265. Open the memo

266. Move to this location and examine the fireplace.

267. Use the memo on the fireplace.
268. Obtain the burnt memo.
269. Move to this location and examine the left side of the fireplace.


270. Focus on the shapes on the memo to read the numbers.

271. Input the following:

272. Obtain the handle

273. Move to this location and examine the left shelf on the screen.


274. Use the handle.

275. Examine the bottom shelf of the shelf.

276. Obtain the tongs.

277. Move to this location and examine the pots on either side of the stairs.

278. Check the patterns on each of the pots on the left and right.


279. Move to this location and examine the left shelf on the screen.

280. Examine the middle shelf of the shelf.

281. Examine the device on the book.
282. Input the following based on the pattern of the pot.


283. Check the pages of the book.

284. Move to this location and examine the fireplace.

285. Pay attention to the charcoal inside the fireplace.

286. Use the tongs.

287. Obtain the charcoal.

288. Move to this location and examine the left shelf on the screen.

289. Examine the middle shelf of the shelf.

290. Examine the device on the book.
291. Examine the torn page of the book.

292. Use the charcoal.

293. Check the numbers.
294. Move to this location and examine the central device.


295. Use the numbers revealed on the book as a reference and input the following:


296. Check the shapes.

297. Move to this location and examine the left door on the screen.


298. Use the shapes as a reference and input the following:


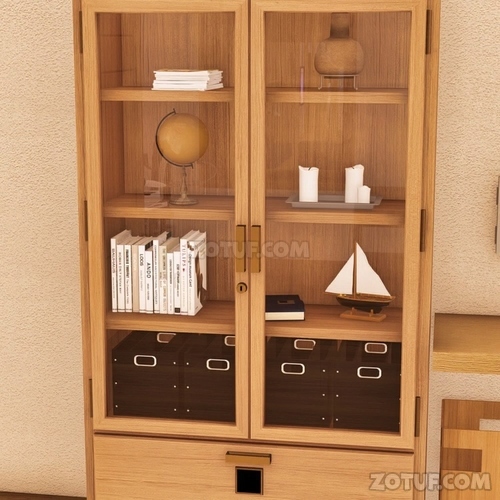
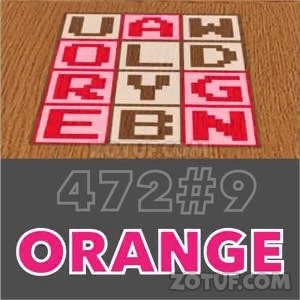
299. Move to this location and examine the pillow.


300. Check the shapes.

301. Move to this location and examine the books on the bookshelf.
302. Check the colors and order of the books.

303. Move to this location and examine the left box on the screen.


304. Combine the color blue for the left side and red for the right side of the shape written on the pillow with the color of the book.

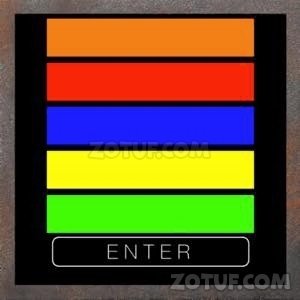
305. Input the following:

306. Obtain the key.
307. Move to this location and examine the central shelf.


308. Use the key.

309. Move to this location and examine the telephone on the right.

310. Note the illuminated button.


311. Move to this location and examine the central shelf.


312. Use the illuminated button as a reference and input the following:
313. Move to this location and examine the inside of the shelf.

314. Examine and move the glass door on the bottom shelf.

315. Check the numbers.

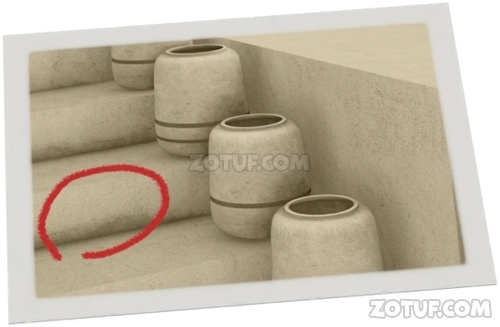
316. Examine the side table on the right of the bed.


317. Use the numbers inside the shelf as a reference and input the following:

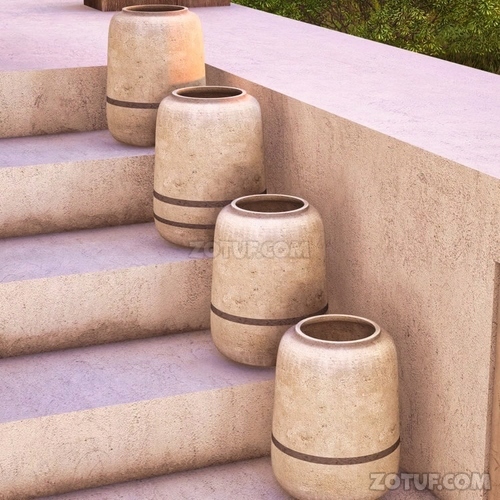
318. Examine the obtained items.

319. Check the photo.

320. Move to this location and examine the right side of the stairs.

321. Examine the stairs based on the photo.


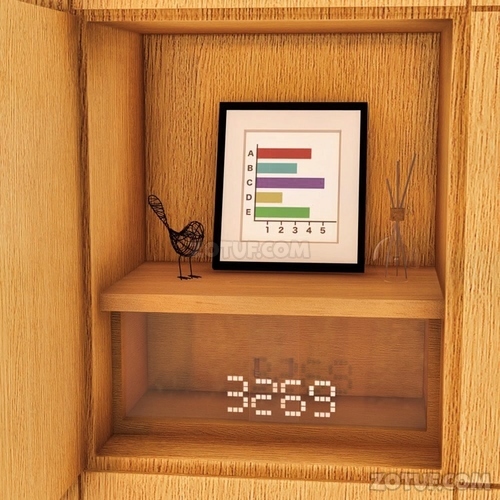
322. Move to this location and examine the inside of the shelf.

323. Examine the frame on the top shelf.

324. Check the graph.

325. Move to this location and examine the left shelf on the screen.

326. Examine the device on the drawer of the shelf.

327. Read the alphabet table based on the length of the graph.


328. Input the alphabet from top to bottom.

329. Check the memo.

330. Move to this location and examine the left side table of the bed.


331. Check the diagram.

332. Move to this location and examine the front door.


333. Combine the shape inside the side table with the buttons on the telephone as follows:

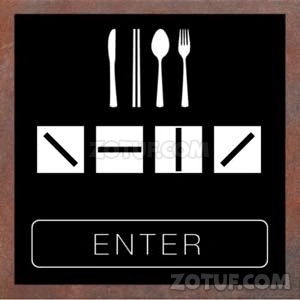
334. Combine the numbers written on the memo with the shape inside the side table as follows:


335. Input the following:
336. Move to this location and examine the table on top.

337. Check the cutlery.

338. Move to this location and examine the shelf on the right of the screen.


339. Based on the order of icons displayed on the device, input the angles of the knife, chopsticks, spoon, and fork on the table as follows:

340. Obtain the ladle.

341. Move to this location and examine the area around the dried leaves on the floor.

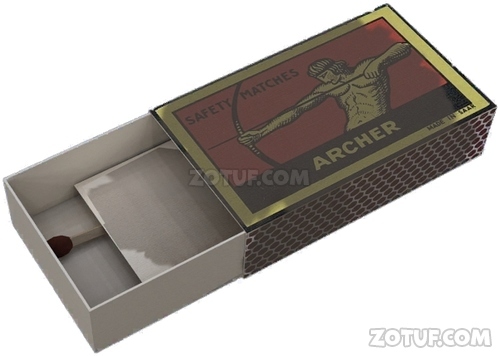
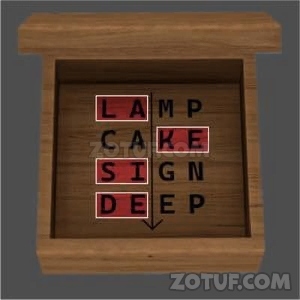
342. Use the ladle.

343. The drain is cleaned, and water drains from the floor.

344. Move to this location and examine the item dropped in the center bottom of the screen.


345. Obtain the wet matchbox.

346. Move to this location and examine the items on the floor.
347. Check the shapes.

348. Move to this location and examine the right door on the screen.


349. Focus on the color of the device to see that the color parts of the shapes correspond to alphabets.
350. Input the following:

351. Obtain the bamboo stick.

352. Move to this location and examine the parasol.


353. Combine the ladle with the bamboo stick.


354. Use the extended ladle handle on the item on top of the parasol.

355. Obtain the key.

356. Move to this location and examine the lock.


357. Use the key.

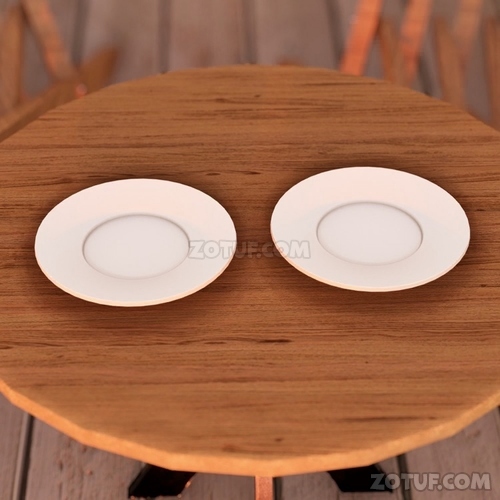
358. Move to this location and examine the flower in the center of the screen.
359. Check the flower.

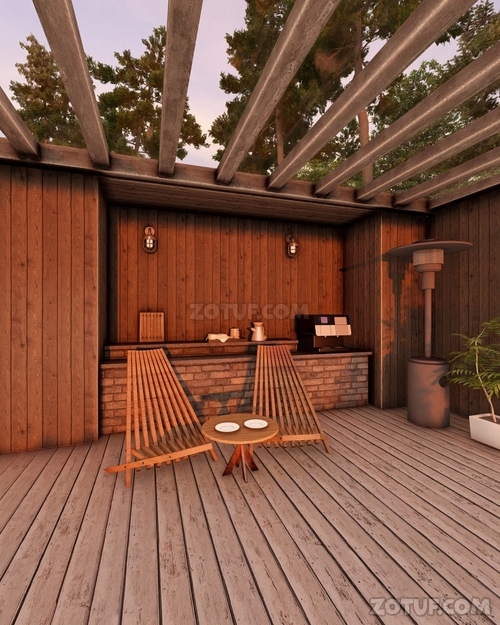
360. Move to this location and examine the table on top.
361. Check the cup.

362. Examine the barbecue grill on the left side of the screen.


363. Based on the color of the flower and the direction of the cup handle, input the following:


364. Obtain the handle.
365. Move to this location and examine the door on the floor at the left end of the screen.

366. Use the handle.

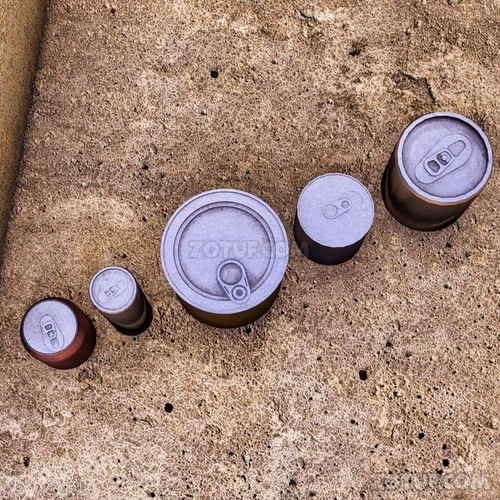
367. Examine the device.

368. Move to this location and examine the door on the left.


369. Examine the can.

370. Check the thickness and height of the can.
371. Move to this location and examine the device inside the door on the floor.

372. Input the height of the can from right to left into the device.

373. Move to this location and examine the area where the fallen leaves were piled up in the bottom right of the screen.

374. Check the national flag.

375. Move to this location and examine the left shelf on the screen.
376. Confirm the contents written in the book.

377. Move to this location and examine the device on the left.


378. Focus on the horizontal lines of the symbols written in the book in the order of the small national flags.


379. Input the following:
380. Move to this location and examine the door in the center of the screen.


381. Combine the two shapes.
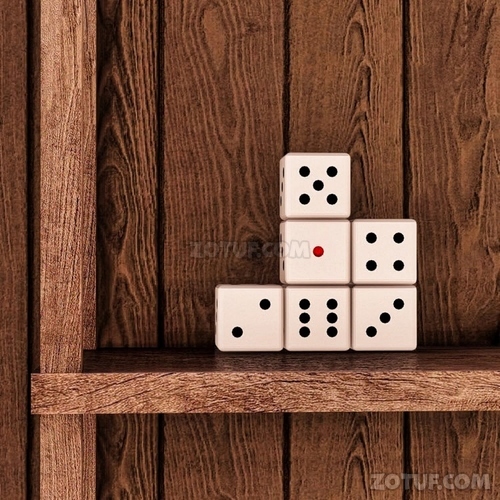
382. Combine the letters in each square part of the two shapes to get the following:

383. Input the following:

384. Move to this location and examine the right shelf on the screen.

385. Check the numbers on the die.
386. Move to this location and examine the device inside the box at the left bottom of the stairs.


387. Enter as follows, considering the number and height of the dice faces.

388. Obtain the handle.

389. Move to this location and examine the device on the left wall.


390. Use the handle.

391. Obtain the key.
392. Move to this location and examine the door on the center wall of the screen.


393. Use the key.

394. Examine the wet matchbox.

395. Obtain the wet memo.
396. Move to this location and examine the door on the center wall of the screen.
397. Examine the item on the left inside the shelf.
398. Obtain the hairdryer.

399. Move to this location and examine the chair on the left of the screen.


400. Use the hairdryer on the outlet.
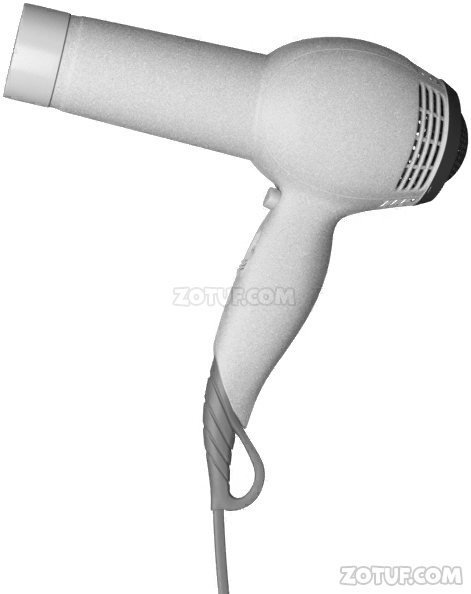
401. Use the memo on the plugged hairdryer.


402. Examine the dry memo.

403. Check the shapes.

404. Move to this location and examine the device next to the window.


405. Input the following based on the shapes:


406. Lower the lever to turn the window into a mirror, then check the framed picture reflected in the mirror.

407. Move to this location and examine the door on the center wall of the screen.

408. Examine the item on the right inside the shelf.

409. Examine the playing cards.

410. Move to this location and examine the device on the right of the fireplace on the screen.


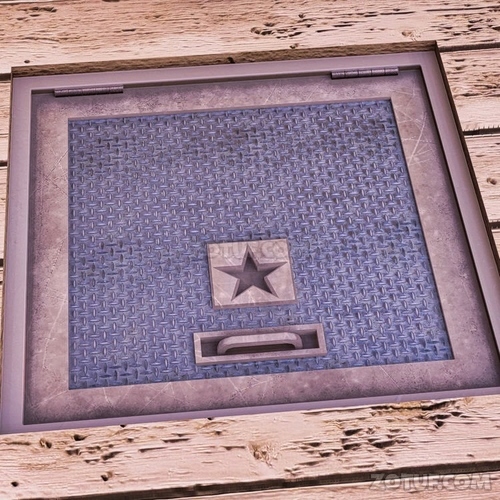
411. Combine the numbers on the four playing cards with the shapes in the frame.


412. Input the following:
413. Obtain star-shaped parts.

414. Move to this location and examine the door on the floor.

415. Use the star-shaped parts.

416. Obtain the box.

417. Examine the item box.
418. Check the hole.

419. Examine the matchbox
420. Obtain the matchsticks.

421. Use the matchsticks.

422. Check the shapes.

423. Move to this location and examine the door on the center wall.

424. Examine the central basket.


425. Combine the shapes in the box with the shapes on the memo.


426. Combine the star positions in the memo’s shapes with the alphabet on the box to get the following:
427. Input the following:

428. Obtain the nuts.

429. Move to this location and examine the bird feeding area.


430. Place the nuts on a plate

431. Move to a different area and then return

432. Obtain the triangular part.
433. Move to this location and examine the door on the floor.

434. Examine the star-shaped part used on the door.

435. Collect the star-shaped part.

436. Move to this location and examine the lower right door of the shelf.


437. Use the triangular and star-shaped parts on the device.


438. The device’s lid opens.

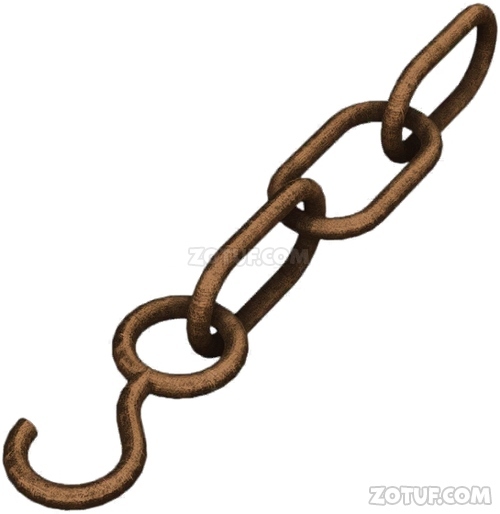
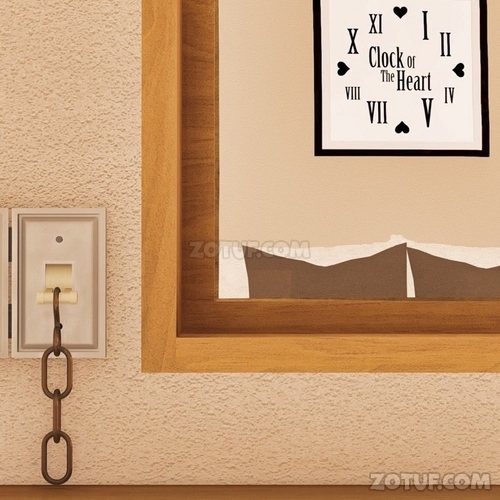
439. Use the matchbox and keep the lid open.
440. Collect the triangular part and replace it with the lower triangular groove.

441. Obtain the chain.
442. Move to this location and examine the left side of the wall.


443. Use the chain on the device.

444. Turn the handle

445. Obtain the circular part.

446. Collect the triangular and star-shaped parts inside the device.


447. Move to this location and examine the board on the right.

448. Use the three parts in the grooves.


449. Obtain the key.

450. Move to this location and examine the left shelf on the screen.


451. Use the key.
452. Move to this location and examine the left side of the wall.

453. Check the shapes of the screws in the corners of the device.

454. Move to this location and examine the left shelf on the screen.

455. Examine the book.


456. Input the following based on the shapes of the screws in the corners of the device.


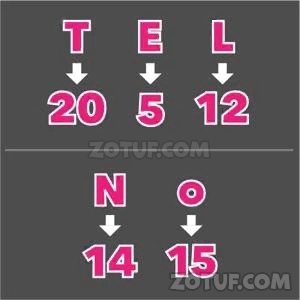
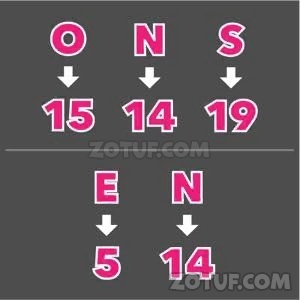
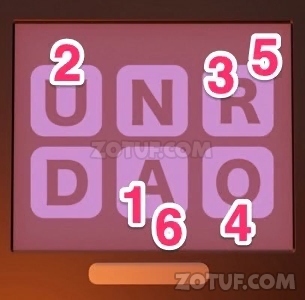
457. Check the book’s page.

458. Move to this location and examine the right shelf on the screen.


459. From ‘ーNo’ and ‘−1415’, where 15 is smaller, it indicates that N=14, O=15

460. Upon checking other characters, it becomes clear that the numbers indicate the order of the alphabet
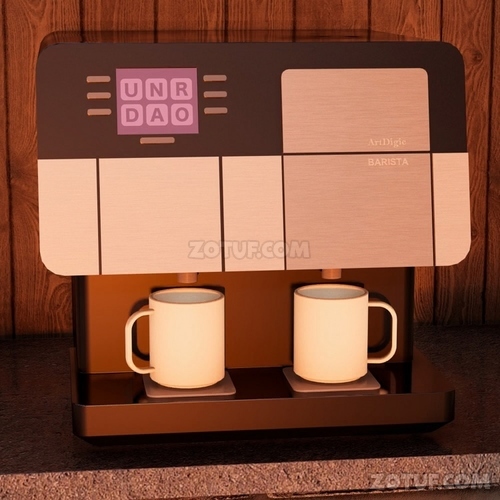
461. Therefore, the numbers for ONSEN are as follows

462. Enter the following

463. Obtain two mugs.

464. Move to this location and enlarge the device on the right side of the shelf.


465. Use the two mugs.


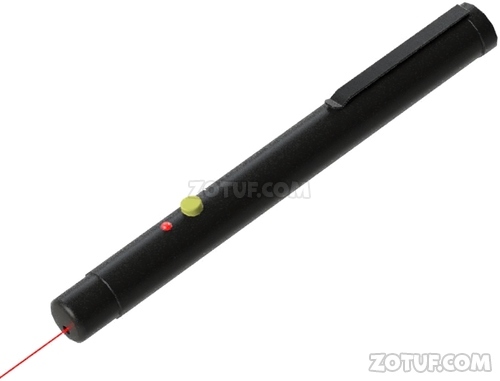
466. Move to this location and examine the device on the bottom right of the screen.


467. Input the combination of colors of the parts in the device with the shapes.


468. Obtain the laser pointer.

469. Move to this location and examine the side table on the left side of the bed.


470. Examine the laser pointer and illuminate it.

471. Use the laser pointer on the stand on the side table.
472. Examine the light’s endpoint of the laser pointer.


473. Obtain the transparent panel.

474. Move to this location and examine the panel on the top shelf on the left.

475. Use the transparent panel.

476. Check the shapes.

477. Move to this location and enlarge the device on the right side of the shelf.

478. Examine the device’s panel.

479. Input the following based on the shapes.


480. Obtain the cup of coffee.

481. Move to this location and examine the table on top.
482. Use the cup of coffee.


483. Move to this location and examine the left side of the wall.

484. Examine the lever.

485. Examine the chain.

486. Collect the chain.

487. Move to this location and examine the lever next to the window.

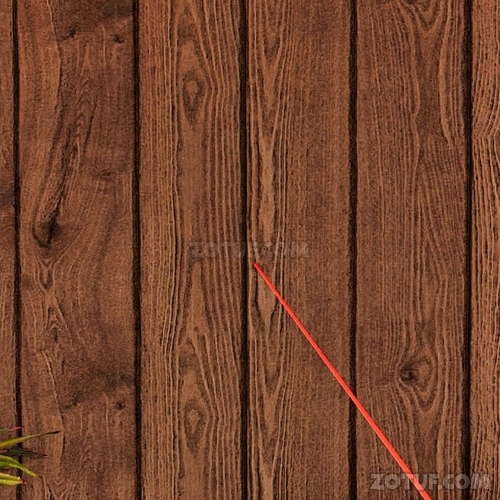
488. Use the chain.

489. The lever remains lowered due to the weight of the chain, and the window remains in a mirror state.
490. Move to this location and examine the endpoint of the laser pointer.


491. Obtain the transparent plate.
492. Move to this location and examine the panel on the top shelf on the left.


493. Use the transparent panel.

494. Check the shapes.

495. Move to this location.

496. Enlarge the table.

497. Collect the mug.

498. Enlarge the device and place the mug.

499. Enlarge the LCD screen.

500. Input the following based on the shapes.

501. Obtain the mug filled with soup.

502. Move to this location and examine the table on top.


503. Use the mug filled with soup.

Congratulations! You have completed the game Villa Lakeside.


