Witch’s Pranks: Frog’s Fortune (Bonus Chapter) – Invites you to uncover another mystery of the wicked witch. It turns out that among her victims there is another prince who needs help. To break the spell, you will have to go on a new adventure: open a portal, explore a mysterious world, solve puzzles and even prepare a magic potion. Along the way you will encounter unusual creatures, complex mechanisms and a journey to a volcanic island. Help the prince to reunite with his beloved and restore his human form.
Bonus Chapter Walkthrough
- It turns out the witch was hiding another victim of her spell.
- Click on the mirror, take the golden sun.
- Go back, click on the witch’s journal.
- Place the golden sun on the middle casket.
- Click on the prince, take the princess’s portrait.
- Return to the mirror.
- Place the princess’s portrait in the eye-framed frame.
- Go through the portal.
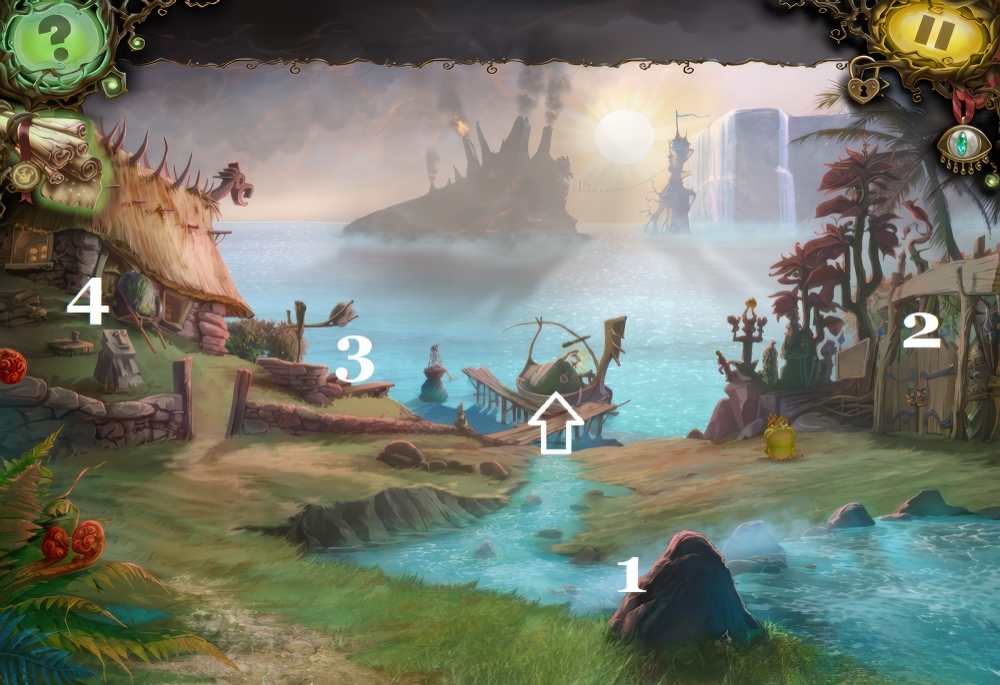
- Click on the river (1), take the lock piece.
- Examine the gate (2).
- Examine the well (3), take the berries.
- Examine the cart (4), take the lock piece.
- Move forward.

- Take the wooden disk (1).
- Take the saw (2).
- Examine the tent (3).
- Notice the vessel in the water (4).
- Go back, click on the gate.
- Place the two lock pieces.
- Click on the buttons in the correct sequence.
- Then use the saw.
- Go through the gate.
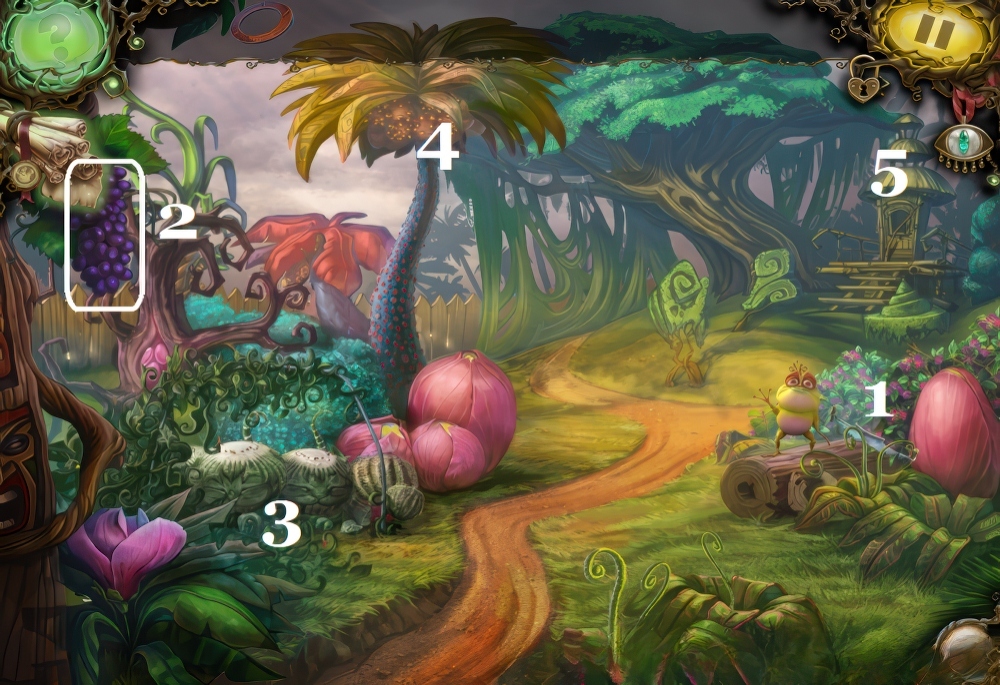
- Click on the prince (1).
- Click on the saw handle three times.
- Take the wooden wheel.
- Take the grapes (2).
- Examine the cacti (3).
- Examine the fruits on the tree (4).
- Click on the gazebo (5), take the bamboo stem.

- Go back and click on the cart.
- Place the wooden wheel and click on the cart.
- Enter the house.
- Take the fruit picker (1).
- Click on the casket (2), place the wooden disk.
- Rotate the disks to restore the picture.
- Solution.

- Examine the fireplace (3).
- Click on the panel (4).
- Take the recipe and the key.
- Exit the house and go through the gate.
- Click on the gazebo and use the key.
- Open the latch.
- Take the ladle, weight, and pruning shears.
- Click on the tree and use the fruit picker.
- Take the combustible fruit.
- Click on the log to the right and use the pruning shears.
- Take the spiky fruits.
- Go to the well.
- Hang the weight on the hook.
- Take the cauldron of water.
- Go to the lake.
- Use the fruit picker on the vessel in the water.
- Take the bottle.
- Place the bamboo stem on the broken fishing rod above the tent.
- Go inside the house and click on the fireplace.
- Place the combustible fruit on the firewood.
- Place the cauldron of water on the hook.
- Put the ingredients in the cauldron.
- Place the bottle near the cauldron.
- Step away from the fireplace and click on the picture on the wall (5).
- Use the pruning shears, take the metal disk.
- Return to the lake and click on the tent.
- Place the metal disk.
- Rotate the disks to restore the picture.
- Click on the tent, take the net and rope.
- Go back and click on the river.
- Place the net to catch a fish.
- Go through the right gate, click on the cacti.
- Give the fish to the cacti.
- Take the crimson fruits and the precious dragon figurine.
- Return to the house.
- Click on the casket and place the precious dragon figurine.
- Take the pacifier.
- Click on the fireplace and place the last ingredient in the cauldron.
- Use the ladle to pour the drink into the bottle.
- Place the pacifier on the bottle.
- Take the bottle with compote.
- Go to the lake and place the rope on the fishing rod.
- Place the bottle with compote on the rope.
- Head to the volcanic island.

- Take the chameleon symbol (1).
- Move the screen up.

- Tap on the cave (2).
- Take the drop key.
- Enter the cave (3).

- Take the chameleon symbol (1).
- Tap on the salamander on the right (2).
- Place the drop key.
- Rotate the central part and assemble the figure from the pieces.

- Tap on the salamander on the left (3).
- Take the metal paw.
- Return to the cave (2).
- Use the metal paw on the lock.
- Follow the prince.
- Take the chameleon symbol.
- Move forward.
- Examine the gazebo on the right (1).
- Tap on the tower door (2).
- Take the wooden handle.
- Tap on the upper balcony (3).
- Take the chameleon symbol and the wooden handle.
- Use the shears on the willow, take the willow branches.
- Tap on the fountain (4), take the chameleon symbol.
- Tap on the gazebo.
- Place 5 chameleons.
- Place the chameleons in the corresponding colored recesses.
- Return to the boat.
- Tap on the boat and place the willow branches on the basket.
- Take the basket and go to the prince.
- Place the basket on the hook and tap on it.
- Move forward.
- Tap on the prince, then tap on the gazebo.
- Take the snowflake key.
- Return to the cave with the salamanders.
- Tap on the salamander on the left and place the snowflake key.

- Rotate the central part and assemble the figure from the pieces.
- Tap on the witch statue to search for objects.
- Find all the figurine pieces.

- Place all figurines in their spots.
- Take the puzzle piece.

- Return to the tower.
- Tap on the tower door and place the puzzle piece.
- Move the sectors to restore all the images.

- Enter the tower.
- Take the dolphin statue (1).
- Exit the tower and tap on the fountain.
- Place the dolphin statue.
- Tap on the valve.
- Take the wooden handle and puzzle piece.
- Return to the tower.
- Place the handles on the winch (2).
- Examine the window (3).
- Examine the door (4).
- Climb to the top of the tower.

- Tap on the princess dummy (1).
- Take the clue with the code, the puzzle piece, and the hairpin.
- Tap on the telescope (2) and enter the code.
- Examine the winch (3).
- Look through the telescope again.

- Solution.
- Take the puzzle piece.

- Go back and tap on the door.
- Place the three puzzle pieces.
- Arrange the tokens in the correct order.
- In rows – by color, in columns – by shape.

- Enter the door.
- Use the hairpin on the lock (1).
- Open the hatch, take the winding handle and sugar.
- Take the mop (2).
- Tap on the table (3), take the dustpan.
- Use the dustpan on the flour sack (4).
- Take the flour.
- Examine the chest (5).
- Leave the kitchen and tap on the window.
- Use the mop on the nest.
- Take the eggs.
- Go up the tower.
- Place the handle on the winch and tap on it.
- Watch the video.
- Tap on the book.
- Take the winding key and read the instructions.
- Return to the kitchen, tap on the table.
- Place the winding key on the mechanical chef.
- Take the toy tail.
- Step away from the table and tap on the chest.
- Place the toy tail.
- Take the oil, the toy chef, and the milk.
- Tap on the stove, place the toy chef.
- Take the cake layers.
- Return to the chef.
- Place the eggs, then the sugar, then the oil, milk, and flour.
- Place the cake layers on the plate.
- Take the frog cake.
- Go to the top of the tower.
- Place the frog cake on the stand.
- Tap on the winch handle.

- Watch the video.
- You have saved the third prince.
Congratulations! You have completed the game Witch’s Pranks: Frog’s Fortune.


