Witch’s Pranks: Frog’s Fortune – An exciting adventure with a humorous touch, in which you will have to interfere in the insidious plans of a wicked witch. She decided to marry a handsome prince, but she faced a problem: all the worthy suitors are already engaged. Annoyed, she went on a cunning scheme and turned the princes into frogs, and imprisoned their brides in enchanted traps. Sleeping Beauty is plunged into eternal sleep, and even her servants cannot awaken. Snow White is poisoned by an enchanted apple, and her crystal coffin is guarded by dwarves. Rapunzel has lost her long braids and is imprisoned in a high tower in the valley of waterfalls. Every fairy tale, familiar from childhood, is now distorted by the spell of the villain. Your task is to help the enchanted frog princes find their way to their lovers to break the curse with the kiss of love. Solve puzzles, solve mysteries and break the witch’s spell to restore justice and give each story a happy ending. If you can not pass any of the puzzles or do not know where the items are, on our site you can watch the walkthrough of the game Witch’s Pranks: Frog’s Fortune, and bring each story to a happy ending.
Witch’s Pranks: Frog’s Fortune – Walkthrough
Here you can see the full walkthrough of Witch’s Pranks: Frog’s Fortune game, namely for all chapters, including the bonus chapter, in pictures.

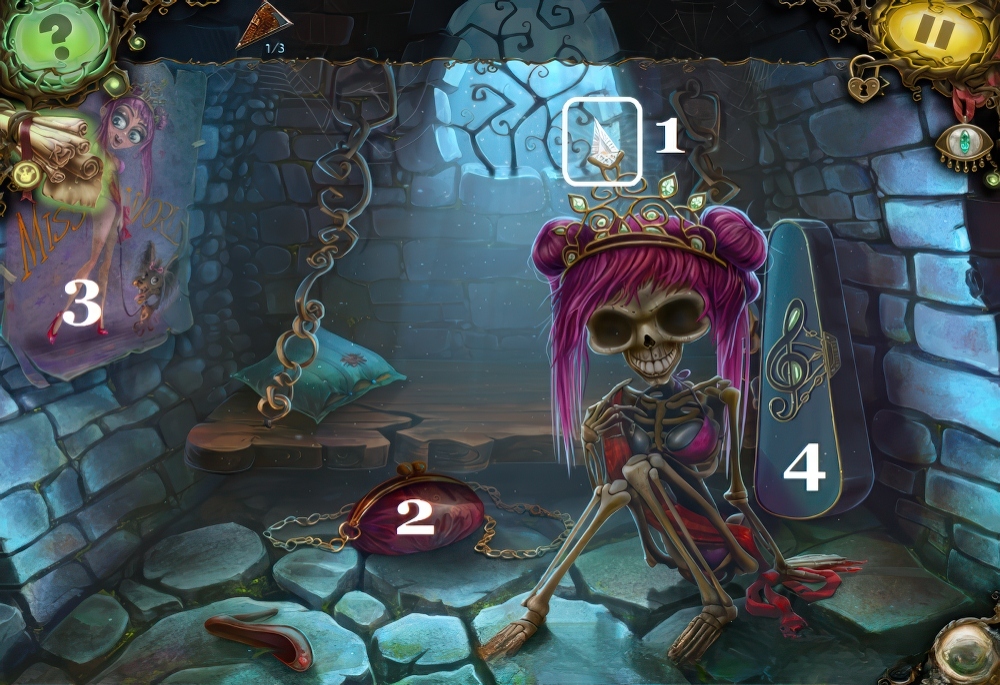
- Take the spoon (1).
- Click on the stone (2) and use the spoon.
- Take the fork, the snake drawing, and the puzzle piece.
- Click on the skeleton (3).
- Use the fork to pull it closer.
- Remove the leash from the skeleton.
- Use the leash on the levers (4).
- Click on the levers.
- Click on the middle lever.
- Click on the opened chamber.
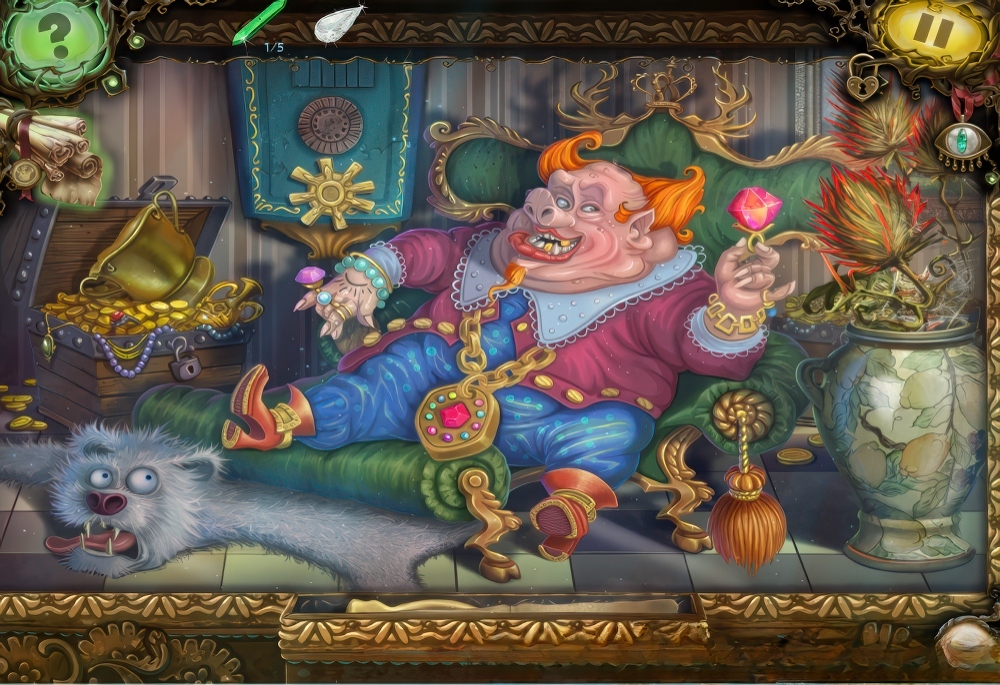
- Click on the skeleton, take the diamond (1).
- Click on the purse (2).
- Take the powder compact and a puzzle piece.
- Click on the poster (3) twice, take a puzzle piece.
- Examine the case (4).

- Go back and click on the door.
- Place three puzzle pieces.
- Move the pieces to restore the image.

- Go through the opened door.
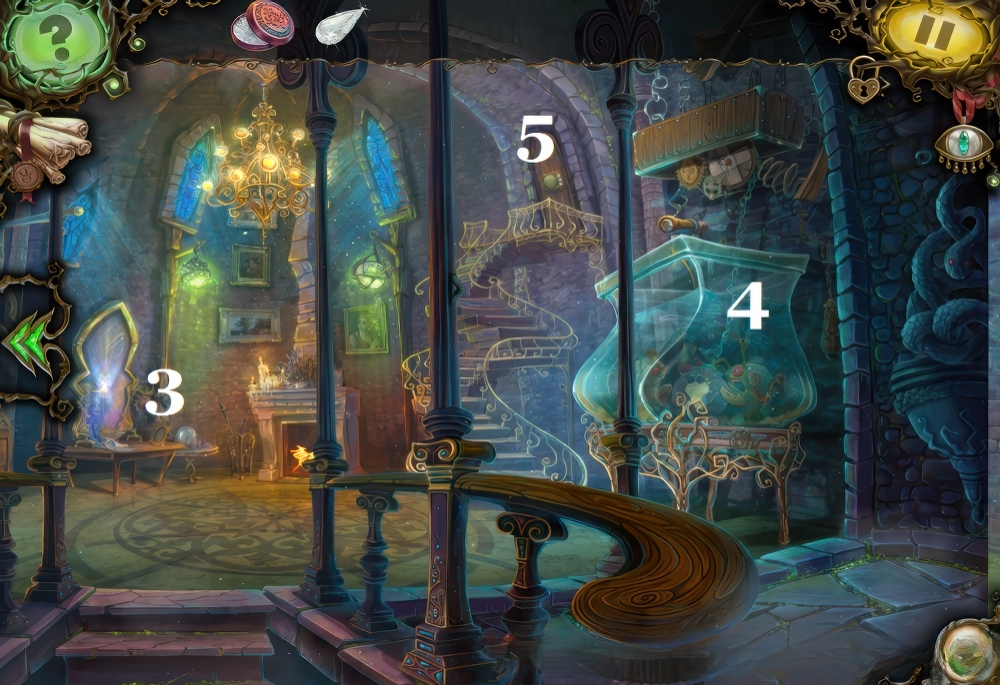
- Click on the arrows on the sides (1) to move the screen.
- Move the screen to the left.
- Click on the hidden object area (2).

- Collect the gemstone pieces.
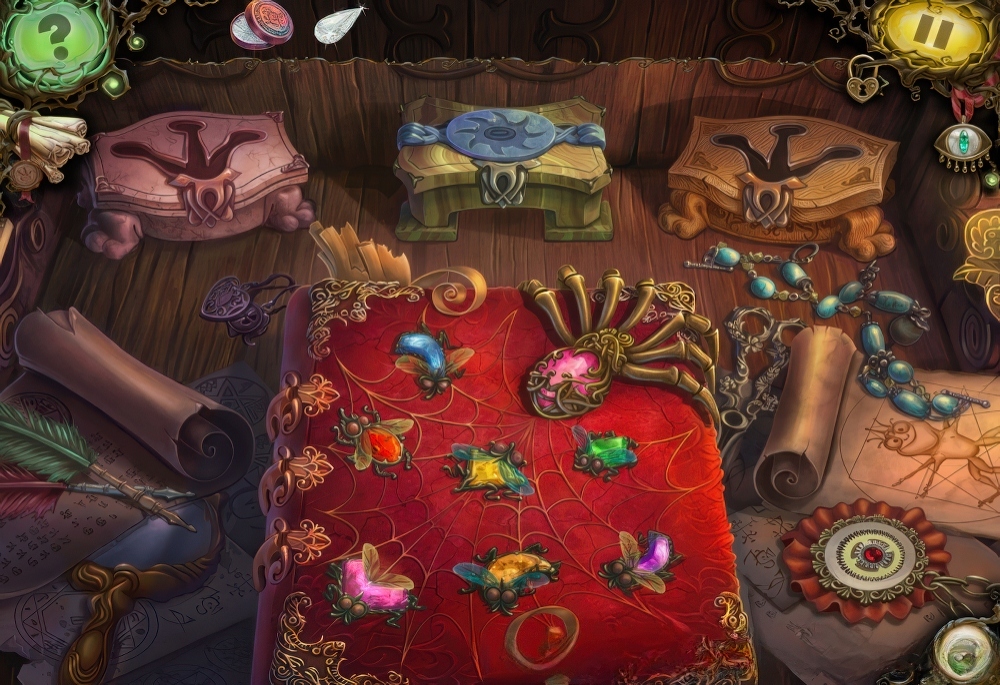
- Then place the gemstones on the book’s binding.
- Take the witch’s portrait.
- Turn the page, read the letter.
- Examine the seal.
- Go back.
- Move the screen to the right.
- Examine the door at the top (5).
- Click on the aquarium (4).
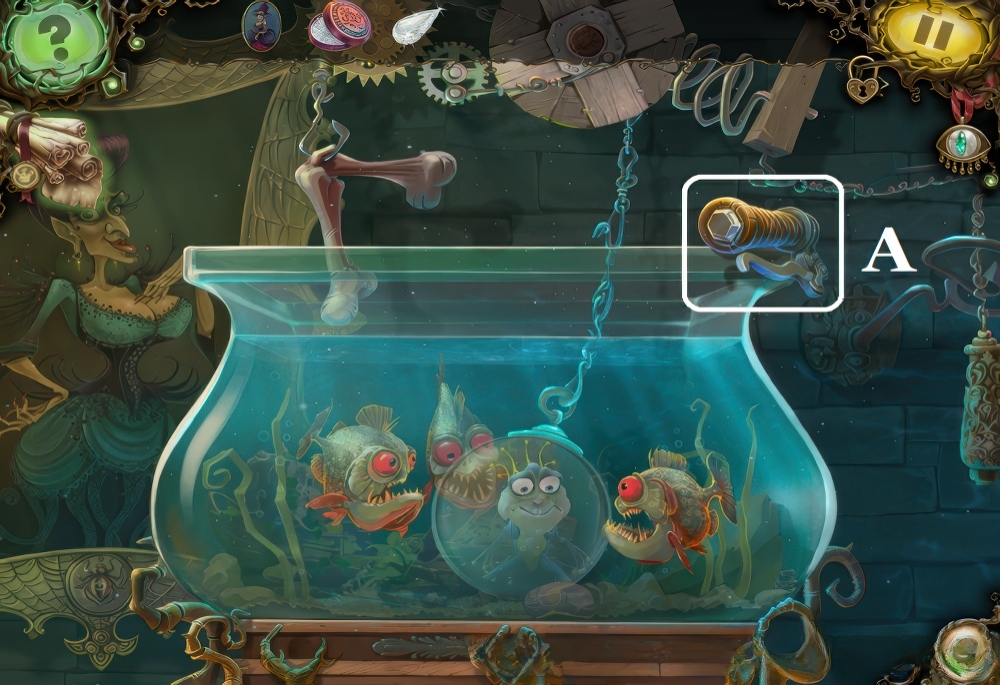
- Take the handle (A).

- Return to the basement.
- Click on the levers and place the handle on the broken lever.
- Click on the lever.
- Click on the opened cage to the left.
- Examine the statue.
- The statue is missing an eye.
- Exit the dungeon and click on the mirror (3).
- Place the witch’s portrait in the eye-framed slot.
- Click on the mirror.

- Read the advertisement booklet (1).
- Note the numbers in the booklet’s corner.
- Take the blue crystal (2).
- Step away from the mirror.
- Move the screen to the left and click on the table with the book.
- Click on the seal and place the blue crystal.
- Rotate the crystals to create the correct code.

- Turn the diary page.
- Take the ruby.
- Return to the dungeon.
- Click on the statue and place the ruby in the eye socket.
- Click on the statue’s mouth.
- Swap the teeth in the lower jaw so the mouth can close.
- Click on the orb with the prince.
- Use the diamond to free the prince.
- Exit the dungeon.
- Click on the table with the diary.
- Click on the prince so he opens the box.
- Take the princess’s portrait.
- Return to the mirror.
- Place the princess’s portrait in the eye-framed slot.
- Click on the mirror and enter the portal.

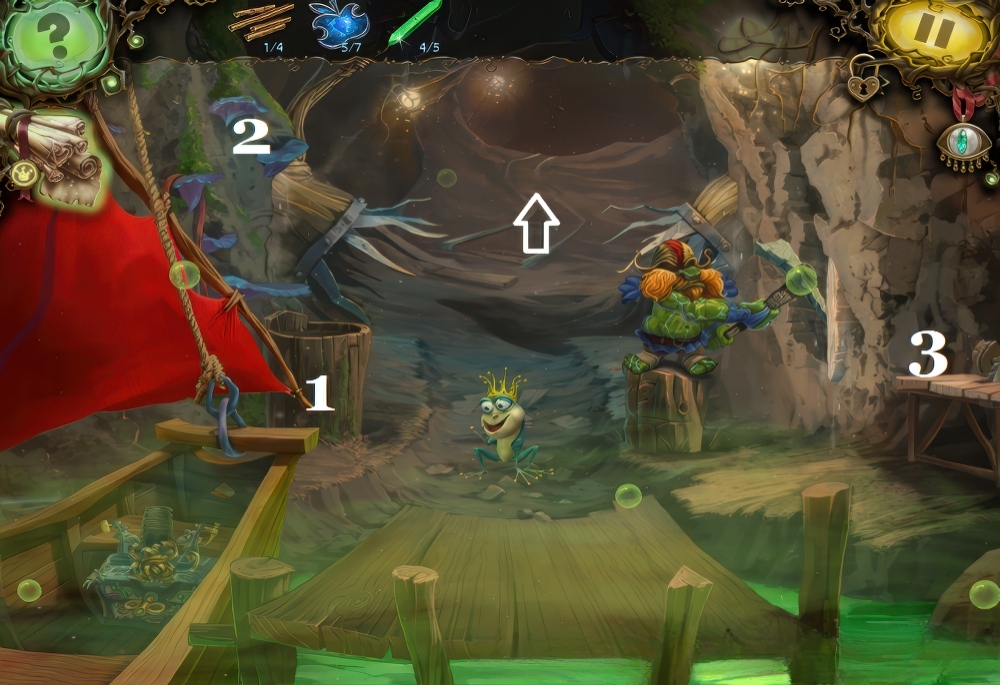
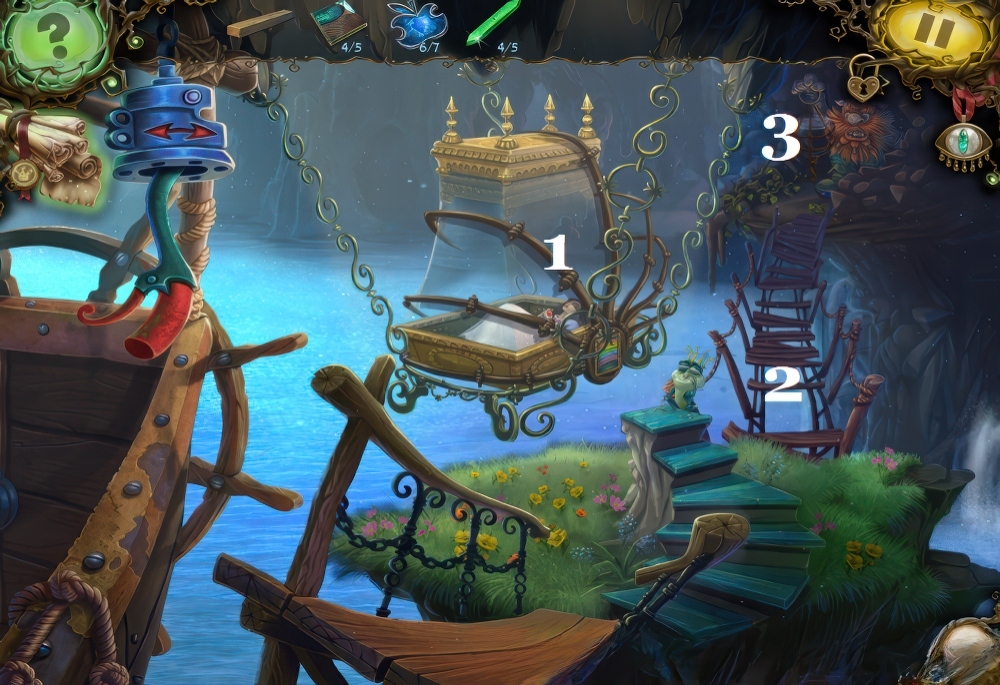
- Click on the catapult (1).
- Take the arrow.
- Take the arrow on the roof of the wagon (2).
- Examine the wagon door (4).
- Click on the wagon wheel (5).
- Take the berries.
- Click on the nest (3).
- Take the eggshell.
- Move the branches on the right, take the snail.
- Click on the castle gate (6).
- Take the snail and the winged heart.
- Click on the wagon wheel, place the snails.
- Take the skull medallion.
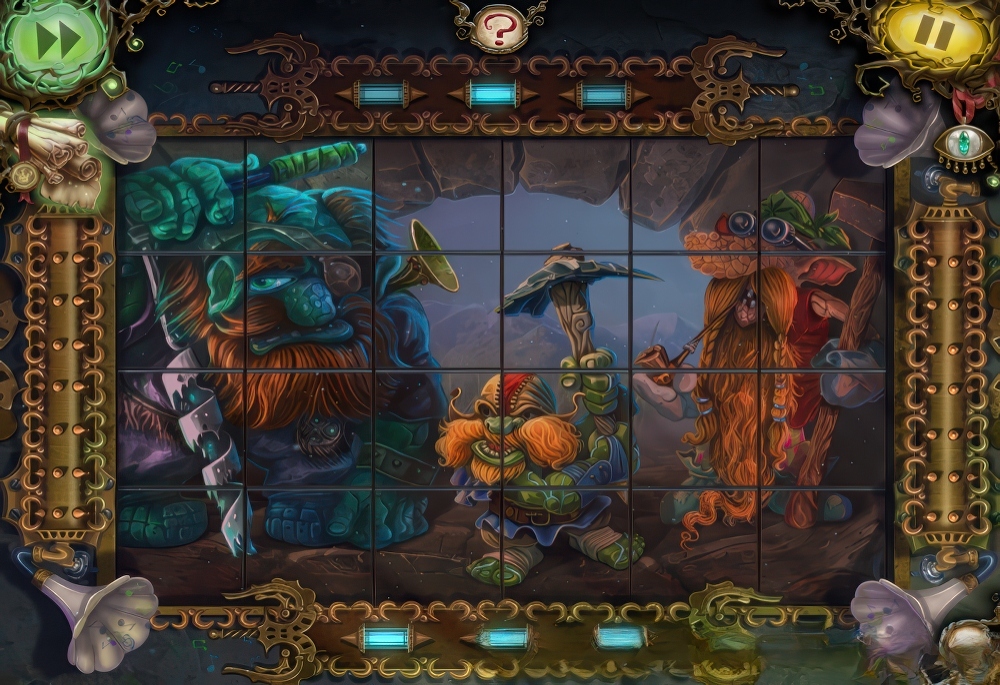
- Click on the wagon door.
- Place the winged heart.
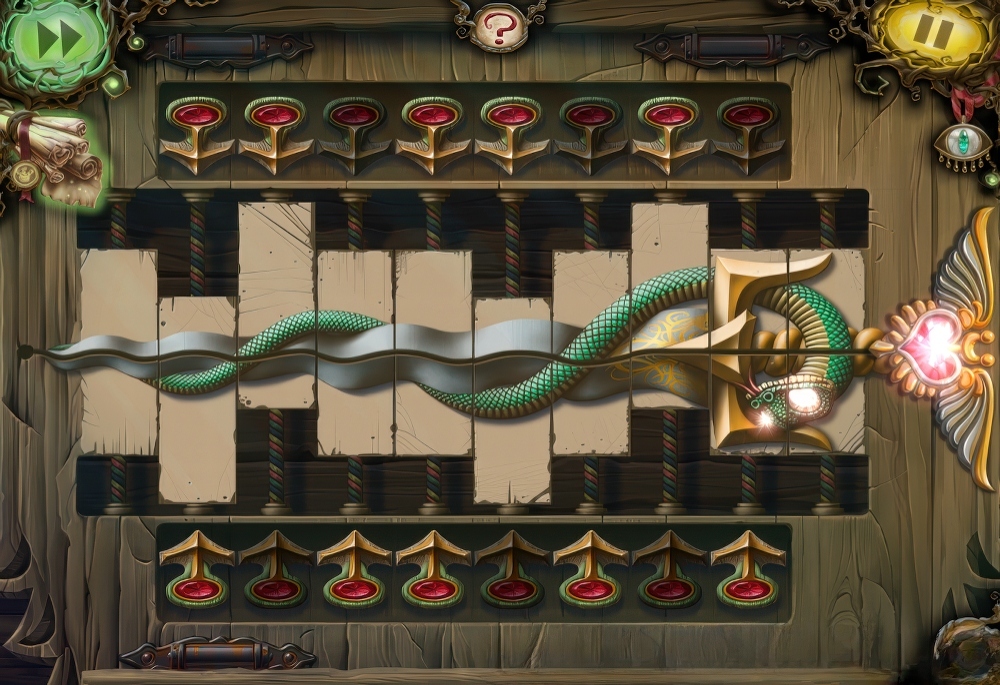
- Swap and adjust the tiles’ heights to restore the image.

- Enter the wagon.
- Click on the flower pot (1).
- Click on the teapot.
- Read the recipe, take the flower.
- Click on the tub (2), examine the umbrella.
- Note the lizard (3).
- Examine the cupboard (4).
- Take the arrow (5).
- Move the screen up.
- Click on the flamingo to get feathers.
- Click on the hanging pepper.
- Take the pepper from the floor.

- Go forward to the herbalist’s table.
- Take the casket.
- Take the cage.
- Read the recipe.
- Place the skull medallion on the book.
- Read the recipe, take the disc.
- Exit the wagon and click on the catapult.
- Use the casket to collect pollen.
- Return to the wagon.
- Click on the floor near the lizard.
- Place the cage, then put the chili pepper in the cage.
- Take the fire salamander.
- Click on the cupboard, place the disc.
- Move the pieces so the images on the pieces and the inner disc match.
- Click on the open cupboard.
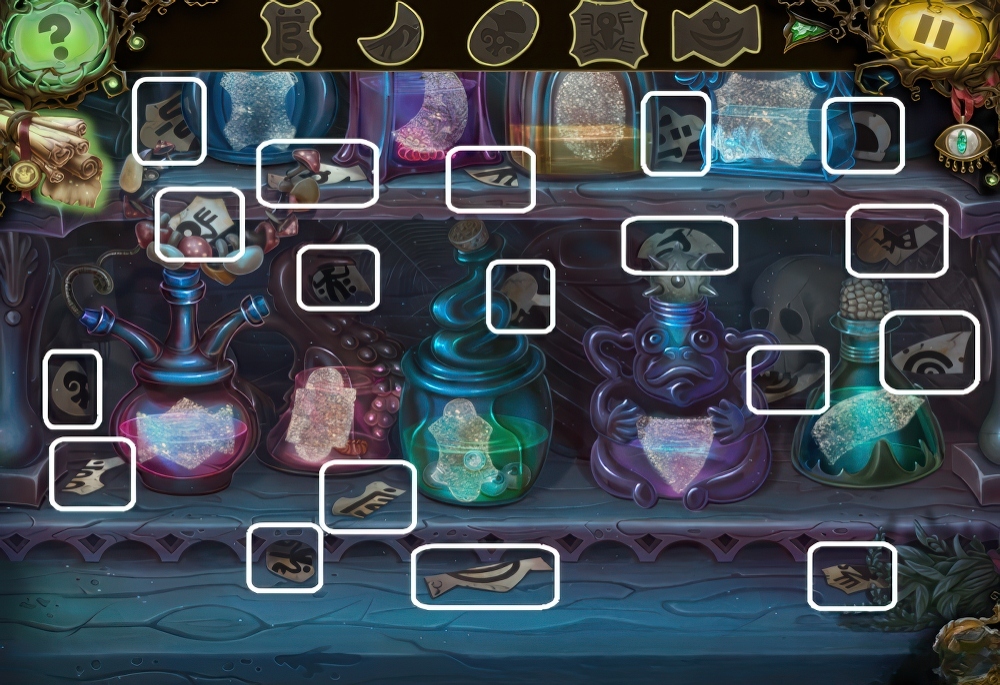
- Use the powder compact to see the label silhouettes.
- Collect the label pieces.

- Then place the labels on the corresponding bottles.
- Take the potions.
- Go to the alchemist’s table.
- Place the salamander, berries, and flower.
- Place the eggshell in the mortar.
- Place the casket with pollen.
- Place the potions.
- Look in the recipe book and click on the ingredients to prepare the burning bane.
- To make the salamander breathe fire, feed it a chili pepper.
- Take the burning bane and the salamander.
- Exit the wagon and click on the castle gate.
- Use the burning bane on the thorny plant.
- Click on the catapult and take the arrow.
- Return to the wagon and click on the broken umbrella.
- Place four arrows on the broken umbrella.
- Take the umbrella and a puzzle piece.
- Exit the wagon and click on the castle gate.
- Use the flamingo feathers to clear the cobwebs.
- Take the net.
- Click on the catapult, place the net.
- Give the prince the umbrella and click on the lever to the right.
- The prince will catapult and open the gate.
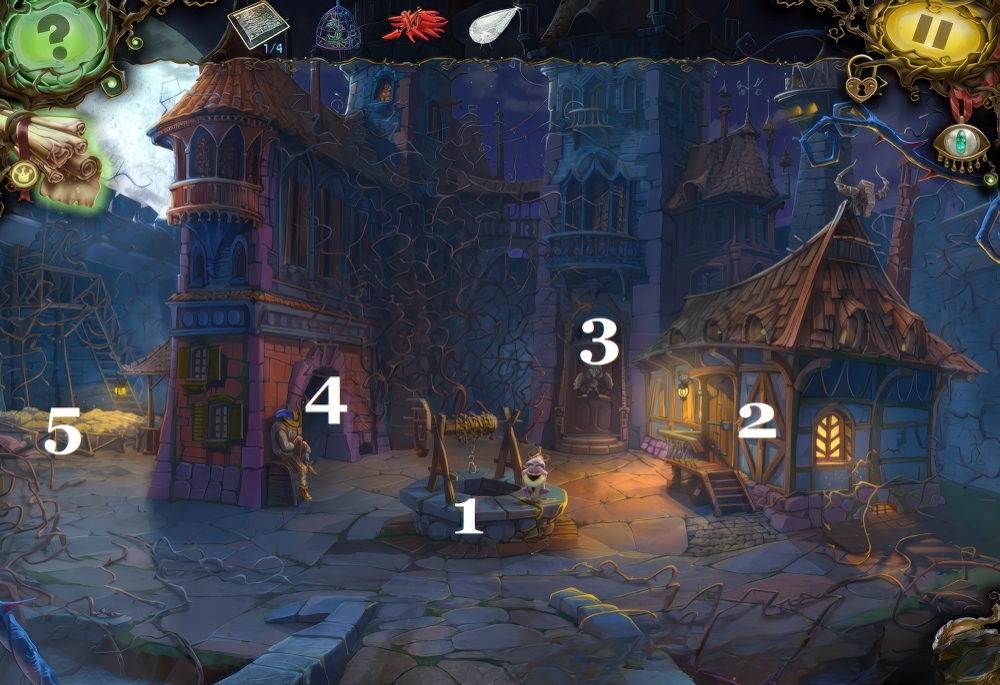
- Enter the gate.
- Examine the well (1).
- Examine the hut door on the right (2).
- Click on the owl door (3).
- Click on the arrow above the door, take a puzzle piece.
- Click on the shepherd (4), take the brush and examine the cupboard.
- Take the feather from the shepherd’s hat.
- Click on the pigsty (5).
- Read the honorary diploma of the sow Dunya.
- Take the bucket.
- Click on the well and place the bucket.
- Click on the well wheel, take the bucket of water.
- Click on the prince, take the puzzle piece.
- Click on the pigsty.
- Use the bucket of water on the pig.
- Take the medal.
- Click on the shepherd.
- Place the medal on the cabinet.
- Take the puzzle piece and the oil can.
- Click on the hut door on the right.
- Use the oil can, then the brush.
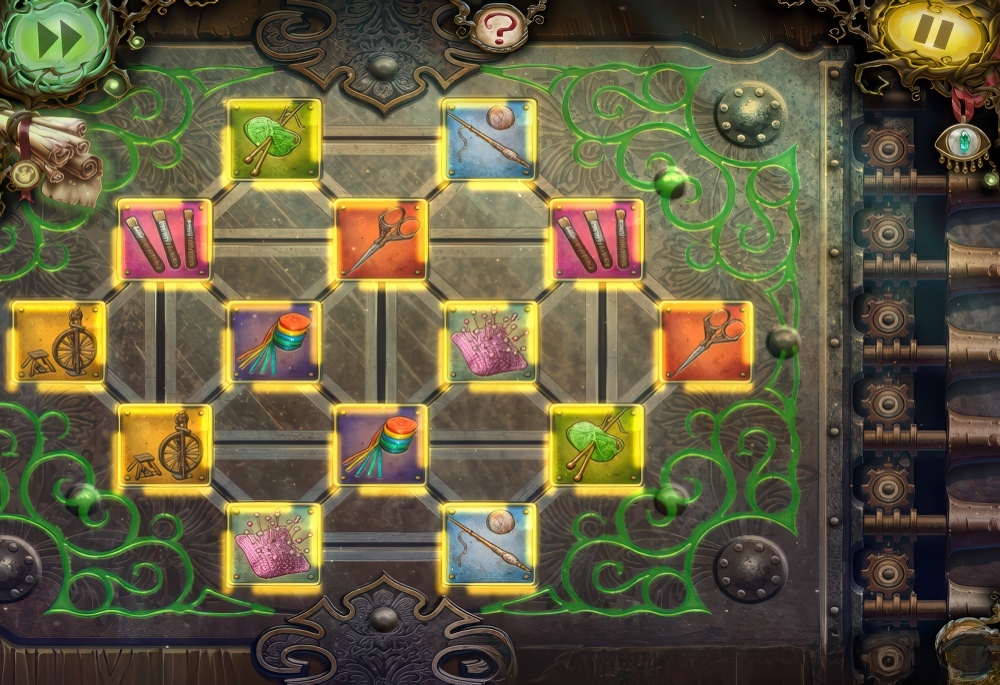
- Click on the lock, place the 4 puzzle pieces.
- Find matching images.
- Click on the loom (1).
- Take the sheep shears.
- Take the feather (2).
- Click on the barrels (3), take the horn.
- Use the oil can on the piece of the knight’s helmet, then use the brush.
- Inspect the niche (4).

- Exit the workshop, click on the pigsty.
- Use the shears on the sheep.
- Take the wool.
- Return to the workshop and click on the niche.
- Place the wool.
- Click on the wool 5 times.
- Take the sheep figurines.
- Exit the workshop, click on the door with the owl.
- Place the sheep figurines above the door.
- Go through the opened door.
- Click on the plaque, take the feather (1).
- Take the piece of the helmet (2).
- Click on the fireplace (3), take the coat of arms sketch.
- Place the salamander in the fireplace and give it chili.
- Take the salamander.
- Click on the torn banner (4), take the scissors.
- Click on the stuffed animal’s head (5).
- Take the shuttle and place the horn.
- Take the corkscrew.
- Take the flower pot (6).

- Return to the workshop.
- Click on the barrels.
- Place the helmet piece on the helmet, then place the feathers.
- Use the corkscrew on the barrel plug.
- Take the sword.
- Click on the loom, place the shuttle.
- Click the shuttle repeatedly until the threads run out.
- Then use the scissors.
- Take the fabric for the pennant.
- Click on the niche to the right, place the fabric.
- Place the coat of arms sketch on the fabric.
- Click to start embroidery.
- Use the threads to embroider the coat of arms.

- Take the pennant.
- Return to the alchemist’s caravan.
- Click on the kettle and place the flower pot.
- Water the flower, take the blooming flower.
- Return to the castle hall.
- Place the helmet on the knight to the right of the fireplace.
- Place the sword on the knight to the left of the fireplace.
- Place the pennant in place of the torn one.
- Place the blooming flower in place.
- Go through the opened door.
- Click on the dog portrait (1).
- Read the instructions and take the bone.
- Click on the princess portrait (2).
- Take the sun model piece.
- Click on the floor hatch (3).
- Click on the sun model on the left and place a part of the model.
- Use the oil can on the lantern.
- Place the salamander and give it the pepper.
- Take the salamander.
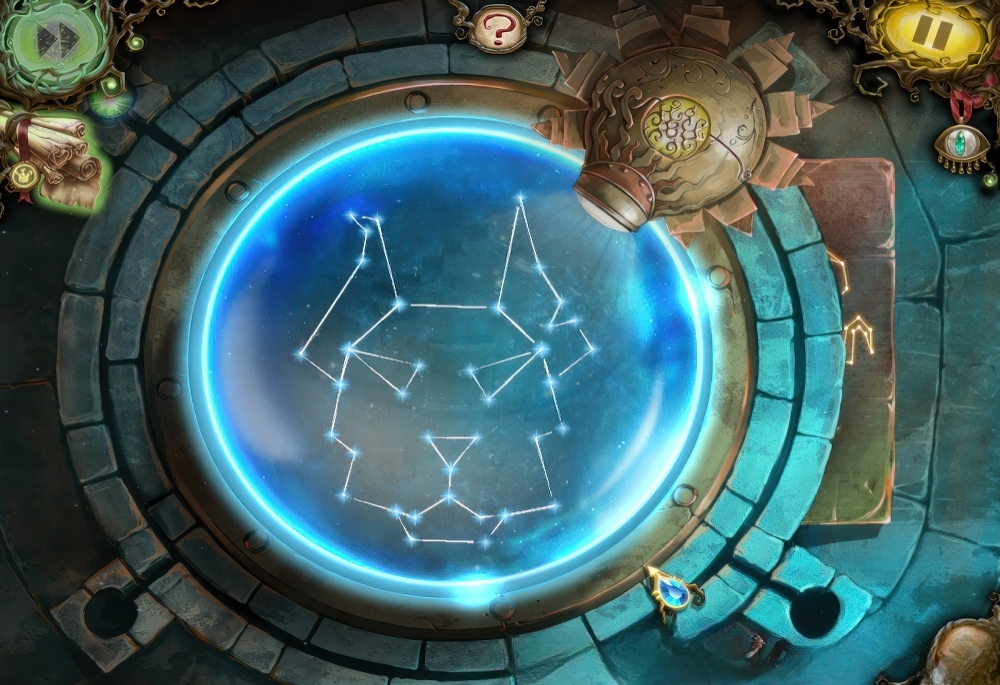
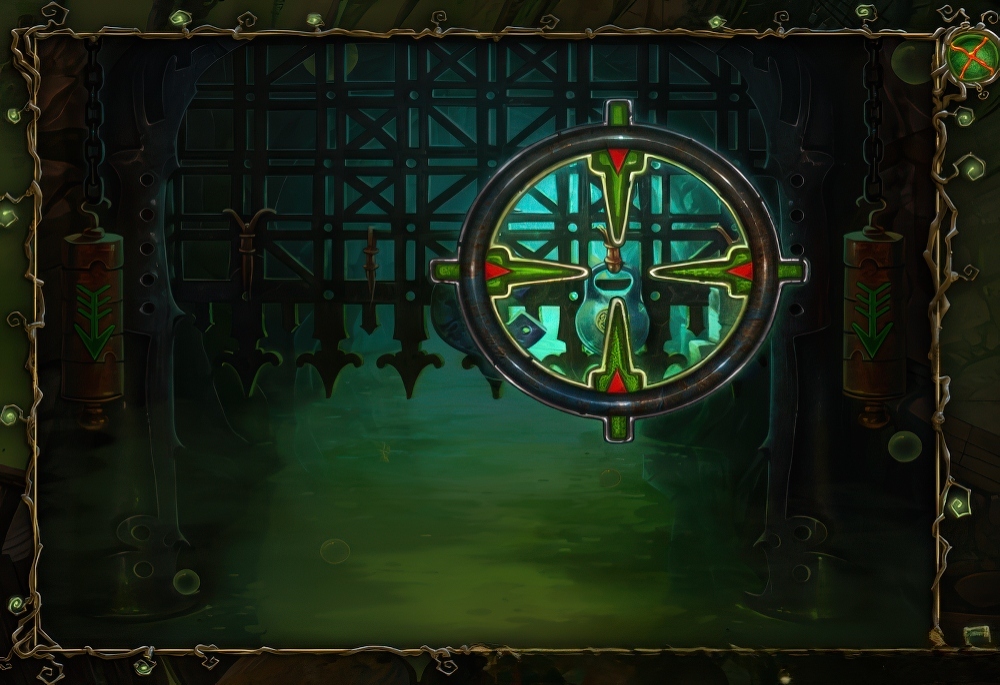
- Rotate the constellation to match the pattern shown on the right.
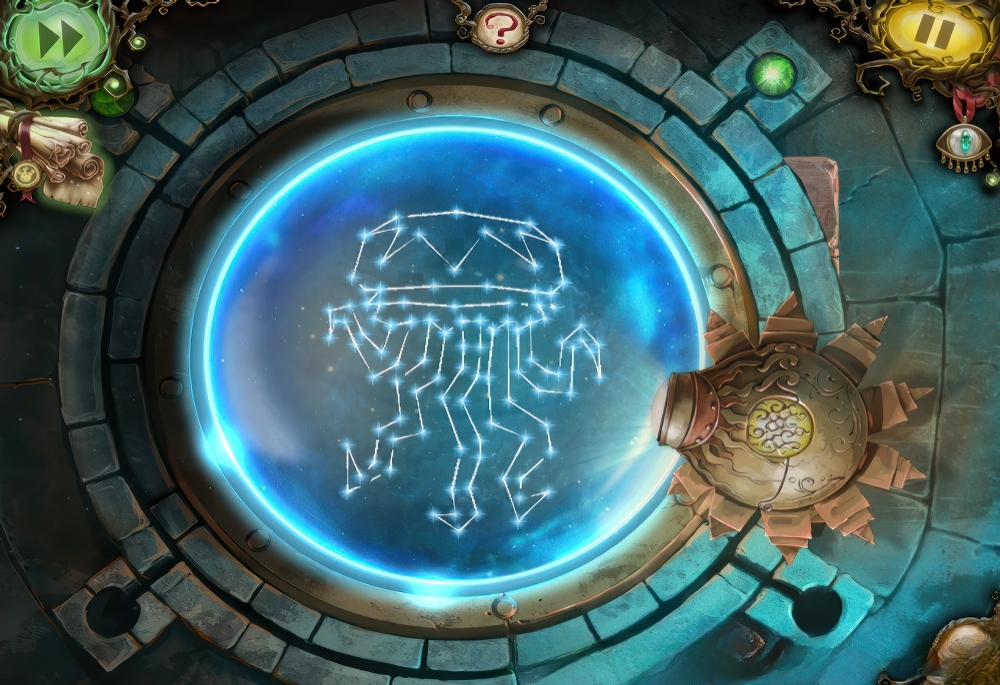
- Solution 2.

- Solution 3.
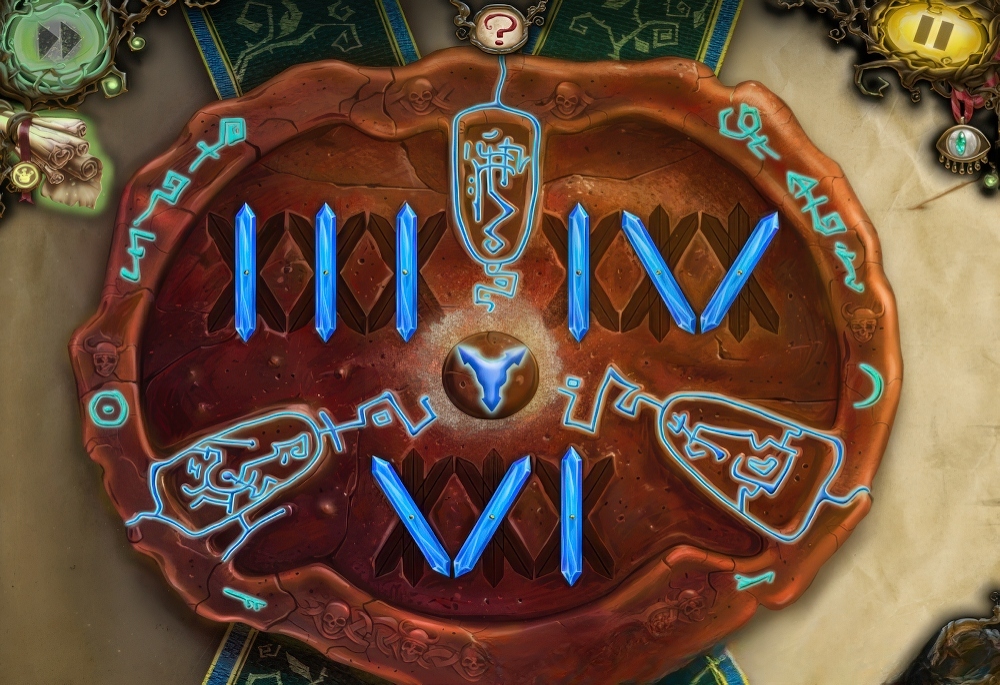
- Click on the control panel and place the bone.
- Turn the bones as shown in the image.
- Then rotate the disks so the holes align with the lever.
- Click on the lever.
- Click on the prince so he jumps into the basket.
- And click on the lever again.
- Click on the control panel.
- Take the crown key.
- Go downstairs and click on the princess’s portrait.
- Place the crown key to open the secret compartment.
- Take the clue and the frame.
- Go back up to the prince.
- Place the frame on the control panel.
- Move the frames to the symbols shown in the image.
- Then move the shapes to free the slot for the lever.
- Click on the lever.
- Wait for the prince to jump into the basket and click the lever again.
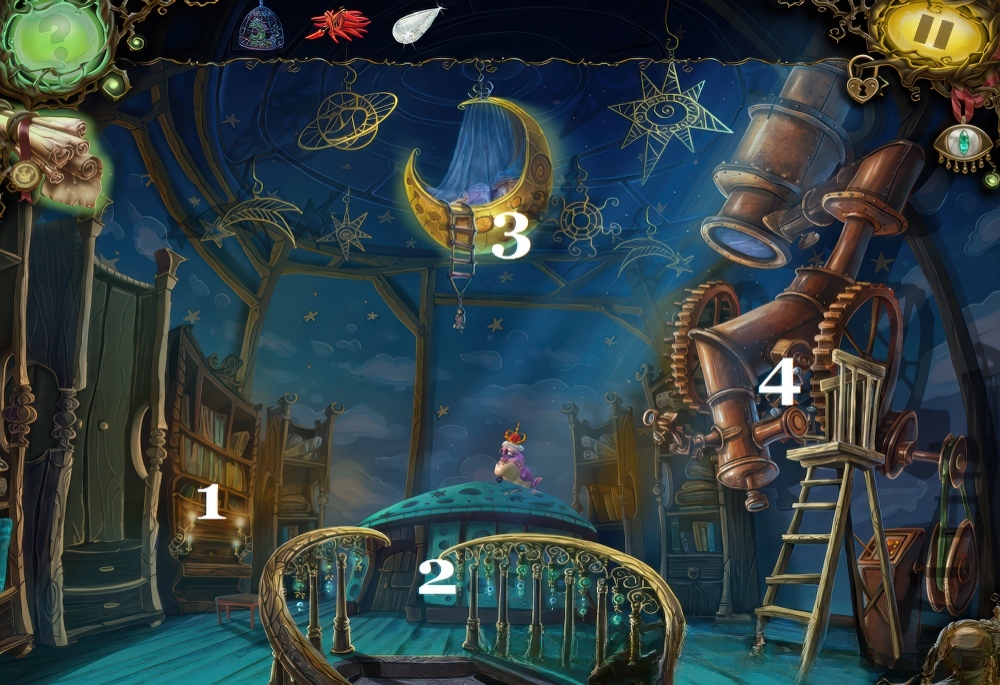
- Go up to the observatory.
- Click on the piano (1).
- Open it and take the cat medallion and the rope.
- Click on the small door (2).
- Place the rope on the hook and take the rope with the hook.
- Use the rope with the hook on the bed (3).
- Click on the bed.
- Take the bird medallion, the sheet music, and the medal from the dog’s collar.
- Click on the piano and place the sheet music.
- Press the paw prints on the keys according to the animals on the sheet music.
- Take the crystal usage diagram and the crystal.
- Go down to the bottom of the tower and click on the dog’s portrait.
- Place the dog medal and take the lenses.
- Go back up to the observatory.
- Click on the telescope (4) and place the lenses.

- Adjust the lenses so the holes in the lenses align with the stars or planets.

- Take the constellation map and the fish medallion.
- Click on the small door.
- Place the three medallions and the constellation map.
- Set the pendants in the correct positions shown on the map.

- Click on the door and place the crystal.
- Place the salamander and give it the pepper.
- You have saved the first prince.

- Click on what fell from the chandelier.
- Take the drawing with the code and the pink crystal.
- Click on the witch’s diary, turn the page, and click on the seal.
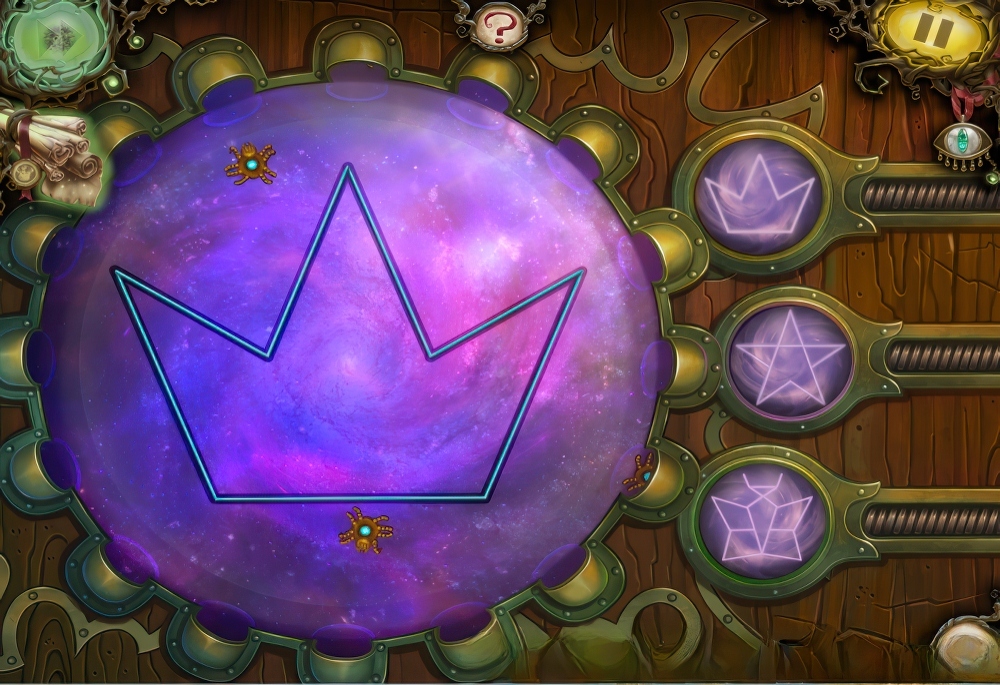
- Place the pink crystal.
- Rotate the crystals to set the code.
- Turn the page and take the precious web.
- Click on the door at the top of the stairs.
- Place the precious web.
- Move the spiders so the web matches the pattern in the magic lens.

- Go up to the second floor.
- Click on the voodoo doll (1) and take the green crystal.
- Inspect the flying broom (2).
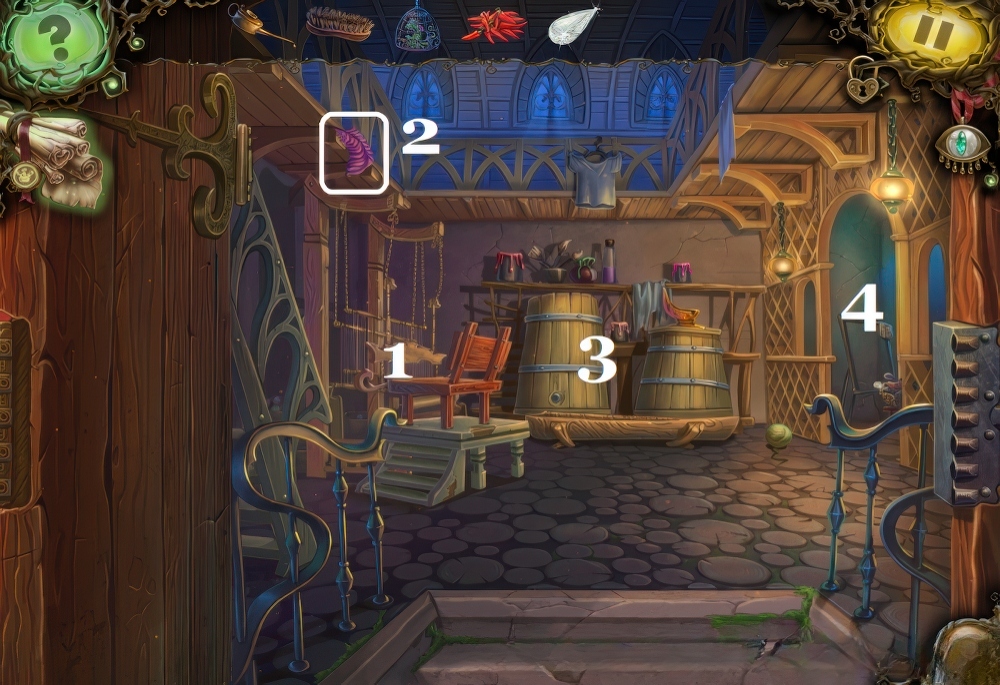
- Notice the sack above the door (3).
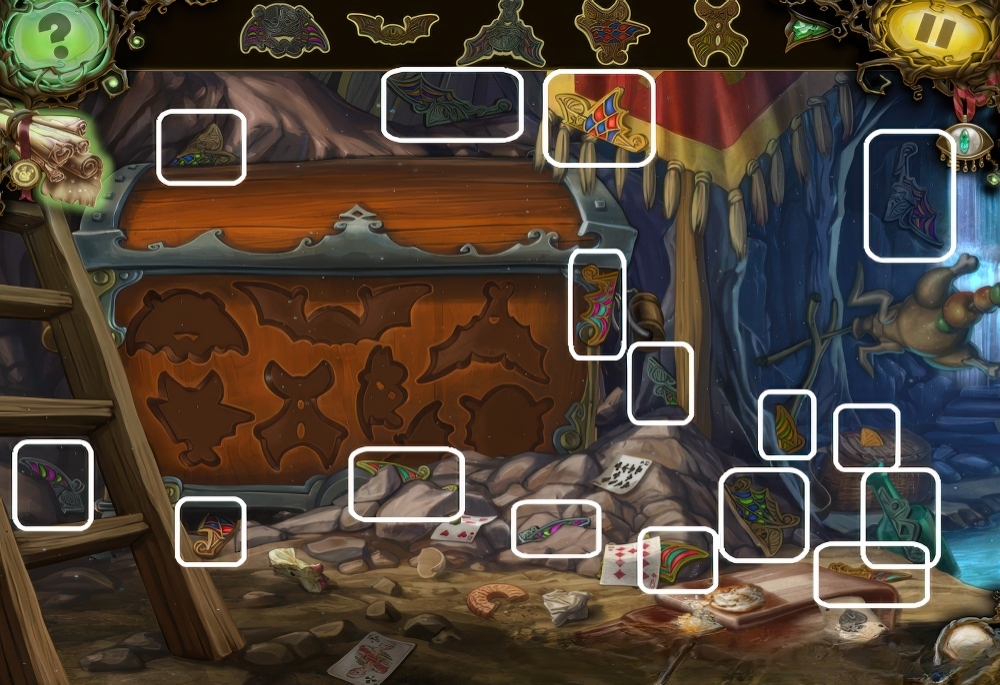
- Click on the painting (4) to search for objects.

- Solution.
- Then place the objects in the corresponding spots.

- Read the letter.
- Take the witch’s emblem.
- Move the screen to the left and take the apple (1).
- Inspect the tree (2).
- Go down to the first floor and click on the floor.
- Place the witch’s emblem.
- Read the broom instructions.
- Take the green crystal and the broom key.
- Go back up to the second floor and click on the broom.
- Use the broom key.
- Click on the fallen sack.
- Move the sack.
- Take the thread and the green crystal.
- Click on the voodoo doll.
- Place the thread and take the needle with thread.
- Click on the sack and use the needle with thread.
- Take the sack.
- Click on the tree.
- Use the sack on the bees.
- Take the green crystal.
- Place the apple in the resin and take the apple.
- Give the resin-covered apple to the chained biting flower.
- Take the meat.
- Go down to the first floor and click on the aquarium.
- Place the meat, then click on the sphere with the prince.
- Use the diamond on the sphere to free the prince.
- Click on the witch’s diary.
- Click on the prince to open the casket.
- Take the princess’s portrait.
- Click on the mirror.
- Place the princess’s portrait in the eye-framed slot.
- Enter the portal.
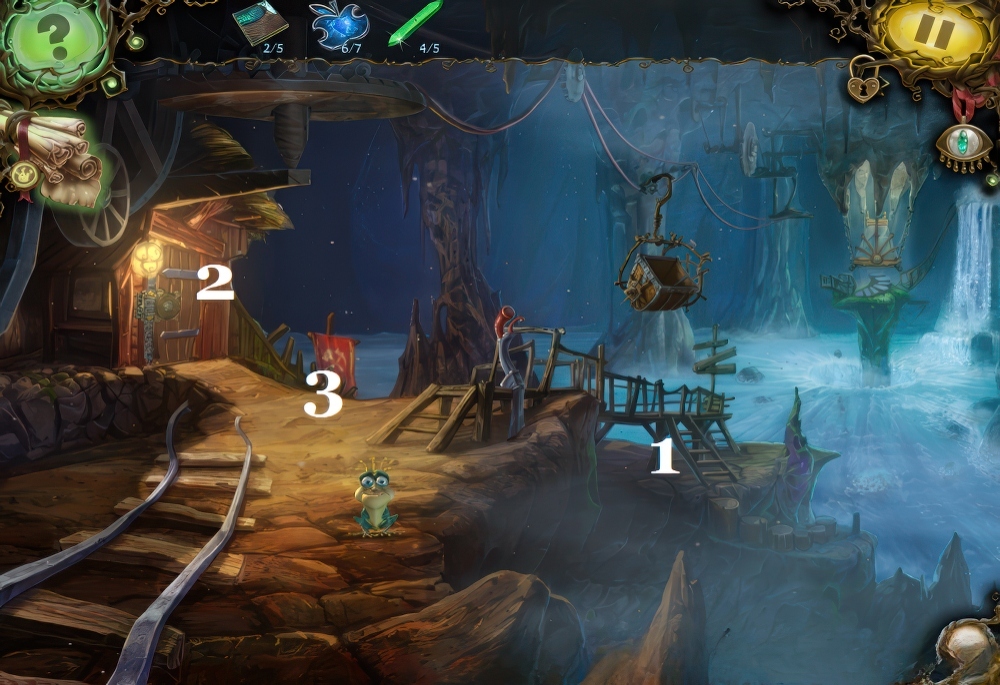
- Click on the chain (1).
- Click on the bottle and take the shard.
- Take the board.
- Move the screen to the right, click on the barrel (2).
- Use the shard and take the barrel.
- Move the screen to the left.
- Use the barrel on the prince.
- Take note of the nest.

- Go through the open gate.
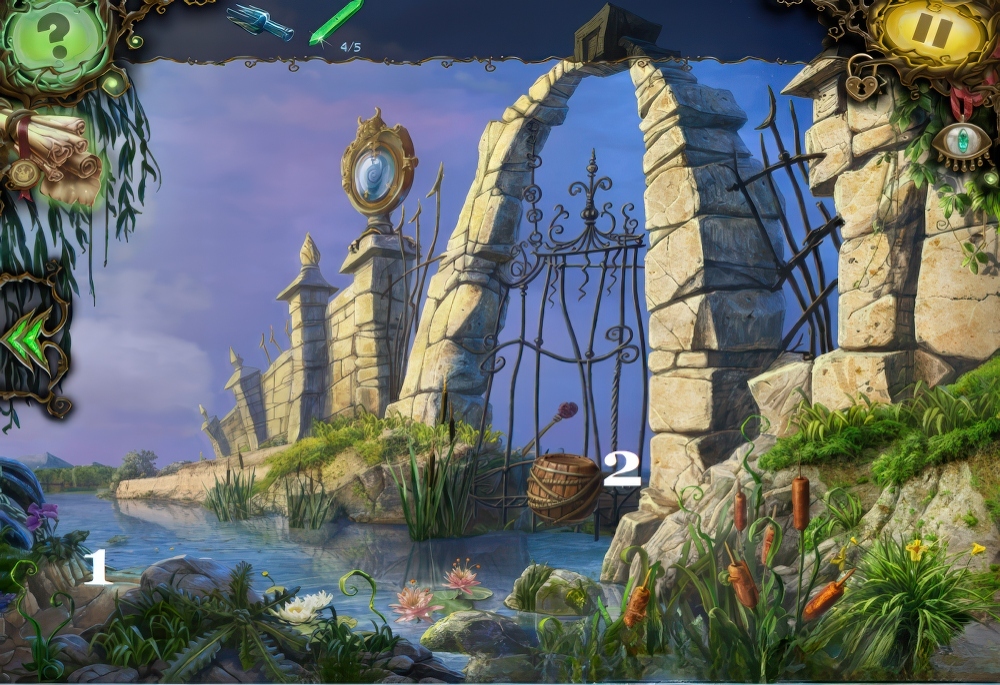
- Click on the fishing rod (1). Stuck.
- See what caught the prince’s attention (2).
- Place the board under the boat, then click on the prince.
- Take the hook and part of the maze.
- Click on the prince near the fishing rod.
- Click on the lily pad.
- Remove the algae.
- Take the sealed bottle and part of the maze.
- Take the fishing rod.
- Examine the owl (3).
- Note the frames (4, 5).

- Move the screen to the right.
- Examine the gate (1).
- Note the frame (2).
- Click on the bench (3).
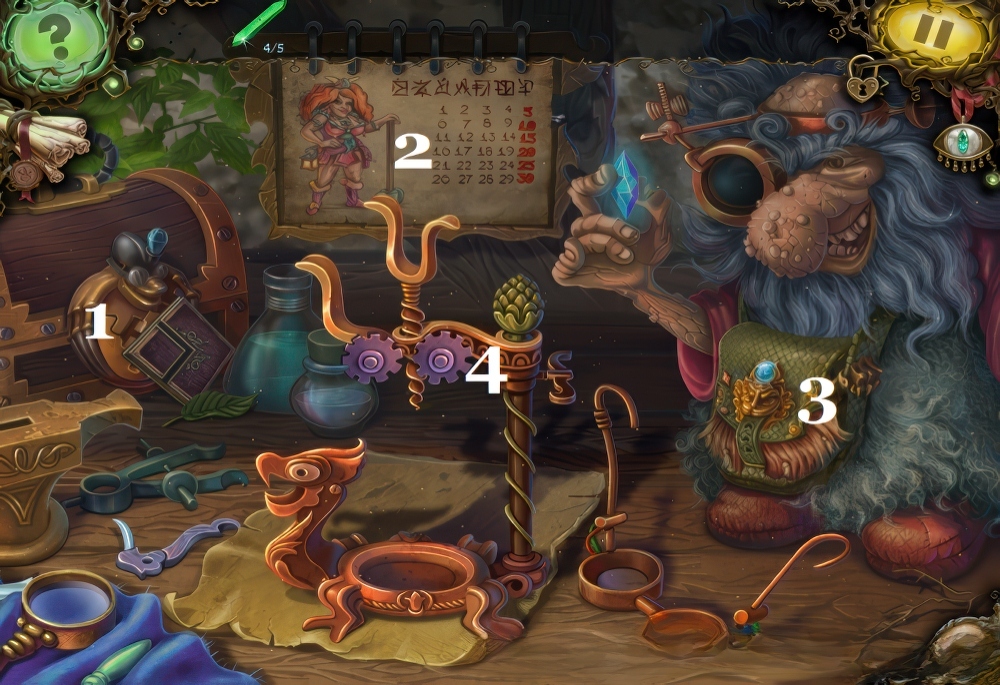
- Click on the chest (1).
- Take part of the maze.
- Click on the calendar (2).
- Turn the pages twice.
- Take the dungeon map and tweezers.
- Note the gnome’s bag (3).
- Place the sealed bottle on the corkscrew (4).

- Take the beam reflection scheme.
- Use the tweezers, take the owl key.
- Go back and click on the owl.
- Use the key, take part of the maze.
- Return to the swamp shore and click on the chain.
- Place the hook to retrieve the chest.
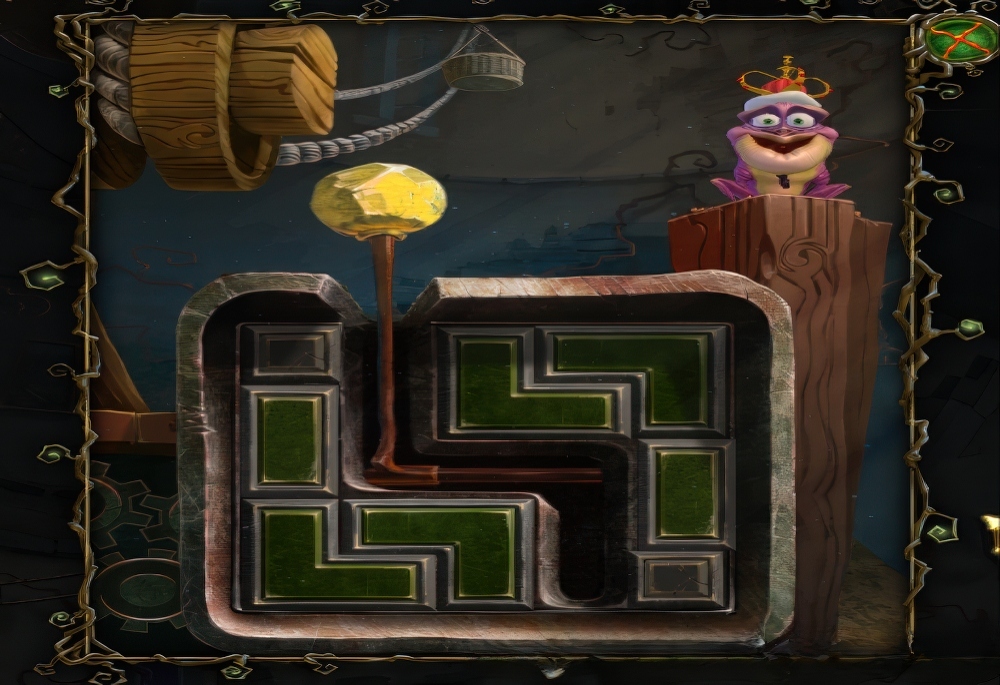
- Click on the chest, place 4 parts of the maze.
- Move the crystals to the corresponding slots.
- Rotate the maze parts to create a path for the crystals.

- Click on the open chest.
- Click on objects to find three reflectors.
- Return to the maze and place the three reflectors in the frames.
- Click the levers to rotate the reflectors correctly.
- Click on the bench, then on the gnome’s bag.
- Take the precious apple and slingshot.
- Return to the swamp shore.
- Use the slingshot on the nest, then use the fishing rod.
- Take the lid with a mole and the miner’s symbol.
- Return to the shop.
- Click on the chest, place the miner’s symbol.
- Take the clock hands and forged star.
- Click on the gate and place the clock hands.
- Set the hands to the correct symbols.
- Enter the dwarves’ cave.
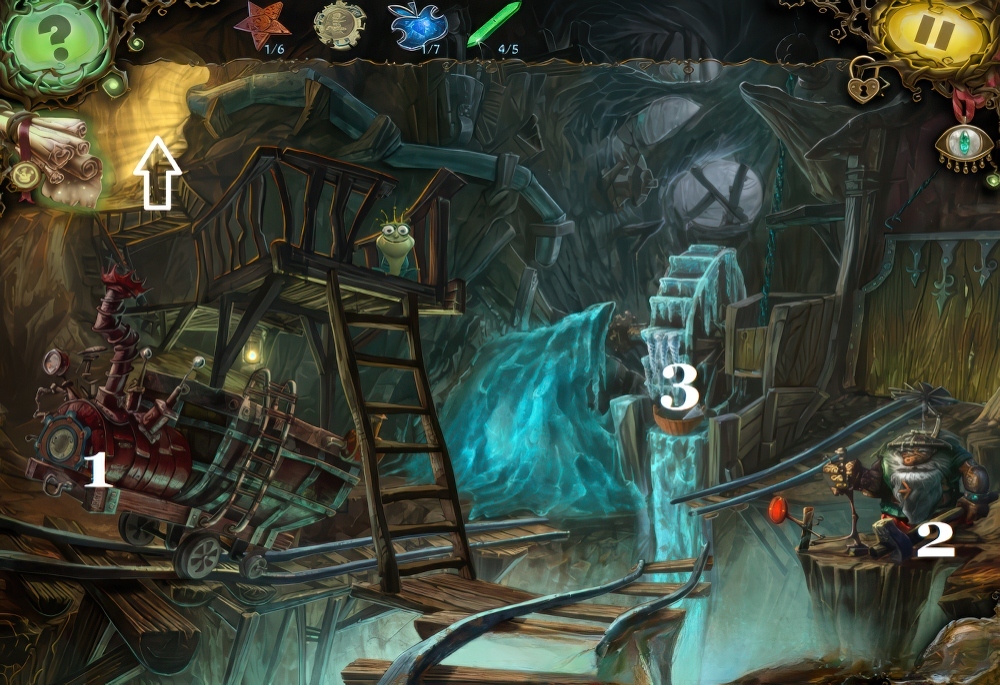
- Click on the cart (1), take the forged star.
- Click on the gnome figurine (2), take the forged star.
- Click on the basket (3), take the forged star.
- Go up the stairs.

- Take the tower mechanism scheme and forged star (1).
- Click on the gnome figurine (2).
- Take the precious apple, click on the lever.
- Take the pickaxe.
- Click on the furnace (3), take the chess mold.
- Examine the workshop (4).
- Go back.
- Click on the basket.
- Use the pickaxe, take the icicles.
- Return to the boiler room.
- Click on the workshop, find two parts of the star.
- Take the star blank.
- Click on the blacksmith gnome and place the star blank.
- Click on the lever, take the forged star.
- Click on the furnace.
- Place 6 forged stars in the corresponding slots.
- Click on the lever.
- Place the icicles in the cart and click on the lever again.
- Examine the waterwheel.
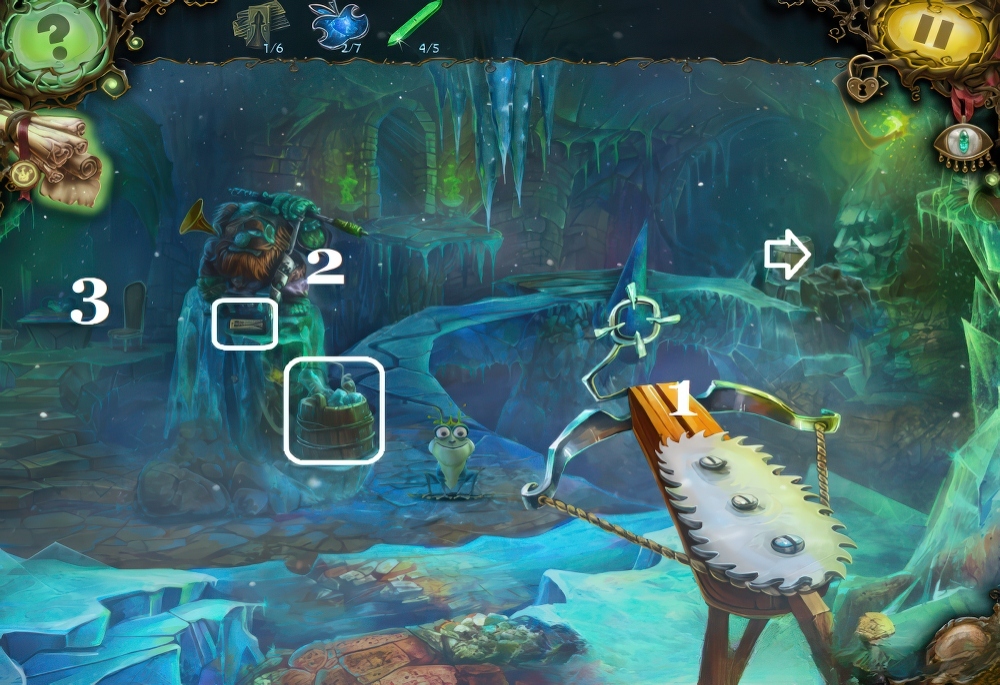
- Follow the prince into the ice cave.
- Examine the crossbow (1).
- Click on the gnome statue (2).
- Take the bucket of ice and chess mold.
- Click on the table (3), take the energy crystal.
- Return to the foundry, click on the furnace.
- Place the bucket of ice, take the bucket of water.
- Return to the ice cave.
- Use the bucket of water on the bridge.
- Follow the prince.
- Take the frozen frog and barrel rim.
- Click on the barrel, move the fish.
- Take the chess mold.
- Go back twice.
- Click on the waterwheel and place the rim.
- Click on the gate.
- Take the candle, energy crystal, and chess mold.
- Click on the gnome figurine, place the candle.
- Click on the gnome again.
- Take the precious apple and screwdriver.
- Click on the lever.
- Take the energy crystal.
- Go to the foundry, click on the furnace.
- Place the frozen prince.
- Take the energy crystal.
- Go back, click on the cart.
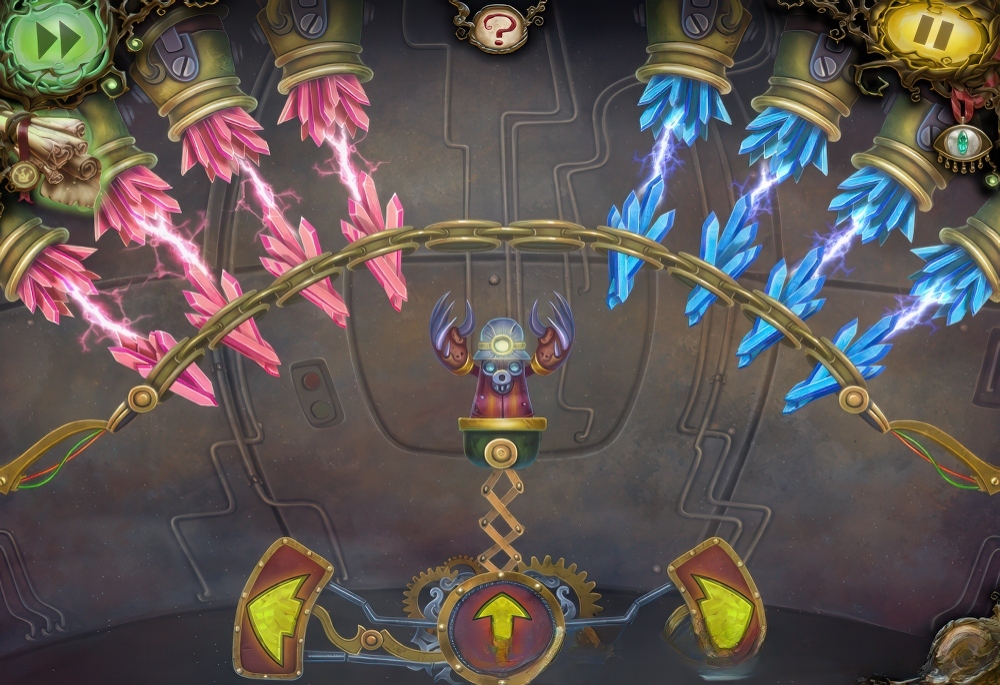
- Place the lid with a mole and turn it.
- Place 4 energy crystals.
- Using the mechanical mole, move the blue and red crystals to the corresponding places.

- Go to the foundry, click on the workshop.
- Click on the megaphone bird and use the screwdriver.
- Take the megaphone.
- Go back, click on the cart.
- Place the megaphone and click to scare the snake.
- Click on the lever.
- Click on the bellows.
- Take the rope and bent valve.
- Click on the bridge (1).
- Take the crossbow instructions and fish part.
- Use the rope on the chest, open it.
- Take the circular saws.
- Place the circular saw on the crossbow.
- Descend to the ship (2).
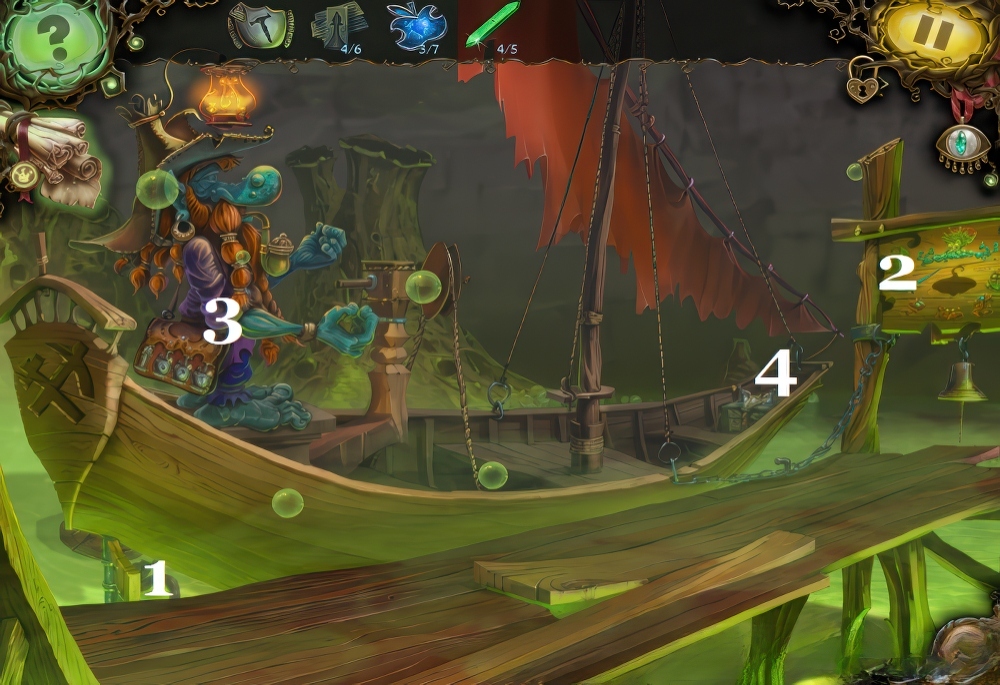
- Click on the keel (1), take the chess mold.
- Examine the plaque (2).
- Click on the gnome’s bag (3).
- Place the fish part.
- Swap the pieces to open the bag.
- Take the precious apple, drawing, and wind-up key.
- Solution.

- Click on the boat’s bow (4), take the bamboo chute.
- Place the wind-up key in the box, take the chess mold.
- Return to the foundry, click on the workshop.
- Place the chess molds.
- Close the mold and turn the valve.
- Take the chess pieces.
- Click on the blacksmith gnome.
- Place the bent valve on the anvil.
- Click on the lever, take the valve.
- Go to the ice cave.
- Place the circular saws on the crossbow.
- Click on the arch, take the wire cutters.
- Go to the ice head.
- Place the chess pieces and click on the snowflake.
- Take the ice chess.
- Go back, click on the table.
- Place the ice chess.
- Take the ice squirrel.
- Click on the gnome figurine.
- Take the precious apple and helm.
- Click on the arch and place the ice squirrel.
- Arrange the figures as shown in the drawing.
- Take the spyglass and the sail.
- Go back and click on the cart.
- Click on the horn, then on the lever.
- Click on the bellows, place the valve, and click on it.
- Click on the bridge, place the spyglass on the crossbow.
- Go to the ship.
- Place the helm and the sail.
- Click on the violin, take the stingray figurine, click on the string.
- Use the pliers to take the string.
- Click on the plaque, place the stingray figurine.
- Return to the crossbow, place the string.
- Shoot the weights on the gate to open them.

- Remember the code.
- Return to the plaque and click on the corresponding symbols.
- Turn the disks so that the holes align with the latches.
- When all the latches open, the chain will be released.
- Click on the pedestal (1), take the puzzle piece.
- Rotate the lid so that the holes align with the protrusions.
- Take the bamboo stem.
- Click on the rock ledge (2), take the belt.
- Click on the saw (3).
- Take the puzzle piece, place the belt.
- Place the bamboo stem and click on the handle.
- Take three chutes.
- Click on the rock ledge and place the three chutes.
- Click on the gnome, take the precious apple.
- Move forward.
- Click on the ladder (1).
- Take the shovel, beam, and puzzle piece.
- Examine the door (2).
- Click on the chest (3), use the shovel.
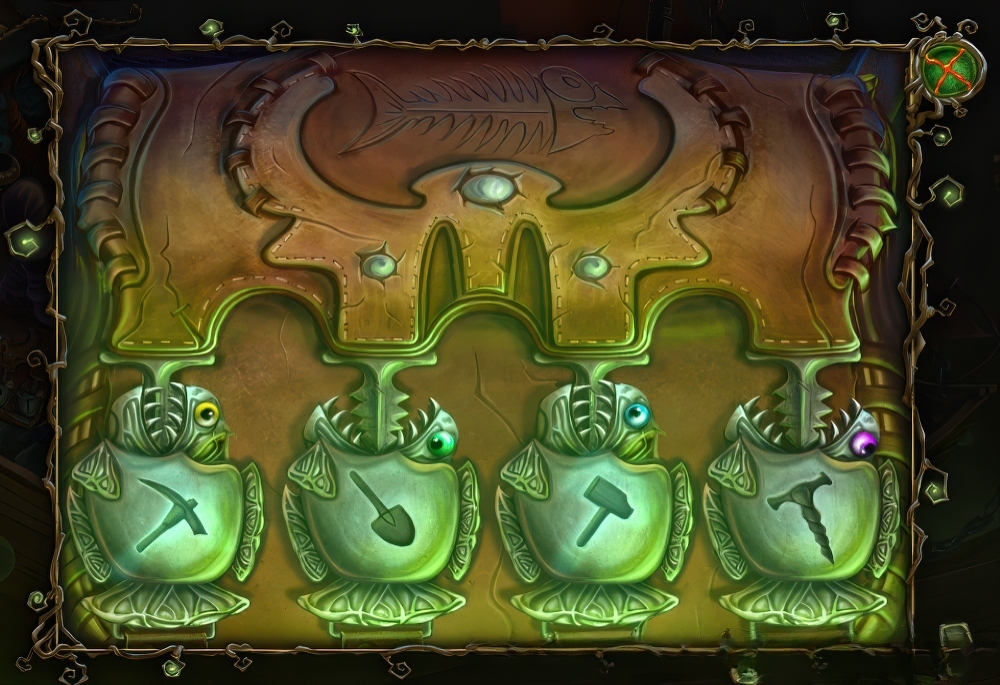
- Find the figurine pieces.

- Place all the figurines on the chest.
- Take the disk.
- Click on the door and place the disk.
- Match the correct hole on the movable tape to each lockpick on the disk.
- To insert a lockpick, click on the center of the disk.
- Click on the opened door.
- Take the wrench and puzzle piece.
- Go back, click on the gnome.
- Use the wrench, take the spring.
- Click on the casket on the ship and place the spring.
- Click on the winding key.
- Take the energy crystal.
- Click on the saw, place the beam.
- Click on the handle, take the planks.
- Return to the hut, place the crystal, and click on the lever.
- Click on the crystal coffin (1), take the puzzle piece.
- Place the planks on the bridge (2), click on the gnome (3).
- Take the aquarium, go back.
- Click on the ladder.
- Use the aquarium on the glowing fish.
- Return to the coffin, click on the gnome.
- Place the glowing fish in the net.
- Place the 5 puzzle pieces and restore the painting.

- Take the precious apple.
- Click on the coffin, place the precious apples.
- Arrange the apples according to the colors of the rainbow.

- You saved the second prince.
- Take the code piece and the green crystal.
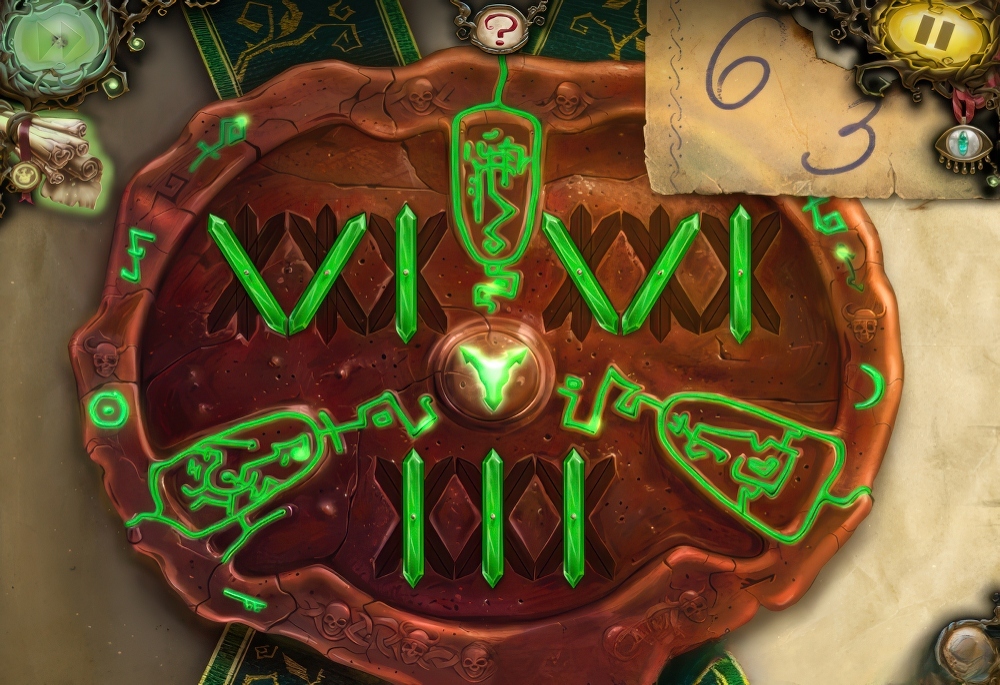
- Click on the witch’s journal and click on the seal.
- Place the green crystals and set the correct code.
- The second digit of the code must be found manually.
- Turn the pages twice, take the scorpion.
- Go up to the second floor.
- Click on the voodoo doll.
- Place the scorpion on the grate.
- Click on the candlestick, take the treble clef and the cauldron.
- Click on the puzzle on the wall.
- Click on the green arrows to rotate the labyrinth.
- Guide the magic orb into the glass tube.
- Take the ball lightning.
- Go down to the dungeon and click on the right cell.
- Place the treble clef on the case.
- Take the violin.
- Return to the second floor.
- Click on the evil shell and use the violin.
- Take the pearl.
- Return to the first floor and click on the mirror.
- Place the cauldron on the table.
- Place the pearl and ball lightning into the cauldron.
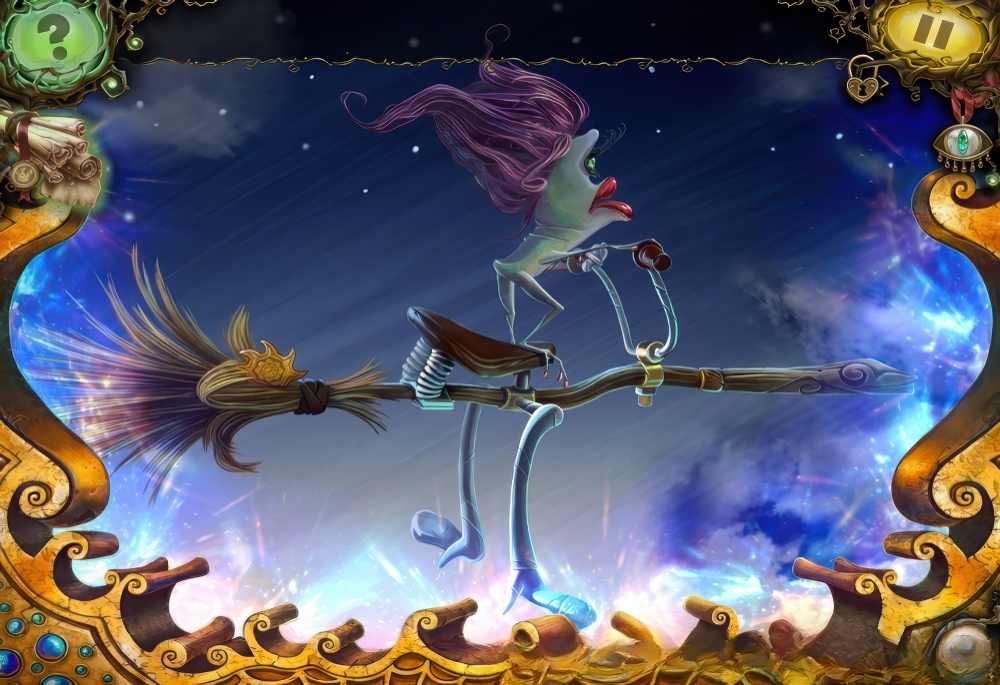
- You turned the witch into a frog.
- Justice has prevailed.
- Walkthrough Bonus Chapter, at the link below.


