
Chimeras 12: Inhuman Nature – You will find yourself in the center of events that involve experiments in a local hospital. Your character, Rosalie Franco, has lost her memory and finds herself in the hospital, where she faces horrible discoveries. Doctors, instead of treating patients, conduct inhuman experiments, turning people into animals. You must help Rosalie recover her memory and uncover the truth about the horrible incidents in the hospital. Find out who is behind these horrible experiments and try to stop the mad scientist who is playing with human nature. If you can not pass any of the puzzles or do not know where the items are, on our site you can watch the walkthrough of the game Chimeras 12: Inhuman Nature, and prevent further evil.
Chimeras 12: Inhuman Nature – Walkthrough
Here you can see the full walkthrough of Chimeras 12: Inhuman Nature game, namely for all chapters, including bonus chapter, in pictures.
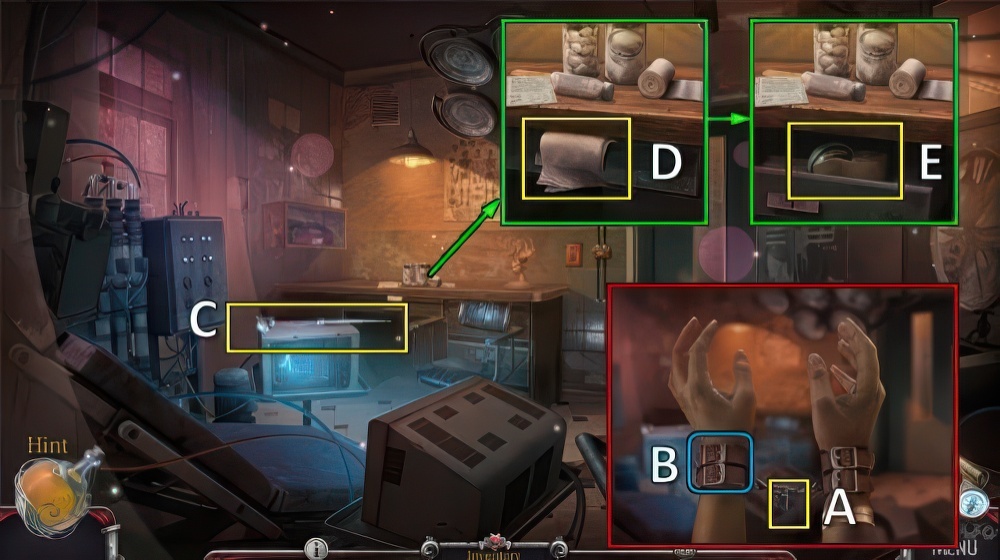
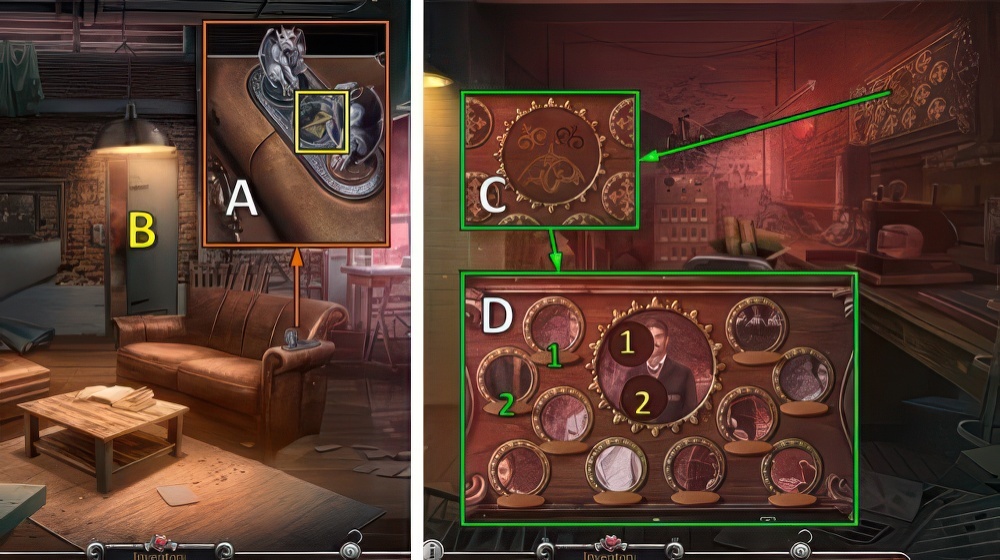
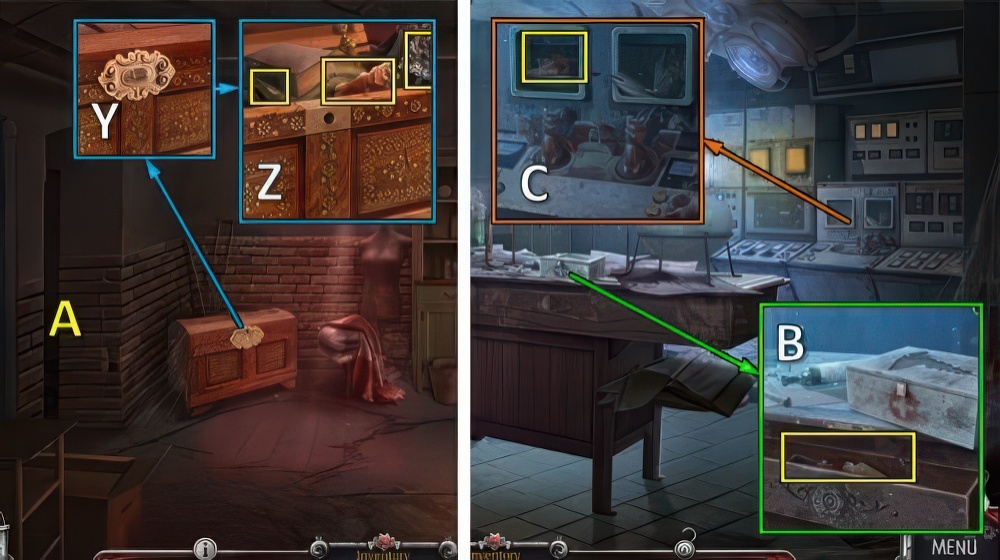
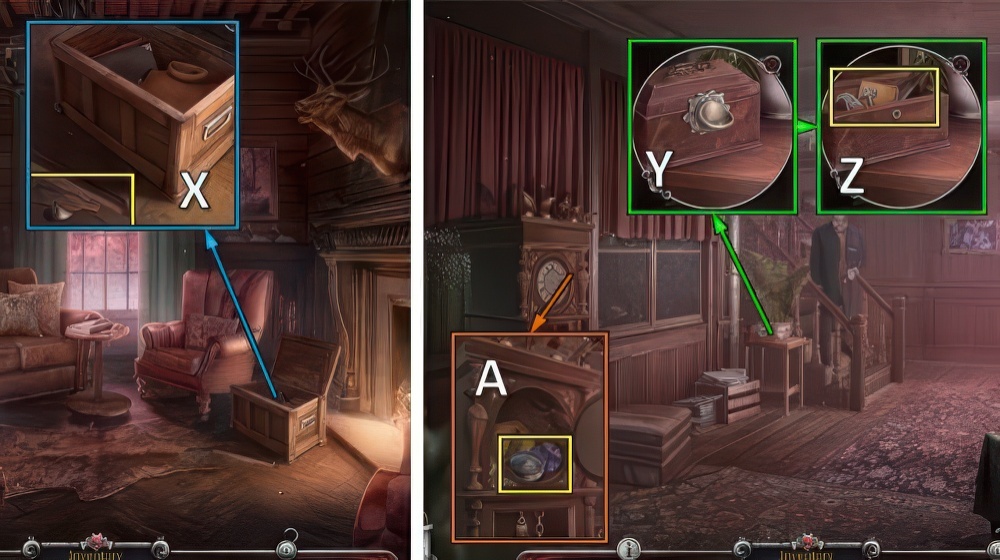
- Take SMALL PICK (A).
- Remove handcuffs (B).
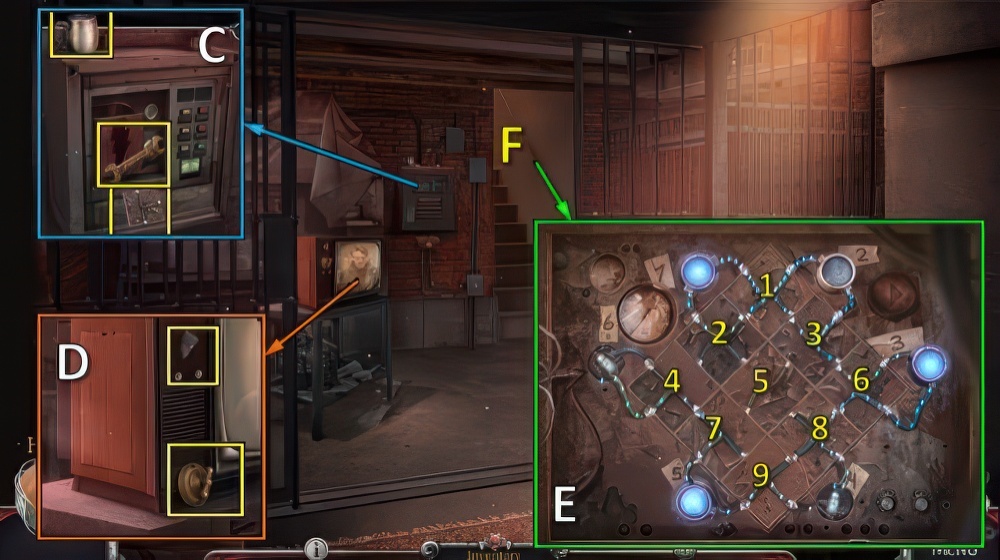
- Take TELESCOPIC POINTER (C).
- Take TOWEL, use SMALL PICK (D).
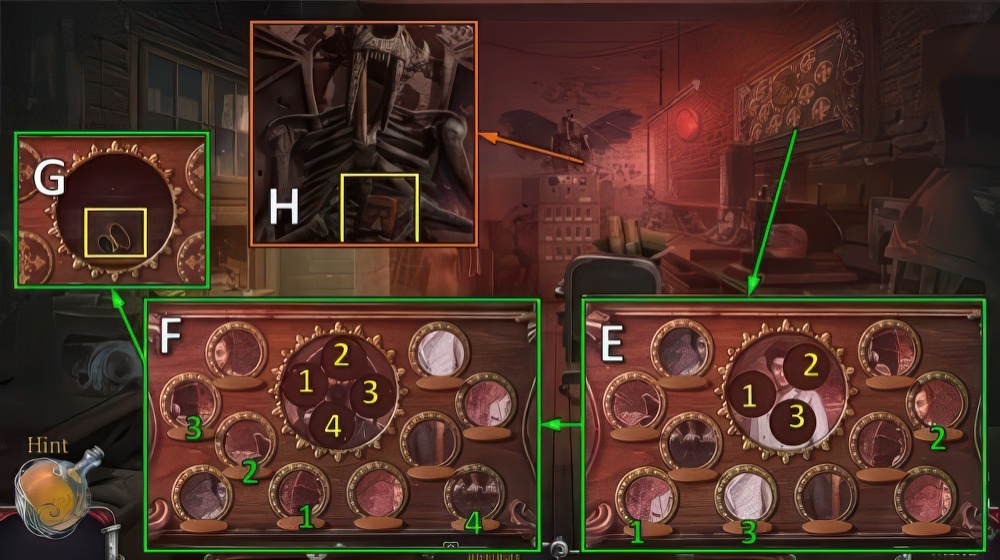
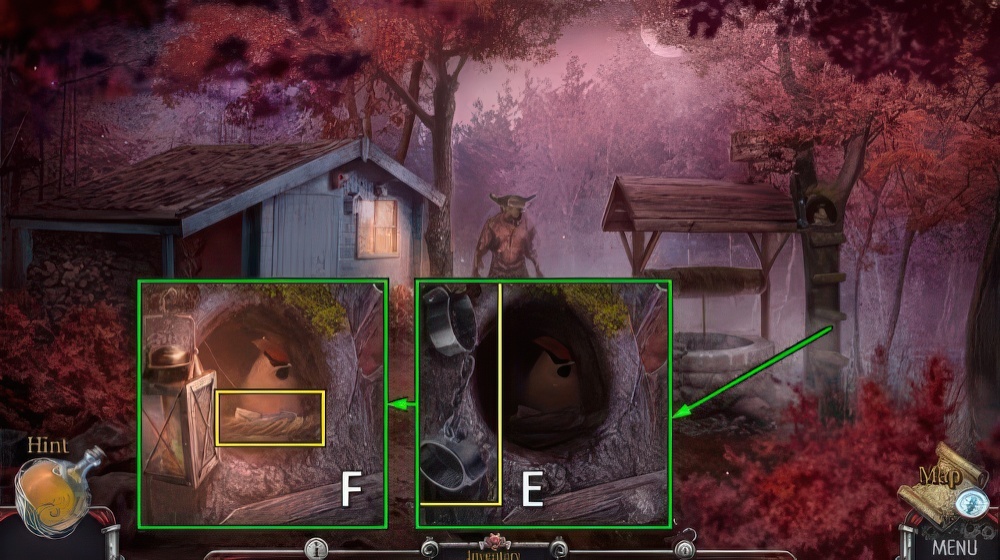
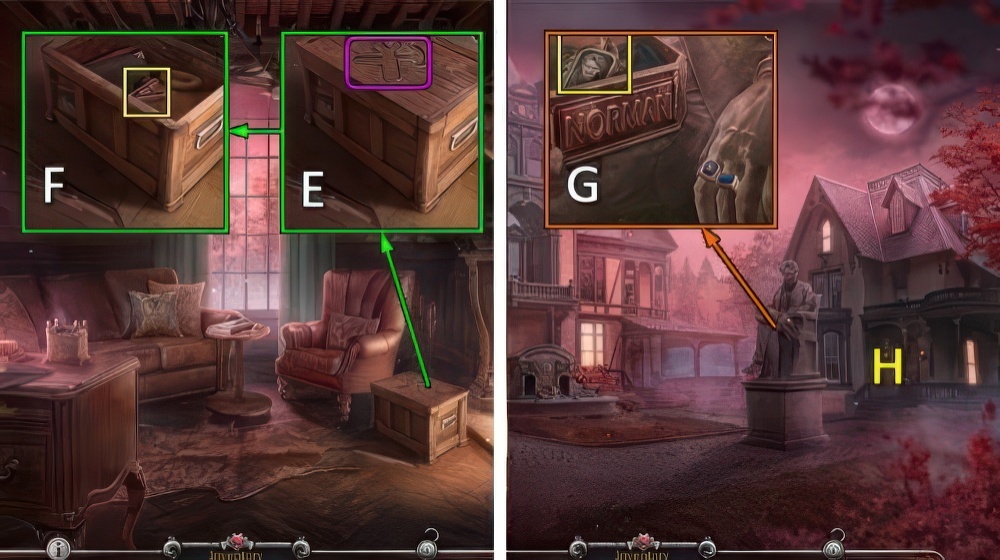
- Take ADHESIVE TAPE and LOCKER HANDLE (E).
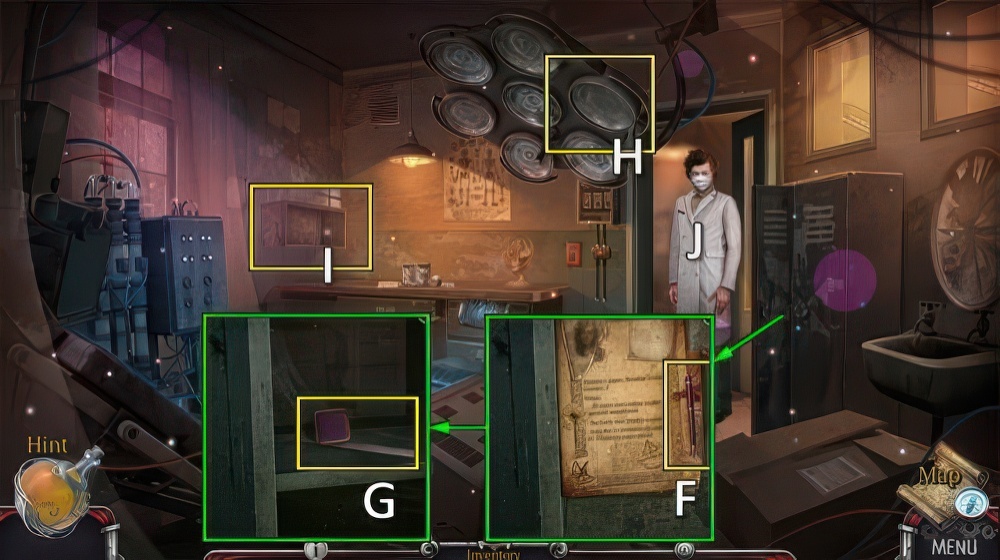
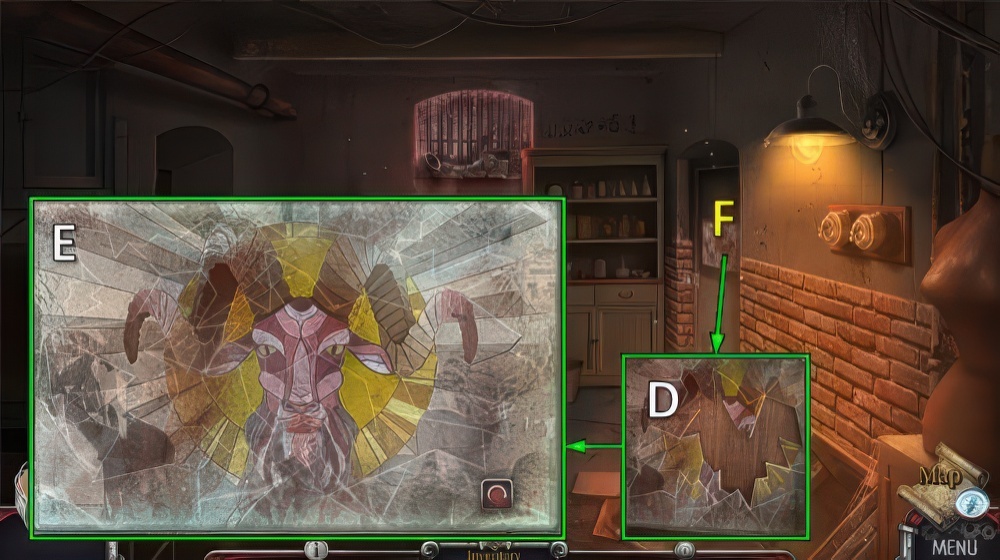
- Take PEN, play puzzle (F).
- Receive PATIENT NUMBER.
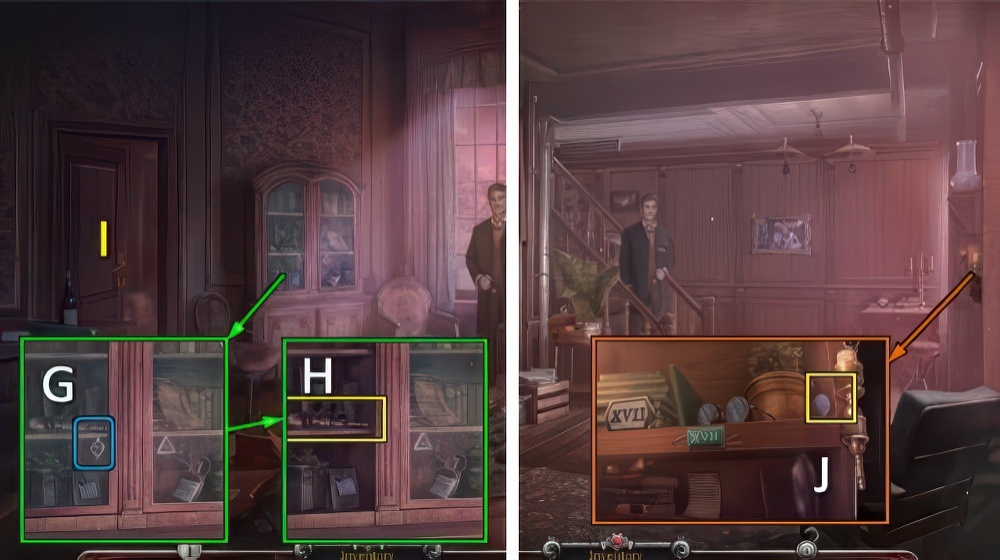
- Place LOCKER HANDLE, take TOKEN 1/4 and RULER (G).
- Extend TELESCOPIC POINTER.
- Add RULER and ADHESIVE TAPE.
- Take LONG POINTER.
- Take HEAVY DISC with LONG POINTER (H).
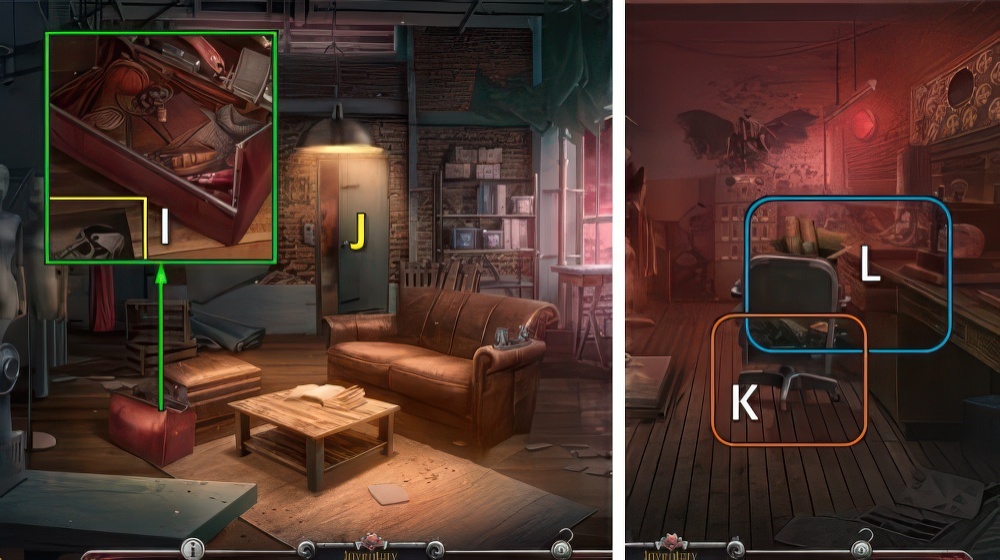
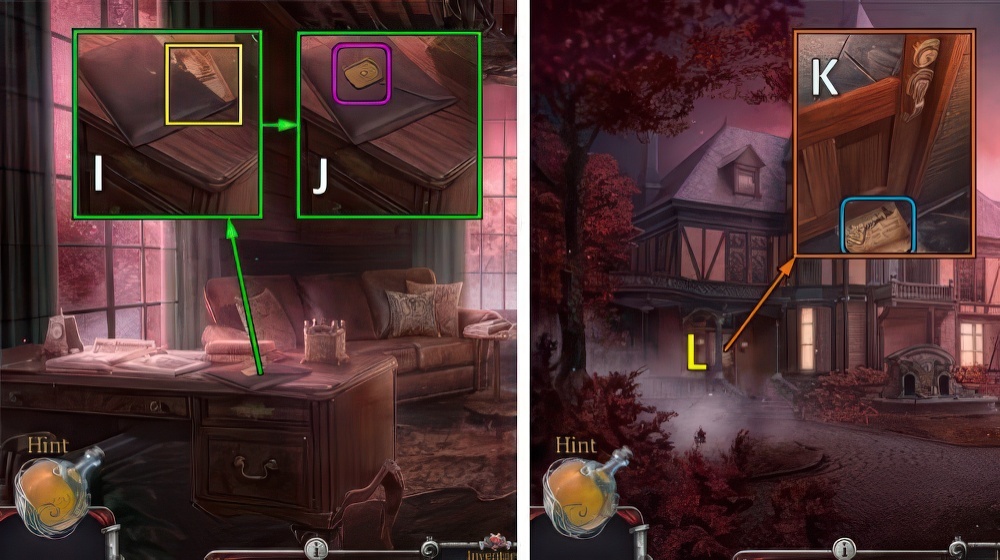
- Use HEAVY DISC, take FIRE EXTINGUISHER (I).
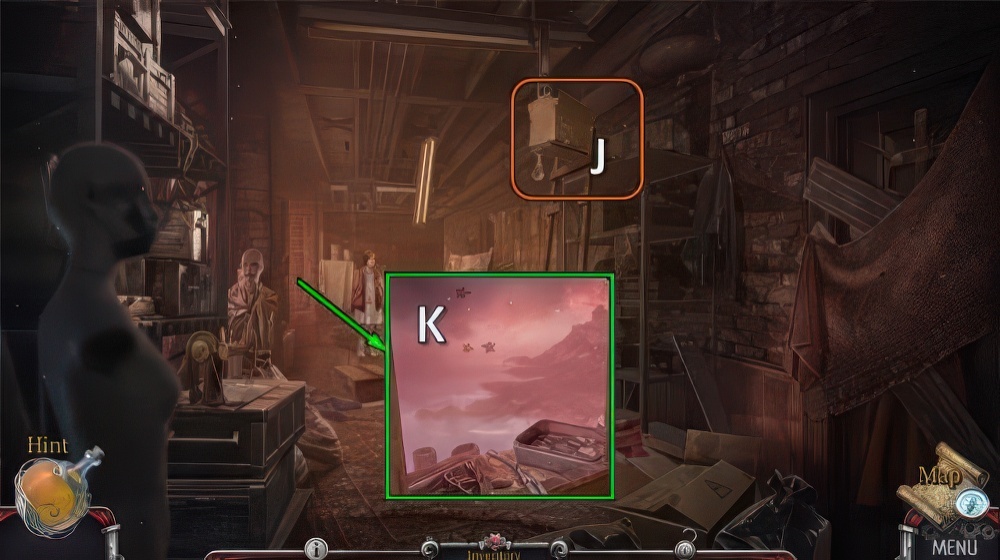
- Use FIRE EXTINGUISHER (J).

- Take NAPKIN, read folder.
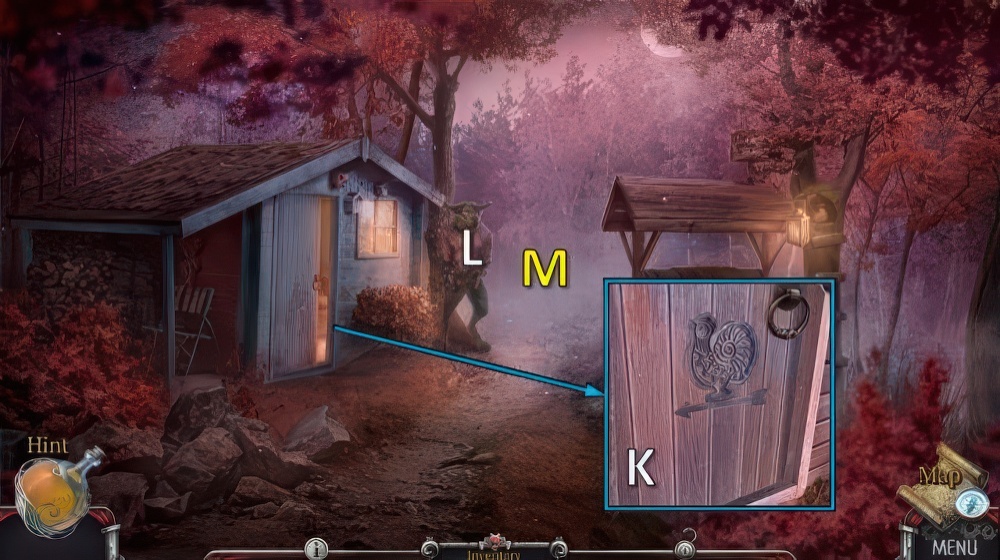
- Take LOCK NUMBER (K).
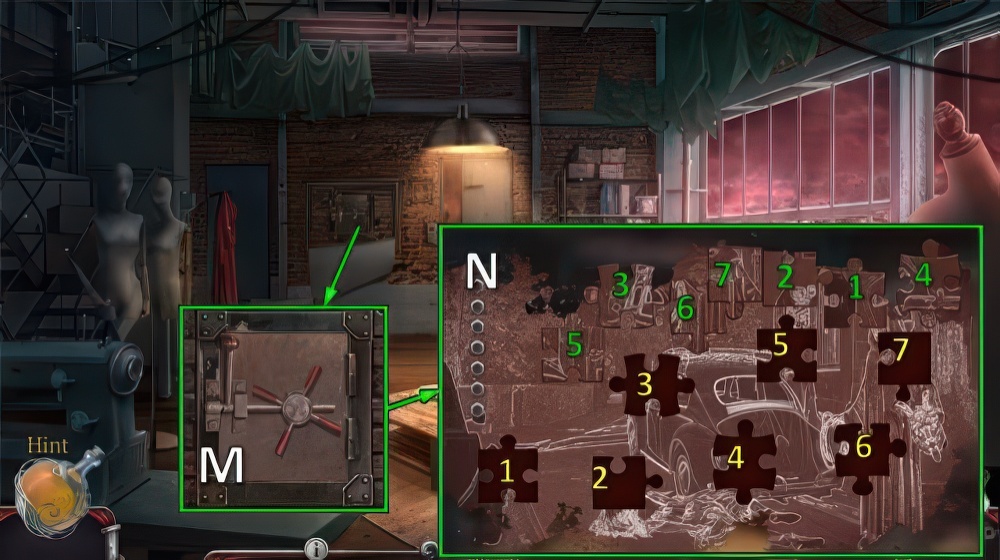
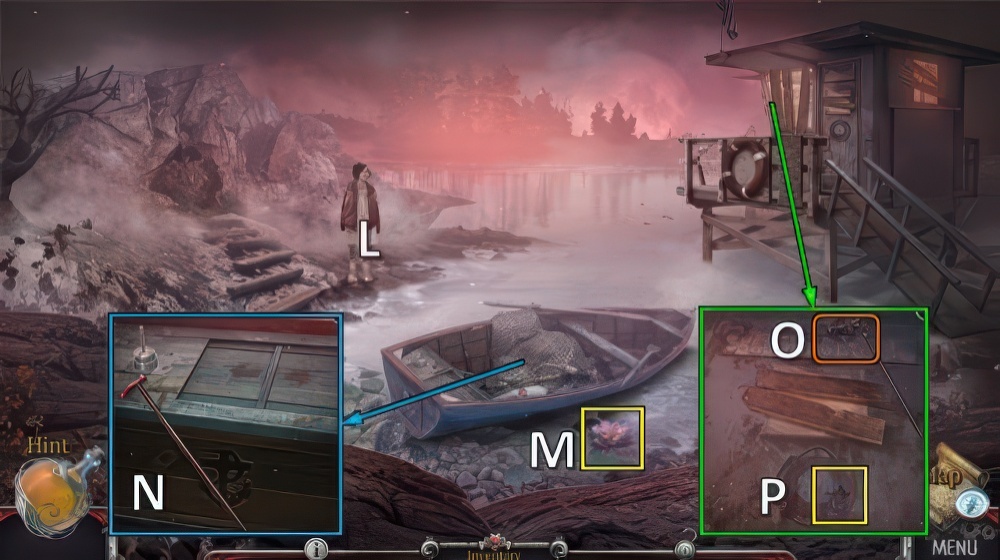
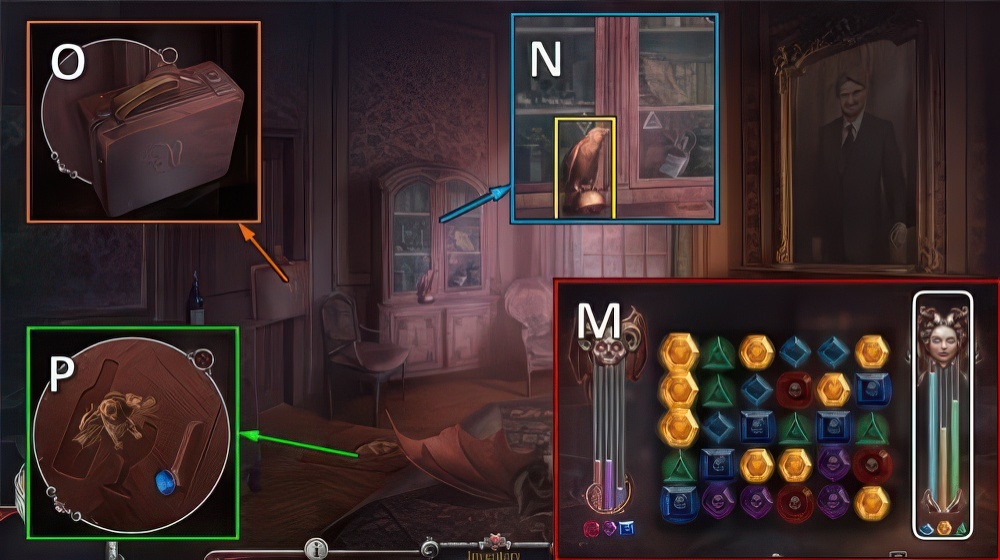
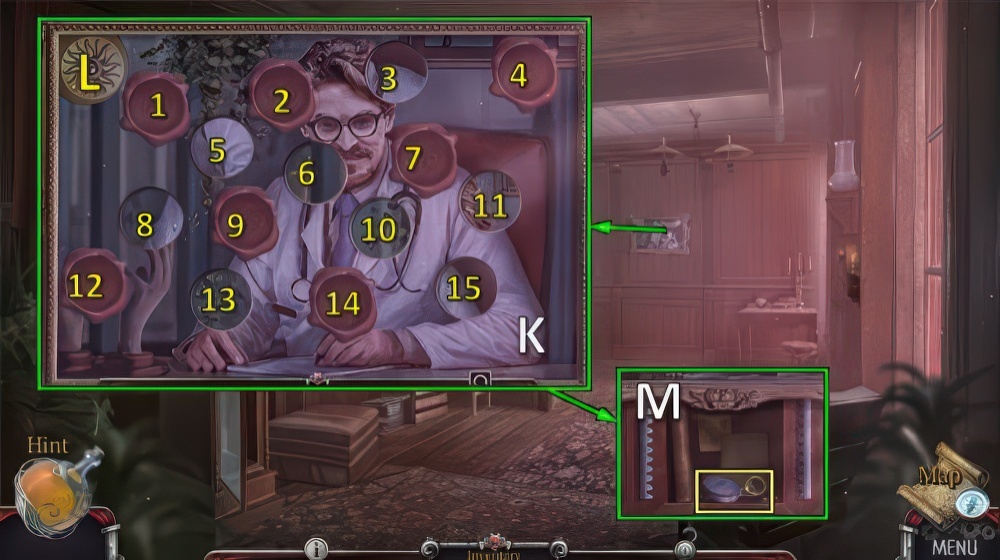
- Take SLIPPERS (L), move token (M).
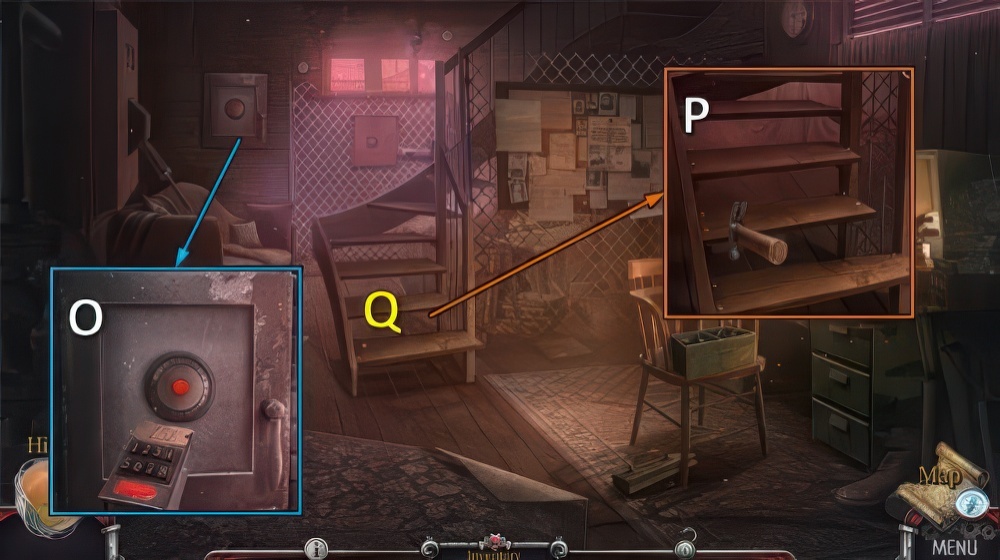
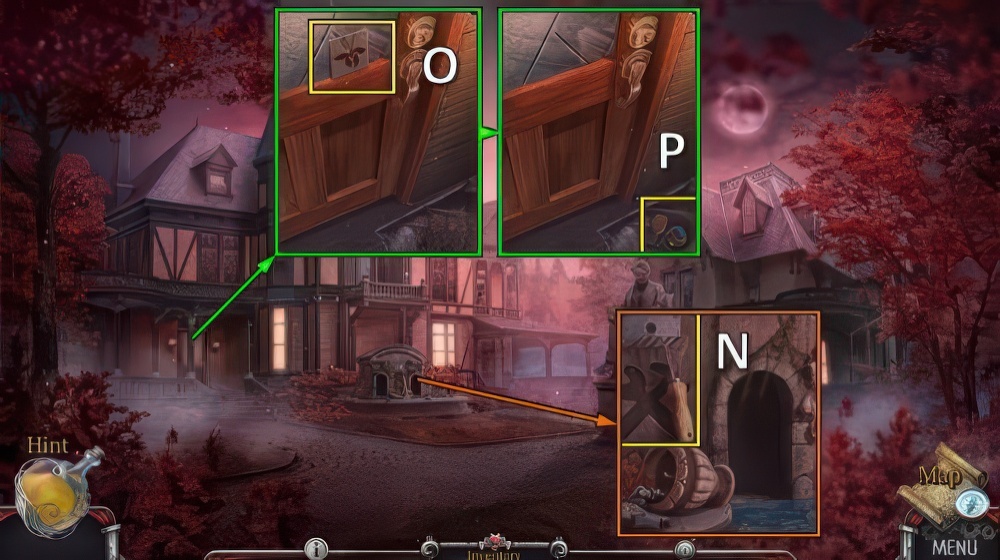
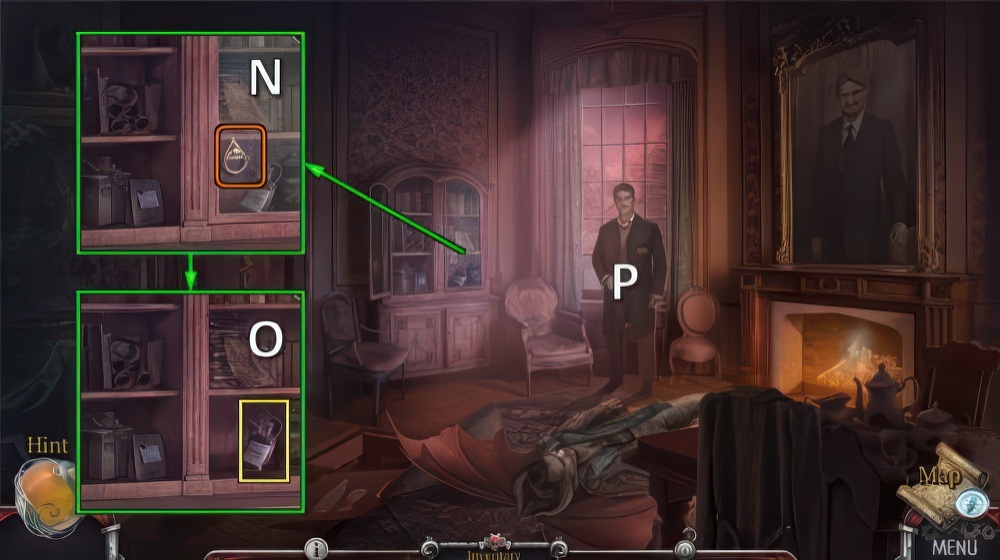
- Place NAPKIN and PEN, take ACCESS CODE (N).
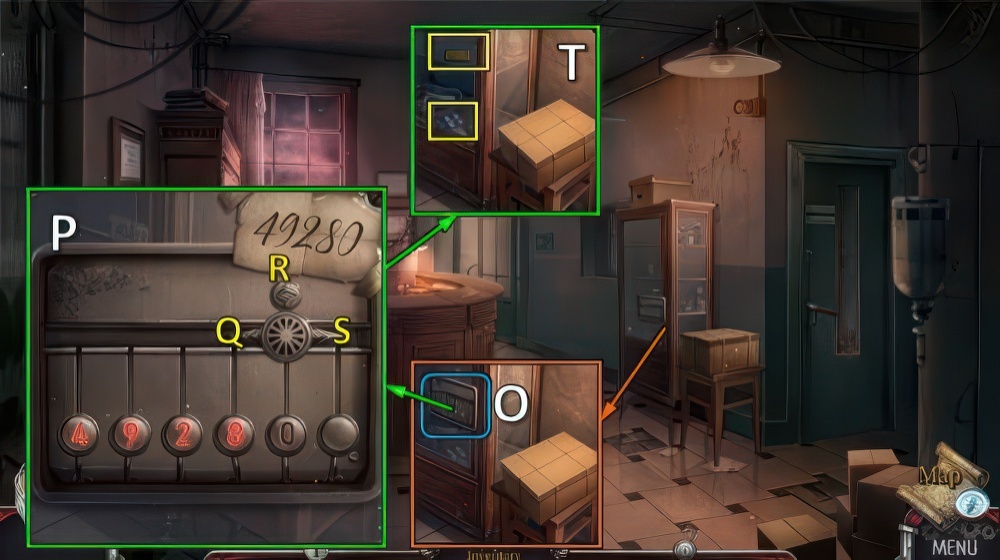
- Place LOCK NUMBER and ACCESS CODE (O).
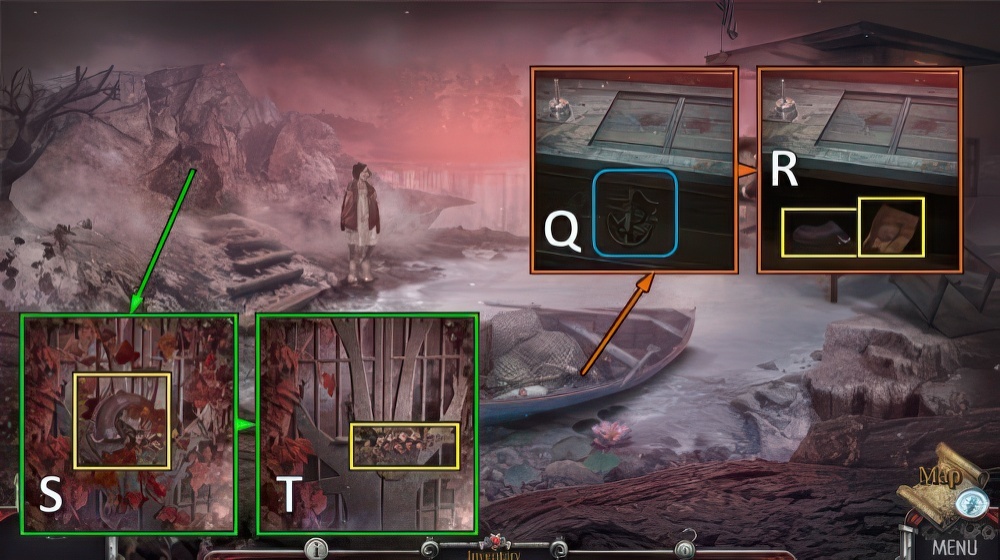
- Solution (P): R-Sx5-R-Q-R-Q-R-Qx3-R-Sx2-R.
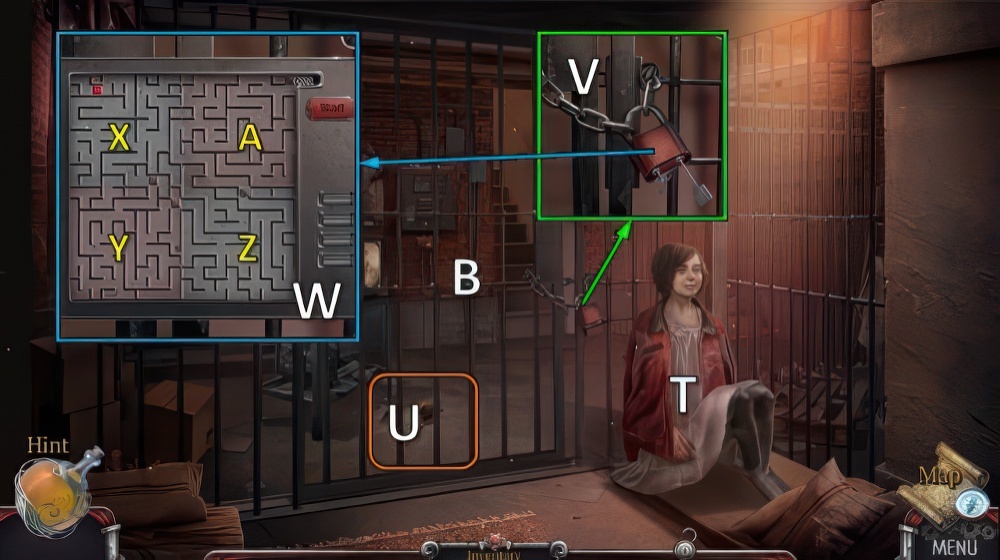
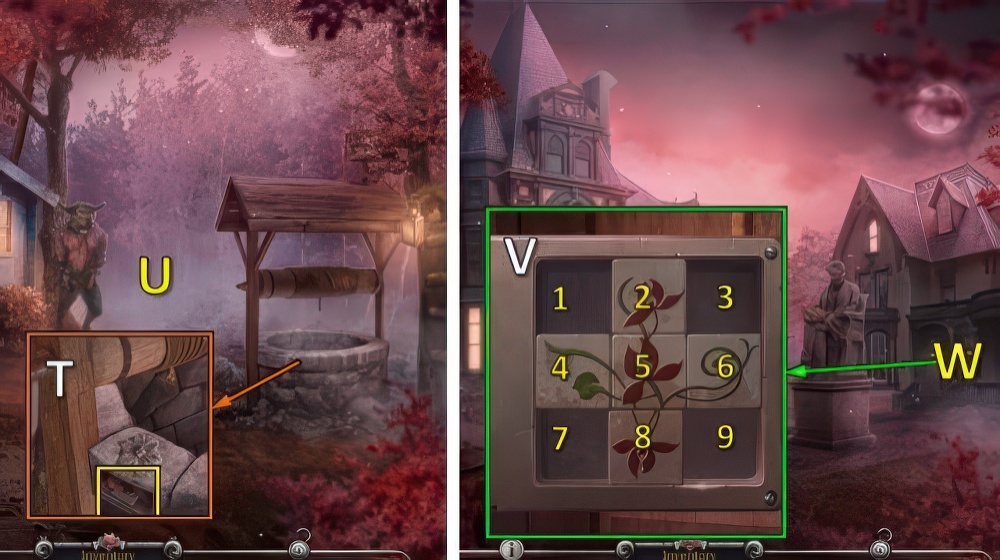
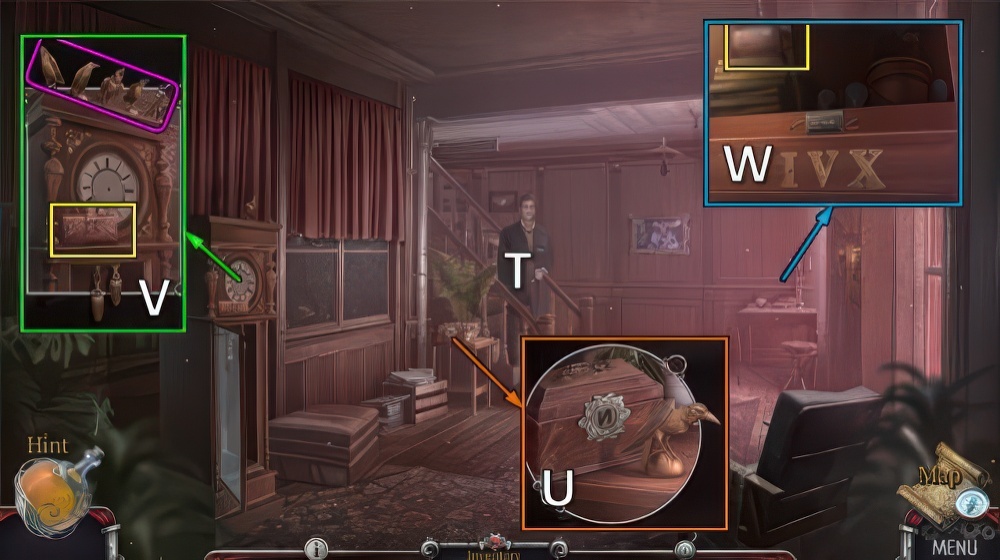
- Take TOKEN 2/4 and SEDATIVE (T).
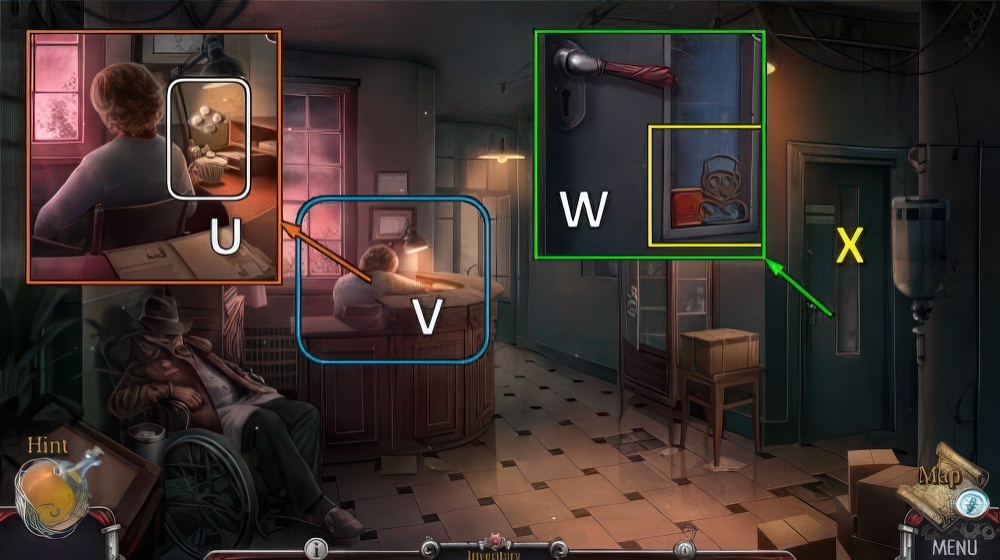
- Use SEDATIVE (U).
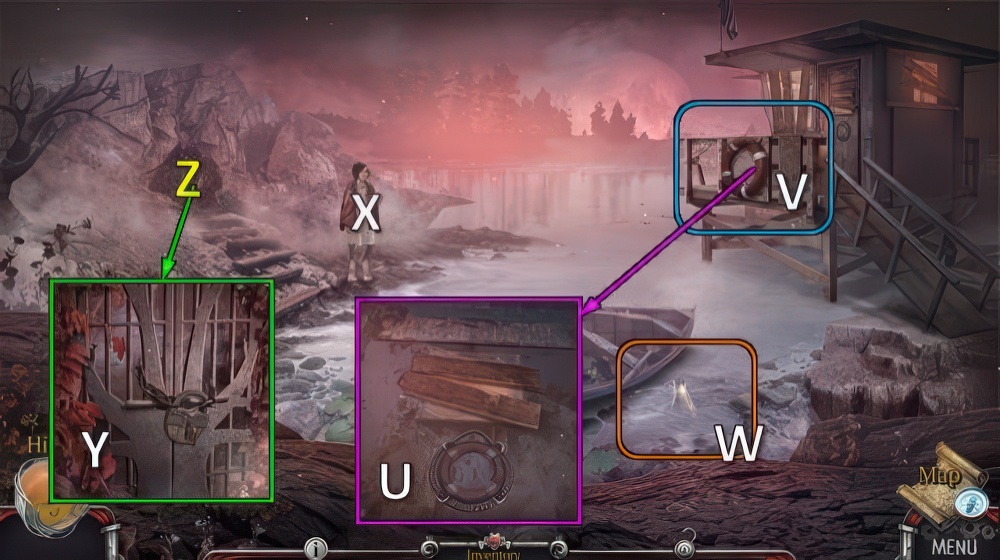
- Play puzzle (V), receive STORAGE KEY.
- Take DOCTOR DECORATION and TOKEN 3/4, use STORAGE KEY (W).
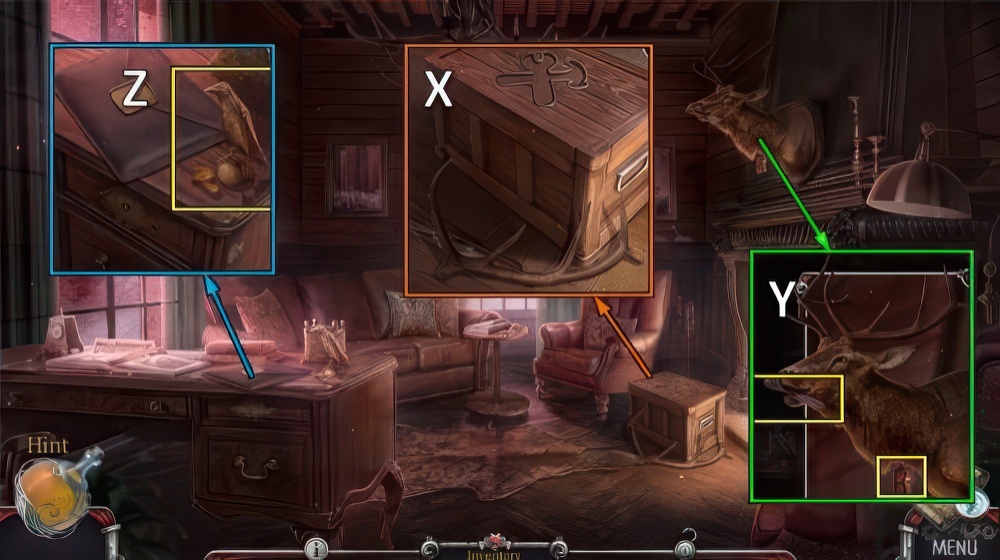
- Go (X).
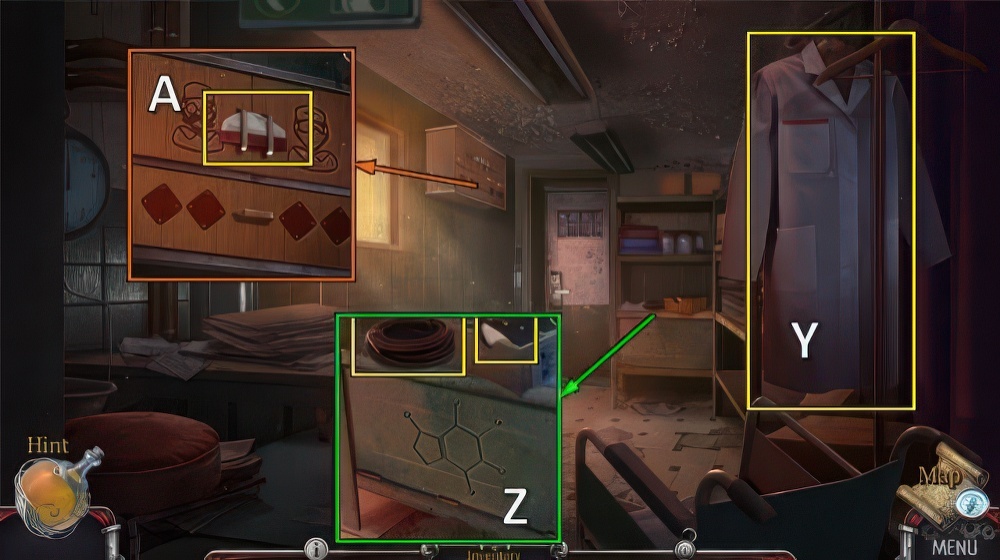
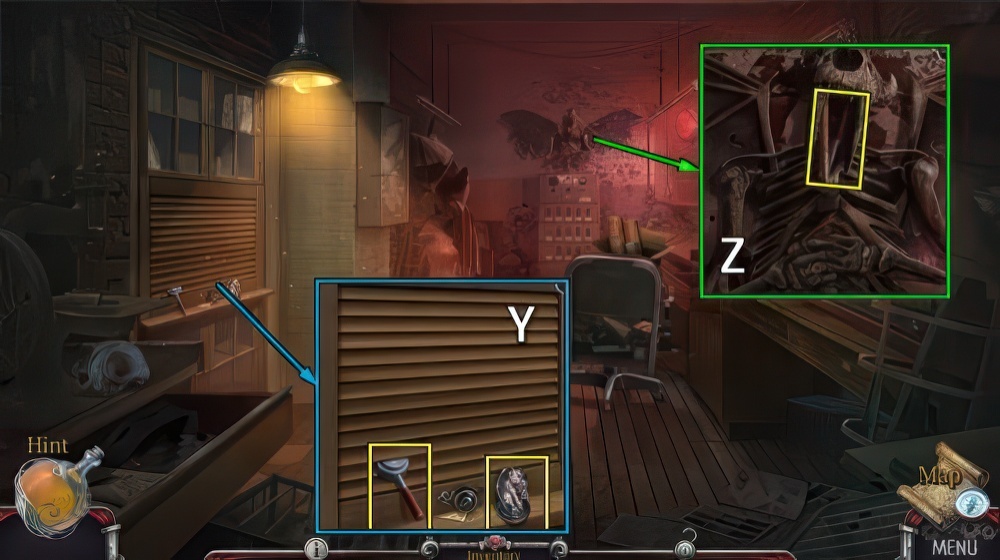
- Take GOWN (Y).
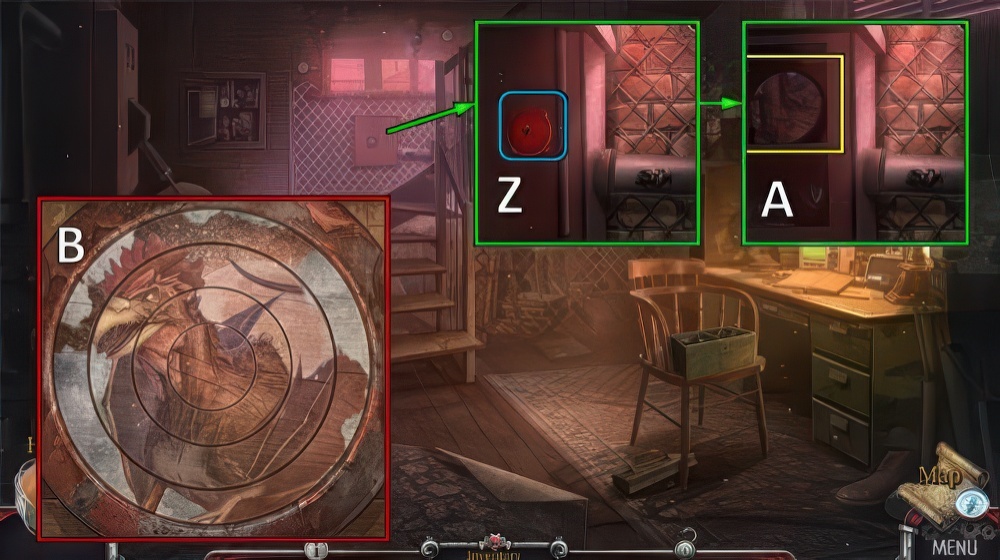
- Take CABLE, take SHARD with TOWEL (Z).
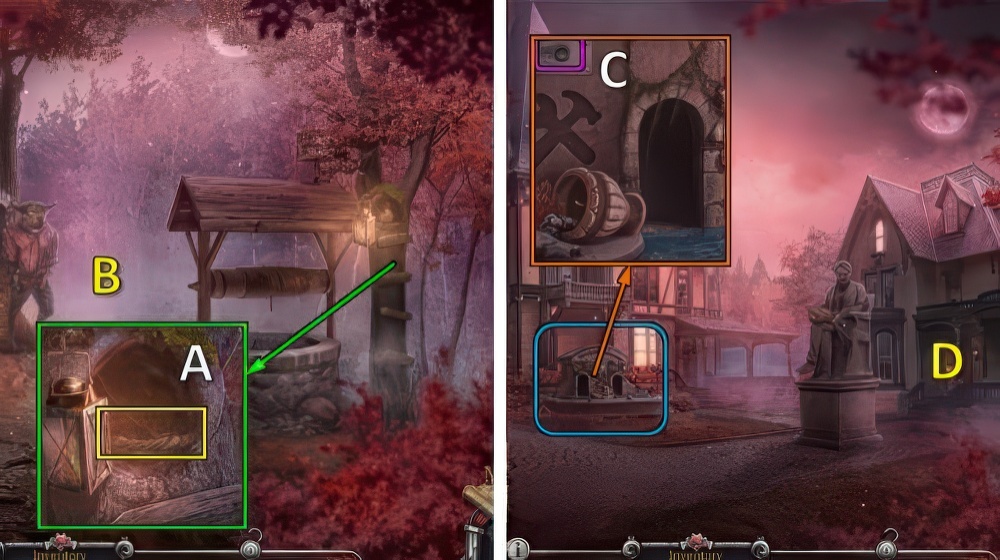
- Take NURSE CAP (A).
- Walk down.
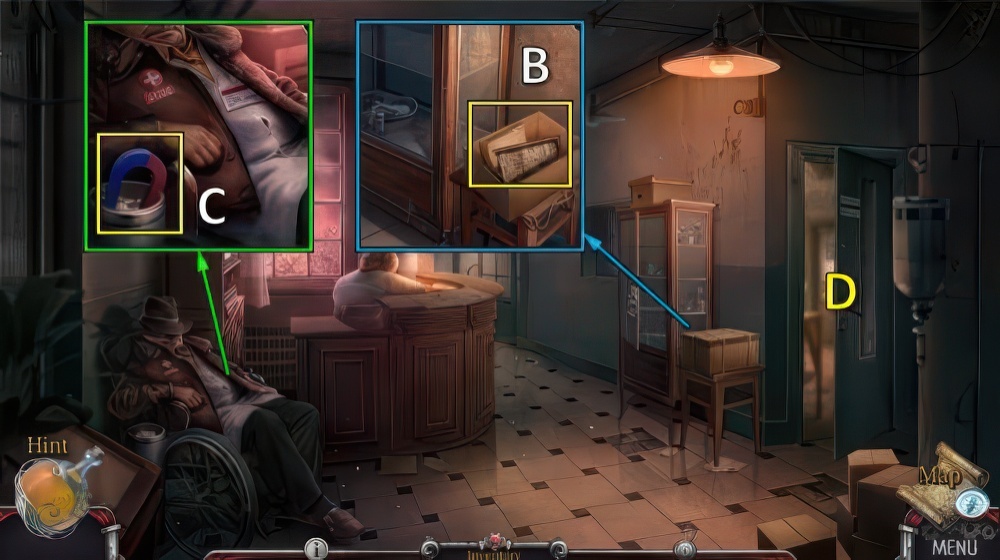
- Use SHARD, take PLAN PART, NURSE DECORATION and MAGNET (B).
- Take DNA AMULET and TOKENS 4/4 with MAGNET (C).
- Go (D).

- Place DOCTOR DECORATION, NURSE DECORATION and TOKENS (E), take PLAN, DOCTOR’S PASS and PLAN PART (F).
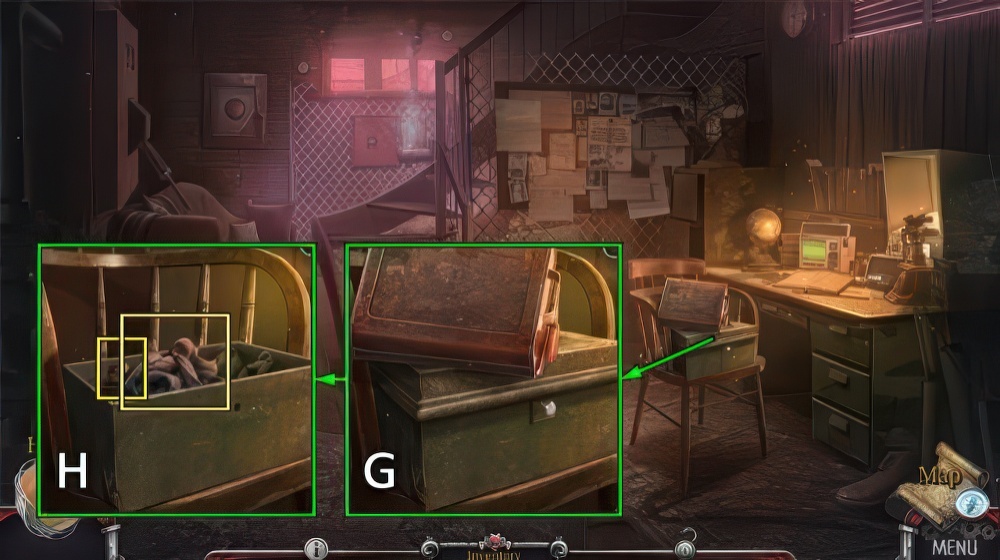
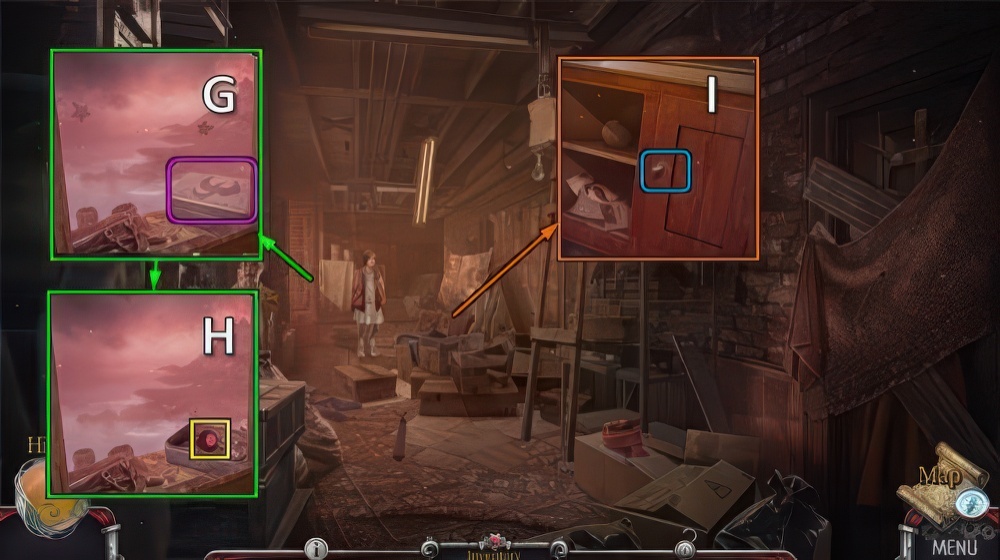
- Use DOCTOR’S PASS (G).
- Play puzzle (H), receive STAPLE GUN.
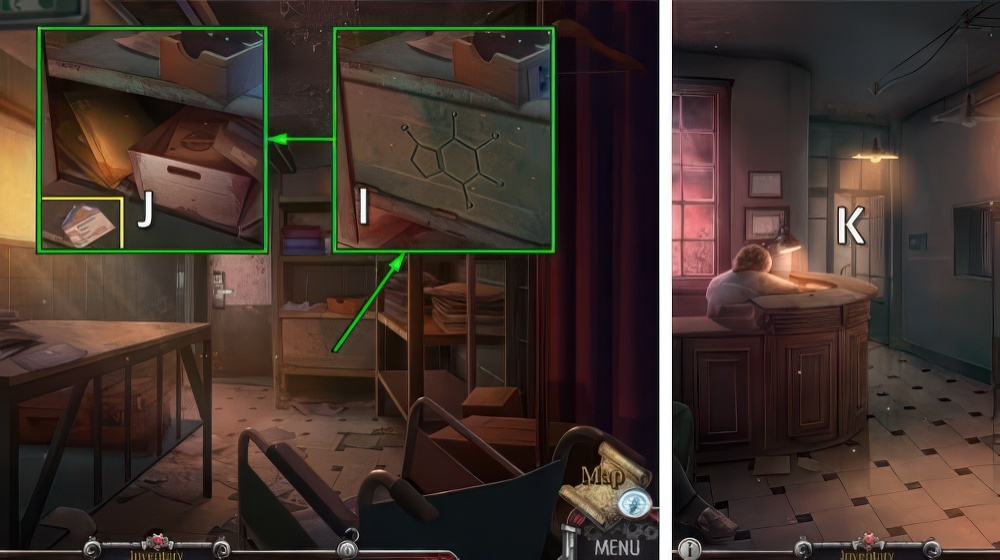
- Place DNA AMULET (I).
- Place PATIENT NUMBER, take card, COIN and MEDICAL MASK (J).
- Walk down.
- SLIPPERS, MEDICAL MASK and NURSE CAP on GOWN, take MEDICAL COSTUME.
- PLAN PART x2 and STAPLE GUN on PLAN, take EVACUATION PLAN.
- Use MEDICAL COSTUME.
- Use EVACUATION PLAN (K).

- Solution (L): select M, N, O when enemies are in position as shown.
- Play puzzle (M), receive TORN PHOTO.

- Talk (N), receive POCKET WATCH.
- Use SHARD, take SNAKE TILE (O).
- Use SHARD (P).
- Take RUBBER GLOVE (Q).

- Use RUBBER GLOVE, take CHIMERA STATUETTE and DRAGON TILE (R).
- Take RIBBON, place DRAGON TILE and SNAKE TILE (S).
- Play puzzle, take PHOTO HALF.
- PHOTO HALF on TORN PHOTO.
- Turn, use ADHESIVE TAPE.
- Receive FINGERPRINT.
- Take PHOTO.
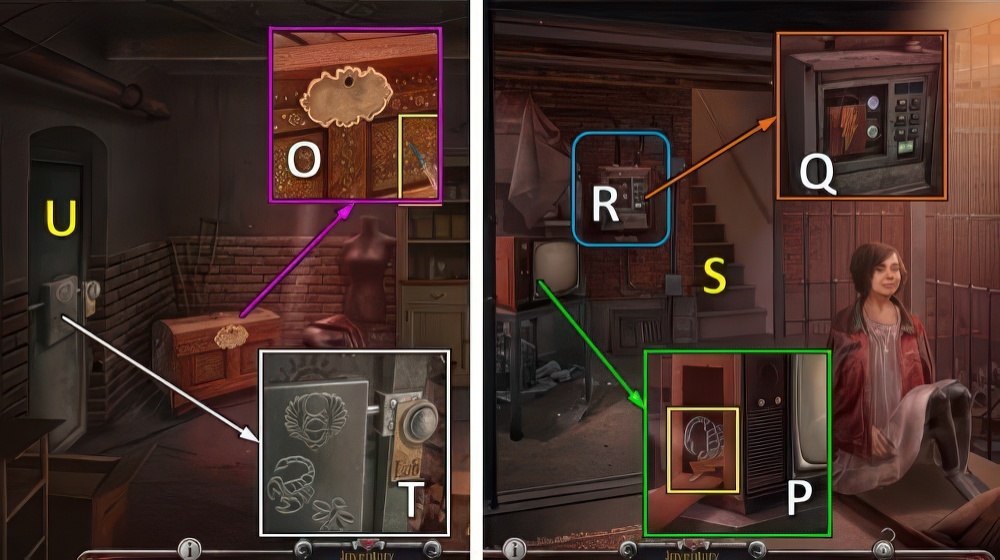
- Use FINGERPRINT, open (T).
- Go (U).
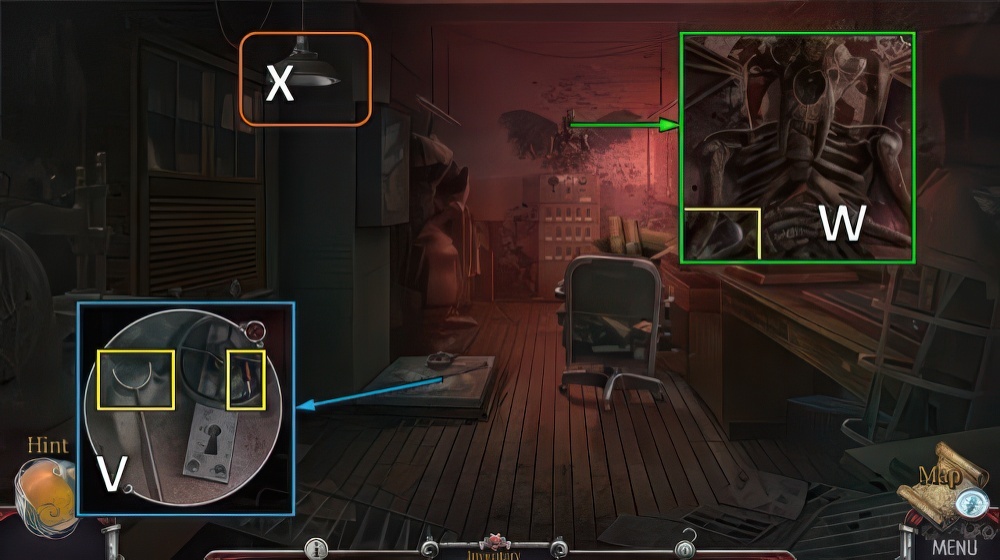
- Take CRUTCH and WHEEL PART 1/3 (V).
- Take BULB (W).
- Place BULB (X).
- Take GARGOYLE STATUETTE and WHEELBASE, place CRUTCH (Y).
- Play puzzle, receive WOODEN PEG.
- Place WOODEN PEG, take WHEEL PART 2/3 (Z).
- Walk down.
- Place CHIMERA STATUETTE and GARGOYLE STATUETTE, take GOLDEN RUNE (A).
- Go (B).
- GOLDEN RUNE on POCKET WATCH, take INLAY.
- Place INLAY (C).
- Solution 1 (D).
- Solution 2 (E): locations of chips are random.
- Solution 3 (F): locations of chips are random.
- Take SIGNET RING (G).
- Place SIGNET RING, take BRIAN’S WALLET (H).
- Walk down.
- NAIL-CLIPPER from BRIAN’S WALLET.
- Use NAIL-CLIPPER, take B MONOGRAM and ARMCHAIR WHEEL (I).
- Go (J).
- Place ARMCHAIR WHEEL (K).
- Play puzzle (L), receive LEVER.
- Walk down.
- B MONOGRAM on BRIAN’S WALLET, take WHEEL PARTS 3/3.
- WHEEL PARTS on WHEELBASE, take SAFE WHEEL.
- Place SAFE WHEEL and LEVER (M).
- Solution 1 (N).

- Solution 2 (O).
- Take BASEMENT KEY (P).
- Go (Q).
- Use BASEMENT KEY (R).
- Play puzzle (S).
- Talk, receive LOCK PART (T).
- Offer PHOTO, receive HOOK (T).
- CABLE on HOOK, take CABLE WITH HOOK.
- Use CABLE WITH HOOK, take LOCK PART and LEVER (U).
- Place LOCK PART x2 (V).
- Solution (W): Xx3-Yx2-Zx2-A.
- Open (B).
- Use COIN, take CUP, FUSE and WRENCH (C).
- Use COIN, take FUSE and TOGGLE SWITCH (D).
- Place FUSE x2 (E).
- Solution: (2-5)-(3-6)-(6-8)-(7-8)-(7-9)-(4-5).
- Go (F).

- Place TOGGLE SWITCH (G).
- Take STAINED GLASS SHARD 1/5, take BROOM with RIBBON (H).
- Take note and PILLS (I).
- Take STAINED GLASS SHARD 2/5 (J).

- Use BROOM, play puzzle (K).
- Receive SCARAB.
- Take NUMBER (L).
- Walk down.
- PILLS in CUP, take PAINKILLER.
- Offer PAINKILLER (M), receive CHISEL HANDLE.
- Go (N).
- Take CHISEL with CHISEL HANDLE (O).
- Walk down.
- Use CHISEL, take LIGHTNING SYMBOL and SCORPION (P).
- Place LIGHTNING SUMBOL (Q).
- Play puzzle (R), receive DRAGONFLY.
- Go (S).
- Place SCARAB, SCORPION and DRAGONFLY, open (T).
- Go (U).

- Take STAINED GLASS SHARD 3/5 and BOX CUTTER (V).
- Use BOX CUTTER, take BAT WINGS, CHEST ELEMENT and STAINED GLASS SHARD 4/5 (W).
- Take FIGURINE BASE and BROKEN REMOTE CONTROL (X).
- Walk down.
- Place CHEST ELEMENT (Y).
- Take FIGURINE BODY, HINT HALF and TABLE DECORATION (Z).
- Go (A).
- Place TABLE DECORATION, take GLUE and NAILS (B).
- FIGURINE BODY, BAT WINGS and GLUE on FIGURINE BASE, take BAT FIGURINE.
- Place BAT FIGURINE, take STAINED GLASS SHARDS 5/5 (C).
- Walk down.
- Place STAINED GLASS SHARDS (D).
- Solution (E).
- Go (F).
- Take FUEL, use WRENCH (G).
- Take RAG and VINTAGE SEAL (H).

- Take SAW BASE and RED BUTTON (I).
- Take PENCIL (J).
- Place RAG, take BATTERY and PLANKS (K).
- Go to Laboratory.

- Use VINTAGE SEAL (L).
- Play puzzle (M), receive HINT HALF.
- Place HINT HALF x2 and PENCIL, take HINT (N).
- Go to Brian’s Study.
- BATTERY, HINT and RED BUTTON on BROKEN REMOTE CONTROL.
- Enter 1-5-8.
- Take SAFE REMOTE CONTROL.
- Use SAFE REMOTE CONTROL, play puzzle (O).
- Receive HAMMER.
- Place BOARDS, NAILS and HAMMER (P).
- Go (Q).

- Talk (R), receive MECHANISM PART 1/3.
- Take WOODEN HANDLE (S).
- Take LIGHTER, place WOODEN HANDLE.
- Open (T).
- Take BOX KEY (U).
- Walk down twice.

- Use BOX KEY, take VALVE and CADUCEUS (V).
- Go (W).
- Place CADUCEUS (X), take MECHANISM PART 2/3 (Y).
- Go to Brian’s Study.
- Place VALVE (Z), take MECHANISM PART 3/3 (A).
- Place MECHANISM PARTS, solution (B).

- Talk (C), receive ANGEL TOKEN.
- Place ANGEL TOKEN (D), take BIRD and SEWING WHEEL (E).
- Place SEWING WHEEL and LEVER, take SAFETY TRIGGER (F).
- Place BIRD (G), take RUBY HANDLE (H).
- Place RUBY HANDLE, play puzzle (I).
- Receive CHAIN.
- CHAIN, FUEL and SAFETY TRIGGER on SAW BASE, take CHAINSAW.
- Use CHAINSAW (J).
- Play puzzle, receive ROPE.
- Place ROPE (K).
- Talk (L), receive MEDICINE RECIPE.
- Take WATER LILY (M).
- Take CANE (N).
- Use CANE (O), take ANCHOR SIGN (P).
- Place ANCHOR SIGN (Q), take SLEEPING POWDER and LOCK PART 1/3 (R).
- Take LOCK PART 2/3 (S).
- Use LIGHTER, take HEATHER (T).
- LOCK PARTS 3/3 from MEDICINE RECIPE.
- Place LOCK PARTS (U).
- Play puzzle (V), receive FLASK.
- Use FLASK (W), receive FLASK WITH WATER.
- HEATHER, WATER LILY, FLASK WITH WATER and SLEEPING POWDER on MEDICINE RECIPE, take ANIMAL SOPORIFIC.
- Offer ANIMAL SOPORIFIC (X), receive GATE KEY.
- Use GATE KEY (Y).
- Go (Z).

- Take EXTINGUISHED LANTERN (A).
- Take WELL LEVER (B).
- Take COLLAR, place and turn WELL LEVER (C).
- Take BOAT STEERING WHEEL and FLINT AND STEEL with BOX CUTTER (D).
- FLINT AND STEEL on EXTINGUISHED LANTERN, take LANTERN.
- Take WIDE RING (E).
- Place LANTERN, take ARROW and TILE 1/4 (F).
- Walk down.

- Place BOAT STEERING WHEEL (G).
- Solution (H): (1-4)-(3-4)-(5-4)-(5-7)-(6-7)-(7-8).
- Take ROOSTER (I).
- Go (J).
- Place ROOSTER and ARROW.
- Open, play puzzle (K).
- Receive STRONG ROPE.
- COLLAR and STRONG ROPE on WIDE RING, take SHACKLES.
- Use SHACKLES (L).
- Go (M).
- Take SMALL RAKE (N).
- Take TILE 2/4 (O).
- Use SMALL RAKE, take BLUE SIGNET RING and WINEGLASS AMULET (P).

- Take BLACK SIGNET RING with CANE (Q).
- Take TILE 3/4 (R).
- Place BLACK SIGNET RING and BLUE SIGNET RING (S), receive STONE FLOWER.
- Walk down.
- Place STONE FLOWER, take TILES 4/4 (T).
- Go (U).
- Place TILES (V).
- Solution: (8-9)-(5-7)-(2-8)-(4-5)-(7-4)-(6-2)-(9-6).
- Go (W).
- Take DEER ANTLER (X).
- Place DEER ANTLER, take LETTER R and HEX KEY (Y).
- Take SEEDS and RAVEN FIGURINE 1/4 (Z).
- Walk down twice.
- Offer SEEDS, take LETTER N and BRANCH (A).
- Go (B).
- Use HEX KEY, play puzzle (C).
- Receive TOOL AMULET.
- Go (D).
- Place TOOL AMULET (E), take LETTER A (F).
- Walk down.
- Place LETTER R, LETTER N and LETTER A, take NORMAN’S PENDANT (G).
- Go (H).
- Place NORMAN’S PENDANT (I).
- Take CARD (J).
- Walk down.
- Place BRANCH and CARD, move key (K).
- Go (L).
- Defeat your opponent (M).
- Take RAVEN FIGURINE 2/4 (N).
- Take SUITCASE (O).
- Take CHIMERA CREST and SAPPHIRE BUTTON (P).
- Go to Gate House.

- Place CHIMERA CREST, take SPARE KEY (Q).
- Go to Living Room.
- Use SPARE KEY (R).
- Go (S).
- Talk (T), receive RUBY BUTTON.
- Take RAVEN FIGURINE 3/4 (U).
- RUBY BUTTON and SAPPHIRE BUTTON on SUITCASE, take INCOMPLETE RECIPE and RAVEN FIGURINE 4/4.
- Take NORMAN’S WALLET, place RAVEN FIGURINES.
- Receive TWEEZERS (V).
- Take EMPTY JAR, place NUMBER (W).
- Offer INCOMPLETE RECIPE (T).
- Talk (T), receive ANTIDOTE LIST.
- Go to Gate House.
- Use TWEEZERS, take NORMAN’S RING and BOTTLE AMULET (X).
- Go to Mansion Hall.
- Place NORMAN’S RING (Y), take MONOGRAM N and BLUE TEST TUBE (Z).
- MONOGRAM N on NORMAN’S WALLET, take PICTURE PART 1/3 and CLOCK HANDS.
- Place CLOCK HANDS, take PICTURE PART 2/3 and SERUM POWDER (A).
- Walk down.

- Place BOTTLE AMULET and WINEGLASS AMULET (B).
- Play puzzle (C), receive ROMAN NUMERAL.
- Go (D).
- Place ROMAN NUMERAL, select X-V-I-I (E).
- Take DIAMOND HANDLE (F).
- Walk down.
- Place DIAMOND HANDLE (G).
- Take CANDLESTICK (H).
- Go (I).
- Place CANDLESTICK, take PICTURE PARTS 3/3 (J).
- Place PICTURE PARTS (K).
- Solution: (5-13)-(13-15)-(11-13)-L-(2-7)-(3-7)-(1-4)-(3-14)-(6-12)-(1-3)-L.
- (6-8)-(3-10)-L-(1-3)-(6-9)-L-(3-6)-(3-13).
- Take ANIMAL VIRUS and TRIANGLE HANDLE (M).
- Walk down.
- Use TRIANGLE HANDLE (N).
- Take ROSALEE’S BLOOD PLASMA (O).
- EMPTY JAR, BLUE TEST-TUBE, ROSALEE’S BLOOD PLASMA, ANIMAL VIRUS and SERUM POWDER on ANTIDOTE LIST, take ANTIDOTE.
- Offer ANTIDOTE, talk (P).
- Walkthrough Bonus Chapter, at the link below.


