Christmas Stories 13: Clara and the Guiding Star – Prince Arthur, turned into the Nutcracker by the villainous Mouser, finds himself in our world. Clara, a young craftswoman, finds the damaged toy and, after fixing it, uncovers an incredible secret. The Nutcracker comes to life and tells Clara about his kingdom, which has been destroyed by the Mouse Queen, and about the magic amulet, a family heirloom that can protect worlds from darkness. However, the amulet has been damaged, and the Mouse Queen won’t stop until she takes possession of its magic. Together with Clara you will have to travel through magical portals, uncover the mystery of the crest and restore the amulet. Explore the Nutcracker Kingdom, Clara’s father’s library and other exciting locations to stop Myshelov and restore peace. If you can not pass any of the puzzles or do not know where the items are, on our site you can watch the walkthrough of the game Christmas Stories 3: The Wonder Box, and recover the amulet.
Christmas Stories 13: Clara and the Guiding Star – Walkthrough
Here you can see the full walkthrough of Christmas Stories 13: Clara and the Guiding Star game, namely for all chapters, including bonus chapter, in pictures.

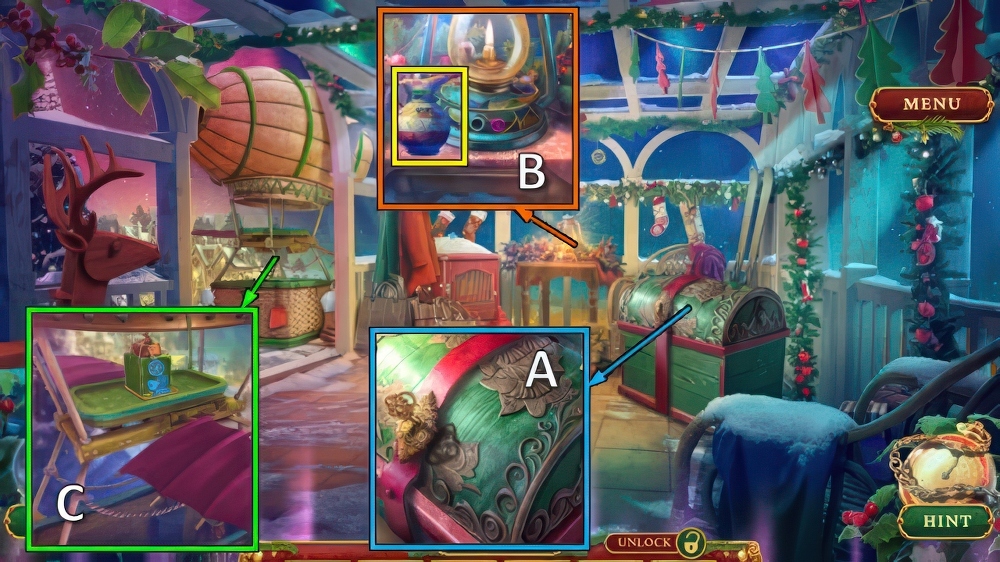
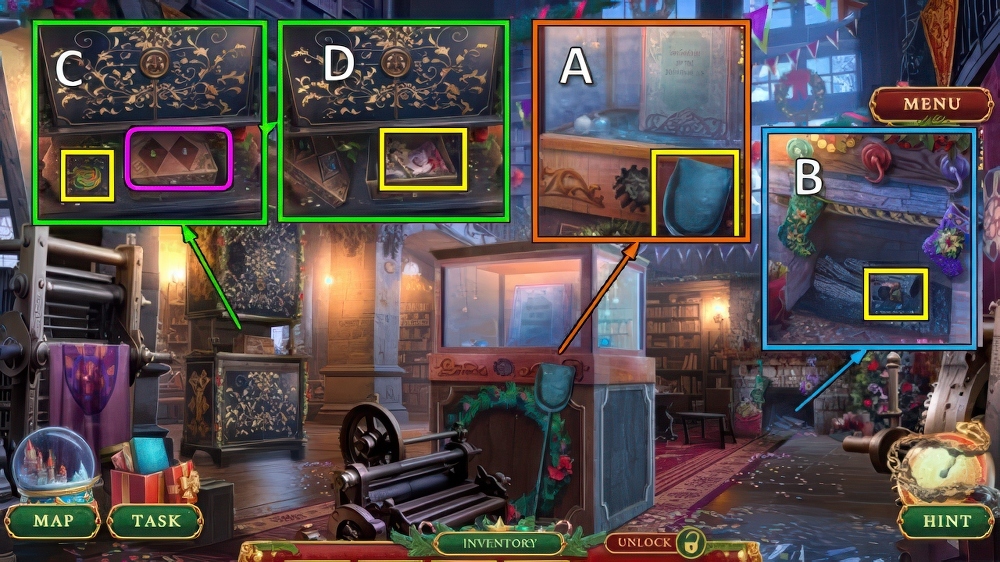
- Take CARVED HANDLE (A).
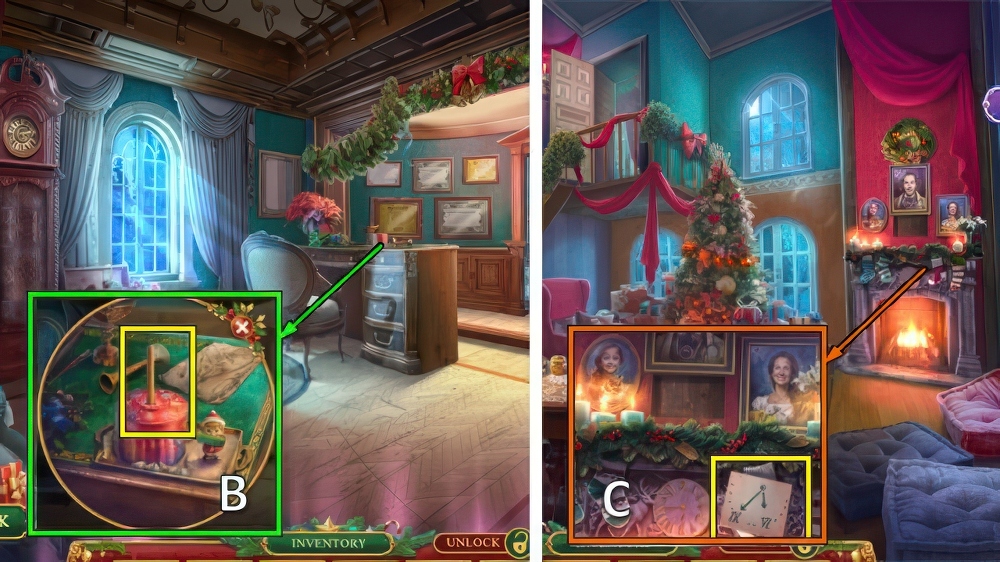
- Take GOLD REINDEER (B).
- Place GOLD REINDEER and CARVED HANDLE, take EMPTY BOX, MAILBOX AMULET 1/2 and SNOWBLOWER (C).
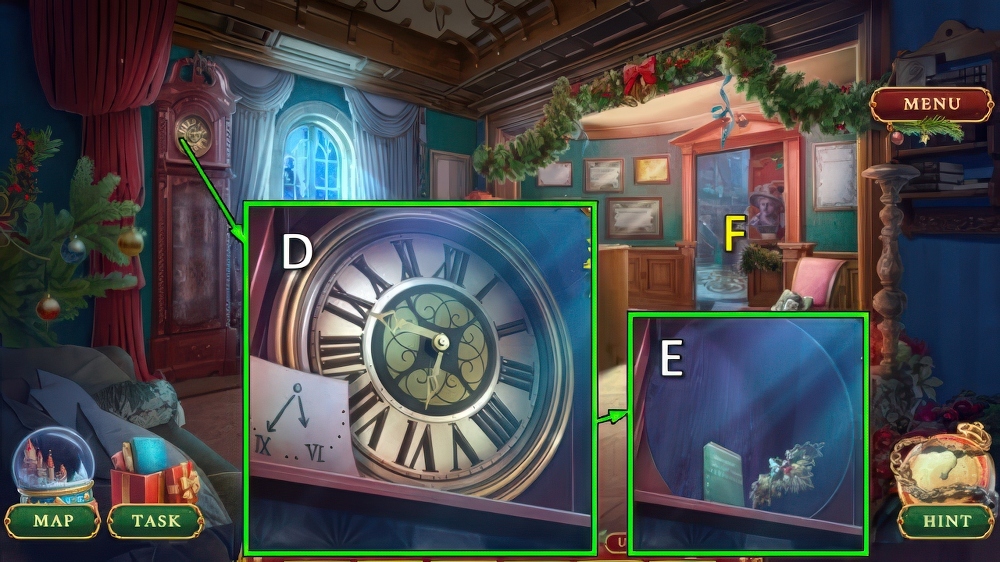
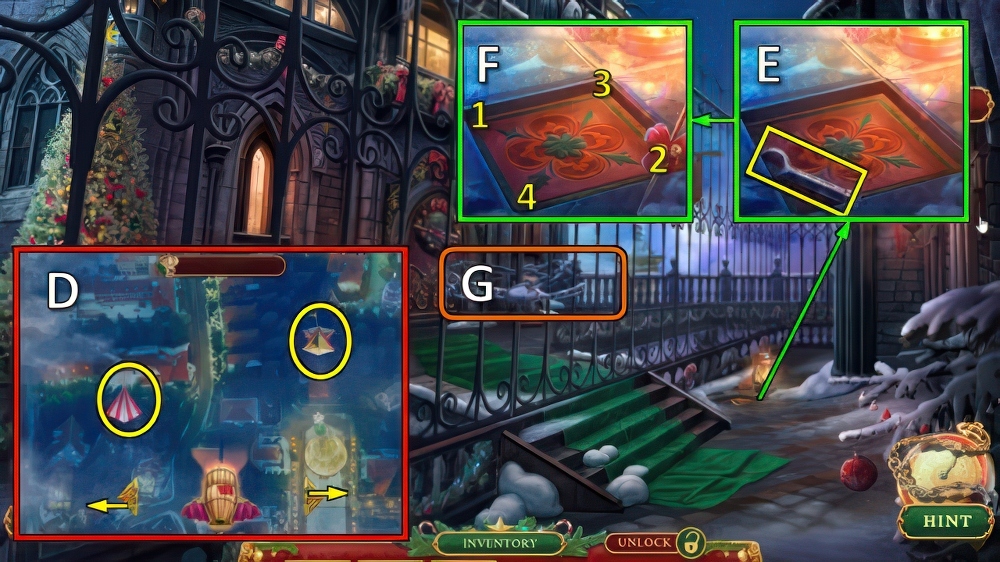
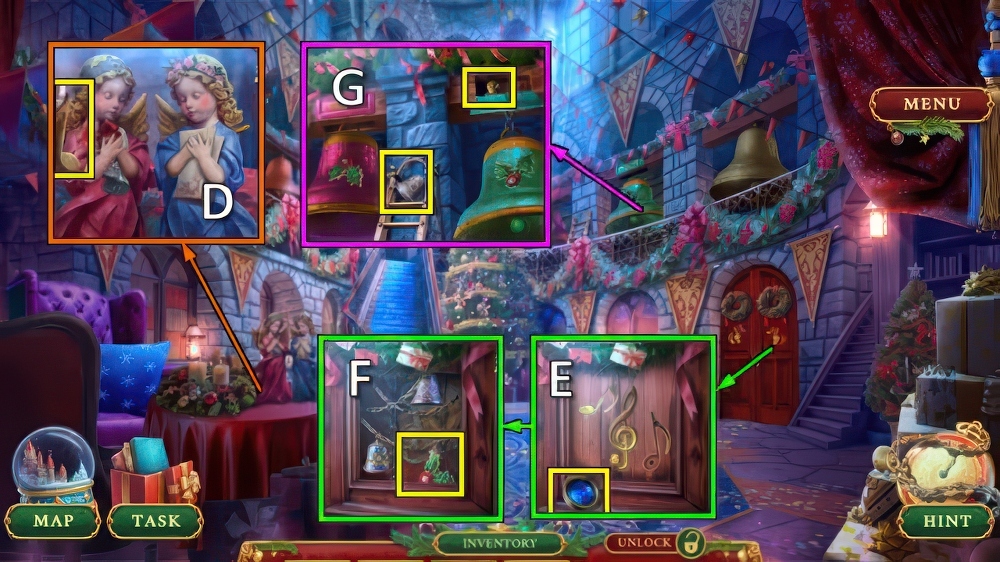
- Use SNOWBLOWER and EMPTY BOX, play puzzle (D).
- Receive NUTCRACKER TOY and GIFT BOX.
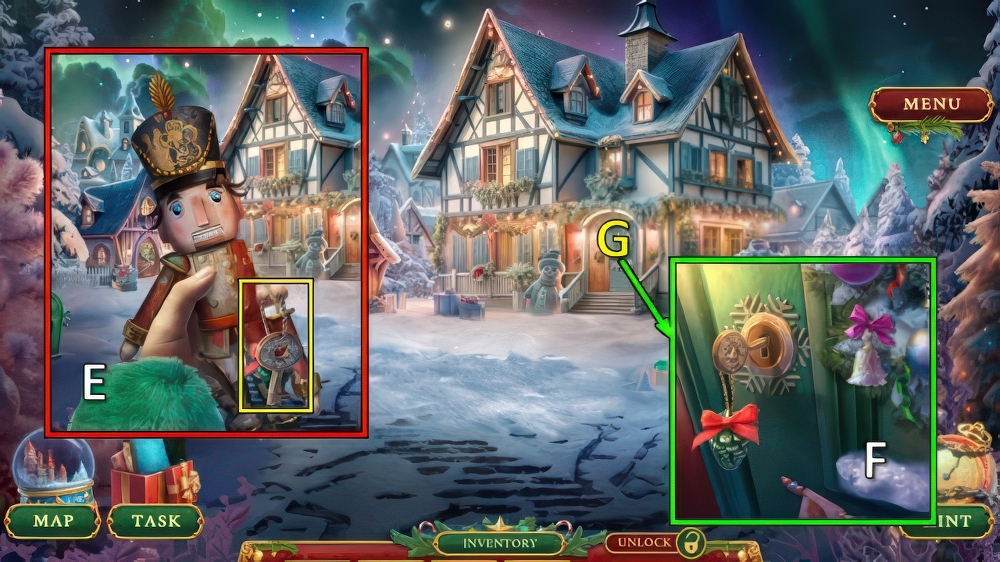
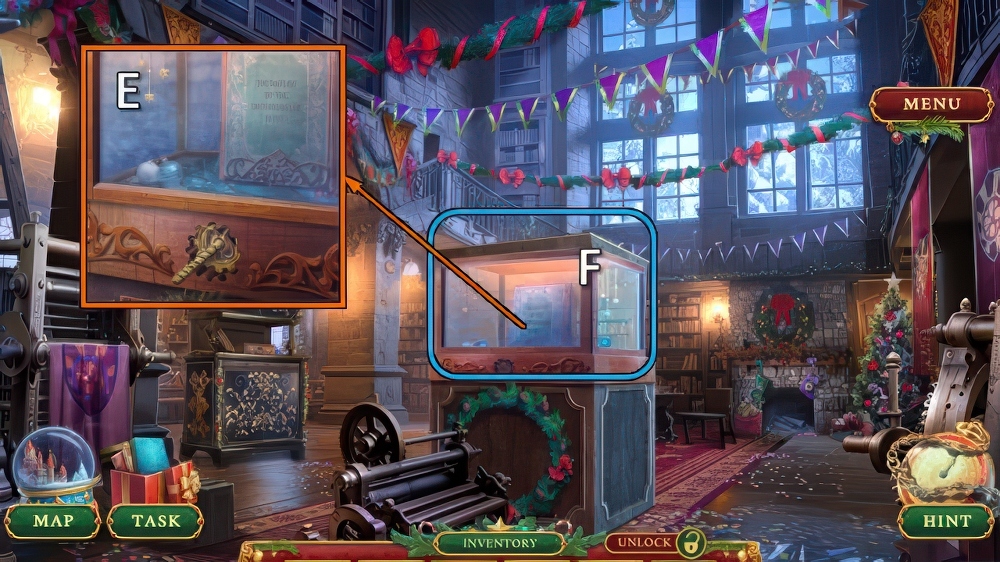
- Take HOUSE KEY (E).
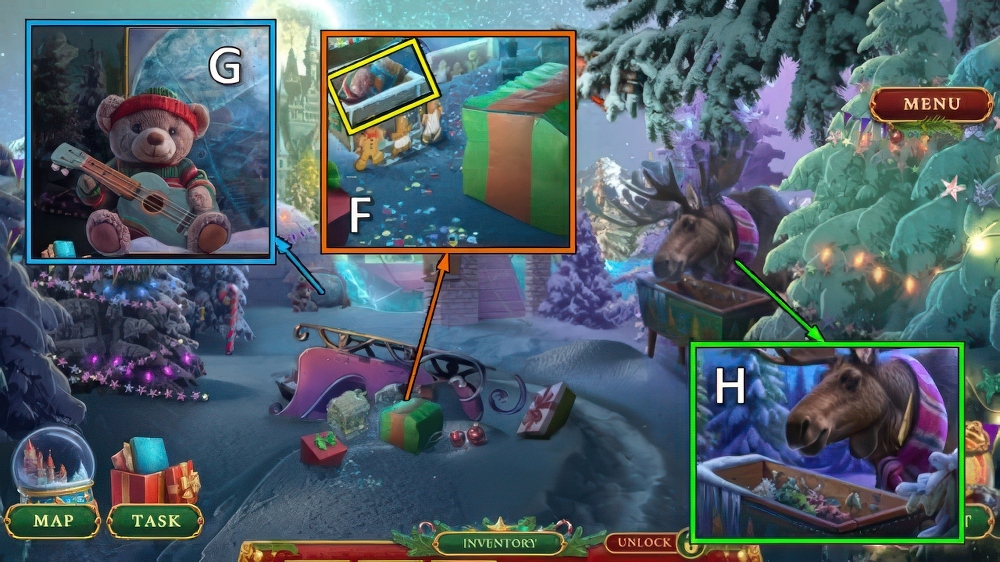
- Use HOUSE KEY (F).
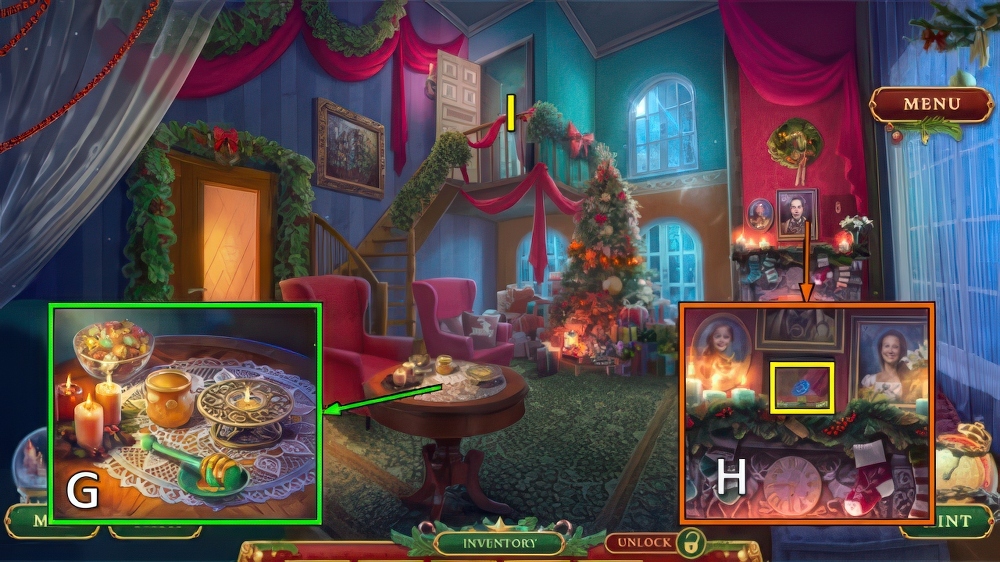
- Go (G).

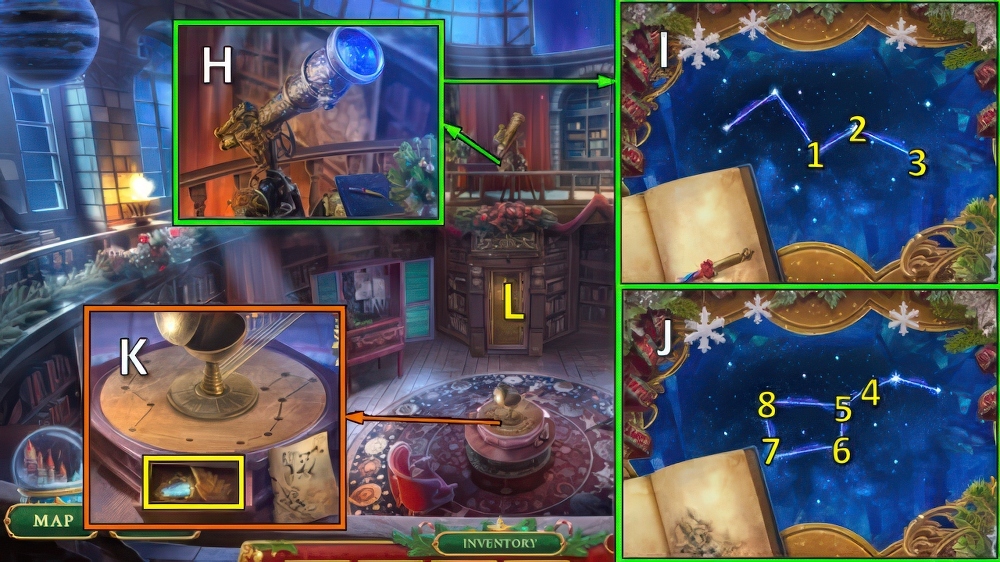
- Take BROKEN TRAIN (H).
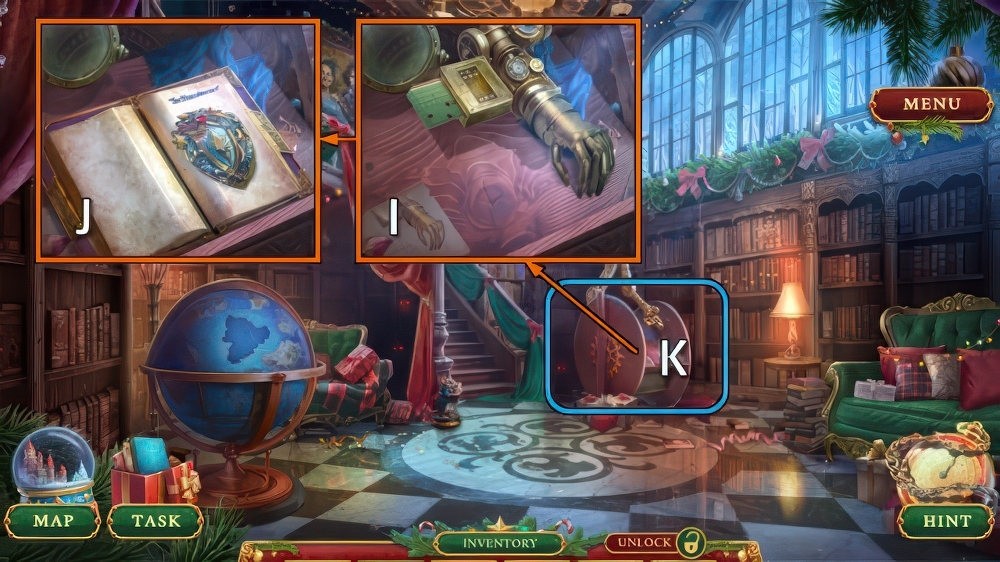
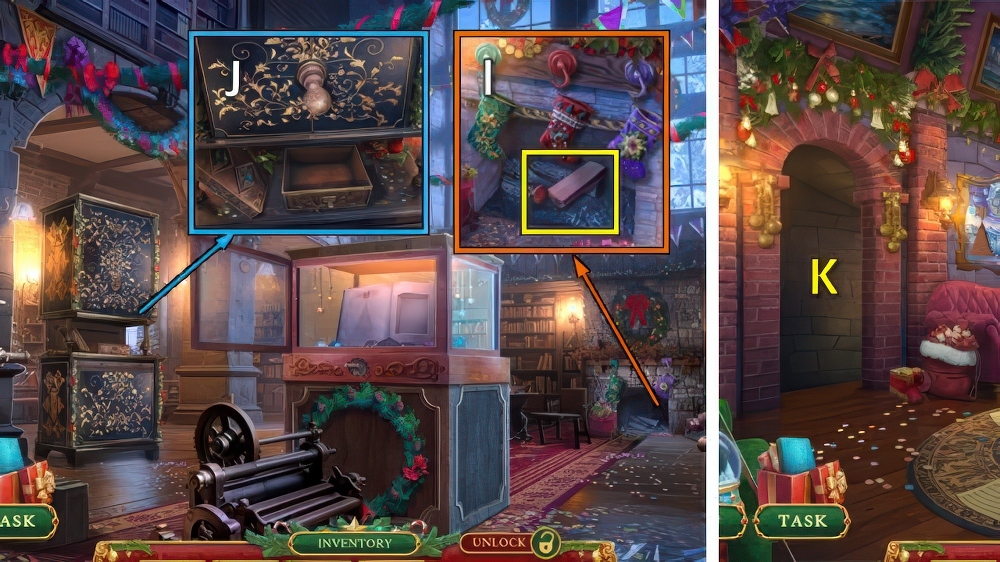
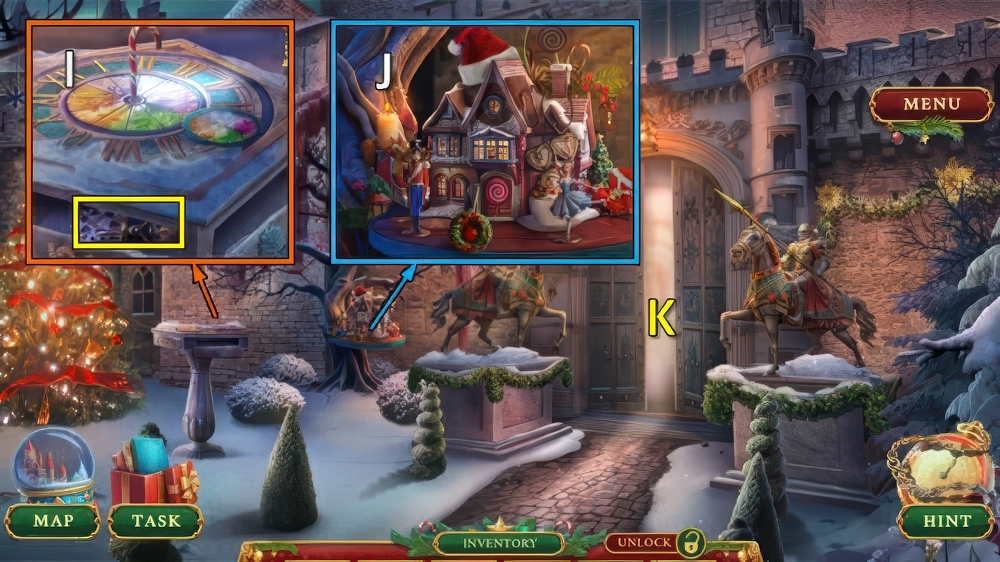
- Play mini-puzzle (I), receive MAILBOX AMULET 2/2.
- Take TRAIN TRACK (J).

- Take CLARA’S GLOVE (K).
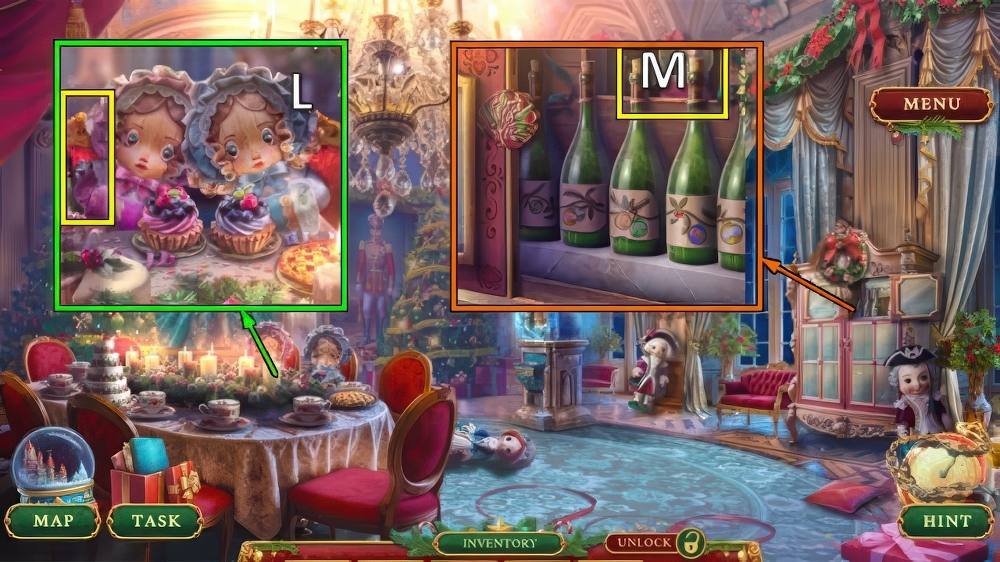
- Take ENGINEER TOY, take HOT TEAPOT with CLARA’S GLOVE (L).
- Walk down.

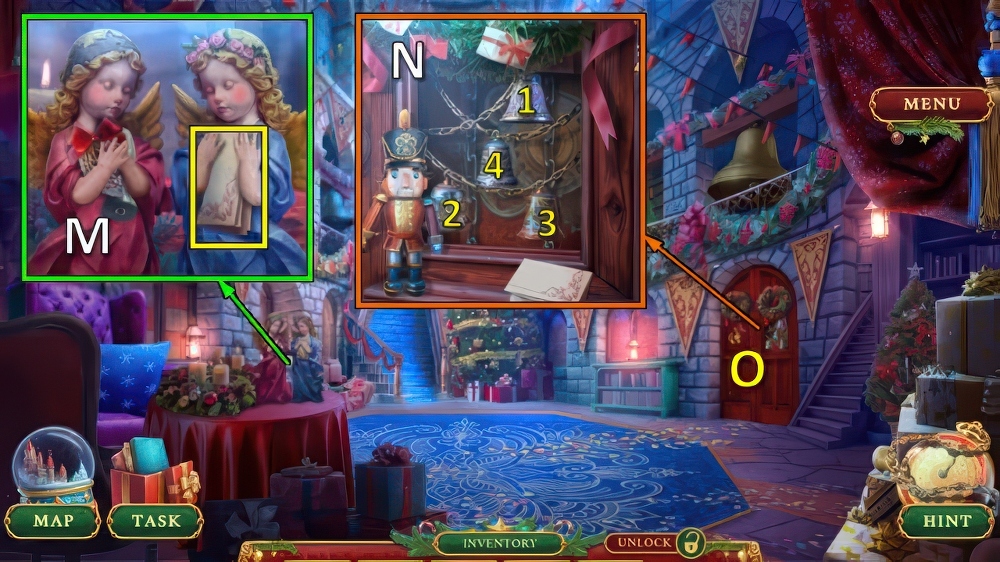
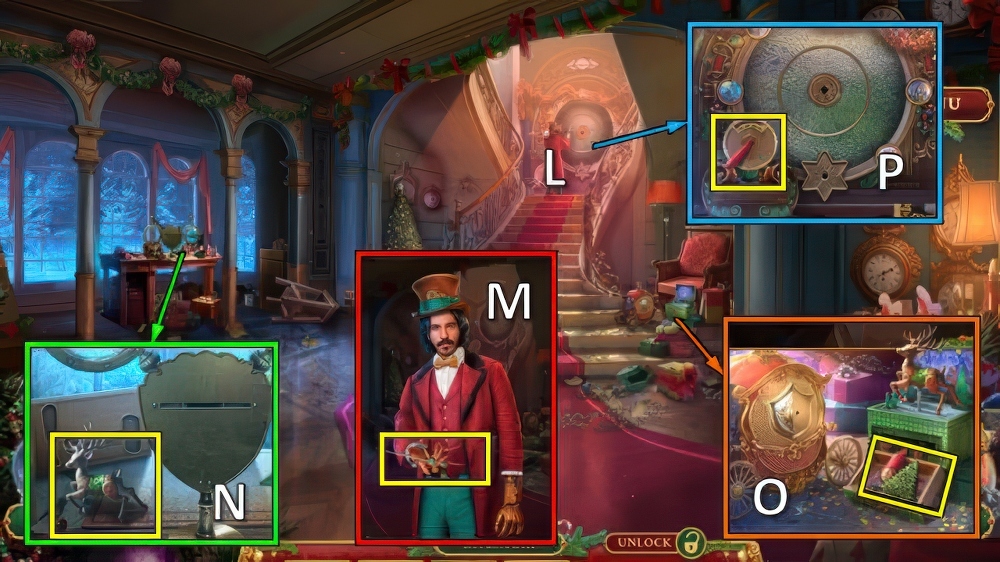
- Place MAILBOX AMULET (M), take BRIMMED HAT (N).
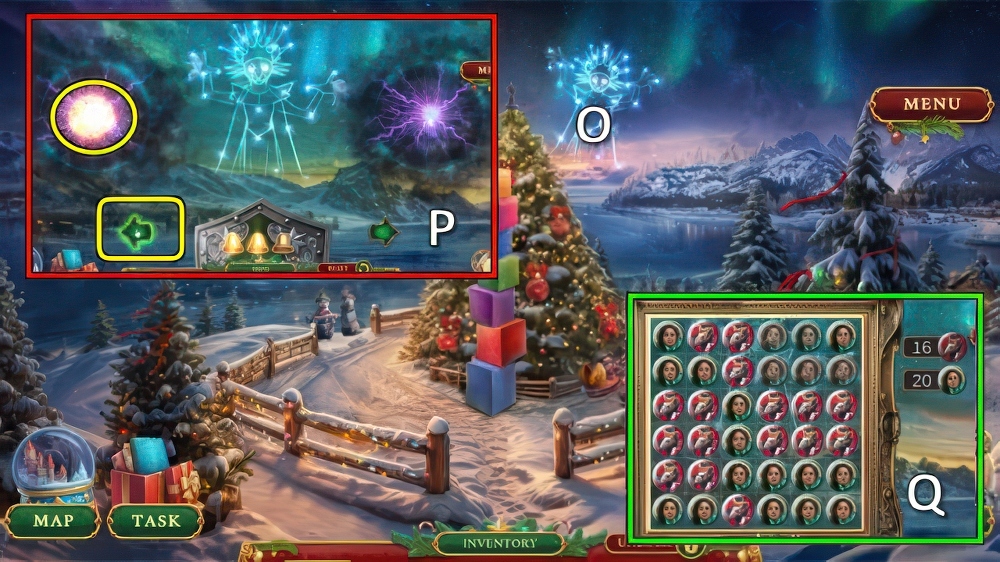
- Use HOT TEAPOT, take SMOKESTACK and CARROT NOSE (O).
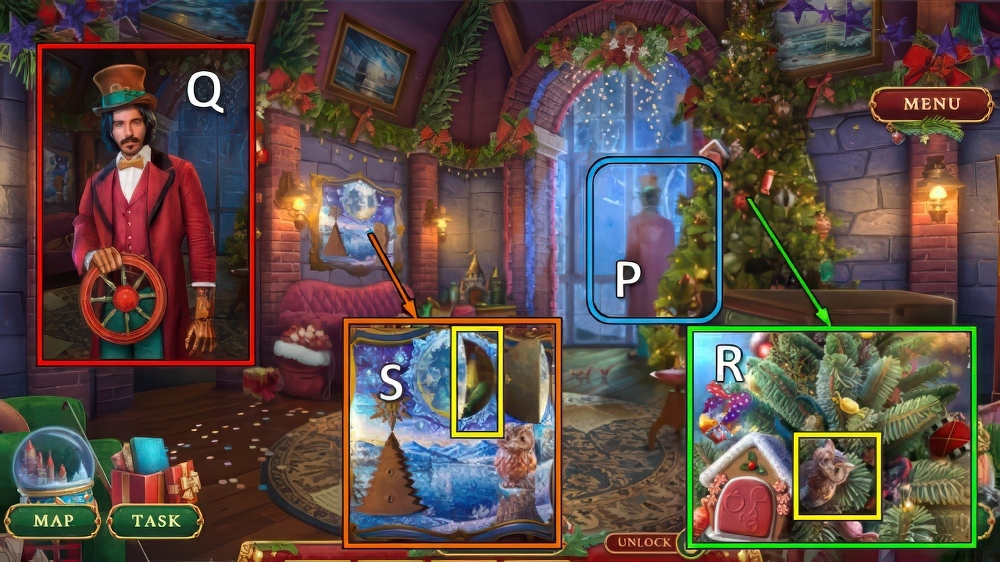
- Go (P).
- ENGINEER TOY and SMOKESTACK on BROKEN TRAIN, take TOY TRAIN.
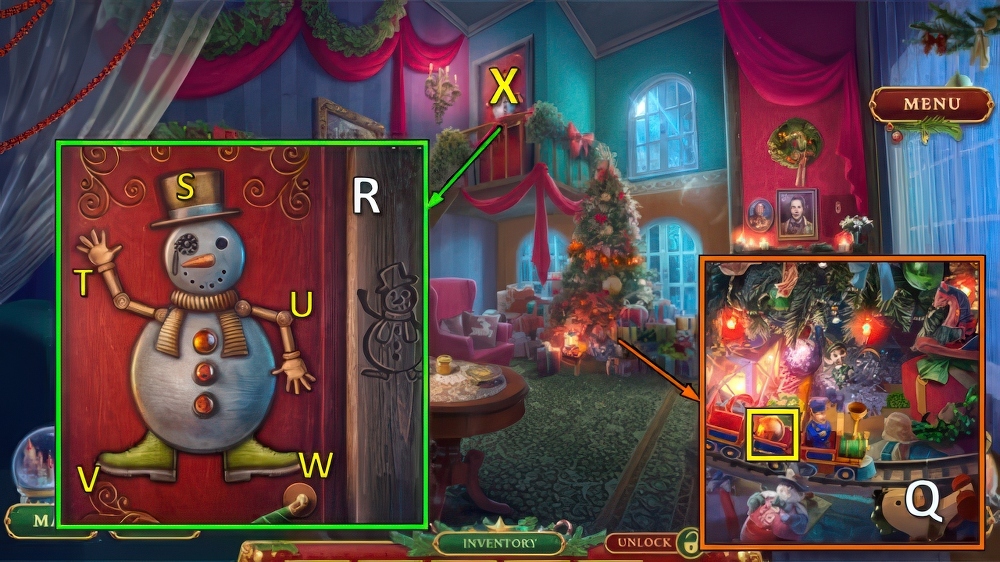
- Place TRAIN TRACK and TOY TRAIN, take AMBER BUTTON (Q).
- Place BRIMMED HAT, AMBER BUTTON and CARROT NOSE (R), select Sx3-Tx2-U-Vx3-Wx2.
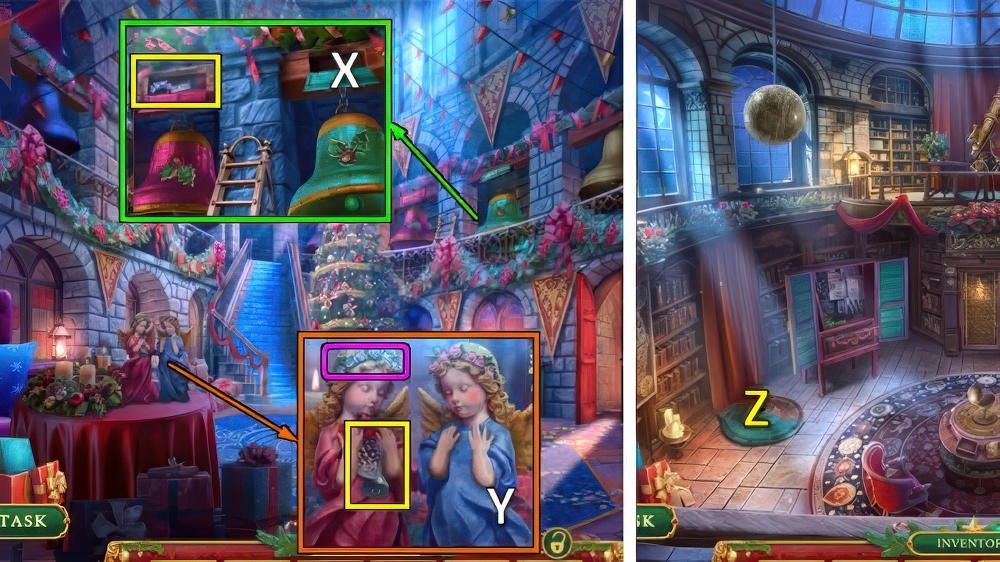
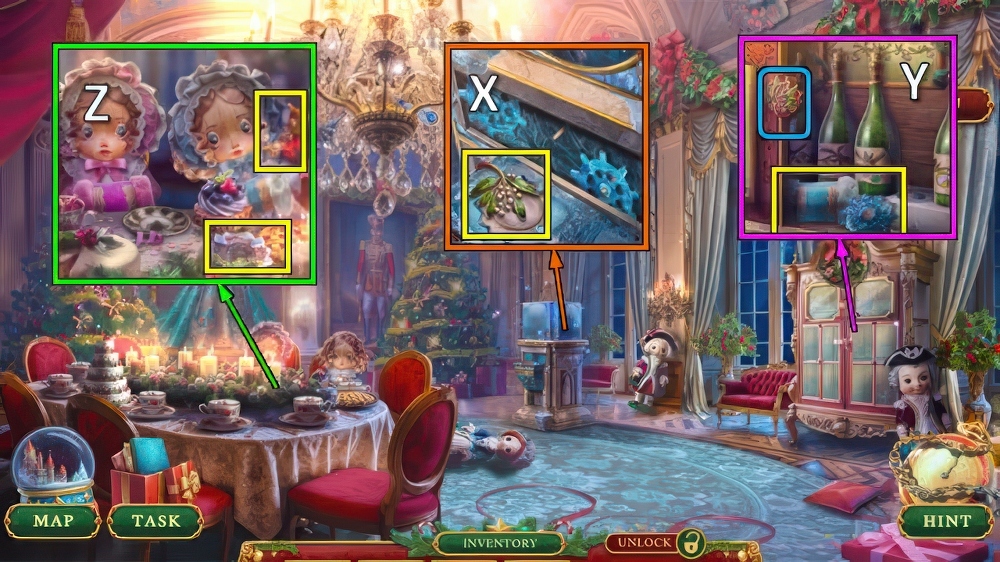
- Go (X).

- Open (Y).
- Take MOTHER’S PICTURE, place GIFT BOX and NUTCRACKER TOY (Z).
- Take HONEY JAR TOPPER (A).
- Take HAND SAW and HONEY DIPPER (B).
- Take EMPTY PALETTE (C).
- Walk down twice.
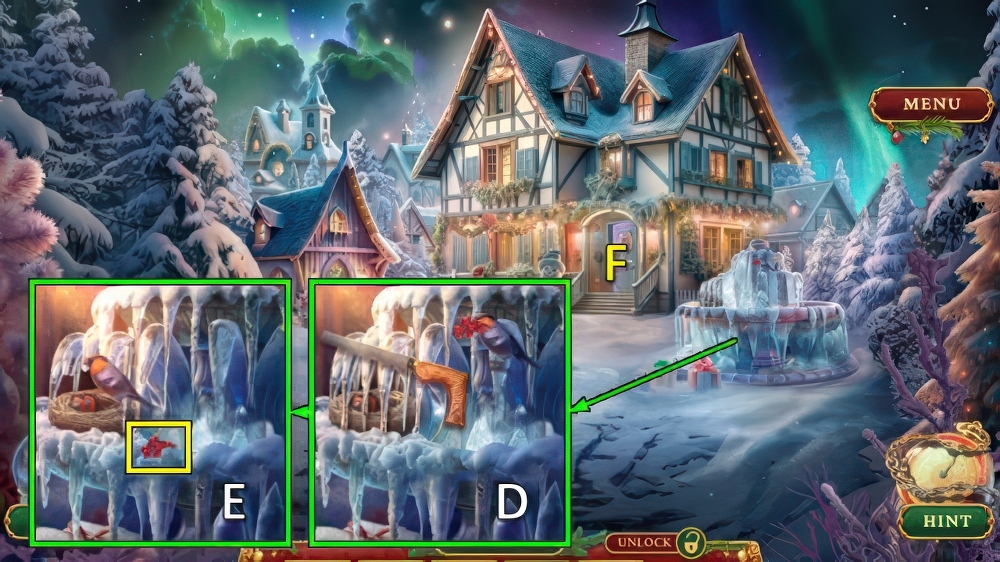
- Use HAND SAW (D), take BERRIES (E).
- Go (F).
- Use HONEY DIPPER and HONEY JAR TOPPER, take HONEY (G).
- Place MOTHER’S PICTURE, take GEAR 1/3 and FAIRYTALE BOOK (H).
- Go (I).

- Place FAIRYTALE BOOK, take GOLDEN GLITTER (J).
- GOLDEN GLITTER, HONEY and BERRIES on EMPTY PALETTE, take WATERCOLORS.
- Place WATERCOLORS (K).
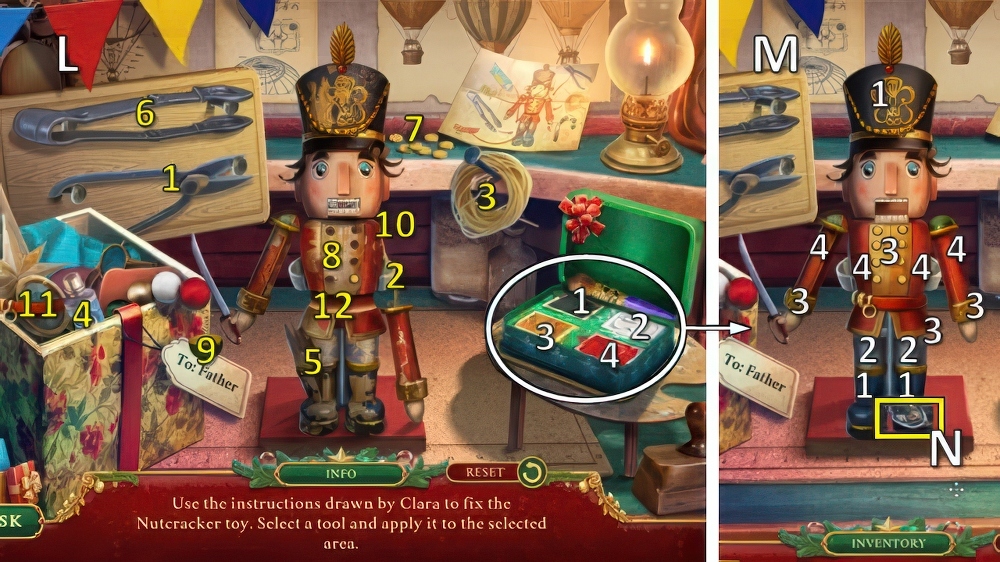
- Solution (L): 1 on 2, 3 on 2, 4 on 5, 6 on 5, 7 on 8, 9 on 10, 11 on 12.
- Solution (M).
- Take NUTCRACKER’S AMULET (N).
- Play puzzle, receive NUTCRACKER.
- Walk down.
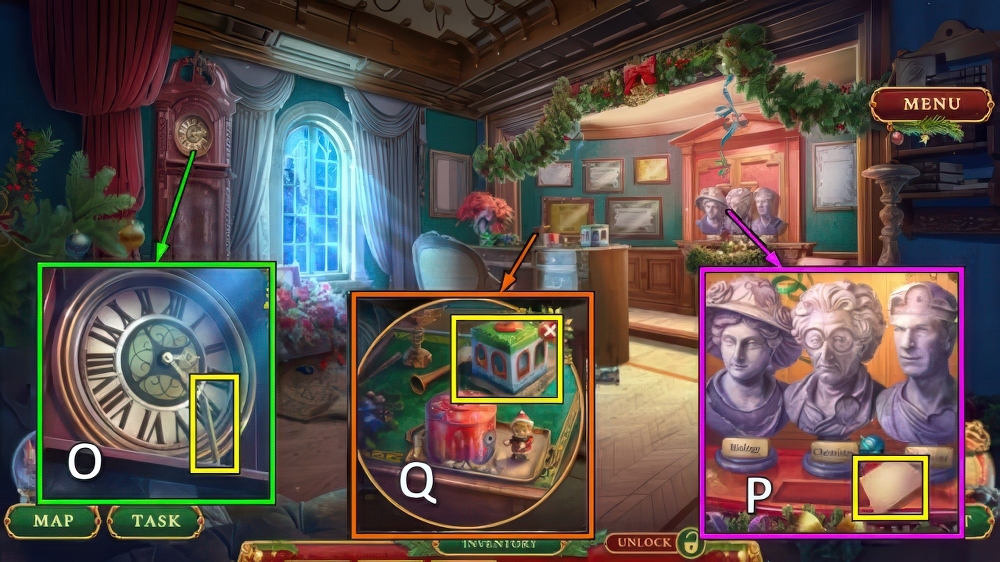
- Take DULL PENCIL (O).
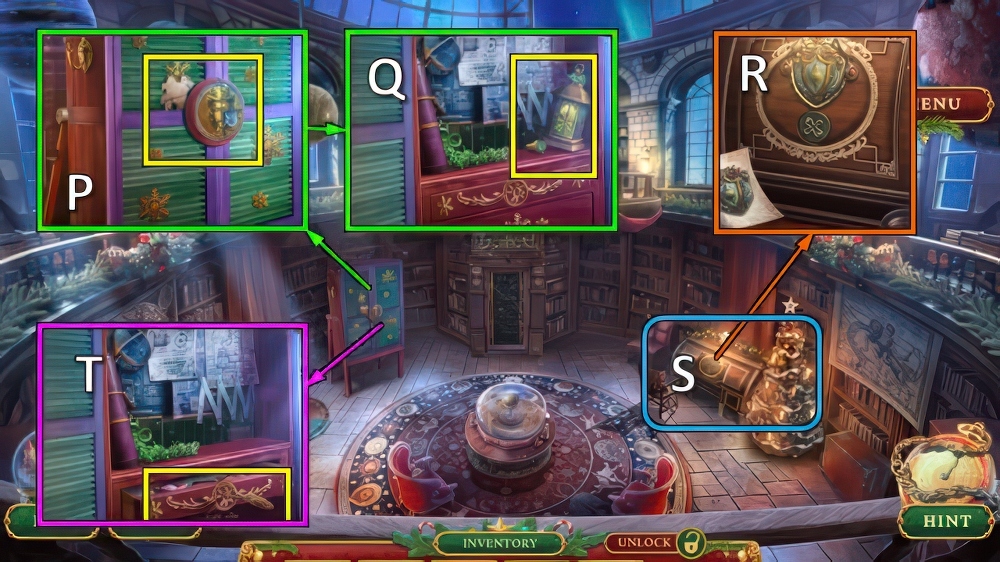
- Take PIECE OF PAPER (P).
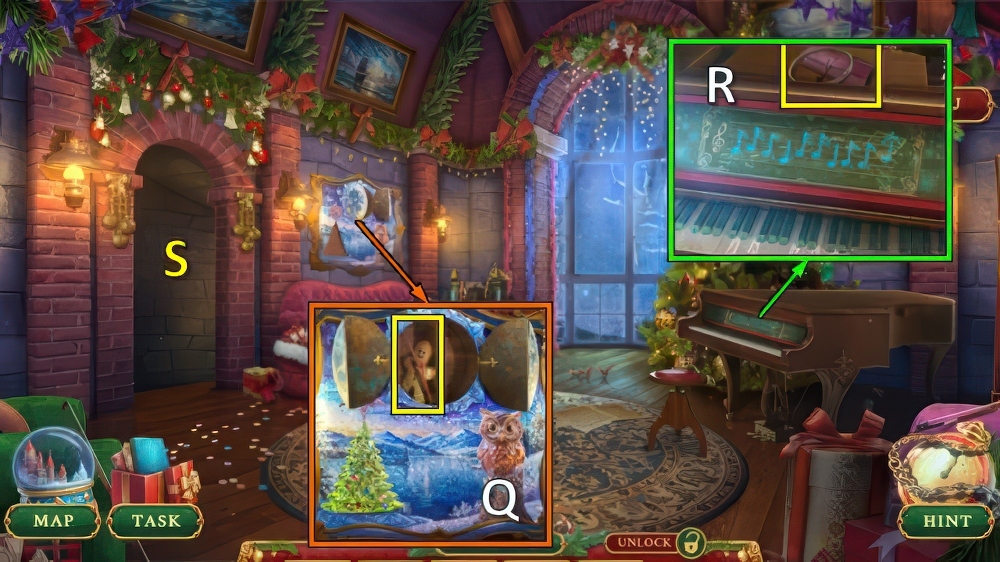
- Take DECORATIVE MUSIC BOX (Q).
- Walk down.

- Use NUTCRACKER, take METAL RING and ELF TOY (R).
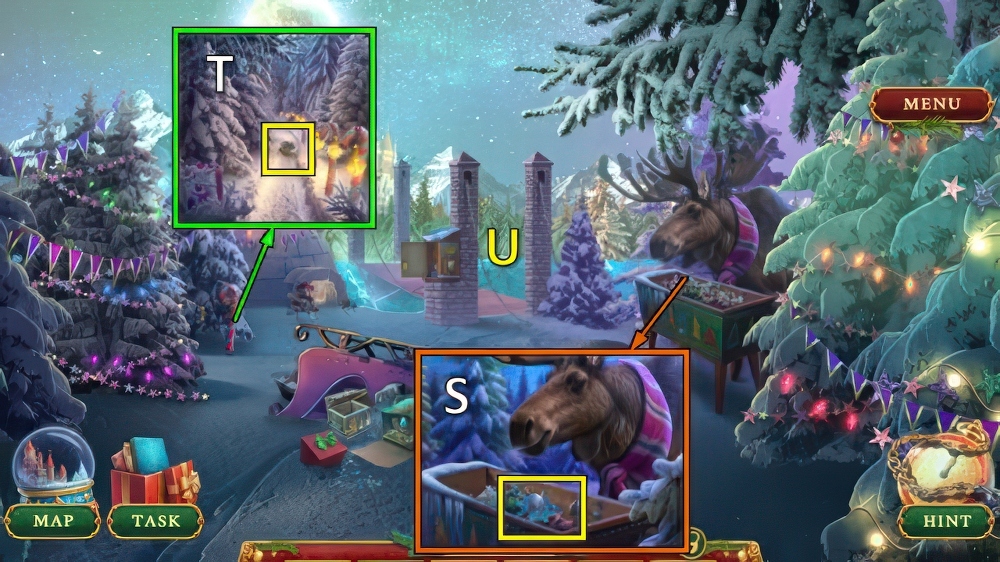
- Go (S).
- Move rug, use METAL RING (T).
- Take SNOWMAN TOY and GEAR 2/3 (U).

- ELF TOY and SNOWMAN TOY on DECORATIVE MUSIC BOX, take BUST DECORATIONS.
- Place BUST DECORATIONS (V).
- Solution: (1-5)-(2-3)-(4-6)-(5-6).
- Take LIBRARY INSTRUCTIONS (W).
- Go (X).

- Take TURNING HANDLE and GEAR 3/3 (Y).
- Take CARD PUNCHER (Z).
- Take BALLERINA FIGURINE (A).
- Walk down.
- Use TURNING HANDLE and DULL PENCIL, take SHARP PENCIL (B).
- Walk down.
- Use PIECE OF PAPER and SHARP PENCIL, take CLOCK ANSWER (C).
- Go to Father’s Study.
- Place CLOCK ANSWER, move hands as shown (D).
- Take PUNCHCARD and PORTRAIT DECORATION (E).
- Go (F).

- Place PORTRAIT DECORATION, take MINI-SCREWDRIVER and METAL HAND (G).
- CARD PUNCHER and PUNCHCARD on LIBRARY INSTRUCTIONS, solution (H).
- Take LIBRARY SEARCH CARD.
- Place METAL HAND and LIBRARY SEARCH CARD (I).
- Place NUTCRACKER’S AMULET (J).
- Play puzzle (K), receive DROSSELMEYER COAT OF ARMS and MAP PIECE.
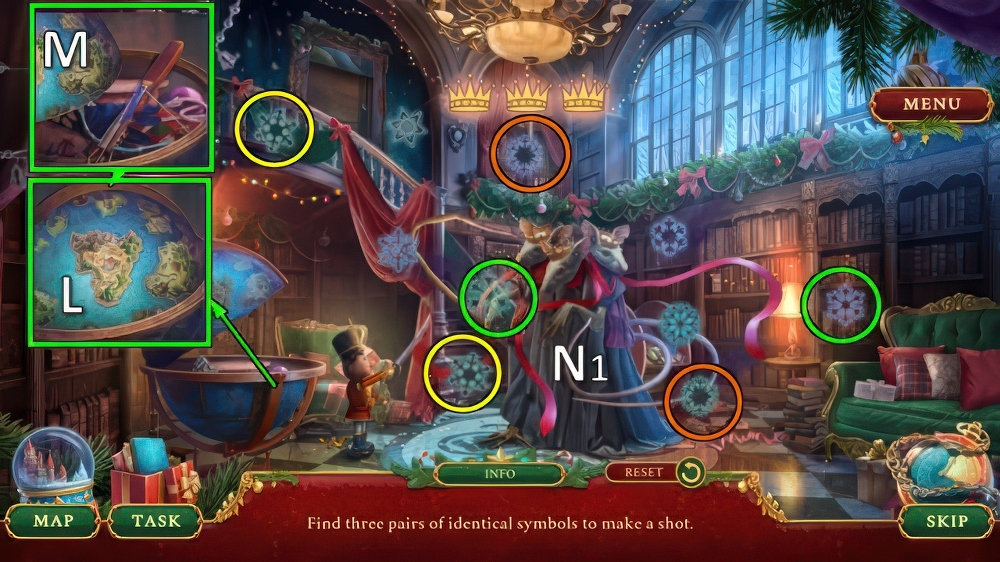
- Place MAP PIECE (L).
- Take VINTAGE CROSSBOW (M).
- Use VINTAGE CROSSBOW and NUTCRACKER (N1).
- Solution (N1).
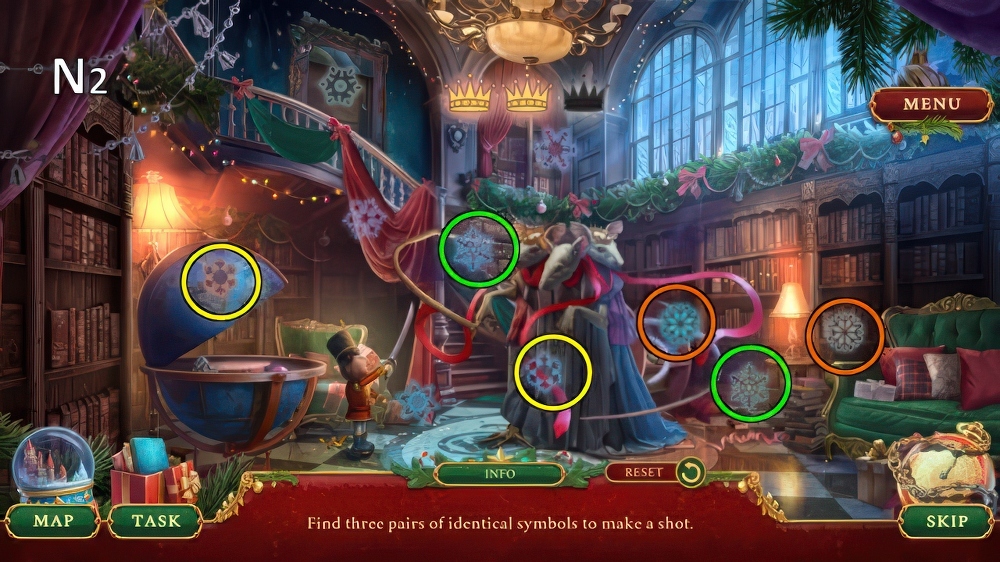
- Solution (N2).
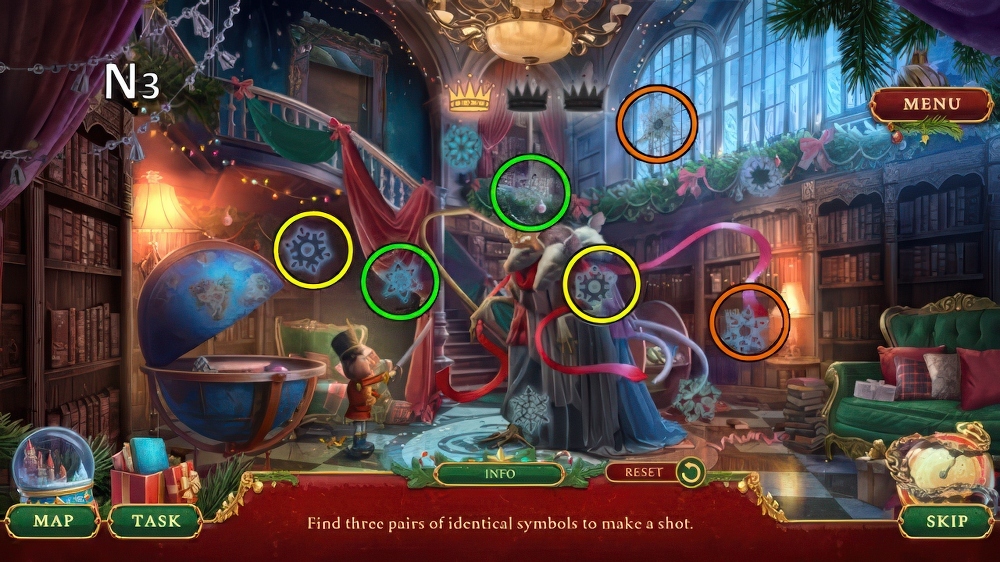
- Solution (N3).
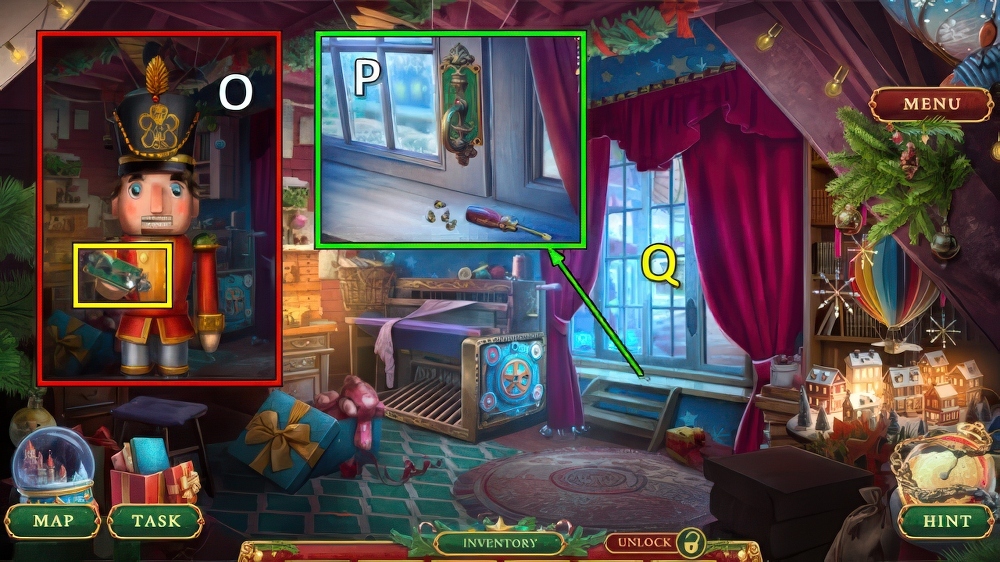
- Take WINDOW HANDLE (O).
- Use WINDOW HANDLE and MINI-SCREWDRIVER (P).
- Go (Q).
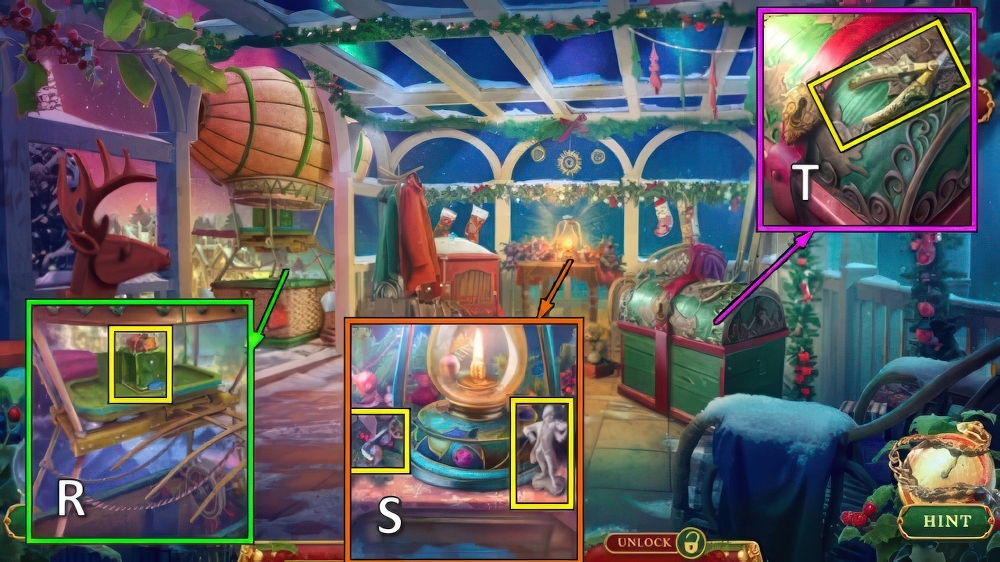
- Take AIRCRAFT STARTER (R).
- Take VIOLINIST FIGURINE and HEX KEY (S).
- Take PRUNERS (T).
- Walk down.
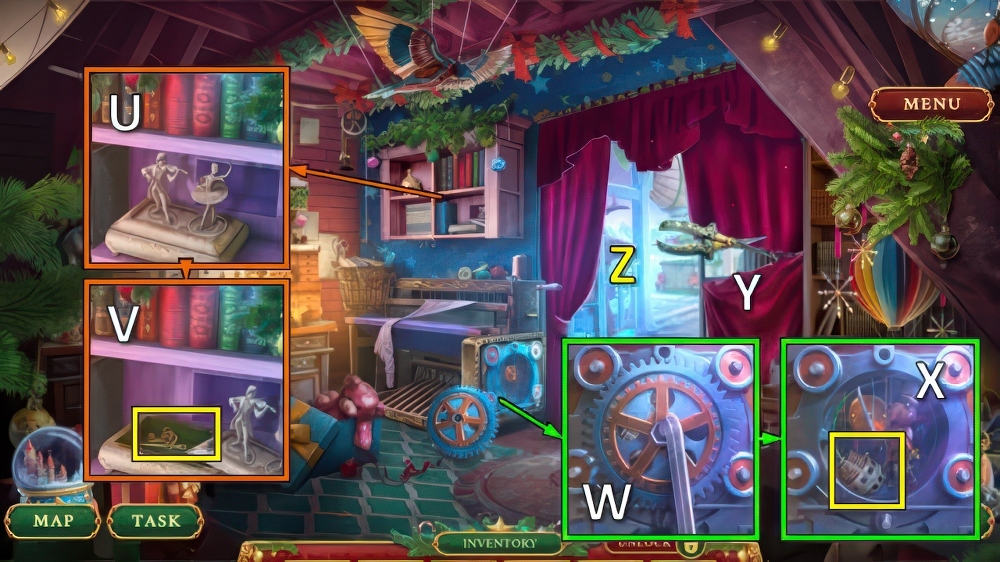
- Place VIOLINIST FIGURINE and BALLERINA FIGURINE (U).
- Take OLD KEY and BONE NEEDLE (V).
- Use HEX KEY (W).
- Use NUTCRACKER, take CROCHET HOOK and SQUEEZEBOX (X).
- Use PRUNERS (Y), receive PIECE OF CURTAIN.
- Go (Z).
- Use OLD KEY for mini-puzzle (A), receive PORCELAIN JUG.
- Use PORCELAIN JUG, take AIRCRAFT FUEL (B).
- GEAR, SQUEEZEBOX and AIRCRAFT FUEL on AIRCRAFT STARTER.
- Place AIRCRAFT STARTER, PIECE OF CURTAIN and BONE NEEDLE (C).
- Avoid obstacles (D).
- Take HOOK BASE (E).
- Place CROCHET HOOK (F), select 1-2-3-4.
- Receive HEAVY TILE.
- Use HEAVY TILE (G).

- Take BROOM (H).
- Use BROOM, take ROPE and DRAWING PART (I).
- Take BOATHOOK TIP (J).

- BOATHOOK TIP and ROPE on HOOK BASE, take GRAPPLING HOOK.
- Use GRAPPLING HOOK, go (K).
- Take MULTI-COLORED PLANET 1/3 (L).
- Take ADJUSTABLE TOOL (M).
- Use ADJUSTABLE TOOL (N), take STICKY MASTIC and MULTI-COLORED PLANET 2/3 (O).
- Take ANCHOR PUZZLE, place DRAWING PART and STICKY MASTIC (P).
- Take INVENTOR’S RING and EXTINGUISHED LANTERN (Q).
- Use DROSSELMEYER COAT OF ARMS and INVENTOR’S RING (R), receive NUTCRACKER’S AMULET.
- Play puzzle (S), receive INVENTOR’S KEY.
- Use INVENTOR’S KEY, take SALT CRYSTALS (T).
- Walk down.

- Use SALT CRYSTALS and NUTCRACKER, take GOLDEN STAR and INCOMPLETE EYEPIECE (U).
- Place GOLDEN STAR (V), take CHRISTMAS CANDLE and SHIP PUZZLE (W).
- Place SHIP PUZZLE and ANCHOR PUZZLE for mini-puzzle (X), receive MULTI-COLORED PLANET 3/3.
- Go (Y).
- Remove glass, place MULTI-COLORED PLANET.
- Take SMOKING PIPE and STAR CHARTS (Z).
- CHRISTMAS CANDLE and SMOKING PIPE on EXTINGUISHED LANTERN, take BRIGHT LANTERN.
- Place BRIGHT LANTERN (A).
- Make your way down (B-C).
- Tip: hands and feet can be on the same rung, both hands must be higher than both feet.
- Take MUSIC NOTE (D).
- Take SAPPHIRE LENS, place MUSIC NOTE (E).
- Take GOLDEN HOLLY (F).
- Place GOLDEN HOLLY, take SHARPNESS REGULATOR and CHRISTMAS BELL (G).
- Walk down.
- SAPPHIRE LENS and SHARPNESS REGULATOR on INCOMPLETE EYEPIECE, take TELESCOPE EYEPIECE.
- Place TELESCOPE EYEPIECE and STAR CHARTS (H).
- Select 1-2-3 (I), 4-5-6-7-8-5 (J).
- Take PENCIL and CONSTELLATION DRAWING.
- Place CONSTELLATION DRAWING, turn x3.
- Take ANGEL WING and ORNATE WINDOW (K).
- Go (L).
- Place ANGEL WING, take BELL HINT (M).
- Place CHRISTMAS BELL, NUTCRACKER and BELL HINT, select 1-2-3-4 (N).
- Go (O).
- Offer NUTCRACKER’S AMULET, play puzzle (P).
- Take STEERING WHEEL BASE (Q).
- Take CRYSTAL OWL (R).
- Place CRYSTAL OWL, take STEERING WHEEL HANDLE 1/4 and GOLDEN TOWER (S).

- Place ORNATE WINDOW and GOLDEN TOWER, take STEERING WHEEL HANDLE 2/4, INVENTOR’S AMULET and MELODY STENCIL (T).
- Place MELODY STENCIL and PENCIL (U).
- Solution (V): 4-2-4-3-2-2-1-4-4-5.
- Take BELL CLAPPER and STEERING WHEEL HANDLE 3/4 (W).
- Walk down.
- Place BELL CLAPPER, take HEX BAR and FLOWER WREATH (X).
- Place FLOWER WREATH, take SUGARED NUT and STEERING WHEEL HANDLE 4/4 (Y).
- Walk down.
- STEERING WHEEL HANDLE and HEX BAR on STEERING WHEEL BASE, take HATCH STEERING WHEEL.
- Place HATCH STEERING WHEEL, go (Z).
- Take SCOOP (A).
- Use SCOOP, take GENTLEMAN 1/2 and WIZARD’S AMULET (B).
- Take STRIPED CANDY, place INVENTOR’S AMULET and WIZARD’S AMULET (C).
- Take DROSSELMEYERS’ KEY and SEAL INSTRUCTIONS (D).
- Use DROSSELMEYERS’ KEY (E).
- Play puzzle, receive GOLDEN APPLE (F).
- Go to Sound Room.

- Place NUTCRACKER, SUGARED NUT, GOLDEN APPLE and STRIPED CANDY, take GENTLEMAN 2/2 and CRYSTAL SNOWFLAKE (G).
- Place GENTLEMAN, take CARVING TOOL and CHRISTMAS SOCK (H).
- Go to Archives.
- Hang CHRISTMAS SOCK, take LOG and CLOCKWORK BIRD (I).
- LOG and CARVING TOOL on SEAL INSTRUCTIONS, take ARCHIVES SEAL.
- Use ARCHIVES SEAL for mini-puzzle (J), receive KINGDOM MAP.
- Go (K).
- Offer KINGDOM MAP (L).
- Take MAGIC CLOCK HANDS (M).
- Take MECHANICAL DEER (N).
- Place MECHANICAL DEER, take CHRISTMAS TREE and CARDINAL BIRD WING (O).
- Take CARDINAL BIRD TAIL (P).
- Walk down.
- Place CRYSTAL SNOWFLAKE and CHRISTMAS TREE, take PIANO PROP and GINGERBREAD MAN (Q).
- Place PIANO PROP, take SILVER STRING and MAGIC TOOLS (R).
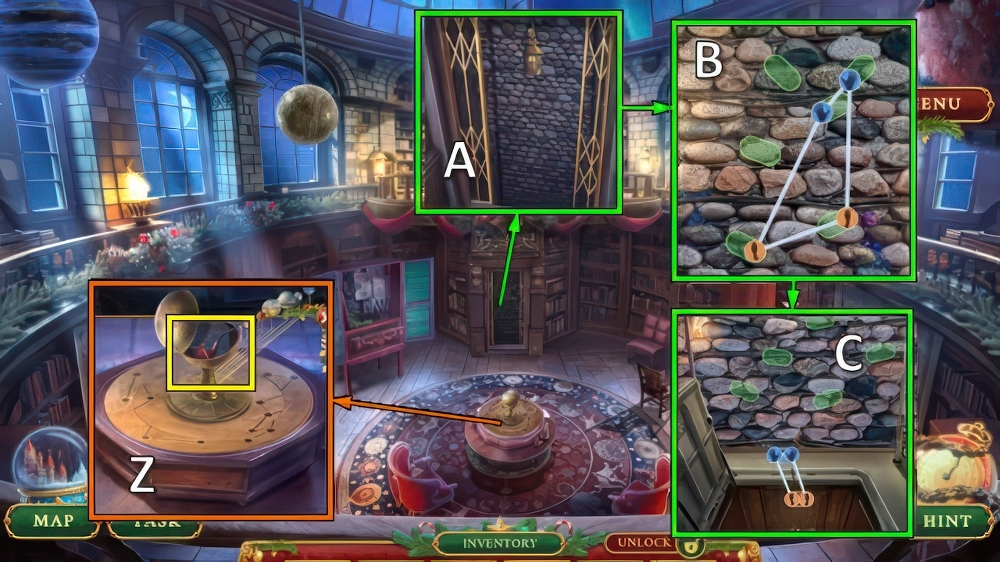
- Go (S).

- Place NUTCRACKER’S AMULET and MAGIC TOOLS (T).
- Solution (U): 1-2, 3-4-5, 6-7-8
- Take SHIELD HALF and STAR AMULET (V).

- Place SHIELD HALF (W), take PORTAL LEVER and COPPER WHEEL (X).
- Place MAGIC CLOCK HANDS, STAR AMULET and PORTAL LEVER (Y).

- Take RED KEY (Z).
- CARDINAL BIRD WING, CARDINAL BIRD TAIL and RED KEY on CLOCKWORK BIRD, take RED CARDINAL BIRD.
- Release RED CARDINAL BIRD (A).
- Receive DIAL FRAGMENT.
- Place DIAL FRAGMENT, solution (B).

- Take STAR AMULET (C).
- Take PATTERNED PLATE (D).
- Use PATTERNED PLATE, take KNITTED MITTENS 1/2 and GINGERBREAD MOM (E).
- Place GINGERBREAD MAN and GINGERBREAD MOM, take BEAR PAW and KNITTED SOCK (F).
- Use BEAR PAW and SILVER STRING for mini-puzzle (G), receive EDIBLE MOSS.
- Offer EDIBLE MOSS (H).

- Take NUTCRACKER (I).
- Take NUTCRACKER RING (J).
- Take SPEAR TIP (K).
- Place COPPER WHEEL and NUTCRACKER RING (L).
- Go (M).

- Take EXQUISITE CANE (N).
- Take BROKEN HELMET and WINTER TILE with EXQUISITE CANE (O).
- Place WINTER TILE (P).
- Solution (Q): (10-2)-(11-3)-(12-1)-(3-1)-(3-2)-(4-9)-(6-8)-(5-7)-(4-6)-(5-6).
- Take KNITTED MITTENS 2/2 and COLORFUL FEATHERS (R).
- Walk down.

- Place KNITTED MITTENS and KNITTED SOCK, take GARLAND BULB and ICE GEAR (S).
- Place GARLAND BULB, take HELMET VISOR and DOLL HAT (T).
- Go (U).

- COLORFUL FEATHERS and HELMET VISOR on BROKEN HELMET, take KNIGHT HELMET.
- Place KNIGHT HELMET and SPEAR TIP for puzzle (V1).

- Solution (V2).
- Solution (V3).
- Go (W).
- Take MISTLETOE BRANCH (X).
- Place MISTLETOE BRANCH, take SAPPHIRE SNOWFLAKE and DOLL MUFF (Y).
- Place DOLL HAT and DOLL MUFF, take DISASSEMBLED LEVER and SLINGSHOT (Z).

- Use SLINGSHOT.
- Shoot twice (A).
- Receive STRIPED CANDY.
- Take PORCELAIN BALLERINA and RUNIC HANDLE (B).
- SAPPHIRE SNOWFLAKE and RUNIC HANDLE on DISASSEMBLED LEVER, take ICE LEVER.
- Place ICE GEAR and ICE LEVER (C).
- Play puzzle (D), receive UNFINISHED MAP.
- Take BEAR SYMBOL (E).
- Walk down twice.

- Place BEAR SYMBOL, take SUN BUTTON and MAP FRAGMENT 1/3 (F).
- Open, place SUN BUTTON.
- Take GLOWING CRYSTAL (G).
- Go (H).
- Place STRIPED CANDY and GLOWING CRYSTAL, take TIN SOLDIER PIECE and MAP FRAGMENT 2/3 (I).
- Place TIN SOLDIER PIECE and PORCELAIN BALLERINA for mini-puzzle (J), receive BERRY CAKE.
- Go (K).
- Place BERRY CAKE, take MAP FRAGMENT 3/3 and COLLECTIBLE WINE (L).
- Place COLLECTIBLE WINE, take SNOWMAN GLOBE and FOREST COMPASS (M).
- Walk down twice.
- MAP FRAGMENTS and FOREST COMPASS on UNFINISHED MAP, take HOMEMADE NAVIGATOR.
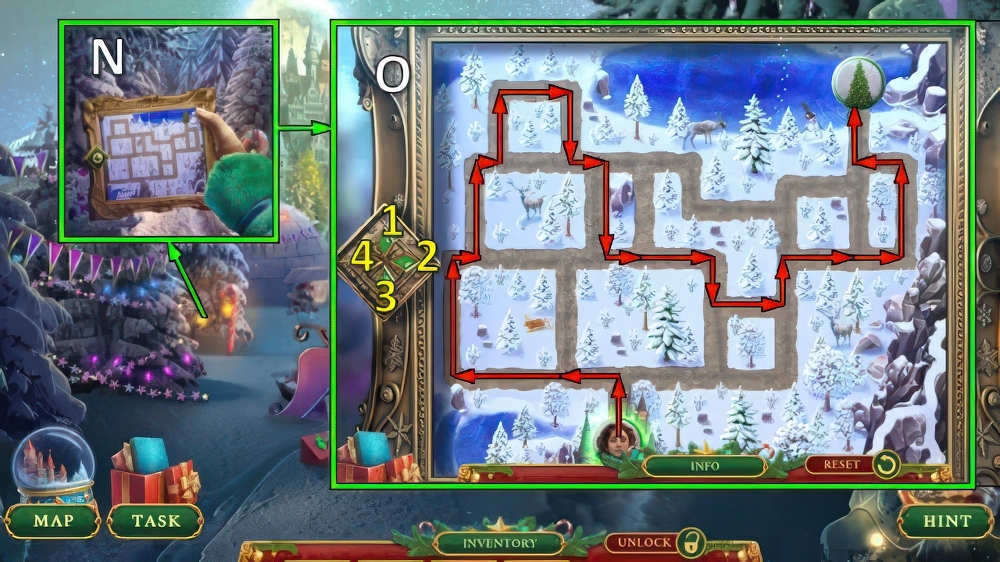
- Use HOMEMADE NAVIGATOR (N).
- Solution (O): 1-4-4-1-2-1-2-1-2-3-2-3-2-2-3-2-1-2-2-1-4-1.

- Take SNOW HAMMER (P).
- Place SNOW HAMMER, take SNOW GLITTER and SILK RIBBON (Q).
- Take AWL (R).
- Place SNOWMAN GLOBE and SNOW GLITTER, select 1-2.
- Take FISHING HOOK and MINIATURE CROWN (S).

- Take CRAMPONS BASE, place FISHING HOOK (T).
- Take TROUT and STAR BAG (U).
- AWL, SILK RIBBON and STAR BAG on CRAMPONS BASE, take ICE CRAMPONS.
- Place ICE CRAMPONS, play puzzle (V).

- Move note, take MOUSE WITH PICKAXE (W).
- Take GIFT BAG (X).
- Place MOUSE WITH PICKAXE, take FISH FIN and SCRATCHER (Y).
- Walk down.

- Use SCRATCHER, take GIFT EMBLEM and FISH TAIL (Z).
- Place FISH FIN, MINIATURE CROWN and FISH TAIL (A).
- Take ENLARGEMENT POWDER and ESSENCE OF MIRACLE (B).
- Go (C).

- GIFT EMBLEM on GIFT BAG, take LADLE CRUCIBLE.
- Use ENLARGEMENT POWDER, take GIFT BOXES.
- Place GIFT BOXES, select 1-6 (D).
- Use NUTCRACKER and STAR AMULET.
- Take BROKEN SHIELD (E).
- Take KNITTING NEEDLES (F).

- Offer KNITTING NEEDLES, take SILVER POLISH and WARM SCARF (G).
- Offer TROUT and WARM SCARF, take GNOME AMULET and SILVER SKATES (H).
- Walk down.

- Place GNOME AMULET (I).
- Take DIAMOND FILE and TOY LEVER (J).
- Use TOY LEVER (K).
- Play puzzle (L), receive BURNER.
- SILVER POLISH, LADLE CRUCIBLE, BURNER, DIAMOND FILE and SILVER SKATES on BROKEN SHIELD, take SILVER SHIELD.
- Use ESSENCE OF MIRACLE and SILVER SHIELD, take CHRISTMAS SHIELD (M).
- Go (N).
- Use CHRISTMAS SHIELD (O).
- Block fireballs (P).
- Defeat Mouserinks (random) (Q).
- Walkthrough Bonus Chapter, at the link below.


