Detective Club 1: Missing in the Fog – Immerse yourself in the atmosphere of Victorian London, where every street is shrouded in mystery. You will find yourself in the role of Thomas, a courageous young detective who heads a small but brave club of detectives. Together with his faithful partner George, he goes in search of his friend Emily, who suddenly disappeared under mysterious circumstances. It all begins with a disturbing conversation: the constable informs him that Emily has not returned from the market, although she is usually never late. Thomas can’t wait three days for the official search to begin and decides to act on his own. From initial questions to neighbors to investigating the crime scene, his journey gradually reveals a frightening picture. You’ll encounter ruthless criminals, explore dark nooks and crannies, and even find yourself drawn into a conspiracy involving the lab and a mysterious shipwreck. George helps keep the atmosphere of the adventure alive by encouraging Thomas and constantly pushing him to take action: eavesdrop on adult conversations, keep an eye out for suspicious individuals, and look for clues that might indicate what happened to Emily. But the dangers will not be long in coming – the heroes are pursued not only by enemies with a dark past, but also by the risk of missing precious clues. Help Thomas and George to solve this complicated case. If you can not pass any of the puzzles or do not know where the items are, on our site you can watch the walkthrough of Detective Club 1: Missing in the Fog, and find out how this story ends.
Detective Club 1: Missing in the Fog – Walkthrough
Here you can see the full walkthrough of Detective Club 1: Missing in the Fog, namely for all chapters, including bonus chapter, in pictures.
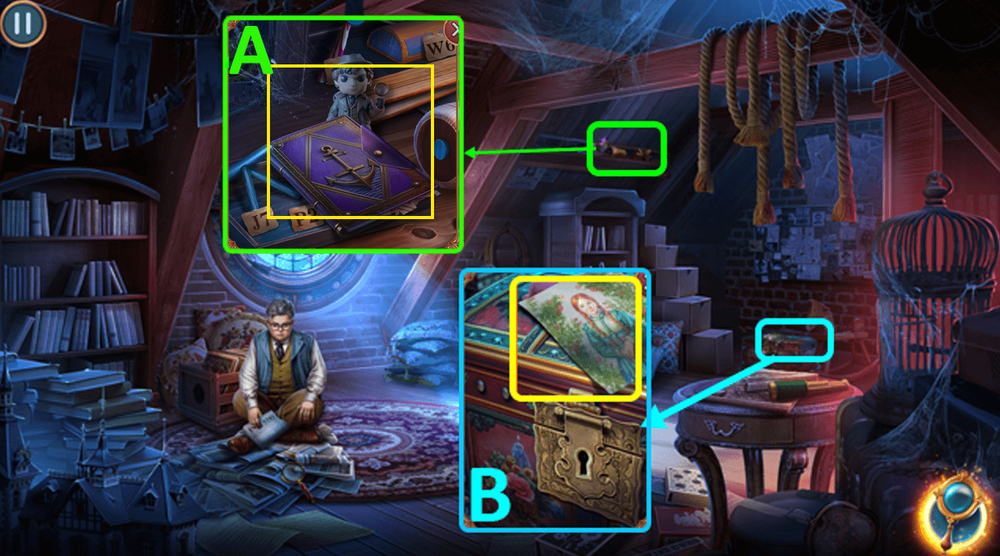
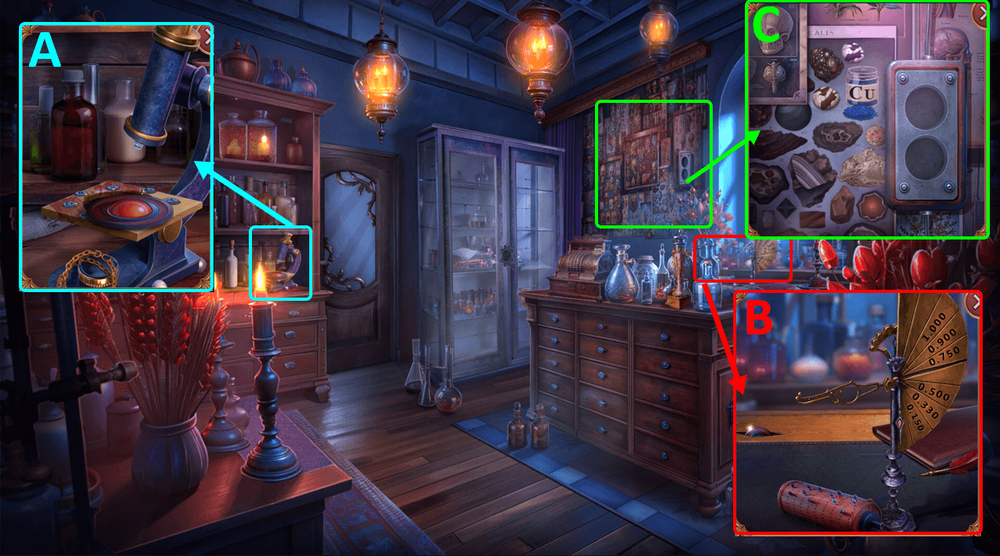
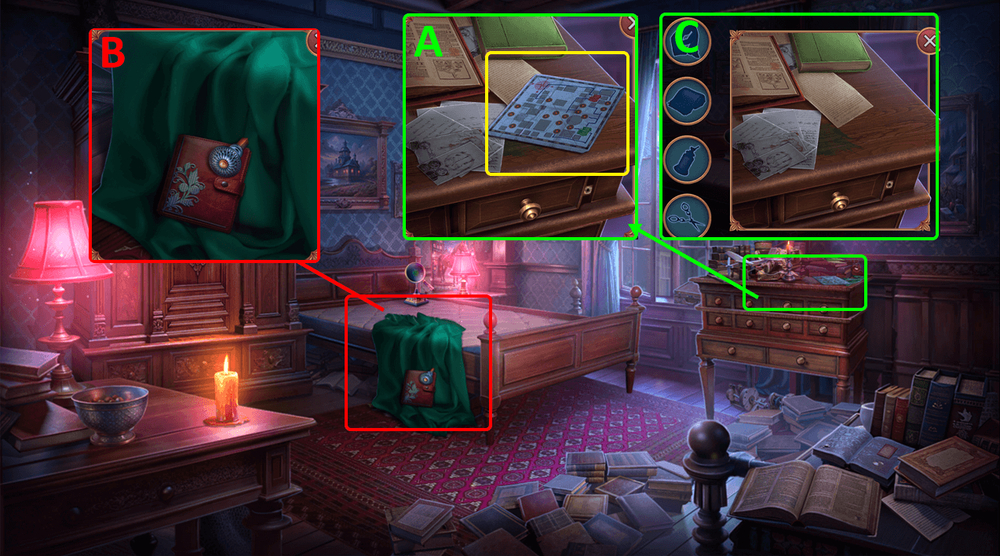
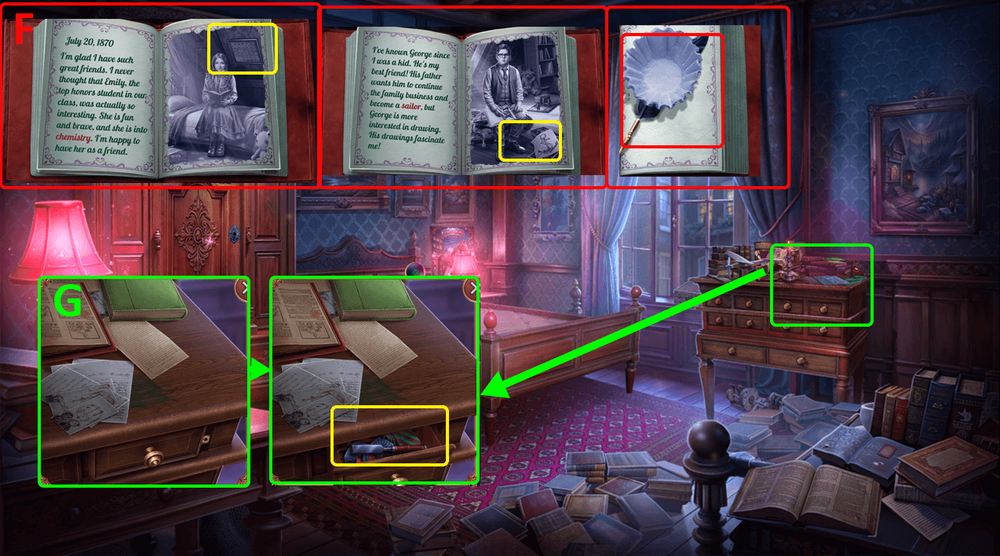
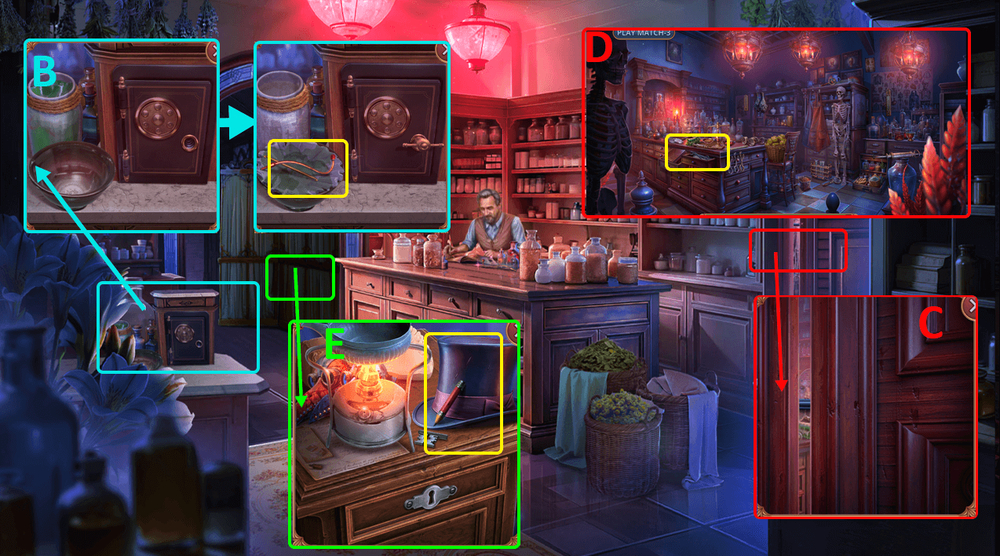
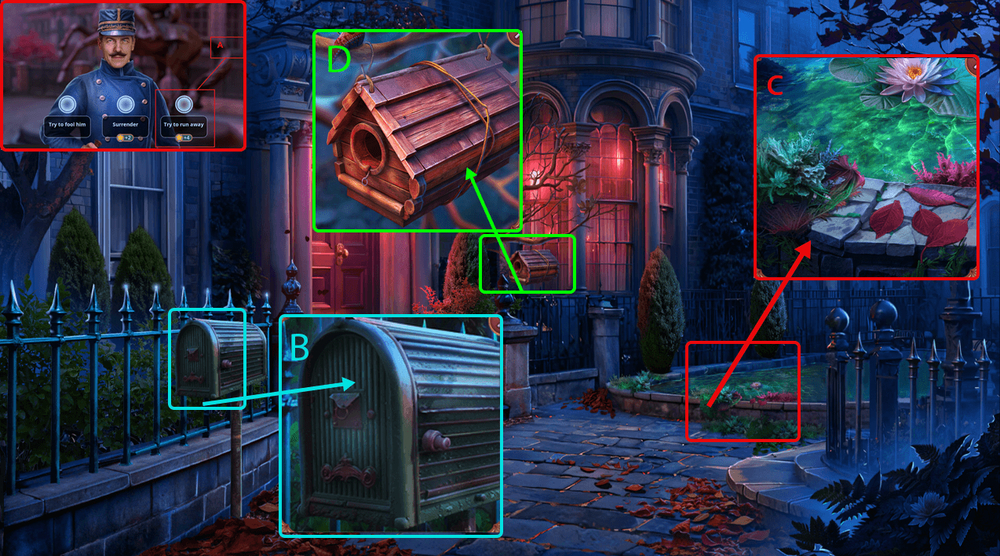
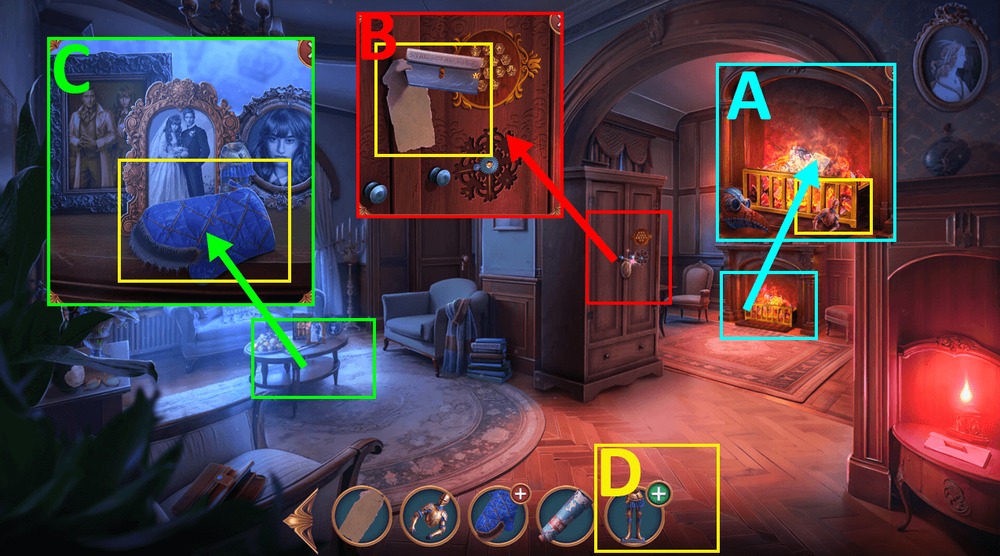
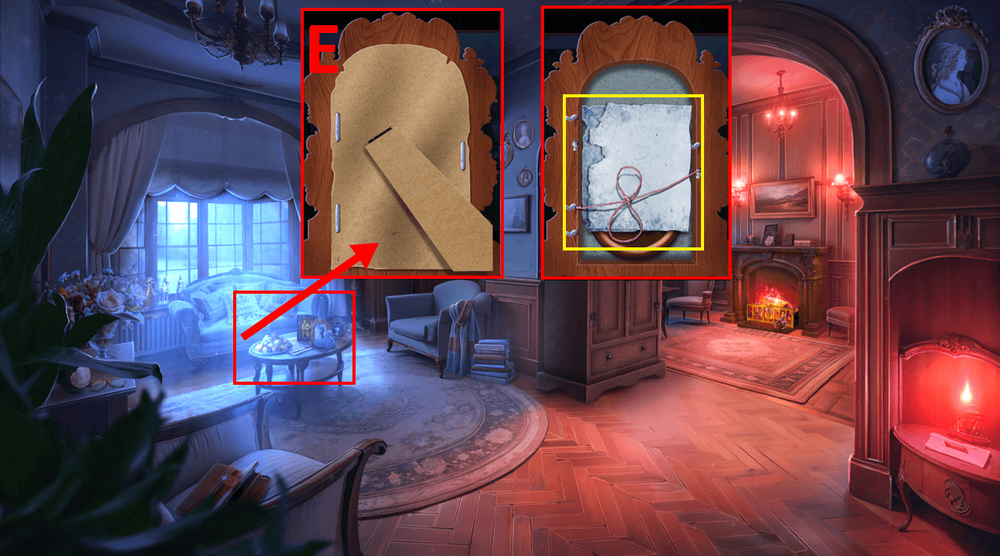
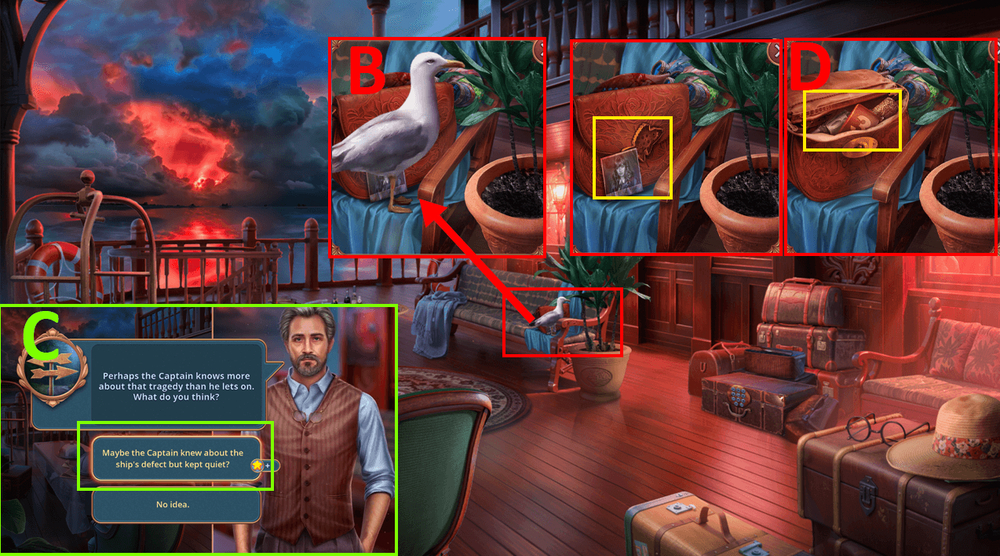
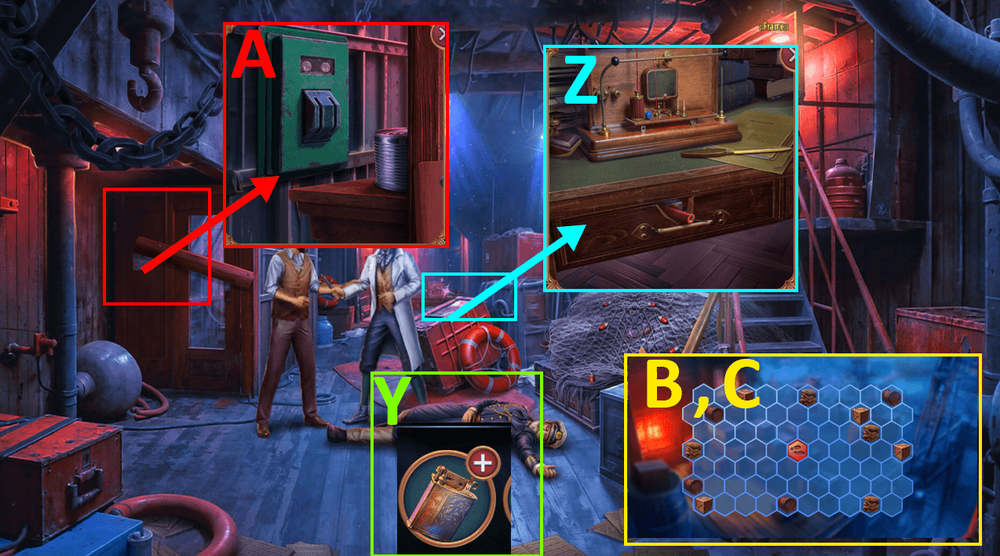
- Take the journal and GAME PIECES 1/2 (A).
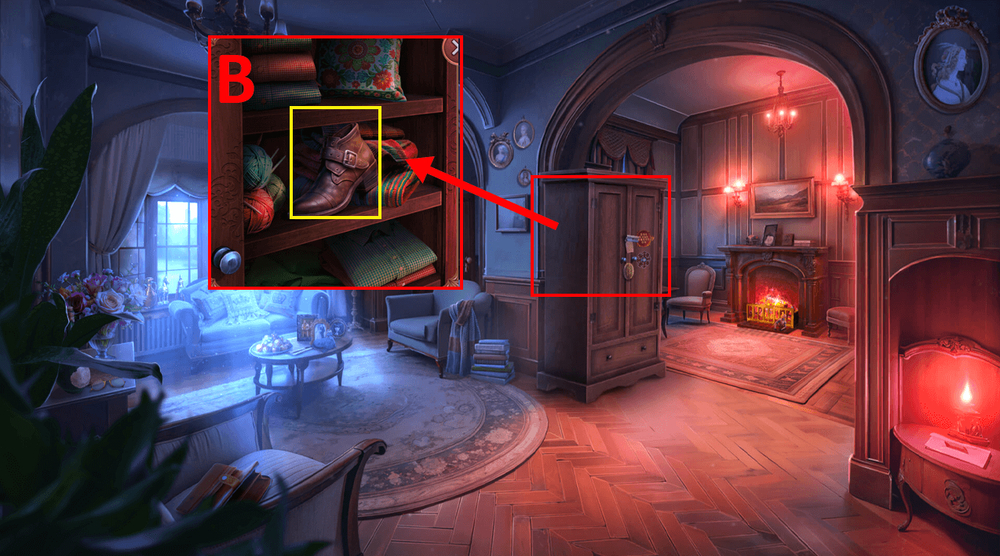
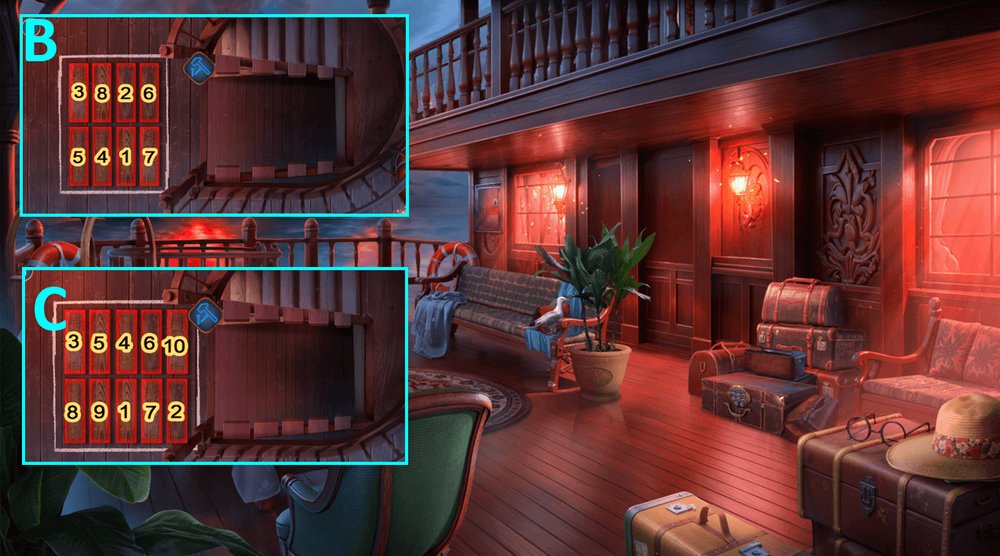
- Examine the picture (B).
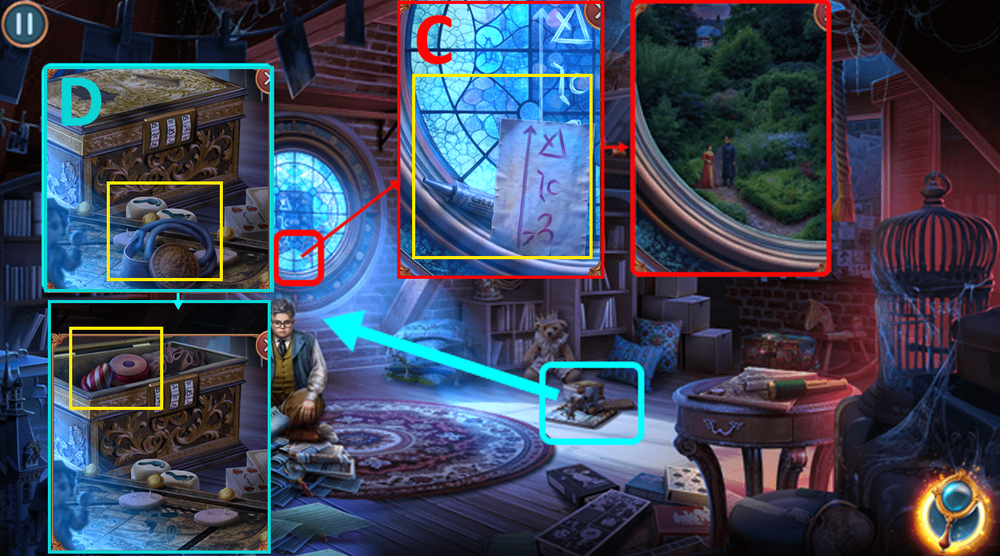
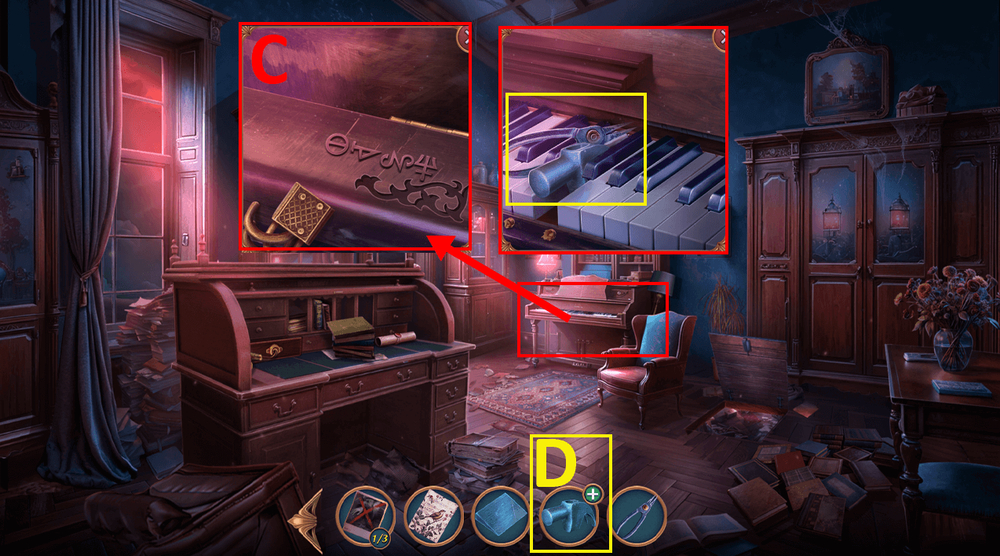
- Get SYMBOLS, take GLUE (C).
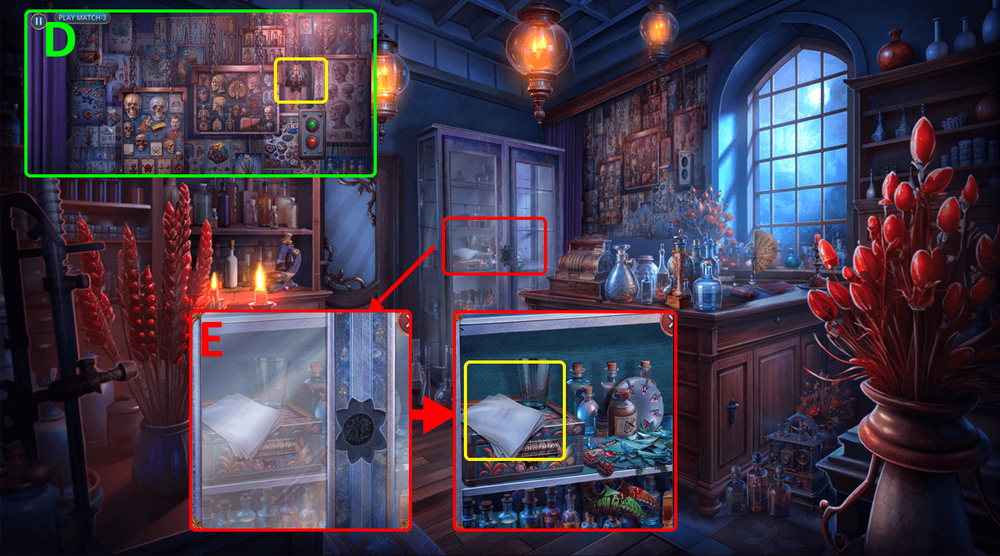
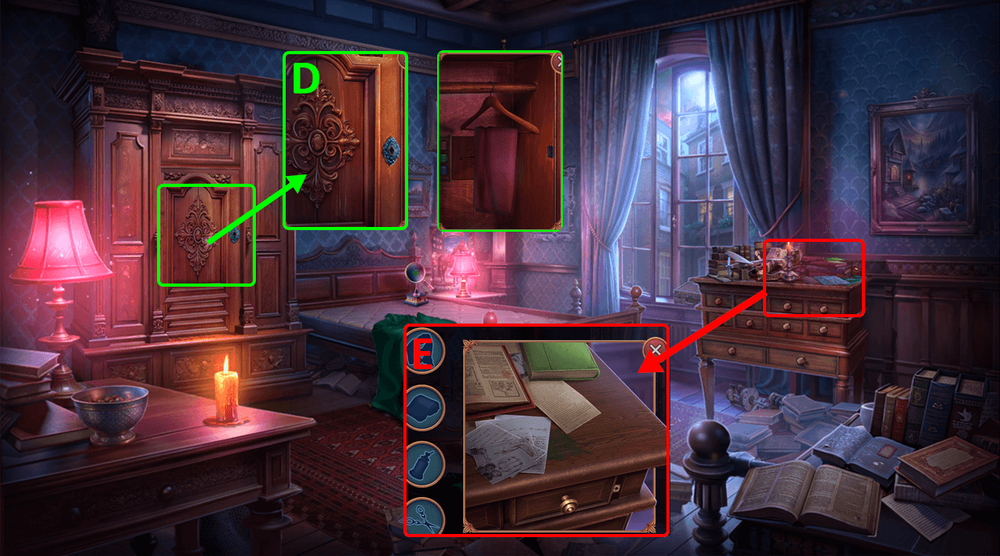
- Take COINS 1/2 and RUBBER BAND, use SYMBOLS on the box, enter the combination from the note, take FLYING INVENTION PARTS (D).
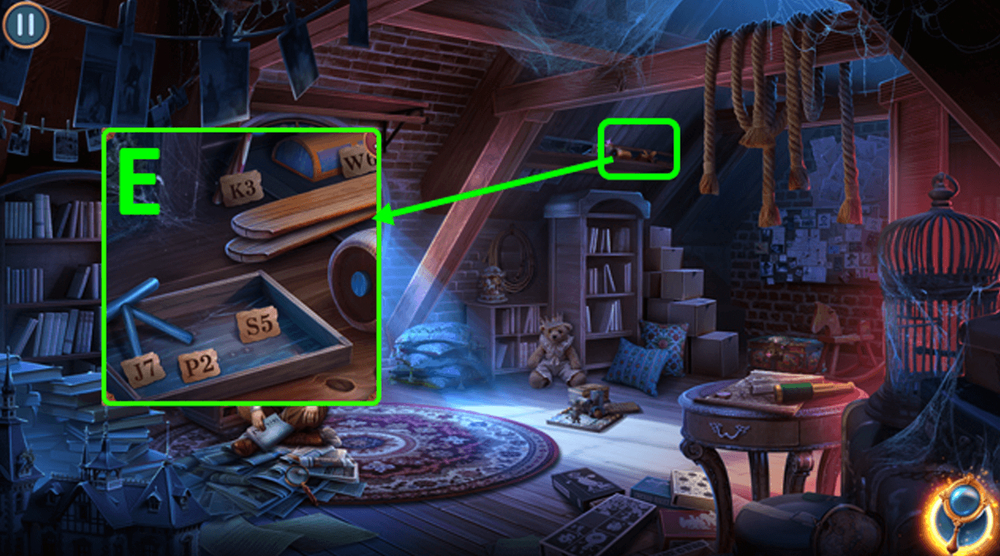
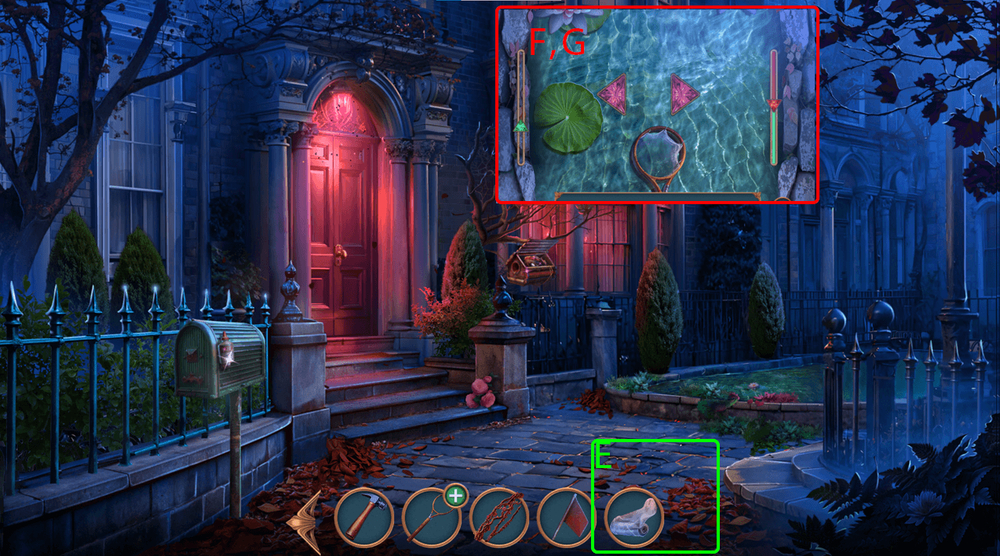
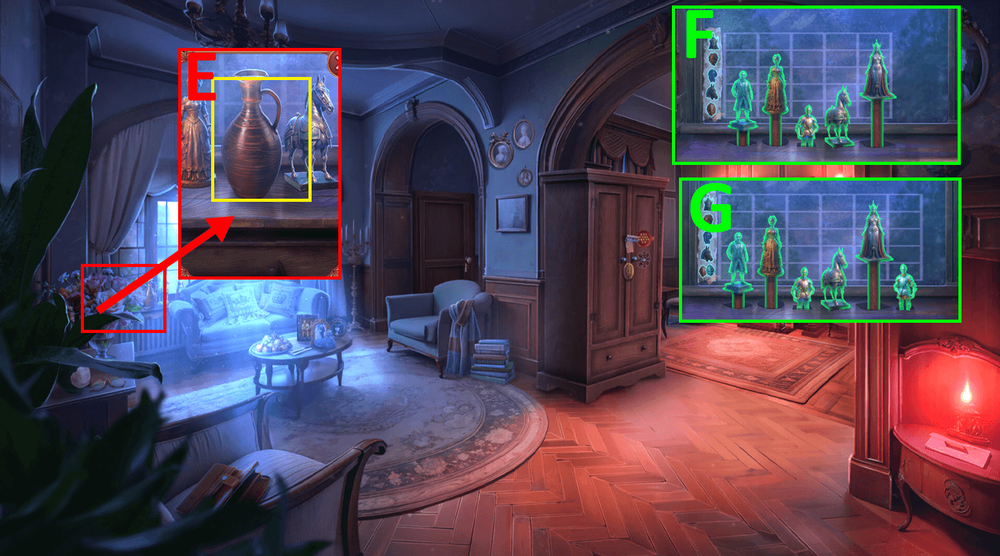
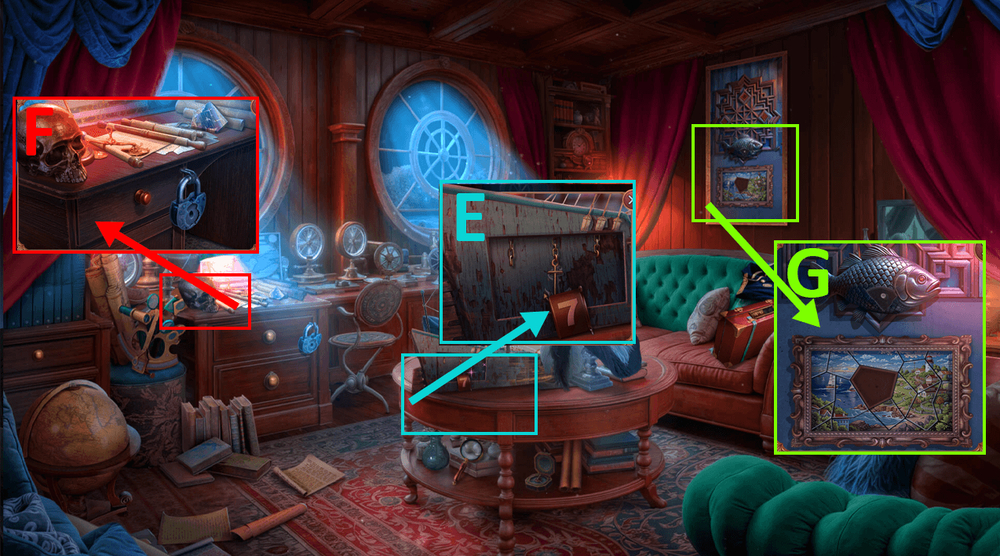
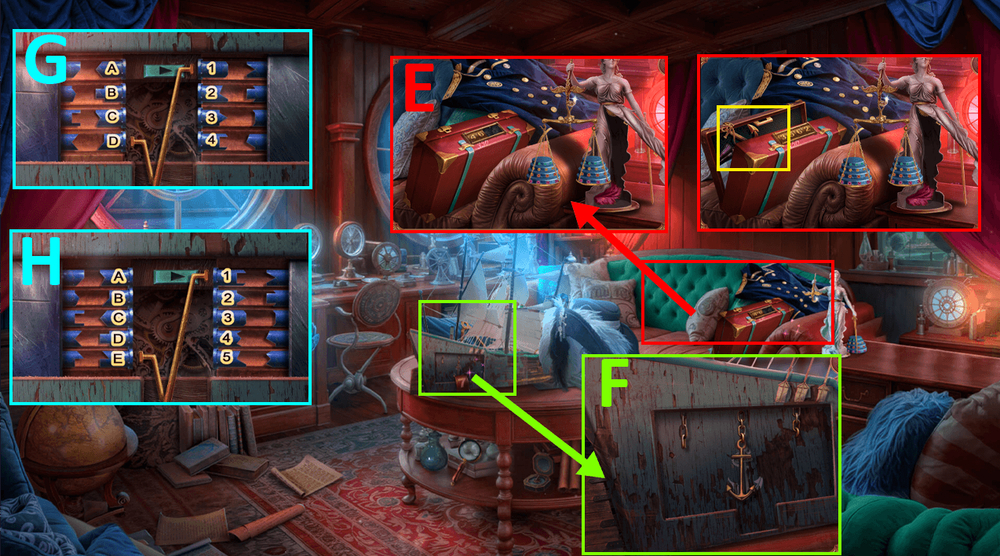
- Use GLUE and FLYING INVENTION PARTS on the table (E).
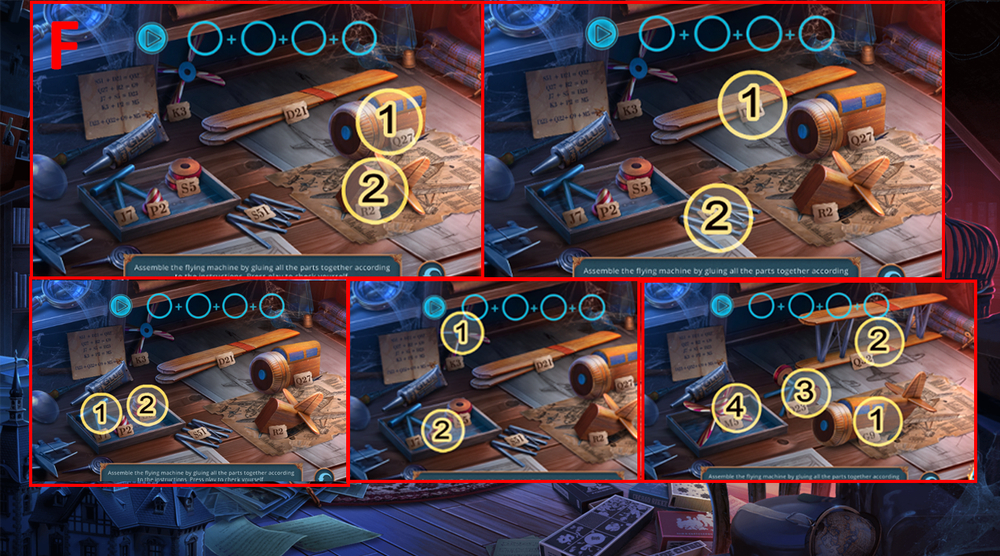
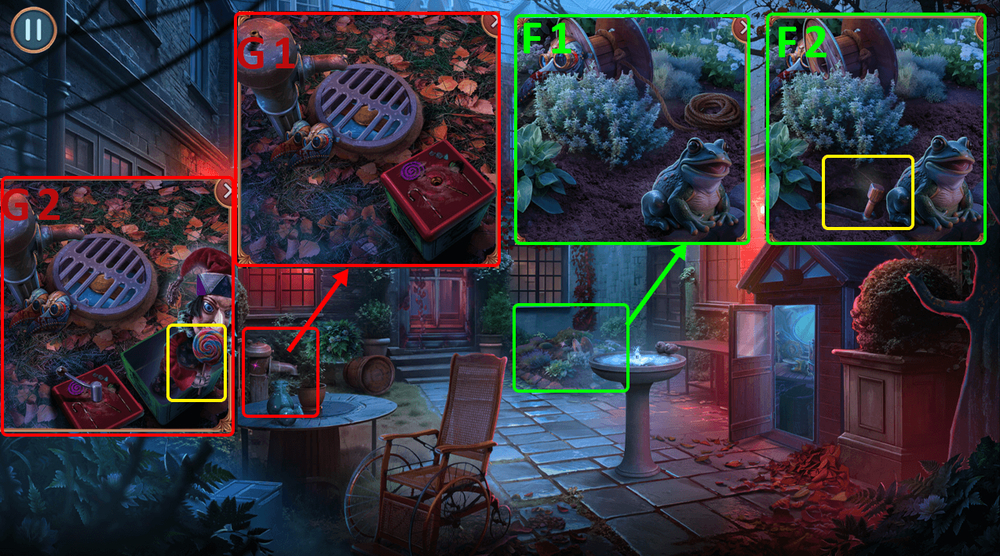
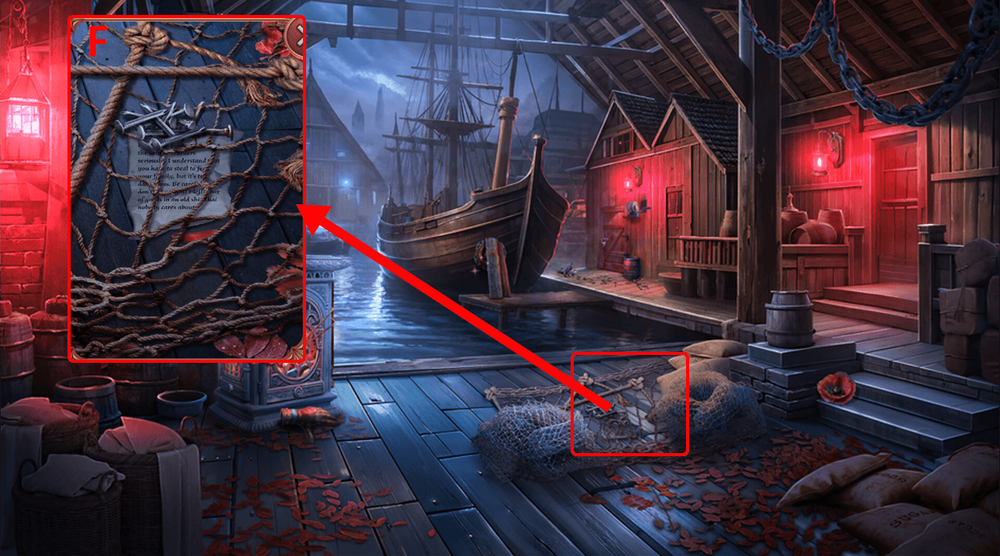
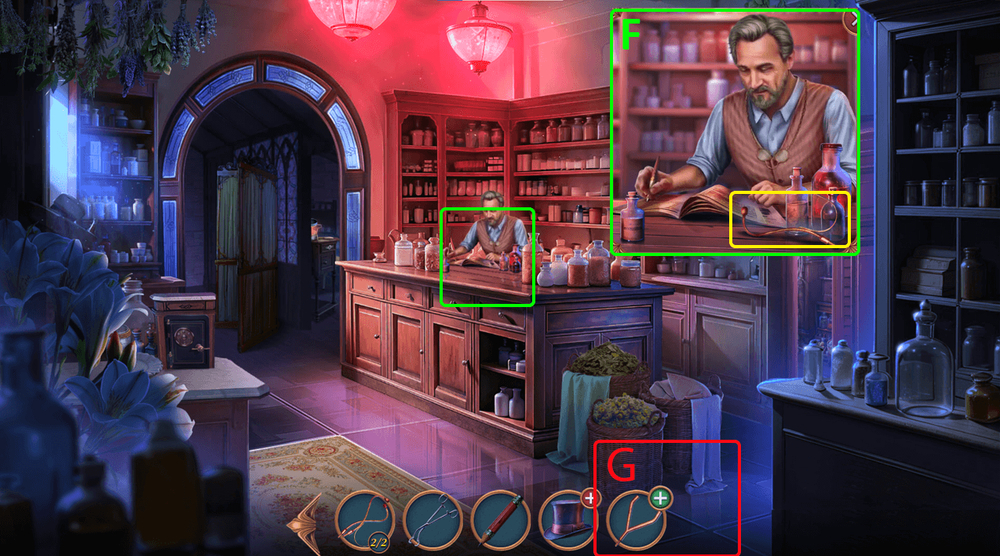
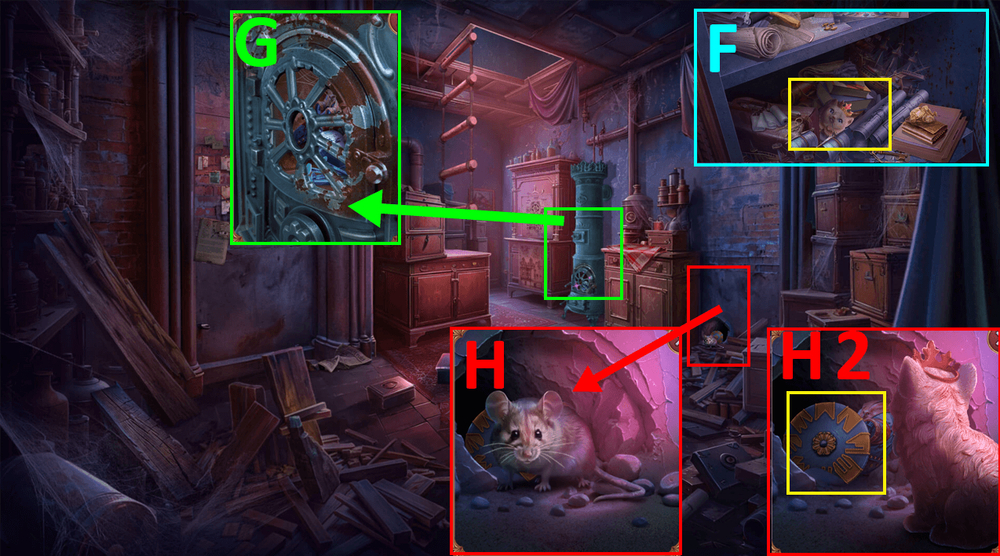
- Easy solution: Select the specified parts and then press the PLAY button (F).
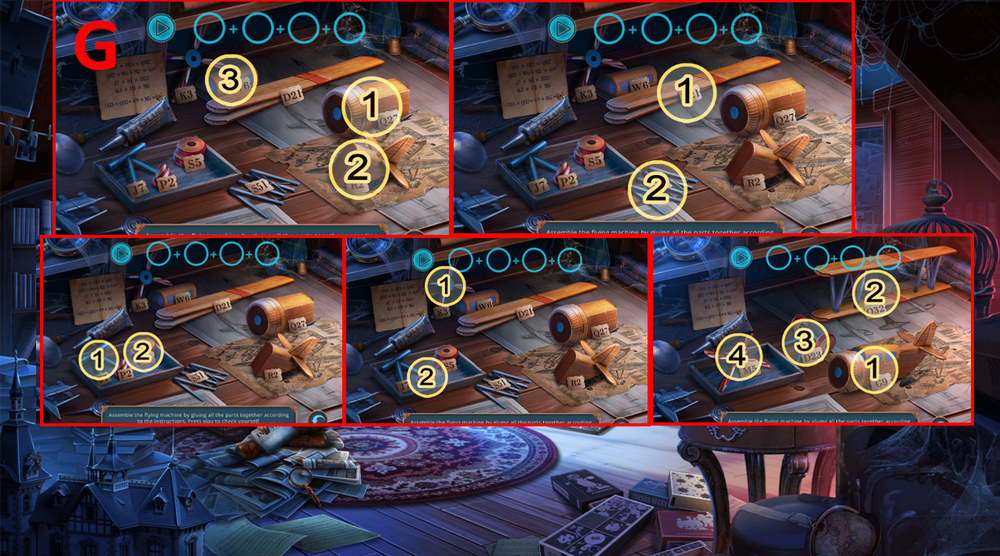
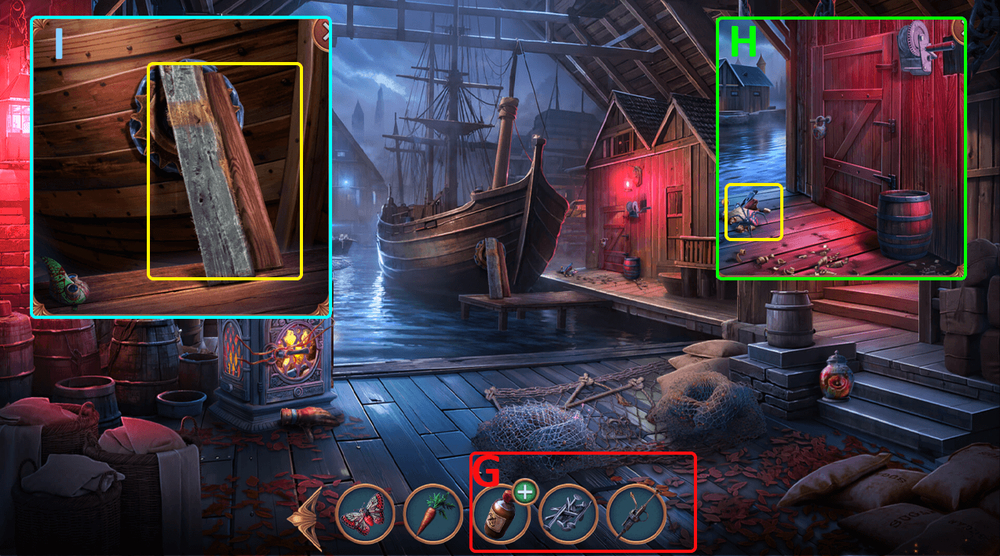
- Hard solution: Select the specified parts and then press the PLAY button (G).
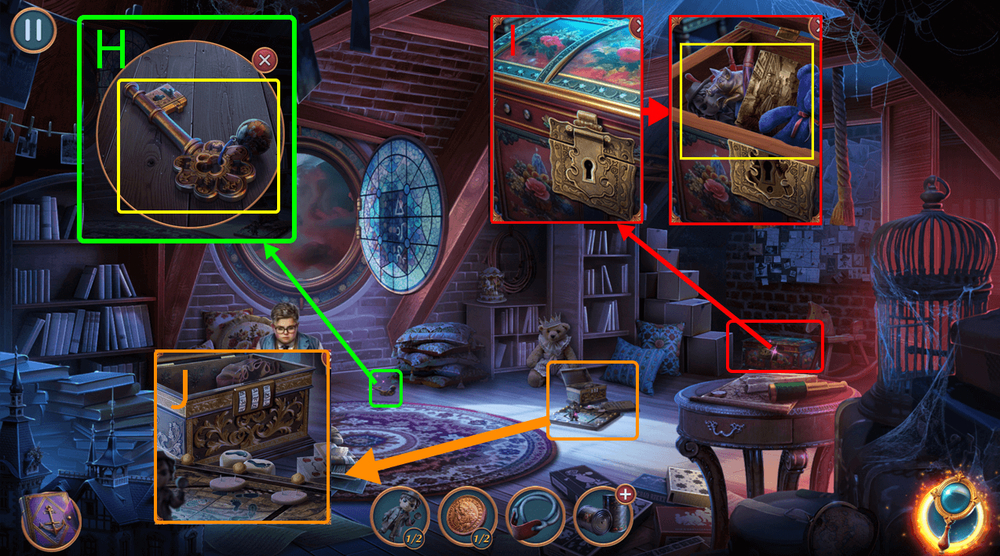
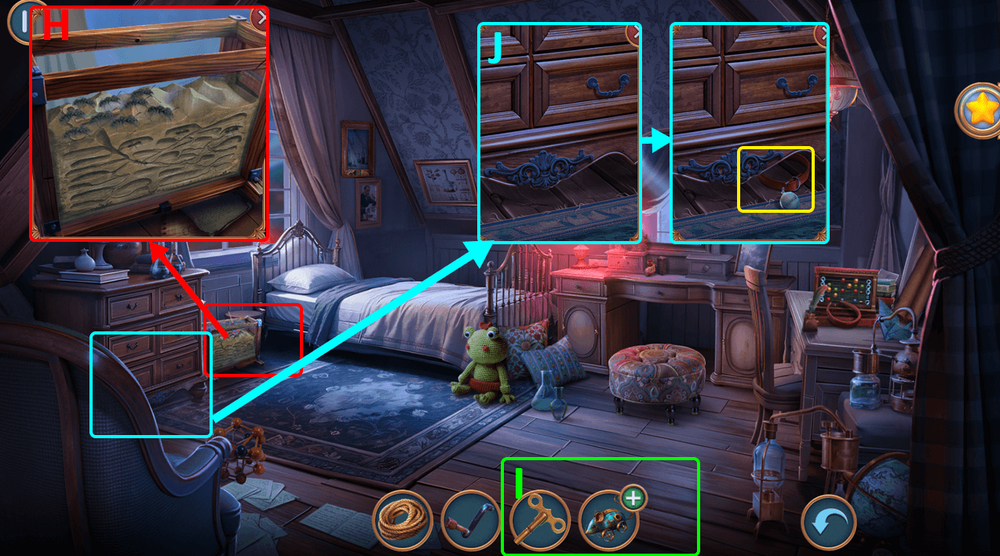
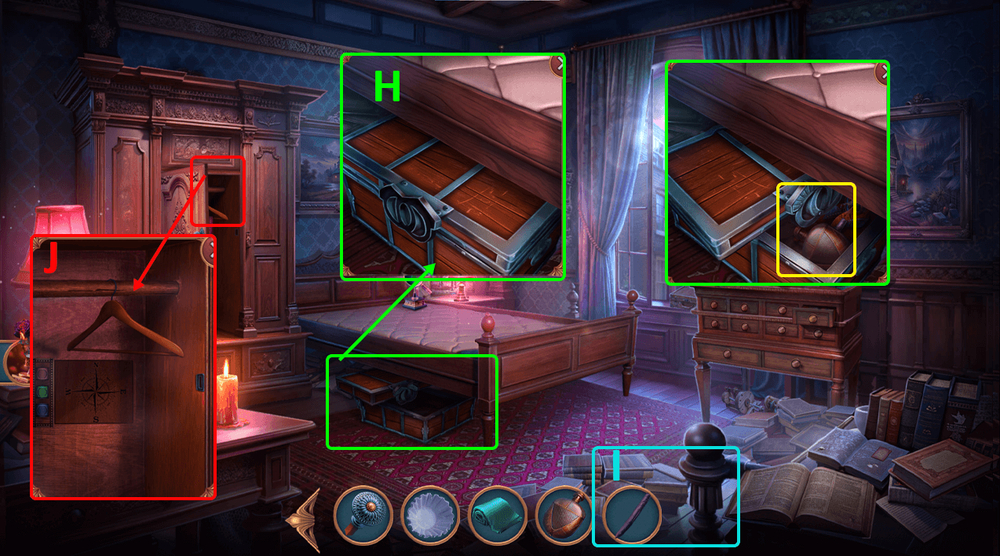
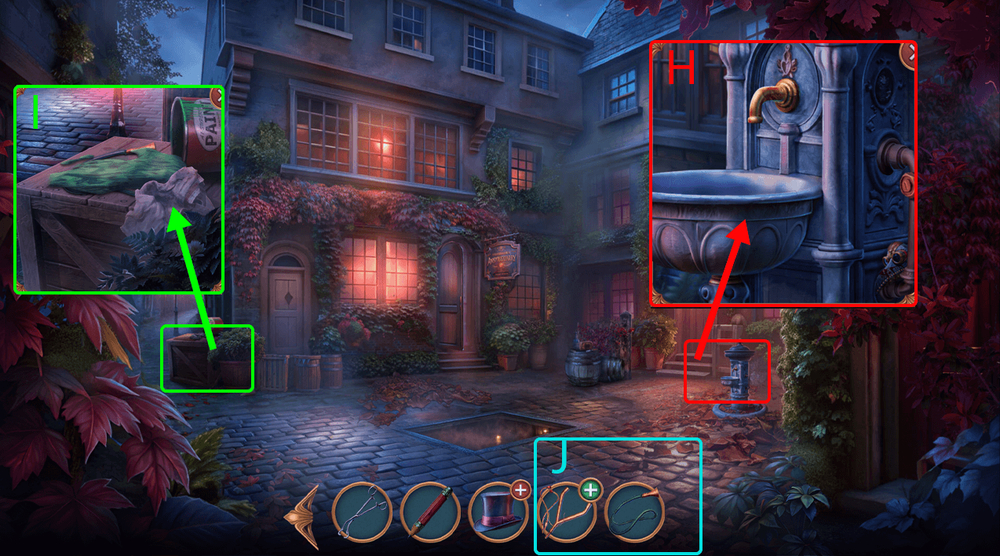
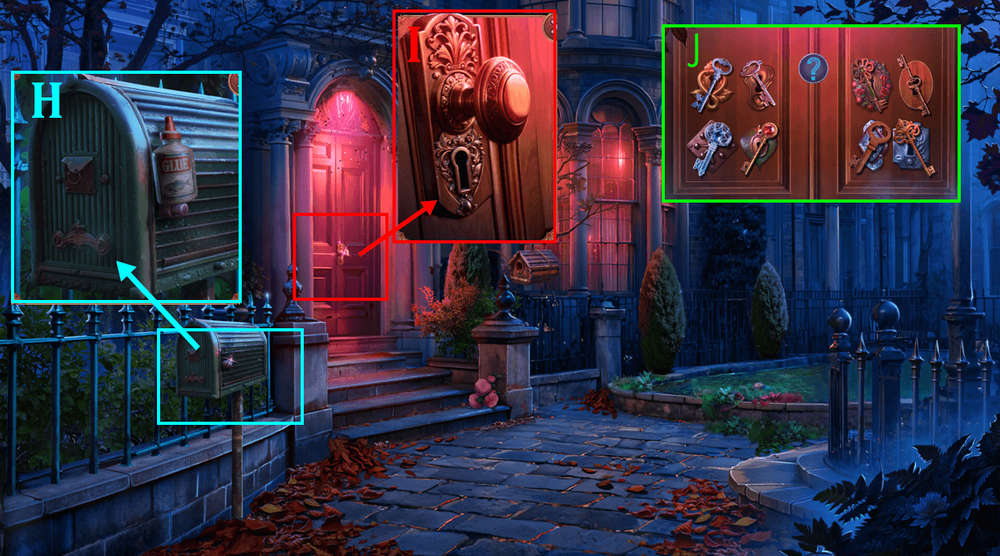
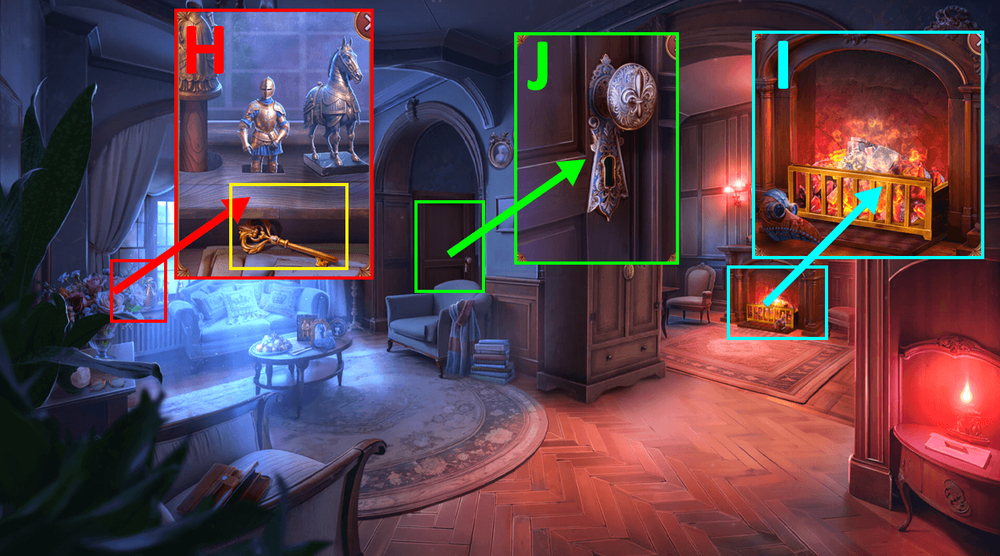
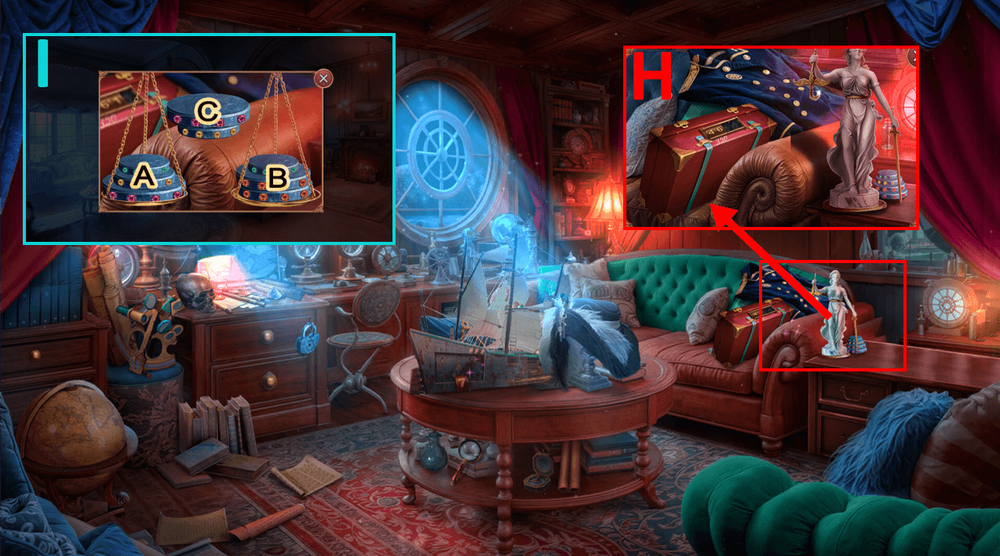
- Examine the item, take CHEST KEY (H).
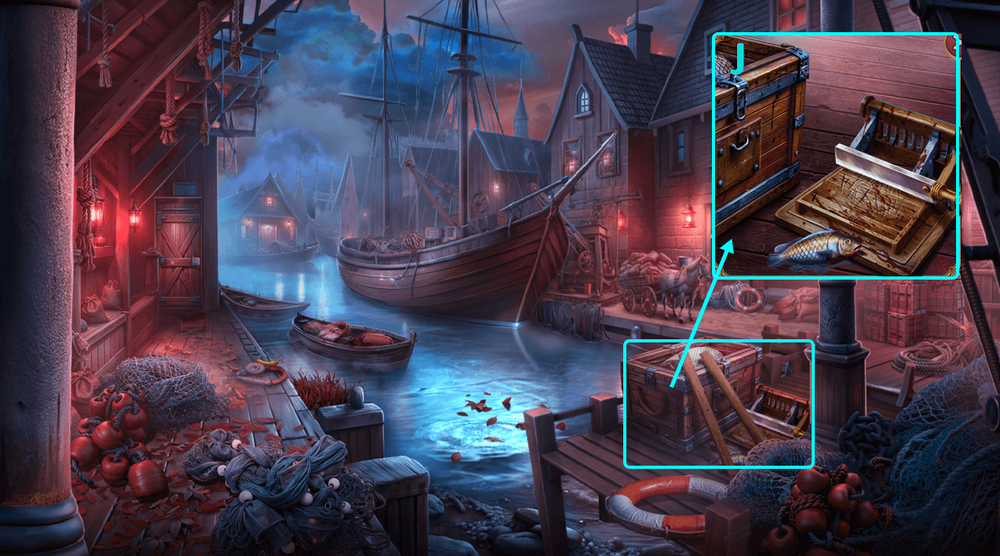
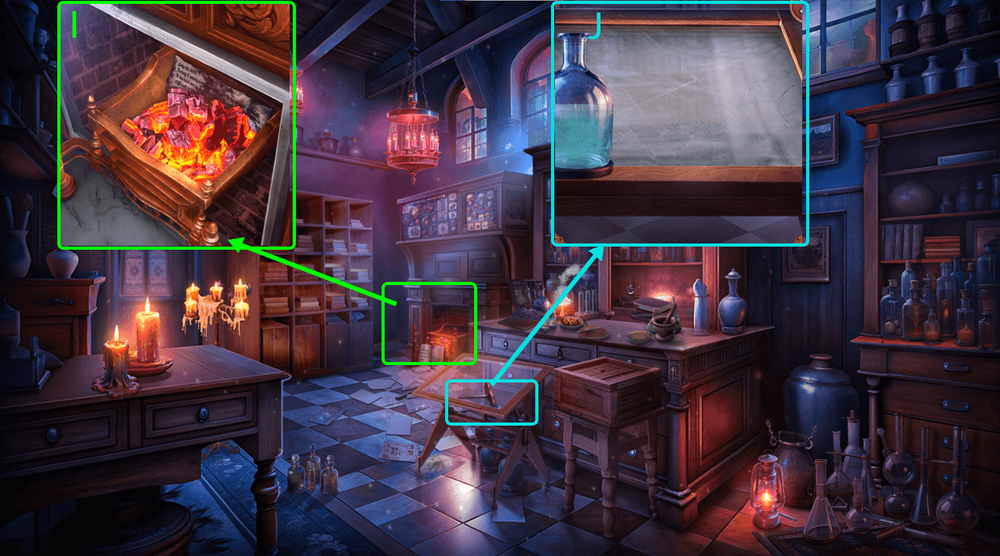
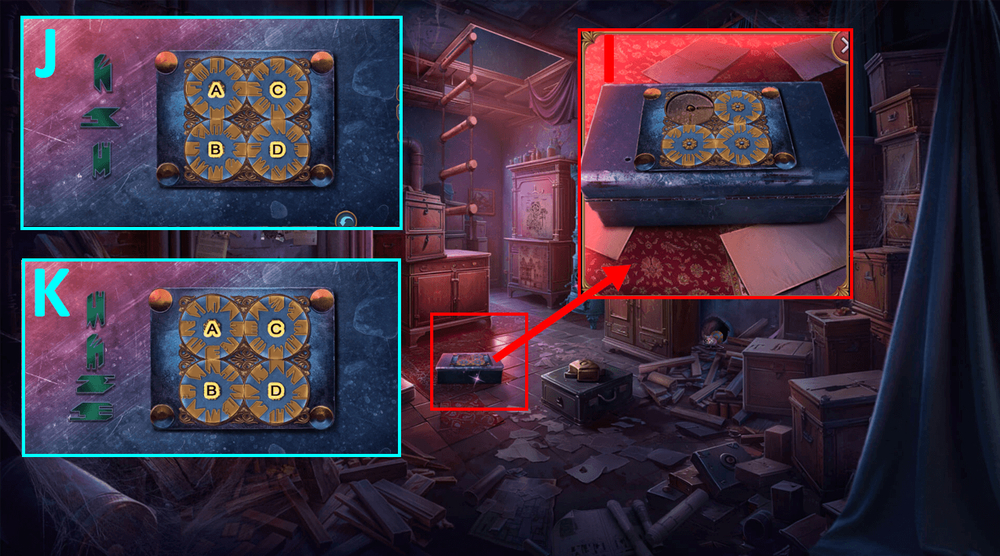
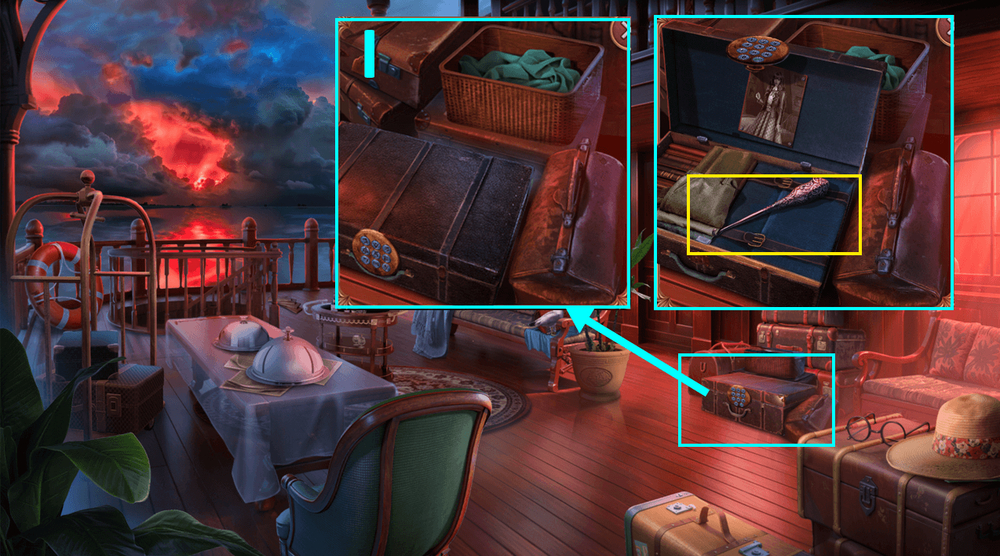
- Use CHEST KEY on the chest, examine the photo, read the note, take SLINGSHOT, CORKSCREW, GAME PIECES 2/2, and STRING (I).
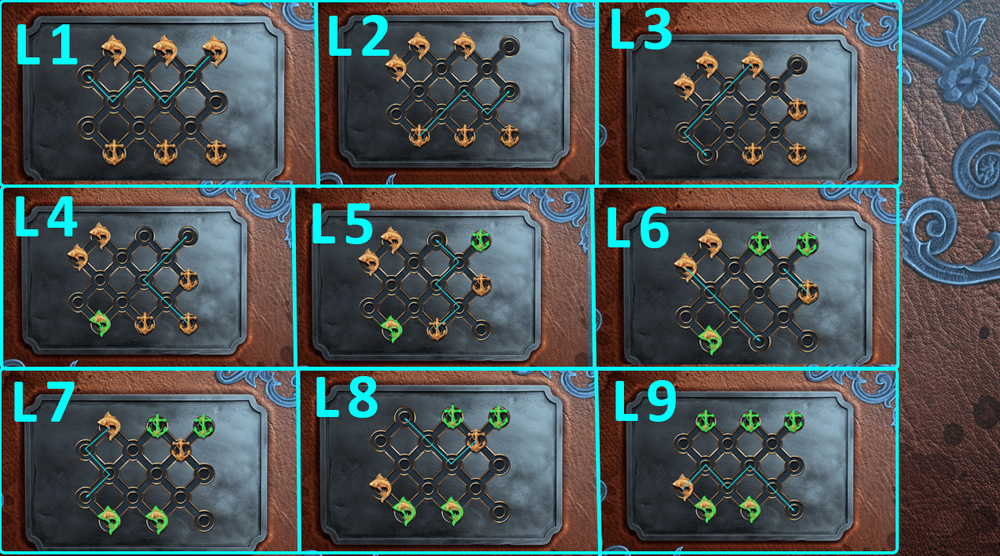
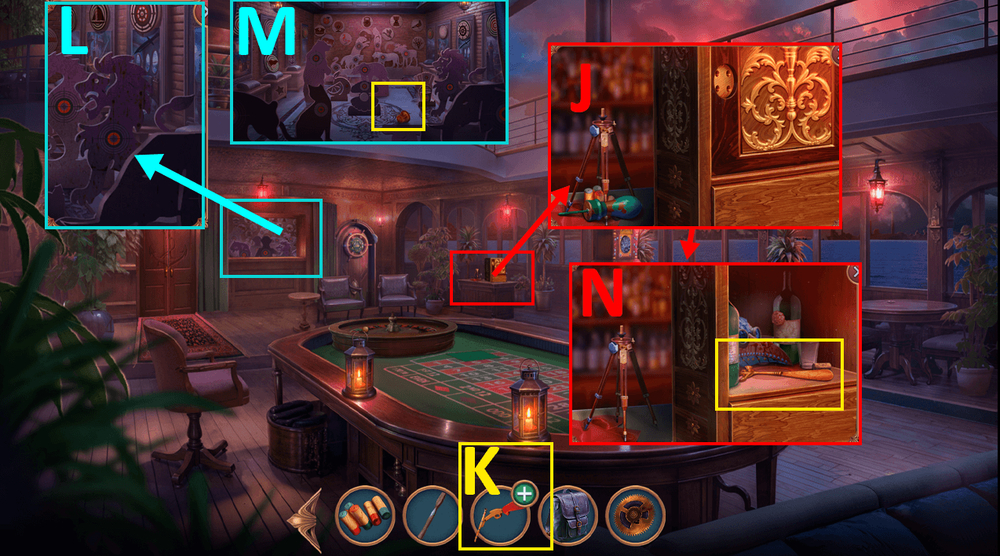
- Use GAME PIECES on the board (J).
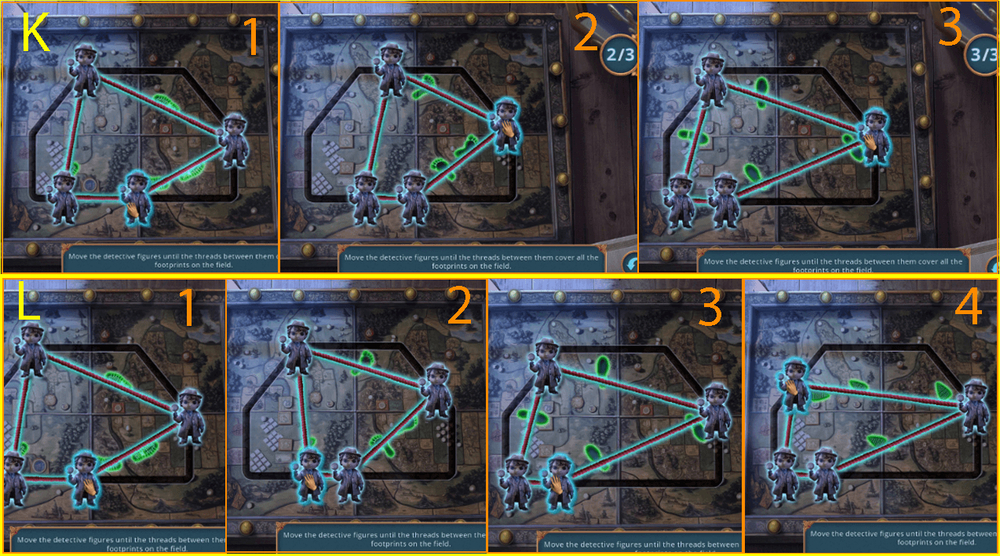
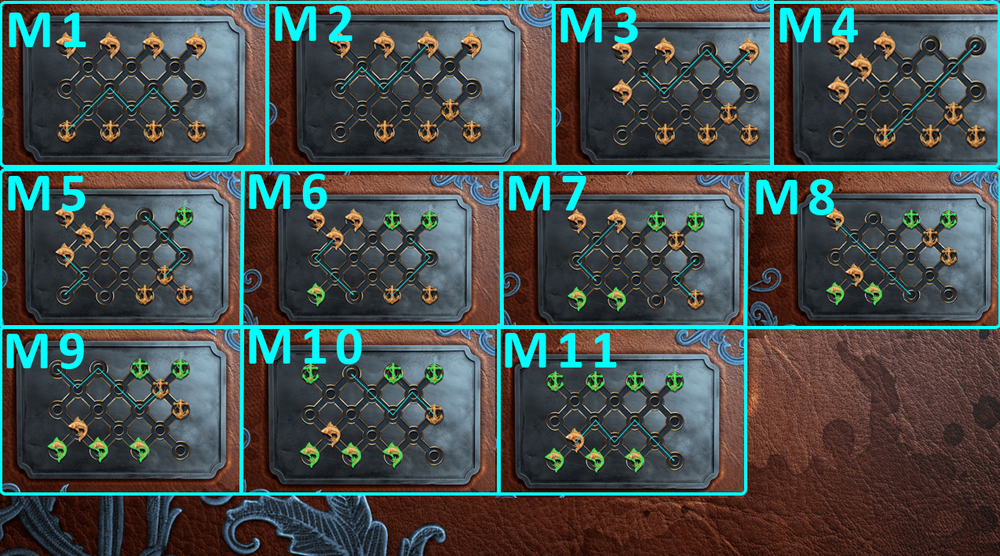
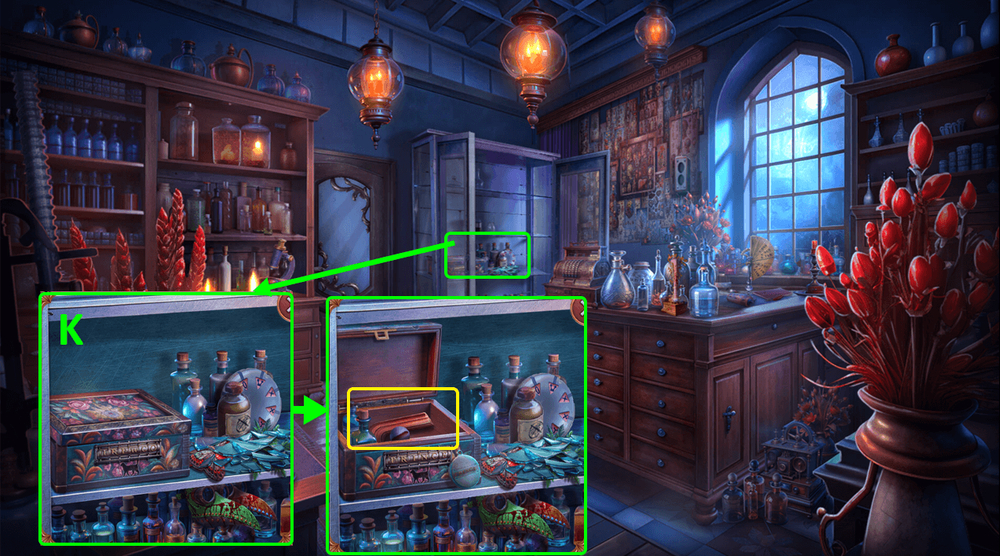
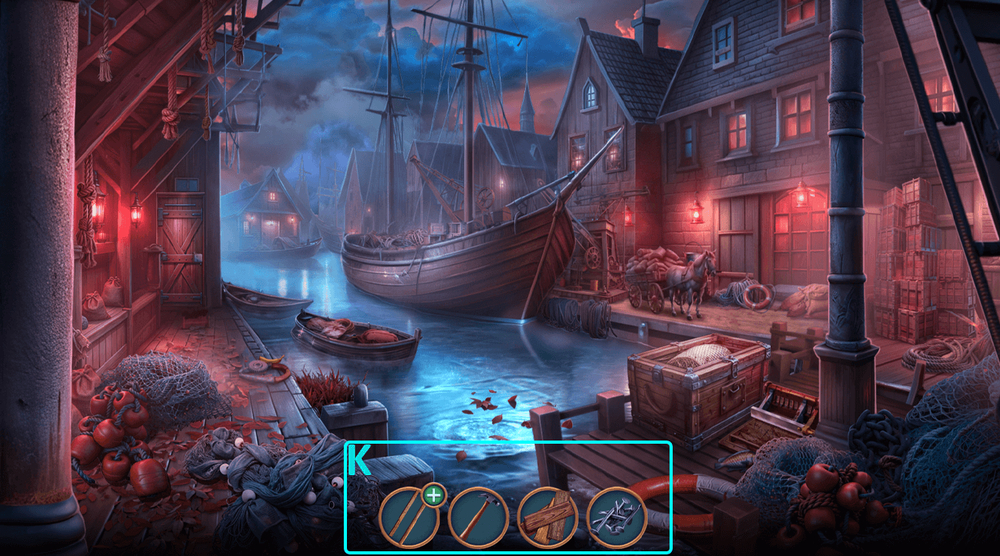
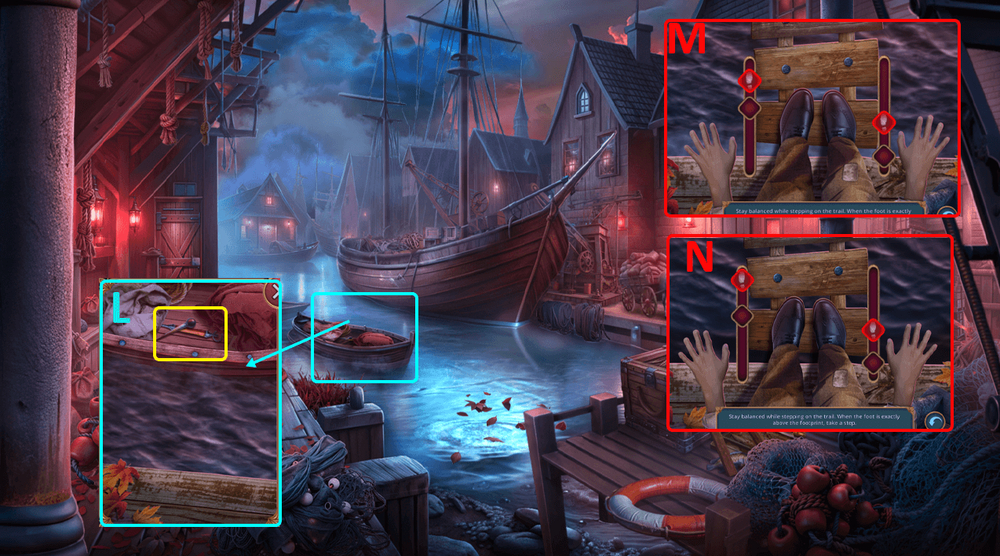
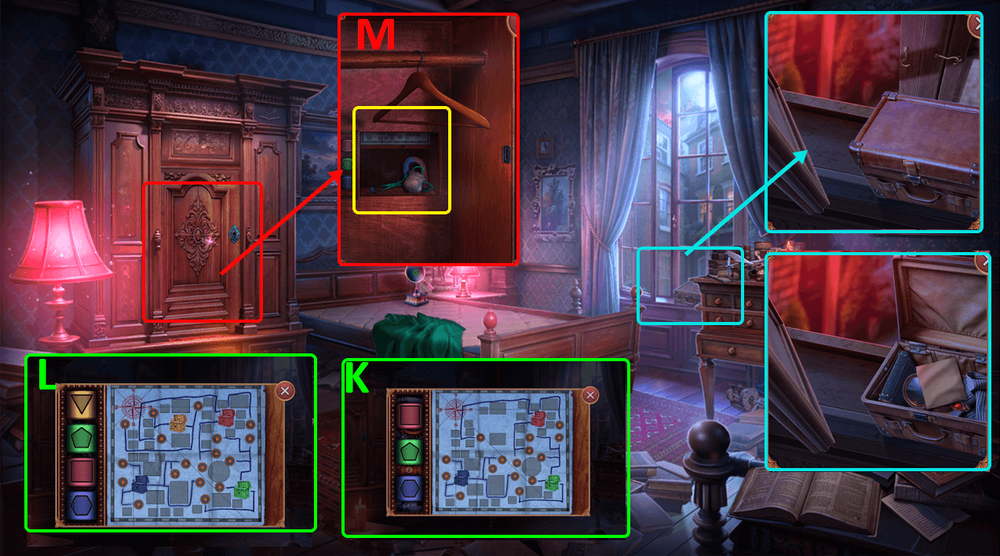
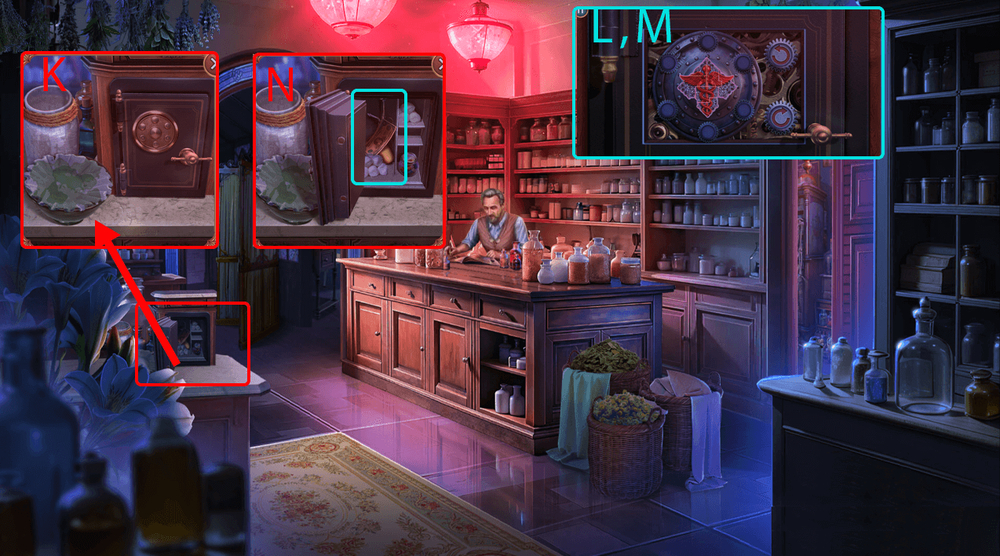
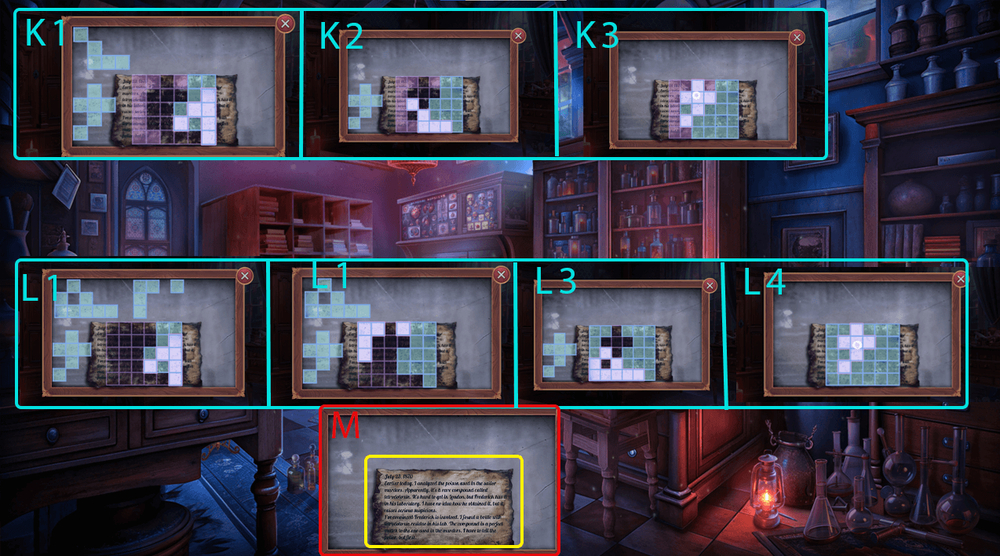
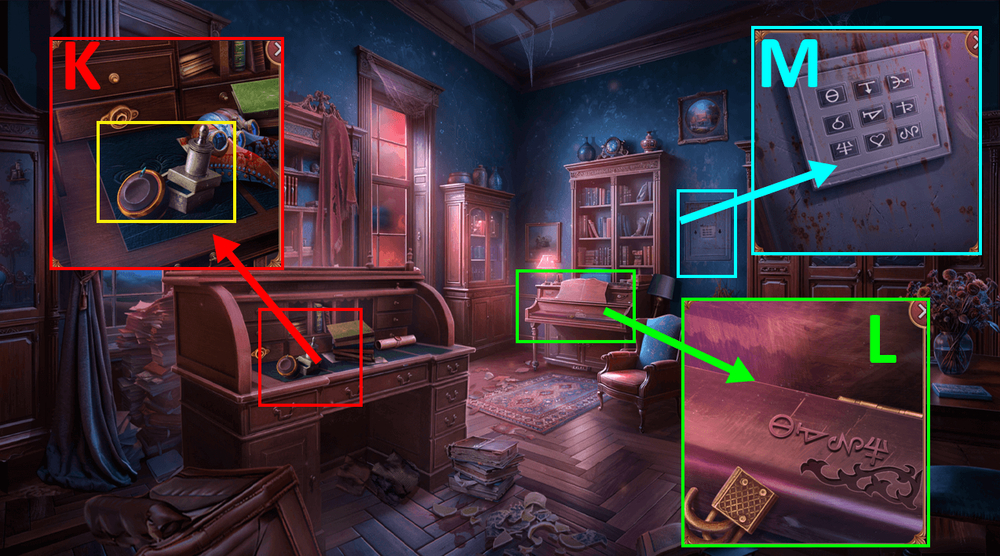
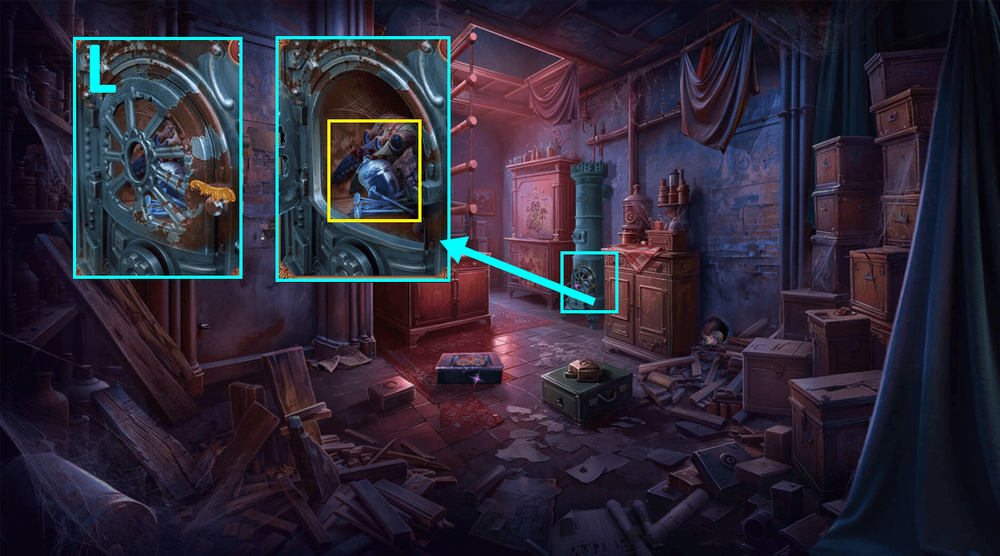
- Easy solution: Follow the instructions on the image (K).
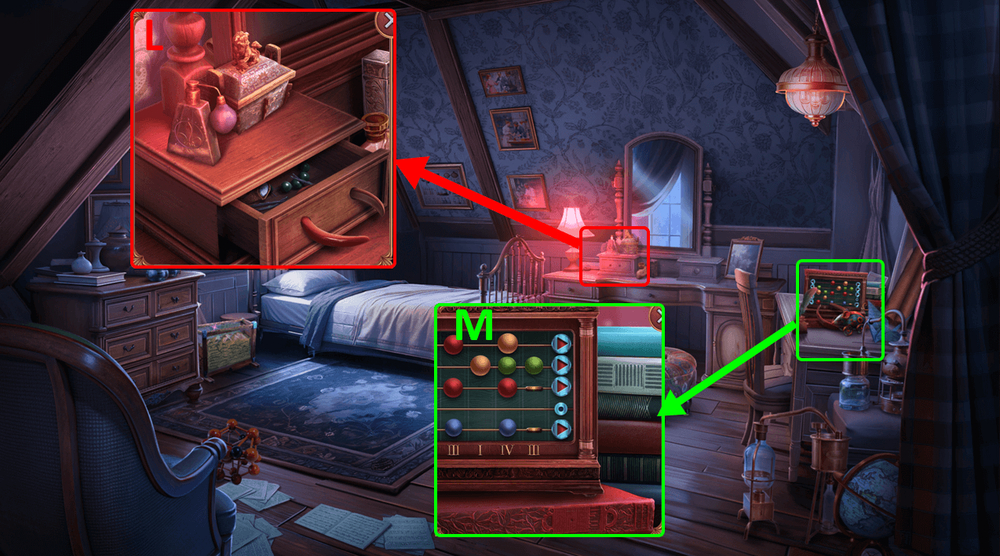
- Hard solution: Follow the instructions on the image (L).
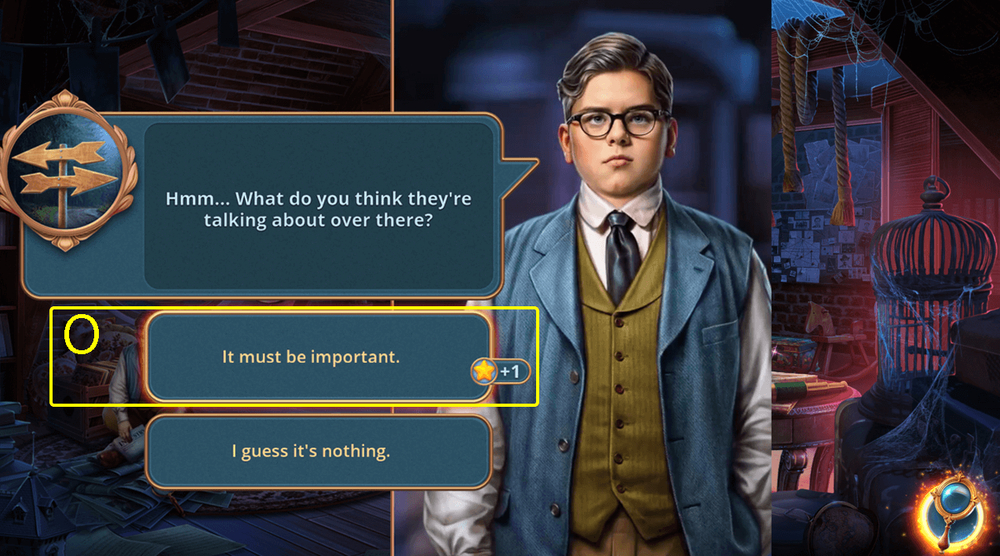
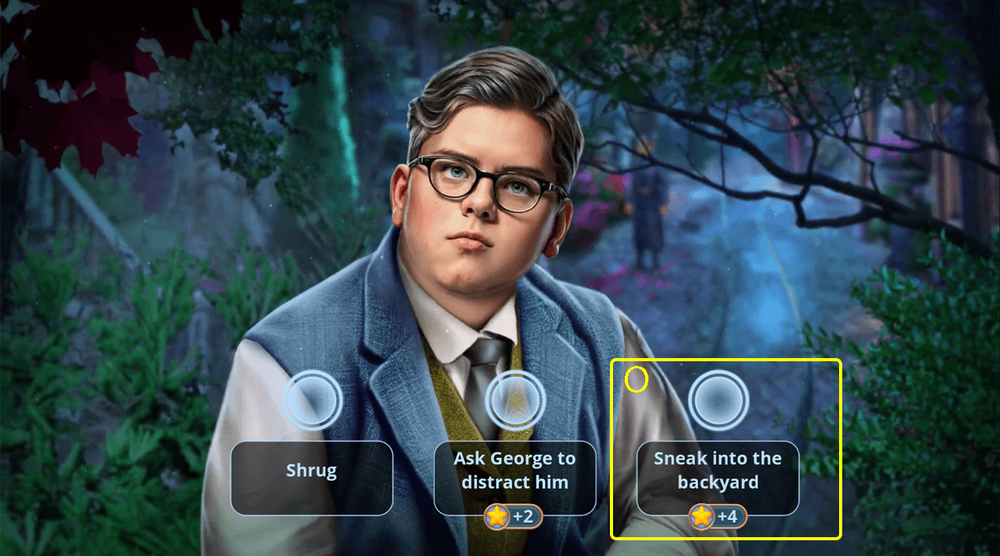
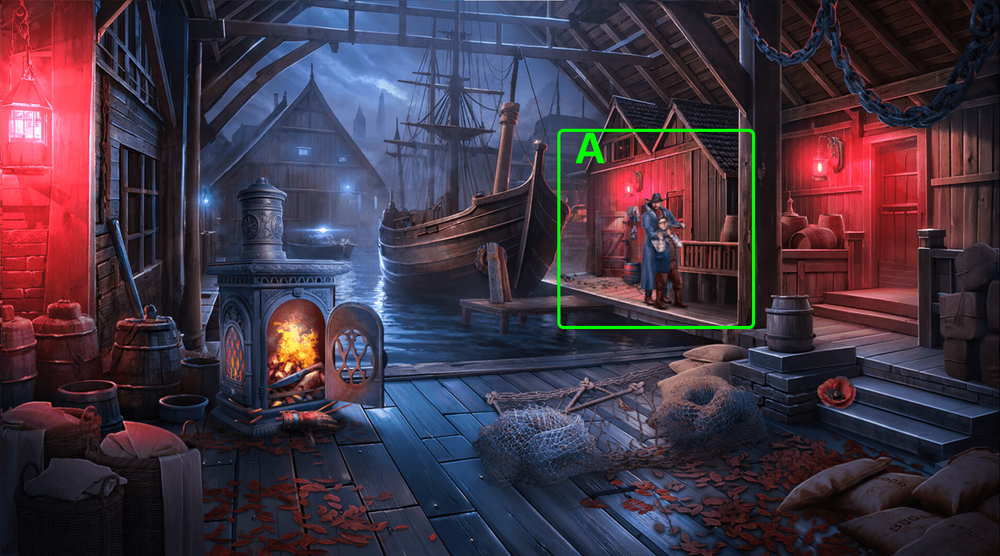
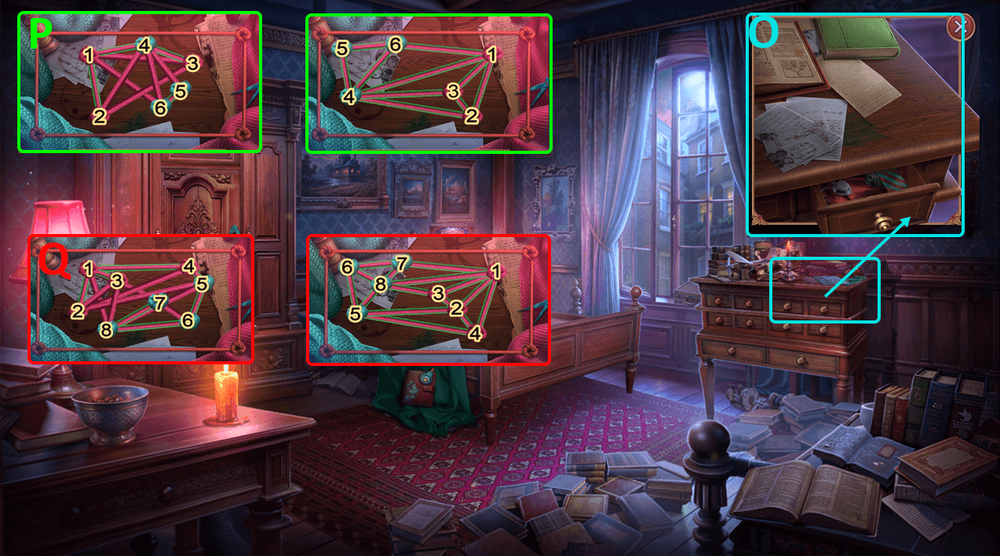
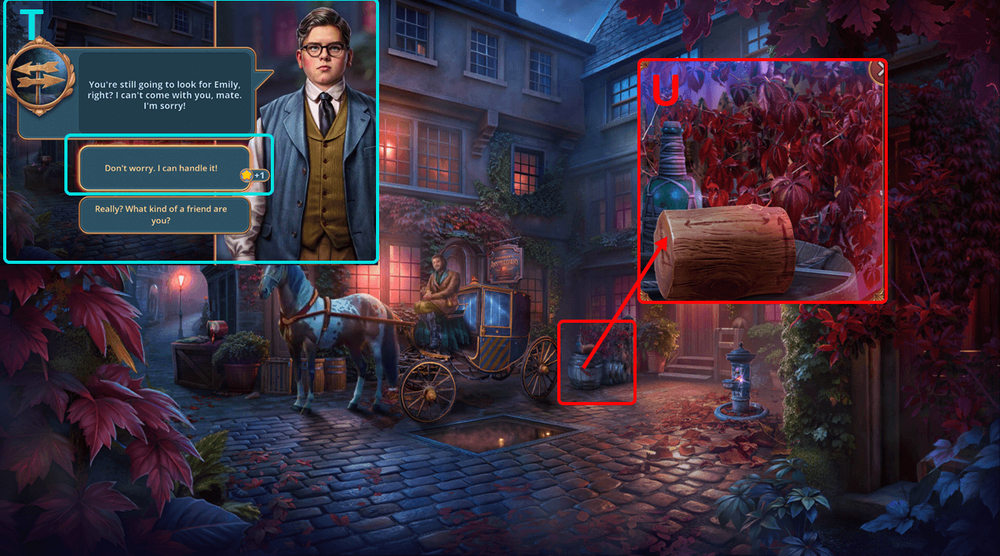
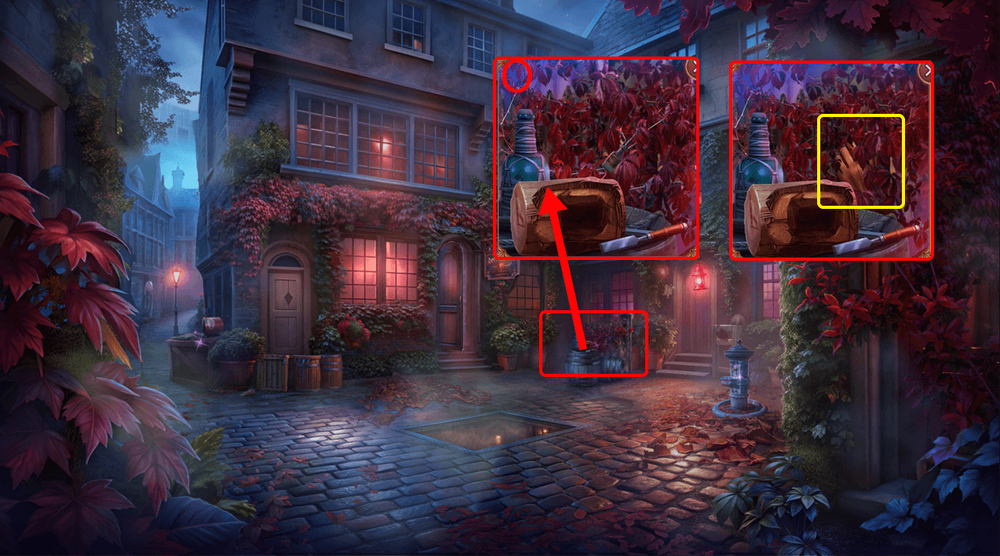
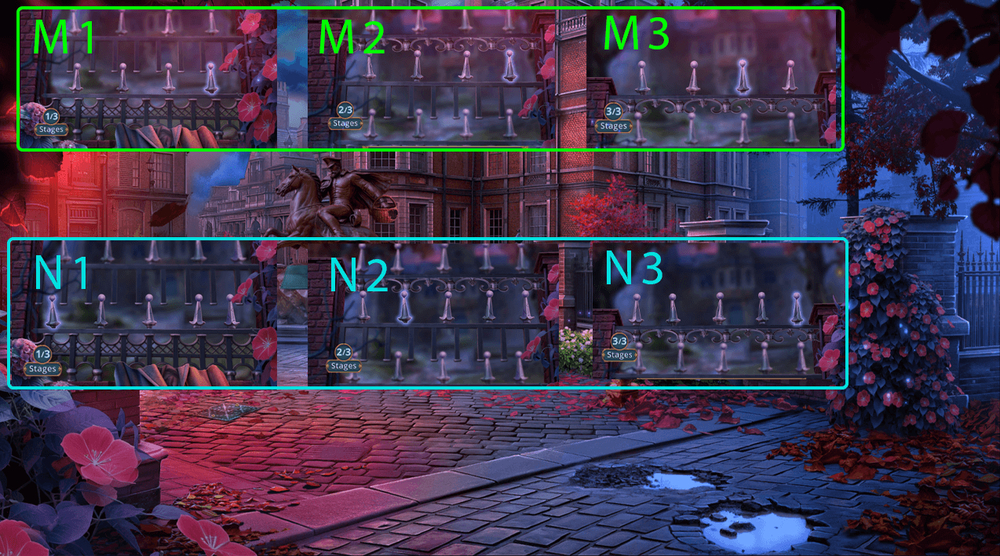
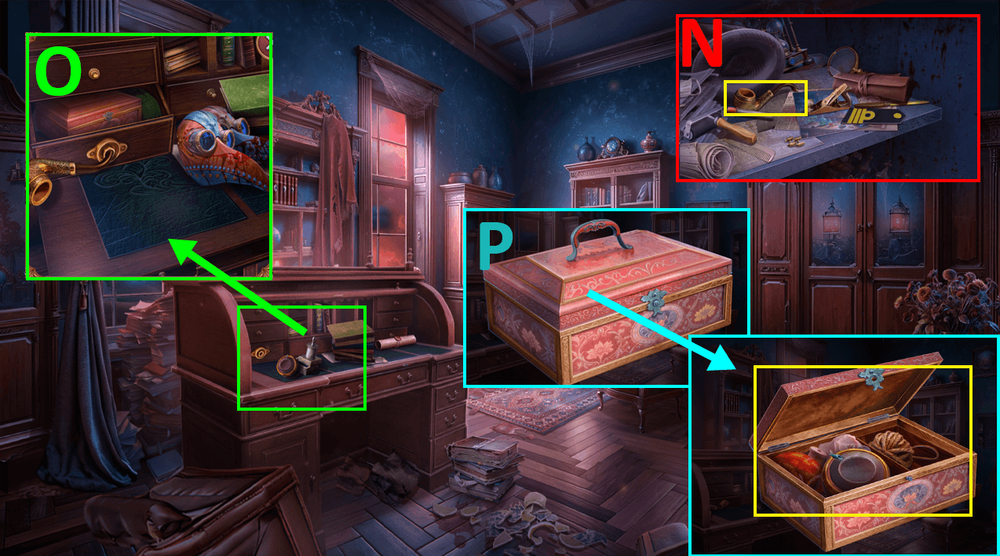
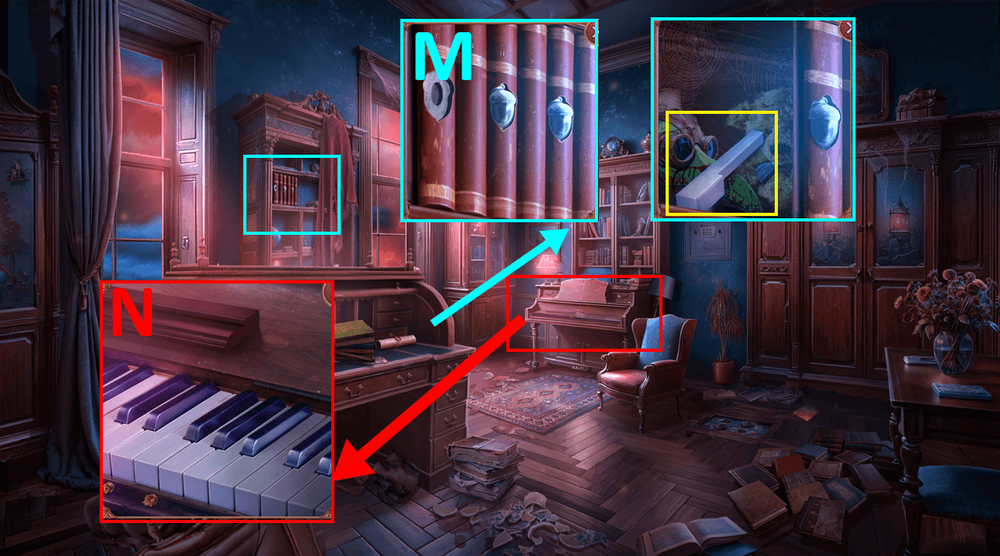
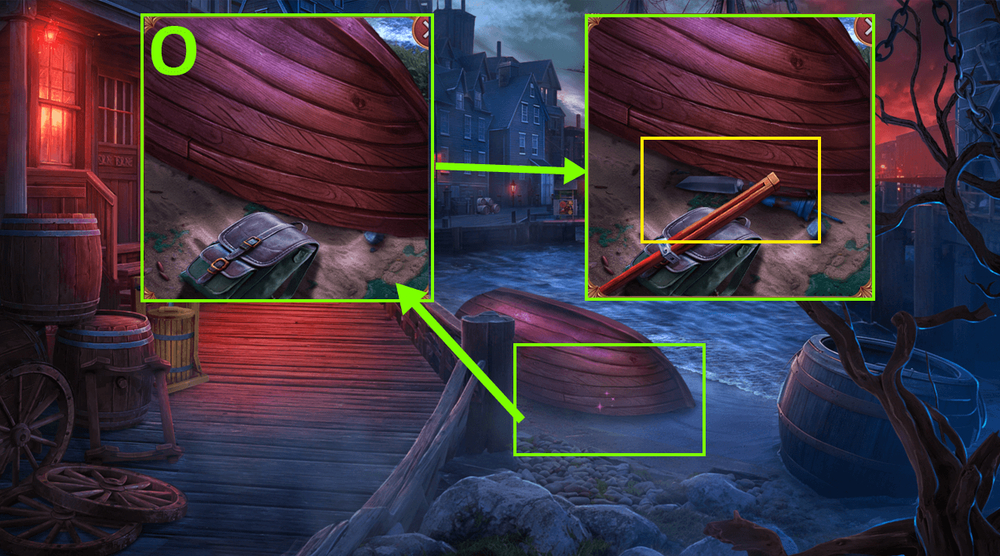
- Select this option, earn BINOCULARS (O).
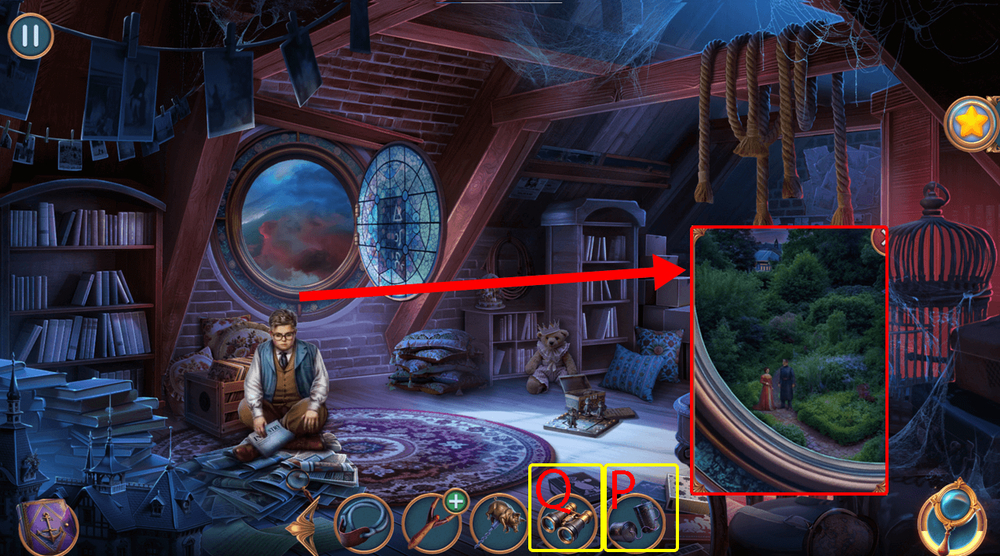
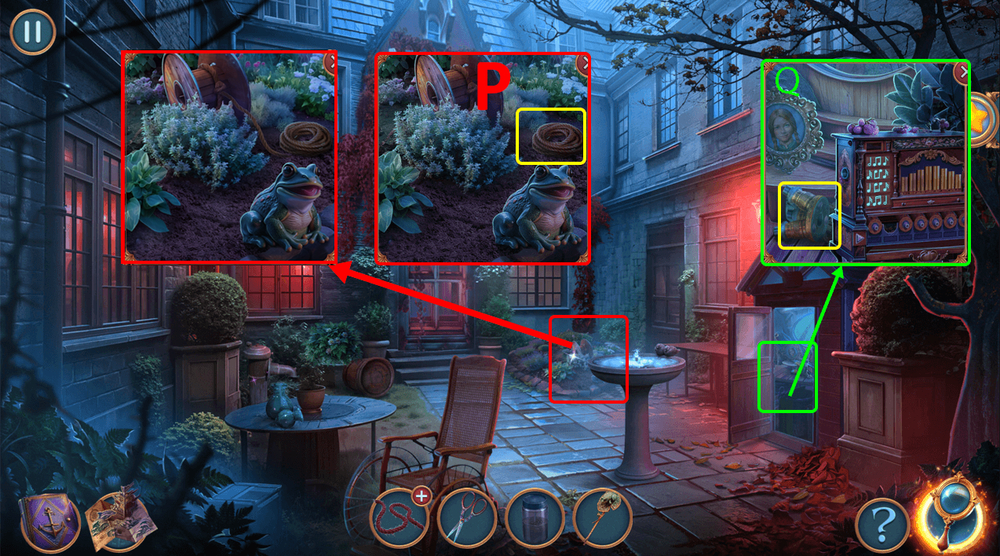
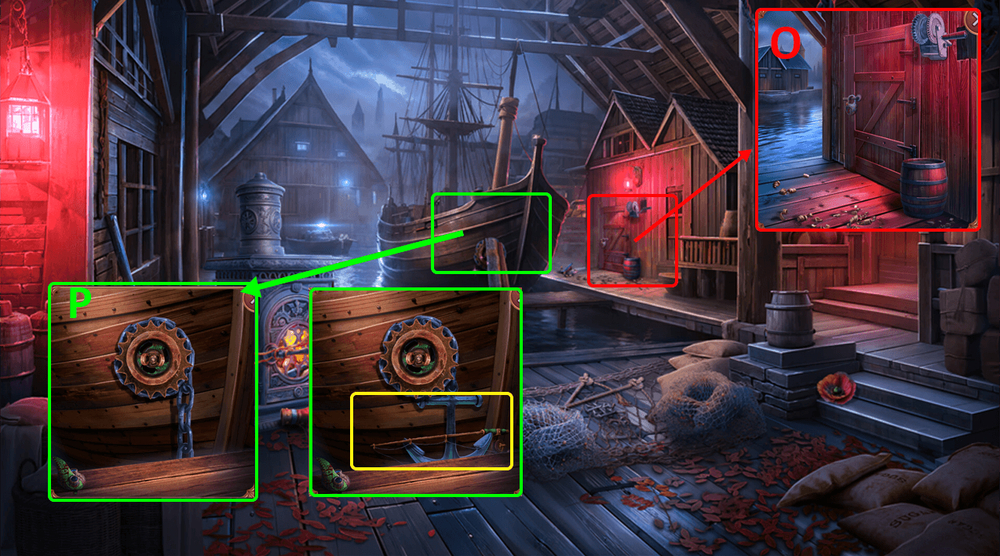
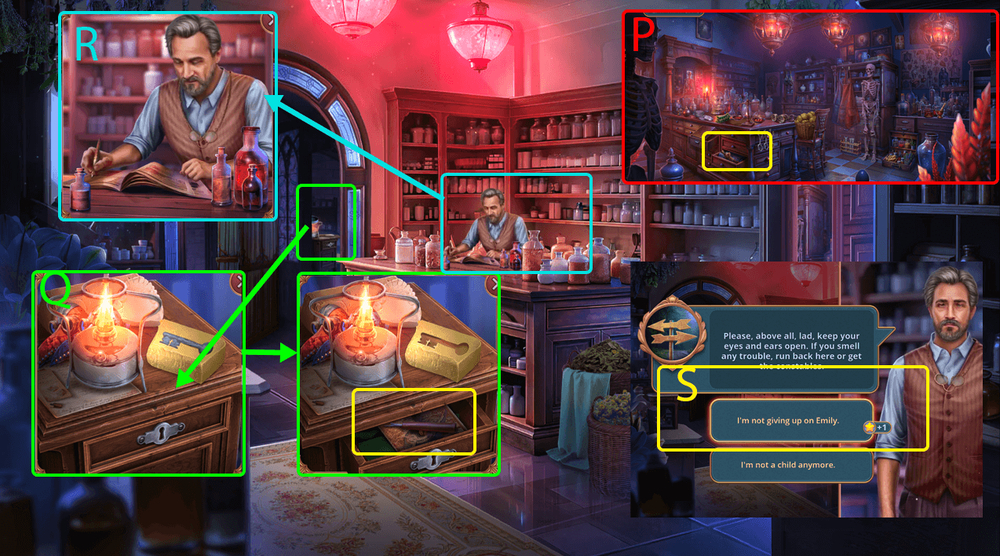
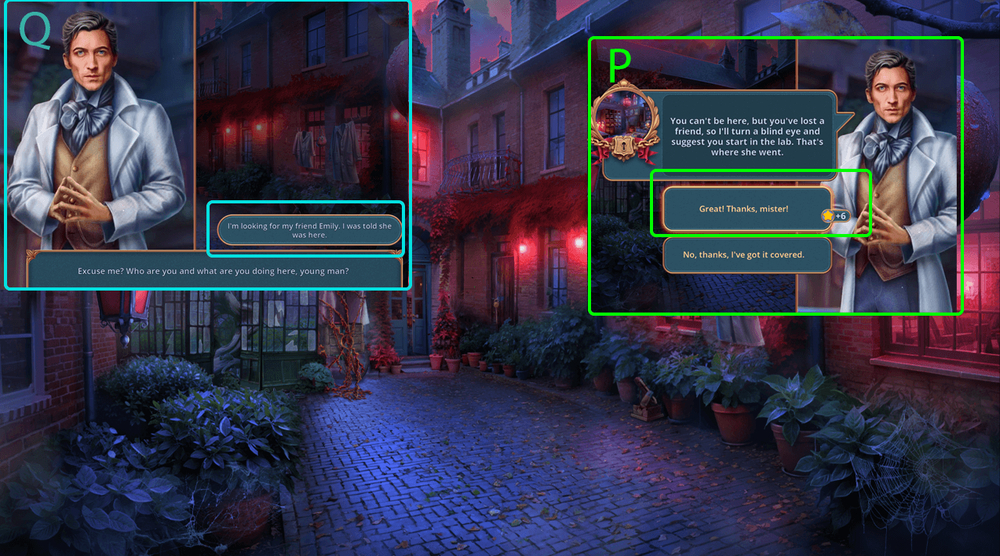
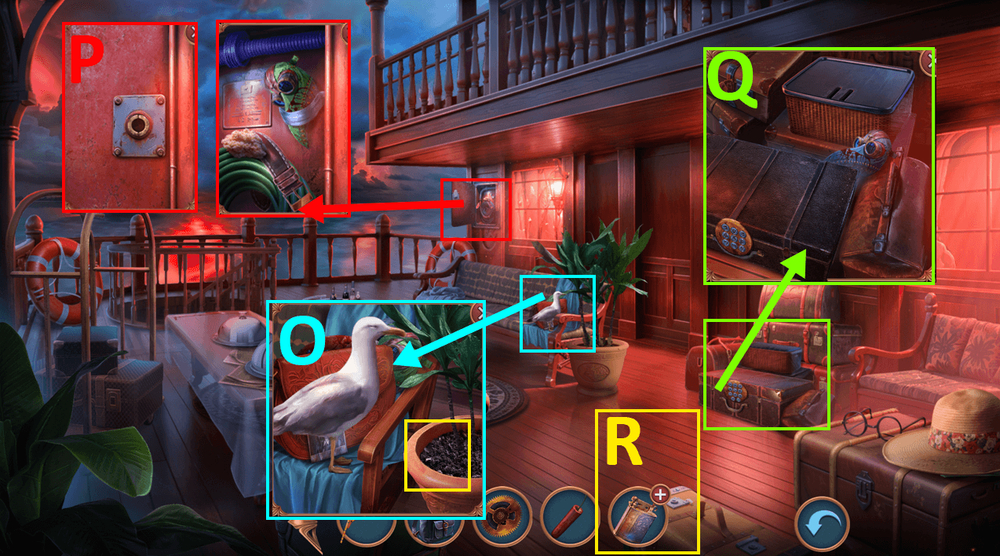
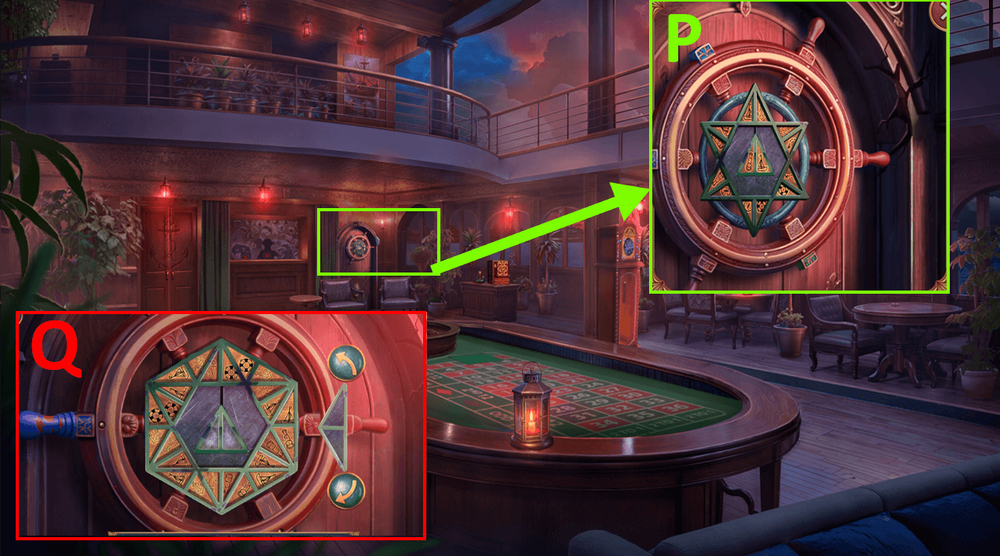
- Use STRING on TALKING CONTRAPTION, get TALKING CONTRAPTION (P).
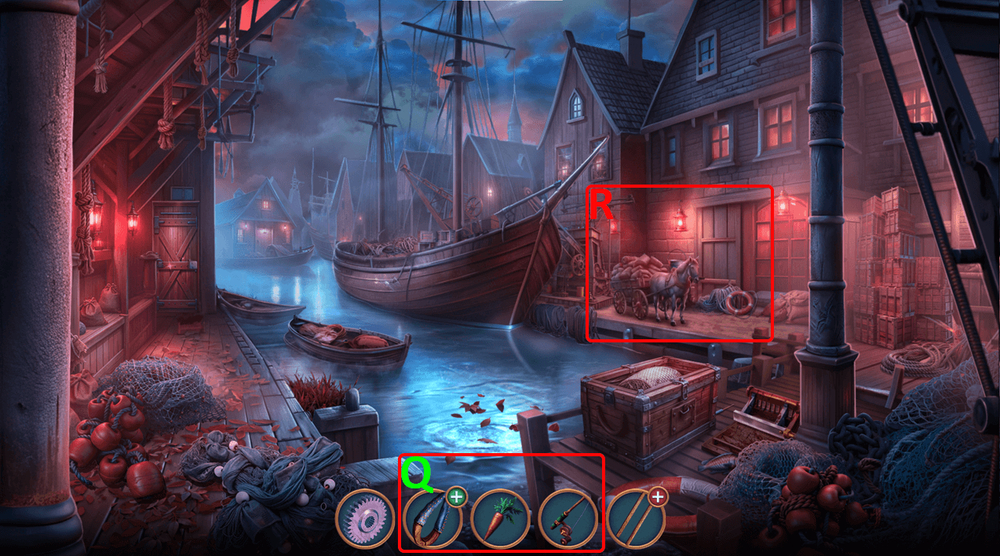
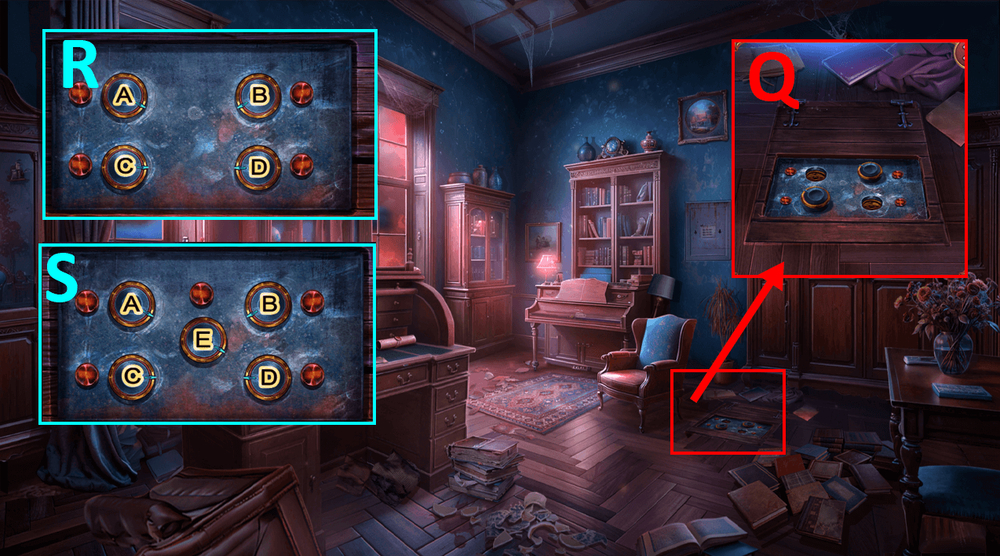
- Use BINOCULARS and TALKING CONTRAPTION on the outside (Q).
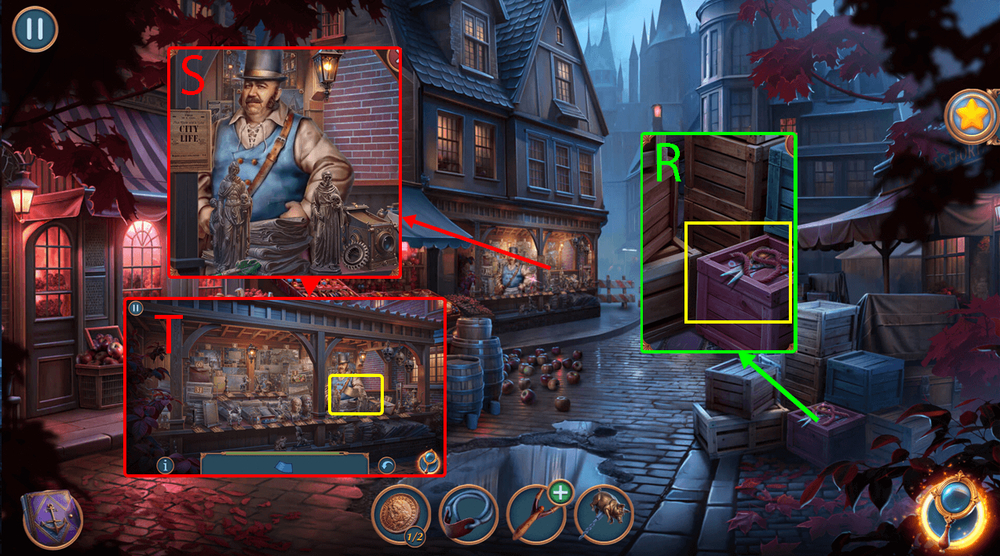
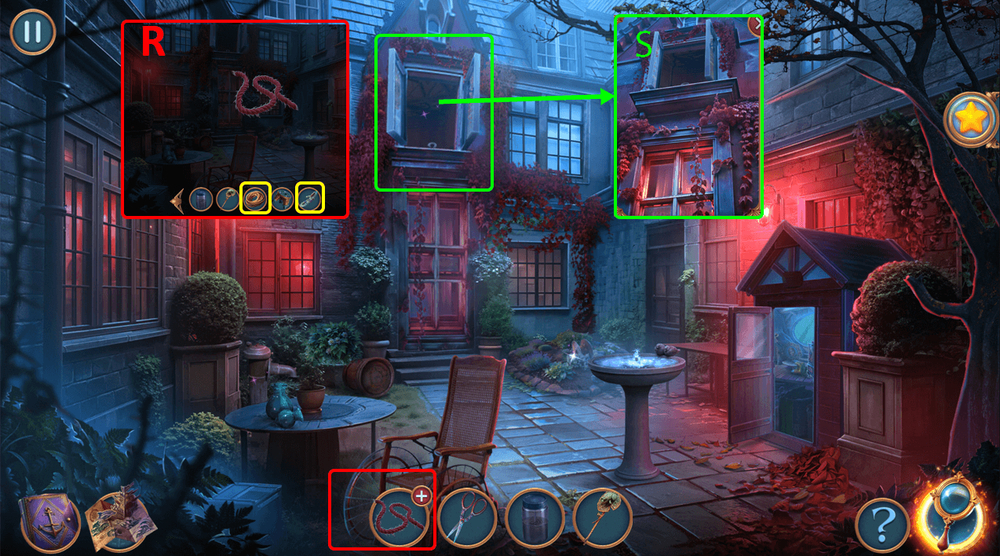
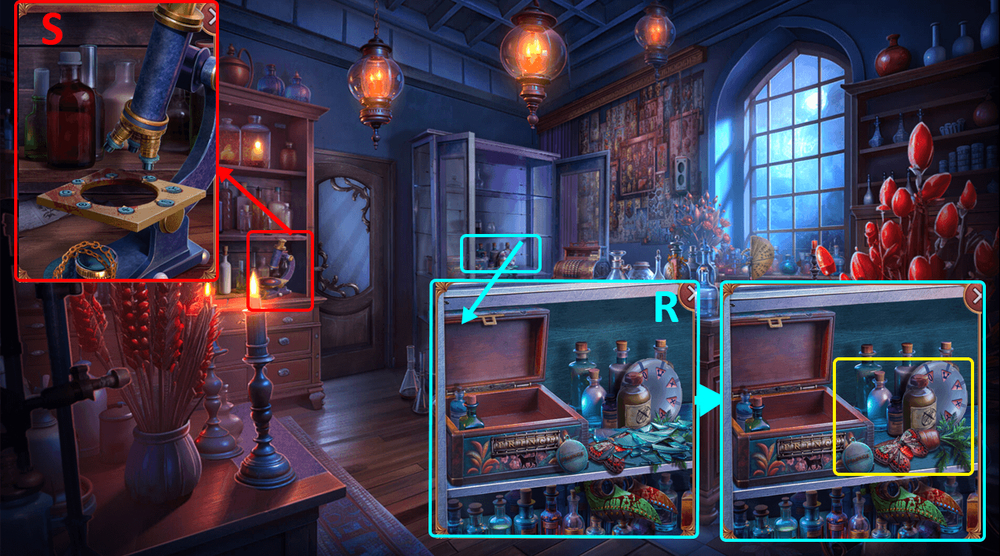
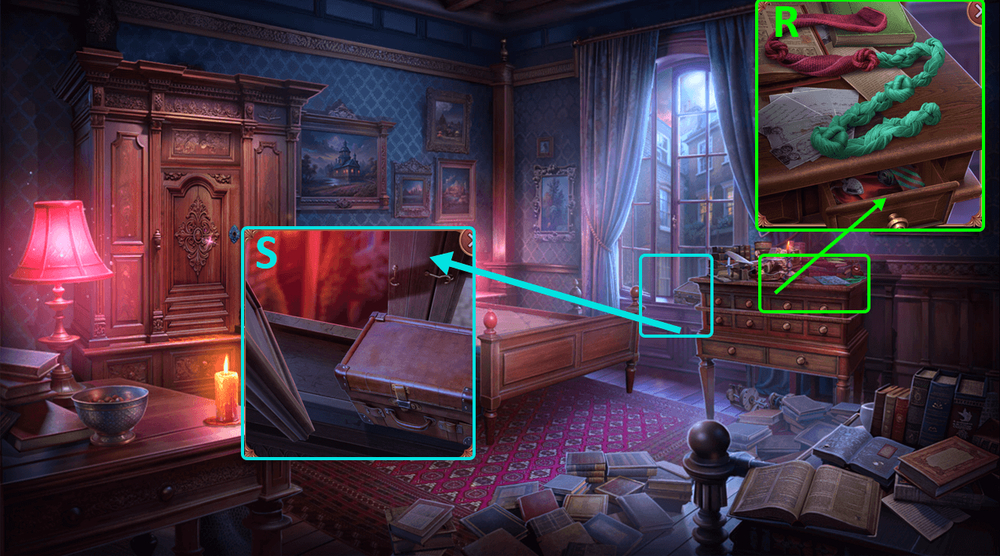
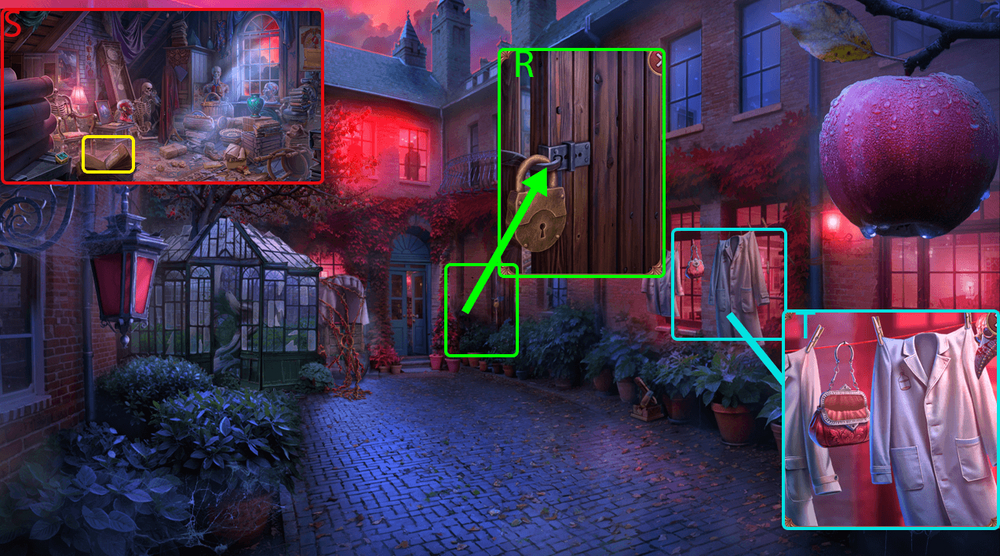
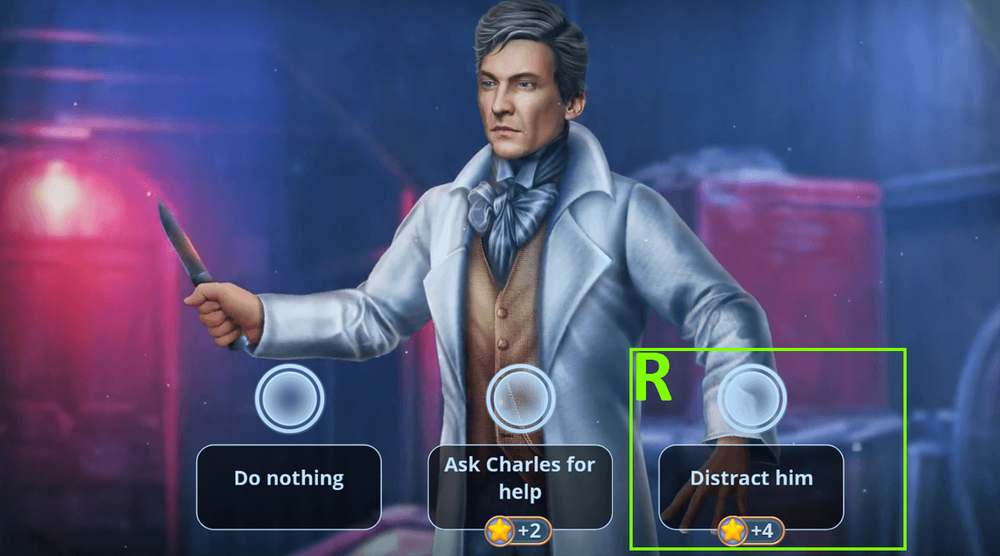
- Take PIECE OF ROPE, SCISSORS, and COINS 2/2 (R).
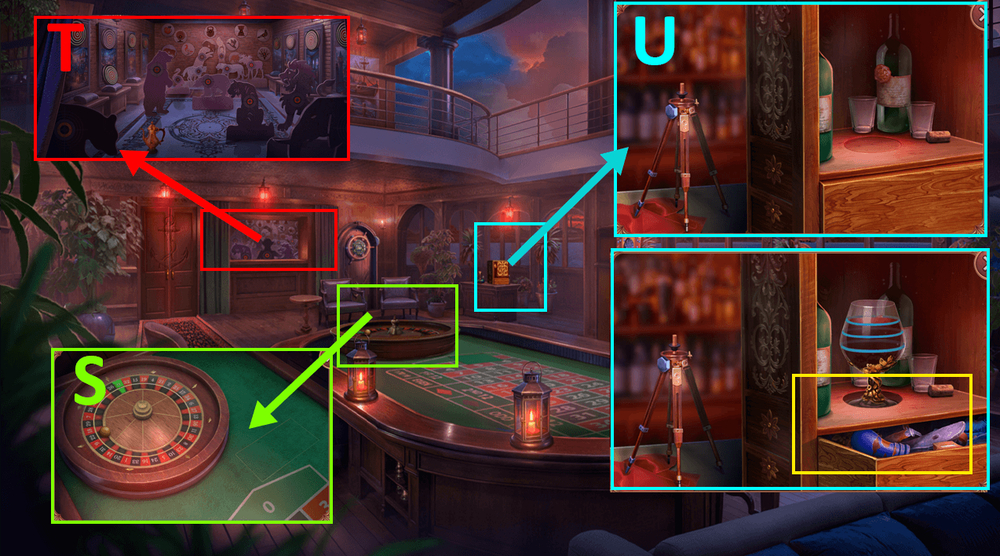
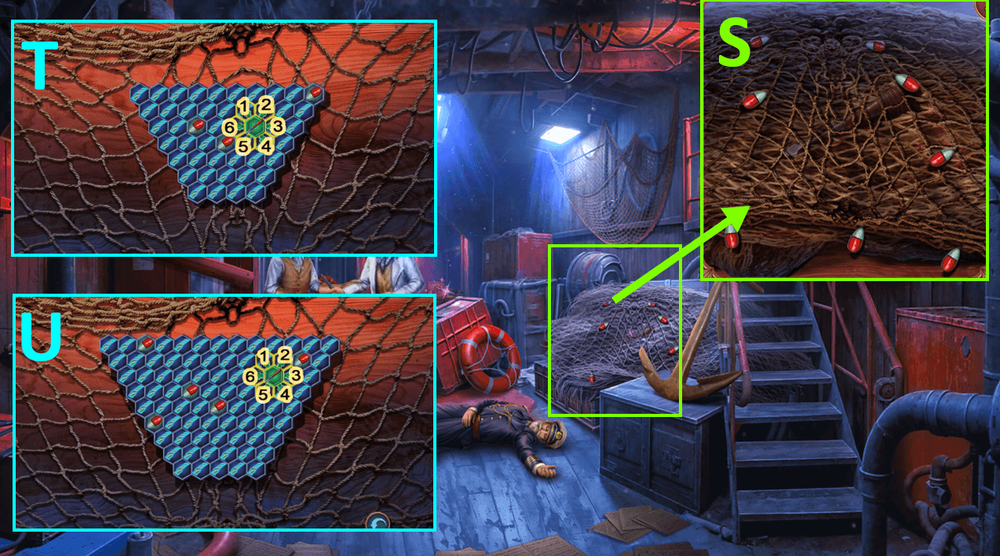
- Give COINS to the merchant (S).
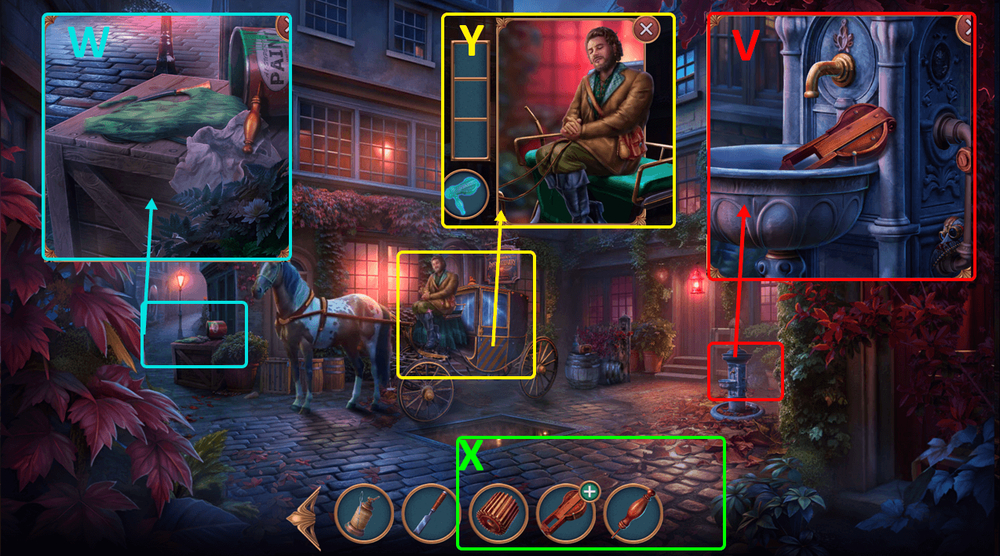
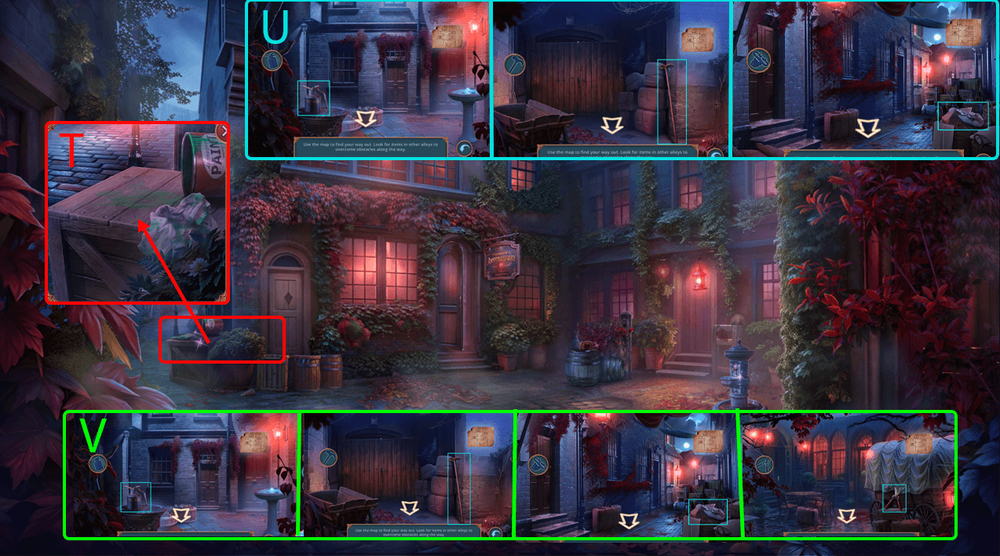
- Play puzzle, earn NEWSPAPER (T).
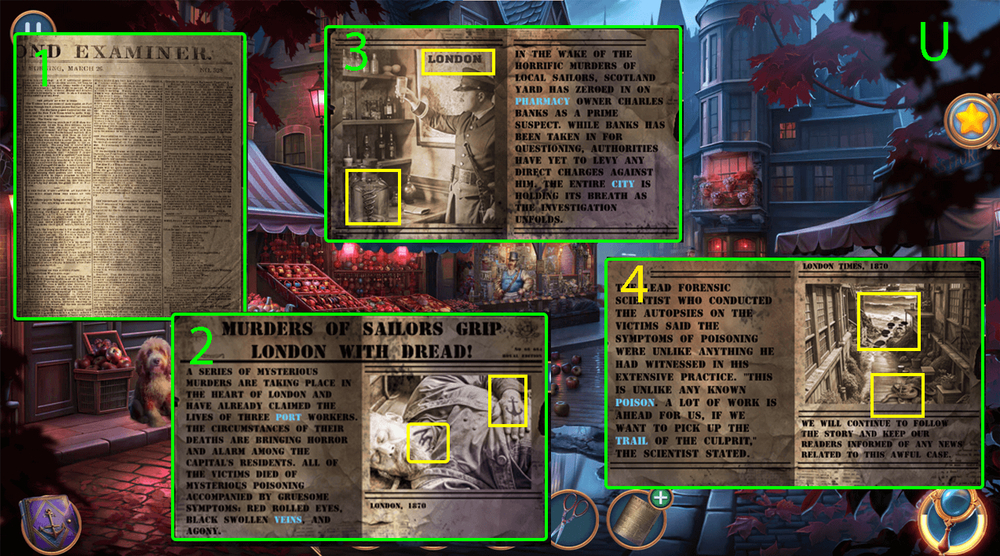
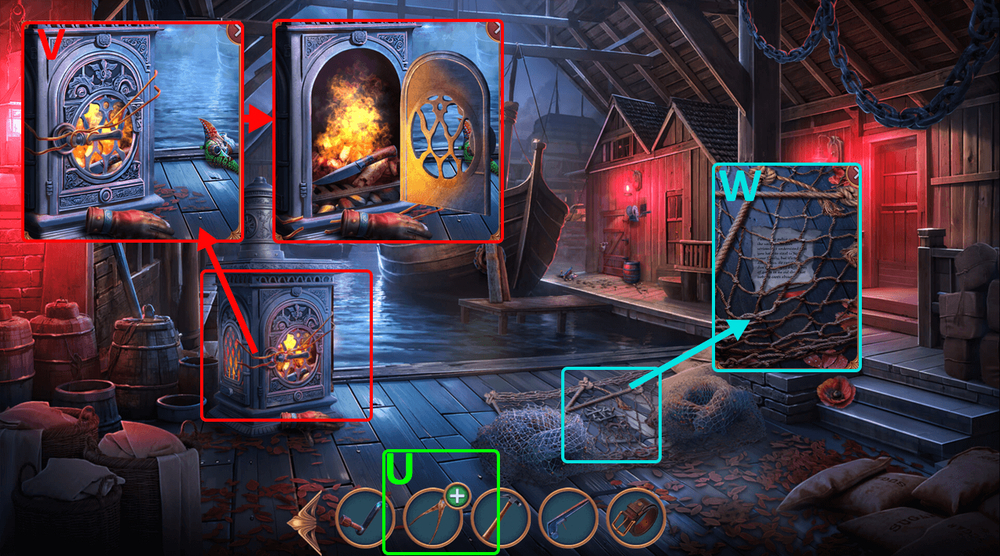
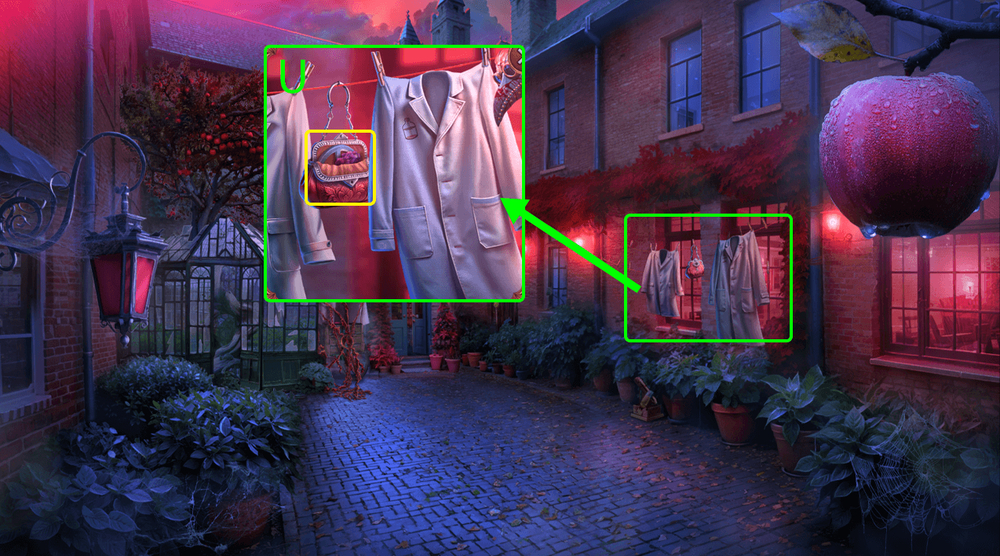
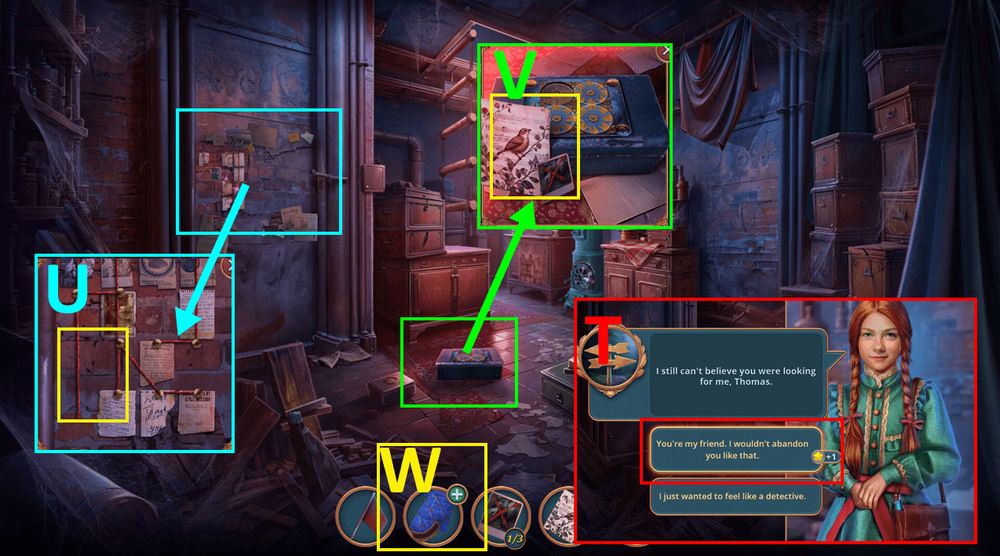
- Examine NEWSPAPER, play puzzle, get NEWSPAPER BAG (U).
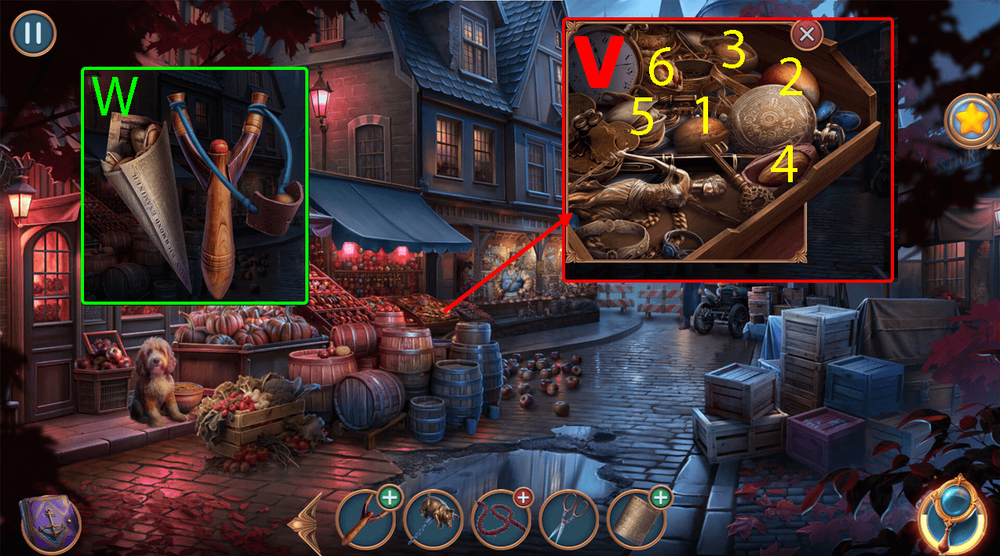
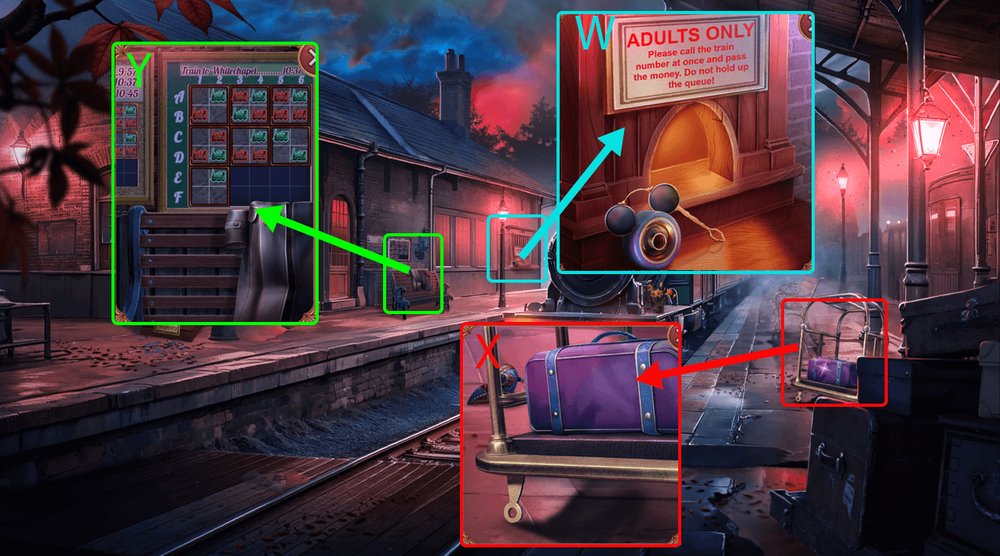
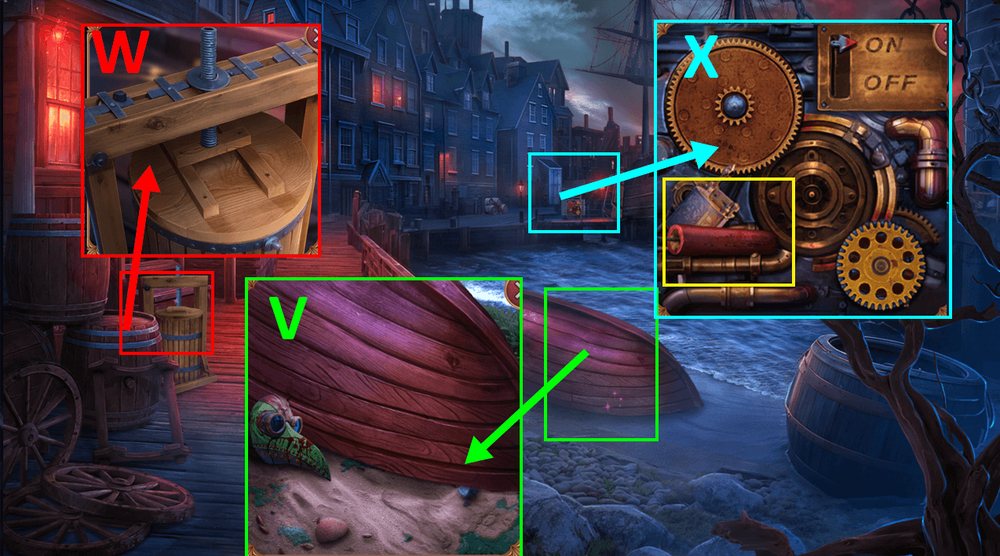
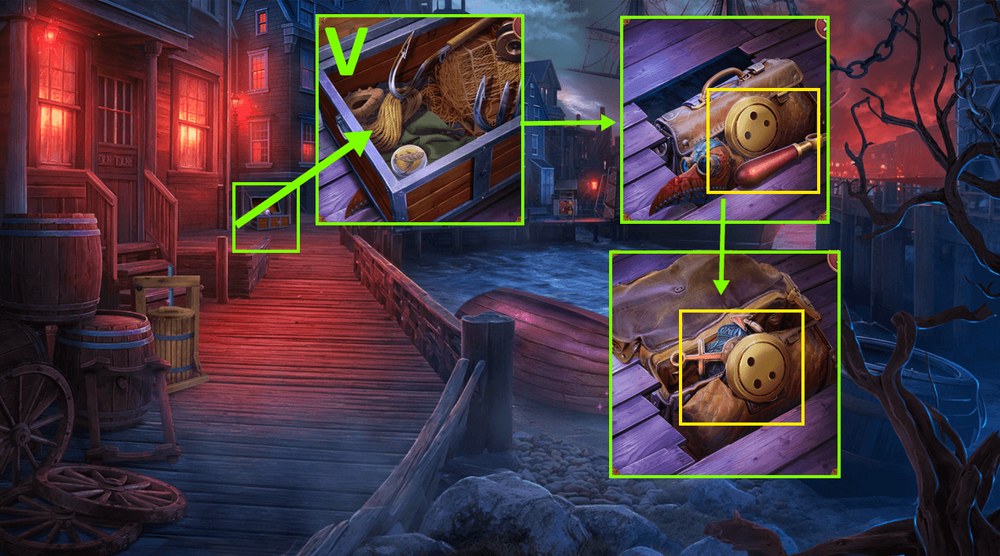
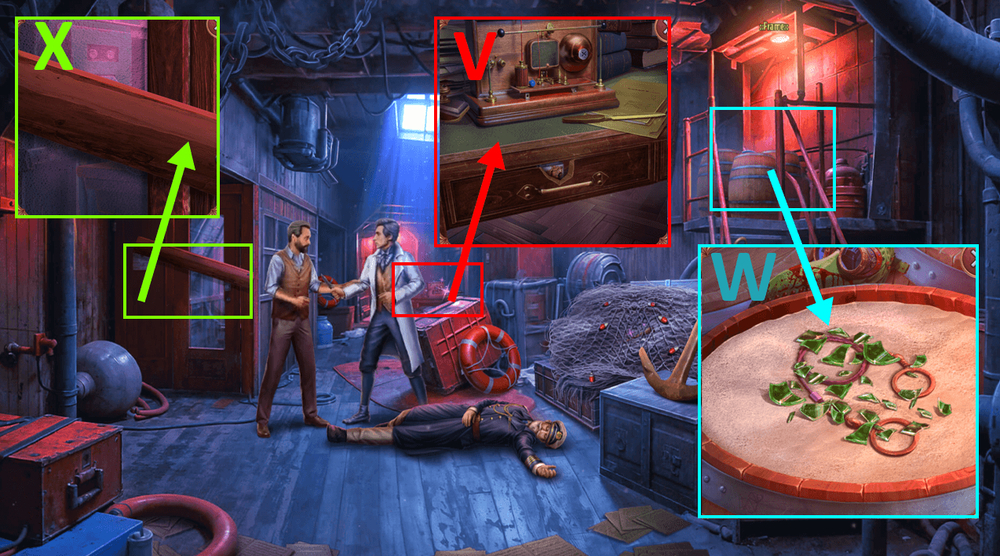
- Use NEWSPAPER BAG on the contents, find all the nuts, get NUTS (V).
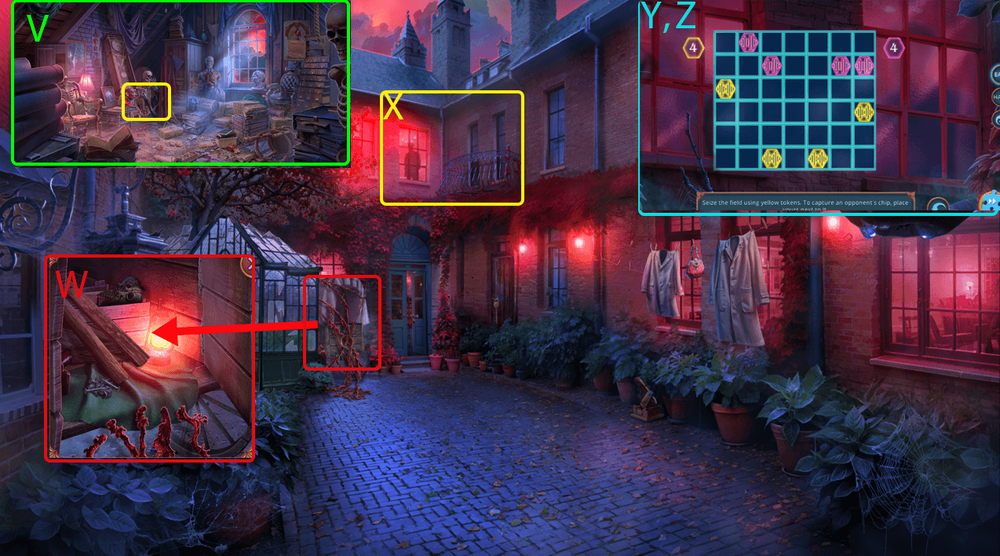
- Use RUBBER BAND and NUTS on SLINGSHOT, get SLINGSHOT WITH NUTS (W).
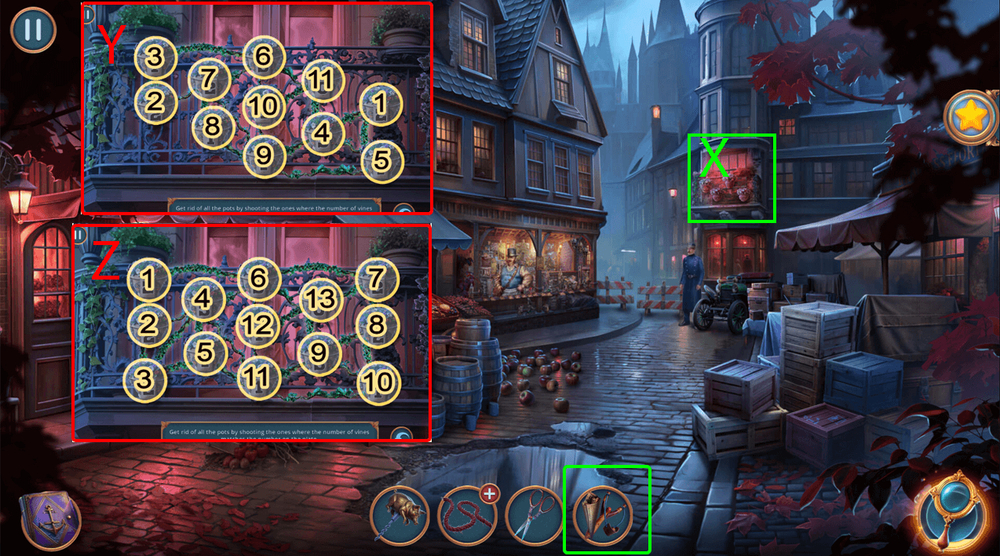
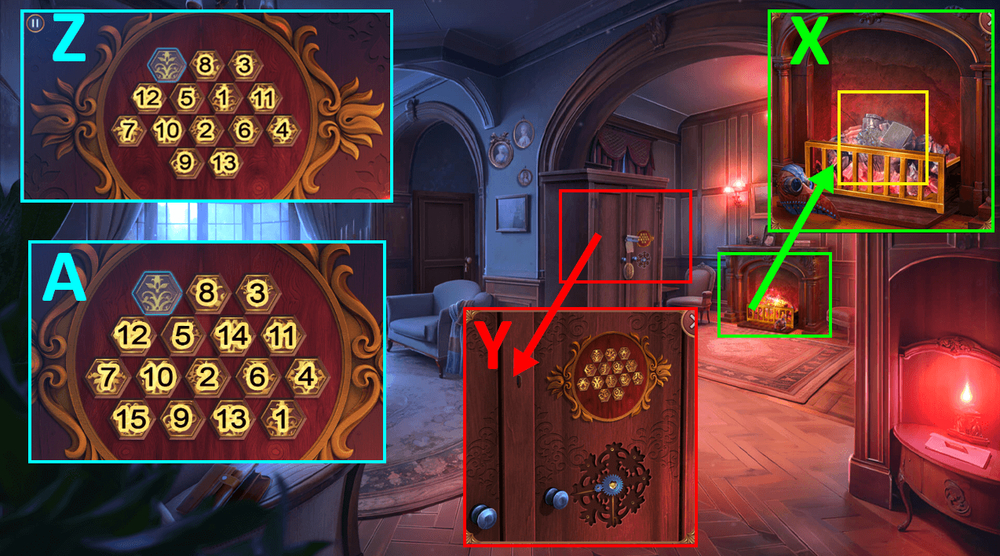
- Use SLINGSHOT WITH NUTS on the balcony (X).
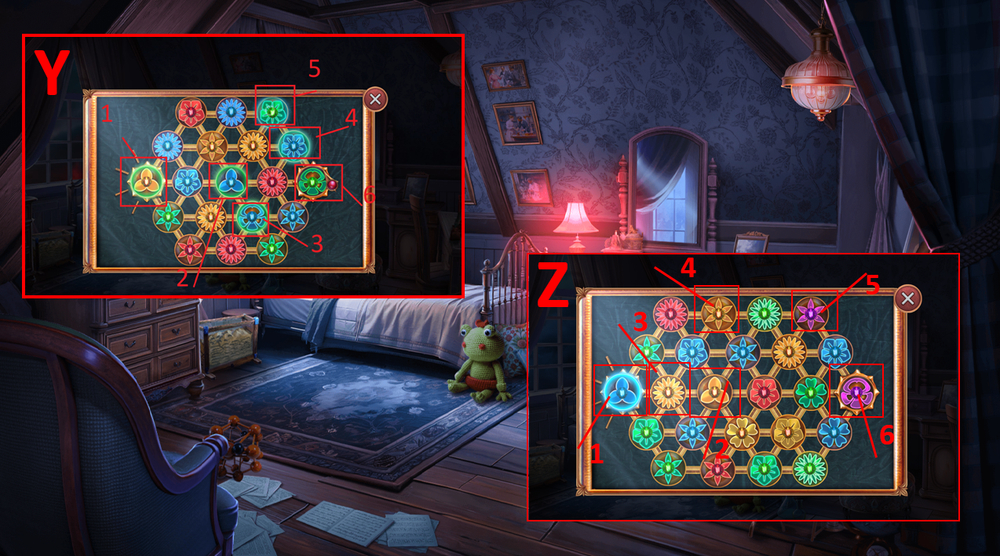
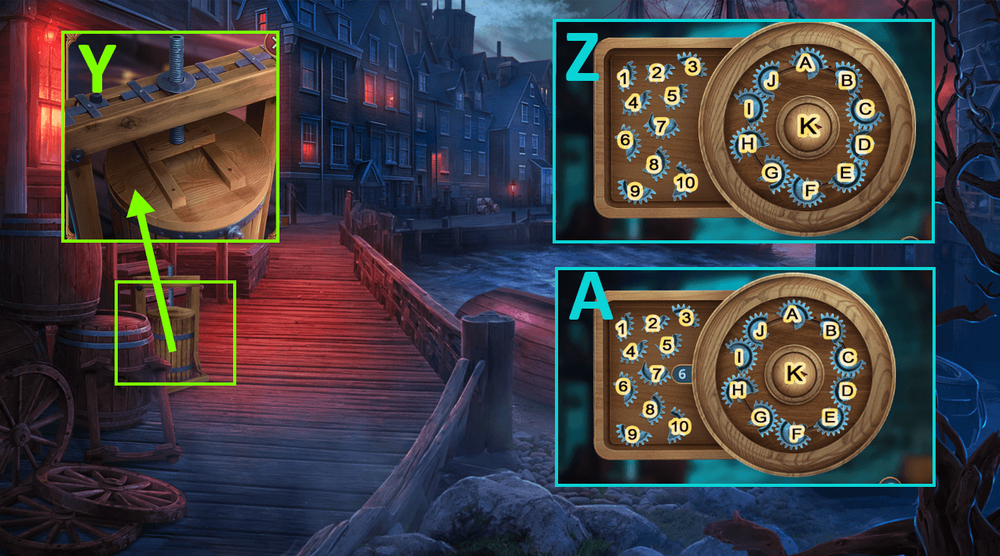
- Easy solution: Click on the flowerpots, in the order shown in the picture (Y).
- Hard solution: Click on the flowerpots, in the order shown in the picture (Z).
- Go forward.
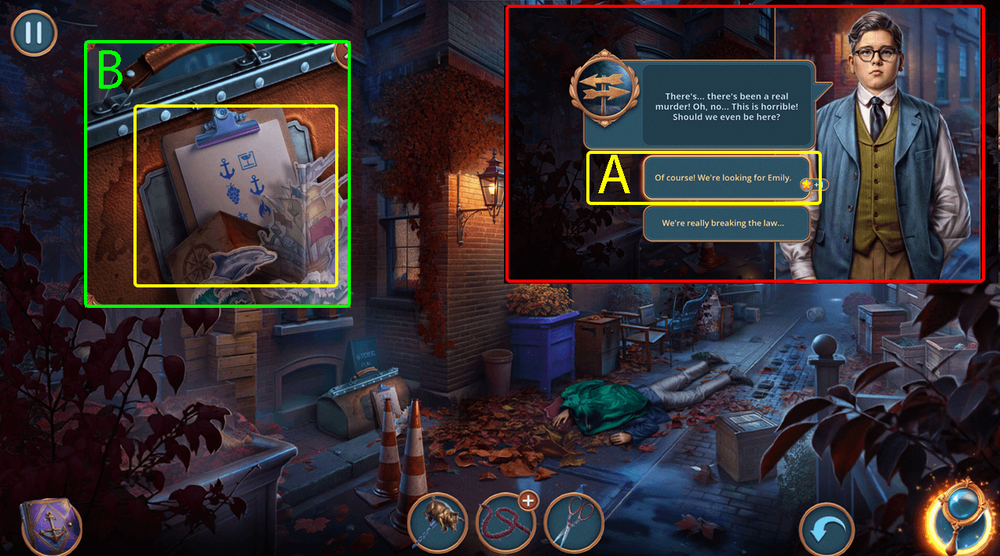
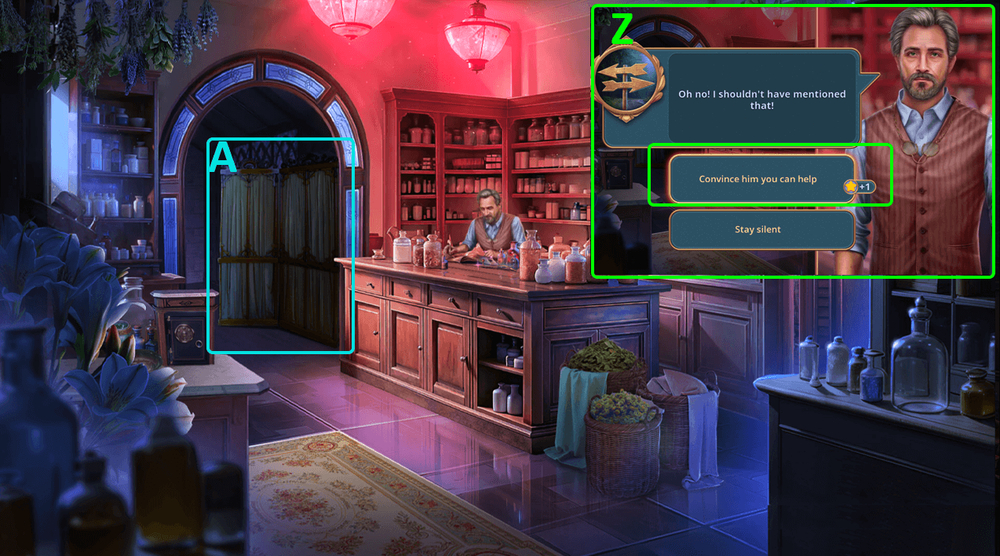
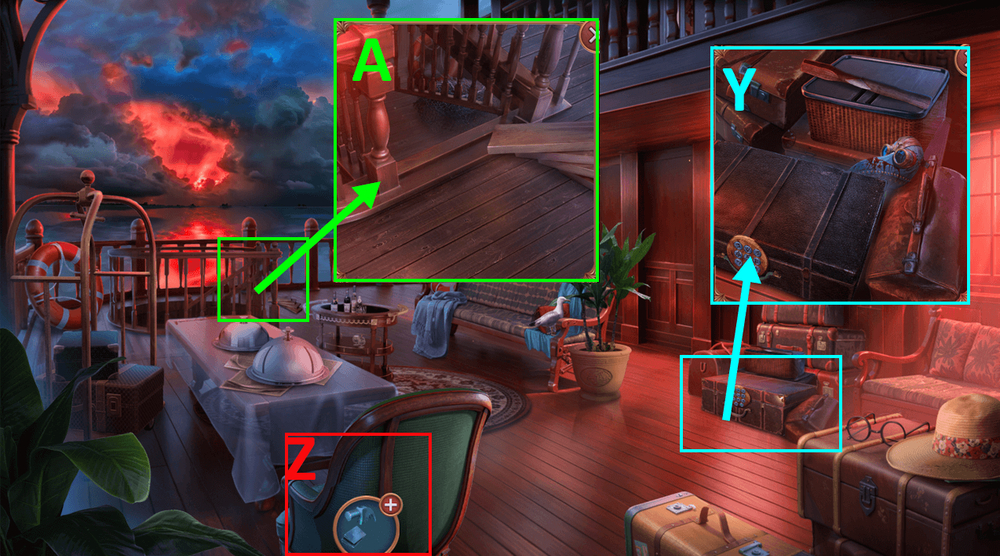
- Select this option (A).
- Take the map and INVENTORY LIST (B).
- Go back.
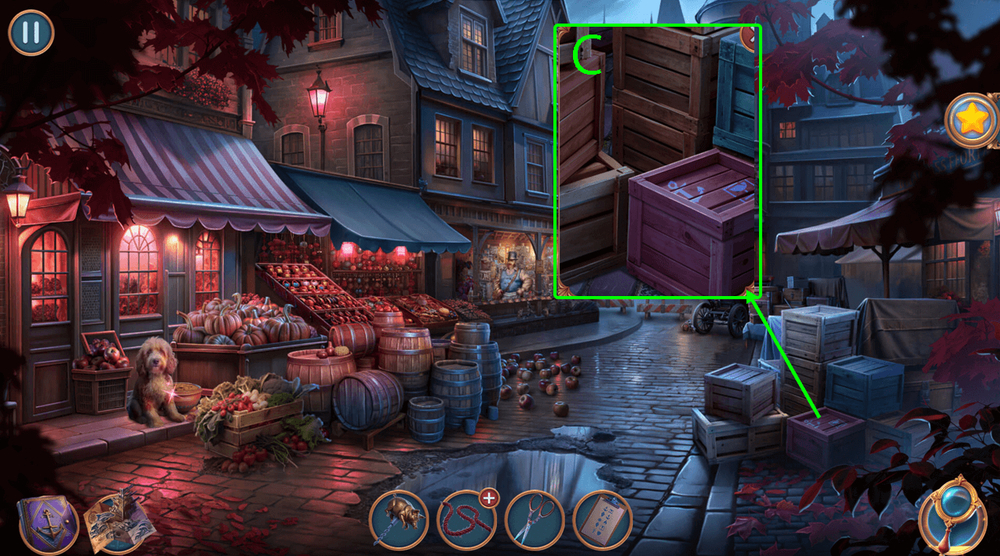
- Use INVENTORY LIST on the crates (C).
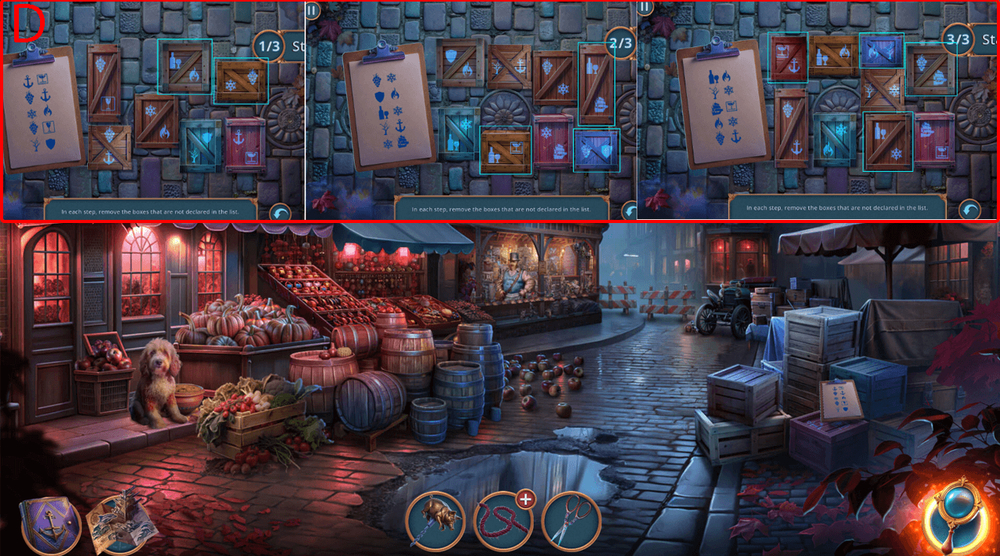
- Easy solution: In each step, remove the boxes that are not specified in the list.
- (D).
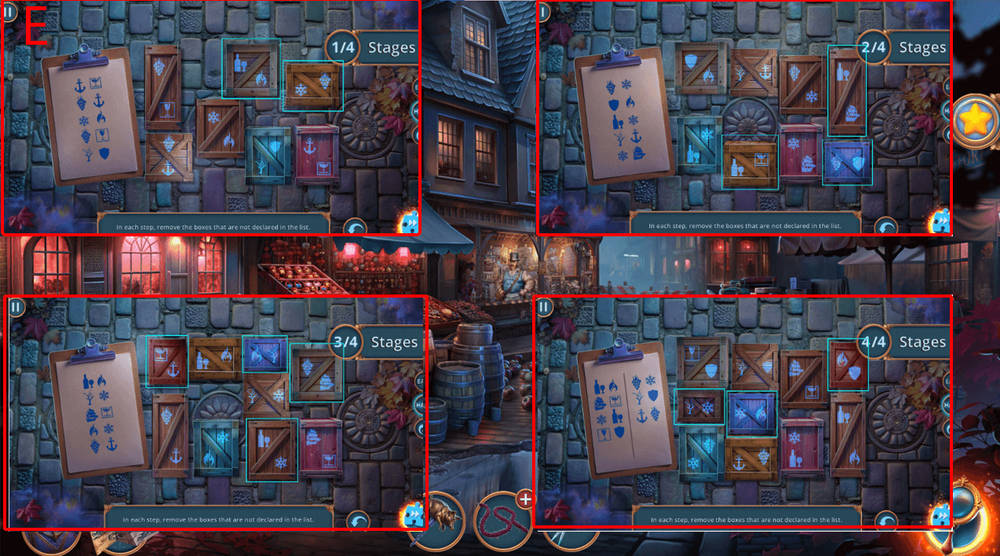
- Hard solution: In each step, remove the boxes that are not specified in the list.
- (E).
- Take MAGNIFYING GLASS.
- Go forward.
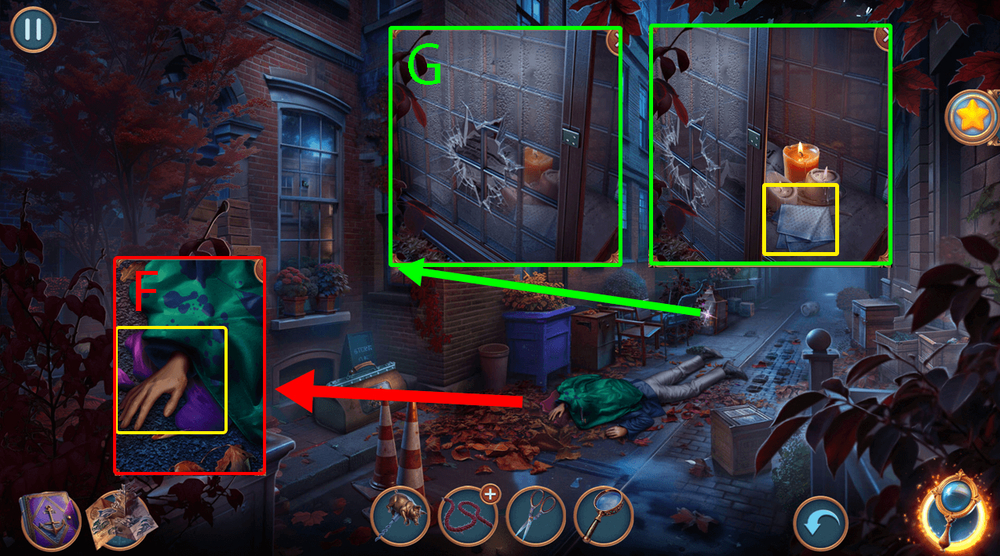
- Use MAGNIFYING GLASS on the body, take BELT (F).
- Use BELT on the broken window, take HANDKERCHIEF (G).
- Go back.

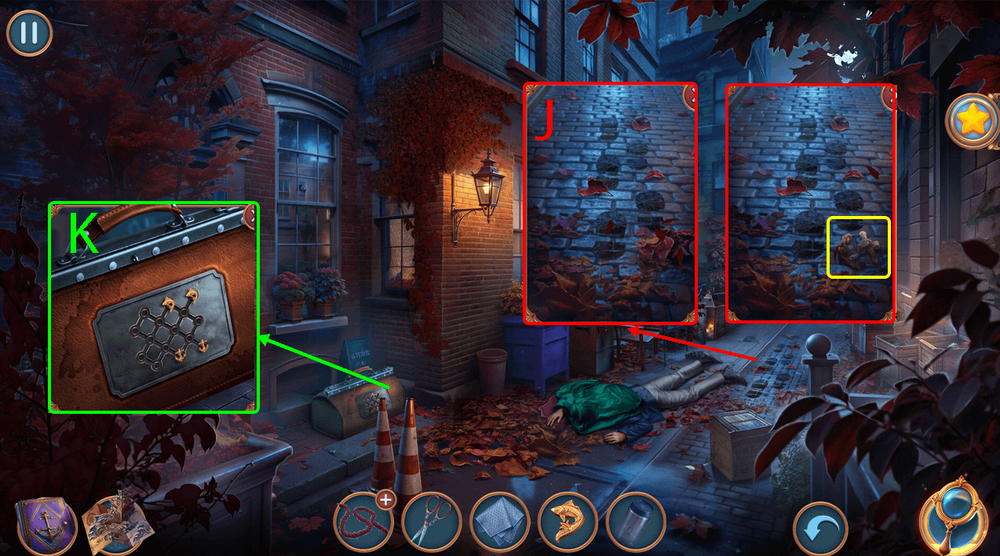
- Play puzzle, earn HAM (H).
- Give HAM to the dog, use CORKSCREW on the flowerpot, take JAR AND SPOON and GOLDFISH PIECE (I).
- Go forward.
- Use JAR AND SPOON on the footprints, get STRANGE DIRT, use HANDKERCHIEF on the anchor, take ANCHOR PIECE (J).
- Use GOLDFISH PIECE and ANCHOR PIECE on the puzzle (K).
- Easy solution: Follow the instructions on the image (L).
- Hard solution: Follow the instructions on the image (M).
- Click on the contents of the chest, take EMILY’S HAIRPIN.
- Select this option (O).
- Use SCISSORS on the rope, take ROPE (P).
- Take MICROSCOPE PART and KNOTTED TABLECLOTH (Q).
- Use ROPE and KNOTTED TABLECLOTH on PIECE OF ROPE, get MAKESHIFT ROPE (R).
- Use MAKESHIFT ROPE on the open window (S).
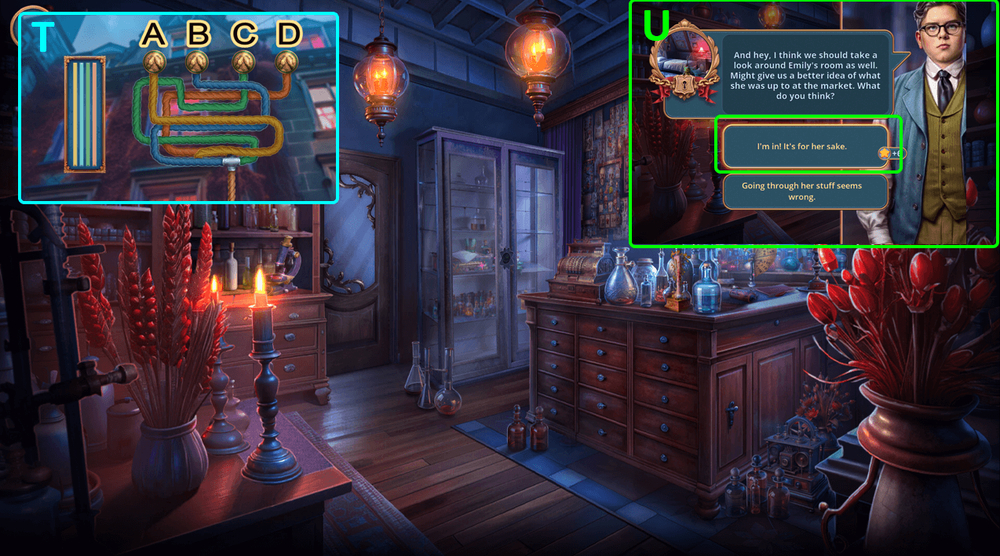
- Solution: Press C, after 2 seconds press D, after another 2 seconds press B, and after another 2 seconds press A (T).
- Select this option (U).
- Go to Emily’s Room.
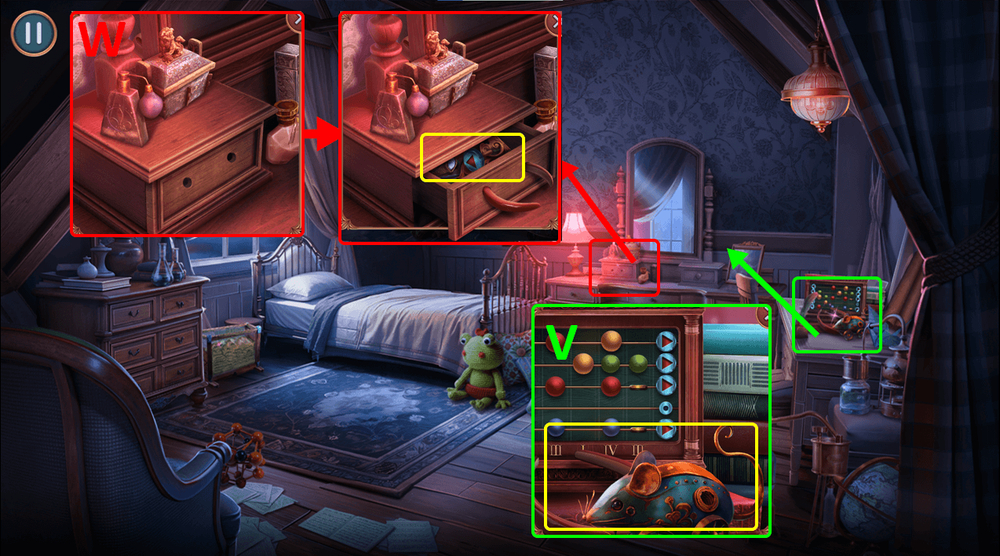
- Take CLOCKWORK MOUSE and EMILY’S HAIRBAND (V).
- Use EMILY’S HAIRBAND on the box, take LAYOUT PIECES 1/3 and FRAME PART (W).
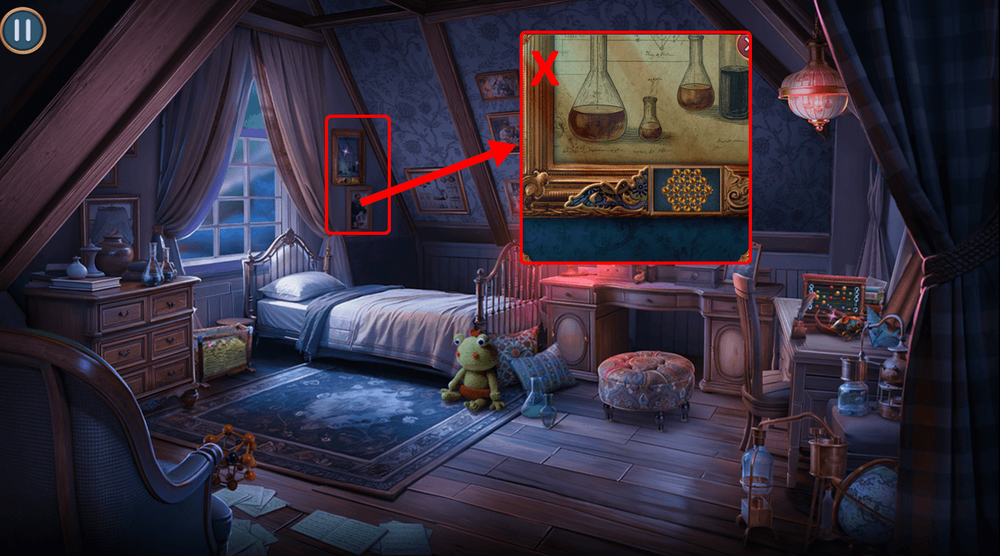
- Use FRAME PART on the frame (X).
- Easy solution: Follow the instructions on the image (Y).
- Hard solution: Follow the instructions on the image (Z).
- Take HANDLE.
- Go back.
- Take BUTTONS 1/2, use MICROSCOPE PART on the microscope (A).
- Use EMILY’S HAIRPIN on the stuck object, get BUTTONS 2/2 and LOCK PICKS 1/2, take MUSIC BOX DRUM, use STRANGE DIRT on the scales (B).
- Use BUTTONS on the sockets (C).
- Play puzzle, earn DOCTOR AMULET (D).
- Use DOCTOR AMULET on the slot, read the note, take MEASURING CUP (E).
- Go back.
- Use MEASURING CUP on the dirt, take MUSIC BOX HANDLE (F2).
- Use HANDLE on the jack-in-the-box, take LOLLIPOP (G2).
- Go to Emily’s Room.
- Use LOLLIPOP on the ants, take WIND-UP KEY (H).
- Use WIND-UP KEY on CLOCKWORK MOUSE, get CLOCKWORK MOUSE (I).
- Use CLOCKWORK MOUSE under the dresser, examine the collar, take CAT’S NAME TAG (J).
- Go back.
- Examine the box, use CAT’S NAME TAG on the box, enter PRINCE, take LAYOUT PIECES 2/3 and MAGNET (K).
- Go to Emily’s Room.
- Use MAGNET behind the mirror, get LAYOUT PIECES 3/3 (L).
- Use LAYOUT PIECES on the puzzle (M).
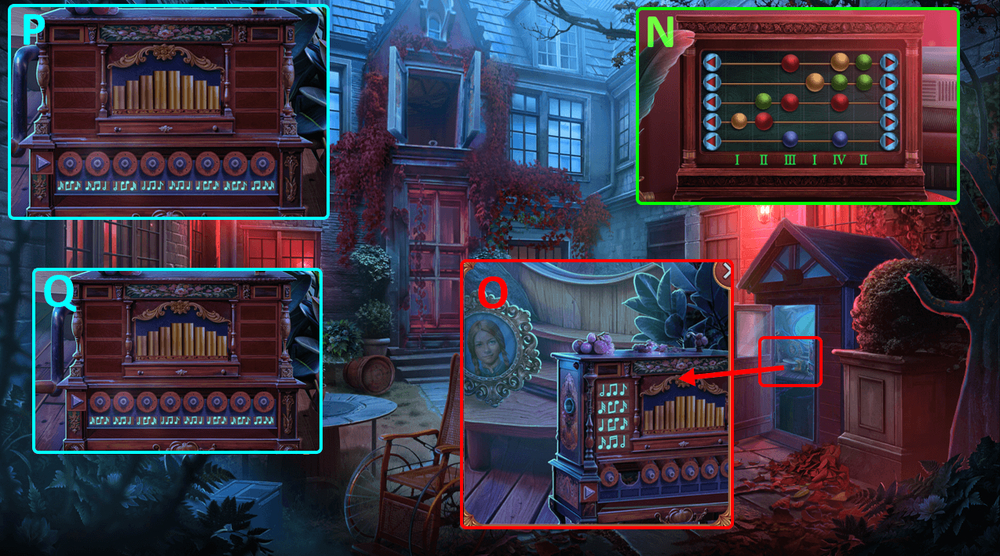
- Solution: Follow the instructions on the image (N).
- Read the note.
- Go to the Pharmacy’s Backyard.
- Use MUSIC BOX DRUM and MUSIC BOX HANDLE on the music box (O).
- Easy solution: Follow the instructions on the image (P).
- Hard solution: Follow the instructions on the image (Q).
- Take FLUFFY DRESS DOLL.
- Go to the Pharmacy.
- Use FLUFFY DRESS DOLL on the shards, take CERAMIC BUTTERFLY, CARROT, INSECTICIDE, and LENS (R).
- Use LENS on the microscope (S).
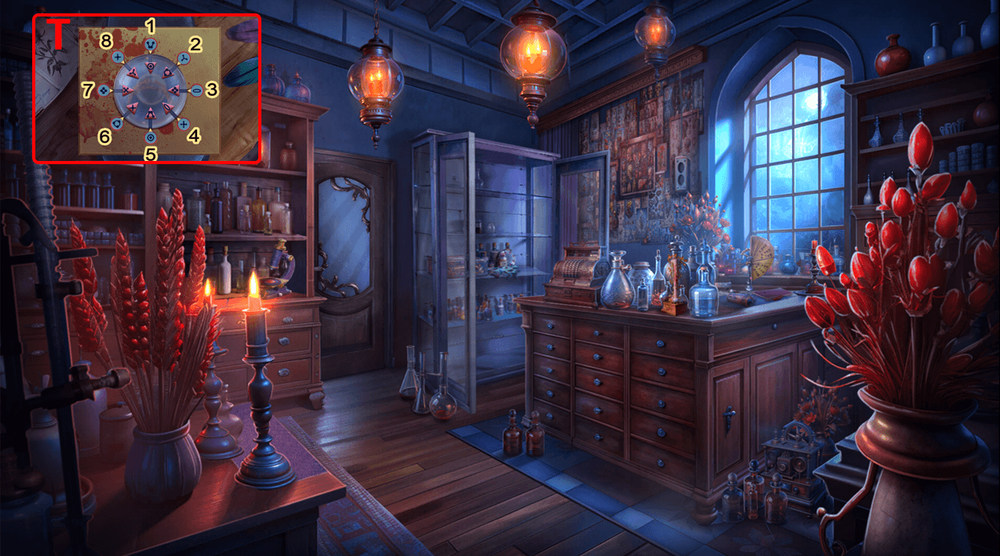
- Solution: Press 1, 4, 6, 5, 2, 6, 6, 5, 5, 1, 8, 5, 3, 5, 7, 1 (T).
- Click on the bracelet, take GOLDEN BRACELET.
- Go back.
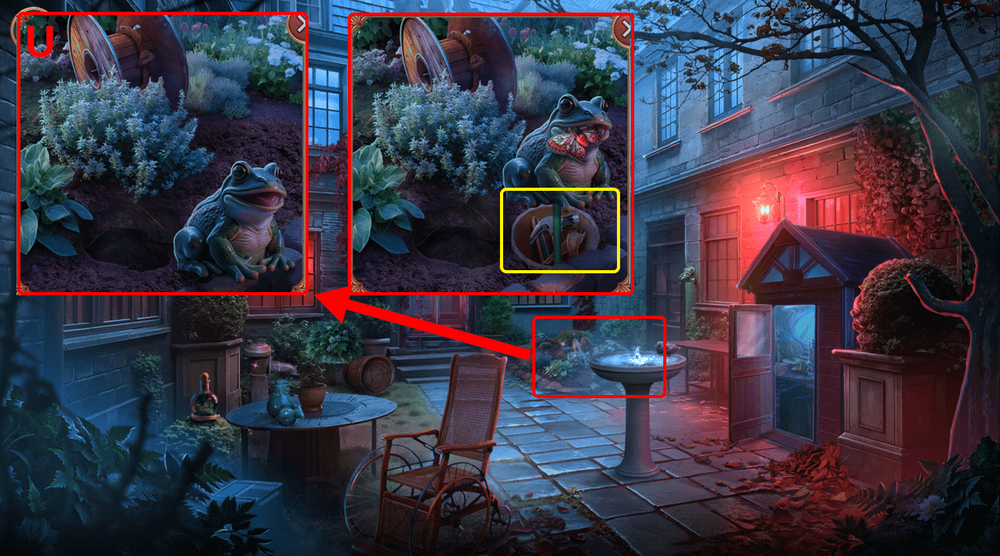
- Use CERAMIC BUTTERFLY on the frog, take BLUNT CUTTERS, HAMMER, and STANDPIPE LEVER (U).
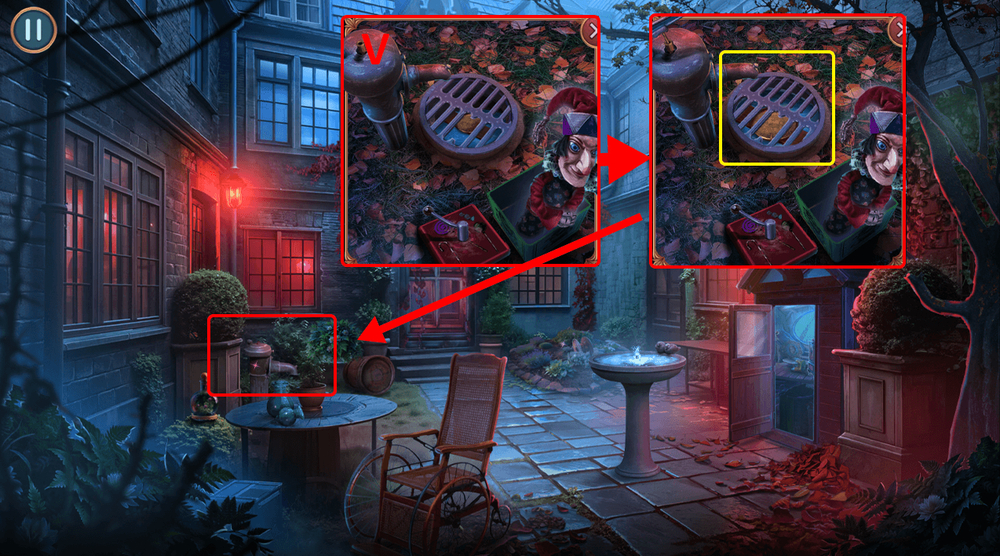
- Use STANDPIPE LEVER on the standpipe, take GOLDEN PLATE (V).
- Go to the Pharmacy.
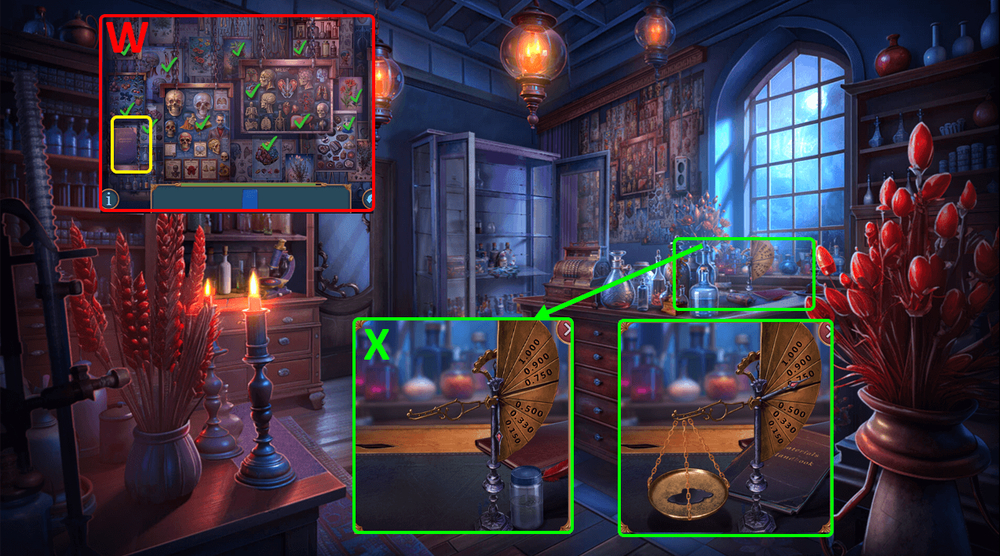
- Play puzzle, earn MATERIALS HANDBOOK (W).
- Use GOLDEN BRACELET and GOLDEN PLATE on the scales, use MATERIALS HANDBOOK on the liquid, open and read the book (X).
- Select this option (Y).
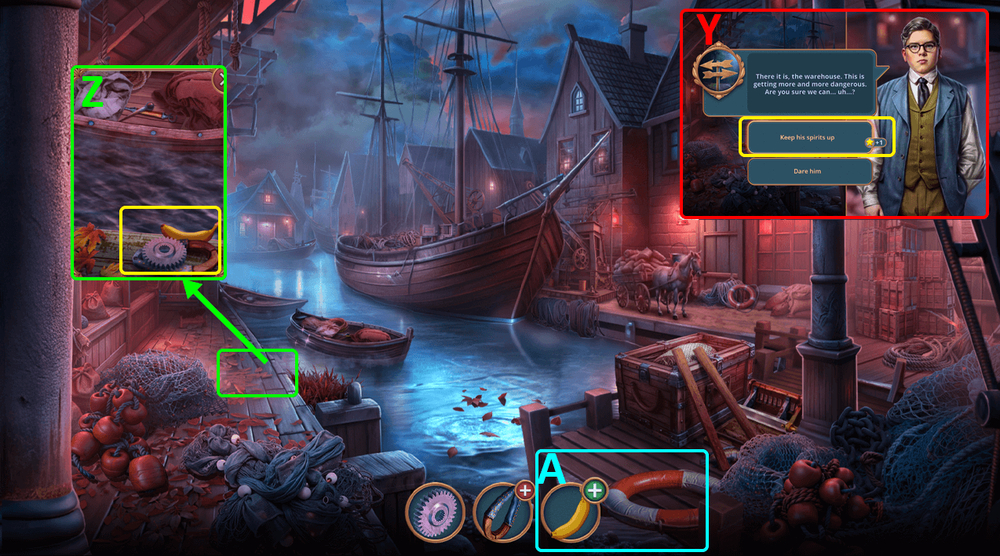
- Take GEAR, HORSE COLLAR, and BANANA (Z).
- Examine BANANA, peel it, get BANANA PEEL (A).
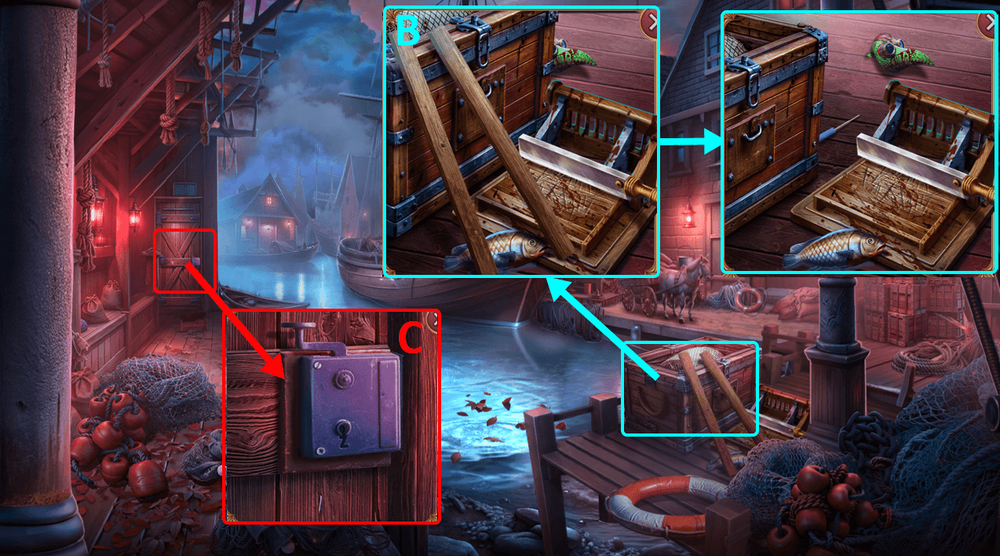
- Take LADDER BASE, use BANANA PEEL on the chest, take LOCK PICKS 2/2 (B).
- Use LOCK PICKS on the lock (C).
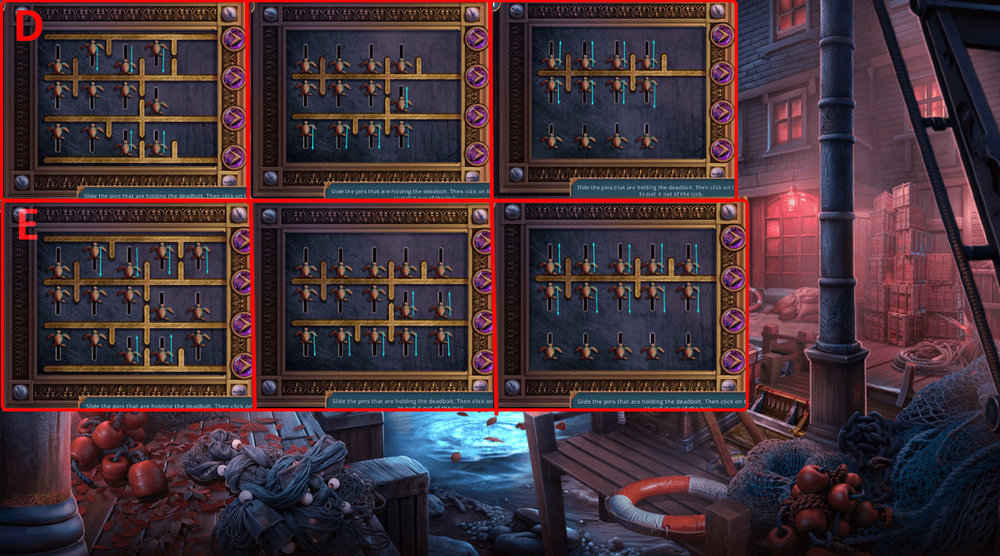
- Easy solution: Follow the instructions on the image (D).
- Hard solution: Follow the instructions on the image (E).
- Go to the Dock Warehouse.
- Take NAILS and SPRAYER (F).
- Use SPRAYER on INSECTICIDE, get INSECTICIDE SPRAY (G).
- Use GEAR on the winch, examine the spider, use INSECTICIDE SPRAY on the spider, read the note, take PLANER (H).
- Use PLANER on the boards, take WOODEN BOARDS (I).
- Go back.
- Use WOODEN BOARDS on the cutting board, get BOARDS (J).
- Use HAMMER, NAILS, and BOARDS on LADDER BASE, get LADDER (K).
- Use LADDER on the water (L).
- Easy solution: You need to correctly time the pressing of the button (M).
- Hard solution: You need to correctly time the pressing of the button (N).
- Take PIPETTE WITH OIL and FIRE POKER.
- Go to the Dock Warehouse.
- Use PIPETTE WITH OIL on the winch (O).
- Use FIRE POKER on the anchor mechanism, take FISHING ROD (P).
- Use CARROT and FISHING ROD on HORSE COLLAR, get HORSE BAIT (Q).
- Go back.
- Use HORSE BAIT on the horse (R).
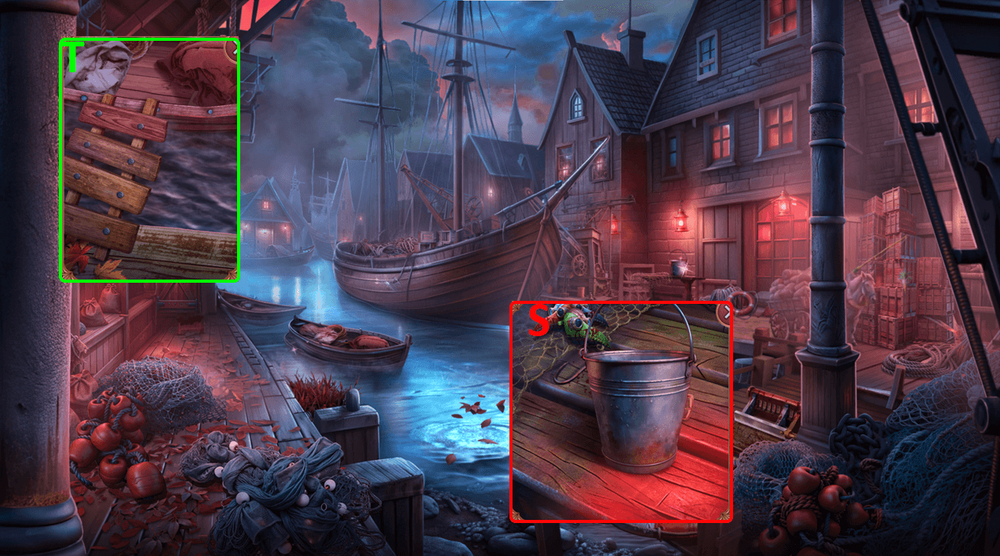
- Take BUCKET and BELT (S).
- Use BUCKET on the water, get WATER (T).
- Use BELT on BLUNT CUTTERS, get CUTTERS (U).
- Go to the Dock Warehouse.
- Use CUTTERS on the wire, use WATER on the fire, use the glove to take KNIFE (V).
- Use KNIFE on the net (W).
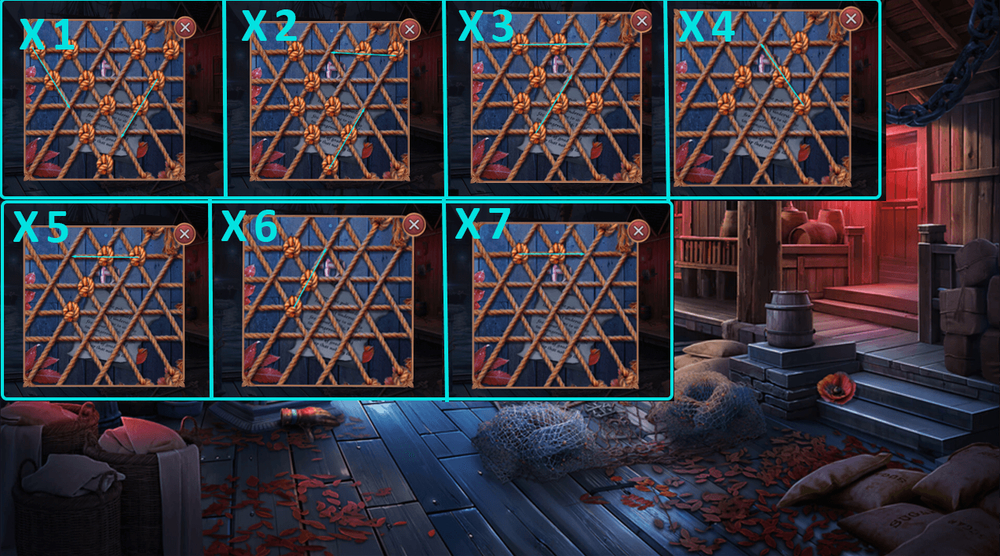
- Easy solution: Follow the instructions on the image (X).
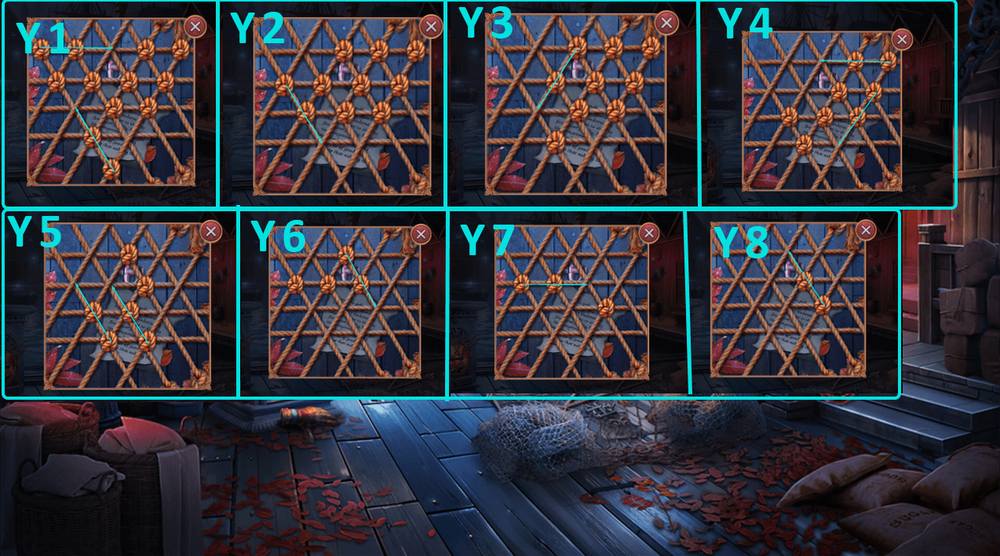
- Hard solution: Follow the instructions on the image (Y).
- Read the note, take HOOK.
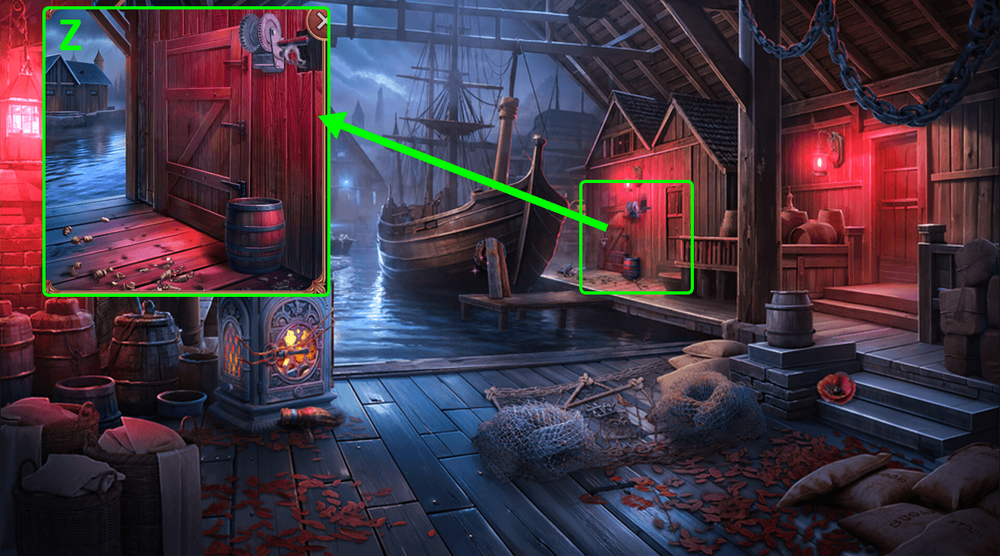
- Use HOOK on the winch (Z).
- Use KNIFE on the criminal (A).
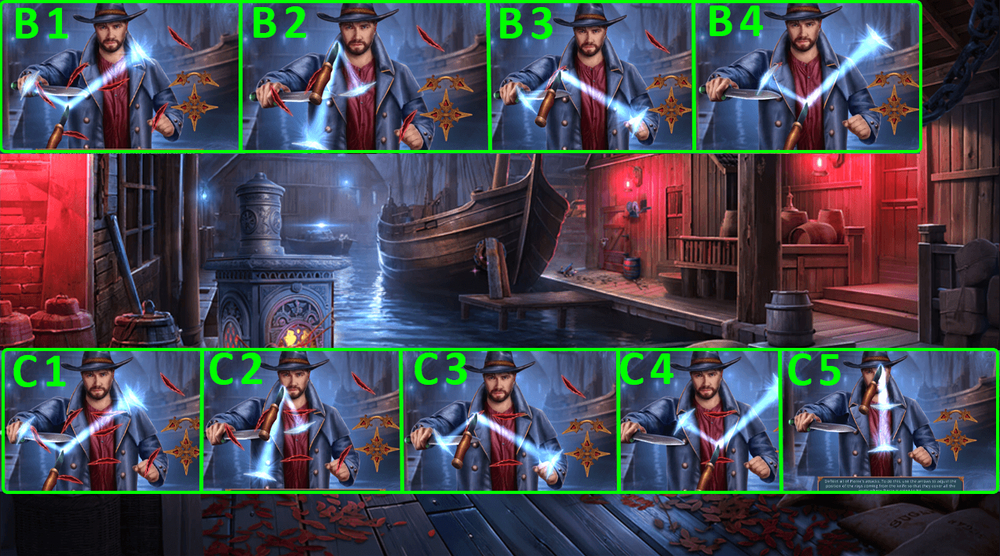
- Easy solution: Follow the instructions on the image (B).
- Hard solution: Follow the instructions on the image (C).
- Take TREASURE MAP (A).
- Take KNOB, DIARY, and BLANKET, click on the chest to move it (B).
- Use BLANKET on the dresser (C).
- Use KNOB on the door, click on the jacket, take SCARF (D).
- Use SCARF on the dresser (E).
- Examine the DIARY, flip through the pages while clicking on the items matching the highlighted words: periodic table, anchor, take PAPER FILTER and QUILL PEN (F).
- Use QUILL PEN on the drawer, take CHISEL and HANDCUFFS AMULET (G).
- Use HANDCUFFS AMULET on the chest, take EMPTY FLASK and COAL (H).
- Use COAL on the TREASURE MAP, earn MARKED CITY MAP (I).
- Use MARKED CITY MAP on the empty slot in the closet (J).
- Easy solution: Follow the instructions (K).
- Hard solution: Follow the instructions (L).
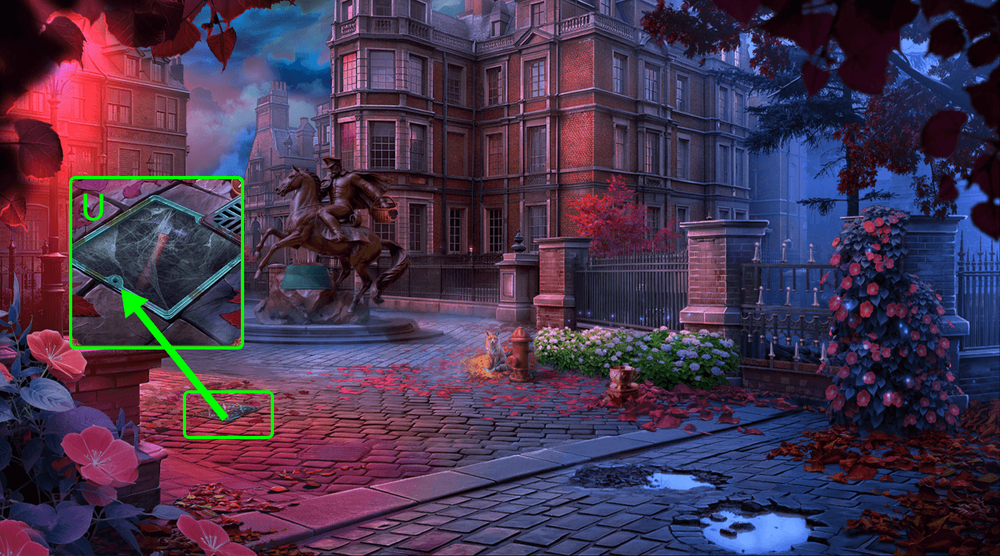
- Take BADGE, SCISSORS, and MAGNET (M).
- Use MAGNET on the suitcase, take PAPER SHEET, MIRROR, and SEWING KIT (N).
- Use SCISSORS and SEWING KIT on the dresser (O).
- Easy solution: Place the nodes like in the picture (P).
- Hard solution: Place the nodes like in the picture (Q).
- Take ROPE (R).
- Use ROPE on the windowsill (S).
- Select this option (T).
- Use CHISEL on the piece of wood, click 1, 2, 3, then 1, 2, 3, 4, then 1, 2, 3, 4, 5, take RATCHET DRUM (U).
- Take BROKEN RATCHET (V).
- Take RATCHET PART (W).
- Use RATCHET DRUM and RATCHET PART on BROKEN RATCHET, earn RATCHET (X).
- Use RATCHET on the sleeping coachman, click on the ratchet (Y).
- Go forward.
- Select this option, earn HANDLE (Z).
- Click on the folding screen to move it (A).
- Use PAPER FILTER on the bowl, use HANDLE on the safe, take STETHOSCOPE EARS 1/2 and HOOK (B).
- Use MIRROR and HOOK on the latch (C).
- Play puzzle, earn MEDICAL CLAMPS (D).
- Take PENCIL, DISGUISE, and OLD STETHOSCOPE (E).
- Take STETHOSCOPE EARS 2/2 (F).
- Use STETHOSCOPE EARS on OLD STETHOSCOPE (G).
- Go back.
- Use MEDICAL CLAMPS on the nut, use EMPTY FLASK on the water, earn WATER (H).
- Use WATER on the green paint, take RUBBER PIPE (I).
- Use RUBBER PIPE on OLD STETHOSCOPE, earn STETHOSCOPE (J).
- Go forward.
- Use STETHOSCOPE on the safe (K).
- Easy solution: Arrange as shown in the picture (L).
- Hard solution: Arrange as shown in the picture (M).
- Take MONEY, BANDAGE, and PESTICIDE (N).
- Go back.
- Use PESTICIDE on the vines, take GLOVE and CANDLE (O).
- Go forward.
- Play puzzle, earn TOY SOLDIER (P).
- Use CANDLE and TOY SOLDIER on the burner, use the key to open the drawer, take SEAM RIPPER, SCREW, and LONDON’S MAP (Q).
- Give LONDON’S MAP to Charles (R).
- Select this option, earn LAB’S LOCATION (S).
- Go back.
- Use LAB’S LOCATION on the box (T).
- Easy solution: Follow the instructions (U).
- Hard solution: Follow the instructions (V).
- Take GLASSES and WHEEL (W).
- Use BADGE, SCREW, and WHEEL on the cart, earn BADGE, take HEELED SHOES (X).
- Use PAPER SHEET and PENCIL on the timetable (Y).
- Easy solution: Follow the instructions (Z).
- Hard solution: Follow the instructions (A).
- Earn NOTE WITH TRAIN NUMBER.

- Take COAT (B).
- Use GLOVE on the shards, take GLUE and MUSTACHE (C).
- Use GLASSES, HEELED SHOES, COAT, and MUSTACHE on DISGUISE (D).
- Use MONEY and NOTE WITH TRAIN NUMBER on the ticket office, earn TRAIN TICKET (E).
- Use TRAIN TICKET on the train (F).
- Easy solution: Press in the order shown in the picture (G).
- Hard solution: Press in the order shown in the picture (H).
- Earn COAT.
- Use BADGE on the screws, take HANDLE (I).
- Take BROKEN BASKET (J).
- Use BANDAGE and HANDLE on the scythe blade, take SCYTHE (K).
- Use COAT on the fence (L).
- Easy solution: Follow the instructions (M).
- Hard solution: Follow the instructions (N).
- Talk to the man, click on this line (Q).
- Select this option (P).
- Go forward.
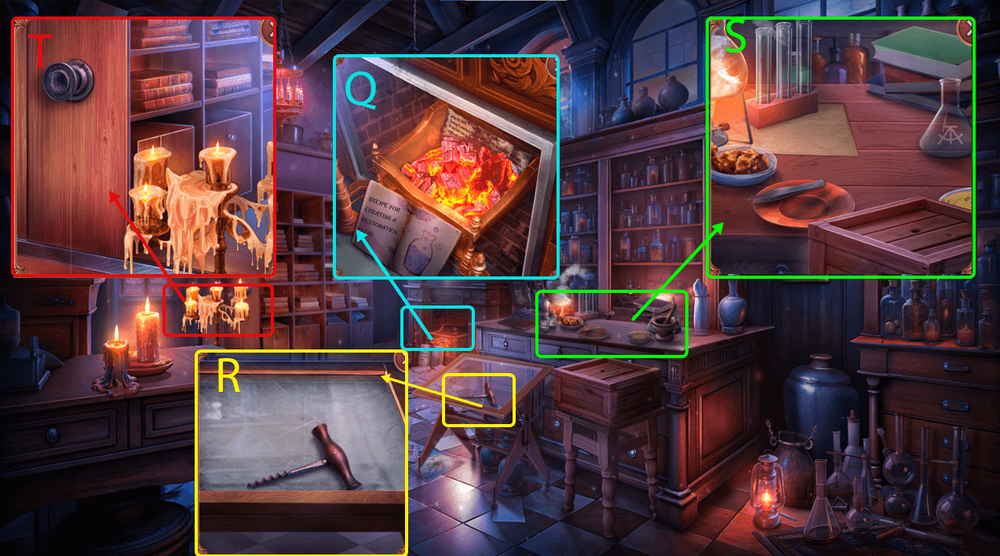
- Take RECIPE (Q).
- Take CORKSCREW (R).
- Use RECIPE on the table, use CORKSCREW on the box, take SCRAPER (S).
- Use SCRAPER on the wax, take SNAKE EMBLEM (T).
- Go back.
- Examine the purse, use SNAKE EMBLEM on the lock, take CHEMICAL REAGENT and VALVE (U).
- Go forward.
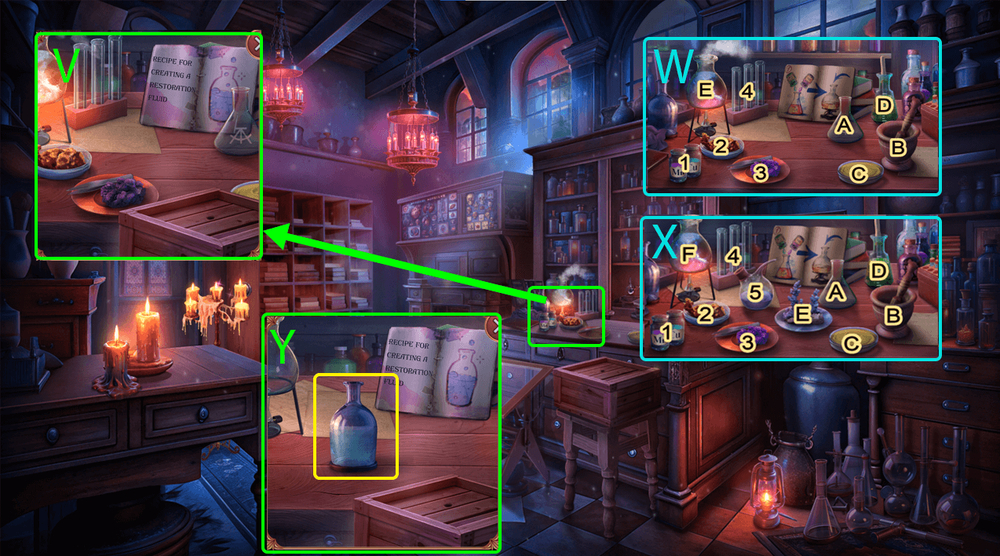
- Use CHEMICAL REAGENT on the table (V).
- Easy solution: Mix the elements in this order: 1+A, 2+B, 3+C, 4+D, A+E, B+E, C+E, D+E (W).
- Hard solution: Mix the elements in this order: 1+A, 2+B, 3+C, 4+D, 5+E, A+F, B+F, C+F, D+F, E+F (X).
- Take RESTORATION FLUID (Y).
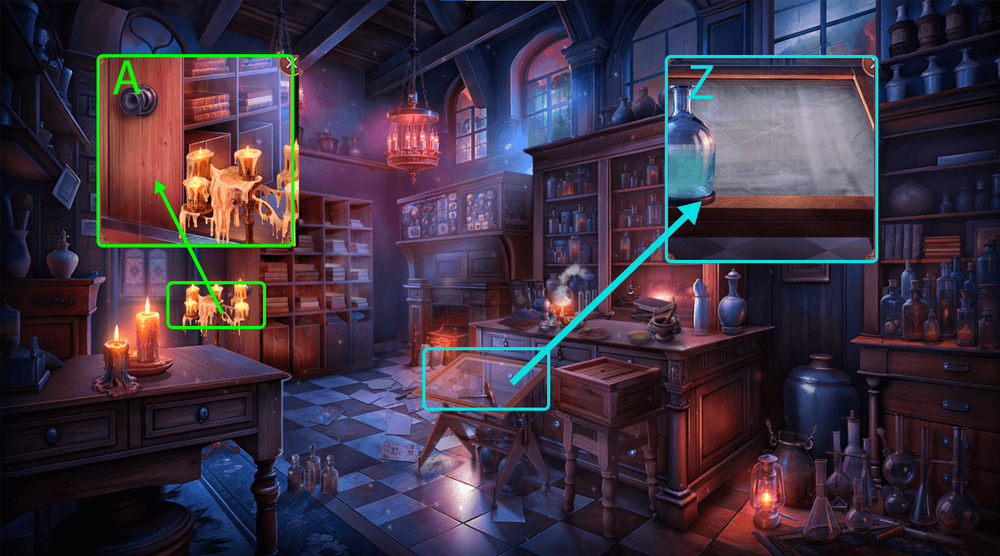
- Use RESTORATION FLUID on the glass table (Z).
- Use VALVE on the door, take SCOOP (A).
- Go back.
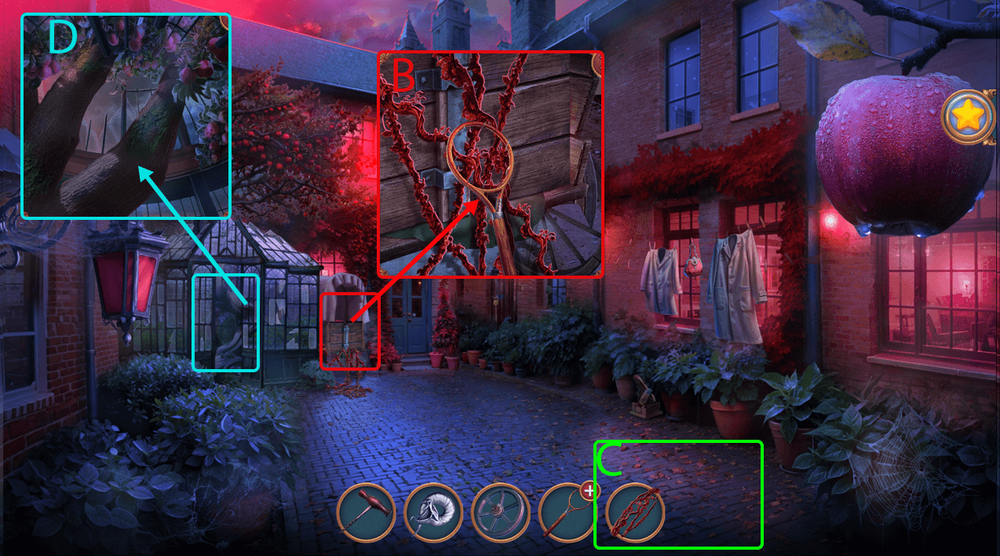
- Take SCOOP NET FRAME, use SCYTHE on the vines, earn VINE (B).
- Use VINE on BROKEN BASKET, earn BASKET (C).
- Use BASKET on the tree (D).
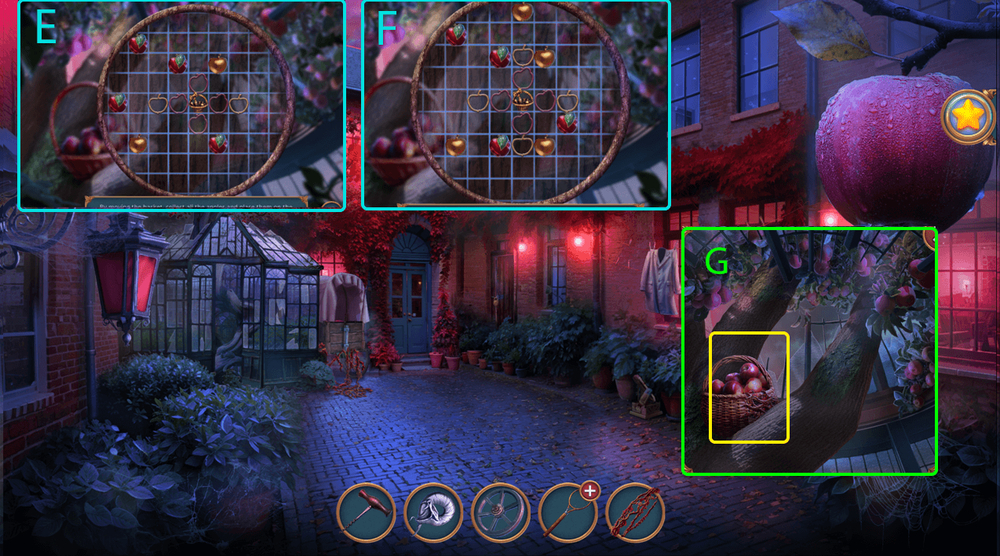
- Easy solution: Drag the cart in this direction: left, left, up, up, right, left, left, down, down, right, right, right, right, down, down, left, left, up, up, right (E).
- Hard solution: Drag the cart in this direction: left, left, up, up, left, right, right, right, down, right, right, down, left, down, down, left, left, right, up, up (F).
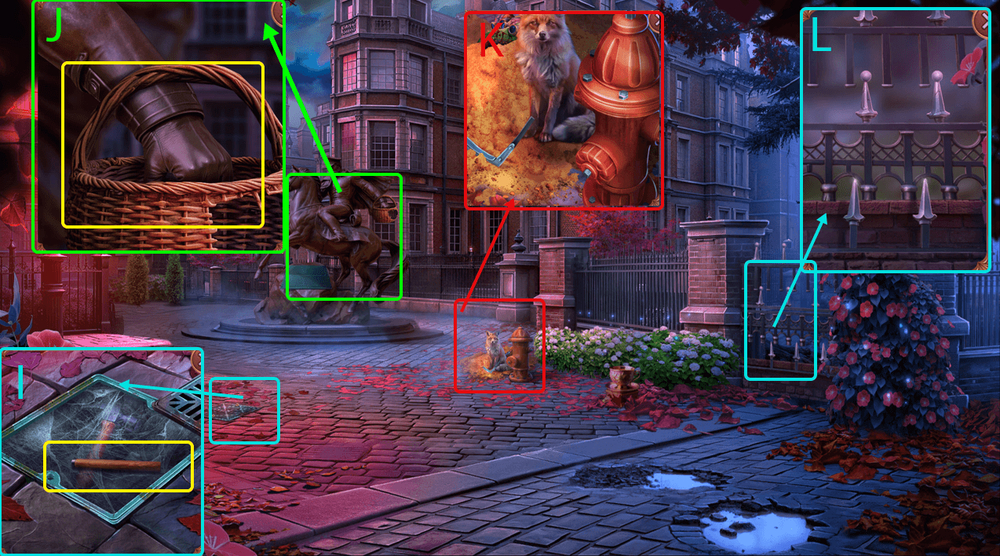
- Take APPLES (G).
- Go back.
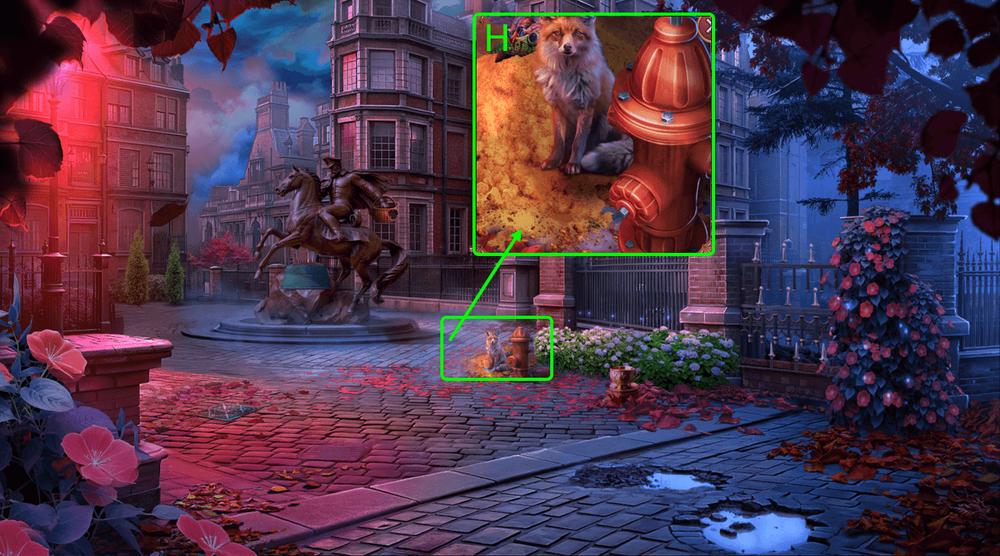
- Give APPLES to the fox, take RAKE and HORSEMAN’S ATTRIBUTE, use SCOOP on the pile of sand, earn SAND (H).
- Go to Whitechapel Lab.
- Use SAND on the fireplace, take SCORCHED PAPER (I).
- Use SCORCHED PAPER on the glass table (J).
- Easy solution: Follow the instructions (K).
- Hard solution: Follow the instructions (L).
- Take and read the note (M).
- Go to Whitechapel Central Square.
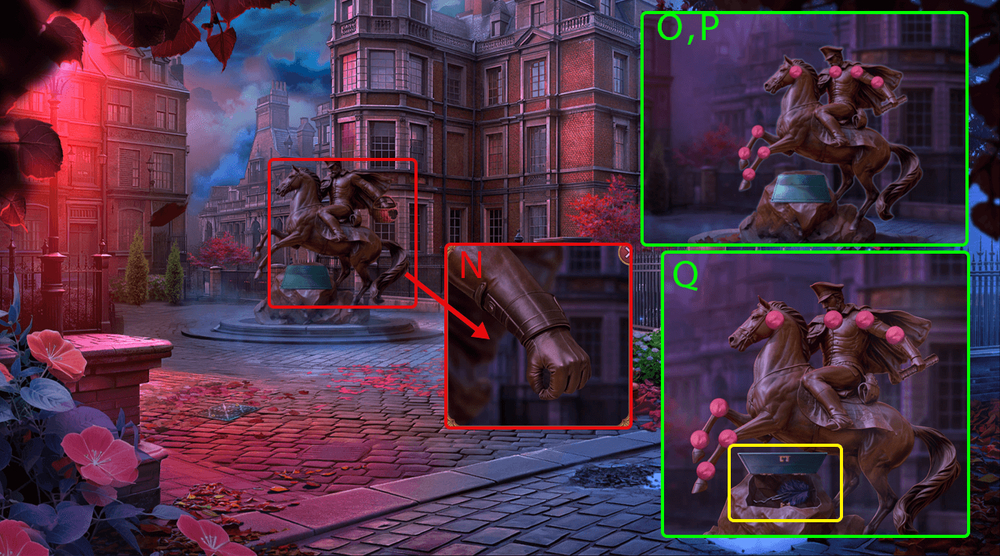
- Use HORSEMAN’S ATTRIBUTE on the statue’s hand (N).
- Easy solution: Set to the position shown in the picture (O).
- Hard solution: Set to the position shown in the picture (P).
- Take LOCK PICK (Q).
- Go forward.
- Use LOCK PICK on the lock (R).
- Play puzzle, earn LAB COAT PATTERN (S).
- Use LAB COAT PATTERN on the lab coat, use SEAM RIPPER on the pocket, take LIGHTER (T).
- Go back.
- Use LIGHTER on the spider web, take HAMMER (U).
- Go forward.
- Play puzzle, earn CROWBAR (V).
- Use CROWBAR on the latch, use HAMMER on the boards, earn LADDER (W).
- Use LADDER on the windows with people’s silhouettes, click on the ladder (X).
- Easy solution: Random (Y).
- Hard solution: Random (Z).
- Select this option (A).
- Use GLUE on the mailbox (B).
- Use RAKE on the pile of algae, take FILE (C).
- Use FILE on the wire, take STOCKING (D).
- Use STOCKING on SCOOP NET FRAME, earn SCOOP NET (E).
- Easy solution: Random (F).
- Hard solution: Random (G).
- Earn POSTAL SIGNAL FLAG.
- Use POSTAL SIGNAL FLAG on the mailbox, click on the flag, take SPARE KEYS (H).
- Use SPARE KEYS on the keyhole (I).
- Solution: The correct position is shown in the picture (J).
- Take PIECE OF FIGURINE (A).
- Take RAZOR and PAPER (B).
- Take RIPPED OVEN MITTEN, GLUE, and BROKEN FIGURINE, examine the photo (C).
- Use PIECE OF FIGURINE and GLUE on BROKEN FIGURINE, earn GLUED FIGURINE (D).
- Take JUG OF WATER, use GLUED FIGURINE on the slot (E).
- Easy solution: The correct position is shown in the picture (F).
- Hard solution: The correct position is shown in the picture (G).
- Take SPARE KEY (H).
- Use JUG OF WATER on the fire (I).
- Use SPARE KEY on the keyhole (J).
- Go forward.
- Take HANDLES 1/2 and STAMP (K).
- Use PAPER and STAMP on the symbols, earn SAFE CODE (L).
- Use SAFE CODE on the safe (M).
- Play puzzle, earn LUXURY PIPE (N).
- Use LUXURY PIPE on the drawer, earn BOX (O).
- Open the BOX, take HANDLES 2/2 (P).
- Use HANDLES on the hatch (Q).
- Easy solution: Press the A button 5 times, press the B button 2 times, press the C button 6 times, press the D button 6 times (R).
- Hard solution: Press the C button 5 times, Press the B button 7 times, press the A button 11 times, press the D button 6 times, press the E button 2 times (S).
- Go forward.
- Select this option (T).
- Use RAZOR on the loose thread, earn SHORT THREAD (U).
- Take OLD PICTURES 1/3 and FAVORITE SHEET MUSIC, examine the needle, use SHORT THREAD on it, earn NEEDLE AND THREAD (V).
- Use NEEDLE AND THREAD on RIPPED OVEN MITT, earn OVEN MITT (W).
- Go to Fredrick’s House.
- Use OVEN MITT on the items in the fireplace, earn METAL WEDGE and CLOSET DECORATION (X).
- Use CLOSET DECORATION on the slot (Y).
- Easy solution: Follow the instructions (Z).
- Hard solution: Follow the instructions (A).
- Take OLD HEELED SHOE (B).
- Go to Fredrick’s Study.
- Use OLD HEELED SHOE on the lock, take OLD HAMMER and CUTTERS, use FAVORITE SHEET MUSIC on the keyboard (C).
- Use METAL WEDGE on OLD HAMMER (D).
- Go back.
- Use CUTTERS on the back of the photo frame, cut the thread and read the note, take OIL (E).
- Go to Fredrick’s Study.
- Play puzzle, earn TOY CAT (F).
- Go to the Basement.
- Use OIL on the rusted lid (G).
- Use TOY CAT on the mouse, take LOCK PART (H-H2).
- Use LOCK PART on the box (I).
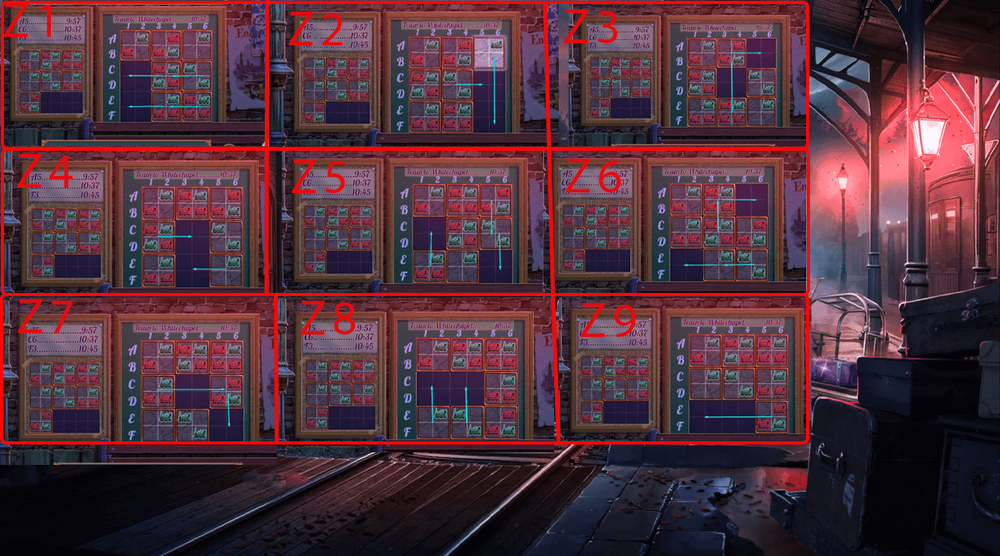
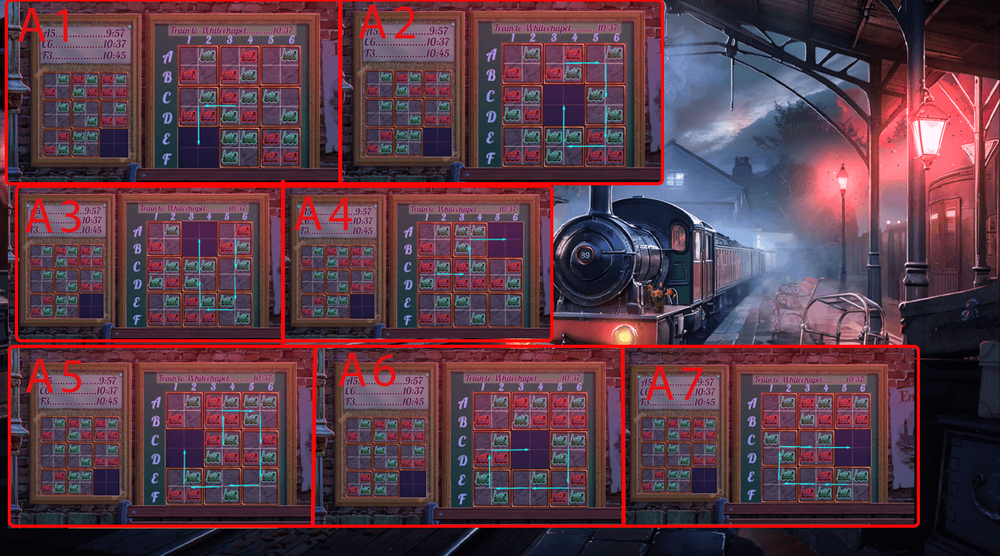
- Easy solution: A4 B6 C4 D1 (J).
- Hard solution: C1 B2 A3 D4 A4 B2 C3 (K).
- Take OLD PICTURES 2/3 and BRUSH.
- Use BRUSH on the rusted lid, take NAILS and BOOK DECORATION (L).
- Go back.
- Use BOOK DECORATION on the book, take PIANO KEY (M).
- Use PIANO KEY on the keyboard (N).
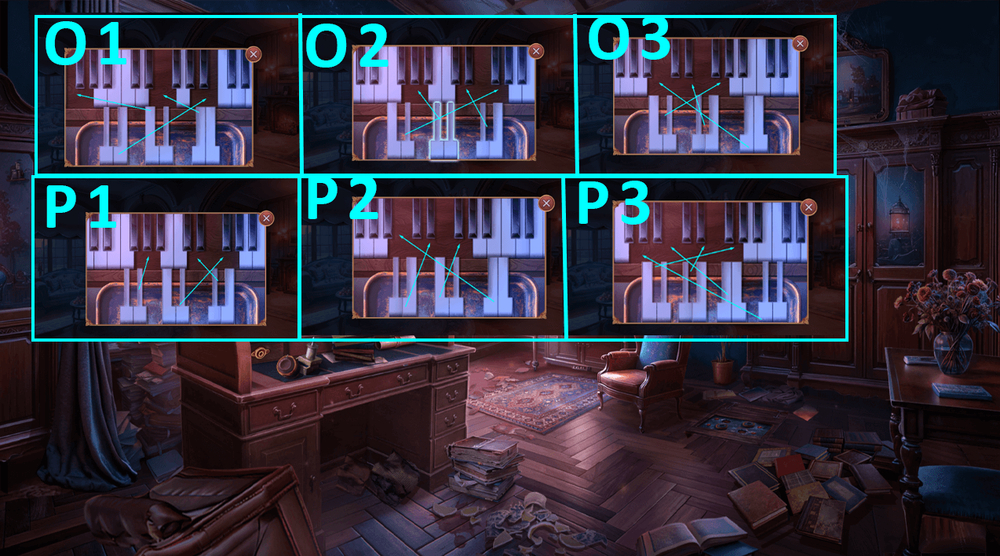
- Easy solution: Follow the instructions (O).
- Hard solution: Follow the instructions (P).
- Take SCREW and OLD PICTURES 3/3.
- Go to the Basement.
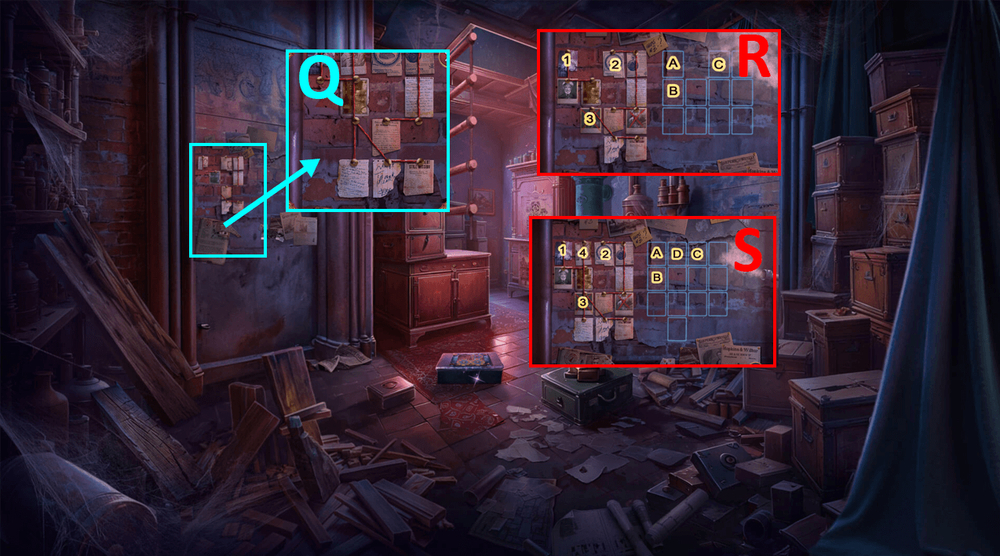
- Use OLD PICTURES on the wall (Q).
- Easy solution: 1B 2C 3A (R).
- Hard solution: 1B 2C 3A 4D (S).
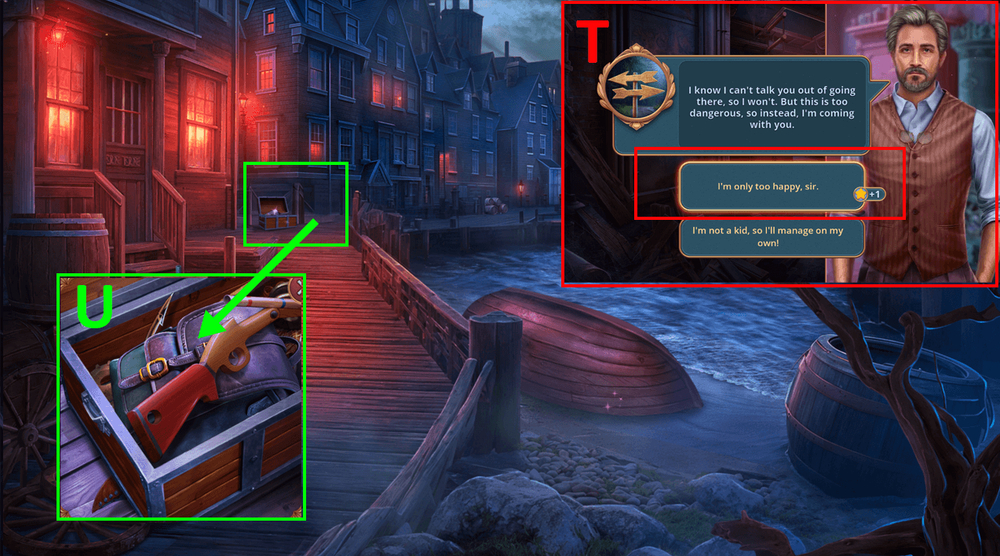
- Select this option (T).
- Take TOY GUN, BACKPACK, and GEAR (U).
- Use BACKPACK on the boat (V).
- Use SCREW on the oil squeezer (W).
- Take FIRECRACKER and EMPTY LIGHTER, use GEAR on the mechanism (X).
- Go to the Ship’s Deck.
- Take HAMMER HANDLE (Y).
- Use HAMMER HANDLE on the OLD HAMMER, earn HAMMER (Z).
- Use NAILS and HAMMER on the stairs (A).
- Easy solution: Install the boards in the order shown in the picture (B).
- Hard solution: Install the boards in the order shown in the picture (C).
- Go to the Passenger Lounge.
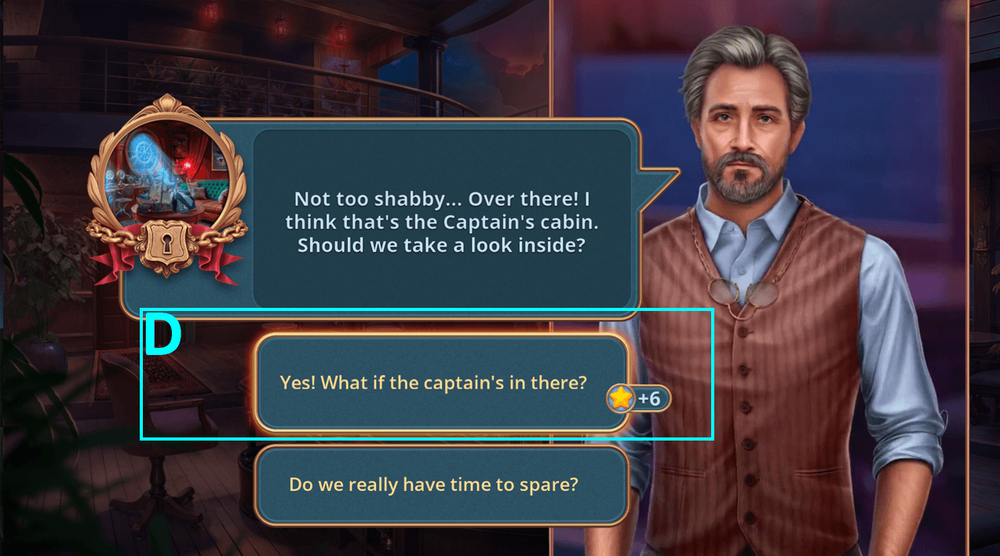
- Select this option (D).
- Go to the Captain’s Cabin.
- Take LOCK PARTS 1/2 (E).
- Take MOSAIC PART and SCALES (F).
- Use MOSAIC PART on the mosaic, take WEIGHT (G).
- Use SCALES and WEIGHT on the statue (H).
- Solution: C-A B-C B-C B-C A-B C-B A-B A-B C-A B-A B-A C-B C-B A-C A-C B-A B-A C-B C-B (I).
- Take GOLDEN FORK.
- Go back.
- Take HELM PARTS 1/3 and TOY AMMO (J).
- Use TOY AMMO on TOY GUN, earn SHOOTING RANGE GUN (K).
- Use SHOOTING RANGE GUN on the shooting range (L).
- Play puzzle, earn MINI-BAR HANDLE (M).
- Use MINI-BAR HANDLE on the mini-bar, take SHOEHORN (N).
- Use SHOEHORN on the flowerpot, take SMALL KEY (O).
- Use SMALL KEY on the round lock, Take COTTON and BELT (P).
- Use BELT on the wick basket, take ROULETTE HANDLE (Q).
- Use COTTON on EMPTY LIGHTER (R).
- Go to the Passenger Lounge.
- Use ROULETTE HANDLE on the roulette wheel, take GIFT GLASS (S).
- Play puzzle, earn COFFEE POT (T).
- Use GIFT GLASS on the mini-bar, use COFFEE POT on the gift glass, take HELM PARTS 2/3 and ROLLER SKATE (U).
- Go to the City Port.
- Use ROLLER SKATE on the chest, take OIL SQUEEZER LEVER, use GOLDEN FORK on the bag’s lock, take SHIP PARTS 1/2 and EMBLEM (V).
- Go to the Captain’s Cabin.

- Use EMBLEM on the lock, read the note, take FIN (W).
- Use FIN on the fish, take FISH AMULET (X).
- Go to the City Port.
- Use OIL SQUEEZER LEVER on the oil squeezer (Y).
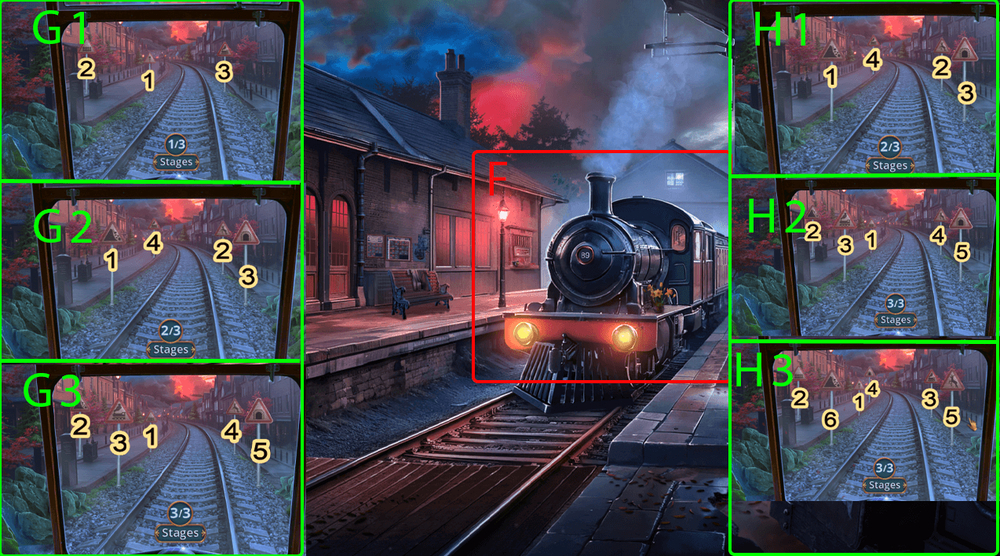
- Easy solution: 8J 2H 3F K 1G 6E K 6I 5H K 9E K 4E KK 10F (Z).
- Hard solution: Follow the instructions (A).
- Take SUNFLOWER SEEDS.
- Go to the Ship’s Deck.
- Use SUNFLOWER SEEDS on the seagull, look at the photo, earn CODE PICTURE (B).
- Select this option (C).
- Use FISH AMULET on the bag, take LOCK PARTS 2/2 (D).
- Go to the Captain’s Cabin.
- Use LOCK PARTS on the suitcase, enter code: 3-5-6-2, take SHIP PARTS 2/2 (E).
- Use SHIP PARTS on the ship (F).
- Easy solution: B4 B2 A1 D1 A3 A1 C4 B4 (G).
- Hard solution: D2 D1 C2 D2 A4 A5 B4 A4 (H).
- Take and read note.
- Go to the Ship’s Deck.
- Use CODE PICTURE on the code lock on the suitcase, enter the code and press on the check mark, take HOOK (I).
- Go to the Passenger Lounge.
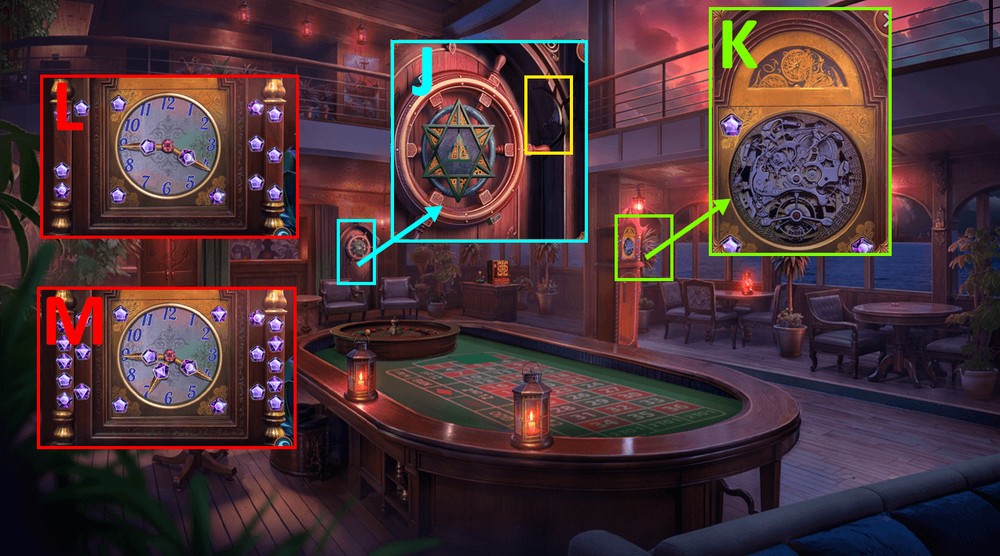
- Use HOOK on the clock in the wall crack, earn CLOCK DIAL (J).
- Use CLOCK DIAL on the clock (K).
- Easy solution: Follow the instructions (L).
- Hard solution: Follow the instructions (M).
- Take WRENCH.
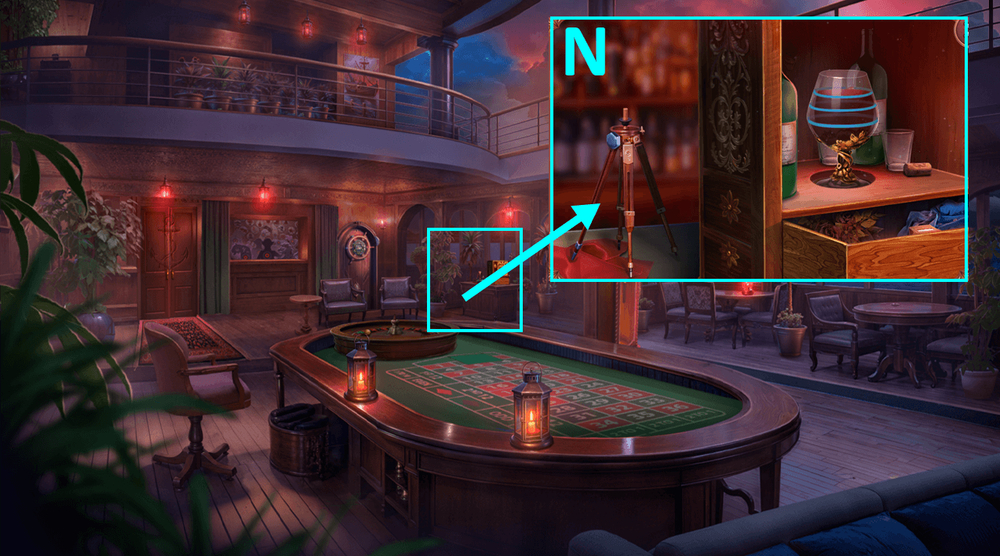
- Use WRENCH on the camera, earn TRIPOD LEG (N).
- Go to the City Port.
- Use TRIPOD LEG on the boat, take KNIFE and HELM PARTS 3/3 (O).
- Go to the Passenger Lounge.
- Use HELM PARTS on the helm (P).
- Solution: Follow instructions (Q).
- Select this option (R).
- Use KNIFE on the fishing net (S).
- Easy solution: 5-6-1-3-4-5-6-2-6-4-2-1-2-3 (T).
- Hard solution: 5-6-1-2-6-1-3-4-3-1-2-3-5-6-2-1-6-4-3-5-6-1-3-1-3-1-2-3 (U).
- Take SCREWDRIVER.
- Use FIRECRACKER on the broken drawer, use SCREWDRIVER on the machine, earn BELL RING (V).
- Use BELL RING on the shards, take WIRE SAW (W).
- Use WIRE SAW on the plank, take GAS (X).
- Use GAS on EMPTY LIGHTER, earn LIGHTER (Y).
- Use LIGHTER on the drawer, take LEVER (Z).
- Use LEVER on the slot (A).
- Easy solution: Random (B).
- Hard solution: Random (C).
- Walkthrough Bonus Chapter, at the link below.


