Halloween Stories 7: Written in Blood – A black book that had long remained out of reach of human eyes became the center of attention at an exhibit on Halloween Eve. However, things didn’t go according to plan: an unknown person stole the exhibit, plunging the museum into grim chaos. Now the fate of not only the exhibition, but also the friends of Catherine Gonzalez, a member of the TruthStalkers team, is in jeopardy. An investigation awaits you, where you will uncover the identity of the mysterious Lord Barlow and learn how he managed to return to the real world. In search of answers, you will have to study ancient materials, unravel the mysteries of the Black Book and stop a series of strange events that have engulfed the museum. Explore every clue, interact with other members of the TruthStalkers team and try to get ahead of the evil before it does irreparable damage. If you can not pass any of the puzzles or do not know where the items are, on our site you can watch the walkthrough of Halloween Stories 7: Written in Blood, and save your friends.
Halloween Stories 7: Written in Blood – Walkthrough
Here you can see the full walkthrough of Halloween Stories 7: Written in Blood game, namely for all chapters, including bonus chapter, in pictures.
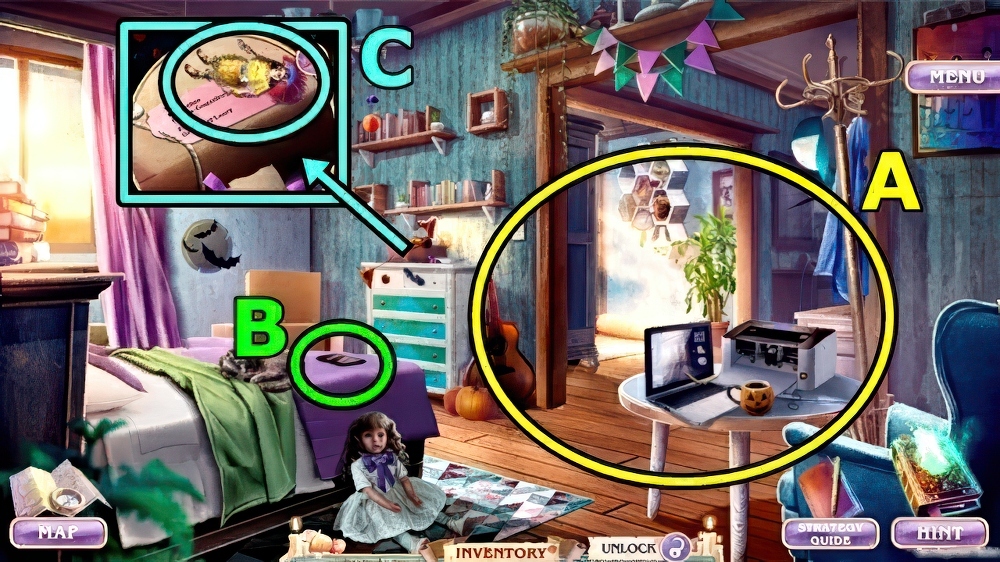
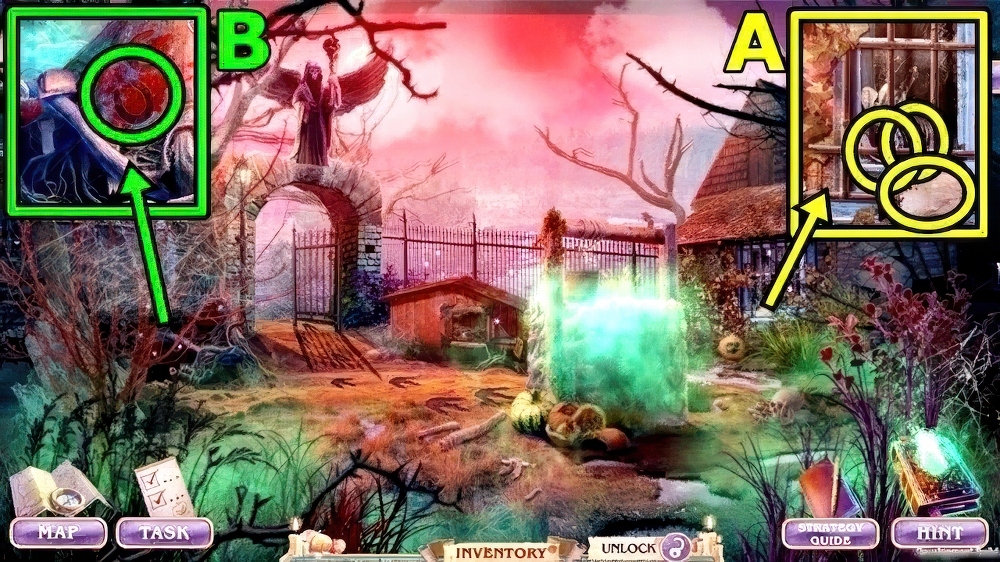
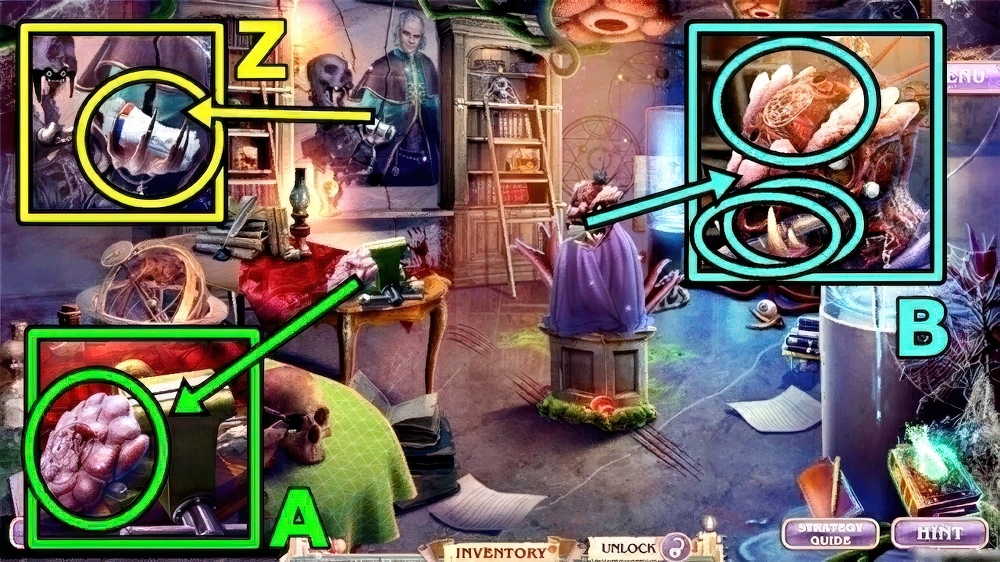
- Examine (A).
- Answer (B).
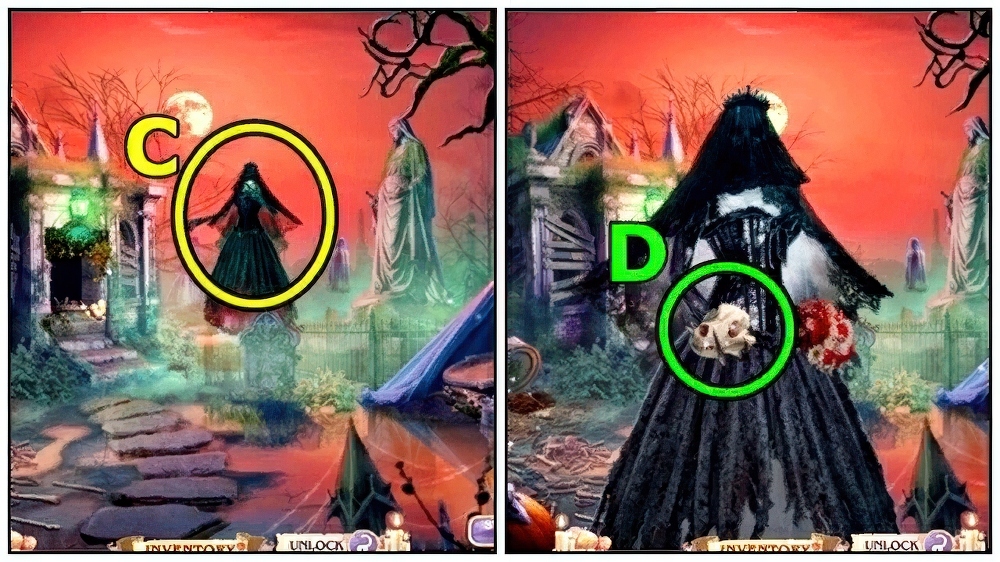
- Take AZTEC STATUE (C).
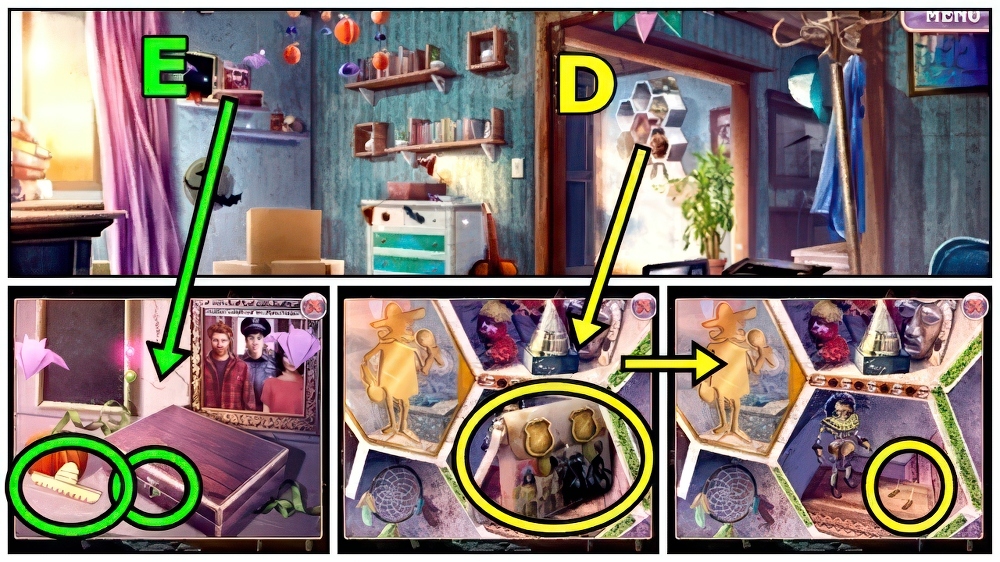
- Take CATHERINE’S BAG (D).
- Add AZTEC STATUE, take LOCKPICK and INK CARTRIDGE.
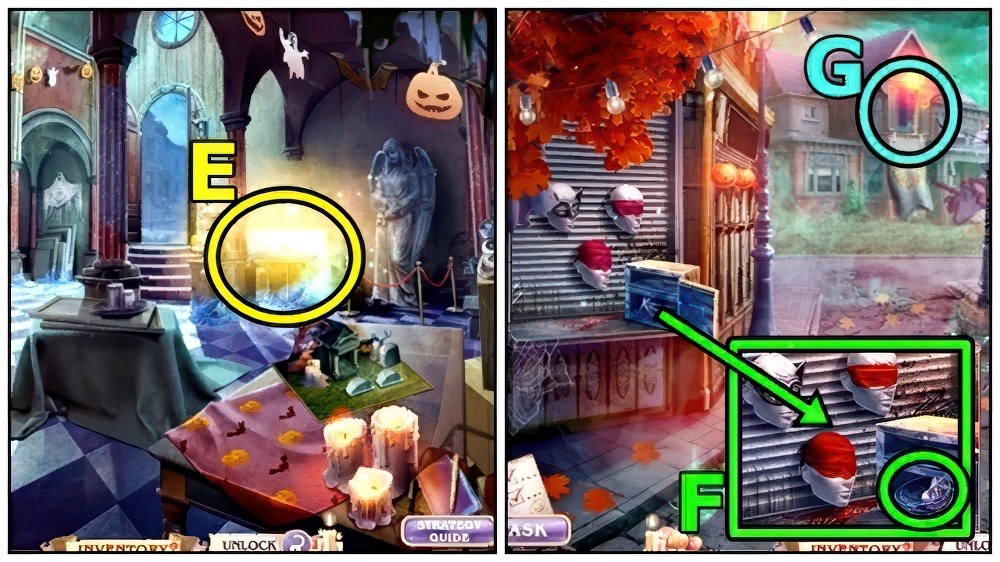
- Take SOMBRERO TOKEN (E).
- Use LOCKPICK, take DEBUNKERS BADGE and ID CARD.
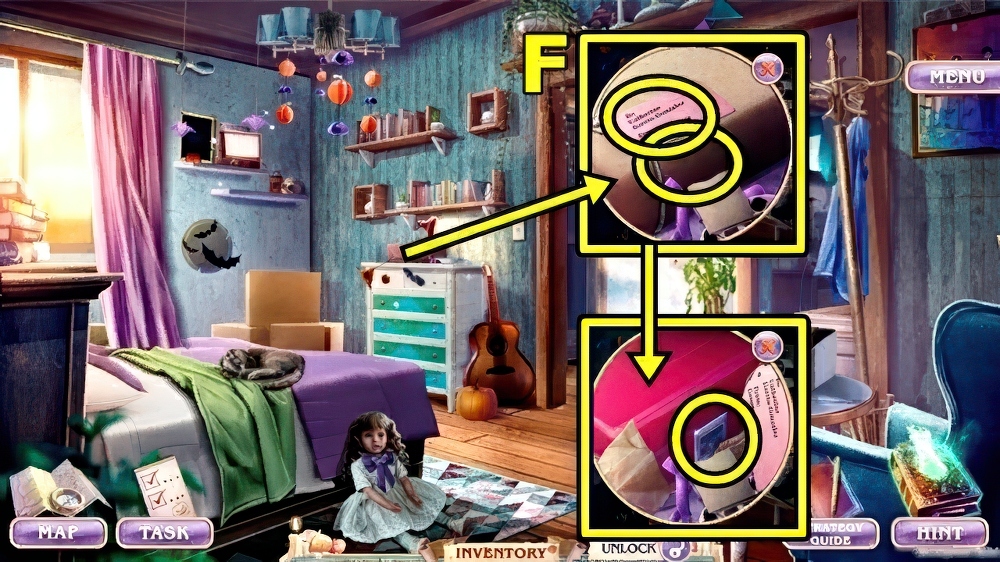
- Read (F), unwrap.
- Use ID CARD.
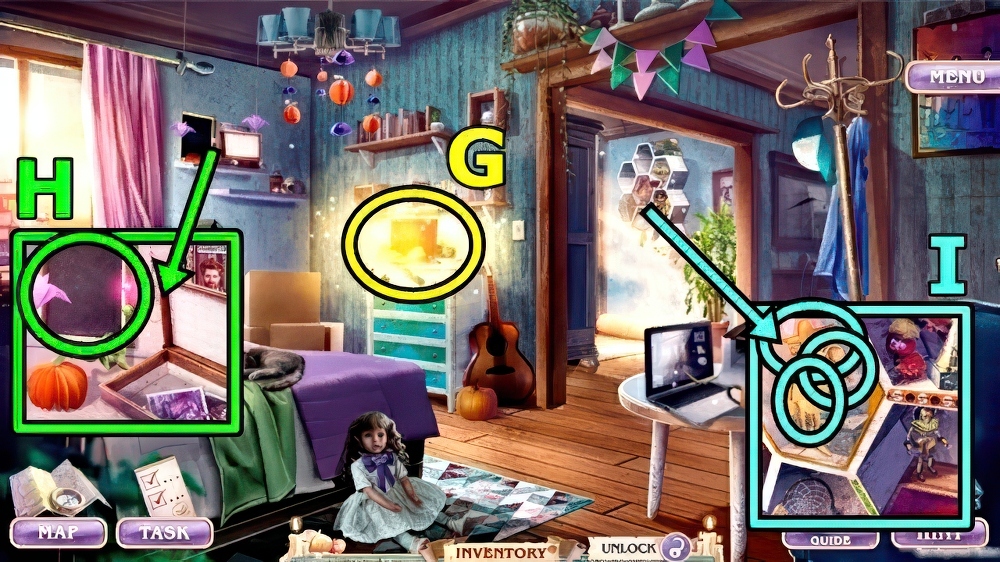
- Play puzzle (G), take STALKERS BADGE.
- DEBUNKERS BADGE and STALKERS BADGE on CATHERINE’S BAG, take GROUP PHOTO and MARACAS TOKEN.
- Add GROUP PHOTO (H), take FIRE EXTINGUISHER and DANCING SKELETON.
- Add DANCING SKELETON (I), MARACAS TOKEN and SOMBRERO TOKEN.
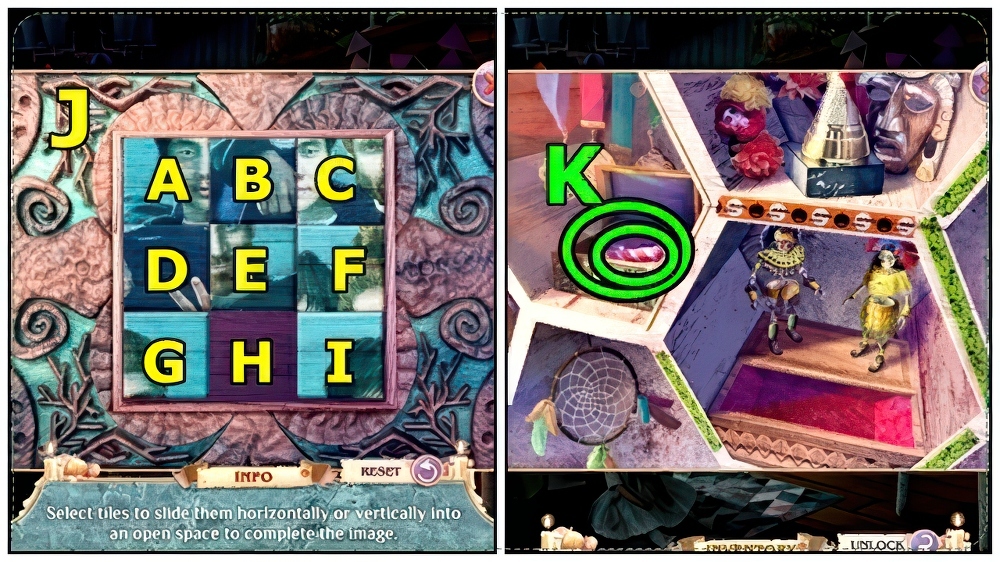
- Solution: (J) I-F-E-H-G-D-A-B-E-H-G-D-A-B-E-F-I-H-E-F-C-B-E-D-G-H-E-F-I-H-G-D-E-H-I-F-E-D-G-H-I.
- Take CANDLE (K) and PRINTER CABLE.
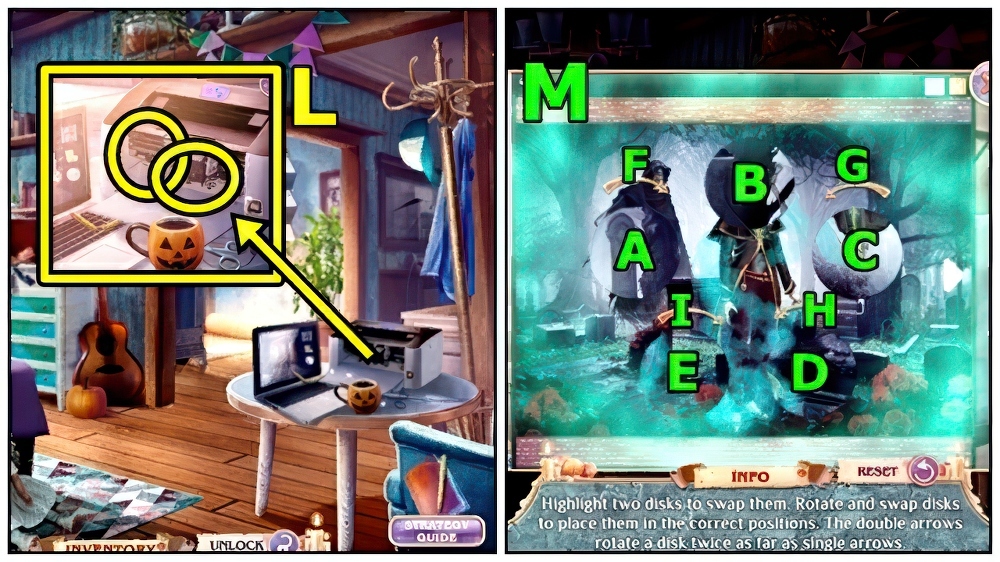
- Add PRINTER CABLE (L) and INK CARTRIDGE.
- Solution: (M) Gx2-(C-B)-(A-C)-F-(D-E)-Ix2.
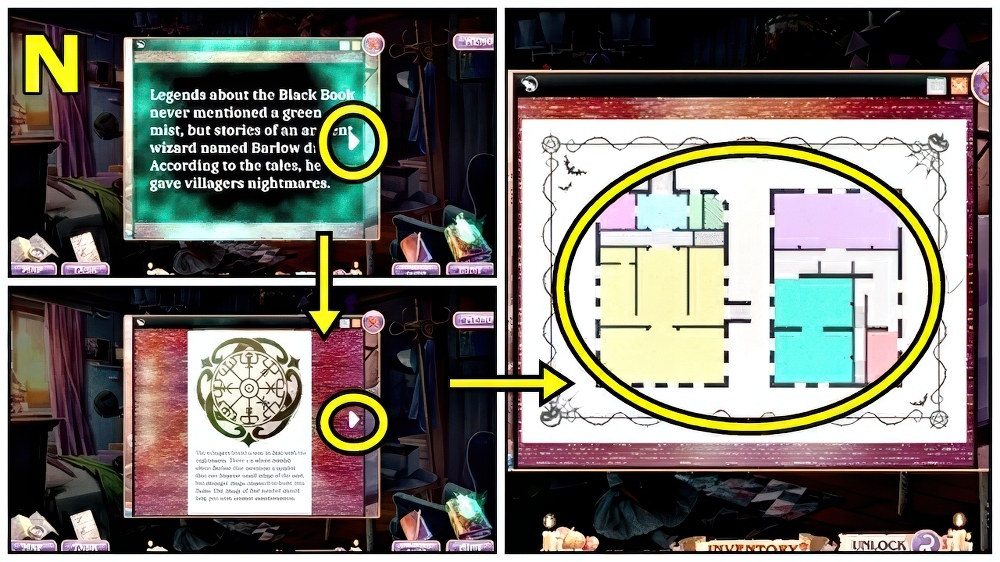
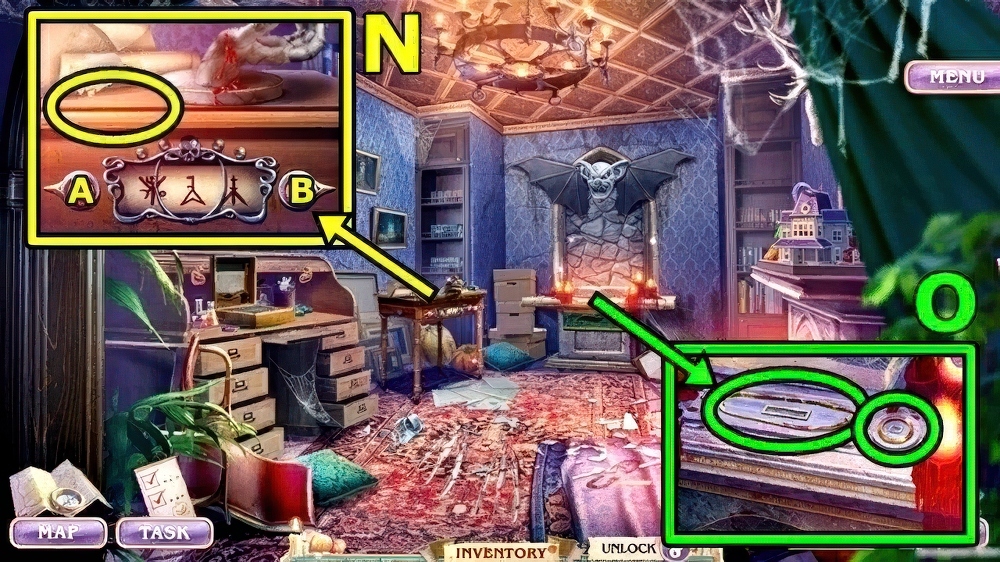
- Press (N), examine.
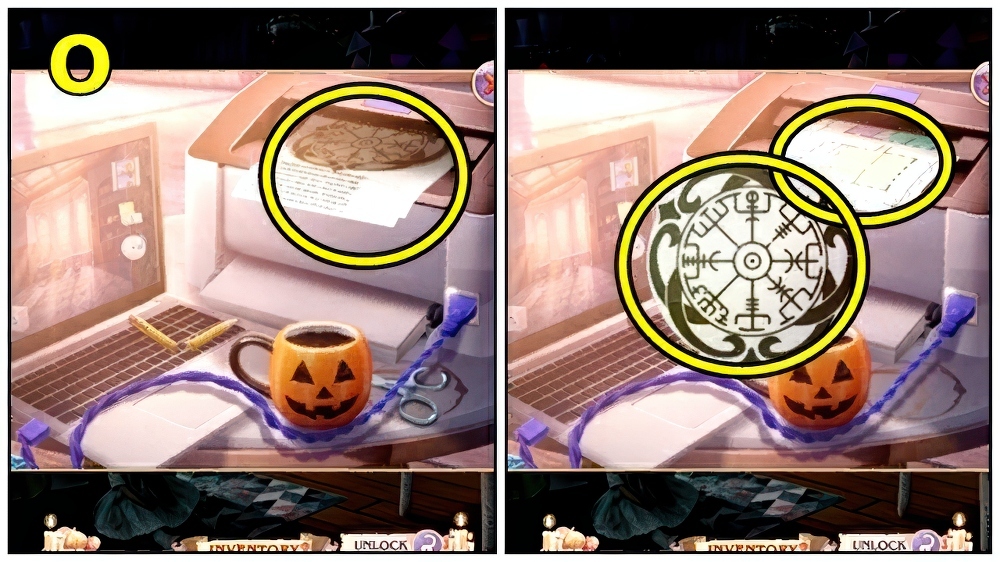
- Examine (O).
- Take PROTECTIVE SYMBOL and MUSEUM MAP.
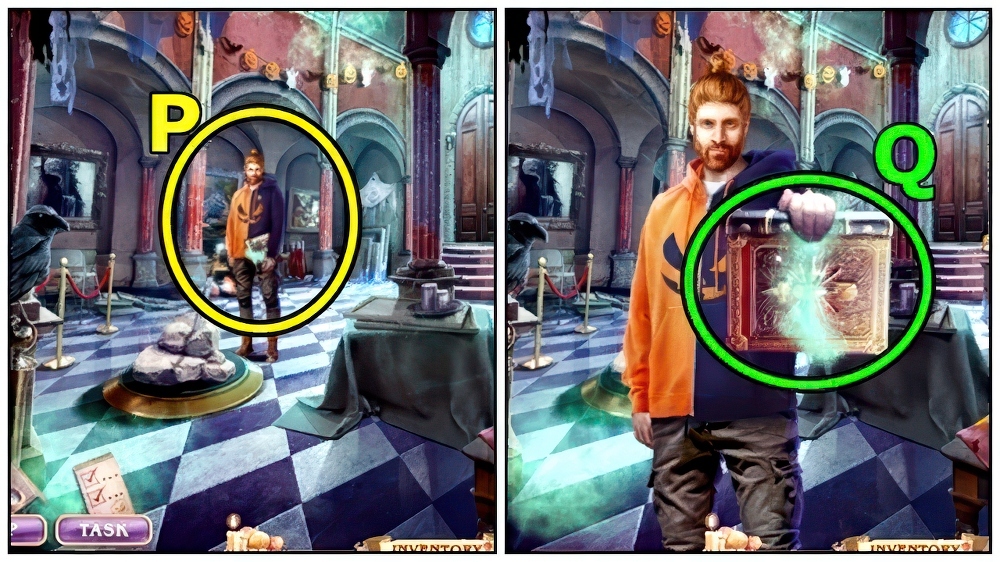
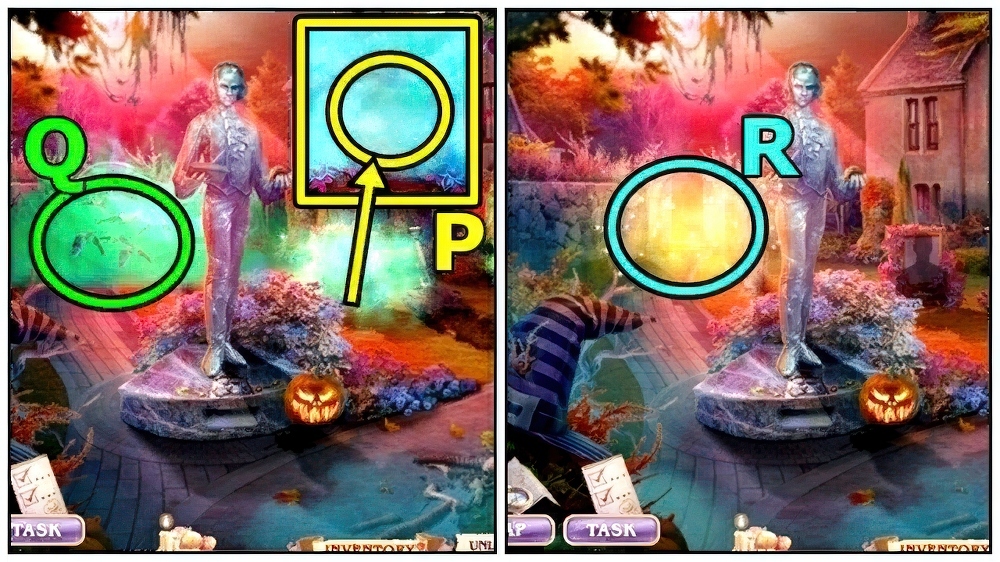
- Talk (P).
- Take BOOK OF LEGENDS (Q).
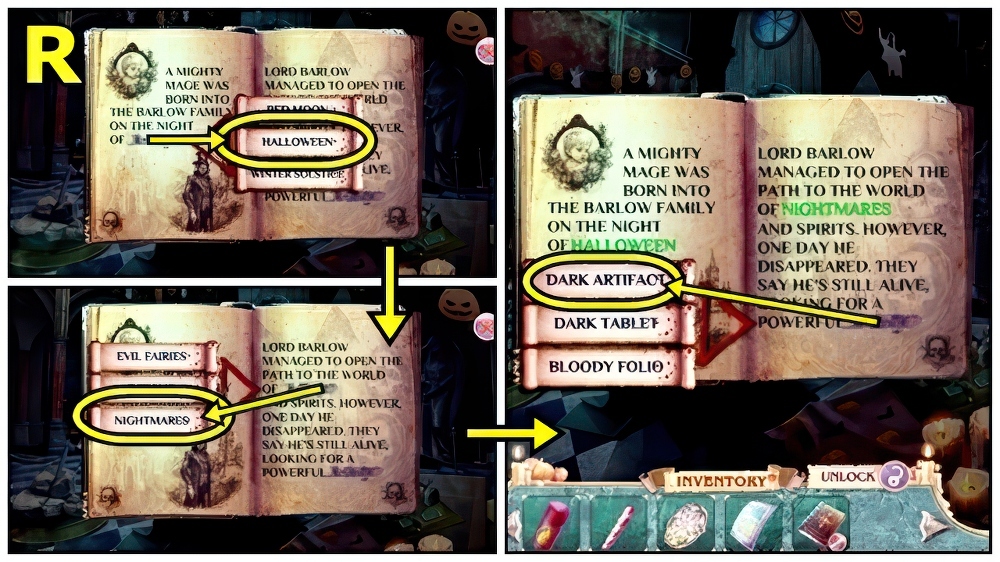
- PROTECTIVE SYMBOL on BOOK OF LEGENDS, select (R).
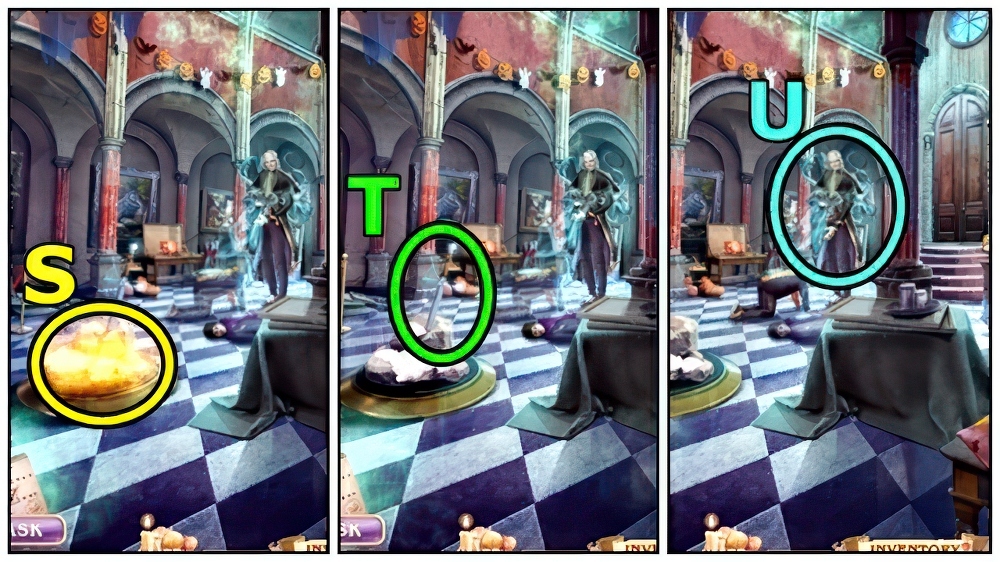
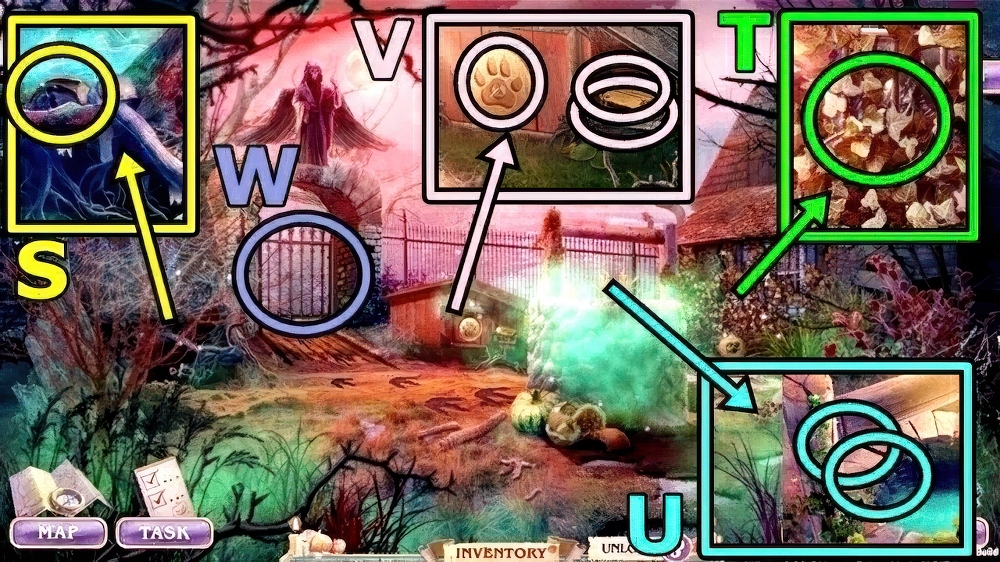
- Use FIRE EXTINGUISHER (S).
- Take EXCALIBUR (T).
- Use EXCALIBUR (U).
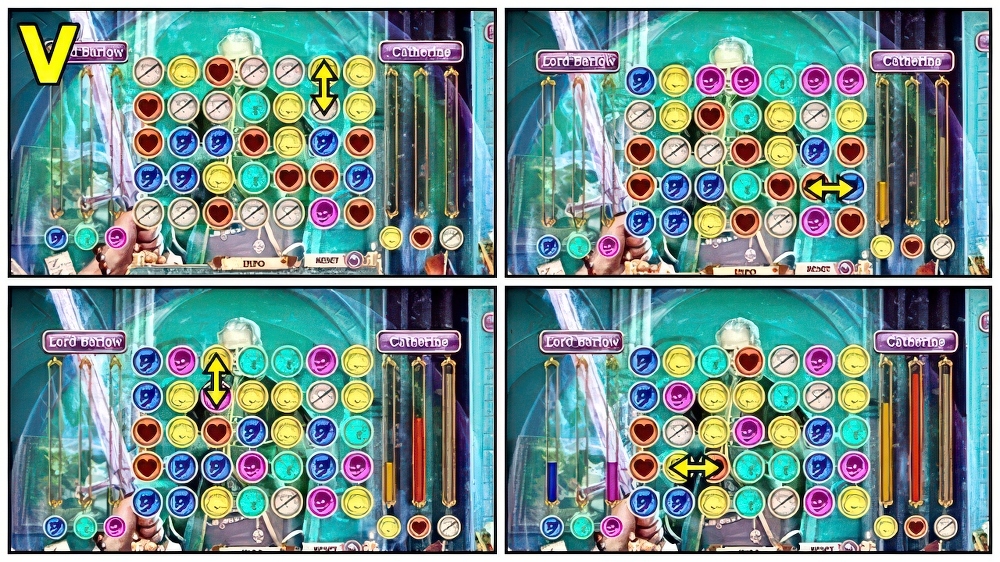
- Solution: (V) Solution is random.
- Receive IRON MAIDEN REPLICA.
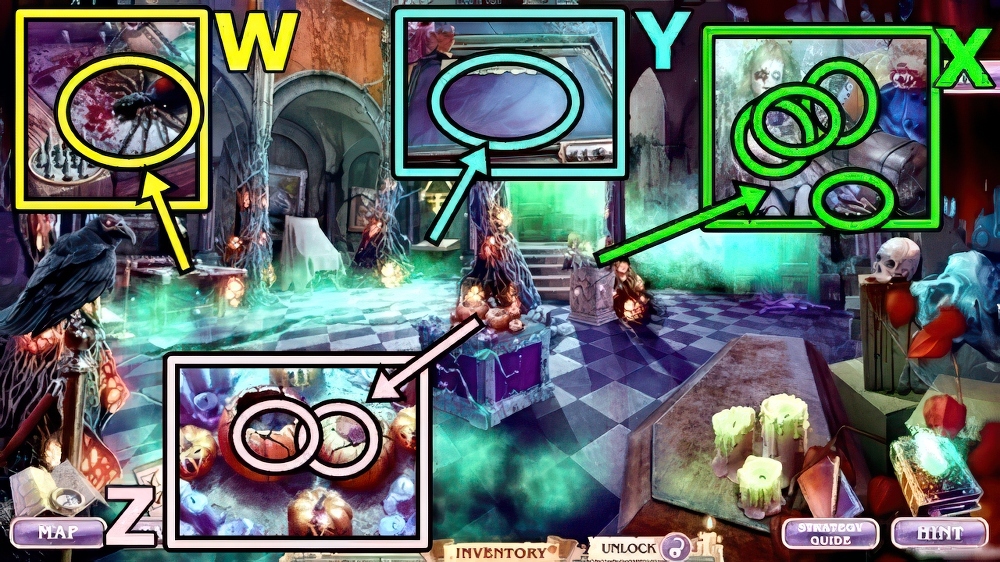
- Take SPIDER DOLL (W).
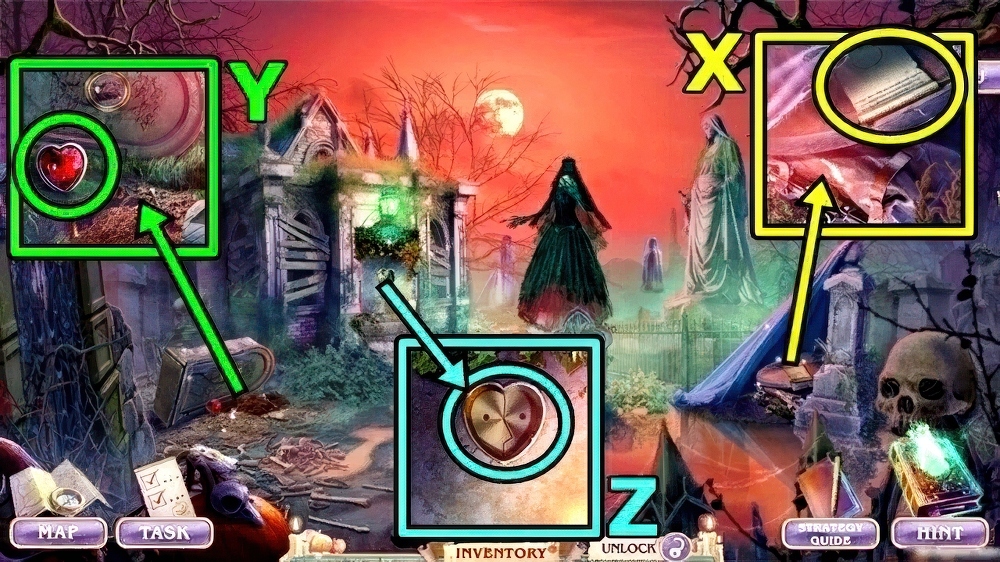
- Take SPIKES (X).
- Use SPIDER DOLL, take PLANT POISON 1/3 and GLASS CUTTER.
- Use GLASS CUTTER (Y), add MUSEUM MAP.
- Take FLINT and RED RESIN.
- Add FLINT (Z) and CANDLE.
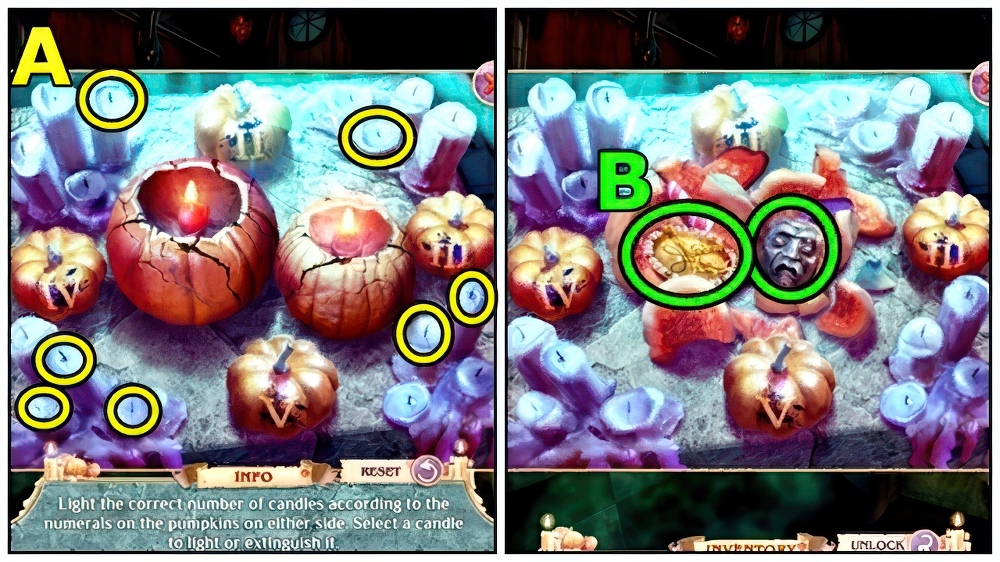
- Solution (A).
- Take SCALES PAN (B) and IRON MASK.
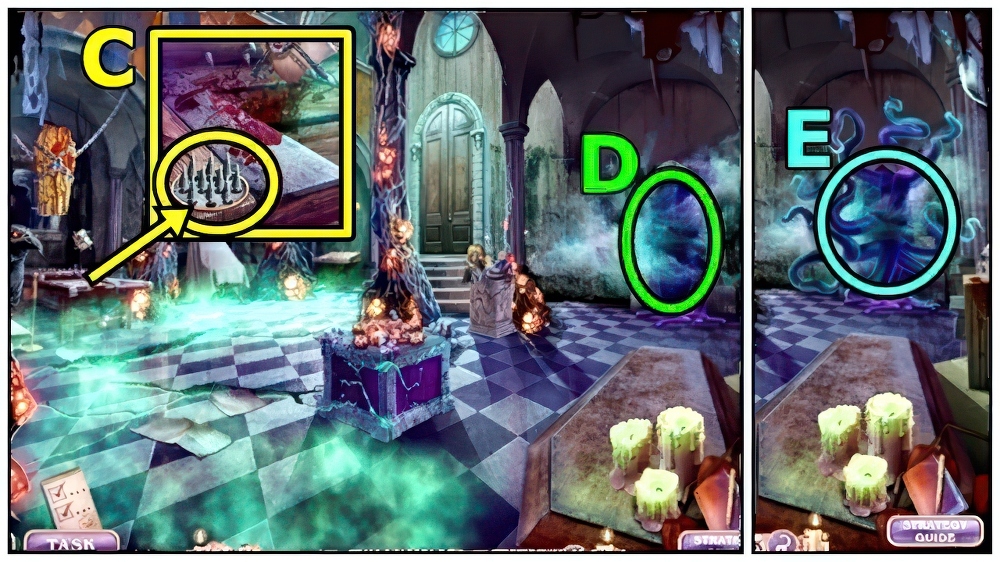
- SPIKES, IRON MASK and RED RESIN on IRON MAIDEN REPLICA.
- Add IRON MAIDEN REPLICA (C), take HIDDEN BLADES and PLANT POISON 2/3.
- Examine (D).
- Use HIDDEN BLADES (E).
- Enter Barlow Exhibit.
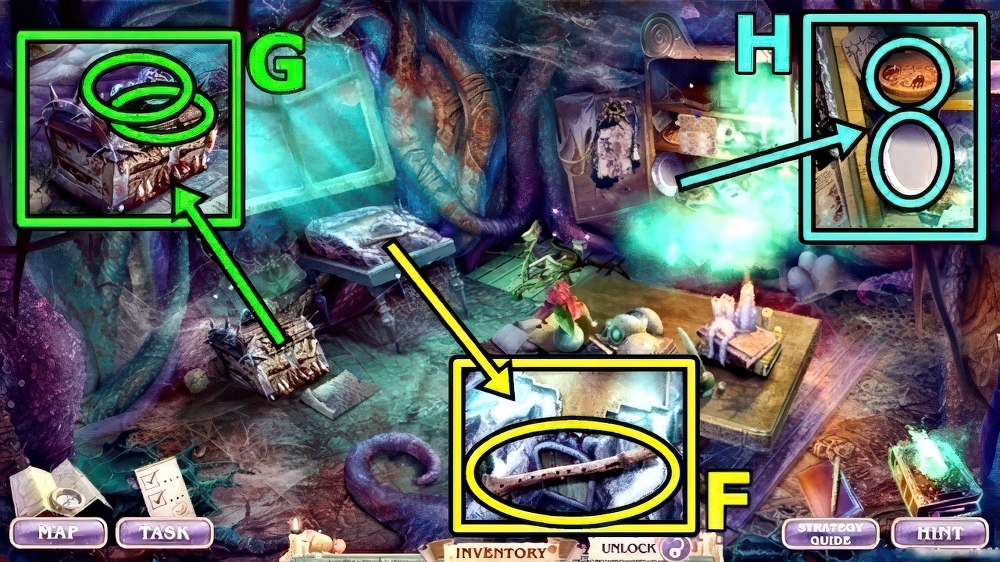
- Take CALMING FLUTE (F).
- Take PLANT POISON 3/3 (G).
- Use CALMING FLUTE, take MONSTER FIGURINE and MYSTICAL RECORD.
- Add PROTECTIVE SYMBOL (H) and MONSTER FIGURINE.
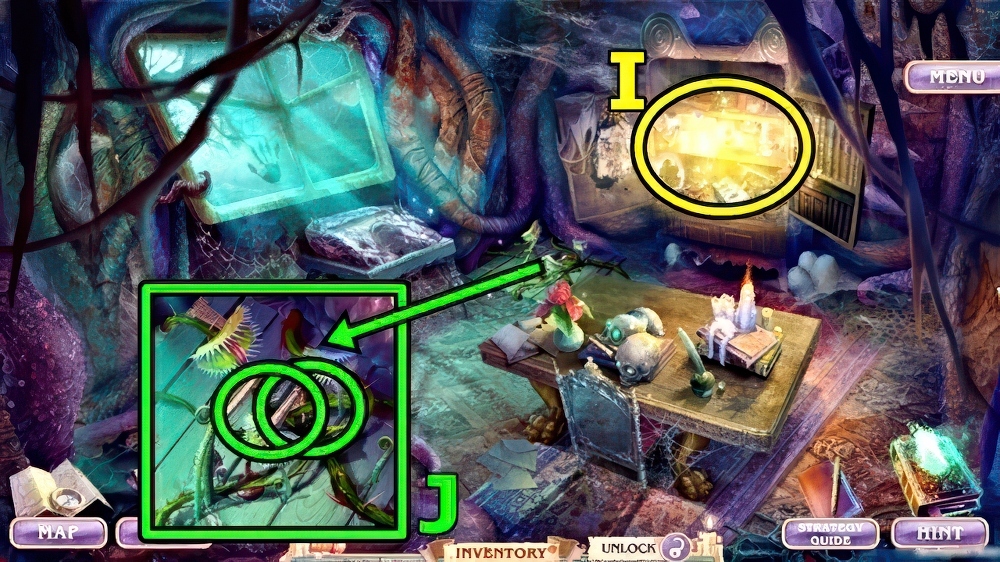
- Play puzzle (I), take PRUNING SHEARS.
- Use PLANT POISON (J), then PRUNING SHEARS.
- Enter Creepy Basement.
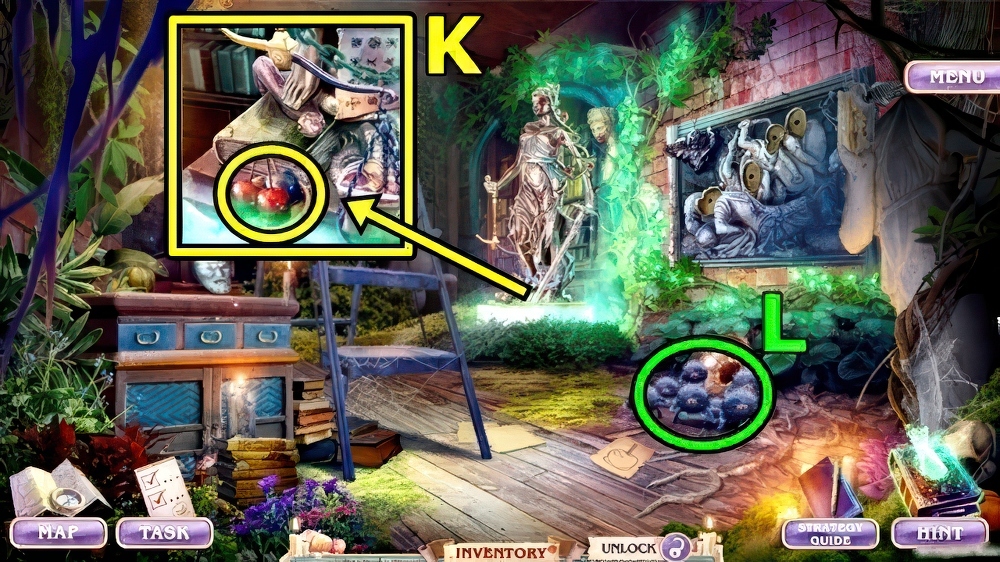
- Take CANDY APPLES (K).
- Give CANDY APPLES (L).
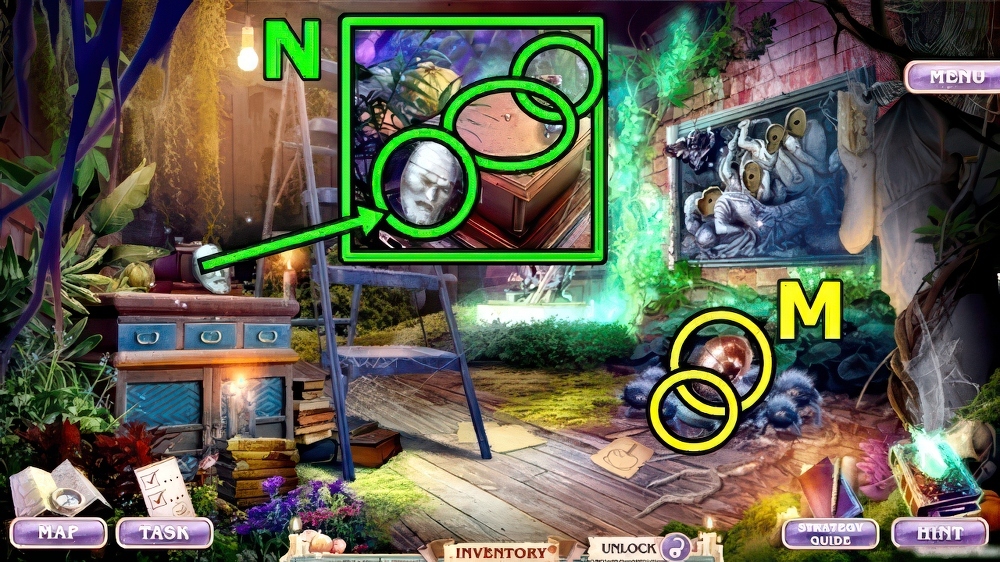
- Take STONE FACES 1/4 (M) and PHONOGRAPH HORN.
- Take STONE FACES 2/4 (N).
- Add MYSTICAL RECORD and PHONOGRAPH HORN, take STAMP HANDLE and SPOOKY HOTEL.
- Move down.
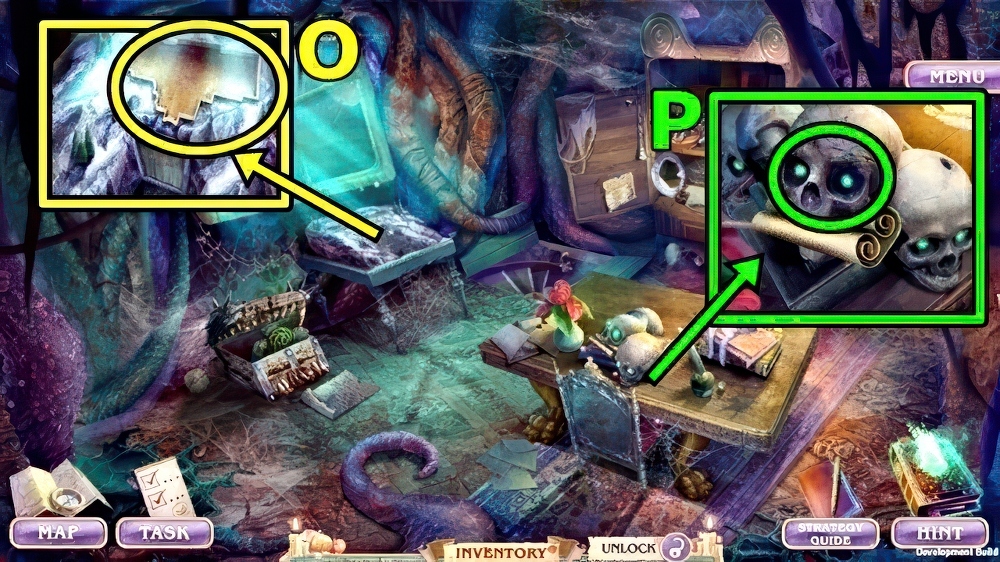
- Add SPOOKY HOTEL (O), take HYPNOSIS PENDANT and STAMP SEAL.
- Use HYPNOSIS PENDANT (P).
- Take STONE FACES 3/4 and PROOF OF GENEROSITY.
- Enter Creepy Basement.
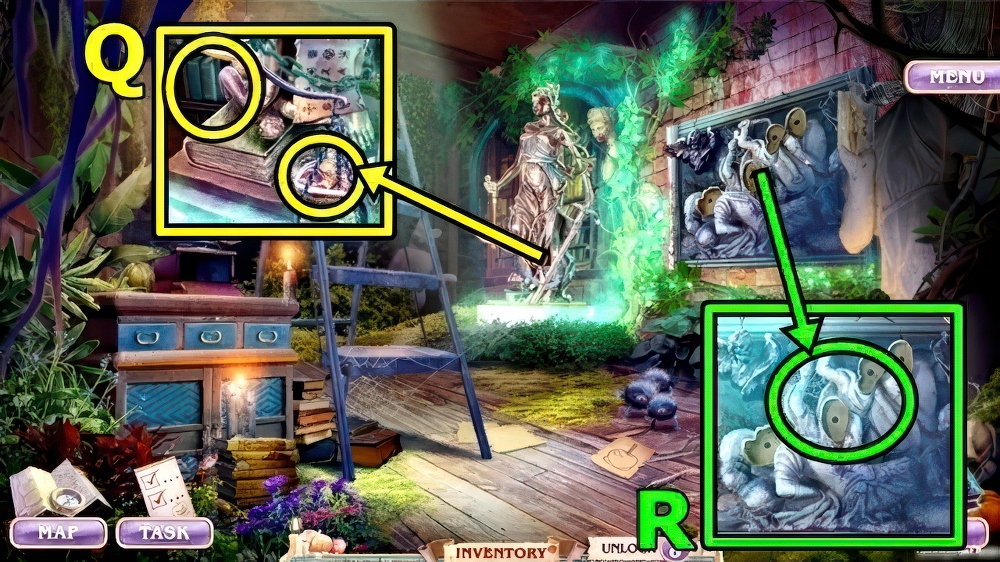
- Add SCALES PAN (Q) and PROOF OF GENEROSITY.
- Find items, receive STONE FACES 4/4.
- Add STONE FACES (R), take DIRTY CIPHER and SEWING KIT.
- Return to Hall of Horrors.
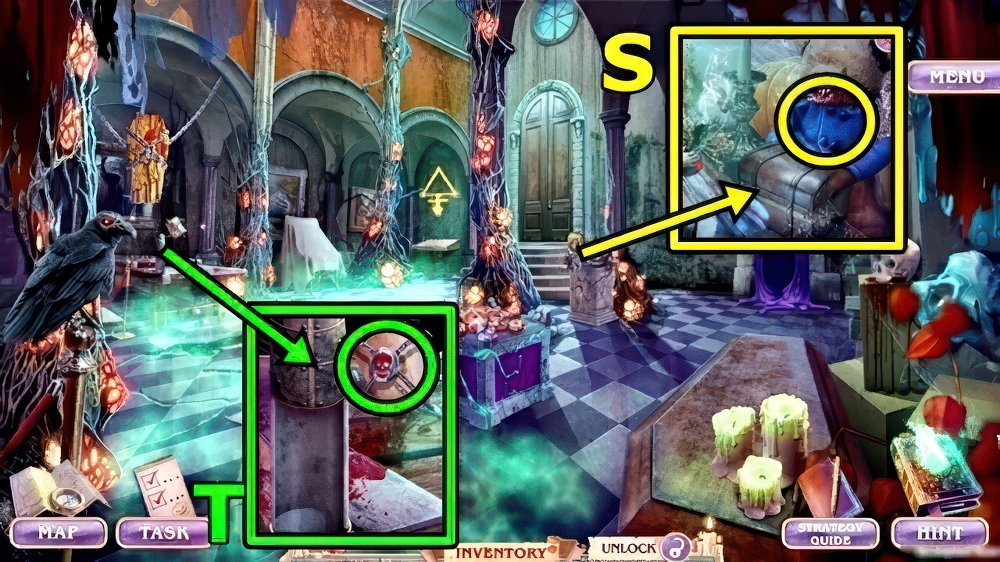
- Add SEWING KIT (S), take GENTLE SOLVENT and INKPAD.
- STAMP SEAL and INKPAD on STAMP HANDLE, take STAMP OF PARDON.
- Use STAMP OF PARDON (T).
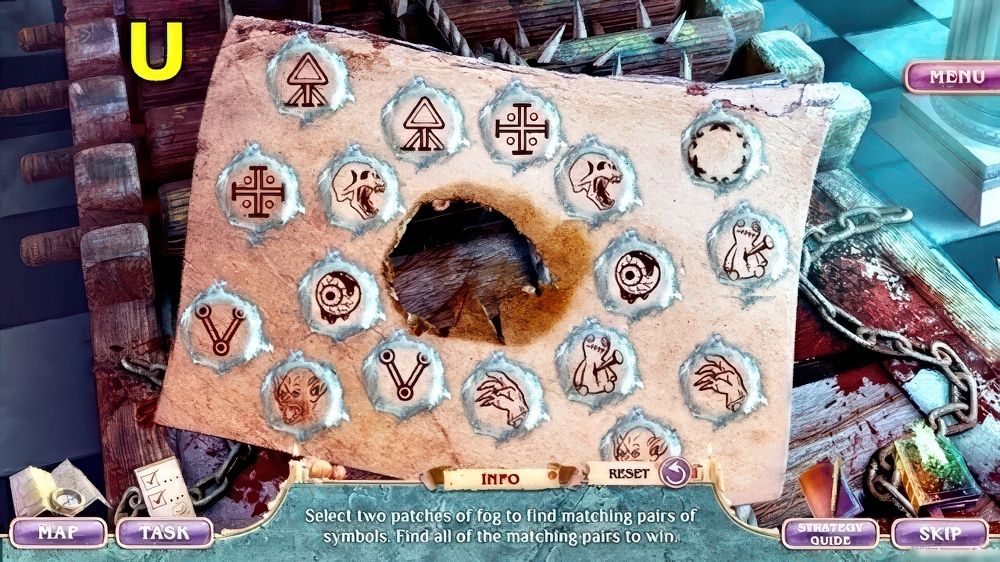
- Solution: (U).
- Receive STRANGE SYMBOL.
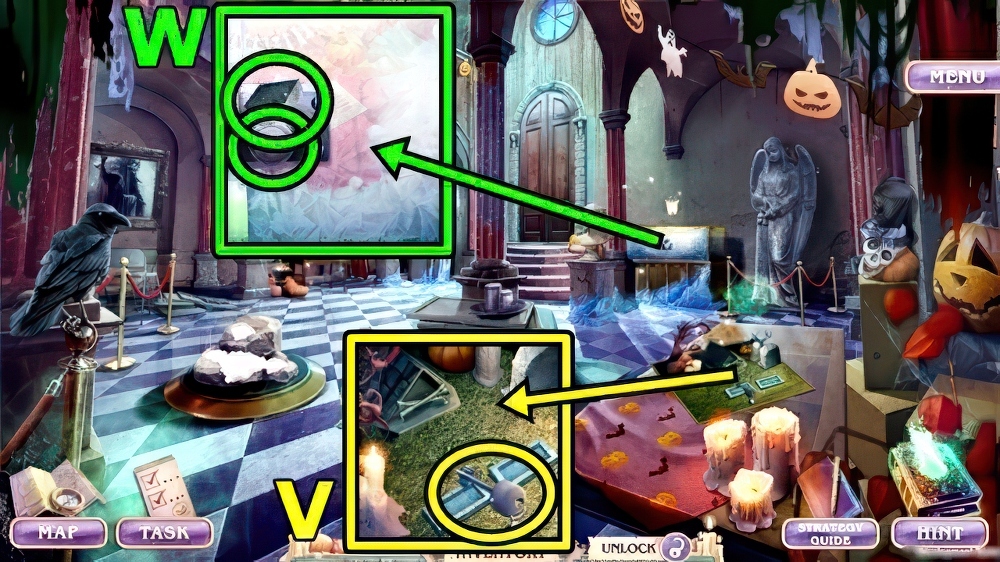
- Take DISPLAY KEY (V).
- Take GRAVESTONE 1/2 (W).
- Use DISPLAY KEY, take HEAVY STATUETTE and COTTON SWAB.
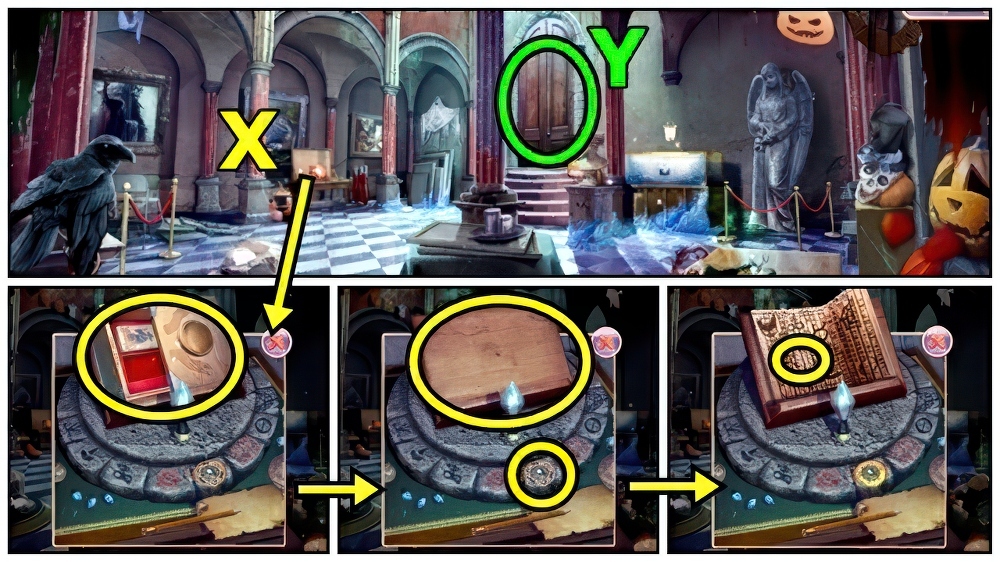
- COTTON SWAB and GENTLE SOLVENT on DIRTY CIPHER, take LANGUAGE CIPHER.
- Take DISPLAY BOX (X).
- Add STRANGE SYMBOL and LANGUAGE CIPHER, examine.
- Receive LIBRARY ADDRESS.
- Use LIBRARY ADDRESS (Y).
- Go to Street.
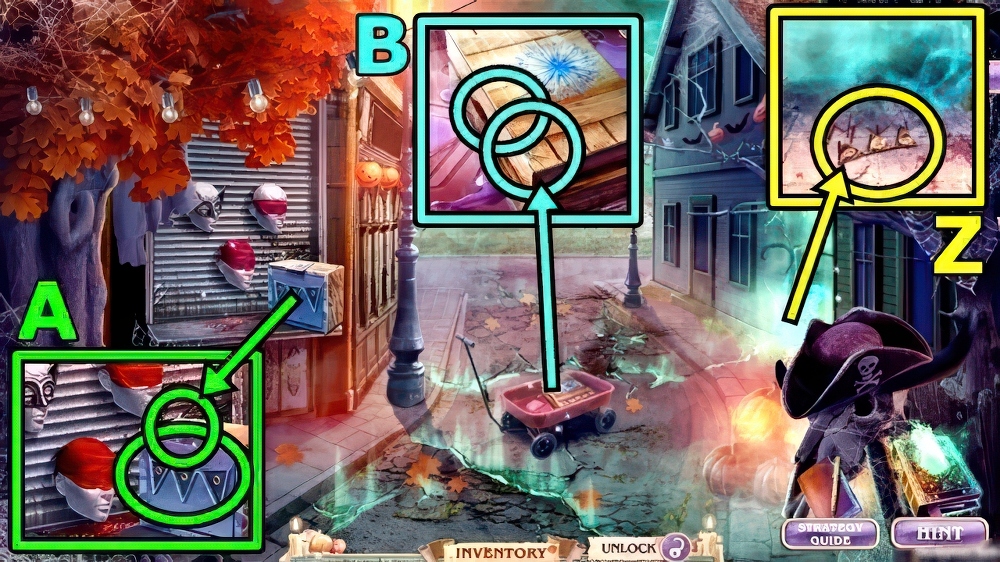
- Take FESTIVE FLAGS (Z).
- Take TAROT CARDS (A).
- Add FESTIVE FLAGS, take FLARE GUN and WEDGE.
- Add WEDGE (B) and HEAVY STATUETTE, take GRAVESTONE 2/2 and FLARE.
- Move down.
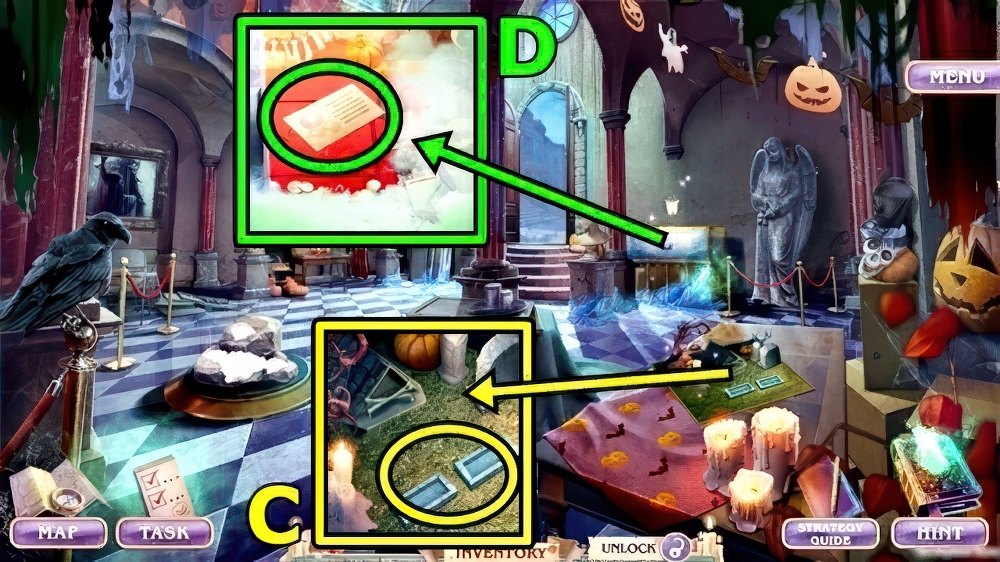
- Add GRAVESTONE (C), take MUMMIFIED FINGER and CRYSTAL BALL.
- CRYSTAL BALL and TAROT CARDS on DISPLAY BOX, take FORTUNE TELLER SET.
- Add FORTUNE TELLER SET (D).
- Play puzzle (E), take RAZOR.
- Move forward.
- Use RAZOR (F), take HOOK and RUNE OF KNOWLEDGE.
- FLARE and HOOK on FLARE GUN, take HOOK GUN.
- Use HOOK GUN (G).
- Enter Library.
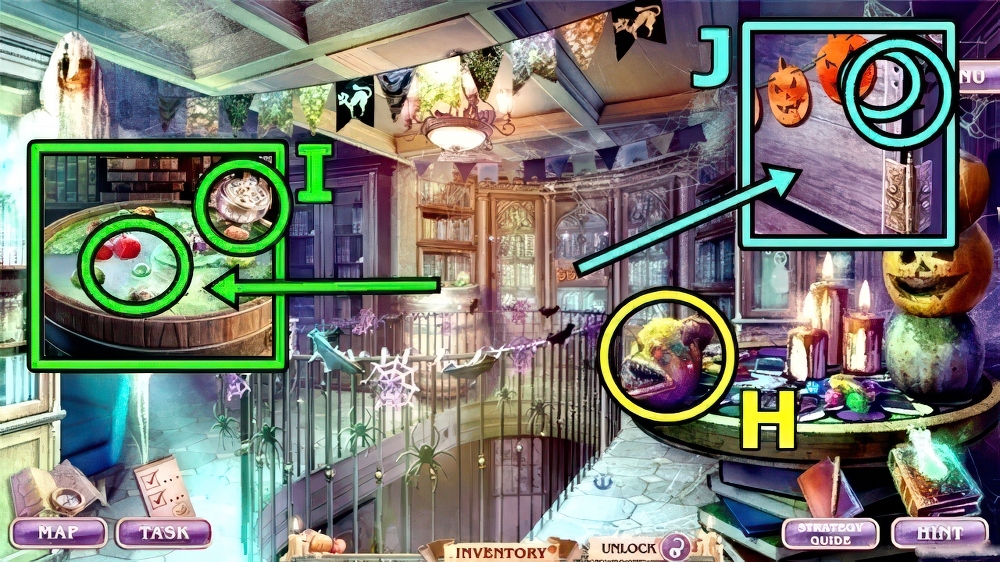
- Take ANGLERFISH (H).
- Take INCENSE BURNER (I).
- Add ANGLERFISH, take JESTER MASK and VINTAGE HINGE.
- Add VINTAGE HINGE (J) and MUMMIFIED FINGER.
- Read, take KING’S MASK and LIGHTER.
- Move down.
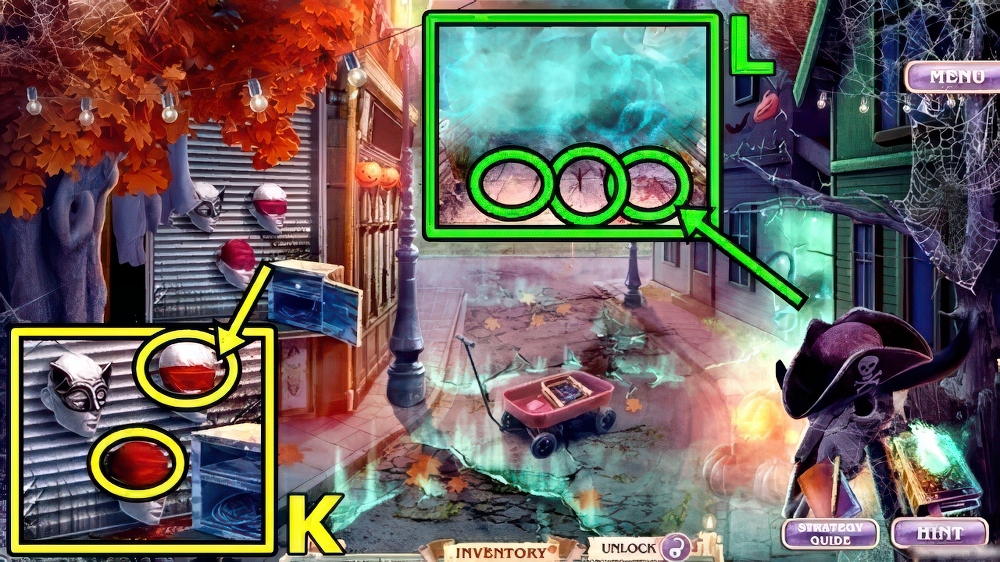
- Add JESTER MASK (K) and KING’S MASK, find items, take POWERFUL INCENSE.
- Add INCENSE BURNER (L), POWERFUL INCENSE and LIGHTER, take VILLAGERS’ TABLET and LEE’S BAG.
- Enter Library.
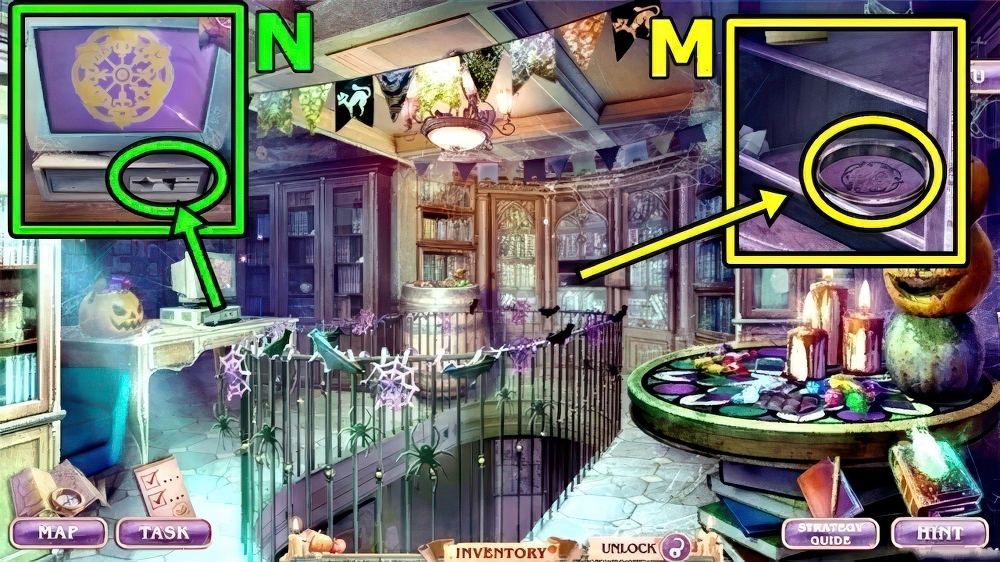
- Add VILLAGERS’ TABLET (M), take LIBRARIAN’S DISK and HUGE FOLIO.
- Insert LIBRARIAN’S DISK (N), read.
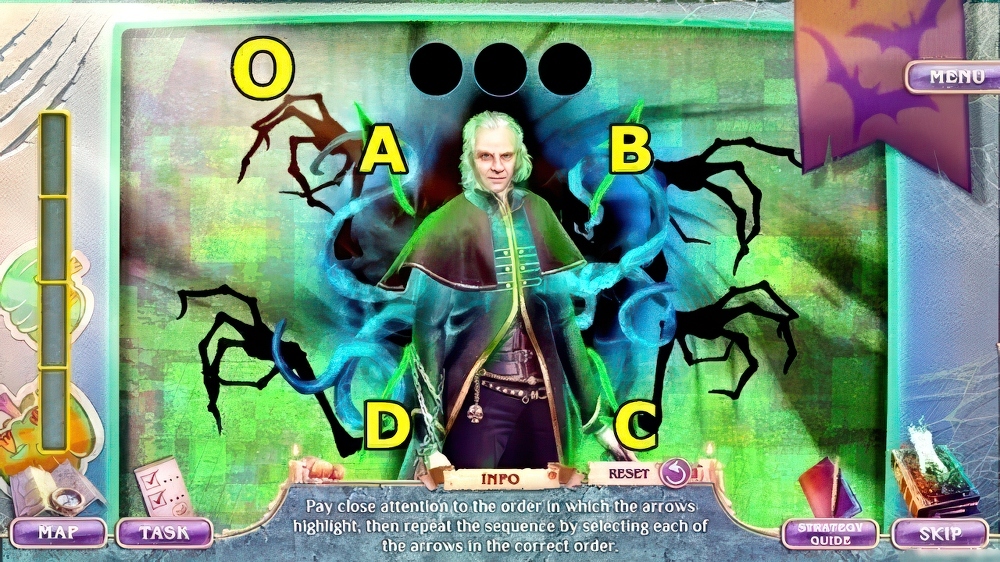
- Solution: (O) A-B-D, B-C-A-D, D-B-C-D-A, D-A-B-C-A-B.
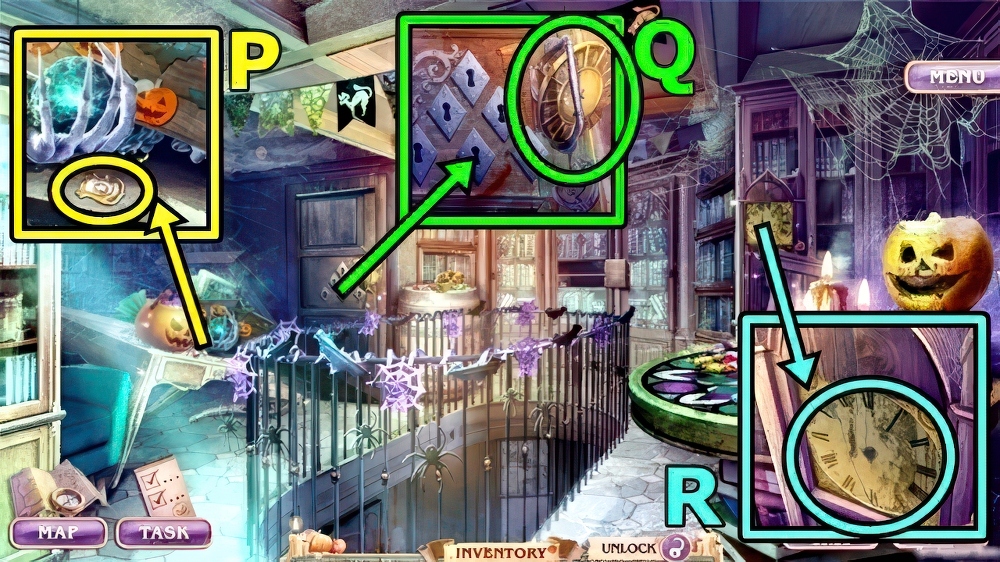
- Take OLD POLICE BADGE (P).
- Take CLOCK FACE (Q).
- Add CLOCK FACE (R), take ANIMAL SKIN and DAMAGED EXHIBIT.
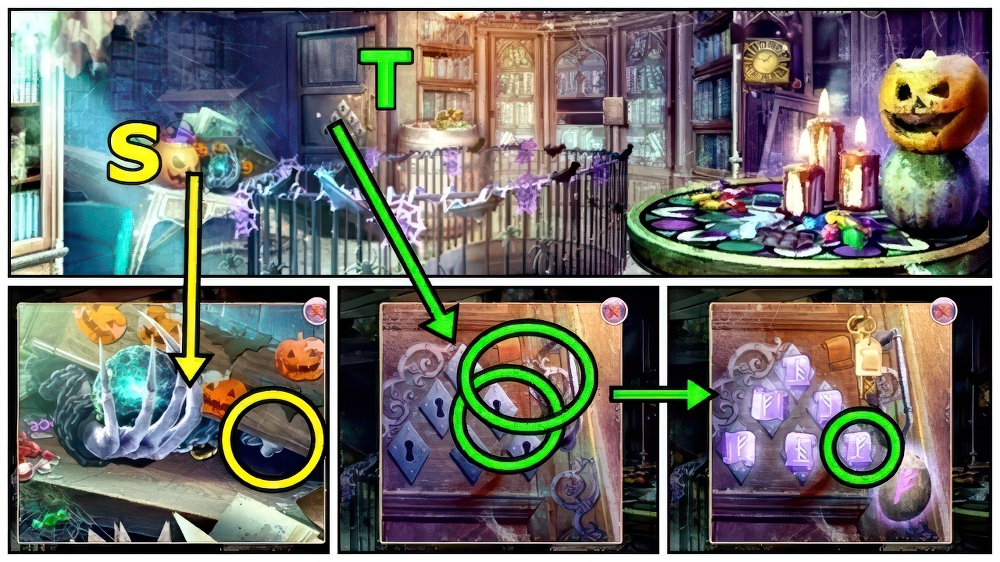
- OLD POLICE BADGE and ANIMAL SKIN on LEE’S BAG, take EXPANDABLE BATON.
- Use EXPANDABLE BATON (S), take CHAIN PART and SERVANT’S KEY.
- Add RUNE OF KNOWLEDGE (T) and SERVANT’S KEY, select.
- Enter Library Abandoned Level.
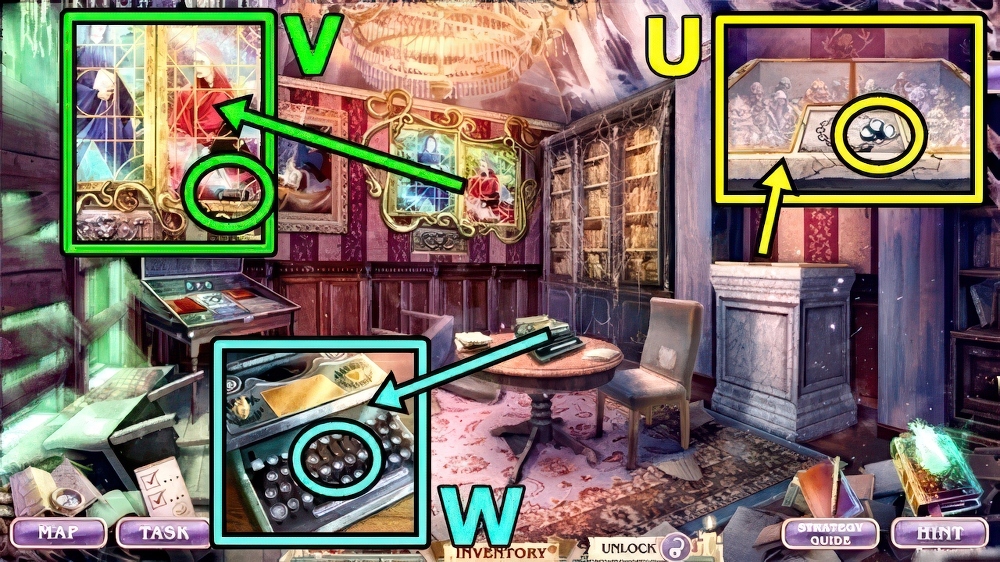
- Take TYPEWRITER BUTTONS (U).
- Take SPRING (V).
- Add TYPEWRITER BUTTONS (W), take RED LENS and STAINED GLASS WITH BOOK 1/5.
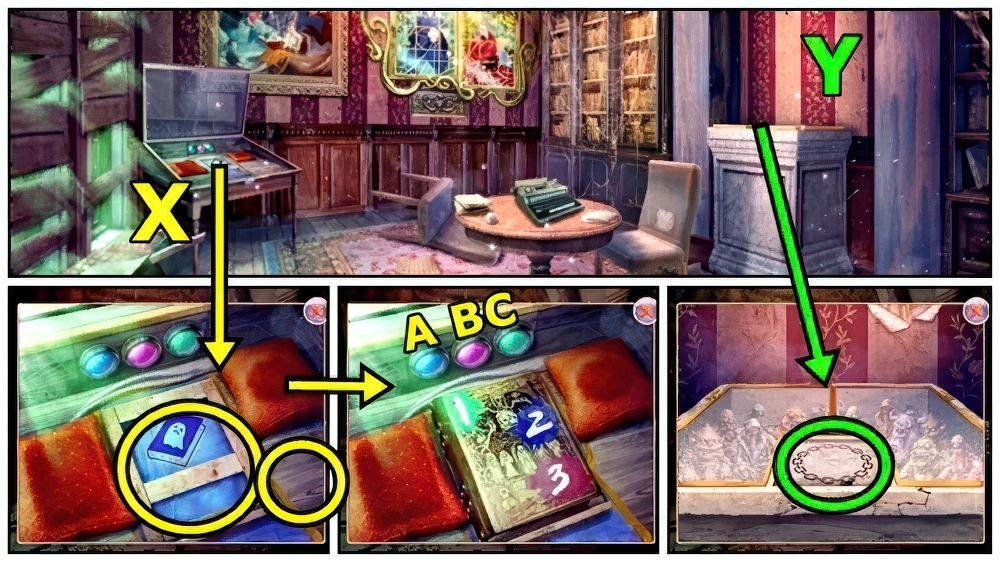
- Add RED LENS (X) and HUGE FOLIO.
- Press C-A-B, take SORCERER’S STATUETTE and STAINED GLASS WITH BOOK 2/5.
- Add SORCERER’S STATUETTE (Y).
- Find items, take CUCKOO TOY.
- Move down.
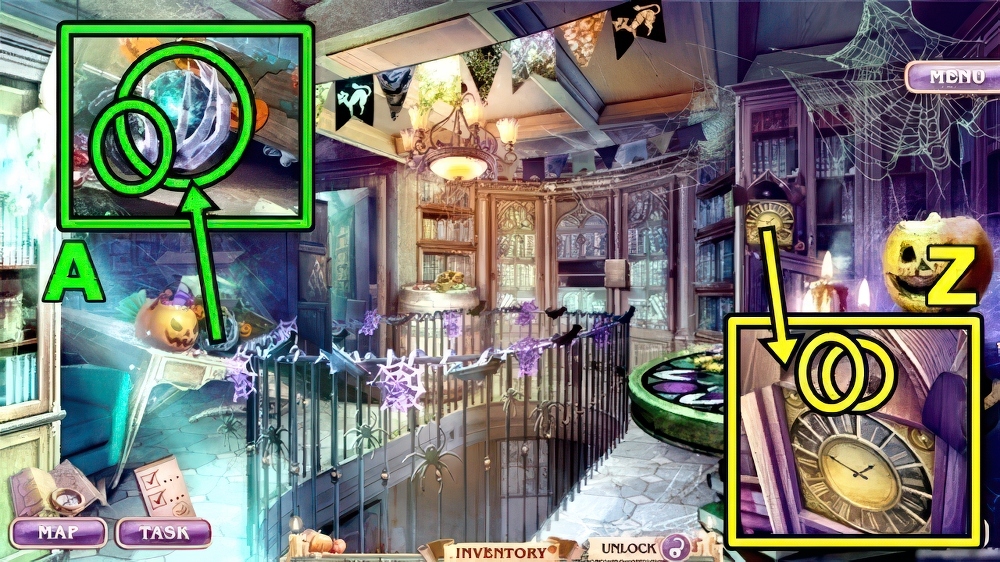
- Add CUCKOO TOY (Z) and SPRING, take STAINED GLASS WITH BOOK 3/5 and SUBORDINATING BRACELET.
- Add SUBORDINATING BRACELET (A), take CONTROLLED HAND and BLACK SPHERE.
- Enter Library Abandoned Level.
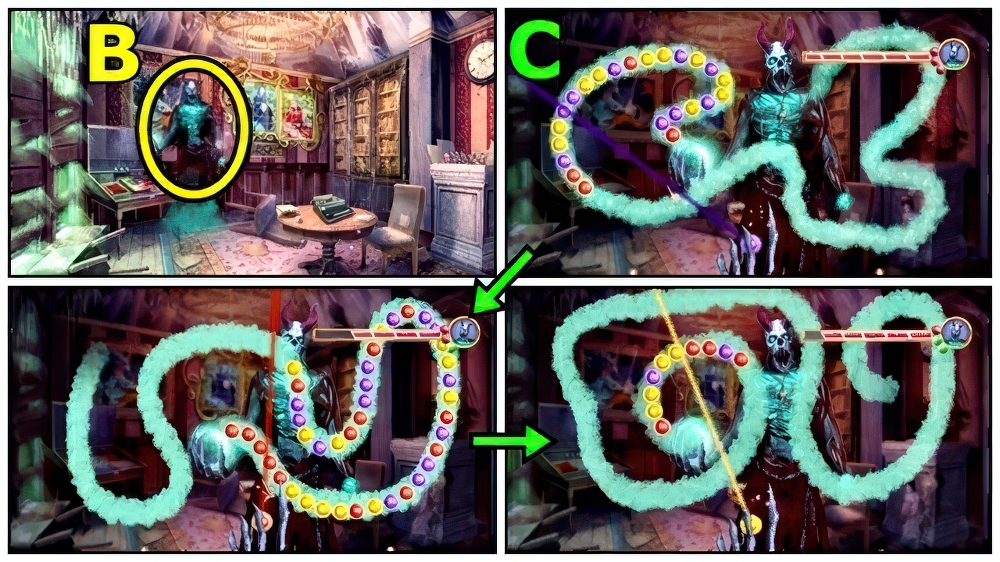
- Add CONTROLLED HAND (B).
- Solution: (C) Solution is random.
- Receive URN WITH ASHES and TOOTH NECKLACE.
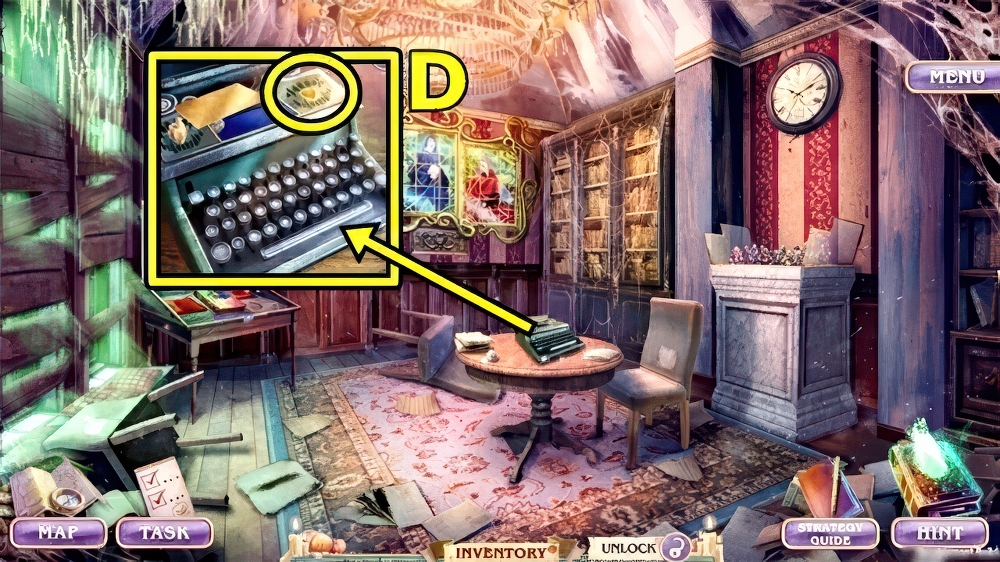
- Add TOOTH NECKLACE (D), take EMPTY SPRAY BOTTLE and DRIED HEART.
- Move down.
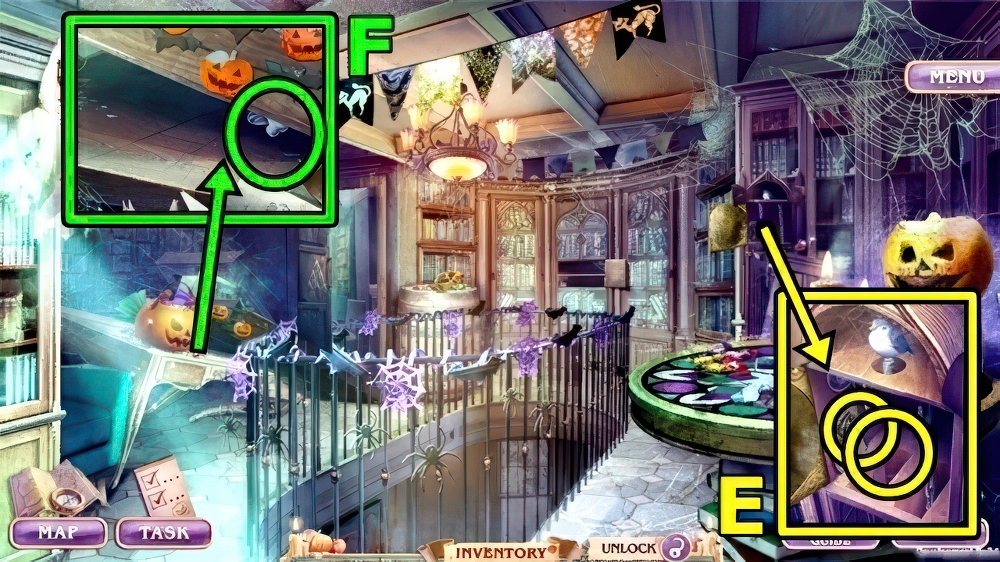
- Add DRIED HEART (E) and CHAIN PART, take STAINED GLASS WITH BOOK 4/5 and EXTENDABLE BOOK HOLDER.
- Add EXTENDABLE BOOK HOLDER (F), take SKELETON’S SWEETS 1/2 and TENTACLE EXHIBIT.
- Enter Library Abandoned Level.
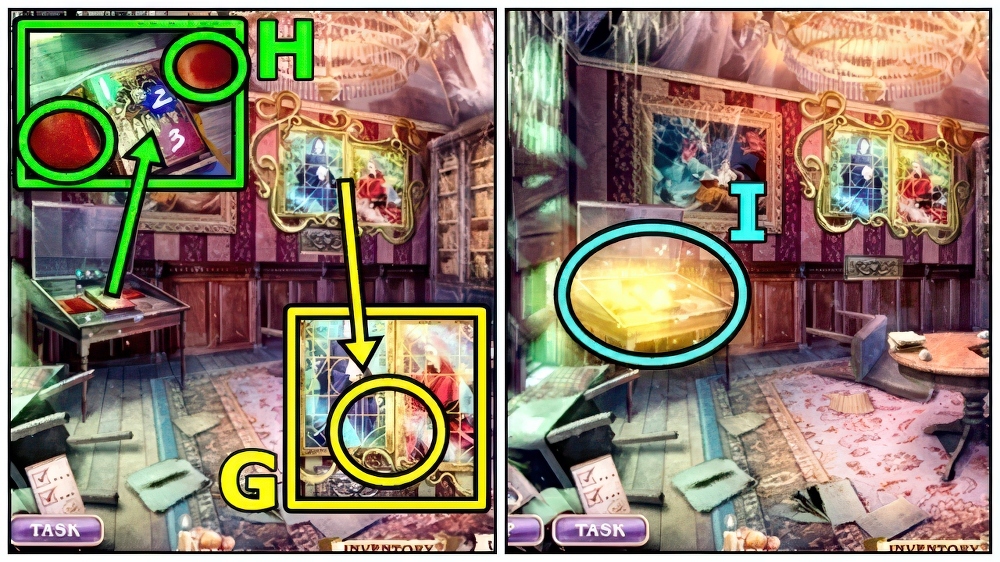
- URN WITH ASHES and TENTACLE EXHIBIT on DAMAGED EXHIBIT, take STAINED GLASS WITH BOOK 5/5.
- Add STAINED GLASS WITH BOOK (G), take SKELETON’S SWEETS 2/2 and ANCIENT BOOK COPY.
- Add ANCIENT BOOK COPY (H) and BLACK SPHERE.
- Play puzzle (I).
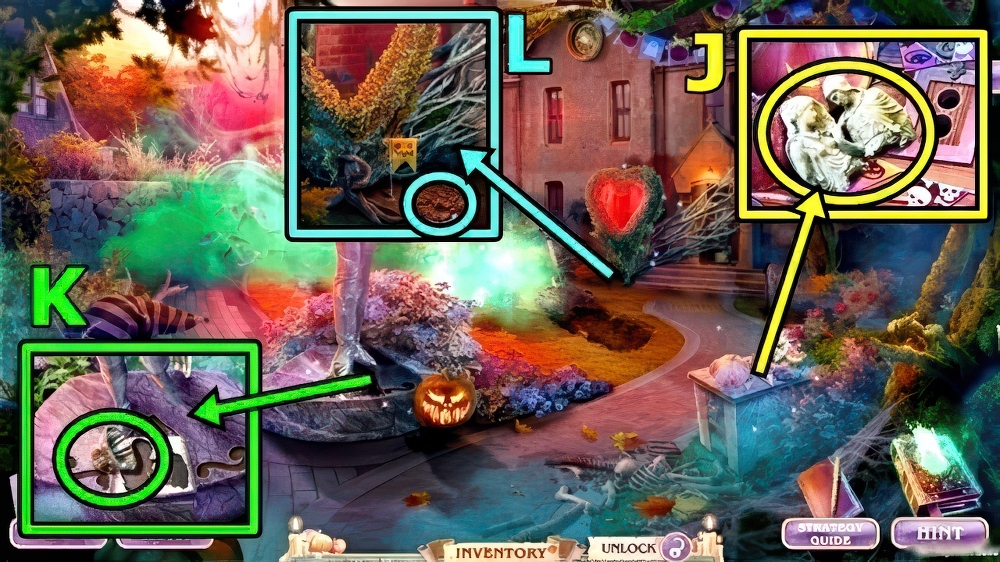
- Take BARLOW’S BAS-RELIEF (J).
- Take CANDY BOWL (K).
- Use CANDY BOWL (L), take FERTILIZER BOWL and SKELETON’S TREAT.
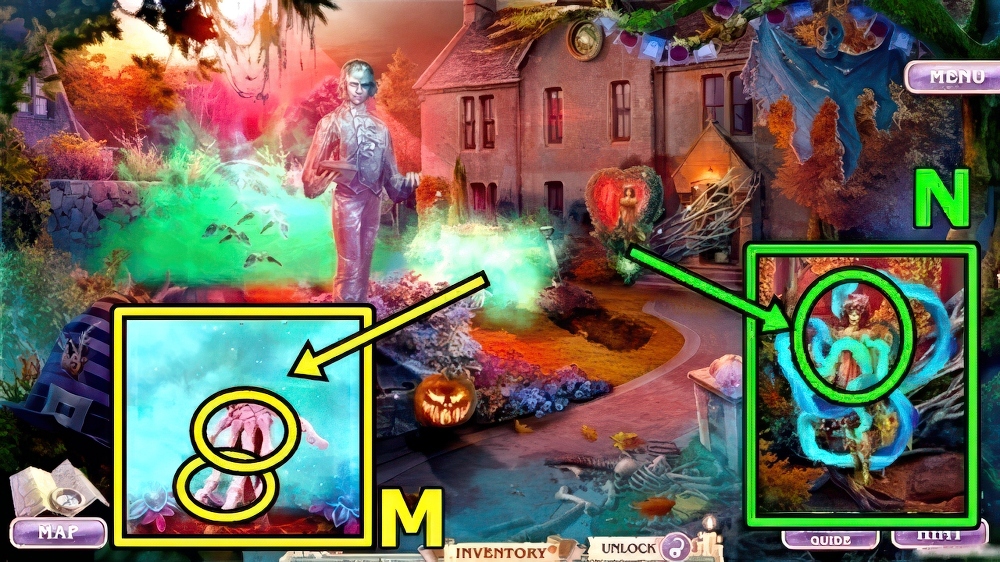
- Give SKELETON’S TREAT (M) and SKELETON’S SWEETS, take ARTIFICIAL BLOOD SYRINGE and DECOR 1/3.
- ARTIFICIAL BLOOD SYRINGE and FERTILIZER BOWL on EMPTY SPRAY BOTTLE, take DARK SPIRIT REMEDY.
- Use DARK SPIRIT REMEDY (N).
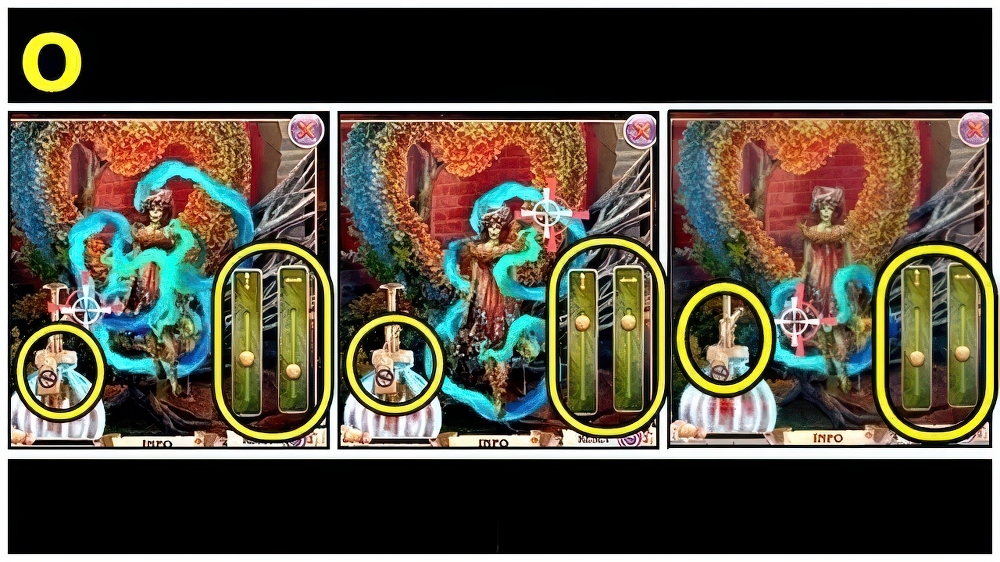
- Solution (O).
- Enter Archive Hall.
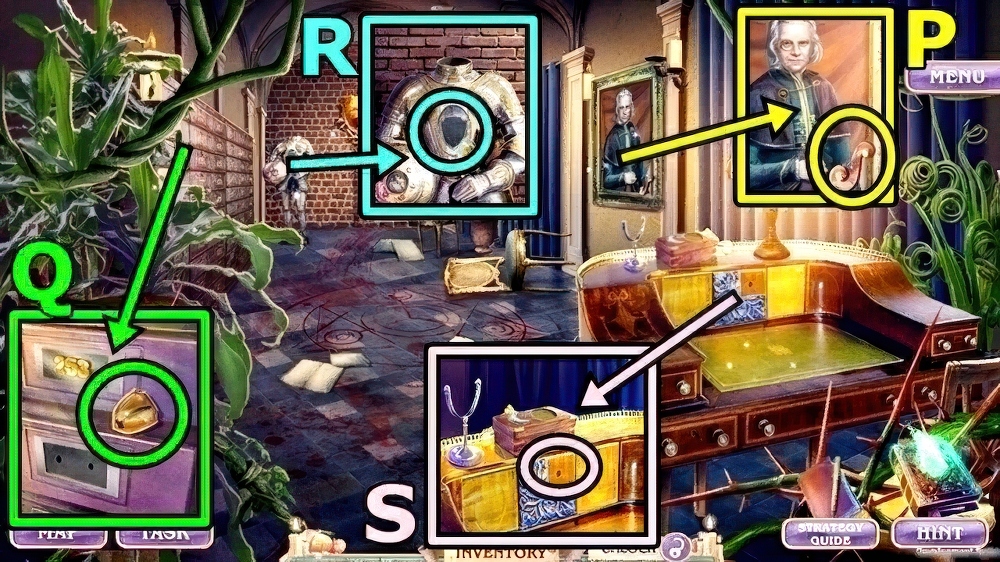
- Take DECOR 2/3 (P).
- Take BARLOW’S CREST (Q).
- Add BARLOW’S CREST (R), take SMOLDERING FIRE and ENGRAVING PART.
- Add ENGRAVING PART (S), take MAGICAL EMBER and DECOR 3/3.
- Move down.
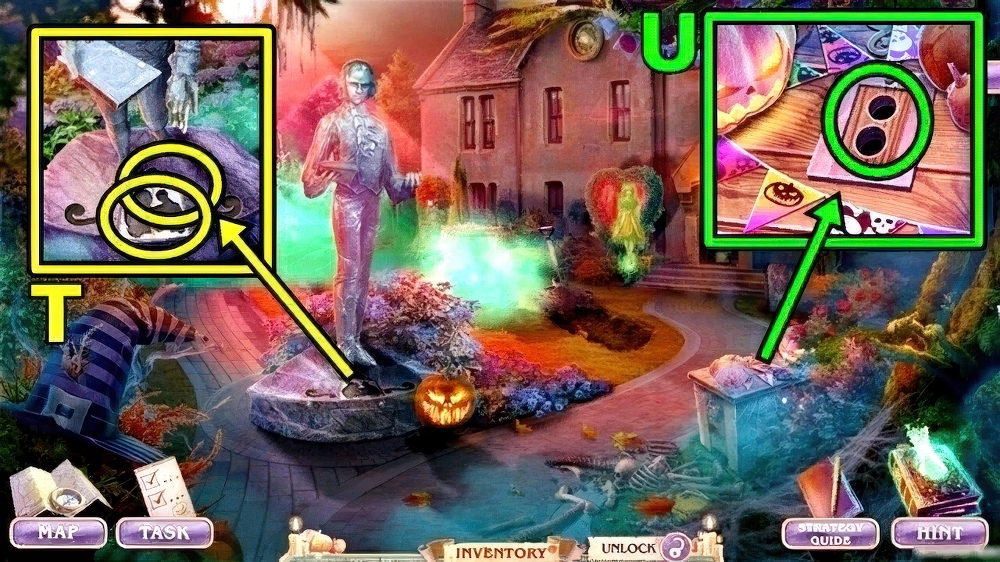
- Add BARLOW’S BAS-RELIEF (T) and DECOR, take FIREPROOF CORK and BLOODY HOOK.
- Use BLOODY HOOK (U), take SECRET ARCHIVE NUMBER and MONOCLE.
- Enter Archive Hall.
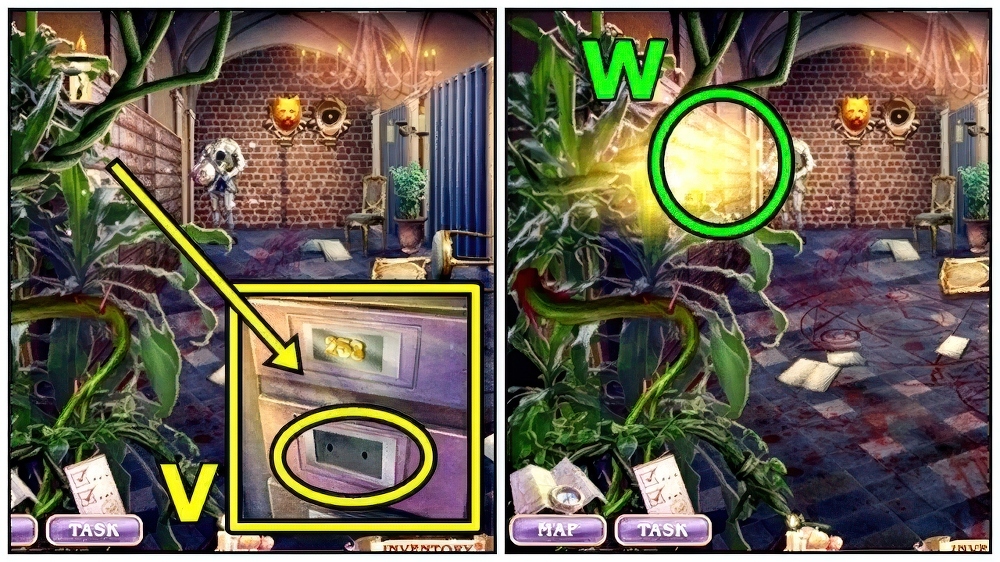
- Add SECRET ARCHIVE NUMBER (V).
- Play puzzle (W), take UV LANTERN.
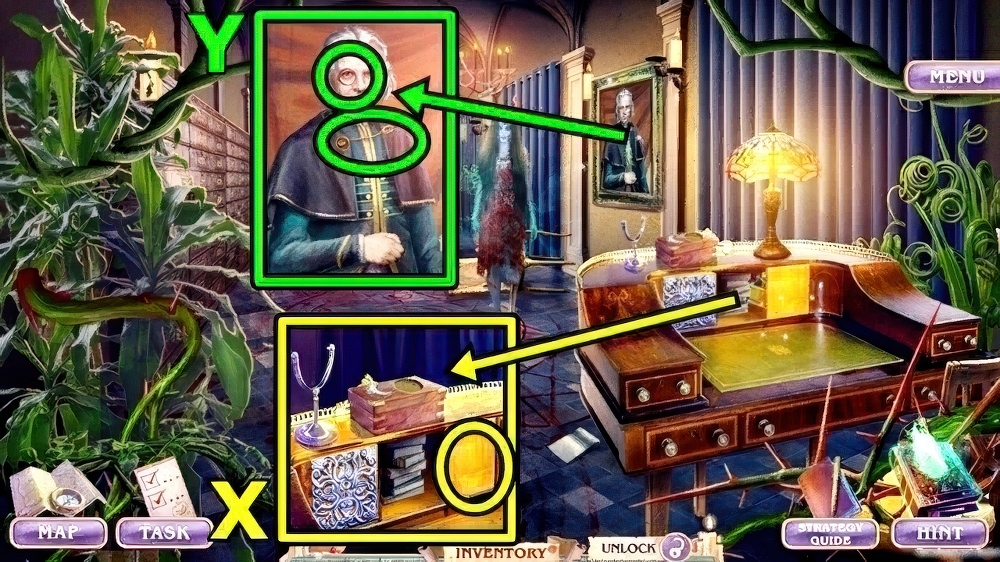
- Use UV LANTERN (X), take GOLDEN AIGUILLETTE and ANCIENT PHONOGRAPH.
- Add MONOCLE (Y) and GOLDEN AIGUILLETTE, take FANGED SKULL and GRAVE INHABITANT 1/2.
- Move down.
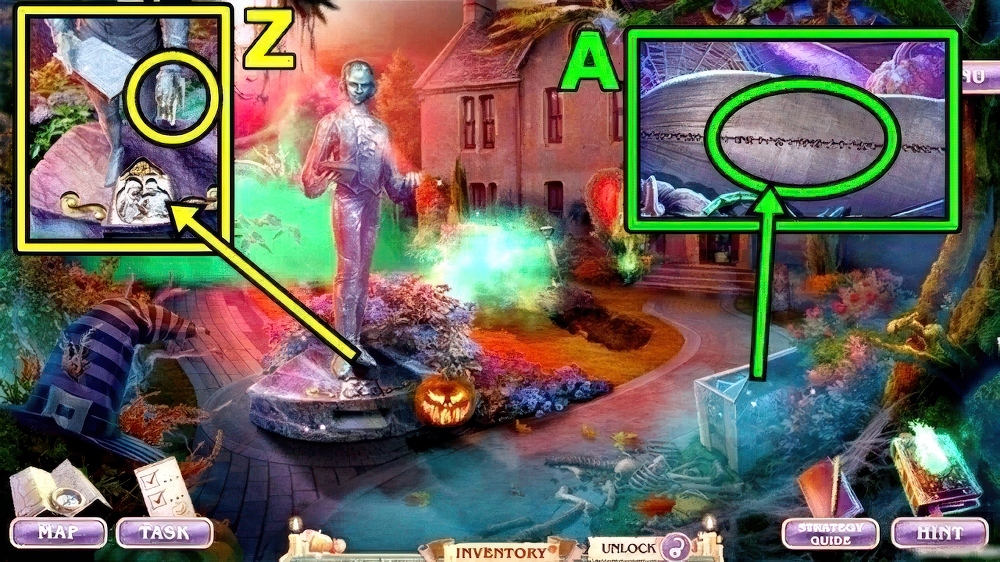
- Add FANGED SKULL (Z), take GLASS WITH HOLES and RITUAL DAGGER.
- Use RITUAL DAGGER (A), take MYSTIC FUEL and PHONOGRAPH RECORDING.
- Enter Archive Hall.
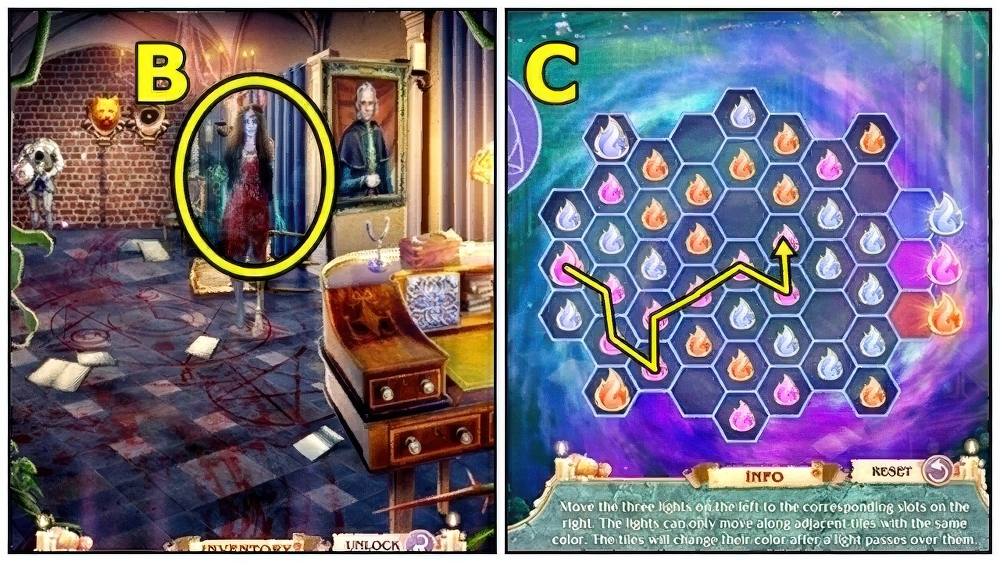
- MAGICAL EMBER, MYSTIC FUEL and FIREPROOF CORK on SMOLDERING FIRE, take LIBERATING FIRE.
- Use LIBERATING FIRE (B).
- Solution (C).
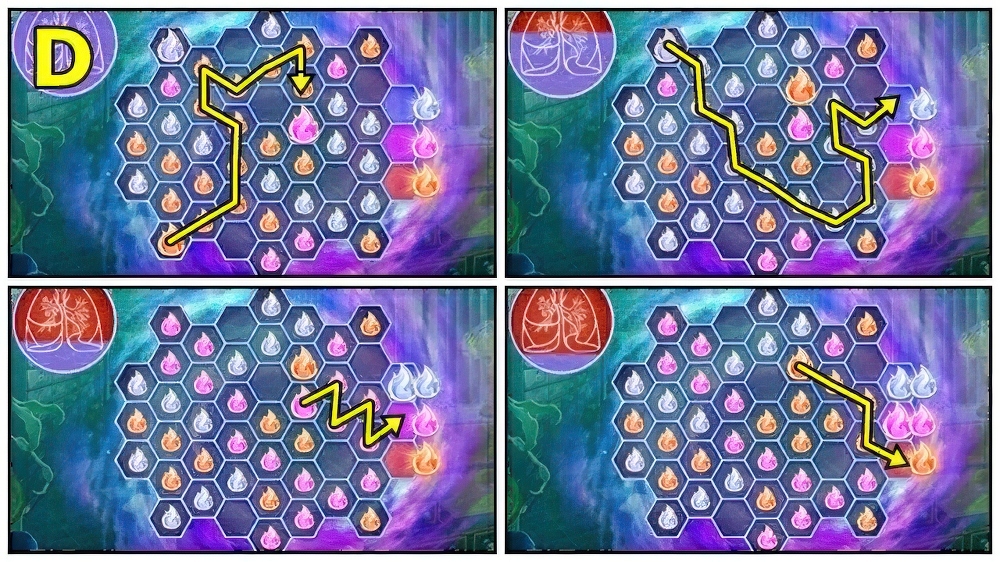
- Solution: (D).
- Receive KNIGHT’S HELMET and GOLDEN SUN.
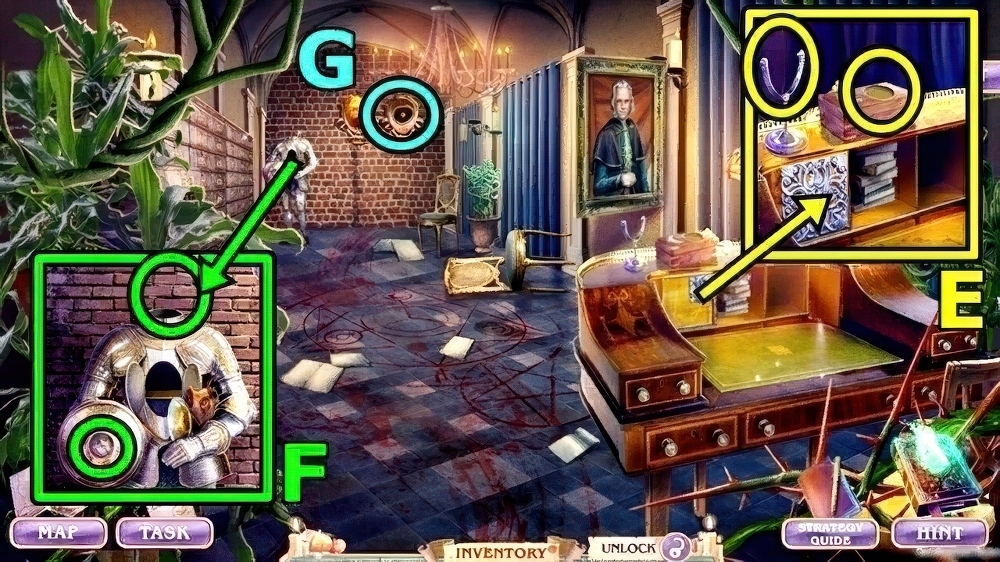
- Add GOLDEN SUN (E) and GLASS WITH HOLES, take DISASSEMBLED LANTERN and TARGE SHIELD PART.
- Add TARGE SHIELD PART (F) and KNIGHT’S HELMET, take BRONZE DOG FACE and PHONOGRAPH HORN.
- Add BRONZE DOG FACE (G).
- Move forward.
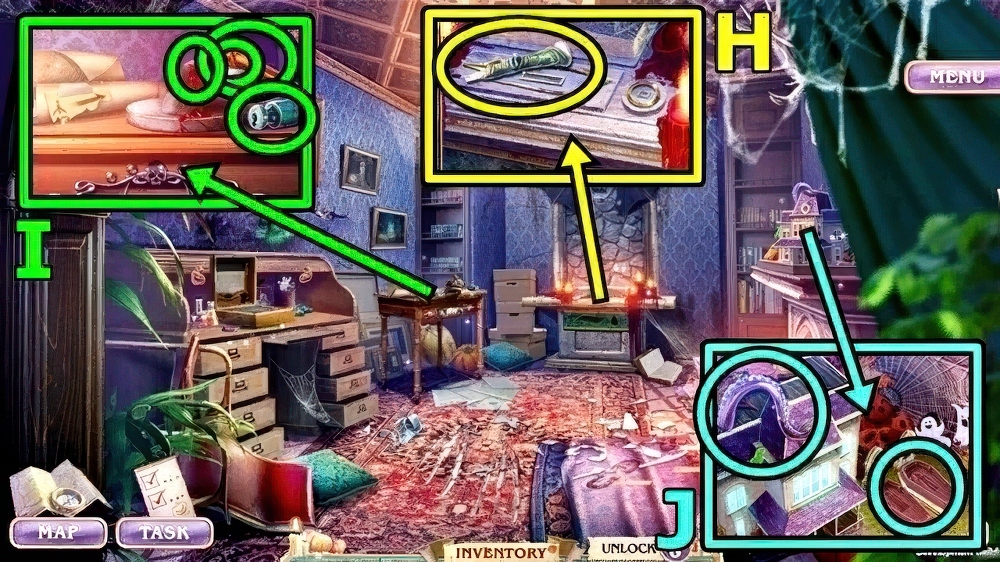
- Take MUMMIFIED FINGER (H).
- Take INKPOT (I).
- Add MUMMIFIED FINGER, take GRAVE INHABITANT 2/2 and DIFFUSING GLASS.
- Take TERRIBLE HANDLE (J).
- Add GRAVE INHABITANT.
- Read.
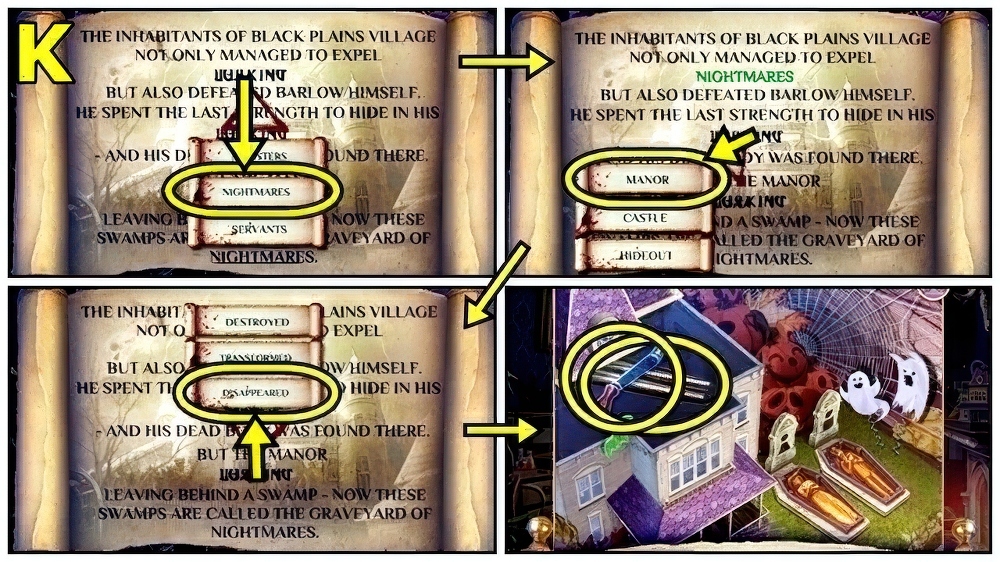
- Select (K), take PHONOGRAPH HANDLE and FOLDING CANE.
- PHONOGRAPH RECORDING, PHONOGRAGH HORN and PHONOGRAPH HANDLE on ANCIENT PHONOGRAPH, take BARLOW’S STORY RECORD.
- Add BARLOW’S STORY RECORD (L).
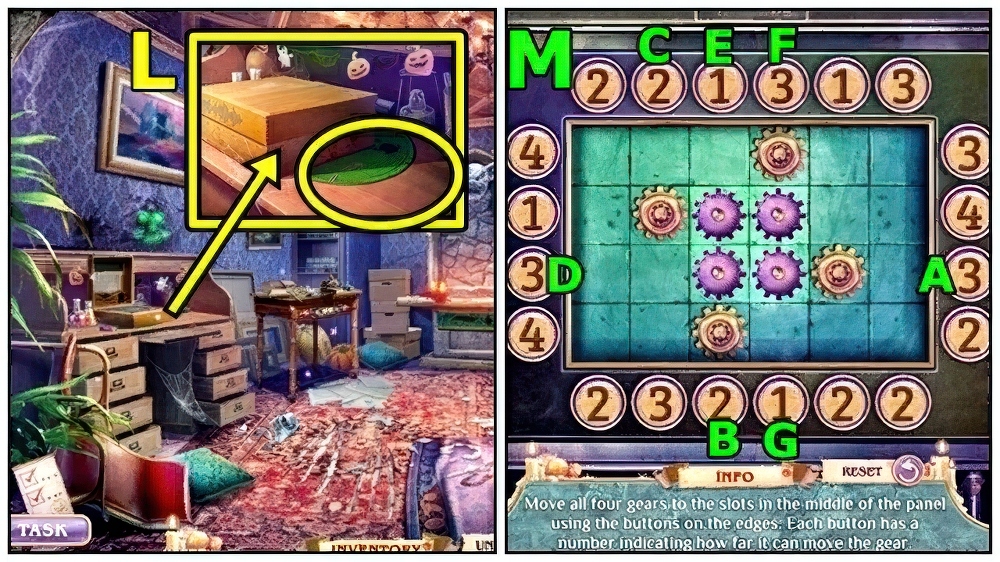
- Solution: (M) A-B-C-D-E-F-G.
- Receive ILLUMINATING EYE and SYMBOL CODE.
- Add SYMBOL CODE (N), press Bx2-A-B.
- Take STAFF OF DEATH and BARLOW’S QUILL.
- Add INKPOT (O) and BARLOW’S QUILL, take GOTHIC HAND FAN and ROPE.
- Return to Archive Garden.
- Use GOTHIC HAND FAN (P), find items, receive BUNDLE OF ENERGY.
- DIFFUSING GLASS, ILLUMINATING EYE, TERRIBLE HANDLE and BUNDLE OF ENERGY on DISASSEMBLED LANTERN, take MONSTROUS LANTERN.
- Use MONSTROUS LANTERN (Q).
- Play puzzle (R).
- Take HUGE CLAW (S).
- Use HUGE CLAW (T), take RUBY SNAKE and ABANDONED BUCKET.
- Use ABANDONED BUCKET (U) and ROPE, take RIDER’S HORSESHOE 1/2 and DOG PAW.
- Read (V), take PET’S COLLAR.
- Add DOG PAW, find items, receive GOLDEN BRANCH.
- RUBY SNAKE and GOLDEN BRANCH on STAFF OF DEATH, take SYMBOL OF DEATH.
- Use SYMBOL OF DEATH (W).
- Move forward.
- Take REVITALIZING SPELL (X).
- Take BROKEN HEART (Y).
- Add BROKEN HEART (Z), take SERVANT’S BELL and MAID’S HANDKERCHIEF.
- Move down.
- Read (A).
- Use FOLDING CANE and MAID’S HANDKERCHIEF, take RIDER’S HORSESHOE 2/2 and PET’S BONES.
- Add RIDER’S HORSESHOE (B), receive WEDDING BOUQUET.
- Move forward.
- Give WEDDING BOUQUET (C).
- Take DOG SKULL (D).
- Move down.
- PET’S BONES, DOG SKULL and REVITALIZING SPELL on PET’S COLLAR.
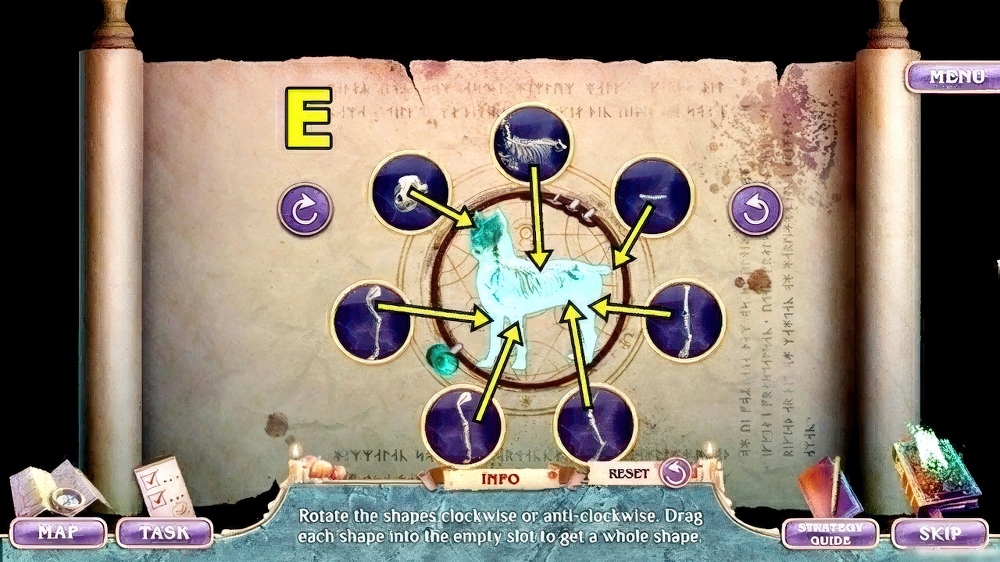
- Solution: (E).
- Game launches randomly, set images as shown in screenshot, then move.
- Receive RESURRECTED PET.
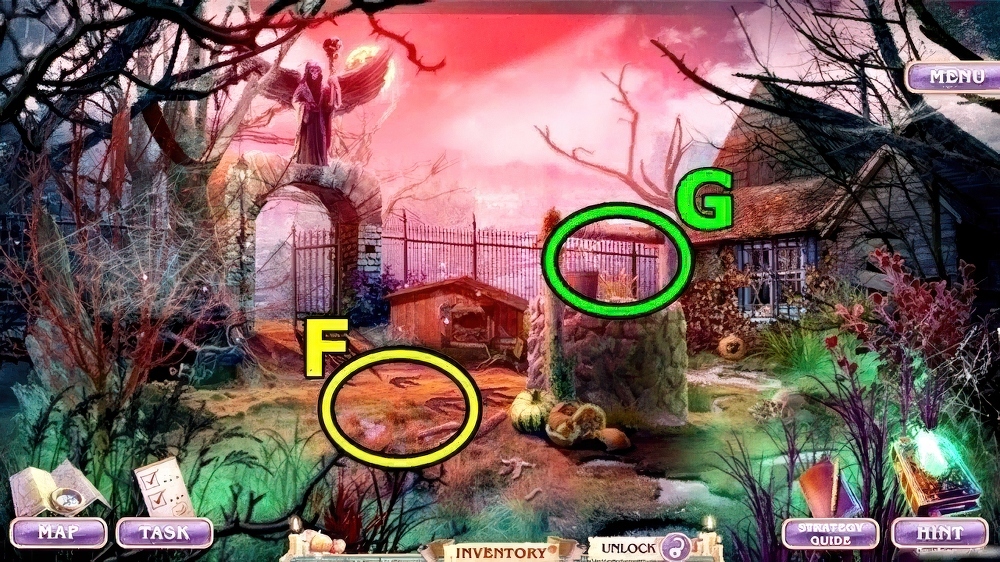
- Add RESURRECTED PET (F).
- Go to Haunted Swamp (G).
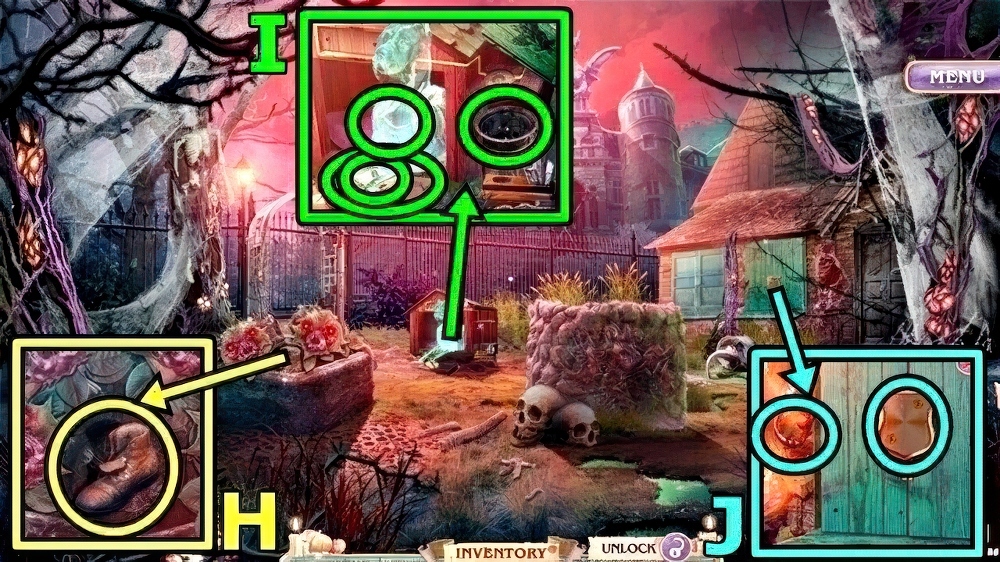
- Take FAVORITE TOY (H).
- Take BOWL (I).
- Give FAVORITE TOY, take LORD’S CREST and PLANK.
- Add SERVANT’S BELL (J) and LORD’S CREST, take ROSE IN POT and STOLEN ALTAR.
- Move down.
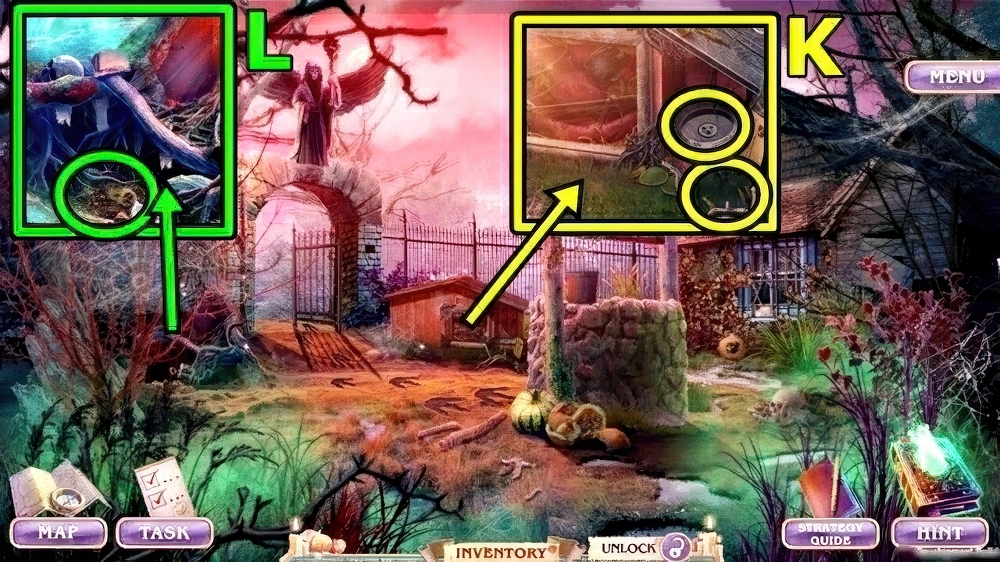
- Add BOWL (K) and STOLEN ALTAR, take NIGHTMARE IN SACK and TABLET WITH NAME.
- Give NIGHTMARE IN SACK (L), take MISTRESS’S KEY and SAW HANDLE.
- Go to Swamp Graveyard.
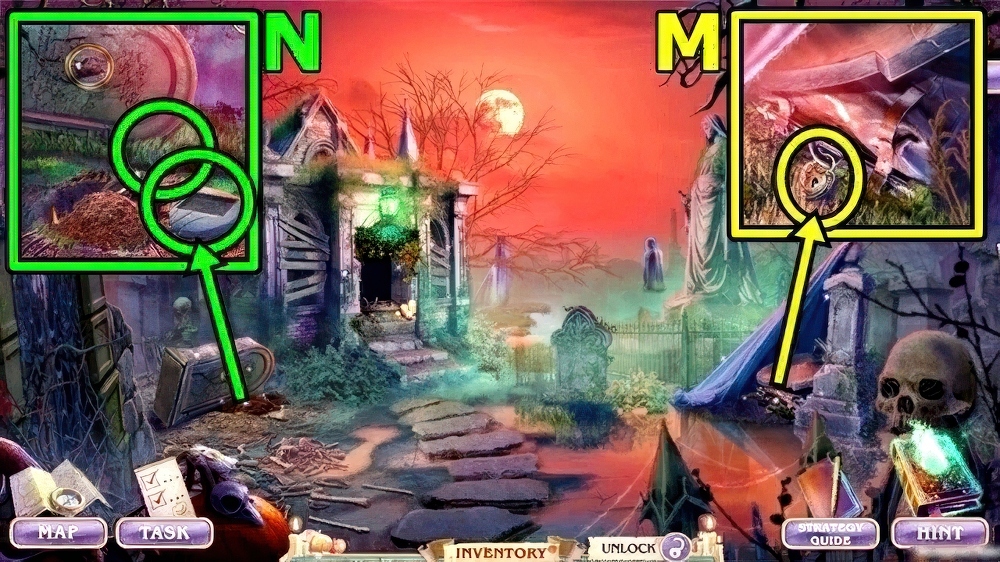
- Insert MISTRESS’S KEY (M), take SAW BLADE and METRONOME.
- Add METRONOME (N) and PLANK cnb, take GHOSTLY SERVANT and BLOODY SCREW 1/3.
- Return to Haunted Swamp.
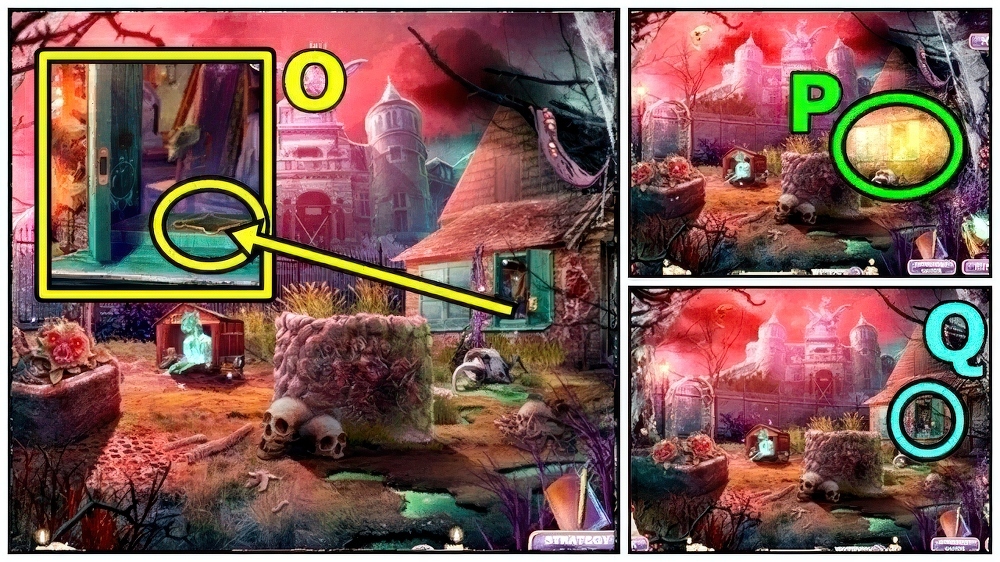
- Add GHOSTLY SERVANT (O).
- Play puzzle (P).
- Enter Manor of Horrors (Q).
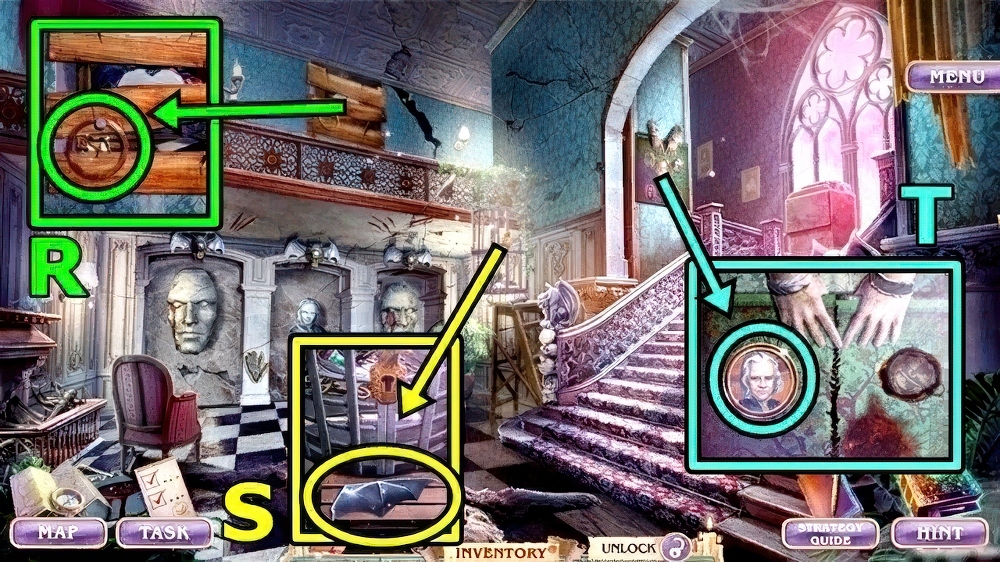
- Take MONSTER’S WING (R).
- Take BRONZE FRAME (S).
- Add BRONZE FRAME (T), take GOLDEN POLLEN.
- Move down.
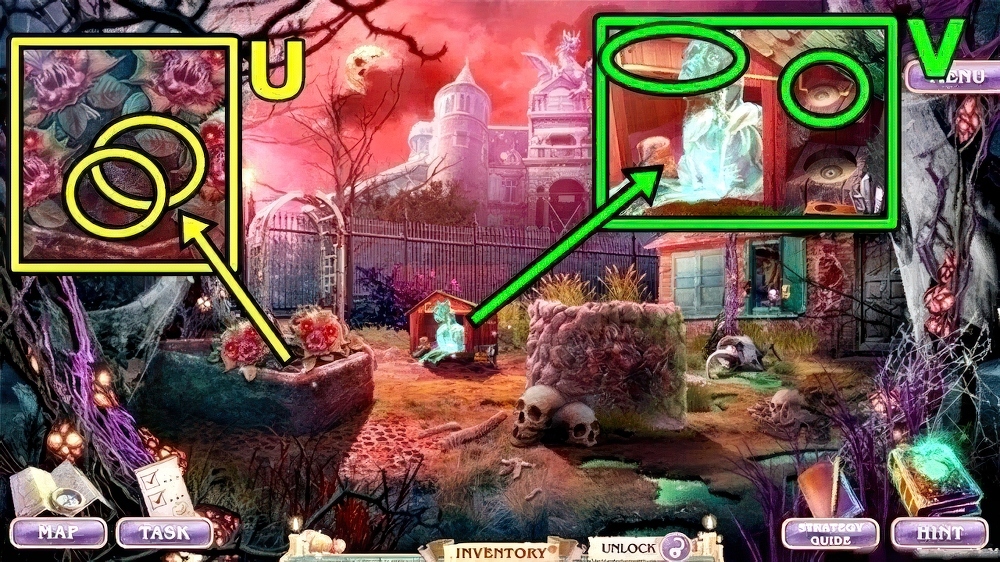
- Add ROSE IN POT (U) and GOLDEN POLLEN, take GARGOYLE and BLOODY SCREW 2/3.
- Add TABLET WITH NAME (V) and GARGOYLE, take BLOODY SCREW 3/3 and GRAY PALETTE.
- Enter Manor of Horrors.
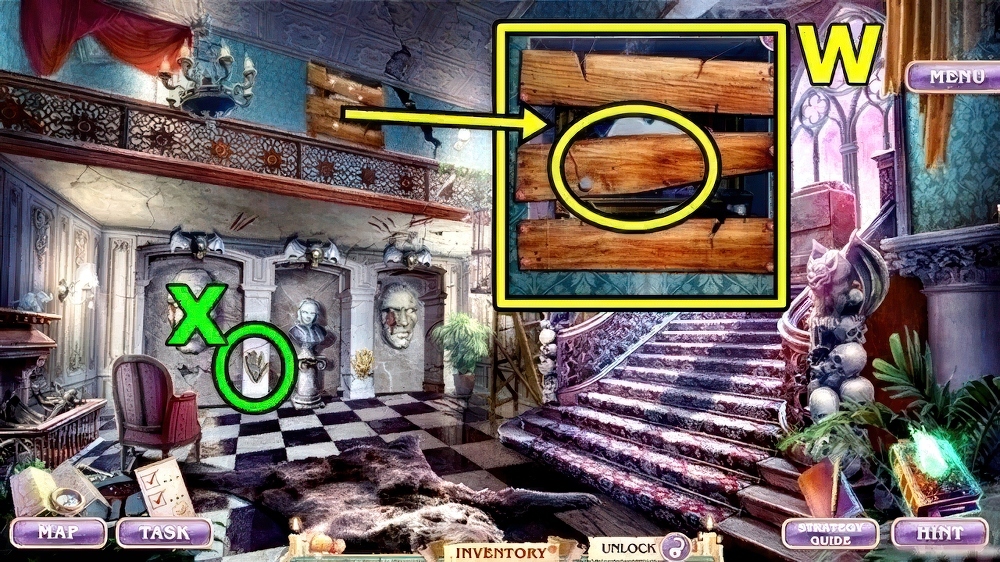
- SAW BLADE and BLOODY SCREW on SAW HANDLE, take SAW.
- Use SAW (W), take FOOTPRINT CAST and INKPOT.
- Add FOOTPRINT CAST (X).
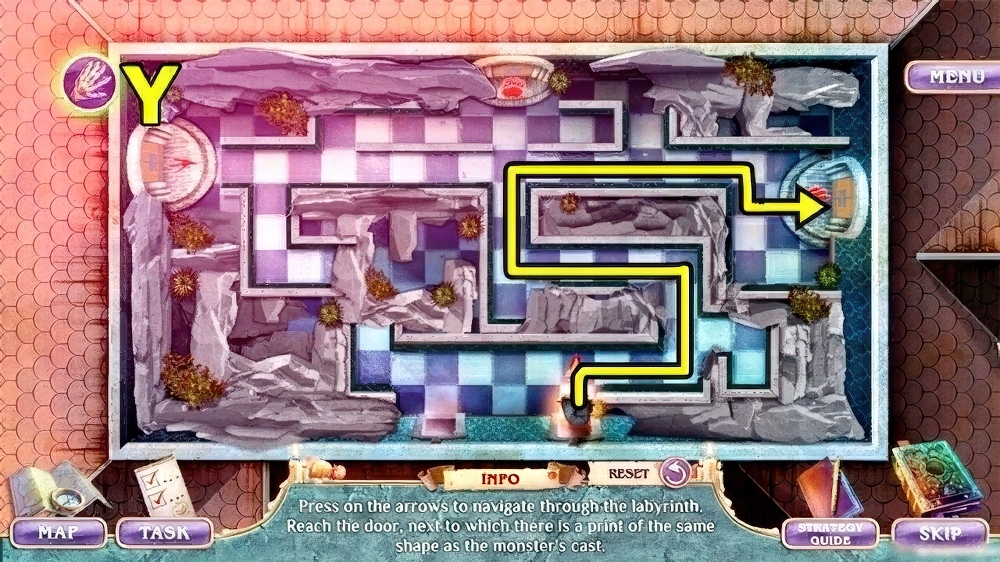
- Solution (Y).
- Take BRIGHT PAINTS (Z).
- Take CHITIN PLATE (A).
- Add CHITIN PLATE (B), take PAINTING KNIFE and MONSTER’S HOOF.
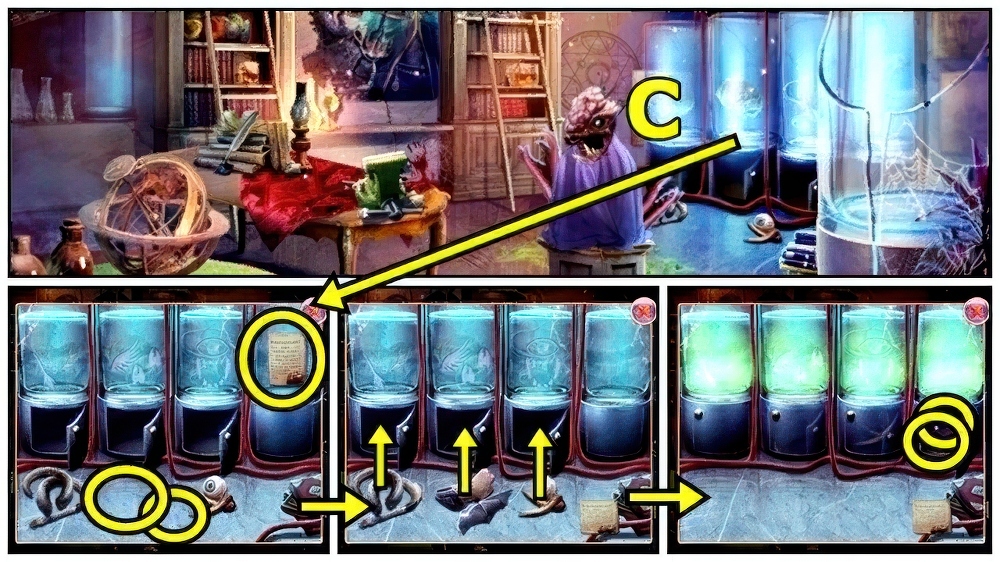
- Read (C).
- Add MONSTER’S WING and MONSTER’S HOOF.
- Add items, take PENDANT BOOK and EXPENSIVE MIRROR.
- Return to Swamp Graveyard.
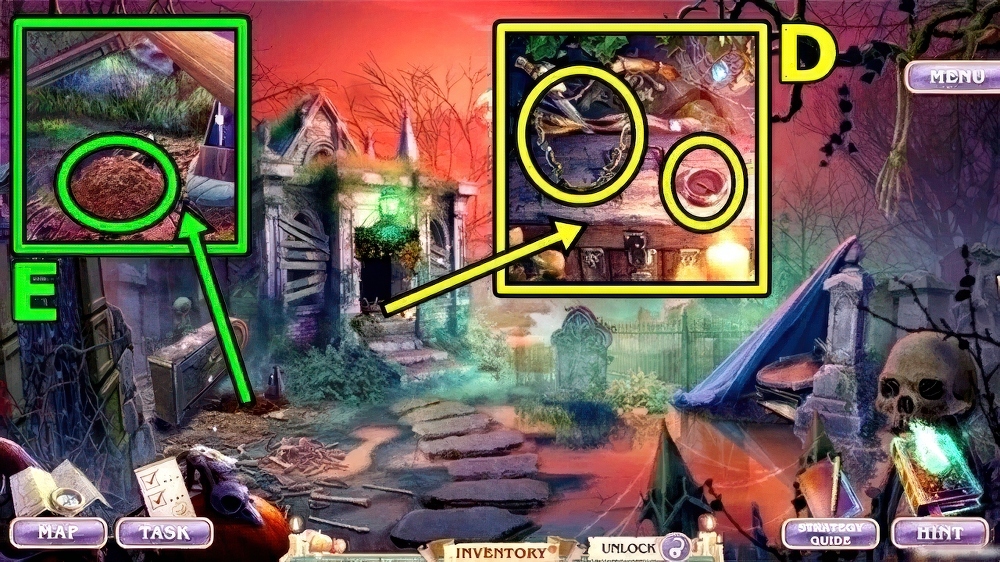
- Add INKPOT (D) and EXPENSIVE MIRROR, find items, take CEREMONIAL CHALICE.
- Use CEREMONIAL CHALICE (E), take MAID’S BROOCH and DAMAGED GOBLET.
- Return to Manor of Horrors.
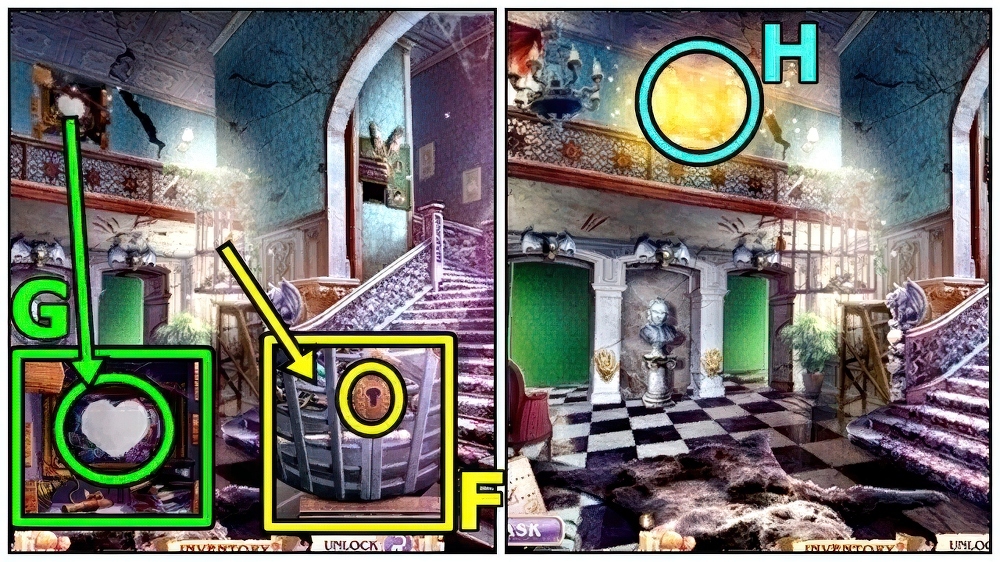
- Use MAID’S BROOCH (F), take CARVED PAINTBRUSH.
- BRIGHT PAINTS, PAINTING KNIFE and CARVED PAINTBRUSH on GRAY PALETTE, take ARTIST’S KIT.
- Add ARTIST’S KIT (G).
- Play puzzle (H).
- Enter Ritual Room.
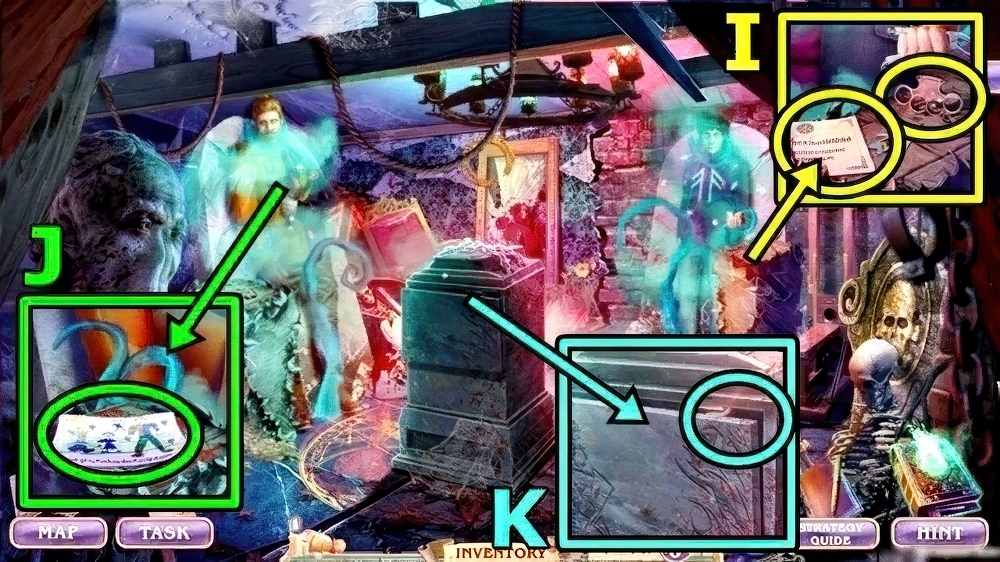
- Read (I), take SHEN’S BRASS KNUCKLES.
- Read (J), take CROWN PRONG.
- Use CROWN PRONG (K), take BROKEN FANG and ORPHANS’ HANDICRAFT.
- Return to Barlow’s Bestiary.
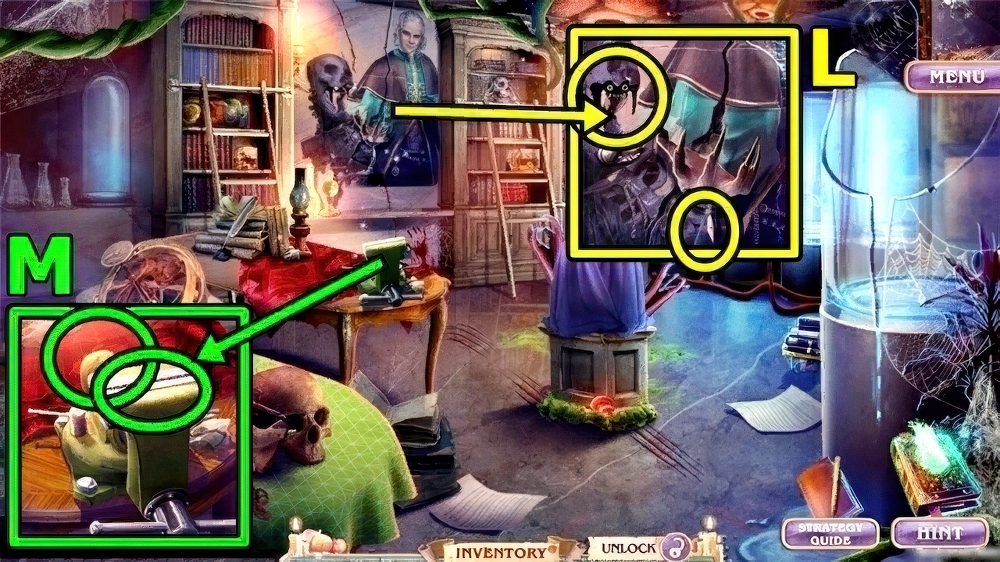
- Add BROKEN FANG (L) and PENDANT BOOK, take RUNE HAMMER and PICTURE FROM THE PAST.
- Add DAMAGED GOBLET (M) and RUNE HAMMER, take CHILDS’ FIGURINE and SERVICE AWARD.
- Return to Ritual Room.
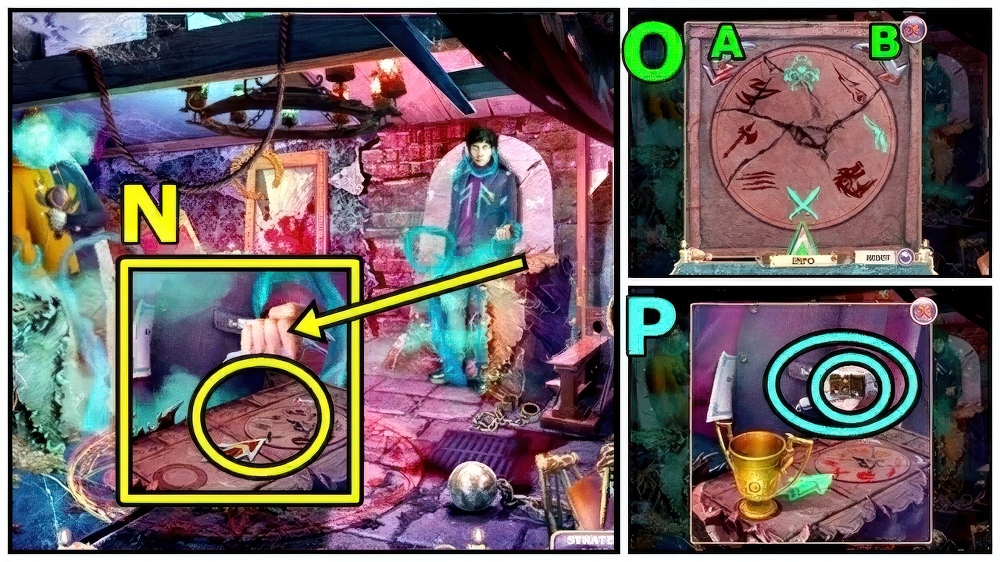
- Add SERVICE AWARD (N).
- Solution: (O) A-B-Ax3.
- Take SHEN’S LIGHTER (P) and SHEN’S MULTITOOL.
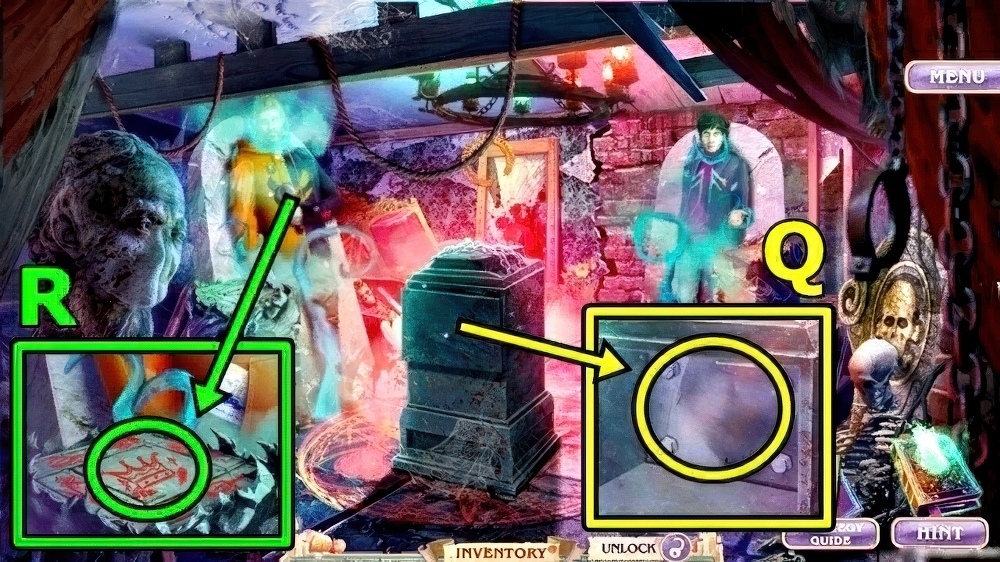
- Use SHEN’S MULTITOOL (Q), take JUG OF OIL and ANCIENT TOY.
- CHILDS’ FIGURINE and ANCIENT TOY on ORPHANS’ HANDICRAFT, take of PROOF OF CHARITY.
- Add PROOF OF CHARITY (R).
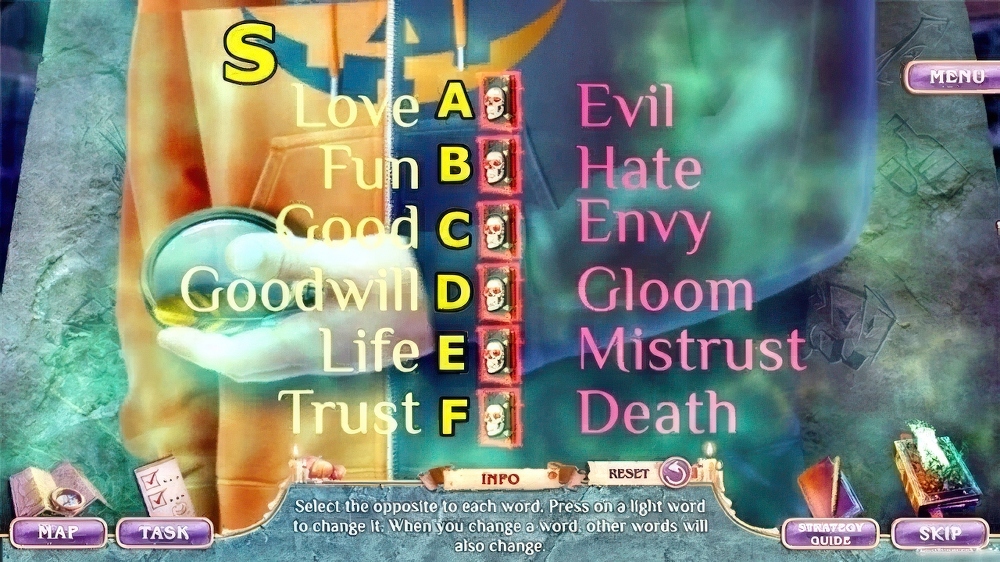
- Solution: (S) Cx5-Bx3-D-Ex3.
- Receive MAGNIFYING GLASS and BARLOW’S QUILL.
- Move down.
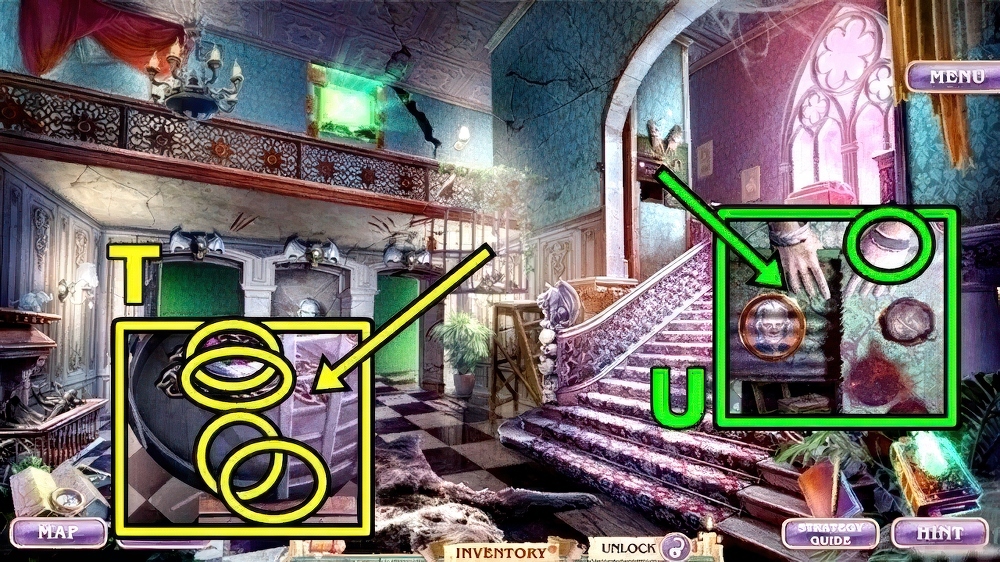
- Add MAGNIFYING GLASS (T) and SHEN’S BRASS KNUCKLES, take ANCESTORS’ BRACELET and FATHER’S GIFT.
- Add ANCESTORS’ BRACELET (U), take NECKLACE WITH GEMS.
- Go to Ritual Room.
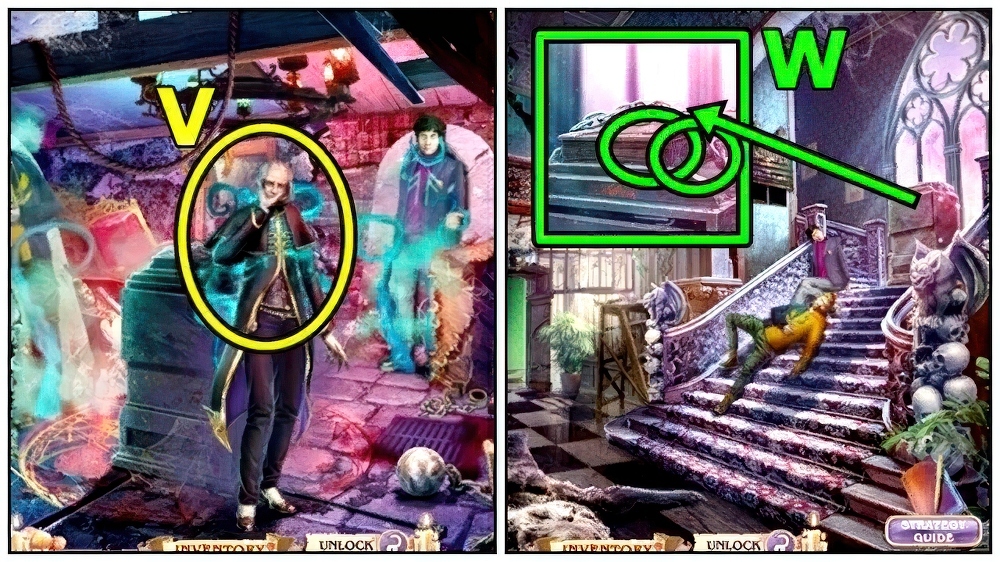
- Add BARLOW’S QUILL, NECKLACE WITH GEMS and FATHER’S GIFT on PICTURE FROM THE PAST, take GOOD MEMORIES.
- Use GOOD MEMORIES (V).
- Add JUG OF OIL (W) and SHEN’S LIGHTER.
- Play puzzle.
- Walkthrough Bonus Chapter, at the link below.


