Lost Lands 4: The Wanderer – Adventure game, you are waiting for a fascinating passage of the mysterious story with the legendary warrior Susan, search for items and solving puzzles. For years now, sailors and pirates of the Lost Lands have spoken of a ghostly ship sailing in the heart of a storm. This vision vanishes as soon as it comes to life, but witnesses still spread the rumors. About a huge octopus traveling with the ship. About its owner, the captain. About the Count’s rage and his curse. And a sorceress they believe is responsible. Meanwhile, somewhere else in space and time, Susan finds a strange pirate chest with a compass of worlds inside and a note asking for help. It’s time for her to return to the Lost Lands again. In the game Lost Lands 4 Wanderer, more than 50 different locations, many great mini-games and interactive scenes with item search. From passing the game Lost Lands 4 you will have both positive and a little negative emotions, because to pass such a story is a whole journey through the mysterious world of lost lands, you will become a real wanderer. If you are stuck at some point, you can watch the Lost Lands 4 walkthrough on our site.
Lost Lands 4: The Wanderer – Walkthrough
Here you can see the full walkthrough for Lost Lands 4: The Wanderer, including the main story and the bonus chapter.
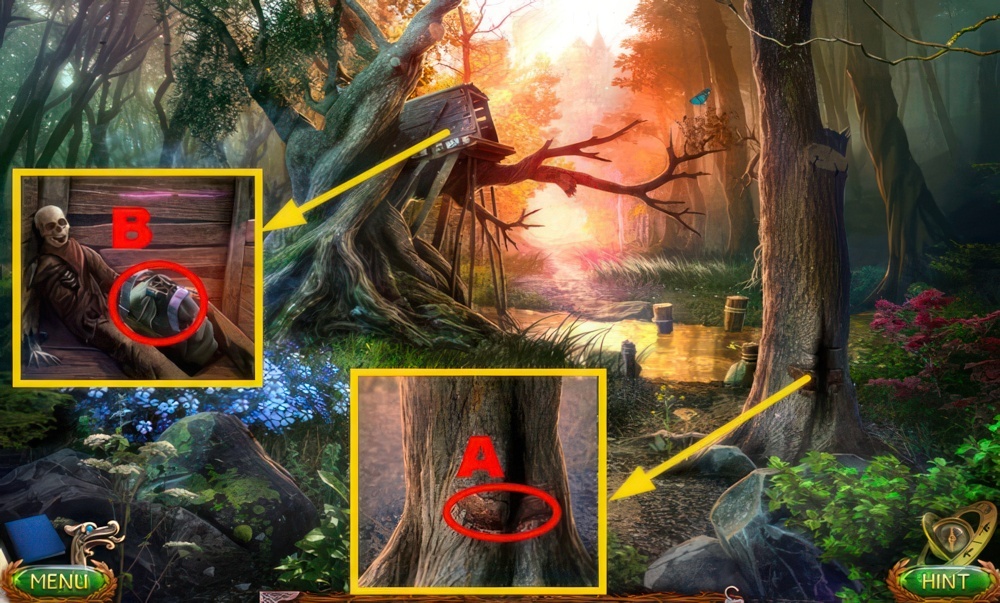
Secret chest
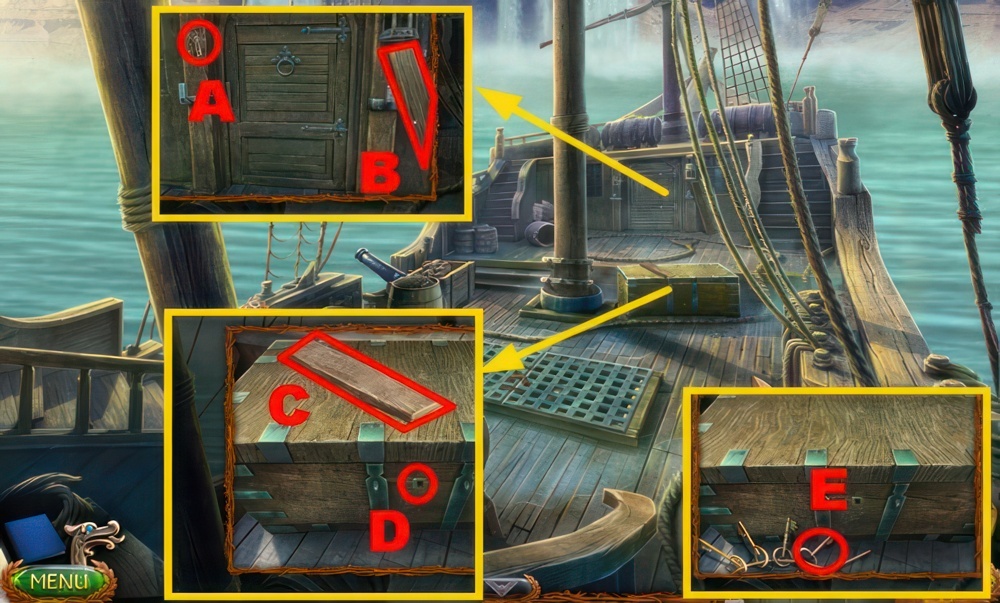
I found an old chest in the middle of my living room. A note attached to it said that the chest can be unlocked using Antimagic Gloves. I must figure out who is behind this.
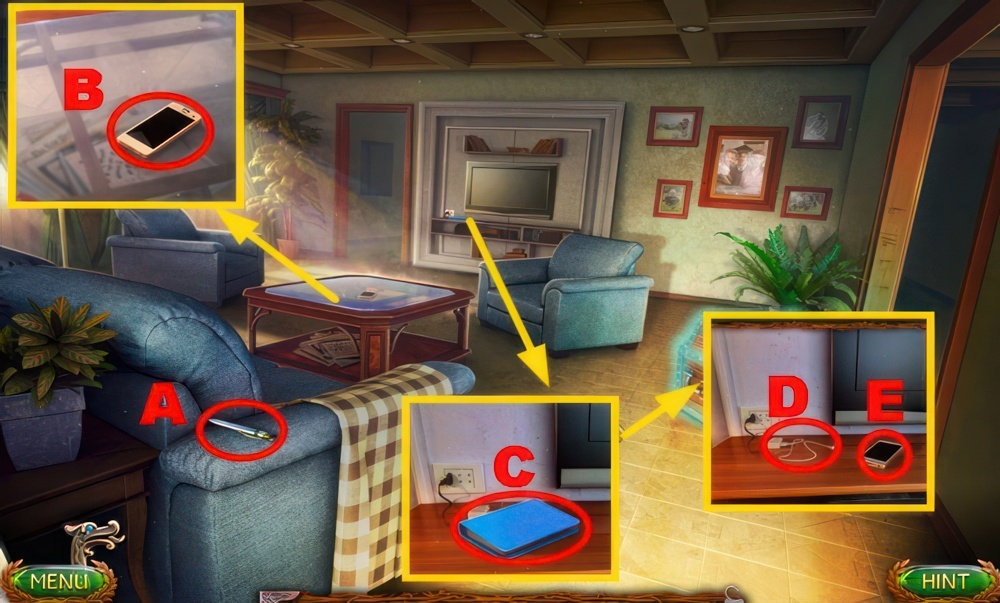
- Take the BALLPOINT PEN (A) and CELL PHONE (B).
- Take the diary and place the CELL PHONE (C).
- Select the plug (D).
- Then the cell phone three times (E).

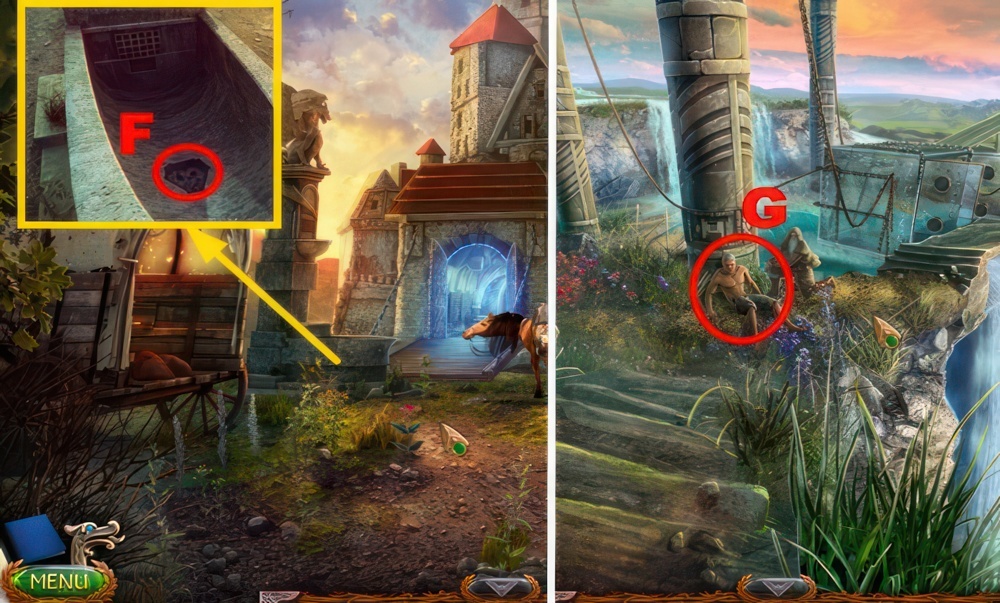
- Use the BALLPOINT PEN (F).
- Enter the correct code 4815162342, confirm it, and grab the magic gloves.
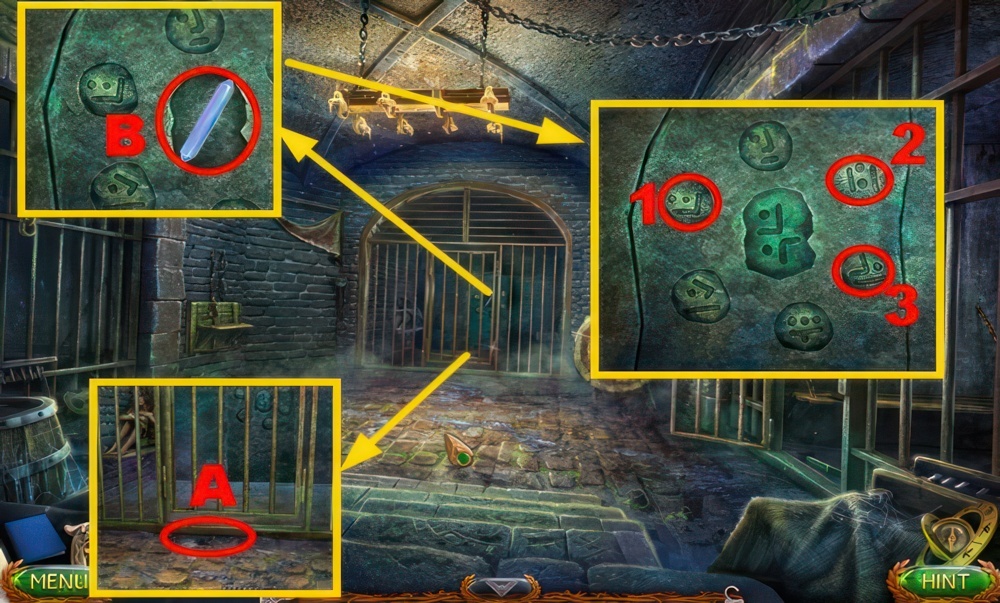
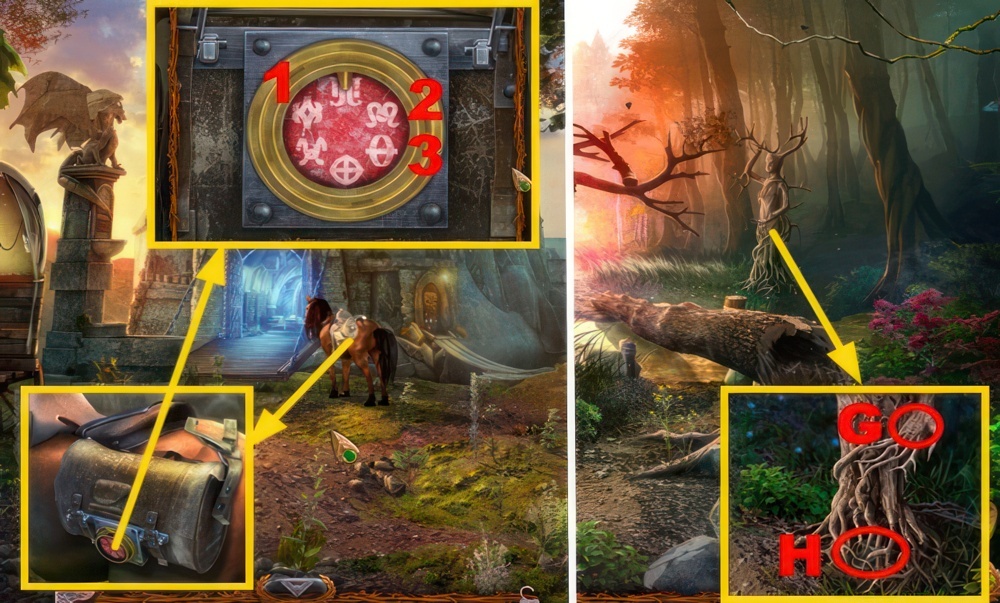
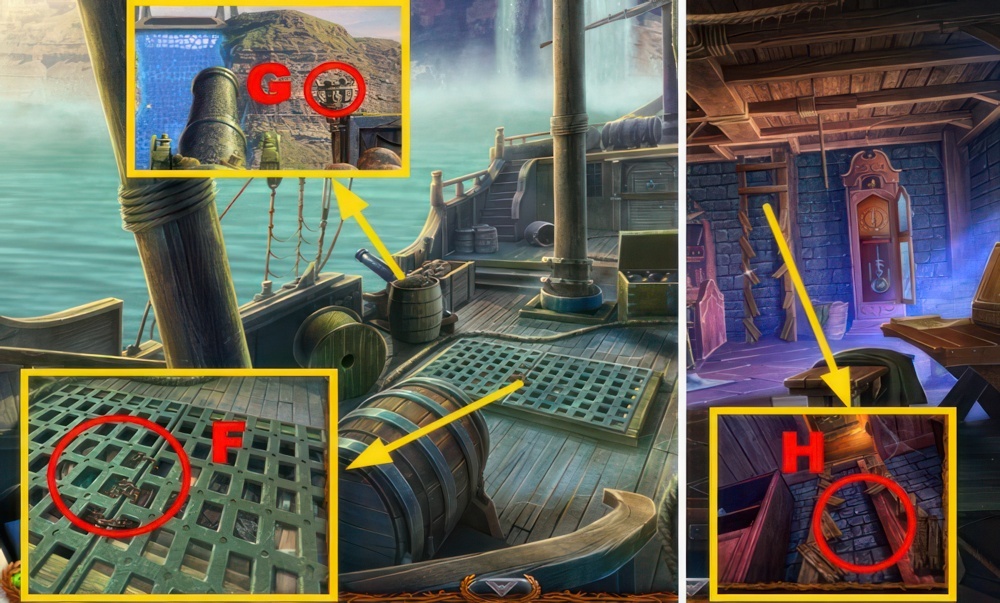
- Take the note, open the chest, and take the scroll and COMPASS OF THE WORLDS (G).
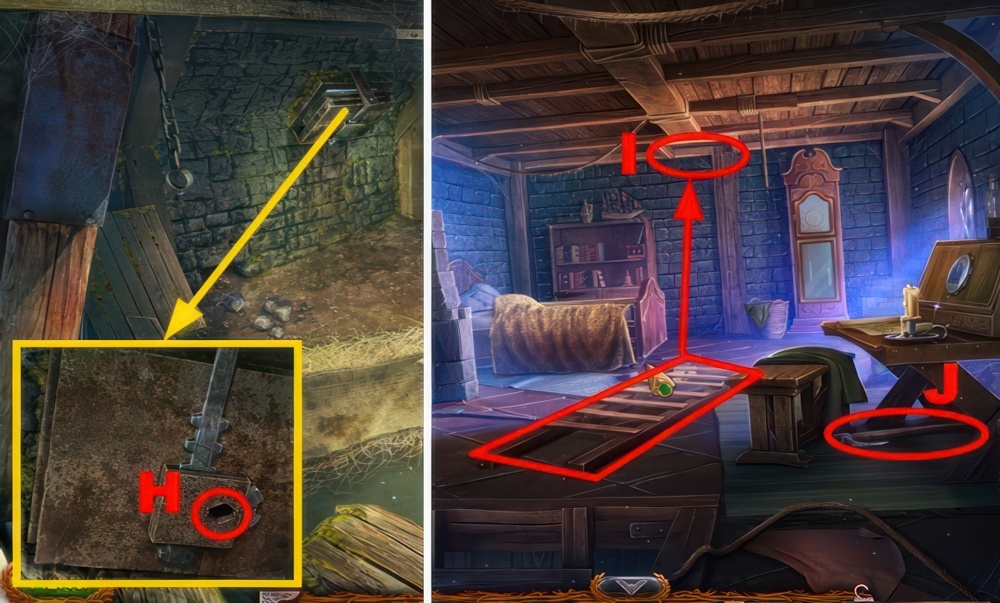
- Open the door (H).
- Go forward.

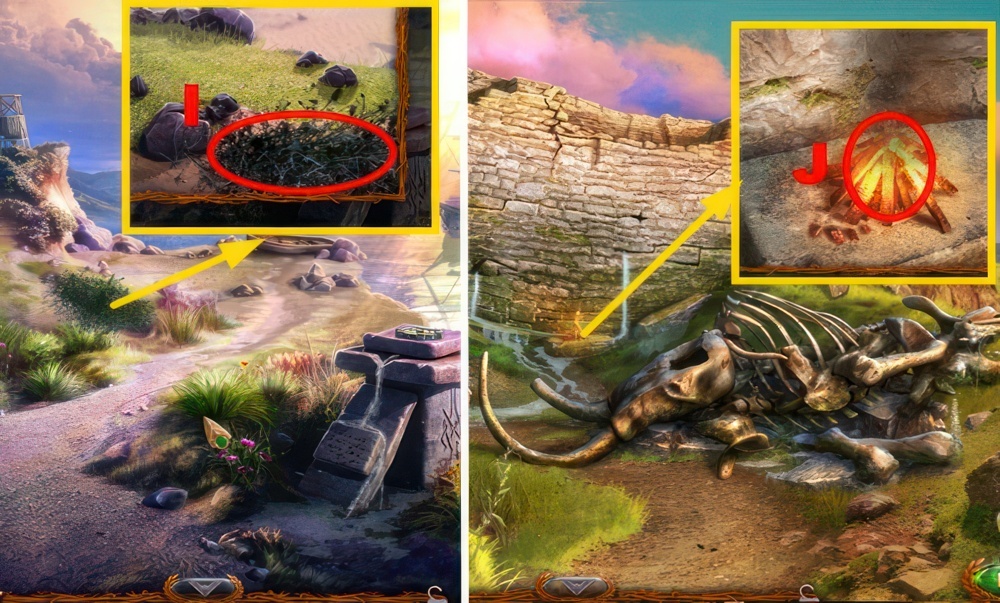
- Talk to Finuer (I).
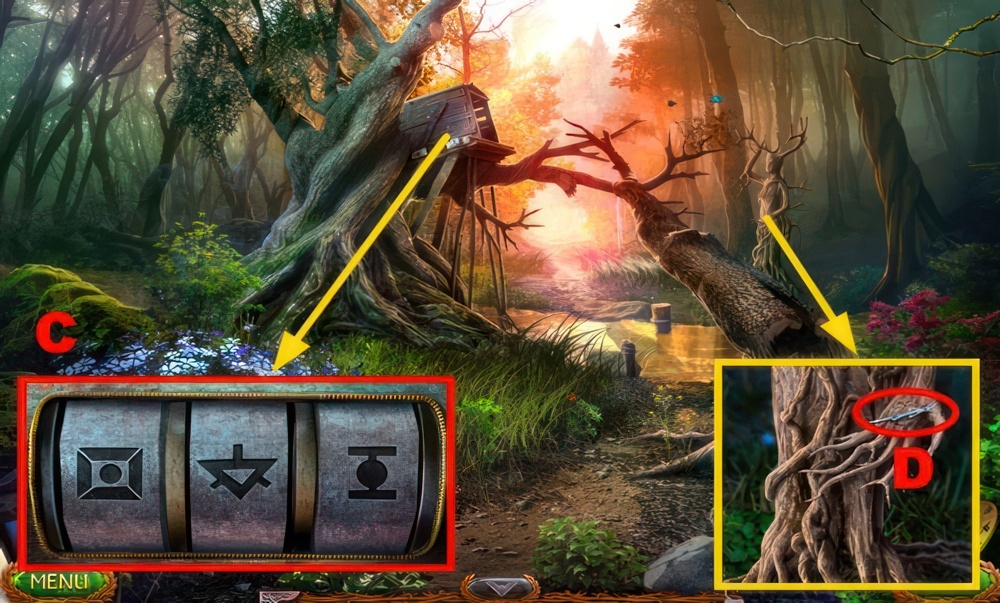
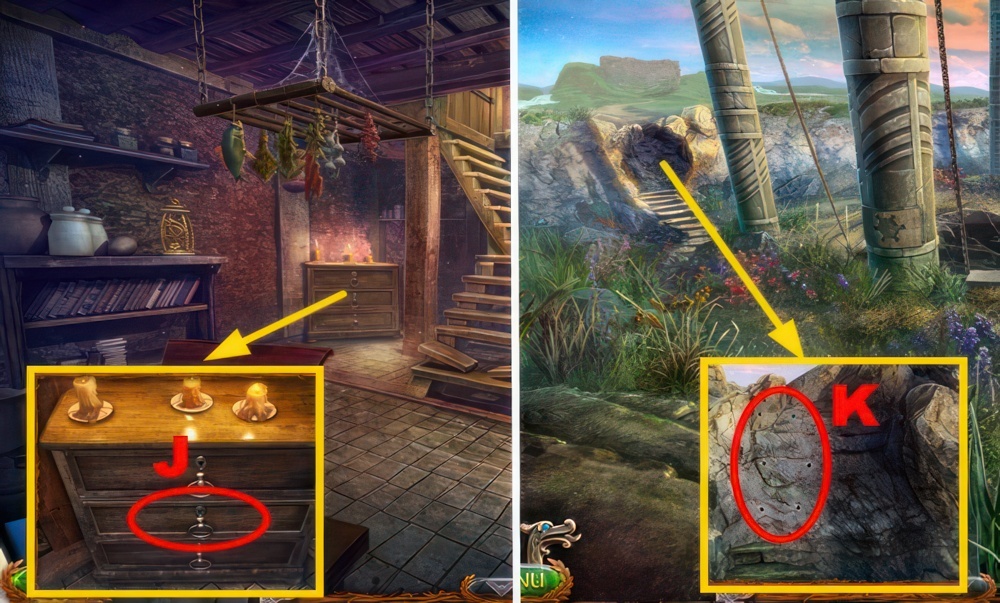
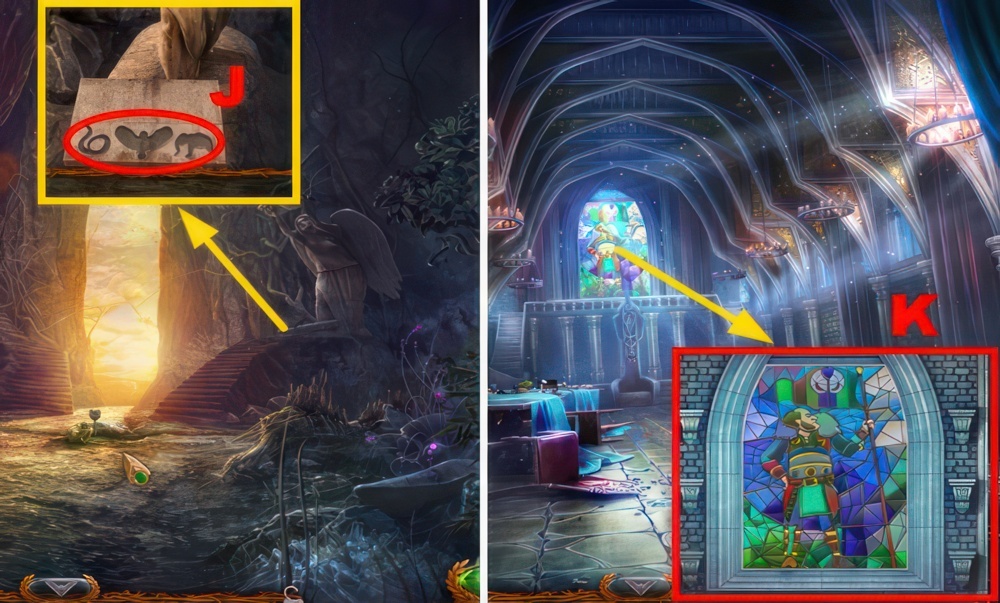
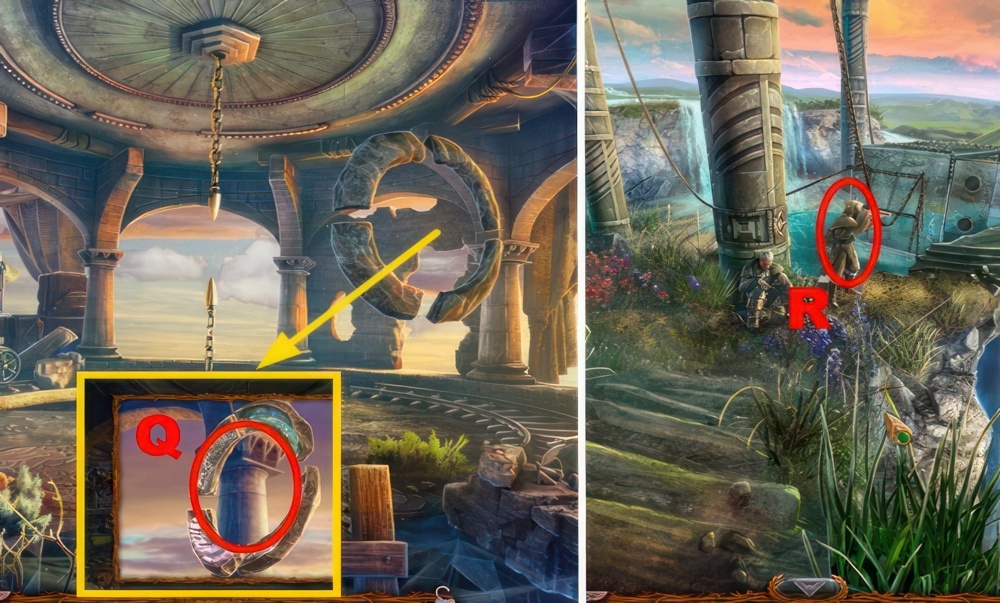
- Place the COMPASS OF THE WORLDS (J).
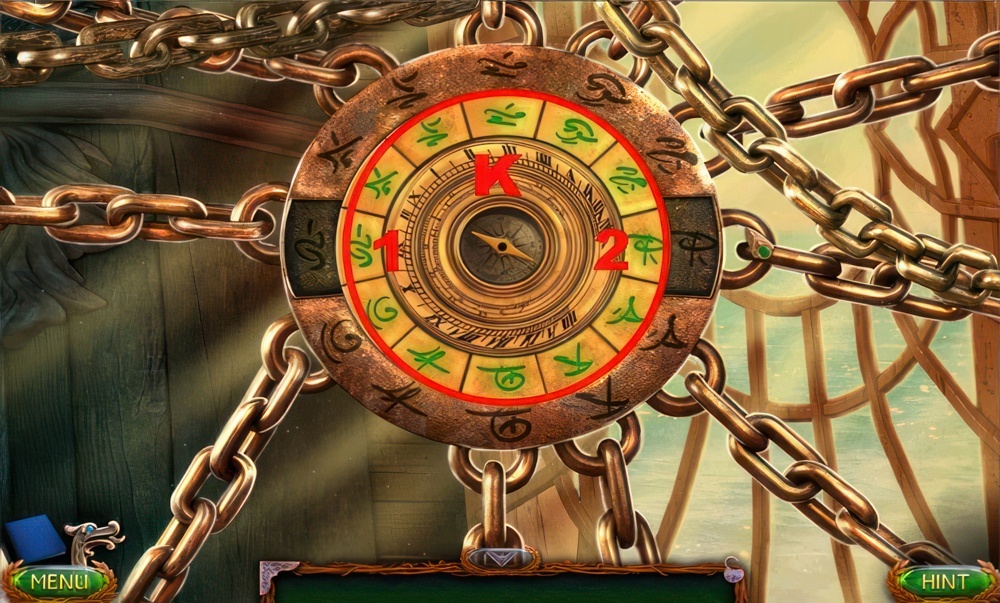
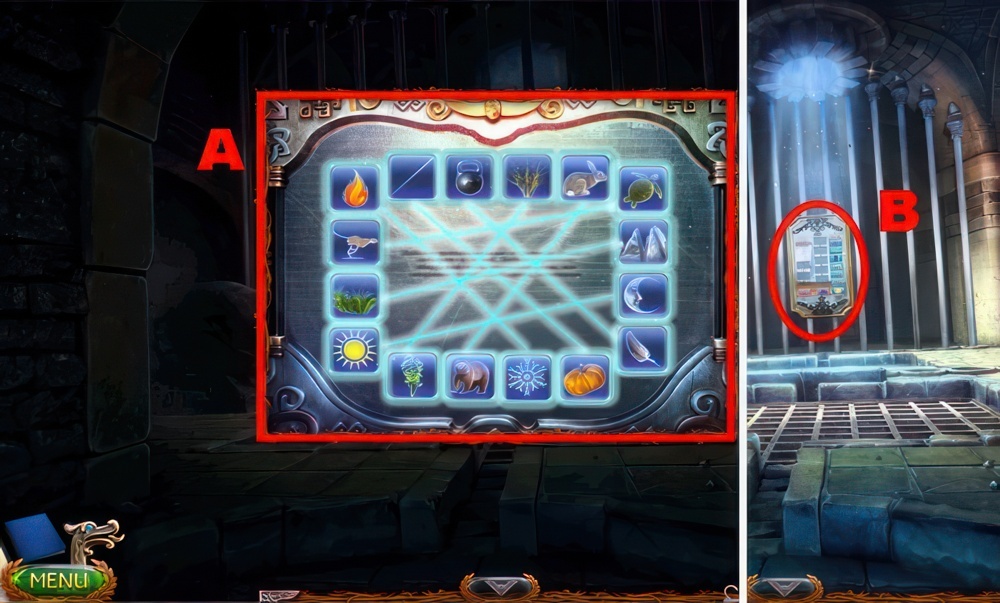
- Play the puzzle.
- Arrange the symbols inside the inner circle to match the ones in the outer circle.
- Clockwise ↻.
- Counterclockwise ↺.
- Walkthrough: (K-↺×2)-1-(K-↺)-2-(K-↺×5)-2-(K-↺)-1-2-(K-↻×4)-1.
- (K-↻×2)-1-(K-↺)-1-(K-↻×5)-2-(K-↺×4)-2-(K-↻×5)-2.
- (K-↺×4)-2-(K-↻×5)-1-(K-↻×4)-1-(K-↻×6)-2-(K-↻×3)-1.
- (K-↻×2)-1-2-(K-↻×6)-2-(K-↺)-2-(K-↺×5)-2-(K-↺)-1.
- (K-↻×2)-2-(K-↺×2)-1-(K-↻×6)-2-(K-↺×2)-2-(K-↺×2)-2-(K-↺×4)-1-(K-↺×4).
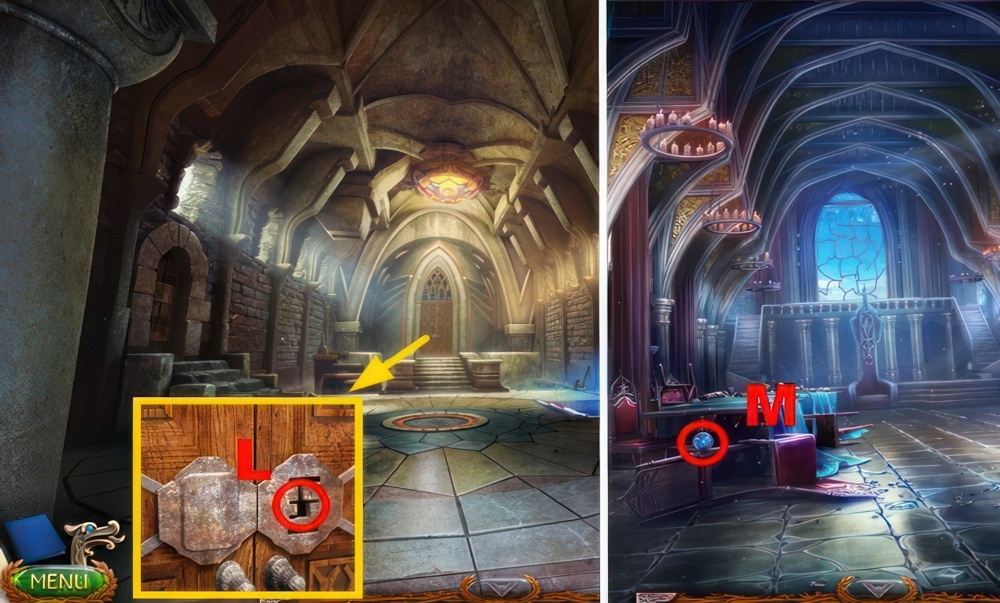
Captain’s body
Captain Stulburn told me that his body is in a magical dream state. However, he has no idea where his real body is located. I need to find out.
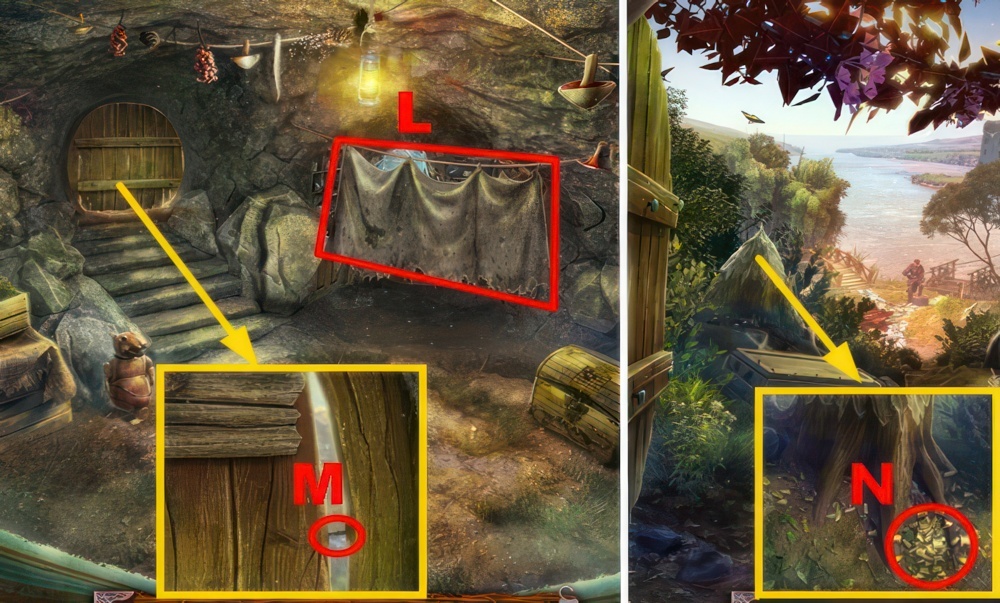
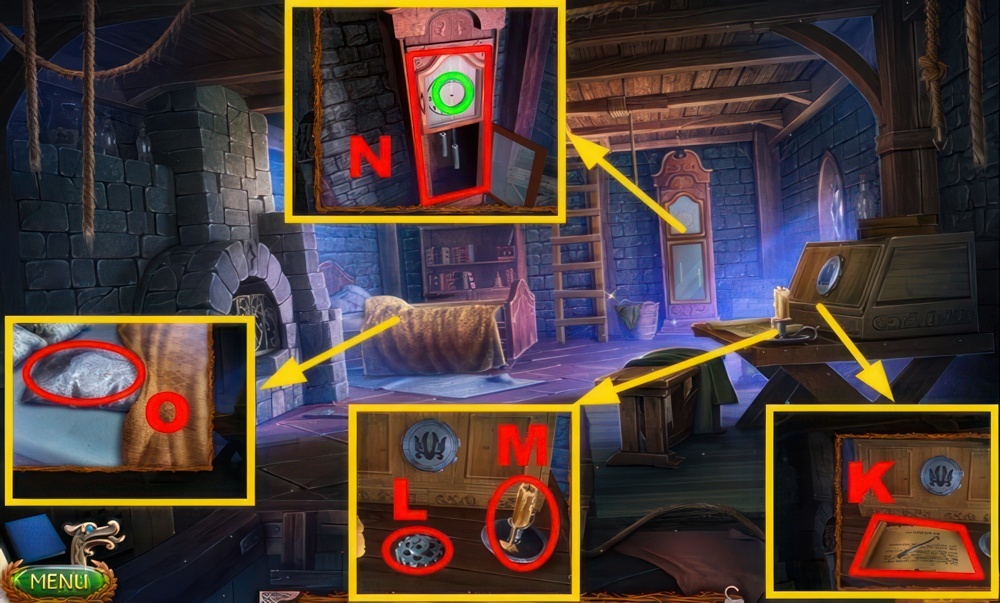
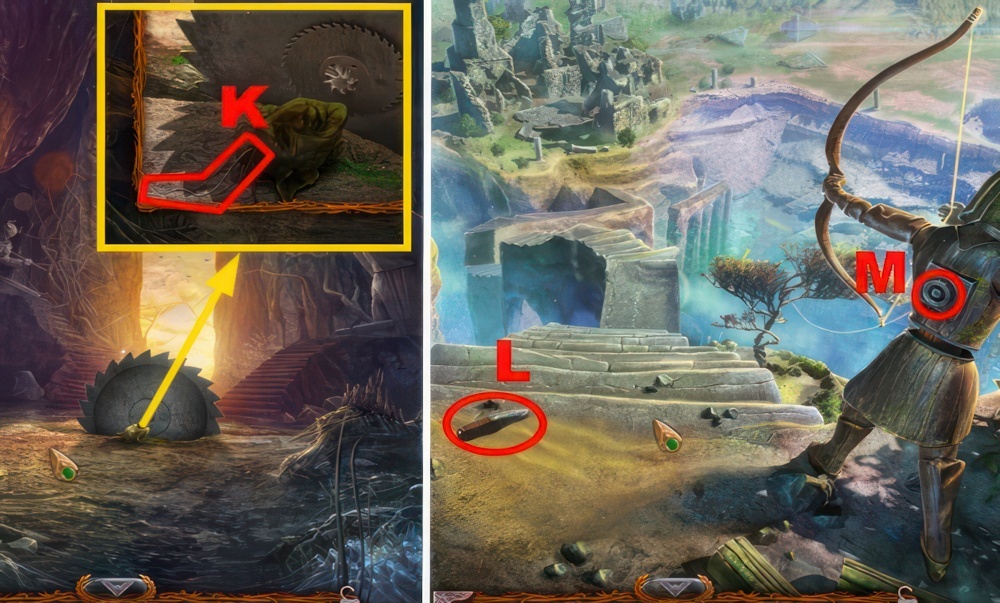
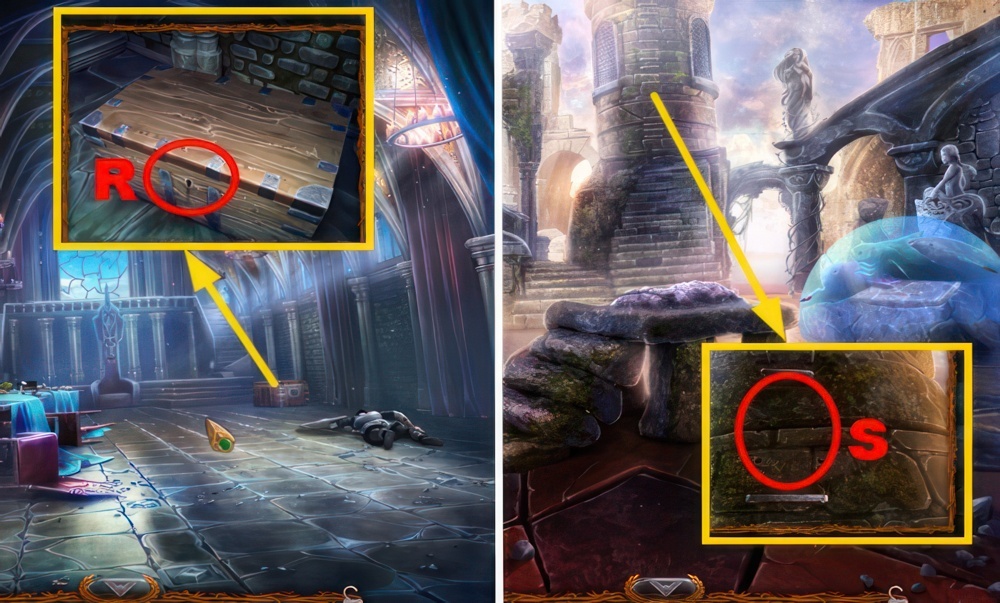
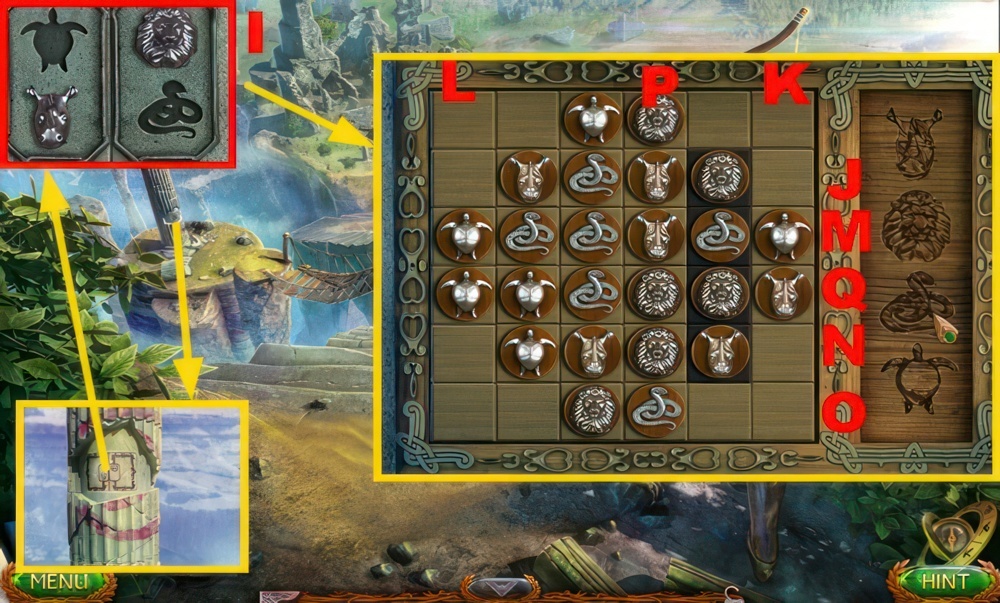
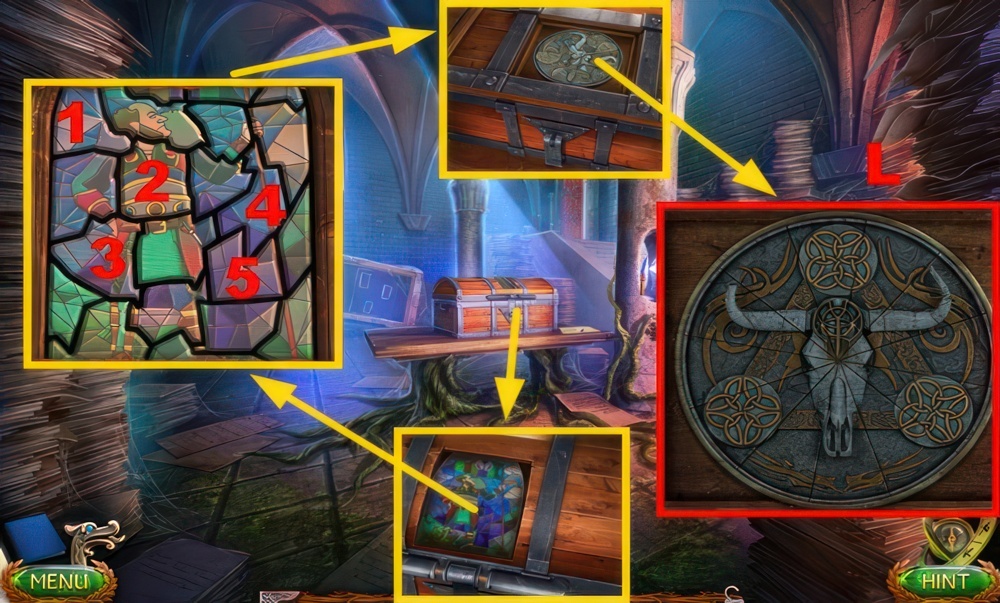
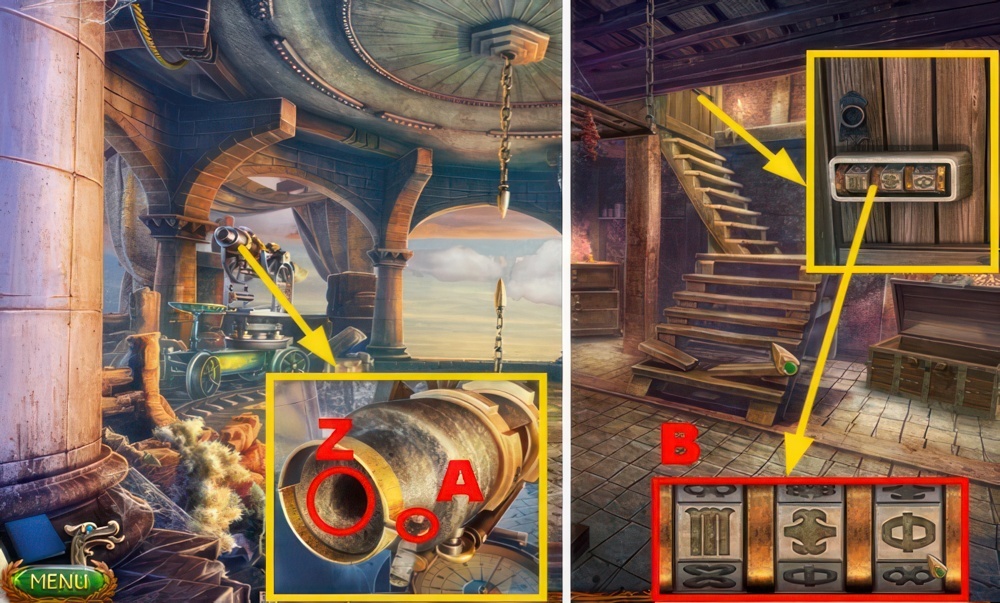
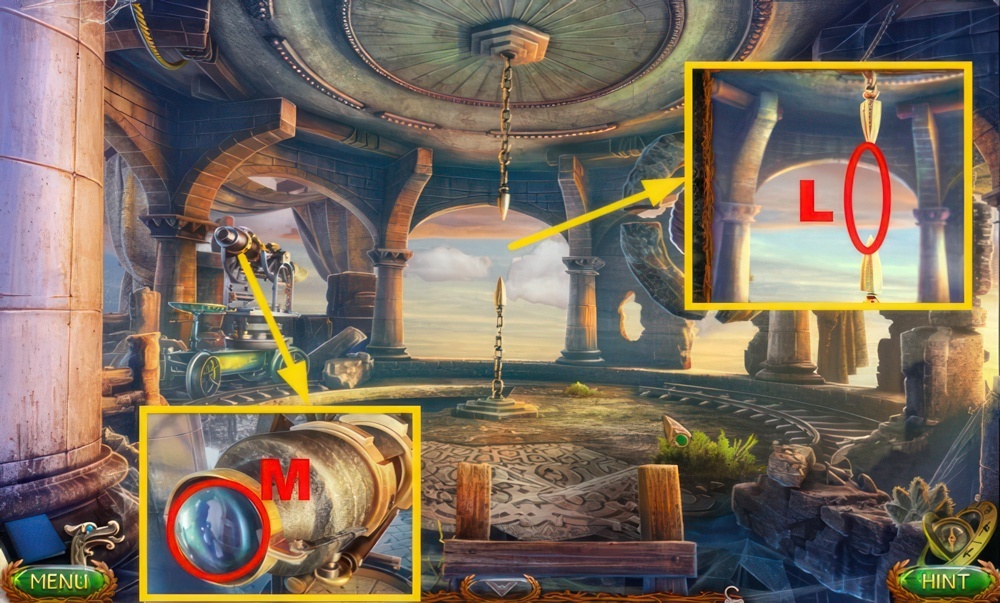
- Remove the blanket and play the puzzle (L), receive the BLUNT KNIFE.
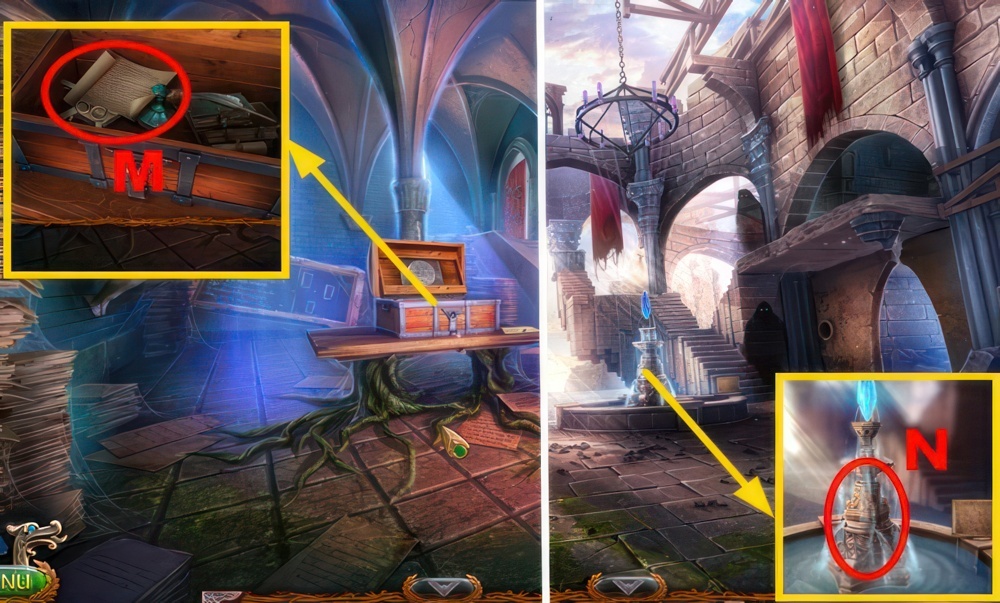
- Use the BLUNT KNIFE (M).
- Go forward.
- Take the WOOD SHAVINGS (N).
- Go forward.
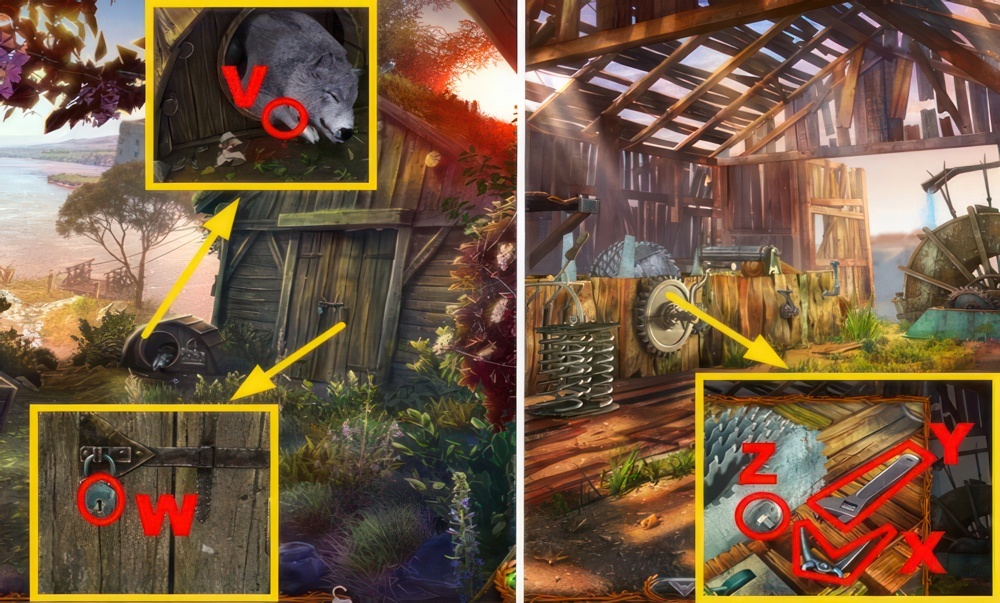
Captain’s friend
I woke up in the Lost Lands yet again. Now I need to find someone who knows something about what happened to Captain Stulburn.

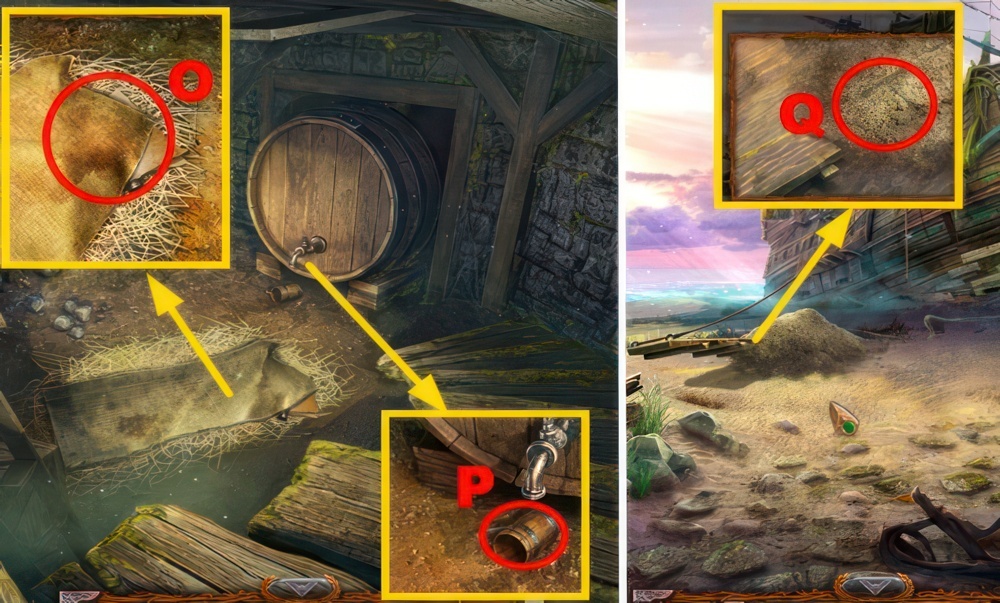
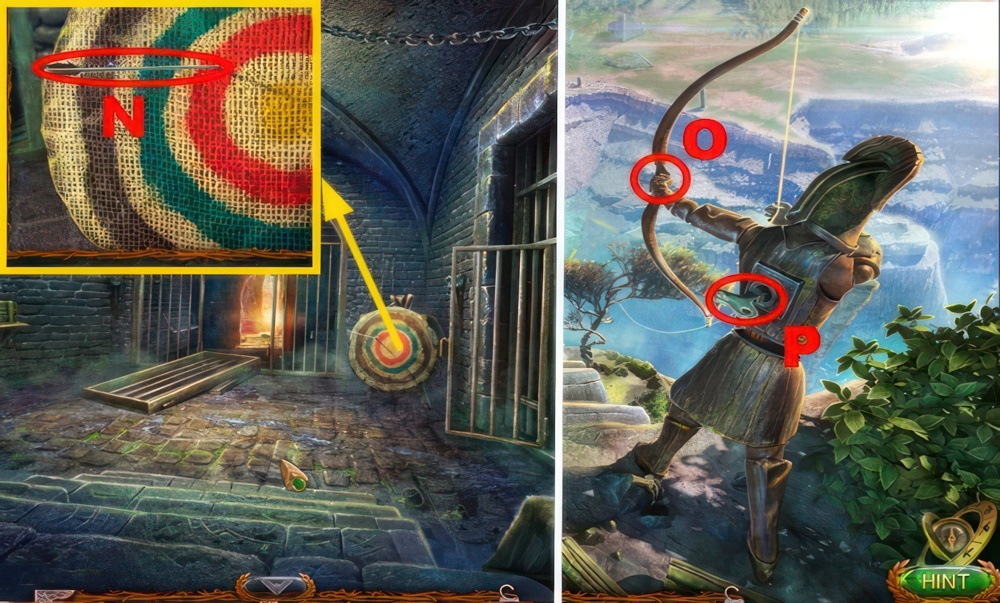
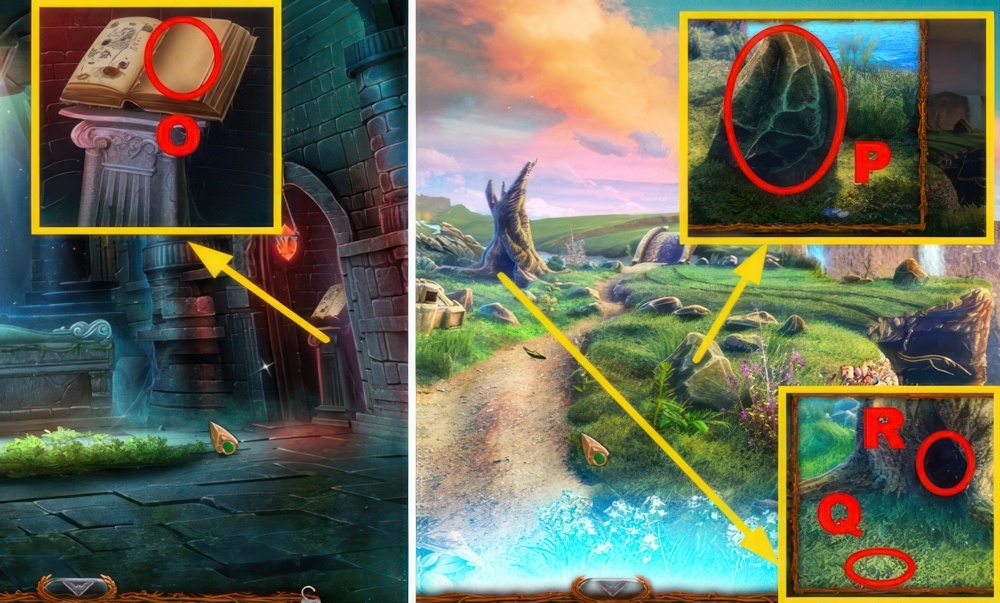
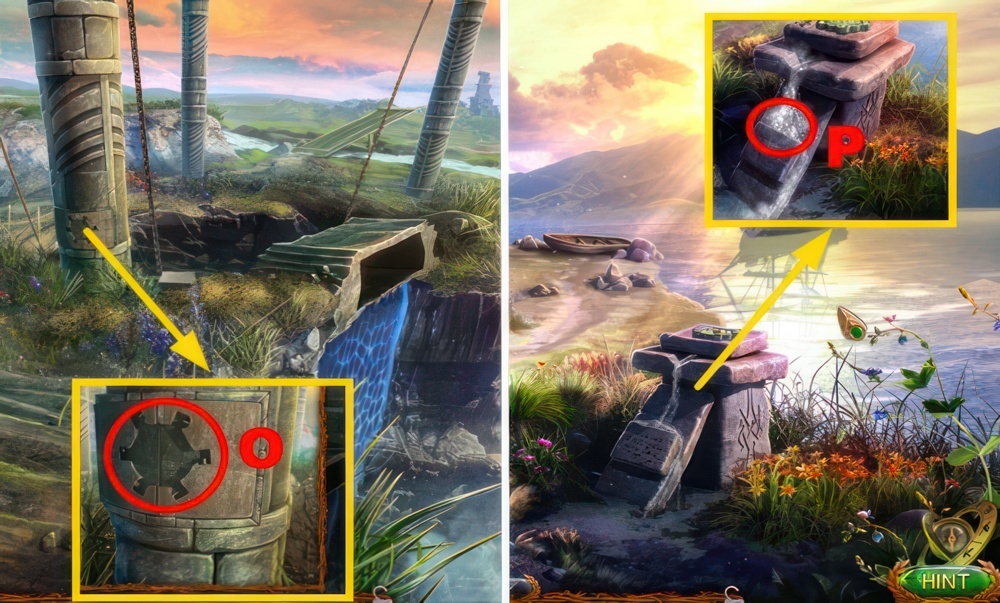
- Talk to Corko (O).
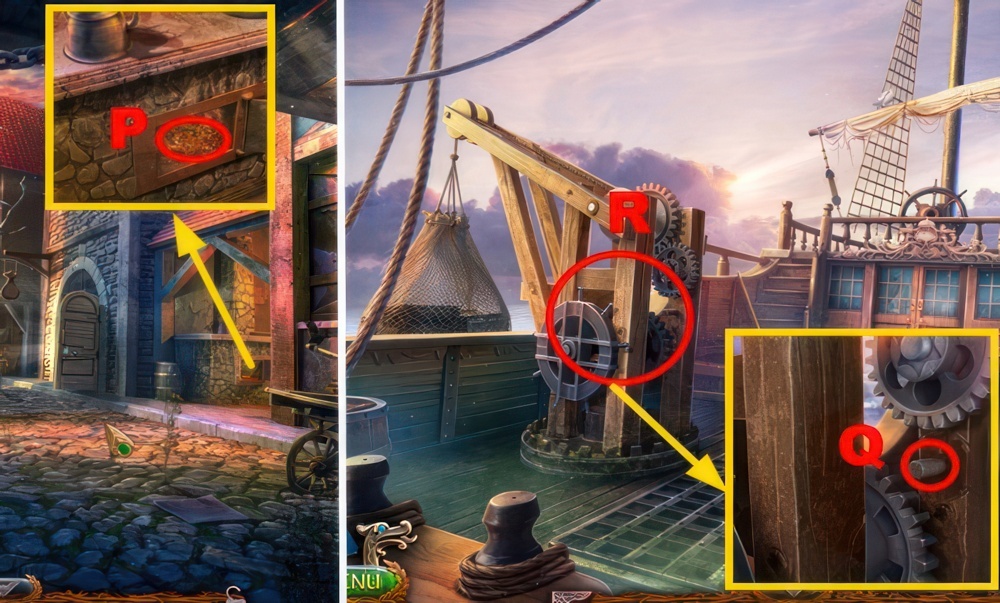
- Take the HAMMER (P) and TEA LEAVES (Q).
- Walk down.
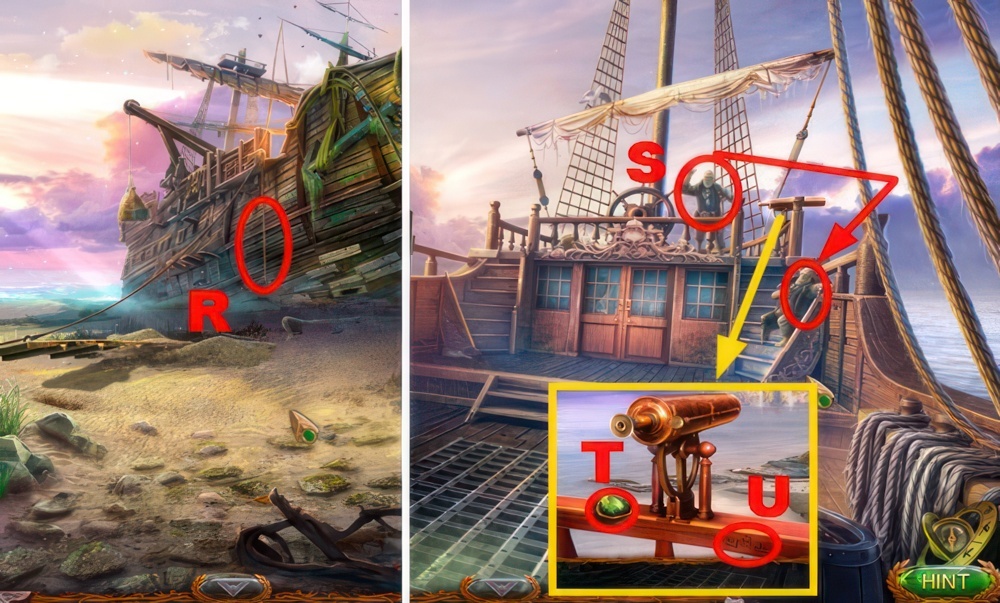
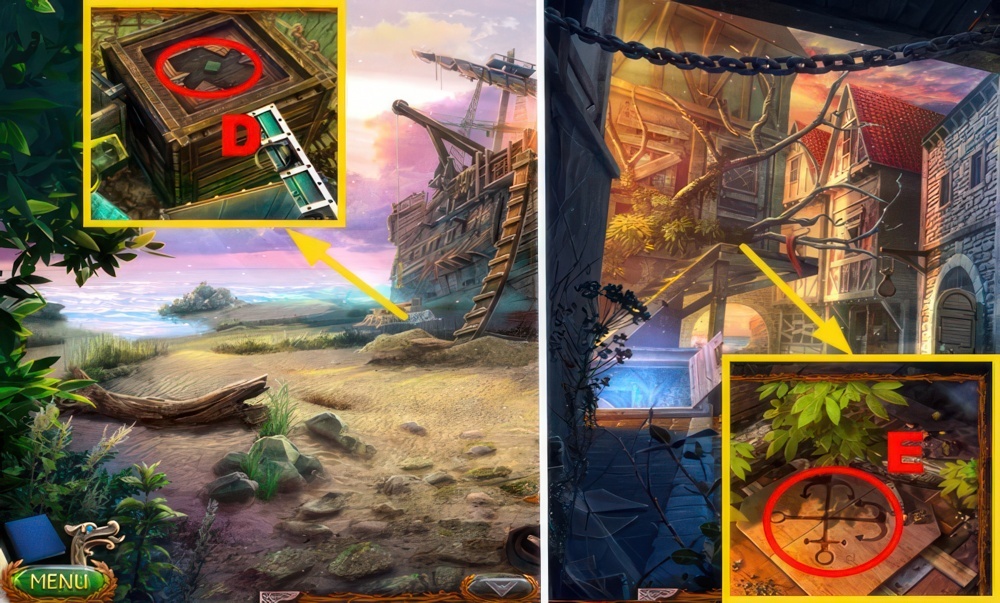
- Use the HAMMER, receive the BENT NAILS, open the crate, and take the FIRE STARTER (R).
- Use the HAMMER on the BENT NAILS, receive the NAILS.
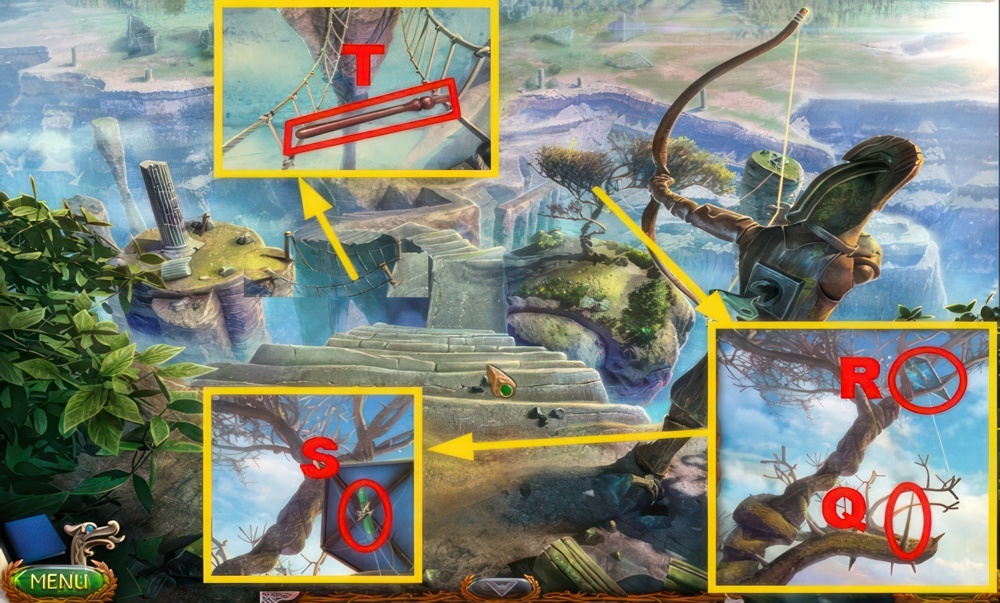
- Go forward.
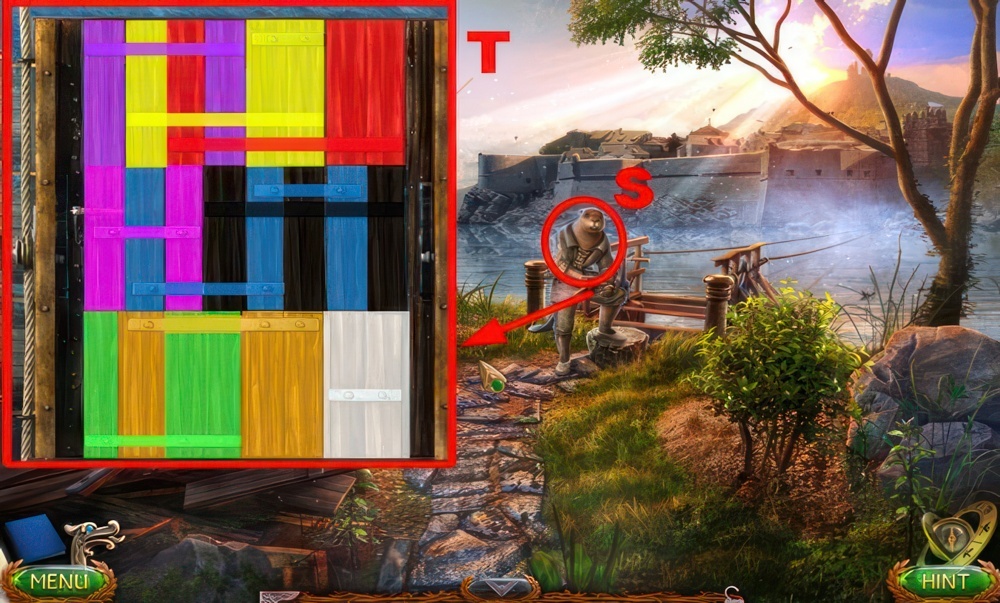
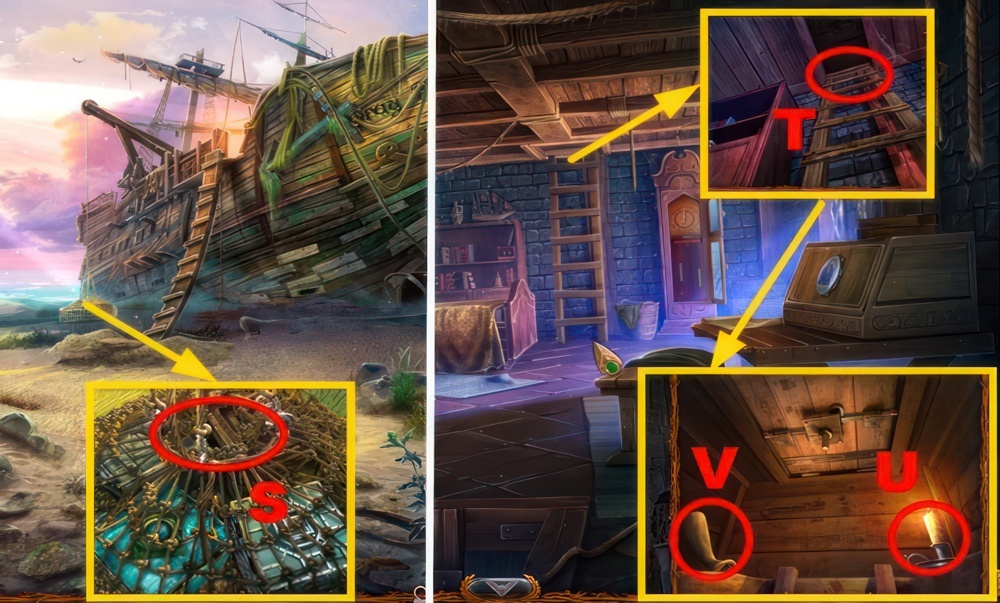
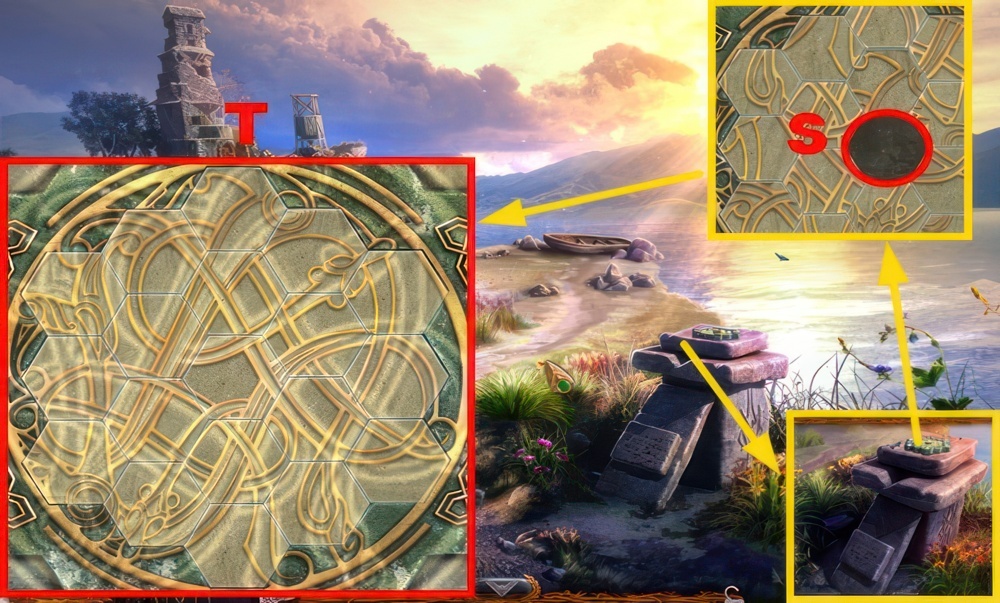
- Give the NAILS (S).
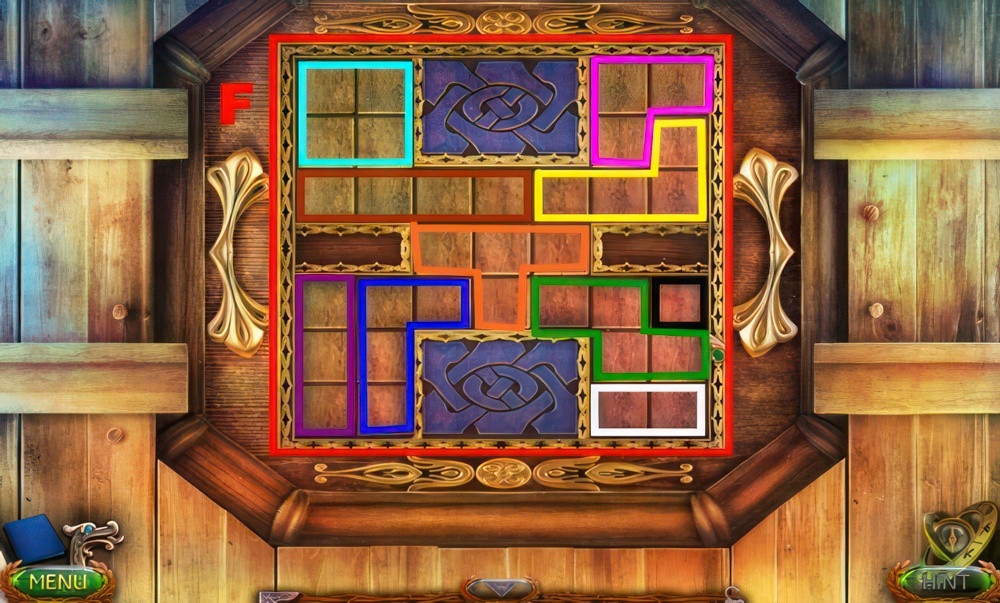
- Play the puzzle.
- Remake the ferry by placing the planks on the frame so that there are no holes left.
- Walkthrough: (T).
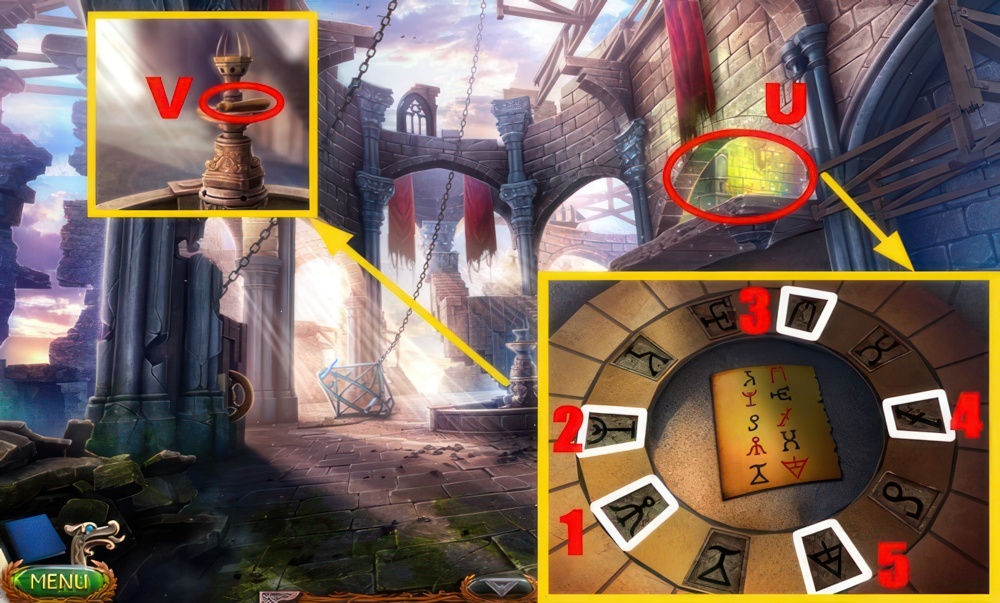
- Turn right.

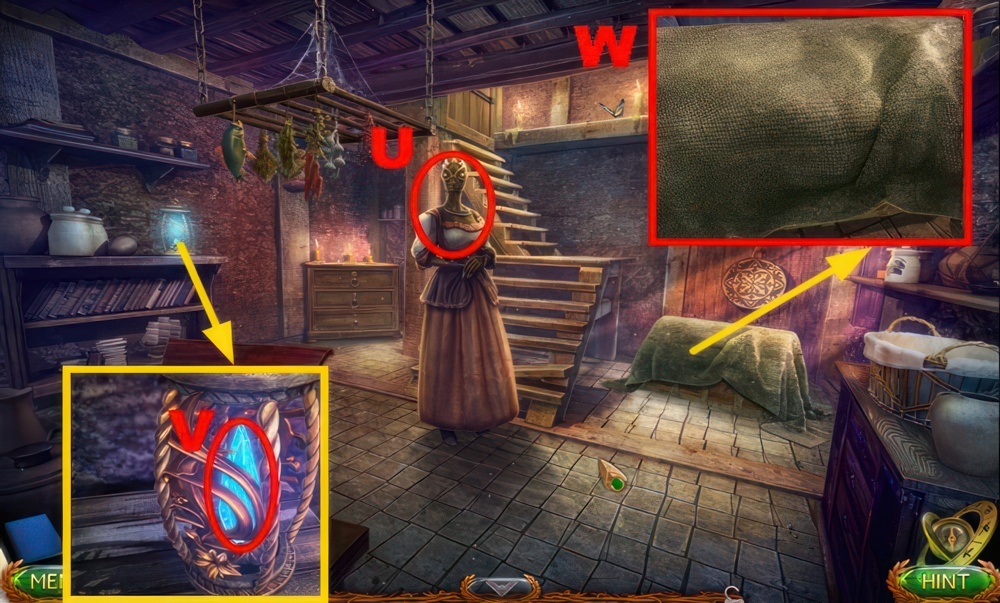
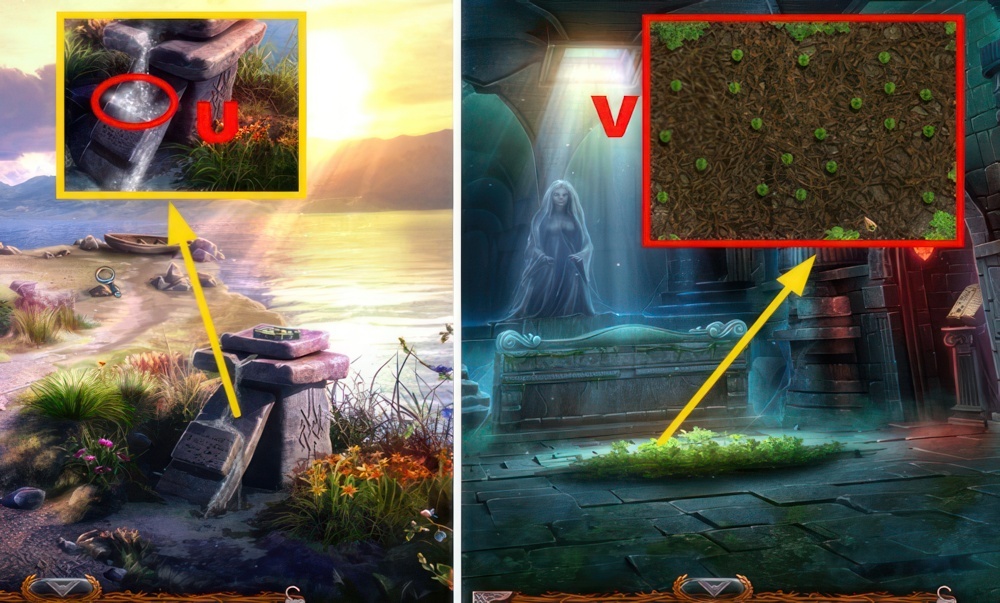
- Use the HAMMER (U).
- Go forward.
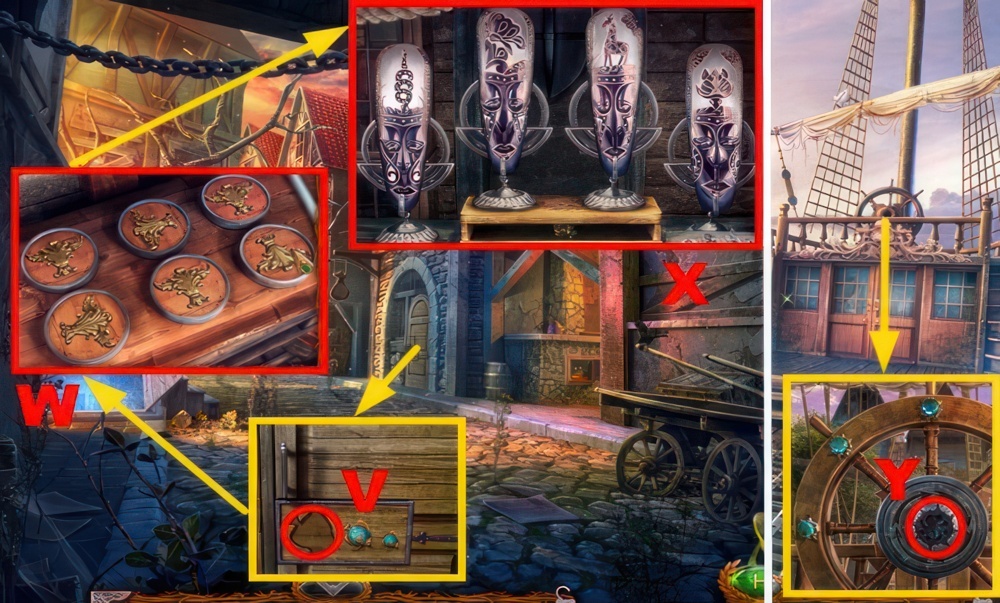
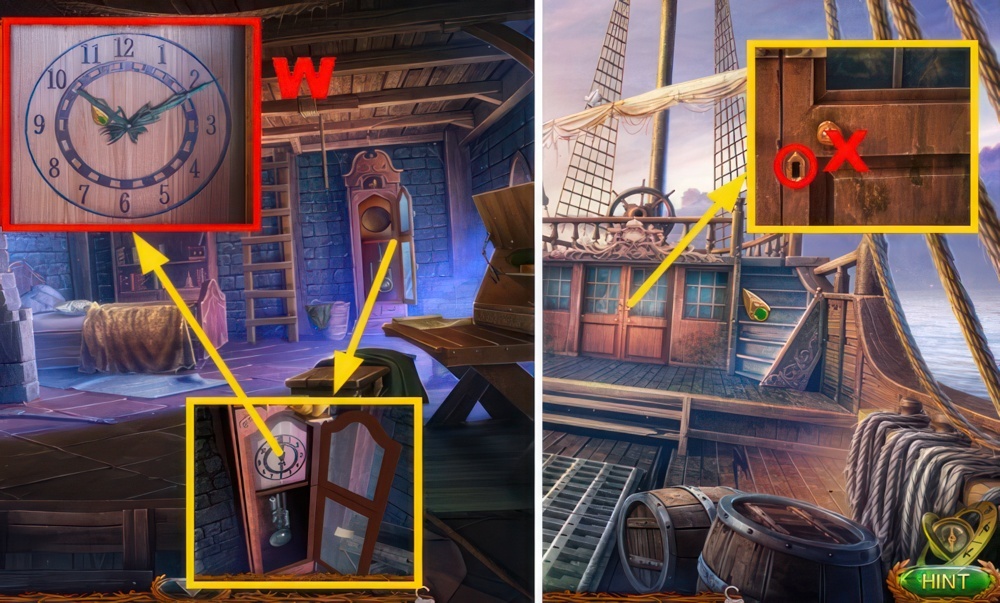
- Inspect the trap (V).
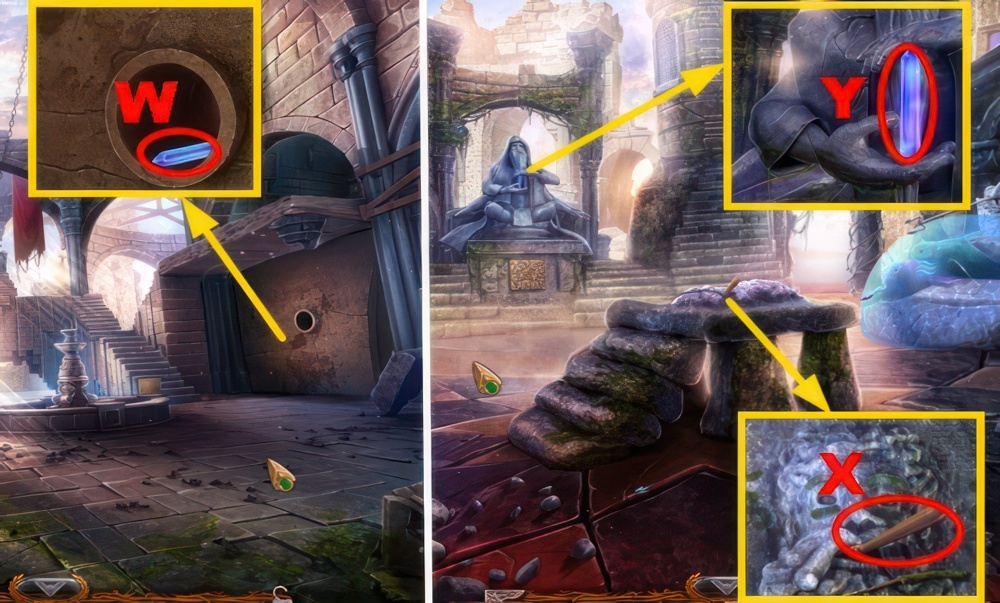
- Place the TEA LEAVES (W).
- Open the door and use the WOOD SHAVINGS (X).
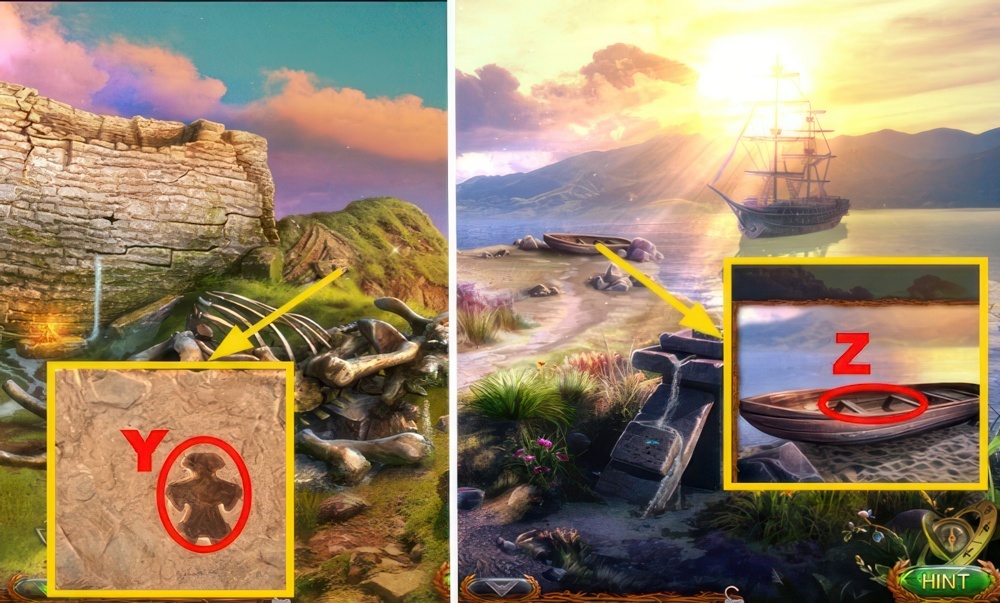
- Take the LONG CLUB and remove items 3 times (Y).
- Turn left.
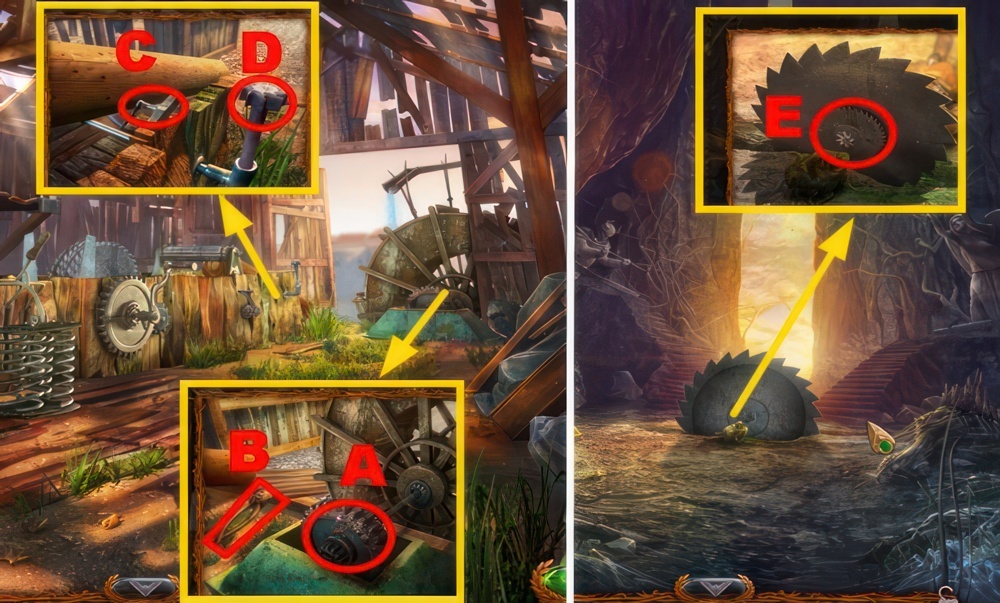
Grey Flounder
I found Captain Stulburn’s real-life ship! I hope it will give me a hint about the fate of its owner. I must get on that ship.
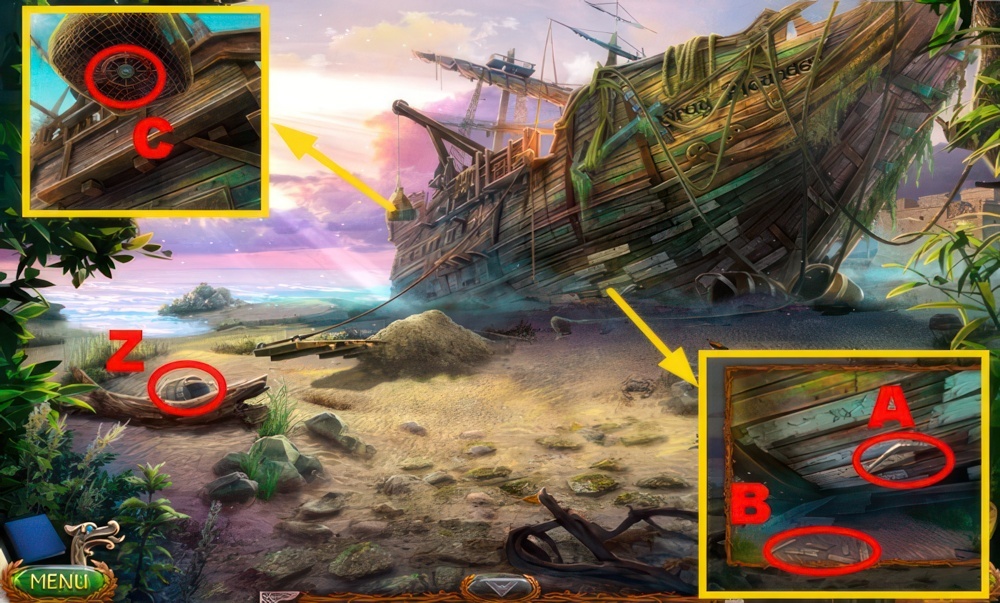
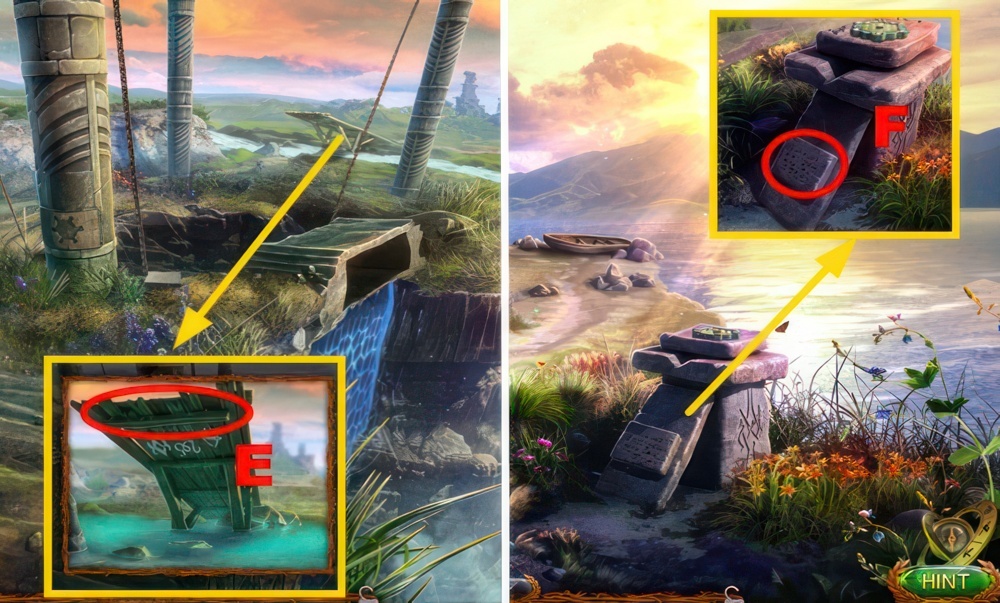
- Take the BUCKET (Z), PRY BAR (A), and KINDLING (B).
- Use the LONG CLUB (C), receive the STEERING WHEEL.
- Walk down.
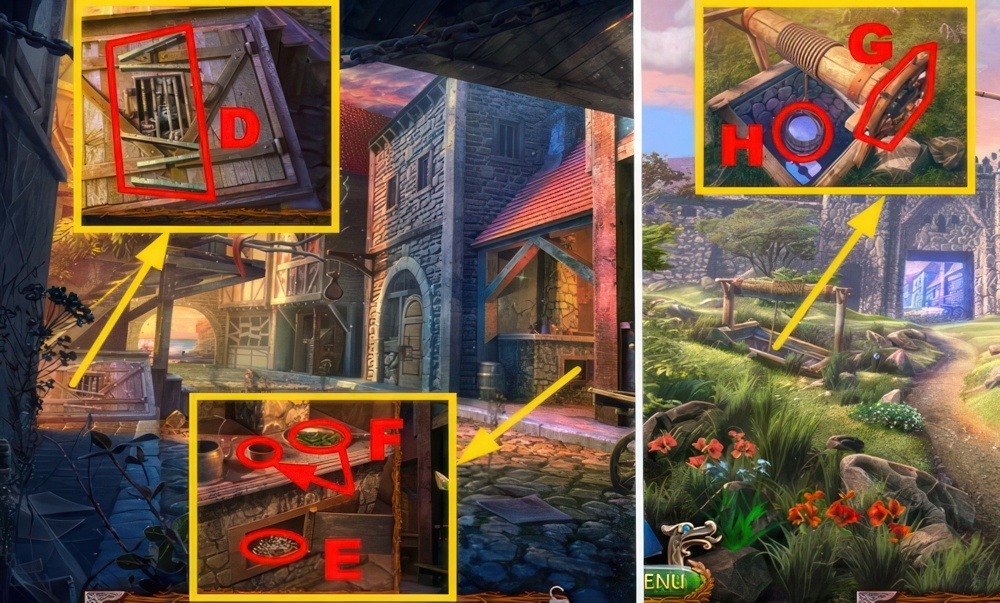
- Use the PRY BAR (D), receive the METAL BARS.
- Use the KINDLING, FIRE STARTER, and BLUNT KNIFE (E).
- Crush and move the tea leaves (F).
- Walk down.
- Place the STEERING WHEEL (G) and BUCKET (H), move the steering wheel twice, and take the BUCKET OF WATER.
- Go forward.
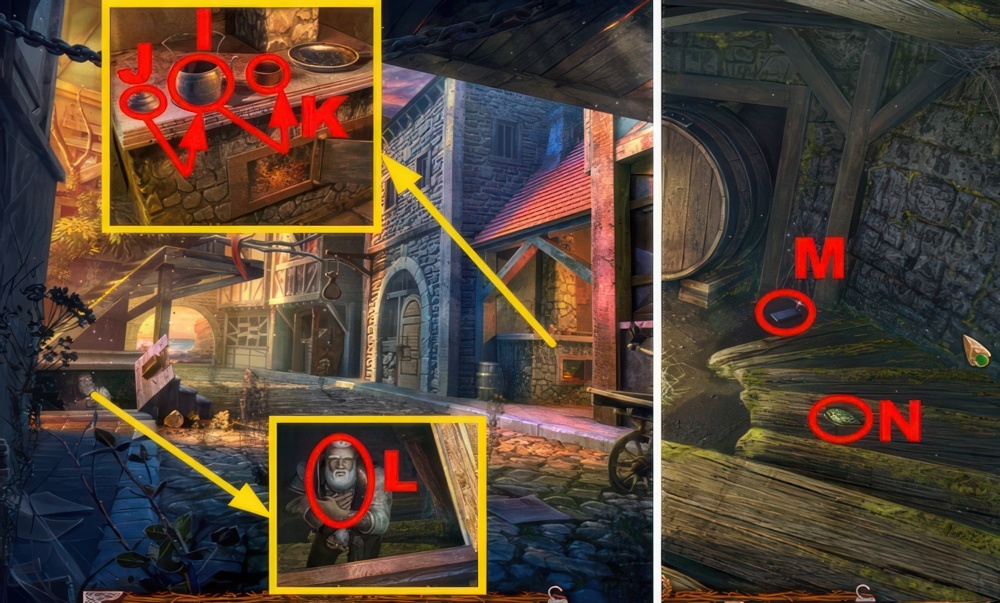
- Use the BUCKET OF WATER (I), lid (J), and kettle (K), take the CUP OF TEA.
- Give the CUP OF TEA (L).
- Go downstairs.
- Take the WHETSTONE (M) and CRYSTAL 1/5 (N).
- Move the blanket and take the SHOVEL BLADE (O).
- Select the mug (P).
- Apply the BLUNT KNIFE to the WHETSTONE, receive the SHARP KNIFE.
- Place the LONG CLUB on the SHOVEL BLADE, apply the SHARP KNIFE to the club, select the club, receive the SHOVEL.
- Go to the Bay Shore.
- Use the SHOVEL and take the FISH FIGURINE (Q).
Captain’s House
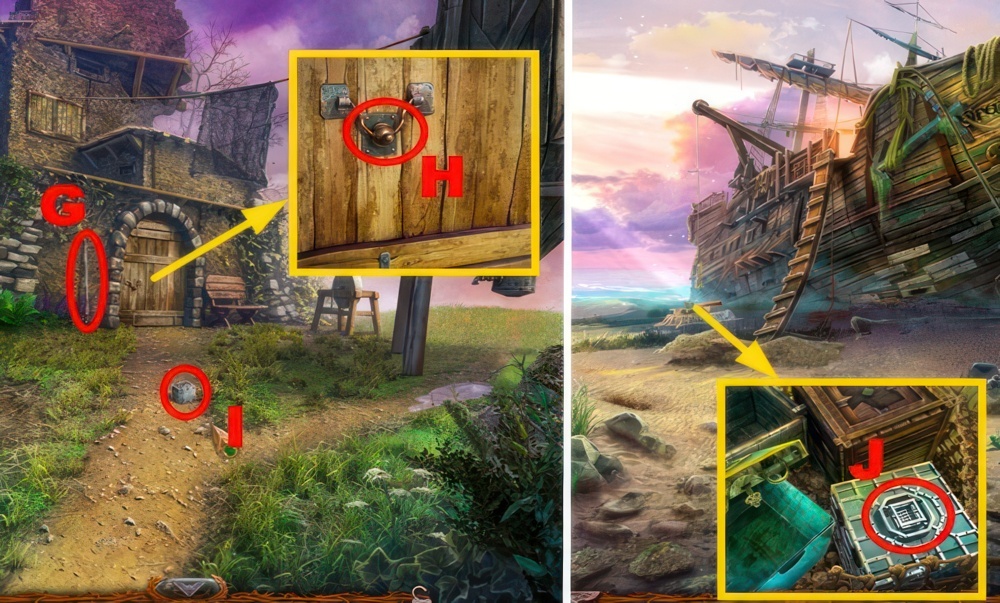
Jepp mentioned that the last time he saw Captain Stulburn was when he was heading home after he’d returned from a journey. Time to visit the Captain’s house and check it out.
- Pull the rope (R).
- Enter the Ship.
- Talk to the man twice (S).
- Take CRYSTAL 2/5 (T) and note the symbols (U).
- Walk down twice.
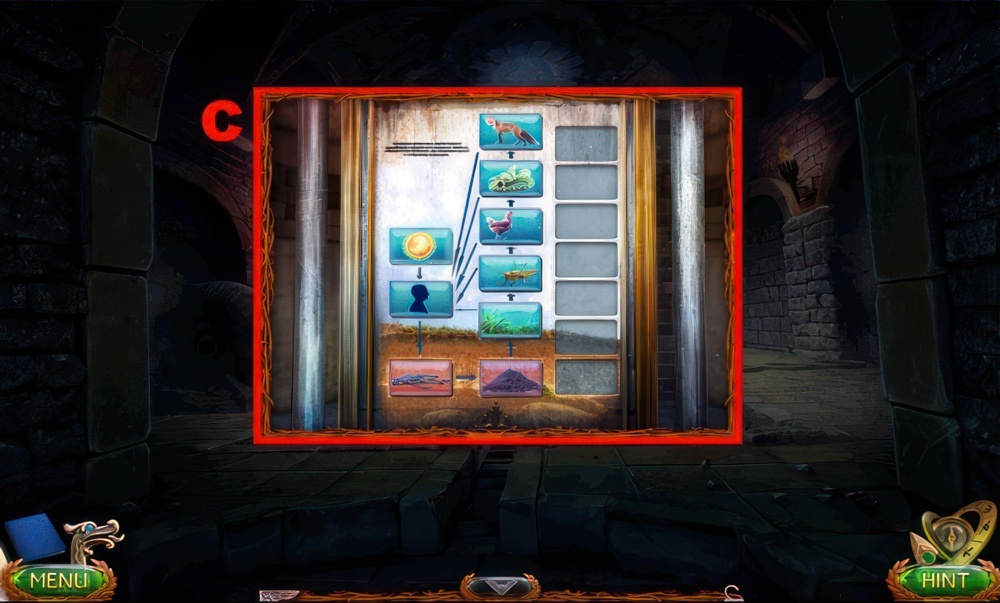
- Place the FISH FIGURINE (V) and play the puzzle.
- Rotate the symbols into the correct positions.
- Puzzle 1 walkthrough: (W).
- Arrange the masks in the correct order.
- Puzzle 2 walkthrough: (X).
- Receive the FRAGMENT.
- Go to the Grey Flounder Deck.
- Place the FRAGMENT (Y).

- Play the puzzle.
- Click on the crystals to direct the green light over all of the lines. You can go over each line once only.
- Walkthrough: D-F-A-C-F-Z-B-G-D-B-E-Z-C-E-G-A-B-C-D-E-F-G-Z-A.
- Take the HAND and KEY.
- Go to the Cellar.
Earl’s Castle
After we examined the Captain’s house, Jepp and I figured out that before he disappeared the Captain went to the earl’s castle. I need to sneak into the castle and learn what happened there.
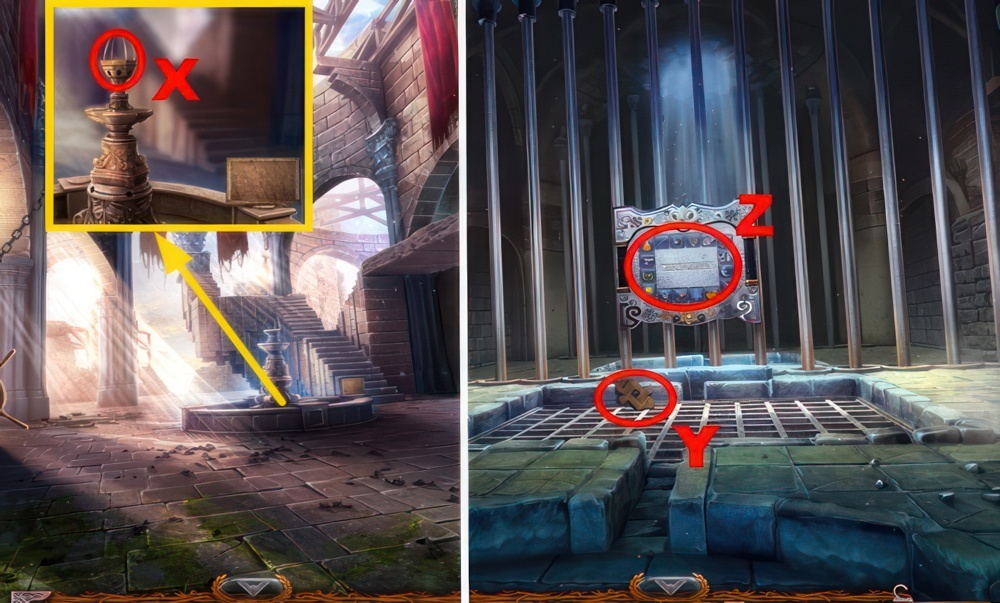
- Use the KEY (H).
- Climb up.
- Place the ladder (I).
- Take the AXE (J).
- Take the LOCK PICK and note (K), receive the RECIPE.
- Take the GEAR (L) and CANDLE (M).
- Open both doors (N), place the HAND (green).
- Remove the blanket, use the SHARP KNIFE, rip the pillow, and take CRYSTAL 3/5 (O).
- Walk down twice.
- Place the CANDLE (P), receive the LIT CANDLE.
- Go to the Grey Flounder Deck.
- Place the GEAR (Q).
- Select the crane (R).
- Walk down.
- Use the SHARP KNIFE and take CRYSTAL 4/5 (S).
- Go to the Captain’s House.
- Climb up (T).
- Place the LIT CANDLE (U), take the BEAVER TAIL (V).
- Go to the Beaverling’s Burrow.

- Place the BEAVER TAIL (W).
- Push it, and take CRYSTAL 5/5 (X).
- Go to the Intersection.
- Place 5 CRYSTALS (Y).
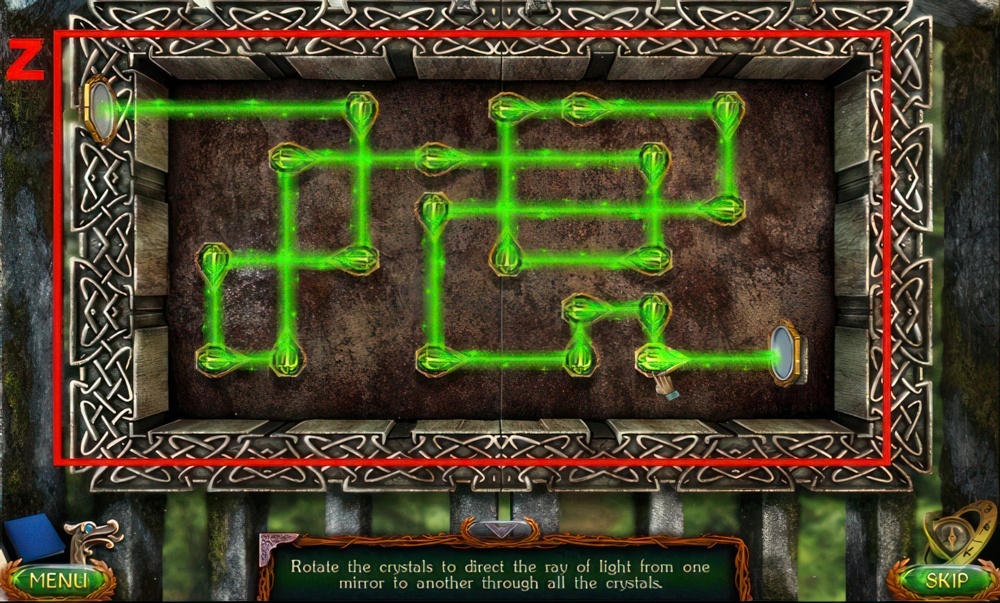
- Play the puzzle.
- Rotate the crystals to direct the ray of light from one mirror to another through all the crystals.
- Walkthrough: (Z).
- Turn right.
- Use the AXE (A).
- Examine the bag (B).
- Play the puzzle.
- Input the correct code. You saw a hint earlier.
- Walkthrough: (C).
- Take the BUTTON.
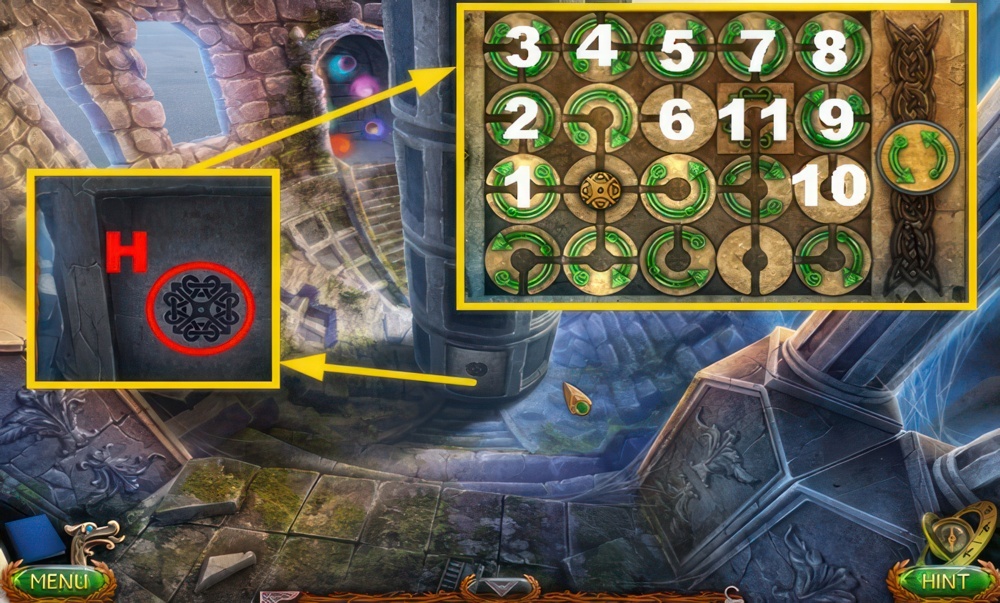
- Take the HAND and inspect the symbol (D).
- Go forward.

- Use the SHARP KNIFE (E), receive the ROPE, and play the puzzle.
- Press the buttons to move the tiles and restore the pattern.
- Puzzle walkthrough: I×2-K-J-I-K-L-K×3.
- Receive the PENDULUM.
- Go to the Captain’s House.
Mysterious clock
In the cache behind the clock dial, Nitielle left something for the Captain. The code to the cache is hidden in his writing desk. I must open it.
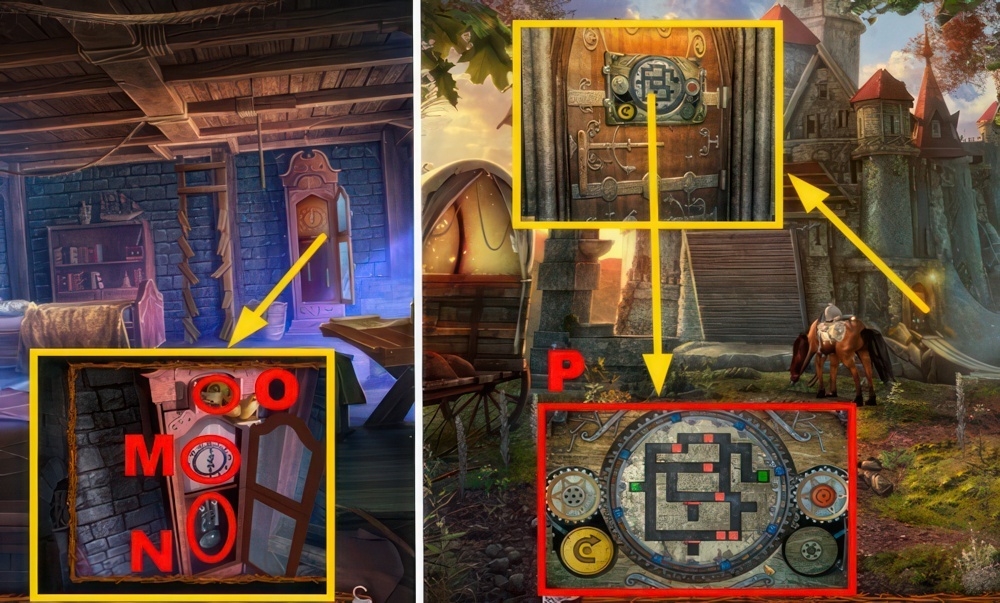
- Place the HAND (M), PENDULUM (N), and pull the pendulum, take the note and BUTTON (O).
- Go to the Earl’s Castle.
- Place 2 BUTTONS (P).
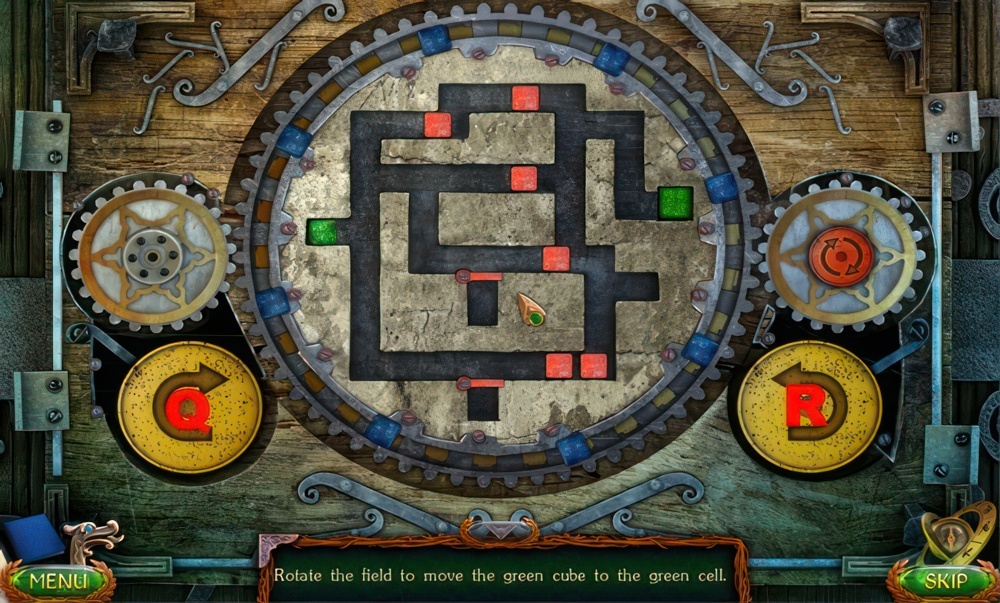
- Play the puzzle.
- Rotate the field to move the green cube to the green cell.
- Walkthrough: Q-R×3-Q×2-R×3-Q-R×2-Q×2-R×2-Q.
- Go through the door.
Locked up
When the earl couldn’t force any information out of me, he ordered that I be thrown into a dungeon. I must figure out how to get out of here.

- Talk to the earl (S).
- Take the STONE TABLET (T) and RAG (U).
- Move items and take the GLASS (V).
- Place the RAG on the GLASS, receive the HANDMADE MIRROR.

- Use the HANDMADE MIRROR and LOCK PICK (W).
- Go forward.
- Talk to Nitielle (X).
- Take the PLANK (Y) and LOG (Z).
- Place the PLANK and LOG (A), select the plank.
- Take STONE 1/5 and place the STONE TABLET (B).
- Select buttons 1-3.
- Go forward.
Way to the island
I helped Nitielle to escape from the prison in which she’d spent so many years all alone. Now both of us must get to Pangonian Island.

- Take the SPEAR (C).
- Play the puzzle.
- Arrange the elements as shown in the hint.
- Walkthrough: E×4-I×2-G-I-G×5-F-G-F-G-F-G×2-F-H×5-G-F×4-J×2.
- Take the KEY.
- Take the GOBLIN’S HAIR (K).
- Go forward.
- Take the PRIMITIVE KNIFE (L).
- Place the KEY (M).
- Walk down twice.
- Use the PRIMITIVE KNIFE and take the ARROW (N).
- Take the OWL FIGURINE from the ARROW.
- Go forward twice.
- Place the ARROW (O), turn the key (P).
- Use the PRIMITIVE KNIFE (Q) to acquire the THORN and use the SPEAR (R).
- Use the PRIMITIVE KNIFE (S), receive STONE 2/5.
- Take LEVER 1/4 (T).
- Go forward.
- Play the puzzle (U).
- Press only correct symbols as shown in the hint.
- Activate sections 1-5.
- Receive the ENERGY SPHERE.
- Take LEVER 2/4 (V).
- Take STONE 3/5 (W).
- Go upstairs.
- Take LEVER 3/4 (X), STONE 4/5, and place the ENERGY SPHERE (Y).

- Take the TWO-PRONGED STAFF (Z) and HAMMER HEAD (A).
- Turn right.
- Take LEVER 4/4 (B).
- Use the TWO-PRONGED STAFF (C).
- Take the FEATHER and STONE 5/5 (D).
- Walk down twice.

- Place 5 STONES (E) and 4 LEVERS (F), pull the wheel.
- Remove the stones, open the box, and take the SYMBOL (G).
- Go to the Portal.
- Place the SYMBOL (H), select the board.
- Play the puzzle.
- Move the coin to the square field.
- Walkthrough: 1-2-3-4-5-6-5-7-8-9-10-9-11.
Portal
Among the ruins in the Necropolis, we came across an object resembling a portal. Nitielle assures me that it will take us to Pangonian Island. We must find a way to activate the device.
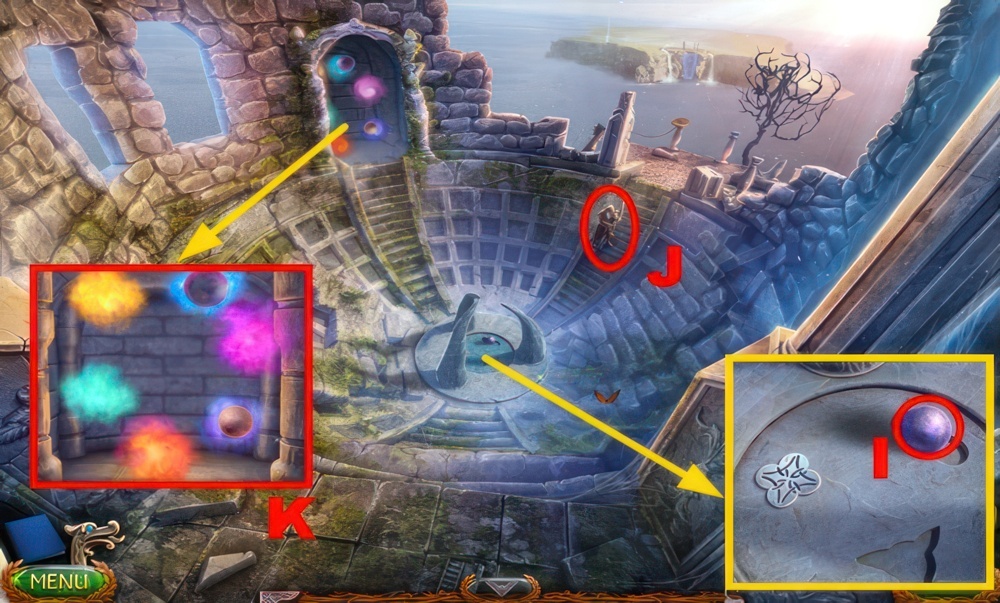
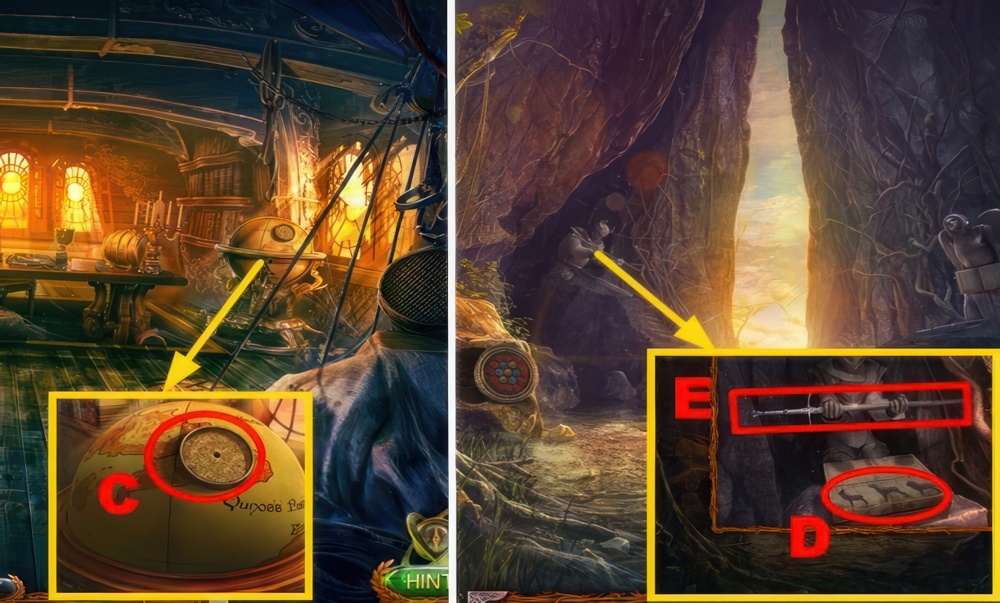
- Take the PLANET MODEL (I).
- Talk to the man (J), receive the KEY.
- Place the PLANET MODEL (K).
- Go to the Castle Hall.
- Insert the KEY and turn it (L).
- Go forward.
- Take the GLASS SPHERE (M).
- Go to the Bay Shore.

- Place the GLASS SPHERE and take the ADRENALINE VIAL (N).
- Go to the Road to the Castle.
- Use the ADRENALINE VIAL (O).
- Take the DROWSY FLOWER and FRAGMENT (P).
- Cut the DROWSY FLOWER with the PRIMITIVE KNIFE, receive the DROWSY FLOWER’S ROOT and take the SLEEPING FLOWER.
- Go to the Beaverling’s Yard.

- Place the SLEEPING FLOWER and remove the bandage (Q).
- Take the LARD (R).
- Walk down.
- Talk to Corko (S), receive the KEY.
- Place the FRAGMENT (T).

- Play the puzzle.
- Draw a closed shape so that each square with a number in it is surrounded by that number of lines.
- Walkthrough: (U).
- Take the EMPTY FLASK.
- Go forward.
Vigilant obstacle
We can’t examine the earl’s throne room due to a guard at its entrance. Luckily he has his back turned to us, so we could try to put him to sleep with the berserker’s weapon. But first we need to make one according to Jepp’s instructions.
- Use the EMPTY FLASK (V), receive the VIAL OF WOLF BLOOD.
- Insert the KEY (W), turn it.
- Enter the Granary.
- Take the TONGS (X).
- Select the wrench (Y), and remove a blade (Z).
- Use the LARD (A).
- Take the JUICER (B).
- Select the fastener (C) and pull the lever (D).
- Go to the Secret Passage.
- Use the TONGS and take the DISK SAW (E).
- Go to the Granary.
More difficulties
Now I know the whereabouts of the captain’s body, but I still need to get to the place and see if this is really his body and not some optical illusion.

- Place the DISK SAW (F) and apply the wrench to it (G), pull the handle (H).
- Select the device (I), take the PLANKS (J).
- Go to the Necropolis Entrance.
- Place the PLANKS (K).

- Take the SAW (L).
- Remove the arrow (M).
- Go to the Ferry.
- Use the SAW (N), receive the BAMBOO ROD.
- Place the GOBLIN’S HAIR, THORN, FEATHER, DROWSY FLOWER’S ROOT, VIAL OF WOLF BLOOD, JUICER, and BAMBOO ROD on the RECIPE.
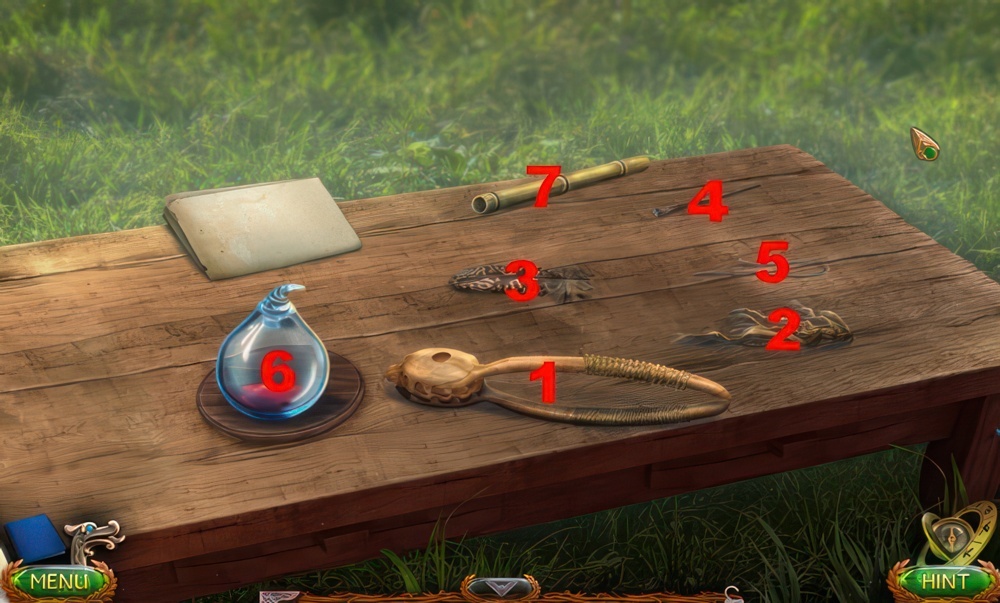
- Prepare the recipe: (1-2)-(3-4)-(5-4)-(4-6)-(4-7).
- Receive the SLEEPING DART.
- Go to the Throne Room.

- Use the SLEEPING DART (O).
- Play the puzzle (P).
- Puzzle walkthrough: 1-4.
- Receive the FLOWER FIGURINE.
- Select and take the KEY (Q).
- Insert the KEY, take the ROPE, SHARP KNIFE, HAMMER, SHACKLES.
- Place the FLOWER FIGURINE, and take the ELEPHANT FIGURINE (R).
- Go to the Pantheon.
- Place the SHACKLES and use the HAMMER (S).
- Go upstairs.

- Take the TILE (T) and PORTAL PART (U).
- Go to the Castle Hall.
- Place the TILE (V).
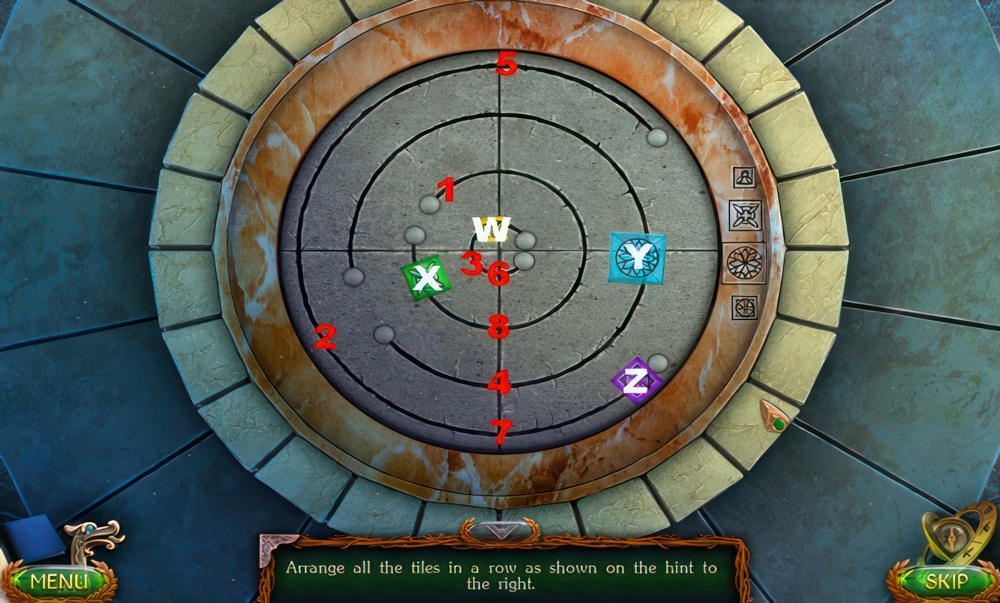
- Play the puzzle.
- Arrange all the tiles in a row as shown on the hint to the right.
- Walkthrough: (X-1)-(Z-2)-(W-3)-(Y-4)-(Z-5)-(W-6)-(Z-7)-(X-8).
- Take the PORTAL PART.
- Go to the Portal.
- Place 2 PORTAL PARTS (A).
- Go down through the portal.
- Use the HAMMER (B).
- Take the HOOK (C).
- Place the ROPE on the HOOK and select it, receive the ROPE WITH A HOOK.
- Throw the ROPE WITH A HOOK (D), receive the MEDALLION.
- Select the MEDALLION twice, receive the TURTLE FIGURINE.
- Go forward.
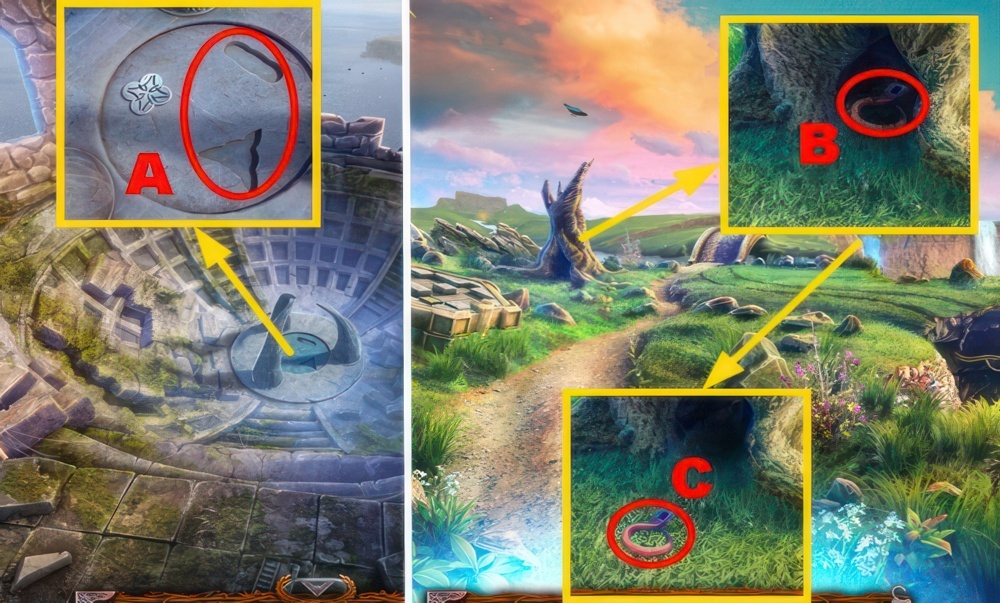
- Inspect the area (E).
- Read the inscription (F).
- Go to the Earl’s Castle.
Another puzzle
Finally we got to the Magic Crypt. Luckily, the body really is inside, but we have no idea how to lift it to the surface.
- Play the puzzle.
- Rotate the wheel to point the arrow to the symbols in the correct order. You saw a hint earlier.
- Walkthrough: 1-3.
- Take the APPLE.
- Select the APPLE twice, receive the SEEDS and take the APPLE CORE.
- Walk down.
- Place the SEEDS (G).
- Take the SNAKE FIGURINE (H).
- Go to the Necropolis Entrance.
- Place the TURTLE FIGURINE and SNAKE FIGURINE (I).
- Play the puzzle.
- Arrange the chips on the black squares in the same order as shown in the hint.
- Walkthrough: (J-right)-(K-down)-(L-up×2)-(M-left)-(K-down)-(N-left)-(O-left)-(P-down)-(Q-right).
- Take the STONE PLATE.
- Go to the Bay Shore.
A witness
We found a house on the island, but we don’t know if anyone lives there. If someone is home, I hope they will be able to help us.

- Place the STONE PLATE and take the JAR WITH SAND (R).
- Select the JAR WITH SAND twice, receive the EMPTY JAR and take the STONE CROWN.
- Go to the Cellar.
- Place the EMPTY JAR, APPLE CORE, and take the RAT IN A JAR (S).
- Take the STONE SICKLE (T).
- Go to the Pangonian Island.

- Place the RAT IN A JAR (U).
- Play the puzzle.
- Click on the arrows to move the cheese into the hole.
- Walkthrough: W-X-W-Y-V-W-V-Y-X.
- Take the STONE BOOK.
- Go to the Castle Hall.

- Place the STONE CROWN (Z), STONE BOOK (A), and STONE SICKLE (B), take the SKULL (purple).
- Go to the Intersection.
- Place the SKULL (C).
- Take the GAFF (D).
- Go to the Energy Reservoir.
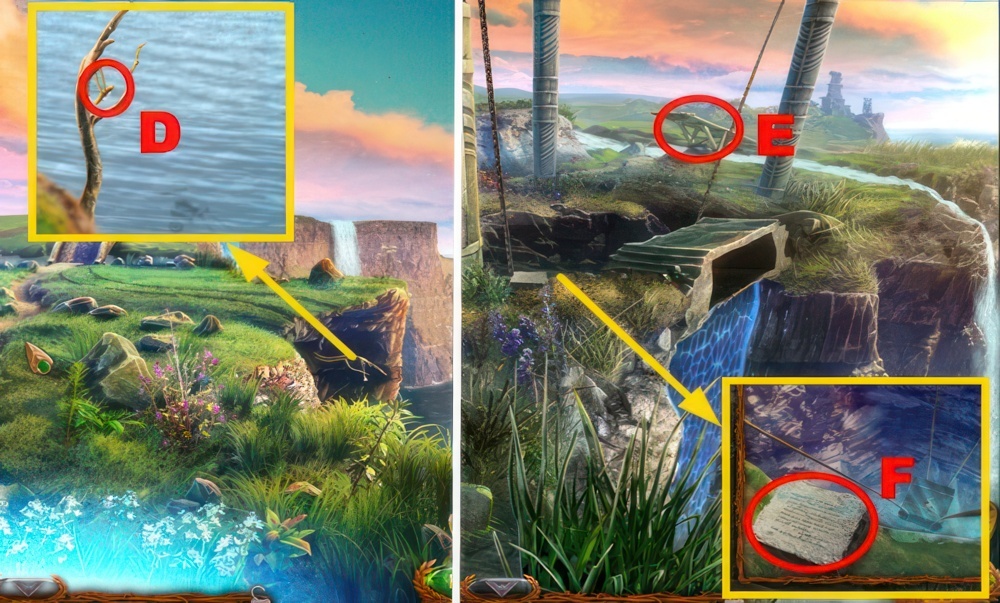
- Use the GAFF (E).
- Read the plate (F).
- Go forward.
- Take the RAKE (G).
- Use the knocker (H).
- Take the IRON CUBE (I).
- Go to the Bay Shore.
- Place the IRON CUBE and take the STONE SWORD (J).
- Go to the Pangonian’s House.

- Use the STONE SWORD (K), acquire the SWORD.
- Walk down.
- Use the SWORD, RAKE and take the HOSE and PIECE (L).
- Go forward.

- Place the HOSE (M), receive the FAUCET NUT.
- Inspect the area (N).
Helping hands
The Pangonian woman is afraid of us, suspecting we’re the earl’s people. If we want to prove otherwise we must complete a couple of tasks for her: clear her garden of rodents, and put a helmet hidden somewhere in the Necropolis on her husband’s grave.
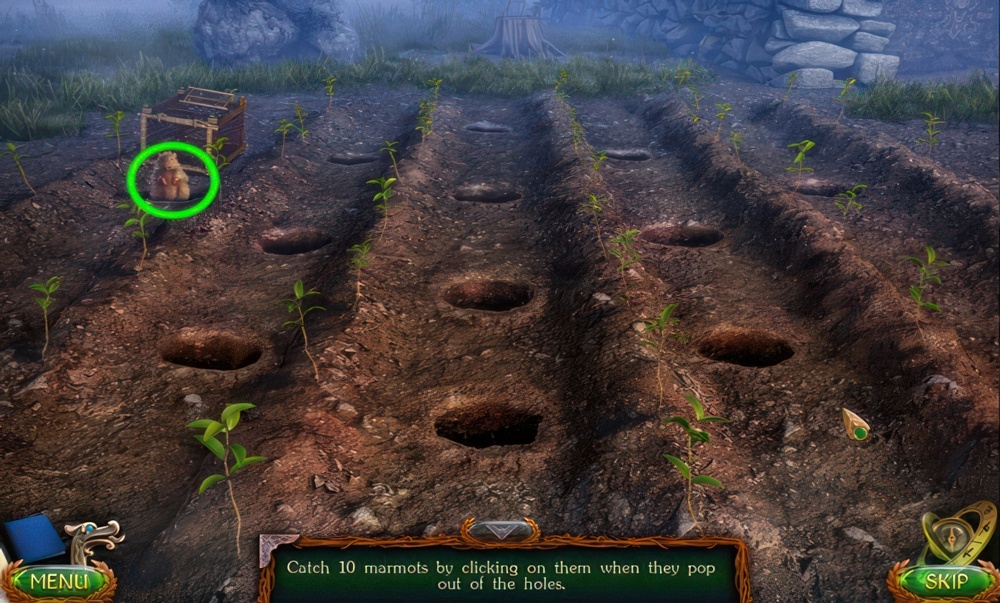
- Play the puzzle.
- Catch 10 marmots by clicking on them when they pop out of the holes.
- Walkthrough: Catch the hamster (green) 10 times.
- Go to the Lighthouse.
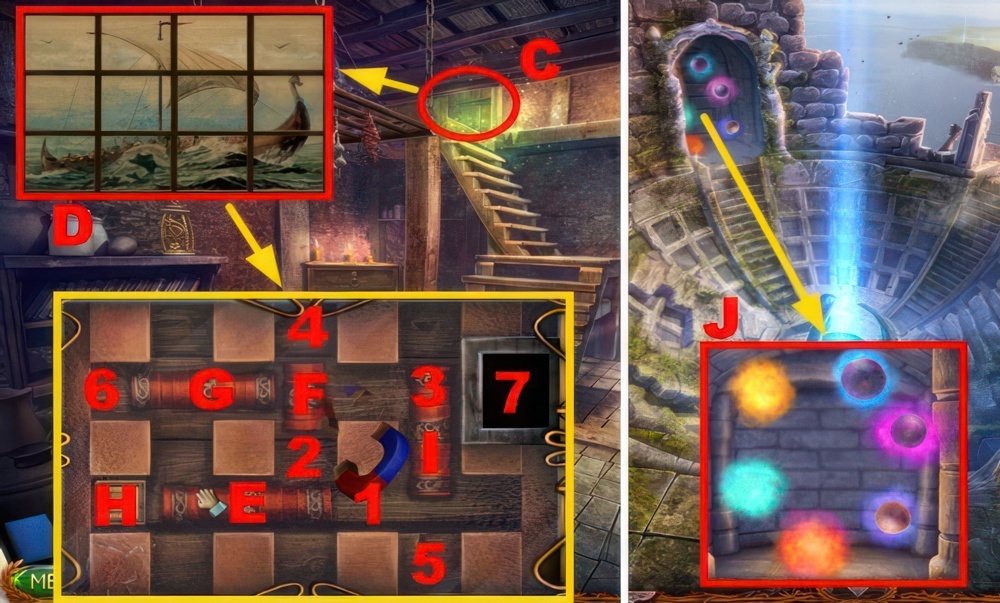
- Place the PIECE (O) and play the puzzle.
- Reassemble the window.
- Puzzle 1 walkthrough: (P).
- Arrange the levers in the correct positions.
- Puzzle 2 walkthrough: (Q).
- Receive the HELMET.
- Go to the Cellar.

- Place the FAUCET NUT and turn it (R).
- Take the MUG OF RUM (S).
- Go to the Cliff Descend.
- Place the HELMET (T).
- Go forward twice.
Sorceress’s sarcophagus
Sheeleesa told us that soon after the Magic Crypt was built, its designer, the sorceress Fahira, died and was buried somewhere in the Necropolis. We must find the place and examine it thoroughly.
- Talk to Sheeleesa (U).
- Take the CRYSTAL (V).
- Remove the blanket (W).
- Go to the Main Sanctuary.
- Place the CRYSTAL (X).
- Turn right.
- Take the WOODEN CUBE (Y).
- Inspect the area (Z).
- Play the puzzle.
- Find opposite images and connect them.
- Walkthrough: (A).
- Inspect the area (B).
- Play the puzzle.
- Arrange all the tiles to show the correct food chain.
- Walkthrough: (C).
- Go to the Bay Shore.
- Place the WOODEN CUBE and take the FIGURINE (D).
- Walk down.
- Place the FIGURINE and inspect the compartment (E).
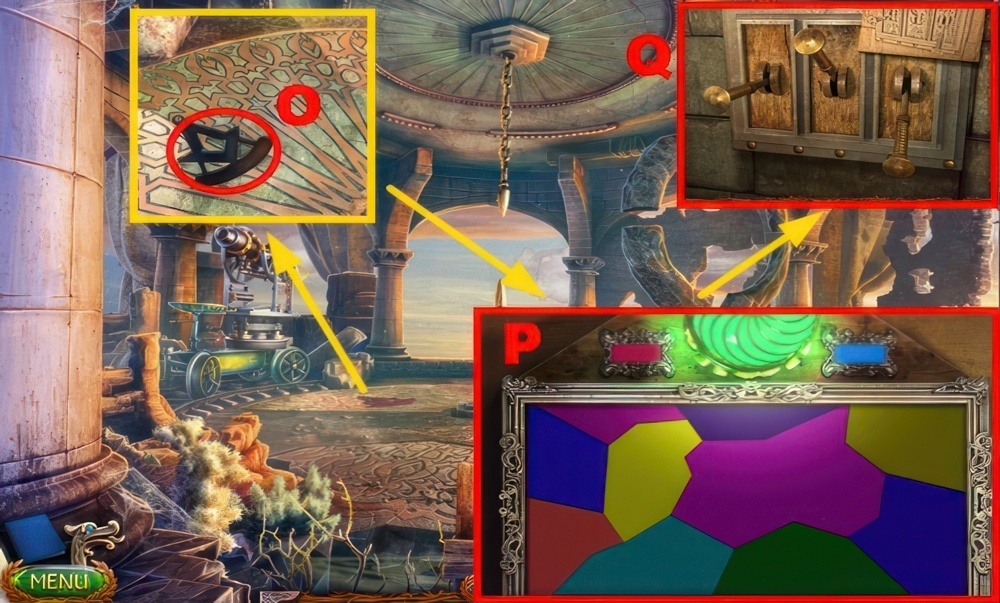
- Play the puzzle.
- Arrange all the pieces in the central field.
- Walkthrough: (F).
- Take the TABLETS WITH NUMBERS.
- Go to the Corridor of Trials.

- Place the TABLETS WITH NUMBERS (G).
- Play the puzzle.
- Place the plates in the correct order as shown in the picture hint.
- Walkthrough: (H).
- Go forward.
- Take the KEY (I).
- Go to the Pangonian’s Living Room.
- Use the KEY and take the PAGE and MOUNTAIN GEAR (J).
- Walk down three times.
- Use the MOUNTAIN GEAR and HAMMER (K).
- Turn left.

- Take the WATERING CAN (L).
- Use the HAMMER HEAD and take the MAMMOTH BRAIN and WATER SYMBOL (M).
- Go to the Pantheon.
- Place the WATER SYMBOL, SWORD, SAW, and HAMMER HEAD and take the note and PATTERNED TILE (N).
- Go to the Archmage Tomb.
- Place the PAGE (O).
- Go to the Pangonian Island.
- Push the rock, open the bag, move the cloth and take the PLANET MODEL, SMALL BOX, and NEEDLES (P).
- Place the SMALL BOX and open it (Q).
- Use the NEEDLES (R) and take the THERMITE CASKET.
- Go to the Cliff Descend.
- Place the PATTERNED TILE (S).
- Play the puzzle.
- Move the tiles to restore the pattern.
- Walkthrough: (T).
- Use the WATERING CAN (U), receive the WATER OF LIFE IN A POT.
- Go to the Archmage Tomb.
- Use the WATER OF LIFE IN A POT (V).
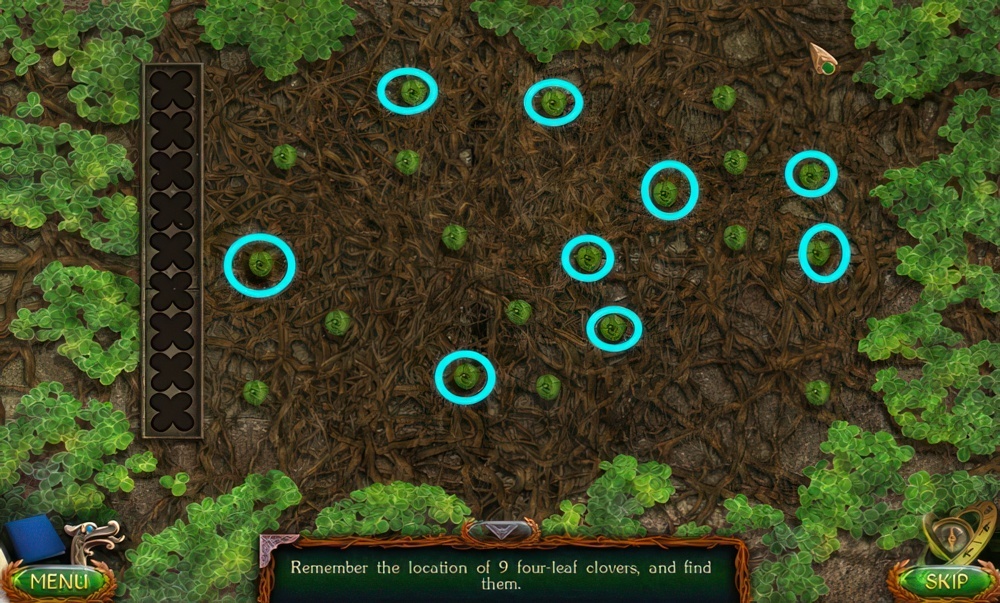
- Play the puzzle.
- Remember the location of 9 four-leaf clovers, and find them.
- Walkthrough: Choose 9 four-leaf clovers (blue).
- Receive the HANDFUL OF CLOVER.
- Go to the Pantheon.
- Place the MAMMOTH BRAIN, MUG OF RUM, THERMITE CASKET, and HANDFUL OF CLOVER (purple).
- Prepare the ritual: (1-2)-(3-4)-2-5-(5-4)-(1-4)-(6-4)-(7-4).
- Go to the Archmage Tomb.
- Talk to Fahira (W).
Secret memoirs
Before her death Fahira described in her memoirs how she enchanted Captain Stulburn and how to lift the spell. We need to find the notes and study them.

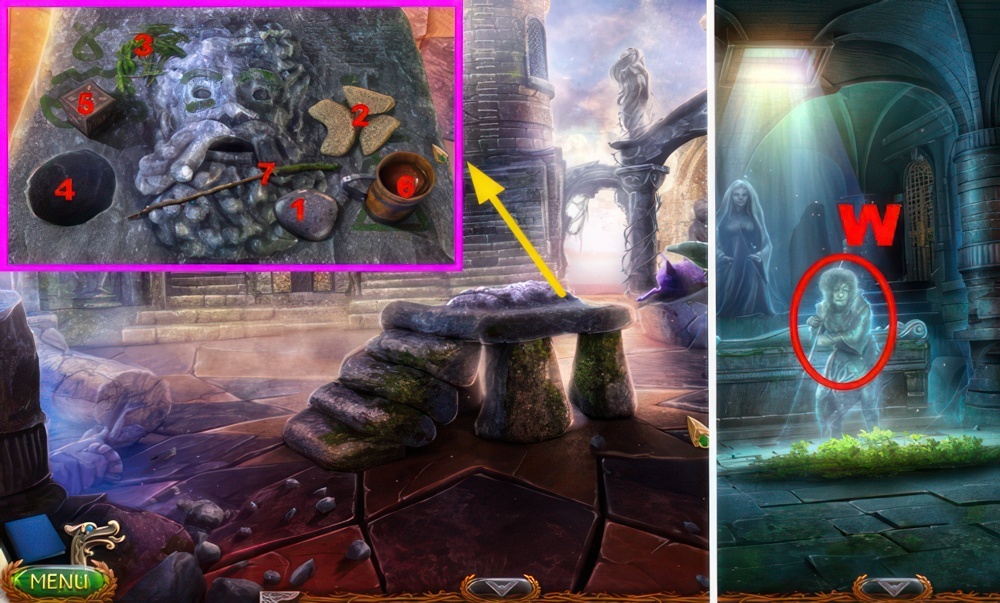
- Take FAHIRA’S HAND and RUNG 1/5 (X).
- Go to the Castle Hall.
- Place FAHIRA’S HAND (Y).
- Turn left.
- Take RUNG 2/5 (Z).
- Use the HAMMER and select the chalk (A).
- Read the note (B).
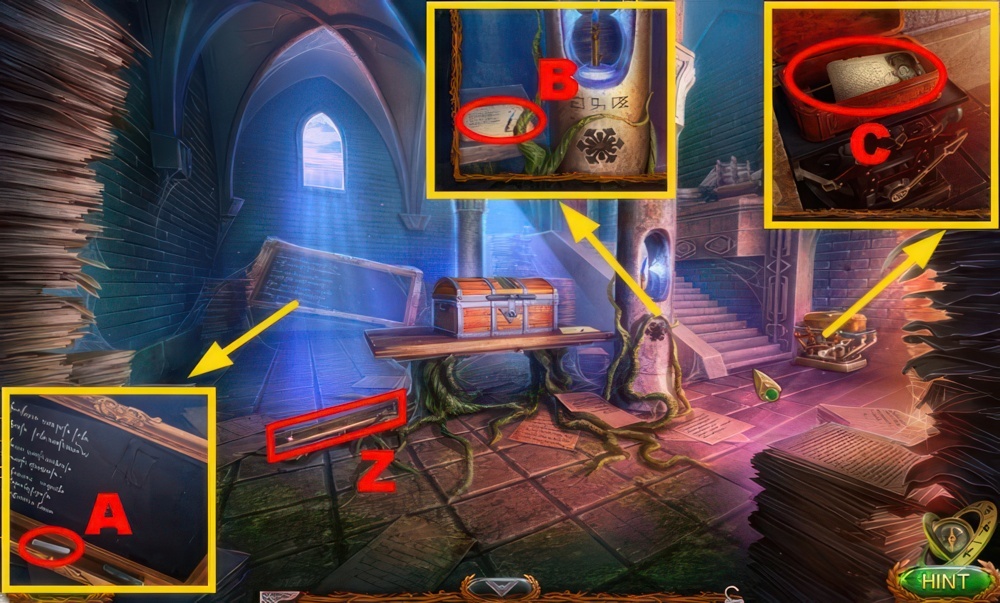
- Open the chest and take the note, KEY, and SNAKE FIGURINE (C).
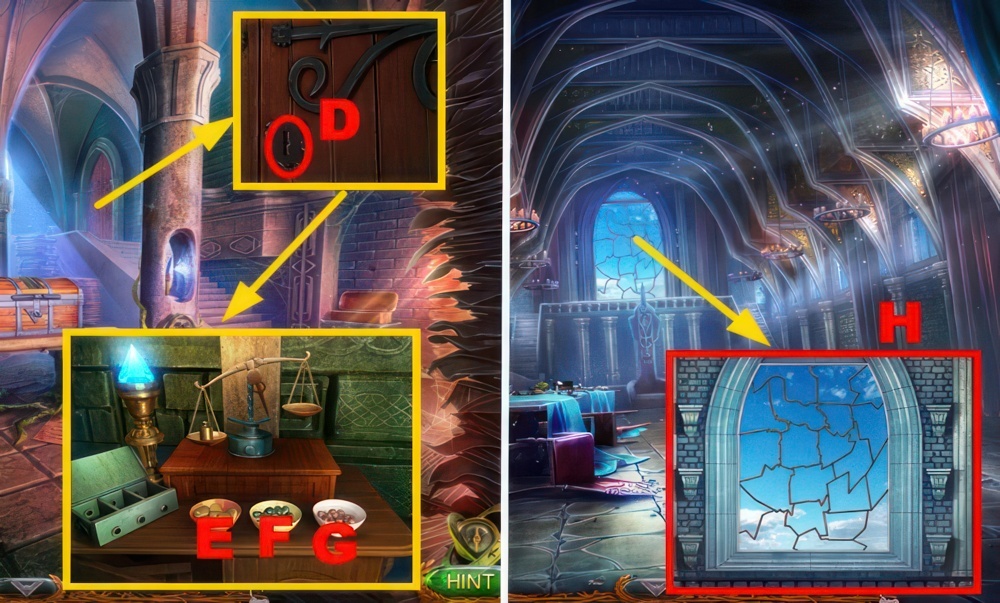
- Insert the KEY (D) and play the puzzle.
- Balance the minerals on the scale.
- Puzzle walkthrough: E×4-F×7-G×16.
- Receive the GLASS.
- Go to the Throne Room.
- Place the GLASS (H).
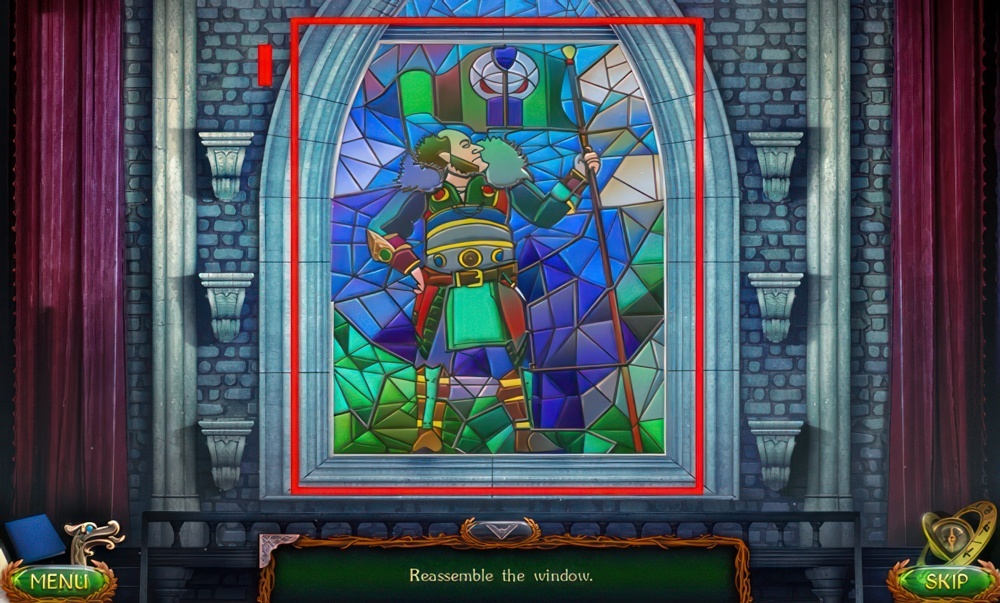
- Play the puzzle.
- Reassemble the window.
- Walkthrough: (I).
- Go to the Secret Passage.
- Place the SNAKE FIGURINE, OWL FIGURINE, ELEPHANT FIGURINE, and take the OBLIVION STONE and PRISM OF SPELLS (J).
- Go to the Throne Room.
- Use the PRISM OF SPELLS (K).
- Go to the Archmage Laboratory.
- Activate sections 1-5.
- Swap the fragments to restore the image.
- Assemble the picture correctly (L).
Awakening
We studied Fahira’s notes describing in detail a method for awakening the captain. All we have to do is to follow the instructions and remove the curse from Finuer Stulburn.
- Take the note, VIAL, and UNUSUAL KEY (M).
- Go to the Main Sanctuary.
- Use the VIAL (N), receive the WATER OF DEATH.
- Go to the Energy Reservoir.
Earl’s ship
A ship under earl Obian’s banner has moored at Pangonian Island. We must infiltrate the ship and use its cannons to demolish the wall that splits the river.
- Place the UNUSUAL KEY and take RUNG 3/5 and the HAND FIGURINE (O).
- Go forward.
- Use the WATER OF DEATH (P), receive the WATER VIAL.
- Go to the Pangonian’s Living Room.

- Insert the HAND FIGURINE and take the TRACING PAPER, RUNG 4/5, and SKULL PIECES (Q).
- Unfold the TRACING PAPER, take the KEY and TRACING PAPER.
- Go to the Lighthouse.
- Use the KEY (R), receive the BROKEN LENS.
- Go to the Corridor of Trials.

- Place the SKULL PIECES (S).
- Play the puzzle.
- Put all the pieces in the correct spots.
- Walkthrough: (T).
- Take the MAN FIGURINE (U).
- Go to the Archmage Laboratory.

- Place the TRACING PAPER (V).
- Use the coal (W), and take the PUNCH CARD.
- Go to the Secret Passage.
- Use the PUNCH CARD (X).
- Go to the Wall.
Maaron’s task
Maaron wants to prepare a special potion to put Captain Stulburn quickly back on his feet. I’m missing just one ingredient – body of a mollusk.
- Place the MAN FIGURINE and take the OAR (Y).
- Go to the Cliff Descend.
- Place the OAR (Z).
- Turn right.
- Take the KEY RING (A).
- Select the board (B).
- Take RUNG 5/5 (C).
- Use the KEY RING (D).
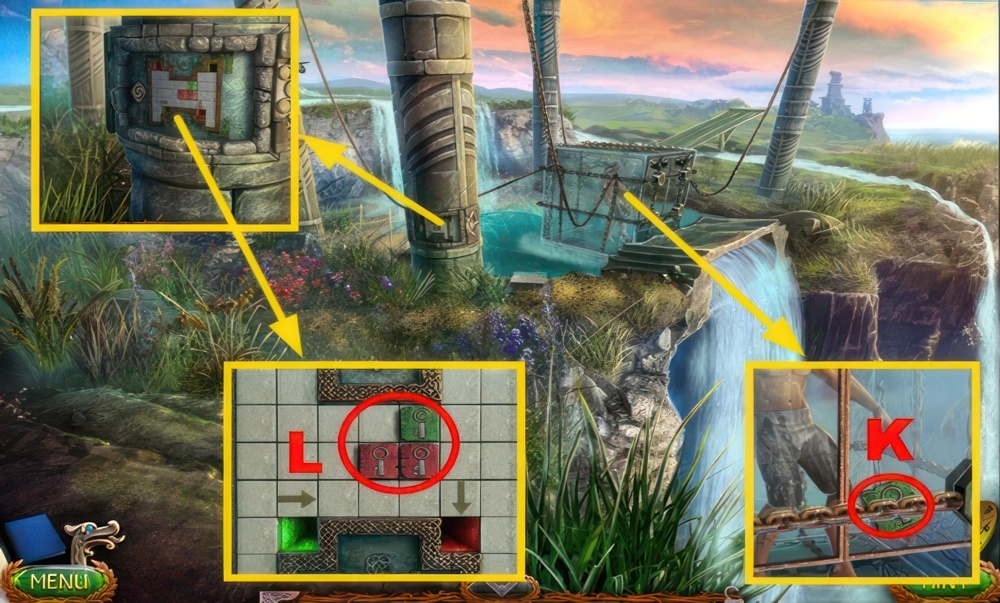
- Play the puzzle.
- Walkthrough: (E).
- Take the WIRE CUTTERS.
- Use the WIRE CUTTERS, open the grid, take the GLOVES, open the barrel, and take the FLINT (F).
- Use the FLINT (G).
- Go to the Captain’s House.
- Use 5 RUNGS and the HAMMER (H).
- Go to the Cliff Descend.
- Use the GLOVES (I), receive the WEED.
- Go to the Wall.
- Place the WEED (J).
- Go to Obian’s Ship.
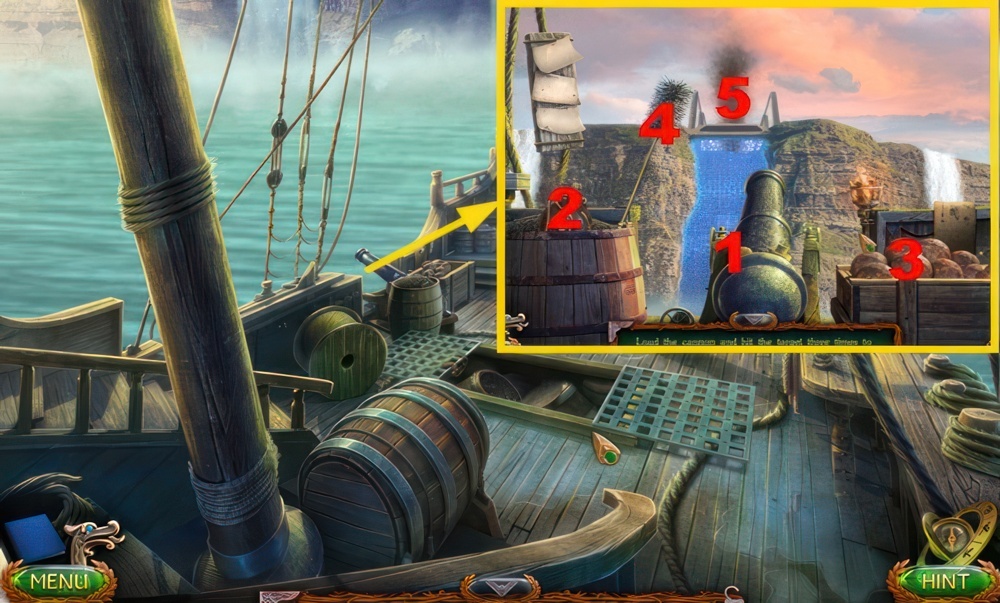
- Play the puzzle.
- Load the cannon and hit the target three times to destroy the wall.
- Walkthrough: 1-5.
- Do this sequence 3 times.
- Go to the Energy Reservoir.
- Take the TILE (K).
- Place the TILE (L).

- Play the puzzle.
- Move the pieces to the holes of the matching color.
- Walkthrough: (O-left)-(O-down)-(M-left)-(M-down)-(M-right)-(P-down)-(P-left)-(N-right)-(N-up)-(O-up).

- Use the WATER VIAL and OBLIVION STONE (Q).
- Play the puzzle.
- Press adjacent buttons to draw specific symbols. You saw them earlier.
- Draw symbols 1-3.
Finuer’s task
While Maaron is tending to the captain’s physical condition, I must bring Stulburn some clothing from his house, and a sword called Smasher from the statue in the Secret Passage.
- Talk to the Captain (R), receive the KEY.
- Go to the Captain’s House.
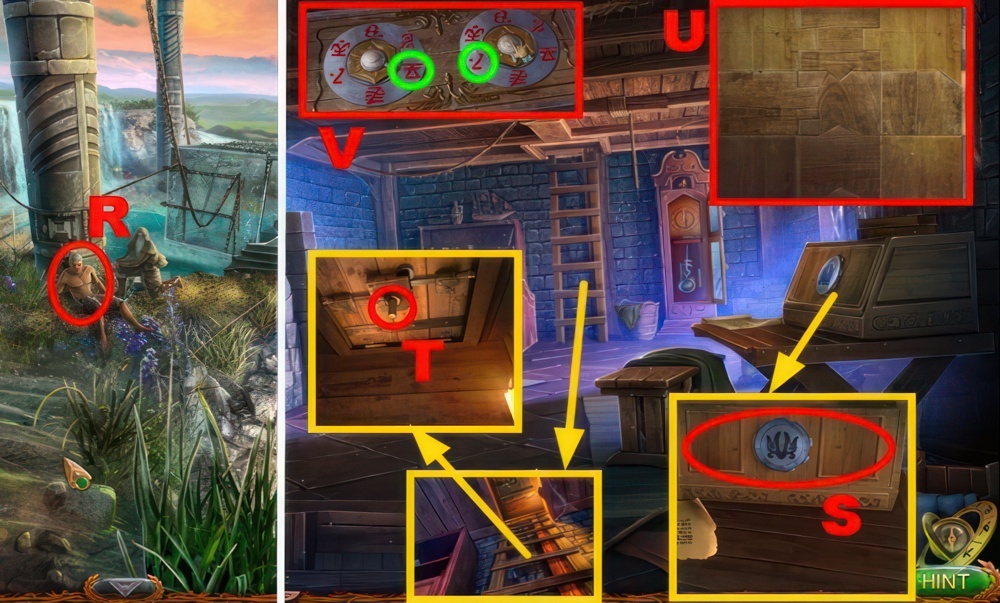
- Place the KEY, take the KNOB, and note the time sketch (S).
- Place the KNOB (T) to play the puzzle.
- Insert all the parts correctly.
- Puzzle 1 walkthrough: (U).
- Set the arrows to point to the right symbols.
- Puzzle 2 walkthrough: (V).
- Receive the SMALL BOX.
- Enter the correct time and take the KEY (W).
- Go to the Grey Flounder Deck.
- Insert the KEY (X).
- Go forward.
- Move the glass and take the KEY (Y).
- Take the MUSICAL SCHEMATICS (Z).
- Insert the KEY into the SMALL BOX, take the DOG FIGURINE and COMPONENT.
- Open the chest, take the CLOTHES and DEER FIGURINE (A).
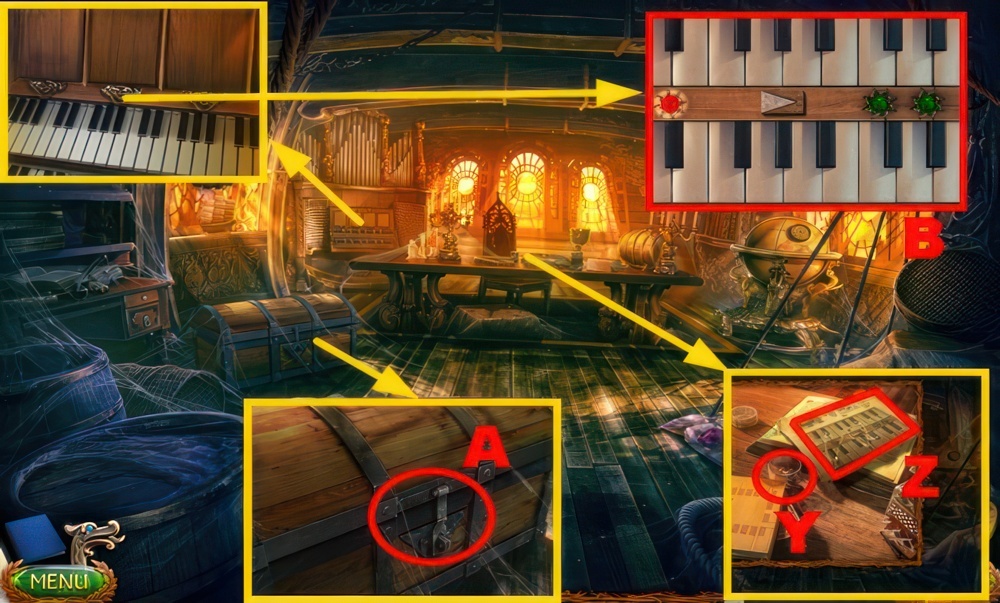
- Place the MUSICAL SCHEMATICS (B).
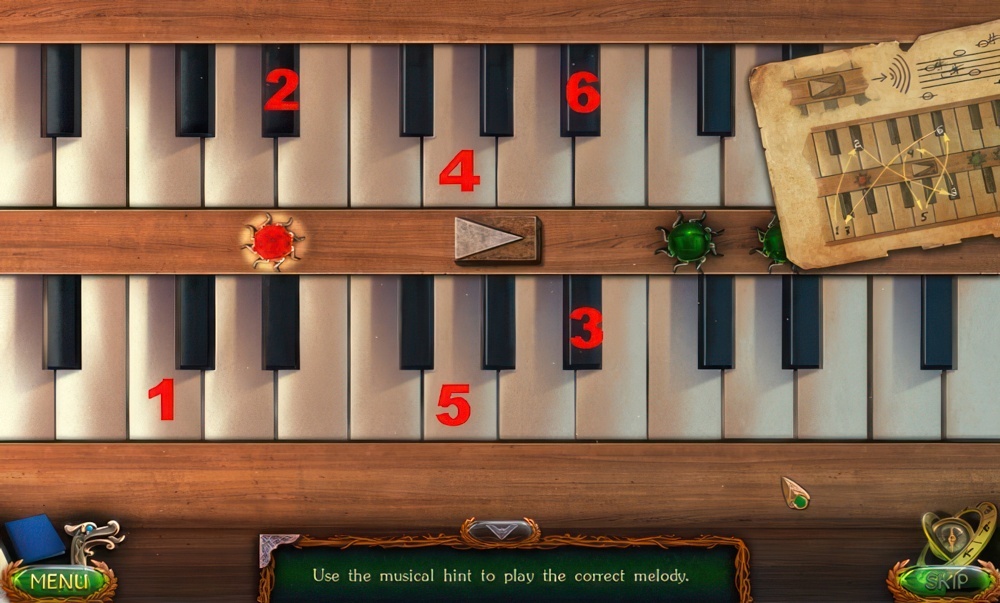
- Play the puzzle.
- Use the musical hint to play the correct melody.
- Walkthrough: 1-2-3-4-5-6-1.
- Take the STONE PIECE and PLANET MODEL.
Last request
The last thing the captain asked me to do is to light the lighthouse in the Necropolis, just like the Mage Guild members used to.
- Place the COMPONENT and take the LION FIGURINE (C).
- Go to the Secret Passage.
- Place the DOG FIGURINE, DEER FIGURINE, and LION FIGURINE and take the HALF-MOON (D) and SWORD (E).
- Go to the Earl’s Castle.
- Place the STONE PIECE (F).
- Go to the Energy Reservoir.
- Give the SWORD and CLOTHES (G).
- Go to the Pangonian’s Living Room.
Sheeleesa’s net
Sheeleesa won’t share anything for free. She asked us to clear her husband’s grave, which is overgrown with moss.

- Talk to Sheeleesa (H), receive the BRUSH.
- Walk down twice.
- Use the BRUSH (I).
- Go forward.

- Talk to Sheeleesa (J).
- Take the FISHING NET (K).
- Go to the Ferry.
- Use the FISHING NET (L).
- Select the net and take the FISH and SNOWFLAKE (M).
- Go to the Bay Shore.

- Use the FISH and SHARP KNIFE (N), receive the MOLLUSK.
- Open the MOLLUSK with the SHARP KNIFE, take the MOLLUSK and SHELL.
- Go to the Archmage Laboratory.
- Place the SNOWFLAKE (O).
- Take the STING OF FROST (P).
- Go to the Lighthouse.
- Place the SHELL (Q).
- Go to the Energy Reservoir.
- Give the MOLLUSK (R), receive the SKULL.
- Go to the Archmage Tomb.

- Place the SKULL (S).
- Turn the switch (T) and take the WHALE OIL (U).
- Insert the HALF-MOON and take the PICK-AXE (V).
- Go to the Wall.
- Use the PICK-AXE (W).
- Take the CLAY (X).
- Place the BROKEN LENS on the CLAY, assemble the pieces, and take the GLASS IN THE CLAY.
- Go to the Earl’s Castle.

- Use the GLASS IN THE CLAY and STING OF FROST (Y).
- Play the puzzle.
- Connect the dots in the right order to draw three symbols. You saw them earlier.
- Walkthrough: 1-3.
- Use the HAMMER and take the LENS (green).
- Go to the Lighthouse.
- Place the LENS (Z) and fasten it (A).
- Go to the Pangonian’s Living Room.
- Use the WHALE OIL and enter the correct code (B).
- Play the puzzle (C).
- Move the fragments to restore the image.
- Puzzle 1 walkthrough: (D).
- Move the gold square to the black hole in the glass.
- Puzzle 2 walkthrough: (E-1)-(F-2)-(I-5)-(G-3)-(H-4)-(G-6)-(H-7).
- Receive the PLANET MODEL.
- Go to the Portal.
- Place 3 PLANET MODELS (J).

- Play the puzzle.
- Swap the planets to move them to areas of the matching color.
- Walkthrough: (K).
- Take the LIGHT (blue).
- Go to the Lighthouse.
- Place the LIGHT (L).
- Select the lens (M).
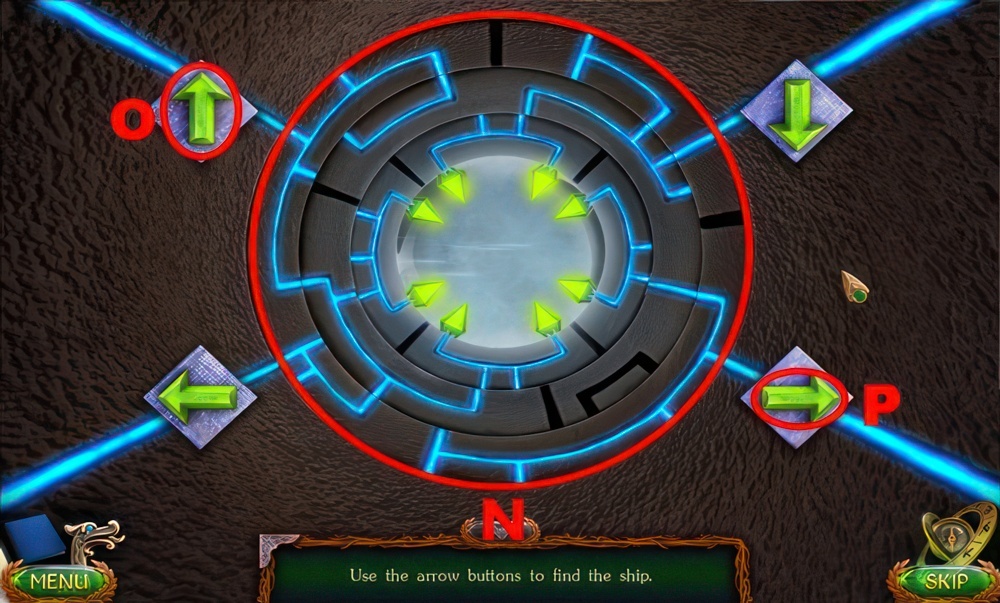
- Play the puzzle.
- Rotate the circles to guide the energy to all eight crystals.
- Walkthrough part 1: (N).
- Use the arrow buttons to find the ship.
- Walkthrough part 2: O×4-P×8.
- Walkthrough Bonus Chapter, at the link below.


