
Lucky Season 2: End of the Rainbow – You find yourself in the midst of disturbing events, the ancient monster Drauberg has awakened after centuries of sleep. He feeds on bad luck and has decided to ruin St. Patrick’s Day by kidnapping leprechauns and sucking the magical power out of them. Now it’s up to you whether you can uncover his secret and regain your lost luck. Leprechaun elders have always told tales that evil dwells in the Deep Forest, and that it is best never to encounter it. These tales could have simply been a caution, or perhaps a warning. After all, what lurks in the forest darkness has the power to take not only magic, but life. You will meet Will, who returns home to find his entire family gone. No news, just an unsettling feeling that something has gone wrong. Lily, frightened and armed with a clover gun, will tell you about the strange mushrooms that have infested the village. They’re not just strange, their smoke turns people hypnotized. This is what happened to her father, Galen, and others who went into the forest. The elder tries to find a cure, but time is short. Rumor has it that there is a magical metronome that can bring people out of hypnosis, and it is up to you to find it in a forgotten building. Lily will give you a clue, a strange object that may prove to be the key to salvation. If you can not pass any of the puzzles or do not know where the items are, on our site you can watch the walkthrough of the game Lucky Season 2: End of the Rainbow, and return the holiday leprechauns.
Lucky Season 2: End of the Rainbow – Walkthrough
Here you can see the full walkthrough of Lucky Season 2: End of the Rainbow, namely for all chapters, including bonus chapter, in pictures.
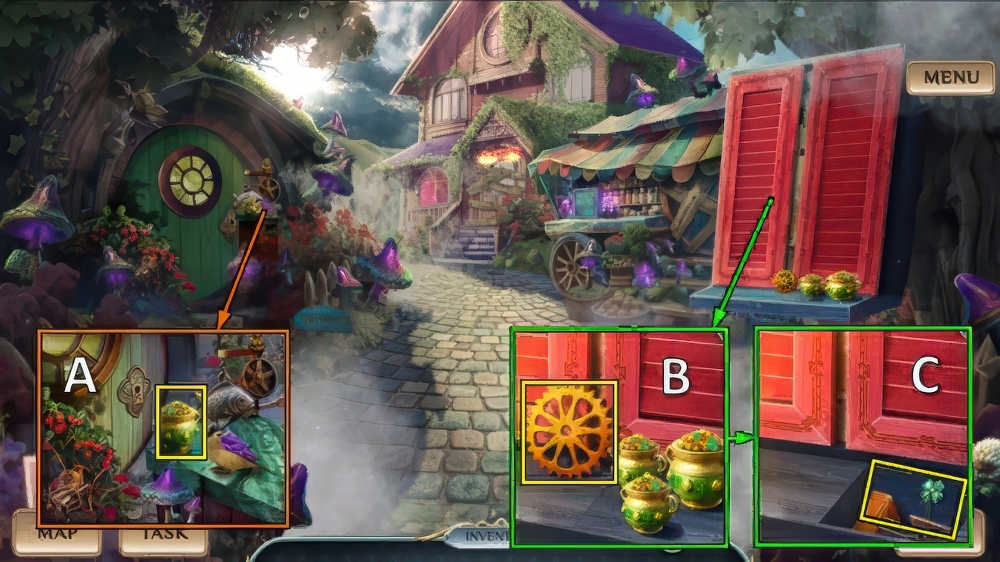
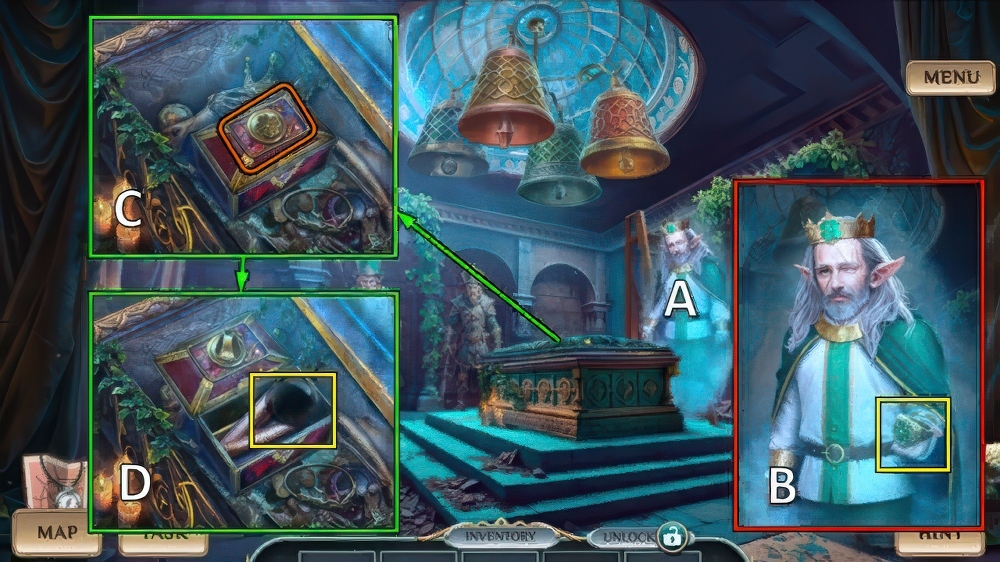
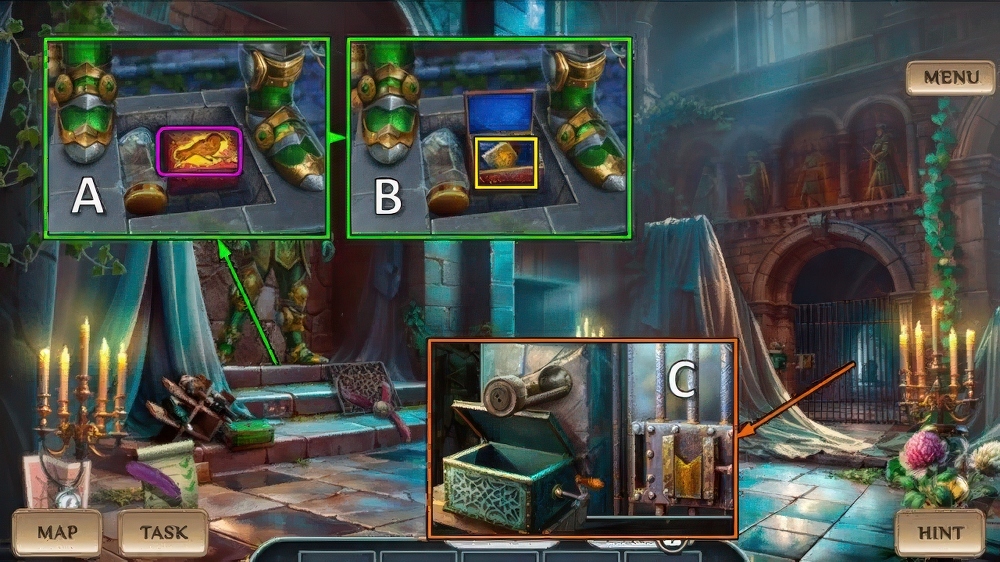
- Take POT OF GOLD (A).
- Take GOLDEN GEAR, place POT OF GOLD (B).
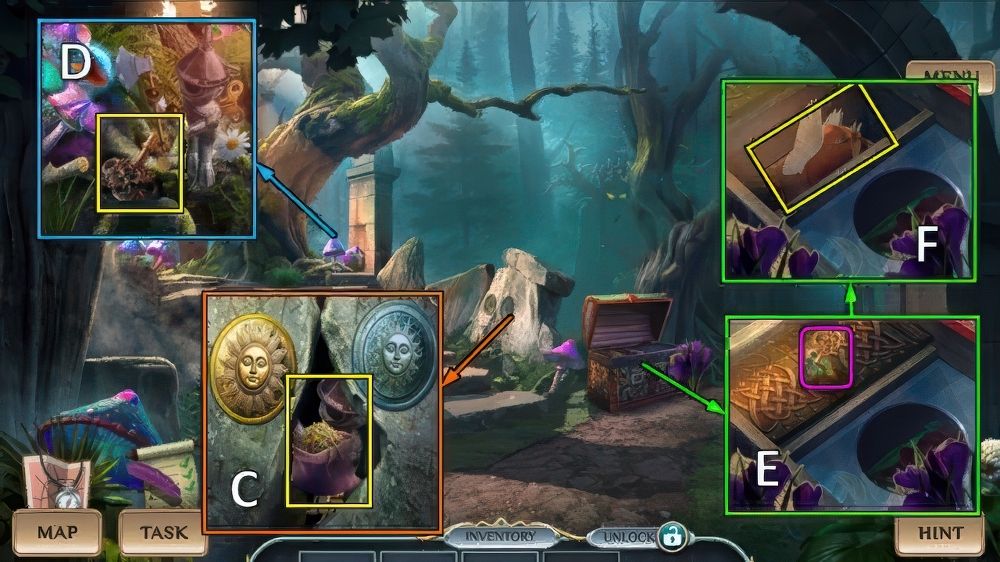
- Take BOX MECHANISM and CLOVER PIN (C).
- Use CLOVER PIN (D).
- Solution (E): 6-5-2-1-4-7-8-5-4-7-8-5-6-9-8-5-6-3-2-5-6-9-8-5-6-3-2-5-6-9.
- Take EGG and SILVER PLATES (F).
- Offer EGG, use GOLDEN GEAR.
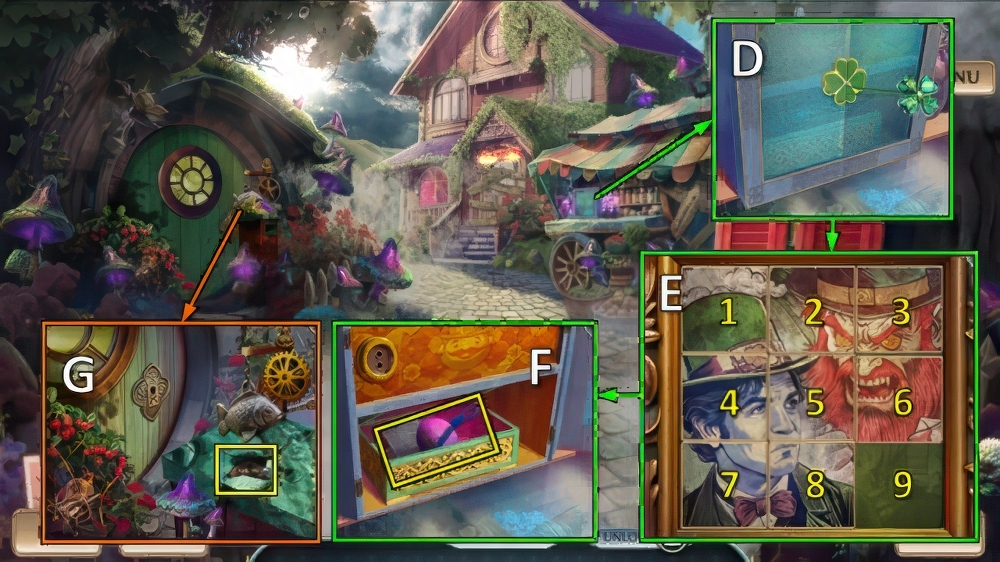
- Take FAMILY PORTRAITS 1/4 and WINDUP KEY (G).

- SILVER PLATES and WINDUP KEY on BOX MECHANISM, take SEPARATOR.
- Use SEPARATOR (H).
- Play puzzle (I), receive BALM RECIPE.
- Take GLOVE (J).
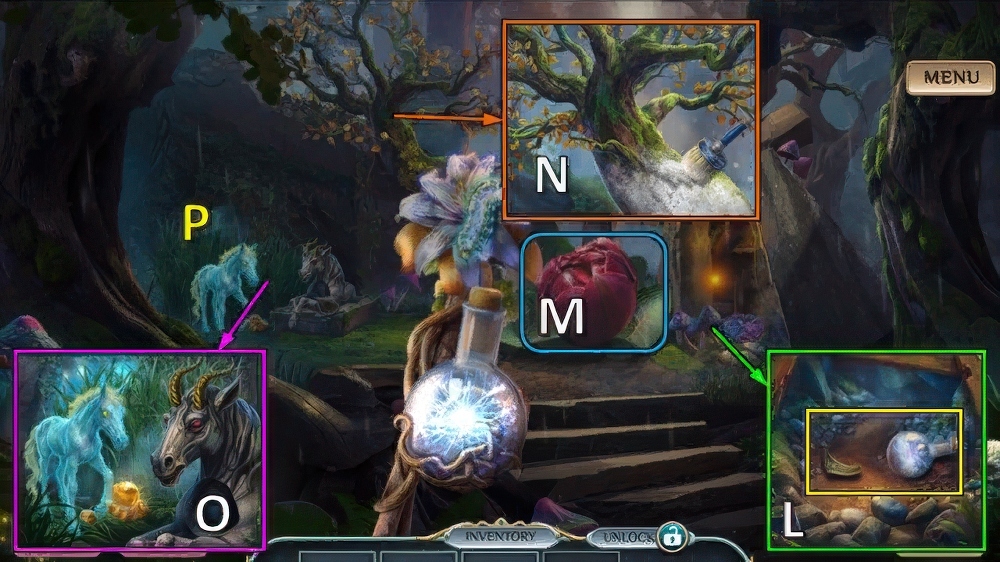
- Use GLOVE, take TUNING FORK and MANDRAKE (K).

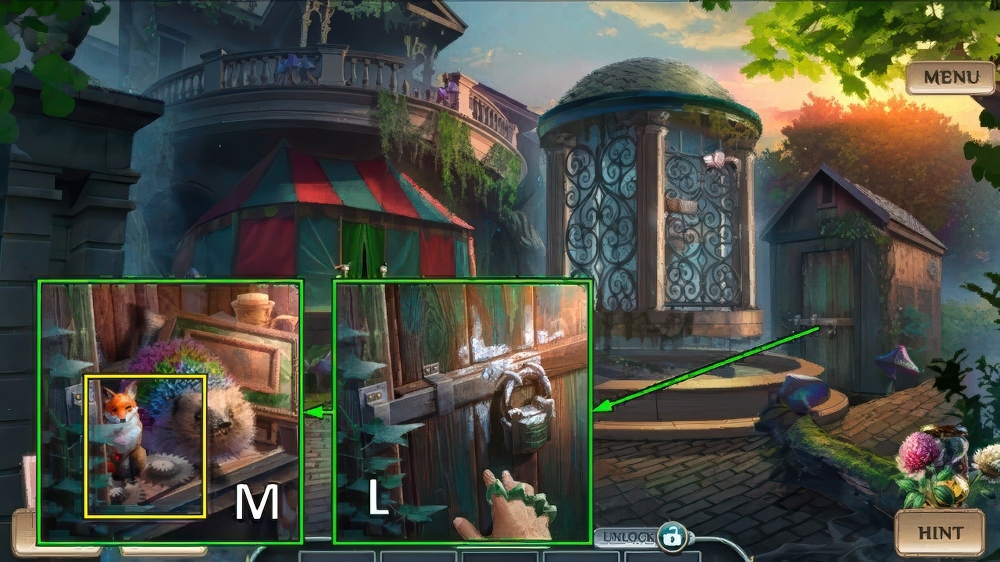
- Use TUNING FORK (L).
- Take FAIRY WING and SPORES (M).
- MANDRAKE and SPORES on BALM RECIPE, take COOLING BALM.
- Use COOLING BALM (N).
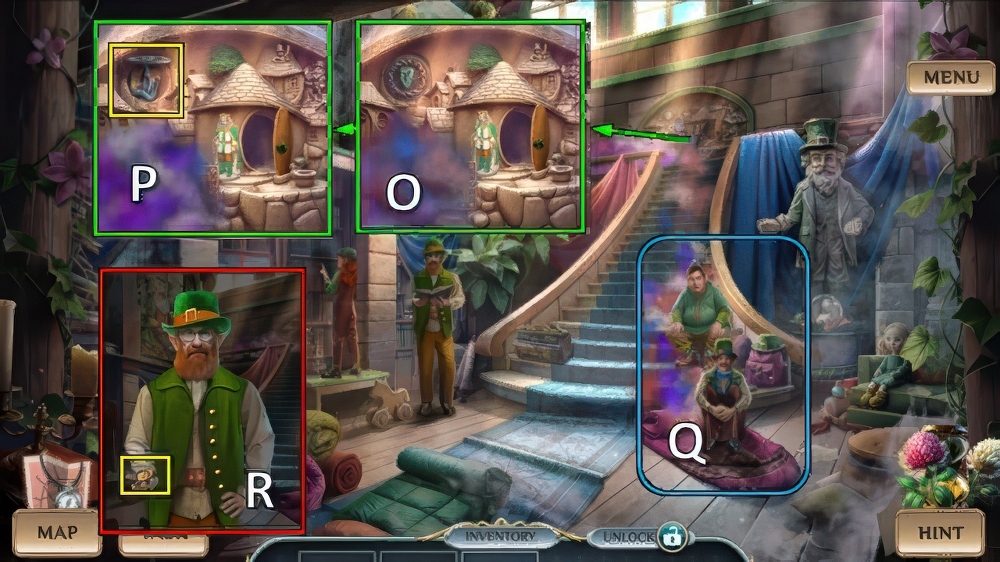
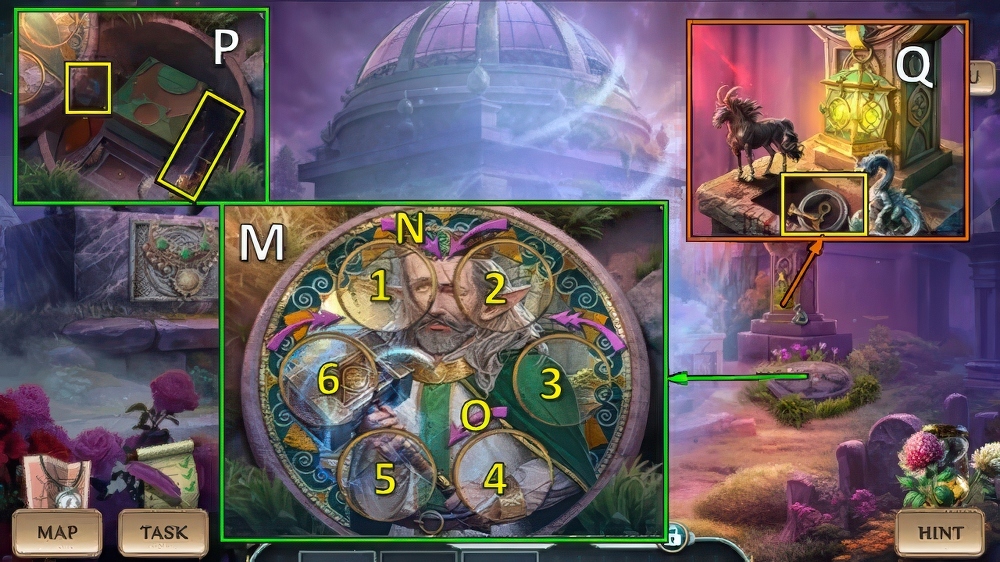
- Take HOUSE KEY and BROKEN STATUE (O).
- Use HOUSE KEY (P).
- Go (Q).

- Take FAMILY PORTRAITS 2/4 (R).
- Take BONE KNIFE (S).
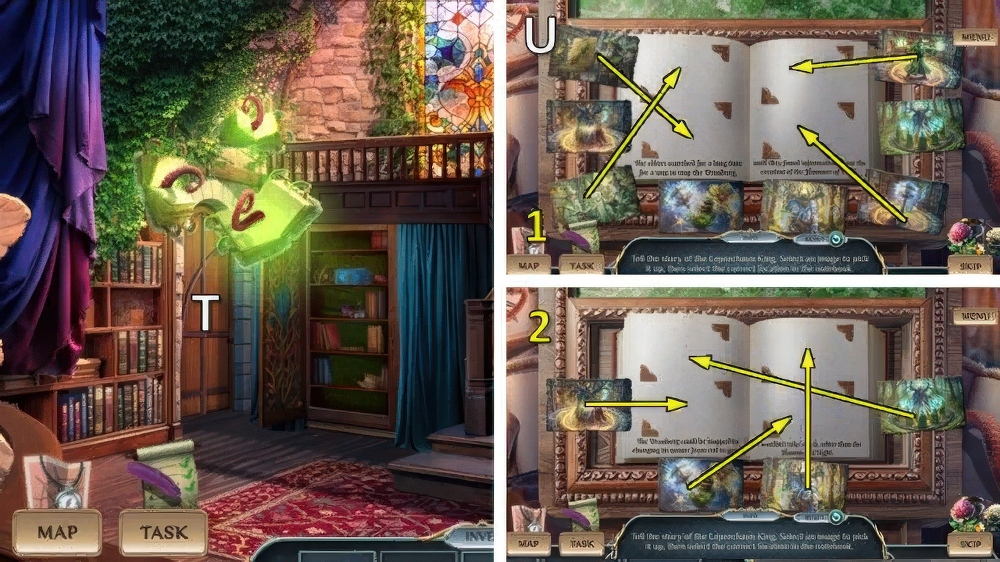
- Use BONE KNIFE (T).
- Open book for mini-puzzle (U), receive WILL’S BROOCH.

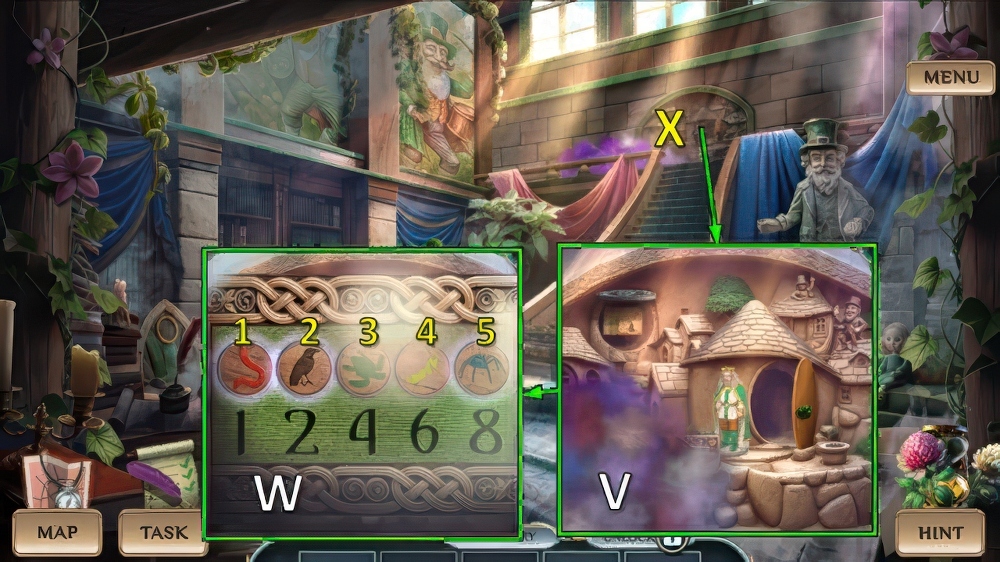
- Take GOLDEN BOOK, place FAIRY WING and WILL’S BROOCH (V).
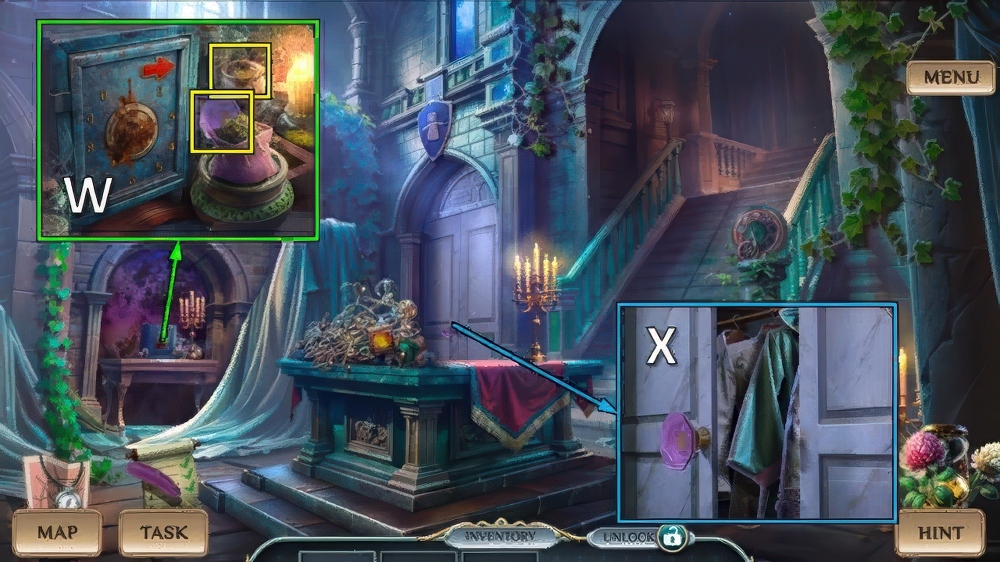
- Take TOGGLE SWITCH and FAMILY PORTRAITS 3/4 (W).
- Walk down.

- Use TOGGLE SWITCH, take FIRECRACKER and STONE HEAD (X).
- Take FAMILY PORTRAITS 4/4 with FIRECRACKER (Y).
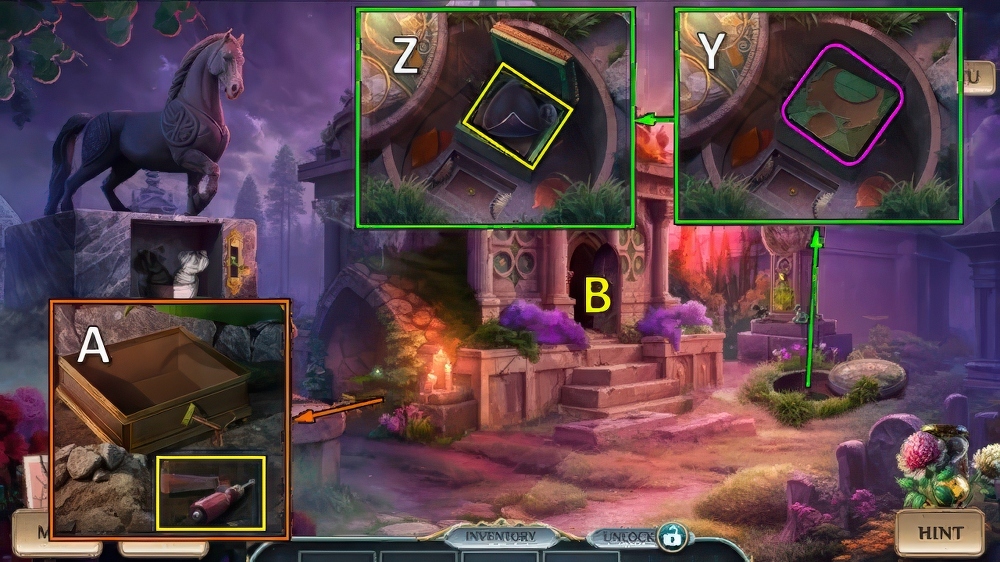
- Go (Z).
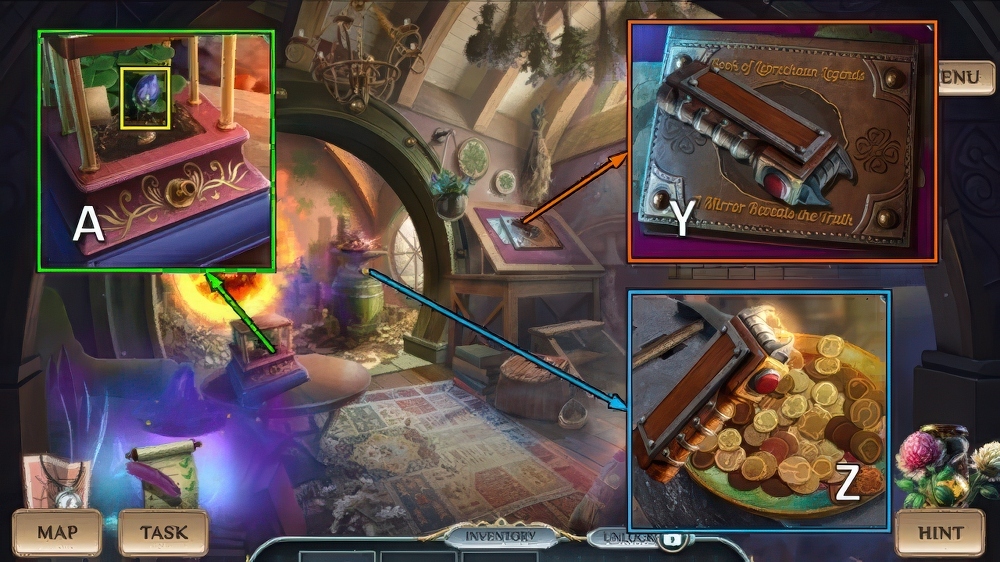
- Place FAMILY PORTRAITS, take CORD and PIPES 1/3 (A).
- Place GOLDEN BOOK and CORD (B).
- Solution (C): 3-5, 2-3-4-4-6-6-8-8, 2-2-4-4-1-6-6-5-7-8-8.
- Go (D).

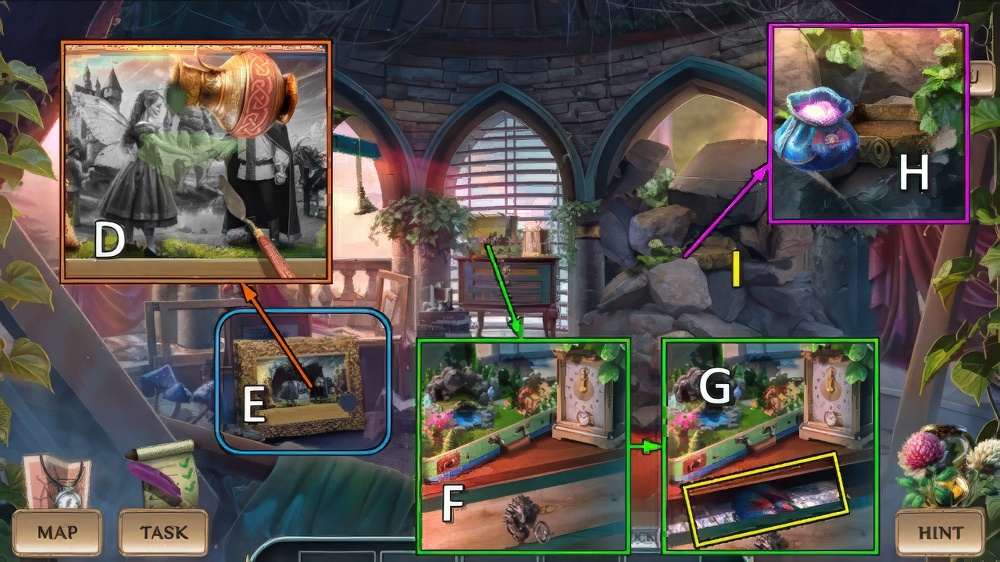
- Talk, take CELTIC SYMBOL (E).
- Take POT OF GLUE (F).
- Take LATCH (G).
- Use LATCH, take HELMET BASE and PAINT (H).
- STONE HEAD, PAINT and POT OF GLUE on BROKEN STATUE, use brush x4 (I).
- Take FIRST KING.
- Place FIRST KING, take RUNIC BRACELET (J).
- Walk down.

- Place RUNIC BRACELET (K), select 3-1-4-2.
- Take BONSAI and FAIRY DUST (L).
- Use FAIRY DUST, take CELTIC RING and PIPES 2/3 (M).
- Go (N).
- Place CELTIC SYMBOL and CELTIC RING (O).
- Take PIPES 3/3 and METRONOME (P).
- Use METRONOME for puzzle (Q).
- Take KNOB (R).

- Use KNOB (S), take LIVING WATER and SOLVENT (T).
- Use SOLVENT and BONE KNIFE, take GLASS DOME and WOODEN BASE (U).
- BONSAI, PIPES and GLASS DOME on HELMET BASE, take LEGEND CARDS 1/5 and GAS MASK.
- Use GAS MASK (V).
- Swap (1-2)-(4-5)-(3-4) (W).
- Go (X).
- Take LUCK METER (Y).
- Use LUCK METER for mini-puzzle (Z), take CHARGED CRYSTAL.
- Take BUD (A).
- Walk down.

- Place BUD and CHARGED CRYSTAL, take CANDLE and SCEPTER (B).
- Place SCEPTER, take MAGIC THREAD and LEGEND CARDS 2/5 (C).
- Go (D).
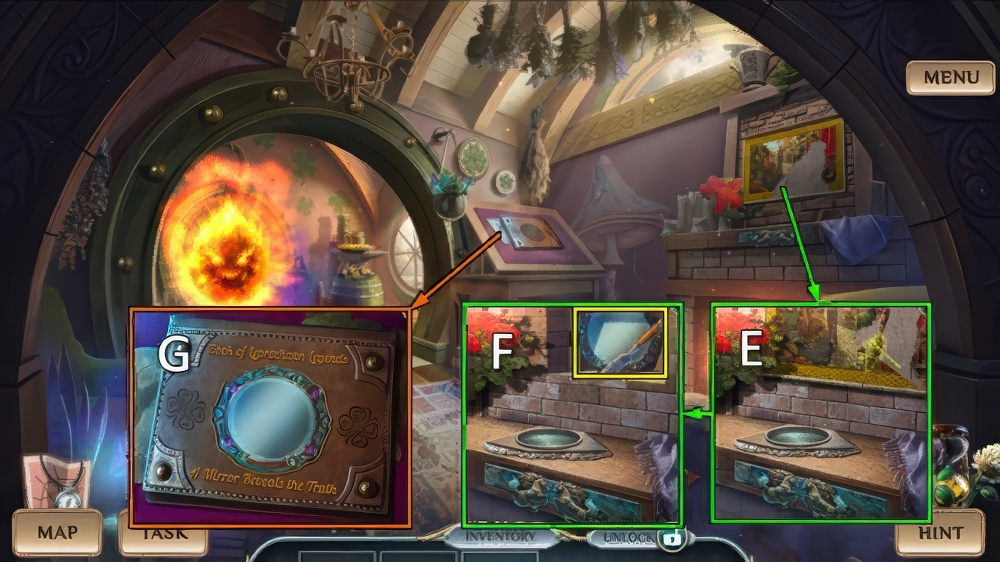
- Use MAGIC THREAD (E), take CHISEL and MAGIC MIRROR (F).
- Place MAGIC MIRROR (G).

- Solution (H).
- Take FAIRY FIGURINE and SPELL TABLET (I).

- Take FERTILIZER (J).
- Use LIVING WATER and FERTILIZER, take MERMAID and LEGEND CARDS 3/5 (K).
- CANDLE, MERMAID and SPELL TABLET on WOODEN BASE, take PROTECTIVE AMULET.
- Use PROTECTIVE AMULET, go (L).

- Take GOLD COIN (M).
- Place GOLD COIN (N).
- Solution 1 (O): 13-11-1-3-13-15-17-3-15.

- Solution 2 (P): 16-1-3-20-18-3-5-22-7-5-20-22.
- Take FOX FIGURINE, LEGEND CARDS 4/5 and BACKPACK (Q).
- Take PÚCA, place FAIRY FIGURINE and FOX FIGURINE (R).
- Take ROUND HANDLE and AREA MAP (S).
- Walk down.

- Use ROUND HANDLE, take POULTICES and KELPIE (T).
- Place KELPIE, take LEGEND CARDS 5/5 and CLOAK (U).
- Go (V).

- Offer LEGEND CARDS for puzzle (W), receive HAMMER.
- Use CHISEL and HAMMER, take SUN and FOOD (X).
- AREA MAP, POULTICES, FOOD and CLOAK on BACKPACK, take SUPPLIES.
- Use SUPPLIES (Y).

- Take DIAMOND DAGGER (Z).
- Open (A).
- Use DIAMOND DAGGER, take LENS FRAME and MOON (B).
- Place SUN and MOON, take INCENSE and LUMBERJACK (C).
- Place LUMBERJACK, take MALACHITE KEY (D).
- Use MALACHITE KEY (E), take SWIFT BOOTS (F).

- Use SWIFT BOOTS (G).
- Solution (H).
- Solution (I).

- Take ANCIENT LEVER (J).
- Take BROKEN NECKLACE, place ANCIENT LEVER (K).
- Take LENS and EARTH RUNE (L).
- Place EARTH RUNE (M).
- Solution: Ox3-(4-3)-O-(4-5)-Ox2-(4-2)-O-N-(1-6)-Nx3.
- Take RITUAL DAGGER and DISCS 1/3 (P).
- Use RITUAL DAGGER and PÚCA, take UNUSUAL KEY and ORNAMENT (Q).

- Use UNUSUAL KEY, take GEMS and DISCS 2/3 (R).
- LENS and GEMS on LENS FRAME, take MAGIC LENS.
- Use MAGIC LENS for puzzle (S).
- Go (S).

- Take PLIERS (T).
- Take FORGE, use PLIERS (U).
- Take MATCHES and SODA BOTTLE (V).
- Use MATCHES and INCENSE, take HONEY and GLASS HANDLE (W).
- Replace GLASS HANDLE for mini-puzzle (X), receive KING’S IMAGE.
- Walk down.
- ORNAMENT, KING’S IMAGE and HONEY on BROKEN NECKLACE, take KING’S NECKLACE.
- Place KING’S NECKLACE (Y).
- Take SHOULDER PLATE and DISCS 3/3 (Z).
- Use SHOULDER PLATE, take SCREWDRIVER and WOODEN HANDLE (A).
- Go (B).

- Use SCREWDRIVER and DISCS (C).
- Solution (D): (1-2)-(2-8)-(3-6)-(3-7)-(3-8)-(3-5)-(4-9).
- Take STAINED GLASS 1/4 and DUSTER (E).
- Go (F).

- Select G-H-I-J.
- Take STAINED GLASS 2/4 (K).

- Take CELTIC KNOT (L).
- Place CELTIC KNOT, take STAINED GLASS 3/4, CLAPPER and LIFE SPHERE (M).

- Use DUSTER and CLAPPER (N), take HAIRPIN and JEWELER’S KIT (O).
- Use HAIRPIN, take COMBINATION and ICE CRYSTAL (P).
- Walk down.

- Use SODA BOTTLE and COMBINATION (Q), select 6-7-9-4.
- Take FISHING HOOK and BUTTERFLY (R).
- Place BUTTERFLY (S), take CLOVER GUN and PLAIN MASK (T).
- Go (U).

- PLAIN MASK and JEWELER’S KIT on FORGE, take PROTECTOR’S MASK.
- Place PROTECTOR’S MASK, take BOAT HOOK (V).
- Use BOAT HOOK, take STAINED GLASS 4/4 and GUN CHARGE (W).
- Place STAINED GLASS and WOODEN HANDLE (X).

- Solution (Y): (1-30)-(2-14)-(3-12)-(4-6)-(5-6)-(6-27)-(7-10)-(8-9)-(9-10)-(11-13)-(12-30).
- (13-14)-(13-31)-(15-19)-(16-24)-(18-22)-(19-23)-(20-24)-(21-25)-(22-26)-(27-28).
- (28-29)-(30-32)-(31-32).
- Take MEMORIES and NUMBER (Z).
- Offer MEMORIES (A).
- Take SIGNET (B).
- Use SIGNET (C), take DEATH SPHERE (D).
- Walk down twice.

- Place LIFE SPHERE and DEATH SPHERE (E).
- Take RAMROD and SEARCHING MECHANISM (F).
- Use SEARCHING MECHANISM, go (G).

- Take RIBBON (H).
- Use RIBBON, take PALETTE KNIFE and VALVE (I).
- Use VALVE (J).
- Solution: 4-3-2-7-6-1-2-7-6-5-4-7.
- Take KING’S PORTRAIT and BRASS KNUCKLES (K).
- Use ICE CRYSTAL and BRASS KNUCKLES (L).
- Take STATUETTES 1/5 and LOCK MECHANISM (M).
- Walk down.

- Place LOCK MECHANISM (N), take STATUETTES 2/5 and FILE (O).
- Use FILE, take LANTERN (P).
- Go (Q).

- Place LANTERN (R).
- Play puzzle (S), receive DELICATE MIRROR.
- Use DELICATE MIRROR and FISHING HOOK (T).
- Take STATUETTES 3/5 and GRAPPLING HOOK (U).
- GUN CHARGE, RAMROD and GRAPPLING HOOK on CLOVER GUN, take GRAPPLING GUN.
- Use GRAPPLING GUN (V).

- Take LOCKPICK (W).
- Use LOCKPICK (X), take LEVITATION SPELL, CLOCK HANDS and STATUETTES 4/5 (Y).
- Place CLOCK HANDS and NUMBER, take SCISSORS and COLOR CODE (Z).
- Walk down.

- Use SCISSORS, take SLEEPING MUSHROOM and LOTUS (A).
- Use SLEEPING MUSHROOM, take WRITING TABLE and VARNISH (B).
- Go (C).
- Use PALETTE KNIFE and VARNISH (D).
- Play puzzle (E), receive SMALL KEY.
- Use SMALL KEY (F), take SCALES and DRAUBERG RECORDS (G).
- SCALES and LOTUS on LEVITATION SPELL, take LEVITATION POWDER.
- Use LEVITATION POWDER (H).
- Go (I).

- Take SAGES’ SYMBOL (J).
- Take OPTICAL CONVERTER, place SAGES’ SYMBOL (K).
- Take DRAUBERG’S PORTRAIT and QUILL (L).
- Place KING’S PORTRAIT and DRAUBERG’S PORTRAIT, take CHARMS 1/5 and STATUETTES 5/5 (M).
- Walk down.

- Place STATUETTES for mini-puzzle (N), receive BOOMERANG.
- Use BOOMERANG (O), receive PETAL.
- Go (P).

- Place PETAL and COLOR CODE (Q), select 1-2-3-4 (R).
- Take LETTER D and BOOKEND (Q).
- Place BOOKEND, take NOTEBOOK (S).
- NOTEBOOK, QUILL and DRAUBERG RECORDS on WRITING TABLE, take STUDY STATION.
- Use STUDY STATION (T).
- Solution (U).

- Take CHARMS 2/5 (V).
- Take STRING (W).
- Use STRING, take CHAIN, SILVER LEVER and STARRY PAINT (X).

- Use SILVER LEVER, take RUST REMOVER and LETTER G (Y).
- Place LETTER D and LETTER G, take CHARMS 3/5 and DIAMOND RING (Z).
- Use DIAMOND RING, take MOON FILTER and PLAIN BRACELET (A).

- MOON FILTER and STARRY PAINT on OPTICAL CONVERTER, take MAGNIFIER.
- Place MAGNIFIER (B).
- Solution (C).

- Take SCIENTISTS’ KEY and FLINT (D).
- Use SCIENTISTS’ KEY (E).
- Go (F).

- Take CLAMP (G).
- Take BOLT CUTTER (H).
- Take BOX HANDLE, use BOLT CUTTER (I).
- Take S-HOOK and LEPRECHAUN’S BOX (J).

- Use S-HOOK and CHAIN, move items (K).
- Take HEXAGON and CHARMS 4/5 (L).
- Place HEXAGON (M), take CAULDRON and STONE HANDLE (N).
- Walk down.

- Remove handle, use RUST REMOVER.
- Place STONE HANDLE for mini-puzzle (O), receive PLANET.
- Place PLANET, take CROCHET HOOK and CHARMS 5/5 (P).
- Go (Q).

- CHARMS and CLAMP on PLAIN BRACELET, take ALCHEMICAL BRACELET.
- Place ALCHEMICAL BRACELET, take ARMOR PARTS 1/3 and INGREDIENTS (R).
- Use FLINT, CAULDRON and INGREDIENTS for puzzle (S), receive ELIXIR OF LIGHT.
- Take LIQUID GOLD (T).
- Use LIQUID GOLD, take PAINTED GEAR and ARMOR PARTS 2/3 (U).
- Walk down.

- Place PAINTED GEAR (V), take CHART (W).
- Use CHART (X).

- Take MONSTER HEAD (Y).
- Take ARMOR PARTS 3/3 (Z).
- Place BOX HANDLE and MONSTER HEAD (A), take UV STONE and BEER (B).

- UV STONE on LEPRECHAUN’S BOX, select 9-4-7-3-5 (C).
- Take FASTENERS and DARK MIRROR.
- Place ARMOR PARTS and FASTENERS, take BRAIN and LEPRECHAUN FIGURINE (D).
- Place LEPRECHAUN FIGURINE (E), take FIREFLY DUST and TWO-PRONGED FORK (F).

- Use TWO-PRONGED FORK (G), take RAINBOW THREAD and ELEMENTS 1/4 (H).
- Use CROCHET HOOK and RAINBOW THREAD (I).

- Solution (J): (1-4)-(2-10)-(5-8)-(12-13)-K-(2-3)-(5-11)-(6-14)-K-(2-10)-(5-8)-(2-15)-K-(2-9)-K-(2-15)-(2-5).
- Go (L).

- Take BELT (M).
- Walk down.

- Use BELT (N), take BRANDY and ELEMENTS 2/4 (O).
- Place BEER and BRANDY, take SCARAB and ELEMENTS 3/4 (P).
- Go (Q).

- Place SCARAB (R).
- Take ELEMENTS 4/4 and LIGHT RUNE (S).
- LIGHT RUNE and FIREFLY DUST on DARK MIRROR, take GLOWING MIRROR.
- Place GLOWING MIRROR (T).
- Take STICK, place BRAIN (U).
- Take SCRAPER and BURNT RECORDS (V).

- Take ENGRAVER, place BURNT RECORDS and ELEMENTS (W).
- Play puzzle (X), receive HAMMER OF LIGHT and SHARD.
- Use SHARD, take PAPERWEIGHT and RUBY (Y).
- Use ENGRAVER and PAPERWEIGHT, take BIRD and FANCY HANDKERCHIEF (Z).
- Walk down.
- Place BIRD (A), take LOCK PIECE (B).
- Place LOCK PIECE (C).

- Solution (D).
- Go (E).

- Take SLING (F).
- Take CATERPILLAR, take HORN with SLING.
- Use SCRAPER, take PUFFBALL MUSHROOMS (G).
- Place HORN and RUBY, take BOTTLE OPENER and LIME (H).
- Walk down.

- Use BOTTLE OPENER, take BOOK and BROKEN GUN (I).
- Place BOOK for mini-puzzle, receive JEWELER’S PICKAXE (J).
- Go (K).
- Use JEWELER’S PICKAXE and FANCY HANDKERCHIEF, take TRIGGER and CLOUD POTION (L).
- CLOUD POTION and CATERPILLAR on STICK, take LIGHTNING ROD.
- Use LIGHTNING ROD, play puzzle (M).
- Receive FORTUNE FLOWER POLLEN and PAINTBRUSH.
- Use LIME and PAINTBRUSH (N), receive GOLDEN APPLE.
- Offer GOLDEN APPLE (O).
- Go (P).

- Take NET (Q).
- PUFFBALL MUSHROOMS, TRIGGER and NET on BROKEN GUN, take STUN GUN.
- Use STUN GUN (R).
- Move stones (S).
- Take GLASS KEY (T).

- Use GLASS KEY (U).
- Take LIFE-GIVING CHALK (V).
- Place ELIXIR OF LIGHT, HAMMER OF LIGHT, FORTUNE FLOWER POLLEN and LIFE-GIVING CHALK (W).

- Solution (X).
- Play match-3 (Y).
- Walkthrough Bonus Chapter, at the link below.


