
Maze 4: Stolen Minds – A tense adventure with puzzle and object search elements, where you will have to figure out what is real and what is just a product of someone’s experiments. After a tiring day as a math teacher, you were hoping for an evening’s rest, but everything turns into a nightmare, an unknown person kidnaps you and you wake up in a strange place. Unclear memories, strange visions, voices and faces of other captives, all make you question your own sanity. One of them, Jonesy, is already desperate to get out, but still hopes to be rescued. What is this experimental treatment, who is behind the kidnapping, and is there a way out of this madness. It’s up to you to find the answers by exploring the gloomy rooms, solving puzzles and gradually recovering the truth before it’s too late. If you can not pass any of the puzzles or do not know where the items are, on our site you can watch the walkthrough of the game Maze 4: Stolen Minds, and escape from the madman.
Maze 4: Stolen Minds – Walkthrough
Here you can see the full walkthrough of Maze 4: Stolen Minds game, namely for all chapters, including bonus chapter, in pictures.
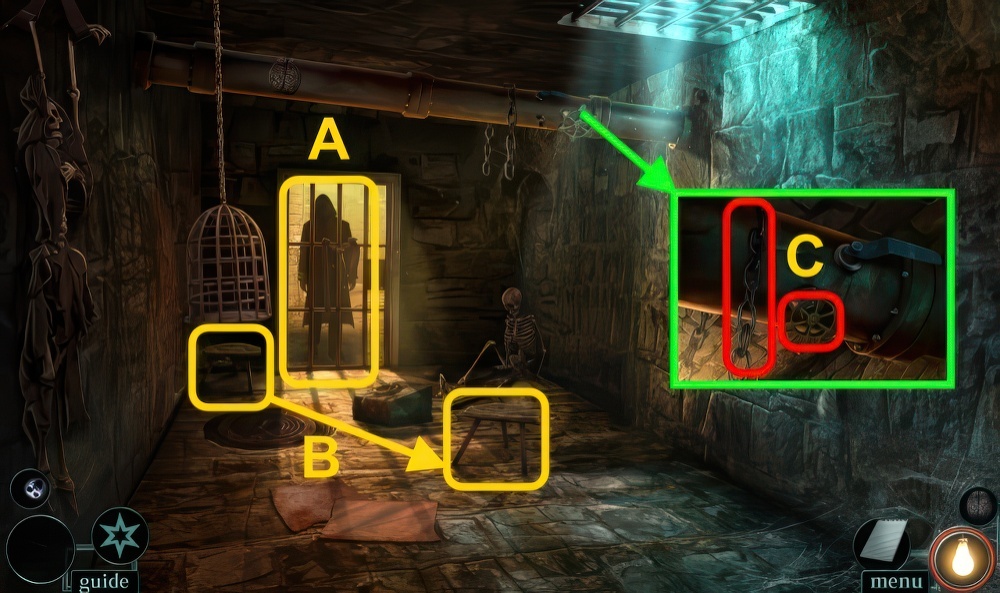
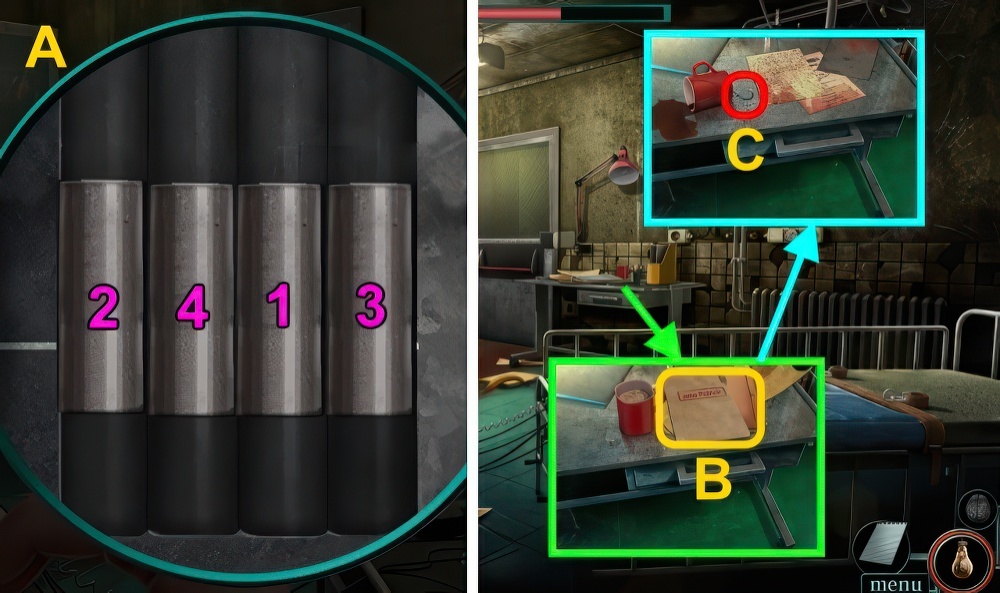
- Talk (A).
- Place stool (B).
- Take CHAIN and VALVE (C).
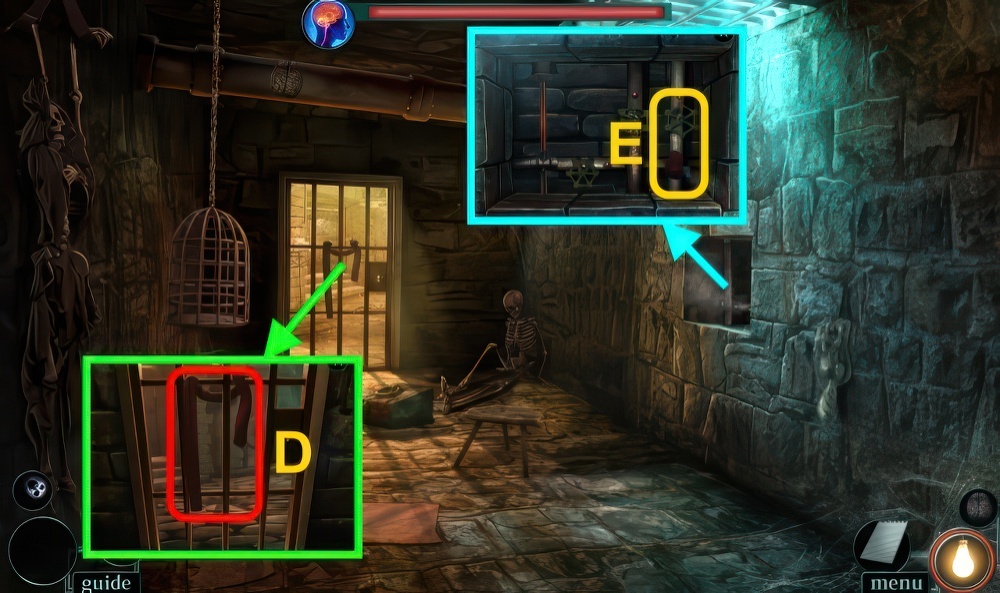
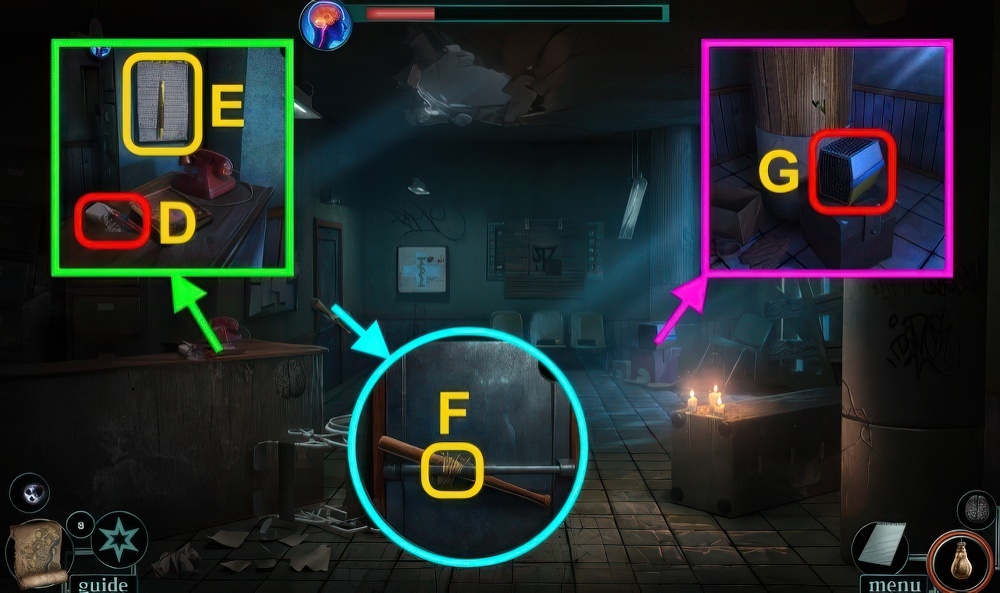
- Take SCARF (D).
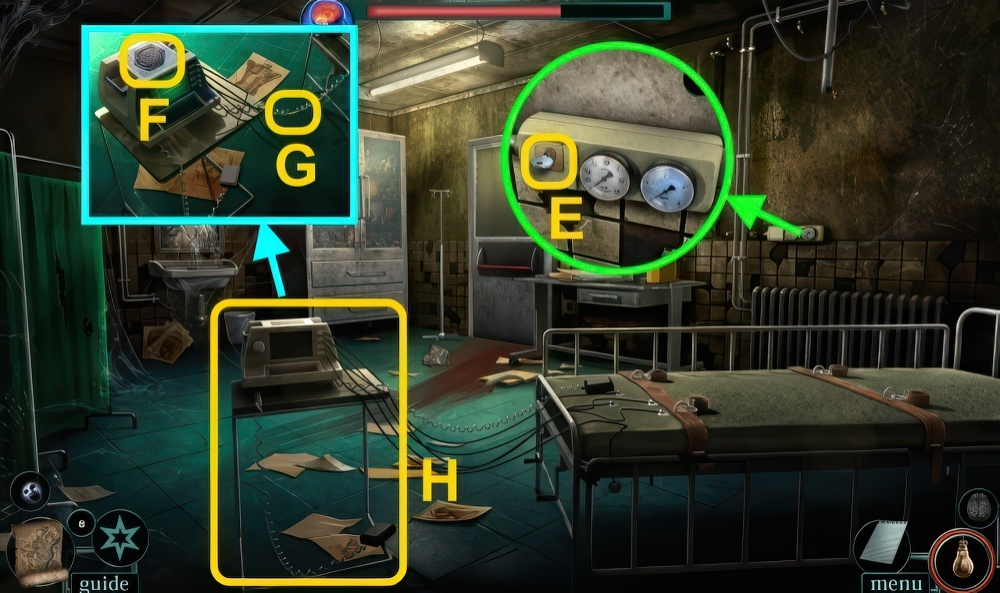
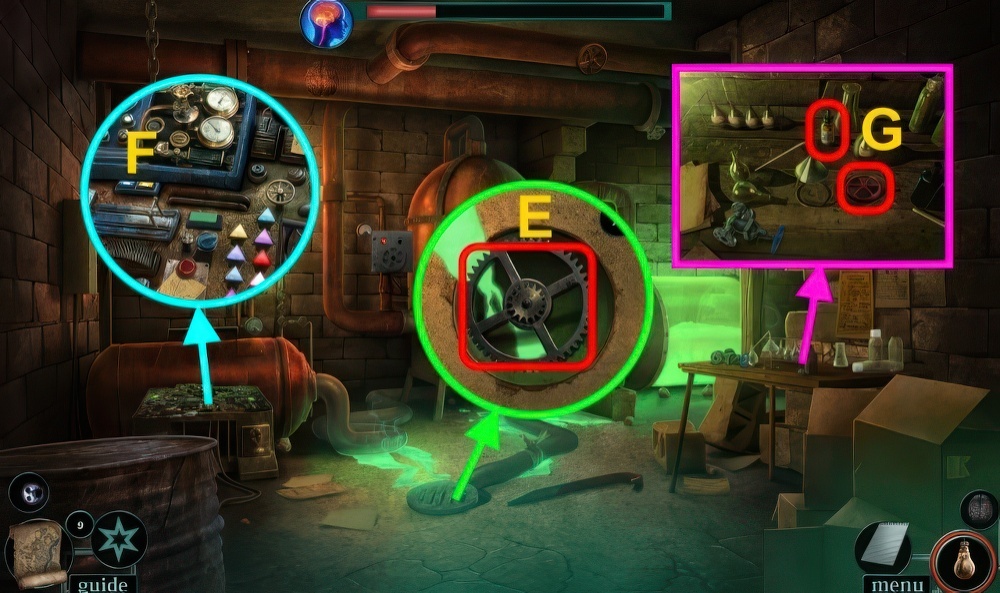
- Use SCARF and VALVE (E).
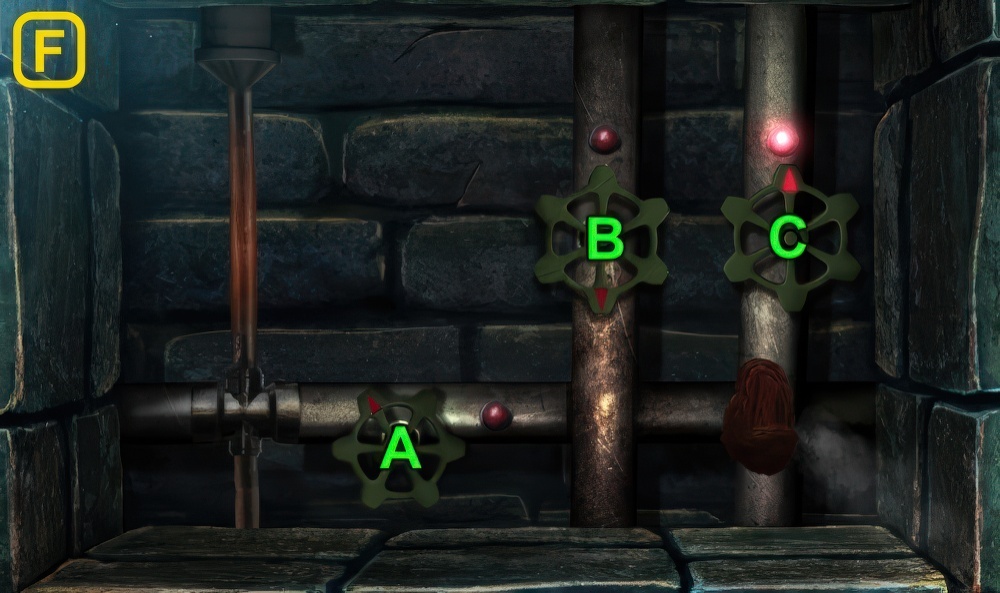
- Turn all of the red lights on.
- Turn the valves until all of the red lights are on.
- Select a valve to move it.
- Moving one valve may move others.
- Walkthrough (F): Ax2-B-Cx2.
- Take PIPE.

- Use PIPE, open.
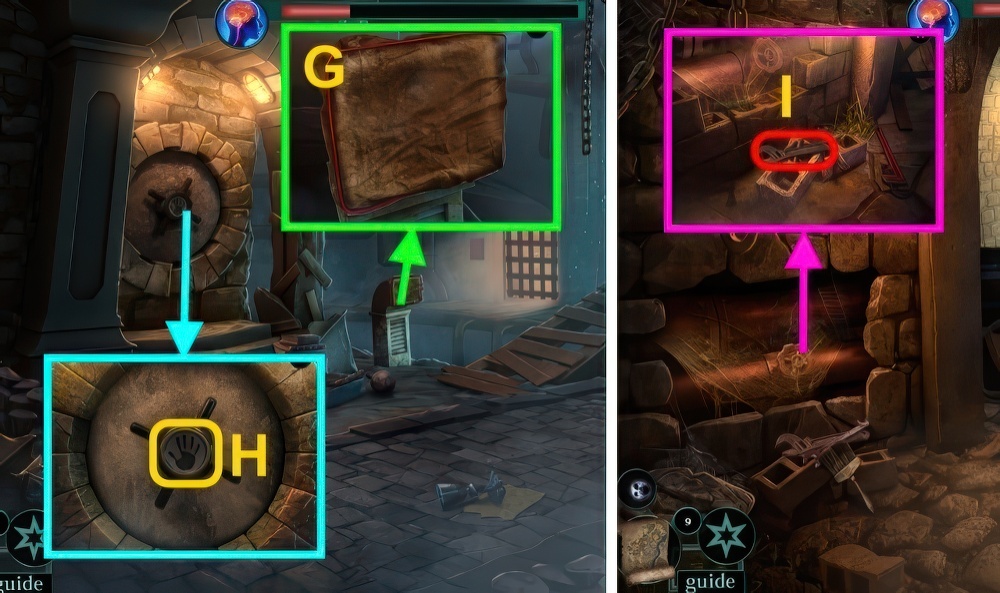
- Take LOCK TOKEN (1/5) and CARABINERS (G).
- CARABINERS on CHAIN, take CHAIN WITH CARABINERS.
- Place CHAIN WITH CARABINERS (H).
- Walkthrough (I): select meter until it’s full.
- Go forward.
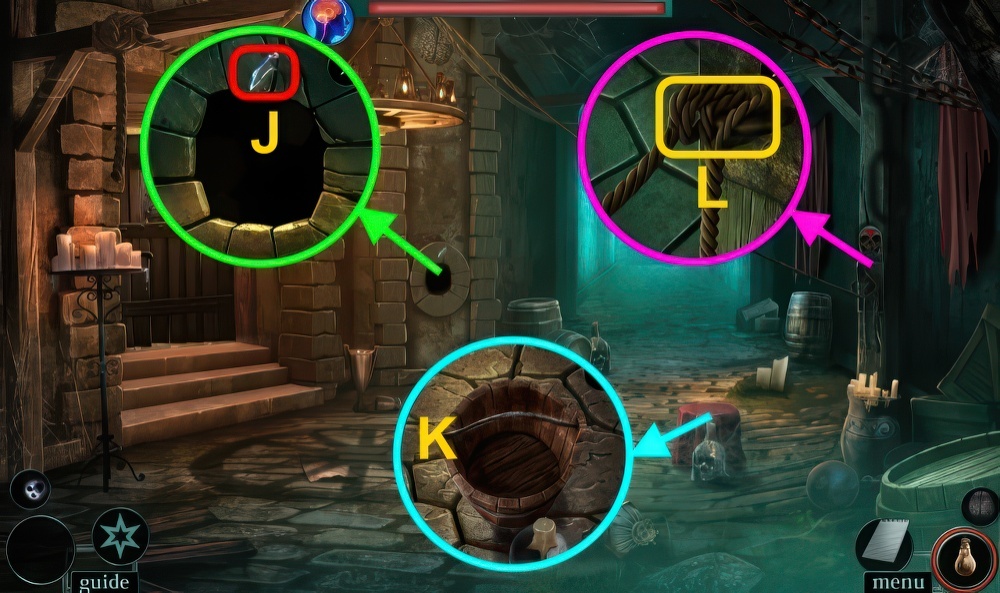
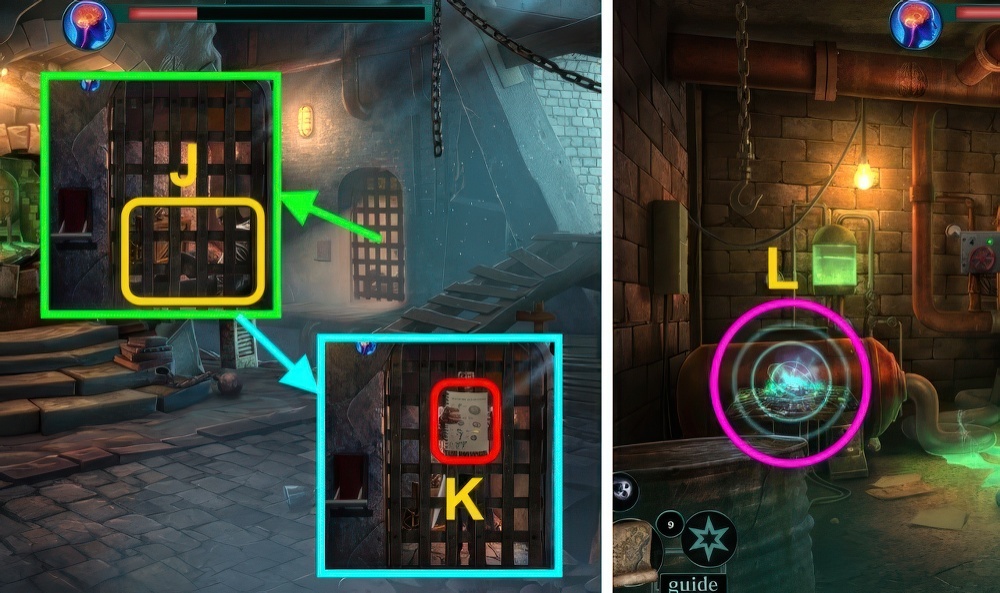
- Take GLASS SHARD (J).
- Remove cloth, take BUCKET (K).
- Use GLASS SHARD (L).
- Go forward.

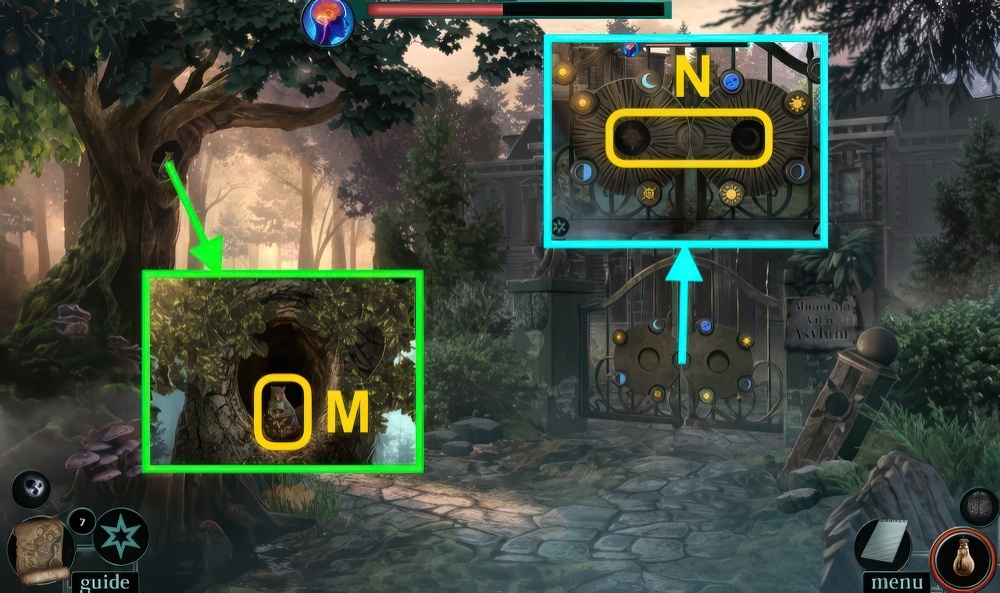
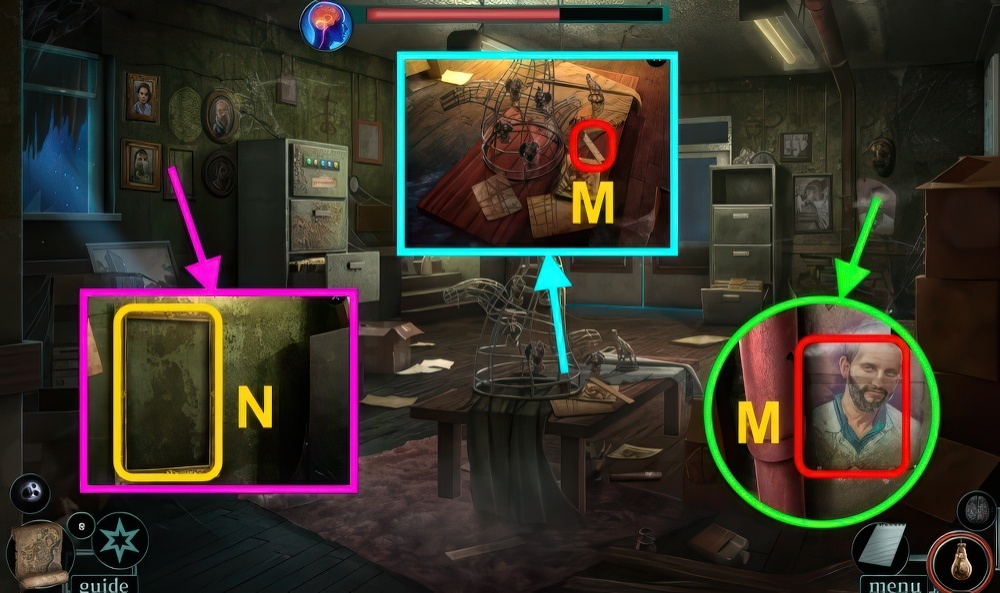
- Inspect, take LOCK TOKEN (2/5) (M).
- Use BUCKET, receive BUCKET Of WATER (N).
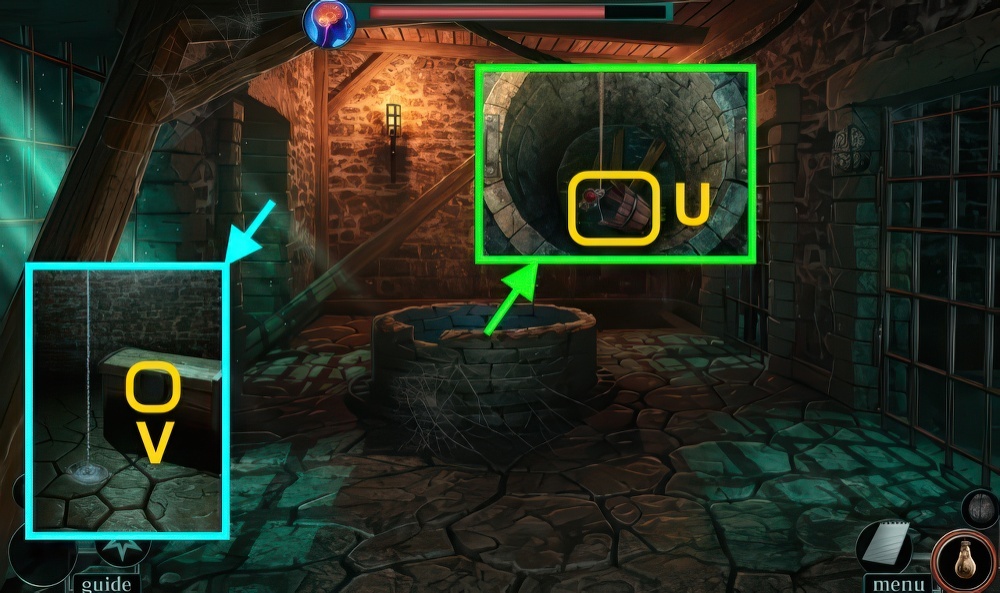
- Take WELL PART (O).
- Select Fight.
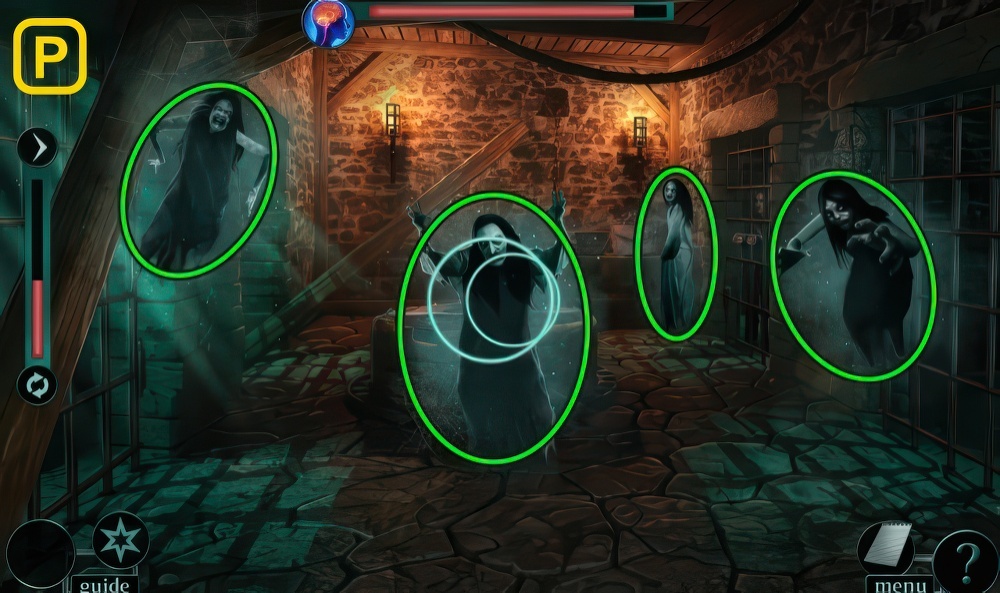
- You need to align the moving circles.
- The small circle moves left and right within the playing field.
- Your goal is to wait until it is completely inside the larger circle, then tap the screen immediately.
- If you time it right, the circles will align and you’ll destroy the ghost.
- Be careful not to miss precision is key.
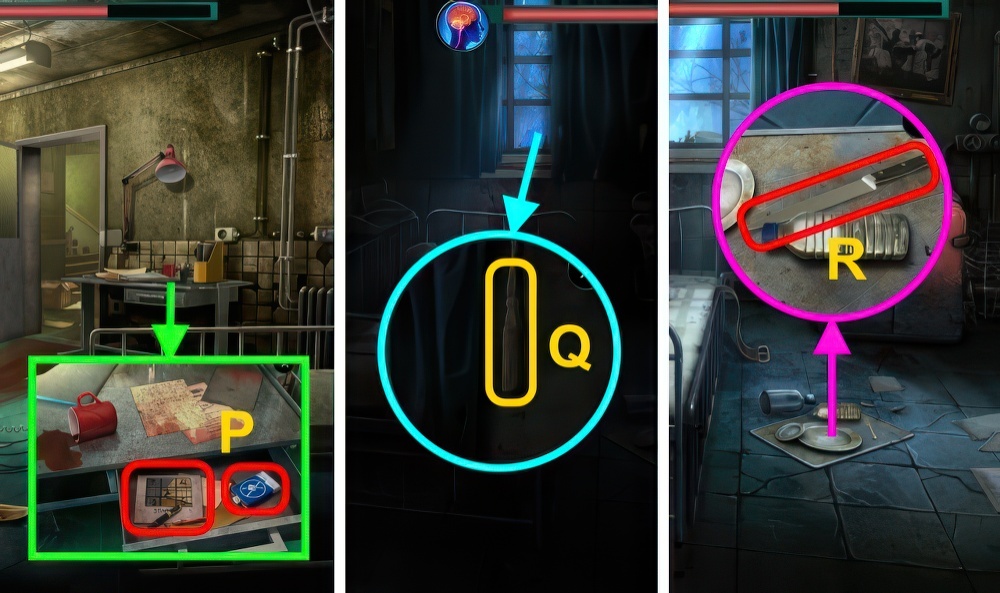
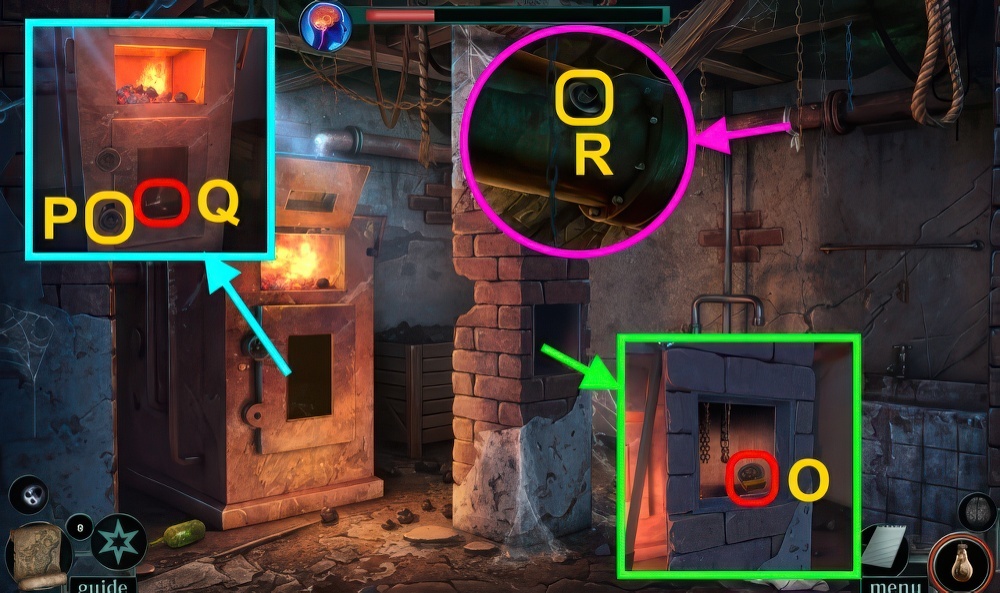
- Walkthrough (P).
- Go down.

- Pour BUCKET OF WATER, receive BUCKET.
- Take LANTERN and ROPE (Q).
- Use LANTERN, take LOCK TOKEN (3/5) (R).
- Go forward.
- ROPE on BUCKET, take BUCKET WITH ROPE.
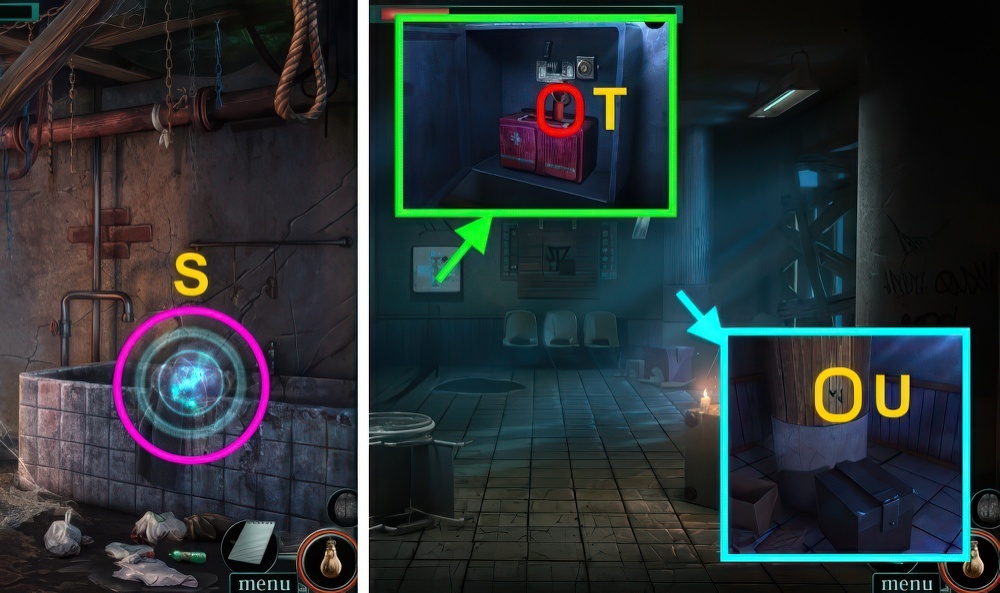
- Place WELL PART (S).

- Rotate the plates to so that you can pull the metal bat out of the lock.
- Select a plate to rotate it.
- Rotating one plate may move others.
- Then select the metal bar to move it.
- Walkthrough (T): D×4-A×7-E×2-B×7.
- Inspect, open.
- Use BUCKET WITH ROPE (U), take LOCK TOKEN (4/5), ENGRAVED PLATE, and CHEST KNOB.
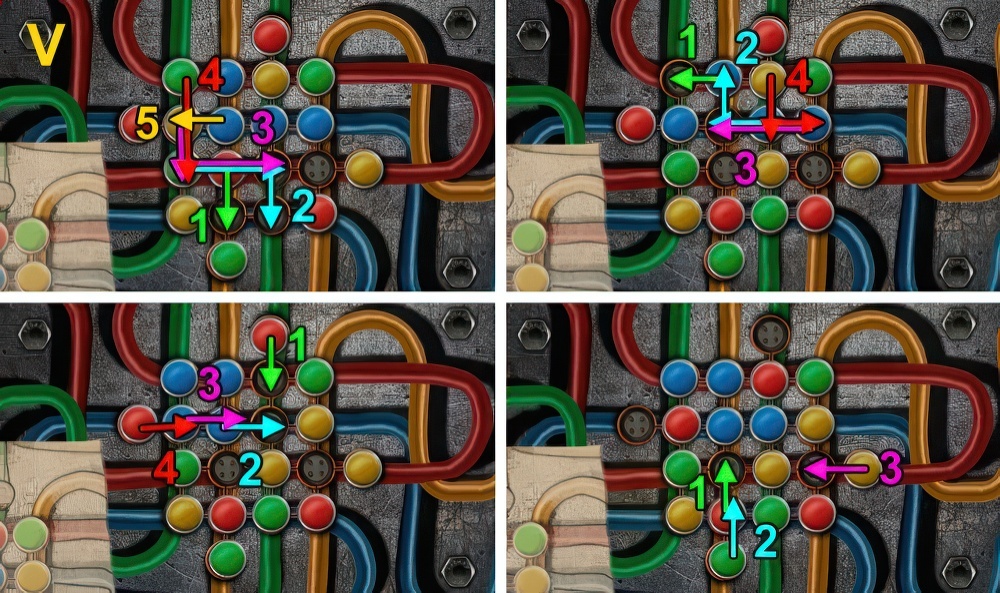
- Inspect (V), place CHEST KNOB.
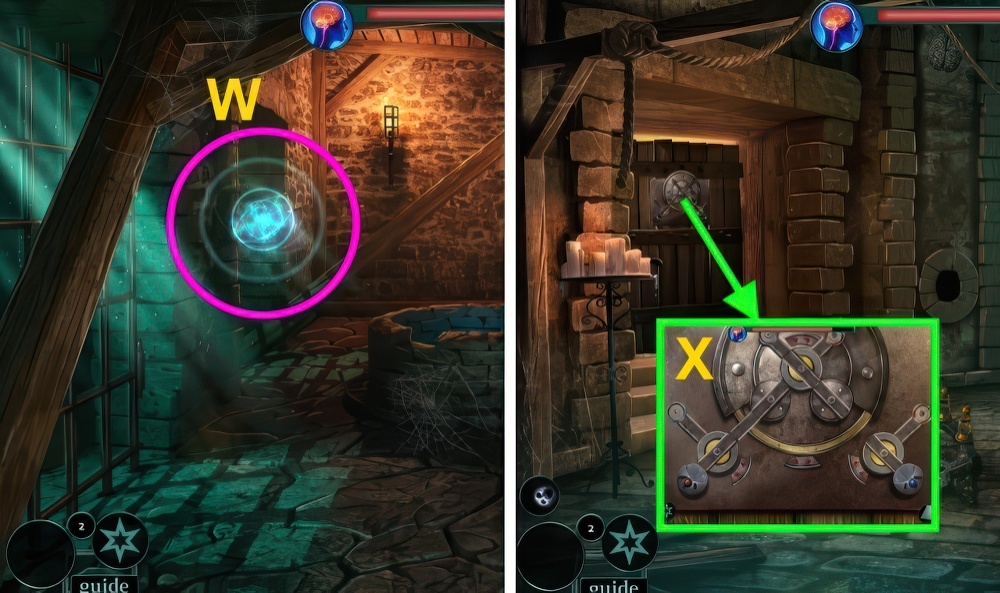
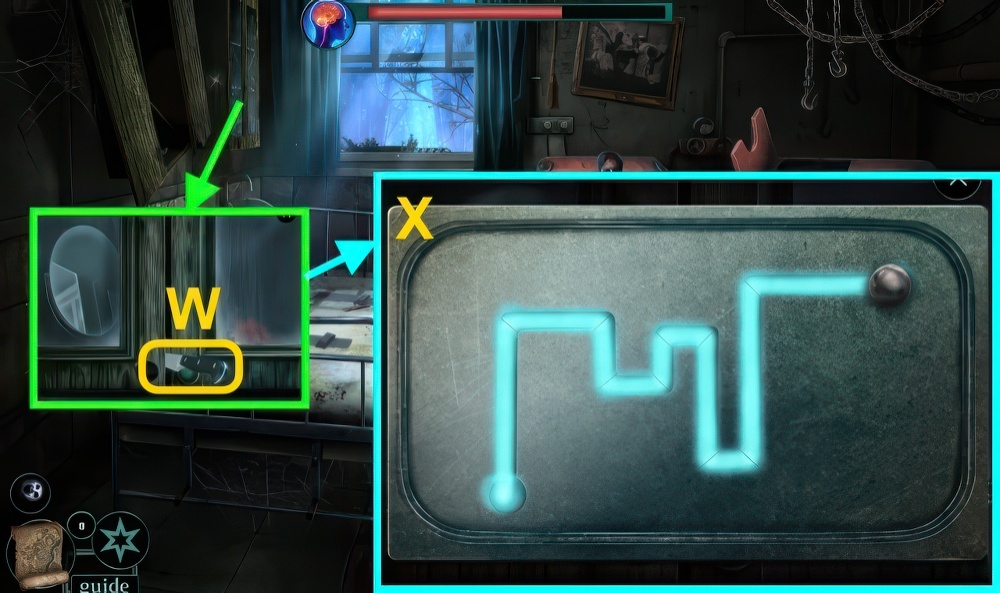
- Play puzzle, receive LOCK TOKEN (5/5) (W).
- Go down.
- Place LOCK TOKEN (5/5) (X).
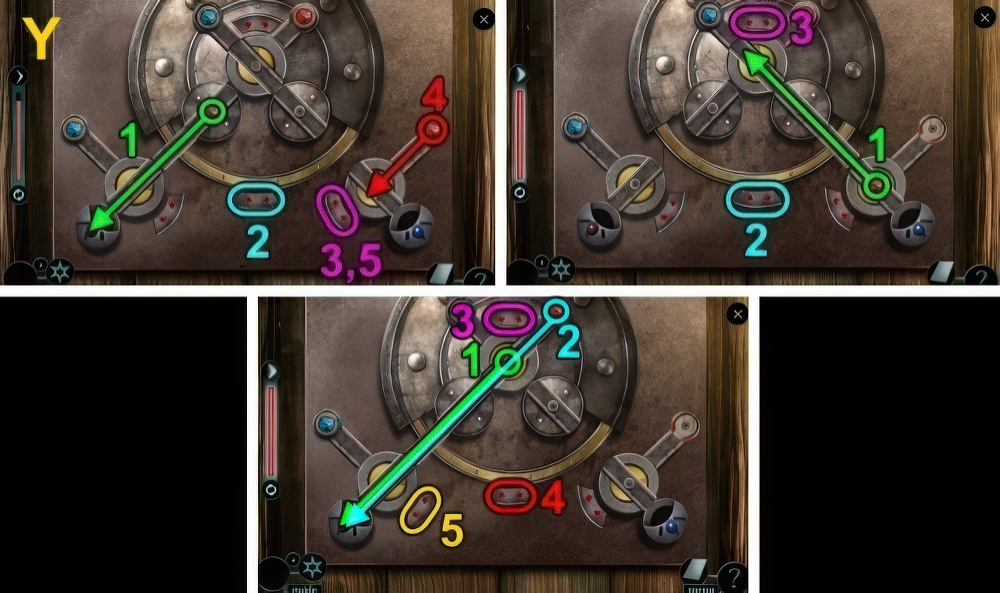
- Rotate the discs to move the tokens to their matching colored slots.
- Select the arrows to rotate the discs.
- Select tokens to move them in the direction indicated.
- Walkthrough (Y).
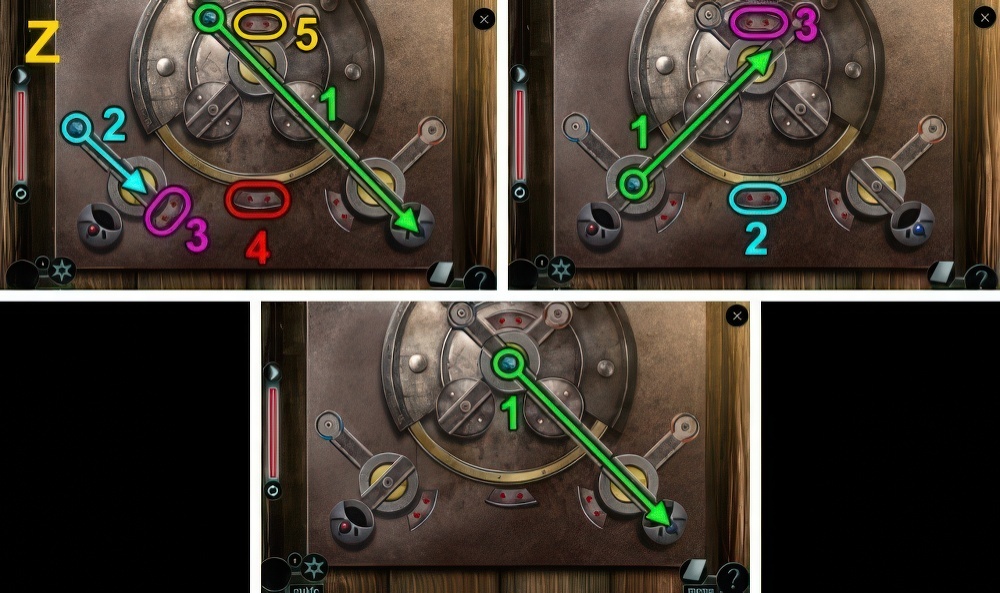
- Walkthrough (Z).
- Go left.

- Select Stay and try to barricade the door behind you.
- Inspect door.
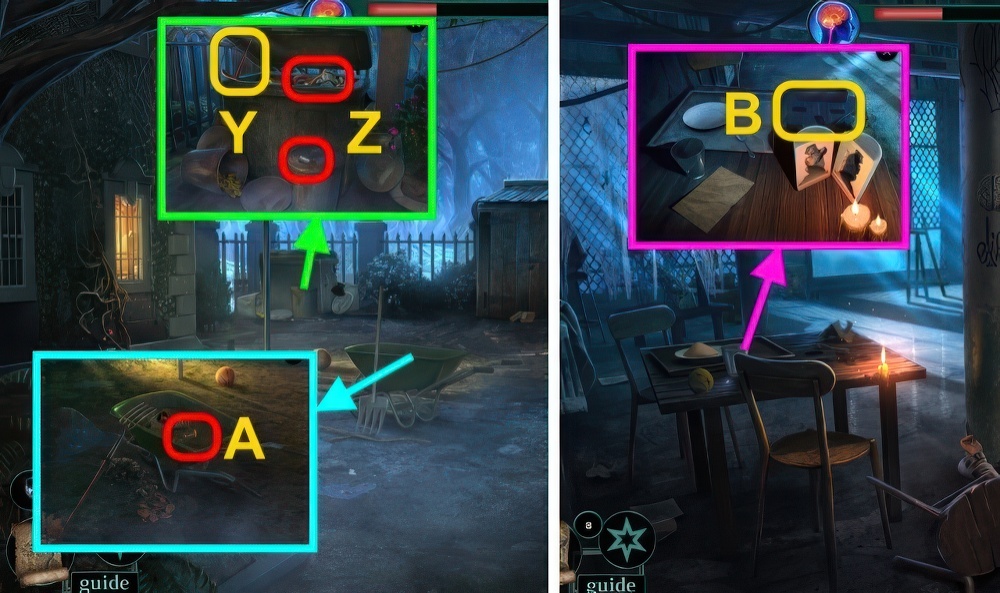
- Walkthrough (A): select meter until it’s full.
- Place boards (1-2).
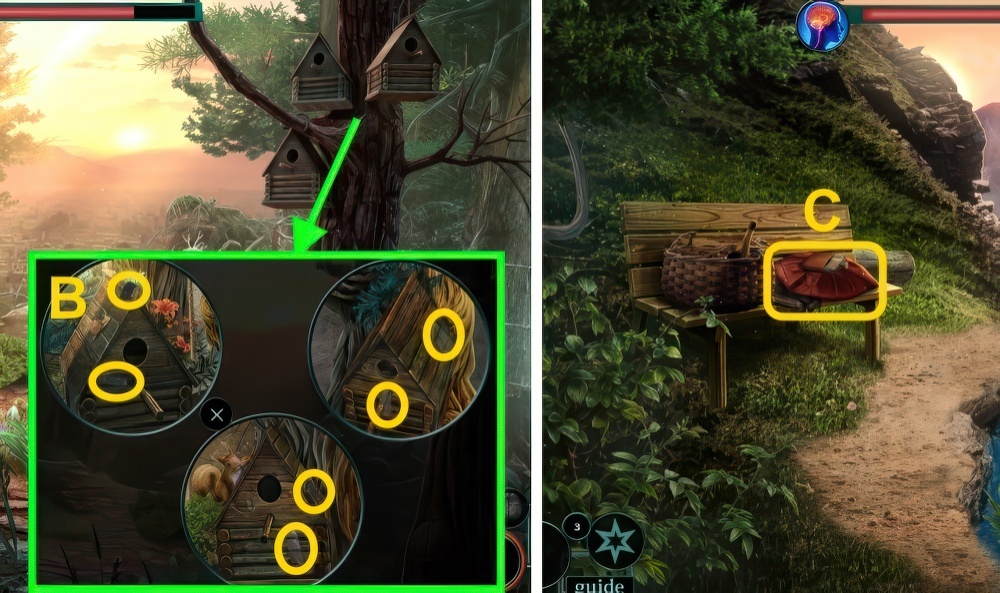
- Move plants and butterfly, collect TAPE PIECES (B).
- Go forward.
- Move items (C), take WORK GLOVES.
- Go down.

- Remove sign and handle (D).
- Place PIPE, take AXE.
- Move plants, use WORK GLOVES (E).
- Take TOOLBOX.
- Rotate the rings to complete the pattern.
- Select and drag a ring to rotate it.
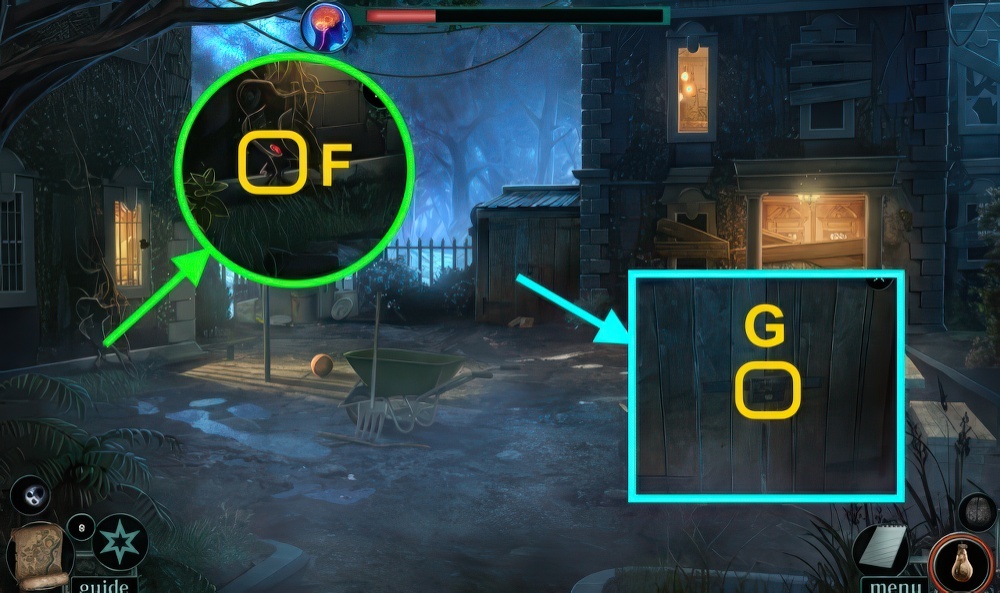
- Inspect TOOLBOX, walkthrough (F).
- Take STRONG GLUE and AIR PUMP HANDLE.

- Use WORK GLOVES and AXE (G), open door.
- Take BROKEN AIR PUMP (H).
- Move curtain (I), use LANTERN.
- Play puzzle, receive INFLATABLE RAFT (J).
- Go forward.

- AIR PUMP HANDLE on BROKEN AIR PUMP, take AIR PUMP.
- GLASS SHARD, TAPE PIECES, and AIR PUMP on INFLATABLE RAFT.
- Use INFLATABLE RAFT (K).
- Guide the raft around the obstacles.
- Select the left and right arrows to move the raft in that direction.
- Walkthrough (L): use arrows to dodge obstacles.
- Go left.
- Talk (M).

- Inspect bag, examine map (N).
- Walkthrough (O), take Map.
- Take HANDKERCHIEF and POCKET KNIFE (P).

- Take VERMIN REPELLANT SPRAY, read newspaper (Q).
- Move items, take BROKEN TROPHY (R).
- Inspect BROKEN TROPHY, place pieces (S).
- Use STRONG GLUE, take MENDED TROPHY.
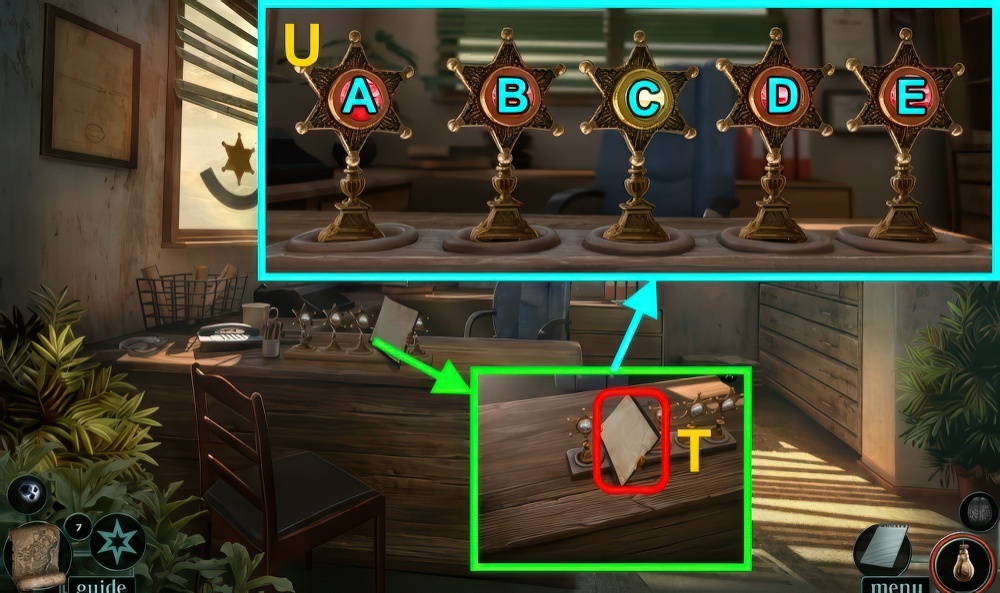
- Take PEN AND PAPER (T), place MENDED TROPHY.
- Swap the trophies until they all turn green.
- Select two trophies to swap them
- Walkthrough (U): (C-E)-(A-D)-(B-E).
- Take PINK KNOB.
- Go down.

- Move can and papers, take COINS (V).
- Use VERMIN REPELLENT SPRAY (W).
- Play puzzle, receive DRAWER KEY (X).
- Go left.

- Use DRAWER KEY (Y), open.
- Take WIRES and SILVER KNOB.
- Go down.
- Take clue (Z).
- Remove cover (A), examine.
- Use WIRES (B).

- Select and drag a wire from one node to another.
- The number on each button indicates connections needed.
- Nodes don’t connect diagonally, but may have multiple connections.
- Walkthrough (C).
- Use COINS (D).
- Take GREEN KNOB (E).
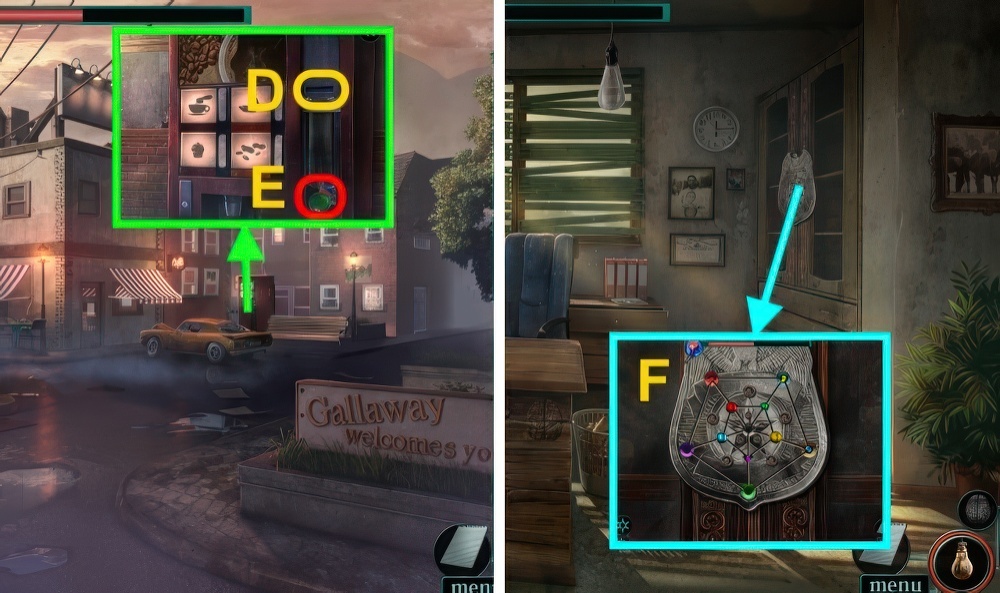
- Go left.
- Place PINK KNOB, SILVER KNOB, and GREEN KNOB (F).

- Place the knobs in their correct spaces based on their color and shape.
- Press button to rotate the knobs.
- Walkthrough (G): F-C-G-C-I-B-A-J-A-J-A-J×2-A-G×2-D×2-G-D-G-D-G-D×3.
- Open, take ELECTRIC SHOCK DEVICE.
- Go right.

- Take radio (H).
- Use rock (I) on plate thrice (J), move leaves (K).
- Collect BERRIES (L).
- Select (1-4), take MOON PLATE.
- Give BERRIES (M), take SUN PLATE.
- Place MOON PLATE, SUN PLATE, and ENGRAVED PLATE (N).
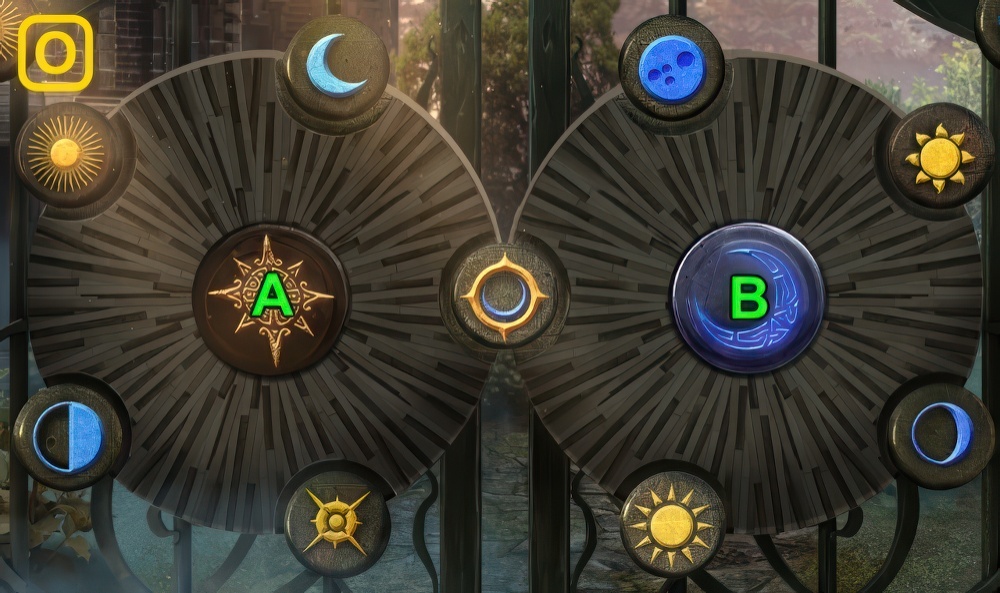
- Move the plates onto their matching colored discs.
- Select the sun and moon plates to rotate the plates around them.
- Some plates must be next to their matching images on the gate.
- Walkthrough (O): A-B×4-A×3-B-A×2-B-A-B×3-A×4-B×4-A-B-A×3.
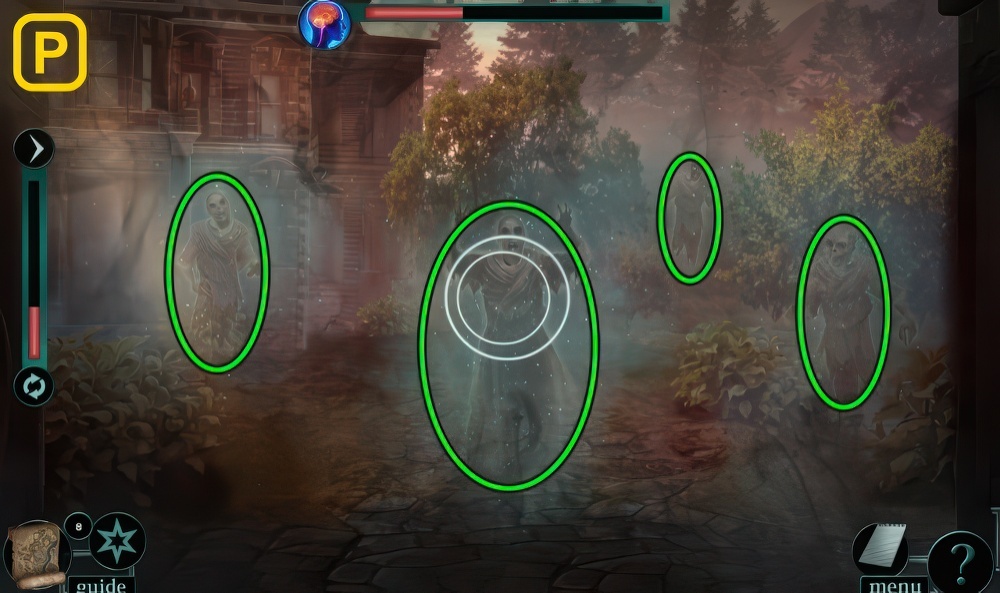
- Align the circles with each other they move left and right.
- When a small circle is inside a large one, click to destroy the ghost.
- Walkthrough (P).

- Give PEN AND PAPER (Q), take ROUTE TO DOCTOR.
- Use ROUTE TO DOCTOR, play puzzle (R).
- Receive LIGHTER FLUID.
- Open gate (S).
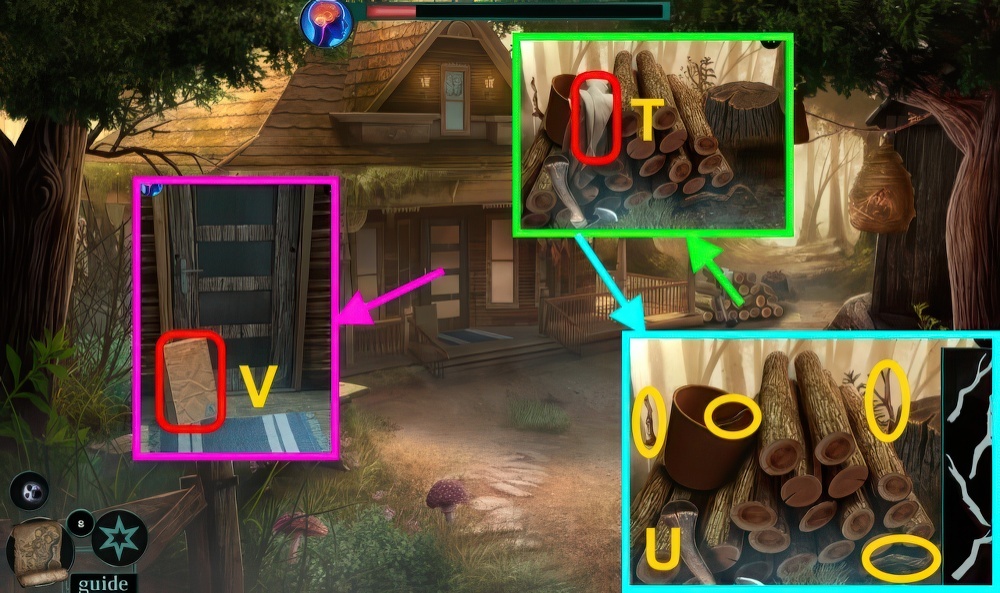
- Take WET BED SHEET (T).
- Move plant, collect branches (U).
- Take BRANCHES.
- Take PACKAGE (V), examine door.
- POCKET KNIFE on PACKAGE, examine pieces.
- Take FRUIT PICKER.

- Use FRUIT PICKER (W), receive BAG.
- Open bag, take MAGNESIUM FIRE STARTER and SCREWDRIVER.
- LIGHTER FLUID on HANDKERCHIEF, take FLAMMABLE HANDKERCHIEF.
- Use BRANCHES, FLAMMABLE HANDKERCHIEF, MAGNESIUM FIRE STARTER, POCKET KNIFE, and WET BED SHEET (X).
- Use SCREWDRIVER.
- Move papers, take DOCTOR’S KEYS (Y).
- Use DOCTOR’S KEYS.
- Inspect jacket (Z), read papers.
- Inspect jacket.
- Select Accept your fate and try to escape later.
- Click the lock pegs in the correct order to pick the lock.
- Walkthrough (A).
- Read file (B).
- Move papers, take SMALL KEY.
- Take FISH HOOK (C).

- Take SOAP, POISON STICKER, and SHEET (D).
- Use SMALL KEY (E), open.
- Take CONNECTORS.
- Inspect (F), place POISON STICKER (G).
- Place CONNECTORS (F).
- Inspect cart (H).

- Inspect machine twice (I).
- Walkthrough (J): press button when pointer is over red section.
- Go forward.
- Inspect, use SOAP (K).
- Close drawer, take PLUNGER CAP (L).
- Take PORTRAIT and RULER (M).
- Place PORTRAIT (N).

- Place the portraits in their proper places.
- Walkthrough (O).
- Take TRANQUILIZER GUN.
- Go down.
- Use RULER, take STENCIL and PAINT THINNER (P).
- Go forward, then left.
- Pull cord (Q).
- Take KNIFE (R).

- Take BRASS ROD (S).
- Move papers, use STENCIL (T).
- Take STAFF COMBINATION.
- Use KNIFE (U), receive MASK.
- Take WIRE (V), use PAINT THINNER.
- Open, take SCREWDRIVER and FLOWER POT.
- Use KNIFE and WIRE (W).
- Pull the metal ball through the maze.
- Walkthrough (X).
- Open, take TRANQUILIZER DART.
- Go down.

- Place STAFF COMBINATION (Y).
- Place the colored balls in the sequence shown in the paper.
- Walkthrough (Z).
- Take STAFF CHARTS.
- Go down.

- Use SCREWDRIVER (A), take LEATHER RESTRAINT.
- BRASS ROD on PLUNGER CAP, take PLUNGER.
- Use PLUNGER, take CABINET KEY (B).
- Use CABINET KEY (C).

- Play puzzle, receive LIGHTER (D).
- Inspect STAFF CHARTS, take CHEMICAL FORMULA.
- Place CHEMICAL FORMULA and TRANQUILIZER DART (E).
- Play puzzle, receive DOSED DART (D).
- Go forward, then left.
- Use LIGHTER, collect gears (F).
- Take GEARS.
- Place GEARS (G).
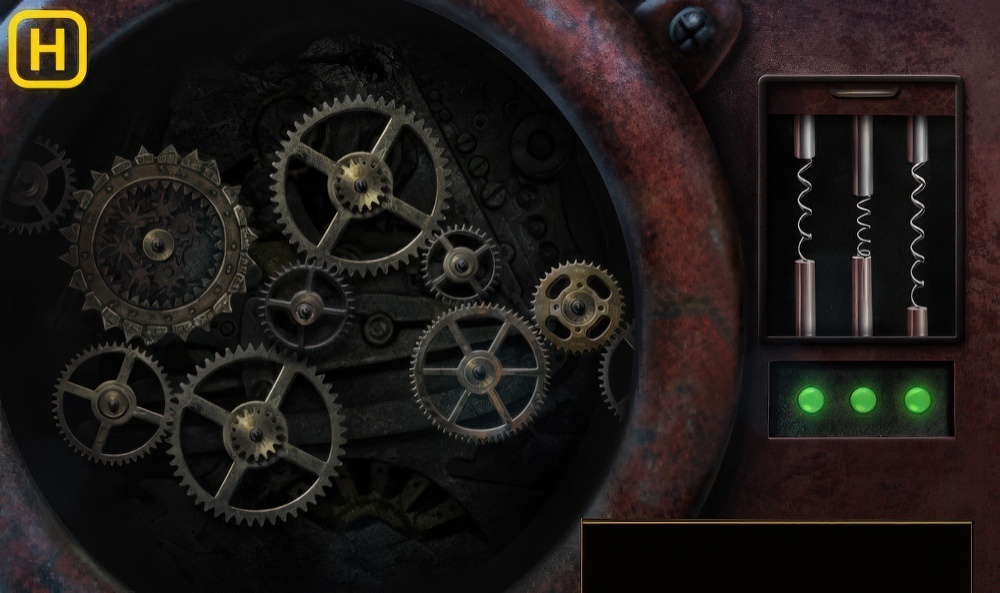
- Repair ihr machine.
- Swap the springs until all indicators are green.
- Then place the gears in their proper positions to form a working mechanism.
- Walkthrough (H).

- Take KEY CARD (I).
- Go down.
- Use KEY CARD (J).
- Try to go forward.
- Select Shut the door on her.
- DOSED DART on TRANQUILIZER GUN.
- Use TRANQUILIZER GUN (K).
- Go forward.

- Use LEATHER RESTRAINT (L), take CRANK (1/2) (M).
- Move sheets, take FUNNEL (N).
- Go down.
- Use FUNNEL and FLOWER POT (O), take POT OF WATER.
- Go forward.

- Use POT OF WATER (P), place mud in mold (Q).
- Use KNIFE and FISH HOOK on mold, close.
- Open, take GARGOYLE.
- Go down.
- Place GARGOYLE (R), take COMPLEX LOCK (S).
- Go forward.
- Place COMPLEX LOCK (T).

- Play puzzle, receive CRANK (2/2) (U).
- Place CRANK (2/2), open window.
- Inspect easel (V).
- Go forward.

- Align the circles with each other they move left and right.
- When a small circle is inside a large one, click to destroy the ghost.
- Walkthrough (W).

- Take CANE, DOMINO (1/2), and RAZOR BLADE (X).
- Inspect, use CANE (Y).
- Take GLASS HOLDER, HOOK, and DOMINO (2/2) (Z).
- Use MASK, take SHED KEY (1/3) (A).
- Go down.
- Place DOMINO (2/2) (B).

- Arrange the dominoes into a loop connecting the numbers on the tiles.
- Use the special slot to rotate the tiles as needed.
- Walkthrough (C).
- Take SHED KEY (2/3).

- Remove cloth, use RAZOR BLADE (D).
- Go forward.
- Inspect (E), enter 7411.
- Open, take PLIERS.
- Use PLIERS (F), take SHED KEY (3/3).
- Inspect (G), place SHED KEY (3/3).

- Move the gems to create the drawing shown below.
- All gems must end up on the opposite side from where they started, in the positions corresponding to the drawing.
- Walkthrough (H).

- Walkthrough (I).

- Walkthrough (J).

- Take LEAF BLOWER (K).
- Inspect SHEET 4 times, receive IMPROVISED ROPE.
- IMPROVISED ROPE and HOOK on LEAF BLOWER, take GRAPPLING GUN.
- Use GRAPPLING GUN (L).
- Select Get inside the office as quickly as possible.

- Open (M), examine.
- Move items, take DIAMOND CAP (N).
- Take EMPTY BURNER (O).
- Move papers, take DOCTOR’S JOURNAL.

- Use DIAMOND CAP and GLASS HOLDER, take KEYS (P).
- Read DOCTOR’S JOURNAL.
- Take ALCOHOL (Q), use KEYS (R).

- Match the keys to the shape above the keyholes.
- Walkthrough (S).

- Inspect files (T), read.
- Take DECODER.
- DECODER on DOCTOR’S JOURNAL.
- To get the password, find the right place on grid for the colored paper shapes.
- Walkthrough (U).
- Select tab (V), take FORMULA.

- Open curtain, place FORMULA (W).
- Play puzzle, receive ANTIDOTE FORMULA (X).
- ALCOHOL on EMPTY BURNER, take BURNER.
- Use ANTIDOTE FORMULA, collect bottles (Y).
- Take CHEMICALS.

- Place BURNER and CHEMICALS (Z), take ANTIDOTE (A).
- Use KEYS, walkthrough (B).
- Go forward.

- Align the circles with each other they move left and right.
- When a small circle is inside a large one, click to destroy the ghost.
- Walkthrough (C).
- Take SCALPEL and PEANUTS (D).
- Inspect paper (E), take GOLDEN PEN.
- Use SCALPEL (F), receive BASEBALL BAT.
- Take CAGE (G).
- Go left.

- Select Give it something to chew on.
- Move leaves, take SCREWDRIVER and RED BOARD GAME TOKEN (H).
- SCREWDRIVER and PEANUTS on CAGE, take BAITED CAGE.
- Use BAITED CAGE (I), receive CAGED SQUIRREL.
- Place CAGED SQUIRREL, examine (J).

- Use SCREWDRIVER (K), take BOBBLE HEAD.
- Take HEAT RESISTANT GLOVES (L).
- Take SHOELACE and SHOVEL HEAD (M).
- Go right.
- Use SHOVEL HEAD and HEAT RESISTANT GLOVES (N), receive SHOVEL WITH COALS.
- Use SHOVEL WITH COALS, take YELLOW BOARD GAME TOKEN and OVEN PART (O).
- Place OVEN PART (P), open.
- Take TAP (Q).
- Place TAP (R).
- Play puzzle, receive PLASTIC BAG (S).
- Go down twice.
- Inspect SHOELACE, use GOLDEN PEN.
- Take PEN HOOK.
- Use PEN HOOK, take PEPPER SPRAY (T).
- Use SCREWDRIVER (U), take GREEN BOARD GAME TOKEN and BODY MIST.

- Inspect BOBBLE HEAD, take RIPPED NAME.
- Inspect paper (V), place RIPPED NAME.
- Read book (W).
- Inspect name (@), take DOOR CODE NOTE.
- Open PLASTIC BAG, take WOODEN TOKEN.
- Use WOODEN TOKEN (X).

- Move the wooden plates to make a complete image of the symbol.
- Walkthrough (Y).

- Use the tokens on the side panels to clear the board.
- Three or more tokens in a row will disappear.
- Walkthrough (Z): (D-K)-(C-L)-(E-M)-(B-N)-(A-O)-(J-P)-(F-Q)-(G-R)-(H-L)-(I-K).
- Take BARRED DOOR PART (1/2).
- Go left.

- Use BODY MIST and SHOVEL HEAD, take BOARD GAME and BOX HANDLE (A).
- Open BOARD GAME, place RED BOARD GAME TOKEN, YELLOW BOARD GAME TOKEN, and GREEN BOARD GAME TOKEN.
- Place the colored figurines so that they sit next to their corresponding symbol.
- Walkthrough (B): (I-B)-(H-C)-(G-A)-(C-G)-(B-H)-(A-B)-(H-C)-(G-D)-(F-A)-(D-H)-(C-I)-(A-C)-(I-A)-(H-D)-(A-E).
- Take GUN KEY.
- Go down.

- Place BOX HANDLE (C), open.
- Take BONE.
- Use GUN KEY (D), receive INJECTION PISTOL.
- ANTIDOTE on INJECTION PISTOL, take INJECTABLE ANTIDOTE.
- Select Wait and use the antidote on the sheriff.
- Press the button until the red scale is completely filled.
- Walkthrough (E).

- Memorize the sequence in which the gas cans lit up and repeat the combination.
- Walkthrough (F).
- Use INJECTABLE ANTIDOTE on scene.

- Play puzzle (G).
- Take BARRED DOOR PART (2/2) (H).
- Go forward, then left.
- Place BONE (I).

- Play puzzle, receive LARGE DOOR NOTE (J).
- DOOR CODE NOTE on LARGE DOOR NOTE, take COMPLETE DOOR NOTE.
- Place BARRED DOOR PART (2/2) and COMPLETE DOOR NOTE (K).

- Rearrange the colored pieces according to the clue using the path to make crosses.
- Walkthrough (L): F-B×6-A×2-F-B×2-C×3-G-C-H-B×3-A×5-E-B-E-B×3-C×7-E-C-A×6-D-A×2-B×5-I-B×3-H.
- Go forward.

- Take THIGH BONE (M).
- Use THIGH BONE (N).
- Move items, take STONE TOKEN (1/3) and TAPE (O).

- Take SKELETON HAND and POINTING STICK (P).
- POINTING STICK and TAPE on SKELETON HAND, take ELONGATED HAND.
- Use ELONGATED HAND (Q).

- Play puzzle, receive BUTTON (R).
- Place BUTTON (S), press.
- Inspect (T).

- Rearrange the colored buttons to match the pattern in the drawing.
- Walkthrough (U).
- Walkthrough (V).
- Go forward.

- Open box, take STONE TOKEN (2/3) (W).
- Move box.
- Take STONE TOKEN (3/3) (X).
- Place STONE TOKEN (3/3) (Y).

- Release the current by rotating the plain metal plates and placing the decorative plates in the right spot to form a continuous path to the door symbol.
- Walkthrough (Z).

- Press button (A).
- Play puzzle, receive HUGE MAGNET (B).
- HUGE MAGNET and TAPE on ELONGATED HAND, take HAND WITH MAGNET.
- Use HAND WITH MAGNET (C), receive CONTROL BOX PIECE.
- Use CONTROL BOX PIECE (D).

- Place the symbol plates in the free slots so that all the symbols touch each other match.
- Fill up the whole field to complete the puzzle.
- Walkthrough (E).
- Select Go through this door.

- Align the circles with each other they move left and right.
- When a small circle is inside a large one, click to destroy the ghost.
- Walkthrough (F).
- Take RUBBER BAND (G), open.
- Take BROKEN GLASS and FINGERPRINT DUSTING KIT.
- Inspect (H).
- Go right.
- Move items, take ADJUSTABLE WRENCH and CELL HANDLE (I).

- Collect feathers (J).
- Take feathers (K), receive FEATHERS.
- Inspect (L).

- Play puzzle, receive SMALL BAG (M).
- Use SMALL BAG and BROKEN GLASS (N), receive BAG WITH ASHES.
- Go down.
- Use CELL HANDLE, open (O).
- Remove chain and cloth, take CIGAR HOLDER (P).

- FEATHERS and RUBBER BAND on CIGAR HOLDER, take IMPROVISED BRUSH.
- TAPE, IMPROVISED BRUSH, and BAG WITH ASHES on FINGERPRINT DUSTING KIT.
- Use FINGERPRINT DUSTING KIT.
- Use brush (P) on ashes (Q), use brush on handle (R).
- Use tape (S) on handle, examine (R).
- Go right.
- Use FINGERPRINT DUSTING KIT.
- Use brush on ashes, use brush on pipe.
- Use tape, examine (T).
- Go down twice.

- Use FINGERPRINT DUSTING KIT.
- Use brush on ash, use brush on canister.
- Use tape, examine (U).
- Go down.
- Use FINGERPRINT DUSTING KIT.
- Use brush on ash, use brush on podium.
- Use tape, examine (V).
- Inspect FINGERPRINT DUSTING KIT, place tape (W).
- Take HANDPRINT.
- Go forward twice.

- Use HANDPRINT (X).
- Select Sneak up on the doctor.
- Click on the shoe when it matches the silhouette position.
- The better the match, the less noise you will make.
- Walkthrough (Y): stop shoes over outlines.
- Walkthrough (Z): stop circle over paper.

- Use BAG WITH ASHES and ADJUSTABLE WRENCH (A).
- Inspect (B).
- Go down.
- Inspect cell (C), pull handle (D).
- Go left.
- Inspect, take EXIT GEAR (E).
- Inspect (F).
- Take MACHINE PART and TRUTH SERUM (G).

- Place MACHINE PART (H).
- Cover the board with your green fields.
- Select a green field and a highlighted space to move.
- Moving to a green space replicates the stone.
- Moving to a yellow space makes the stone move two spaces.
- When one stone touches an oppositely colored stone, all adjacent stones will change color.
- Walkthrough is random (I).
- Go down.
- Open EMPTY PEPPER SPRAY, use TRUTH SERUM.
- Take TRUTH SERUM GAS.
- Use ADJUSTABLE WRENCH (J), talk.
- Use TRUTH SERUM GAS, take note (K).
- Go left.
- Play puzzle, receive BOTTLE OF WATER (L).
- Go down three times.

- Use BOTTLE OF WATER (M).
- Go to Maze exit.
- Place EXIT GEAR (N).

- Rotate the arrows and the ring so that the sum of the numbers the arrows point to match with the clue.
- The ring automatically rotates in a pattern.
- Walkthrough (O).
- Go forward.
- Walkthrough Bonus Chapter, at the link below.


