
New York Mysteries 4: The Outbreak – An adventure game with unforgettable characters, lots of puzzles and item search. The game will take place on the streets of New York in the late 60’s, where at that time the epidemic is killing hundreds of thousands of residents. Laura and her faithful partner will need to investigate a complex case of a strange disease poisoning the city. Later you will discover that it may have something to do with a mysterious artifact stored in the archives of a secret order. A shadow hangs over New York City, and time is passing quickly. You as a modern plague doctor must cure everyone and save the city, and this will require you to pass many incredible puzzles, find a variety of objects and solve riddles. Enjoy stunning locations, great graphics, exciting mini-games and puzzles. If you can not pass any of the puzzles or do not know where the items are, on our site you can watch the walkthrough of the game Urban Legends 3: Ghost of Misty Hill to complete the investigation.
New York Mysteries 4: The Outbreak – Walkthrough
Here you can see the full walkthrough of New York Mysteries 4: The Outbreak game, namely for all chapters, including bonus chapter, in pictures.
Go outside
Was someone attacking me in my home. I lost consciousness and woke up here, in this strange place looking like a dressing room trailer. I think I’m here all alone. I must get out of here as soon as possible.
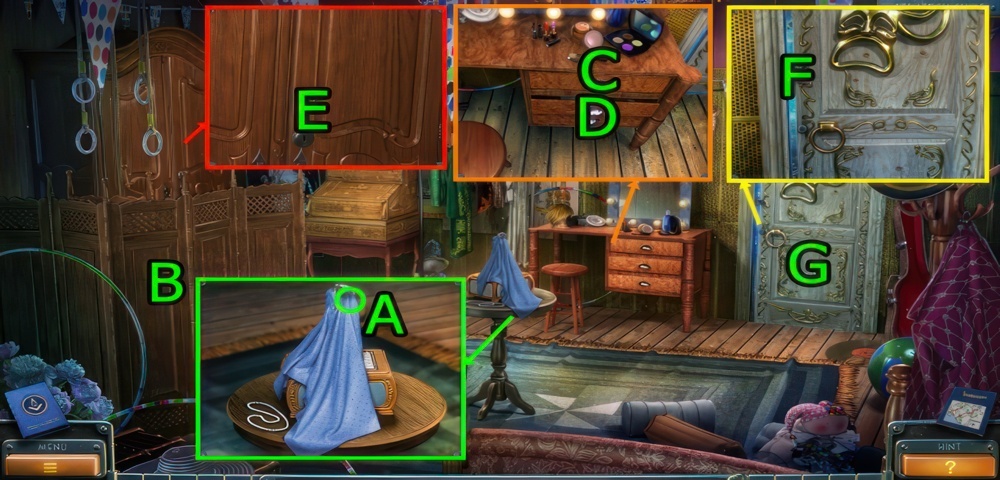
- Get RING (A).
- Press (B).
- Press (C×6), get KEY.
- Press (D×3), get PLIERS.
- Use KEY and press (E×3), get HANGER.
- PLIERS on HANGER, get A THIN TUBE.
- Use A THIN TUBE on (F).
- Go (G).
Return to the city
I need to find a way out of the abandoned amusement park and return to city.
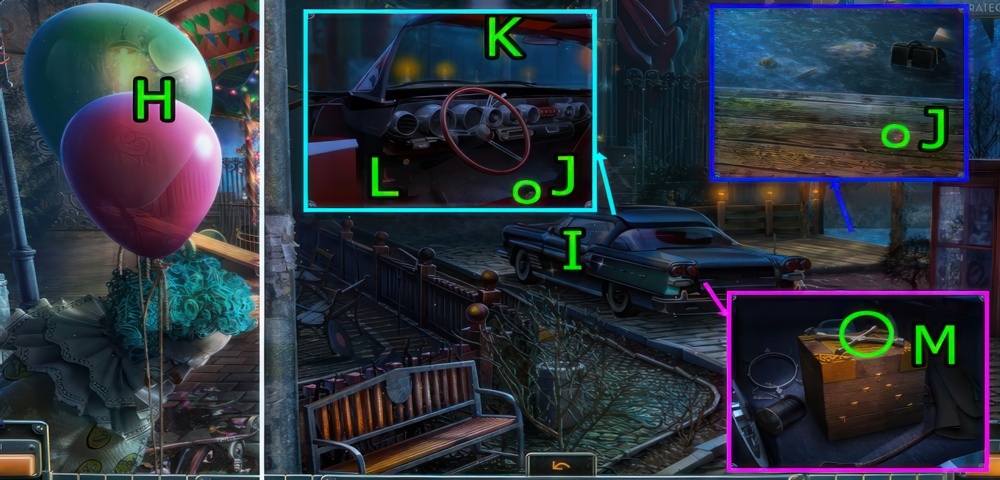
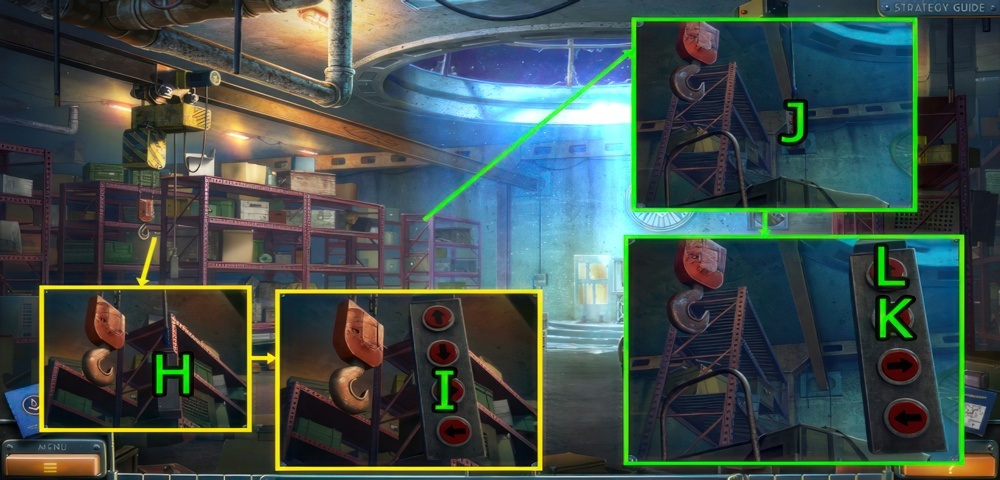
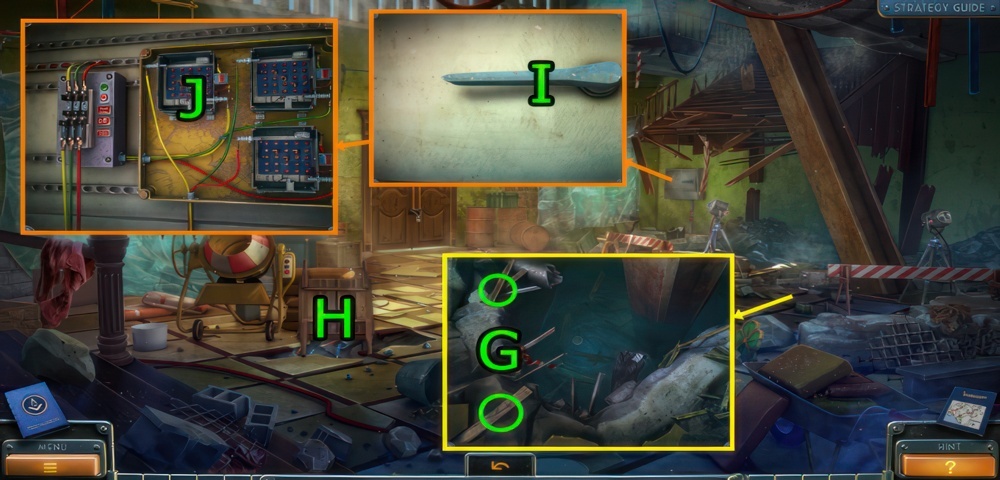
- Press (H×2).
- Go (H).
- Press (I).
- Get 1-2/5 GAME PIECE (J).
- Press (K), get 3/5 GAME PIECE.
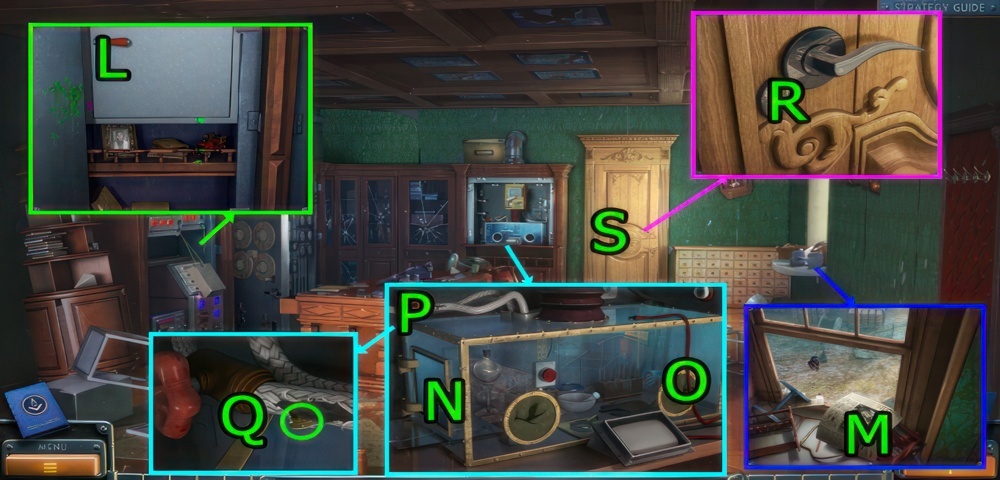
- Press (L).
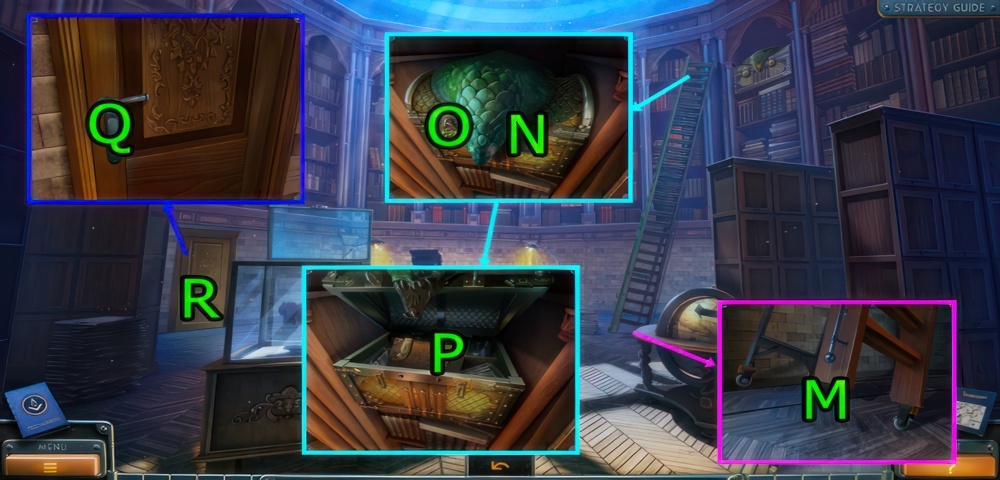
- Get WRENCH (M).
- Go Amusement Park.
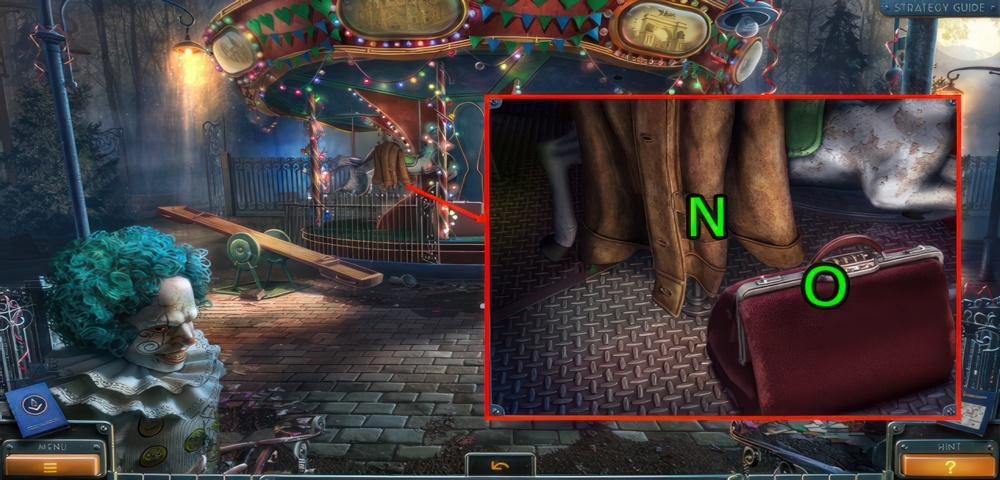
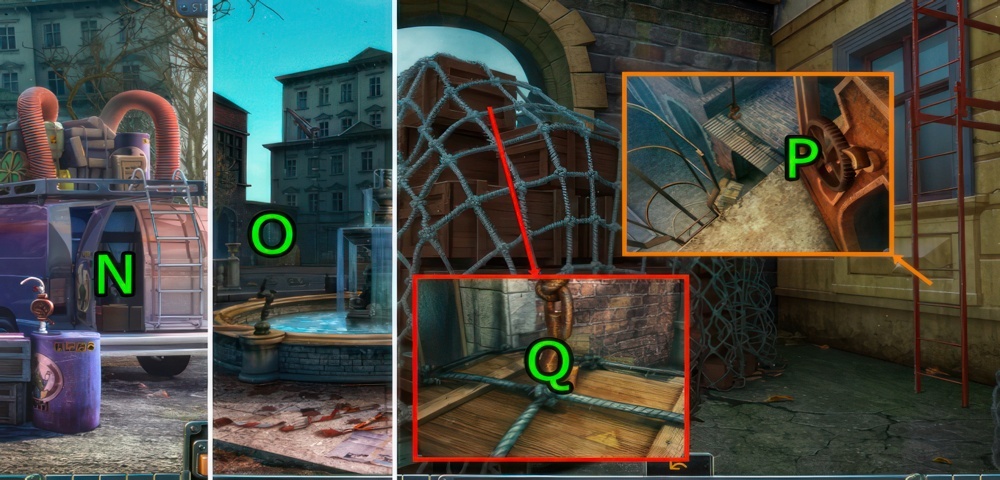
- Press (N), get 1/5 MASK and 4/5 GAME PIECE.
- Go (O).
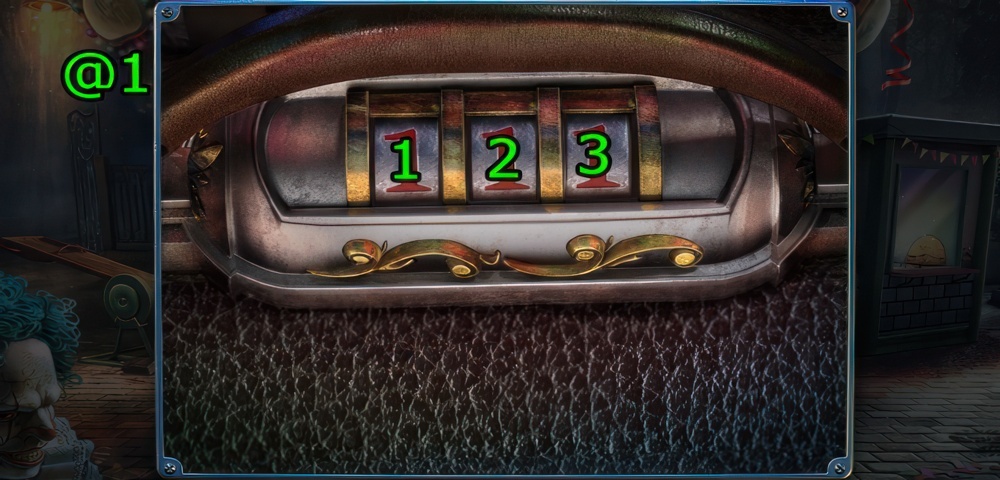
- Walkthrough (@1): (1×3)-(3×2).
- Get CAR KEY.
Help the stranger
I was in an abandoned amusement park. Apparently, the park hasn’t been operational for a while. While seeking for a way out, I bumped into one of the most popular rides Tunnel of Love. If felt like there wasn’t a soul around, but suddenly I heard a hoarse cry coming from that tunnel. A male voice asked for help. I’ll try to help him.
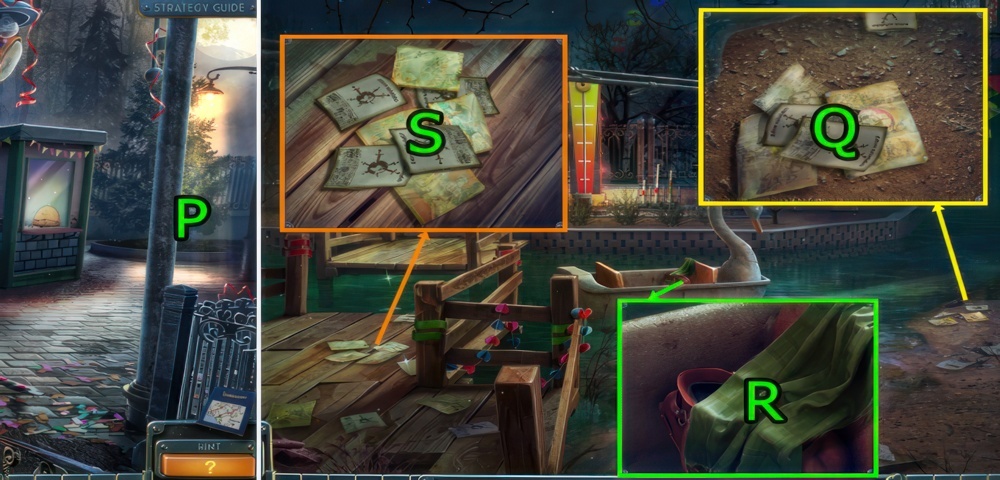
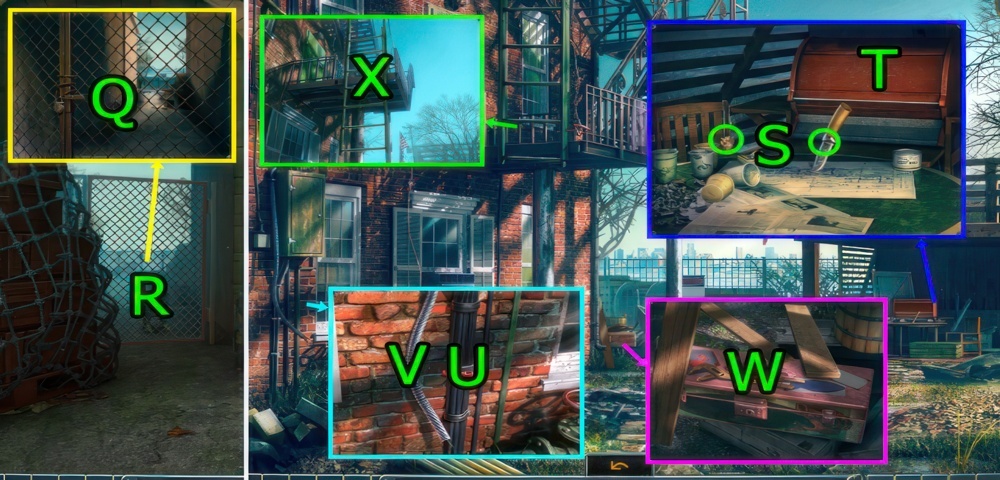
- Go (P).
- Press (Q×2), get MAGNET.
- Press (R), get CROCHET, press (R), get FLASHLIGHT.
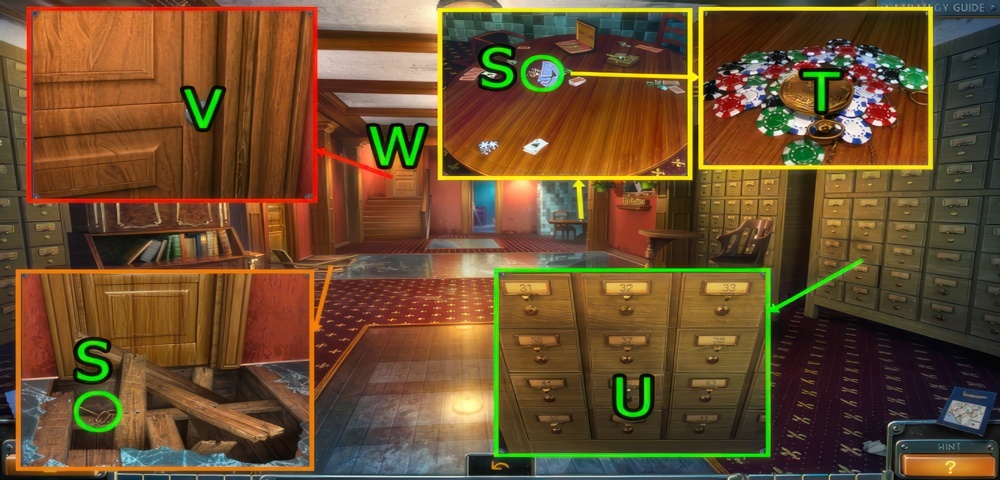
- Press (S×2) and use CROCHET on (S), get 2/5 MASK.
- Go Amusement Park.
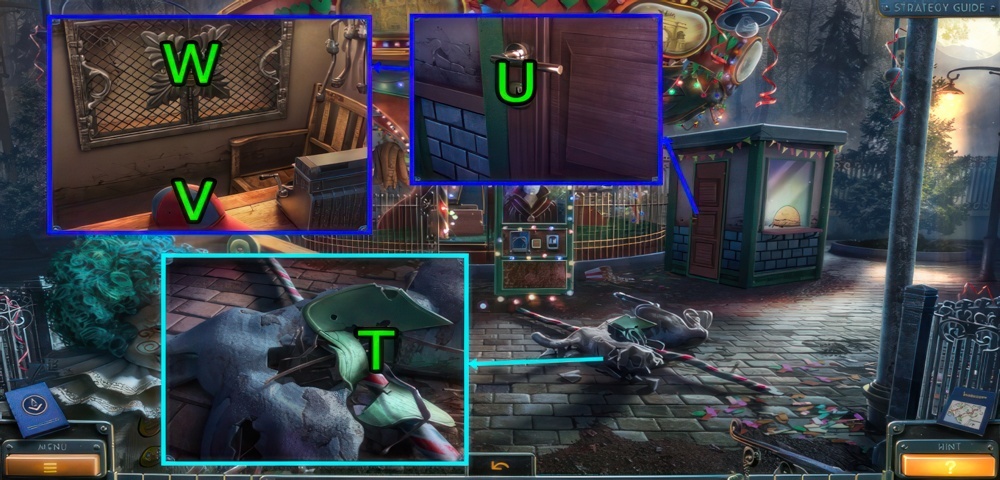
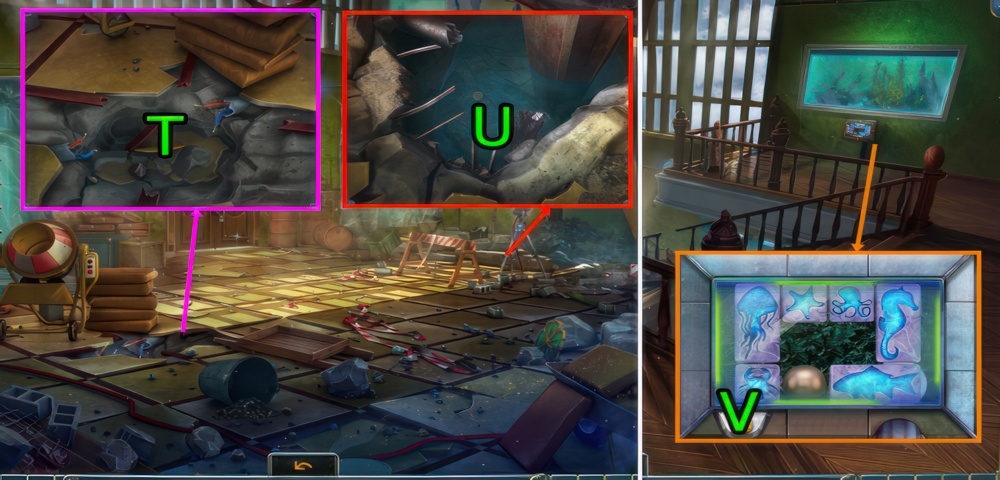
- Use MAGNET on (T), get KEY.
- Use KEY and press (U).
- Press (V), get 5/5 GAME PIECE.
- Go (W).
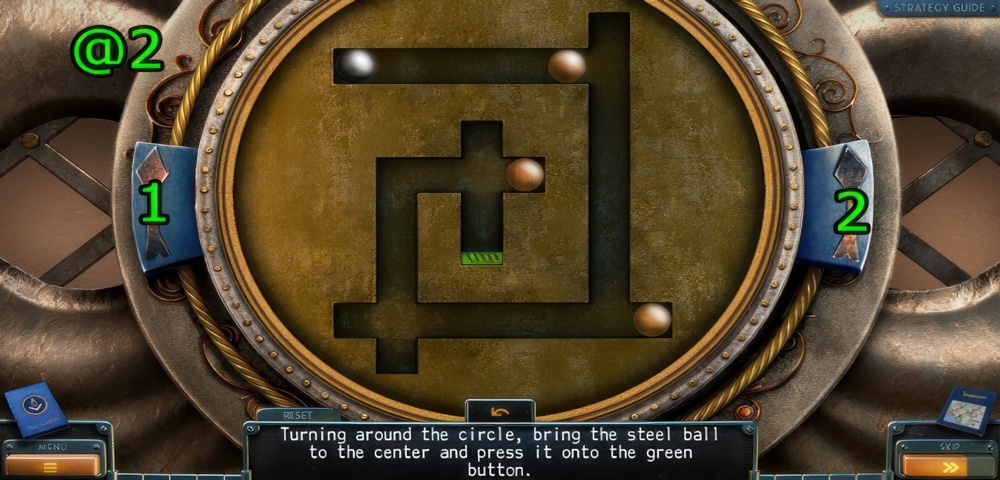
- Turning around the circle, bring the steel ball to the center and press it onto the green button.
- Walkthrough (@2): 1-2-1-2×2-1-2×2-1-2×2-1-2-1-2×2.
- Get HOOK-AND-LOOP.
- Go Park Exit.
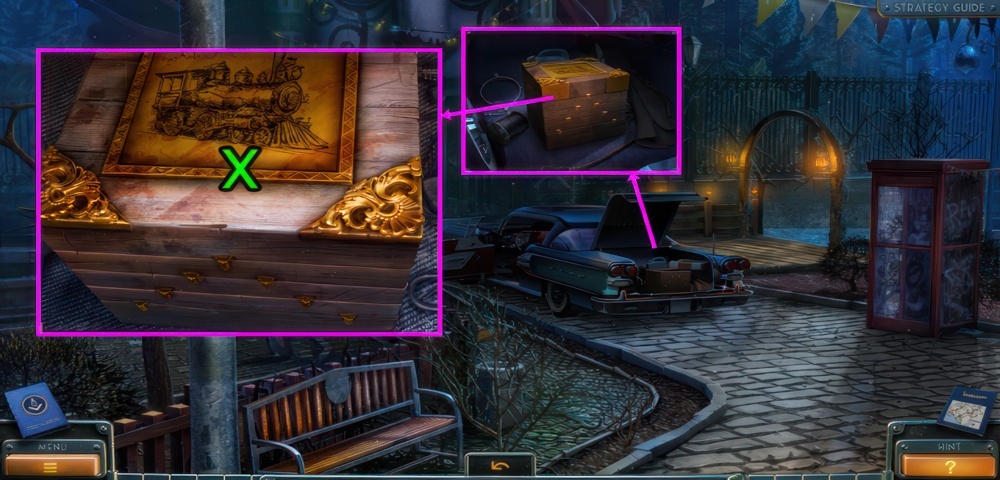
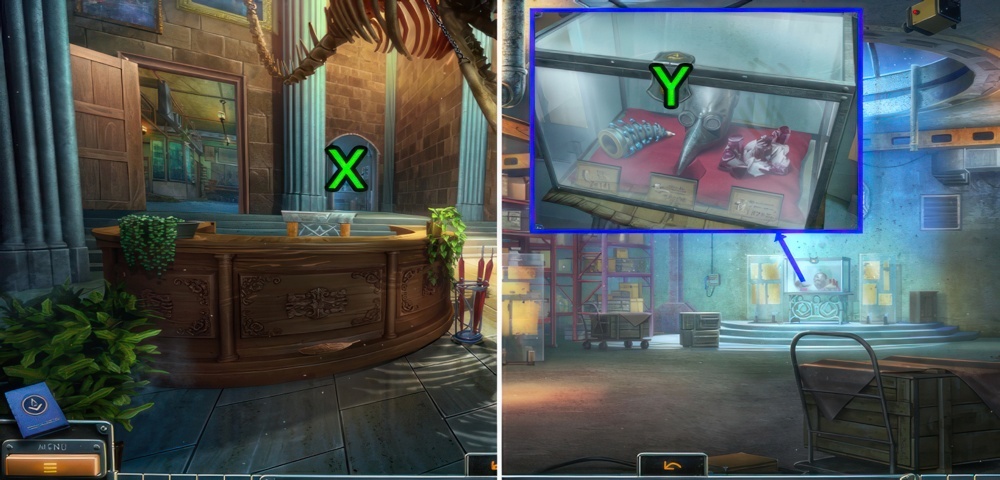
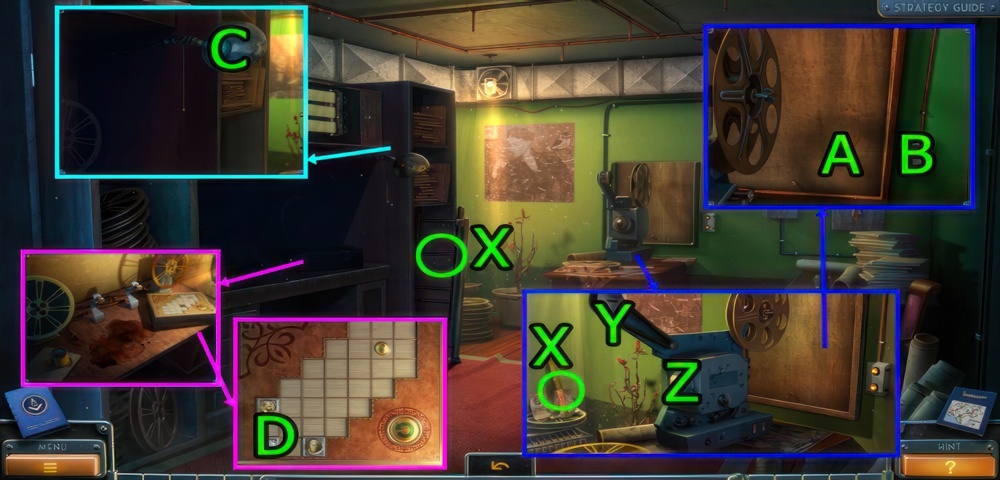
- Press and use 5 GAME PIECE on (X).
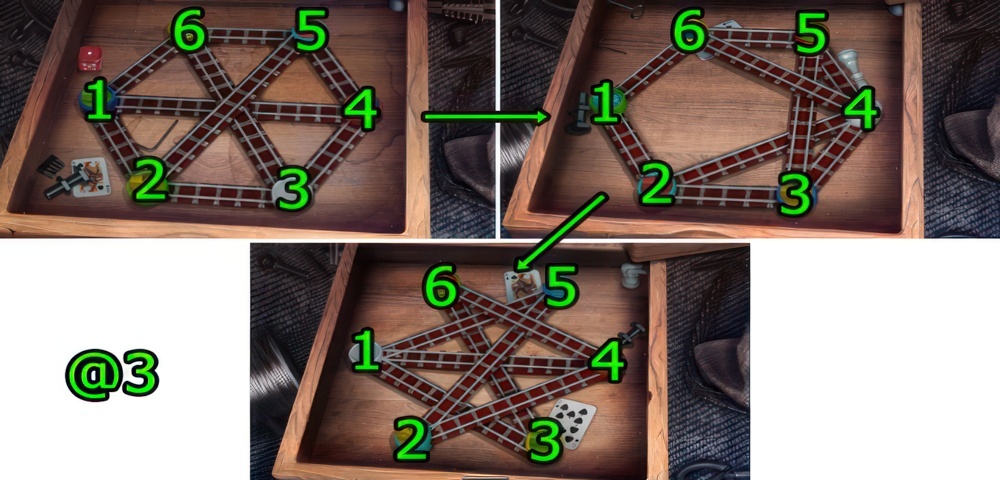
- Move the model trains into the appropriately colored slots.
- Walkthrough (@3): 2-1-4-5-6-3.
- 5-6-4-5-3-2-1-6-5-3-4.
- 5-2-4-1-5-2-4-6-3-1.
- Get HANDLE OF THE GLOVE COMPARTMENT.
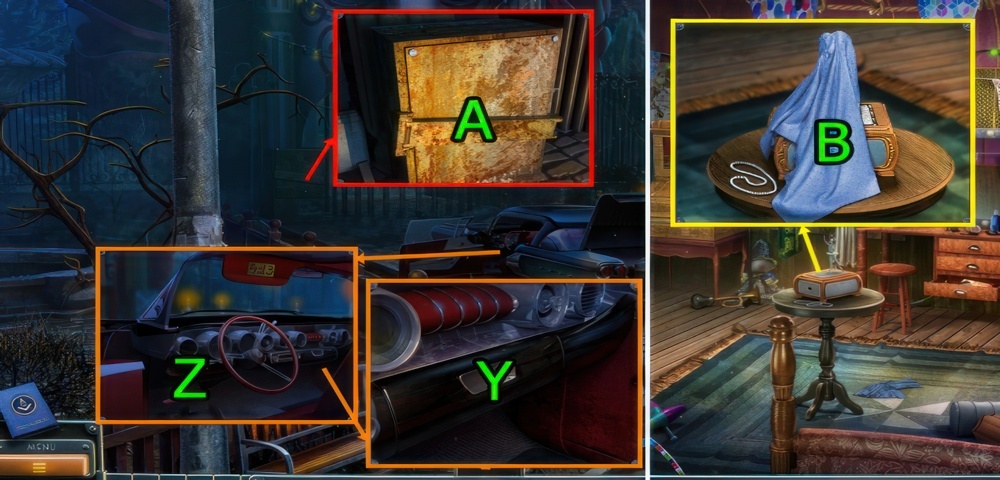
- Use HANDLE OF THE GLOVE COMPARTMENT on (Y), get 3/5 MASK.
- Use CAR KEY on (Z).
- Press and use WRENCH on (A), get SCREWDRIVER.
- Go Dressing Room Trailer.
- Press and use SCREWDRIVER on (B), get BATTERY.
- BATTERY on FLASHLIGHT, get FLASHLIGHT.
- Go Water Channel.
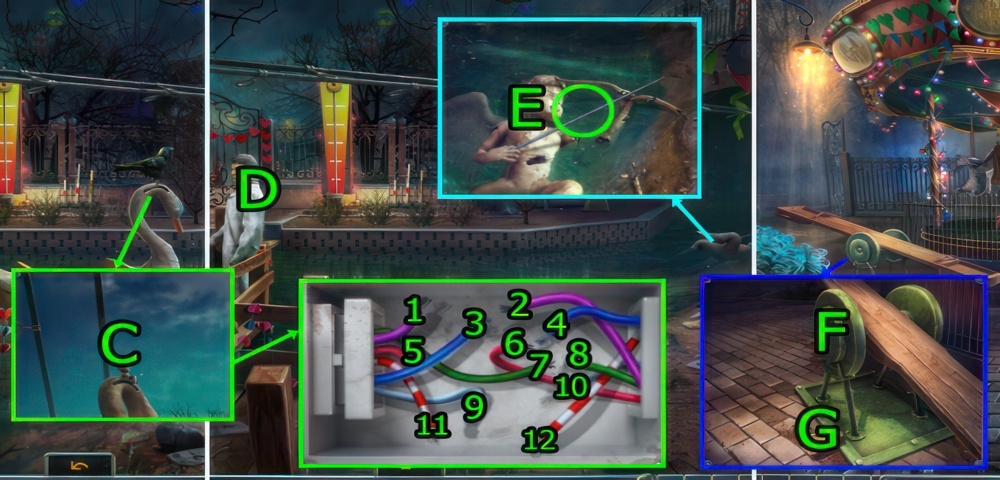
- Use HOOK-AND-LOOP on (C).
- Play puzzle.
- Connect wires of the same color.
- Walkthrough: (1-2)-(3-4)-(5-6)-(7-8)-(9-10)-(11-12).
- Get POLE HOOK.
- Press (D).
- Get METAL ROD (E).
- Go Amusement Park.
- Use METAL ROD on (F) and drag (G)-(F), get LONG BOARD.
- Go Water Channel.
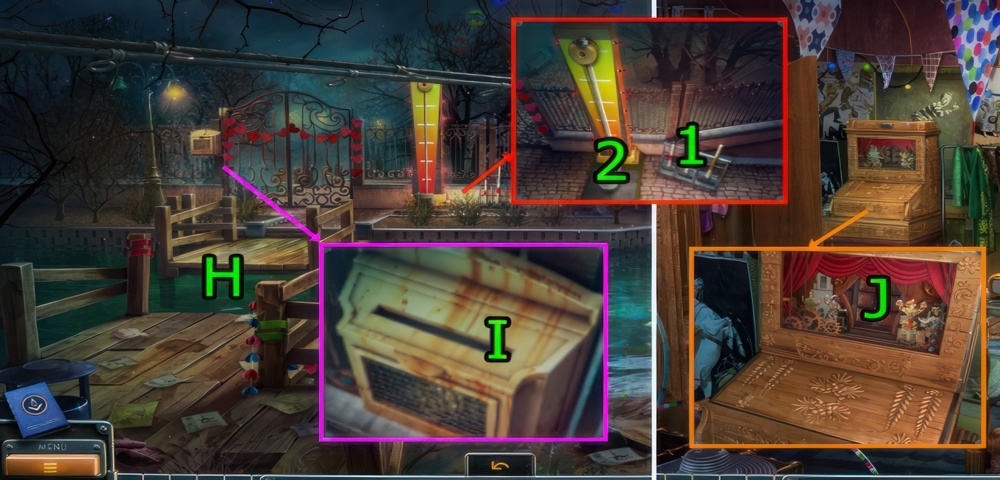
- Use LONG BOARD on (H).
- Use CROCHET on (I), get 4/5 MASK.
- Drag (1-2), get 5/5 MASK.
- Go Dressing Room Trailer.
- Use 5 MASK on (J).
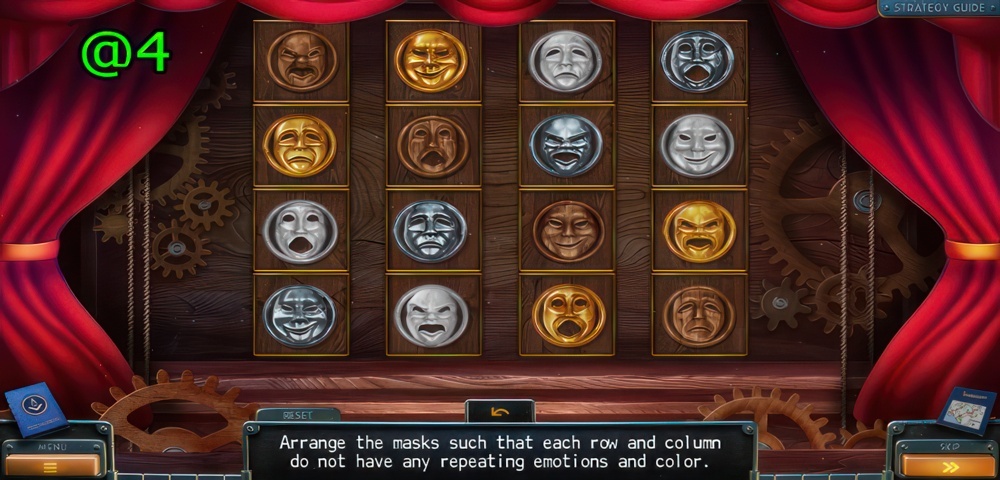
- Arrange the masks such that each row and column do not have any repeating emotions and color.
- Walkthrough (@4).
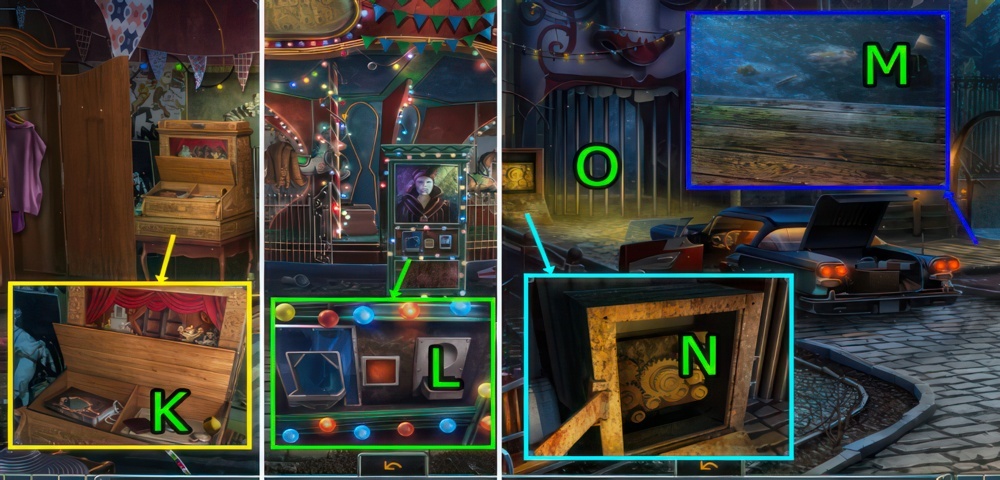
- Press (K×3), get TOKEN.
- Go Amusement Park.
- Use TOKEN on (L), get GEAR.
- Go Park Exit.
- Use POLE HOOK and press (M), get COIN and MACHINE OIL.
- Use GEAR and MACHINE OIL and press (N).
- Go (O).
Lead Travis to the laboratory
A man who asked for help is named Travis. Once I was able to free him, he told me an incredible story. Aside from being a famous scientist, Travis also said that, most likely, he, like me, was abducted by representatives of an extremist organization. The dissenters were going to spread a deadly virus, stolen from Travis laboratory, and it looks like they succeeded. Travis says that at the moment millions of people are in danger. Our Order has, perhaps, the only nearest safe laboratory. I’ll have to neglect one of the Order’s main rules and brought Travis inside.
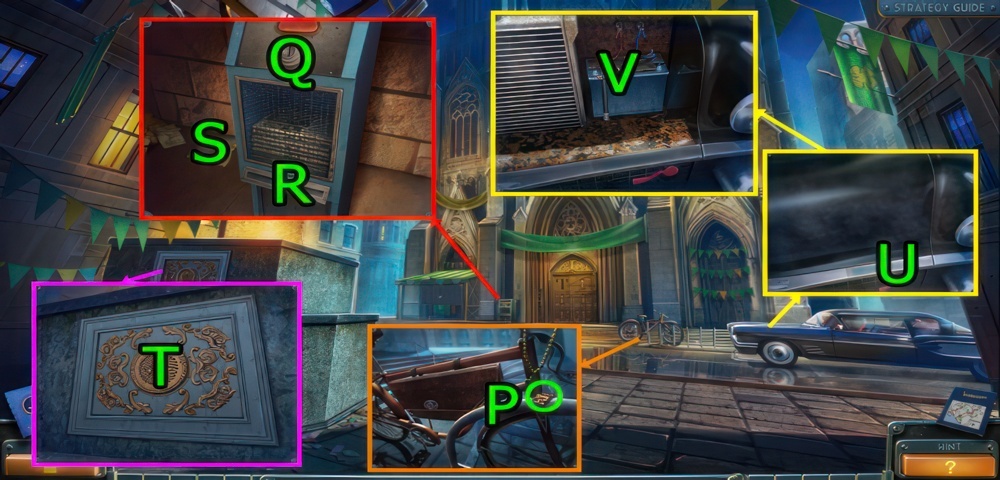
- Get BUTTON (P).
- Use COIN on (Q).
- Press (R), get NEWSPAPER.
- Press (S), get BUTTON.
- Use RING on (T).
- Press (U) and (V).
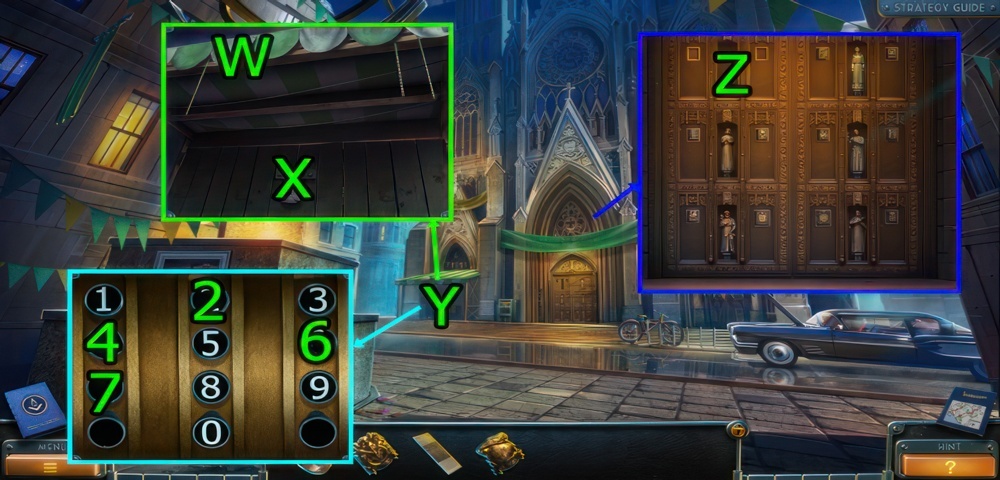
- Press (W), drag (W-X) and press (X).
- Play puzzle (Y).
- Enter the correct code.
- Walkthrough: 4, 7, 2, 6.
- Get FIGURINE OF ST. PATRICK.
- Use FIGURINE OF ST. PATRICK, BUTTON, BUTTON, and NEWSPAPER on (Z).
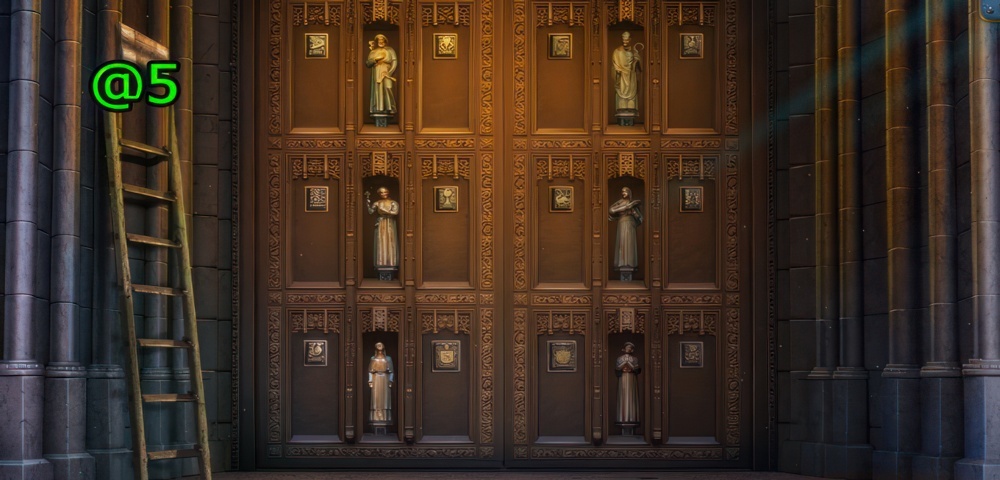
- By pressing the buttons, change the position of the figurines in accordance with the photo from the newspaper.
- Walkthrough (@5).
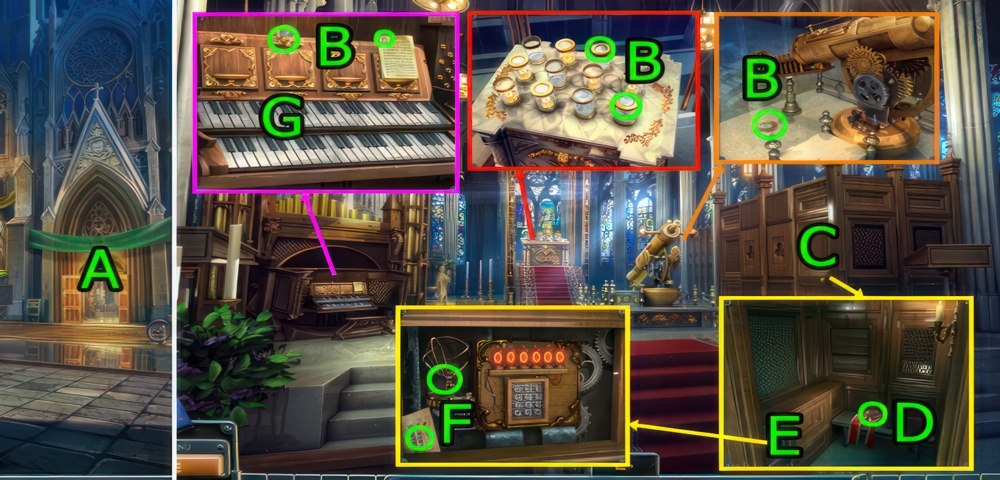
- Go (A).
- Get 1-2-3-4/7 LENS (B).
- Press (C).
- Get 5/7 LENS (D).
- Press (E).
- Get DRAWING WITH KEYS and ATLAS STATUE FIGURINE (F).
- Use DRAWING WITH KEYS on (G).
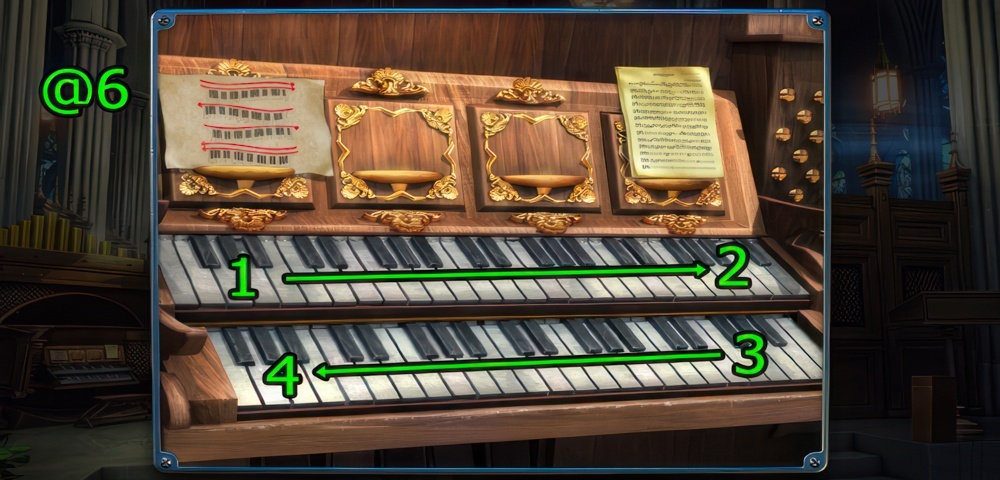
- lide over the keys following the hint.
- Walkthrough (@6): (1-2×2)-(3-4)-(1-2)-(3-4×2).
- Get 6/7 LENS.
- Go Square in Front of the Cathedral.
Descend into the Order
Travis knows the formula for the drug, he studied this terrible virus in his research. But his lab was destroyed and finding another one now carries too great of a risk of infection. We have a great laboratory at the Order, but am I allowed to bring a stranger into our secret headquarters. I am faced with a difficult choice: either I go against all the rules, or all the infected die without an antidote.
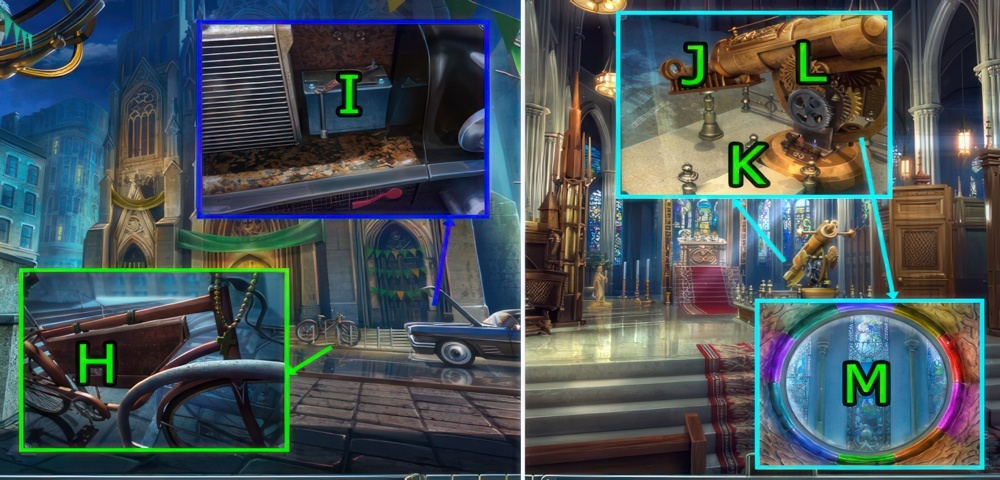
- Use CLIP and press (H), get 7/7 LENS and WRENCH.
- Use WRENCH and press (I), get BATTERY.
- Go Inside the Cathedral.
- Use 7 LENS on (J).
- Use BATTERY on (K) and press (L×2).
- Press (M).
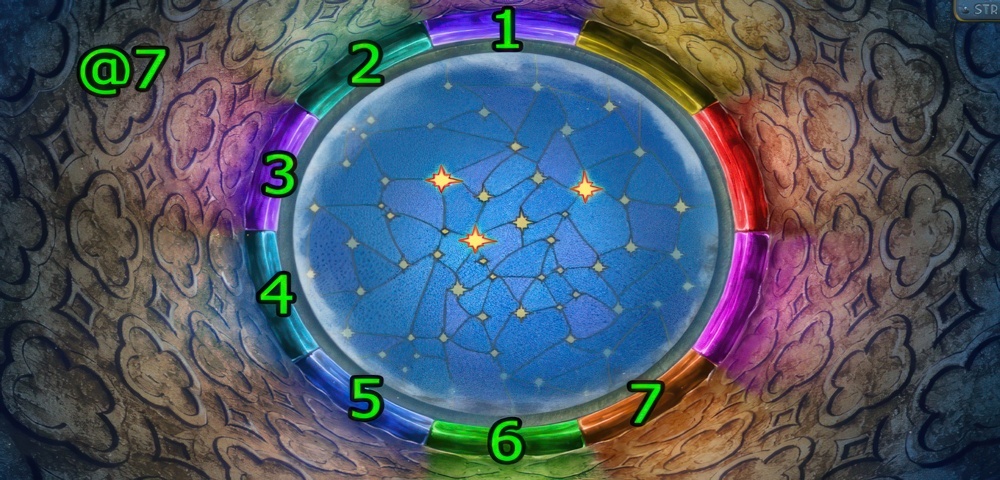
- Clicking on sectors around the night sky, activate the lenses so as to display only constellations that contain bright stars.
- Walkthrough (@7): 1, 2, 3, 4, 5, 6, 7.
- Get MAP OF THE STARRY SKY.
- Go Square in Front of the Cathedral.
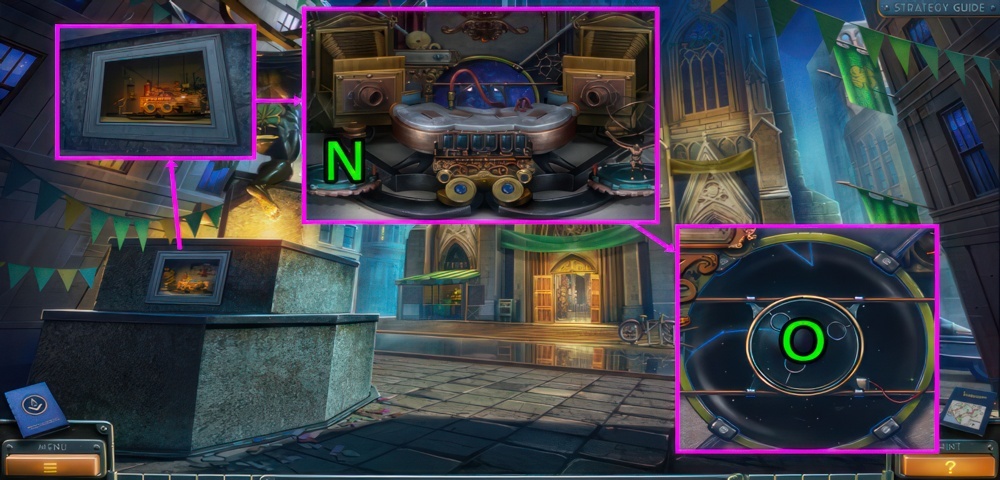
- Use ATLAS STATUE FIGURINE on (N).
- Use MAP OF THE STARRY SKY on (O).
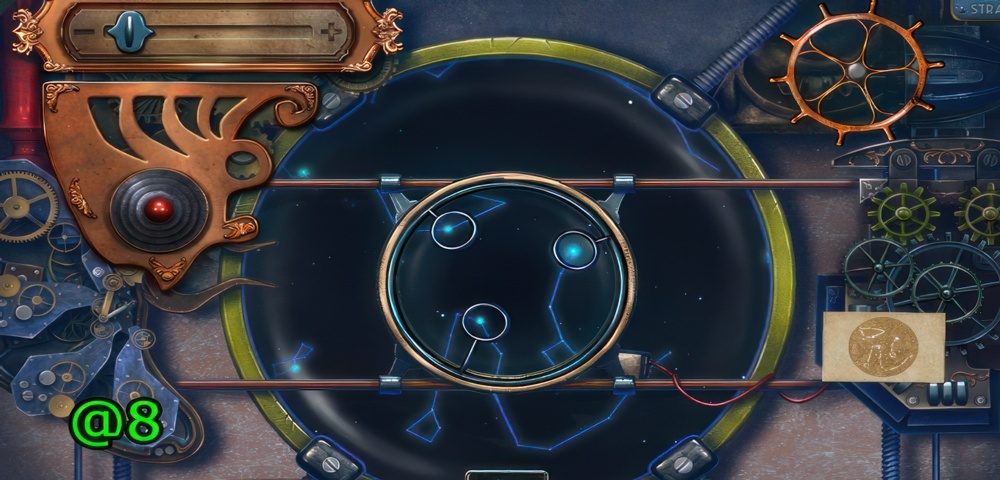
- Using the elements of the controller, position the telescope to point at the stars as per diagram.
- Walkthrough (@8).
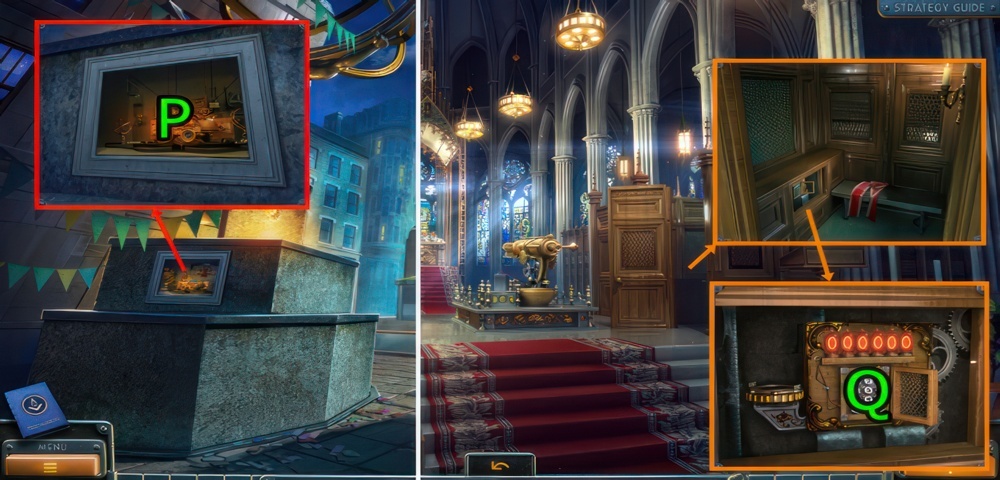
- Go (P).
- Go Inside the Cathedral.
- Press and go (Q).
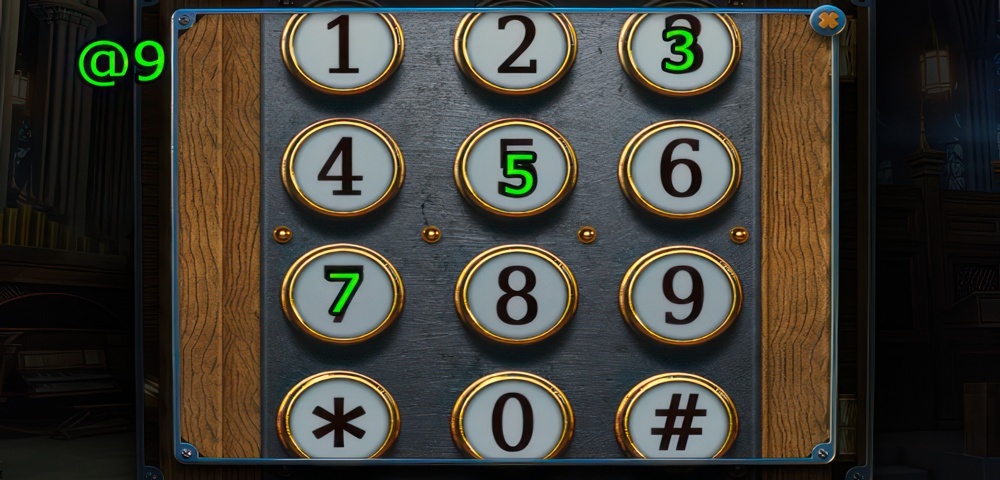
- Enter the correct code.
- Walkthrough (@9): (5-7-3×2-5-3).
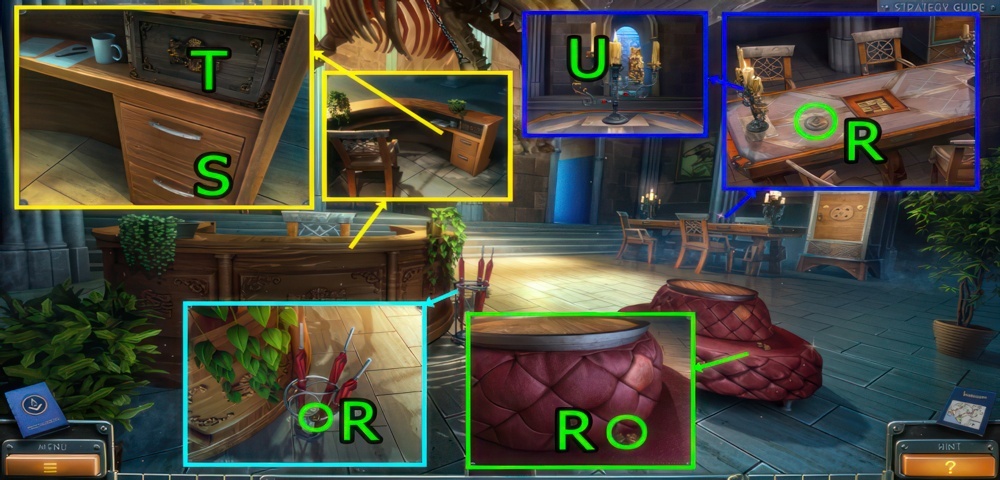
- Get 1/10 KEYS, MEDALLION OF THE ORDER, and LIGHTER (R).
- Press (S×3), get CANDLE.
- Press (T), get 2/10 KEYS and PRECISION SCREWDRIVER.
- Use CANDLE on (U).
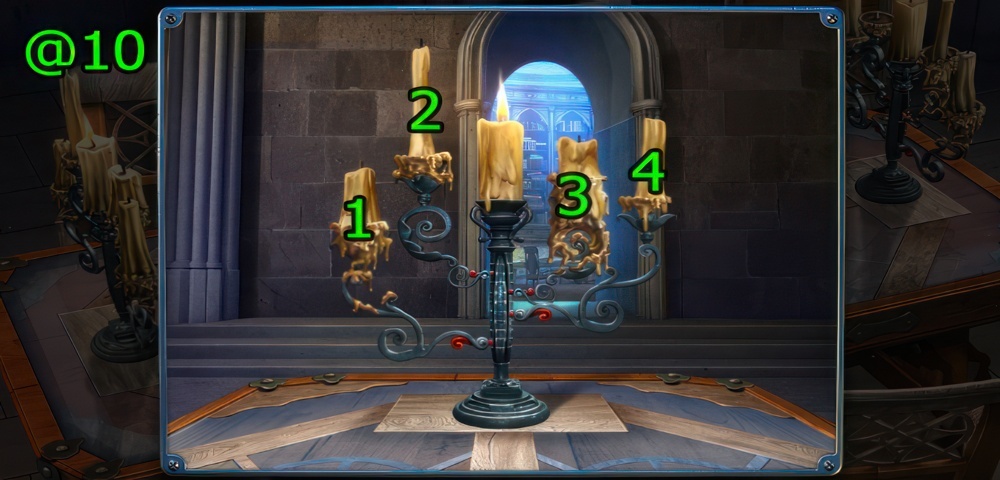
- Align candles in candlesticks.
- Walkthrough (@10): (2-3)-(1-4).
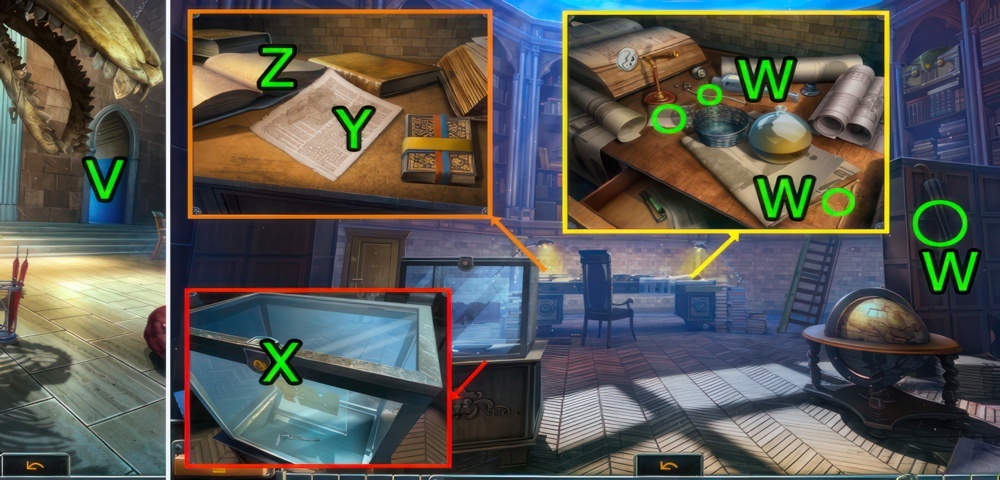
- Go (V).
- Get UMBRELLA, DRY WICK, COMPASS FIGURINE, and PAPER (W).
- Use RING on (X), get RED SNAKE KEY.
- Press (Y), get 1/3 PART OF THE SCHEME.
- Press (Z), get 3/10 KEYS.
- Go Hall of the Order.
Open the door to the lab
We went down to the headquarters of the Order. Nobody is here; most likely, all of them are resting easy at home. Hopefully, they’re all ok and no one is infected. I found that the door to the laboratory was locked, and I don’t know where they put the key. We’ll have to look for it or find a way to break open the door.
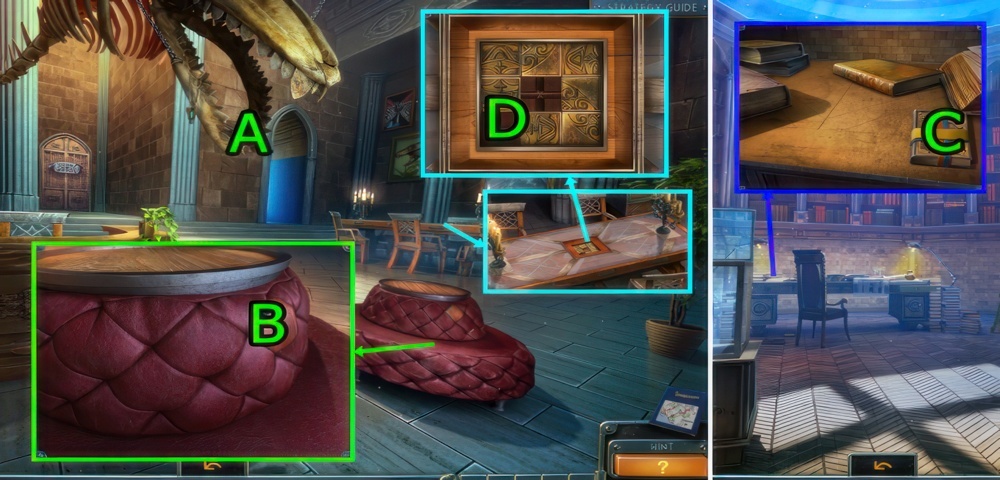
- Use UMBRELLA on (A), get 4/10 KEYS and SHARP TOOTH.
- Use SHARP TOOTH on (B), get 2/3 PARTS OF THE SCHEME and COTTON BALL.
- Go Archive of the Order.
- Use SHARP TOOTH and press (C), get PART OF THE MOSAIC.
- Go Hall of the Order.
- Use PART OF THE MOSAIC on (D).
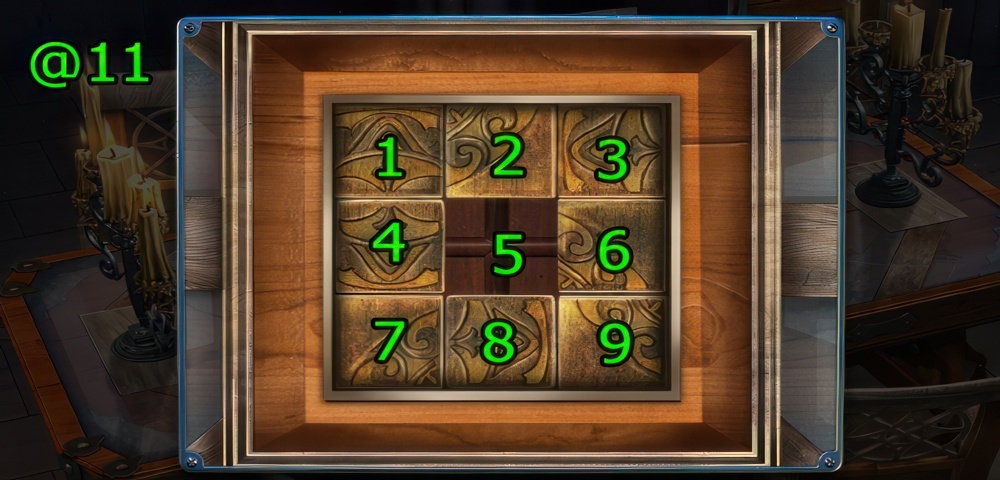
- Assemble the pattern by re-arranging the pieces.
- Walkthrough (@11): 2, 3, 6, 5, 8, 9, 6, 5, 4, 7, 8, 5, 2, 1, 4, 5.
- Get CANDLE.
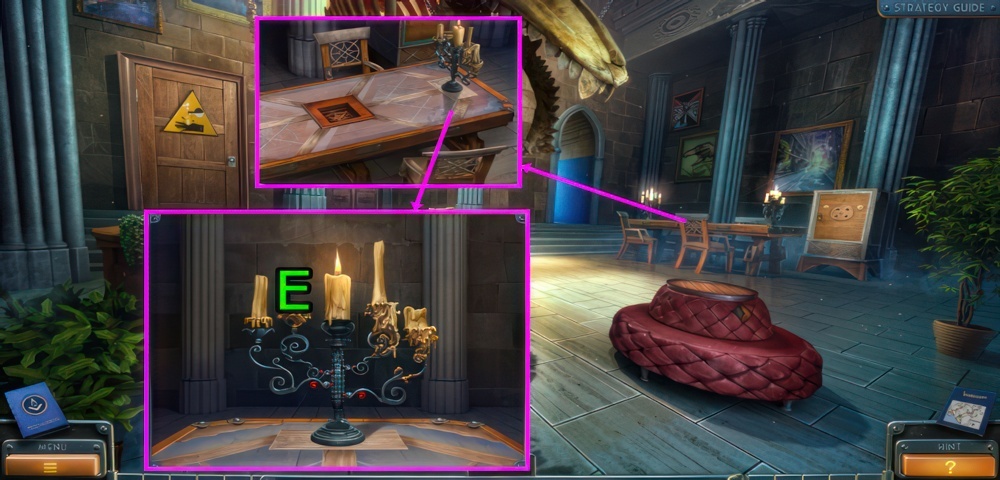
- Use CANDLE on (E).
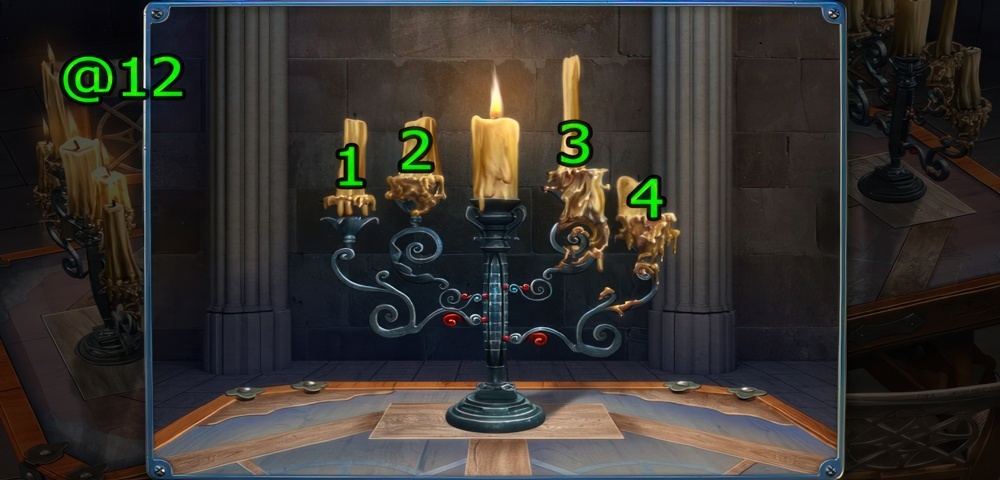
- Align candles in candlesticks.
- Walkthrough (@12): (1-2×2-4).
- Get HINT.
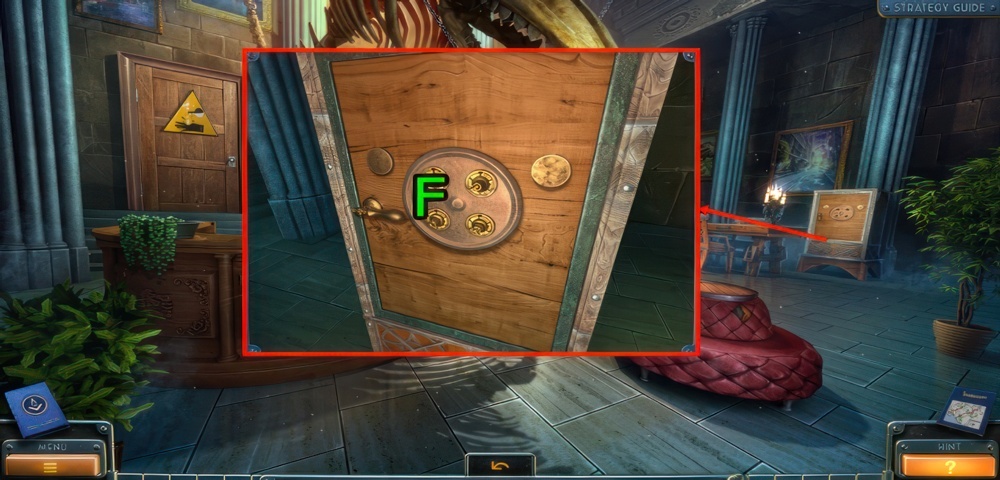
- Use HINT on (F).
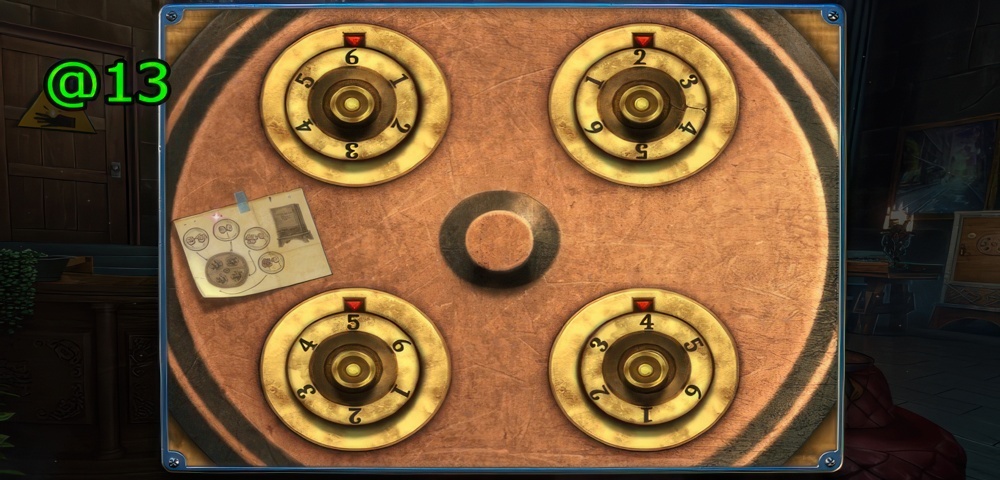
- Using the hint, place the handle in a specific position.
- Walkthrough (@13).
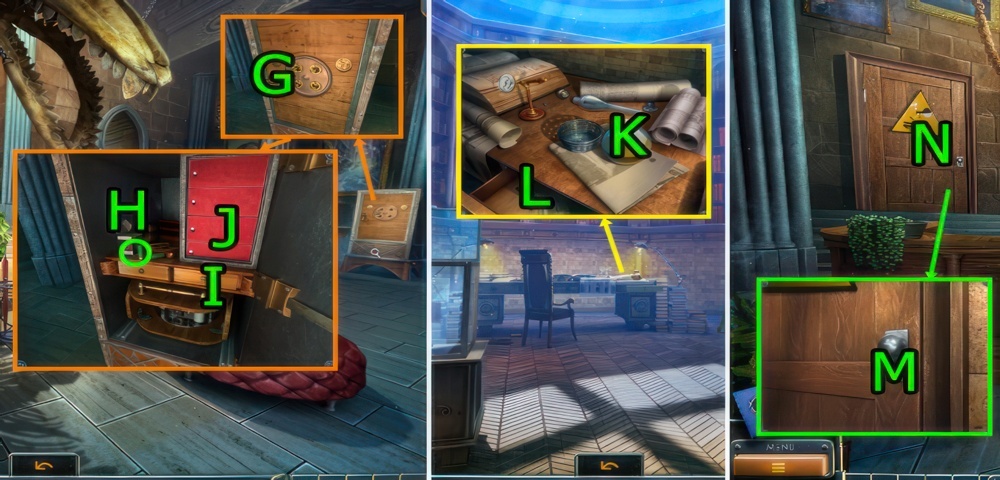
- Press (G).
- Get SHOTSHELL (H).
- Press (I×2), get TWEEZERS.
- Press (J), get 5/10 KEYS.
- PAPER on SHOTSHELL, get PAPER WITH POWDER.
- Go Archive of the Order.
- Use DRY WICK, COTTON BALL, TWEEZERS, and TWEEZERS on (K).
- Get COTTON SOAKED IN FUEL and WICK.
- Press (L), get 6/10 KEYS.
- PRECISION SCREWDRIVER and COTTON SOAKED IN FUEL on LIGHTER, get LIGHTER.
- Go Hall of the Order.
- Use PAPER WITH POWDER, WICK, and LIGHTER on (M).
- Press and go (N).
Help Travis
We were able to crack open the door to the lab. We found Bishop inside. To my dismay, he, too, was infected. His face was mutilated, his eyes were still and full of insanity. Bishop came straight at me, as I was petrified with fear. Fortunately, Travis saved me in time, with a strong blow he knocked out Bishop and bound him. It was a necessary precaution to make sure Bishop will not attack and infect us. Quickly assessing the laboratory, Travis began creating the serum. I did my best to try and help him.
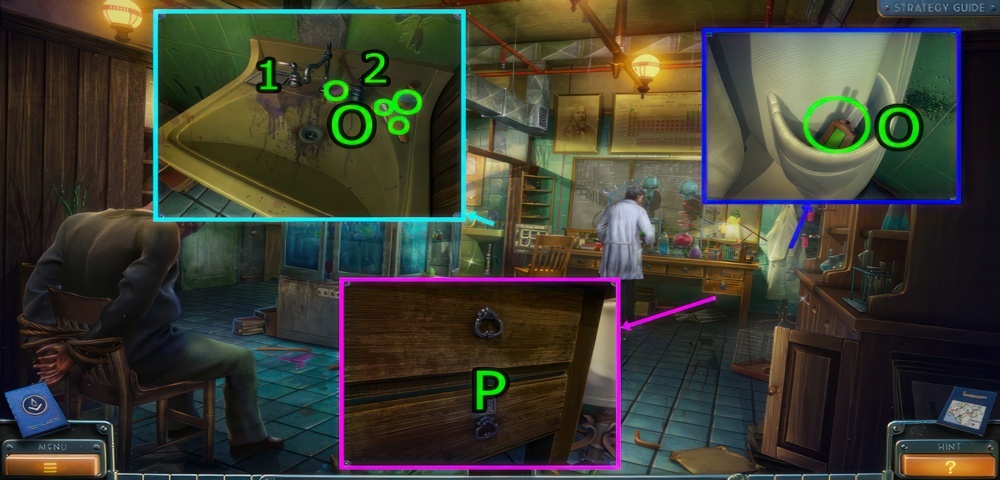
- Get 7-8/10 KEYS, SCALPEL, PHOTO DEVELOPMENT LIQUID, and 3/3 PARTS OF THE SCHEME (O).
- Use SCALPEL and press (P×2), get 9/10 KEYS.
- Press (P×2), get LAMP.
- Press (1-2), get PHOTO TRAY.
- PHOTO TRAY and PHOTO DEVELOPMENT LIQUID on SCHEME, get SCHEME.
- Go Archive of the Order.
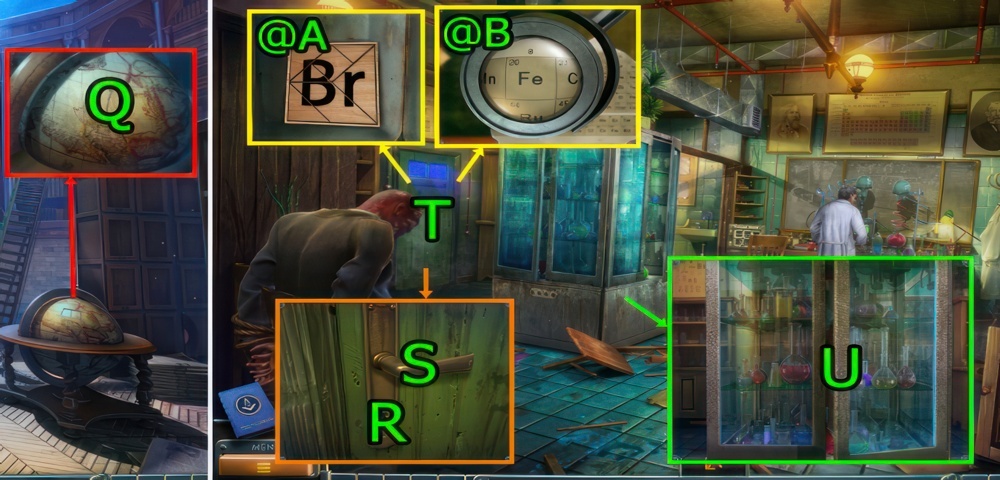
- Use SCALPEL on (Q), get KEY.
- Go Laboratory of the Order.
- Use KEY on (R) and press (S).
- Play puzzle (T).
- Arrange the boards to restore the inscription on them.
- Walkthrough (@A).
- Move the lens to find iron (Fe) in the periodic table of chemical elements.
- Walkthrough (@B).
- Get UV LAMP.
- UV LAMP on LAMP, get UV LAMP.
- Press and use UV LAMP on (U).
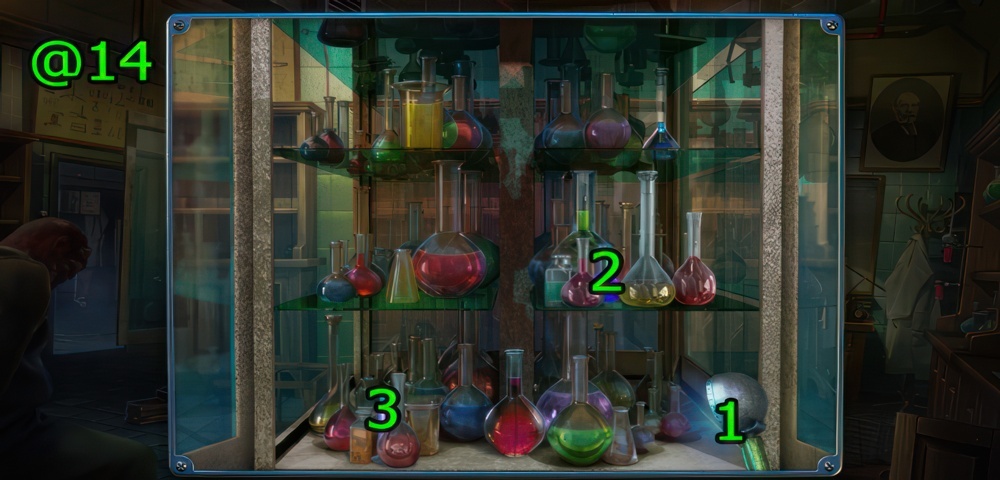
- Using the lamp, find two luminous chemical agents.
- Walkthrough (@14): Drag (1-2)-(1-3).
- Get 1-2/2 CHEMICAL AGENTS.
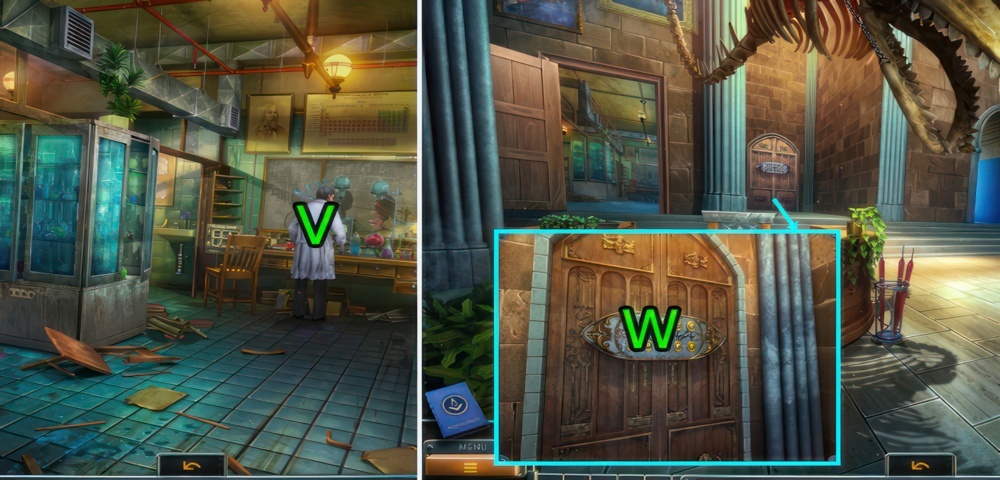
- Use 2 CHEMICAL AGENTS on (V), get 10/10 KEYS.
- Go Hall of the Order.
- Use SCHEME and 10 KEYS on (W).
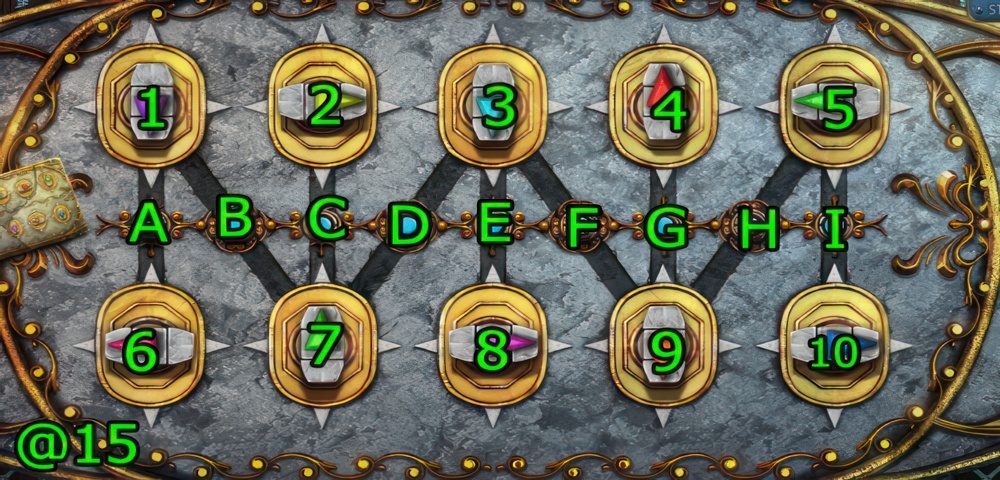
- Set the position of the keys as shown in the diagram.
- You can rotate the keys by pressing them.
- Use the blue buttons to switch key positions.
- Walkthrough (@15): (D-F-H-E-B-A-D-C-D-F-G-D-F-E-B).
- (1×3-2×2-3×3-4-7-8×2-9×3-10×2).
- Go (X).
- Use RING on (Y), get ELBAITE.
- Go Laboratory of the Order.
Get out of the storage
Suddenly there was an explosion, which nearly deafened Bishop and I. Travis, using the power of the mask, literally flew up into the air and disappeared from the Order flying through the protective glass dome. The alarms were working restlessly at this point and all the doors got automatically locked down. It turned out, from the moment I woke up in the abandoned park, I was under the influence of powerful psychotropic substance. Everything that I saw in front of me was a hallucination. A man, calling himself Travis, used me to get into the Order and take possession of that mysterious mask.
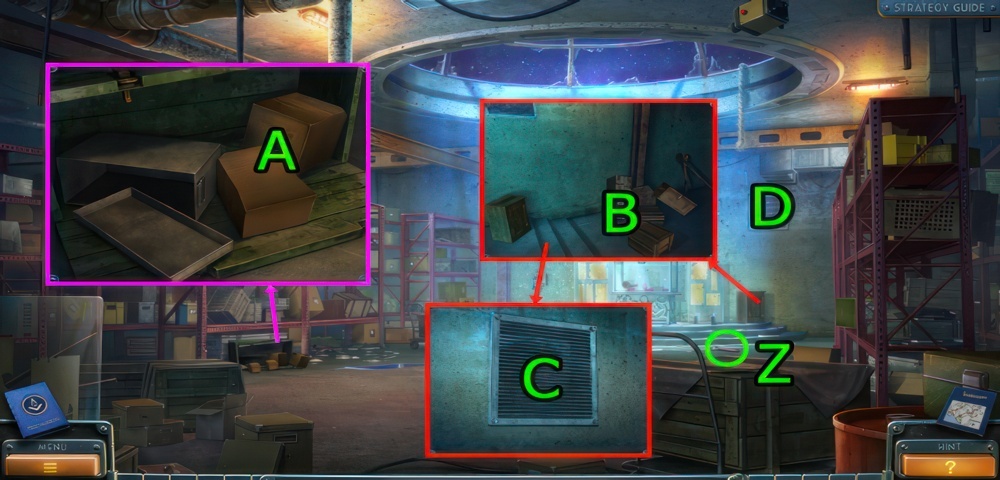
- Get CROWBAR (Z).
- Press (A×2), get RUBBER GLOVES.
- Press (B×5), use CROWBAR on (C).
- Go (D).
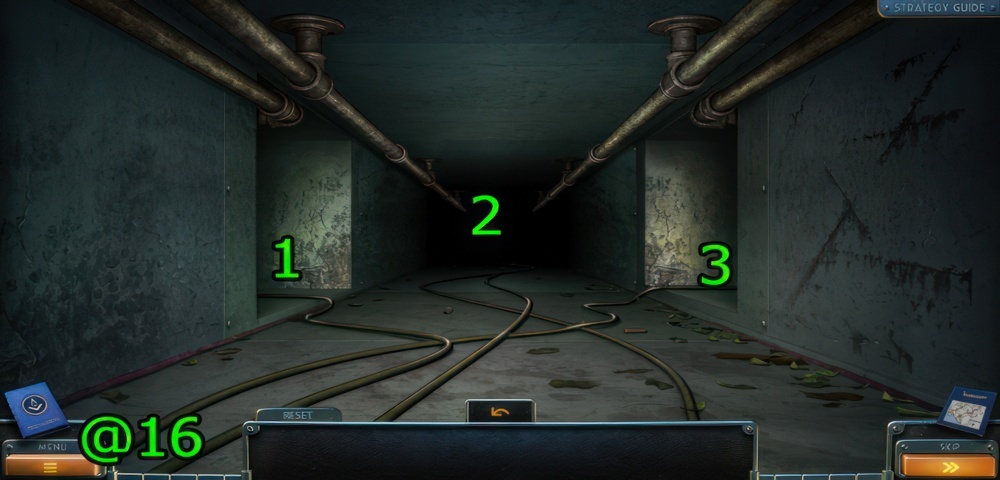
- Find a way out of the vent.
- Walkthrough (@16): 2-3-1-3.
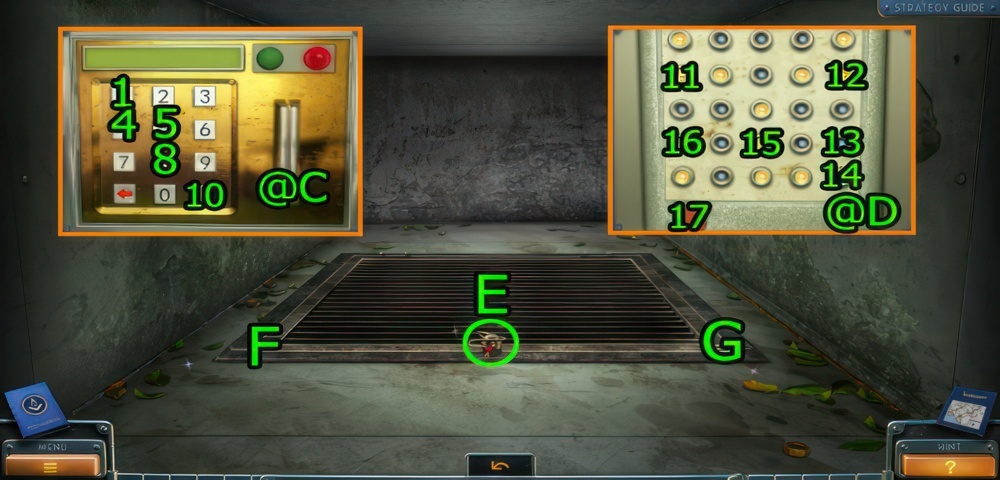
- Get WIRE (E).
- Press (F-G).
- Play puzzle.
- Enter the correct code.
- Walkthrough (@C): 1, 4, 5, 8, 10.
- Turn off all the chips.
- Clicking on any of the chips will switch it, as well as the state of all neighbouring chips to the inverse.
- Walkthrough (@D): 11, 12, 13, 14, 15, 16, 17.
- Get GREEN SNAKE KEY.
- Go Storage of the Order.
Find information about the mask
We need to find information about the mask. It must be in the archive, which stores all documents and information for each of the objects. there was an identification number beside the mask. We need to find the account ledger of the Order, then we will be able to determine which case the mask is assigned to and where to find the files on that case.
- Press and use RUBBER GLOVES and WIRE on (H), press (H×2).
- Press (I).
- Press (J).
- Press (K-L), get ROLLER.
- Go Archive of the Order.
- Use ROLLER on (M).
- Use RED SNAKE KEY on (N).
- Use GREEN SNAKE KEY on (O).
- Press (P×2), get KEY.
- Use KEY on (Q).
- Go (R).
- Get PLAYING CARDS and LOCK PIN (S).
- Press (T), get PORTRAIT.
- Press (U×10), get VIDEOTAPE and DOOR HANDLE.
- Use DOOR HANDLE on (V).
- Go (W).
Watch the video
We managed to find the required papers. There turned out to be many and videotape was one of them. Bishop will examine the papers, and I’ll try to find a way to view the video content.
- Get SLIDING LADDER and HAMMER (X).
- LOCK PIN on SLIDING LADDER, get FOLDING LADDER.
- Use VIDEOTAPE on (Y).
- Press (Z).
- Press (A), get LIGHT BULB.
- Press (B).
- Press, use LIGHT BULB, and press (C).
- Use PORTRAIT on (D).
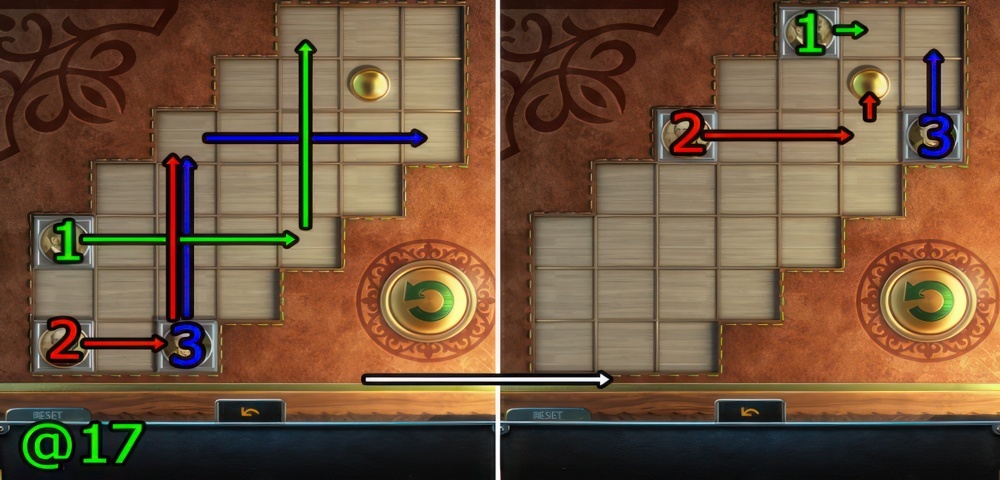
- Moving the portraits horizontally or vertically, occupy the marked cell with any of the portraits.
- Walkthrough (@17): Drag (3 ↑)-(3 →)-(1 →)-(1 ↑)-(2 →)-(2 ↑), (2 →)-(3 ↑)-(1 →)-(2 ↑).
- Get MINUTE HAND.
- Go Corridor of the Archive of the Order.
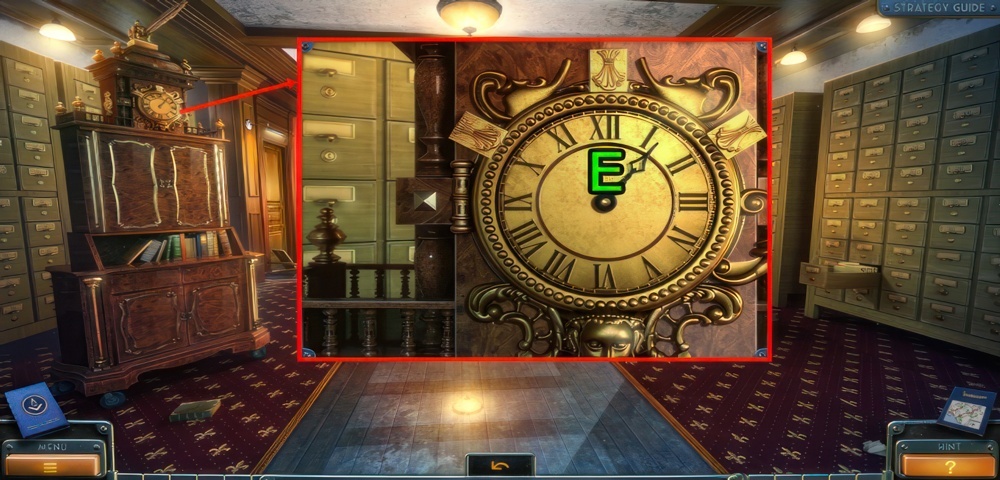
- Use MINUTE HAND on (E).
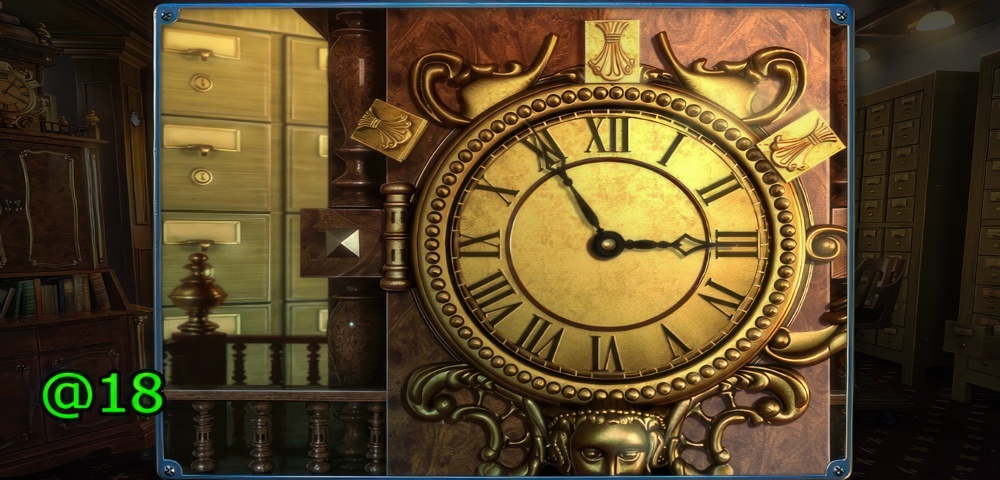
- You need to set the correct time.
- Walkthrough (@18).
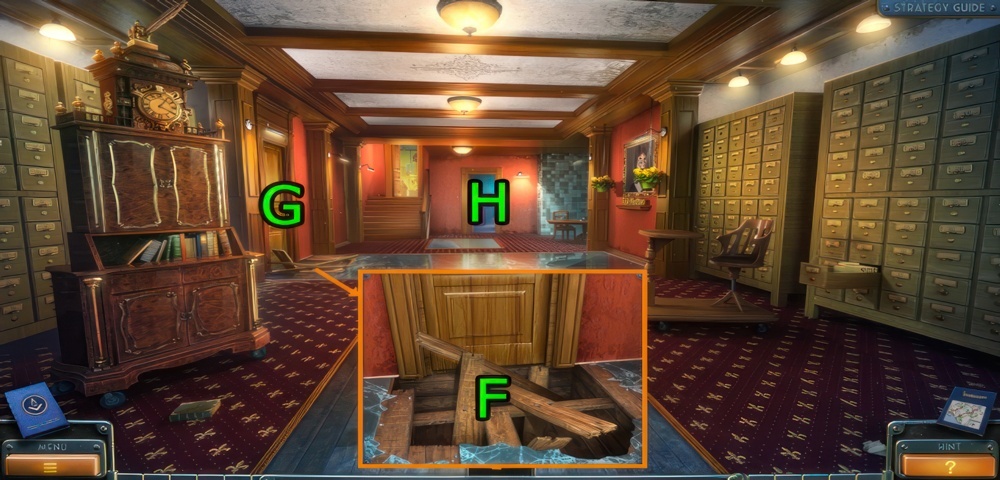
- Use HAMMER on (F).
- Play puzzle (G), get PROJECTOR LENS.
- Go (H).
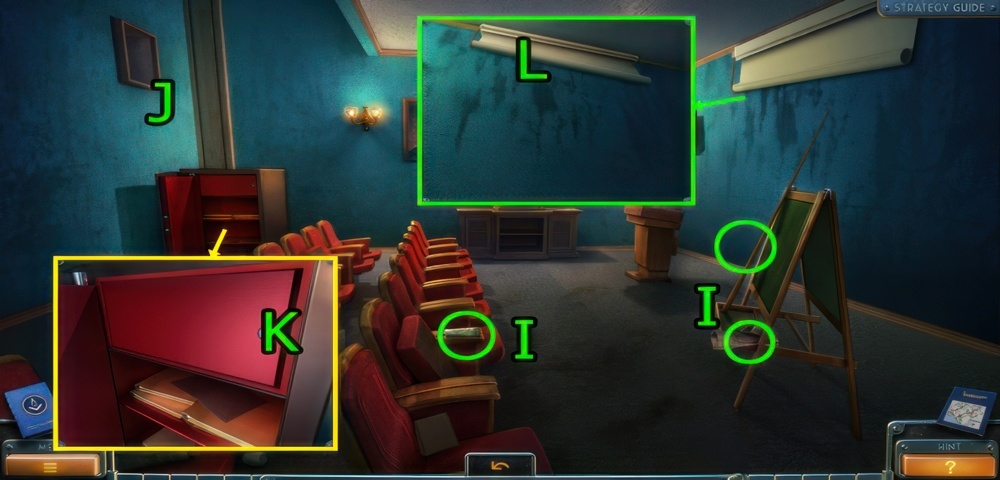
- Get POINTER, GLUE, DRY RAG (I).
- Use FOLDING LADDER on (J).
- Use PLAYING CARDS on (K), get ROLLER.
- Use POINTER on (L).
- Go Laboratory of the Order.
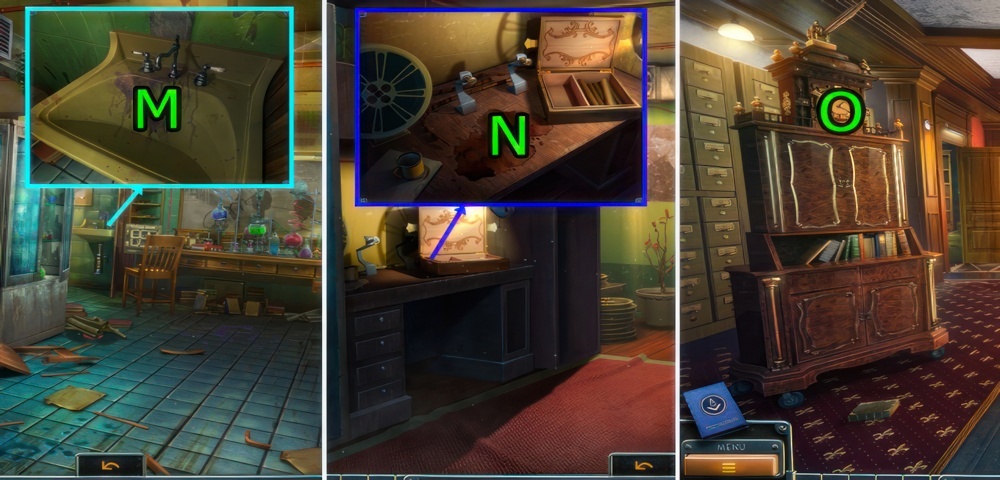
- Use DRY RAG and press (M), get WET RAG.
- Go Room with a Video Projector.
- Use WET RAG on (N).
- Go Corridor of the Archive of the Order.
- Go (O).
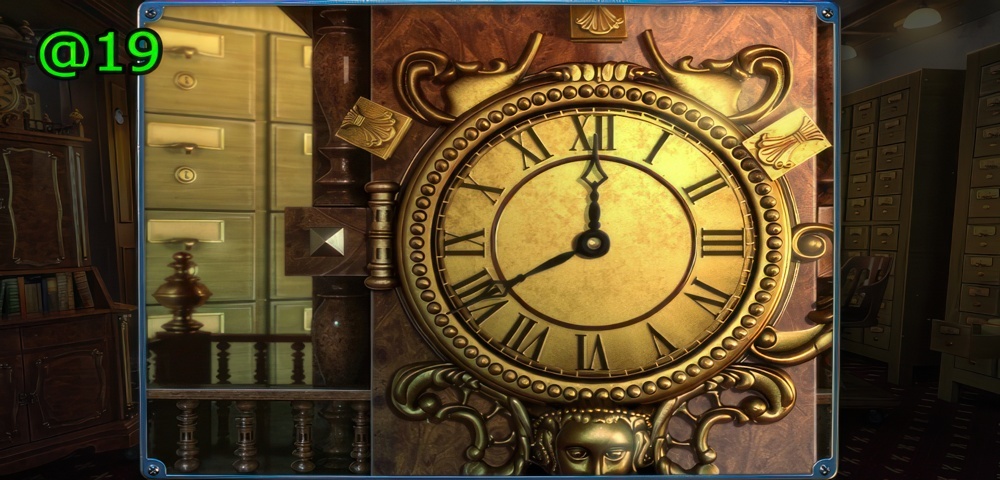
- You need to set the correct time.
- Walkthrough (@19).
- Go Meeting Room.
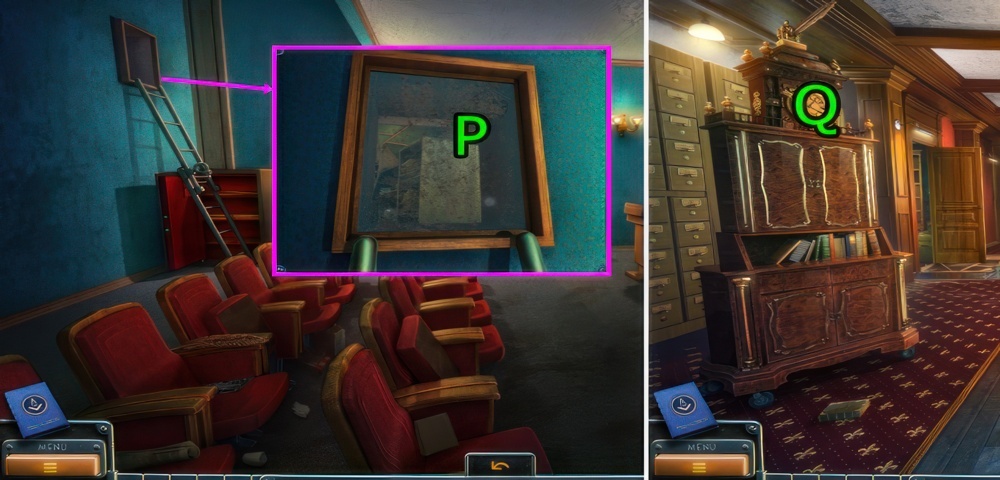
- Use WET RAG on (P).
- Go Corridor of the Archive of the Order.
- Go (Q).
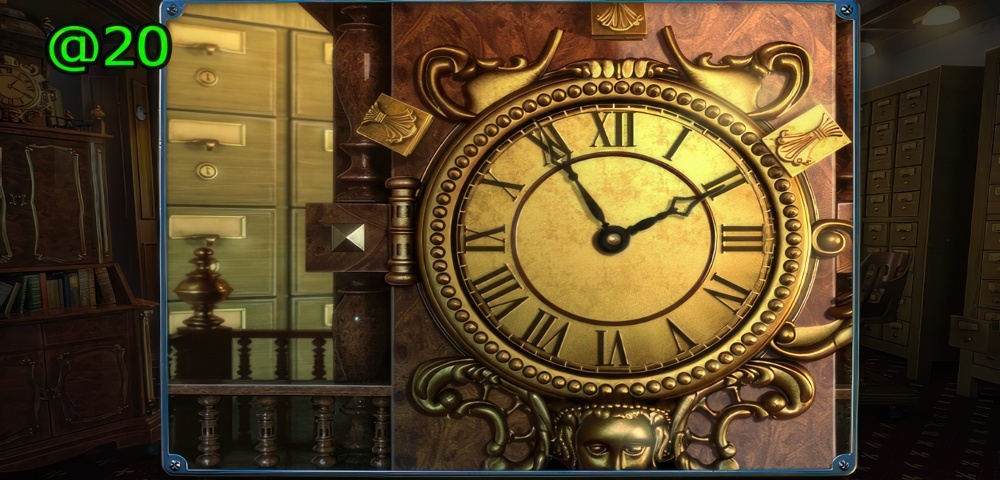
- You need to set the correct time.
- Walkthrough (@20).
- Get ANGLE BRACKET FIGURINE, NIPPERS, and GEAR.
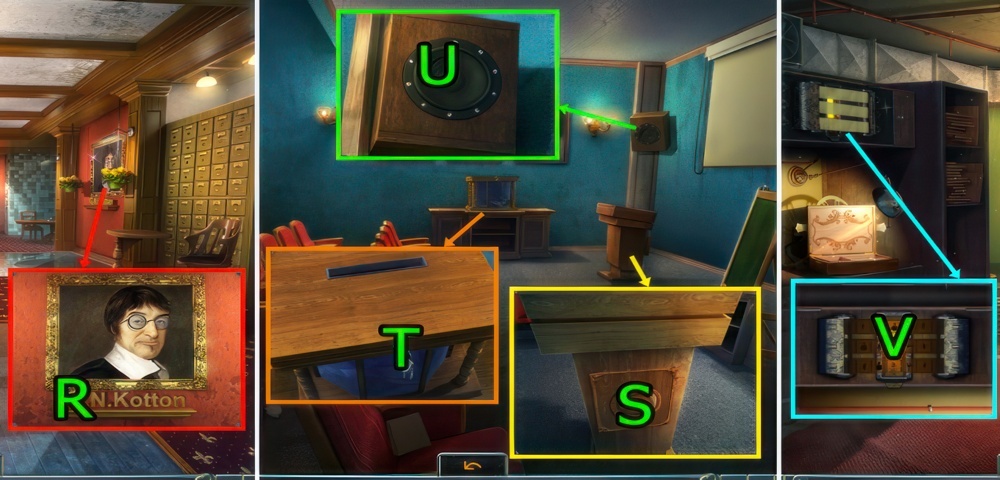
- Use NIPPERS on (R), get LETTER FIGURINE.
- COMPASS FIGURINE, LETTER FIGURINE, ANGLE BRACKET FIGURINE, and RING on MEDALLION OF THE ORDER, get MEDALLION.
- Go Meeting Room.
- Use MEDALLION on (S), get AUDIO CABLE and SCISSORS.
- Use NIPPERS on (T), get SHEET OF PAPER and STENCIL.
- Use SHEET OF PAPER, SCISSORS, and GLUE on (U).
- Go Room with a Video Projector.
- Use STENCIL on (V).
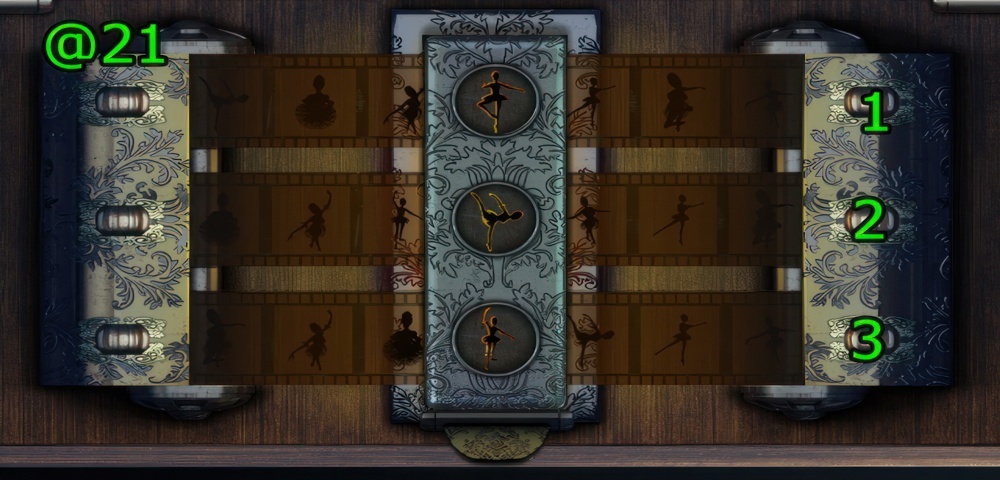
- Using the buttons, drag the film so that it matches the stencil design.
- Walkthrough (@21): 1×3-2×3-3×3.
- Get PROJECTOR BULB.
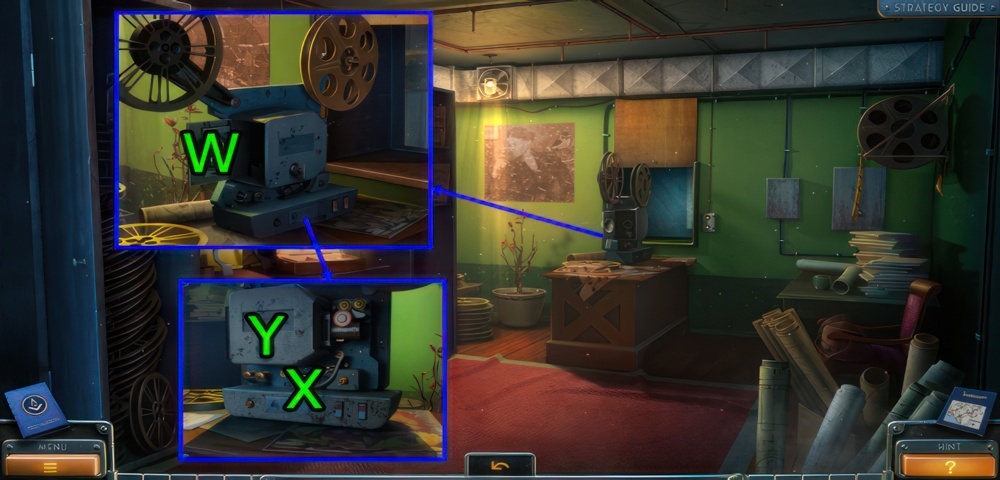
- Use PROJECTOR BULB and press (W).
- Use PROJECTOR LENS, ROLLER, GEAR, and AUDIO CABLE on (X).
- Press (Y).
Find Travis office
After analyzing the videotape and the papers, it became clear that the mask has a special power and is able to enslave the mind of a man. It encourages its owner to destroy mankind as if it were a species threatening the planet, and the method suits the wearer’s skills. We have come to the conclusion that Travis worked at the Institute of a large pharmaceutical company. I arrived at his place of work in hopes of finding more information.
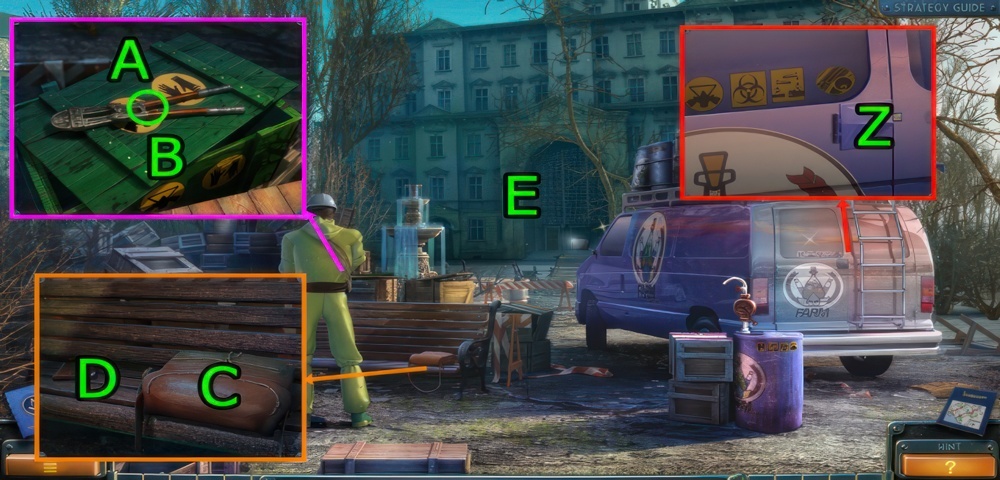
- Press (Z).
- Get TIN SNIPS (A).
- Press (B), get CHEMICAL PROTECTION KIT.
- Press (C×2), get KEY.
- Press (D×3), get HAM.
- Go (E).
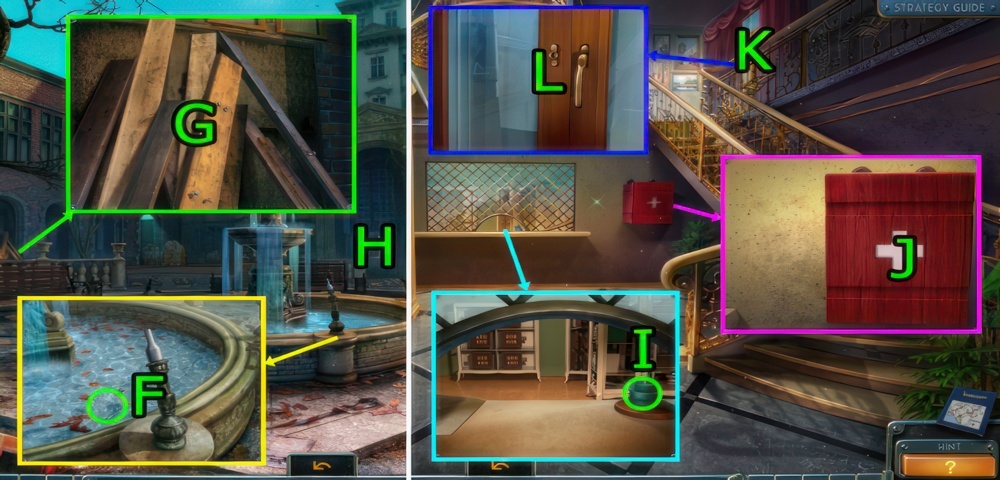
- Get WINDOW HANDLE (F).
- Press (G×5), get KEY.
- Press (G×2).
- Go (H).
- Get PACKING TAPE (I).
- Press (J), get SLEEPING PILLS.
- SLEEPING PILLS on HAM, get HAM WITH SLEEPING PILLS.
- Press (K).
- Use WINDOW HANDLE and press (L×2).
- Go Yard.
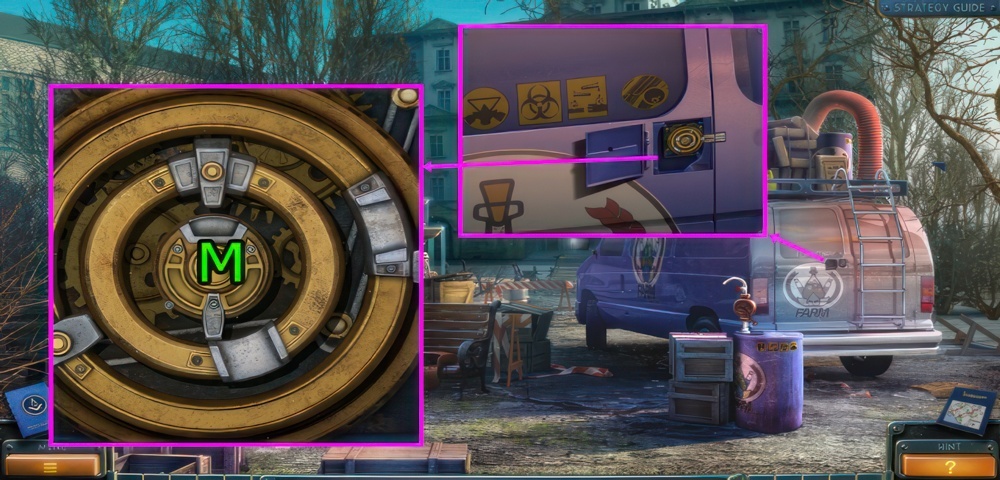
- Use KEY on (M).
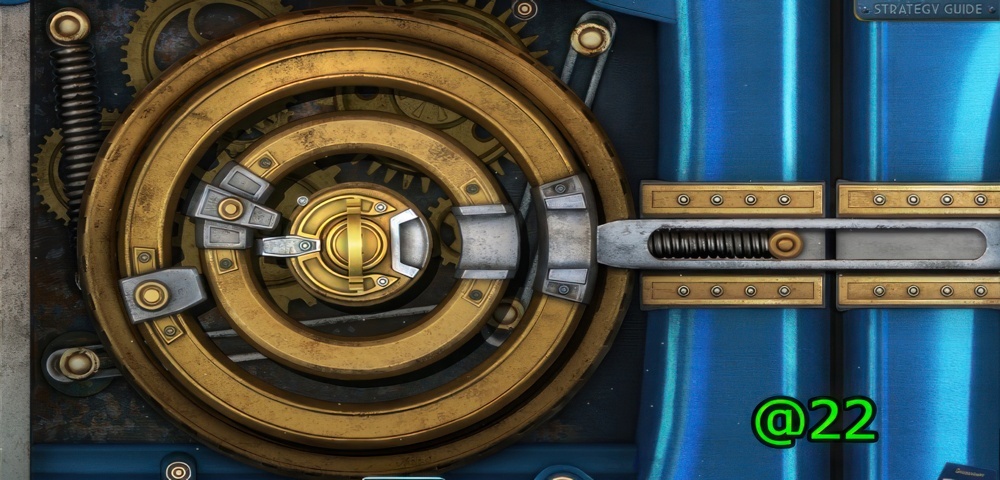
- Turning the central dial of the mechanism, rotate the wheels so that the lock opens up.
- Walkthrough (@22).
- Play puzzle (N), get LEVER.
- Go Fountain.
- Go (O).
- Use LEVER and press (P).
- Press (Q).
- Press (P).
- Use TIN SNIPS and HAM WITH SLEEPING PILLS on (Q).
- Go (R).
- Get KNIFE and WOODEN FIGURINE (S).
- Press (T), get POKER.
- Press (U), get PIPE CLAMP.
- Use KNIFE on (V), get HOSE.
- Press (W), get ADJUSTABLE WRENCH.
- Press and use KEY on (W), get FISHING ROD.
- Use FISHING ROD on (X).
- Go Fountain.
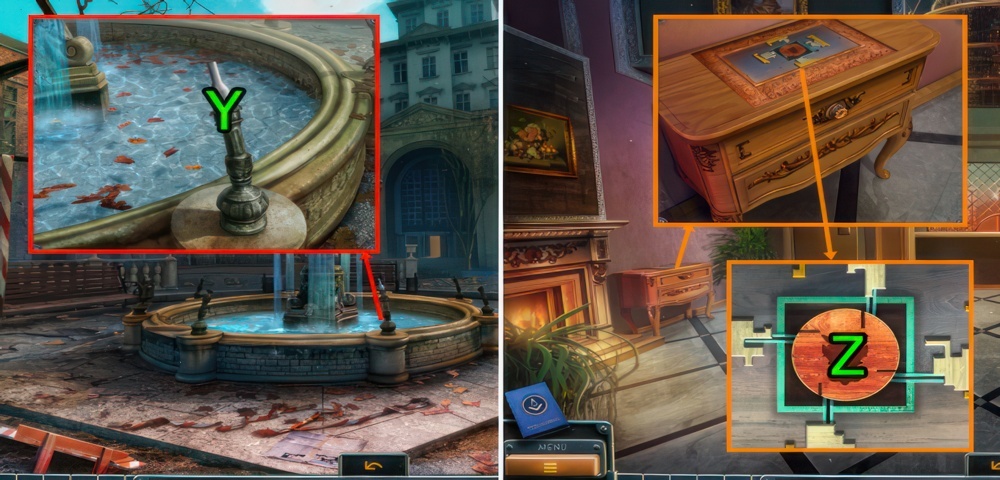
- Use ADJUSTABLE WRENCH on (Y), get NOZZLE.
- Go Lobby.
- Use WOODEN FIGURINE on (Z).
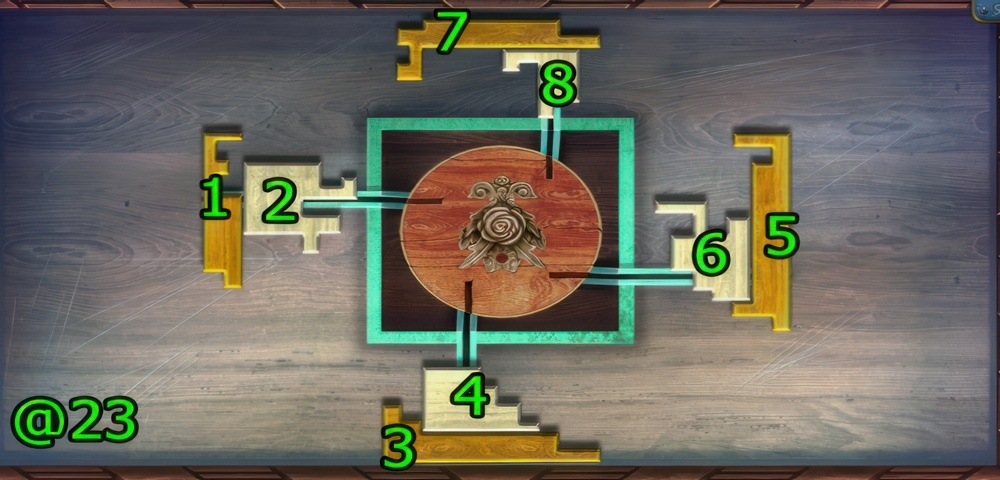
- Move the mosaic pieces into the center so that they form a square.
- Walkthrough (@23): (2-4-6-8)-(7-1-3-5).
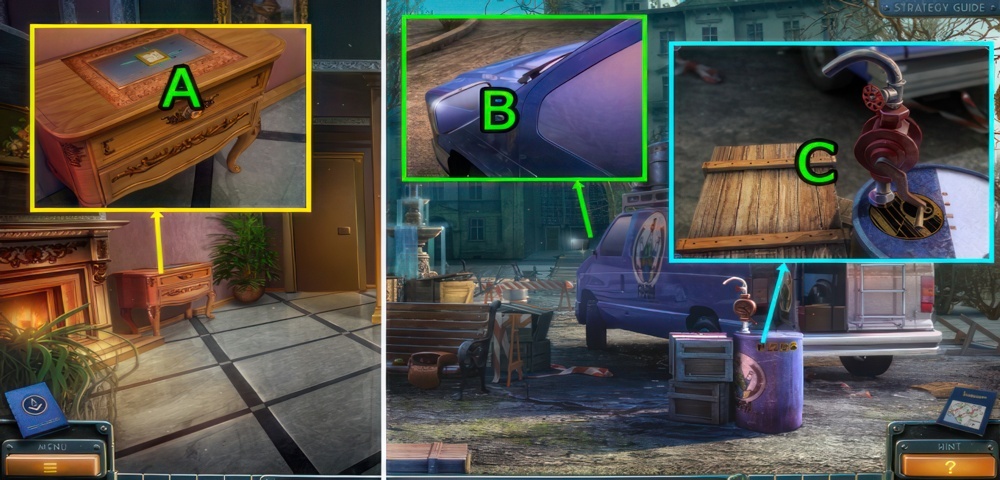
- Press (A), get GLASS CONTAINER.
- Go Yard.
- Use POKER on (B), get MIRROR.
- Use GLASS CONTAINER, HOSE, NOZZLE, PIPE CLAMP, and CHEMICAL PROTECTION KIT on (C).
- Press (C×6), get ACID.
- MIRROR and PACKING TAPE on POKER, get MIRROR ATTACHED TO THE POKER.
- Go Lobby.
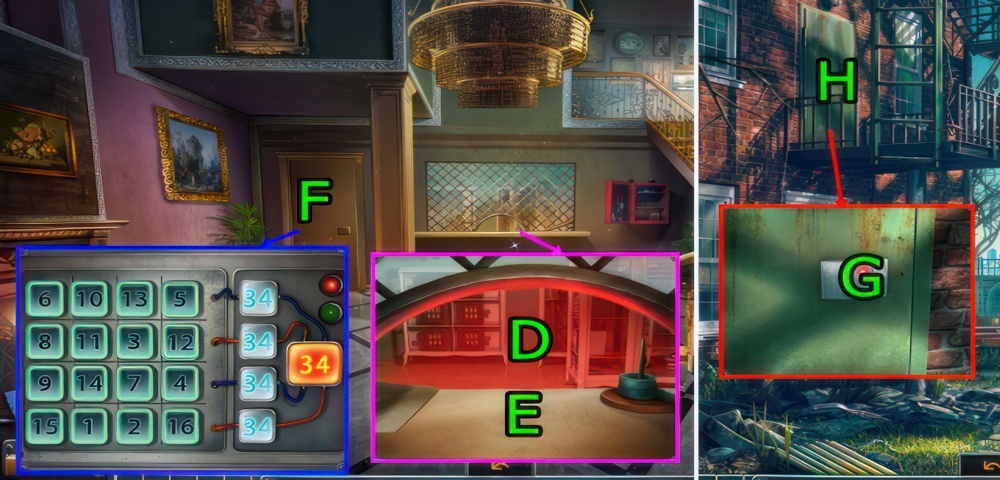
- Use MIRROR ATTACHED TO THE POKER and press (D).
- Use ACID, CHEMICAL PROTECTION KIT, and MIRROR ATTACHED TO THE POKER on (E).
- Press (D).
- Play puzzle.
- Swapping buttons, arrange them so that the sum of the numbers in each row is equal to 34.
- Walkthrough (F).
- Get KEYCARD.
- Go Backyard.
- Use KEYCARD on (G).
- Go (H).
Determine the contents of the test tube
I was pointed in the direction of Travis office. Inside, I saw him in that same mask and strange attire. He was taking out vials from the laboratory safe. Travis pushed me away, using something like a shock wave, and I lost consciousness. When I woke up, Travis was gone. Fortunately, Will came to help me. Given that Travis was engaged in the development of vaccines against some of the most dangerous viruses, the threat of an epidemic is growing to be very real. We need to find out exactly which samples the scientist took from the safe.
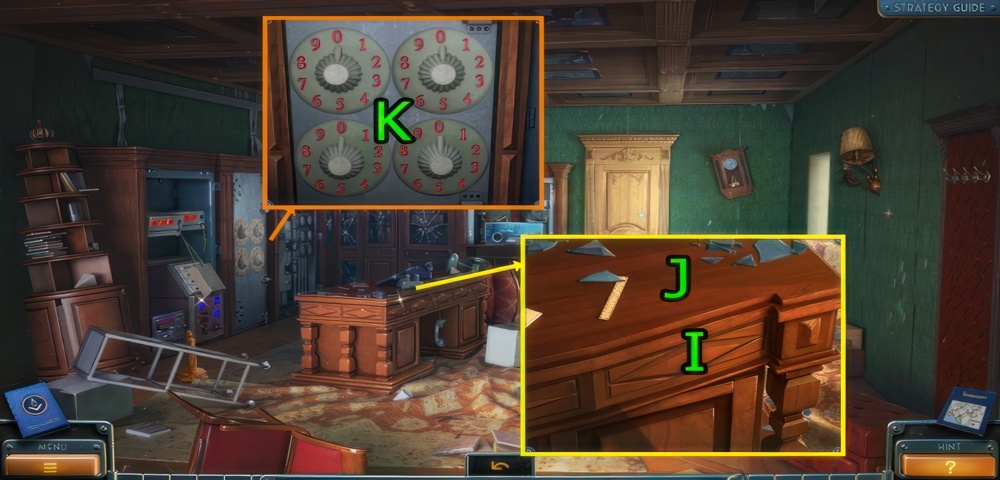
- Use KNIFE and press (I×2).
- Press (J×3), get NOTE WITH A HINT.
- Use NOTE WITH A HINT on (K).
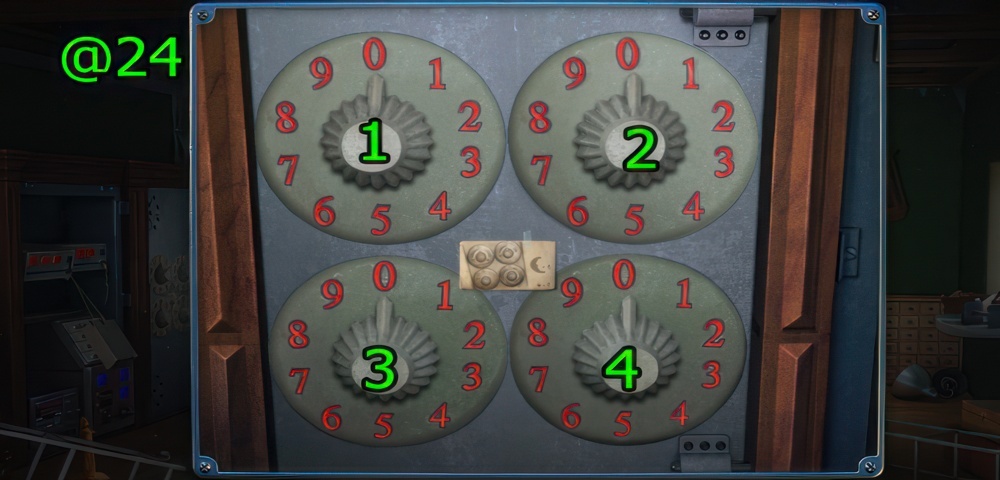
- Using the hint, set the handles into the correct position.
- Walkthrough (@24): (1×8)-(2×5)-(3)-(4×9).
Repair the device
We can accurately determine the contents of the flask, but the device must be repaired first.
- Press (L), get TUBE.
- Press (M×2), get HANDLE OF A KNIFE SWITCH.
- Press (N), use TUBE and press (N).
- Press (O) and (P).
- Get KEY (Q).
- Use KEY on (R).
- Go (S).
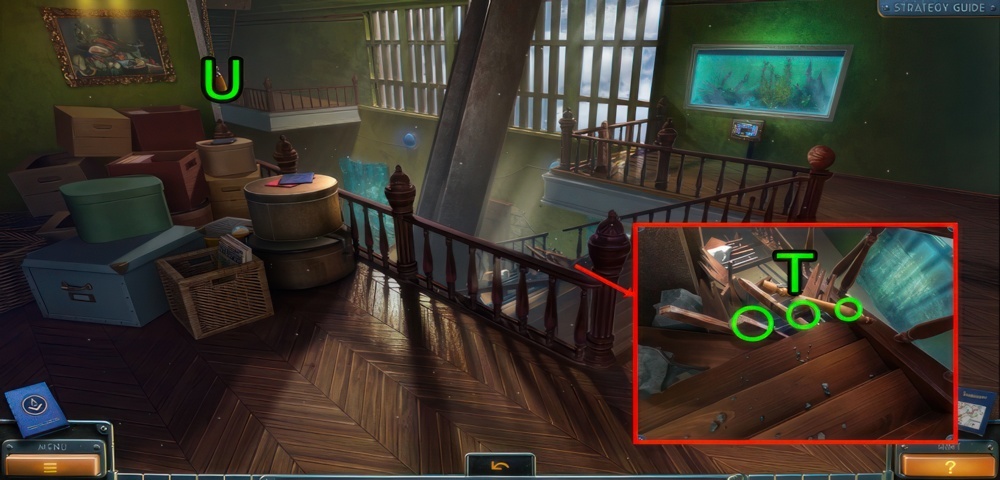
- Get BALUSTER, 1-2/4 SMALL BOARDS (T).
- Press and go (U).
Back to the car
We need to stop Travis, but first we need to go back to the car, avoiding the dog that’s blocking the exit from the office.
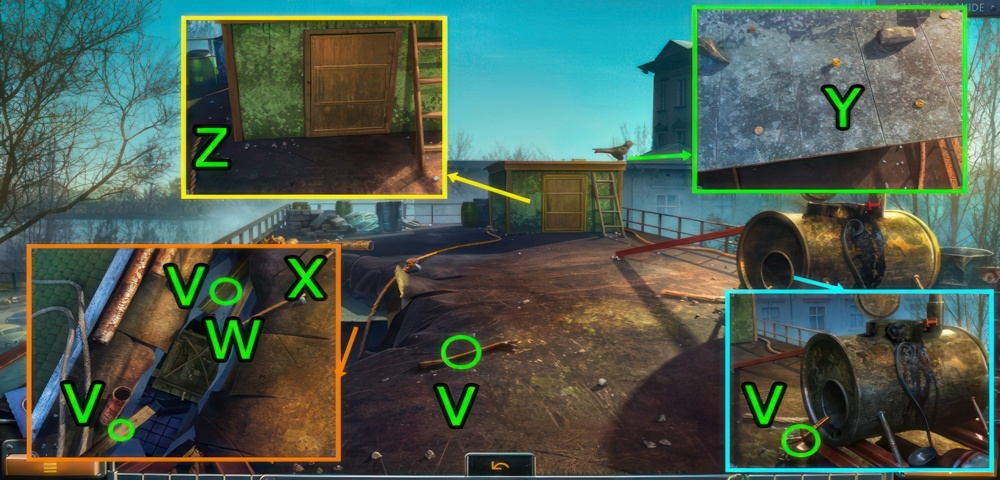
- Get NAIL REMOVER, EMPTY BURNER, 3/4 SMALL BOARDS, and 1/2 LARGE BOARDS (V).
- Use KNIFE on (W) and (X).
- Use NAIL REMOVER on (Y), get NAIL.
- Use KNIFE on (Z), get ROPE.
- Use ROPE on (Y).
- Go Second Floor.
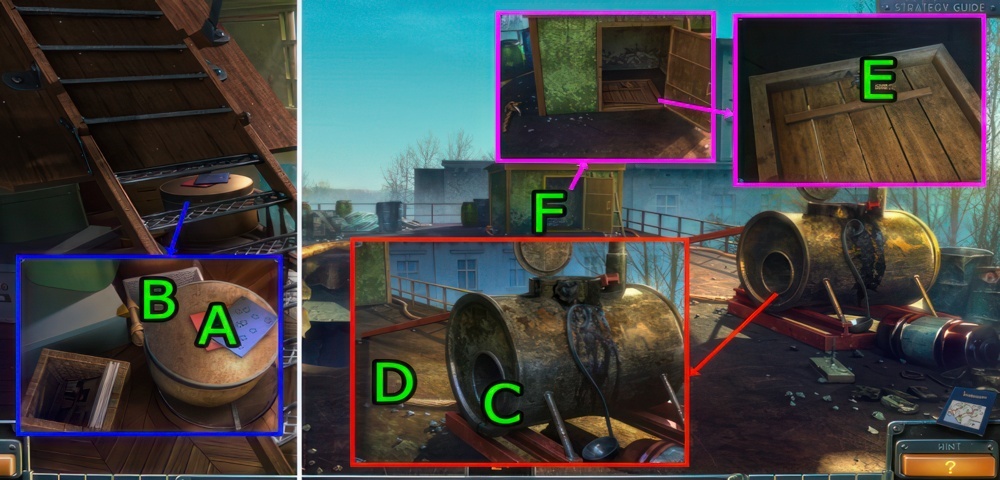
- Press (A×4), get HAY and PLATE.
- Press (B), get BOWL OF KEROSENE.
- BOWL OF KEROSENE on EMPTY BURNER, get BURNER WITH KEROSENE.
- Go Roof.
- Use HAY on (C).
- Use PLATE on (D).
- Use BURNER WITH KEROSENE and NAIL REMOVER on (E).
- Go (F).
- Get 2/2 LARGE BOARDS and 4/4 SMALL BOARDS (G).
- Press (H).
- Press (I).
- Go (J).
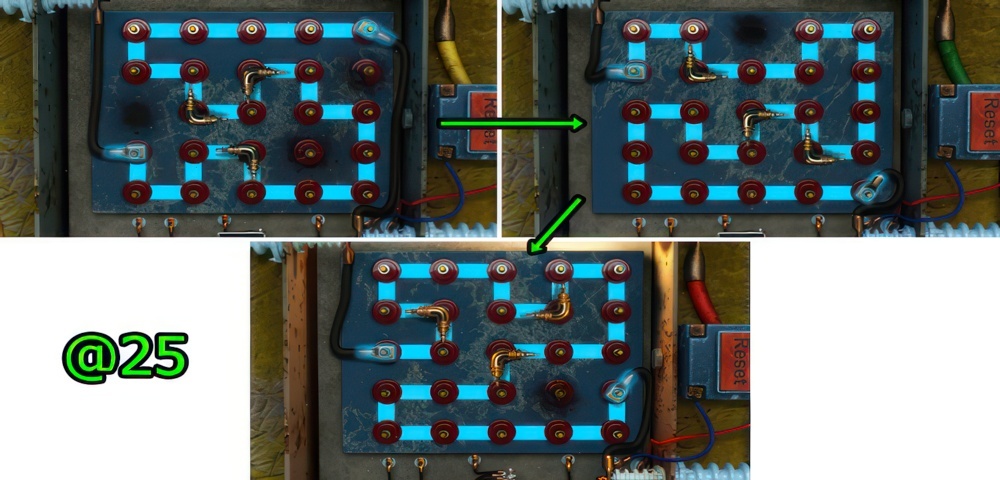
- Lead the wire from one terminal to another, using all points.
- You can rotate the angled wires.
- Walkthrough (@25).
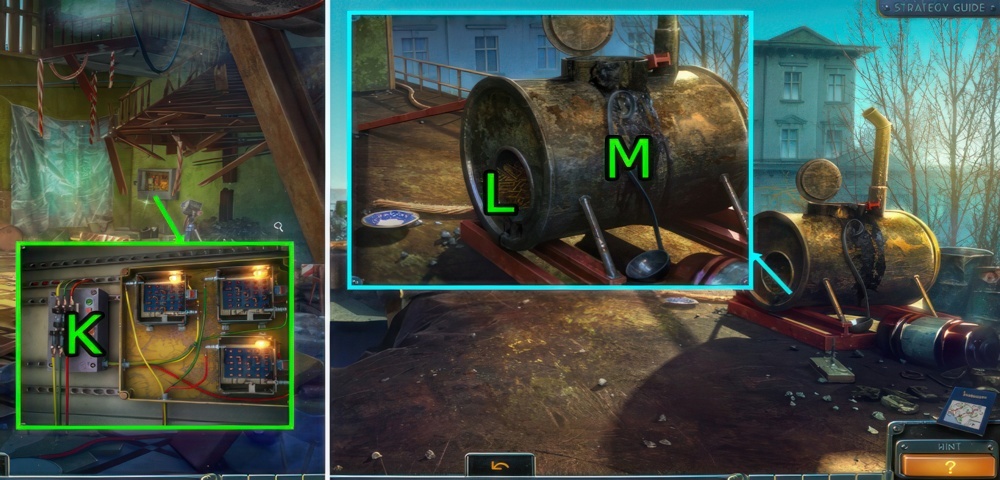
- Use HANDLE OF A KNIFE SWITCH and press (K).
- Go Roof.
- Use 4 SMALL BOARDS, 2 LARGE BOARDS, and BURNER WITH KEROSENE on (L).
- Press (M×2), get TAR.
- Use BALUSTER on (M), get TAR-STAINED BALUSTER.
- Go Travis Cabinet.
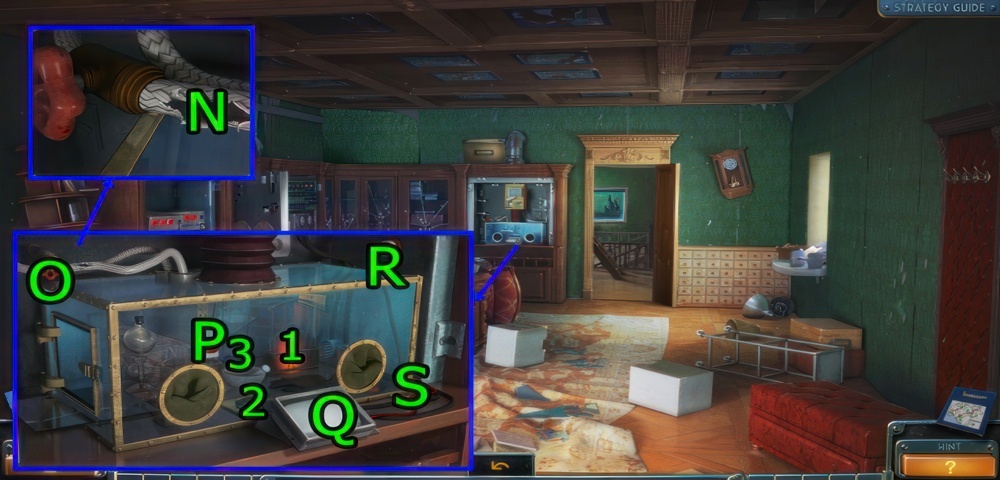
- Use TAR on (N).
- Press (O).
- Drag (1-2), drag (2-3), press (P).
- Press (Q) and (R).
- Use KNIFE on (S), get CABLE.
- KNIFE on CABLE, get CABLE.
- Go First Floor.
- Use CABLE on (T).
- Use TAR-STAINED BALUSTER on (U), get TRINKET.
- Go Second Floor.
- Use TRINKET on (V).
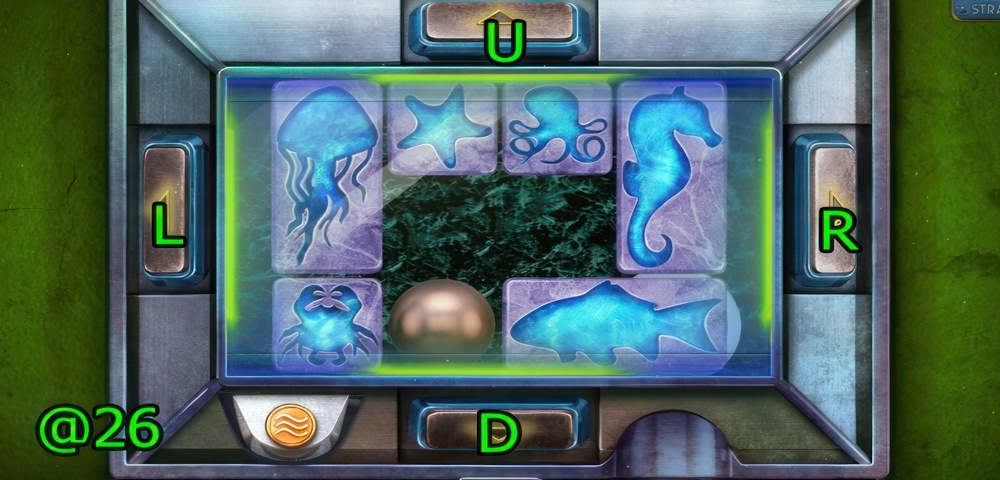
- Moving the blocks around, get the gem to a hole in the bottom right corner.
- Walkthrough (@26): U-L-D-R-U-R-D-L-U-R-D-R-U-L-D-R-U-L-D-R-D-R-U-L-D.
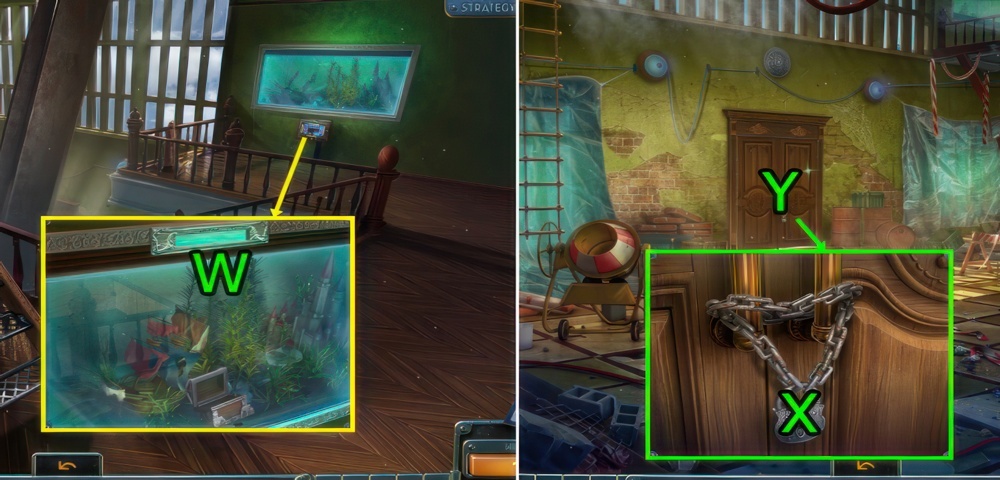
- Use NAIL on (W), get KEY.
- Go First Floor.
- Use KEY on (X).
- Go (Y).
Infiltrate Travis home
Just as we have hypothesized, Travis took samples of a very dangerous virus from the safe, no treatment for this virus has been found to date. It is easy to imagine what he’s going to do with it cause an outbreak of an epidemic. How do we stop him. Hopefully, he went home, where surely he has everything necessary for a fanatical scientist. Perhaps we can intercept him on the way.
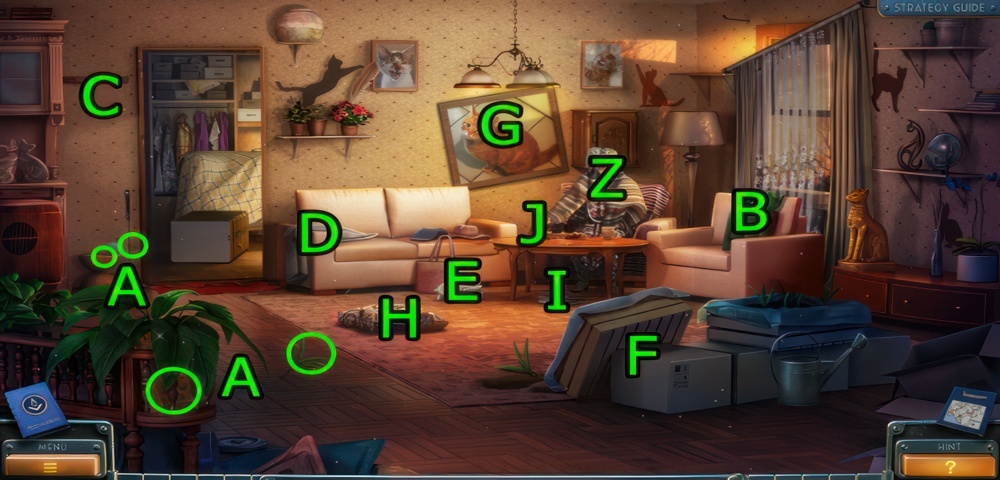
- Press (Z).
- Get BAG OF SOIL, SCOOP, 1/5 BALLS OF YARN, and 1/10 SPROUT (A).
- Drag (B)-(C), (D)-(C).
- Press (F)-(G)-(H).
- Drag (E-J)-(E-C)-(I-J).
Help the old lady
The guy who we met at the institute, has kindly agreed to help us to find the address of Travis in the directory. Upon arrival, we met Travis neighbor. The old woman mistook us for social workers. She said that Travis did not show up home for a long time, and inside is a real laboratory. She promised to let us in through the corridor to his house, provided that we can help her. Given that the old lady is a little crazy, it will be easier to play along and help her. In return, we will be able to get inside.
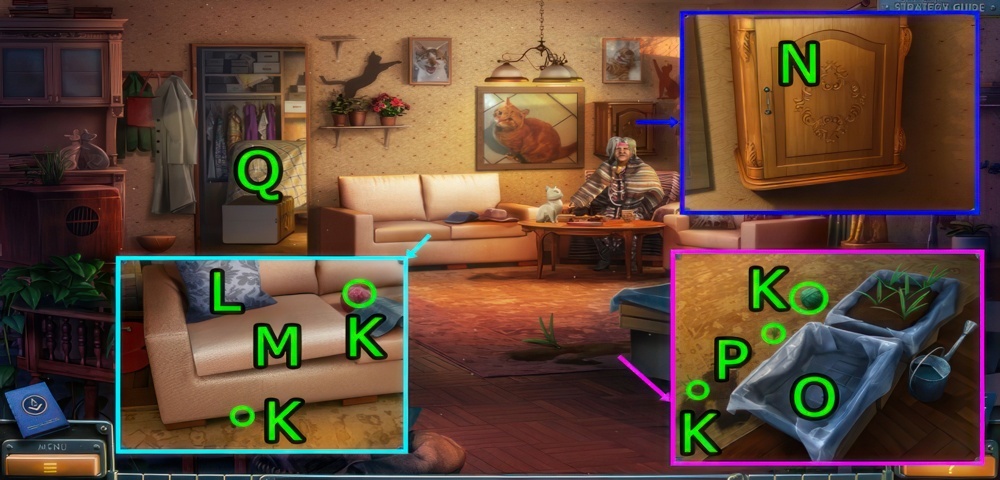
- Get 2-3/5 BALLS OF YARN, 2-3-4/10 SPROUT (K).
- Press (L), get 5/10 SPROUT.
- Press (M), get 1/5 THREADS.
- Press (N), get BRUSH.
- Use BAG OF SOIL and KNIFE on (O).
- Use SCOOP and BRUSH on (P).
- Go (Q).
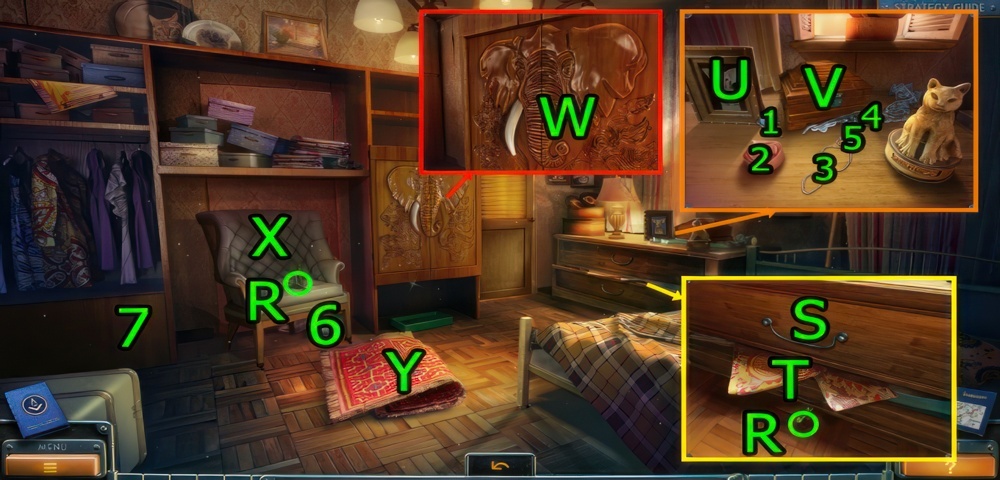
- Get 6-7/10 SPROUT (R).
- Press (S), get 2/5 THREADS, 4/5 BALLS OF YARN, and 8/10 SPROUT.
- Press (S), get KEY.
- Press (S) and (T), get 3/5 THREADS.
- Press (T).
- Press (U).
- Use KEY on (V), get TUSK.
- Drag (1-V)-(2-V)-(3-V)-(4-V)-(5-V).
- Press (V).
- Use TUSK on (W), get 4/5 THREADS.
- Press (X).
- Drag (6-7)-(6-7).
- Press (Y), get 9/10 SPROUT.
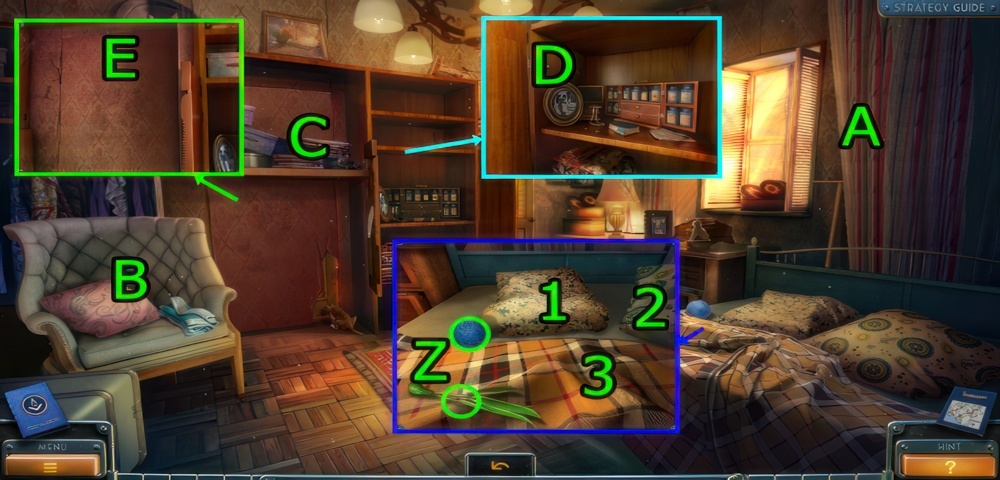
- Get 10/10 SPROUT and 5/5 BALLS OF YARN (Z).
- Press (1-2-3).
- Press (A), get PUSH BROOM.
- Press (B).
- Press (C).
- Use KNIFE on (D).
- Use KNIFE on (E).
- Go Living Room.
- Get CELLAR KEY.
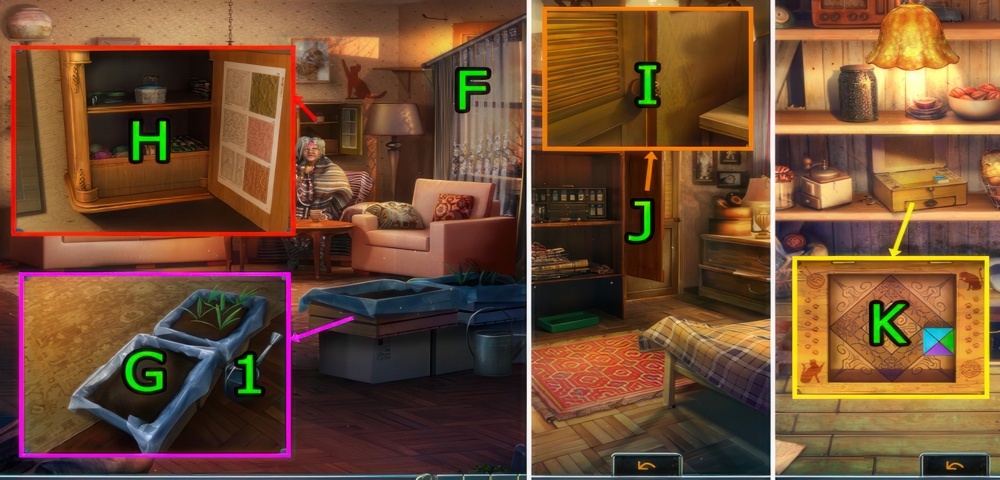
- Use PUSH BROOM on (F).
- Use 10 SPROUT on (G), drag (1-G), get 5/5 THREADS.
- Use 5 BALLS OF YARN and 5 THREADS on (H).
- Go Bedroom.
- Use CELLAR KEY on (I).
- Play puzzle (J), get BLOCKS.
- Use BLOCKS on (K).
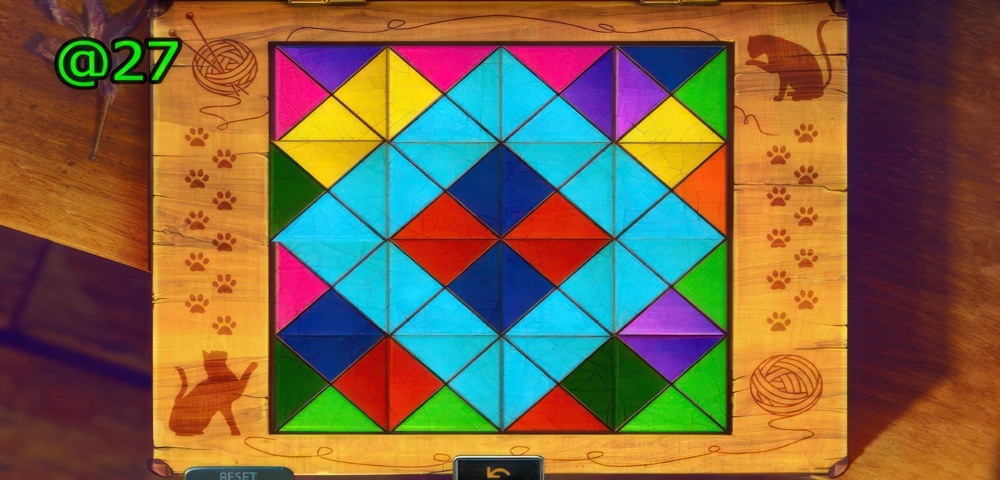
- Place the cubes in the box so that their contiguous sides are of the same color.
- Walkthrough (@27).
- Get GLASSES.
- Go Living Room.
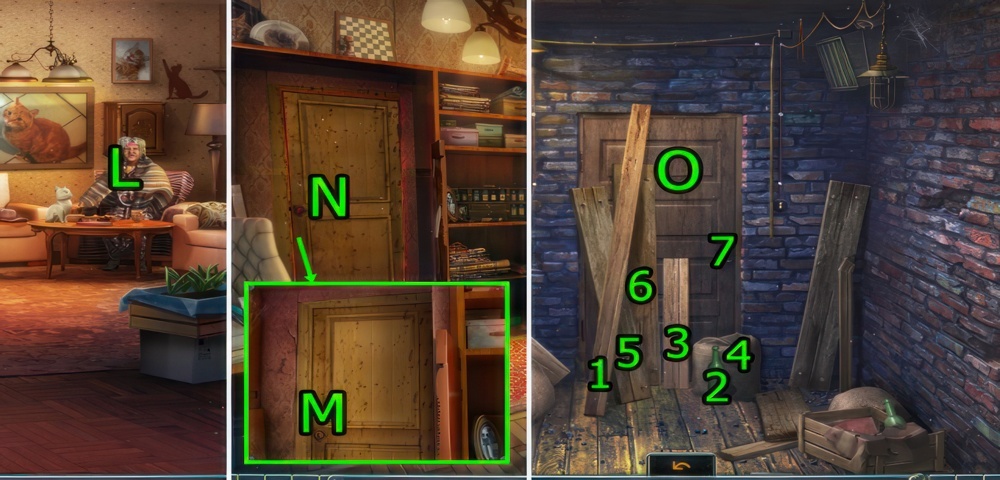
- Use GLASSES on (L), get ADJACENT CORRIDOR KEY.
- Go Bedroom.
- Use ADJACENT CORRIDOR KEY on (M).
- Go (N).
- Press 1, 2, 3, 4, 5, 6, 7.
- Go (O).
Figure out Travis plan
Now we need to look around Travis home and determine his plans.
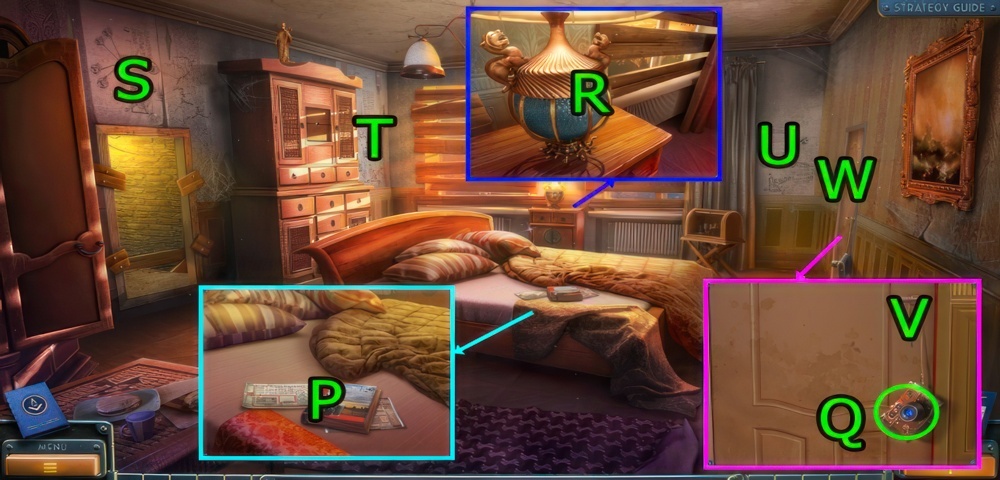
- Press (P×2), get MANUAL ON PHOTOGRAPHY, EMERGENCY EVACUATION PLAN, and PHOTO.
- Get CAMERA (Q).
- Use KNIFE on (R), get CHIP.
- Go (S)-(T)-(U).
- Press (V).
- Go (W).
Develop photographic film
The camera contains used film. I wonder what the scientist was photographing.
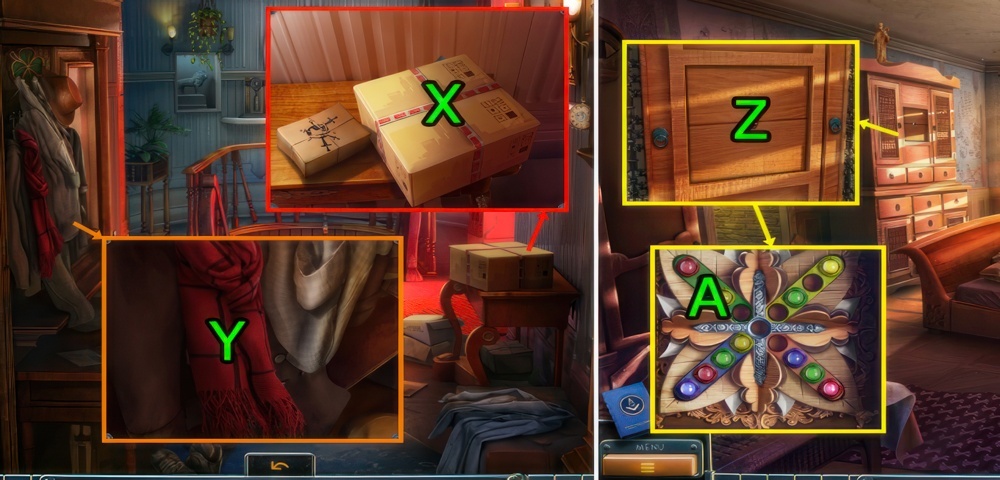
- Use KNIFE and press (X×2), get TANK FOR A PHOTOGRAPHIC FILM and PHOTO PAPER.
- Press (Y×2), get KEY.
- Go Travis Bedroom.
- Use KEY on (Z).
- Use CHIP on (A).
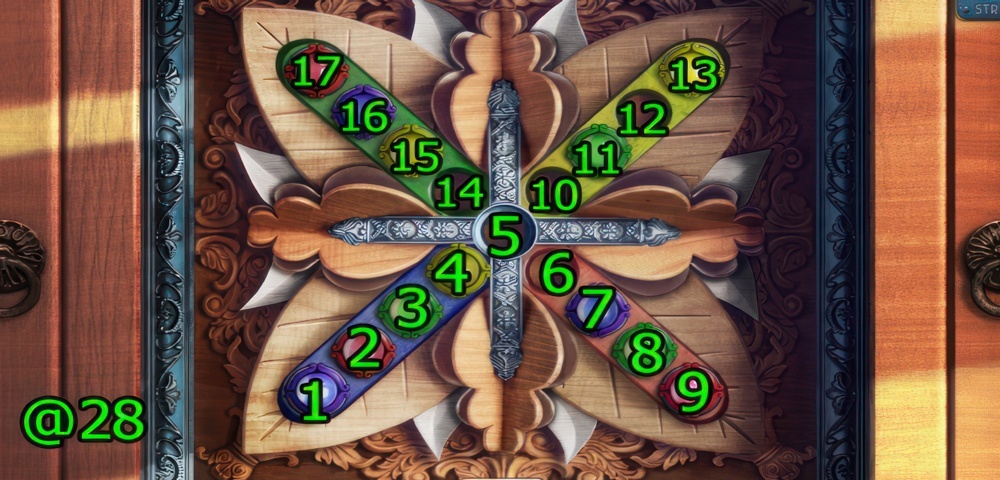
- Move the chips according to the colors of containers.
- Walkthrough (@28): (11-6-15-12-4-11-16-10-17-4-6-17-4-16-3-15-2).
- (14-7-2-10-3-8-10-14-8-15-4-16-7-4-16-10-15).
- Get KEY.
- Go Corridor in the Travis House.
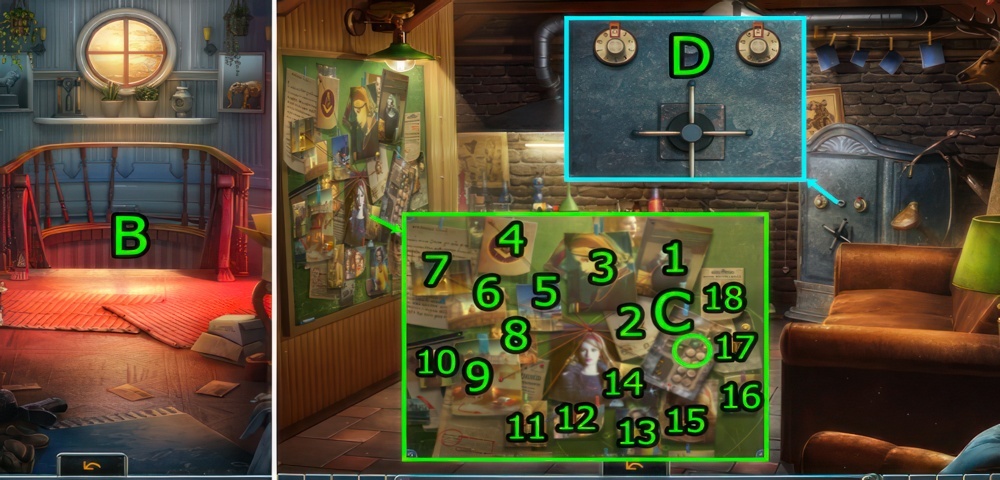
- Go (B).
- Get PHOTO (C).
- Walkthrough: 1, 2, 3, 4, 5, 6, 7, 8, 9, 10, 11, 12, 13, 14, 15, 16, 17×2, 18.
- Use KEY on (D).
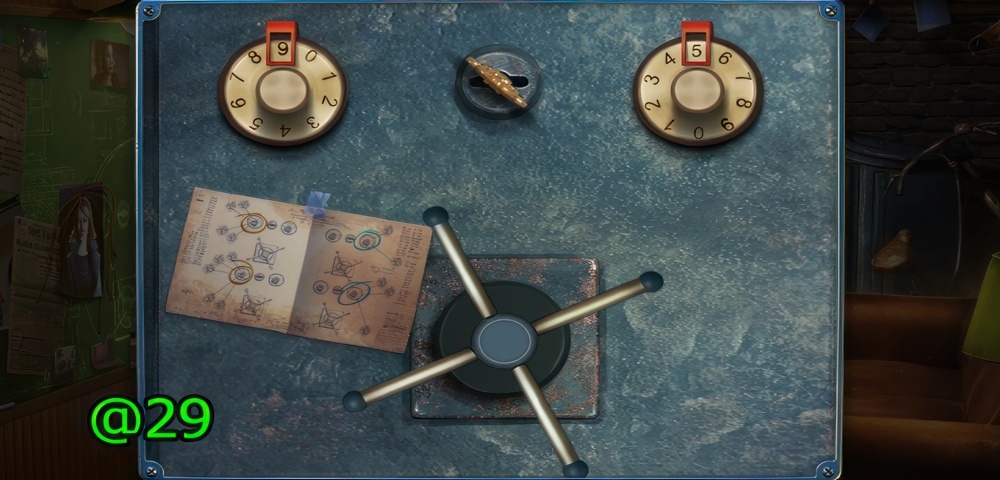
- Using the hint, rotate the dials and set the correct code.
- Walkthrough (@29).
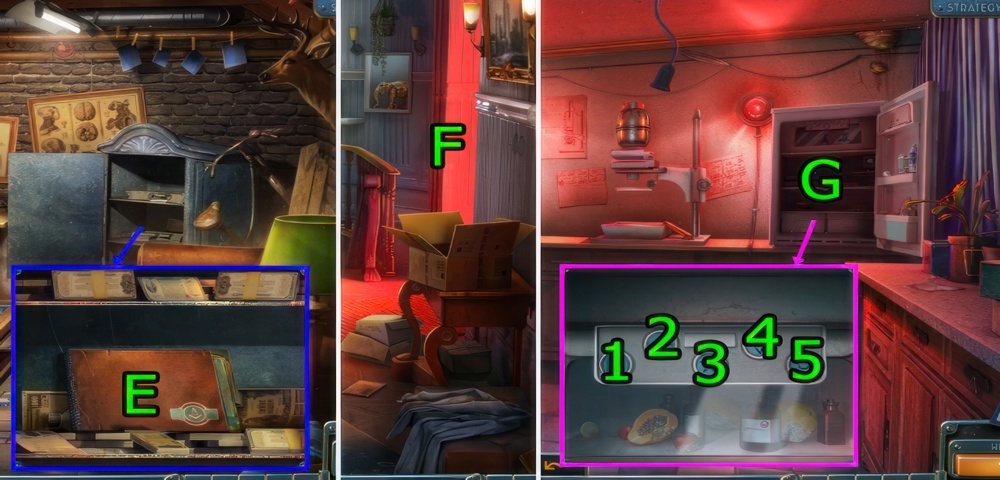
- Press (E×2), get FIXING SOLUTION.
- Go Corridor in the Travis House.
- Go (F).
- Play puzzle (G).
- Press the buttons in the correct order.
- Pay attention to the shapes on the buttons.
- Walkthrough: 5, 2, 4, 1, 3.
- Get SODIUM SULPHATE SOLUTION and BENZOL.
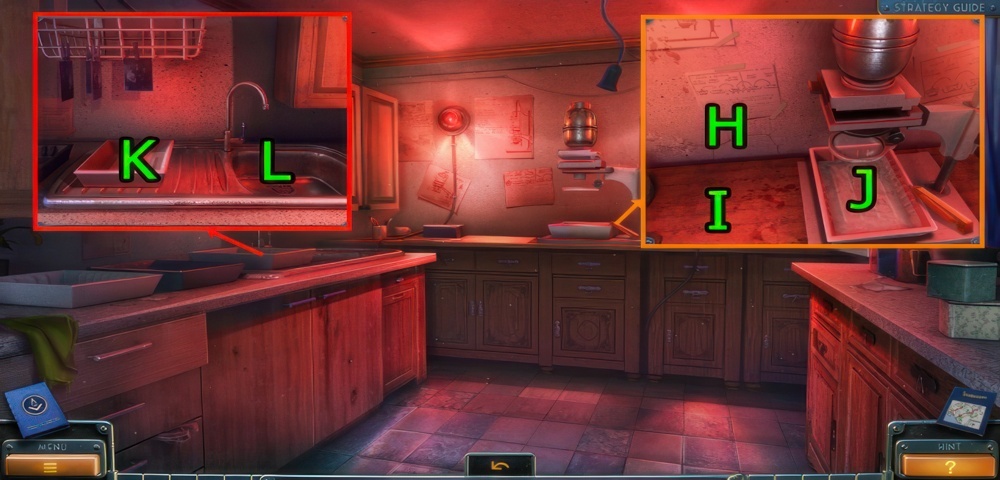
- Use MANUAL ON PHOTOGRAPHY on (H).
- Use PHOTO PAPER on (I).
- Use FIXING SOLUTION on (J).
- Use KNIFE on (I).
- Drag (I)-(J).
- Drag (K-L).
- Go Basement.
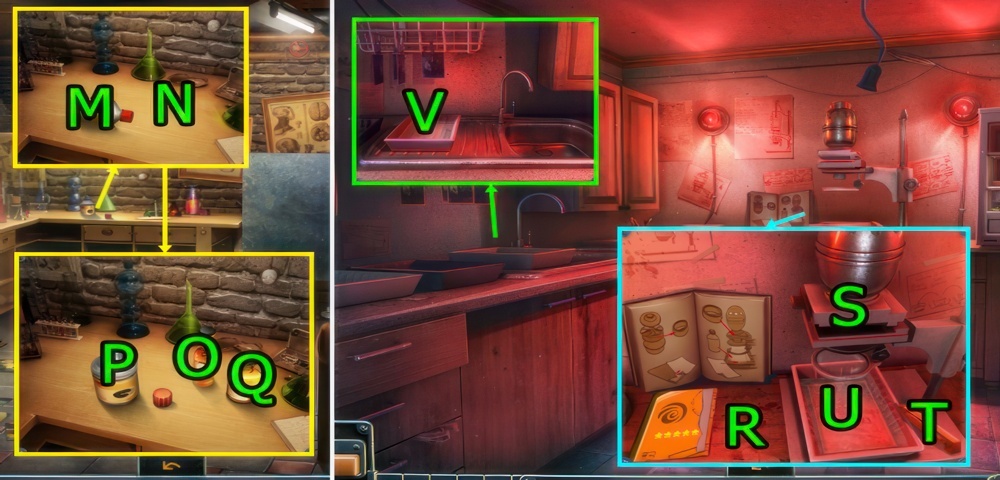
- Press (M).
- Use SODIUM SULPHATE SOLUTION and BENZOL on (N).
- Drag (O-P), drag (Q-P).
- Press (P), get DEVELOPING SOLUTION.
- Go Kitchen.
- TANK FOR A PHOTOGRAPHIC FILM and DEVELOPING SOLUTION on CAMERA, get TANK WITH THE DEVELOPED FILM.
- Use TANK WITH THE DEVELOPED FILM on (R).
- Drag (R-S) and press (S), drag (T-U), get UNDEVELOPED PHOTO.
- Use UNDEVELOPED PHOTO on (V), get PHOTO.
- Go Basement.
Infiltrate the water-pumping station
We found a lot of clues in Travis home. It turned out that he was unaware of the existence of the Order and by chance stumbled upon my trail. Among other things, Travis was interested in methods of hypnosis, as a result of which, he was able to make me believe the outbreak was real and had me bring him to the Order. We found a few other things in the safe. From one of the more recent Travis diary entries, Will and I found out that one mineral, elbaite, paralyzes the carrier of the mask and, in addition, the mask is very sensitive to magnets. Having studied the papers found in Travis study, we assumed that he wants to spread the virus through the water system. According to the papers, he studied the southern water tower. I hopes that our assumptions are correct, we hurried there to try and stop him.
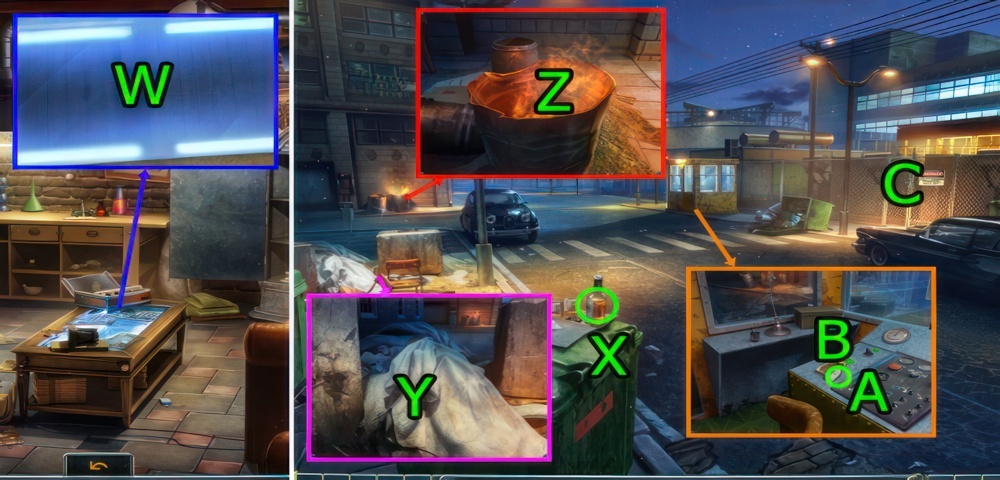
- Use PHOTO, PHOTO, PHOTO, and EMERGENCY ESCAPE PLAN on (W).
- Get BOTTLE OF ALCOHOL (X).
- Use KNIFE on (Y), get PIECE OF CLOTH.
- PIECE OF CLOTH on BOTTLE OF ALCOHOL, get MOLOTOV COCKTAIL.
- Use MOLOTOV COCKTAIL on (Z).
- Get SIGNAL PISTOL (A).
- Press (B).
- Go (C).
Stop Travis
It appears that we were able to get to the station before Travis. We must prepare for a meeting with him. Will got an idea to empty all but one of the water tanks, and in this case, Travis will come to the single full tank. Our plan is to bring a huge magnetic crane to the reservoir, lure him Travis under it and turn on the magnetic field. The mineral that we have with us should help too.
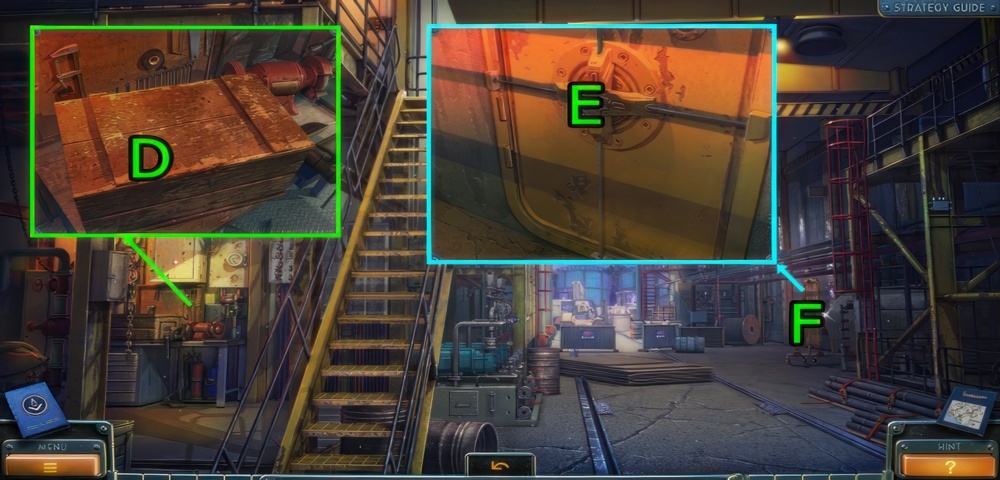
- Press (D×2), get VALVE.
- Use VALVE on (E).
- Go (F).
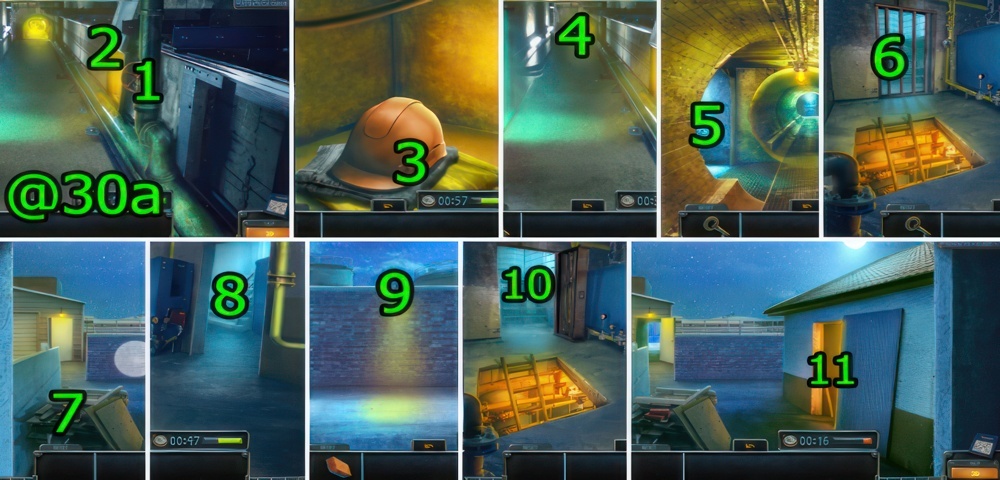
- Using available items, get to the water tanks in the allotted time, bypassing the guards.
- Walkthrough (@30): Press (1), go (2), press (3×2), get KEY (3).
- Go down, go (4), go (5), use KEY and go (6), get BRICK (7), go down.
- Go (8), use BRICK on (9), go back, go (10), go (11).
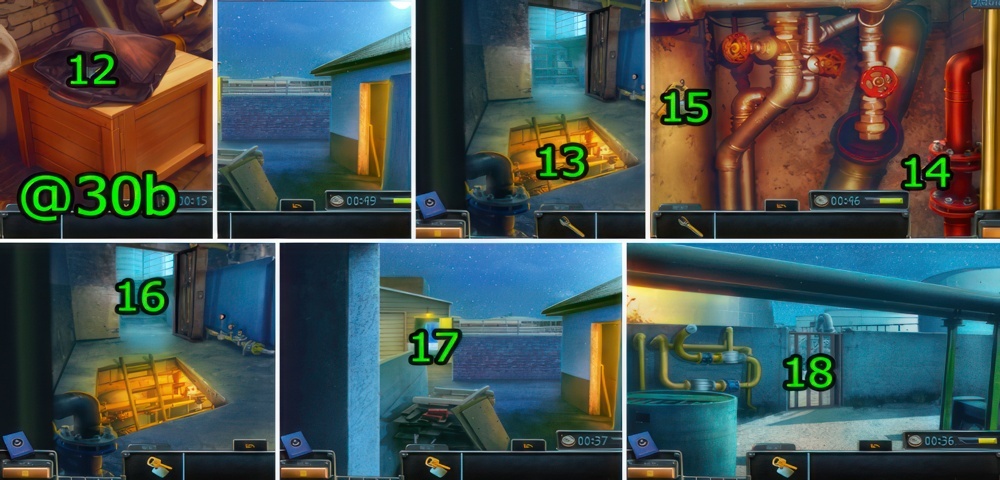
- Get WRENCH (12), go down, go down (13), use WRENCH on (14).
- Get KEY (15), go down, go (16), go (17), use KEY and go (18).
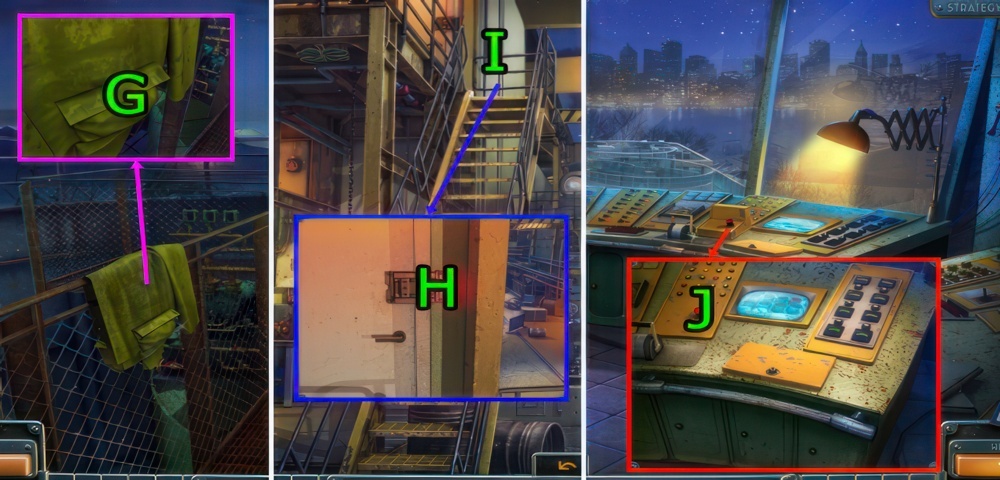
- Press (G), get MAGNETIC ACCESS CARD.
- Go Inside the Water-Pumping Station.
- Use MAGNETIC ACCESS CARD on (H).
- Go (I).
- Press (J), get KEY.
- Go Water Tank.
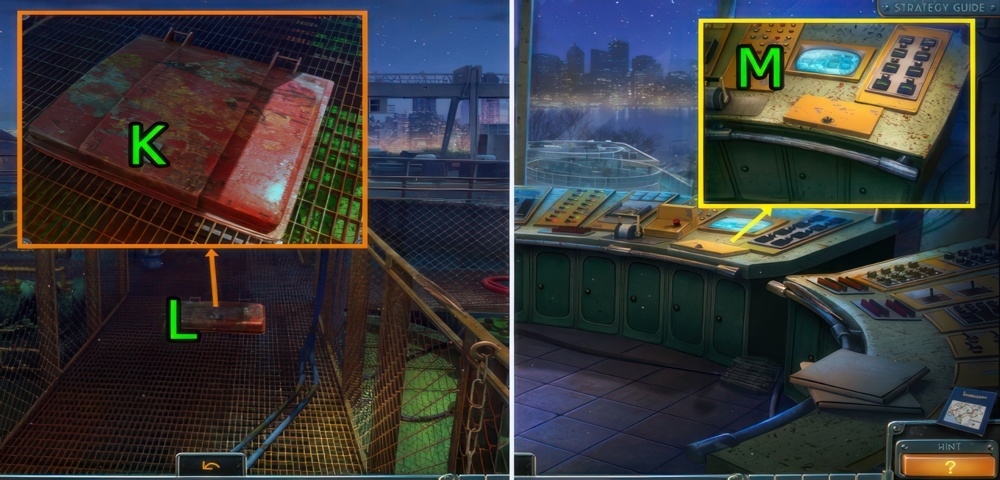
- Use KEY on (K).
- Play puzzle (L).
- Go Control Terminal.
- Press (M).
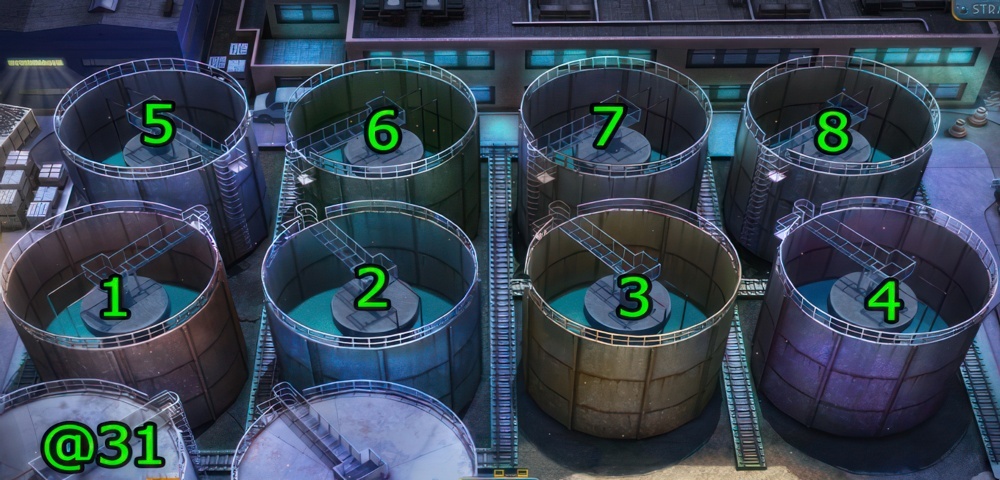
- Clicking on the tanks, pump all the water into the upper right tank.
- Walkthrough (@31): 3, 6, 3, 2, 1, 6, 3, 5, 6, 3, 1, 6, 3, 7, 4, 3, 1, 6, 3.
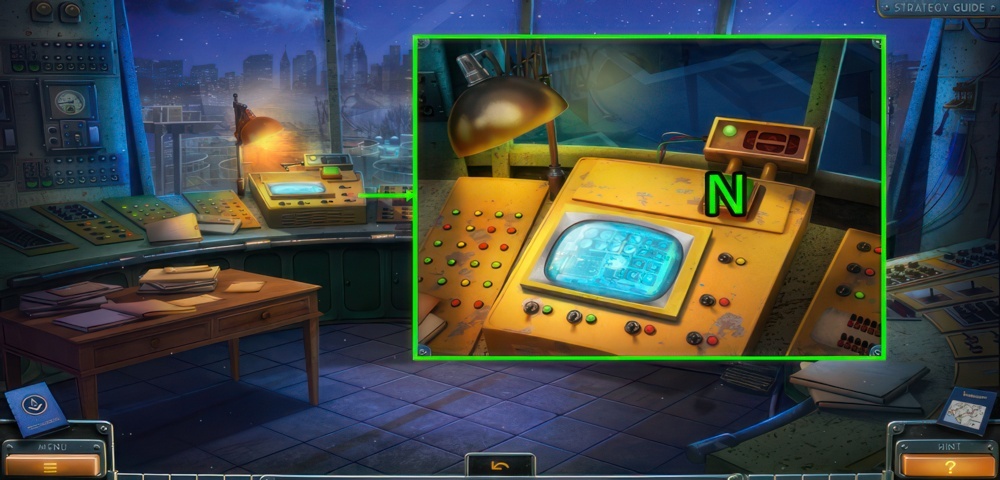
- Press (N).
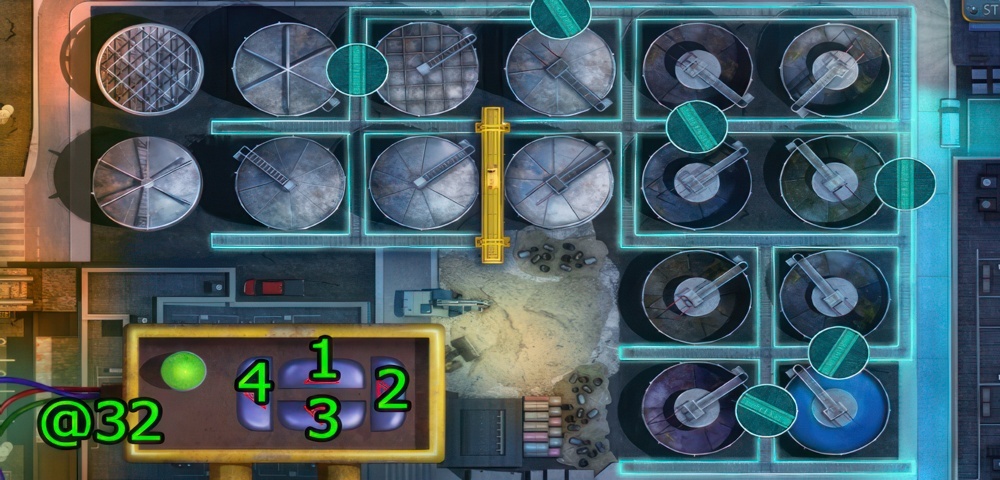
- Move the magnetic crane to the tank filled with water.
- Walkthrough (@32): 4×2-2-1-2×2-3-1-2×2-4-2-3-4-2-3-4×2-2-3-4-2×2.
- Go Water Tank.
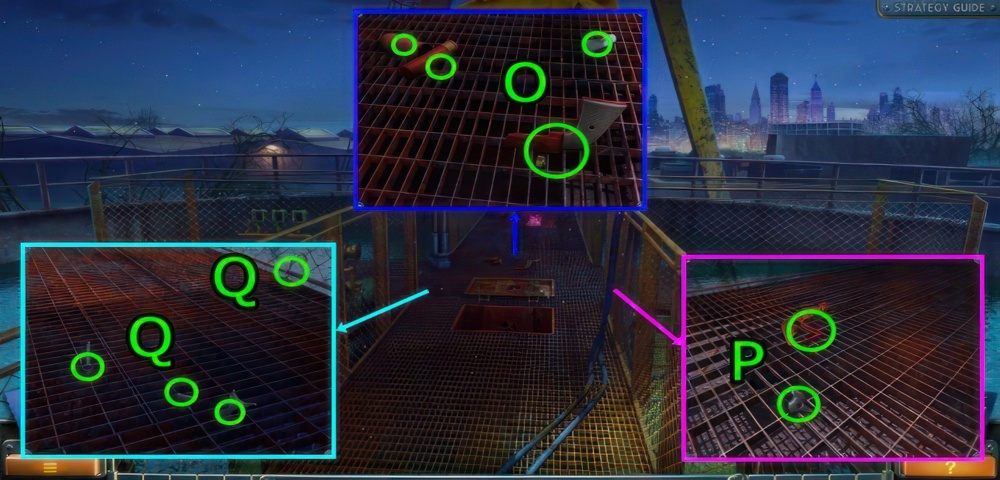
- Get 1-2-3-4/10 BROKEN SIGNAL PISTOL (O).
- Get 5-6/10 BROKEN SIGNAL PISTOL (P).
- Get 7-8-9-10/10 BROKEN SIGNAL PISTOL (Q).
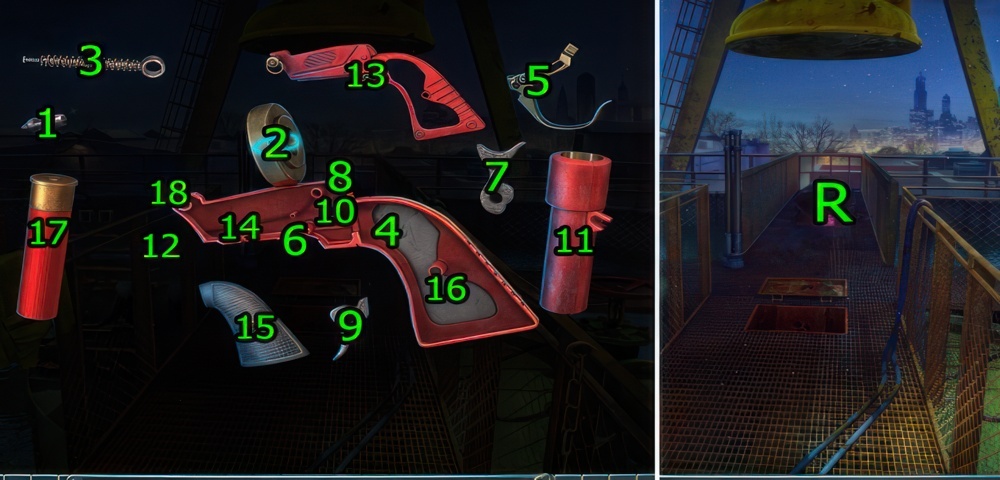
- Use 10 BROKEN SIGNAL PISTOL.
- Drag (1-2)-(3-4)-(5-6)-(7-8)-(9-10).
- (11-12)-(13-14)-(15-16)-(17-18), get SIGNAL PISTOL.
- Use SIGNAL PISTOL on (R).
- Walkthrough Bonus Chapter, at the link below.


