Unsolved Case 1: Fatal Clue – The walkthrough of the game starts with the fact that you have a new case, an employee of an architectural agency has been murdered, and it happened in the central park. It’s a horrific incident that could cause the agency’s reputation to suffer. Scott Matthews will be working with you on the case. It turns out that being a brilliant detective doesn’t mean you have great people skills, so it’s up to you to gain the trust of the witnesses at the interview. Remember that none of them will share information with you voluntarily, be careful and cunning. If you can not pass any of the puzzles or do not know where the items are, on our site you can watch the walkthrough of the game Unsolved Case 1: Fatal Clue, and complete the investigation.
Unsolved Case 1: Fatal Clue – Walkthrough
Here you can see full walkthrough of Unsolved Case 1: Fatal Clue game, namely for all chapters, including bonus chapter, in pictures.

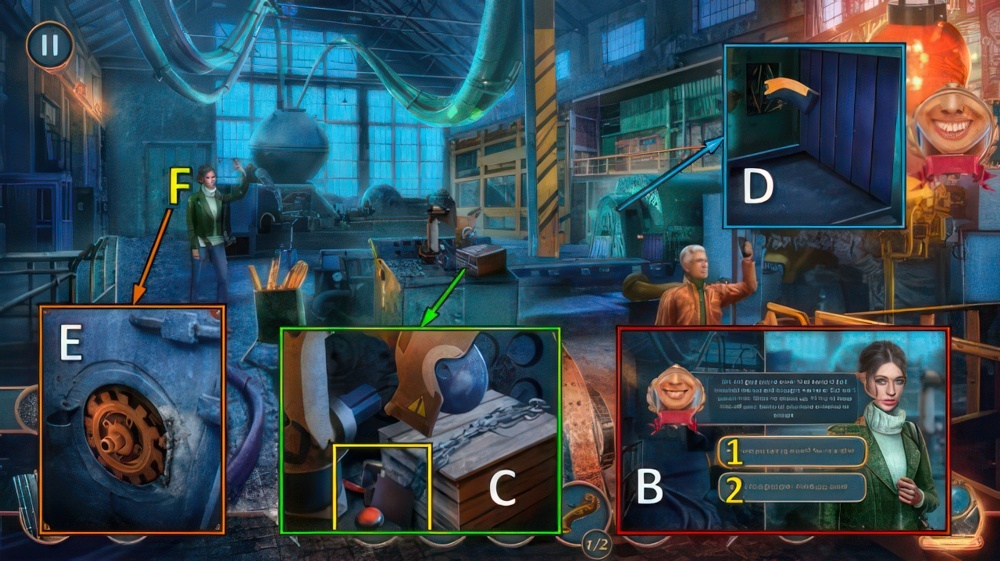
- Talk, go through all dialog options (A).
- Receive LATEX GLOVES.
- Use LATEX GLOVES for puzzle (B), receive evidence 1/5.
- Receive DETECTIVE’S TOOLKIT.
- POLAROID, journal, FINGERPRINTING KIT and PLASTIC BAGS from DETECTIVE’S TOOLKIT.
- Take evidence 2/5 with PLASTIC BAGS.
- Use FINGERPRINTING KIT, receive evidence 3/5 (C).
- Take BROKEN UV LAMP and GARDEN RAKE (D).
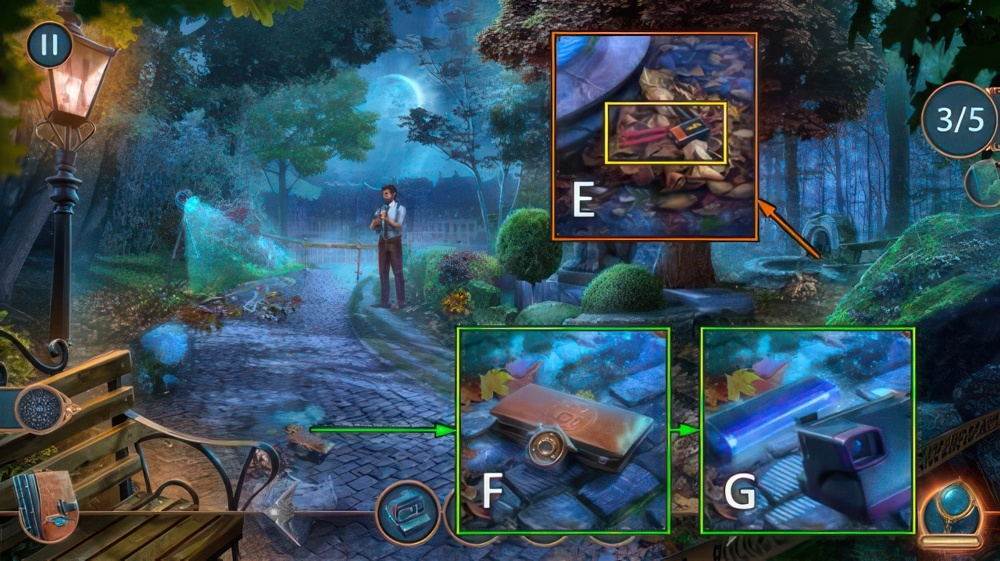
- Use GARDEN RAKE, take BATTERY.
- Take evidence 4/5 with PLASTIC BAGS (E).
- BATTERY on BROKEN UV LAMP, receive UV LAMP.
- Take HOUSE-SHAPED KEYRING and WALLET (F).
- Use UV LAMP, use POLAROID.
- Take evidence 5/5 (G).
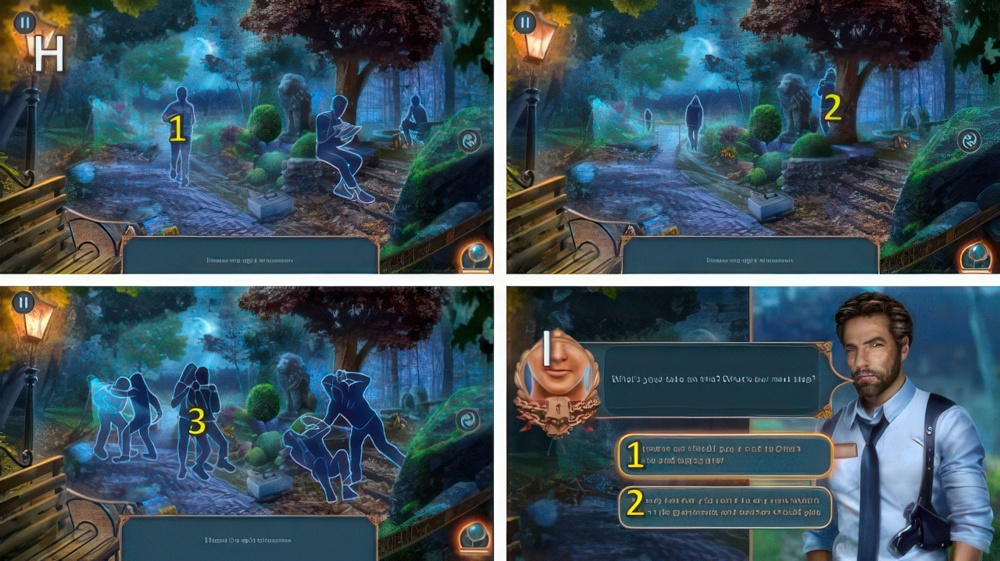
- Choose the right silhouettes.
- Select 1-2-3 (H).
- Select 1 or 2 (I).
- Note: answer 1 unlocks a chain.
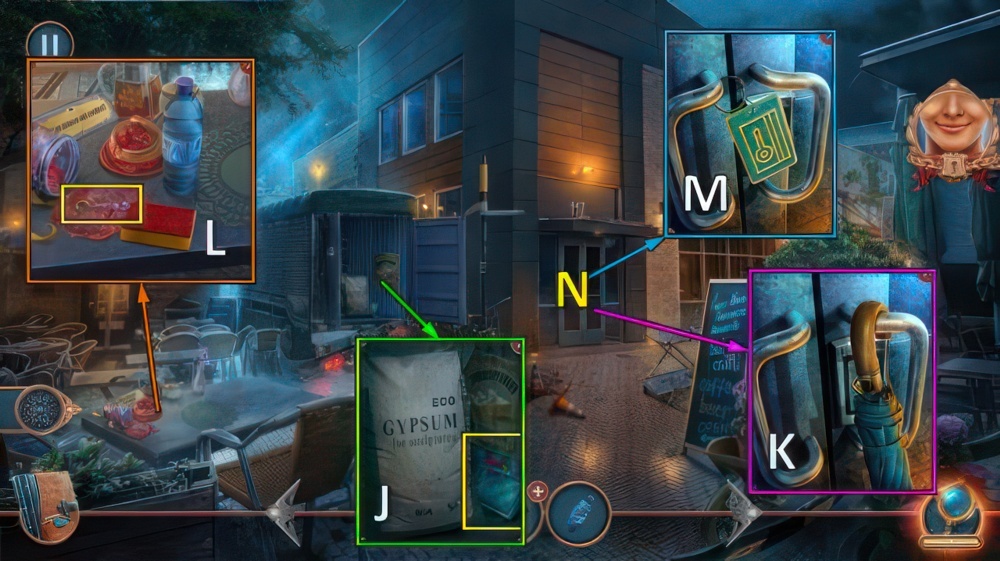
- Receive BOTTLED WATER.
- Take map, DUCT TAPE and SPONGE (J).
- Take FOLDABLE UMBRELLA (K).
- Use SPONGE and BOTTLED WATER, take HOOK EARRING (L).
- HOOK EARRING on WALLET, take notes, COIN 1/3 and OTTO’S PERMIT.
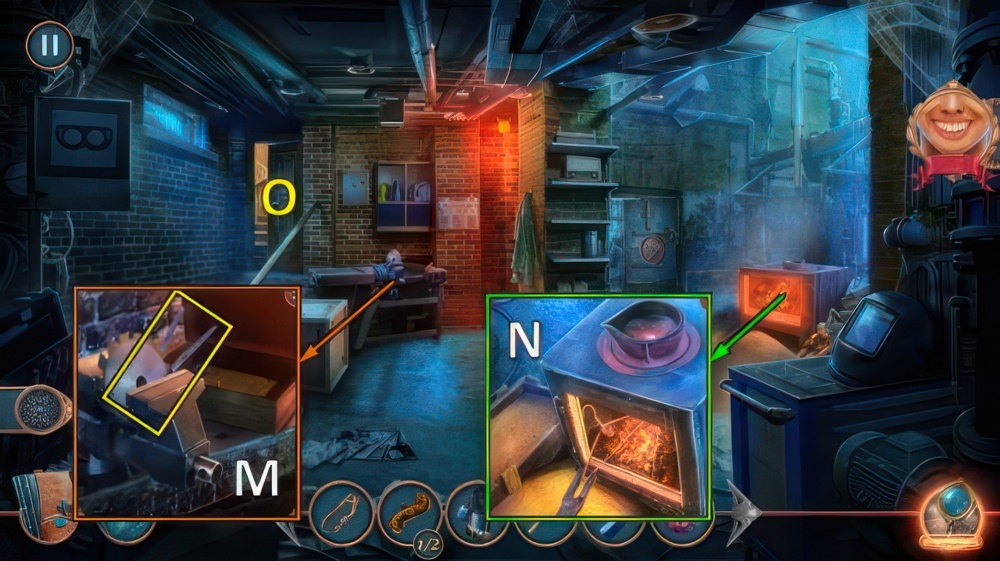
- Use OTTO’S PERMIT (M).
- Go (N).

- Go through all dialog options (O).
- Take COIN 2/3 and CABLE PLUG (P).
- Use CABLE PLUG and DUCT TAPE (Q), receive HDMI CABLE.
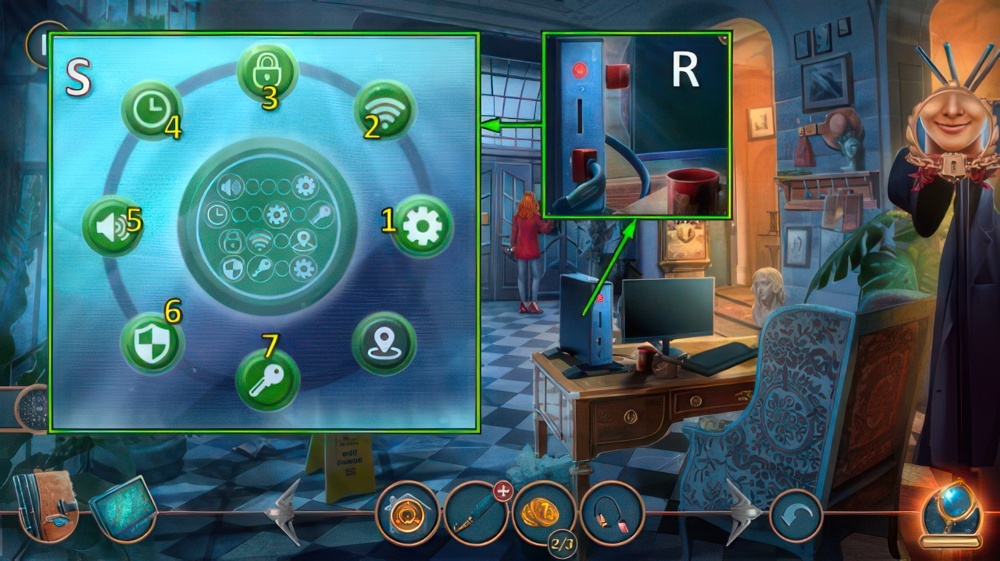
- Place HDMI CABLE (R).
- Arrange the tokens with symbols in accordance with the hint you see on the screen.
- Click on a token to move it.
- Select two tokens on the same track to swap them.
- Tokens should be placed in a clockwise direction.
- Easy walkthrough (S).
- Hard walkthrough (S): (2-3)-(3-4)-(4-5)-(5-6)-(6-7)-(3-4)-(4-5).
- (5-6)-(3-4)-(4-5)-(2-3)-(3-4)-(1-2)-(2-3)-(1-2).

- Select 1 or 2 (T).
- If you’ve selected 2, skip the steps marked with # below.
- # Receive MAGNETIC KEY.
- # Use MAGNETIC KEY (U).
- # Go (V).
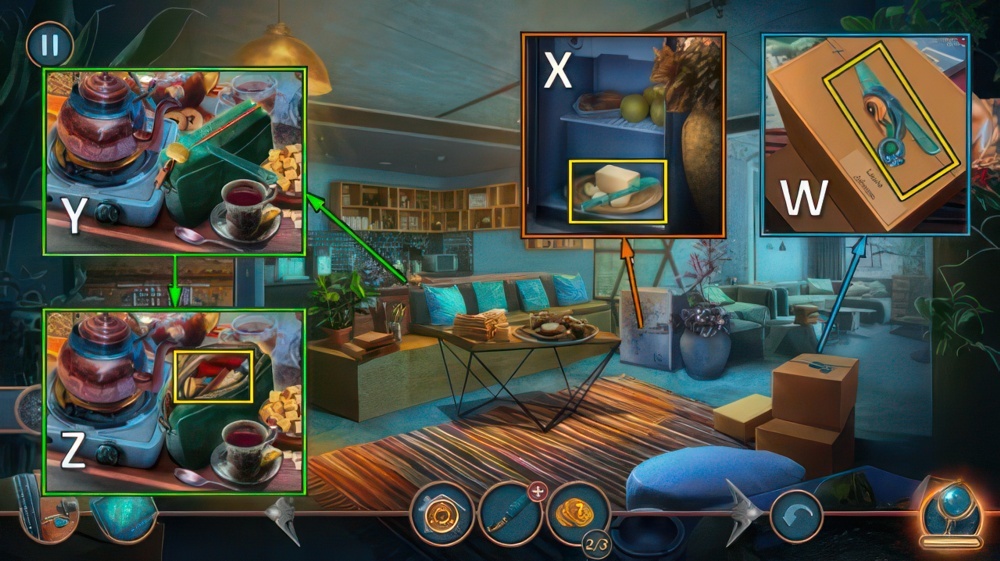
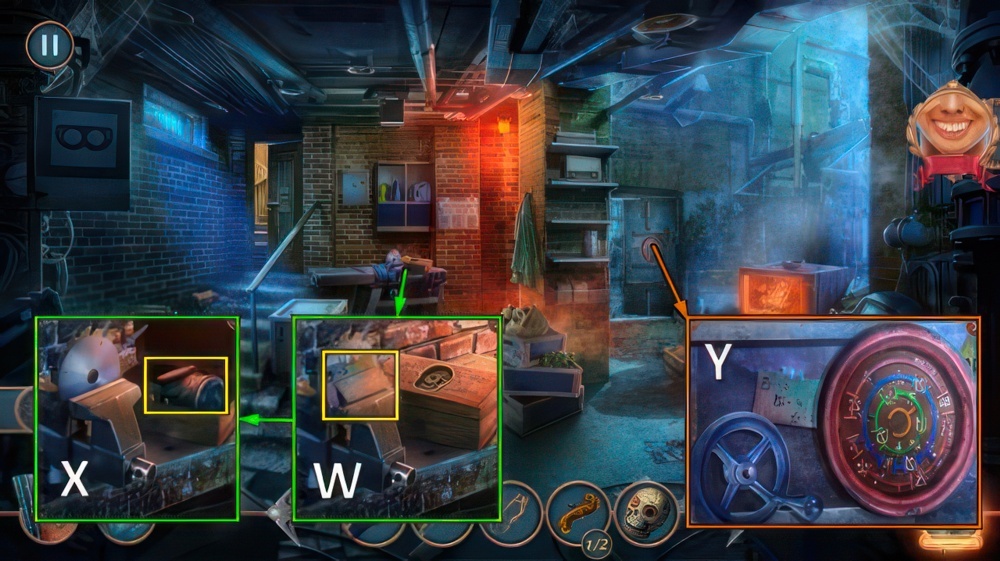
- # Take BROKEN AMULET and KNIFE (W).
- # Open.
- # Use KNIFE, receive BUTTER KNIFE (X).
- # Use BUTTER KNIFE (Y).
- # Take note, GLUE and SILVER CHAIN (Z).
- Go to Otto’s Office.
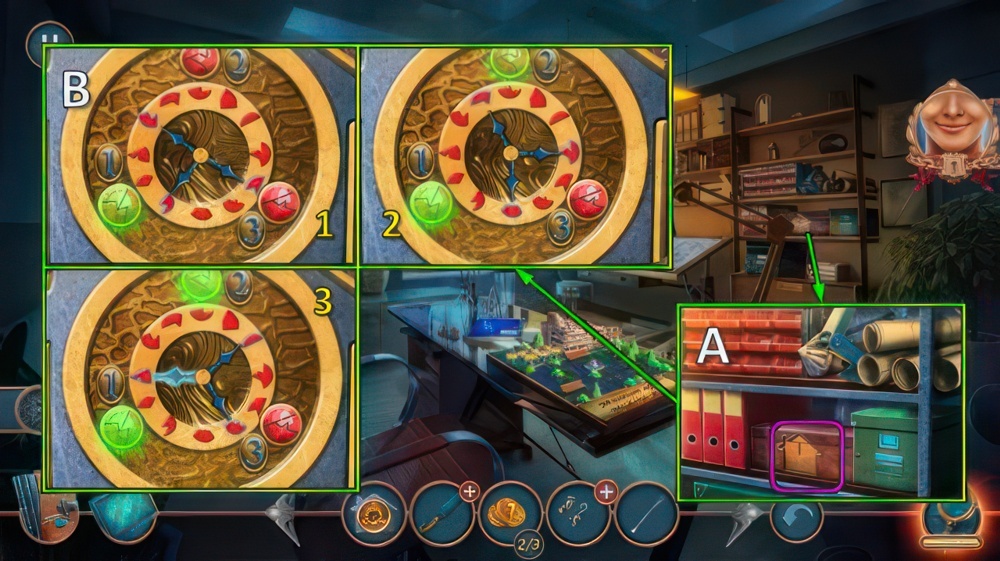
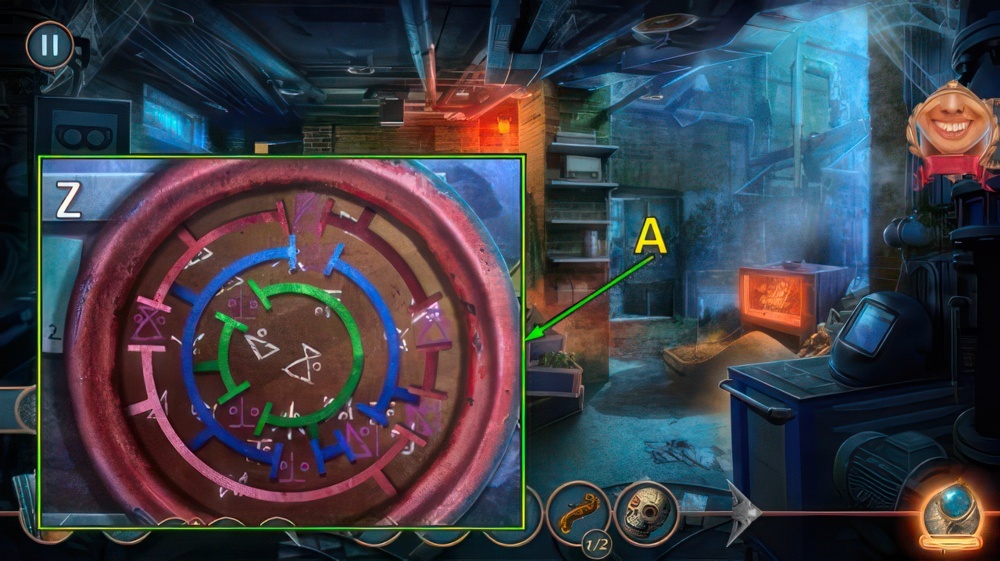
- Place HOUSE-SHAPED KEYRING (A).
- Place the arrows on the fragments of the circles that make up the larger circle you need.
- Mind the sequence of the arrows.
- Easy walkthrough (B).

- Hard walkthrough (C).
- Take picture, ARCHITECTURAL COMPASS, DISASSEMBLED JACK and TOWER MOCK-UP (D).

- # Place and pull SILVER CHAIN, touch lamp.
- # Take AMULET HALF (E).
- Take COIN 3/3 with ARCHITECTURAL COMPASS (F).
- # Go to Break Room.

- # GLUE and AMULET HALF on BROKEN AMULET, receive FIRE AMULET.
- # Place FIRE AMULET (G).
- # Move the amulets by crossing all the red checkpoints.
- # Once a checkpoint is crossed, it will turn green.
- # Easy walkthrough (H).
- # Hard walkthrough (I).

- # Take note and DIADEM (J).
- # Use DIADEM, take NAIL FILE (K).
- # Walk down.
- # Use NAIL FILE, take ANCHOR KEYCHAIN (L).
- Go to Near Architectural Studio.
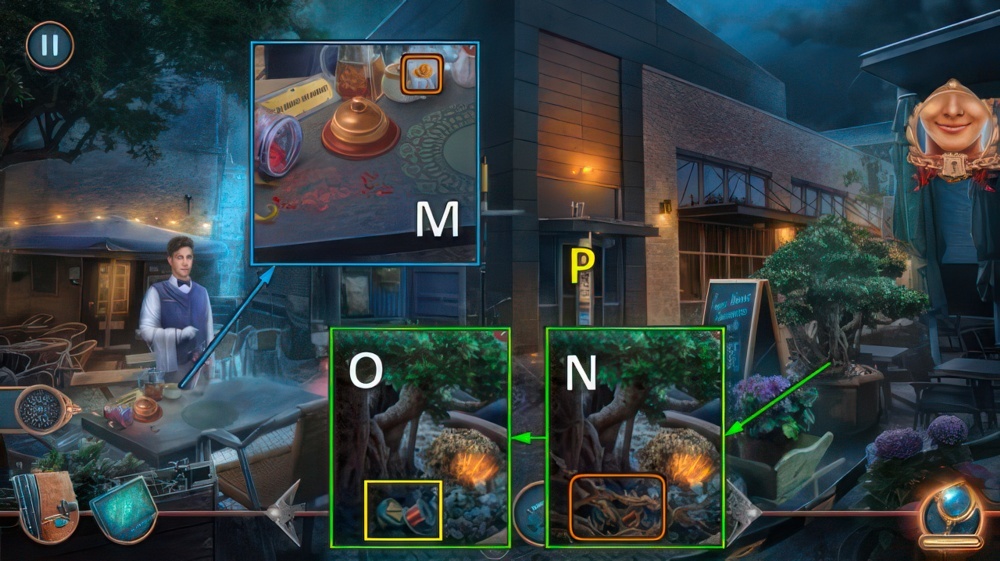
- Ring bell, offer COIN for puzzle (M).
- Receive TABLE NAPKIN.
- Use TABLE NAPKIN (N).
- Take WIRE and UMBRELLA BUTTON (O).
- Go (P).

- UMBRELLA BUTTON on FOLDABLE UMBRELLA, receive FOLDED UMBRELLA.
- Use FOLDED UMBRELLA, take CUP and AWL (Q).
- Walk down.
- Use AWL, take note, NOTEPAD WITH PEN 1/2 and BROKEN DUMMY (R).
- Use BROKEN DUMMY, take LANTERN MOCK-UP (S).
- Go to Otto’s Office.
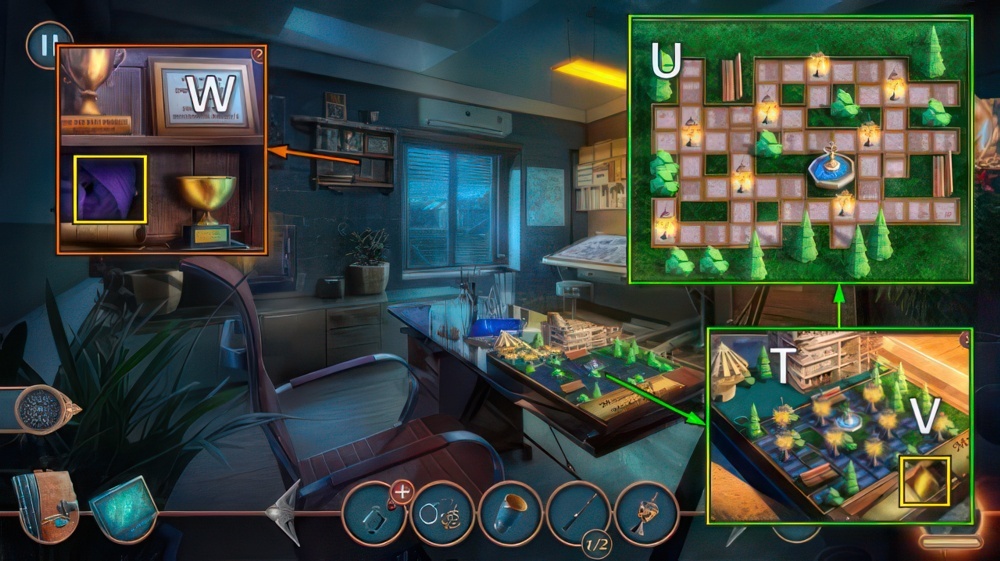
- Place TOWER MOCK-UP and LANTERN MOCK-UP (T).
- Place lanterns on the playing field so that the light from them illuminates all the paths on the field.
- Easy and hard walkthrough (U).
- Take note and OUTSTANDING ARCHITECT AWARD (V).
- Place OUTSTANDING ARCHITECT AWARD, take SCARF and JACK LEVER (W).
- Walk down twice.

- WIRE and JACK LEVER on DISASSEMBLED JACK, receive JACK.
- Place JACK, take SCULPTURE FRAGMENT (X).
- # Use ANCHOR KEYCHAIN, take STAPLE REMOVER (Y).
- # Go to Break Room.
- # Use STAPLE REMOVER for puzzle (Z), receive PHOTO.
- Go to Lobby.
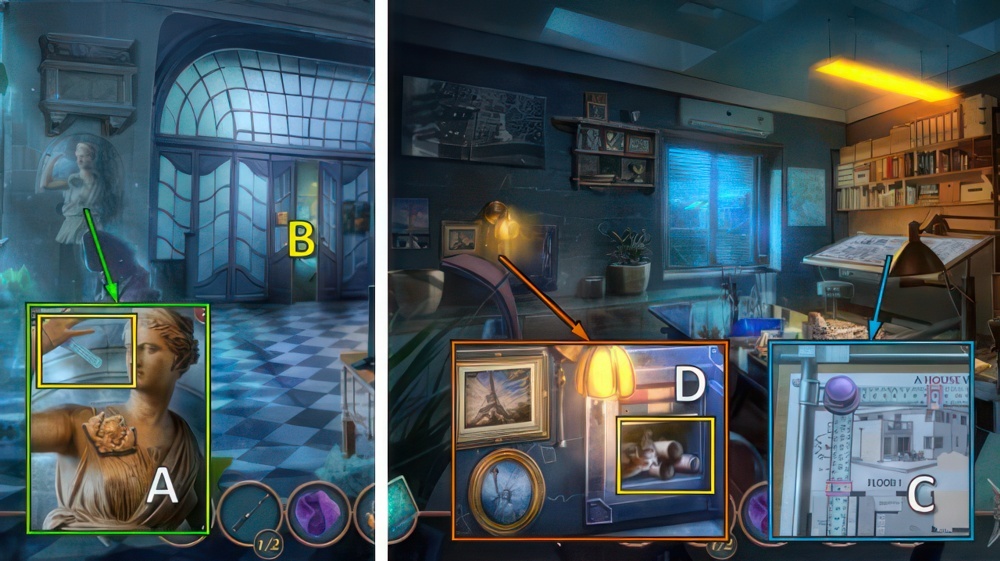
- Place SCULPTURE FRAGMENT, take RULER (A).
- Go (B).
- Place RULER for puzzle (C), receive STATUE OF LIBERTY DRAWING.
- Place STATUE OF LIBERTY DRAWING, take PISTOL and blueprints (D).

- Take paper (E).
- Select 1 or 2 (F).
- Note: answer 1 unlocks a chain.

- Take PHONE and NOTEPAD WITH PEN 2/2 (G).
- Place NOTEPAD WITH PEN, go through all dialog (H).
- Receive WITNESS TESTIMONY.
- # Offer PHOTO (H).
- Use CUP (I), receive GLASS OF WATER.
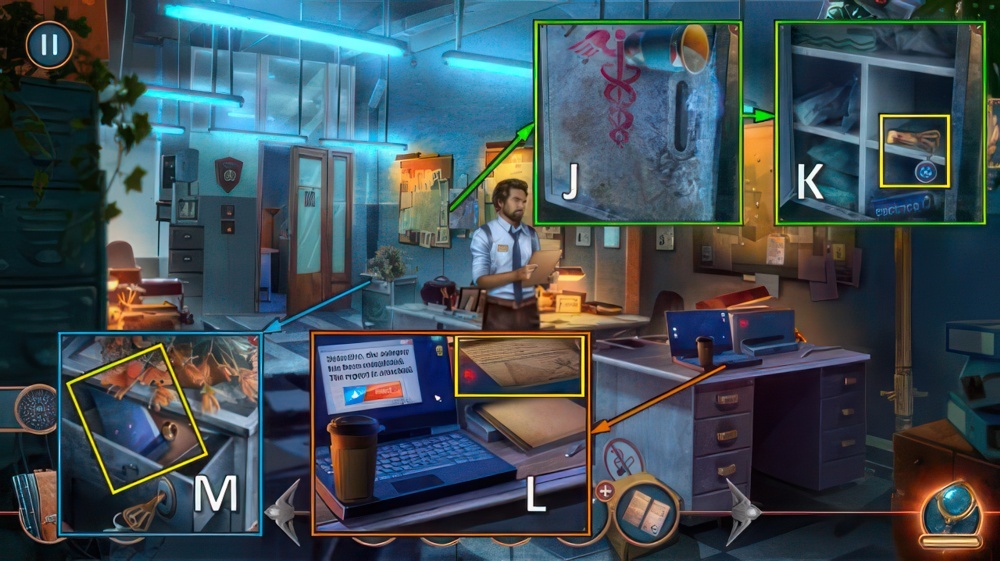
- Use GLASS OF WATER (J), take BOLT and KEY (K).
- Use KEY, take NUT and PAPER (L).
- Turn on laptop, place PAPER.
- Take DAMAGE REPORT (M).
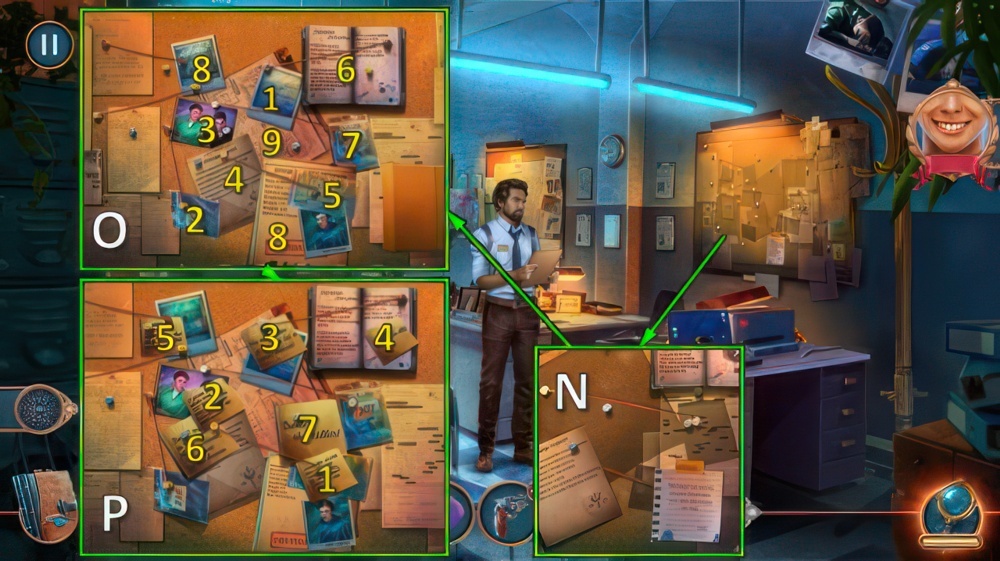
- Place WITNESS TESTIMONY and DAMAGE REPORT (N).
- Match all the evidence to the suggestions on the notepad.
- Place 1-9 (O).
- Place 1-7 (P).

- Select 1 or 2 (Q).
- Note: answer 1 unlocks a chain.
- Receive DANIEL SMITH’S ADDRESS.

- DANIEL SMITH’S ADDRESS on PHONE.
- Receive LOCKPICKS.
- Note: you only receive these if you chose enough correct answers to unlock two chains.
- Take STAR PART 1/2 and LOCK PART.
- Open, use SCARF.
- Take BULLET (R).
- BULLET on PISTOL, receive REVOLVER.
- Use REVOLVER (S), take CROWBAR (T).
- Use CROWBAR (U).
- Select Scott (V).
- Go (W).
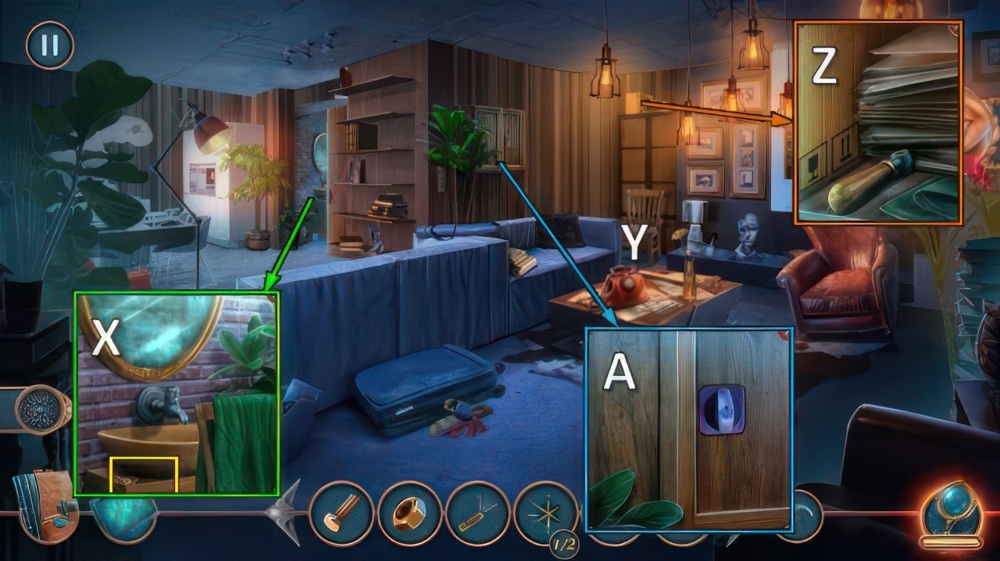
- Take MONOGRAM.
- Move sweater, take STURDY CHAIR (X).
- Place STURDY CHAIR (Y).
- Take VALVE (Z).
- Use LOCKPICKS (if you’ve received them) for puzzle (A).

- Place VALVE, BOLT and NUT (B).
- Place LOCK PART, enter 4-2-9-4 for puzzle (C).
- Receive MAIL HORN.
- Walk down.
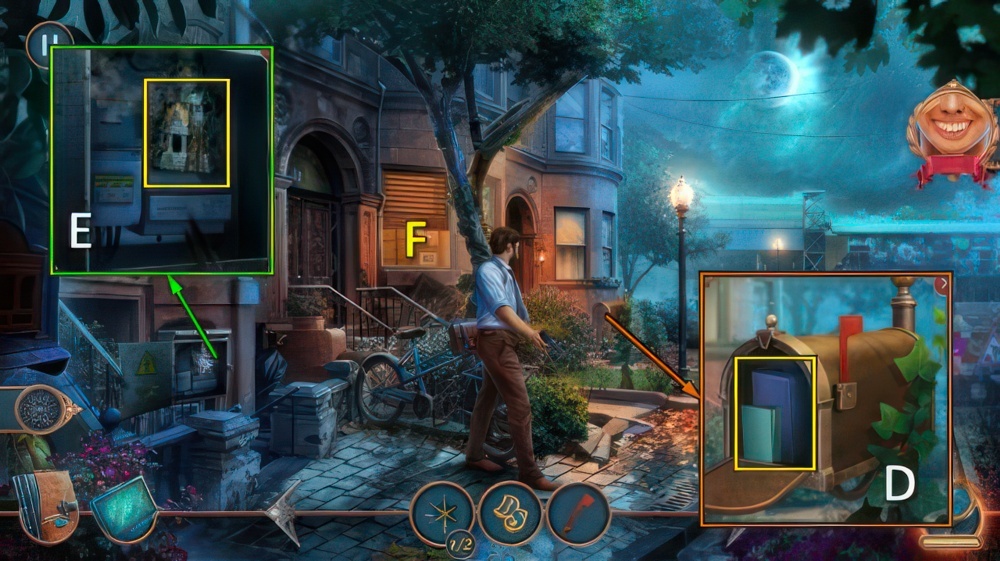
- Place MAIL HORN, take note and BASEBALL MITT (D).
- Use BASEBALL MITT, take TOWER FIGURINE (E).
- Go (F).
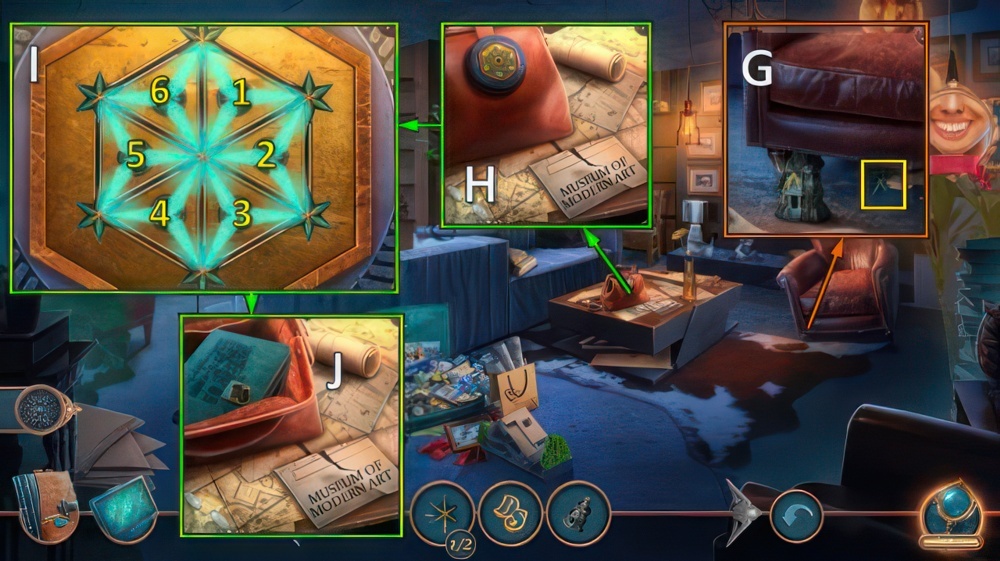
- Place TOWER FIGURINE, take STAR PART 2/2 (G).
- Place STAR PART (H).
- Place the arrows on the parts of the circles that compose the needed circle.
- Walkthrough (I): 1-1-3-2-4-3-5-4-6-6.
- Take DANIEL’S DIARY (J).
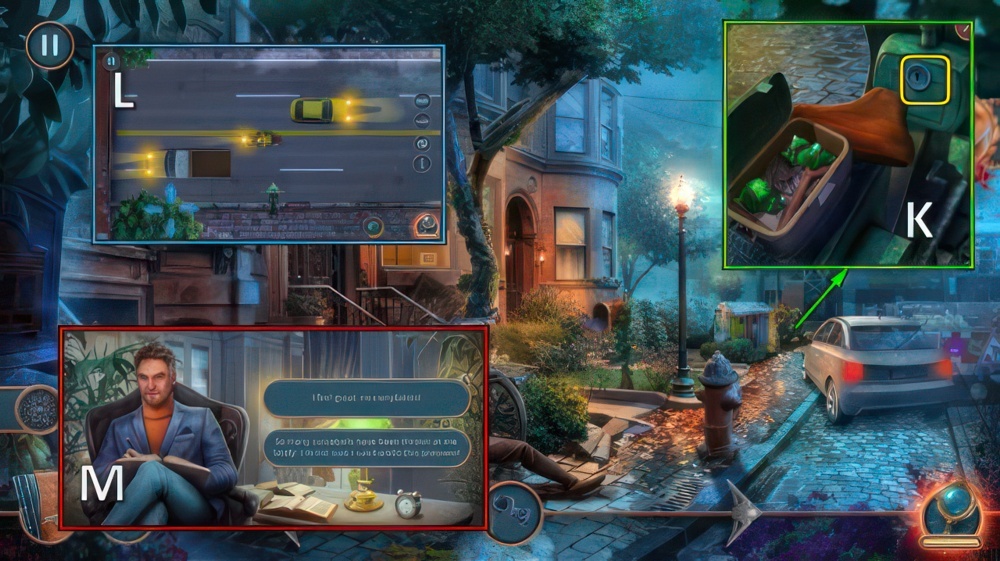
- MONOGRAM on DANIEL’S DIARY, read and receive BIKE KEY.
- Use BIKE KEY (K).
- Cross the road safely (L).
- Select any dialog options (M).
- Receive OUR BAG.

- Take ARROWHEADS 1/2, SPARE PARTS and paper (N).
- PICKLOCK 1/2, FAN and SCREWDRIVER from OUR BAG.
- Place SPARE PARTS and SCREWDRIVER, take IMPROVISED TAPE RECORDER (O).
- Use IMPROVISED TAPE RECORDER for puzzle (P).
- Receive SECURITY DESK KEY.
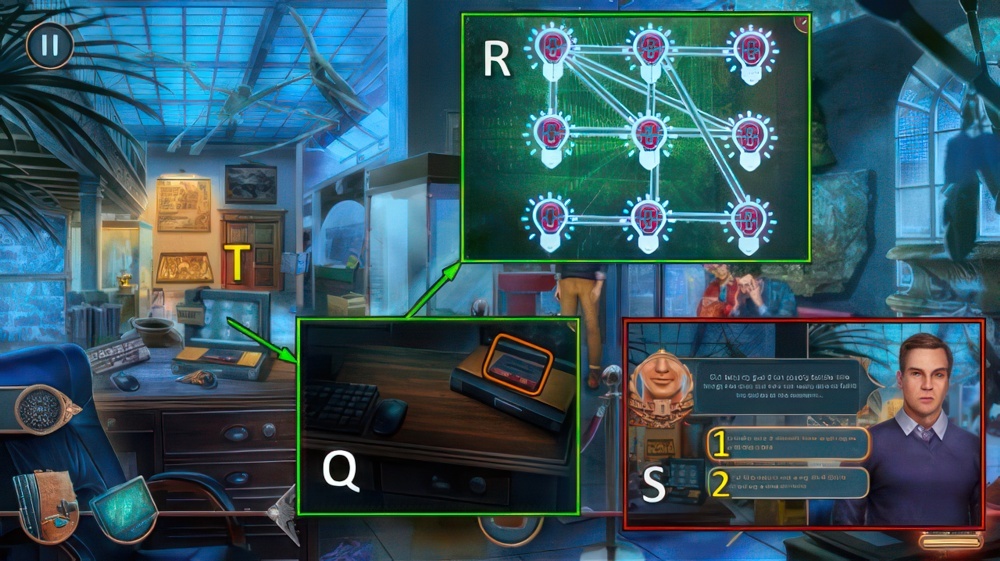
- Place SECURITY DESK KEY (Q).
- Crack the code and gain access to the security control panel to disable the alarm.
- Connect the light bulbs according to the digits on them.
- The number of connections should match the number of bulbs.
- Possible walkthrough (R).
- Select 1 or 2 (S).
- Note: option 1 unlocks a chain.
- Go (T).

- Take FIVE-DOLLAR BILL and PEN (U).
- Use FAN, take SCRAPER (V).
- Go to Street Outside Museum.

- Open, take LIQUID COLLECTING KIT 1/2 and POLICE TAPE (W).
- Use SCRAPER, take HOOK (X).
- Use HOOK (Y).
- Take POWDER BRUSH.
- Use POLICE TAPE, take CANE WITH POLICE TAPE (Z).
- Walk down.
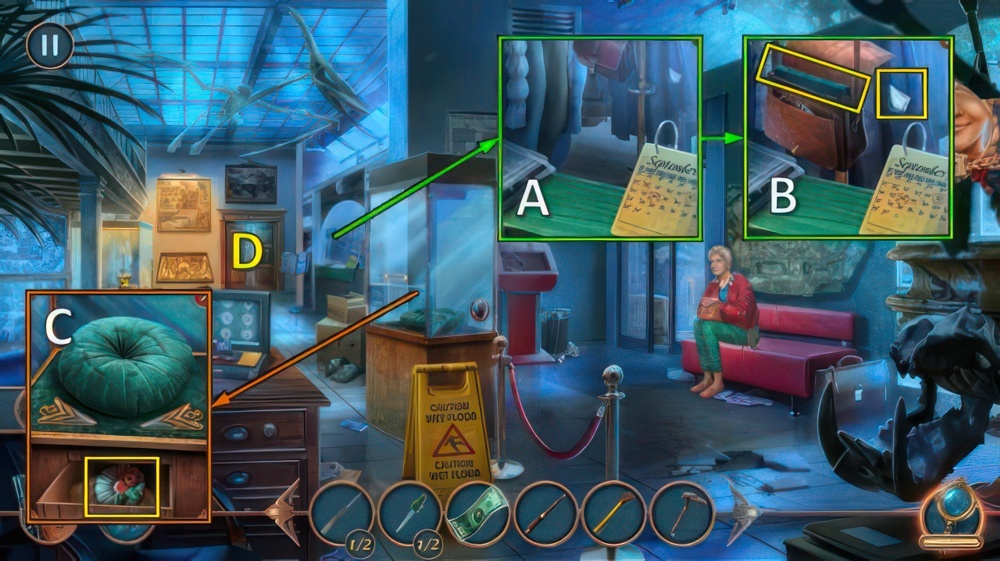
- Use CANE WITH POLICE TAPE (A).
- Open, take book, note and ARROWHEADS 2/2 (B).
- Open, place ARROWHEADS.
- Take SOUVENIR MAGNET (C).
- Go (D).

- Use SOUVENIR MAGNET (E).
- Take SOLDERING IRON (F).
- Use PEN, take LIQUID COLLECTING KIT 2/2 (G).
- Use LIQUID COLLECTING KIT, take COFFEE IN TEST TUBE (H).
- Go to Street Outside Museum.

- Use COFFEE IN TEST TUBE (I).
- Separate the molecules of coffee from the particles of poison.
- To do that, guide the molecule of poison through the maze with the help of the buttons.
- Easy walkthrough (J): L-1-K-2-L-3-K-4.
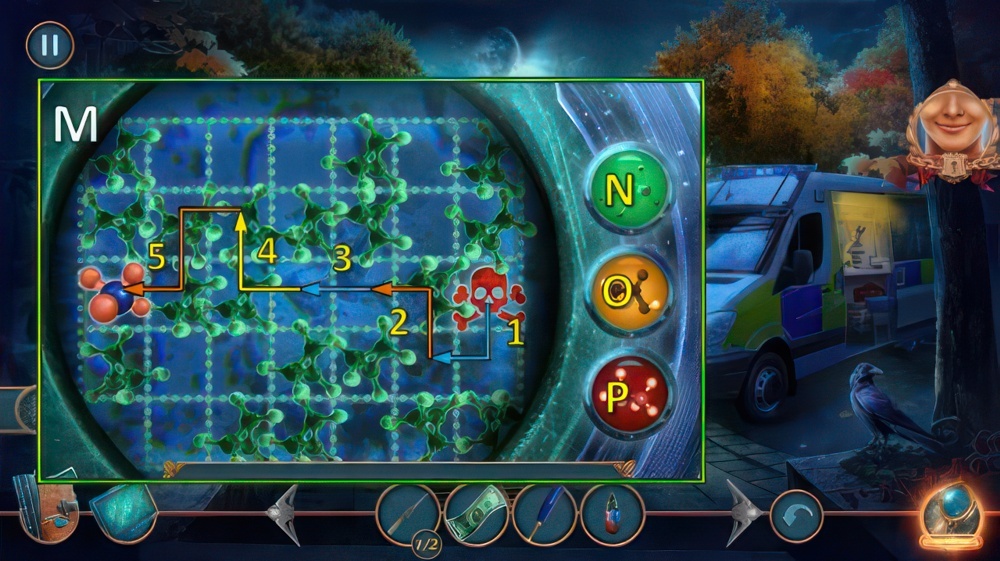
- Hard walkthrough (M): 1-P-2-N-3-O-4-P-5.

- Select 1 or 2 (Q).
- Note: option 1 unlocks a chain.
- Receive WIRE CUTTERS.
- Use WIRE CUTTERS, take SMOKING PIPE (R).
- Walk down.
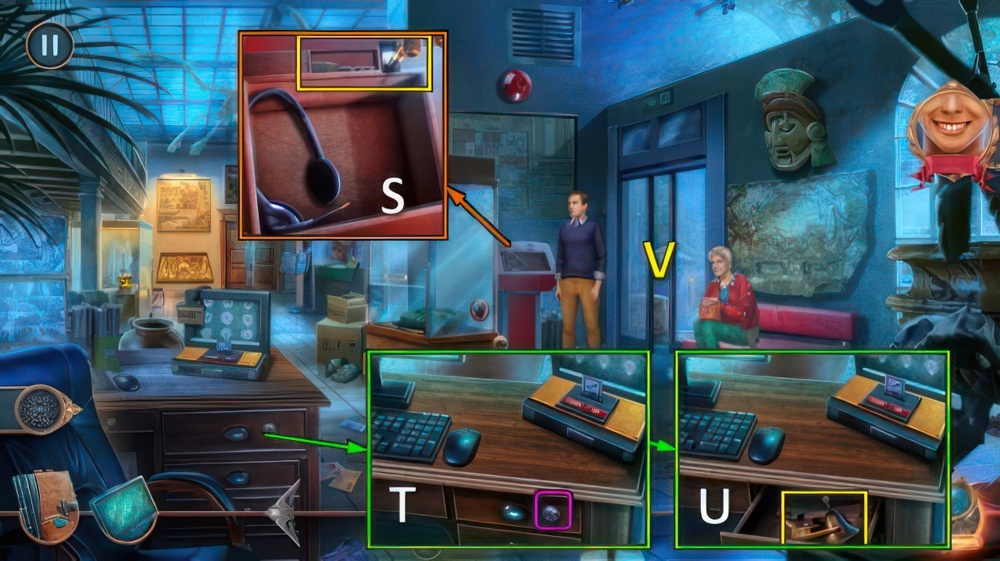
- Place SMOKING PIPE, take PICKLOCK 2/2 (S).
- Use PICKLOCK (T).
- Take BROKEN PENCIL and ENTRANCE ALERT CHIME (U).
- Go (V).
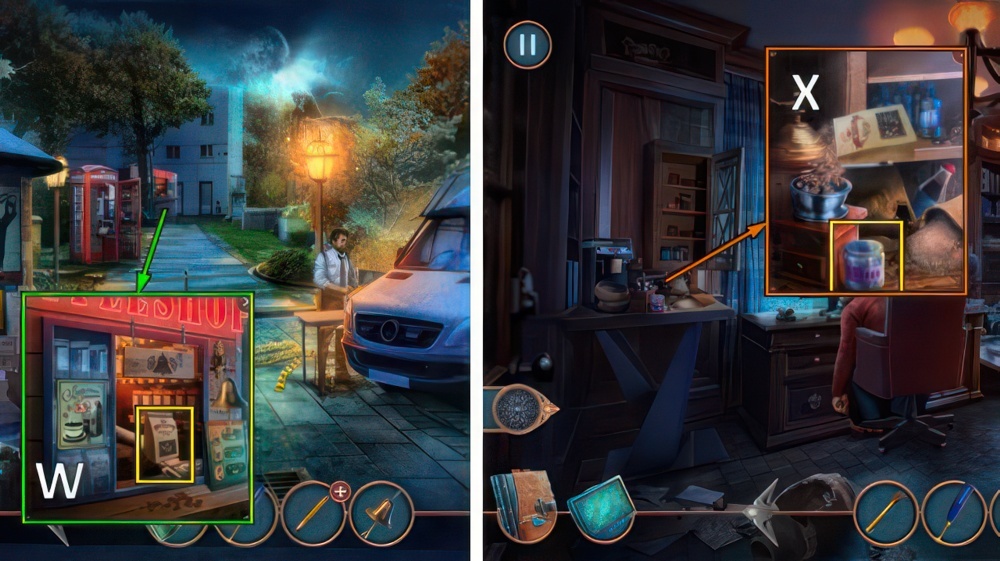
- Use ENTRANCE ALERT CHIME and FIVE-DOLLAR BILL, take GRAIN COFFEE (W).
- Go to Director’s Office.
- Use GRAIN COFFEE, take GROUND COFFEE (X).
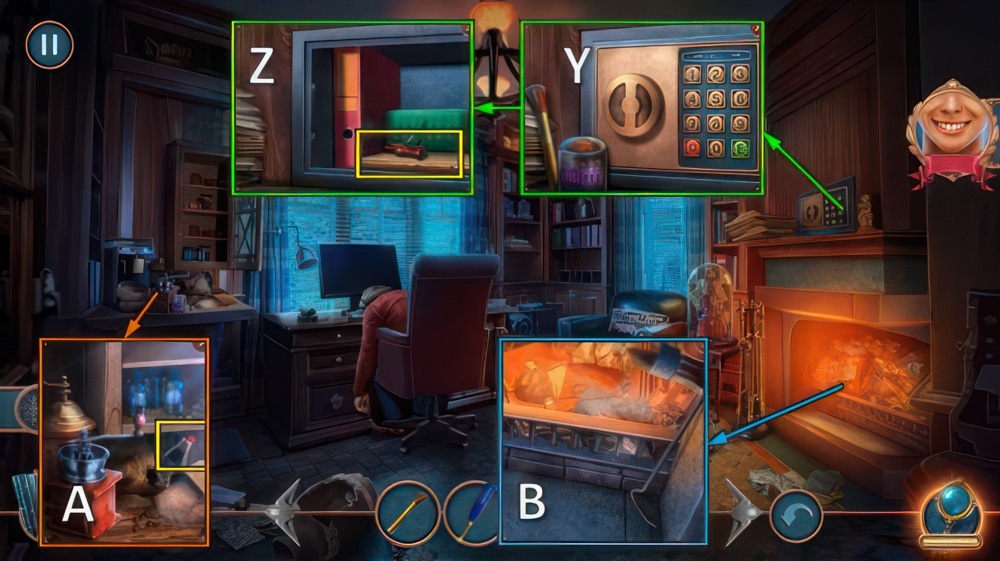
- Place POWDER BRUSH and GROUND COFFEE, enter 2-6-8-1-E (Y).
- Take CORKSCREW and FLAT BOTTLE OPENER (Z).
- Use FLAT BOTTLE OPENER, take SPARKLING WATER (A).
- Use SPARKLING WATER for puzzle (B).
- Receive CHARRED DOCUMENT.

- Take PENCIL SHARPENER (C).
- PENCIL SHARPENER on BROKEN PENCIL, receive PENCIL.
- Take CHEESE-FLAVORED CRISPS.
- Place PENCIL, receive REAGENT FORMULA (D).
- Open, place REAGENT FORMULA.
- Add 1-2-3 to 4.
- Take REAGENTS (E).

- Place REAGENTS and CHARRED DOCUMENT (F).
- Easy walkthrough (G): select 4-2-3-5-4.
- Hard walkthrough (H): select 1-2-1-5-3-4-6-5.

- Walkthrough (I).
- Receive RESTORED DOCUMENT.
- Place RESTORED DOCUMENT, select 1-2-3-4 (J).

- Knock (K).
- Take BROKEN PRUNING SHEARS and NAIL FILE (L).
- Use SOLDERING IRON (M), receive IRON KEY.
- Use IRON KEY (N).
- Go (O).

- Place CHEESE-FLAVORED CRISPS (P), move clover (Q).
- Rotate the elements of the lock to make the latches fit into the appropriate slots.
- The door of the hatch will open once all the latches are placed correctly.
- Click on the flower to check.
- Easy walkthrough (R): Tx12-Ux4-V.
- Hard walkthrough (R): Sx2-Tx6-Ux4-V.

- Take PRUNING SHEARS PART and SLEDGEHAMMER (W).
- Use SLEDGEHAMMER for puzzle (X), receive FIRST AID KIT.
- Use FIRST AID KIT (Y).
- Select 1 or 2 (Z).
- Note: option 1 unlocks a chain.
- Receive INVITATION TO AUCTION.
- Walk down.

- Offer INVITATION TO AUCTION (A).
- Go (B).
- Select 1 or 2 (C).
- If you’ve selected 2, skip the steps marked with # below.

- Take UNLOADED REVOLVER and JUG OF WATER (D).
- Use CORKSCREW, take STAPLE REMOVER (E).
- Use STAPLE REMOVER (F).
- Take PRUNER (G).
- # Go (H).
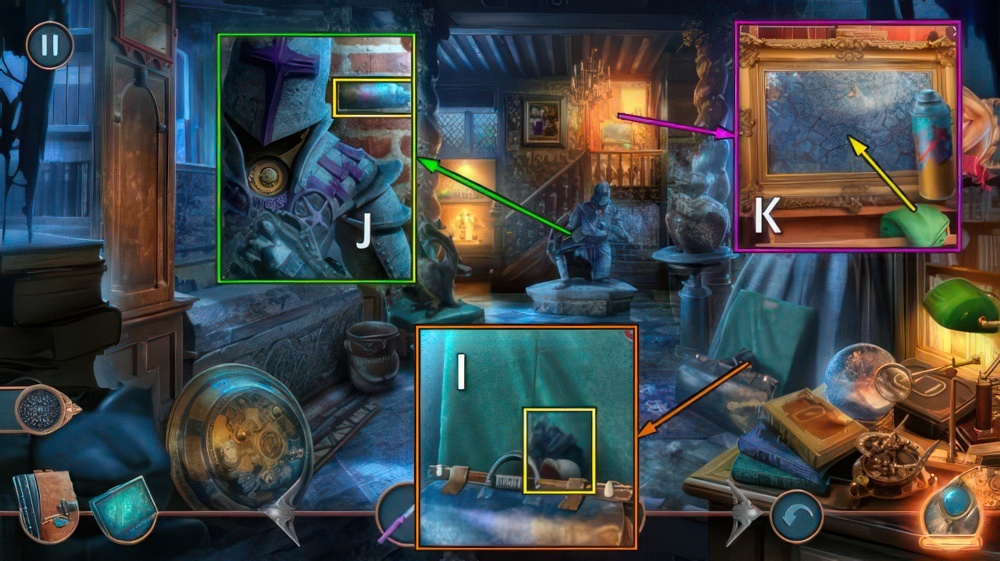
- # Take SEASHELL and DUSTER BRUSH (I).
- # Use DUSTER BRUSH, take CLEANSER (J).
- # Use CLEANSER and rag (K).

- # Enter 1-3-7-2 (L).
- # Take notes, AMULET SHARDS 1/2 and THIRD EYE (M).
- Go to Backyard.

- PRUNING SHEARS PART and PRUNER on BROKEN PRUNING SHEARS, receive PRUNING SHEARS.
- Use PRUNING SHEARS, take GYPSUM ADHESIVE (N).
- # Place THIRD EYE, take AMULET SHARDS 2/2 (O).
- # Use SEASHELL, take GEMSTONES 1/3 (P).
- Use GYPSUM ADHESIVE and JUG OF WATER, use spoon.
- Take GARDEN GNOME (Q).
- Walk down.

- Place GARDEN GNOME (R).
- Arrange the garden gnomes.
- Press the button to check your answer.
- The gnomes you’ve placed correctly will sink a bit deeper into the ground while the eyes of the misplaced ones will go red.
- Walkthrough (S): (1-4)-(2-3)-(4-5)-T.
- Take LOADED SLINGSHOT (U).
- Use LOADED SLINGSHOT (V).
- Take FLEUR-DE-LIS, take METAL FIGURINE with NAIL FILE (W).
- # Go to Storage Room.

- # Place AMULET SHARDS for puzzle (X), receive JADE AMULET.
- # Place JADE AMULET, take GEMSTONES 2/3 and TWEEZERS (Y).
- Go to Auction Hall.
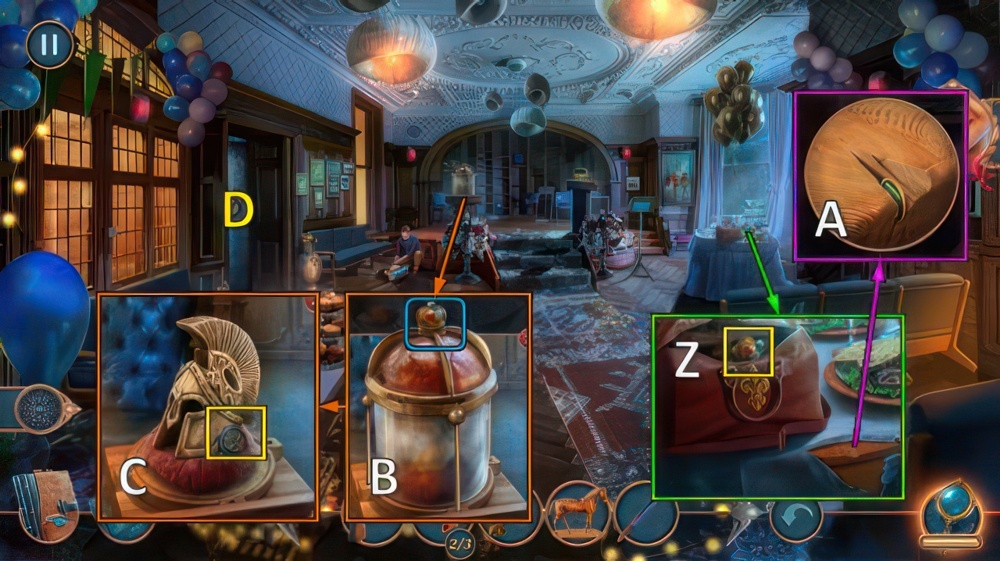
- Place FLEUR-DE-LIS, take IRON CROWN (Z).
- # Take GEMSTONES 3/3 with TWEEZERS (A).
- Place IRON CROWN, remove (B).
- Take MARKED KEY (C).
- # Go (D).
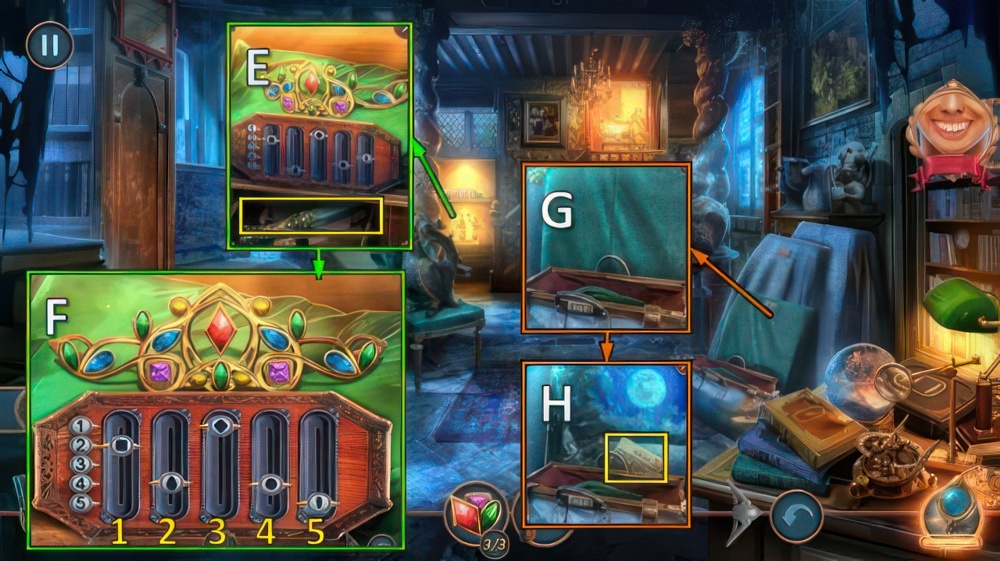
- # Place GEMSTONES (E).
- Count all the gemstones adorning the diadem and enter the code that corresponds to their quantity.
- Easy walkthrough (F).
- Hard walkthrough (F): move 5, 4, 1, and 3 into positions shown.
- # Take PRECIOUS DAGGER (E).
- # Use PRECIOUS DAGGER (G).
- # Take note (H).
- Go to Near Auction House.
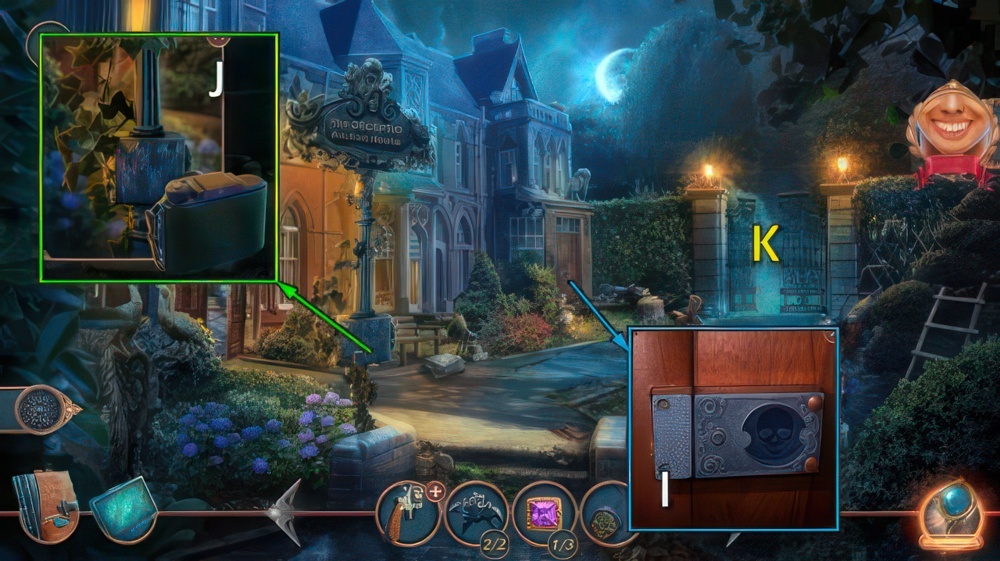
- Use MARKED KEY for puzzle (I), receive VINTAGE POLAROID.
- Use VINTAGE POLAROID, receive PICTURE OF GARGOYLES (J).
- Go (K).
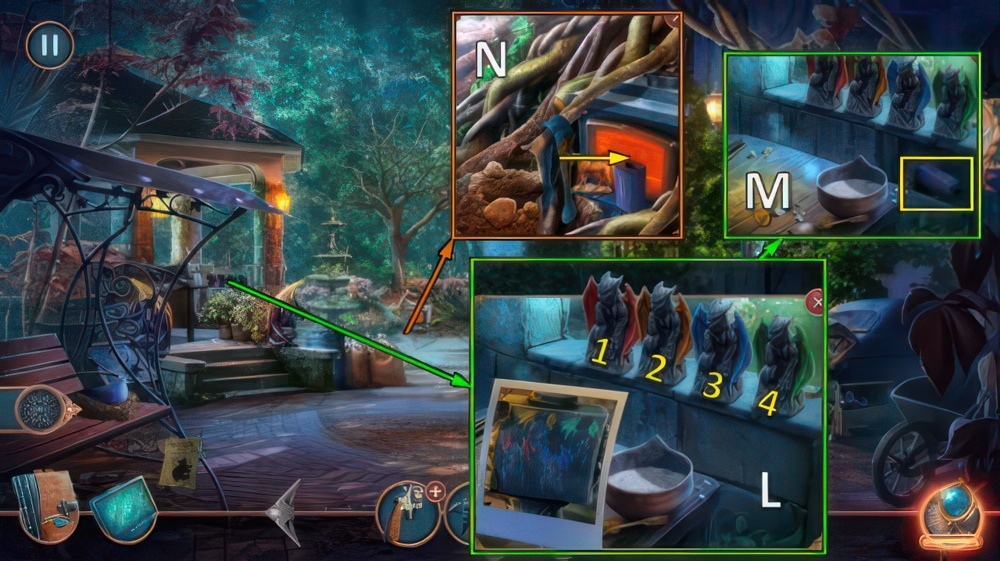
- Place PICTURE OF GARGOYLES (L).
- Walkthrough (L): (4-3)-(3-2)-(2-1)-(4-3)-(3-2).
- Take BULLET MOLD (M).
- Place METAL FIGURINE and BULLET MOLD.
- Use tongs, take CARTRIDGE (N).
- Go to Auction Hall.

- CARTRIDGE on UNLOADED REVOLVER, receive REVOLVER.
- Use REVOLVER (O).
- Replicate the symbols drawn beside Grace to dodge all the bullets.
- Easy walkthrough (P): 2-8-4-3-7-5, 5-4-6-3-7-2-8, 5-8-7-3-4-1-6.
- Hard walkthrough (P): 2-3-5-8-4-1-7, 6-2-4-8-7-5-3, 1-7-5-3-8-4-6.
- Select any dialog (Q).
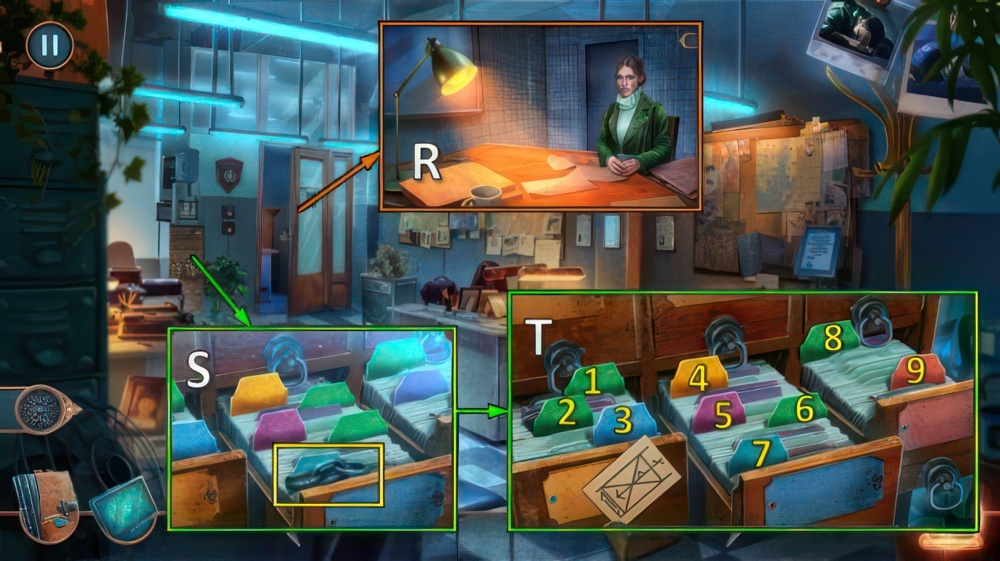
- Talk (R), receive ENVELOPE.
- SYMBOL and LETTER from ENVELOPE.
- Take CHAIN, place SYMBOL (S).
- Easy walkthrough (T): (2-6)-(3-9)-(4-8).

- Hard walkthrough (U): (2-7)-(3-11)-(4-9).
- Take FOLDER (V).
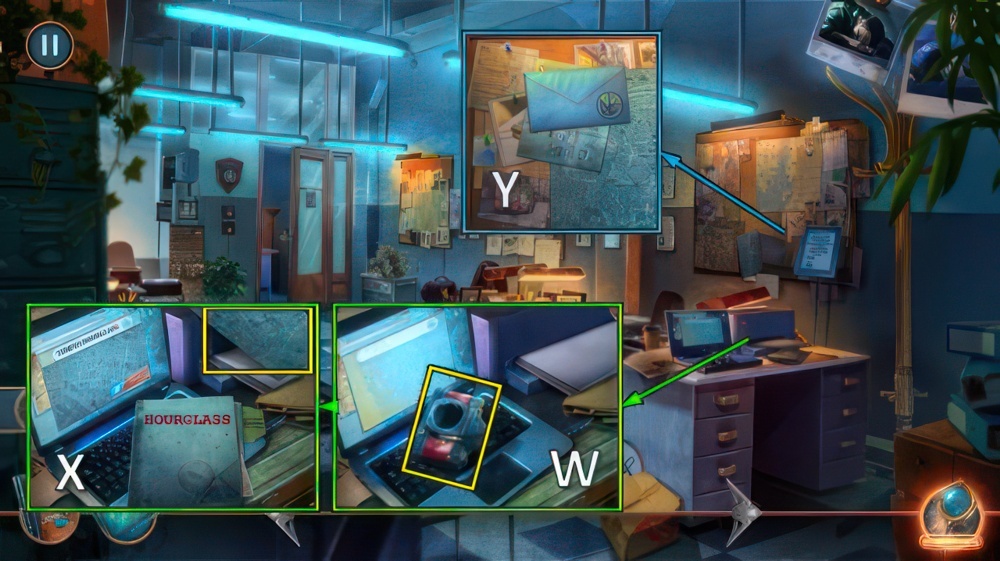
- Take CAMERA (W).
- Place FOLDER.
- Print, take MAP (X).
- Place MAP and LETTER for puzzle (Y), receive CALENDAR.
- Take LOCKPICKS 1/2 and CORKSCREW.

- Place CALENDAR, take POSTER (Z).
- Select 1 or 2 (A).
- Note: option 1 unlocks a chain.
- Offer POSTER (B).
- Go (C).
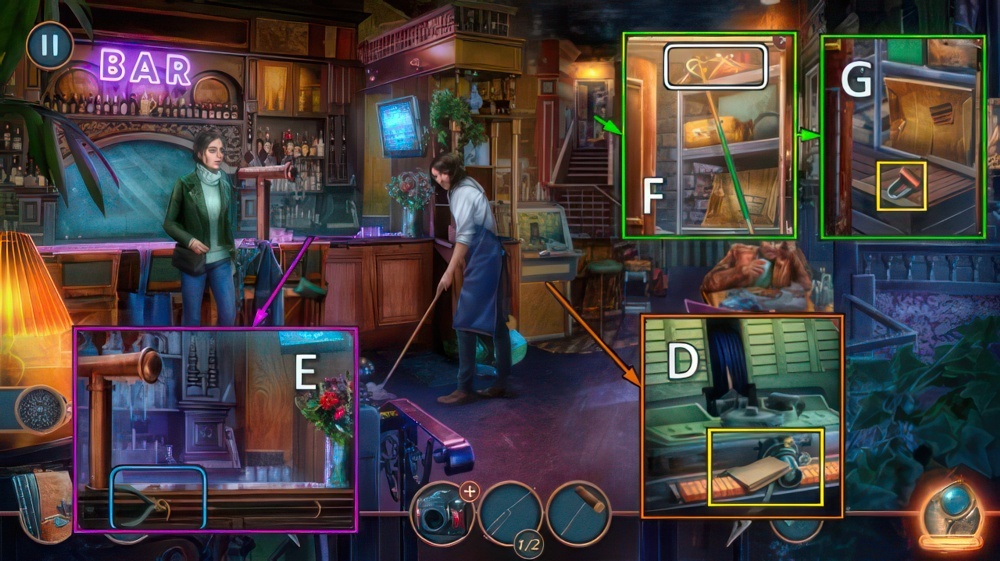
- Take note, LENS and WIRE CUTTERS (D).
- Take CUE with WIRE CUTTERS (E).
- Use CUE (F).
- Take LOCK (G).
- Walk down.

- Place CHAIN and LOCK, take TWEEZERS and TOOLKIT (H).
- Open, place TOOLKIT (I).
- Activate all the indicators by placing clips on them in such a way that there are no wire intersections.
- Easy walkthrough: start (J) – finish (K).
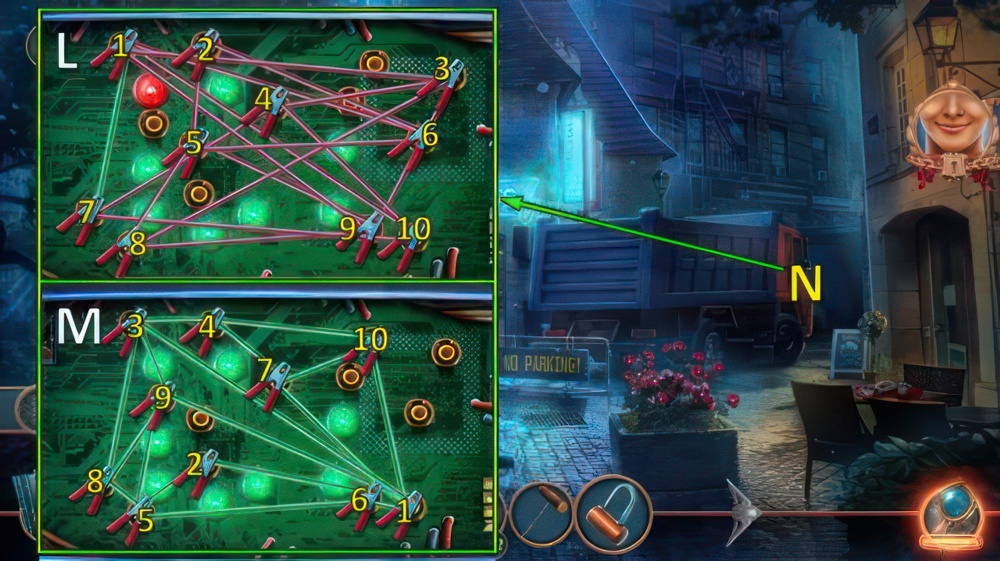
- Hard walkthrough: start (L) – finish (M).
- Go (N).
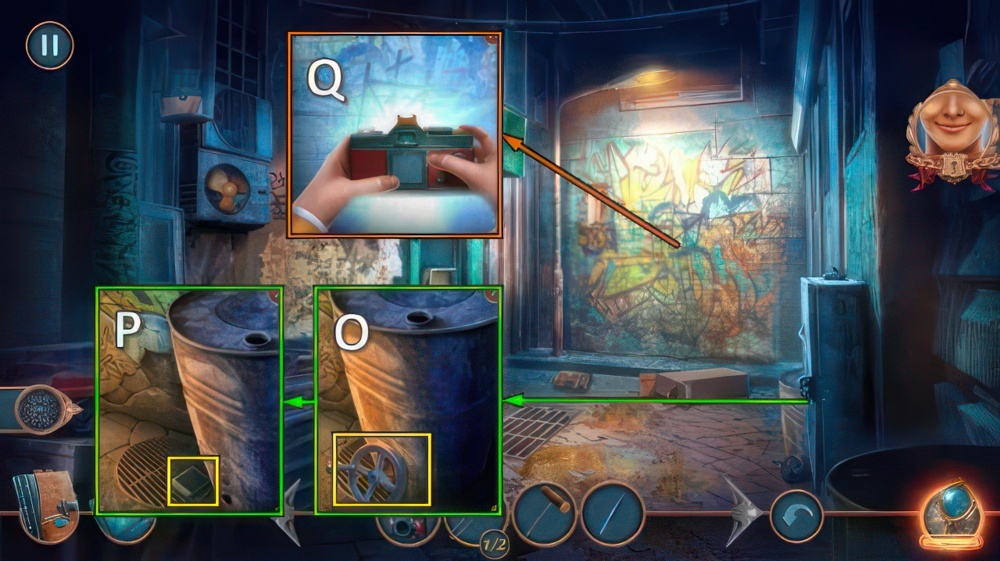
- Take DOOR HANDWHEEL, use CORKSCREW (O).
- Take INSTANT FILM (P).
- LENS and INSTANT FILM on CAMERA, receive CAMERA WITH INSTANT FILM.
- Use CAMERA WITH INSTANT FILM (Q), receive PHOTO.
- Go to Hourglass Bar.
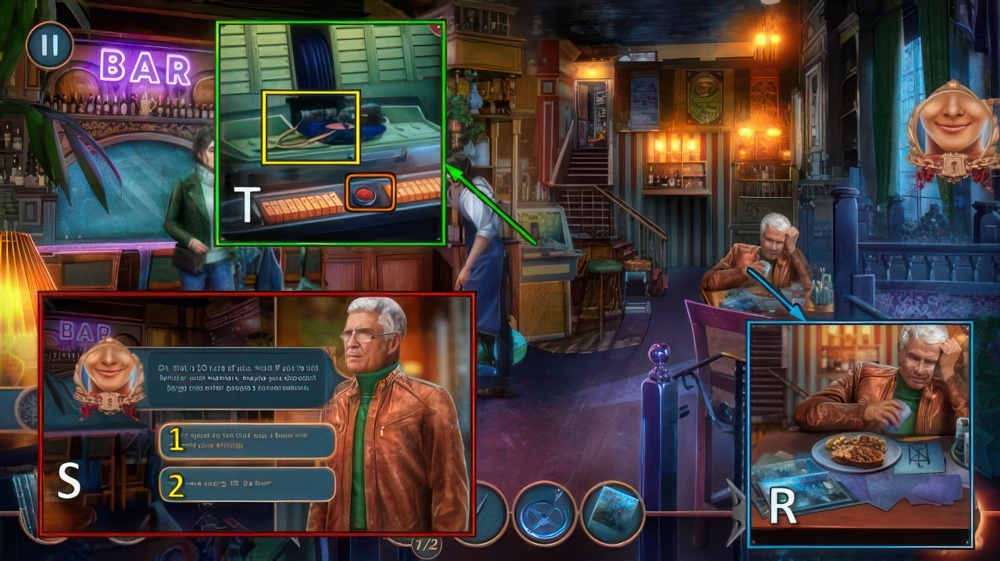
- Offer PHOTO for puzzle (R).
- Select 1 or 2 (S).
- Note: option 1 unlocks a chain.
- Receive VOLUME BUTTON.
- Place and press VOLUME BUTTON, take HANDLE (T).
- Go to Alley.

- Place HANDLE, take PENKNIFE.
- Take COIN with TWEEZERS (U).
- Walk down.
- Use COIN (V).

- Make all the blue balls turn green by sliding the coin over them.
- Use the arrows to move the coin.
- Mind that the golden disks with grooves rotate every time the coin moves.
- Easy walkthrough (W): Z-A-Xx2-Z-X-Y-Z-Yx2-Z-Y-X-A-X-A-Z-Yx2-Z-A-X-Ax2-Zx2-X-A.
- Hard walkthrough (W): Z-A-Y-Z-X-Yx2-Z-X-Y-X-A-Y-Zx2-X-Y-X-Ax2-X-Y-Z-Y-Z-A-X-Ax2-X-Ax2-Z.
- Take note and KEY FOB (B).
- Go (C).

- Take LOCKPICKS 2/2 with KEY FOB (D).
- Use LOCKPICKS (E).
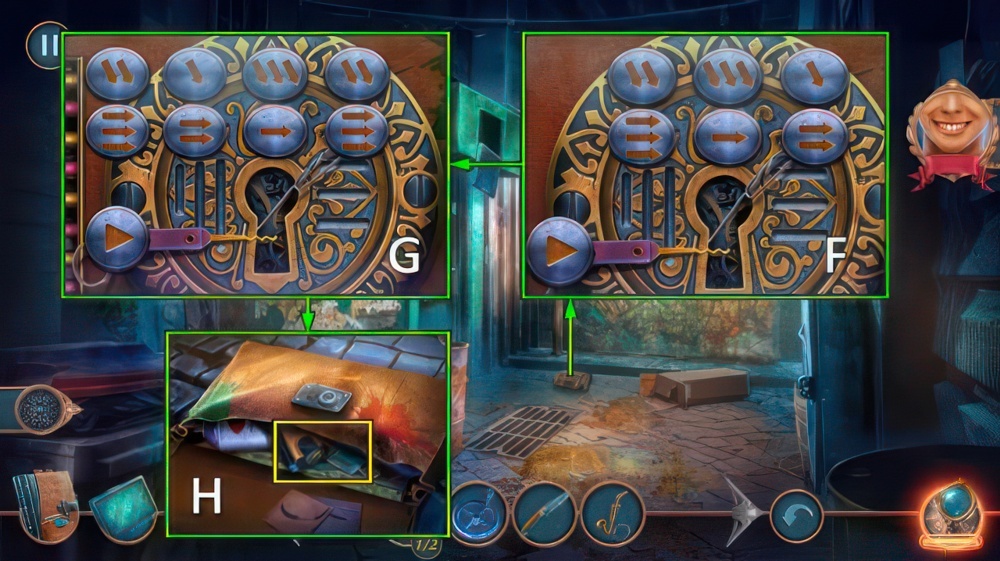
- Set the right combination of moves for the lockpicks to make to lower all the pegs of the lock.
- Press the PLAY button to check your combination.
- Easy walkthrough (F).
- Hard walkthrough (G).
- Take DISCHARGED TASER and EARL’S ID (H).
- Go to Hourglass Bar.

- Show EARL’S ID (I).
- Break free (J).
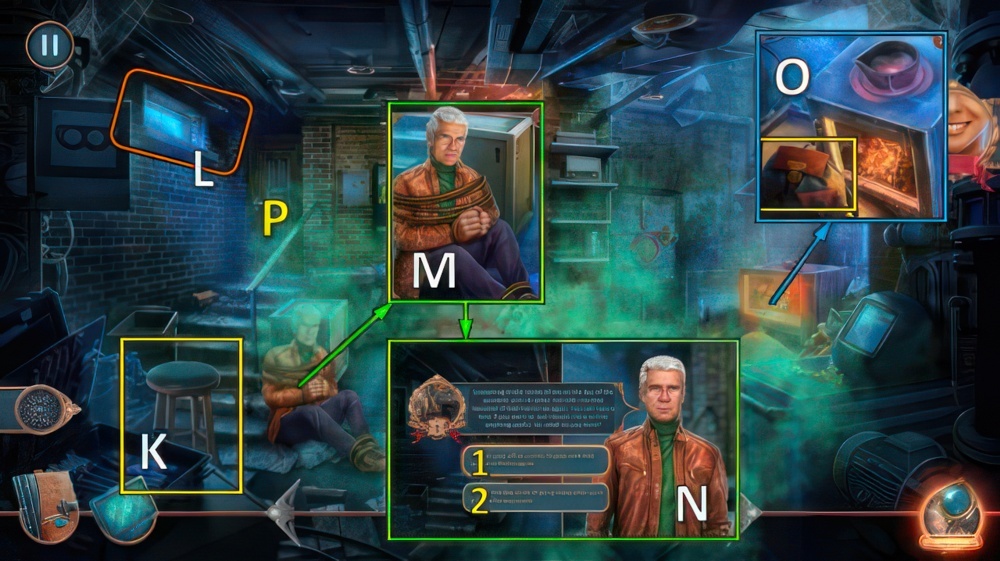
- Take STOOL (K).
- Use STOOL (L).
- Untie (M), receive ROPE.
- Select 1 or 2 (N).
- If you’ve selected 2, skip the steps marked with # below.
- Take BAG (O).
- # Go (P).

- # Take FRAME PATTERN 1/2 and GLUE (Q).
- # Use GLUE, take MASK (R).
- # Place MASK (S).

- # Put the masks in their places.
- # Easy walkthrough (T): 3-4-5-2-6-1.
- # Hard walkthrough (U): 8-6-4-5-7-2-3-1.
- # Take SKULL AMULET (V).
- # Walk down.
- Take note and HINT (W).
- # Place SKULL AMULET, take FLASHLIGHT (X).
- DISCHARGED TASER, DOOR HANDWHEEL and PENKNIFE from BAG.
- Place DOOR HANDWHEEL and HINT (Y).
- Set the spinners so that the circles have the correct number of symbols, as shown in the hint.
- Walkthrough (Z).
- Go (A).
- Select 1 or 2 (B).
- Note: option 1 unlocks a chain.
- Take note, VALCODER 1/2, PLASTICINE and BATTERIES (C).
- BATTERIES on DISCHARGED TASER, receive SHOCKER.
- Take note, use SHOCKER for puzzle (D).
- Receive GEAR.
- Place GEAR (E).
- Go (F).

- Take PUMP and WOODEN PYRAMID (G).
- Use PENKNIFE, take EMPTY PAINT CAN (H).
- Place EMPTY PAINT CAN (I).
- Take WRENCH and VALCODER 2/2 (J).

- # Use FLASHLIGHT, take MAGNET (K).
- Make AMULET MOLD with PLASTICINE (L).
- Walk down twice.
- Use WRENCH, take SAW and TONGS (M).
- Use TONGS, take HANGER (N).
- # Go (O).

- # Use MAGNET for puzzle (P), receive HACKSAW.
- # Use HACKSAW, take SMALL KEY (Q).
- # Walk down.
- # Use SMALL KEY, take FRAME PATTERN 2/2 (R).
- # Go (S).
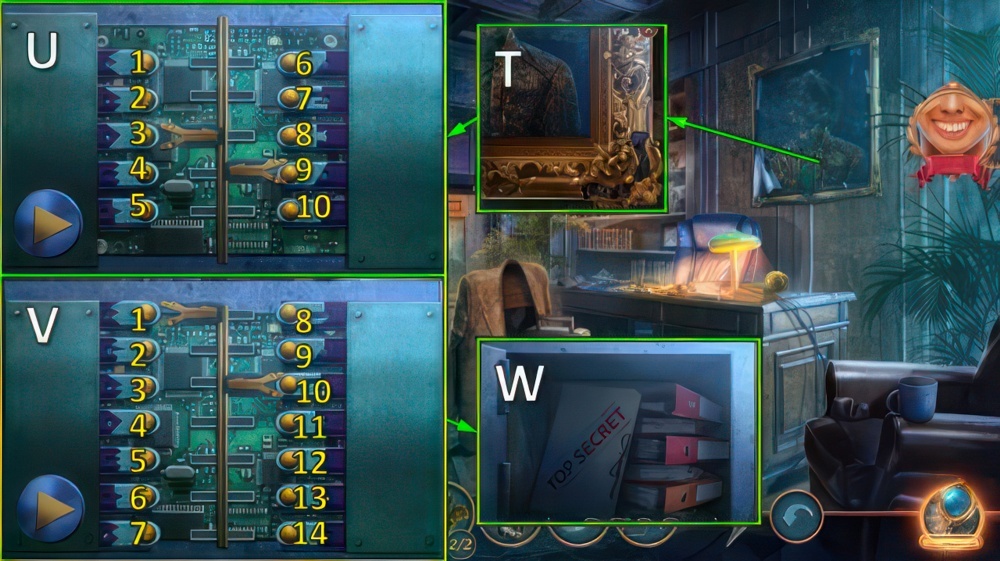
- # Place FRAME PATTERN (T).
- # Place all the fragments in the central part so that after activation they are connected to the fragments along the walls.
- # Easy walkthrough (U): (3-6)-(1-6)-(2-6)-(3-6)-(4-7)-(4-6)-(5-9)-(5-7)-(4-8)-(4-10)-(4-9).
- # Hard walkthrough (V): (7-14)-(1-14)-(7-8)-(4-10)-(2-10)-(4-8)-(3-14).
- # (4-14)-(7-10) -(5-12)-(5-10)-(5-14)-(5-11)-(5-13)-(6-12)-(5-12).
- # Take notes (W).
- Go to Factory Hall.

- Turn HANGER into METAL HANGER.
- Place VALCODER and METAL HANGER (X).
- Turn everything into the correct position.
- Easy walkthrough (Y): A-Z-Bx5.
- Hard walkthrough (C): Ex11-Dx2-Gx5.

- Use ROPE (H).
- Take note, BOMB INSTRUCTION and SCREW (I).
- Place SAW and SCREW, push button.
- Take note, LIGHTER and HOSE (J).
- Go (K).

- HOSE on PUMP.
- Place PUMP, take PLANK (L).
- Place WOODEN PYRAMID and PLANK for puzzle (M), receive VALVE.
- Place VALVE, take COMB (N).
- Walk down twice.
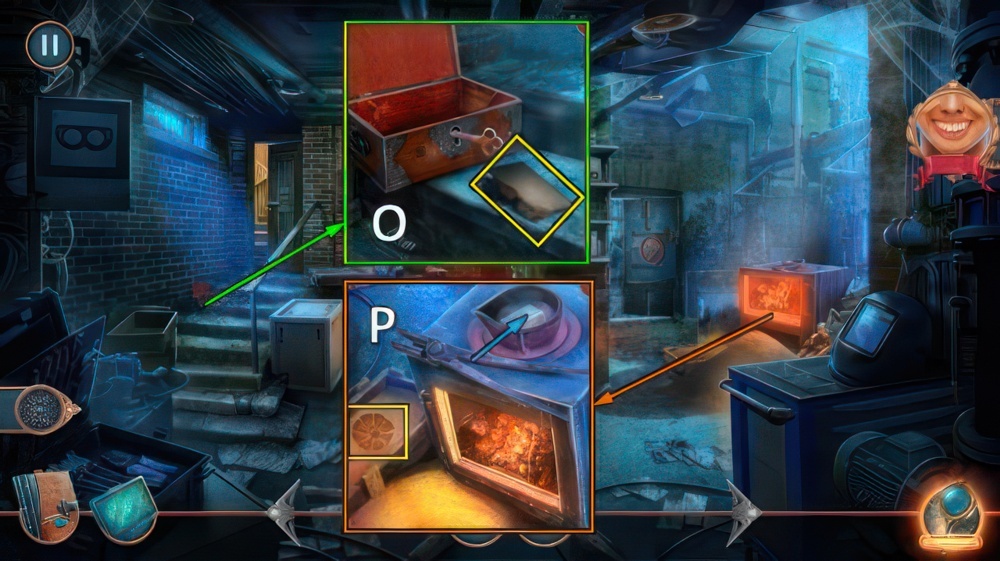
- Use COMB, take note and IRON BAR (O).
- Use AMULET MOLD and IRON BAR, use tongs.
- Take STAR (P).
- Go to Abandoned Area.

- Place STAR, take PEGS (Q).
- Take note, place PEGS (R).
- Walk across the field without getting caught in the working traps.
- When you get caught in a working trap, you have to start over.
- Easy walkthrough (S).
- Hard walkthrough (T).
- Take LEMON (U).
- Walk down.

- Lighter and LEMON on BOMB INSTRUCTION.
- Place BOMB INSTRUCTION (V).
- Put each symbol into the correct place, with the help of the indicators.
- If the first symbol is not correct, then the other symbols are not correct either.
- Watch the timer.
- Easy walkthrough (W).
- According to the hint, turn off all the toggle switches on the bomb in the correct order.
- Easy walkthrough (X): 2-3-5-7-1.
- Stretch the accidentally cut wire to close the circuit.
- Easy walkthrough (Y): Ax2-B-C-B-Ax2-B-Ax2-B-C.
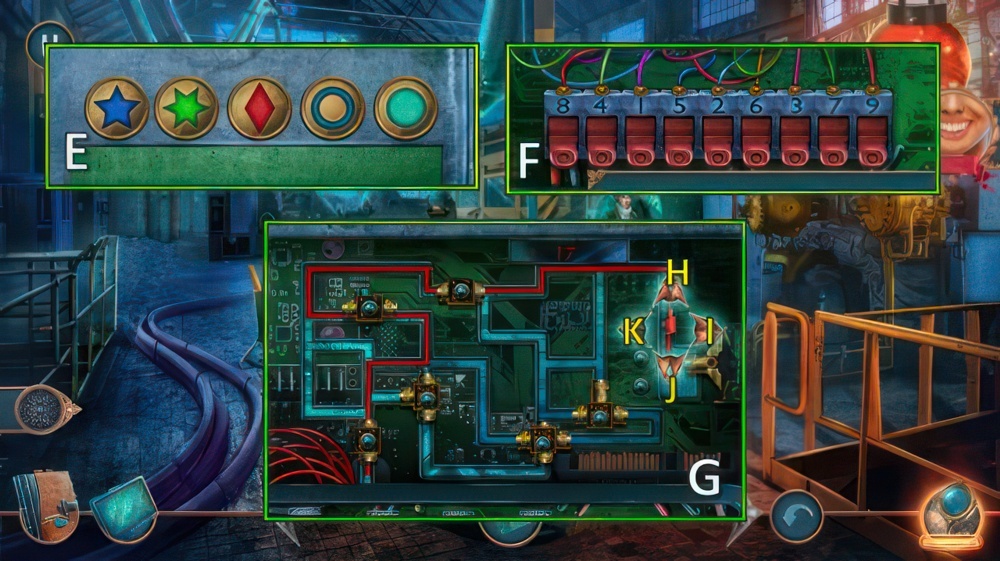
- Hard walkthrough (E).
- Hard walkthrough (F): 3-7-9-1-4.
- Hard walkthrough (G): Hx3-I-H-Kx2-H-I-J-Ix3-H-Ix2-J.
- Walkthrough Bonus Chapter, at the link below.

