Grimwood Secrets 1: Cursed Heirloom – Young witch Mabel Grimwood arrives in Grimhollow with her parents for the traditional family gathering, where witches, vampires, and other magical creatures come together for an ancient ritual. This time, the magical Heart of Unity mask is supposed to choose a new head of the clan, but the celebration turns into a tragedy: Mabel’s grandfather, the powerful wizard Oberon, is murdered, and the town is placed under lockdown until the culprit is found. The prime suspect is Ezra, a monster hunter who had been secretly spying on the Grimwoods. Mabel doesn’t believe he’s guilty and decides to investigate the incident herself. As she examines the crime scene, studies family heirlooms, and questions relatives, she discovers that many had reasons to wish for Oberon’s death. Missing documents, disputes over the inheritance, and the strange behavior of family members suggest that there may be more to the murder than a simple power struggle. The investigation leads Mabel to unusual paintings that conceal entire worlds with their own inhabitants and secret passages. To continue her search for her grandfather’s will, she’ll have to uncover her relatives’ secrets, escape traps, and unravel the stories of those who find themselves trapped on the other side of the frames. Soon, the clues lead the witch to the swamps, home to another branch of the Grimwood family. There, ancient sanctuaries, flooded lands, and new causes for family conflict await her. You’ll need to help Mabel piece together the events of that fateful night, find clues, and figure out which of her relatives she can trust. If you’re stuck on a puzzle or don’t know where to find items, you can check out the walkthrough for Grimwood Secrets 1: Cursed Heirloom on our website to find out who’s really trying to get their hands on the Grimwood inheritance.
Grimwood Secrets 1: Cursed Heirloom – Walkthrough
Here you can see the complete walkthrough for Grimwood Secrets 1: Cursed Heirloom, namely all chapters, including the bonus chapter, in pictures.

- Take BARNABY’S BONE KNIFE and METTING INVITATION, USE BARNABY’S BONE KNIFE on the case (A).
- Play puzzle (B).
- Select this option, earn POCKET MONEY (C).
- Use POCKET MONEY on the store, take GEM (D).
- Use Magic Staff on the pumpkin (E).
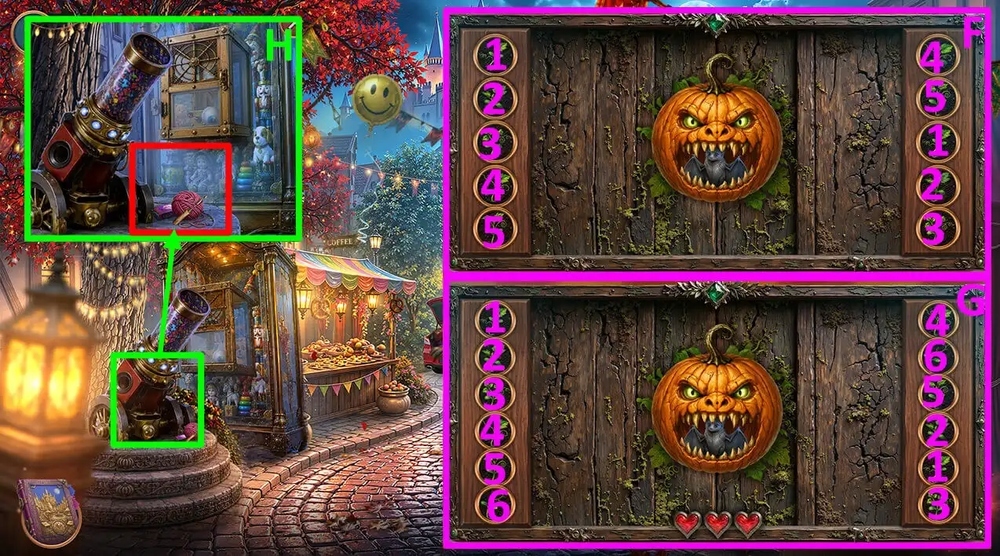
- Easy Solution: click on the buttons as shown in the picture, earn LITTLE BAT (F).
- Hard Solution: click on the buttons as shown in the picture, earn LITTLE BAT (G).
- Take NEEDLES WITH YARN and BUBBLE GUM, use LITTLE BAT on the item, take BIRD SCISSORS (H).
- Go forward.
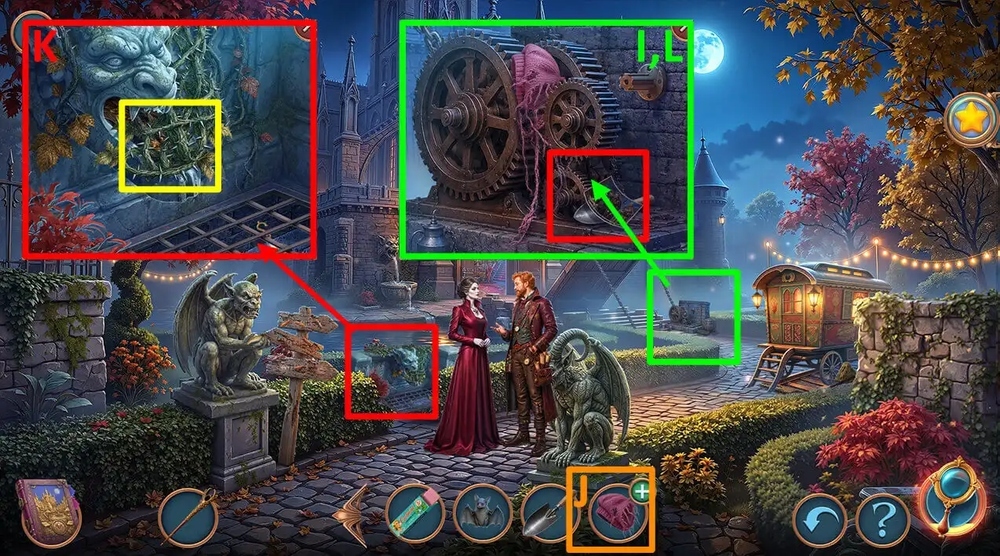
- Take and read the note, take TROWEL, use BIRD SCISSORS on the gears, earn UNFINISHED BERET (I).
- Use NEEDLES WITH YARN on the UNFINISHED BERET, earn KNITTED BERET (J).
- Use KNITTED BERET on the vine, take PHOENIX FEATHER GLOVE and GEAR (K).
- Use GEAR on the pin (L).
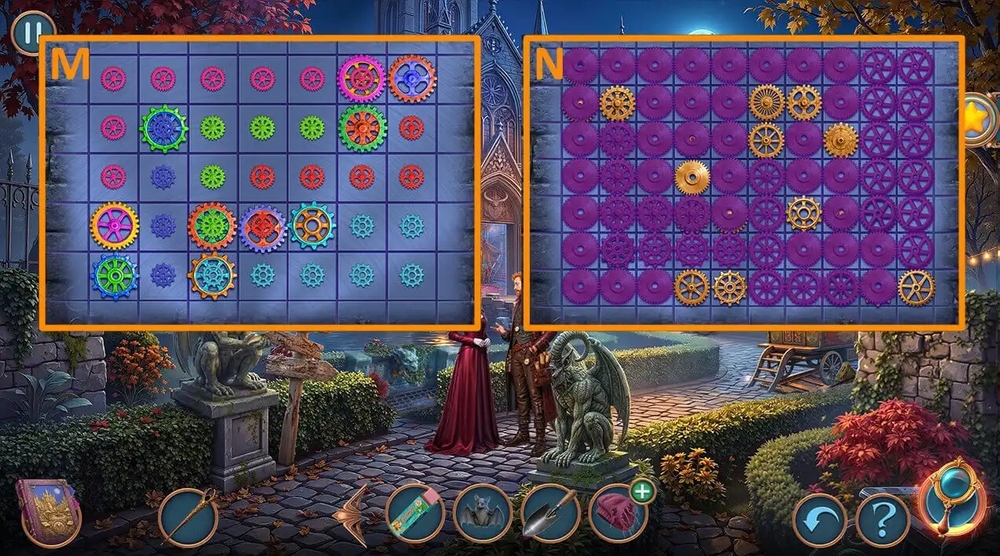
- Easy Solution: lay the paths as shown in the picture (M).
- Hard Solution: lay the paths as shown in the picture (N).
- Go forward.

- Take COFFIN POCKET MIRROR, mapbook, take and read the note, use METTING INVITATION on the table, take SPIDER KNOCKER (O).
- Use SPIDER KNOCKER on the door (P).
- Go forward.
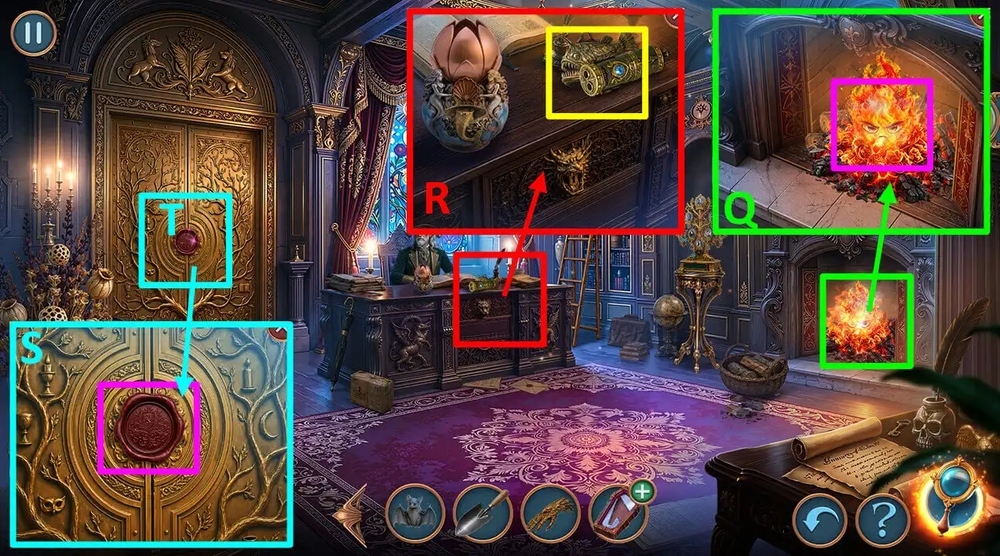
- Use PHOENIX FEATHER GLOVE on the fire, earn HOT SEAL (Q).
- Take TUBE WITH LETTER, STUFFED ANGLERFISH and BONE FINGER ARROWS (R).
- Use HOT SEAL on the wax (S).
- Play puzzle, earn HEART OF UNION (T).
- Go back.
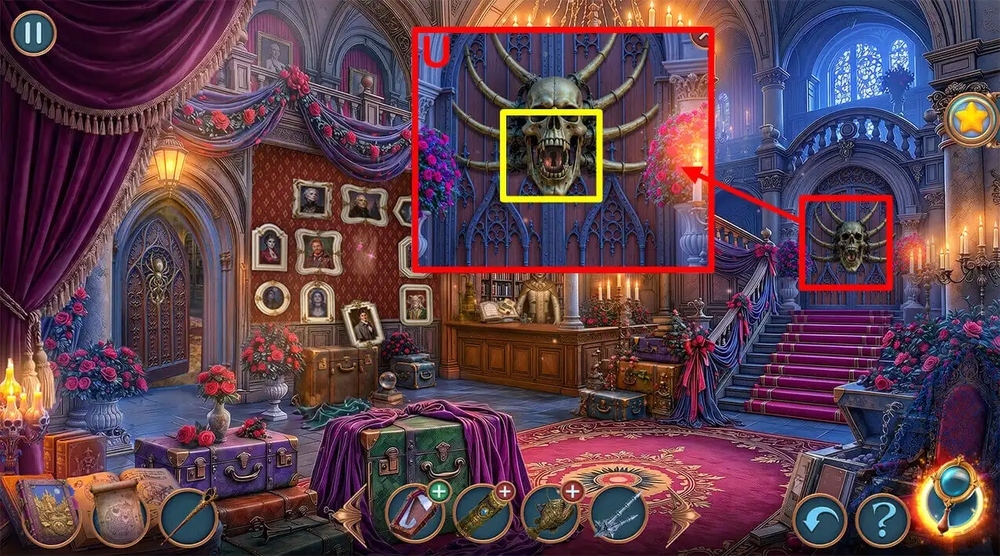
- Use SCELETON KEY TO THE GREAT HALL on the door (U).
- Go to Grand Masquerade Hall.
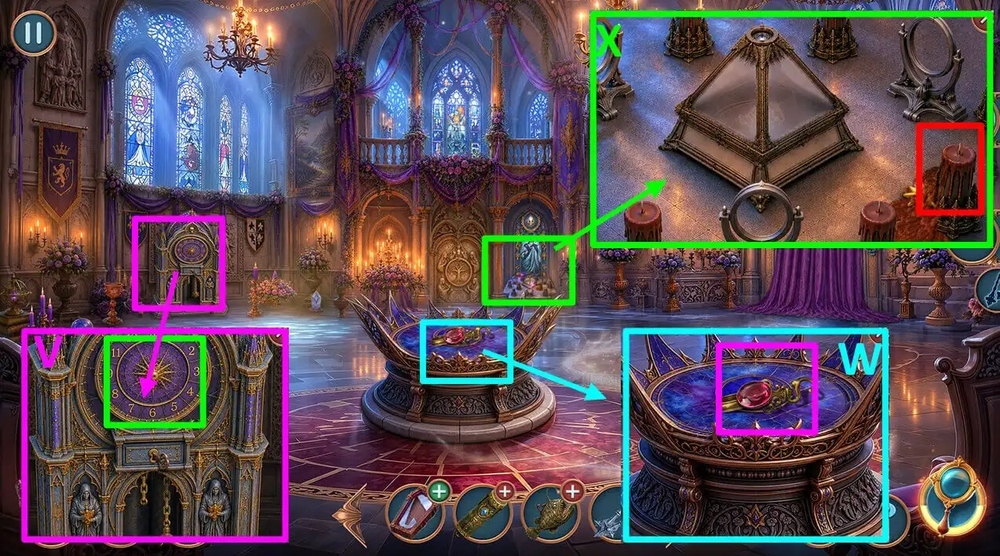
- Use BONE FINGER ARROWS on the clock, earn first evidence (V).
- Take PYRAMID LENSES 1/3, BRASS CLAMP and Magic Gem, use HEART OF UNION on the altar, earn second evidence (W).
- Use Magic Staff on the candles (X).
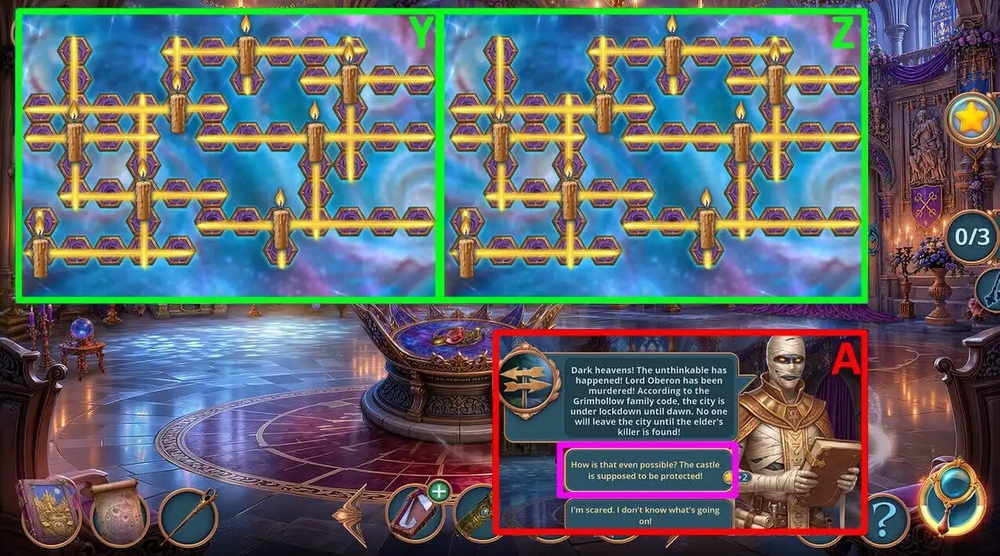
- Easy Solution: arrange the candles as shown in the picture, earn third evidence (Y).
- Hard Solution: arrange the candles as shown in the picture, earn third evidence (Z).
- Select this option (A).
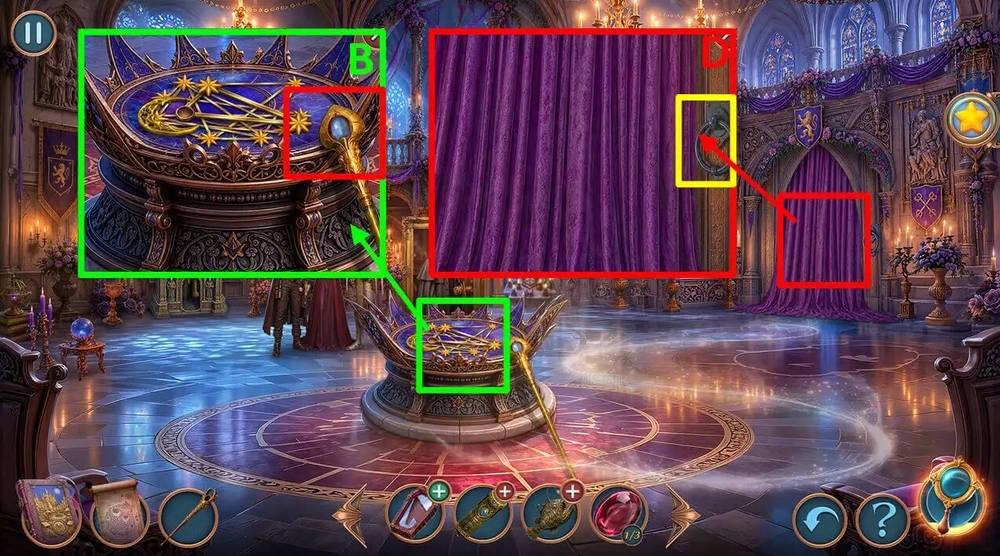
- Take Magic Gem (B).
- Use Magic Staff on the room.
- Use BRASS CLAMP on the ring (D).
- Go forward.

- Take HEART BATTERY (E).
- Use HEART BATTERY on the TUFFED ANGLERFISH, earn LIT ANGLERFISH LANTERN (F).
- Use LIT ANGLERFISH LANTERN on holder (G).
- Play puzzle, earn FLUFFY DUSTER (H).
- Use FLUFFY DUSTER on the spiderweb, take DIAMOND RING (I).

- Take CLOSED SHELL, use DIAMOND RING on the mirror, earn MIRROR SHARD (J).
- Use BUBBLE GUM and MIRROR SHARD on the COFFIN POCKET MIRROR, earn COFFIN MIRROR (K).
- Use COFFIN MIRROR on the gorgon’s head (L).
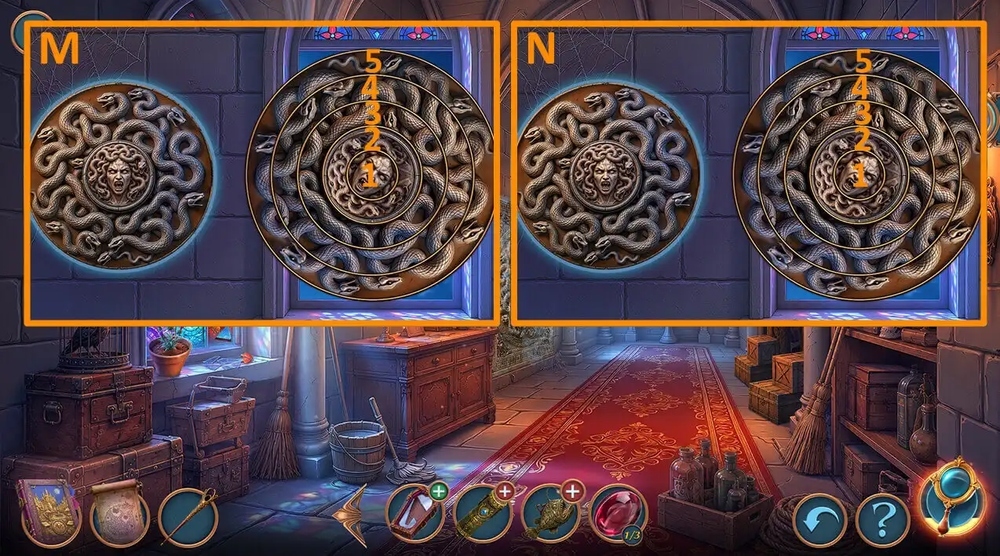
- Easy Solution: press the rings in the following order: 1×7-2×2-3×6-4×5-5×4, take GORGON MEDUSA PLATE (M).
- Hard Solution: press the rings in the following order: 1×7-5×5-4×5-3×1-2×5, take GORGON MEDUSA PLATE (N).
- Go forward.

- Use GORGON MEDUSA PLATE on the scorpion, take POUCH (O).
- Use POUCH and TROWEL on the garbage, take CONFETTI MACHINE BUTTON (P).
- Take SCREW and GLASS EYES 1/2 (Q).
- Go to Grimhollow Main Square.

- Use CONFETTI MACHINE BUTTON on the machine (R).
- Easy Solution: click on the cells in the order as shown in the picture, take JACK IN BOX (S).
- Hard Solution: click on the cells in the order as shown in the picture, take JACK IN BOX (T).
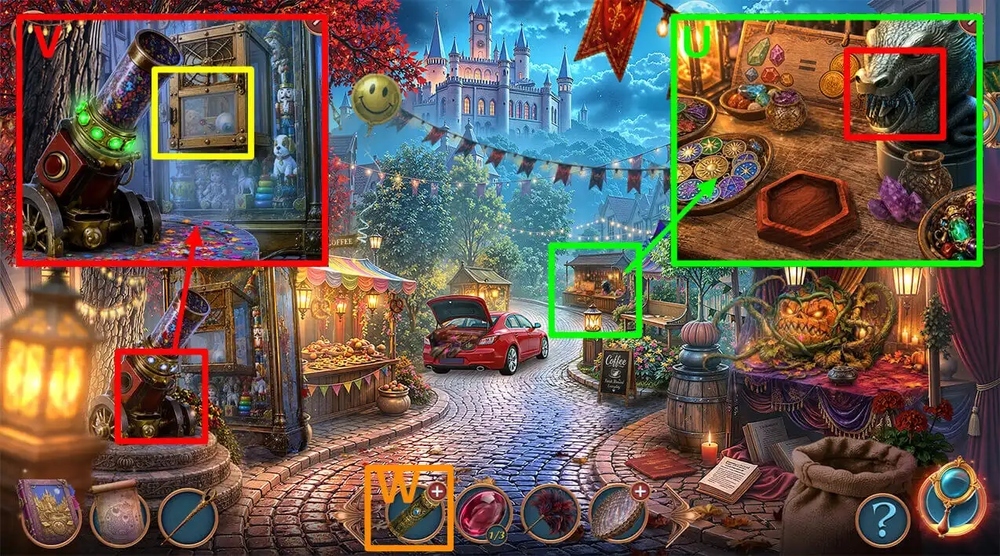
- Use JACK IN BOX on the dragon mouth, take WIND-UP SPIDER (U).
- Use WIND-UP SPIDER on the door, take GLASS EYES 2/2 (V).
- Use GLASS EYES 2/2 on the TUBE WITH LETTER, take OBERON’S LETTER (W).
- Go to Oberon’s Study.

- Use OBERON’S LETTER on the room (X).
- Play puzzle, earn SILVER TRITON (Y).
- Use SILVER TRITON on the vase, take NIMRA’S BRANCH TOKKEN (Z).
- Use NIMRA’S BRANCH TOKKEN on the hook, take MAGIC RED PAINT (A).
- Go to Grimwood Hall Service.

- Use MAGIC RED PAINT on the shards (B).
- Easy solution: arrange the fragments as shown in the picture, take MOON POINTER (C).
- Hard solution: arrange the fragments as shown in the picture, take MOON POINTER (D).
- Use SCREW and MOON POINTER on the pipes, take PORTABLE IRRIGATOR and EMPTY JAR (E).
- Go to Grimwood Castle.

- Use EMPTY JAR on the pointer, earn JAR OF BARK-BORING TERMITES (F).
- Use JAR OF BARK-BORING TERMITES on the wood (G).
- Play puzzle, earn BAND WITH HORNS (H).
- Use AND WITH HORNS on the gargoyle’s head, take FANG AMULET (I).
- Use FANG AMULET on the CLOSED SHELL, earn MOTHER PEARL and OPEN SHELL (J).
- Go to Grand Masquerade Hall.
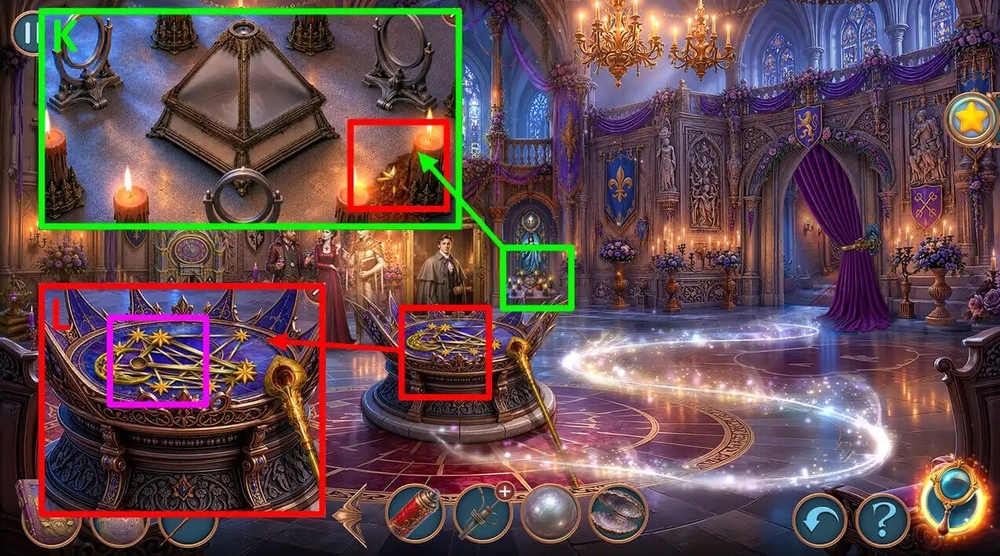
- Use OPEN SHELL on the wax, earn GOLD STAR (K).
- Use GOLD STAR on the empty slot (L).

- Easy Solution: arrange the stars as shown in the picture, take BOWL OF OIL (M).
- HARD Solution: arrange the stars as shown in the picture, take BOWL OF OIL (N).
- Use BOWL OF OIL on the key, take FLAGPOLE HANDLE (O).
- Go to Gallery and Castle Roof.
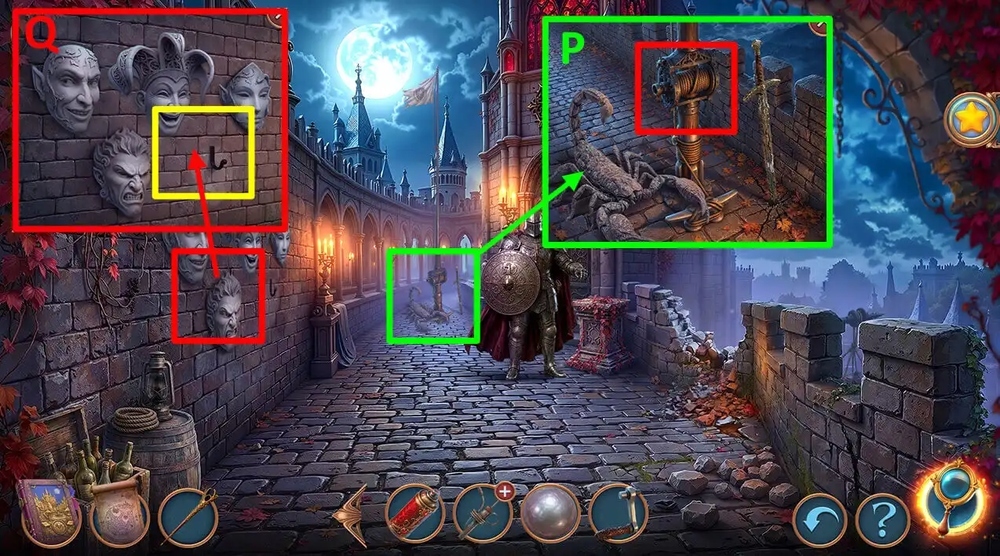
- Use FLAGPOLE HANDLE on the mechanism, take SAD MASK (P).
- Use SAD MASK on the hook (Q).

- Easy Solution: place the masks as shown in the picture, take IRON PEN (R).
- Hard Solution: place the masks as shown in the picture, take IRON PEN (S).
- Use IRON PEN on the hole, take METAL FLOWER (T).
- Go to Grandfater Oberon’s.

- Use METAL FLOWER on the hook, take Magic Gem (U).
- Use Magic Staff on the fire, take GOLDEN KEY (V).
- Use GOLDEN KEY on the lock, take and read the note, take SEPTUM RING and PYRAMID LENSES 2/3 (W).
- Go to Grimwood Castle.

- Play puzzle, earn MONOCLE CHAIN WITHOUT LENS (X).
- Use MONOCLE CHAIN WITHOUT LENS on the grid, earn CLOCK WEIGHT ON HOOK (Y).
- Go to Grand Masquerade Hall.

- Use CLOCK WEIGHT ON HOOK on the chain, take PYRAMID LENSES 3/3 (Z).
- Use PYRAMID LENSES 3/3 and MOTHER PEARL on the PYRAMID, take BELT WITH GOLD BUCKLE (A).
- Go forward.
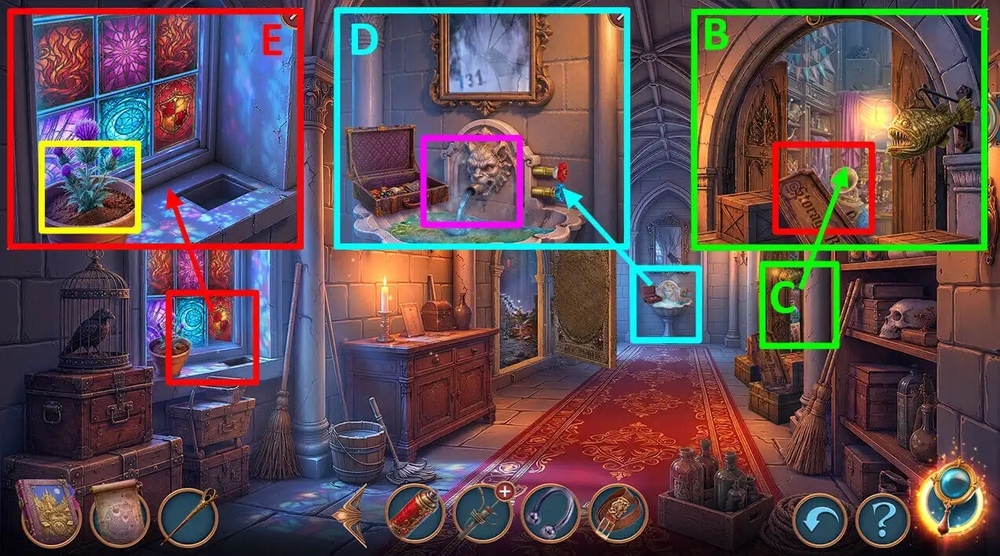
- Use BELT WITH GOLD BUCKLE on the storage (B).
- Play puzzle, earn BATH BOMB (C).
- Use BATH BOMB on the water, take BRASS SPOON (D).
- Use BRASS SPOON on the ground, take NAIL (E).
- Go to Grimwood Grand Hall.

- Use NAIL on the wall (F).
- Easy Solution: click on the portraits in the order shown in the picture, take RAVEN CANE and PRINTING ON BLOTTING PAPER (G).
- Hard Solution: click on the portraits in the order shown in the picture, take RAVEN CANE and PRINTING ON BLOTTING PAPER (H).
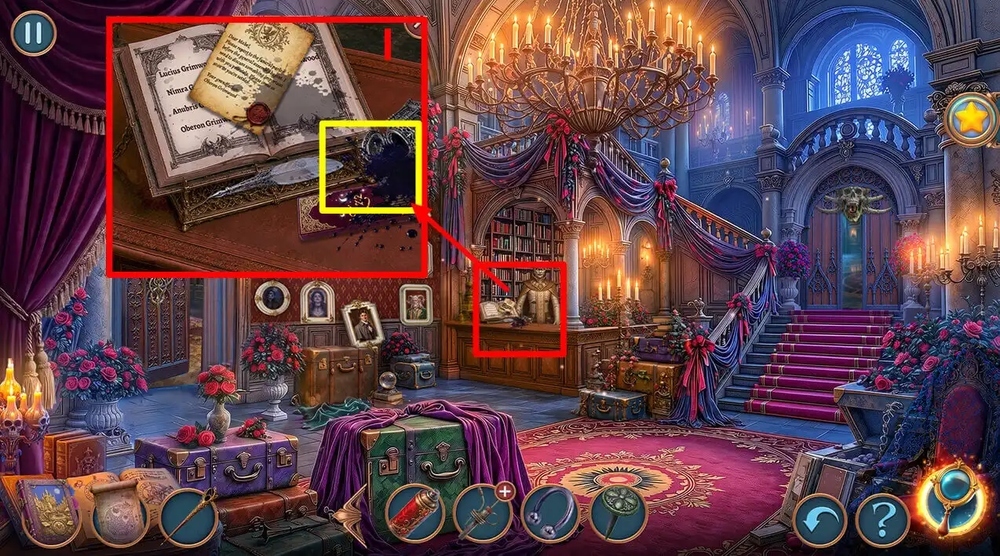
- Use PRINTING ON BLOTTING PAPER on the ink, take SOOTHING INCENSE (I).
- Go to Grimhollow Main Square.
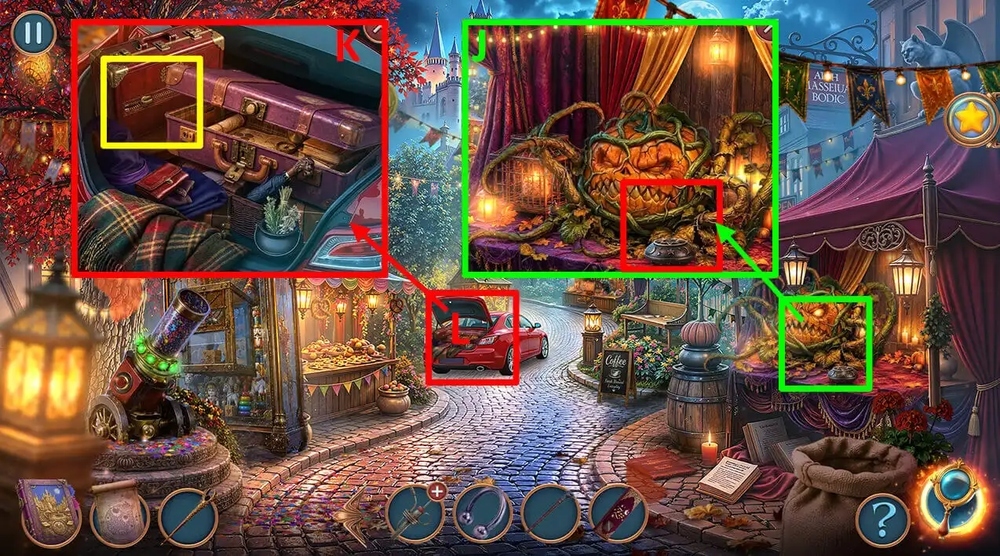
- Use SOOTHING INCENSE on the pumpkin, take CHAINMAIL GLOVE, JAR LID and MABEL’S AMULET KEY CHAIN (J).
- Use MABEL’S AMULET KEY CHAIN on the bag (K).
- Play puzzle, earn FEATHER (L).
- Go to Gallery and Castle Roof.
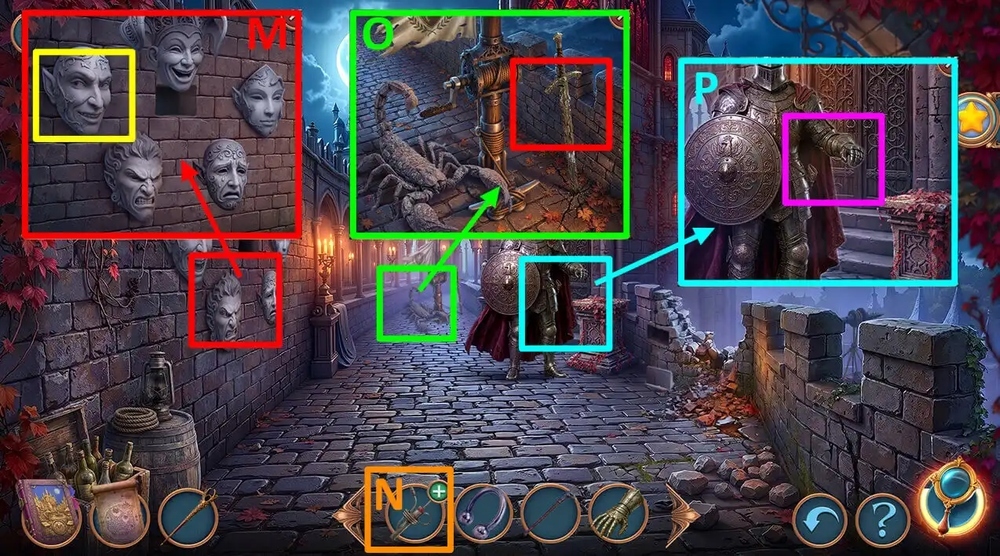
- Use FEATHER on the mask, take WEREWOLF WASH (M).
- Use WEREWOLF WASH on the PORTABLE IRRIGATOR, earn CHARGED IRRIGATOR (N).
- Use CHARGED IRRIGATOR on the sword, take CLEAN SWORD (O).
- Use CLEAN SWORD on the knight (P).

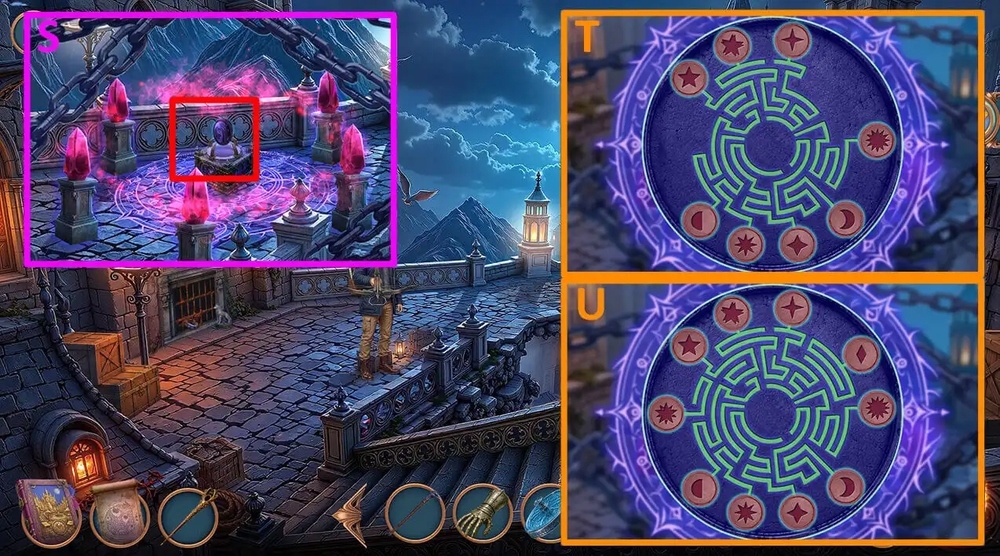
- Easy Solution: arrange the symbols as shown in the picture (Q).
- Hard Solution: arrange the symbols as shown in the picture (R).
- Use LITTLE BAT on the alter, take Magic Gem, use Magic Staff on the alter (S).
- Easy Solution: arrange the parts as shown in the picture (T).
- Hard Solution: arrange the parts as shown in the picture (U).

- Select this option (V).
- Use LITTLE BAT on the Ezra (W).
- Use MAGIC RED PAINT on the lion, take WOLF STATUETTE (X).
- Use FLUFFY DUSTER on the salt, take METAL RINGS 1/2, use RAVEN CANE and WOLF STATUETTE on the bell, take POWDER WITH PUFF and FILE (Y).
- Use FILE on the grid, take METAL RINGS 2/2 (Z).
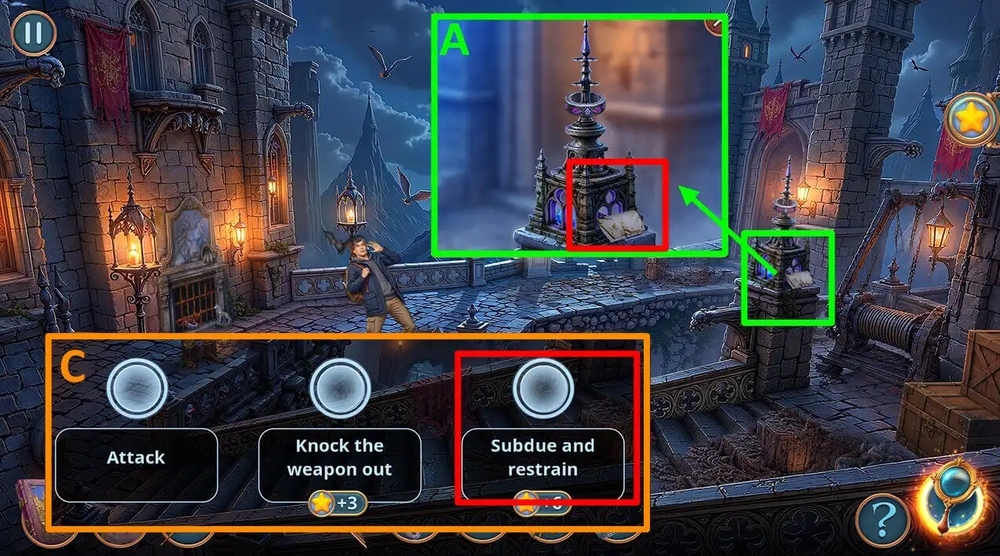
- Take and read the note, use METAL RINGS 2/2 on the lightning rod, take Magic Gem (A).
- Use Magic Staff on the background.
- Select this option (C).

- Easy Solution: tap the screen at the right time (D).
- Hard Solution: tap the screen at the right time (E).

- Select all options (A).
- Take CLUES (B).
- Take OIL (C).
- Use SEPTUM RING on bag, read and take note, read and take EVIDENCE, take AMULET OF ANUBRIS (D).
- Use AMULET OF ANUBRIS on book, take KEY (E).
- Use KEY on door (F).
- Go forward.
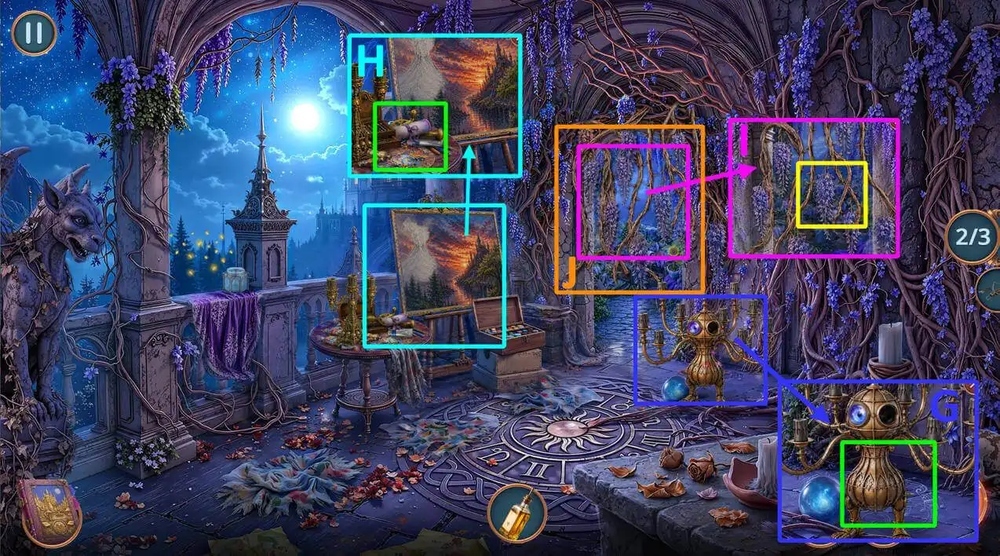
- Take DIVINATION BALL (G).
- Read and take note, take VINTAGE DRILL and KILLER’S SILVER TRAIL (H).
- Use CHAINMAIL GLOVE on vines (I).
- Play puzzle, earn THIN CHOPSTICKS (J).
- Go back.
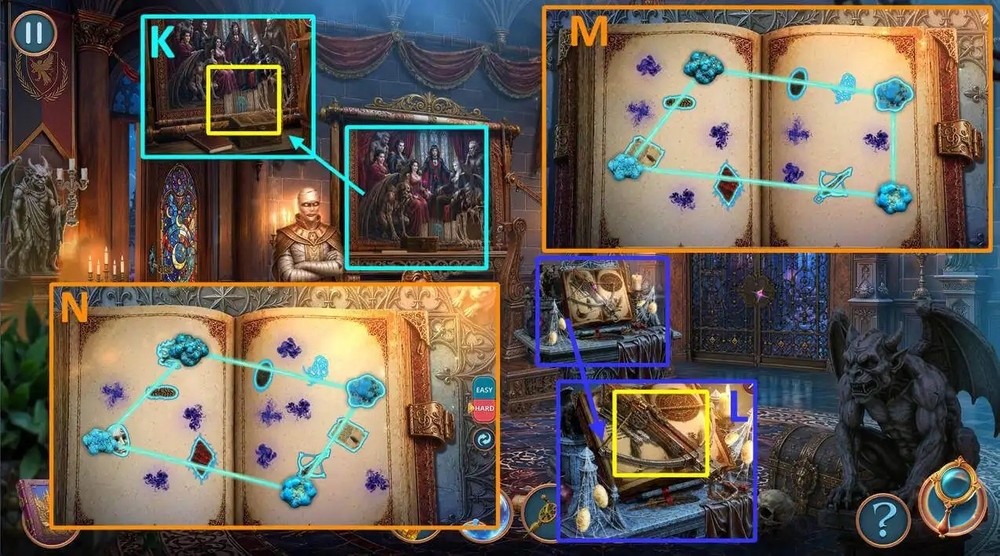
- Use THIN CHOPSTICKS on threads, take gemstone for a magic wand (K).
- Use CLUES, EVIDENCE and KILLER’S SILVER TRAIL on open book, Use MAGIC WAND on book (L).
- Easy solution: Arrange the objects as shown in the figure (M).
- Hard solution: Arrange the objects as shown in the figure (N).
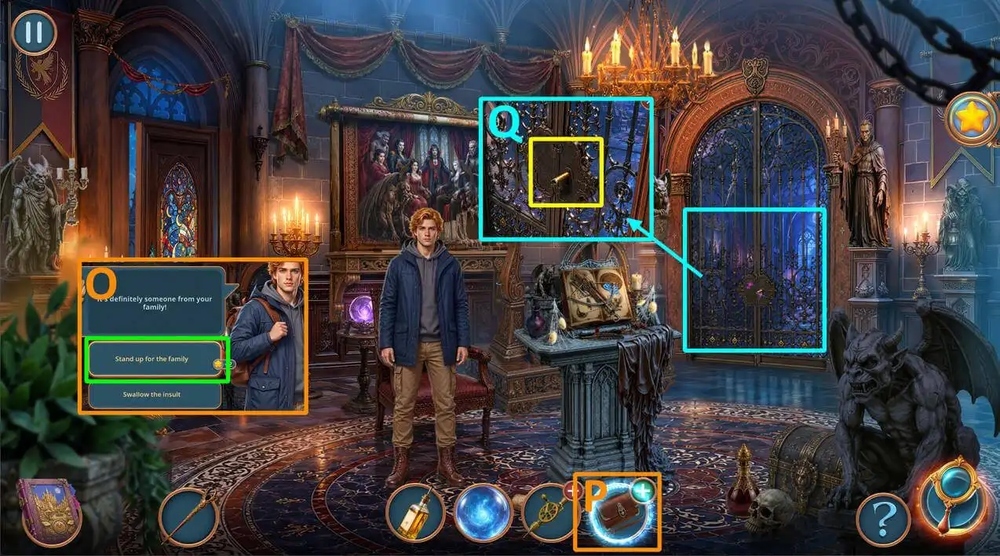
- Select this option (O).
- Click on bag, read and take note, take TRAP (P).
- Use TRAP on broken key (Q).
- Go forward.

- Use POWDER WITH PUFF on lock, take HOT GLUE GUN (R).
- Take BOW, Use HOT GLUE GUN on broken dragon, earn WIND-UP DRAGON, take CLOVER (S).
- Use CLOVER on slot, take KING FIGURINE (T).
- Go forward.

- Read and take MAGIC DEW IN A JAR, Use KING FIGURINE on game board (U).
- Easy solution: Arrange the objects so that the picture matches the hint, take LUMINESCENT MUSHROOM (V).
- Hard solution: Arrange the objects so that the picture matches the hint, take LUMINESCENT MUSHROOM (W).
- Go to Balcony.

- Use LUMINESCENT MUSHROOM and JAR LID on fireflies, take FIREFLIES JAR (X).
- Go to Portrait Gallery.

- Use FIREFLIES JAR on chandelier, take gemstone for a magic wand (Y).
- Use MAGIC WAND on frame (Z).
- Easy solution: Color the portrait as shown in the picture (A).
- Hard solution: Color the portrait as shown in the picture (B).
- Go forward.
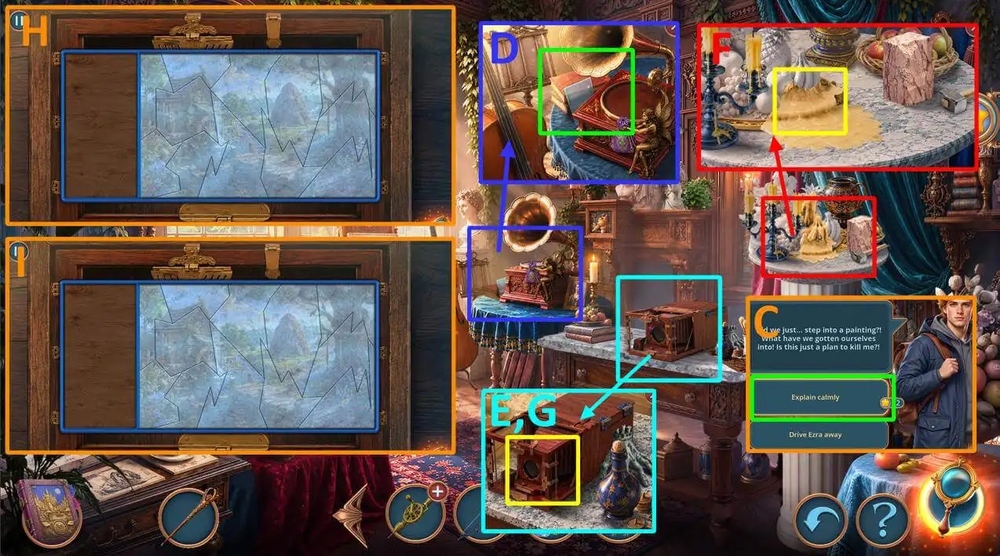
- Select this option (C).
- Take GLASS SQUARE (D).
- Take MESSENGER HAND and MARKER, Use OIL on rust, take GOLEM FIGURINE (E).
- Use WIND-UP DRAGON on wax, take CAMERA SHUTTER (F).
- Use GLASS SQUARE and CAMERA SHUTTER on camera (G).
- Easy solution: Assemble the picture from the fragments as shown in the figure (H).
- Hard solution: Assemble the picture from the fragments as shown in the figure (I).
- Go forward.
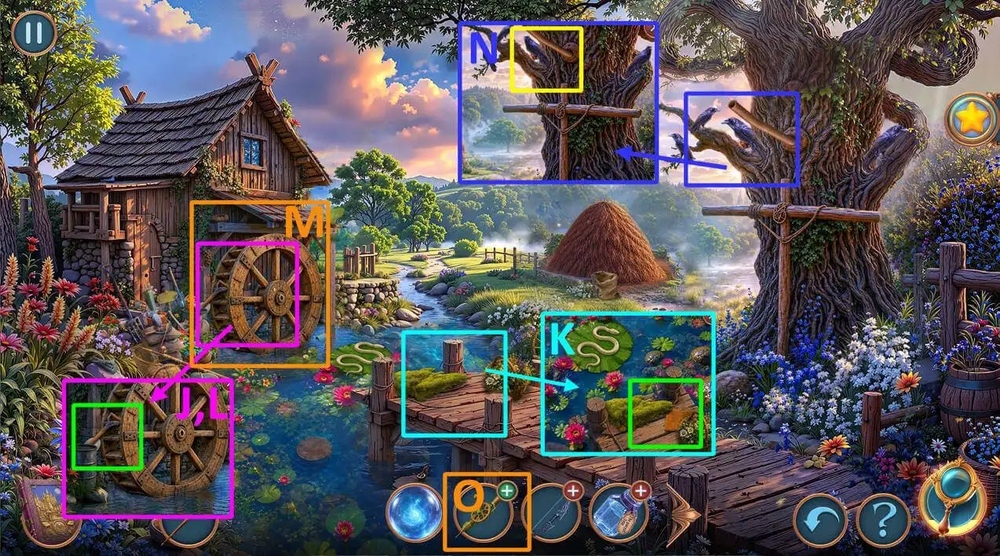
- Take HANDLE and SHELL SCRAPER (J).
- Take WAX HONEYCOMB, Use SHELL SCRAPER on moss, Take MILL HANDLE (K).
- Use MILL HANDLE on water wheel (L).
- Play puzzle, earn SAW (M).
- Use SAW on branch, earn HOLLOW TWIG (N).
- Use HOLLOW TWIG on VINTAGE DRILL, earn SWAMP FLUTE (O).

- Use SWAMP FLUTE on snake (P).
- Easy solution: Assemble the picture from the fragments as shown in the figure (Q).
- Hard solution: Assemble the picture from the fragments as shown in the figure (R).
- Go forward.
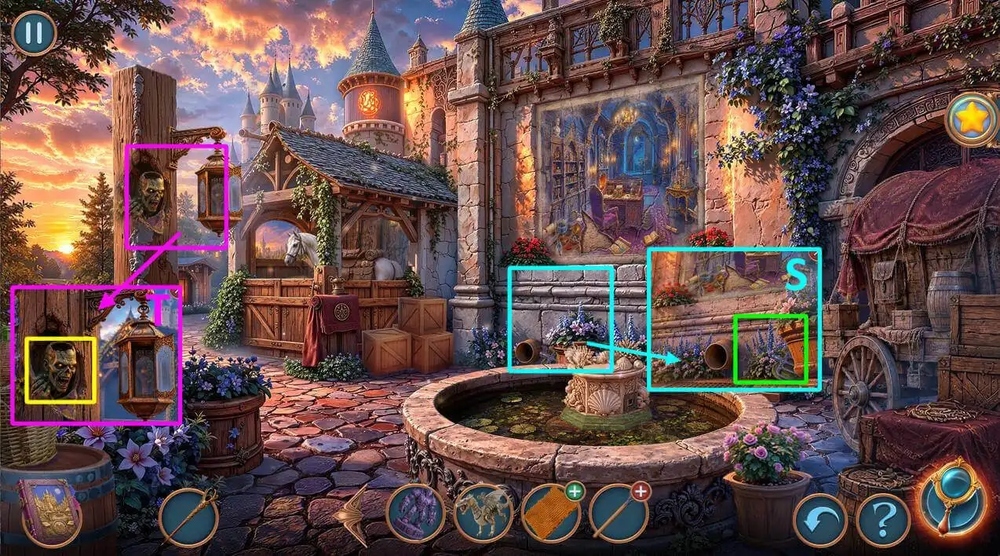
- Take PITCHFORK and CREEPY BOWLER HAT, Use MESSENGER HAND on pipe, earn WALNUT KERNEL (S).
- Use WALNUT KERNEL on zombie, take FRESCO PIECE (T).

- Use FRESCO PIECE on fresco (U).
- Easy solution: Assemble the picture from the fragments as shown in the figure (V).
- Hard solution: Assemble the picture from the fragments as shown in the figure (W).
- Go forward.
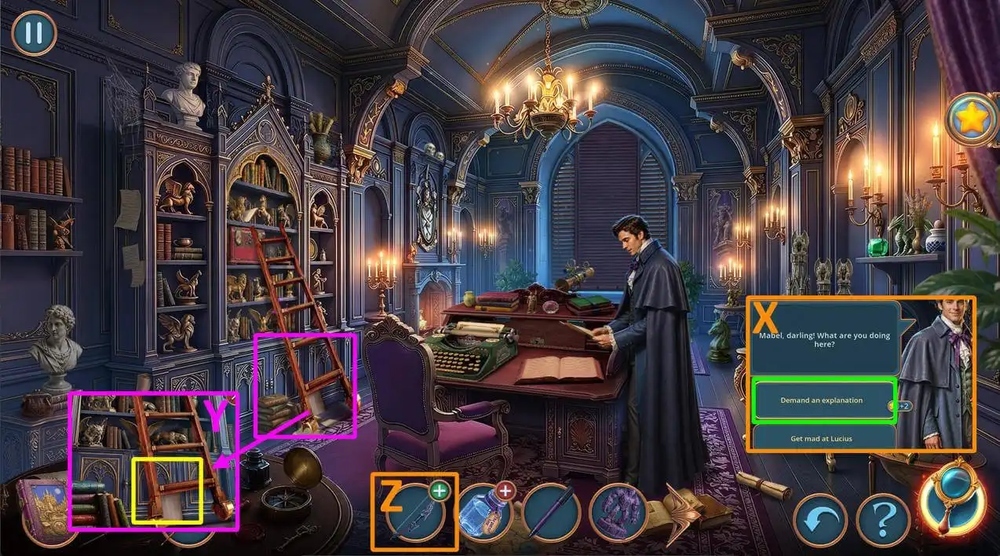
- Select this option (X).
- Take PAPER and CIRCUS STRONGMAN FIGURINE, use DIVINATION BALL on ladder, read and take note, take TYPEWRITER KEYS 1/3 and SUCTION CUP ARROW (Y).
- Use SUCTION CUP ARROW on BOW, earn BOW (Z).
- Go to Balcony.

- Use BOW on ball (A).
- Easy solution: Tap the screen when the ball is in the green zone, earn GLASS EYE (B).
- Hard solution: Tap the screen when the ball is in the green zone, earn GLASS EYE (C).
- Use GLASS EYE on chandelier, take MAGIC BRUSH (D).
- Use MAGIC BRUSH on paint, take VOLCANO (E).
- Go to Victorian Art Studio.
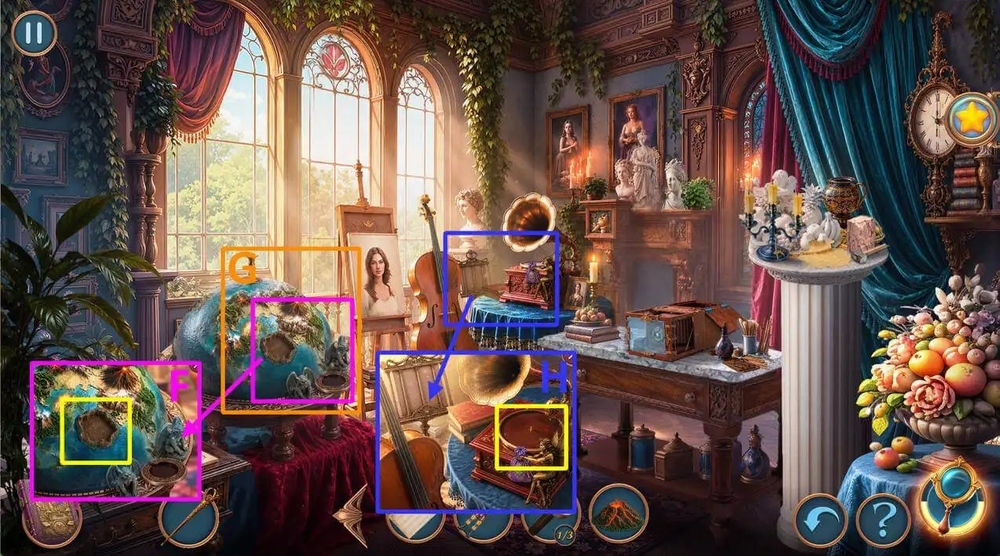
- Use VOLCANO on volcano place (F).
- Play puzzle, earn MUSIC DISC (G).
- Use MUSIC DISC on gramophone, take FLOWER FERTILIZER (H).
- Go back.
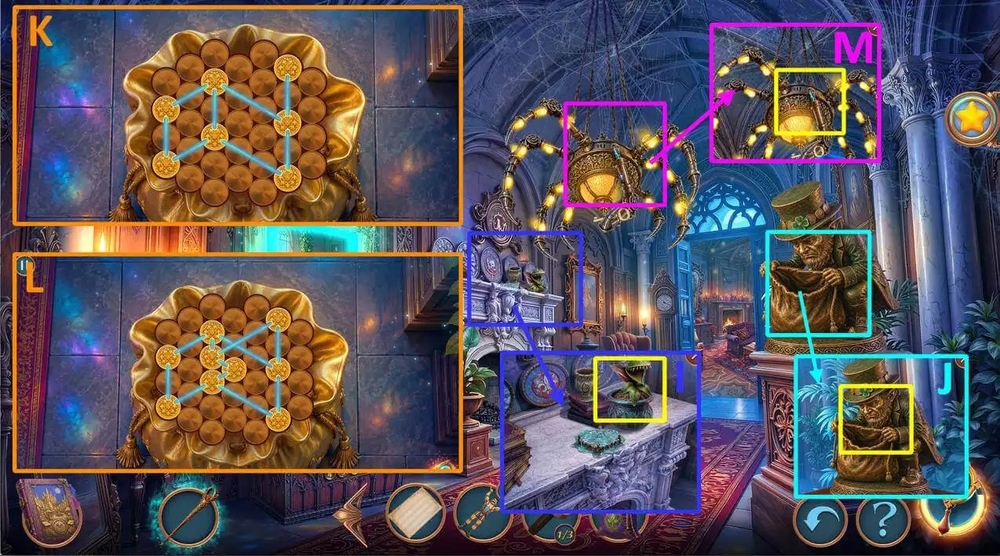
- Use FLOWER FERTILIZER on flower, take gemstone for a magic wand, take STUCK-CLEANER (I).
- Use MAGIC WAND on empty bag (J).
- Easy solution: Arrange the elements as shown in the figure, take TYPEWRITER KEYS 2/3 and HINGE (K).
- Hard solution: Arrange the elements as shown in the figure, take TYPEWRITER KEYS 2/3 and HINGE (L).
- Use HINGE on chandelier, take KEY (M).
- Go to Oberon’s Study Painting.

- Use KEY on lock, take NET and BLIND HANDLE (N).
- Use BLIND HANDLE on blinds (O).
- Easy solution: Move the token across all the squares a specified number of times (P).
- Hard solution: Move the token across all the squares a specified number of times (Q).
- Click on the gargoyles, take TYPEWRITER KEYS 3/3 (R).
- Use TYPEWRITER KEYS 3/3 on typewriter, take WYVERN’S SPIRAL HORN (S).
- Use WYVERN’S SPIRAL HORN on MAGIC DEW IN A JAR, earn MAGIC DEW IN A JAR (T).
- Go to Family Living Room.

- Use STUCK-CLEANER and MAGIC DEW IN A JAR on mirror (U).
- Play puzzle, earn SNUFFER (V).
- Use SNUFFER on flower, take SHEARS and WRENCH (W).
- Use WRENCH on bolt, take METAL COUPLER (X).
- Go to Landscape Painting

- Use PITCHFORK and METAL COUPLER on HANDLE, earn PITCHFORK (Y).
- Use PITCHFORK on hay (Z).
- Easy solution: Select all matching pairs one by one (A).
- Hard solution: Select all matching pairs one by one (B).
- Take MARBLE WORKING SCHEME and STRAW BAG.
- Use STRAW BAG, MARKER and CREEPY BOWLER HAT on crows, take gemstone for a magic wand (C).
- Go to Balcony.
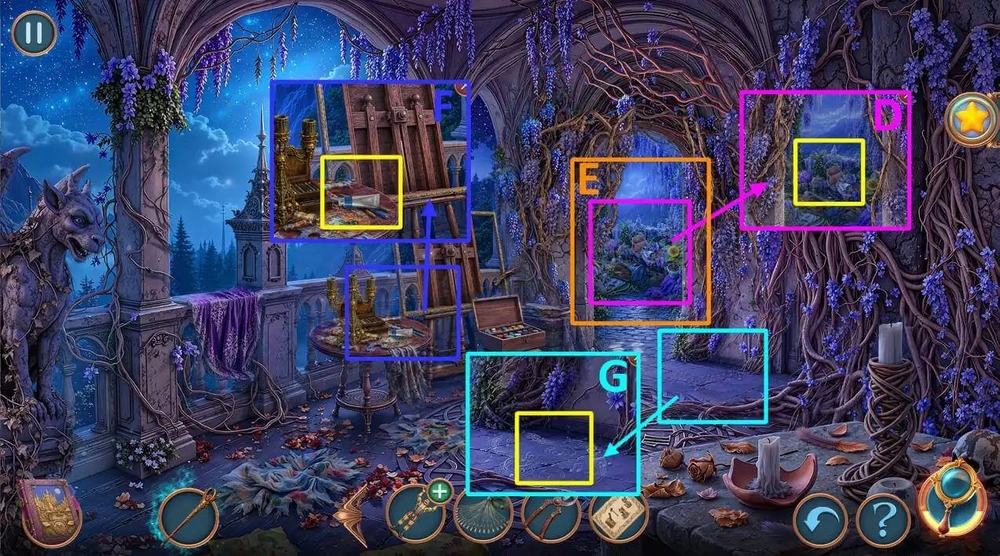
- Use MAGIC WAND on pass (D).
- Play puzzle, earn PALETTE KNIFE (E).
- Use PALETTE KNIFE on paint, earn PALETTE KNIFE WITH PAINT (F).
- Use PALETTE KNIFE WITH PAINT and PAPER on notes, earn DANCING NOTES (G).
- Go to Victorian Art Studio.

- Use DANCING NOTES on stand (H).
- Easy solution: Click on the fragments in the following order: A-B-C, take PLIERS (I).
- Hard solution: Click on the fragments in the following order: A-B-C, take PLIERS (J).
- Click on CIRCUS STRONGMAN FIGURINE, Use PLIERS on CIRCUS STRONGMAN FIGURINE, earn WIND-UP CIRCUS STRONGMAN FIGURINE (K).
- Go to Family Living Room.

- Use WIND-UP CIRCUS STRONGMAN FIGURINE on head, read and take PHOTO FROM THE PAST (L).
- Use PHOTO FROM THE PAST on mirror (M).
- Play puzzle, earn ENCHNTED APPLE (N).
- Go to Castle Painting.

- Use ENCHNTED APPLE on horse, take VALVE (O).
- Use VALVE on hole (P).
- Easy solution: Connect the cells as shown in the figure, Take EMPTY VIAL and OILED WICK (Q).
- Hard solution: Connect the cells as shown in the figure, Take EMPTY VIAL and OILED WICK (R).
- Use WIND-UP DRAGON and OILED WICK on WAX HONEYCOMB, earn HOMEMADE CANDLE (S).
- Use HOMEMADE CANDLE on lamp, take COUNTRY FLAG (T).
- Go to Victorian Art Studio.

- Use COUNTRY FLAG on slot (U).
- Play puzzle, earn CHISEL (V).
- USE MARBLE WORKING SCHEME and CHISEL on mramor, take MARBLE TRITON FIGURINE (W).
- Go to Castle Painting.

- Use MARBLE TRITON FIGURINE on stand, take FAKE VAMPIRE FANGS (X).
- Use FAKE VAMPIRE FANGS on bag, take SONAR and CREST (Y).
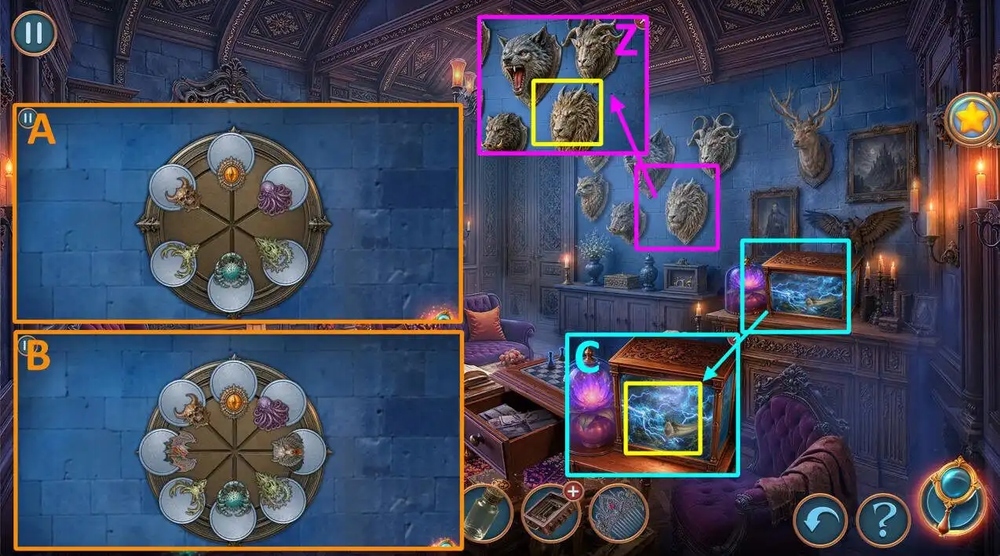
- Use CREST on lion (Z).
- Easy solution: Swap the icons to arrange them as shown on the screen, take gemstone for a magic wand (A).
- Hard solution: Swap the icons to arrange them as shown on the screen, take gemstone for a magic wand (B).
- Use MAGIC WAND on hailstorm, take WEREWOLF FANG (C).
- Go to Landscape Painting
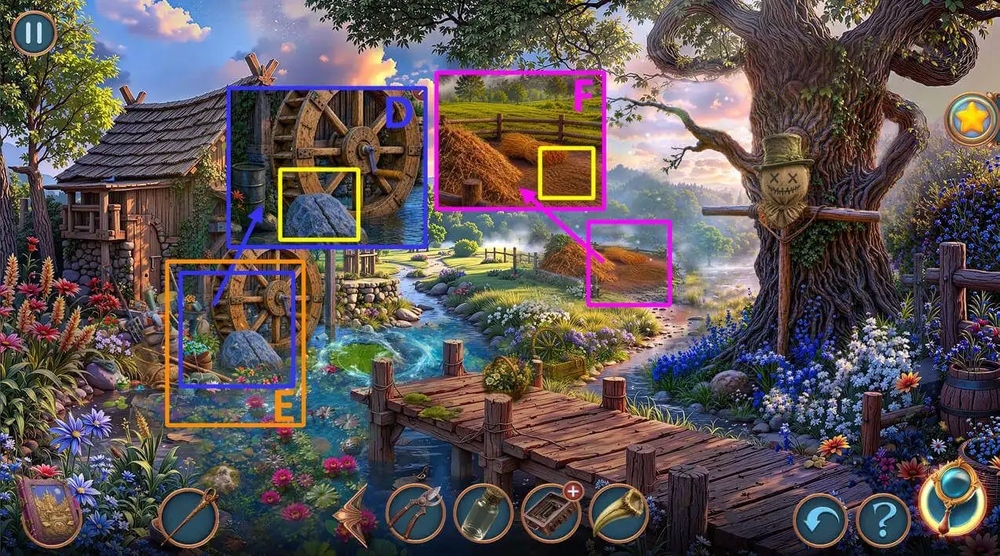
- Use WEREWOLF FANG and GOLEM FIGURINE on stone, take (D).
- Play puzzle, earn SHOVEL (E).
- Use SHOVEL on ground, take EMPTY SPINDLE (F).
- Go to Family Court Room.
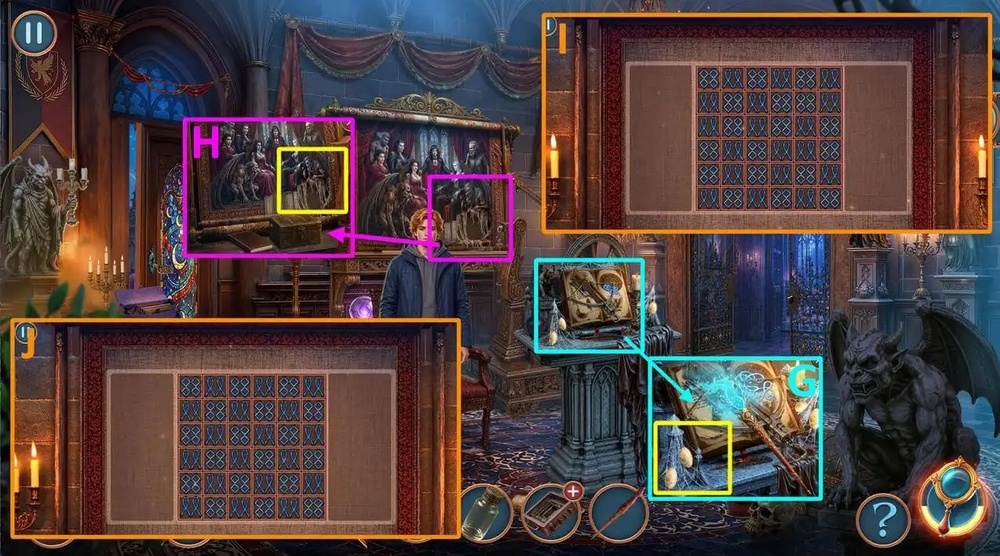
- Use EMPTY SPINDLE on spy web, earn SILK SPINDLE (G).
- Use SILK SPINDLE on paint (H).
- Easy solution: Place the objects as shown in the figure, take OBERON’S CAMEO (I).
- Hard solution: Place the objects as shown in the figure, take OBERON’S CAMEO (J).
- Go to Oberon’s Study Painting.

- Use OBERON’S CAMEO on box, read an take TORN WILL (K).
- Select this option (L).
- Read and take Nimra’s Branch Token and STAR COORDINATES (M).
- Use STAR COORDINATES on scope, read and take note, take gemstone for a magic wand (N).
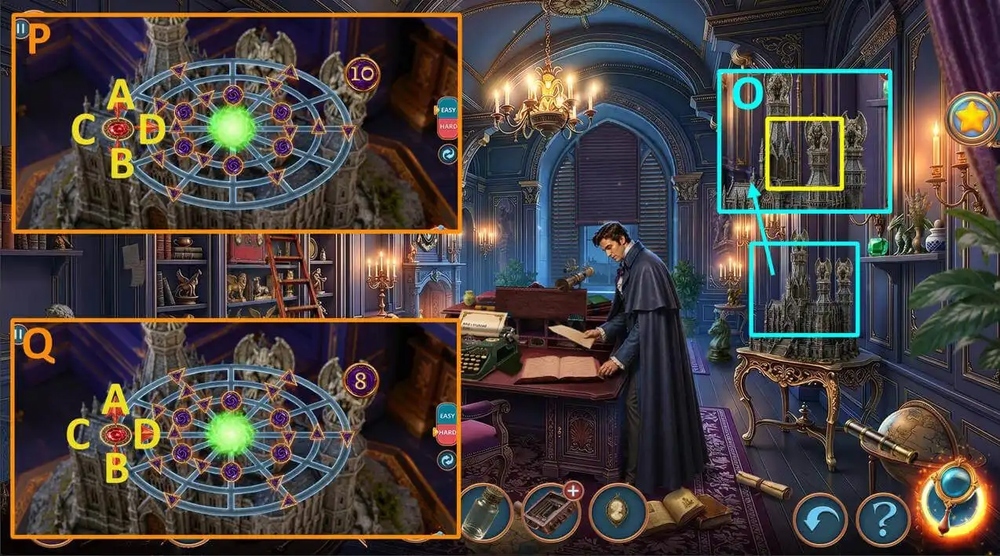
- Use MAGIC WAND on castle (O).
- Easy solution: Move by pressing the buttons in the following sequence: A-D-B-D-D (P).
- Hard solution: Move by pressing the buttons in the following sequence: A-D-B-D-D (Q).

- Select this option (A).
- Take BOARD, use SHEARS on the vines, take and read the note, take LIQUID NITROGET (B).
- Take ARROW INDICATOR, use LIQUID NITROGET on the chest, take SCRAPER (C).
- Take RESEARCHER’S BAG and SUNGLASSES, use SCRAPER on the mushrooms (D).
- Play puzzle, earn STONE FISH (E).
- Use STONE FISH on the pin (F).
- Go forward.
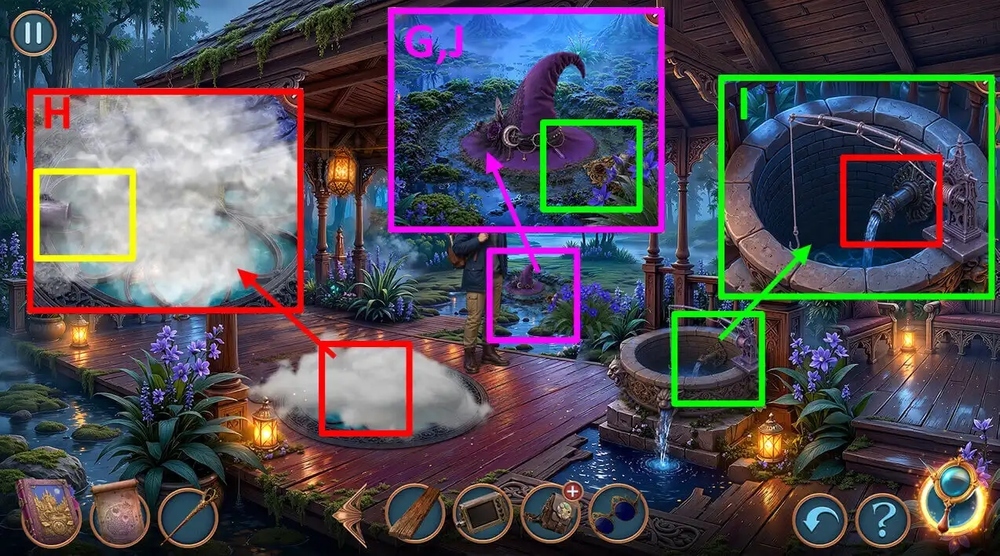
- Take STONE CLAW and CREST, use NET on the hat, earn WITCH’S HAT (G).
- Use WITCH’S HAT on the pipe, take AIR MATTRESS and SWAMP BOOTS (H).
- Use EMPTY VIAL on water stream, earn RAINWATER (I).
- Use SWAMP BOOTS on the swamp (J).

- Easy Solution: pairs of buttons are shown in the picture (K).
- Hard Solution: pairs of buttons are shown in the picture (L).
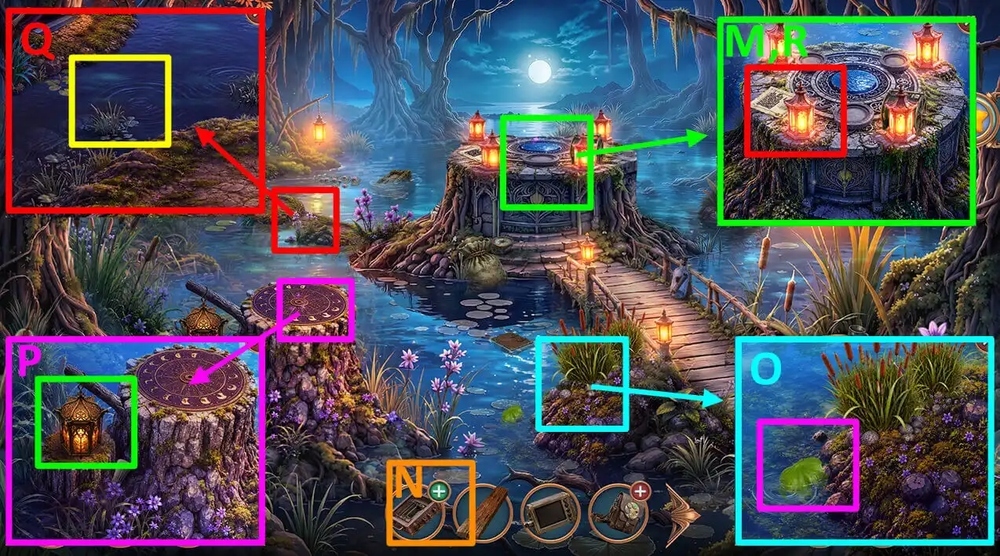
- Take and read the note, take WIRE COIL (M).
- Use ARROW INDICATOR and WIRE COIL on the SONAR, earn SONAR (N).
- Take and read the note, use SONAR on the water, take PEARL SHELL (O).
- Take GLOWING LANTERNS 1/2 (P).
- Use BOARD on the water, take BLADDER MOSS (Q).
- Use BLADDER MOSS, RAINWATER and PEARL SHELL on the alter (R).

- Easy Solution: follow the arrows shown in the picture (S).
- Hard Solution: follow the arrows shown in the picture (T).
- Select this option (U).

- Take DOOR VALVE (V).
- Take DULL MACHETE, DOOR VALVE on the door (W).
- Play puzzle, earn BLACKSMITH FIGURINE (X).
- Use BLACKSMITH FIGURINE on the stone, take STONE PATTERN (Y).
- Use STONE PATTERN on the column (Z).

- Easy Solution: connect the pairs of symbols as shown in the picture, take OILER (A).
- Hard Solution: connect the pairs of symbols as shown in the picture, take OILER (B).
- Go to Grimwood Conservatory.
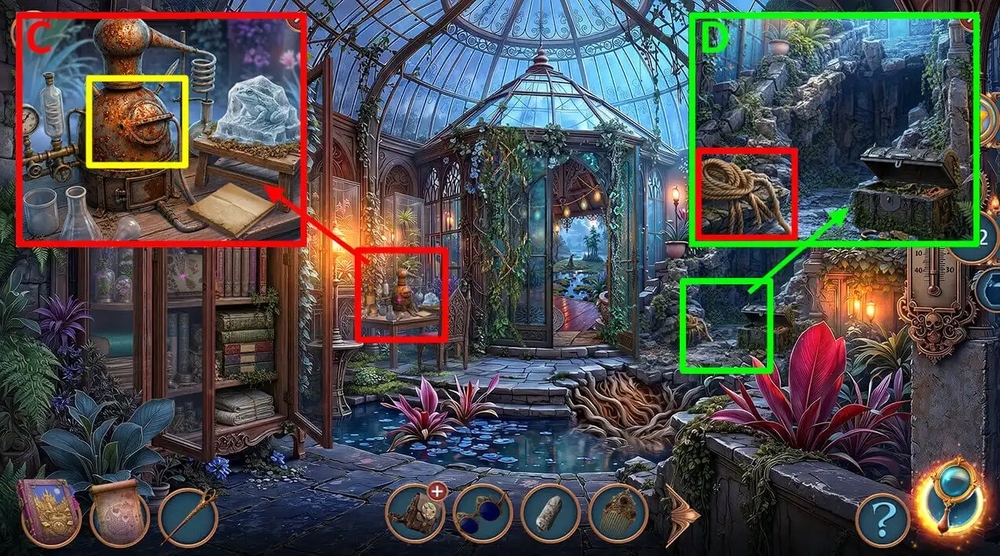
- Take and read the note, use OILER on the machine, take HOOK (C).
- Use HOOK on the broken stairs (D).
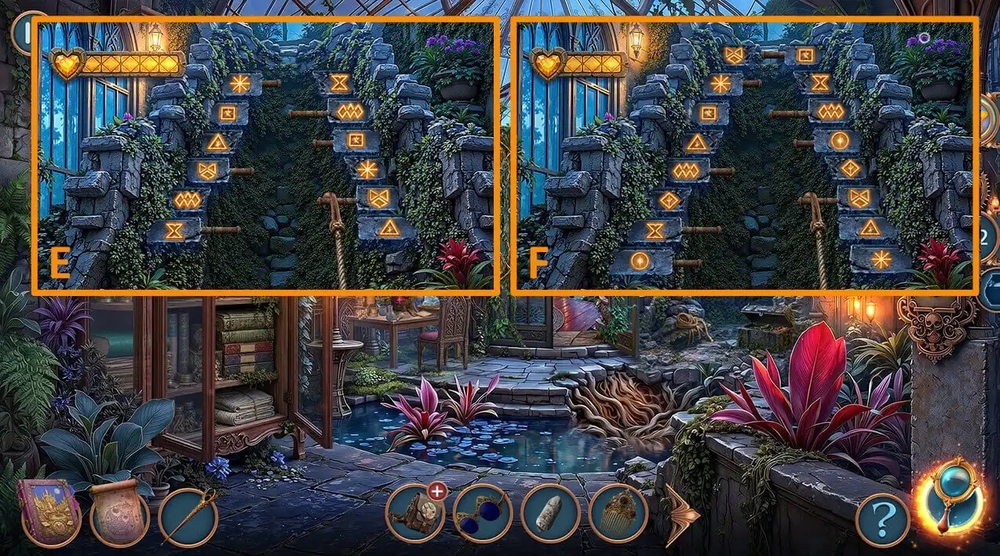
- Easy Solution: The correct pairs are shown in the picture (E).
- Hard Solution: The correct pairs are shown in the picture (F).
- Go forward.

- Take ELECTRICAL TAPE and SILICA GEL PACKET (G).
- Use CREST on the garbage, take Magic Gem (H).
- Use Magic Staff on the boards (I).
- Easy and Hard Solution: follow the description of the mini-game (J).
- Go forward.

- Take BROKEN FIGURINE, use STONE CLAW on the hand, take Magic Gem (K).
- Take FERTILIZER and HERBARIUM PRESS, use Magic Staff on the wall (L).
- Play puzzle, earn BELT WITHOUT BUCKLE (M).
- Use BELT WITHOUT BUCKLE on the window, earn ARROW WITH SUCTION CUP (N).
- Go back.

- Use ARROW WITH SUCTION CUP on the tile, take PUMP (O).
- Use PUMP and AIR MATTRESS on the roof (P).
- Go to Grimhollow Old Canal.
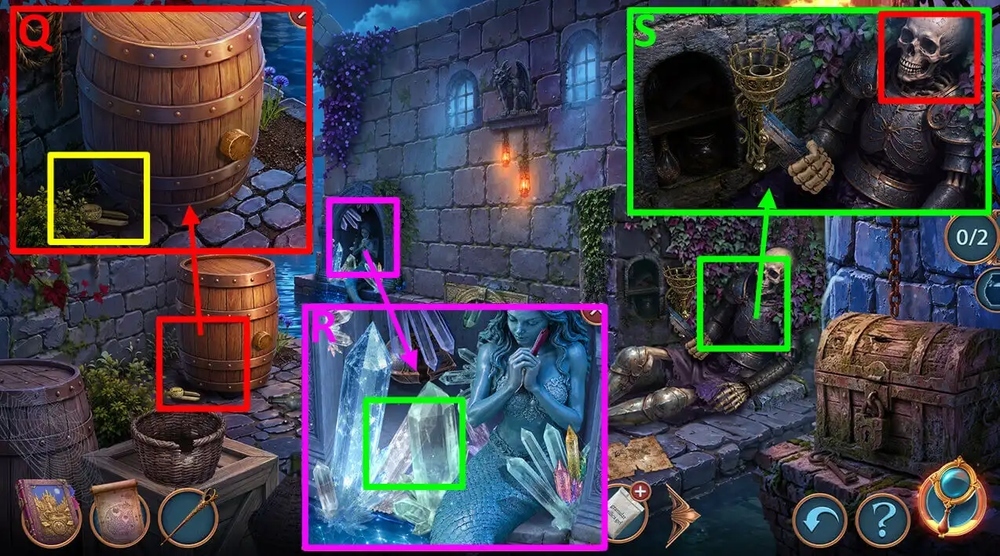
- Take GOLD RINGS 1/2 and TUNING FORK (Q).
- Use TUNING FORK on the crystals, take KNIGHT’S HELMET (R).
- Use KNIGHT’S HELMET on the skeleton, take SWORD FRAGMENT (S).
- Go to Gargoyle Tower.

- Use SWORD FRAGMENT on the stone, take Magic Gem (T).
- Use Magic Staff on the statues (U).

- Easy Solution: the differences are shown in the figure (V).
- Hard Solution: the differences are shown in the figure (W).
- Select this option (X).
- Go forward.
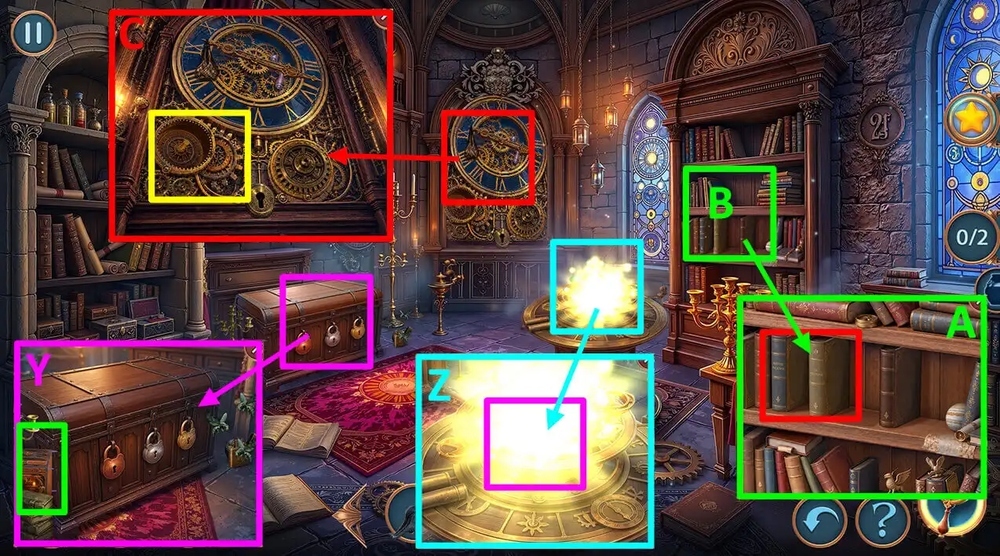
- Take BOOK NOOK (Y).
- Use SUNGLASSES on the glow, take WATER RESIN SAMPLE and COUNTERFEIT BOOK, take and read the note (Z).
- Take PLANETS 1/3, use COUNTERFEIT BOOK on the shelf (A).
- Play puzzle, earn GEAR (B).
- Use GEAR on the mechanism, earn COIL HANDLE (C).
- Go to Water Pavilion.
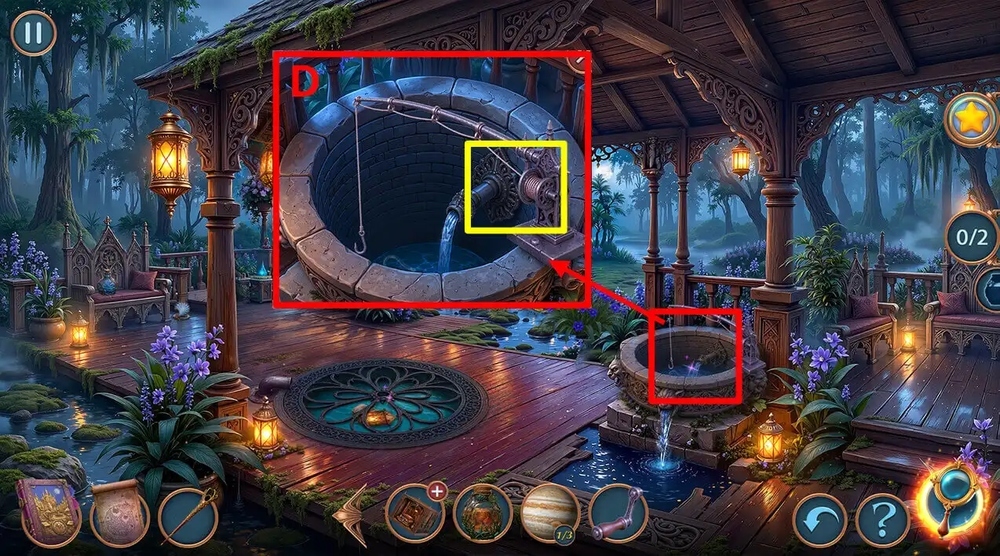
- Use COIL HANDLE on the rod, take DISTILLATION TUBE (D).
- Go back.
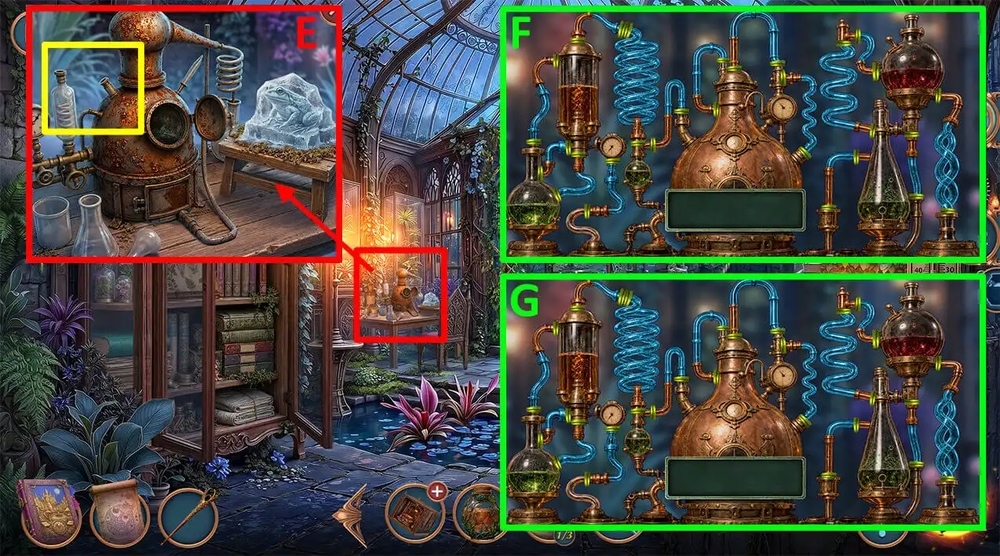
- Use DISTILLATION TUBE on the machine (E).
- Easy Solution: arrange the pipes as shown in the picture, take BOOMERANG (F).
- Hard Solution: arrange the pipes as shown in the picture, take BOOMERANG (G).
- Go to Water Pavilion.
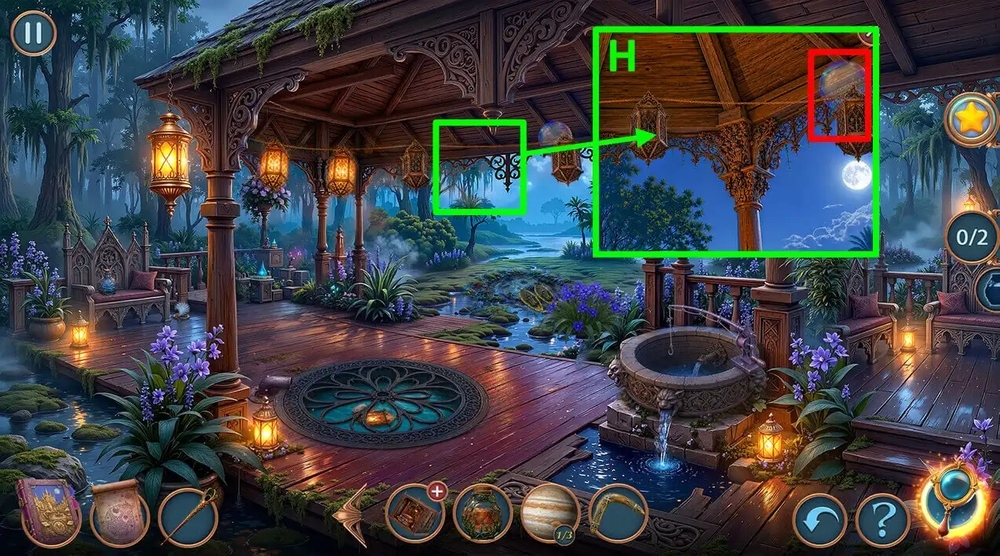
- Use BOOMERANG on the bubble, earn AIR BUBBLE (H).
- Go to Nimra Swamp.
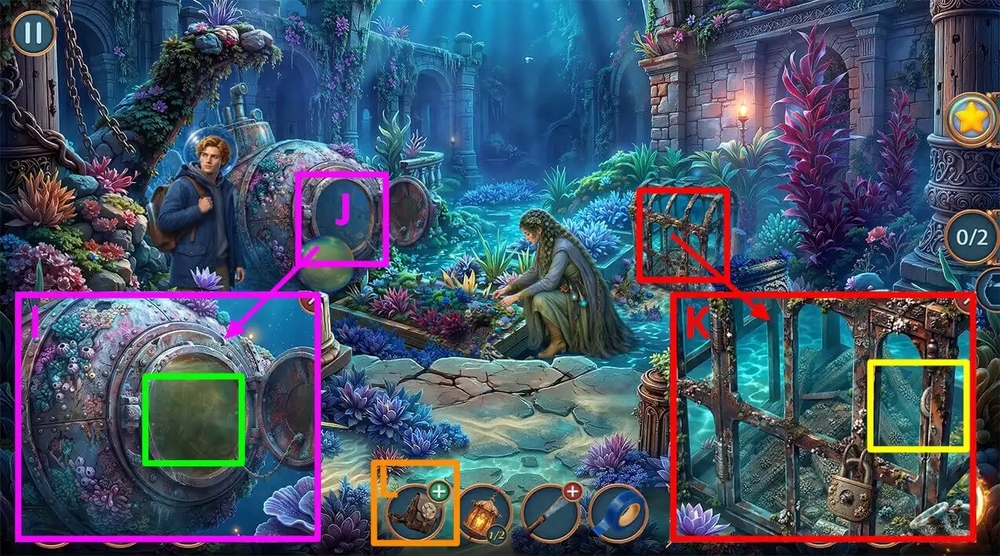
- Use AIR BUBBLE on the submarine (I).
- Play puzzle, earn NAVIGATOR’S DIVIDER (J).
- Use NAVIGATOR’S DIVIDER on the hole, earn FLOWER AMULET (K).
- Use FLOWER AMULET on the RESEARCHER’S BAG, take and read the note, take BOOK NOOK SECOND PART and KEYS (L).
- Go to Tower Cache.

- Use KEYS on the chest (M).
- Easy Solution: Press the buttons in the following order: 5-6-4-6-7-8×3-3-2-3×2-1, take WINDING CLOCK KEY (N).
- Hard Solution: Press the buttons in the following order: 5-6-4-6-7-8×3-3-2-3×2-1, take WINDING CLOCK KEY (O).

- Use WINDING CLOCK KEY on the clock, take BOOK NOOK WINGS (P).
- Use BOOK NOOK WINGS and BOOK NOOK SECOND PART on the BOOK NOOK, earn ALIVE BOOK NOOK (Q).
- Use ALIVE BOOK NOOK on the shelf (R).
- Play puzzle, earn Magic Gem (S).
- Go to Water Pavilion.
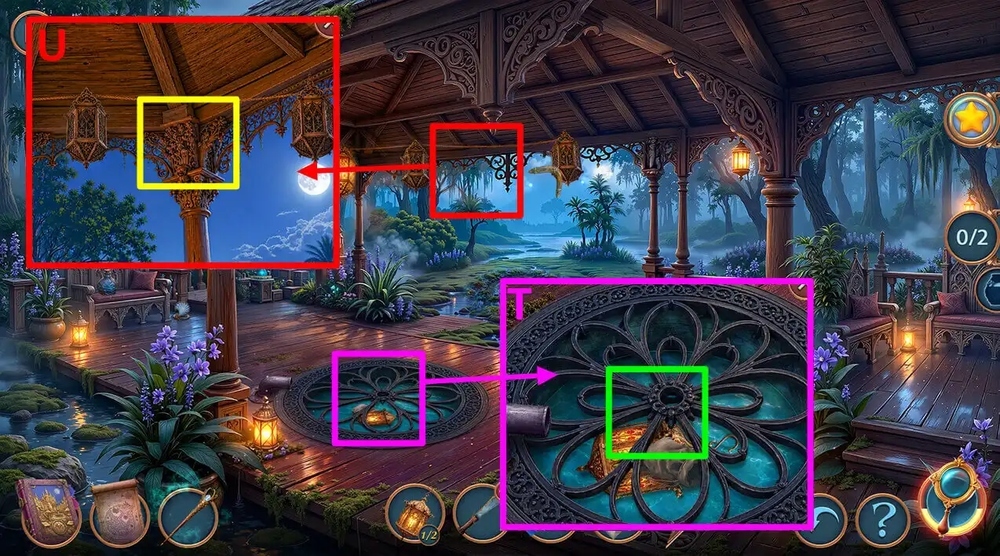
- Use Magic Staff on the grid, SMALL POUCH and GLOWING LANTERNS 2/2 (T).
- Use GLOWING LANTERNS 2/2 on the hooks (U).

- Easy Solution: Press the buttons in the following order: 2-3×2-1-2-1-3-2-1-3-2-3-2-3×3-2-1-3×2-2-1×3-3×2, take PLANETS 2/3 and FAST-GROWING MUSHROOM (V).
- Hard Solution: Press the buttons in the following order: 3×2-2-1×3-2-1-2-1×2-3-2-3×3-2-1×2-2×2, take PLANETS 2/3 and FAST-GROWING MUSHROOM (W).
- Go forward.

- Use FAST-GROWING MUSHROOM on the tent, take FIRESTEEL and WHETSTONE (X).
- Use WHETSTONE on the DULL MACHETE, earn MACHETE (Y).
- Use MACHETE on the bush, take MOON CLOCK HAND (Z).
- Use MOON CLOCK HAND on the slot (A).

- Easy Solution: arrange the pipes as shown in the picture, take CRESCENT AMULET (B).
- Hard Solution: arrange the pipes as shown in the picture, take CRESCENT AMULET (C).
- Go to Roof Over Old Canal.

- Use CRESCENT AMULET on the box, take PART OF THE FIGURINE (D).
- Use PART OF THE FIGURINE and ELECTRICAL TAPE on the BROKEN FIGURINE, earn METAL BLACK CAT FIGURINE (E).
- Use METAL BLACK CAT FIGURINE on the weather vane (F).
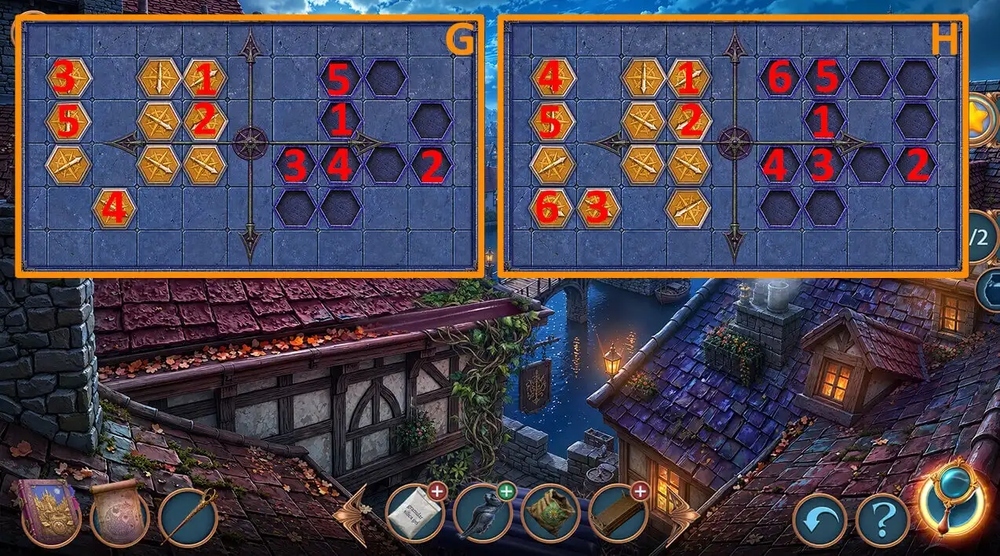
- Easy Solution: arrange the groups of arrows as shown in the picture, take CORKSCREW FUNNEL (G).
- Hard Solution: arrange the groups of arrows as shown in the picture, take CORKSCREW FUNNEL (H).
- Go to Grimhollow Old Canal.

- Use CORKSCREW FUNNEL on the cork, take WET TINDER (I).
- Use WET TINDER on the SILICA GEL PACKET, earn DRY TINDER (J).
- Use DRY TINDER and FIRESTEEL on the holder (K).
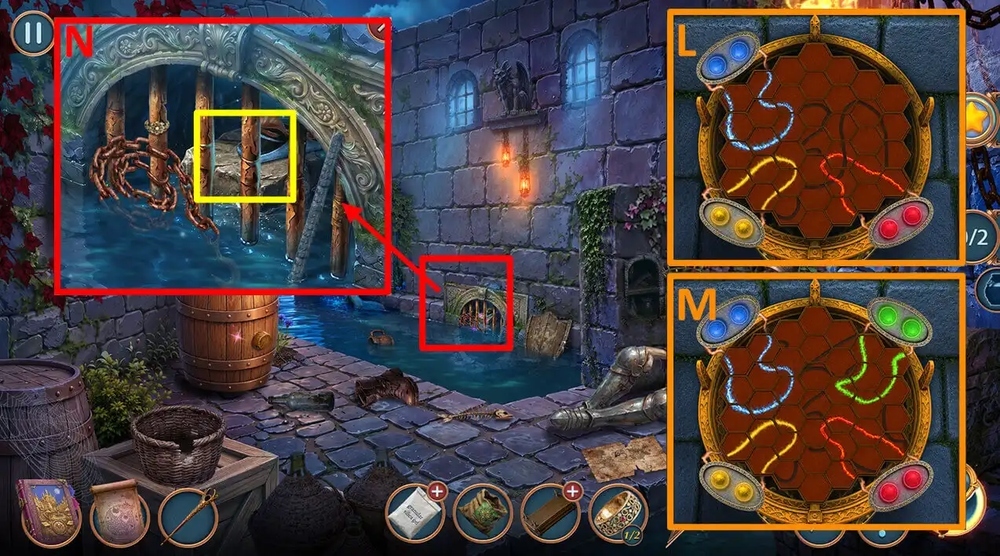
- Easy Solution: arrange the cells as shown in the picture, take INTERLEAVING PAPER and OLD SHAWL (L).
- Hard Solution: arrange the cells as shown in the picture, take INTERLEAVING PAPER and OLD SHAWL (M).
- Use OLD SHAWL on the grid, take SMALL PLANE TOOL (N).
- Go to Magic Marsh.
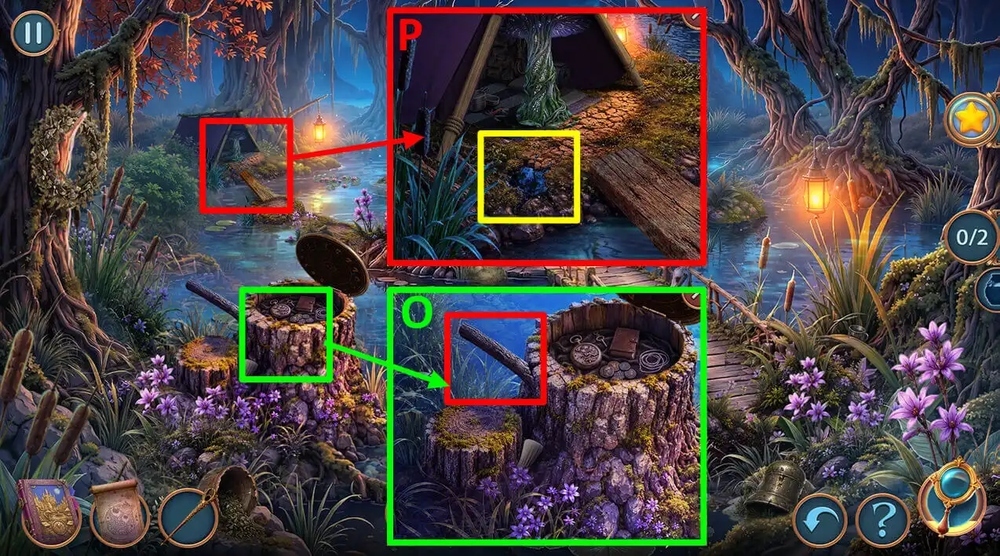
- Use SMALL PLANE TOOL on the stick, take BRUSH (O).
- Use BRUSH on the ink, earn BRUSH WITH INK (P).
- Go to Gargoyle Tower.
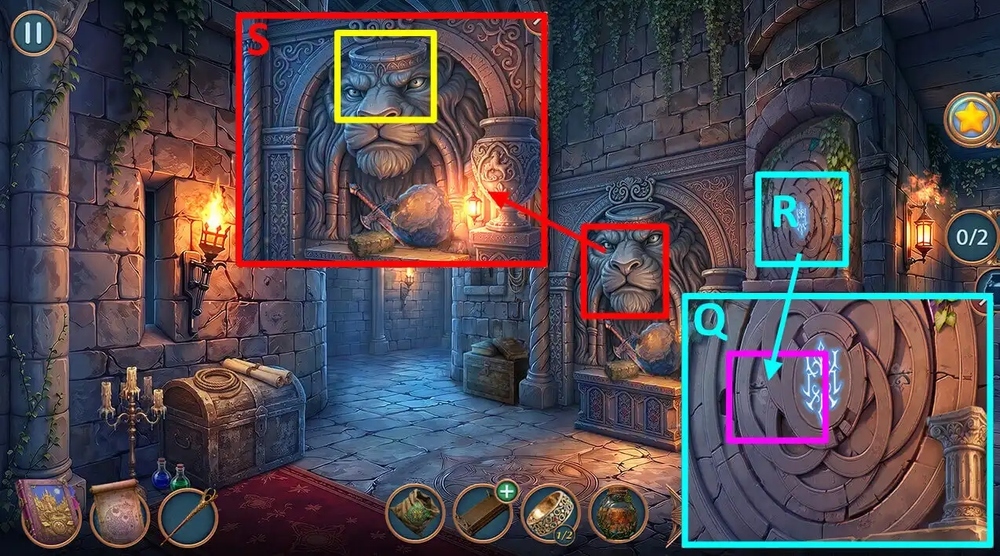
- Use BRUSH WITH INK on the wall (Q).
- Play puzzle, earn STONE CROWN (R).
- Use STONE CROWN on the statue, take PLASTIC KNIFE and SHELL HOUSE (S).
- Go to Nimra Swamp.

- Use SHELL HOUSE on the lobster, take SEEDS OF TRACER PLANTS (T).
- Use FERTILIZER and SEEDS OF TRACER PLANTS on the ground (U).
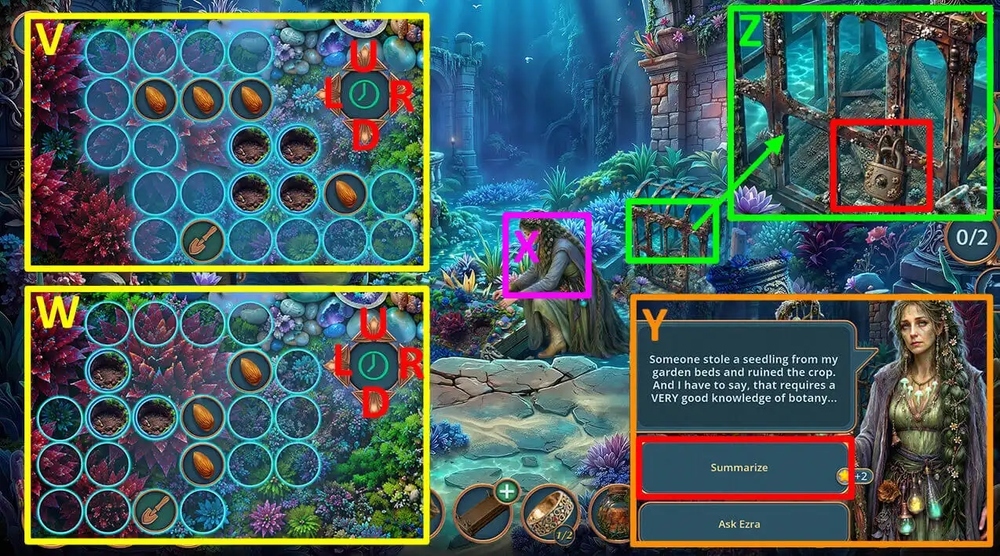
- Easy Solution: Click on the arrows in the following order: L-Ux2-L-Ux2-Rx3-Dx2-R-D-L-Ux3-Lx2-D-R-U-R-Dx2-R-Dx2 -Lx3-Ux2-L-U-R-Dx3-Rx2-U-D-Lx2-U-R-D-Rx4-U-L-D-L-U-D-Lx2 -U-R-Lx2-Ux3-Rx2-Dx2-Ux2-Lx2-D-R-U-R-D, earn FRESH UNDERWATER RESIN (V).
- Easy Solution: Click on the arrows in the following order: Lx2-Ux2-R-Ux2-Rx3-Dx2-Lx2-Rx2-Ux2-Lx3-Dx2-L-Dx2-Rx3 -U-D-Lx3-Ux2-R-Ux2-Rx3-Dx2-R-D-L-Ux3-Lx3-Dx2-Rx2-Lx3 -Dx2-Rx3-U-R-U-L-Dx2-Lx3-Ux2-R-Ux2-Rx3-D-R-Dx2-Lx2 -D-Lx2-Ux2-Dx2-Rx2-Ux2-L-R-D-Rx2-U-Lx2, earn FRESH UNDERWATER RESIN (W).
- Use WATER RESIN SAMPLE and FRESH UNDERWATER RESIN on the Nimra (X).
- Select this option, earn SHELL AMULET (Y).
- Use SHELL AMULET on the lock, take FILE (Z).
- Go to Grimhollow Old Canal.

- Use FILE on the rod, take CHAIN and GOLD RINGS 2/2 (A).
- Use GOLD RINGS 2/2 on the statue (B).
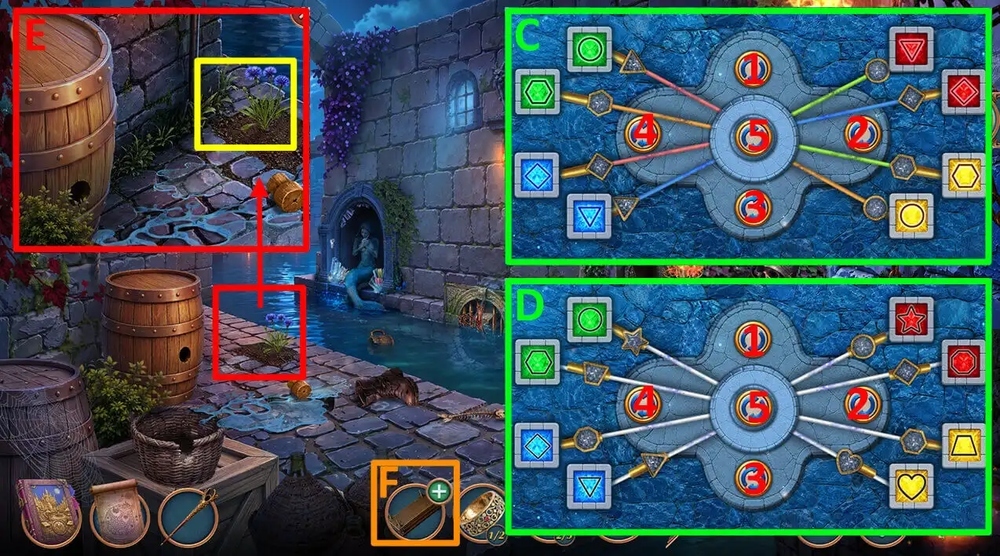
- Easy Solution: Press the buttons in the following order: 1-3-5-1-3-4-5-4-3-5-1-3-5-3-4-1-5×5, take SMALL SHOVEL (C).
- Easy Solution: Press the buttons in the following order: 1-3-5-1-3-4-5-4-3-5-1-3-5-3-4-1-5×5, take SMALL SHOVEL (D).
- Use SMALL SHOVEL on the ground, earn FRESH CORNFLOWER (E).
- Use FRESH CORNFLOWER and INTERLEAVING PAPER on the HERBARIUM PRESS, earn DRIED FLOWERS (F).
- Go to Grimwood Conservatory.

- Use DRIED FLOWERS on the book (G).
- Play puzzle, earn MAGIC FIRE BUTTERFLY (H).
- Use MAGIC FIRE BUTTERFLY on the ice, take STONE MAGIC TOAD (I).
- Go to Tower Cache.

- Use STONE MAGIC TOAD on the insects, take LIGHTER and PLANETS 3/3 (J).
- Use PLANETS 3/3 on the slots (K).
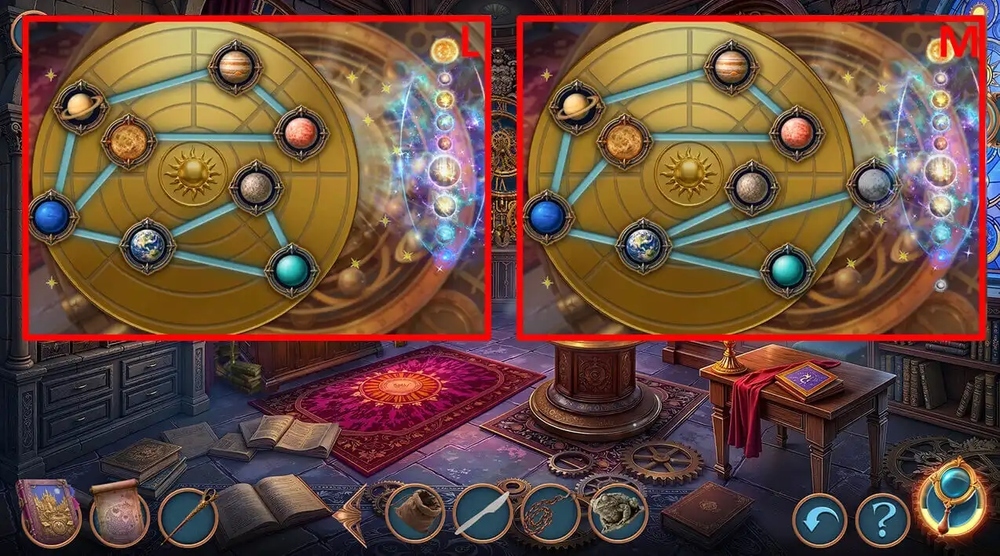
- Easy Solution: arrange the planets as shown in the picture, take and read the note (L).
- Hard Solution: arrange the planets as shown in the picture, take and read the note (M).
- Walkthrough Bonus Chapter, at the link below.