Grimwood Secrets 1: Cursed Heirloom (Bonus Chapter) – The investigation into Oberon’s murder is drawing to a close, but Mabel and Ezra still have to uncover the Heart of Unity’s greatest secret. The ancient relic chooses the future head of the Grimwoods on its own, guided not by the candidates’ age or merits, but by who is truly capable of leading the family forward. Oberon knew much more about this than he let on to his relatives, and now Mabel must find out why her grandfather kept his decision a secret. Returning to the events of that fateful night, the heroine compares the accounts of family members and carefully examines the clues left behind. Oberon’s stopped clock, Ezra’s broken trap, the archival seal, and the elder’s letter addressed to Anubris force her to take a fresh look at the circumstances of the crime. Anubris served the Grimwoods for many years and enjoyed the trust of all his relatives, so suspicions directed at him raise quite a few questions. Together with Ezra, Mabel must piece together the sequence of events, unravel others’ motives, and expose the true culprit. Now the witch must not only prove herself right to the entire family, but also understand what choice the Heart of Unity will make. The future of every Grimwood depends on the ancient mask’s decision, and the truth about Oberon’s murder will finally set everything right.
Bonus Chapter Walkthrough

- Take and read the note (A).
- Take TROWEL, BAG OF POWDER and Magic Gem (B).
- Use Magic Staff on the character (C).

- Easy Solution: follow the arrows shown in the picture (D).
- Hard Solution: follow the arrows shown in the picture (E).
- Select this option (F).

- Take IRON SPONGE, use TROWEL and SMALL POUCH, take BAG OF SAND (G).
- Use BAG OF SAND on the fire, take CROWBAR (H).
- Use CROWBAR on the hatch (I).
- Go forward.
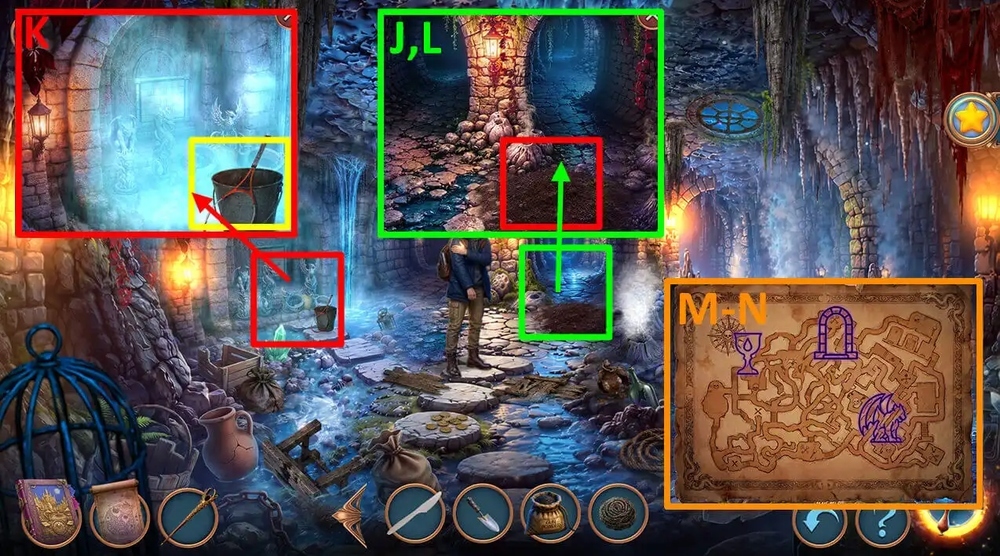
- Use TROWEL on the ground, take UMBRELLA (J).
- Take BROKEN RACKET and BUCKET, use UMBRELLA on the waterfall, take SHACKLES and UNDERGROUND MAP (K).
- Use UNDERGROUND MAP on the tunnel (L).
- Easy Solution: Click on the symbols in the following order: cup, gate, gargoyle, hat, wolf, fire, snake (M).
- Hard Solution: Click on the symbols in the following order: cup, gate, gargoyle, hat, wolf, fire, snake, bird, book, footprint, bat, moon (N).
- Go forward.

- Select this option (O).
- Take DIAMOND RING and FLYING SHOES, use SHACKLES on the chain (P).
- Play puzzle, earn CIGAR GUILLOTINE (Q).
- Use CIGAR GUILLOTINE on the wick, take THIN WICK (R).
- Use BAG OF POWDER, THIN WICK and LIGHTER on the chest, take CERAMIC SKULL (S).
- Use CERAMIC SKULL on the pin (T).
- Go forward.

- Use PLASTIC KNIFE on the PYRAMID, earn PYRAMID (U).
- Take IRON HEART and ANCIENT PAPYRUS, use PYRAMID on the pin (V).
- PLAY puzzle, earn LAMP OIL (W).
- Use LAMP OIL and LIGTHER on the bowl, take S-SHAPED CARBINE (X).
- Use S-SHAPED CARBINE and CHAIN on the BUCKET, earn BUCKET WITH HOOK (Y).
- Go to Secret Underground.

- Use BUCKET WITH HOOK on the lid (Z).
- Click on the rocks (A).
- Go to Castle Courtyard.

- Take MAGIC FEATHERS 1/3 and LAWNMOWER HANDLE (B).
- Use LAWNMOWER HANDLE on the tool, take PRUNING SHEARS (C).
- Use PRUNING SHEARS on the ivy, take MAGIC FEATHERS 2/3 and VESPERA’S HAIRPIN (D).
- Use ANCIENT PAPYRUS and VESPERA’S HAIRPIN on the lock, take MAGIC FEATHERS 3/3 (E).
- Use MAGIC FEATHERS 3/3 on the FLYING SHOES, earn FLYING SHOES (F).
- Use FLYING SHOES on the window (G).

- Easy Solution: Press the buttons as shown in the picture (H).
- Hard Solution: Press the buttons as shown in the picture (I).

- Use LAMP OIL on the rust, take FORTUNE-TELLER’S BALL (J).
- Use FORTUNE-TELLER’S BALL on the holder (K).
- Play puzzle, earn POWDER (L).
- Take MORTAR AND PESTLE and TRANSLUCENT NAIL POLISH, use TRANSLUCENT NAIL POLISH and POWDER on the lock, take Magic Gem (M).
- Go to Grimwood Underground.

- Use Magic Staff on the tree (N).
- Easy Solution: arrange the crystals as shown in the picture (O).
- Hard Solution: arrange the crystals as shown in the picture (P).
- Go to Gallery of Ancient Monsters.

- Take MONSTER EMBLEMS 1/4 and WYVERN SCALES, use IRON SPONGE on the statue, take FISH TANK FILTER (Q).
- Use FISH TANK FILTER on the aquarium (R).
- Play puzzle, earn MUSIC BOX DISC (S).
- Use USIC BOX DISC on the music box, take GLASSES (T).
- Go to Castle Courtyard.

- Use GLASSES on the door, take SILVER PAN FLUTE (U).
- Use SILVER PAN FLUTE on the door (V).
- Go forward.
- Select this option (W).
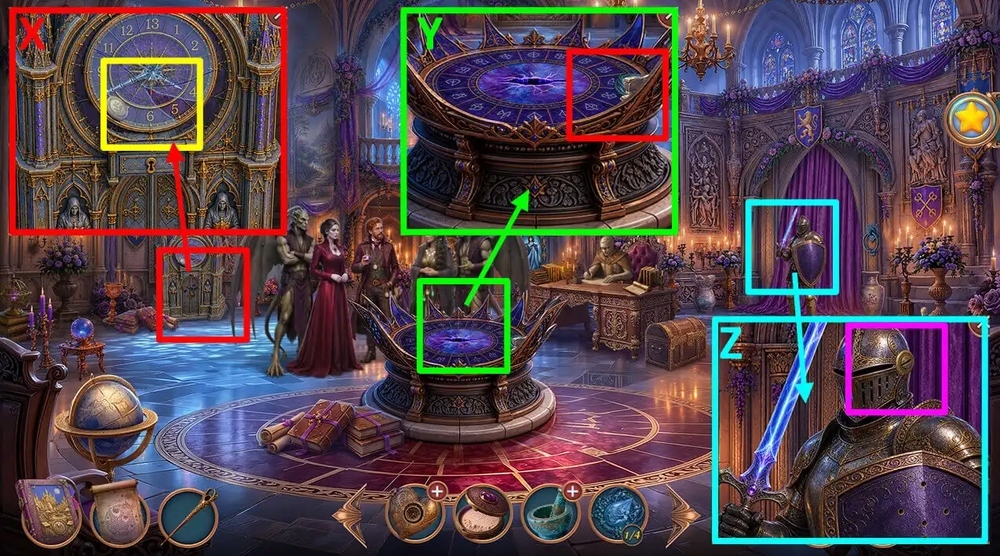
- Use DIAMOND RING on the glass, take THIN COIN (X).
- Take STAPLER and MONSTER EMBLEMS 2/4 (Y).
- Use THIN COIN on the helmet, take MONSTER EMBLEMS 3/4 and VAMPIRE TOTEM PIECE (Z).
- Go to Secret Underground.
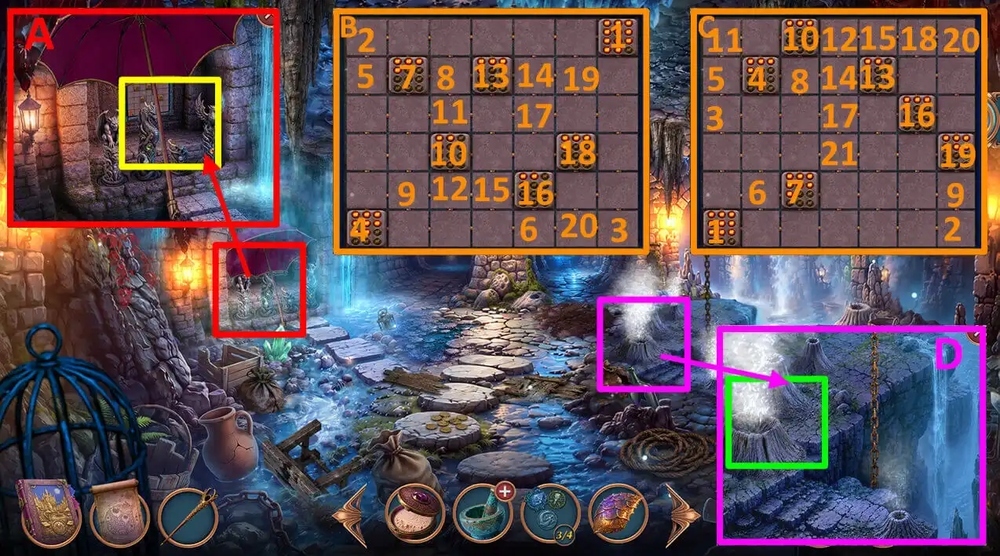
- Use VAMPIRE TOTEM PIECE on the totems (A).
- Easy Solution: Click on the cells as shown in the picture, take WATER FLOWER ROOT and GARGOYLE’S HEAD (B).
- Hard Solution: Click on the cells as shown in the picture, take WATER FLOWER ROOT and GARGOYLE’S HEAD (C).
- Use GARGOYLE’S HEAD on the hole, take SULFUR and MONSTER EMBLEMS 4/4 (D).
- Go to Gallery of Ancient Monsters.

- Use MONSTER EMBLEMS 4/4 on the portraits (E).
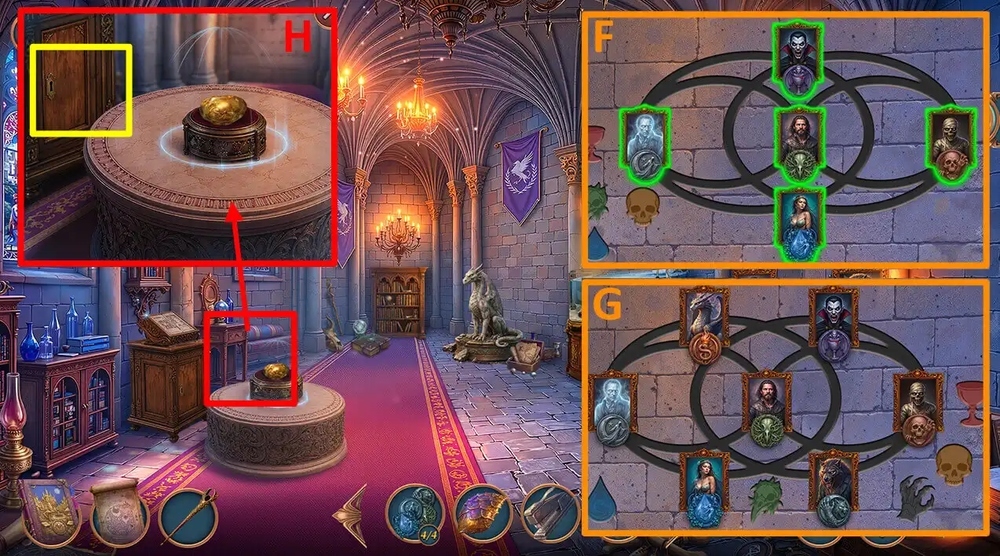
- Easy Solution: arrange the portraits as shown in the picture, take THIN KEY (F).
- Hard Solution: arrange the portraits as shown in the picture, take THIN KEY (G).
- Use THIN key on the door, take MIRROR, open MIRROR, take MIRROR BUTTON (H).
- Go to Grimwood Underground.

- Use MIRROR BUTTON on the empty slot (I).
- Play puzzle, earn HEART KEY (J).
- Go to Anubris’s Office.

- Use HEART KEY on the lock, take GEAR (K).
- Use LAMP OIL and GEAR on the IRON HEART, earn DOLL’S IRON HEART (L).
- Go back.

- Use DOLL’S IRON HEART on the doll (M).
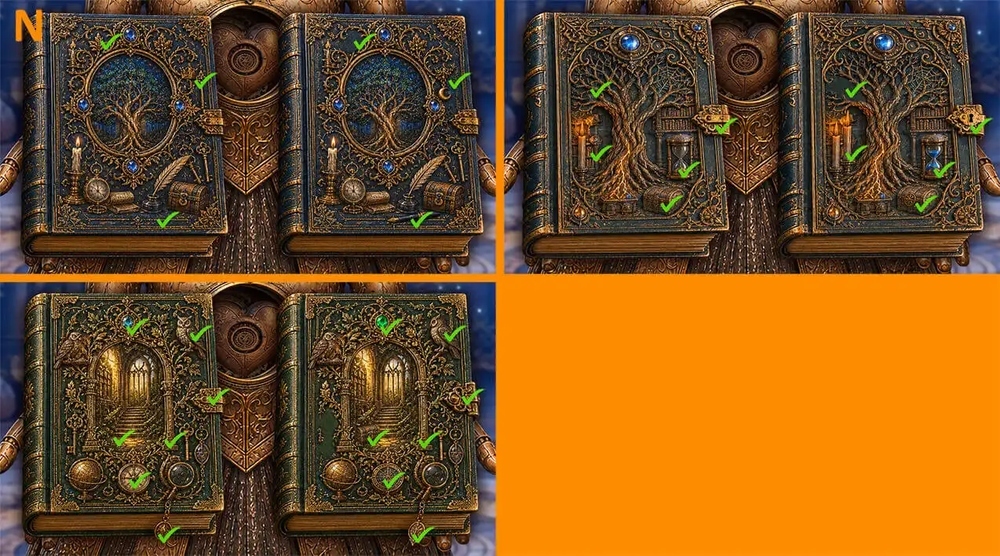
- Easy Solution: the location of the differences is shown in the figure, take and read the note, earn TOY UNICORN and GOLDEN SCARABS 1/2 (N).

- Hard Solution: the location of the differences is shown in the figure, take and read the note, earn TOY UNICORN and GOLDEN SCARABS 1/2 (O).
- Go to Anubris’s Office.

- Use TOY UNICORN on the stone, take THIN CLOTH (P).
- Use STAPLER and THIN CLOTH on the BROKEN RACKET, earn SIEVE (Q).
- Use SIEVE on the sand (R).
- Play puzzle, earn TYPEWRITER ROLLER (S).
- Use TYPEWRITER ROLLER on the typewriter, take and read the note, take HERALDIC LILY (T).
- Go to Great Masquerade Hall.

- Use HERALDIC LILY on the shield (U).
- Easy Solution: arrange the fragments as shown in the picture, take SWORD OF POWER (V).
- Hard Solution: arrange the fragments as shown in the picture, take SWORD OF POWER (W).
- Use SWORD OF POWER on the altar, take TAROT CARDS 1/3, OBERON’S POCKET WATCH and DRY BAIT (X).
- Go to Gallery of Ancient Monsters.
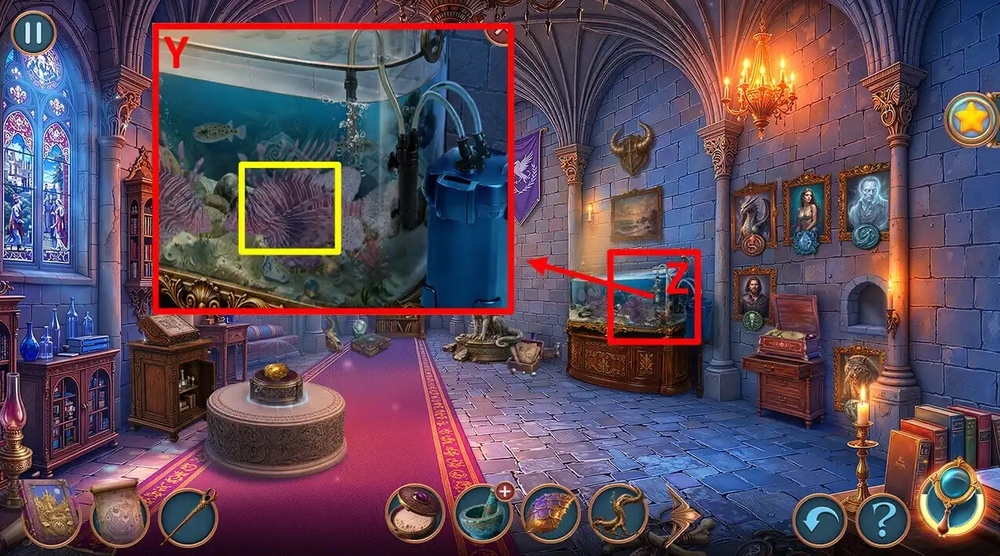
- Use DRY BAIT on the fish (Y).
- Play puzzle, earn SPEAKER HANDLE (Z).
- Go to Festival Square.

- Use SPEAKER HANDLE on the pump, take SCALES WEIGHTS, GOLDEN CRESCENT and POST TAG (A).
- Go to Castle Courtyard.

- Use POST TAG on the bats (B).
- Easy Solution: arrange the chips as shown in the picture, earn BOTANY BOOK (C).
- Hard Solution: arrange the chips as shown in the picture, earn BOTANY BOOK (D).

- Use BOTANY BOOK on the water, earn TYRIAN PURPLE (E).
- Use TYRIAN PURPLE on the MORTAR AND PESTLE, earn PURPLE POWDER (F).
- Go to Mabel’s Room.

- Use WYVERN SCALES, WATER FLOWER ROOT, SULFUR and PURPLE POWDER on the cauldron (G).
- Easy Solution: arrange the chips as shown in the picture, take MAGIC GLUE and GLYCERIN RESIDUE (H).
- Hard Solution: arrange the chips as shown in the picture, take MAGIC GLUE and GLYCERIN RESIDUE (I).
- Use GLYCERIN RESIDUE on the lamp, take WYVERN WING (J).
- Go to Gallery of Ancient Monsters.

- Use MAGIC GLUE and WYVERN RING on the statue (K).
- Easy Solution: the correct arrangement of the fragments is shown in the figure, take TAROT CARDS 2/3 and MAGIC GEM (L).
- Hard Solution: the correct arrangement of the fragments is shown in the figure, take TAROT CARDS 2/3 and MAGIC GEM (M).

- Use POWDER and Magic Staff on the rays, earn SCARAB IN AMBER (N).
- Go to Anubris’s Office.

- Use SCARAB IN AMBER on the mouth, take GOLDEN SCARABS 2/2 (O).
- Use GOLDEN SCARABS 2/2 on the slots (P).

- Easy Solution: the correct pattern is shown in the picture, take and read the note, take FORCEPS (Q).
- Hard Solution: the correct pattern is shown in the picture, take and read the note, take FORCEPS (R).
- Go to Mabel’s Room.

- Use FORCEPS on the crack, earn MABLE’S FIBULA and TAROT CARDS 3/3 (S).
- Use TAROT CARDS 3/3 on the magic ball (T).
- Play puzzle, earn GOLDEN STAR (U).
- Use GOLDEN CRESCENT and GOLDEN STAR on the slots, take CRAB FLAVOR CHIPS (V).
- Go to Festival Square.
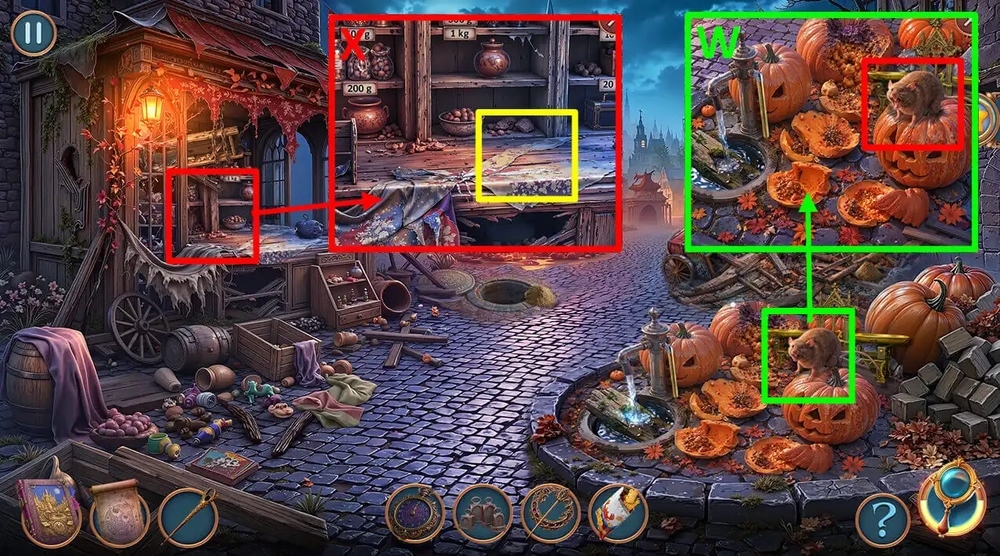
- Use CRAB FLAVOR CHIPS on the rat, take COMMERCIAL SCALES (W).
- Use COMMERCIAL SCALES and SCALES WEIGHTS on the table (X).
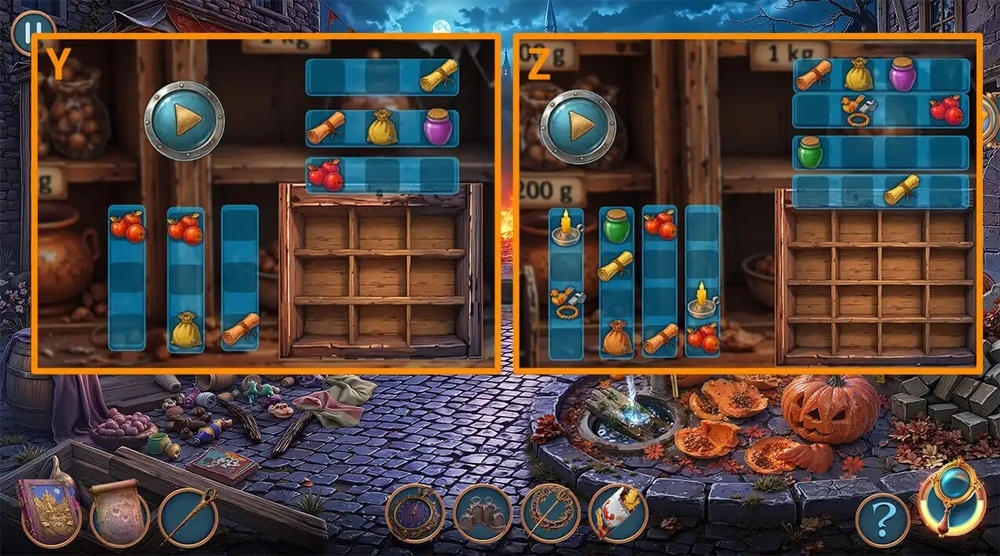
- Easy Solution: Place the tiles as shown in the picture, press the PLAY button, take CLOCK WIND-UP KEY (Y).
- Hard Solution: Place the tiles as shown in the picture, press the PLAY button, take CLOCK WIND-UP KEY (Z).
- Go to Great Masquerade Hall.

- Use OBERON’S POCKET WATCH and CLOCK WIND-UP KEY on the watch, take and read the note, take OLD MONOCLE (A).
- Use OLD MONOCLE on the altar, take Magic Gem and LAST CLUE (B).
- Select this option, earn EVIDENCE BAG (C).
- Use MABLE’S FIBULA on the EVIDENCE BAG, earn EVIDENCE (D).
- Use EVIDENCE on the table, use Magic Staff on the EVIDENCE (E).
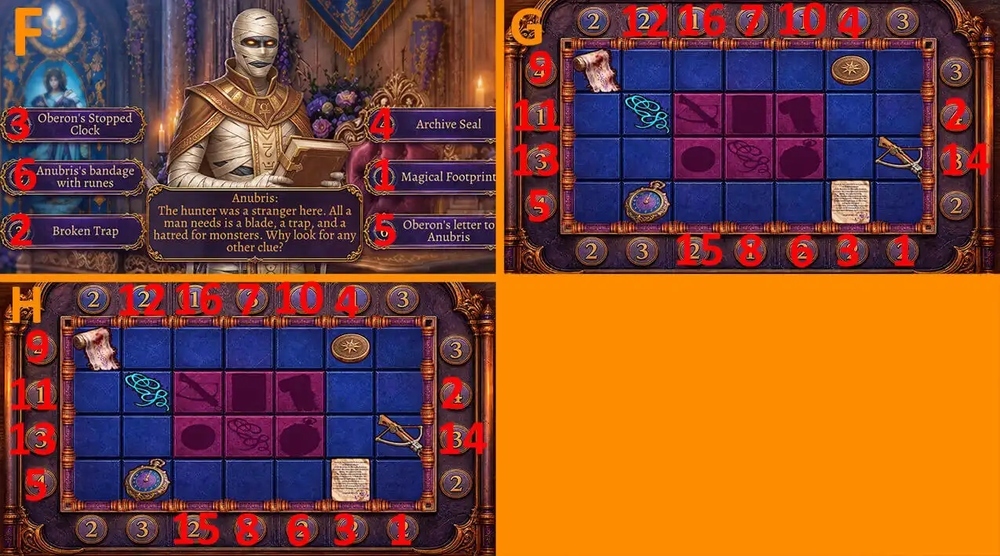
- Solution: Press the buttons as shown in the picture (F).
- Easy Solution: Press the buttons in the following order: 1-2-3-2-4-2-5-6-7-8-9-10-11-12-6-13-14-15-10-14-16-13-15-16 (G).
- Hard Solution: Press the buttons in the following order: 1-2-3-2-4-2-5-6-7-8-9-10-11-12-6-13-14-15-10-14-16-13-15-16 (H).
Congratulations! You have completed the game Grimwood Secrets 1: Cursed Heirloom.