Criminal Archives 5: Symphony of Death (Bonus Chapter) – You must complete the investigation and expose Clara Morro. Melinda Watson suggests staging a special performance that should help catch her red-handed. But first, you need to prepare the theater for the final act, check the sets, the prop weapons, and the orchestra pit. Among the items left behind, your attention is drawn to a violin case that Melinda had already encountered during the investigation. The detective leaves a code that allows you to open it and discover what’s hidden inside. As you search, you’ll need to revisit the story of Astrid Villar and examine photographs and testimonies that will help piece together the details of her fate. Clara is still determined to carry out her plan for revenge, so the outcome of the final confrontation depends on your actions. You can stop her, try to convince her to abandon her plan, or simply watch what unfolds. Every choice you make will influence the course of events and the outcome of this story.
Bonus Chapter Walkthrough

- Take HYGIEIA AMULET PART, read the note (A).
- Use HYGIEIA AMULET PART on the first aid kit on the wall, take OVEN MITTEN and STENCIL (B).
- Use STENCIL on the panel with many buttons (C).
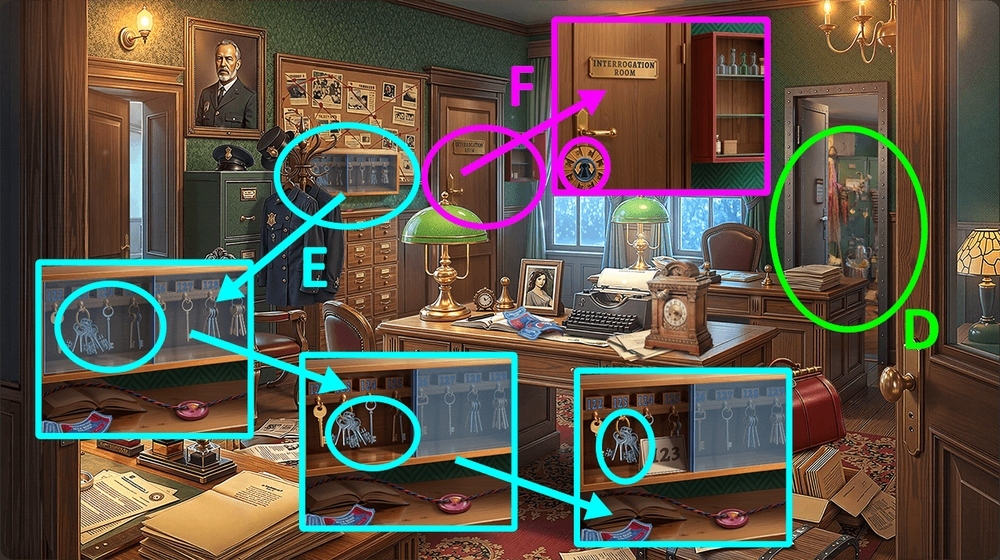
- Play puzzle, earn ROOM NUMBER (D).
- Tap on the key box to open it, use ROOM NUMBER on the key box, take BUNCH OF KEYS (E).
- Use BUNCH OF KEYS on the interrogation room door (F).
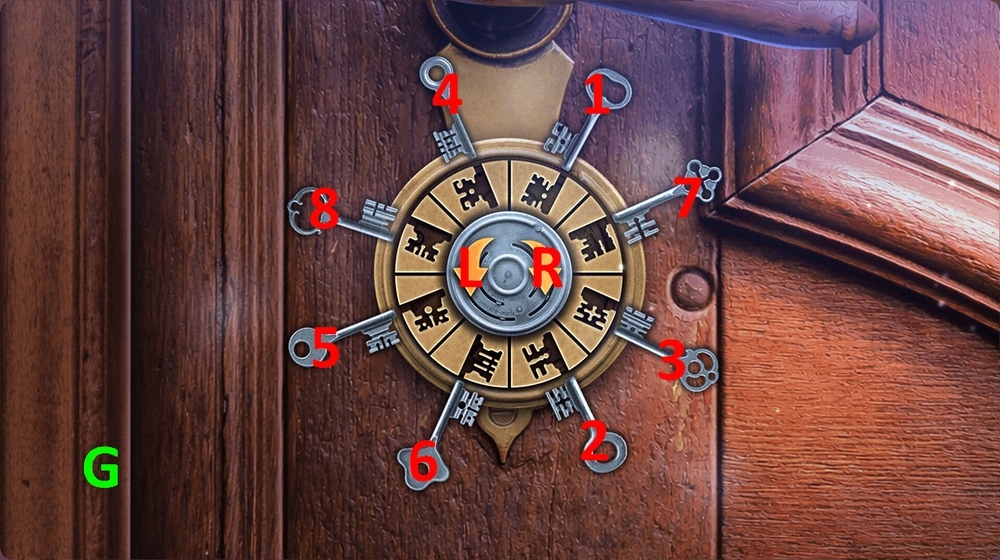
- Easy solution: R-1-2-R-3-R-4-Lx4-5-6-L-7-L-8 (G).

- Hard solution: 1-R-2-3-4-Lx3-5-6-L-7-8-Lx3-9-L-10 (H).
- Go forward.
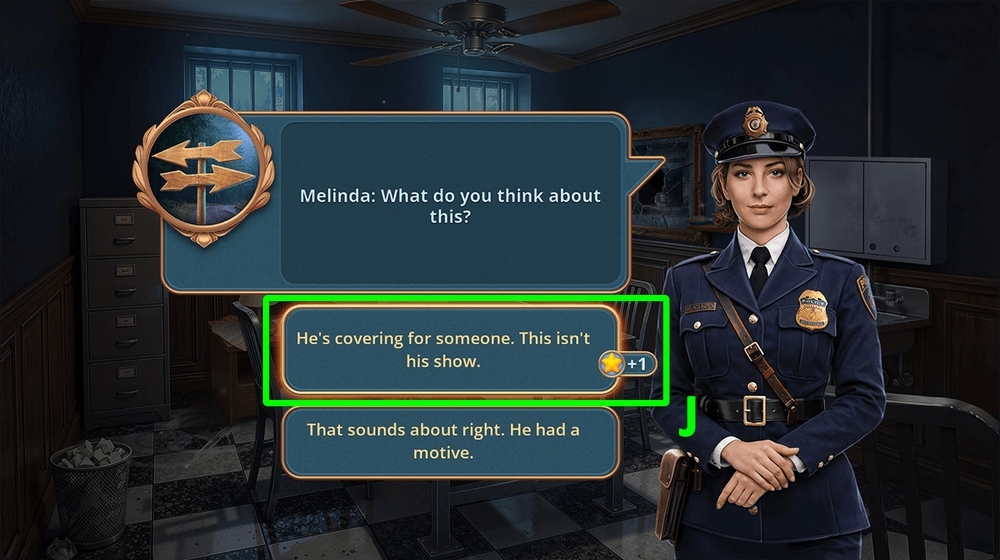
- Select this option (J).

- Use OVEN MITTEN on the shattered glass, take LIGHT BULB (K).
- Read the note, take BOARDS 1/2, use LIGHT BULB on the lamp, take HAIR CLIP (L).

- Use HAIR CLIP on the bag clasp (M).
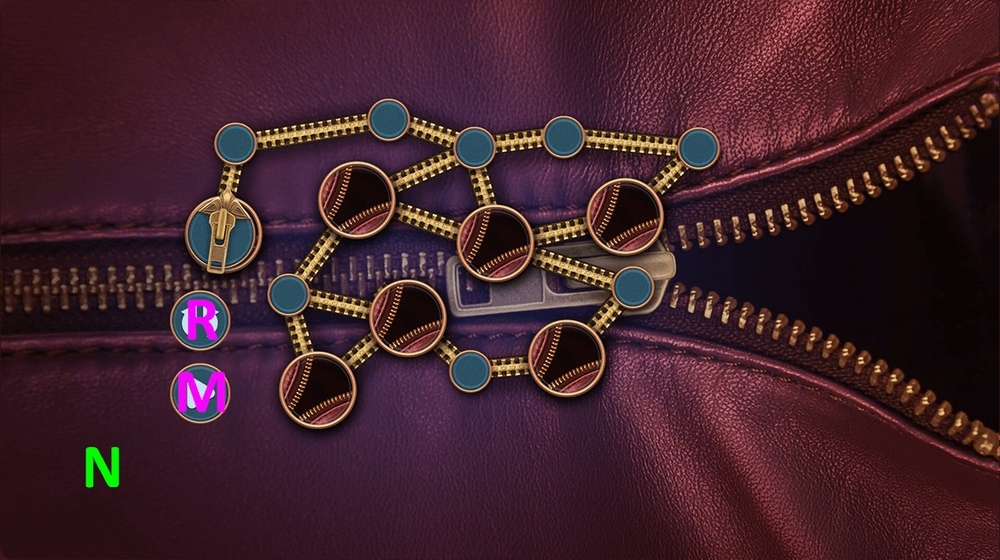
- Easy solution: Mx3-Rx2-Mx6-R-Mx2-R-Mx3 (N).

- Hard solution: Mx3-Rx2-Mx2-R-Mx8-R-Mx2-R-Mx3 (O).

- Take TIE (P).
- Use TIE on the drawer, take CLOCK HANDS (Q).
- Go to Police Station.

- Use CLOCK HANDS on the clock face (R).
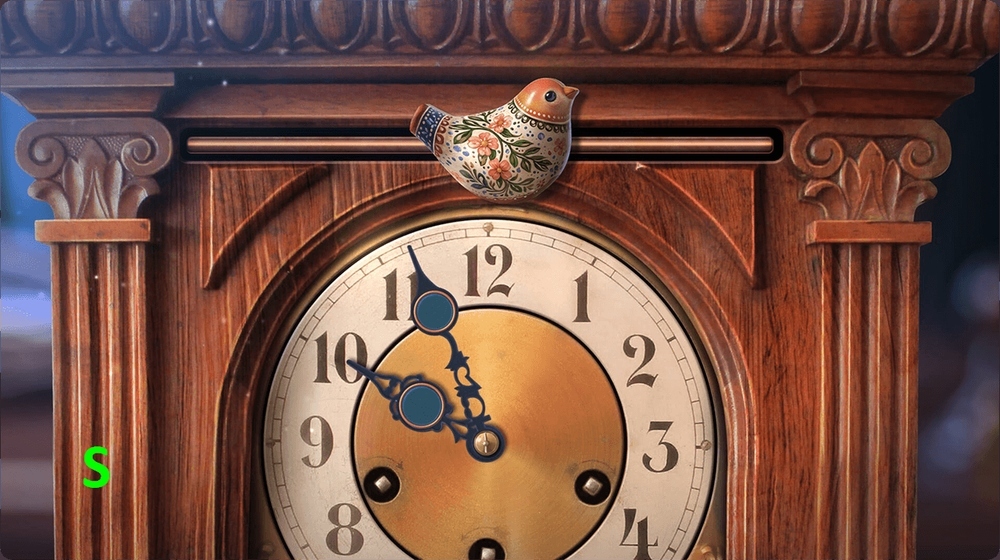
- Easy solution: Follow the instructions included with the game (S)

- Hard solution: Follow the instructions included with the game (T)
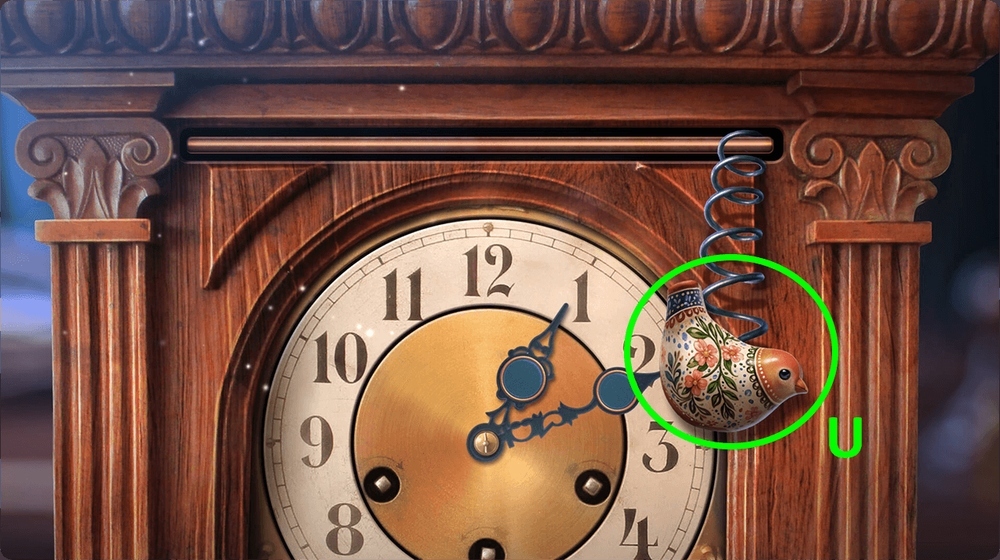
- Take BIRD WHISTLE (U).
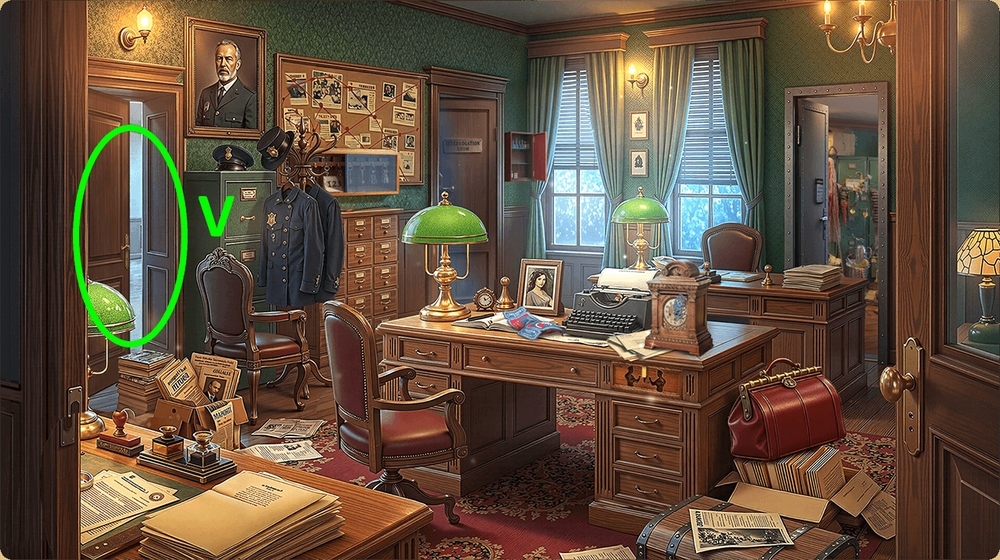
- Go forward (V).
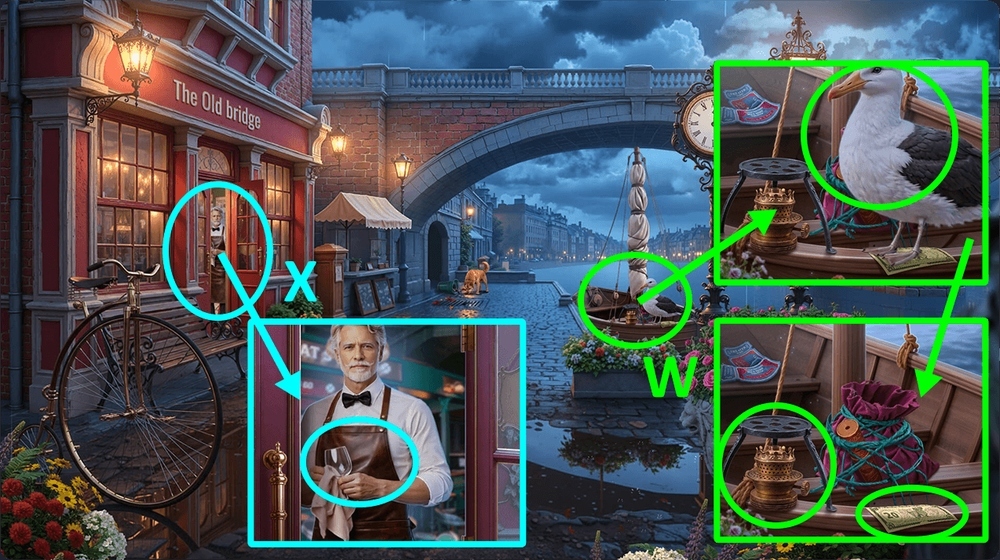
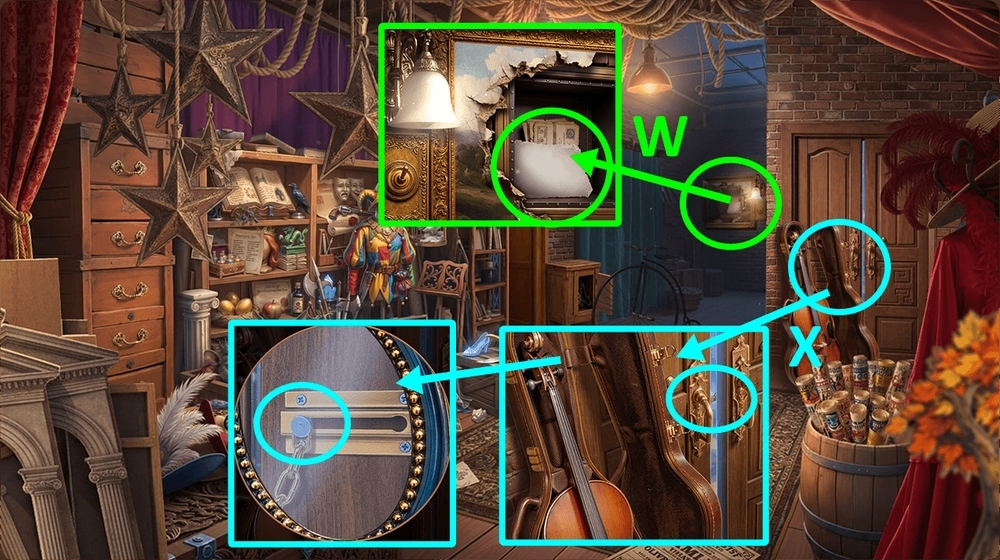
- Use BIRD WHISTLE on the albatross, take KEROSENE BURNER and BANKNOTES 2/2 (W).
- Use BANKNOTES 2/2 on the bartender (X).
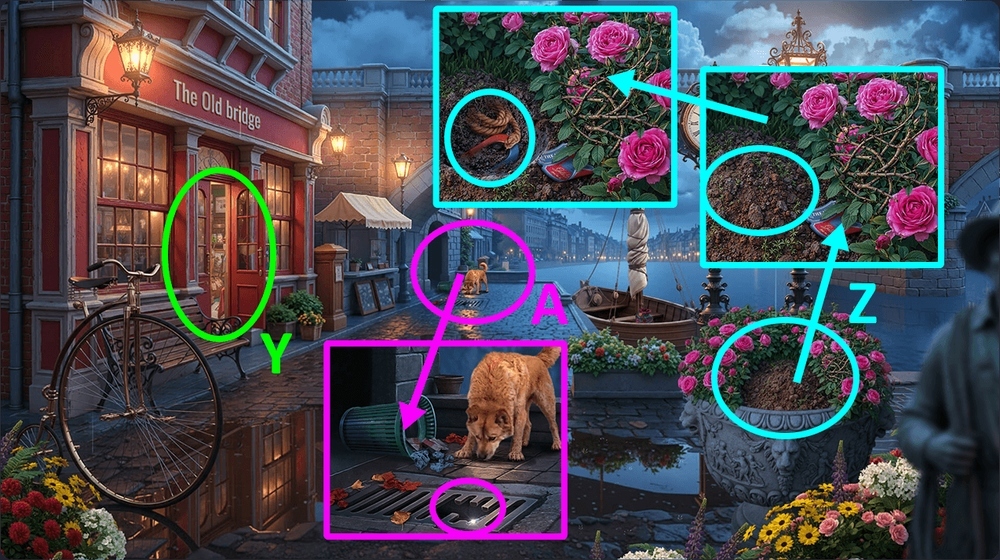
- Play puzzle, earn TROWEL (Y).
- Use TROWEL on the dirt, take MAGNET (Z).
- Use MAGNET on the drain where the item fell, earn KNIFE (A).
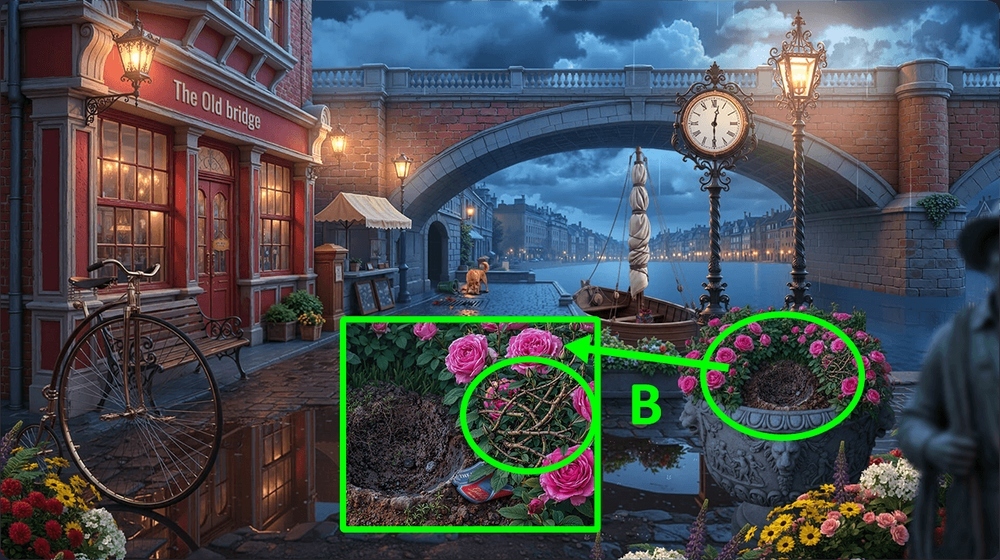
- Use KNIFE on the prickly branches (B).

- Easy solution: A-B-D-H-E-F-G-H-B-A-G-Fx3-E-Gx2-D (J)
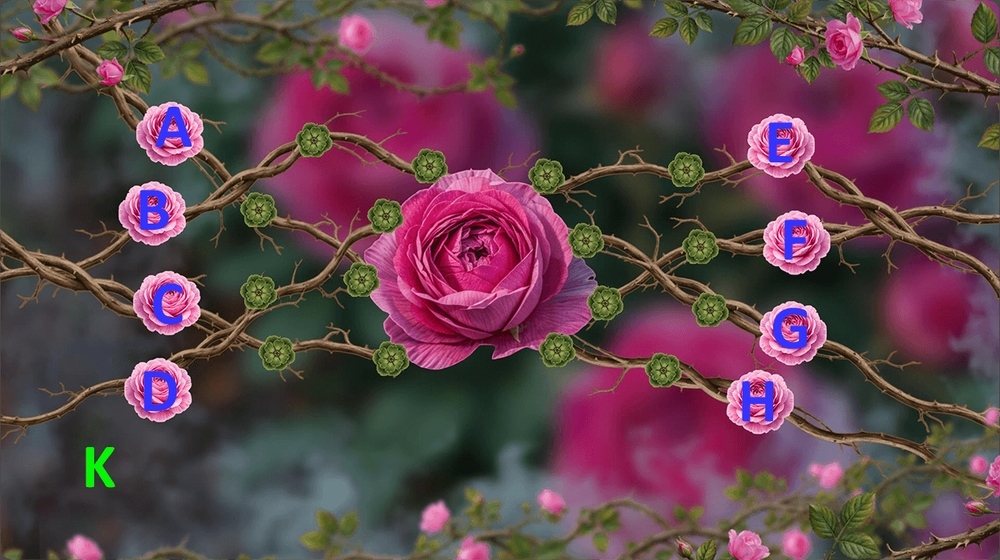
- Hard solution: F-G-Hx2-G-F-Ax2-Gx2-Dx2-Cx2-Fx2-Bx2-Ex2 (K)
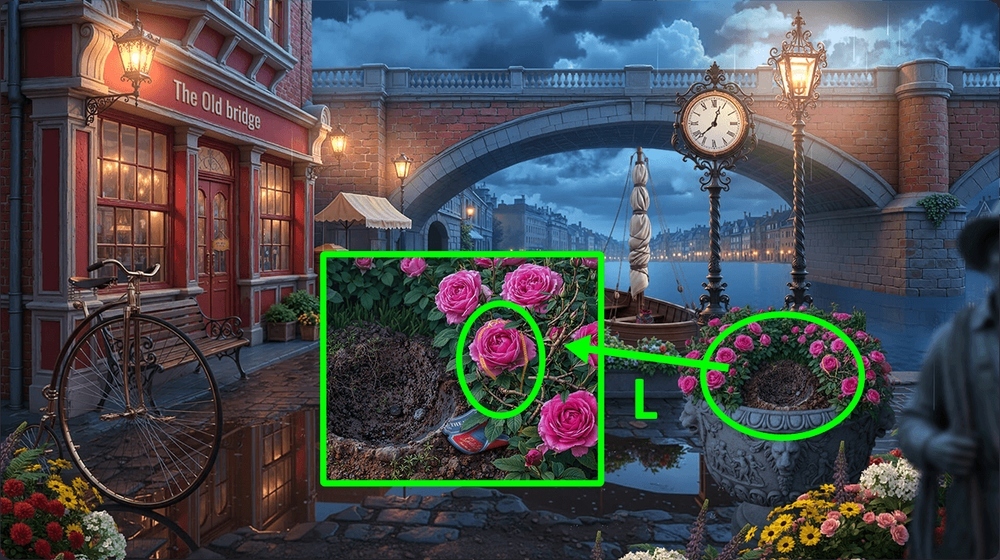
- Take CHAIN (L).
- Go to Interrogation Room.

- Use CHAIN on the HOOK, earn CHAIN WITH HOOK.
- Use CHAIN WITH HOOK on the cork, take SOAP (M).
- Use SOAP on the floor under the night stand, take BONES and FLASK (N).
- Go to Promenade.
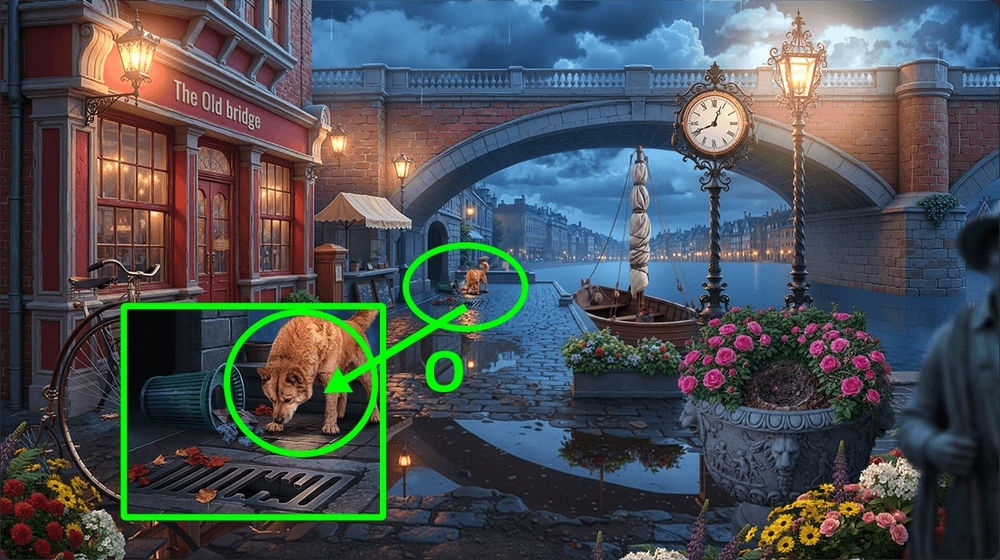
- Use BONES on the dog (O).

- Easy solution: 1-1, 2-2, 3-3, 4-4, 5-5, 6-6, 7-7, 8-8, 9-9 (P).

- Hard solution: 1-1-1, 2-2-2, 3-3-3, 4-4-4, 5-5-5, 6-6-6, 7-7-7 (Q).
- Go forward.
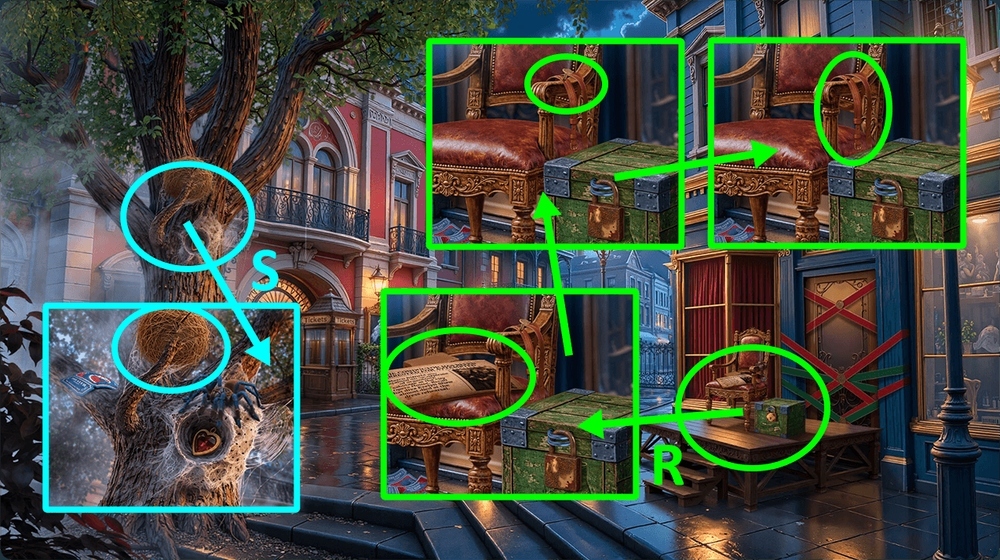
- Read the note, take CHAIN, BROKEN KEY and MIRROR, use FORK on the sticking out nail, take BELT (R).
- Use YO-YO on the bird’s nest (S).
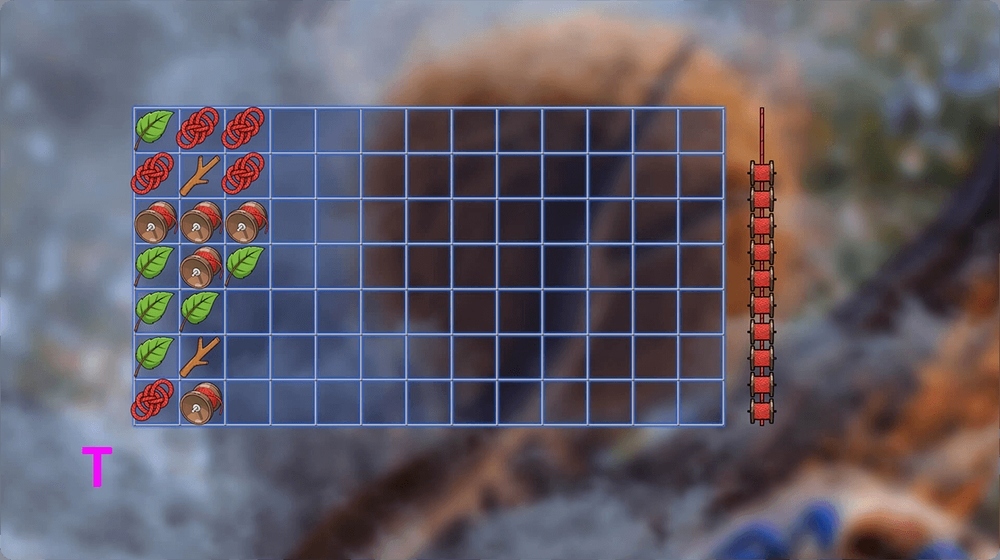
- Easy solution: Solution is random (T).

- Hard solution: Solution is random (U).

- Take FOLDING CANE and TIN FIGURINE (V).
- Use FLASK on the garden fountain, earn WATER (W).

- Use BROKEN KEY, CLAY MOLD, TIN FIGURINE and WATER on the KEROSENE BURNER, earn KEROSENE BURNER and KEY CAST.
- Use KEY CAST on the barred door, take BOARDS 2/2 and SPRING (X).
- Go to Interrogation Room.

- Use BOARDS 2/2 on the niche in the wall (Y).
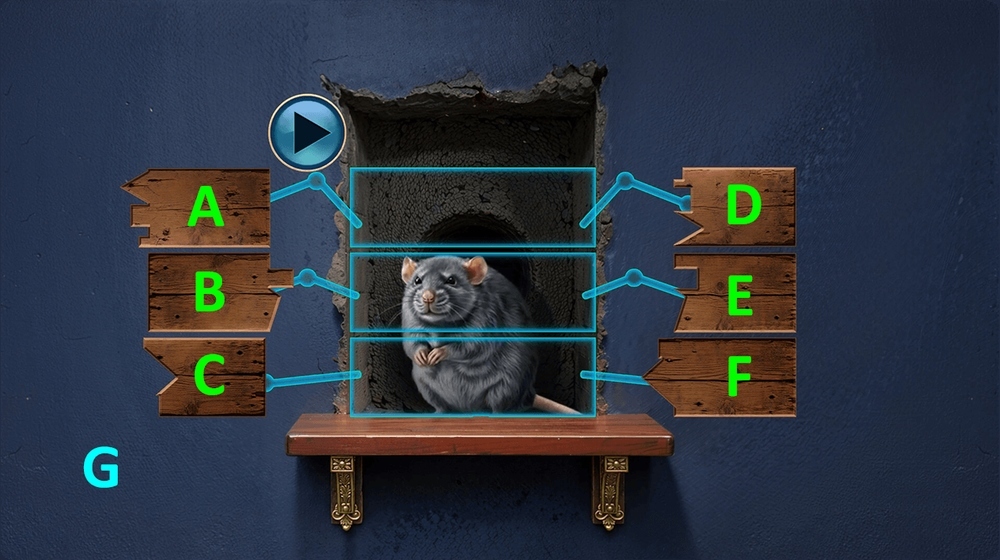
- Easy solution: Ax1-Bx3-Cx2-Dx2-Ex3-Fx1 (G).
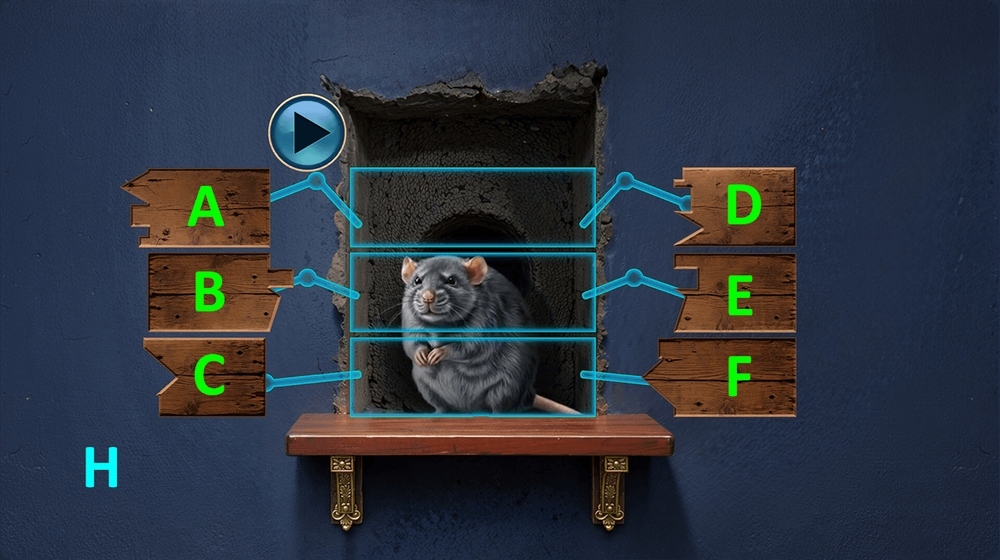
- Hard solution: Ax1-Bx3-Cx2-Dx2-Ex3-Fx1 (H).

- Take LAMP BUTTON and SCREWDRIVER (J).
- Use SCREWDRIVER on the screws on the box, take QUIVER (K).
- Go to Theater Street.
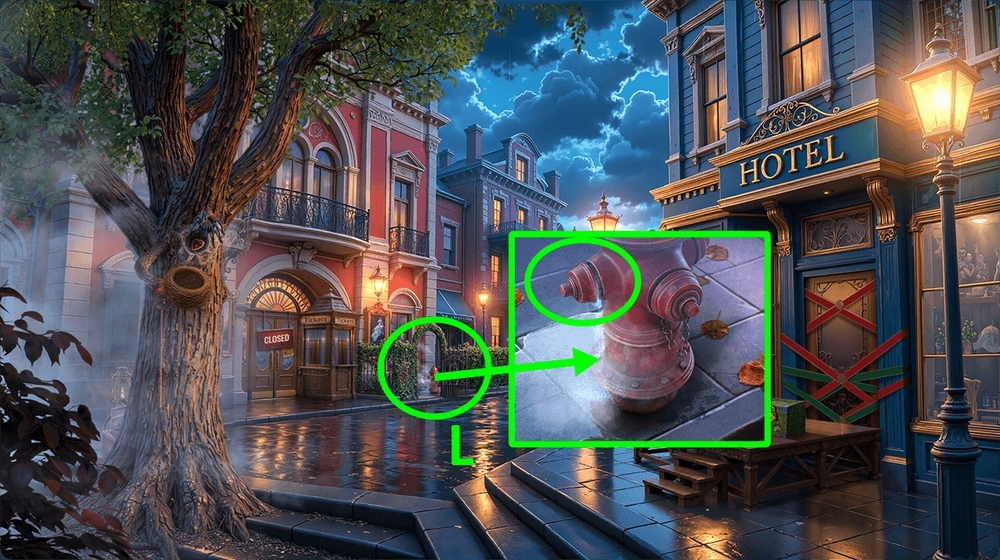
- Use QUIVER and BELT on the hydrant (L).

- Easy solution: Arrange the drop chains as shown in the steps (1-4).
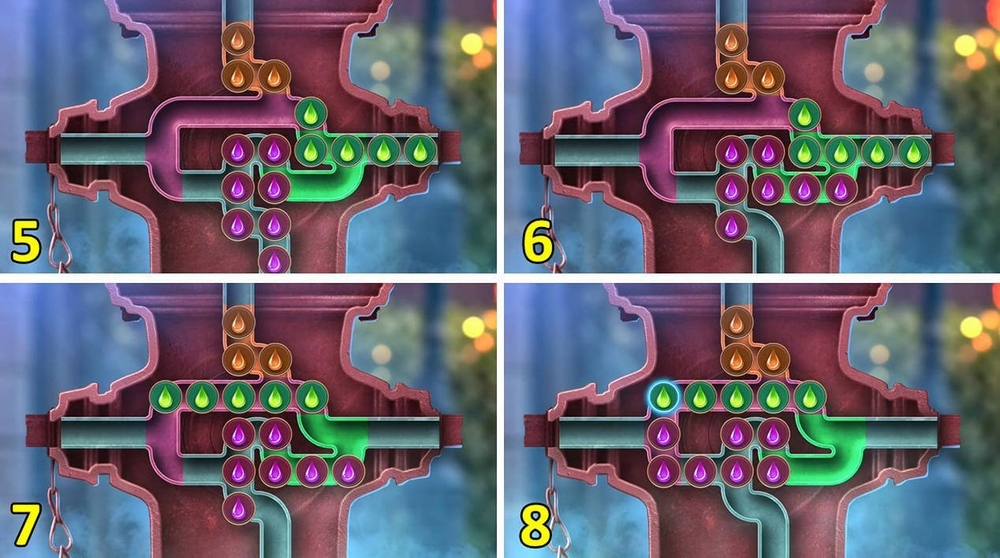
- Easy solution (5-8).

- Easy solution (9-12).
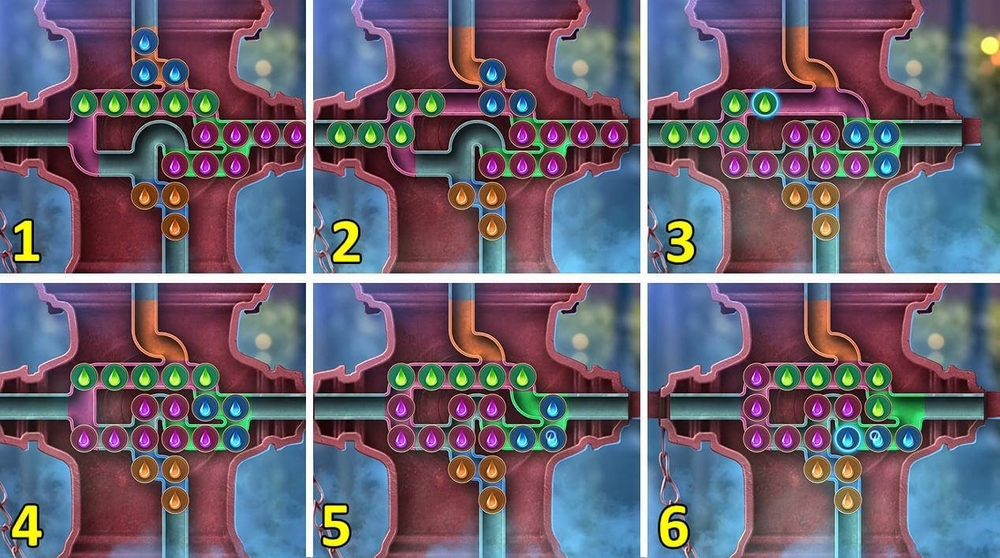
- Hard solution: Arrange the drop chains as shown in the steps (1-6).
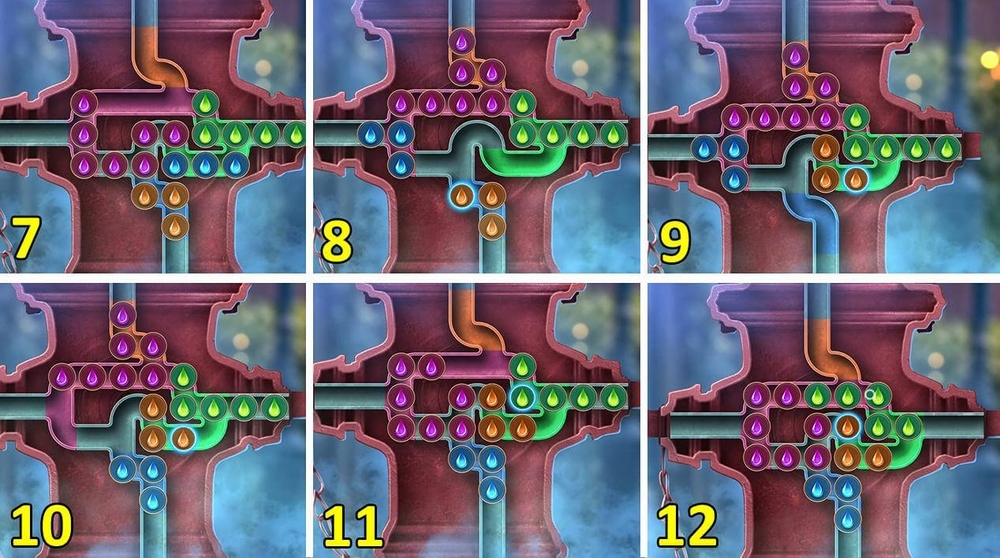
- Hard solution (7-12).
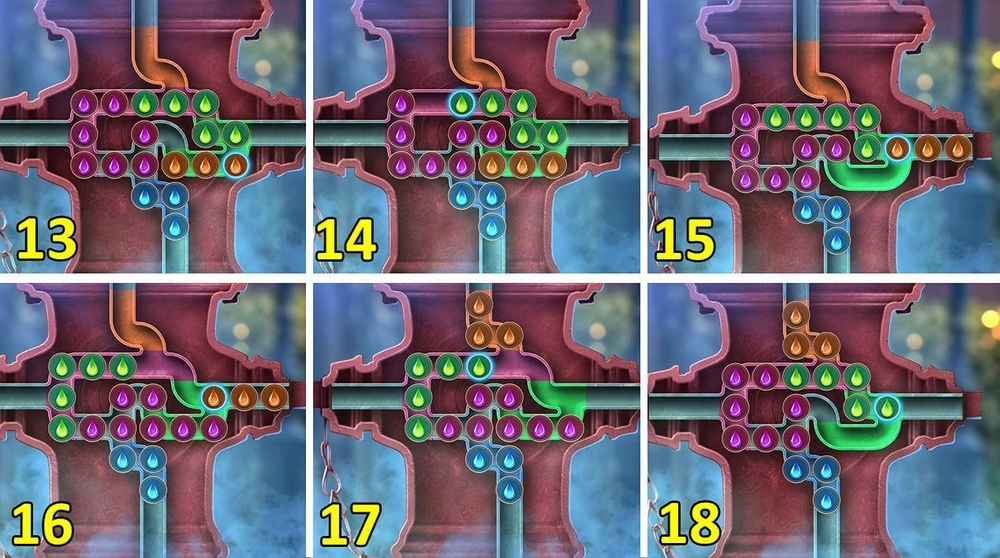
- Hard solution (13-18).
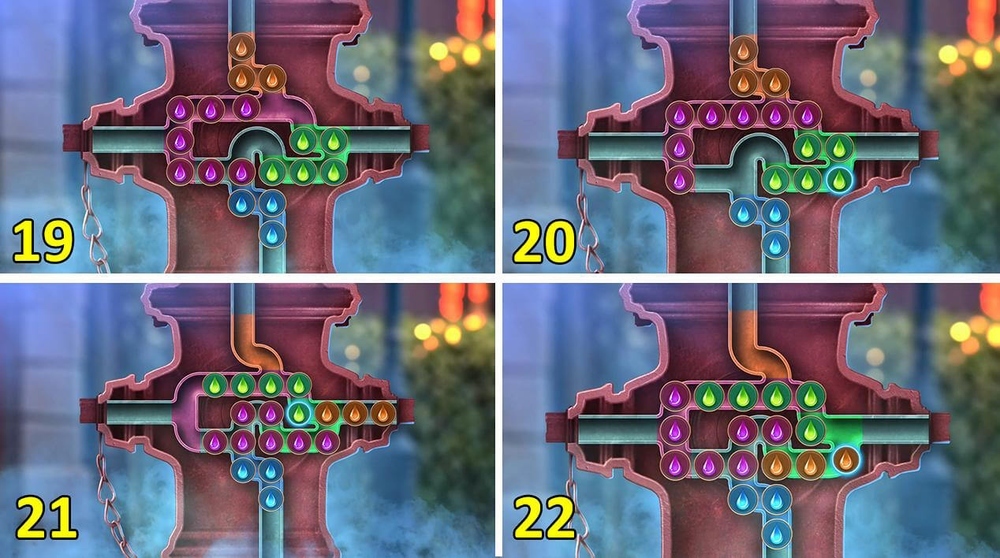
- Hard solution (19-22).
- Go forward.
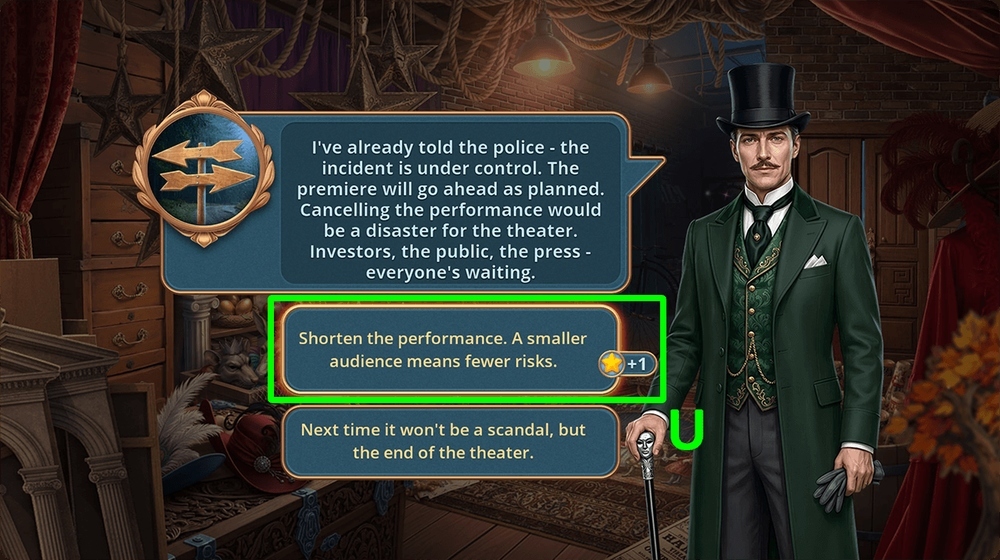
- Select this option (U).

- Use LAMP BUTTON on the wires, take RULER (V).
- Take SAFE HANDLE, use RULER on the cupboard, read the note, take INVENTORY LIST (W).

- Use INVENTORY LIST on the inventory (X).

- Play puzzle, earn MUSICAL NOTE AMULET (Y).
- Use MUSICAL NOTE AMULET on the case, take SHOE POLISH and JACK (Z).
- Use JACK on the lift grid (A).

- Solution: Arrange the elements as shown in the picture and click the “Go” button (B).
- Go forward.
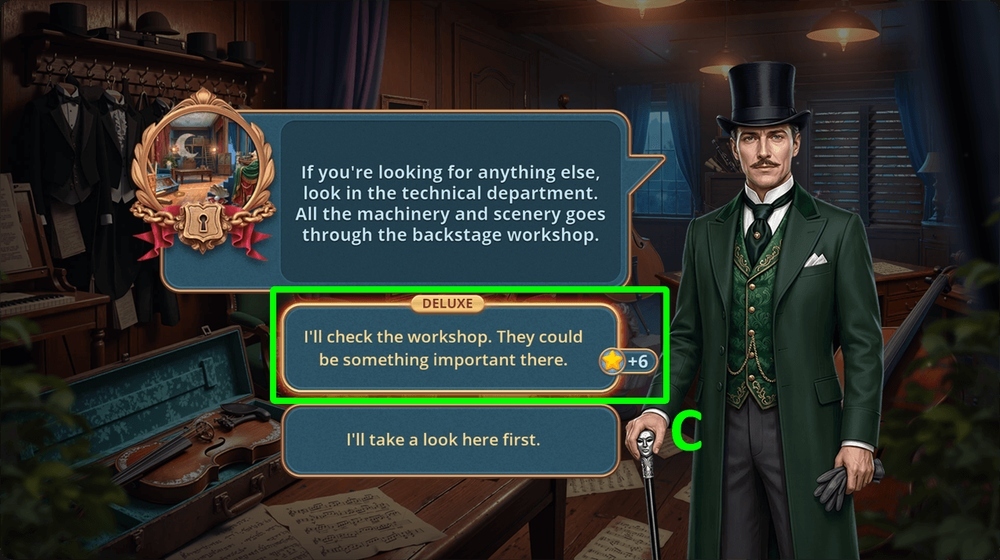
- Select this option (C).
- Go forward.
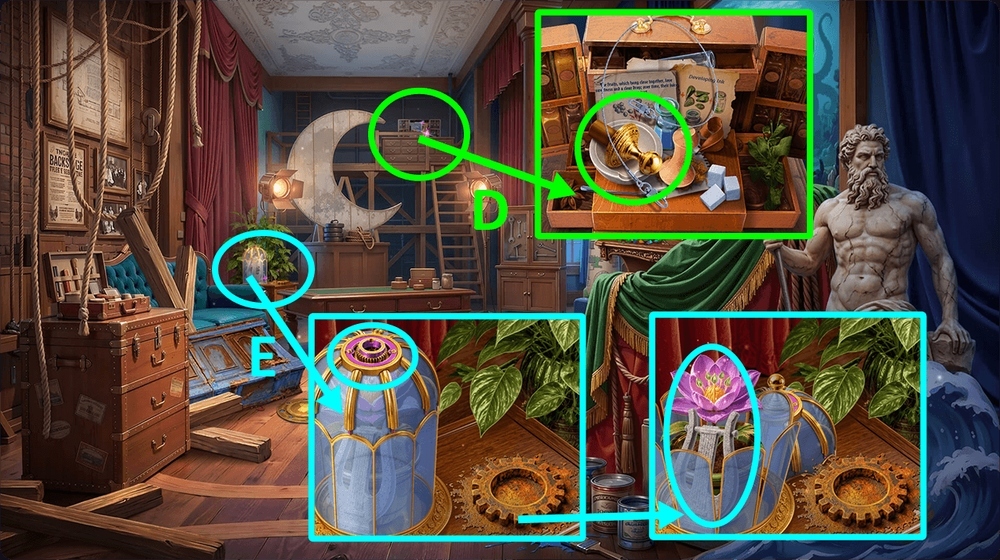
- Take STRING and DOME HANDLE (D).
- Use DOME HANDLE on the flower covered by a dome, take PECULIAR FLOWER SEEDS and STONE HARP (E).

- Use STONE HARP on the bust of Hermes, take BRUSH and BRASS KNUCKLES (F).
- Use BRASS KNUCKLES on the STRING, earn STRING SAW.
- Use STRING SAW on the debris, take BOTTLES 1/2 and MEDICAL STAPLE REMOVER (G).
- Go to Orchestra Room.
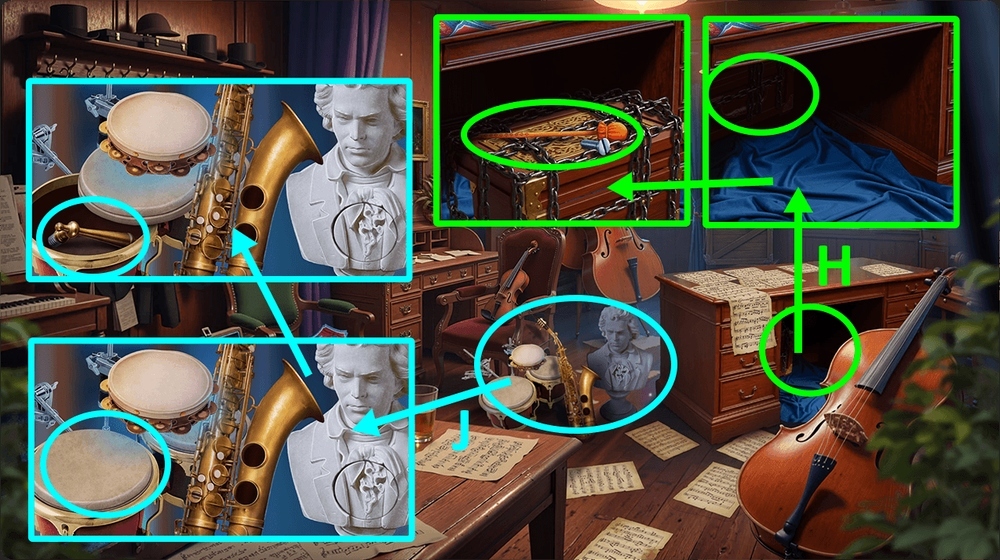
- Use FOLDING CANE on the box of props, take DRUMSTICK and SCREWS 1/2 (H).
- Use DRUMSTICK on the musical instruments, take BLINDS HANDLE (J).
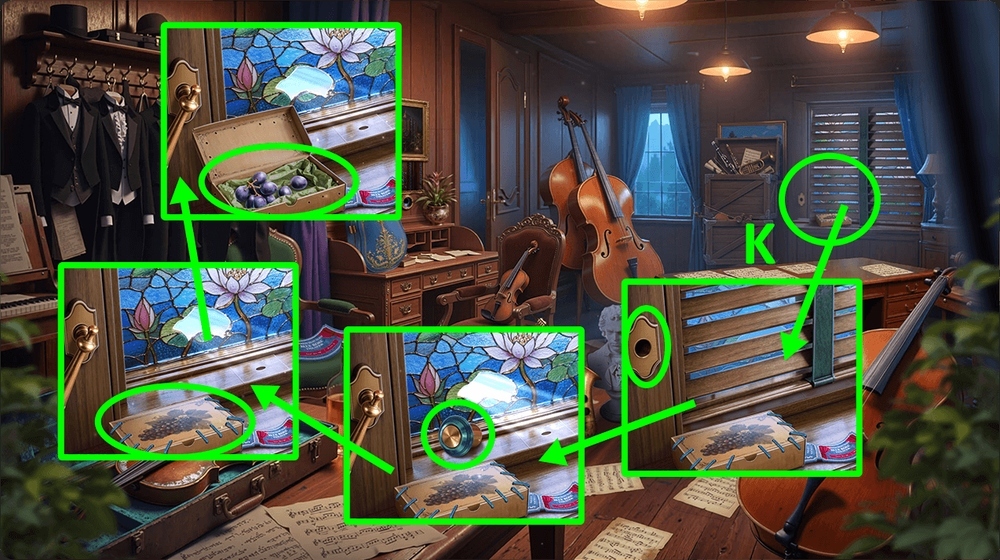
- Use BLINDS HANDLE on the place for a handle, take BUTTON, use MEDICAL STAPLE REMOVER on the package, take GRAPES (K).
- Go to Technical Workshop.

- Use GRAPES on the mortar, take GRAPE VINEGAR (L).
- Use GRAPE VINEGAR and BRUSH on the rust, take GOLDEN GEAR (M).

- Use GOLDEN GEAR on the closed hatch, take PAPER CLIP (N).
- Go to Orchestra Room.

- Use BUTTON and SPRING on the control panel, read the note, take HEARING TUBE (O).
- Go to Technical Corridor.

- Use SAFE HANDLE and HEARING TUBE on the safe (P).
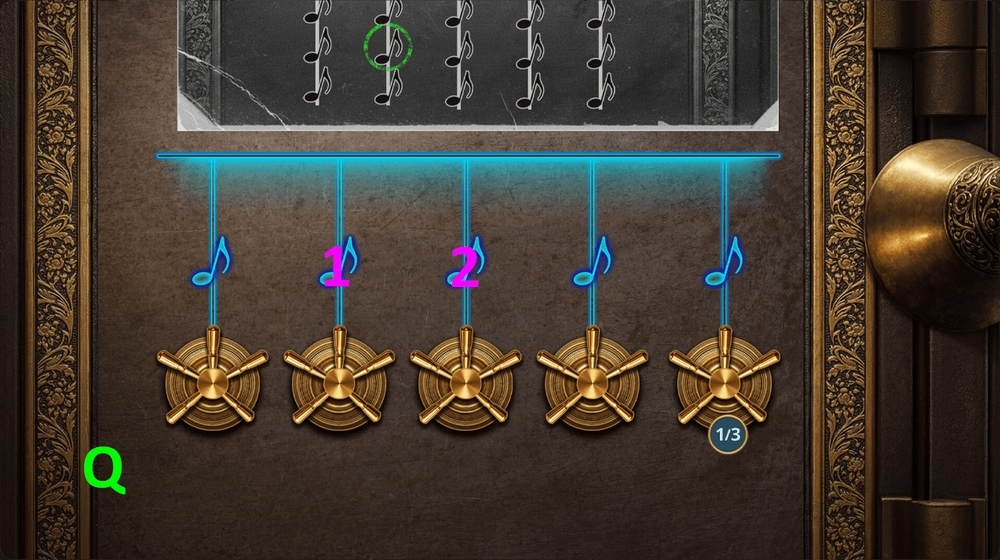
- Easy solution: Step 1: 1-2 (Q).
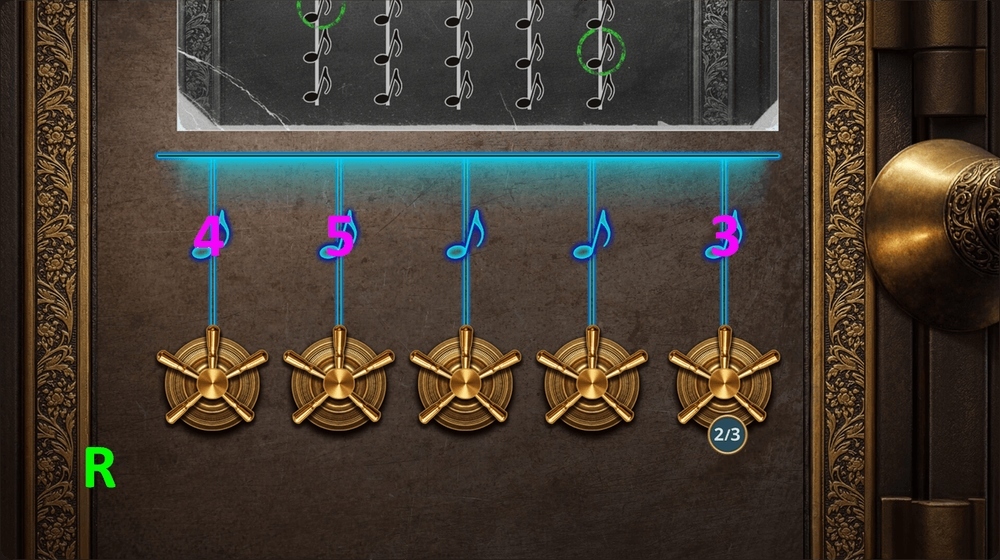
- Step 2: 3-4-5 (R).
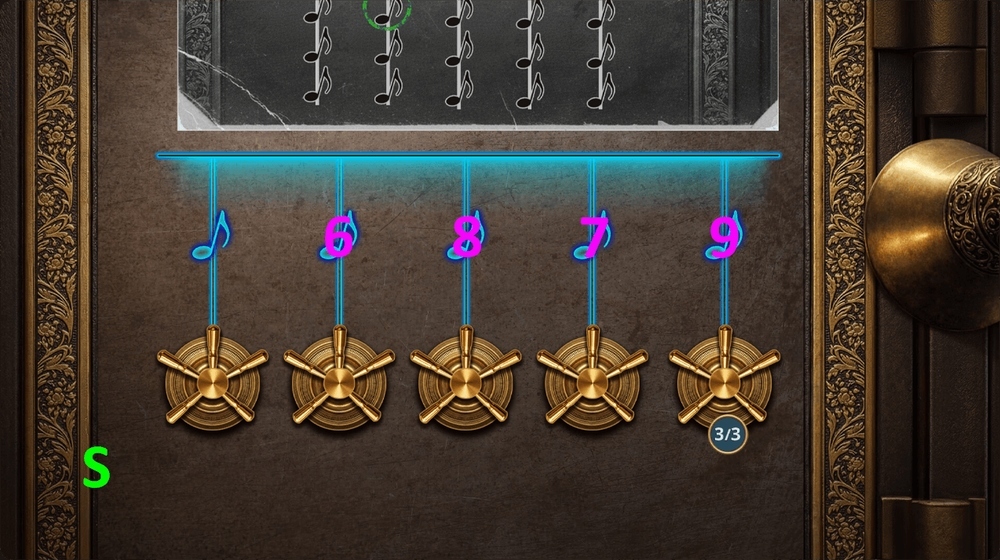
- Step 3: 6-7-8-9 (S).
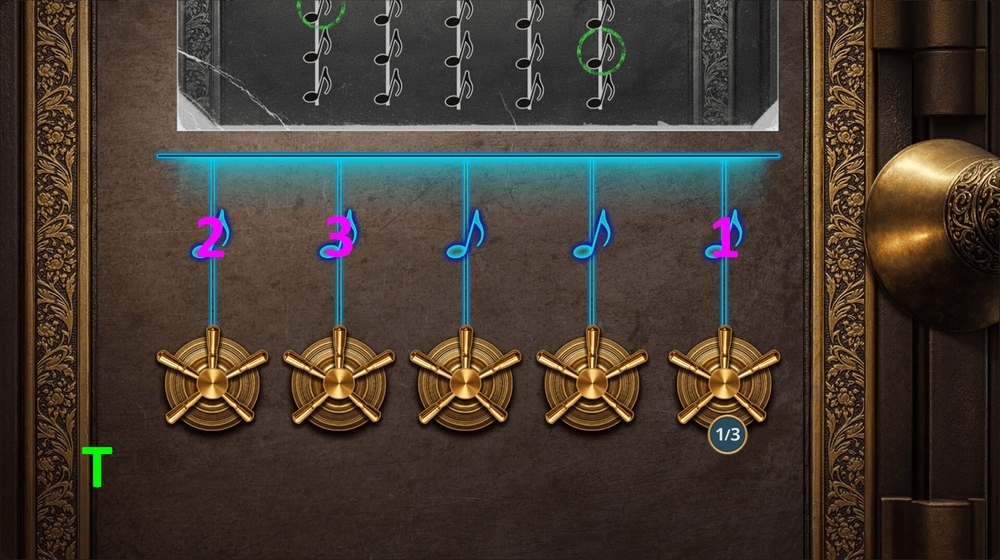
- Hard solution: Step 1: 1-2-3 (T).

- Step 2: 4-5-6-7 (U).
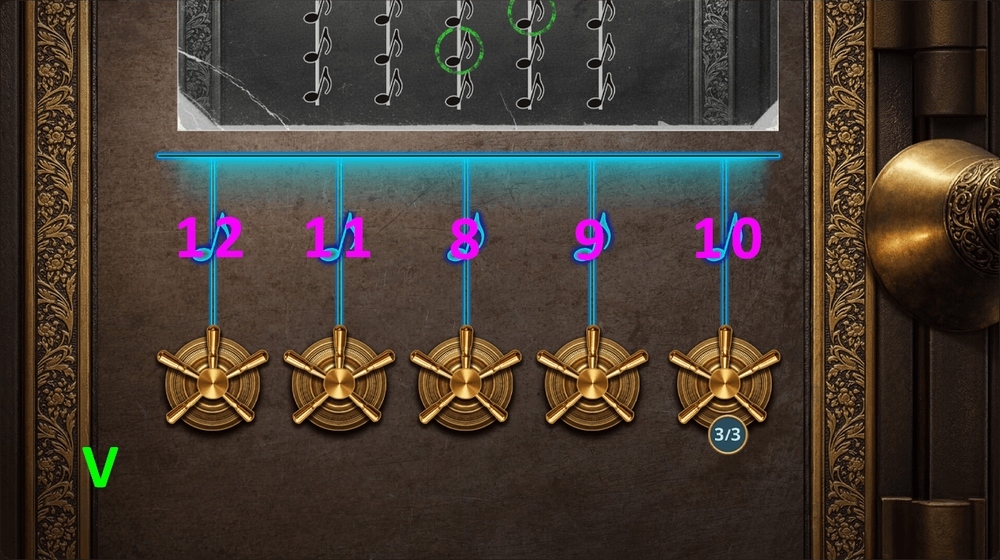
- Step 3: 8-9-10-11-12 (V).
- Take BLANK SHEET and EARRING (W).
- Use MIRROR on the door, use EARRING on the latch (X).
- Go forward.
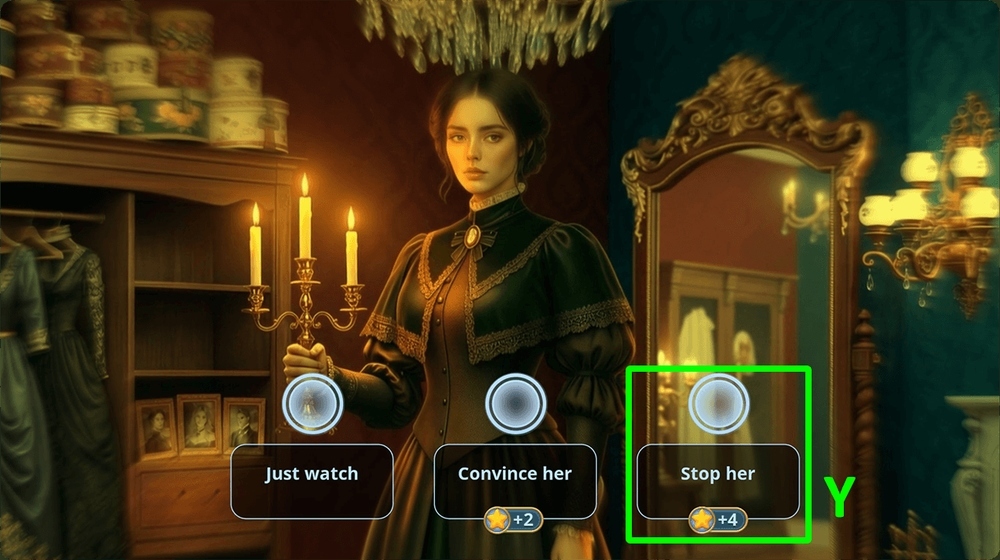
- Select this option (Y).
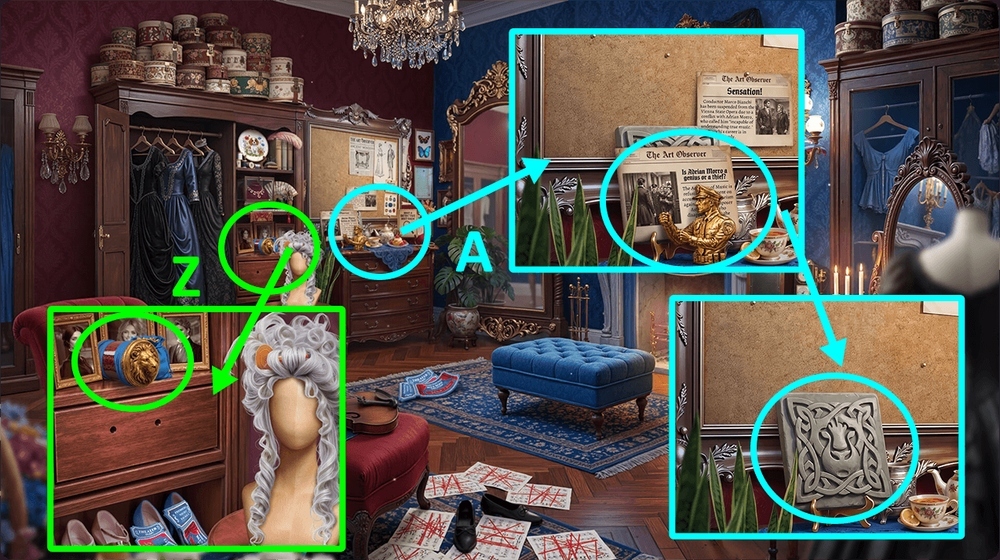
- Take LION CRYPTEX (Z).
- Take FIGURINES 1/2, read the note, use BLANK SHEET and SHOE POLISH on the pattern, earn PATTERN IMPRINT (A).
- Use PATTERN IMPRINT on the LION CRYPTEX.

- Easy solution: Arrange all the elements as shown in the image (B).
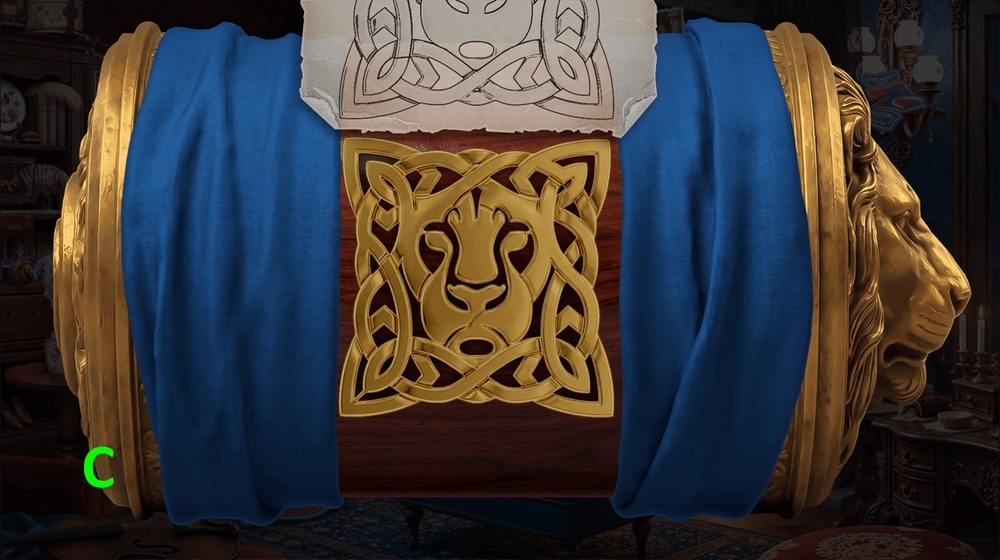
- Hard solution: Arrange all the elements as shown in the image (C).

- Read the note, take LONG COMB (D).
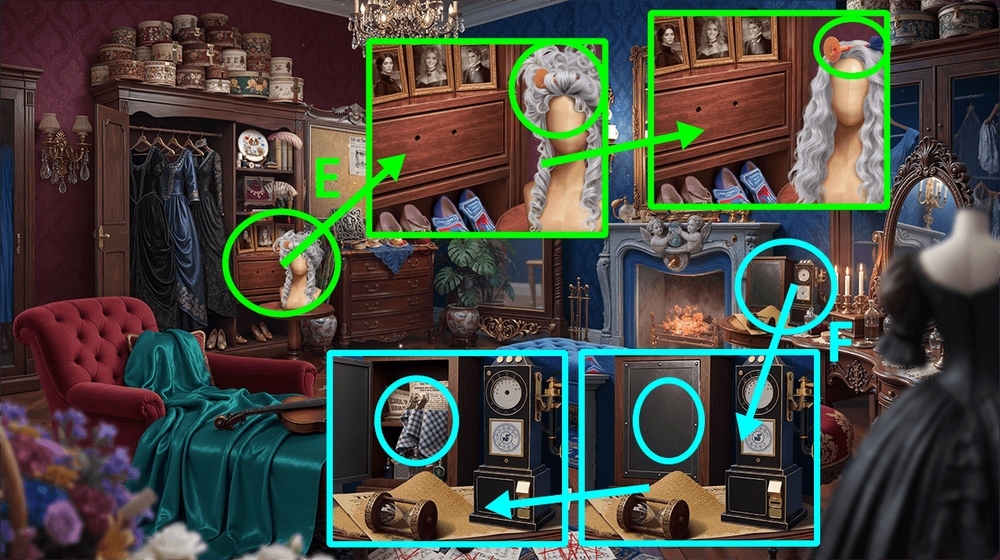
- Use LONG COMB on the bust with a wig, take TOY DART WITH SUCTION CUP (E).
- Use TOY DART WITH SUCTION CUP on the tin door, take TOWEL and NEWSPAPER CLIPPINGS (F).

- Use NEWSPAPER CLIPPINGS on the wall (G).

- Play puzzle, earn SHELL-SHAPED HAIRPIN (H).
- Use SHELL-SHAPED HAIRPIN on the polish, take KNITTING NEEDLES, use PAPER CLIP on the pin, take BOTTLES 2/2 (J).
- Go to Technical Workshop.
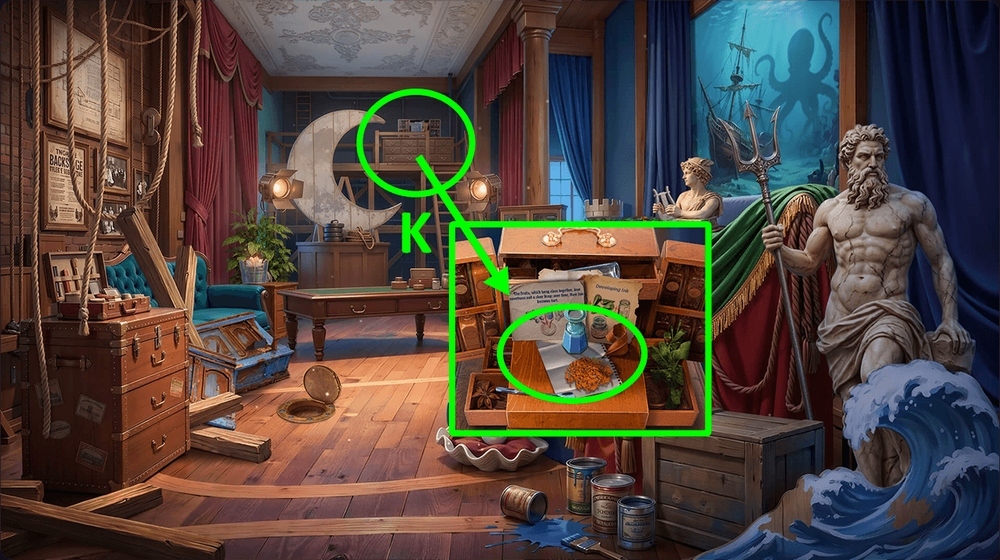
- Use BOTTLES 2/2 and PECULIAR FLOWER SEEDS on the weird laboratory (K).

- Easy solution: 1-1, 2-2, 3-3, 4-4, 5-5, 6-6, 7-7, 8-8 (L).
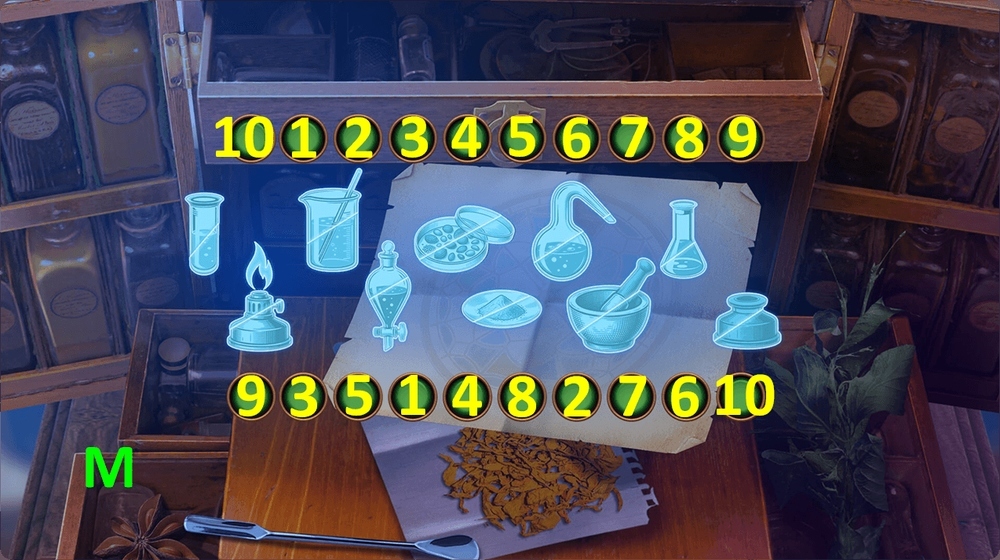
- Hard solution: 1-1, 2-2, 3-3, 4-4, 5-5, 6-6, 7-7, 8-8, 9-9, 10-10 (M).

- Take MOSAIC SCHEME (N).

- Use MOSAIC SCHEME on the mosaic box, read the note (O).
- Go to Promenade.
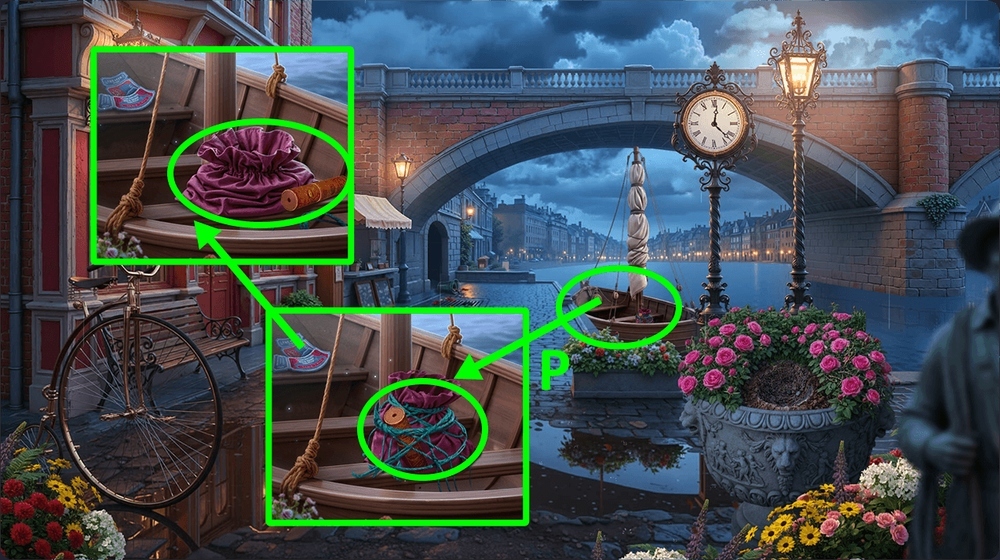
- Use KNITTING NEEDLES on the threads, take CIGAR CASE and EMPTY POUCH (P).

- Play puzzle, earn SPATULA (Q).
- Go to Clara’s Dressing Room.
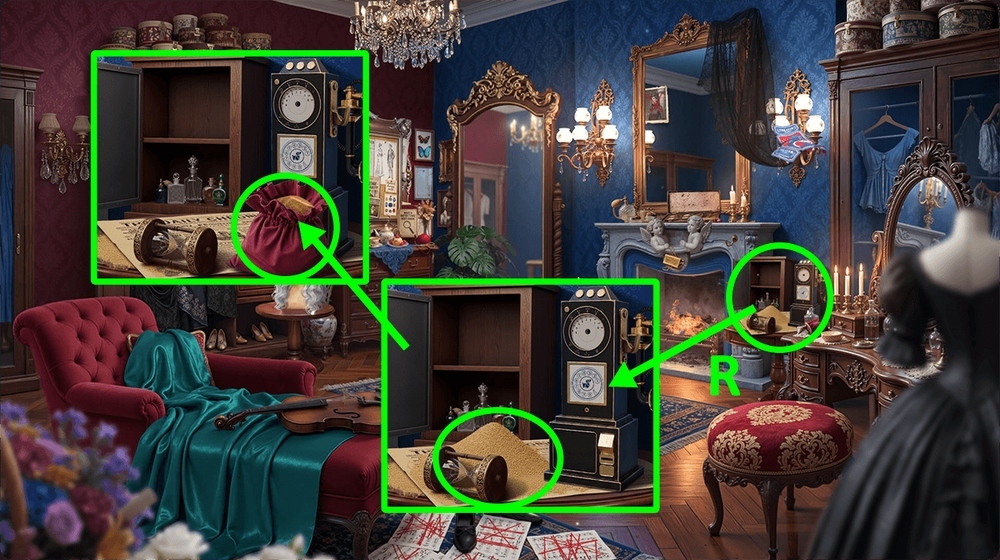
- Use EMPTY POUCH and SPATULA on the sand, take SAND (R).

- Use SAND and TOWEL on the fireplace, earn TIARA and TELEPHONE DIAL (S).
- Use TELEPHONE DIAL and TELEPHONE NUMBER on the old telephone (T).

- Select this option, earn CODE (U).
- Go to Orchestra Room.

- Use CODE on the code lock, read the note, take SAXOPHONE VALVES (V).
- Use SAXOPHONE VALVES on the saxophone (W).

- Easy solution: Ax1-Bx2-Cx2-Dx2-Ex1-Fx1-K (X).

- Hard solution: Ax3-Bx1-Cx2-Dx2-Ex2-Fx2-Gx2-Hx2-K (Y).
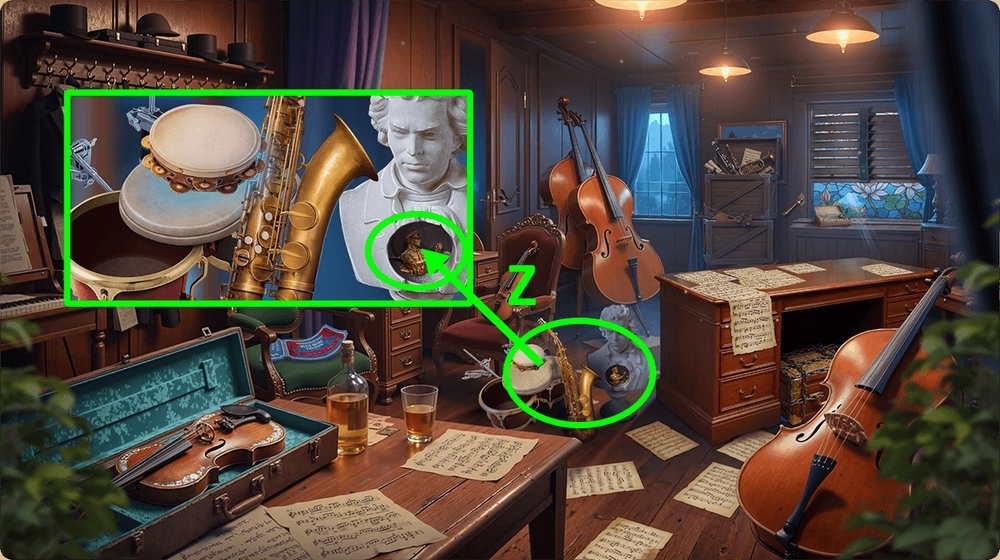
- Take FIGURINES 2/2 (Z).
- Go to Police Station.
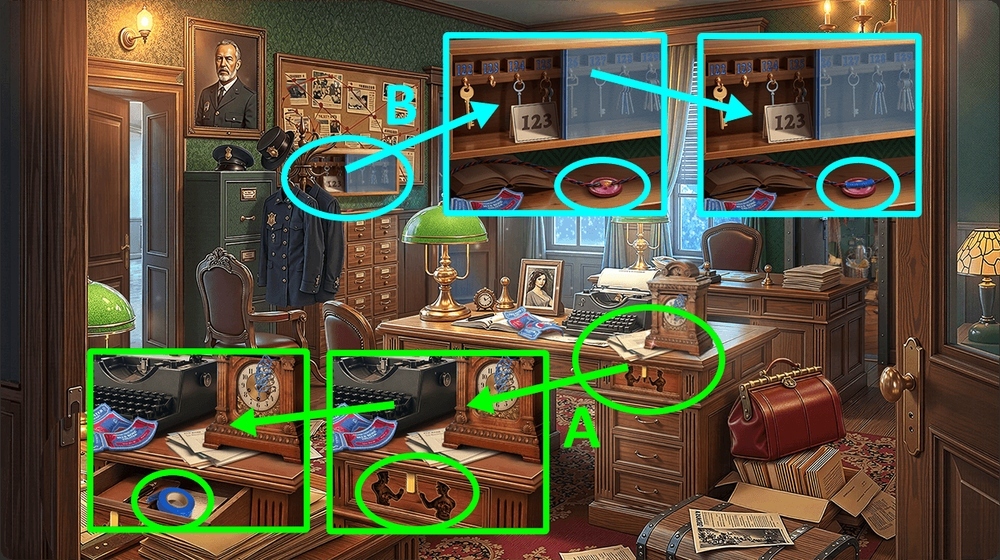
- Use FIGURINES 2/2 on the cupboard, take DUCT TAPE (A).
- Use DUCT TAPE on the exposed wires, take BUTTON (B).

- Play puzzle, earn METAL STAG BEETLE (C).
- Go to Theater Street.

- Use METAL STAG BEETLE on the padlock, take SCREWS 2/2 (D).
- Go to Clara’s Dressing Room.

- Use SCREWS 2/2, BUTTON and TIARA on the wooden drawer, take WAXED CORD (E).

- Play puzzle, earn GLASS DOME (F).
- Go to Theater Street.
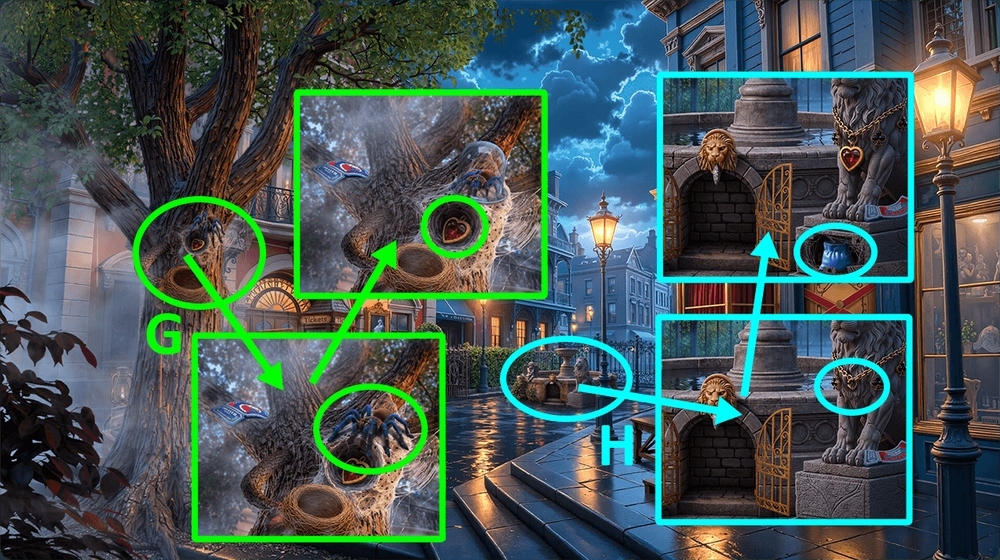
- Use GLASS DOME on the spider, take NECKLACE PART (G).
- Use NECKLACE PART on the statue of a theater lion, take SMOKY GUNPOWDER (H).
- Go to Technical Corridor.
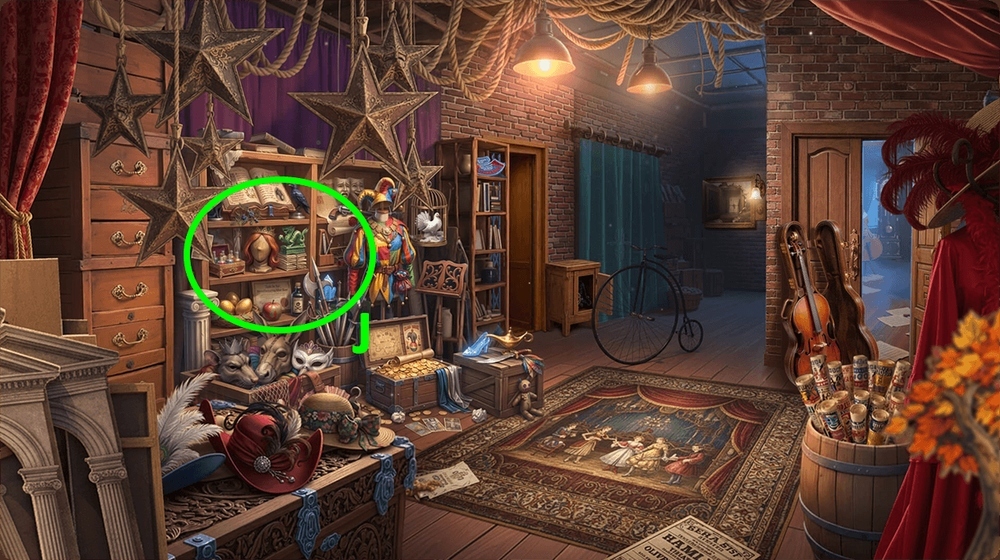
- Play puzzle, earn STAINED GLASS PART (J).
- Go to Orchestra Room.

- Use STAINED GLASS PART on the stained glass, take SEALING WAX (K).
- Use SEALING WAX, SMOKY GUNPOWDER and WAXED CORD on the CIGAR CASE, earn EXPLOSIVES.
- Use EXPLOSIVES on the box of props (L).

- Easy solution: Arrange all the elements as shown in the image (M).

- Hard solution: Arrange all the elements as shown in the image (N).

- Hard solution (O).
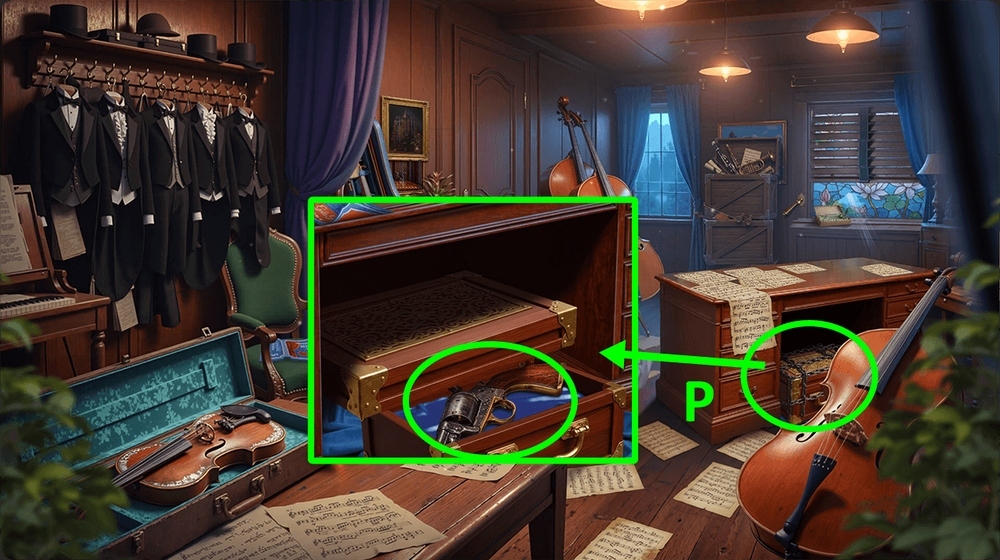
- Take REVOLVER (P).
Congratulations! You have completed the game Criminal Archives 5: Symphony of Death.