Halloween Secrets 2: Midnight Guise – Casey and Ryan head to the annual Halloween party at Blackwood University. Costumes, music, and festive decorations promise a fun-filled night, but everything changes when the students start acting strangely after putting on antique carnival masks. Soon, the party turns into a real nightmare, and the campus is engulfed in supernatural events. Casey and Ryan must figure out who is behind what’s happening and why this year’s celebration is repeating a tragedy that occurred many years ago. Their investigation leads the protagonists to the legend of Jack-o’-Lantern, a creature that uses masks to remain in the world of the living. By examining old records and eyewitness accounts, Casey learns about previous Halloween masquerades and students who were unable to remove their costumes after the party. The clues also lead to a store where many partygoers bought their masks. Gradually, it becomes clear that an outside force is behind the spread of the curse, and some of the protagonists’ acquaintances know far more than they’re willing to reveal. You’ll explore abandoned lecture halls, the university library, an old theater, backstage areas, and other corners of the campus. You’ll need to pay special attention to the six copies of the bride’s mask, which serve as ritual anchors and sustain the creature’s power. Casey and Ryan must find them and break their hold before Jack completes his ritual. However, destroying the masks isn’t enough—the heroes must find a way to stop him once and for all. As events unfold, the true intentions of those involved in the investigation will be revealed, and Casey will face a difficult choice. Your decisions will influence the relationships between characters and the course of events, and the story can end with one of three different endings. If you’re stuck on a puzzle or don’t know where to find items, you can check out the walkthrough for Halloween Secrets 2: Midnight Guise on our website to stop the ancient ritual before dawn breaks.
Halloween Secrets 2: Midnight Guise – Walkthrough
Here you can see the complete walkthrough for Halloween Secrets 2: Midnight Guise, namely all chapters, including the bonus chapter, in pictures.
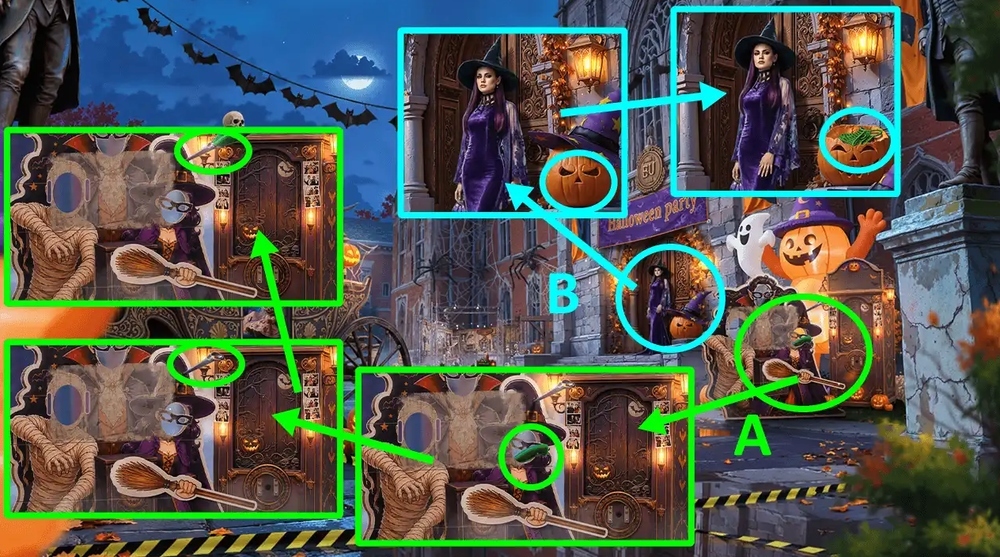
- Take KNIFE HANDLE, use KNIFE HANDLE on the blade stuck in the frame, take CARVING KNIFE (A).
- Use CARVING KNIFE on the pumpkin, take BAG (B).
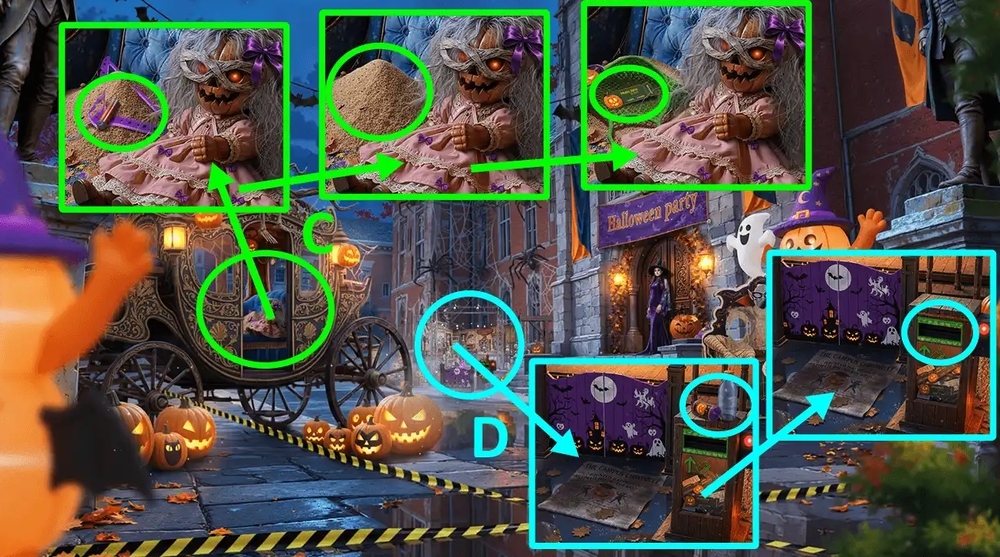
- Take BATTERY and CLOTHES HANGERS 1/2, use BAG on the pile of leaves and debris, take PHOTO ZONE TICKET (C).
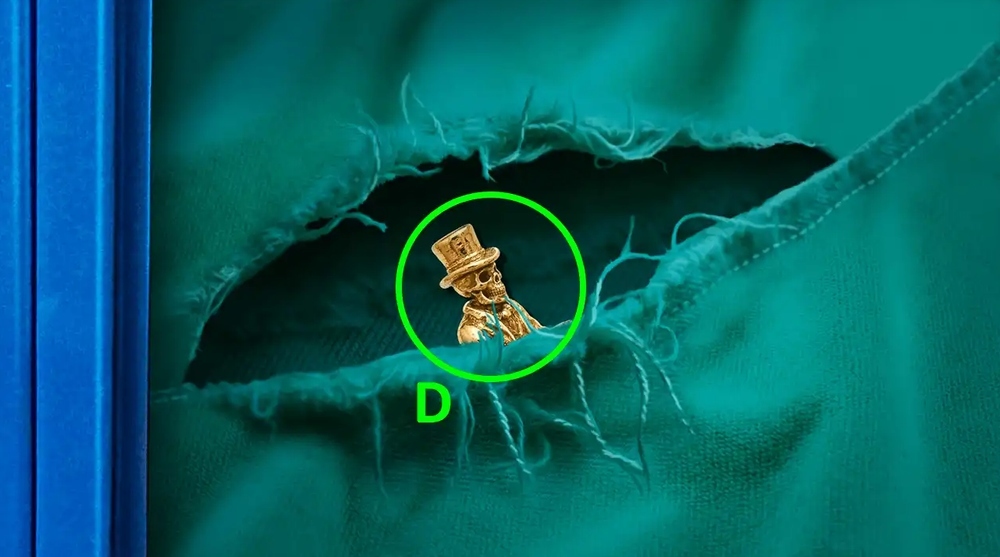
- Take HALLOWEEN FIRECRACKER and BOTTLE, use PHOTO ZONE TICKET on the gap next to the fence (D).

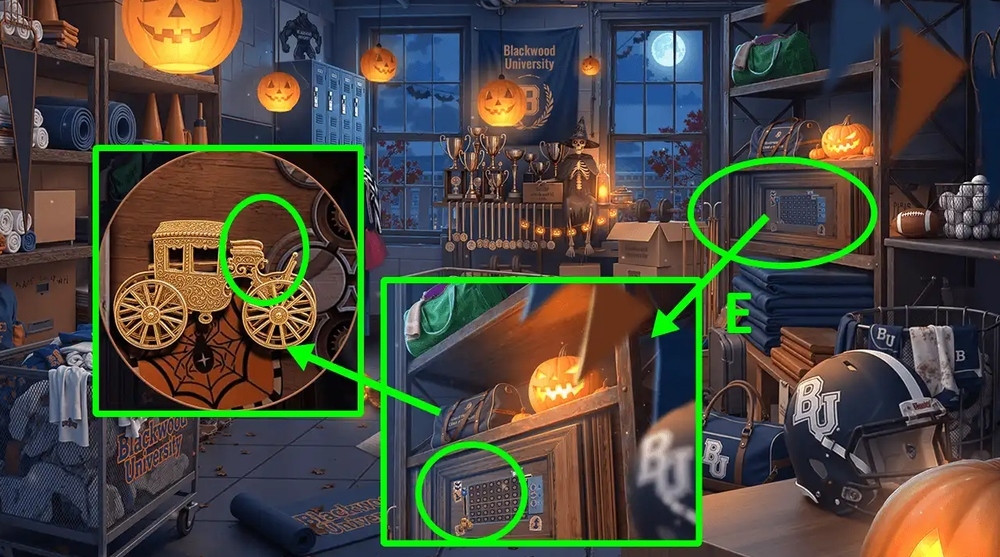
- Play puzzle, earn ID BRACELET (E).
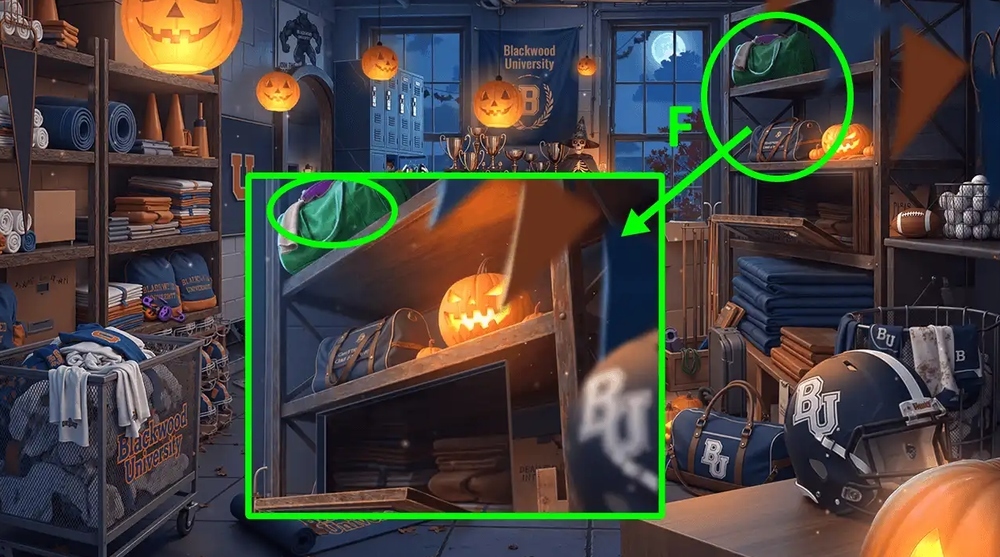
- Use ID BRACELET on the volunteer (F).
- Go forward.

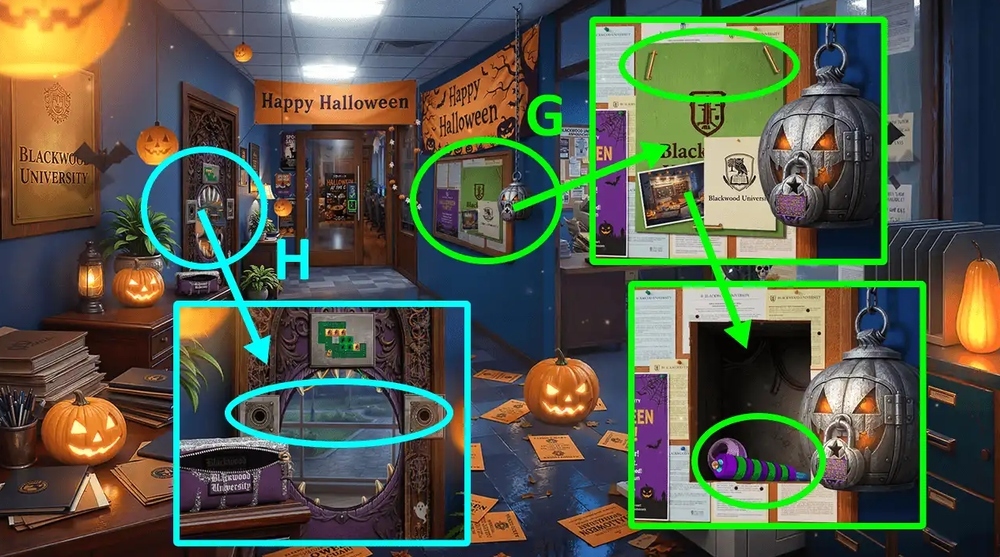
- Select this option (G).
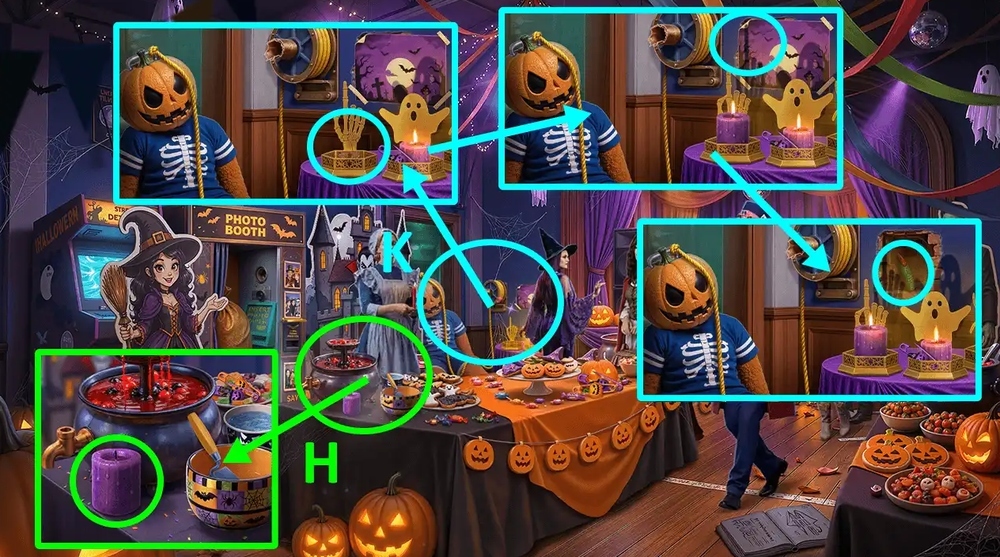
- Take HALLOWEEN CANDLE (H).
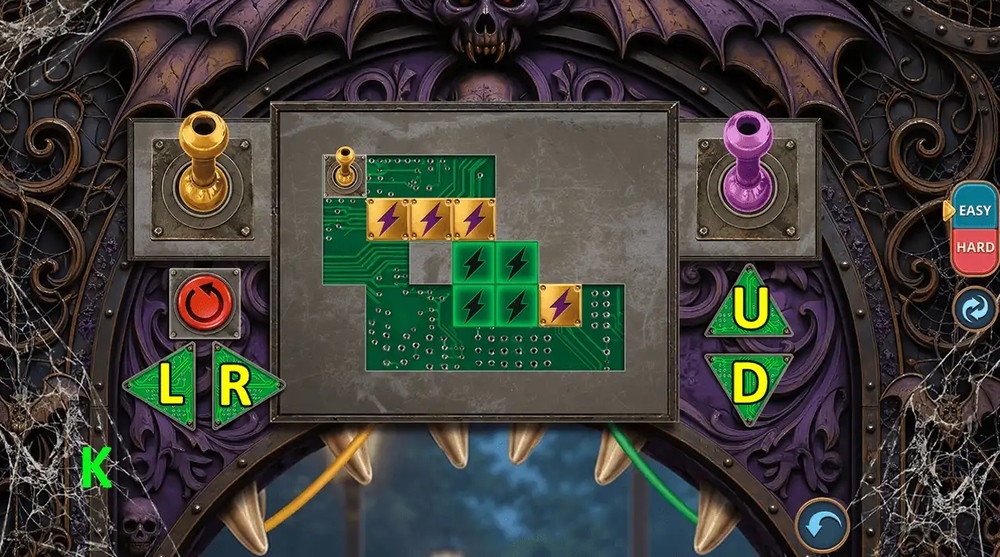
- Use HALLOWEEN CANDLE on the empty flashlight, tap on the poster, take LONG NAIL (K).
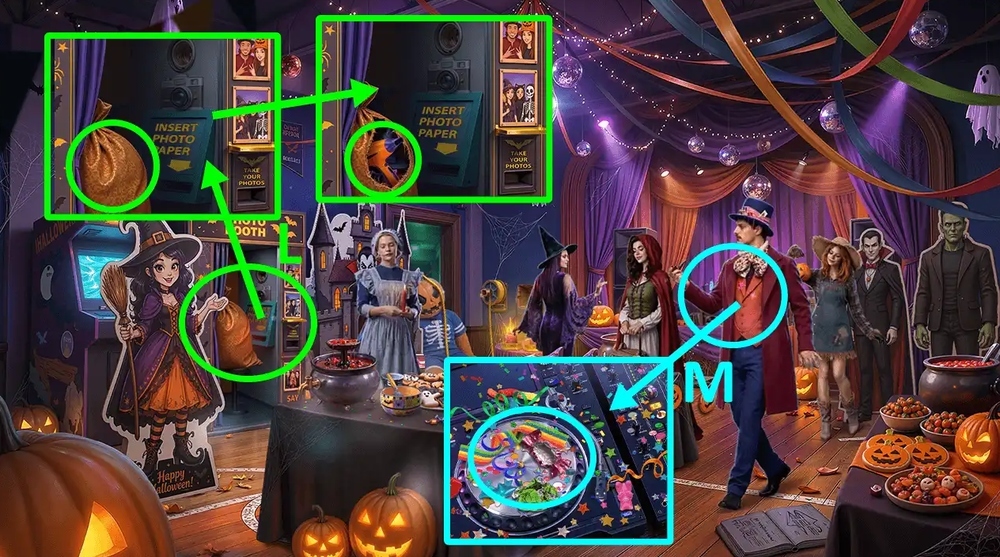
- Use LONG NAIL on the prop bag, take HAIR DRYER (L).
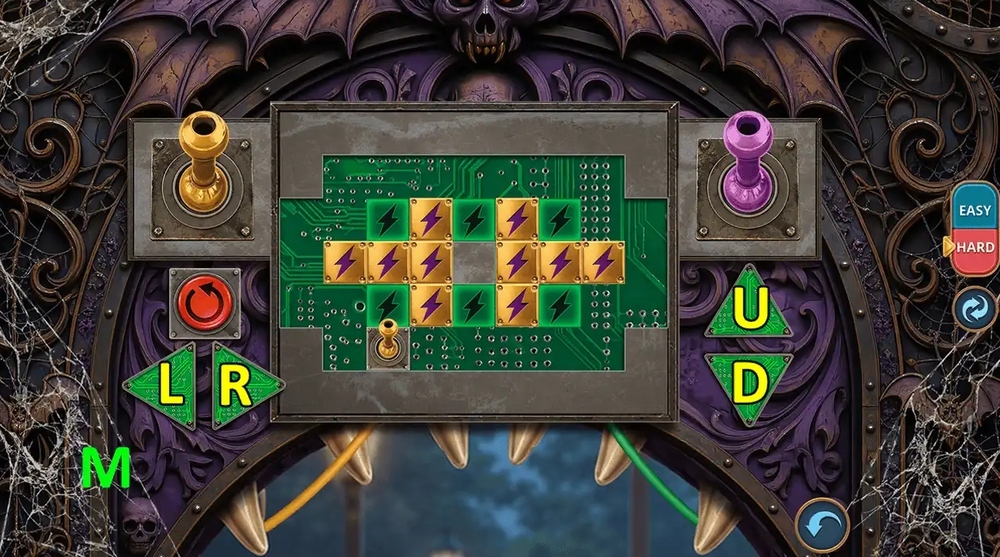
- Use HAIR DRYER on the garbage (M).
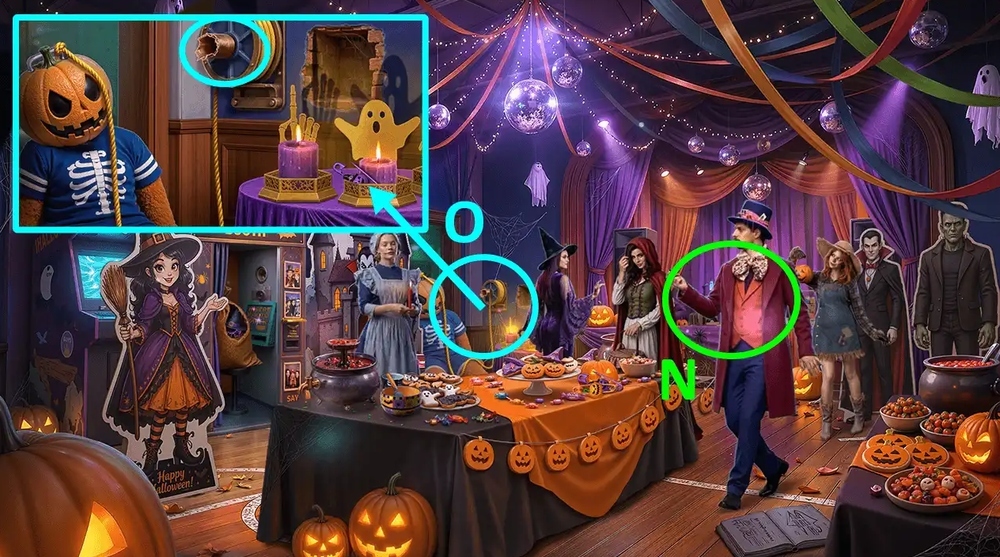
- Play puzzle, earn WITCH’S STAFF (N).
- Use WITCH’S STAFF on the broken winch pin (O).
- Go forward.
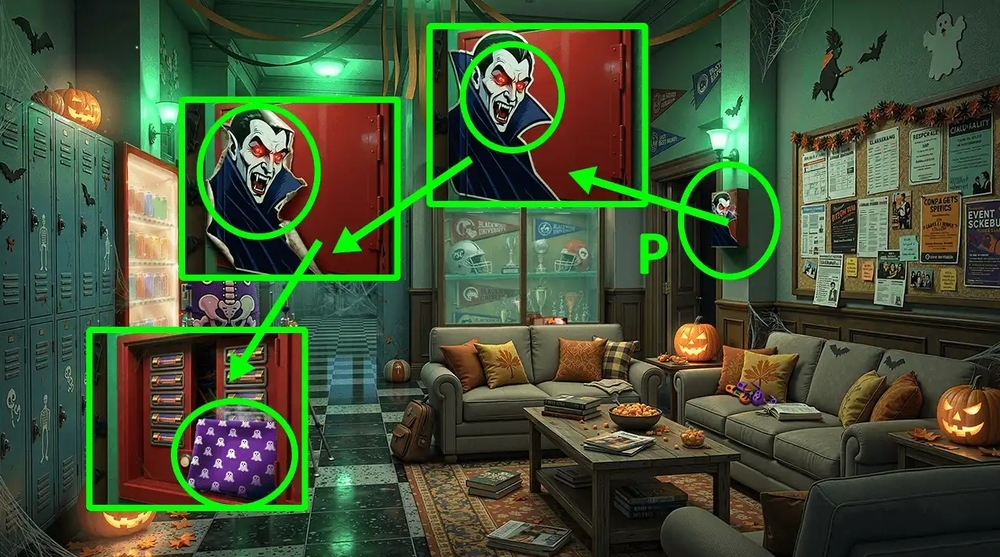
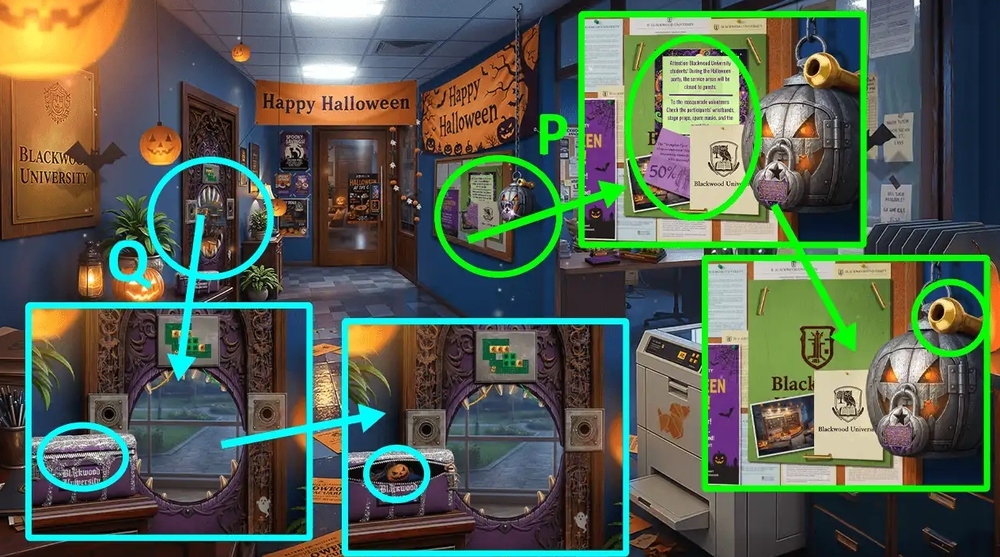
- Use HAIR DRYER on the sticker, tap on sticker, take HANDKERCHIEF (P).

- Take RUBBER BALL and PHOTO PAPER (Q).
- Use HANDKERCHIEF on the hot light bulb, earn LIGHT BULB (R).
- Go to Decorated Gym.
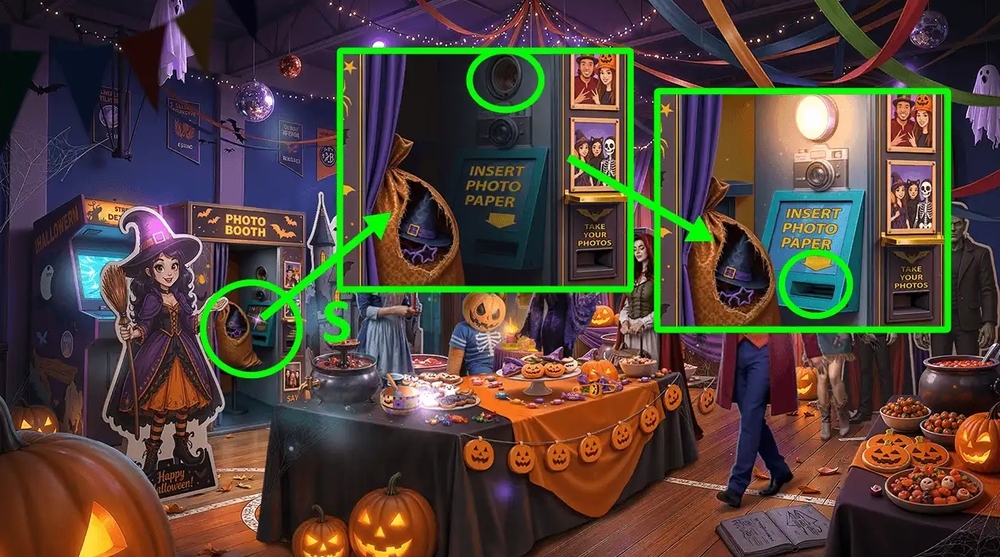
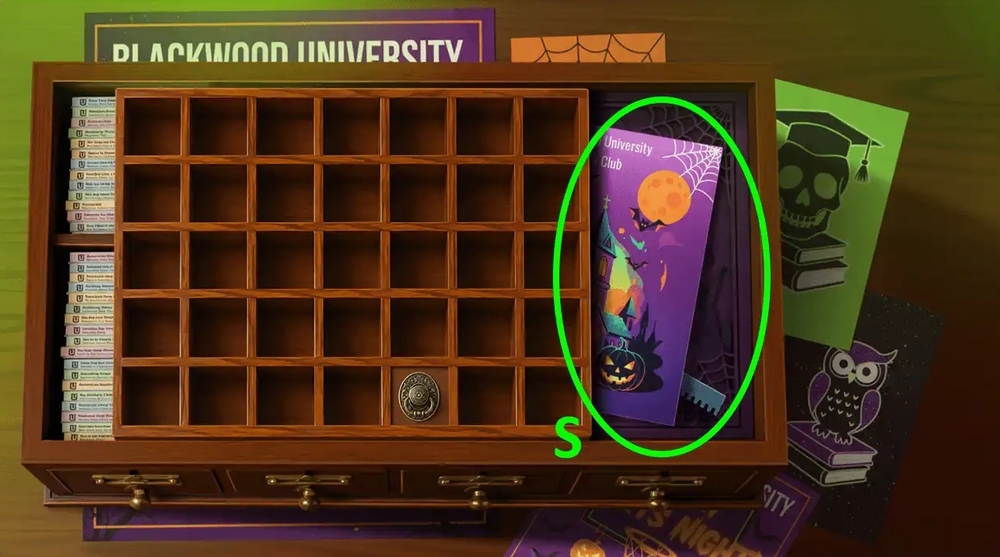
- Use LIGHT BULB on the lamp socket, use PHOTO PAPER on the photo booth tray (S).

- Easy solution: Arrange all the puzzle pieces as shown in the image (T).
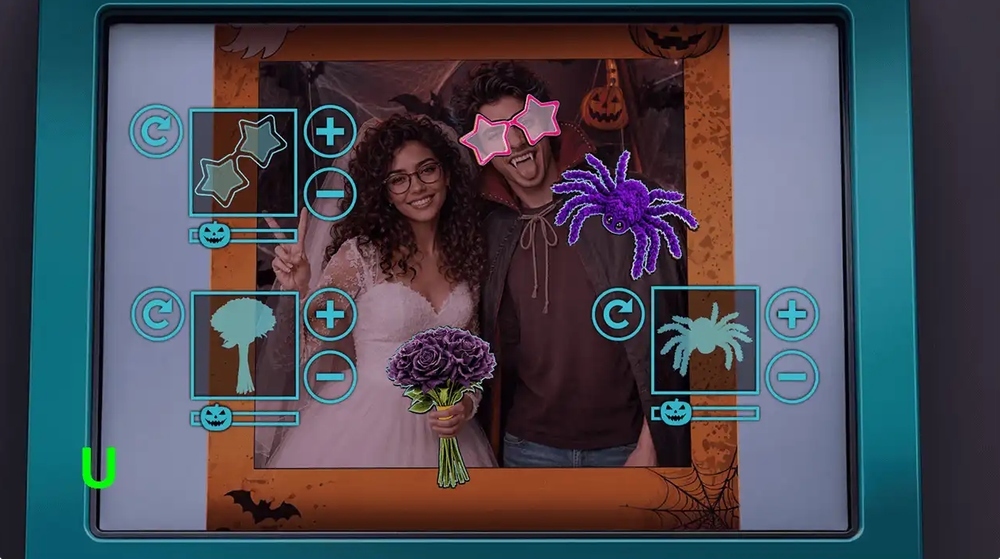
- Hard solution: Arrange all the puzzle pieces as shown in the image (U).

- Take STRANGE PHOTO (V).
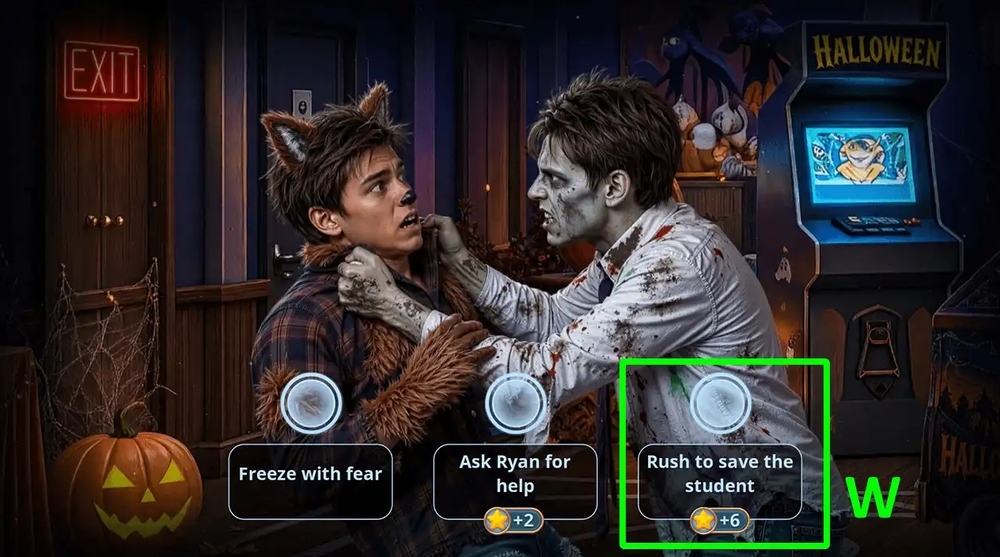
- Select this option (W).

- Use HALLOWEEN FIRECRACKER on the student-monster (X).

- Take FUSE (Y).
- Go to Sports Wing.
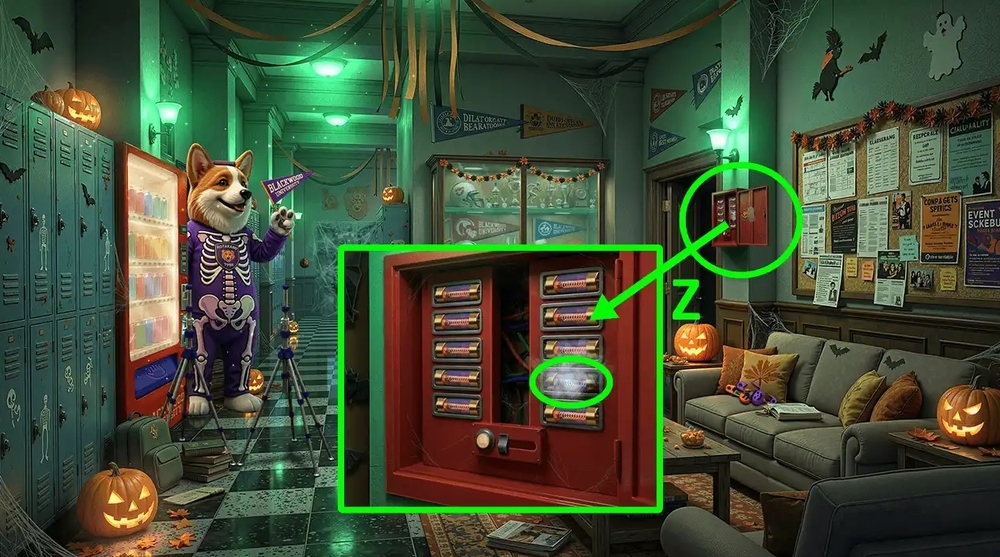
- Use FUSE on the shield (Z).

- Easy solution: Arrange all the puzzle pieces as shown in the image (A).

- Hard solution: 1-C, 2-L, 3-E, 4-F, 5-D, 6-M, 7-K, 8-H, 9-G, 10-N, O (B).
- Go forward.

- Take 3D PEN, EXPANDER BASE and MILK (C).
- Use BATTERY on the disco ball, earn DISCO BALL (D).
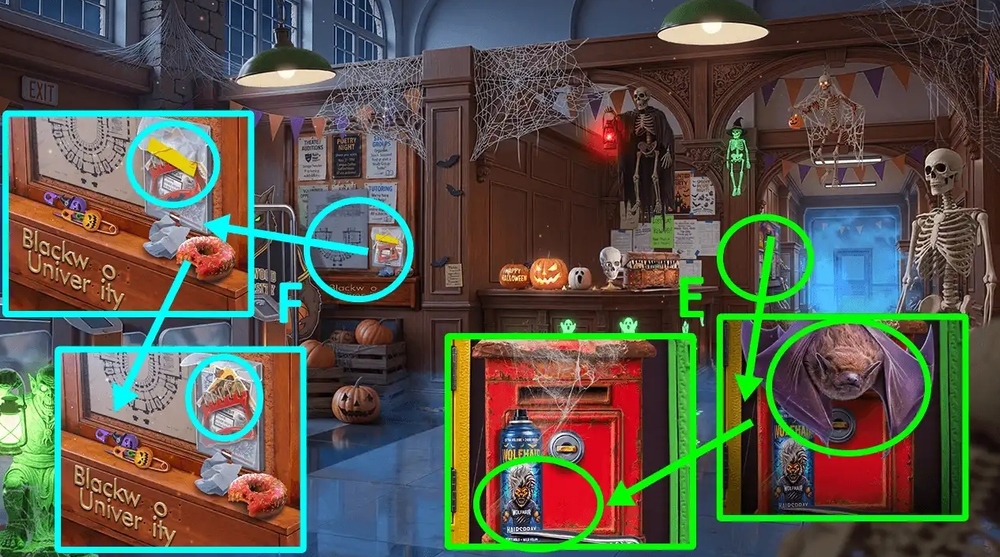
- Use DISCO BALL on the bat, take LONG TWEEZERS and HAIRSPRAY (E).
- Use LONG TWEEZERS on the plastic notice pocket, read the notes, take EXPANDER HANDLE (F).
- Use EXPANDER HANDLE and RUBBER BALL on EXPANDER BASE, earn LOADED EXPANDER.
- Go to Sports Wing.
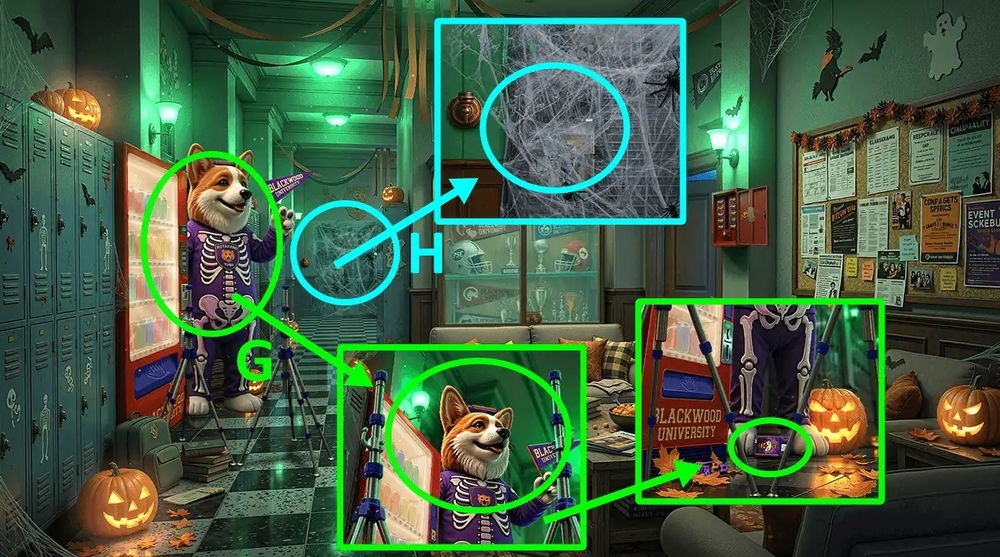
- Use LOADED EXPANDER on the tripods, take LIGHTER (G).
- Use HAIRSPRAY and LIGHTER on the web (H).
- Go forward.

- Use HAIR DRYER on the Halloween fog, take WEIGHT and CLOTHES HANGERS 2/2 (K).
- Read the note, take SKELETON BONE, use CLOTHES HANGERS 2/2 on the suit hanger (L).

- Play puzzle, earn GOLDEN CHAIN (M).
- Use GOLDEN CHAIN on the lamp, take KIOSK KEY (N).
- Go forward.
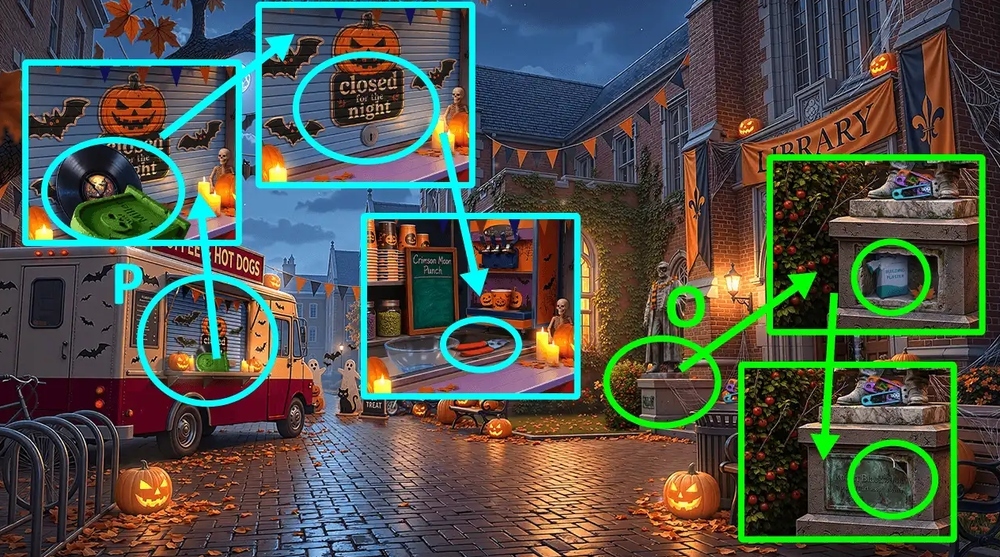
- Use SKELETON BONE and WEIGHT on the metal plate, take PLASTER POWDER (O).
- Take GRAVESTONE OF “D. MILLER” and BROKEN VINYL RECORD, use KIOSK KEY on the lock, take SHEARS (P).
- Use SHEARS on the ivy, take BILLIARD CUE and DOG EMBLEM (Q).

- Go forward.
- Select this option (R).

- Take GRAVESTONE OF “CASEY H.”, use DOG EMBLEM on the lock, take LIBRARY CARD (S).
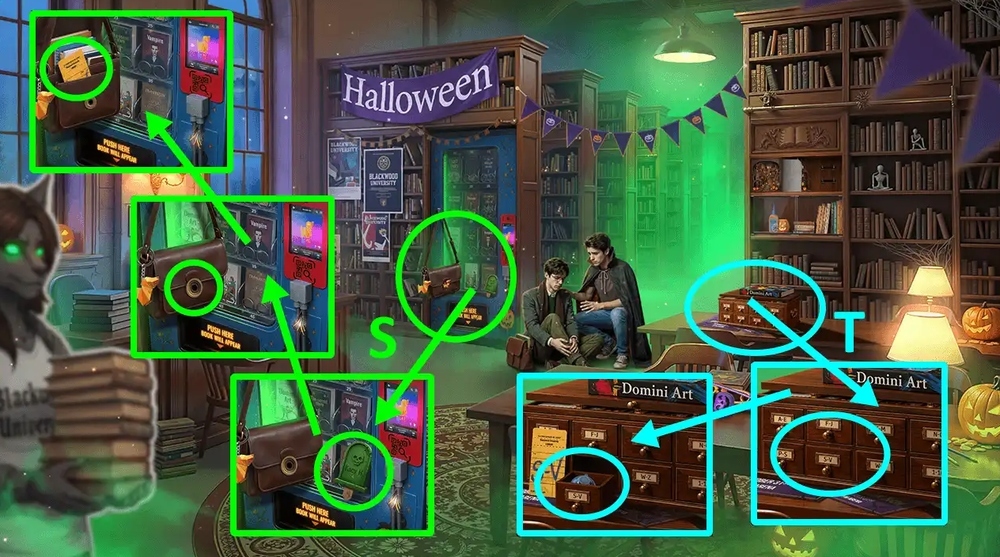
- Use LIBRARY CARD on the block of drawers with cards, take SUCTION CUP (T).
- Take LECTURE NOTES, use SUCTION CUP on the glass, take WHITE GLUE (U).

- Use PLASTER POWDER and WHITE GLUE on the empty bowl, take STICKY PLASTER (V).
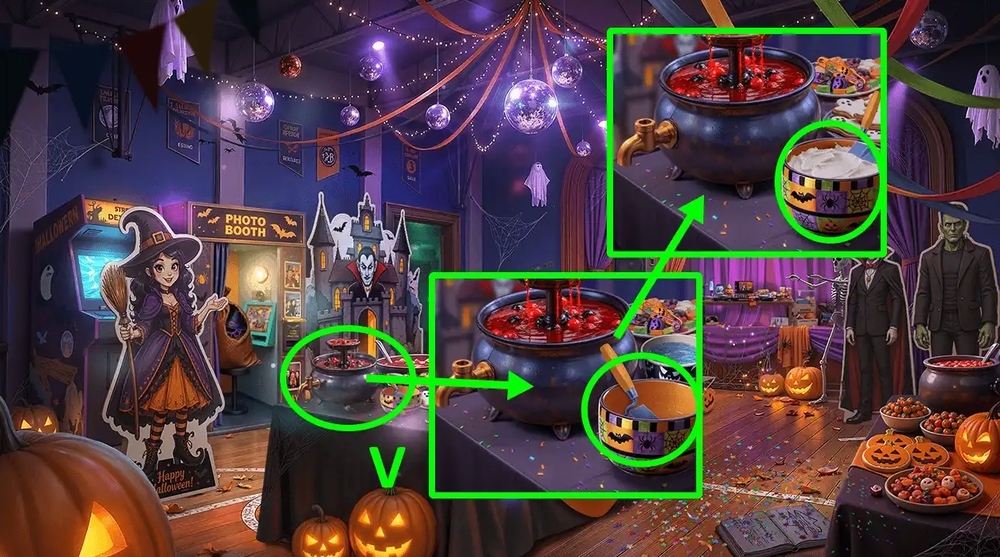
- Go to Walking Gallery.
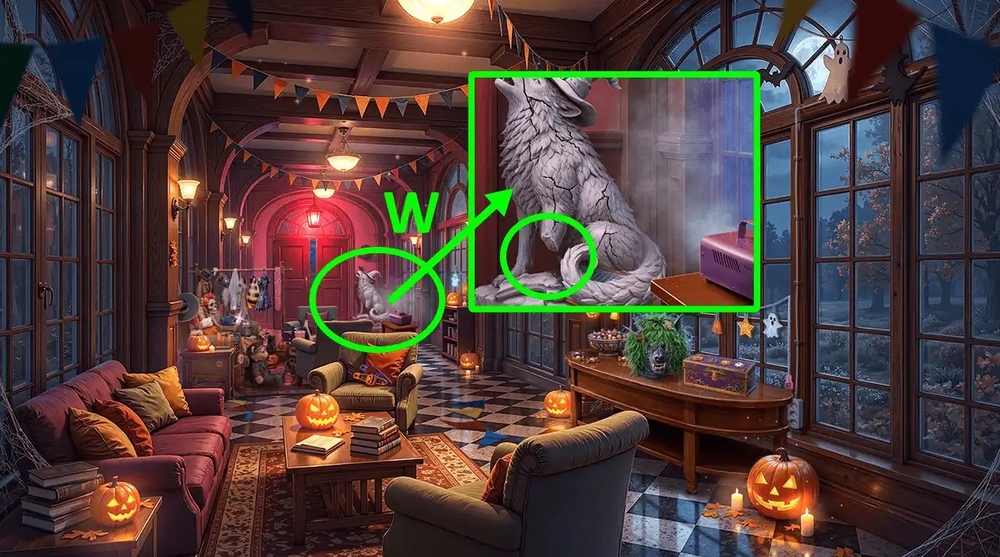
- Use STICKY PLASTER on the chipped paw (W).
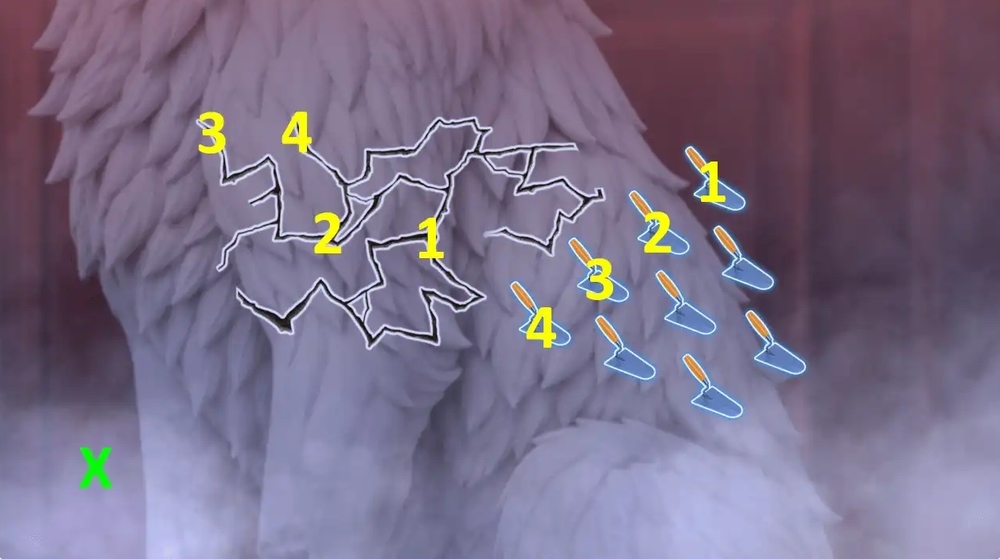
- Easy solution: 1-1, 2-2, 3-3, 4-4 (X).
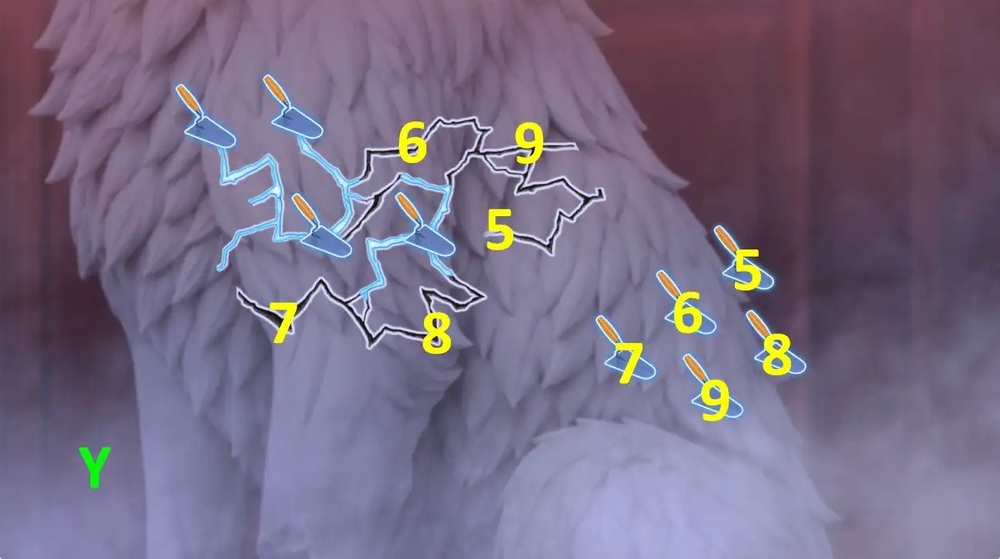
- Easy solution: 5-5, 6-6, 7-7, 8-8, 9-9 (Y).
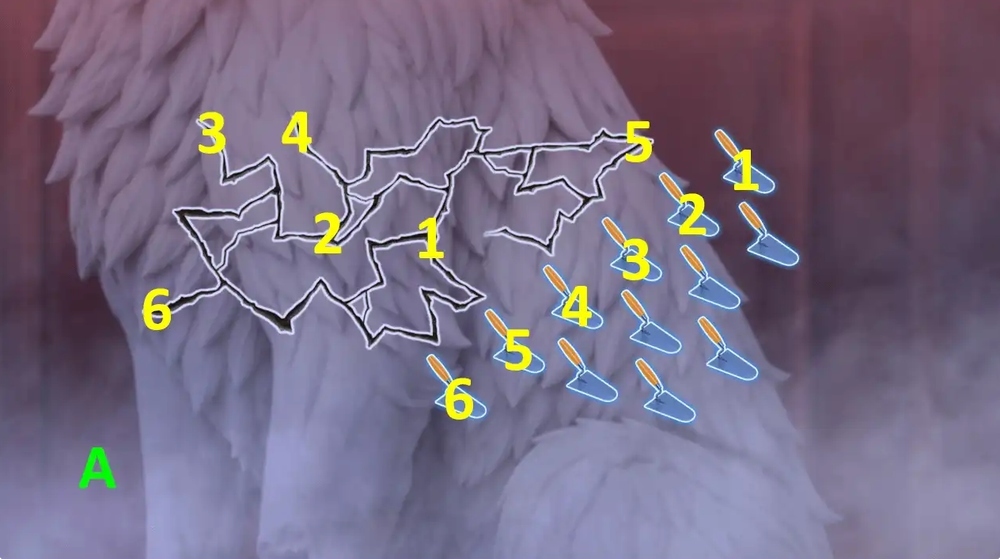
- Hard solution: 1-1, 2-2, 3-3, 4-4, 5-5, 6-6 (A).
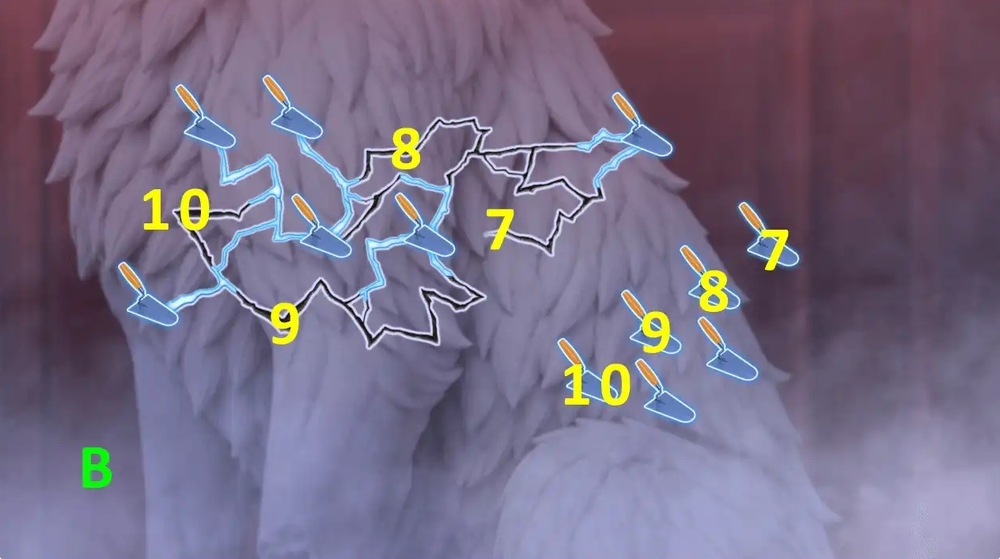
- Hard solution: 7-7, 8-8, 9-9, 10-10 (B).
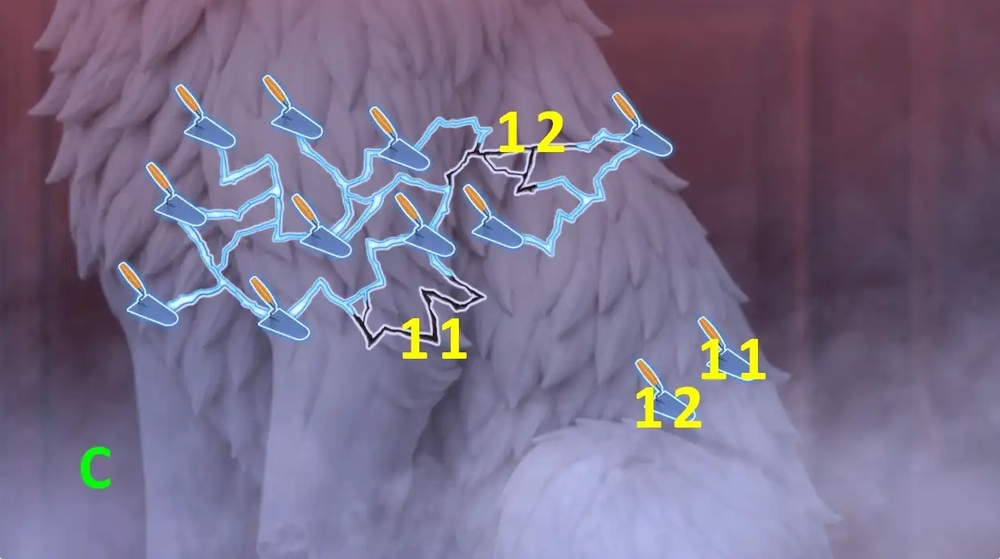
- Hard solution: 11-11, 12-12 (C).
- Take COSTUME LIST and EXTENSION CORD (D).
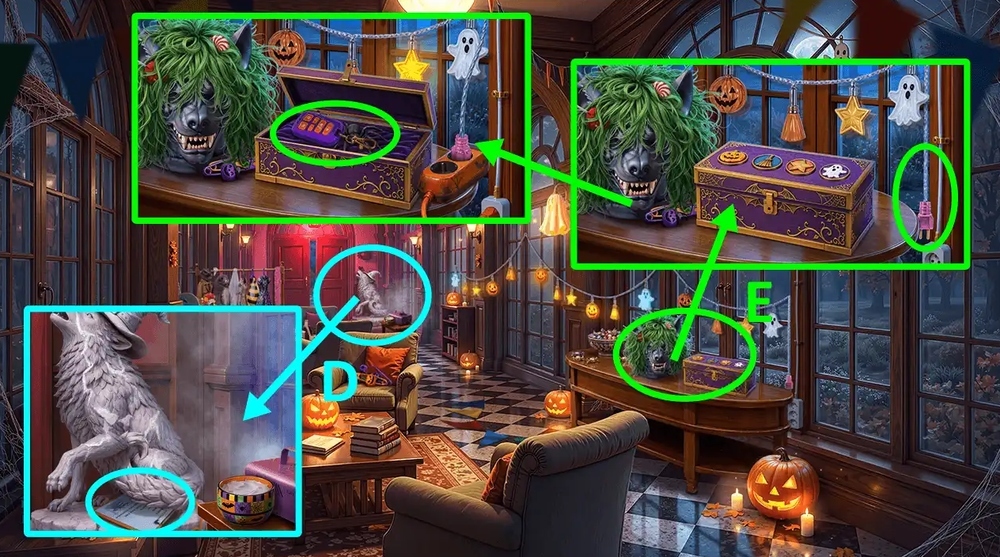
- Use EXTENSION CORD on the garland, take MOPED ALARM (E).
- Go to Main Alley.
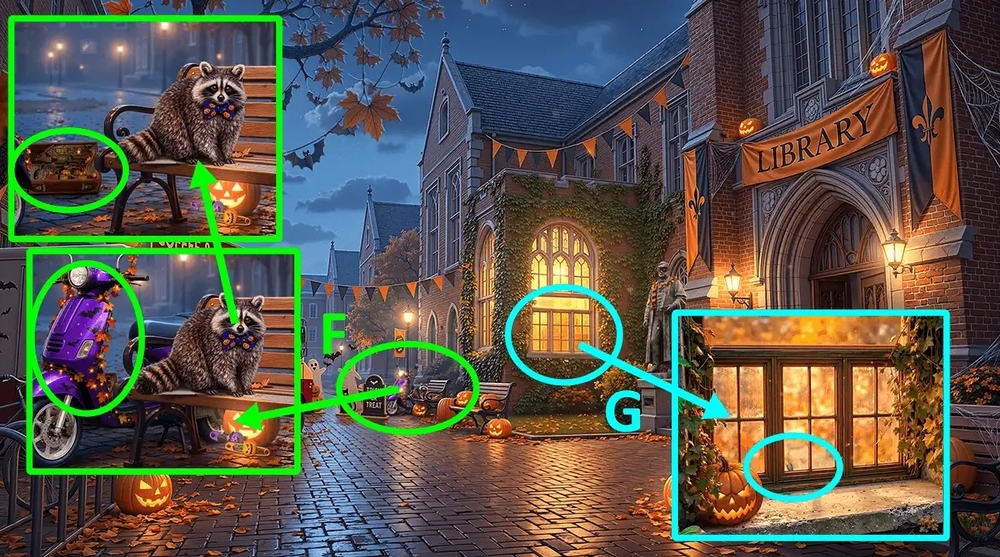
- Use MOPED ALARM on the moped, take BOOK NOOK and FISHING LINE (F).
- Use FISHING LINE on BILLIARD CUE, earn FISHING ROD.
- Use FISHING ROD on the window bolt (G).
- Solution: Random (H).

- Go forward.
- Take MINI-MOON and WOODEN MOP (K).
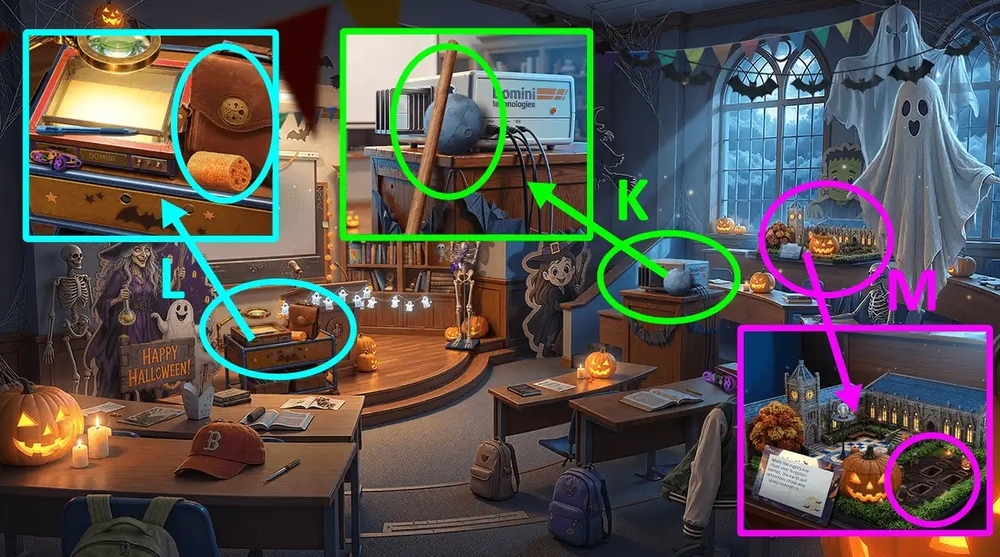
- Take LOOFAH, PROFESSOR’S BAG and GRAVESTONE OF “RYAN W.” (L).
- Use MINI-MOON, GRAVESTONE OF “D. MILLER”, GRAVESTONE OF “CASEY H.” and GRAVESTONE OF “RYAN W.” on the layout (M).
- Easy solution: Arrange all the puzzle pieces as shown in the image (N).
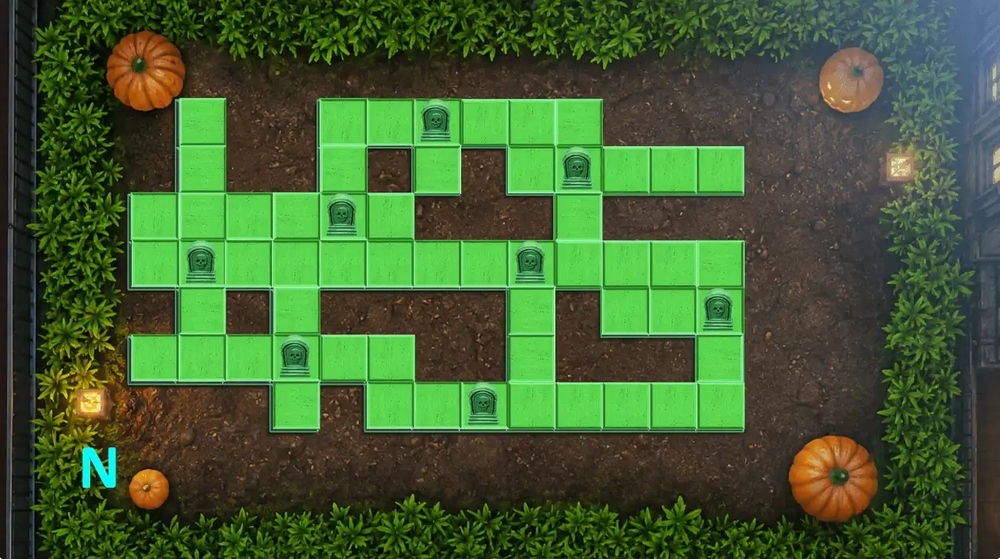
- Hard solution: Arrange all the puzzle pieces as shown in the image and tap the button “P” (O).

- Take SCOTCH TAPE and CIGAR CUTTER (P).
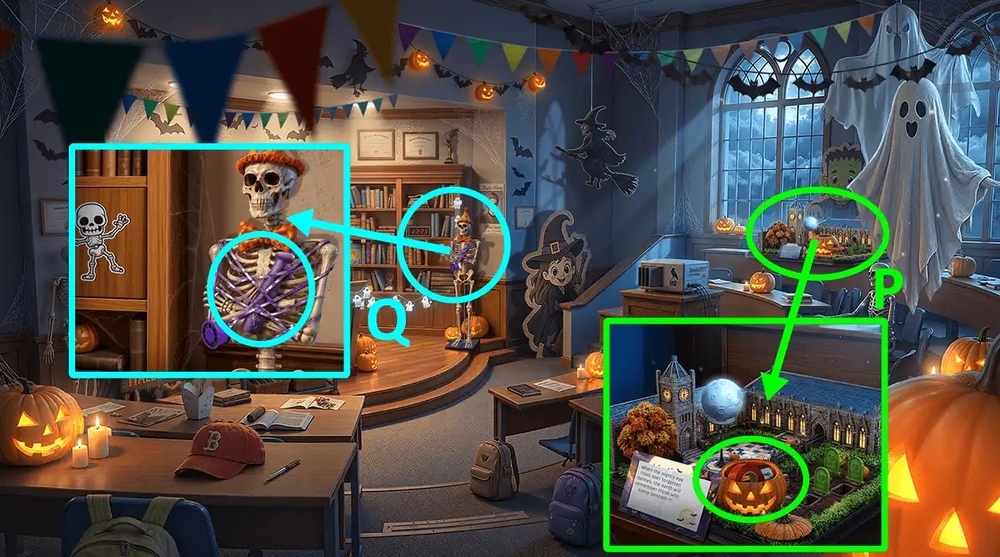
- Use CIGAR CUTTER on the ribbon on the skeleton, earn PLASTIC MATERIAL and HAIR CONDITIONER (Q).
- Use PLASTIC MATERIAL and 3D PEN on BROKEN VINYL RECORD, earn VINYL RECORD.
- Go to Decorated Gym.
- Use VINYL RECORD on the record player (R).
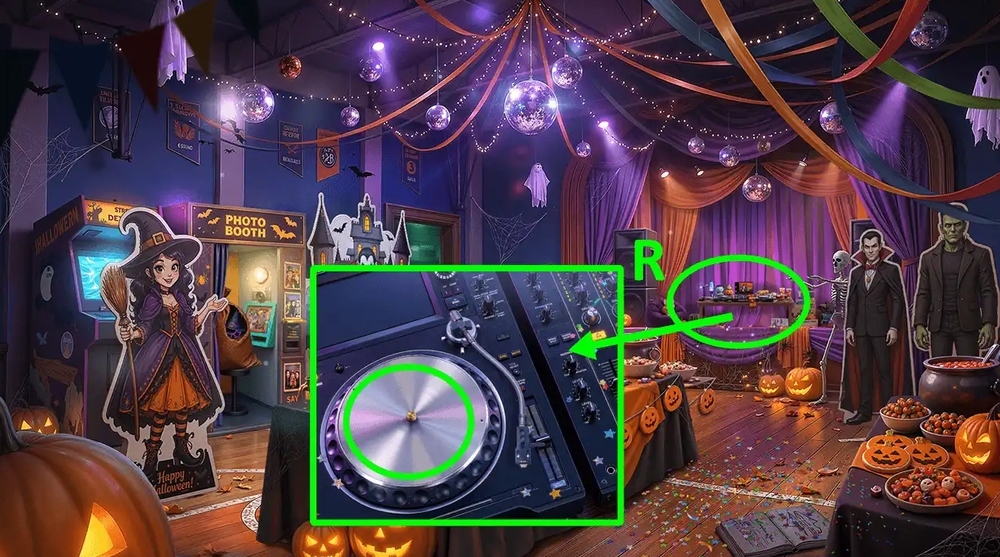
- Play puzzle, earn TAP (S).

- Use TAP and BOTTLE on the punch station, earn BOTTLE OF PUNCH (T).
- Go to Walking Gallery.
- Use COSTUME LIST on the bench with costume accessories (U).
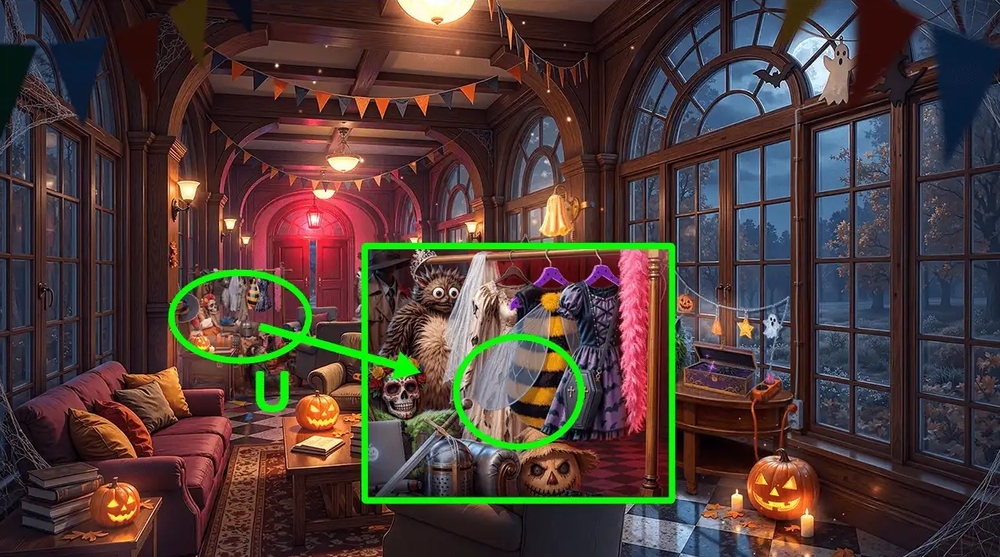
- Play puzzle, earn HAIR BRUSH (V).
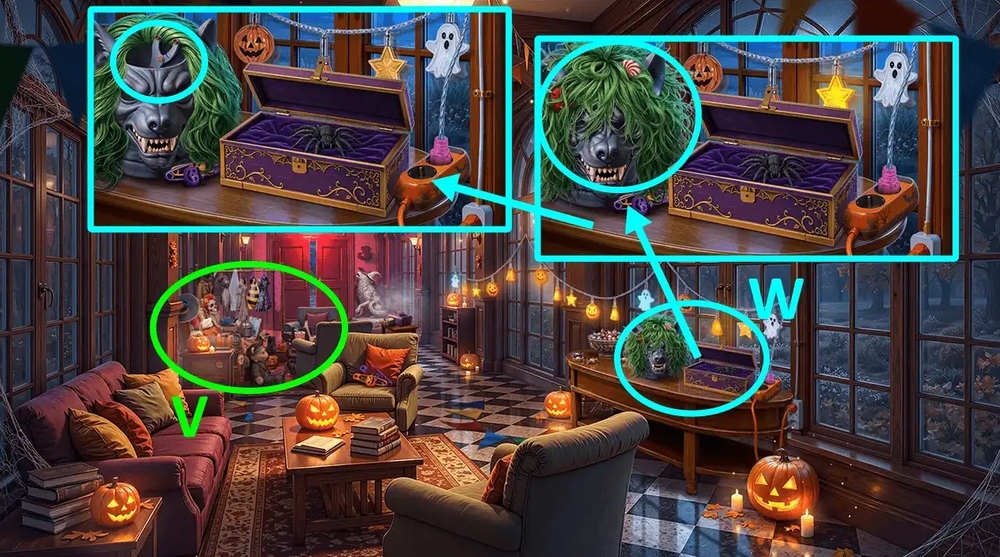
- Use HAIR BRUSH and HAIR CONDITIONER on the wig with werewolf mask, take BIKE WRENCH (W).
- Use BIKE WRENCH on the lamp holder, take SAW and UNIVERSITY STAMP (X).

- Go to University Library.
- Use LECTURE NOTES and UNIVERSITY STAMP on the pattern on the windowsill, take QR-CODE (Y).

- Use 3D PEN on the broken wire, use QR-CODE on the scanner (Z).
- Easy solution: 1-2-3-4-5-6-7-8-9-10-11-12-13-14 (A).
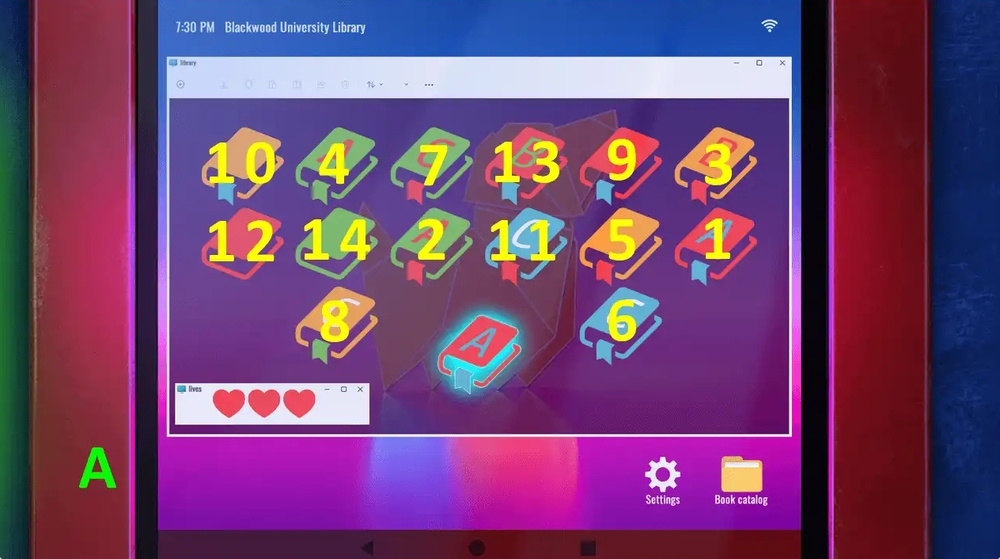
- Hard solution: 1-2-3-4-5-6-7-8-9-10-11-12-13-14-15-16 (B).

- Take BOOK WITH SKELETON (C).
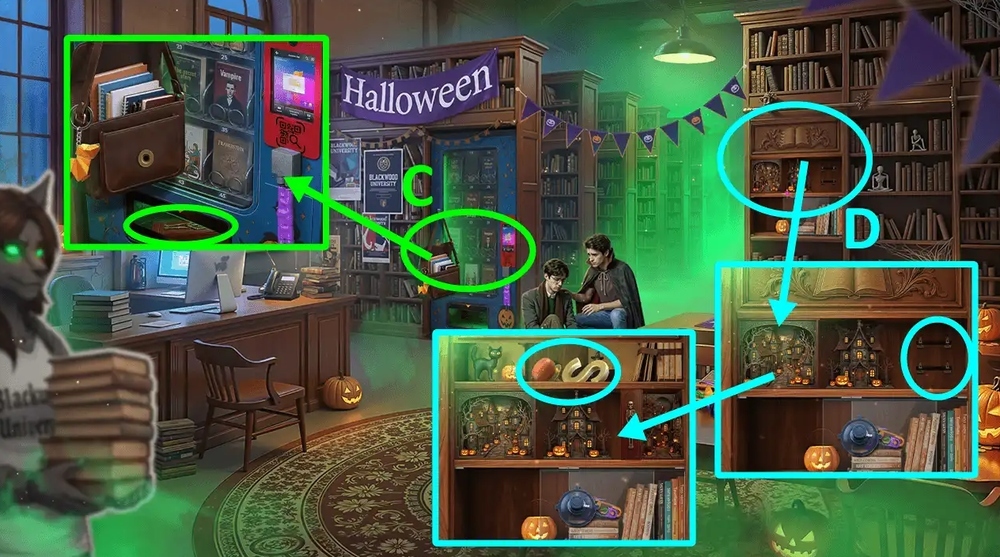
- Use BOOK WITH SKELETON on BOOK NOOK, earn HALLOWEEN BOOK NOOK.
- Use HALLOWEEN BOOK NOOK on the shelf space, take MISSING LETTERS 1/3 and STAND BUTTON (D).
- Go to In Front of the Gym.
- Use STAND BUTTON on the empty hole, take TORN COSTUME (E).
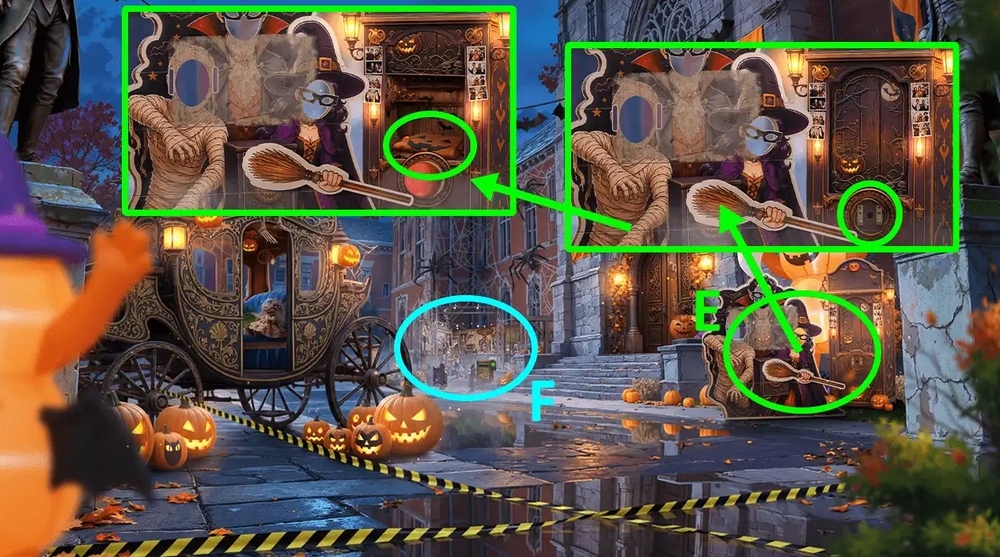
- Play puzzle, earn STOCKING (F).
- Go to Main Alley.
- Use STOCKING on the cranberry bushes, earn CRANBERRIES (G).

- Use CRANBERRIES, BOTTLE OF PUNCH and MILK on the mobile kiosk (H).
- Solution: Random (K).
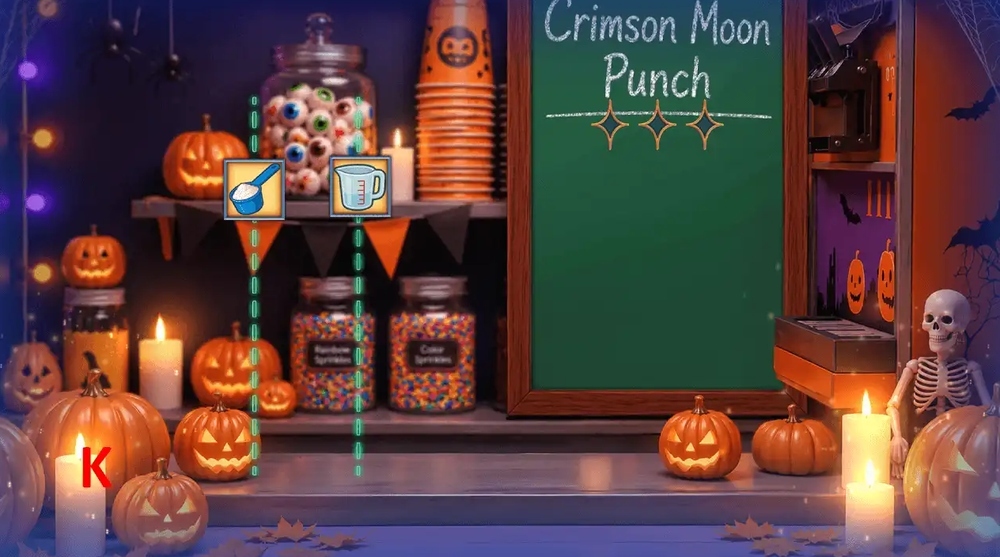
- Take PUNCHY ICE CREAM (L).

- Use PUNCHY ICE CREAM on the raccoon, take PAPER and BANKNOTE (M).
- Go to Sports Wing.
- Use BANKNOTE on the drink machine, take SODA (N).

- Use SODA and LOOFAH on the display case, take MISSING LETTERS 2/3 and MEDAL (O).
- Go to University Library.
- Use MEDAL on the stuck drawer (P).
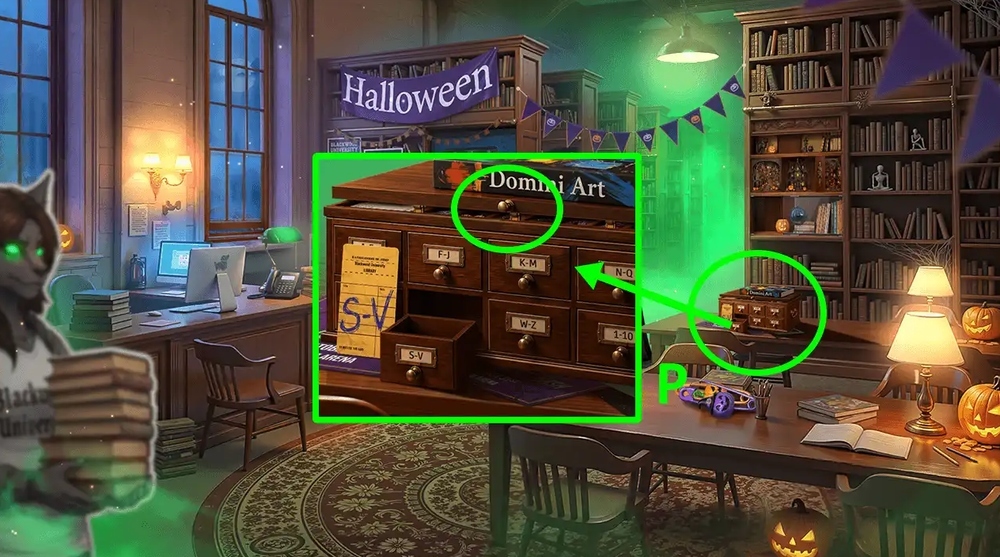
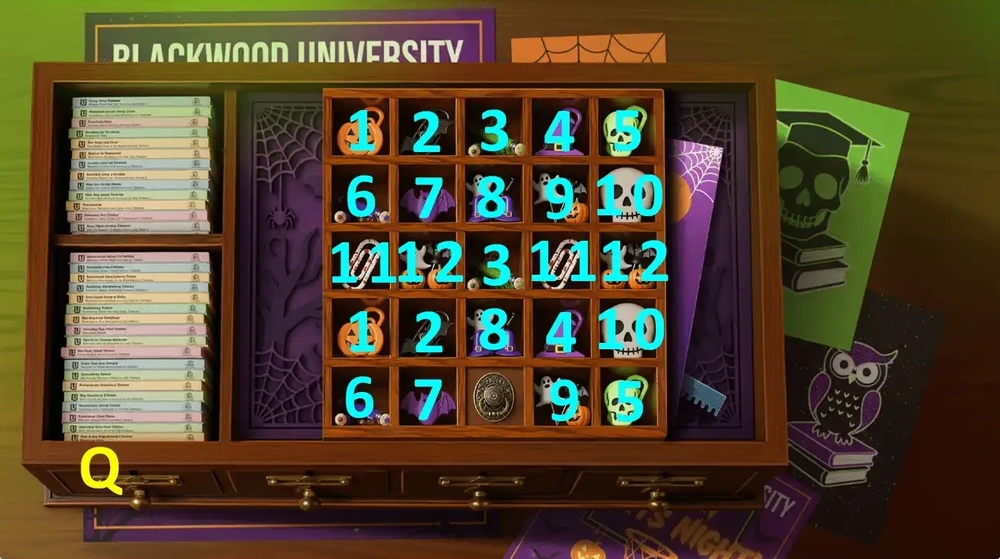
- Easy solution: 1-1, 2-2, 3-3, 4-4, 5-5, 6-6, 7-7, 8-8, 9-9, 10-10, 11-11, 12-12 (Q).
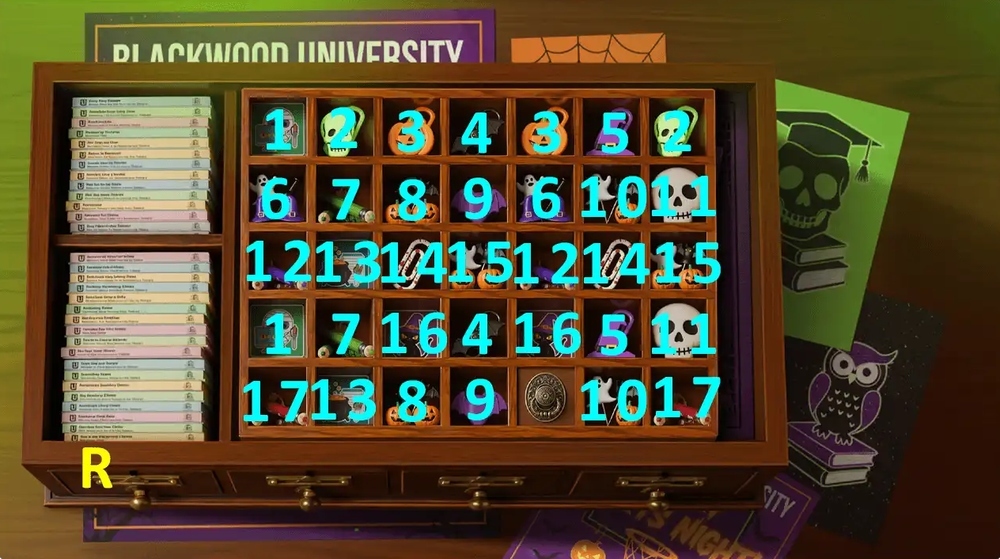
- Hard solution: 1-1, 2-2, 3-3, 4-4, 5-5, 6-6, 7-7, 8-8, 9-9, 10-10, 11-11, 12-12, 13-13, 14-14, 15-15, 16-16, 17-17 (R).
- Read the note, take SPREADER (S).
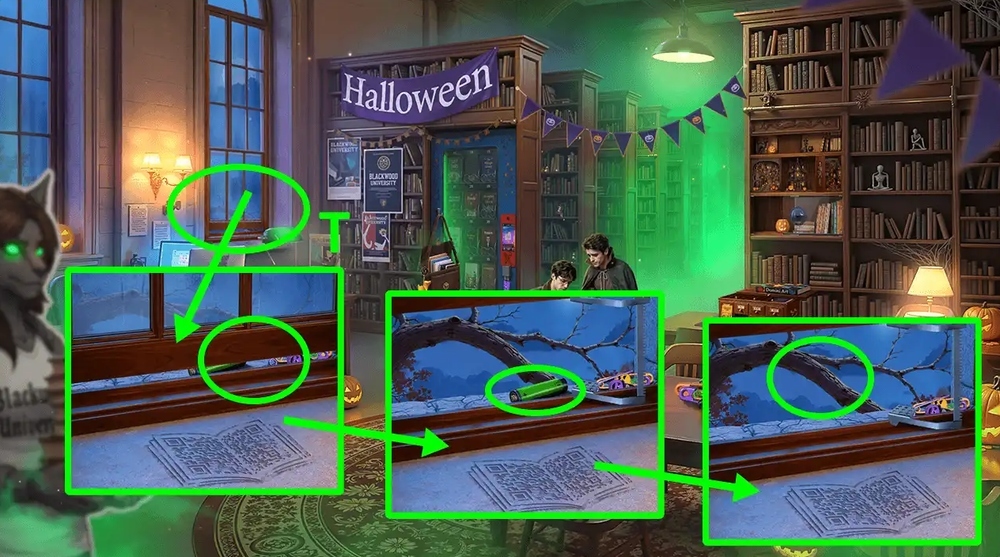
- Use SPREADER on the basement window, take BATTERIES 1/2, use SAW on the branch, earn SHORT BRANCH (T).
- Use SHORT BRANCH and TORN COSTUME on WOODEN MOP, earn IMPROVISED CRUTCH.
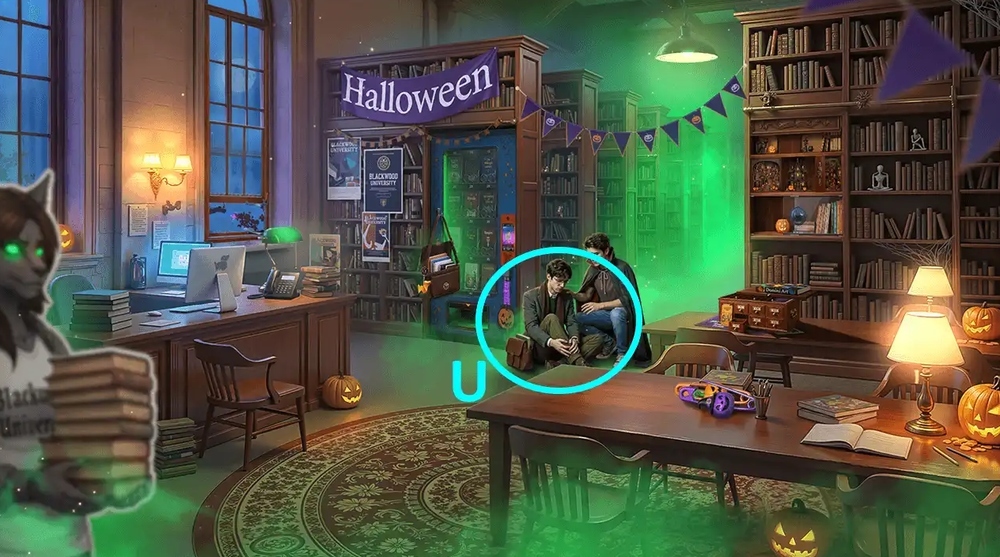
- Use IMPROVISED CRUTCH on Noah (U).
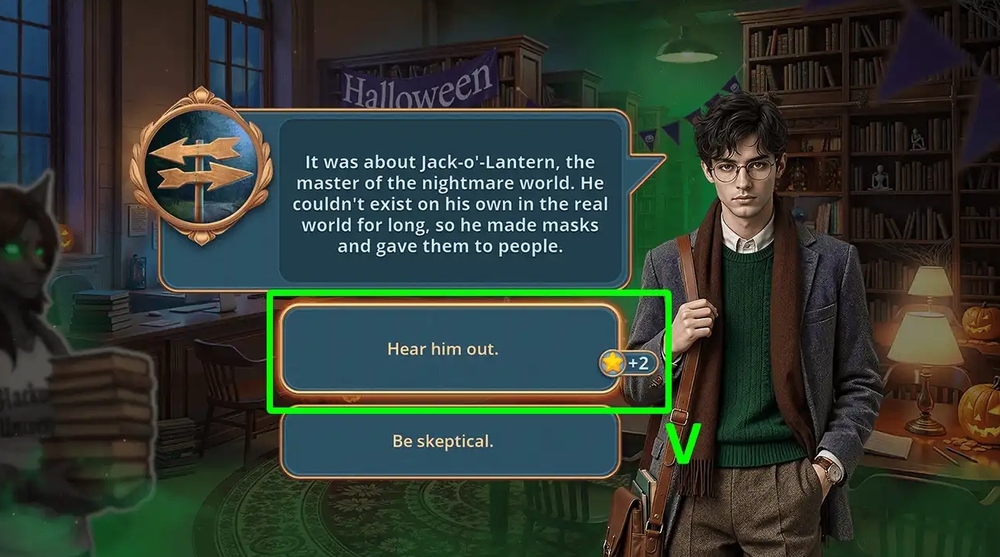
- Select this option, earn REMOTE CONTROL (V).
- Go to Study Hall.
- Use REMOTE CONTROL on the projector (W).
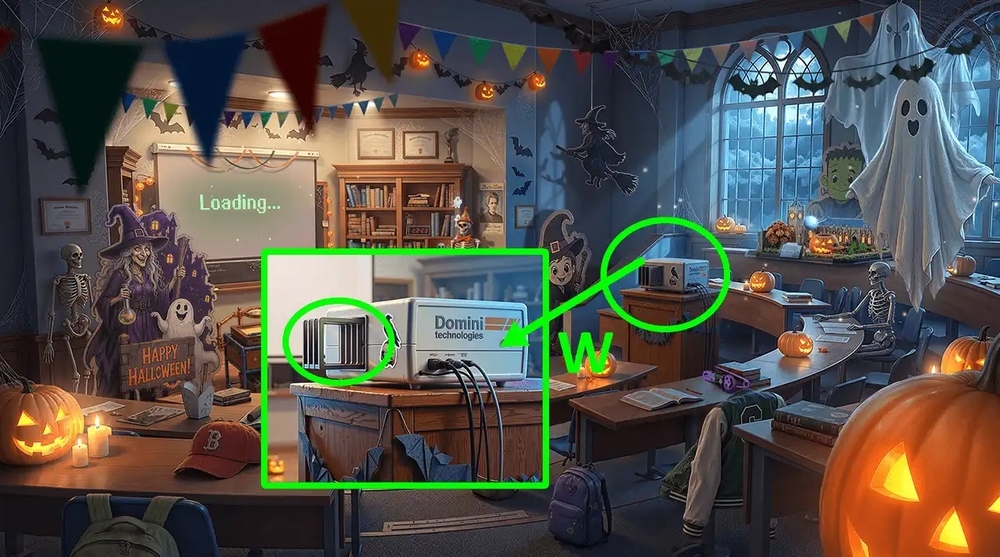
- Play puzzle, earn HEADPHONES (X).
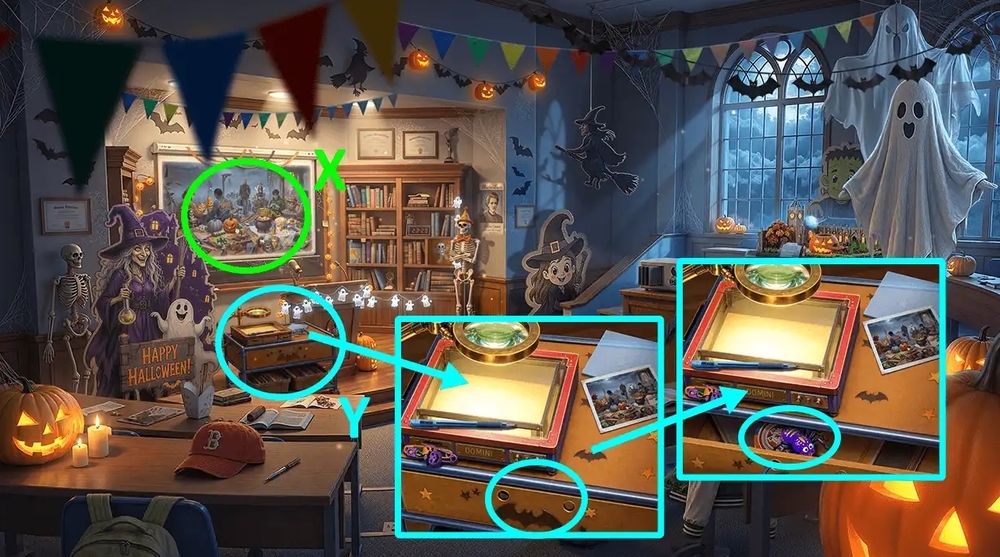
- Use HEADPHONES on the closed box, take PLASTIC SPIDERS 1/2 and SOUVENIR MAGNET (Y).
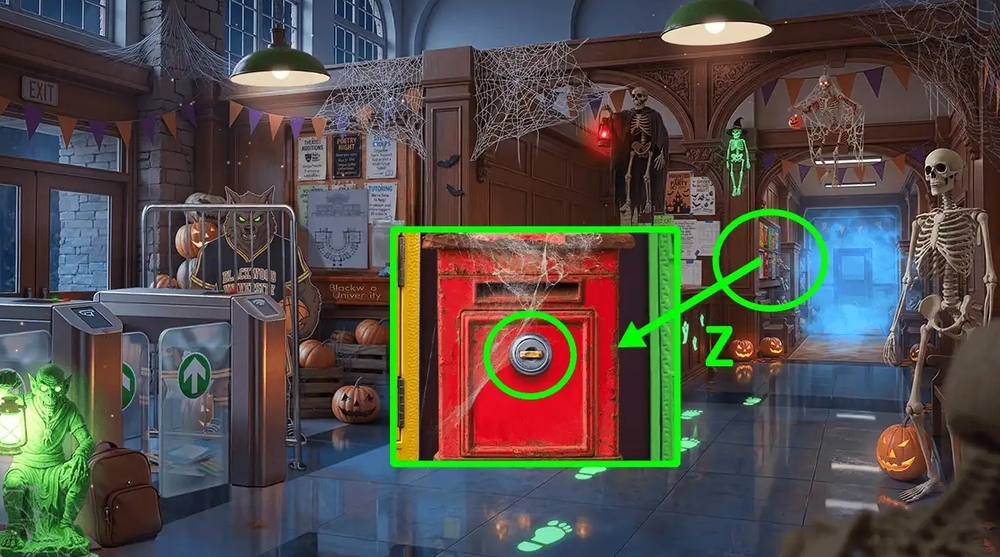
- Go to University Hall.
- Use SOUVENIR MAGNET on the keyhole (Z).
- Easy solution: Arrange all the puzzle pieces as shown in the image (A).
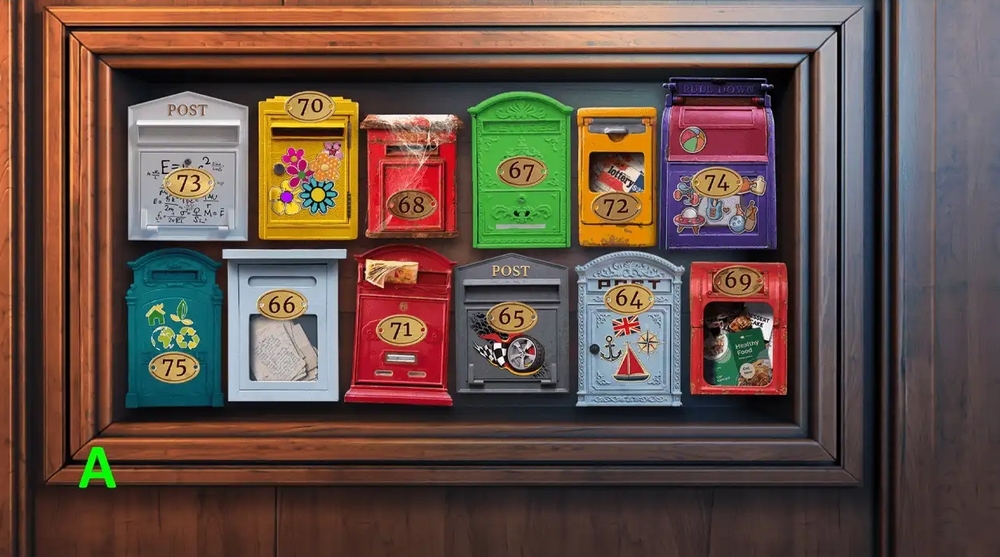
- Hard solution: Arrange all the puzzle pieces as shown in the image (B).
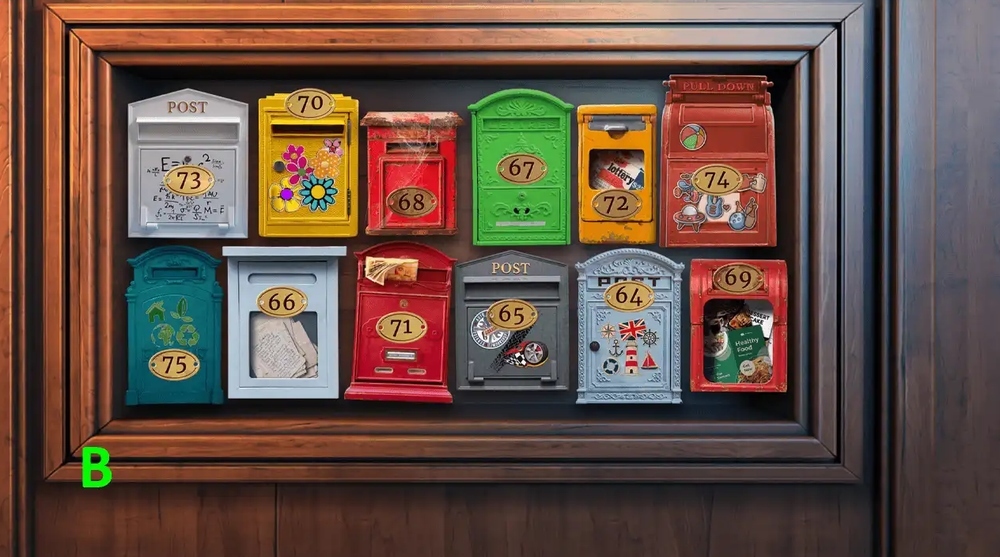
- Take GUMMY EYE (C).

- Use GUMMY EYE on the skull eye socket, take MISSING LETTERS 3/3 (D).
- Use MISSING LETTERS 3/3 on the pylon bottom panel, take MR. SKELETUS’S HAND (E).

- Go to Study Hall.
- Use MR. SKELETUS’S HAND on the projector (F).
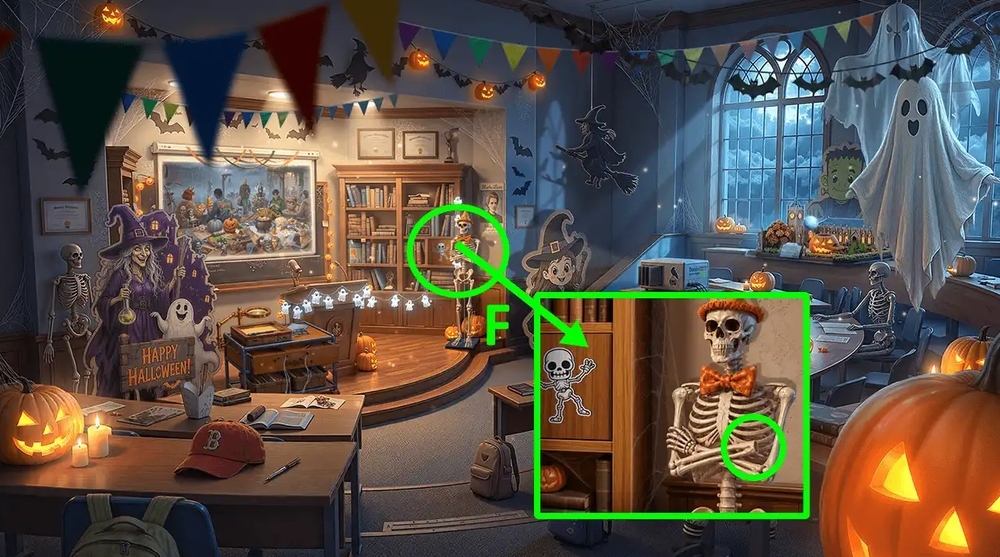
- Easy solution: Ax6-Bx2-Cx1-Dx3-Ex4-Fx1-Qx1-Rx1 (G).
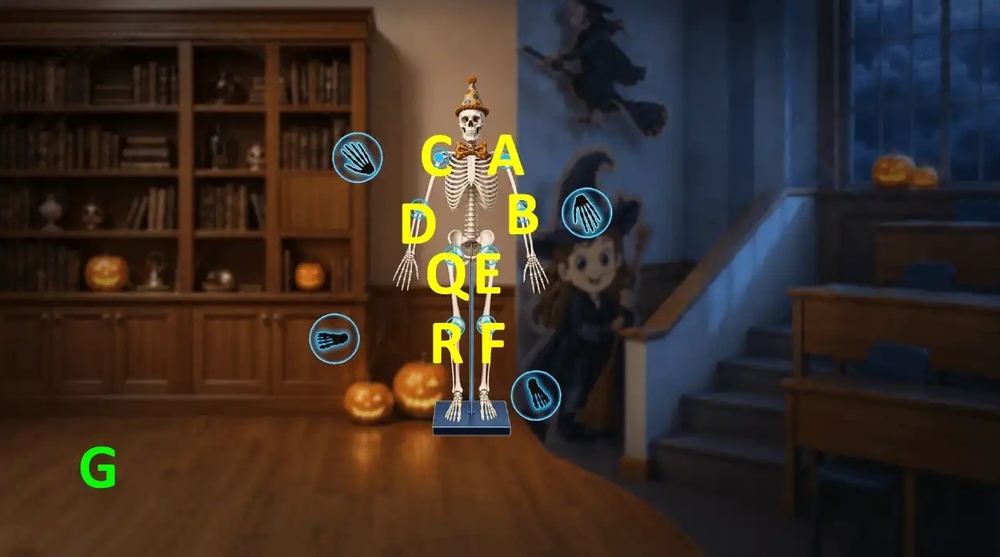
- Hard solution: Ax6-Bx2-Cx5-Dx4-Ex2-Fx3-Qx2-Rx1-Sx8-Tx2-Ux2-Vx6 (H).
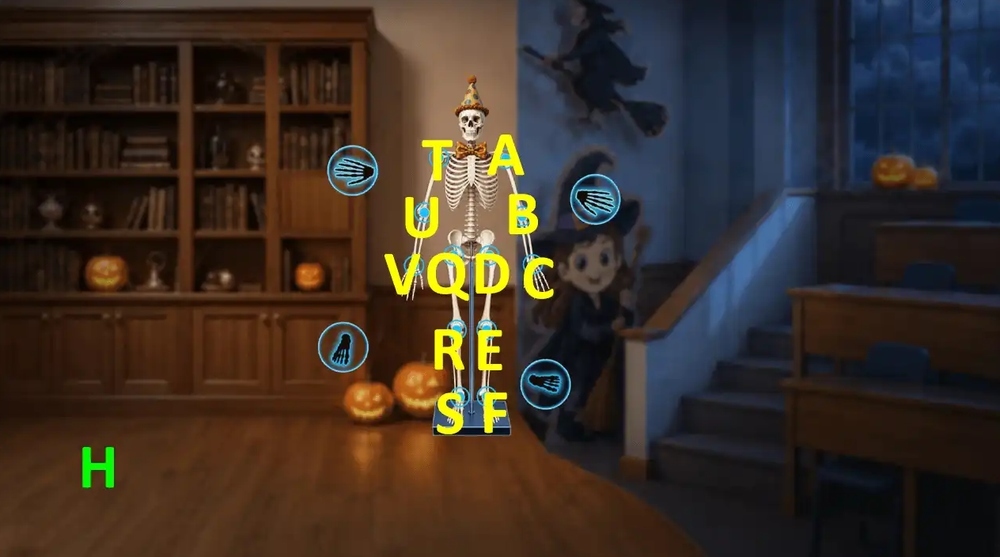
- Take WEREWOLF WEATHER VANE (K).

- Use WEREWOLF WEATHER VANE on the tower, take LIPSTICK and MIRROR (L).
- Go to In Front of the Gym.
- Use MIRROR on the old doll, take PHOTO MASK (M).
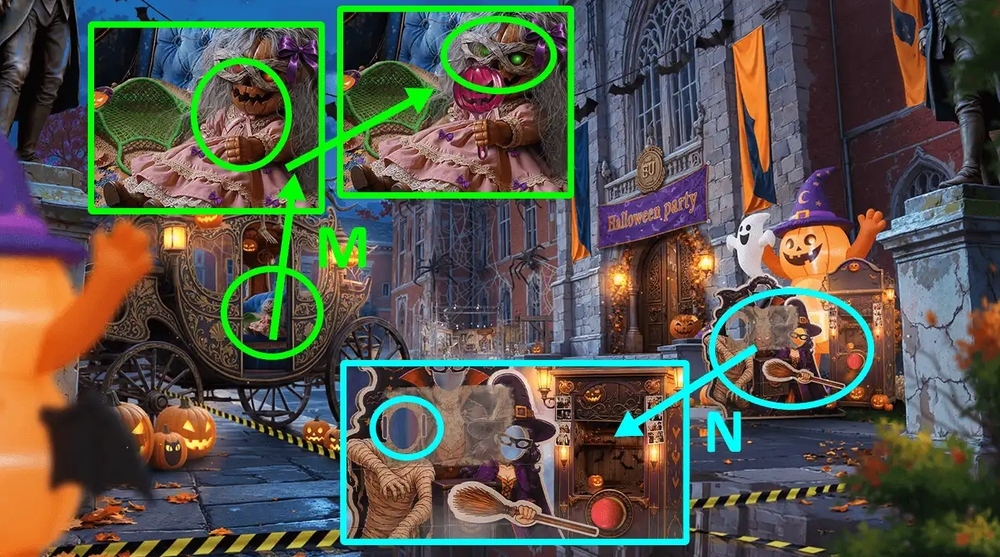
- Use PHOTO MASK on the Halloween-photo frame (N).
- Easy solution: Arrange all the puzzle pieces as shown in the image and press the “P” button (O).

- Hard solution: Arrange all the puzzle pieces as shown in the image and press the “P” button (Q).

- Take PHOTO FRAME (R).

- Go to Study Hall.
- Use PHOTO FRAME on the teacher’s cart, take SUSPICIOUS FOOTAGE (S).
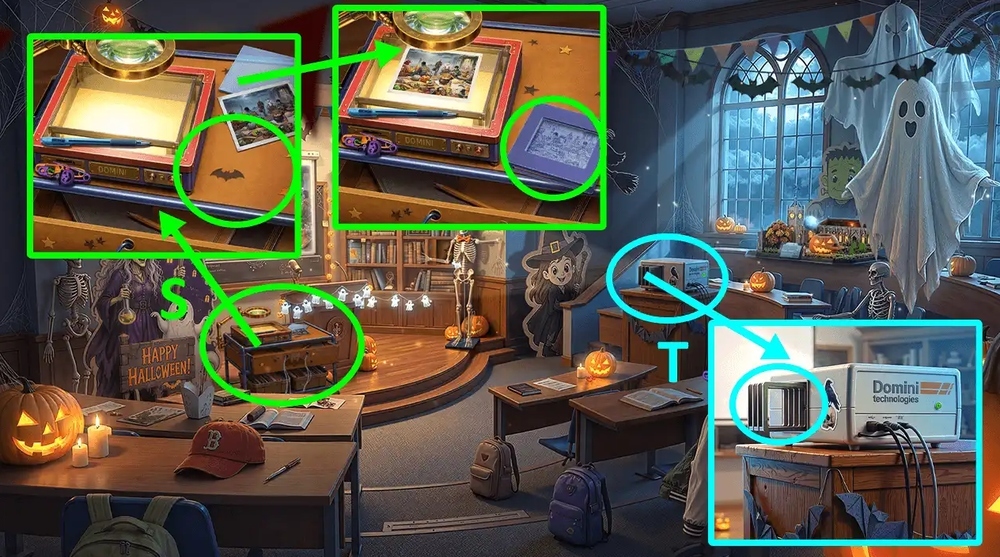
- Use SUSPICIOUS FOOTAGE on the projector (T).
- Play puzzle, earn ANTLER (U).

- Go to University Hall.
- Use ANTLER on the toothy chest, take AMULET (V).
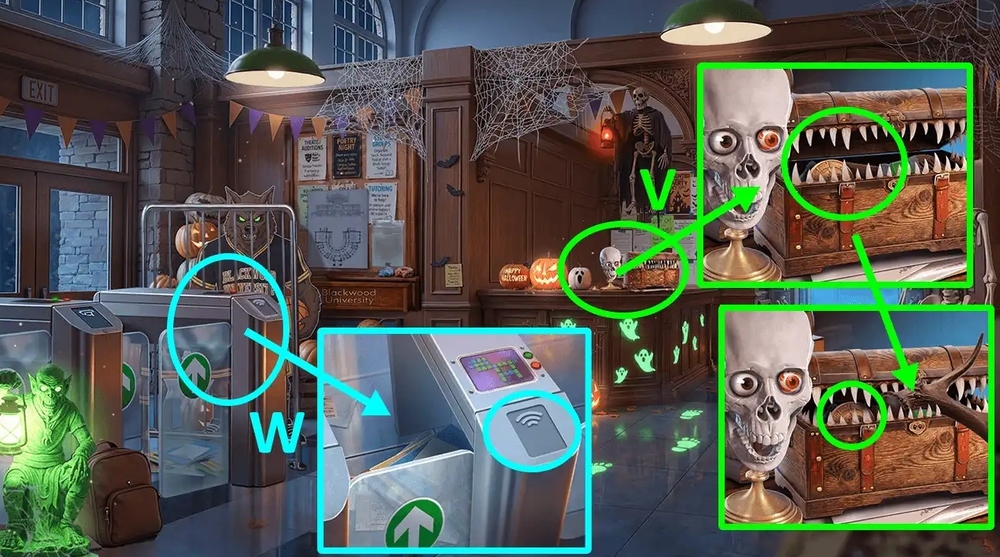
- Use AMULET on PROFESSOR’S BAG, earn E-PASS.
- Use E-PASS on the card scanner (W).

- Easy solution: 1-2-3-4-5-6-7-8-9-10-11-12 (A).

- Easy solution: 13-14-15-16-17-18-19-20-21-22 (B).
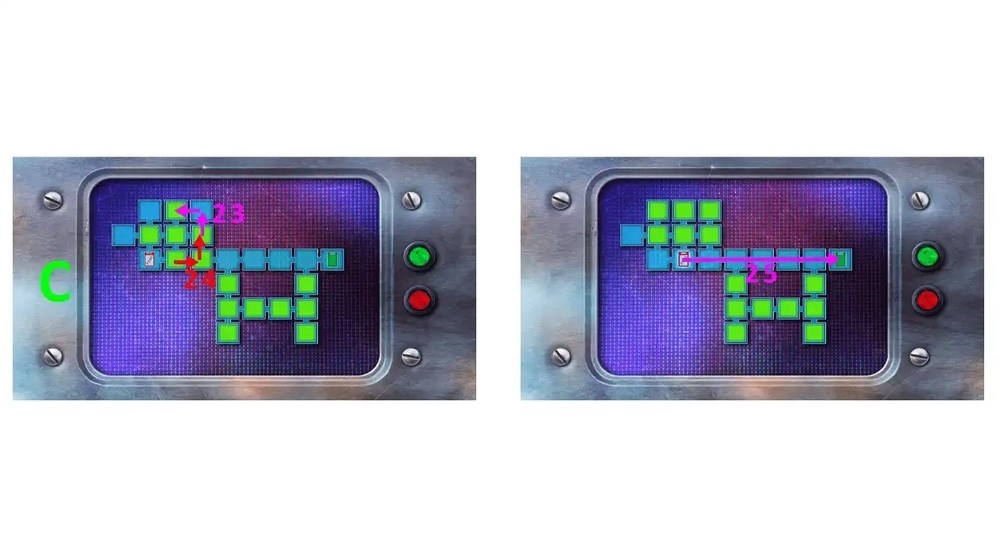
- Easy solution: 23-24-25 (C).
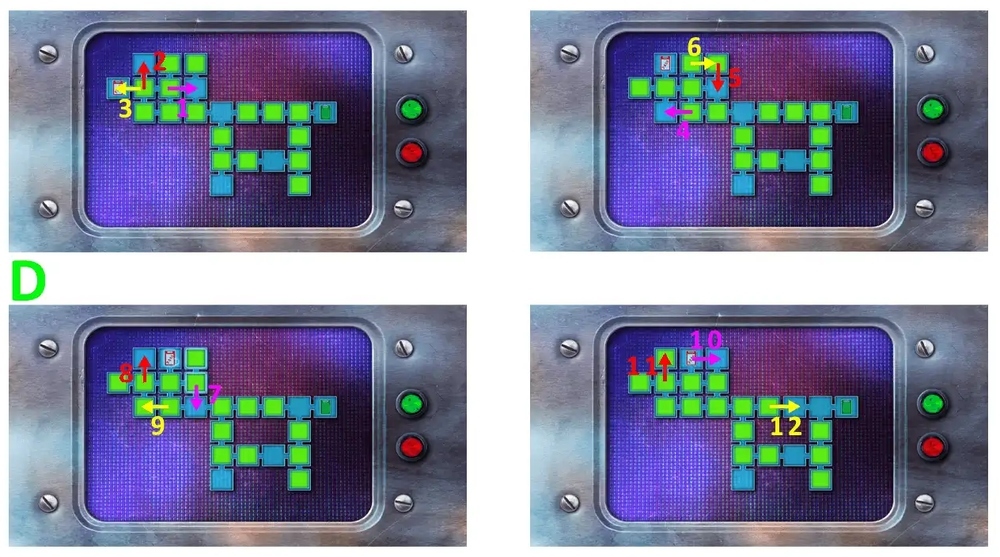
- Hard solution: 1-2-3-4-5-6-7-8-9-10-11-12 (D).
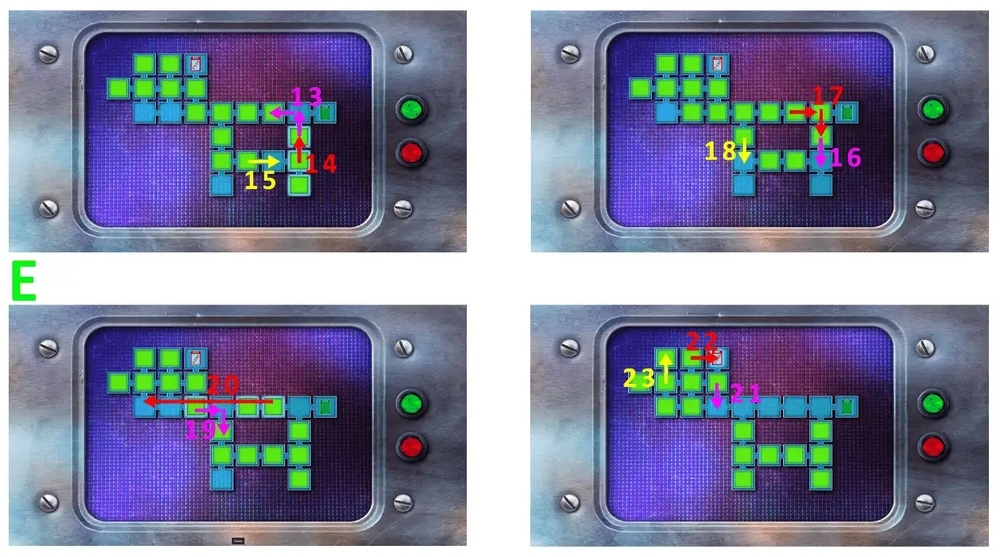
- Hard solution: 13-14-15-16-17-18-19-20-21-22-23 (E).

- Hard solution: 24-25-26 (F).
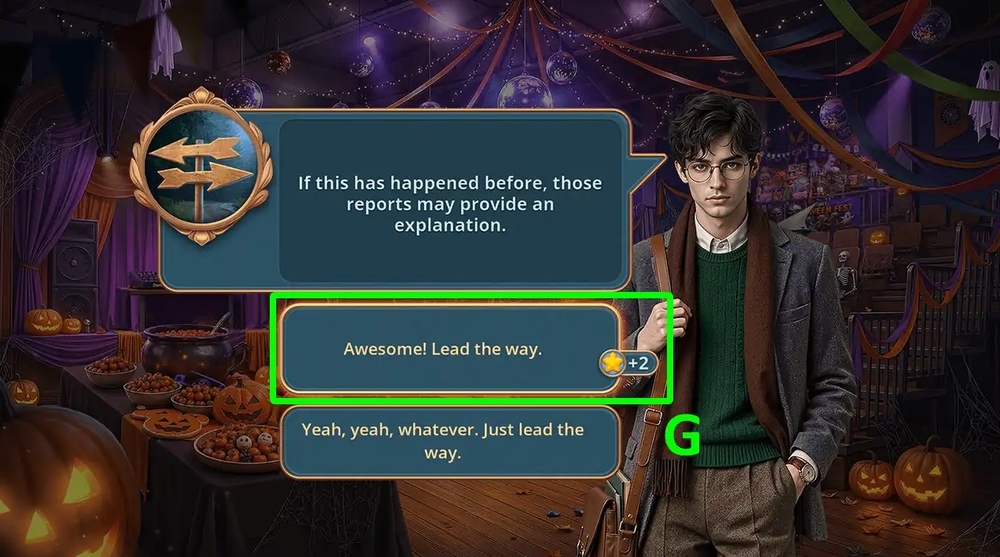
- Select this option (G).
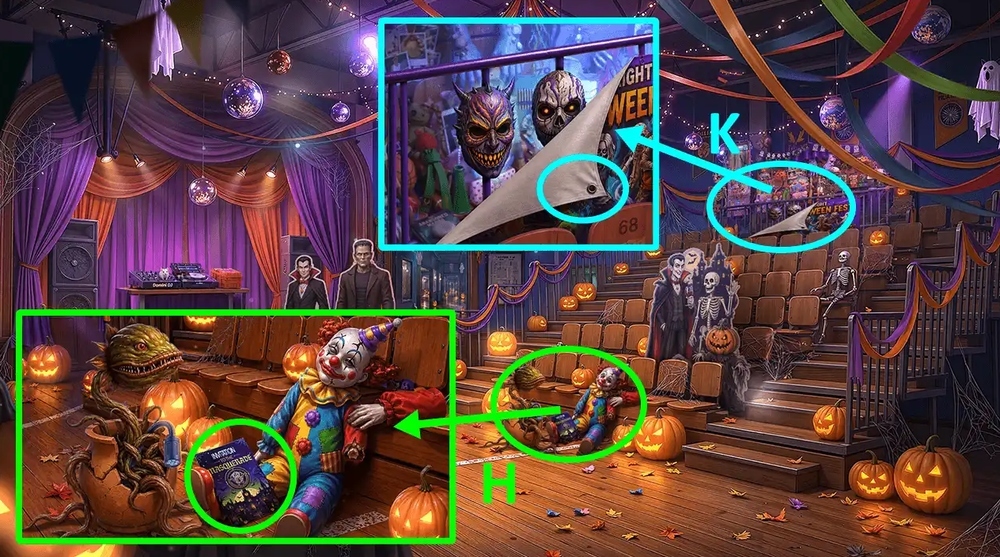
- Read the note, take RYAN’S PIN (H).
- Use RYAN’S PIN on the masquerade banner (K).
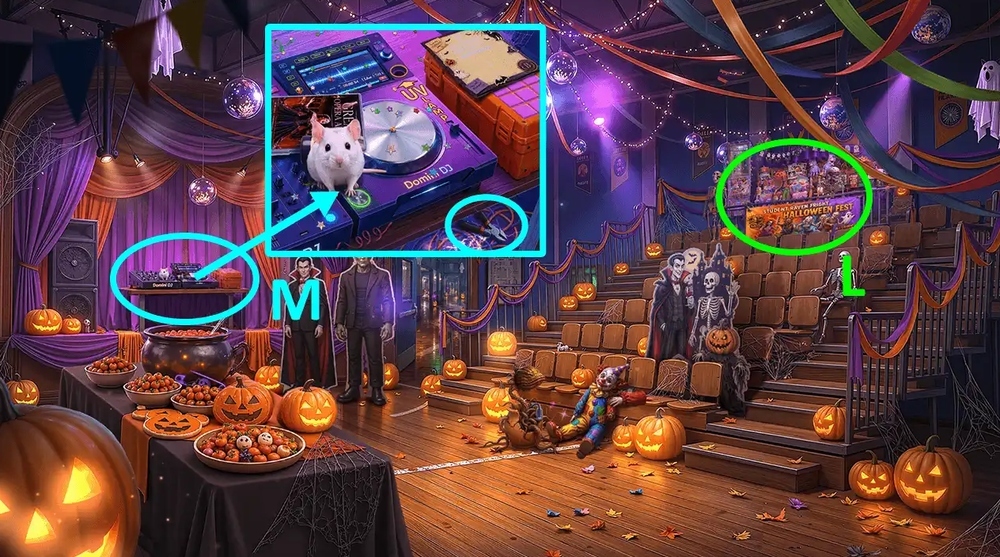
- Play puzzle, earn FOAM ARM (L).
- Use FOAM ARM on the exposed wires, earn MINI WIRE CUTTERS (M).
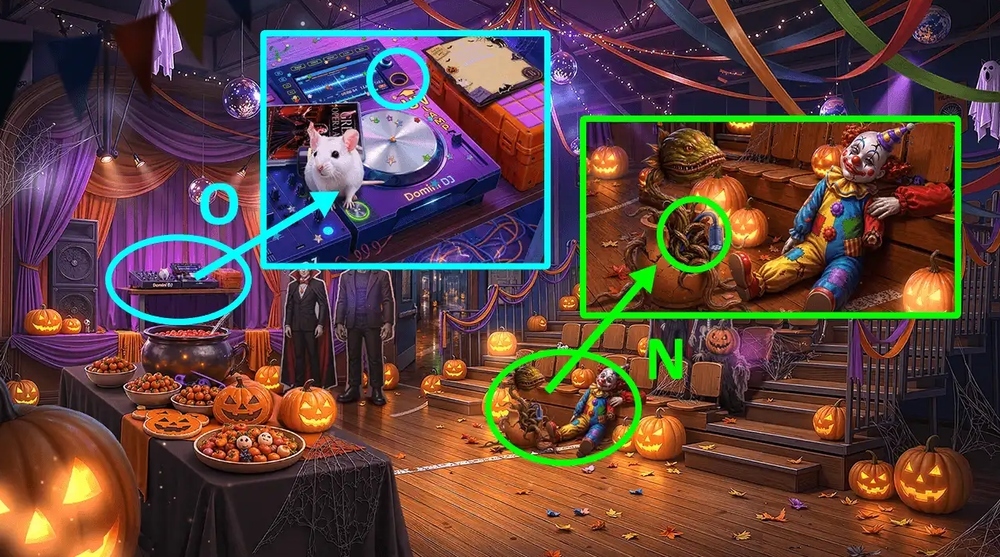
- Use MINI WIRE CUTTERS on the plant, earn UV LAMP HANDLE (N).
- Use UV LAMP HANDLE on the mount (O).

- Easy solution: 1-2-3-4-5-6-7-8-9-10-11-12 (P).

- Hard solution: 1-2-3-4-5-6-7-8-9-10-11-12 (Q).
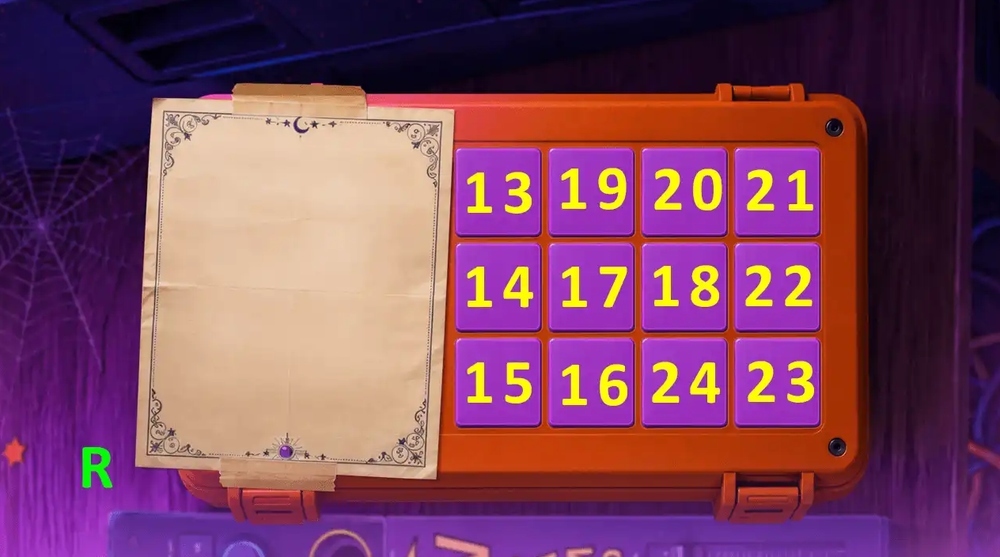
- Hard solution: 13-14-15-16-17-18-19-20-21-22-23-24 (R).

- Hard solution: 25-26-27-28-29-30-31-32-33-34-35-36 (S).
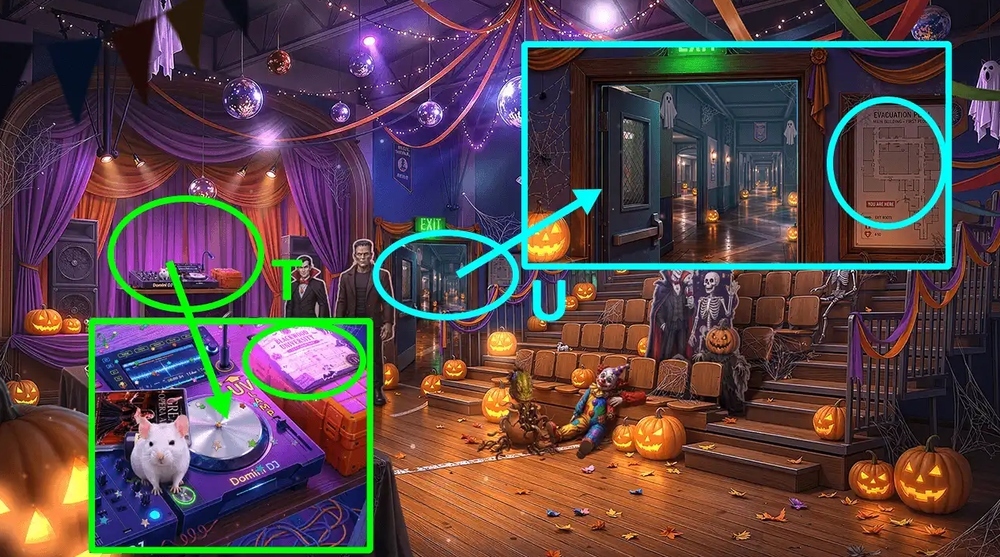
- Take SHORT ROUTE MAP (T).
- Use SHORT ROUTE MAP on the evacuation plan (U).
- Go forward.

- Take TOOTHBRUSH (V).
- Use RYAN’S PIN on the seam on an old suit (W).
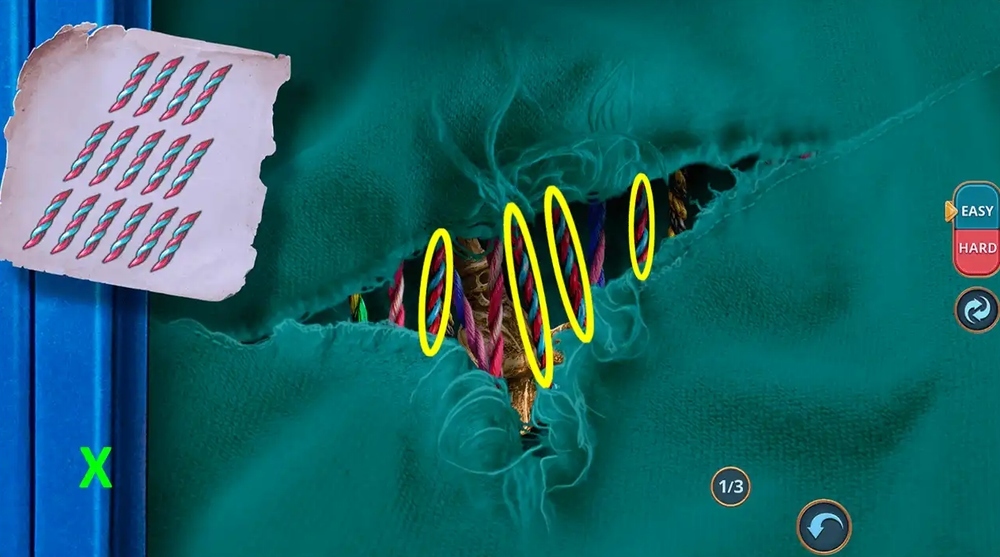
- Easy solution: Click on all the selected threads (X).
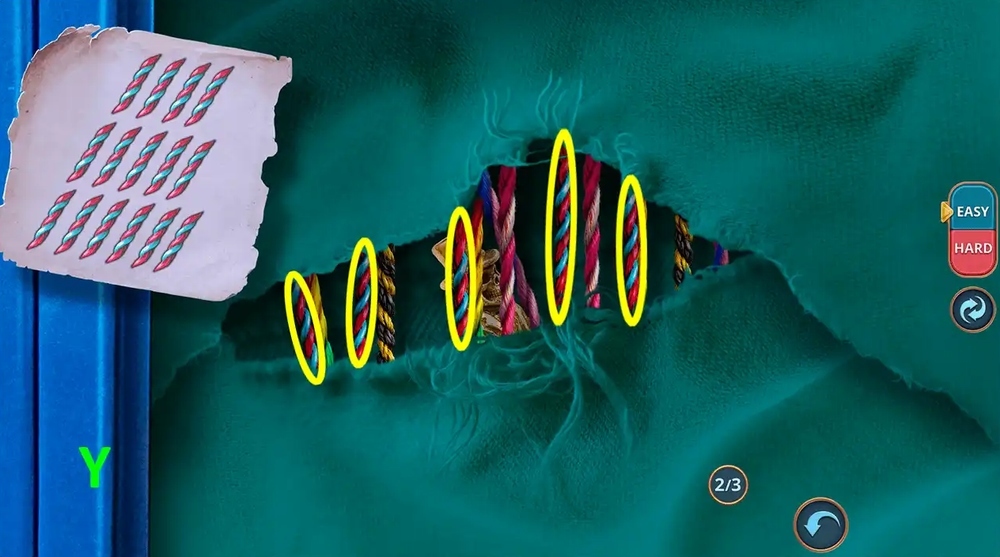
- Easy solution (Y).
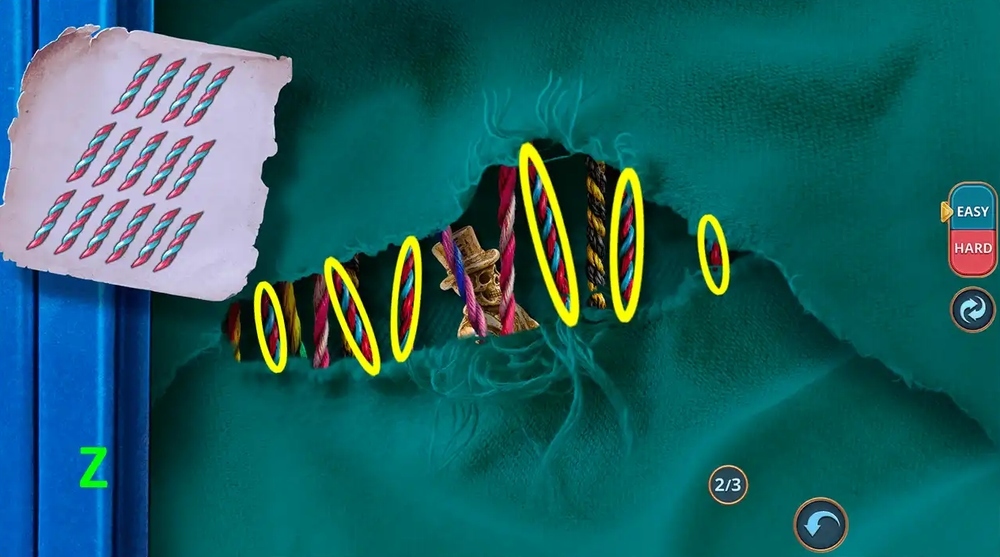
- Easy solution (Z).

- Hard solution: Click first on all the threads highlighted in yellow, and then on all the threads highlighted in green (A).
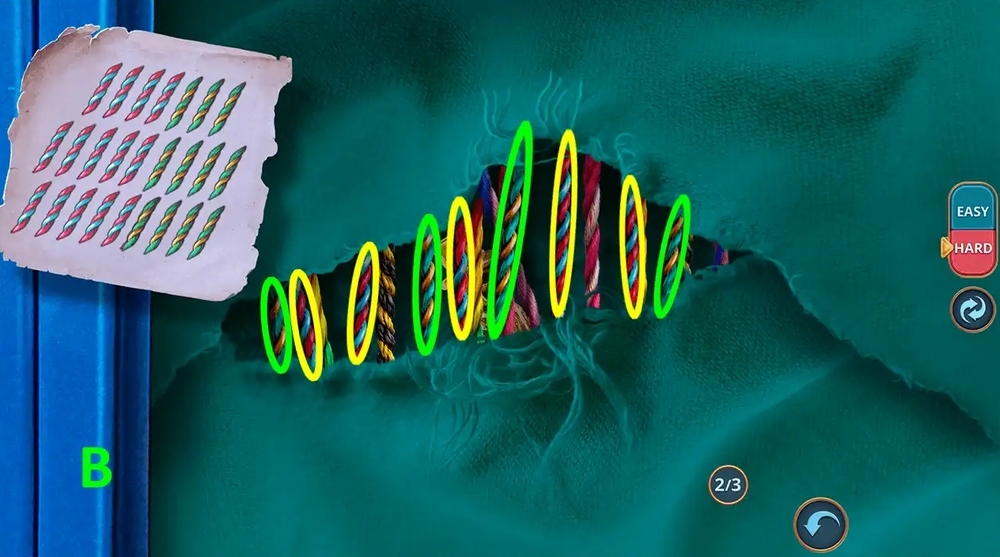
- Hard solution (B).

- Hard solution (C).
- Take GHOST COACHMAN FIGURINE (D).
- Use GHOST COACHMAN FIGURINE on the driver’s seat (E).
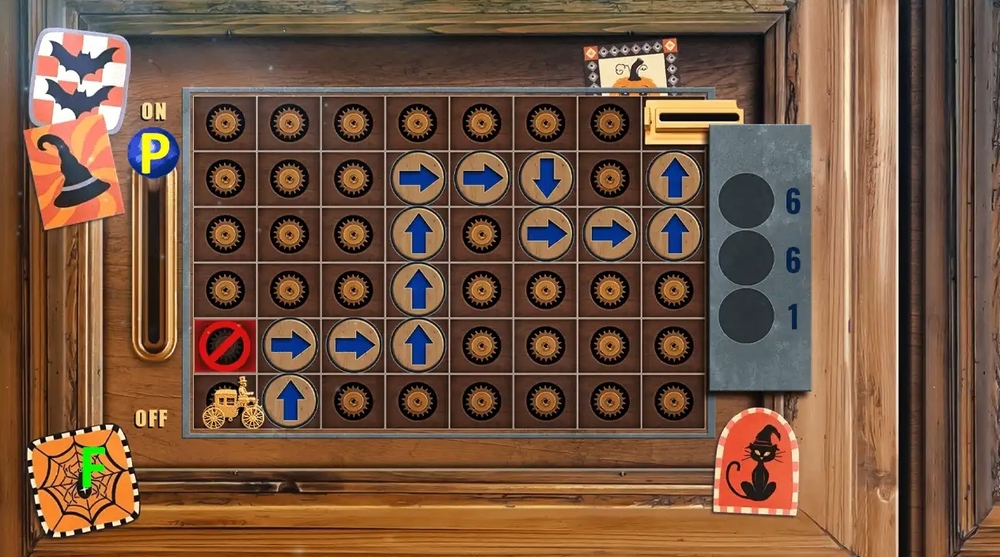
- Easy solution: Set the arrows as in the picture and press “P” (F).

- Hard solution: Set the arrows as in the picture and press “P” (G).

- Take FAKE FANG (H).
- Use FAKE FANG on the mouth of the skull, take SCREWDRIVER (K).
- Use SCREWDRIVER on the bolts on the grille, take POTHOLDERS (L).

- Use POTHOLDERS on the bent handle (M).

- Play puzzle, earn UNIVERSITY’S HISTORY POSTER (N).
- Use UNIVERSITY’S HISTORY POSTER on the combination lock (O).
- Go forward.
- Read the notes, take LEVERS 1/2 (P).
- Use LIPSTICK on the zipper, take PUMPKIN MAGNET (Q).

- Use PUMPKIN MAGNET on the iron stamp, earn IRON STAMP (R).
- Take PAINT, use IRON STAMP and PAPER on the ink pad, earn BARCODE IMPRINT (S).
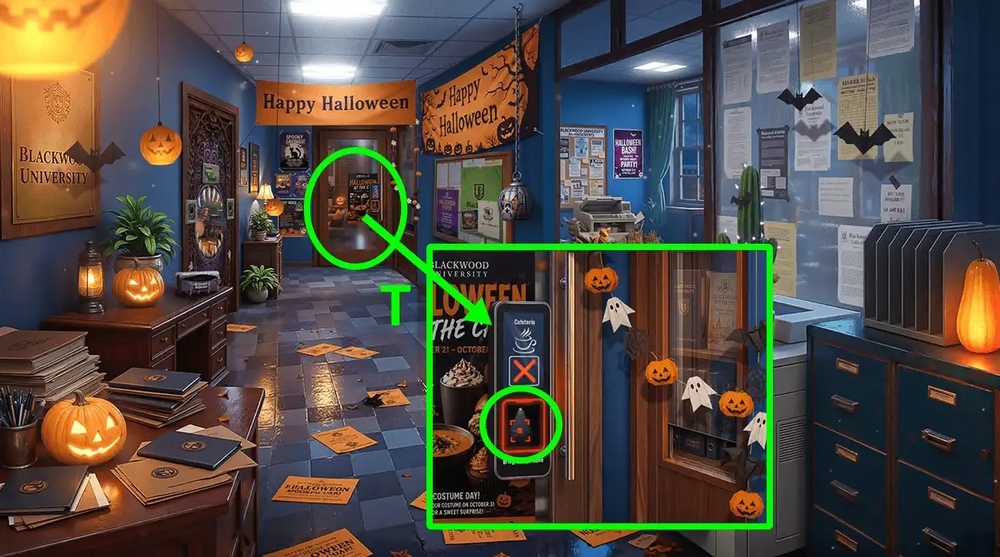
- Use BARCODE IMPRINT on the reader (T).

- Easy solution: Solution is random (U).

- Hard solution: Solution is random (V).
- Go forward.

- Read the note, take SPICE SCOOP (W).
- Use SPICE SCOOP on the pumpkin, earn WORM CANDY (X).
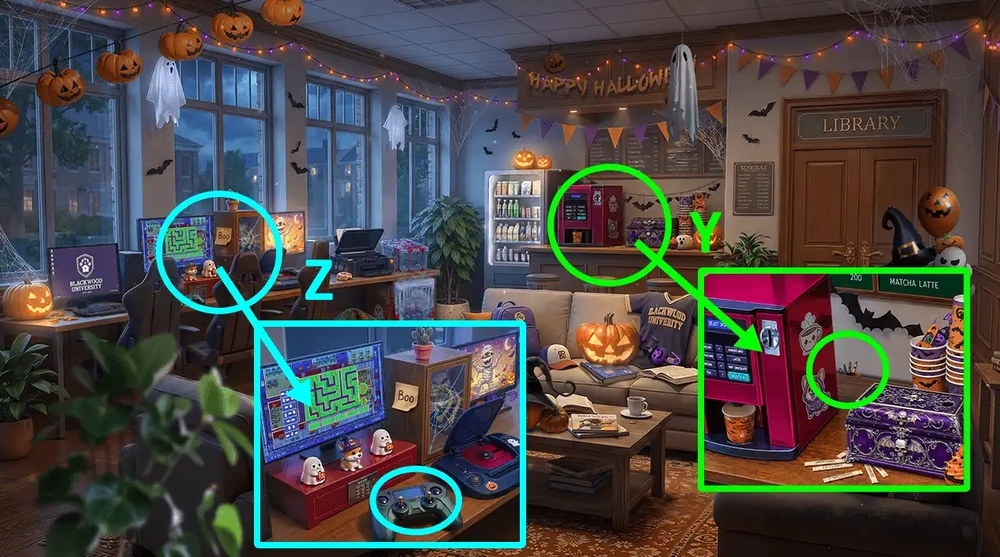
- Use WORM CANDY on the spider, earn PLASTIC SPIDERS 2/2 (Y).
- Use PLASTIC SPIDERS 2/2 on the joystick (Z).

- Easy solution: set the arrows as in the picture and press “P” (A).
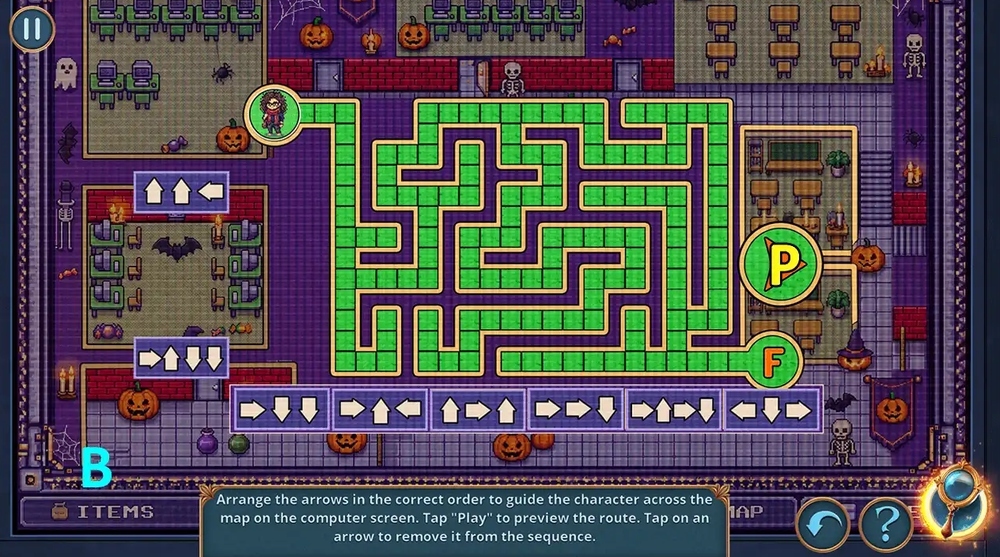
- Hard solution: set the arrows as in the picture and press “P” (B).

- Take COIN (C).
- Use COIN on the machine, take GLASS OF WATER (D).
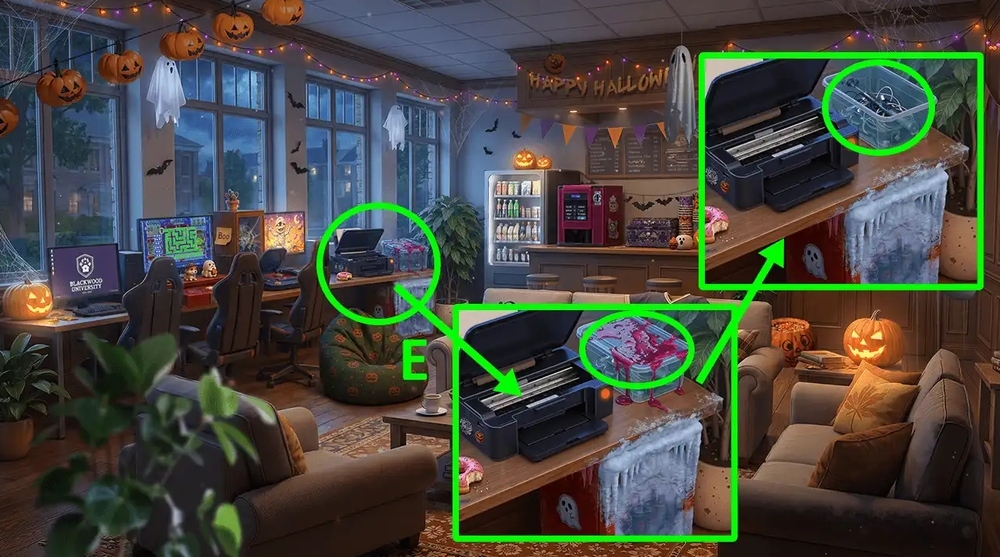
- Use GLASS OF WATER and TOOTHBRUSH on the dried syrup, take SELFIE STICK (E).
- Go to Sports Equipment Room.
- Use SELFIE STICK on the dried syrup, earn STAPLE REMOVER (F).
- Go to Administrative Building.
- Use STAPLE REMOVER on the schedule sheet, take TELESCOPIC BANNER HANDLE and LEVERS 2/2 (G).
- Use LEVERS 2/2 on the partition with spikes (H).
- Easy solution: Click: R*3, D*2, R, D, L, U*3, L*2, D, R, U, R, D*2, R, D*2, L, U, D, L*2,
- U, R*2, D, R, U, D, R*2, U, L, D, L*4, U*2, L, U, R, U, R*2, D*2, U*2, L*2, D, R, U, R, D (K).
- Hard solution: Click: R*2, U, R, D, L*3, U, R, L*3, U*2, R*2, D, U*2, R*2, D, L, U, R*3,
- D, L, R*3, D*2, L, U, R, U, L, U, L*2, D*2, R, L, U*2, R*2, D, R, D*2, L, D, L*2, U (M).
- Go forward.
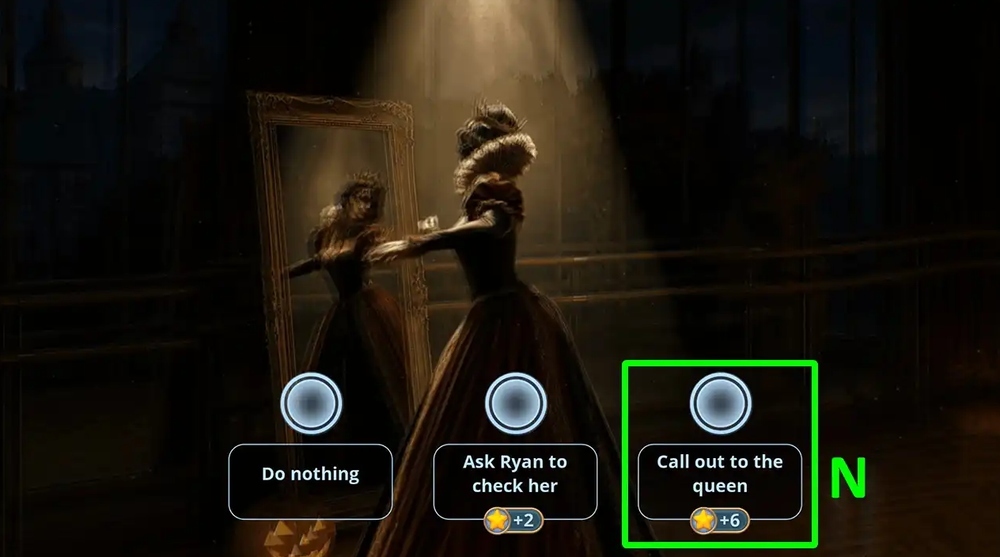
- Select this option (N).
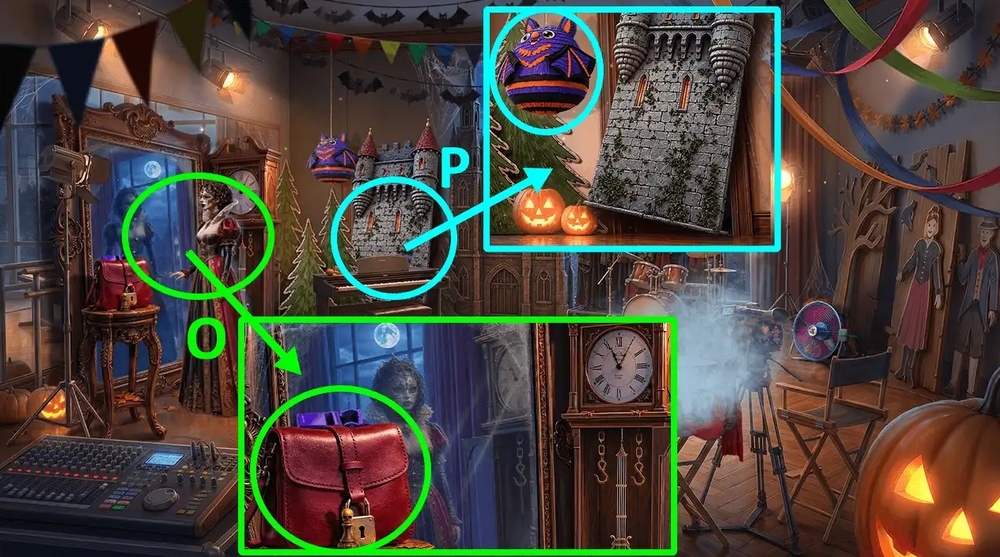
- Take HORRID PAWN and BROKEN REFEREE’S WHISTLE (O).
- Use TELESCOPIC BANNER HANDLE on the pinata (P).
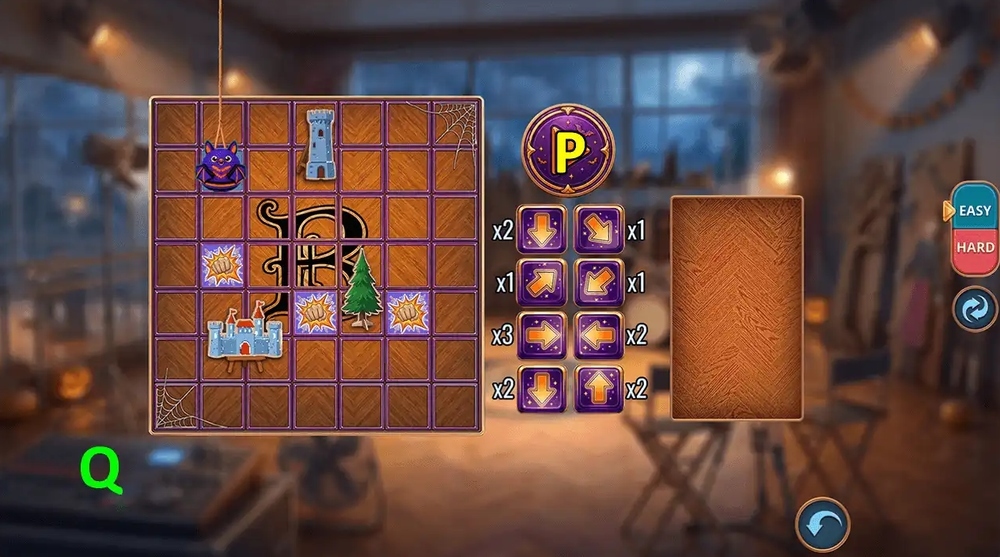
- Easy solution: Set the arrows as shown in the picture and press “P” (Q).

- Hard solution: Set the arrows as shown in the picture and press “P” (R).

- Take BAT HAIRPIN (S).
- Use BAT HAIRPIN on the keyhole, take HAT (T).
- Use HAT on the smoke (U).
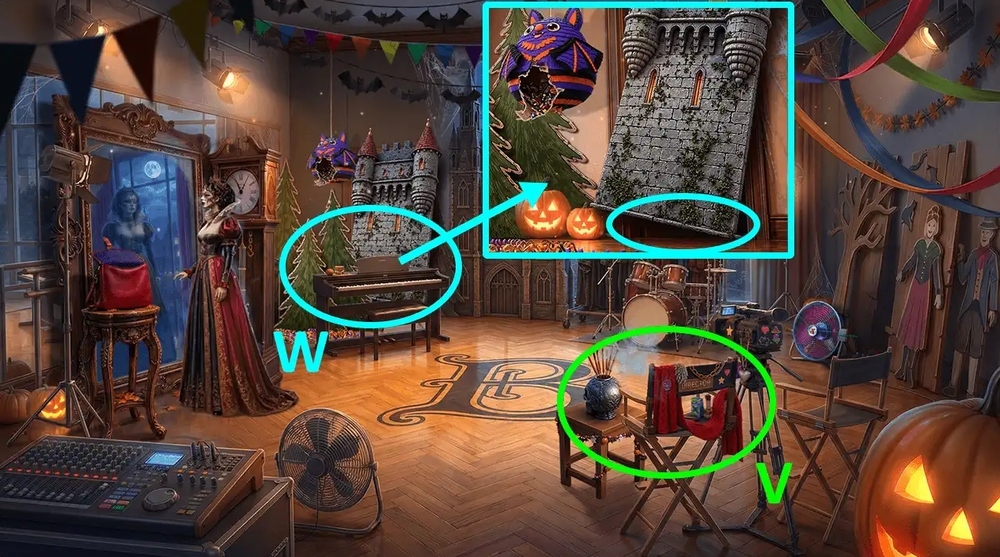
- Play puzzle, earn JACK (V).
- Use JACK on the heavy screen (W).
- Go forward.

- Take WOODEN BOXES 1/2, use HORRID PAWN on the chessboard, take TV REMOTE (X).
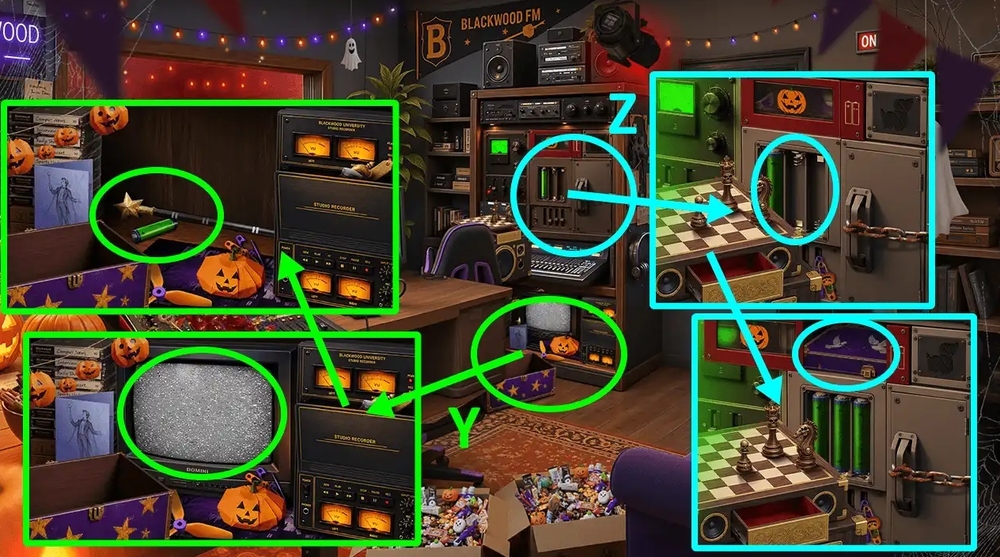
- Use TV REMOTE on the TV, take BATTERIES 2/2 and MAGIC WAND (Y).
- Use BATTERIES 2/2 on the battery compartment, take MAGICIAN’S BOX LID (Z).
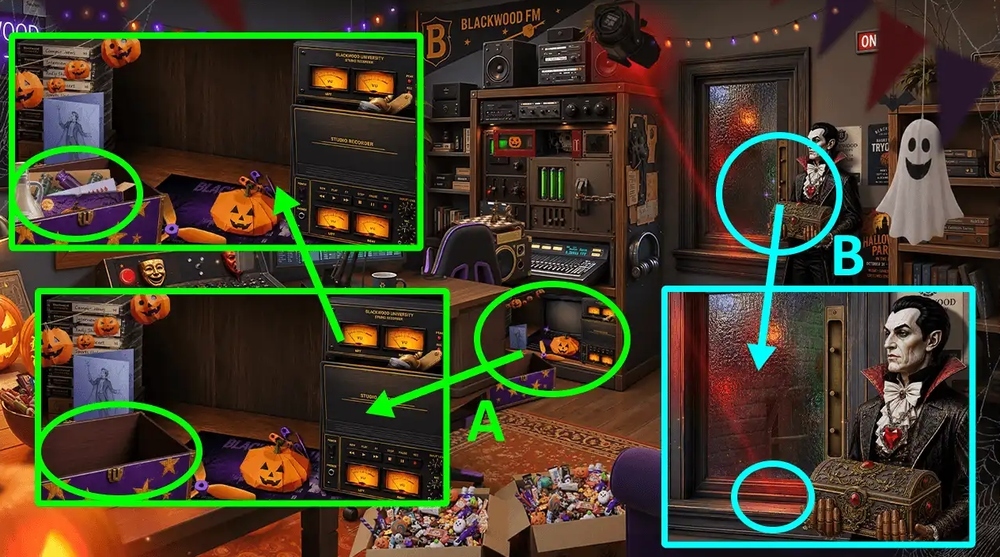
- Use MAGICIAN’S BOX LID and MAGIC WAND on the old wooden box, take VIAL OF VINEGAR and POCKET MIRROR (A).
- Use POCKET MIRROR on the windowsill (B).

- Easy solution: Click: A, C, E*2, B*3, D, F (C).

- Hard solution: Click: F, E, B, C*2, E, F*3, D*2 (D).

- Take FLUFFY GARLAND (E).
- Use FLUFFY GARLAND on the sticky mass, take SPARE CARTRIDGE (F).
- Go to Campus Internet Cafe.
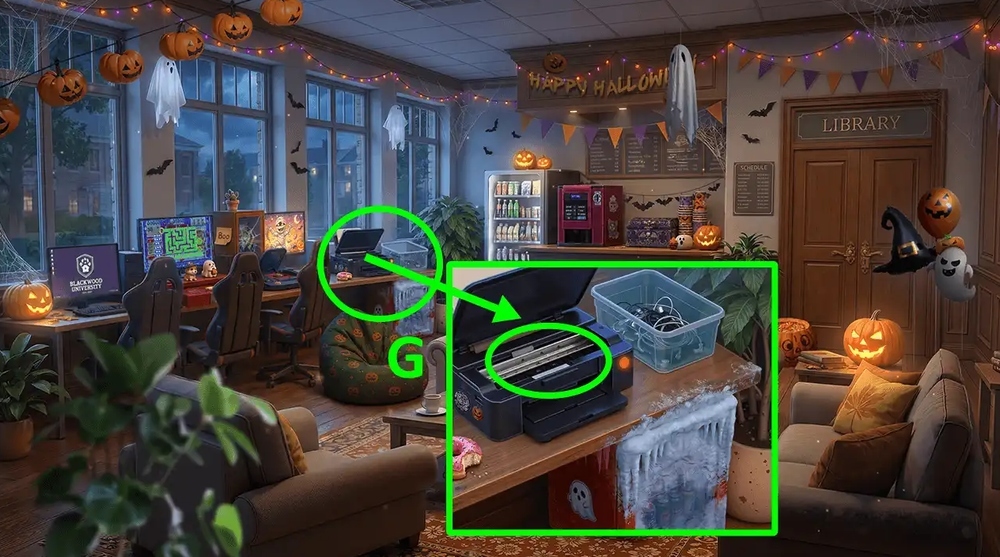
- Use SPARE CARTRIDGE on the printer (G).
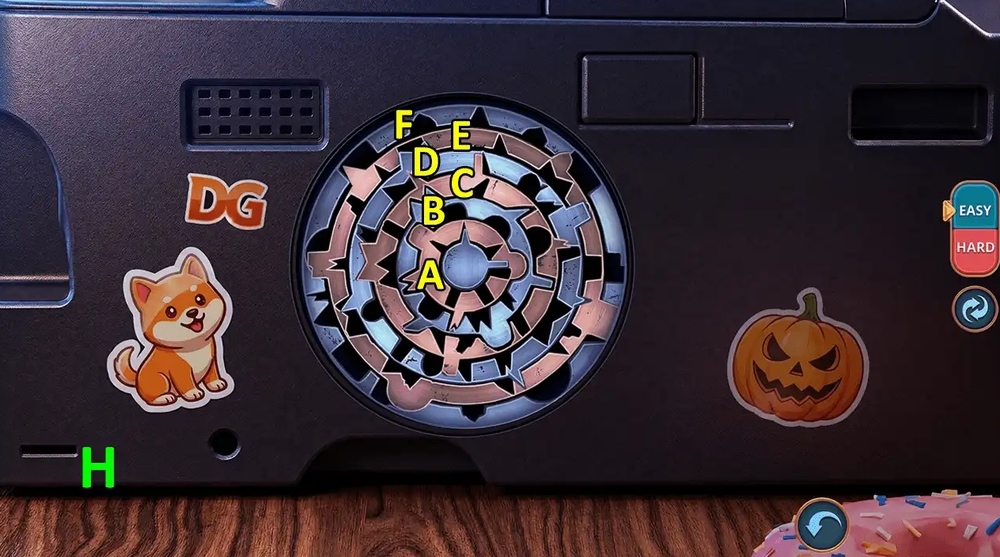
- Easy solution: Click: A*5, B*5, C*5, D*3, E*4, C*2, F*3 (H).

- Hard solution: Click: A*5, B*5, C*5, D*7, A*5, E*4, C*2, F*3 (K).
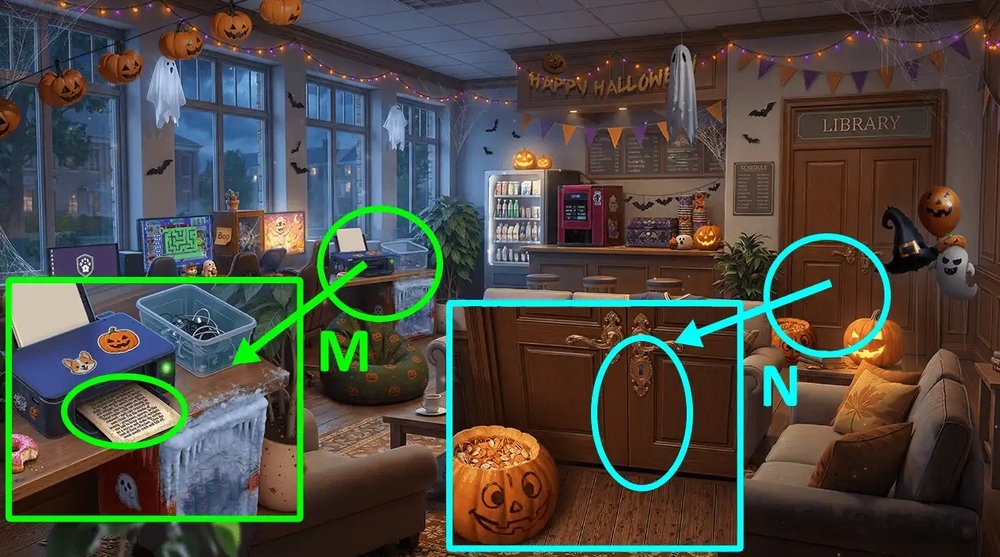
- Read the note, take DRAWING WITH SYMBOLS and HALLOWEEN PARTY FLYER (M).
- Use HALLOWEEN PARTY FLYER and FAKE FANG on the door to the book club (N).
- Go forward.
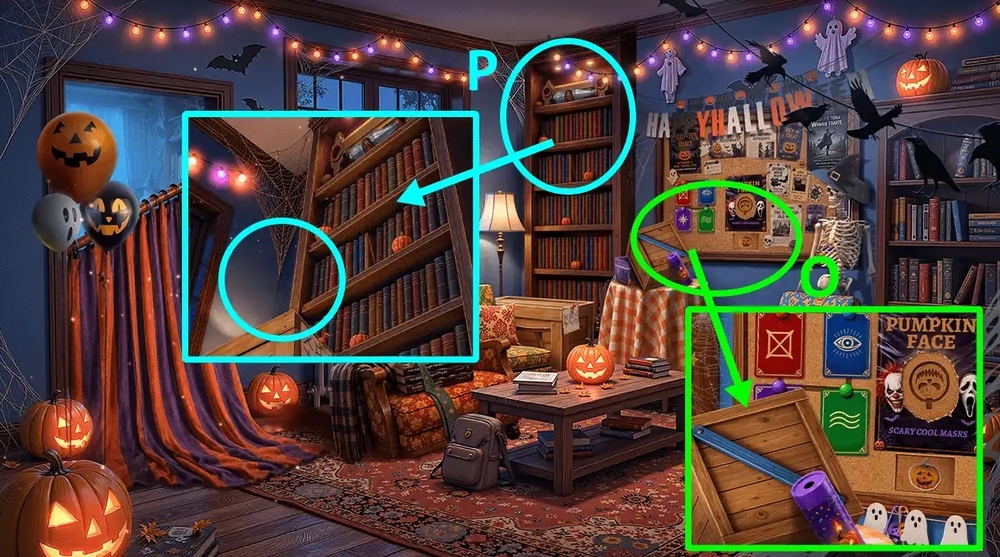
- Take TUBE and WOODEN BOXES 2/2 (O).
- Use WOODEN BOXES 2/2 on the bookshelves (P).
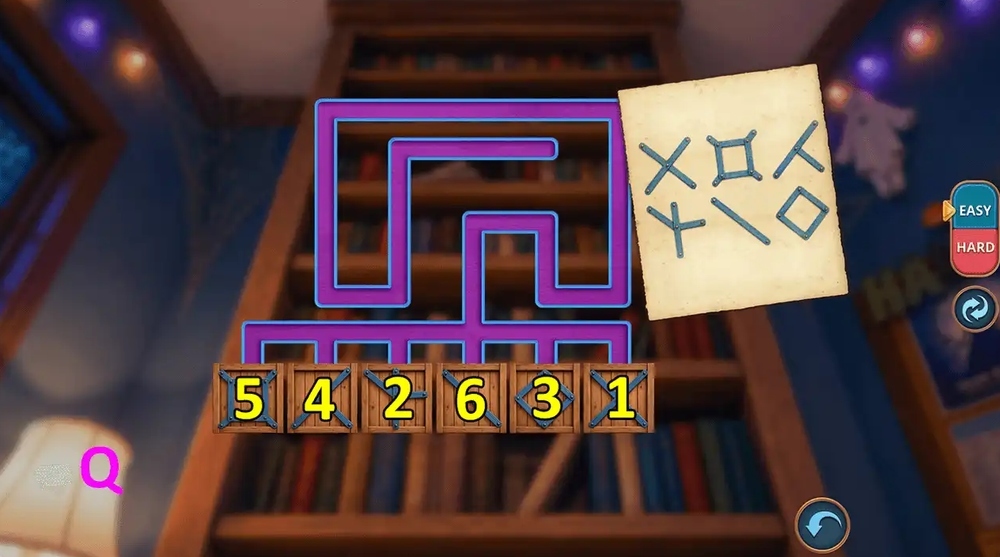
- Easy solution: Click: 1, 2, 3, 4, 5, 6 (Q).
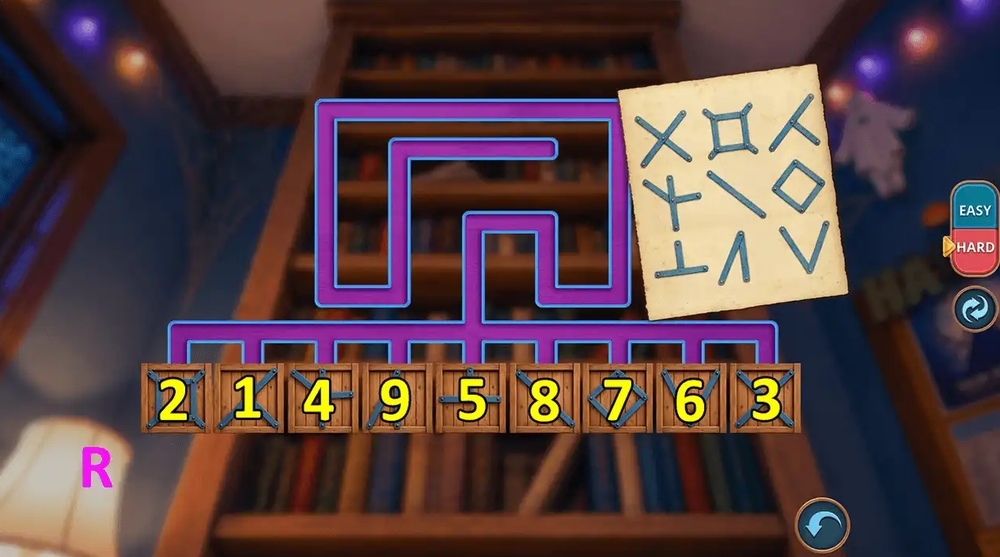
- Hard solution: Click: 1, 2, 3, 4, 5, 6, 7, 8, 9 (R).

- Take SODA BOTTLE (S).
- Use SODA BOTTLE on the sagging side of the chair, take LEMON JUICE and MOP (T).
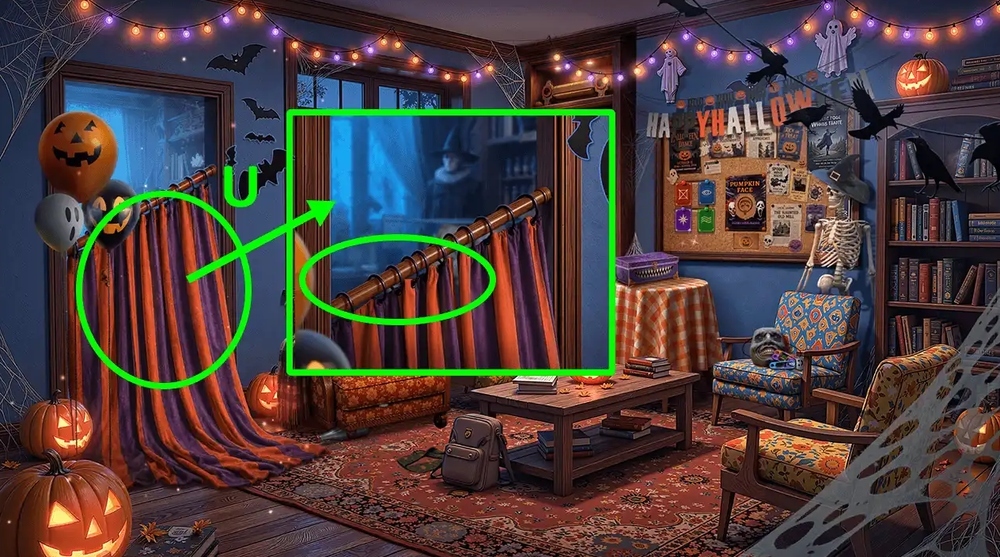
- Use MOP on the cornice (U).
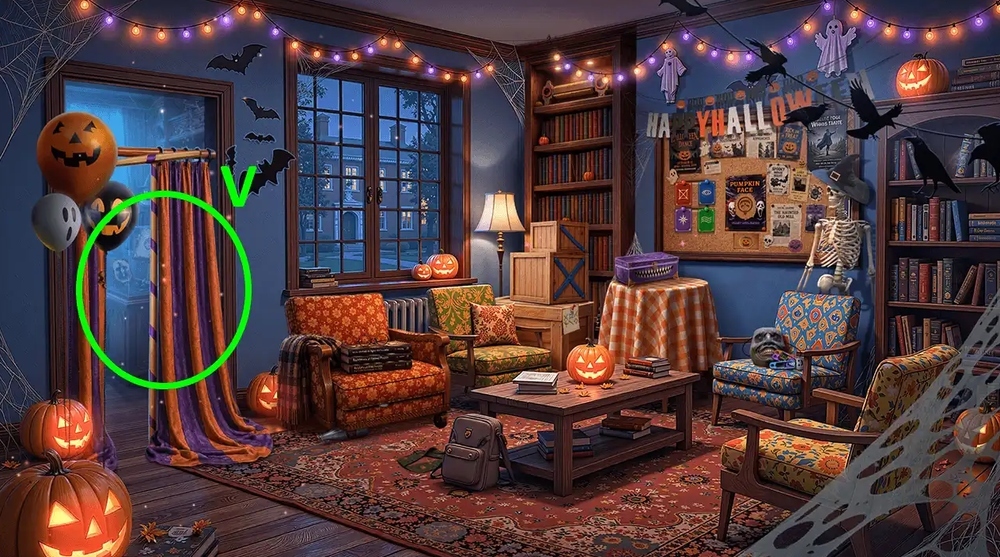
- Play puzzle, earn CLIPPERS (V).
- Go to Rehearsal Hall.

- Use CLIPPERS on the plastic tie, take HEAVY STATUETTE and BRUSH (W).
- Use DRAWING WITH SYMBOLS, BRUSH and PAINT on the mirror, click on all the drawn symbols (X).
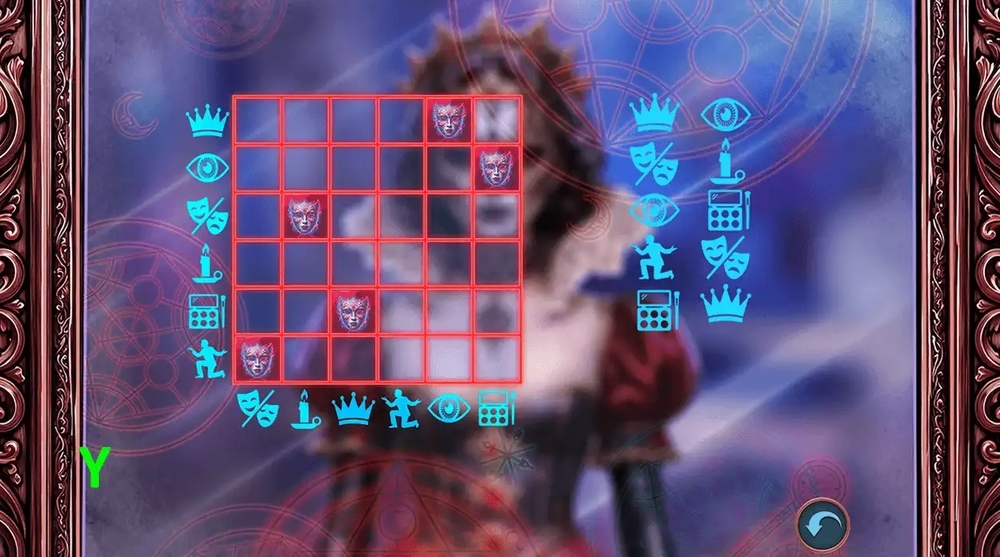
- Easy solution: Use the picture as a hint (Y).
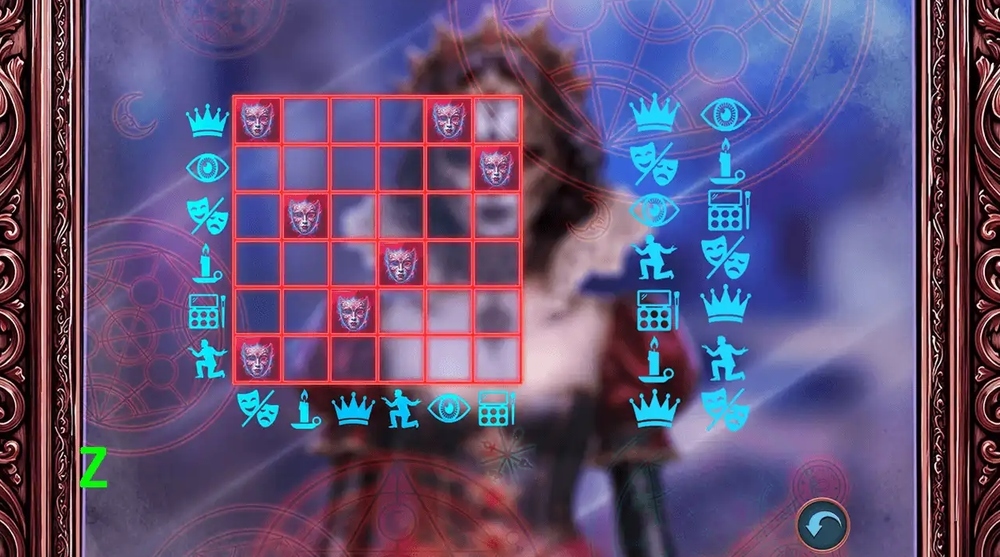
- Hard solution: Use the picture as a hint (Z).
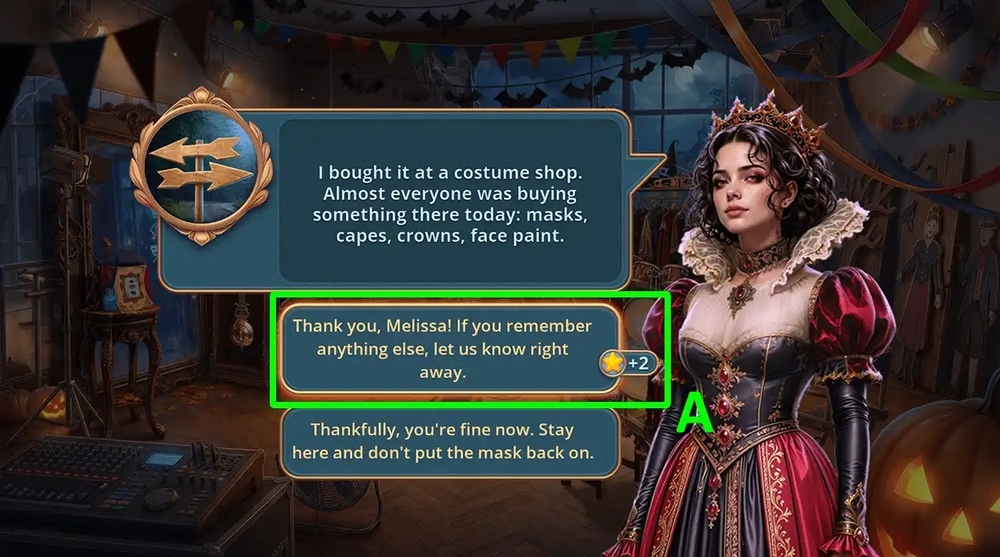
- Select this option, earn QUEEN’S DIADEM (A).
- Go to Campus Internet Cafe.

- Use QUEEN’S DIADEM on the box, take BALL and ANTIFREEZE SPRAY (B).
- Use ANTIFREEZE SPRAY on the mini refrigerator, take GLUE PASTE (C).
- Use GLUE PASTE and BALL on the BROKEN REFEREE’S WHISTLE, earn REFEREE’S WHISTLE.
- Go to Decorated Gym.

- Use REFEREE’S WHISTLE on the mouse, take COAL DUST and CD WITH OPERA (D).
- Go to Campus Internet Cafe.
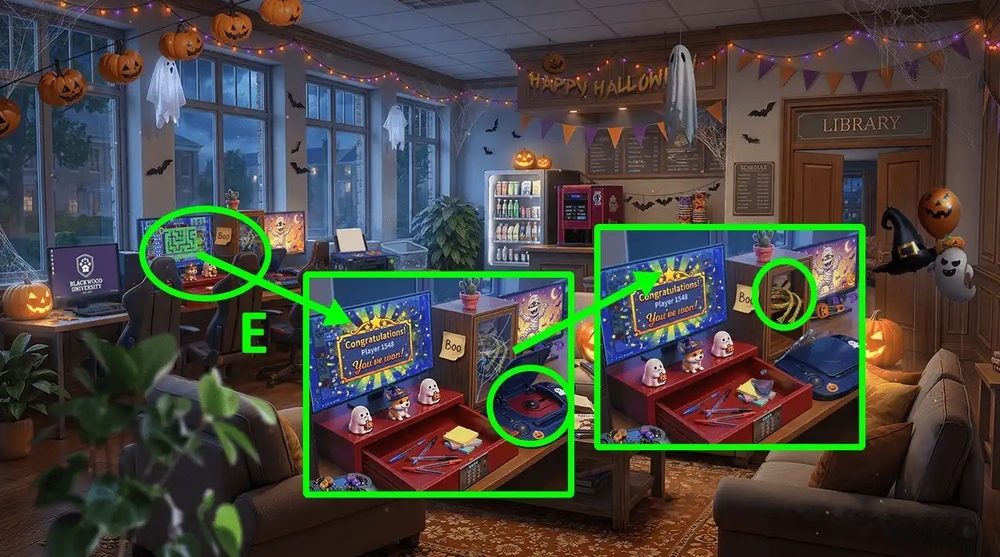
- Use CD WITH OPERA on the tape recorder, take WICK, LIGHTER and BAKING SODA (E).
- Go to Campus Radio Room.

- Use LEMON JUICE and BAKING SODA on the VIAL OF VINEGAR.
- Easy solution: Click: B*3, C*2, D, E*2, A (F).

- Hard solution: Click: B*3, D, C*2, A (G).
- Earn HOMEMADE ACID.

- Use HOMEMADE ACID on the chain link, take BATTERY, GLASSES FRAME and PLASTIC WEDGE (H).
- Take PROPELLERS 1/2, use PLASTIC WEDGE and HEAVY STATUETTE on the lid, take SALTPETER, LENSES and WINDOW HANDLE (K).
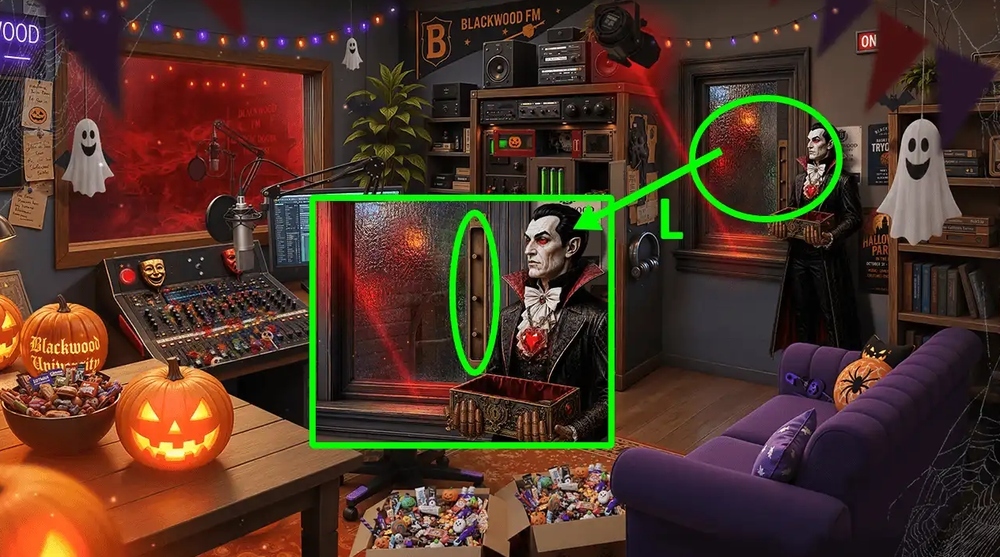
- Use WINDOW HANDLE on the sash (L).
- Go forward.

- Take DRONE BODY and SULFUR (M).
- Use SALTPETER, SULFUR and COAL DUST on the TUBE, earn EXPLOSIVES.
- Use EXPLOSIVES and LIGHTER on the locker (N).
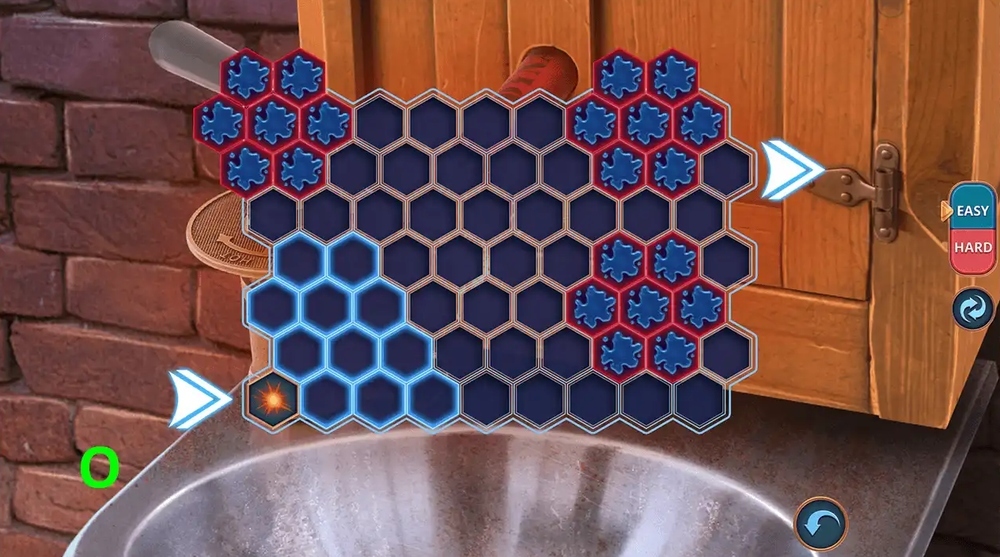
- Easy solution: Solution is random (O).
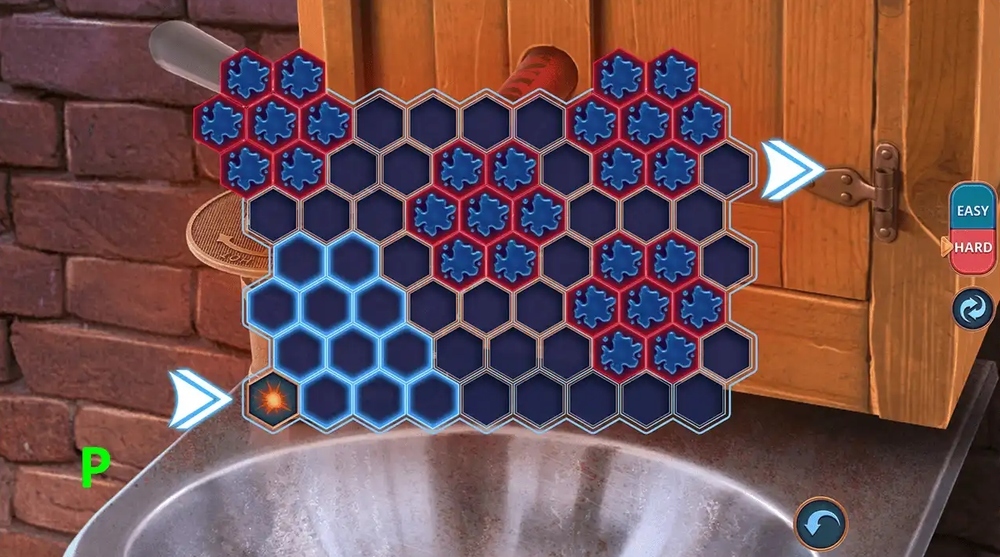
- Hard solution: Solution is random (P).
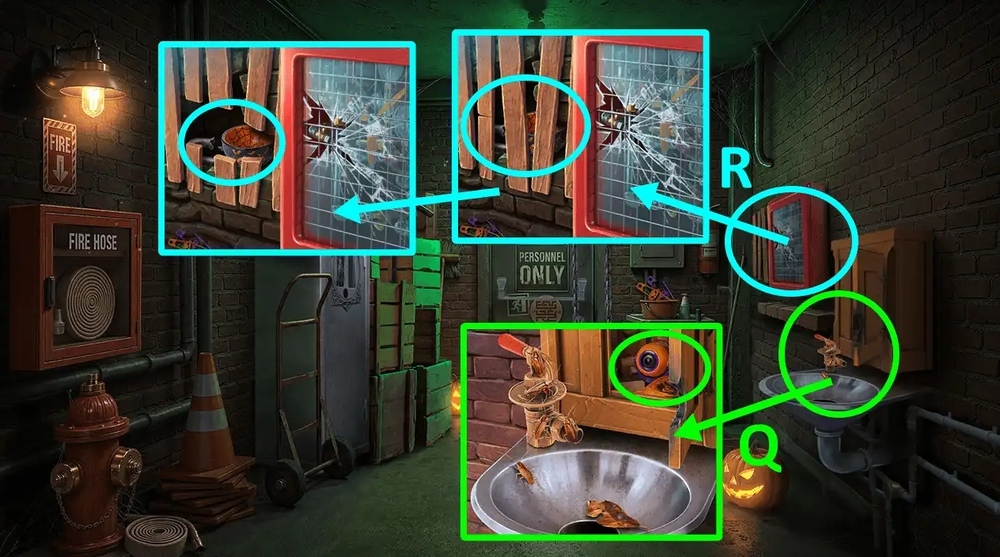
- Take BALLOON, CAMERA and SAW (Q).
- Use SAW on the pieces of wood, take CERAMIC BOWL and BROKEN CHAIN LINK (R).

- Use BROKEN CHAIN LINK on the end of the chain, take HALLOWEEN TAPE (S).
- Use HALLOWEEN TAPE on the bars of the grate, take FLAGPOLES 1/3 and PROPELLERS 2/2 (T).

- Use PROPELLERS 2/2, CAMERA and BATTERY on DRONE BODY, earn DRONE.
- Use DRONE on the top drawer, take CLOCK WEIGHTS 1/2 and FLAGPOLES 2/3 (U).
- Use LENSES on the GLASSES FRAME, earn GLASSES WITH LIGHT FILTERS.
- Go to Rehearsal Hall.
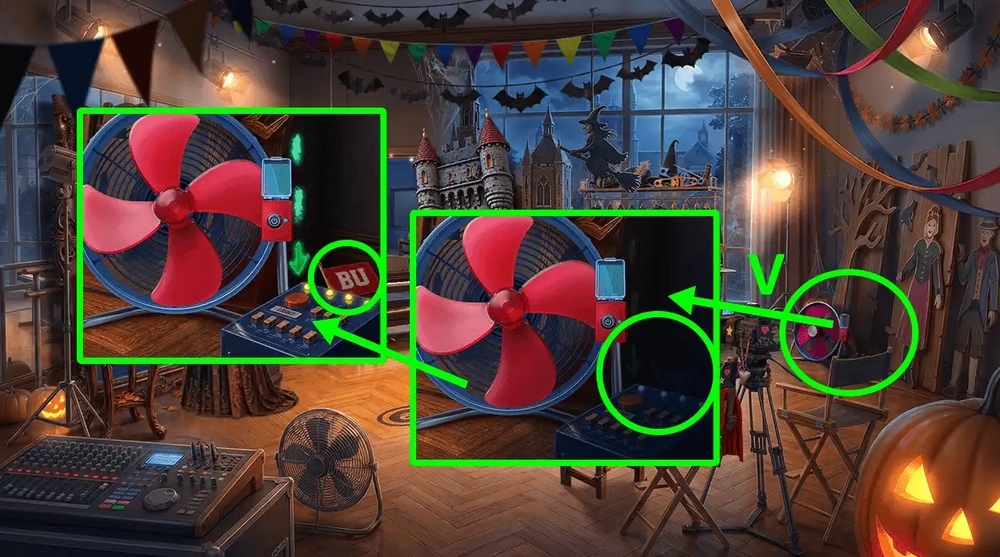
- Use GLASSES WITH LIGHT FILTERS on the darkness, take FLAGPOLES 3/3 (V).
- Go to Sports Equipment Room.
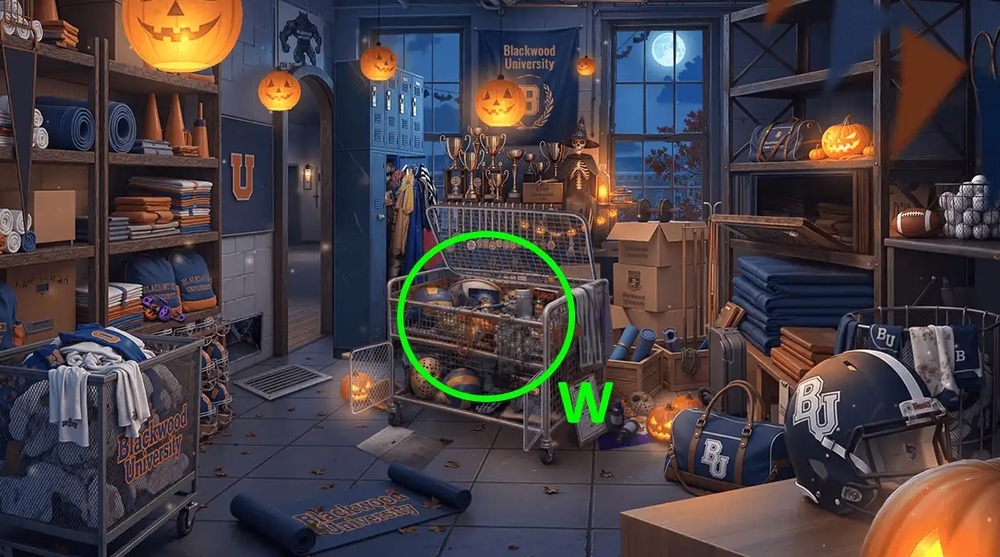
- Play puzzle, earn UPSIDE-DOWN PUMPKIN AMULET (W).
- Go to Book Club Room.

- Use UPSIDE-DOWN PUMPKIN AMULET on the ads, take TOWERS (X).
- Go to Administrative Building.

- Use TOWERS and FLAGPOLES 3/3 on the layout, take WINDOW CLEANER (Y).
- Go to Decorated Gym.
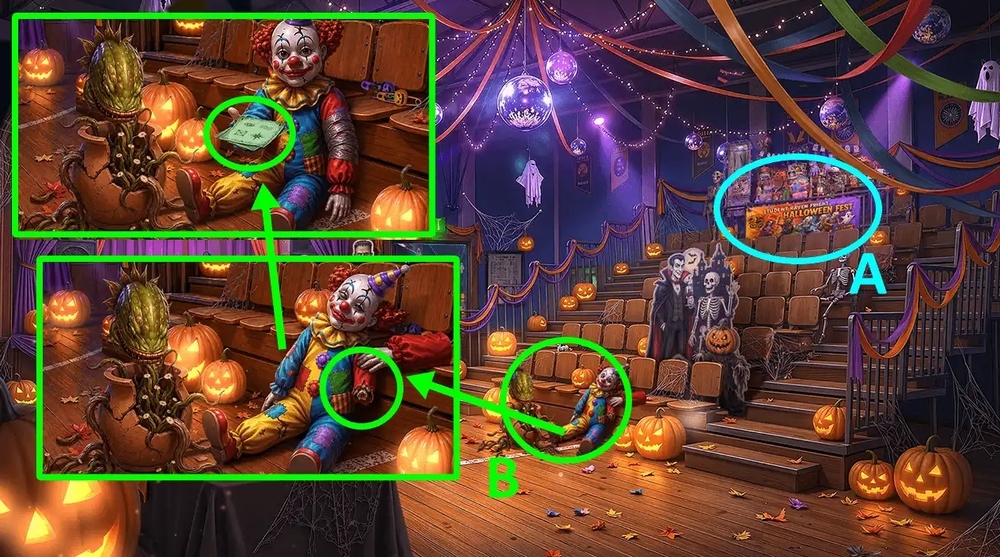
- Play puzzle, earn DUCT TAPE (A).
- Use DUCT TAPE on the clown doll, take PAPER WITH SYMBOLS (B).
- Go to Book Club Room.

- Use PAPER WITH SYMBOLS on the symbols, click three times on the symbols, take ESSENTIAL OIL (C).

- Play puzzle, read the note, earn EYES (D).
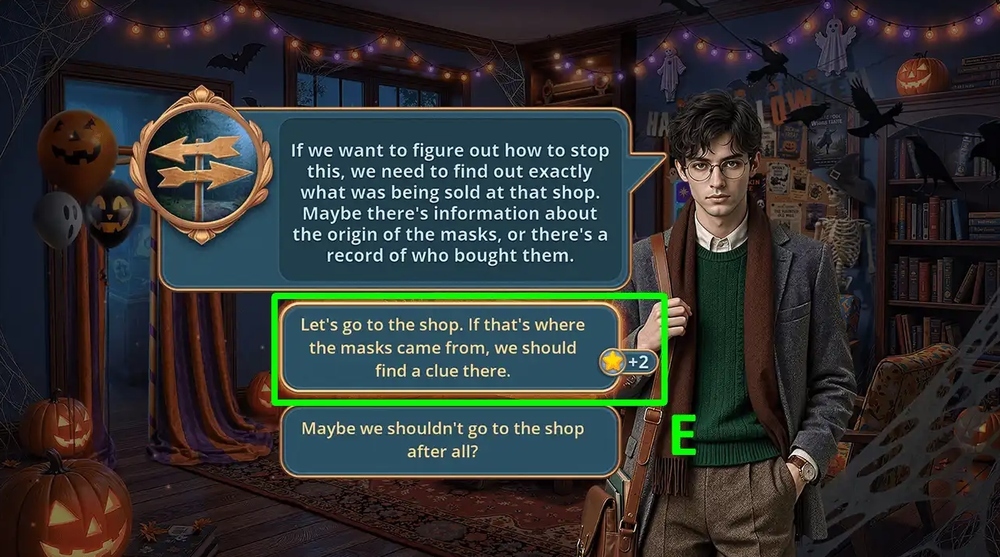
- Select this option (E).

- Use EYES on the old wall map, take STRANGE KEY (F).
- Go to Administrative Building.

- Use STRANGE KEY on the lock (G).
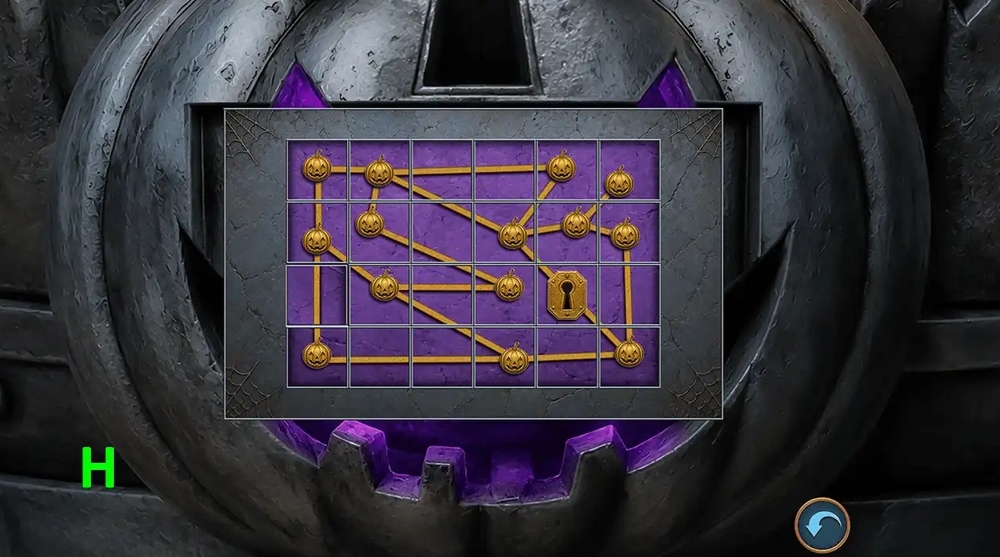
- Easy solution: Use the picture as a hint (H).

- Hard solution: Use the picture as a hint (K).
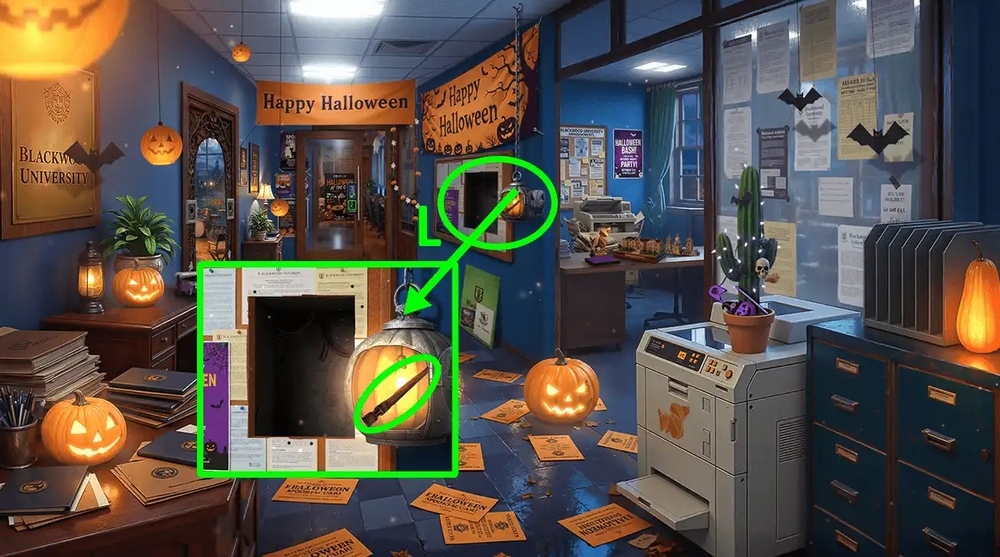
- Take WOODEN STAKE (L).
- Go to Service Exit to the Courtyard.
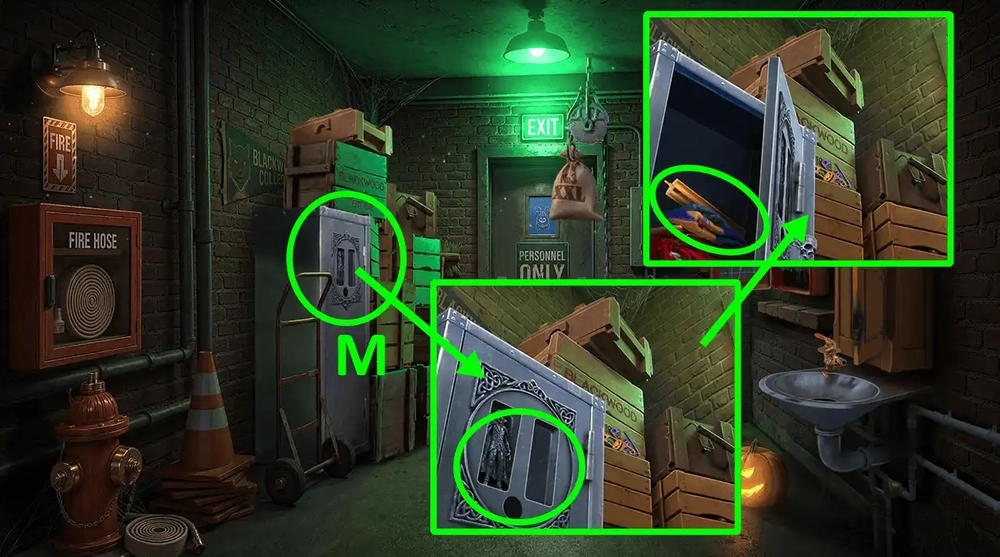
- Use WOODEN STAKE on the box with a lock, take CLOCK WEIGHTS 2/2 (M).
- Go to Rehearsal Hall.

- Use CLOCK WEIGHTS 2/2 on the mechanism chain, take CLASP 1/2 (N).
- Play puzzle, earn SAD MASK (O).
- Go to Campus Radio Room.
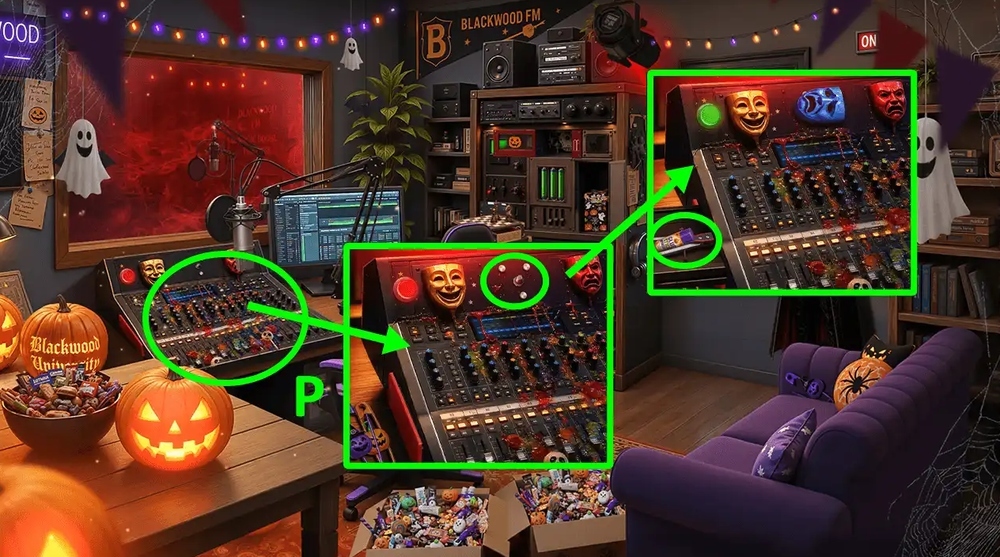
- Use SAD MASK on the mixing console, take GLUE and DIVIDERS (P).
- Go to Book Club Room.

- Use DIVIDERS on the armchair with a blanket, take TEALIGHT (Q).
- Use ESSENTIAL OIL, TEALIGHT and LIGHTER on the CERAMIC BOWL, earn AROMA LAMP.
- Go to Service Exit to the Courtyard.

- Use AROMA LAMP on the insects, take BUNCH OF KEYS (R).
- Use BUNCH OF KEYS on the door (S).
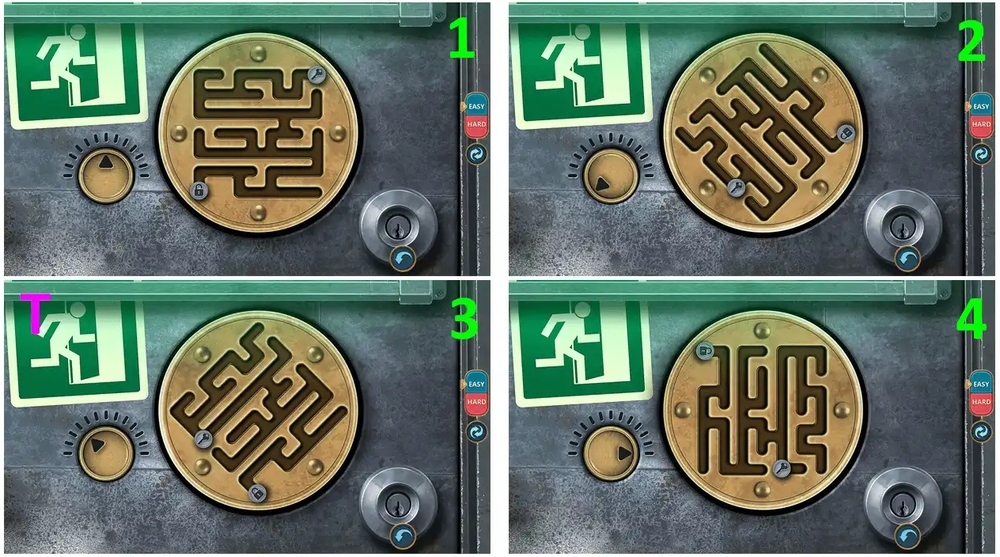
- Easy solution: Follow steps 1–4 (T).

- Easy solution: Follow steps 5–8 (U).

- Easy solution: Follow steps 9–10 (V).
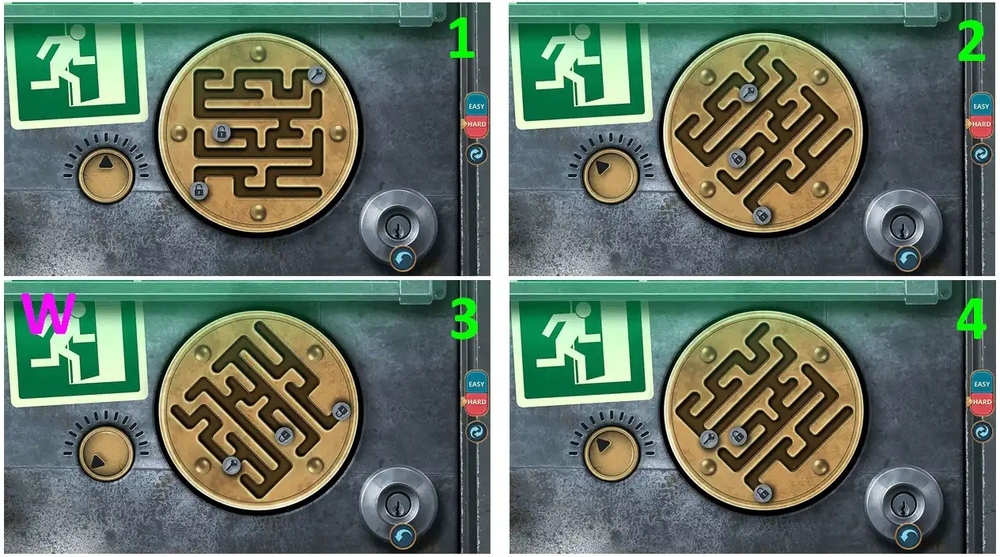
- Hard solution: Follow steps 1–4 (W).

- Hard solution: Follow steps 5–8 (X).
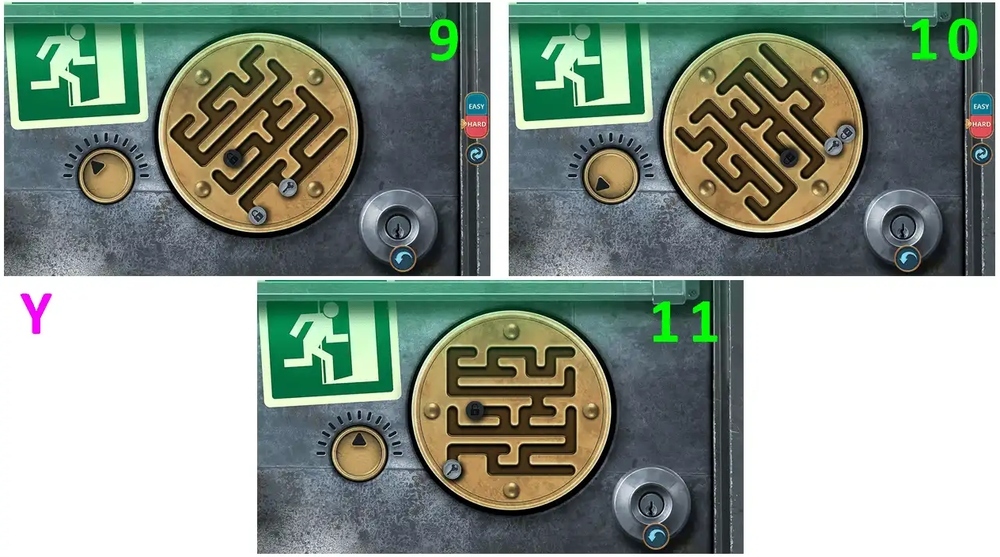
- Hard solution: Follow steps 9–11 (Y).

- Take LAUGHTER CARD, read the note, take NERF BLASTER (A).
- Use NERF BLASTER on the slot machine, take GREEN BILLIARD BALL and T-SHIRT (B).
- Use WINDOW CLEANER and T-SHIRT on the dirty glass (C).
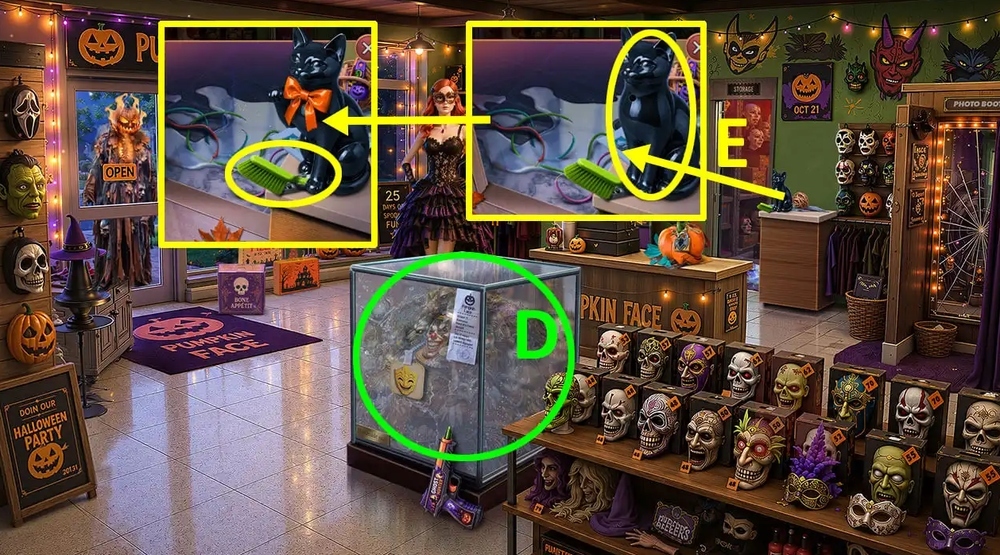
- Play puzzle, earn BOW (D).
- Use BOW on the cat figurine, take BRUSH and CLASP 2/2 (E).
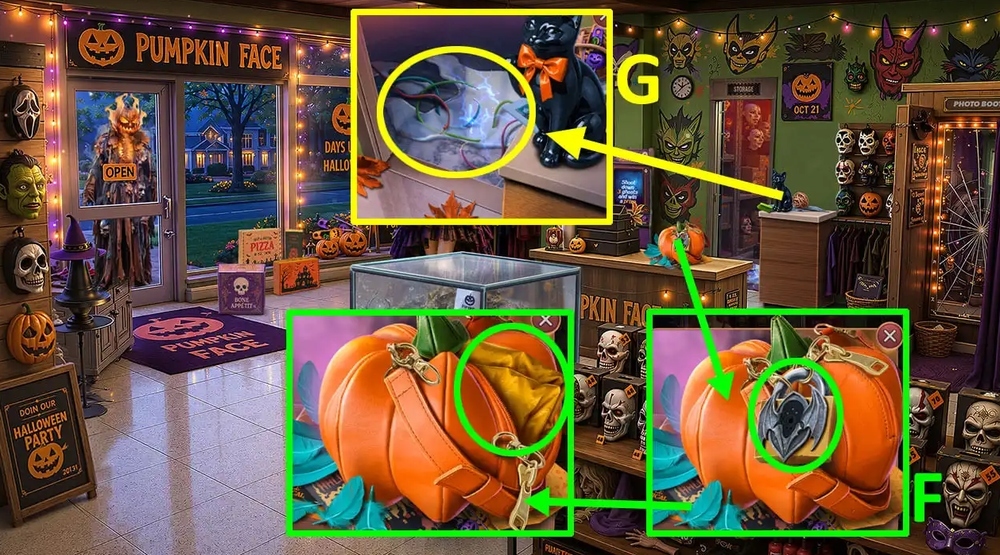
- Use CLASP 2/2 on the lock, take YELLOW RAINCOAT (F).
- Use YELLOW RAINCOAT on the wires in a puddle of water (G).
- Go forward.

- Take SUITCASES 1/2, ANGER CARD and MANNEQUIN HEAD (H).
- Use BRUSH on the shards of glass, take FEAR CARD (I).
- Use LAUGHTER CARD, ANGER CARD and FEAR CARD on the shelf with masks (J).
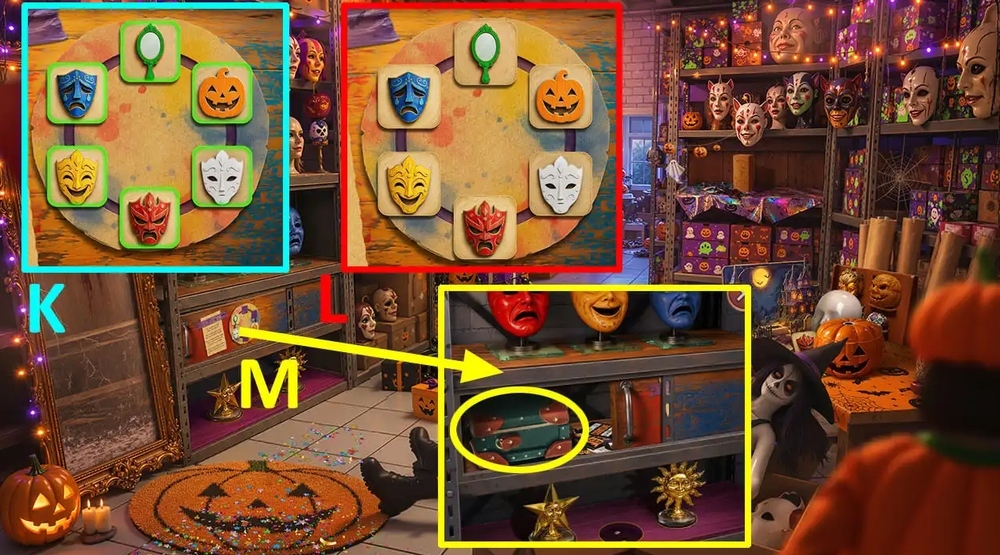
- Easy solution: Use the picture as a hint (K).
- Hard solution: Use the picture as a hint (L).
- Take SUITCASES 2/2 and CARDBOARD JACK-O’-LANTERN (M).
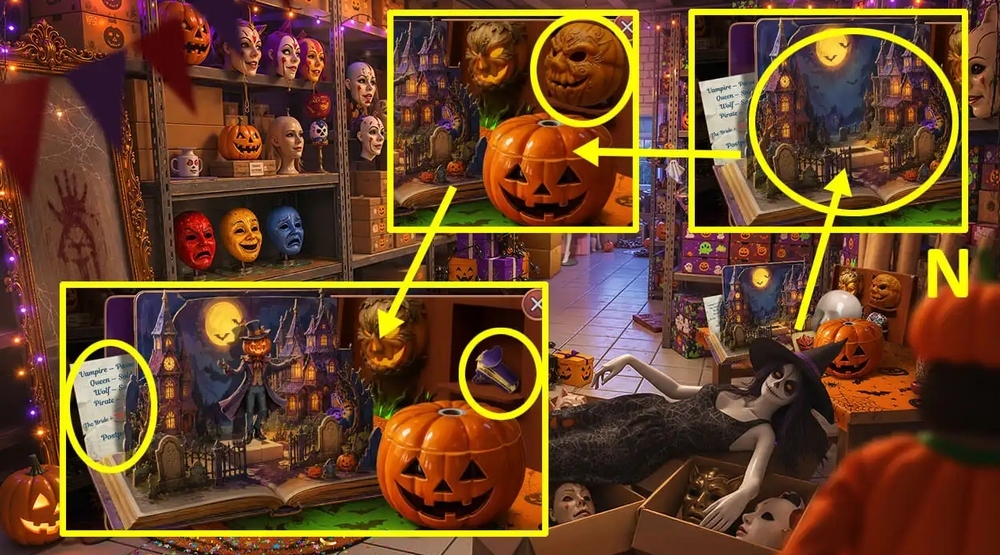
- Use GLUE and CARDBOARD JACK-O’-LANTERN on the diorama book, tap on the mask, take STAPLE REMOVER, read the note (N).

- Use STAPLE REMOVER on the box, take WD-40, PLAGUE DOCTOR MASK and RED BILLIARD BALL (O).
- Go back.
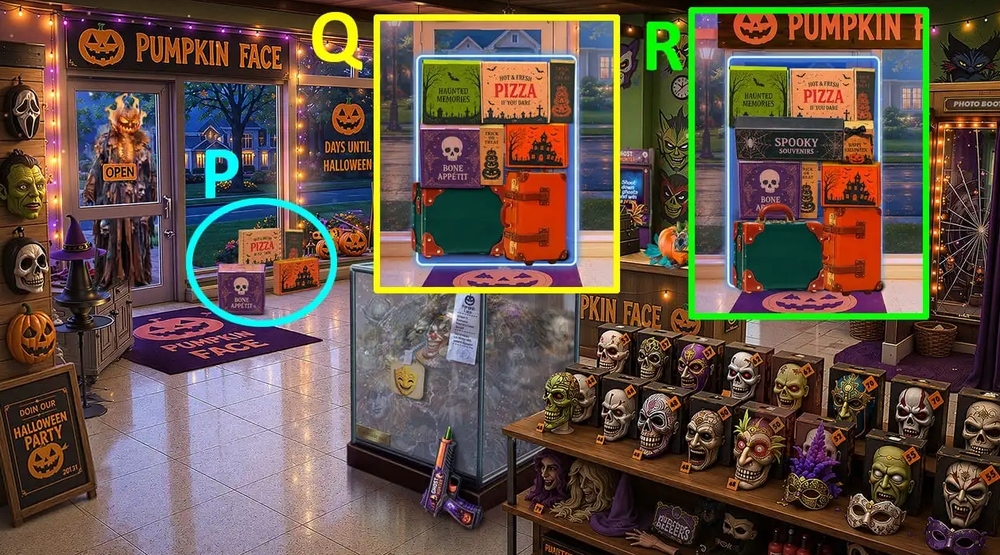
- Use SUITCASES 2/2 on the boxes (P).
- Easy solution: Use the picture as a hint (Q).
- Hard solution: Use the picture as a hint (R).
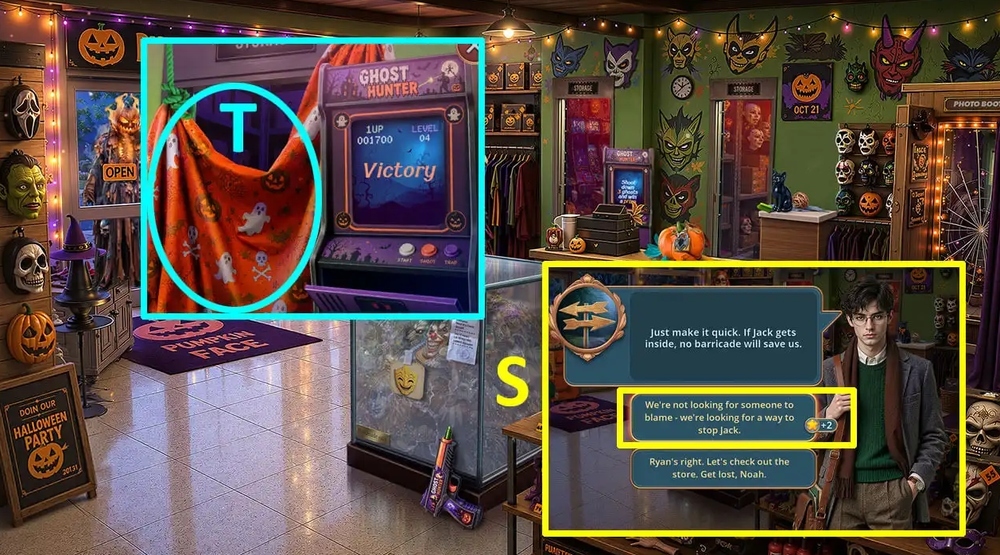
- Select this option, earn STAFF OF DEATH (S).
- Use STAFF OF DEATH on the curtain (T).
- Go to the Arcade Club.
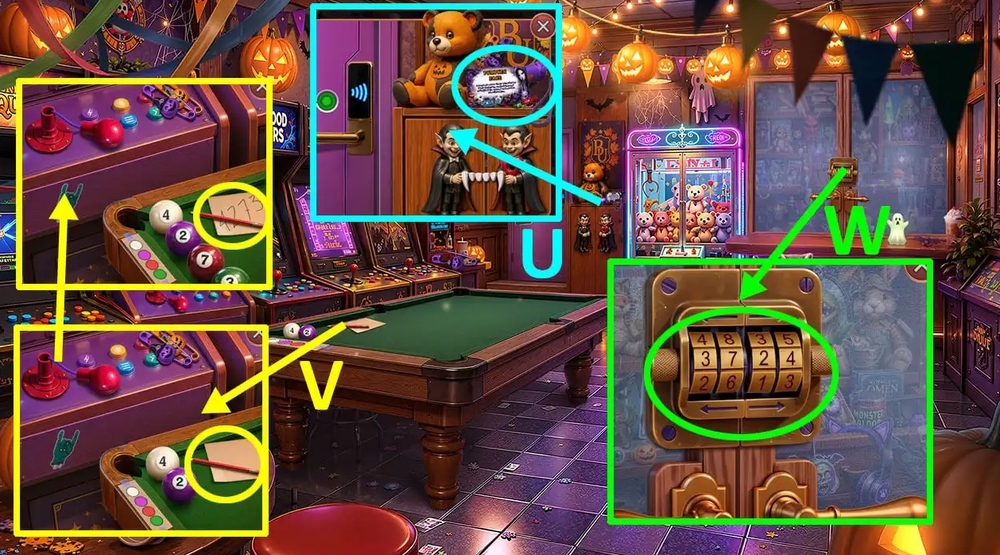
- Read the note, take PLASTIC FLASHLIGHT CASING (U).
- Use GREEN BILLIARD BALL and RED BILLIARD BALL on the billiard table, take CODE (V).
- Use CODE on the combination lock (W).
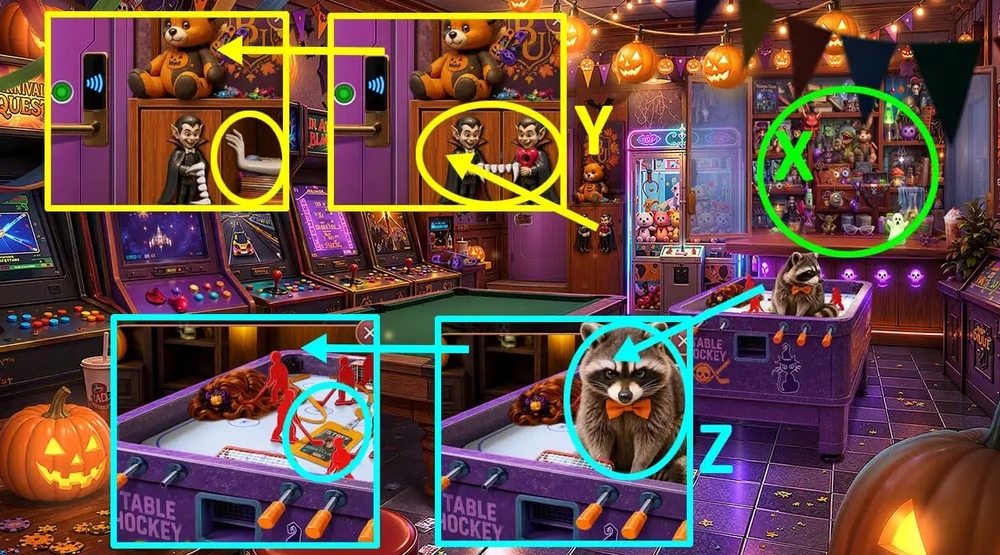
- Play puzzle, earn VAMPIRE STAKE (X).
- Use VAMPIRE STAKE on the vampire figurine, take MANNEQUIN’S HAND, LIGHT BULB and NEEDLE (Y).
- Use BALLOON and NEEDLE on the raccoon, take ELECTRONIC CARD (Z).
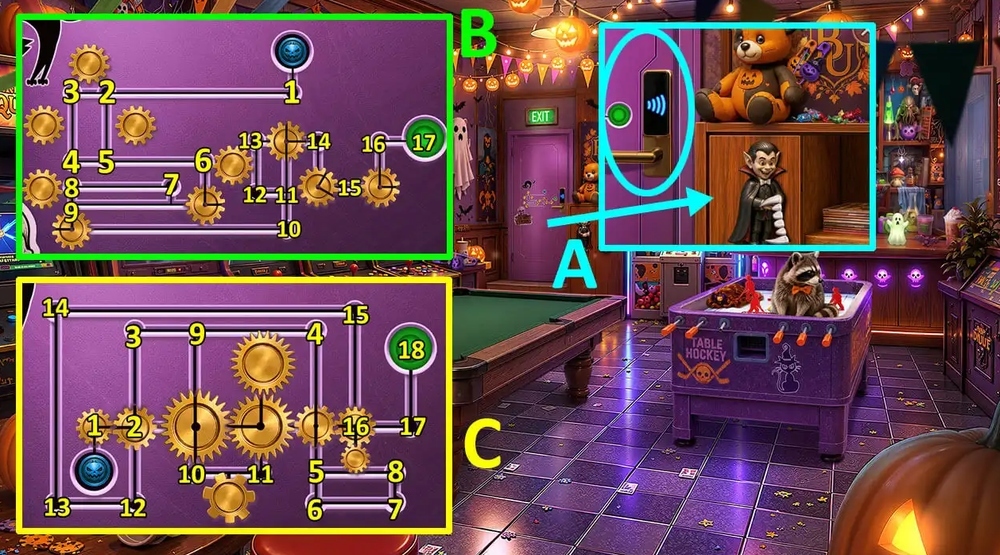
- Use ELECTRONIC CARD on the electronic lock (A).
- Easy solution: Move the chip along the dots: 1, 2, 3, 4, 5, 2, 3, 4, 5, 2, 3, 4, 6, 7, 8, 9, 10, 11, 12, 13, 14, 15, 16, 17 (B).
- Hard solution: Move the chip along the dots: 1, 2, 3, 4, 5, 6, 7, 8, 5, 6, 7, 8, 5, 4, 9, 10 , 11, 2, 12, 13, 14, 15, 16, 17, 18 (C).
- Go forward.
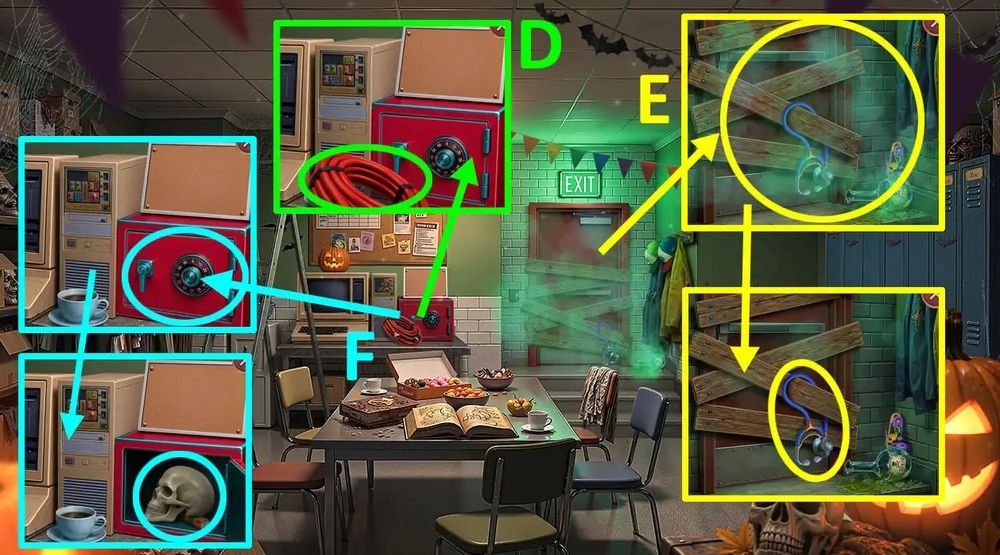
- Take HOSE (D).
- Use PLAGUE DOCTOR MASK on the smog, take STETHOSCOPE (E).
- Use STETHOSCOPE on the safe, take PLASTIC SKULLS 1/2 and BATTERY (F).

- Use LIGHT BULB and BATTERY on PLASTIC FLASHLIGHT CASING, earn EMERGENCY FLASHLIGHT.
- Use EMERGENCY FLASHLIGHT on hole in the ceiling, take KEY (G).
- Use KEY on the closed cabinet (H).

- Easy solution: Click: A, 6, R, R, R, 1, B, 4, C, 6, R, R, 8, tap on the door (I).
- Hard solution: Click: C, 2, 8, A, 7, 1, B, 3, 2, 9, 5, 4, tap on the door (J).

- Take WEB STICKER, read the note (K).
- Select this option (L).
- Go back.

- Use WEB STICKER on the broken lever, take BANKNOTE and FADED POSTER (M).
- Play puzzle, earn HANDLE (N).
- Use HANDLE on table hockey, take WIG (O).
- Go to the Mask Warehouse.
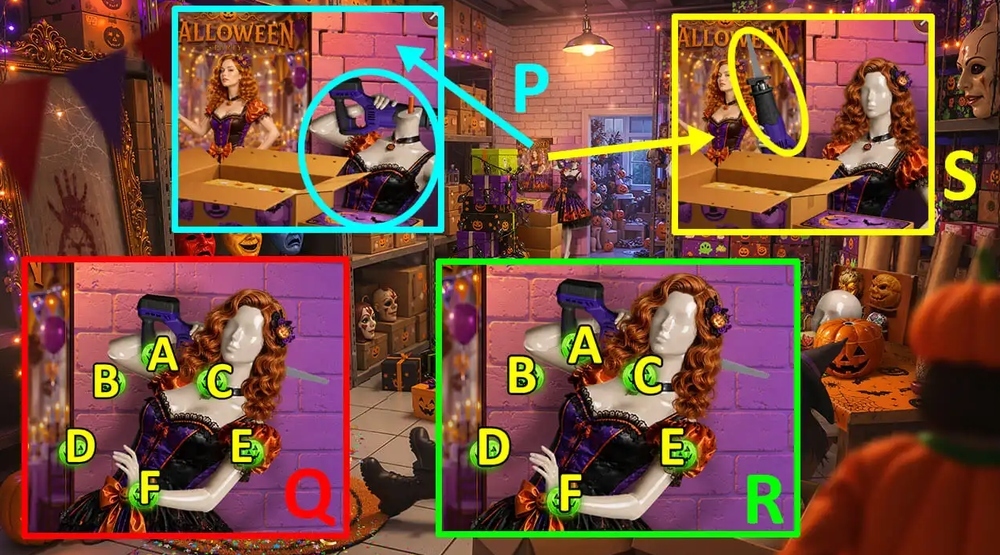
- Use MANNEQUIN HEAD, MANNEQUIN’S HAND and WIG on the mannequin body (P).
- Easy solution: Click: F, B*2, D*2, E*2 (Q).
- Hard solution: Click: F, B*2, D*2, E*2 (R).
- Take JIGSAW (S).

- Use JIGSAW on wood, take CRESCENT FIGURINE (T).
- Use CRESCENT FIGURINE on shelf with figurines, take D20 DICE and MINT AIR FRESHENER (U).
- Go to the Staff Room.
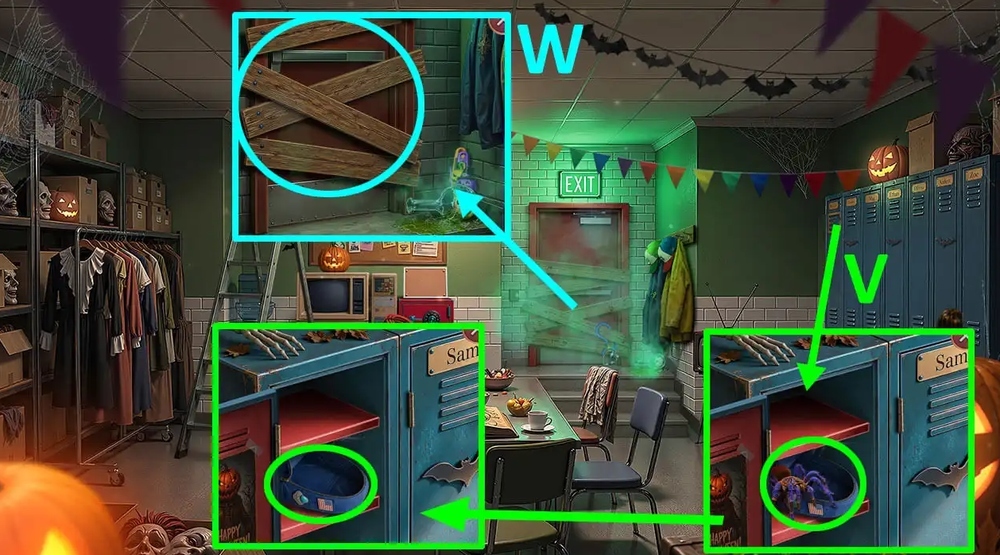
- Use MINT AIR FRESHENER on the spider, take BACKPACK and SNAKE-SHAPED CANE TOP (V).
- Use SNAKE-SHAPED CANE TOP on the nails (W).
- Go forward.
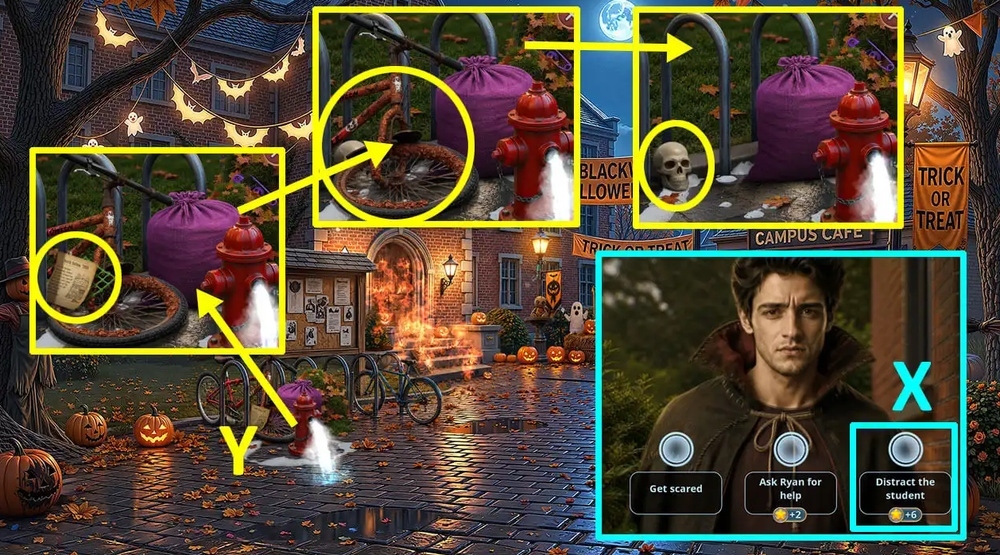
- Select this option (X).
- Read the note, take PLASTIC NET, use WD-40 on the rusty bicycle, take PLASTIC SKULLS 2/2 (Y).
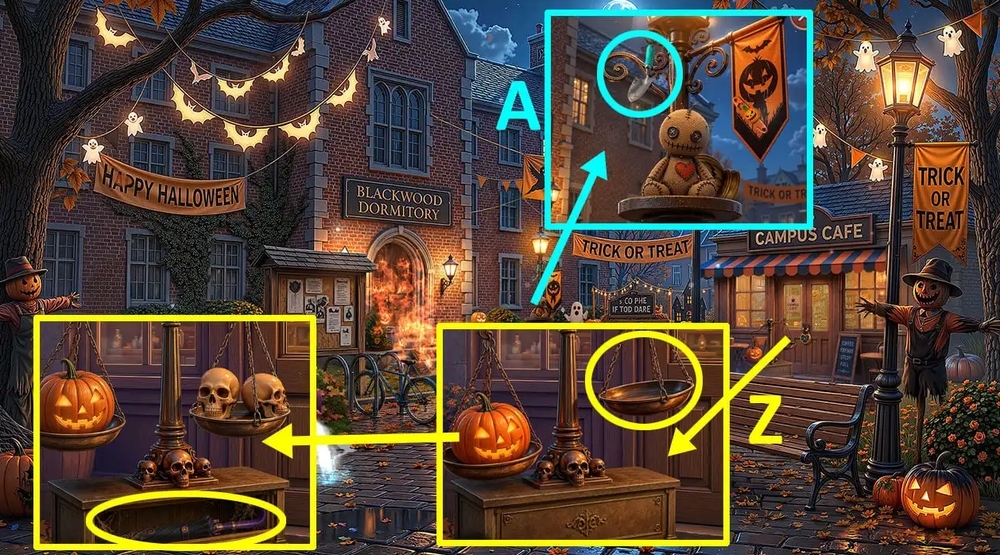
- Use PLASTIC SKULLS 2/2 on the scale, take FOLDED UMBRELLA (Z).
- Use FOLDED UMBRELLA on an item stuck on a street lamp, earn TROWEL (A).
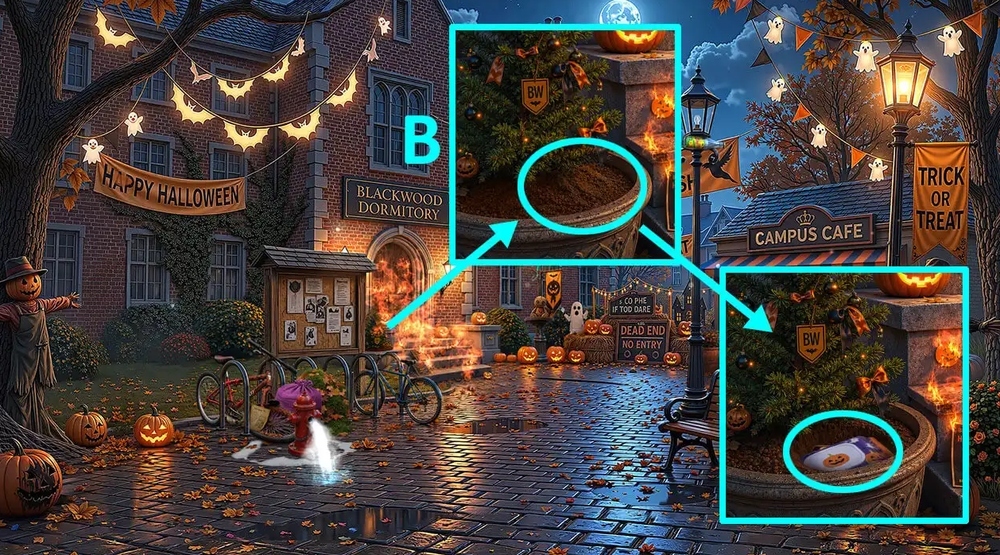
- Use TROWEL on the soil in a pot with a plant, take WET WIPES and IODINE (B).
- Go back.

- Use IODINE on FADED POSTER, earn POSTER WITH WIRING DIAGRAM.
- Use POSTER WITH WIRING DIAGRAM on the computer (C).
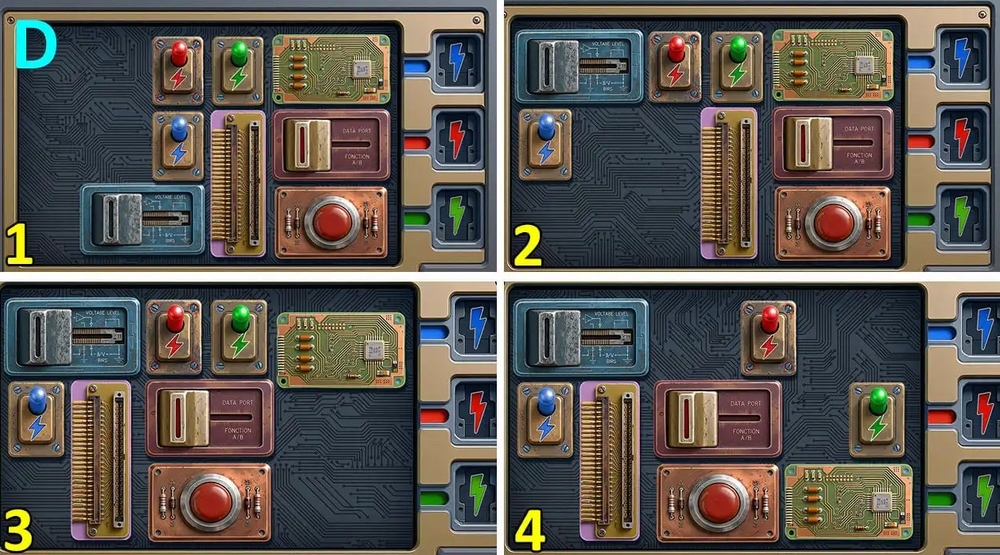
- Easy solution: Follow steps 1–4 (D).

- Easy solution: Follow steps 5–8 (D).

- Hard solution: Follow steps 1–4 (E).

- Hard solution: Follow steps 5–8 (E).

- Hard solution: Follow steps 9–12 (E).

- Hard solution: Follow steps 13–16 (E).

- Take ELASTIC SLIME (F).
- Use ELASTIC SLIME on the item stuck in the ceiling crack, earn ADJUSTABLE WRENCH (G).
- Go forward.
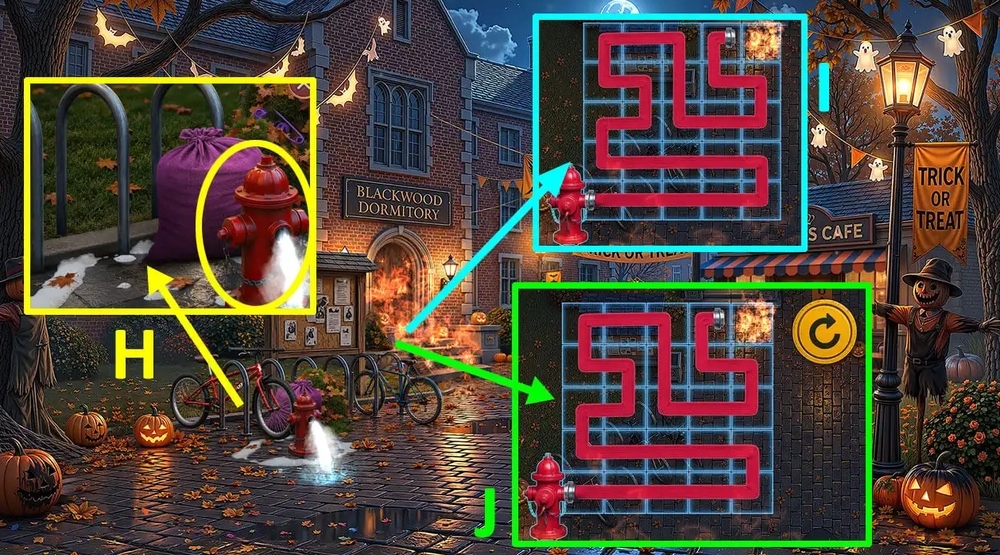
- Use HOSE and ADJUSTABLE WRENCH on the fire hydrant (H).
- Easy solution: Use the picture as a hint (I).
- Hard solution: Use the picture as a hint (J).
- Go forward.

- Use BANKNOTE on the soda machine, take TOY OCTOPUS and SALT (K).
- Use SALT on the ghost (L).
- Play puzzle, earn MOON BUTTON (M).

- Use MOON BUTTON on the lock, take GRAPHITE PENCIL (N).
- Use GRAPHITE PENCIL on the notice board, take BULB HALF and BANDS (O).

- Use WET WIPES and BANDS on PLASTIC NET, earn HANDMADE FILTER.
- Use HANDMADE FILTER on the hood (P).
- Easy solution: Click: A, B, B, C, D, D, D, A, E, E, E, E, D, D (Q).
- Hard solution: Click: A, A, A, A, A, B, C, C, D, D, D, D, B, B, E, E, E, E, A, A (R).
- Go forward.

- Select this option (S).
- Use D20 DICE on the board game, take BINGO CHIP and DEMON FIGURINE (T).
- Use DEMON FIGURINE on the empty space next to another demon figurine (U).
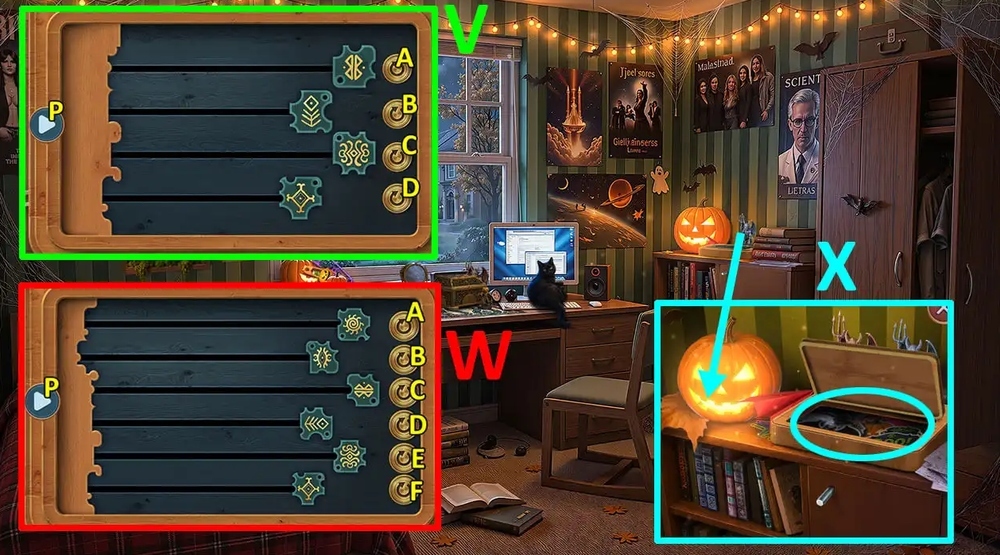
- Easy solution: Click: A*4, B*3, C*2, D*6, P (V).
- Hard solution: Click: A, C*5, D*2, E*5, F*3, P (W).
- Take STICKERS (X).
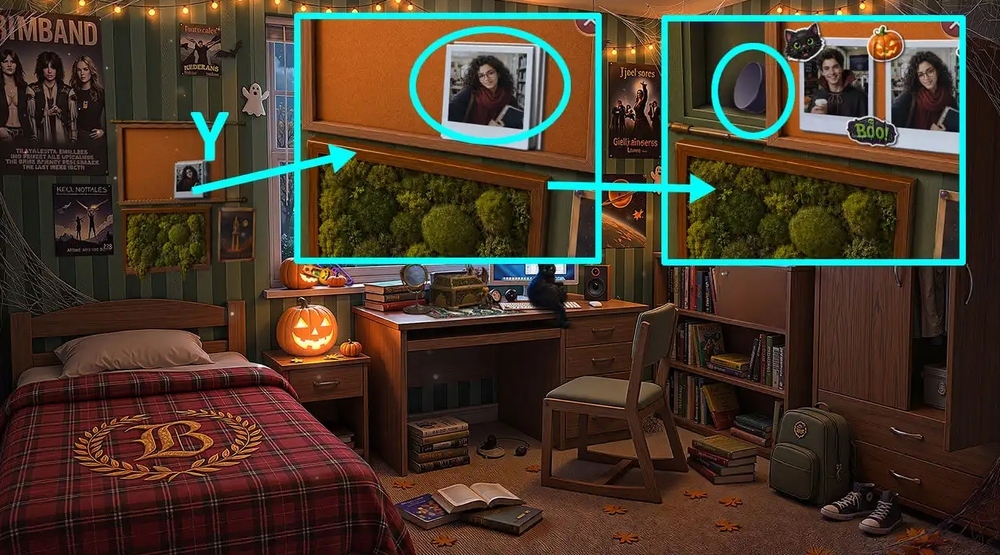
- Use STICKERS on the photo wall, take HOCKEY PUCK (Y).
- Go to the Arcade Club.

- Use HOCKEY PUCK on the table hockey machine (Z).
- Easy solution: Use the picture as a hint (A).
- Hard solution: Use the picture as a hint (B).
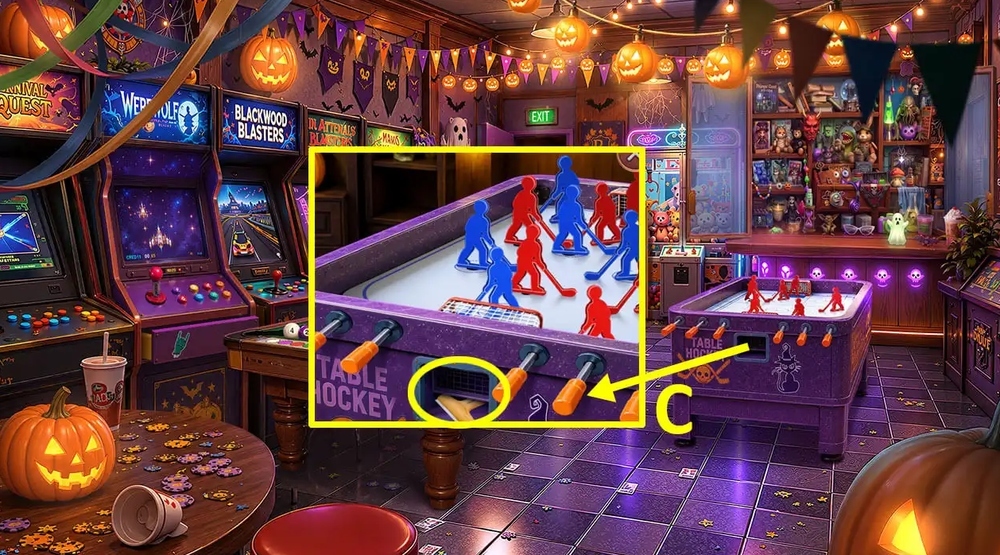
- Take SCRAPER (C).
- Go to Noah’s Room.

- Use SCRAPER on the wood fungus, take BUBBLE GUM (D).
- Use BUBBLE GUM and BINGO CHIP on the pin, take SCREWDRIVER (E).
- Go back.
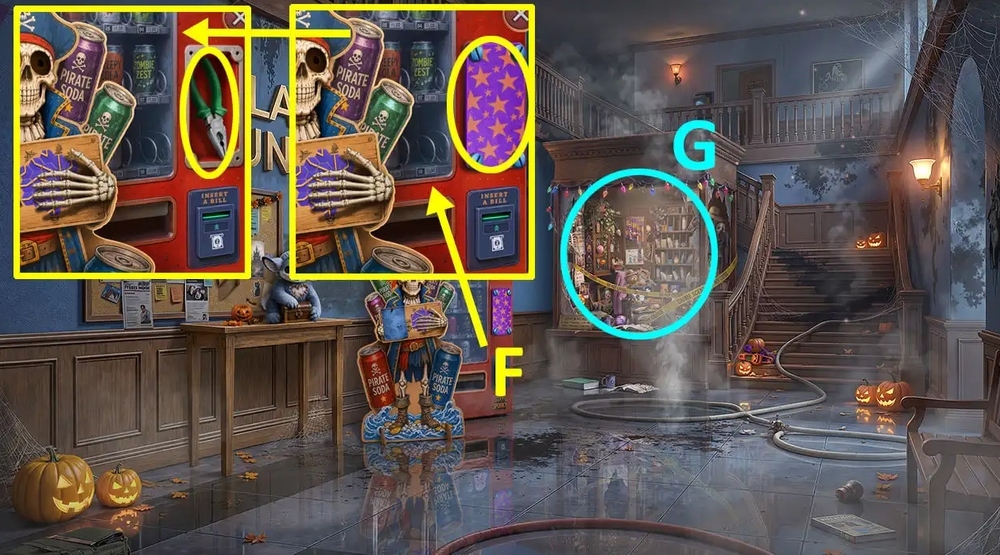
- Use SCREWDRIVER on the screws, take PLIERS (F).
- Play puzzle, earn KNIFE (G).
- Go back.

- Use KNIFE on the bag, take THREAD AND NEEDLE and DART WITH SOFT TIP (H).
- Use BACKPACK and DART WITH SOFT TIP on the item stuck on the lamppost, take BOTTLE (I).

- Use PLIERS on BOTTLE, read the note, earn VOODOO NEEDLE.
- Use VOODOO NEEDLE on the voodoo doll, take HEAVY STATUETTE, “WITNESS” CARD and LOCK PICK (J).
- Use LOCK PICK on the lock (K).
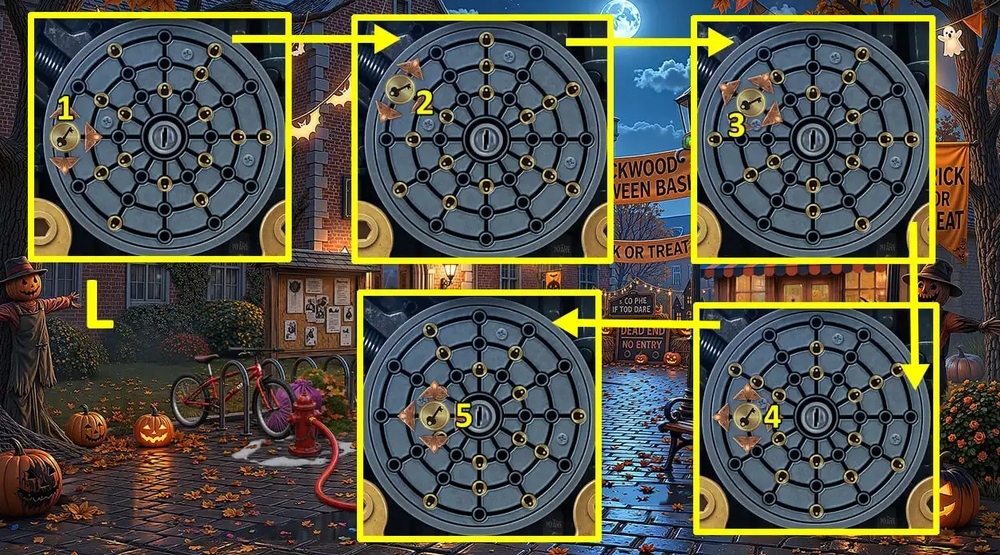
- Easy solution: Click: 1, 2, 3, 4, 5 (L).

- Hard solution: Click: 1, 2, 3, 4, 5, 6, 7 (M).
- Go to the Dormitory Café.
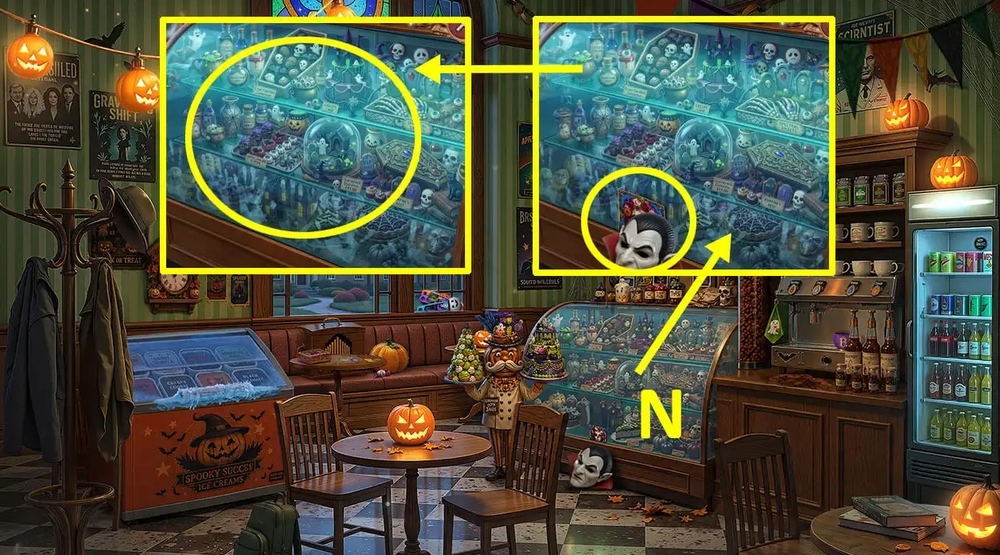
- Take PROP HEAD and “BRIDE” CARD, use TOY OCTOPUS on the glass (N).
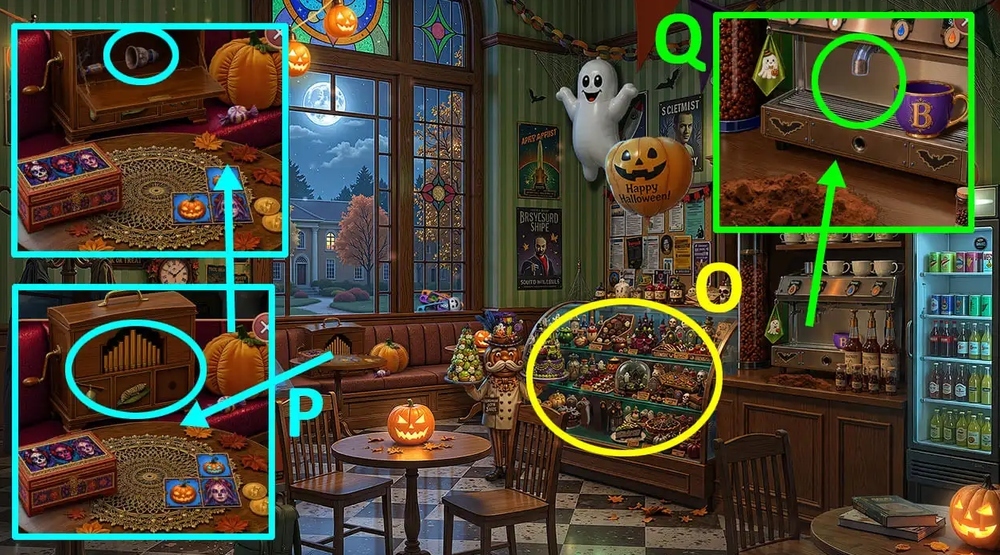
- Play puzzle, earn BUTTERFLY (O).
- Use BUTTERFLY on the box, take PEAR HALF (P).
- Use PEAR HALF on BULB HALF, earn VACUUM CUFF.
- Use VACUUM CUFF on the coffee machine (Q).

- Easy solution: Place the timers as shown in the picture and click on “P” (R).
- Hard solution: Place the timers as shown in the picture and click on “P” (S).
- Take HOT CUP (T).
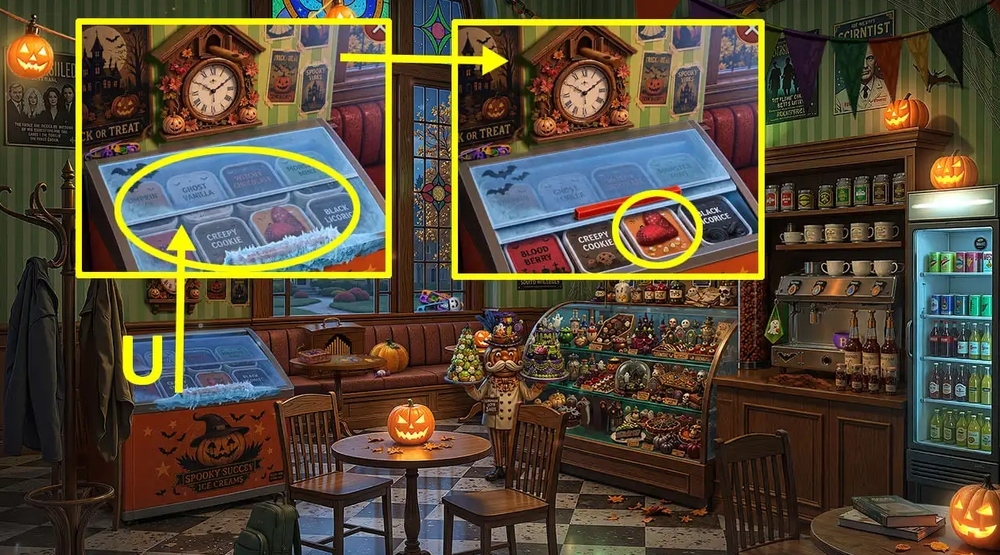
- Use HOT CUP on the freezer, take TOY HEART (U).
- Go to the Dormitory.

- Use THREAD AND NEEDLE and TOY HEART on the plush toy, take DOUBLOON COIN (V).
- Tap on the note, use DOUBLOON COIN on the skeleton (W).
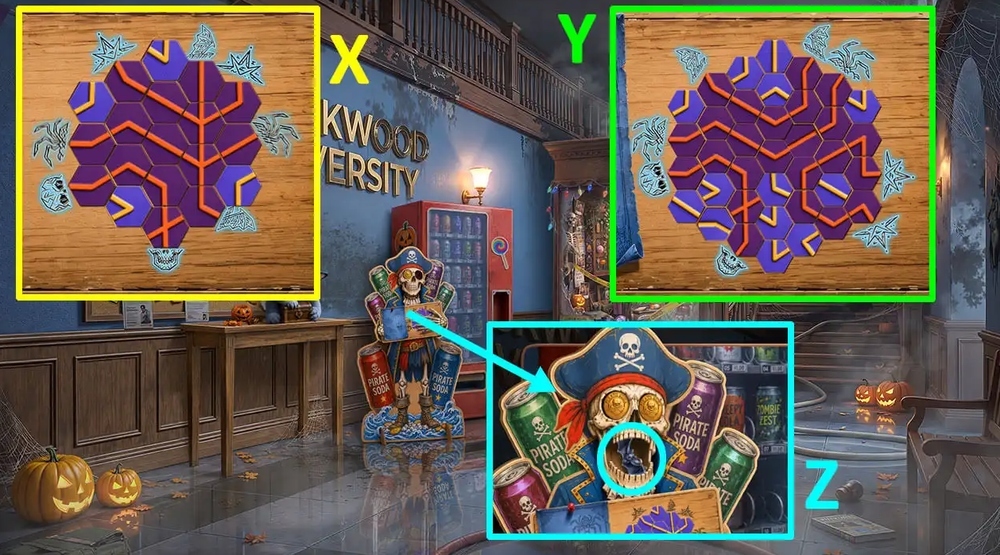
- Easy solution: Use the picture as a hint (X).
- Hard solution: Use the picture as a hint (Y).
- Take BAT AMULET (Z).
- Go to the Dormitory Café.
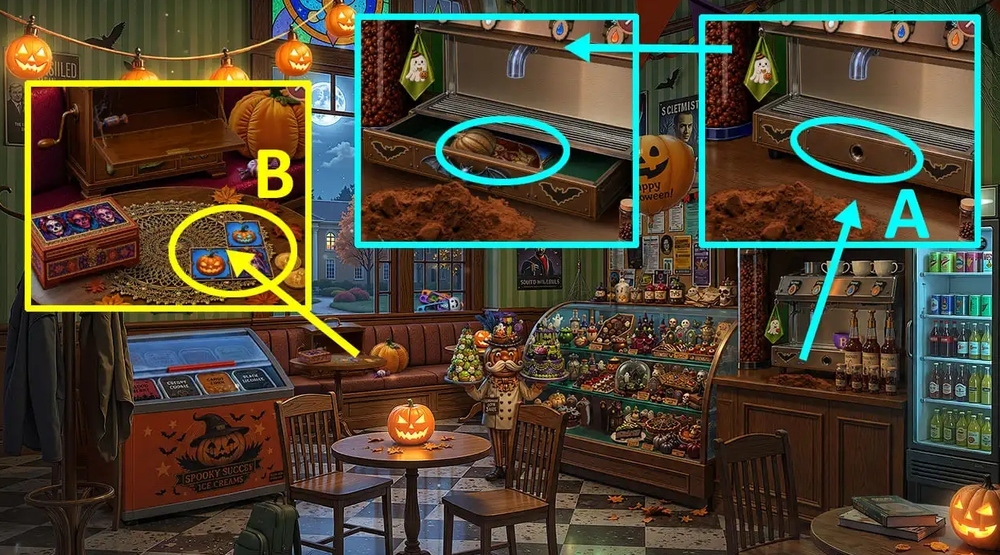
- Use BAT AMULET on the empty amulet slot, take PUMPKIN KEYCHAIN, THEATER PATCH and “HOST” CARD (A).
- Use “WITNESS” CARD, “BRIDE” CARD and “HOST” CARD on the card deck (B).
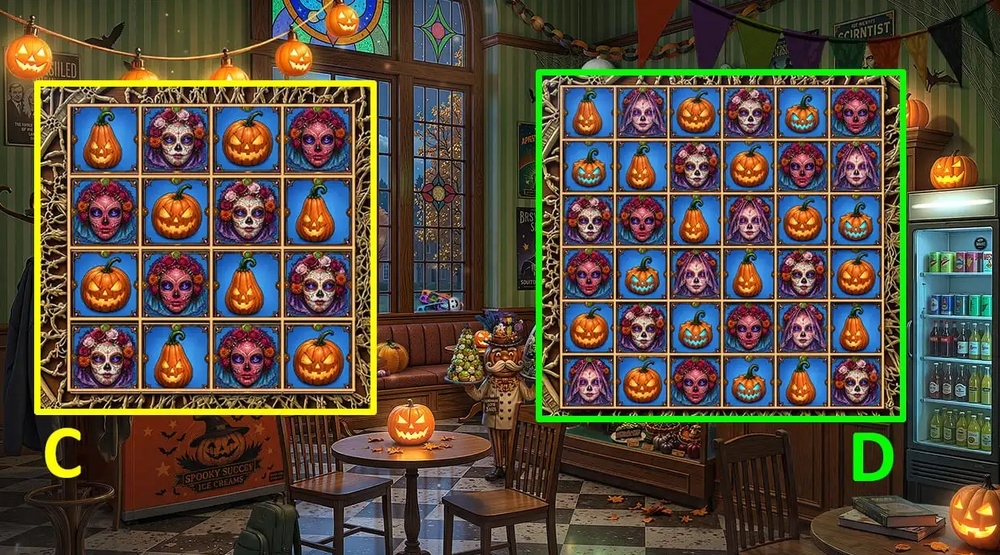
- Easy solution: Use the picture as a hint (C).
- Hard solution: Use the picture as a hint (D).
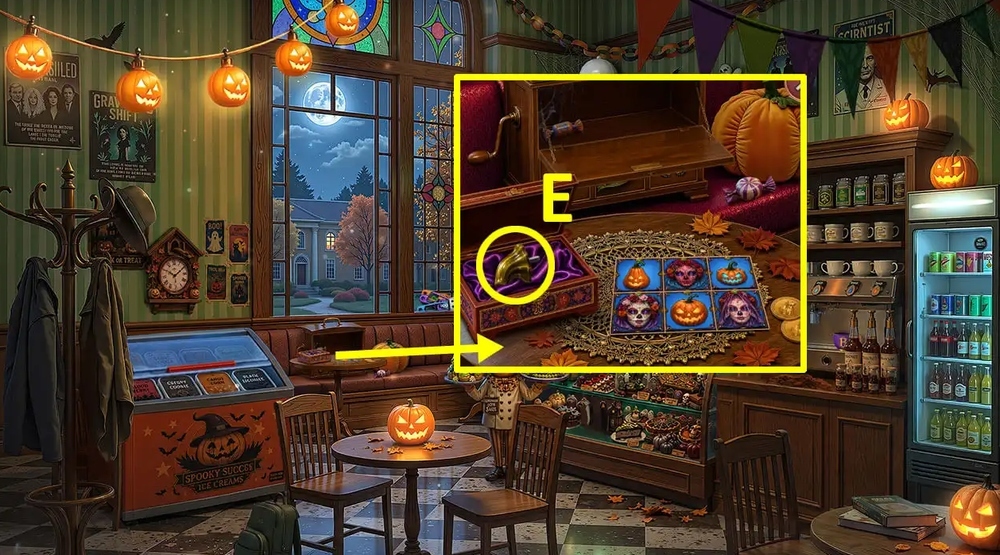
- Take PUMPKIN TAIL (E).
- Go to the Mask Warehouse.

- Use PUMPKIN TAIL on the pumpkin, take AWL (F).
- Use AWL and HEAVY STATUETTE on the bricks in the wall, take BLOOD (G).
- Go back.

- Play puzzle, earn FRIENDSHIP BRACELET (H).
- Use FRIENDSHIP BRACELET on the feathers, earn FEATHER DUSTER (I).
- Go to the Dormitory Café.
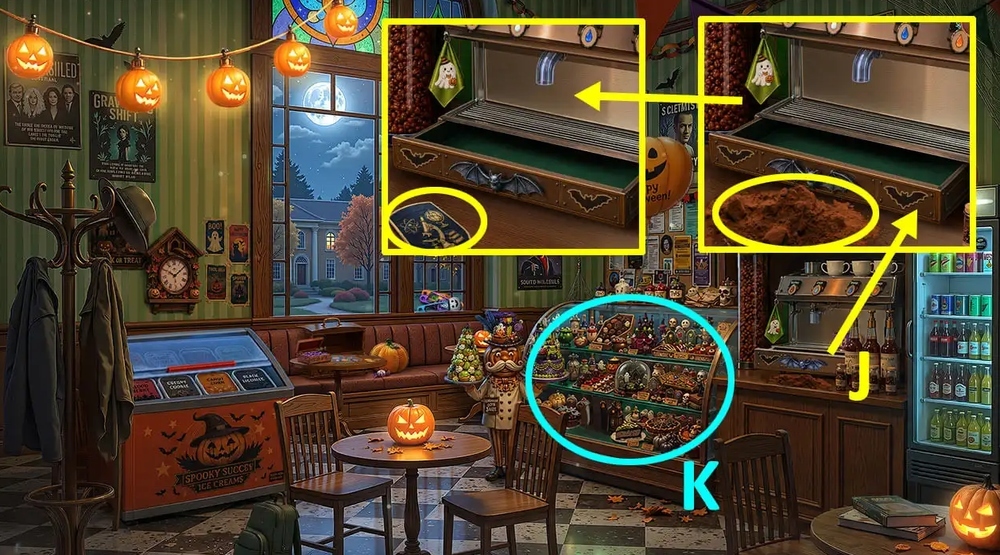
- Use FEATHER DUSTER on the coffee, take SCIENCE PATCH (J).
- Play puzzle, earn WIND-UP BIRD (K).
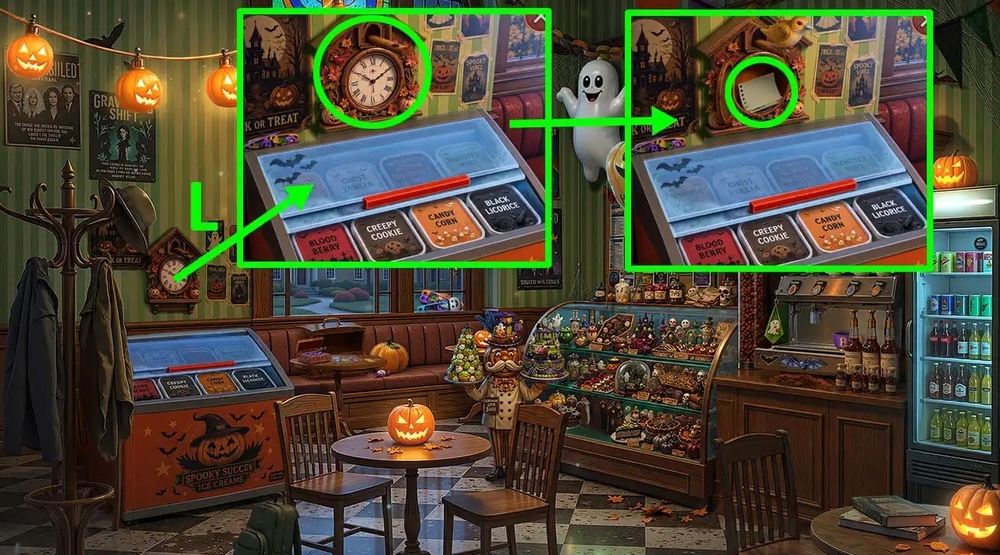
- Use WIND-UP BIRD on the clock, read the note, take CAT FOOD (L).
- Go to the Noah’s Room.
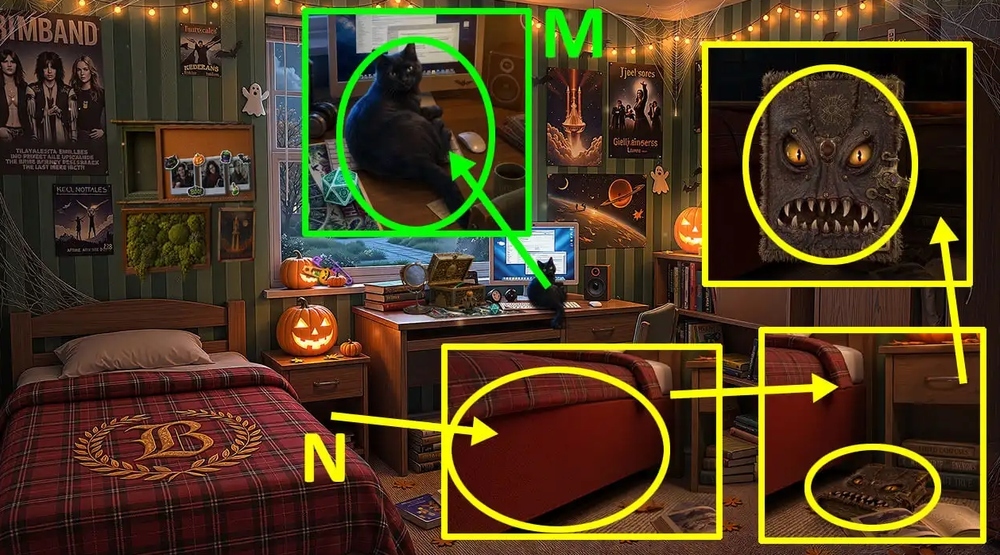
- Use CAT FOOD on the cat, earn CAT (M).
- Use CAT on the bed, tap on the book, use BLOOD on the book (N).

- Easy solution: Place the tiles on sides A and B as shown in the pictures (O).
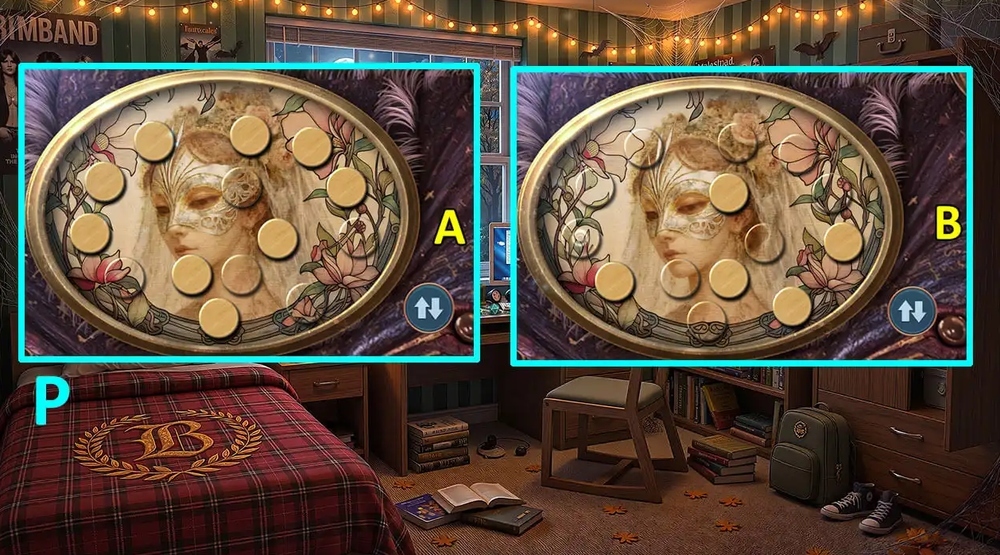
- Hard solution: Place the tiles on sides A and B as shown in the pictures (P).
- Walkthrough Bonus Chapter, at the link below.