Secrets of Salem 3: Tarot Murders – The next installment in the mystical mystery series, in which Victor Grayson must investigate a series of deaths linked to the ancient magic of the Tarot. Together with his partner, Sam Hawkins, he travels to Salem after the body of Henry Miller is discovered on the shore of Goldfish Lake. The Moon card is found on the victim’s chest, and medical examiner Shirley Morris confirms that the man drowned. However, a similar death occurred just a week ago, and a review of police records reveals that such cases have plagued the city for several decades. Despite the discovery of Tarot cards, all previous incidents were officially ruled accidents. The investigation leads Victor to the town fair, where he meets Madame Zosta. The fortune-teller offers visitors predictions and curse-removal services, but her arrival in Salem somehow coincides with the new deaths. The detective also learns about Lionel Brighton, who, shortly before his death, had been independently investigating old crimes. His wife, Porcha, explains that her husband was so fascinated by the Tarot that he even used the cards when making everyday decisions. In Lionel’s study and workshop, Victor finds letters, notes, and documents confirming a connection between Zosta’s return and the series of tragedies that have occurred in the city every few decades. To understand the nature of what is happening, Grayson turns to Sabilla Spellman, who is familiar with forbidden magical practices. From her, he learns that Tarot cards can be used to bind human souls to death. Meanwhile, Sam decides to meet Madame Zosta on his own, but soon after, he vanishes without a trace. Victor and Sebille have to continue the investigation without him, trying to figure out where the fortune-teller took his partner and what role he now plays in her plans. Their search leads them to a secret hideout beneath the old Church of Saint Libelia. In the crypt located there, they discover the imprisoned spirit of Serenity, who has been watching over Zosta for several centuries. It is she who reveals the fortune-teller’s secret to longevity the witch imprisons the souls of her victims in Tarot cards, adding them to her own deck and prolonging her own life. Each card holds the soul of a deceased person, and the entire deck allows Zosta to return even after death. To stop Zosta once and for all, Victor must destroy her, but this will not be easy the fortune-teller is already preparing to complete her main ritual on an island near an old house by a mountain river. If you’re stuck on a puzzle or don’t know where to find items, you can check out the walkthrough for Secrets of Salem 3: Tarot Murders on our website and stop the witch before she completes her plan.
Secrets of Salem 3: Tarot Murders – Walkthrough
Here you can see the complete walkthrough for Secrets of Salem 3: Tarot Murders, namely all chapters, including the bonus chapter, in pictures.

- Take CHAIR LEVER, HAMMER, read and take the note, take BATTERY, use CHAIR LEVER on the chair mechanism, take MY WALLET, SODA (A).
- Take BANKNOTE (B).
- Use SODA on the fire, take PLANKS 1/2, PUMP PEDAL (C).
- Use PUMP PEDAL on the pump, take LIGHTER, PLANKS 2/2 (D).
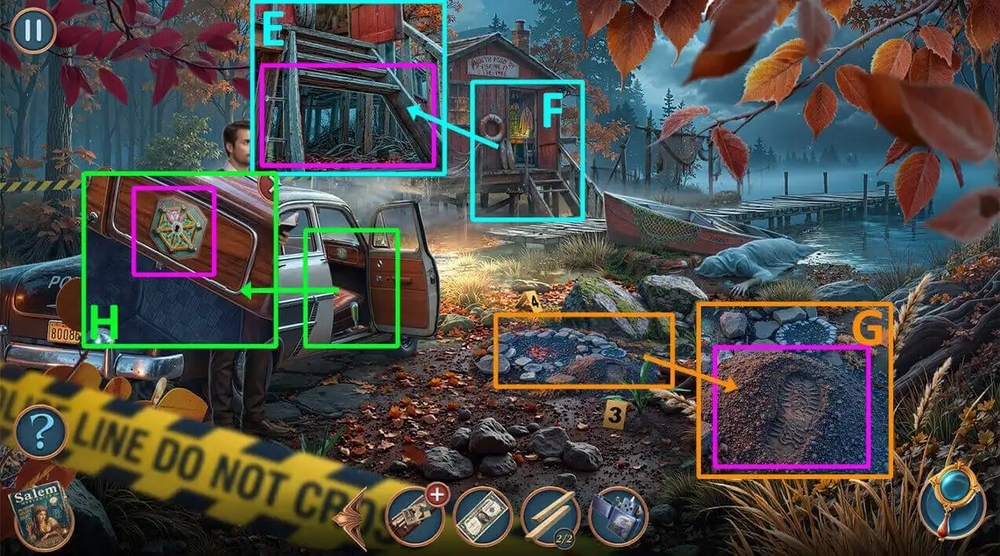
- Use PLANKS 2/2, HAMMER on the ladder (E).
- Play puzzle, earn SHOVEL (F).
- Use SHOVEL on the pile of dirt, take FISHING HOOKS (G).
- Use FISHING HOOKS on the glove compartment (H).
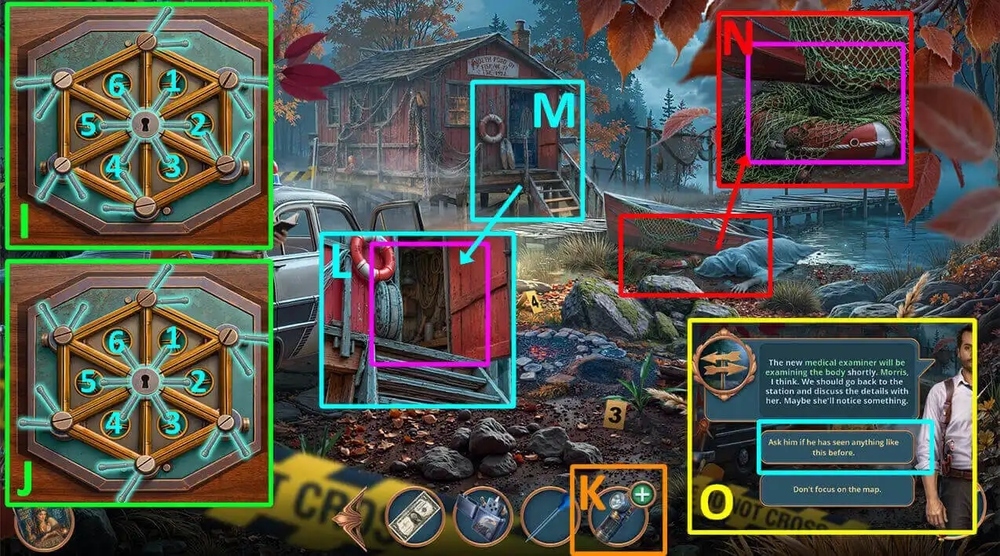
- Easy solution: Click 6, 5, 3, 1, 6 (I).
- Hard solution: Click 3, 4, 5, 6, 4, 2, 3, 4, 5, 4, 2 (J).
- Take EMPTY PIPETTE, POLICE FLASHLIGHT.
- Use BATTERY on POLICE FLASHLIGHT, earn POLICE FLASHLIGHT (K).
- Use POLICE FLASHLIGHT on the tower (L).
- Play puzzle, earn FISHERMAN’S KNIFE (M).
- Use FISHERMAN’S KNIFE on the net, take MYSTERIOUS TAROT CARD (N).
- Select this option (O).
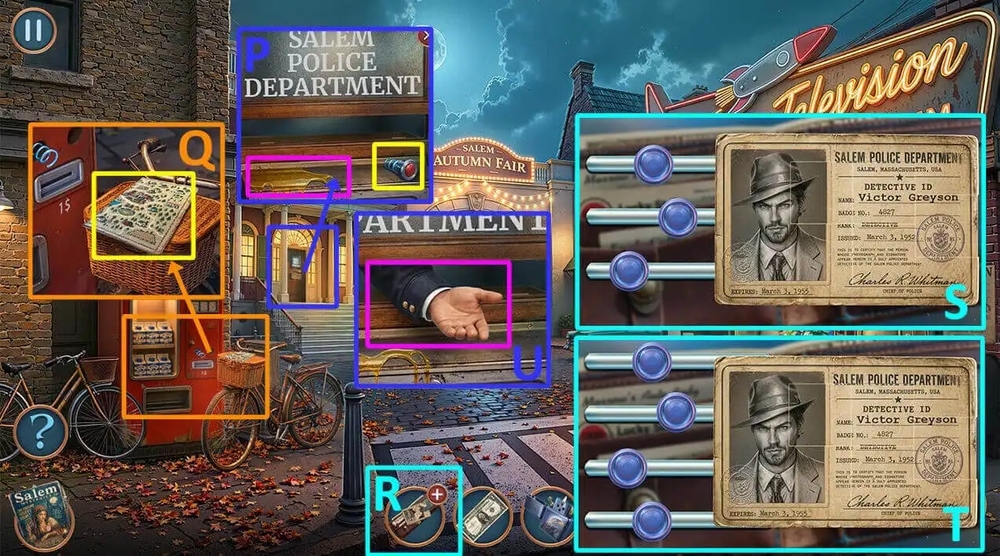
- Use EMPTY PIPETTE on the spilled oil, earn PIPETTE WITH OIL, take MILK MACHINE BUTTONS 1/2 (P).
- Take MAP OF LOCAL AREA, use PIPETTE WITH OIL on the rusty lock, read and take the note, take DUCT TAPE (Q).
- Use DUCT TAPE on MY WALLET (R).
- Easy solution: follow the instructions in the image (S).
- Hard solution: follow the instructions in the image (T).
- Earn MY POLICE ID.
- Use MY POLICE ID on the officer on duty, earn MY POLICE ID (U).
- Go forward.
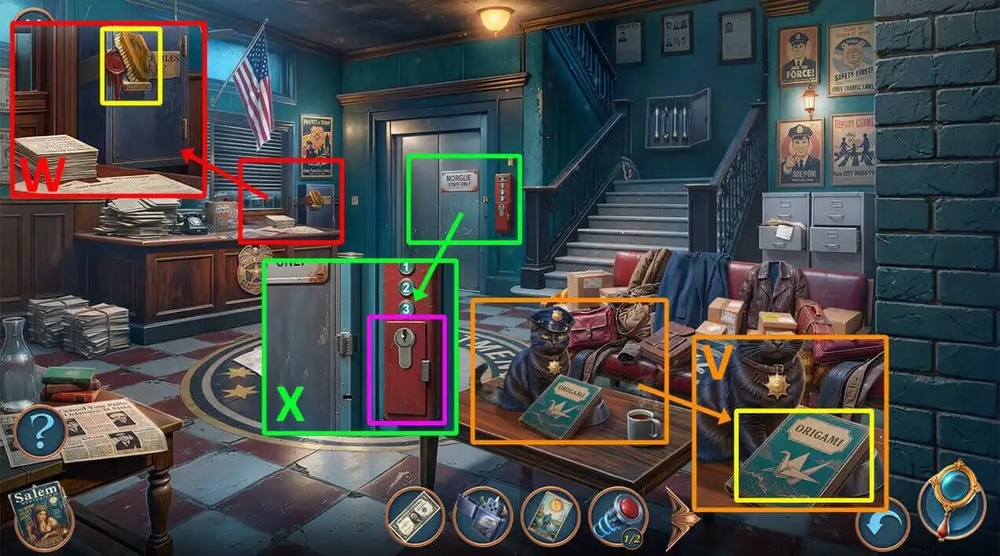
- Take ORIGAMI BOOK (V).
- Take BRUSH, use LIGHTER on the wax seal, take CONTROL PANEL KEY (W).
- Use CONTROL PANEL KEY on the keyhole, take PAPER CLIP (X).
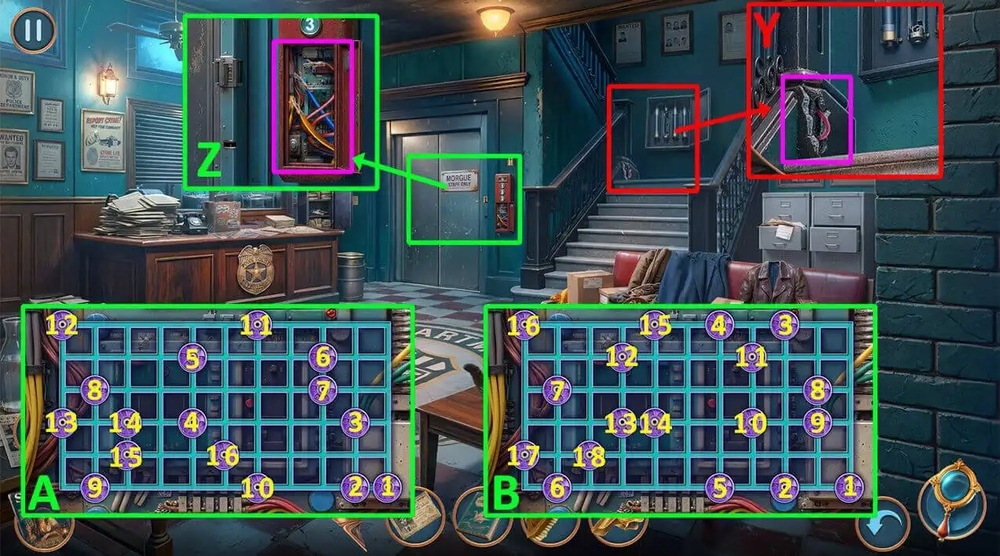
- Use PAPER CLIP on the tangled wire, earn WIRE (Y).
- Use WIRE on the panel with wires (Z).
- Easy solution: Click 1-16 (A).
- Hard solution: Click 1-18 (B).
- Go forward.
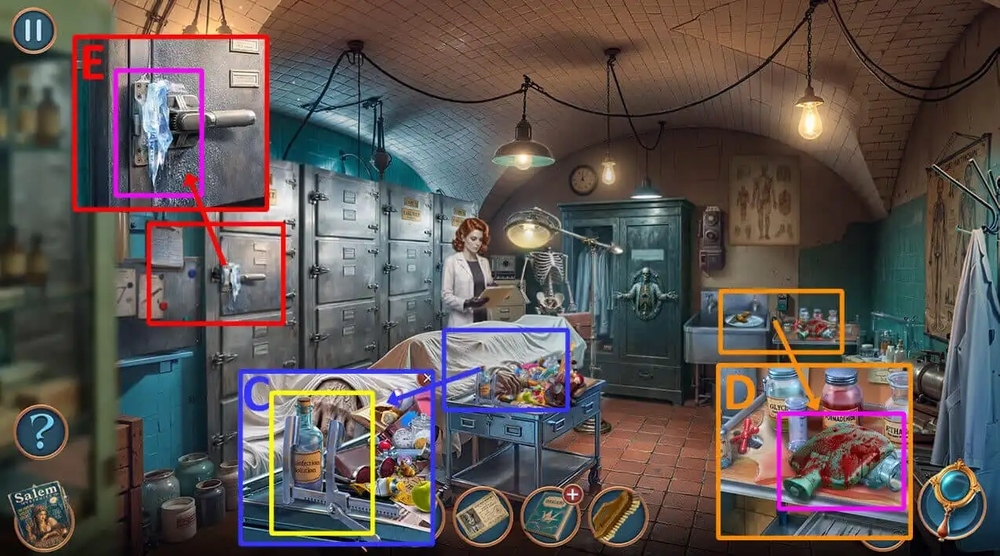
- Take RIB SPREADER, DISINFECTING SOLUTION (C).
- Use BRUSH, DISINFECTING SOLUTION on the water heater, take HAND WARMER (D).
- Use HAND WARMER on the ice, take HEART AMULET (E).
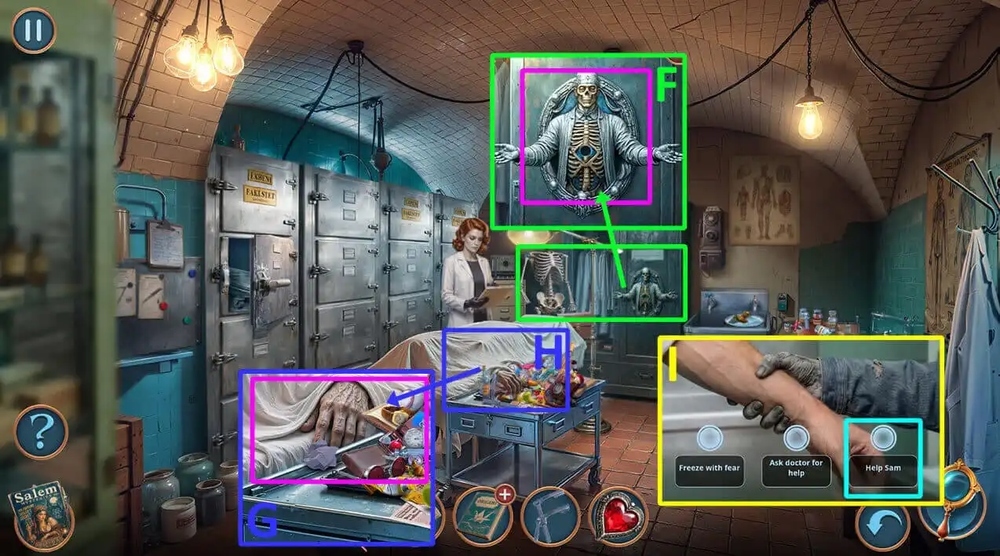
- Use HEART AMULET on the door, take FORENSIC REPORT (F).
- Use FORENSIC REPORT on the deceased (G).
- Play puzzle (H).
- Select this option (I).
- Earn SCRAPER, CASE NUMBER.
- Go back.
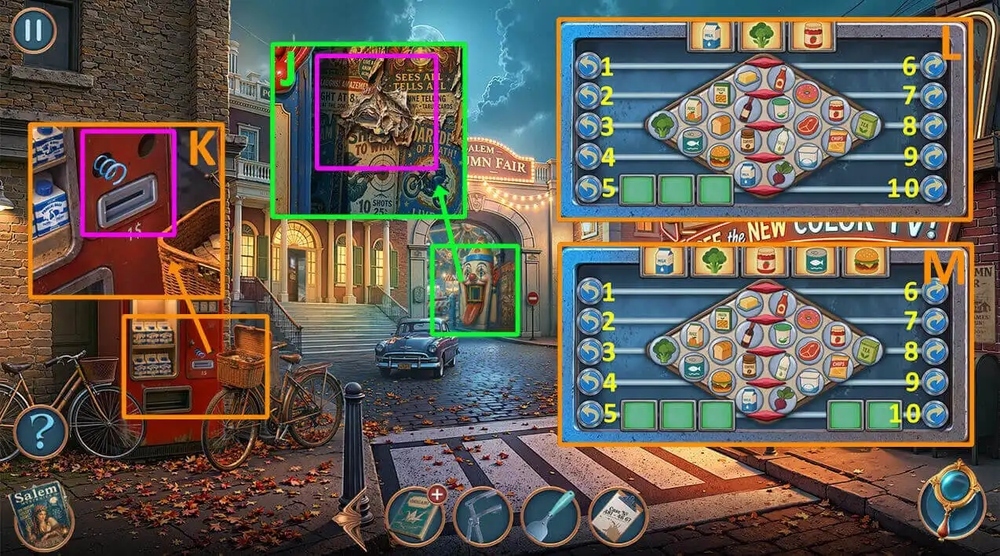
- Use SCRAPER on the posters on the wall, earn SCRAPER, take MILK MACHINE BUTTONS 2/2 (J).
- Use MILK MACHINE BUTTONS 2/2, BANKNOTE on the milk vending machine (K).
- Easy solution: Click 4, 10, 1, 10, 4, 6 (L).
- Hard solution: Click 4, 10, 1, 10, 4, 6, 2, 10, 3, 10 (M).
- Take MILK CARTON.
- Go forward.
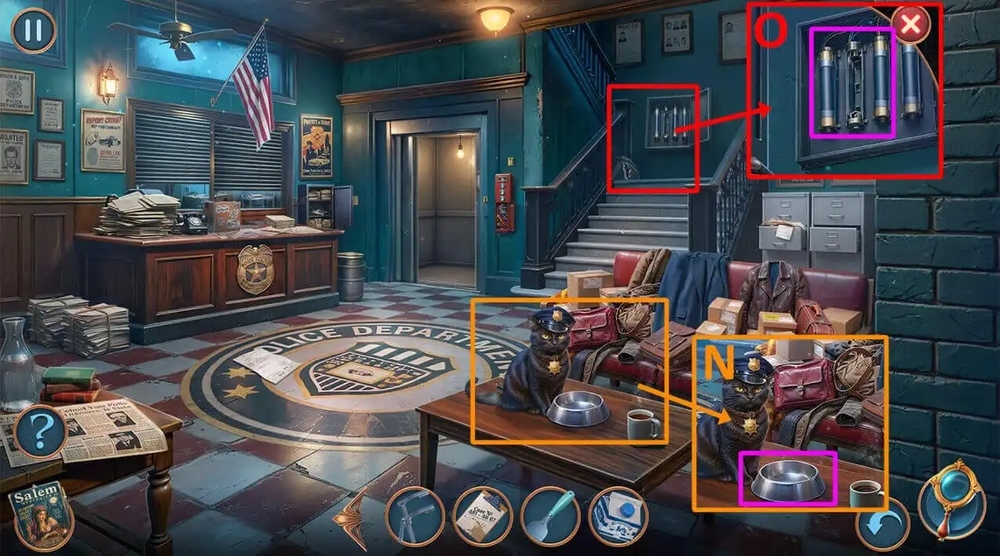
- Use MILK CARTON on the bowl, take MAP, FUSE (N).
- Use FUSE on the panel (O).
- Go forward.
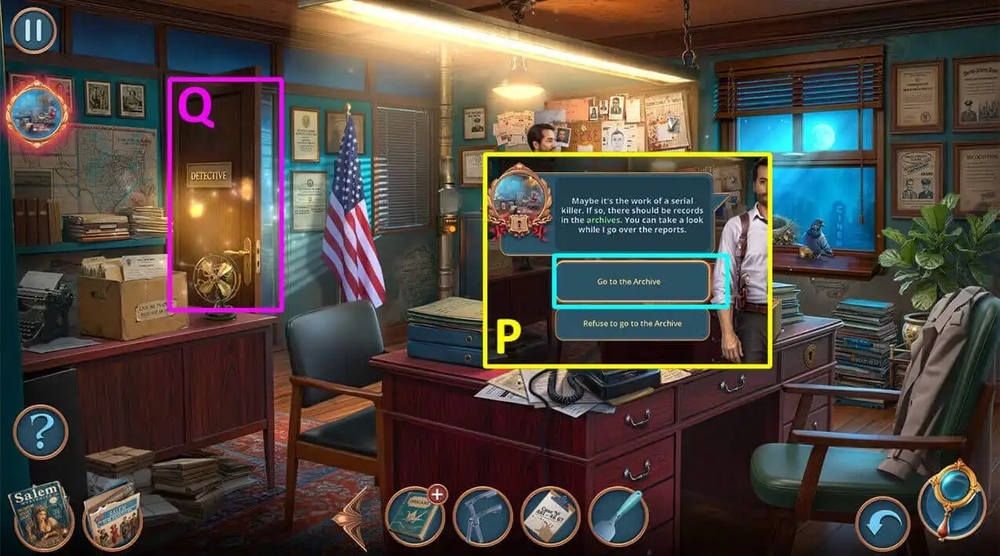
- Select this option (P).
- Go forward (Q).
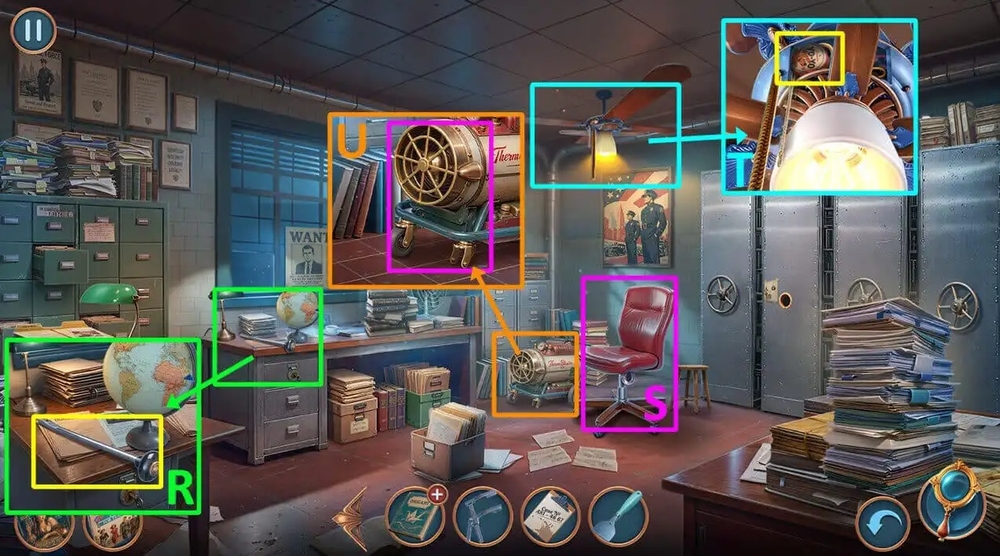
- Take ARMCHAIR LEVER (R).
- Use ARMCHAIR LEVER on the chair (S).
- Take YO-YO (T).
- Use YO-YO on the heat gun, take ROOT (U).
- Go back.
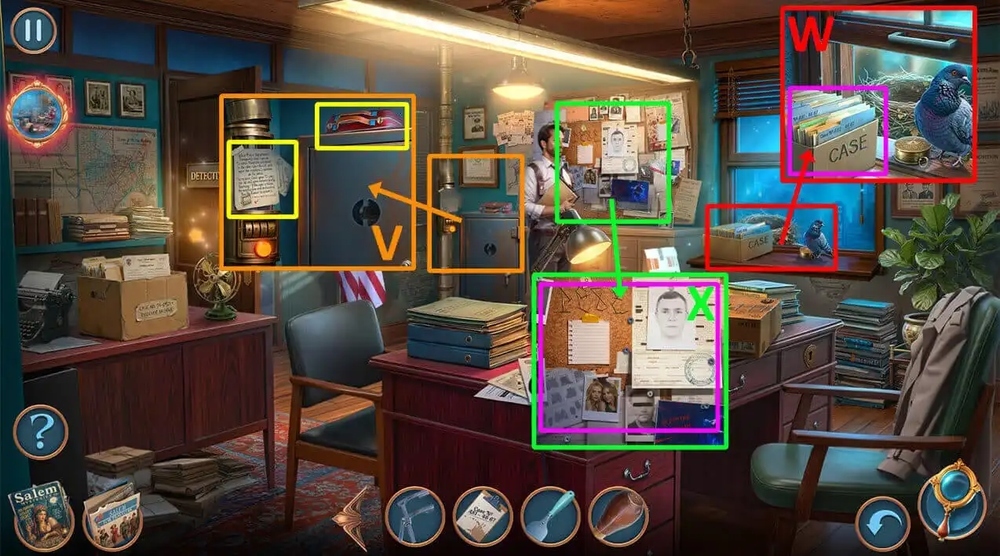
- Take SEALED FIRST-AID KIT, read and take the note (V).
- Use CASE NUMBER on the box of files, take CASE NOTES (W).
- Use MAP OF LOCAL AREA and CASE NOTES on the board (X).
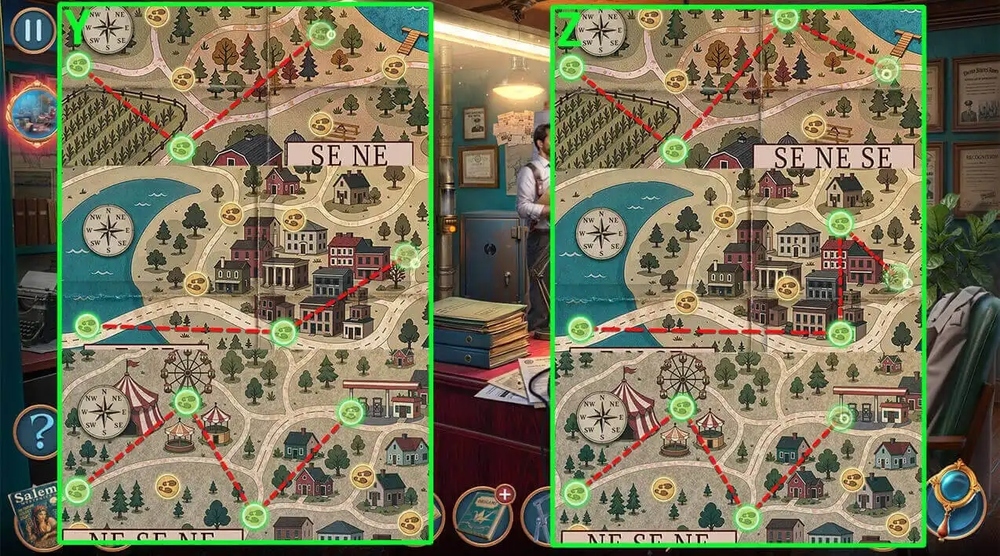
- Easy solution: follow the instructions in the image (Y).
- Hard solution: follow the instructions in the image (Z).
- Click on the map, take NOTEBOOK.
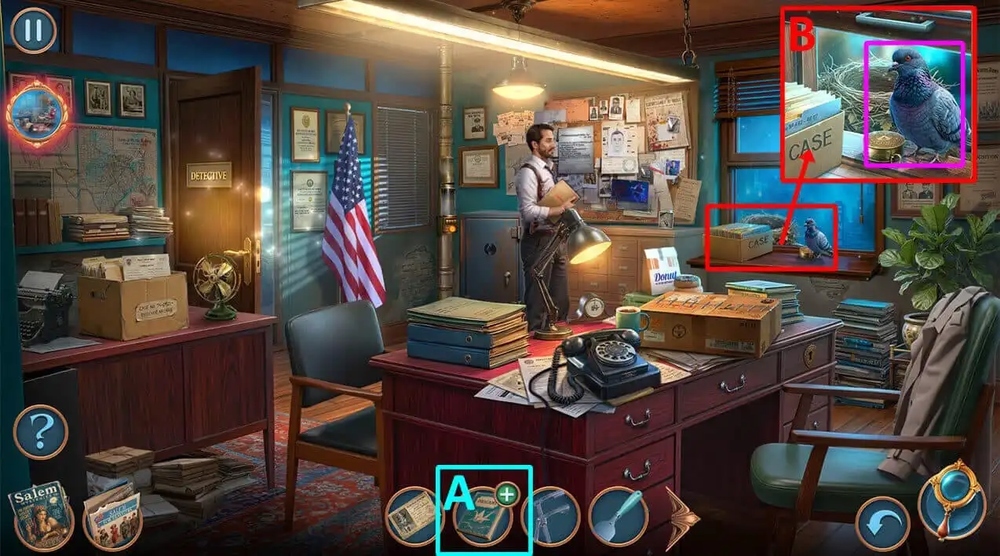
- Use NOTEBOOK on ORIGAMI BOOK, earn NOTEBOOK, PAPER DOVE (A).
- Use PAPER DOVE on the dove, take MEASURING TAPE (B).
- Go to Street near the Station.
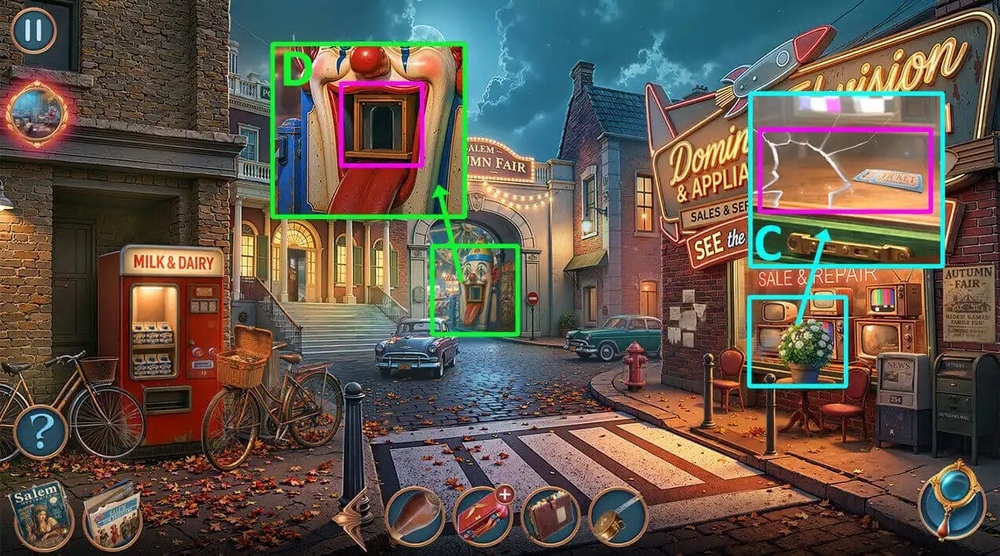
- Use MEASURING TAPE on the display case, earn FAIR TICKET (C).
- Use FAIR TICKET on the ticket booth (D).
- Go forward.
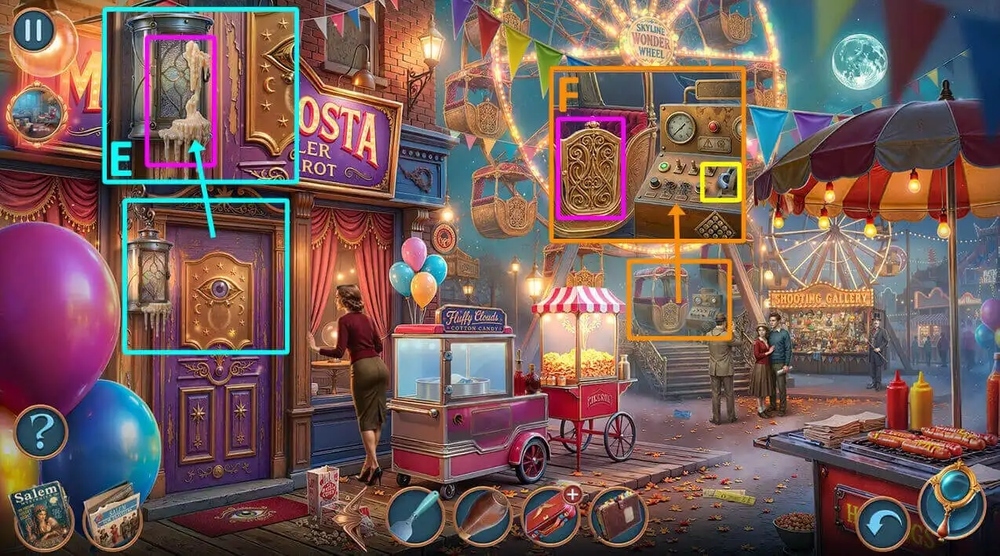
- Use SCRAPER on the wax, take WATERPROOF GASKET, MONOCLE (E).
- Take NUT, use RIB SPREADER on the door, take TOY RIFLE (F).
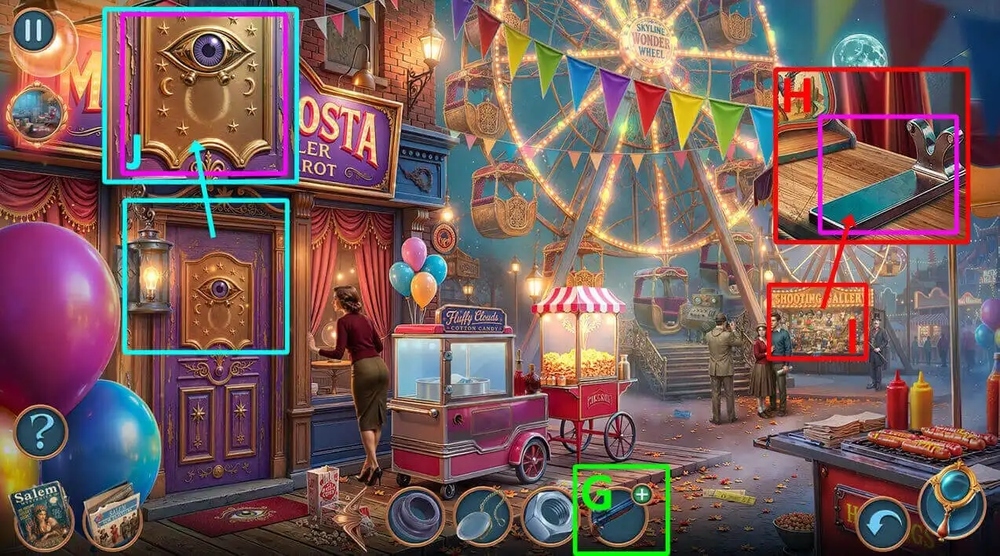
- Use MONOCLE on TOY RIFLE, earn TOY RIFLE (G).
- Use TOY RIFLE on the rifle stand (H).
- Play puzzle, earn BRACELET WITH METAL SNAKE (I).
- Use BRACELET WITH METAL SNAKE on the door (J).
- Go forward.
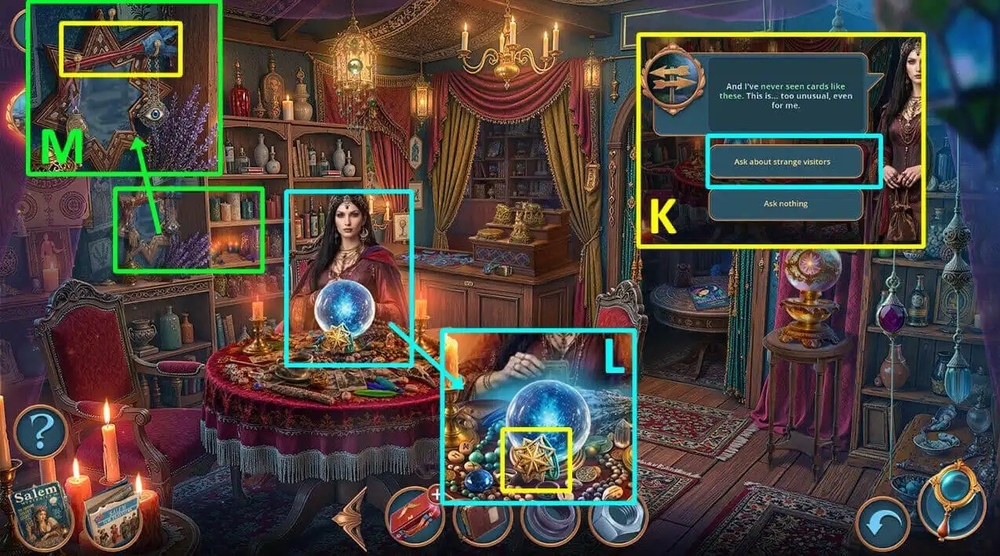
- Select this option (K).
- Take STAR AMULET (L).
- Take FEATHERLESS DUSTER, use STAR AMULET on the mirror, take CRESCENT RITUAL KNIFE (M).
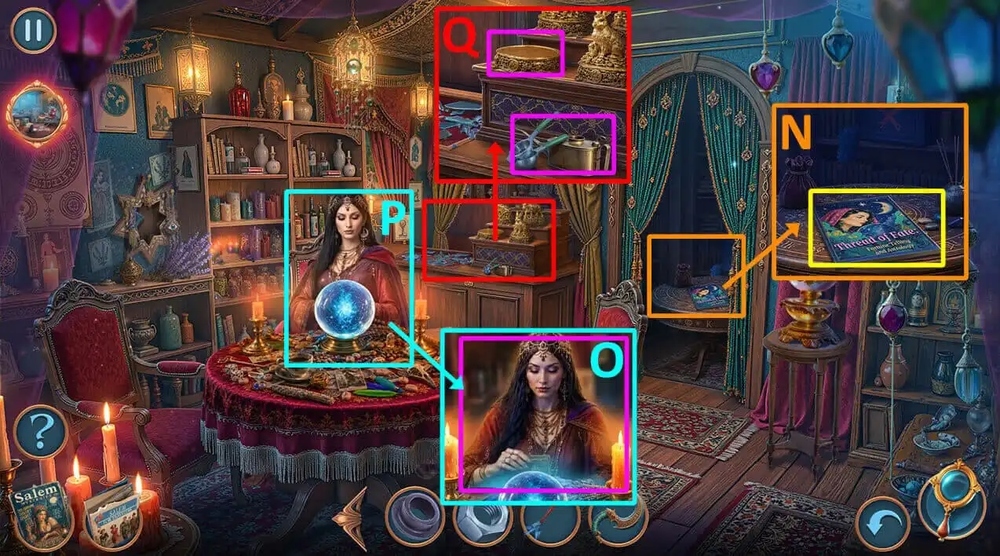
- Click on the journal, use CRESCENT RITUAL KNIFE on the journal, earn FREE FORTUNE-TELLING COUPON (N).
- Use FREE FORTUNE-TELLING COUPON on the fortune-teller (O).
- Play puzzle, earn PIGGY BANK (P).
- Use PIGGY BANK on the stand, take BONE HAND, FOLDING CART, use ROOT on the oiler, earn OILER (Q).
- Go to Police Archives.
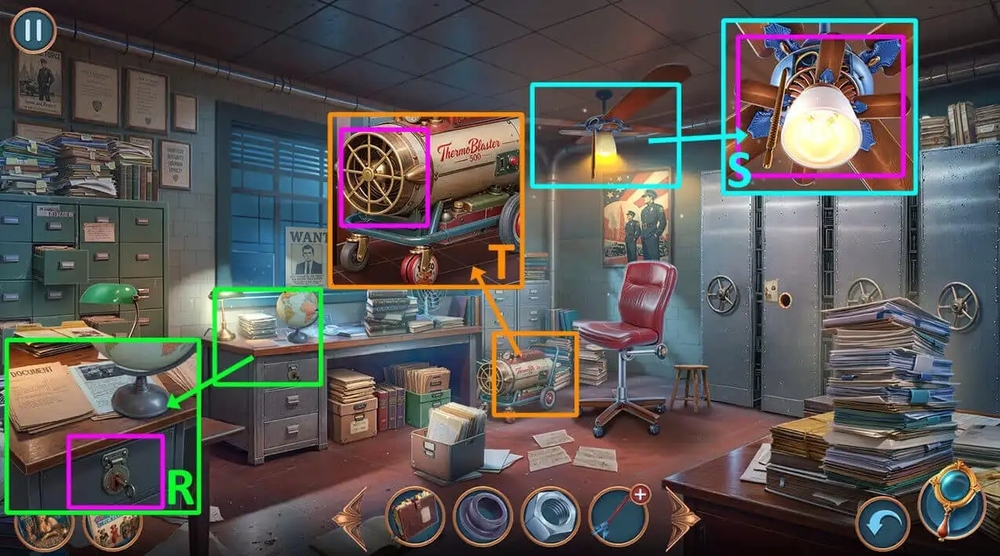
- Use OILER on the drawer, take SOLDERING IRON (R).
- Use SOLDERING IRON on the blades, earn FAN PART (S).
- Use FAN PART on the heat gun, take SEAM RIPPER (T).
- Go to Station Hall.
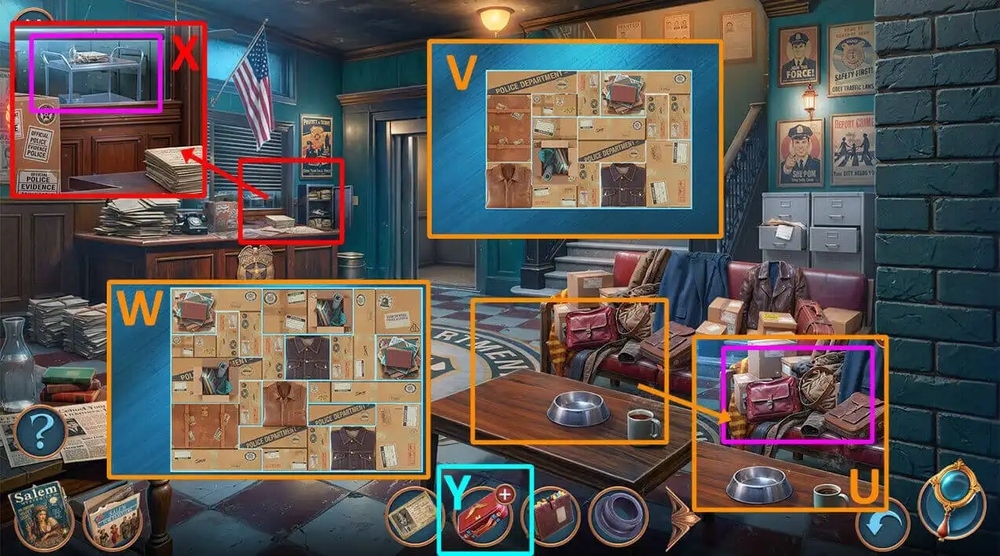
- Use FOLDING CART on the scattered things (U).
- Easy solution: follow the instructions in the image (V).
- Hard solution: follow the instructions in the image (W).
- Take GLUE, SAFE DIAL, and METAL HANGER.
- Use METAL HANGER on the cart, take CADUCEUS WITHOUT WINGS (X).
- Use CADUCEUS WITHOUT WINGS on SEALED FIRST-AID KIT, earn NEW GLOVES (Y).
- Go to County Morgue.
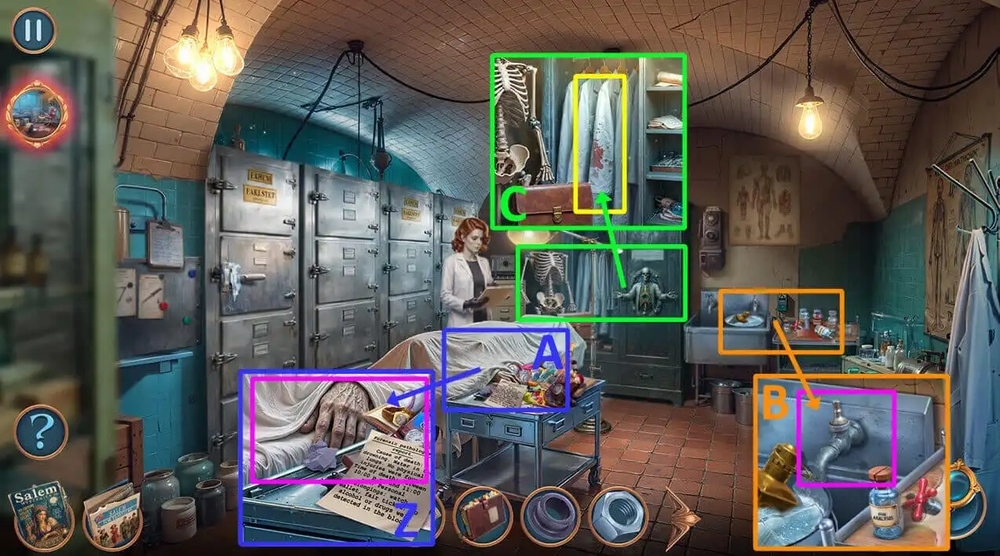
- Use NEW GLOVES on the deceased (Z).
- Play puzzle, earn CALIPER (A).
- Use WATERPROOF GASKET, NUT, CALIPER on the sink, take PLASTIC STICK, EMPTY LANTERN (B).
- Click on the robe’s sleeve, use SEAM RIPPER on the seam, take DIVIDERS (C).
- Go to Police Archives.
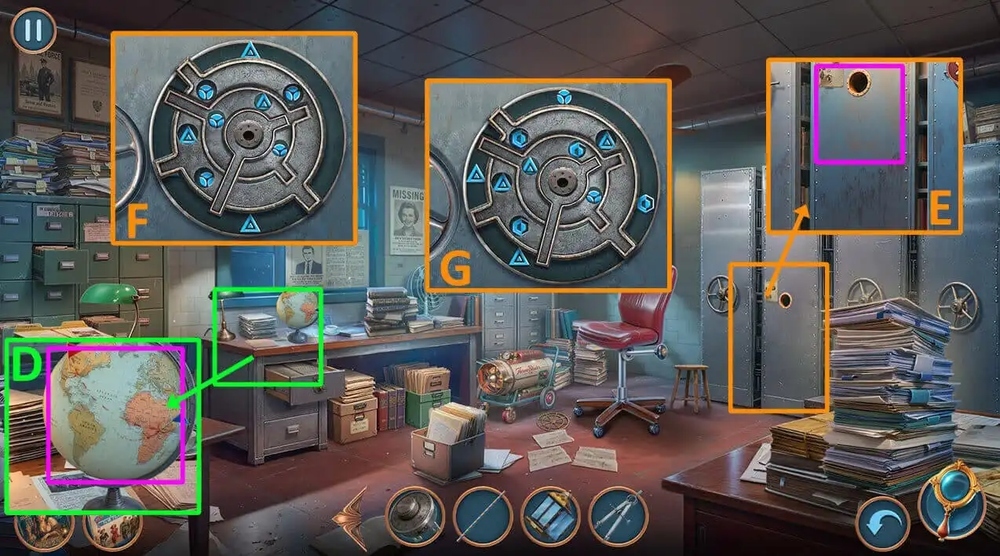
- Use DIVIDERS on the globe, take LARGE SHELF VALVE (D).
- Use LARGE SHELF VALVE on the stand (E).
- Easy solution: follow the instructions in the image (F).
- Hard solution: follow the instructions in the image (G).
- Read and take the note.
- Go to Madame Zosta’s Magic Shop.
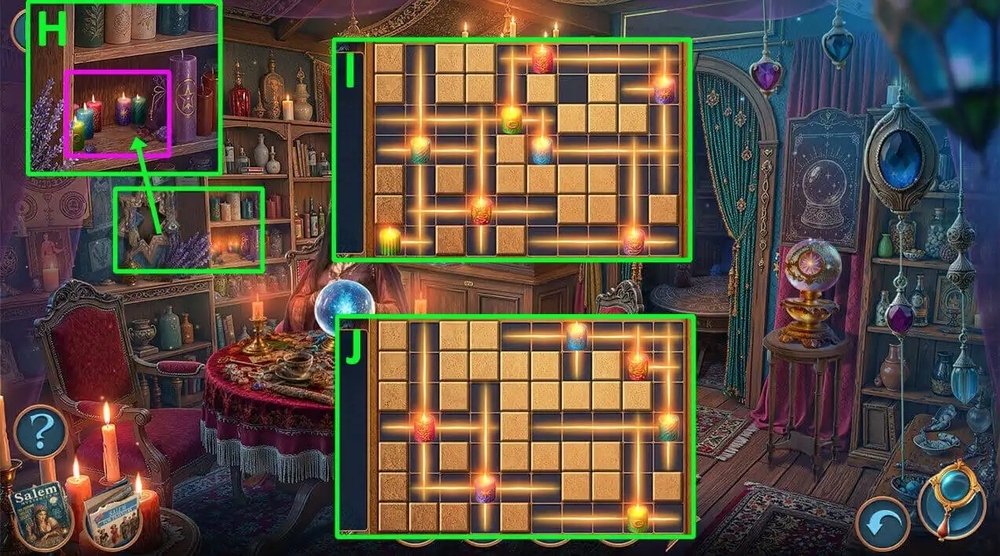
- Use EMPTY LANTERN on the shelf with candles (H).
- Easy solution: follow the instructions in the image (I).
- Hard solution: follow the instructions in the image (J).
- Take LANTERN WITH CANDLE.
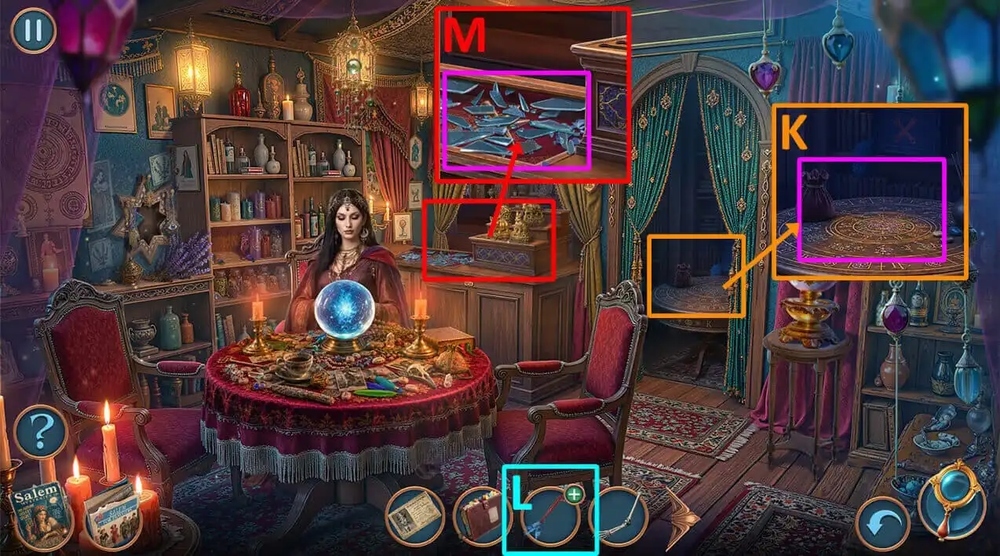
- Use LANTERN WITH CANDLE on the table, take TOOLBOX, FLUFFY BOA (K).
- Use GLUE, FLUFFY BOA on FEATHERLESS DUSTER, earn FEATHER BOA DUSTER (L).
- Use FEATHER BOA DUSTER on the shards, take EXTRA BULLETS (M).
- Go back.
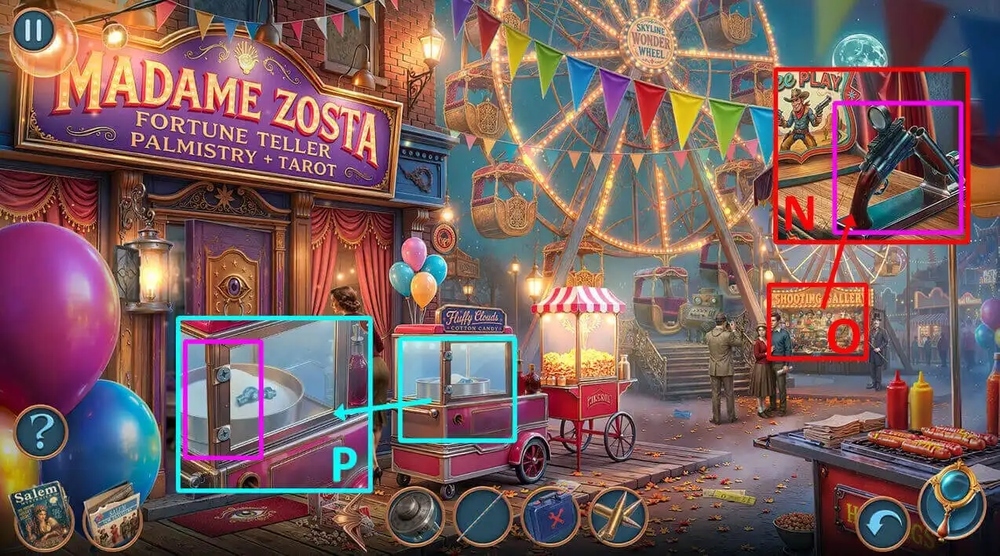
- Use EXTRA BULLETS on the shooting range gun (N).
- Play puzzle, earn TOY SCREWDRIVER (O).
- Use TOY SCREWDRIVER on the screws, take JOINT (P).
- Go to County Morgue.
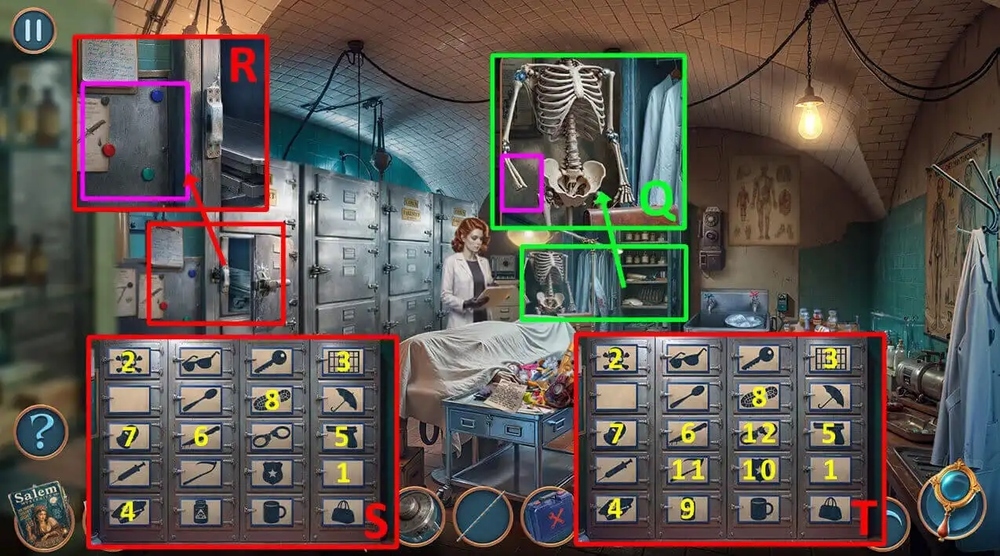
- Use JOINT, BONE HAND on the skeleton, take BALL, VICTIMS’ FILES (Q).
- Use VICTIMS’ FILES on the board (R).
- Easy solution: Click 1, take 1, use 2, take 2, use 3, take 3, use 4, take 4, use 5, take 5, use 6, take 6, use 7, take 7, use 8 (S).
- Hard solution: Click 1, take 1, use 2, take 2, use 3, take 3, use 4, take 4, use 5, take 5, use 6, take 6, use 7, take 7, use 8, take 8, use 9, take 9, use 10, take 10, use 11, take 11, use 12 (T).
- Take STAMP.
- Go to Police Offices.

- Use NOTEBOOK, STAMP on the numbers on the board, earn NEW SAFE CODE (U).
- Use SAFE DIAL, NEW SAFE CODE on the safe, take BOTTLE OF CHAMPAGNE, read and take the file, take CARDS FROM PREVIOUS CRIMES 1/3, ELECTRICAL WHIP (V).
- Go to City Fair.
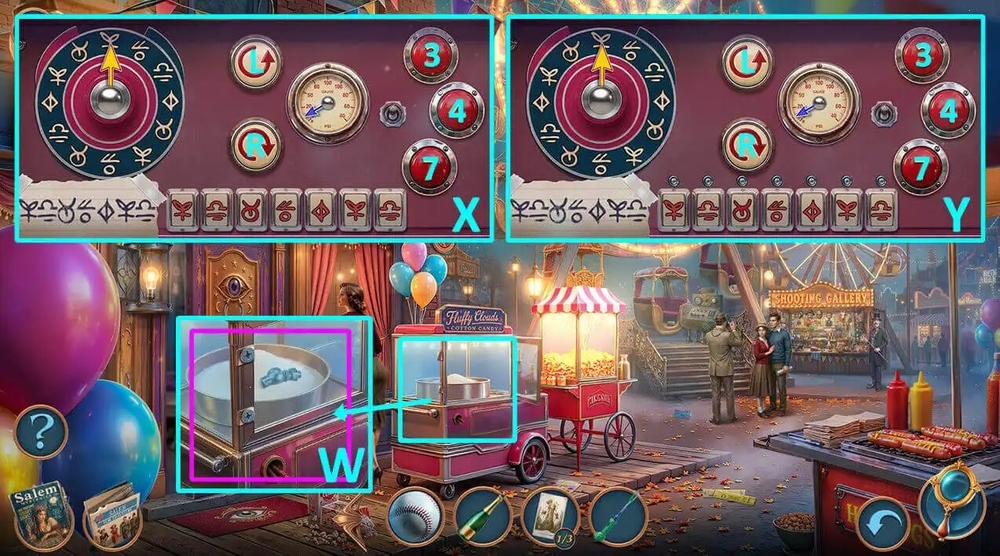
- Use PLASTIC STICK, ELECTRICAL WHIP on the cotton candy machine (W).
- Easy solution: Click 7, L, 3, L, L, 7, R, 3, R, R, 4, L (X).
- Hard solution: Click 7, L, 3, L, L, 7, R, 3, R, R, 4, L (Y).
- Earn COTTON CANDY.
- Go to Street near the Station.
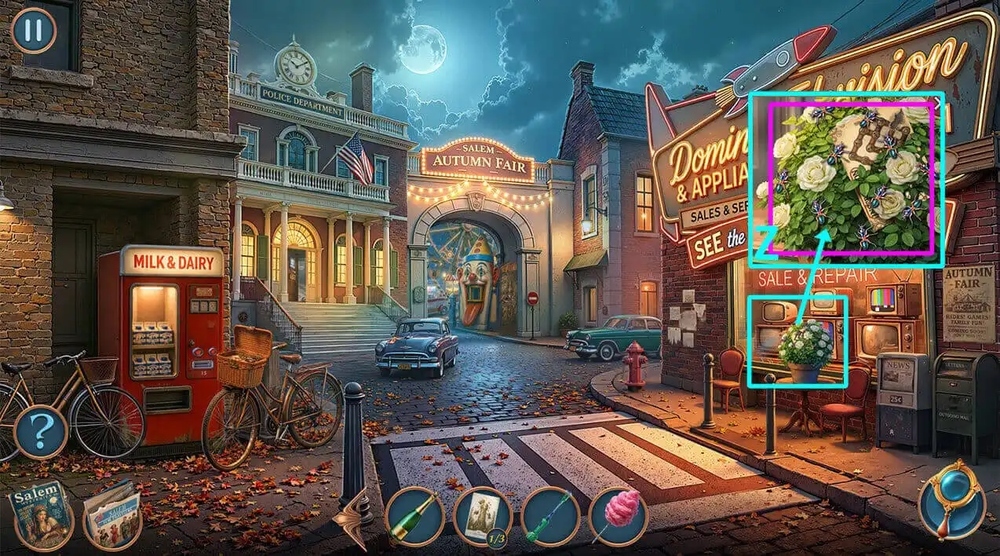
- Use COTTON CANDY on the ants, take REPAIR INSTRUCTIONS (Z).
- Go to City Fair.

- Use TOOLBOX, REPAIR INSTRUCTIONS on the control panel (A).
- Easy solution: Click 4(x3), 7, 11, 7(x3), 11, 5, 2(x2), 5, 16(x3), 15(x2), 13(x3), 10, 13(x3), 8, 5(x3), 12, 14(x2), 12(x3), 14(x2) (B).
- Hard solution: Click 4(x3), 7, 11, 7(x3), 11, 5, 2(x2), 5, 16(x3), 15(x2), 13(x3), 10, 13(x3), 8, 5(x3), 12, 14(x2), 12(x3), 14(x2) (C).
- Take STAPLE REMOVER.
- Go to Police Offices.

- Use STAPLE REMOVER on the box, take THICK PAPER SHEET, CARDS FROM PREVIOUS CRIMES 2/3, CASE FOLDER (D).
- Click on the CASE FOLDER, open the folder, read and take the note, take CARDS FROM PREVIOUS CRIMES 3/3 (E).
- Go to Madame Zosta’s Magic Shop.
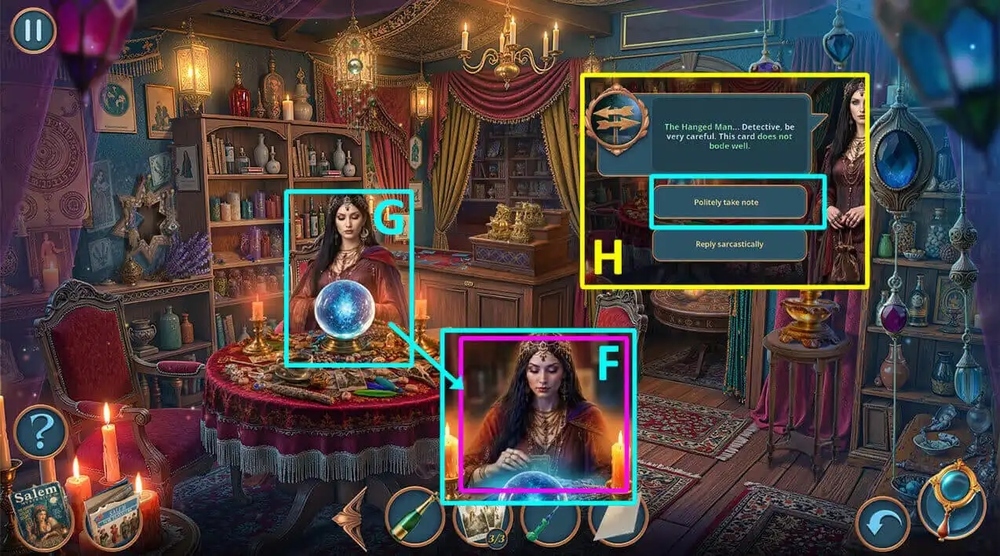
- Use CARDS FROM PREVIOUS CRIMES 3/3 on the fortune-teller (F).
- Play puzzle (G).
- Select this option, earn BRACELET (H).
- Go to Police Offices.
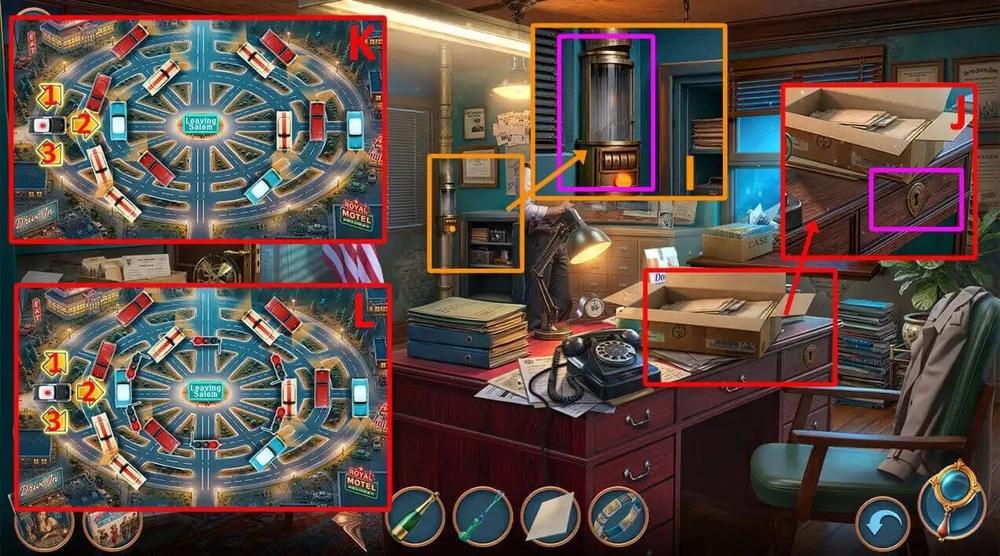
- Use BRACELET, MY POLICE ID on the pneumatic tube, earn MY POLICE ID, take MY DESK KEY (I).
- Use MY DESK KEY on the desk drawer, take WARRANT, REVOLVER, IDENTIFICATION, and CAR KEYS (J).
- Easy solution: Click 1, 2, 3, 2, 2 (K).
- Hard solution: Click 1, 2, 3, 2, 2 (L).
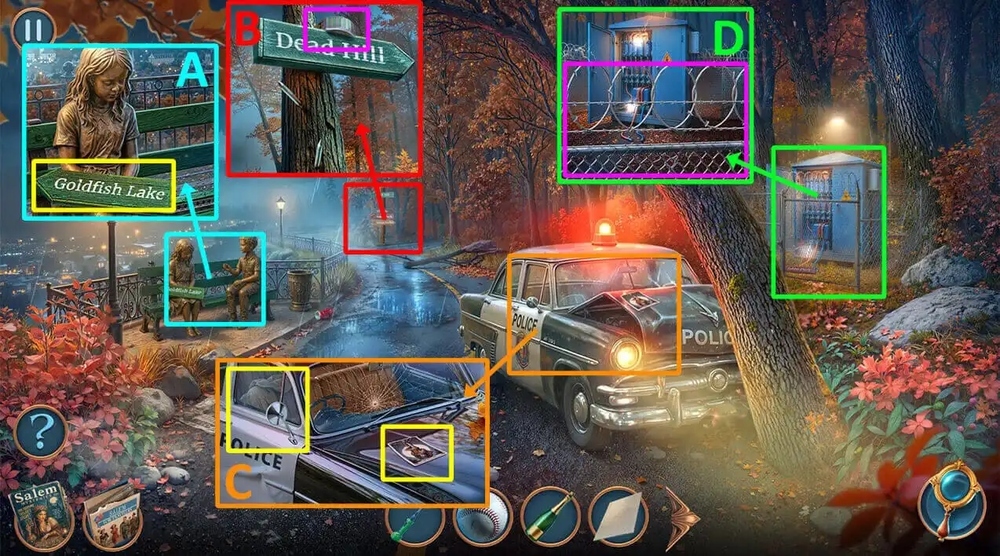
- Take POINTERS 1/2 (A).
- Use BOTTLE OF CHAMPAGNE to knock down the item on top of the signpost, earn MEASURING TAPE (B).
- Take the tarot card, click on the hood, take DEAD BATTERY, click on the car window, use BALL on the window, use MEASURING TAPE on the car door latch, take MY COAT (C).
- Use MY COAT on the barbed wire on the fence, take POINTERS 2/2 (D).
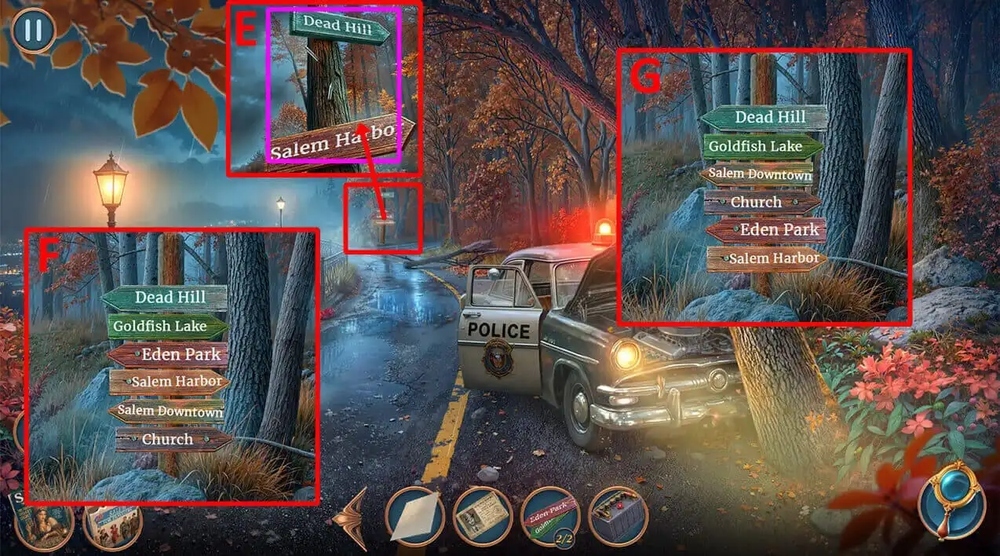
- Use POINTERS 2/2 on the sign (E).
- Easy solution: follow the instructions in the image (F).
- Easy solution: follow the instructions in the image (G).
- Go forward.
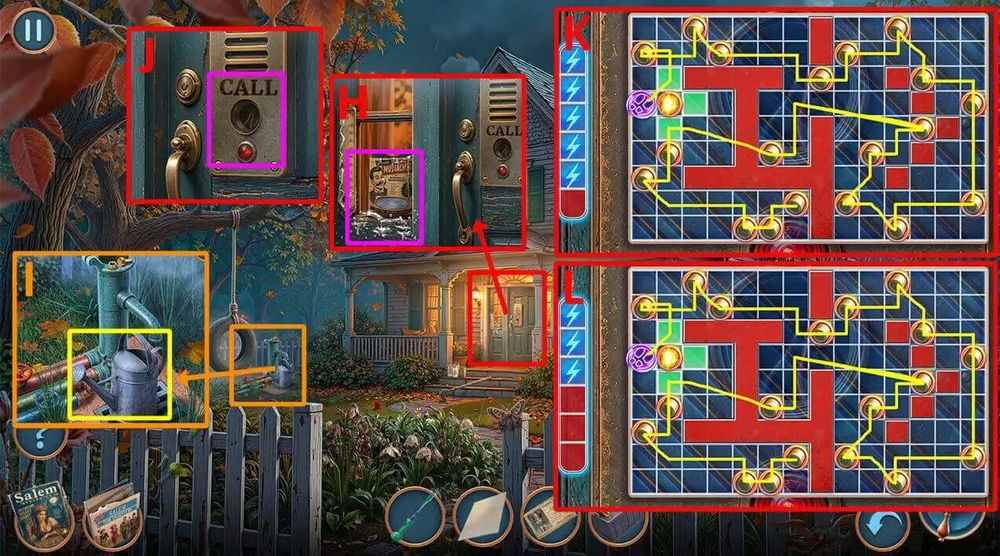
- Use THICK PAPER SHEET on the mercury, take MASQUERADE MUSTACHE (H).
- Take EMPTY WATERING CAN, CLIPPER, click on the drain grate, Use MASQUERADE MUSTACHE on the fallen item, earn MICROPHONE (I).
- Use MICROPHONE on the door lock (J).
- Easy solution: follow the instructions in the image (K).
- Hard solution: follow the instructions in the image (L).
- Go forward.
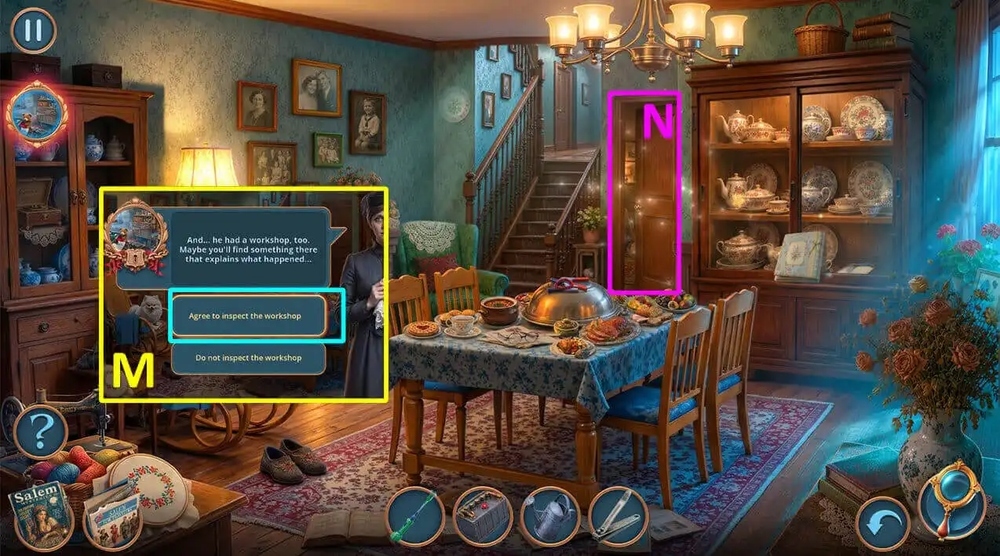
- Select this option (M).
- Go forward (N).
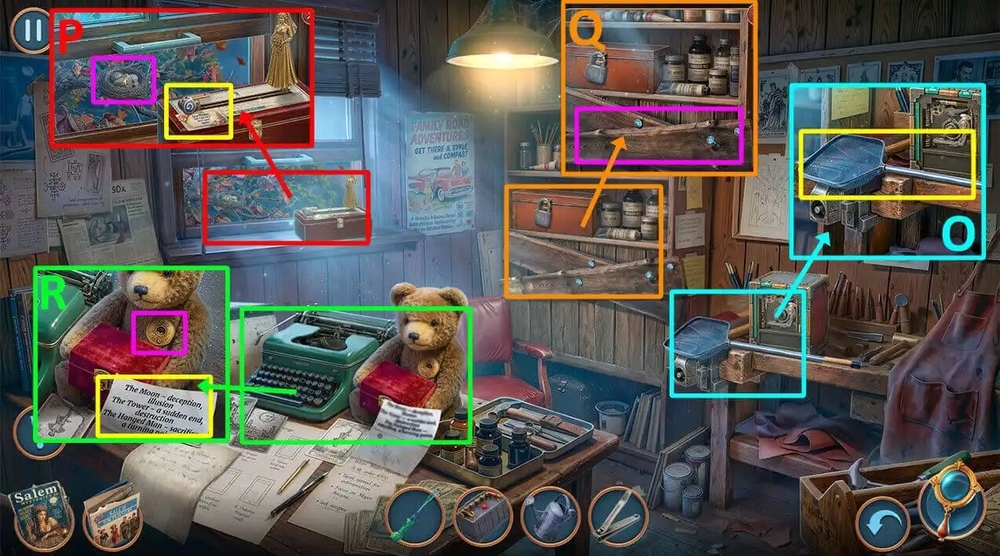
- Take AQUARIUM NET (O).
- Take TYPEWRITER KEYS 1/3, read and take the note, use AQUARIUM NET on the nest, take COMB (P).
- Use COMB on the boards nailed down, read and take the note, take BENT FIGURINE, STURDY FIGURINE, WIND-UP KEY (Q).
- Read and take the note, use WIND-UP KEY on the teddy bear, read and take the note, take PEARL NECKLACE (R).
- Go back.

- Use CLIPPER on the wire, take SILVER DISH HANDLE (S).
- Take HAIRBAND, METAL CLAMPS, use SILVER DISH HANDLE on the dish lid (T).
- Play puzzle, earn CANAPE (U).
- Use CANAPE on the dog, read and take the note, take BUNCH OF KEYS (V).
- Go forward (W).
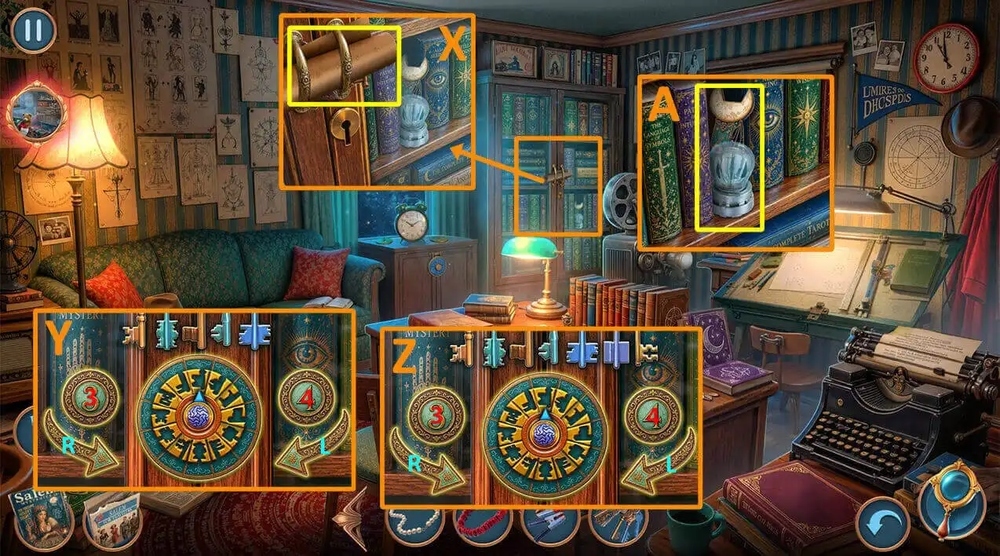
- Take CRAFT PAPER, TAURUS PENDANT, GNOMES WITH HAMMERS 1/2, Use BUNCH OF KEYS on the door (X).
- Easy solution: Click 3, R, R, R, L, L, 4, L, L, 3, L (Y).
- Hard solution: Click 3, R, R, R, L, L, 4, L, L, 3, L, 4, R, 3, L (Z).
- Take PROJECTOR BULB, MOON BOOKMARK (A).
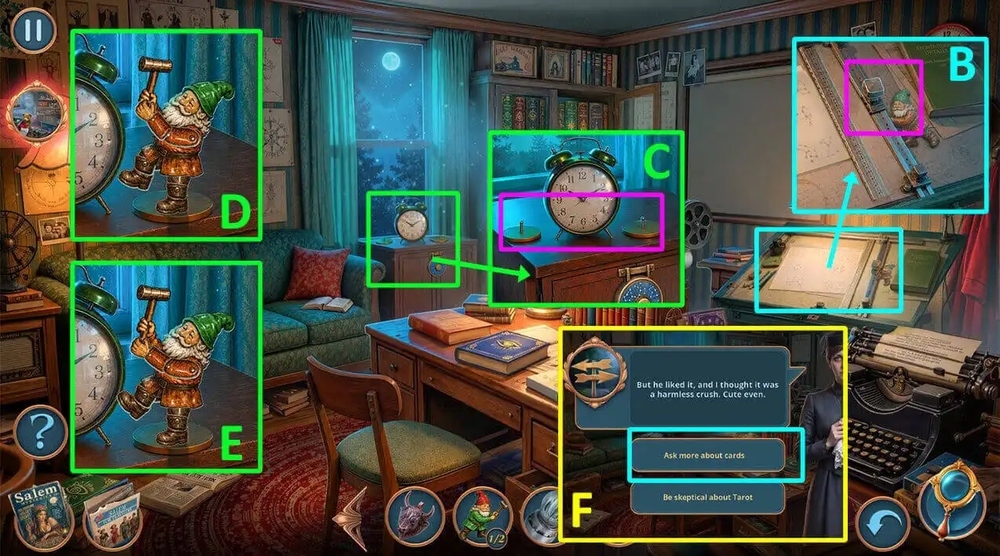
- Use MOON BOOKMARK on the bolt, earn GNOMES WITH HAMMERS 2/2 (B).
- Use GNOMES WITH HAMMERS 2/2 on the alarm stand (C).
- Easy solution: follow the instructions in the image (D).
- Easy solution: follow the instructions in the image (E).
- Read and take the note, take REEL WITH TORN FILM, BROKEN CLOCK, CONSTRUCTION TAPE PIECE.
- Select this option, earn LIONEL’S BRIEFCASE (F).
- Go to Near the Brightons’ Country House.
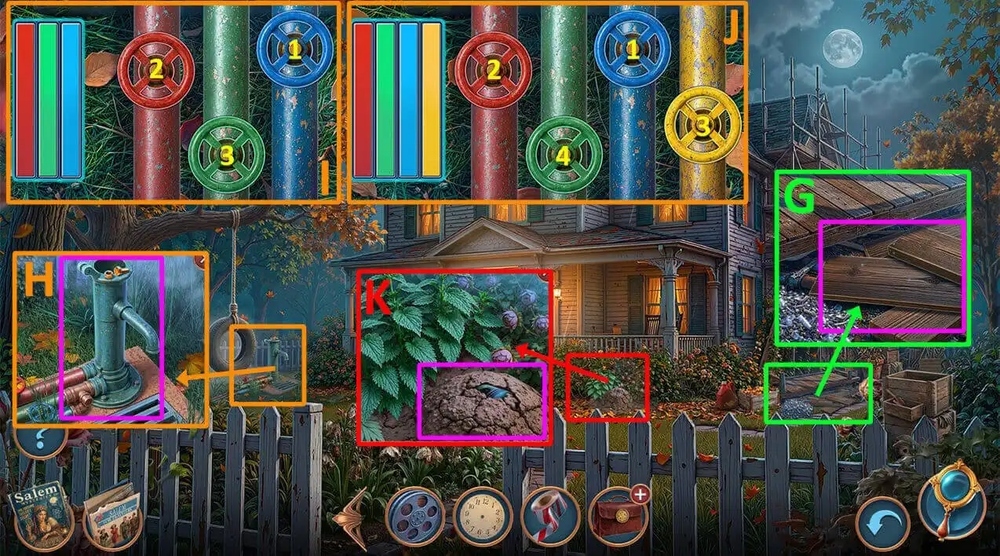
- Use CONSTRUCTION TAPE PIECE on the boards, take WATER PUMP HANDLE (G).
- Use EMPTY WATERING CAN and WATER PUMP HANDLE on the water fountain (H).
- Easy solution: Click 1-3 (I).
- Hard solution: Click 1-4 (J).
- Take FULL WATERING CAN.
- Use FULL WATERING CAN on the dried-up ground, take HANDLE, NEW PISTON (K).
- Go back.
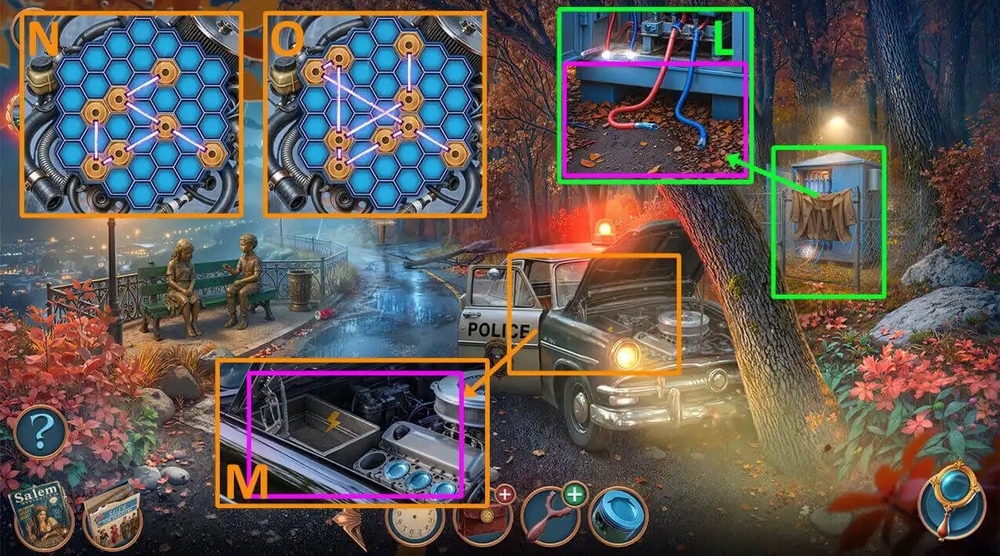
- Use DEAD BATTERY on the panel, use METAL CLAMPS on the dead battery, earn CHARGED BATTERY (L).
- Use CHARGED BATTERY and NEW PISTON on the hood (M).
- Easy solution: follow the instructions in the image (N).
- Easy solution: follow the instructions in the image (O).
- Go forward.
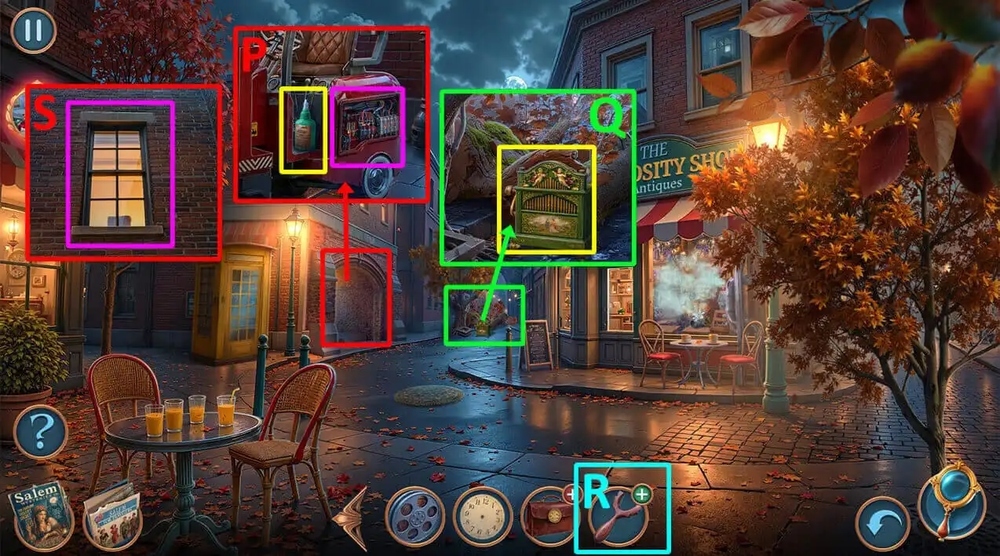
- Take GLUE, use ELECTRICAL WHIP on the lift, take PEONY, SHELL DECORATION (P).
- Take TOY BARREL ORGAN, use SHELL DECORATION on the moss, take ACORNS (Q).
- Use HAIRBAND, ACORNS on HANDLE, earn SLINGSHOOT WITH ACORNS (R).
- Use SLINGSHOOT WITH ACORNS on the window (S).
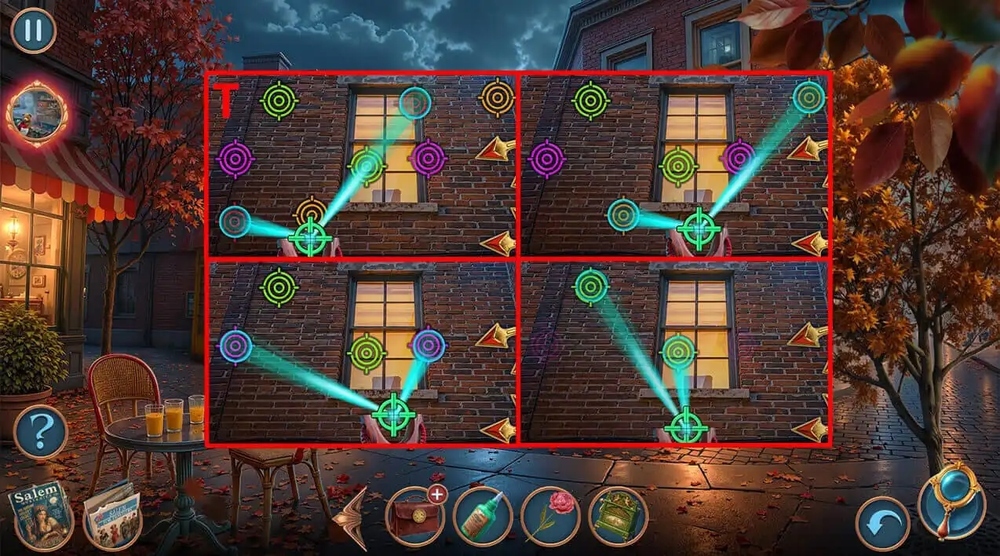
- Easy solution: follow the instructions in the image (T).
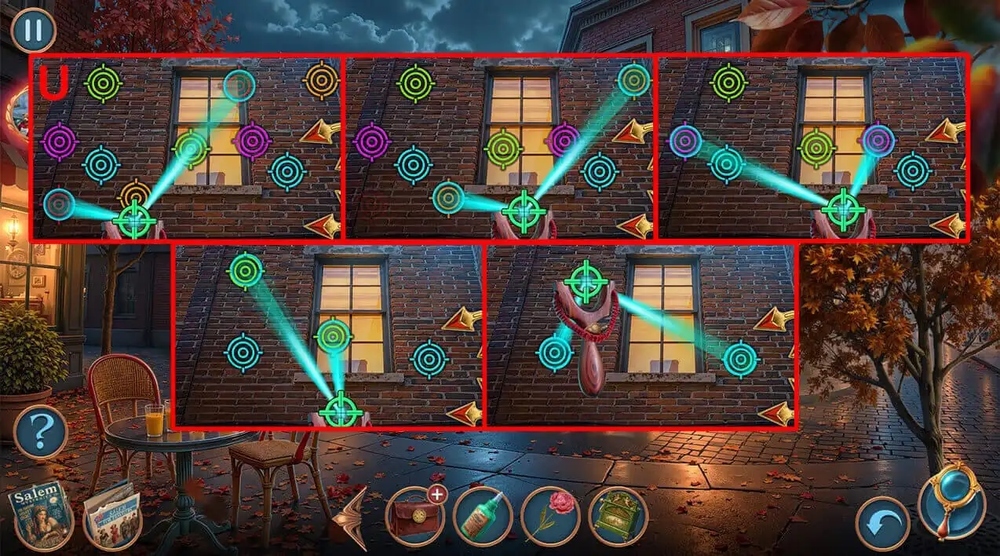
- Easy solution: follow the instructions in the image (U).
- Go forward.
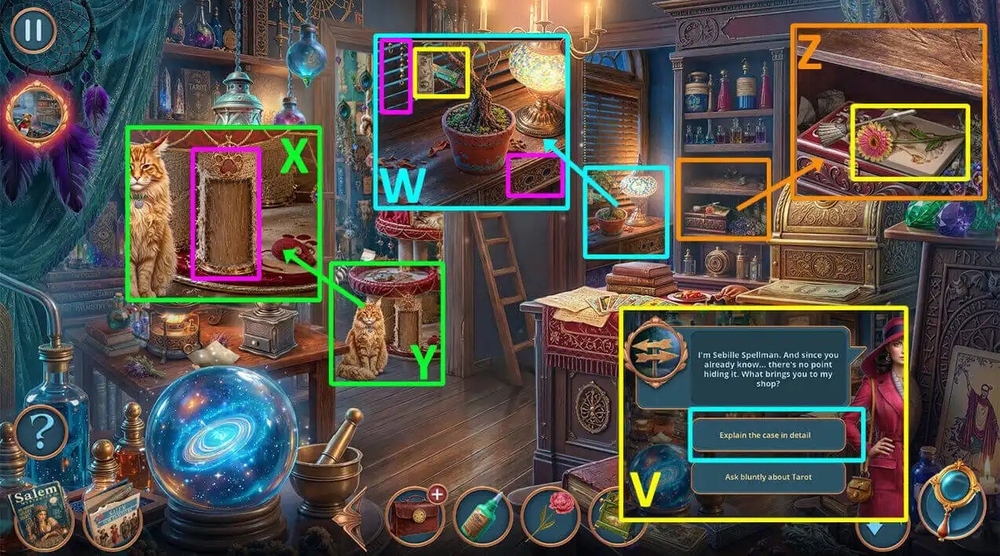
- Select this option (V).
- Take OLD BANKNOTE, GUM, use TAURUS PENDANT on the countertop drawer, take SCRATCHING POST PART, use PEARL NECKLACE on the blinds, take LIQID NITROGEN CANISTER (W).
- Use GLUE and SCRATCHING POST PART on the scratching post (X).
- Play puzzle, earn HAIRBAND (Y).
- Take DAISY, MOLD (Z).
- Go to Lionel’s Workshop.
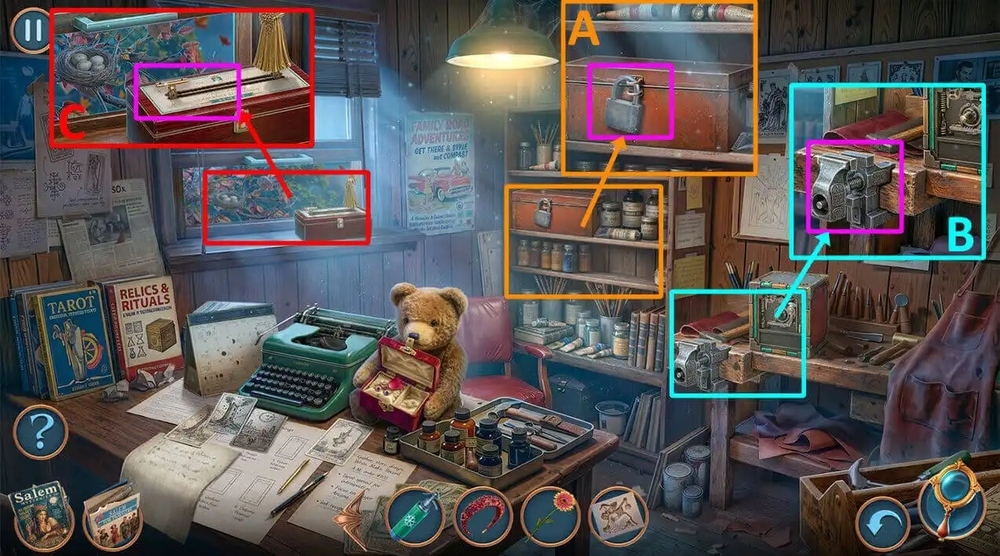
- Use LIQID NITROGEN CANISTER, STURDY FIGURINE on the lock, take TYPEWRITER KEYS 2/3, VISE HANDLE (A).
- Use VISE HANDLE and BENT FIGURINE on the vise, take GROOM FIGURINE (B).
- Use GROOM FIGURINE on the box, take CORKSCREW (C).
- Go to City Street.
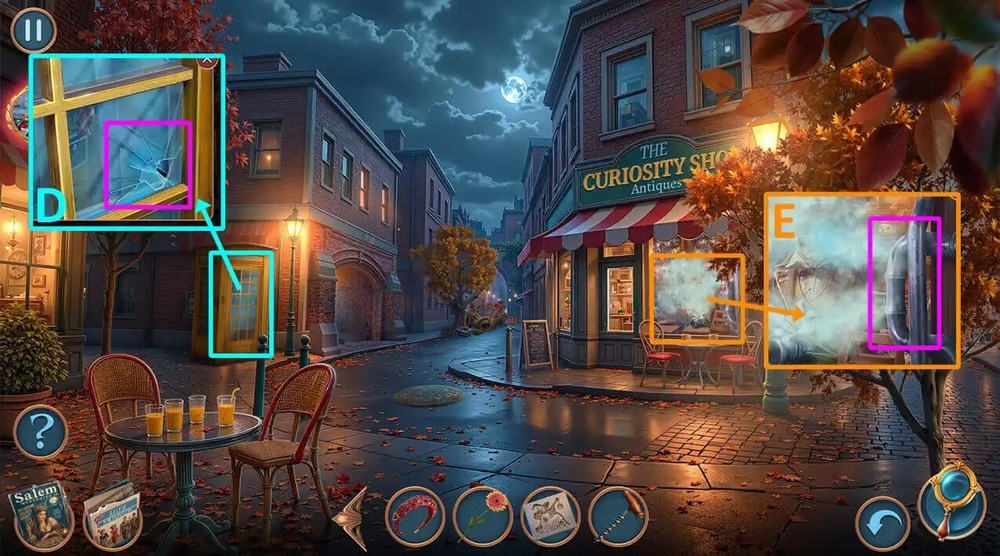
- Use HAIRBAND on the door, take BROKEN TOY SOLDIER, NECKERCHIEF (D).
- Use GUM, NECKERCHIEF on the pipe, take LILY, LENS (E).
- Go to Victim’s Study.
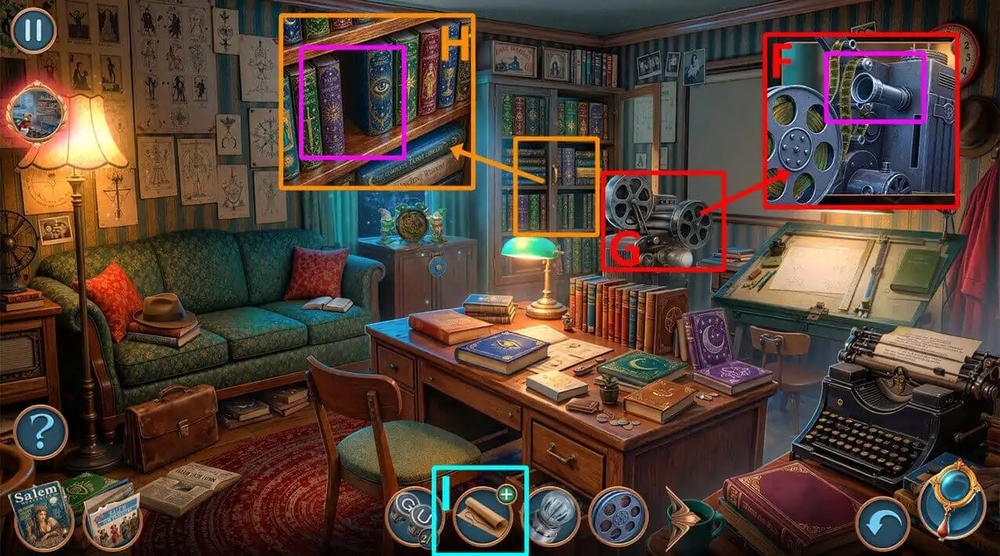
- Use LENS, PROJECTOR BULB on the projector (F).
- Play puzzle, earn ORNATE BOOK (G).
- Use ORNATE BOOK on the book case, click on the book, take DRIED ROSE, read and take the book (H).
- Use PEONY, LILY, DAISY, DRIED ROSE on CRAFT PAPER, earn BOUQUET OF FLOWERS (I).
- Go to Mountain Road.
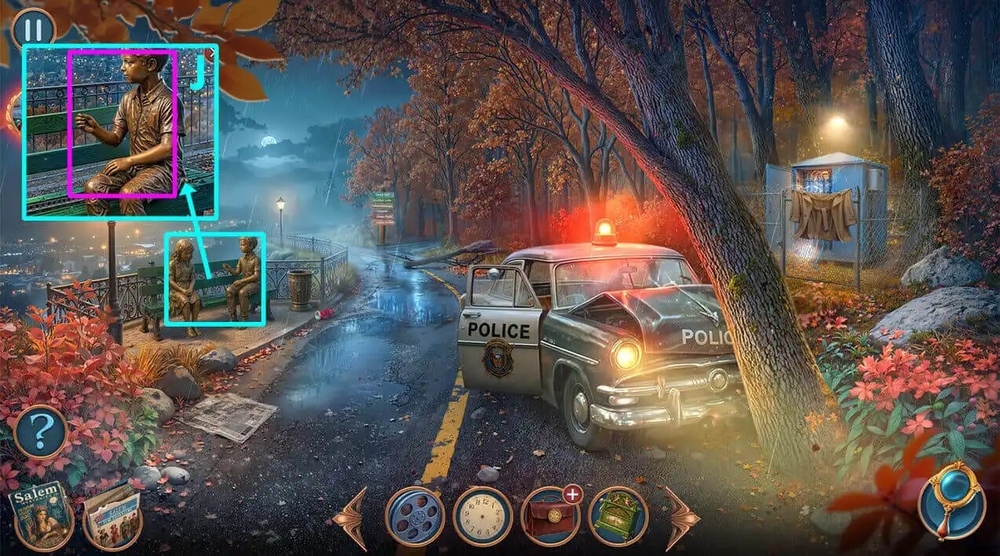
- Use BOUQUET OF FLOWERS on the statue, take COIL, MONOCLE, SEWING KIT (J).
- Go to Brightons’ Living Room.
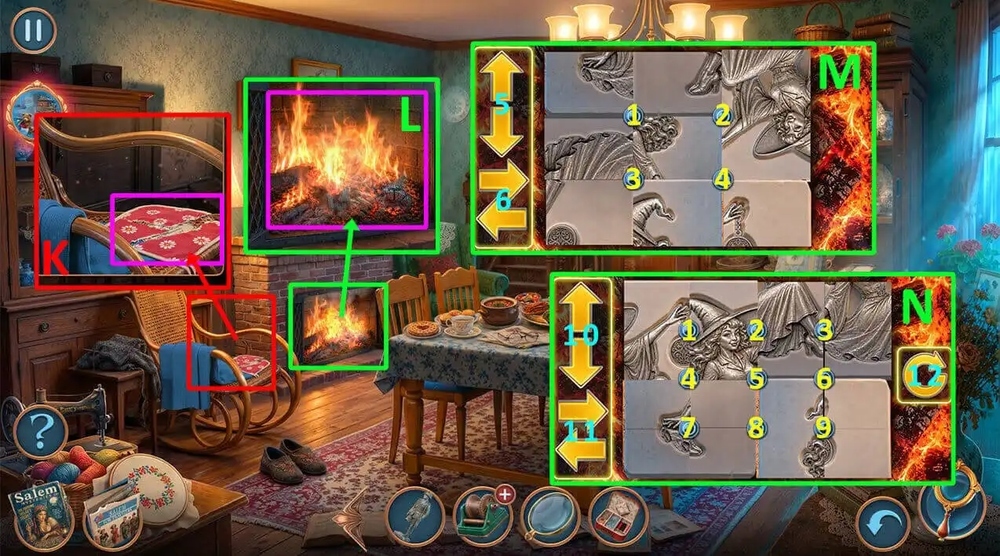
- Use SEWING KIT on the torn mitten, earn SEWING KIT, POTHOLDER, read and take the note (K).
- Use MOLD, BROKEN TOY SOLDIER, POTHOLDER on the fireplace (L).
- Easy solution: Click 3, 6, 5, 1, 5, 2, 6, 3, 5, 4, 5, 2, 5 (M).
- Hard solution: Click 6, 10, 3, 10, 2, 11, 1, 11, 2, 11, 8, 11, 7, 12, 4, 10, 5, 10, 8, 11, 9, 10, 8, 11, 6, 10, 7, 11, 9, 11, 8, 11 (N).
- Earn WITCH FIGURINE.
- Go to Sebille and Dakota’s Shop.

- Use WITCH FIGURINE on the box, take the tape and put it on the shelf, take LIPSTICK (O).
- Read the book, use BROKEN CLOCK, OLD BANKNOTE, MONOCLE, LIPSTICK on the table (P).
- Easy-hard solution: Remember the starting position of the required chip and click on it after shuffling (Q).
- Earn MAGIC GROWTH POTION.
- Use MAGIC GROWTH POTION on the tree, take SPOOL HANDLE, RAZOR BLADE (R).
- Use REEL WITH TORN FILM, RAZOR BLADE on the shelf, take WHOLE FILM REEL (S).
- Go to Victim’s Study.
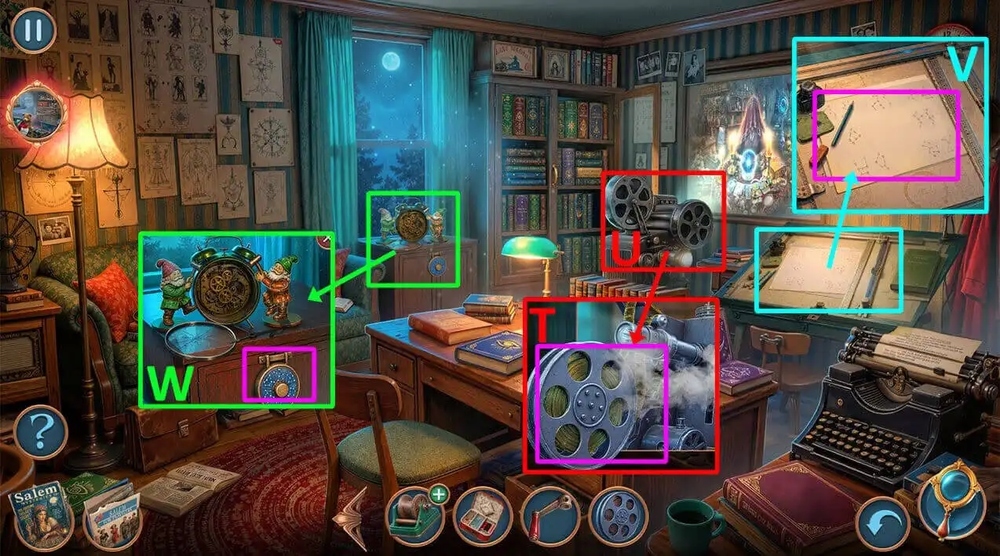
- Use WHOLE FILM REEL on the projector (T).
- Play puzzle, earn CONSTELLATIONS STENCIL (U).
- Use CONSTELLATIONS STENCIL on the table, take PATTERN CODE (V).
- Use PATTERN CODE on the lock on the door, take TORN PUPPET, POLICE PHONE NUMBER, ELEGANT MELODY (W).
- Go to City Street.
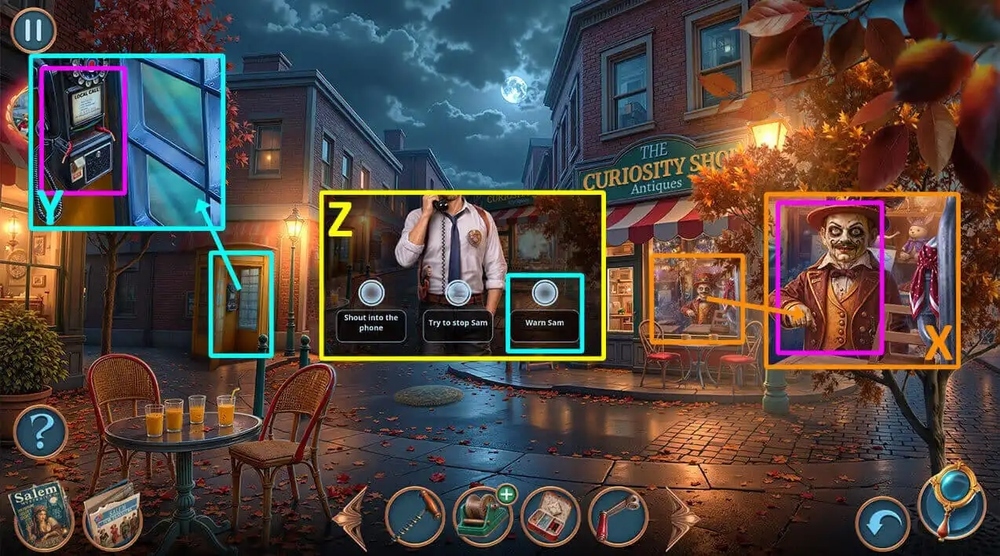
- Use TOY BARREL ORGAN and ELEGANT MELODY on the organ player, take CABLE WITH HOOK, WIRE (X).
- Use POLICE PHONE NUMBER and WIRE on the phone (Y).
- Select this option (Z).
- Take STRONG BOLT.
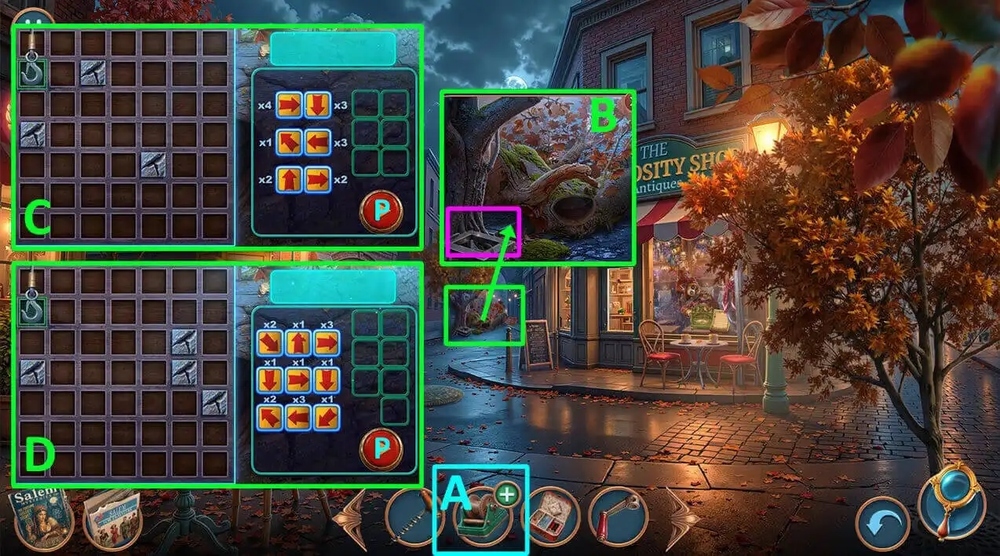
- Use SPOOL HANDLE, CABLE WITH HOOK, STRONG BOLT on COIL, earn MANUAL WINCH (A).
- Use MANUAL WINCH on the stand (B).
- Easy solution: follow the instructions in the image and press P (C).
- Easy solution: follow the instructions in the image and press P (D).
- Go forward.
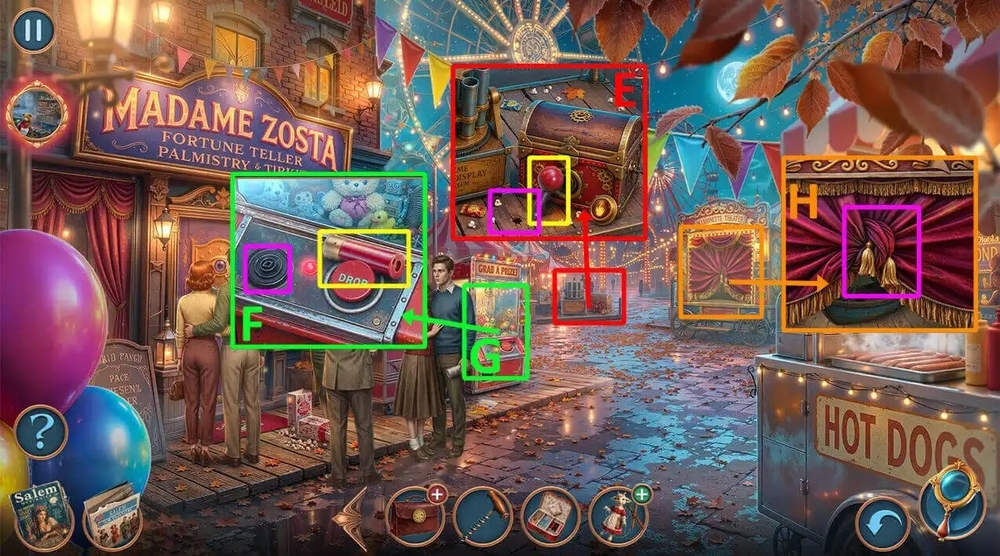
- Take MACHINE LEVER, use CORKSCREW on the board, earn TYPEWRITER KEYS 3/3, GEAR (E).
- Take FIREWORKS, use MACHINE LEVER on the toy machine (F).
- Play puzzle, earn STURDY HAIRPIN (G).
- Use STURDY HAIRPIN on the curtain, take FAN (H).
- Go to Lionel’s Workshop.
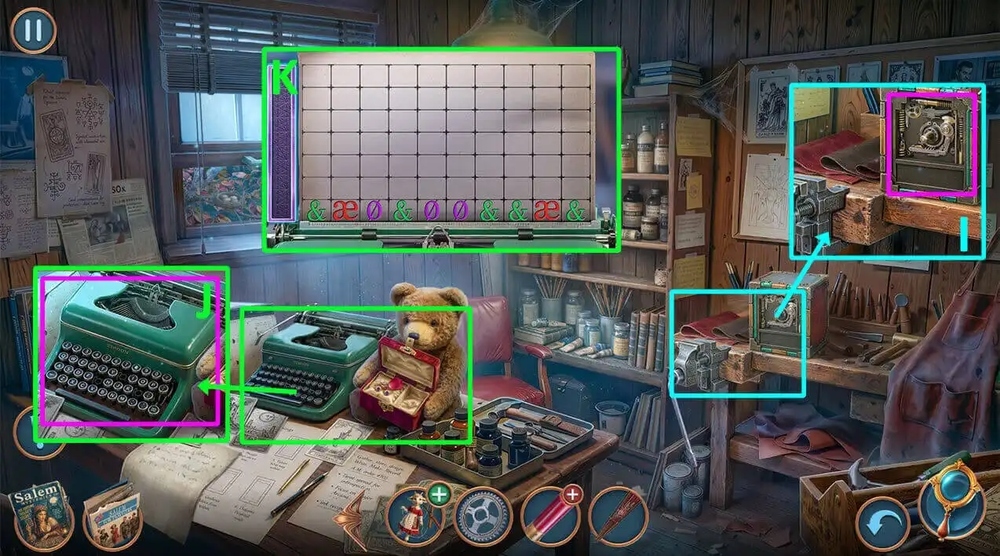
- Use GEAR on the mechanism, take TYPEWRITER ROLLER (I).
- Use TYPEWRITER KEYS 3/3 and TYPEWRITER ROLLER on the typewriter (J).
- Easy-hard solution: Solution is random (K).
- Read and take the note.
- Go to Near the Brightons’ Country House.
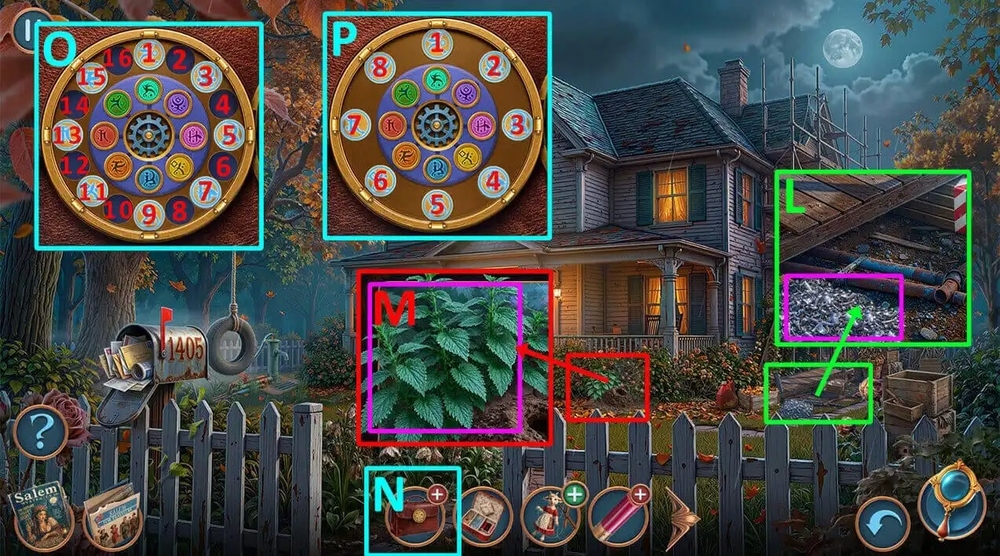
- Use FAN on the metal shavings, take PUMP, GARDEN SHEAR (L).
- Use GARDEN SHEAR on the nettle, take METAL AMULET (M).
- Use METAL AMULET on LIONEL’S BRIEFCASE (N).
- Easy solution: Click 13, 16, 7, 14, 11, 6, 14, 15, 6, 2, 8, 2, 3, 3, 4, 2, 16, 1, 8, 9, 2, 3, 4, 5 (O).
- Hard solution: Click 2, 1, 6, 8, 5, 3, 3, 8, 7, 4, 3, 8 (P).
- Read and take the note, take LIGHTER, SUCTION CUP.
- Go forward.
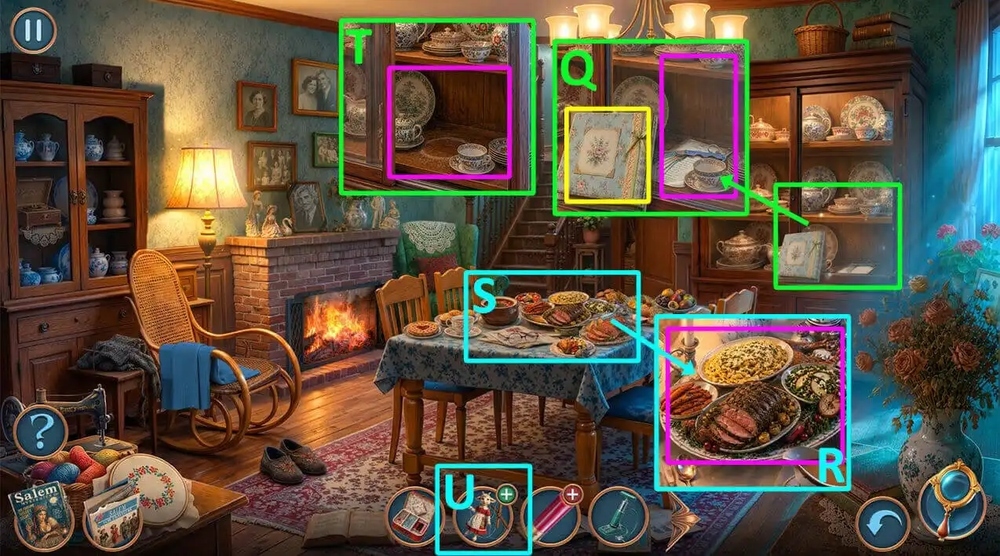
- Read and take the note, use SUCTION CUP on the glass, take LOCK PICK SET, FUNERAL MENU (Q).
- Use FUNERAL MENU on the table (R).
- Play puzzle, earn TEAPOT (S).
- Use TEAPOT on the sideboard, take CIGAR CUTTER, PATCH (T).
- Use SEWING KIT, PATCH on TORN PUPPET, earn PUPPET (U).
- Go to City Fair.

- Use PUPPET on the theater stage (V).
- Easy solution: Click 1, L, 1, R, 2, L, 2, 1, R, 1, 3, L, 3, R, 1, L, 1 (W).
- Hard solution: Click 1, L, 1, R, 2, L, 2, 1, R, 1, 3, L, 3, R, 1, L, 1 (X).
- Take WICK, SPRING.
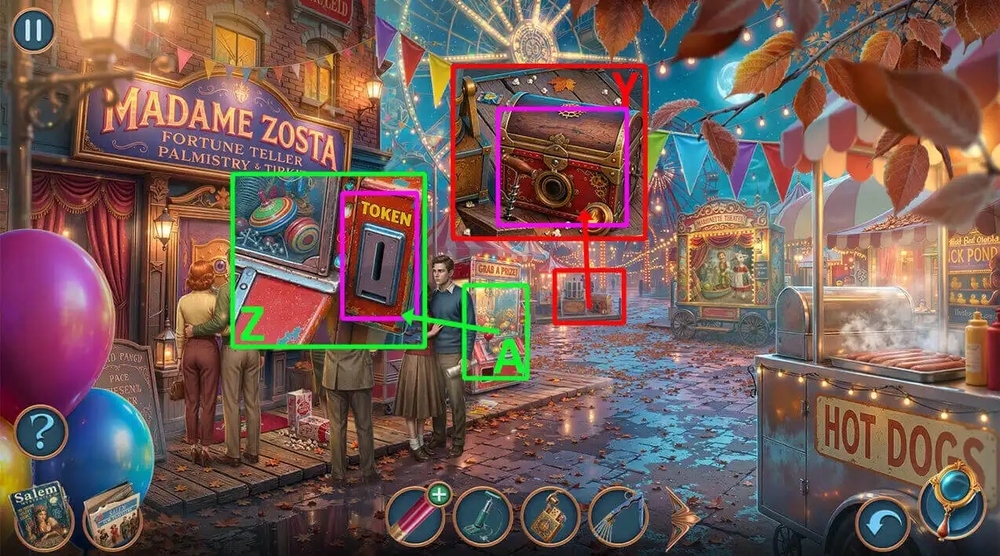
- Use SPRING on the box, take MACHINE TOKEN (Y).
- Use MACHINE TOKEN on the coin receiver (Z).
- Play puzzle, earn RUBBER SQUEAKER (A).
- Go to Mountain Road.
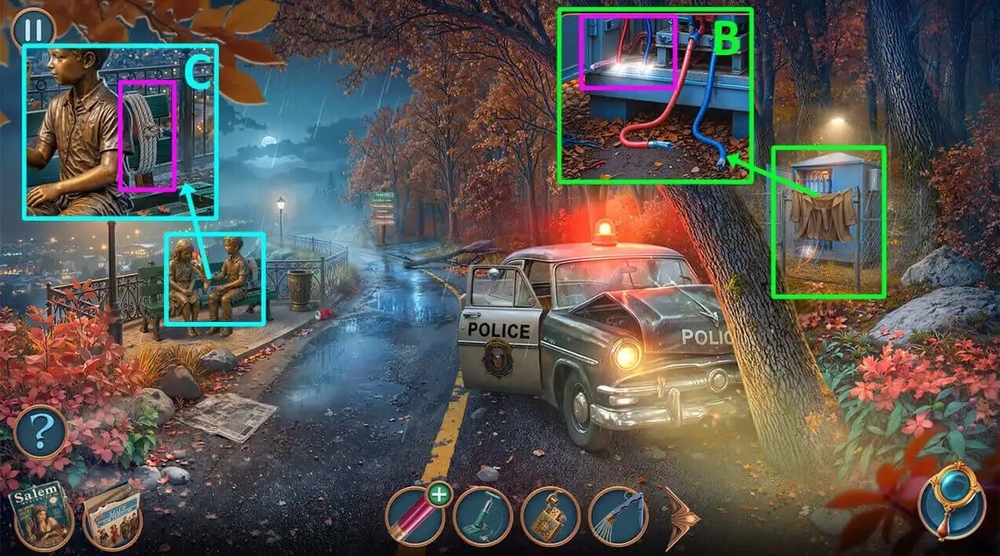
- Use RUBBER SQUEAKER on the wires, take KNIFE (B).
- Use KNIFE on the rope, earn MY CAR KEYS, PET BRUSH (C).
- Go to Sebille and Dakota’s Shop.
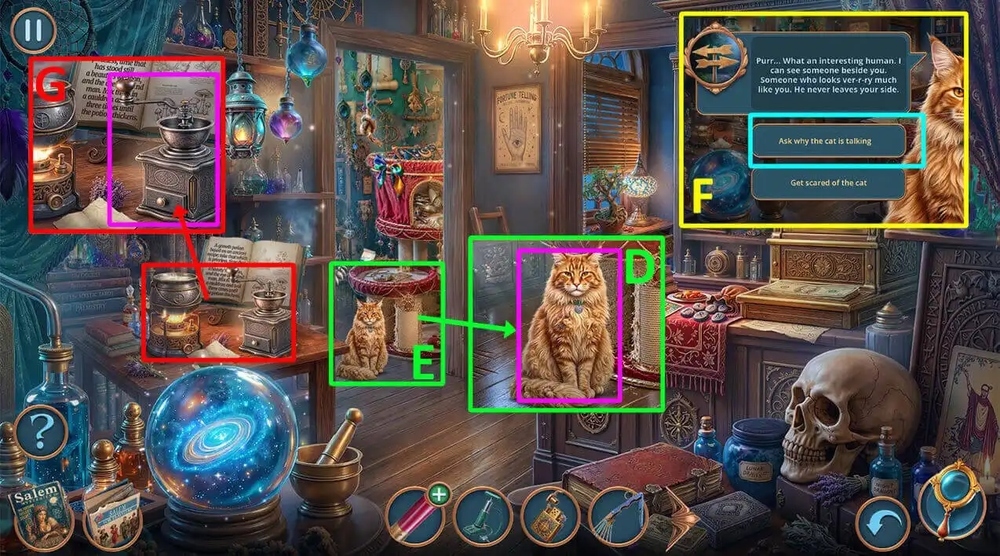
- Use PET BRUSH on the cat (D).
- Play puzzle, earn NITRATE STONE (E).
- Select this option (F).
- Use NITRATE STONE on the coffee grinder, take NITRATE POWDER (G).
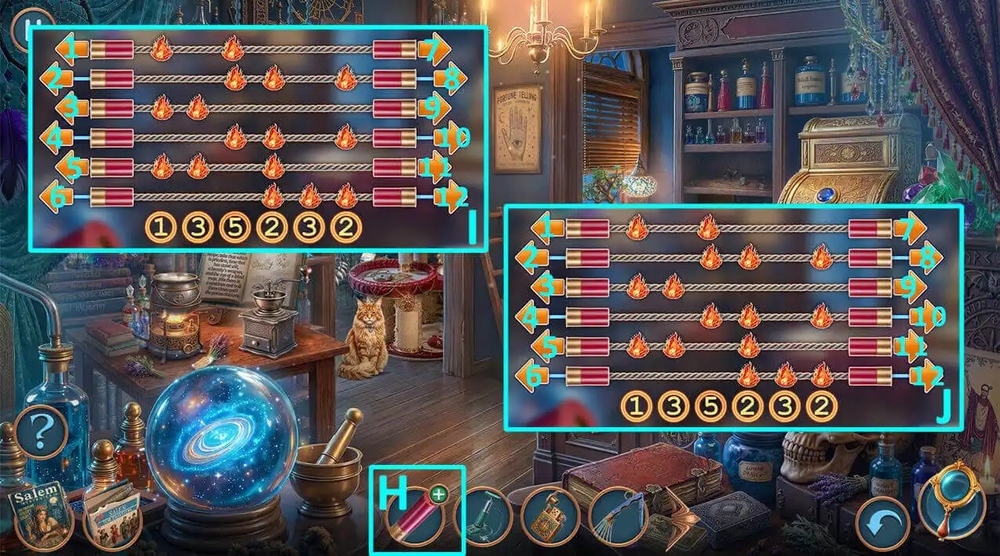
- Use WICK, NITRATE POWDER on FIREWORKS (H).
- Easy solution: Click 2, 9, 4, 11, 11 (I).
- Hard solution: Click 9, 11, 11, 4, 12, 1, 2 (J).
- Earn FIREWORKS.
- Go to City Fair.
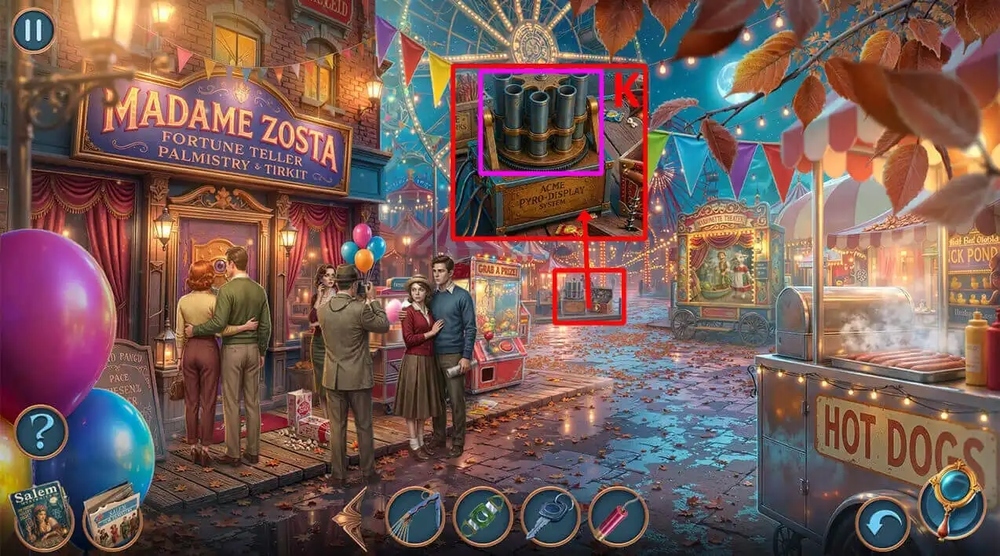
- Use FIREWORKS, LIGHTER on the fireworks launch pad, earn LIGHTER (K).
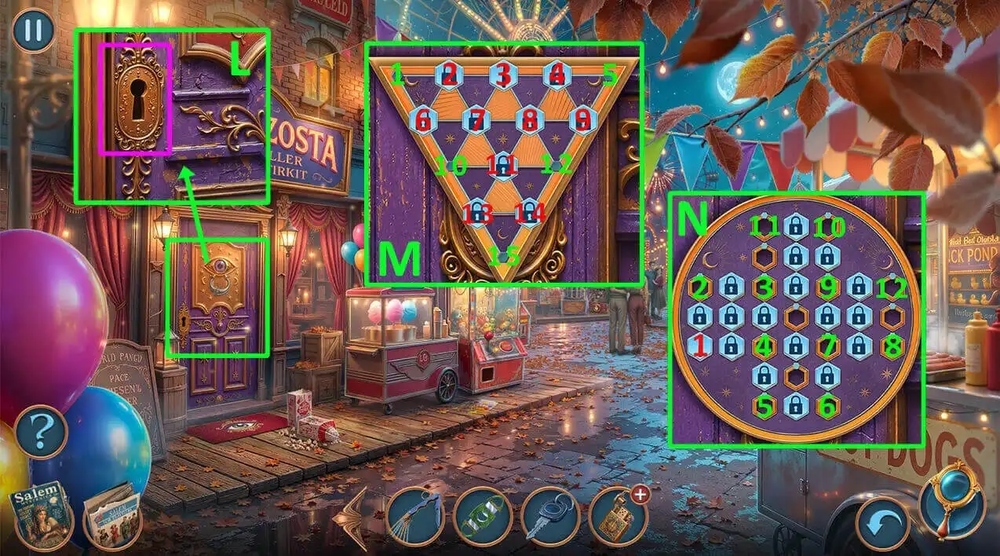
- Use LOCK PICK SET on the door (L).
- Easy solution: Click 3-5, 5-12, 12-15, 15-10, 10-12, 12-3, 3-10, 10-1, 1-3 (M).
- Hard solution: Click 1-2, 2-3, 3-1, 1-4, 4-5, 5-6, 6-7, 7-8, 8-9, 9-10, 10-11, 11-9, 9-7, 7-4, 4-3, 3-9, 9-12 (N).
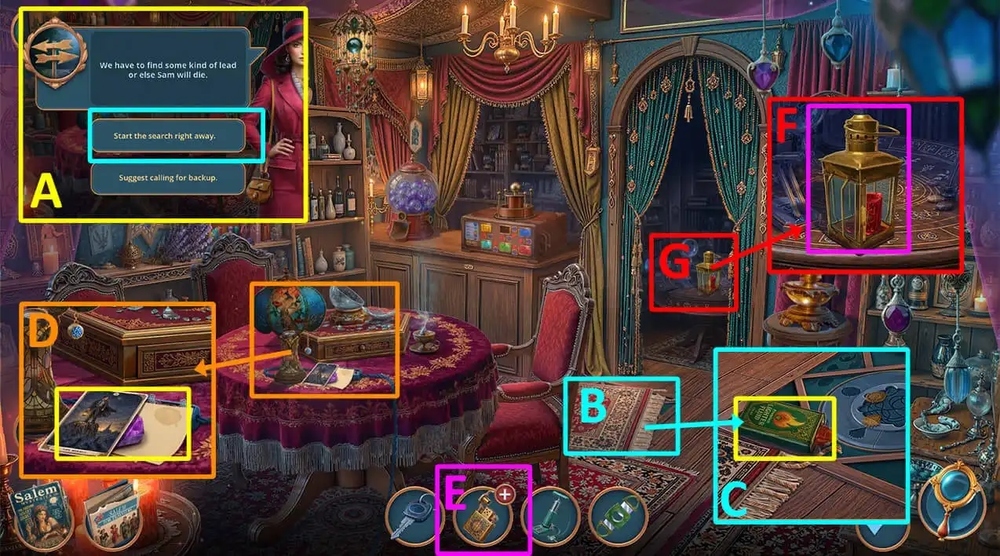
- Select this option (A).
- Click on the carpet (B).
- Take LIGHTER FLUID, use CIGAR CUTTER on the edge of the carpet, earn CARPET TASSEL (C).
- Take Tarot card, take CRYSTAL, PAPER (D).
- Use LIGHTER FLUID and CARPET TASSEL on LIGHTER, earn LIGHTER (E).
- Use LIGHTER on the candle (F).
- Play puzzle, earn STAMP PAD (G).
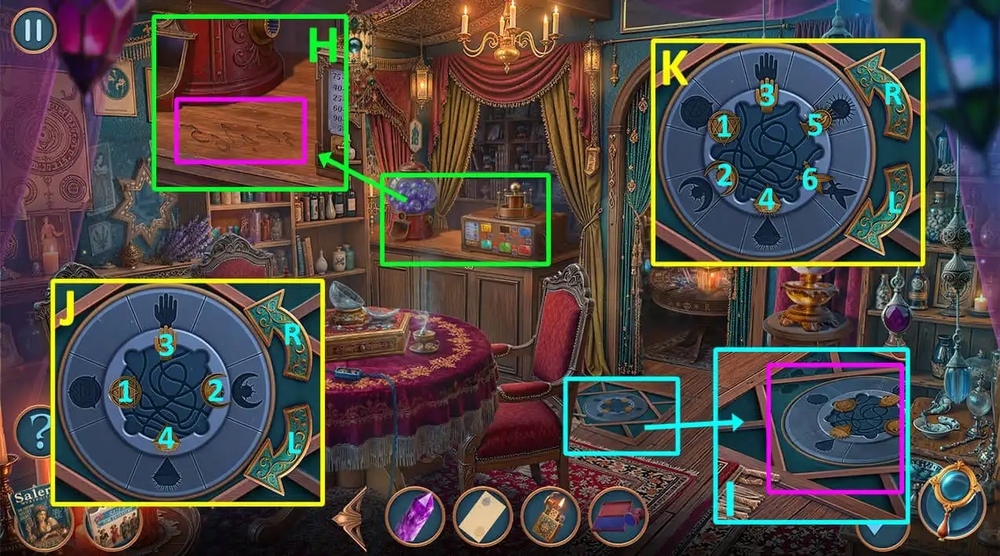
- Use STAMP PAD, PAPER on the scratched symbols, earn CODE (H).
- Use CODE on the hatch (I).
- Easy solution: Click L, L, 1, L, L, L, 2, L, 3, R, R, R, 4 (J).
- Hard solution: Click L(x5), 1, L(x4), 2, 3, R(x4), 4, R(x2), 5, R(x4), 6 (K).
- Go forward.
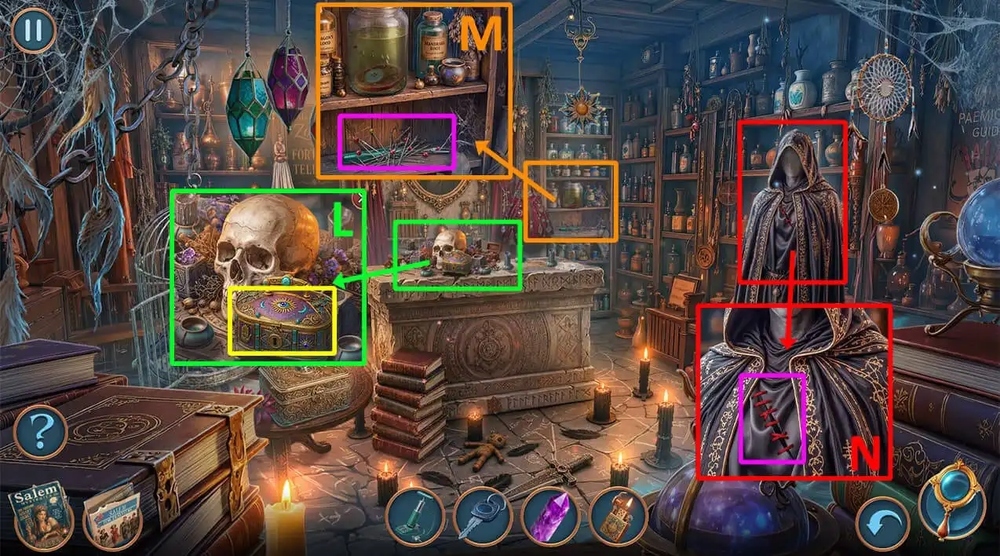
- Take ZOSTA’S BOX, use CRYSTAL on the stand, take STAR TOY (L).
- Use STAR TOY on the needles, take SEAM RIPPER (M).
- Use SEAM RIPPER on the seam, take MAGNET, read and take the note, take FLAG LOCK (N).
- Go back.
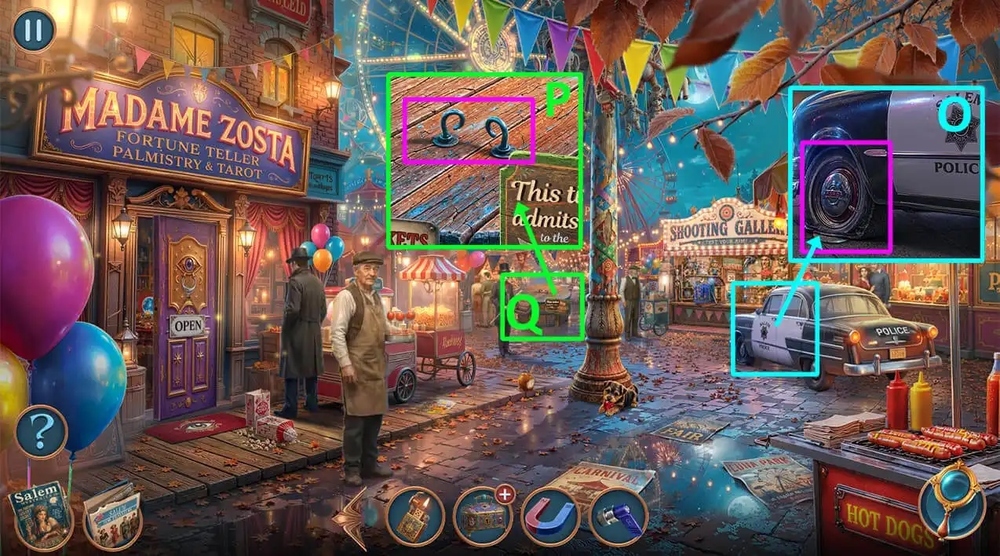
- Use PUMP, FLAG LOCK on the car wheel, take HORSESHOE, use MY CAR KEYS on the car door (O).
- Use HORSESHOE on the lid (P).
- Play puzzle, earn TOY GRABBER (Q).
- Take STICKY STICK, GUN WITH RUBBER BULLETS, use TOY GRABBER on the map, earn CITY MAP (R).
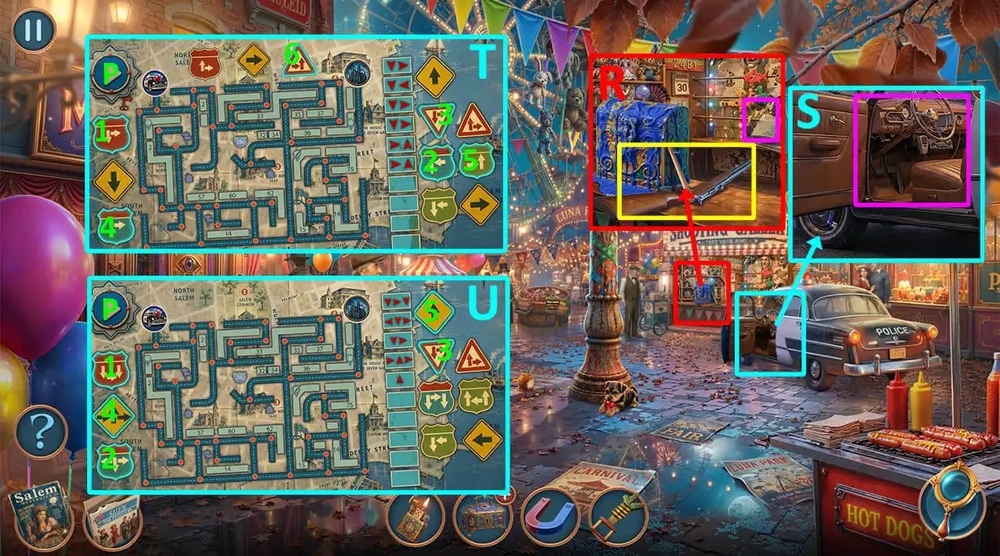
- Use CITY MAP on the car (S).
- Easy solution: Click 1-6, P (T).
- Hard solution: Click 1-5, P (U).
- Go forward.
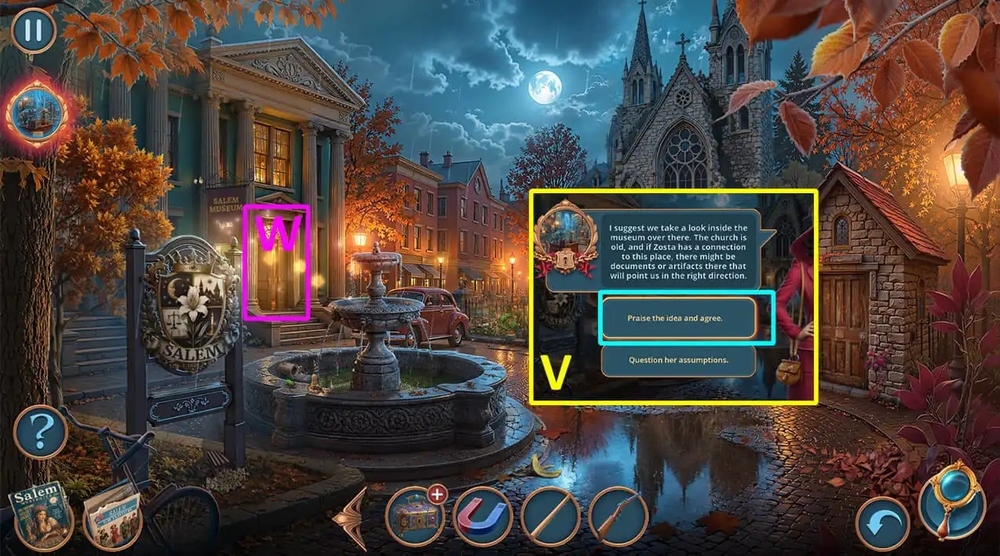
- Select this option (V).
- Go forward (W).

- Take BOOMERANG (X).
- Use BOOMERANG on the mill figurine, take KNITTING NEEDLES (Y).
- Use KNITTING NEEDLES on the hole in the tapestry, take PALETTE KNIFE (Z).
- Use PALETTE KNIFE on the box on the easel, take SUSPENDERS BUCKLE (A).
- Go back.
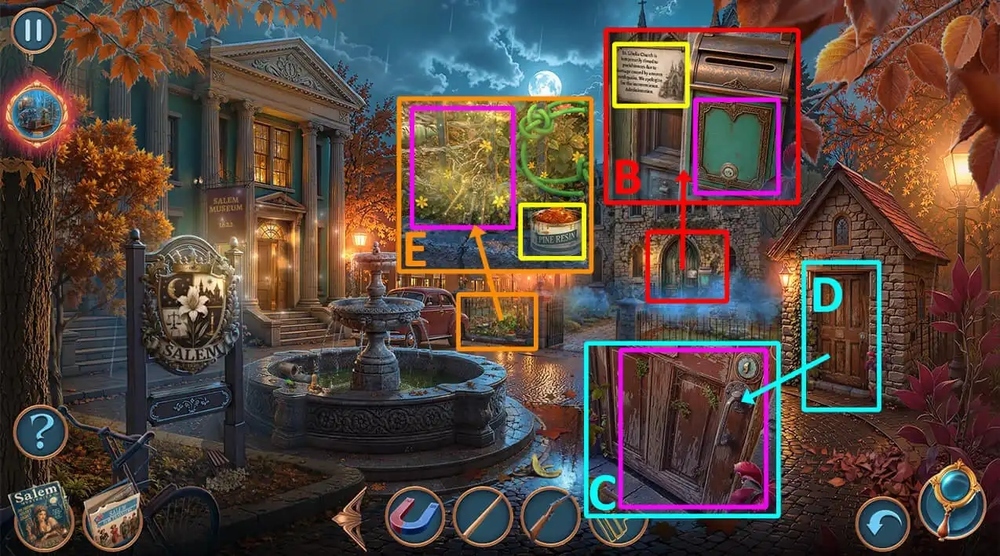
- Read and take the note, use MAGNET on the mailbox, take NEWSPAPER (B).
- Use NEWSPAPER on the door, use STICKY STICK on the keyhole (C).
- Play puzzle, earn PLASTIC FAN (D).
- Take THICK RESIN, use PLASTIC FAN on the pollen, earn PLASTIC FAN, take BUNCH OF KEYS (E).
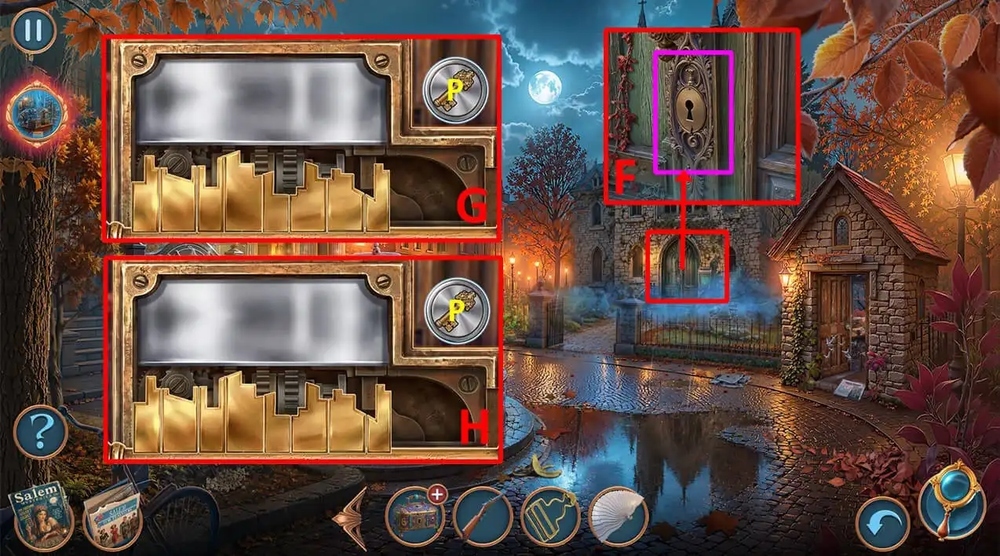
- Use BUNCH OF KEYS on the door (F).
- Easy solution: follow the instructions in the image and press P (G).
- Easy solution: follow the instructions in the image and press P (H).
- Go forward.
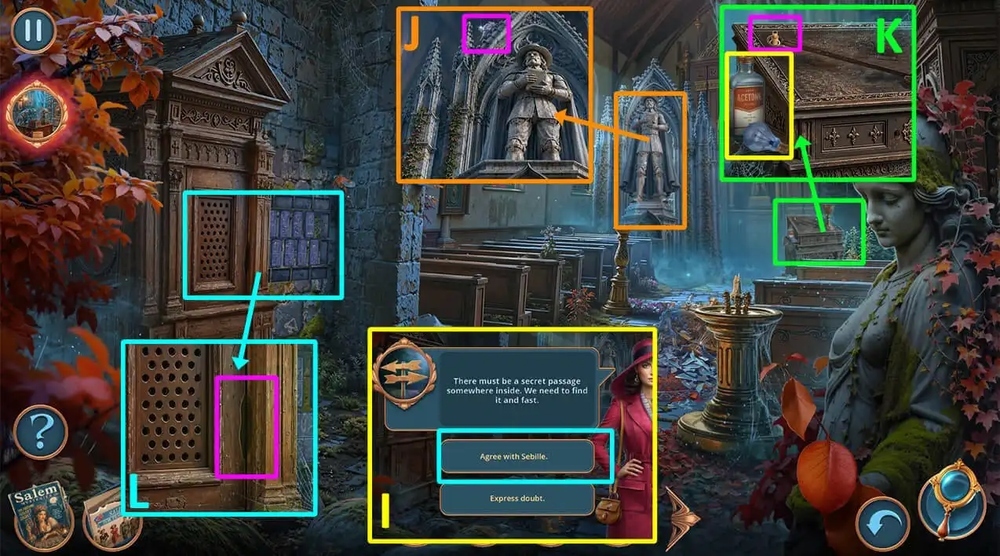
- Select this option (I).
- Use GUN WITH RUBBER BULLETS on the object on top of the statue, earn GRAPE AMULET (J).
- Take LIGHT BULB, ACETONE, use GRAPE AMULET on the stand, take BLOOD PRESSURE MONITOR (K).
- Use BLOOD PRESSURE MONITOR on the door, take ATTRACTION TICKET (L).
- Go to City Fair.
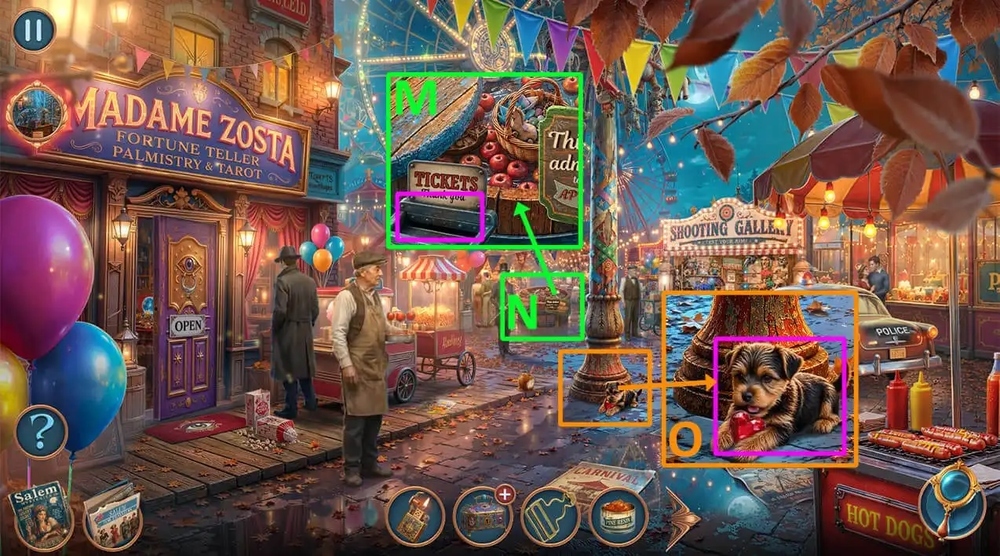
- Use ATTRACTION TICKET on the ticket acceptor (M).
- Play puzzle, earn TOY BONE (N).
- Use TOY BONE on the dog, take WITCH HEART (O).
- Go to Secret Cellar Under the Shop.
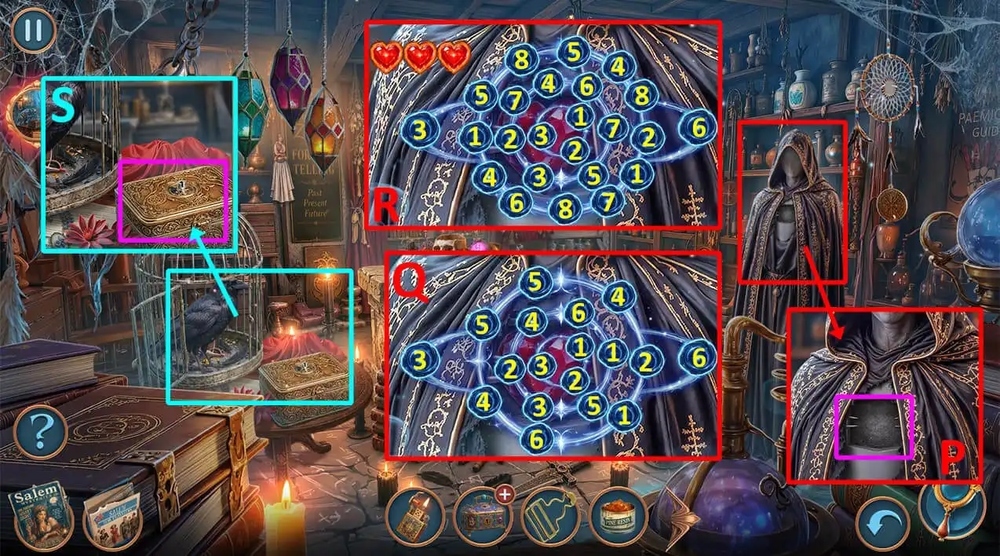
- Use WITCH HEART on the empty slot (P).
- Easy solution: Click 1-1-1, 2-2-2, 3-3-3, 4-4-4, 5-5-5, 6-6-6 (Q).
- Hard solution: Click 1-1-1, 2-2-2, 3-3-3, 4-4-4, 5-5-5, 6-6-6, 7-7-7, 8-8-8 (R).
- Take BALLERINA FIGURINE.
- Use BALLERINA FIGURINE on the box, take POWDER (S).
- Go to Inside the Church.
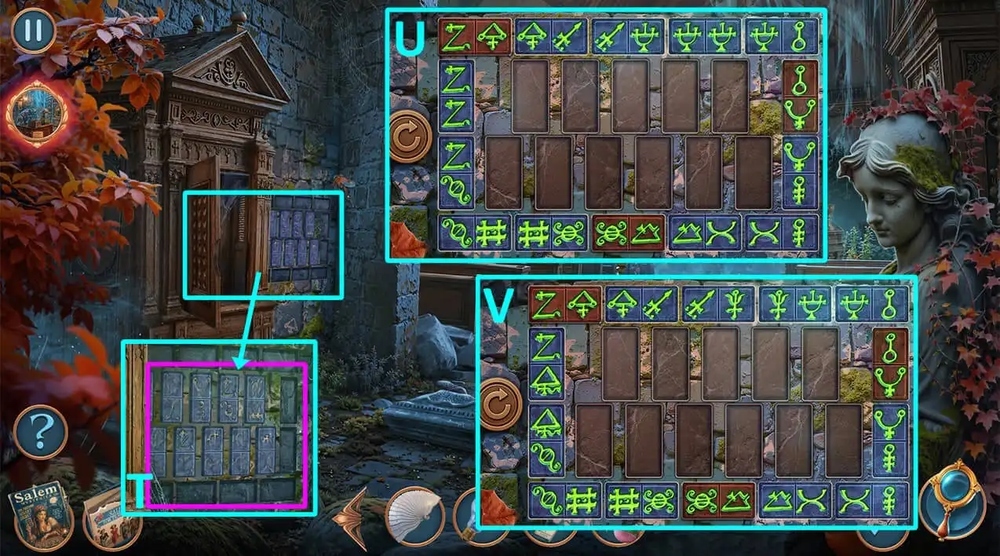
- Use POWDER on the symbols on the wall (T).
- Easy solution: follow the instructions in the image (U).
- Hard solution: follow the instructions in the image (V).
- Go forward.
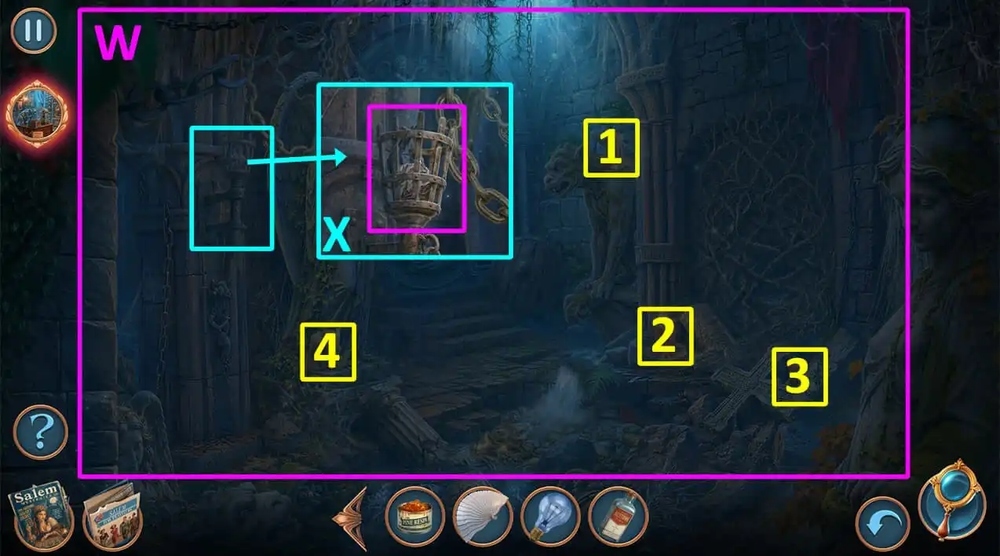
- Use LIGHTER on the dark, click 1-4 (W).
- Use LIGHTER on the torch (X).
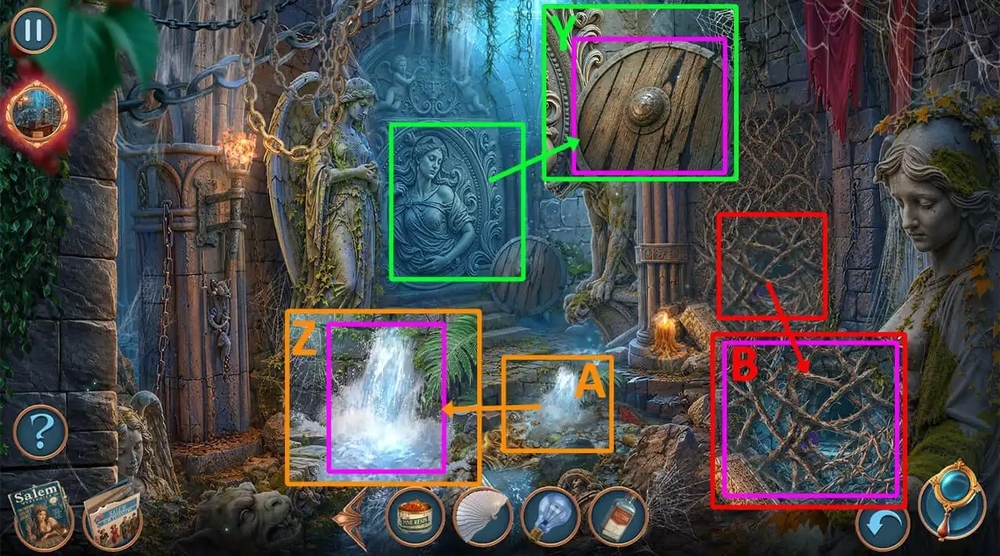
- Use THICK RESIN on the shield, take OLD SHIELD (Y).
- Use OLD SHIELD on the waterfall (Z).
- Play puzzle, earn SICKLE (A).
- Use SICKLE on the branches, take COIL BATTERY (B).
- Go to Madame Zosta’s Magic Shop.

- Use COIL BATTERY on the empty slot (C).
- Easy solution: follow the instructions in the image (D).
- Hard solution: follow the instructions in the image (E).
- Take BLACK CANDLES 1/3, LAMP BUTTON.
- Use LIGHT BULB on the lamp, use LAMP BUTTON on the switch, click on the lamp, take KEY (F).
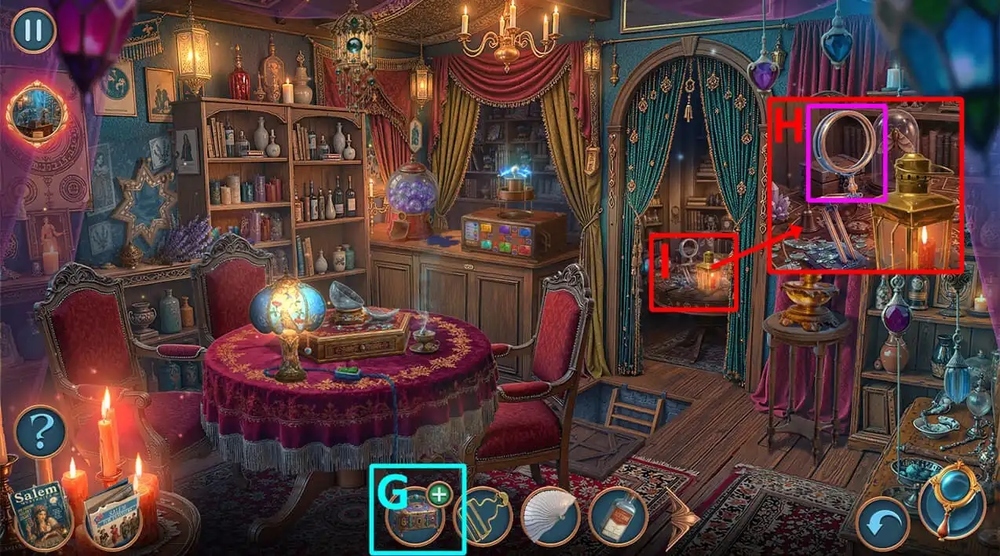
- Use KEY on ZOSTA’S BOX, take TELEPHONE CAPSULE, read and take the note, take MONOCLE (G).
- Use MONOCLE on the stand (H).
- Play puzzle, earn GLOVE (I).
- Go to Inside the Church.
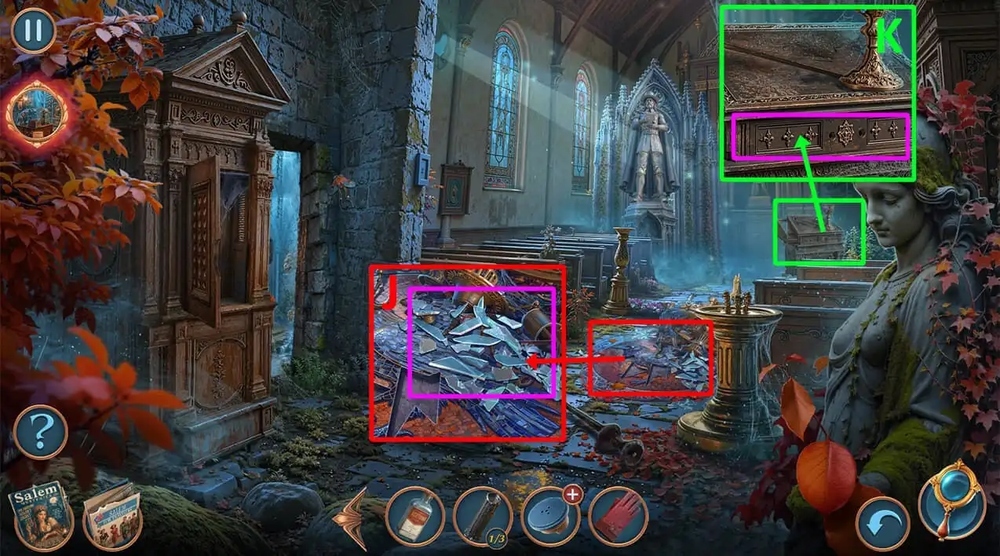
- Use GLOVE on the shards, take GLASSES (J).
- Use GLASSES on the department box, take JAMMED CAMERA, STENCIL, DIADEM (K).
- Go forward.
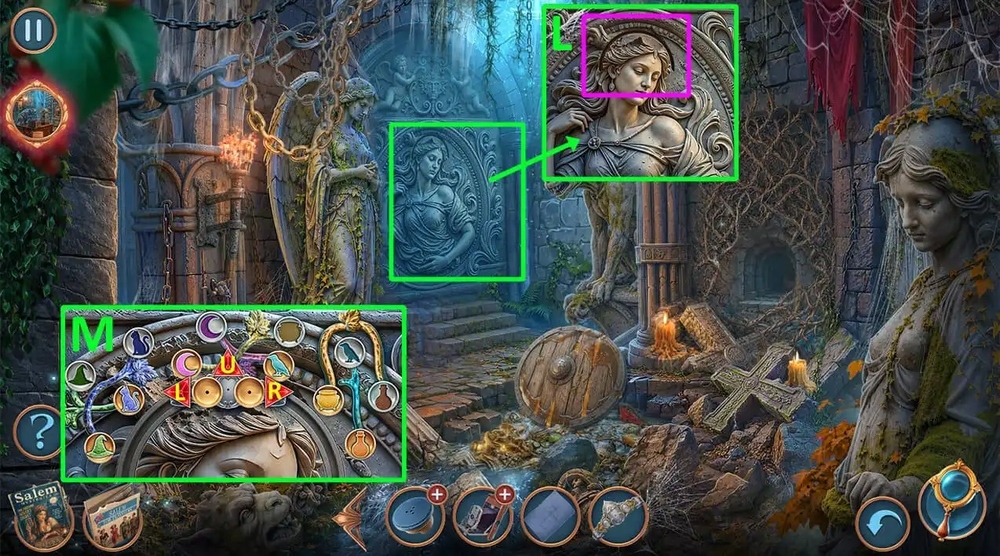
- Use DIADEM on the bas-relief (L).
- Easy-Hard solution: Click L, U, R, R, U, L, L, U, R, R, R, U, L, L, L, U, R, U, L, L U, R, R, U, L, U, L, U, R, R, R, R, U (M).
- Go forward.
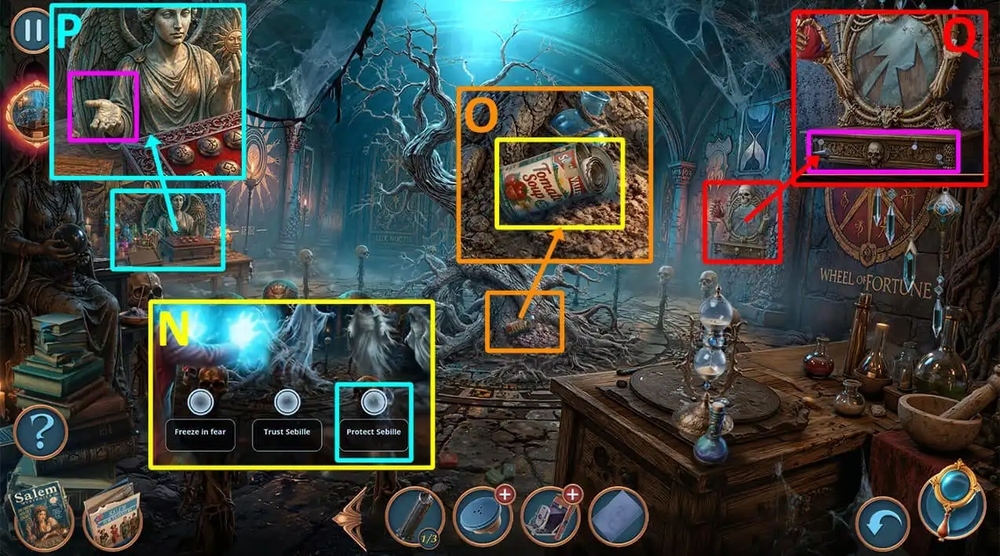
- Select this option (N).
- Read and take the note, take EMPTY CAN, BLACK CANDLES 2/3, use PLASTIC FAN on the pile of dirt, take MOON SPHERE (O).
- Use MOON SPHERE on the statue, take HAIR BRUSH (P).
- Use SUSPENDERS BUCKLE on the nails, take BRUSH, COAT OF ARMS (Q).
- Go to Salem Museum.
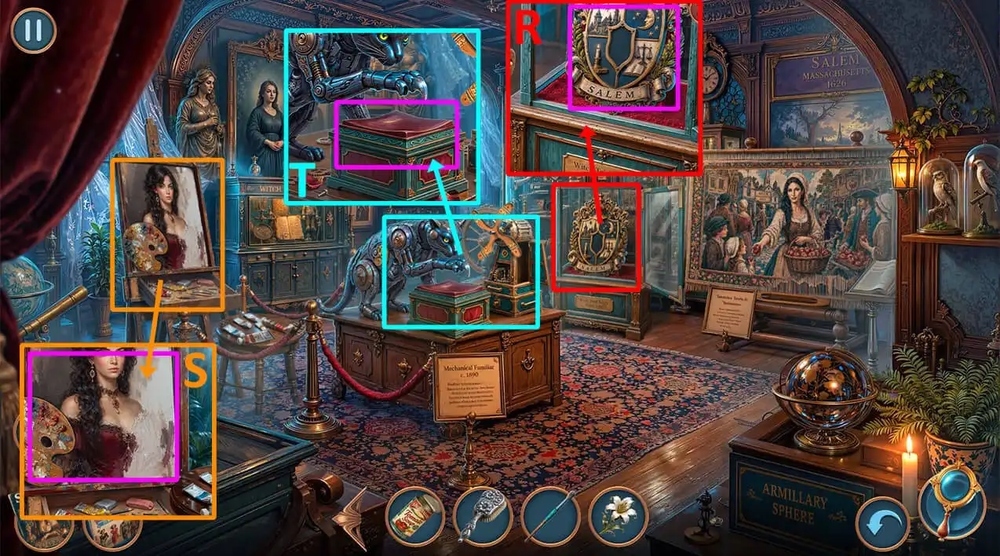
- Use COAT OF ARMS on the coat of arms, take PAINT SQUEEZER (R).
- Use PAINT SQUEEZER, BRUSH on the easel, take MECHANIC MOUSE (S).
- Use MECHANIC MOUSE on the box, take LIP BALM (T).
- Go to City Fair.
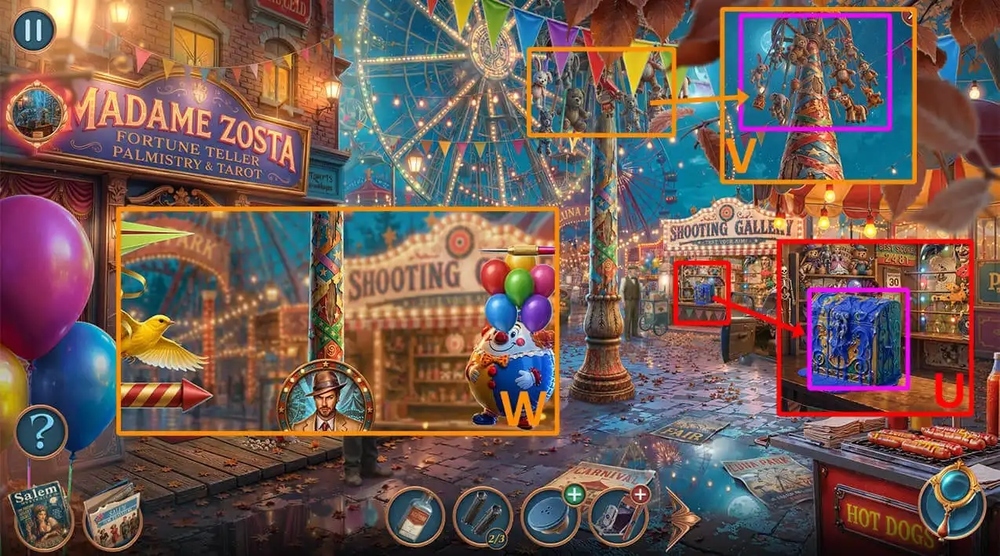
- Use ACETONE, HAIR BRUSH on the paint, take BUBBLE GUM, ROPE (U).
- Use ROPE on the pillar (V).
- Easy-Hard solution: Climb up the pole and clear away any obstacles so they don’t get in your way. (W).
- Earn TOY NUTCRACKER, TOY CAR.
- Go to Old Town of Salem.
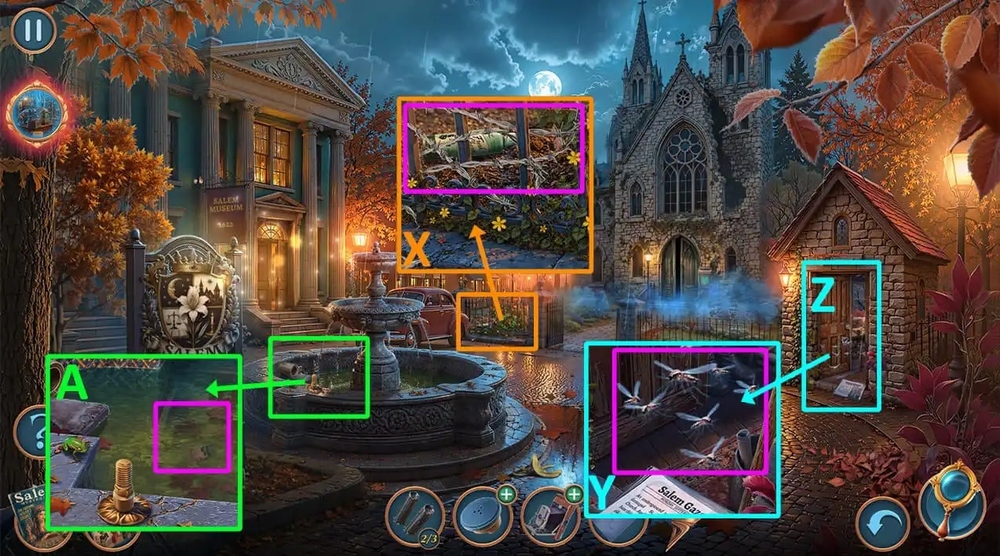
- Use TOY NUTCRACKER on the barbed wire, take DEODORANT (X).
- Use DEODORANT on the mosquitoes (Y).
- Play puzzle, earn GARDEN SIEVE (Z).
- Use GARDEN SIEVE on the objects in water, take SMALT PIECES 1/3, BONE HAND (A).
- Go to Mystical Crypt.
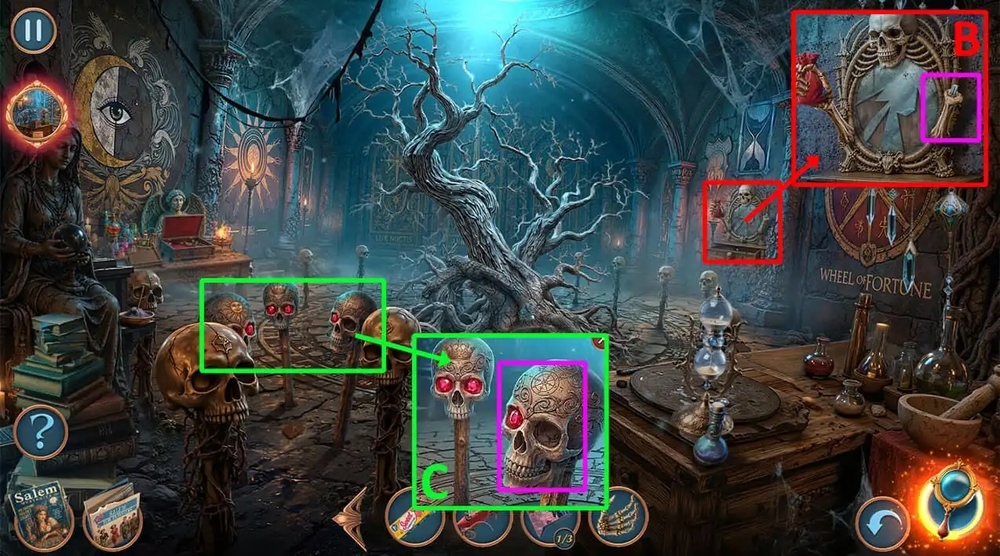
- Use BONE HAND on the skeleton, take CHLORINE TABLET, SMALT PIECES 2/3, FAKE EYE (B).
- Use FAKE EYE on the skeleton head, take WHEAT EAR (C).
- Go to Secret Cellar Under the Shop.
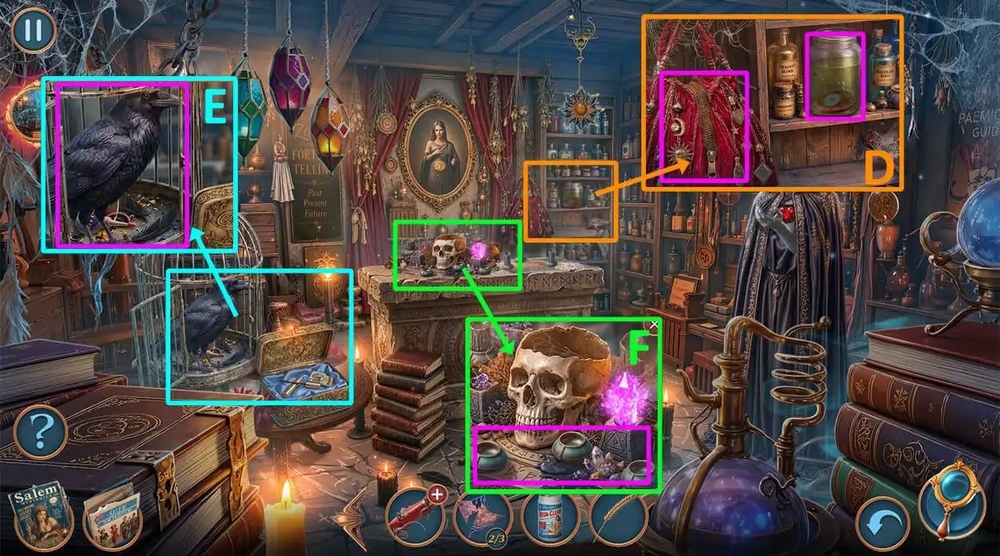
- Use CHLORINE TABLET on the jar, take BUTTON, VALVE, use LIP BALM on the bag, take SPINNING WHEEL PEDAL (D).
- Use WHEAT EAR on the crow, take GLUE, KITCHEN FUNNEL, BLACK CANDLES 3/3 (E).
- Use BLACK CANDLES 3/3 on the stand (F).
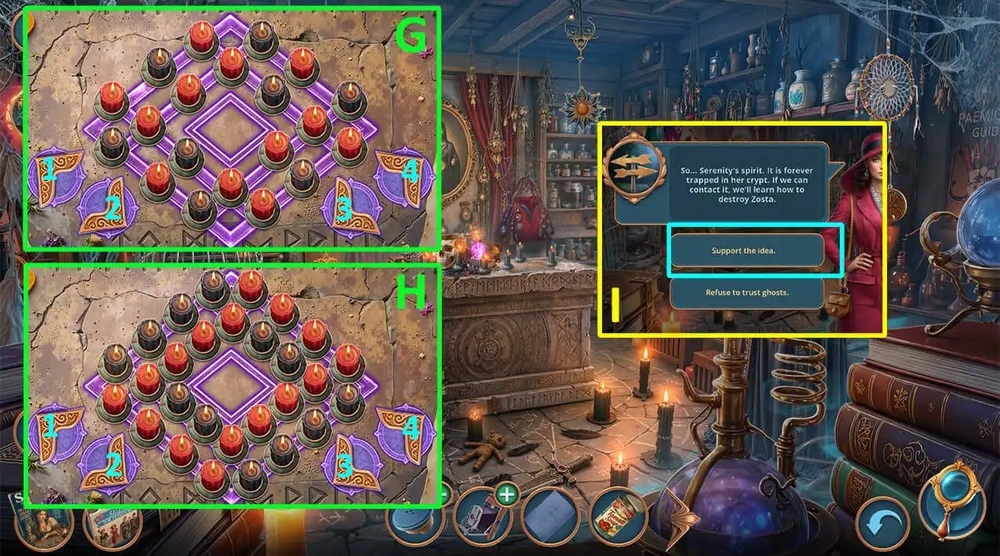
- Easy solution: Click 4, 2, 2, 4, 4, 2 (G).
- Hard solution: Click 4, 4, 1, 1, 1, 1, 3, 2, 4, 2, 2, 4, 4, 4, 2, 2, 4, 1, 3, 2 (H).
- Take ZOSTA’S DIARY, HEXAGONAL RING.
- Select this option (I).
- Go to Salem Museum.
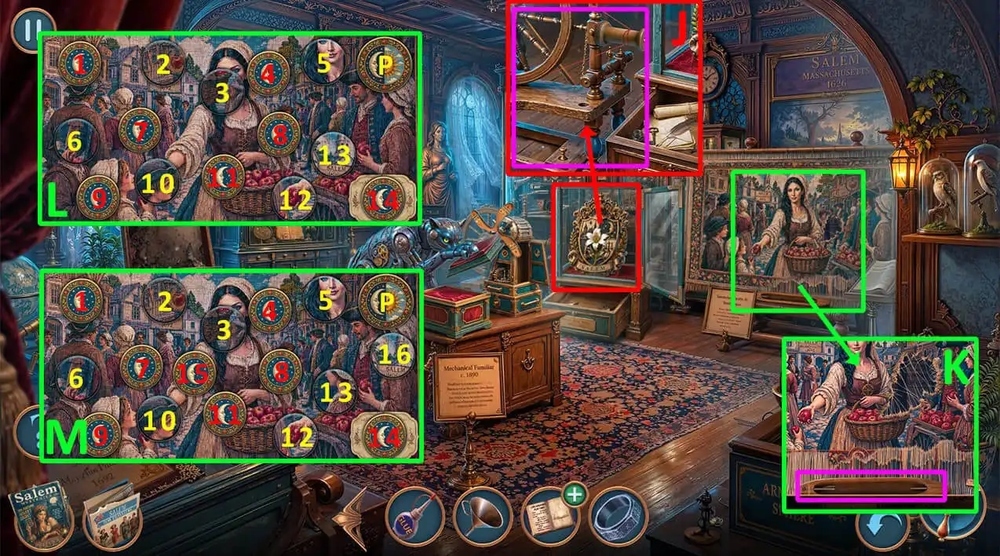
- Use SPINNING WHEEL PEDAL on the spinning wheel, take WOOL THREAD (J).
- Use WOOL THREAD on the loom (K).
- Easy solution: Click 2-13, 10-6, 5-3, 12-10, 13-5, 12-13, P, 1-4, 9-1, 7-14, 8-11, 7-1 (L).
- Hard solution: Click 2-16, 10-6, 12-10, 5-3, 13-16, 5-13, 12-13, P, 1-15, 4-1, 1-9, 1-14, 8-11, 7-14 (M).
- Read and take the note.
- Go to Old Town of Salem.
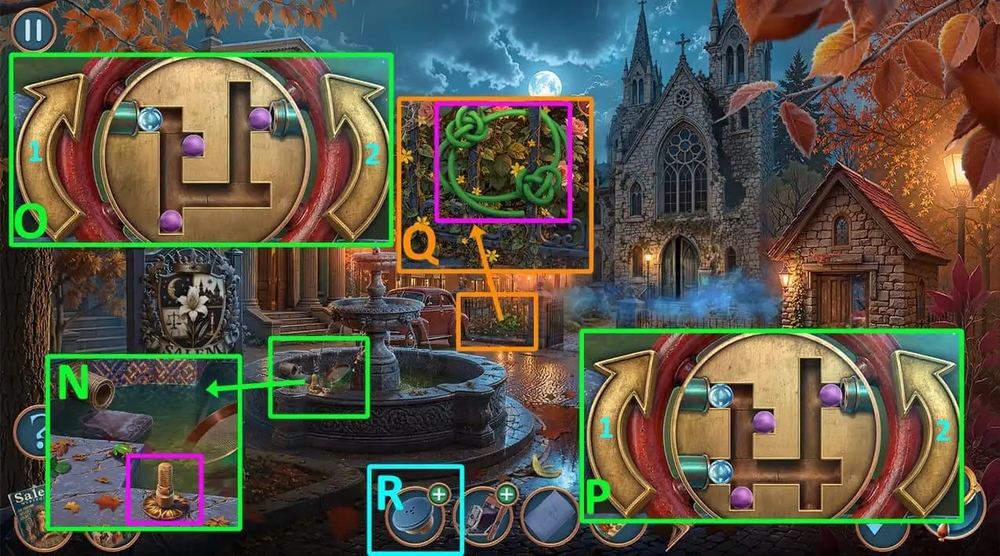
- Use VALVE, HEXAGONAL RING on the fountain (N).
- Easy solution: Click 2(x5), 1, 1, 2, 1, 2, 1, 1, 2, 1, 2 (O).
- Hard solution: Click 2(x5), 1, 1, 2, 1, 1, 2, 2, 2, 1, 1, 1, 2, 1, 2 (P).
- Click on the flask, take ESSENTIAL OIL, INSTRUCTIONS FOR UNTYING KNOTS.
- Use INSTRUCTIONS FOR UNTYING KNOTS on the tied hose, earn RUBBER HOSE (Q).
- Use EMPTY CAN, KITCHEN FUNNEL, RUBBER HOSE on TELEPHONE CAPSULE, earn SONAR (R).
- Go to Secret Passageway.
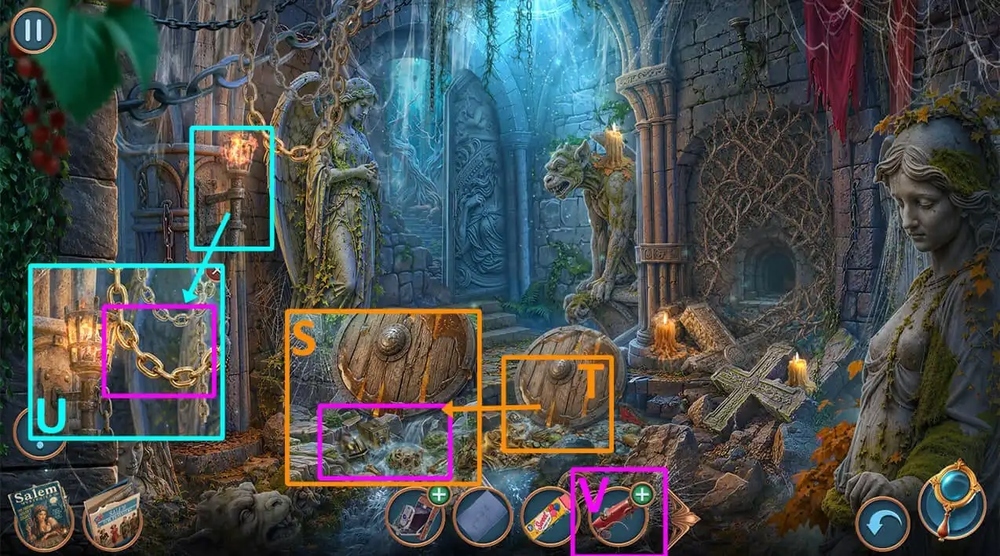
- Use SONAR on the water (S).
- Play puzzle, earn FILE (T).
- Use FILE on the chain, earn GOLDEN EARRING (U).
- Use BUTTON, GOLDEN EARRING on TOY CAR, earn WIND-UP CAR (V).

- Use WIND-UP CAR on the tunnel (W).
- Easy solution: Click 1(x3), 5(x3), 6(x3), 2(x3), 3(x3), 7, 11(x3), 10(x3), 14(x3), 15, 16(x3), 12(x3) (X).
- Hard solution: Click 3(x3), 11(x3), 12(x2), 5(x3), 16(x3), 14, 7, 6(x3) (Y).
- Earn FOX TAIL, SMALT PIECES 3/3.
- Go back.

- Use SMALT PIECES 3/3 on the pattern on the floor, take OLD LANTERN, BUTTON (Z).
- Use BUBBLE GUM, BUTTON on JAMMED CAMERA, take STATUE PHOTO (A).
- Use STATUE PHOTO on the statue (B).
- Easy solution: follow the instructions in the image (C).
- Hard solution: follow the instructions in the image (D).
- Take MATCHES, FORTUNE-TELLING MACHINE HANDLE.
- Go to Madame Zosta’s Magic Shop.
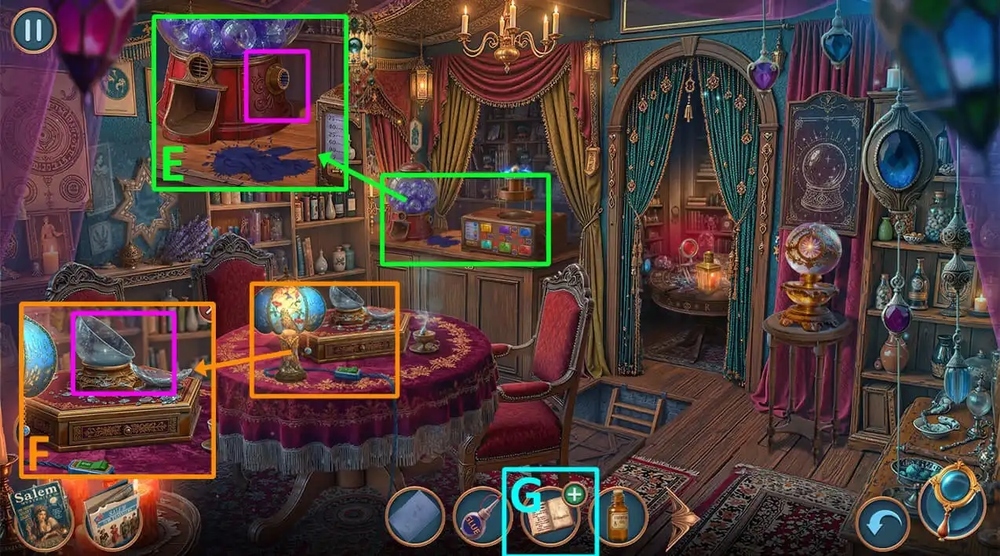
- Use FORTUNE-TELLING MACHINE HANDLE on the slot machine, take HALF A SPHERE, MIRROR SHARDS (E).
- Use GLUE, HALF A SPHERE on the broken ball, take STRANGE DECK OF CARDS, PENCIL (F).
- Use STENCIL, PENCIL on ZOSTA’S DIARY, take SPELLBOOK (G).
- Go to Mystical Crypt.
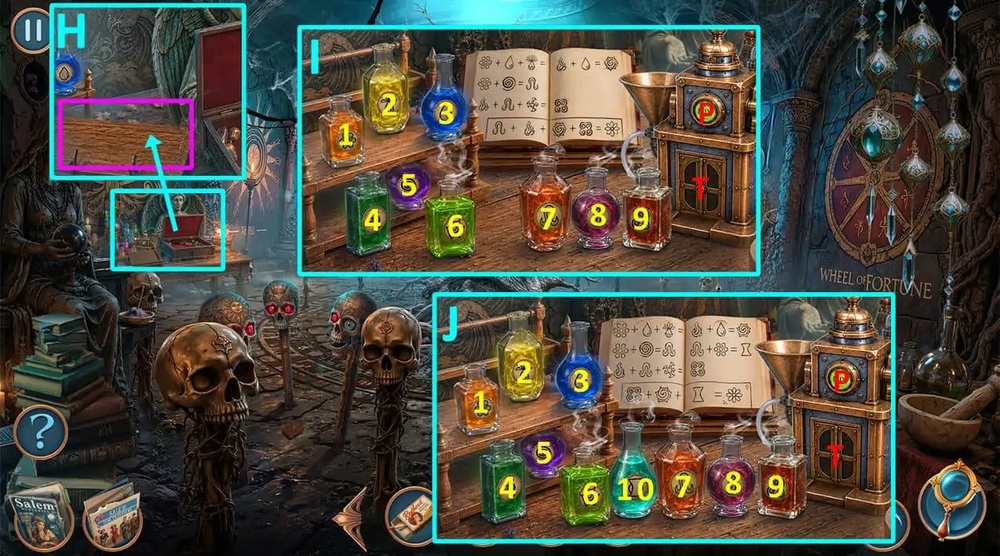
- Use SPELLBOOK on the book stand (H).
- Easy solution: Click 1, 2, 3, P, T, 9, 3, P, T, 1, 5, P, T, 9, 7, 4, P, T, 6, 7, 8, 9, P (I).
- Hard solution: Click 1, 2, 3, P, T, 9, 3, P, T, 1, 5, P, T, 7, 1, P, T, 9, 7, 4, P, T, 9, 6, 10, P (J).
- Earn SPELLBOOK, ESSENCE OF LIFE.
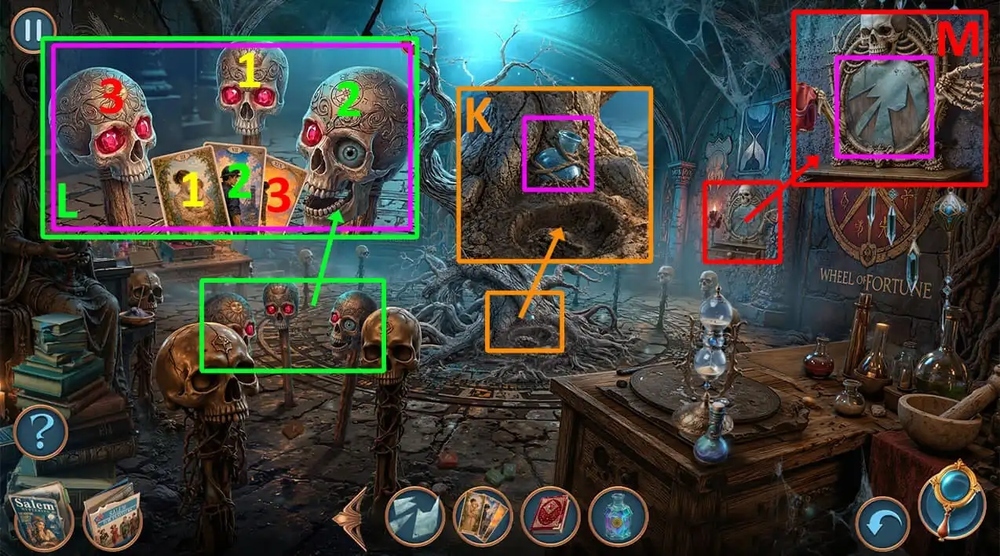
- Use ESSENCE OF LIFE on the empty flask (K).
- Use STRANGE DECK OF CARDS on the skulls, Take card 1 and place it on skull 1, take card 2 and place it on skull 2, take card 3 and place it on skull 3 (L).
- Use MIRROR SHARDS on the mirror (M).
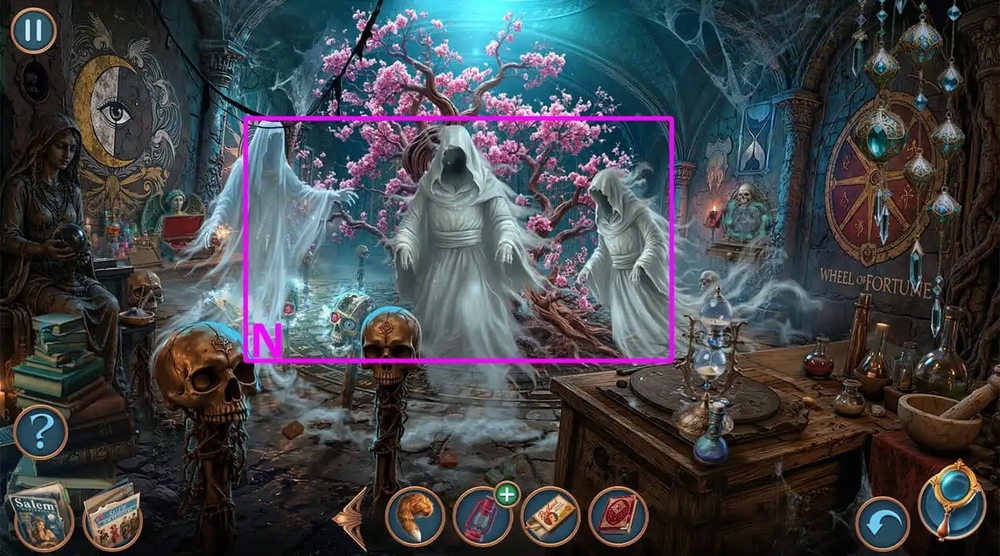
- Use SPELLBOOK on the ghosts, click on ghosts (N).
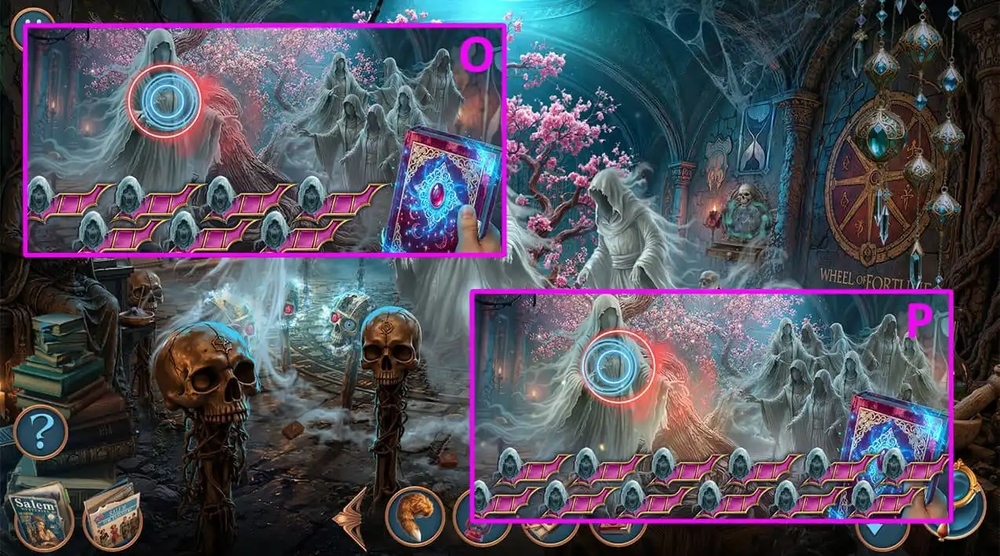
- Easy solution: Click the screen the moment the targets converge on the ghost to eliminate them (O).
- Hard solution: Click the screen the moment the targets converge on the ghost to eliminate them (P).
- Walkthrough Bonus Chapter, at the link below.