Maze 5: Sinister Play – A dark adventure in which a harmless trip with friends turns into a fight for survival. Sophie, along with her longtime friends, the stylish and charming Dario and horror fan JP, goes on a camping trip to relax, share scary stories around the campfire, and reminisce about their school days. But everything changes in an instant: in the middle of the road, Sophie notices a strange figure, which she manages to capture on camera. Her friends don’t believe her until frightening children appear on the screen. The unknown creatures capture them, and it soon becomes clear that the stories told around the campfire are coming to life. The ghost of an old teacher named Abigail, who sets her school on fire every night. A creature from another reality, invisible in any light, that hunts for the sake of killing. A monster hiding in the ice and darkness of an abandoned polar station. All of this is now not fiction, but part of a nightmarish game in which the characters are drawn in with no right to refuse. The children behind this horror perceive people as puppets. All around them are deception, ghostly visions, and the growing threat of an explosion in the boiler room. Sophie herself feels more and more that reality and fantasy are beginning to blur. She must understand what is really happening, find a way to escape, and stop the evil that feeds on fear. If you can’t solve any of the puzzles or don’t know where to find the items, you can check out the walkthrough for Maze 5: Sinister Play on our website and get out alive.
Maze 5: Sinister Play – Walkthrough
Here you can see the complete walkthrough for Maze 5: Sinister Play, including all chapters, including the bonus chapter, in pictures.

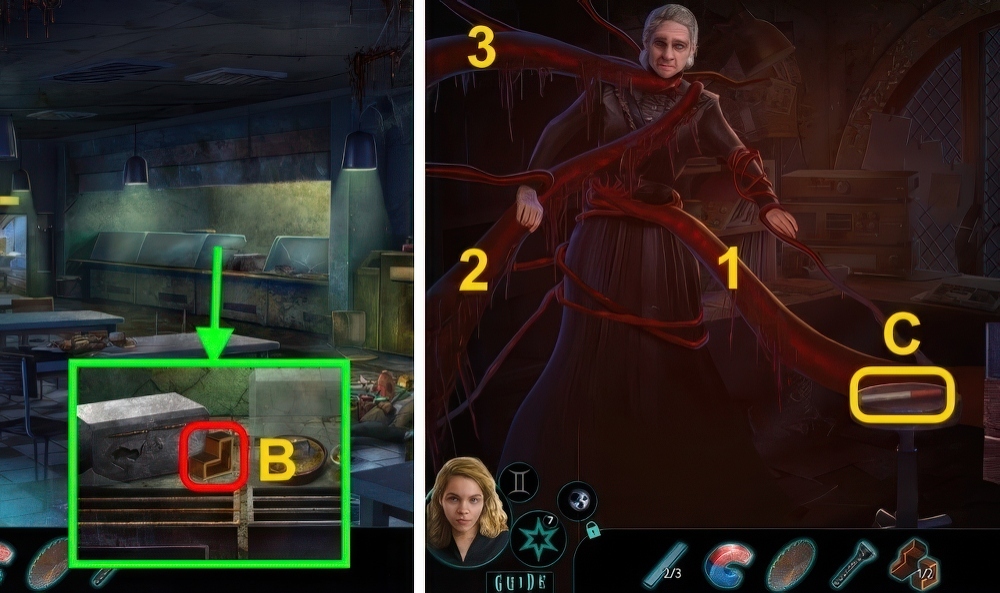
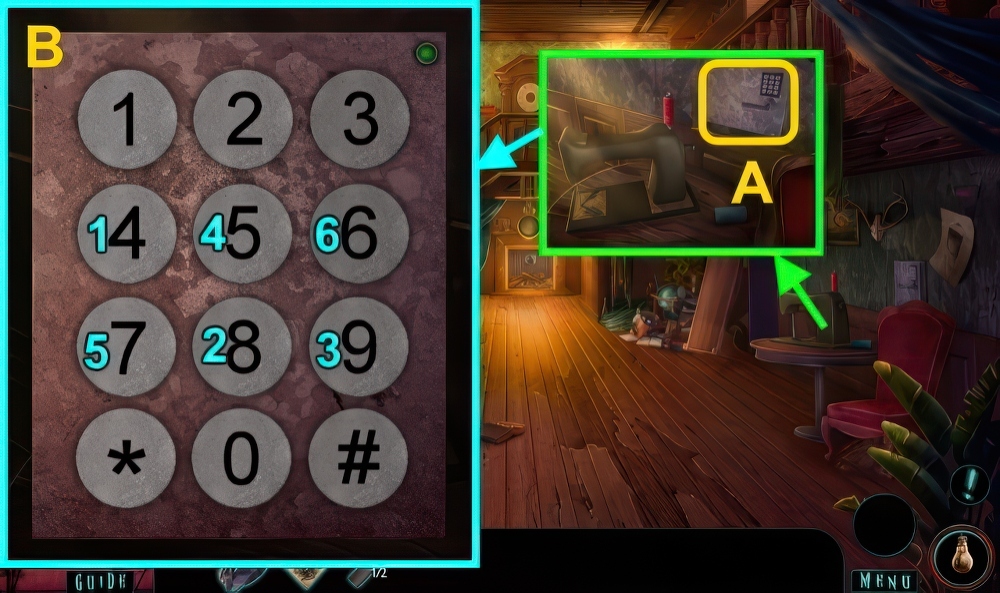
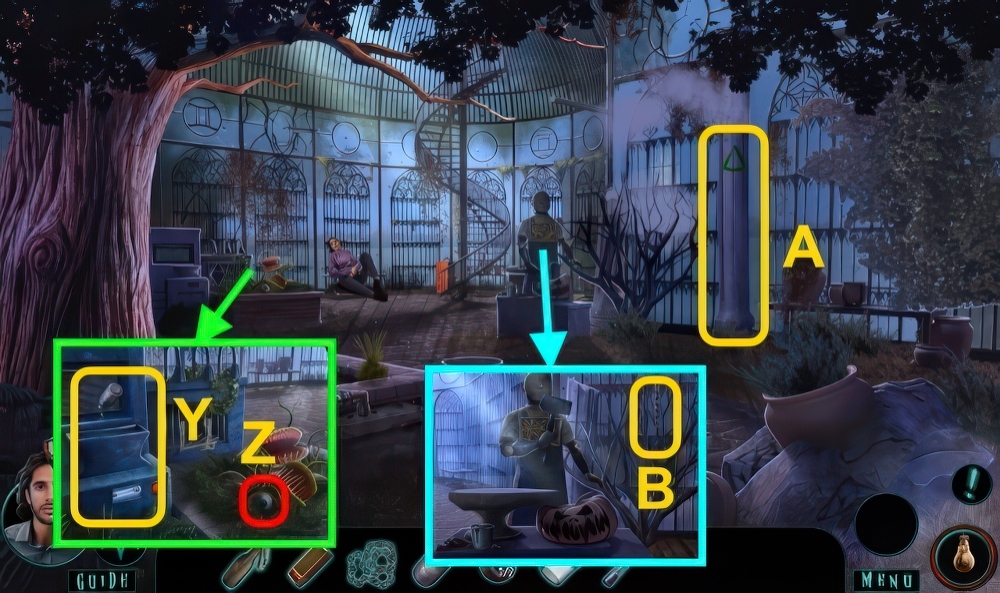
- Talk (A).
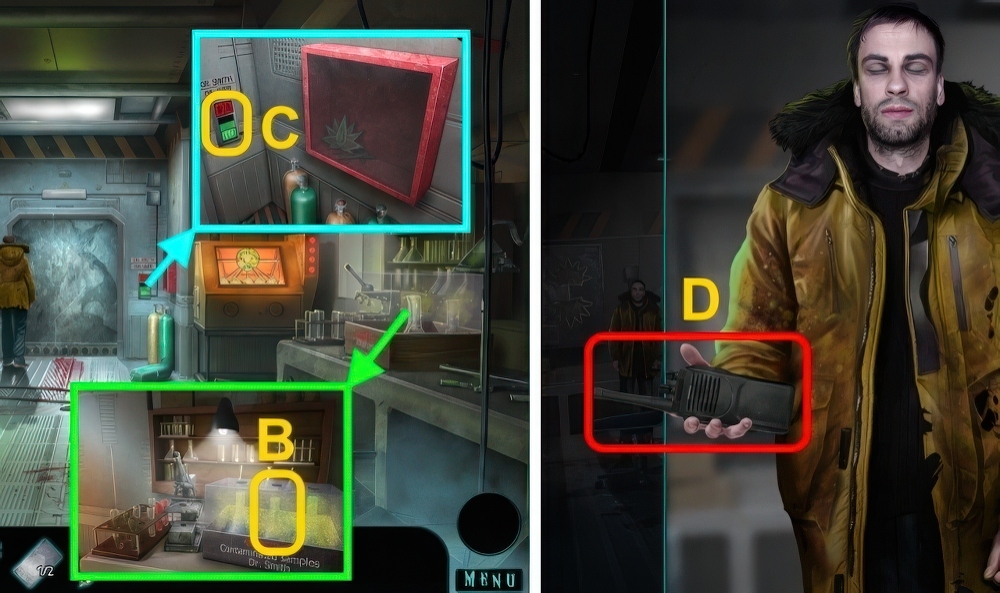
- Take CAMERA (B).
- Take photo and CHARGER (C).
- Examine CAMERA, use CHARGER.
- Take UNCHARGED CAMERA.
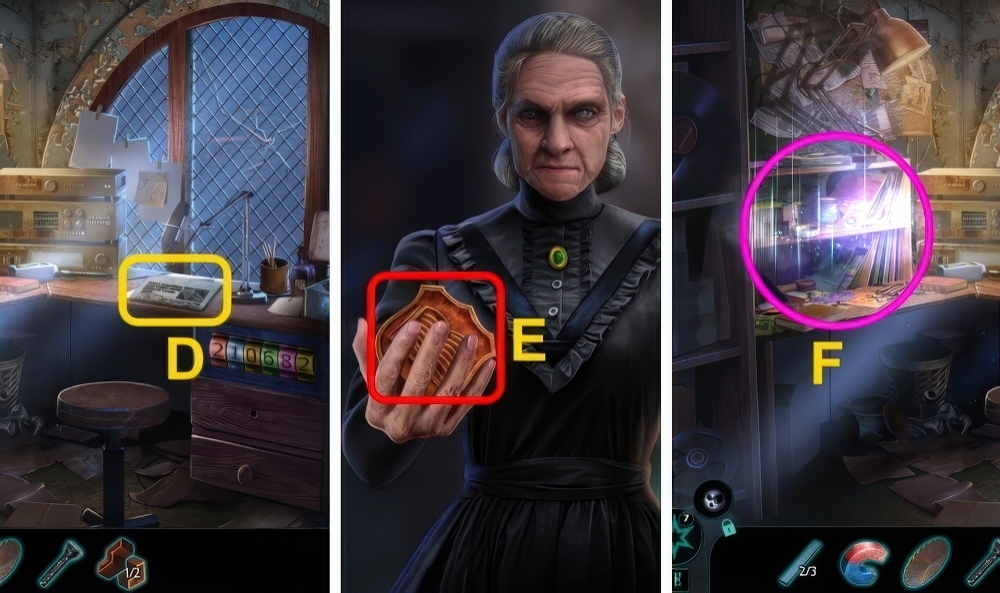
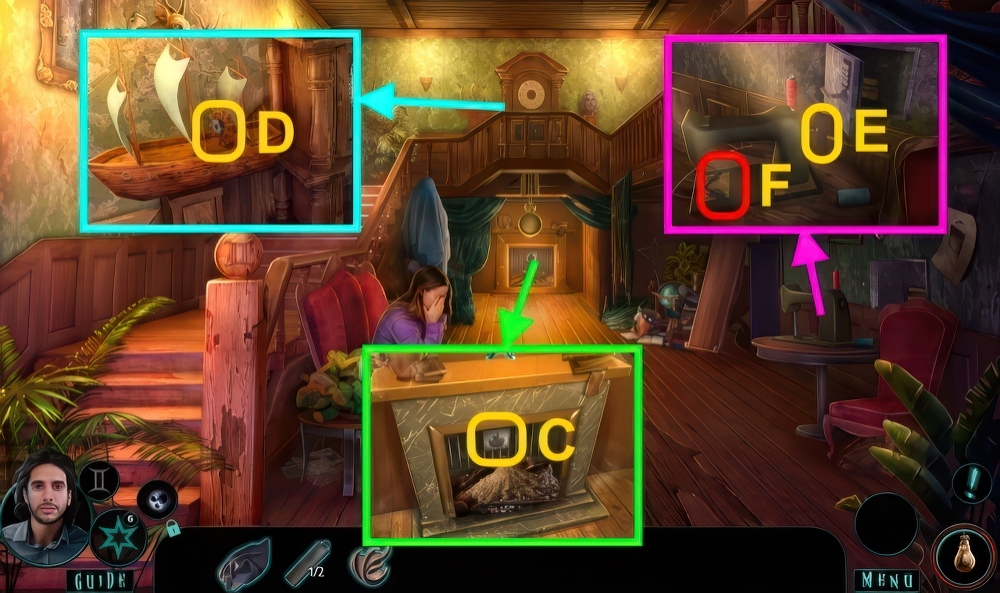
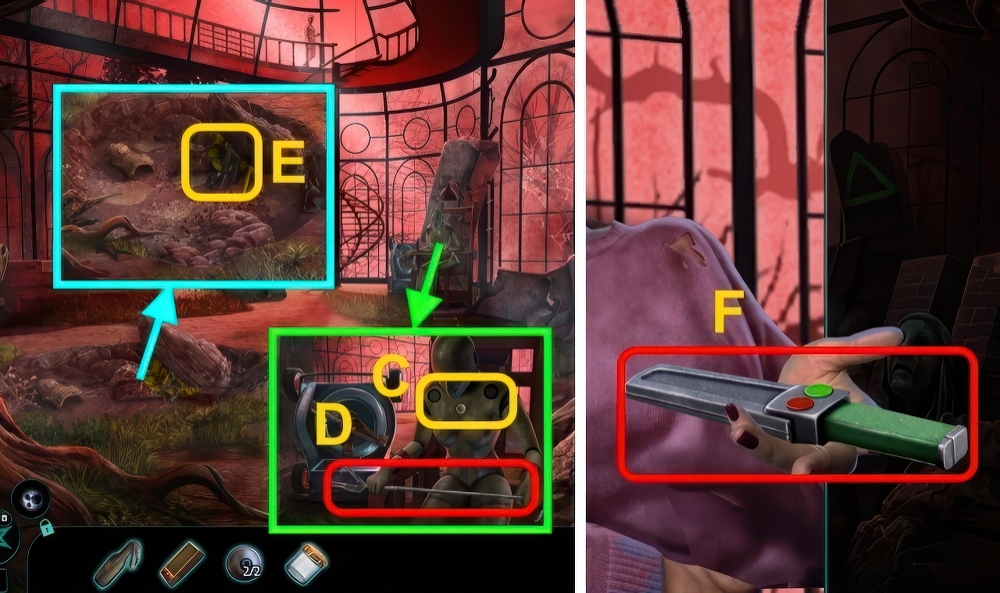
- Take photo (D), place UNCHARGED CAMERA.
- Move the items to their places.
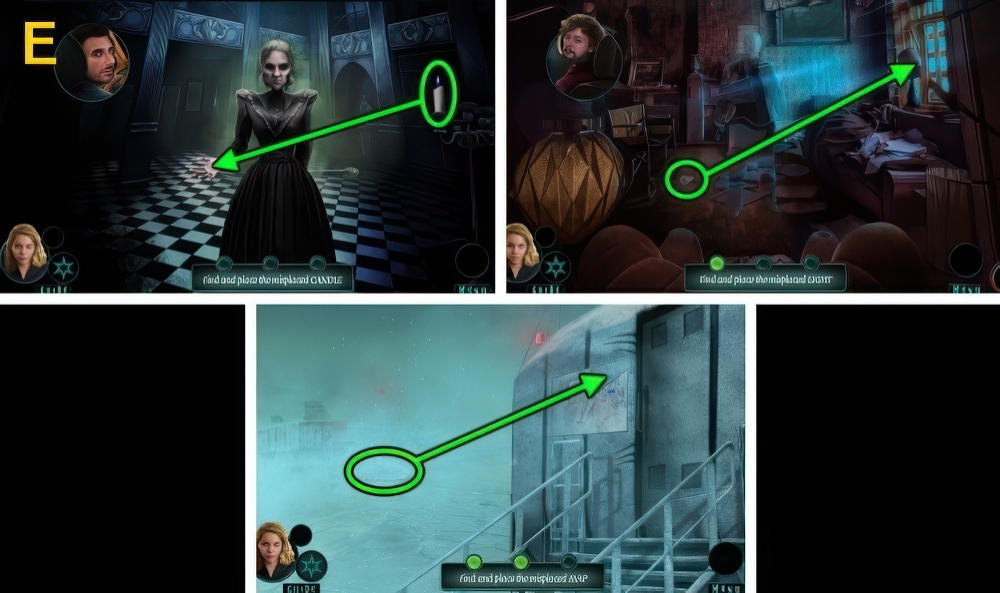
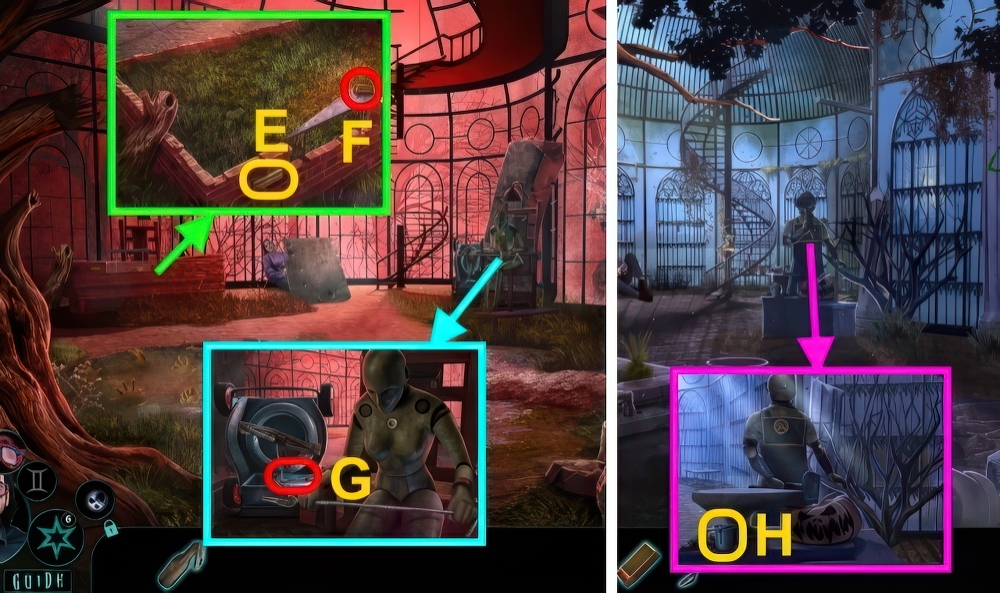
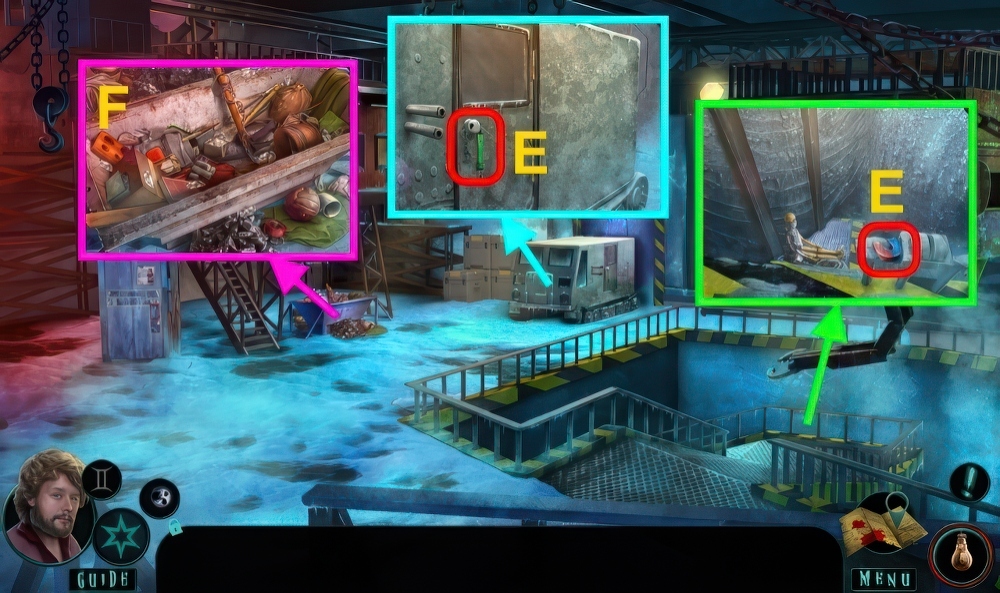
- Walkthrough (E).
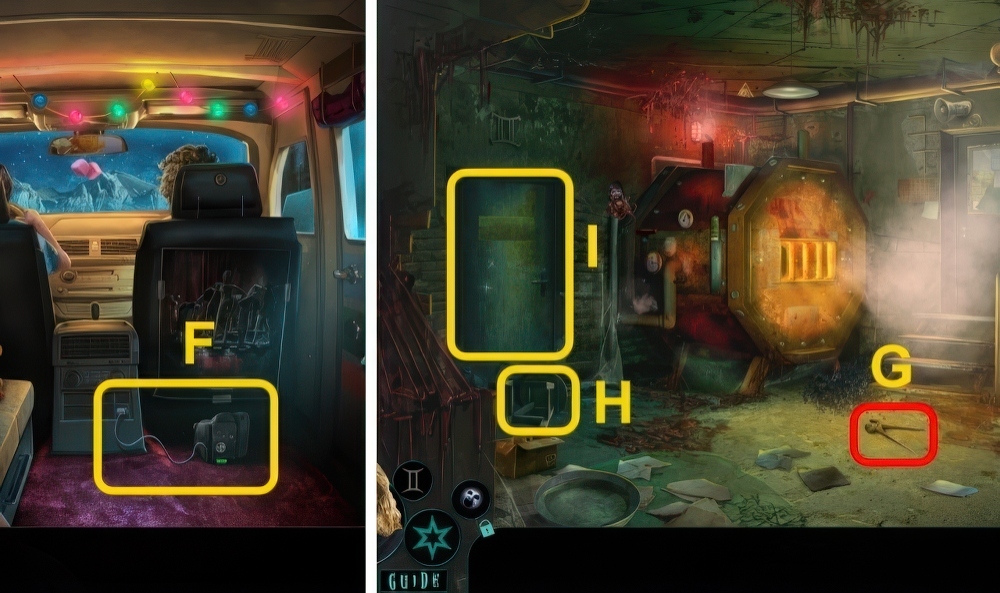
- Take camera (F), examine scene.
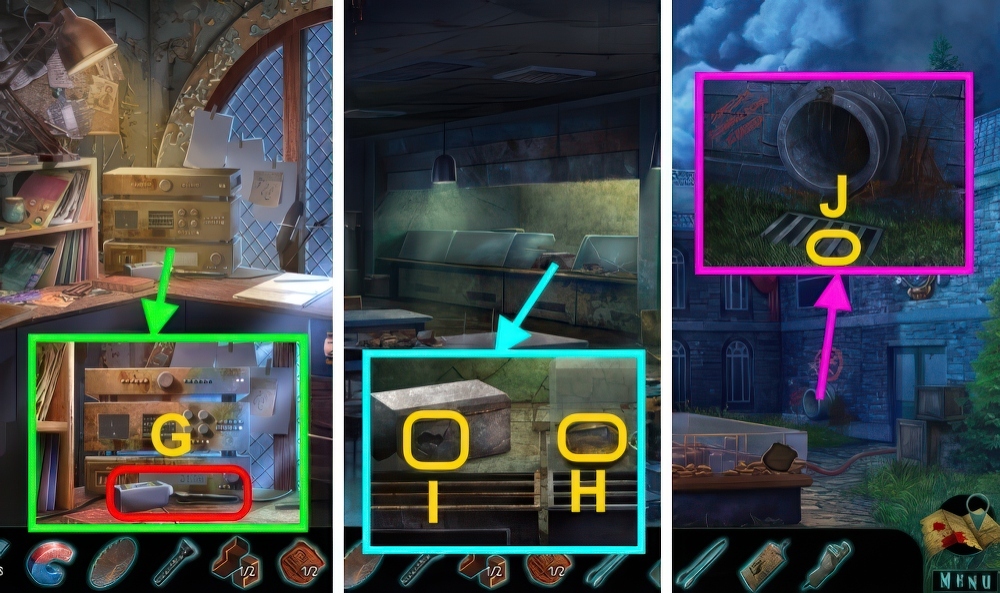
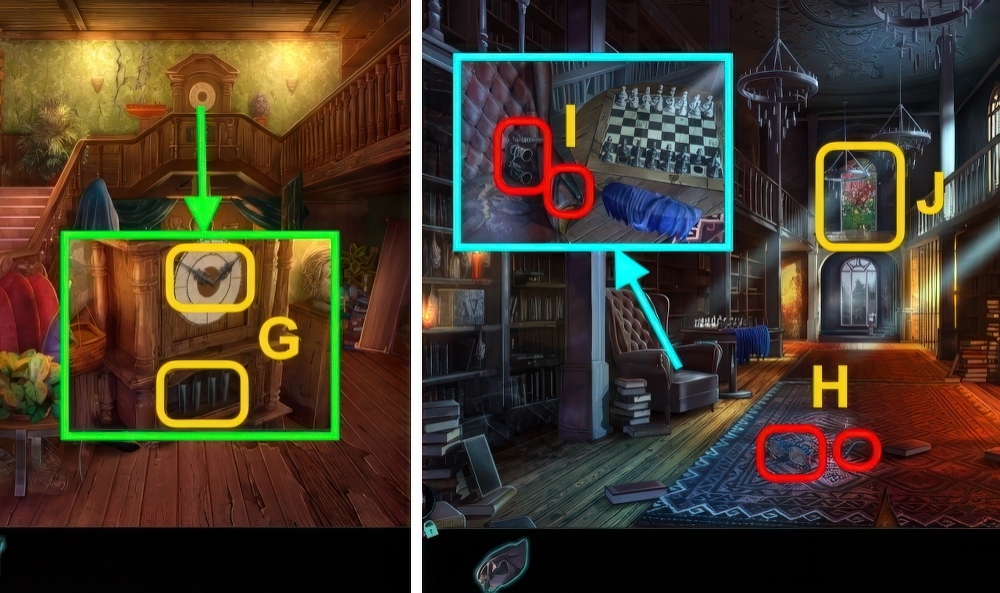
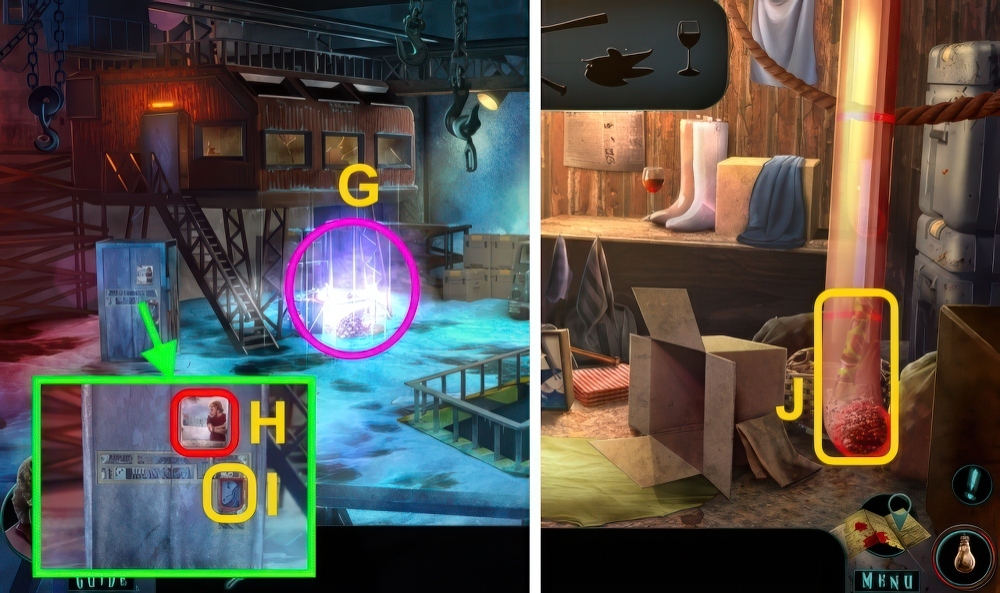
- Take PLIERS (G).
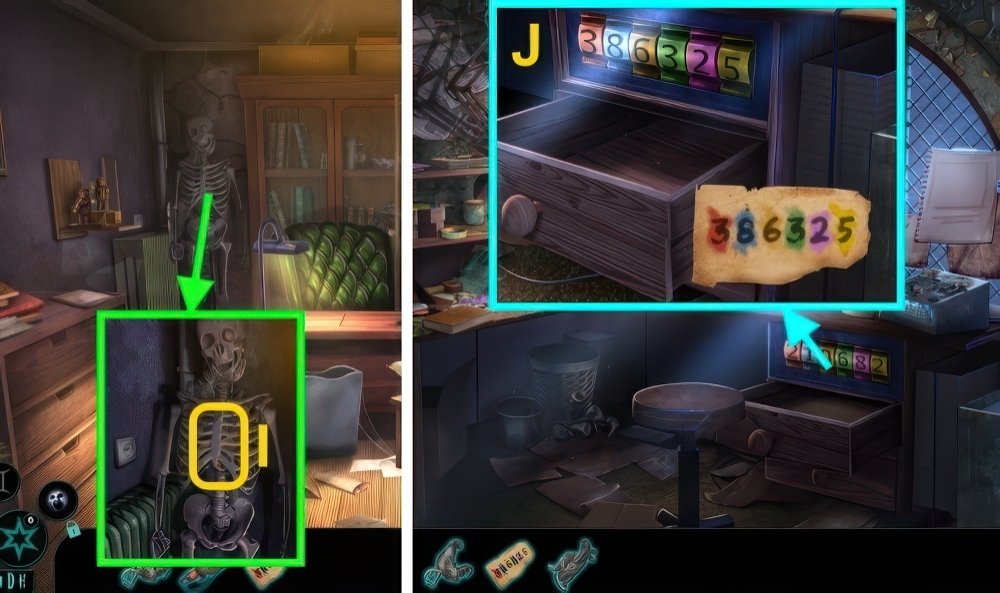
- Move stool (H).
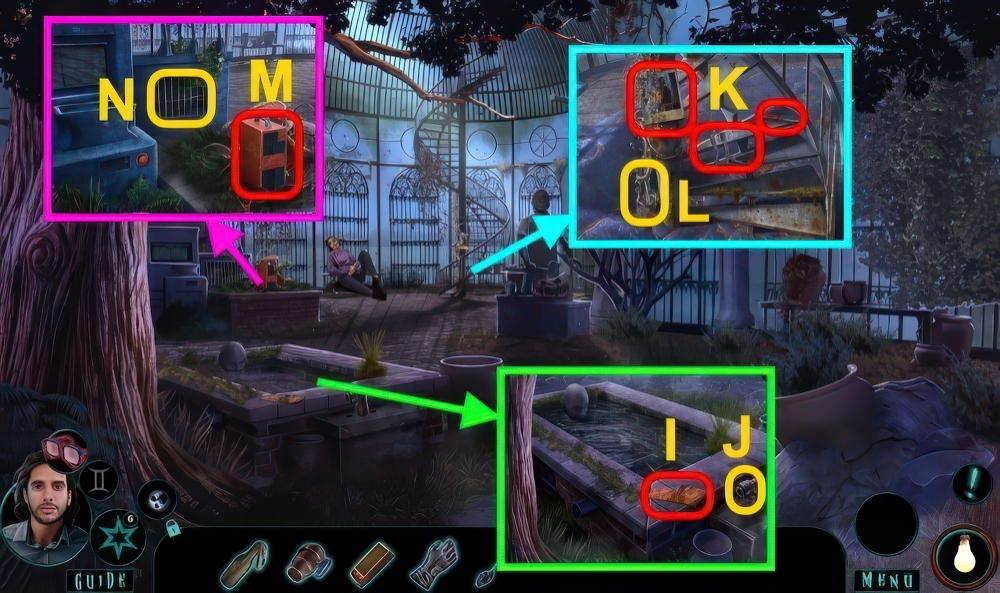
- Examine door (I).
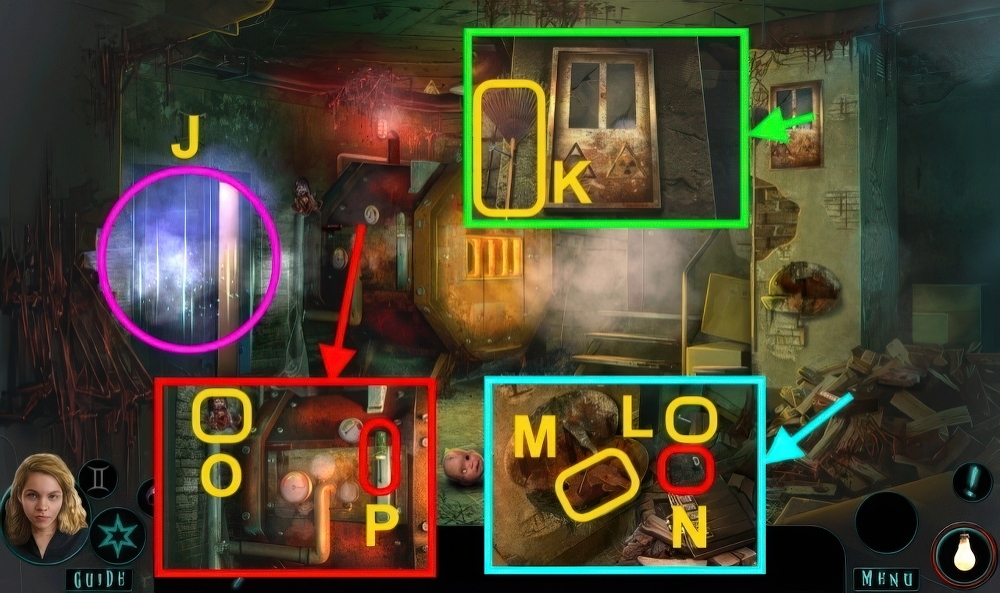
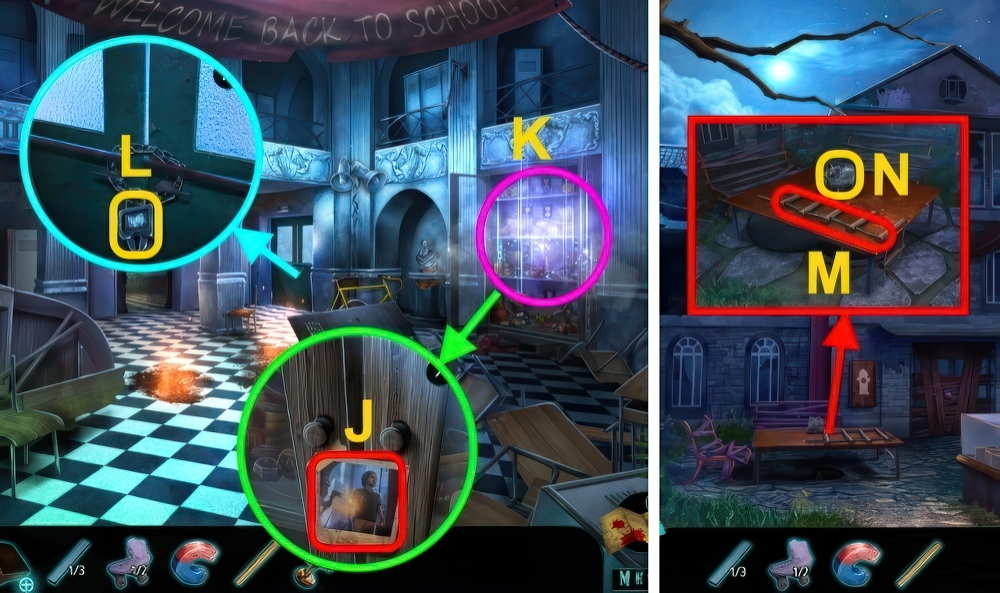
- Play puzzle, receive GAUGE (1/2) (J).
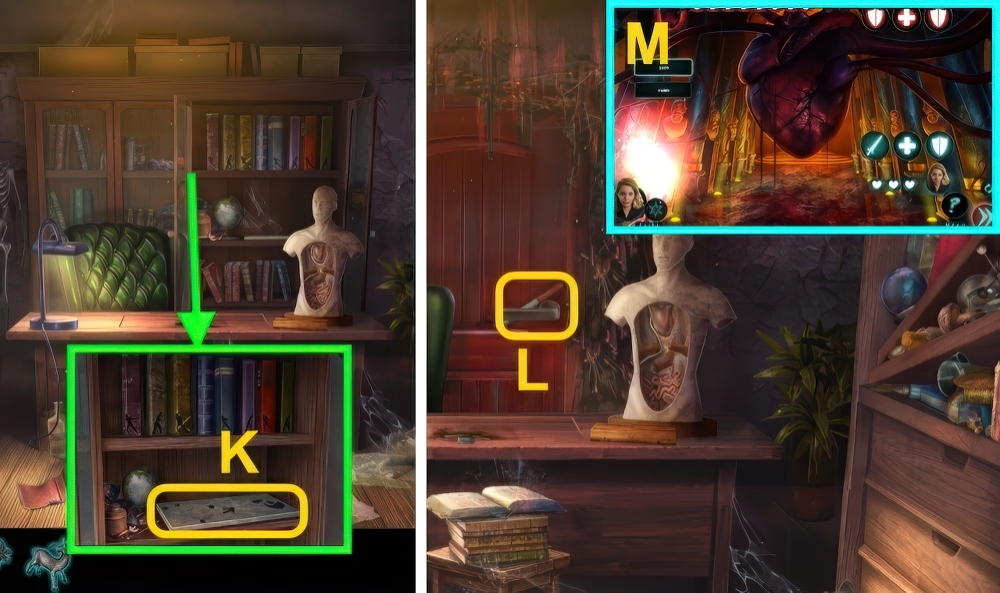
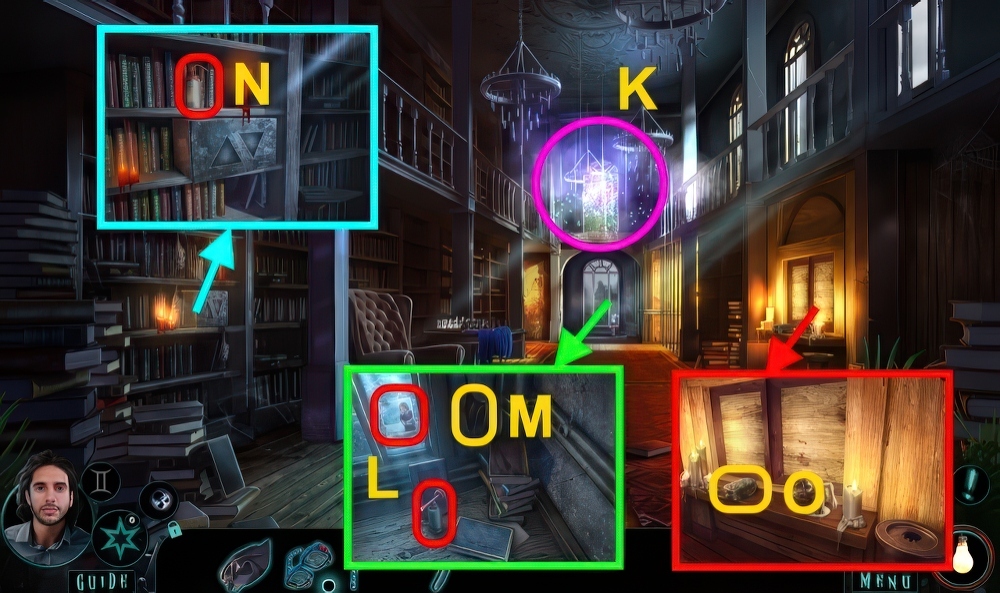
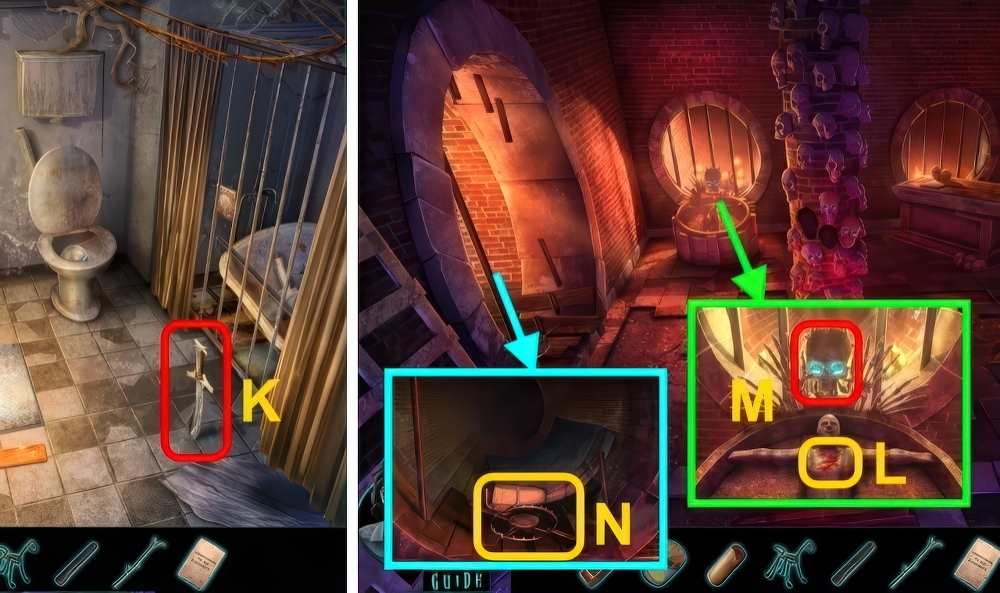
- Use PLIERS (K), receive NAIL (1/2) and RAKE.
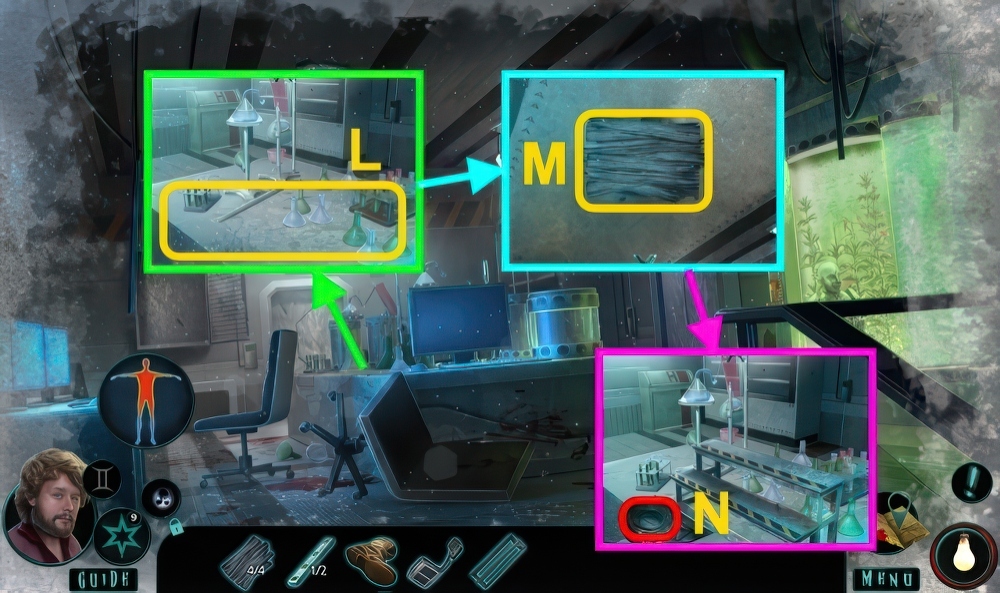
- Use PLIERS (L), receive NAIL (2/2).
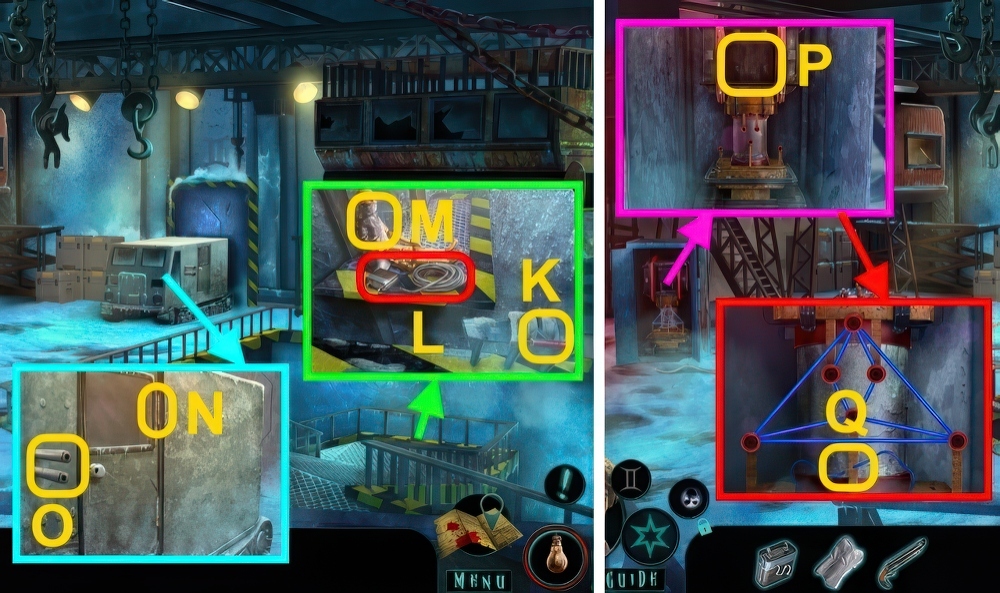
- Move pieces (M), take NAIL CLIPPERS.
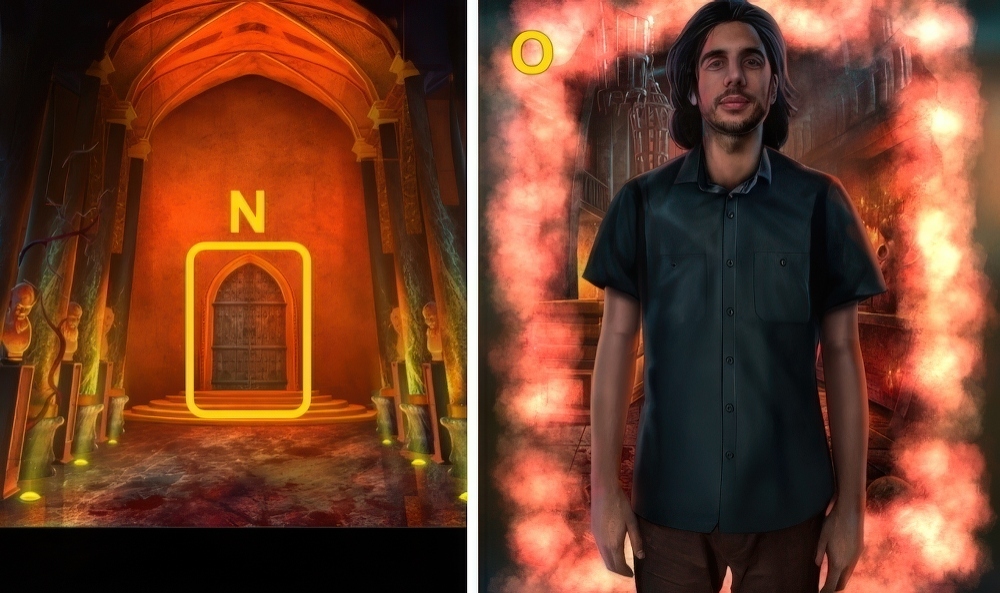
- Take DIARY (N).
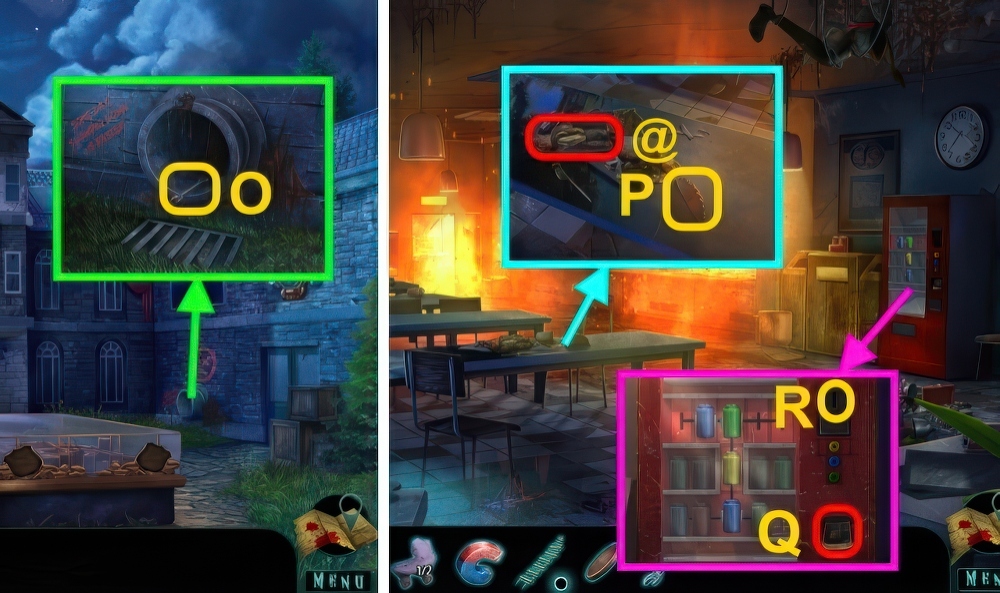
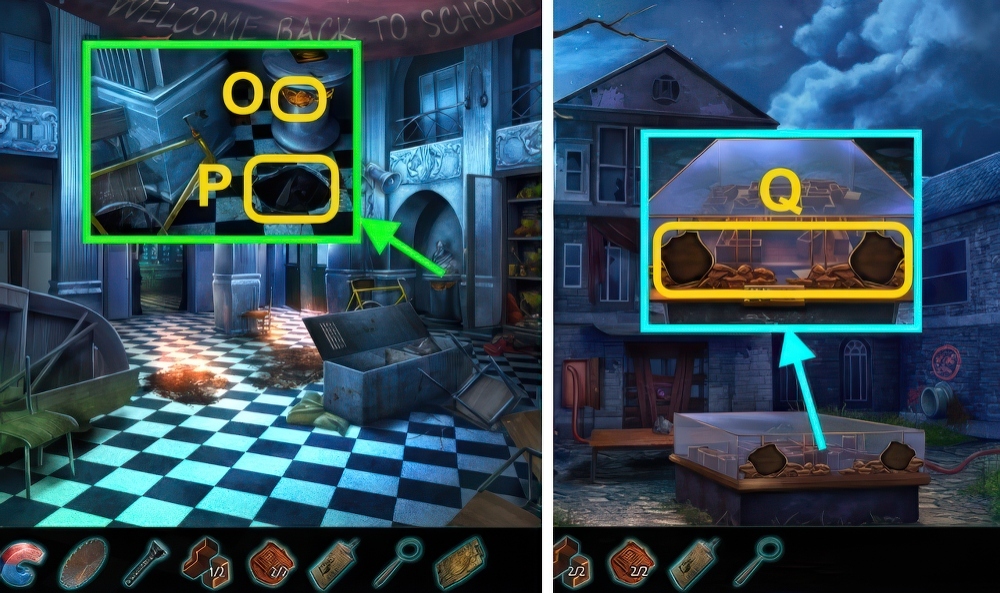
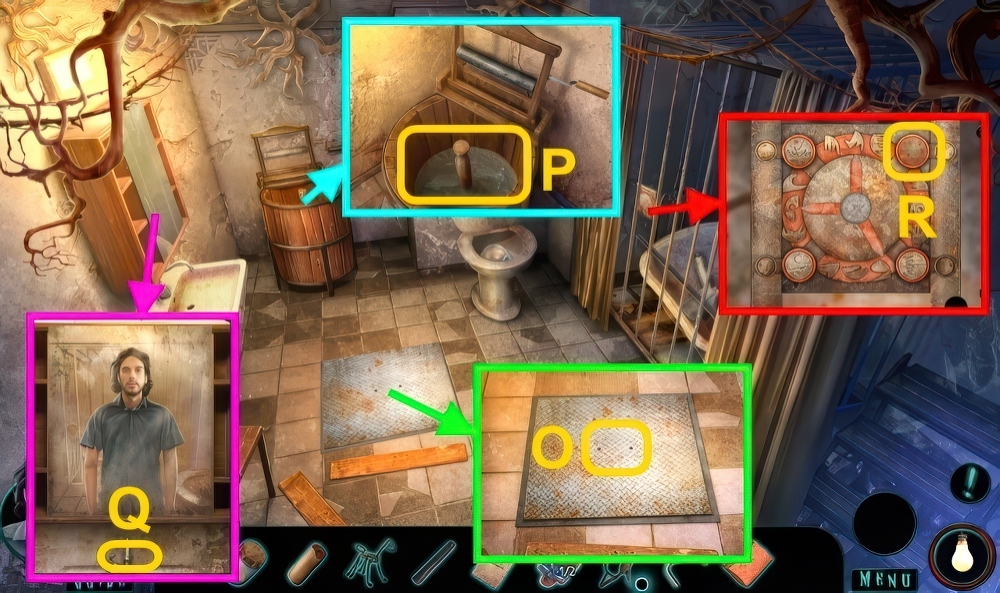
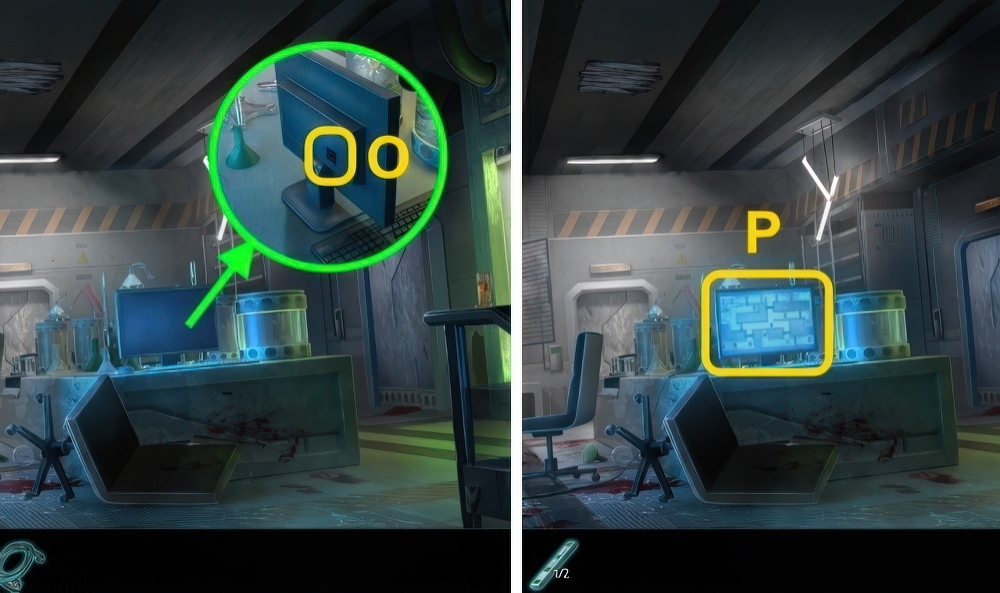
- Examine 4 times (O), receive ROPE.
- Take VOODOO DOLL.
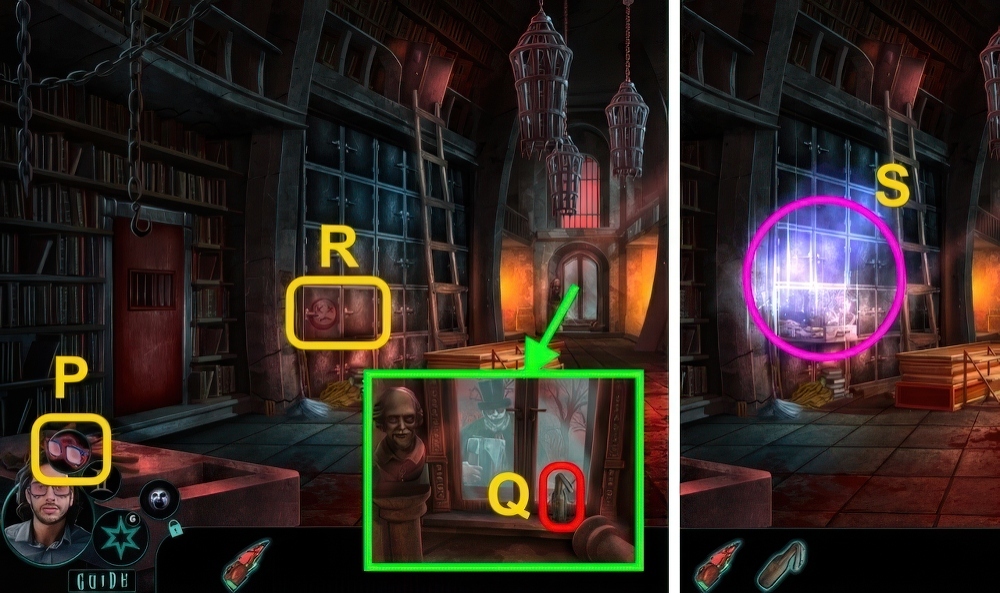
- Take SMALL SCREWDRIVER (P).
- NAIL (2/2) on VOODOO DOLL, take DIARY KEY.
- DIARY KEY on DIARY, take SUITCASE CODE.
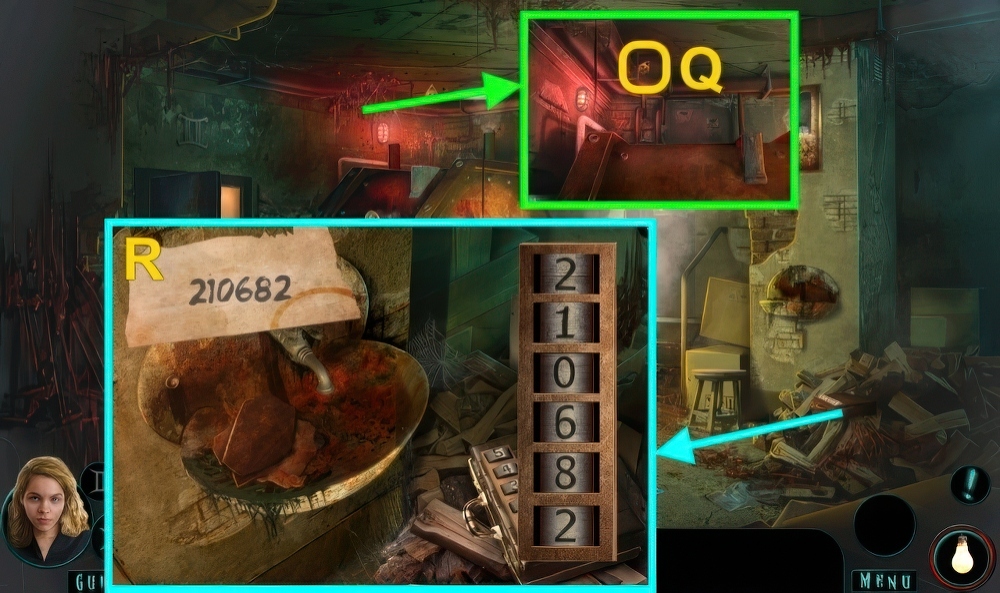
- Use RAKE (Q), receive BROKEN HANDLE.
- Press the numbers to change them and enter the same code on the note.
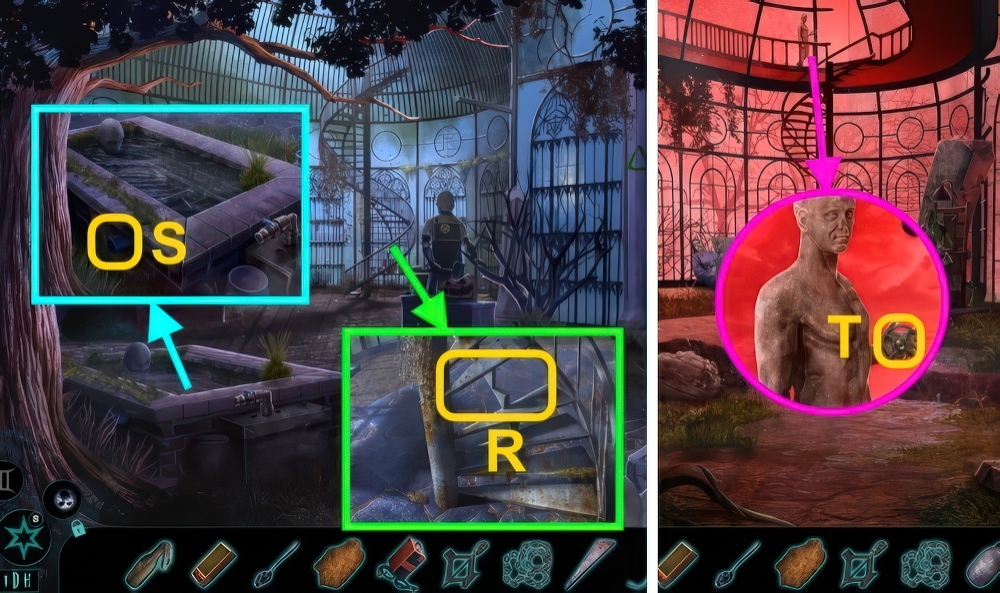
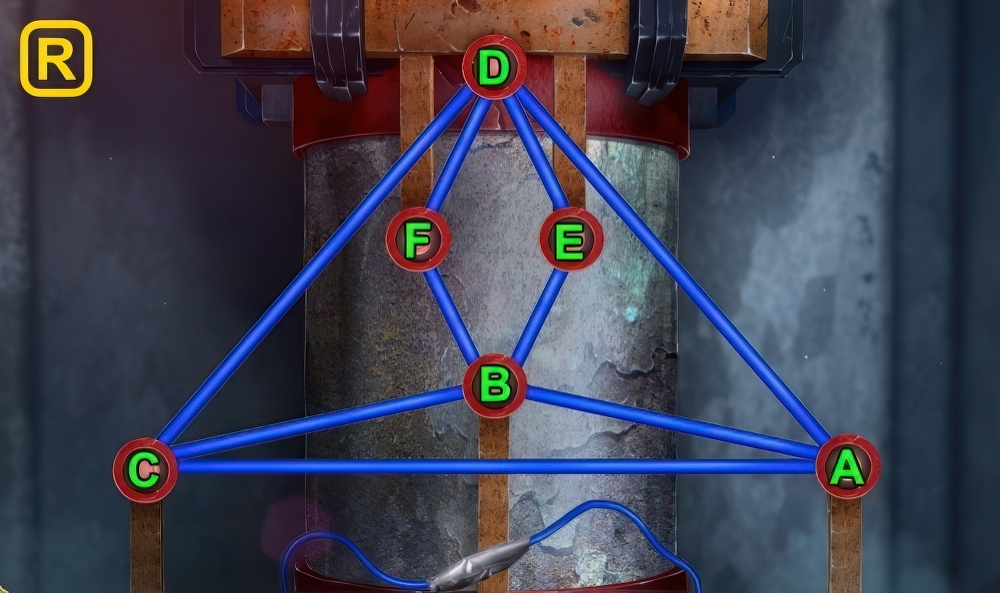
- Use SUITCASE CODE, walkthrough (R).
- Take DOLL HAND.
- DOLL HAND and ROPE on BROKEN HANDLE, take IMPROVISED CATCHER.
- Use IMPROVISED CATCHER (Q), receive EMERGENCY INLAY.
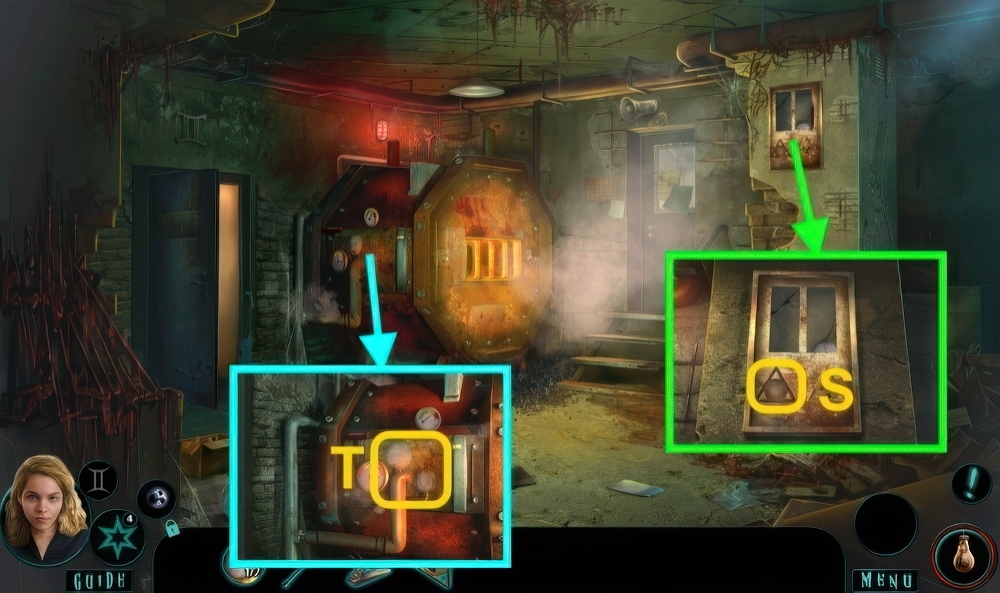
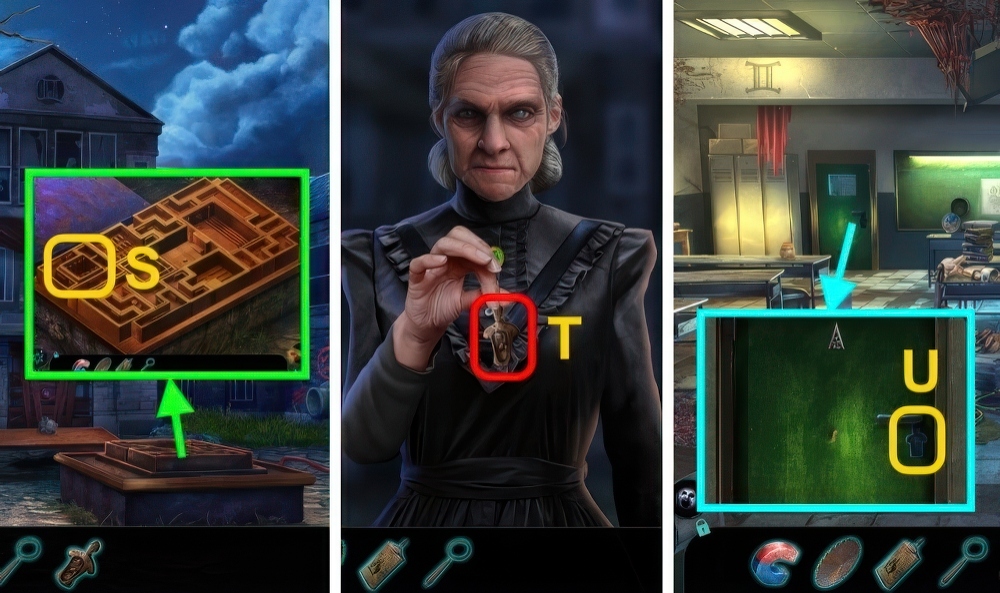
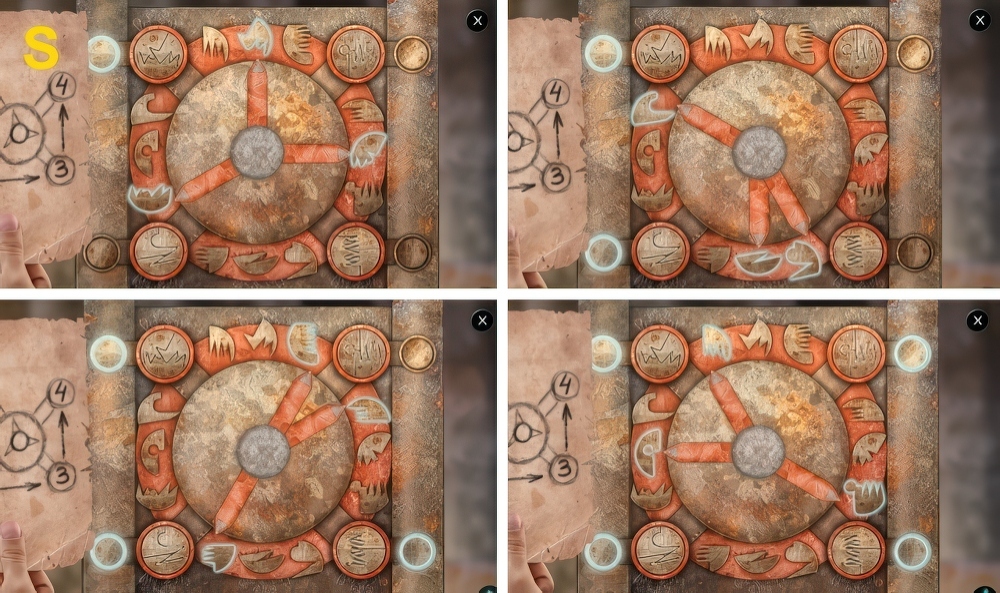
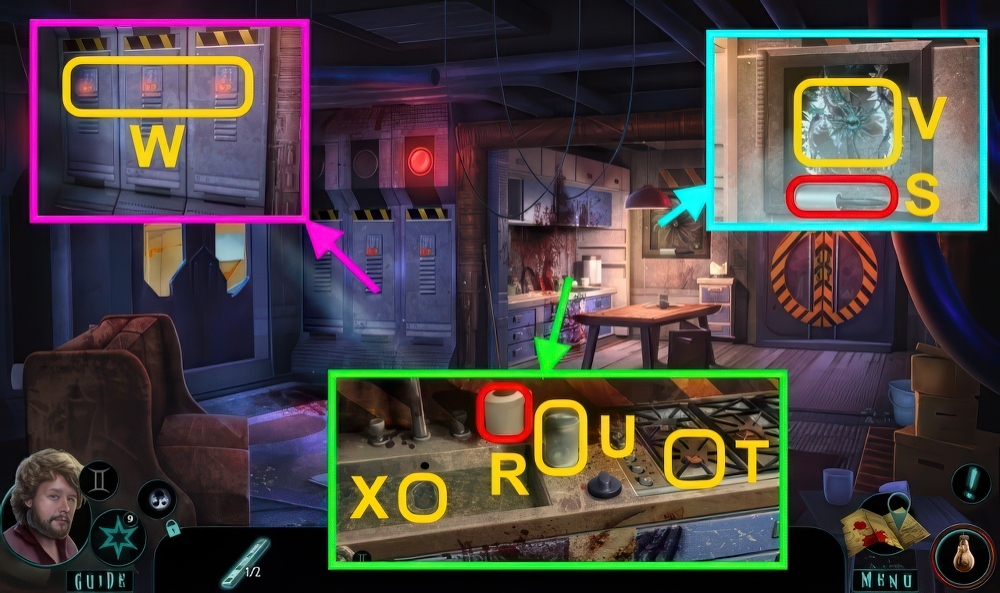
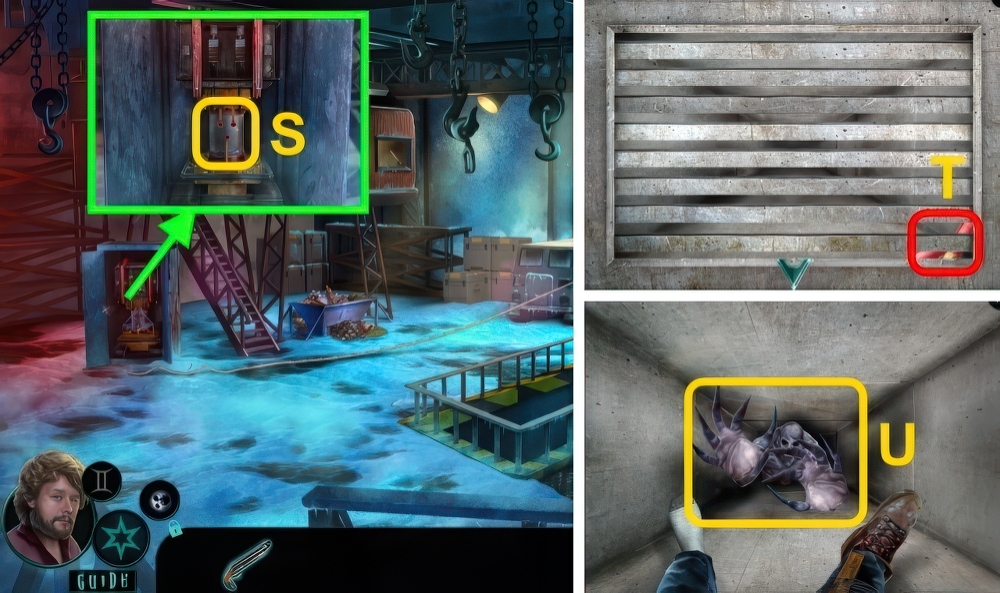
- Place EMERGENCY INLAY (S).
- Take CHALK and GAUGE (2/2).
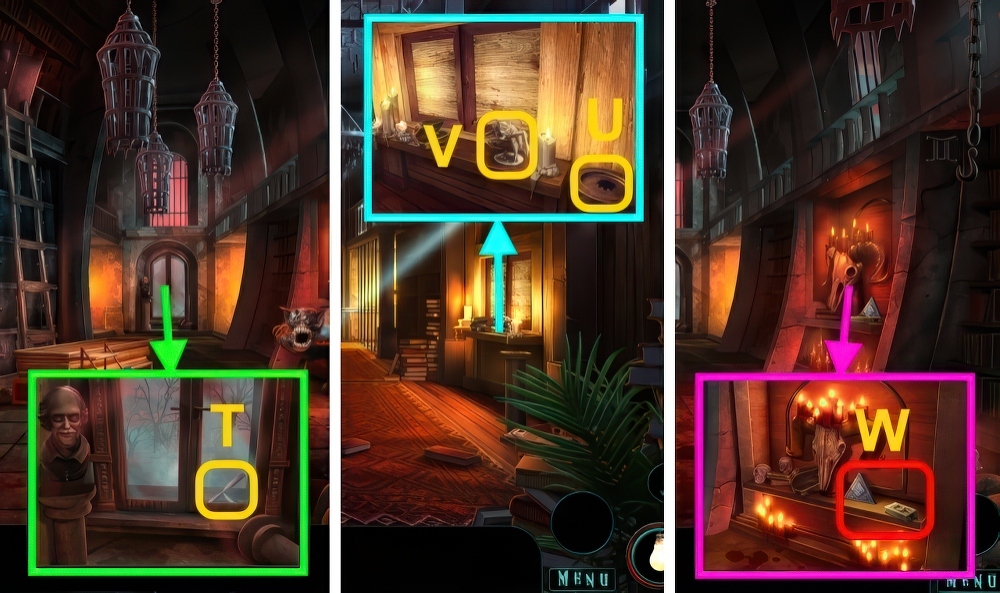
- Place GAUGE (2/2) (T).
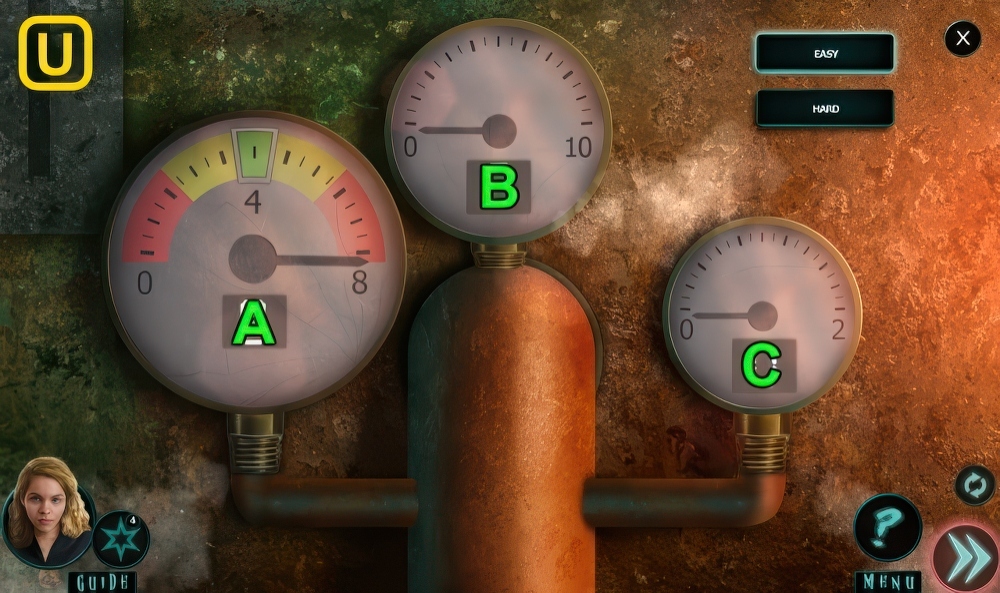
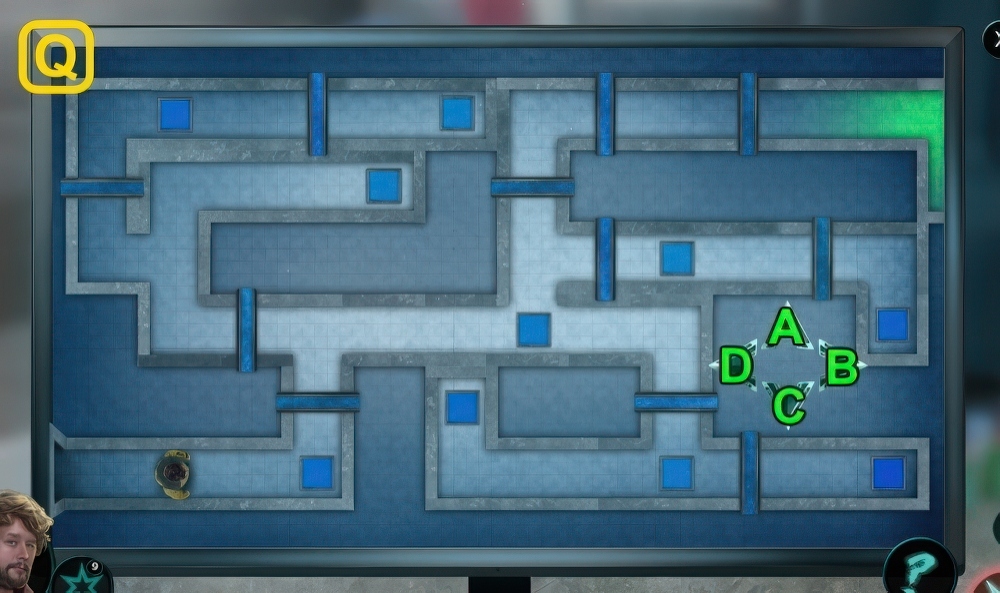
- Transfer pressure between gauges, and so that pointer lands in the green.
- To transfer pressure, select the gauge you want to take the pressure out of and then the gauge you want to transfer the pressure to.
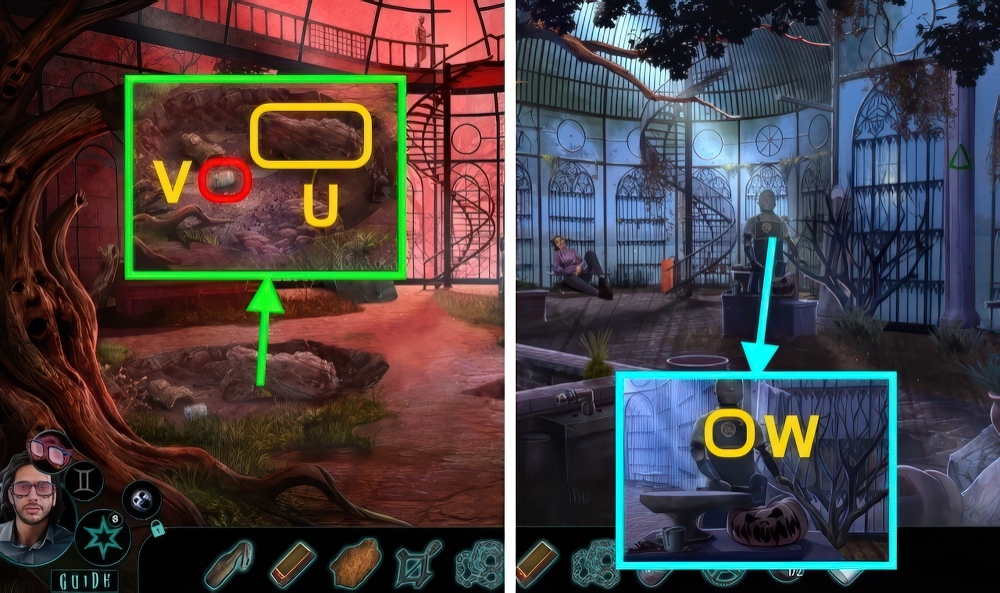
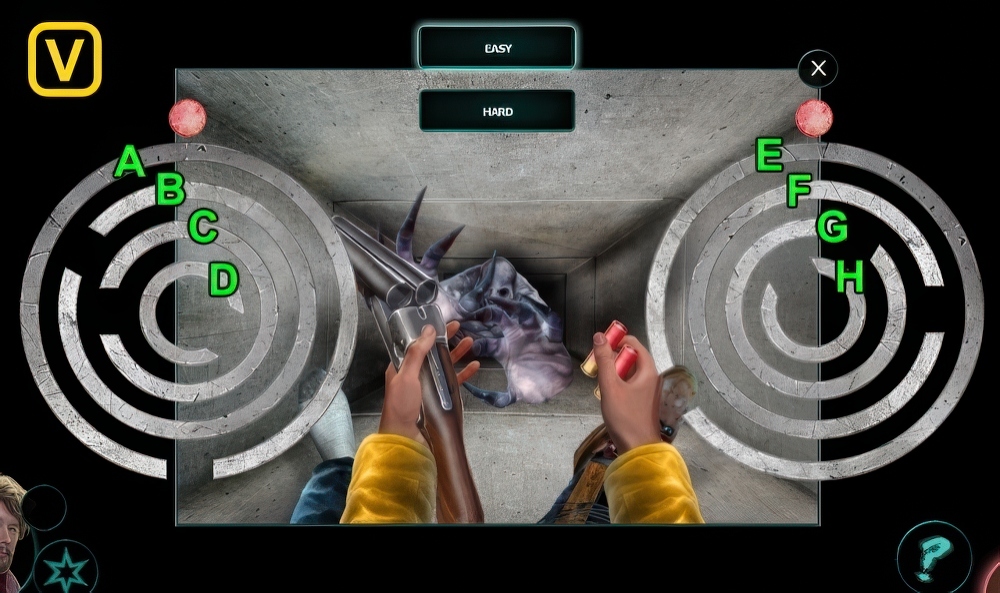
- Walkthrough (U).
- Easy: A-B×2-C×2-A-B-C×2-A.
- Hard: A-B×2-C×2-A-B-C-A-B×2-C×2-A.
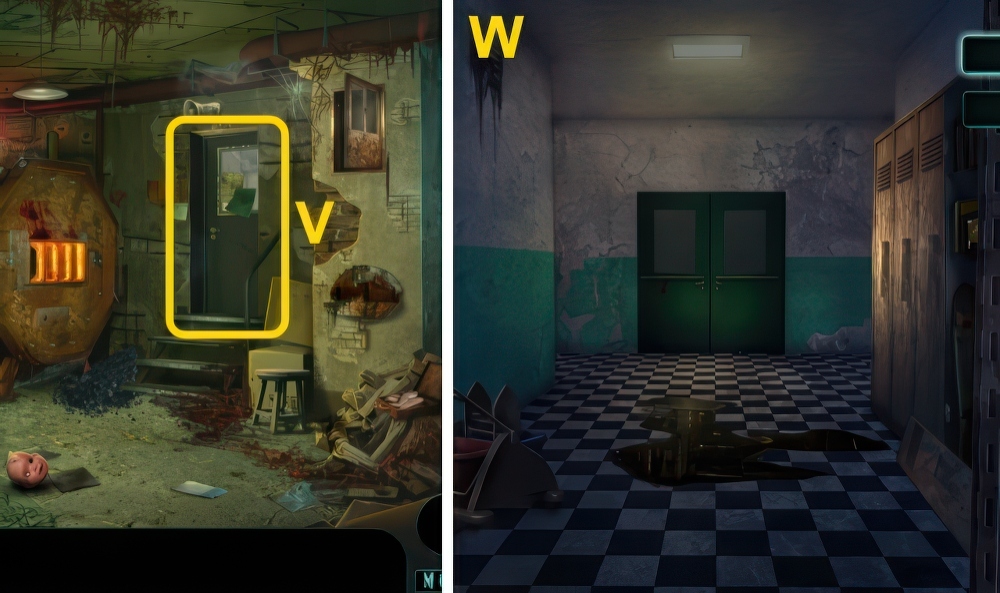
- Open door (V).
- Go forward.
- Use CHALK on scene.
- Find a way out of the maze. Select a direction (left, right, or back) to move in.
- Walkthrough (W).
- Easy: (←), examine scene, (→), (←)×2.
- Hard: (←), examine scene, (→)×2, examine scene, (←)×2, (→)×3, (←)×2.
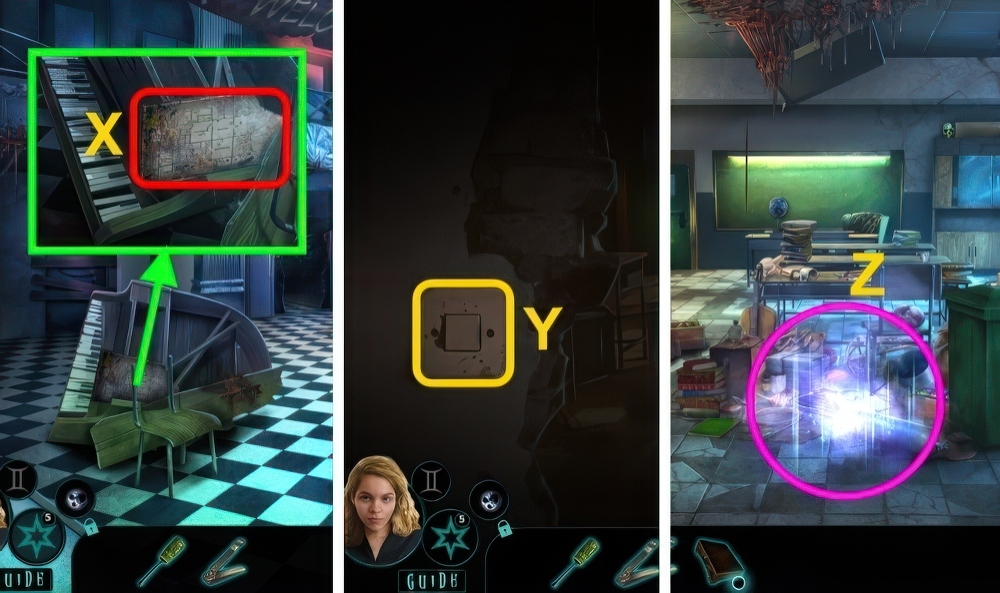
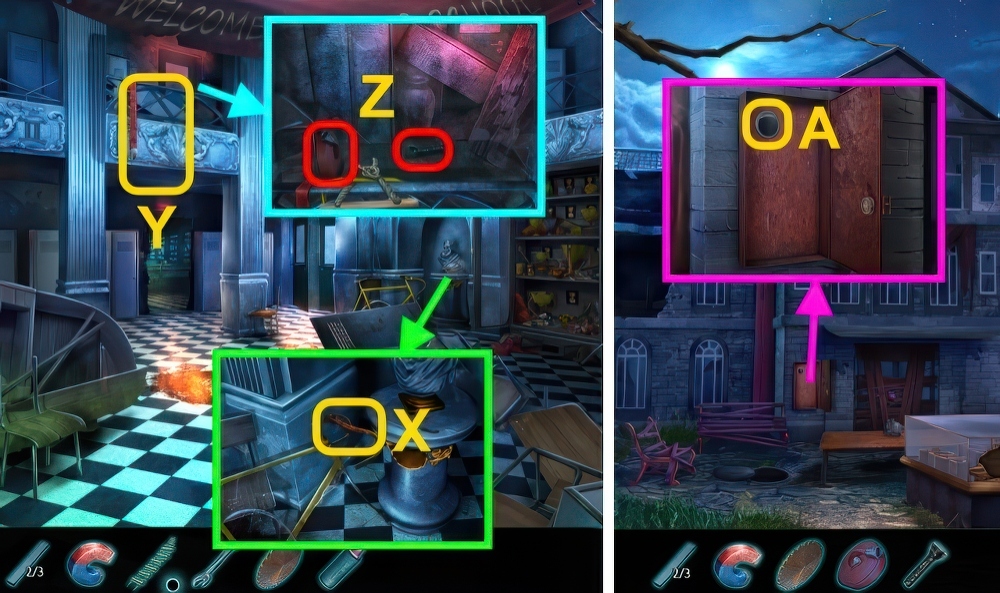
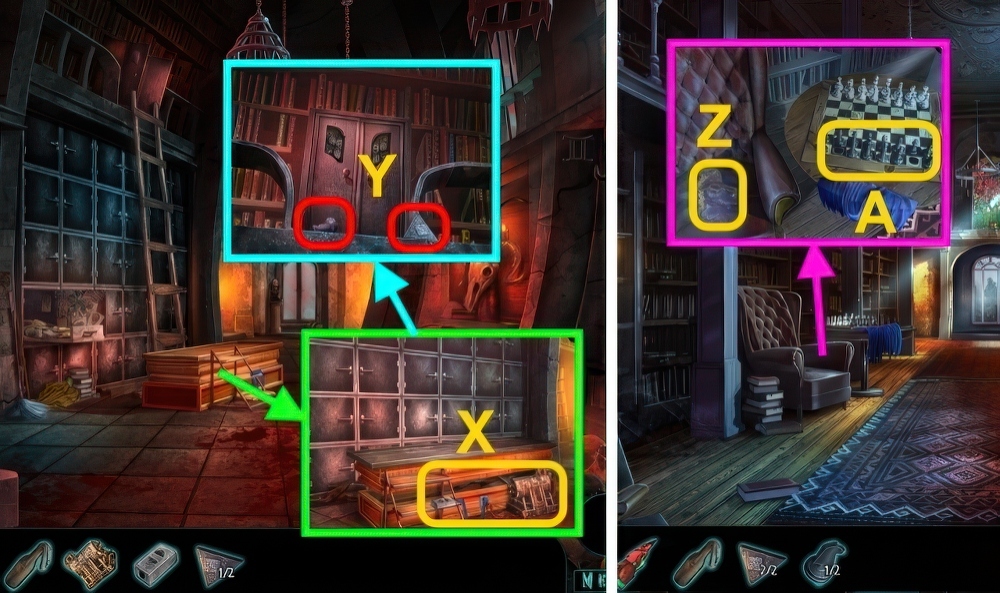
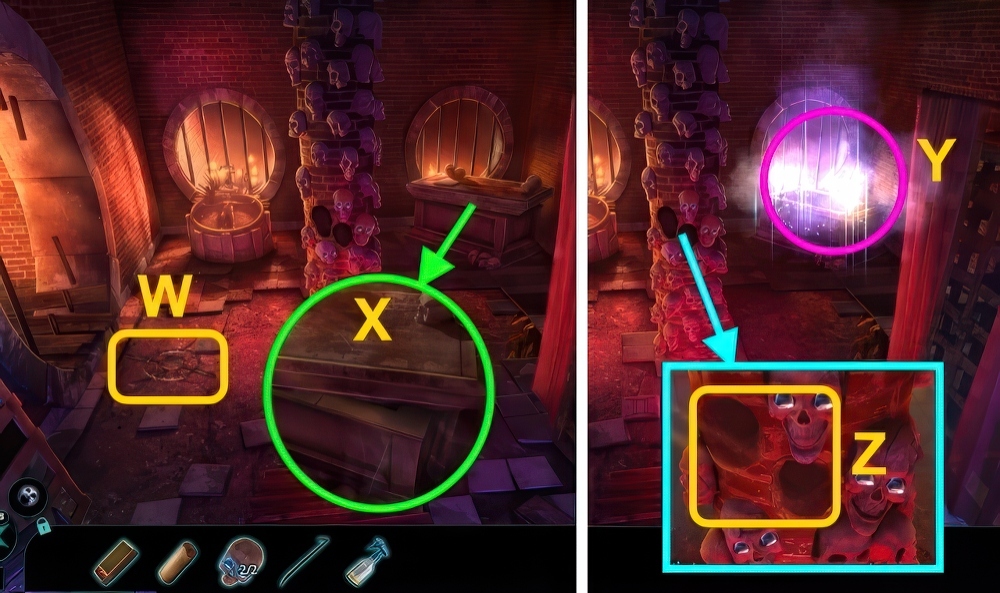
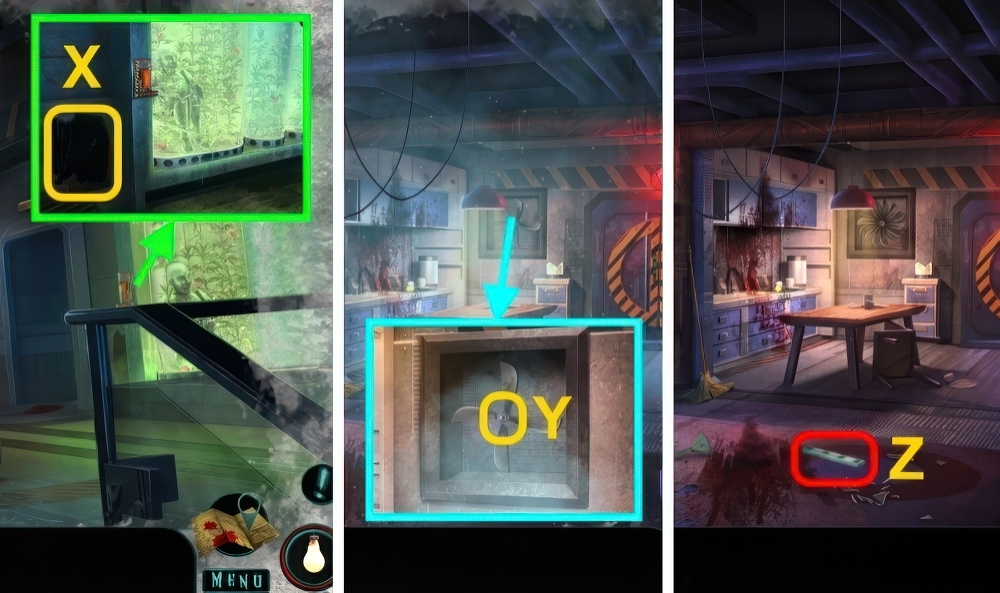
- Take Map and MUSIC BOX (X).
- Go forward.
- Examine (Y).
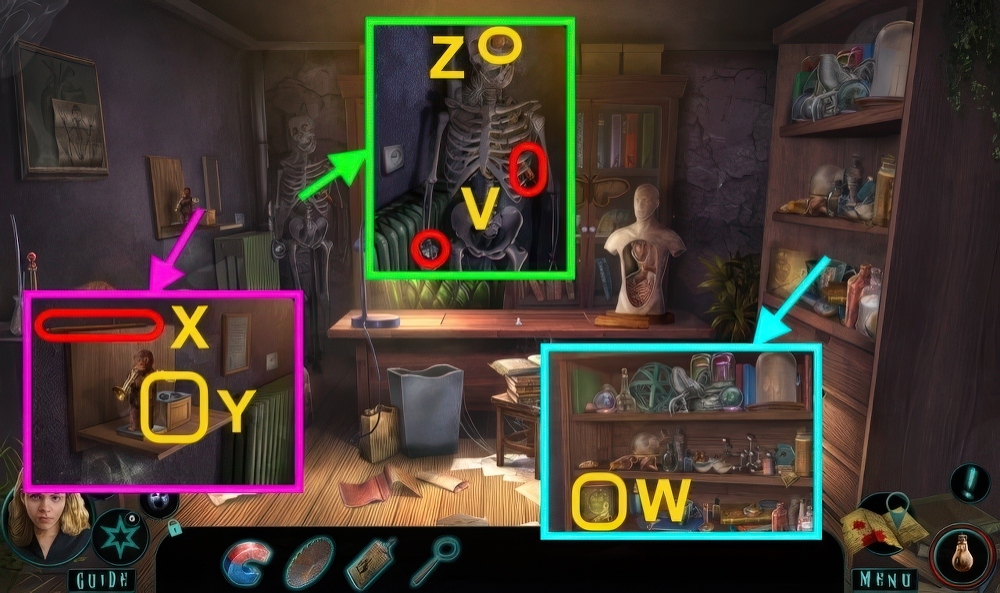
- Play puzzle, receive PIANO KEY (1/3) (Z).
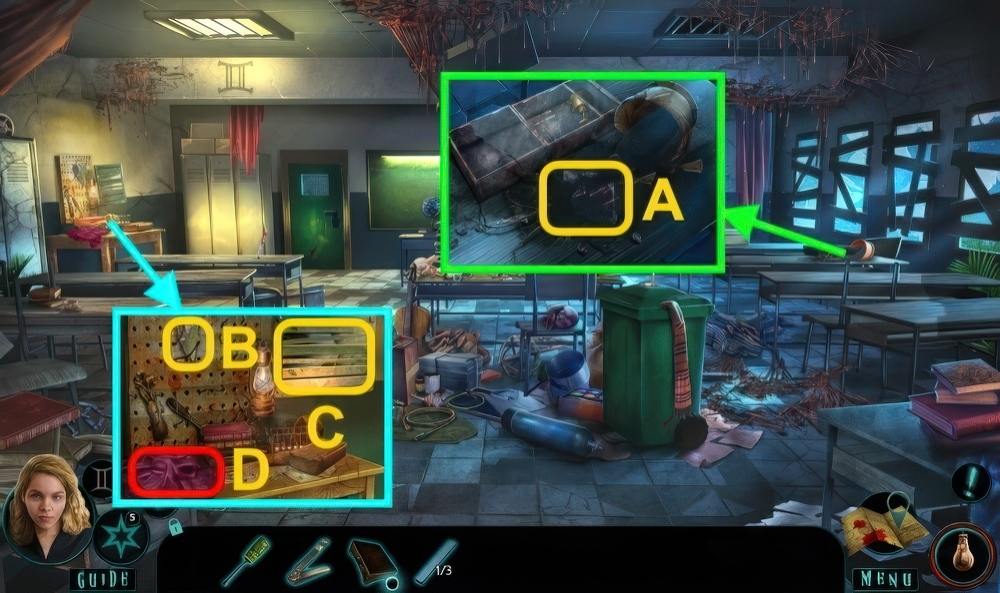
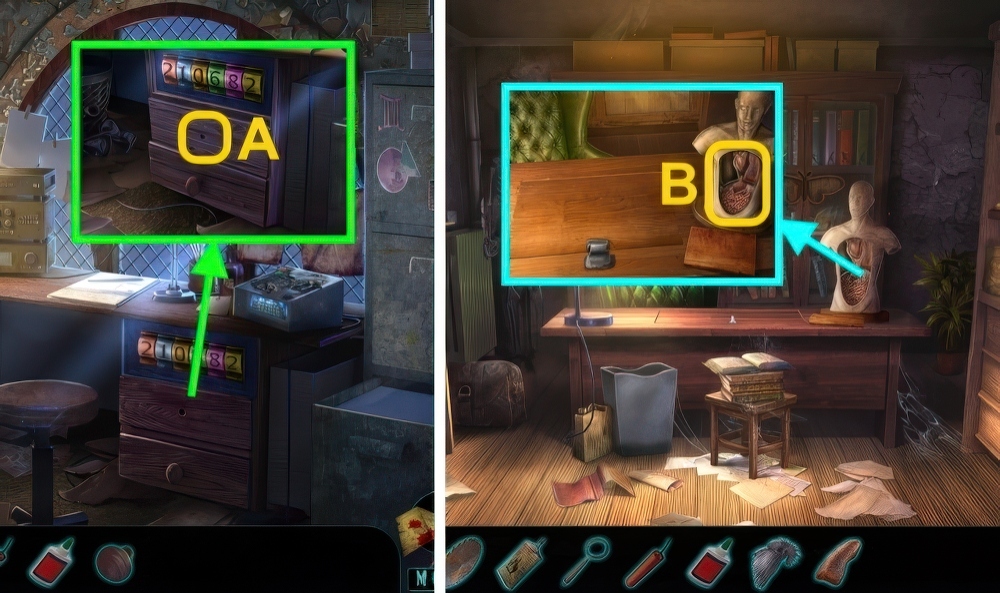
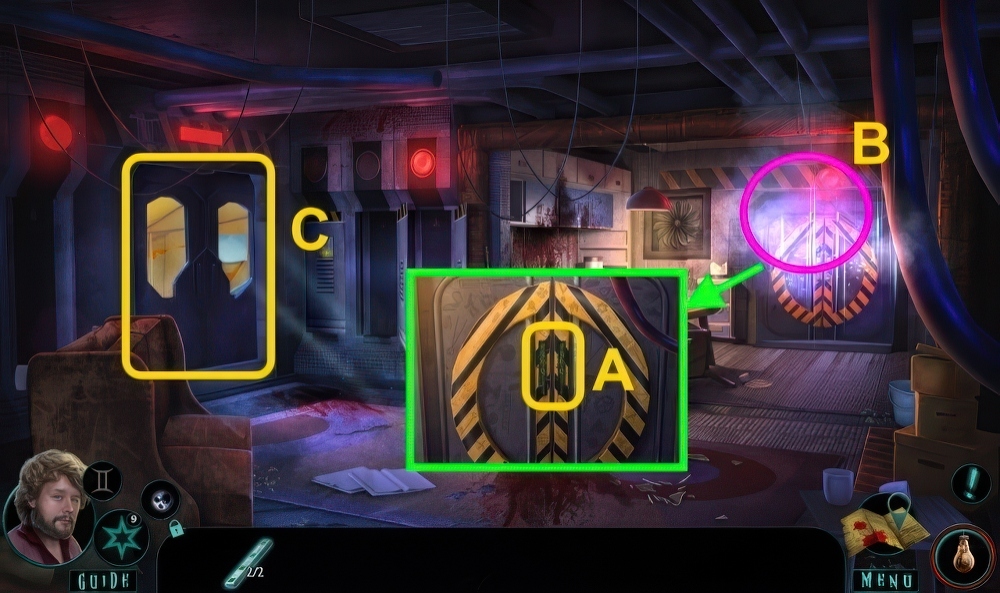
- Examine 3 times (A), take photo and CROCHET HOOK.
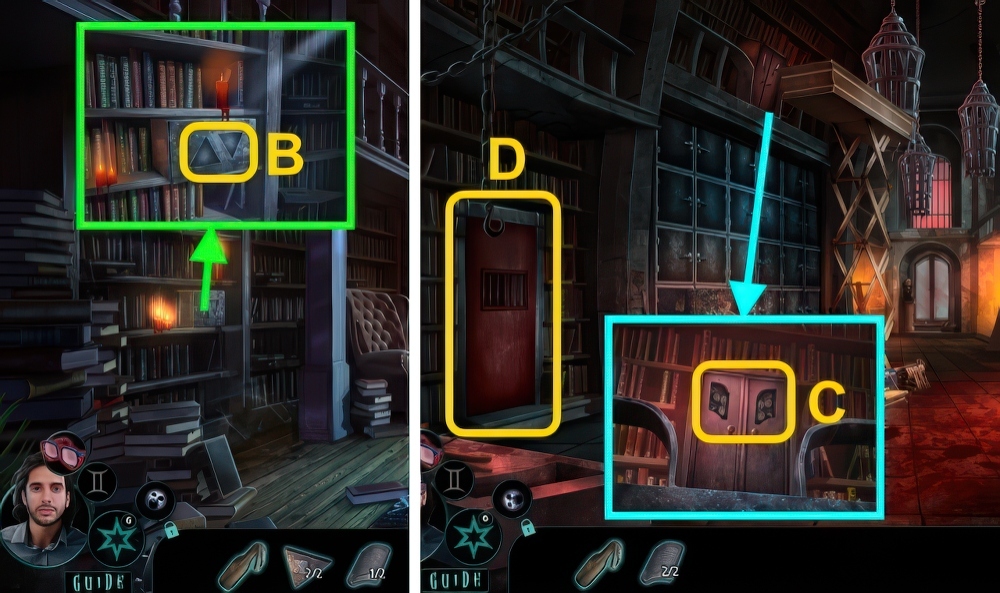
- Use NAIL CLIPPERS (B), take GLOBE INSET (1/2).
- Use SMALL SCREWDRIVER (C), examine 4 times.
- Take ROLLER SKATES (1/2).
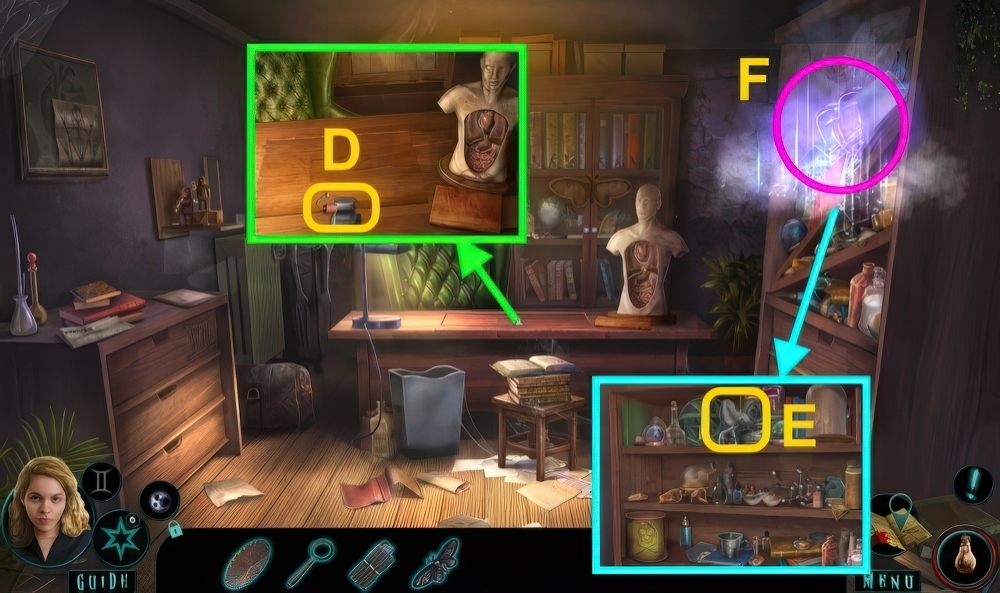
- Take SWEATER (D).
- Examine SWEATER, use CROCHET HOOK.
- Take PIN.
- Go down.

- Examine 3 times, use PIN (E).
- Select the lock pins in the correct order to lift them all before they lower again.
- Select a lock pin to lift it.
- Lock pins lower at different speeds.
- Walkthrough (F).
- Take MAGNET, SCHOOL BAG, and GLOBE INSET (2/2).
- Examine SCHOOL BAG, take notebook and RULER.
- Go forward.
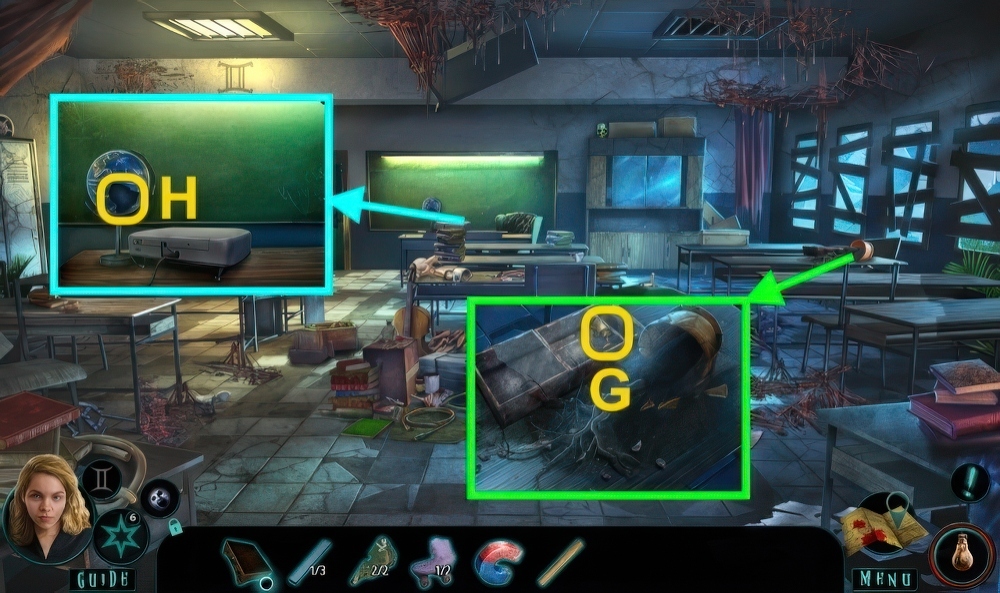
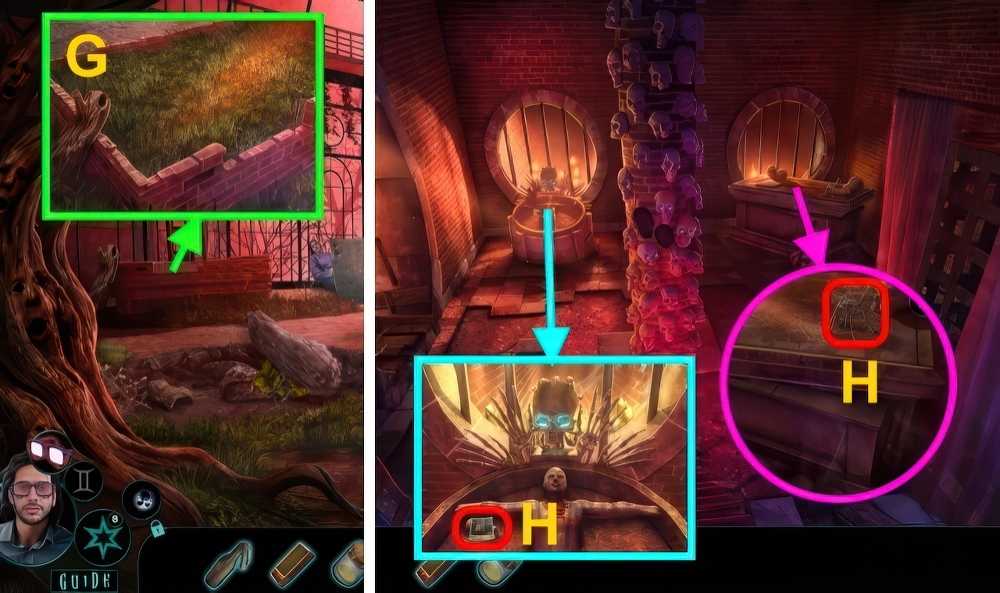
- Use MAGNET (G), receive TROPHY CASE KEY.
- Place GLOBE INSET (2/2) (H).
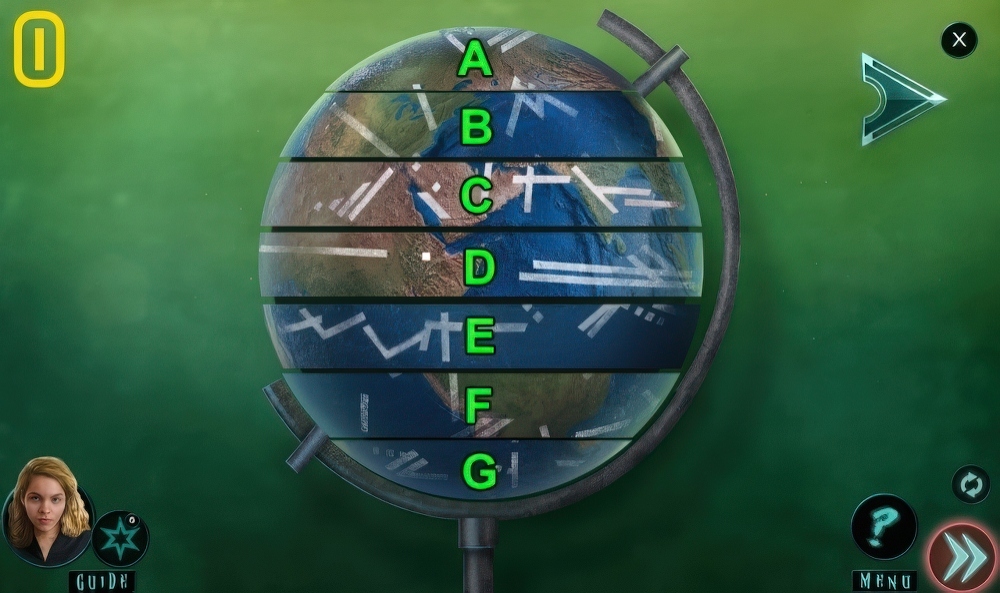
- Match the pattern on the globe to the pattern on the other screen.
- Select globe parts to rotate them.
- Select the arrow to move between screens.
- Walkthrough (I): A×3-B-C×2-E×2-F-G×3.
- Take BALLERINA FIGURINE.
- Go down.
- Take photo (J), place TROPHY CASE KEY.
- Play puzzle, receive MUSIC BOX LEVER (K).
- BALLERINA FIGURINE and MUSIC BOX LEVER on MUSIC BOX, take ATRIUM KEY.
- Use ATRIUM KEY (L).
- Go School Atrium.
- Take ROPE LADDER (M).
- Examine (N), use RULER.
- Take COIN.
- Examine (O), select “Grab it slowly”.
- Receive WRENCH.
- Go right.
- Examine (P), take CIRCULAR BLADE.
- Take WINDUP TOY (@).
- Take photo (Q), use COIN (R).
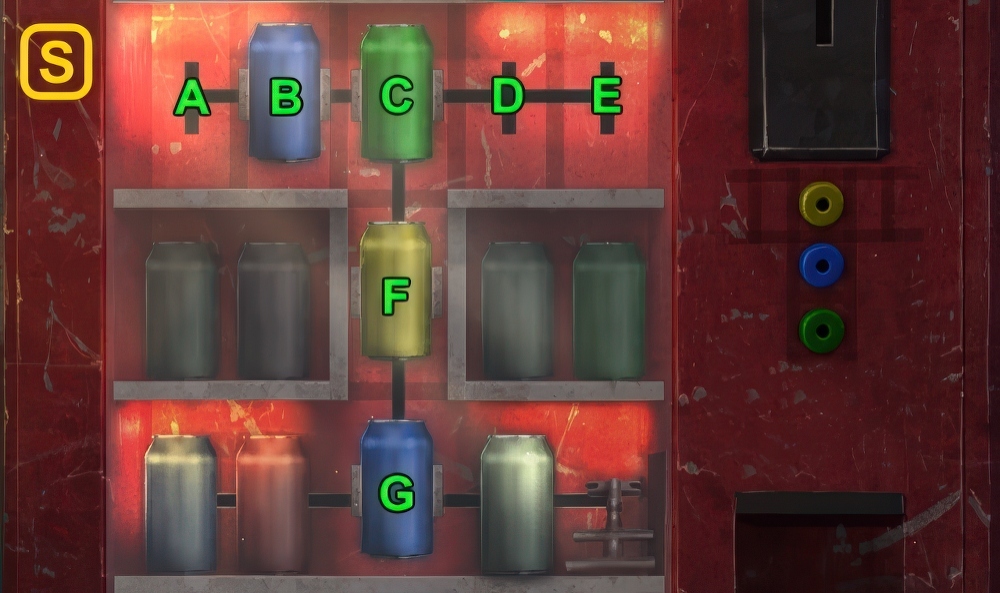
- Arrange the cans in the center according to the clue.
- Select a can and an empty adjacent space on the lines to move it.
- Cans can’t lump over each other.
- Walkthrough (S): B-A-C-B-F-C×2-E-G-C×2-D-B-C×2-G-D-C×2-F-E-C.
- Take HYDRANT KEY.
- Go down.
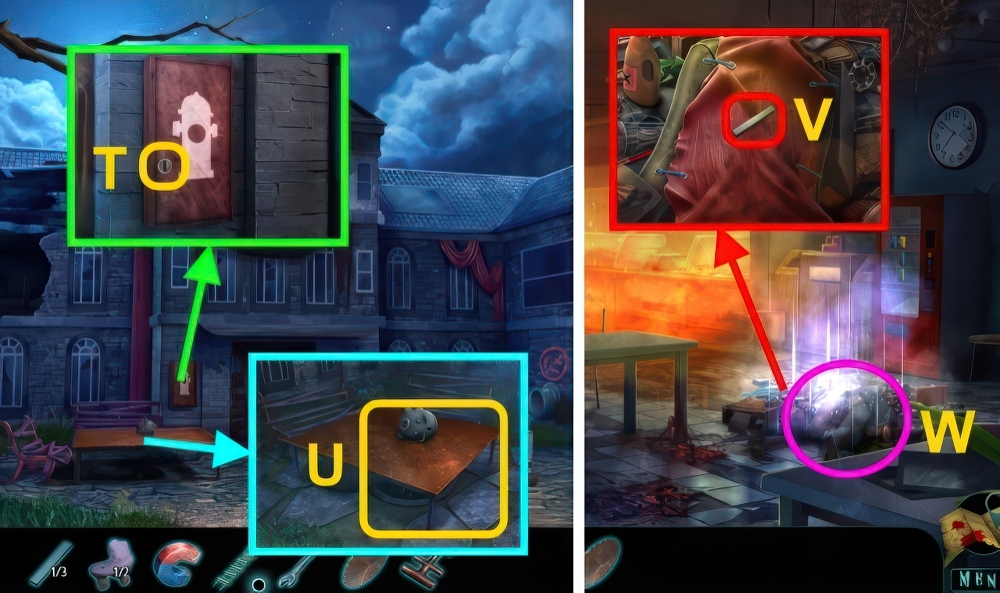
- Use HYDRANT KEY (T), take ROLLER SKATES (2/2).
- Use ROLLER SKATES (U), take STRAIGHT RAZOR.
- Go right.
- Take PIANO KEY (2/3) (V), use STRAIGHT RAZOR.
- Play puzzle, receive ANTI-RUST SPRAY (W).
- Go down twice.
- Use ANTI-RUST SPRAY and WRENCH (X), take BICYCLE HANDLEBARS.
- BICYCLE HANDLEBARS on ROPE LADDER, take IMPROVISED LADDER.
- Use IMPROVISED LADDER (Y).
- Take HOSE and FLASHLIGHT (Z).
- Go School Atrium.
- Use HOSE (A).
- Go right.
- Select “Put the fire out from the bottom up”.
- Take SCHOOL MODEL PART (1/2) (B).
- Go forward.
- Examine (C).
- Examine (1-3).
- Examine (D).
- Take SCHOOL MODEL INLAY (1/2) (E).
- Play puzzle, receive PIANO KEY (3/3) (F).
- Take TONGS and ACID CAN (G).
- Go down.
- Use TONGS (H), receive LIGHTER FLUID.
- Use ACID CAN (I), take STONE HAND.
- Go down.
- Use TONGS (J), receive MAGNIFYING GLASS.

- Place STONE HAND (K).
- Take SCHOOL MODEL INLAY (2/2) (L).
- Go down.
- Use PIANO KEY (3/3) (M).
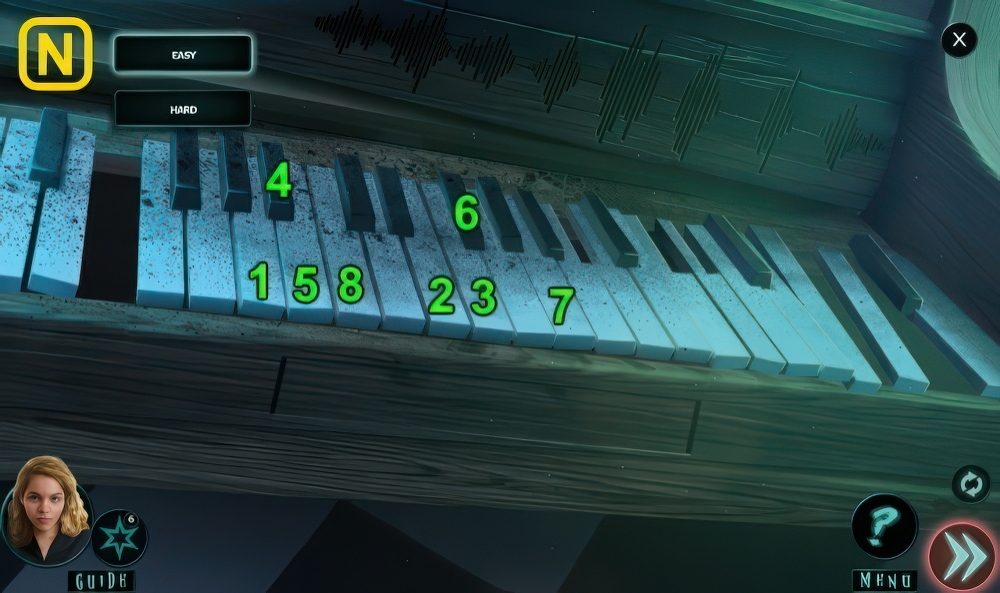
- Press the piano keys in the correct sequence.
- Walkthrough (N).
- Easy: (1-8).
- Hard: (1-3)-(1-6)-(1-8).
- Take BUST INLAY.
- Place BUST INLAY (O).
- Use FLASHLIGHT (P), take SCHOOL MODEL PART (2/2).
- Go to School Atrium.
- Place SCHOOL MODEL INLAY (2/2) and SCHOOL MODEL PART (2/2) (Q).
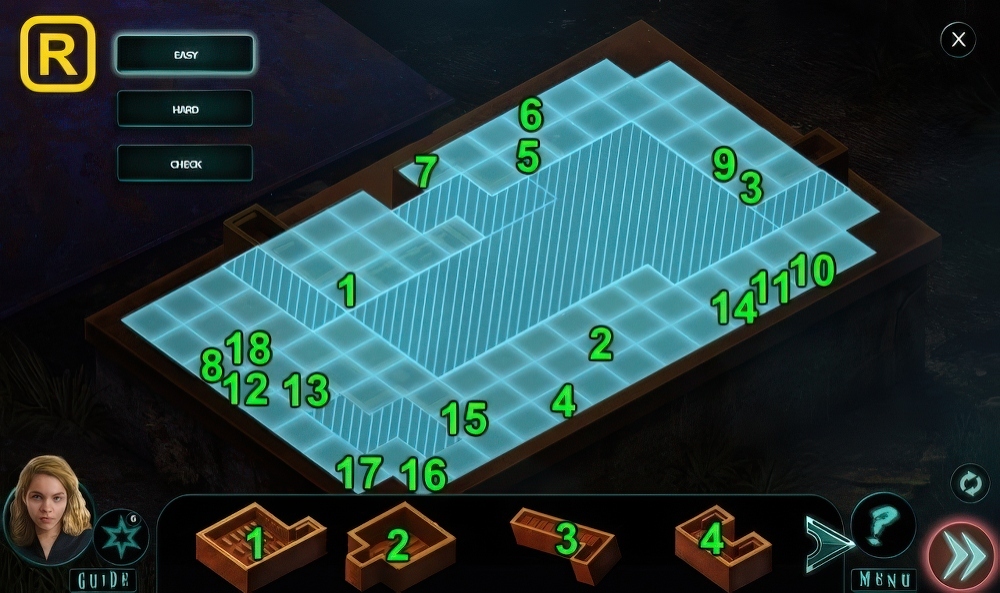
- Arrange the puzzle pieces correctly on the board.
- Select a puzzle piece and an empty space to place it there.
- Select the check button to check your arrangement.
- Spaces turn green when placed correctly and red when placed in correctly.
- Easy and hard walkthrough (R): (1-1)-(2-2)-(3-3)-(4-4)-(1-5)-(2-6)-(3-7).
- (4-8)-(1-9)-(2-10)-(3-11)-(4-12)-(1-13)-(2-14)-(3-15)-(4-16)-(1-17)-(2-18).
- Examine (S).
- Take BIOLOGY ROOM KEY (T).
- Go to Classroom.
- Scroll down, use BIOLOGY ROOM KEY (U).
- Go forward.
- Take FIRECRACKER and PENCIL SHARPENER (V).
- Use MAGNET (W), receive WINDING KEY.
- WINDING KEY on WINDUP TOY.
- Take DRUMSTICK (X).
- Place WINDUP TOY (Y), take GLUE.
- PENCIL SHARPENER on DRUMSTICK, take SHARP STICK.
- Use SHARP STICK (Z), receive KNOB.
- Go to Radio Room.
- Place KNOB (A), take ROOSTER HEAD and PLASTIC LUNG.
- Go to Biology Room.
- Place PLASTIC LUNG (B).
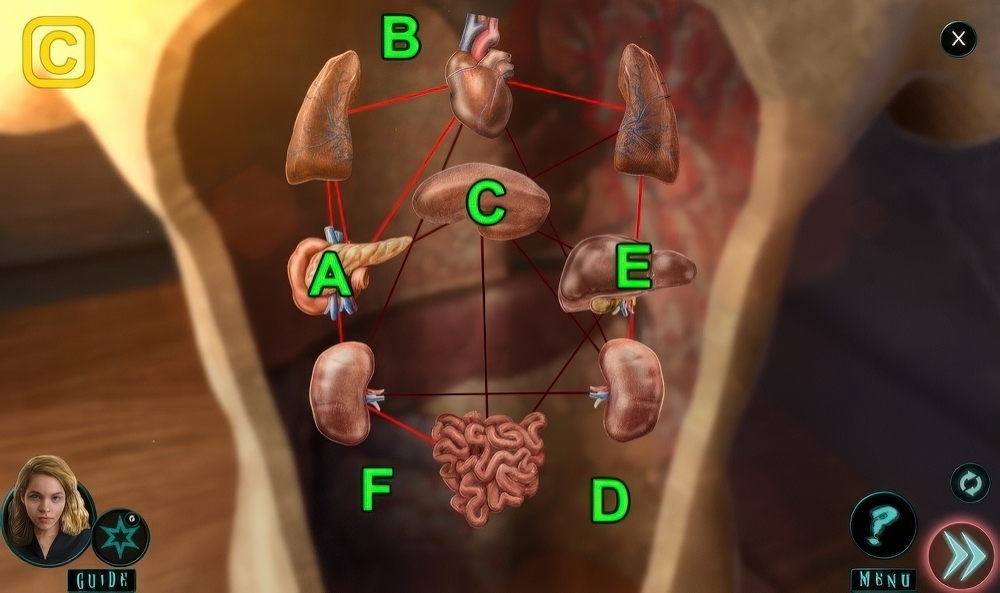
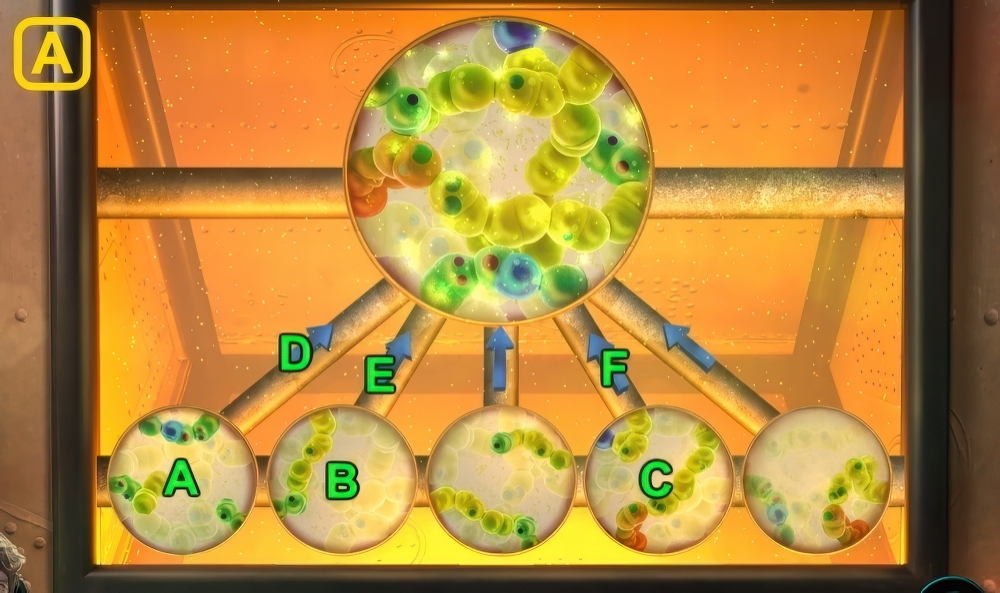
- Select and drag organs so that the red lines between them don’t overlap.
- Lines light up when they don’t overlap with other lines.
- Walkthrough (C): (A-B)-(C-D)-(E-F).
- Take LIGHTER.
- Examine LIGHTER 2 times, use LIGHTER FLUID.
- Use FIRECRACKER and LIGHTER (D), take DEATH MOTH.
- Use GLUE and ROOSTER HEAD (E).
- Play puzzle, receive ROOSTER FIGURINE (F).

- Use DEATH MOTH (G).
- Use LIGHTER (1-6), take SAW WITHOUT BLADE and BUTTERFLIES.
- CIRCULAR BLADE on SAW WITHOUT BLADE, take SAW.
- MAGNIFYING GLASS on BUTTERFLIES.
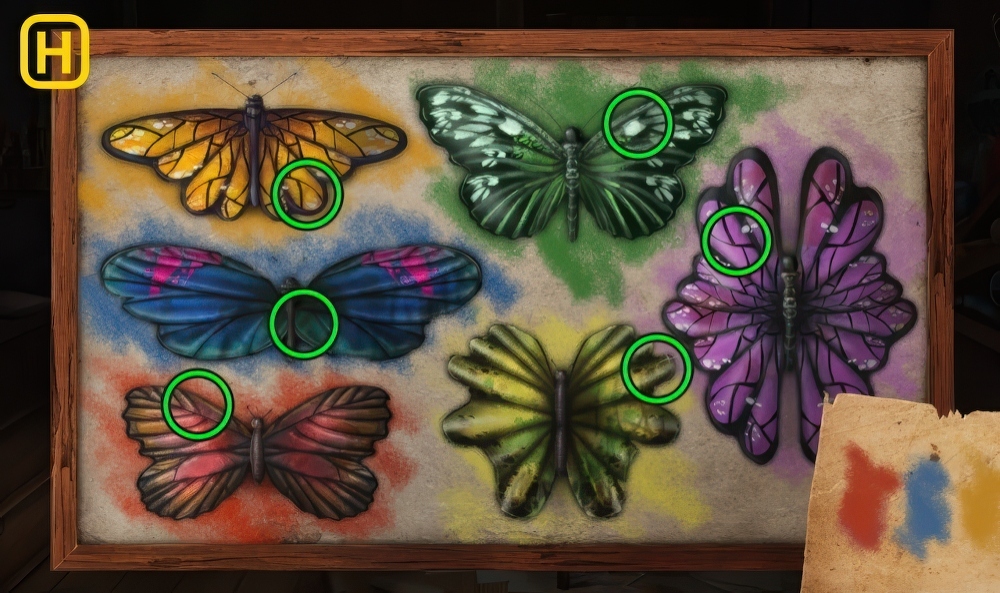
- Move the magnifying glass over the butterflies and find all the numbers.
- Walkthrough (H).
- Take BUTTERFLY CODE.
- Use SAW (I), take RAT FIGURINE.
- Go to Radio Room.
- Use BUTTERFLY CODE (J), enter code.
- Take GOAT FIGURINE.
- Go to Biology Room.
- Place ROOSTER FIGURINE, RAT FIGURINE, and GOAT FIGURINE (K), select “Push the book”.
- Take FLARE STICK (L).
- Go forward.
- Select the circles to choose an action.
- The actions you chose will go against the heart’s actions m the order you selected them.
- Get enemy hearts to turn black before yours do.
- Sword symbols deals damage, shield symbols cancel swords, the plus symbol heals one heart unless it’s against the sword symbol.
- Walkthrough is random (M).
- Examine door (N).
- Talk.
- Select (O).
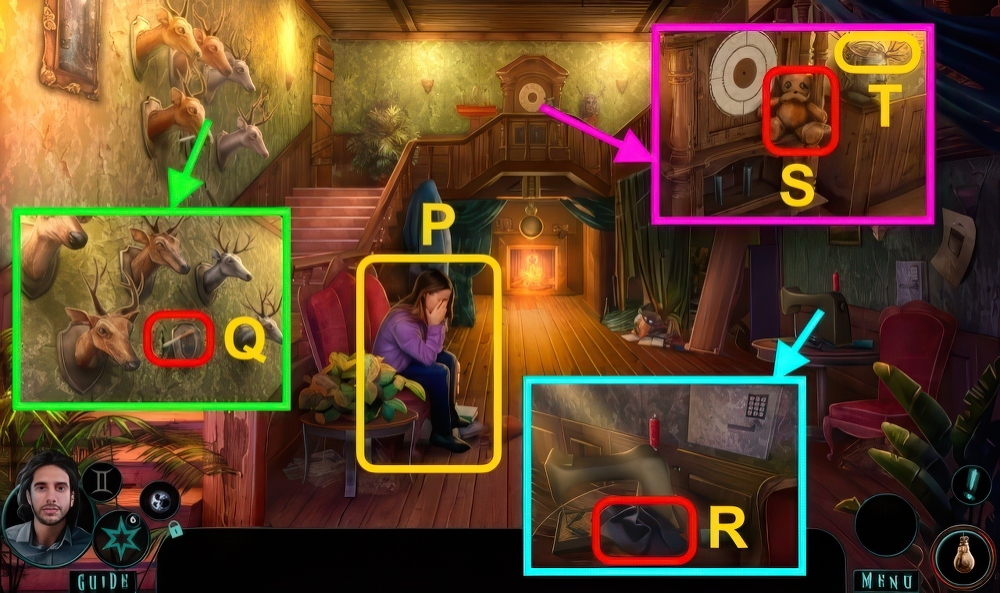
- Talk (P).
- Take RASP (Q).
- Take RUG and POLICE BADGE (R).
- Take DOLL (S).
- Use RASP (T), take ANTLERS.
- POLICE BADGE on DOLL, take SAND.
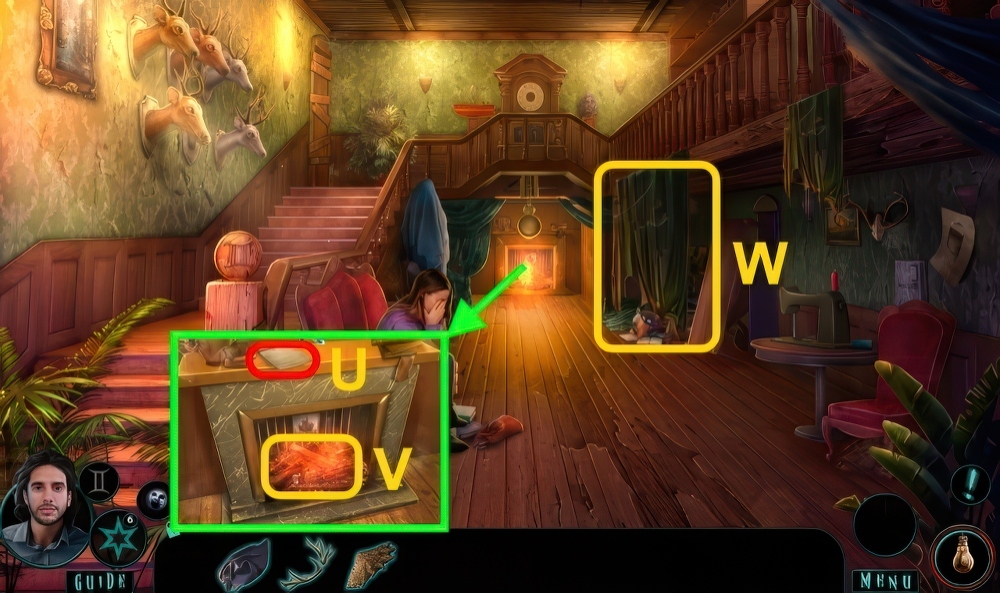
- Take PAPERS (U).
- Use SAND (V), take BURNT LOG.
- BURNT LOG on PAPERS, take SAFE CODE.
- Examine (W).
- Play puzzle, receive DEER HEAD (X).
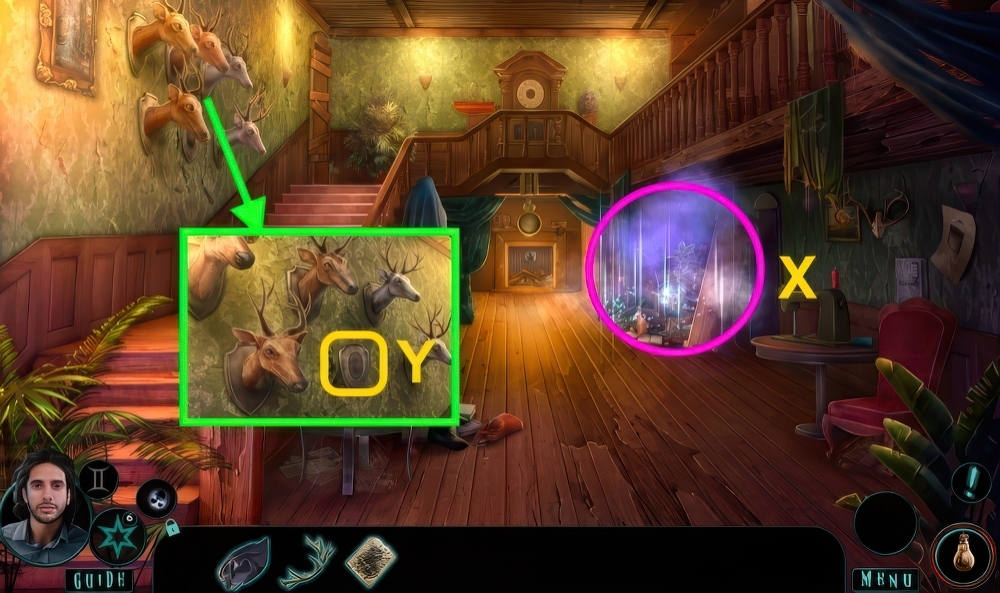
- Place DEER HEAD and ANTLERS (Y).
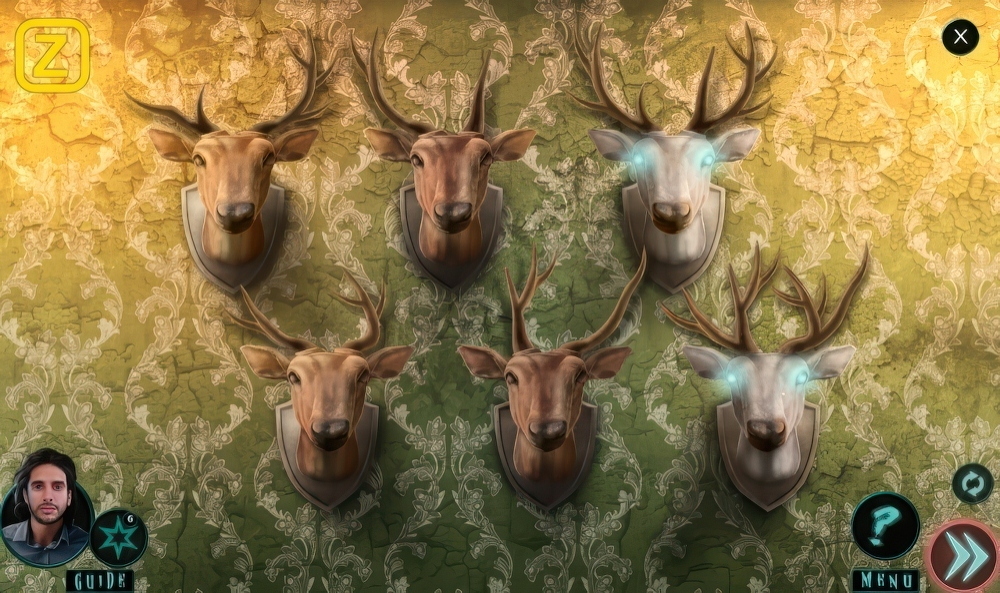
- Select the antlers to switch them to match the antlers in the same row.
- Walkthrough (Z), take WEIGHT (1/2).
- Pull switch.
- Use SAFE CODE (A).
- Walkthrough (B): Code 489576.
- Take FIRE INSET.
- Place FIRE INSET (C), take WEIGHT (2/2) and HEX WRENCH.
- Use HEX WRENCH (D), take SEWING WHEEL.
- Place SEWING WHEEL (E).
- Take CLOCK ARMS (F).
- Place WEIGHT (2/2) and CLOCK ARMS (G).
- Go Down.
- Take BROKEN GLASSES and GLASSES PART (H).
- Take THEATER BINOCULARS and WIRE CUTTER (I).
- Use THEATER BINOCULARS (J).
- Play puzzle, receive SHARP GLASS (K).
- Take photo and AIR HORN (L).
- Use WIRE CUTTER (M), receive WIRES.
- Use AIR HORN, take ACETONE (N).
- Use ACETONE (O), open.
- Take TOOTHPASTE.
- TOOTHPASTE, GLASSES PART, WIRES, and RUG on BROKEN GLASSES, take Glasses.
- Use Glasses (P).
- Take MOLOTOV COCKTAIL (Q).
- Examine (R).
- Play puzzle, receive BRASS KNUCKLES (S).
- Use BRASS KNUCKLES (T), take T-HANDLE.
- Use Glasses.
- Place T-HANDLE (U), press.
- Use BRASS KNUCKLES (V), take MECHANISM.
- Use Glasses.
- Take LIFT CONTROL and STONE INSET (1/2) (W).
- Use MECHANISM and LIFT CONTROL (X).
- Take CHESS FIGURINE (1/2) and STONE INSET (2/2) (Y).
- Use Glasses.
- Use SHARP GLASS (Z), take CHESS FIGURINE (2/2).
- Place CHESS FIGURINE (2/2) (A), take LIBRARY INSET (1/2).
- Place STONE INSET (2/2) (B), take LIBRARY INSET (2/2).
- Use Glasses.
- Place LIBRARY INSET (2/2) (C), take GARDEN KEY.
- Select “Make the cage fall on him”.
- Use GARDEN KEY (D).
- Examine (E), take FAUCET.
- Take MATCHES (F).
- Take SPOON (G).
- Use Glasses.
- Select “Grab the one on the anvil”, receive LEATHER GLOVE.
- Use SPOON (H), receive SPOON WITH GREASE.
- Take LEATHER (I).
- Use FAUCET (J), examine.
- Take BELT.
- Take photo, RIB SPREADER, and SCREWDRIVER (K).
- Use LEATHER GLOVE (L), take SHOVEL.
- Take WELDING MACHINE (M).
- Use RIB SPREADER (N), take CAR JACK.
- Use Glasses.

- Use SHOVEL (O).
- Play puzzle, receive CHAIN.
- Use SCREWDRIVER (P), take STEP.
- Use BELT (Q), take PLUMBER”S SNAKE.
- Use Glasses.
- Use STEP and WELDING MACHINE (R).
- Use PLUMBER”S SNAKE (S), take WEED KILLER.
- Use Glasses.
- Use SPOON WITH GREASE (T), take MECHANICAL WHEEL.
- Use CARJACK (U), take DOLL INSET (1/2).
- Take JAR (V).
- LEATHER on JAR, take COLLECTING JAR.
- Use Glasses.
- Place MECHANICAL WHEEL (W).
- Select the wheels and then put them in the correct order so they turn each other.
- Walkthrough (X).
- Take FUSE.
- Use FUSE and WEED KILLER (Y), take DOLL INSET (2/2) (Z).
- Use CHAIN (A).
- Examine chain (B).
- Use Glasses.
- Place DOLL INSET (2/2) (C), take SNAKE STICK (D).
- Use SNAKE STICK and COLLECTING JAR (E), receive JAR WITH POISON.
- Take METAL DETECTOR (F).
- Use METAL DETECTOR, use MOLOTOV COCKTAIL (G).
- Examine arm.
- Select “Run underground”.
- Take photo, CANDLE, and WIRE FIGURE (H).

- Take LASER (I).
- Use Glasses.
- Take TWIG and PAPER (J).
- Take SACRIFICIAL KNIFE (K).
- Use Glasses.
- Use SACRIFICIAL KNIFE (L).
- Take SKULL (1/2) (M).
- Use TWIG (N), take CLOSED BEAR TRAP and SHAFT INSET.
- Use SACRIFICIAL KNIFE, receive SPONGE.
- Use Glasses.
- Use SHAFT INSET (O).
- Use LASER, take JAIL INSET.
- Use SPONGE (P), take FAUCET HANDLE.
- Use FAUCET (Q) and PAPER, take JAIL CODE.
- Place JAIL INSET and JAIL CODE (R).
- Select and drag the pointers so that the symbols match the circles in the same order as in the clue.
- Walkthrough (S).

- Take CROWBAR, SPRAYER, and ROLLER (T).
- Use ROLLER and WIRE FIGURE (U), receive IMPROVISED HOOK.
- Use IMPROVISED HOOK (V), receive SKULL (2/2).
- JAR WITH POISON on SPRAYER, take POISON SPRAYER.
- CROWBAR on CLOSED BEAR TRAP, take BEAR TRAP.
- Use Glasses.
- Place BEAR TRAP (W).
- Use CROWBAR, CANDLE, and MATCHES (X).
- Play puzzle, receive NOZZLE (Y).
- Place SKULL (2/2) (Z).
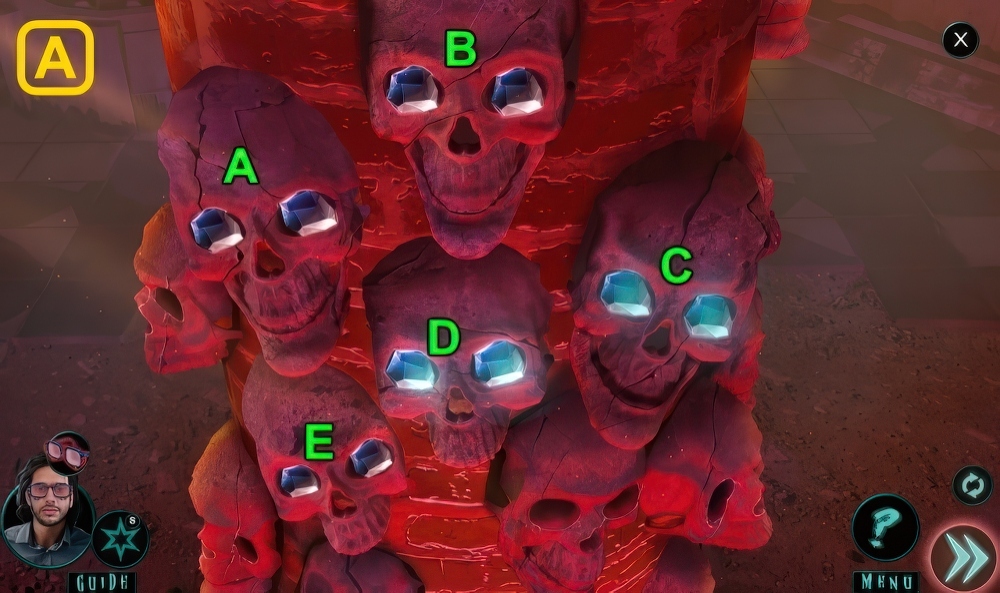
- Select the skulls in the correct order so all of their eyes (B) glow at the same time.
- Walkthrough (A): D-A-E-A-C-E-C-B.
- Take INCOMPLETE LIQUID NITROGEN.
- NOZZLE on INCOMPLETE LIQUID NITROGEN, take LIQUID NITROGEN.
- Use Glasses.
- Use LIQUID NITROGEN (B).
- Use Glasses.
- Select “Spray the killer with poison”.
- Talk (C).
- Take coat and GLUE (D).
- Take ROCK (E).
- Take SANDPAPER (F).
- Use ROCK (G), receive SKATE BLADE.
- Use SKATE BLADE (H), take NET.

- Use NET (I), take GLOVES.
- GLUE and SANDPAPER on GLOVES, take CLIMBING GLOVES.
- Use CLIMBING GLOVES (J).
- Take SHOELACES (K).
- Take BOARD (L).
- Play puzzle, take CHIP (M).
- Use SKATE BLADE (N), take METAL POLE.
- Examine broom (O).
- Use METAL POLE, BOARD, and SHOELACES (P).
- Go forward.
- Open, use CHIP (Q).
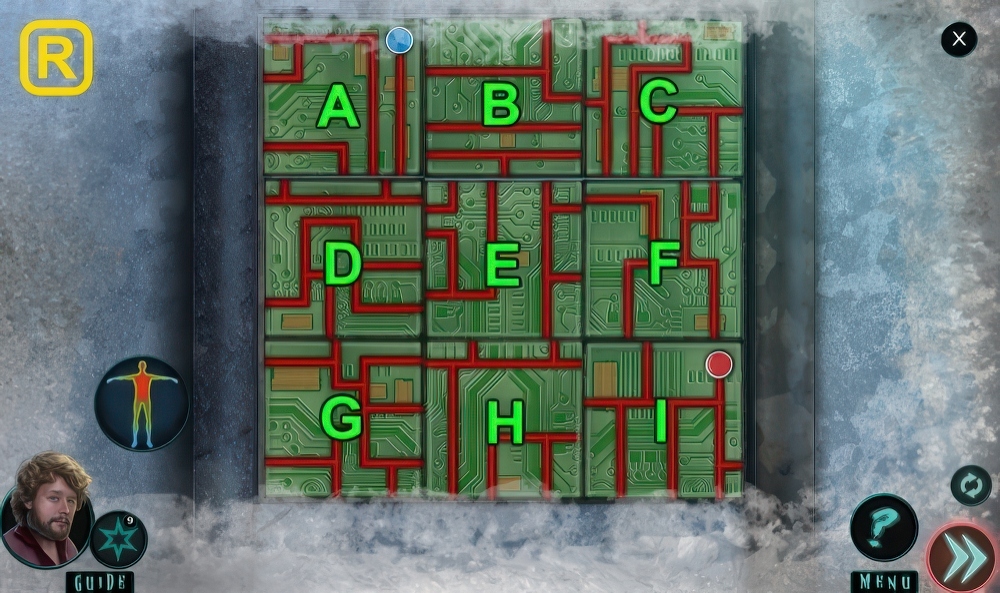
- Select the ties to rotate them in order to create a Iine that connects the circles.
- Walkthrough (R): A-B×2-C×3-D-E×2-F×3-G-H×2-I×3.
- Examine scene 4 times.
- Select “Close the door”.
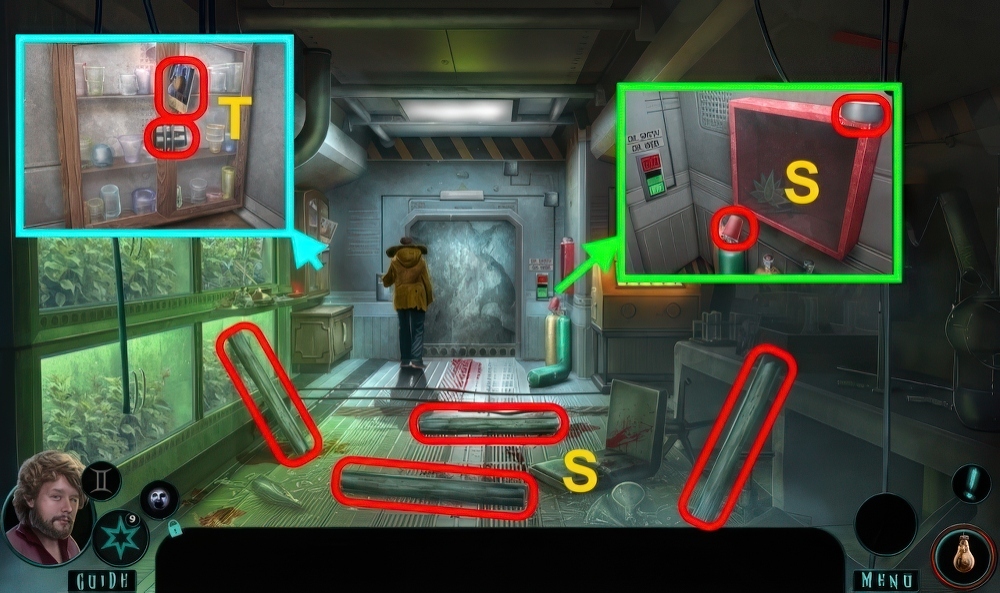
- Take PLASTIC CUP, DUCT TAPE, and BOARDS (1/4)-(4/4) (S).
- Take photo and CASETTE TAPE (T), open cupboard.
- Use PLASTIC CUP on light, receive LIGHTBULB.
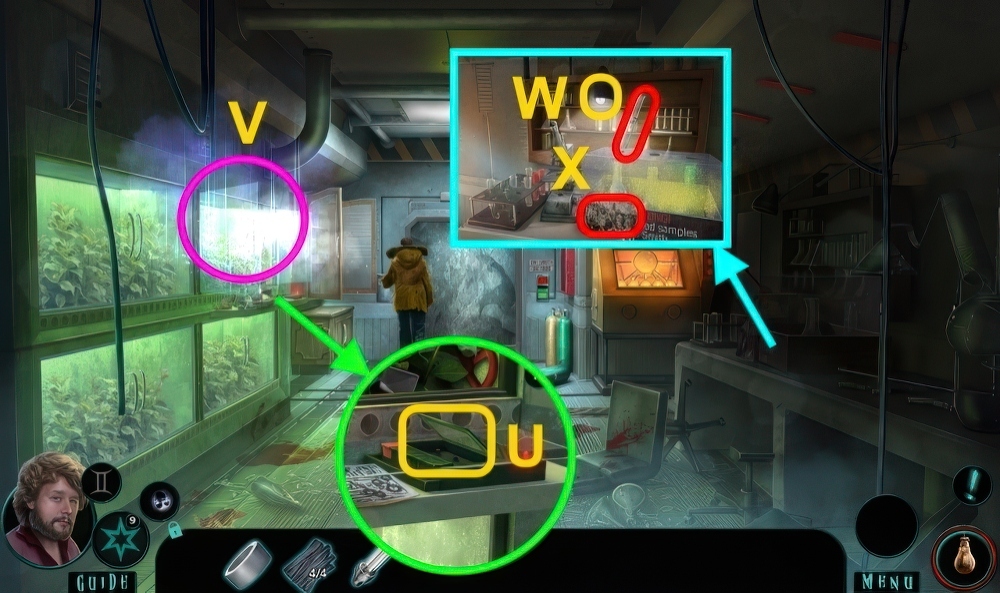
- Use CASETTE TAPE (U).
- Play puzzle, receive DUST (V).
- Use LIGHTBULB (W).
- Take PICTURE and VIRUS SAMPLE (X).
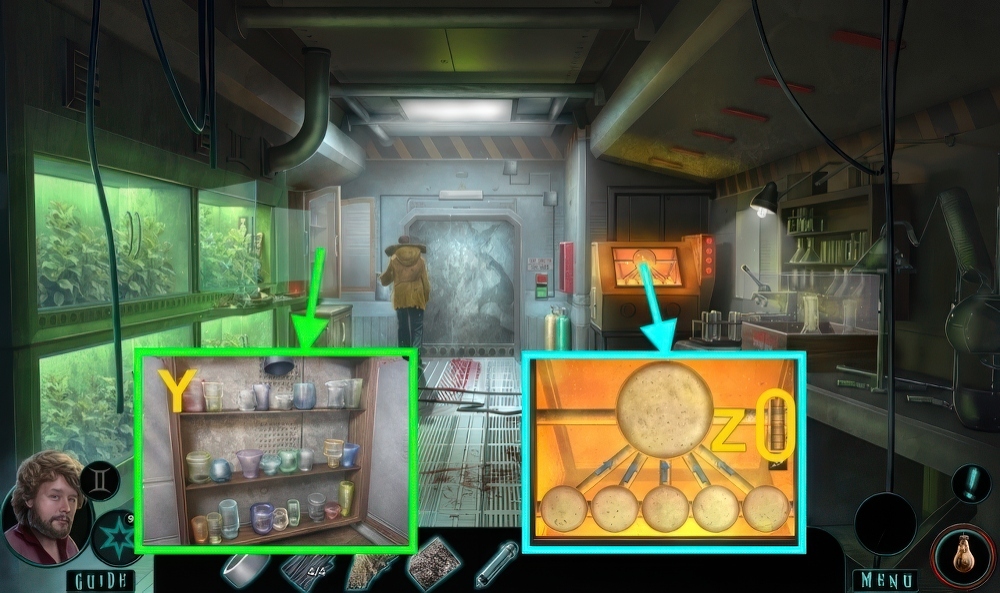
- Use PICTURE (Y).
- Play puzzle, take DR.
- WEB”S GLASS.
- DUST and DUCT TAPE on DR.
- WEB”S GLASS, take FINGERPRINT (1/2).
- Use VIRUS SAMPLE (Z).
- Select the circles to rotate them.
- Select the button to add the picture from the corresponding circle to circle.
- Combining the images in the circles should match the mage in the circle.
- Walkthrough (A): A×3-B×5-C×5-D-E-F.
- Take ANTI-VIRUS.
- Use ANTI-VIRUS (B).
- Use DUST and DUCT TAPE, receive FINGERPRINT (2/2).
- Use FINGERPRINT (2/2) (C).
- Go forward.
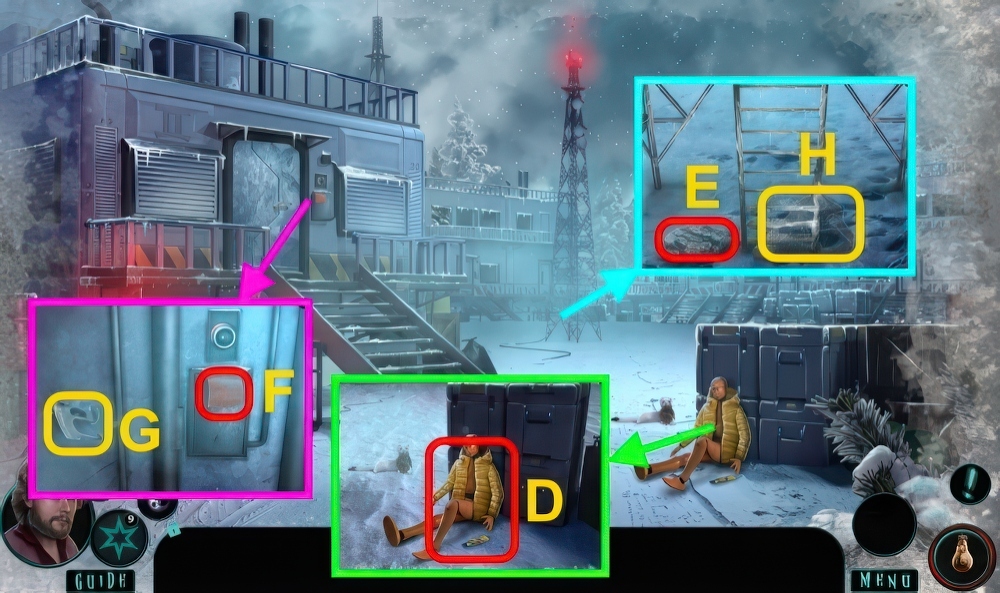
- Take radio (D).

- Take photo, Map, LOCK INSET (1/2), SHIFTER, and GLASS CUTTER (E).
- Examine (F).

- Examine 3 times, take BOOT (G).
- Use SHIFTER (H).
- Play puzzle, receive MEDICAL INSET (1/2) (I).
- Go down.

- Use GLASS CUTTER (J), take MEDICAL INSET (2/2) and NAILS.
- Go forward.
- Place MEDICAL INSET (2/2) (K), take DEFIBRILLATOR and SMALL STEPS.
- Use SMALL STEPS (L).
- Select “Use defibrillator”, use BOARDS (4/4), NAILS, and BOOT (M).
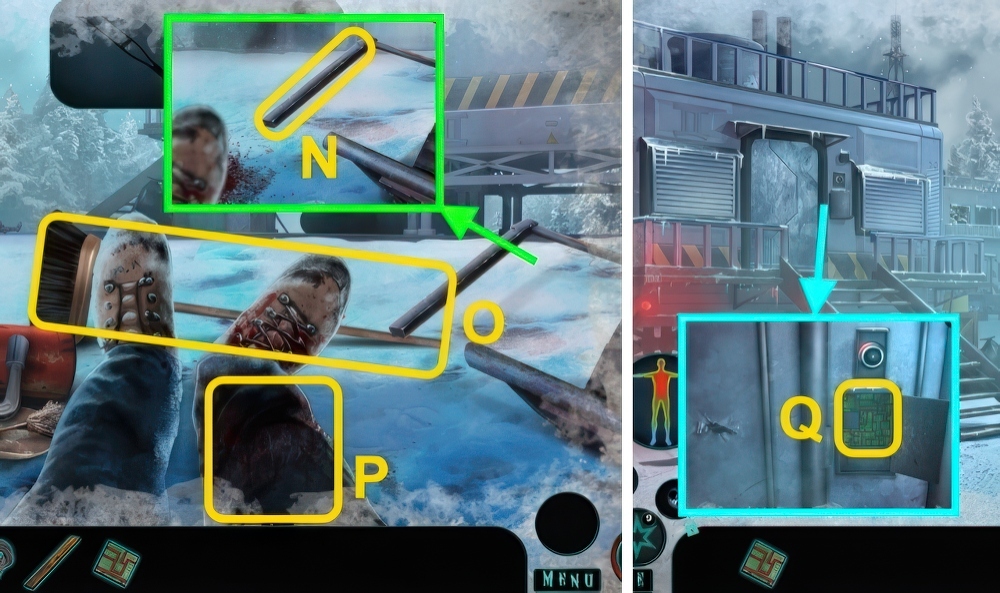
- Scroll down, take COMPUTER POWER CORD (N).
- Examine, use COMPUTER POWER CORD (O).
- Examine (P).
- Use the arrows to move m order to reach the goal.
- Tiles open some doors if your character is standing on them.
- Walkthrough (Q): B-A-B×2-C-D-A-C-B-A-D-A-B-D-C-A×2-B.
- Go right.
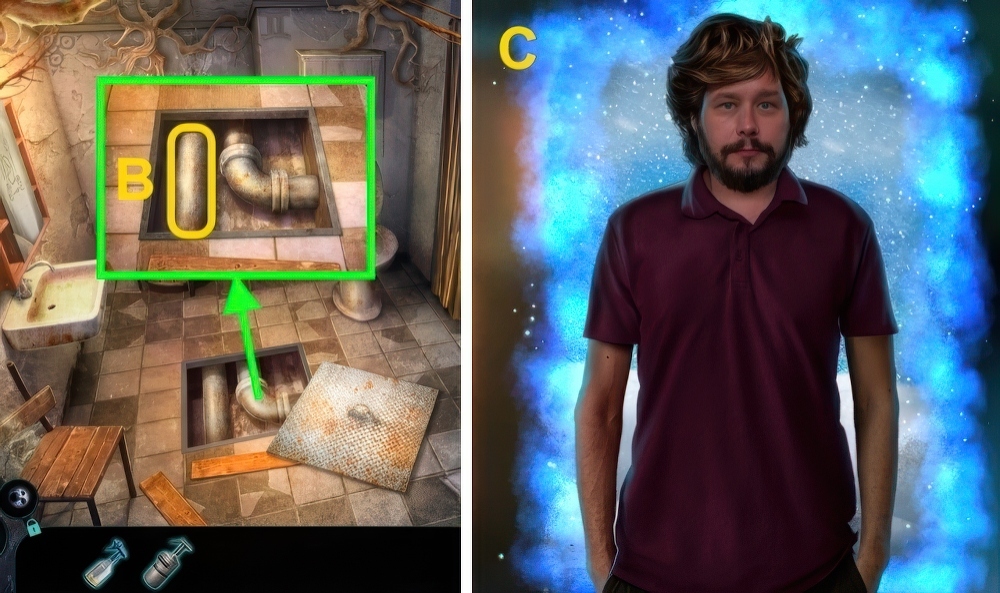
- Take TOILET PAPER (R).
- Take HANDLE (S).
- HANDLE on TOILET PAPER, take IMPROVISED TORCH.
- Use IMPROVISED TORCH (T).
- Use water (U).
- Take BURNING IMPROVISED TORCH.
- Use BURNING IMPROVISED TORCH (V), take ID CARD.
- Use ID CARD (W), open lockers.
- Take HAZARD GLOVES and SILICA GEL.
- Use HAZARD GLOVES (X), receive SMARTPHONE.
- SILICA GEL on SMARTPHONE.
- Go down.
- Use SMARTPHONE (X), take DRILL.
- Go right.
- Use DRILL (Y).
- Take LOCK INSET (2/2) (Z).
- Place LOCK INSET (2/2) (A).
- Play puzzle, receive HAZMAT SUIT (B).
- Use HAZMAT SUIT (C).
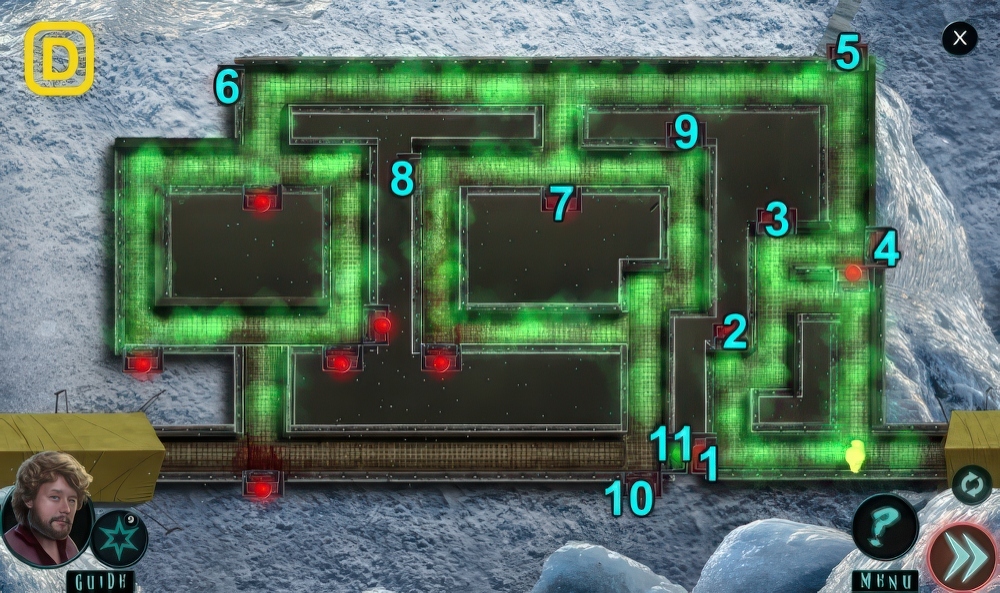
- Select the lights to turn the fans on or off.
- The fans will clear the poison in the corridor so you can move, using the arrows, through them.
- Get to the exit.
- Walkthrough (D): 1-(←)-2-(↑)-3-(→)-(↑)×2-4-(→)-5-(↑)-6-(←)-7-(↓)-8-(→)-9-(↓)-10-(←)-(↓)×2-11-(←)×2.
- Take MAGNET and SOLDERING IRON (E).
- Use MAGNET (F).
- Play puzzle, receive ROBOT INSET (G).
- Take photo (H).
- Place ROBOT INSET (I).
- Take SPATULA.
- Go Office.
- Use SOLDERING IRON (J), take LIP BALM.
- Play puzzle, take LEVER.
- Go down.
- Use LEVER (K).
- Take STEEL ROPE and ROBOT BATTERY (1/2) (L).
- Use SPATULA (M), receive ALUMINUM.
- Pull lever.
- Use LIP BALM (N), open.
- Take SHOTGUN and ROBOT BATTERY (2/2).
- Use STEEL ROPE (O).
- Place ROBOT BATTERY (2/2) (P).
- Use ALUMINUM (Q).
- Select the circles in order to turn all of the wires black.
- Walkthrough (R): A-B-C-A-D-E-B-F-D-C.
- Examine (S).
- Go forward.
- Select “Run in shaft”.
- Scroll up, take SHOTGUN SHELLS (T).
- Use SHOTGUN and SHOTGUN SHELLS (U).
- Select the parts of the circles to rotate them so the balls will have a clear path to the center.
- Easy walkthrough (V): B×10-H×3-F×3-D×5-E×8-C×7-A×6-G×5.
- Hard walkthrough is random.
- Walkthrough Bonus Chapter, at the link below.


