Detectives United 8: Vengeance from the Past – An investigation where the stakes are higher than ever. The DU team is back in action: this time, they must penetrate the heart of an ancient evil that has awakened in the abandoned Brown family mansion. When anomalies and bursts of dark magic begin to disturb the neighborhood, Anna Gray, Dorian Brown, and their partners head to the scene to find out what lies behind these strange events. Each room of the mansion is a new mystery, trap, or memory. Explore secret rooms, activate ancient artifacts, and collect clues to get to the bottom of what’s happening. But be careful—the mansion has a dark life of its own, and distorted copies of the agents themselves can emerge from the shadows at any moment. To stop the ritual and prevent the portal from consuming all life, you will have to use the abilities of each team member, solve puzzles, and keep your cool. Your choices will determine the fate not only of the agents, but also of everything they protect. Immerse yourself in an atmosphere where the past comes to life and trust is put to the test. You will have to find out which of your allies will fall under the influence of darkness, what secrets are kept in old diaries, and whether Dorian will be able to face his family curse. If you can’t solve any of the puzzles or don’t know where to find the items, you can check out the walkthrough for Detectives United 8: Vengeance from the Past on our website and close the portal.
Detectives United 8: Vengeance from the Past – Walkthrough
Here you can see the complete walkthrough for Detectives United 8: Vengeance from the Past, namely all chapters, including the bonus chapter, in pictures.
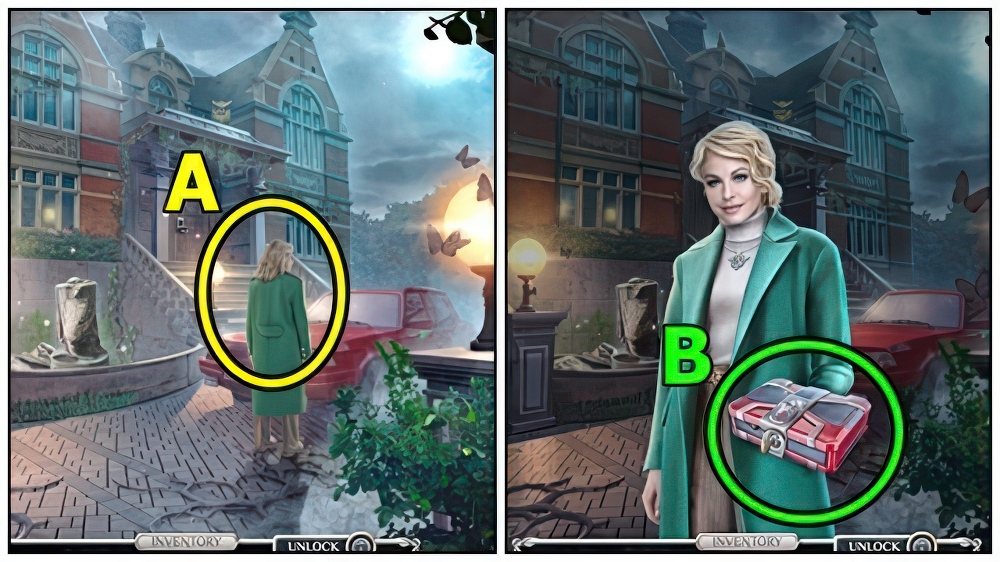
- Talk (A).
- Take LOCKED CASE (B).
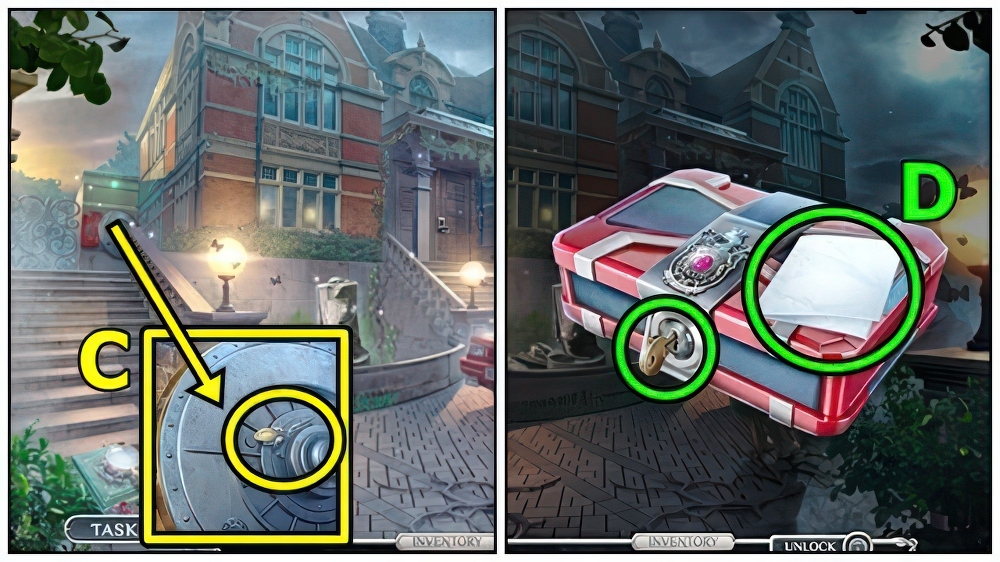
- Take ELEGANT HAIRPIN (C).
- Remove key from LOCKED CASE (D), read.
- Use ELEGANT HAIRPIN, take CODE GHOST and LASER CUTTER.
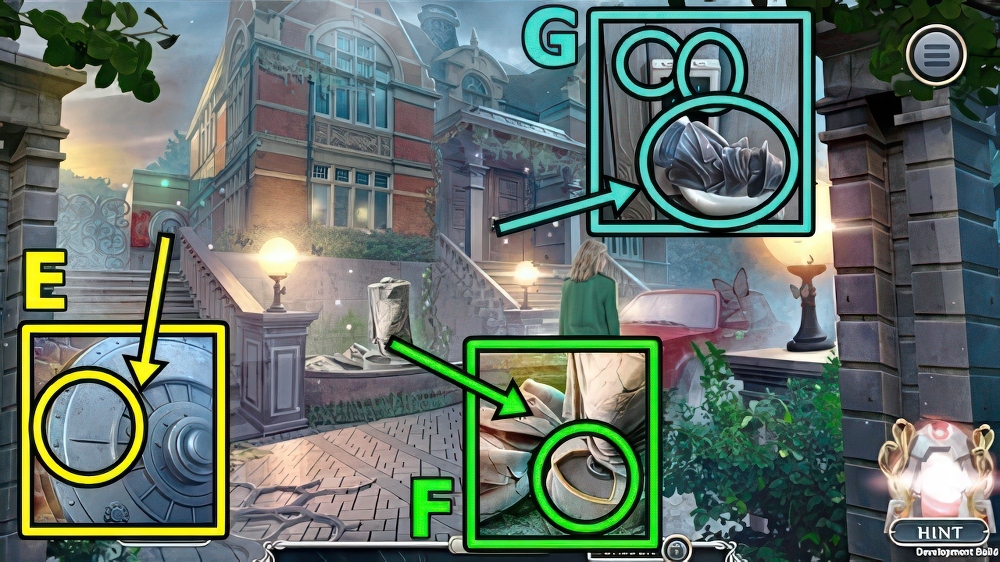
- Use LASER CUTTER (E), take BROWN COAT OF ARMS and DORIAN’S IMAGE.
- Add BROWN COAT OF ARMS (F), take BROKEN PLIERS and SCREWDRIVER.
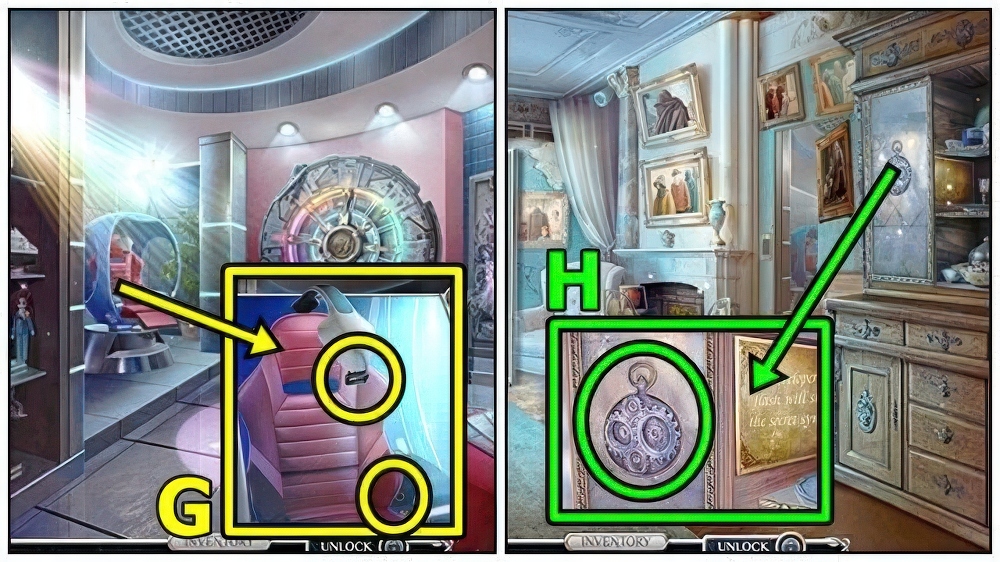
- Take THE BROWNS’ BUSTS 1/3 (G).
- Add CODE GHOST and SCREWDRIVER.
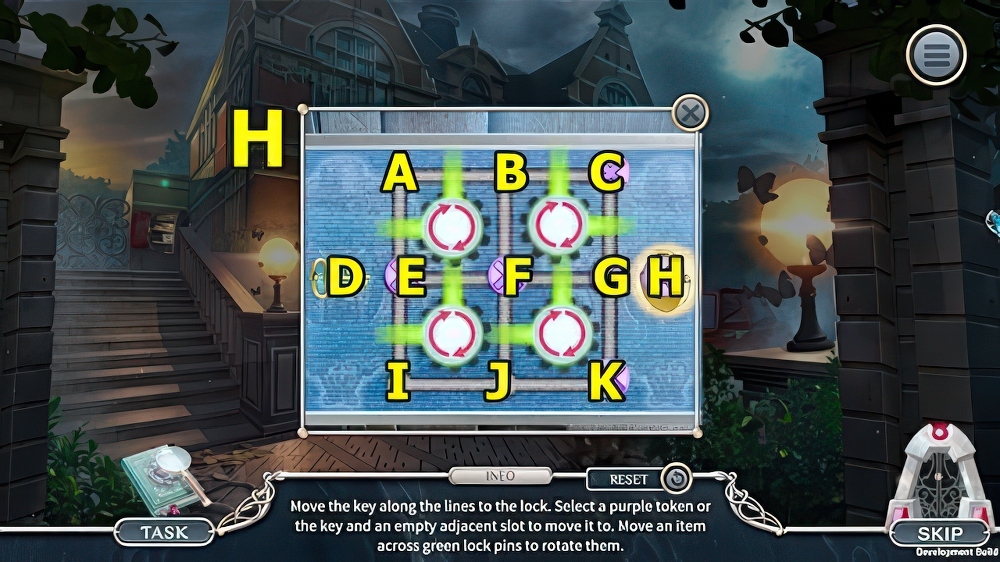
- Solution (H): (E-I)-(F-J)-(G-F)-(F-E)-(E-A)-(H-G)-(D-E)-(E-F)-(A-E)-(E-D)-(F-B)-(G-F)-(F-E)-(B-F)-(F-G)-(G-H).
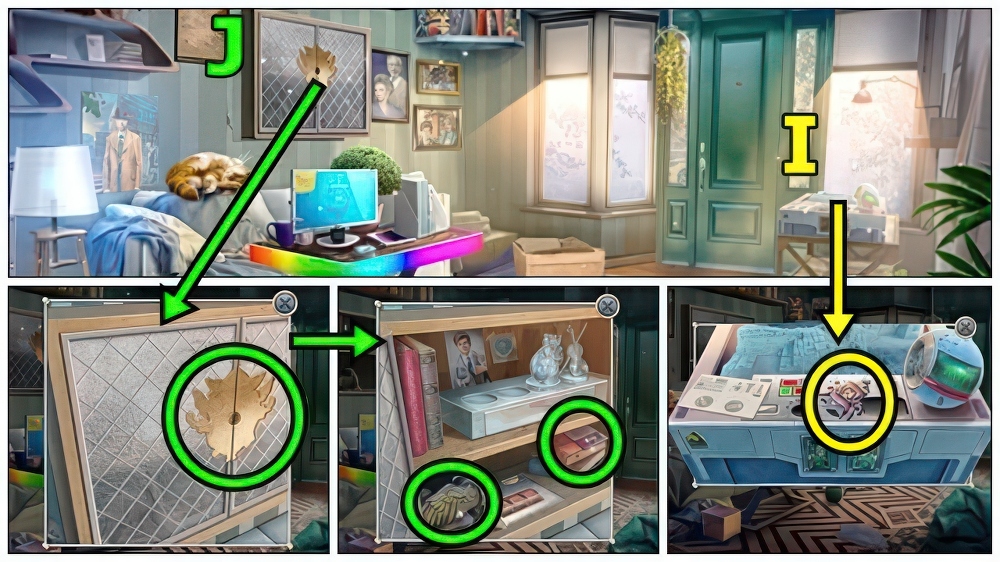
- Take DU SYMBOL (I).
- Add DU SYMBOL (J), take BOOKEND and ACCESS CARD.
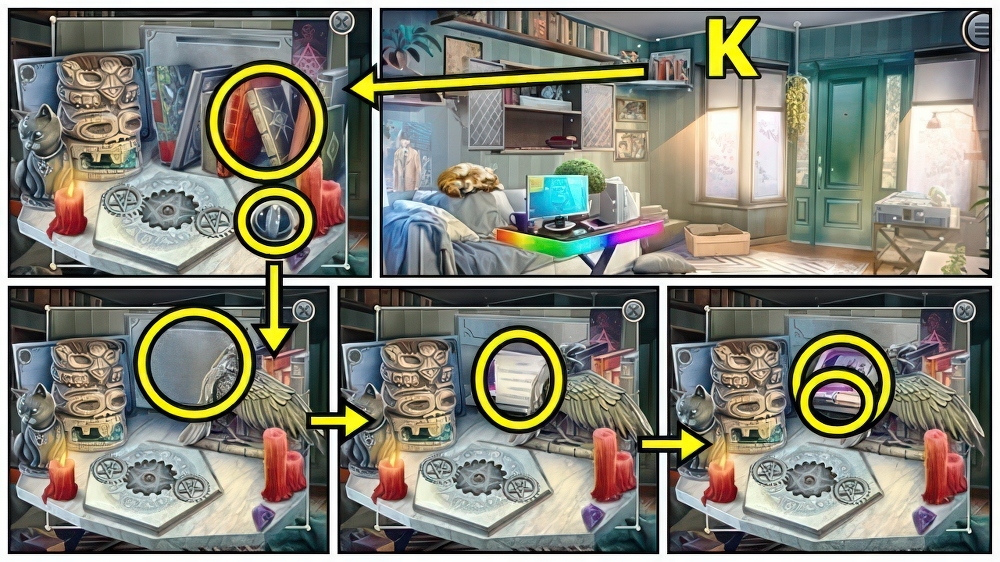
- Take SWITCH 1/2 (K).
- Add BOOKEND, open, read, take HEX KEY and HARD DRIVE.
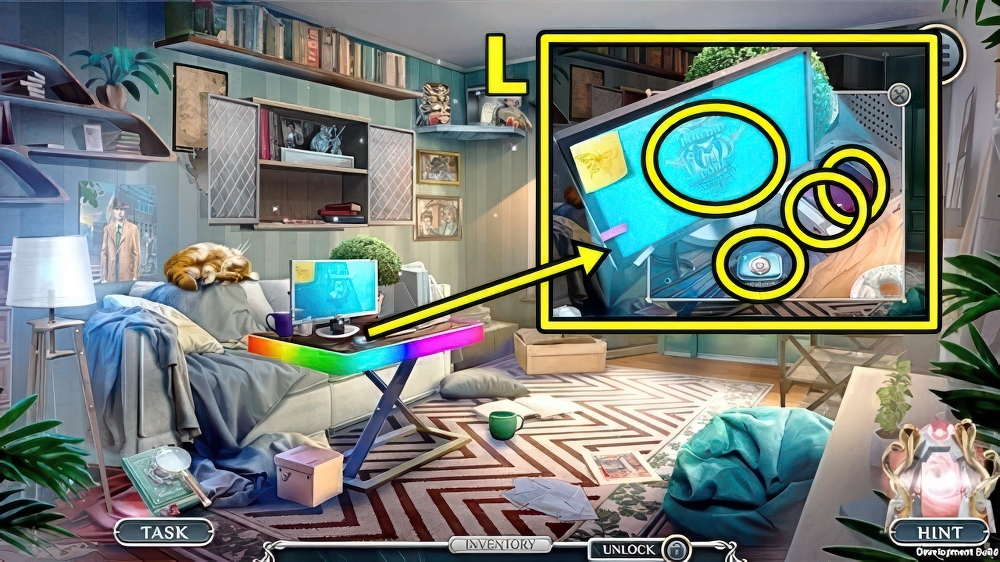
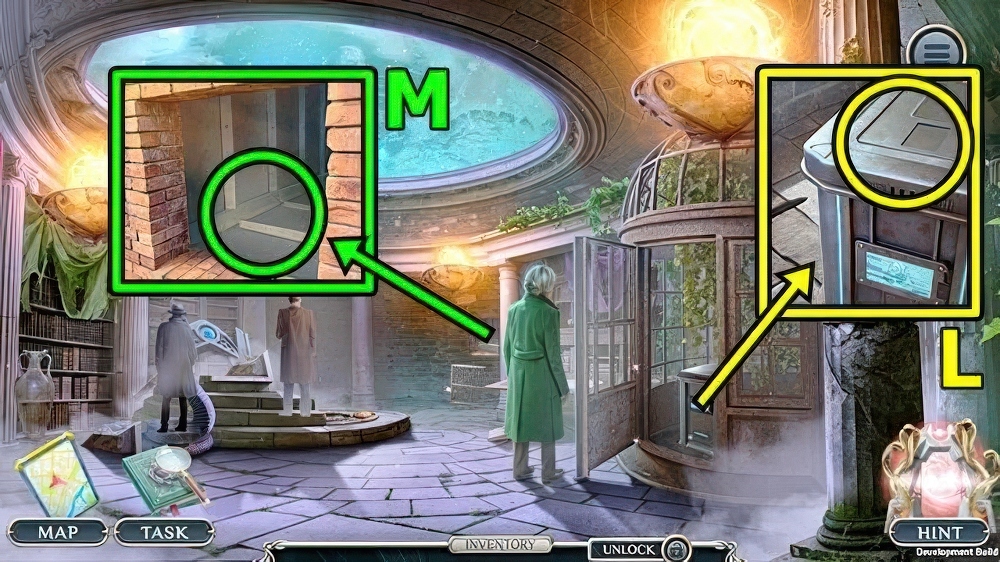
- Take CONNECTION PANEL (L).
- Press monitor.
- Add ACCESS CARD and HARD DRIVE.
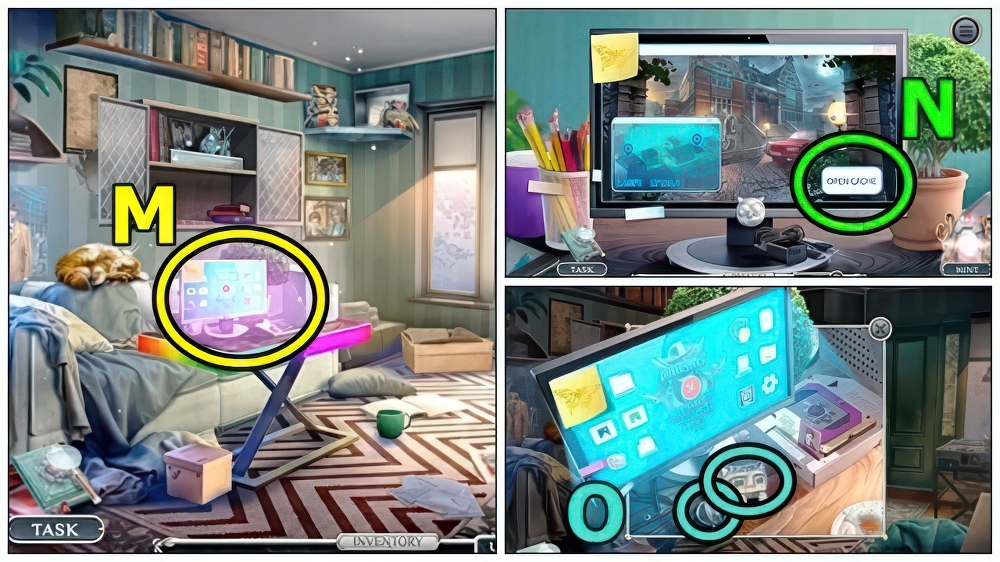
- Play puzzle (M).
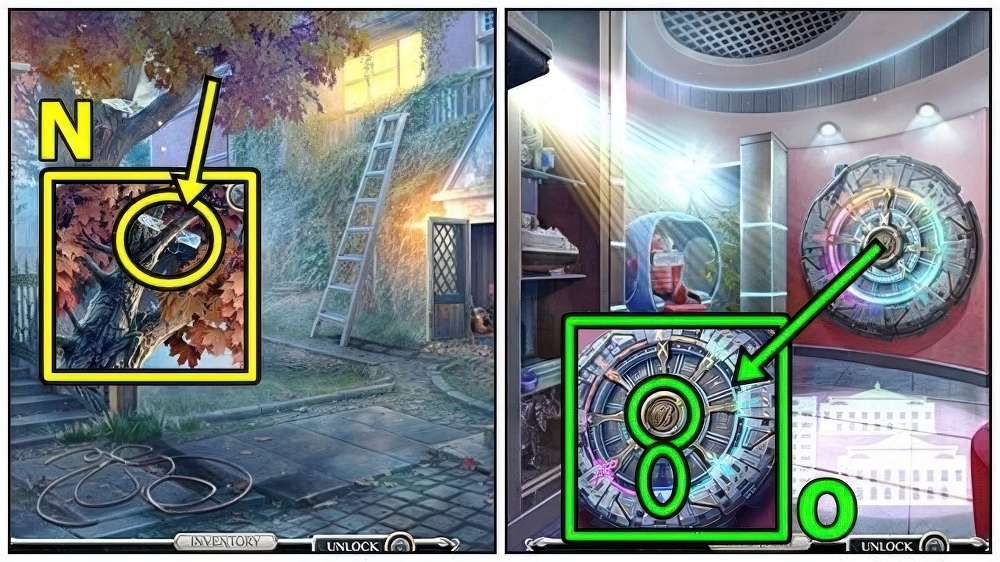
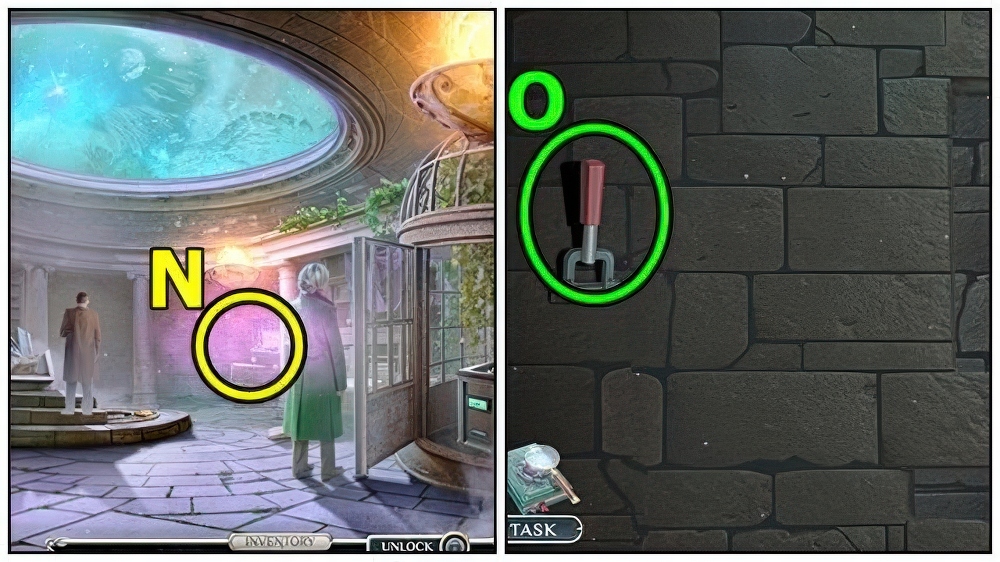
- Press (N).
- Take TOTEM PART (O) and SWITCH 2/2.
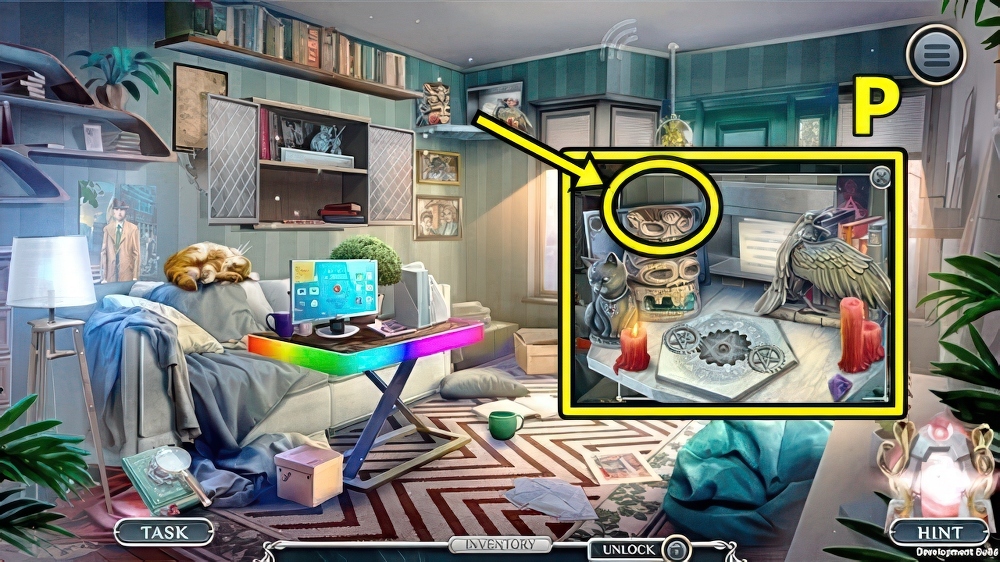
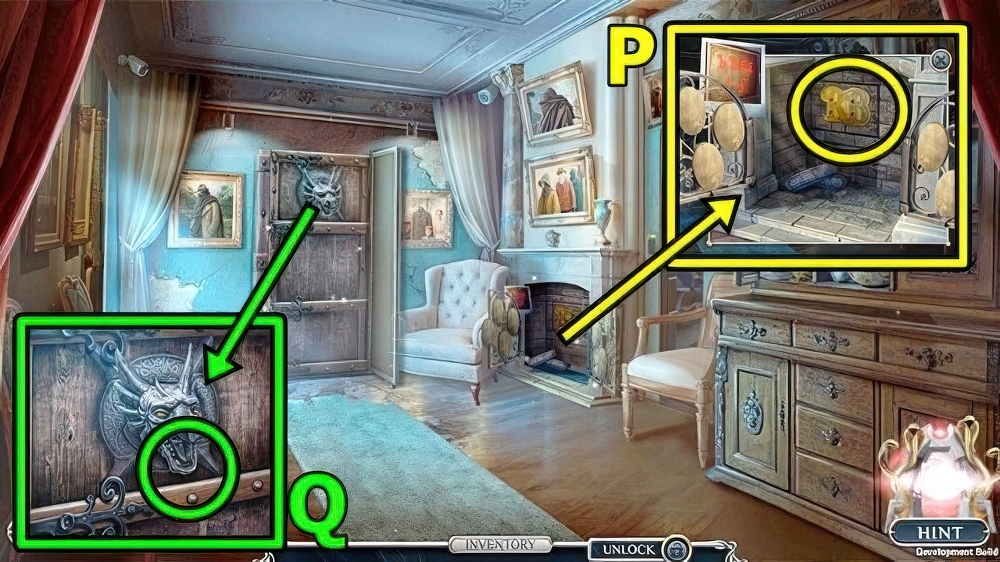
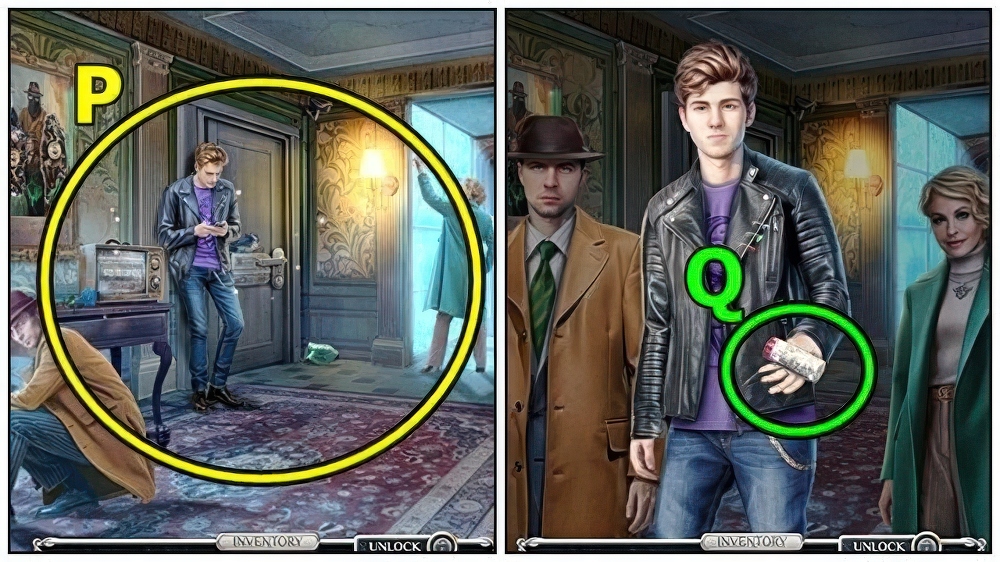
- Add TOTEM PART (P), take TRAP BASE and MOTHERBOARD.
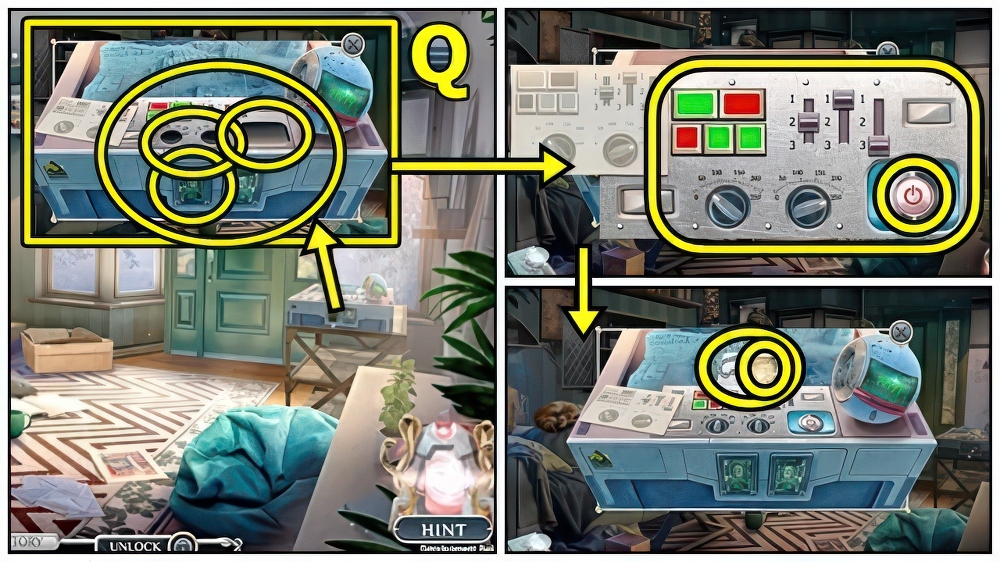
- Examine (Q).
- Add CONNECTION PANEL, SWITCH and MOTHERBOARD.
- Arrange to match diagram, press power button.
- Take CODE TABLET and CHAIN.
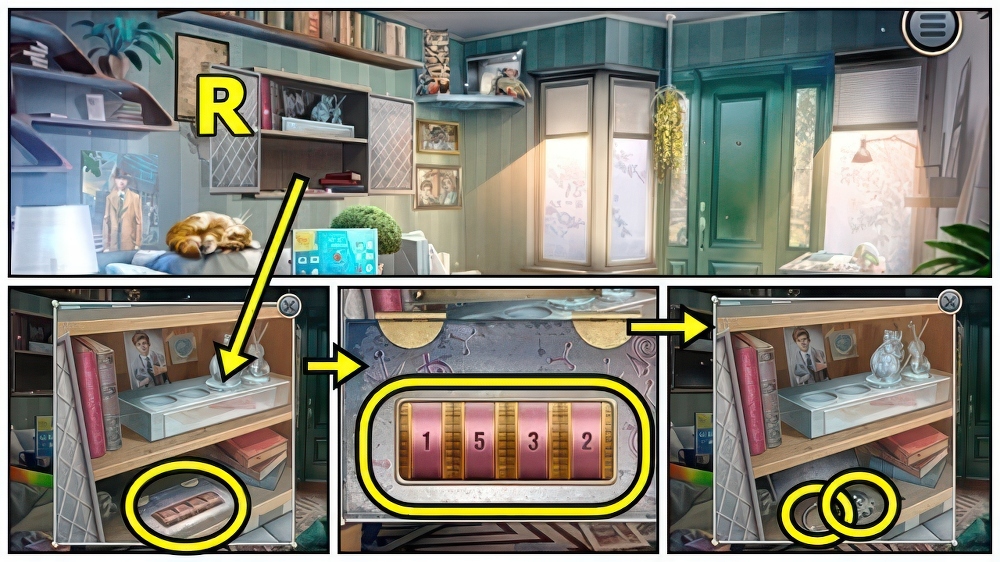
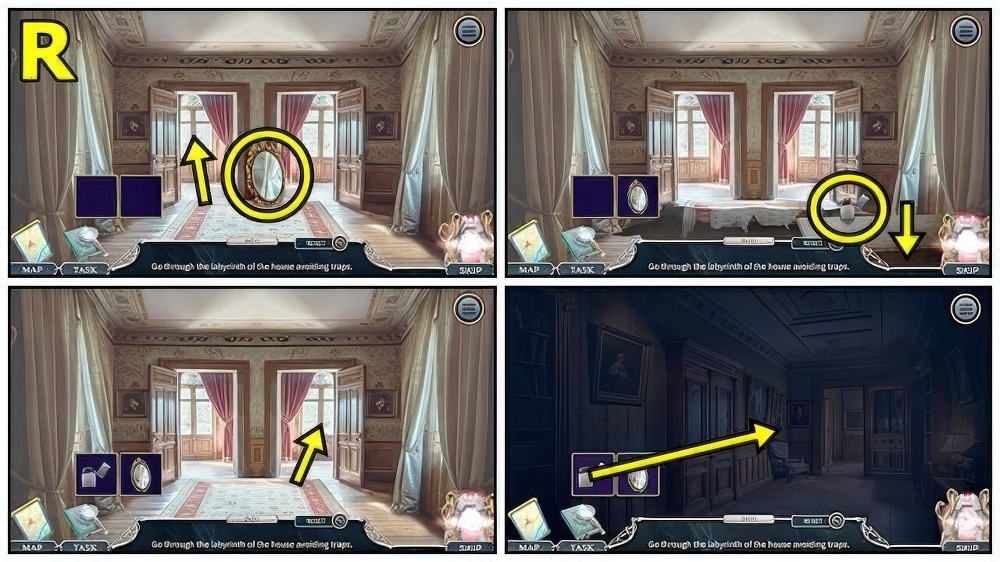
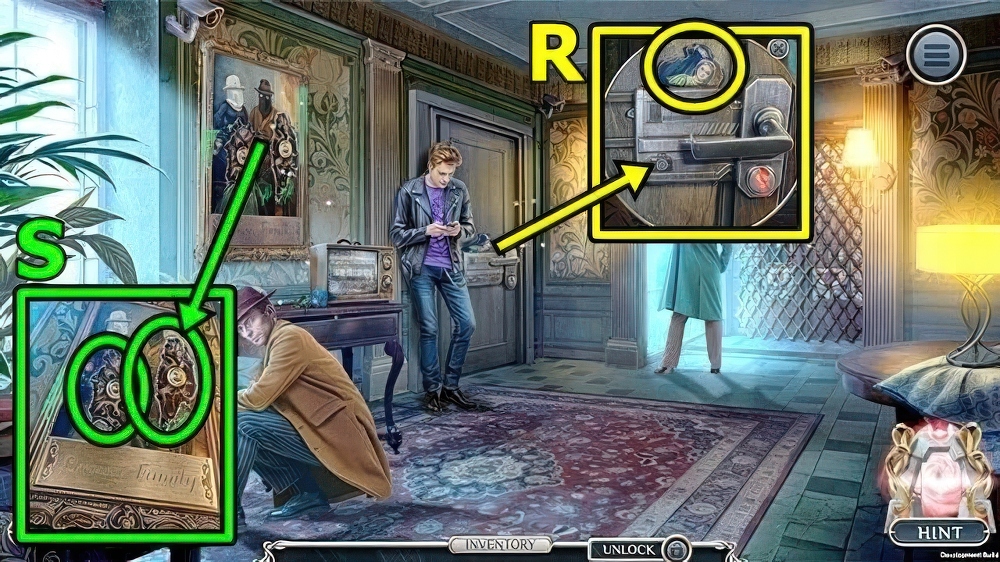
- Add CODE TABLET (R), adjust dials: 1-5-3-2.
- Take BLACK GEAR and INCOMPLETE BRACELET.
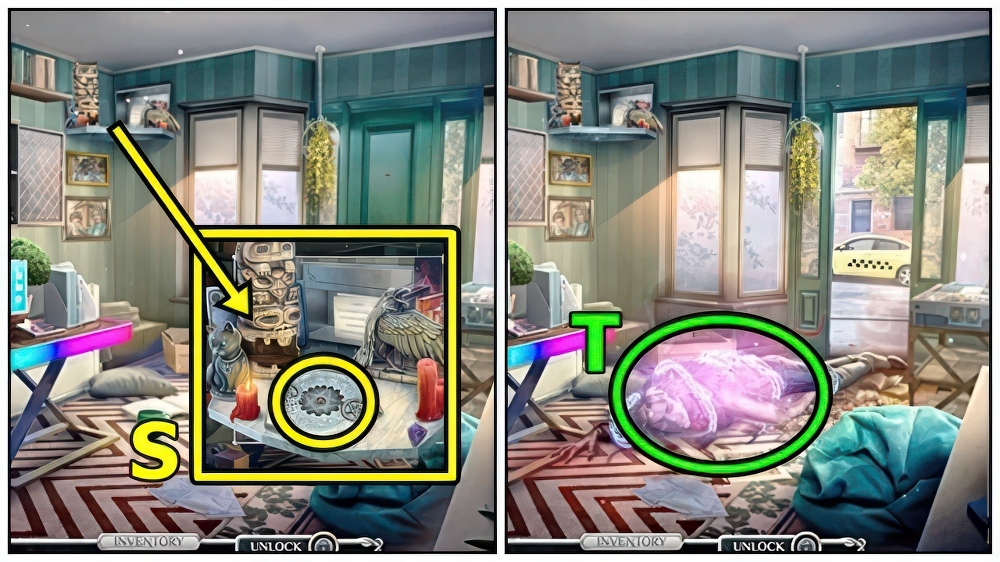
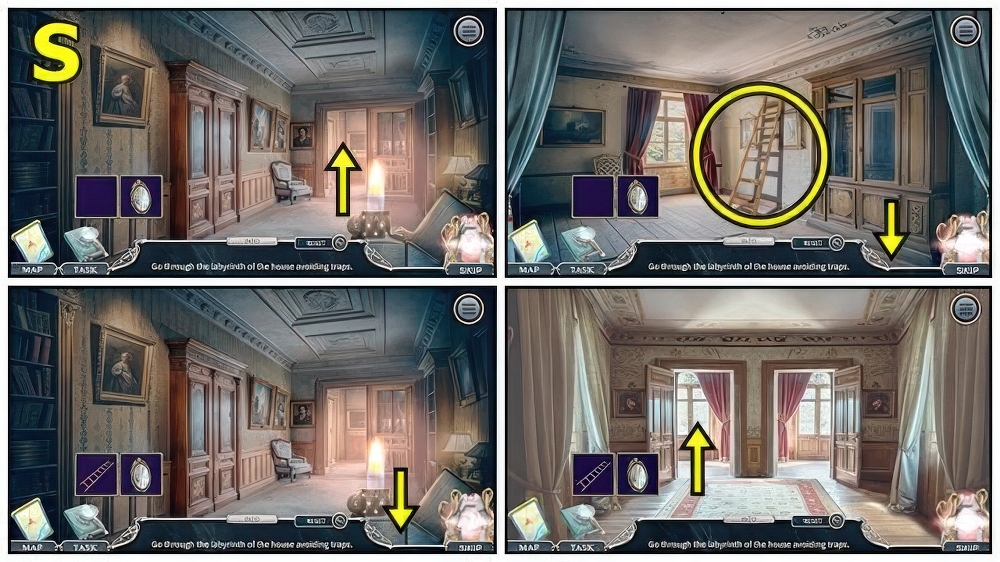
- Add BLACK GEAR (S), take DYNAMO GENERATOR and CUBE OF REALITY.
- DYNAMO GENERATOR and CHAIN on TRAP BASE.
- Play puzzle (T), receive BLUE ROSE.
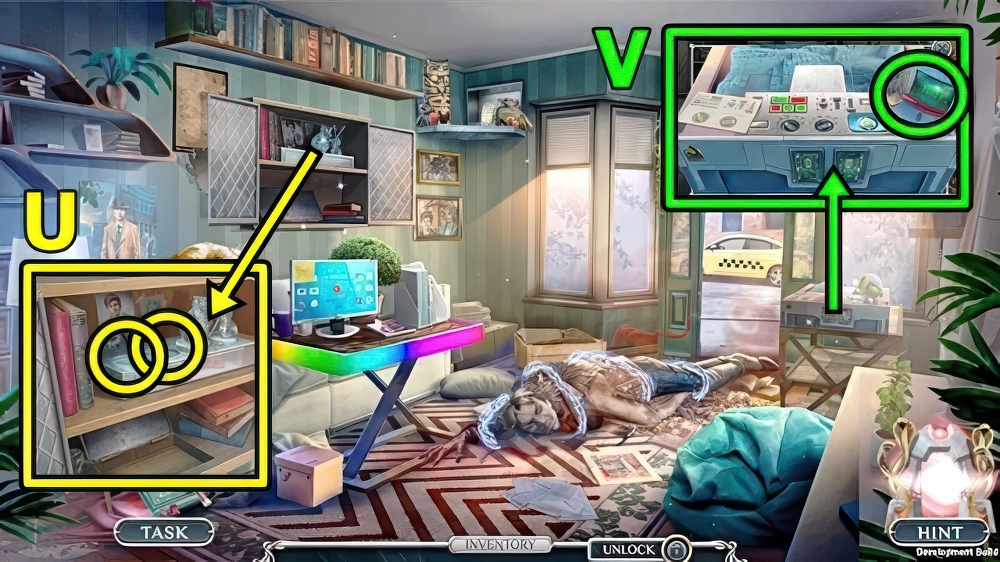
- Add CUBE OF REALITY (U) and BLUE ROSE, take JAMES’ COORDINATES and PLAYING TICKET 1/4.
- Add JAMES’ COORDINATES (V), take PLAYING TICKET 2/4 and HOLOGRAPHIC MAP.
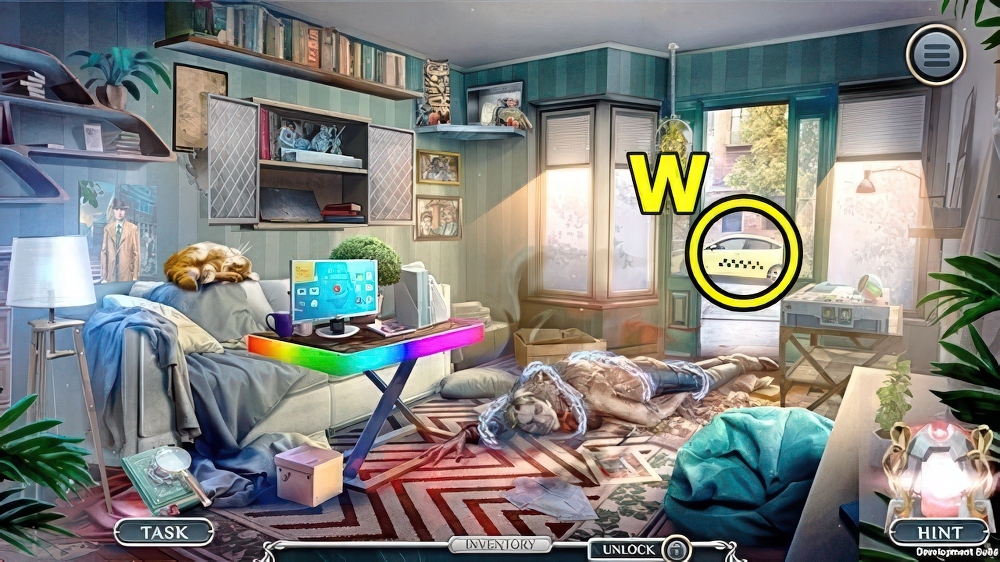
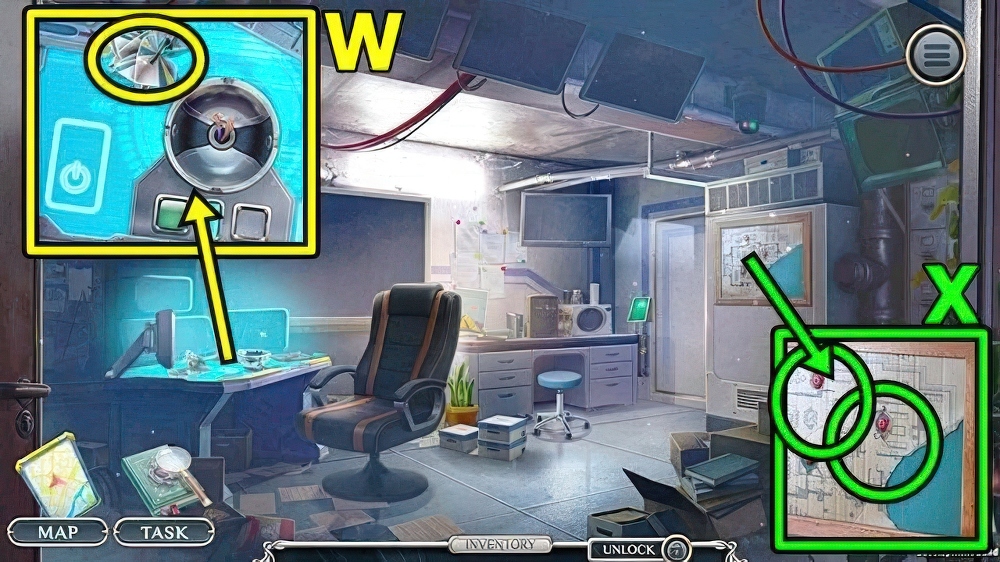
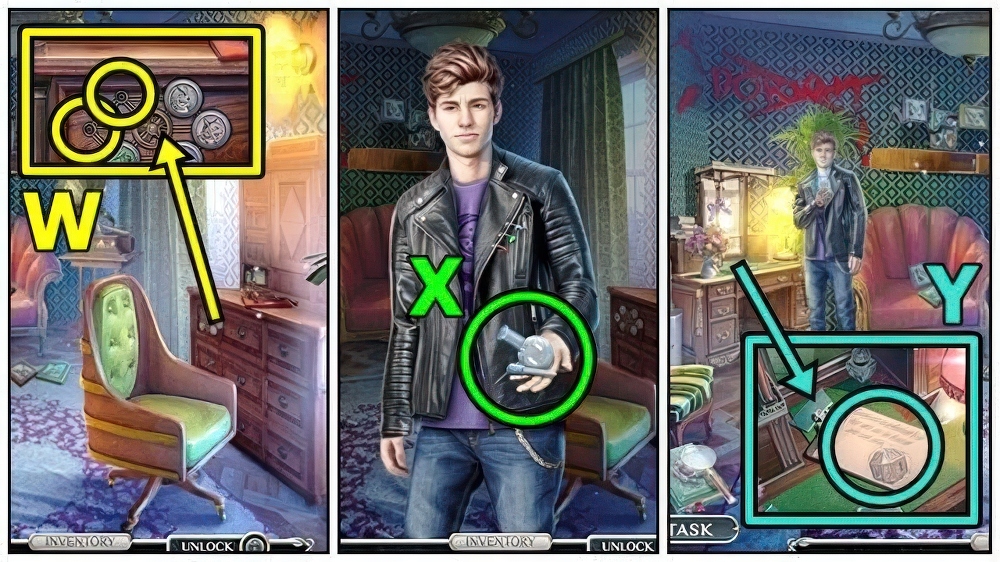
- Use HOLOGRAPHIC MAP (W).
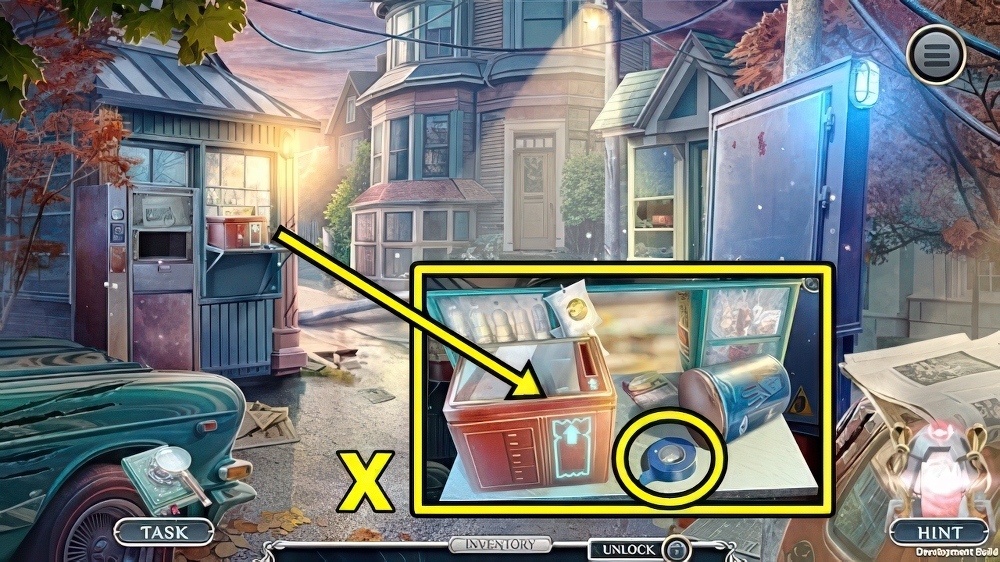
- Take ADHESIVE TAPE (X).
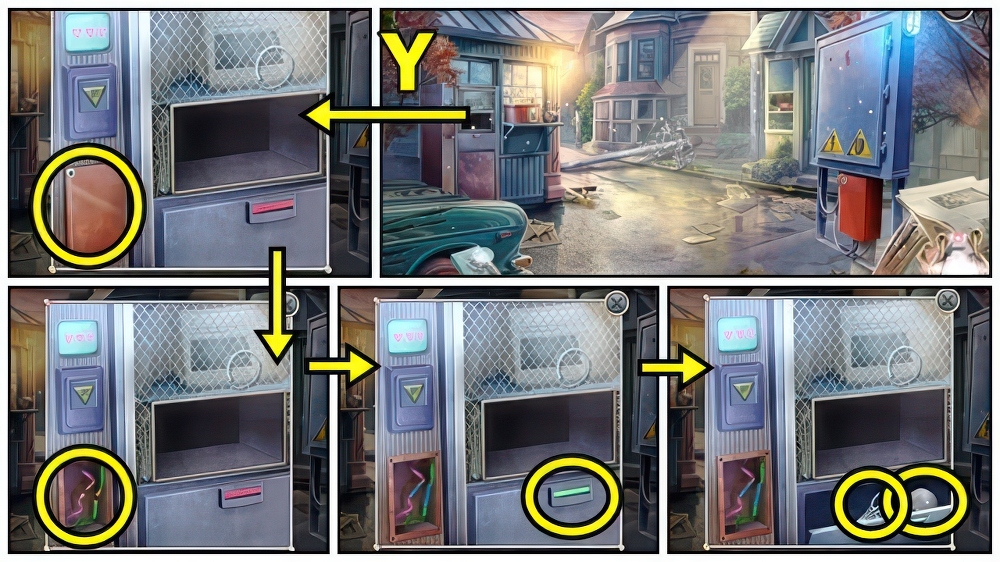
- Use HEX KEY (Y).
- Use ADHESIVE TAPE, open, take CLAMP and SKULL SYMBOL.
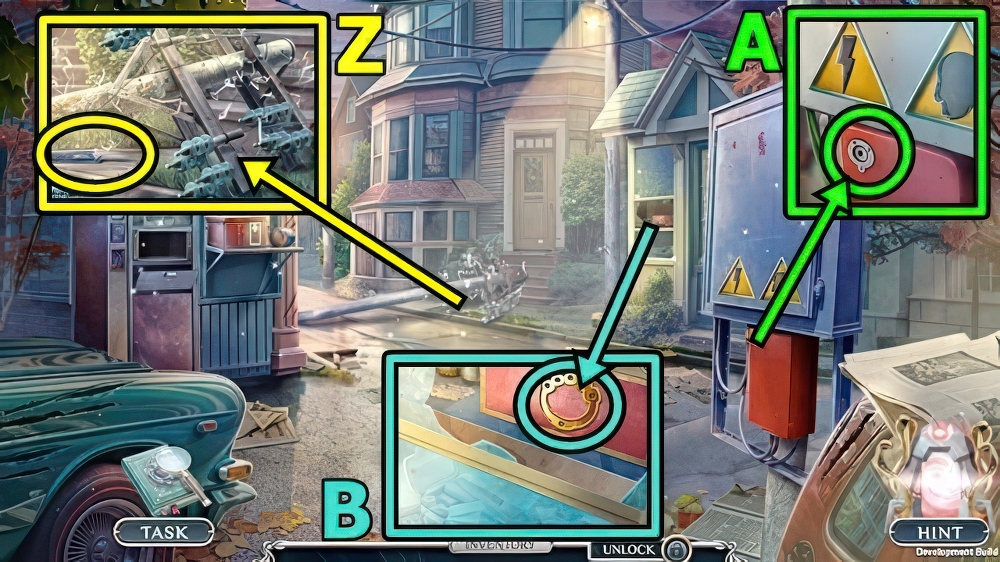
- Take LOCKPICK (Z).
- Use LOCKPICK (A), take CADUCEUS CHARM and PLAYING TICKET 3/4.
- CADUCEUS CHARM and CLAMP on INCOMPLETE BRACELET, take CHARM BRACELET.
- Add CHARM BRACELET (B), take BROKEN TOY and PLAYING TICKET 4/4.
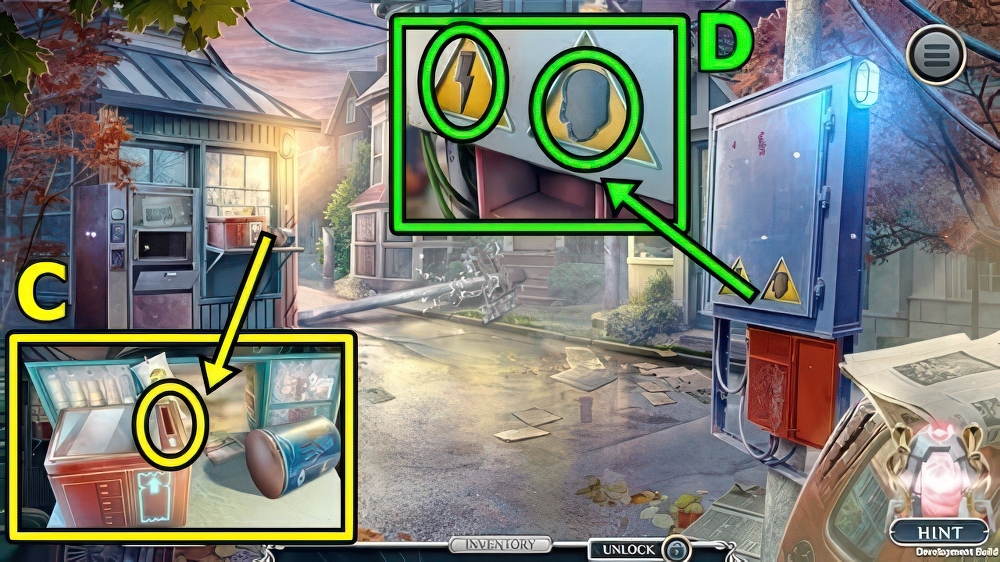
- Add PLAYING TICKET (C), take SUCTION CUP and LIGHTNING SYMBOL.
- Add SKULL SYMBOL (D) and LIGHTNING SYMBOL.
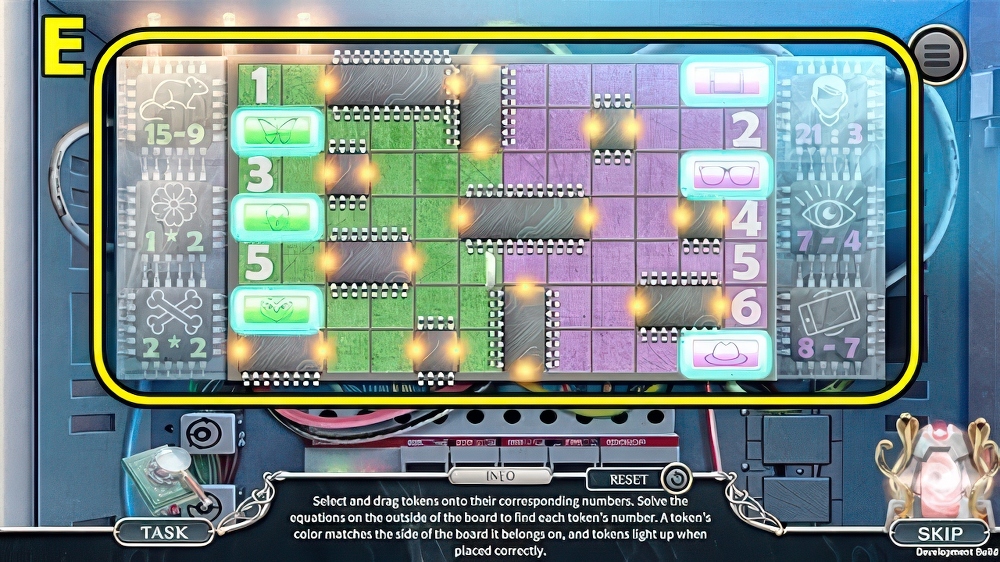
- Solution: (E).
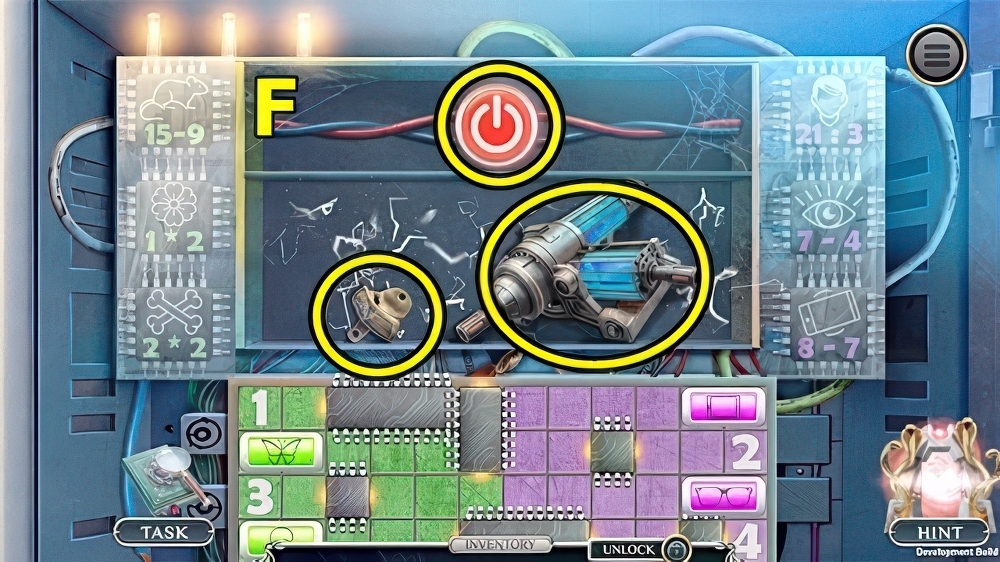
- Press power button (F), take VINTAGE CAN OPENER and GRAVITY GUN.
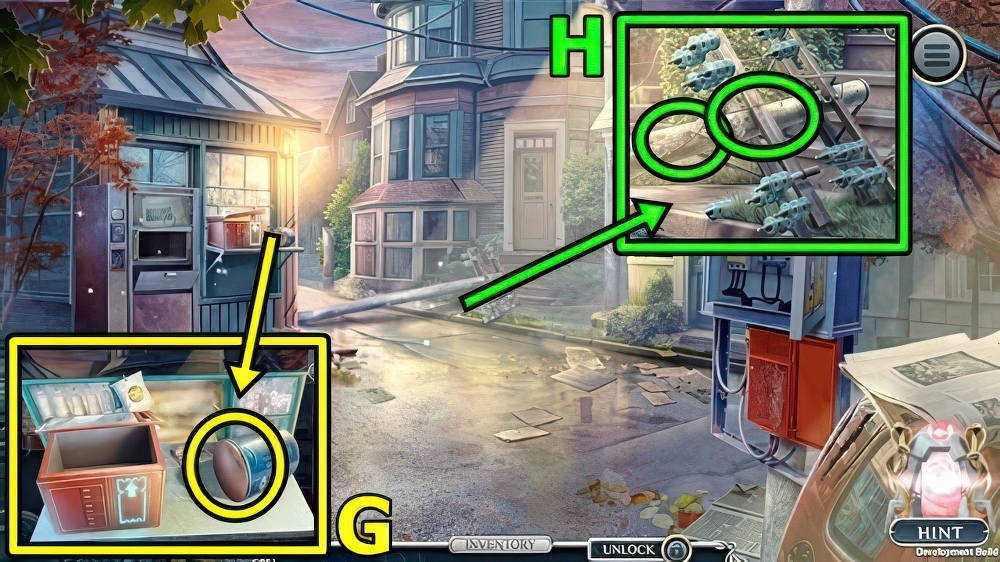
- Use VINTAGE CAN OPENER (G), read, take NEWSPAPER TOKEN 1/3 and ANTI-MAGNETIC GLOVES.
- Add ANTI-MAGNETIC GLOVES (H) and GRAVITY GUN.
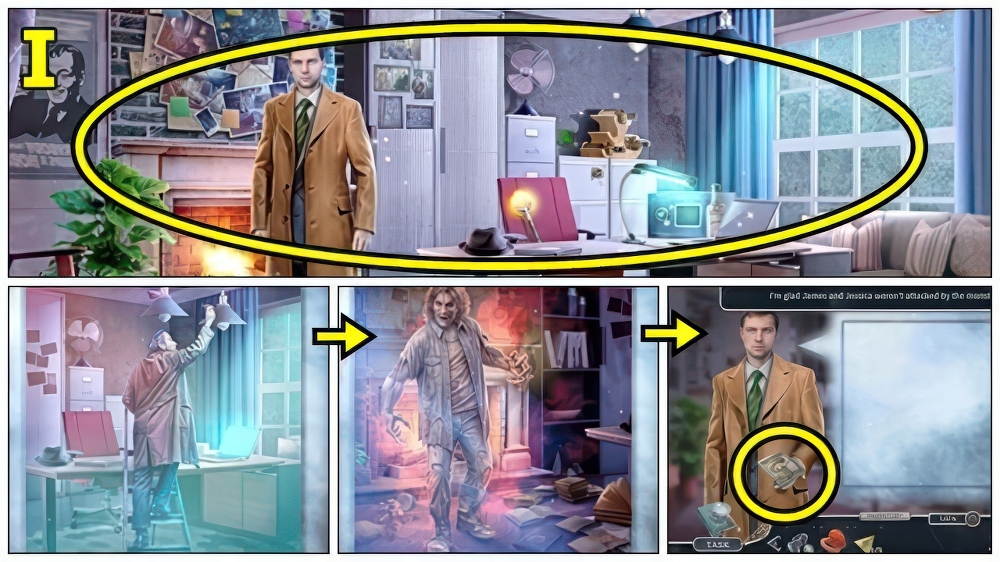
- Examine (I).
- Solution.
- Take JESSICA’S PHOTO.
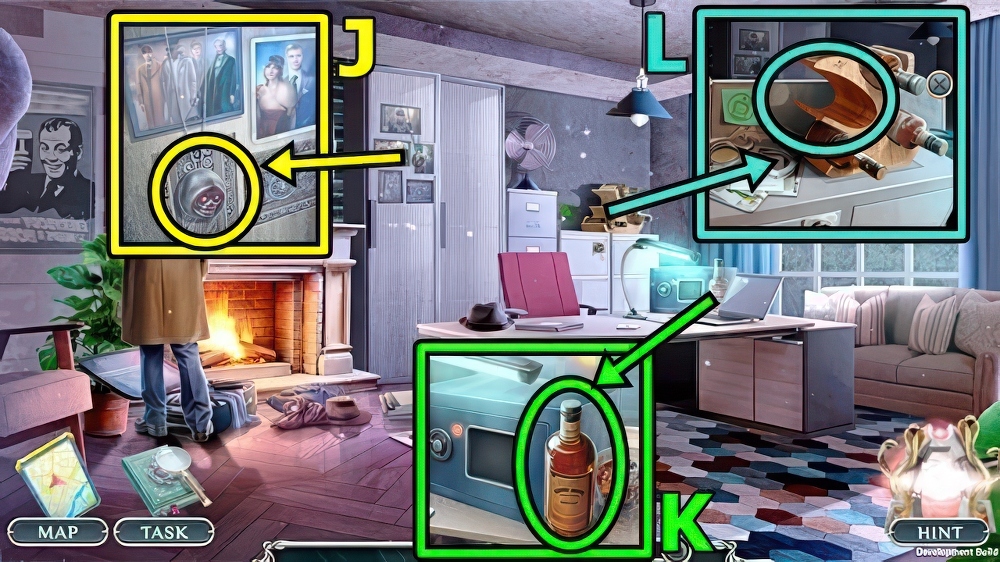
- Take MONSTER HEAD (J).
- Take WHISKEY BOTTLE (K).
- Add WHISKEY BOTTLE (L).
- Take SPRING and NEWSPAPER TOKEN 2/3.
- Remove spring from BROKEN TOY, add SPRING and MONSTER HEAD.
- Take BOBBLEHEAD TOY.
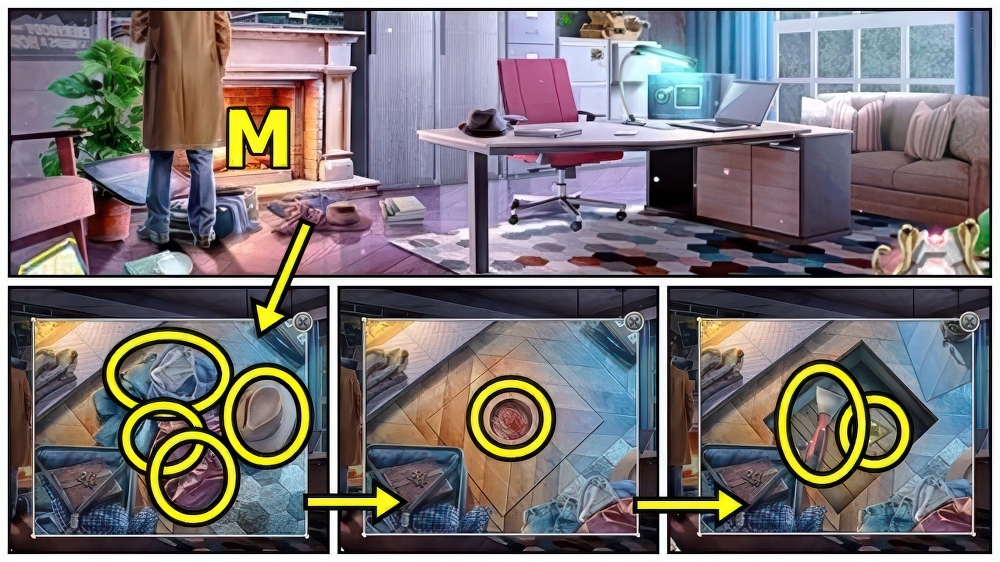
- Move items (M), add BOBBLEHEAD TOY.
- Take SPATULA and NEWSPAPER TOKEN 3/3.
- Move down.
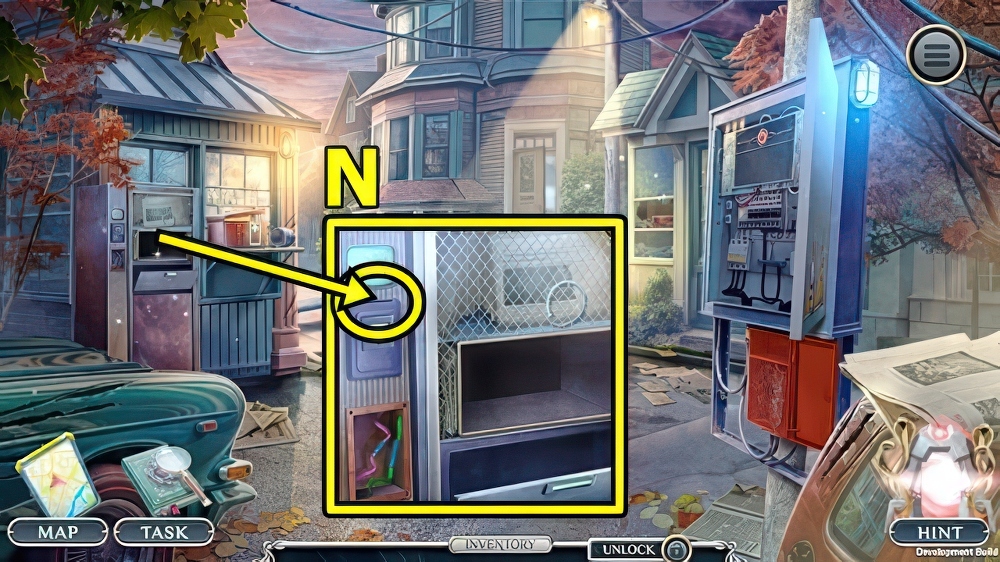
- Add NEWSPAPER TOKEN (N), take DIAMOND RING and PUZZLE PIECE 1/3.
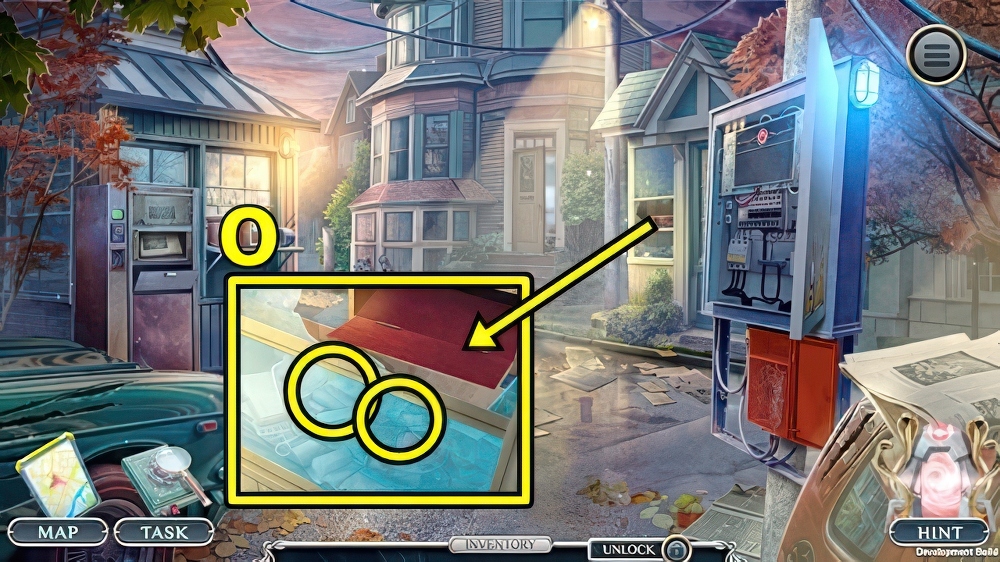
- Use DIAMOND RING (O) and SUCTION CUP.
- Find items, take CABINET BUTTON.
- Enter James’ Living Room.
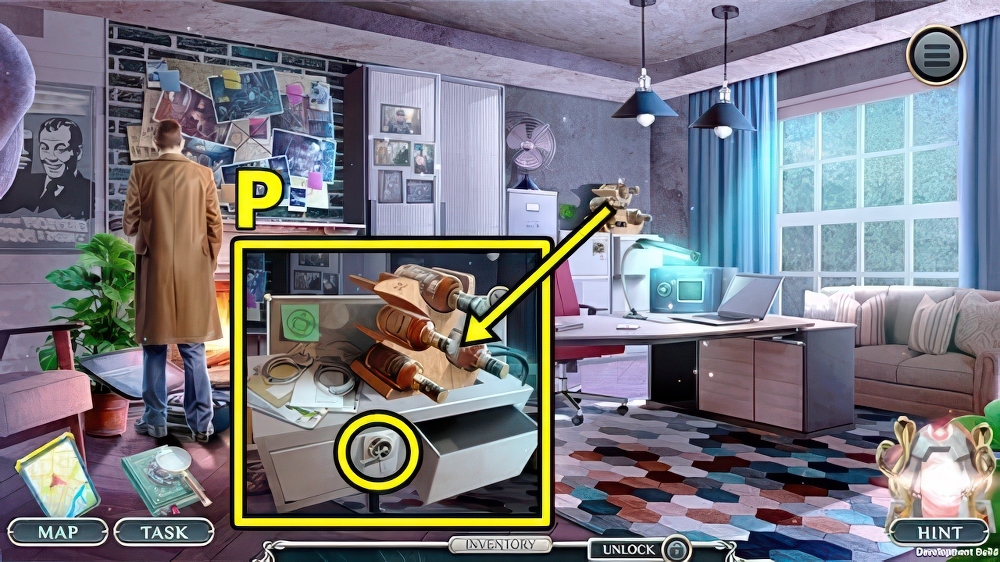
- Add CABINET BUTTON (P), examine, take CODE PANEL.
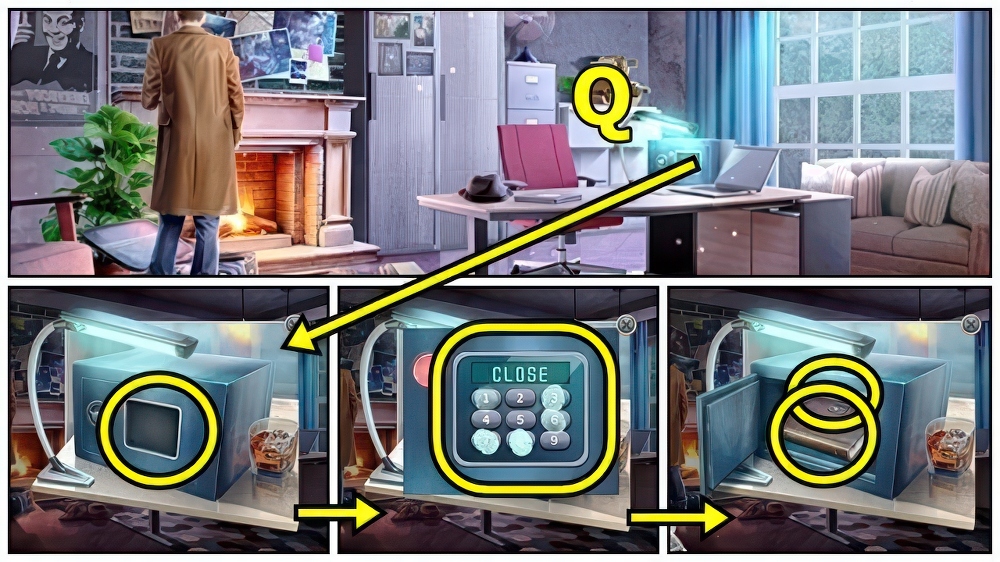
- Add CODE PANEL (Q), enter code: 8-7-3-6-1.
- Read, take JAMES’ PHOTO.
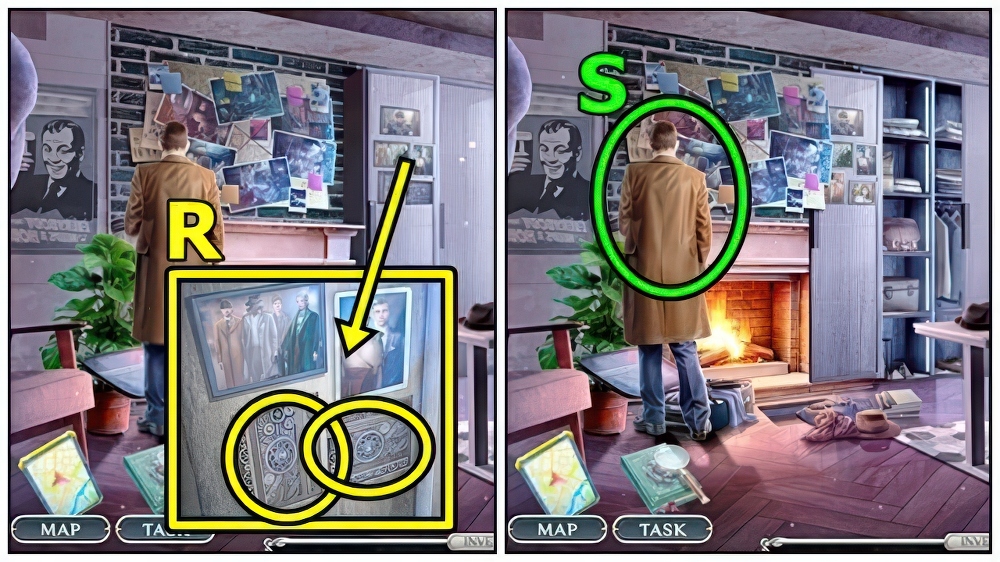
- Add JESSICA’S PHOTO (R) and JAMES’ PHOTO, take JAMES’ KEYS and KEY BASE.
- Give JAMES’ KEYS (S).
- Play puzzle.
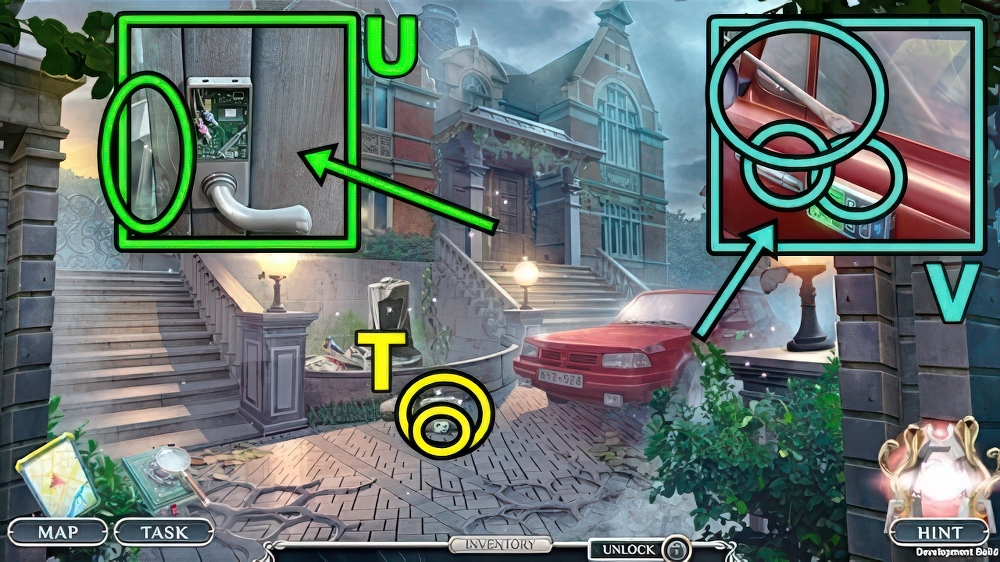
- Take DECODER (T) and BROKEN P.A.T.R.I.C.K.
- Take MAGNIFYING LENS (U).
- Take OLD CROWBAR (V).
- Add DECODER and MAGNIFYING LENS.
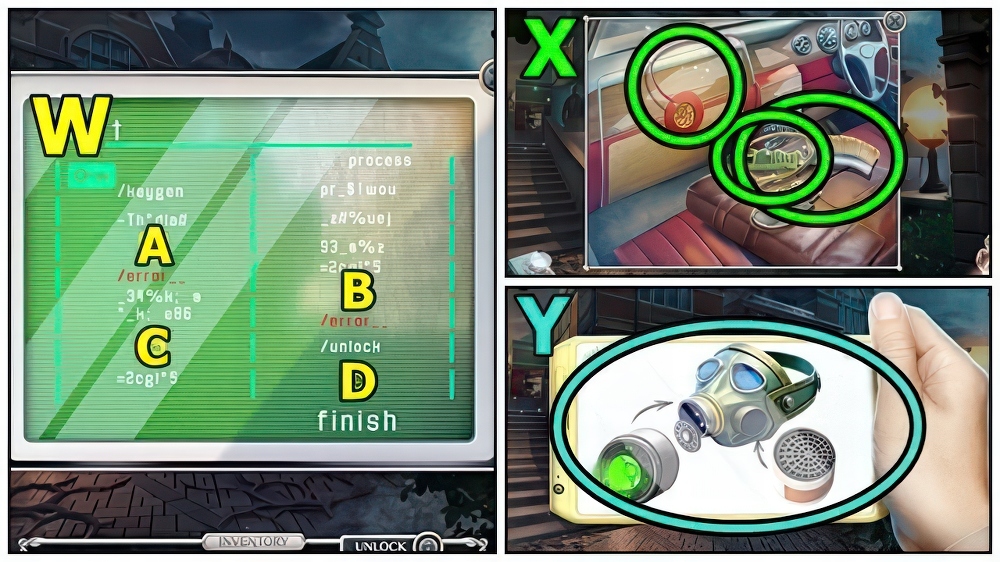
- Press (A-B)-(B-C)-(C-D) (W).
- Take WIRES 1/4 (X), GARNET TIARA and WIRE BRUSH.
- Take DEVICE PLANS (Y).
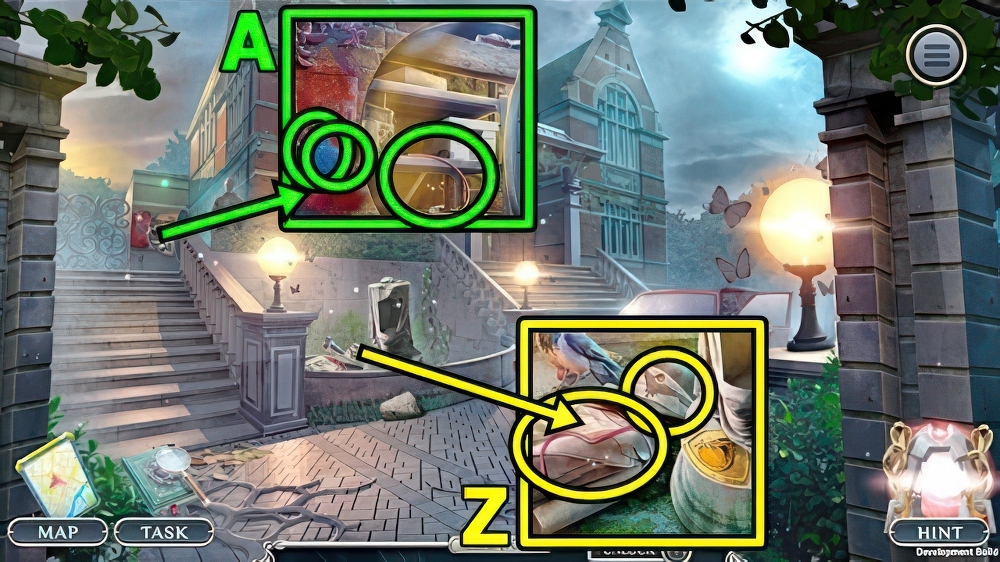
- Take WIRES 2/4 (Z).
- Add GARNET TIARA, take CLEANER and CARBON FILTER.
- Take WIRES 3/4 (A).
- Use CLEANER and WIRE BRUSH, take MASK BASE and MT SYMBOL.
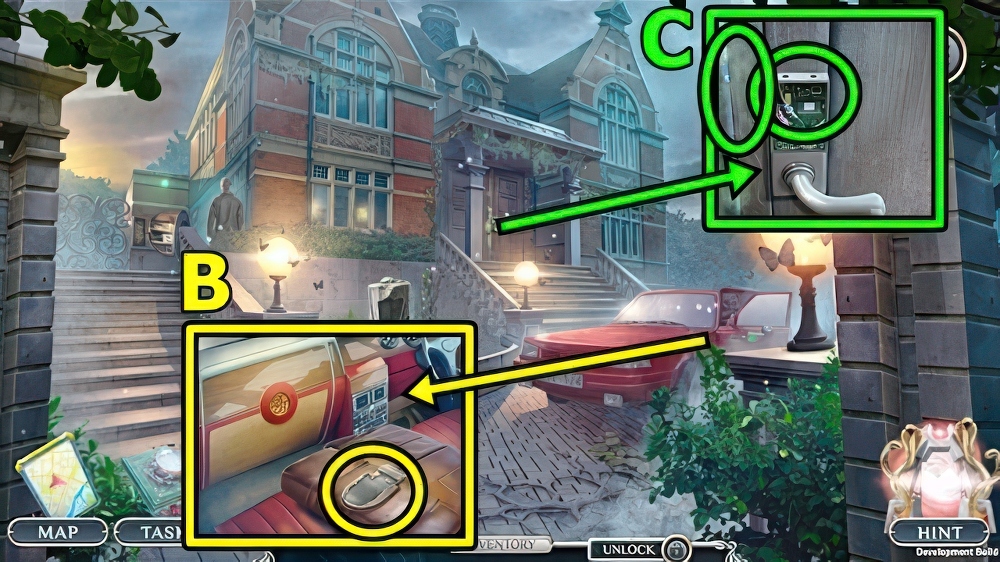
- Add MT SYMBOL (B), take CYBER GLASSES and BREATH CONTROLLER.
- CARBON FILTER, MASK BASE and BREATH CONTROLLER on DEVICE PLANS, take PROTECTIVE MASK.
- Use OLD CROWBAR (C) and PROTECTIVE MASK.
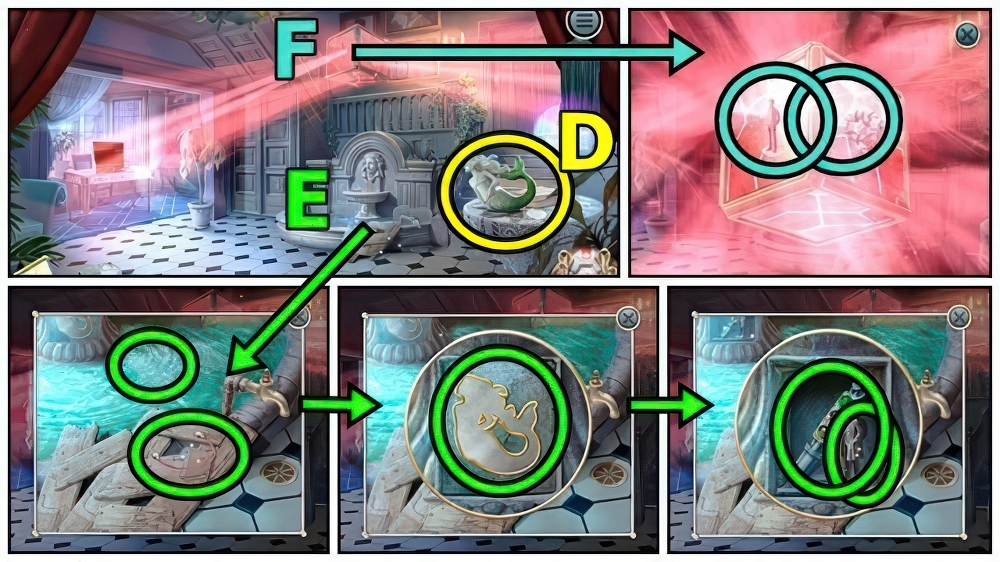
- Take PLASTER MERMAID (D).
- Take WIRES 4/4 (E).
- Add PLASTER MERMAID, take NEUTRALIZER and AGENT FIGURINES 1/5.
- Add CYBER GLASSES (F) and NEUTRALIZER.
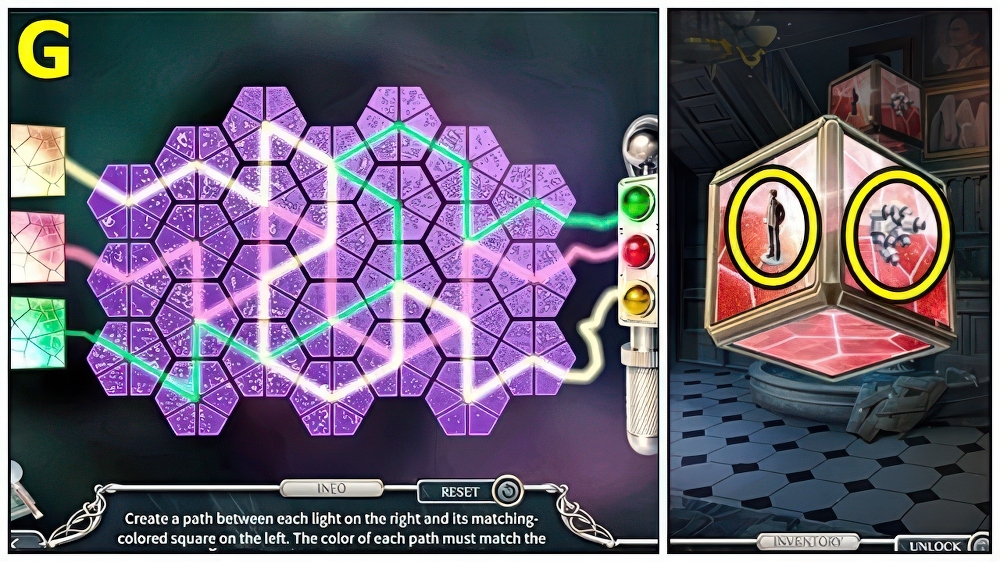
- Solution: (G).
- Read, take AGENT FIGURINES 2/5 and PLUGS.
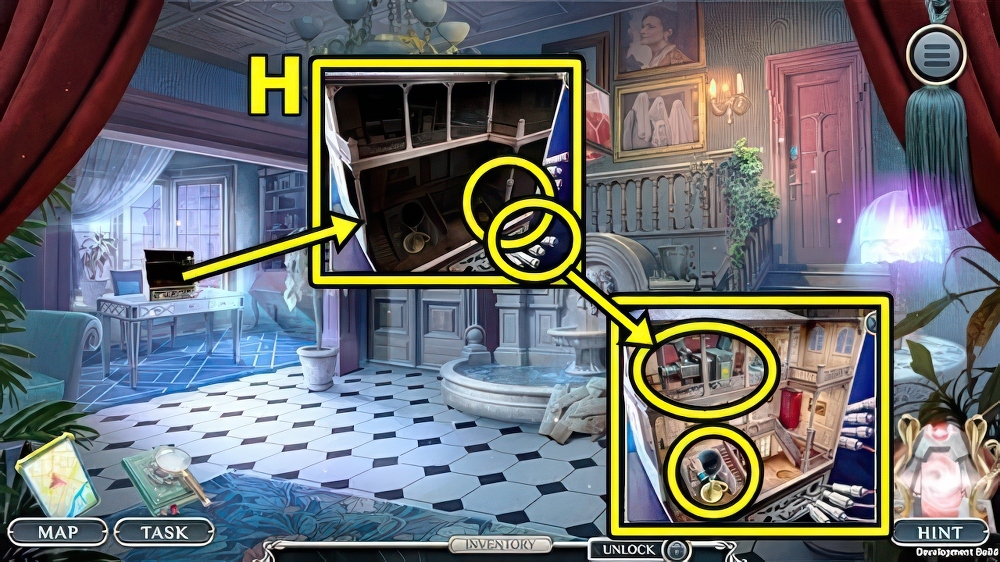
- Add PLUGS (H) and WIRES, take AIR HORN and BROKEN PROJECTOR.
- Move down.
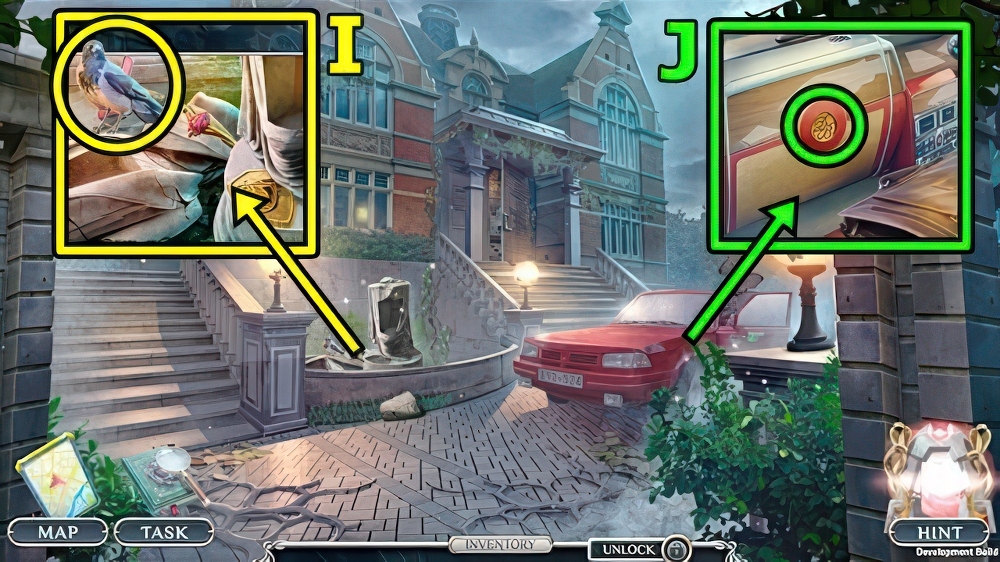
- Use AIR HORN (I), take ANNA’S LIGHTER and DORIAN’S SIGNET.
- Insert DORIAN’S SIGNET (J), take AGENT FIGURINES 3/5 and DORIAN’S VOICE RECORDER.
- Enter Mansion Hall.
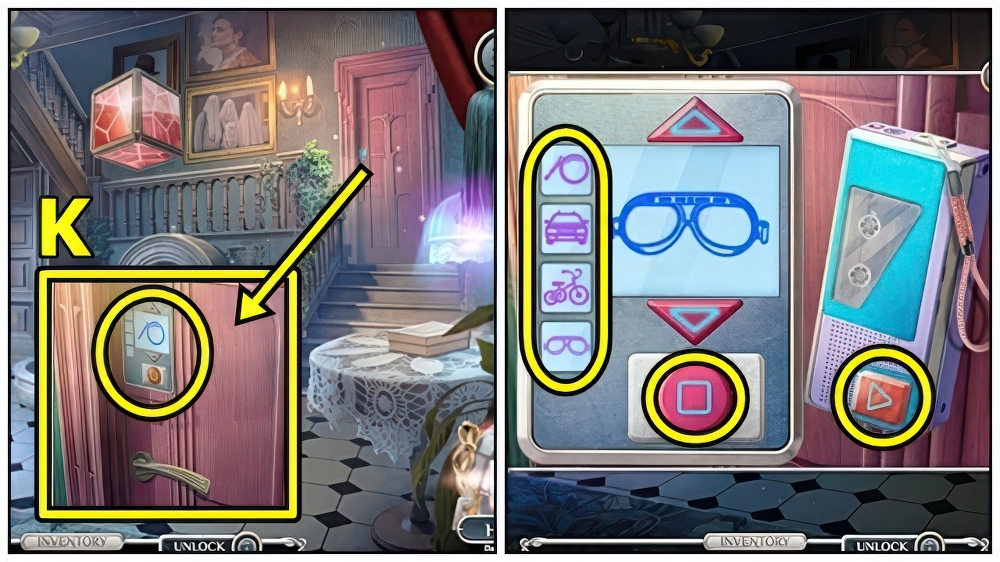
- Use DORIAN’S VOICE RECORDER (K).
- Press Play, arrange items.
- Enter Raphael Brown’s Office.
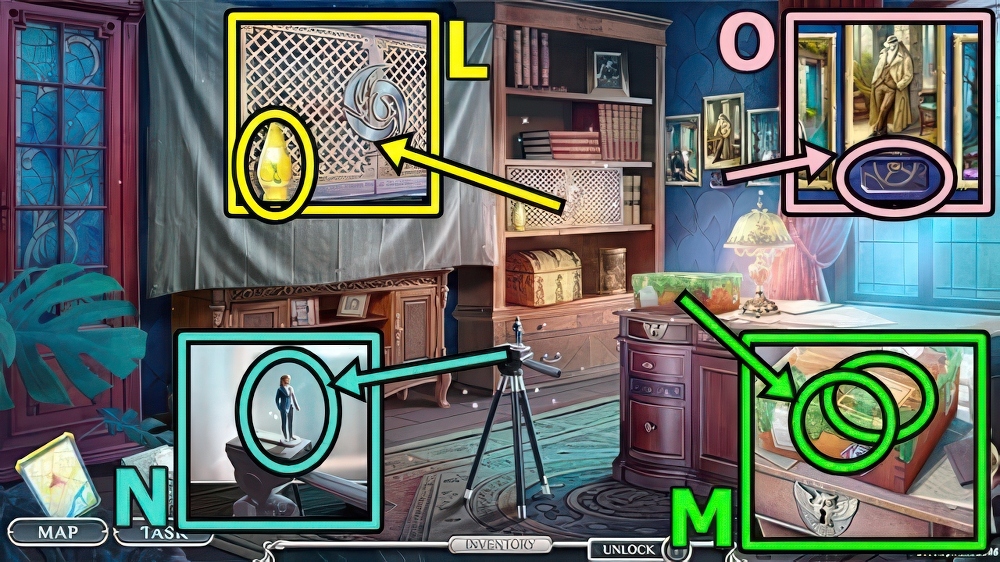
- Take LEMON JUICE (L).
- Use LEMON JUICE (M), then ANNA’S LIGHTER.
- Take NAMEPLATE and BROWNS’ FILM.
- Take AGENT FIGURINES 4/5 (N).
- Add NAMEPLATE (O).
- Read, play puzzle, take AGENT FIGURINES 5/5 and ACCUMULATOR BATTERY.
- Move down.
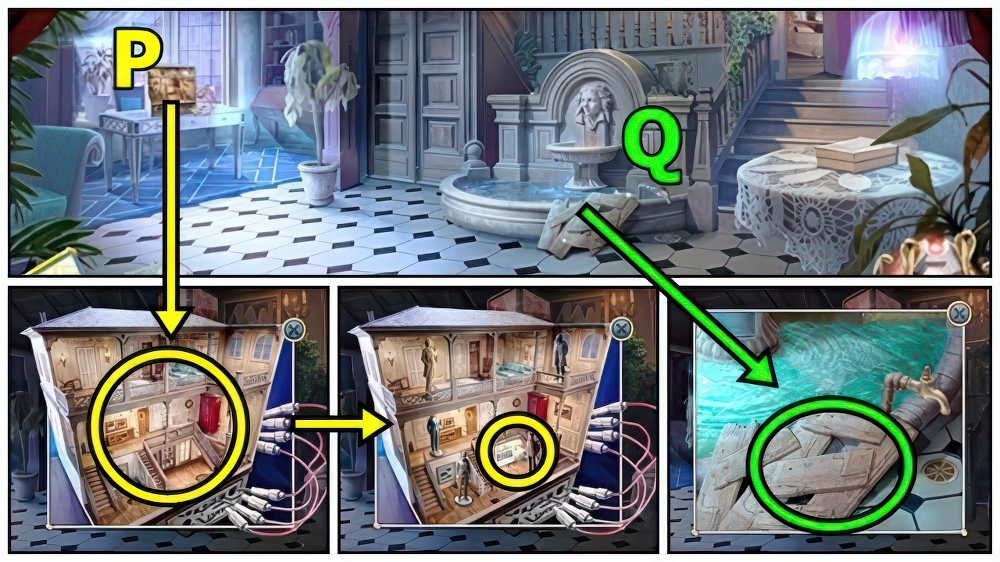
- Add AGENT FIGURINES (P), examine, take PROJECTION LIGHT and HACKSAW.
- Use HACKSAW (Q), take OBJECTIVE LENS and REMOTE CONTROL.
- Enter Raphael Brown’s Office.
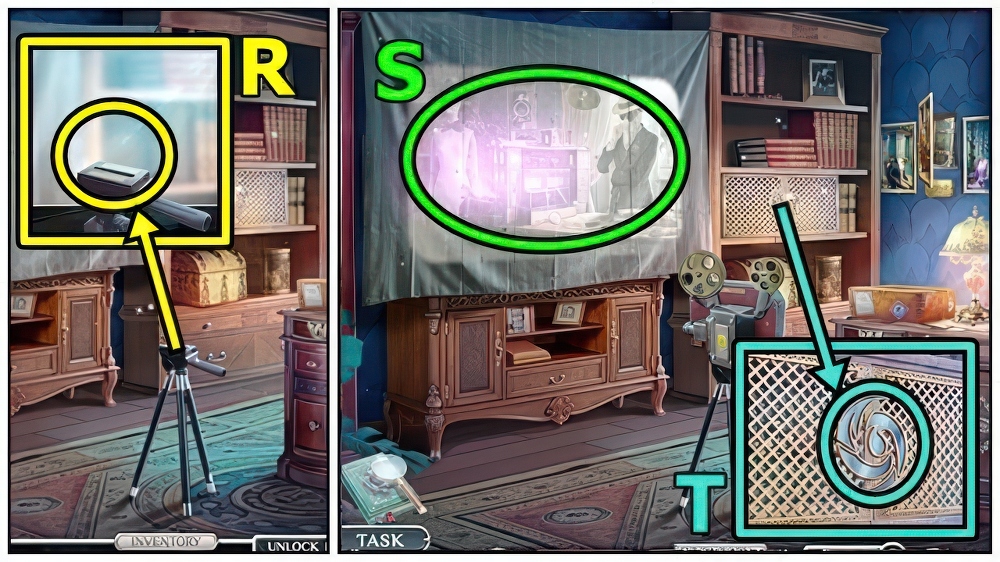
- Remove items from BROKEN PROJECTOR, add BROWNS’ FILM, PROJECTION LIGHT and OBJECTIVE LENS, take VINTAGE PROJECTOR.
- Add VINTAGE PROJECTOR (R).
- Play puzzle (S), take CATACLYSM SYMBOL.
- Add CATACLYSM SYMBOL (T), take RED THREAD and VALVE.
- Move down.
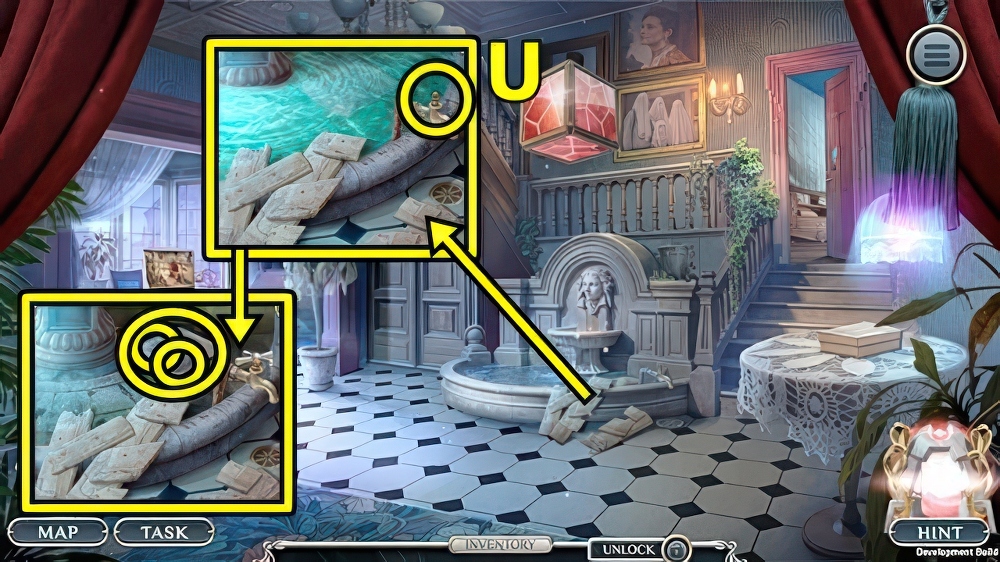
- Add VALVE (U), open, take DETECTOR PART and AI ADAPTER.
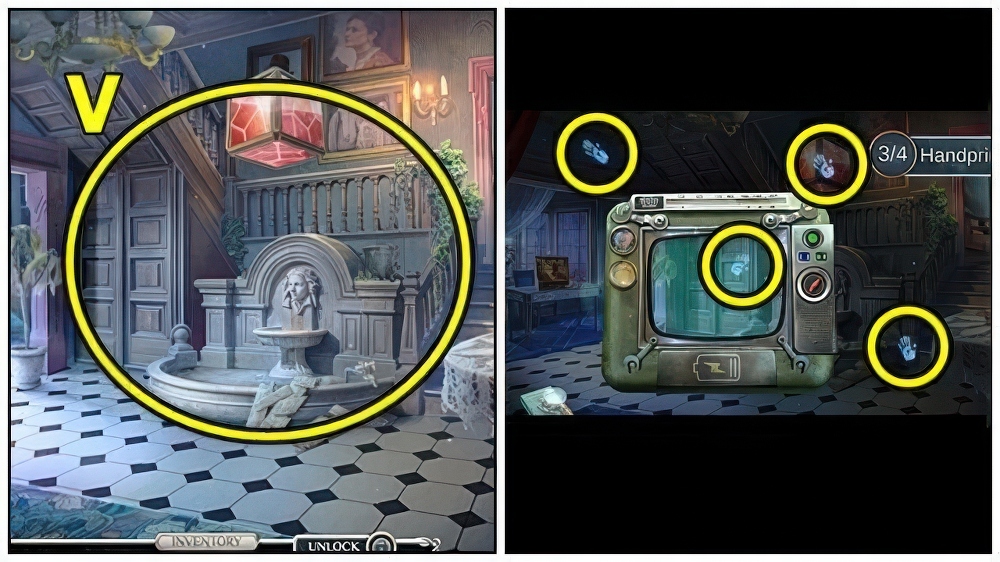
- Remove battery from BROKEN P.A.T.R.I.C.K., add ACCUMULATOR BATTERY and DETECTOR PART, take TRACE DETECTOR.
- Use TRACE DETECTOR (V).
- Find fingerprints.
- Enter CCTV Room.
- Take COLORED DARTS (W).
- Add COLORED DARTS (X) and RED THREAD, take TONE ARM and EXTENDABLE CANE.
- Return to Mansion Exterior.
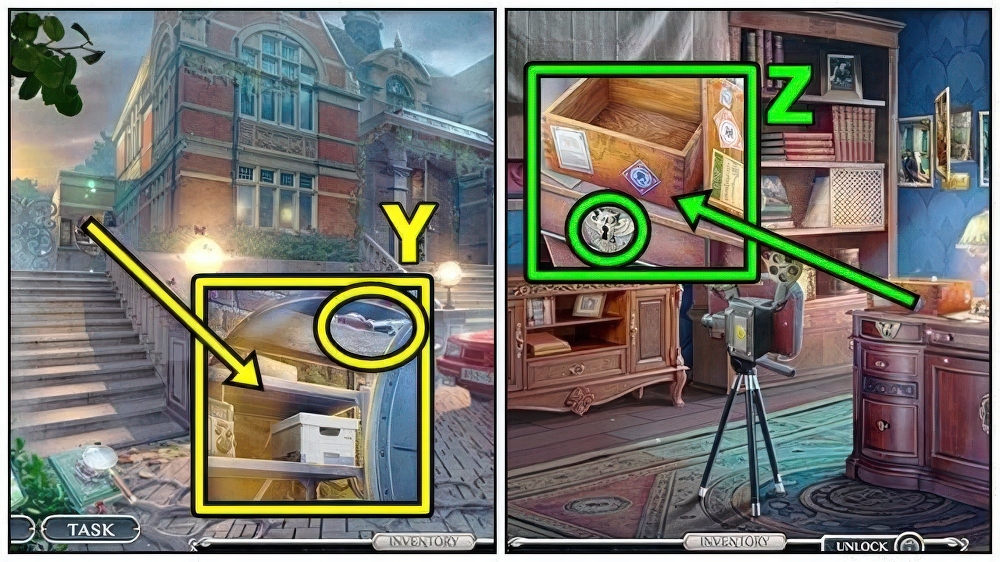
- Use EXTENDABLE CANE (Y), receive UNUSUAL KEY and EMPTY BODY.
- Return to Raphael Brown’s Office.
- Use UNUSUAL KEY (Z), read, take CONNECTION SCHEME and BOX CYLINDER.
- Return to CCTV Room.
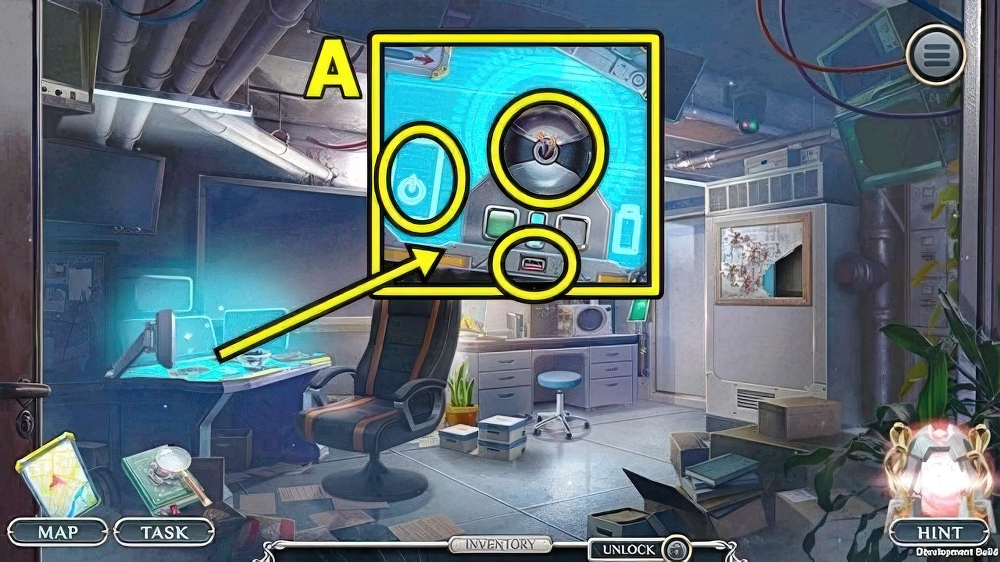
- Add AI ADAPTER (A), REMOTE CONTROL and CONNECTION SCHEME.
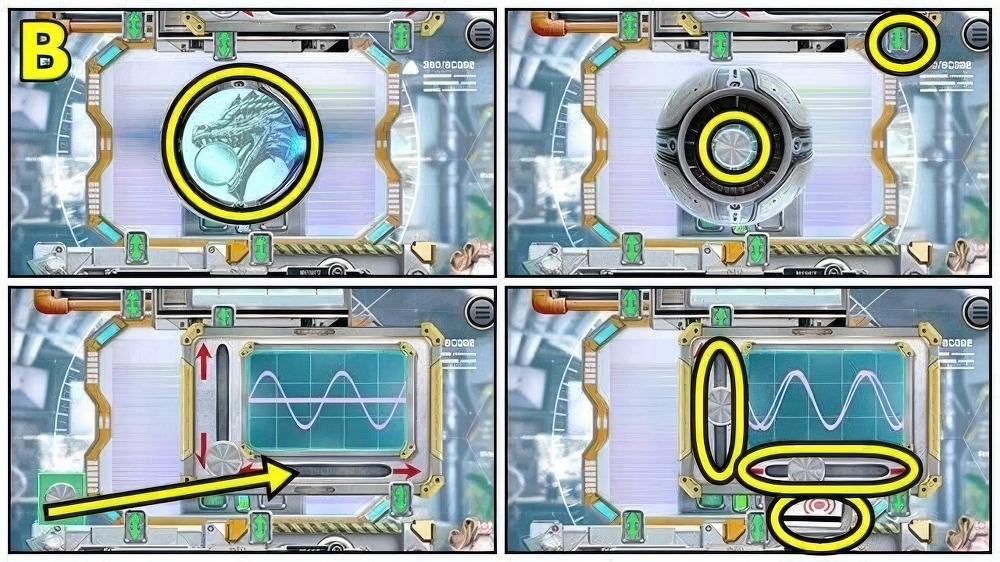
- Solution: (B).
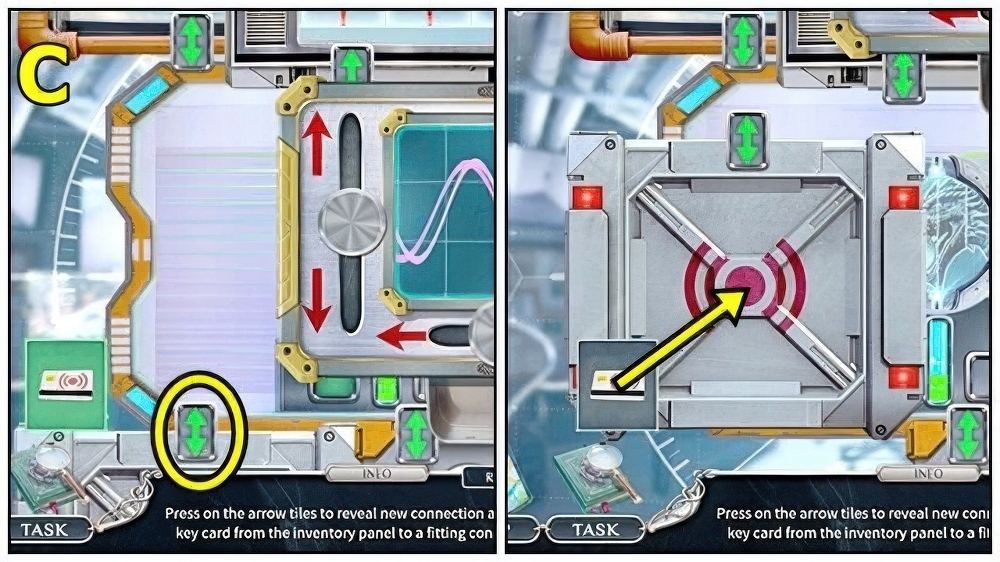
- Solution: (C).
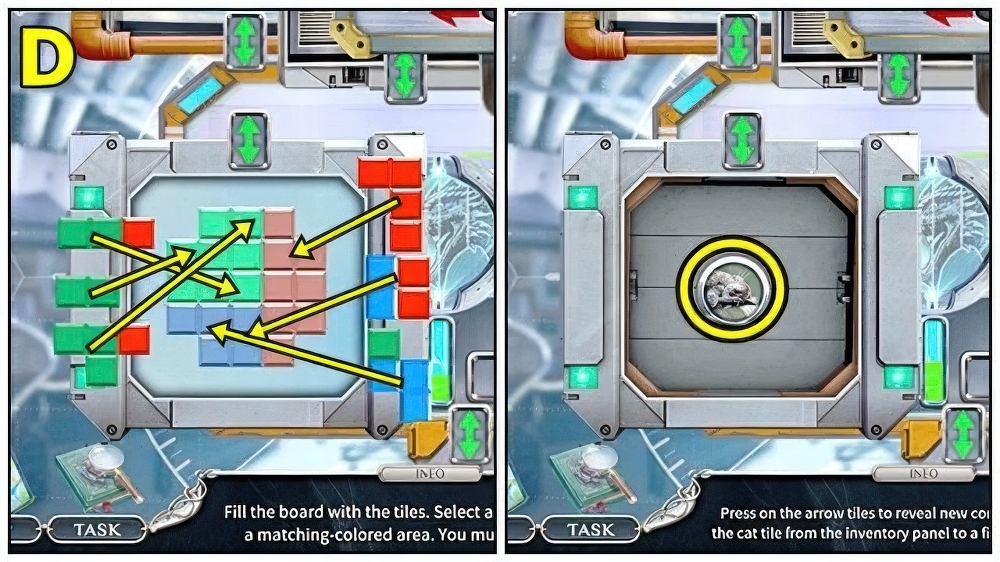
- Solution: (D).
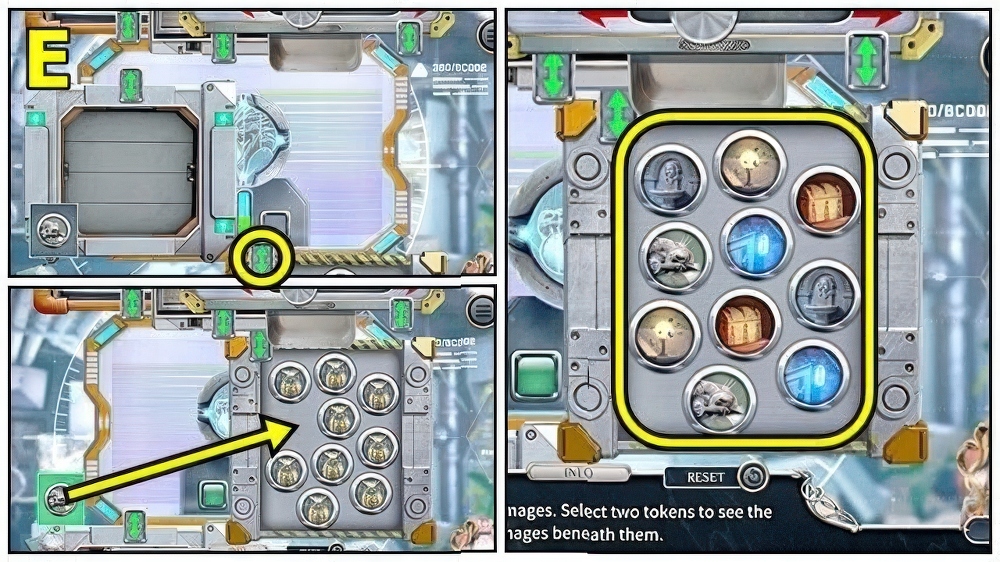
- Solution: (E).
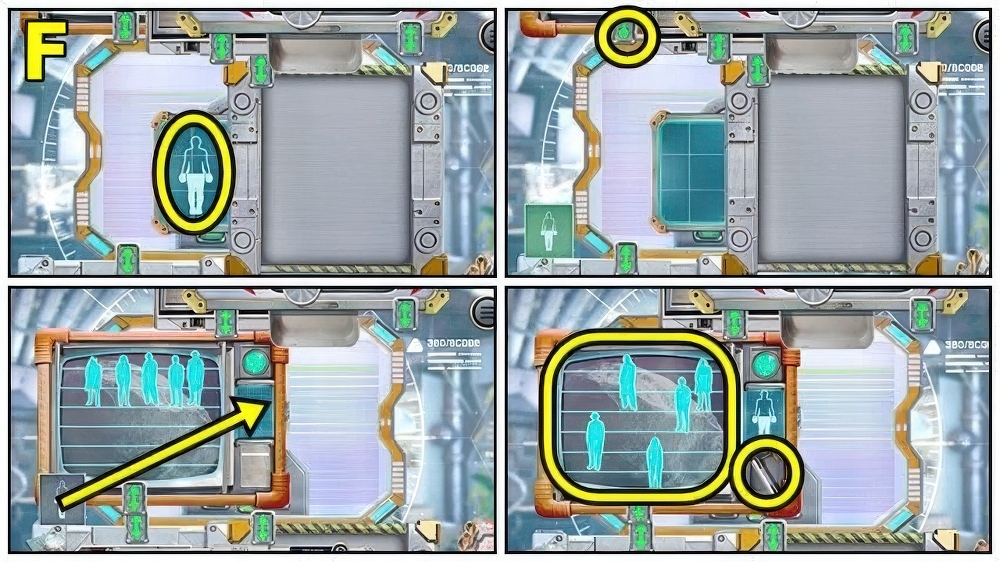
- Solution: (F).
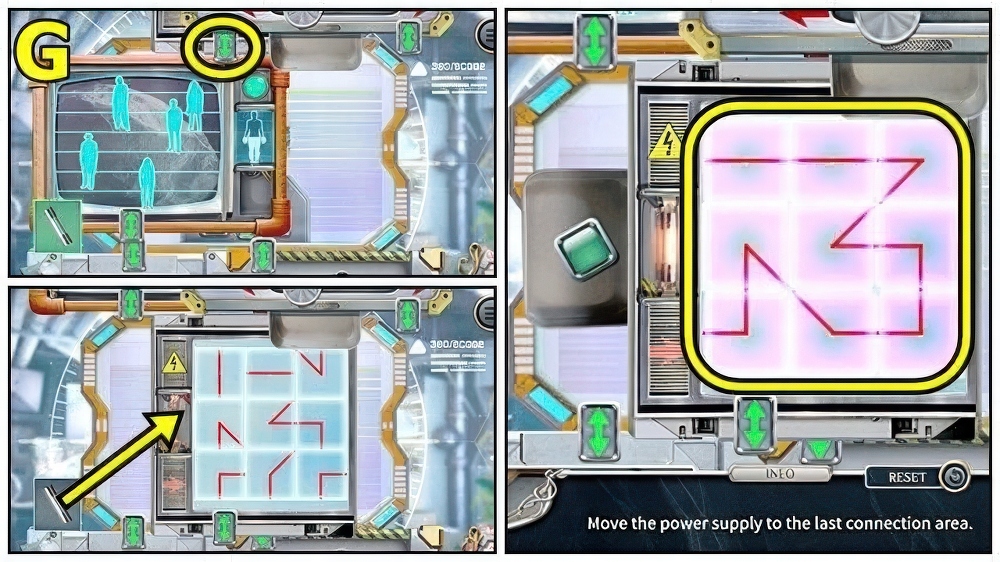
- Solution: (G).
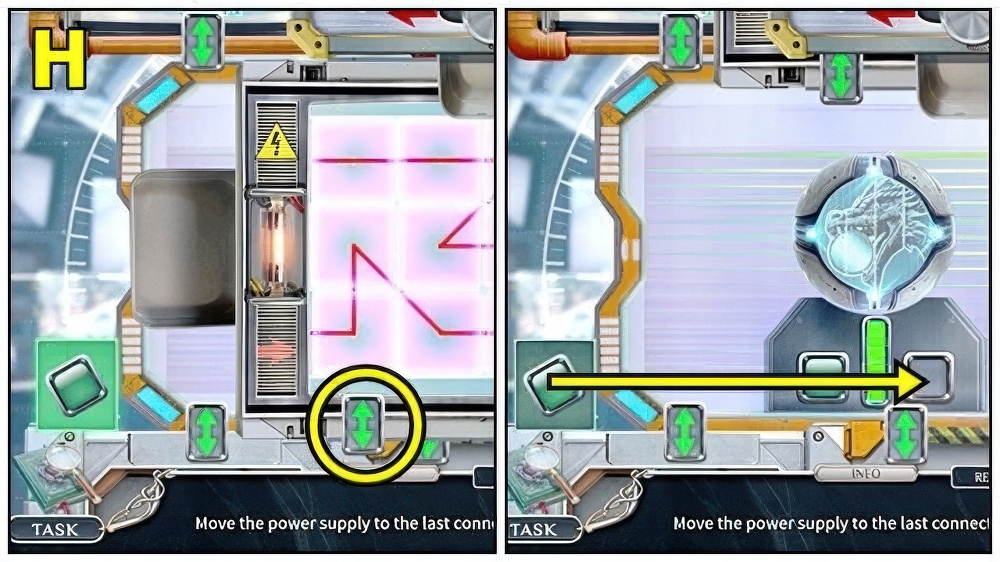
- Solution: (H).
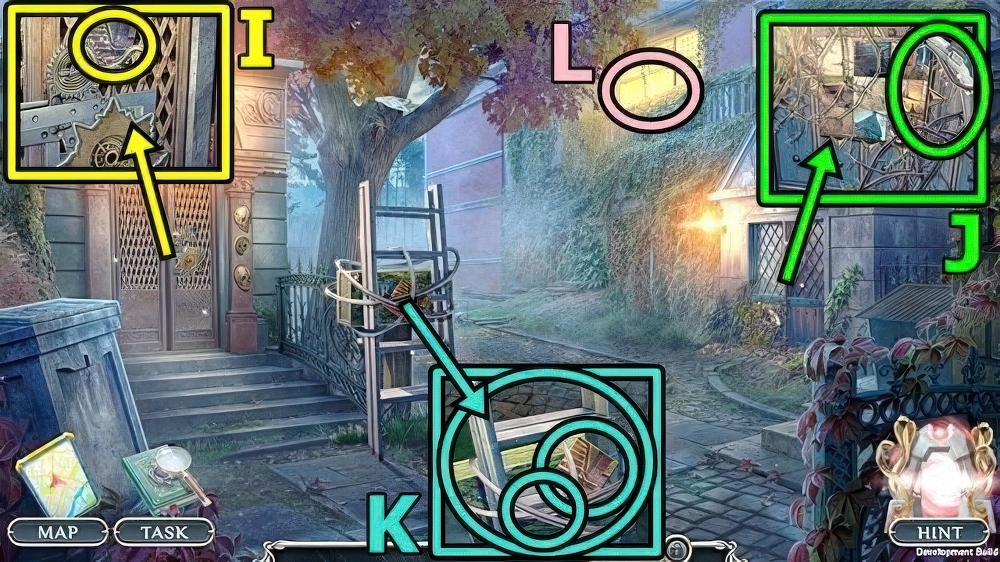
- Take PUZZLE PIECE 2/3 (I).
- Take PORTABLE CUTTER (J).
- Use PORTABLE CUTTER (K), take PUZZLE PIECE 3/3 and IRON STEPLADDER.
- Use IRON STEPLADDER (L).
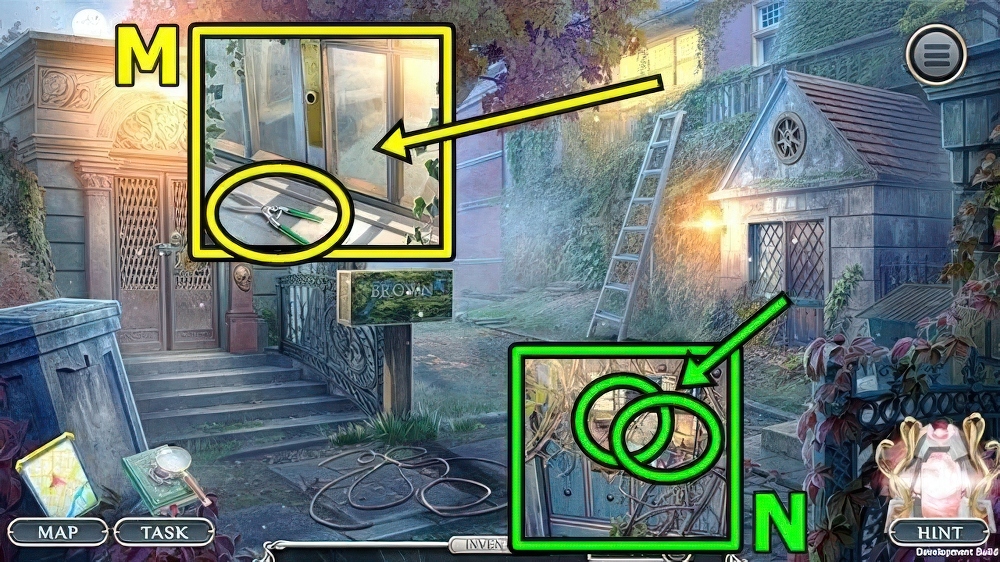
- Take METAL SCISSORS (M).
- Add METAL SCISSORS (N) and PUZZLE PIECE.
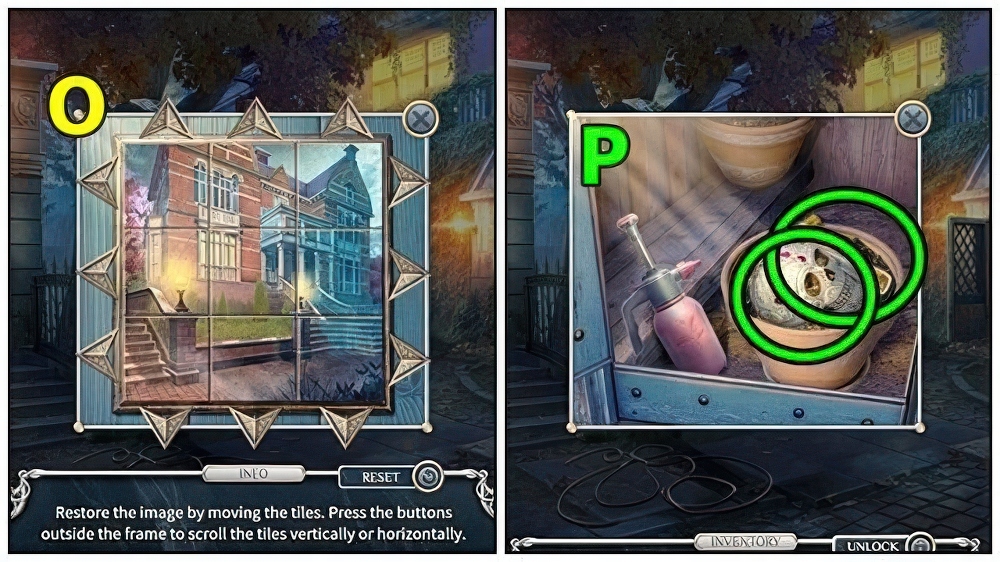
- Solution (O): Puzzle solution is randomly generated.
- Take INLAID SKULL (P) and MAGNET HANDLE.
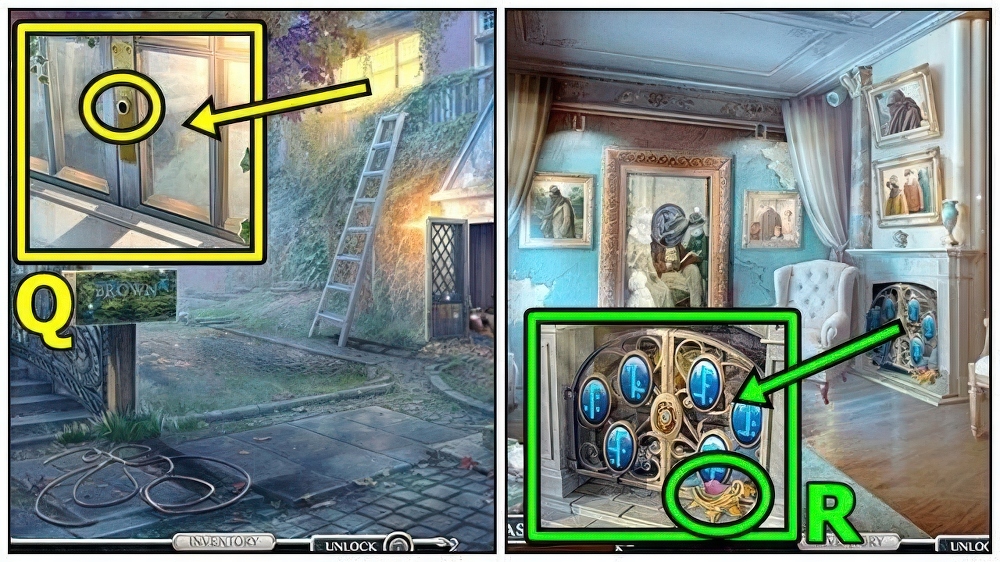
- Use MAGNET HANDLE (Q).
- Enter Picture Gallery.
- Take KEY PART (R).
- Move down.
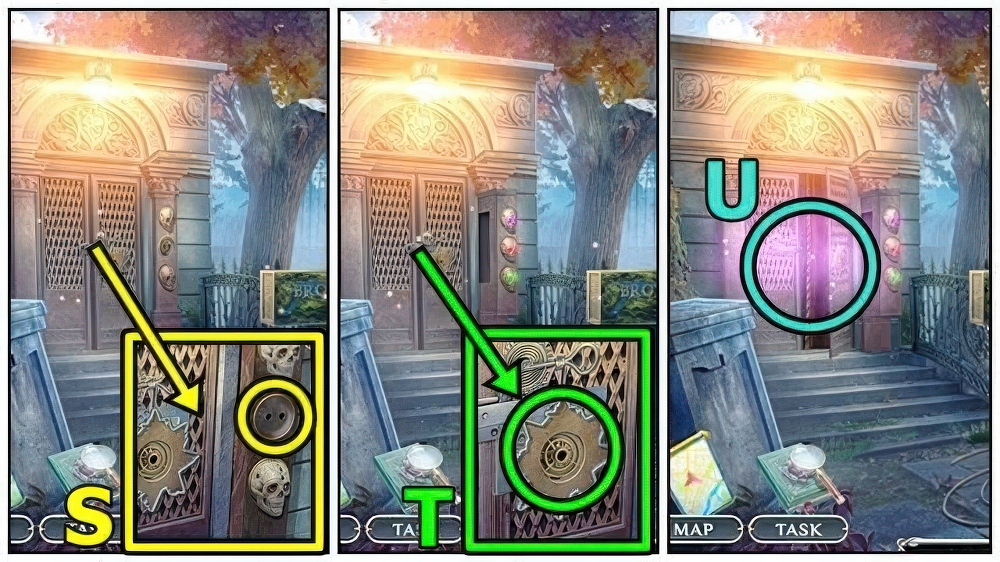
- Add INLAID SKULL (S), take START BUTTON and GOLDEN DRAGON.
- KEY PART and GOLDEN DRAGON on KEY BASE, take CRYPT KEY.
- Add CRYPT KEY (T).
- Play puzzle (U), receive DEVELOPING INSTANT CAMERA.
- Enter Picture Gallery.
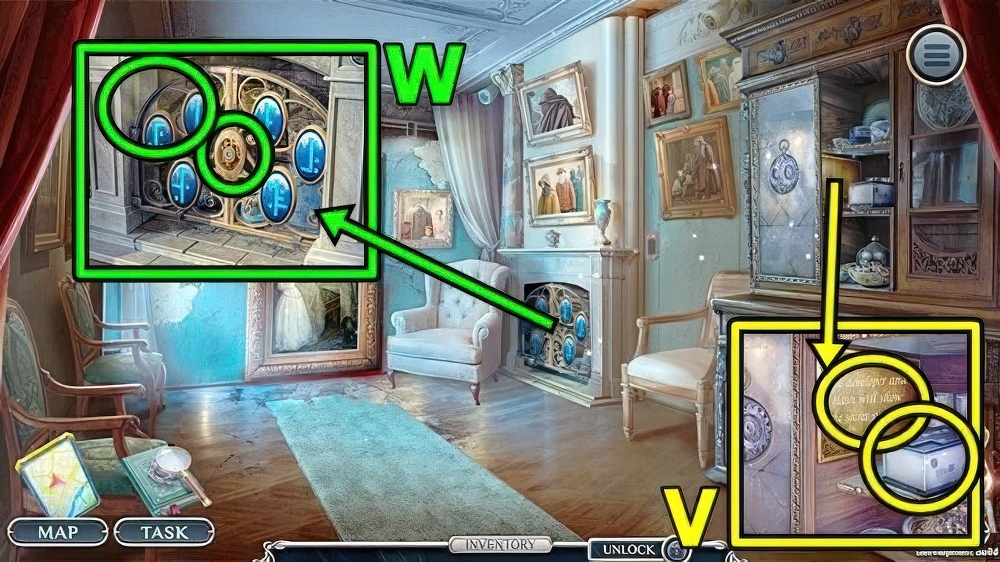
- Take BROKEN BATTERY (V).
- Use DEVELOPING INSTANT CAMERA, take STASH HINT.
- Use STASH HINT (W) and START BUTTON.
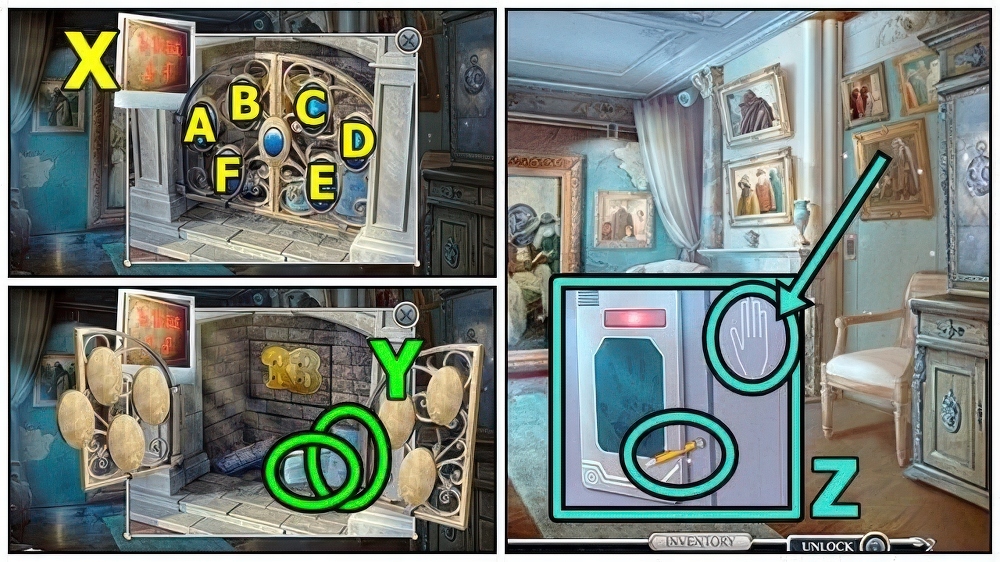
- Press B-E-A-C-D-F (X).
- Take VR HEADSET (Y) and INVISIBLE PRINT.
- Take ALUMINUM WIRE 1/3 (Z).
- Use INVISIBLE PRINT.
- Enter Virtual Reality Room.
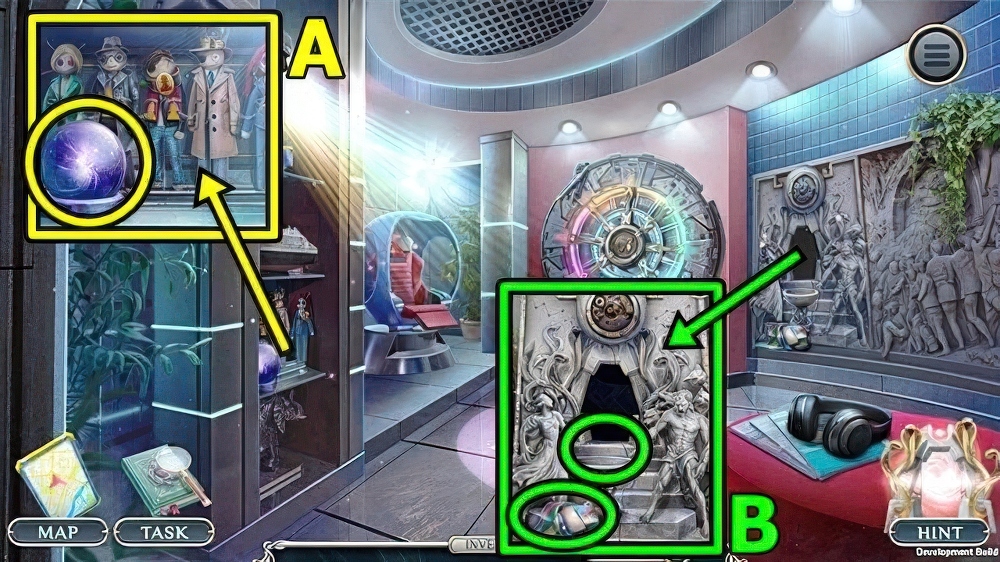
- Take GLOWING SPHERE (A).
- Take FABRIC PIECE (B).
- Add GLOWING SPHERE.
- Examine, take MANSION MAP 1/3 and SIGN PART.
- Return to Behind Mansion.
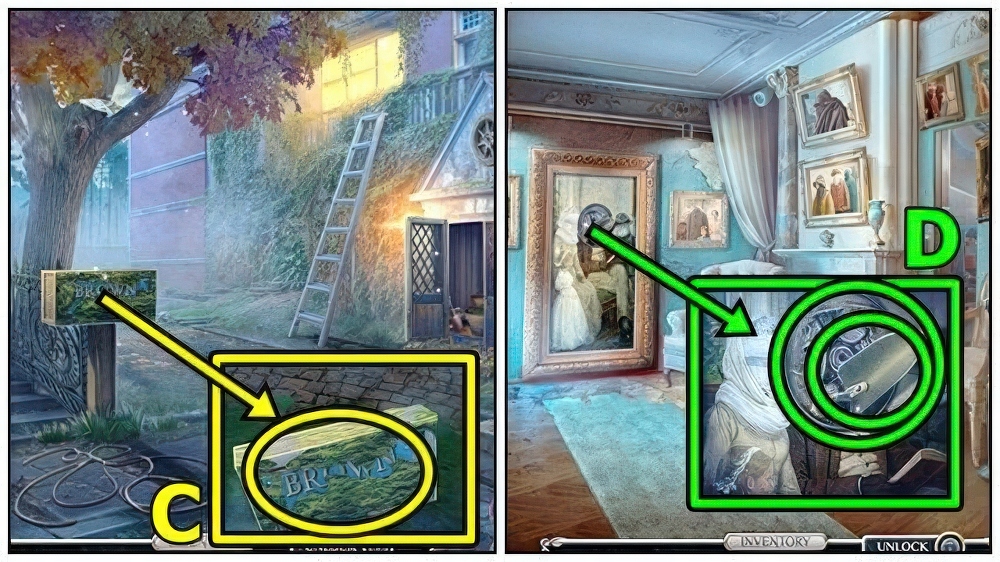
- Use SPATULA (C), add SIGN PART.
- Take RAPHAEL’S IMAGE and ALUMINUM WIRE 2/3.
- Enter Picture Gallery.
- Take SMALL SHOVEL (D).
- Add RAPHAEL’S IMAGE, take DATA ACQUISITION UNIT and METAL COLLAR 1/4.
- Enter Virtual Reality Room.
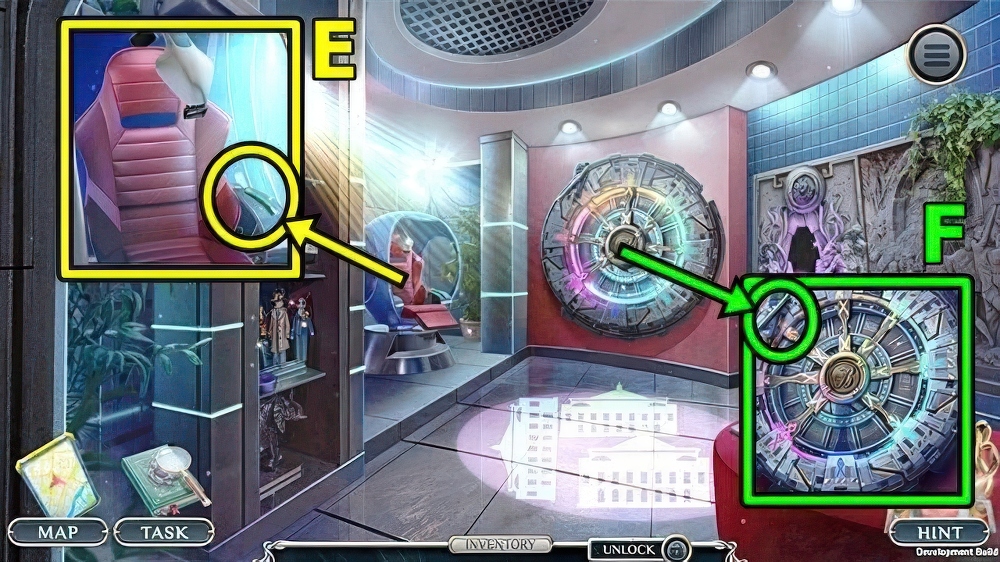
- Take ALUMINUM WIRE 3/3 (E).
- Take COLD WELDING (F).
- Remove top from BROKEN BATTERY, add COLD WELDING, DATA ACQUISITION UNIT and ALUMINUM WIRE, take MODULAR BATTERY.
- Add MODULAR BATTERY (G) and VR HEADSET.
- Play puzzle, take METAL COLLAR 2/4 and FAMILY WATCH.
- Move down.
- Add FAMILY WATCH (H), take UNUSUAL SEED and METAL COLLAR 3/4.
- Move down.
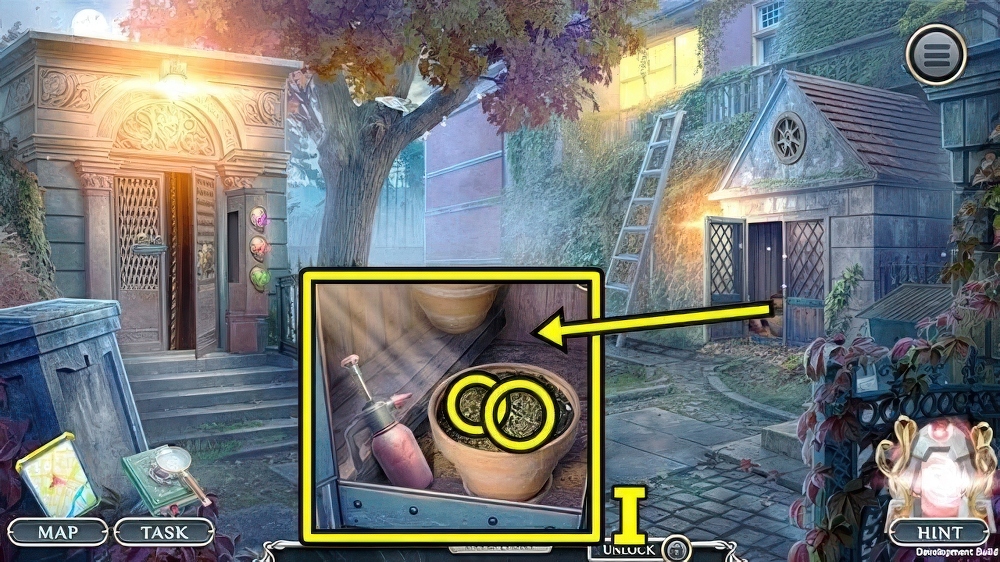
- Use SMALL SHOVEL (I) and UNUSUAL SEED, take KITE STRUTS and ANTIQUE COMPASS.
- Return to Virtual Reality Room.
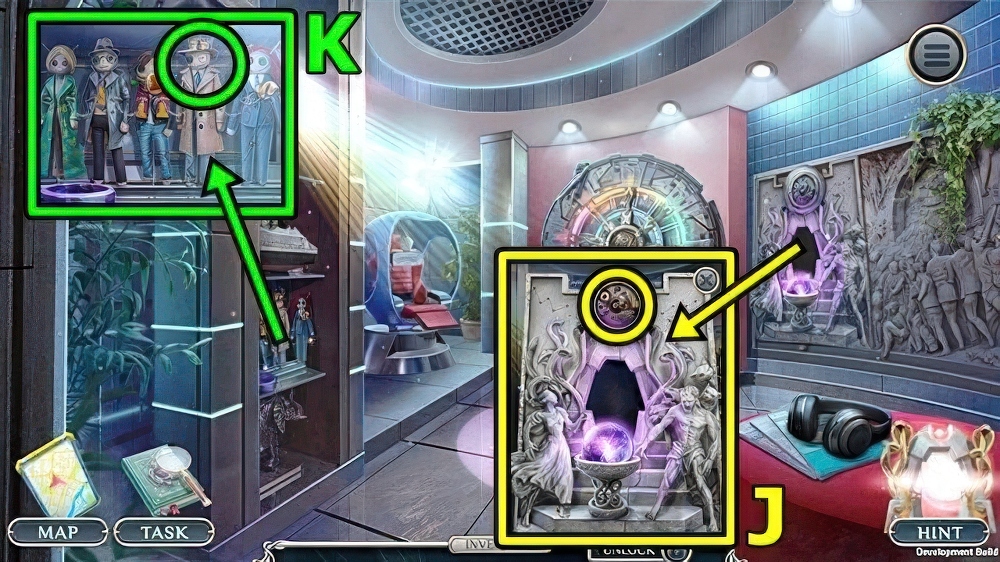
- Add ANTIQUE COMPASS (J).
- Play puzzle, receive METAL COLLAR 4/4 and FAMILY SEAL.
- Add METAL COLLAR (K).
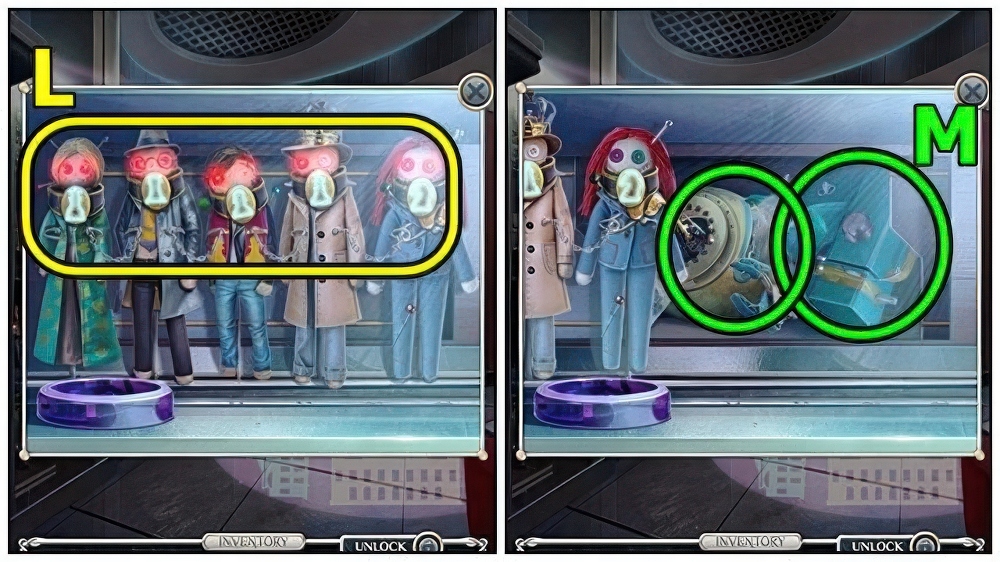
- Adjust collars (L).
- Take MECHANICAL ASSISTANT (M) and PORTABLE SEWING MACHINE.
- Return to Behind Mansion.
- Examine FABRIC PIECE, read, add PORTABLE SEWING MACHINE and KITE STRUTS, take KITE.
- Use KITE (N), receive UNUSUAL PART.
- Return to Virtual Reality Room.
- Add UNUSUAL PART (O) and FAMILY SEAL, take KNIFE SLAB and RB LETTER.
- Move down.
- Add RB LETTER (P), read, take DOOR KNOCKER.
- Add DOOR KNOCKER (Q).
- Solution: (R).
- Solution: (S).
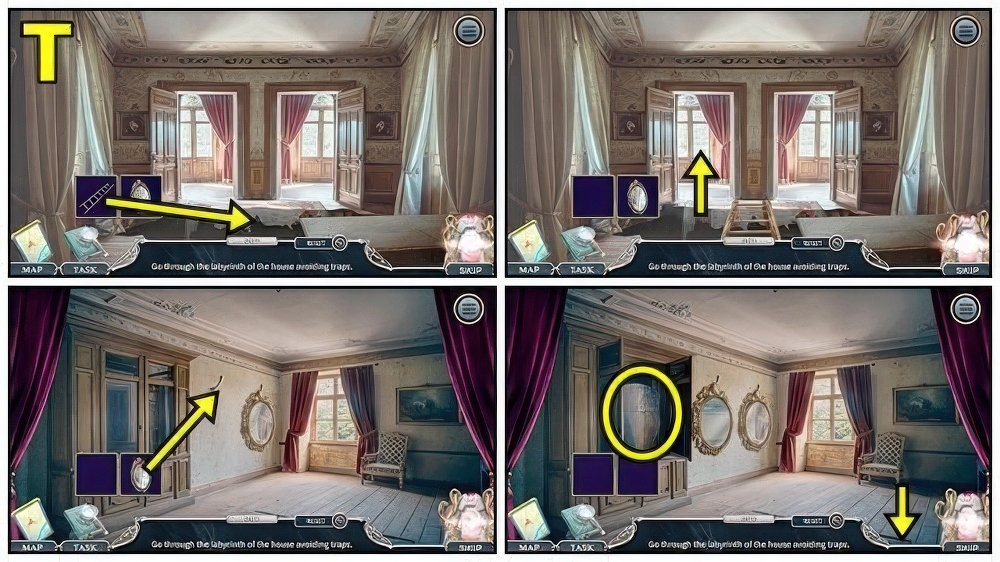
- Solution: (T).
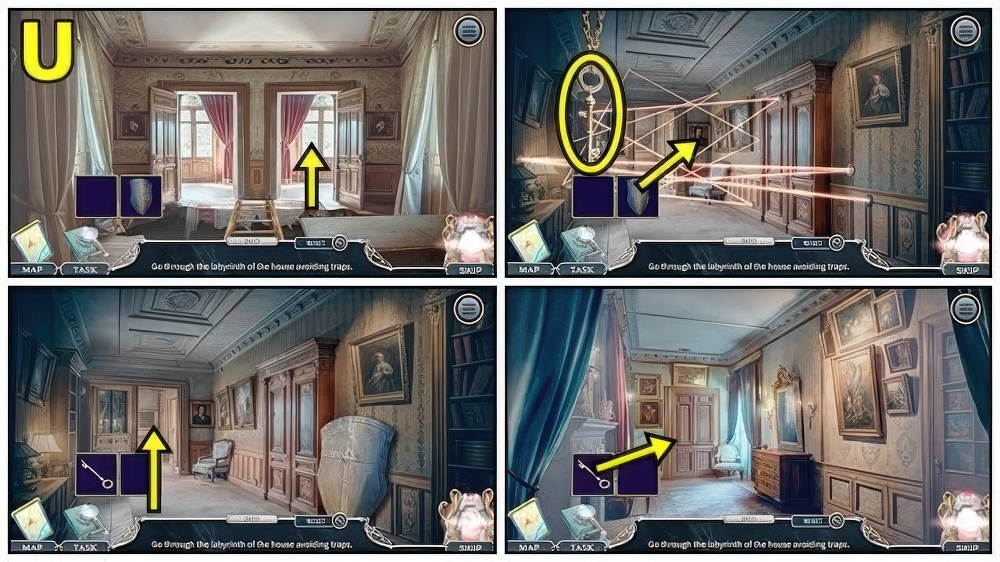
- Solution: (U).
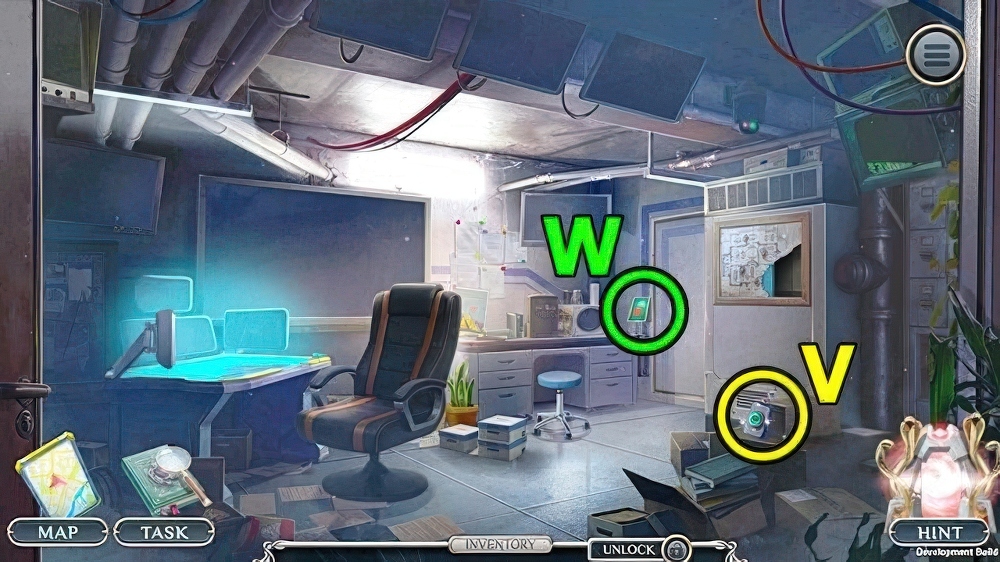
- Take ACTIVATION REMOTE (V).
- Use ACTIVATION REMOTE (W).
- Enter The Brown’s Library.
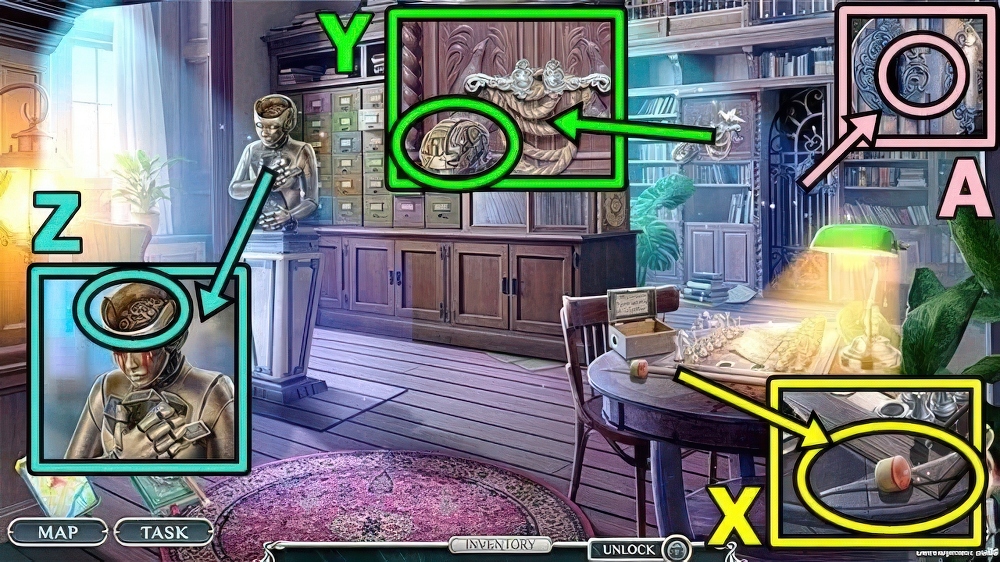
- Take LID WITH WICK (X).
- Take MECHANICAL BRAIN (Y).
- Add MECHANICAL BRAIN (Z), take POTASSIUM NITRATE and DEACTIVATED ARTIFACT.
- POTASSIUM NITRATE and LID WITH WICK on EMPTY BODY, take IMPROVISED EXPLOSIVE.
- Add IMPROVISED EXPLOSIVE (A).
- Enter Mortimer’s Office.
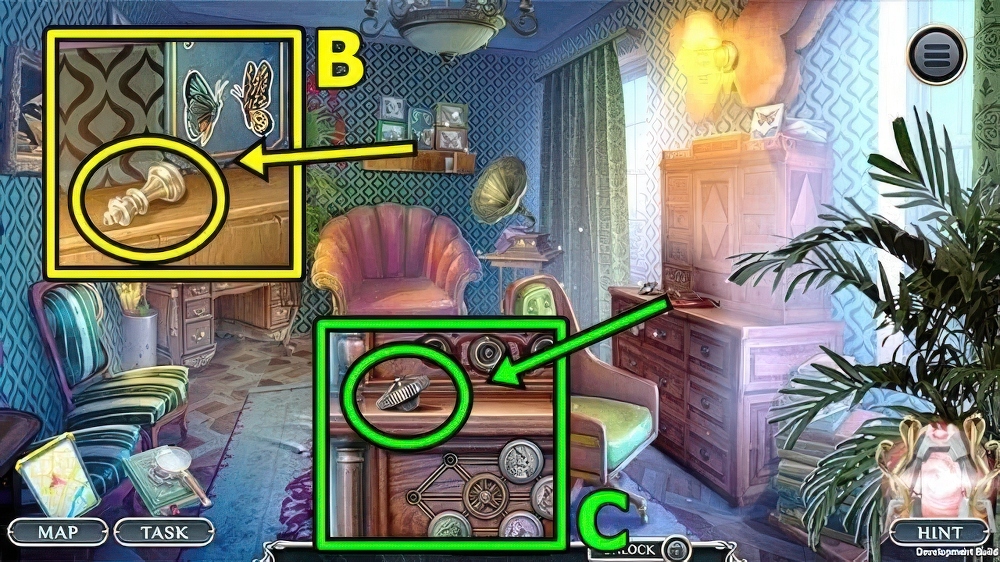
- Take CHESS KING (B).
- Take NEEDLE HOLDER (C).
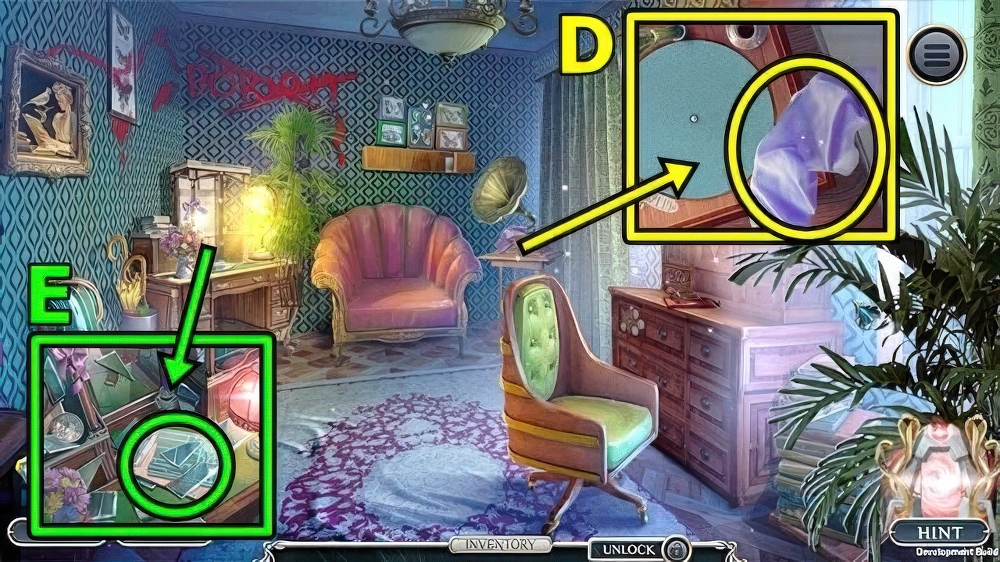
- Take SHIRT PIECE (D).
- Use SHIRT PIECE (E).
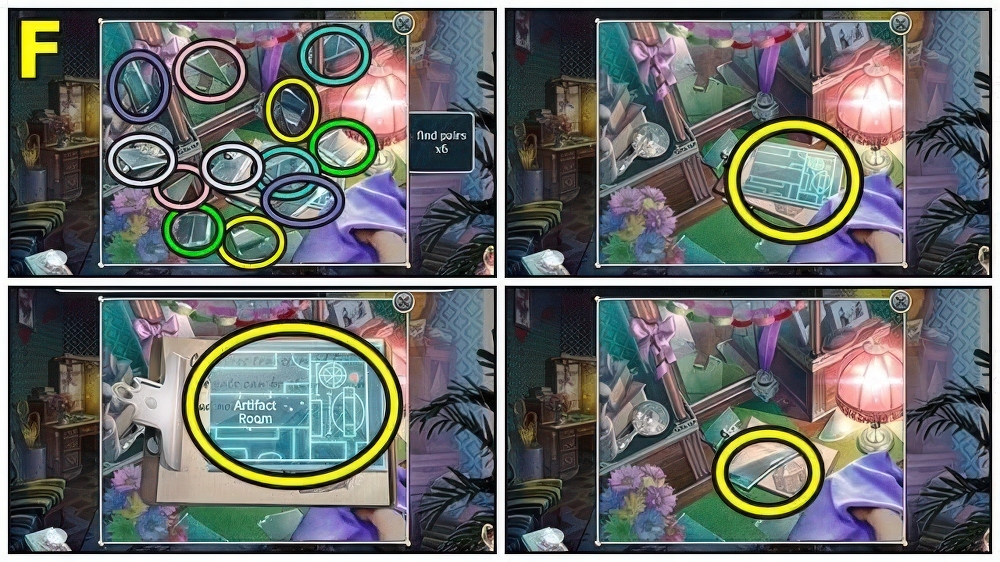
- Find items (F), take TABLET MAP and SHARP GLASS.
- Move down.
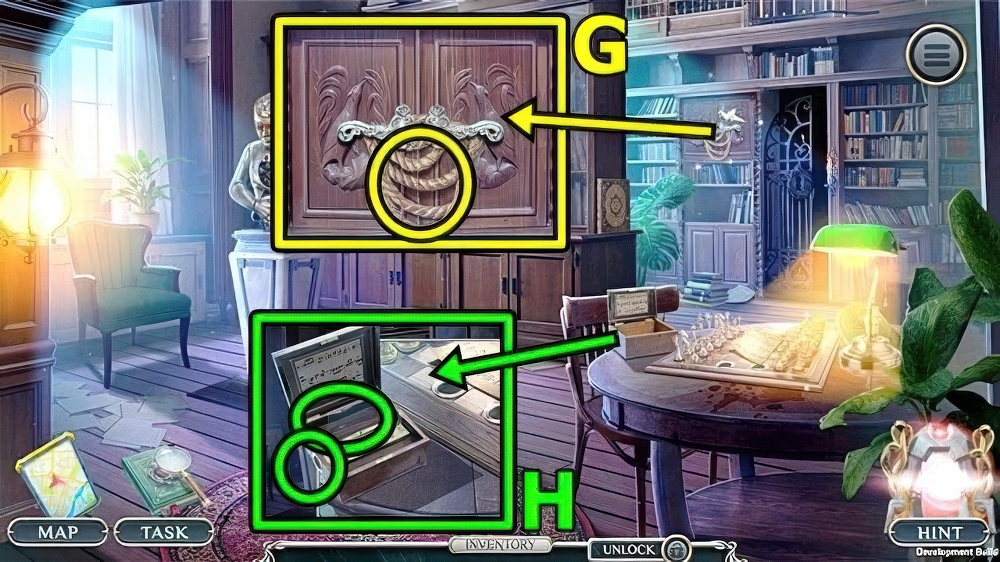
- Use SHARP GLASS (G), take BOX HANDLE and SKETCHBOOK.
- Add BOX HANDLE (H) and BOX CYLINDER, take FILE and DOG GEAR.
- Enter Mortimer’s Office.
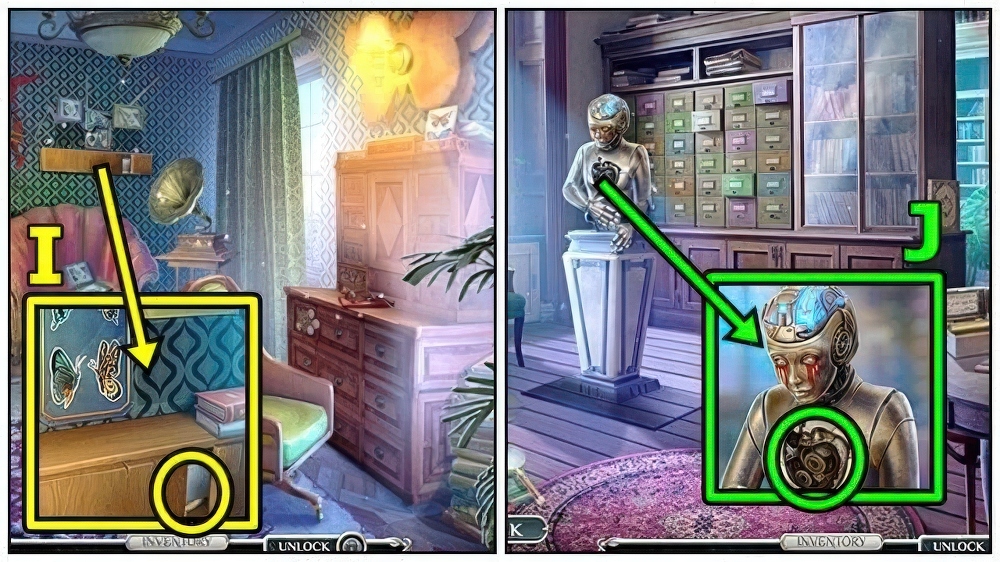
- Use FILE (I), take RIBBON WITH HOOK and SWITCH LEVER.
- Move down.
- Add SWITCH LEVER (J).
- Enter Artifact Room.
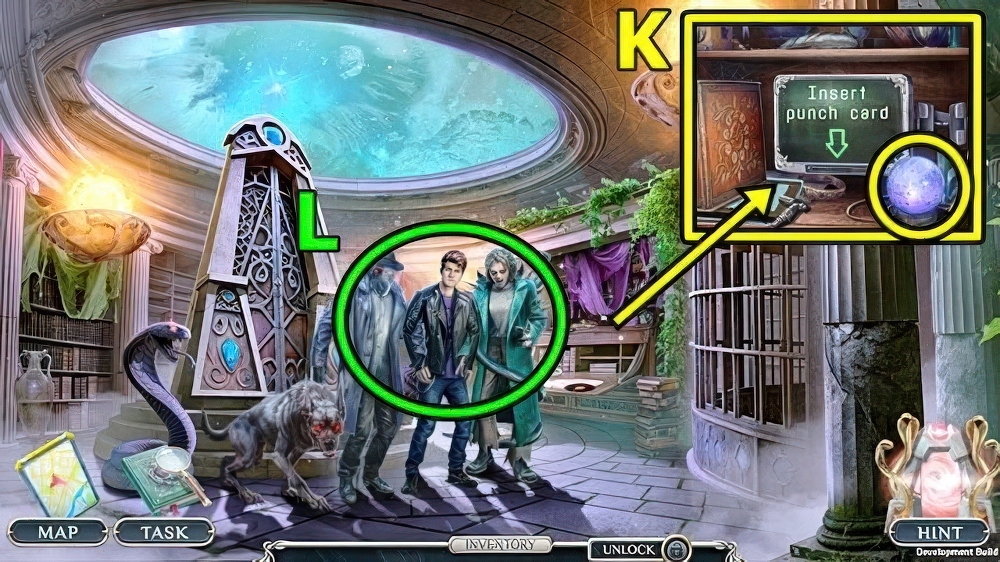
- Take ARTIFACT AUDIO SYSTEM (K).
- ARTIFACT AUDIO SYSTEM on DEACTIVATED ARTIFACT, take CALL OF LAURUS.
- Use CALL OF LAURUS (L).
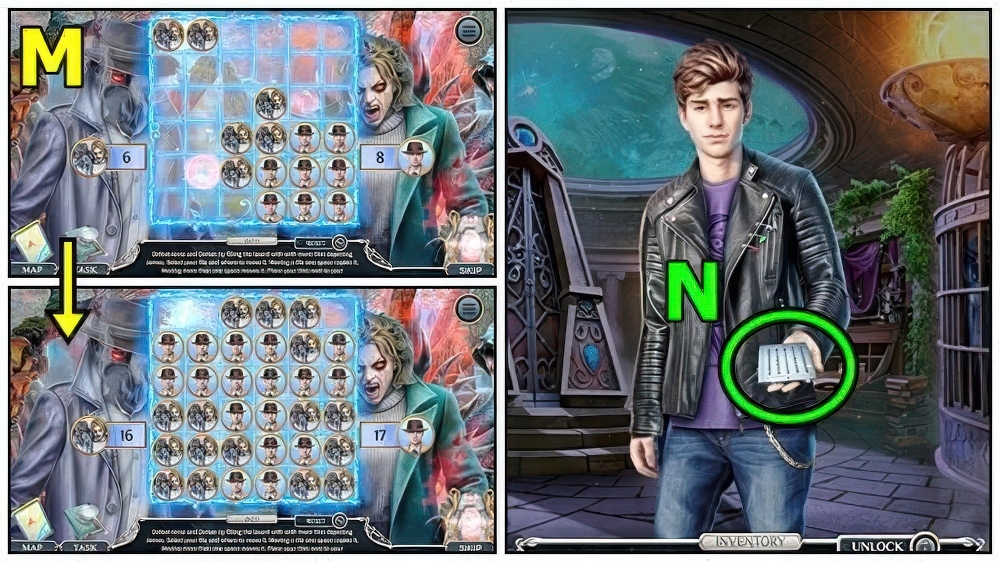
- Solution (M): Puzzle is randomly generated.
- Screenshot is an example.
- Take SEARCH PUNCH CARD (N).
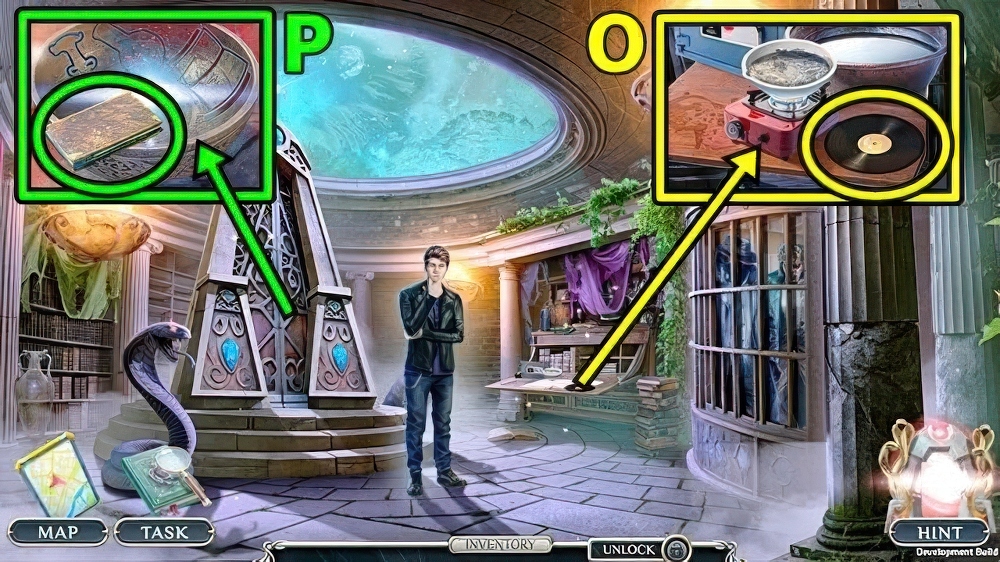
- Take MORTIMER’S RECORD (O).
- Take FAMILY BOOK 1/5 (P).
- Return to Mortimer’s Office.
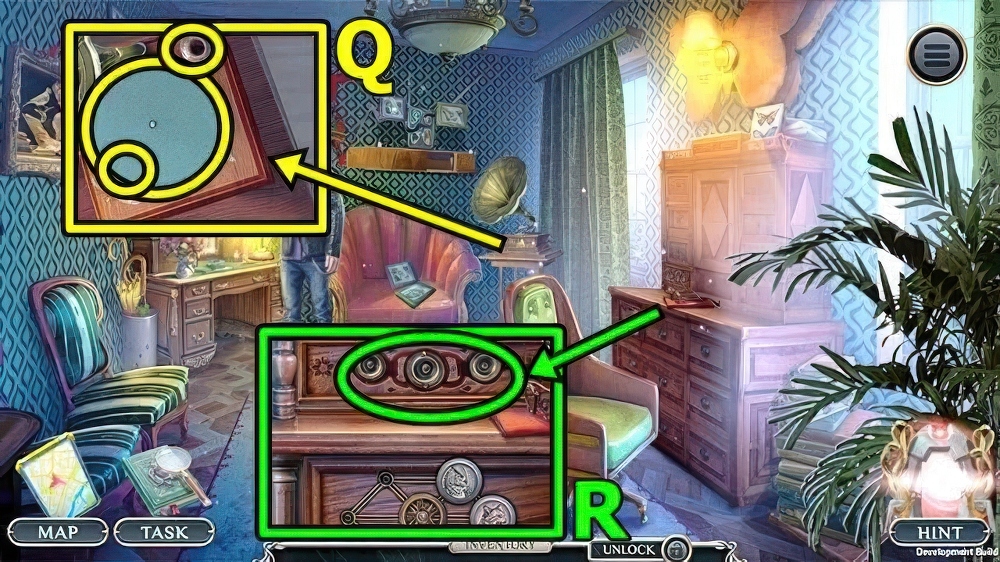
- Add MORTIMER’S RECORD (Q), NEEDLE HOLDER and TONE ARM, take MORTIMER’S BRACELET and FAMILY BOOK 2/5.
- Add MORTIMER’S BRACELET (R), take BALLOON and CHESS ROOK.
- Move down.
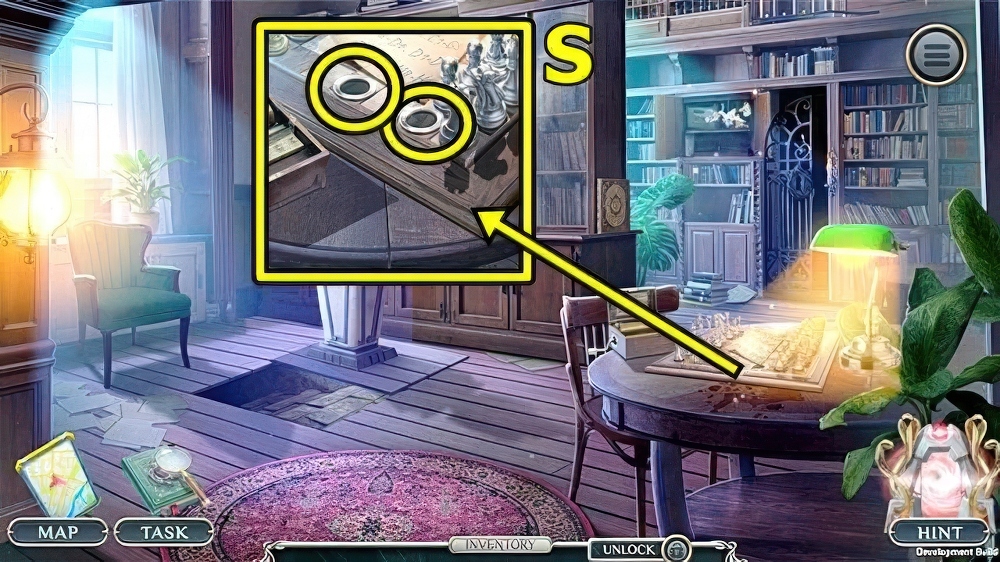
- Add CHESS KING (S) and CHESS ROOK.
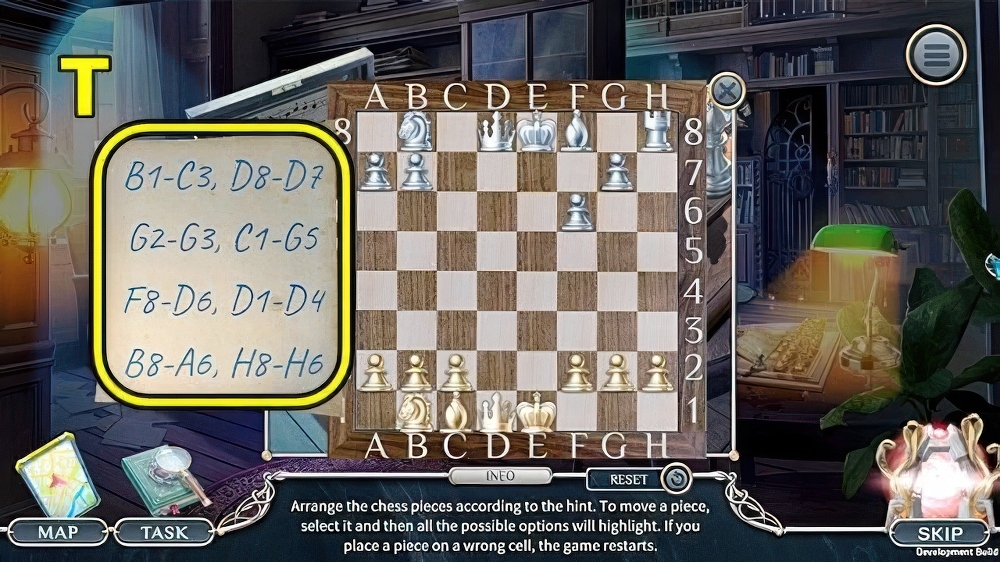
- Solution: (T).
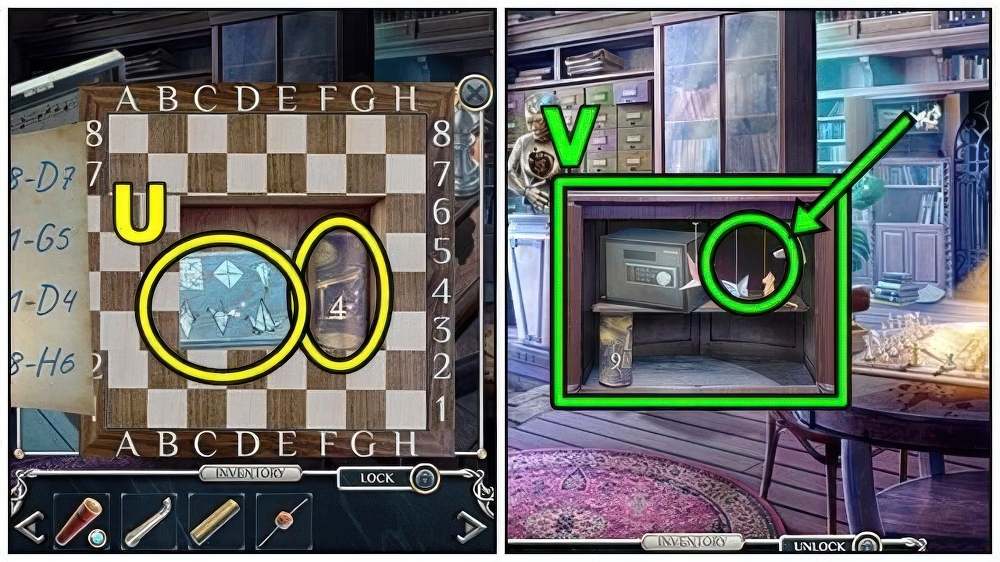
- Take ORIGAMI INSTRUCTIONS (U) and FAMILY BOOK 3/5.
- ORIGAMI INSTRUCTIONS and RIBBON WITH HOOK on SKETCHBOOK, fold, take ORIGAMI DRAGON.
- Add ORIGAMI DRAGON (V), take SNAKE GEAR.
- Enter Mortimer’s Office.
- Add DOG GEAR (W) and SNAKE GEAR.
- Play puzzle, take PART SHAPE.
- Take DROPPER WITH FLASK (X).
- Use DROPPER WITH FLASK (Y), receive MORTIMER’S BLOOD.
- Return to Artifact Room.
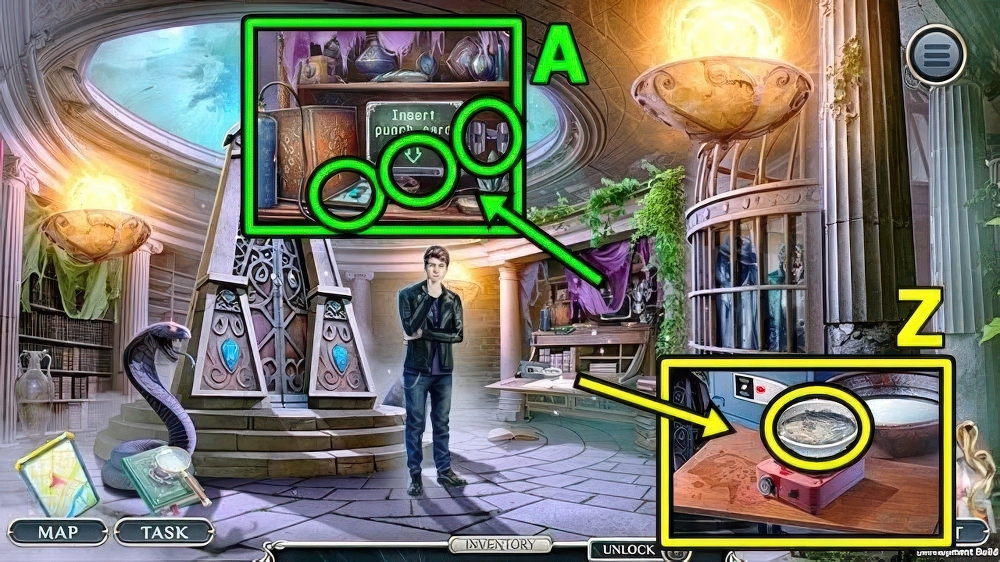
- Add PART SHAPE (Z), take MECHANICAL ARM.
- Insert SEARCH PUNCH CARD (A) and MECHANICAL ARM, take HECATE’S DAGGER and FAMILY BOOK 4/5.
- Add BALLOON, take EUMAEUS ATALA and FAMILY BOOK 5/5.
- Move down.
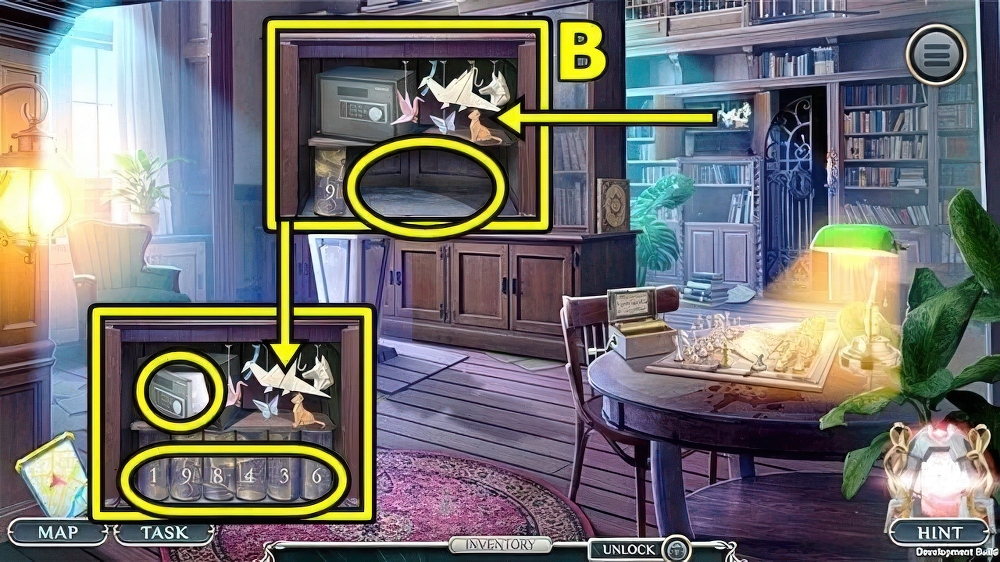
- Add FAMILY BOOK (B), rearrange 1-9-8-4-3-6, take KEY CARD.
- Return to Artifact Room.
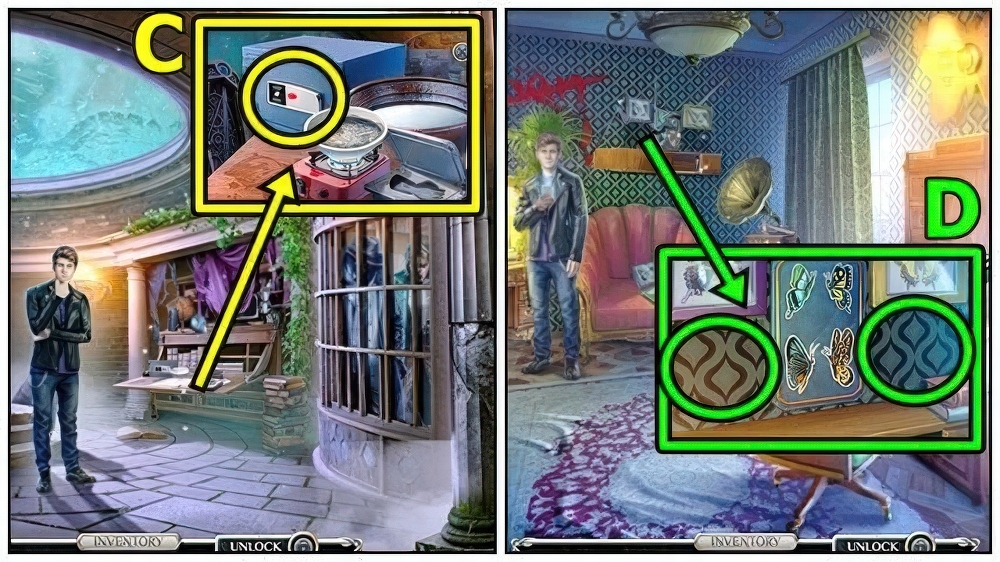
- Use KEY CARD (C), take PAPILIO ANTIMACHUS.
- Return to Mortimer’s Office.
- Add EUMAEUS ATALA (D) and PAPILIO ANTIMACHUS, read, take DARK GRIMOIRE.
- Return to Artifact Room.
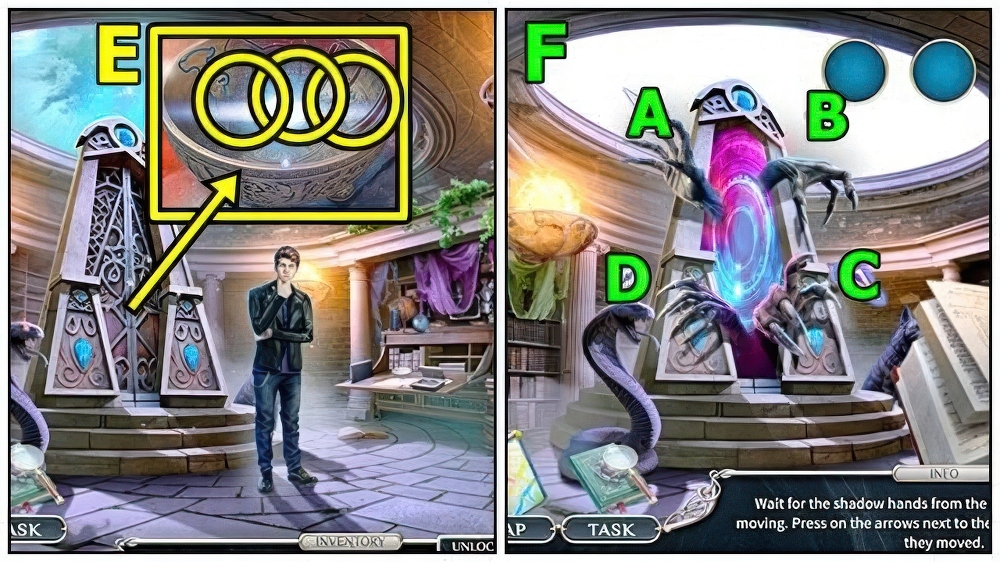
- Add MORTIMER’S BLOOD (E), HECATE’S DAGGER and DARK GRIMOIRE.
- Solution (F): (A-B-D)-(B-C-A-D)-(D-B-C-D-A)-(D-A-B-C-A-B).
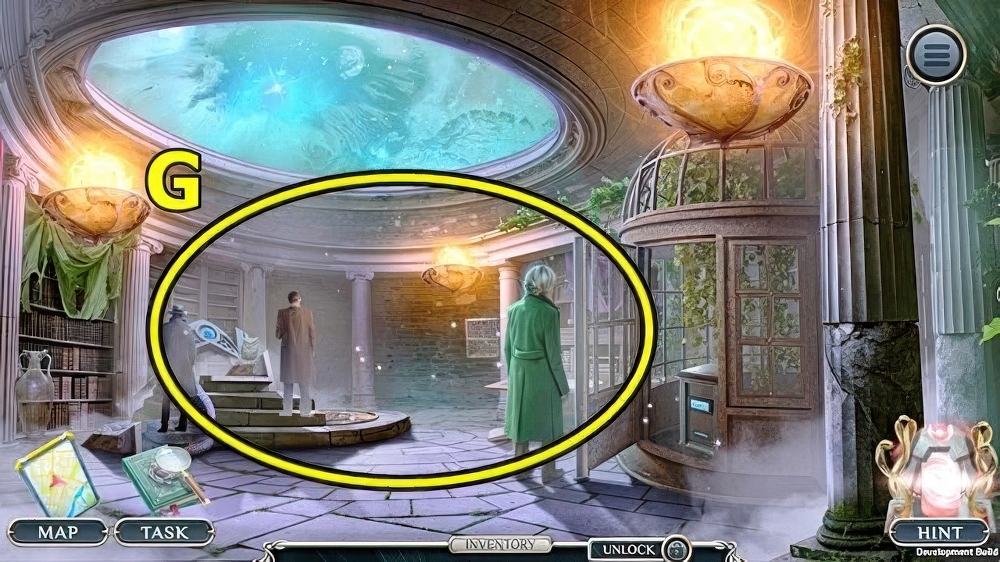
- Talk (G).
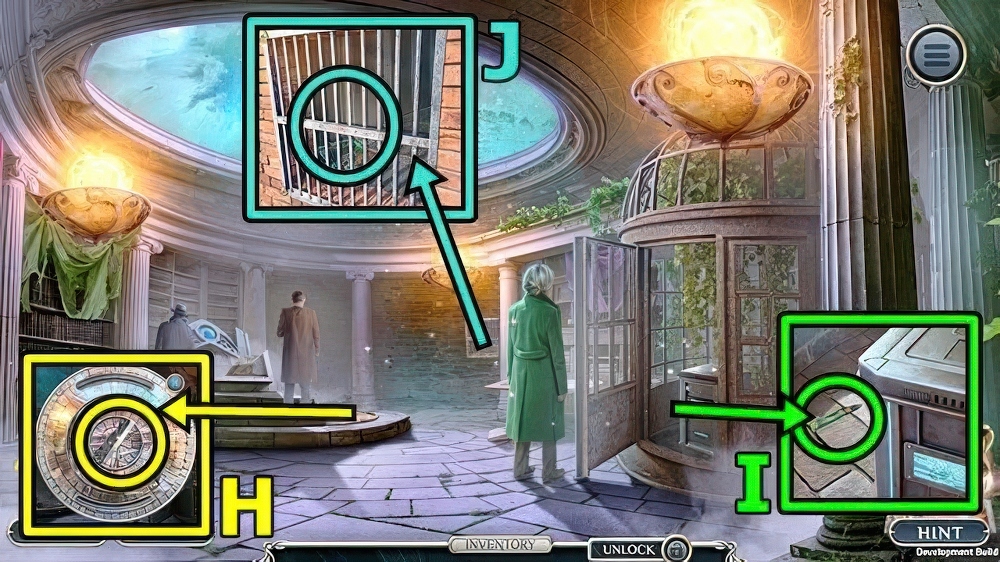
- Take TWEEZERS (H).
- Use TWEEZERS (I), take VALVE SCREWDRIVER.
- Use VALVE SCREWDRIVER (J), take FOLIO SLAB and MICROCIRCUIT.
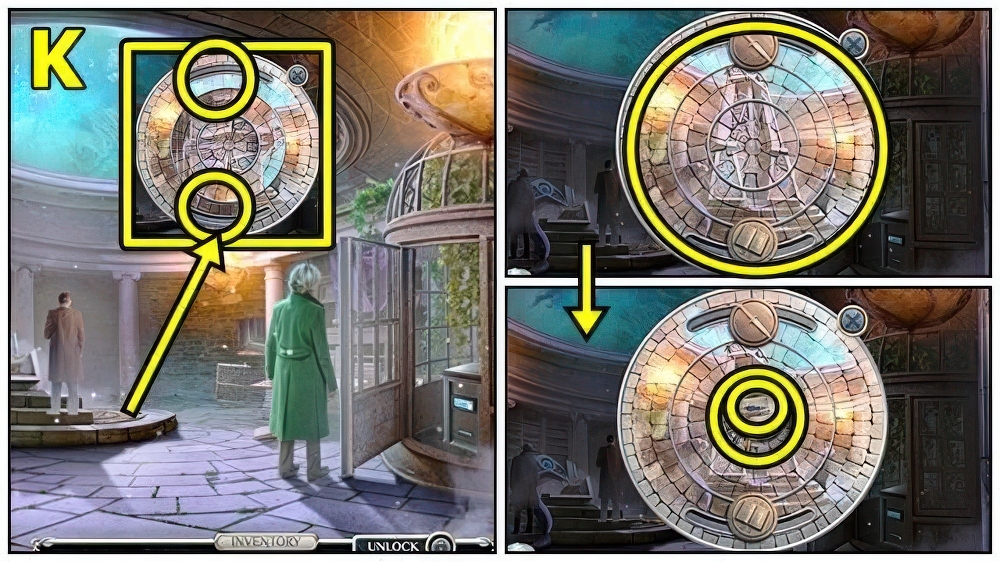
- Add KNIFE SLAB (K) and FOLIO SLAB, adjust slabs, examine, take MECHANICAL EYE.
- Remove item from MECHANICAL ASSISTANT, add MICROCIRCUIT and MECHANICAL EYE, take DU ROBOT.
- Add DU ROBOT (L), take DETECTIVE’S SET.
- Add DETECTIVE’S SET (M).
- Play puzzle (N).
- Pull lever (O).
- Talk (P).
- Take USED FIRECRACKER (Q).
- Take ARABELLA’S IMAGE (R).
- Add DORIAN’S IMAGE (S) and ARABELLA’S IMAGE, take IRON RULER and DEVELOPING ROOM KEY.
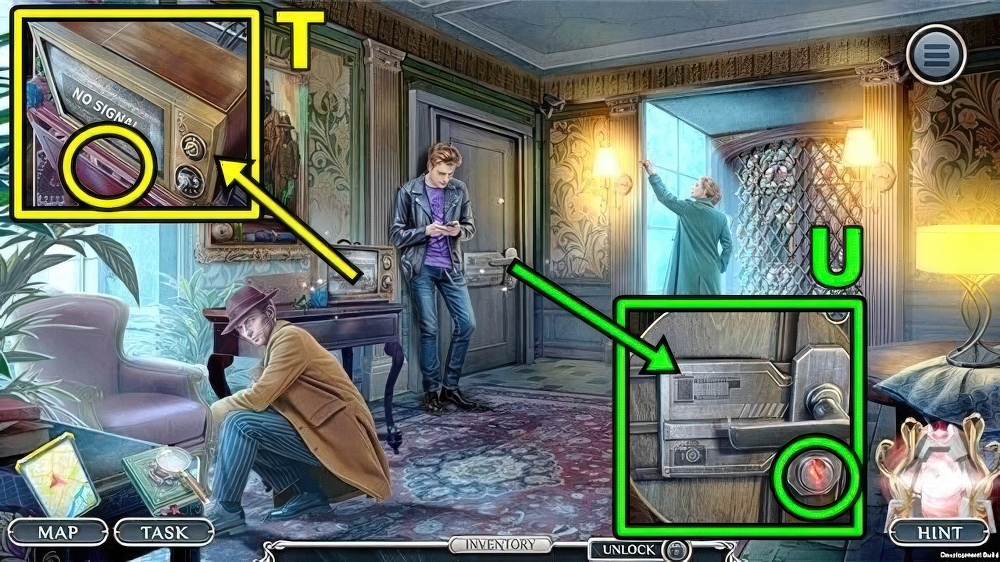
- Use IRON RULER (T), examine, take SPRING and MOTHER’S AMULET.
- Use DEVELOPING ROOM KEY (U).
- Enter Developing Room.
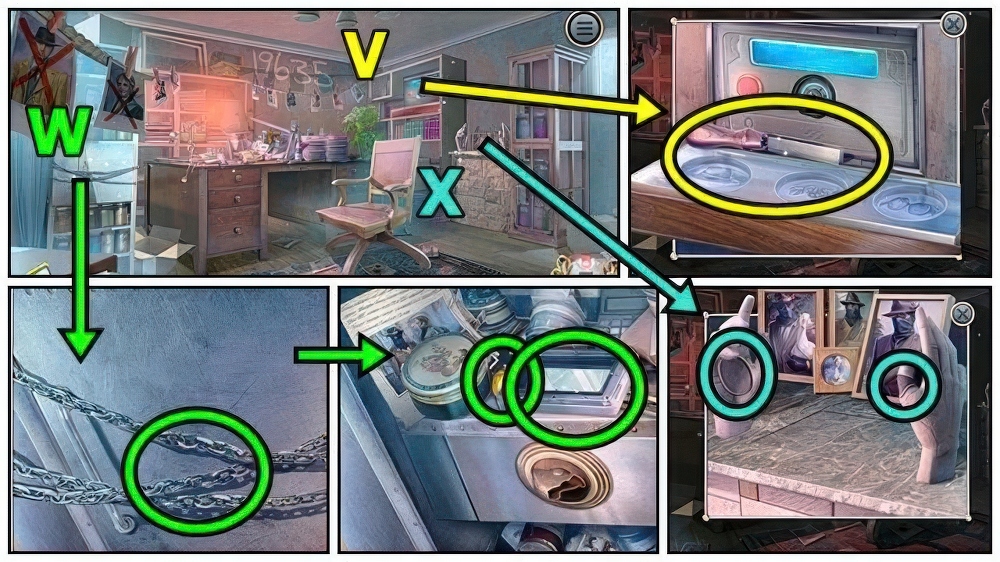
- Take SANDING BLOCK (V).
- Remove spring from BROKEN PLIERS, add SPRING and SANDING BLOCK, take PLIERS.
- Use PLIERS (W).
- Take PHOTO DEVELOPER and FATHER’S RING.
- Add MOTHER’S AMULET (X) and FATHER’S RING, take CASE COVER and HOISTER.
- Move down.
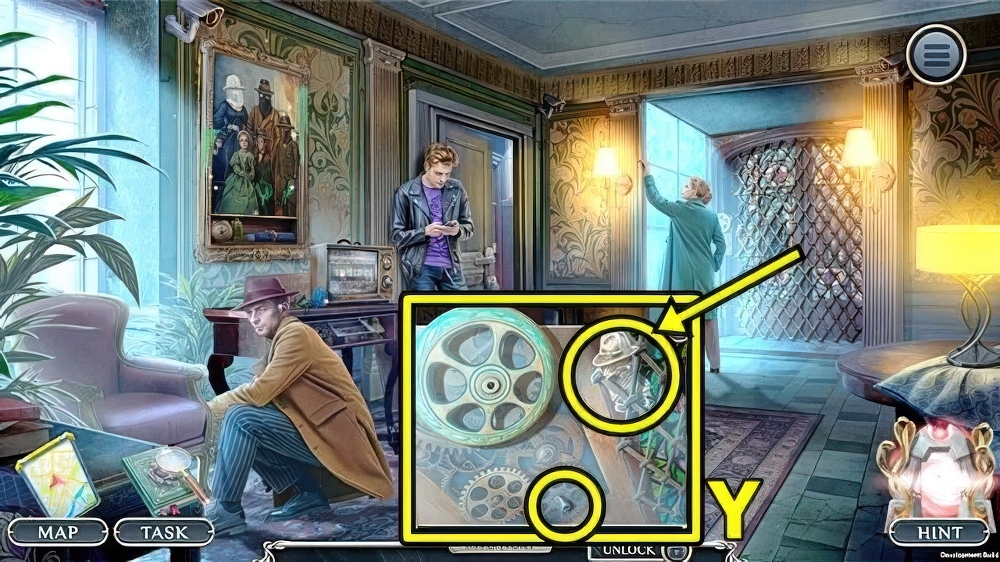
- Take THE BROWNS’ BUSTS 2/3 (Y).
- Add HOISTER.
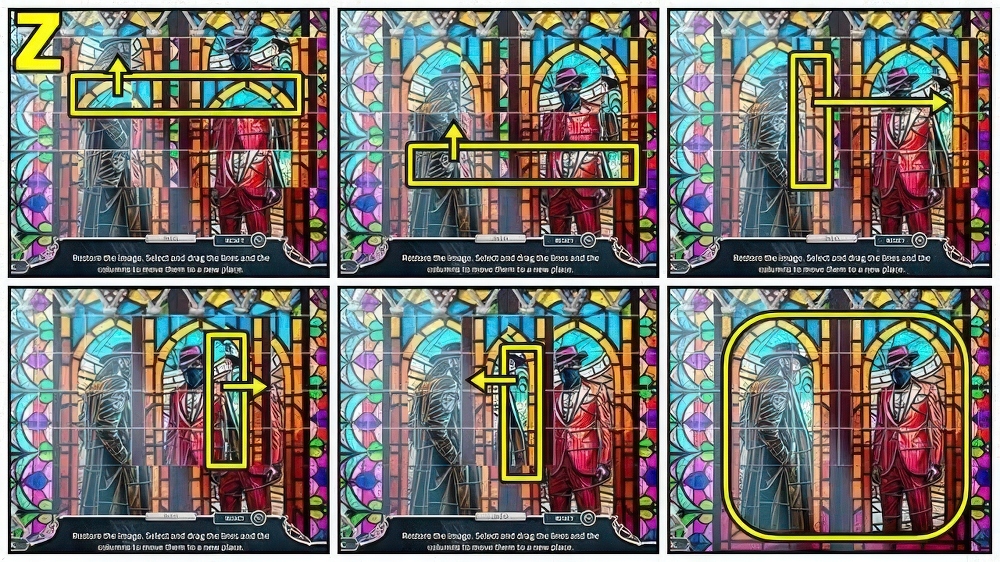
- Solution: (Z).
- Enter Greenhouse Interior.
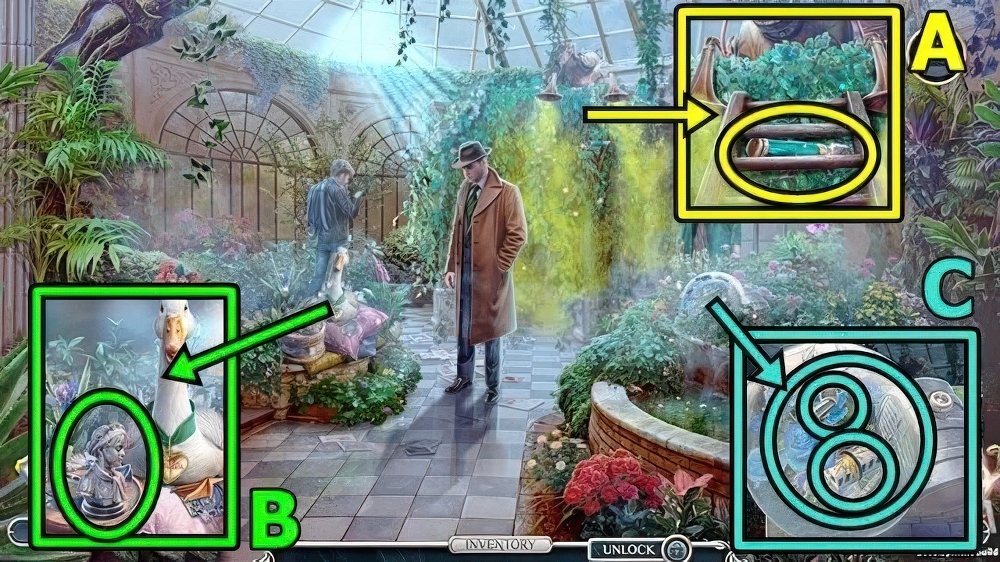
- Take GLASS-CUTTER (A).
- Take THE BROWNS’ BUSTS 3/3 (B).
- Use GLASS-CUTTER (C), take MECHANICAL LEVER and FIREWORKS CHARGE.
- Return to Developing Room.
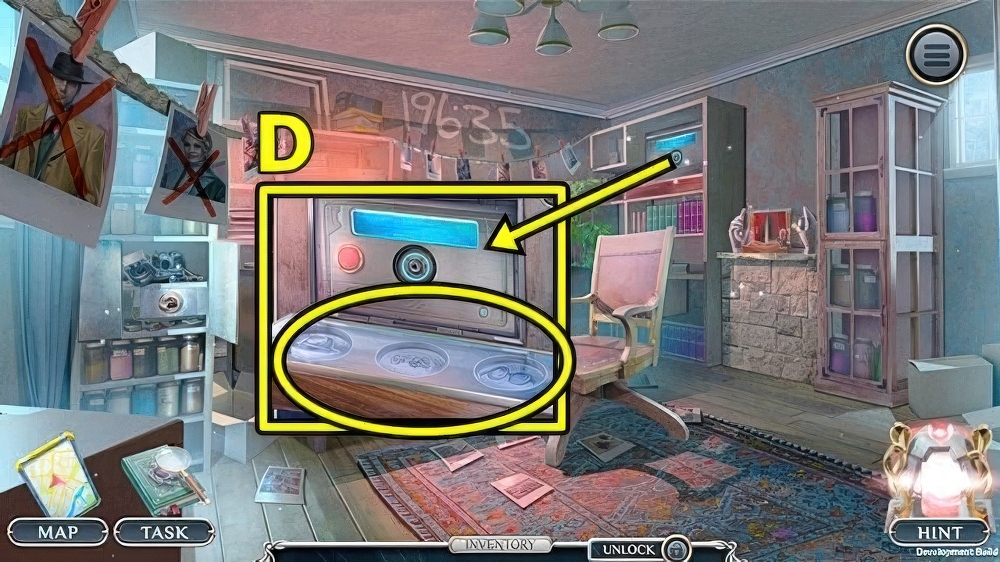
- Add THE BROWNS’ BUSTS (D), take PHOTO FILM 1/4 and PLASTIC KNOB.
- Move down.
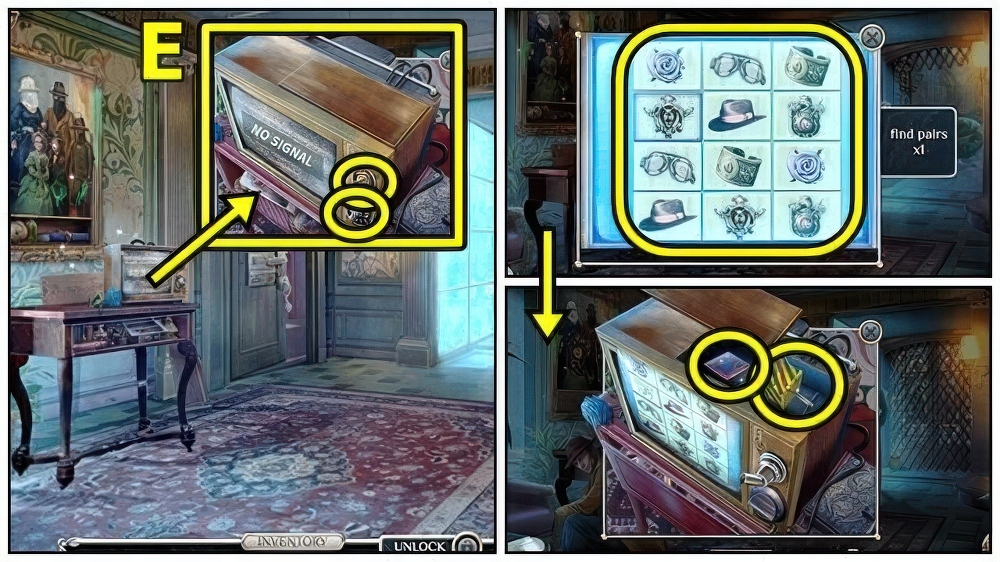
- Add PLASTIC KNOB (E) and MECHANICAL LEVER.
- Find pairs, take PHOTO FILM 2/4 and FIREWORKS ACTIVATOR.
- Enter Greenhouse Interior.
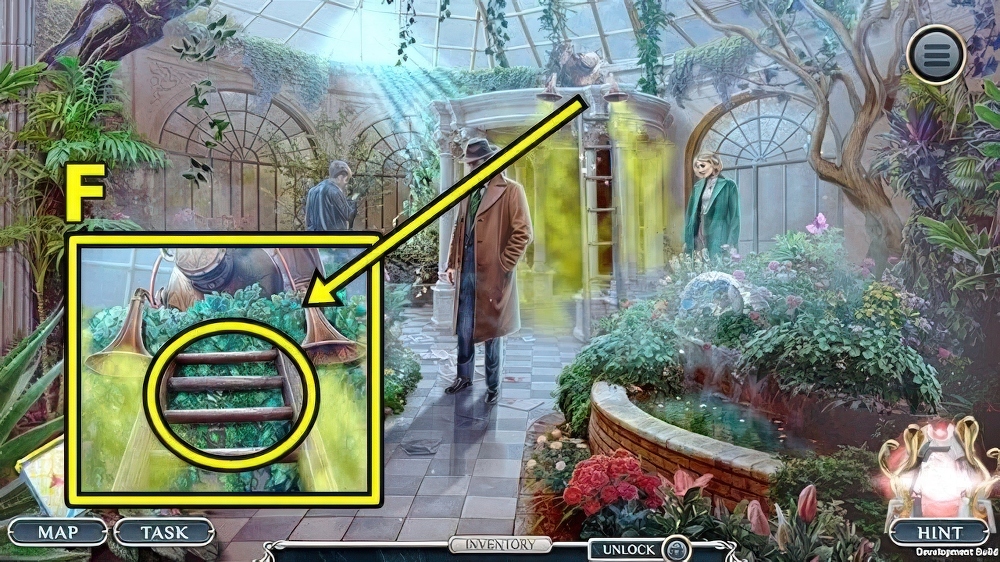
- FIREWORKS CHARGE, FIREWORKS ACTIVATOR and CASE COVER on USED FIRECRACKER, take FIREWORKER’S SET.
- Use FIREWORKER’S SET (F).
- Enter Passage Hall.
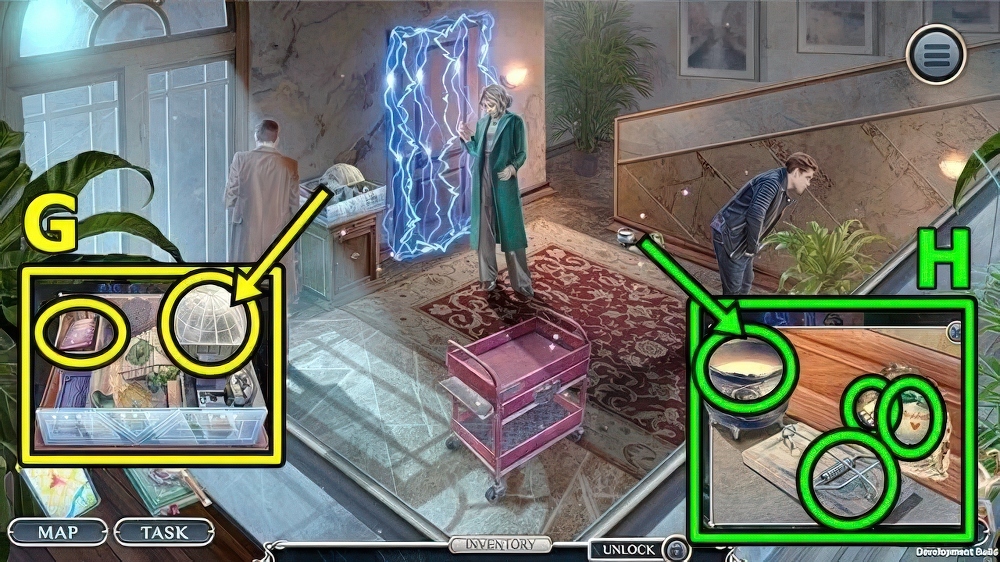
- Take PHOTO FILM 3/4 (G) and PLASTIC HAND.
- Take GLASS MASS (H).
- Add PLASTIC HAND, take ARABELLA’S TREAT and PHOTO FILM 4/4.
- Return to Developing Room.
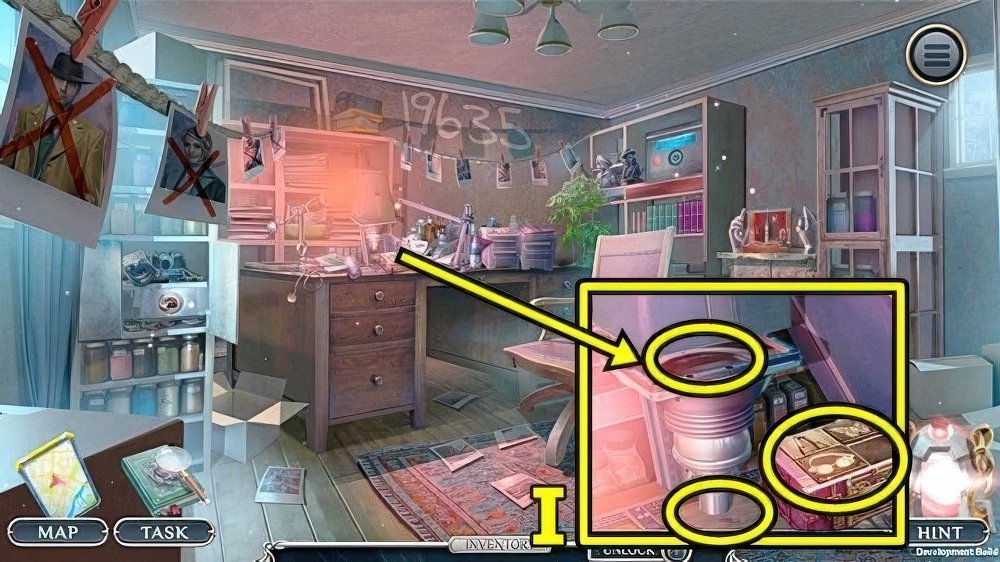
- Take SECRET BOX (I).
- Add PHOTO DEVELOPER and PHOTO FILM.
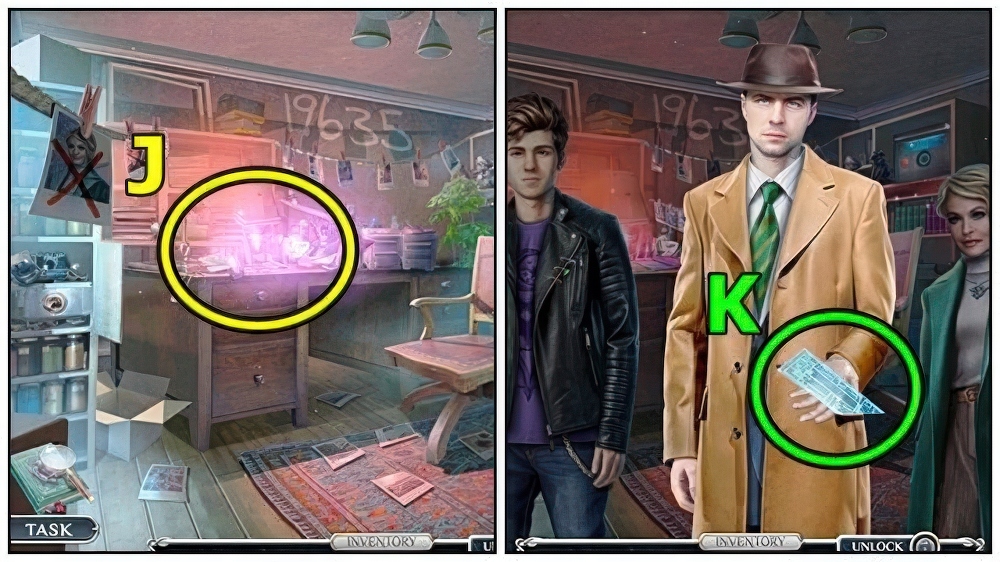
- Play puzzle (J), take UV STICK.
- Take MANSION MAP 1/3 (K).
- Move down.
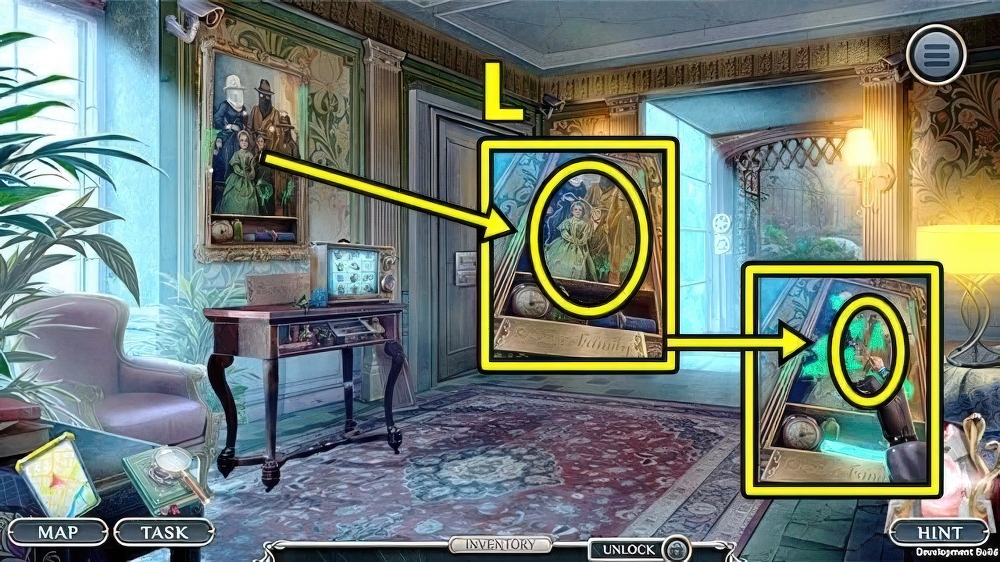
- Add UV STICK (L), take BOX SYMBOLS.
- Enter Greenhouse Interior.
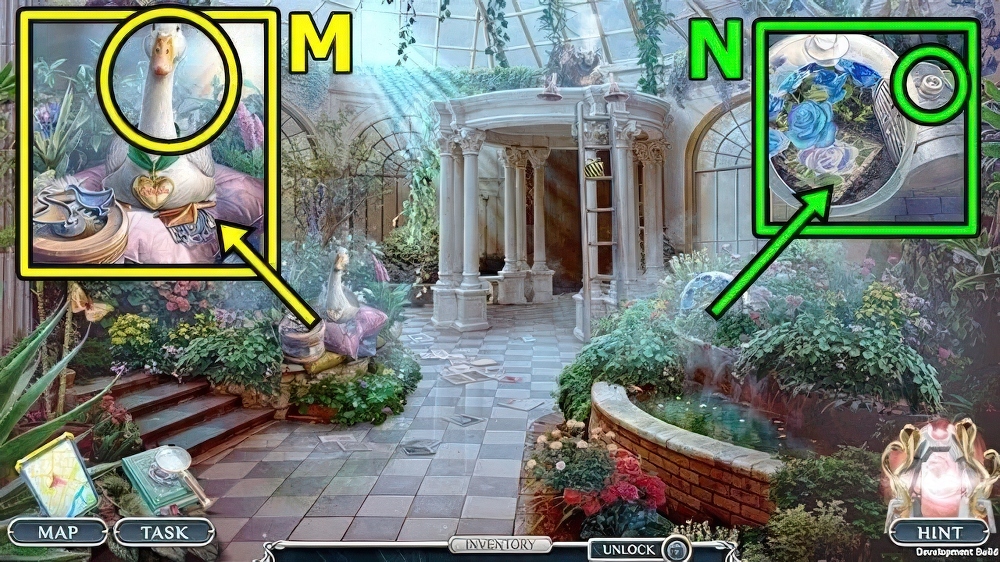
- Give ARABELLA’S TREAT (M), receive TOKEN OF INVISIBLE and CHARACTERS’ TOKENS.
- TOKEN OF INVISIBLE and BOX SYMBOLS on SECRET BOX, press symbols, take BICYCLE PUMP and MORTIMER’S FIGURINE.
- Use BICYCLE PUMP (N), take MORTIMER’S CAMEO 1/4 and LAYOUT PART.
- Return to Developing Room.
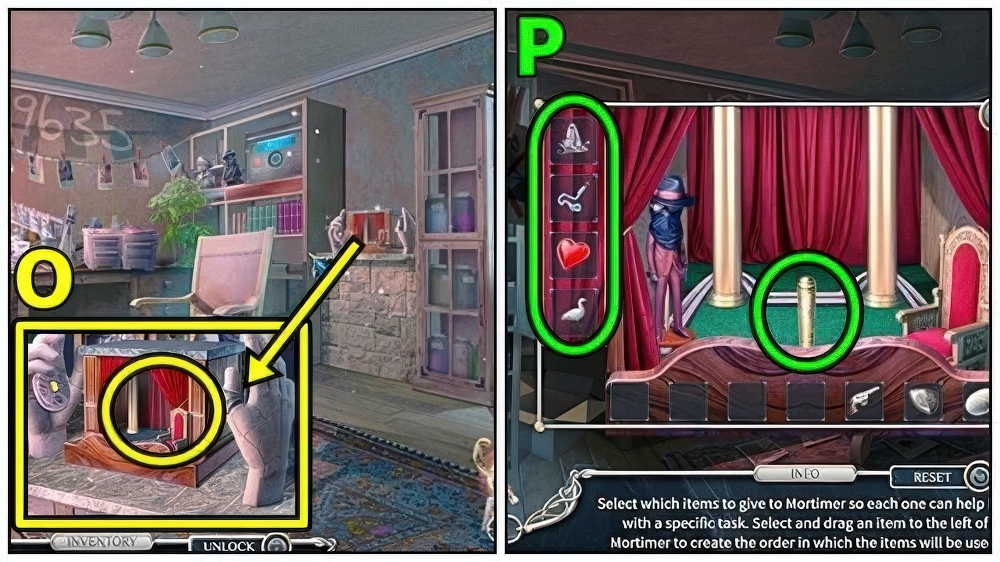
- Add MORTIMER’S FIGURINE (O).
- Solution: (P).
- Take MANSION MAP 2/3 and HOOK LOCKPICK.
- Return to Passage Hall.
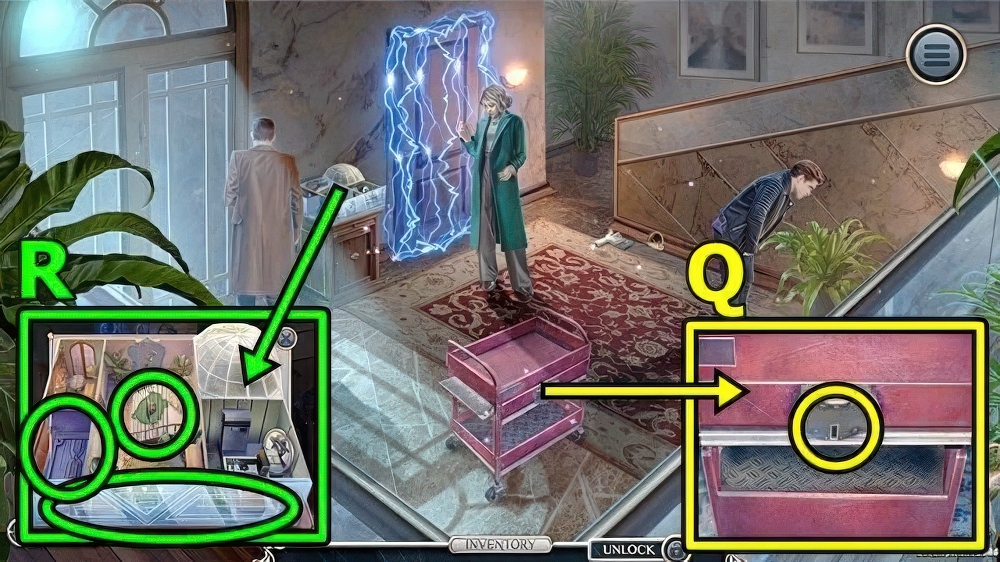
- Use HOOK LOCKPICK (Q), take MANSION MAP 3/3 and MOSAIC SHAPE.
- Add LAYOUT PART (R), CHARACTERS’ TOKENS and MANSION MAP.
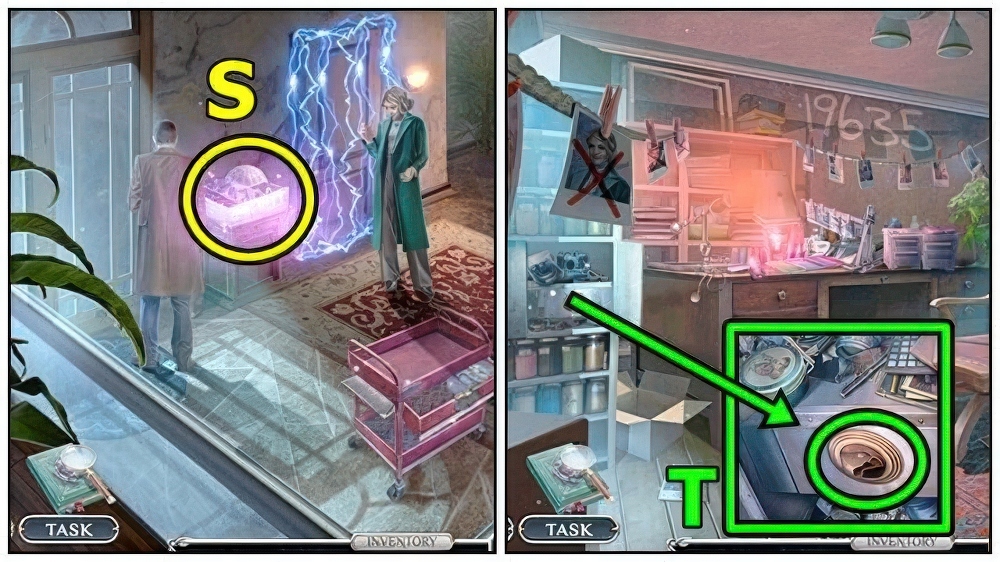
- Play puzzle (S), take MECHANICAL MOUSE and KNOB LOCK.
- Return to Developing Room.
- Add KNOB LOCK (T), take FREEZE and ENGRAVER’S TOOLS.
- Return to Greenhouse Interior.
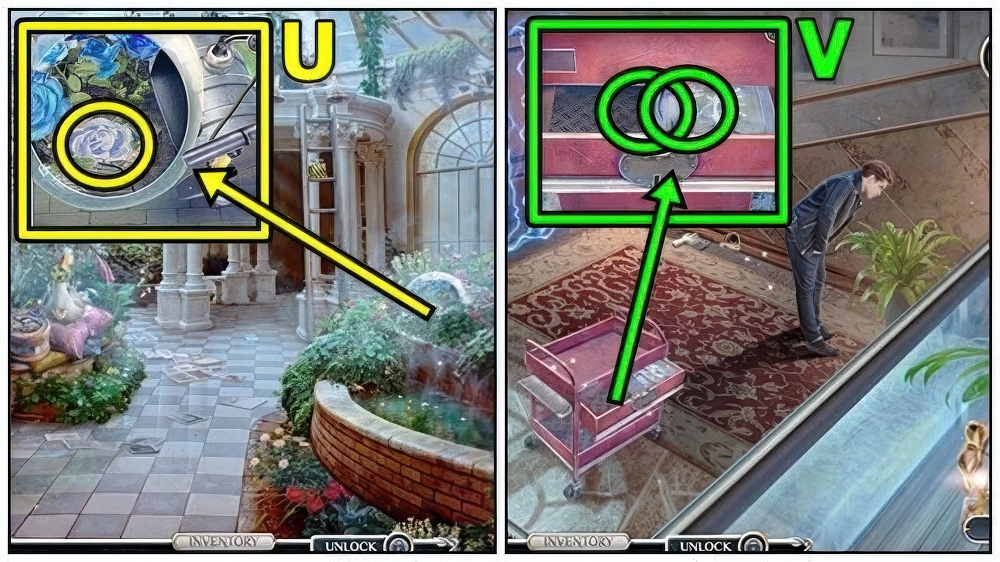
- ENGRAVER’S TOOLS and MOSAIC SHAPE on GLASS MASS, take MOSAIC TILE.
- Add MOSAIC TILE (U), take STEEL AWARD and BLUE GOOSE.
- Enter Passage Hall.
- Use FREEZE (V) and STEEL AWARD, take GAS CYLINDERS and SAFE DIAL.
- Return to Developing Room.
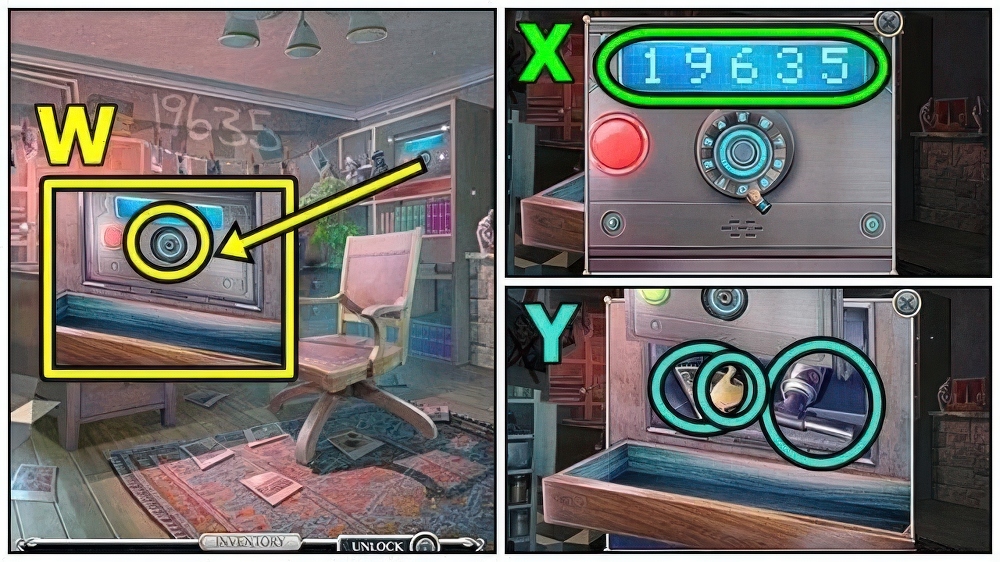
- Add SAFE DIAL (W).
- Solution: (X).
- Take BROWN GOOSE (Y), MORTIMER’S CAMEO 2/4 and BURNER.
- Return to Greenhouse Interior.
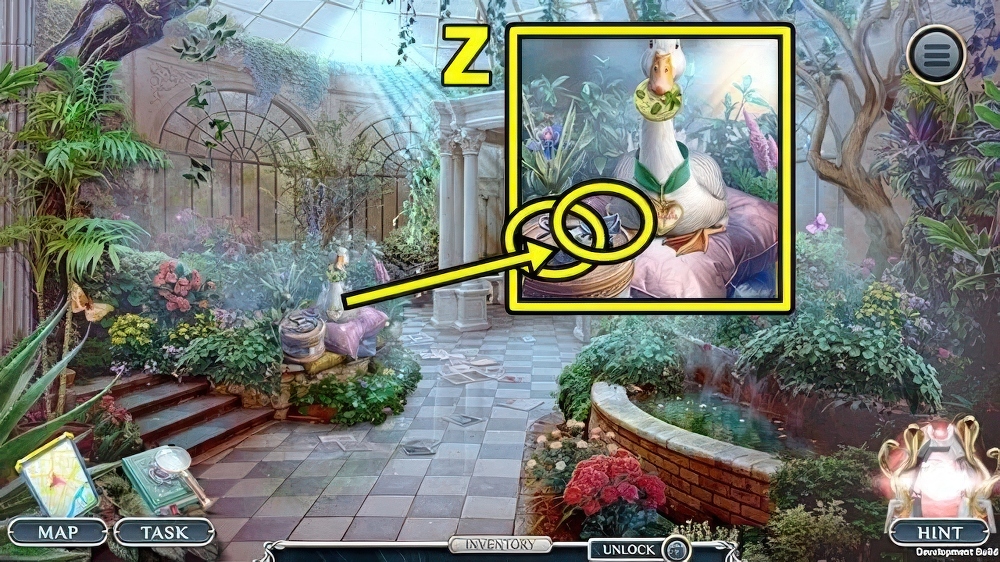
- Add BLUE GOOSE (Z) and BROWN GOOSE, take MORTIMER’S PRINT and MOUSE REMOTE CONTROL.
- Enter Passage Hall.
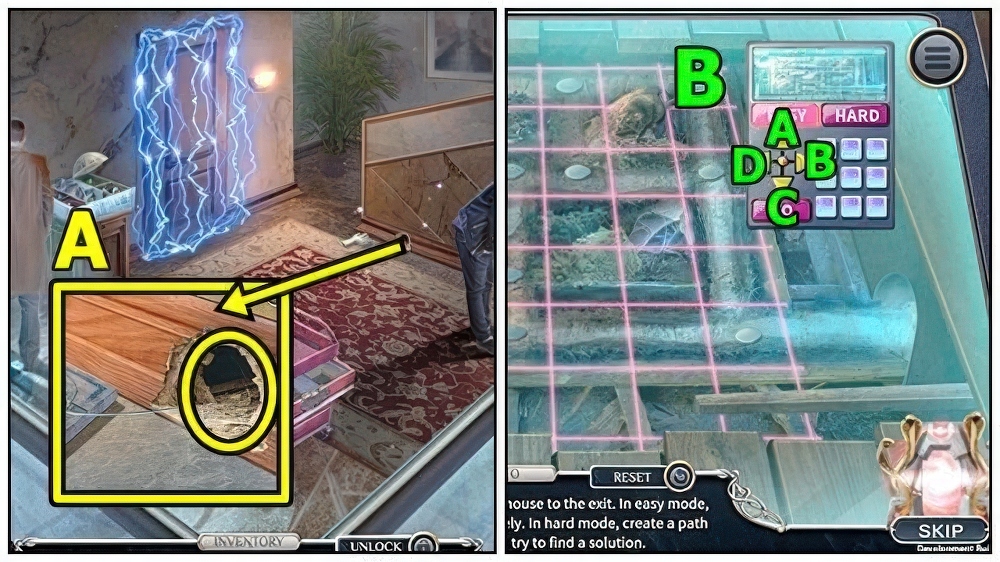
- MOUSE REMOTE CONTROL, GAS CYLINDERS and BURNER on MECHANICAL MOUSE, take MOUSE WITH GAS.
- Use MOUSE WITH GAS (A).
- Solution (B): Easy and Hard: B-Cx2-B-A-B-C-Bx2.
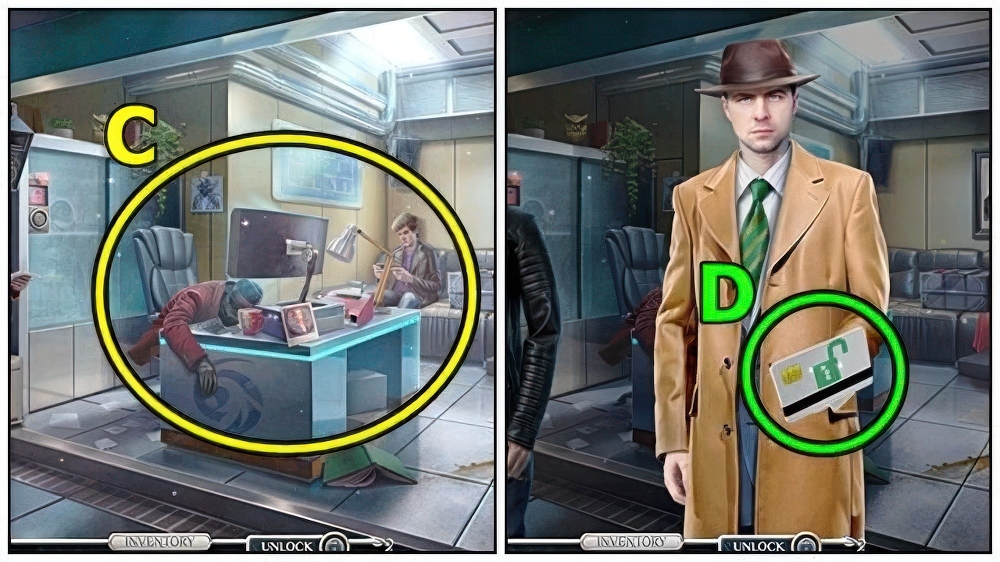
- Talk (C).
- Take ACCESS CARD (D).
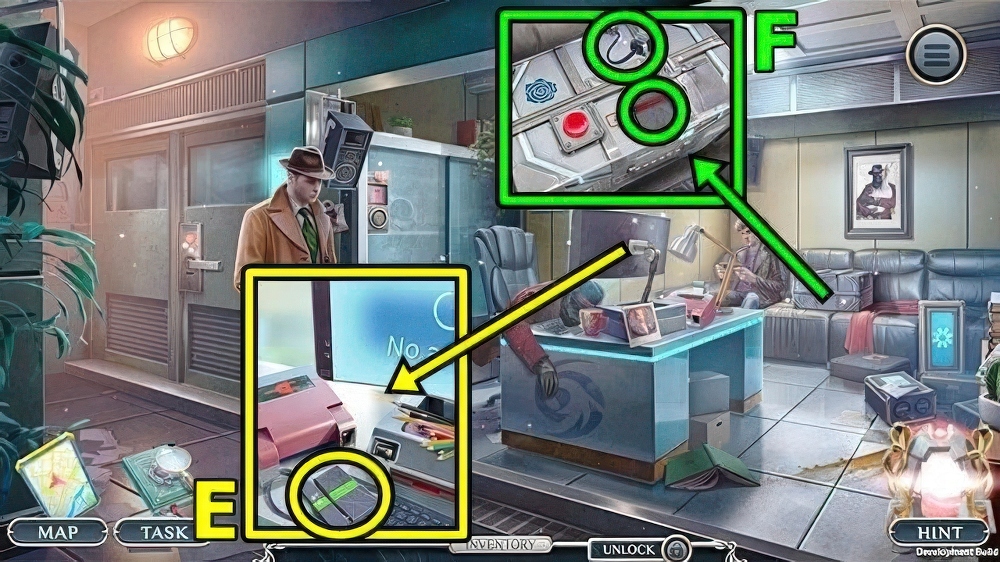
- Take POWER UNIT (E).
- Take PRINTER CABLE (F).
- Add POWER UNIT, take VOICE MOLD.
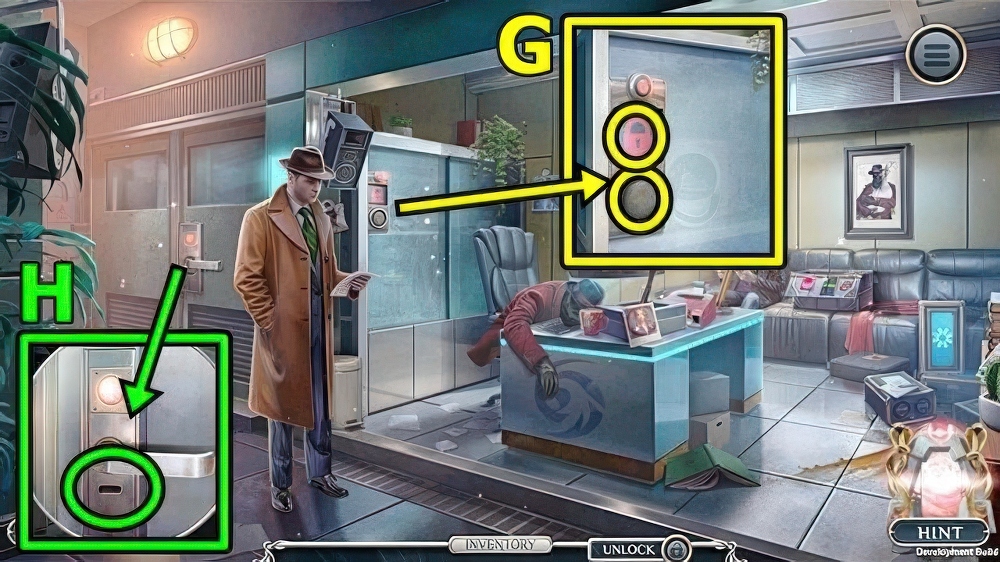
- Use VOICE MOLD (G), then MORTIMER’S PRINT, take MORTIMER’S CAMEO 3/4 and SERVER ROOM KEY.
- Use SERVER ROOM KEY (H).
- Enter Server Room.
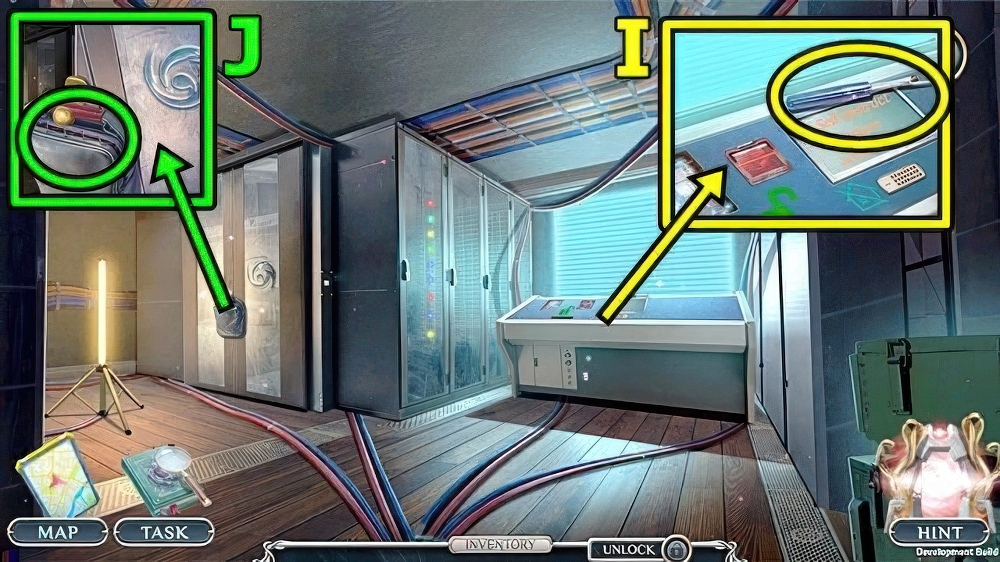
- Take SEAM RIPPER (I).
- Use SEAM RIPPER (J), take MORTIMER’S CAMEO 4/4.
- Move down.
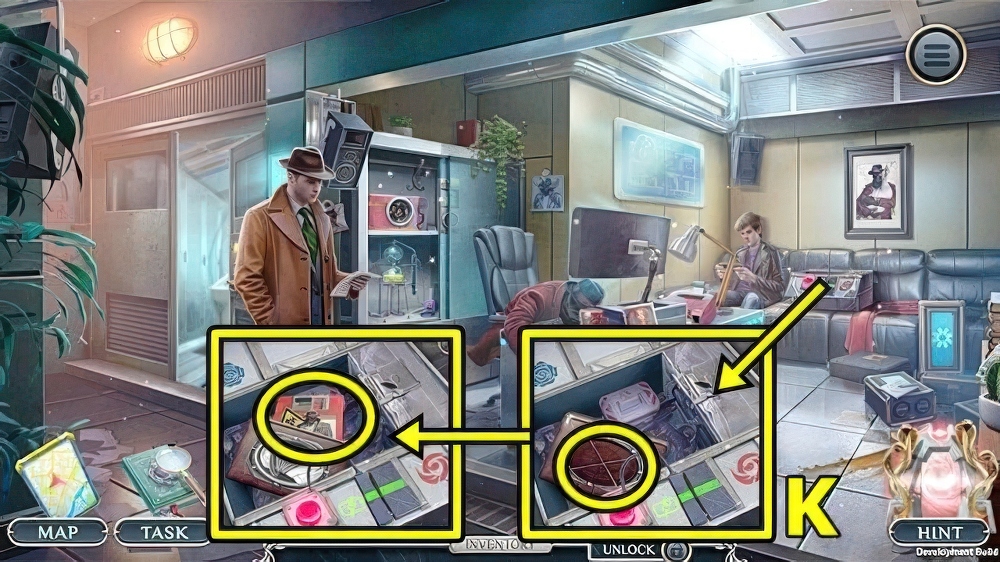
- Add MORTIMER’S CAMEO (K), find items, take DORIAN’S VIRUS.
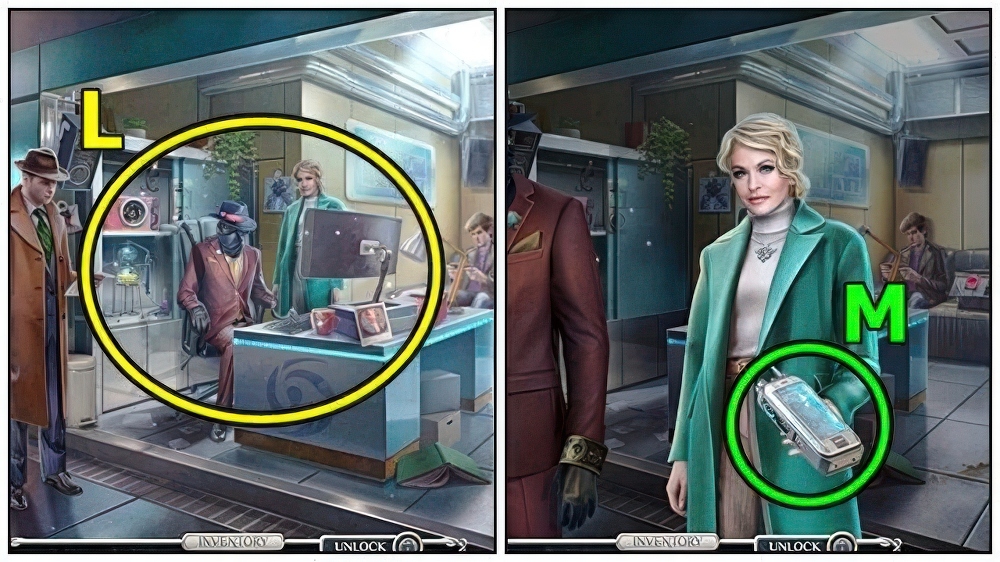
- Talk (L).
- Take MORTIMER’S DEVICE (M).
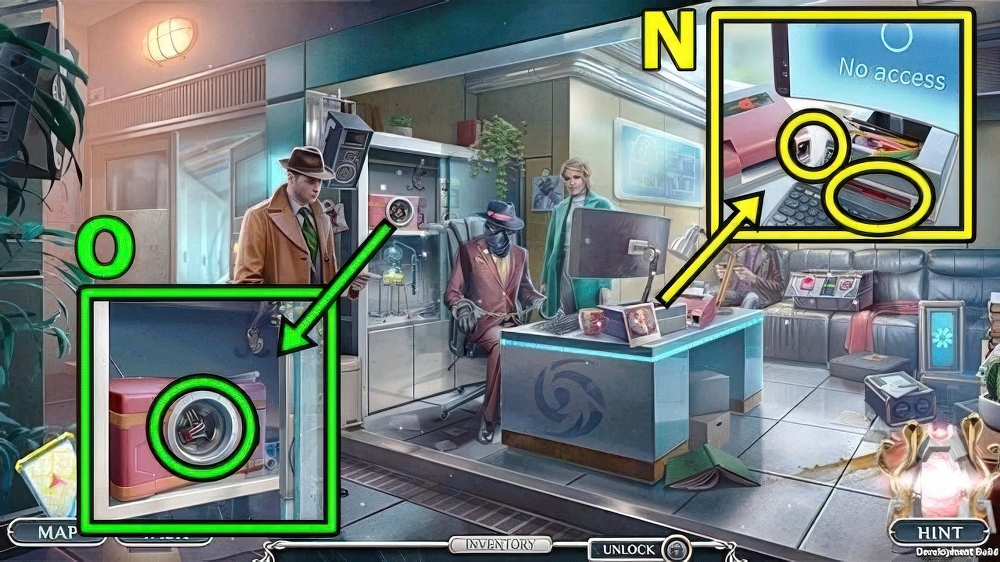
- Add DORIAN’S VIRUS (N) and PRINTER CABLE, take DRAWER BUTTON and ACCESS CODES.
- Add DRAWER BUTTON (O), take HOLOGRAPHIC SYMBOL.
- Enter Server Room.
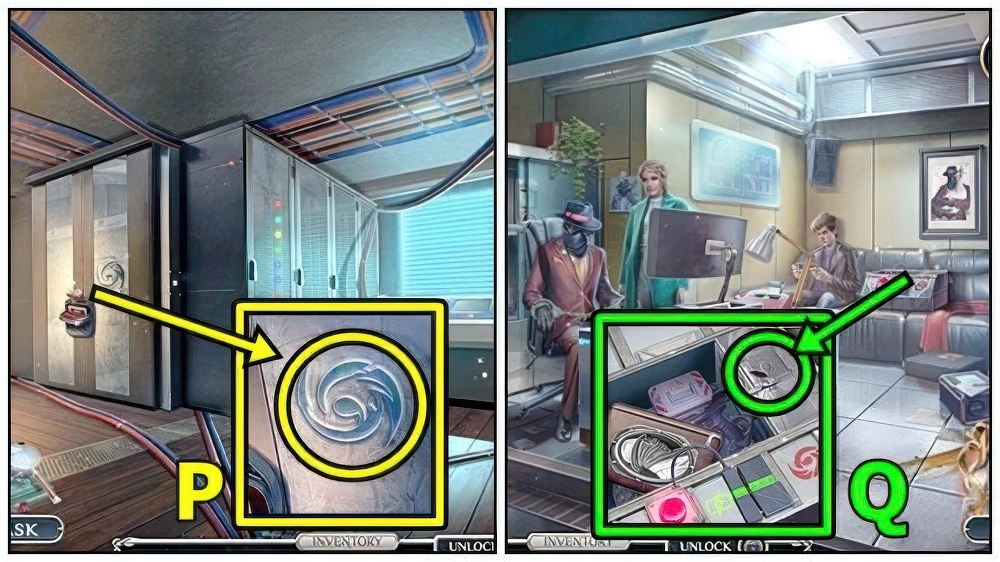
- Add HOLOGRAPHIC SYMBOL (P), take FUNCTIONAL CORKSCREW.
- Move down.
- Use FUNCTIONAL CORKSCREW (Q), take SHUTDOWN DEVICE.
- Enter Server Room.
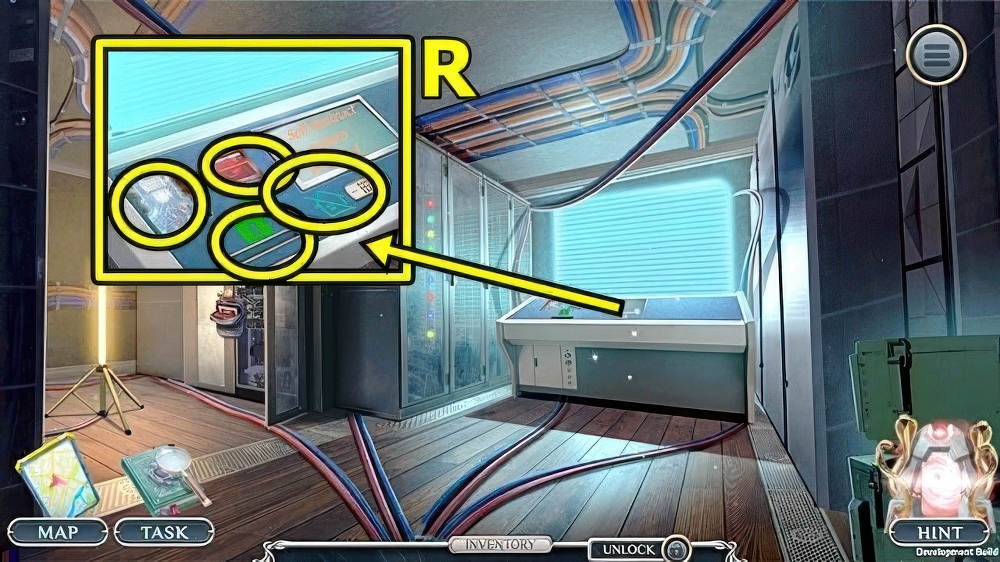
- Add ACCESS CARD (R), ACCESS CODES, SHUTDOWN DEVICE and MORTIMER’S DEVICE.
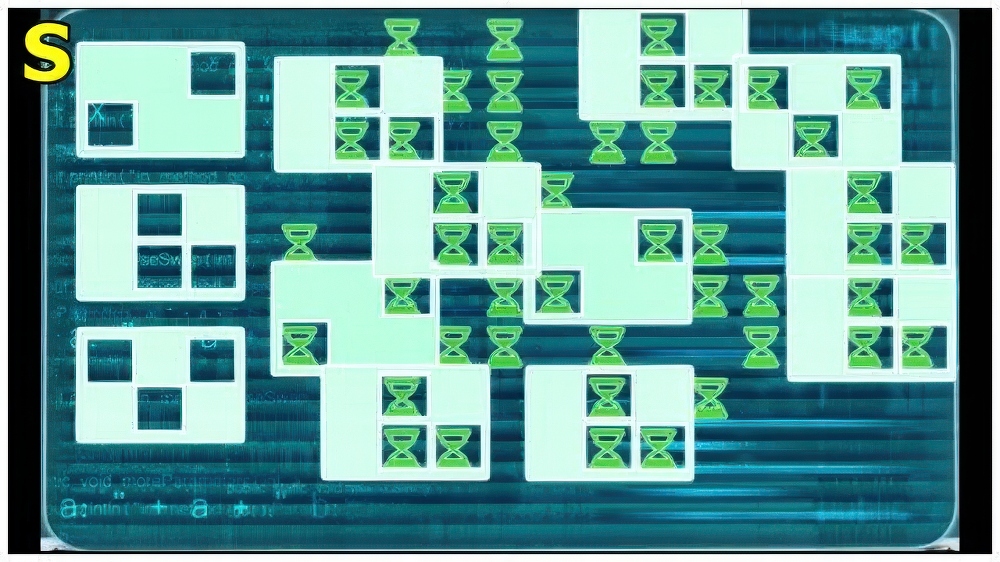
- Solution: (S).
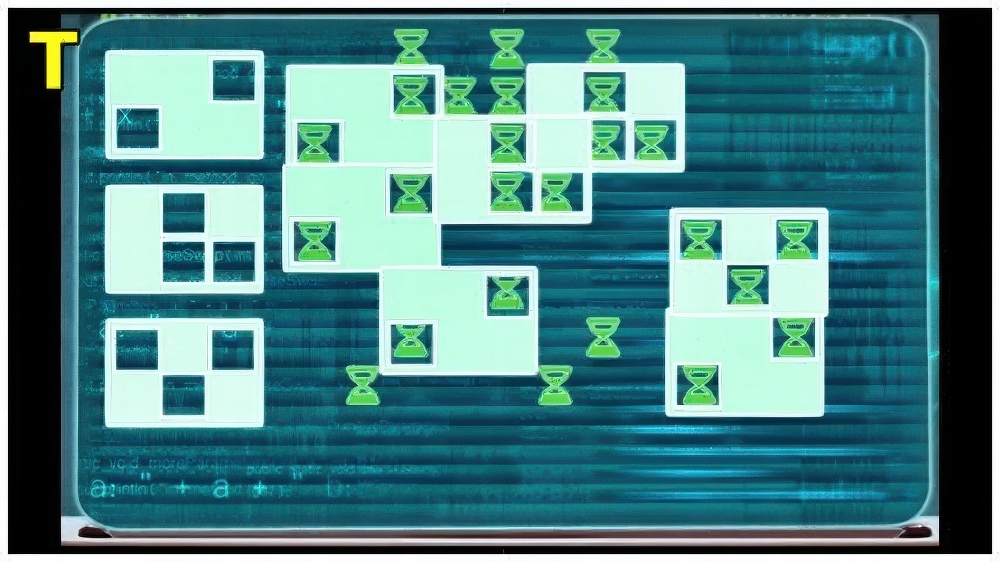
- Solution: (T).
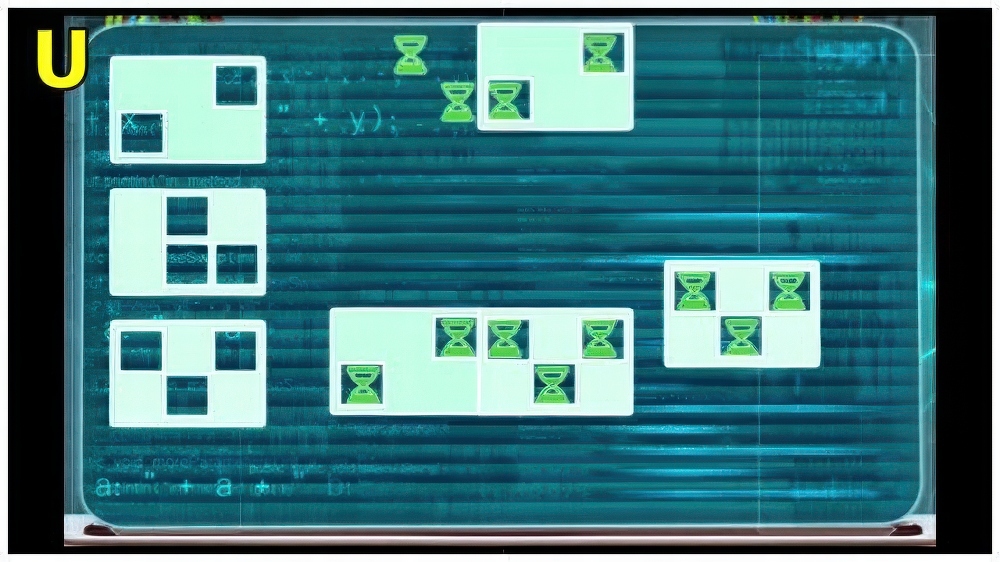
- Solution: (U).
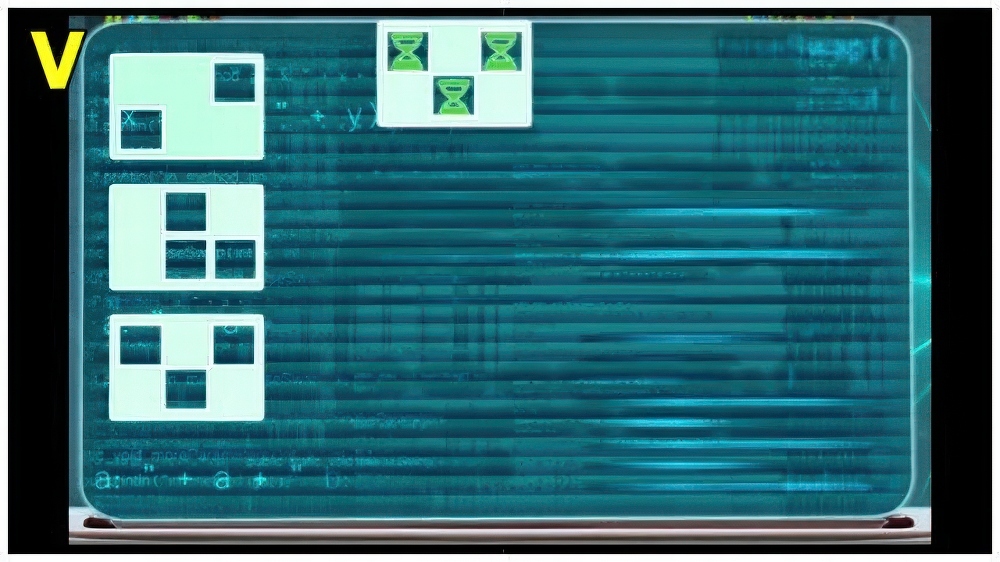
- Solution: (V).
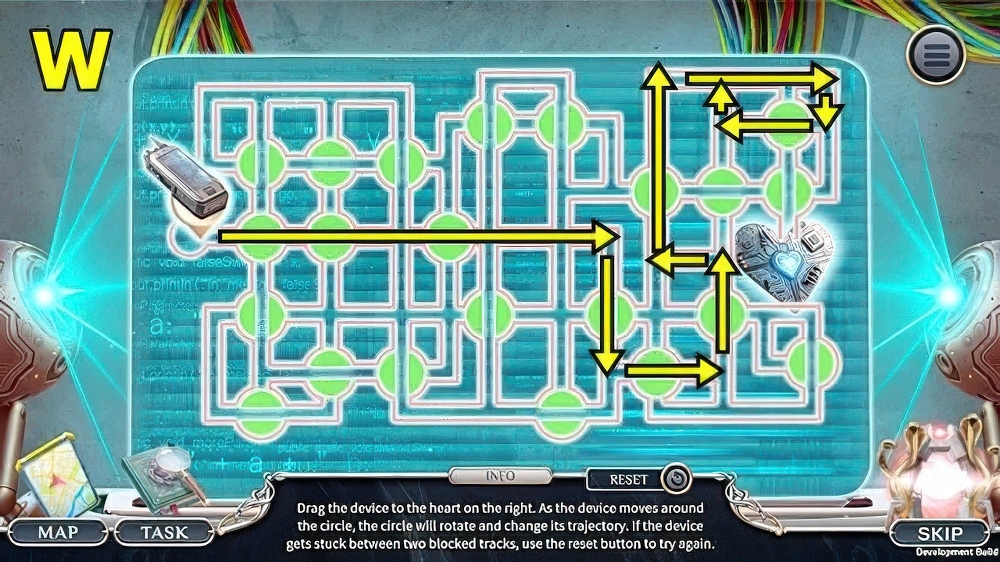
- Solution: (W).
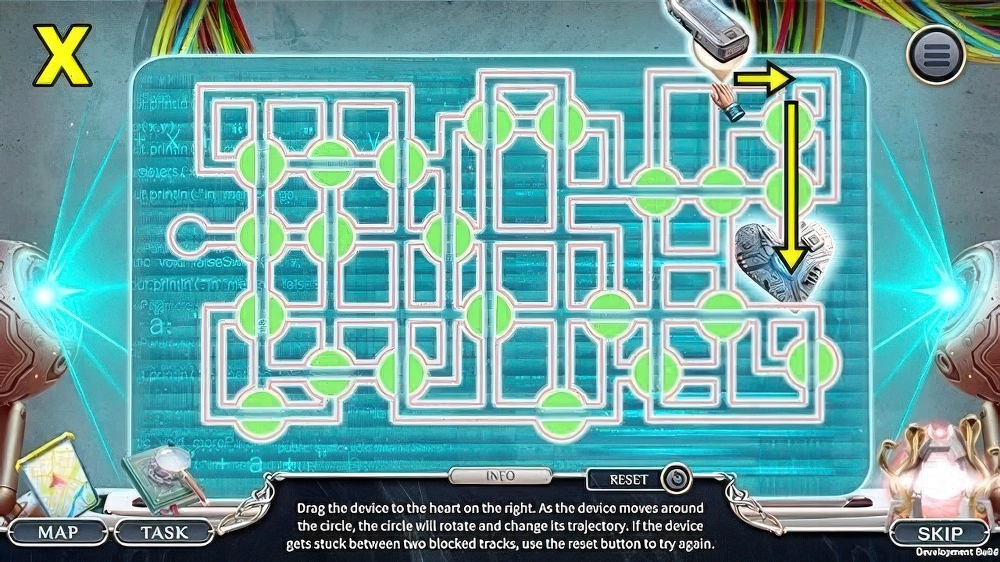
- Solution: (X).
- Walkthrough Bonus Chapter, at the link below.


