
Royal Romances 2: Forbidden Magic – The walkthrough of the game begins with the fact that you, once again, find yourself in a magical world where forbidden magic threatens the entire kingdom. Together with the main characters, Ida and Illeon, you will have to go in search of a way to defeat evil and save the world. During your journey you will encounter various dangers, enemies and riddles that you will have to solve in order to reach your goal. At every step you will have to make difficult decisions that will affect the further course of events and the development of relationships between the characters. A very exciting story will unfold before you, forcing you to participate in exciting adventures, experience strong emotions and make responsible decisions. If you can not pass any of the puzzles or do not know where the items are, on our site you can watch the walkthrough of the game Royal Romances 2: Forbidden Magic, and save the kingdom.
Royal Romances 2: Forbidden Magic – Walkthrough
Here you can see the full walkthrough of Royal Romances 2: Forbidden Magic game, namely for all chapters, including bonus chapter, in pictures.

- Take Journal (A), SEEDS and CROWBAR.
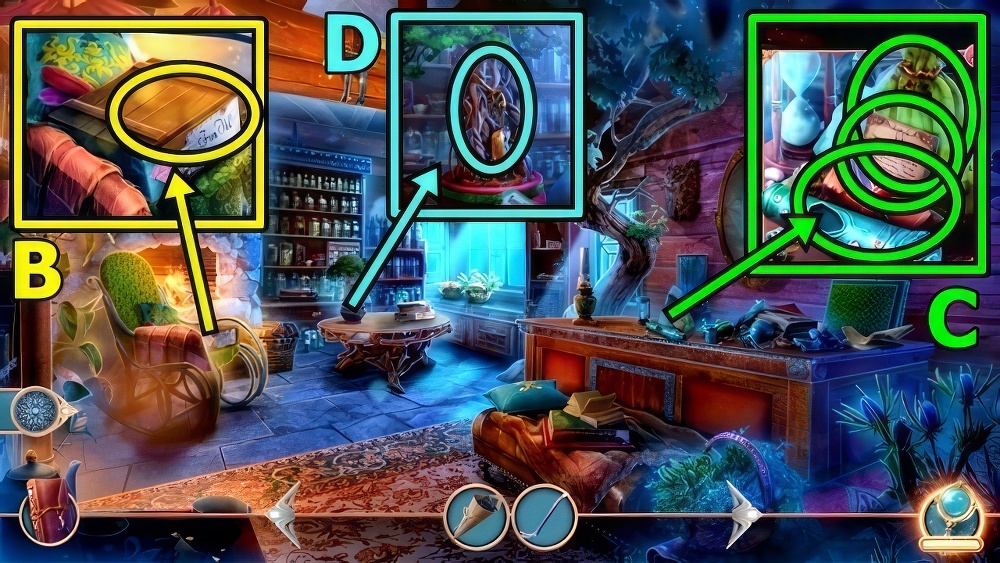
- Use CROWBAR (B), take COMB and DIAMOND SCISSORS.
- Take Map (C), read.
- Use DIAMOND SCISSORS, take DENDRONT STATUETTE and BONSAI FERTILIZER.
- Add BONSAI FERTILIZER (D), receive CABINET KEY.

- Use CABINET KEY (E), find runes.

- Find runes (F).
- Examine, open, take RED GEM.

- Add RED GEM (G).
- Play puzzle.
- Select (H).

- Take PLAYING CARDS 1/3 (I), read.
- Use COMB, take LEAFLET.
- Offer SEEDS (J), take PIGEON.
- Open (K), take MAGIC WAND, LEATHER BRACELET, PLAYING CARDS 2/3 and TOP HAT.
- Add PIGEON, MAGIC WAND and TOP HAT to LEAFLET, receive MAGIC TRICK.
- Knock (L), use MAGIC TRICK.
- Enter The Drunken Dragon.

- Talk (M).
- Select all.

- Read (N), take RUSHLIGHT.
- Add LEATHER BRACELET, take SLEEPING POWDER and PLAYING CARDS 3/3.
- Add PLAYING CARDS (O).
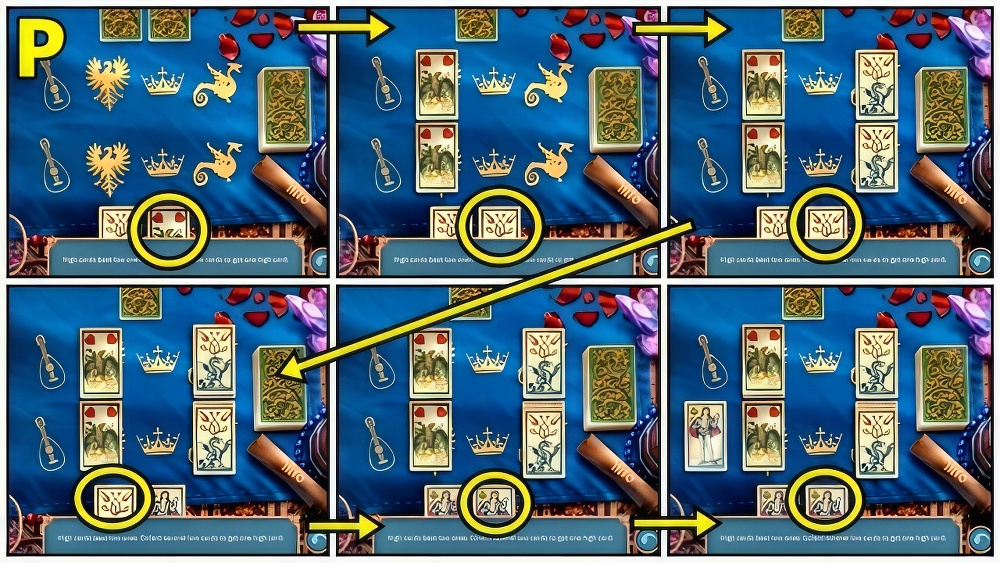
- High cards beat low ones.
- Collect several low cards to get one high card.
- Walkthrough: Easy and Hard (P) solution is random, screenshot shows possible solution.

- Walkthrough: Easy and Hard (Q) solution is random, screenshot shows possible solution.
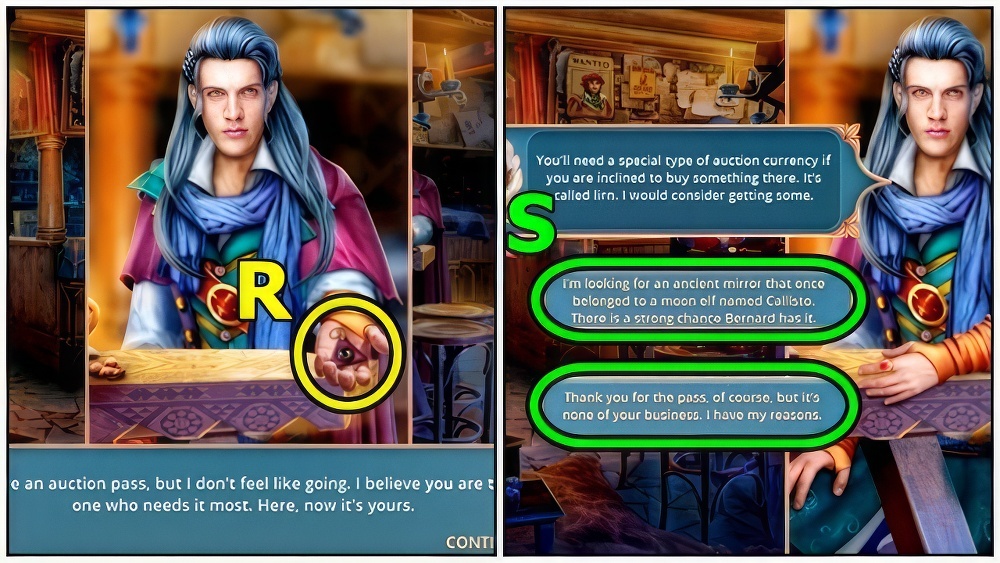
- Take PASS (R).
- Select (S).

- Offer PASS (T).
- Enter Clandestine Market.
- Talk (U).
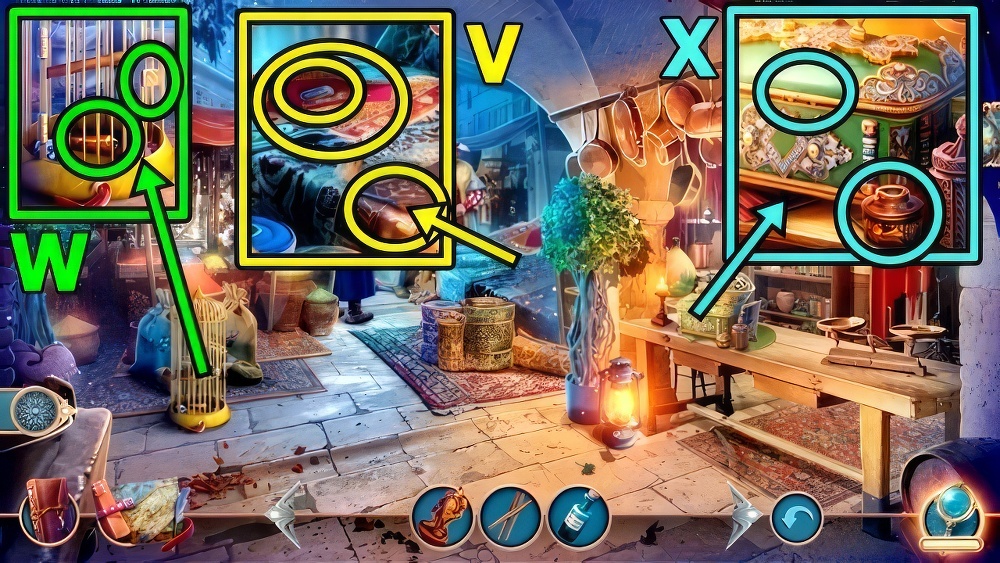
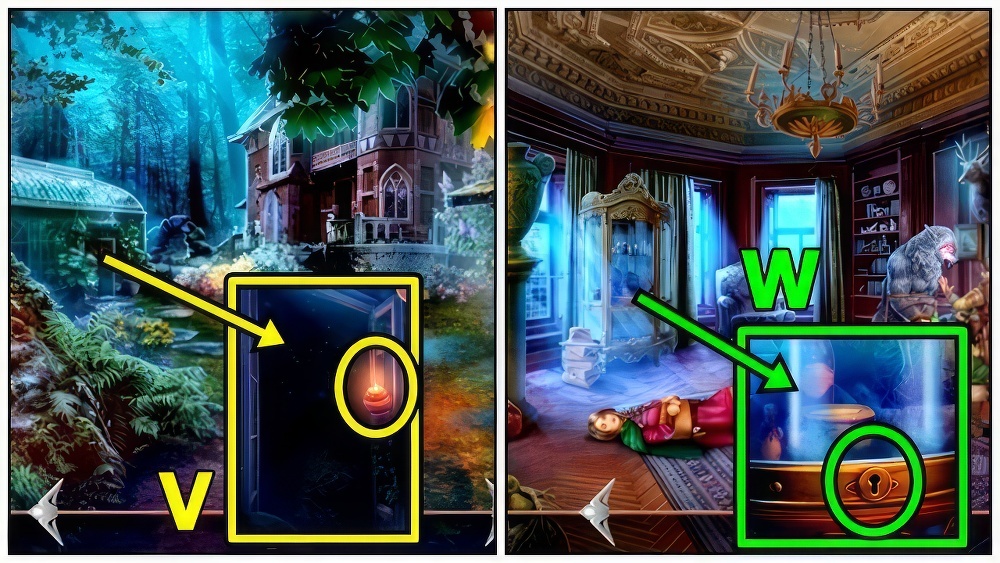
- Take GARDENING SHEARS (V).
- Add SLEEPING POWDER, take SILVER BOOKMARK.
- Use DENDRONT STATUETTE (W), take DRAGON’S FANG 1/2.
- Take GLUE (X).
- Add SILVER BOOKMARK, take MAGIC STONES, read, take MIRROR.
- Move down.

- Add RUSHLIGHT (Y) and MIRROR, take GOLDEN PIN.
- Move down.
- Insert GOLDEN PIN (Z).

- Find the correct position for each pin to open the lock.
- Use the arrow buttons next to the pins to move them.
- Select the arrow button in the middle to open the lock.
- Walkthrough: (A) Easy (B×2)-C-(E×2)-G-(J×2)-K-(M×2)-O.
- Walkthrough: (A) Hard (B×2)-C-(E-2)-H-(J×2)-H-L-C-E-H-O.
- Take MAGIC FEATHER (B).
- Return to Clandestine Market.

- MAGIC FEATHER on MAGIC STONES (C), receive FIVE LIRNS.
- Offer FIVE LIRNS (D).
- Take MOON AMULET (E).
- Return to Flamedorn Kingdom Streets.
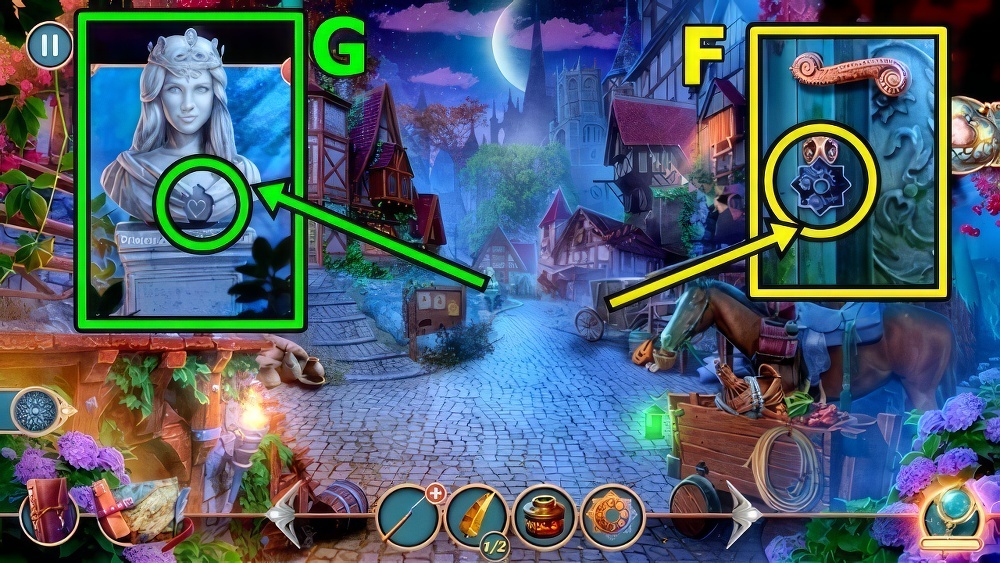
- Insert MOON AMULET (F).
- Play puzzle, take HEART PENDANT.
- Insert HEART PENDANT (G).
- Take FLASK OF ALCOHOL and MAGNET.
- Enter The Drunken Dragon.
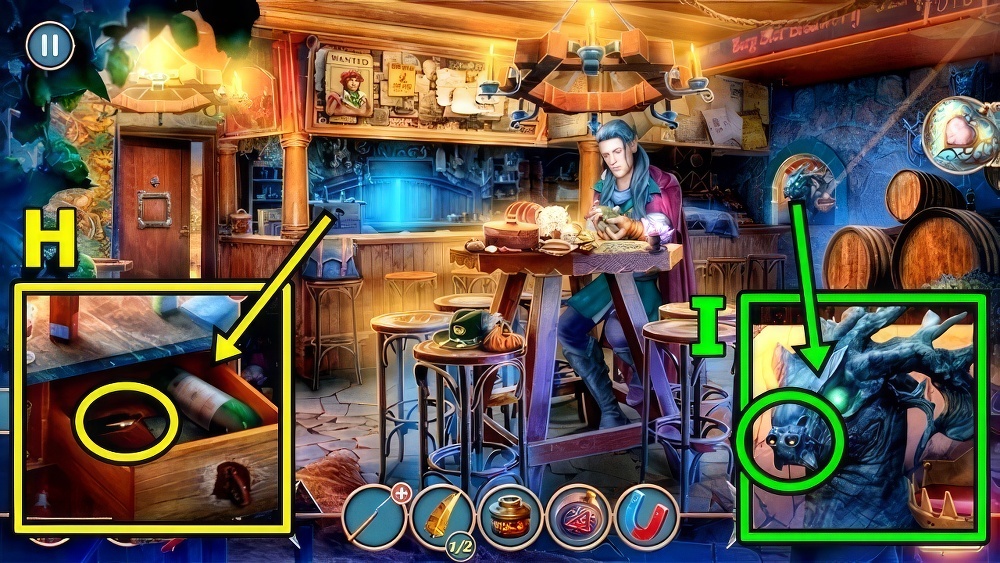
- Use MAGNET (H), receive DRAGON’S FANG 2/2.
- Insert DRAGON’S FANG (I), take HOOK, FIRE STRIKER and BRUSH.
- Enter Clandestine Market.

- Add GLUE (J) and BRUSH.

- Assemble the mirror by connecting its fragments.
- Look at the arrows to determine which direction they point in.
- Make sure you use each fragment.
- Walkthrough: (K) Easy A to X.

- Walkthrough: (L) Hard A to II.
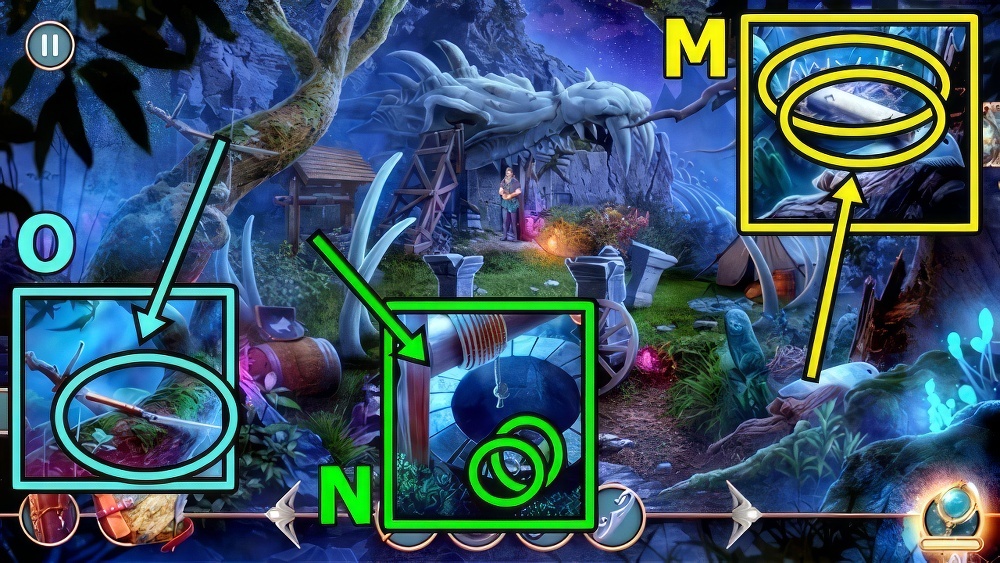
- Take DRAWING (M) and STRAW.
- Take RINGS 1/2 (N) and METAL WEDGE.
- Take PRUNER PART (O).
- METAL WEDGE and PRUNER PART on GARDENING SHEARS.
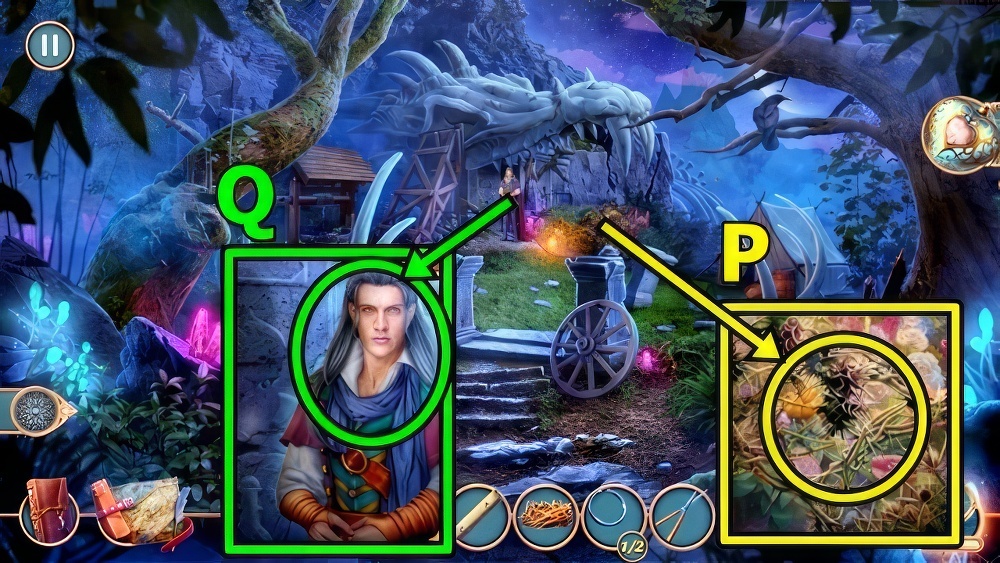
- Use GARDENING SHEARS (P).
- Play puzzle, take CYCLAMEN.
- Give CYCLAMEN (Q).
- Enter Moon Elves Mine.

- Select (R).
- Enter Dragon Study Room (S).

- Take HANDMADE CORKSCREW (T), BOOK 1/3 and BLUNT BOOMERANG.
- Use HANDMADE CORKSCREW (U), read, take PLIERS.
- Take THREE PRONGED FORK (V).
- Move down.

- Take GLOVES (W).
- Use GLOVES (X), receive RINGS 2/2.
- PLIERS on THREE-PRONGED FORK.
- Take WING (Y).
- Use THREE-PRONGED FORK.
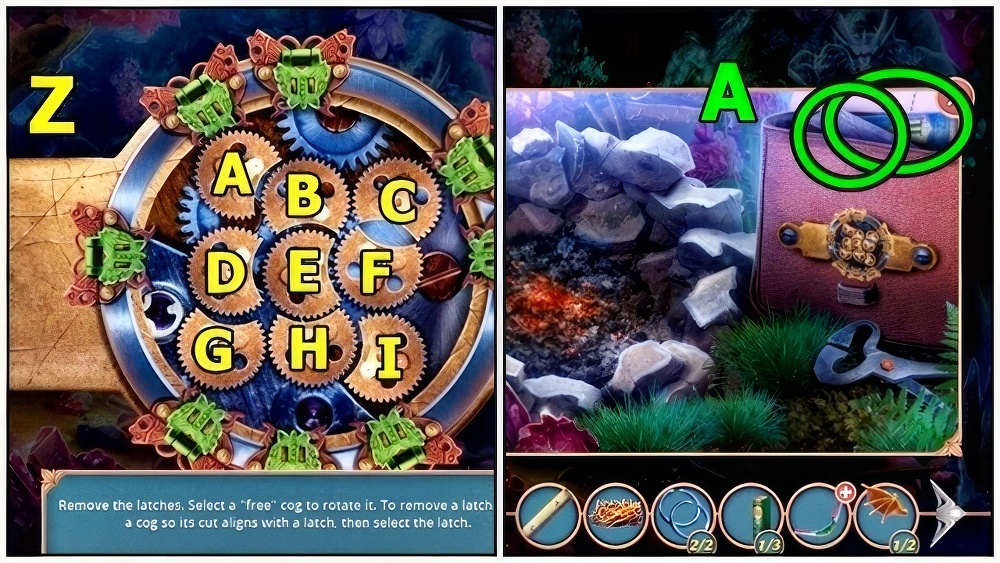
- Remove the latches. Select a “free” cog to rotate it.
- To remove a latch, rotate a cog so its cut aligns with a latch, then select the latch.
- Walkthrough: (Z) (C×4)-(F×3)-E-H-(I×4)-(H×3)-E-D-(G×4)-(D×3)-E-B-(A×4)-B.
- Take WHETSTONE (A) and BOOK 2/3.
- Enter Dragon Study Room.
- WHETSTONE on BLUNT BOOMERANG , receive SHARP BOOMERANG.
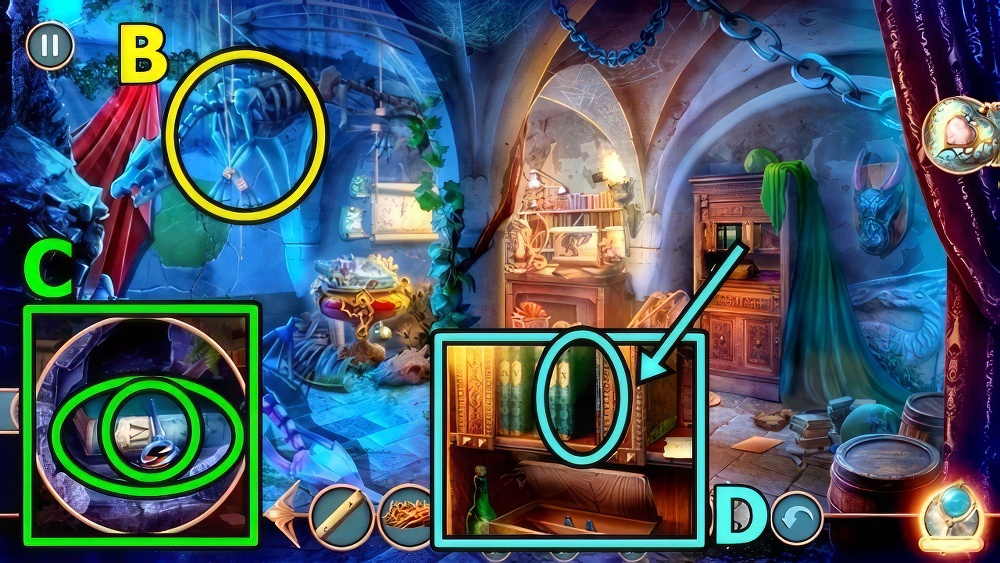
- Use SHARP BOOMERANG (B).
- Take SILVER BIRD PAW (C) and BOOK 3/3.
- Add BOOK (D).
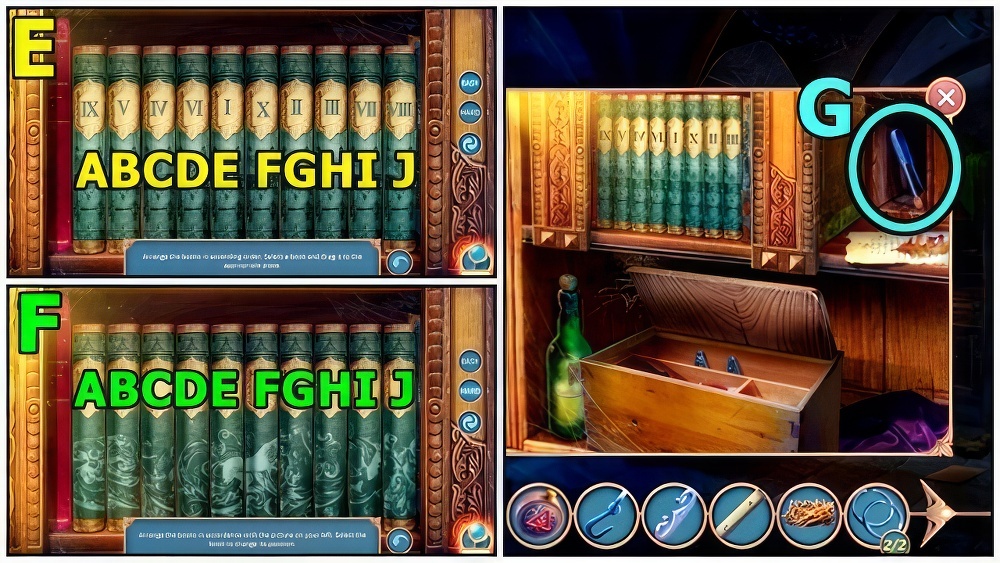
- Arrange the books so that you get the right pattern.
- Select the book to change its position.
- Walkthrough: (E) Easy (E-F)-(B-H)-(H-J)-(A-H)-(H-J).
- Walkthrough: (F) Hard (B-G)-(B-C)-(A-H)-(F-G)-(A-B)-(A-B)-(I-J)-(H-J).
- Take TWEEZERS (G).
- Return to By Dragonberg Mountain.

- Add RINGS (H), receive SAW.
- Use SAW (I), receive BRANCH.
- Add HOOK (J) and BRANCH.
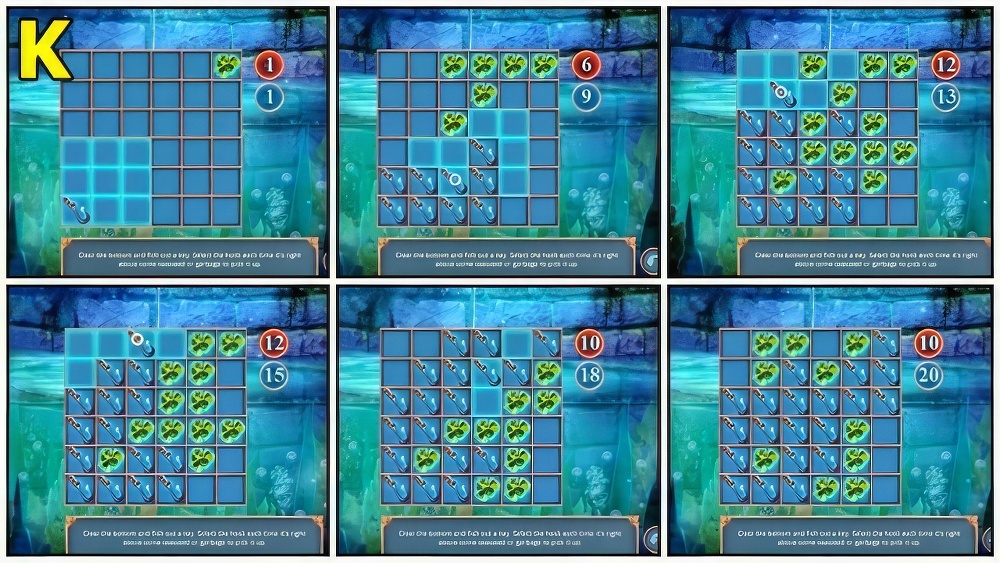
- Clear the bottom and fish out a key.
- Select the hook each time it’s right above some seaweed or garbage to pick it up.
- Walkthrough: (K) Easy and Hard: Solution is random.

- Take KEY IN RESIN (L).
- Enter Moon Elves Mine.
- Add FLASK OF ALCOHOL (M), STRAW, FIRE STRIKER, then KEY IN RESIN.
- Use Pincers, receive CALLISTO’S PENDANT.
- Add CALLISTO’S PENDANT (N).
- Enter Mirror Room.

- Take WING 2/2 (O), FEATHERS and MIRROR OF TRUTH PICTURE.
- Add WING (P), take DOLL.
- Use TWEEZERS, receive NUT.
- Add DRAWING (Q) and DOLL.
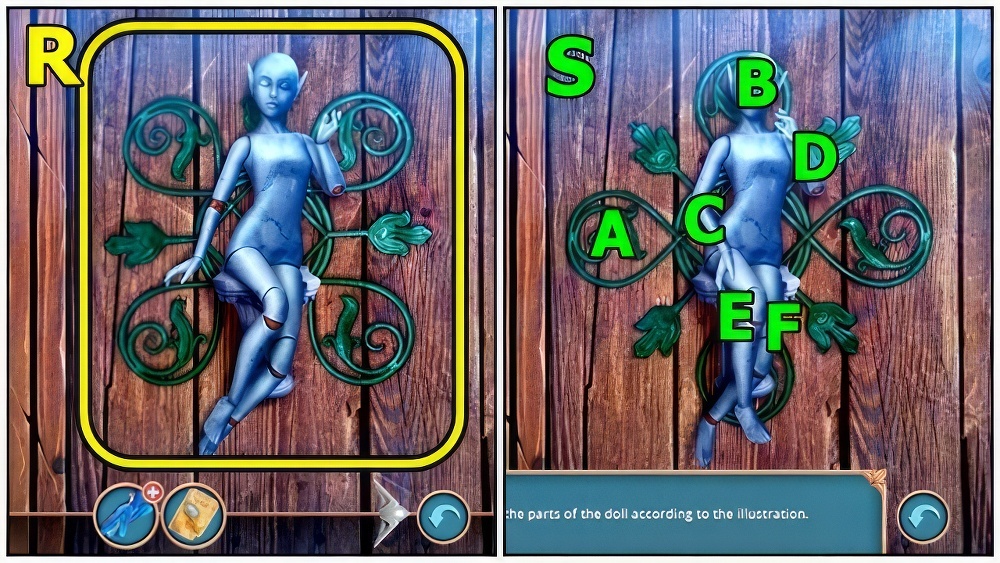
- Arrange the parts of the doll according to the illustration.
- Walkthrough: (R) Easy.
- Walkthrough: (S) Hard A-D×3-C-E×2-F×4.

- Take TOTEM (T).
- Return to By Dragonberg Mountain.
- Add TOTEM (U), take DAGGER.
- Return to Mirror Room.
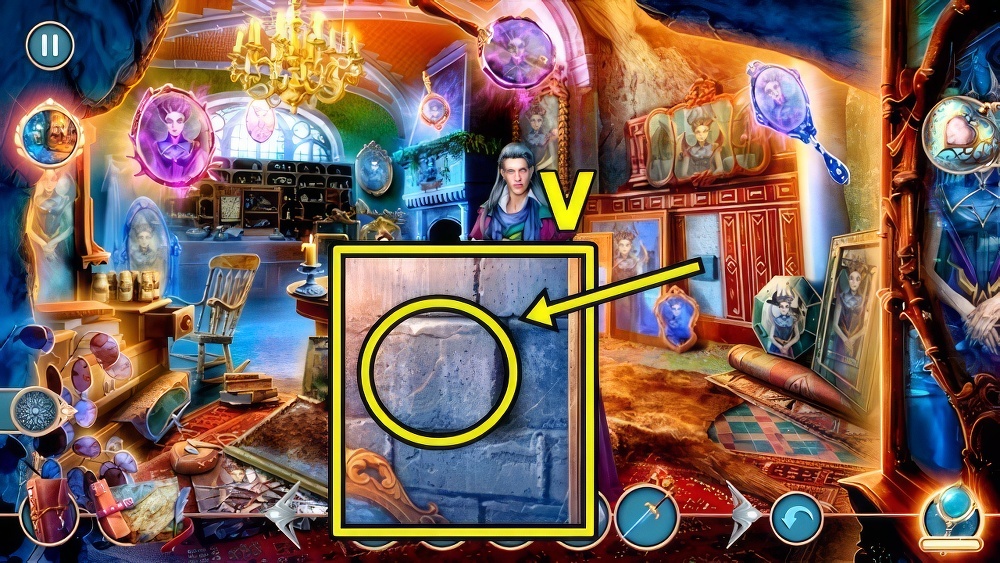
- Use DAGGER (V), take DIAMOND PICKAXE.
- Move down.

- Use DIAMOND PICKAXE (W).
- Play puzzle, take FIGURINE.
- Add FIGURINE (X), take RIBBON.
- Enter to Dragon Study Room.

- Remove (Y), add NUT and SILVER BIRD PAW.
- Take DRAGON STATUETTE.
- Add DRAGON STATUETTE (Z).
- Play puzzle.
- Return to Mirror Room.

- RIBBON on FEATHERS, receive BUNCH OF FEATHERS.
- Use BUNCH OF FEATHERS (A), then add MIRROR OF TRUTH PICTURE.
- Take MIRROR OF TRUTH.
- Use MIRROR OF TRUTH (B).
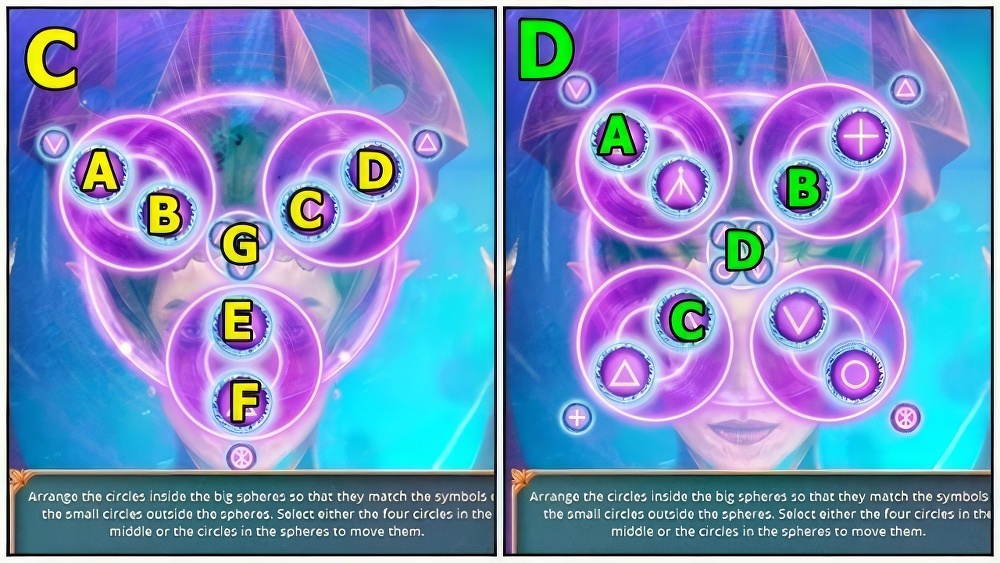
- Arrange the circles inside the big spheres so that they match the symbols on the small circles outside the spheres.
- Select either the four circles in the middle or the circles in the spheres to move them.
- Walkthrough: (C) Easy A-C-E-G-A-F-G-D-G-C-G-C.
- Walkthrough: (D) Hard A-B-C-D×3.

- Select (E).

- Take STONE (F), HAMMER and LADLE.
- Take BROKEN BEAR TRAP (G) and ROPE.
- Add STONE, use LADLE.
- Open, take CORN COB and EOLYN’S AMULET.

- Add EOLYN’S AMULET (H).
- Select (I).
- Play puzzle, receive WRENCH.

- Use WRENCH (J), receive BOLT.
- BOLT on BROKEN BEAR TRAP, receive BEAR TRAP.
- Add BEAR TRAP (K), read, take BALL OF YARN.
- Add BALL OF YARN (L).

- You have to go through exactly as many cells of different types as shown above.
- Walkthrough: (M) Easy.
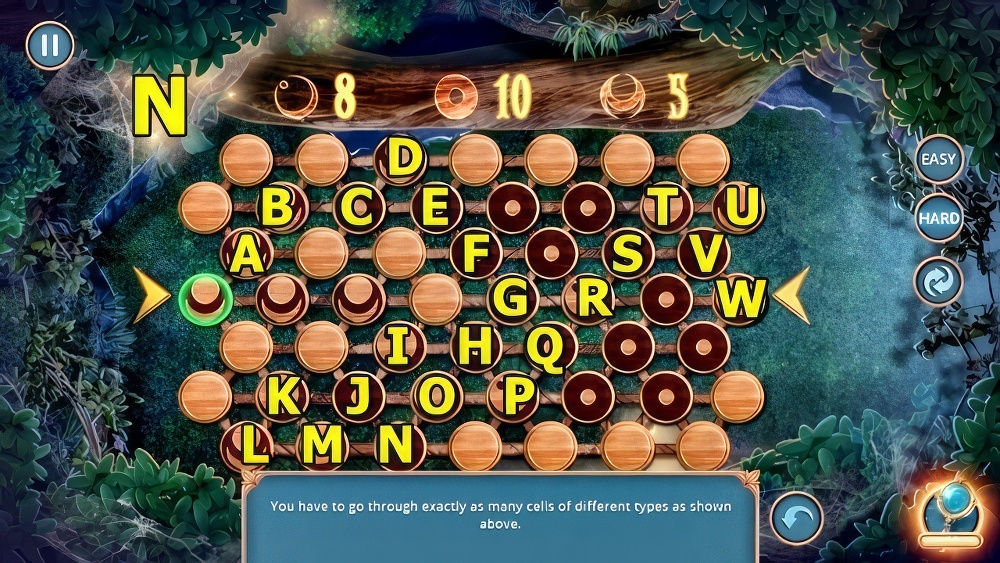
- Walkthrough: (N) Hard.
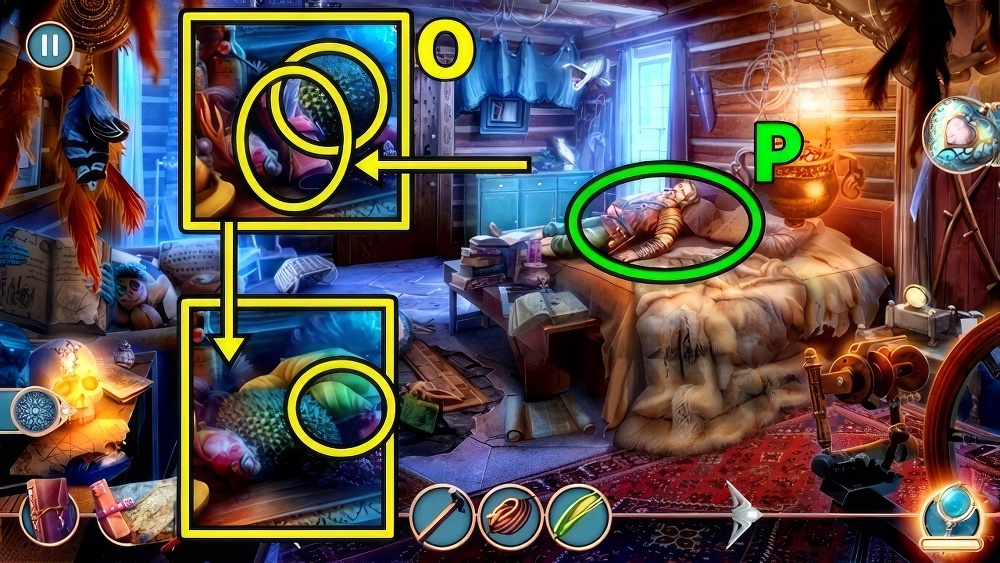
- Take Map (O), use HAMMER, take DURIAN.
- Use DURIAN (P).

- Select (Q).
- Move forward.
- Add CORN COB (R).
- Take BIG TUSK (S).
- Go to Forbidden Forest.

- Add ROPE (T) and BIG TUSK.
- Play puzzle, take SHARP GEMSTONE.
- Take BROKEN EGGSHELL (U).
- Use SHARP GEMSTONE, take TOY BALLISTA PART 1/2 and HATCH HANDLE.
- Return to Gwendolyn’s House.

- Read (V), take TORN PLAGUE DOCTOR MASK.
- Add HATCH HANDLE.
- Go to Crypt Under Gwendolyn’s House.

- Talk (W).
- Select (X).
- Enter Eolyn’s Chamber.
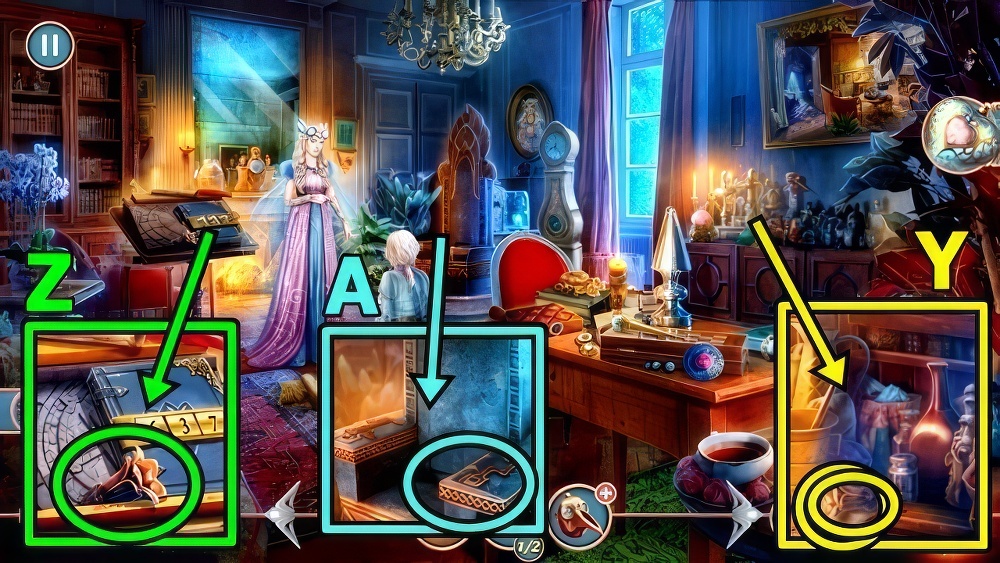
- Take FLOWER STATUETTE 1/2 (Y) and PAPER.
- Take FLOWER STATUETTE 2/2 (Z).
- Add FLOWER STATUETTE (A).

- Move the flowers using arrows.
- Their movement is linked.
- Get them to green points.
- Walkthrough: (B) Easy C-B-C-A-C-B-C-(A×2).

- Walkthrough: (C) Hard C-B-C-(A×2)-(C×2)-B-D-(B×2)-(C×2)-A-C-A-D-C-(B×2).

- Take LEATHER BRACELET (D).
- Add LEATHER BRACELET (E), take GOLDEN PEN.
- Move down.
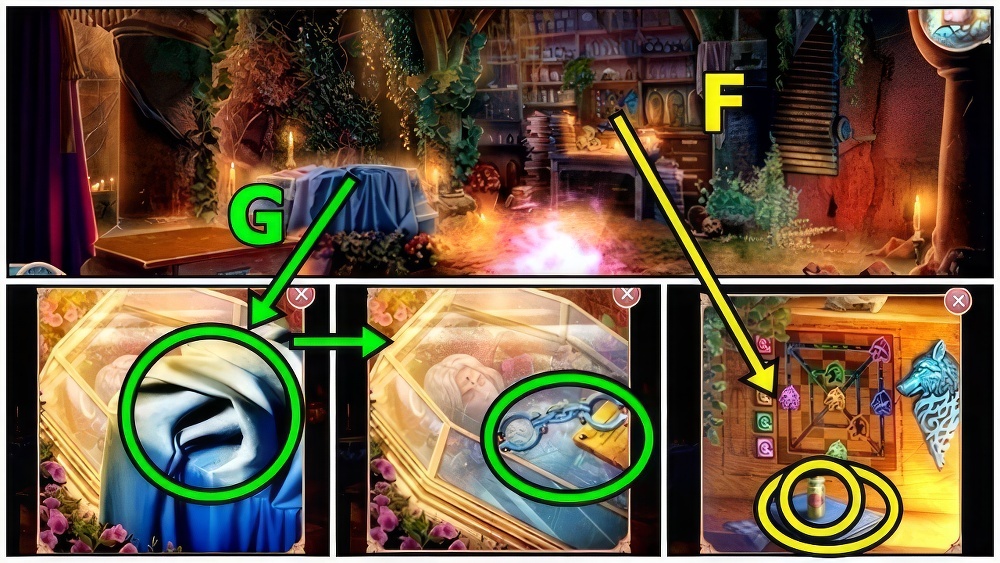
- Take GLUE (F).
- Read, take PAGE WITH SYMBOLS.
- Take SHEET (G) and CHAINS.

- Add CHAINS (H).
- Read, take NEEDLE AND THREAD and DRESSER HANDLE.
- Add DRESSER HANDLE (I), take LINE WITH HOOK.
- Add PAPER and GOLDEN PEN, receive CODE.
- Enter Eolyn’s Chamber.

- Add CODE (J), enter 2-5-9.
- Play puzzle, take TREE AMULET.
- Add TREE AMULET (K), take TWO RUBIES.
- Return to Forbidden Forest.

- Take PESTLE (L).
- Use LINE WITH A HOOK, take TOY BALLISTA PART 2/2.
- Move down.
- Take FOUNTAIN PEN (M).
- Add TOY BALLISTA PART.

- Paint the ballista as instructed.
- Mix different kinds of paint to get new colors.
- Walkthrough: (N) Easy (A-G)-(B-L)-(C-H)-(D-J)-(E-I)-(F-K).

- Walkthrough: (O) Hard (A-I)-(A-B-D)-(B-G)-(B-C-H)-(C-F)-(C-A-E).
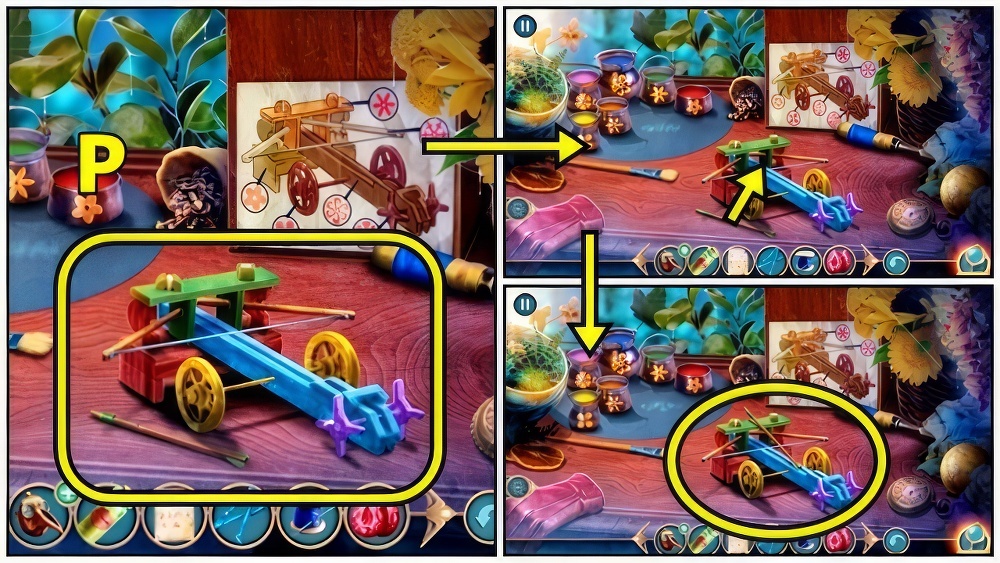
- Walkthrough (P).
- Add Arrow, take TOY BALLISTA.
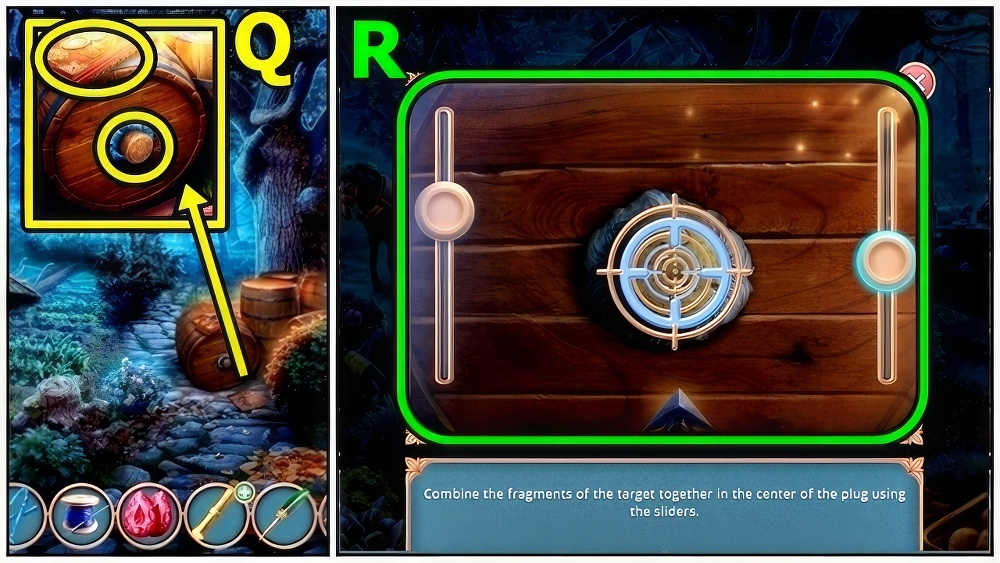
- Examine (Q), add TWO RUBIES.
- Take BOOK PAGE.
- Add TOY BALLISTA.
- Combine the fragments of the target together in the center of the plug using the sliders.
- Walkthrough: (R) Easy.
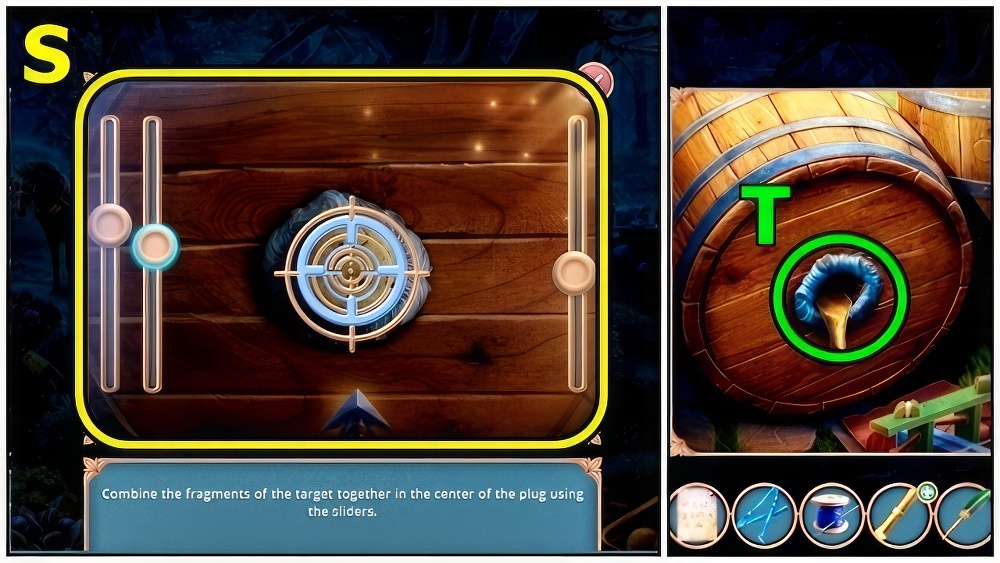
- Walkthrough: (S) Hard.
- Add BROKEN EGGSHELL (T), receive EGGSHELL WITH HONEY.
- Move forward.

- Offer EGGSHELL WITH HONEY (U), take BLOOMING FERN, POT CAP and COAL.
- NEEDLE AND THREAD and BLOOMING FERN on TORN PLAGUE DOCTOR MASK, receive PLAGUE DOCTOR MASK.
- Use PLAGUE DOCTOR MASK (V).
- Take PAINTING PART 1/2, BROKEN WHEEL and MORTAR.
- Return to Crypt Under Gwendolyn’s House.
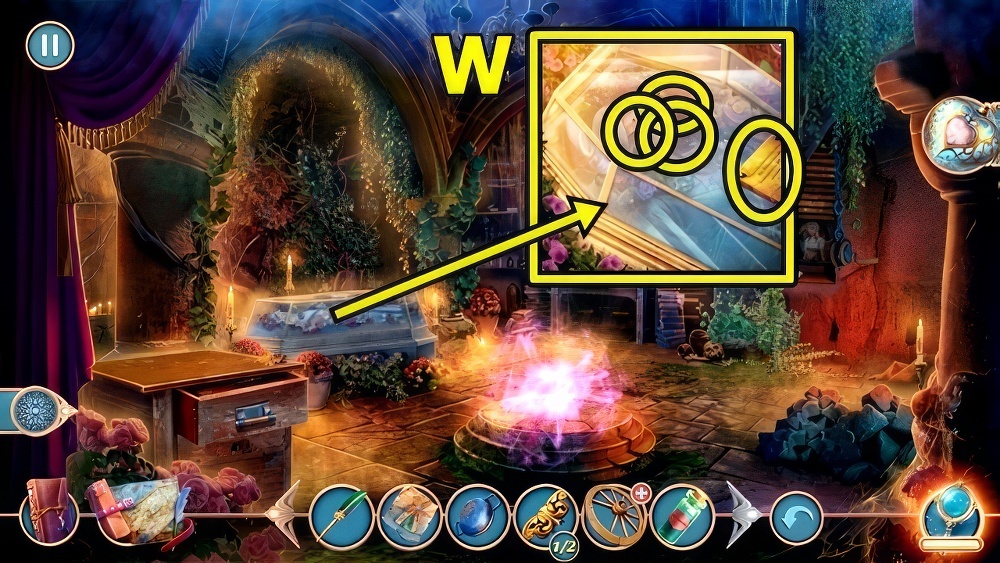
- GLUE, MORTAR and COAL on PESTLE, receive PESTLE WITH INK.
- Read (W).
- Add FOUNTAIN PEN, PAGE WITH SYMBOLS and PESTLE WITH INK.
- Play puzzle, take MIRROR OF TRUTH.
- Enter Eolyn’s Chamber.
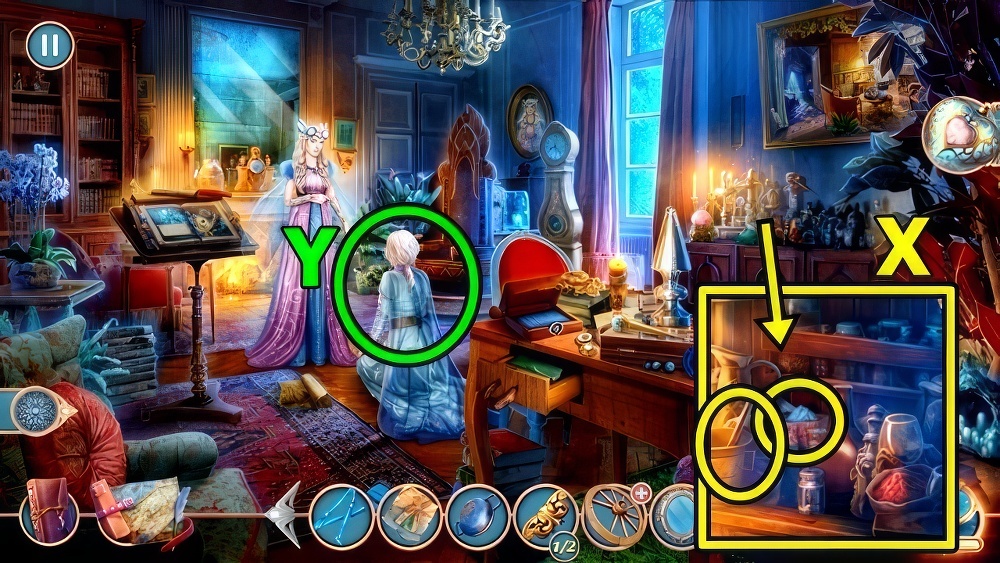
- Add BOOK PAGE (X), take MEMORY POWDER.
- Use MEMORY POWDER (Y).

- Choose a pair for each element.
- Walkthrough: (Z) Easy (A-P)-(B-K)-(C-I)-(D-M)-(E-O)-(F-N)-(G-J)-(H-L).

- Walkthrough: (A) Hard (A-T)-(B-K)-(C-N)-(D-M)-(E-S)-(F-R)-(G-Q)-(H-L)-(I-P)-(J-O).
- Return to Forbidden Forest.

- Use MIRROR OF TRUTH (B).
- Move forward.
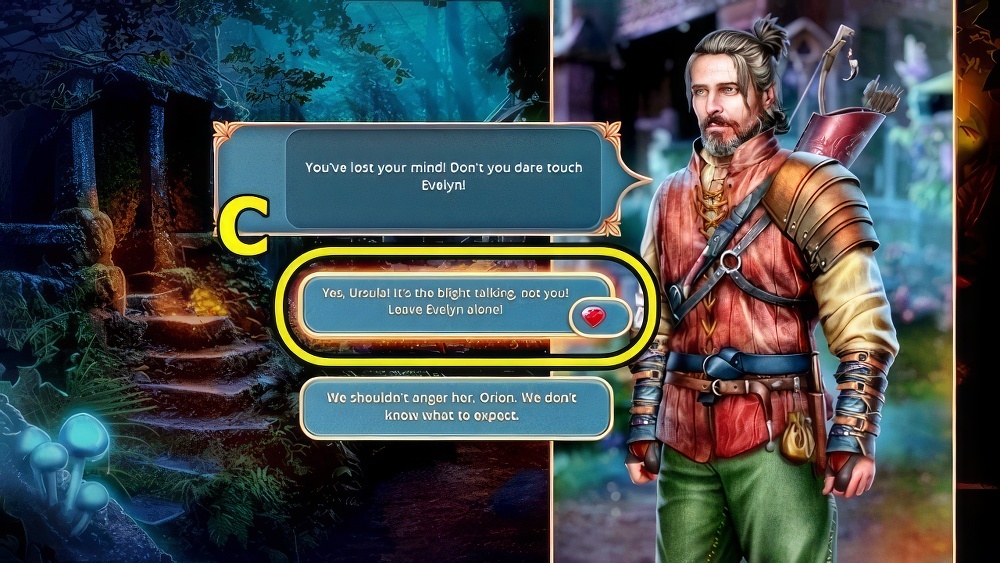
- Select (C).

- Take CIRCLE (D).
- Take INSTRUCTIONS (E).
- Use SHEET, take WINE and STOOL LEG.
- Return to Around Gwendolyn’s House.

- CIRCLE and STOOL LEG on BROKEN WHEEL, receive WHEEL.
- Add WHEEL (F), take RELIEF PART.
- Return to Around Ida’s Estate.
- Add RELIEF PART (G).

- Turn the fragments and click the button.
- Turn the fragments so that they form an image.
- Walkthrough: (H) Easy A-(B×3)-(D×2)-(E×2)-(F×2)-G.
- Walkthrough: (H) Hard (A×3)-(B×2)-(D×2)-(E×3)-(F×3)-G.

- Take MANDRAGORA (I).
- Use MADRAGORA (J).

- Add POT CAP (K), take WALKING STICK and GLASS BOTTLE.
- Take WATER BUCKET (L).
- Use WALKING STICK, receive PAINTING PART 2/2.
- Return to Crypt Under Gwendolyn’s House.
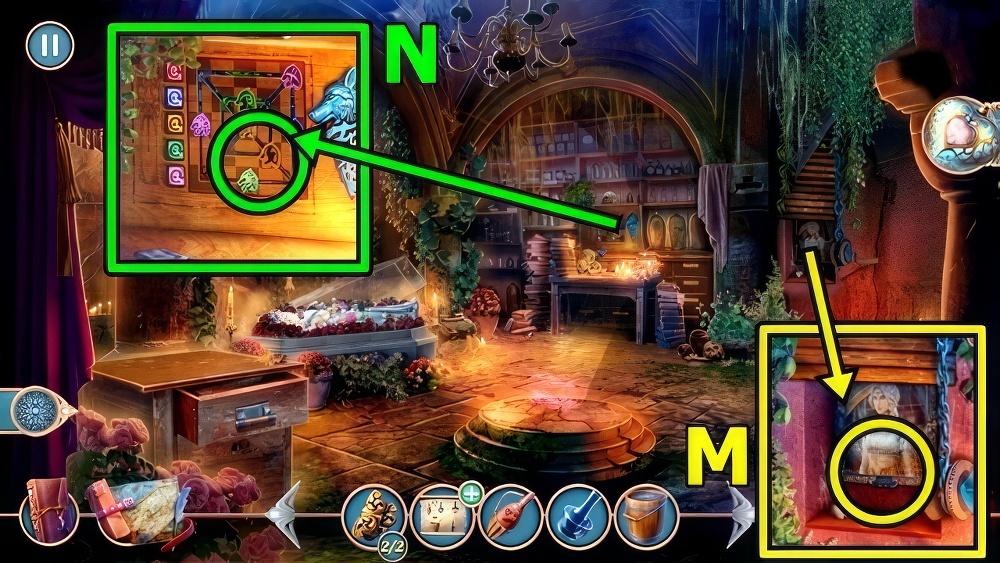
- Add PAINTING PART (M), read, take WOLF AMULET.
- Add WOLF AMULET (N).

- Put the tokens in the appropriate slots using buttons.
- Walkthrough: (O) Easy (B×3)-(C×3)-(D×2)-(E×2)-(C×4)-(E×4)-A-(B×6).
- Walkthrough: (P) Hard (B×3)-(C×3)-(D×2)-(E×2)-(C×4)-(E×4)-A-(B×2)-E-(B×4)-(E×7).

- Take BOLAS (Q) and WOLF STATUETTE.
- Return to Ida’s Estate.
- Use BOLAS (R).
- Add WOLF STATUETTE (S), take STRING and PLAYING FIELD.
- Return to Gwendolyn’s House.

- Add PLAYING FIELD (T).
- Play puzzle, take FORCEPS.
- Use FORCEPS (U), receive HOT COAL.
- Return to Around Ida’s Estate.
- WINE, GLASS BOTTLE, WATER BUCKET, STRING and HOT COAL on INSTRUCTIONS, receive LAMP BULB.
- Use LAMP BULB (V), take KEY.
- Enter Ida’s Estate.
- Use KEY (W), take Ring.

- Combine 3 symbols to get the next.
- Get the last symbol.
- Walkthrough: (X) Easy and Hard: Solution is random.
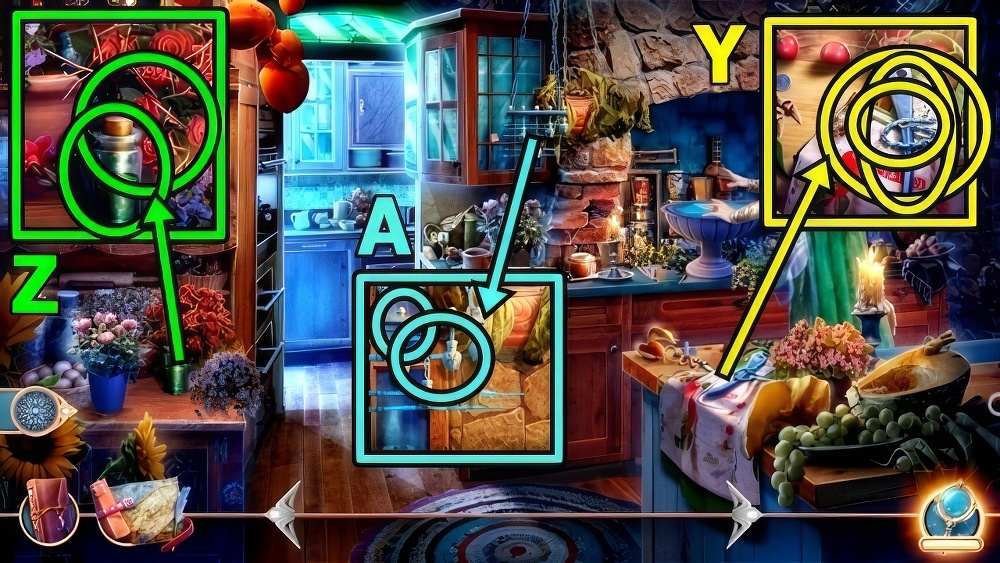
- Take CHAIN (Y), NIPPERS PART and APRON.
- Take CAUSTIC SOLUTION (Z).
- Use APRON, receive WEIGHT.
- Add CHAIN (A) and WEIGHT.
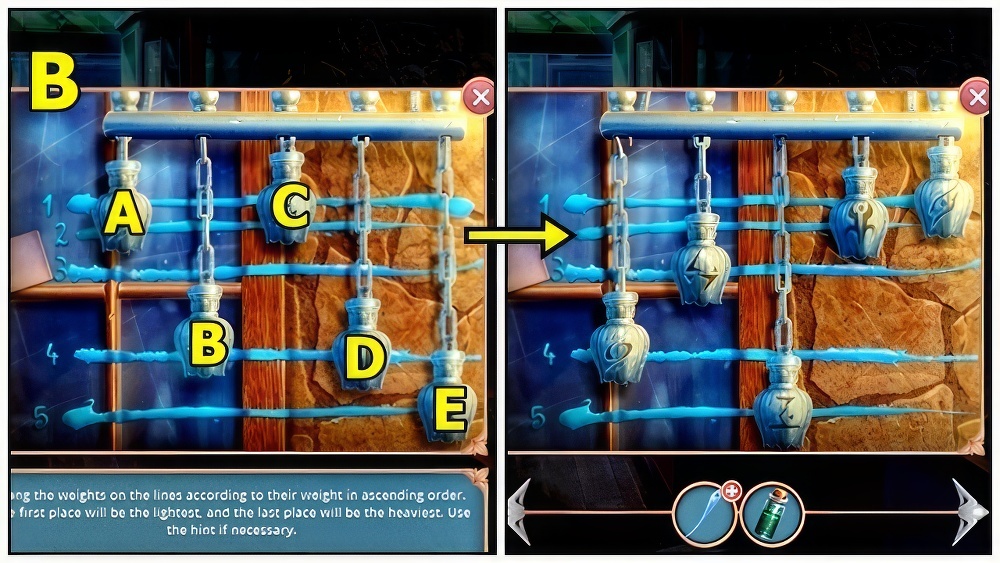
- Hang the weights on the lines according to their weight in ascending order.
- The first place will be the lightest, and the last place will be the heaviest.
- Use the hint if necessary.
- Walkthrough: (B) Easy (A×4)-(B×3)-(C×5).

- Walkthrough: (C) Hard (A×6)-(C×4)-(E×5).

- Take NUTCRACKER (D).
- Use NUTCRACKER (E), take SPATULA and MOON AMULET.
- Add MOON AMULET (F), turn pages, receive SPELL BOOK.

- Offer SPELL BOOK (G).
- Play puzzle.
- Select (H).

- Take NIPPERS PART (I), PEGS 1/3 and SPOKE 1/2.
- Use SPATULA (J), receive BOLT.
- NIPPERS PART and BOLT on NIPPERS PART, receive NIPPERS.
- Use NIPPERS (K), open.
- Take SILVER ORNAMENTS and LION HEAD HANDLE.
- Add LION HEAD HANDLE (L).
- Enter Tervenir’s House.

- Talk (M).
- Select (N).
- Enter Tervenir’s House.

- Take JUG (O).
- Add JUG (P), take METAL BRUSH.
- Take FRYING PAN (Q).
- Move down.
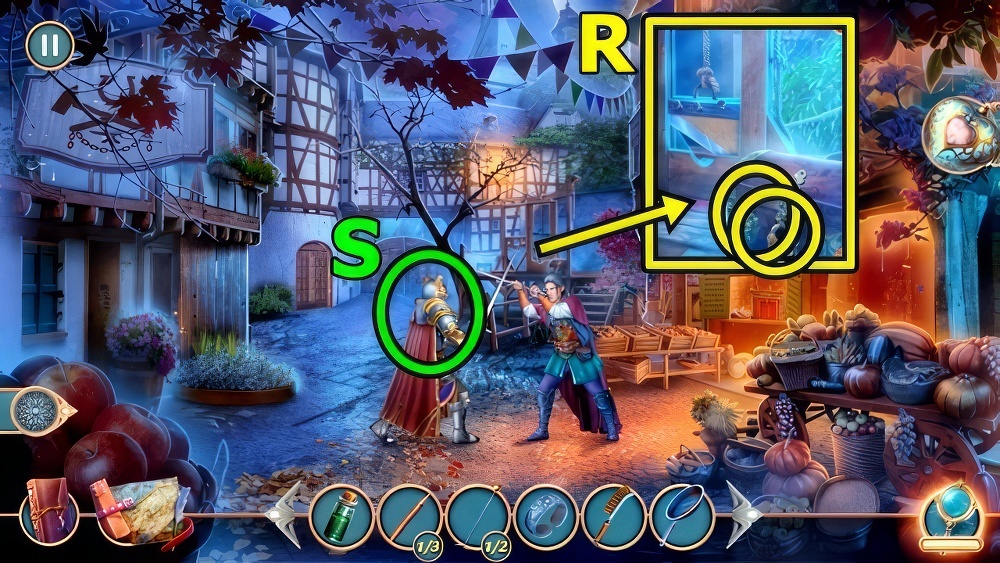
- Add CAUSTIC SOLUTION (R) and METAL BRUSH, read, take SLEEP POWDER.
- Use SLEEP POWDER (S).

- Take FENCE KEY (T).
- Insert FENCE KEY (U).
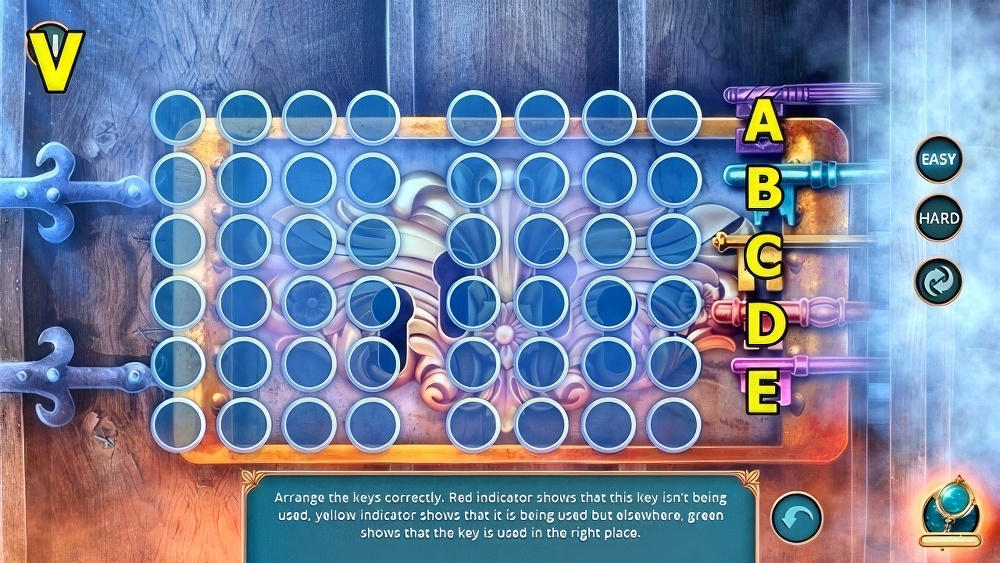
- Arrange the keys correctly.
- Red indicator shows that this key isn’t being used, yellow indicator shows that it is being used but elsewhere, green shows that the key is used in the right place.
- Walkthrough: (V) Easy B-C-A-D.
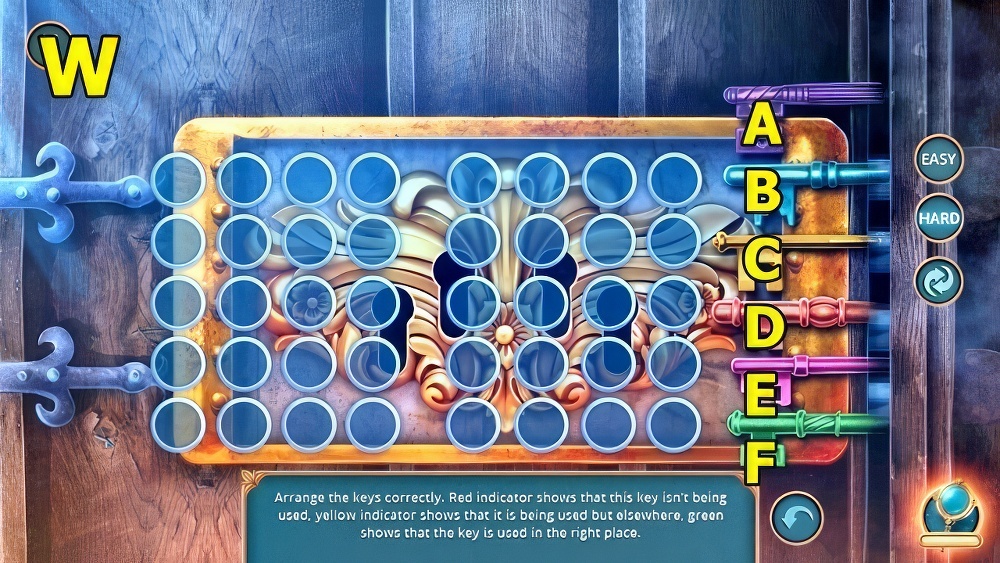
- Walkthrough: (W) Hard F-C-A-D.
- Move forward.

- Take BELT (X) and PEGS 2/3.
- Take PEGS 3/3 (Y).

- Add PEGS (Z), take SPOKE 2/2.
- Add SPOKE (A).

- The lock will open if all pins are above the specified line, the pins cannot be pressed again until they are in their original position
- Walkthrough: (B) Easy – press quickly: E-C-A-D-B.
- Walkthrough: (C) Hard – press quickly: H-E-G-D-C-A-F-B.
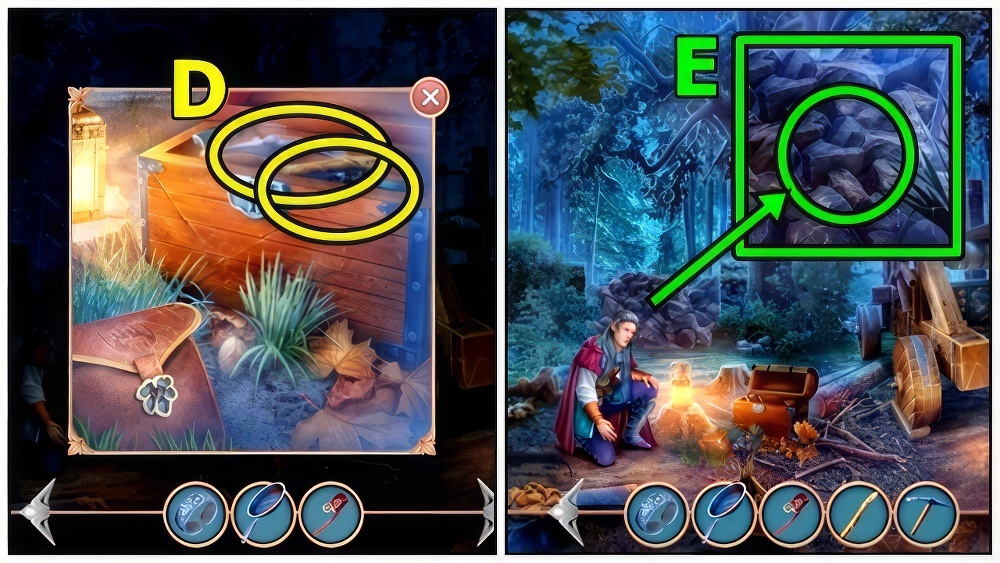
- Take HOE HANDLE (D) and PICK.
- Use PICK (E).
- Move forward.

- Select (F).

- Take MAGNET (G).
- Add FRYING PAN (H) and SILVER ORNAMENTS, take BOWL OF MOLTEN SILVER.
- Add BOWL OF MOLTEN SILVER (I), take COIN.
- Enter Fringilda’s Wagon.

- Take NOTATION (J) and TREE EMBLEM.
- Add NOTATION (K), take SILVER CUP.
- Read (L), use SILVER CUP, receive MAGICAL WATER.
- Return to Flamdorn Street.

- Add COIN (M).
- Play puzzle, take SHUTTERS HANDLE.
- Add SHUTTERS HANDLE (N), take AMELIA’S HANDKERCHIEF.
- Return to Forest Tabor.
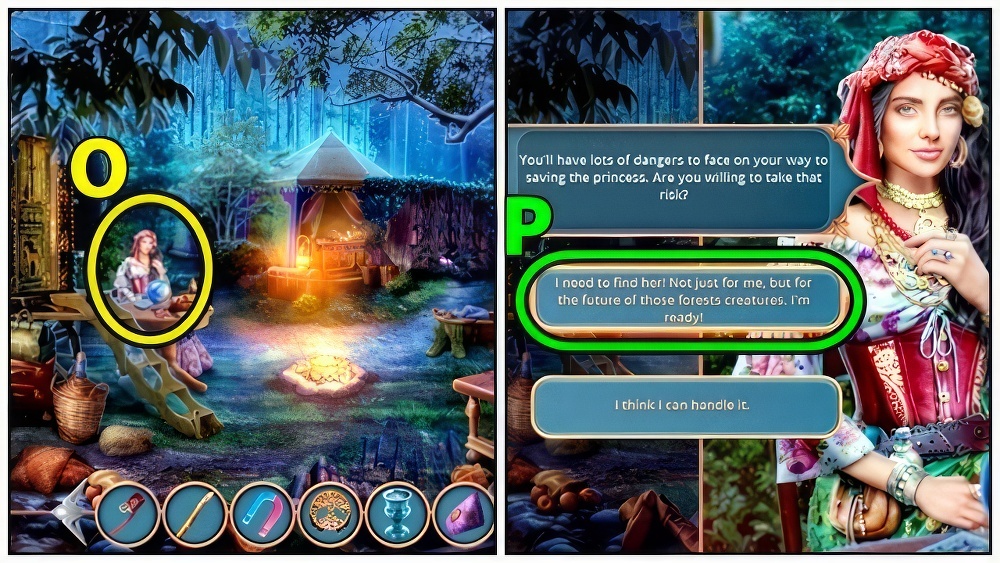
- Give AMELIA’S HANDKERCHIEF (O).
- Select (P).
- Receive PROPHESY TOME.
- Return to Tervenir’s House.

- Read PROPHESY TOME, take BOOKMARK.
- Insert TREE EMBLEM (Q), receive SPELL.
- Use BOOKMARK, take LADLE and BOX OF CANDY.
- Open BOX OF CANDY, receive OPEN CANDY BOX.
- Use MAGNET (R), take CARABINE.
- Add OPEN CANDY BOX, take AMULET 1/2 and CREST.
- Move down.

- Use CREST (S).
- Examine, add BELT and HOE HANDLE, receive BLADE MACHETE.
- Return to Forest Tabor.
- Use BLADE MACHETE (T).
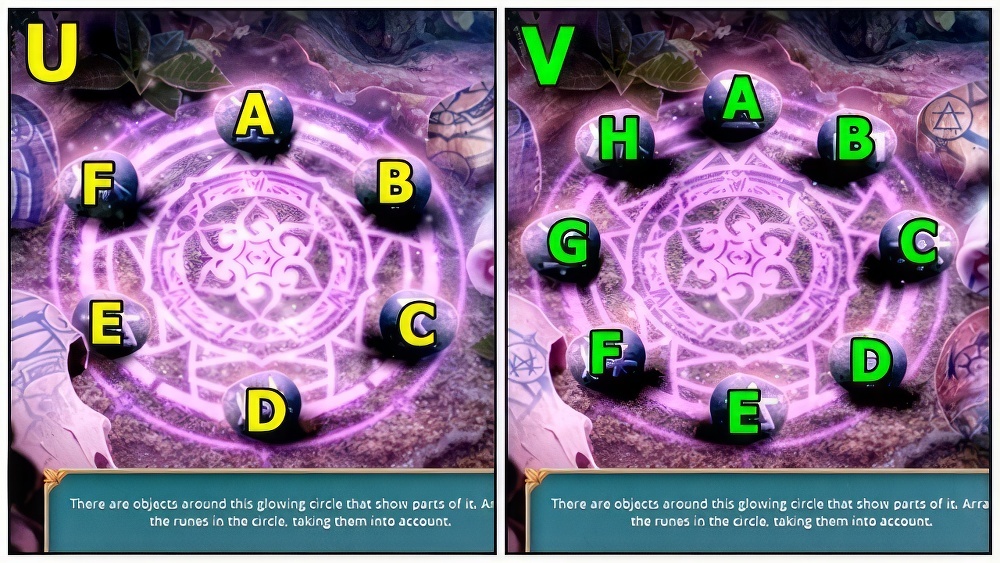
- There are objects around this glowing circle that show parts of it.
- Arrange the runes in the circle, taking them into account.
- Walkthrough: (U) Easy (F-E)-(A-C)-(A-E)-(B-D)-(A-D).
- Walkthrough: (V) Hard (A-E)-(H-B)-(G-C)-(A-F)-(A-D)-(B-D).

- Use LADLE (W), take SMOKING PIPE.
- Take LILY (X).
- Take SMALL TRAP (Y) and DART.
- Move down.

- Open (Z), give LILY, receive CATAPULT MECHANISM PART.
- Move down.
- Add CATAPULT MECHANISM PART (A).

- Put the gears in their place.
- Walkthrough: (B) Easy (A-G)-(B-I)-(C-L)-(D-J)-(E-H)-(F-K).
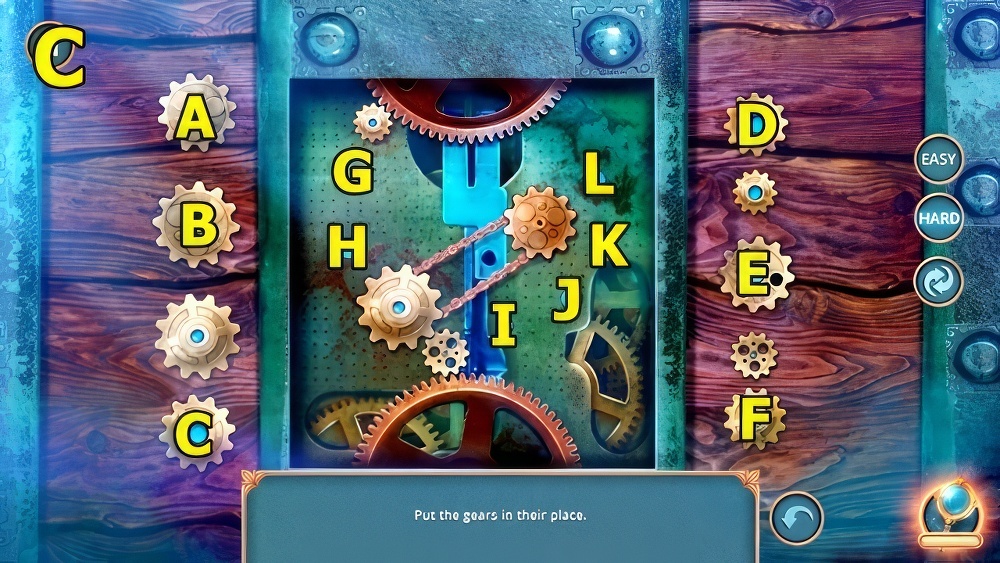
- Walkthrough: (C) Hard (A-G)-(B-I)-(C-L)-(D-J)-(E-H)-(F-K).
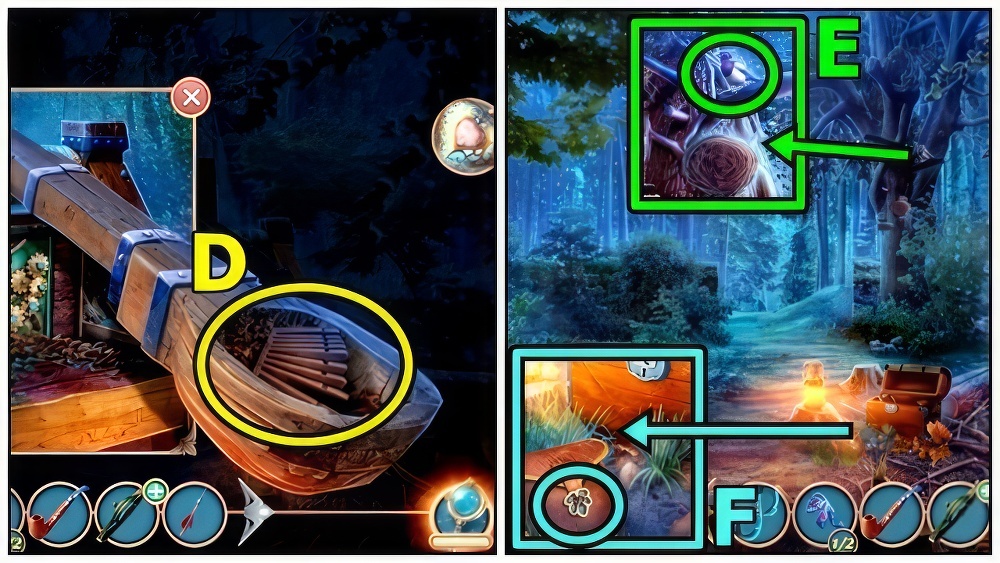
- Take RATCHET (D).
- Use RATCHET (E), take AMULET 2/2.
- Insert AMULET (F), take LINE and BOOK OF MAGIC FLOWERS.
- Return to Tervenir’s House.

- SMOKING PIPE on SMALL TRAP, receive TINY TRAP.
- Use TINY TRAP (G), take SPICE MIX.
- Add SPICE MIX (H).

- Match the appropriate labels with the spice jars based on the cook’s reaction.
- Walkthrough: (I) Easy G-(F-G)-H-(A-H)-I-(B-I)-J-(C-J)-K-(D-K)-L-(E-L).

- Walkthrough: (J) Hard I-(H-I)-J-(A-J)-K-(B-K)-L-(C-L)-M-(D-M)-N-(E-N)-O-(G-O)-P-(F-P).

- Take VALERIAN (K).
- Return to Before the Tower.

- Use VALERIAN (L).
- Take HORSESHOE.
- Use HORSESHOE (M).
- Play puzzle, take NET GUN.
- Use BOOK OF MAGIC FLOWERS (N).
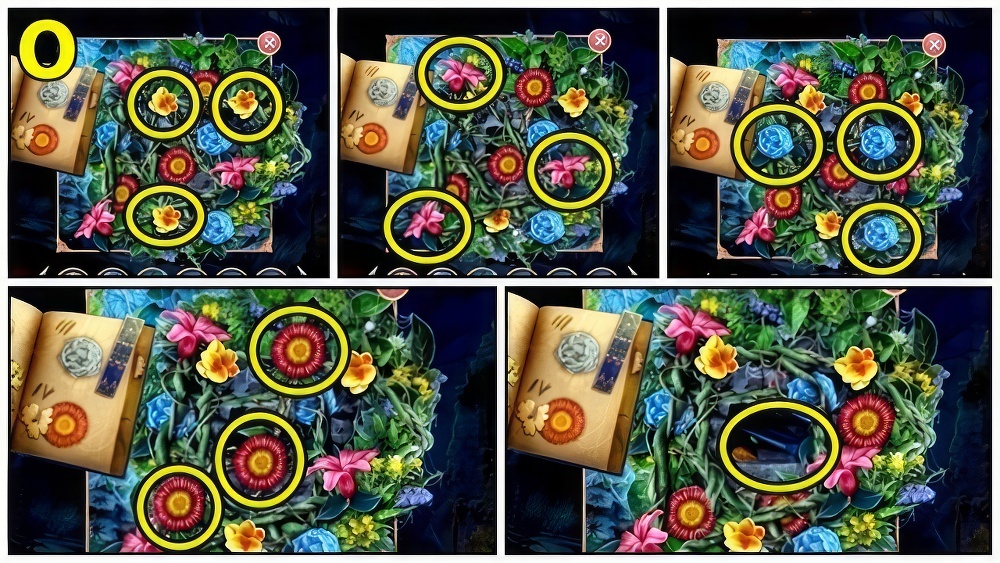
- Remove flowers (O), take FORCEPS.

- Use FORCEPS (P), receive CHAIN.
- Use NET GUN (Q).

- Add CARABINE (R) and CHAIN.
- Play puzzle, take LION STATUETTE.
- Add CLAY LUMP (S), take ROPE PIECE.
- Add LION STATUETTE, read, take INSTRUCTIONS PIECE and TUNING FORK.
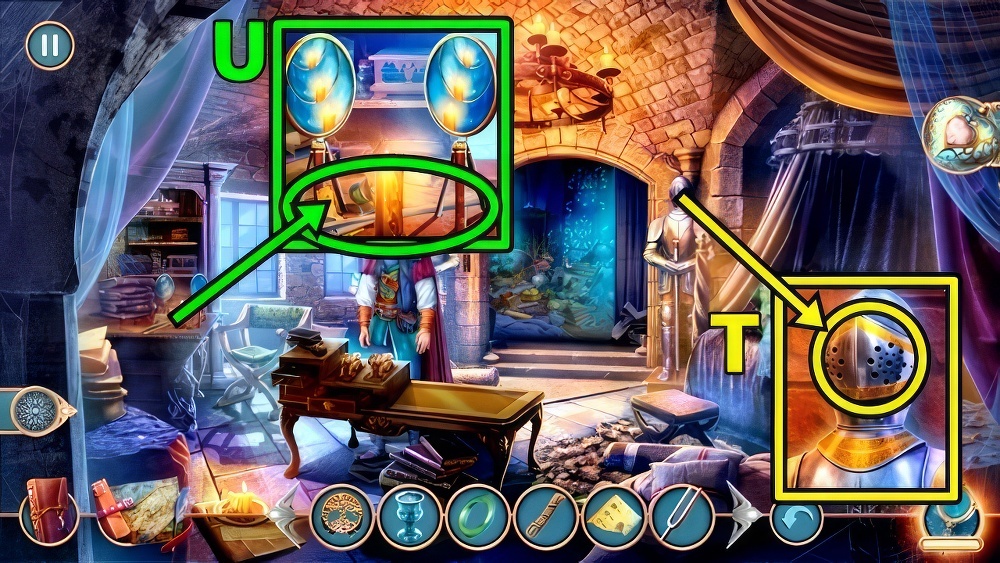
- Add TUNING FORK (T), take HOOK.
- Take FISHING ROD (U).
- Return to Before the Forest.

- LINE, HOOK and ROPE PIECE on FISHING ROD.
- Use FISHING ROD (V), take LIPSTICK.
- Return to Fringilda’s Wagon.
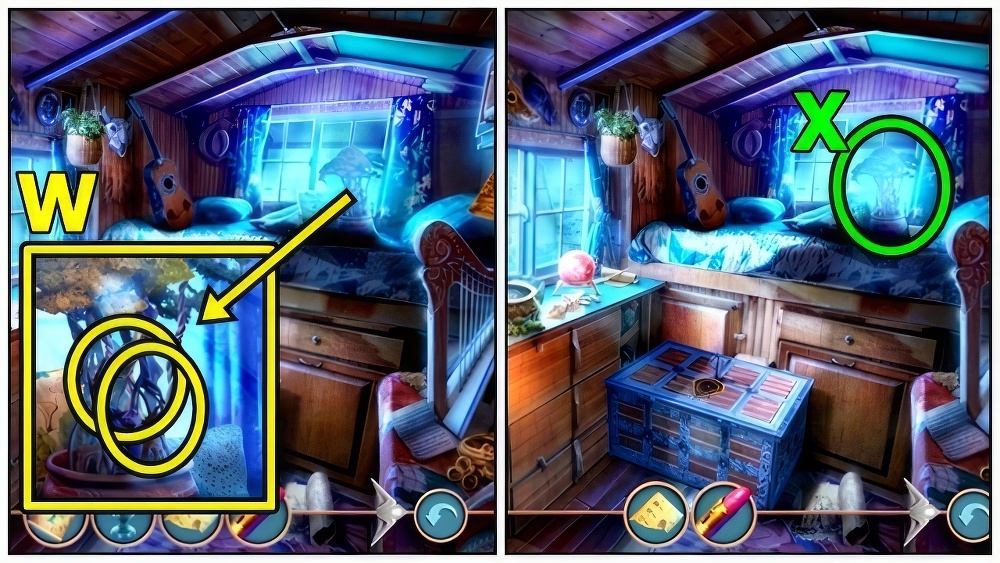
- Add MAGICAL WATER (W) and SPELL.
- Examine (X).

- Place the branches according to the picture.
- Clicking on the acorns will move the ropes.
- Walkthrough: (Y) Easy D-(C×3)-(B×3)-E-K-(O×2)-(K×2)-(N×3)-M-N-(M×3)-N.

- Walkthrough: (Z) Hard F-D-(C×3)-(B×3)-(J×3)-O-N-(O×3)-N-(R×3)-M-P.
- R-(M×2)-R-P-(Q×3)-P-Q-(P×3)-Q.

- Take LONG SILVER HAIRPIN (A).
- Return to Trevenir’s House.
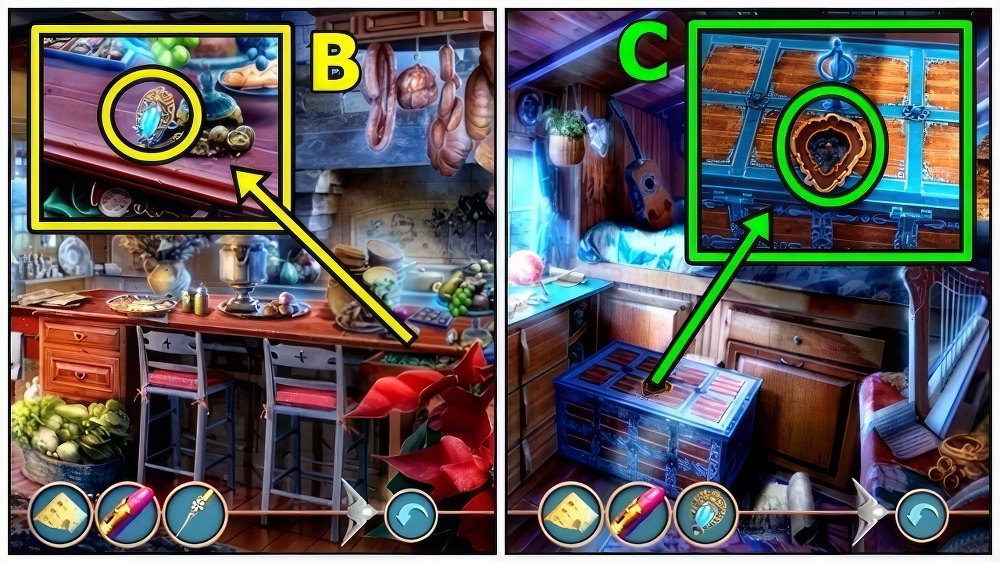
- Use LONG SILVER HAIRPIN (B), receive GEMSTONE.
- Return to Fringilda’s Wagon.
- Insert GEMSTONE (C), move items, read, examine, open.
- Play puzzle.
- Return to Inside the Tower.

- Read (D), add INSTRUCTIONS PIECE, examine.
- Use LIPSTICK.
- Take BOX.

- Open BOX, read, take MAGICAL RING.
- Give MAGICAL RING (E).
- Examine.
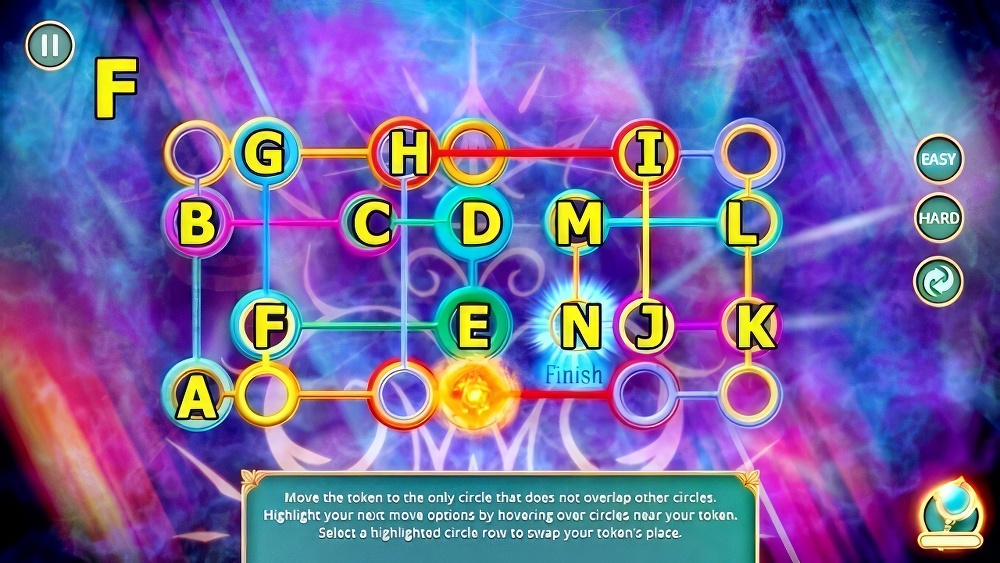
- Move the token to the only circle that does not overlap other circles.
- Highlight your next move options by hovering over circles near your token.
- Select a highlighted circle row to swap your token’s place.
- Walkthrough: (F) Easy and Hard: A through N.
- Walkthrough Bonus Chapter, at the link below.


