
Wild Story 1: Primal Secrets (Bonus Chapter) – Continues the investigation at Wildfront Reserve and takes you to a dangerous mountainous area ravaged by fire. This time, Alex Green and Leah Marlow set out along a scorched route through slopes, cliffs, and ruined trails after receiving an alarm signal: poachers are becoming increasingly active, animals continue to disappear, and more and more traps are appearing in the forest. The tracks lead the rangers to an old mountain site where bridges are damaged, communications are down, and something far more dangerous than ordinary hunting lurks. While climbing through Mountain Trail, Crevice, Cliff Edge, and Shoreline, the heroes find a wrecked truck with no driver and realize that someone was trying to hide an important cargo. As they explore the slopes and cliffs, Alex gradually pieces together the chain of events: unknown assailants were trying to reach an ancient underground cavern, and their attempt to breach it triggered a landslide and further destruction. At the same time, it becomes clear that communication with base has been virtually lost, so the heroes must make their way to the station at the top of the cliff to reestablish contact and call for help. Nolan Shepard’s behavior grows increasingly suspicious; he hides evidence, uses UV markers for hiding spots, and leaves signs that are impossible to see without special lamps. Alex and Lia realize that Shepard’s research is connected not only to the ancient tribe but also to the poachers he used as a cover for his search. Gradually, the investigation leads the heroes to ancient ritual symbols hidden beneath a slope and to a sealed cave, where the key to the mystery of the entire reserve may lie.
Bonus Chapter Walkthrough
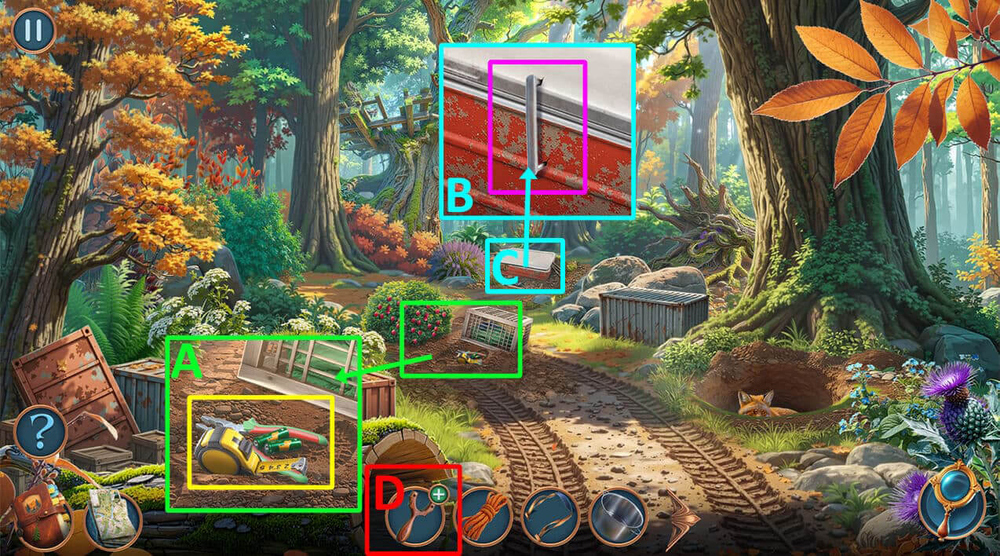
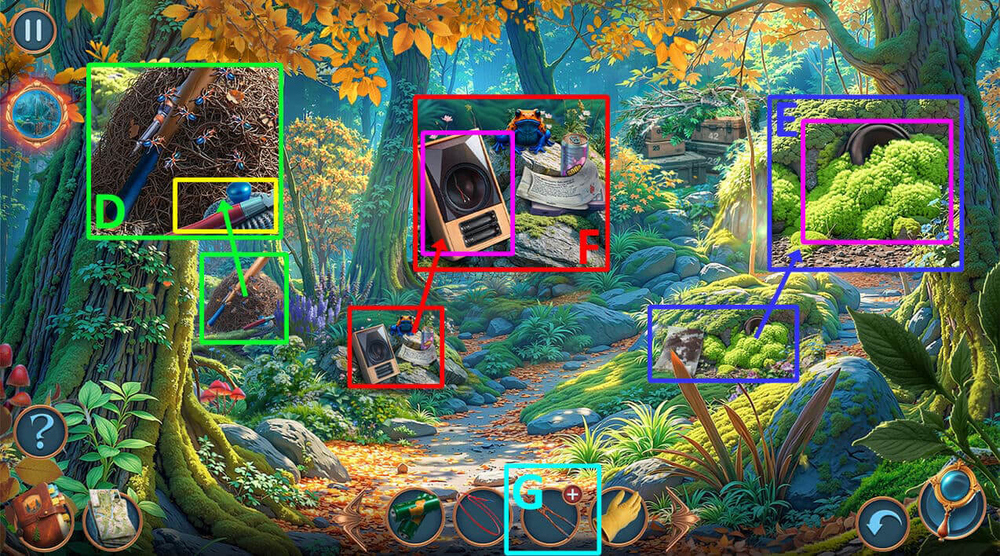
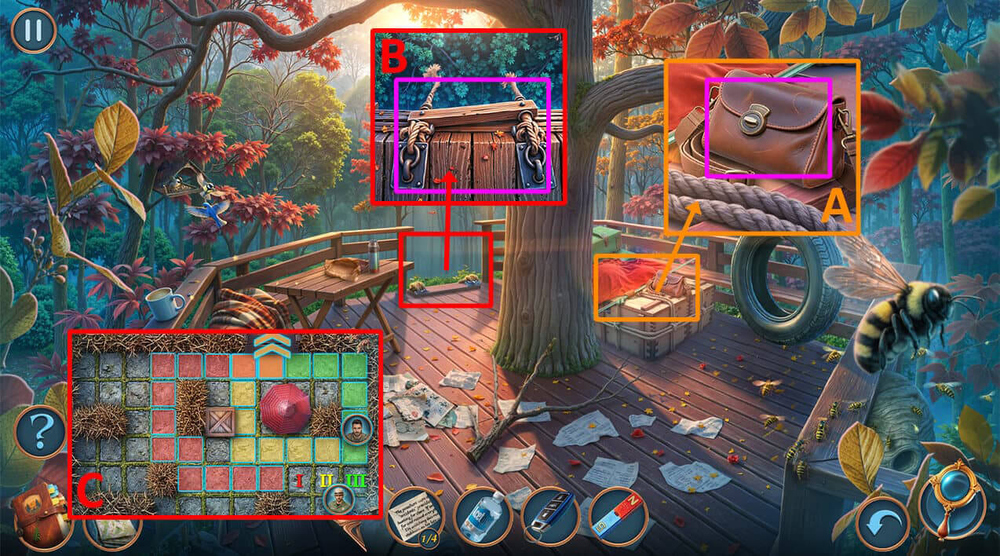
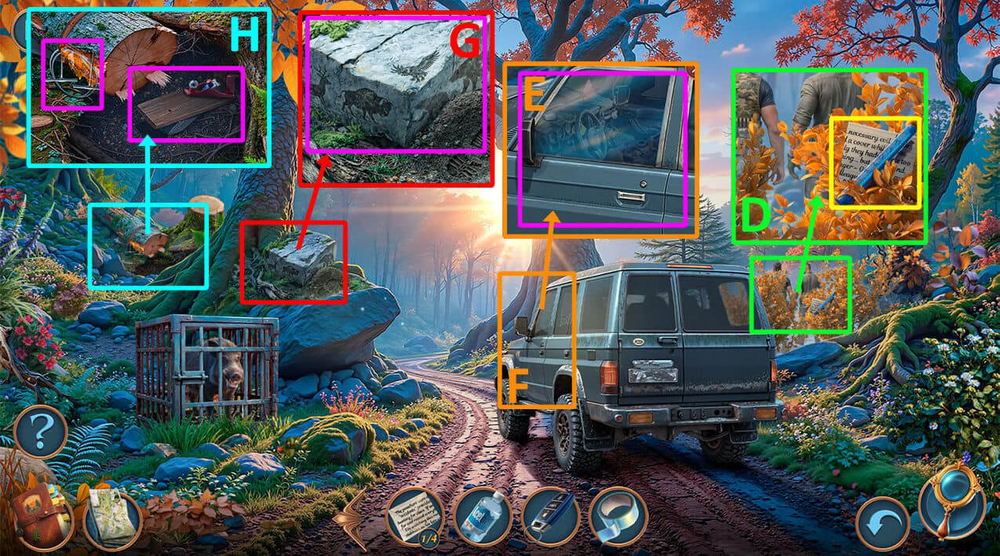
- Take TAPE MEASURE, BATTERIES, PLIERS (A).
- Use PLIERS on the steel bracket (B).
- Play puzzle, earn BUCKSHOT (C).
- Use ELASTIC BAND and BUCKSHOT on SLINGSHOT, earn SLINGSHOT (D).
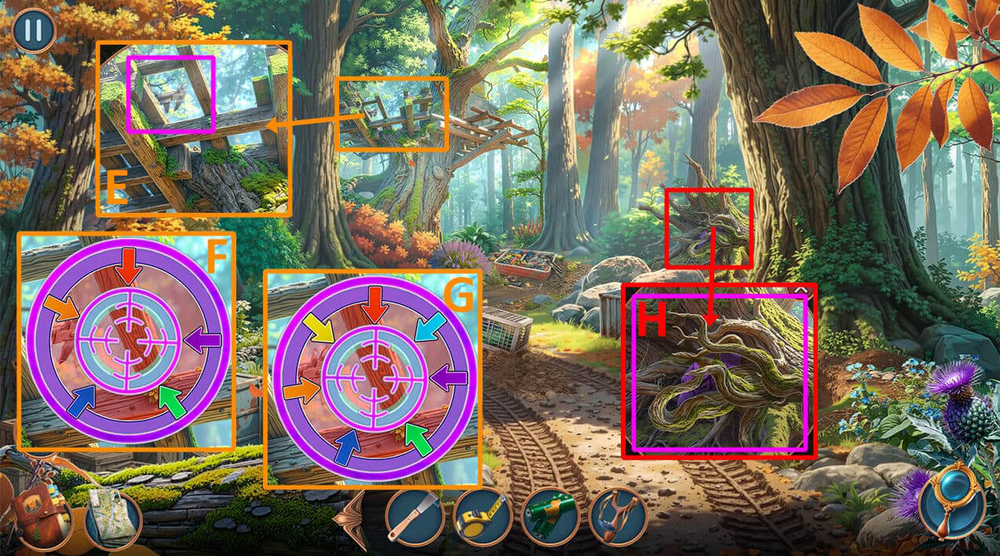
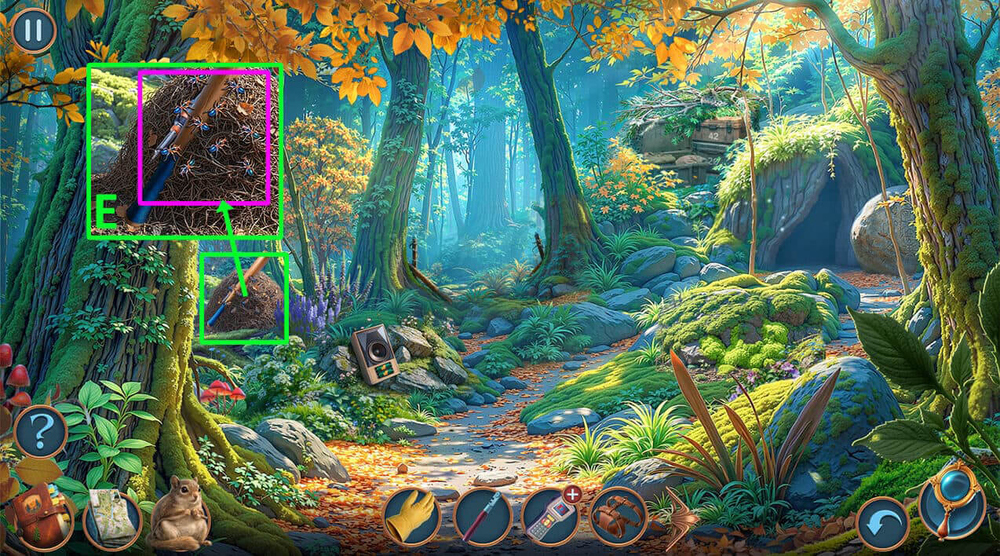
- Use SLINGSHOT on the treetop (E).
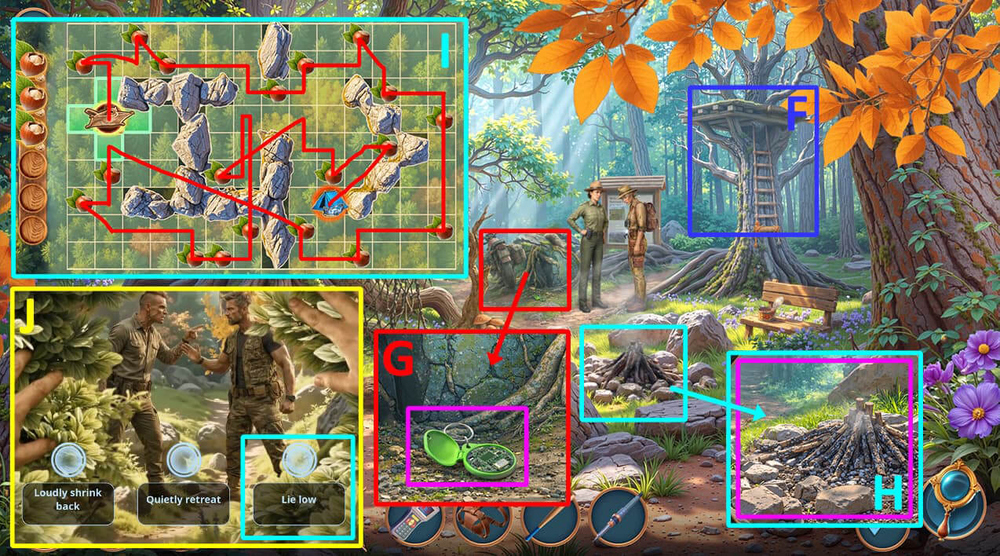
- Easy solution: follow the instructions in the image (F).
- Hard solution: follow the instructions in the image (G).
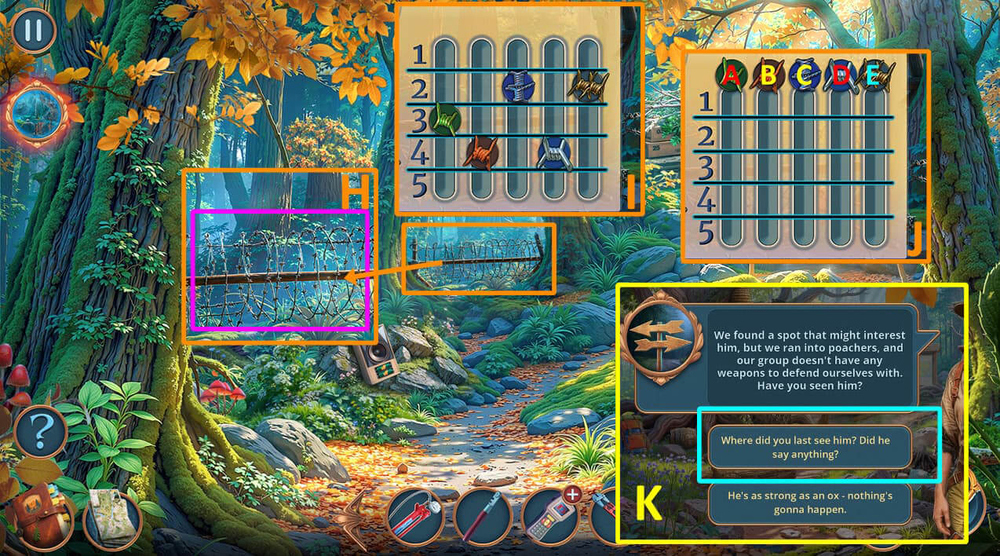
- Earn CALIPER.
- Use CALIPER on the roots, take HAT (H).
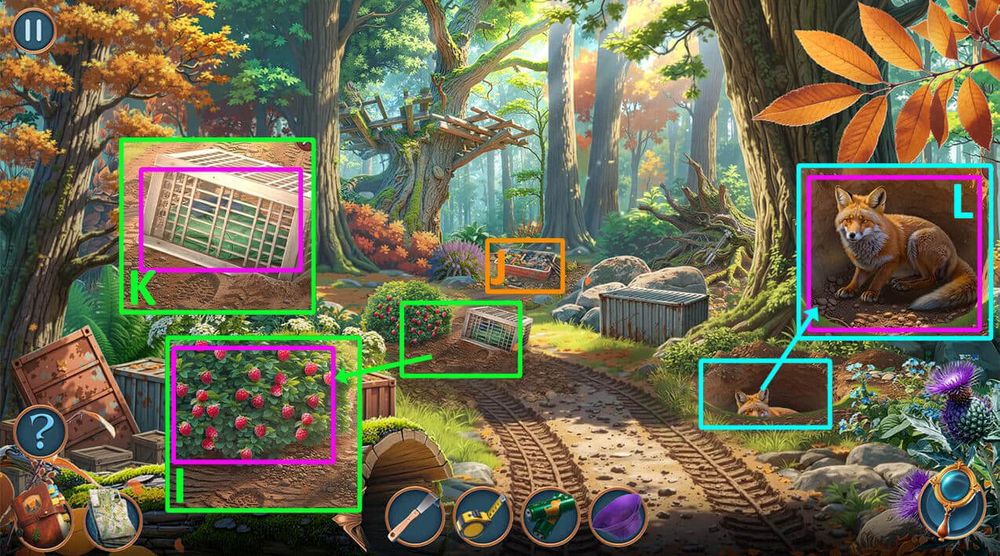
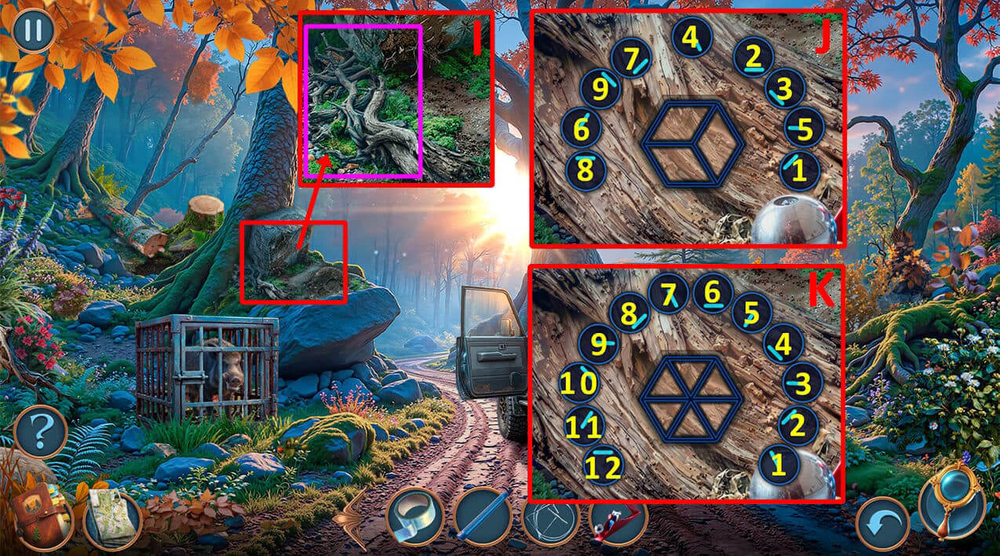
- Use HAT on the bush with berries, take BERRIES (I).
- Play puzzle, earn SAW (J).
- Use SAW on the cage, take JACKET (K).
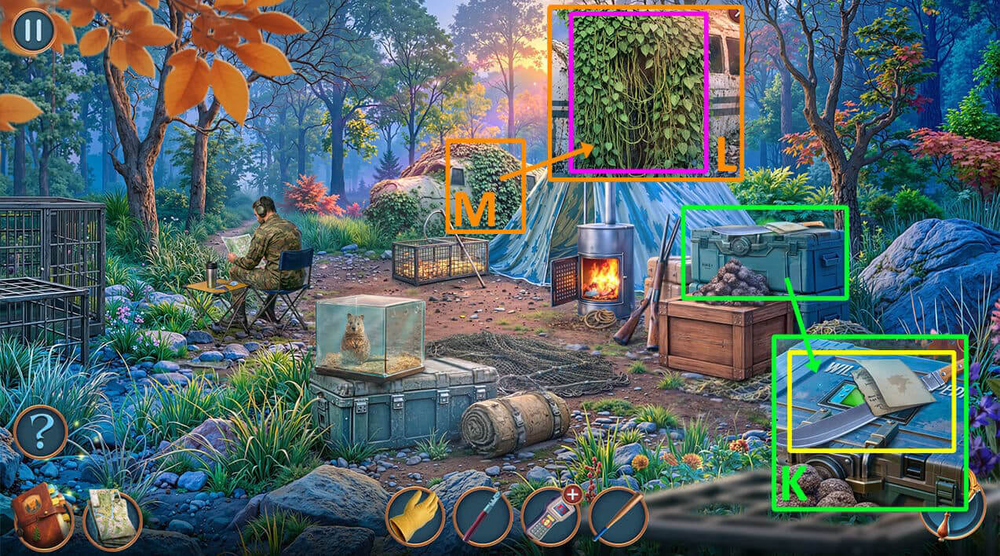
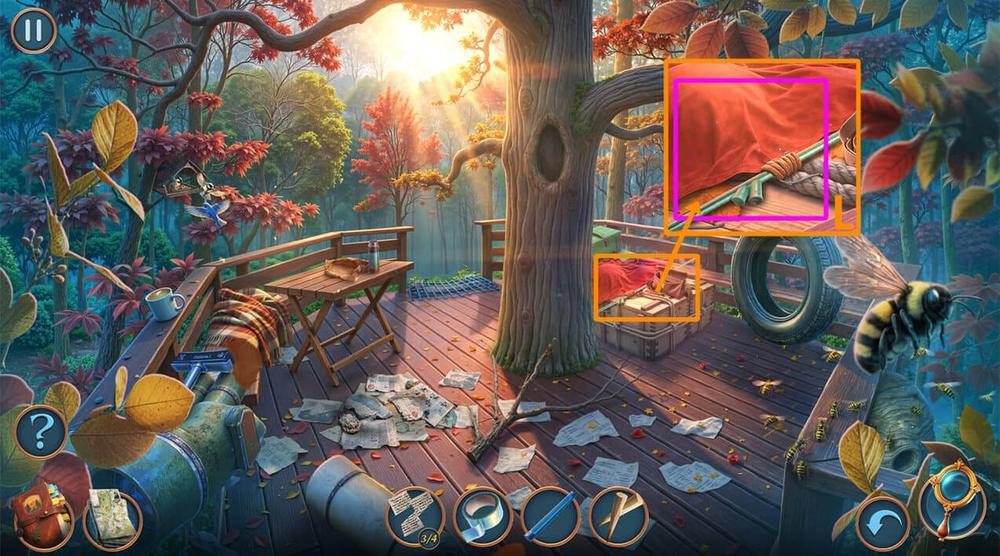
- Use BERRIES and JACKET on the hole (L).
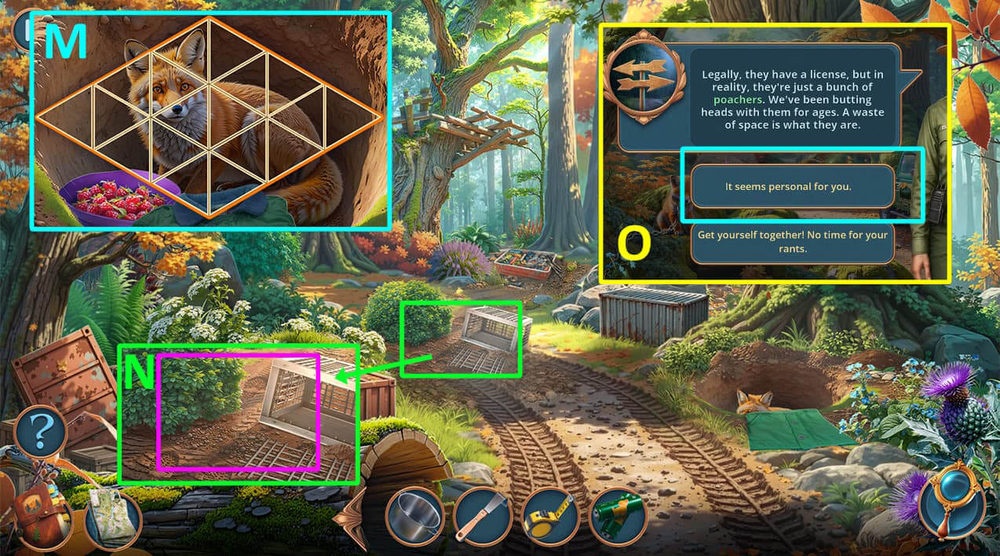
- Solution: follow the instructions in the image, earn fox (M).
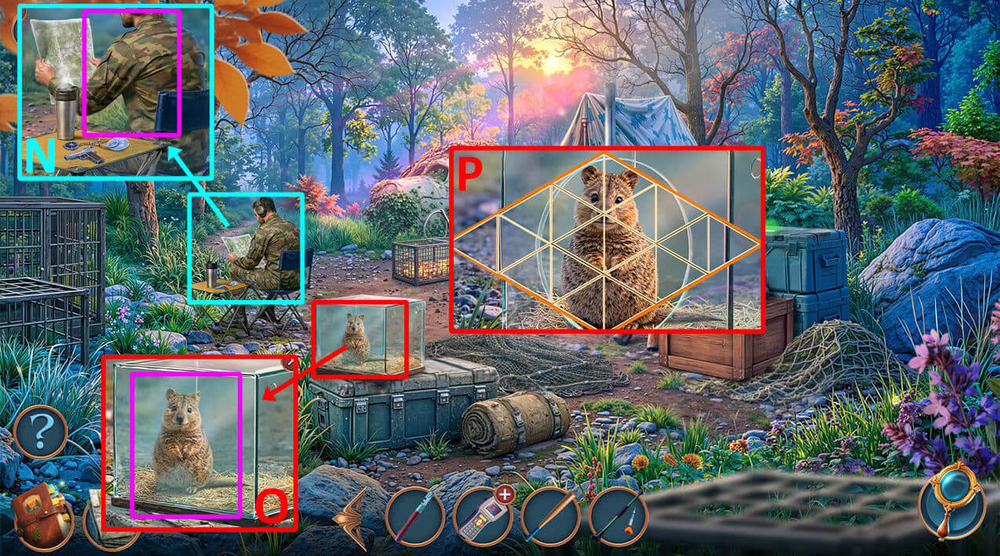
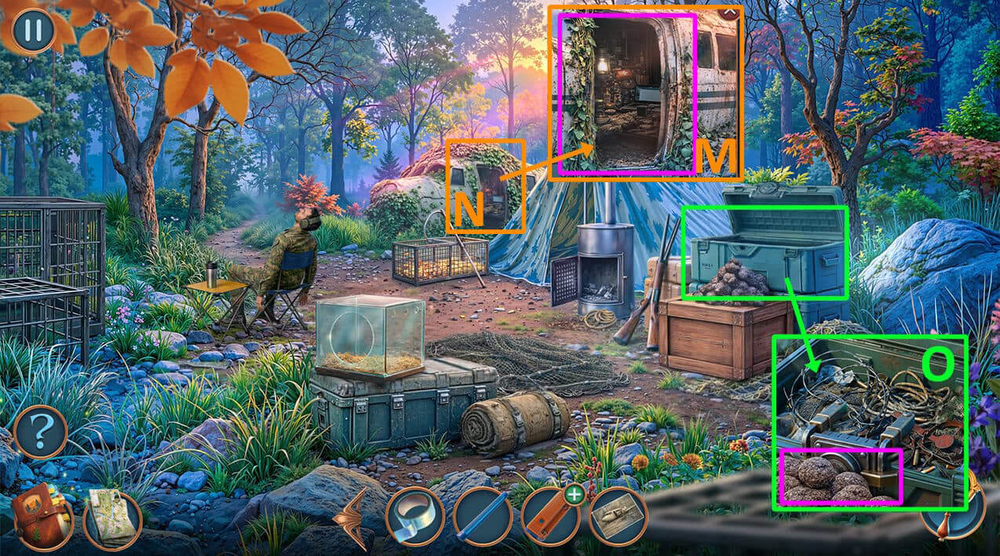
- Use fox on the road (N).
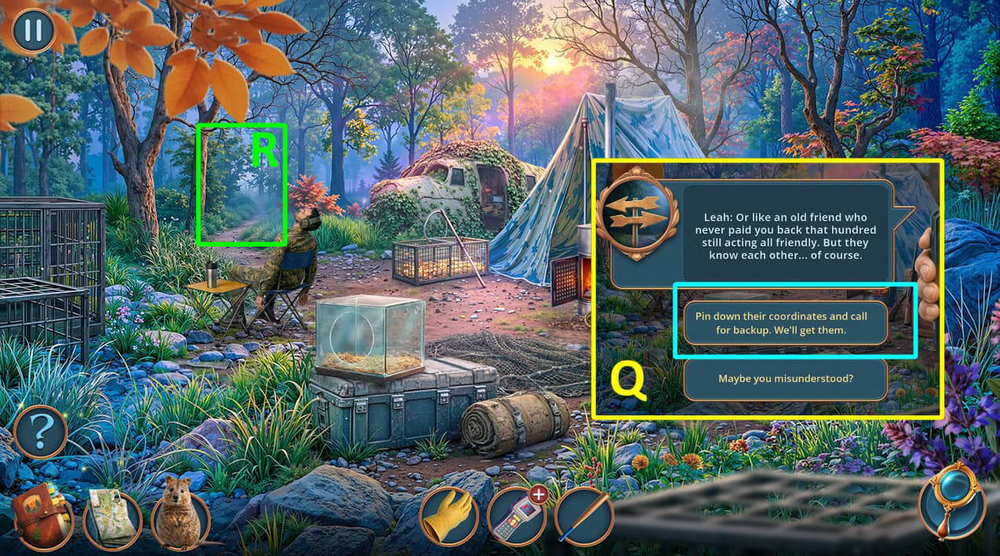
- Select this option (O).
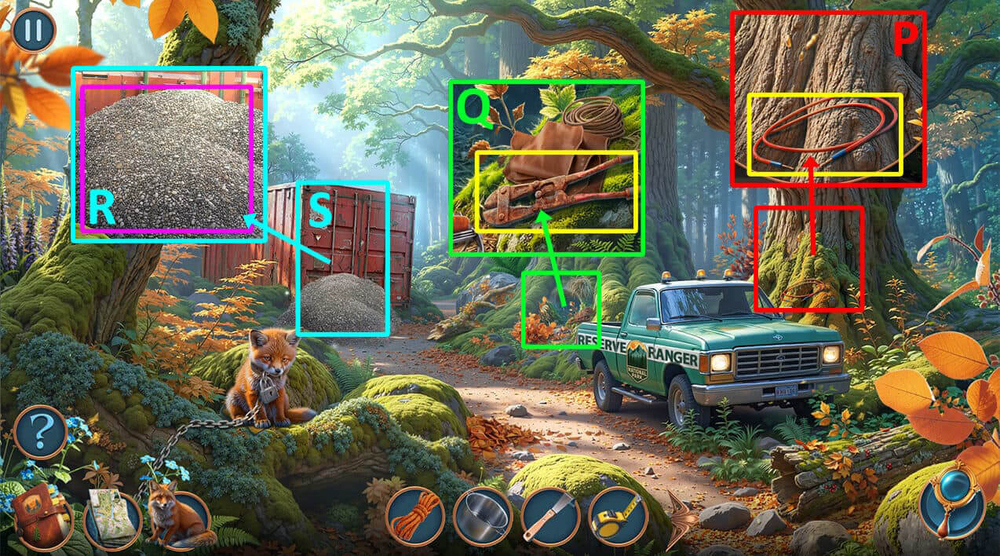
- Take WIRE (P).
- Take RUSTY BOLT CUTTER (Q).
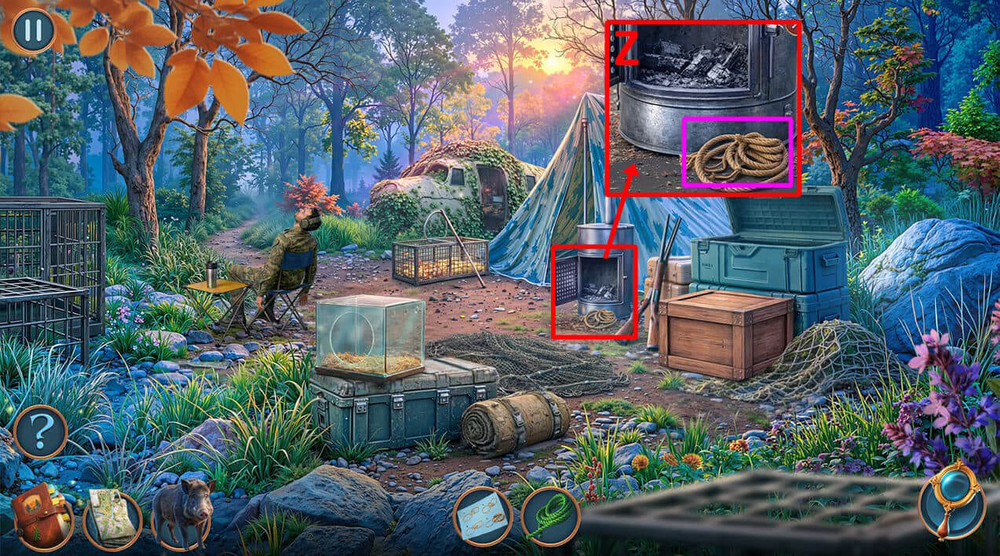
- Use CAMPING POT on the rubble (R).
- Play puzzle, earn COLLAR KEY (S).
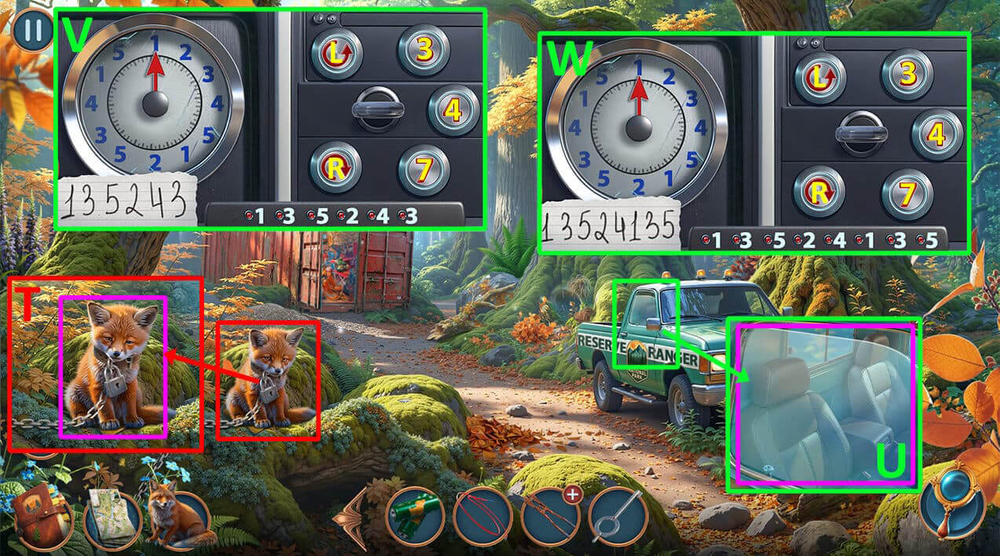
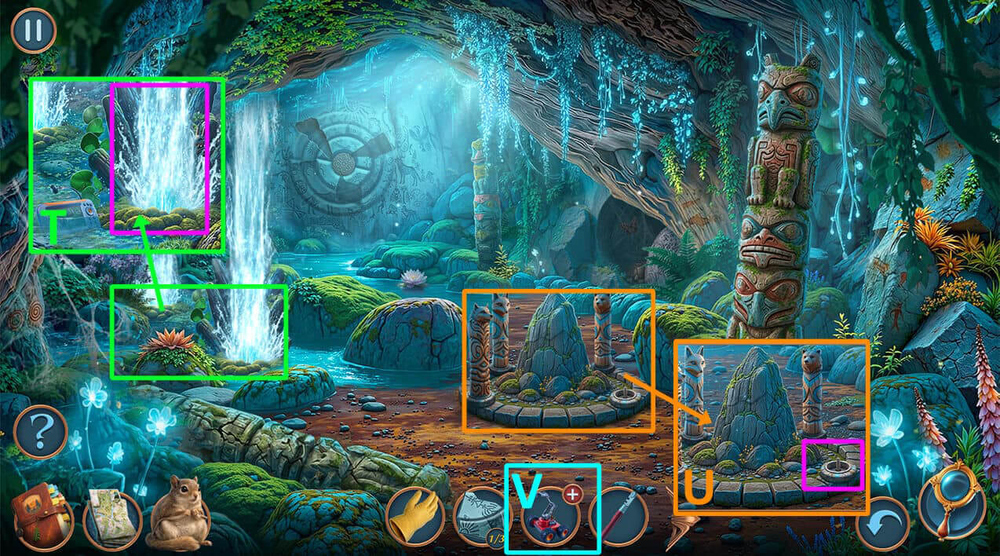
- Use COLLAR KEY on the collar lock, use fox on the little fox, take HEAT-RESISTANT GLOVE, BASEBALL (T).
- Use BASEBALL, TAPE MEASURE on the car window (U).
- Easy solution: click 7, L, 3, R, 4, L, 3, L, 4, L, 7, L (V).
- Hard solution: click 7, L, 3, R, 4, L, 3, L, 4, L, 3, R, 4, L, 3, R (W).
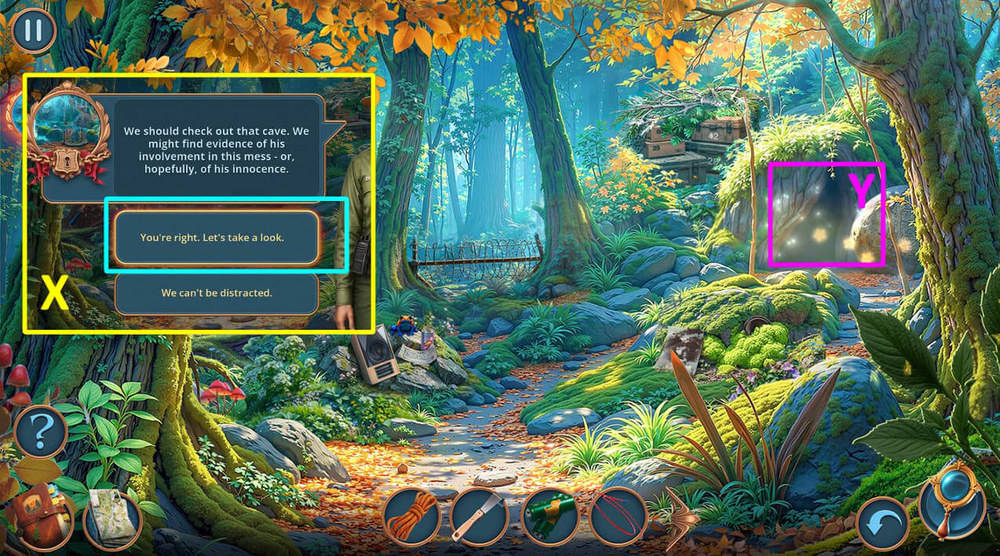
- Select this option (X).
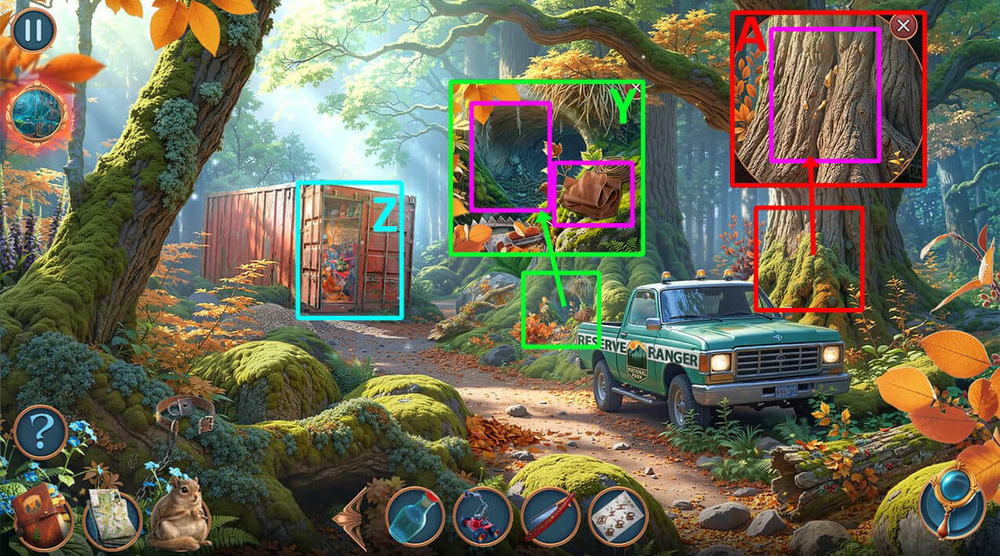
- Go forward (Y).
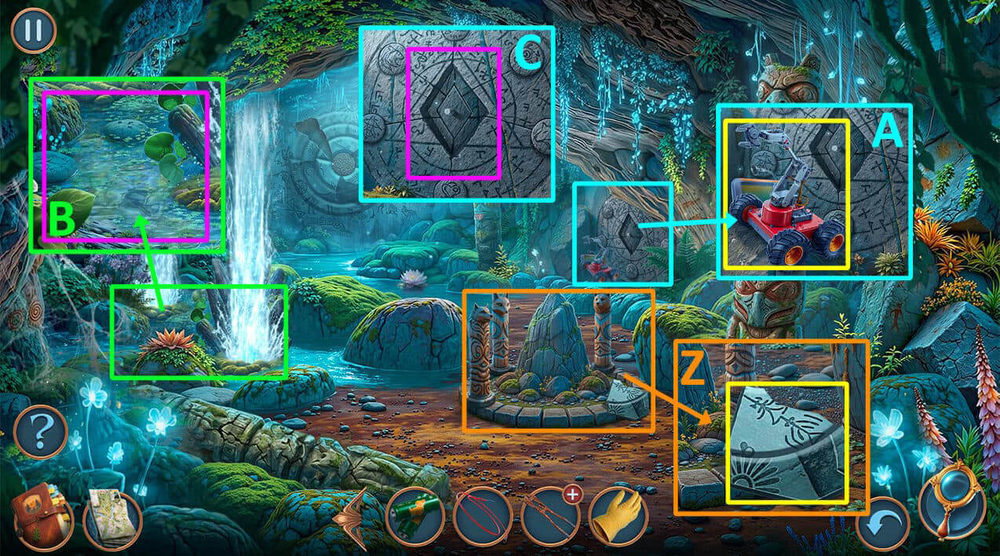
- Take BAS-RELIEF PARTS 1/3 (Z).
- Take DRONE CAR, SONAR (A).
- Use SONAR on the water, take STONE WOLF (B).
- Use STONE WOLF on the slot in the wall, take HYDRAULIC PUMP (C).
- Go back.
- Take GLASS CUTTER, ROUGH SPONGE (D).
- Use SCRAPER on the moss, take SPEAKER (E).
- Use BATTERIES, WIRE and SPEAKER on the music speaker, read and take the note, take DEAD SCANNER, SODA POP (F).
- Use ROUGH SPONGE and SODA POP on RUSTY BOLT CUTTER, earn BOLT CUTTER (G).
- Use BOLT CUTTER on the barbed wire (H).
- Easy solution: follow the instructions in the image (I).
- Hard solution: move A-3, C-4, D-4, C-2, E-4, B-4, E-2 (J).
- Select this option (K).
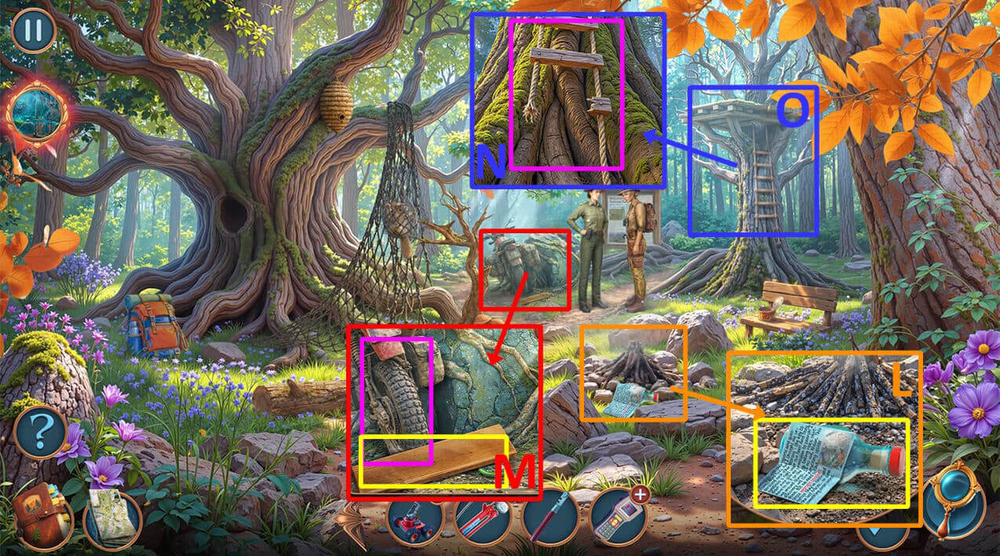
- Read and take the note, take EMPTY VIAL (L).
- Take PLANK, use HYDRAULIC PUMP on the moped wheel, take STONE SLAB (M).
- Use ROPE and PLANK on the rope ladder (N).
- Play puzzle, earn CAMPING LANTERN (O).
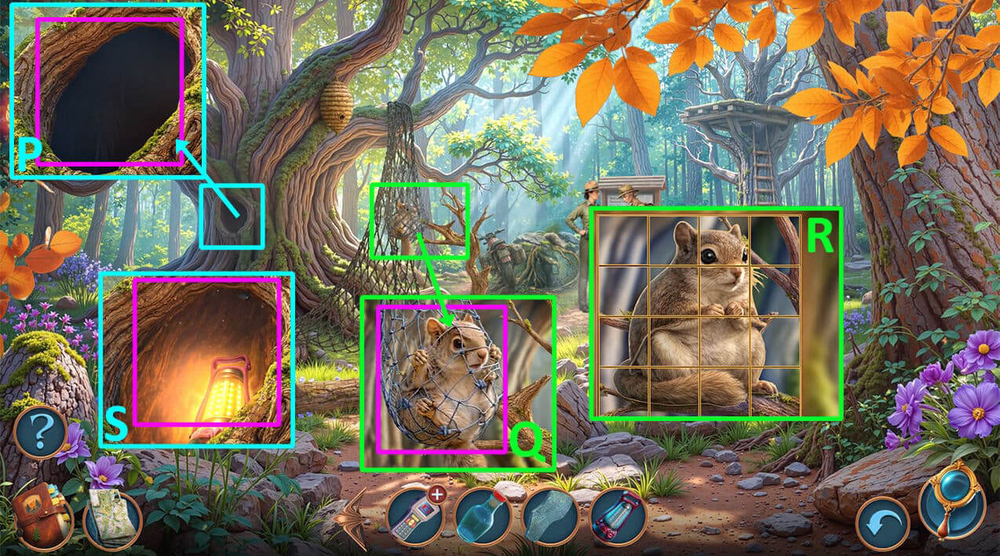
- Use CAMPING LANTERN on the hollow, take NEEDLE (P).
- Use NEEDLE on the net (Q).
- Solution: follow the instructions in the image, earn flying squirrel (R).
- Use flying squirrel on the hollow, earn POACHER’S DELIVERY TAG (S).
- Go to Ancient Sealed Cave.
- Use STONE SLAB on the geyser, take RABBIT TOTEM (T).
- Use RABBIT TOTEM on the empty slot, take BAS-RELIEF PARTS 2/3, REMOTE CONTROL (U).
- Use REMOTE CONTROL on DRONE CAR, earn DRONE CAR (V).
- Go back.
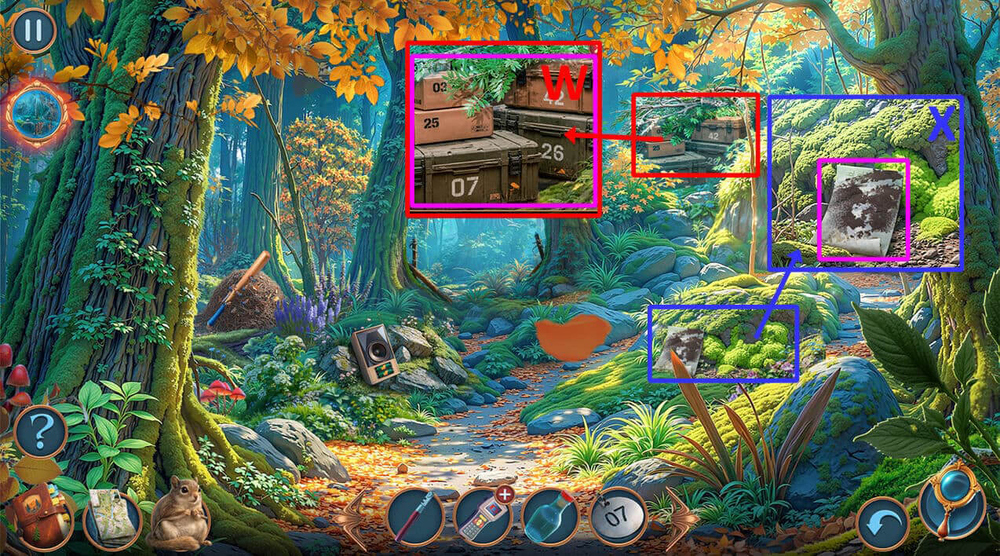
- Use POACHER’S DELIVERY TAG on the boxes, take SHARP RAZOR, FLUFFY BRUSH (W).
- Use FLUFFY BRUSH on the dust, take DIAGRAM FOR HARNESS (X).
- Go back.
- Use SHARP RAZOR and DIAGRAM FOR HARNESS on the leather, take HARNESS, use DRONE CAR on the hole, take BAS-RELIEF PARTS 3/3 (Y).
- Play puzzle, earn TREE TAPPER (Z).
- Use EMPTY VIAL and TREE TAPPER on the tree, earn MAPLE SYRUP (A).
- Go to Ancient Sealed Cave.
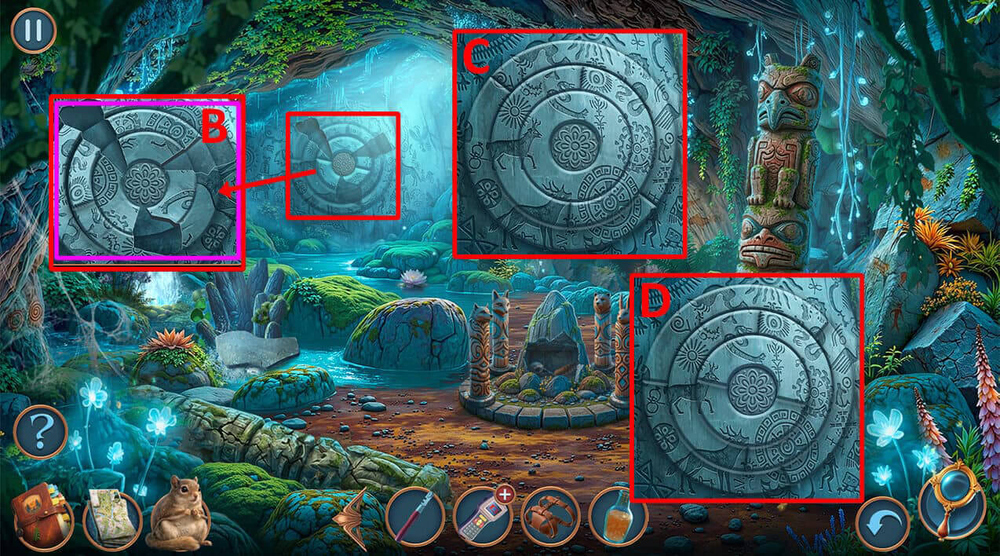
- Use BAS-RELIEF PARTS 3/3 on the bas-relief (B).
- Easy solution: follow the instructions in the image (C).
- Hard solution: follow the instructions in the image (D).
- Read and take the note.
- Go back.
- Use MAPLE SYRUP on the ants, take BAT, SMALL SOLDERING IRON (E).
- Go forward.
- Play puzzle, earn SPARE SENSOR (F).
- Use SMALL SOLDERING IRON and SPARE SENSOR on the broken beacon, take BEACON (G).
- Use HARNESS, BEACON, and the flying squirrel on the trail (H).
- Solution: follow the instructions in the image (I).
- Select this option (J).
- Read and take the note, take MACHETE (K).
- Use MACHETE on the vines (L).
- Play puzzle, earn TUBE WITH SLEEPING DART (M).
- Use TUBE WITH SLEEPING DART on the watchman, take SUCTION-CUP KEYCHAIN (N).
- Use SUCTION-CUP KEYCHAIN, GLASS CUTTER on the glass (O).
- Solution: follow the instructions in the image, earn quokka (P).
- Select this option (Q).
- Go forward (R).
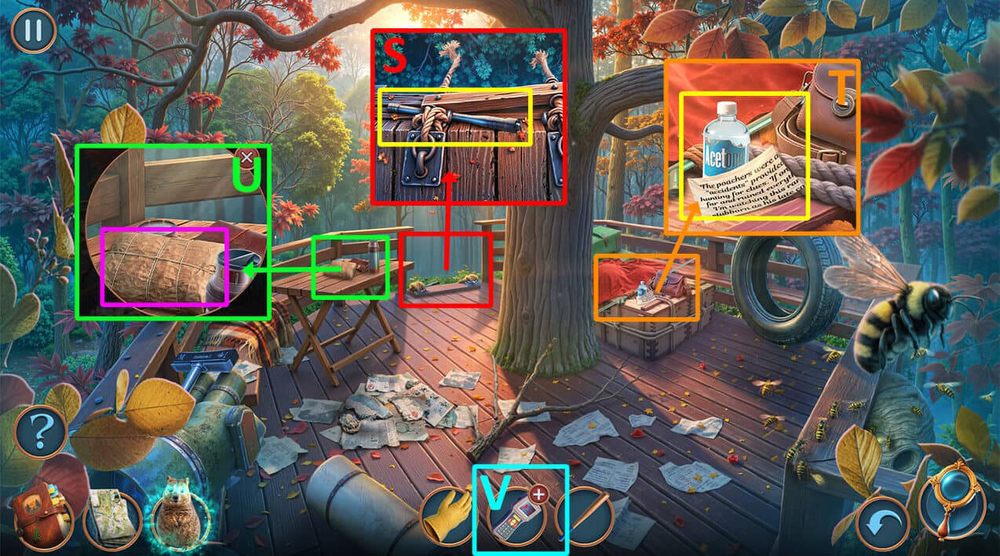
- Take ANTENNA (S).
- Take TORN DOCUMENTS 1/4, ACETONE (T).
- Use quokka on the bundle, take POWER BANK (U).
- Use ANTENNA and POWER BANK on DEAD SCANNER, earn SCANNER (V).
- Go back.
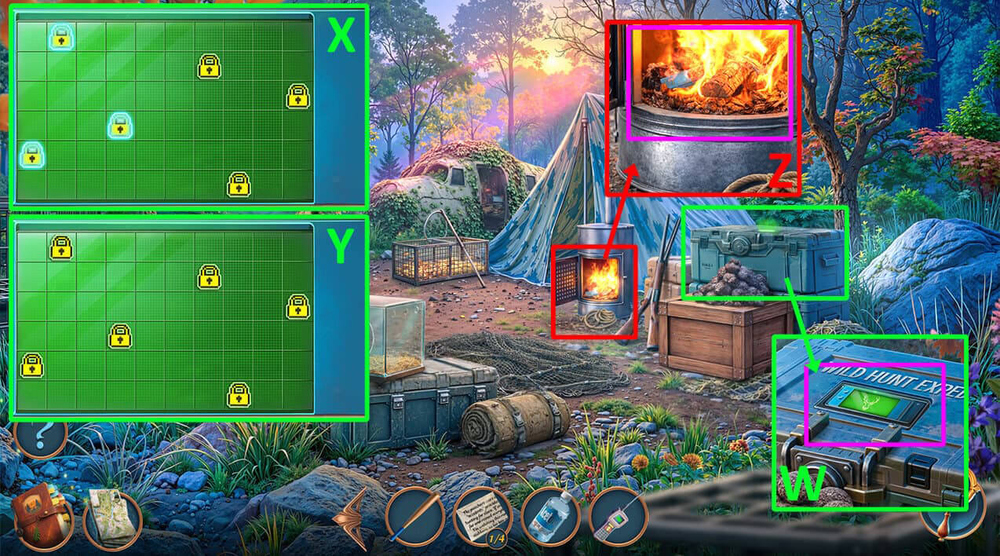
- Use SCANNER on the electronic lock (W).
- Easy solution: follow the instructions in the image (X).
- Hard solution: follow the instructions in the image (Y).
- Take SUV KEYS, BOTTLE OF WATER.
- Use BOTTLE OF WATER on the fire, use HEAT-RESISTANT GLOVE on the magnet, earn MAGNET (Z).
- Go forward.
- Use MAGNET on the bag, take NETS, DUCT TAPE (A).
- Use NETS on the ladder (B).
- Solution: Choose one of the three paths at random to avoid crossing paths with the poachers. (C).
- Take UV LIGHT BULB, TORN DOCUMENTS 2/4 (D).
- Use SUV KEYS on the car (E).
- Play puzzle, earn WOLF FIGURINE (F).
- Use WOLF FIGURINE, BAT on the stone, take TORN DOCUMENTS 3/4, STONE (G).
- Use ACETONE on the resin, take SAW, use STONE on the plank, take PLANE (H).
- Use SAW and PLANE on the driftwood (I).
- Easy solution: click 1-8 (J).
- Hard solution: click 1-12 (K).
- Earn PEGS.
- Go back.
- Use PEGS on the canopy, read and take the note, take BROKEN UV LAMP, FALLEN AIRPLANE PHOTO (L).
- Go back.
- Use FALLEN AIRPLANE PHOTO on the airplane (M).
- Play puzzle, earn POACHER’S HAT (N).
- Use POACHER’S HAT on the truffles, earn HAT WITH TRUFFLES (O).
- Go to Meadow by the Old Road.
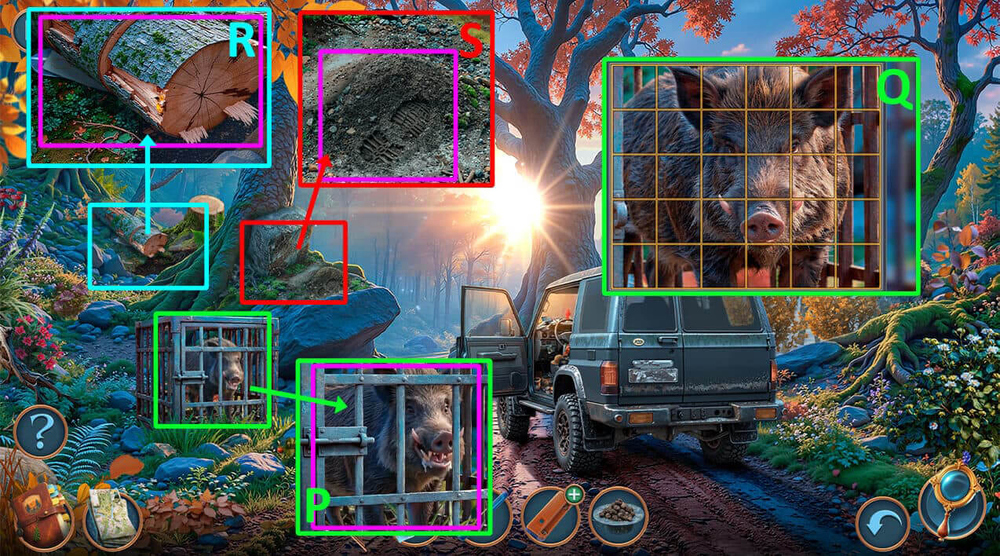
- Use HAT WITH TRUFFLES on the boar (P).
- Solution: follow the instructions in the image, earn boar (Q).
- Use boar on the log, take LASSO MAKING INSTRUCTIONS, SHOVEL (R).
- Use SHOVEL on the dirt, take TORN DOCUMENTS 4/4 (S).
- Go back.

- Use TORN DOCUMENTS 4/4 and DUCT TAPE on the burnt papers (T).
- Easy solution: follow the instructions in the image and press P (U).
- Hard solution: follow the instructions in the image and press P (V).
- Read and take the note, take POWER ON BUTTON.
- Use UV LIGHT BULB and POWER ON BUTTON on BROKEN UV LAMP, earn UV LAMP (W).
- Go forward.
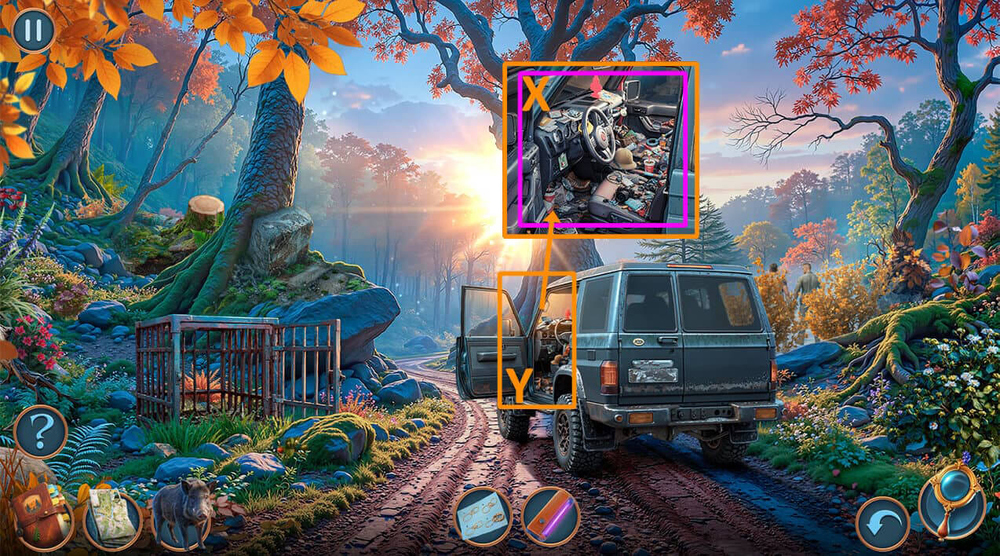
- Use UV LAMP on the car (X).
- Play puzzle, earn PIECE OF ROPE (Y).
- Go to Poacher’s Camp.
- Use LASSO MAKING INSTRUCTIONS and PIECE OF ROPE on the rope, take LASSO (Z).
- Go to Meadow by the Old Road.
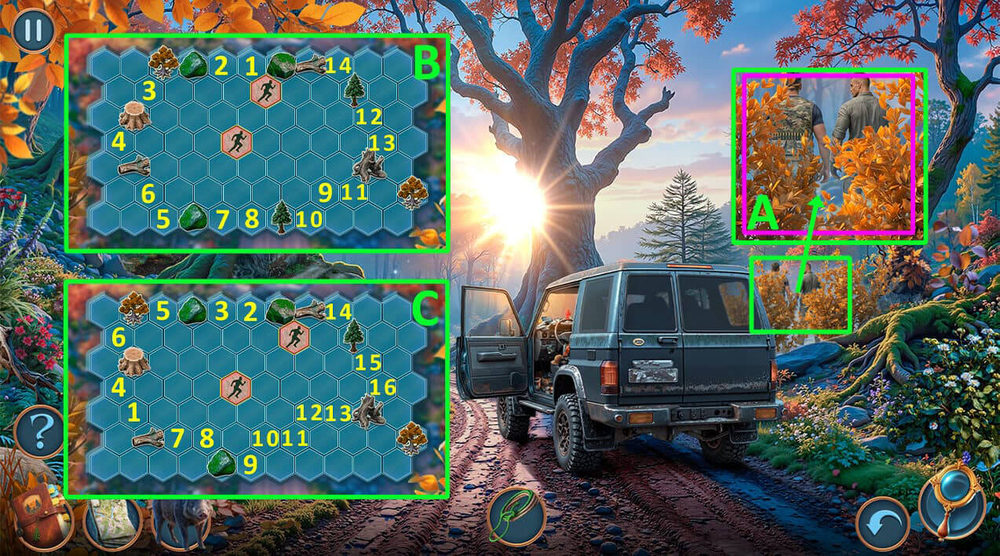
- Use LASSO, boar on the bushes (A).
- Easy solution: click 1-14 (B).
- Hard solution: click 1-16 (C).
Congratulations! You have completed the game Wild Story 1: Primal Secrets.


