
Chimeras 13: What Wishes May Come – Derek Pierce is going through what seems to be the hardest time of his life. After a tragic car accident, his wife Christina is in a coma and Derek himself has lost his taste for life. Haunted by guilt and despair, he is ready to do anything to get his beloved back. When a creature appears on his path, offering to fulfill his wish in exchange for a year of life, Derek is faced with a difficult choice. The genie promises the impossible, the healing of Cristina. However, the price of the bargain transcends time: Derek will have to give up what he values most. As Derek follows his quest for a miracle, he learns that behind every wish there is a price. Will he be able to save himself while saving the love of his life? What is the true nature of wishes, and are they really worth the price asked for them? An emotional story of love, sacrifice and the consequences of decisions made, where every action can change the fate of the characters awaits you. If you can not pass any of the puzzles or do not know where the items are, on our site you can watch the walkthrough of the game Chimeras 13: What Wishes May Come, and solve the mystery of the lamp of wishes.
Chimeras 13: What Wishes May Come – Walkthrough
Here you can see the full walkthrough of Chimeras 13: What Wishes May Come, namely for all chapters, including bonus chapter, in pictures.

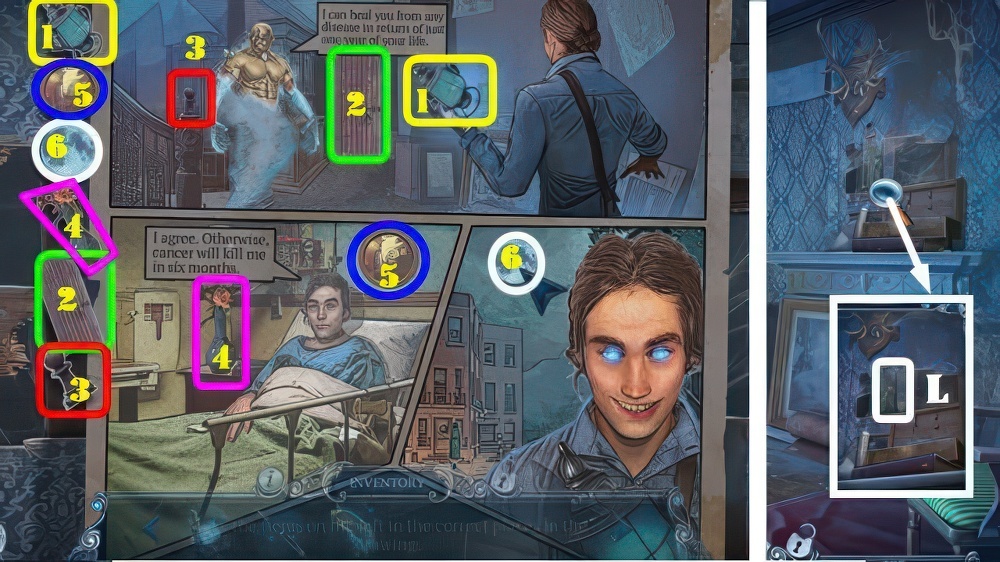
- Take HOOK (A).
- Open briefcase and look at photo.
- Take DEREK’S RING, BROKEN REMOTE, and POCKET KNIFE (B).
- Use POCKET KNIFE and play puzzle (C), receive MAGIC LAMP.
- Select MAGIC LAMP in inventory.

- Talk, then give DEREK’S RING (D).
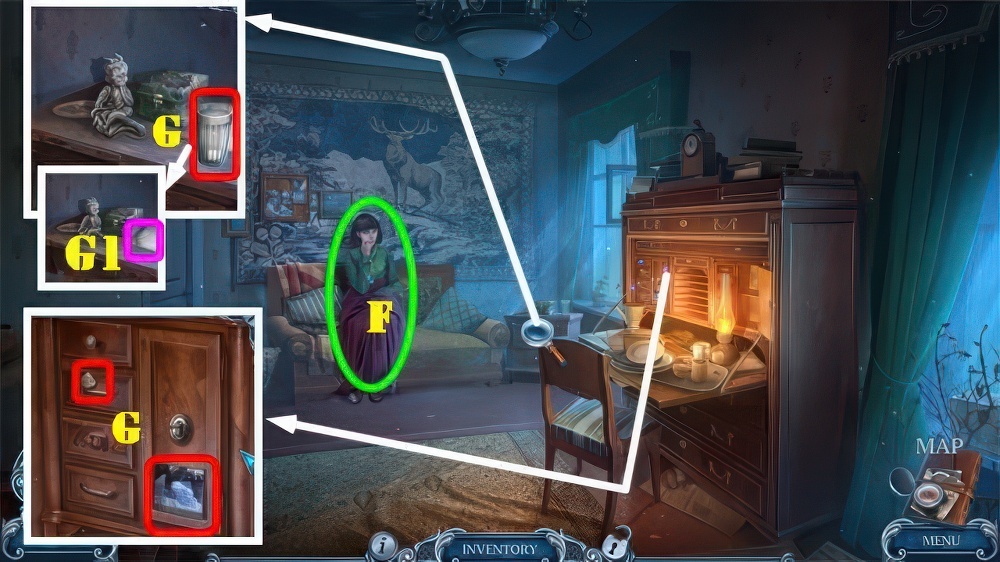
- Take BELL 1/3 and COIN (E).
- Use COIN, take BATTERY (F).
- Select BROKEN REMOTE 2x and place BATTERY, take ALARM REMOTE.
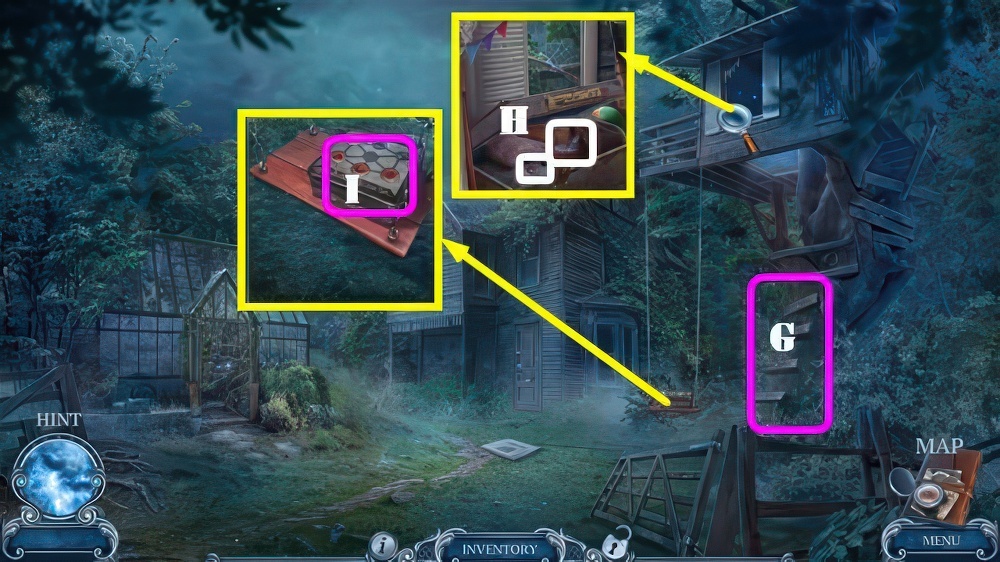
- Use ALARM REMOTE (G) and select car.

- Talk (H), receive NOTEBOOK.
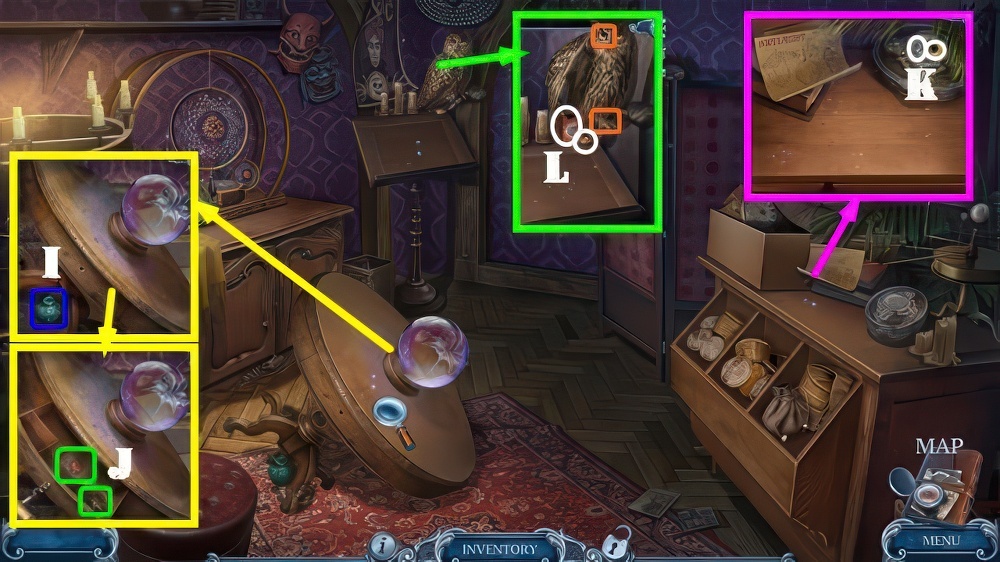
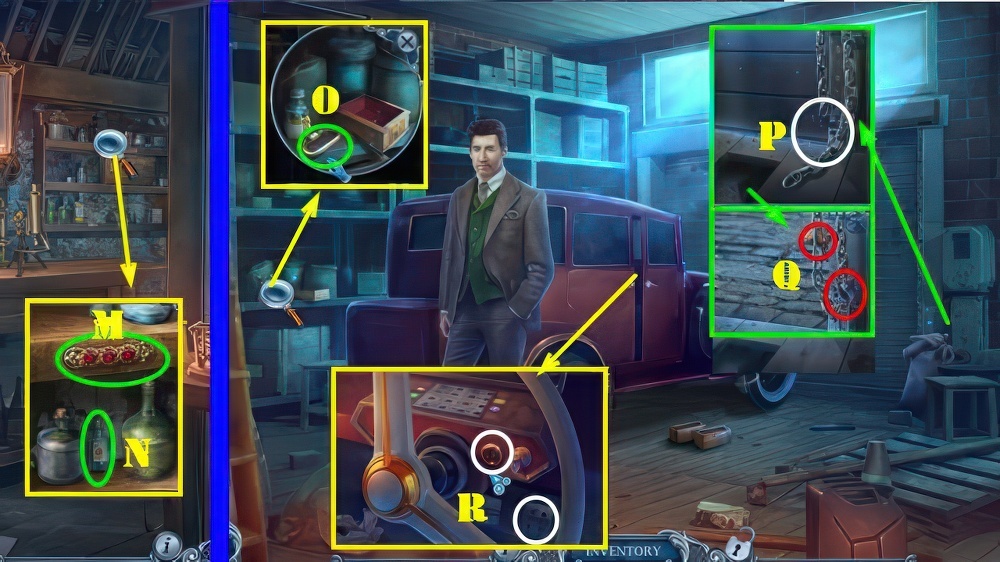
- Take PHOTO, SCRAPER, BROKEN PHONE, and DRAGON FIGURINE (I).
- Look at 2 notes (J).
- Use SCRAPER, take HAIRPIN (K).

- Use HAIRPIN, take PHOTO (L).
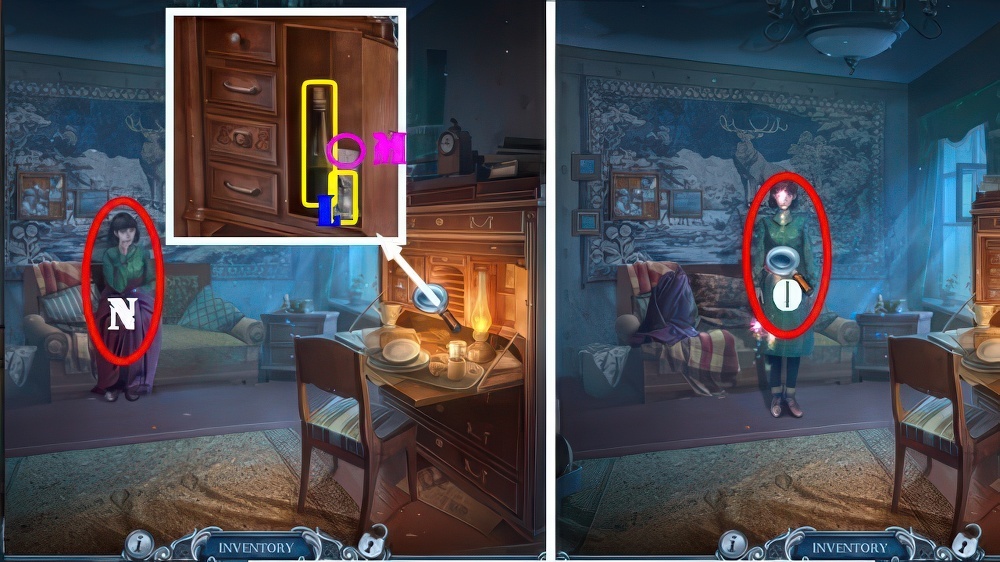
- Place DRAGON FIGURINE (M).
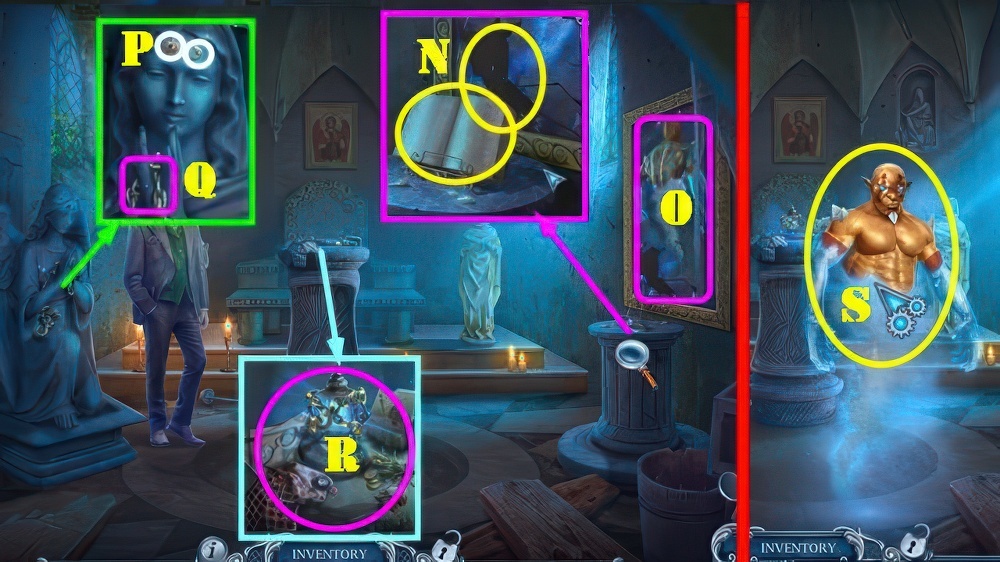
- Take CHRISTINA’S BRACELET (N).
- Place the 2 PHOTOS (O).
- Play puzzle (P), receive MONOGRAM K.
- Place CHRISTINA’S BRACELET, take PHONE PLUG and HANDKERCHIEF (Q).
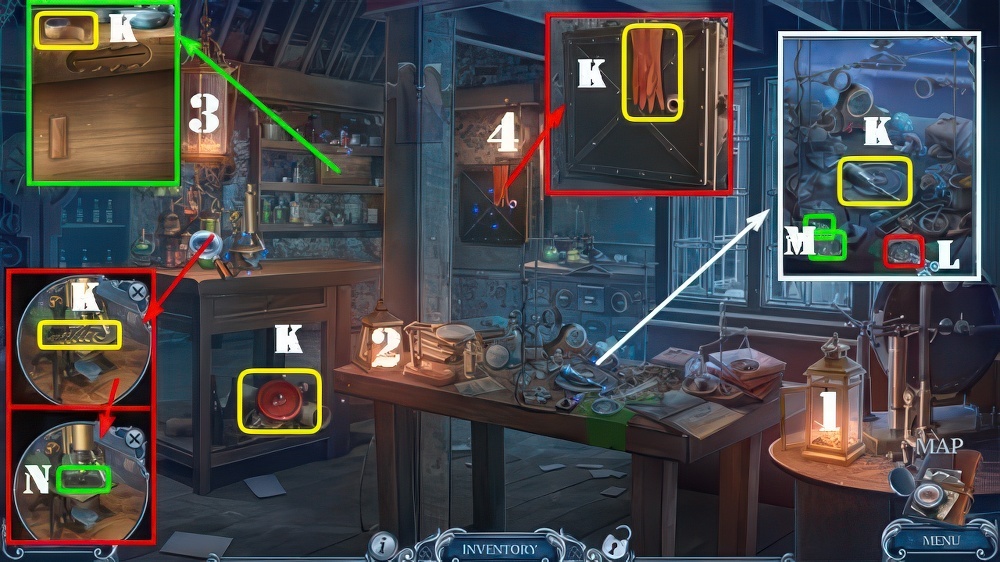
- Walk down.

- Go (R).

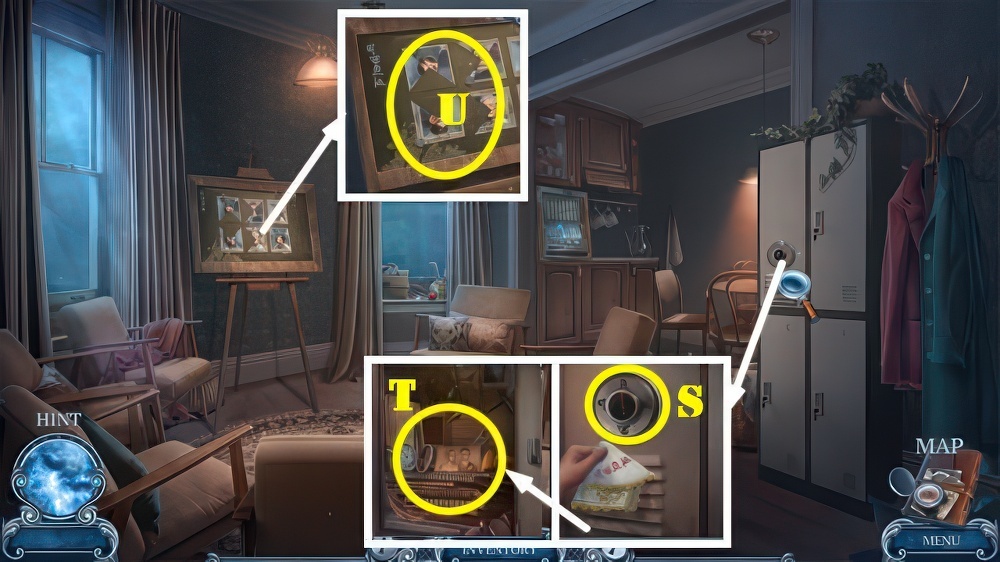
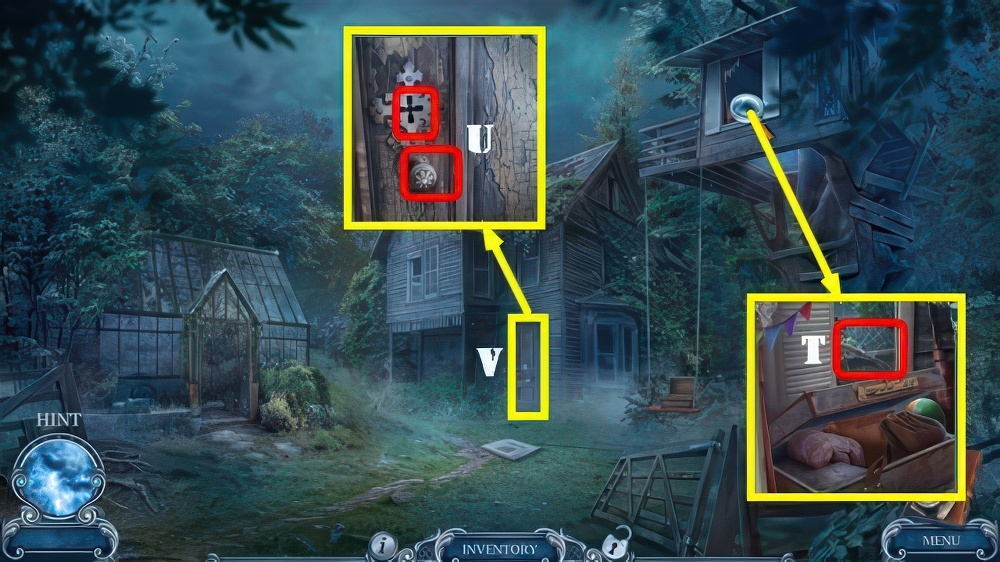
- MONOGRAM K on NOTEBOOK, look at note, take DRAWER CODE and DOCTOR’S PHONE NUMBER.
- Place DRAWER CODE, select S-T-U.
- Take ELECTRICAL TAPE (V).
- PHONE PLUG and ELECTRICAL TAPE on BROKEN PHONE, take PHONE.
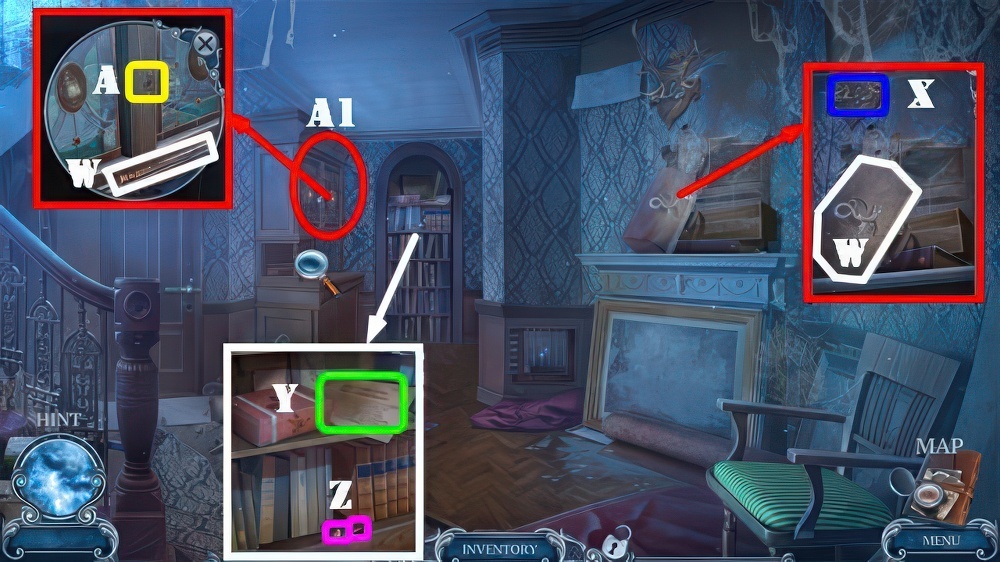
- Place PHONE and use DOCTOR’S PHONE NUMBER (W).
- Select MAGIC LAMP in inventory.
- Use HANDKERCHIEF, take MAGIC LAMP and CLINIC KEY (X).
- Walk down.

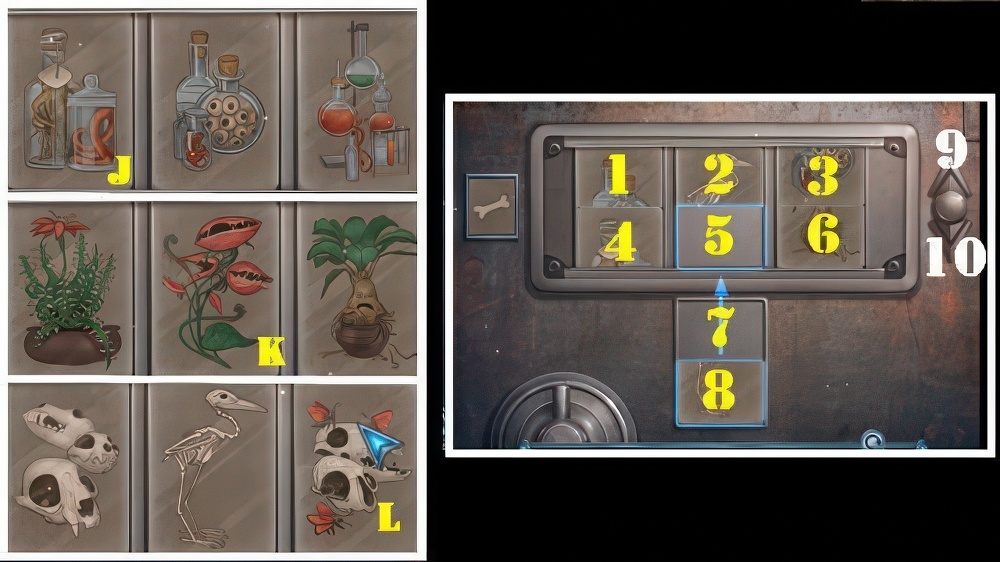
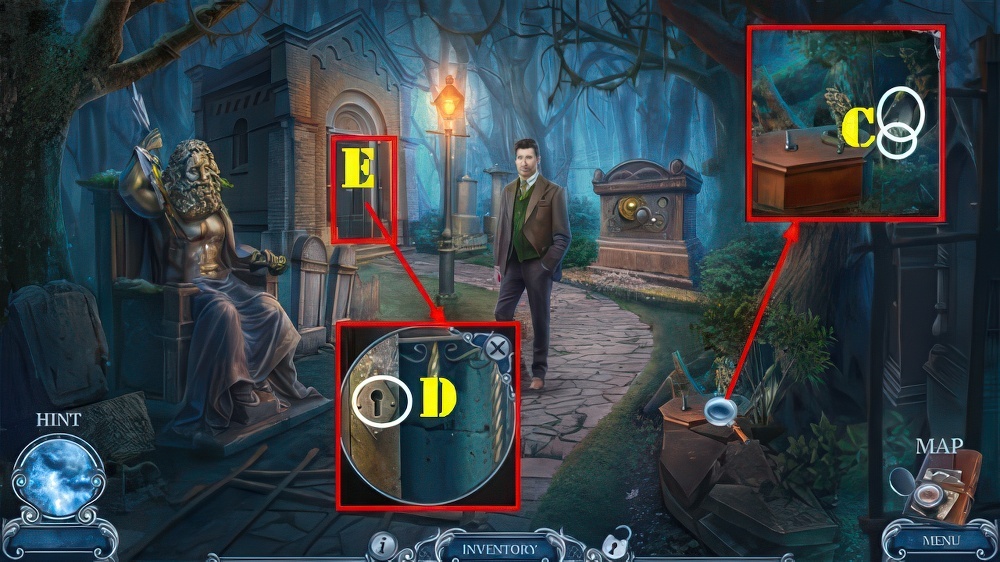
- Use CLINIC KEY (Y).
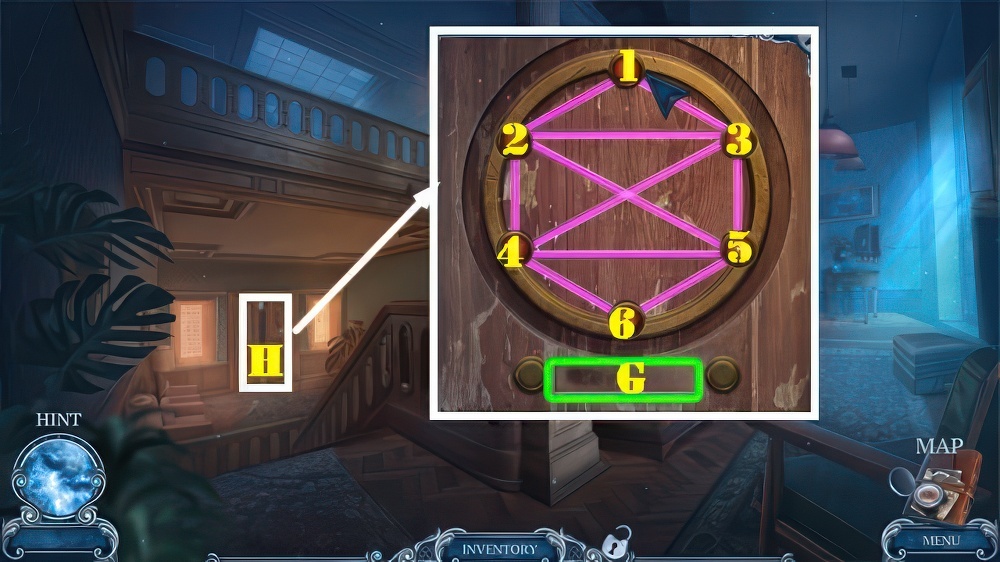
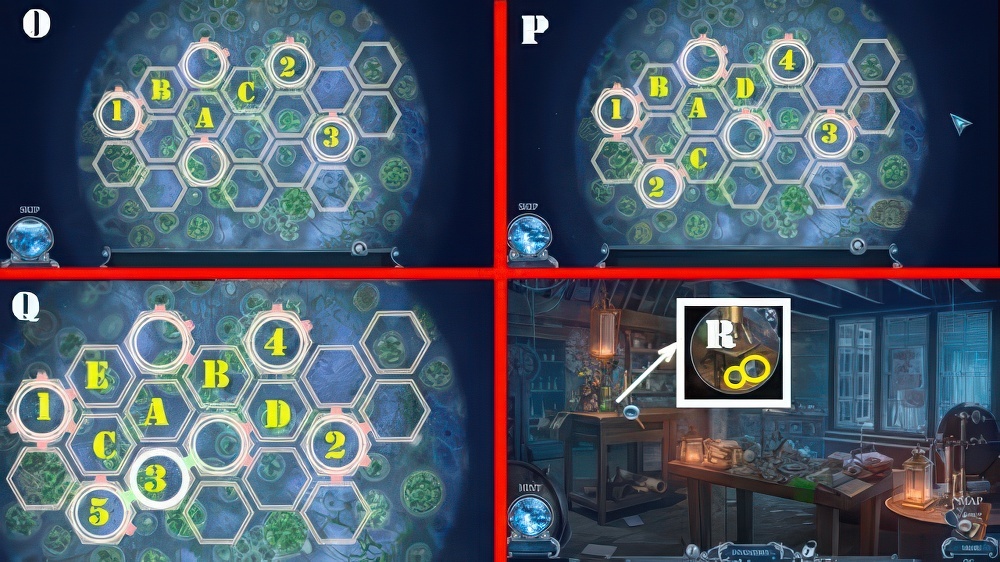
- Solution (1-6).

- Solution (7-12).
- Solution: (13-14)-(14-17)-(15-18)-(17-18).
- Enter (Z).

- Take LIPSTICK and SHOVEL (A).
- Walk down.
- Use SHOVEL, take BOX and BELL 2/3 (B).
- Go (C).

- Use POCKET KNIFE on BOX, receive STRING.
- Use STRING and HOOK (D), receive BELL 3/3 and GOLDEN KEY.
- Place BELLS (E), take SILVER KEY (E1).
- Place GOLDEN KEY and SILVER KEY (F).
- Play puzzle (F1), receive GROUP’S TOKEN.
- Insert GROUP’S TOKEN (G).
- Solution: (1-2-3-4-5-6)-(4-2-5-3-1).
- Enter (H).

- Take GLUE, GROUP MEMBERS’ PHOTO 1/4, GROUP MEMBERS’ PHOTO 2/4, and DOLLAR BILL (I).
- Place HANDKERCHIEF and use LIPSTICK, take LOCKER COMBINATION (J).
- Insert DOLLAR BILL (K), take LOLLIPOP (L).
- Place LOLLIPOP (M), take GROUP MEMBERS’ PHOTO 3/4 and GROUP’S SYMBOL (N).
- Walk down.

- Place GROUP’S SYMBOL, take STRANGE EMBLEM and ELECTRIC FAN SWITCH (O).
- Place ELECTRIC FAN SWITCH (P).
- Take LIGHTER and CODE WHEEL (Q).
- Go (R).
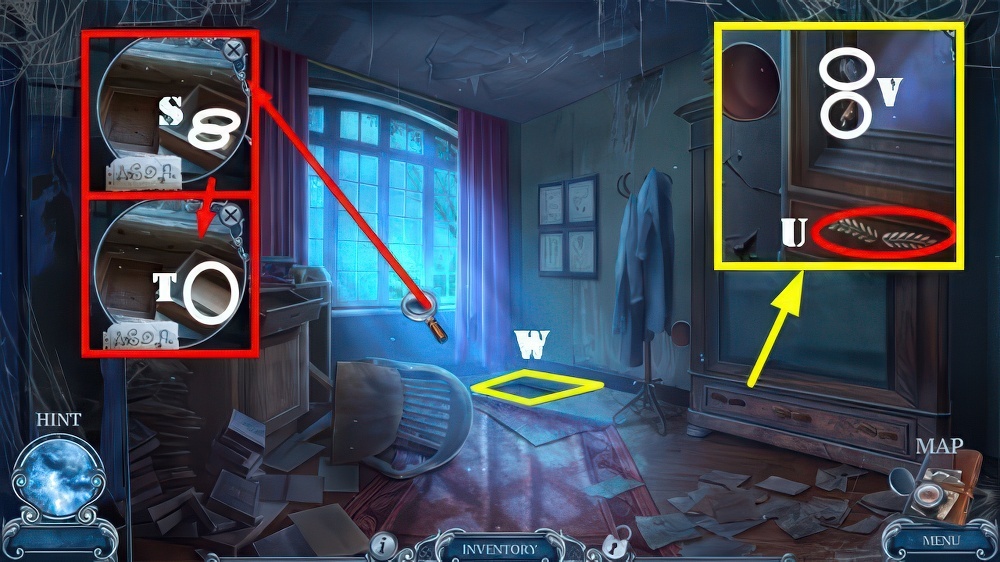
- Place CODE WHEEL and LOCKER COMBINATION, select dial (S).
- Play puzzle (T), receive MEETING LOG.
- STRANGE EMBLEM on BOX, take GROUP MEMBERS’ PHOTO 4/4.
- Place GROUP MEMBERS’ PHOTOS and MEETING LOG (U).

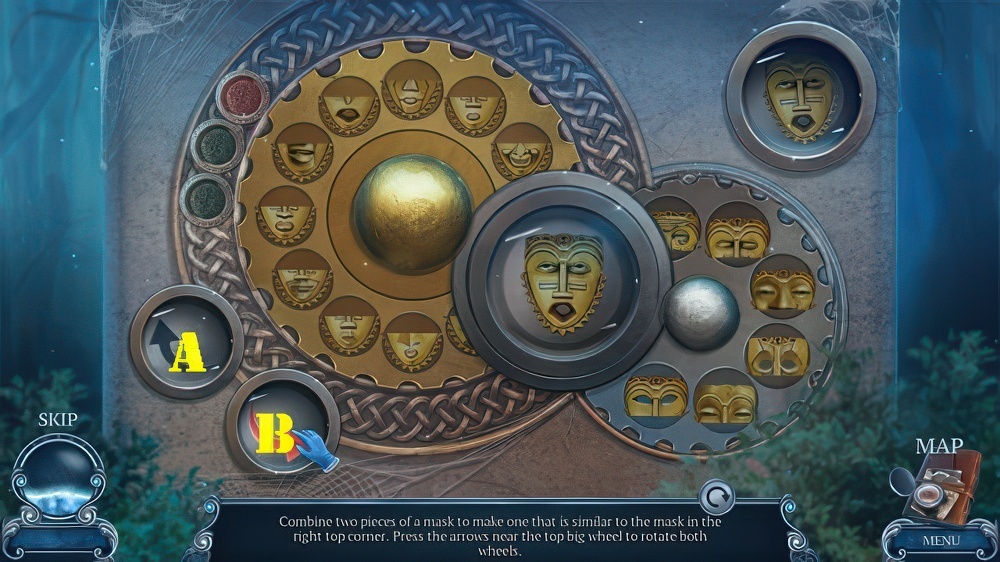
- Place fragment on double arrows (V) to rotate it.
- Use the clip (W) to hold a fragment.
- Solved image (X).
- Flip page, take ELLA’S ADDRESS (Y).
- Walk down twice.

- Place ELLA’S ADDRESS (Z1).
- Go (Z2).

- Take SLINGSHOT and PAINTING FRAGMENT 1/3 (A).
- Use COIN, take DOORBELL BUTTON and ELASTIC (B).
- Look at ID (C).
- Place DOORBELL BUTTON (D).
- Enter (E).
- Talk (F).
- Take EMPTY GLASS, PAINTING FRAGMENT 2/3, and STONE (G).
- Look at note (G1).
- Walk down.

- ELASTIC and STONE on SLINGSHOT, take LOADED SLINGSHOT.
- Use LOADED SLINGSHOT (H), receive KIOSK SIGN.
- Place KIOSK SIGN (I), take MEDICATION and TWEEZERS (J).
- Go (K).
- Use TWEEZERS, take BROKEN STATUETTE and WATER BOTTLE (L).
- Look at note (M).
- Select EMPTY GLASS, receive WINGS.
- Use WATER BOTTLE and MEDICATION on EMPTY GLASS, select bottle and take ELLA’S MEDICATION.
- Give ELLA’S MEDICATION (N).
- Play puzzle (O), receive CHIMERA AMULET.

- Place CHIMERA AMULET, take ELLA’S RING (P).
- Use ELLA’S RING, take ANGEL’S HEAD and look at note (Q).
- GLUE, ANGEL’S HEAD, and WINGS on BROKEN STATUETTE, take ANGEL STATUETTE.
- Place ANGEL STAUETTE (R), take PAINTING FRAGMENT 3/3 (S).
- Place PAINTING FRAGMENTS (T).

- Solution: (3-1-3-8-7-5-1-6).
- Take BOOK PAGE.
- Give BOOK PAGE and talk (U).

- Select scene.
- Talk (A), receive ANCIENT BOOK and GATE KEY.
- Walk down.
- Use GATE KEY (B).
- Go (C).

- Take CORKSCREW and RULER (D).
- Use RULER and LIGHTER, take DIAMOND RING and CRYSTAL PIECE 1/3 (E).
- Use DIAMOND RING, take CRYSTAL PIECE 2/3 and SCARAB (F).

- Place SCARAB (G).
- Solution (1)-(10)-(14)-(13)-(15)-(16)-(15×2)-(11)-(16×2)-(4)-(8×3)-(4×3).
- Enter (H).
- Take EMPTY FLASK (I).
- Use CORKSCREW, take RED DREAMCATCHER and OWL CLAW (J).
- Use COIN, take LATCH SPRING and OWL EYE (K).
- Place OWL EYE and OWL CLAW (orange), take LATCH BUTTON and BAKING SODA (L).
- Walk down.

- Place LATCH SPRING and LATCH BUTTON, take CRANK and LEMON JUICE (M).
- Place CRANK (N), receive BLUE DREAMCATCHER and CHEESE.
- Go (O).

- Place RED DREAMCATCHER and BLUE DREAMCATCHER (P).
- Play puzzle (Q), receive SPRAY NOZZLE.
- Place EMPTY FLASK, BAKING SODA, and LEMON JUICE on counter.
- Place SPRAY NOZZLE on flask, take RUST REMOVER (R).
- RUST REMOVER on ANCIENT BOOK, take GENIE’S BOOK.
- Place GENIE’S BOOK (S).
- Play puzzle (T), receive HOUSE DRAWING.
- Give HOUSE DRAWING (U).

- Talk (V), receive FORTUNE-TELLER’S LOCKET.
- Place FORTUNE-TELLER’S LOCKET, take CRYSTAL PIECE 3/3 and LOCK TILE (W).
- Look at note (blue).
- Place CRYSTAL PIECES, take CRYSTAL BALL (X).
- Place LOCK TILE and CRYSTAL BALL.
- Select 1-4, take BAT TOKEN and TAROT CARDS (Y).
- Give TAROT CARDS (V).

- Solution is random (@1).
- Select cards from the pile (W).
- Collect three matching cards (X) to destroy the fortune teller’s card of the same type (Y).
- Collect four matching cards to get an hourglass card (Z).

- Talk (A), receive MAP.
- Walk down.
- Place MAP (B) and select scene.

- Select scene.
- Look at newspaper (C).
- Take PENCIL, BROKEN SAW, and HAMMER (D).
- Give CHEESE to the mouse, take NAILS and STARTER (E).
- Use HAMMER (F), receive PLANKS.
- Place PLANKS, use NAILS and HAMMER (G).
- Use PENCIL, take GAS and SPIDER TOKEN (H).
- Place SPIDER TOKEN and BAT TOKEN (I).

- Solution (4-5-1-2-3-4)-(1-5-6-7-3-2)-(1-4-6-7-3-4).
- Take SPRINKLER and SAW BLADES (J).

- Remove starter from BROKEN SAW and replace with STARTER (K).
- Place SAW BLADES (L).
- Use GAS (M), take SAW.
- Use SAW (N).
- Go (O).

- Select scene.
- Take HUNTER FIGURINE, STAPLER, BROKEN NET, FAUCET HANDLE, and SCISSORS (P).
- Place SPRINKLER and FAUCET HANDLE (Q).
- Play puzzle (R), receive HOUSE KEY.
- Use SCISSORS (S), receive NET, SNAKE TOKENS 1/5, and LEFT WING.
- Walk down.
- Remove net on BROKEN NET, place NET and use STAPLER, take NET.
- Use NET (T), receive DOOR HANDLE.
- Place DOOR HANDLE and use HOUSE KEY (U).
- Enter (V).
- Select scene.
- Take POINTER and ANCIENT GRIPSACK (W).
- Use POINTER (X), receive SPOON.
- Look at article (Y).
- Use SPOON, receive SNAKE TOKENS 2/5.
- Take LOCKPICK and RIGHT WING (Z).
- Use LOCKPICK (A).
- Play puzzle (A1), receive TRITON STATUETTE.
- Select scene.
- Go to Greenhouse.

- Place TRITON STATUETTE (B), take SNAKE TOKENS 3/5 and HYDRA HEAD (C).
- LEFT WING, RIGHT WING, and HYDRA HEAD on ANCIENT GRIPSACK, open it and look at note.
- Take SNAKE TOKENS 4/5 and GROWTH EXTRACT.
- Use GROWTH EXTRACT, take SMOKE GRENADE and BUD WITH POLLEN (D).
- Go to Hall.

- Use BUD WITH POLLEN and select, take PEN and SNAKE TOKENS 5/5 (E).
- Place SNAKES (F).

- Solution (1-4).
- Take DOG FIGURINE and SMOKE CARTRIDGE.

- Place HUNTER FIGURINE and DOG FIGURINE, take TOOL HANDLE (G).
- Go to Greenhouse.
- Place TOOL HANDLE (H), receive TROWEL.
- Use TROWEL, take FUSE and LUMINISCENT ROOTS (I).
- Go to Hall.

- Select SMOKE GRENADE and look at note.
- Place FUSE and SMOKE CARTRIDGE, take SMOKE GRENADE.
- Place SMOKE GRENADE and use LIGHTER (J).
- Select drawing (K).
- Solution (1-6).
- Take MEDICAL BOOK (L).

- Place MEDICAL BOOK (M).
- Go (N).

- Select scene.
- Take GEAR, LETTER E, PAPER, and DUSTER (A).
- Use DUSTER.
- Place PAPER and use PEN, take WINDOW CODE (B).
- Place WINDOW CODE, select 1-4, take ANCIENT LOCKET and SIGNET RING (C).

- Use SIGNET RING, take SWITCH and LETTER G (D).
- Place LETTER G and LETTER E (F).
- Play puzzle (G), receive JADE HEART.
- JADE HEART on ANCIENT LOCKET and select, take DOCTOR’S LOCKET and automatically receive TRIPLE KEY.
- Place SWITCH and GEAR (H).

- Solution (6-3-3-2).
- Use TRIPLE KEY (I).
- Go (J).
- Place LUMINISCENT ROOTS 4x (1-4).
- Take GOLDEN LAUREL, GLOVE, DRILL BIT, TAPE, and OLD HAND DRILL (K).
- Use GLOVE (L), take PETRI DISH and GIRL’S PHOTO (M).
- Place PETRI DISH (N).
- Solution one (O): (1-A)-(2-B)-(3-C).
- Solution two (P): (1-A)-(2-B)-(3-C)-(4-D).
- Solution three (Q): (1-A)-(2-B)-(3-C)-(4-D)-(5-E).
- Take PRISM and COLORED LENS 1/3 (R).
- Walk down.
- Place GIRL’S PHOTO, take HAND CRANK and GOLDEN LAUREL (S).
- Look at note (T).
- Place 2 GOLDEN LAURELS (U), take HANDLE and COLORED LENS 2/3 (V).
- Go (W).

- HANDLE, HAND CRANK, and DRILL BIT on OLD HAND DRILL, take HAND DRILL.
- Use HAND DRILL, take COLORED LENS 3/3 (X).
- Place MAGIC LAMP, PRISM, and COLORED LENSES (Y).
- Flip switch (Z).
- Play puzzle (Z1).
- Give DOCTOR’S LOCKET and talk (Z2), receive MAGIC LAMP and LOCK MECHANISM.
- Walk down twice.

- Place LOCK MECHANISM and select (A).
- Go (B).

- Talk (C), receive STARTER BUTTON.
- Take SCREWDRIVER, PICTURE 1/3, and BROKEN PUMP (D).
- Use SCREWDRIVER, take TORN HOSE and CLIPPERS (E).
- Use CLIPPERS, take PICTURE 2/3 and RUBBER PATCH (F).

- TORN HOSE and TAPE on BROKEN PUMP, take PUMP.
- Place RUBBER PATCH and TAPE on tire and then use PUMP (G).
- Move bricks, take PICTURE 3/3 and BURNER (H).
- Go to Laboratory.
- Place PICTURES (I).
- Solution: (8-5)-(1-7)-(4-8)-(9)-(7-2)-(-8-4).
- (1-4)-(9)-(7-3)-(8-5)-(4-5).
- (2-6)-(9)-(7-3)-(8-6)-(3-4)-(10)-(8-6).
- (10)-(8-6)-(7-5)-(10)-(7-1)-(8-3).
- Solved Images (J-K-L).
- Take RUBY BROOCH and look at photo.
- Place RUBY BROOCH (M), take SOLVENT (N).
- Go to Garage.
- Use SOLVENT, take CARABINER (O).
- Use CARABINER (P), take CLAY and PEDAL (Q).
- Place STARTER BUTTON and PEDAL (R).

- Solution (6-11)-(9-6)-(16-9)-(4-16)-(1-4)-(8-3)-(13-1)-(15-8).

- Select scene.
- Talk (S), receive BROKEN KEY.
- Take IRON ROD (T).
- Use IRON ROD, take LIGHTNING and SILVER DISK (U).
- Place LIGHTNING (V), receive GOLD DISK and FRESCO PART 1/3.
- Place SILVER DISK and GOLD DISK (W).
- Solution one (Ax2-B-A).
- Solution two (Bx3-A-B).
- Solution three (Bx5-A-B-A-B).
- Take RITUAL DAGGER and TIN FIGURINE.
- Use RITUAL DAGGER, take MOON AMULET and GAS (C).
- Select the ladle on the BURNER.
- Place CLAY, BROKEN KEY, TIN FIGURINE and GAS on BURNER.
- Take TIN KEY.
- Use TIN KEY (D), enter (E).

- Take FRESCO PART 2/3 (F).
- Use RITUAL DAGGER (G).
- Play puzzle (H), receive BRASS BRACELET.
- Walk down.

- Place BRACELET (I), receive FRESCO PART 3/3 and BASILISK FIGURINE.
- Place BASILISK FIGURINE (J).
- Take SUN AMULET and BOOK OF HIEROGLYPHS (K).
- Look at note (L).
- Go (M).
- Place BOOK OF HIEROGLYPHS and FRESCO PARTS (N).
- Play puzzle (O), receive TABLET WITH RITUAL.
- Place MOON AMULET and SUN AMULET (P).
- Take RUNED CHAIN (Q).
- Place TABLET WITH RITUAL, MAGIC LAMP, RUNED CHAIN, and RITUAL DAGGER (R), receive RITUAL DAGGER.
- Use RITUAL DAGGER (S).

- Select matching pairs (1-2)-(3-4)-(5-6-7)-(8-9).
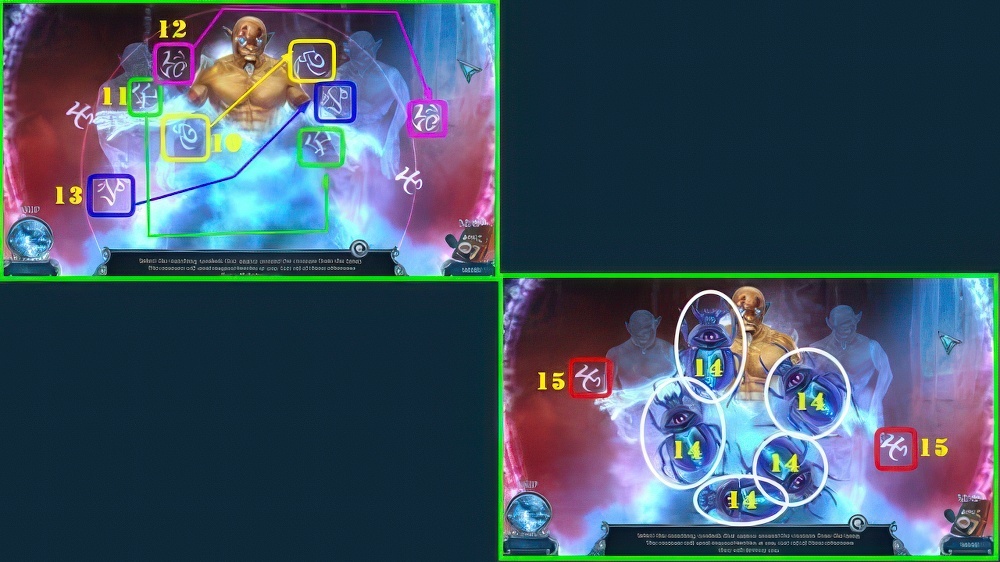
- Select matching pairs (10-11-12-13)-(14-15).
- Walkthrough Bonus Chapter, at the link below.


