Darkness and Flame 2: Missing Memories – An adventure game, the passage of which will pull you into the cycle of events involved girl in Darkness and Flame. Somewhere deep in your memories there is always a key. Will Alice find a way to not only help her uncle remember his past, but also learn how to use the power of burning Flame. Together with her Uncle Colin, Alice embarks on a journey full of wonders and twists and turns that threaten their lives. At the same time, Colin finds himself trapped in his nightmares again and again. A slightly familiar woman asks him for help. The man is convinced that once he reconstructs his memories, they will find answers to their most pressing questions. The woman from Colin’s dreams, who is she. How to control the power of the flame his niece possesses. Two confused men travel to the desert where the healer who could restore Colin’s lost memories lives in darkness. Together they will face many challenges, solve dozens of puzzles and finally face the dark army that threatens the whole world. While playing the game you will encounter unexpected plot twists, unforgettable characters and exciting puzzles. If you can not pass any of the puzzles or do not know where the items are, on our site you can watch the walkthrough of the game Darkness and Flame 2: Missing Memories, and save the world from destroying all living threats.
Darkness and Flame 2: Missing Memories – Walkthrough
Here you can see the full walkthrough of Darkness and Flame 2: Missing Memories, namely for all chapters, including bonus chapter, in pictures.
Wake up Colin
Colin brought me here to this miraculously preserved ancient city. It’s inhabited by the Sacuums. Uncle says we’re safe here, beyond the reach of the Darkness. We were given a small room and some food. Looks like the Sacuums have a good relationship with my uncle. I wonder why they treat him so suspiciously then. In his turn, uncle Colin asked me to hide the mark on my arm and say nothing of the bird of fire. In any case, we can’t return to the valley the servants of Darkness lie in wait there. I hope this place will become our new home. Looks like Uncle is having another nightmare. I need to wake him up quickly.
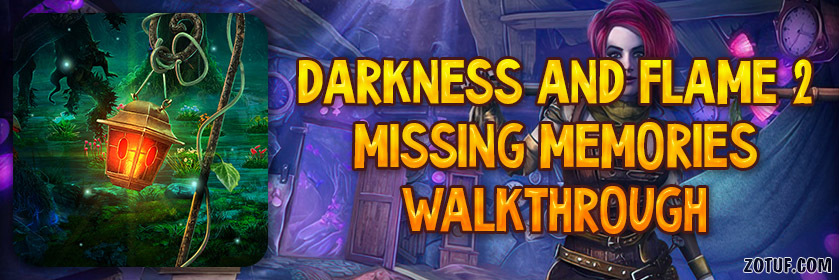
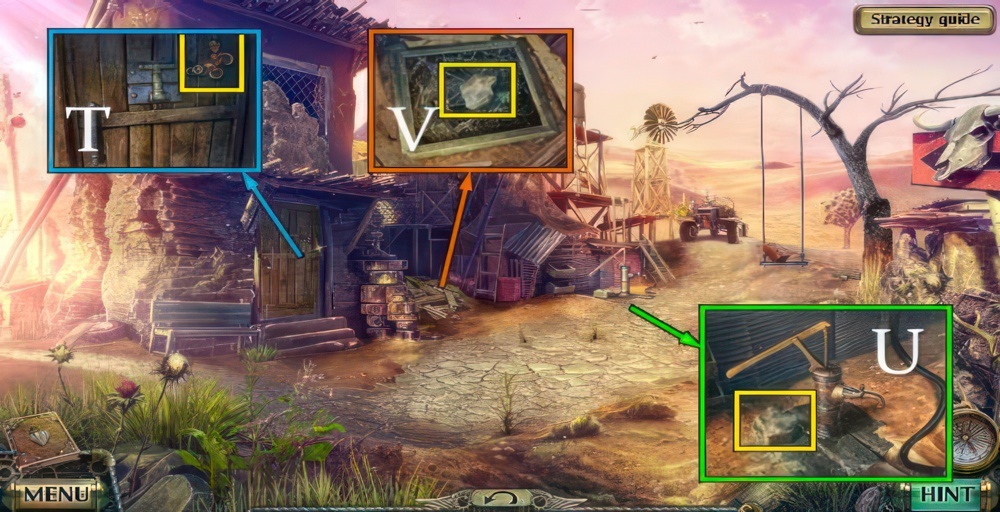
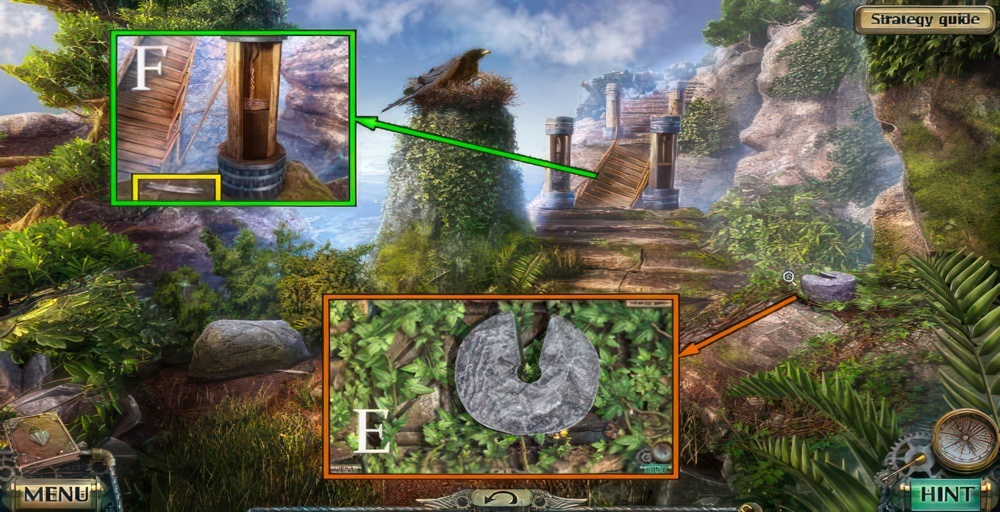
- Take RAZOR (A).
- Open backpack.
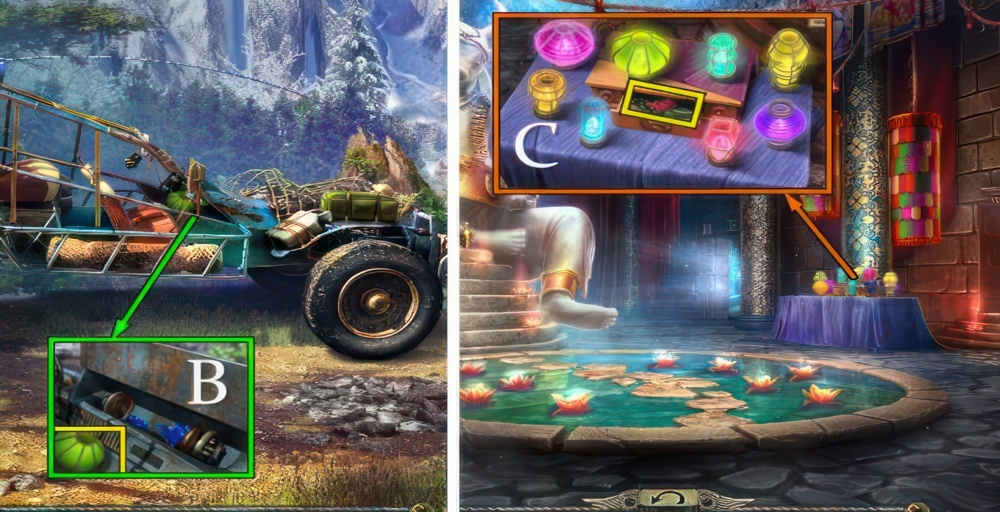
- Use RAZOR and remove rope, take diary and VALVE (B).
- Take MUG (C).

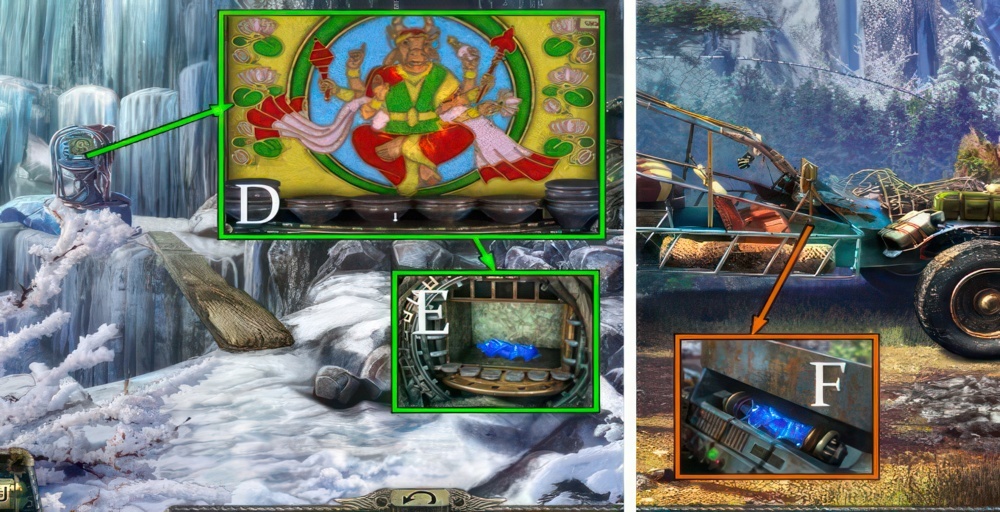
- Place VALVE and MUG, receive MUG OF WATER (D).
- Use MUG OF WATER (E).
- Open (F).
- Go forward and left.
Go to the hermit for help
Uncle Colin has been having the same nightmare, in which a vaguely familiar woman is begging him for help. Who is she. Just today, Colin confessed that he has almost no memory of his childhood and youth. That’s because he was among the unlucky ones whose consciousness fell under the shade of the Darkness. Luckily, Uncle was rescued from its dreadful clutches, but he paid a price, his memory. The Sacuums town is wonderfully peaceful, but Uncle Colin insists we move on. Deep in the desert lives a wise healer, who might restore my uncle’s lost memory. Colin is convinced that after he regains it we will find answers to our most pressing questions.
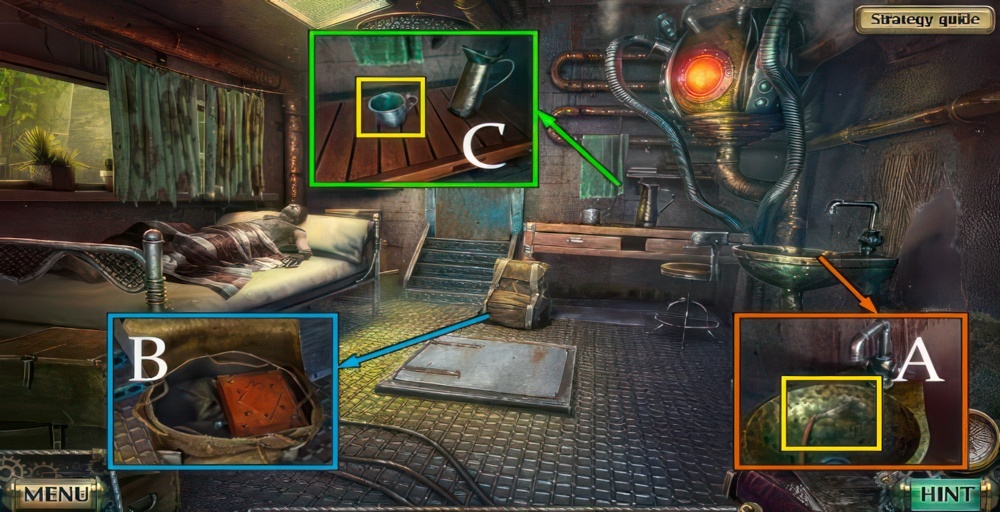
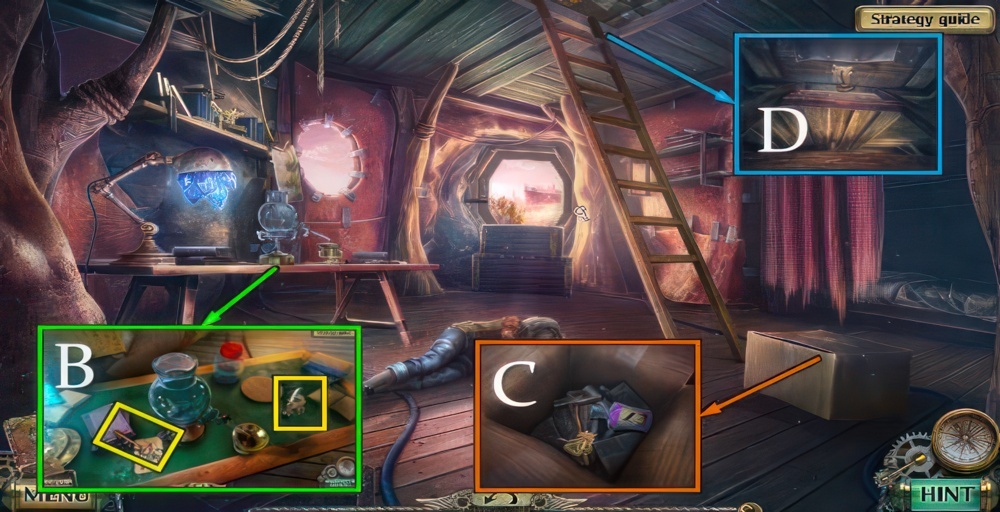
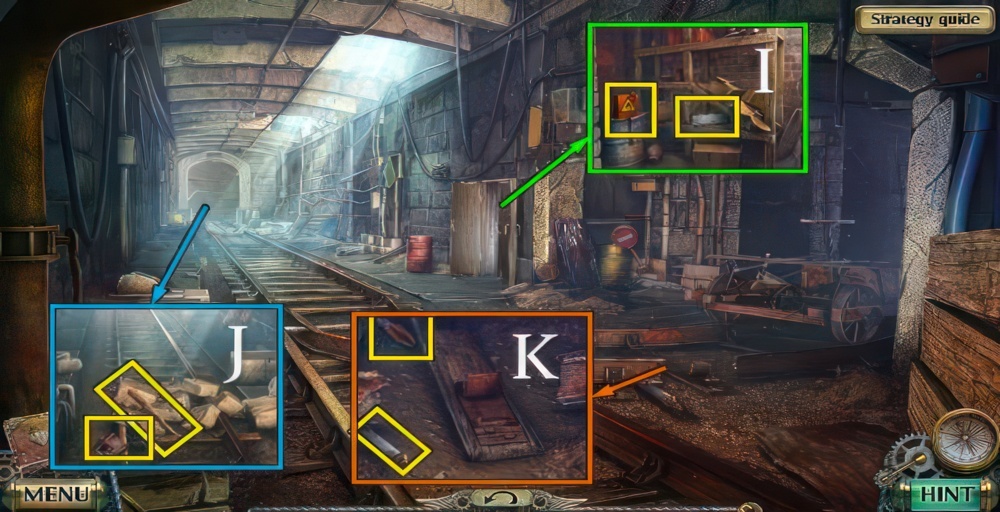
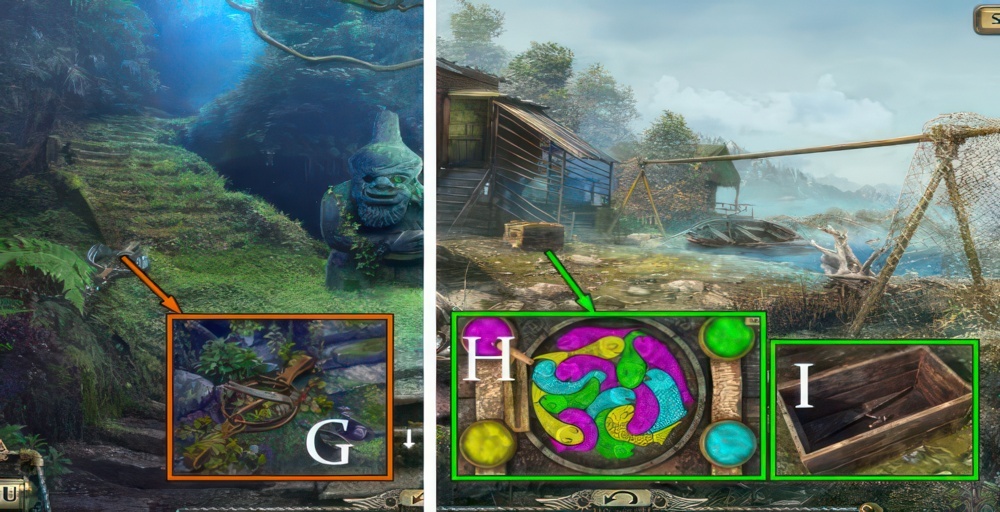
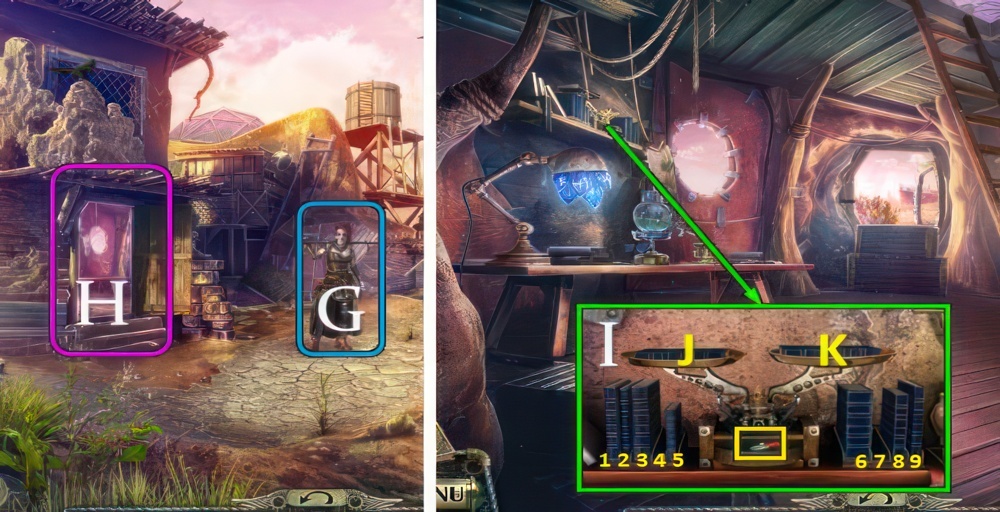
- Take ROAD SIGN FRAGMENT (G).
- Open jacket, take capsule and PIPE (H).
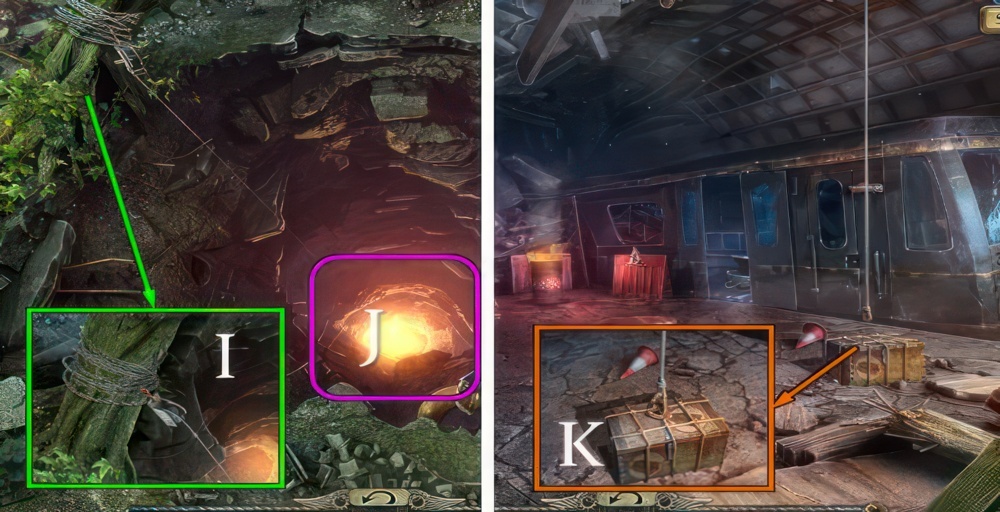
- Take and place seat (I).

- Take CROWBAR and BAG OF CHARCOAL (J).
- Use PIPE, open crate and take PUMP and JACK (K).
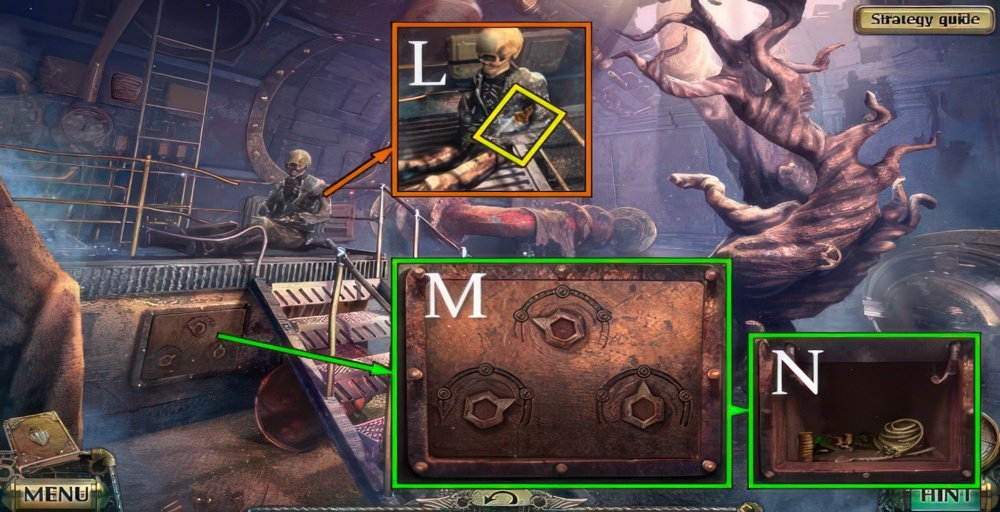
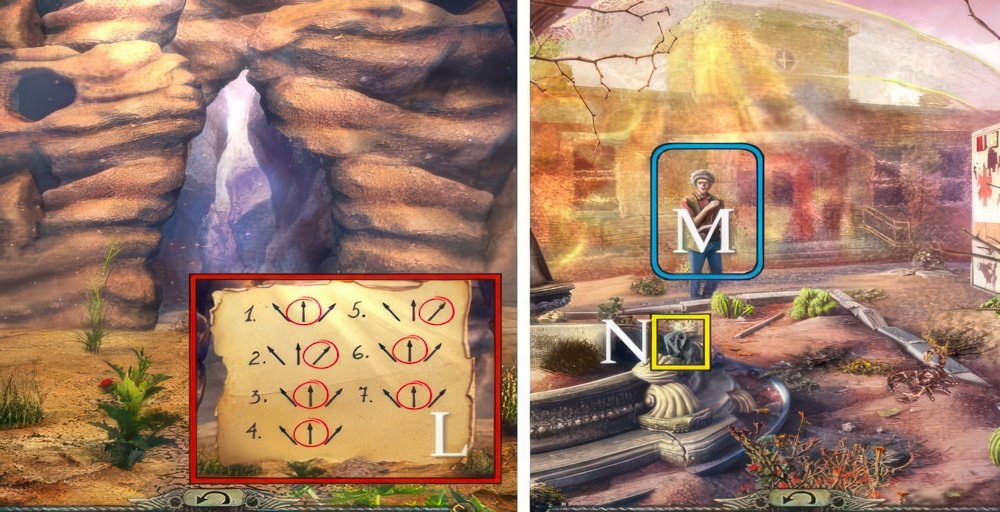
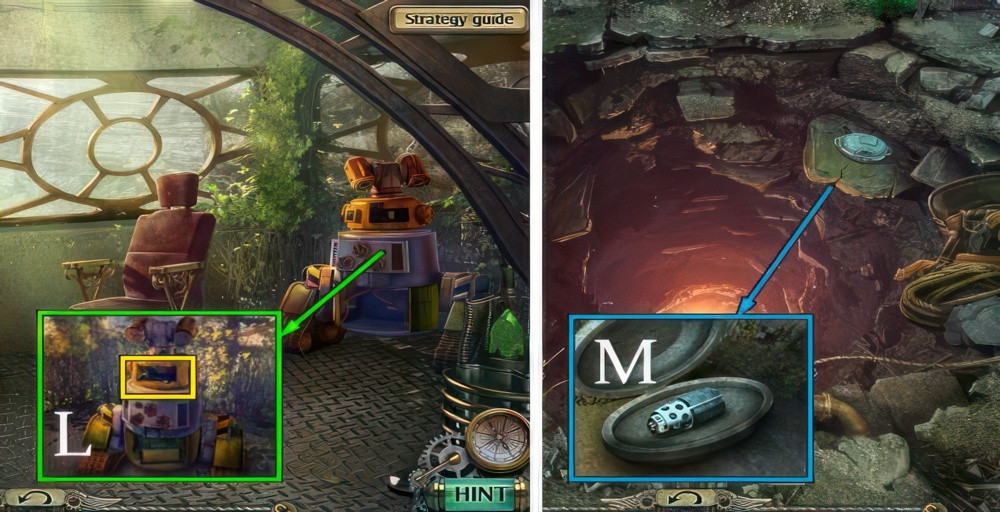
- Place JACK (L).
- Go down.

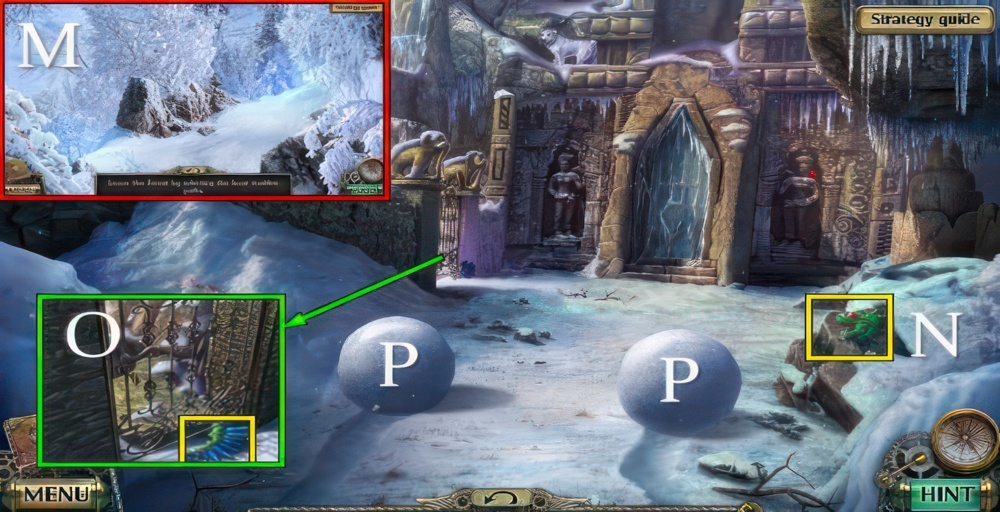
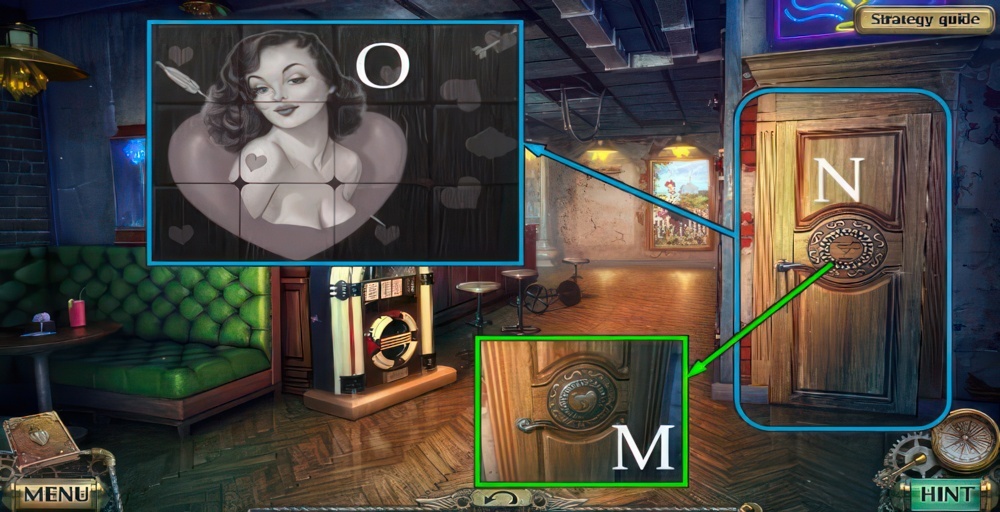
- Take FLAT TIRE with ROAD SIGN FRAGMENT (M).
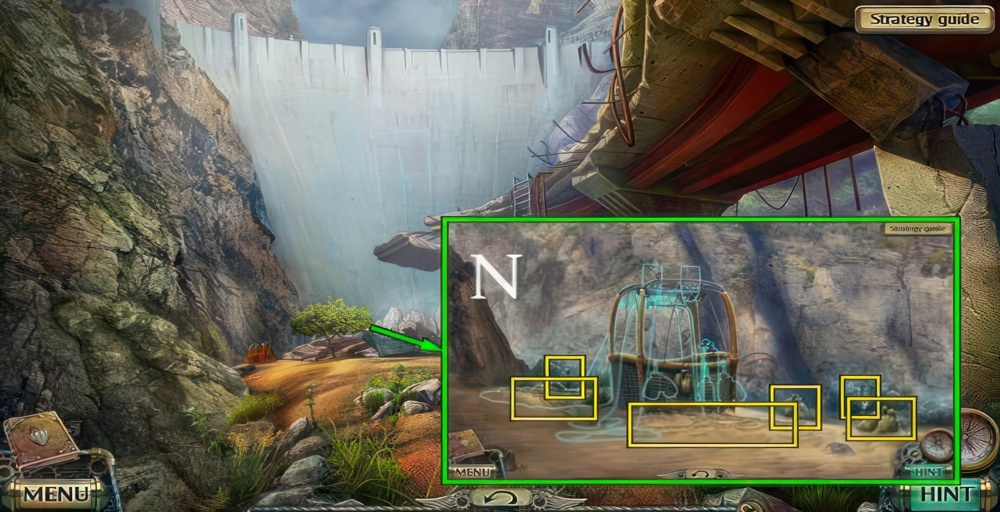
- Use CROWBAR (N).
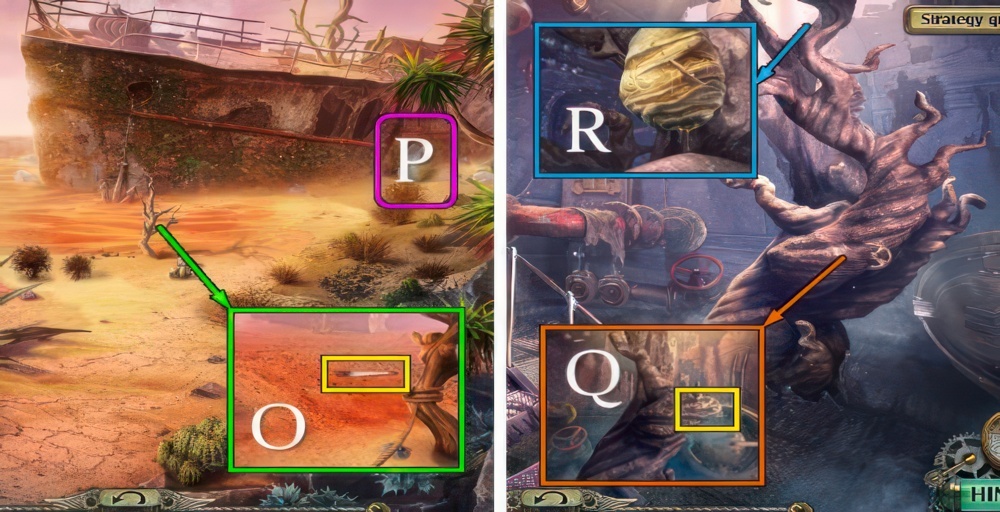
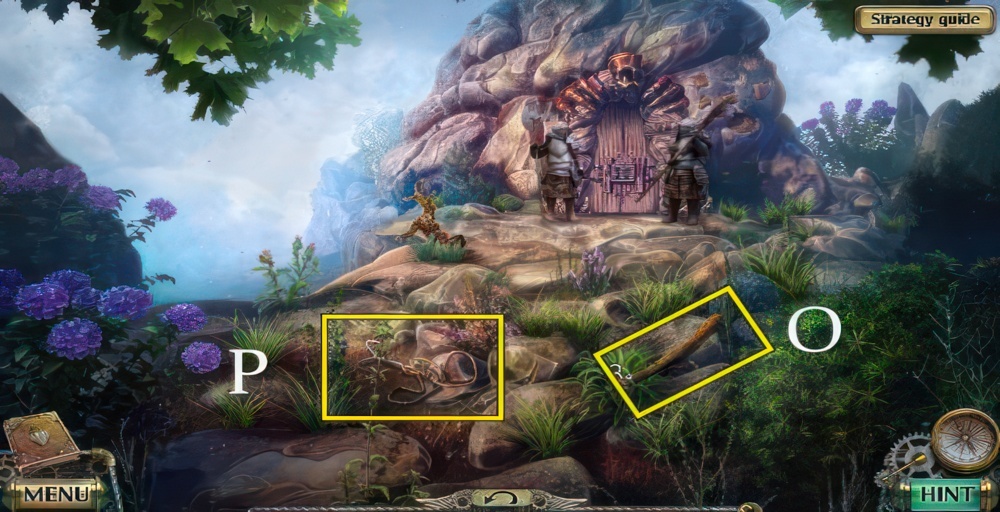
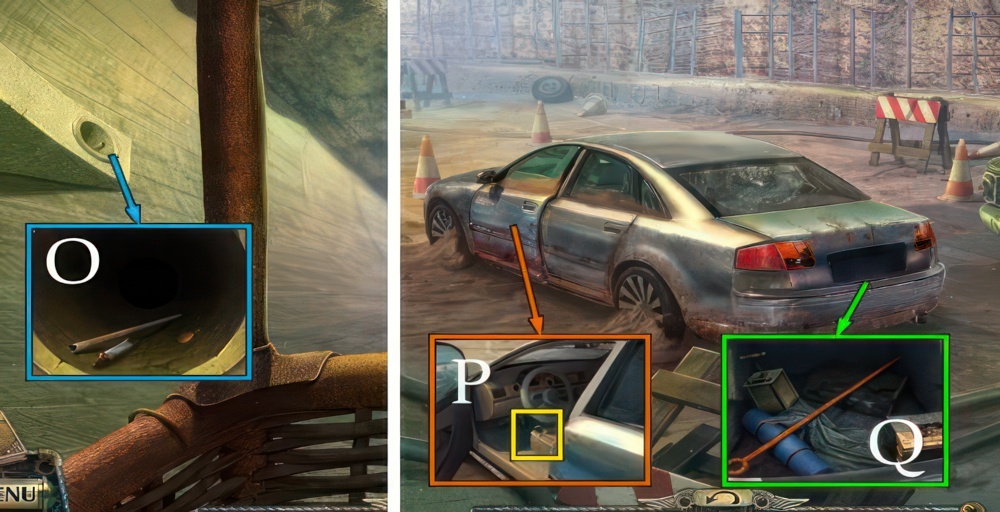
- Play the puzzle (O), receive UTILITY KNIFE.
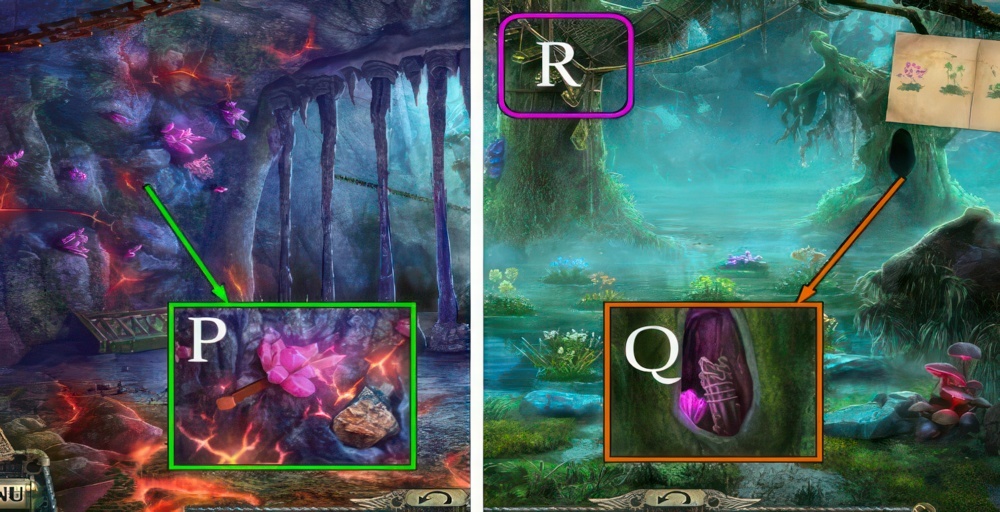
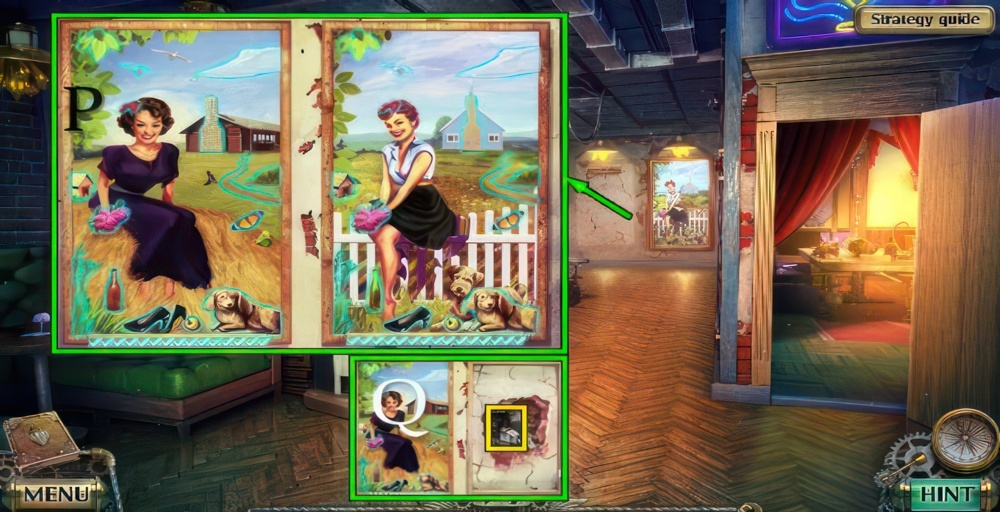
- Go (P).
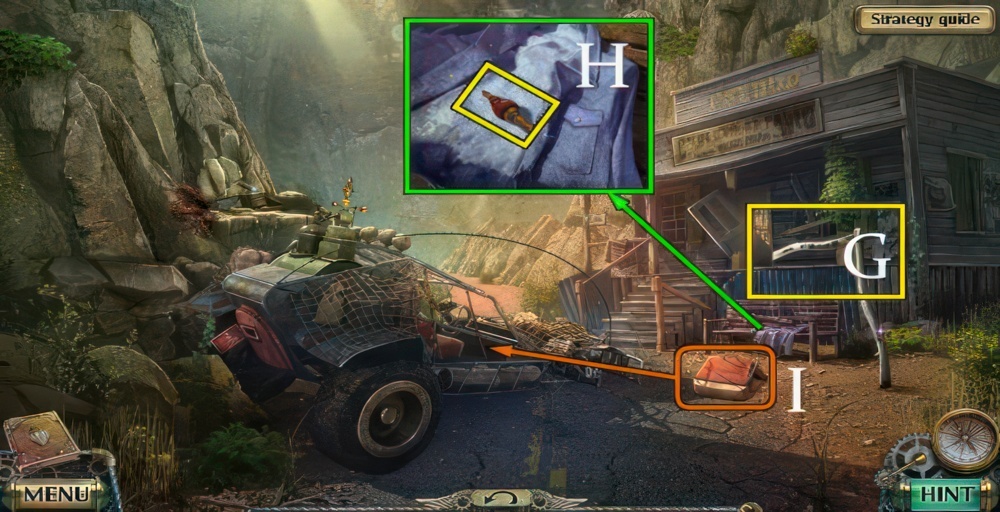
- Open BAG OF CHARCOAL with UTILITY KNIFE, take CHARCOAL.
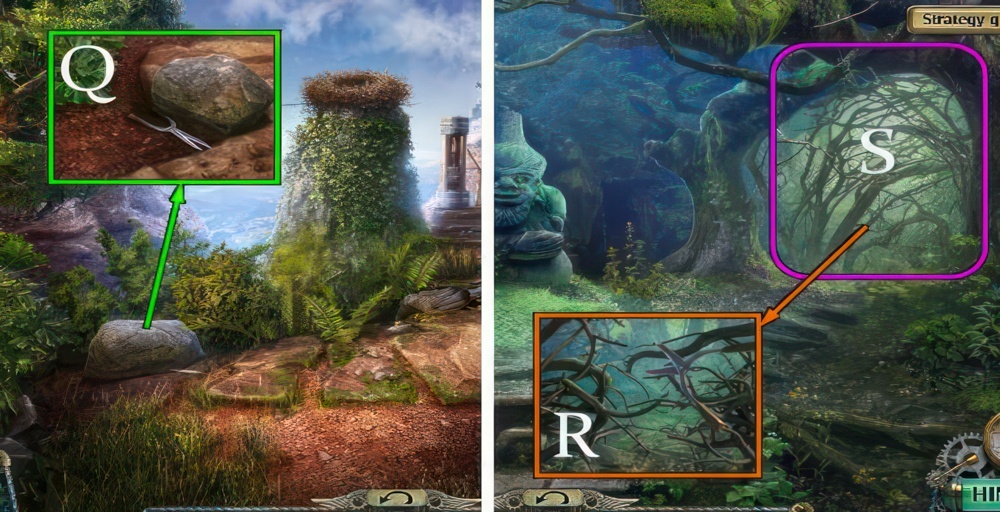
- Place CHARCOAL (Q).
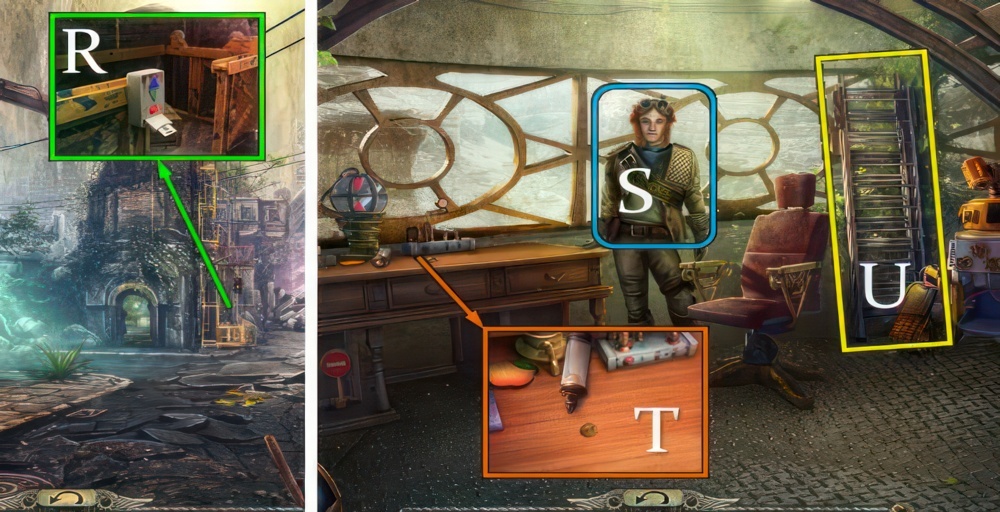
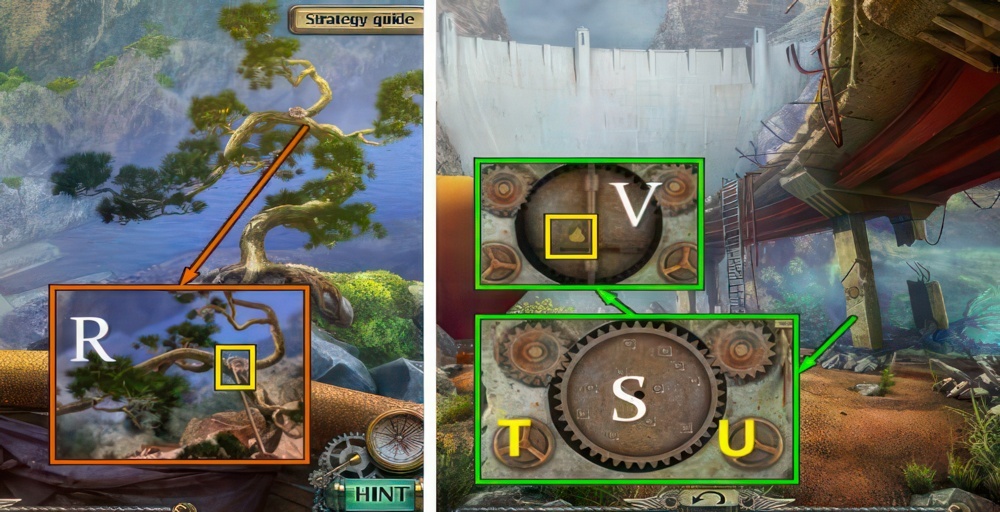
- Place FLAT TIRE and use PUMP (R).
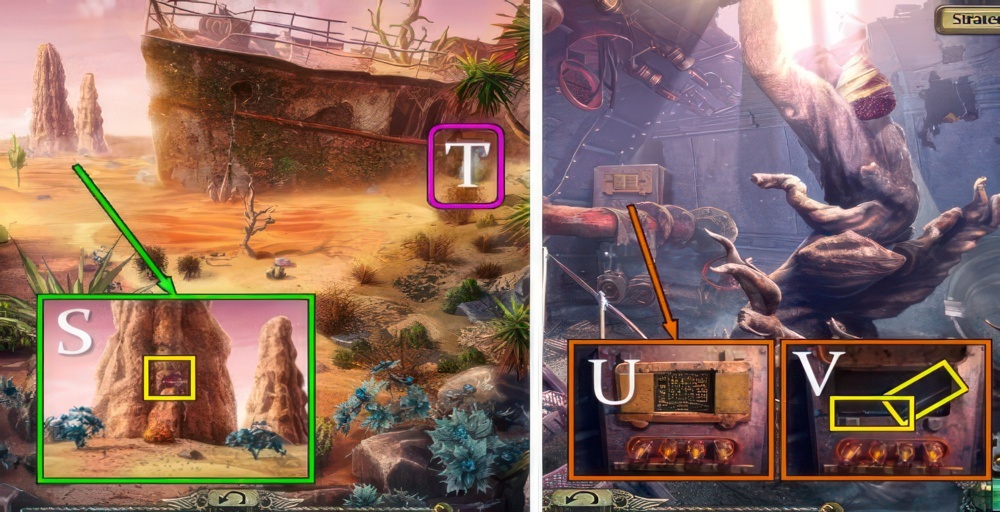
- Go (S).
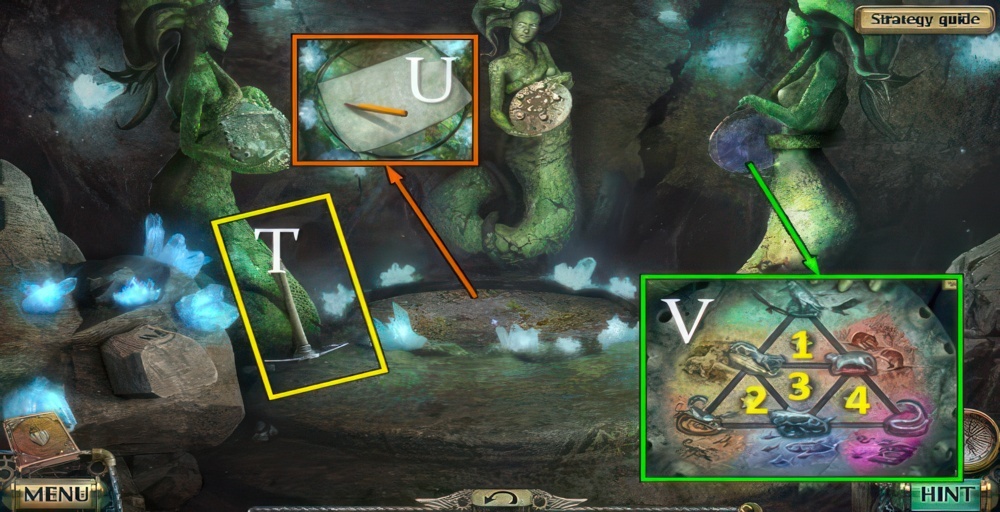
Get inside the hermit’s hut
The door is locked from the inside, and nobody is answering our knock. We’d better check if the owner is all right.
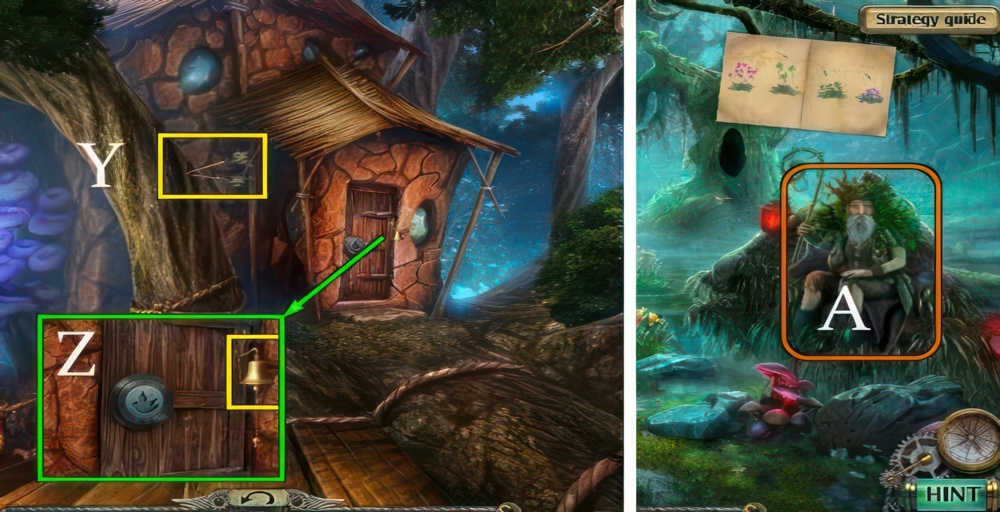
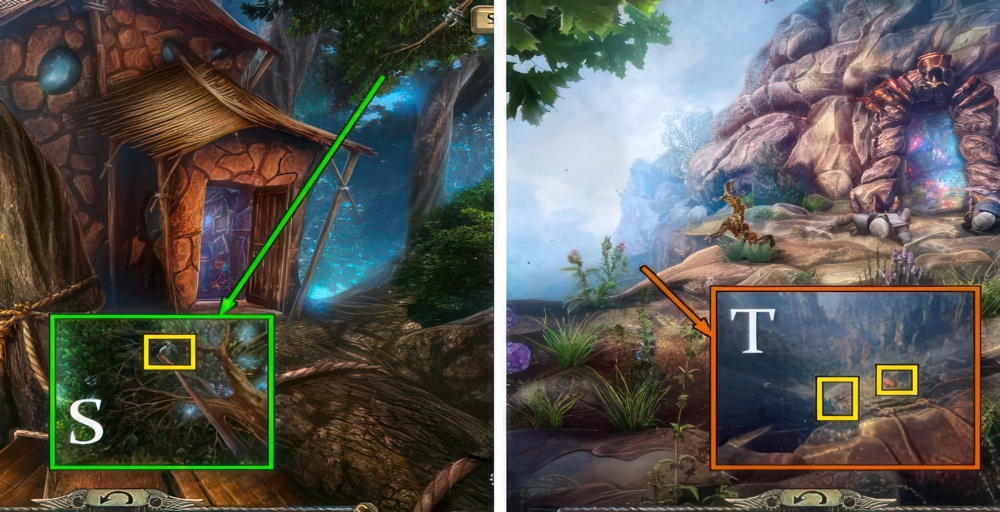
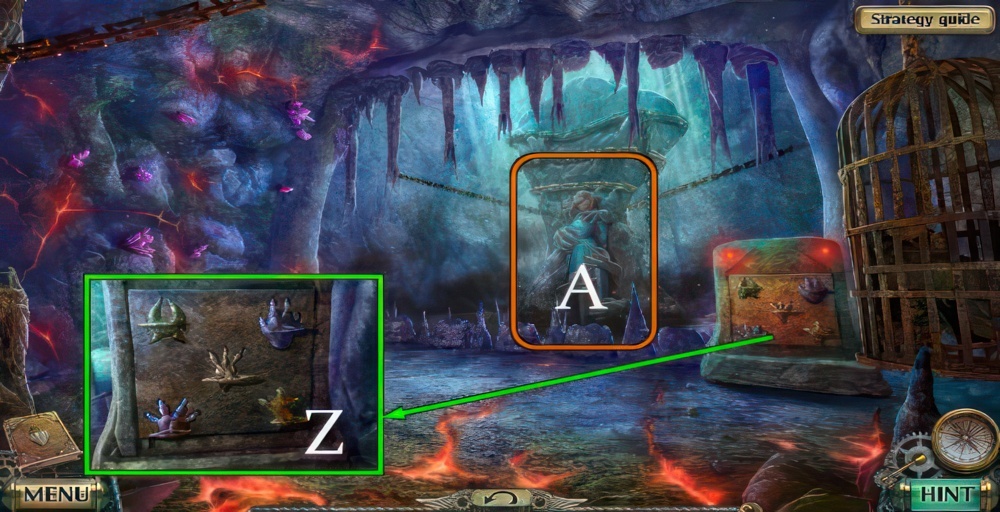
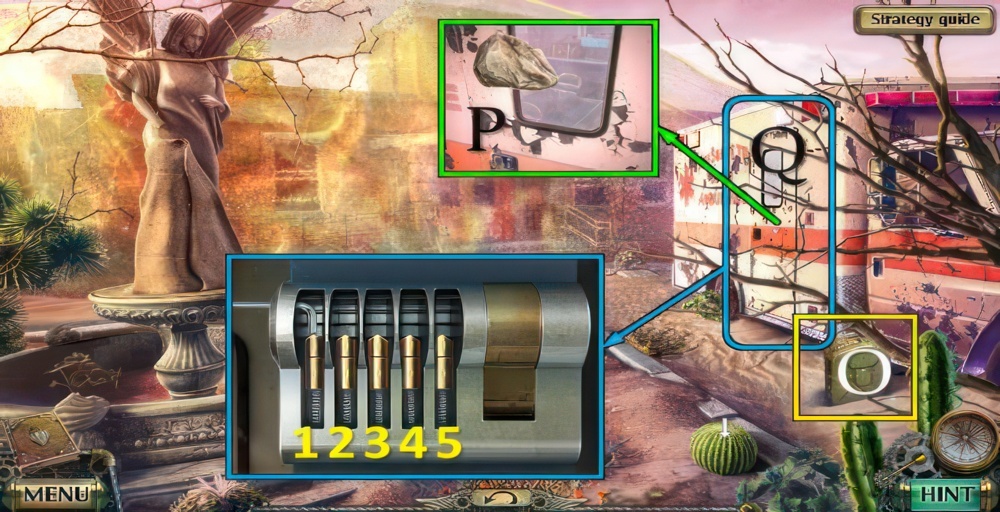
- Knock, take BUTTERFLY (T).
- Take STONE, attach hose (U).
- Move boards, take STONE (V).

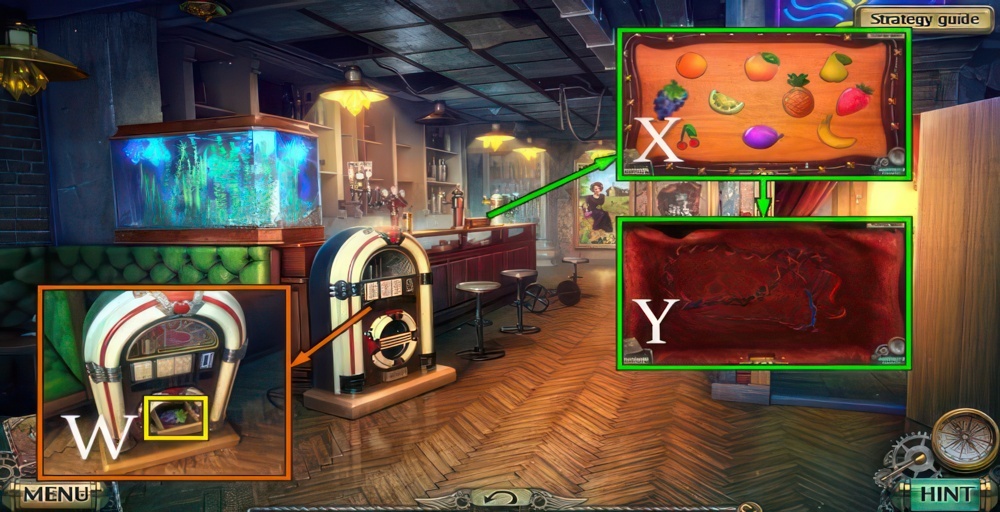
- Take CASKET (W).
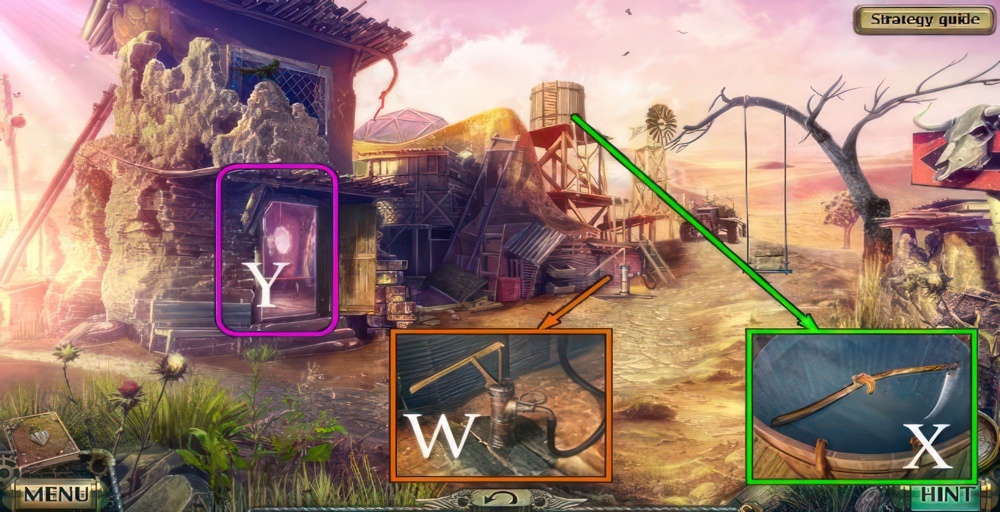
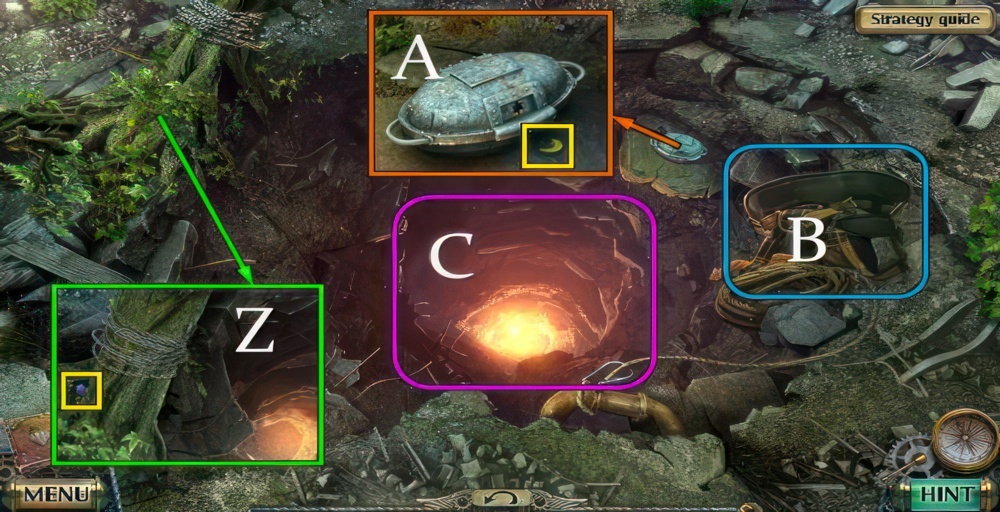
- Place stone and two STONES (X).
- Take BUTTERFLY (Y).

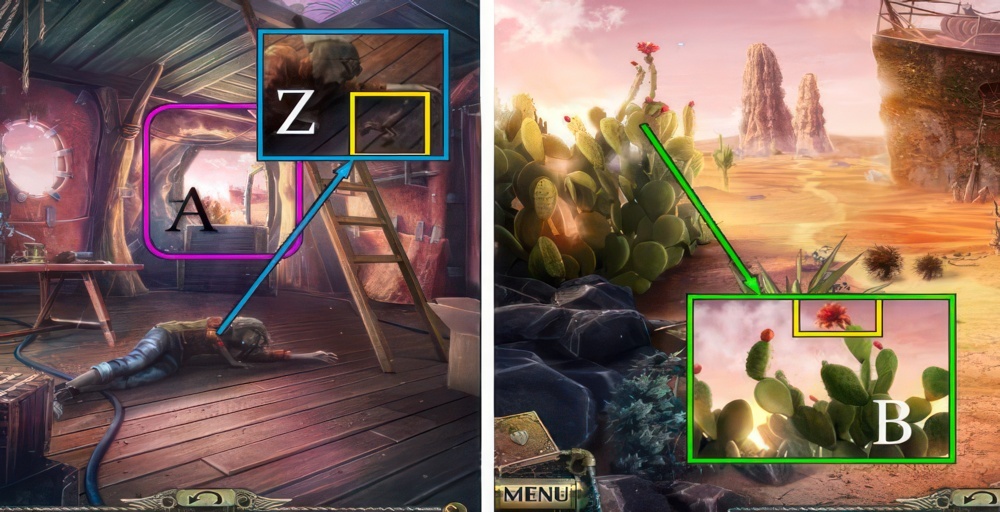
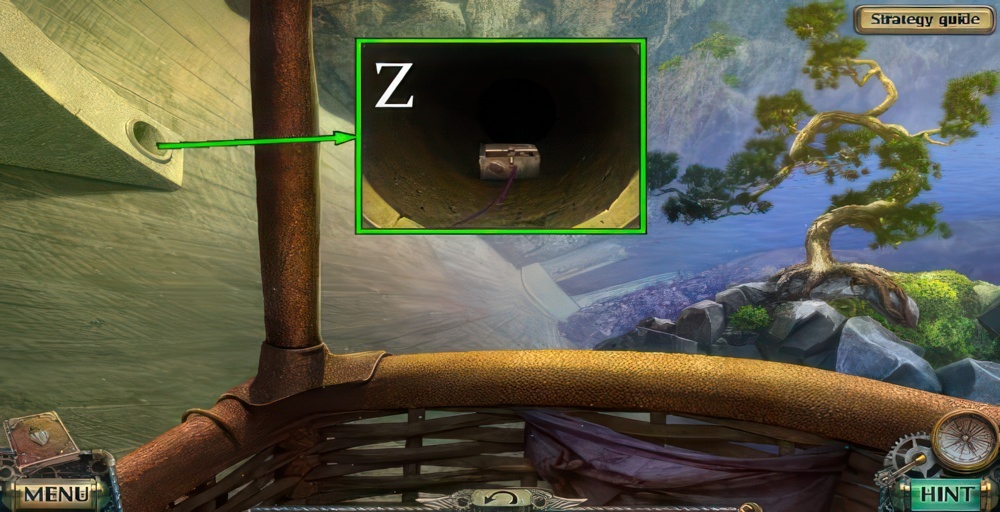
- Place two BUTTERFLIES (Z).
- Move the butterflies into the correct positions so that each one matches the shape underneath.
- Walkthrough: 2, 1, 3, 4, 5, 2, 1, 4, 7, 5, 4, 6, 3, 1, 2, 5, 4, 2, 1, 4, 6, 3, 4.
- Go (A).
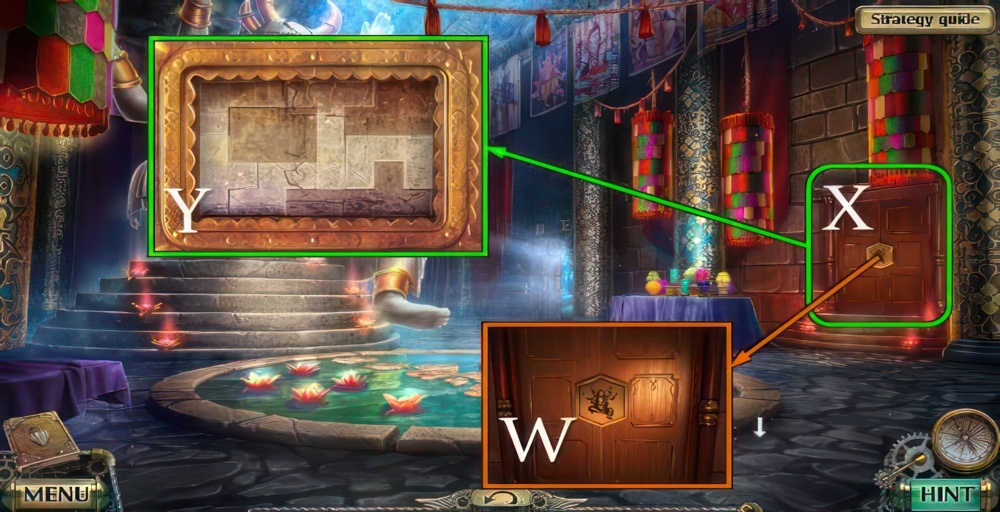
Help the healer
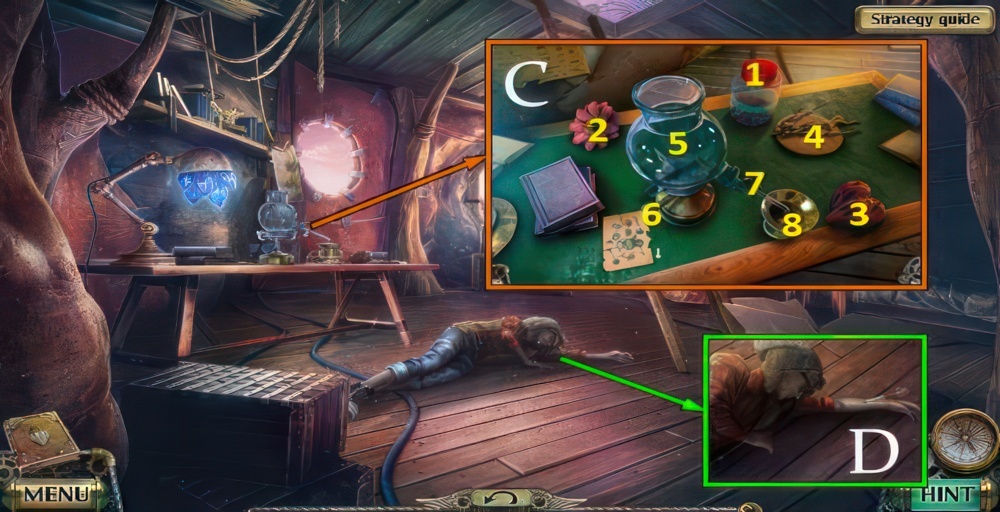
The owner of this hut was stung by a scorpion and we need to help him right away. On the table there’s a recipe for an antidote.
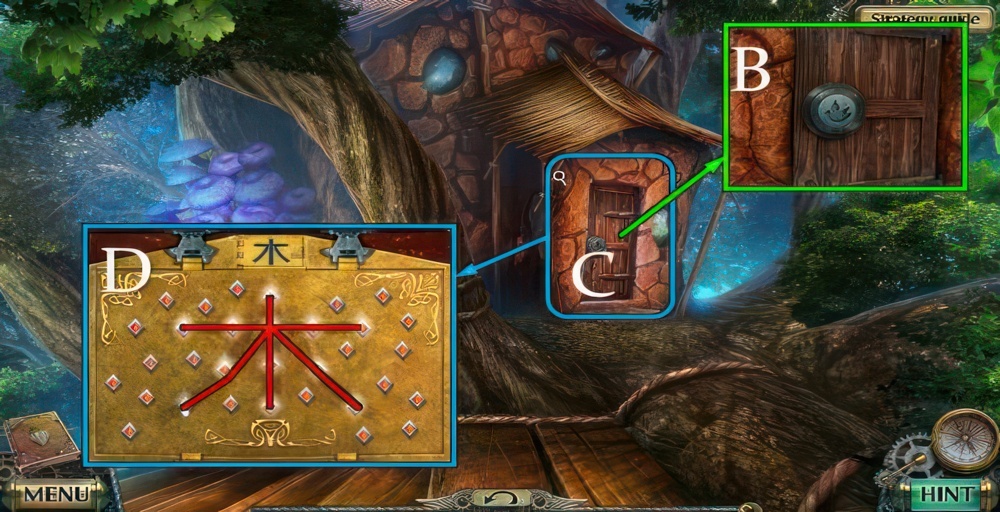
- Move recipe and take KEY, DEER FIGURINE and KNIFE (B).
- Use KNIFE, take SNAKE FIGURINE, BOTTLE OF ACID and HAMMER (C).
- Use KEY (D).

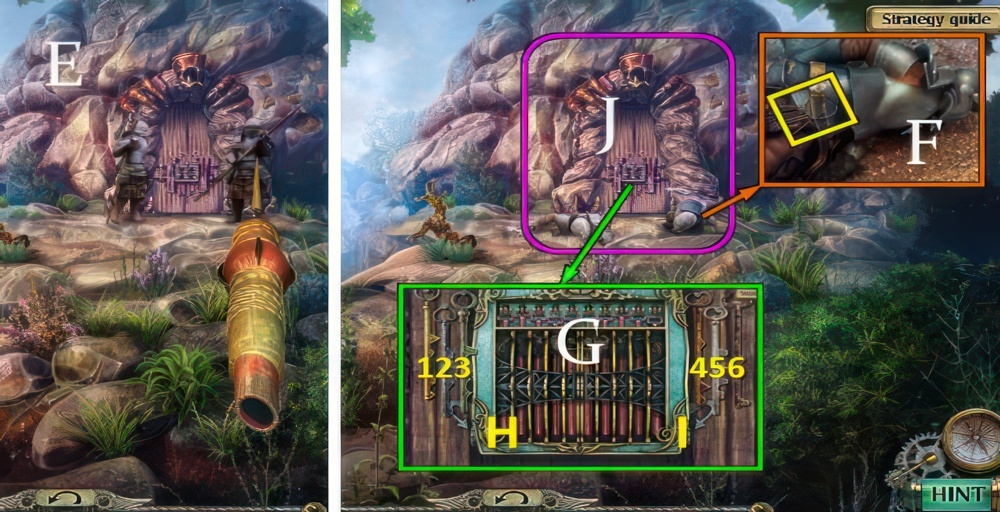
- Play the puzzle (E).
- Arrange the flowers in the correct order.
- Walkthrough (F).
- Receive FRUIT.
- Use HAMMER (G).
- Go (H).

- Find the flower pairs.
- By excluding matching flowers, you’ll find the rare plant you need.
- Walkthrough: Pull up plant and take ROOT with KNIFE (I).
- Use BOTTLE OF ACID, open door (J).
- Go (K).
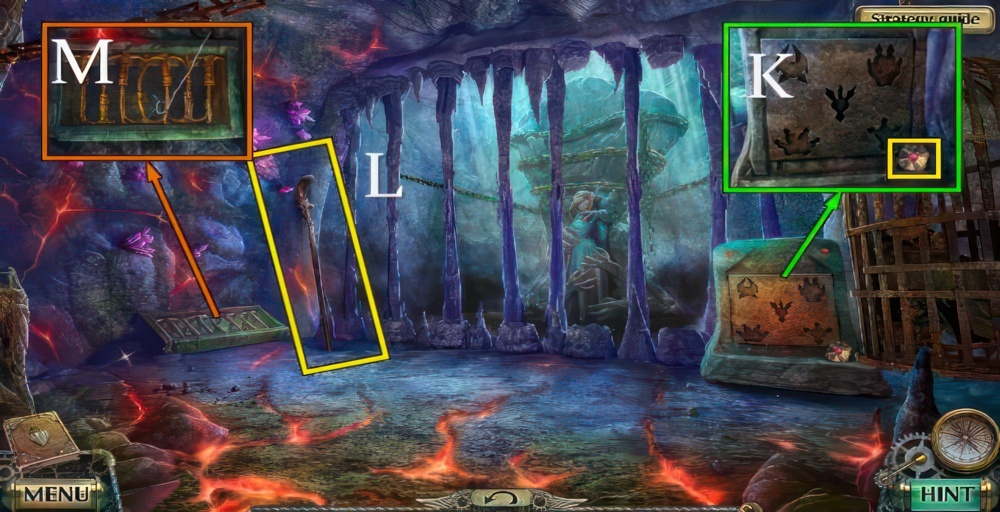
- Take capsule (L).
- Figure out the correct position of the switches.
- Walkthrough (M).
- Take WASP FIGURINE and ROPE (N).
- Go down.
- Place and tie ROPE, take HANDSAW (O)
- Go (P).
- Use HANDSAW, take HANDWHEEL (Q).
- Take HONEYCOMB with KNIFE (R).
- Go down.
- Place HONEYCOMB, take PART (S).
- Go (T).
- Place PART and play the puzzle (U).
- Make matches of three or more identical figures so that you can open a chest with a key.
- Don’t forget to use the buttons rotating the field.
- Take SYRINGE and TWEEZERS (V).
- Go to Desert Settlement.
- Place HANDWHEEL and pull lever (W).
- Take LIZARD FIGURINE and SCYTHE (X).
- Go (Y).
- Take SCORPION with TWEEZERS (Z).
- Go (A).
- Take a CACTUS FLOWER with SCYTHE (B).
- Go down.
- Place FRUIT, ROOT and CACTUS FLOWER.
- Use KNIFE on 4 and remove lid (1).
- Put 1-4 and SCORPION into 5.
- Turn 6 and 7 and take ANTIDOTE (8) with SYRINGE (C).
- Use ANTIDOTE (D).
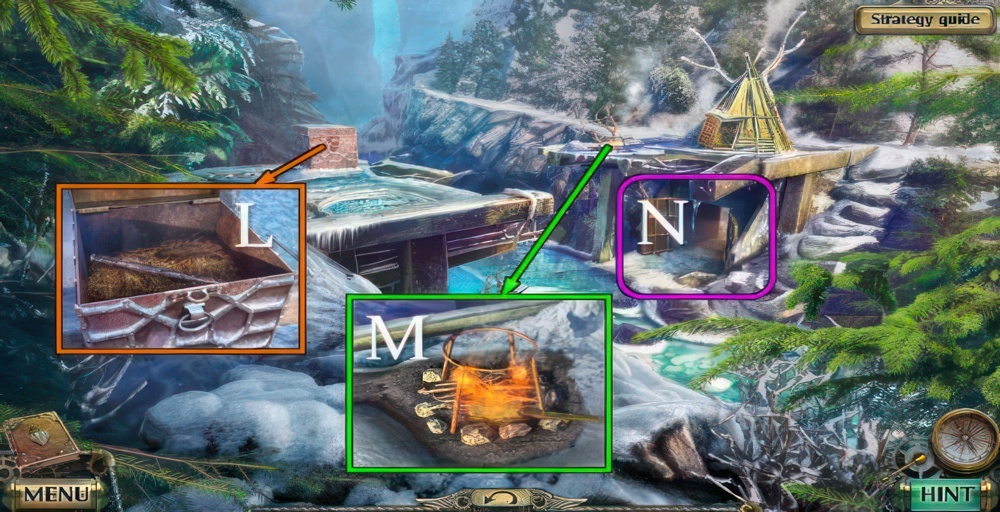
Search for the magic stone
Thanks to our quick help, the antidote saved Steve’s life. Alas, the healer was unable to help Colin restore his lost memories. He did leave us one faint hope, though. He told us there is a temple lost in the Eternal Ice where a stone of extraordinary qualities is hidden. It can restore the health and strength of anyone who touches it.

- Go (E).
- Drive the whole distance without hitting any of the obstacles.
- Move shrubs, take BONE (F).
- Go (G).

- Throw BONE (H).
- Receive FLINT.
- Take LION FIGURINE and SPLINTERS (I).
- Place SPLINTERS and use FLINT and fan.
- Put snow in cauldron.
- Take CAULDRON OF HOT WATER (J).
- Use CAULDRON OF HOT WATER, take CRYSTAL (K).
- Go (L).
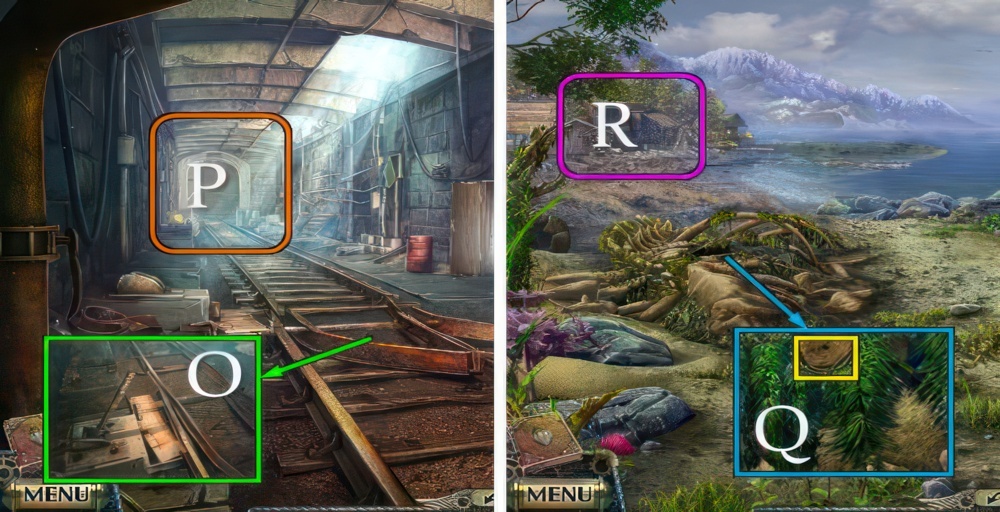
Journey to the temple
A man we met on the road told us the shortest way to the temple. We need to continue our journey.
- Leave the forest by selecting the least trodden paths.
- Walkthrough (M): → , ← , ↑ , ← , → , ← , ← , → , ↑ , →.
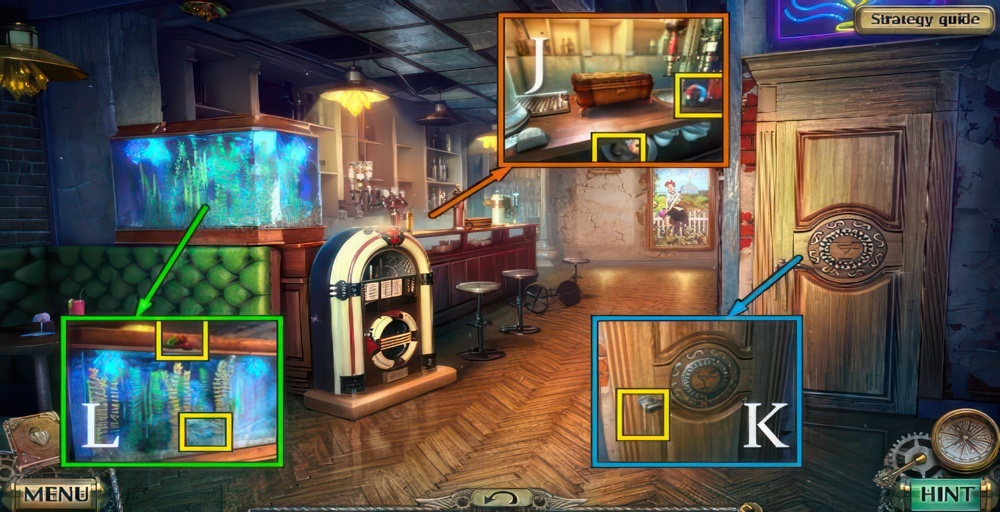
- Take 1/7 BAS-RELIEF PART (N).
- Take 2/7 BAS-RELIEF PART (O).
- Roll snowballs (P).
- Take CRYSTAL (Q).
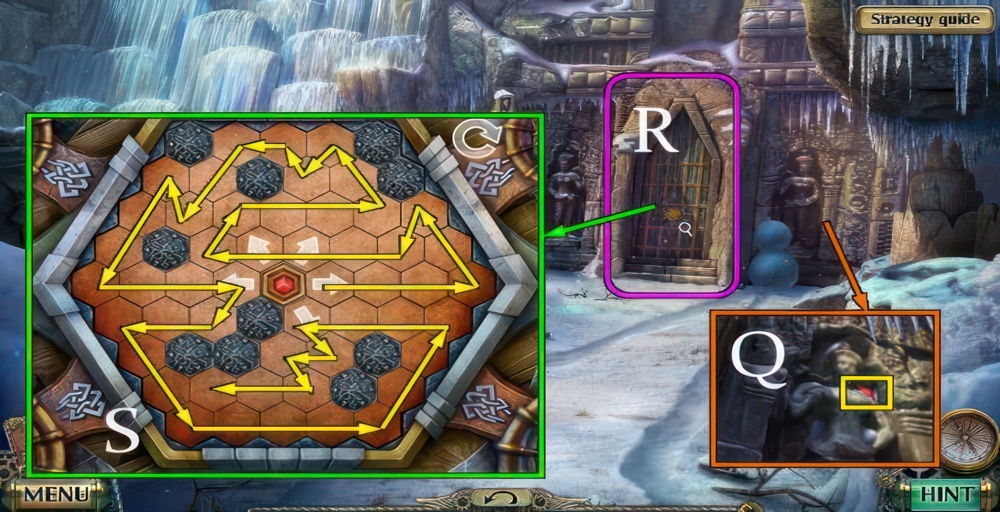
- Inspect door (R).
- Place two CRYSTALS (S).
- Press the arrows to cross over all the empty cells.
- Go (R).
Where’s the stone
Finally we’re inside the temple, but there’s no trace of the stone. We’d better examine the place thoroughly the stone is our last hope.

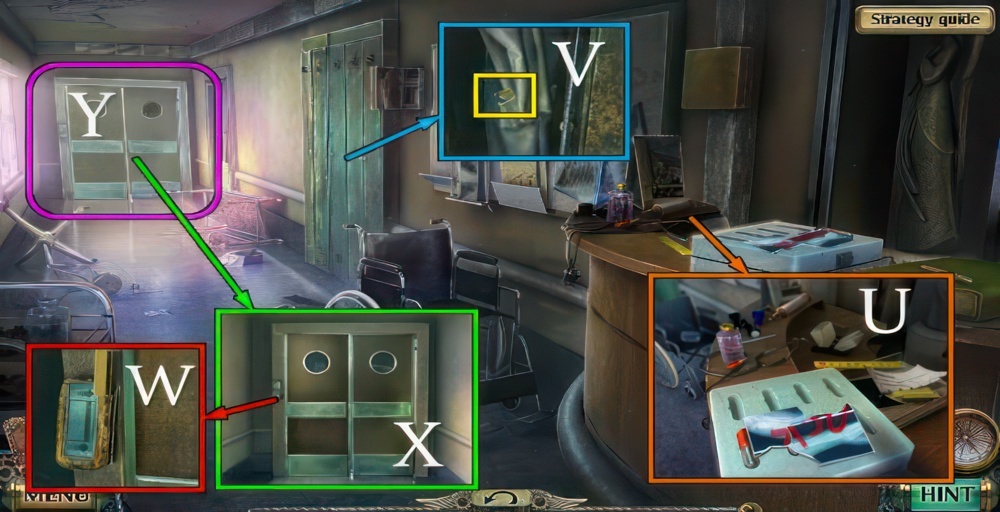
- Take SHOVEL (T).
- Take PLANK (U).
- Move objects, take 3/7 BAS-RELIEF PART and BOOK (V).
- Take PEN AND PAPER and 4/7 BAS-RELIEF PART (W).
- Take CRYPTEX (X).
- Go down.

- Use SHOVEL, take OIL (Y).
- Use OIL, turn key (Z).
- Go (A).

- Take 5/7 BAS-RELIEF PART (B).
- Take FISH FIGURINE (C).
- Place PLANK (D).
- Take GEAR (E).
- Go down ×2.
- Place GEAR (F).
- Play the puzzle (G), receive BIRD FIGURINE.
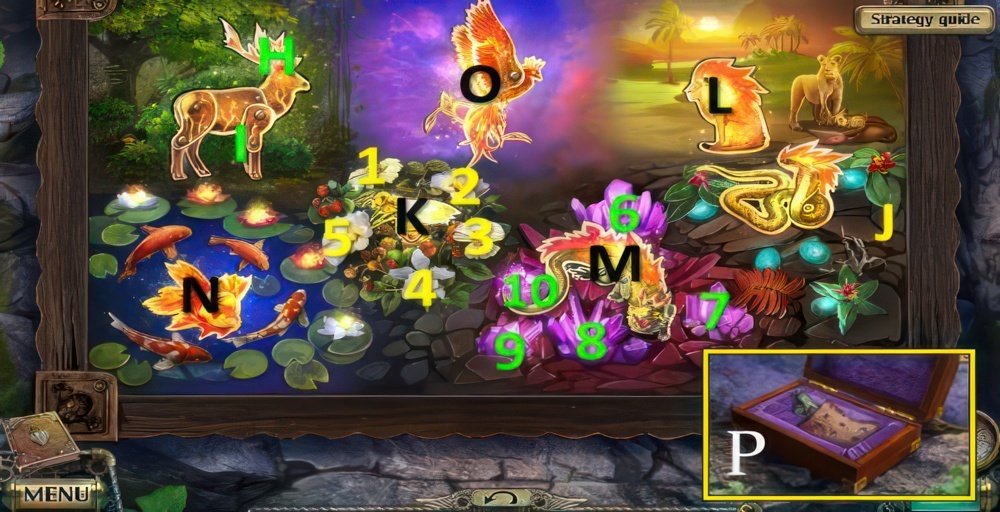
- Place DEER FIGURINE on CASKET.
- Arrange the fish figurines correctly using their outlines.
- Walkthrough: H-I-H.
- Place SNAKE FIGURINE.
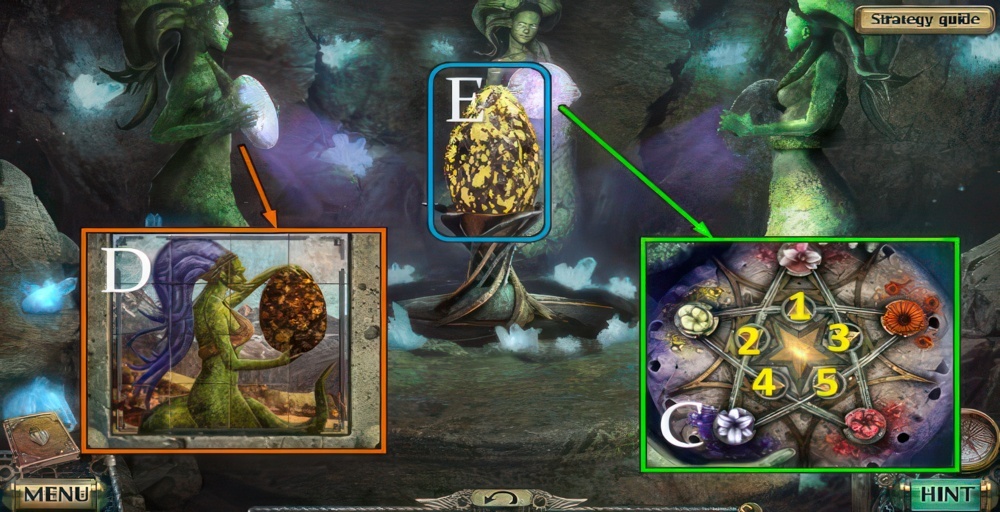
- Find eggs (J).
- Place WASP FIGURINE (K).
- Walkthrough: 1, 4, 2, 5, 3.
- Place LION FIGURINE (L).
- Move lions.
- Place LIZARD FIGURINE (M).
- Walkthrough 7, 10, 6, 7, 8, 9, 6.
- Place FISH FIGURINE.
- Walkthrough (N).
- Place BIRD FIGURINE, remove clouds (O).
- Take HIEROGLYPHIC MESSAGE and BIRD FIGURINE (P).
- Go forward ×2.
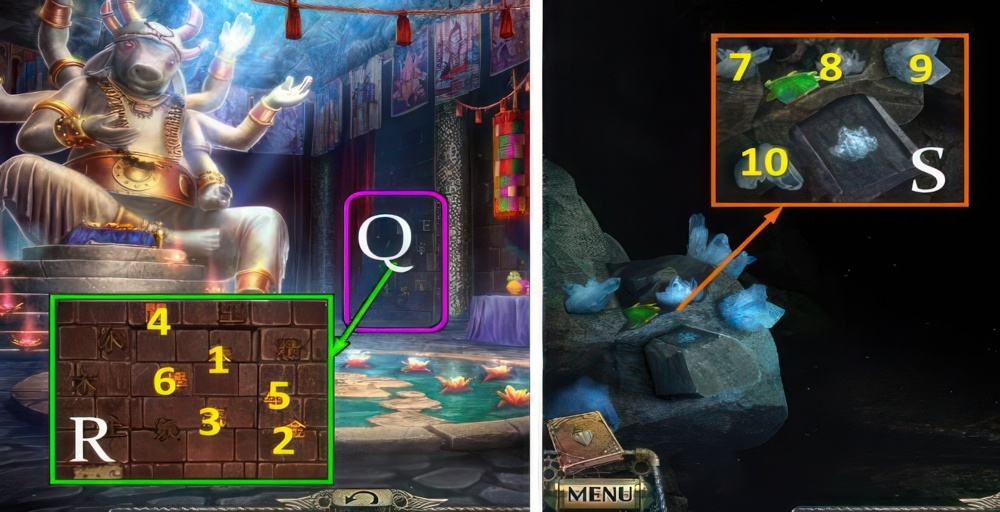
- Move drapes (Q).
- Place HIEROGLYPHIC MESSAGE (R).
- Press the hieroglyphs in the correct order.
- Walkthrough: 1, 2, 3, 4, 5, 6.
- Go (Q).
- Take 6/7 BAS-RELIEF PART.
- Press the crystal, and then repeat the correct sequence.
- Walkthrough: 7, 9, 8, 10, 9, 7.
- Place hand (S).
- Take PICK-AXE (T).
- Place PEN AND PAPER (U), receive HINT.
- Place BIRD FIGURINE (V).
- Figure out the correct position of the figurines.
- Walkthrough: 4, 3, 1, 4, 2.
- Go down.
- Place HINT on CRYPTEX and enter code.
- Take DEITY-SHAPED KEY.
- Place DEITY-SHAPED KEY (W).
- Play the puzzle (X).
- Walkthrough (Y).
- Receive FLOWER.
- Go down and left.
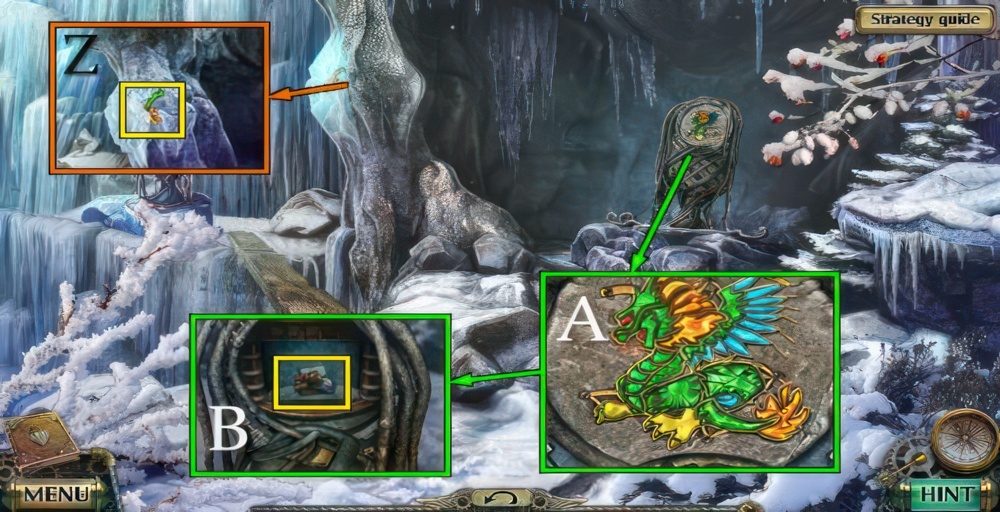
- Use PICK-AXE, take 7/7 BAS-RELIEF PART (Z).
- Place 7 BAS-RELIEF PARTS (A).
- Take MOSAIC PARTS (B).
- Go to Secret Chamber.
- Place FLOWER (C).
- Figure out the correct position of the flowers.
- Walkthrough: 3, 4, 2, 5.
- Place MOSAIC PARTS.
- Restore the image by swapping its parts.
- Walkthrough (D).
- Inspect (E).
- Go to Mountain Foothills.
Searching for the dream woman
The woman from Colin’s dreams was the one who tried to stop the Darkness from getting the stone. That’s why she dropped it into the ocean. She calls my uncle by name in his nightmares. What if she’s still trapped on that strange island with the two-headed mountain. We’ve decided to help her.

- Talk (F).
- Receive KEY.
- Use KEY (G).
- Go (H).
An old mine
Nort gave us the keys to an abandoned mine. A railroad was built inside years ago. It will lead us to the island.
- Take FUEL and RAIL PART (I).
- Take FASTENING and CLUB and move rocks (J).
- Take capsule and CLIPPERS, place RAIL PART and FASTENING (K).
- Go down.
- Use CLIPPERS, take RAG and LEVER (L).
- Combine RAG and FUEL with CLUB.
- Wrap rag around club and pour fuel.
- Receive TORCH.
- Light TORCH (M).
- Go (N).
Getting to the island
The island we need lies before us, but we’re not there yet. We’ve found some parts of a raft on the beach. I wonder if we can fix it.
- Place LEVER (O).
- Use TORCH (P).
- Take ROPE (Q).
- Go (R).

- Take OAR (S).
- Move shells, take LOAD 1/3 (T).
- Use KNIFE, take SAILCLOTH (U).
- Take capsule and RAKE (V).
- Go down.

- Use RAKE, take KEY (W).
- Go (X).
- Use KEY (Y).
- Play the puzzle (Z), receive NAIL PULLER.
- Use NAIL PULLER (A), receive MAST.
- Go down.
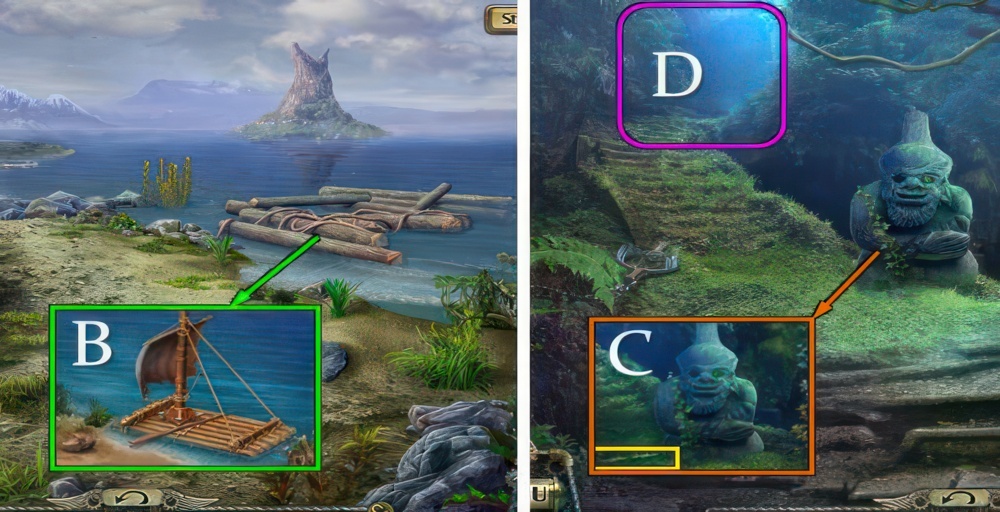
- Assemble raft, place MAST, use rock and place SAILCLOTH, ROPE and OAR (B).
- Take PIPE (C).
- Go (D).
- Take LOAD 2/3, move vines (E).
- Take SPREADER (F).
- Go down.
- Place SPREADER, take BRUSH (G).
- Go down and left.
- Place BRUSH.
- Paint the fish in such a way that no fish is adjacent to one of the same color.
- Walkthrough (H).
- Take FISHING ROD (I).
- Go down.

- Extend FISHING ROD.
- Catch FISH with FISHING ROD (J).
- Go right and left.
- Throw FISH (K).
- Take LOAD 3/3 (L).
- Place LOAD (M).
- Go (N).
A way to the dungeon
We found our way to that island from my uncle’s nightmares. It’s small, and there are a couple of watchmen on top of the mountain. I bet they were placed here to guard something. They look exactly the same as the ones who killed my father. So the Darkness has reached this place, too. We have no weapons and have to be careful as we find a way to disarm the guards, get inside the dungeon and see for ourselves if the strange woman is still here.
- Take CLUB (O).
- Take ROPE WITH HOOK (P).
- Go down.
- Use CLUB, take GARDEN SHEARS (Q).
- Go down.
- Use GARDEN SHEARS (R).
- Go (S).

- Talk (T).
- Receive MAP.
- Place MAP (U).
- Use the map to cross the swamp.
- Select indicated flowers (V).
- Use ROPE WITH HOOK (W).
- Go (X).
- Take DARTS (Y).
- Take BELL (Z).
- Go down.
- Offer BELL (A).
- Receive KEY.
- Go forward.
- Use KEY (B).
- Play the puzzle (C).
- Illuminate only those crystals which make up the correct symbol.
- Walkthrough (D).
- Receive SLEEPING POTION.
- Go to On the Mountain.
- Dip DARTS in SLEEPING POTION, put darts in PIPE.
- Receive BLOW PIPE.
- Use BLOW PIPE (E).
- Take BUNCH OF KEYS (F).
- Remove KEYS from BUNCH OF KEYS and bend wire into a HOOK.
- Place KEYS (G).
- Find 2 matching keys.
- Note that the top key should lift the levers in such a way that all 5 loops in the top are hooked and locked.
- Walkthrough: (1-I), (4-H).
- Go (J).
- Take DETAIL (K).
- Take STAFF (L).
- Take KEY with HOOK (M).
- Go down ×2.

- Place DETAIL.
- Press the arrows to direct the beam through all the chips.
- Walkthrough (N).
- Take KEY and CHISEL (O).
- Go forward ×2.
- Place CHISEL and use rock (P), receive CRYSTAL.
- Go to Swamp.
- Place CRYSTAL, take ROPE LADDER (Q).
- Go (R).
- Take KEY with STAFF (S).
- Go to On the Mountain.
- Place ROPE LADDER, take KEY and MUSHROOM (T).
- Go to Tree House.
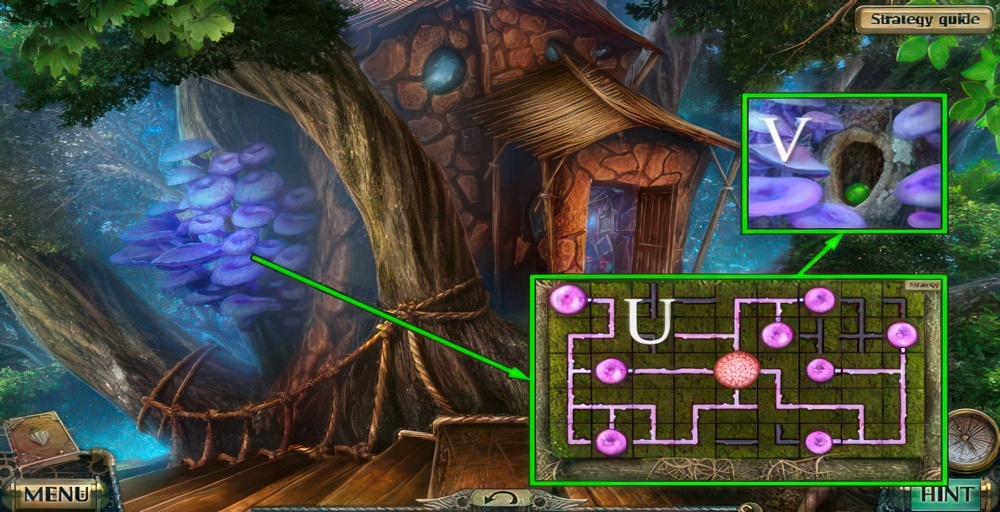
- Place MUSHROOM.
- Rotate the mushroom fragments to create a continuous chain and light up all the mushrooms.
- Walkthrough (U).
- Take STATUE EYE (V).
- Go down ×2.
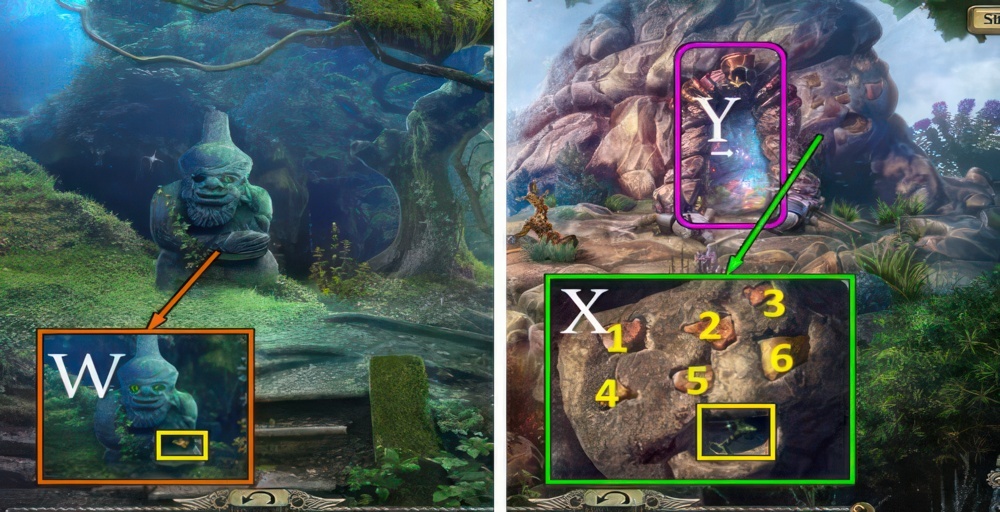
- Place STATUE EYE, take RUNE (W).
- Go left and forward.
- Place RUNE.
- Press the runes in the correct sequence so that all the runes remained pressed.
- Walkthrough: 4, 2, 5, 3, 1, 6.
- Take KEY (X).
- Go (Y).
- Place five KEYS (Z).
- Talk (A).
- Go down seven times.
Blood transfusion
We managed to get the iron shackles off, but the woman barely had any life in her. The worst part was that her mind was clearly fogged by the Darkness. Colin proposed a rather difficult and risky way to help her by using his own blood, filled with antibodies after the Sacuums healed him. What if we transfuse some of his blood to the woman, It might set her free from the Darkness. I think Steve can help us, but we need to get back to him right away.
- Take LANTERN (B).
- Go to In the Temple.
- Place LANTERN.
- Move lanterns.
- Arrange the lanterns on the crystals so they match colors.
- Take COLORFUL MOSAIC PARTS (C).
- Go down and left.
Find a crystal for the device
The crystal we need for the device is broken. I recall seeing a similar one somewhere in the temple. I have to find it.
- Place COLORFUL MOSAIC PARTS.
- Restore the pattern.
- Walkthrough (D).
- Take ENERGY CRYSTAL (E).
- Go down ×3.
- Place ENERGY CRYSTAL (F).
- Talk (G).
- Receive MAP.
- Go (H).
- Place BOOK (I).
- Balance the scales using the books.
- Walkthrough: (4-J), (7-K).
- Take PILL 1/6.
- Go down and left.
- Place MAP (L).
- Go through the labyrinth with the help of the hint.
- Walkthrough: ↑ , → , ↑ , ↑ , → , ↑ , ↑.
- Talk (M).
- Receive SPECIAL POWDER.
- Take STONE (N).
- Take JERRYCAN OF GAS (O).
- Use STONE, open door (P).
- Play the puzzle (Q).
- Open the lock.
- To do so, find the correct order to move all the latches down.
- Walkthrough: 3, 5, 2, 4, 1.
- Receive STATUE HAND.

- Place STATUE HAND, take capsule, PILL 2/6 and BANDAGE (R).
- Use SPECIAL POWDER, open door (S).
- Go (T).
- Take capsule, PILL 3/6, IMAGE FRAGMENTS, RULER and PART (U).
- Use RULER, take CARD and PILL 4/6 (V).
- Use CARD (W).
- Open door (X).
- Go (Y).

- Place IMAGE FRAGMENTS, take FUNNEL (Z).
- Take PILL 5/6, place FUNNEL and JERRYCAN OF GAS.
- Pull handle ×3 (A).
- Select 7450 and enter (B).
- Take SYRINGE and PILL 6/6 (C).
- Go down.

- Place 6 PILL, take KEY and PIPES (D).
- Go forward.
- Combine BANDAGE, PIPES and SYRINGE with PART, receive a TRANSFUSION PUMP.
- Place TRANSFUSION PUMP (E).
- Go down ×2.
Warn the Sacuums
We could have talked for ages, but my aunt hurried us up. Since her mind had been fogged by the Darkness, she knew all its plans. An enormous army of Darkness was on its way to the Forbidden City. We have to go there and warn the people. My aunt will stay behind with Steve and rest.

- Use KEY and zoom in (F).
- Find the items and place them in the correct spots.
- Walkthrough (G).
- Go forward.

- Enter the correct code.
- Enter 6347 (H).
- Go (I).
- Take CARABINER and MAGNET (J).
- Take ROPE (K).
- Attach ROPE to MAGNET.
- Take 1/9 FRUIT, take GOBLET-SHAPED KEY with MAGNET (L).
- Use GOBLET-SHAPED KEY (M).
- Play the puzzle (N).
- Rotate the chips to restore the correct image.
- Walkthrough (O).
- Receive PICTURE.
- Place PICTURE.
- Find and mark all the identical elements on both images.
- Walkthrough (P).
- Take KEY CARD (Q).
- Go down.
Dam destruction
The Forbidden City lies at the bottom of a canyon. A dam which holds back thousands of tons of water was built on one side of the city. The Army of Darkness is on the march from the opposite side. Our only viable option to counter an army thousands strong is to blow up the dam and flood the warriors of Darkness. We have to understand that the city will be destroyed in the process, and even though it’s empty now well, that is the price we have to pay for our freedom.
- Use KEY CARD (R).
- Talk (S).
- Take capsule, 2/9 FRUIT and COIN (T).
- Take LADDER (U).
- Go down.

- Place LADDER (V).
- Go (W) and go forward.
- Take 3/9 FRUIT (X).
- Take STRAPS (Y).
- Go down and right.
- Take 4/9 FRUIT (Z).
- Take 5/9 FRUIT (A).
- Place STRAPS (B).
- Go (C).

- Take GAS TANK (D).
- Take BALLOON CANVAS (E).
- Play the puzzle (F).
- Find the objects displayed in the top panel within 60 seconds.
- Receive HOIST.
- Take ROPE and PIN (G).
- Use PIN, take BATTERY and 6/9 FRUIT (H).
- Go down.
- Place HOIST and ROPE (I).
- Go (J).
- Place and attach CARABINER (K).
- Receive DYNAMITE.
- Go to Lookout Tower.
- Place BATTERY, take KEY (L).
- Go to Mine Entrance.
- Use KEY, take BURNER (M).
- Go down.
- Assemble balloon and place BALLOON CANVAS, GAS TANK and BURNER (N).
- Take capsule, METAL PIPE and 7/9 FRUIT (O).
- Go to the Abandoned Freeway.
- Use METAL PIPE, take KEY (P).
- Use KEY, take HOOK and DETONATOR (Q).
- Go down and left.
- Get GEAR with HOOK (R).
- Go down.
- Place GEAR for a puzzle (S).
- Rotate the field to move the ball into the hole.
- Walkthrough: U, 5T, 3U, 3T, U, 3T, U.
- Take 8/9 FRUIT (V).
- Go to Bar.
- Use COIN, take 9/9 FRUIT (W).
- Place 9 FRUITS (X).
- Take FUSE (Y).
- Open DYNAMITE and place DETONATOR and FUSE.
- Attach fuse to receive BOMB.
- Go to Top of the Dam.
- Place BOMB (Z).
- Walkthrough Bonus Chapter, at the link below.


