
Enchanted Stories 1: Mystic Woods (Bonus Chapter) – Continues Rose’s story after the events of the main game, plunging you into a new, tense adventure where the future of the magical forest is once again at stake. As Rose and her allies try to restore balance, a new threat rises in the forest. The woodcrafters haven’t gone away, they’re back, armed with magic and sharpened axes capable of cutting down any tree. Erling has delivered a magic crystal to enhance the power of the weapons, and now Morgan’s fate hangs in the balance. They must act quickly to settle things, the woodsmen have already captured the mage, and now he’s after the powerful artifact known as the Sphere of Life. Rose must travel to the Cave of the Sages to find an ancient map that can point the way to the Sphere. But time is short: the waters of the Valley of the Falls are poisoned and the purifying streams are cursed. You will need to break the spell, restore the purity of the rivers, and heal the forest before the darkness takes root for good. The dryads need your help, the valley cries out for protection, and the path to salvation is hidden behind a waterfall in a cave. Fight your way through it to uncover secrets, find the power to resist the mage, and restore hope to the forest. The flowers will bloom again, praising your bravery if you make it through.
Bonus Chapter Walkthrough

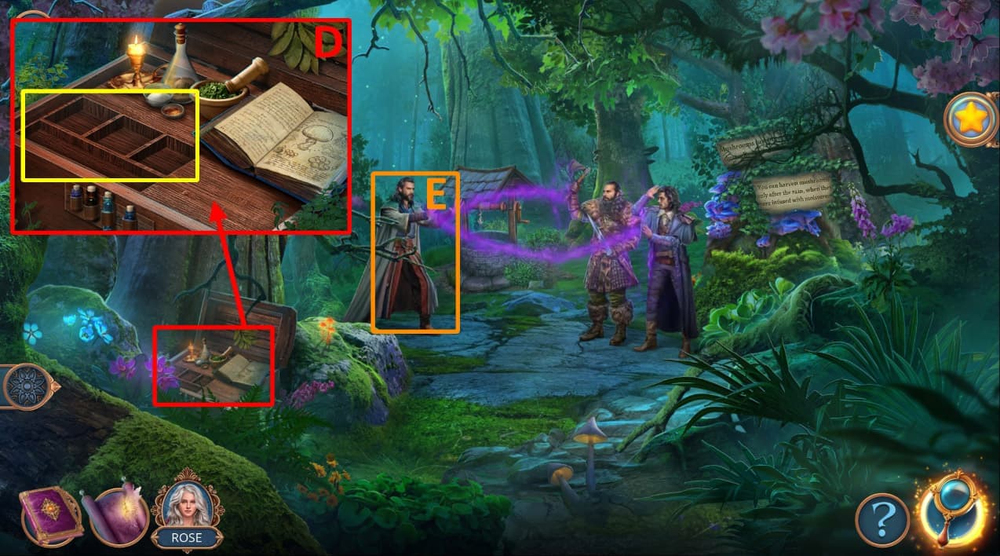
- Take DARK CLOTH SCRAP and BOWL WITH RESIN (A).
- Take MASKS 1/2 and PLANKS (B).
- Take WOODEN MUG (C).
- Use BOWL WITH RESIN and PLANKS on the hole, use WOODEN MUG on the water, take DIVIDERS, BROKEN OAR, CANE TOP, and MANGO (D).
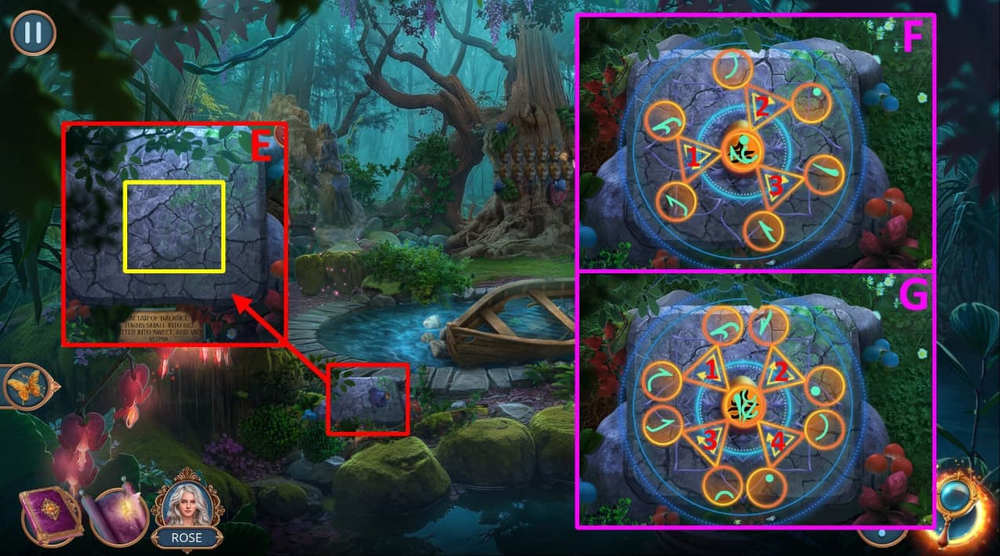
- Use MANGO on the altar (E).
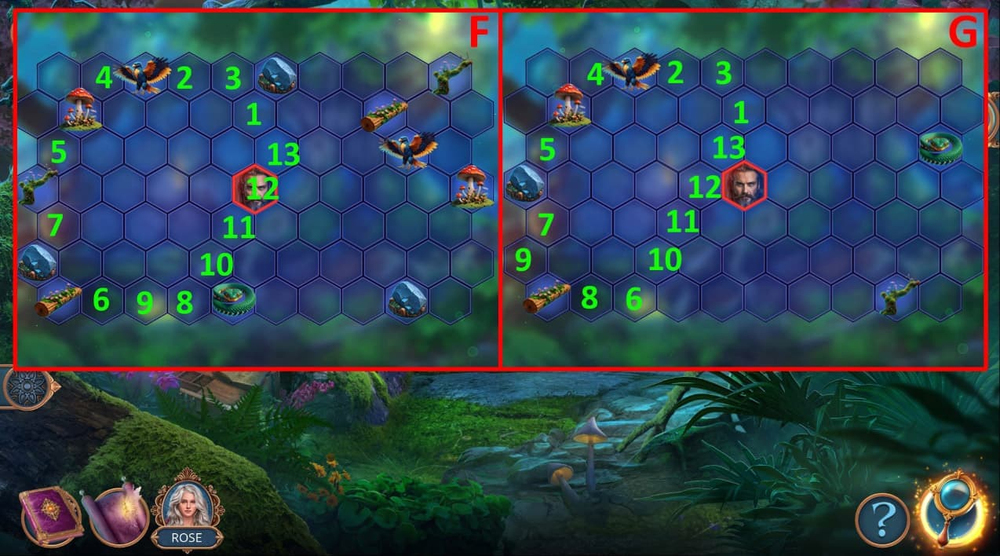
- Easy solution: Click on the triangles in the following order:1-2-3-1×2-2×2-3×2-1×2-2×2-3×2 (F).
- Hard solution: Click on the triangles in the following order:1-2×2-3×2-4-1-2×2-3-4×2-1-2×2-3-4×2 (G).
- Take DURIAN.

- Use DURIAN on the Dryad (H).
- Select this option (I).
- Earn HEALING OINTMENT.

- Use HEALING OINTMENT on the damaged tree bark, take THORNS (J).
- Use CANE TOP and THORNS on the broken wheel (K).
- Use DARK CLOTH SCRAP on DIVIDERS (L).
- Go forward.
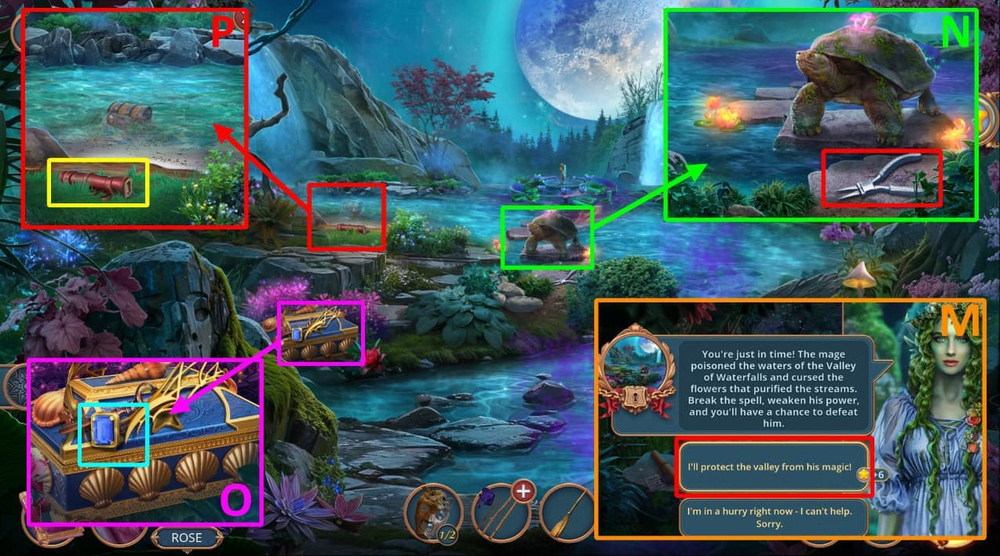
- Select this option (M).
- Go forward.
- Take NEEDLE-NOSE PLIERS (N).
- Take CHEST KEY, examine the diadem, use NEEDLE-NOSE PLIERS on the gem, earn SAPPHIRE (O).
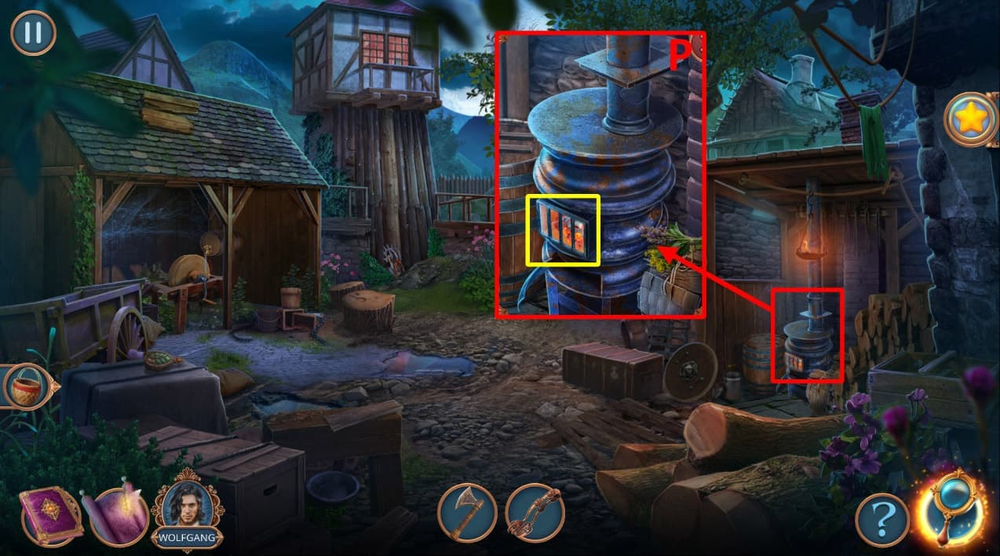
- Examine the case, use SAPPHIRE on the slot, take COMB (P).
- Go back.

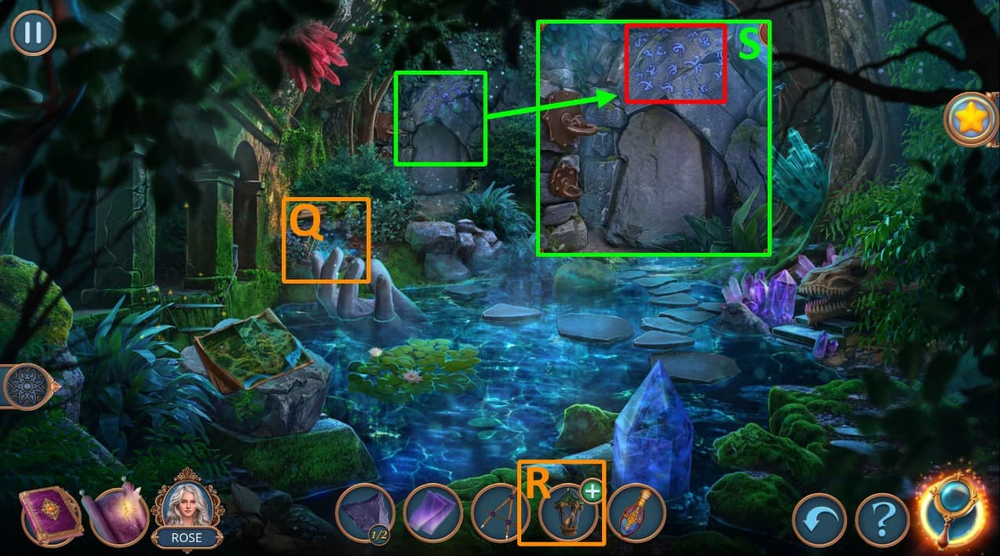
- Take FLINT AND STEEL 1/2, take and read the note (Q).
- Go back.

- Use COMB on the seaweed, take STARFISH (R).
- Go to the Valley of Waterfalls.
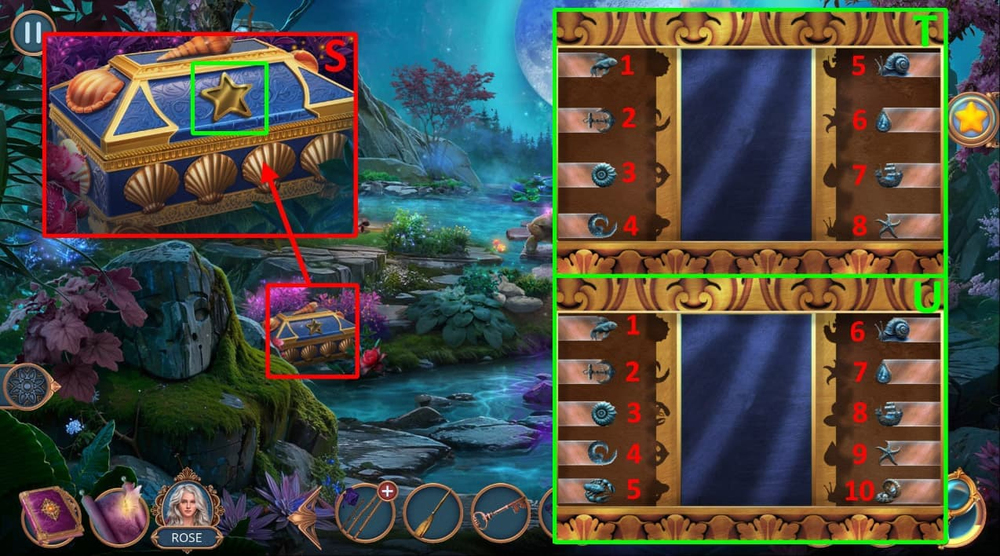
- Use STARFISH on the slot (S).
- Easy solution: Swap the following positions: 3-5-1-3-3-8-6-3-7-3-4-5-2-5-3-5 (T).
- Hard solution: Swap the following positions: 2-9-7-4-4-9-2-7-1-6-1-10-1-8-5-6-3-6-1-6 (U).
- Take STRAWBERRY.

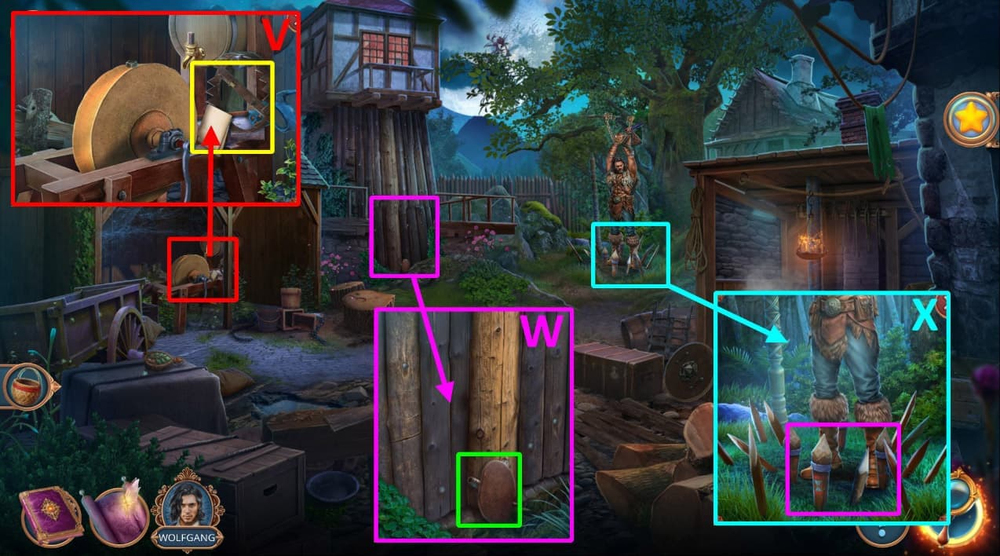
- Give STRAWBERRY to the turtle (V).
- Take CROCHET HOOK (W).
- Go back.

- Use CROCHET HOOK on the net, take FISHING NET, take and read the note, take FLUTE (X).
- Go forward.
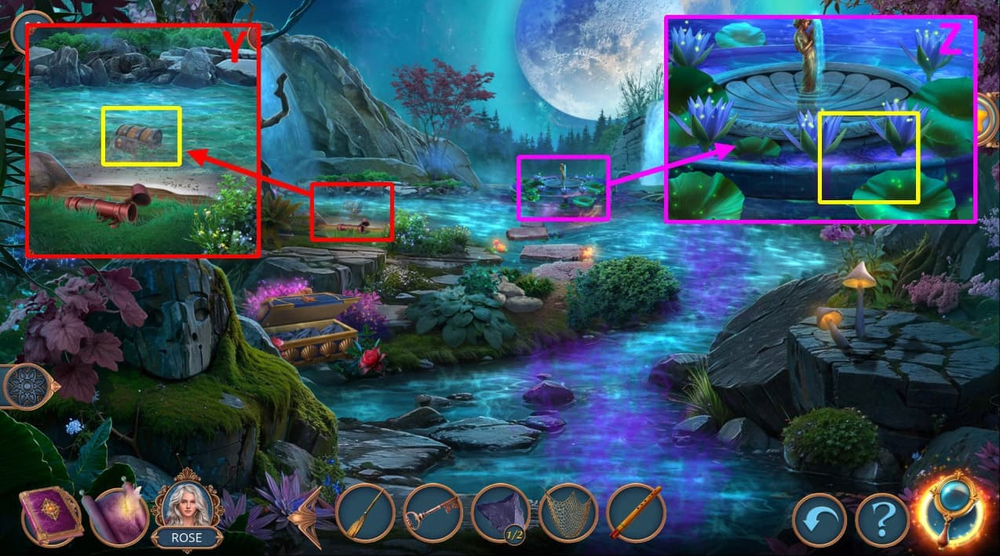
- Use FISHING NET on the chest, use CHEST KEY on the chest, take SHEET OF MUSIC (Y).
- Use SHEET OF MUSIC and FLUTE on the flowers (Z).

- Easy solution: Arrange the notes as shown in the picture (A).
- Hard solution: Arrange the notes as shown in the picture (B).
- Go back.

- Take TORCH (C).
- Use BROKEN OAR and TORCH on the rope ladder (D).
- Play puzzle, earn DIAMOND PENDANT (E).
- Use DIAMOND PENDANT on the crystal, earn VIOLET GLASS, take FILE and MASKS 2/2 (F).
- Use FILE on DIVIDERS, earn DIVIDERS (G).
- Go back.

- Use MASKS on the tree (H).
- Easy solution: Click on the masks in the order shown in the picture (I).
- Hard solution: Click on the masks in the order shown in the picture (J).
- Take DRAGON FANG.
- Go forward.
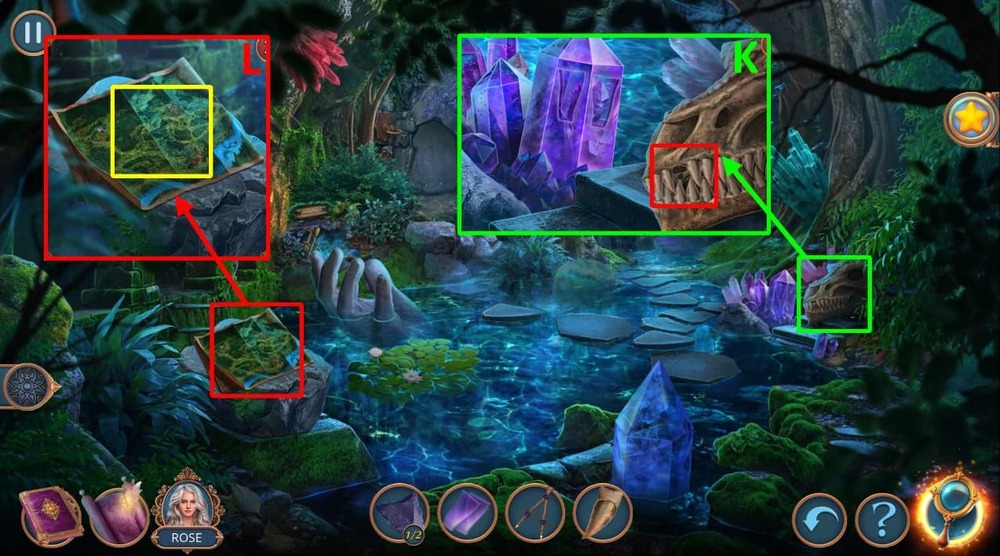
- Use DRAGON FANG on the dragon skull, take LANTERN and VIAL WITH SILVER WATER (K).
- Use VIAL WITH SILVER WATER on the map, then use DIVIDERS on it (L).

- Easy solution: Lay out the path as shown in the picture (M).
- Hard solution: Lay out the path as shown in the picture (N).
- Select this option (O).
- Earn CRYSTAL BALL AMULET.
- Go back.

- Examine the bag, use CRYSTAL BALL AMULET on the slot, take FLINT AND STEEL 2/2 (P).
- Go forward.
- Play puzzle, earn NIGHT FLOWER (Q).
- Use VIOLET GLASS, NIGHT FLOWER, and FLINT AND STEEL on LANTERN (R).
- Use MAGIC LANTERN on the symbols (S).

- Easy solution: Press the stones in the following order: 1-4-5-1, click on the symbol, 3-2-6-3, click on the symbol, 3-8, click on the symbol (T).
- Hard solution: Press the stones in the following order: 1-4-5-1, click on the symbol, 3-2-6-3, click on the symbol, 3-8, click on the symbol, 3-5, click on the symbol, 3-6-4-7, click on the symbol (U).
- Take and read the note, take DICE 1/2, BROKEN TRAP, and SAW (V).
- Take TRAP PAN (W).
- Use SAW on the stakes, take QUILL and SCARF (X).

- Use SCARF on the chimney flap, take PAPER, MAGNET, and SCREW (Y).
- Use TRAP PAN and SCREW on BROKEN TRAP, earn TRAP (Z).
- Use TRAP on the chains (A).

- Select this option (B).
- Earn CLEATS.
- Use CLEATS on the fence (C).

- Easy solution: Press the arrows in the following order: Bx2-C-F-G-J-K-N-P (D).
- Hard solution: Press the arrows in the following order: Bx2-C-F-Hx2-Ix2-K-Mx2-P (E).

- Take INK and SPONGE (F).
- Use MAGNET on the latch, take SHARP AXE and BELL (G).
- Use BELL on the pole, take and read the note, take DICE 2/2 (H).

- Use DICE on the board (I).
- Easy solution: Click on the cells in the sequence shown in the picture (J).
- Hard solution: Click on the cells in the sequence shown in the picture (K).
- Take and read the note, take VALVE.
- Go back.

- Use VALVE on the tap, use SPONGE on the water, earn WET SPONGE (L).
- Go forward.

- Use WET SPONGE on the stains, take LOCK PICKS (M).
- Use LOCK PICKS on the door, use QUILL, PAPER, and INK on the code, earn PAPER WITH CODE (N).
- Use PAPER WITH CODE on the lock, press the buttons in the order shown in the clue, take TONGS (O).
- Go back.
- Use TONGS on the fire, earn TONGS WITH COAL (P).
- Go forward.

- Use TONGS WITH COAL on the crystal, then use SHARP AXE on it (Q).
- Solution: Click the arrows: L-Dx4-Lx2-R-L-Ux2-Rx7-Ux2-Lx2-Dx2-Ux4-L-U-D-U-D-L-U-D-L-R-Lx3-R-Lx2-Dx2-Ux2-Dx2-L-R-D (R).
- Select this option (S).

- Take ACORN and PLANK (T).
- Take CLOCK HANDS 1/2 and GARDEN TROWEL (U).
- Use GARDEN TROWEL on the pile of dirt, take GLUE and ROPE (V).

- Use ROPE on the higher branch, take TREE BARK, take and read the note, take RITUAL TAMBOURINE (W).
- Use RITUAL TAMBOURINE on the clouds (X).
- Play puzzle (Y).
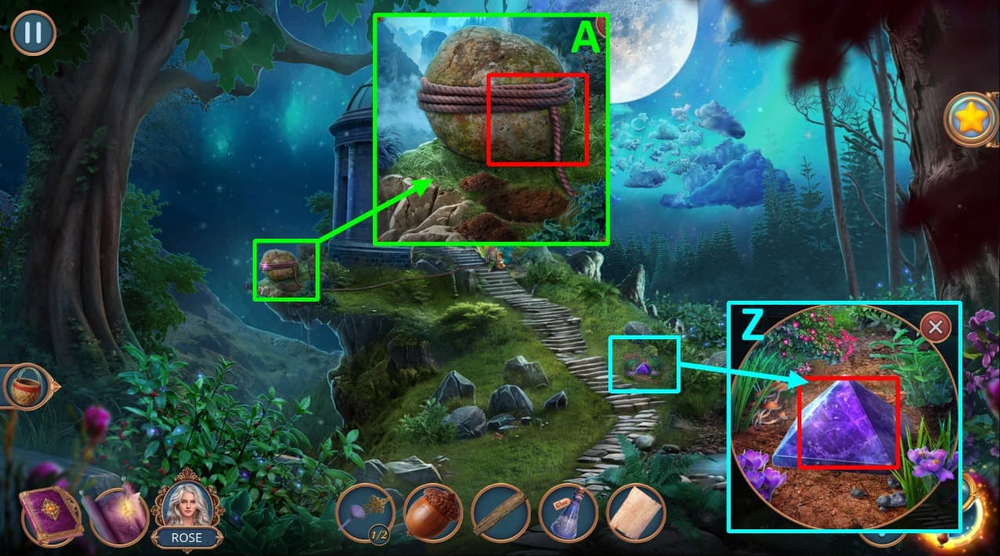
- Take PYRAMID (Z).
- Use PLANK and PYRAMID on the boulder (A).
- Go forward.

- Take and read the note, take SIEVE, use ACORN on the plate (B).
- Take BRANCH WITH LEAVES (C).
- Use BRANCH WITH LEAVES on the web, examine the book, click on the items that match the highlighted words: swirls of wind, wings.
- Take KITE and BROKEN ARROW (D).

- Use BROKEN ARROW on the brick, take TWO-PRONGED FORK (E).
- Use GLUE, TREE BARK, and TWO-PRONGED FORK on SIEVE, earn SIEVE (F).
- Go back.

- Use SIEVE on the water (G).

- Easy solution: Use the arrows to position the rays as shown in the pictures (H).
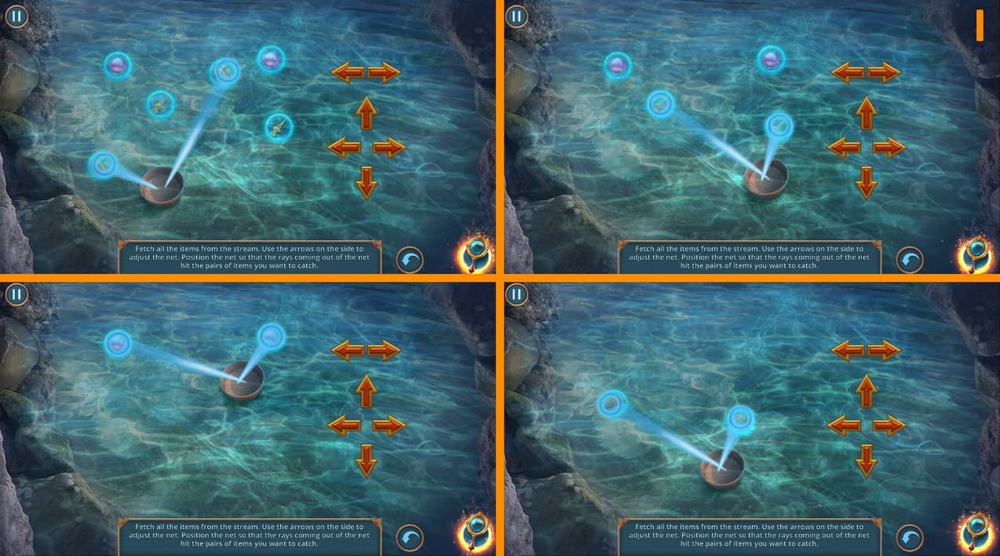
- Hard solution: Use the arrows to position the rays as shown in the pictures (I).
- Take CLOCK HANDS 1/2, PEARL, and GOLD.
- Go forward.

- Use CLOCK HANDS and GOLD on the scale, examine the scale, take BRUSH, BOWL, and BAG (J).
- Use BAG on dandelions, earn BAG OF DANDELIONS (K).

- Use PEARL and BAG OF DANDELIONS on the plate (L).
- Solution: Click on the flasks: 1×2-2×4-3×5-4×7 (M).
- Take SPHERE and SEALED SCROLL.
- Talk to Erling.
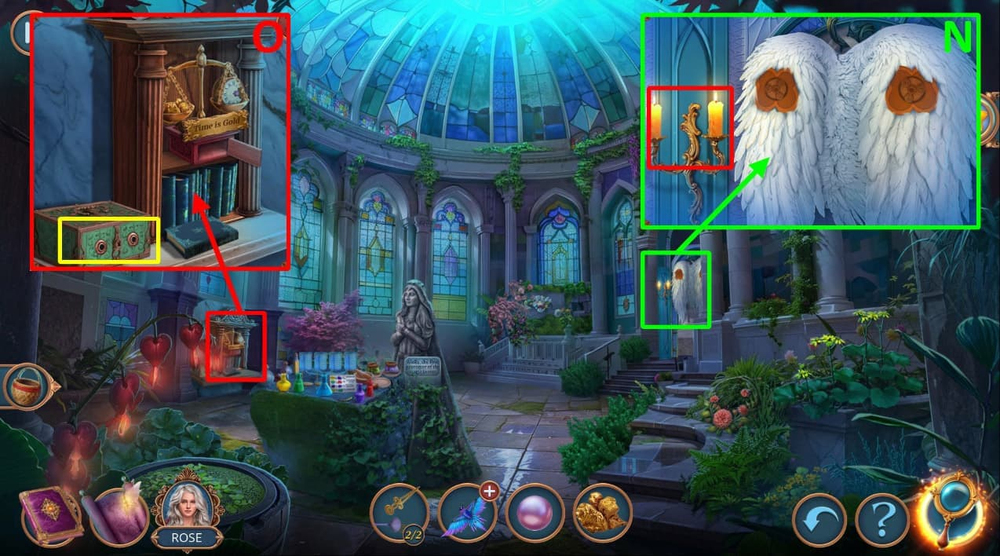
- Use SEALED SCROLL on the candle, read it, take RIBBON, earn SCROLL (N).
- Use RIBBON on the box, take ORNATE AMULETS 1/2 and KNIFE (O).
- Go back.

- Play puzzle (P).
- Take STAINED GLASS SHARD (Q).
- Go forward.

- Use STAINED GLASS SHARD on the slot (R).
- Easy solution: Rotate the pieces to create the image shown in the picture (S).
- Hard solution: Rotate the pieces to create the image shown in the picture (T).
- Take ORNATE AMULETS 2/2.
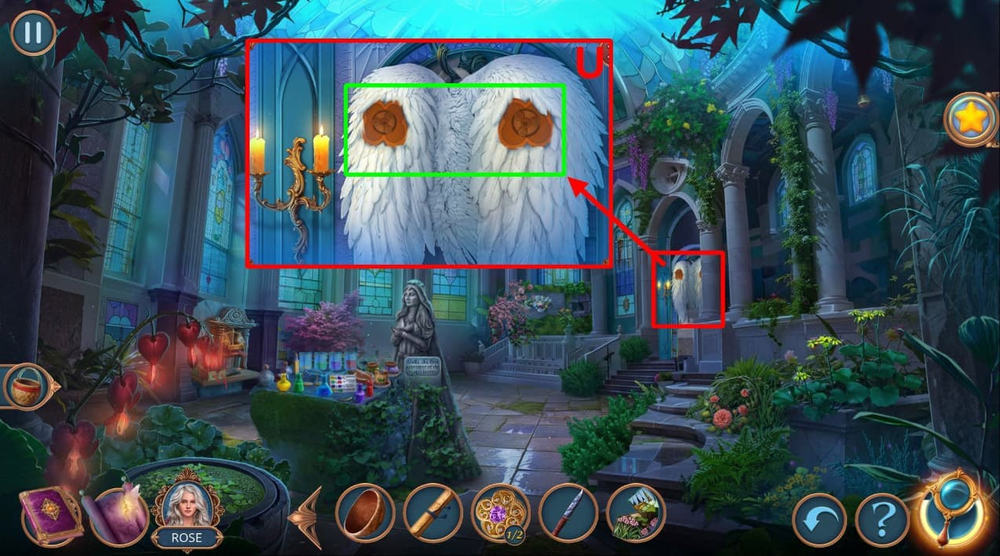
- Use ORNATE AMULETS on the wings, take WINGS (U).

- Take SPINDLE and SEPTUM RING, use SCROLL on the book (V).
- Use SPINDLE on KITE, earn KITE (W).
- Use KITE on the handle, earn WELL HANDLE (X).

- Take VIAL, use SEPTUM RING and WELL HANDLE on the well, earn WOODEN BUD and BUCKET OF WATER, examine the berry bush, use BOWL on it, take BERRIES (Y).
- Use BUCKET OF WATER on the mushrooms, use KNIFE on the mushrooms, earn WATER MUSHROOM (Z).
- Use WOODEN BUD on the wooden stem, use BRUSH on the butterflies (A).

- Easy solution: Arrange the butterflies as shown in the picture (B).
- Hard solution: Arrange the butterflies as shown in the picture (C).
- Earn BRUSH WITH POLLEN.
- Use VIAL, BERRIES, WATER MUSHROOM, and BRUSH WITH POLLEN on the book, take MAGIC POWER POTION (D).
- Click on Morgan (E).
- Easy solution: Click on the cells in the order shown in the picture (F).
- Hard solution: Click on the cells in the order shown in the picture (G).
Congratulations! You have completed the game Enchanted Stories 1: Mystic Woods.


