Halloween Stories 6: Mark on the Bone (Bonus Chapter) – You will learn the story of Teresa Adamini, the rightful owner of an ancient castle. Teresa is preparing for an important event, the execution of inheritance papers that will return her rights to the castle and reveal its past. However, harmless preparation for the celebration suddenly turns into a struggle to save the village. An exciting journey through the streets of the village awaits you, where you will search for lost papers and armor, help prepare the feast, and protect the villagers from the threat. Robert, driven by his thirst for power, is ready to do anything to achieve his goal, and only you can distract him to give the villagers a chance to save themselves.
Bonus Chapter Walkthrough

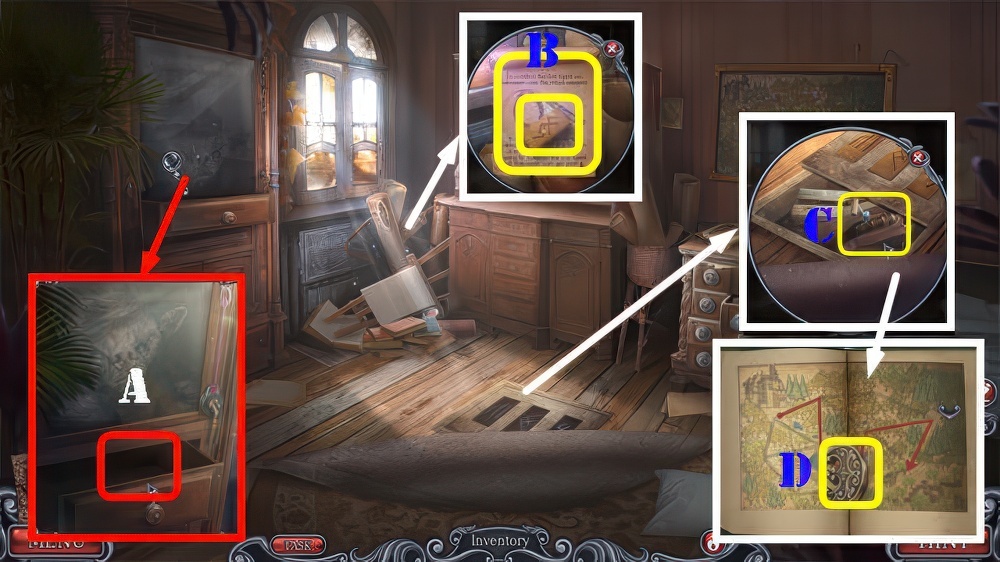
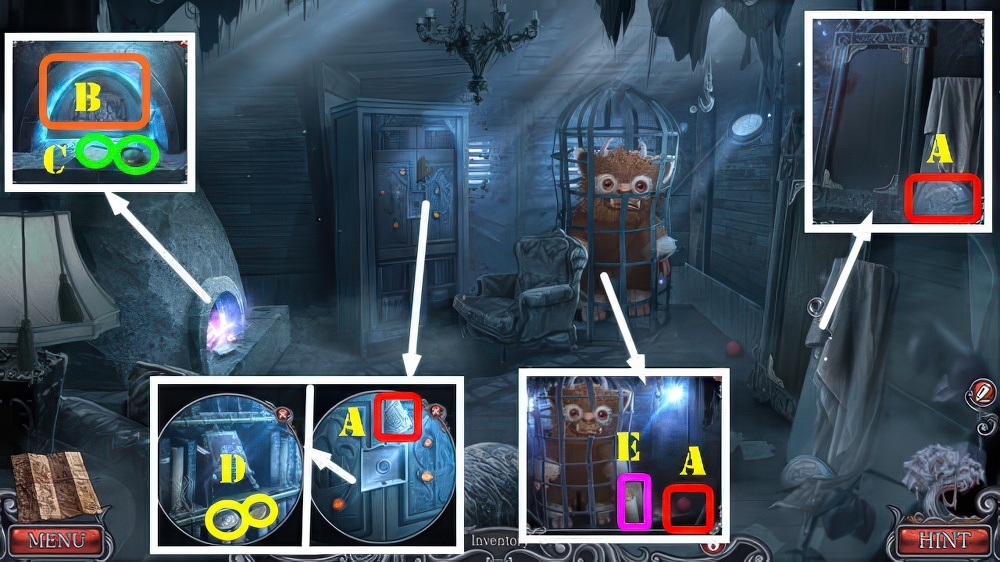
- Talk (A).
- Take HEADMAN’S PAPERS 1/5-5/5, SLINGSHOT, and WOODEN CREST (B).
- Give HEADMAN’S PAPERS 5/5 (A), receive WOODEN STAMP.

- Place WOODEN CREST and WOODEN STAMP, take FLOWER AMULET and BUCKET (C).
- Place FLOWER AMULET (D).
- Take PRUNERS and RUBBER BAND (E).
- Use PRUNERS (F).
- Play puzzle, receive GRANDMOTHER’S COIN.

- RUBBER BAND and GRANDMOTHER’S COIN on SLINGSHOT, take LOADED SLINGSHOT.
- Use LOADED SLINGSHOT (G), receive GRANDMOTHER’S COIN.
- Use GRANDMOTHER’S COIN, take CLOVER AMULET and CHAIN WITH HOOK (H).
- Use CHAIN WITH HOOK and BUCKET (I), receive WATER and SATCHEL.
- Use WATER and then enter (J).
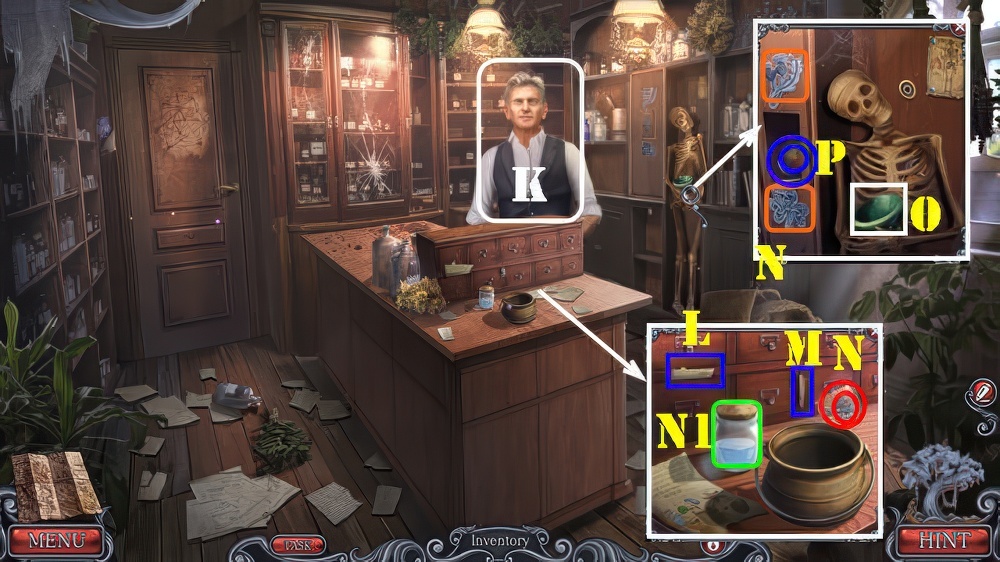
- Talk (K), receive FORCEPS.
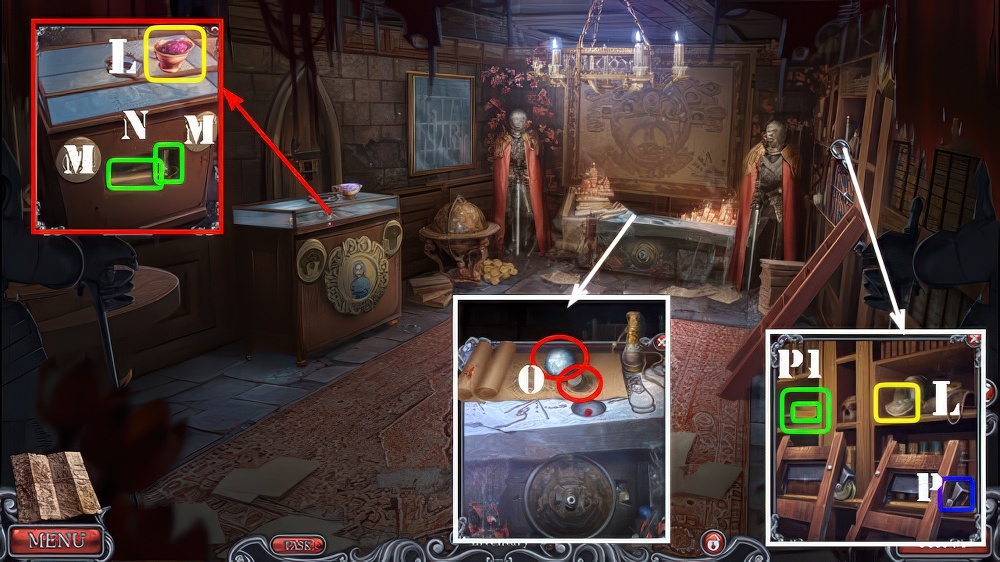
- Look at Note (L).
- Use FORCEPS (M).
- Take THISTLE AMULET and MARAUDER’S NOTE (N).
- Select (N1).
- Take SPIRIT’S BOWL (O).
- Place CLOVER AMULET and THISTLE AMULET (orange), take CHALK and TREAT (P).

- Use CHALK (Q).
- Solution (1-17).
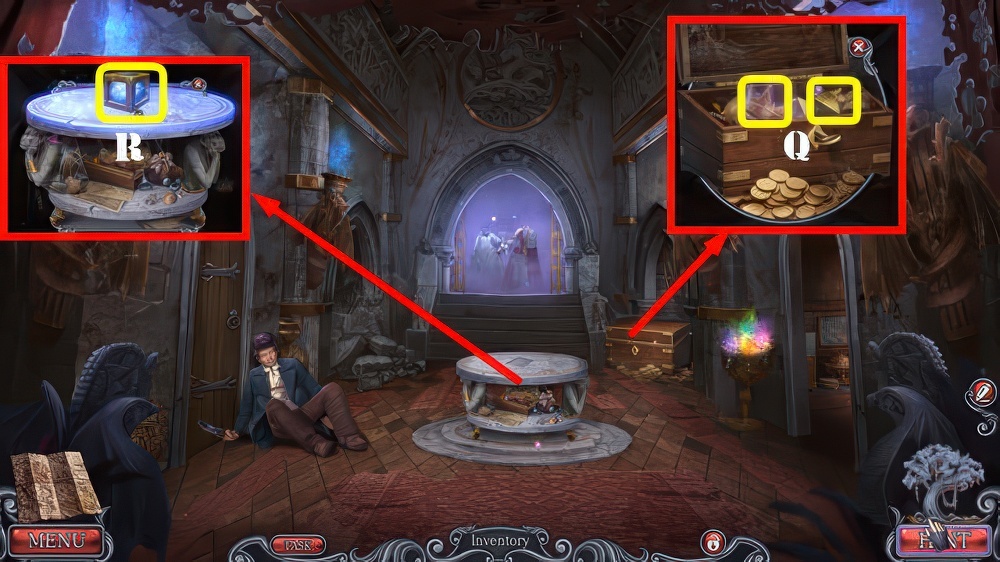
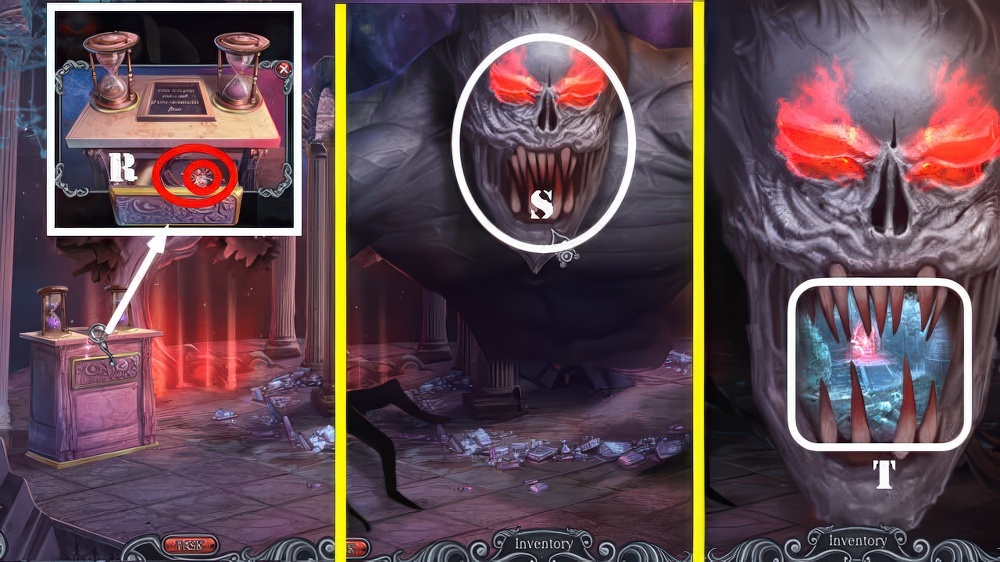
- Go (R).

- Take DRAWER HANDLE and SECURITY RUNE (S).
- Place MARAUDER’S NOTE and select, place DRAWER HANDLE.
- Select 4x, take FINGERPRINT and LOCKPICK (T).
- LOCKPICK on SATCHEL, take VEIL SPELL and LIVING HERBS.
- Use VEIL SPELL (U).
- Take BLOODHOUND CLAW and SKELETON BRACE (U1).
- Walk down.

- Place SKELETON BRACE (V), take STARFISH and PROTECTION RUNE (W).
- Place LIVING HERBS, BLOODHOUND CLAW, STARFISH, and FINGERPRINT, take FINGERPRINT POTION (X).
- Go (Y).
- FINGERPRINT POTION and TREAT in SPIRIT’S BOWL, take SPIRIT OFFERING.
- Use SPIRIT OFFERING (A).
- Play puzzle, receive FEATHER EMBLEM.
- Place FEATHER EMBLEM and open scroll, take SERENITY RUNE and BLOOD DROP (B).
- Place SECURITY RUNE, PROTECTION RUNE, and SERENITY RUNE, take HOIST (C).
- Select book 3x, take RHEA’S EARRING (D).
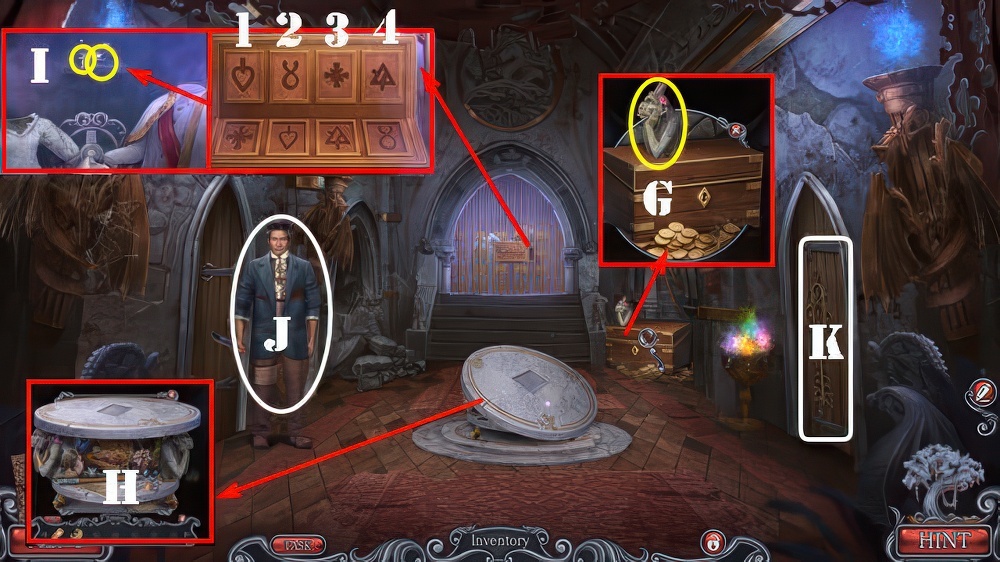
- Take GARGOYLE FIGURINE (G).
- Use HOIST and GARGOYLE FIGURINE (H).
- Play puzzle, receive PLATE CLUE.
- Place PLATE CLUE, solution: 3-1-4-2.
- Take NEEDLE and SLEEPING DART (I).
- Use SLEEPING DART (J).
- Play puzzle, receive UNLOCKING SPELL.
- Use UNLOCKING SPELL and go (K).
- Take RHEA’S COMB and MAGICAL SAND (L).
- Place RHEA’S EARRING and RHEA’S COMB (M).
- Take SUMMONING SCROLL and ANCESTOR’S BLOOD (N).
- Place ANCESTOR’S BLOOD, BLOOD DROP, and NEEDLE, take LADDER WHEEL and MAGICAL CRYSTAL (O).
- Place LADDER WHEEL (P).
- Take DISASSEMBLED CUBE and TWISTED KEY (P1).
- Walk down.
- Use TWISTED KEY, take KING’S CROWN and CUBE FASTENERS (Q).
- MAGICAL CRYSTAL, DISASSEMBLED CUBE, and CUBE FASTENERS on SUMMONING SCROLL.
- Select pieces to combine them with others, take SOUL SUMMONING SPELL.
- Place SOUL SUMMONING SPELL (R), receive QUEEN’S CROWN.

- Place KING’S CROWN and QUEEN’S CROWN (S), take VALVE (S1).
- Go (T).
- Use VALVE (U).
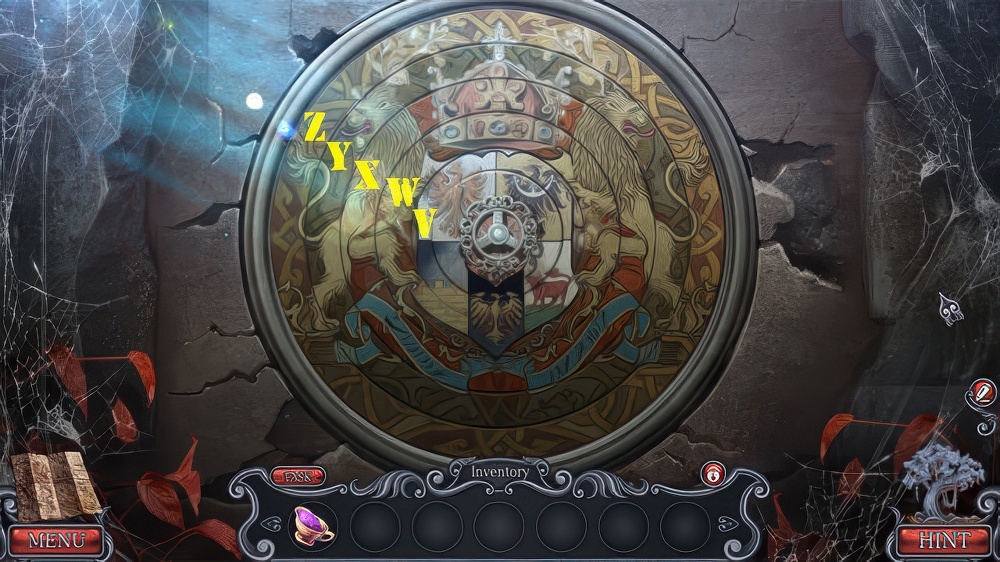
- Solution (Vx6-Wx3-Xx5-Y-Zx4).
- Take FAMILY CREST.
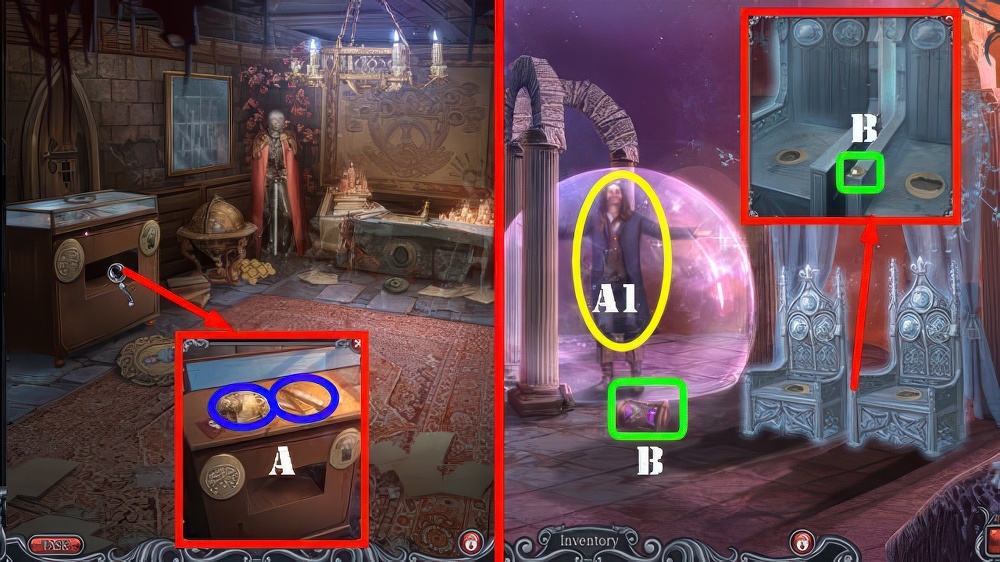
- Place FAMILY CREST, take GOVERNOR STATUE and BROKEN RITUAL WEAPON (A).
- Talk (A1).
- Take HOURGLASS and TAPE (B).

- Place HOURGLASS (C) and use MAGICAL SAND (D), take KEEPER STATUE (E).
- Place GOVERNOR STATUE and KEEPER STATUE (F).
- Take LYRE and STAFF OF DESTRUCTION (F1).
- Use STAFF OF DESTRUCTION (G).

- Solution: (H-Ix3)-(J-Kx2)-(Lx3-Mx2)-(Nx3-Ox3)-(Px3-Qx3).
- Receive TONGS.
- Use TONGS, take OTHERWORLDLY SPIDER and WHIP (R).
- WHIP and TAPE on BROKEN RITUAL WEAPON, take RITUAL WEAPON.
- Use RITUAL WEAPON (S).
- Go (T).

- Take MIRROR FRAME 1/3 and PICKAXE (U).
- Use PICKAXE, take PLANKS and MIRROR FRAME 2/3 (V).
- Place PLANKS (W), take MUSIC SHEET (W1).
- Place MUSIC SHEET (X) and use LYRE (Y).
- Enter (Z).
- Take CATACOMBS MAP, GUIDING THREAD, and OVEN DOOR (A).
- Place OVEN DOOR (B), take BOOK EMBLEM and BROKEN COMPASS (C).
- Place BOOK EMBLEM, take COMPASS FACE and PADLOCK (D).
- Select gate and look at Note (E).
- Walk down.

- Place OTHERWORLDLY SPIDER and PADLOCK (F).
- Play puzzle, receive DIAMOND PENDANT.
- Use DIAMOND PENDANT, take COMPASS NEEDLE and MIRROR FRAME 3/3 (G).
- COMPASS FACE and COMPASS NEEDLE on BROKEN COMPASS, take COMPASS.
- Place CATACOMBS MAP and COMPASS (H).

- Solution (@1): (Nx2-Ex2)-(N-W-N)-(E-N-E)-(S-E-Nx2).
- Take PUZZLE BOX.
- Go (I).

- Give PUZZLE BOX, take BOOK STRAP 1/3 (J), receive GUIDE.
- Place MIRROR FRAME 3/3 and GUIDE (K).
- Go (L).

- Take BOOK STRAP 2/3 and ASTRAL DAGGER (M).
- Use ASTRAL DAGGER (N), take MATERIALIZATION CAGE and CANE (O).
- Use CANE (P), take BOOK STRAP 3/3 and OTHERWORLDLY CHAIN, look at Note (Q).
- Walk down.

- Use BOOK STRAP 3/3 (R) and select book (S).
- Play puzzle, receive MATERIALIZATION CLOAK.
- OTHERWORLDLY CHAIN and MATERIALIZATION CLOAK on MATERIALIZATION CAGE, take OTHERWORLDLY CAGE.
- Hang OTHERWORLDLY CAGE (T).
- Take GATEKEEPER and OTHERWORLDLY BIRD (U).
- Go (V).

- Place OTHERWORLDLY BIRD, take GLOWING BIRD (W).
- Use GUIDING THREAD and GLOWING BIRD (X).
- Place GATEKEEPER, select and then take ADAMINI FAMILY POWER (Y).
- Use ADAMINI FAMILY POWER (Z).

- Yellow (@1): (Lx5-Mx4-Ux4-Lx2).
- Green (@2): (Mx5-L).
- Red (@3): (Rx14).
- Purple (@4): (Mx14-Dx7-Lx4).
- Blue (@5): (Lx10-Ux6-Mx10-Rx2).
Congratulations! You have completed the game Halloween Stories 6: Mark on the Bone.


