Lost Lands 6: Mistakes of the Past – An adventure game with an incredible story, during the passage you will encounter the dark sorceress Kassandra, who was buried alive many centuries ago, but suddenly she came to life and broke out, instilling fear in the inhabitants of the game Lost Lands 6 You will play as the main character Susan who needs to unravel the secrets and puzzles of the witch. To complete the game Lost Lands 6, you have to go back in time and correct all the mistakes of other people. If you are stuck at some point in the game and do not know how to proceed further, you can always watch the Lost Lands 6: Mistakes of the Past walkthrough on our website.
Lost Lands 6: Mistakes of the Past – Walkthrough
Here you can watch the full walkthrough of Lost Lands 6: Mistakes of the Past, namely the main story and the bonus chapter.
Monster attack
I need to free Fiora from the monster’s paws.

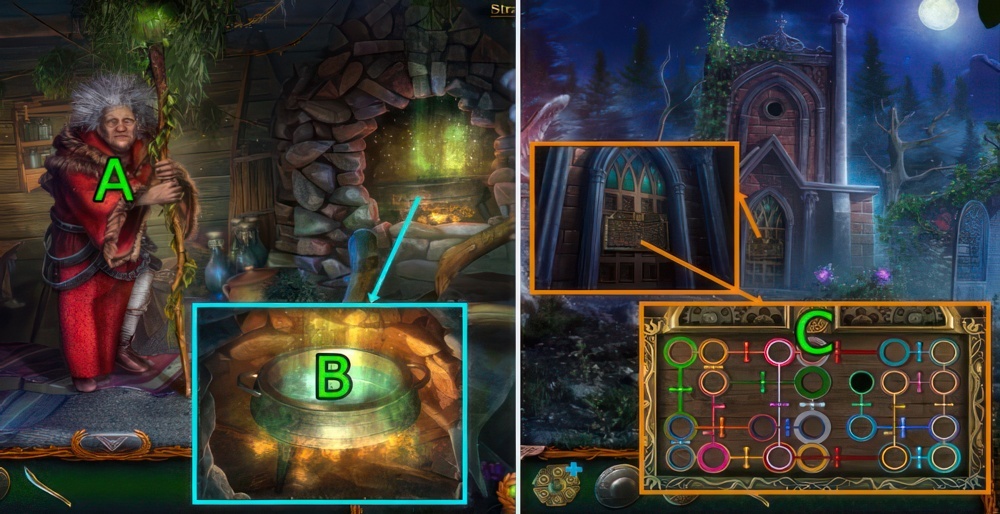
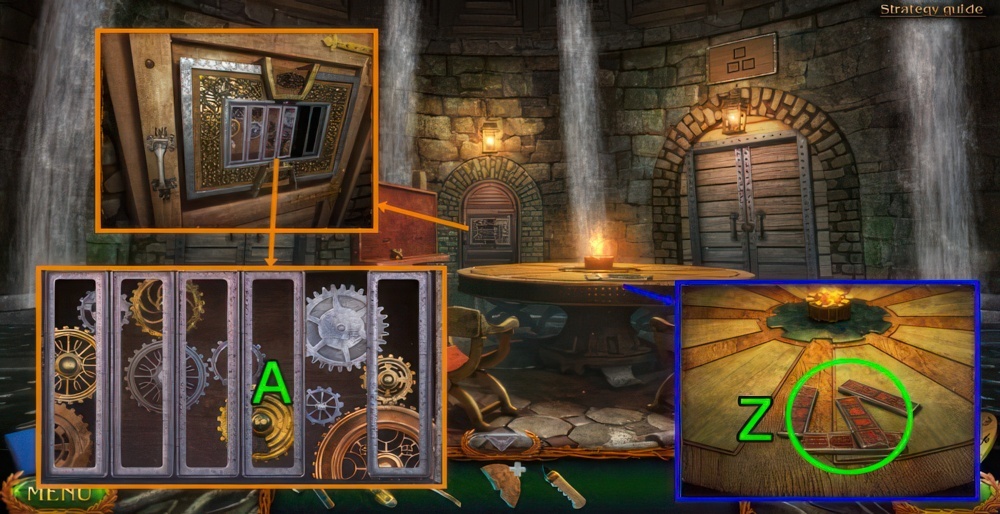
- Press (A).
- Get SHOVEL and HINGE (B).
- Use SHOVEL on (C), get SHOVEL WITH COAL.
- Use SHOVEL WITH COAL and HINGE on (D).
- Press (E×2).

- Restore the ladder by placing the boards into places.
- There should be no gaps between the pairs of boards, and they should not overlap.
- Walkthrough (@1): Drag (1-13)-(2-14)-(3-15)-(4-16)-(5-17)-(6-18).
- (7-19)-(8-20)-(9-21)-(10-23)-(11-24)-(12-22).
Secret creation
I need to get into Maaron’s laboratory and find out what exactly he worked on so diligently lately.

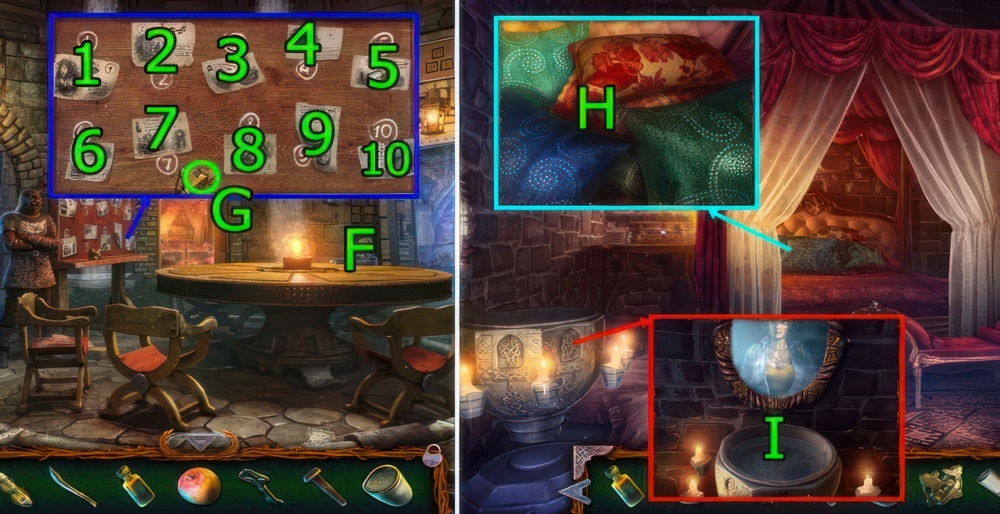
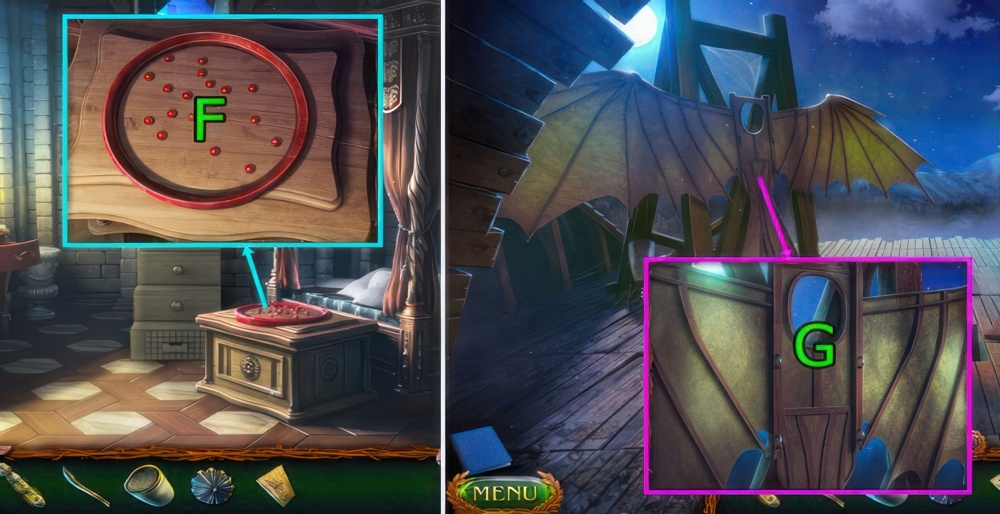
- Go forward (F).
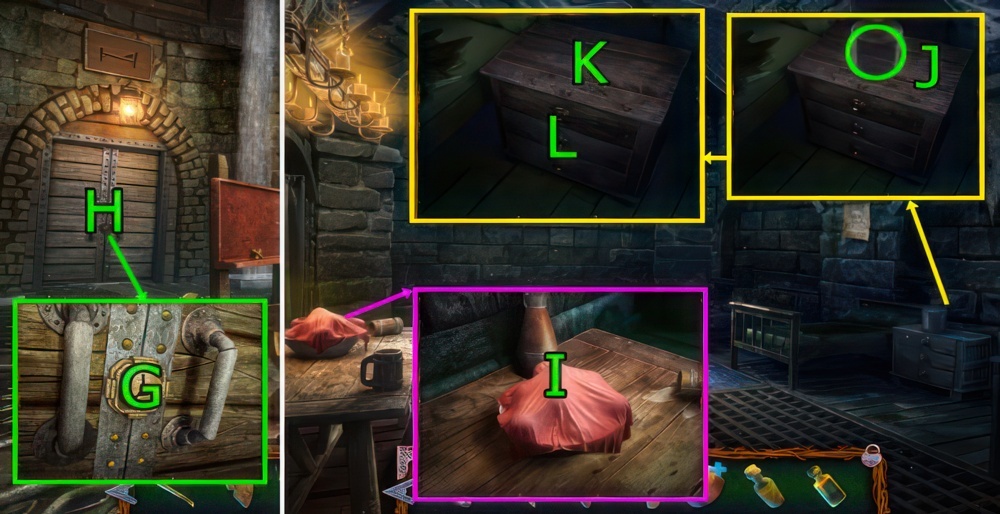
- Get FIGURINE OF A MAN, STONE OF THE MOON, STONE WITH A LETTER, STONE WITH A LETTER, and STONE WITH A LETTER (G).
- Use STONE WITH A LETTER, STONE WITH A LETTER, and STONE WITH A LETTER on (H).
Affairs of past times
I decided to go back in time instead of Maaron. I need to find out what happened back then and what worried him so much.

- Make up a name from the letters.
- Walkthrough (@2): Press (3-2-6-1-4-5).
Time hexagon
I need to fill the “Time hexagon” with corpse ashes and go to the past. Straight to 3088, August 23rd, 20 minutes after midnight.
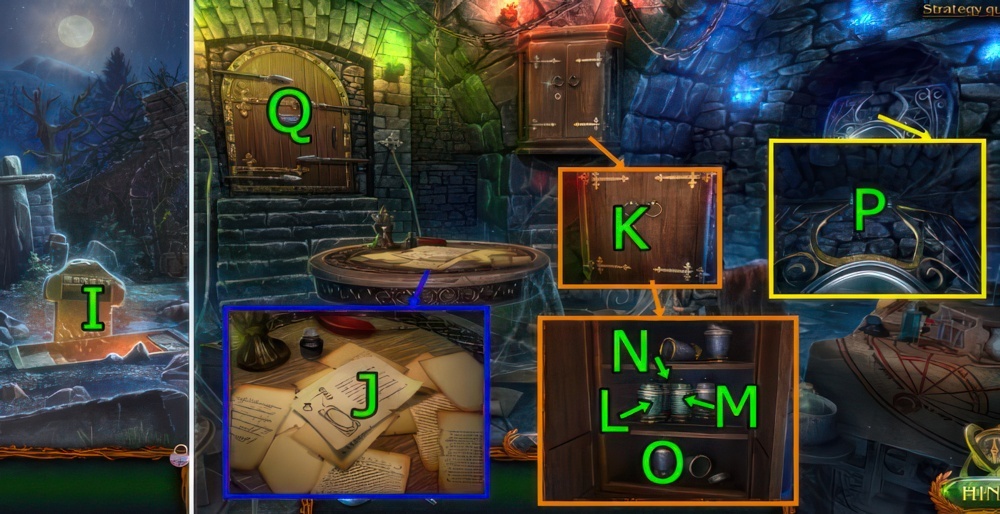
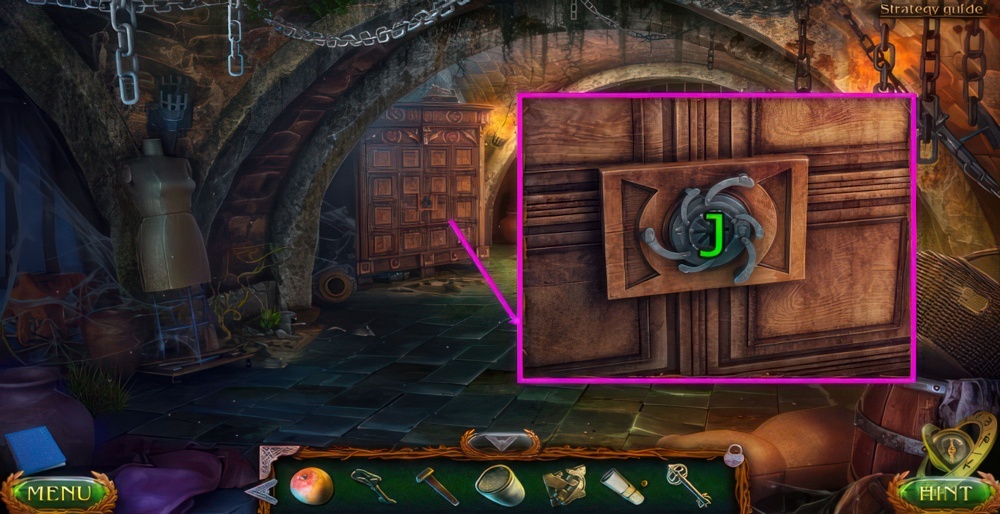
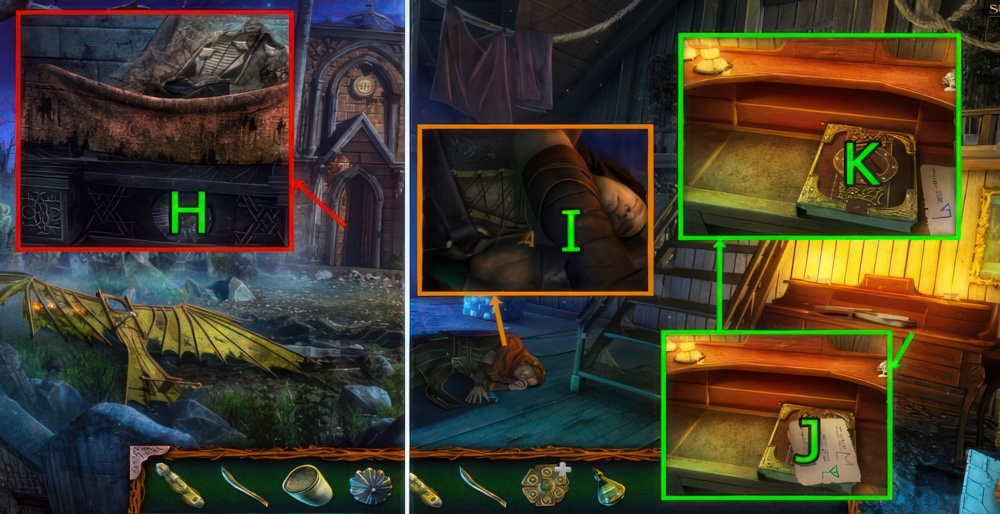
- Go (I).
- Press (J×6): get KEY, SAND OF TIME, and FIGURINE OF A MAN.
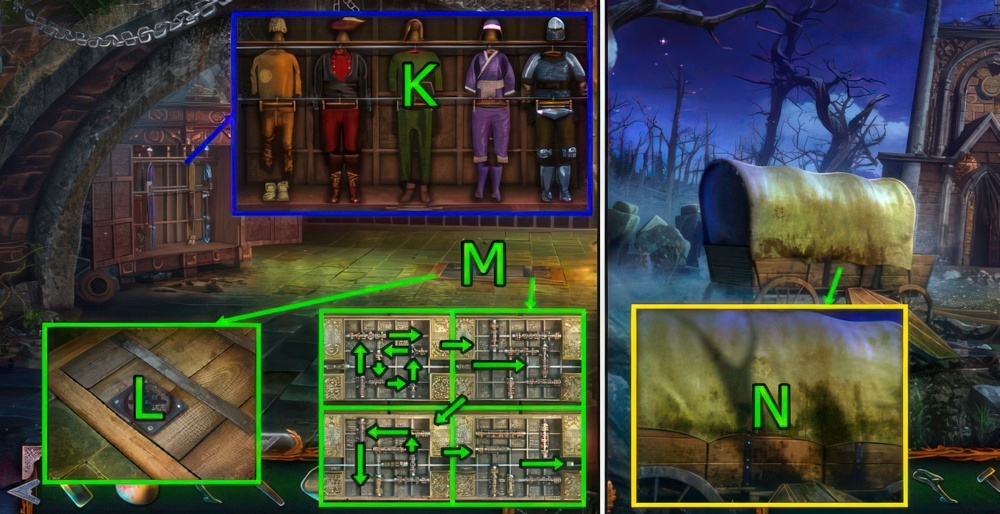
- Use KEY on (K), press (L-M-N-O), get FIGURINE OF A MAN and EMPTY HOURGLASS.
- SAND OF TIME on EMPTY HOURGLASS, get HOURGLASS.
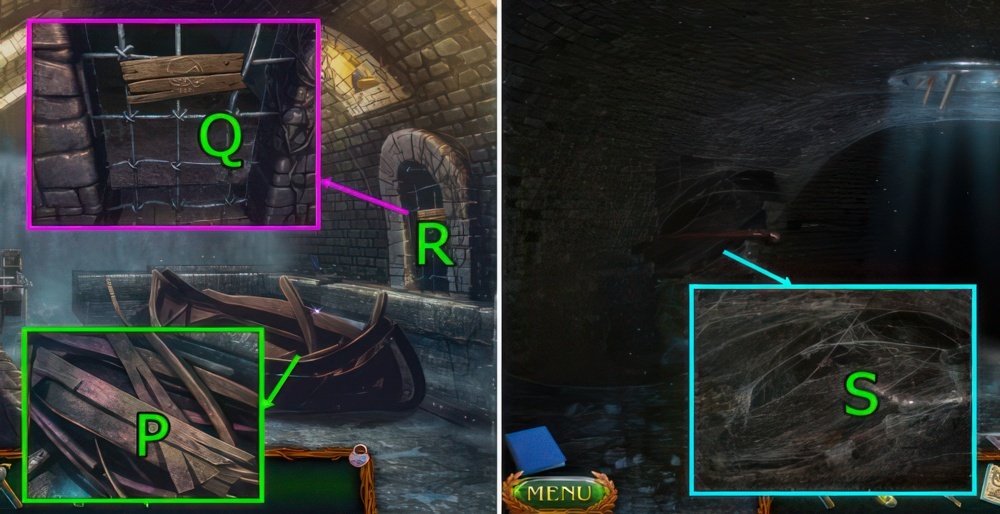
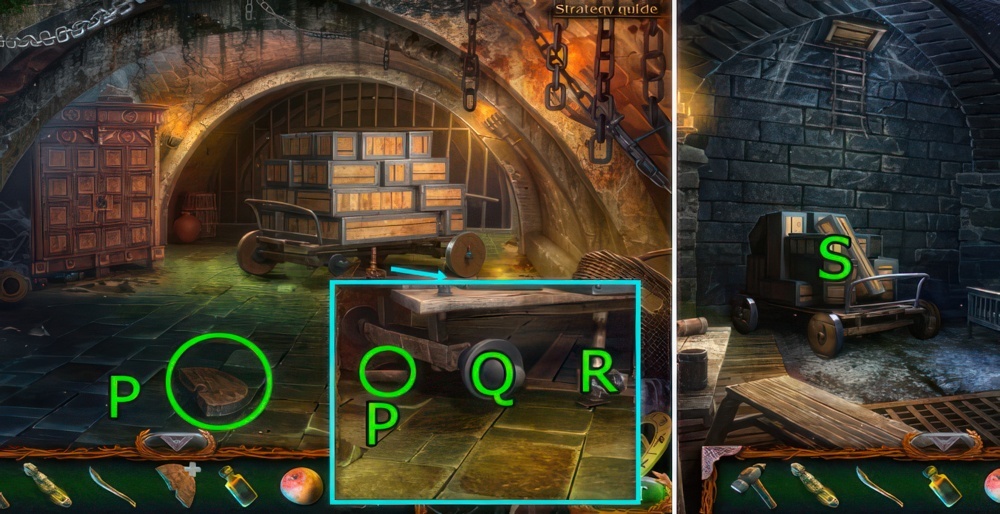
- Use HOURGLASS on (P).
- Go (Q).

- Enter the correct code. You’ve seen it before.
- Walkthrough (@3): Press (1×3)-(2×2)-(3×5).
Hexagon feeding
I have to go back in time and talk to Helma. So I need to get some corpse ashes.

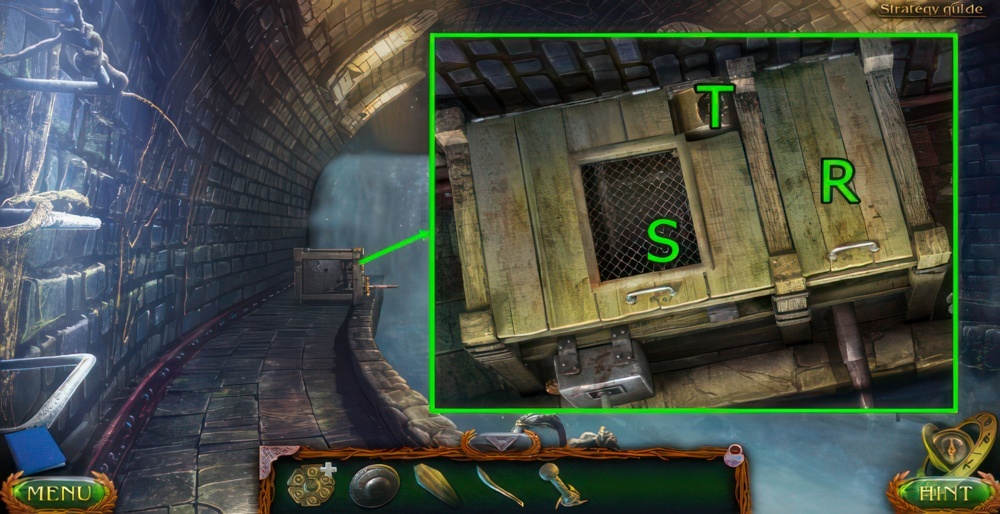
- Play the puzzle (R).
- Determine the correct sequence by pressing the buttons, so that all the clamps remain open.
- Puzzle walkthrough: Press (1-2-3-4).
- Get TIME HEXAGON.
- Go Old Cemetery.
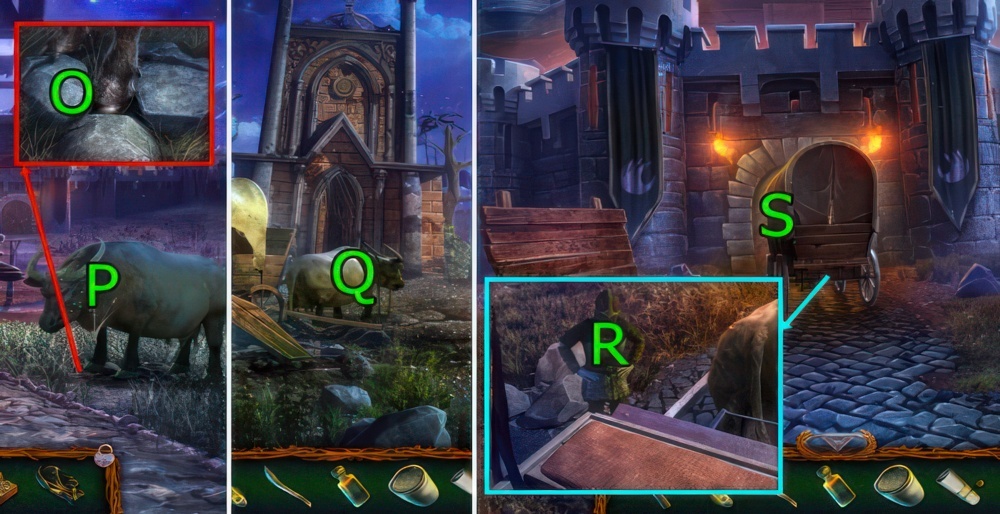
- Use FIGURINE OF A MAN, FIGURINE OF A MAN, and FIGURINE OF A MAN on (S).

- By moving the figurines, make a circle dance around the central image of the sun.
- The hands of the figurines must be situated on the circle.
- Walkthrough (@4).
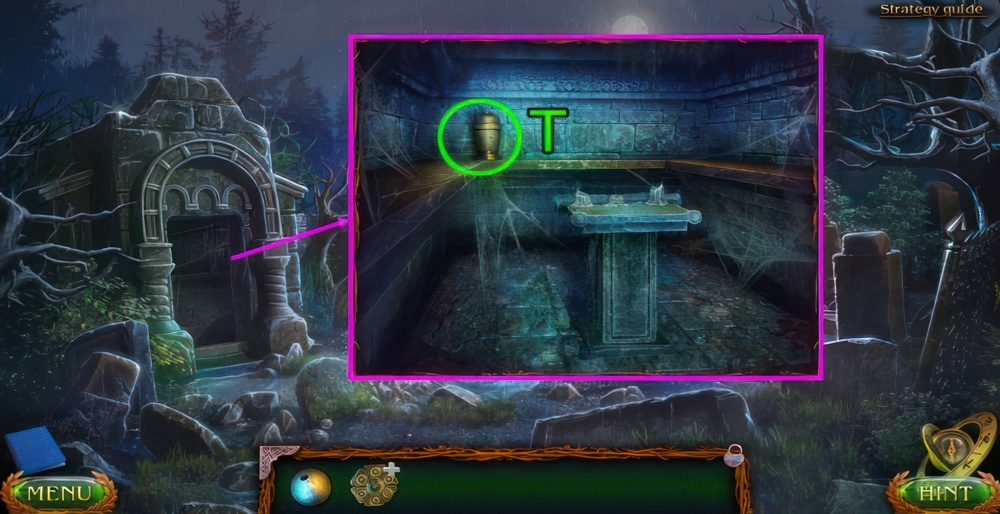
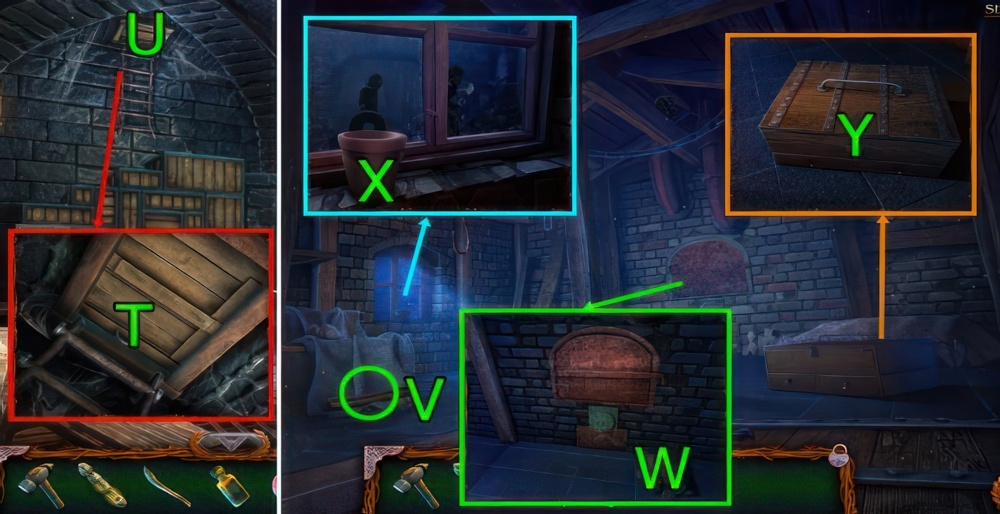
- Get URN WITH ASHES (T).
- URN WITH ASHES on TIME HEXAGON.
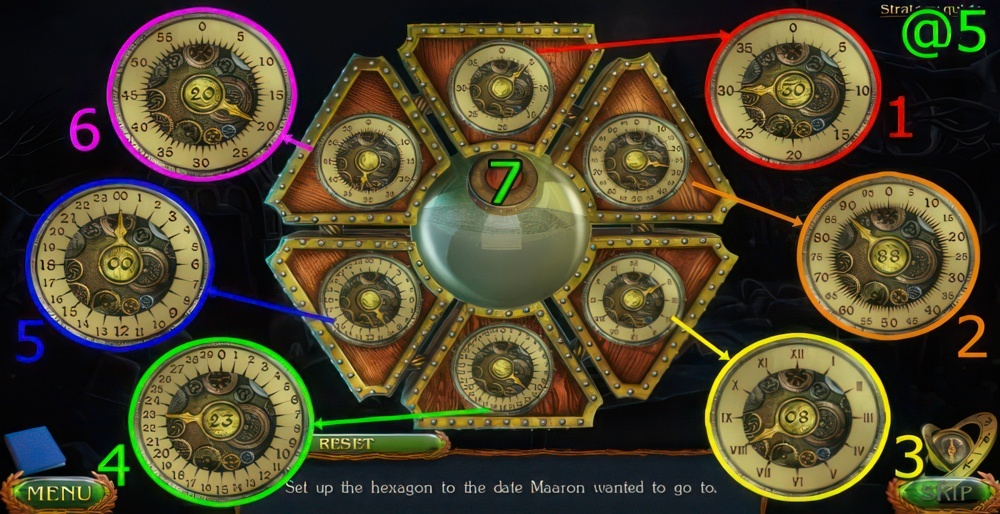
- Set up the hexagon to the date Maaron wanted to go to.
- Walkthrough (@5): Rotate (1-30)-(2-88)-(3-08)-(4-23)-(5-00)-(6-20), press (7).
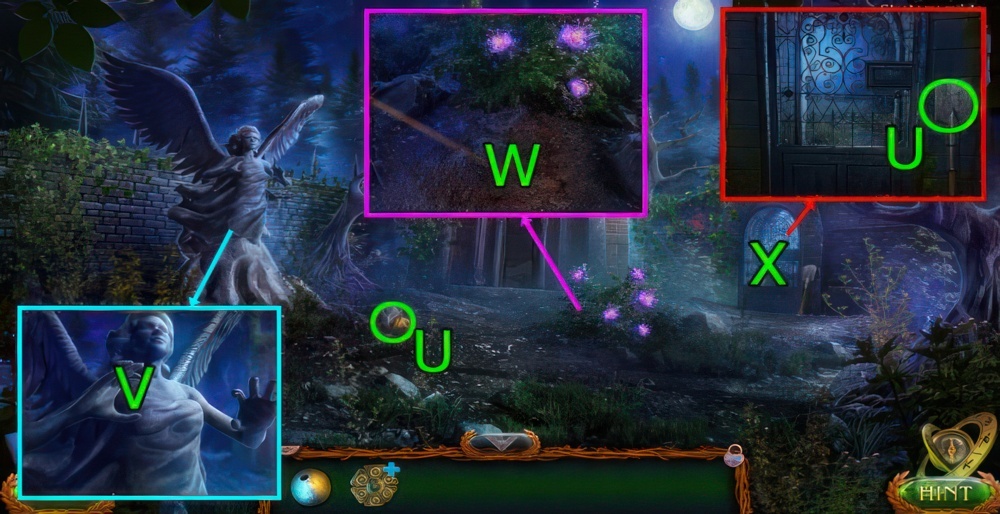
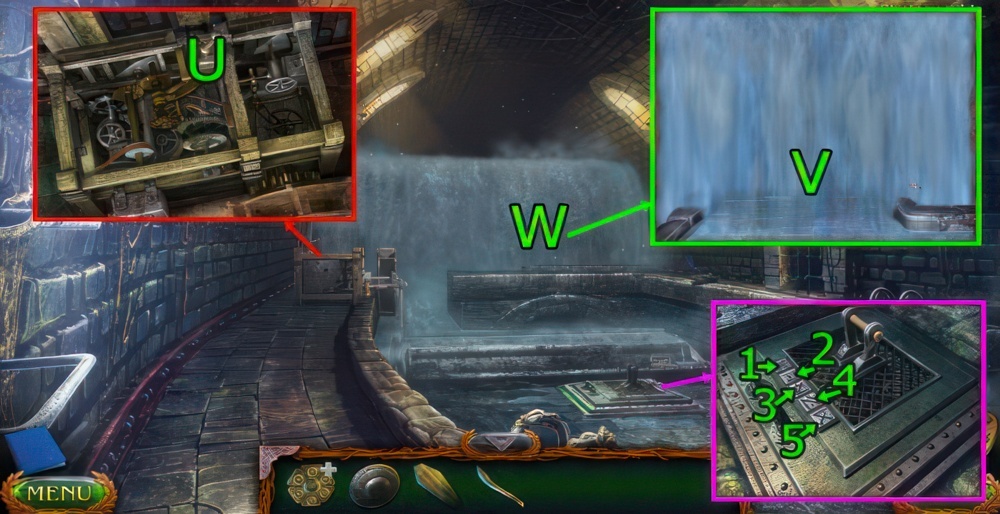
- Get PACKAGE and SPADE (U).
- Use PACKAGE, get STONE OF THE SUN.
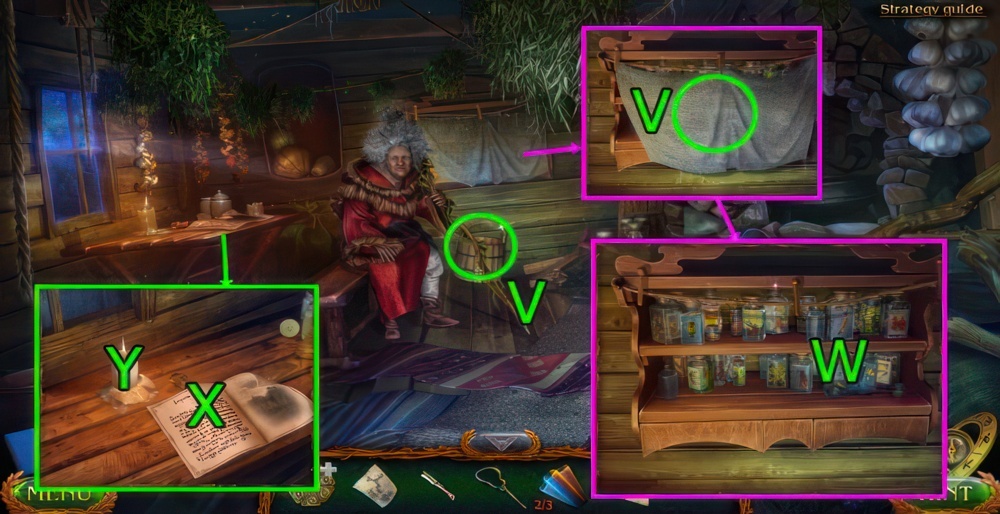
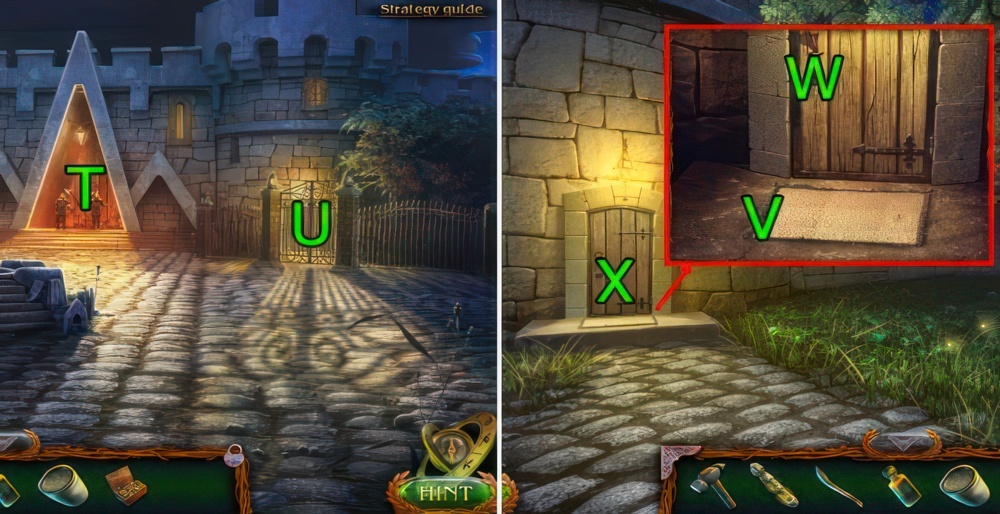
- Use STONE OF THE SUN and STONE OF THE MOON on (V).
- Use SPADE and press (W), get MAGNET and FIRESTEEL.
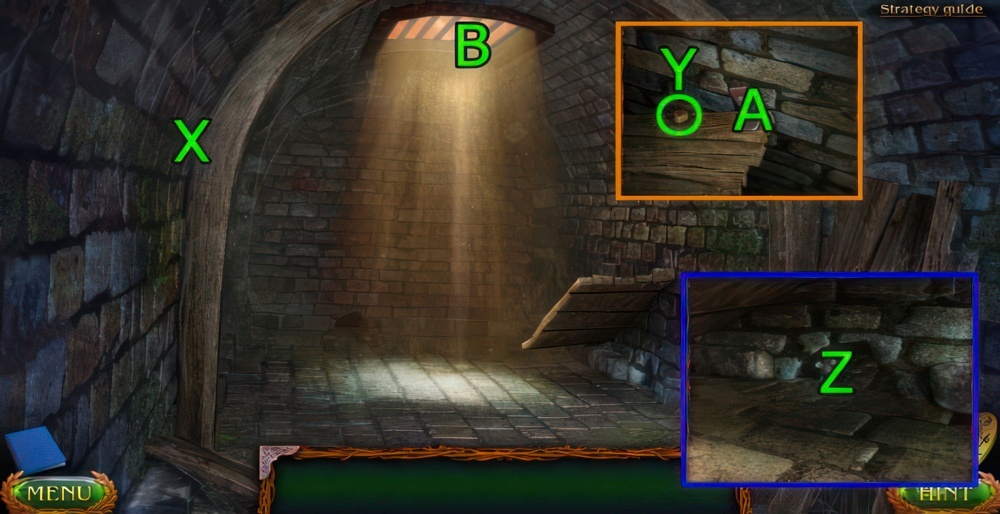
- Go forward (X).
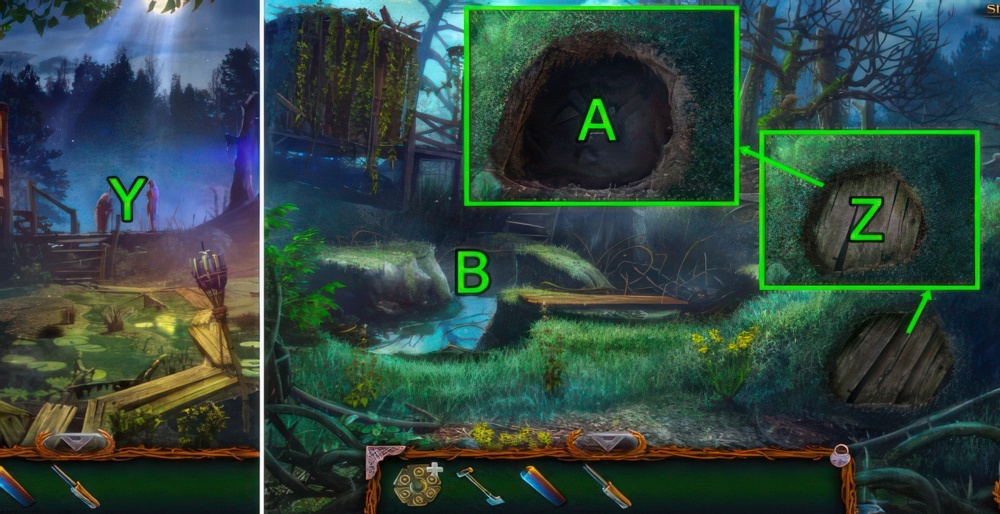
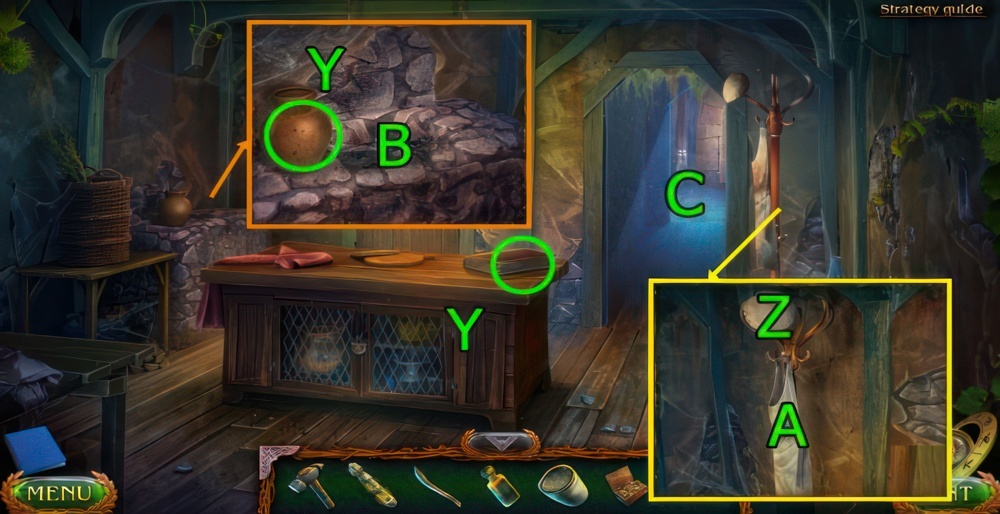
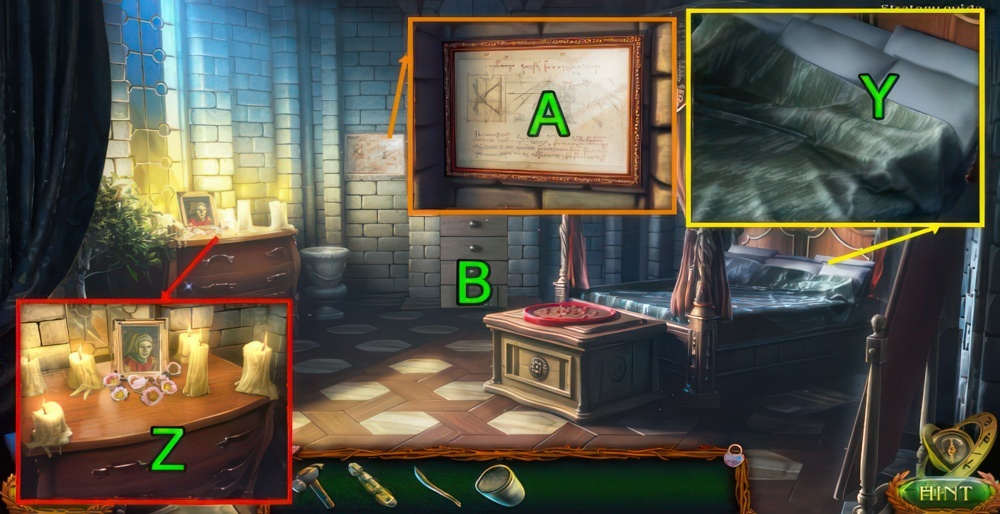
- Press (Y).
- Use SPADE on (Z), get BOARDS.
- Press (A×7), get MAP WITH A PLACEMARK, RAG, and PIECE OF THE SWORD.
- Use BOARDS on (B).
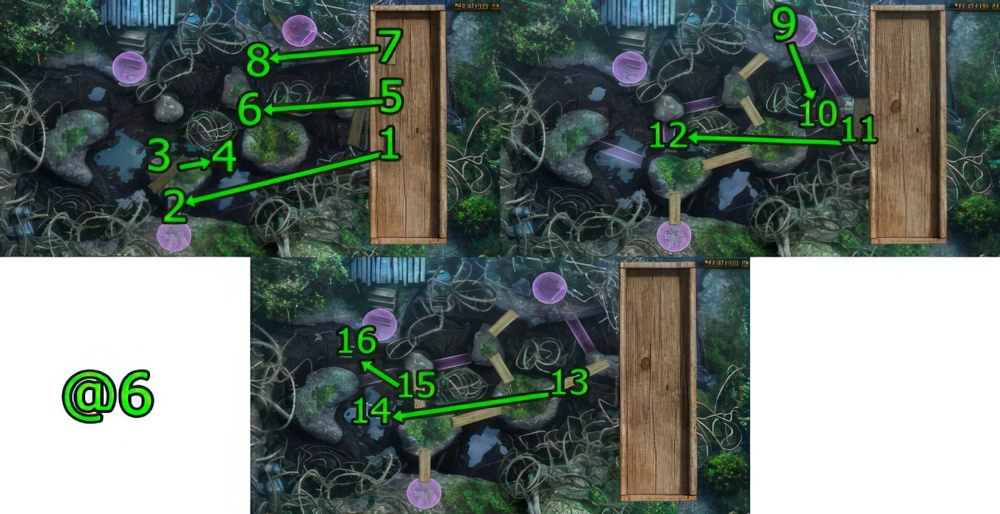
- Relocate the boards so that there is a path between all three purple dots.
- Walkthrough (@6): Drag (1-2)-(3-4)-(5-6)-(7-8), (9-10)-(11-12), (13-14)-(15-16).
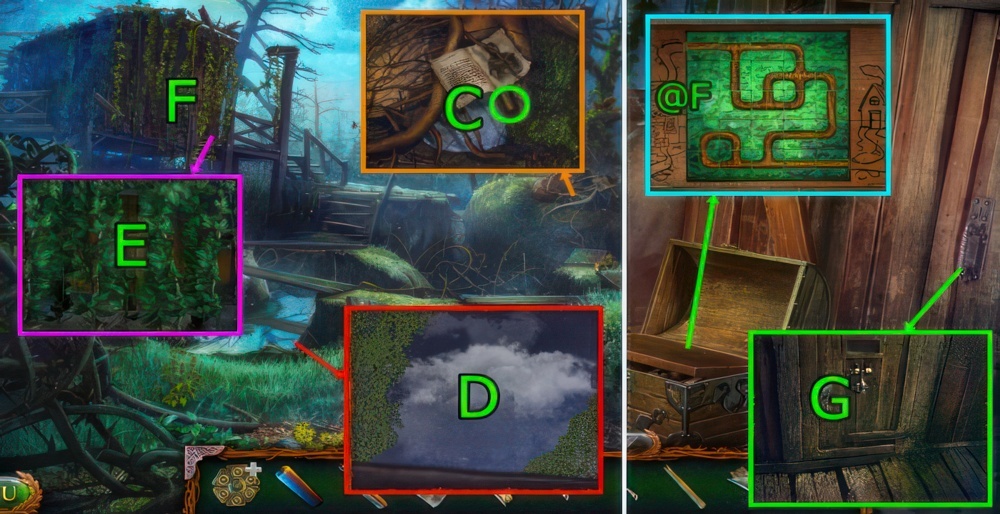
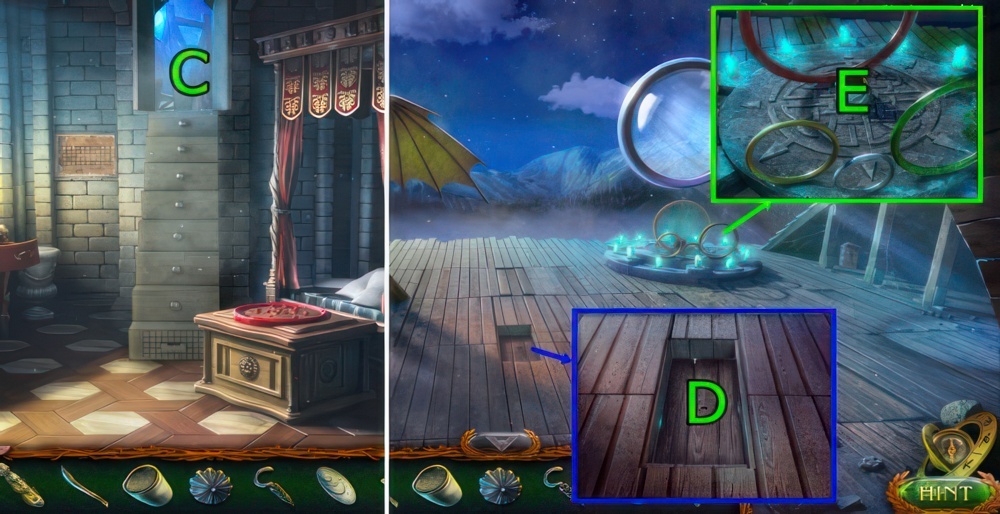
- Get SHAFT (C).
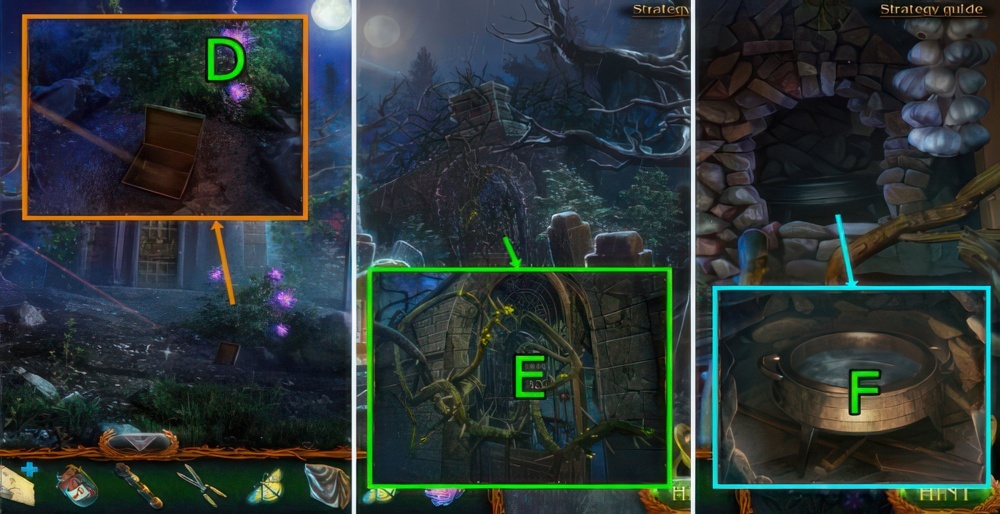
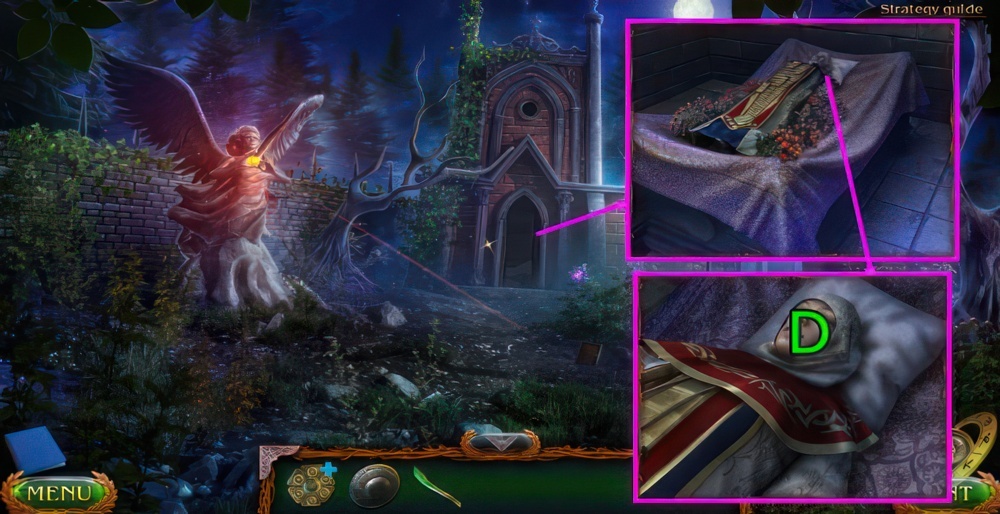
- Use RAG on (D), get WET CLOTH.
- Use PIECE OF THE SWORD on (E).
- Play the puzzle (F).
- By clicking on the logs, create a track between two banks.
- Remember that the track should be continuous.
- Puzzle walkthrough: (@F).
- Get KEY TO THE HUT.
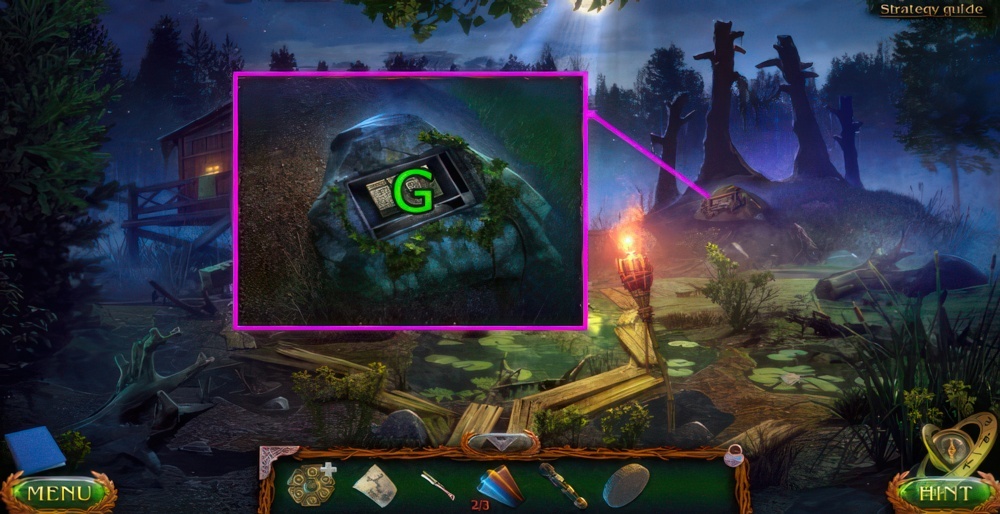
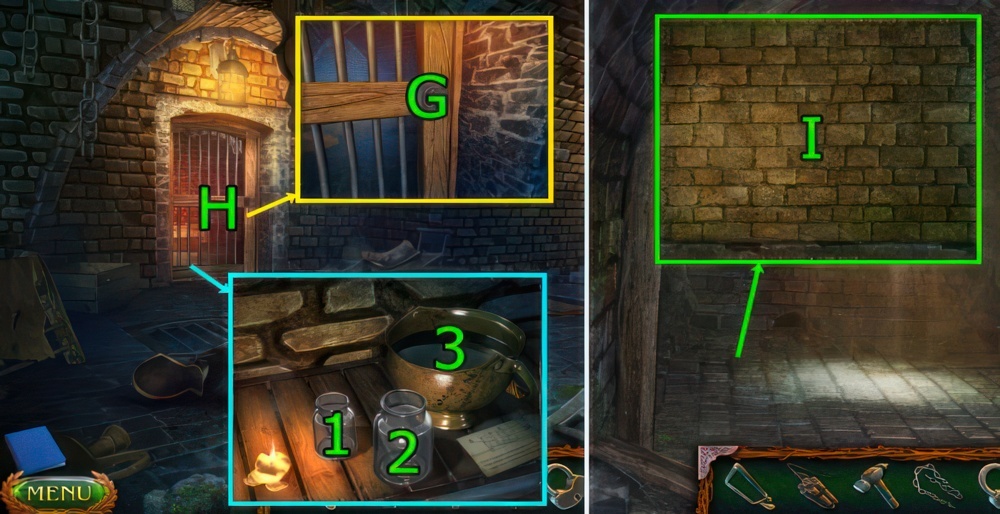
- Use KEY TO THE HUT on (G).
- Go (F).

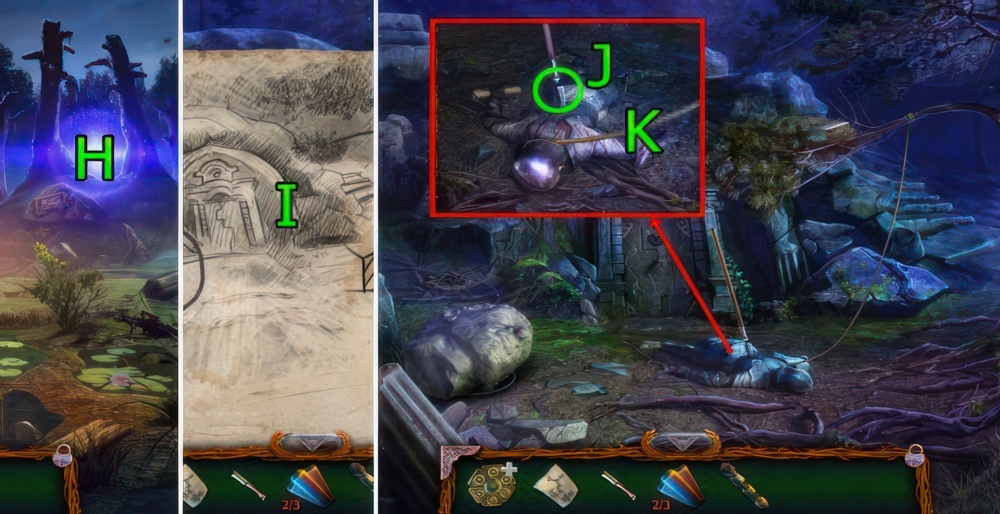
- Use PIECE OF THE SWORD on (H), get STRAW.
- Use WET CLOTH and SHAFT and press (I), get KEY TO THE PADLOCK.
- Use KEY TO THE PADLOCK and press (J×3), get BOTTLE OF RUM.
- PIECE OF THE SWORD on BOTTLE OF RUM, get UNCORKED BOTTLE OF RUM.
- Use STRAW, UNCORKED BOTTLE OF RUM, FIRESTEEL, and PIECE OF THE SWORD on (I).
- Press (K-I), get WITCH’S ASHES.
- WITCH’S ASHES on TIME HEXAGON.
Back to the future
I need to return to our times and tell Fiora everything.
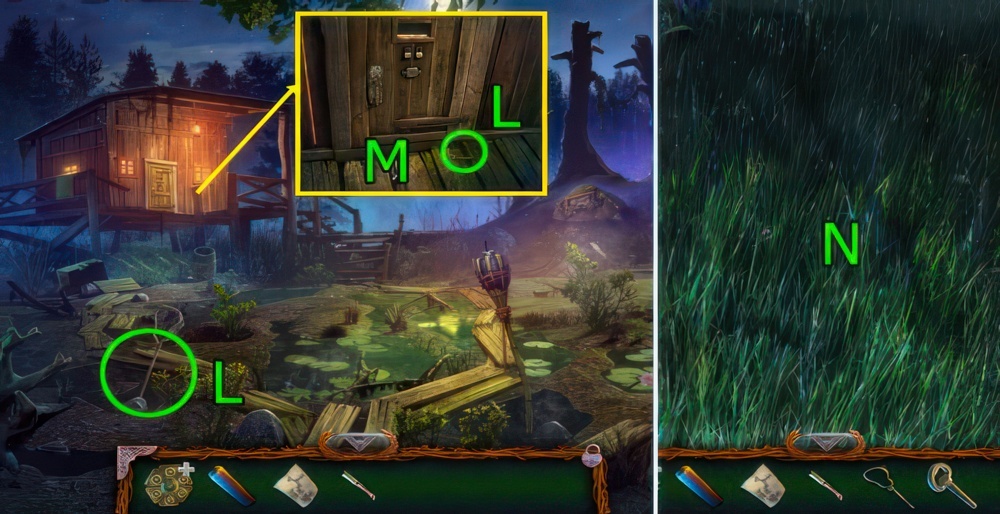
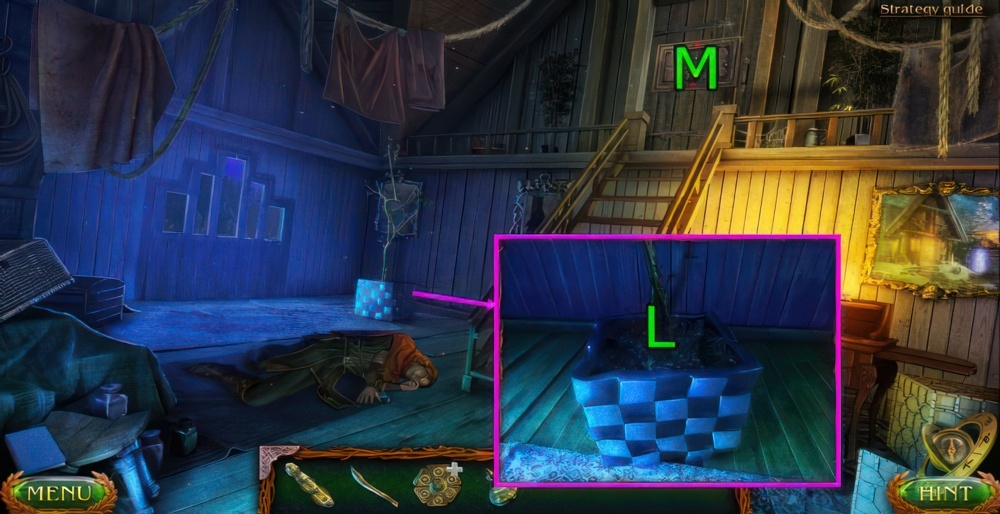
- Get SCOOP-NET and SHAFT OF THE DOOR-KNOCKER (L).
- Press (M).
- Use MAGNET on (N).
Evidence
I need to find some of Maaron’s stuff to show to Helma so that she is convinced it was him who sent me.
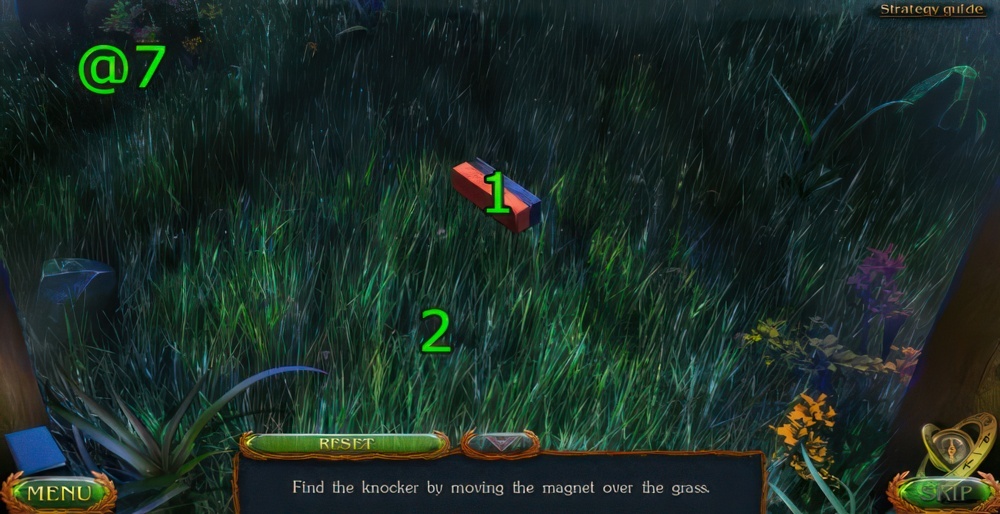
- Find the knocker by moving the magnet over the grass.
- Walkthrough (@7): Drag (1-2), press (2).
- Get DOOR KNOCKER and MAGNETS (1/3).
Destructive potion
I need to collect all the ingredients for the potion.

- Use DOOR KNOCKER and SHAFT OF THE DOOR KNOCKER and press (O).
- Go Maaron’s Laboratory.
- Press (P), get PART OF THE PUZZLE.
- Use PART OF THE PUZZLE on (Q).
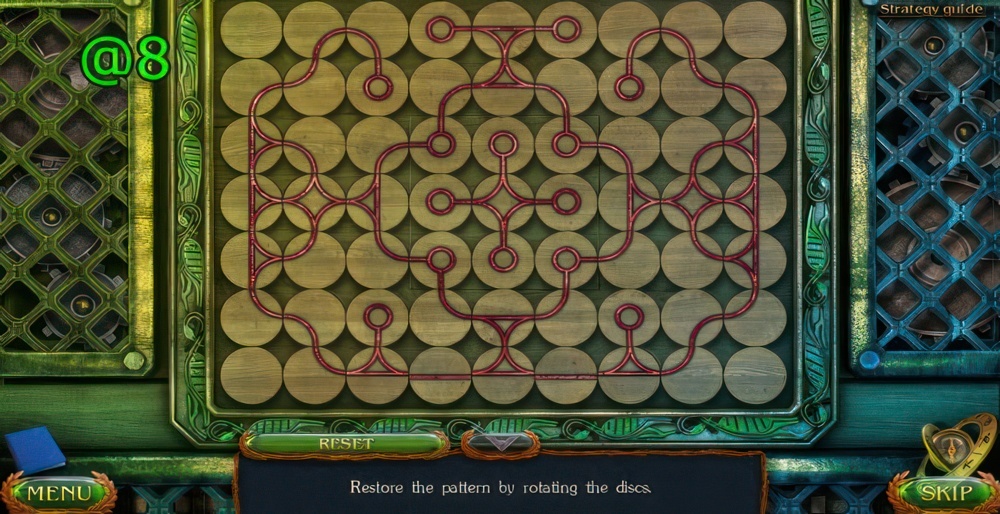
- Restore the pattern by rotating the discs.
- Walkthrough (@8).
Killing Cassandra
I need to pierce Cassandra’s heart with a poisoned Sword of Justice.
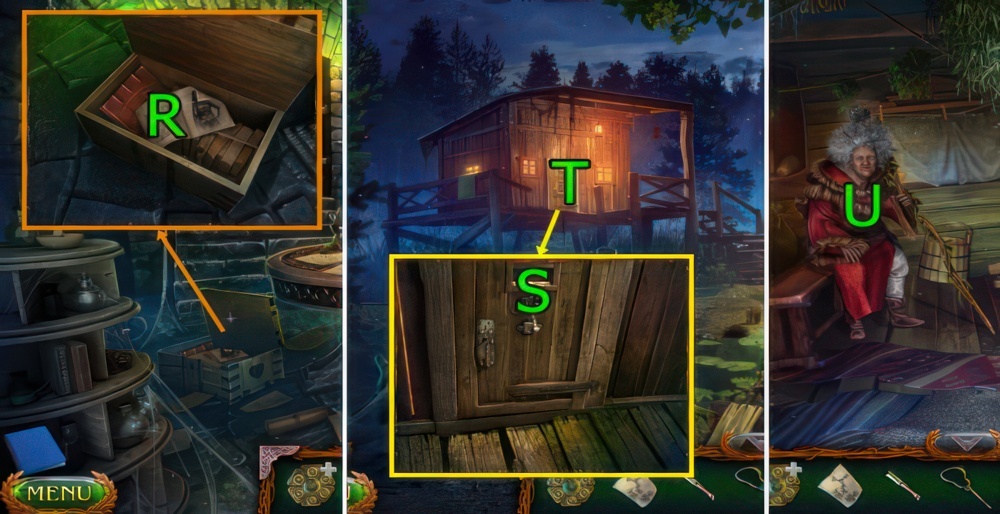
- Press (R×2), get MAARON’S DIARY and MAGNETS (2/3).
- Go Witch’s Swamp.
- Press and use MAARON’S DIARY on (S).
- Go (T).
- Press (U), get DESTRUCTIVE POTION RECIPE.
- Get CLOSED BUCKET and GAUZE (V).
- Press (W×4), get RED MANTIS.
- Press (X×3), drag (X-Y), get FIRE KEEPER.
- PIECE OF THE SWORD on CLOSED BUCKET, get HEDGE CUTTER and BUCKET.
- Go Witch’s Swamp.

- Use BUCKET on (Z), get FRESH WATER.
- Use FIRE KEEPER and SCOOP-NET on (A).
- Catch all the swamp moths by moving the scoop-net.
- Drag (B) to all the moths, get SWAMP MOTHS.
- Go Witch’s Hut.
- Use GAUZE and FRESH WATER on (C), get WET GAUZE.
- Go New Cemetery.
Sword of Justice
I need to get the Sword of Justice and dip it into the potion cooked by Helma.
- Press and use WET GAUZE on (D), get FIERY FLOWER.
- Go Old Cemetery.
- Use HEDGE CUTTER on (E), get THORN BRANCH WITH BERRIES.
- RED MANTIS, SWAMP MOTHS, FIERY FLOWER, and THORN BRANCH WITH BERRIES on DESTRUCTIVE POTION RECIPE, get POTION INGREDIENTS.
- Go Witch’s Hut.
- Use FIRE KEEPER and POTION INGREDIENTS on (F), get STONE DISC.
- Go WItch’s Swamp.
- Use STONE DISC on (G).

- Recreate the pattern by rotating the stone discs.
- Walkthrough (@9).
- Go forward (H).
- Press (I).
- Get SPEAR (J).
- Use PIECE OF THE SWORD on (K).

- Press (L).
- Get ANVIL STAMP (M).
- Use PIECE OF THE SWORD on (N), get ROPE.
- Use SPEAR and press (O), get LONG STICK and SHIELD.
- Use MAP WITH A PLACE MARK on (P).
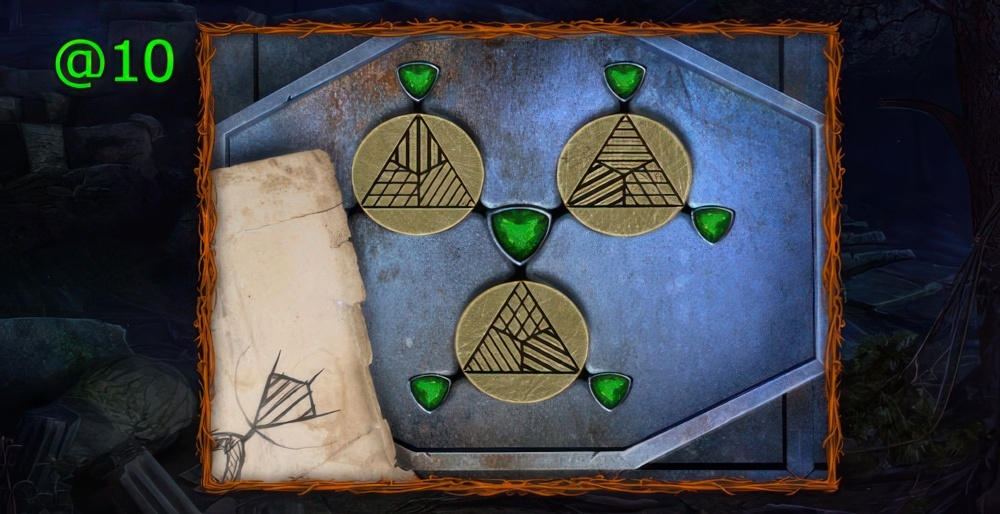
- Turn and install the discs according to the hint.
- Walkthrough (@10).
- Get PIECE OF THE SWORD.

- Press (Q), get MAGNETS (3/3).
- Use MAGNETS (3/3) and press (R).
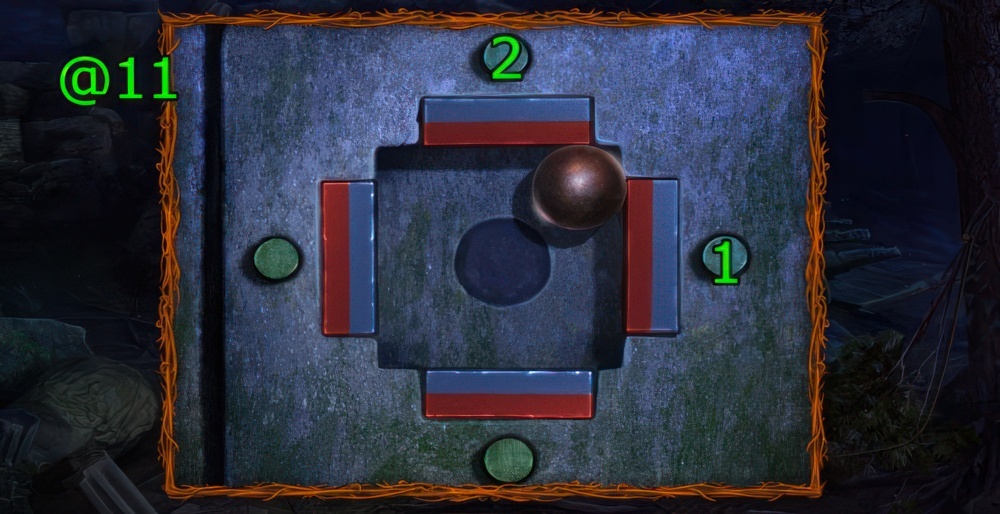
- Move the ball to the center by turning the magnets.
- Walkthrough (@11): Press (1-2).

- Go (S).
- Press (T), get HATCHET.
- Go Ruins of Elogan.
- Use HATCHET on (U), get PINE TWIGS.
- PINE TWIGS and ROPE on LONG STICK, get BROOM.
- Go Master Blacksmith’s Underground.
- Use BROOM on (V), get HAMMER STAMP.
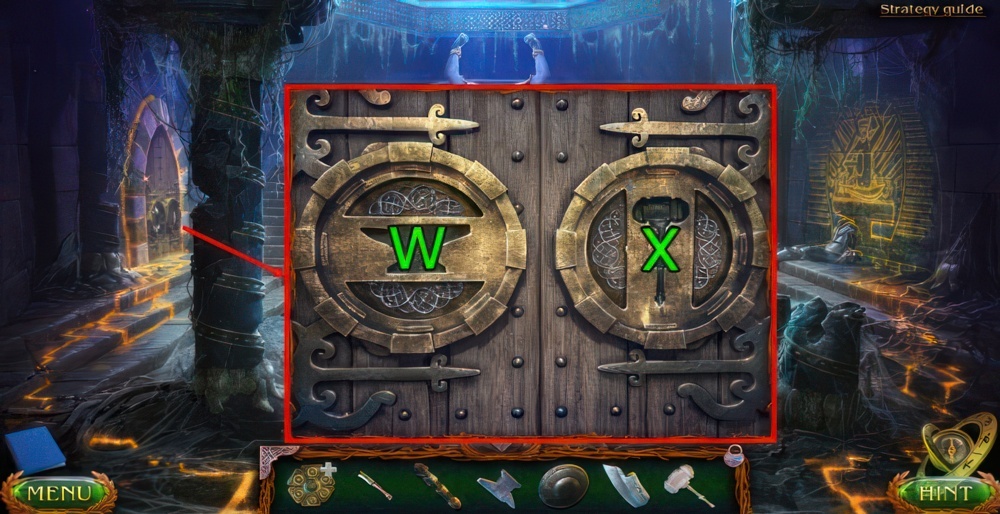
- Use ANVIL STAMP on (W).
- Use HAMMER STAMP on (X).
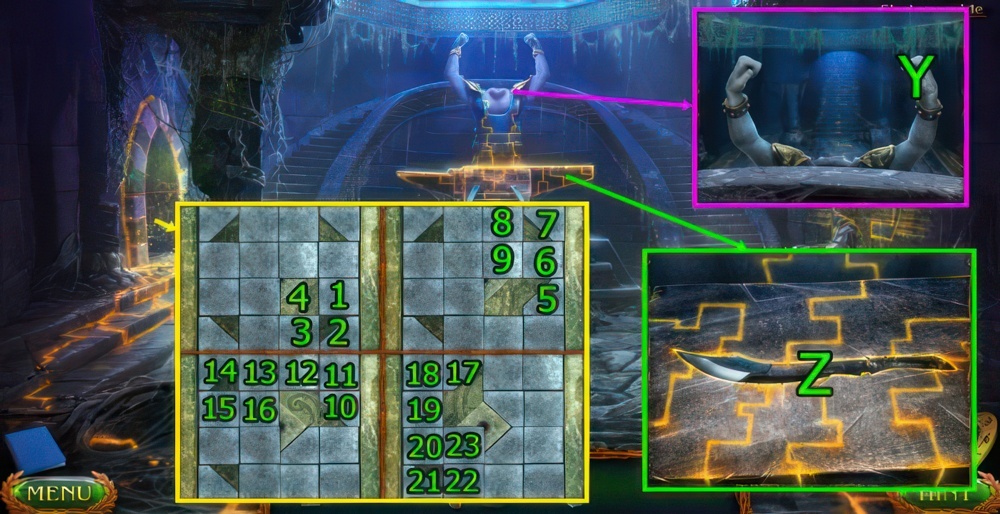
- Play the puzzle (Y).
- Move the tiles to form a rhombus in the middle.
- Puzzle walkthrough: Press (1-2-3-4)-(5-6-7-8-9)-(10-11-12-13-14-15-16).
- (17-18-19-20-21-22-23-20).
- Get HAMMERS OF THE MASTER BLACKSMITH.
- Use HAMMERS OF THE MASTER BLACKSMITH on (Y).
- Use PIECE OF THE SWORD, PIECE OF THE SWORD, and FIRE KEEPER on (Z), get SWORD OF JUSTICE.
- Go Witch’s Hut.
- Press (A), get COIN.
- Use SWORD OF JUSTICE on (B), get POISONED SWORD.
- Go New Cemetery.
- Use COIN on (C).
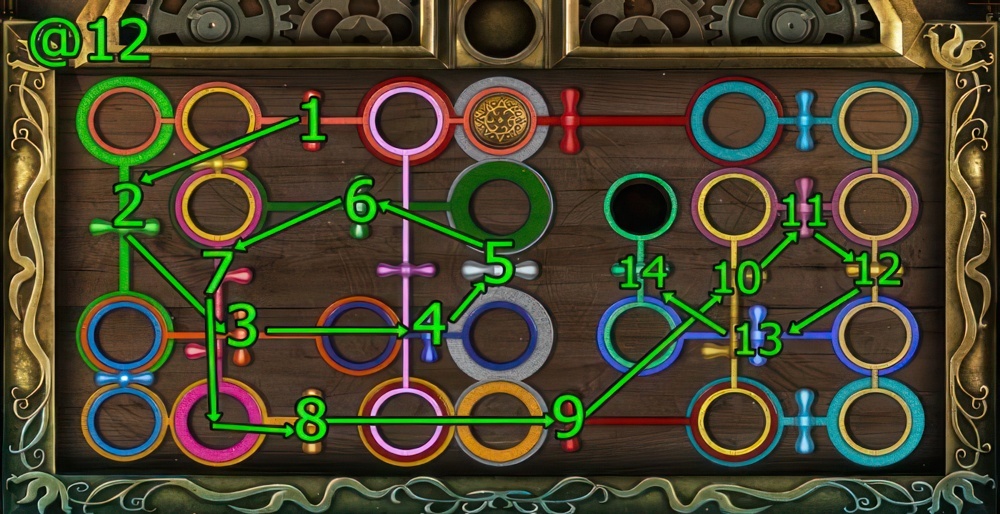
- Move the coin to the opening by pressing on the handles of the slats where the coin is located.
- Walkthrough (@12): Press (1-2-3-4-5-6-7)-(8-9-10-11-12-13-14).
- Use POISONED SWORD on (D).
Time and place
I have to find out where and when I find myself.
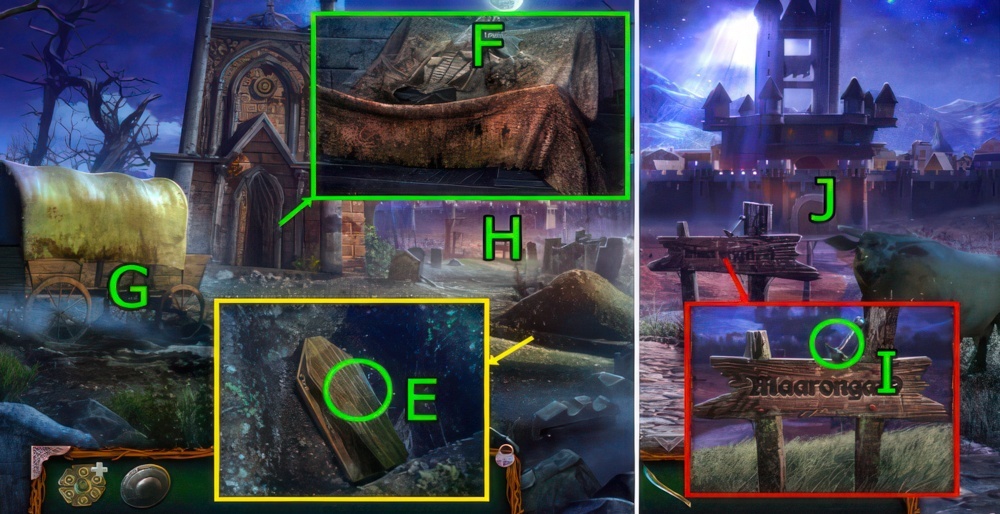
- Get COFFIN LID (E).
- Press (F×2), get SWORD OF JUSTICE.
- Use COFFIN LID on (G).
- Go (H).
- Get LEVER (I).
- Go (J).

- Press (K).
- Press (L×3).
- Press (M), get GUARD’S BUNCH OF KEYS.
- Go Road to the City.
- Use GUARD’S BUNCH OF KEYS on (N).
- Use GUARD’S BUNCH OF KEYS on (O), get PRECIOUS RING.
- Go The Gate of Maarongard.
- Use PRECIOUS RING and SWORD OF JUSTICE on (P).
- Go (Q).
- Press (R) and (S), Use LEVER on (T).
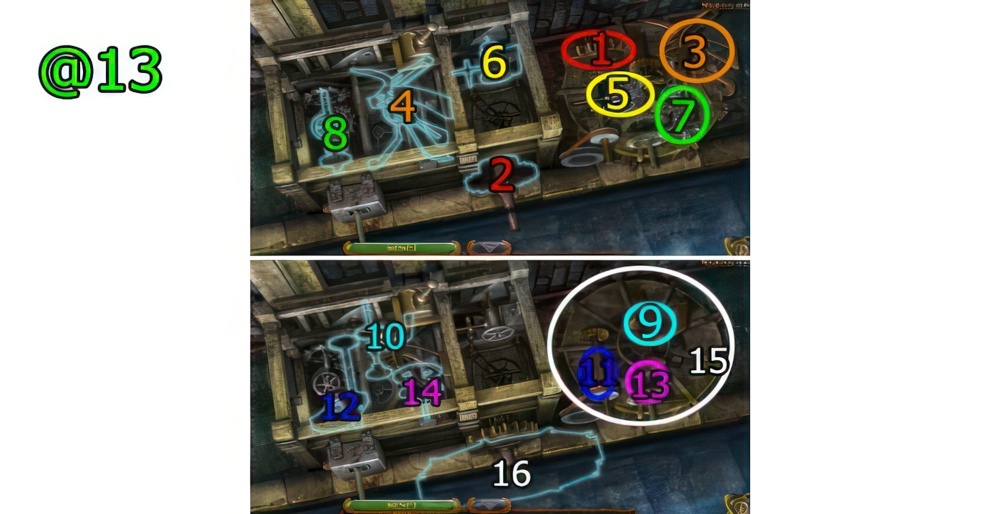
- Assemble the mechanism.
- Walkthrough (@13): Drag (1-2)-(3-4)-(5-6)-(7-8)-(9-10)-(11-12)-(13-14)-(15-16).
- Press (U).
- Enter the correct code.
- Press (4-5-2-1-3), get STAND FOR THE OIL LAMP.
- Use STAND FOR THE OIL LAMP and SHIELD on (V).
- Go forward (W).
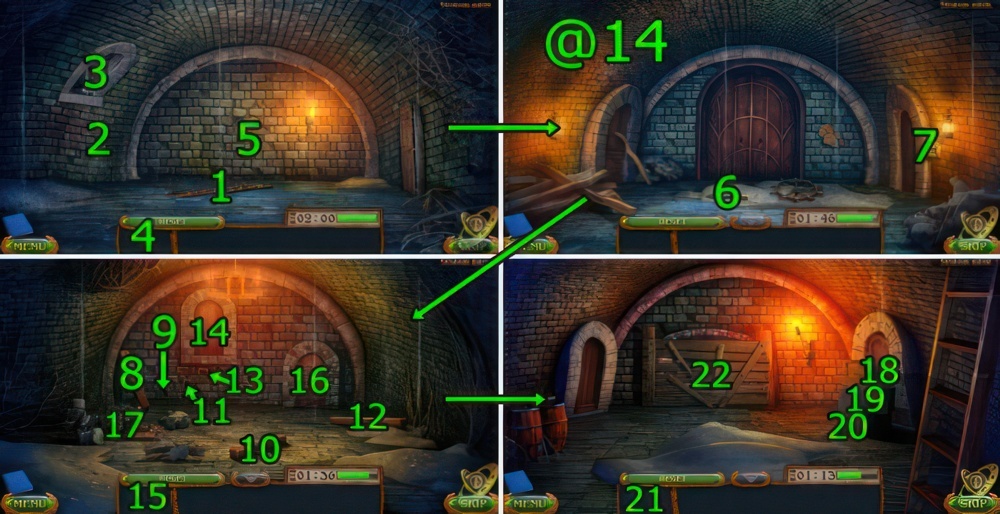
- Escape from the guards in the allotted time.
- Walkthrough (@14): Press (1-2-3-4-5)-(5), (6-7)-(7)
- Drag (8-9)-(10-11)-(12-13).
- Press (14×2-15-16×3)-(15-17×2)-(17), (18-19-20-19)-(21-22).
Escape
I must get out of the prison.
- Get DRIED BREAD (Y).
- Use DRIED BREAD on (Z).
- Get SHARP PIECE OF METAL (Z).
- Use SHARP PIECE OF METAL on (A), get PLANK BED.
- Go (B).

- Use PLANK BED on (C).
- Press (D×4), get HACKSAW FOR CUTTING METAL and DYNAMITE.
- Get HAMMER and ADDITIONAL CHAIN (E).
- Press (F), get LOCK and KEY TO THE STORAGE.
- Use KEY TO THE STORAGE on (G).
- Play the puzzle (H).
- Fill the jar with four measures of water.
- Puzzle walkthrough: Drag (1-3)-(1-2)-(1-3)-(1-2), (2-3)-(1-2)-(1-3)-(1-2).
- Get BACKPACK WITH THINGS, get FIRE KEEPER and SWORD OF JUSTICE.
- Go Casemate.
- Use HAMMER on (I).
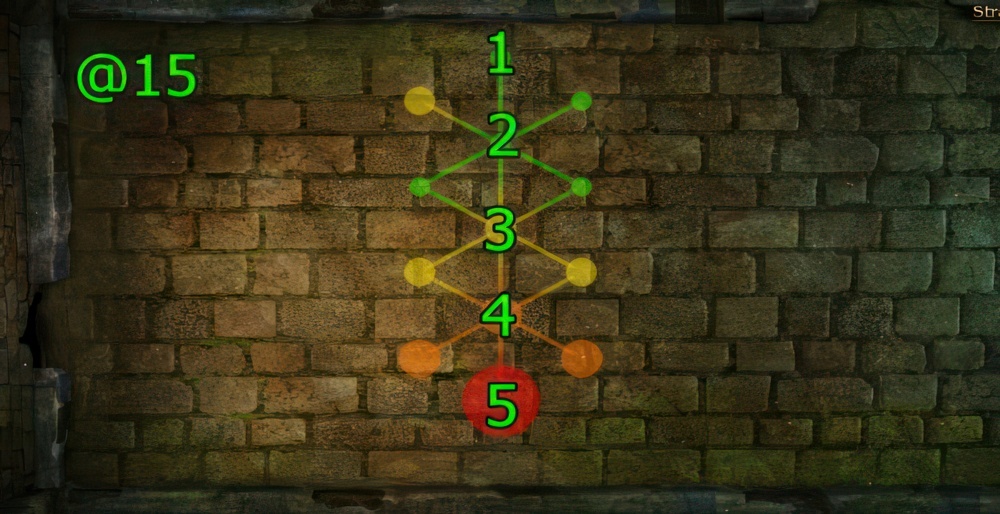
- Tapping the wall find the weakest place.
- Walkthrough (@15).

- Use DYNAMITE on (K).
- Go Prison.
- Use FIRE KEEPER on (L).
- Go Casemate.
- Use LOCK and ADDITIONAL CHAIN on (M).
- Press (N).
- Go (O).
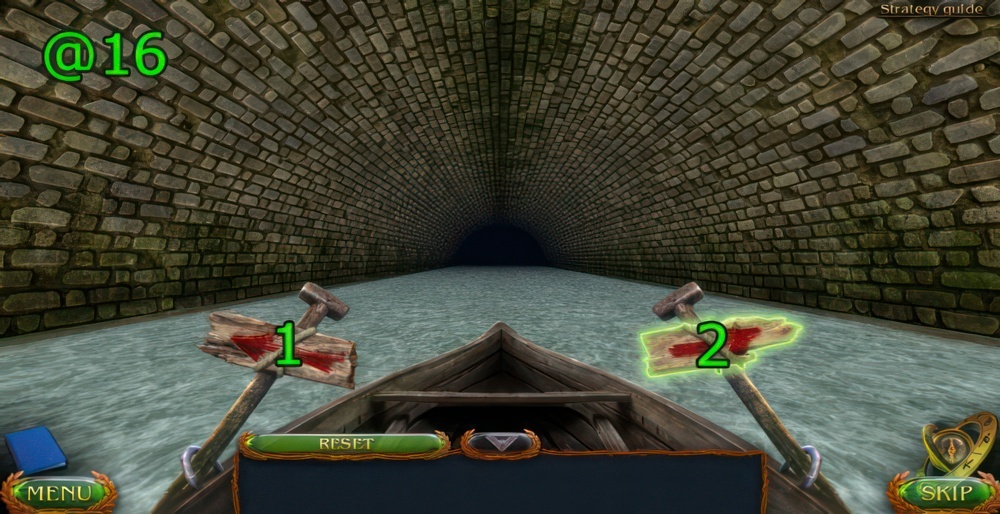
- Use the left and right buttons to avoid obstacles.
- Hold on afloat for 60 seconds.
- Walkthrough (@16): Press (1) and (2) to dodge obstacles.
Way to the shelter
As soon as two my rescuers take me to their shelter, I will need to talk to their leader.
- Press (P×3), get KEY TO THE PASSAGE.
- Use HACKSAW FOR CUTTING METAL on (Q).
- Go (R).
- Use FIRE KEEPER on (S).

- Press (T), get HALF OF THE WHEEL.
- Press (U), get PIPE.
- Use PIPE on (V).
- Press (W×2), get GLASS CUTTER.
- Use KEY TO THE PASSAGE on (X).
- Go (Y).
- Get CHIPS FOR THE PUZZLE (Z).
- Use CHIPS FOR THE PUZZLE on (A).
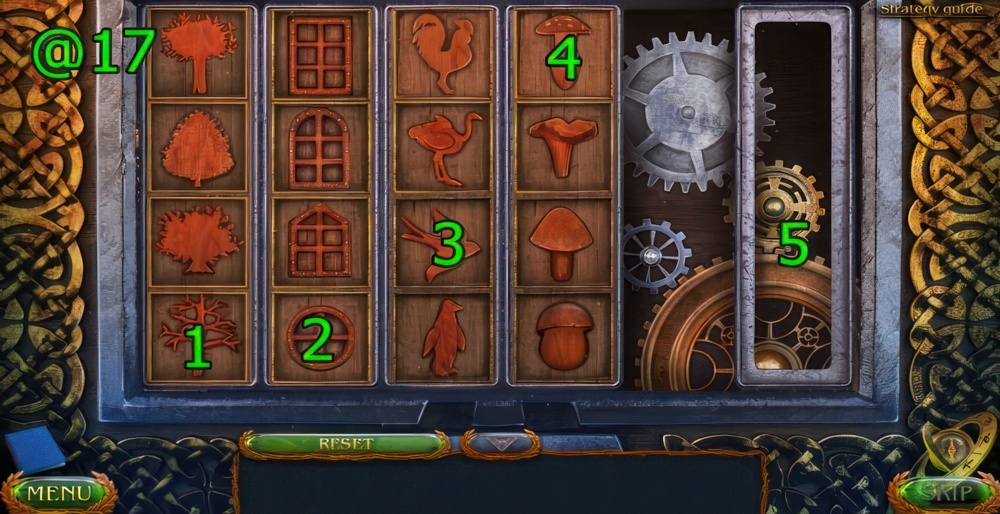
- Find an extra tile in each column.
- Walkthrough (@17): Press (1-2-3-4-5).
Ashes from the crematorium
There must be a handful of ashes in the city crematorium. I need to get it and return to the shelter to discuss the plan.
- Go (B).
- Press (C).
- Press (D×5), get RECIPE OF THE POISONOUS POWDER, OIL LAMP, and KEY.
- Get FUEL OIL (E).
- Use RECIPE OF THE POISONOUS POWDER on (F).
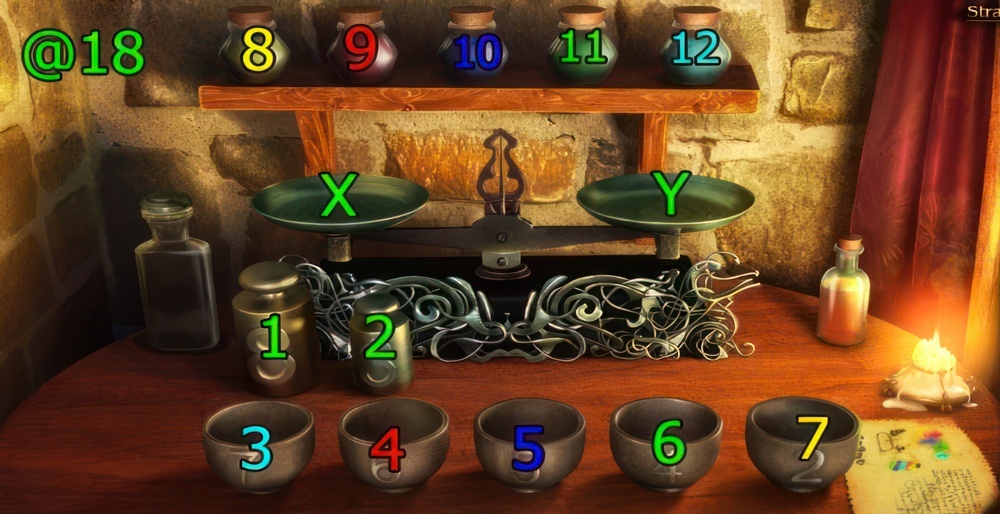
- With the help of scales, weights and bowls, measure the number of parts according to the instructions.
- Walkthrough (@18): Drag (1-X)-(2-Y)-(5-Y)-(10-Y), (2-X)-(7-X)-(5-Y)-(8-X).
- (5-X)-(7-X)-(3-Y)-(12-Y), (3-X)-(2-Y)-(6-Y)-(9-Y), (4-X)-(6-Y)-(7-Y)-(11-X).
- Get POISONOUS POWDER.
- Go Central Collector.
- Use KEY on (G).
- Go (H).
- Press (I×2), get APPLE.
- Get JAR (J).
- FUEL OIL, FIRE KEEPER, JAR, and GLASS CUTTER on OIL LAMP, get HANDMADE LAMP.
- Use HANDMADE LAMP on (K).
- Press (L×4), get BELT and KEY.
- Go Central Collector.
Hexagon stealing
I must enter the castle and find the time hexagon there.

- Use KEY on (M).
- Go (N).
- Press (O×4).
- Get HALF OF THE WHEEL and WOODEN BAR (P).
- HALF OF THE WHEEL and BELT on HALF OF THE WHEEL, get WHEEL.
- SWORD OF JUSTICE on WOODEN BAR, get WOODEN PLUG.
- WHEEL, WOODEN PLUG, and HAMMER on (Q).
- Press (R), get JACKSCREW.
- Go Barracks.
- Go (S).

- Arrange the boxes so that you can climb them up to the ladder.
- Walkthrough (@19).
- Press and use JACKSCREW on (T).
- Go (U).
- Get LEG OF THE STOOL (V).
- Press (W), get LEG OF THE STOOL.
- Press (X×3), get KEY.
- Go (Y).
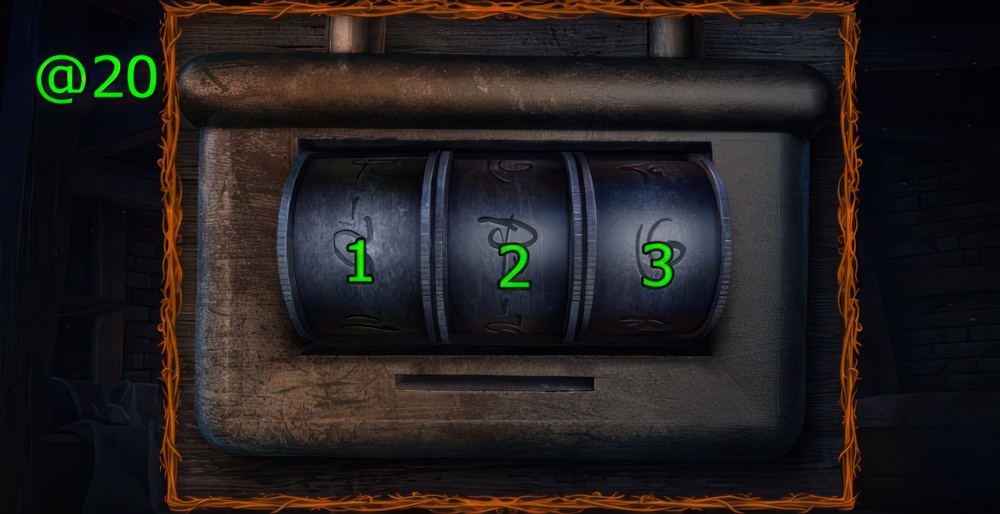
- Rotate the cylinders to assemble the desired combination of symbols.
- Walkthrough (@20): Press (1×5)-(2×5)-(3).

- Get CHISEL and NAILS (Z).
- Use LEG OF THE STOOL and LEG OF THE STOOL on (A).
- Press and use NAILS, and HAMMER on (A).
- Get EMPTY TIN and HAND WHEEL (B).
- Press (C) and (D).
- Use HAND WHEEL and press (E).
- Use EMPTY TIN on (C), get TIN WITH ASHES.
- Go Central Collector.
Bon Appetit
I will have to find a way to poison Maaron.
- Press (F).
- Get KEY TO THE CELLAR (G).
- Press (1-2-3-4-5-6-7-8-9-10), get FALSE PASS.
- Go Prophetess’ Chamber.
- Press (H×6), get ELIXIR OF FACELESS.
- Use ELIXIR OF FACELESS on (I), get KEY TO THE CABINET.
- Go Warehouse.
- Use KEY TO CABINET on (J).
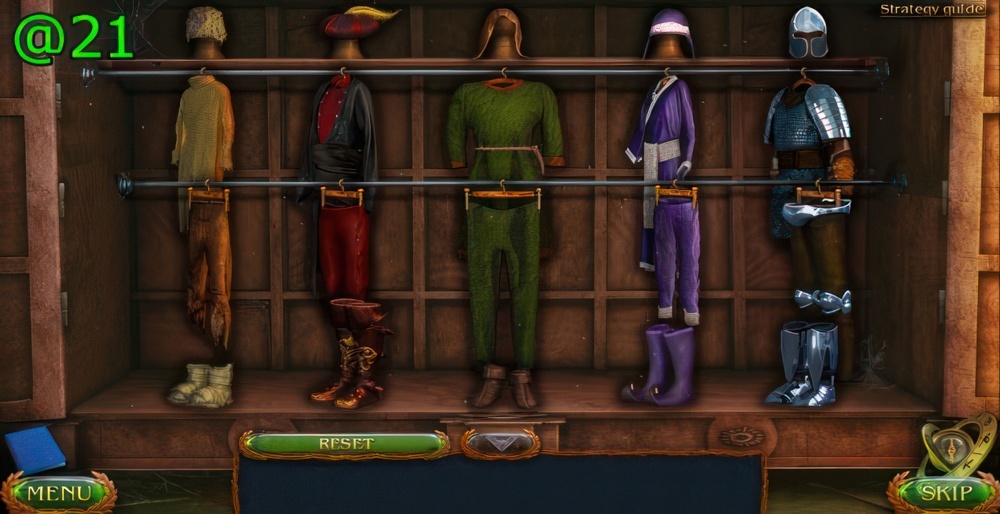
- Collect all the sets of clothes.
- Walkthrough (@21).
- Press (K).
- Use KEY TO THE CELLAR and press (L).
- Play the puzzle (M).
- Slide the cylinder from the left groove to the right.
- Puzzle walkthrough.
- Get BOX WITH FOOD.
- Go Endless Cemetery.
- Use SWORD OF JUSTICE and KEY and press (N), get HARNESS.
- Go Road to the City.
- Use CHISEL and HAMMER on (O).
- Use HARNESS and APPLE on (P).
- Go Endless Cemetery.
- Press (Q×2).
- Use FALSE PASS on (R).
- Go (S).
- Go (T).
- Go (U).
- Press (V), drag (V)-(W).
- Go (X).
The dish for my lord
I need to find out what Maaron eats at night, cook and serve it properly.
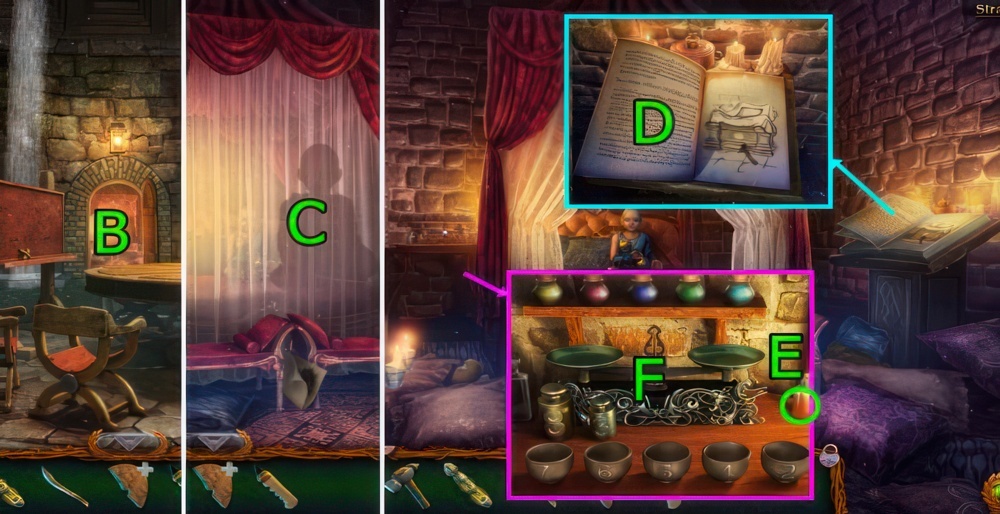
- Get RECIPE BOOK and JUG (Y).
- Press (Z) and (A).
- Use FIRE KEEPER on (B).
- Go (C).

- Press (D×3), get PIECE OF PAPER WITH THE CODE.
- Go forward (E).
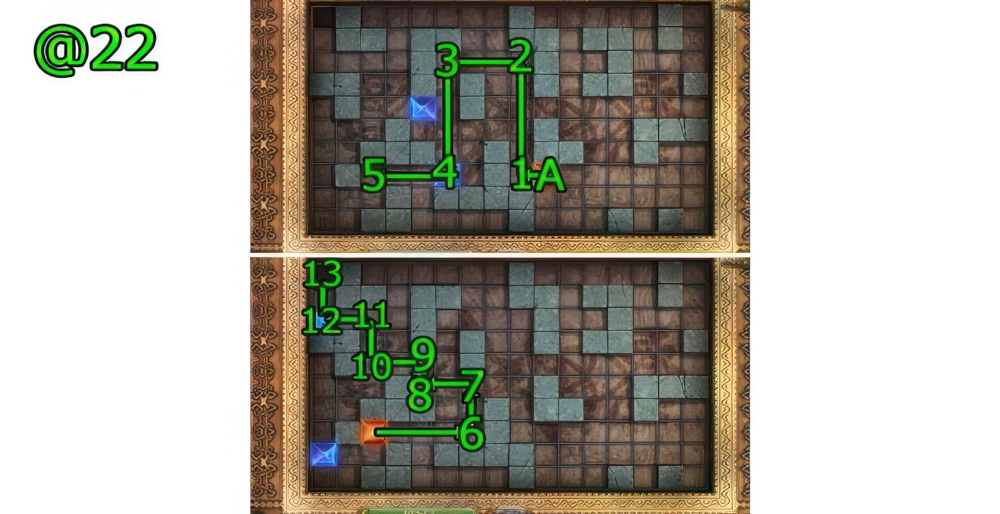
- Move the red chip. The red chip should not stop next to the blue one.
- Walkthrough (@22): Drag (A)-(1-2-3-4-5-6-7-8-9-10-11-12-13).
- Go Kitchen.
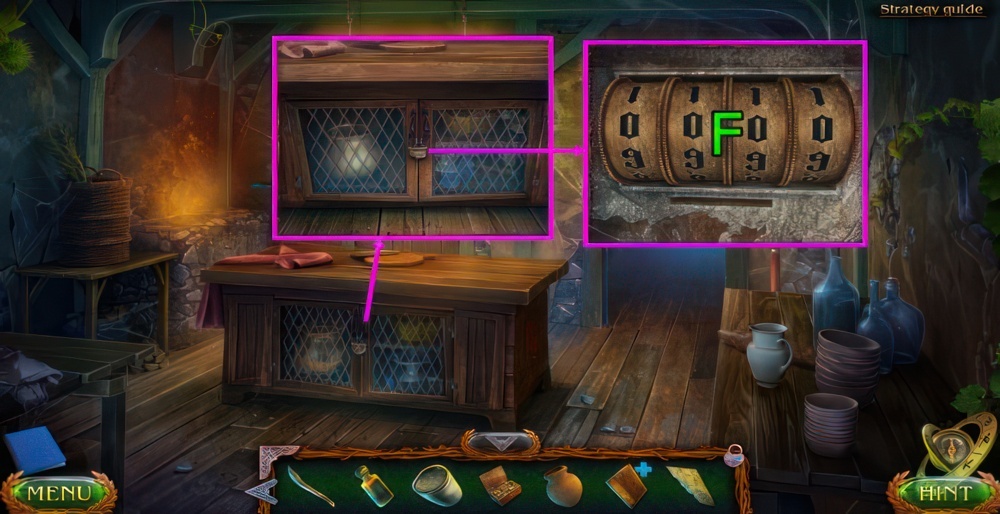
- Use PIECE OF PAPER WITH THE CODE on (F).
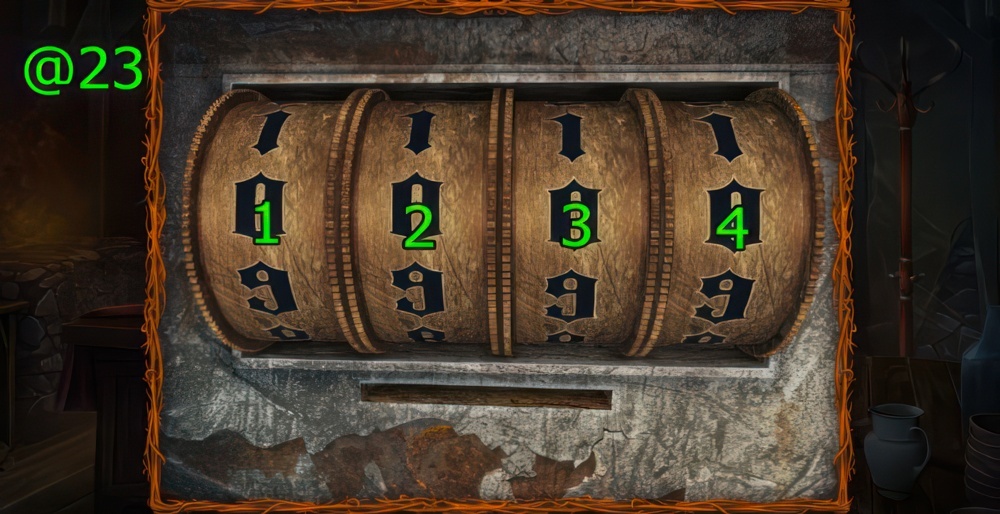
- Enter the correct code.
- Walkthrough (@23): Press (1×2)-(2×3)-(3×8)-(4×8).
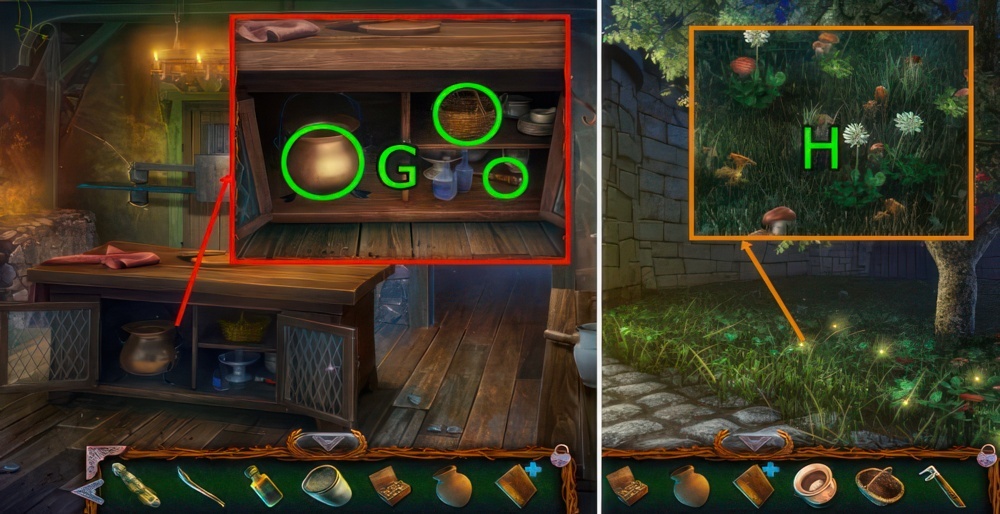
- Get POT, HANDLE, and BASKET (G).
- Go Garden.
- Use BASKET on (H).
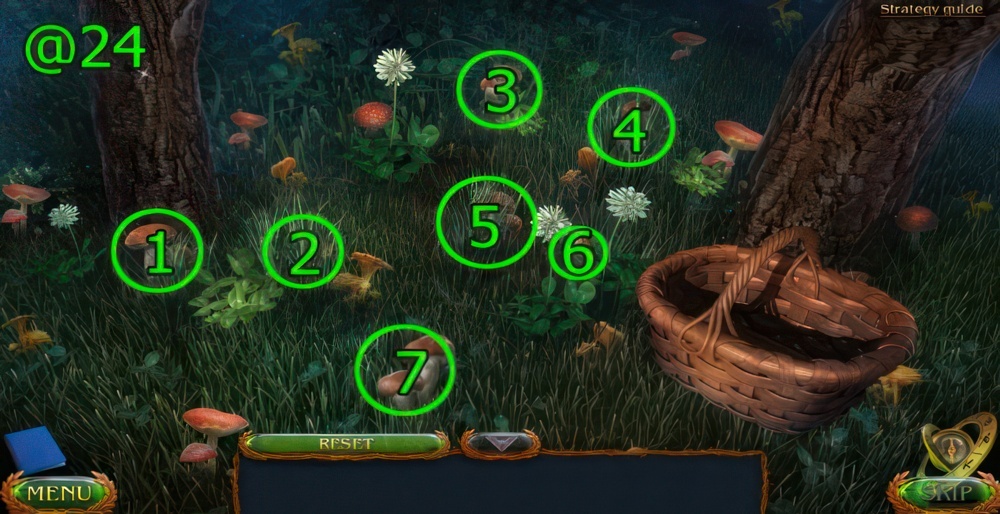
- Collect all the porcini mushrooms.
- Walkthrough (@24): Press (1-2-3-4-5-6-7).
- Get MUSHROOMS.
- Go Central Square.
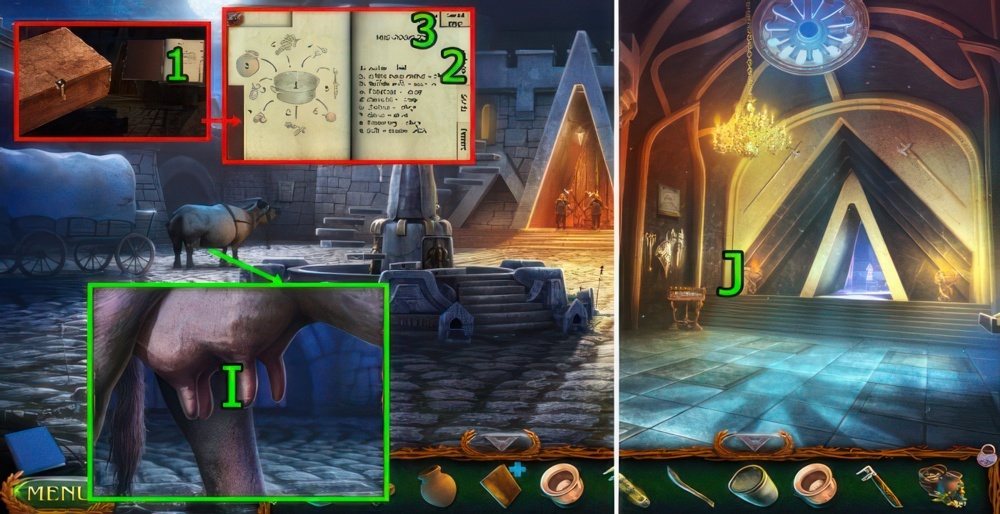
- BOX WITH FOOD on RECIPE BOOK, press (1-2-3).
- Use JUG on (I), get BUFFALO MILK.
- MUSHROOMS, POISONOUS POWDER, and BUFFALO MILK on RECIPE BOOK, get SOUP INGREDIENTS.
- Go Hall.
- Go forward (J).

- Press (K).
- Use SWORD OF JUSTICE on (L), get CRYSTAL.
- Press (M×2).
- Go Hall.
- Use CRYSTAL on (N).
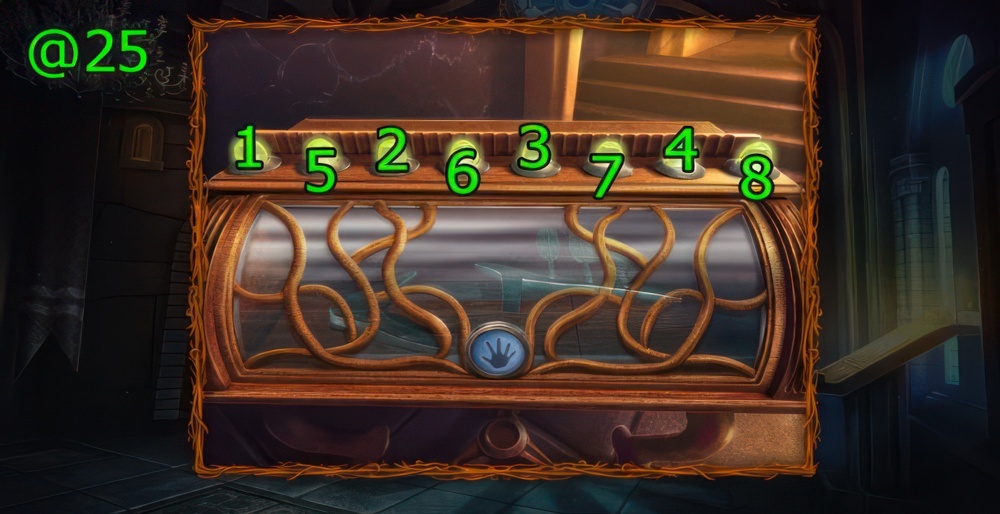
- Click on the crystals in a certain sequence. To see the sequence click on the button with a hand.
- Walkthrough (@25): Press (1-2-3-4-5-6-7-8).
- Get TOP PART OF THE FOUNTAIN.
- Go Central Square.
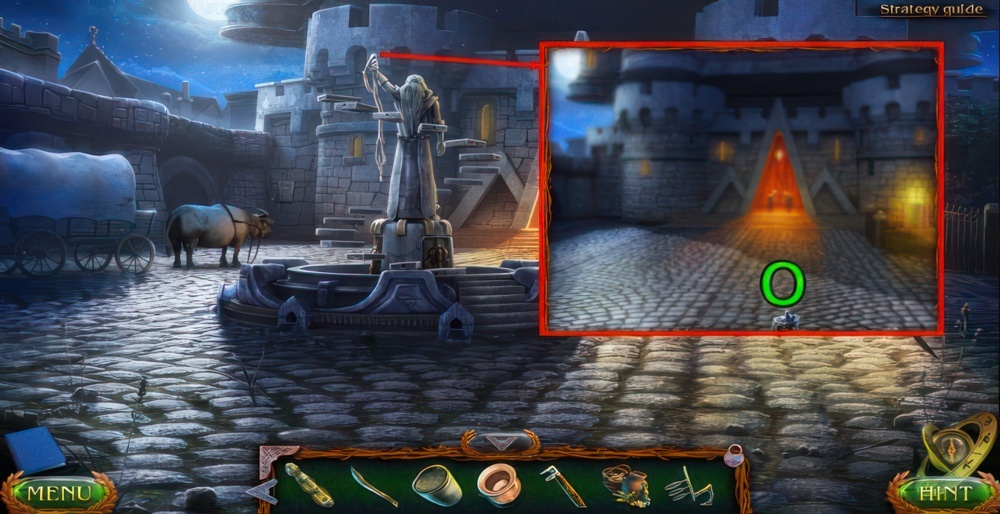
- Use TOP PART OF THE FOUNTAIN on (O).
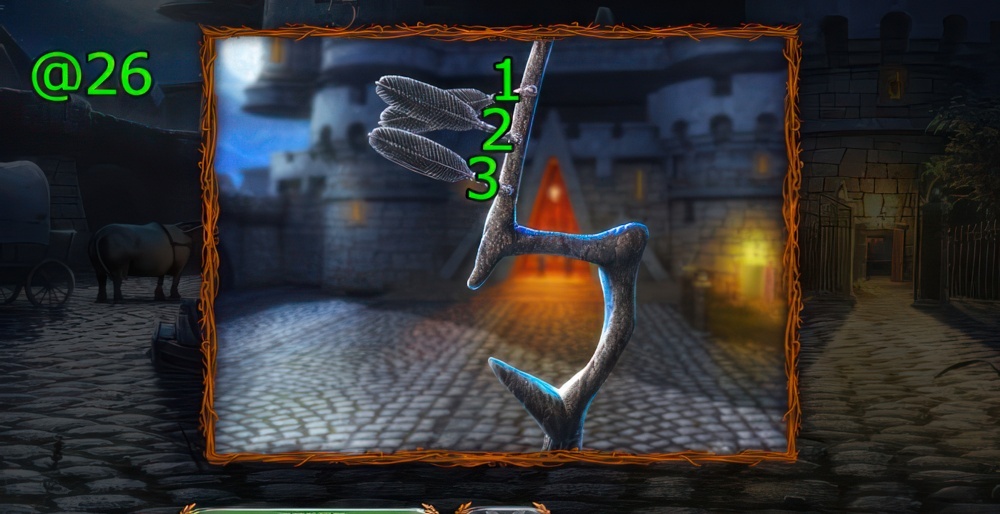
- You need to put the feathers in the right position, you’ve seen it before.
- Walkthrough (@26): Press (1×1)-(2×1)-(3×2).
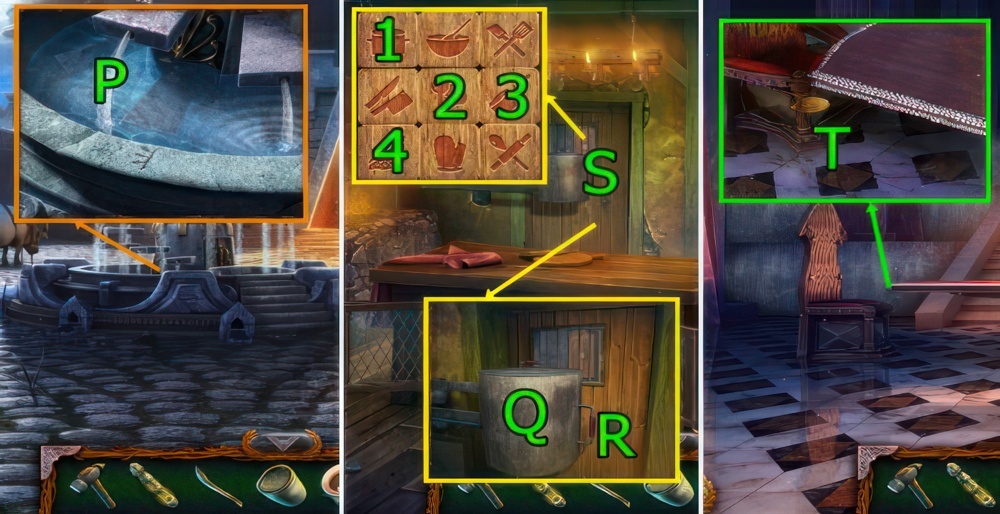
- Use POT on (P), get POT WITH WATER.
- Go Kitchen.
- Use POT WITH WATER on (Q).
- Use HANDLE on (R).
- Use SOUP INGREDIENTS on (S).
- Play the puzzle (S).
- Enter the correct code.
- Puzzle walkthrough: Press (1-2-3-4), get TEA TROLLEY.
- Go Throne Room.
- Use TEA TROLLEY on (T).
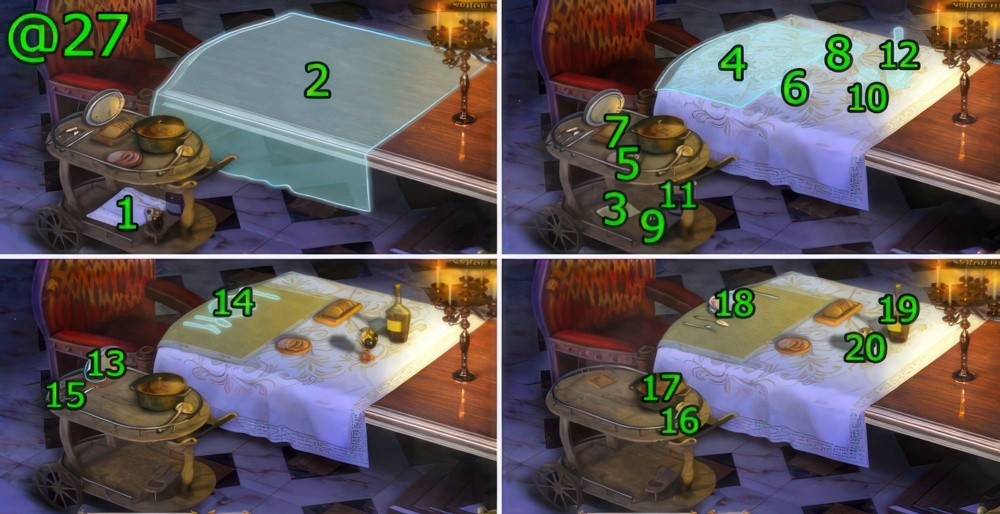
- Lay the table.
- Walkthrough (@27): Drag (1-2), (3-4)-(5-6)-(7-8)-(9-10)-(11-12).
- (13-14)-(15-14), (16-17)-(17-18)-(19-20).
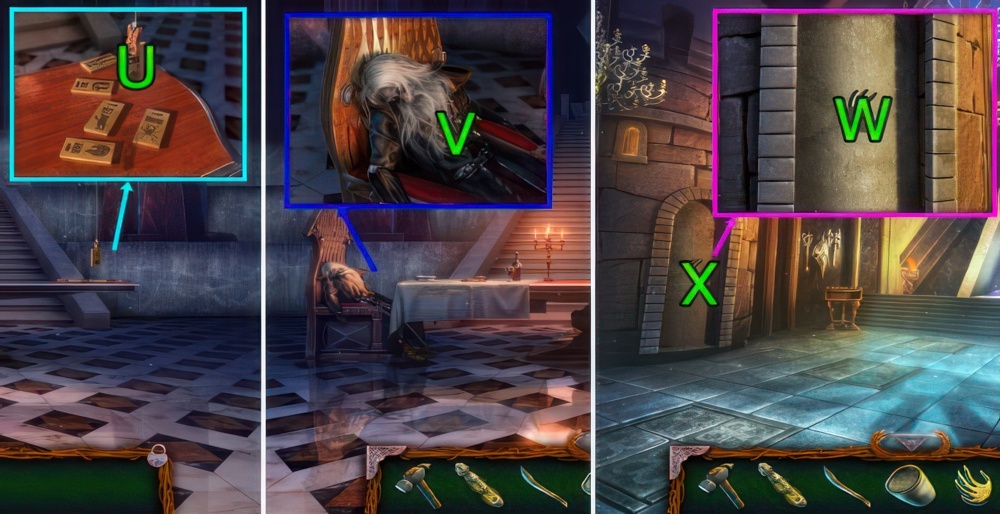
- Press (U).
- Get HAND (V).
- Go Hall.
- Use HAND on (W).
- Go (X).
- Press (Y×4), get TIN PUNCH CARDS.
- Press (Z), get CENTRAL PART OF THE PATTERN and SCREW HOOK.
- Use HAMMER and press (A), get DRAWING OF THE HANG GLIDER.
- Go (B).
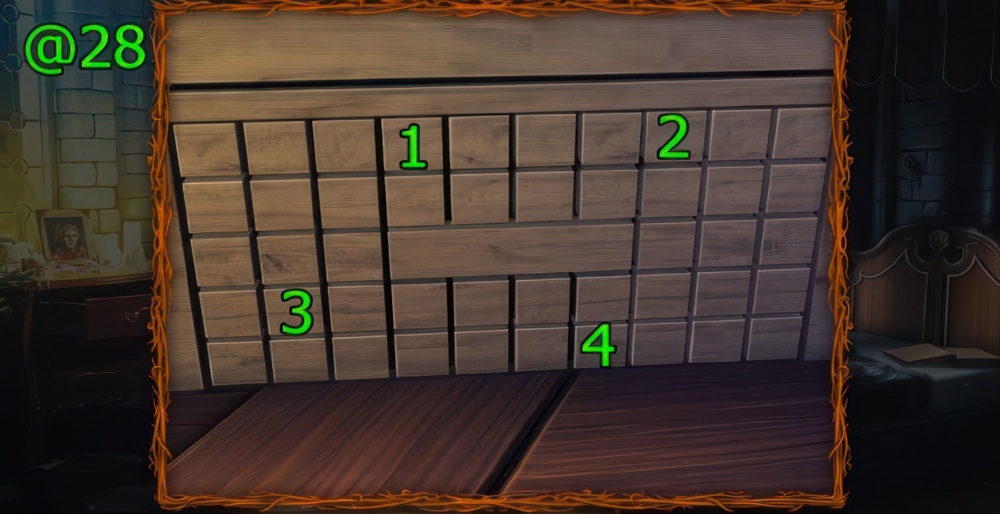
- Enter the correct code.
- Walkthrough (@28): Press (1-2-3-4).
- Go forward (C).
- Use SCREW HOOK on (D), get MOON ICE.
- Use MOON ICE and TIN PUNCH CARDS on (E).
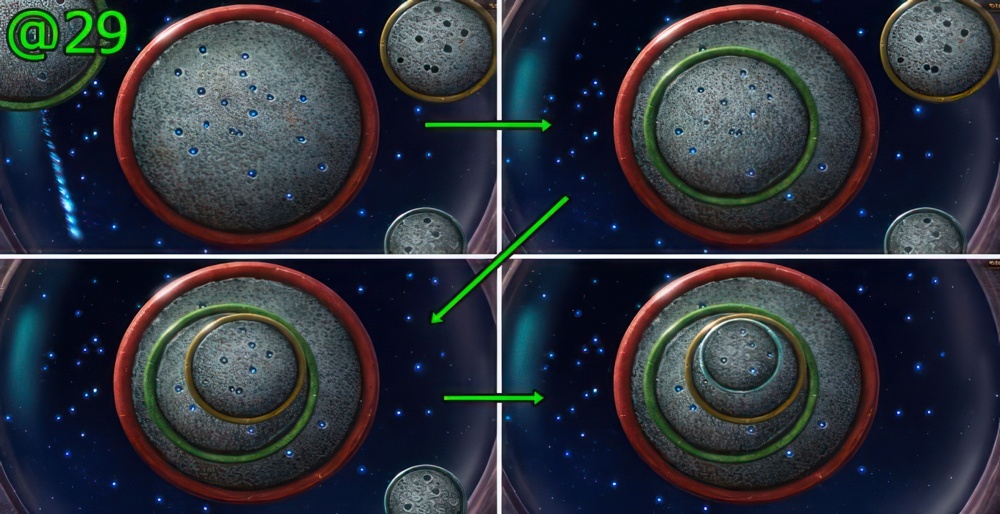
- Set the templates so that a star is visible through each hole.
- Walkthrough (@29).
- Go Maaron’s Private Room.
- Press (F), get TIME HEXAGON and HARNESS STRAPS FOR THE HANG GLIDER.
- Go Tower Roof.
- Use DRAWING OF THE HANG GLIDER and HARNESS STRAPS FOR THE HANG GLIDER on (G).
Jump of faith
The way from the castle is cut off. In my opinion, I have to jump.
- Use CENTRAL PART OF THE PATTERN on (H), get HELMA’S POTION.
- TIN OF ASHES on TIME HEXAGON.
- Get MEDALLION (I).
- Press (J×2).
- Use MEDALLION and press (K×2).
Initial point
I need to return to the past and persuade the young Maaron to kill Cassandra.
- Use SWORD OF JUSTICE on (L), get YOUNG TREE TRUNK.
- Go (M).
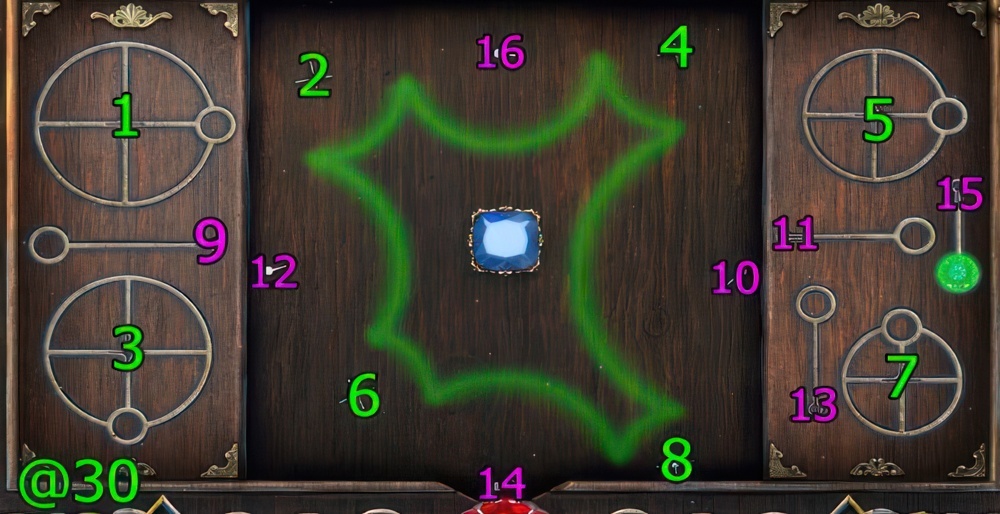
- Place the details of the mechanism so that the crystal is moved along the entire closed path.
- Walkthrough (@30): Drag (1-2)-(3-4)-(5-6)-(7-8), (9-10)-(11-12)-(13-14)-(15-16).
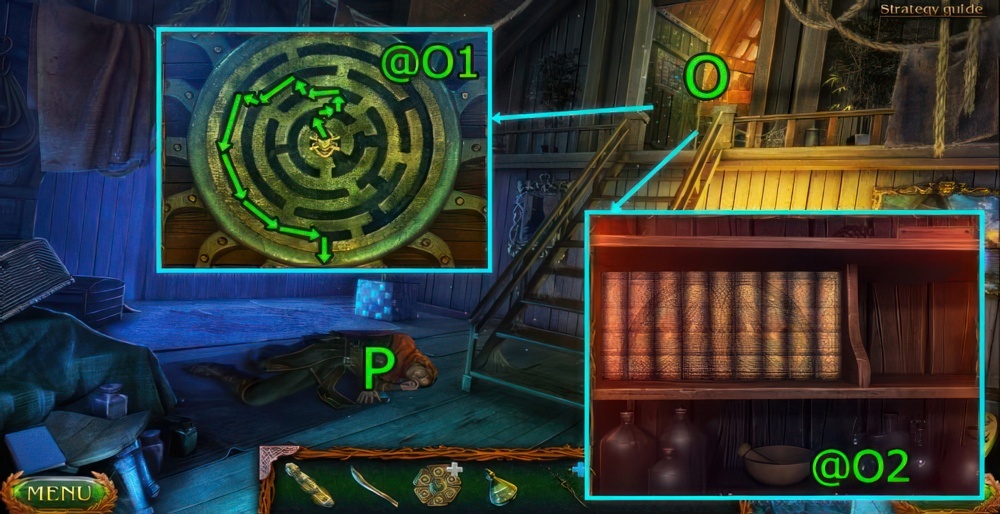
- Play the puzzle (O).
- By turning the labyrinth point the chip into the hole below.
- Puzzle walkthrough (@O1).
- Changing books in places, rearrange them so that they form a picture.
- Puzzle walkthrough (@O2).
- Get FEATHERS.
- SWORD OF JUSTICE and FEATHERS on YOUNG TREE TRUNK, get MAGIC STAFF.
- Use MAGIC STAFF on (P).
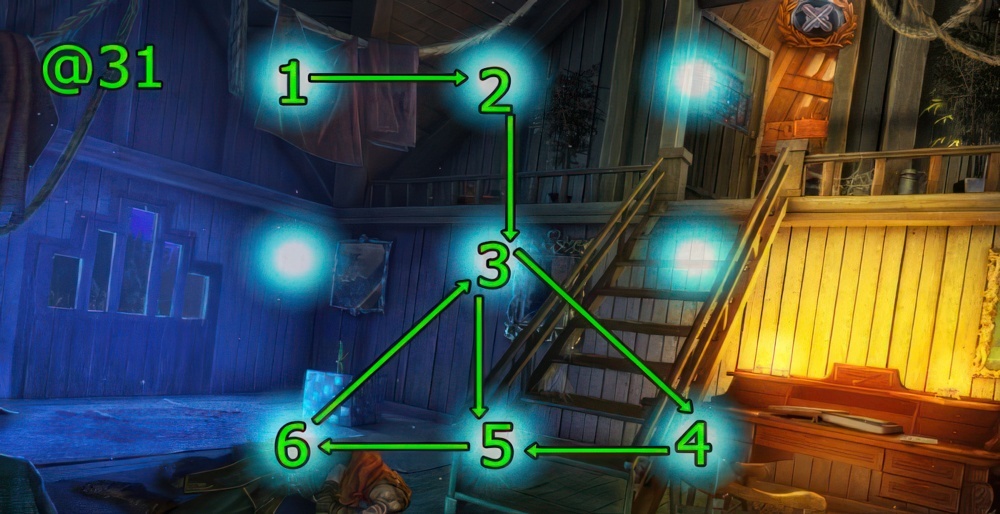
- Click on the dots to draw the correct symbol. You’ve seen it before.
- Walkthrough (@31): Press (1-2-3-4-5-6-3-5).
Lonely grave
There is a grave on the glade in front of the crypt. Whose grave is it.
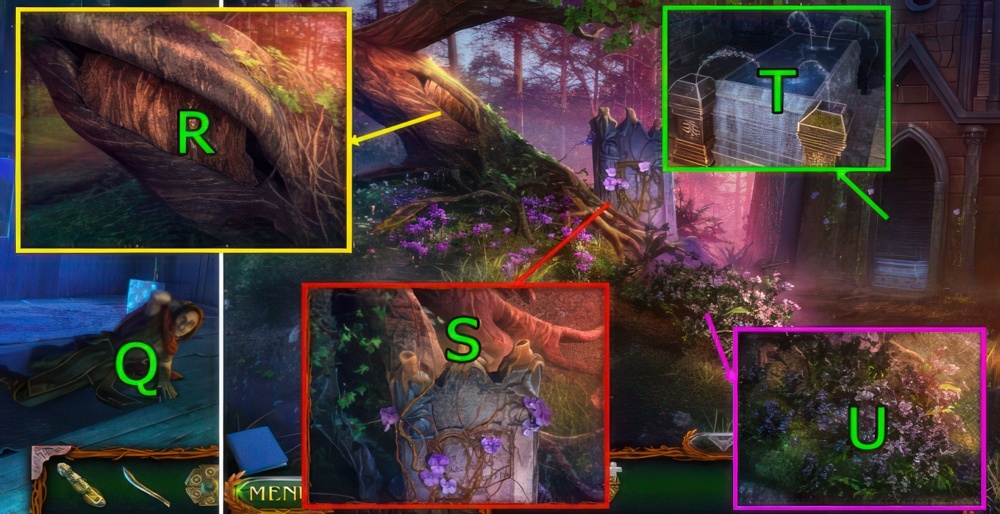
- Use SWORD OF JUSTICE and HELMA’S POTION on (Q).
- Press (R), get LADLE.
- Use FIRE KEEPER on (S).
- Use LADLE on (T), get LADLE WITH WATER.
- Use LADLE WITH WATER on (U).
- Walkthrough Bonus Chapter, at the link below.


