Mind Echoes 1: The Lost Mysteries – Ten years after her parents disappeared, Emily Rivers receives official notice: they have been declared dead. But she doesn’t believe it. Since childhood, Emily has been able to see and hear spirits, and her parents, studying unexplained phenomena, taught her to understand and control this gift. That’s why she can’t accept their fate, too many questions left unanswered. Returning to the inherited esoteric store that once belonged to her mother, Emily begins searching for any clues. Among the old books, amulets, and ritual objects, she finds her mother’s diary. It tells of events that took place in an abandoned hotel, about which there are many eerie rumors. According to the records, it was there that her parents went for the last time before their disappearance. Emily decides to find out the truth and goes to the hotel, but from the first minutes she realizes that this place is not just an old abandoned building. The corridors seem alive, the air is filled with whispers, and strange shadows flicker in the darkness. The workers who have tried to restore the hotel refuse to stay here after sunset. When a man died unexpectedly at the construction site, restoration work was finally halted. But Emily isn’t about to back down. She begins to explore the rooms, dilapidated hallways and dark stairwells. She searches for hidden clues, examines old documents, and listens to voices that only she can hear. Some spirits help her by leaving hints and clues. But there are others who don’t want the truth to come out. Especially frightening is her stalker, a sinister entity that lurks in the shadows and watches her every move. Help Emily solve the mystery of the 13th floor, find out what happened to her parents, and get out alive. If you can not pass any of the puzzles or do not know where the items are, on our site you can watch the walkthrough of Mind Echoes 1: The Lost Mysteries, and help the girl.
Mind Echoes 1: The Lost Mysteries – Walkthrough
Here you can see the full walkthrough of Mind Echoes 1: The Lost Mysteries game, namely for all chapters, including bonus chapter, in pictures.
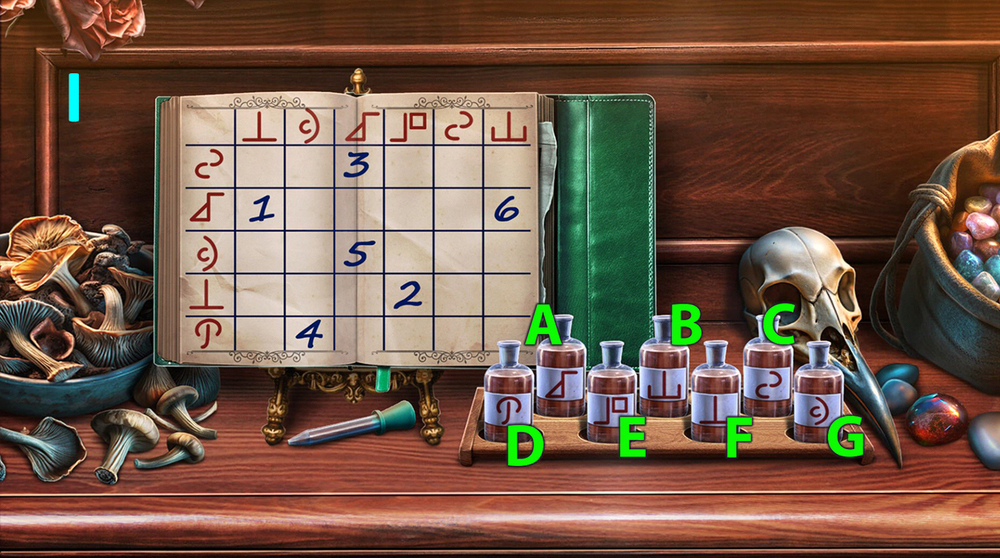
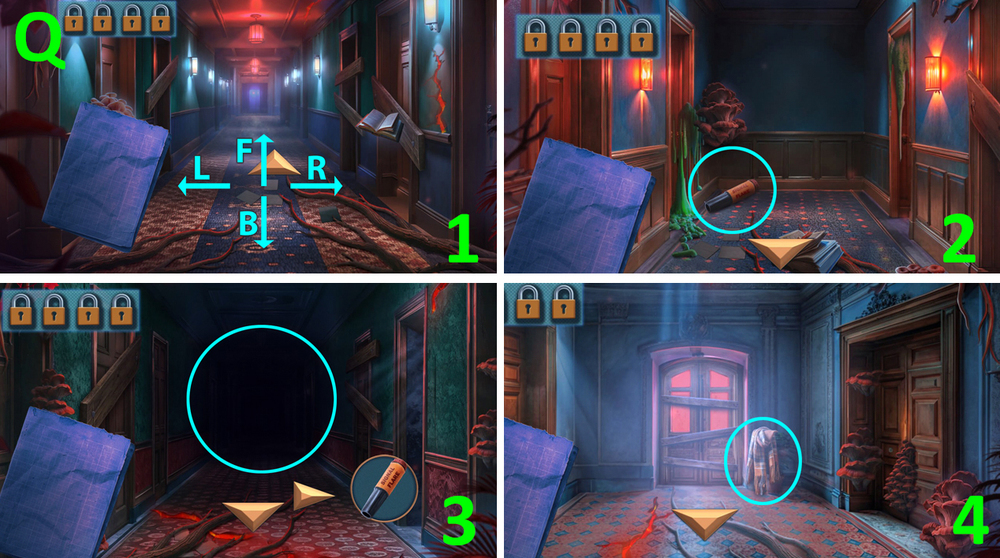
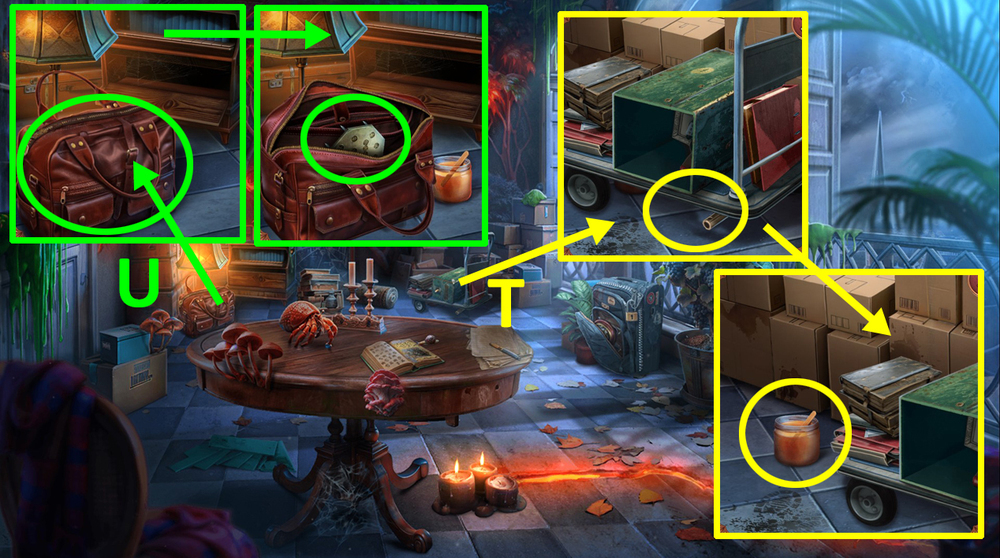
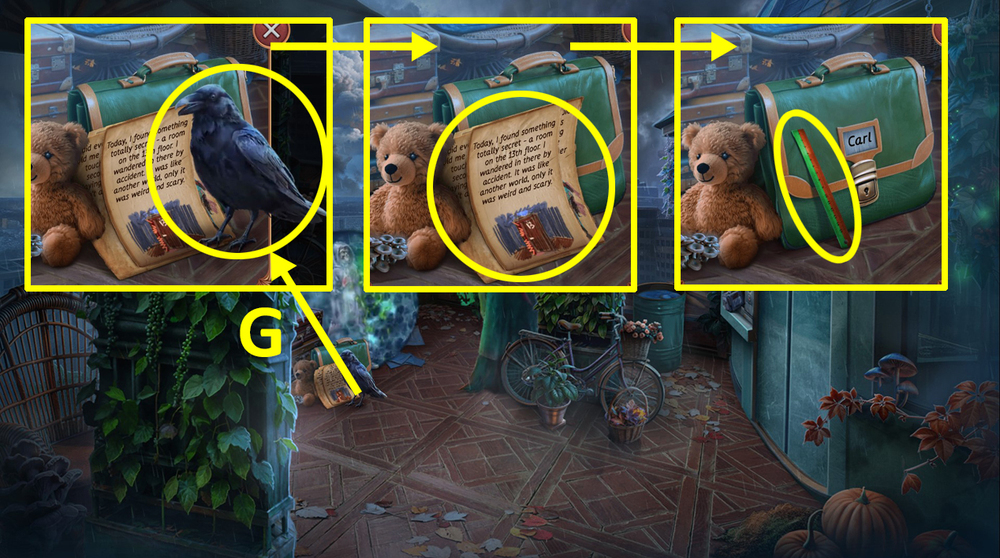
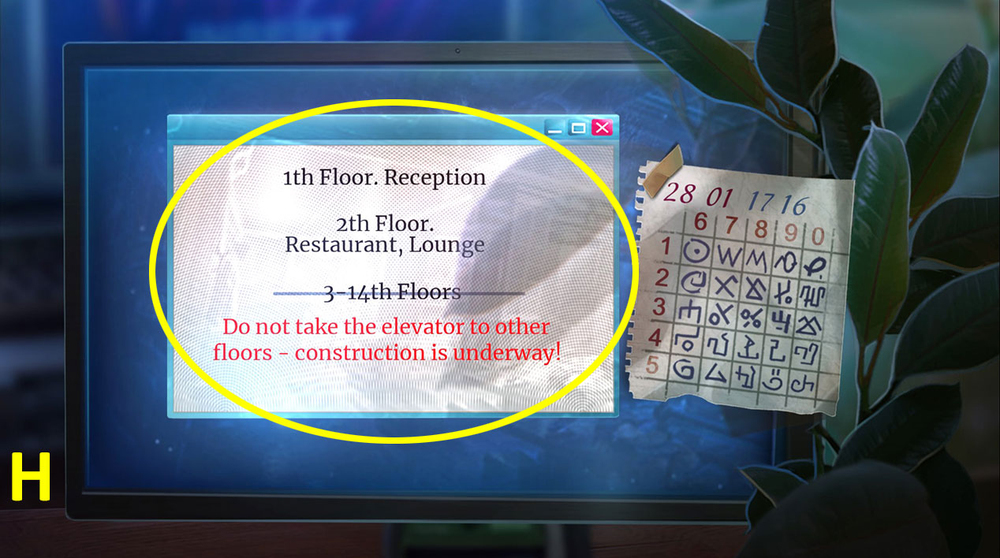
- Examine MY BAG, open the bag, read the diary, take BRUSH and MY PHONE.
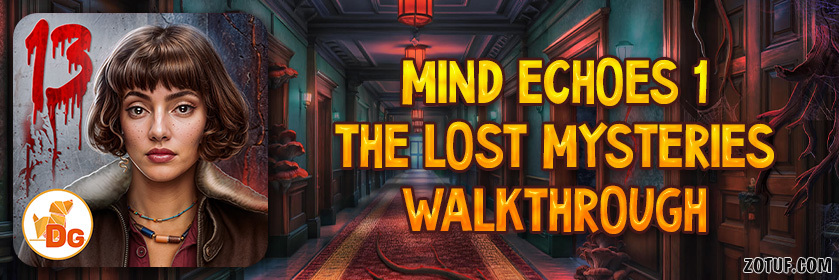
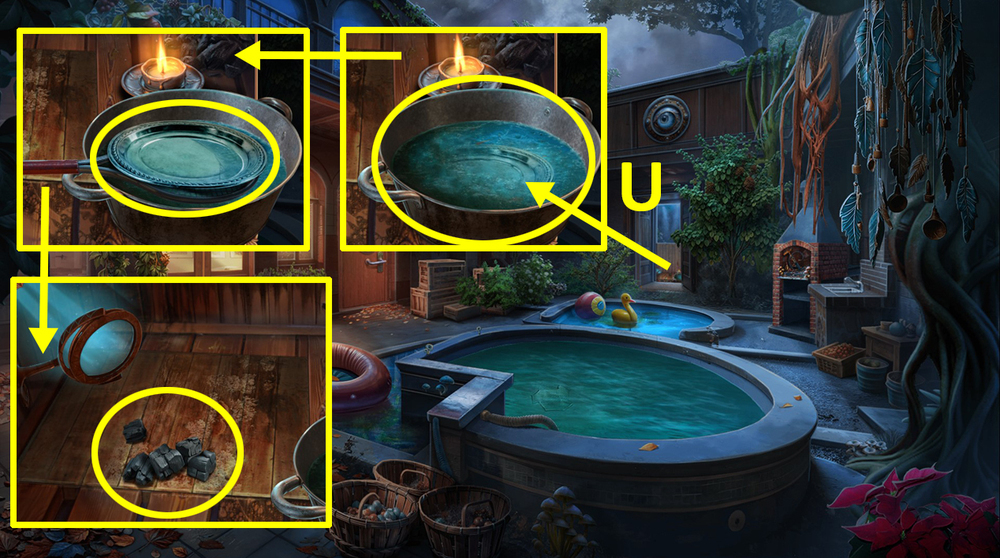
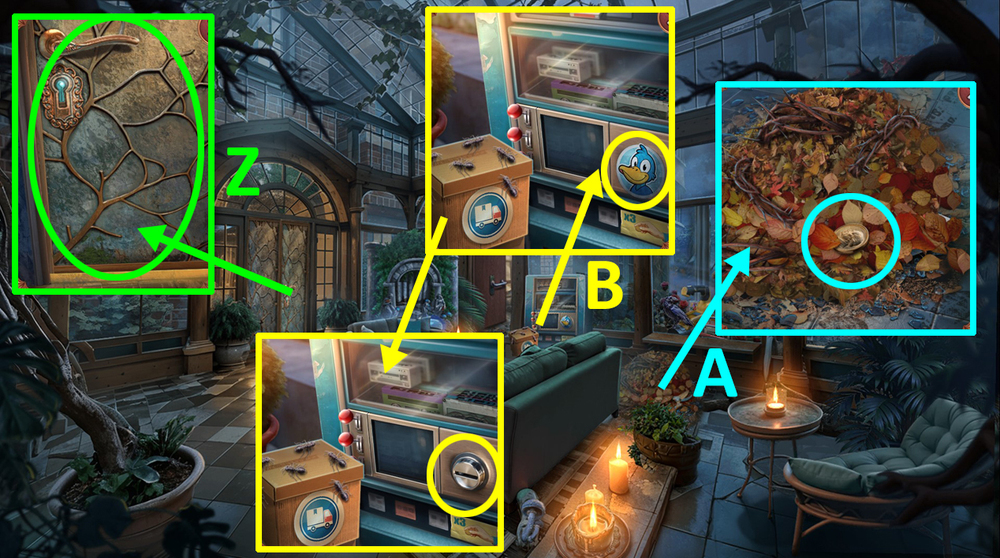
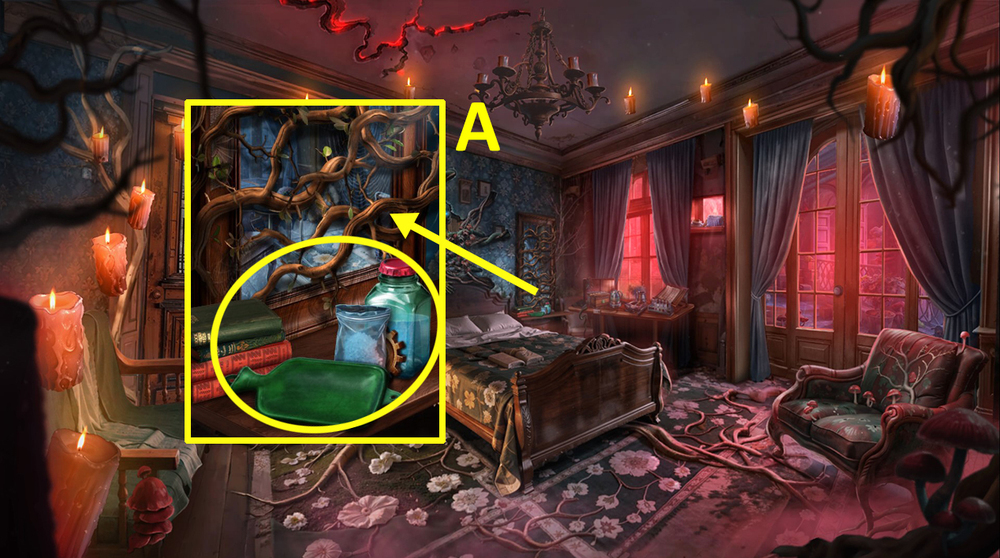
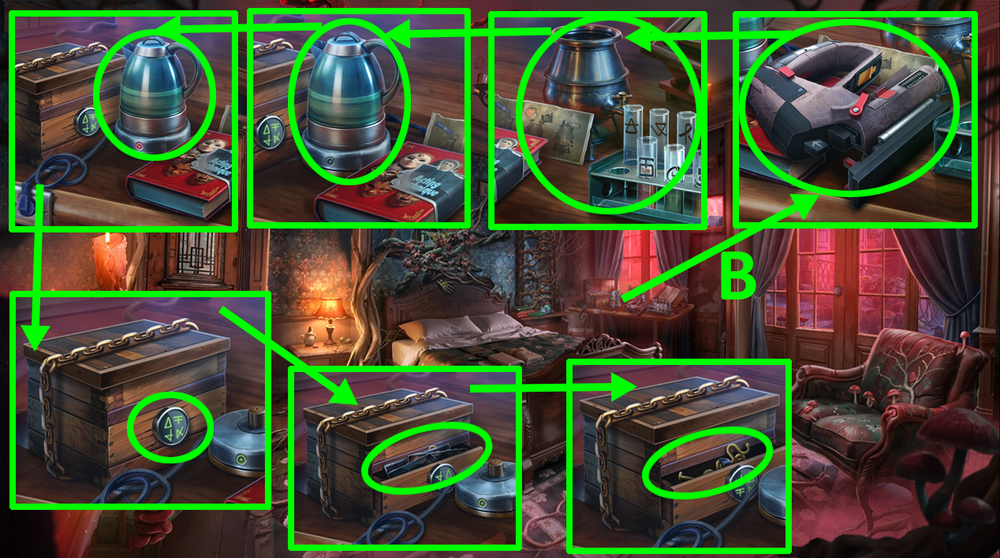
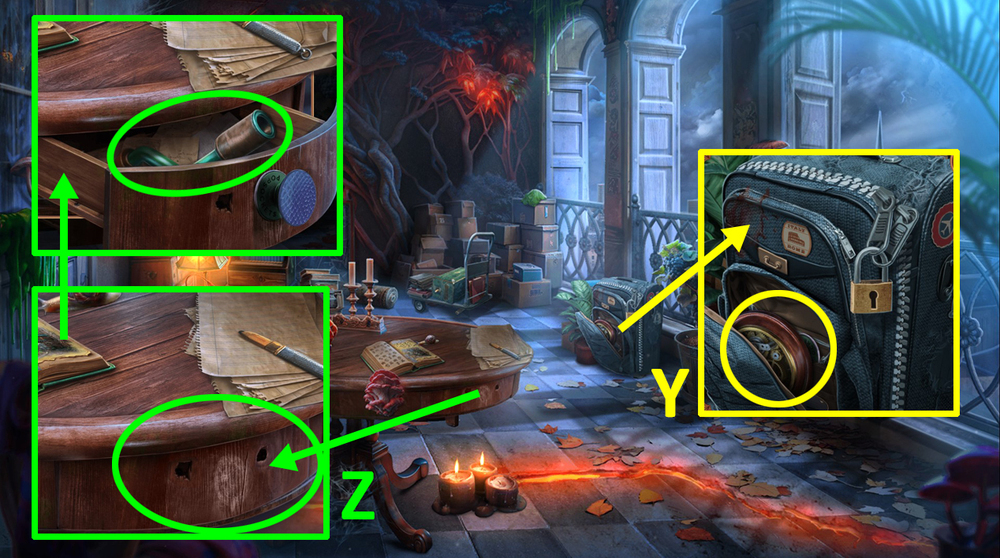
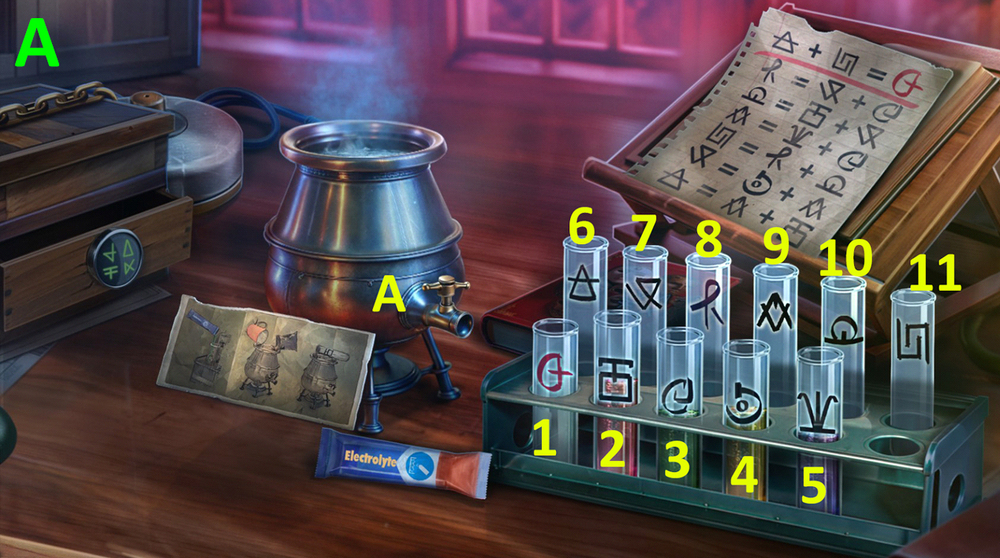
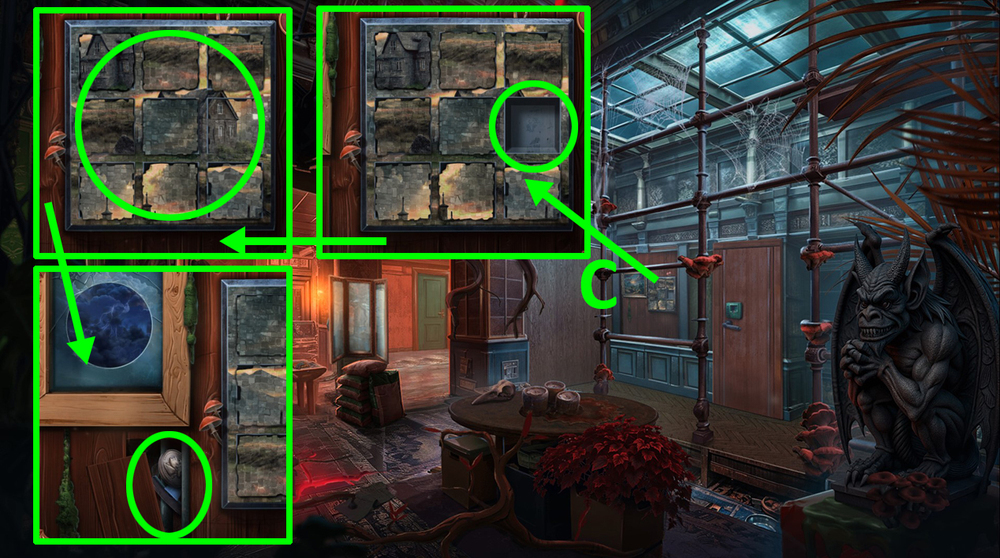
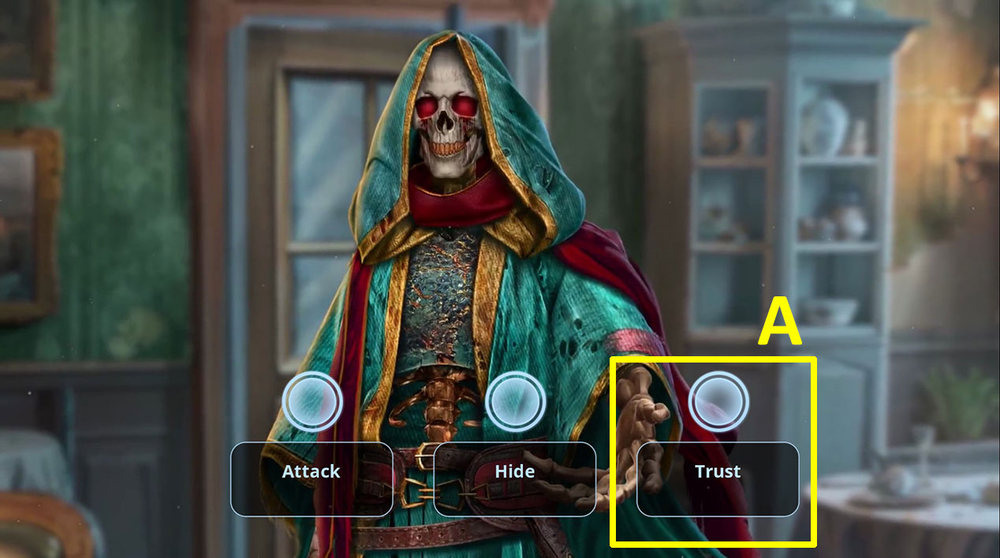
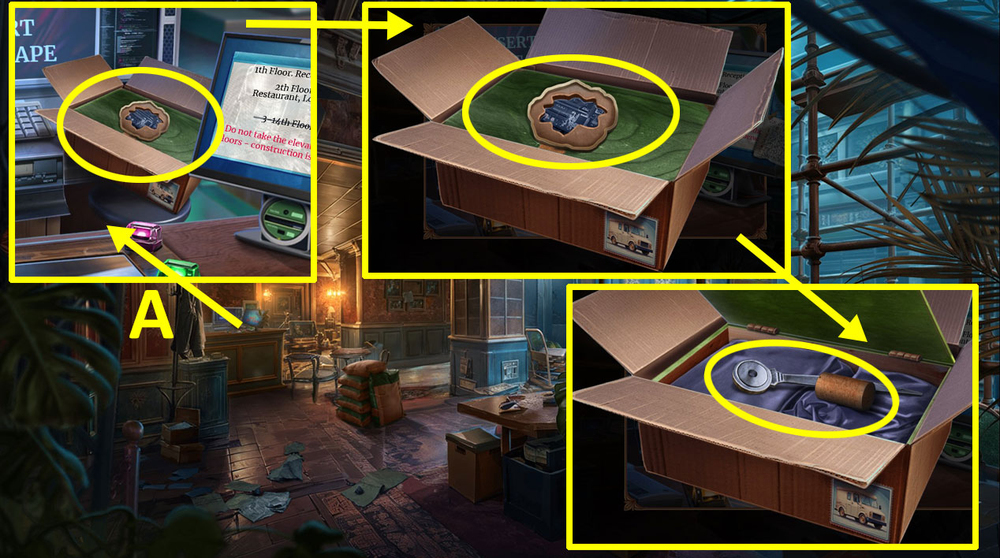
- Take the journal, OWL FIGURINE, FULL KETTLE, and DROPPER (A).
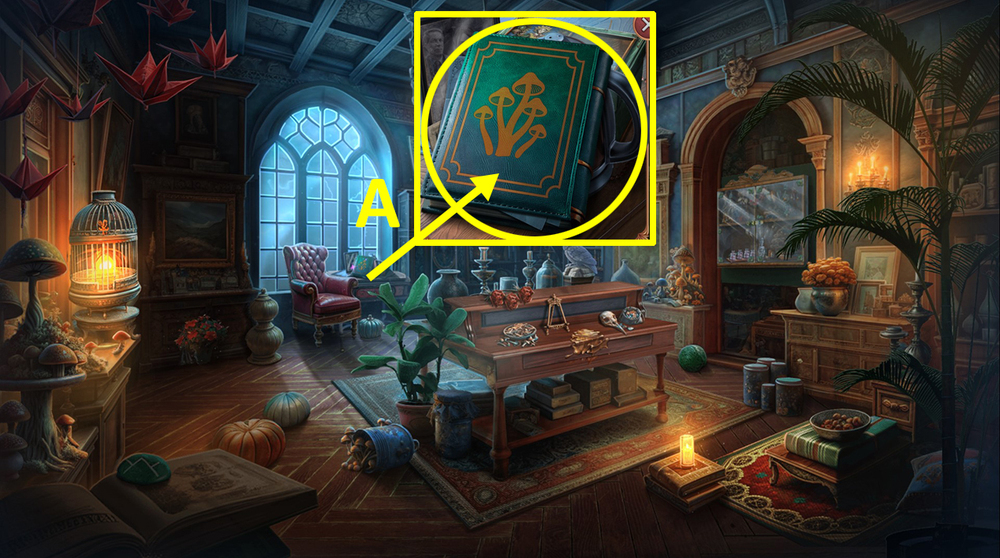
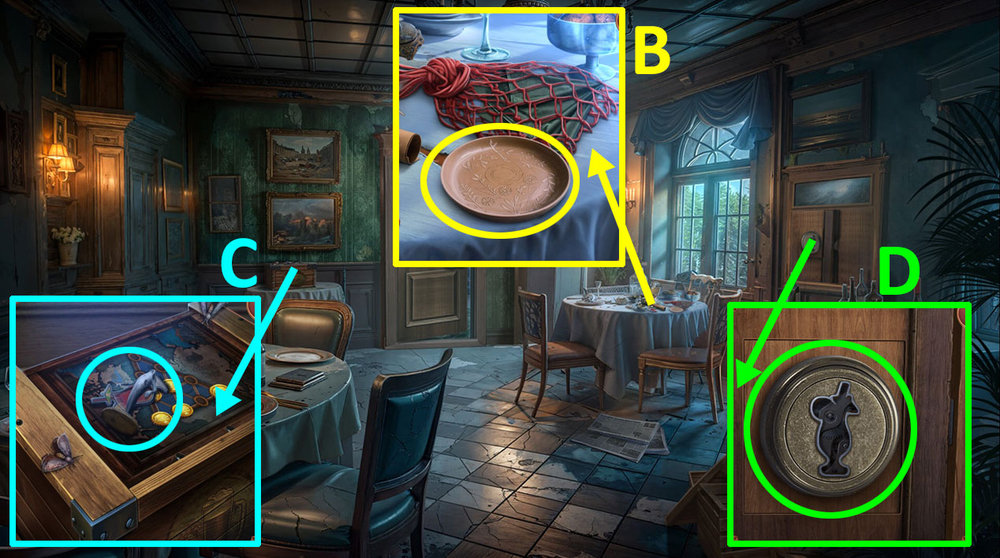
- Use BRUSH and FULL KETTLE on the stain, take BASEBALL, UMBRELLA HANDLE, and BOX IMAGE, examine the diary, use DROPPER on the diary (B).
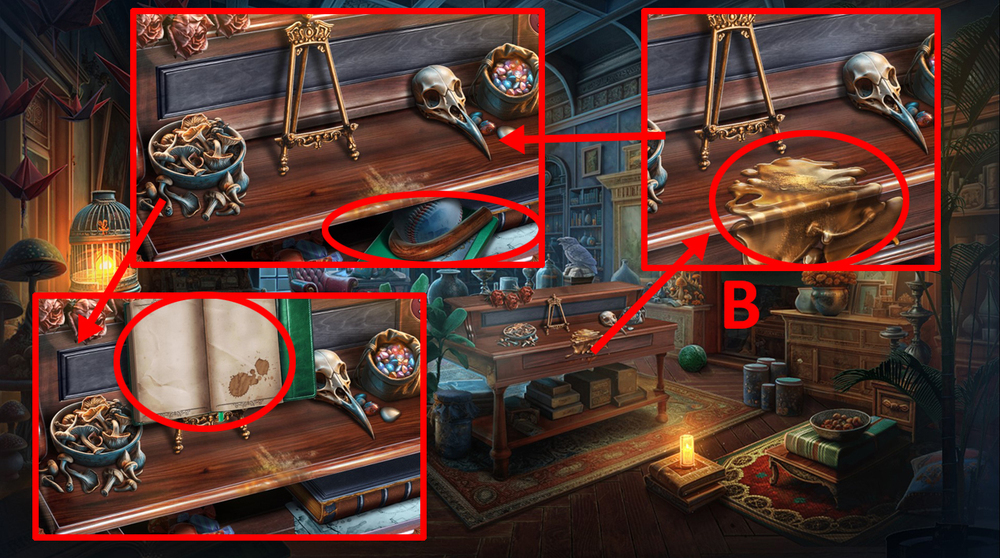
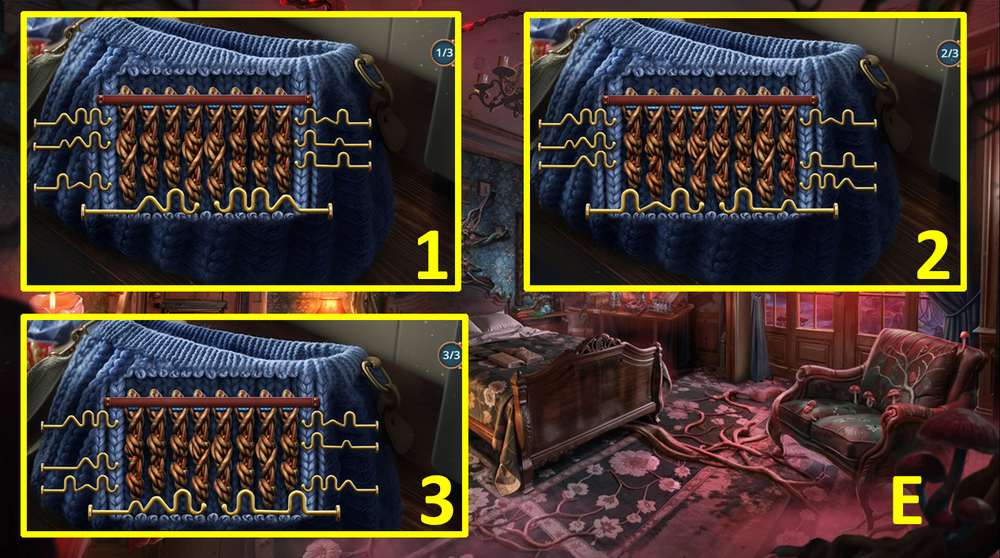
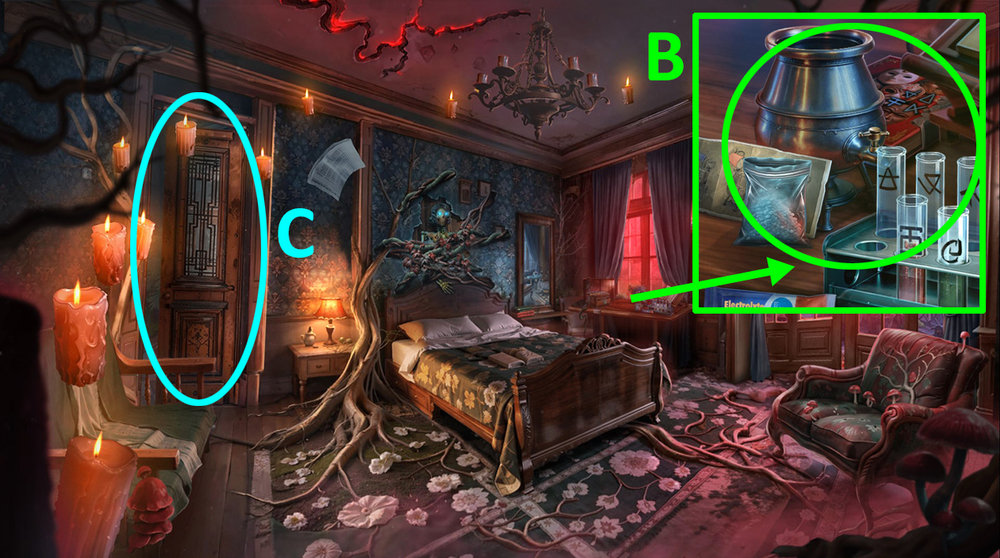
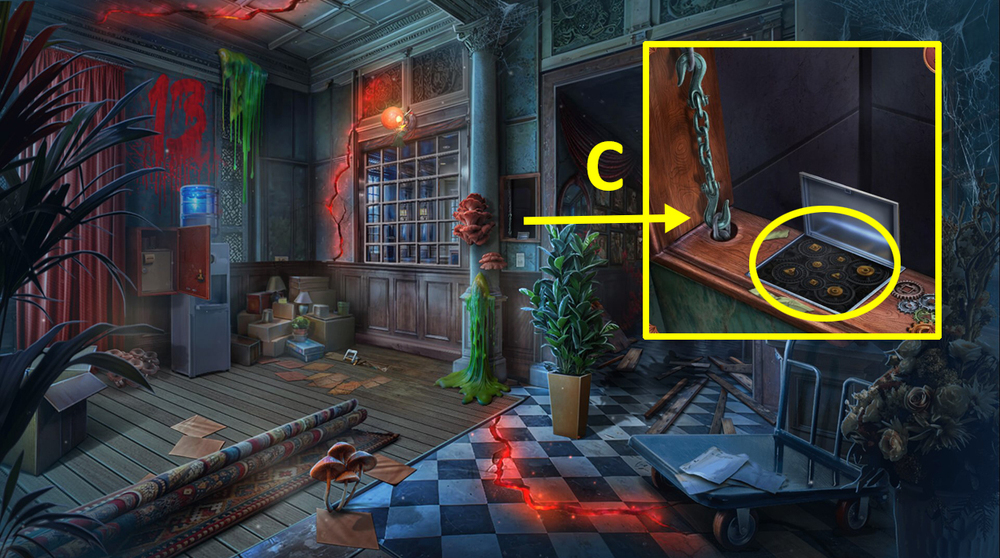
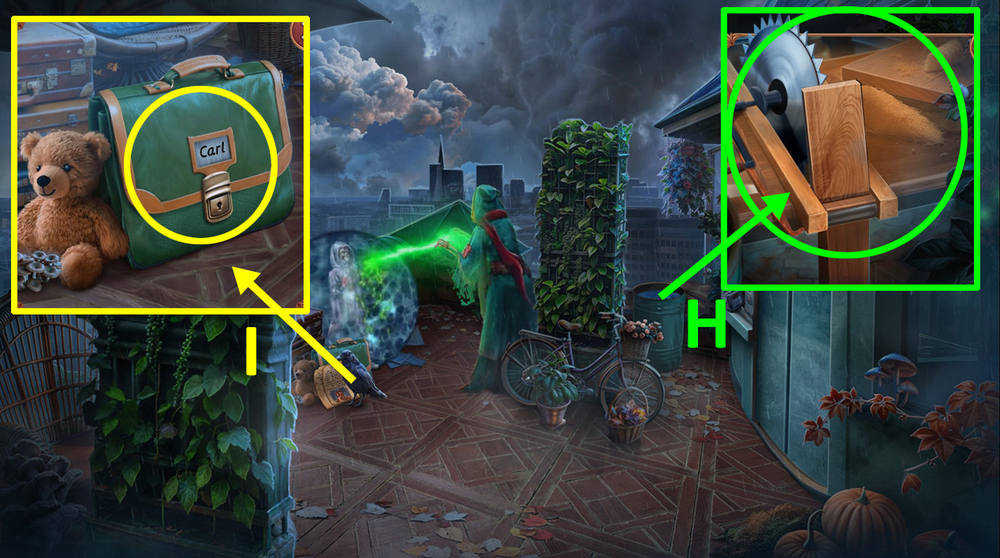
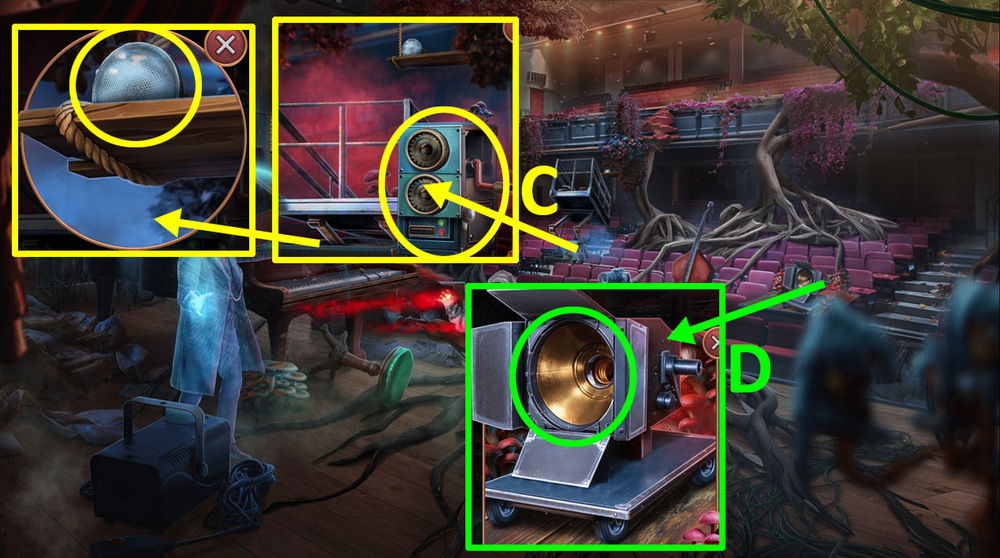
- Use BOX IMAGE on the jewelry box (C).
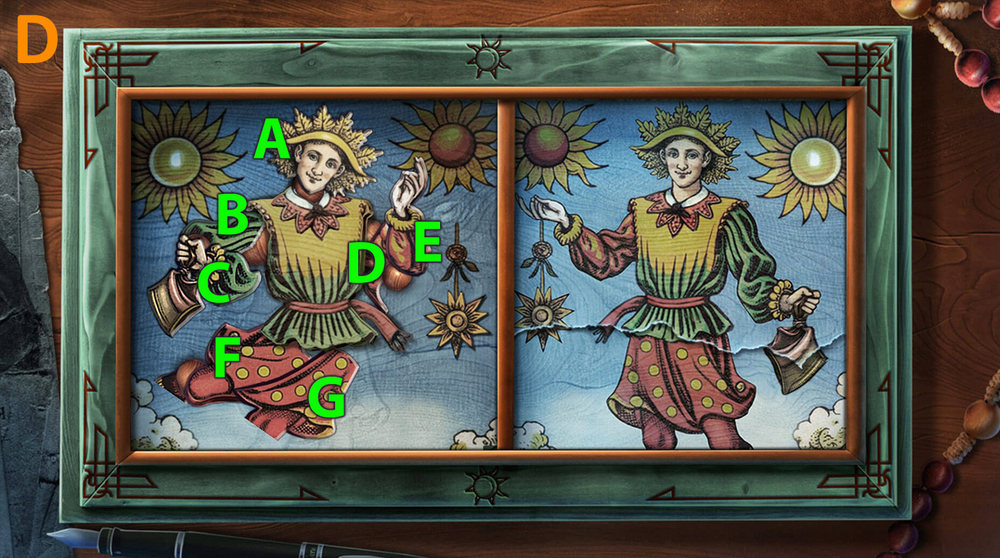
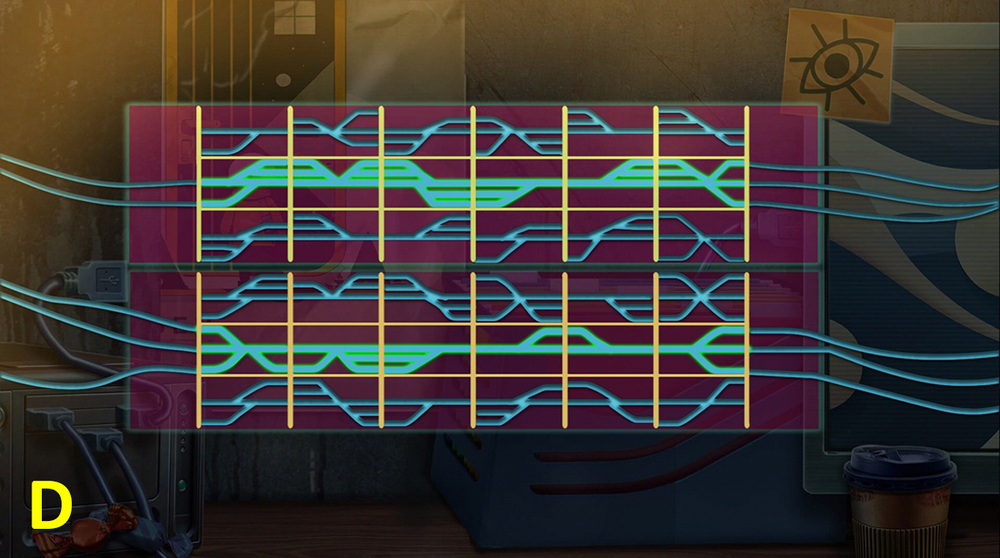
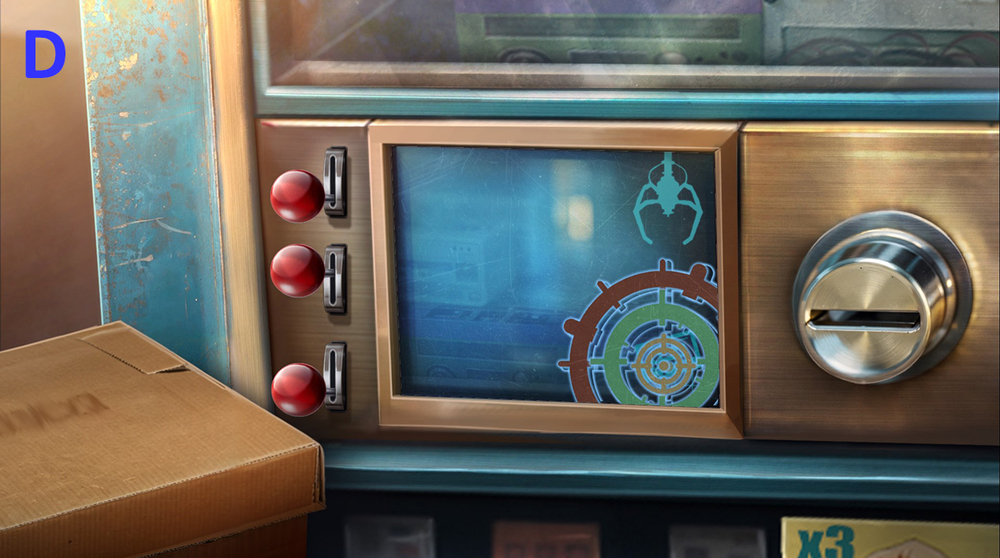
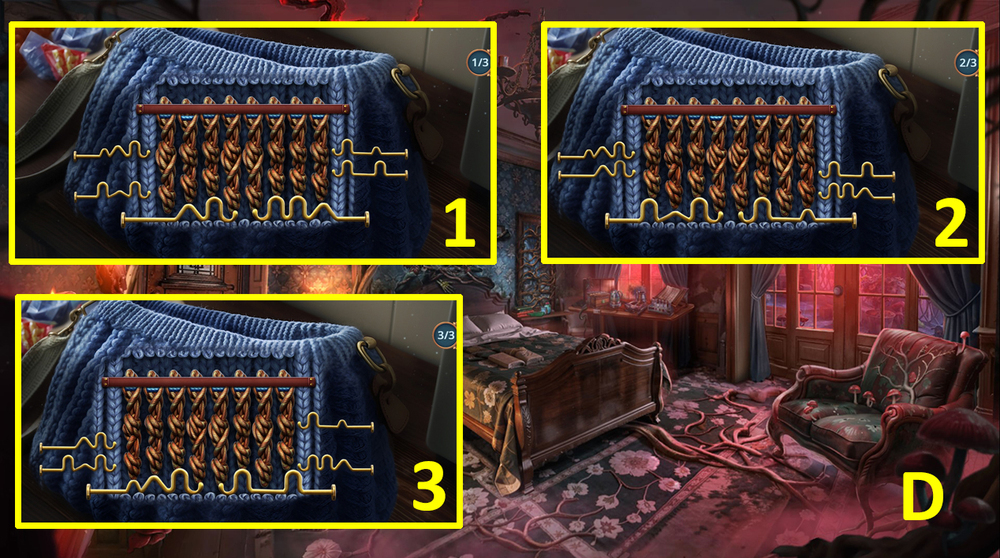
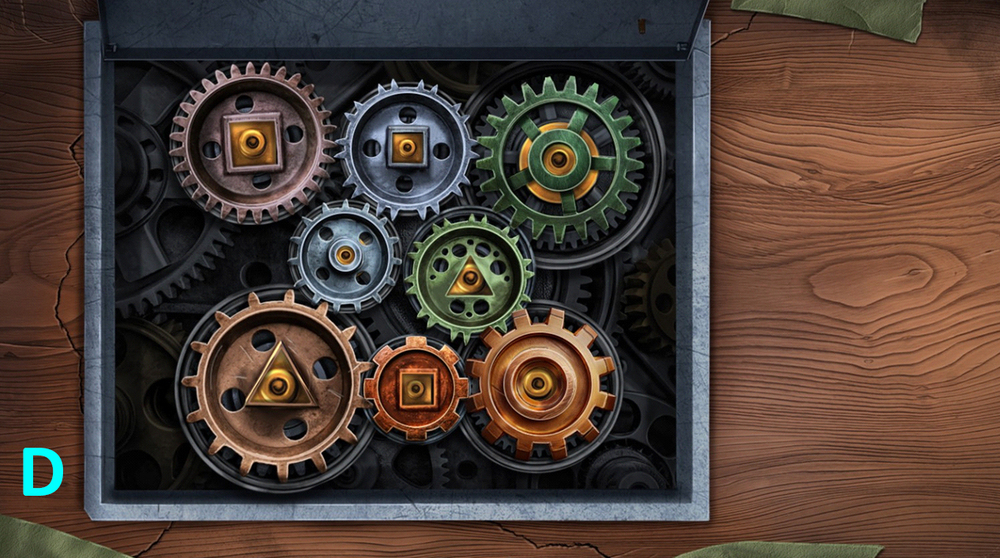
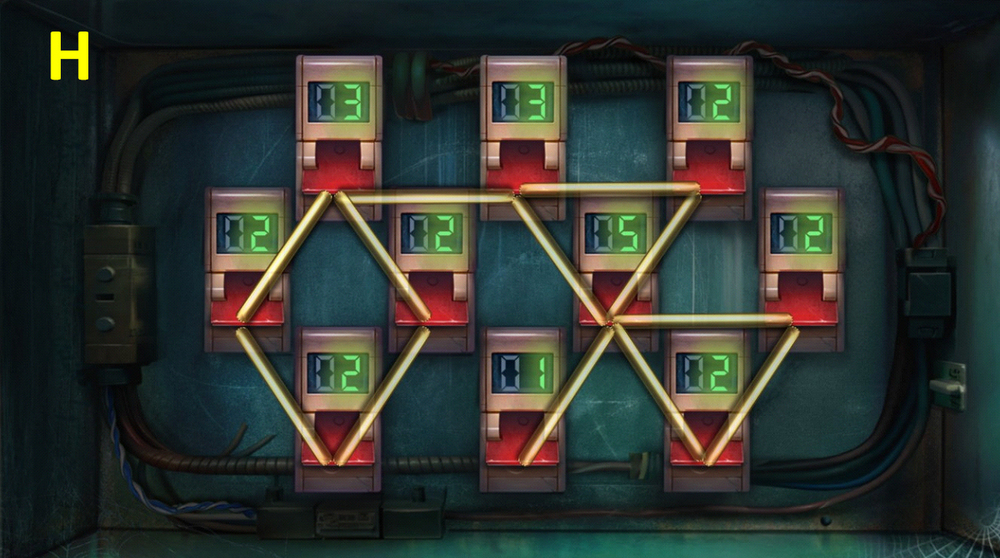
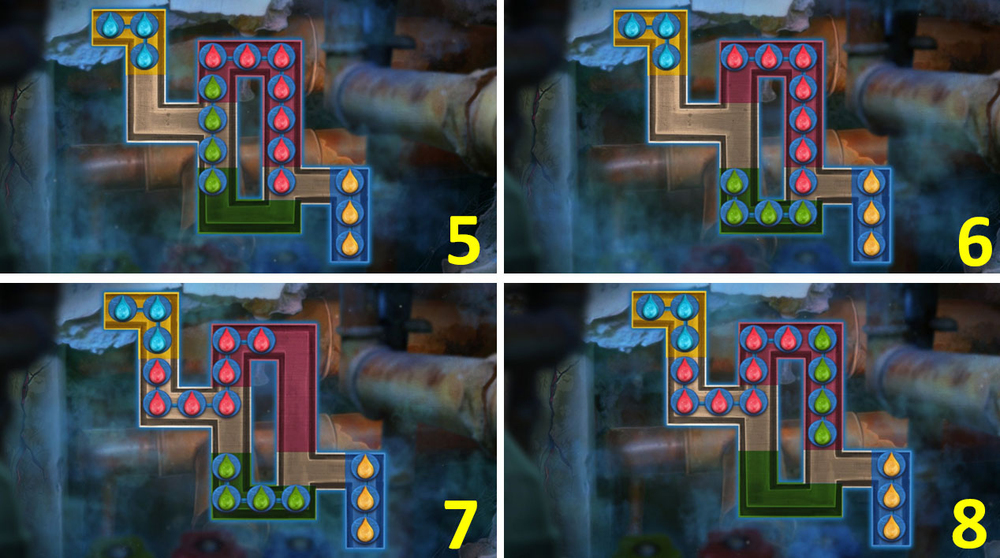
- Easy solution: A, Bx2, Cx2, Dx3, Ex3, Fx3, Gx3 (D).
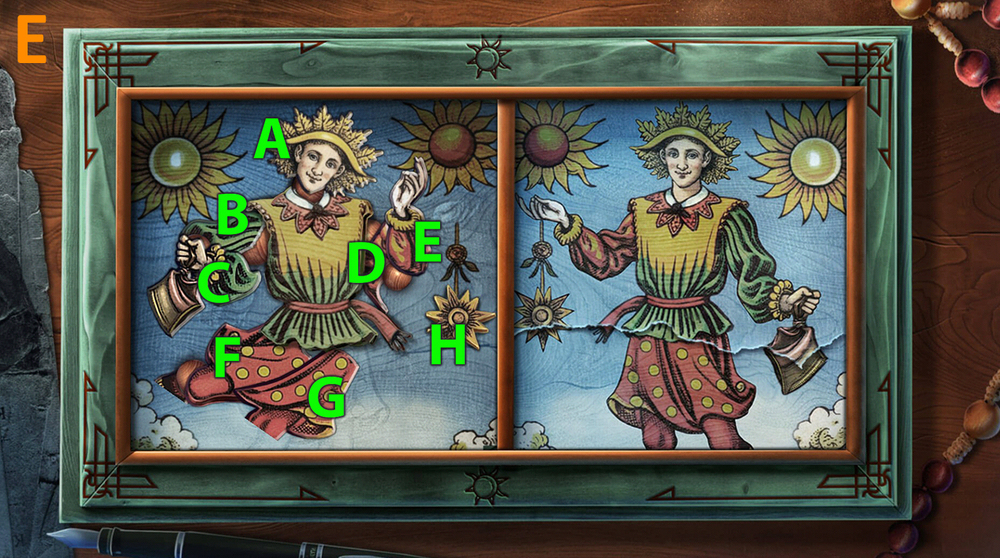
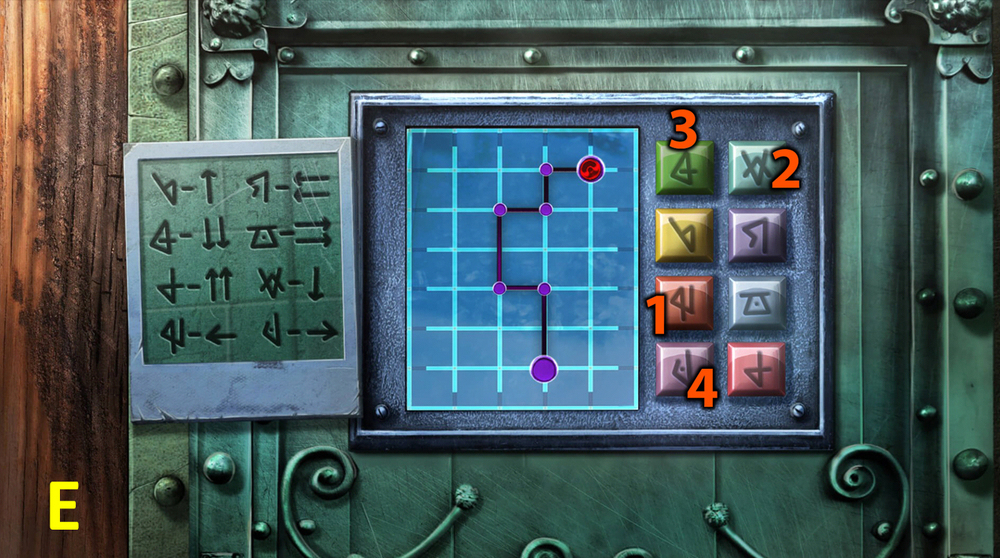
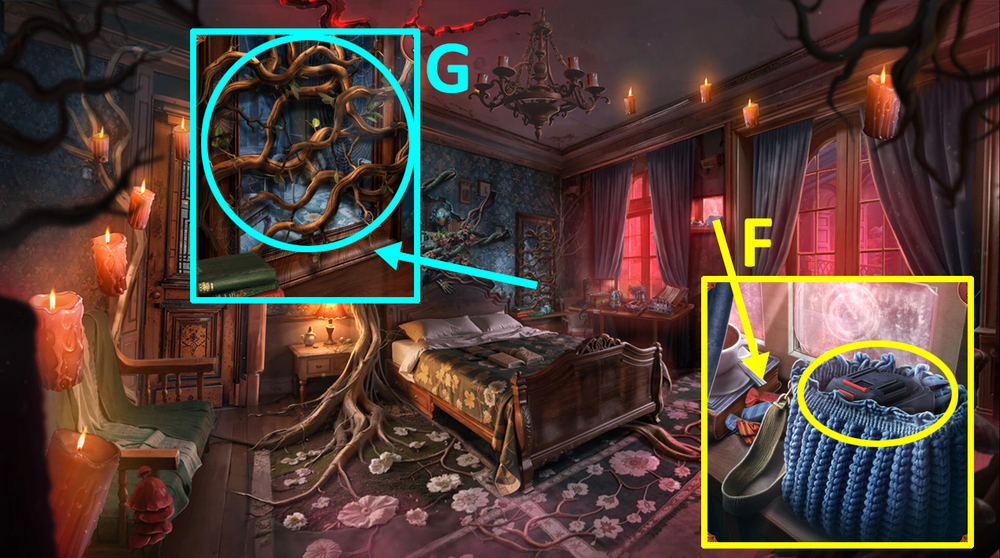
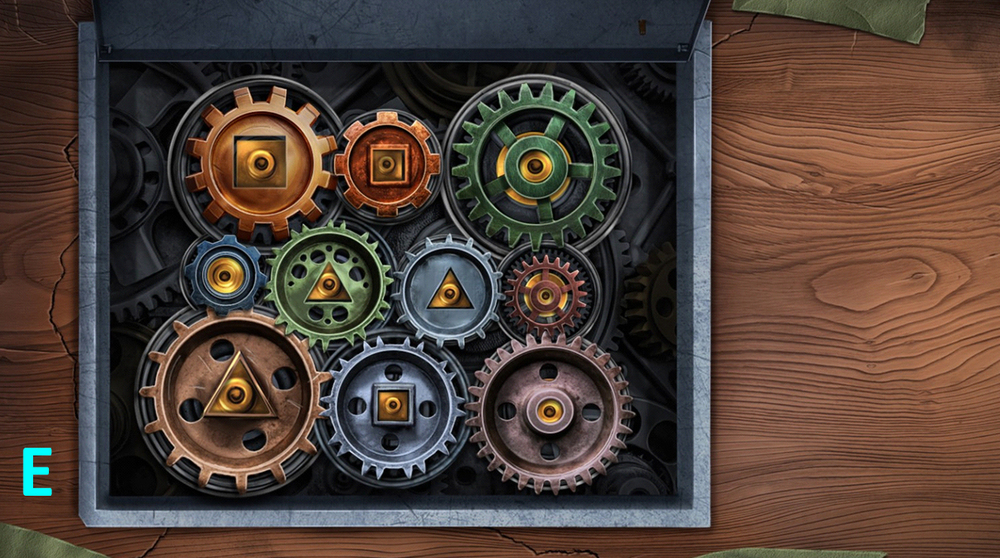
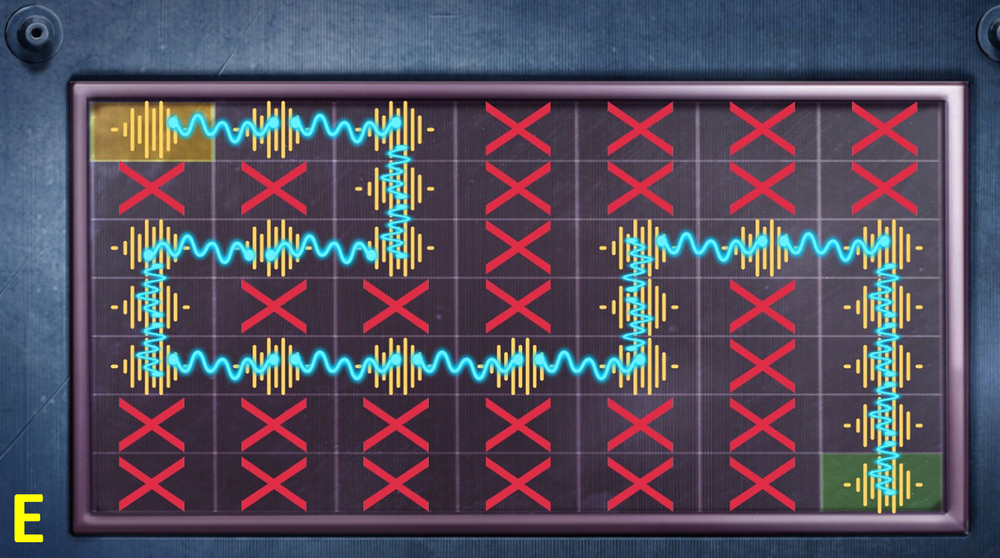
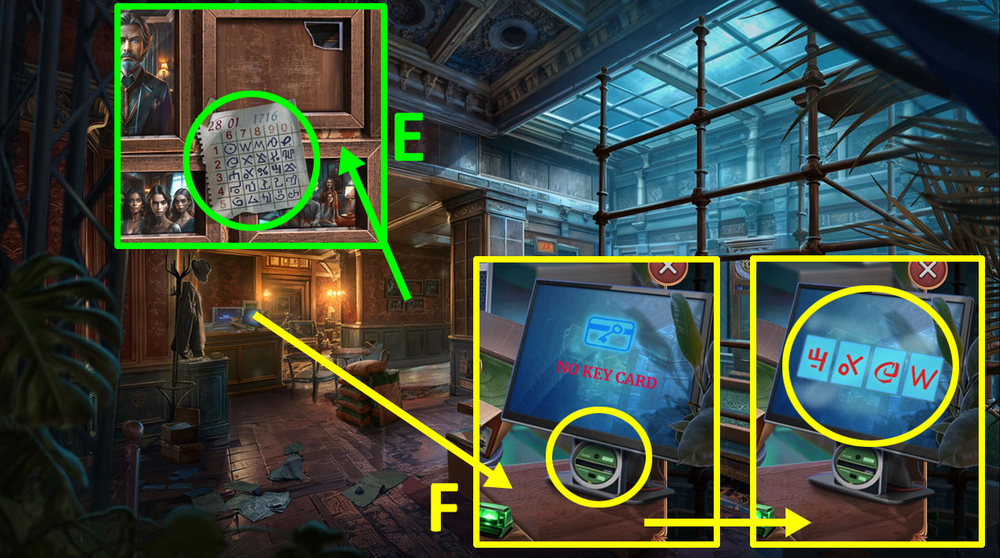
- Hard solution: A, Bx2, Cx2, Dx3, Ex3, Fx3, Gx3, H (E).
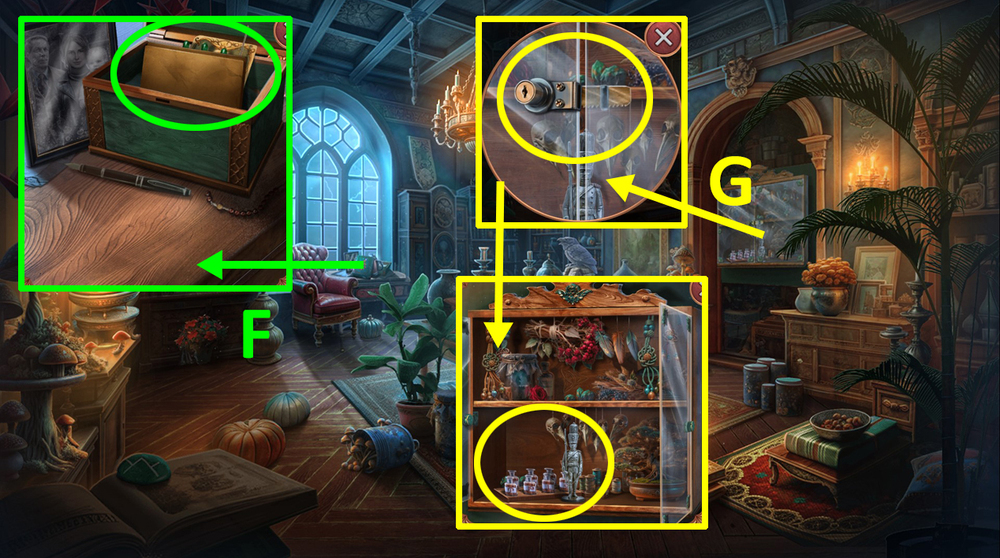
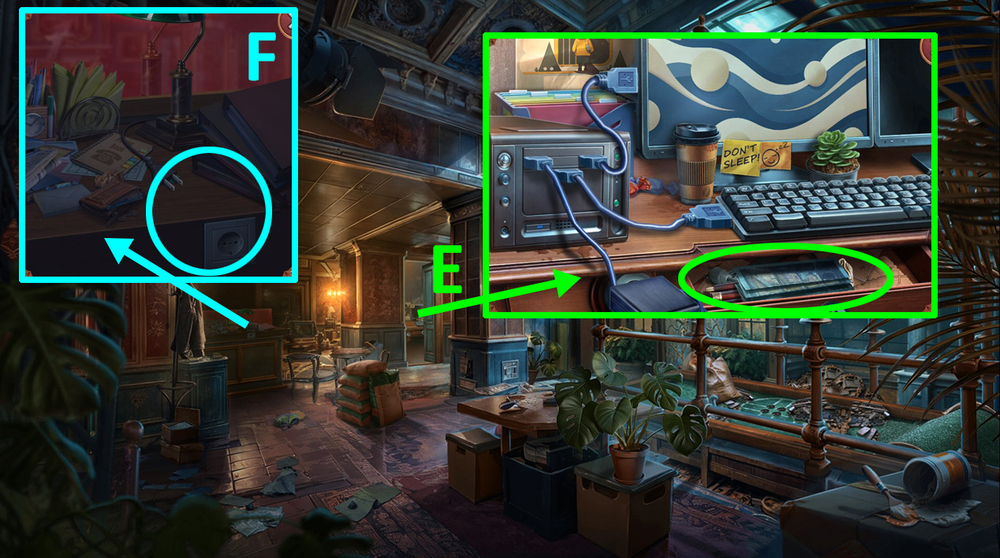
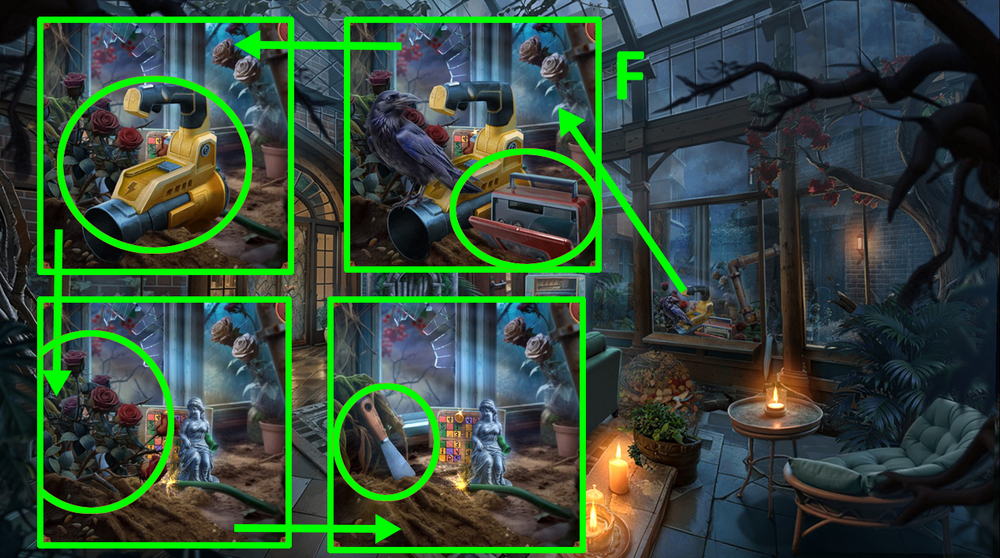
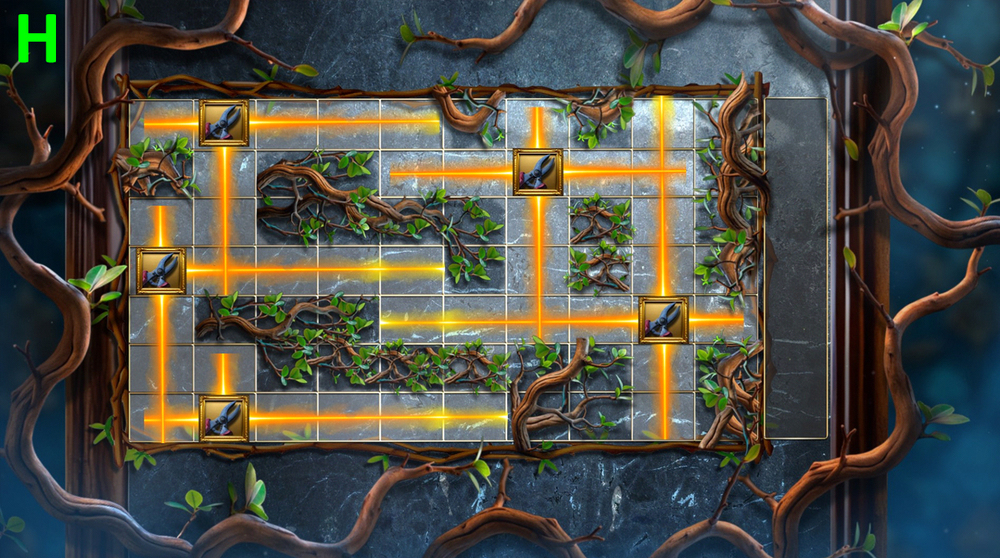
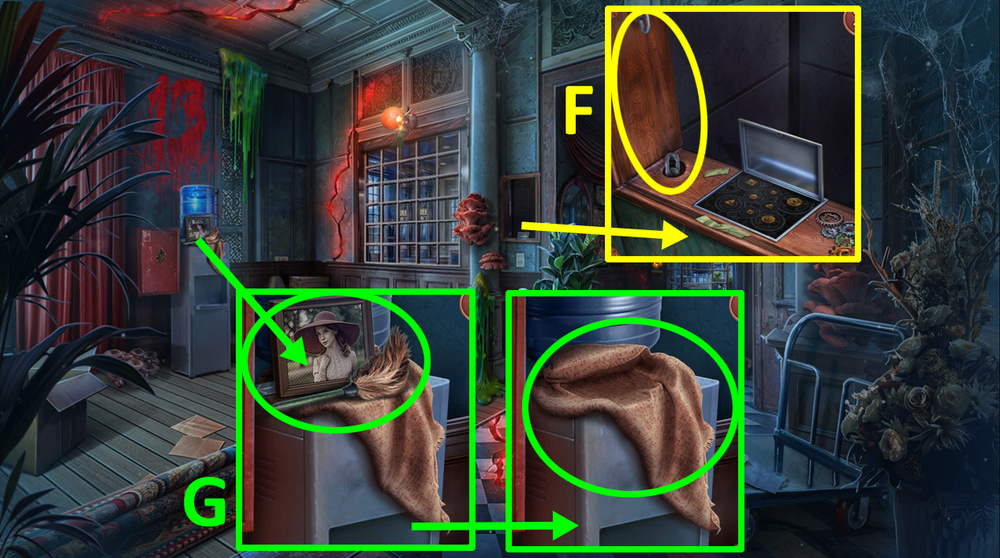
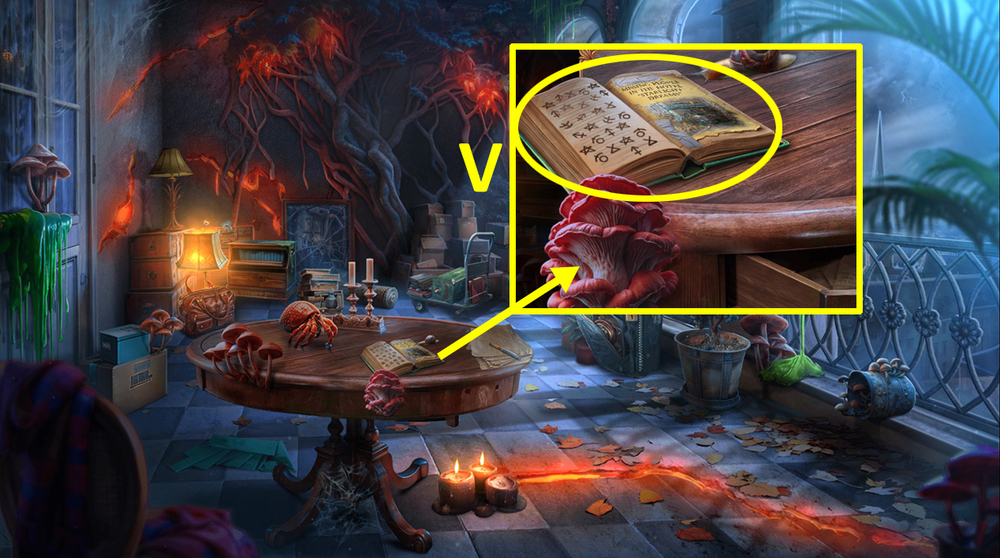
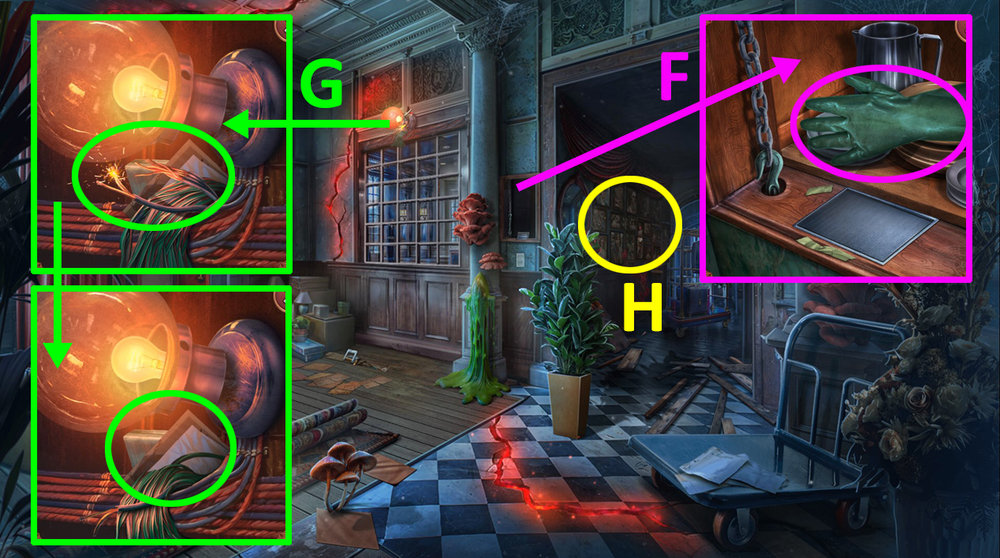
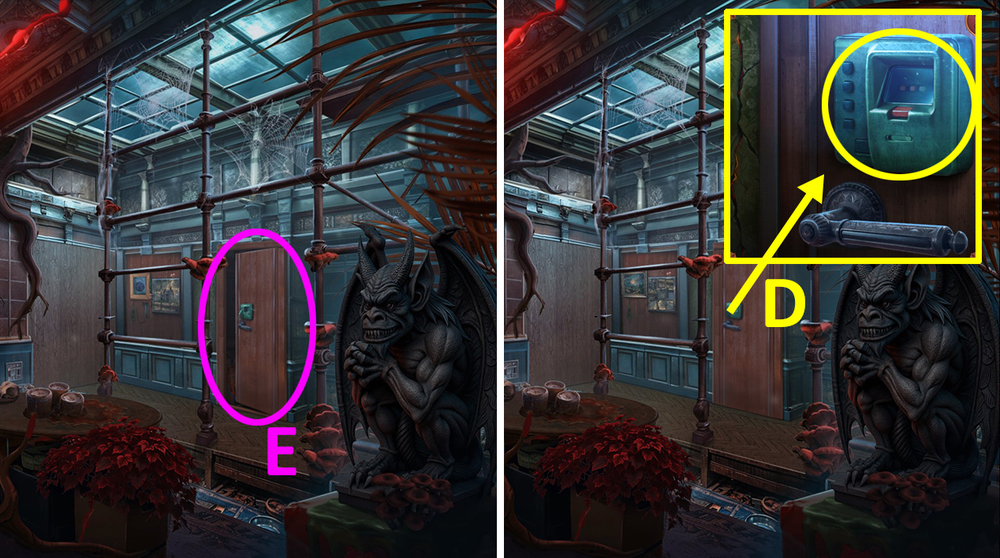
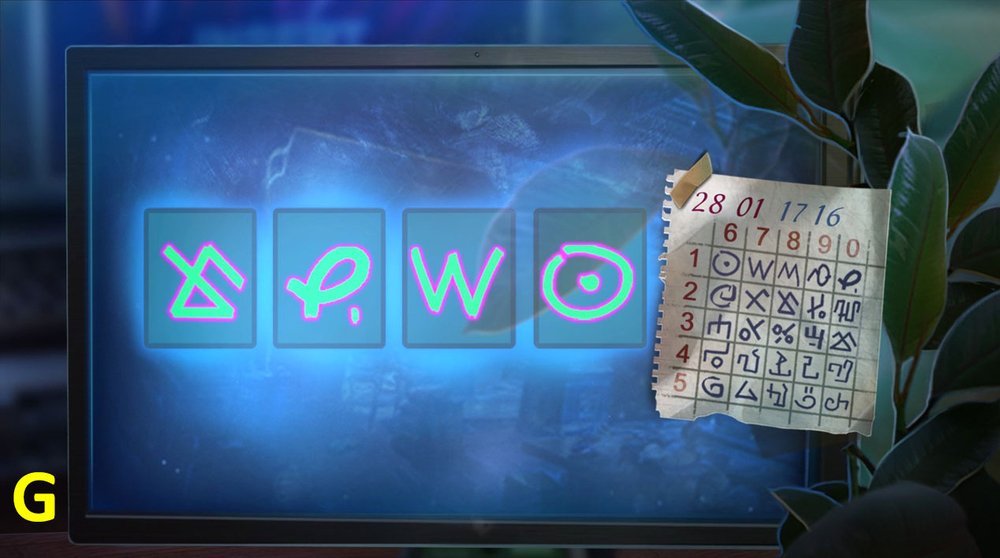
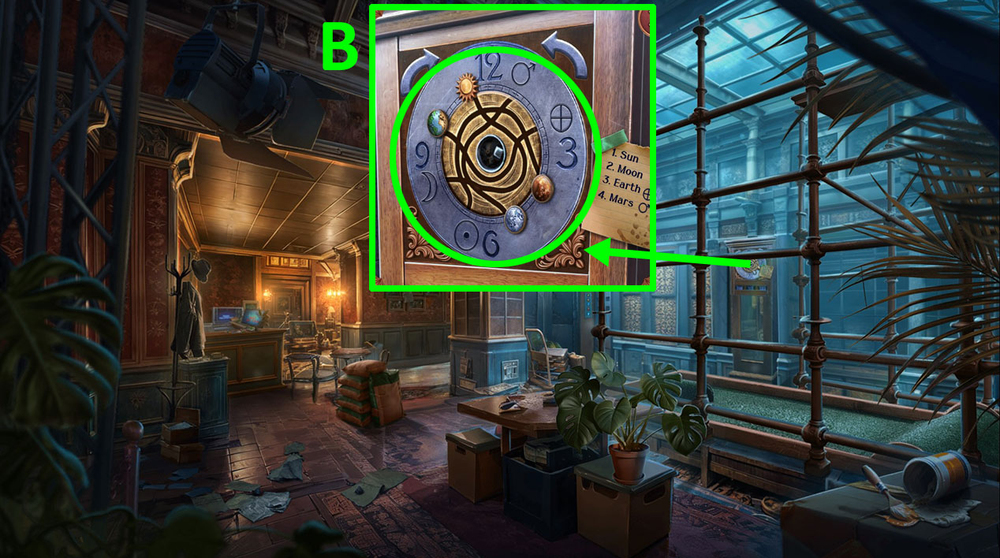
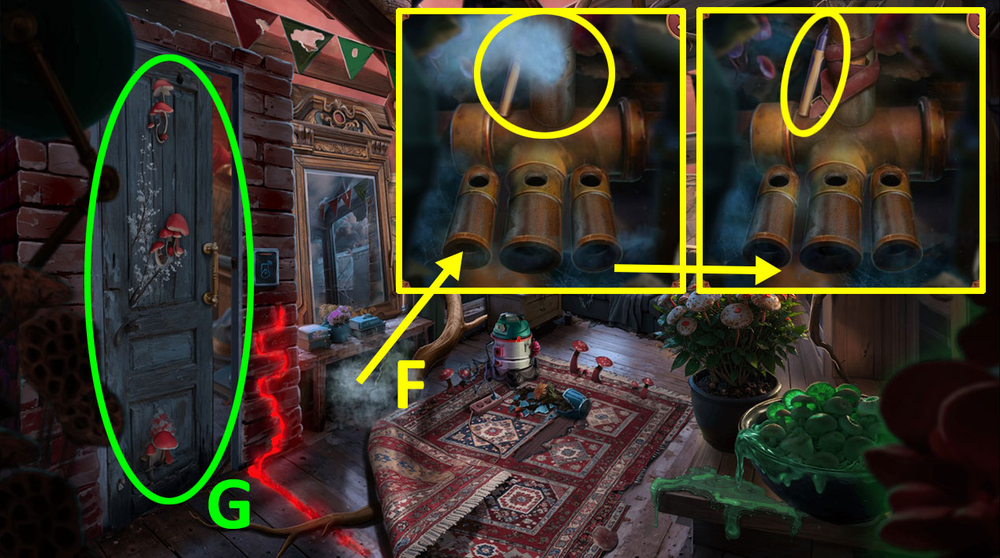
- Read the note, take the EMF detector and TAROT CARD (F).
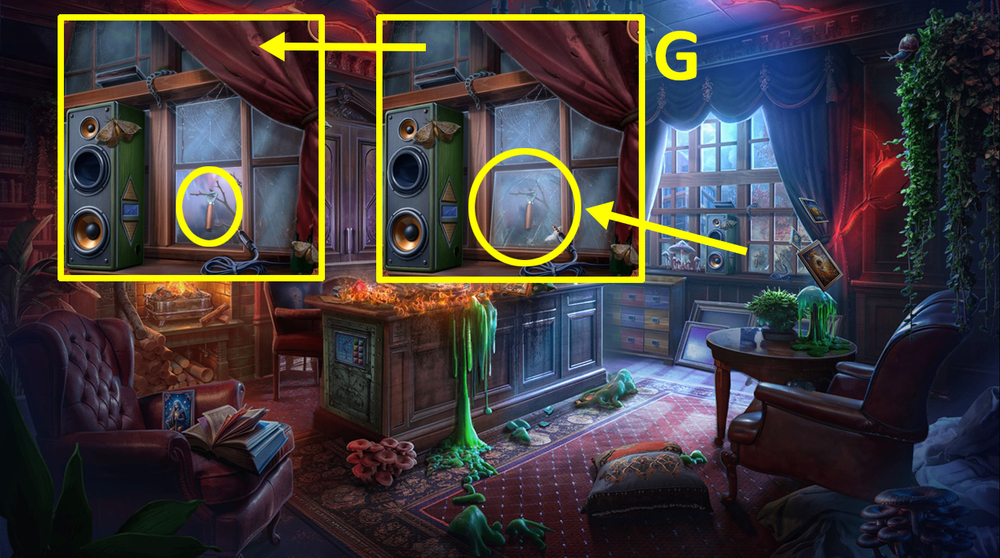
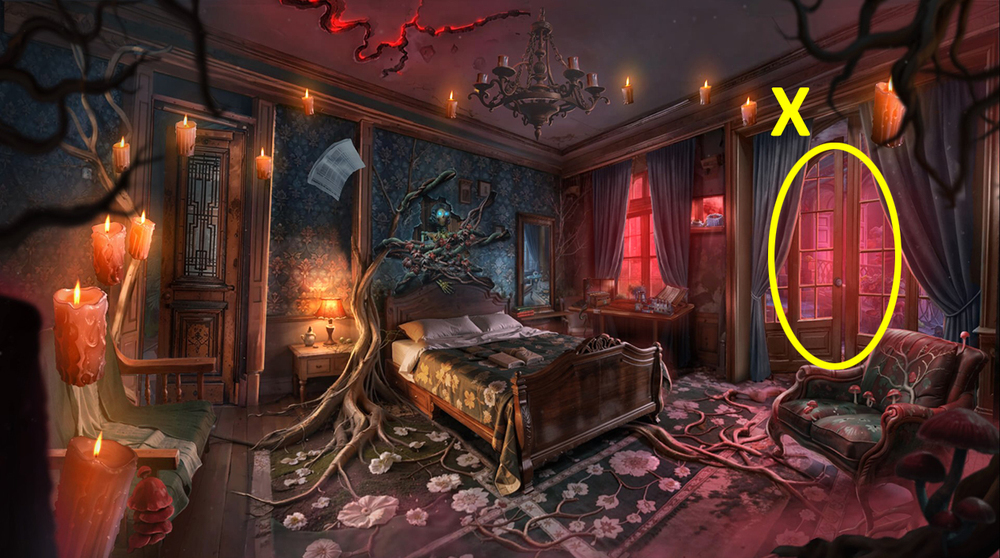
- Use TAROT CARD on the glass doors, take TIN SOLDIER and CHEMICALS (G).
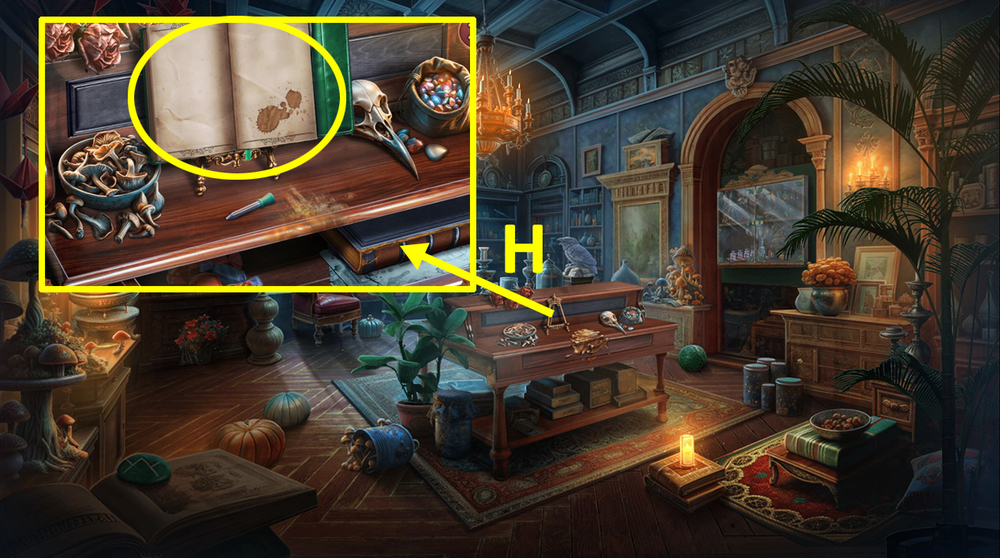
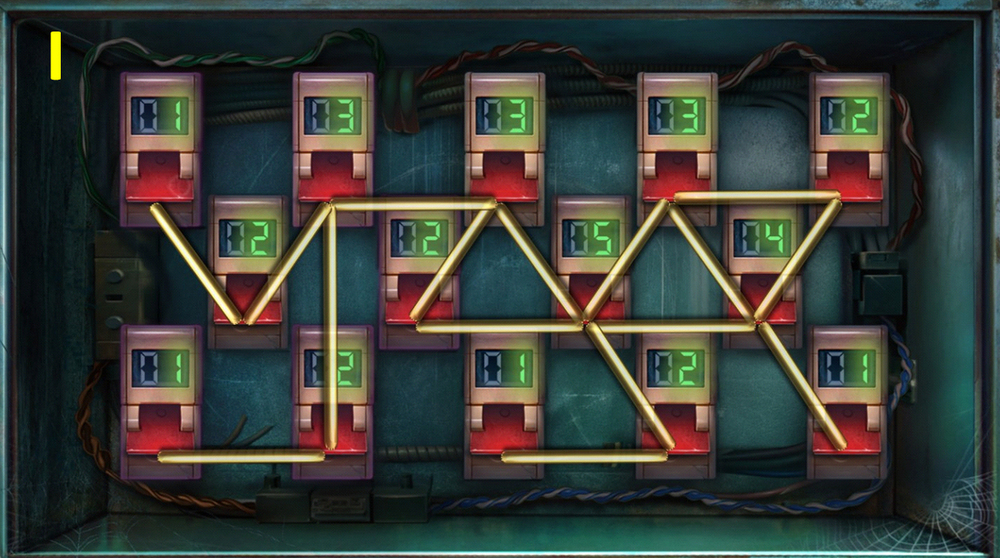
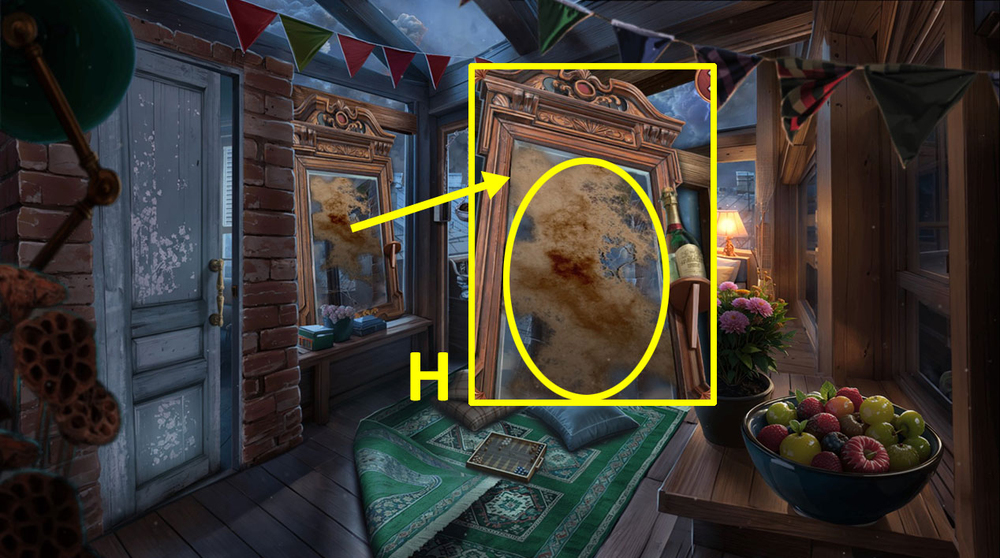
- Use CHEMICALS on the diary (H).
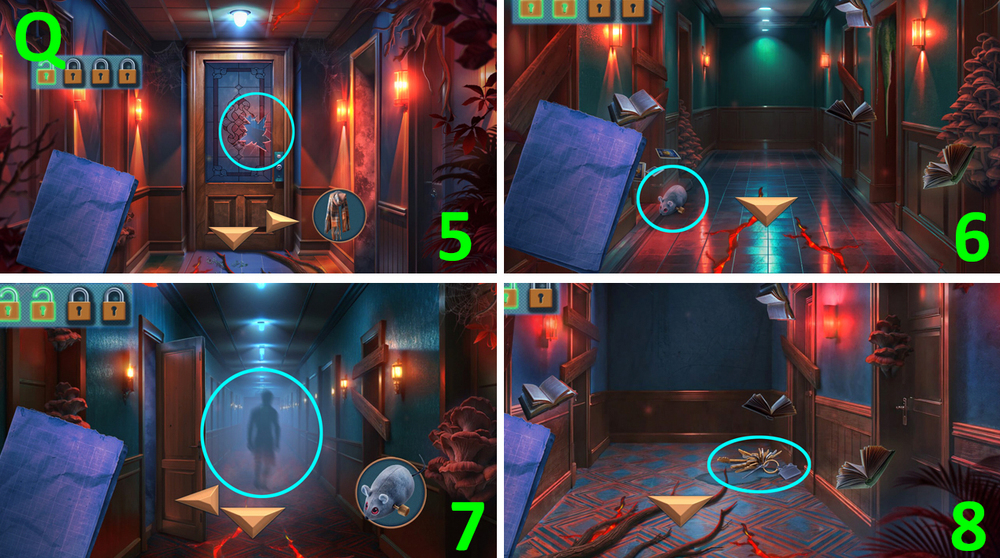
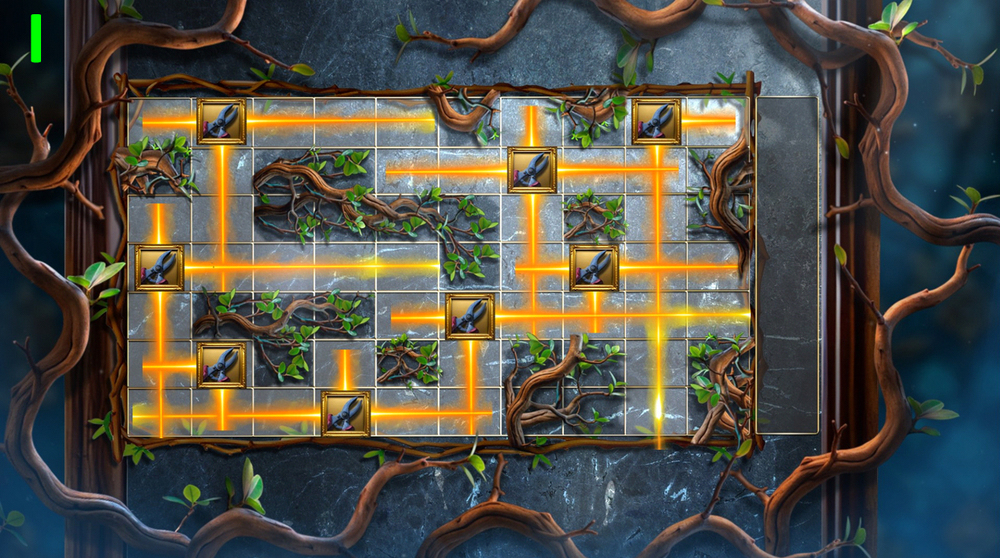
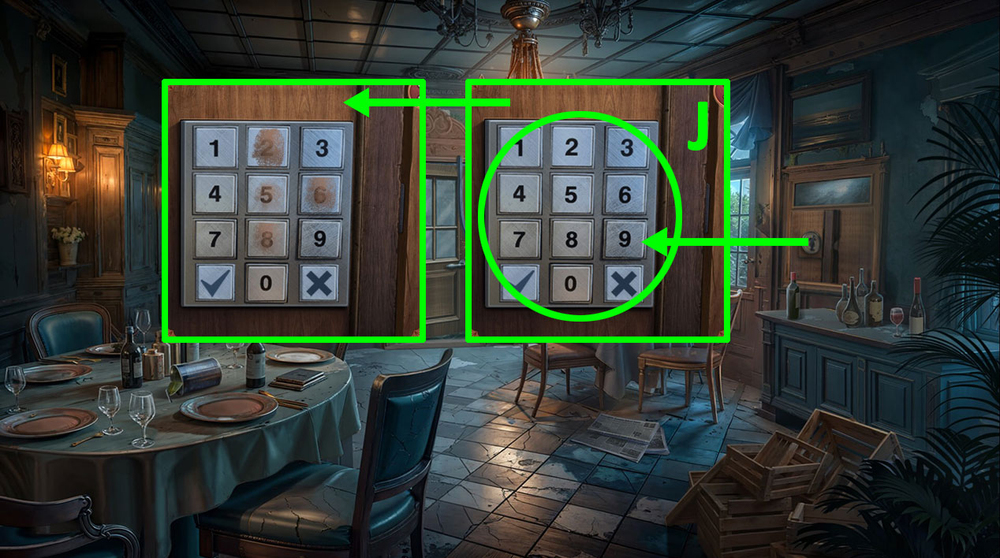
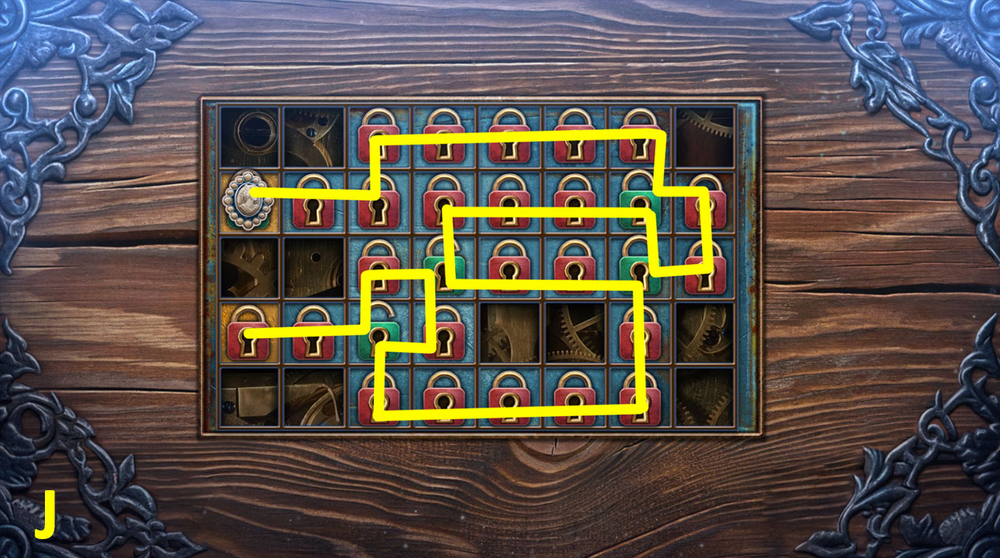
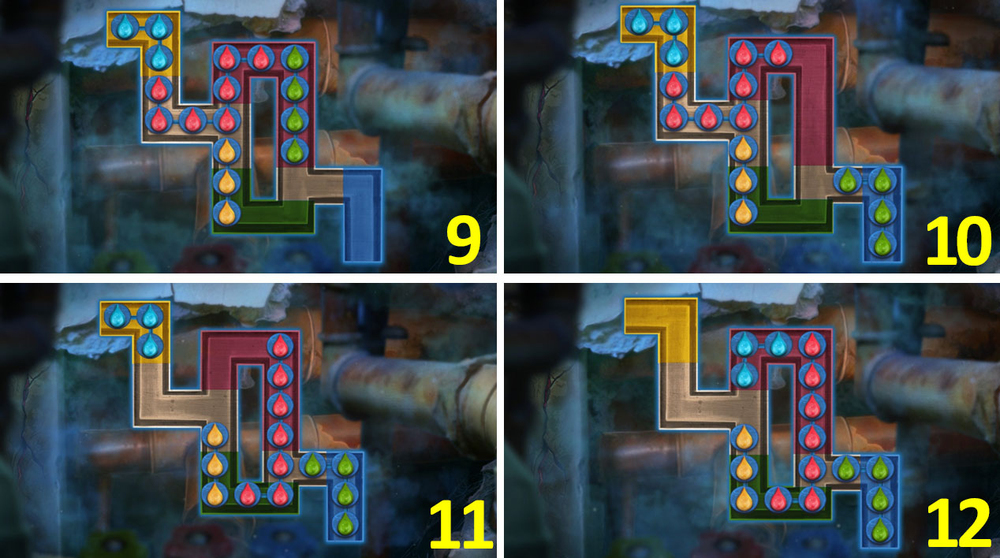
- Easy solution: F-A, E-F, A-C, D-G, A-G, B-A (I).
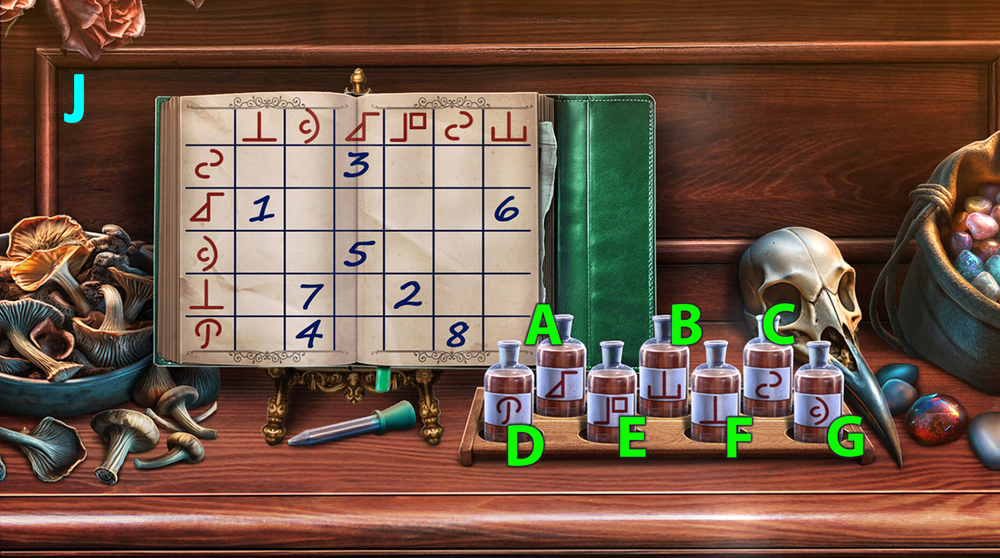
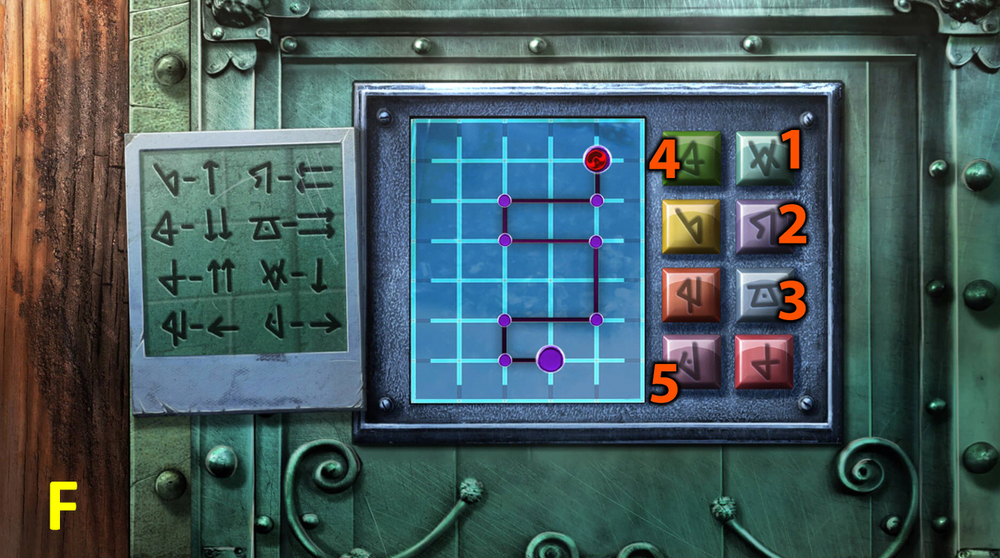
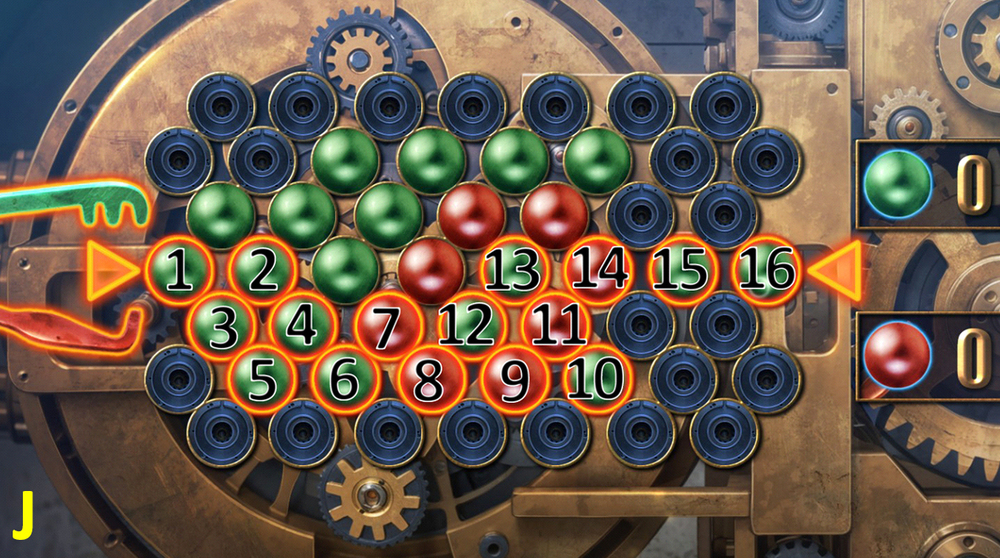
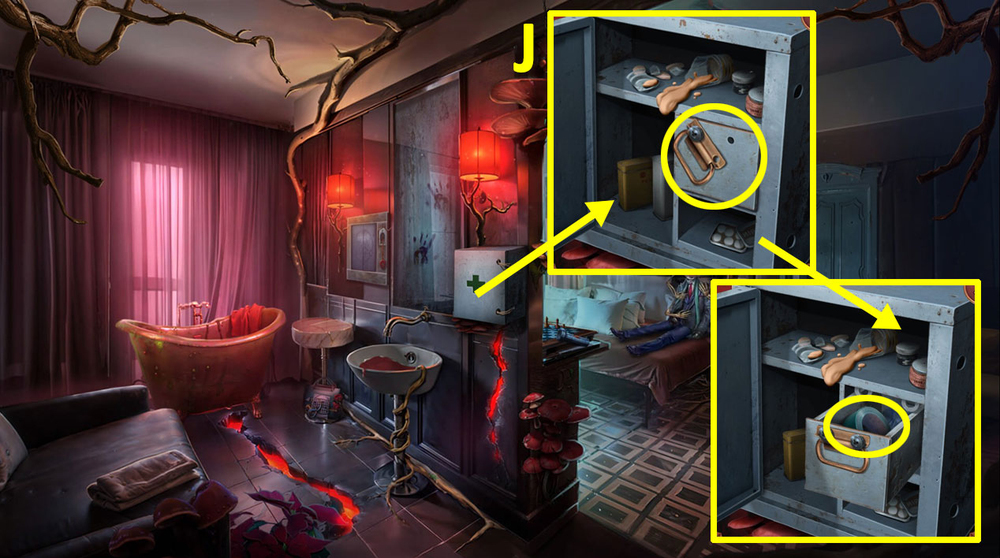
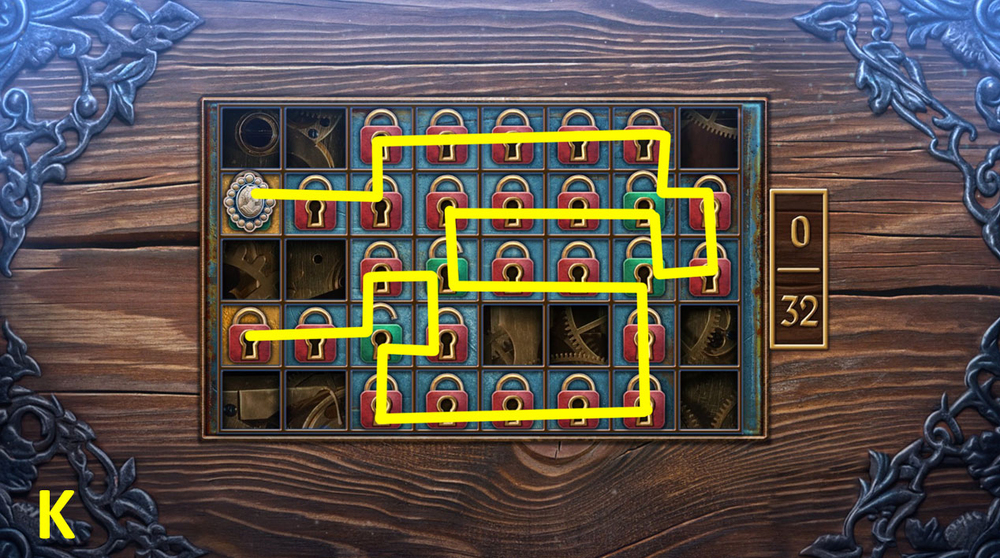
- Hard solution: F-A, E-F, A-C, D-G, A-G, B-A, F-G, C-D (J).
- Read and take CATHERINE’S DIARY.
- Use CATHERINE’S DIARY on MY PHONE, read the article and press OK.
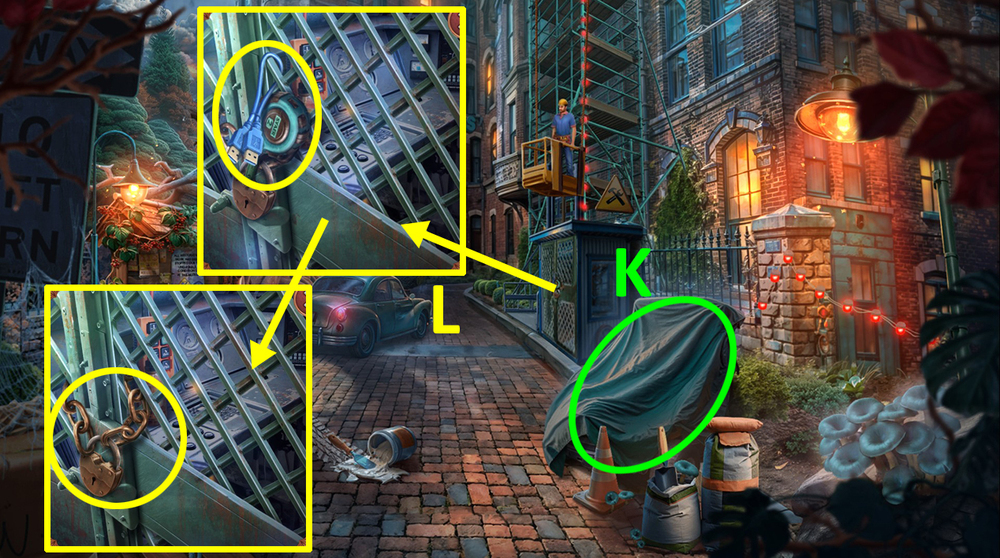
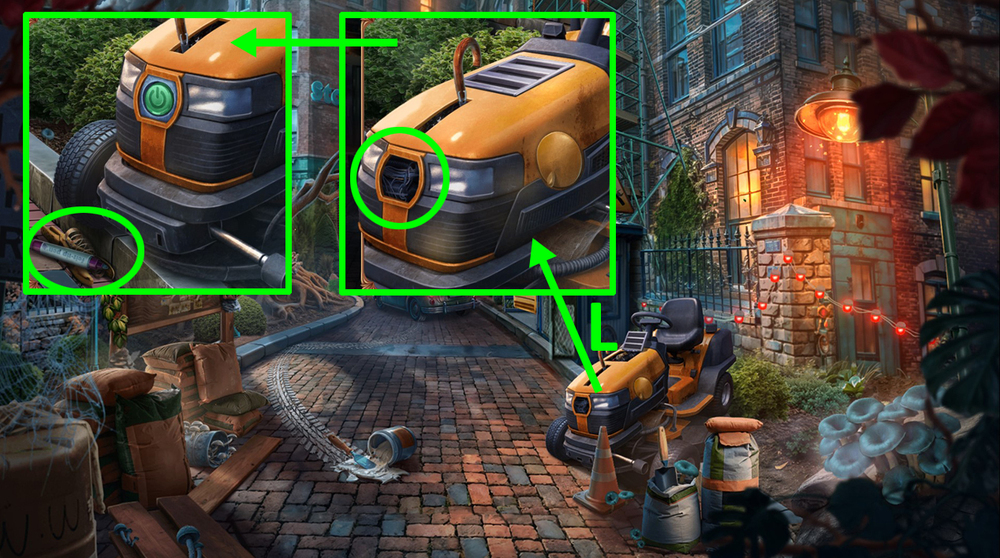
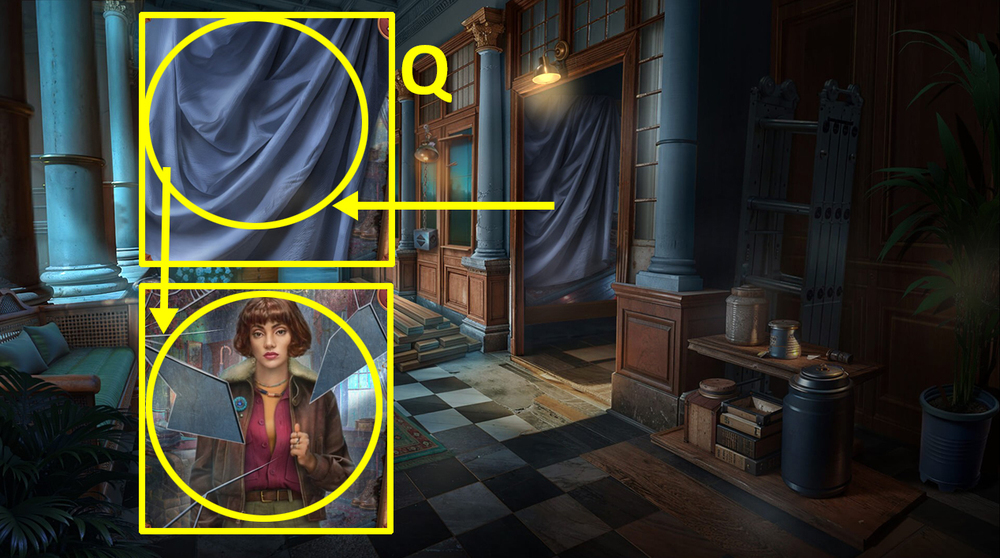
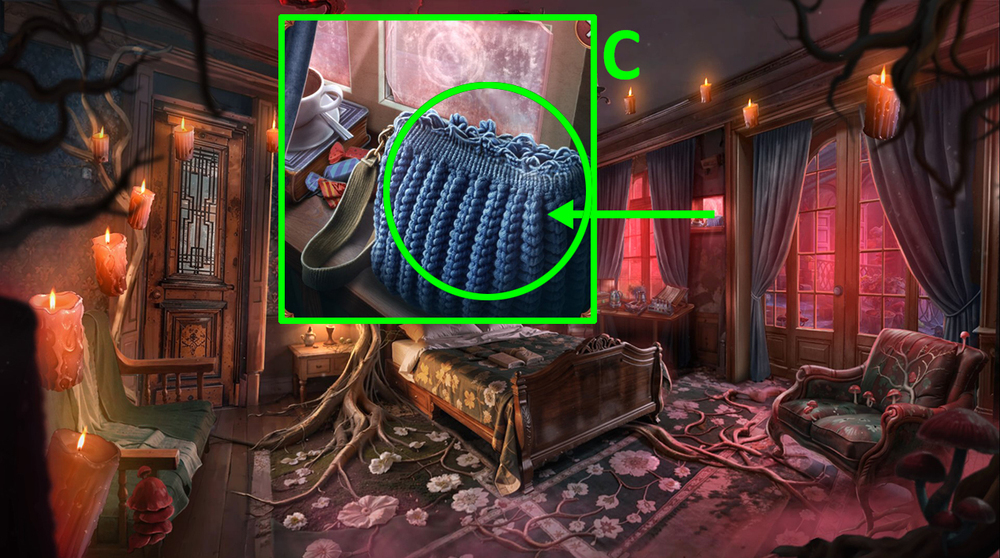
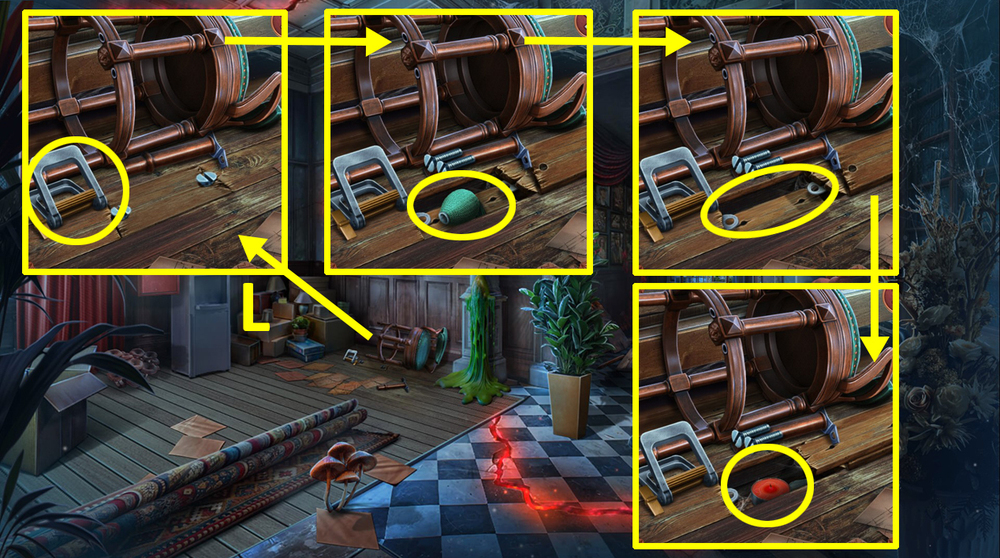
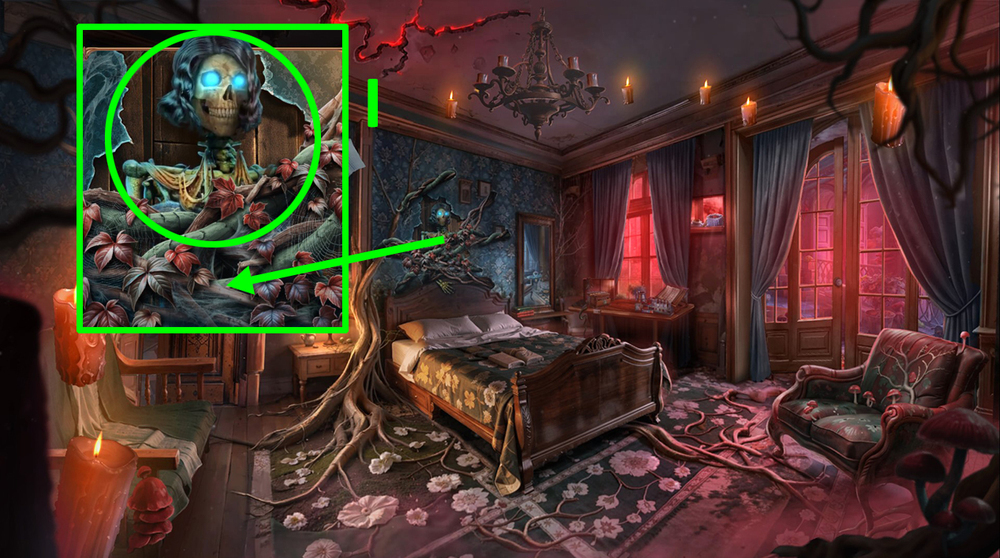
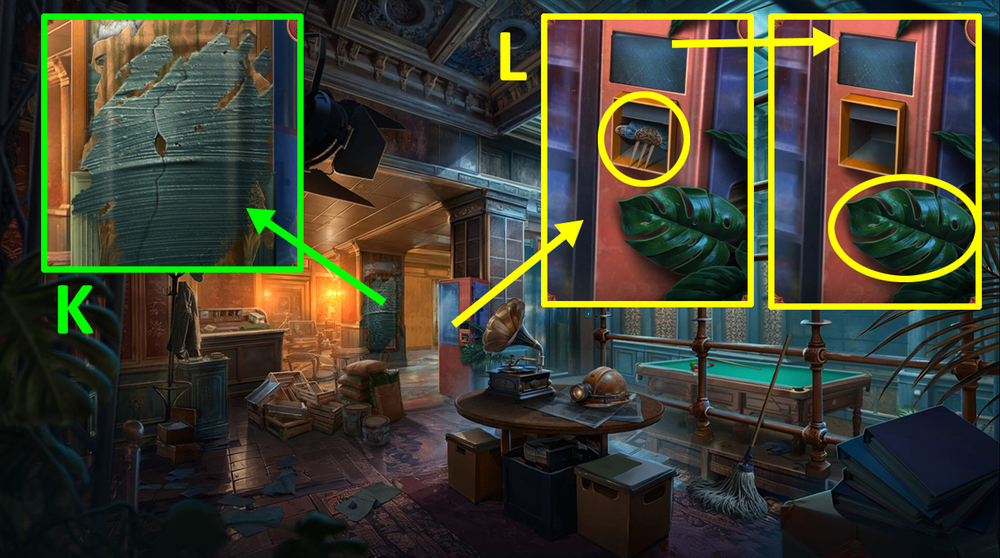
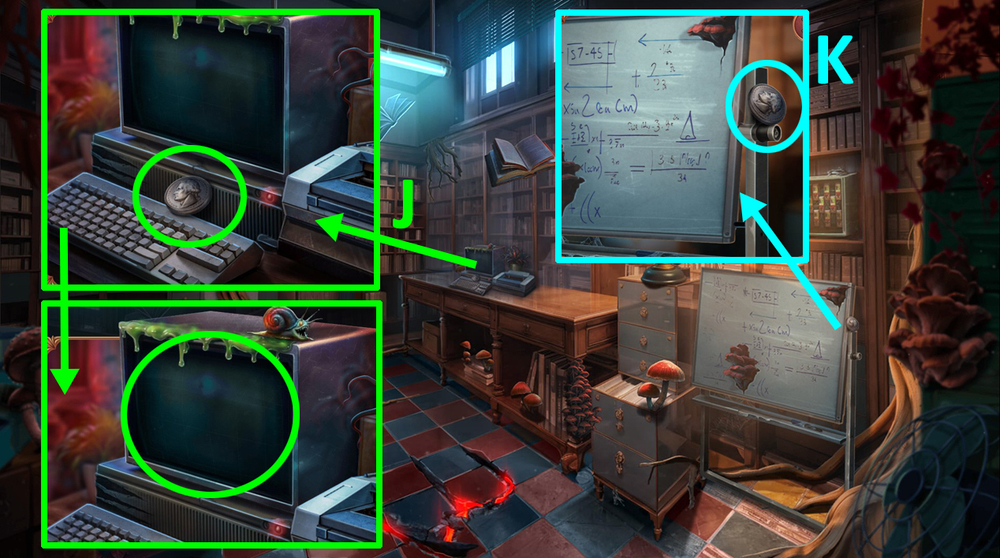
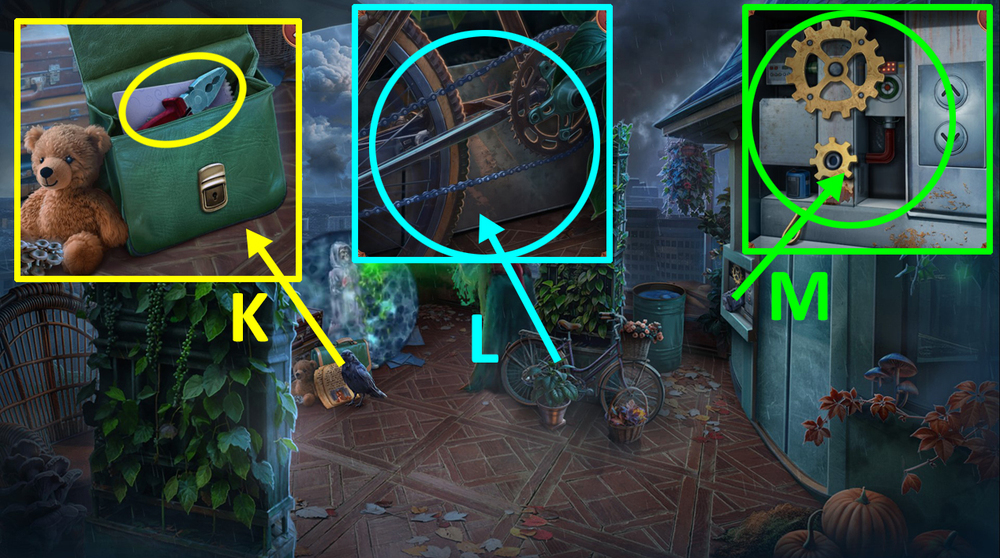
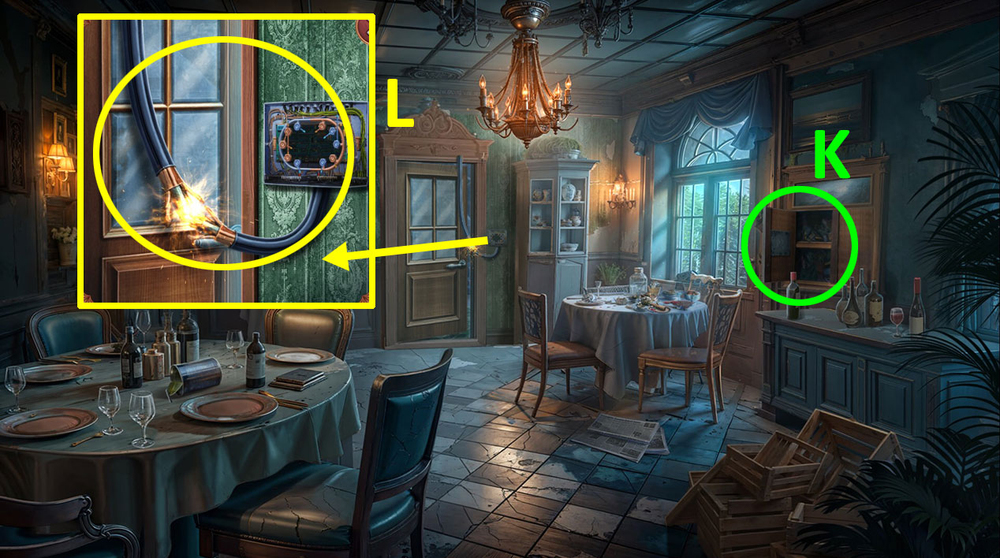
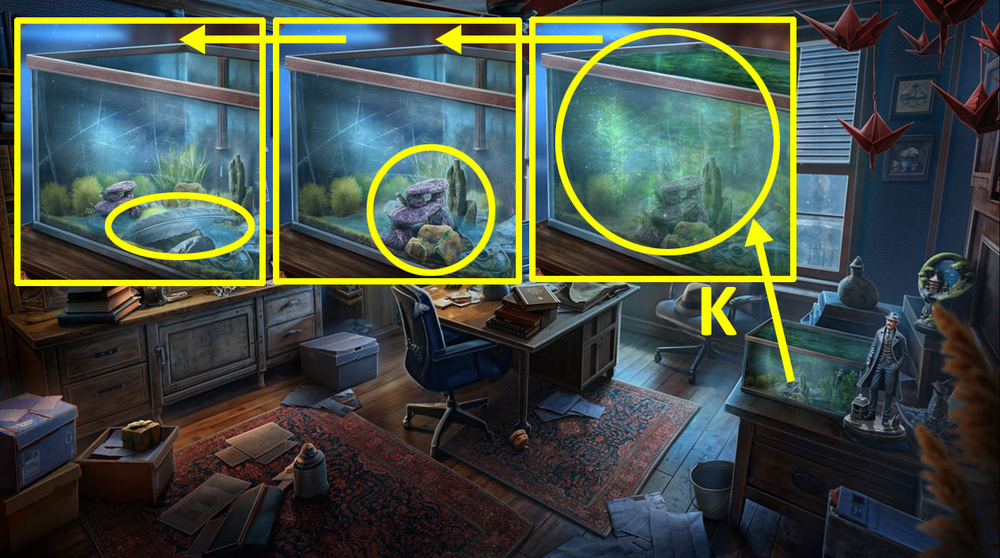
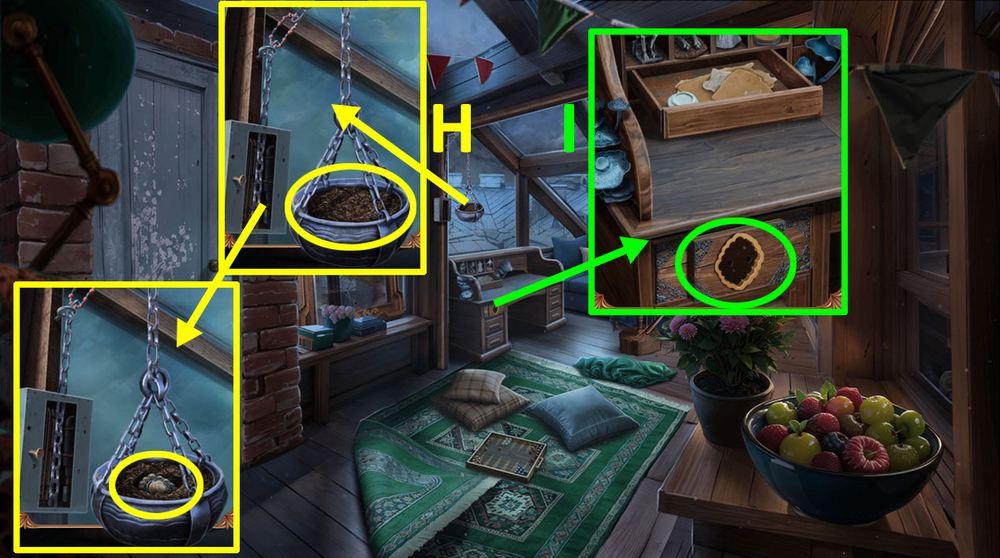
- Move the tarp (K).
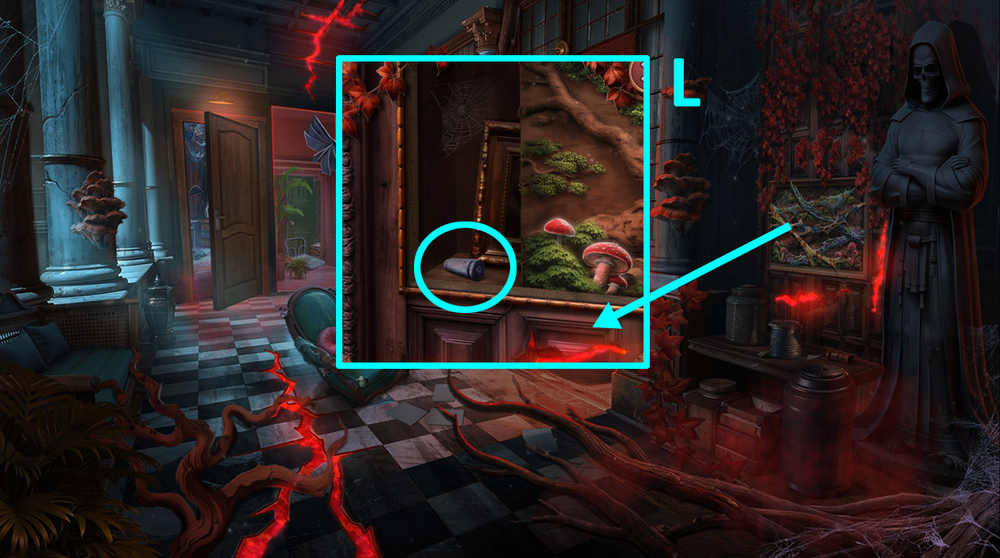
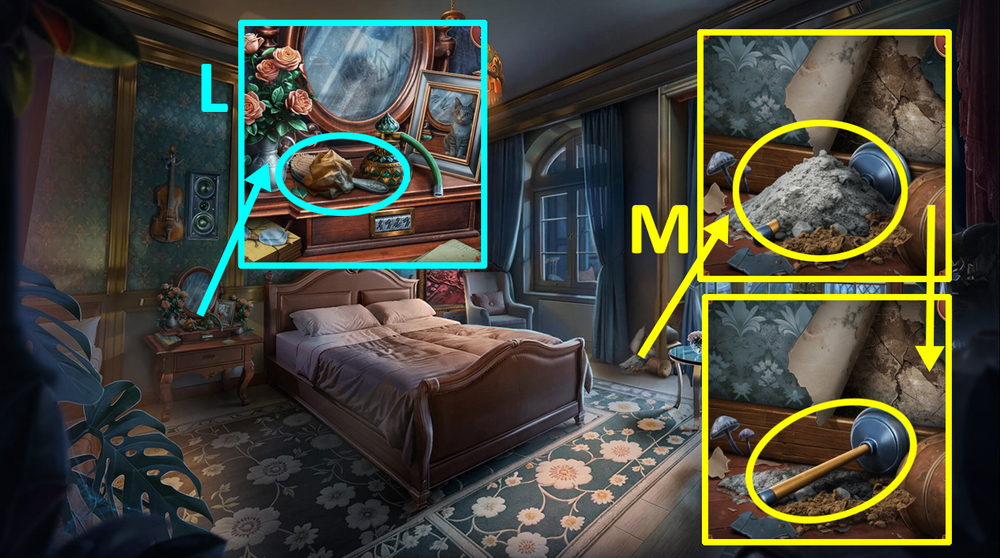
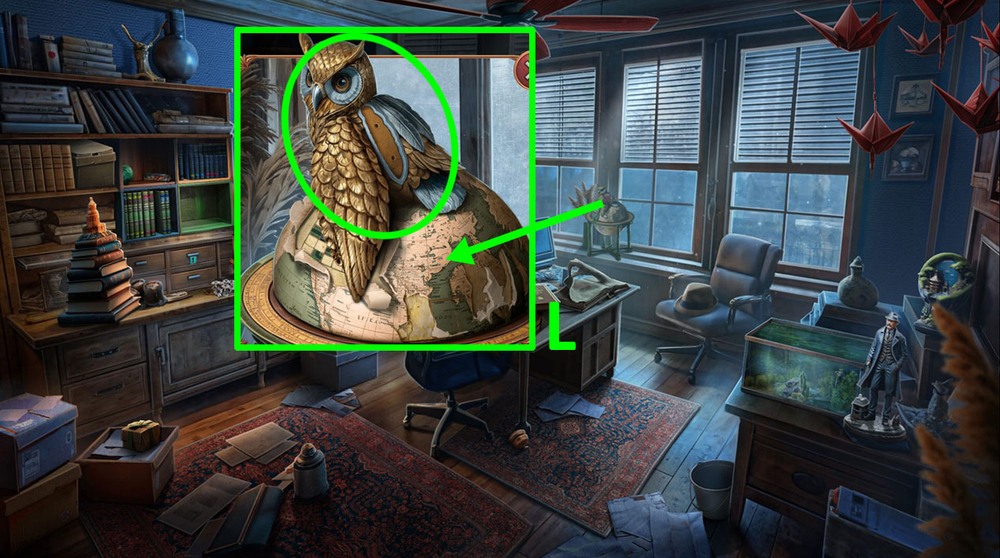
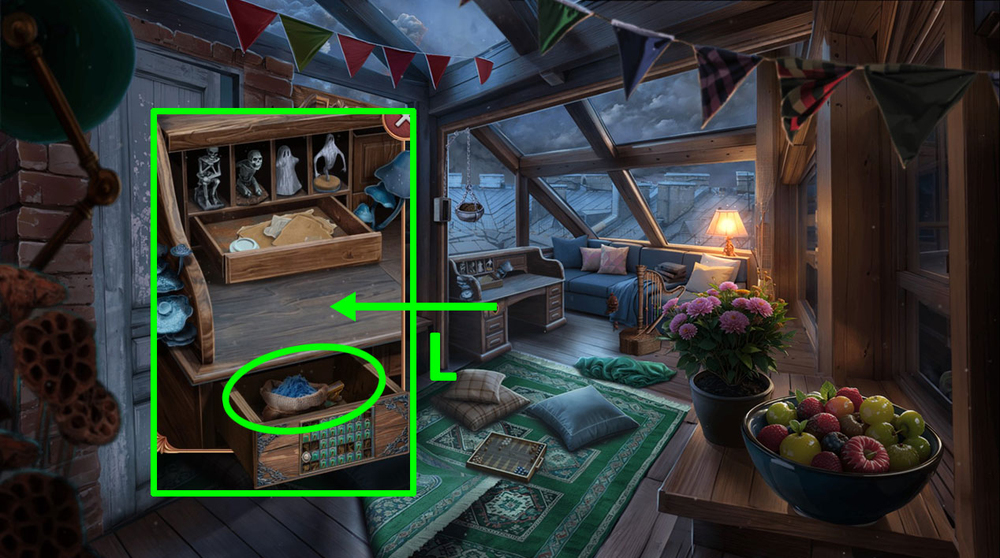
- Take WIRES 1/3 and MEASURING TAPE, use OWL FIGURINE on the lock (L).
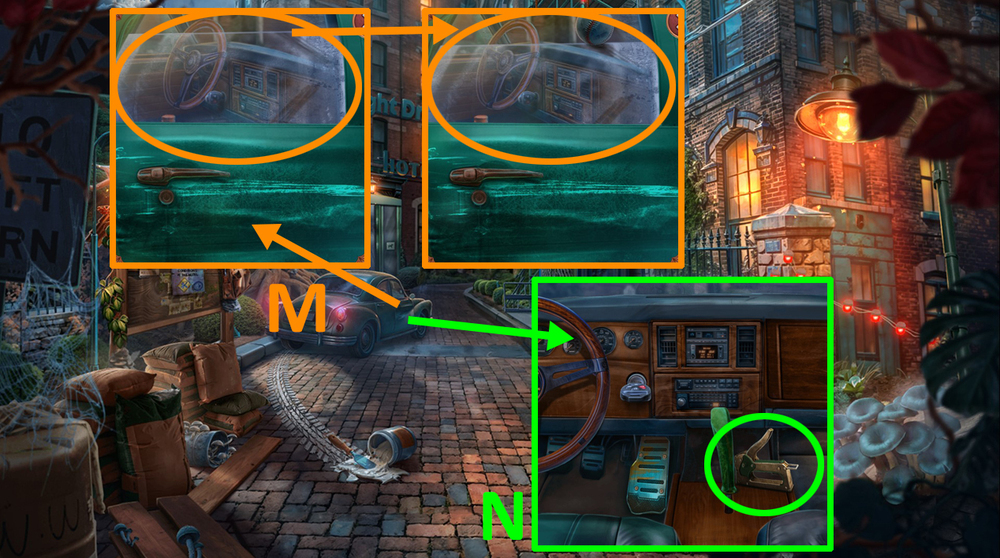
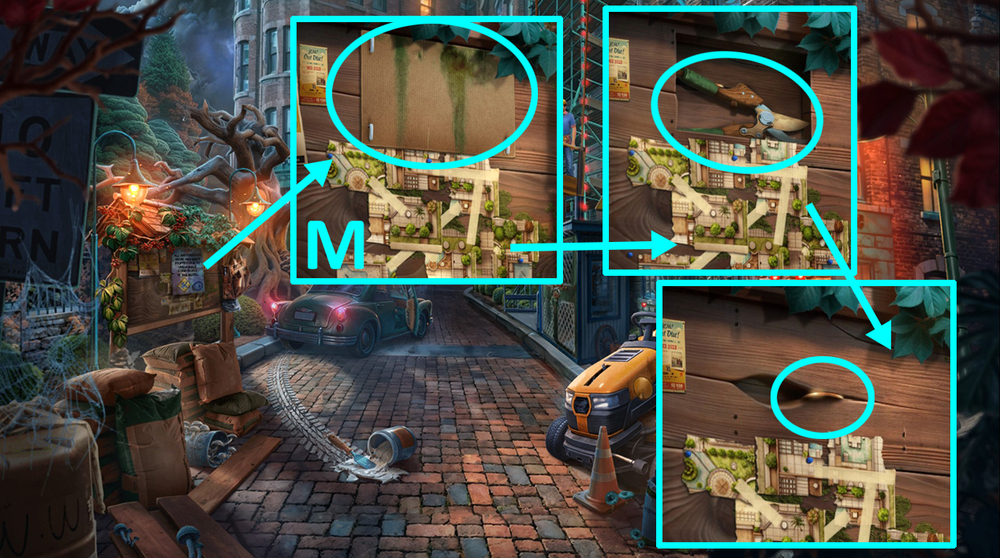
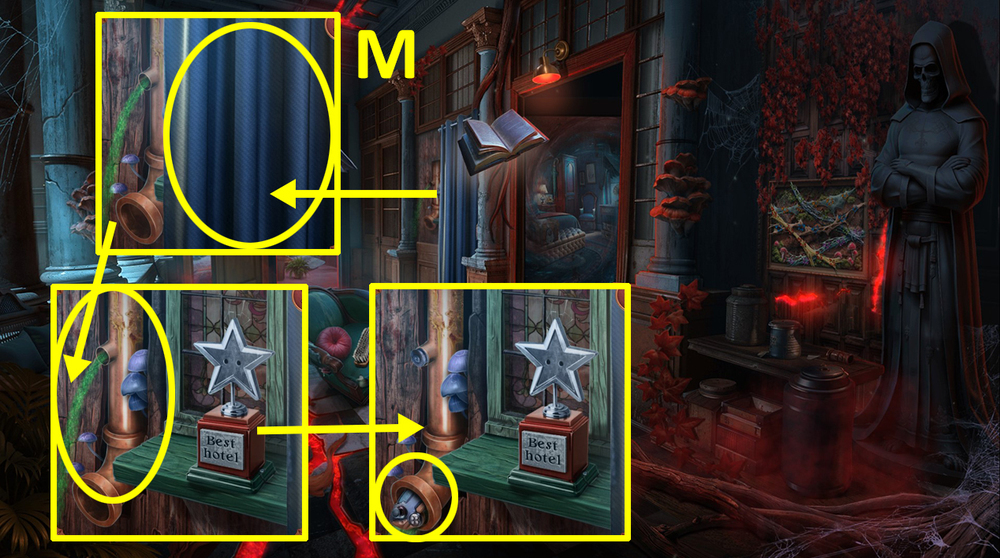
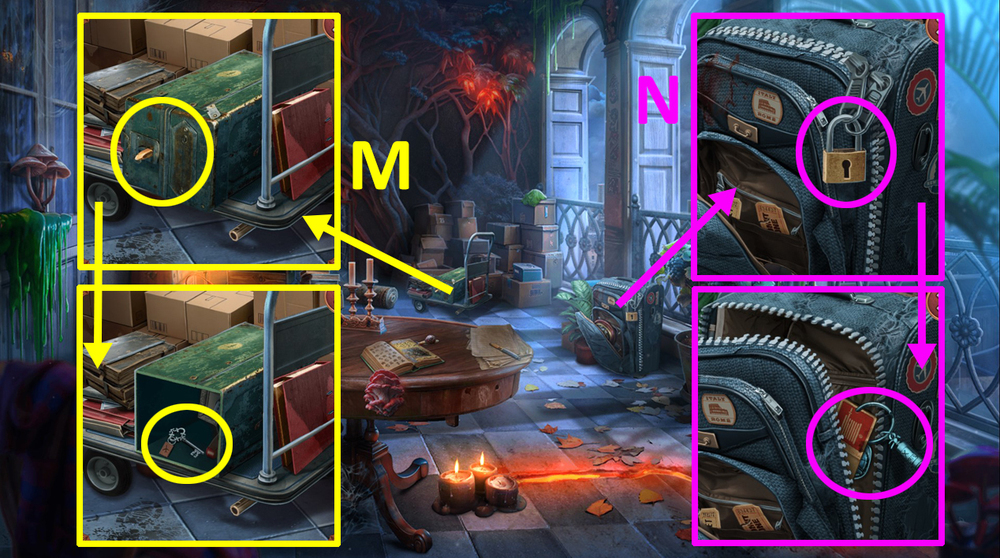
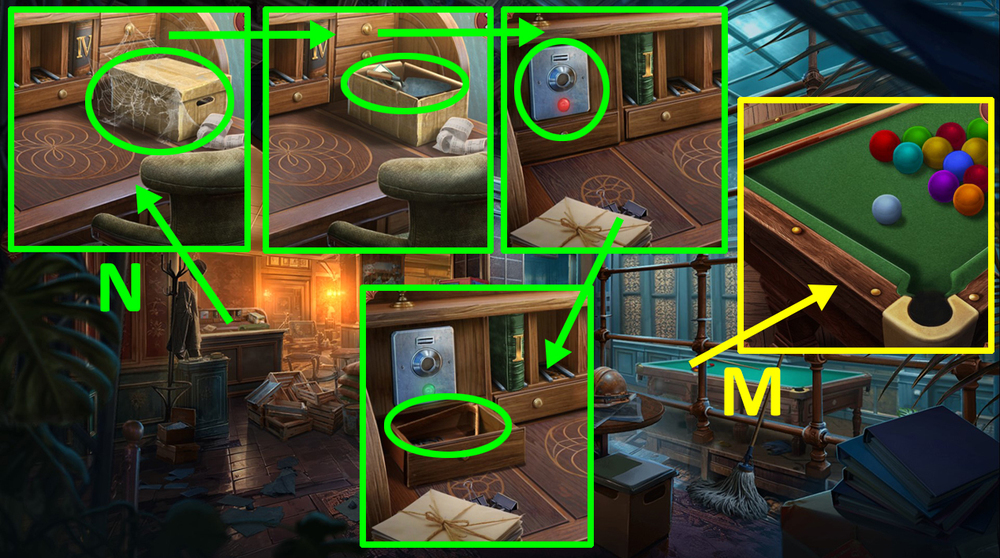
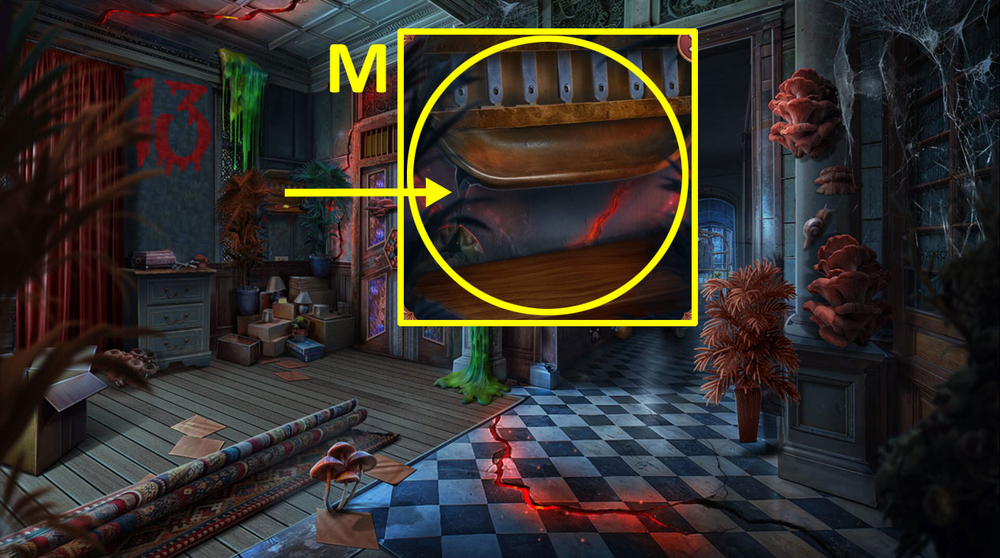
- Use BASEBALL and MEASURING TAPE on the car door window (M).
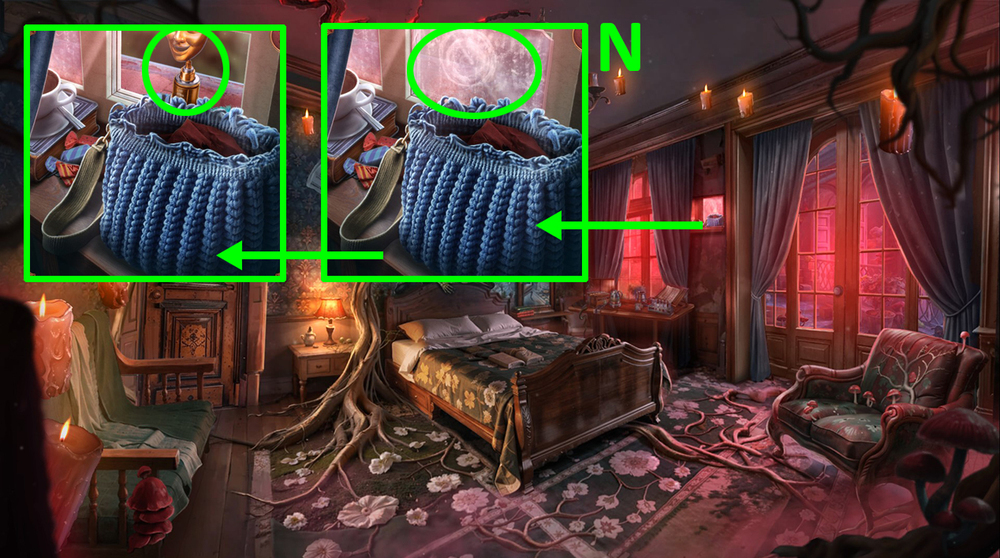
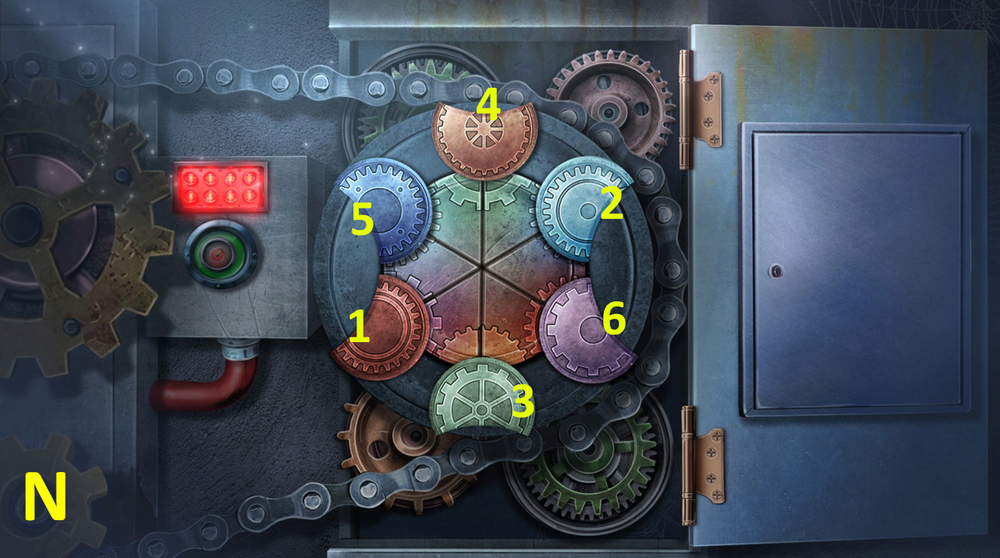
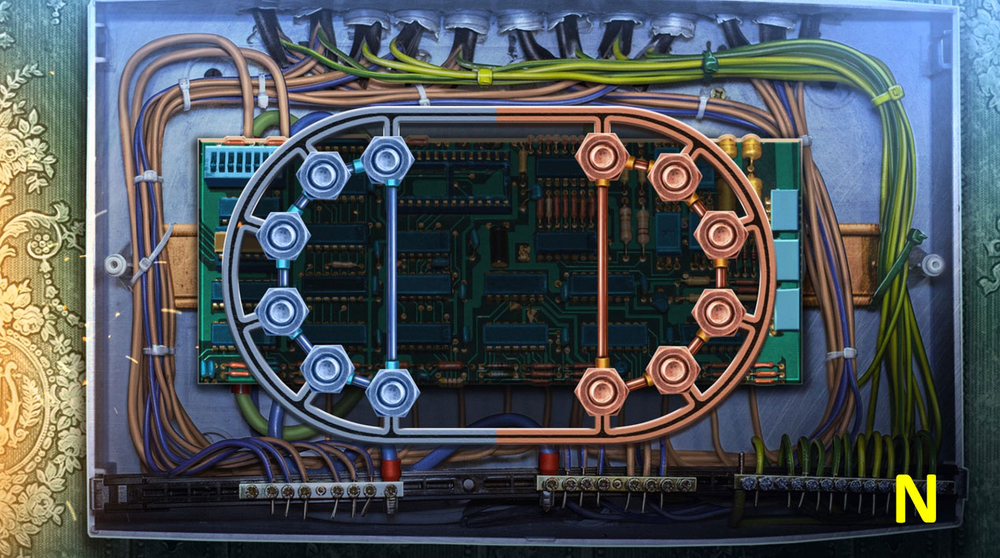
- Take STAPLE GUN (N).
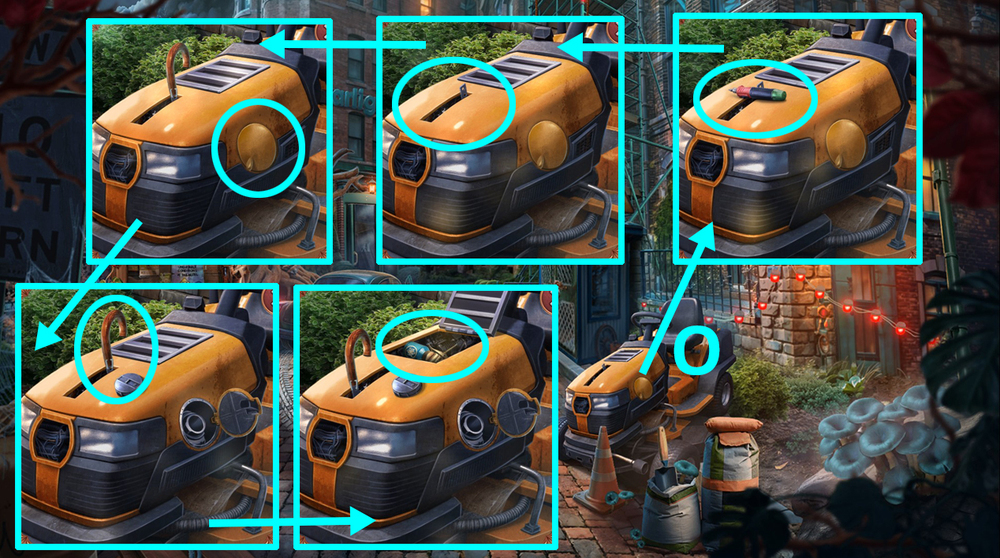
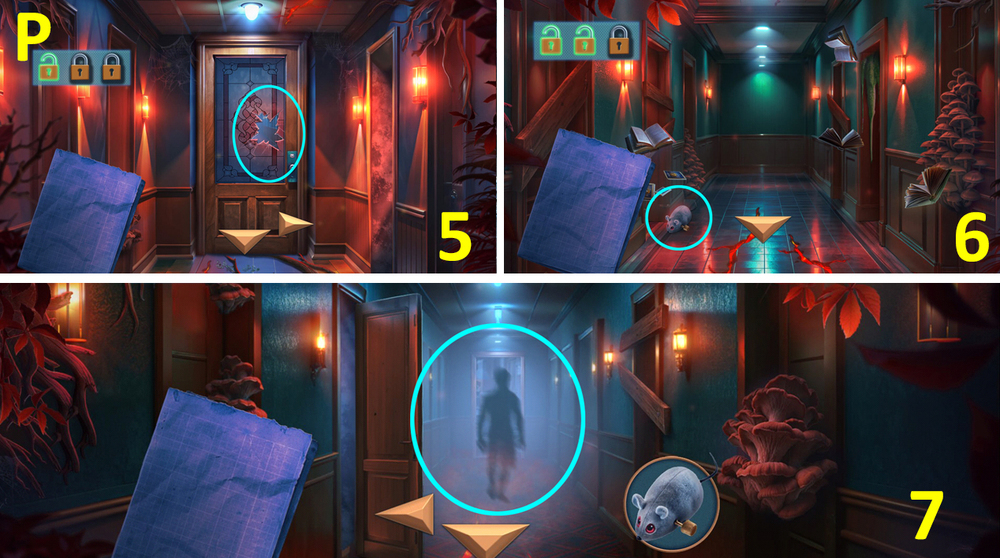
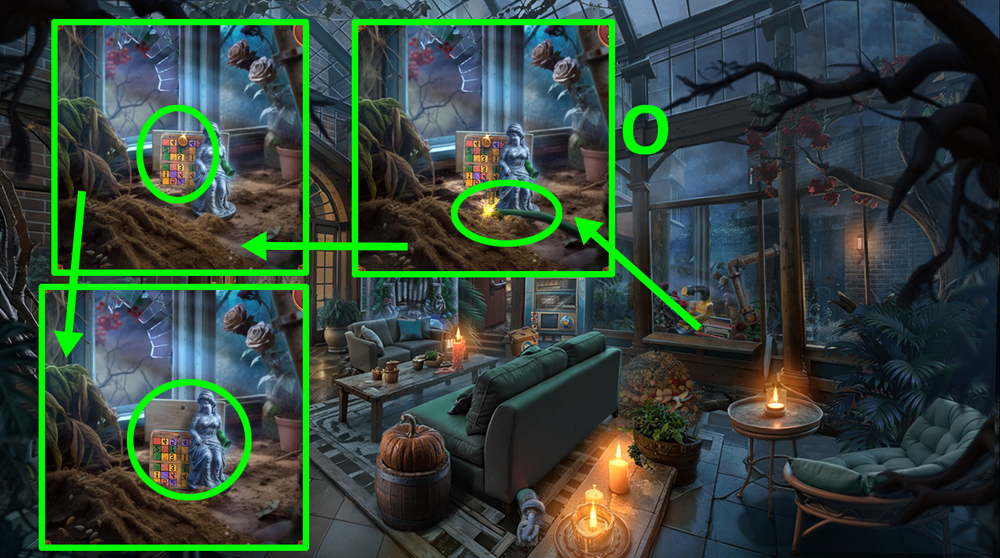
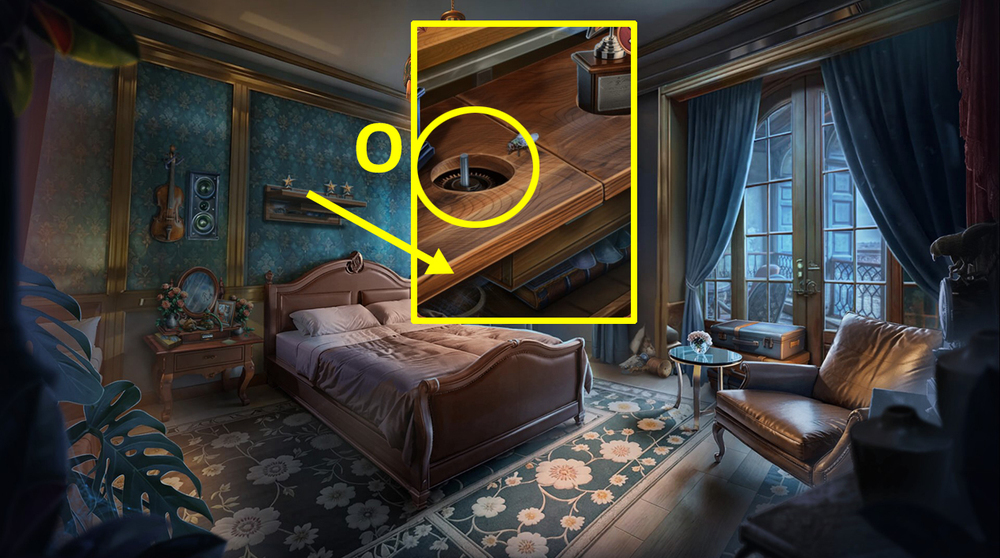
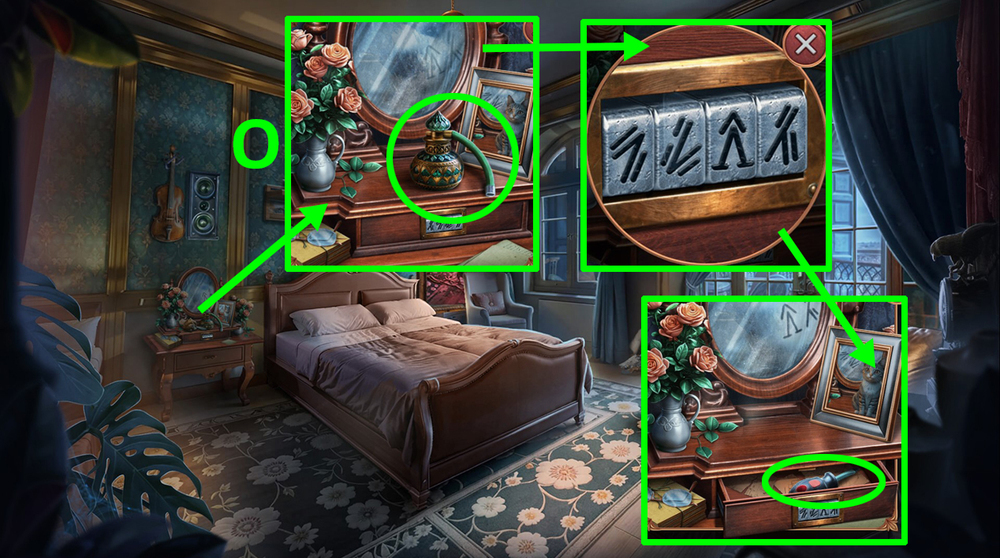
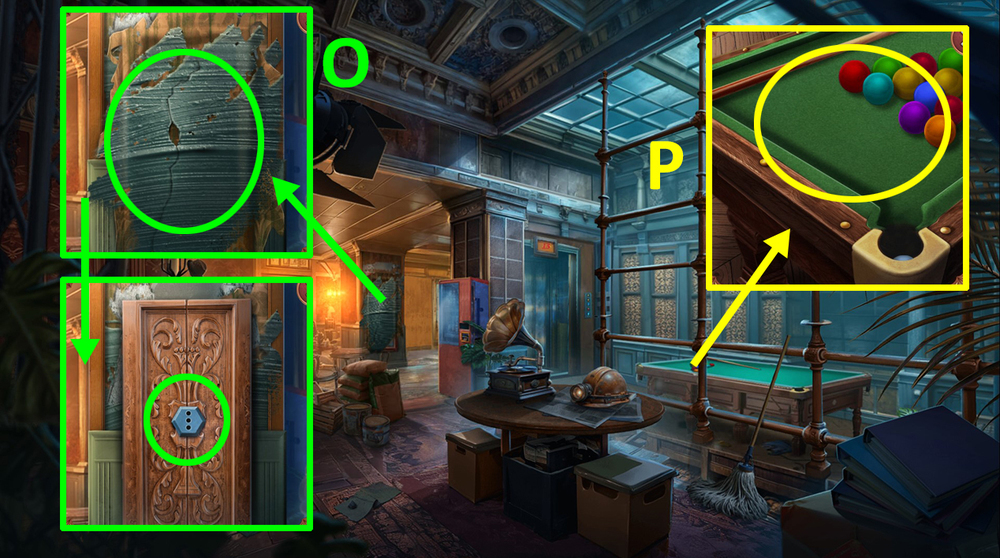
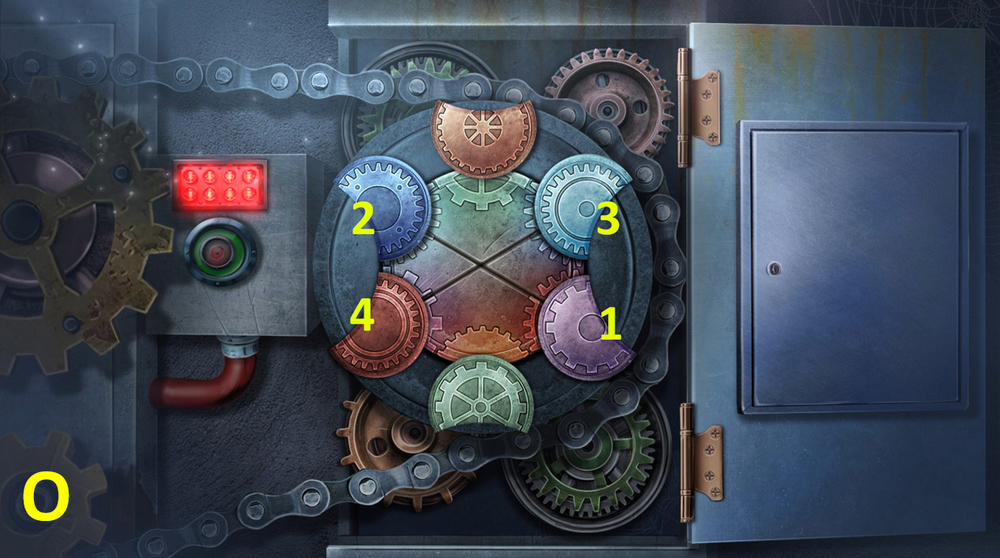
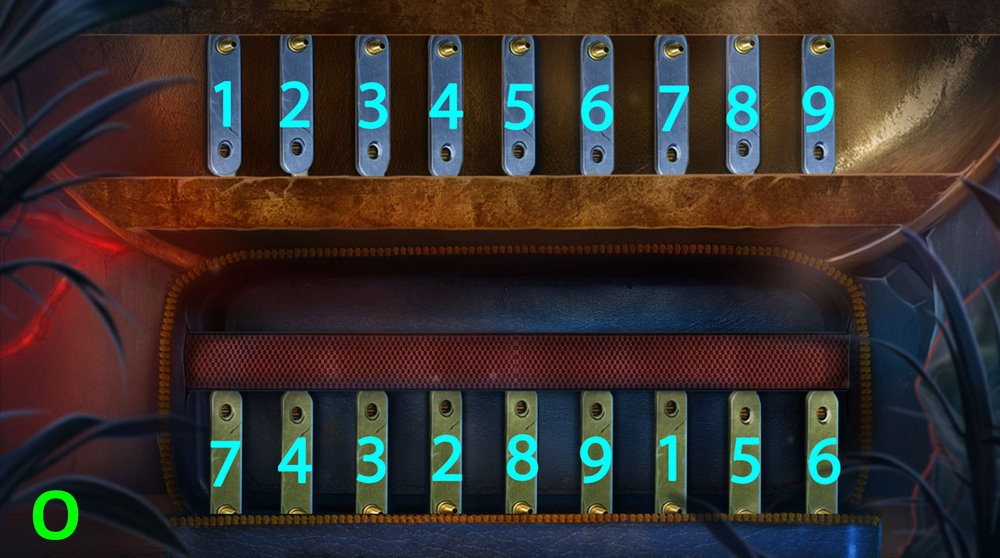
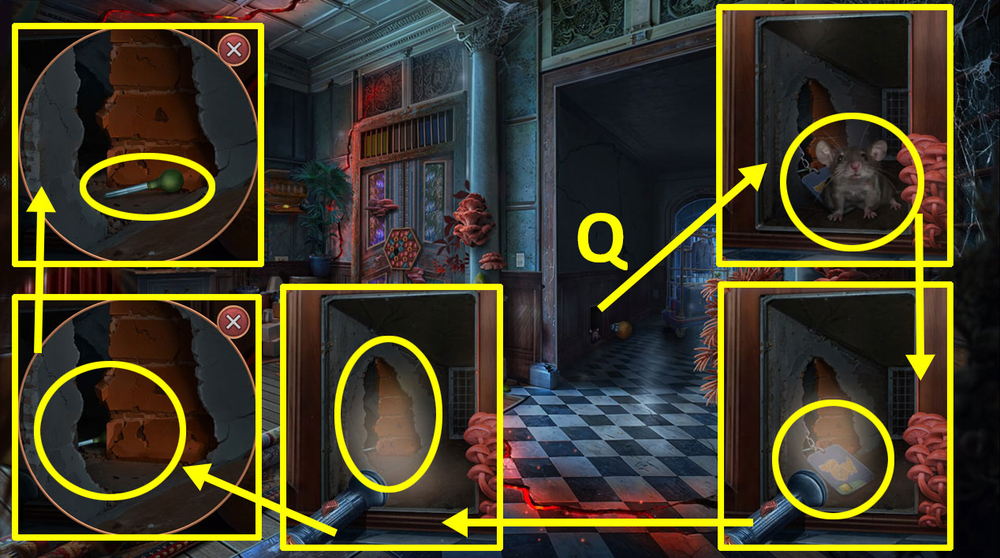
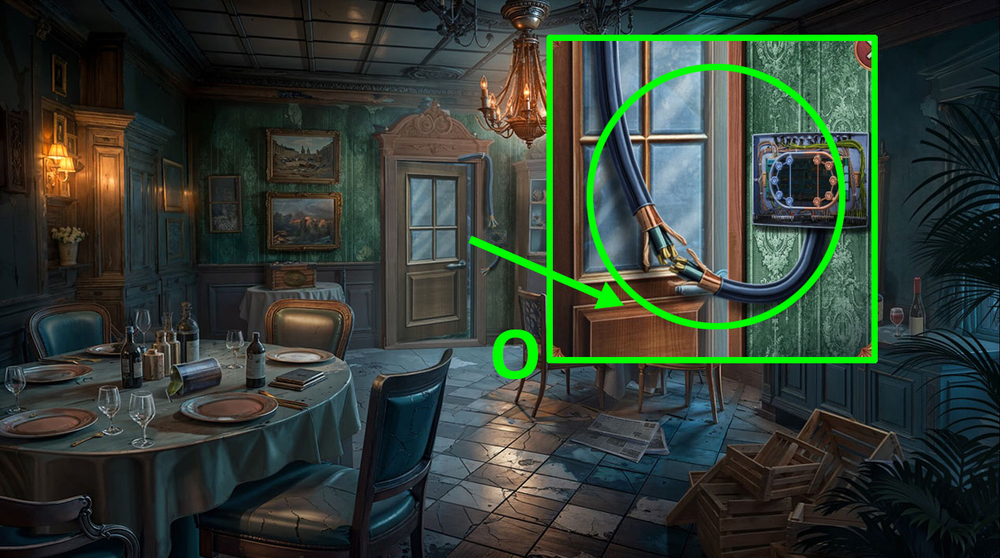
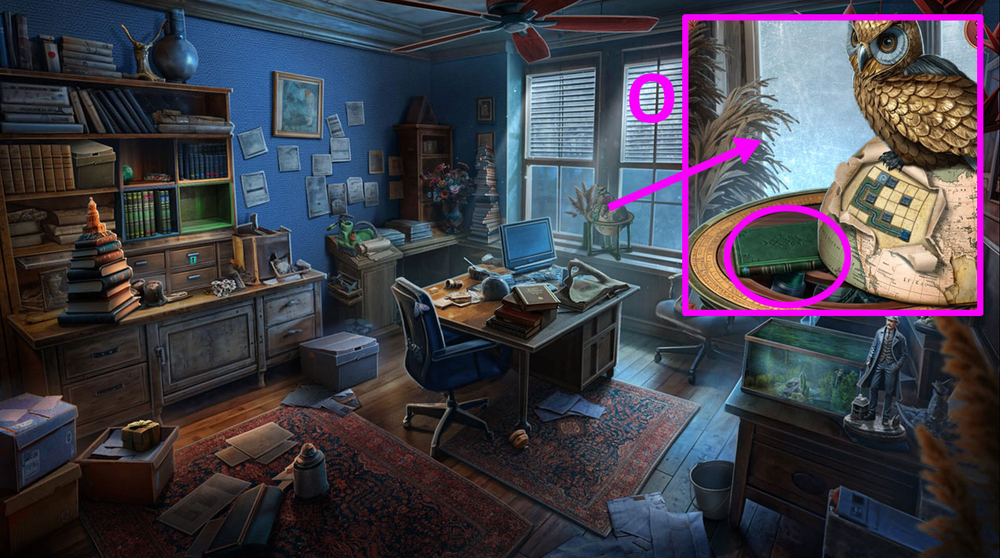
- Take SOLDERING IRON, use UMBRELLA HANDLE and STAPLE GUN on the slot for the lever, open the gas tank, pull the lever, take NITROGEN (O).
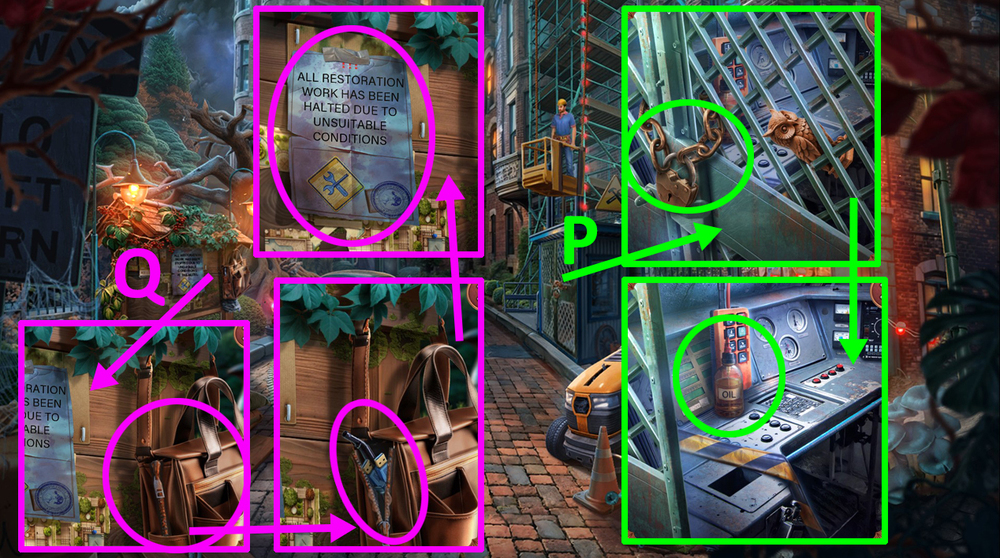
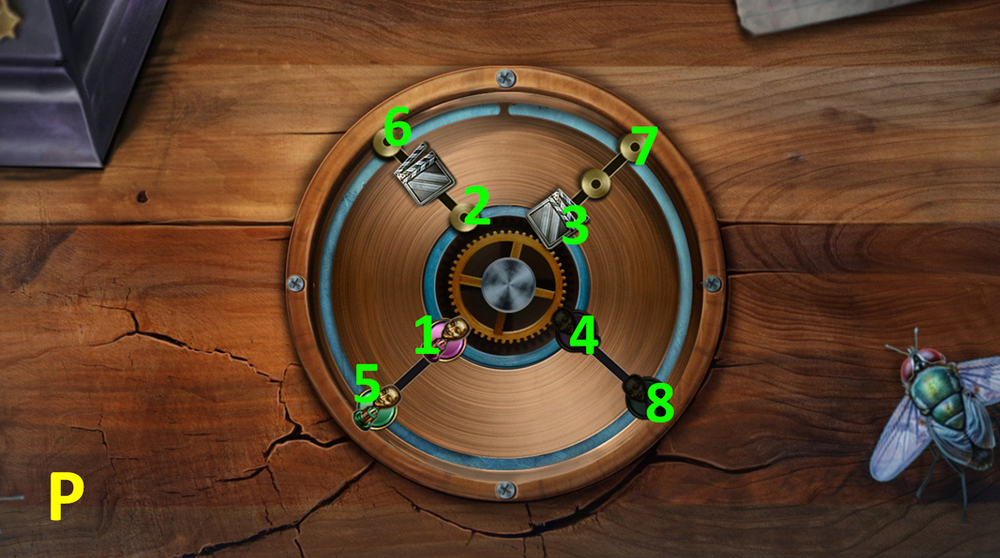
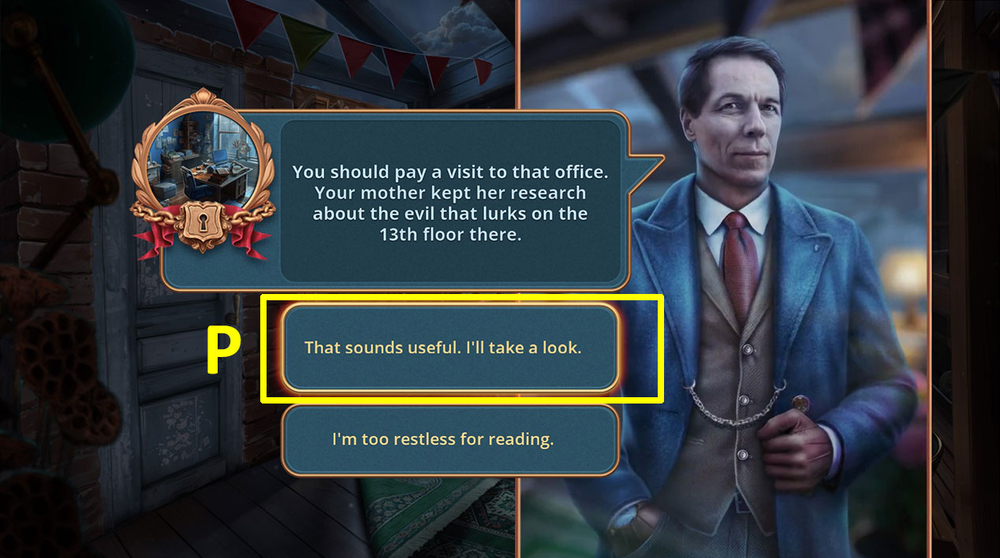
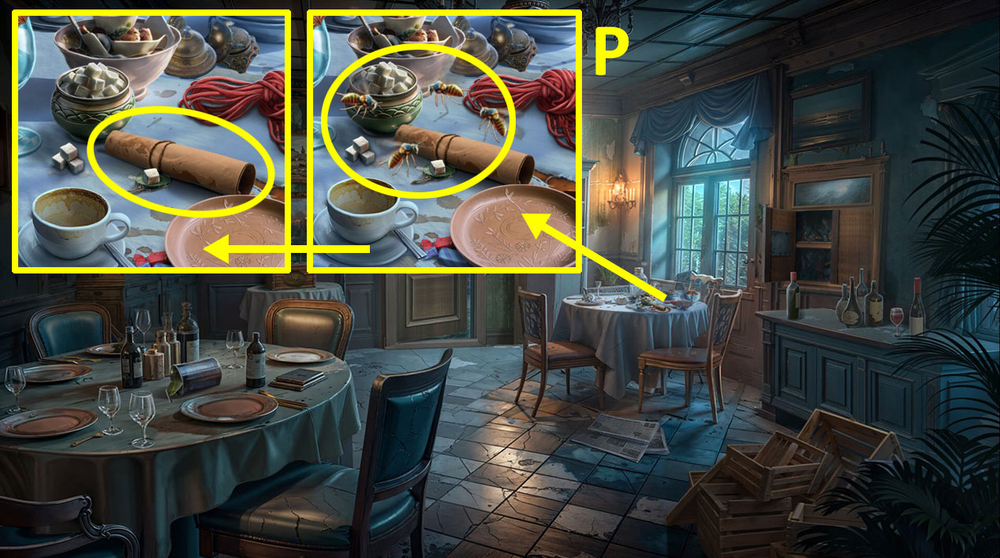
- Use NITROGEN on the lock, take OIL (P).
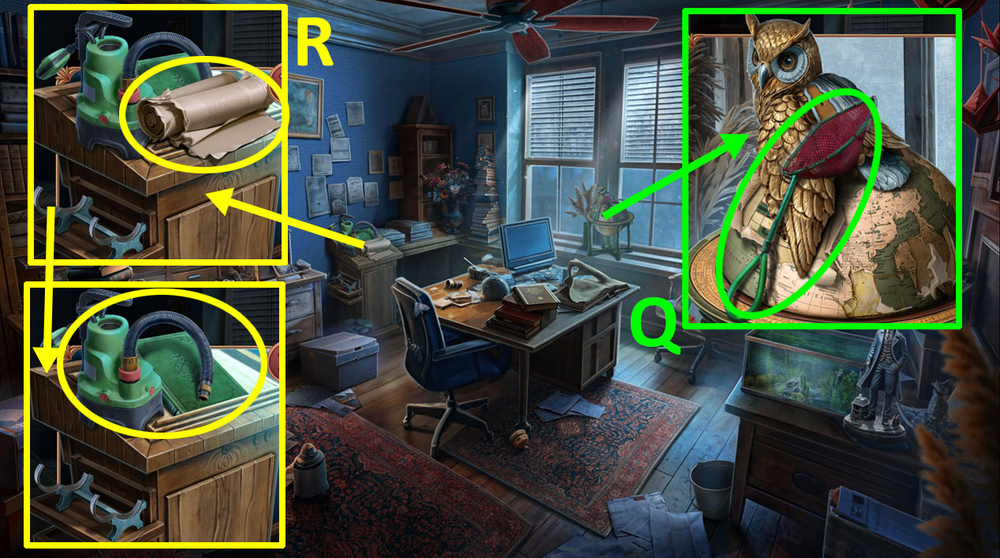
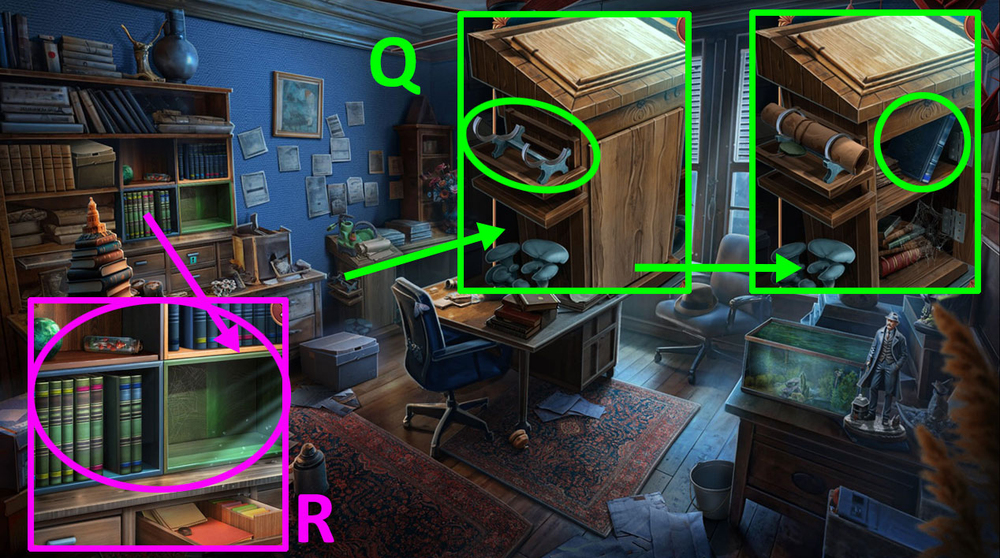
- Use OIL on the zipper, take WIRES 2/3, GASOLINE, and SCREWDRIVER, read the note (Q).

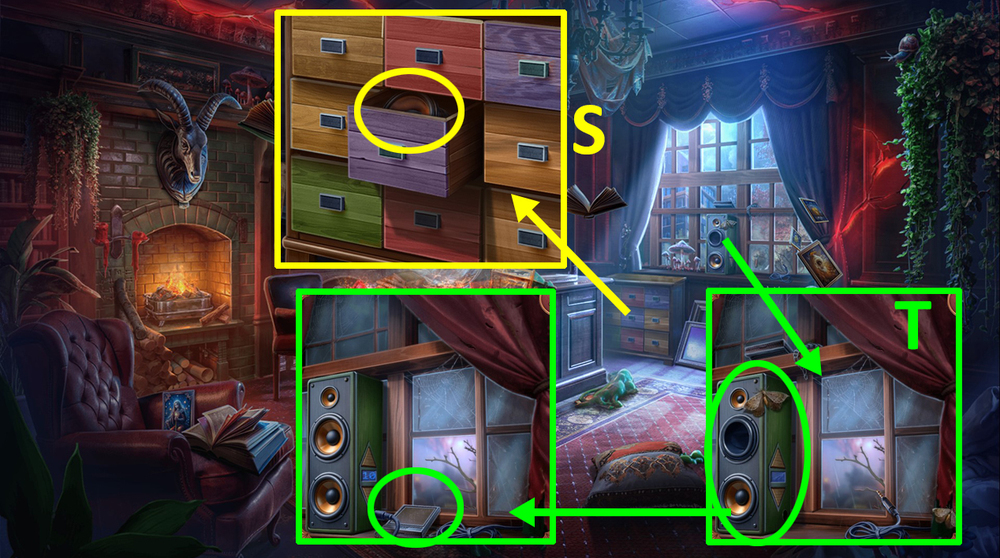
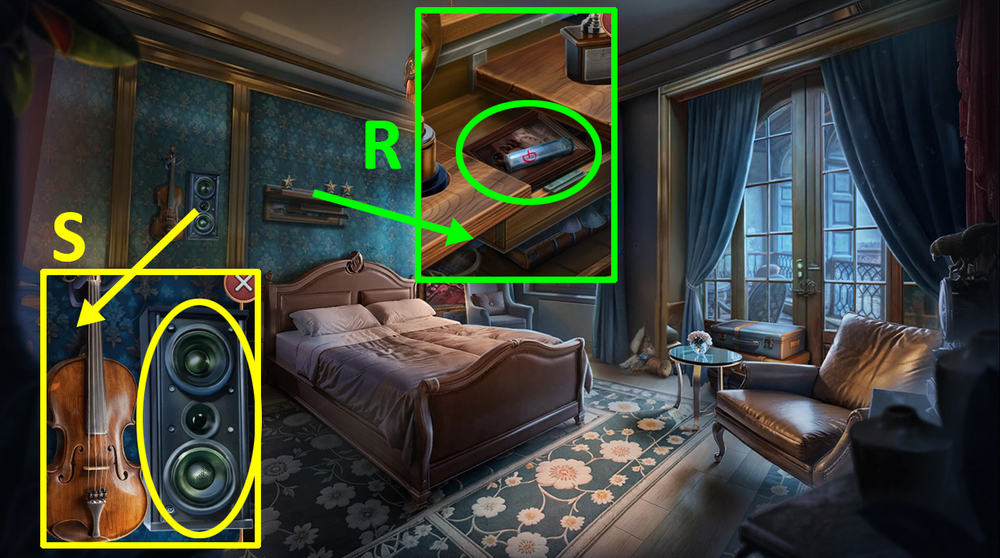
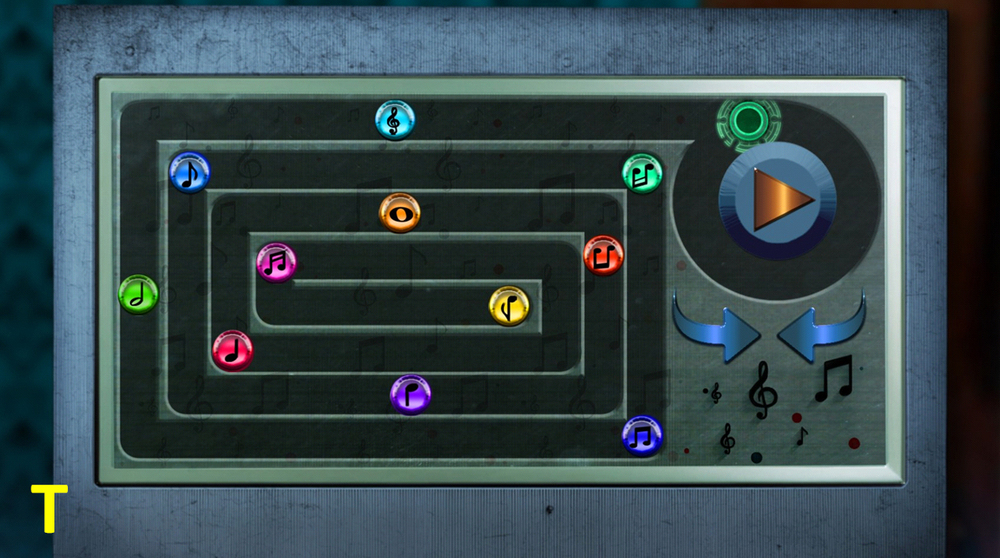
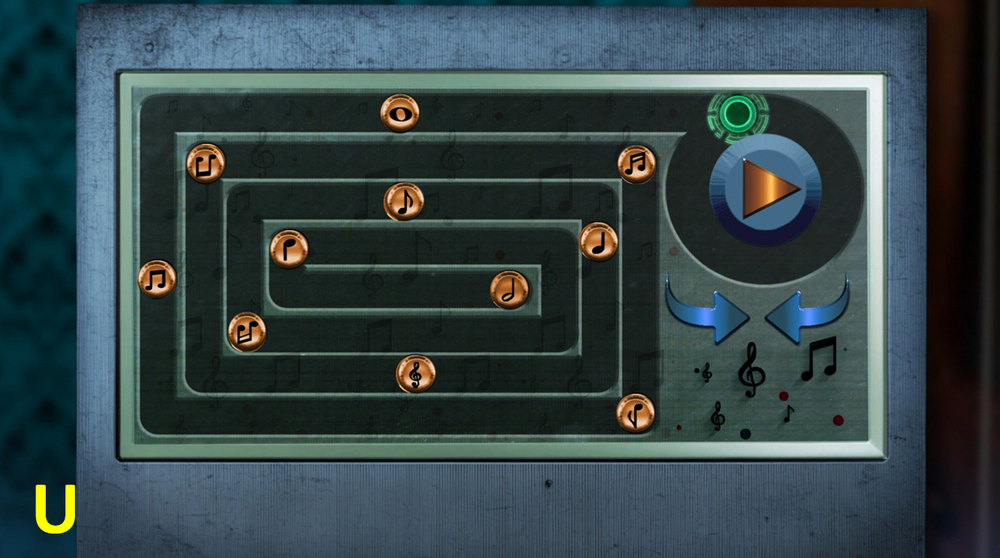
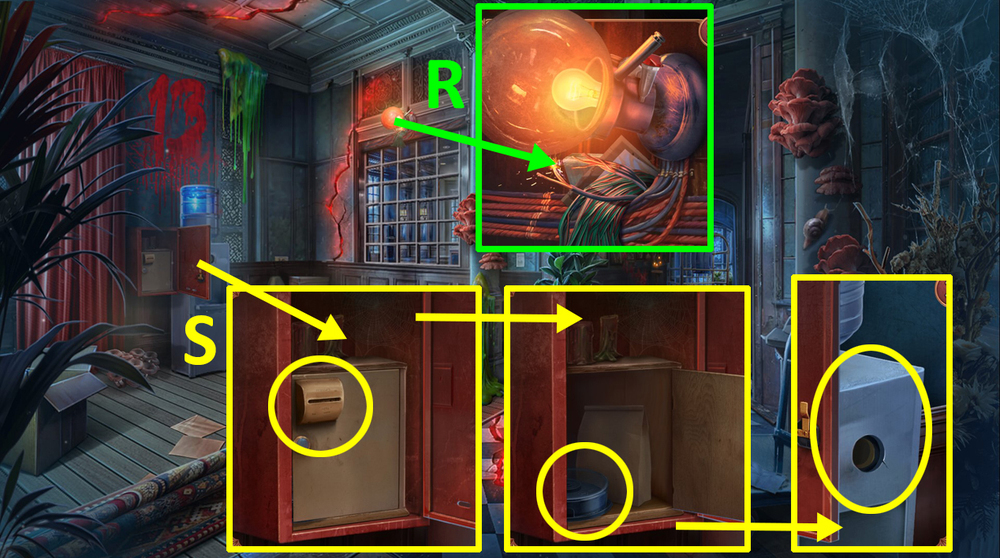
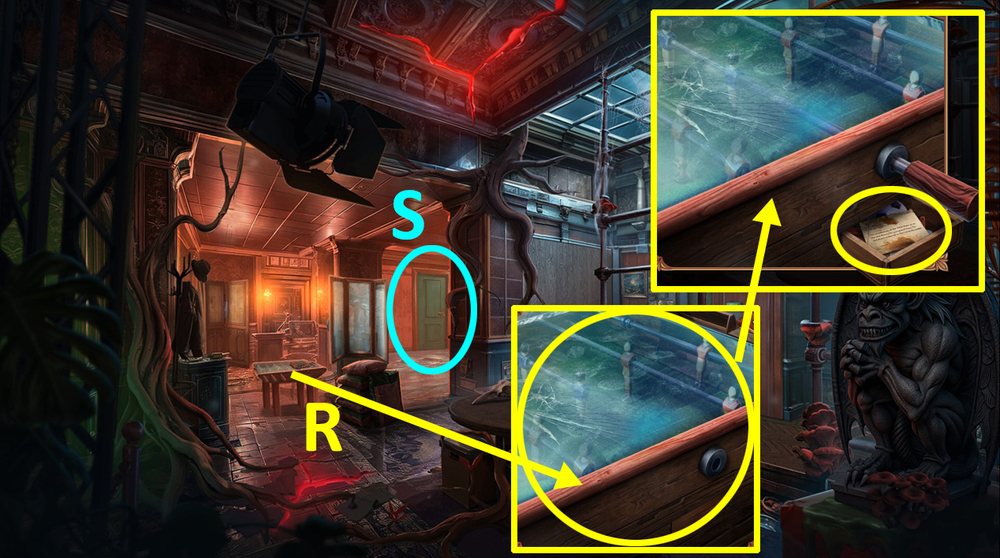
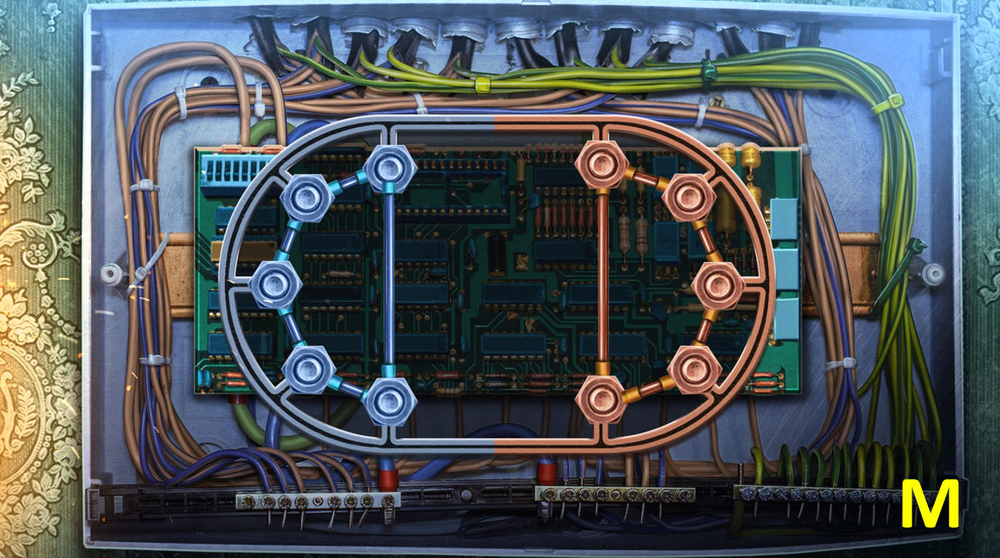
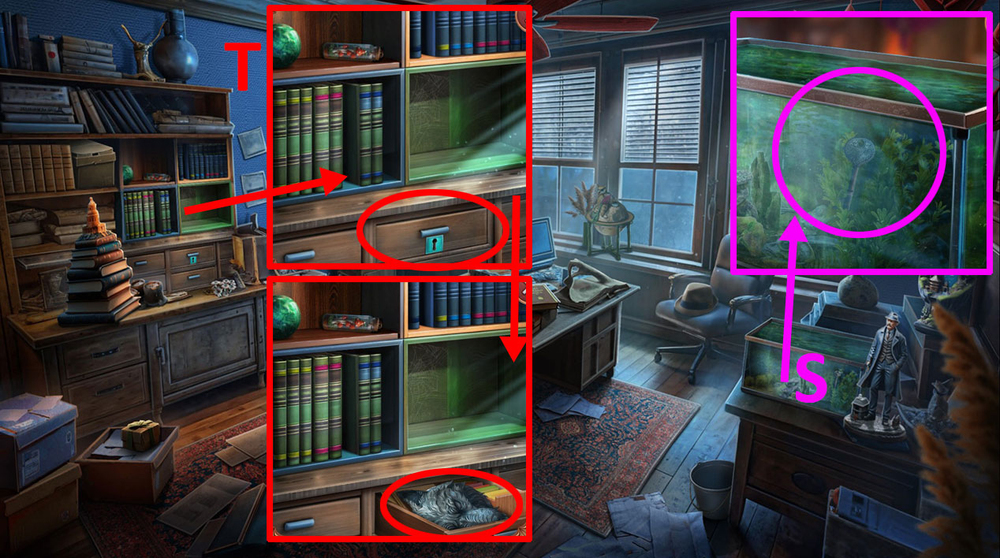
- Examine the controls, use SCREWDRIVER, SOLDERING IRON, and TIN SOLDIER on the panel (R).
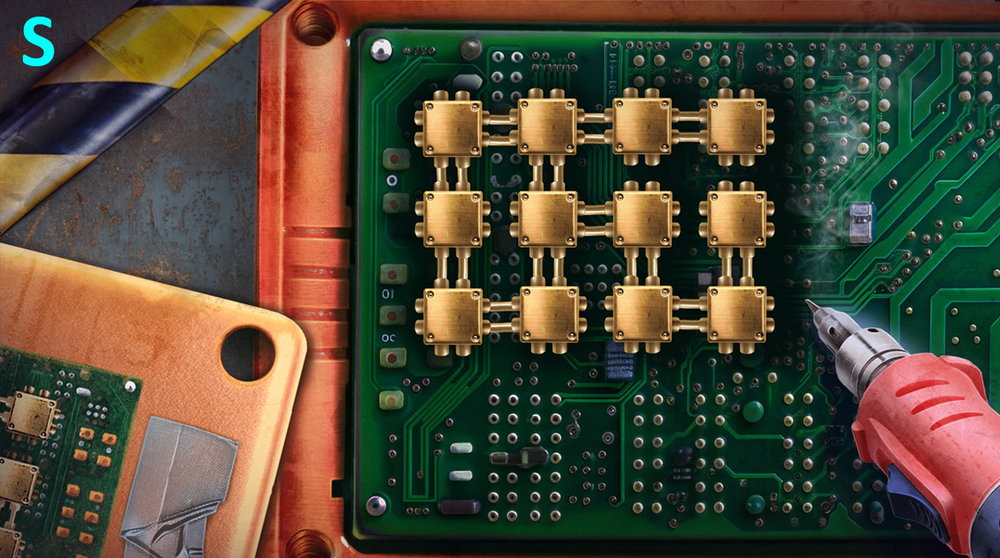
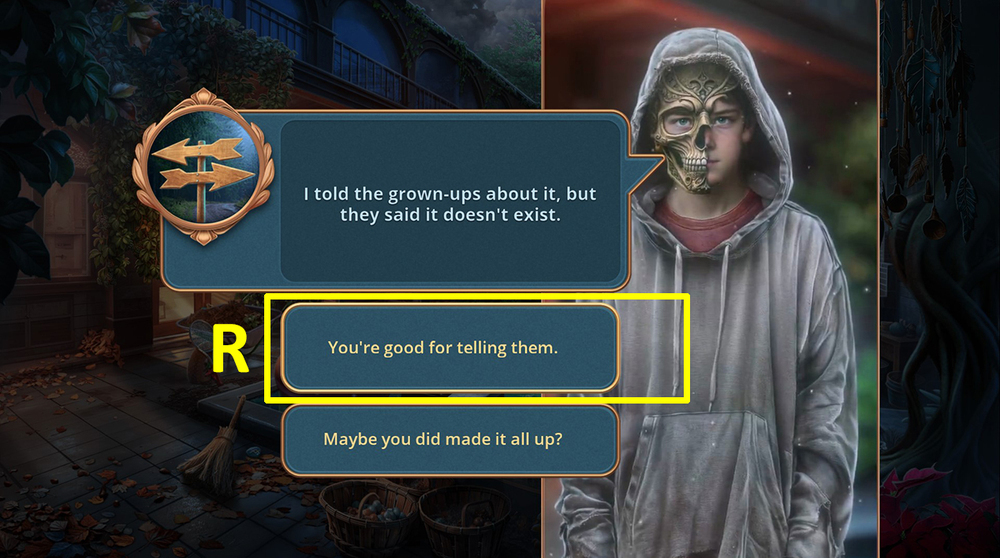
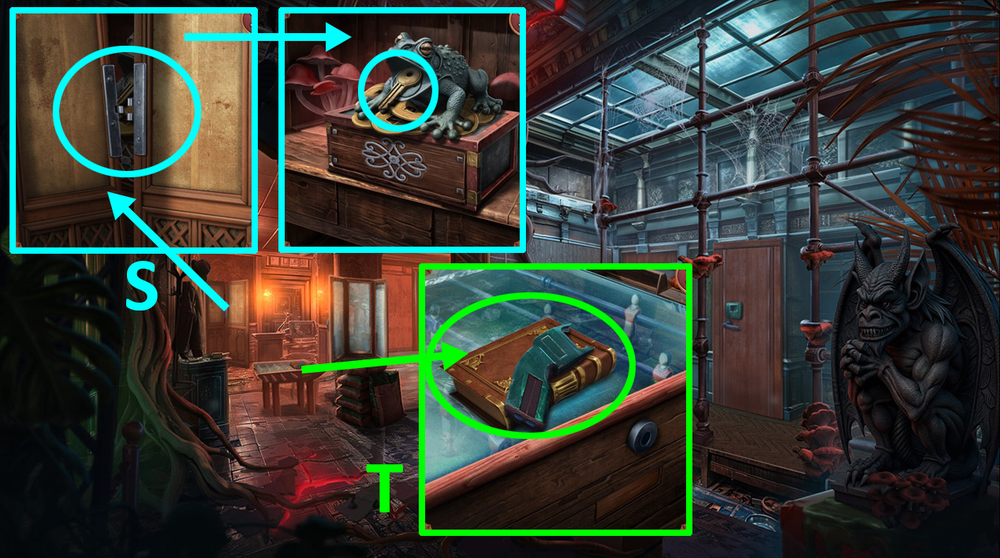
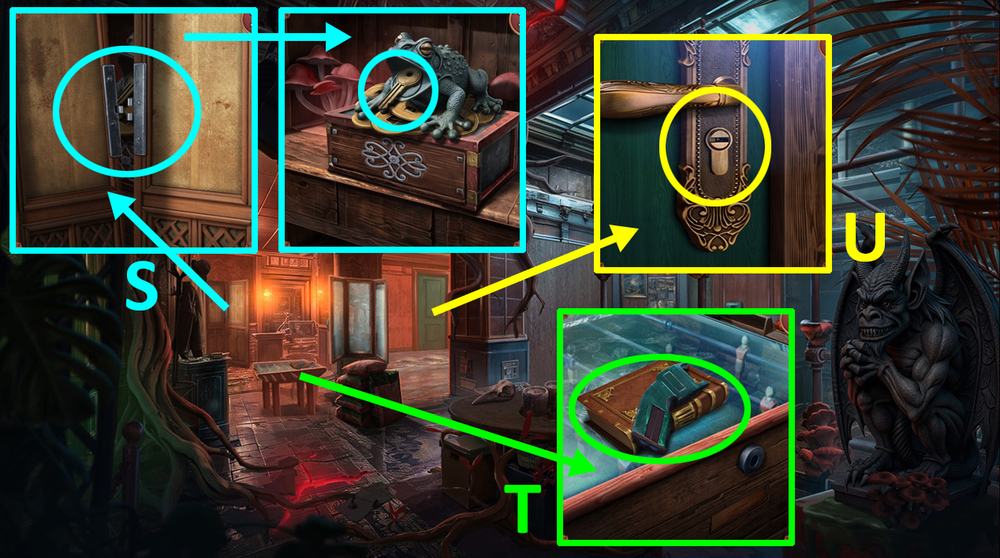
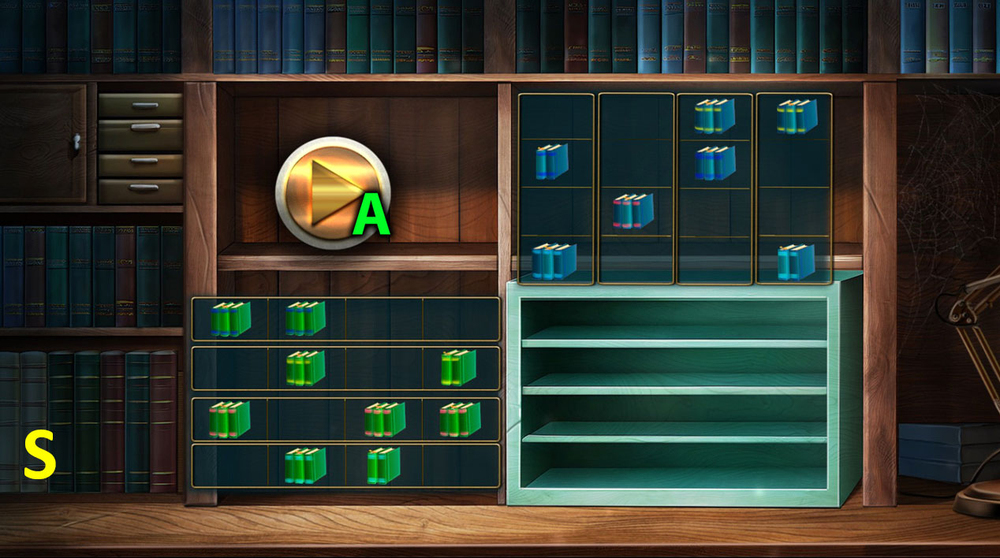
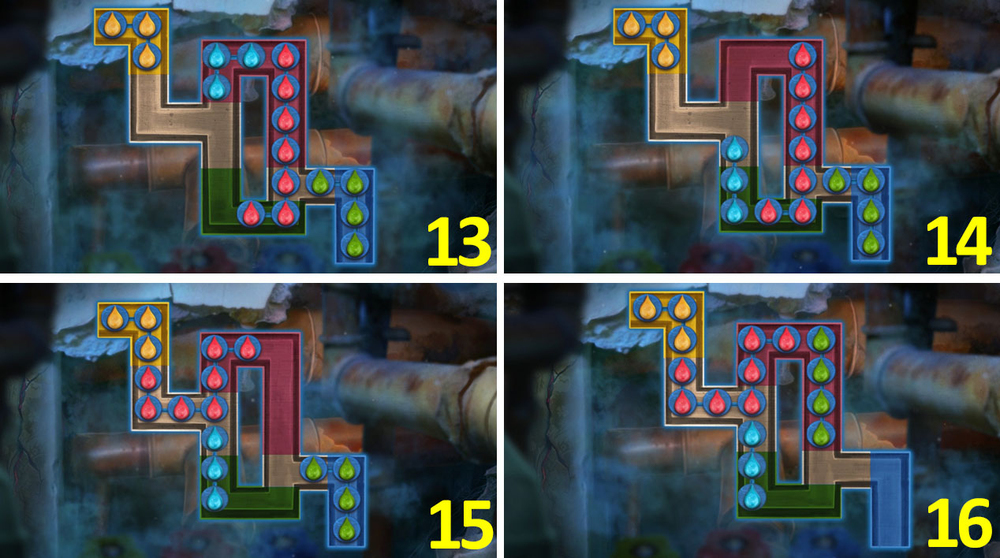
- Easy solution: Follow the instructions on the image (S).
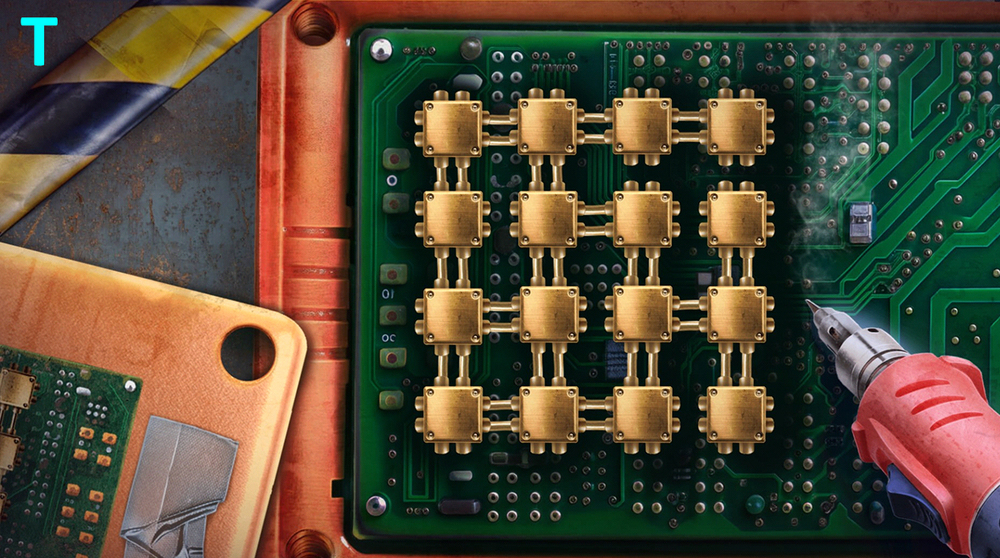
- Hard solution: Follow the instructions on the image (T).
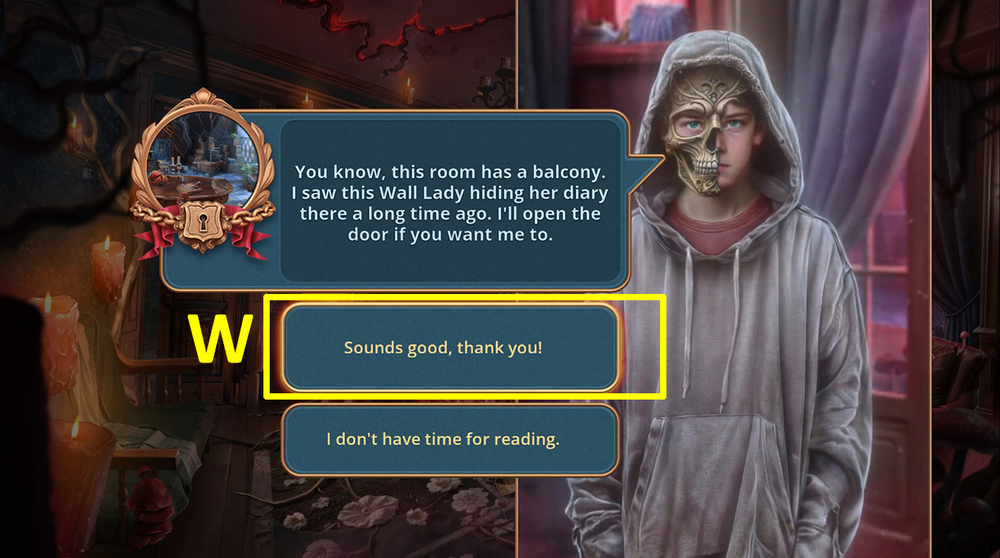
- Get REMOTE CONTROL.
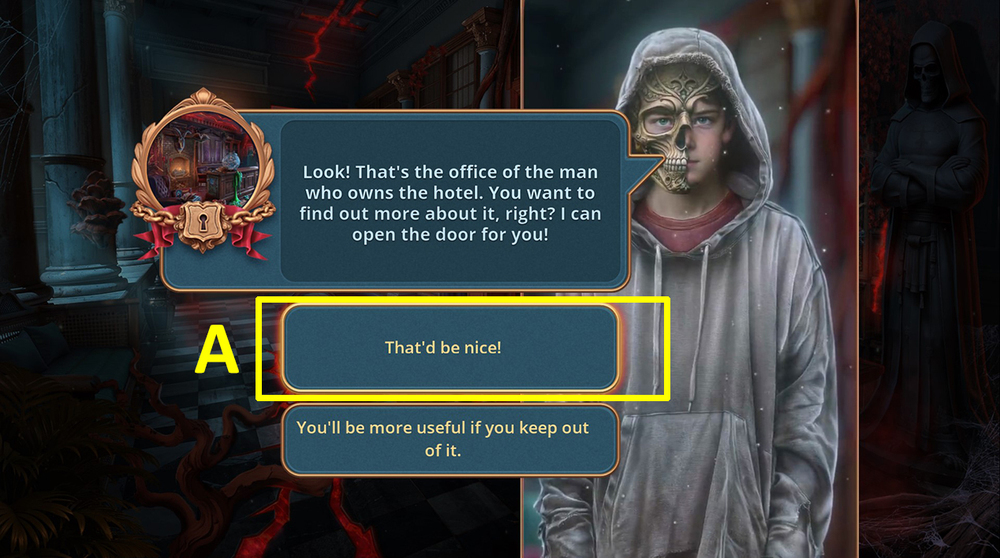
- Use REMOTE CONTROL on the person.
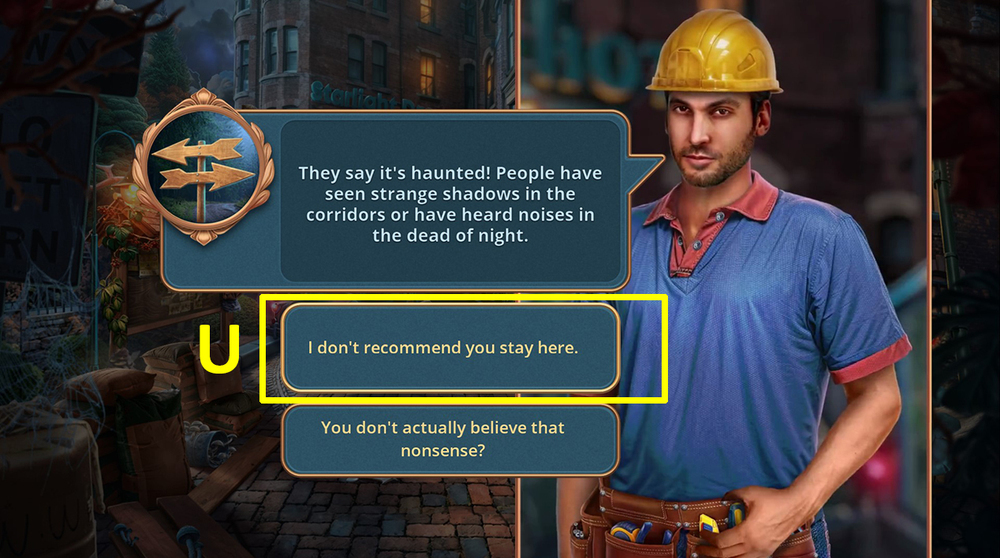
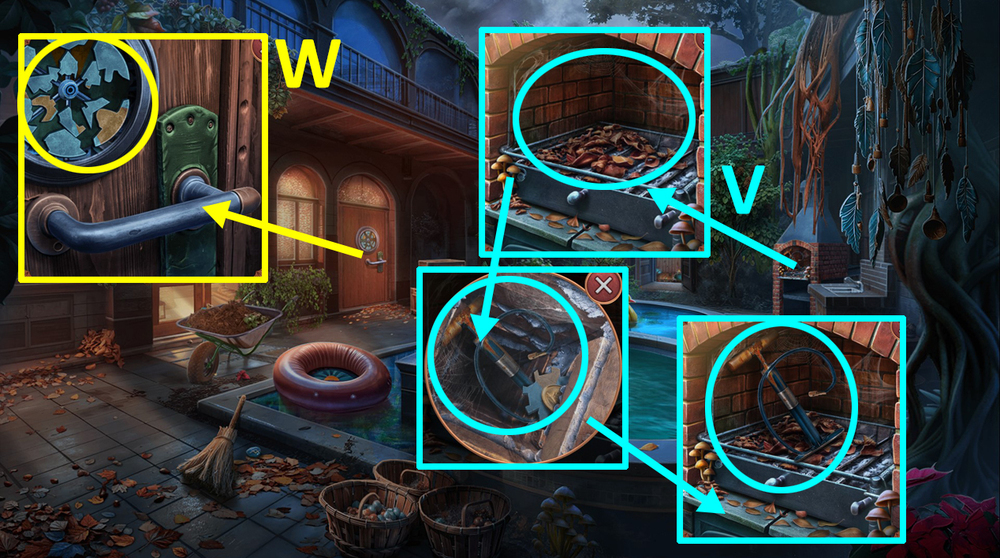
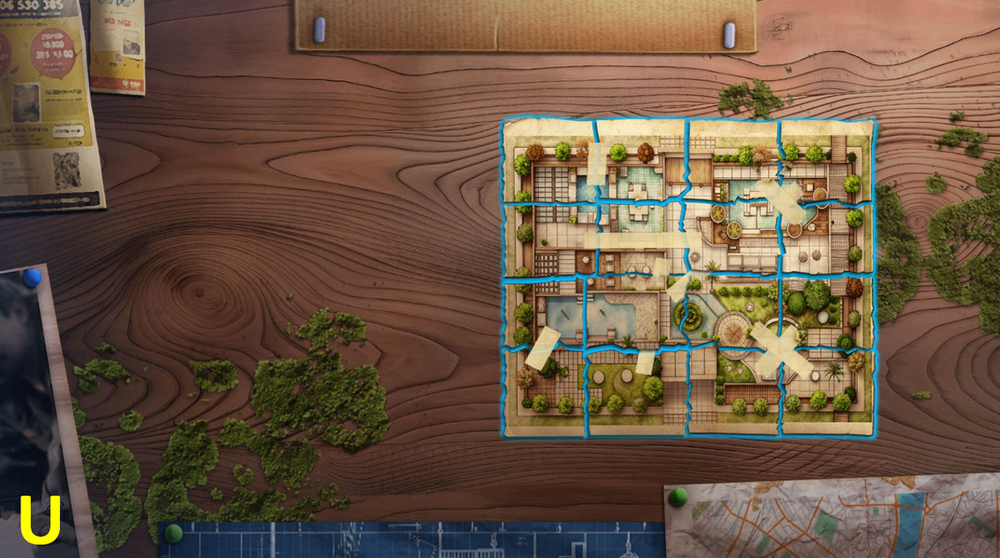
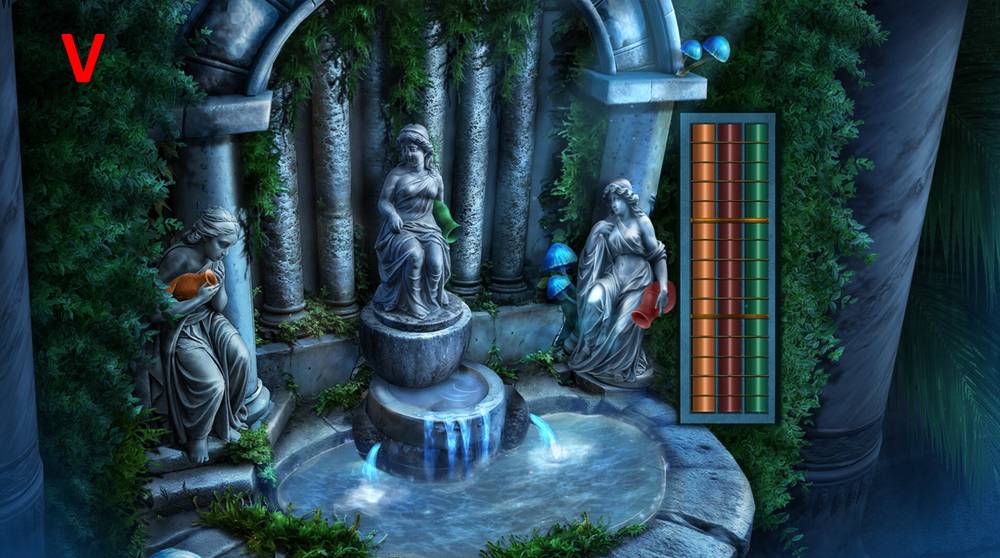
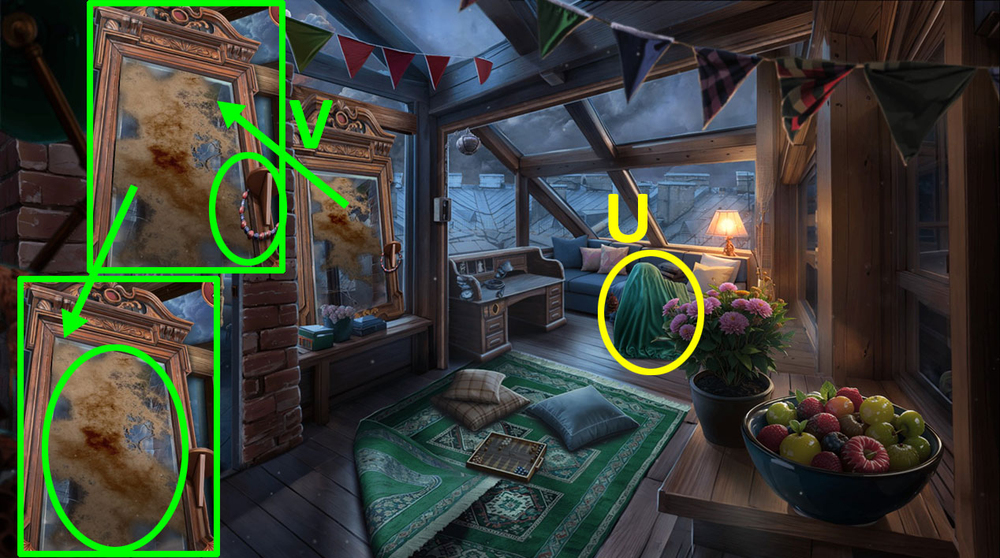
- Select this option, take ROPED HOOKS (U).
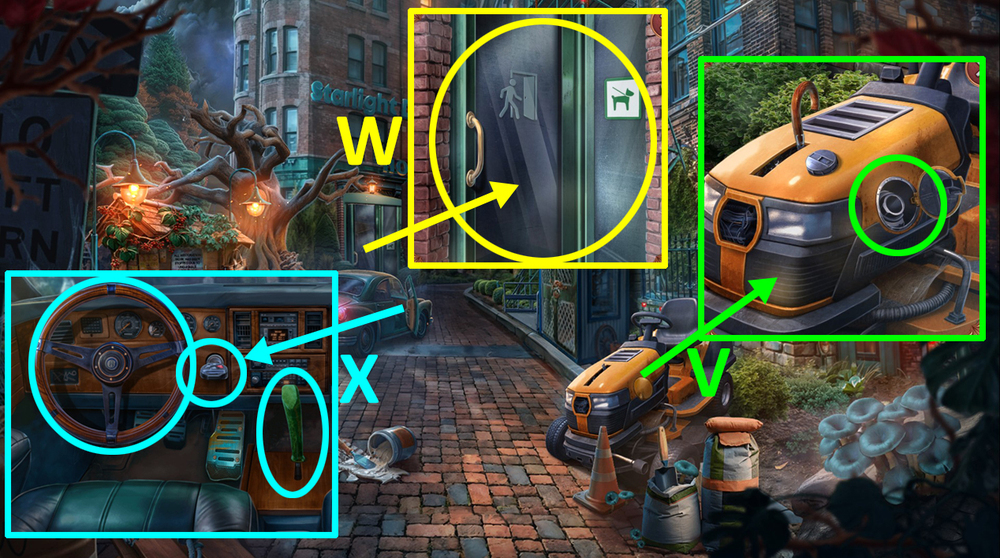
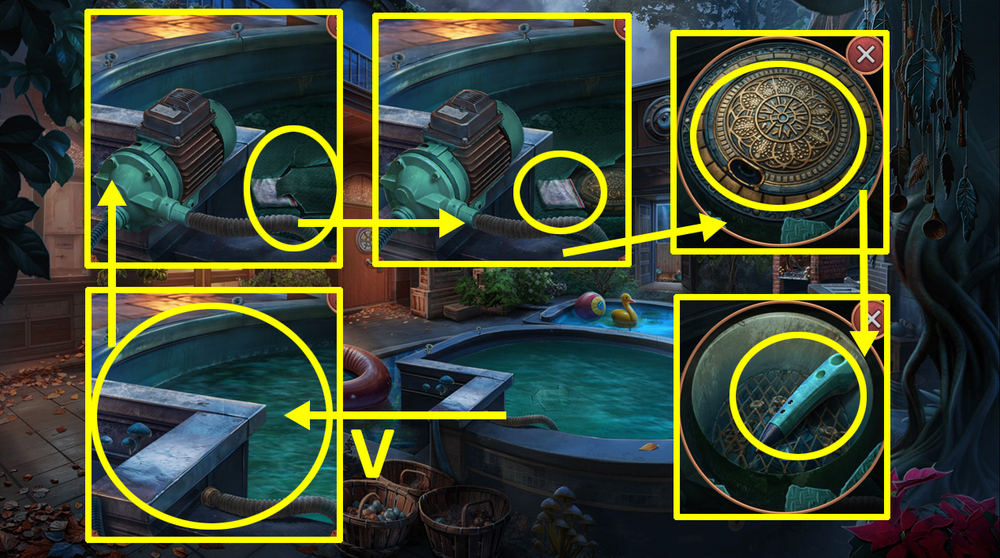
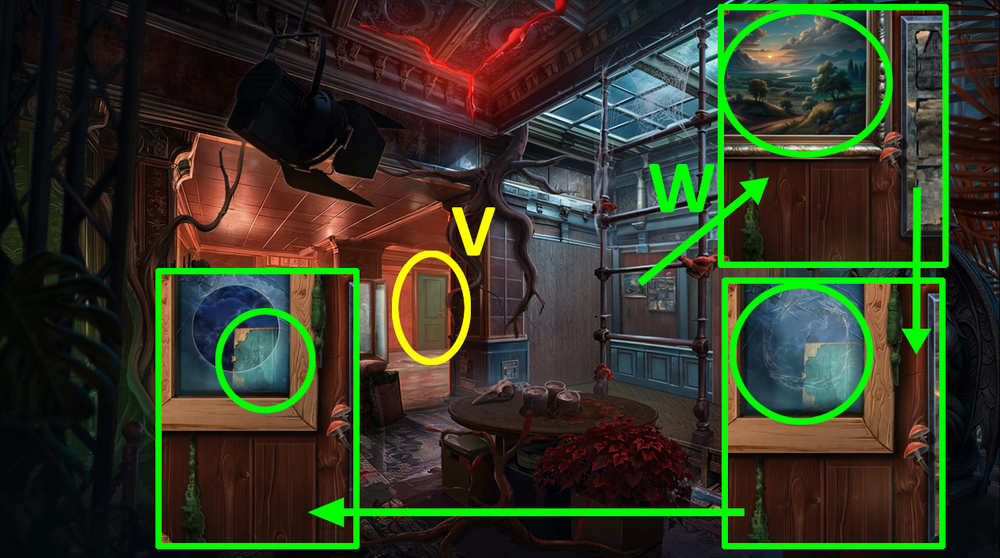
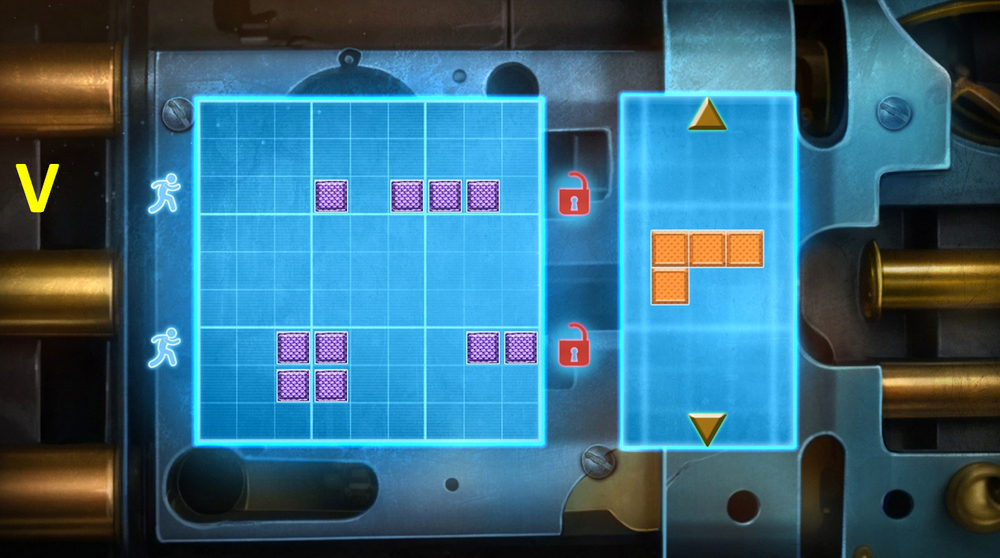
- Use GASOLINE on the gas tank (V).
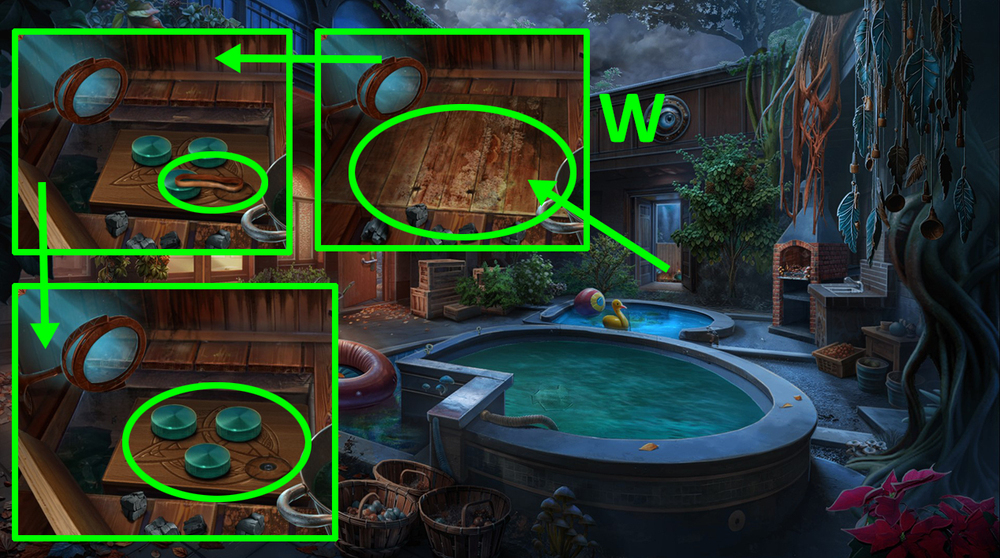
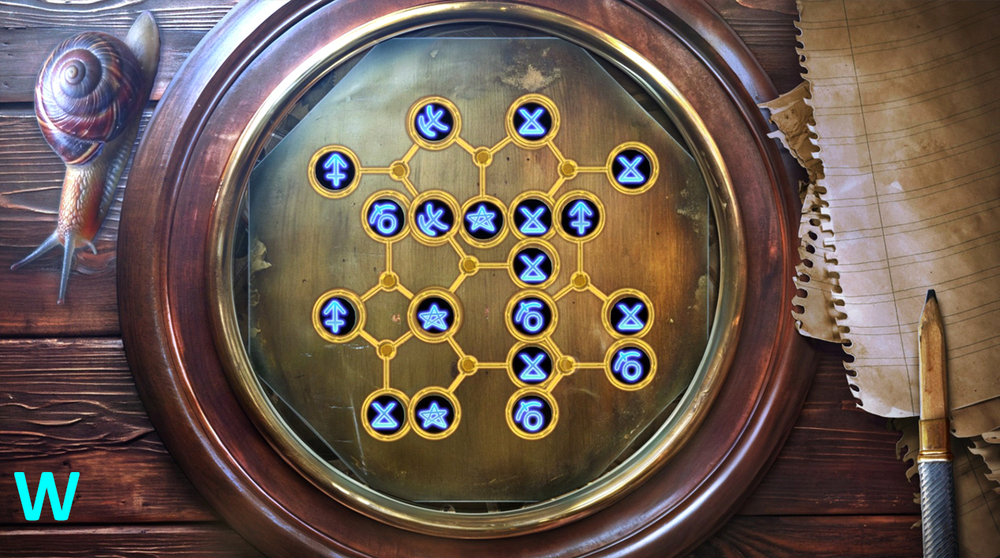
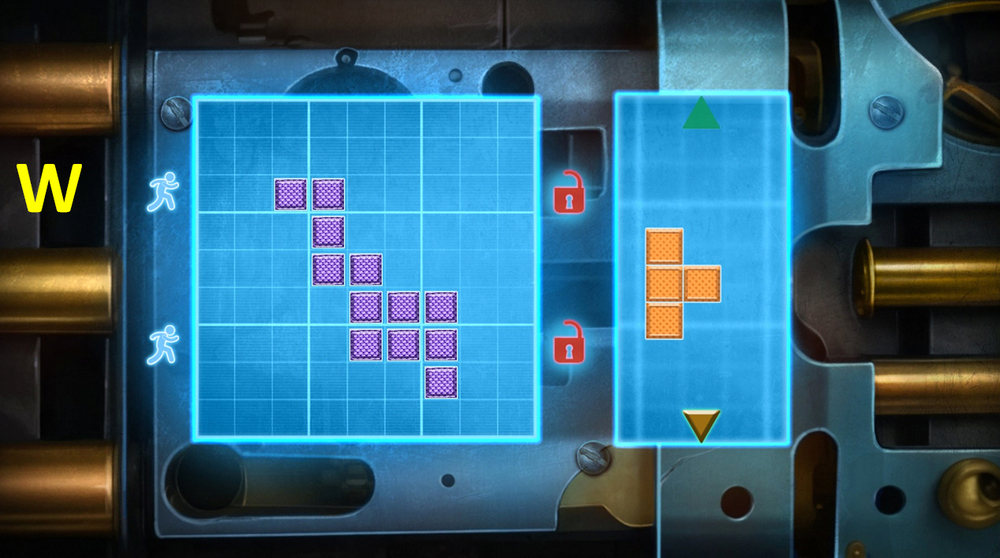
- Use ROPED HOOKS on the doors (W).
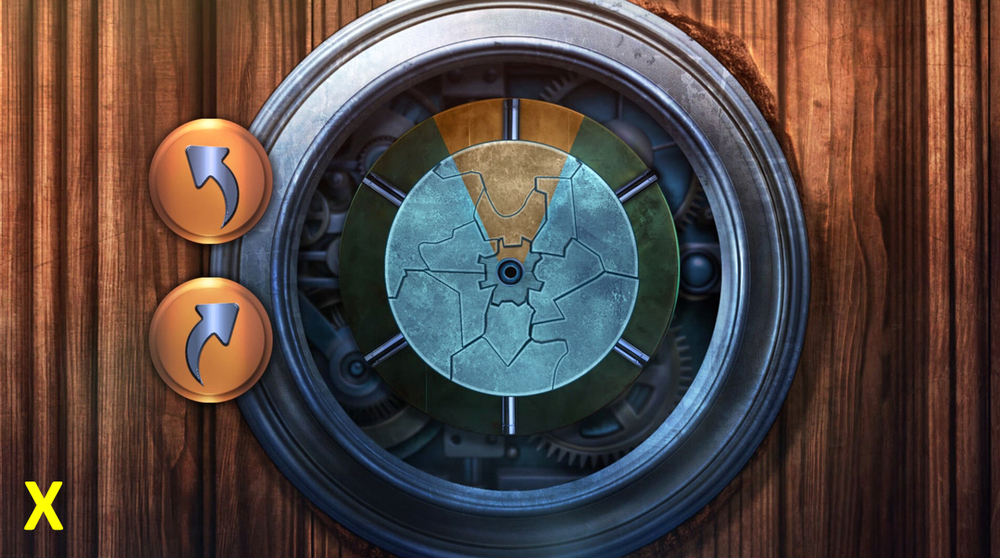
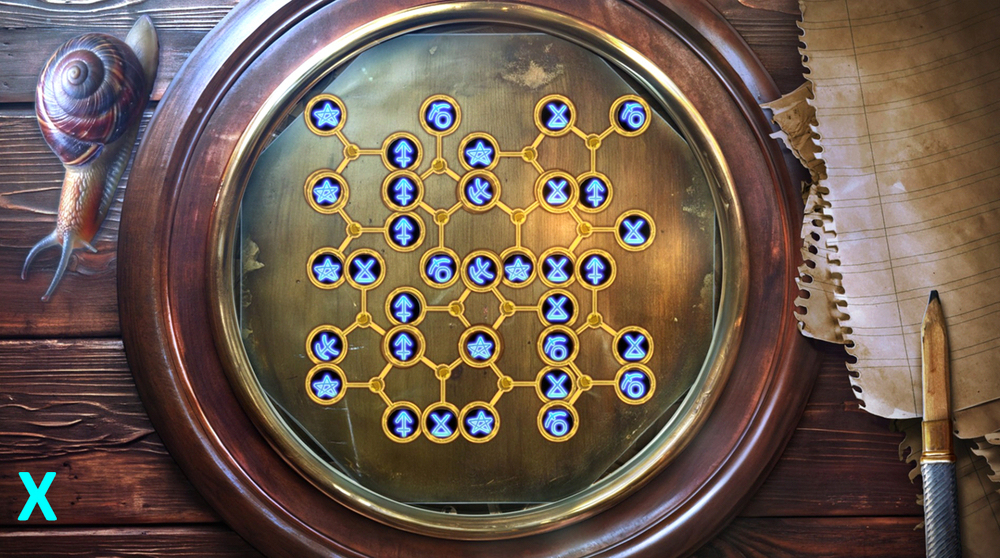
- Start the car, shift the gear, move the steering wheel (X).
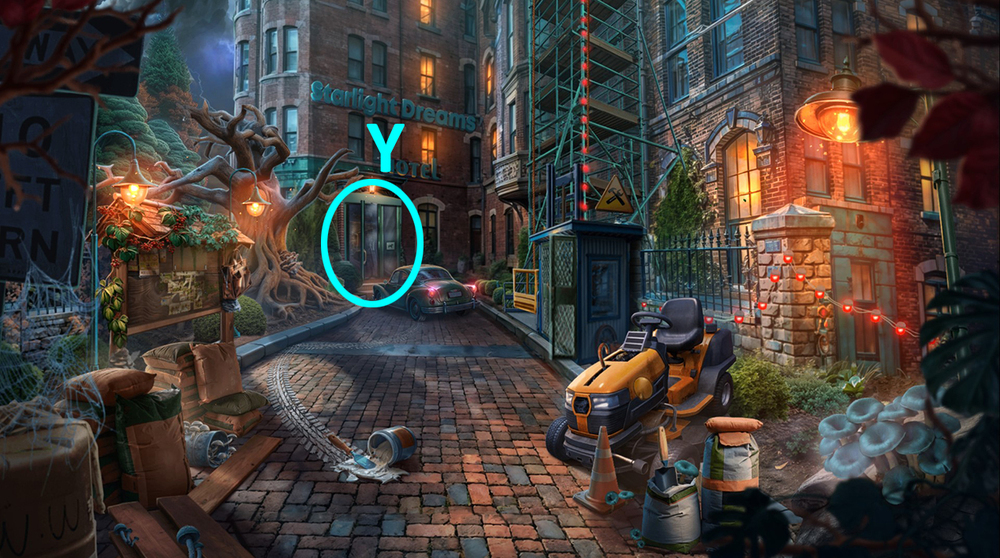
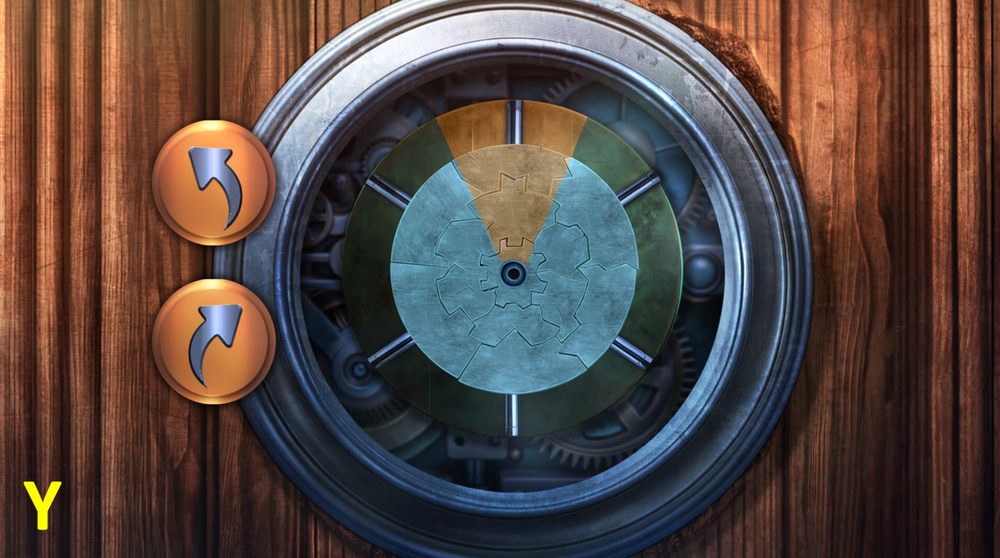
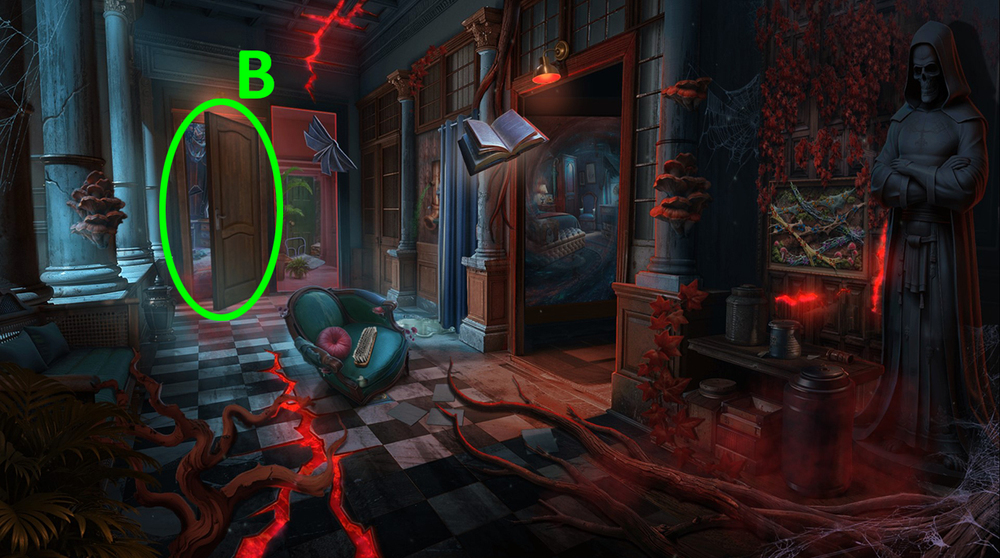
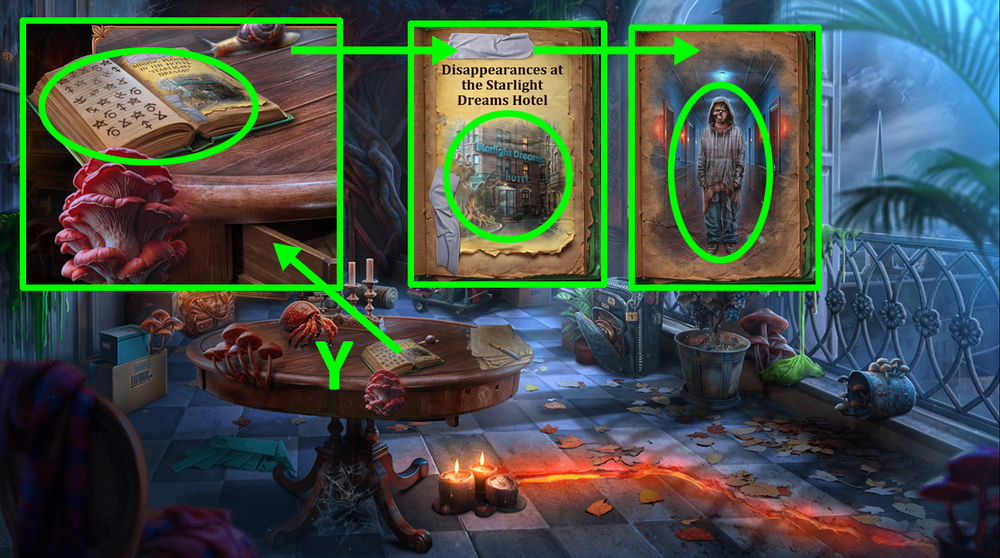
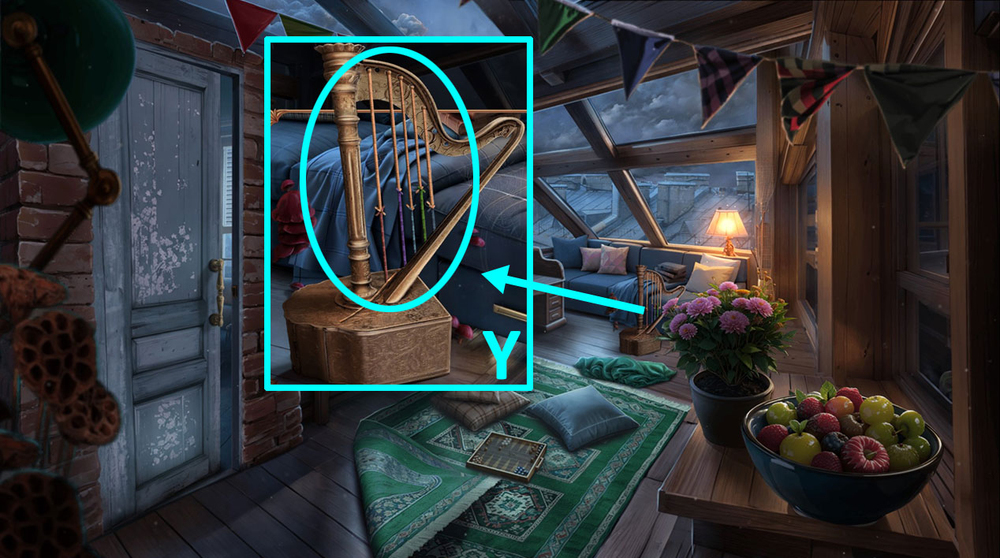
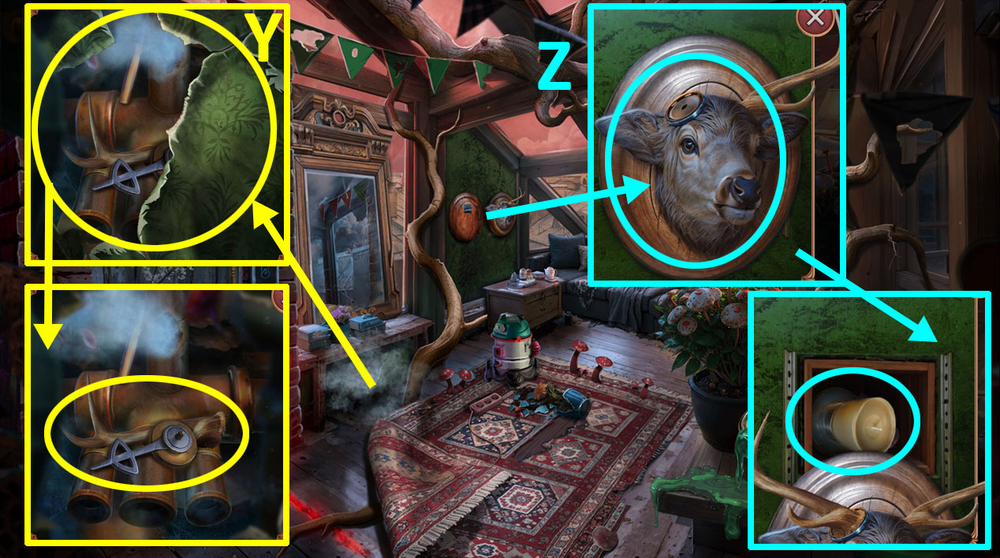
- Go forward (Y).

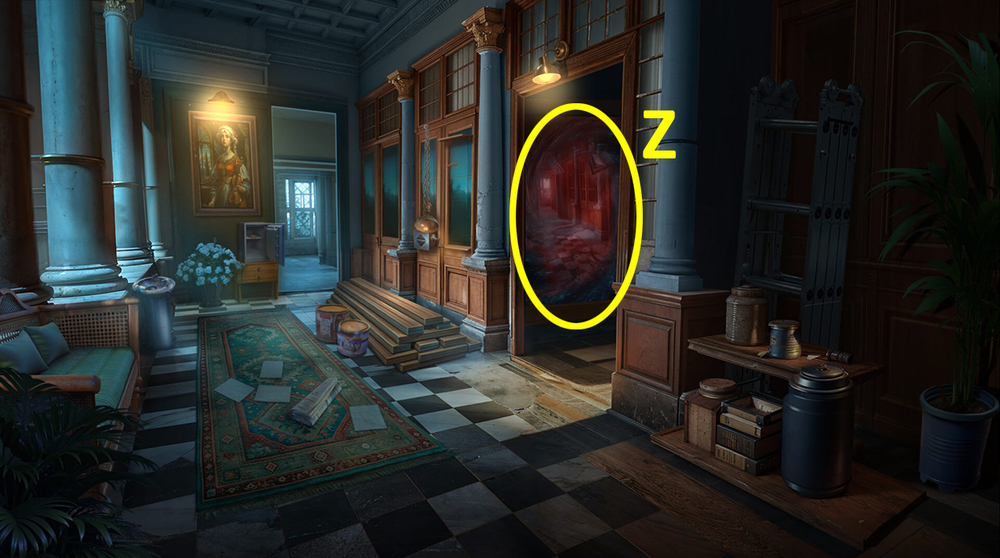
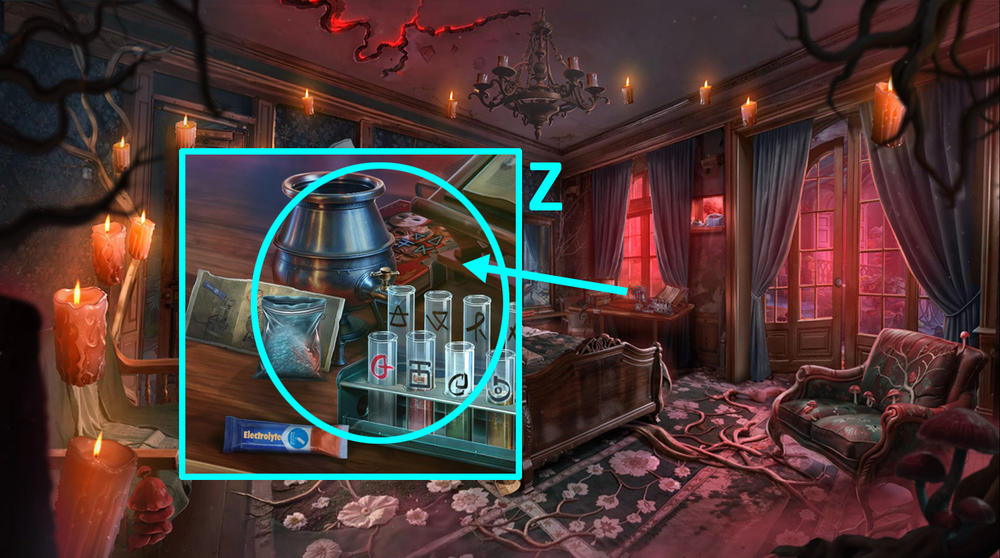
- Use the EMF detector on the background.
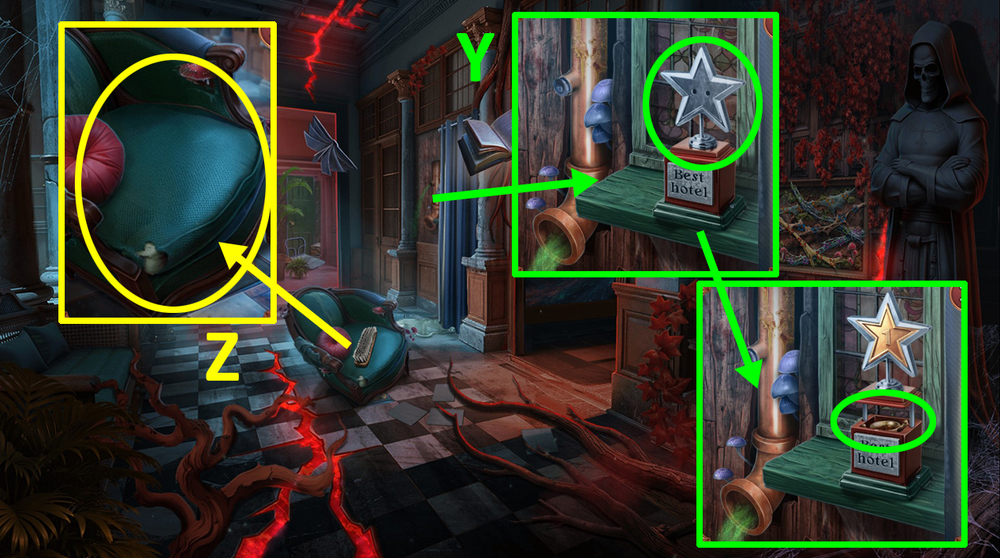
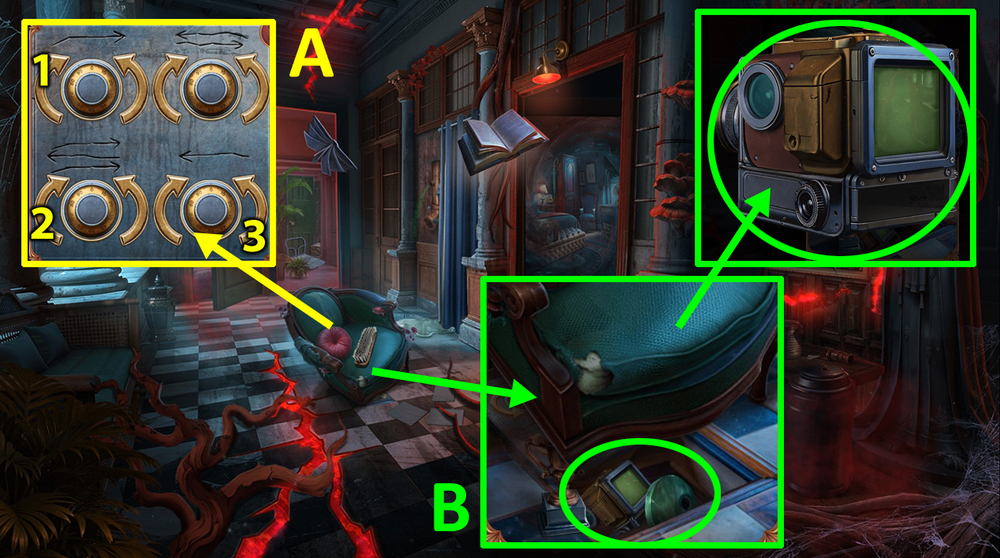
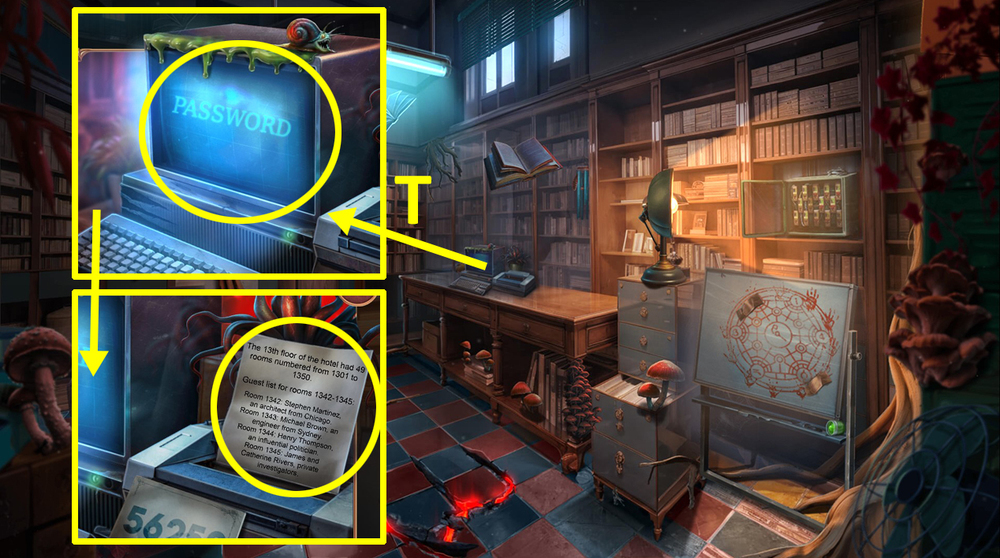
- Take TWEEZERS and SYSTEM UNIT (Z).
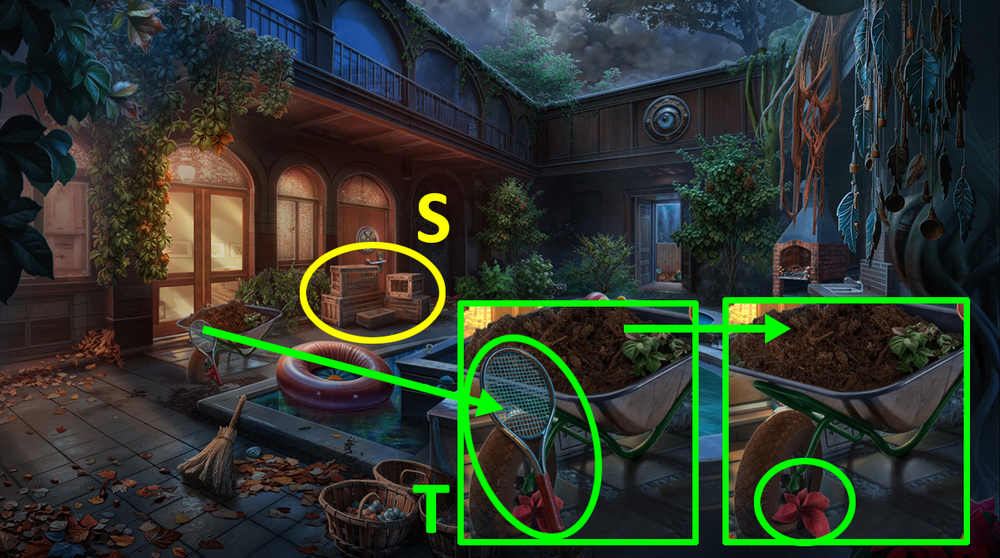
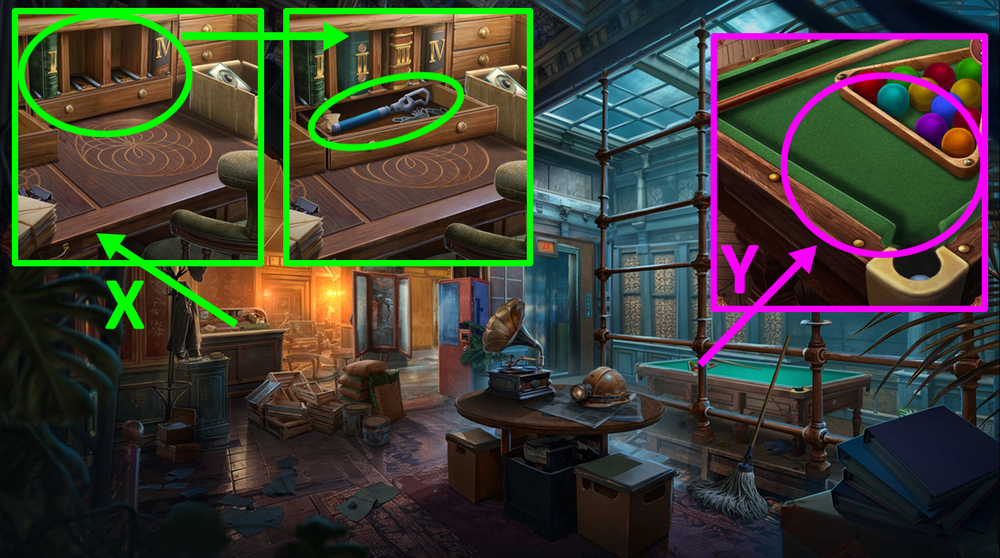
- Take the shoe, find all the occurrences of the number 13, click on the shoe, take WIRES 3/3 (A).

- Use WIRES and SYSTEM UNIT on the outlet (B).
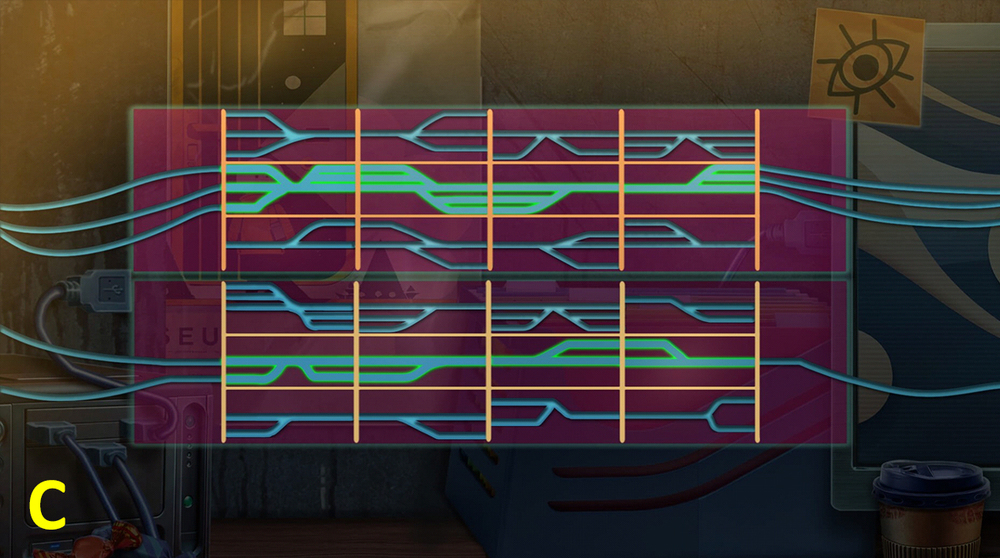
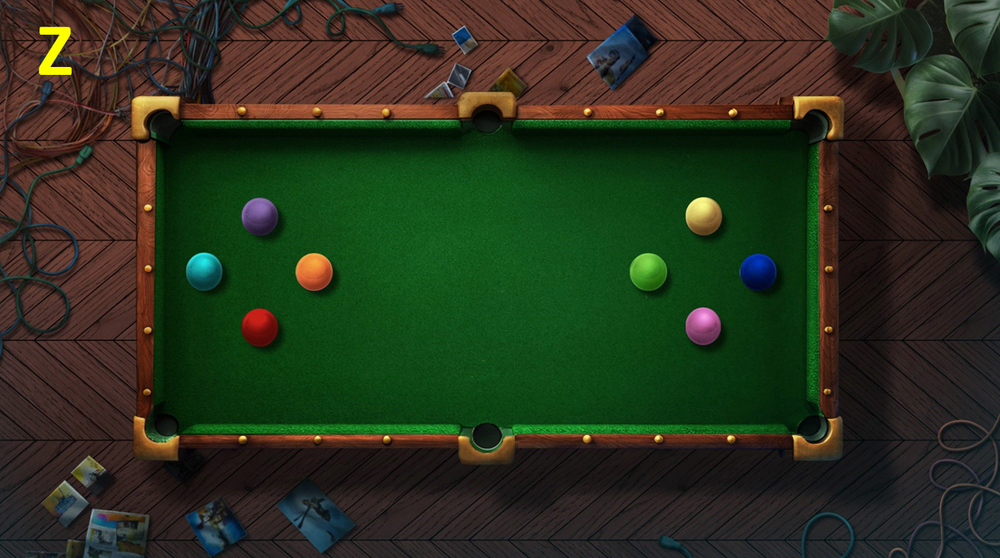
- Easy solution: Follow the instructions on the image (C).
- Hard solution: Follow the instructions on the image (D).
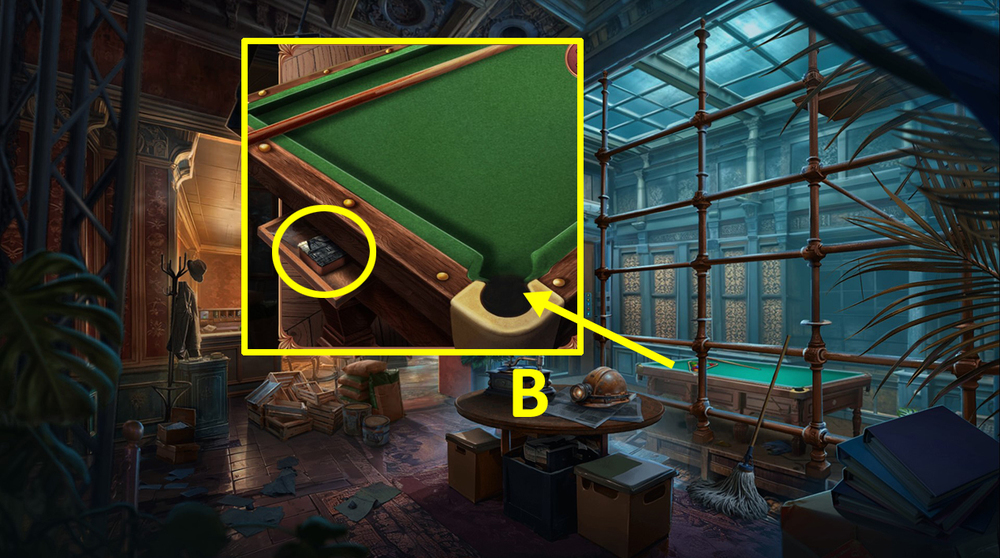
- Take the map, CANE, and EXTENSION CORD (E).
- Use EXTENSION CORD on the outlet (F).
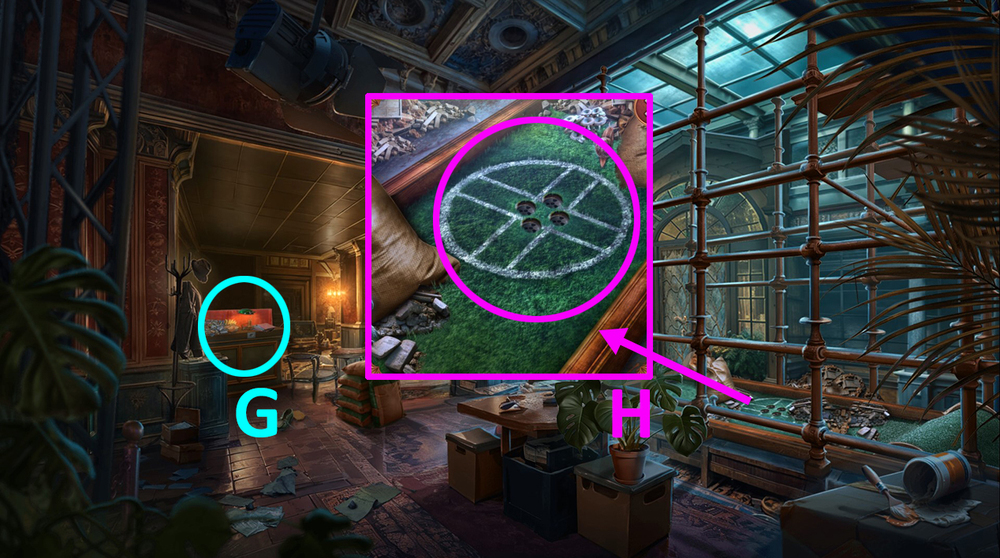
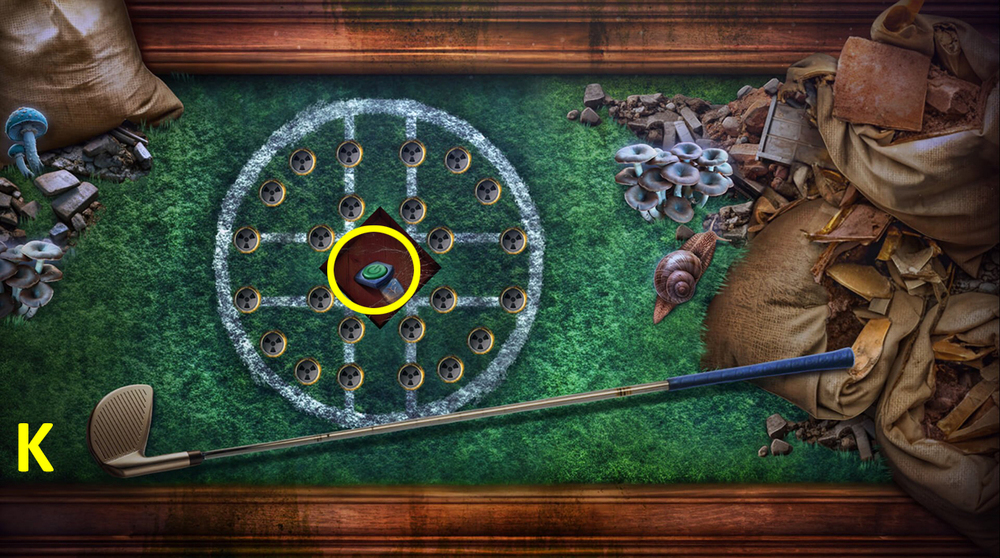
- Play puzzle, earn GOLF CLUB (G).
- Use BASEBALL and GOLF CLUB on the grass (H).
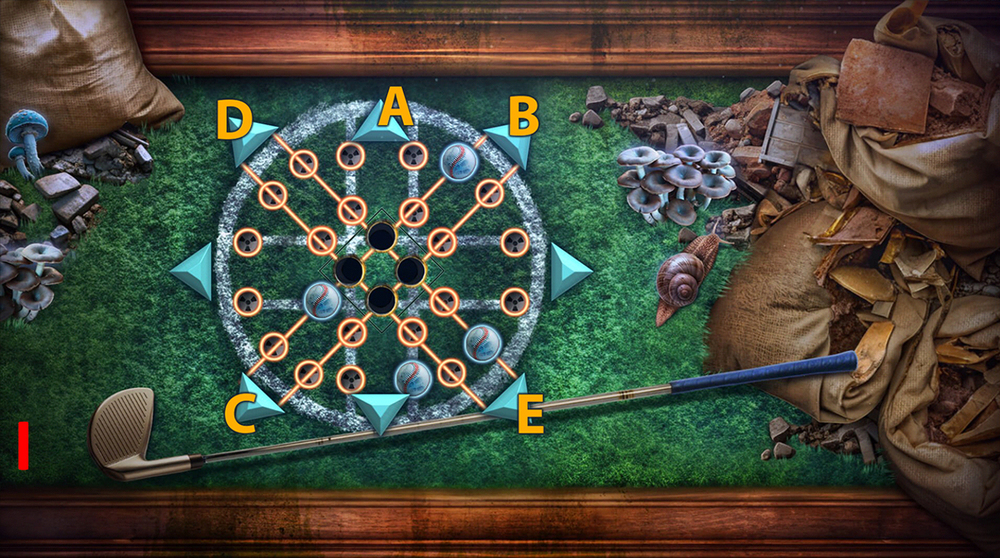
- Easy solution: A, Bx3, Cx2, Dx4, Ex2 (I).

- Hard solution: A, Bx3, Cx2, Dx4, Ex2 (J).
- Take POWER BUTTON (K).
- Go back.
- Use POWER BUTTON on the empty socket, take MARKER, SPRING, and PLIERS (L).
- Use PLIERS on the cardboard sheet, take BROKEN PRUNING SHEARS, use TWEEZERS on the coin, get COINS 1/3 (M).
- Use SPRING on BROKEN PRUNING SHEARS, get PRUNERS.
- Go to the Main Hall.

- Play puzzle, read the note (N).

- Select this option (O).

- Easy solution (P): F, R, F, take the flare, B, B, use the flare, F, F, R, F, R, L, take the scarf, B, B, B, B.
- Use the scarf, F, F, take the mouse, B, B, R, F, R, use the mouse.
- Hard solution (Q): F, R, F, take the flare, B, B, use the flare, F, F, R, F, R, L, F, L, take the scarf, B, B, B, B, B, B.
- Use the scarf, F, F, take the mouse, B, B, R, F, R, use the mouse, F, take the keys.

- B, L, F, use the keys.
- Talk with the person, select this option (R).
- Move the crates (S).
- Take BADMINTON RACKET, move the red leaves (T).
- Use BADMINTON RACKET on the bucket, take PLATE, move the coals (U).
- Use PLATE inside the fireplace, use CANE on the items, get COINS 2/3 and LOCK PART, use OIL on the pump (V).
- Use LOCK PART on the lock (W).
- Easy solution: Follow the instructions on the image (X).
- Hard solution: Follow the instructions on the image (Y).
- Go forward.
- Use PLATE on the door (Z).
- Take COINS 3/3 (A).
- Click on the duck sticker, use COINS on the money receiver (B).

- Easy solution: Follow the instructions on the image (C).
- Hard solution: Follow the instructions on the image (D).

- Take TAPE (E).
- Use MARKER on TAPE, get CASSETTE TAPE.
- Use CASSETTE TAPE on the cassette player, take BROKEN LEAF BLOWER, use PRUNERS on the roses, take SCRAPER (F).

- Use SCRAPER on the moss, take ELEVATOR BUTTON and WIRE BRUSH (G).
- Go to the Spa Complex.
- Use WIRE BRUSH on the pump, get PUMP (H).
- Use PUMP on the wheel, take BATTERY, UV FLASHLIGHT, and INSECTICIDE (I).
- Use BATTERY on BROKEN LEAF BLOWER.
- Go to the Greenhouse.
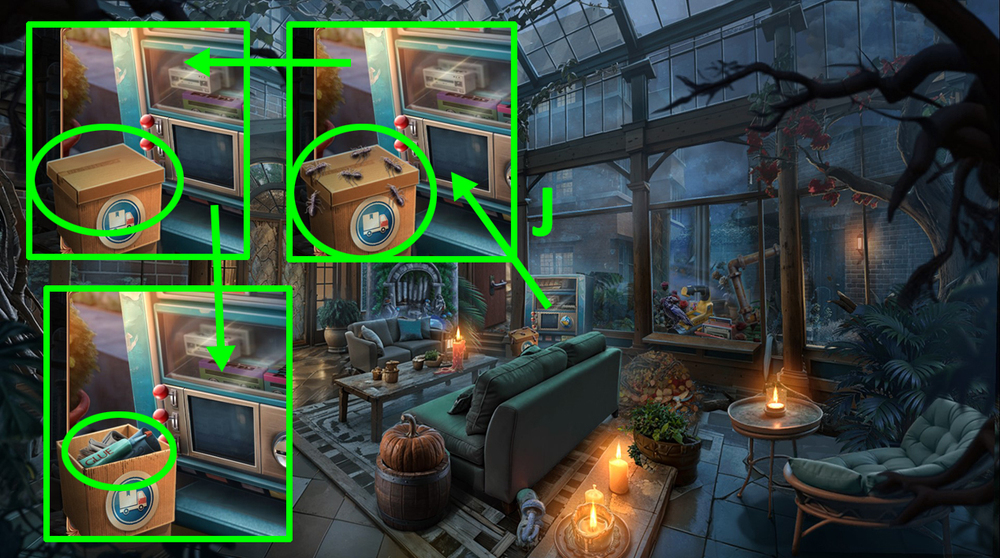
- Use INSECTICIDE on the ants, open the box, take GLUE and LEAF BLOWER TUBE (J).

- Use LEAF BLOWER TUBE on BROKEN LEAF BLOWER, get LEAF BLOWER.
- Use LEAF BLOWER on the leaves, take WATER PUMP, read the note, take MIRROR SHARDS 1/2, RED FILM, and KNITTING NEEDLE (K).
- Use KNITTING NEEDLE on the door, take the key and use it on the keyhole (L).
- Use RED FILM on UV FLASHLIGHT.
- Go forward.
- Use ELEVATOR BUTTON and GLUE on the panel (M).
- Select this option (N).
- Take DRONE AND CONTROLS 1/2, DUCT TAPE, and VINEGAR (O).
- Use VINEGAR on the sink, take BOX PART and MIRROR SHARDS 2/2 (P).
- Move the sheet, use MIRROR SHARDS on the mirror (Q).

- Play puzzle, earn HANDLE (R).
- Use HANDLE on the socket for the handle, take LEVER and MAP PIECE (S).
- Go to the Starlight Dreams Hotel.

- Use DUCT TAPE and MAP PIECE on the torn map (T).
- Solution: Follow the instructions on the image (U).
- Go to the Spa Complex.
- Use WATER PUMP on the hose, move the metal plate under the water, take VIOLET FOIL, use LEVER on the hatch, take 3D PEN (V).
- Use 3D PEN on the hatch, take HAIR TIE, use BOX PART on the puzzle (W).
- Use VIOLET FOIL and HAIR TIE on UV FLASHLIGHT, get UV LIGHT.
- Go to the 12th Floor.

- Use UV LIGHT on the safe, enter the code 482E, take WHEEL 1/2 (X).
- Play puzzle (Y).
- Go forward (Z).
- Use the EMF detector on the background.
- Select this option (A).
- Go to the Office (B).

- Move the curtain (C).
- Open the fridge, take ICE (D).
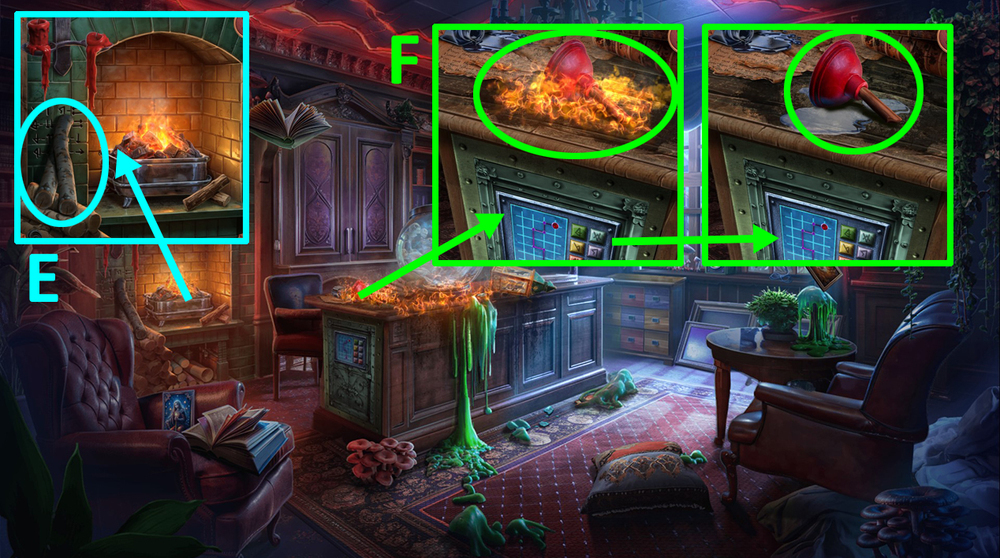
- Move the firewood (E).
- Use ICE on the fire, take PLUNGER (F).
- Use PLUNGER on the tilted glass, take OPENER (G).
- Go back.
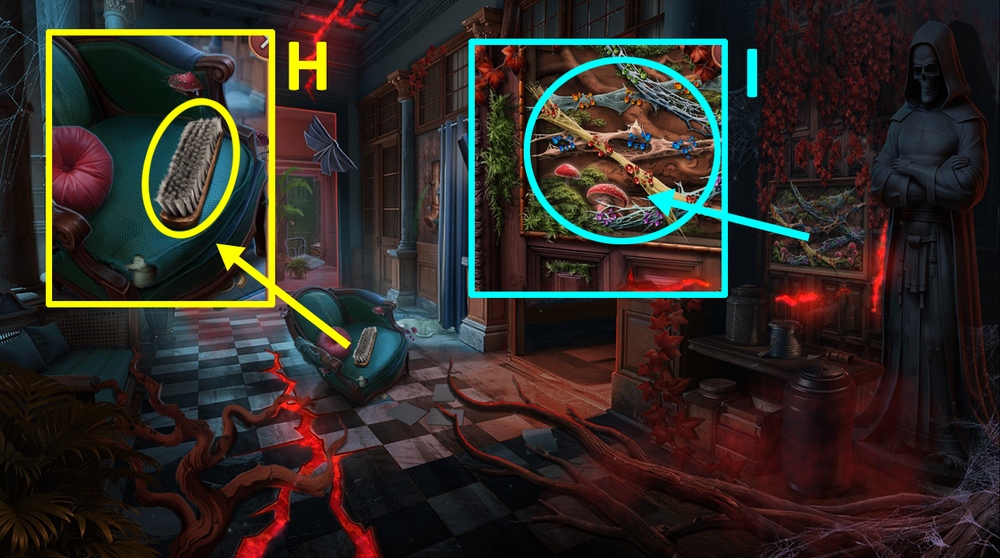
- Take BRUSH (H).
- Use BRUSH on the webs (I).
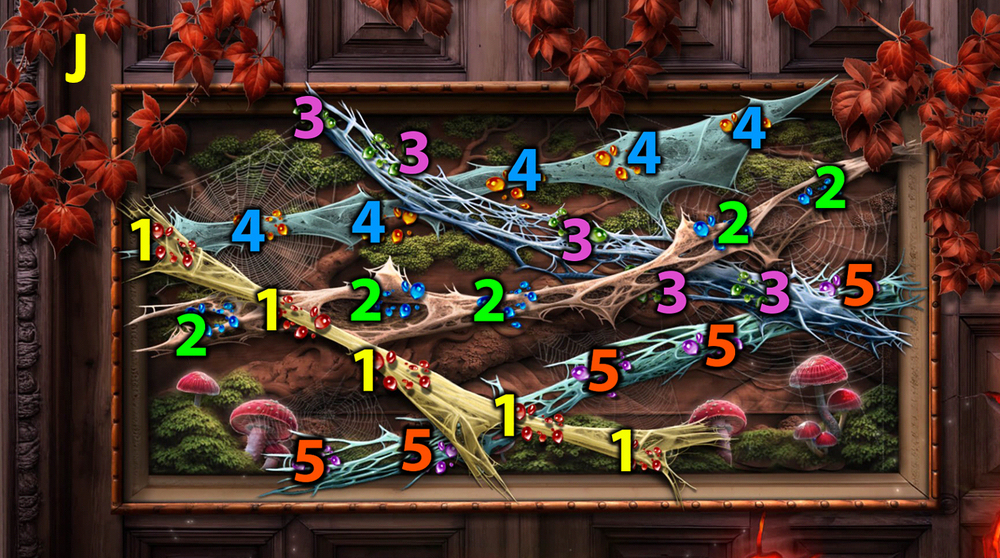
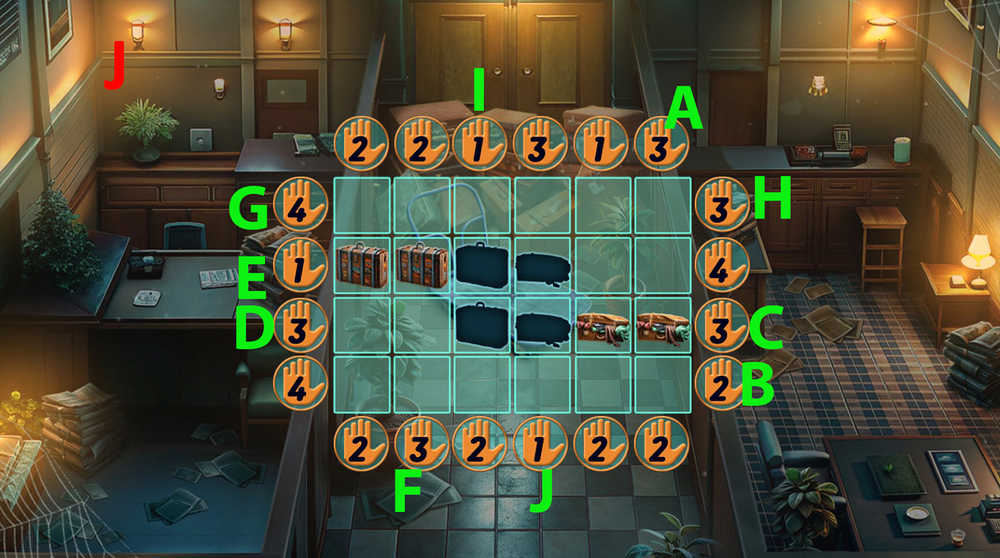
- Easy solution: 1-1-1-1-1, 2-2-2-2-2, 3-3-3-3-3, 4-4-4-4-4, 5-5-5-5-5 (J).
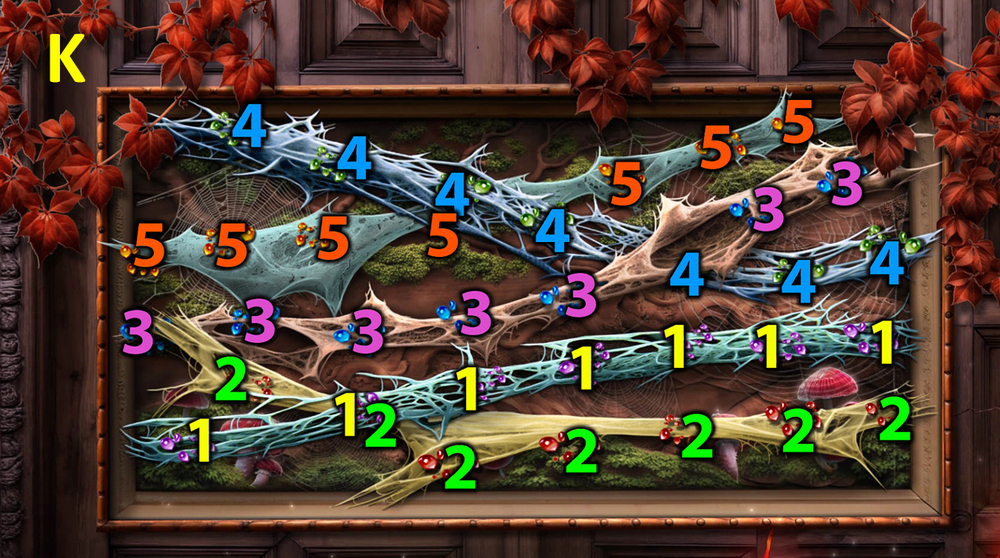
- Hard solution: 1-1-1-1-1-1-1, 2-2-2-2-2-2-2, 3-3-3-3-3-3-3, 4-4-4-4-4-4-4, 5-5-5-5-5-5-5 (K).
- Take SHELL CASING (L).
- Move the curtain, use SHELL CASING on the pipe, take DRONE AND CONTROLS 2/2 (M).
- Go back.

- Use DRONE AND CONTROLS on the clothespin, get CLOTHESPIN (N).
- Go to the GREENHOUSE.
- Use CLOTHESPIN on the wire, use OPENER on the tablet, take FOUNTAIN STATUETTE and HINT (O).
- Go to the Office.

- Use HINT on the drawers (P).
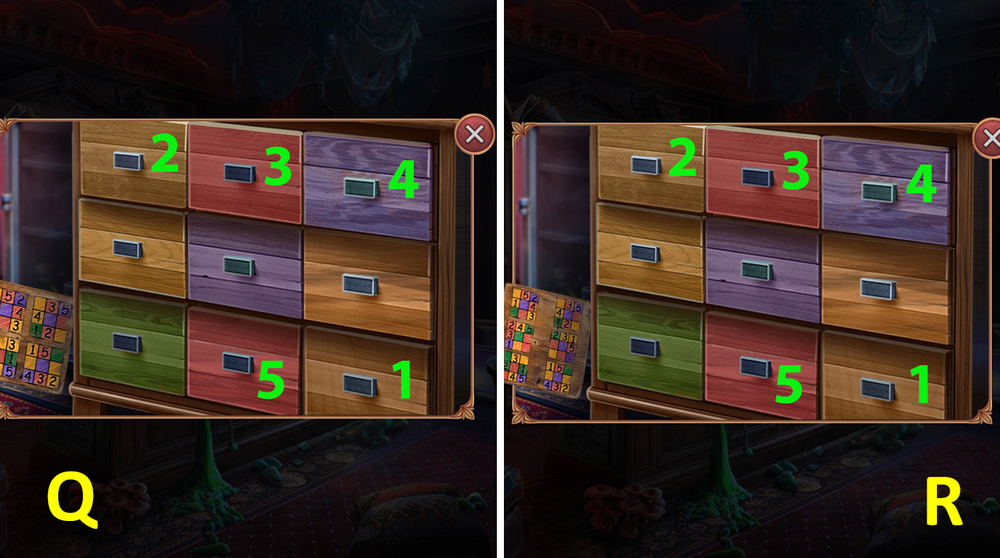
- Easy solution: 1-2-3-4-5 (Q).
- Hard solution: 1-2-3-4-5 (R).
- Take SPEAKER (S).
- Use SPEAKER on the loudspeaker, take FILM (T).
- Go to the Greenhouse.

- Use FOUNTAIN STATUETTE on the fountain (U).
- Easy solution: Random (V).

- Hard solution: Random (W).

- Take MEDAL (X).
- Go to the Nether 12th Floor.
- Use MEDAL on the award, take AWARD (Y).
- Use AWARD on the chair (Z).
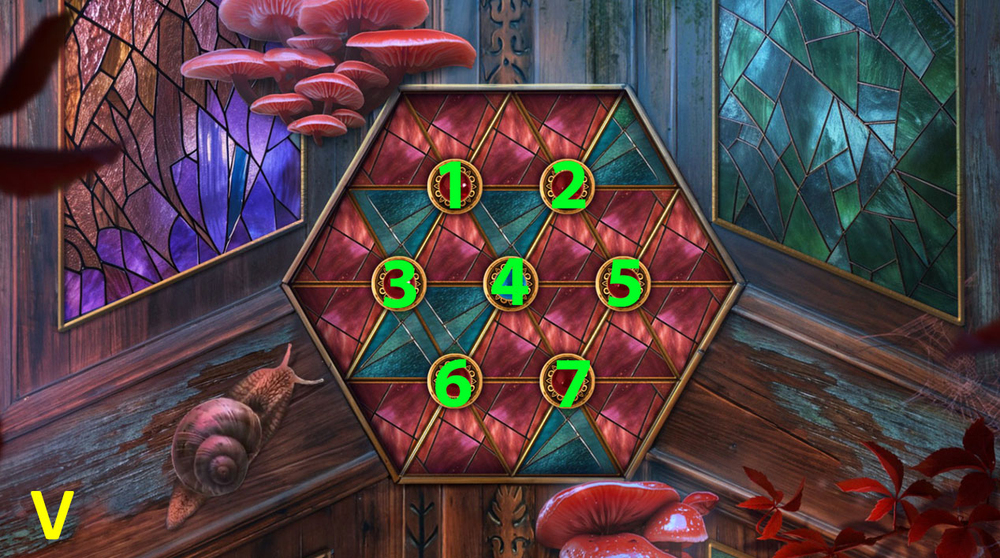
- Solution: 1, 2, 3 (A).
- Take GLASS, examine the camera, use FILM on the camera, get CAMERA (B).
- Go to the Office.

- Use CAMERA on the symbols, get PHOTO (C).
- Use PHOTO on the panel (D).
- Easy solution: 1, 2, 1, 3, 4, 3 (E).
- Hard solution: 1, 2, 1, 3, 4, 2, 1, 5 (F).

- Read the journal (G).
- Go to the Spa Complex.

- Use GLASS on the frame, push the illuminated button, take WHEEL 2/2 (H).
- Go to the Nether 12th Floor.
- Use WHEEL on the trolley (I).
- Solution: A, B, C, D, E, F, G, H, I, J (J).
- Use the EMF detector on the background.
- Take EMPTY HOT-WATER BOTTLE, POUCH OF SALT, GEARS 1/2, and WATER (A).
- Take JIGSAW, use POUCH OF SALT on the burner, click on the kettle, use WATER and EMPTY HOT-WATER BOTTLE on the kettle, take EMPTY KETTLE, click on the button with symbols, examine the photos, take HOOKS (B).
- Use HOOKS on the bag (C).
- Easy solution: Use the pictures as a hint (D).
- Hard solution: Use the pictures as a hint (E).
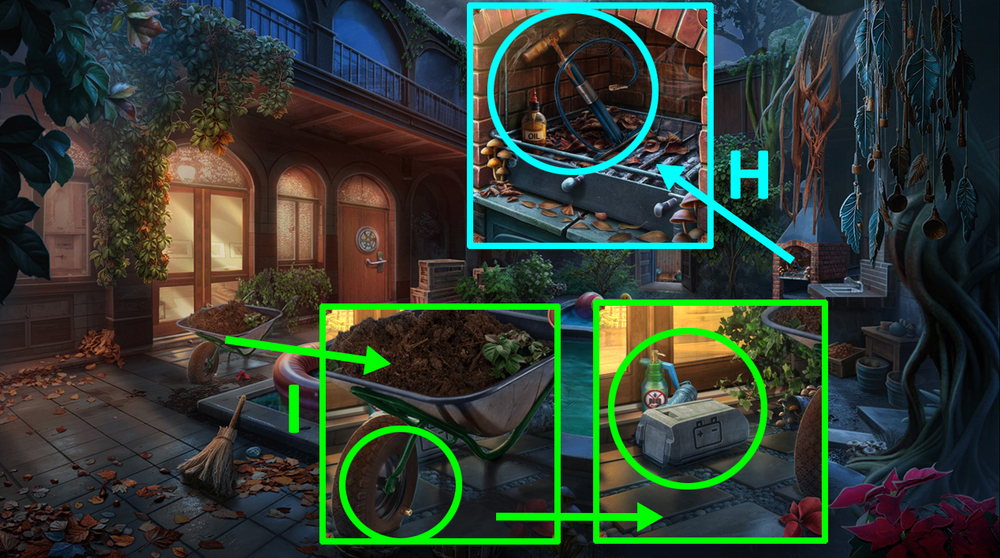
- Take BATTERY, ELECTROLYTE, and PRUNING SHEARS (F).
- Use PRUNING SHEARS on the vines (G).
- Easy solution: Use the picture as a hint (H).
- Hard solution: Use the picture as a hint (I).

- Use ELECTROLYTE on the burner (J).
- Use BATTERY on JIGSAW.
- Go forward (K).
- Read the note, take COMB (L).
- Use COMB on the pile of dust, take PLUNGER (M).
- Go back.
- Use PLUNGER on the glass, take OLIVIA’S AWARD (N).
- Go to Olivia’s Room.
- Use OLIVIA’S AWARD on the shelf (O).
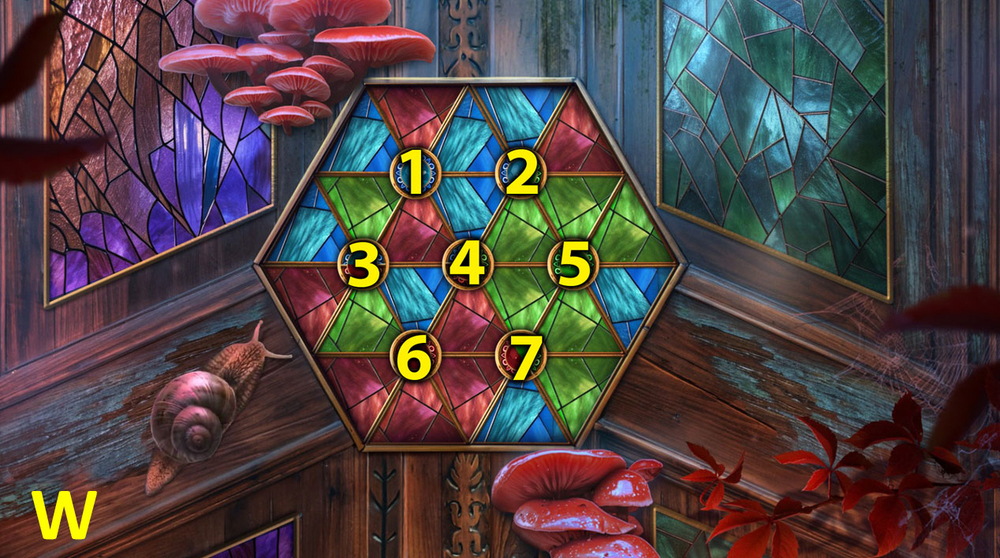
- Easy solution: Click: 1-2, 2-3, 3-4, 5-1, 1-5, 5-6, 6-7, 7-8 (P).

- Hard solution: Click: 1-2, 2-3, 3-4, 5-1, 1-5, 5-6, 6-7, 7-8, 9-1, 1-9, 9-10, 10-11, 11-12 (Q).
- Take TUBE, PHOTOS 1/2, and TUNER (R).
- Use TUNER on the violin (S).
- Easy solution: Use the picture as a hint (T).
- Hard solution: Use the picture as a hint (U).

- Click on the recorder 3 times (V).
- Go back.
- Talk with Carl, select this option (W).
- Go to the Nether Balcony (X).
- Take BROKEN DECODER and POPSOCKET (Y).
- Use POPSOCKET on the drawer, take HANDLE (Z).

- Use HANDLE on the barrel organ, take GLASSES (A).
- Go back.
- Use TUBE on the burner (B).
- Go to the 13th Floor Corridor (C).

- Click on the flowerpot (D).
- Take CHAIN (E).
- Use CHAIN on the broken chain (F).
- Take DUSTER, PHOTOS 2/2, and BLADE, click on the piece of fabric (G).

- Use BLADE on JIGSAW, get JIGSAW.
- Use JIGSAW on the rubble in the corridor (H).
- Use PHOTOS on the wall with pictures (I).

- Play puzzle, earn FLAME AMULET (J).
- Use FLAME AMULET on the fire extinguisher box, take BOTTLE CAP (K).
- Use BOTTLE CAP on the tube squeezer, get PERFUME PUMP, use GLASSES on the floorboard, take CANDLE (L).
- Go to the Nether Balcony.
- Use CANDLE on the metal case, take SMALL KEY (M).
- Use SMALL KEY on the lock, earn PUNCH CARD (N).
- Go to Olivia’s Room.
- Use PERFUME PUMP on the perfume bottle, click on the drawer and enter the code, take SCREWDRIVER (O).
- Go to the 13th Floor Corridor.

- Use SCREWDRIVER on the stool, take STOOL (P).
- Use STOOL on the sparkling bulb (Q).
- Take PIN and COOLER FAUCET (R).
- Use PUNCH CARD on the card reader, take CD PACKAGING, use COOLER FAUCET and EMPTY KETTLE on the cooler, get HOT WATER (S).
- Go to the Nether Balcony.
- Use CD PACKAGING on the cart, take PARAFFIN WAX (T).
- Use PARAFFIN WAX on the bag’s zipper, take DECODER PART (U).
- Use DECODER PART on BROKEN DECODER, earn DECODER.
- Use DECODER on the book (V).
- Easy solution: Use the picture as a hint (W).
- Hard solution: Use the picture as a hint (X).
- Click on the picture of the hotel and the boy, take the note (Y).
- Go back.
- Use HOT WATER on the burner (Z).
- Solution: Click: 5, 3, A, 9, 2, A, 4, 9, A, 7, 3, A, 2, 7, A, 8, 10, A, 6, 11, A, 1 (A).

- Get ACID SOLUTION, use ACID SOLUTION on the chain, take BROKEN TOGGLE SWITCH, STAFF KEY FOB, and GEARS 2/2 (B).
- Go to the 13th Floor Corridor.
- Use GEARS on the mechanism (C).
- Easy solution: Use the picture as a hint (D).
- Hard solution: Use the picture as a hint (E).
- Take RUBBER GLOVE (F).
- Use RUBBER GLOVE on the wires, read the note, take BATTERIES (G).
- Play puzzle, earn AMULET (H).
- Go back.
- Use AMULET on Olivia (I).
- Select this option (J).
- Use the EMF detector on the background.
- See the painted wall (K).
- Take COMB, click on the leaf (L).
- Check the pool table (M).
- Use DUSTER on the web, take PALETTE KNIFE, use STAFF KEY FOB on the access panel, take TRIANGLE (N).
- Use PALETTE KNIFE on the painted wall, use COMB on the lock (O).
- Use TRIANGLE on the billiard table (P).
- Go forward (Q).
- Select this option (R).
- Use PIN on the cabinet doors’ hinge, take KEY (S).
- Take BROKEN TASER and BOOKS 1/2 (T).
- Use KEY on the door (U).
- Play puzzle, earn GLASS CUTTER (V).
- Click on the painting, use GLASS CUTTER on the glass, take BOOKS 2/2 (W).
- Use BATTERIES on BROKEN TASER.
- Go back.
- Use BOOKS on the table, take SELFIE STICK (X).
- Use SELFIE STICK on the nearest pool table pocket (Y).
- Easy solution: Play the game (Z).

- Hard solution: Play the game (A).
- Take PUZZLE PIECE (B).
- Go to the Nether Main Hall.
- Use PUZZLE PIECE on the puzzle, click on the pieces to place them in their proper places, take COINS 1/3 and BATTERY COVER (C).
- Use BATTERY COVER on BROKEN TASER, earn TASER and BATTERIES.
- Use TASER on the access panel (D).
- Go forward (E).

- Select this option (F).

- Take CARABINER and CLEANSING FOAM, use BROKEN TOGGLE SWITCH and RUBBER GLOVE on the sparkling panel (G).
- Easy solution: Use the picture as a hint (H).
- Hard solution: Use the picture as a hint (I).
- Take COINS 2/3, click on the monitor (J).
- Take COINS 3/3 (K).
- Go to the Hotel’s Main Hall.

- Use COINS on the vending machine (L).

- Easy solution: Set steps as shown in the picture and then press A (M).

- Hard solution: Set steps as shown in the picture and then press A (N).
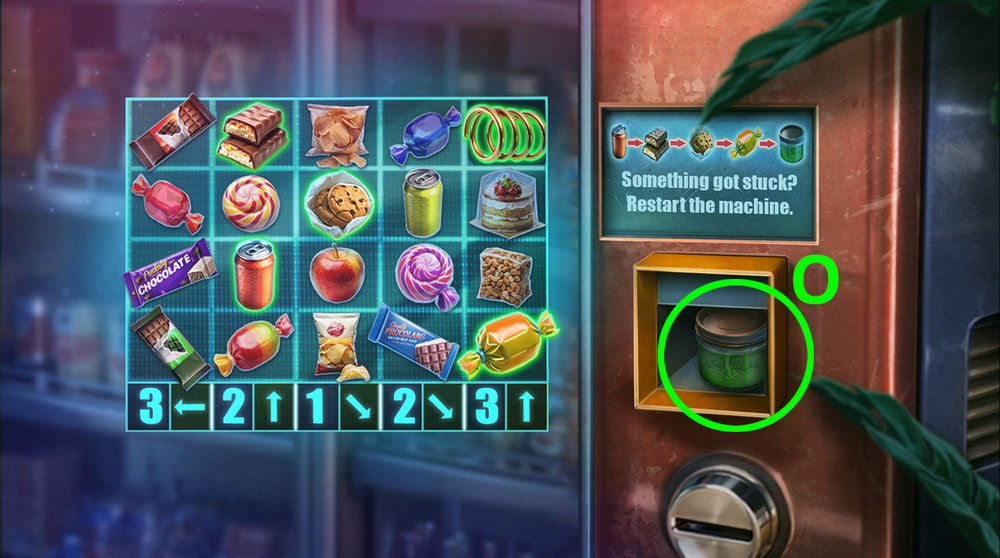
- Take SLIME (O).
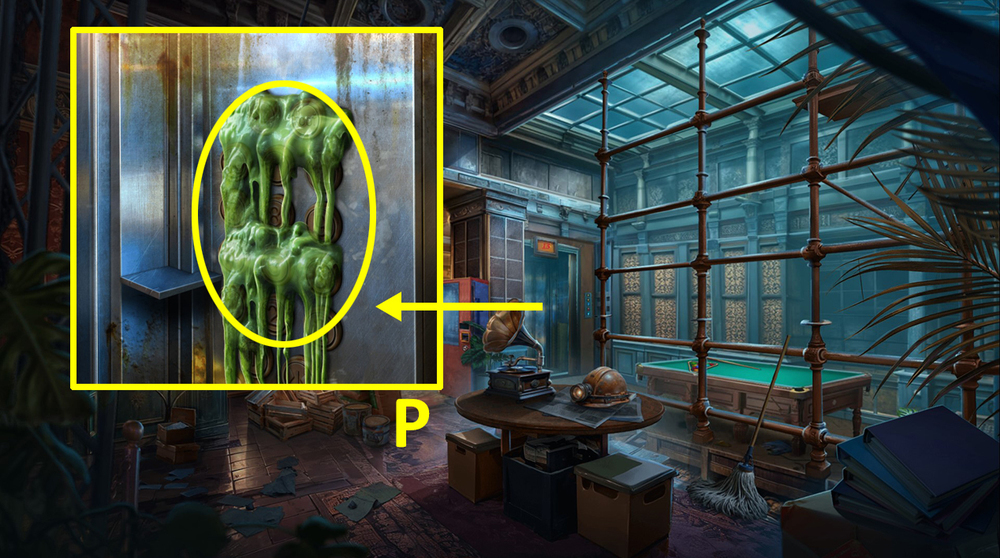
- Use CLEANSING FOAM on the green slime (P).
- Go to the Nether Archive.
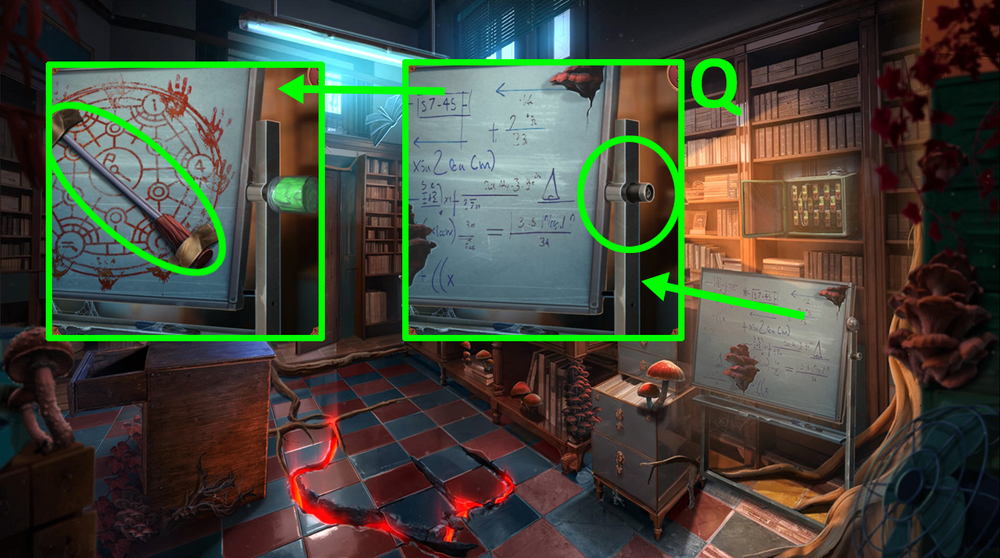
- Use SLIME on the writing board, take CONTROL PIN (Q).
- Go back.
- Use CONTROL PIN on the game, read the note, take LOCK PICK and BALL (R).
- Play puzzle, earn CODE PART (S).
- Go to the Nether Archive.
- Use CODE PART on the monitor, read the note (T).

- Use BALL on the wind chime (U).
- Easy solution: Follow the instructions (V).
- Hard solution: Follow the instructions (W).
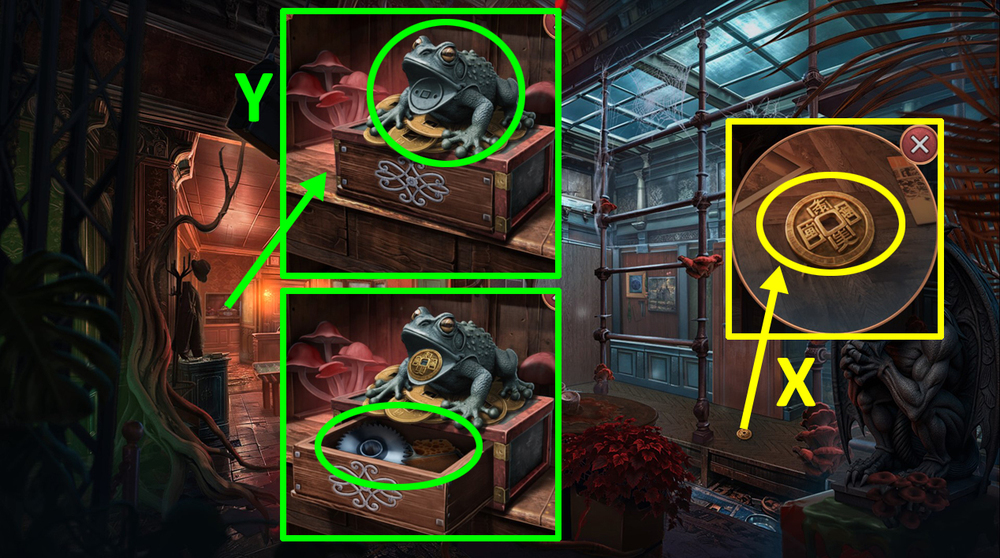
- Take ANTIQUE COIN (X).
- Use ANTIQUE COIN on the frog, take SAW BLADE, GUN, and SPONGE (Y).
- Go back.
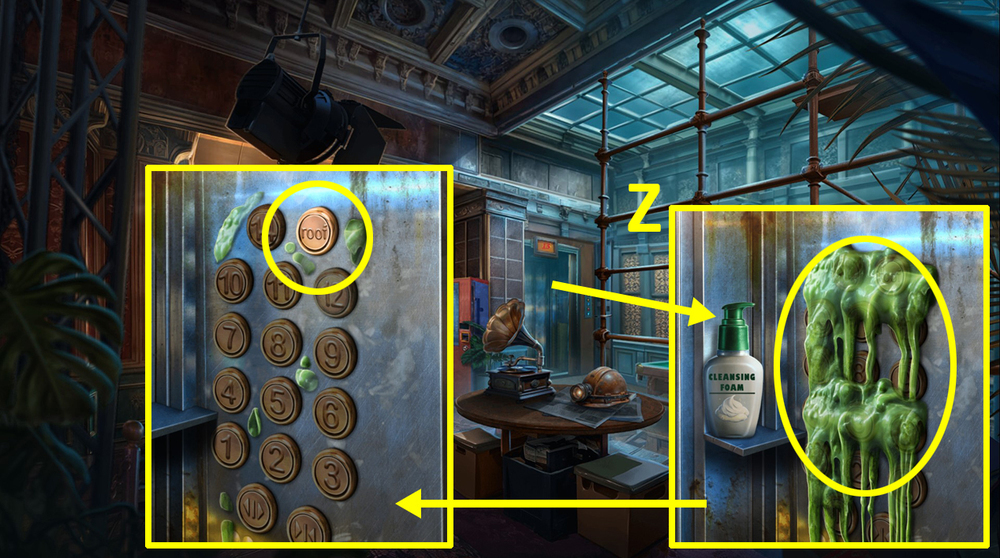
- Use SPONGE on the green slime, press the roof button (Z).
- Select this option (A).
- Take TAPE RECORDER, use CARABINER on the mechanism (B).
- Use GUN on the barrel, take SPEAKER, use LOCK PICK and SAW BLADE on the workbench (C).

- Click on the plant by the bike (D).
- Use BATTERIES and SPEAKER on TAPE RECORDER.
- Easy solution: Use the picture as a hint (E).

- Hard solution: Use the picture as a hint (F).
- Earn TAPE RECORDER.
- Use TAPE RECORDER on the bird, read the notes, take RULER (G).
- Use RULER on the workbench, get LOCK PICKS (H).
- Use LOCK PICKS on the bag (I).
- Solution: Click: 1, 2, 3, 4, 5, 6, 7, 8, 9, 10, 11, 12, 13, 14, 15, 16 (J).
- Take CUTTERS (K).
- Use CUTTERS on the chain, get CHAIN (L).
- Use CHAIN on the mechanism (M).
- Easy solution: Click: 1-2, 1-2, 3-4, 5-6, 4-3 (N).
- Hard solution: Click: 1-2, 3-4, 2-1, 2-1, 3-4 (O).
- Talk with the character.

- Take WIRES 1/3, INSTRUCTION, and CUTTERS (A).
- Use CUTTERS on the wires, take ANTENNA and QUEEN, read the label (B).
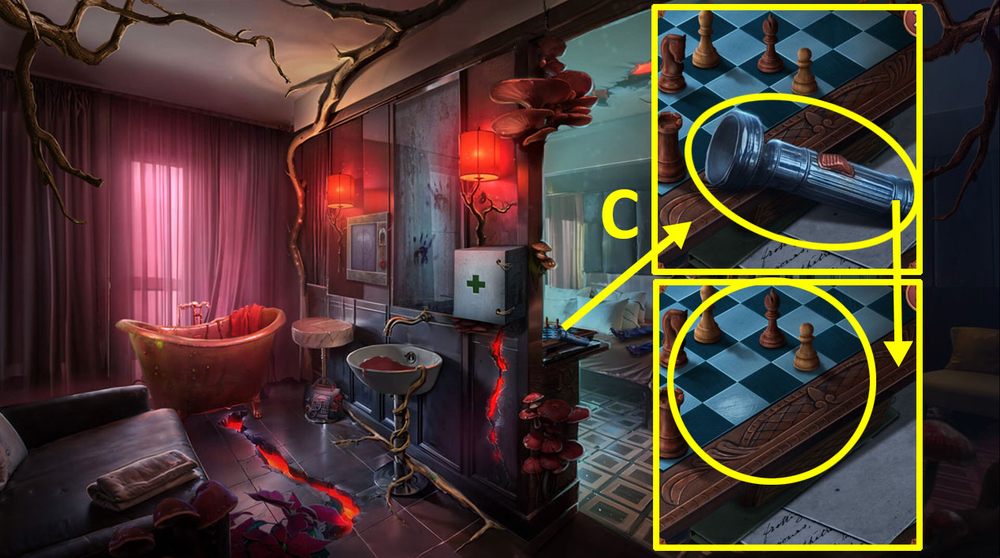
- Take OLD FLASHLIGHT, use INSTRUCTION and QUEEN on the chessboard (C).

- Easy solution: Follow the instructions in the image (D).
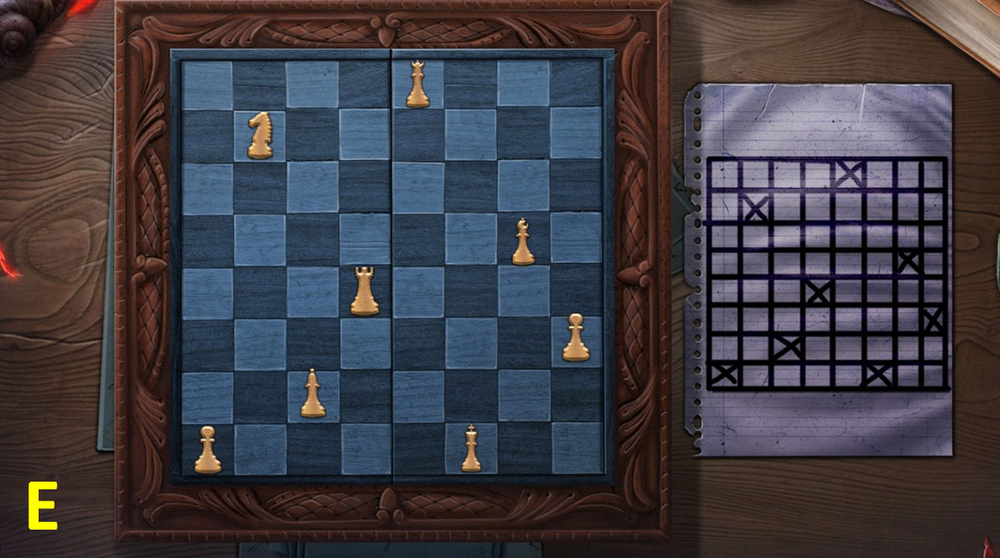
- Hard solution: Follow the instructions in the image (E).
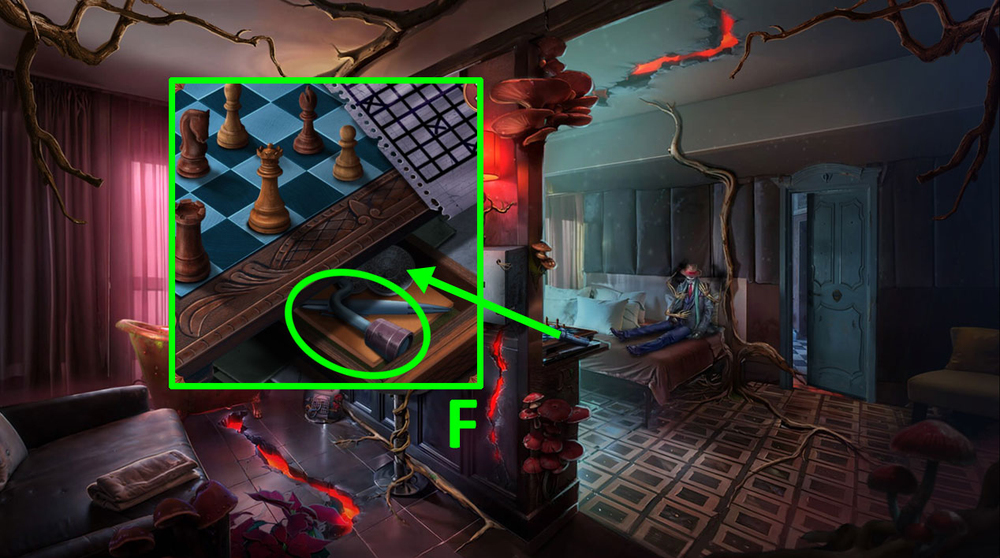
- Take HANDLE (F).
- Examine OLD FLASHLIGHT, open it.
- Go to the Nether Hallway.
- Take BOTTLE CAPS 1/2, WIRES 2/3 (G).
- Use HANDLE on the music box, take SCREWDRIVER (H).
- Use SCREWDRIVER on the bulb, get SCREW, take WIRES 3/3 (I).
- Go back.
- Use SCREW and SCREWDRIVER on the closed section, take DUCT TAPE (J).

- Use WIRES and DUCT TAPE on the broken panel, click on the red button, take FATHER’S RING, read the book, take RITUAL GUIDE (K).
- Select this option, take LOCK PICKS (L).
- Go to the Nether Hallway.
- Use LOCK PICKS on the shelf (M).

- Easy solution: Click 1-1, 2-2, 3-3, 4-4, 5-5, 6-6, 7-7 (N).
- Hard solution: Click 1-1, 2-2, 3-3, 4-4, 5-5, 6-6, 7-7, 8-8, 9-9 (O).

- Take BATTERIES (P).
- Use BATTERIES on OLD FLASHLIGHT, get OLD FLASHLIGHT.
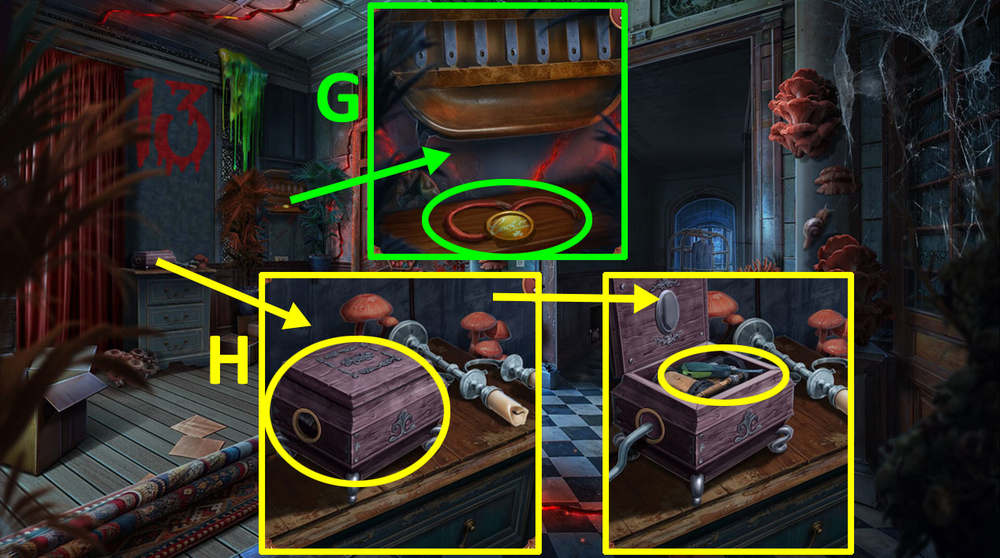
- Use OLD FLASHLIGHT on the mouse, take KEY CARD, examine the hole in the wall, use ANTENNA on it, take PIPETTE (Q).
- Go back.
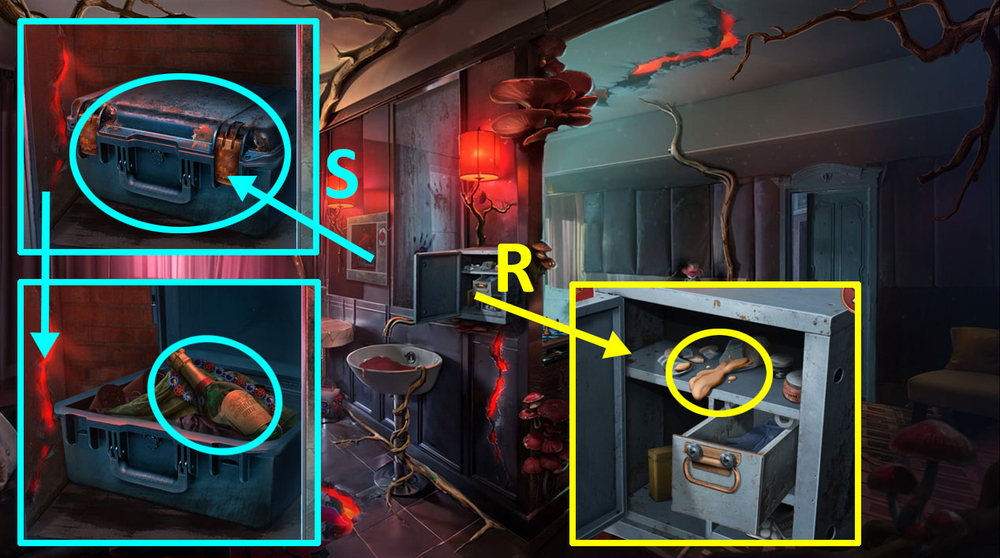
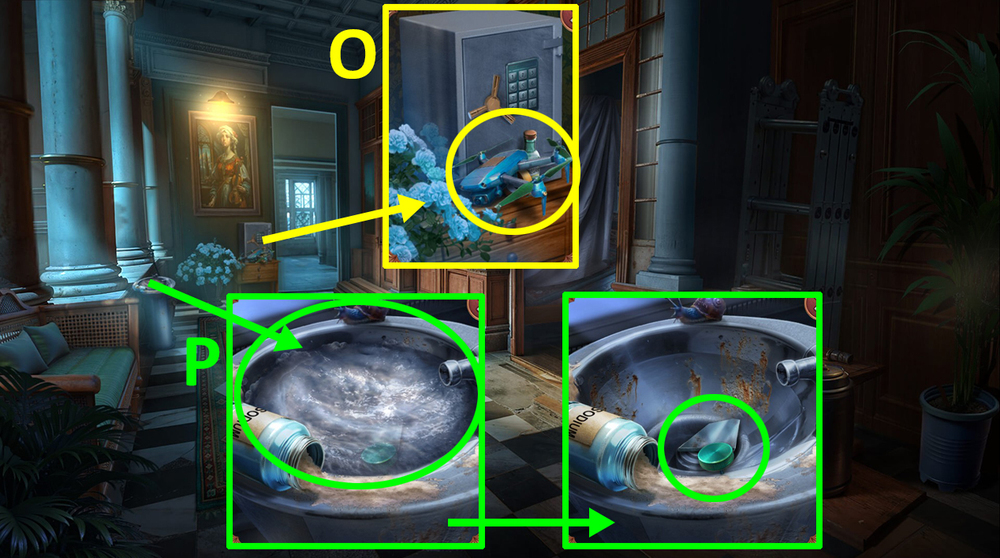
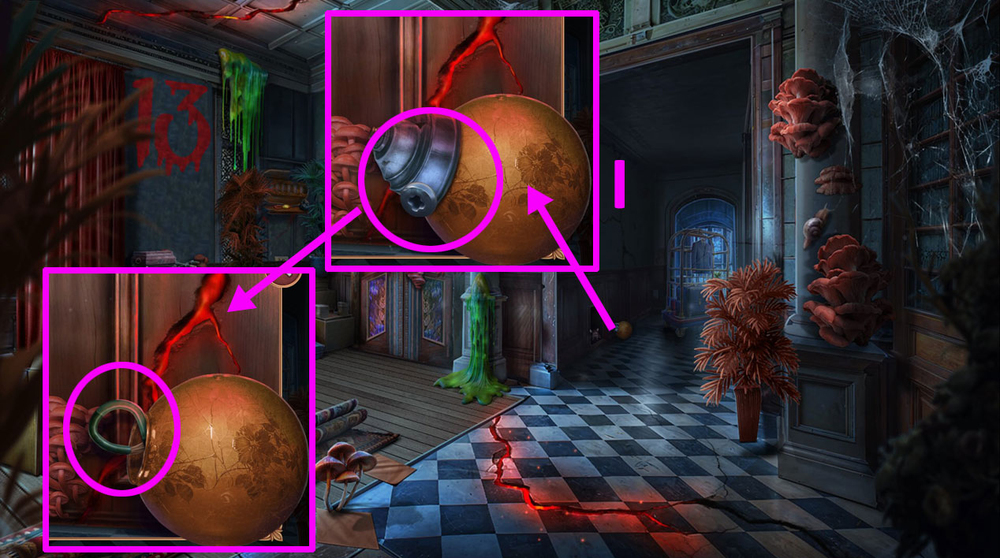
- Use PIPETTE on the liquid, get RUST REMOVER (R).
- Use RUST REMOVER on CASE, take CHAMPAGNE and LOCK PART (S).

- Use LOCK PART on the purse (T).
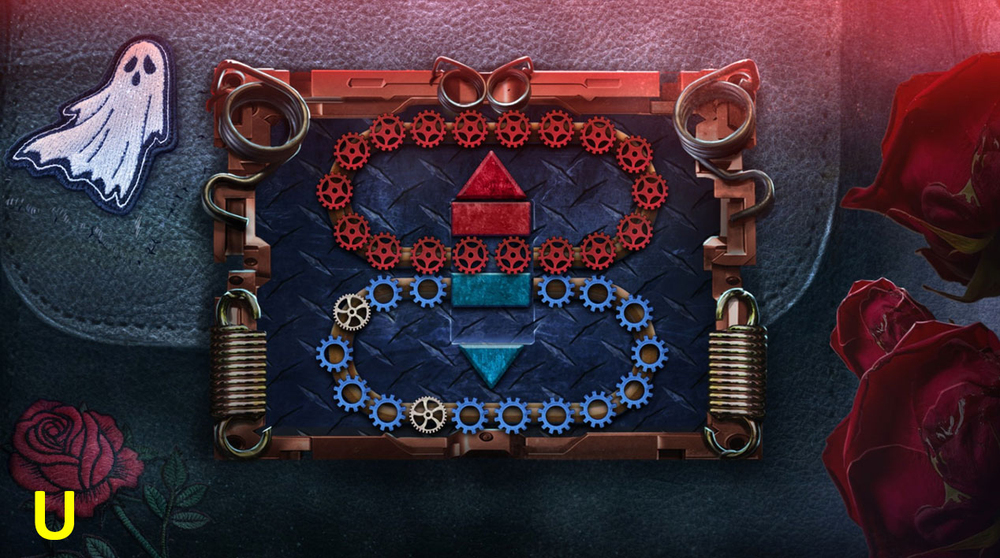
- Easy solution: Follow the instructions in the image (U).

- Hard solution: Follow the instructions in the image (V).
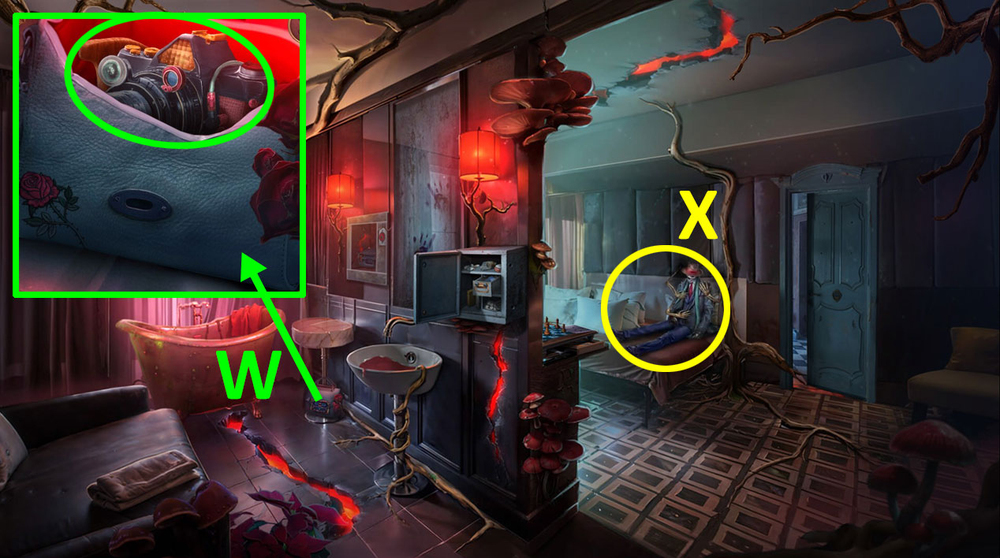
- Take DETECTIVE’S CAMERA (W).
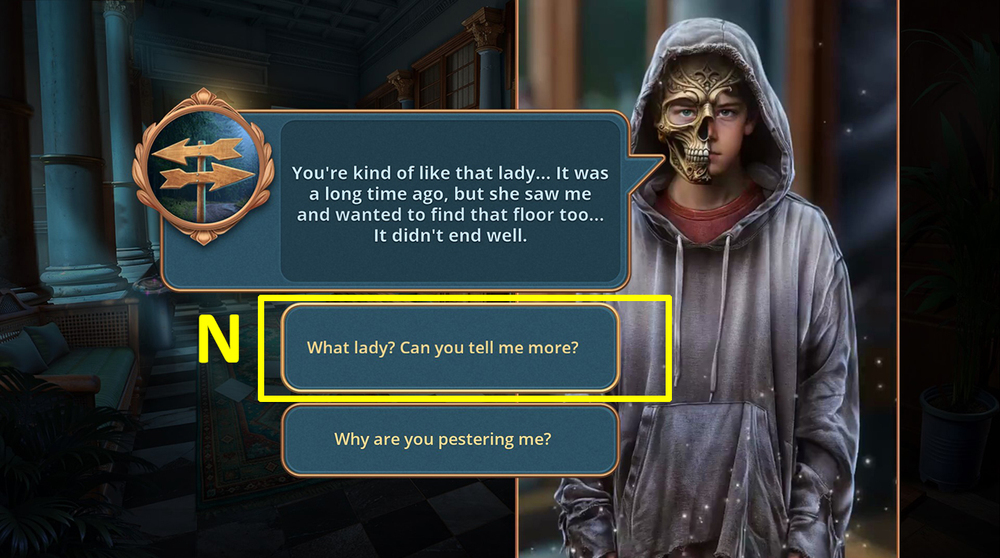
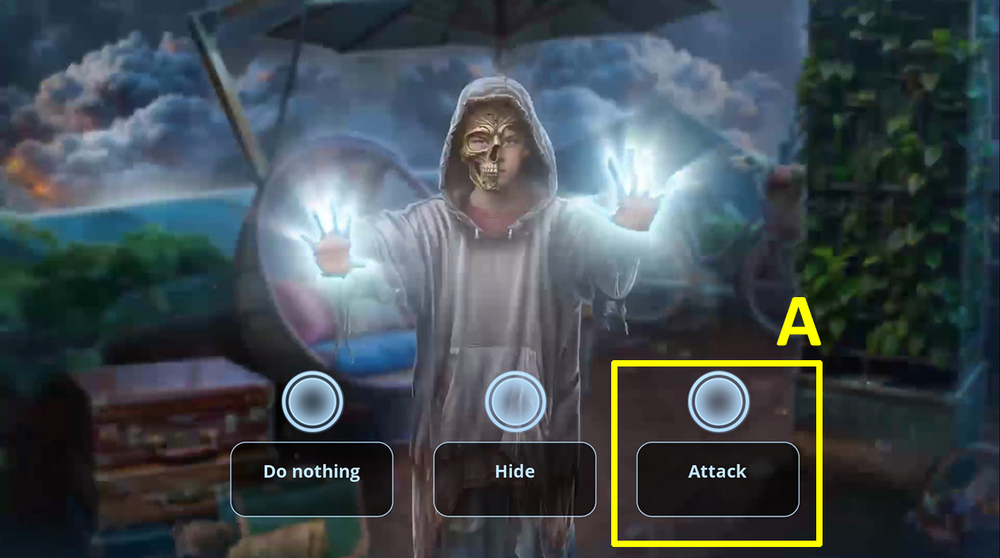
- Use DETECTIVE’S CAMERA on the character (X).

- Use CHAMPAGNE on the trolley (Y).
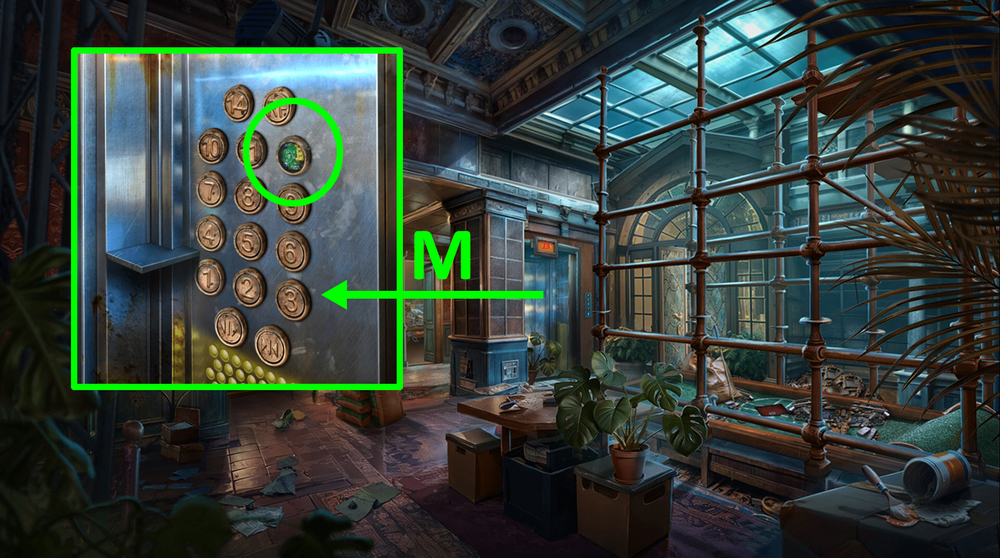
- Press the floor 2 button (Z).
- Select this option (A).
- Move the plate (B).
- Take GHOST FIGURINE and GLASS AMULET (C).
- Use GLASS AMULET on the panel (D).
- Go back.
- Take CODE (E).
- Use KEY CARD and CODE on the right computer (F).
- Solution: Follow the instructions in the image (G).
- Read the text (H).

- Take POWDER (I).
- Go to the Restaurant.
- Use POWDER on the pin pad, enter 2685, then check (J).
- Play puzzle, earn RUBBER GLOVES (K).
- Use RUBBER GLOVES on the broken panel (L).
- Easy solution: Follow the instructions in the image (M).
- Hard solution: Follow the instructions in the image (N).
- Move the wire (O).
- Go forward.
- Select this option (P).
- Go to the Study Room.
- Take SCOOP NET (Q).
- Move the paper, take OLD PUMP and BOOKS 1/3 (R).
- Use SCOOP NET on the fish tank, get WOODEN KEY (S).
- Use WOODEN KEY on the keyhole, take WOLF’S HEAD (T).
- Go back.
- Move the blanket (U).
- Take BEADS, use CHAMPAGNE on the mirror (V).

- Use BEADS on the broken chain ends, take SKELETON FIGURINE (W).
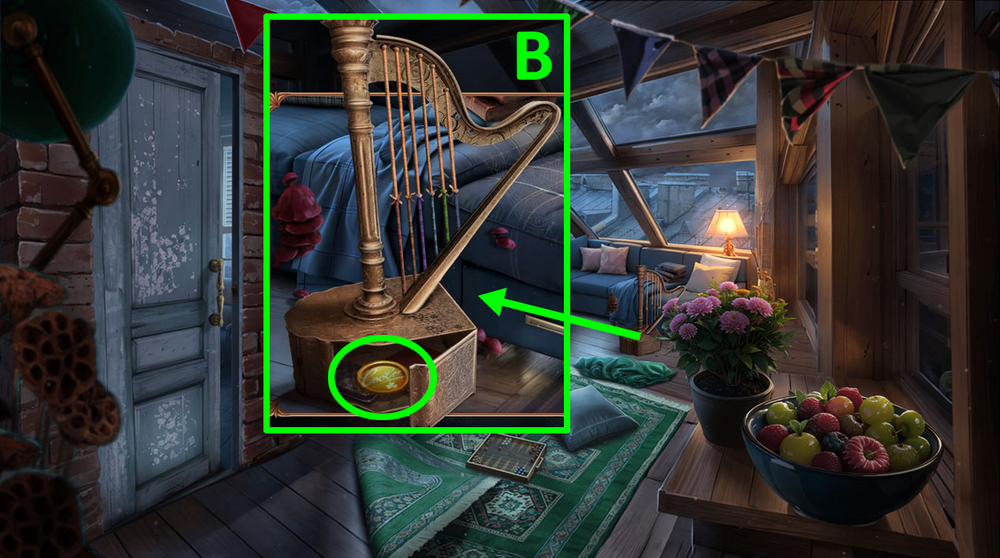
- Take EXTENSION CORD, use GHOST FIGURINE and SKELETON FIGURINE on the table, take STRING (X).
- Use STRING on the harp (Y).
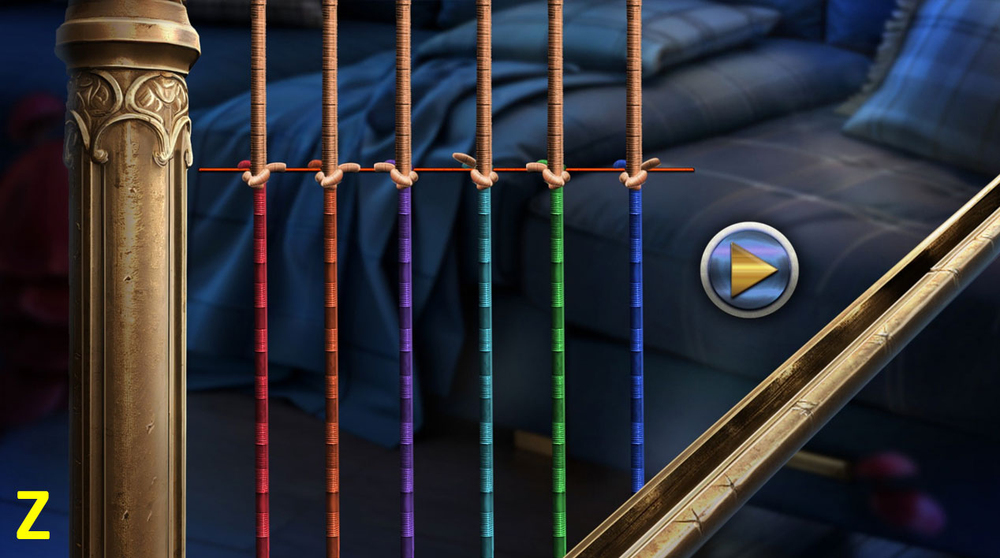
- Easy solution: Follow the instructions in the image (Z).
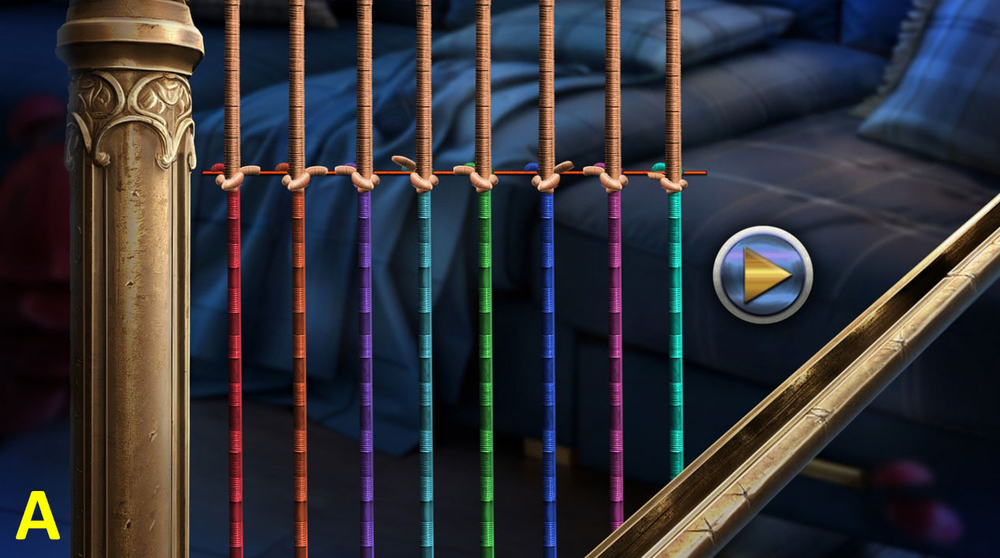
- Hard solution: Follow the instructions in the image (A).
- Take BOTTLE CAPS 2/2 (B).
- Go back.

- Use BOTTLE CAPS on the puzzle (C).

- Easy solution: Click 1, 2, 3, 4, 5, 6, 7, 2, 4, 3, 3, 8 (D).
- Hard solution: Click 1, 2, 3, 4, 5, 6, 7, 8, 9, 10, 2, 11, 10, 9, 6, 11, 9, 10, 12, 11 (E).
- Take ANTIQUE KNIFE (F).
- Use ANTIQUE KNIFE on the net, take HANDKERCHIEF (G).
- Go to the Lounge.
- Use HANDKERCHIEF on the mirror (H).
- Go to the Nether Lounge.
- Select this option (I).

- Use the EMF detector on the background.
- Use WOLF’S HEAD on the wall, take PUMP MOTOR (J).
- Use PUMP MOTOR on OLD PUMP, get WATER PUMP.
- Go to the Study Room.
- Use WATER PUMP on the fish tank, click on it, take METAL FEATHER (K).
- Use METAL FEATHER on the owl (L).

- Easy solution: Follow the instructions in the image (M).

- Hard solution: Follow the instructions in the image (N).
- Take BOOKS 2/3 and DEODORANT (O).
- Go to the Restaurant.
- Use DEODORANT on the wasps, take SCROLL (P).
- Go to the Study Room.
- Use SCROLL on the mount, take BOOKS 3/3 (Q).
- Use BOOKS on the shelf (R).
- Solution: Arrange like in the image and click A (S).

- Read the note, take CARL’S FAVORITE TOY (T).
- Go to the Nether Lounge.

- Use EXTENSION CORD on the vacuum cleaner (U).
- Use KEY CARD on the panel (V).

- Play puzzle, earn HOSE WITH NOZZLE (W).
- Use HOSE WITH NOZZLE on the vacuum cleaner, take GLUE (X).
- Peel off the wallpaper, take CLOCK HANDS 1/2 and ANTLER (Y).
- Use GLUE and ANTLER on the deer head, take RITUAL COMPONENTS 1/3 and ROSE AMULET (Z).
- Go to the Main Hall.
- Examine the box, use ROSE AMULET on it, take CORK and CLOCK HANDS 2/2 (A).
- Use CLOCK HANDS on the clock (B).
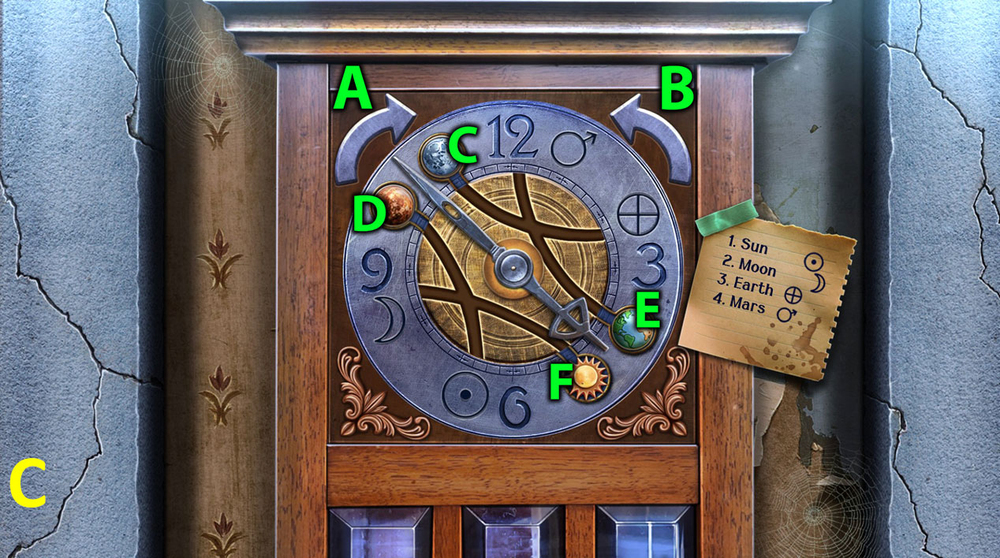
- Easy solution: Click B, E, B, B, C, D, B, B, F (C).

- Hard solution: Click B, E, F, D, C, A, A, H, A, A, G (D).

- Take VALVES 1/3 and BELT (E).
- Go to the Nether Lounge.
- Use CORK and BELT on the burst pipe, take DRY MARKER (F).
- Play puzzle, earn TROWEL (G).
- Go back.
- Use TROWEL on the flowerpot, take BROOCH (H).
- Use BROOCH on the drawer (I).
- Easy solution: Follow the instructions in the image (J).
- Hard solution: Follow the instructions in the image (K).
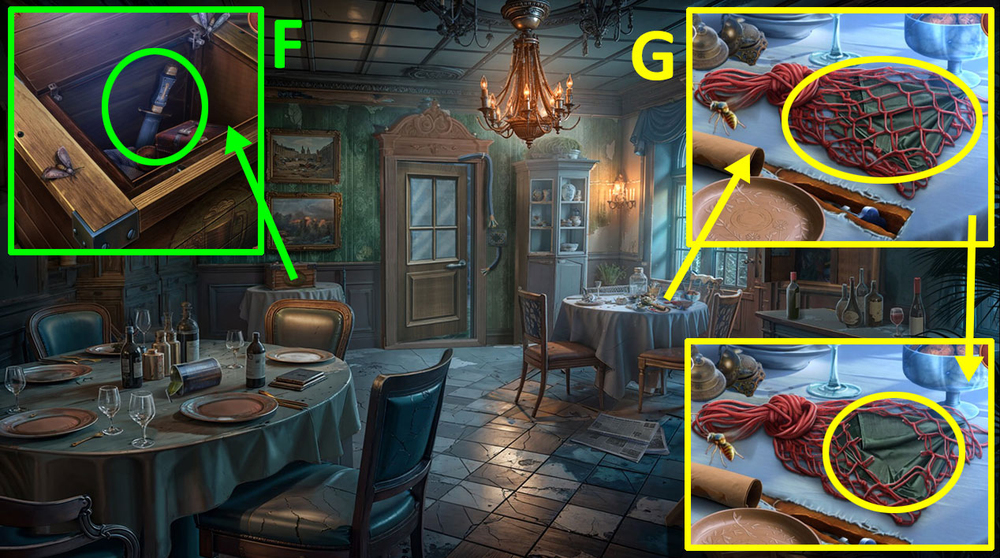
- Take RITUAL COMPONENTS 2/3, STAINED GLASS SHARD, and TIE CLIP (L).
- Go back.

- Use TIE CLIP on the crack on the table, get VALVES 2/3 (M).
- Play puzzle, earn PHOTO (N).
- Go back.
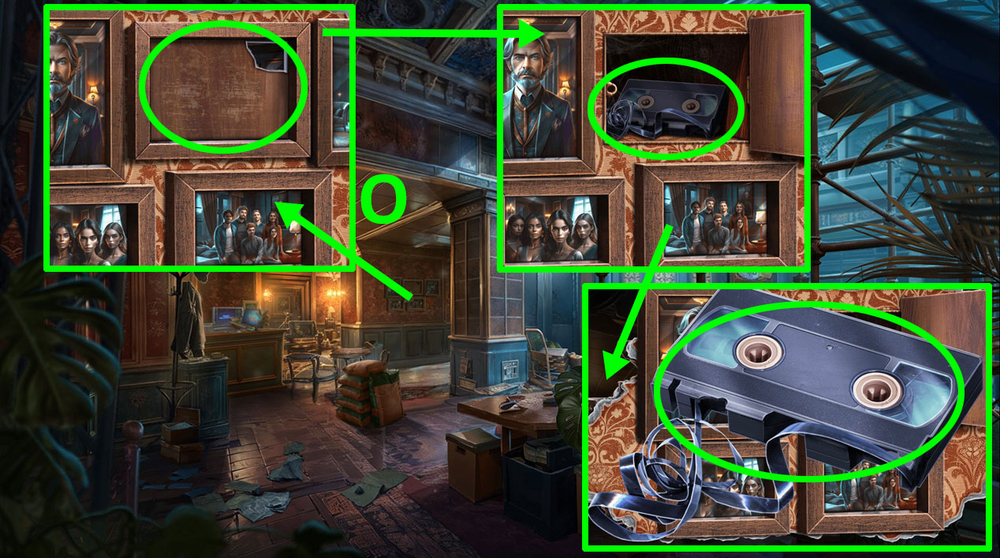
- Use PHOTO on the frame, examine the VHS, use DRY MARKER on it, get VIDEOTAPE (O).

- Use VIDEOTAPE on the video player, take LIGHTER and VALVES 3/3 (P).
- Go to the Nether Lounge.
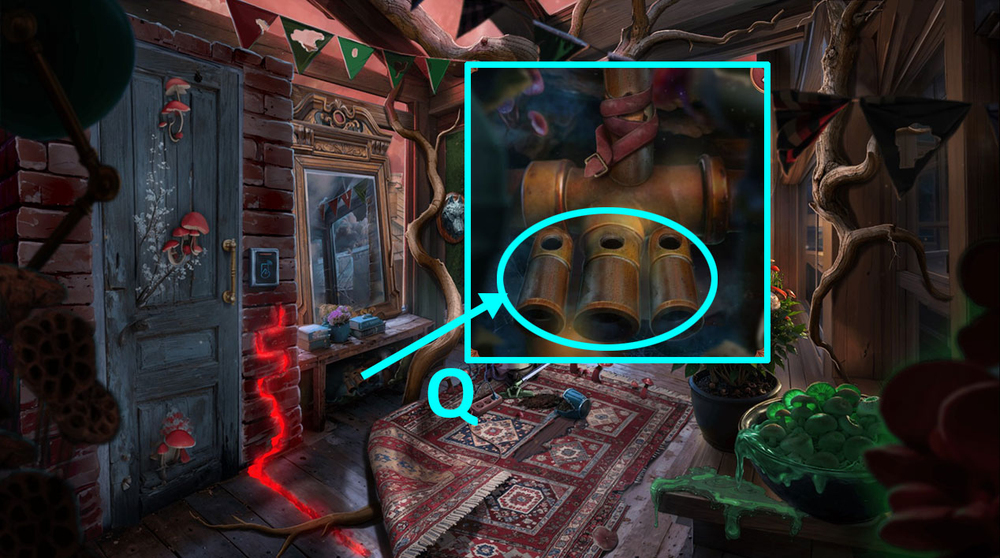
- Use VALVES on the pipe (Q).
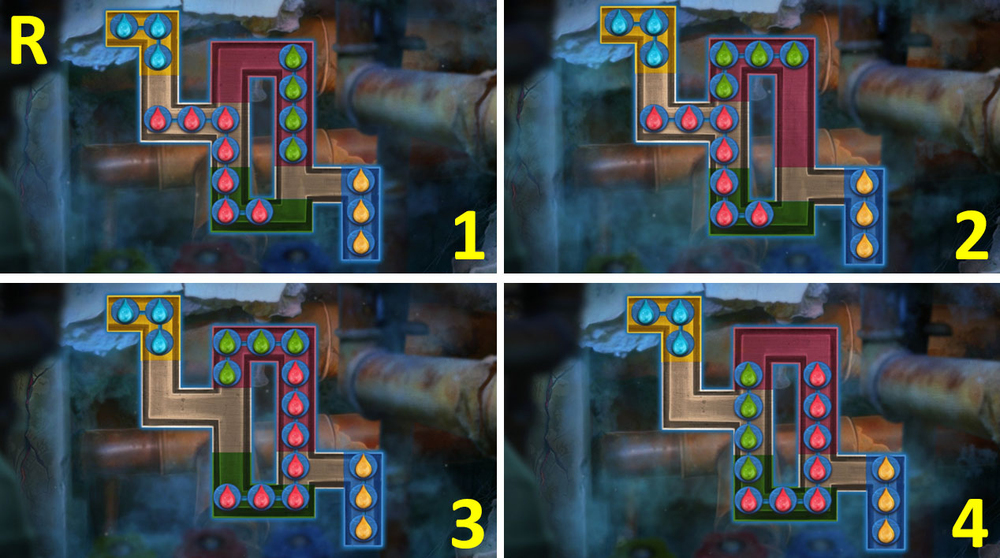
- Solution: Follow the instructions in the image (R).
- Solution 5-8 (R).
- Solution 9-12 (R).
- Solution 13-16 (R).

- Solution 17-19 (R).
- Get RITUAL COMPONENTS 3/3.

- Select this option (S).

- Use the EMF detector on the background.
- Use LIGHTER and STAINED GLASS SHARD on the candles, get STICKY STAINED GLASS (T).
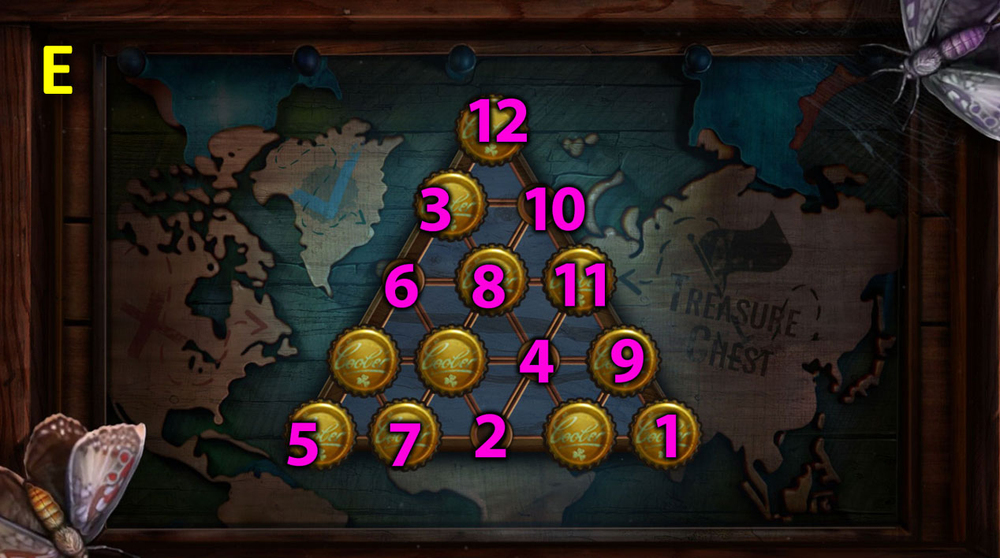
- Use STICKY STAINED GLASS on the puzzle (U).
- Easy solution: Click 7, 7, 4, 4, 4, 4, 6, 1, 1, 4, 2, 2, 2, 2, 4, 4, 4, 4, 4, 1, 1 (V).
- Hard solution: Click 5, 5, 5, 1, 1, 2, 2, 2, 1, 2, 2, 2, 1, 1, 1, 4, 4, 6, 4, 4, 4, 4, 3, 6, 1, 1, 1, 1, 3, 3, 6, 6, 3, 7, 6, 6, 6, 3, 3, 7, 7, 7, 7, 7 (W).
- Go forward.
- Take GEAR (X).
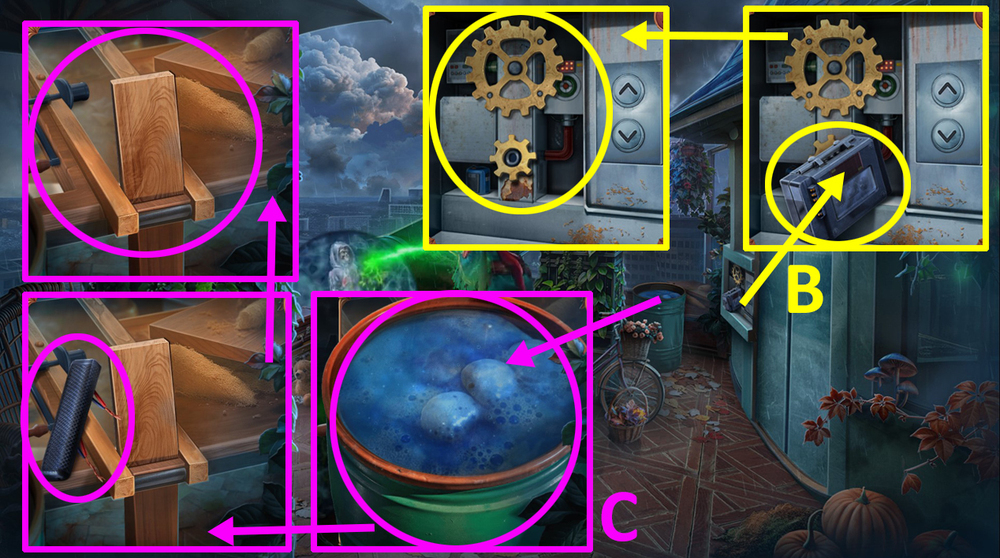
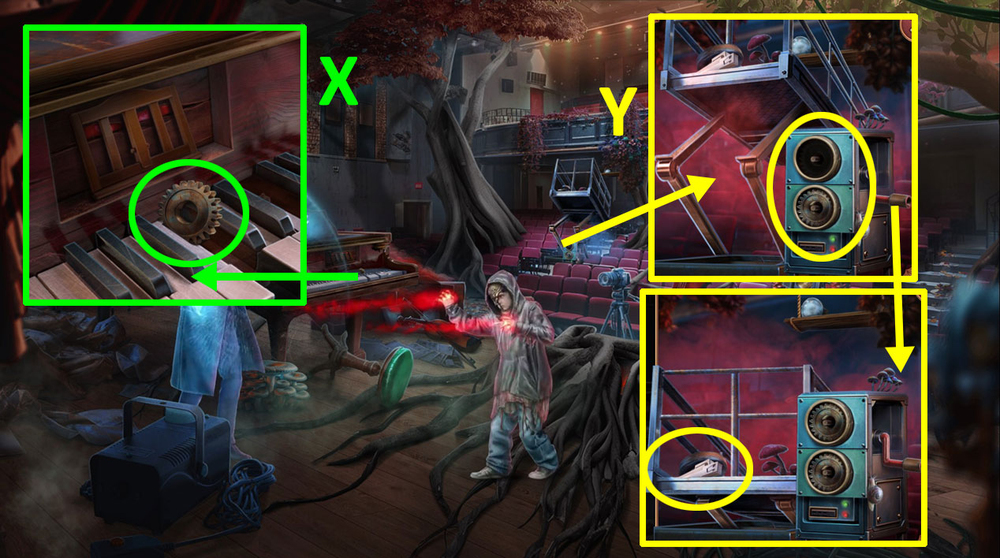
- Use GEAR on the control box, take WHEEL and KEYS (Y).
- Use KEYS on the piano (Z).
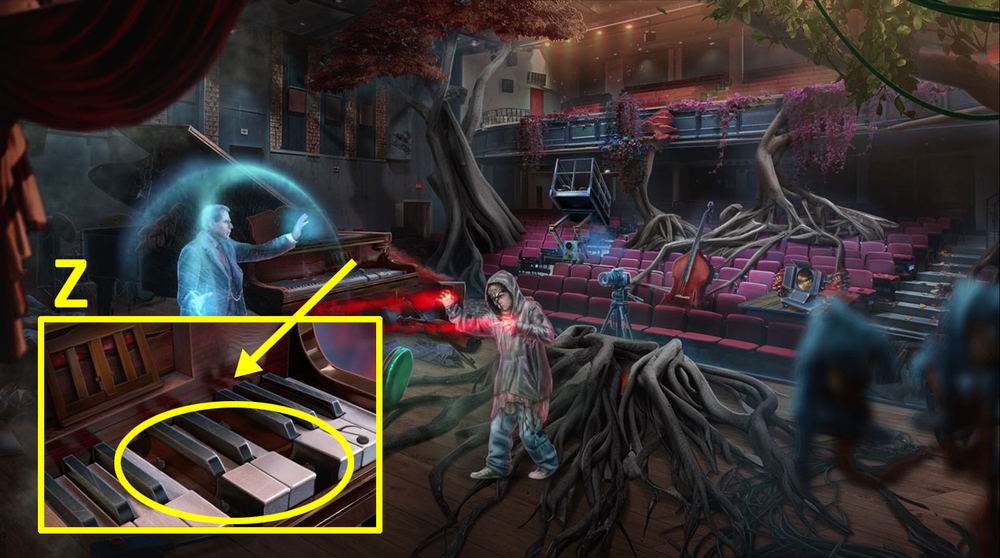
- Move the plant, use WHEEL on the spotlight, move it, take MUSIC SHEET (A).

- Use MUSIC SHEET on the piano, press the keys in order, take REMOTE CONTROL (B).
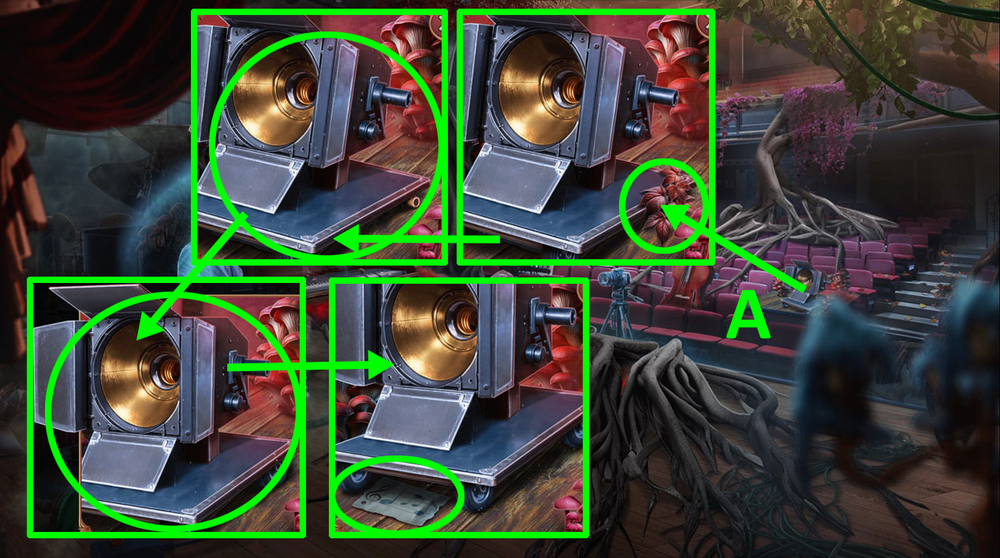
- Use REMOTE CONTROL on the control box, take LAMP (C).
- Use LAMP on the spotlight (D).

- Use RITUAL GUIDE, RITUAL COMPONENTS, and LIGHTER (E).
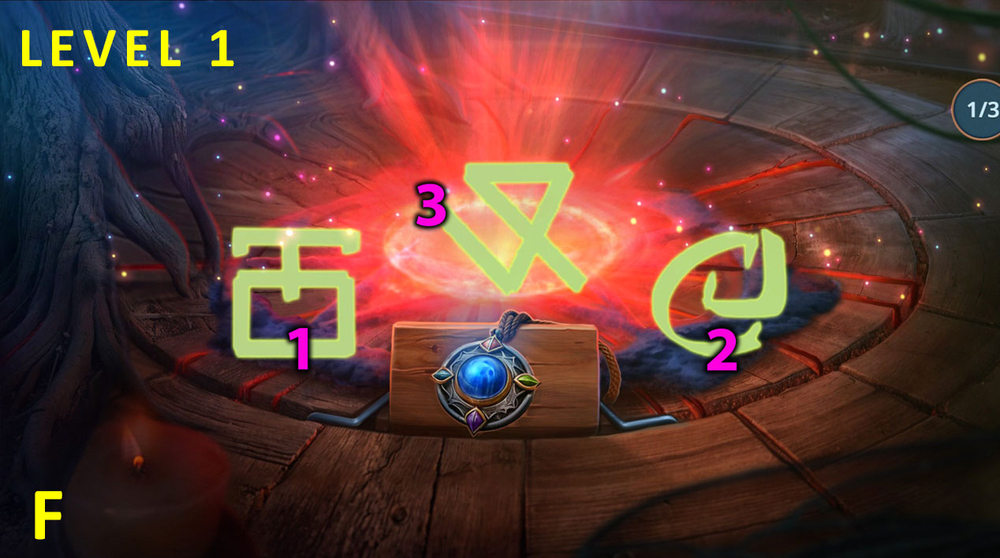
- Easy solution: Follow the instructions in the images, level 1 (F).
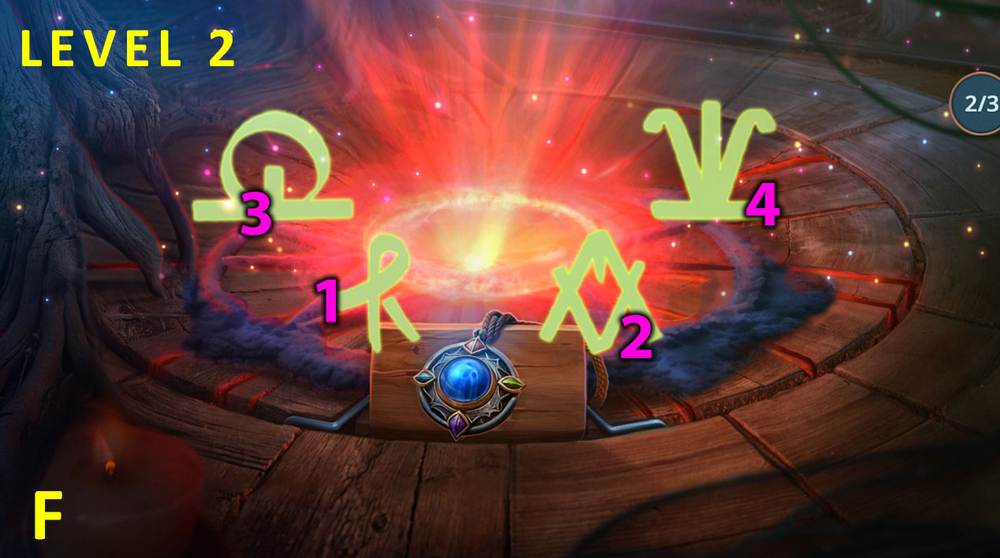
- Easy solution: Level 2 (F).
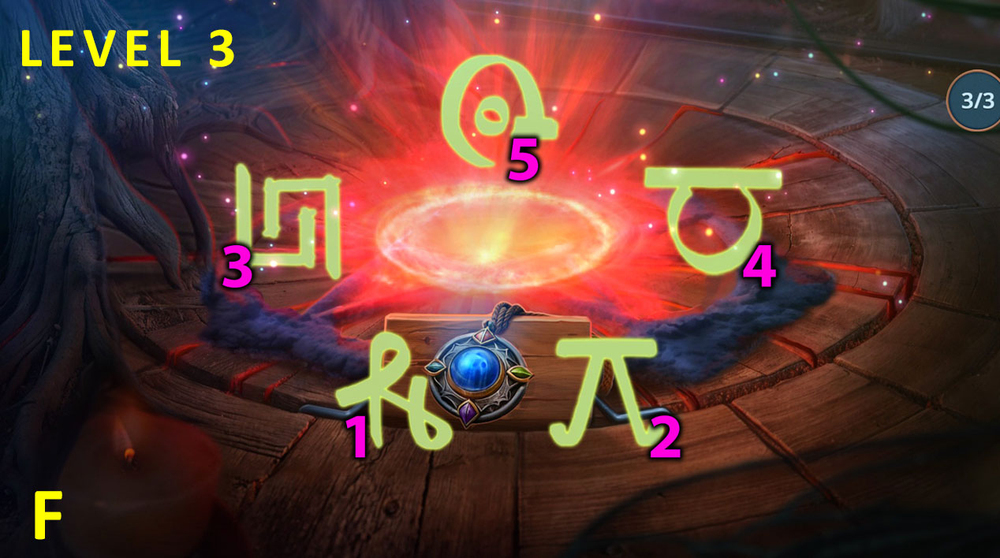
- Easy solution: Level 3 (F).

- Hard solution: Follow the instructions in the images, level 1 (G).
- Hard solution: Level 2 (G).
- Hard solution: Level 3 (G).
- Walkthrough Bonus Chapter, at the link below.


