
Ms. Holmes 7: The Death of Peter Blackheart – Charlotte Holmes complains of boredom, crime in London is down and there are no new cases. Oscar Watson assures her that this is only temporary, but at that moment there is a knock at the door. Opening it, they see a man who can barely stand on his feet and then passes out. It is Harold Kern, an old friend of Oscar’s, accused of the murder of Captain Peter Blackheart. Scotland Yard is convinced Harold is guilty. But he himself desperately denies involvement. He admits that he served as quartermaster on the Mermaid under Captain John Peter Bradley, who resigned after finding Morgan’s treasure. Harold was happy for the captain, but after being transferred to another ship, he hadn’t heard from him in years. And then the sudden news, Bradley, now referred to by everyone as Peter Blackheart, is dead. His body was found nailed to the wall with a harpoon. You will have to find out why he was killed, who could have crossed the road former captain, what the old sea secrets have to do with this case. Explore the gloomy house of the captain, solve puzzles and analyze the evidence. Every detail you find could be a clue. Be careful – there is more behind this crime than meets the eye. If you can not pass any of the puzzles or do not know where the items are, on our site you can watch the walkthrough of Ms. Holmes 7: The Death of Peter Blackheart, and find the real killer.
Ms. Holmes 7: The Death of Peter Blackheart – Walkthrough
Here you can see the full walkthrough of Ms. Holmes 7: The Death of Peter Blackheart, namely for all chapters, including bonus chapter, in pictures.
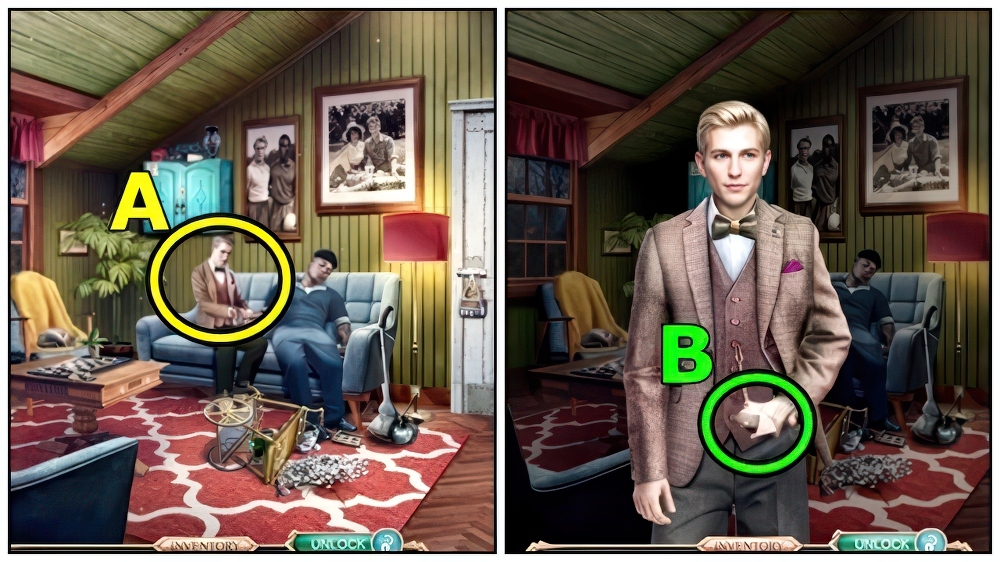
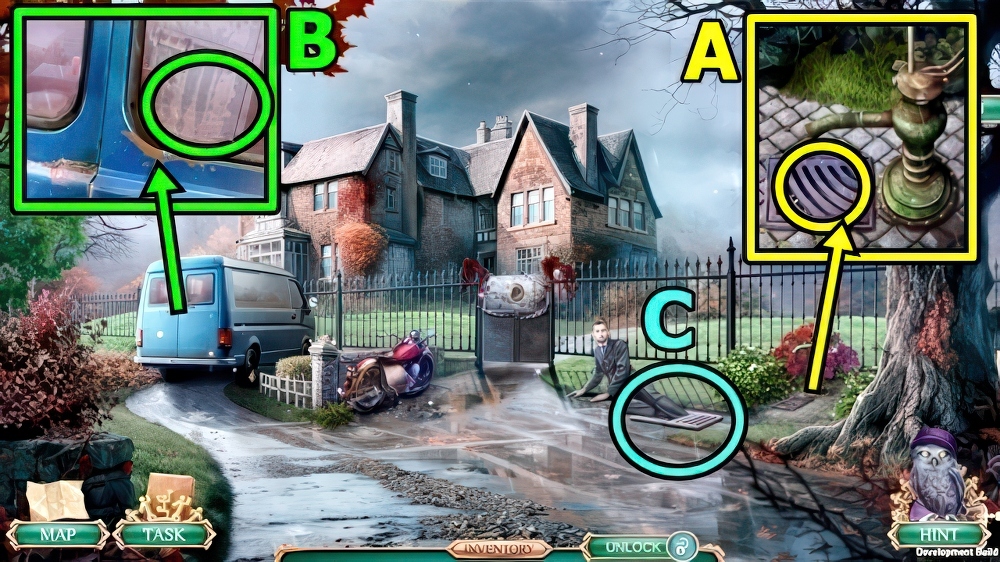
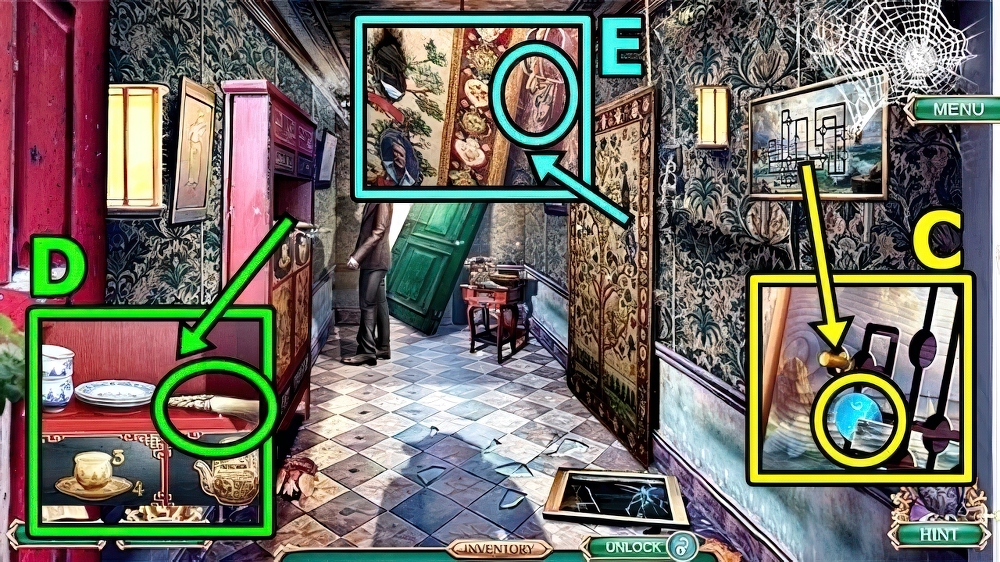
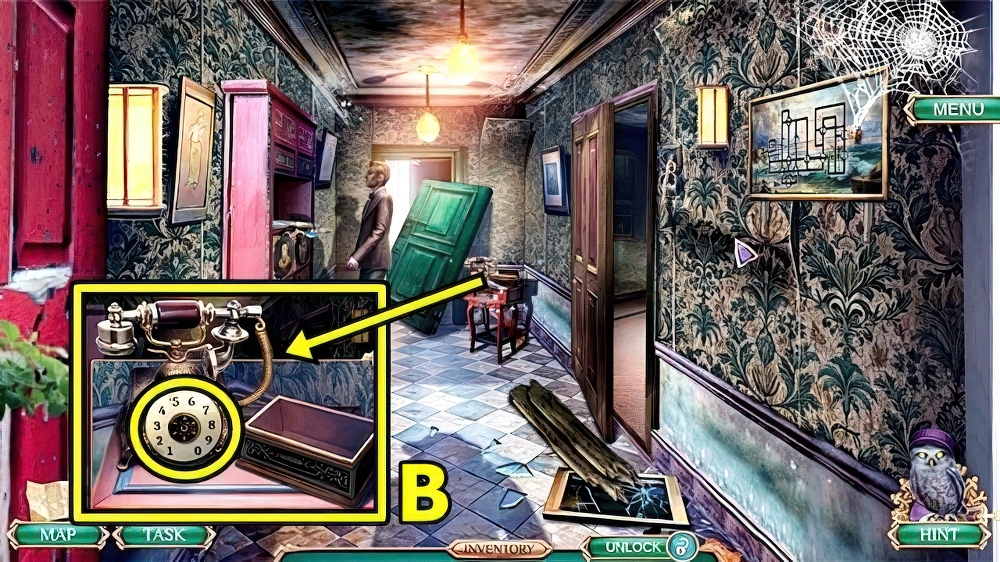
- Talk (A).
- Take GAUZE (B).
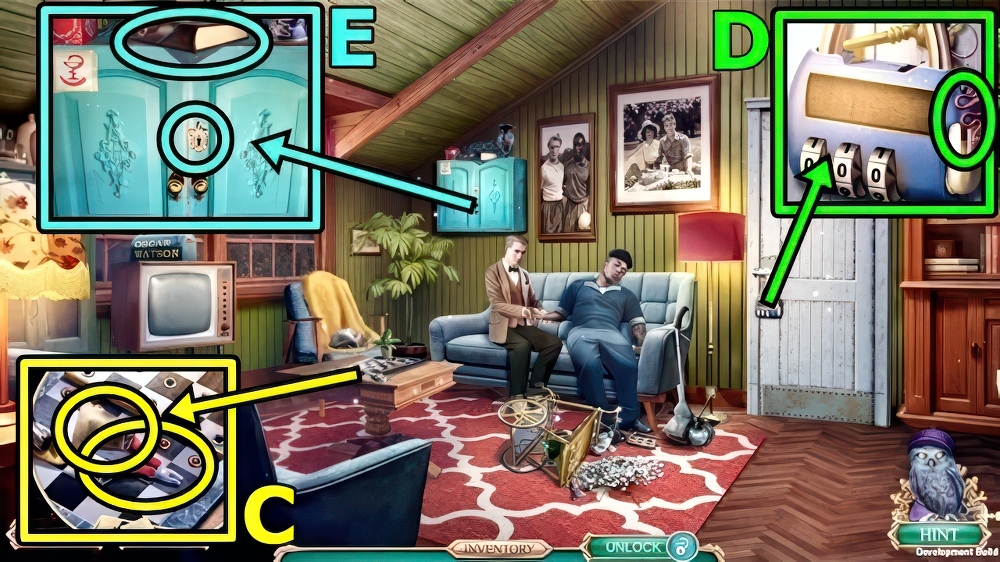
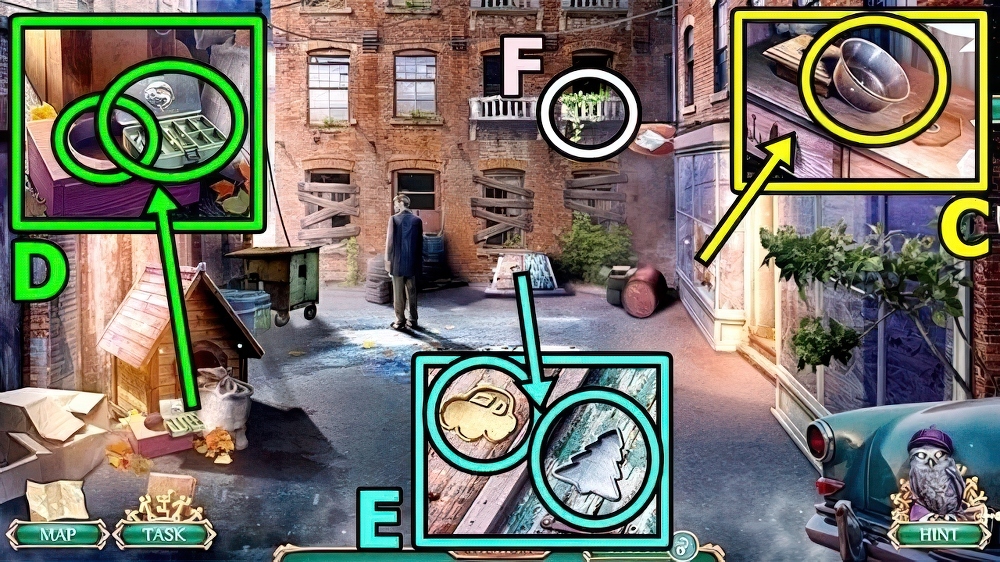
- Take COAL (C) and UTILITY KNIFE.
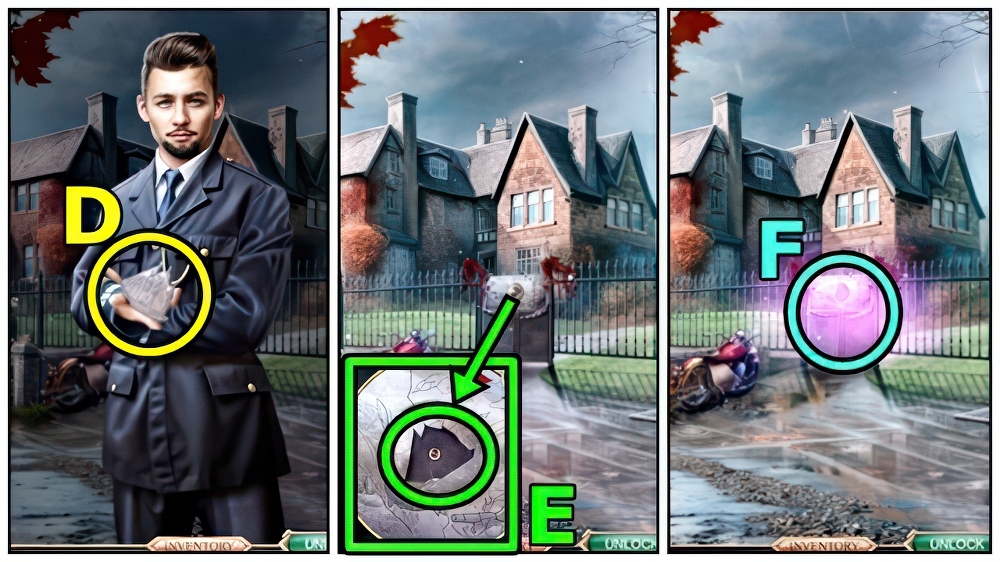
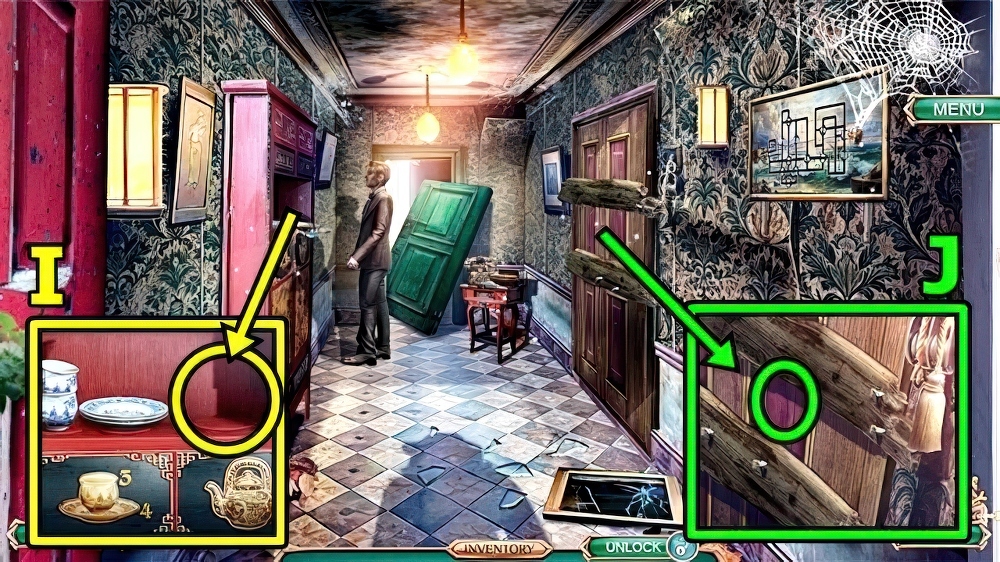
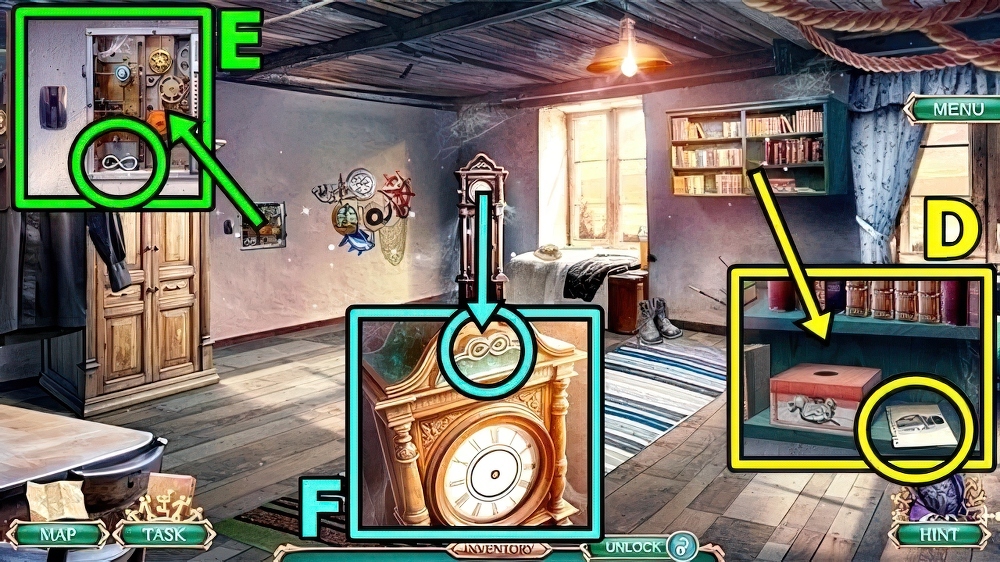
- Take FIRST-AID KIT KEY (D).
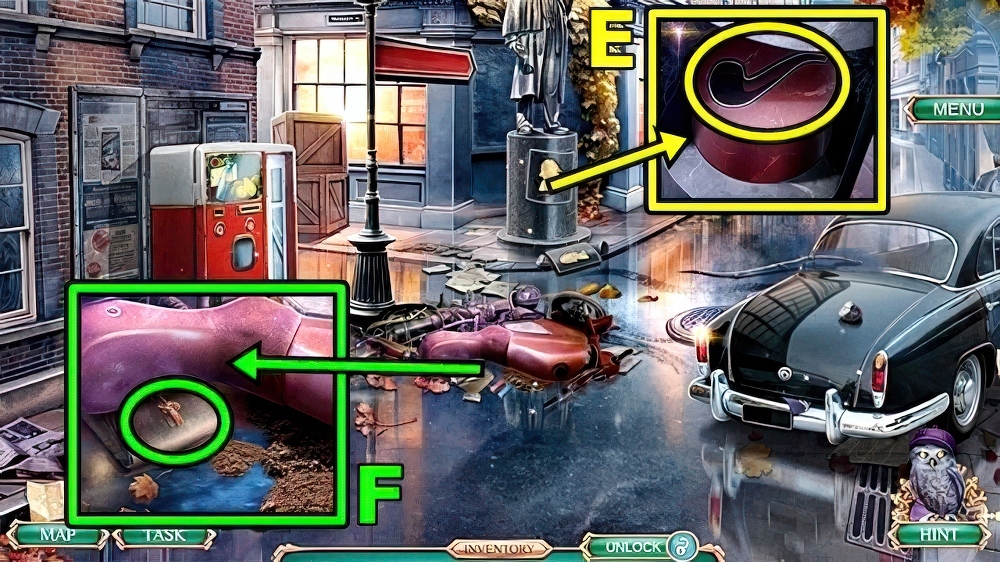
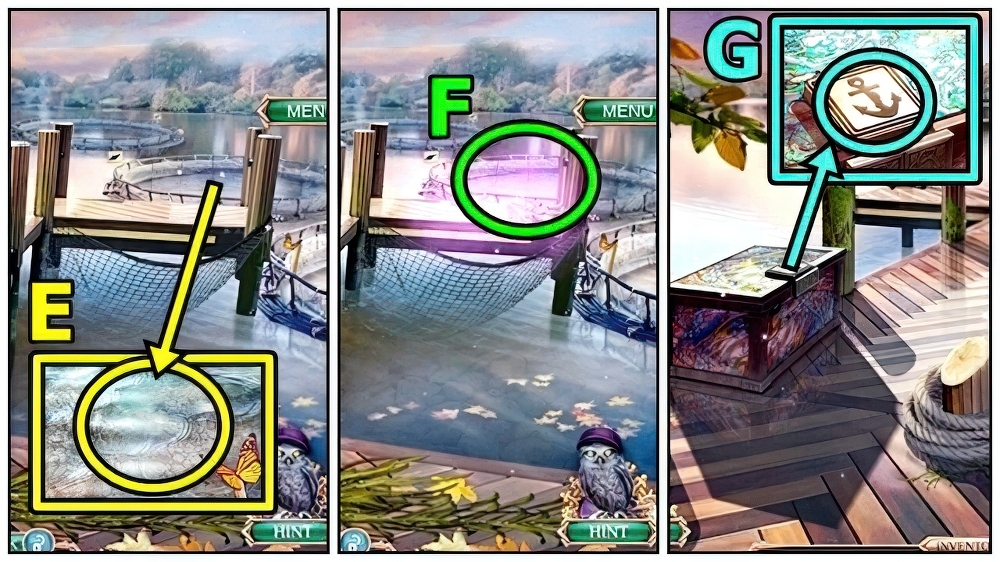
- Read (E).
- Take SCHOOL ALBUM.
- Use FIRST-AID KIT KEY.
- Play puzzle, receive SMELLING SALTS.
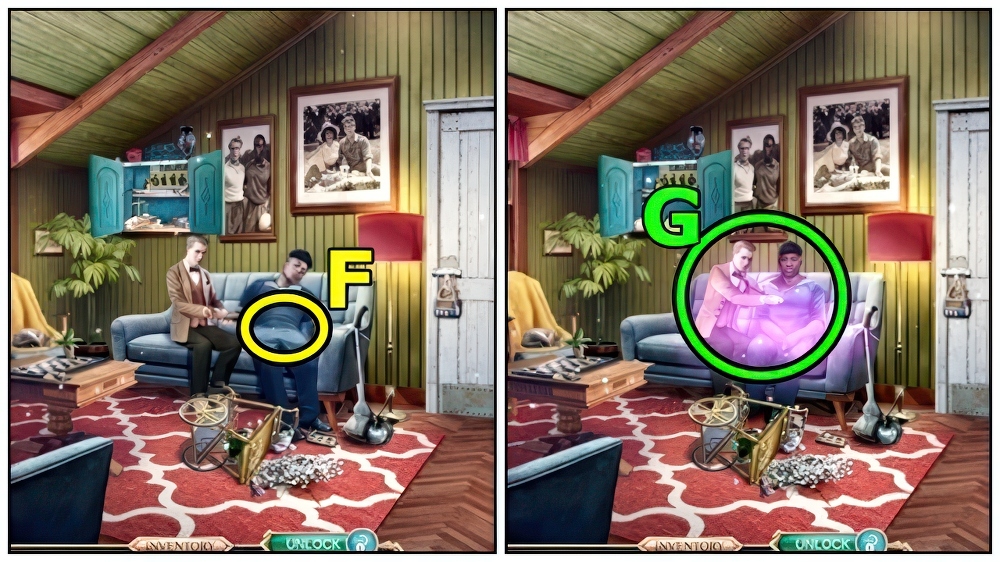
- SMELLING SALTS and UTILITY KNIFE on GAUZE, take SOAKED GAUZE and GAUZE PIECE.
- Use SOAKED GAUZE (F).
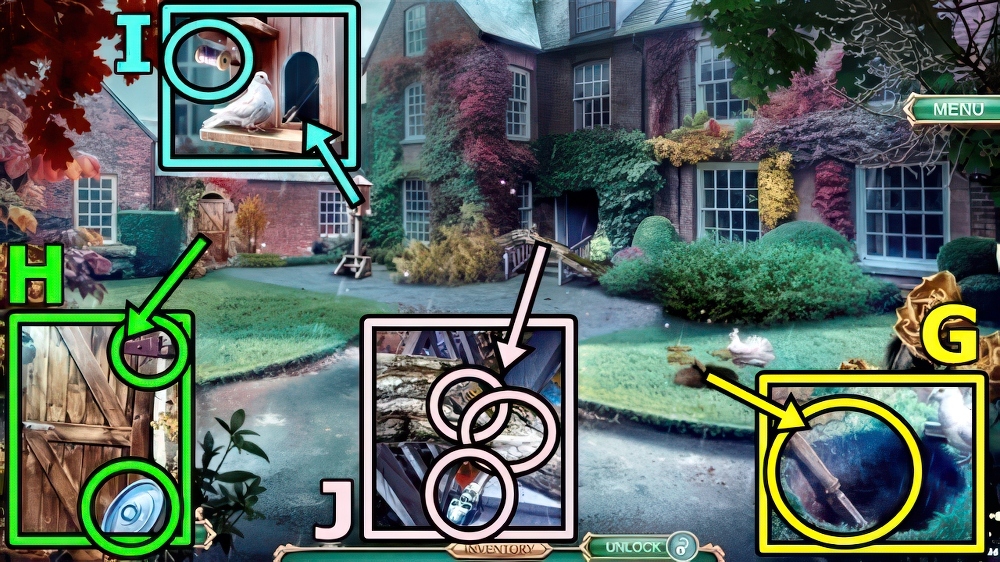
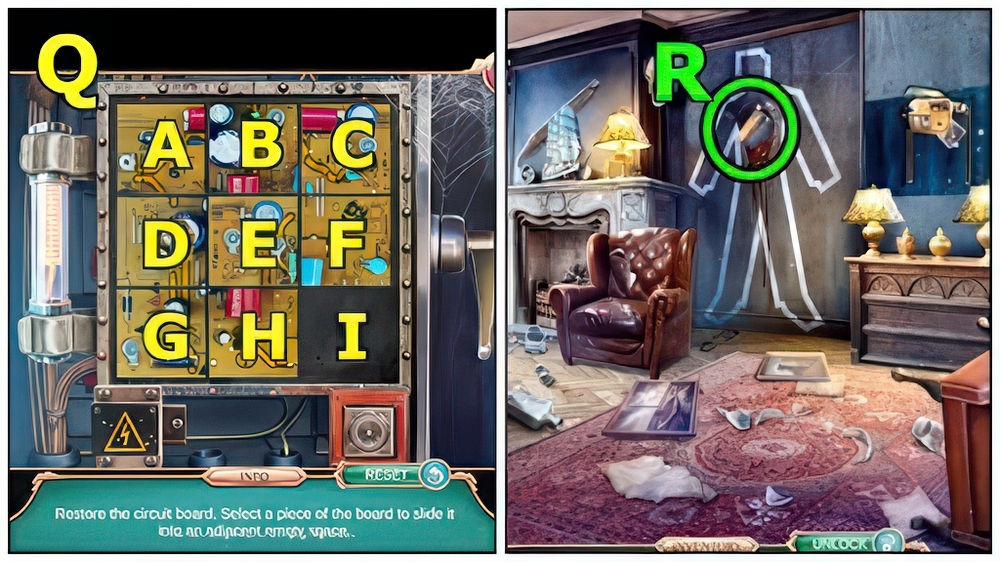
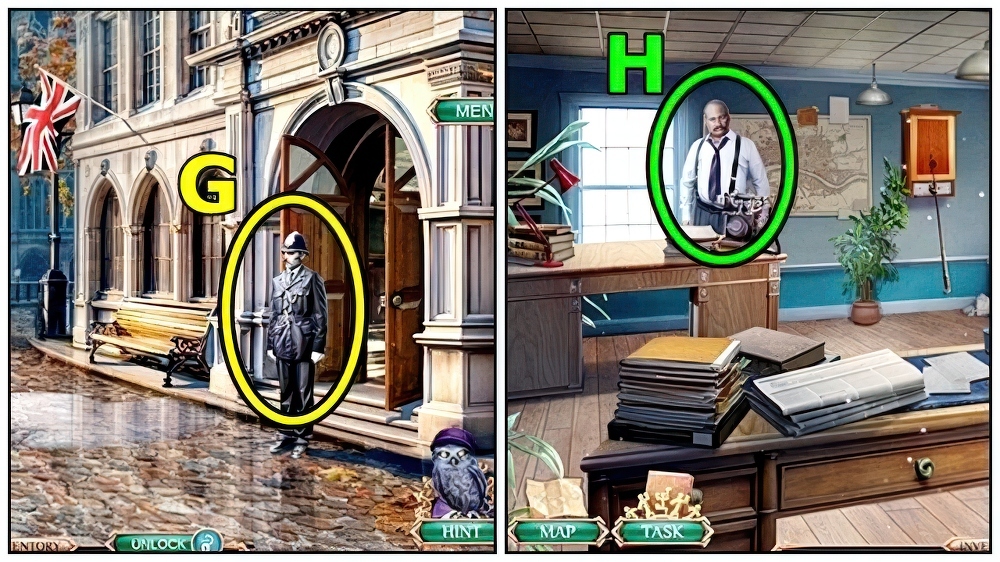
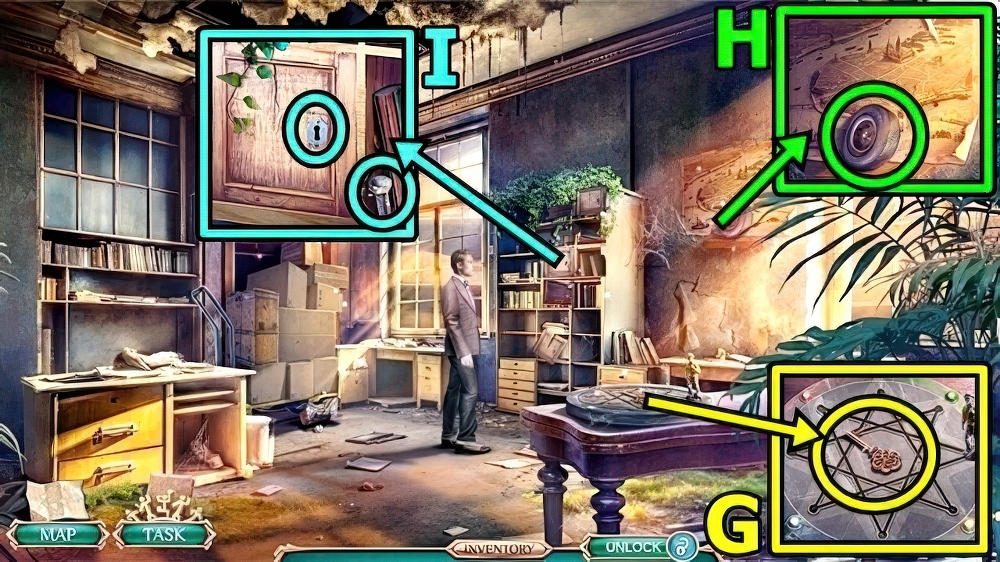
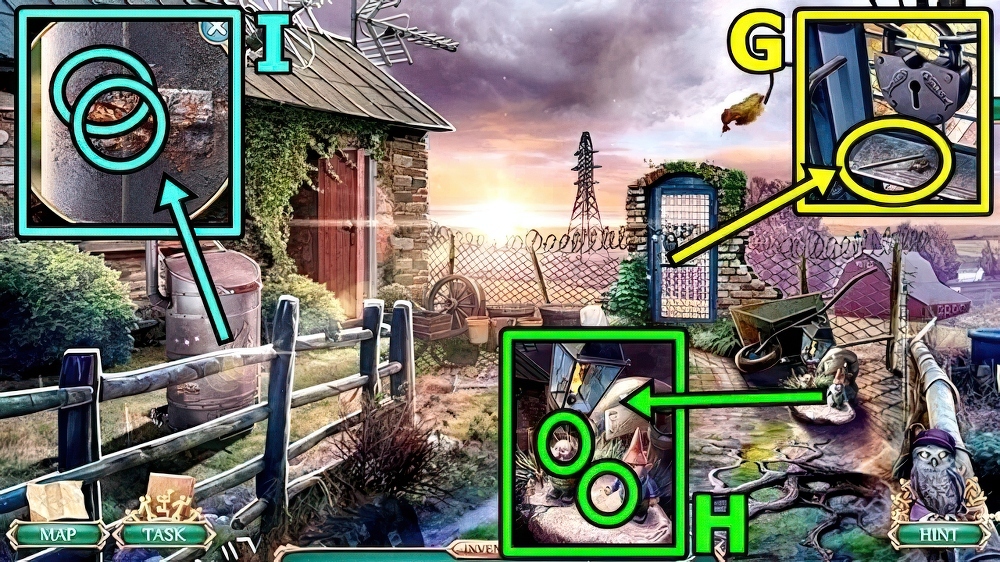
- Play puzzle (G).

- Take LAB CODE (H).
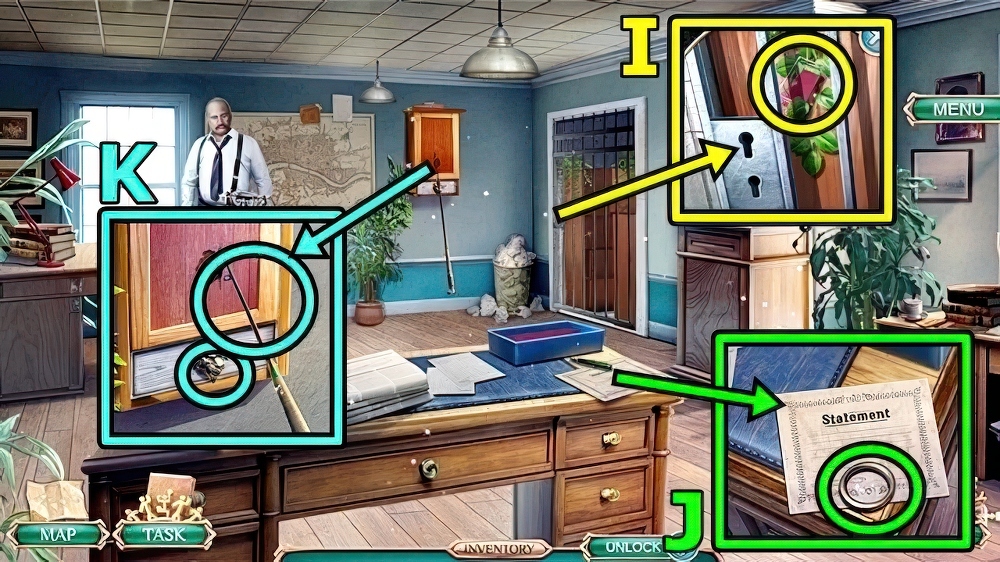
- Add LAB CODE (I), enter 4-2-1.
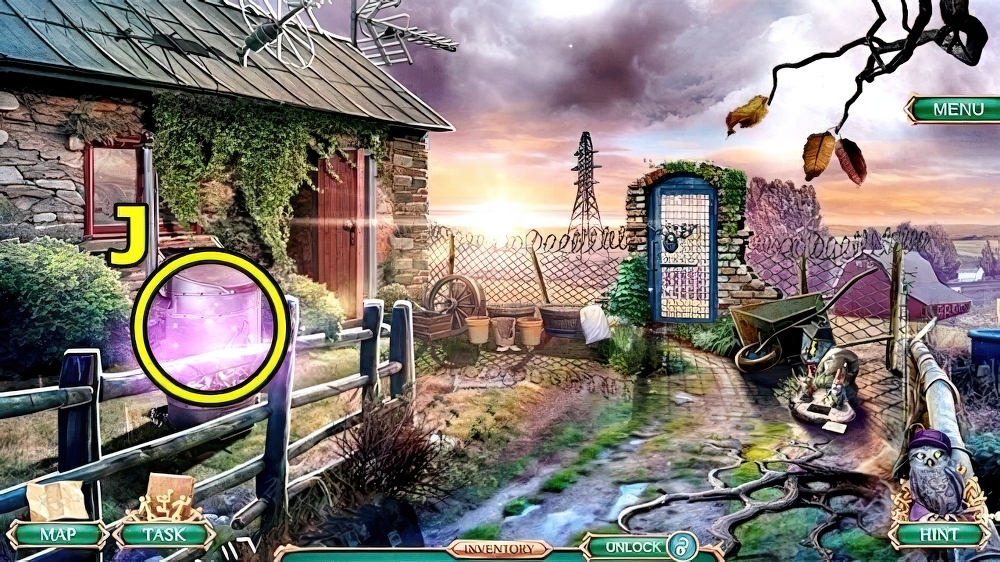
- Enter Oscar’s Lab.

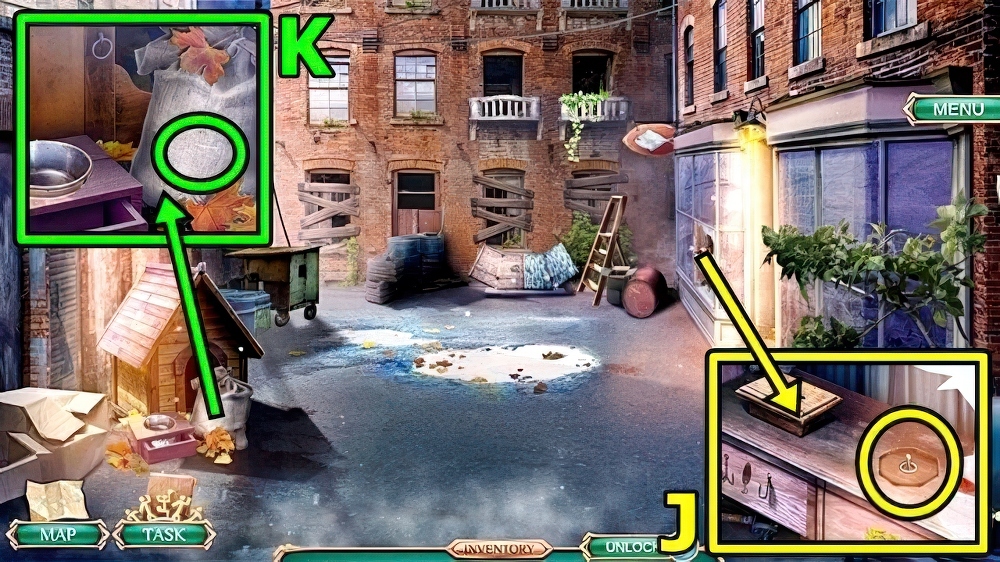
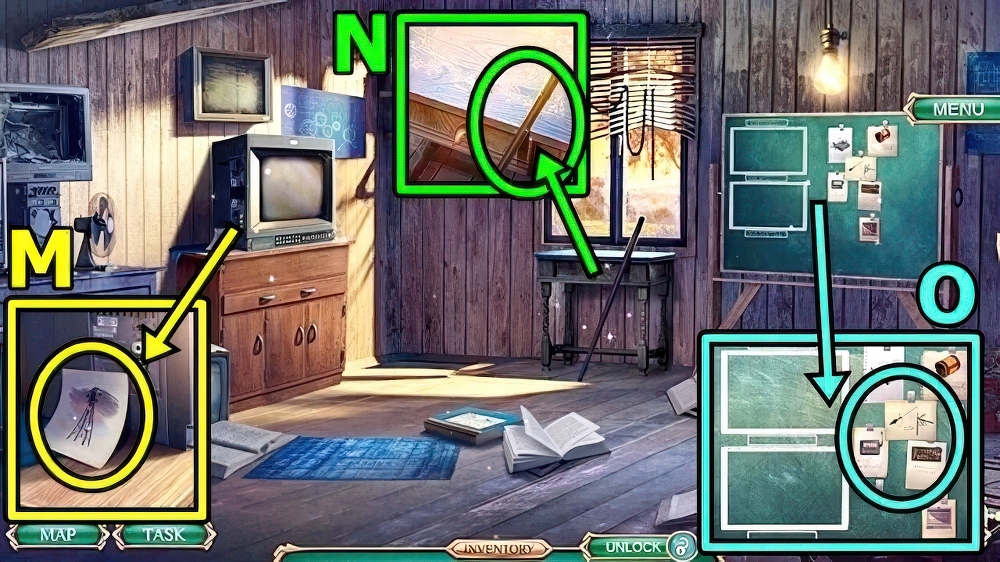
- Take ACID NEUTRALIZER (J).
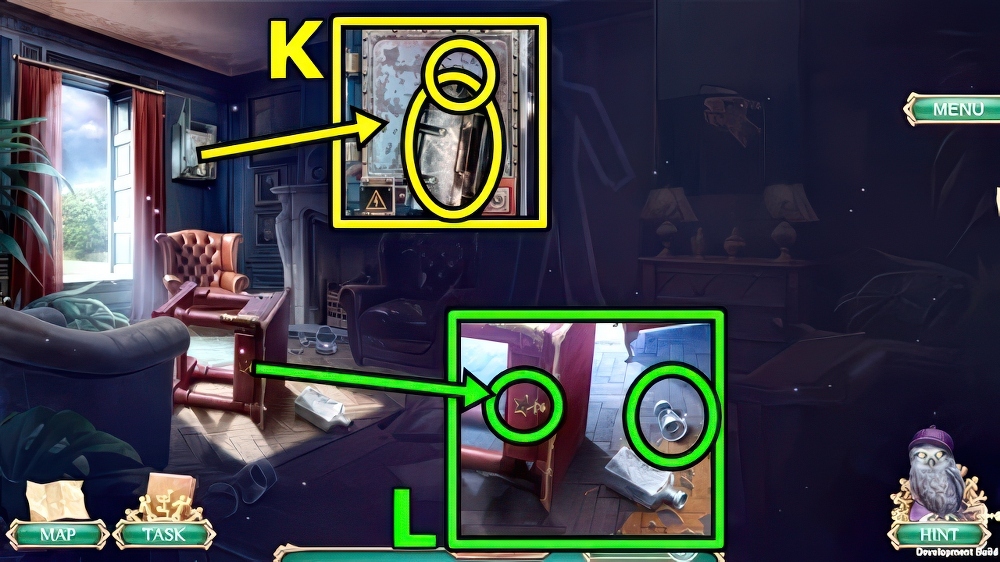
- Take PHONE RECEIVER (K) and EMPTY COAL IRON.
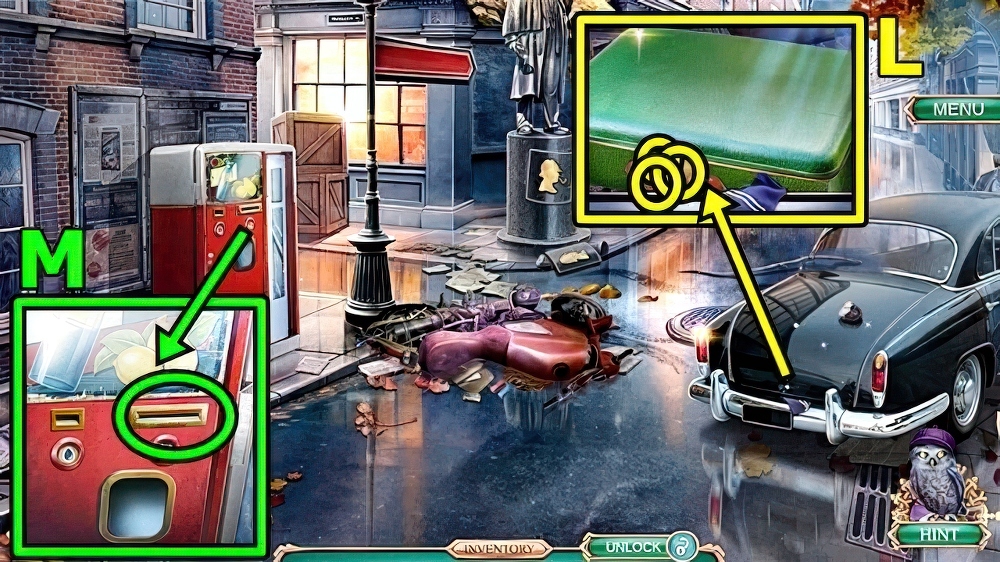
- Take VACUUM BAG (L).
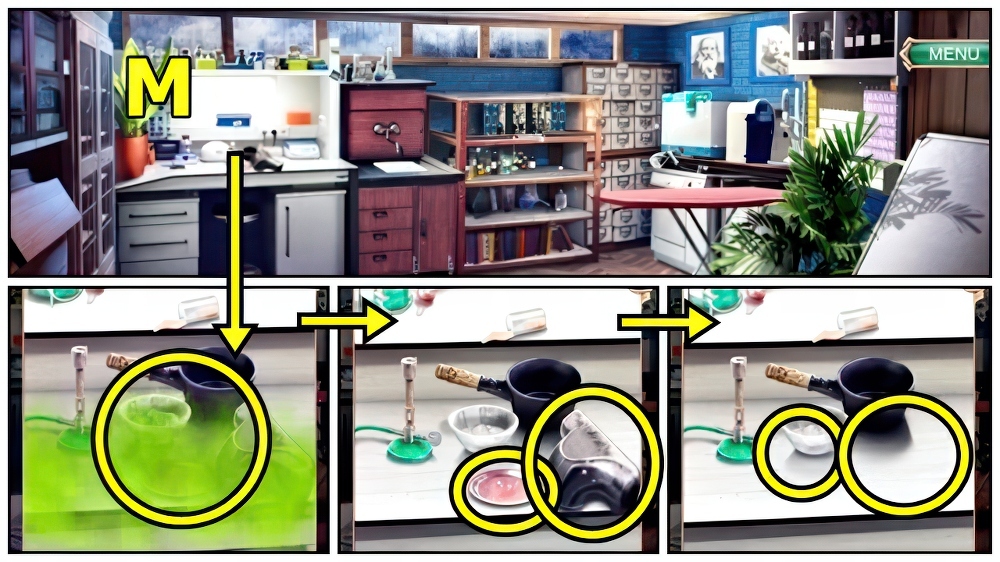
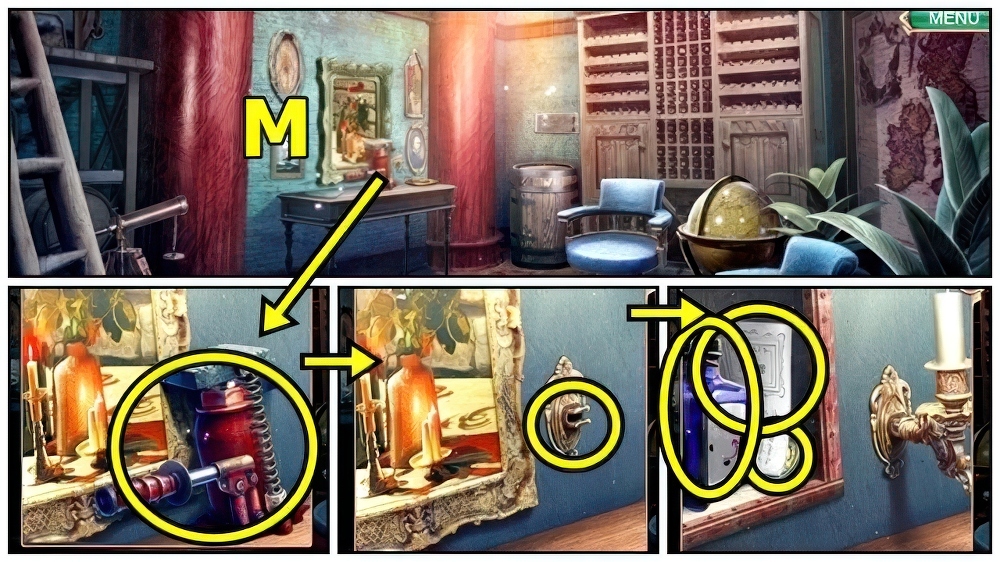
- Use ACID NEUTRALIZER (M).
- Take FLOOR NOZZLE and SCALE PAN.
- Add EMPTY COAL IRON and COAL, take HOT IRON.
- Move down.
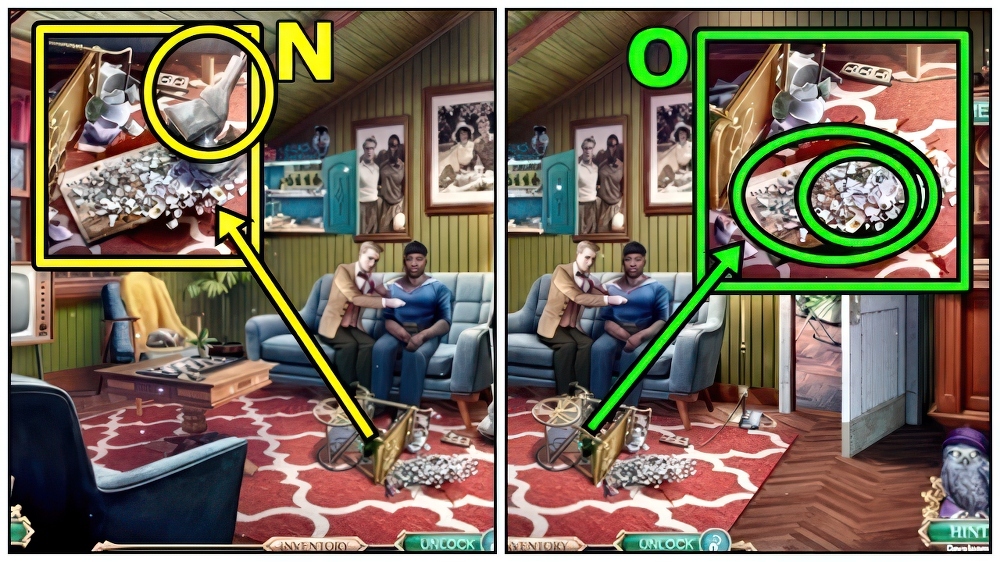
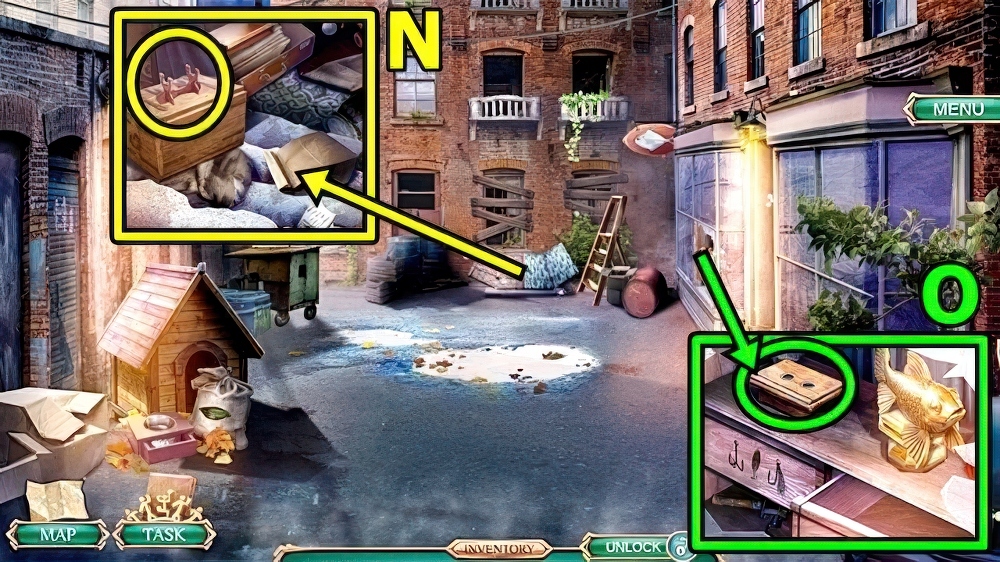
- Take DISASSEMBLED VACUUUM (N).
- VACUUM BAG and FLOOR NOZZLE on DISASSEMBLED VACUUM, take VACUUM CLEANER.
- Use VACUUM CLEANER (O), take WET NEWSPAPER and PHONE DIAL.
- Enter Oscar’s Lab.
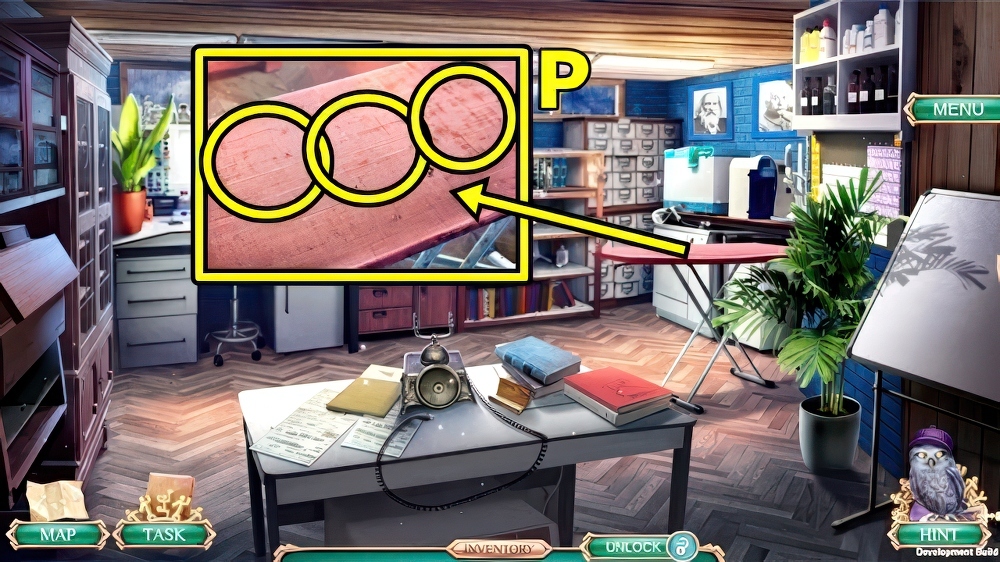
- Add GAUZE PIECE (P), HOT IRON and WET NEWSPAPER.
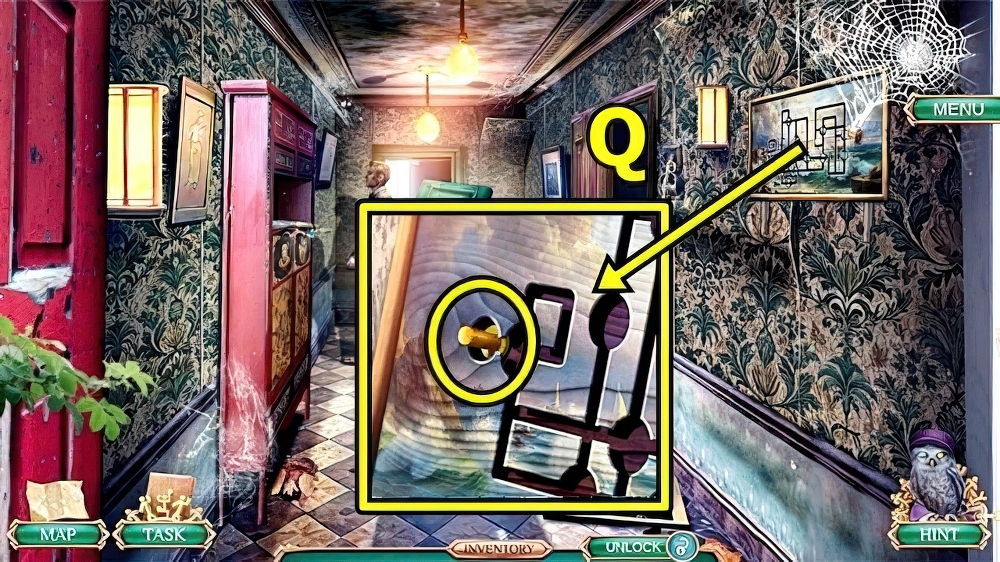
- Play puzzle, take CHAIN.

- Solution: (D-C)-(C-A)-(A-B) (Q).
- Move down.

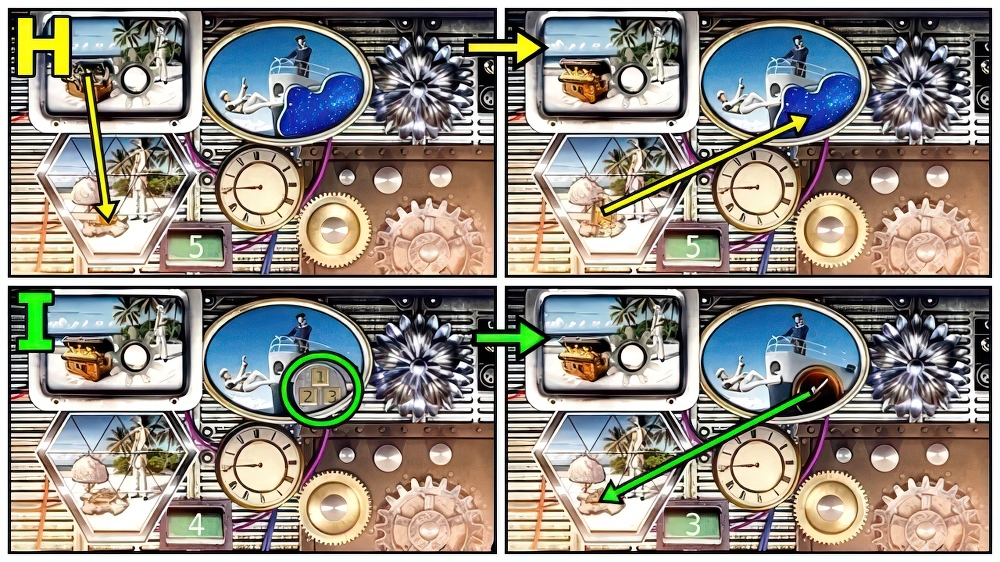
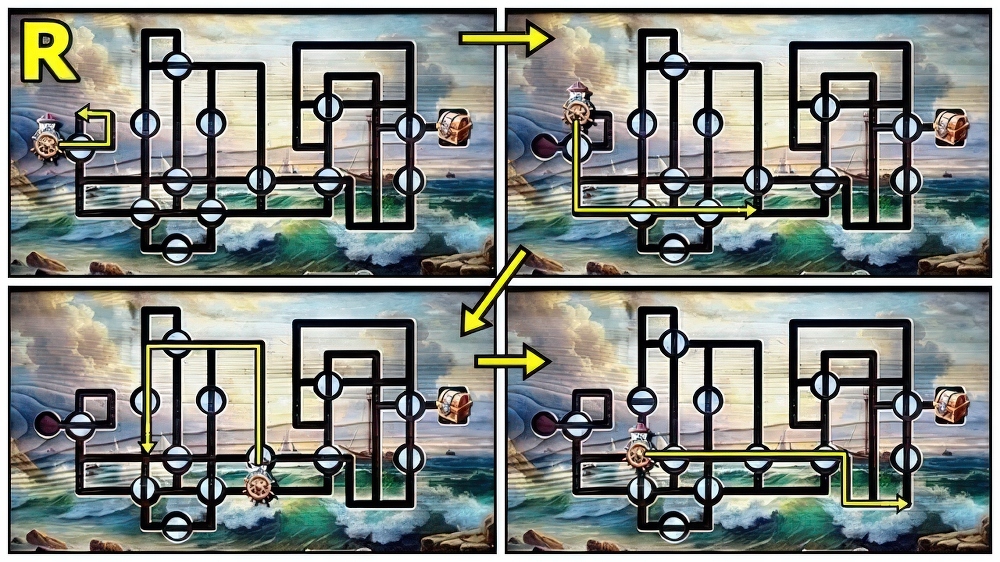
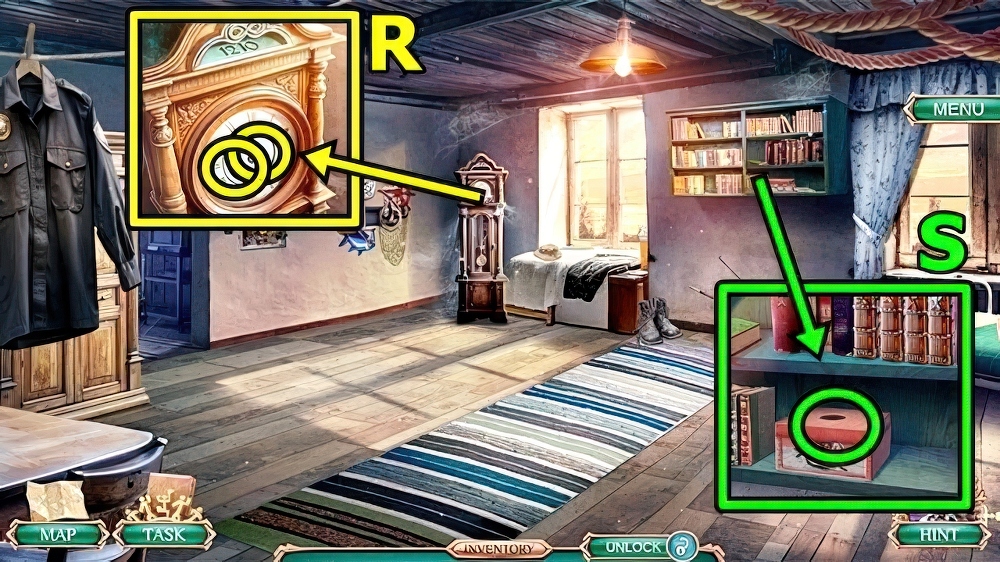
- Add SCALE PAN (R) and CHAIN, add weights, take SMALL HANDLE and GAME TOKENS.

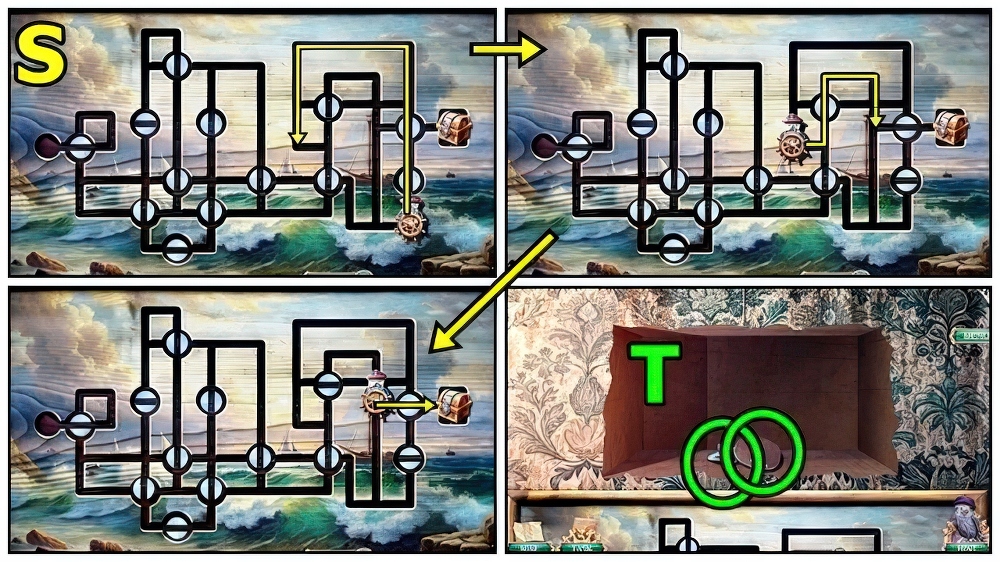
- Add GAME TOKENS (S).
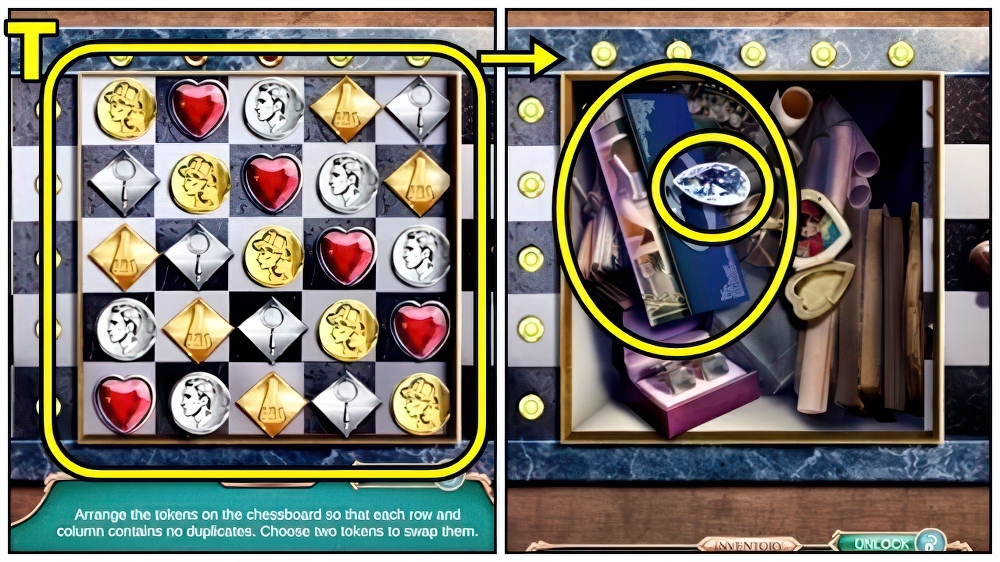
- Solution (T).
- Take DIAMOND and HOLMES’S STORIES.
- Enter Oscar’s Lab.

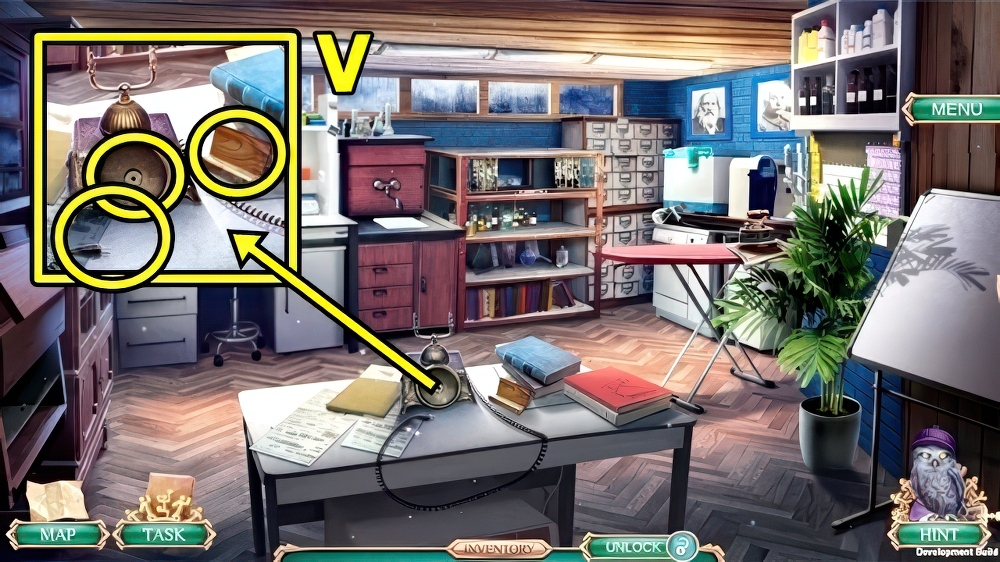
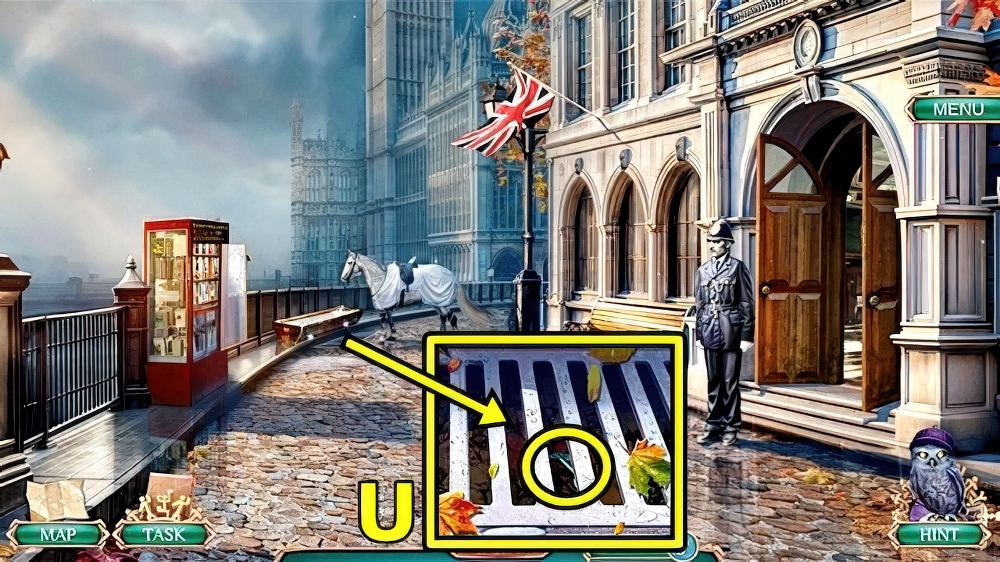
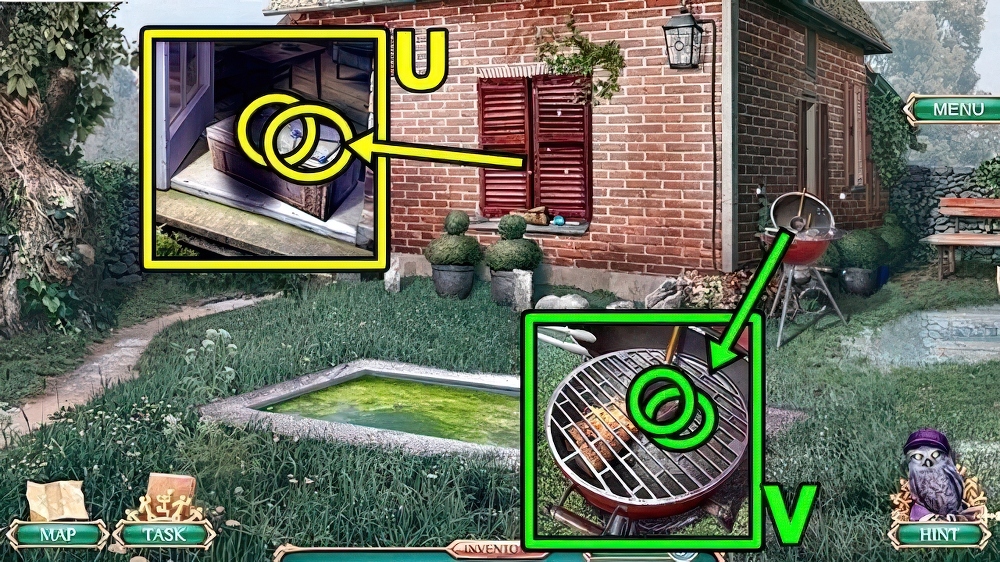
- Add SCHOOL ALBUM (U) and HOLMES’S STORIES.
- Rearrange, press, take HANDKERCHIEF and SCOTLAND YARD NUMBER.
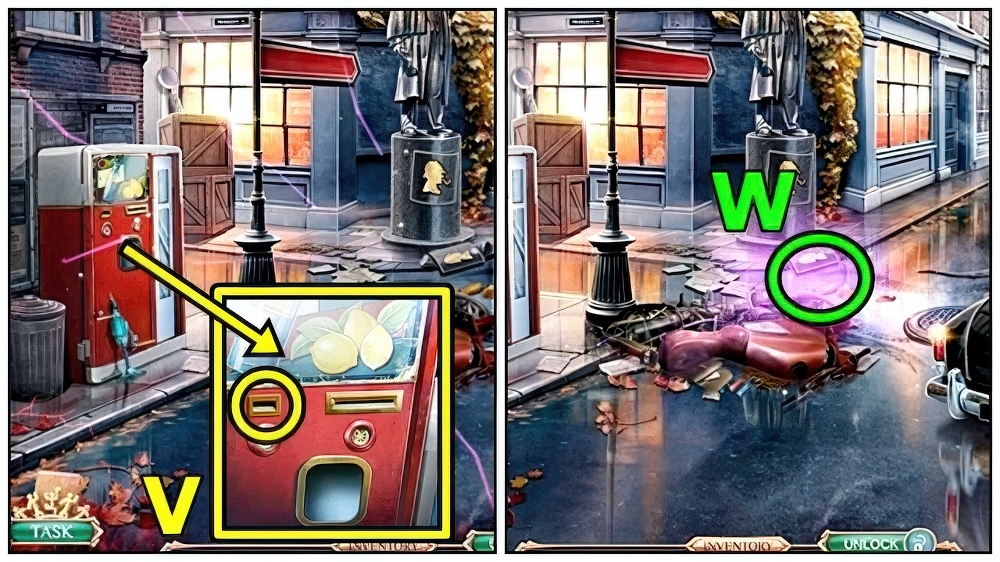
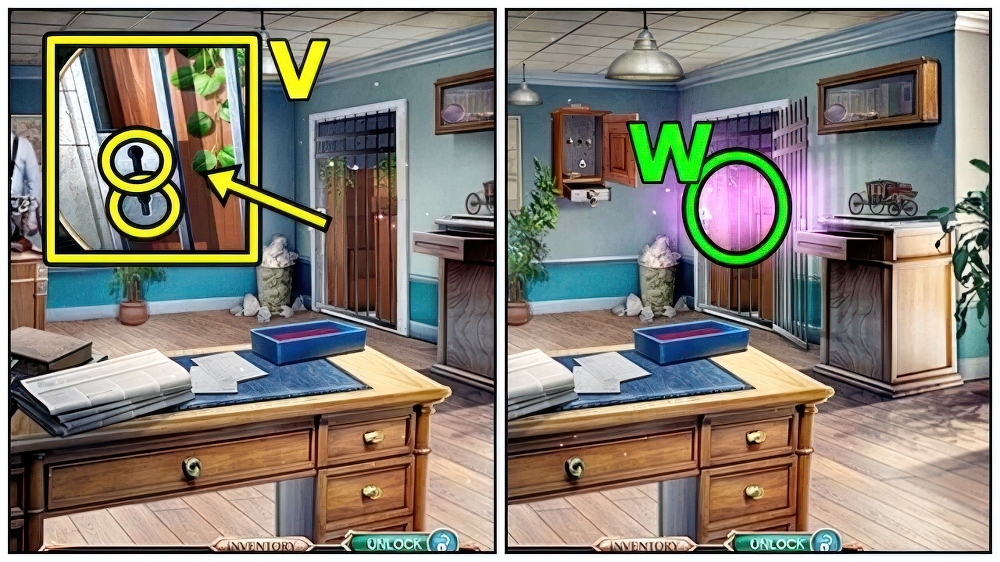
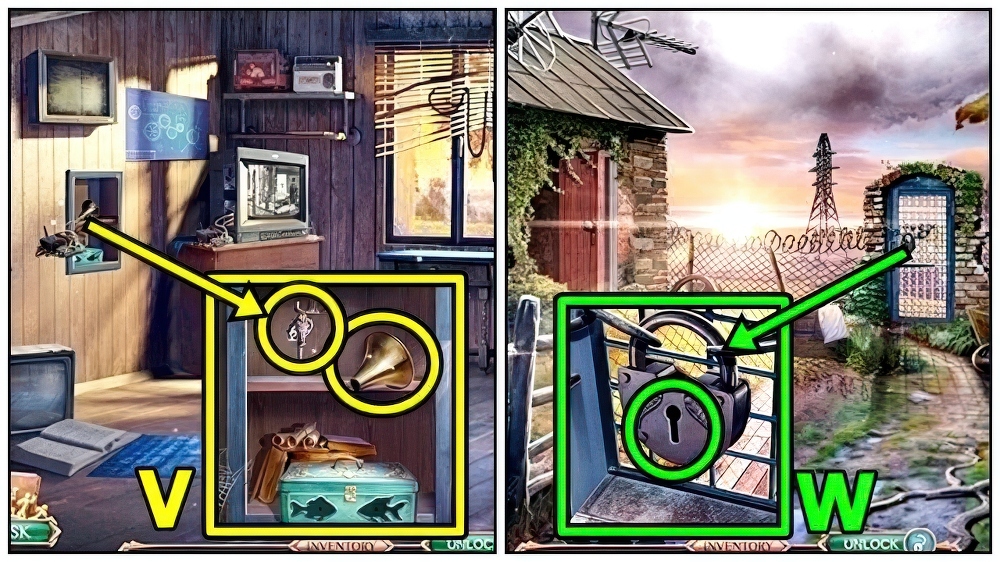
- Add PHONE RECEIVER (V), PHONE DIAL and SCOTLAND YARD NUMBER.

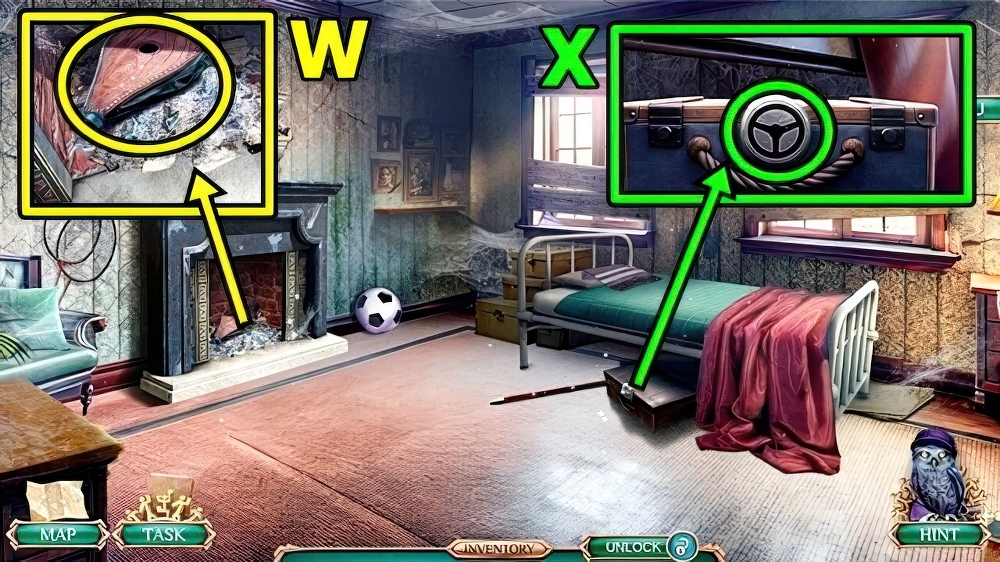
- Examine (W).

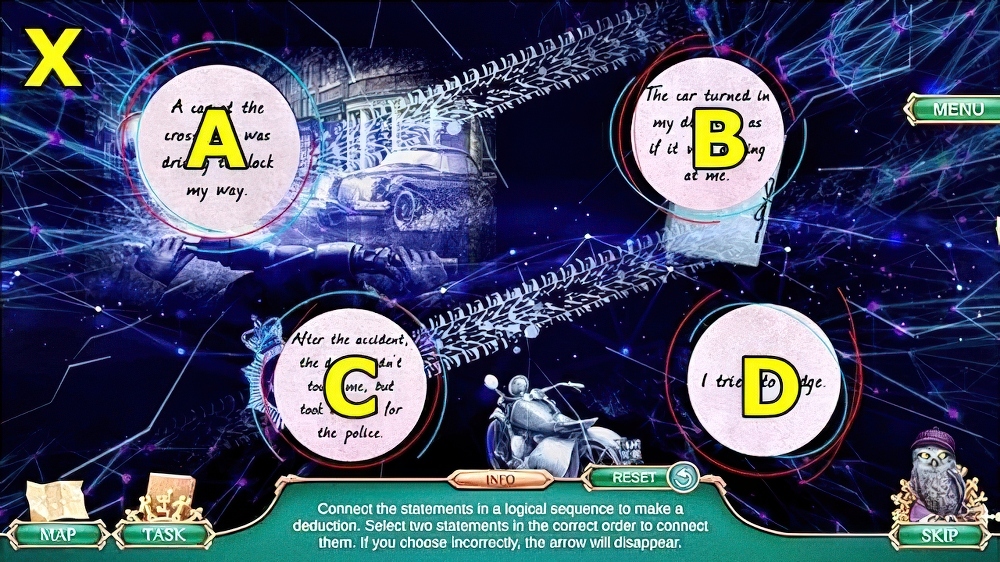
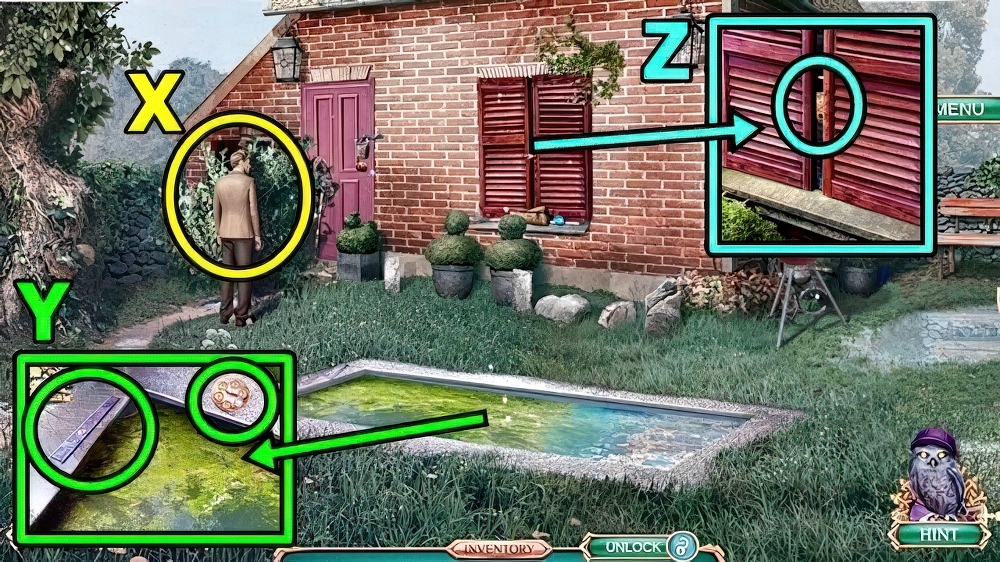
- Talk (X).
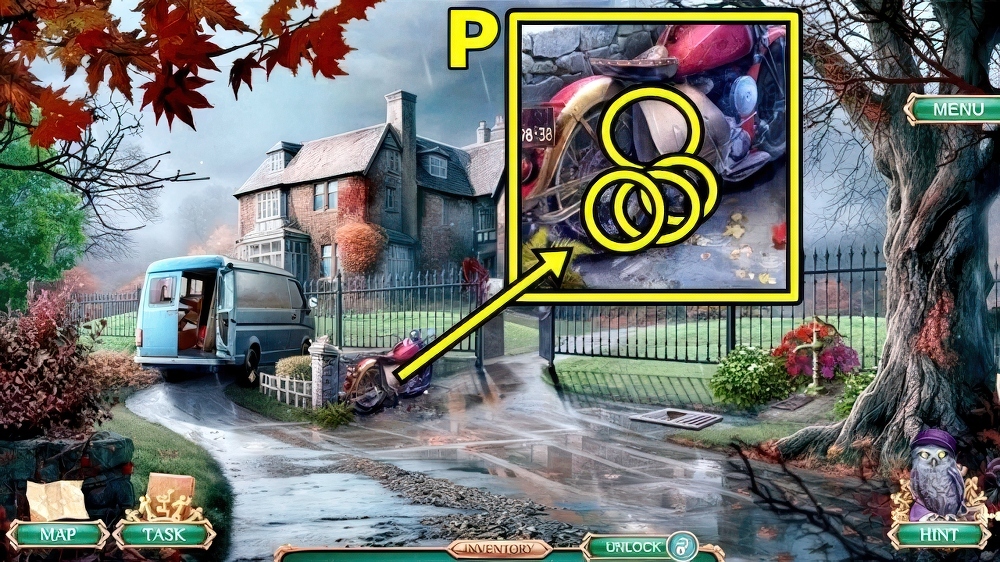
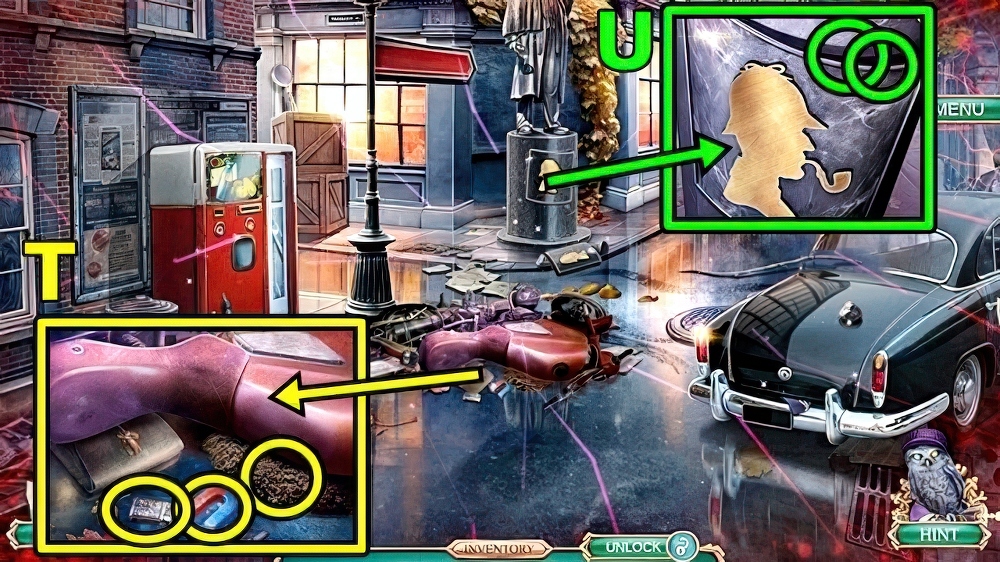
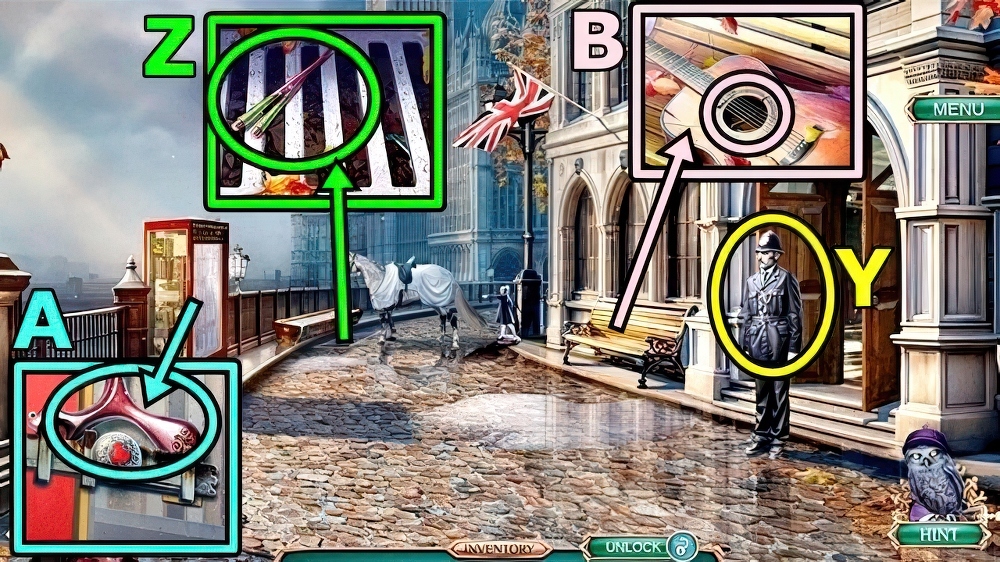
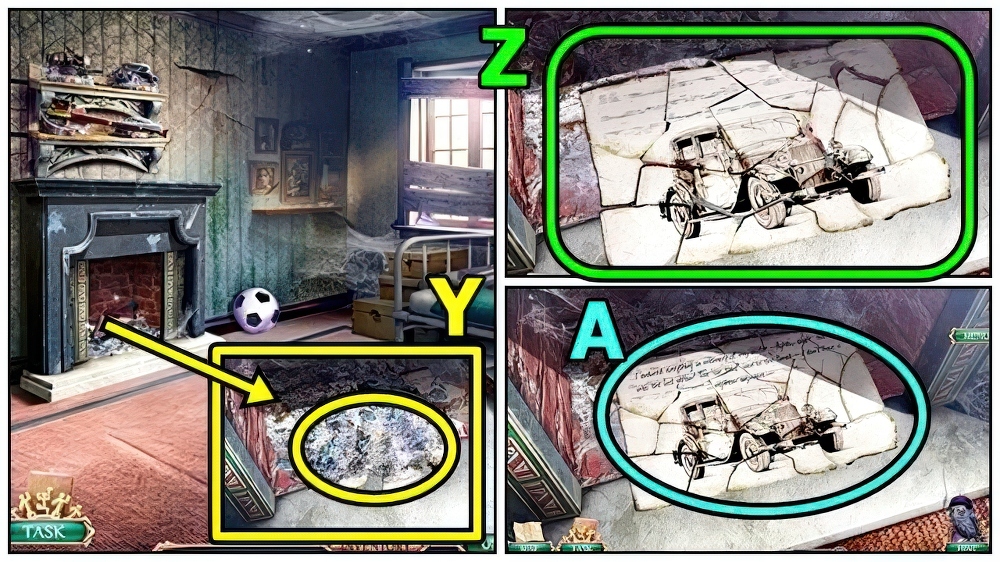
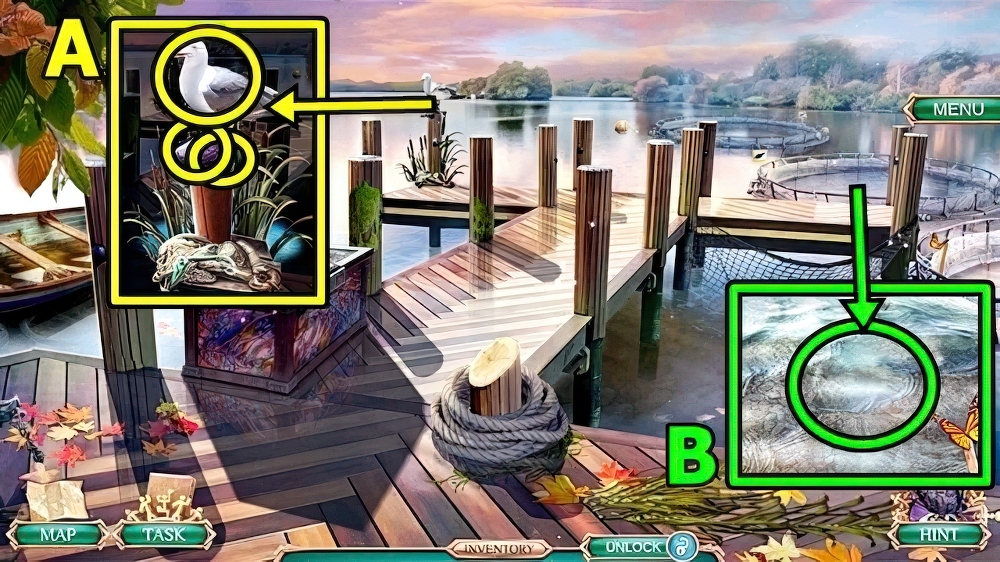
- Take HOOK AND LINE (Y).
- Take BLACK POWDER (Z).
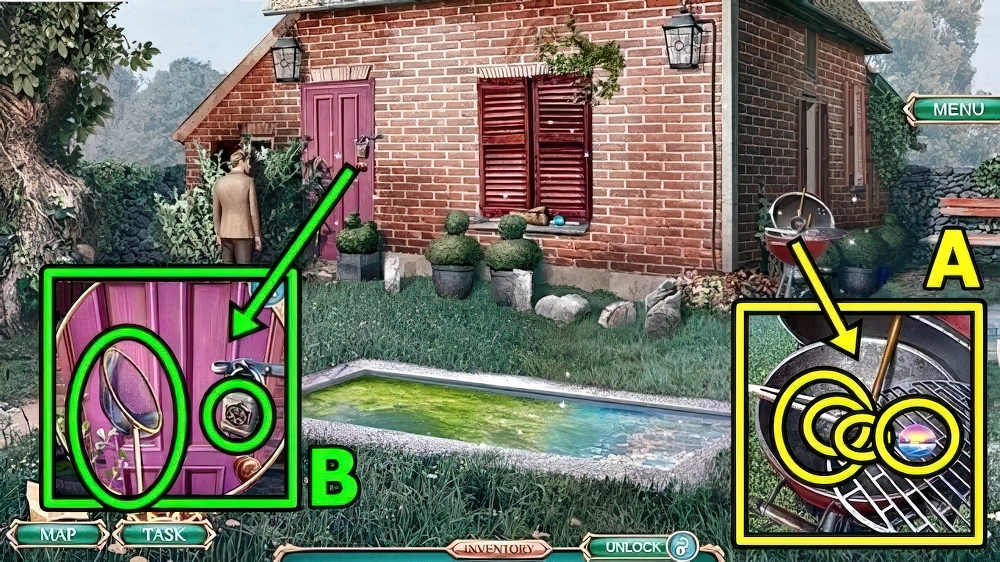
- Use HOOK AND LINE (A), take FASTENING RING.
- FASTENING RING, UTILITY KNIFE and DIAMOND on SMALL HANDLE, take IMPROVISED GLASS CUTTER.
- Use IMPROVISED GLASS CUTTER (B), take VEGETABLE OIL and HAMMER.
- Use VEGETABLE OIL (C).
- Take MAGNETIC KEY (D).
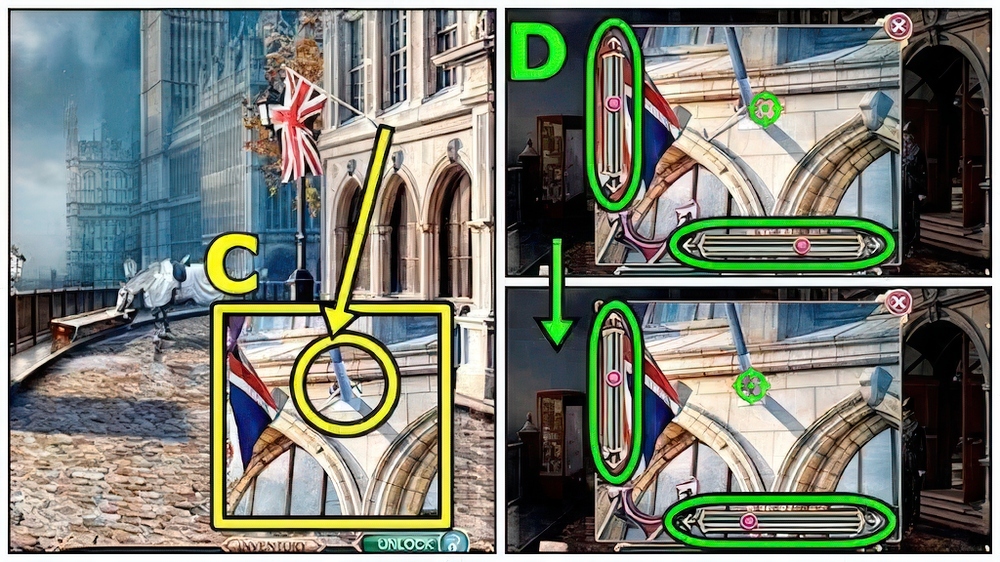
- Use MAGNETIC KEY (E).
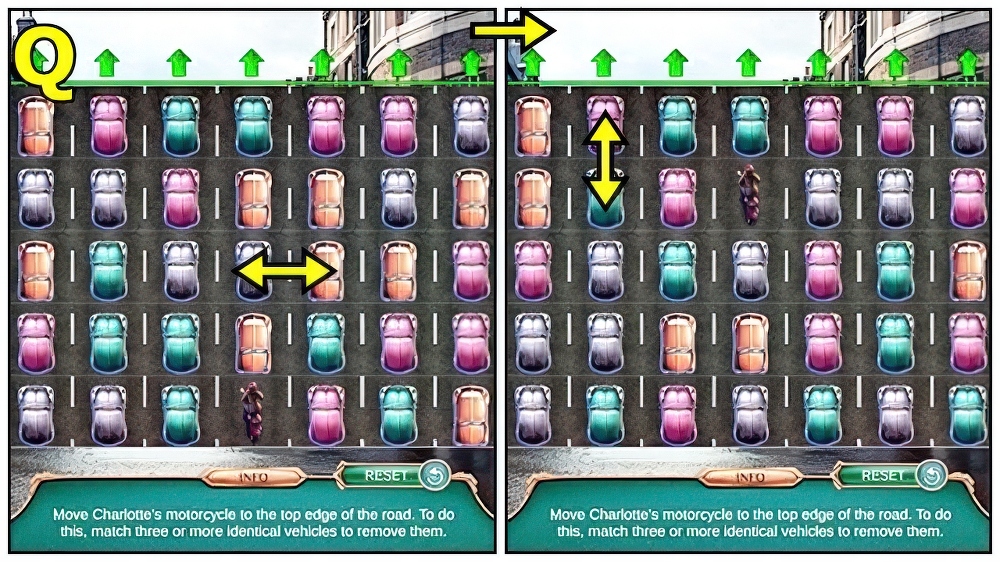
- Play puzzle (F).
- Enter Mansion Yard.
- Take FILE (G).
- Take POT LID (H), use FILE.
- Take WIRE 1/2 and SCREW.
- Take THREAD (I).
- THREAD, SCREW and BLACK POWDER on HANDKERCHIEF, take EXPLOSIVE.
- Take CANE (J).
- Use HAMMER and EXPLOSIVE.
- Enter Crime Scene.
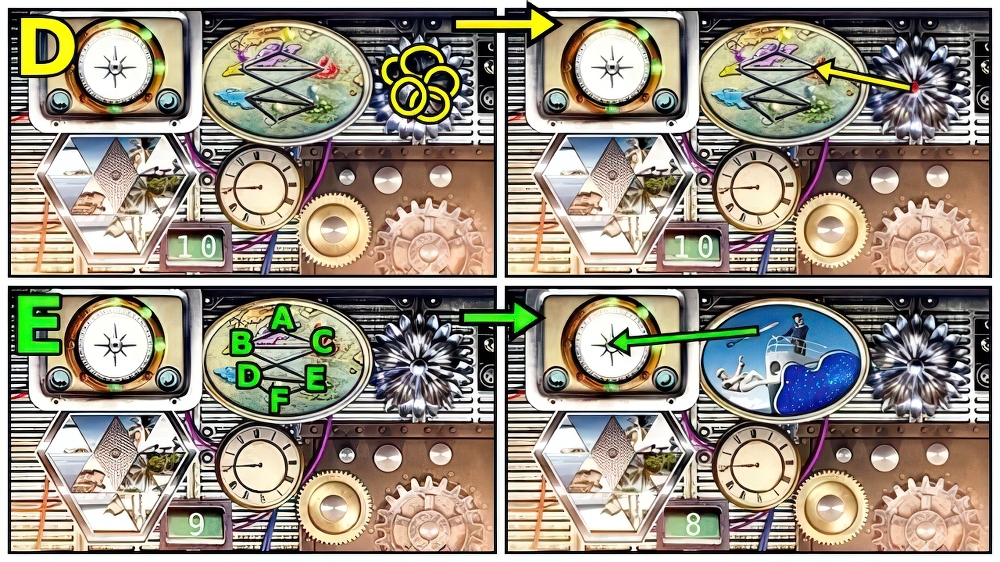
- Take CAPTAIN’S STAR (K) and INCOMPLETE DETECTIVE’S KIT.
- Take EVIDENCE 1/4 (L).
- Add CAPTAIN’S STAR, take BIRD SEED and IRON BRUSH.
- Move down.

- Add BIRD SEED (M), POT LID and CANE, take FUSE and DOVE.
- Add DOVE (N), take DETECTIVE’S BRUSH and WIRE 2/2.
- Enter Crime Scene.

- Open (O).
- Add WIRE and FUSE.
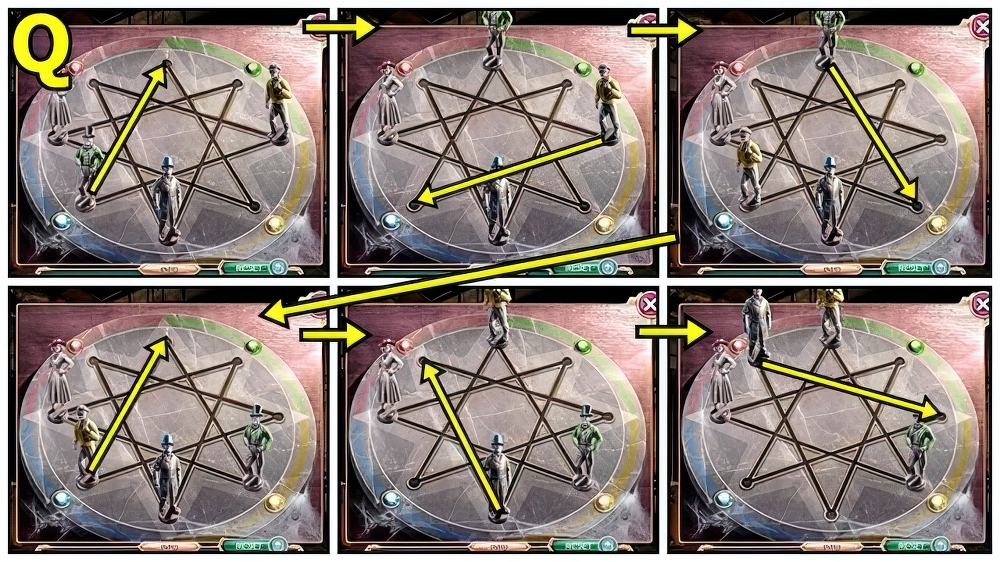
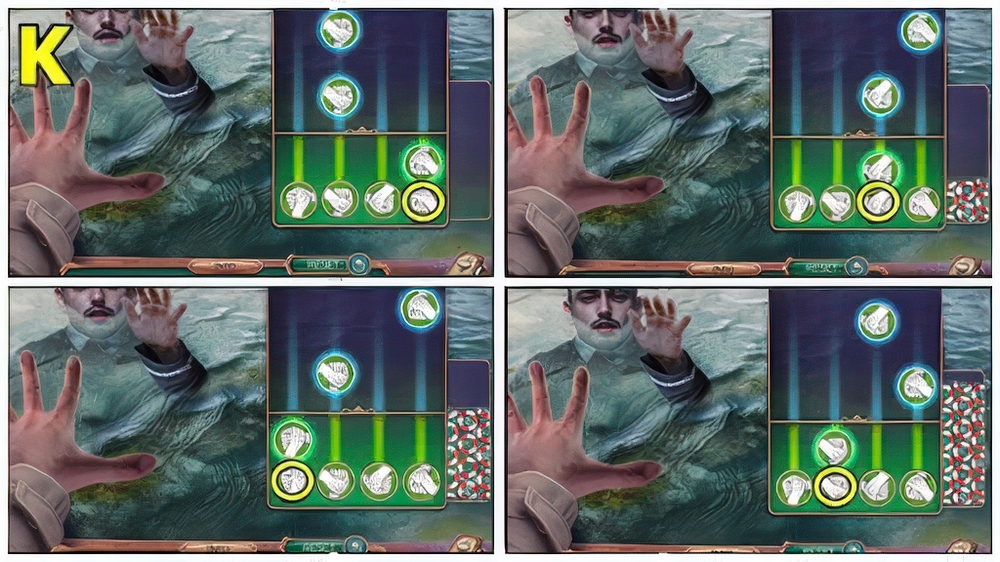
- Solution: (P).
- Solution (Q): H-E-H-G-D-A-B-E-D-A-B-E-D-G-H-I.
- Take EVIDENCE BOX (R).

- Take HINT (S) and SHIP IN A BOTTLE.
- Take MAGNIFYING GLASS (T).
- DETECTIVE’S BRUSH and MAGNIFYING GLASS on INCOMPLETE DETECTIVE’S KIT, take DETECTIVE’S KIT.
- Use DETECTIVE’S KIT (U).

- Play puzzle (V), receive TWEEZERS and EVIDENCE 2/4.
- UTILITY KNIFE and TWEEZERS on SHIP IN A BOTTLE, take CAPTAIN FIGURINE and LOCK UPPER PIECE.
- Place HINT (W) and CAPTAIN FIGURINE.

- Solution: Ax3-B-C-Dx2 (X).
- Take PUMP HANDLE (Y) and LEMON.
- Return to Solitary Hill.

- Add IRON BRUSH (Z) and LEMON, take BUCKET and SPARE WHEEL.
- Add PUMP HANDLE (A) and BUCKET, take BUCKET OF WATER.
- Enter Mansion Yard.

- Add BUCKET OF WATER (B), take LOCK LOWER PIECE and RUM.
- Enter Crime Scene.
- Add LOCK UPPER PIECE (C) and LOCK LOWER PIECE.
- Solution: (D).
- Solution (E): C-A-B-C-D-E-F.
- Move.

- Solution (F): A-B-Ax2.
- Move.
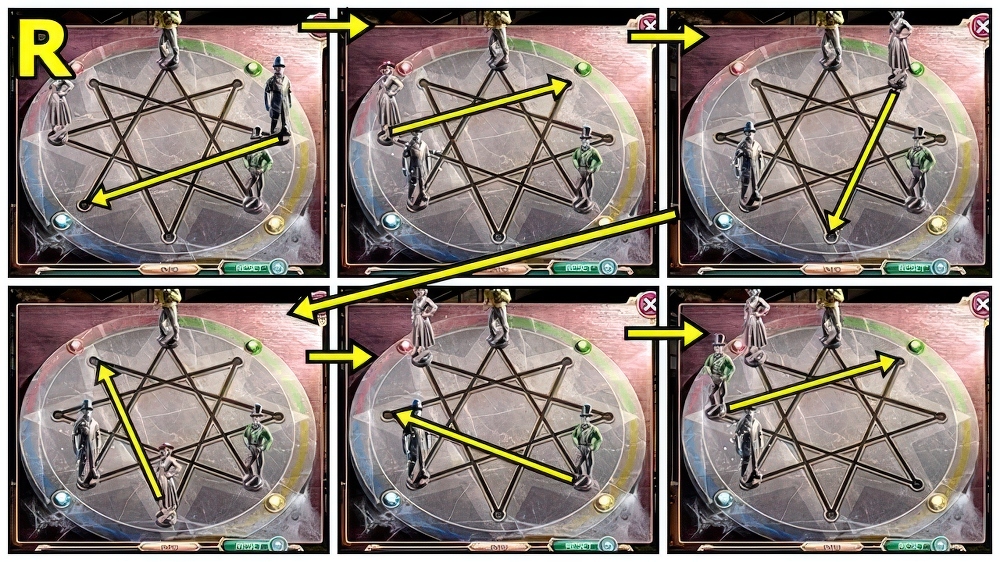
- Solution (G): C-G-I-C-H-A-D.
- Unlock.
- Solution (H): Light.
- Solution (I): 3-1-2.
- Dig.

- Solution (J).
- Enter Secret Room.
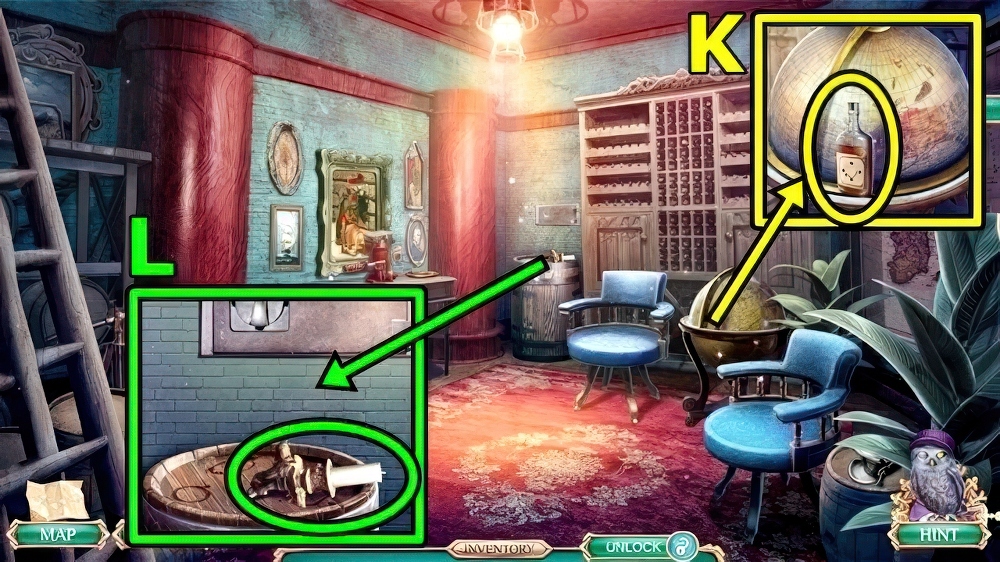
- Take BRANDY (K).
- Take WALL SCONCE (L).
- Take JACK (M).
- Add WALL SCONCE, take TEQUILA, read, take EVIDENCE 3/4.

- Add BRANDY (N), RUM and TEQUILA, read, take LIGHTER and EVIDENCE 4/4.
- EVIDENCE on EVIDENCE BOX, replace items, take COORDINATES and EVIDENCE FOR POLICE.
- Add COORDINATES (O), take PUMP and MAGNET.
- Return to Solitary Hill.
- Add SPARE WHEEL (P), PUMP, JACK and UTILITY KNIFE.
- Solution: Puzzle is randomly generated (Q).

- Take HAND DRILL (R).
- Take STONE (S).
- Use HAND DRILL, take CAR FIRST-AID KIT and SPATULA.
- Take LIGHTER (T) and MAGNET.
- Use SPATULA, take WEDGE and WALLET.
- Use WEDGE (U) and STONE, take GLUE and MARBLES.
- GLUE on WALLET, take FILE and COIN.
- Insert COIN (V), take WATER BOTTLE.
- MARBLES, WATER BOTTLE and FILE on CAR FIRST-AID KIT.
- Play puzzle (W).
- Solution: (A-D)-(D-B)-(B-C) (X).
- Move forward.
- Talk (Y).
- Take CHOPSTICKS (Z).
- Take SLINGSHOT BASE (A).
- Use CHOPSTICKS (B), take SLINGSHOT BAND.
- SLINGSHOT BAND and MARBLES on SLINGSHOT BASE, take LOADED SLINGSHOT.
- Use LOADED SLINGSHOT (C).
- Solution (D).
- Receive LOCKPICK BAR and HOLMES’S PIPE.
- Move down.
- Insert HOLMES’S PIPE (E), take PENKNIFE.
- Use PENKNIFE (F), examine, take DETECTIVE’S LICENSE and OUR ID.
- Move forward.
- Show OUR ID (G).
- Enter Scotland Yard.
- Talk (H).
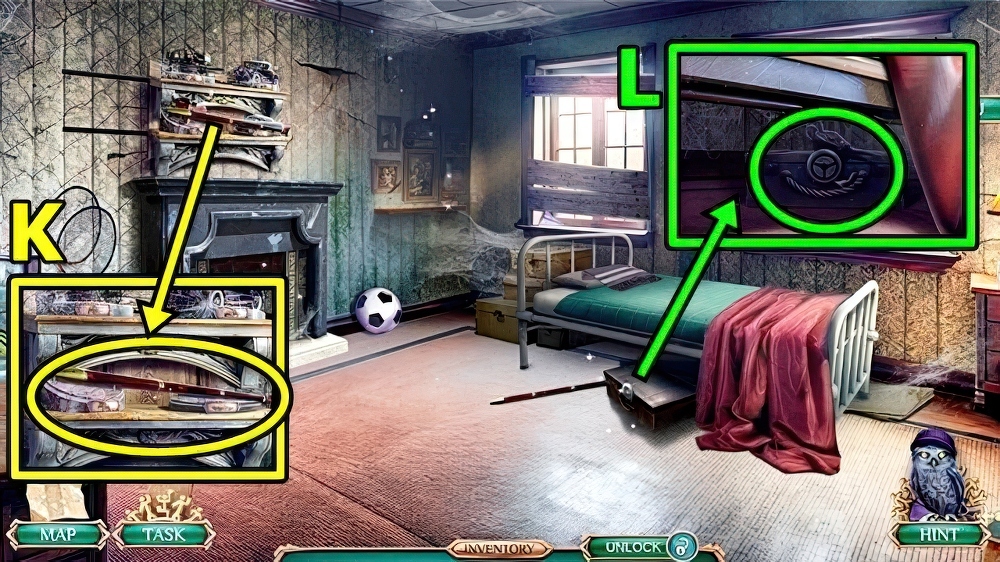
- Take COACH DRIVER’S SEAT (I).
- Take LION’S KNOCKER (J).
- Take FISHING ROD (K).
- Add LION’S KNOCKER, take HARD BRUSH and LOCKPICK.
- Return to Crossroads.
- Use LIGHTER (L), LOCKPICK and LOCKPICK BAR.
- Play puzzle, take BANK NOTE.
- Insert BANK NOTE (M), take LEMON JUICE.
- Move forward.

- Add LEMON JUICE (N) and HARD BRUSH.
- Solution (O).
- Take CARRIAGE WINDOW (P) and PEN.
- Enter Scotland Yard.

- Add DETECTIVE’S LICENSE (Q) and PEN, take COMPLETED STATEMENT.
- Give COMPLETED STATEMENT (R).
- Take POLICE PASS.
- Insert POLICE PASS (S), take CARRIAGE WHEEL.
- Add CARRIAGE WHEEL (T), CARRIAGE WINDOW and COACH DRIVER’S SEAT, take SKEIN OF FISHING LINE and SERGEANT’S KEY.
- Move down.
- SKEIN OF FISHING LINE and MAGNET on FISHING ROD, take MAGNETIC FISHING ROD.
- Use MAGNETIC FISHING ROD (U), take CONSTABLE’S KEY.
- Enter Scotland Yard.
- Use SERGEANT’S KEY (V) and CONSTABLE’S KEY.
- Play puzzle (W), receive STEERING WHEEL IN WAX.
- Talk (X).
- Take THIN RULER (Y) and LOCKED BOX.
- Use THIN RULER (Z), take BADGE 1/3 and FIREWOOD.
- Take BADGE 2/3 (A).
- Add STEERING WHEEL IN WAX, LIGHTER and FIREWOOD, take COPPER STEERING WHEEL.
- Take POOL SCOOP-NET (B).
- Add COPPER STEERING WHEEL.
- Enter Dusty Corridor.
- Take BADGE 3/3 (C).
- Take HEAVY CORD (D).
- Add HEAVY CORD (E), take CENTER TEXT and SAUCER 1/2.
- Move down.

- BADGE and CENTER TEXT on LOCKED BOX.
- Solution (F).
- Take CHLORINE FOR POOL and CUP.

- Use POOL SCOOP-NET (G) and CHLORINE FOR POOL.
- Play puzzle (H), receive CHINESE TEAPOT.
- Enter Dusty Corridor.
- Add CHINESE TEAPOT (I), take ANCIENT LAMP and TWO-PRONGED FORK.
- Use TWO-PRONGED FORK (J).
- Enter Abandoned Room.
- Take CANE (K).
- Use CANE (L), take LAMP OIL and SEAGULL DECORATION.
- Move down.
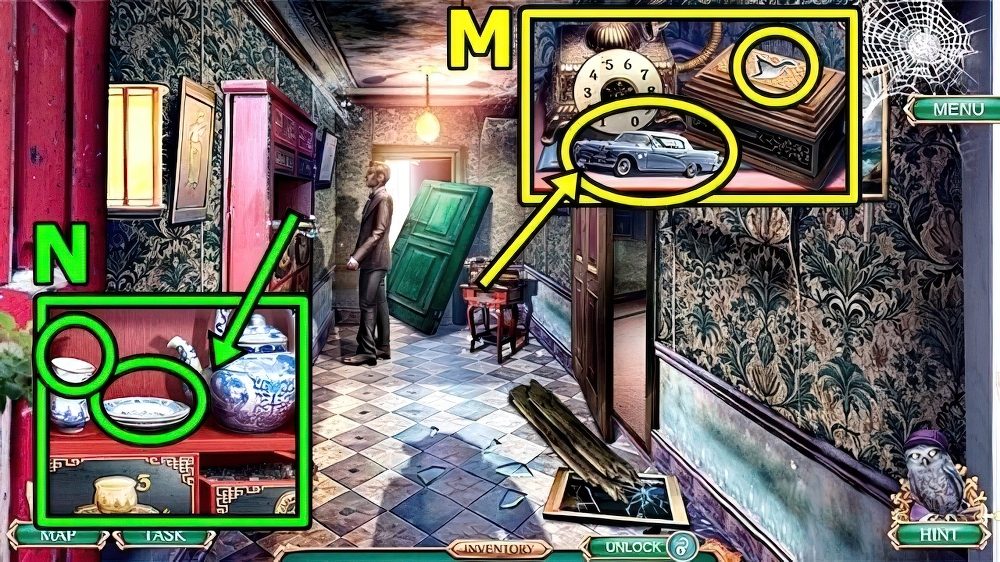
- Take MODERN CAR (M).
- Add SEAGULL DECORATION, take WICK and SAUCER 2/2.
- Add CUP (N) and SAUCER, take ANCIENT CAR and CONSTELLATION STAR.
- Enter Abandoned Room.

- Add ANCIENT CAR (O) and MODERN CAR, take MOLD and LAMP BULB.
- LAMP OIL, WICK, LAMP BULB and LIGHTER on ANCIENT LAMP, take LIT LAMP.
- Add LIT LAMP (P), play puzzle, take SAILOR.
- Move down.
- Add SAILOR (Q).
- Solution (R).
- Solution (S).
- Take LEATHER PATCH (T) and NORTH STAR.
- Move down.
- Add CONSTELLATION STAR (U) and NORTH STAR, take FISHING LURE and TIN.
- Add MOLD (V) and TIN, take TIN STEERING WHEEL.
- Return to Abandoned Room.
- Take SHABBY BELLOWS (W).
- Add TIN STEERING WHEEL (X), take BLADE and NOZZLE.
- NOZZLE, LEATHER PATCH and GLUE on SHABBY BELLOWS, take ANCIENT BELLOWS.
- Use ANCIENT BELLOWS (Y).
- Solution (Z).
- Examine (A), take CAR BADGE and PHONE DIAL.
- Move down.
- Add PHONE DIAL (B).
- Take LOST DISH (C).
- Take PARTIAL TACKLE BOX (D).
- Add LOST DISH, take RANGER BADGE and THICK FABRIC.
- Add RANGER BADGE (E) and CAR BADGE, play puzzle, receive FOLDING LADDER.
- Place FOLDING LADDER (F).
- Enter Archive.
- Take OLD KEY (G).
- Take WHEEL (H).
- Take SCREW (I).
- Insert OLD KEY, take FISHING AWARD and FISHING SINKER 1/4.
- Move down.
- Add FISHING AWARD (J), take ADHESIVE TAPE and FISHING SINKER 2/4.
- ADHESIVE TAPE and THICK FABRIC on BLADE, take KNIFE.
- Use KNIFE (K), take METAL GENTLEMAN and NEEDLE-NOSE PLIERS.
- Enter Archive.

- Take FISHING SINKER 3/4 (L).
- Add WHEEL, SCREW and NEEDLE-NOSE PLIERS.
- Play puzzle (M), receive REVOLVER REPLICA.
- Move down.
- Place REVOLVER REPLICA (N), take METAL LADY and FISHING SINKER 4/4.
- FISHING SINKER and FISHING LURE on PARTIAL TACKLE BOX, take TACKLE BOX.
- Add TACKLE BOX (O), take SANDPAPER and METAL CONSTABLE.
- Enter Archive.

- Place METAL GENTLEMAN (P), METAL LADY and METAL CONSTABLE.
- Solution: (Q).
- Solution (R).

- Solution (S).
- Take SCRAPER (T) and PENCIL.

- Use SCRAPER (U), take LONDON MAP.
- Give LONDON MAP (V) and PENCIL.

- Take MAP TO FARM (W).
- Move down.
- Place MAP TO FARM (X).

- Solution (Y).

- Take WIRE HANGER (Z).
- Take LANTERN VALVE (A).

- Add LANTERN VALVE (B), take CHAIN and LOCKPICK TYPES.
- NEEDLE-NOSE PLIERS and LOCKPICK TYPES on WIRE HANGER, take IMPROVISED LOCKPICK.
- Insert IMPROVISED LOCKPICK (C).
- Enter Large Room.
- Take INSTRUCTIONS PART 1/2 (D).
- Take INFINITY DECORATION (E).
- Add INFINITY DECORATION (F), take GNOME HAT.
- Move down.
- Take GNOME FISHING ROD (G).
- Add GNOME FISHING ROD (H) and GNOME HAT, take COPPER GEAR and VINEGAR.
- Add SANDPAPER (I) and VINEGAR.
- Play puzzle (J), take PRESERVER REPLICA.
- Enter Large Room.

- Take LEVER (K).
- Add PRESERVER REPLICA, take IRON GEAR and MINUTE HAND.
- Add LEVER (L), CHAIN, COPPER GEAR and IRON GEAR.
- Enter Equipment Room.
- Take INSTRUCTIONS PART 2/2 (M).
- Take PIKE POLE BASE (N).
- Add INSTRUCTIONS PART (O).

- Solution (P).
- Take SIGNAL RECEIVER (Q) and HOUR HAND.
- Move down.
- Add MINUTE HAND (R) and HOUR HAND, take MERMAID and HORN CURL.
- Add MERMAID (S), take PIKE POLE HANDLE and MONITOR DISPLAY WIRES.
- Enter Equipment Room.

- Insert MONITOR DISPLAY WIRES (T) and SIGNAL RECEIVER.
- Solution: H-B-G-D-A-C-F-E (U).
- Take HEAVY KEY (V) and SMALL MEGAPHONE.
- Return to Farmyard.
- Use HEAVY KEY (W).
- Move forward.

- Take LIVE FISH 1/3 (X).
- Take LIVE FISH 2/3 (Y).
- Take RUBBER BULB (Z).
- SMALL MEGAPHONE and RUBBER BULB on HORN CURL, take HORN.
- Use HORN (A), take LIVE FISH 3/3 and RESIN.
- Add LIVE FISH (B), take GOLDFISH and FISH SIGN.
- Return to Large Room.

- Add FISH SIGN (C), play puzzle, examine, take STAPLE REMOVER.
- Use STAPLE REMOVER (D), receive CROSSBOW and PIKE POLE TIP.
- Return to Farm Pier.
- PIKE POLE TIP and PIKE POLE HANDLE on PIKE POLE BASE, take PIKE POLE.
- Use PIKE POLE (E).
- Play puzzle (F), receive ANCHOR DECORATION.
- Add ANCHOR DECORATION (G), take DRAWER HANDLE and SEAWEED.
- Return to Equipment Room.

- Add DRAWER HANDLE (H) and RESIN, take CLOWNFISH and CROSSBOW BOLT.
- Add GOLDFISH (I) and CLOWNFISH, take TRIPWIRE and NET.
- Return to Farm Pier.

- CROSSBOW BOLT and NET on CROSSBOW, take CROSSBOW WITH NET.
- Add CROSSBOW WITH NET (J), SEAWEED and TRIPWIRE.
- Solution: Puzzle is random, screenshot is an example (K).
- Walkthrough Bonus Chapter, at the link below.


