Mystical Riddles Season 1 Episode 1: Ship From Beyond – The walkthrough of the game begins with the fact that the lighthouse keeper turns to you and reports that something strange is happening in the coastal town. A strange fog has enveloped the shore, and many fishermen go out to sea and never return. He can’t trace any signals from where all the fishermen are supposed to have disappeared. People in the city are scared. You, as an expert on the paranormal, must get there and find out what happened. Arriving at the last point where the radar sensors detected the signal of the missing people, you find a ship that should not exist. If you can’t complete any of the puzzles or don’t know where the items are, you can watch the Mystical Riddles Season 1 Episode 1: Ship From Beyond walkthrough on our website and find out what happened to the fishermen.
Mystical Riddles Season 1 Episode 1: Ship From Beyond – Walkthrough
Here you can watch the full walkthrough of Mystical Riddles Season 1 Episode 1: Ship From Beyond, namely the main story.
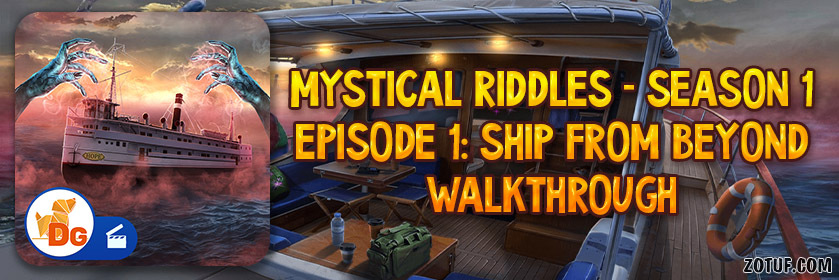
- Take BATTERY INSTRUCTIONS, FOLDING CANE and ROUND KEY (A).
- Take note, use ROUND KEY (B).
- Take notebook and BATTERY (C).
- Take map, LINE and CABLES (D).

- BATTERY and CABLES on BATTERY INSTRUCTIONS (E).
- Solution: Fx2-Gx3-Hx4-J.
- Receive CHARGED BATTERY.
- Remove old battery, place CHARGED BATTERY (K).
- Play puzzle (L).
- Receive BROOCH.

- Use BROOCH, take note, CABLE CUTTER and camera (M).
- Use camera (N).

- Take note, CHISEL and PIANO KEYS 1/2.
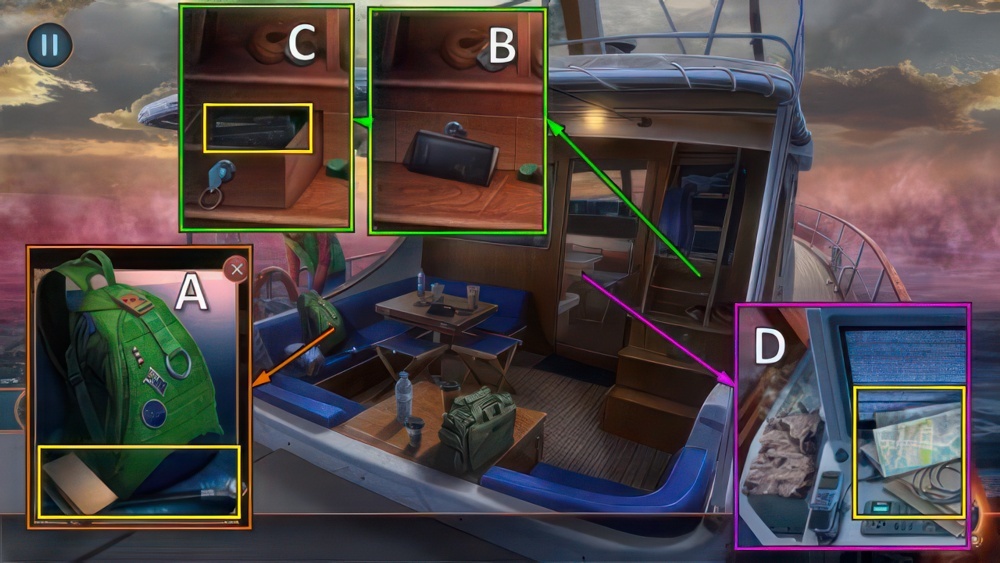
- Use CABLE CUTTER (O).
- Roll out hose (P).
- Take MUSIC SHEET and BOARD (Q).

- Take DRAINAGE PUMP, move hose (R).
- Place FOLDING CANE and BOARD (S).
- Select diamonds when they are green (T).
- Go (U).

- Use camera (V).
- Take note, COMPASS and PIANO KEYS 2/2 (W).
- Place MUSIC SHEET and PIANO KEYS (X).

- Easy and hard solution (Y): 9-14-1-3-10-11-15-12-8-5-7-6-13-4-2.
- Take BOUNCING BALL, POWDER CASE and MAGNET (Z).

- MAGNET on LINE, receive MAGNET ON LINE.
- Use MAGNET ON LINE.
- Take METAL SWITCH (A).
- Open, place and move METAL SWITCH (B).
- Go (C).

- Take note and LIGHTER (D).
- Take FISHERMAN LICENSE (E).
- Offer FISHERMAN LICENCE (F).
- Select 1 or 2 (G).
- Note: if you’ve selected 2, you need to skip the steps marked #, below.
- Receive DRAGONFLY.

- Place DRAGONFLY (H).
- Easy solution (I): (1-5)-(2-3)-(8-9)-(3-8)-(4-7)-(5-6).
- Hard solution (I): (1-5)-(2-3)-(5-6)-(4-7)-(4-6)-(1-7)-(8-9)-(2-9)-(3-8).
- Take OCTOPUS DRAWING and PEARL (J).

- Place PEARL (K), take BIRD LOCK (L).
- # Go (M).

- # Take SCALES and KITCHEN SCAPULA (N).
- # Use KITCHEN SCAPULA (O).
- Take EMBLEMS 1/2 and WEIGHT (P).

- # Place SCALES and WEIGHT (Q).
- # Solution (R): swap (1-8)-(3-9).
- # Take SHIP PARTS 1/3 and TUNING FORK (S).
- Go to Cruise Ship Restaurant.

- Place BIRD LOCK (T).
- Take PLASTER TENTACLES 1/4 and RUBBER (U).
- # Use TUNING FORK, take FISHERMAN’S KNIFE (V).

- BOUNCING BALL and RUBBER on COMPASS, receive SLINGSHOT.
- Use SLINGSHOT (W).
- Take WHEEL HANDLES 1/3 (X).
- Use CHISEL, take QUARTER (Y).
- Walk down.

- Use QUARTER (Z).
- Play puzzle (A).
- Take KLAXON (B).
- Use KLAXON, take PLASTER TENTACLES 2/4, SCREW, and FLAG (C).
- # Use FISHERMAN’S KNIFE, take UMBRELLA BUTTON (D).
- Go to Upper Deck.

- Use FLAG, take WHEEL HANDLES 2/3 (E).
- Use DRAINAGE PUMP, take LEATHER GLOVE (F).
- # Place UMBRELLA BUTTON, take SHIP PARTS 2/3 and EMBLEMS 2/2 (G).
- Use LEATHER GLOVE, take POWDER PUFF (H).
- # Go (I).

- # Place EMBLEMS (J).
- # Easy and hard solution (K): (1-12)-(2-6)-(3-12)-(4-8)-(6-8)-(7-12)-(8-12)-(9-10)-(10-12).
- # Take note and FIN (L).
- # Place FIN, take FISH AMULET (M).
- Go to Cruise Ship Restaurant.

- Use POWDER CASE and POWDER PUFF.
- Select 8-3-1-4 (N).
- Take PLASTER TENTACLES 3/4 and LIGHTER GAS (O).
- # Place FISH AMULET, take note, LOCK DISC 1/2 and SUCTION CUP KEYCHAIN (P).
- # Go (Q).

- # Use SUCTION CUP KEYCHAIN (R).
- # Take LOCK DISC 2/2 (S).
- # Go (T).

- # Place LOCK DISC (U).
- Enter 1-2-3-9 (V).
- Take note, SHIP PARTS 3/3 and SHIP PHOTO (W).
- # Place SHIP PARTS and SHIP PHOTO (X).
- # Play puzzle (Y).
- Go to Cruise Ship Restaurant.

- LIGHTER GAS on LIGHTER.
- Use LIGHTER (X).
- Take RESIN and PLASTER TENTACLES 4/4 (Y).
- Go (Z).

- Place OCTOPUS DRAWING and PLASTER TENTACLES (A).
- Easy solution (B): 5-7-3-1-2.
- Hard solution (B): 5-7-3-1-2-4-6.
- Take FOUNTAIN PEN and METAL ANCHOR (C).
- Use METAL ANCHOR, take CRAB FIGURINE and WHEEL HANDLES 3/3 (D).
- Walk down twice.

- Place WHEEL HANDLES (E).
- Easy solution (F): 2-5-6-7-8.
- Hard solution (G): 4-5-6-8-9.

- Take WRENCH, ANCHOR CHAIN and note (H).
- Use ANCHOR CHAIN.
- Take CASED SPOTTING SCOPE and VALVE (J).
- Place SCREW, WRENCH and VALVE (J).
- Go (K).

- Use camera (L).
- Take TRAVEL BAG, CAT AMULET and HEAVY-HEELED SHOE (M).
- Use HEAVY-HEELED SHOE (N).
- Play puzzle (O), receive ROLLER SKATES.
- Use ROLLER SKATES (P).
- Go (Q).

- Use camera (R).
- Take STAPLE REMOVER (S).
- STAPLE REMOVER on CASED SPOTTING SCOPE, receive SPOTTING SCOPE.
- Open, use SPOTTING SCOPE (T).
- Take note and HAIRPIN (U).
- Use FOUNTAIN PEN, take LIGHT BULB (V).
- Walk down.

- Use HAIRPIN (W).
- Take STEERING WHEEL PATTERN (X).
- Place STEERING WHEEL PATTERN, take WIRE.
- Place RESIN, take SEAHORSE FIGURINE (Y).
- Walk down.

- Place CRAB FIGURINE and SEAHORSE FIGURINE (Z).
- Easy solution (A): Ex3-D-E-Bx2-Dx2-Bx3-Ex2, Fx2-Ix2-Gx4-Ix2.
- Hard solution (A): Ex2-D-Ex2-Bx2-Dx2-Bx2-D-Bx2-Ex2, Fx3-Ix2-Gx5-Ix2.
- Take GEARS 1/3 and GOLDEN BRACELET (J).

- Place LIGHT BULB and GOLDEN BRACELET, pull bracelet (K).
- Take CORKSCREW (L).
- Go (M).

- Use CORKSCREW, take PAPER SHEET and SHIP AMULET (N).
- SHIP AMULET on TRAVEL BAG.
- Easy solution (O).
- Hard solution (P).
- Take SCOOP.
- Us SCOOP, take TAPE (Q).
- Go (R).

- Place WIRE and TAPE (S).
- Play puzzle (T), receive CAT TREAT.
- Offer CAT TREAT, place CAT AMULET (U).
- Take GEARS 2/3 and LIPSTICK (V).
- Walk down twice.

- Place PAPER SHEET and LIPSTICK (W), receive CHEST PASSWORD.
- Place CHEST PASSWORD (X).
- Select 1-2-3 (Y).
- Take HANGER (Z).
- Go to Cargo Section.
- Use HANGER (A).
- Take GEARS 3/3 (B).
- Place GEARS (C).
- Avoid obstacles (D).
Congratulations! You have completed the game Mystical Riddles Season 1 Episode 1: Ship From Beyond.


On Mystical Riddles: Ship from Beyond, Ch. 1, penultimate screen in the walkthrough
When I press the three configurations on the chest, the circular spot, parallel to the three on the bottom left begins pulsing and won’t finish the action intended. I have tried this multiple times with the same result.
There are a few glitches in this game, I had to restart certain parts of it before it would let a tap be recognised.