
Paranormal Files 5: Trials of Worth (Bonus Chapter) – You will have to look at the events from the other side and solve the mystery hidden by Rachel Cowell, a professor of ancient history. Together with Rick Rogers she participated in solving the mysteries of the Trials of Worth, but what motivated her to join the expedition? Now you’ll find out her story. Rachel receives an invitation from Arthur Novak to participate in the study of artifacts from an ancient Mayan burial site. The dead language inscriptions could be the key to unlocking the legendary path to all knowledge. However, academia is skeptical of such stories, which fuels Rachel’s desire to prove the legends are real. Her determination and drive for discovery leads her to the Archaeology Center, where the trials that changed everything begin. What secrets does her past hold, and how are they connected to the mystical power of artifacts? In this chapter, you’ll find out what’s really behind her actions.
Bonus Chapter Walkthrough

- Open folder (A).
- Look at photo (B).
- Select monitor (C) and then email.

- Take TRIBAL NECKLACE, ENGINE OIL, and RACHEL’S BRIEFCASE (D).
- ENGINE OIL on RACHEL’S BRIEFCASE and select, take CENTER CONSOLE KEY and VOYAGER EMBLEMS 1/3.
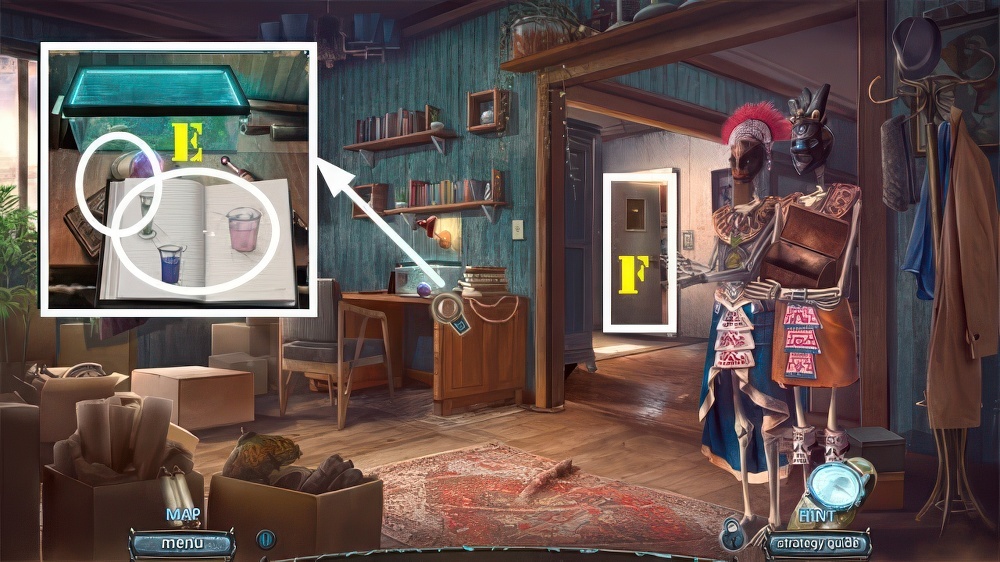
- Use CENTER CONSOLE KEY, take ARCHAEOLOGIST BRUSH and BUILDING CODE (E).
- Place BUILDING CODE, enter 0412 (F).
- Go (G).

- Take ANTIQUE BOX, VOYAGER EMBLEMS 2/3, HAMMER, and ANCIENT SYMBOL PART (H).
- Walk down.
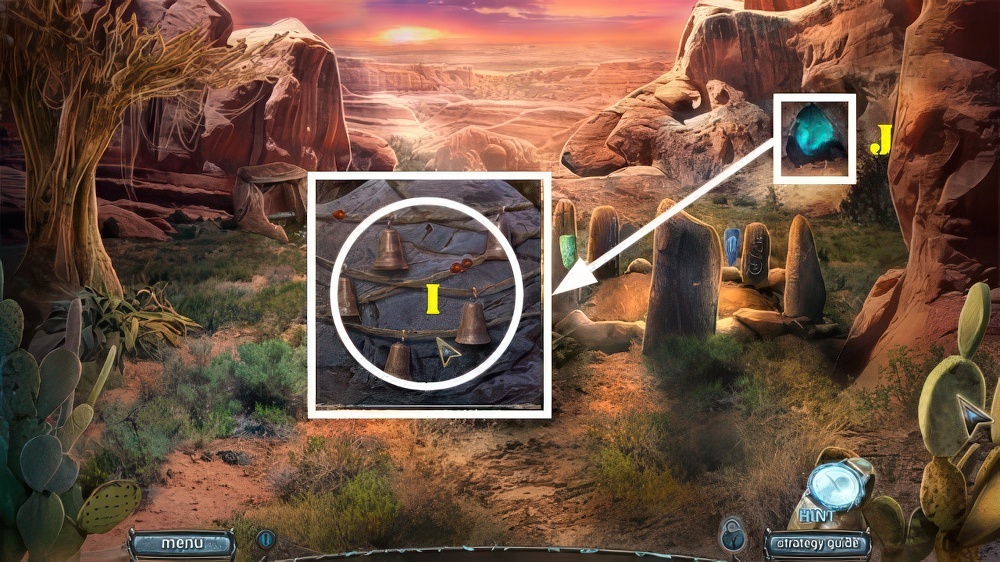
- Use HAMMER, take ANTIQUE MAGNIFIER and CRACKED MAYAN MASK (I).
- Go to Arthur’s Office.

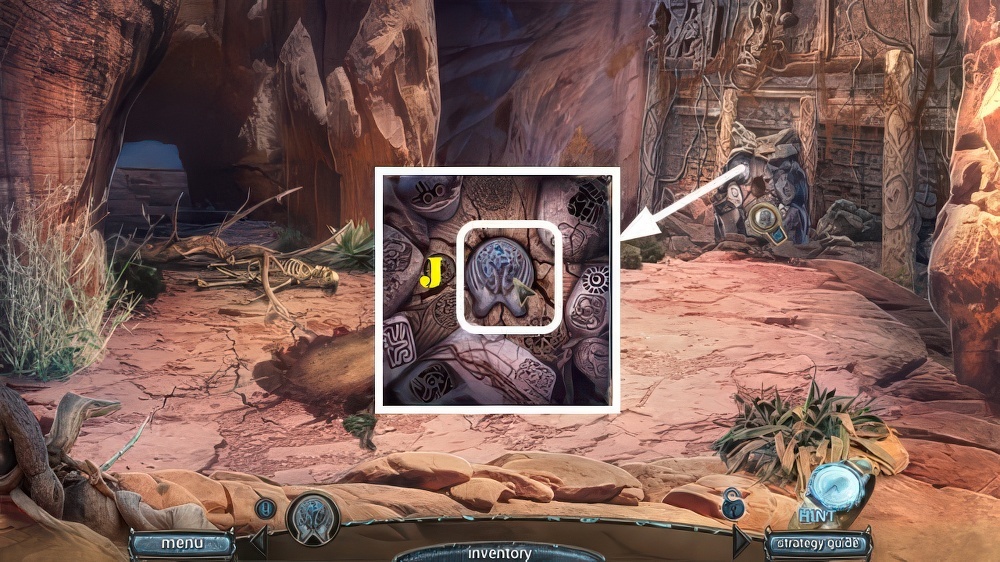
- Use ARCHAEOLOGIST BRUSH and ANTIQUE MAGNIFIER (J), play mini-puzzle.
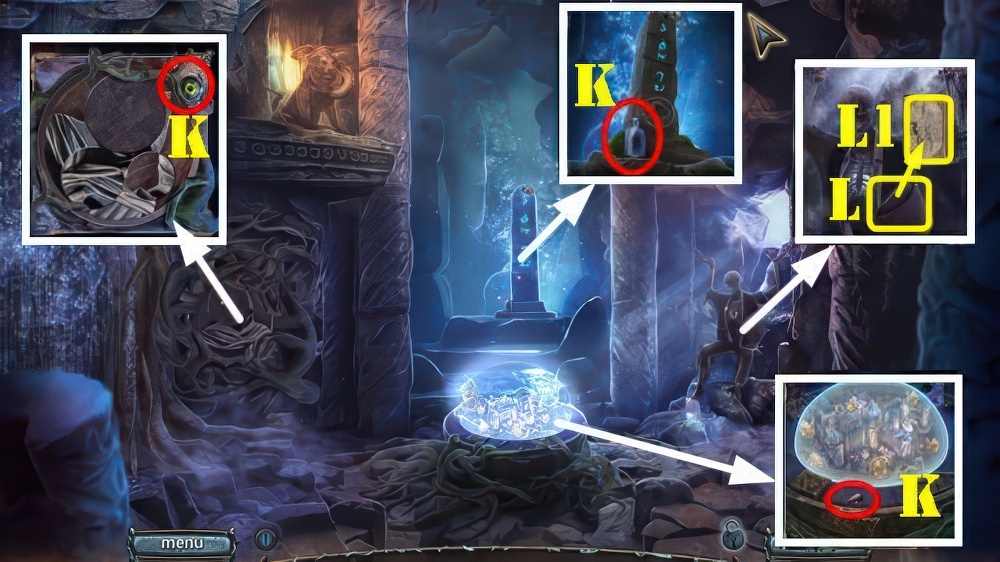
- Take OLD SCROLL (J) and LIFE STONE (K).
- LIFE STONE on CRACKED MAYAN MASK, take MAYAN MASK.
- Place MAYAN MASK and TRIBAL NECKLACE (L), take VOYAGER EMBLEMS and RECORD (M).
- Walk down.
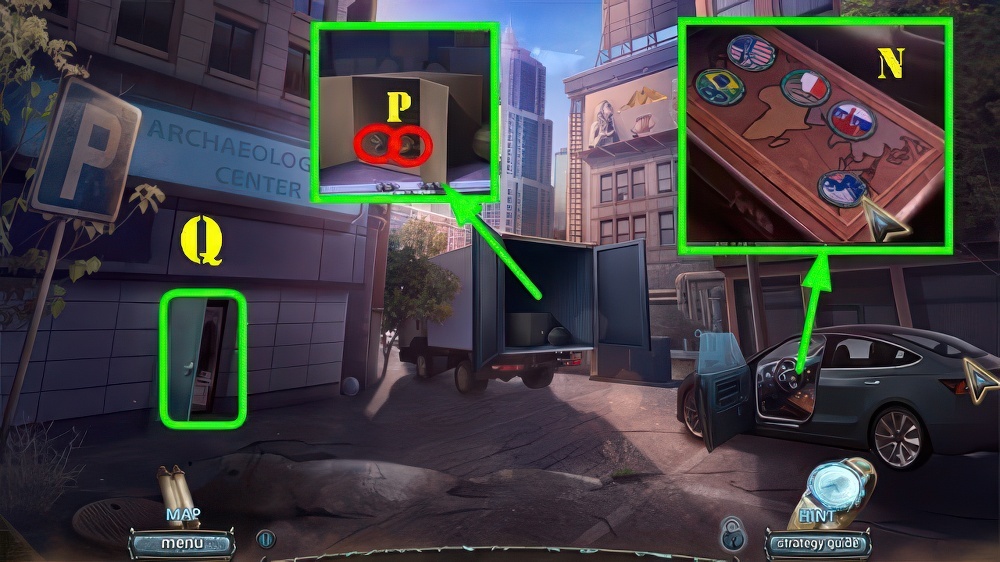
- Place VOYAGER EMBLEMS, solution (N).
- Play puzzle (O), receive ANTIQUE KNIFE.
- Use ANTIQUE KNIFE, take COMPASS and STARFISH ORNAMENT (P).
- Go (Q).
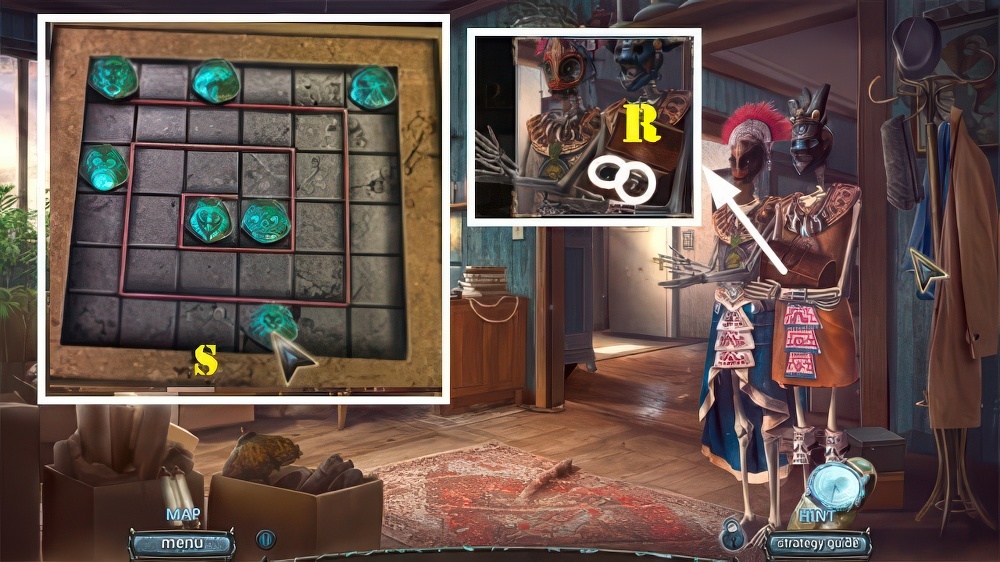
- Place COMPASS, take ANCIENT SYMBOL PART and TONE ARM (R).
- Two ANCIENT SYMBOL PARTS and OLD SCROLL on ANTIQUE BOX.
- Solution (S).
- Take FISH ORNAMENT and MAGE FIGURINE.

- Place STARFISH ORNAMENT and FISH ORNAMENT, take FISH FOOD (T).
- Use FISH FOOD, take ARTHUR’S PASS (U).
- Use ARTHUR’S PASS (V).
- Go (W).
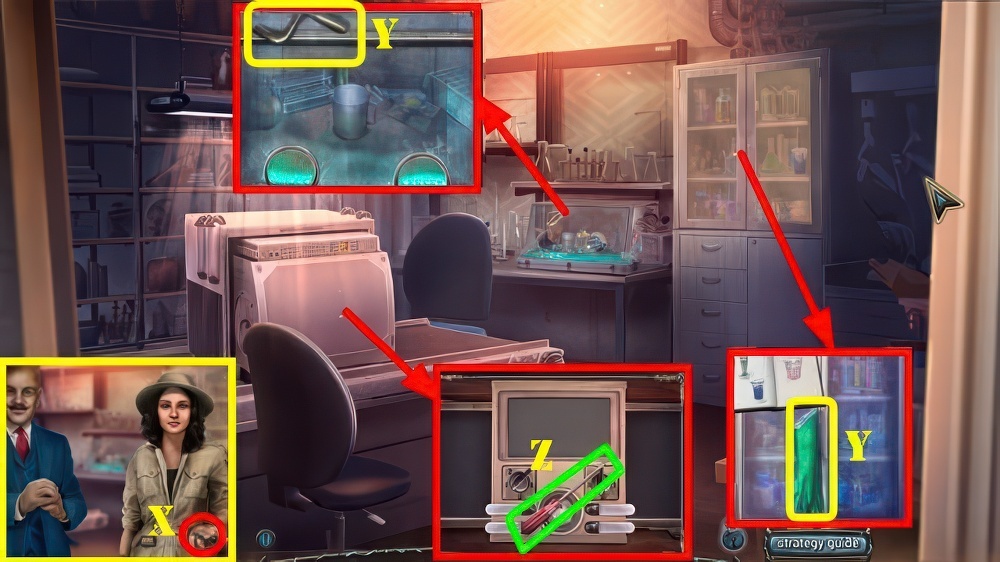
- Take MACHINE KEY (X).
- Take GRAMOPHONE HANDLE and GLOVES (Y).
- Use MACHINE KEY, take SCREWDRIVER (Z).
- Walk down.
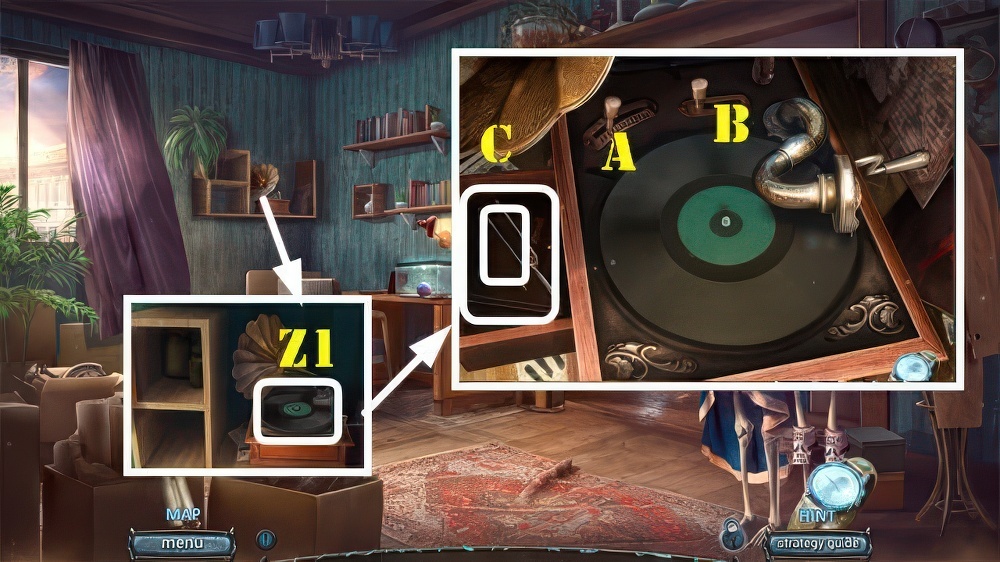
- Place RECORD, TONE ARM, and GRAMOPHONE HANDLE.
- Use SCREWDRIVER (Z1).
- Solution (Ax4-Bx2).
- Take TUNING FORK and ARTHUR’S NOTES (C).
- Select ARTHUR’S NOTES 2x, take ARTIFACT NOTES.
- Place ARTIFACT NOTES, take LIST OF CHEMICALS and IMPORTANT ARTIFACTS (E).
- Go (F).

- Use TUNING FORK and LIST OF CHEMICALS.
- Select three vials (G), receive SCANNER SETTINGS, take CHEMICAL SET (H).

- Use GLOVES and CHEMICAL SET, select the three vials (orange), take CHEMICAL MIXTURE (I).
- Place CHEMICAL MIXTURE, IMPORTANT ARTIFACTS, and SCANNER SETTINGS, set left dial to 4 (J) and right one to 1 (K).

- Talk to characters, play automatic puzzle.
- Take BAS-RELIEF PART, DOOR RING, and GUARDIAN FIGURINE (M).
- Use DOOR RING, take WARRIOR FIGURINE (N).
- Place MAGE FIGURINE, WARRIOR FIGURINE, and GUARDIAN FIGURINE (O), take STONE SPHERE and BAS-RELIEF PART (P).
- Place two BAS-RELIEF PARTS, take TRAP CLUE (Q), go left.
- Place STONE SPHERE and TRAP CLUE (R), go left.
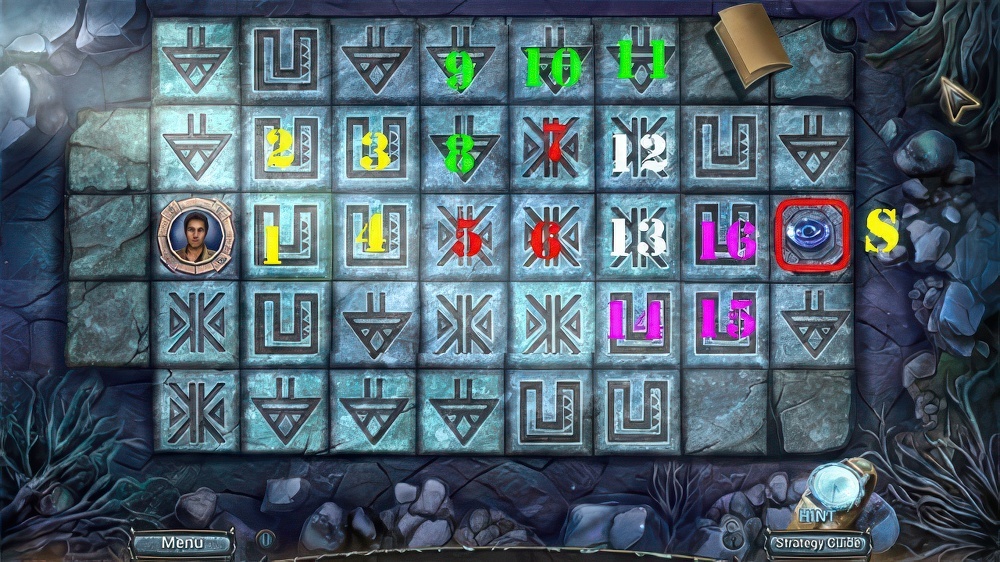
- Solution (1-16).
- Take ALL-SEEING EYE (S).

- Place ALL-SEEING EYE (T).
- Take MAGIC SAND (U).
- Select folded map (V) and place MAGIC SAND (W).

- Take ANCIENT PIN, OLD BACKPACK, EARTH RUNE, and BELLS 1/5 (W).
- ANCIENT PIN on OLD BACKPACK, take AIR RUNE and BELLS 2/5.
- Place EARTH RUNE and AIR RUNE (orange), take LEVITATION STONE (X).
- Use LEVITATION STONE (Y), walk forward.

- Solution one (A-C-B).
- Solution two: (E-I-G).
- Solution three: (K-O-M-J-N).
- Take BELLS 3/5, BRANCH, CHESS PIECE, and POWER SYMBOL (P).
- Walk down.

- Place CHESS PIECE, take CHISEL and BEAST SKULL (Q).
- Go (R).
- Place BEAST SKULL (S), take BELLS 4/5 and WOODEN LADLE (T).
- Walk down.

- Use WOODEN LADLE (U), receive LADLE WITH SAND and SANDPAPER.
- SANDPAPER and CHISEL on BRANCH, take WOODEN HANDLE.
- Place WOODEN HANDLE (V), receive HATCHET.
- Go (W).
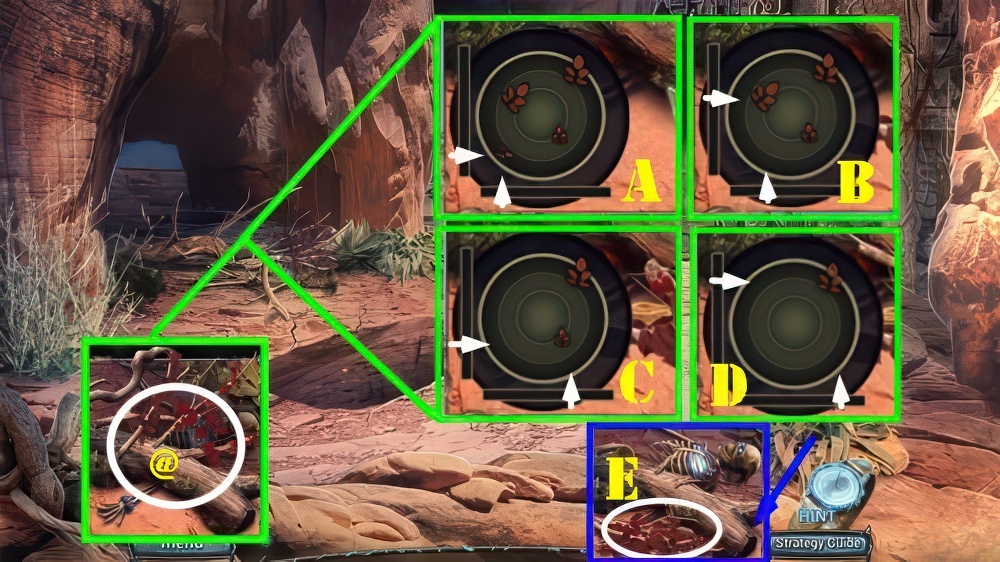
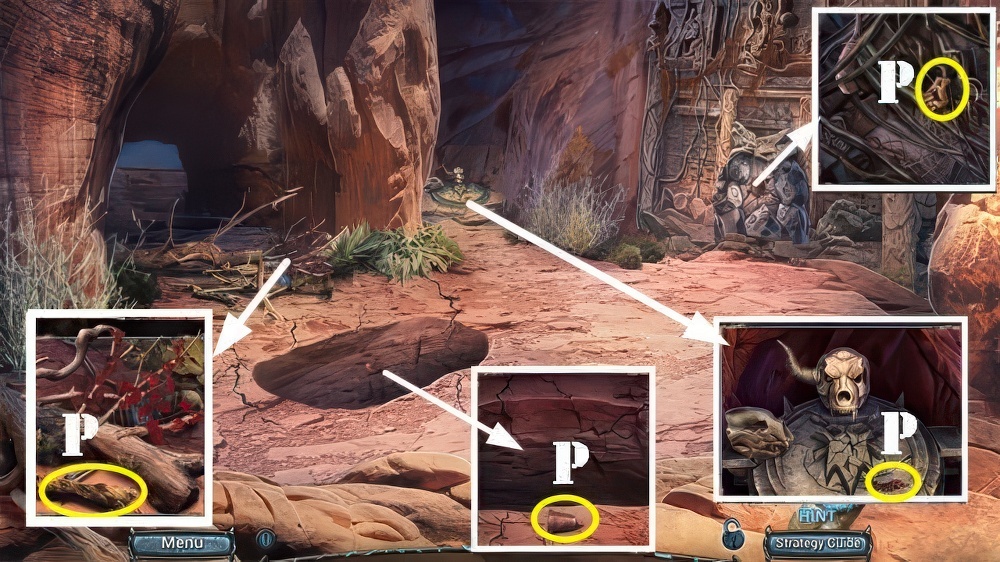
- Use HATCHET (@), solution (A-B-C-D).
- Take BRANCHES (E).

- Use HATCHET, take BEAST HORN and LIANA (F).
- Use BRANCHES, LIANA, and LADLE WITH SAND (G).
- Play puzzle (H), receive BELLS.
- Walk down.
- Place BELLS (I).
- Go (J).
- Take BEAST EYE, BROKEN SOUL VIAL, and BEAST FANG (K).
- Use POWER SYMBOL and look at the book (L), take KEY PARTS 1/3 (L1).
- Go to Plateau.

- Place BEAST FANG, BEAST HORN, and BEAST EYE, take ROPE, ANCIENT BOOK, and STONE SPIDER (M).
- Place STONE SPIDER, take KEY PARTS 2/3 and METAL FEATHER (N).
- Go to Cave.

- Place ROPE (O), take WOODEN DISC (P).
- Place WOODEN DISC, rotate into place in order (1-4), take BROKEN STONE PAW and KEY PARTS.
- Use KEY PARTS, take SOUL EMBLEM and METAL LIGHTNING (Q).
- Walk down.

- METAL FEATHER and METAL LIGHTNING on ANCIENT BOOK, select page and take UNUSUAL LOCKPICK.
- Use UNUSUAL LOCKPICK, take OLD MIRROR and WATER DRAGON STATUETTE (R).
- Use OLD MIRROR (S), take GLASS STOPPER and STONE HEART (T).
- Go (U).

- Place STONE HEART (V), take FIRE DRAGON STATUETTE (V1).
- Place WATER DRAGON STATUETTE and FIRE DRAGON STATUETTE (W).
- Play puzzle, receive ICE SPELL.
- Place ICE SPELL, take STONE SHARDS 1/2 and SPEAR (X).
- Use SPEAR (Y), take SNAKE HEAD and POTION VIAL (Z).
- Go to Plateau.

- Use POTION VIAL, take FIRE SPELL, ANCIENT GOBLET, and STONE SHARDS (A).
- Use ANCIENT GOBLET (B), receive GOBLET WITH RESIN.
- Go to Cave.

- GOBLET WITH RESIN, STONE SHARDS, and FIRE SPELL on BROKEN STONE PAW, take STONE PAW.
- Place SNAKE HEAD and STONE PAW (purple), take STAFF OF TRUTH (C).
- Use STAFF OF TRUTH, complete mini-puzzle, take LIT CRYSTAL (D).
- Place LIT CRYSAL, take SOUL STONE (E).
- SOUL STONE, SOUL EMBLEM, and GLASS STOPPER on BROKEN SOUL VIAL, take SOUL VIALS 0/2.
- Use SOUL VIALS 0/2 (F), receive SOUL VIALS 1/2.
- Go to Plateau.

- Use SOUL VIALS 1/2 (G), receive SOUL VIALS.
- Go to Cave.
- Use SOUL VIALS (H).
- Take GUARDIAN’S SYMBOL (I).
- Go to Plateau.
- Place GUARDIAN’S SYMBOL (J).
- Play puzzle.
Congratulations! You have completed the game Paranormal Files 5: Trials of Worth.


