
Paranormal Files 8: Price of a Secret – The game walkthrough begins with the Russells winery being at the centre of strange events earlier this year. Many believe in the stories of ghosts appearing there. However, we were unable to find any traces of paranormal activity. Especially since nothing out of the ordinary has happened here in years. Rachel has new news from Rogers. She was watching a video of an old winery and suddenly saw Rick’s name carved into a tree. It can’t be a coincidence. After all these years of fruitless searching, any mention of Rick is worth considering. What I was able to find out about this winery is that it is located on a secluded island. According to the locals, it’s been haunted many times. If Rick was there, the rumours could be true. You’ll book rooms at a local hotel and send all the information. While you prepare for your trip, Gabriel will pass on information about the case to the others. If you can not pass any of the puzzles or do not know where the items are, on our site you can watch the walkthrough of the game Paranormal Files 8: Price of a Secret, and find out what forces really work there.
Paranormal Files 8: Price of a Secret – Walkthrough
Here you can see the full walkthrough of Paranormal Files 8: Price of a Secret game, namely for all chapters, including bonus chapter, in pictures.
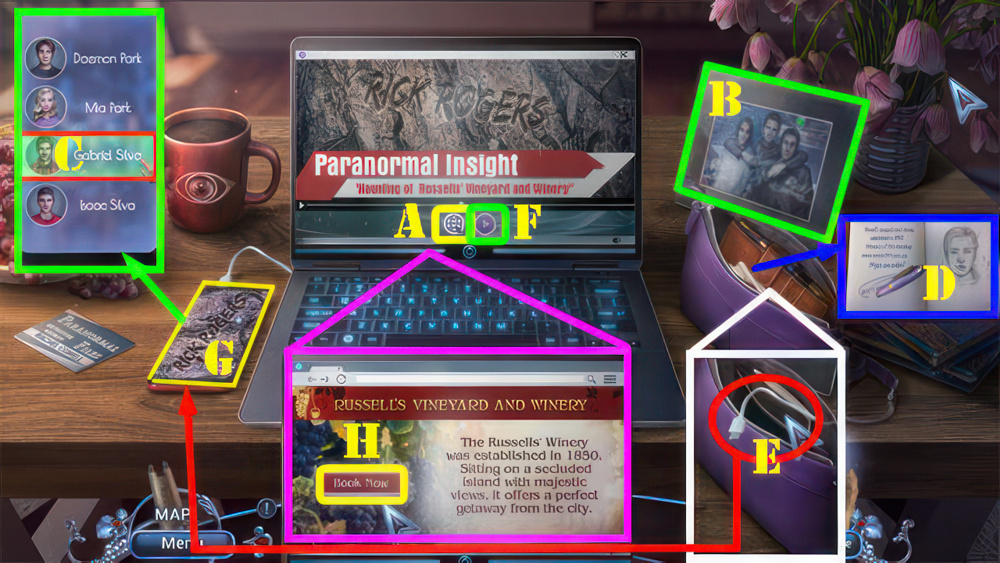
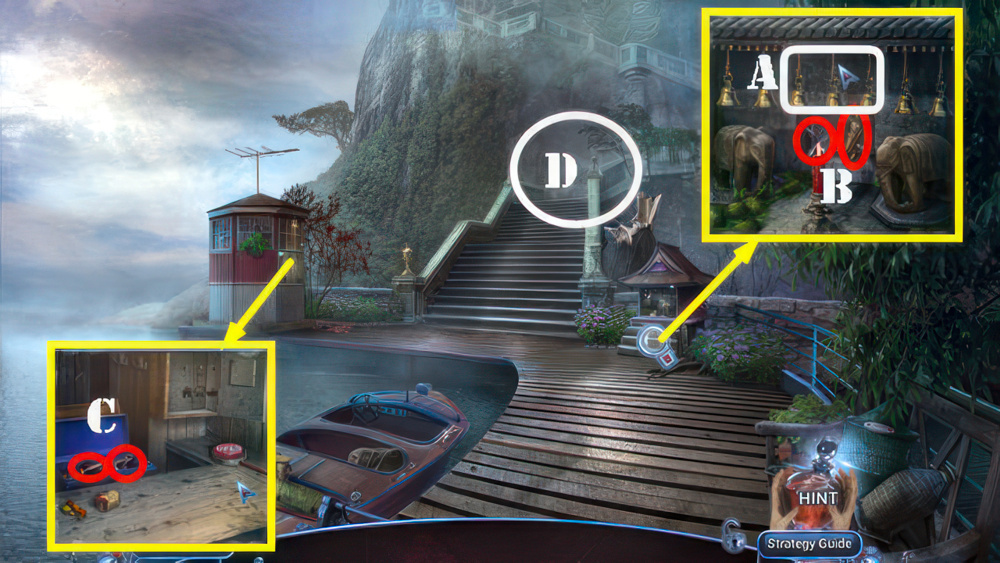
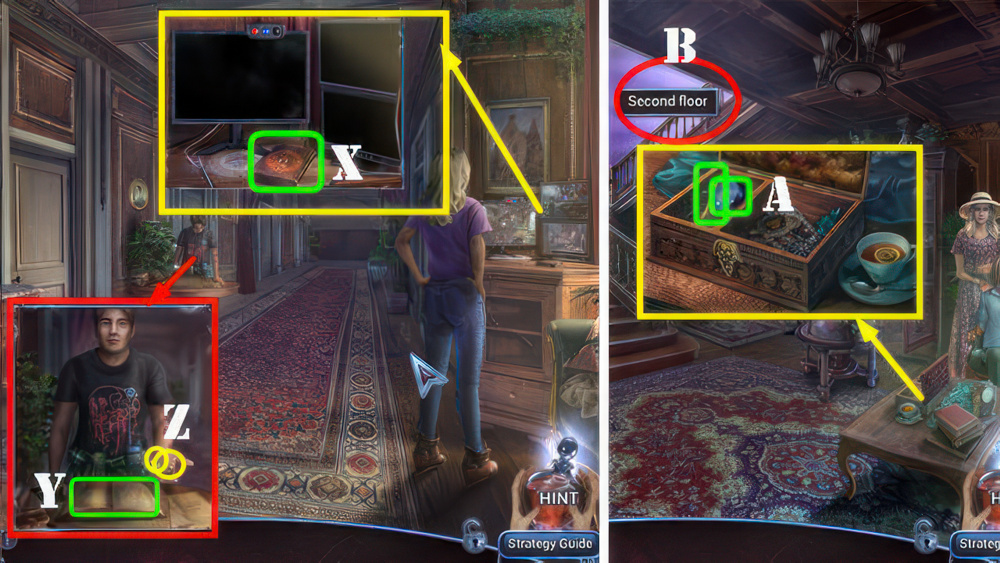
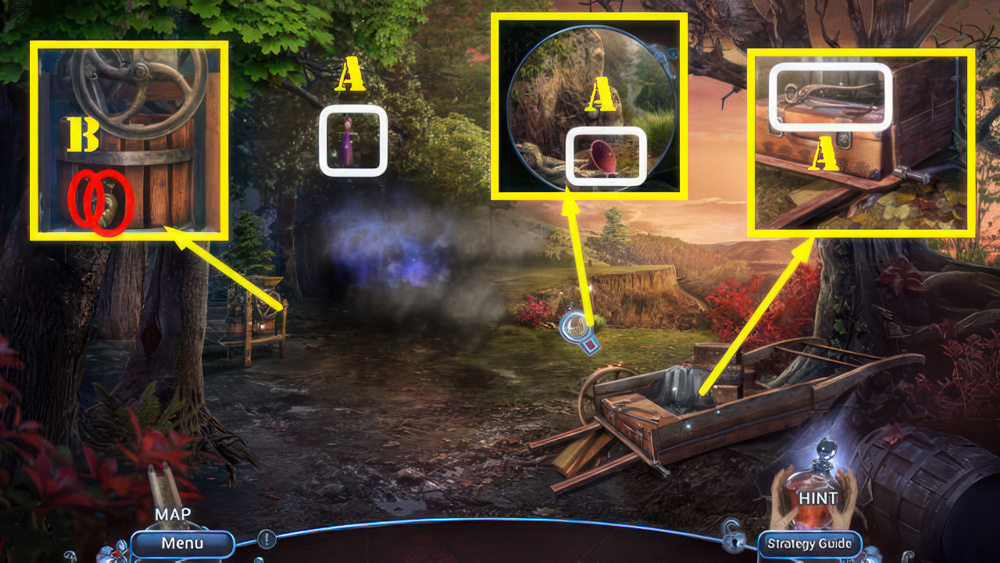
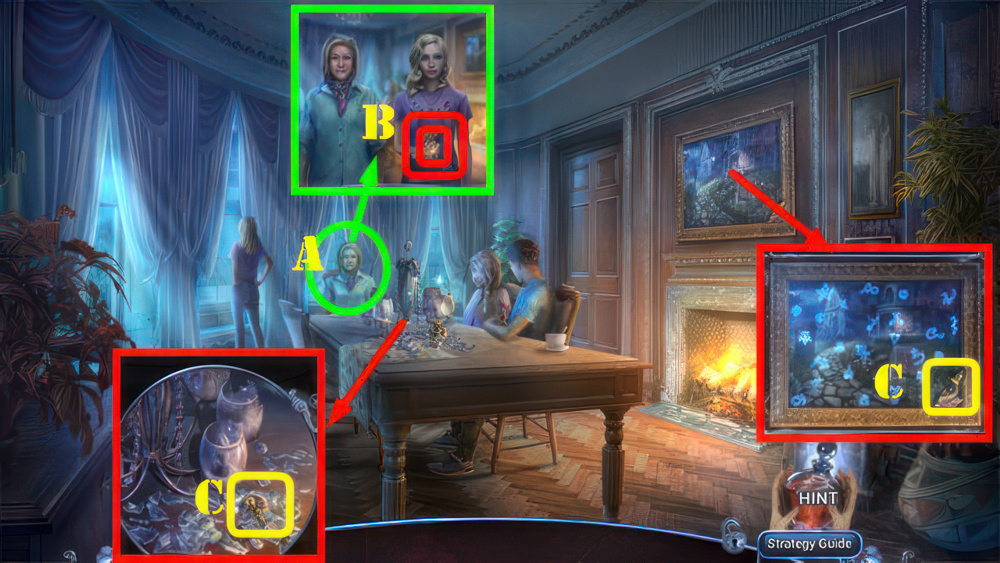
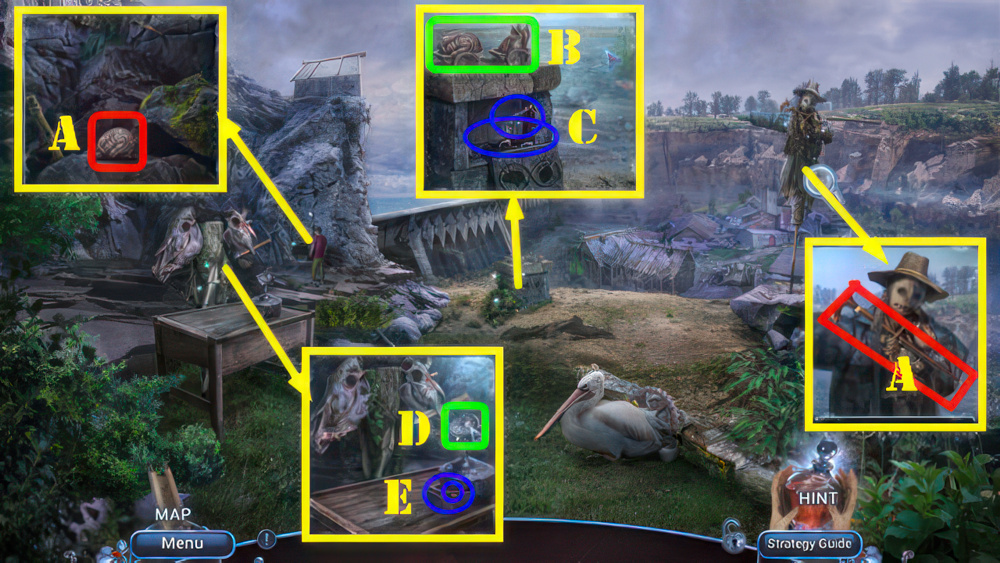
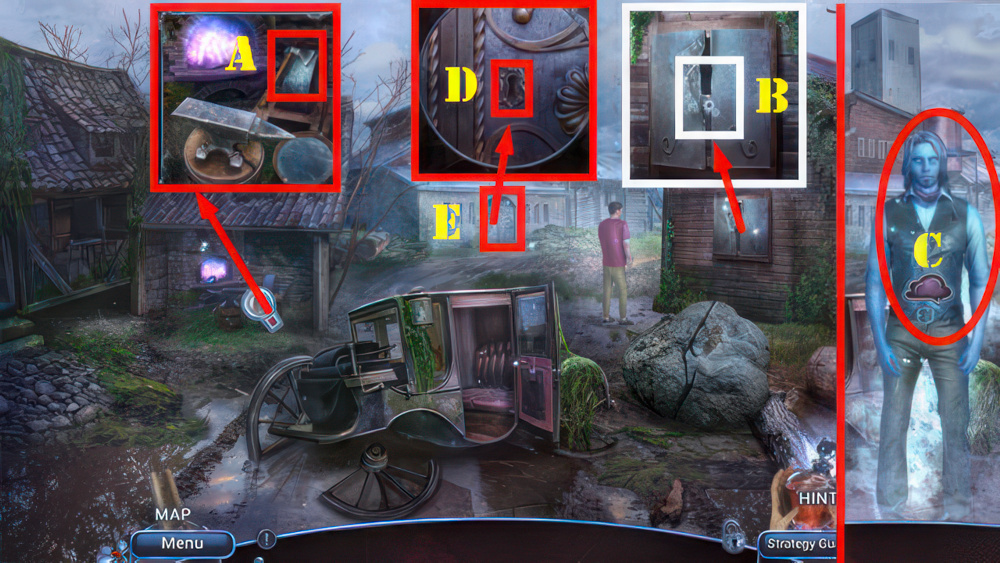
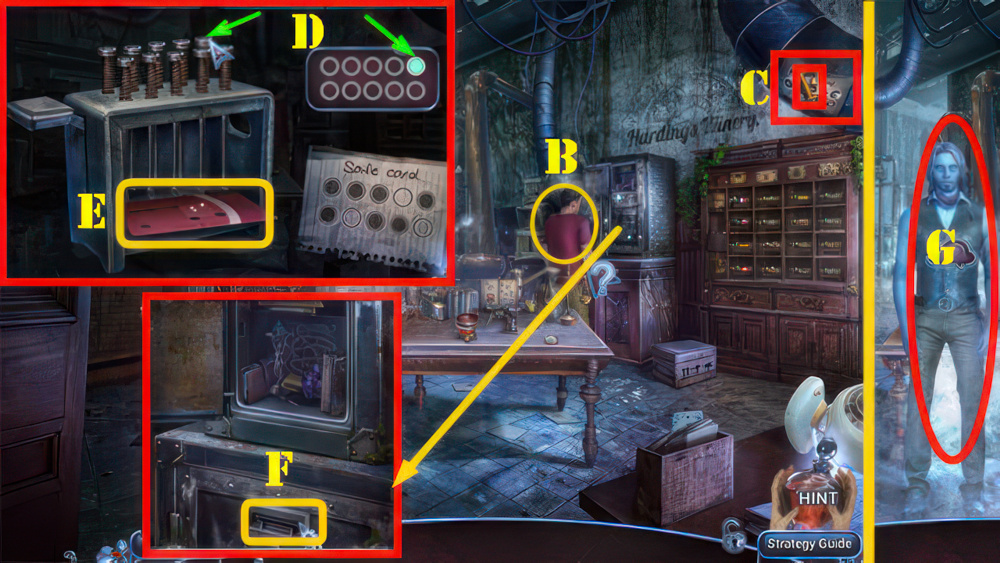
- Select Browser icon (A).
- Look at picture (B).
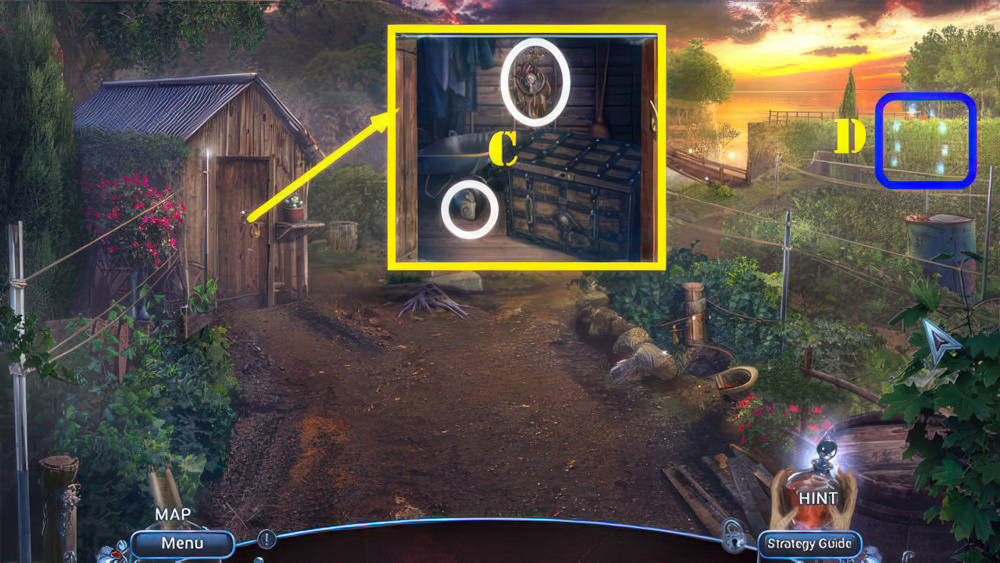
- Select handset icon and then Gabriel Silva (C).
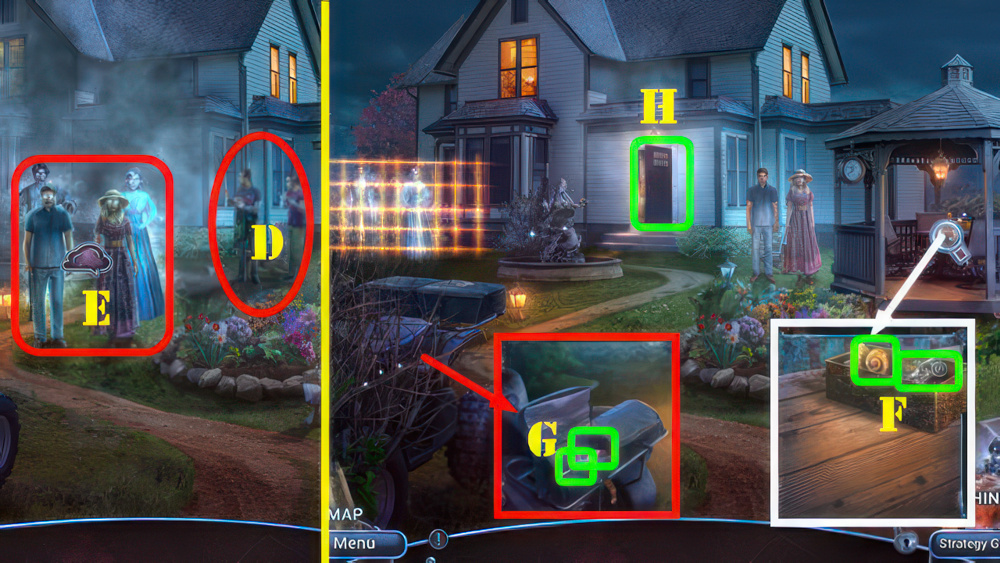
- Select notebook twice (D).
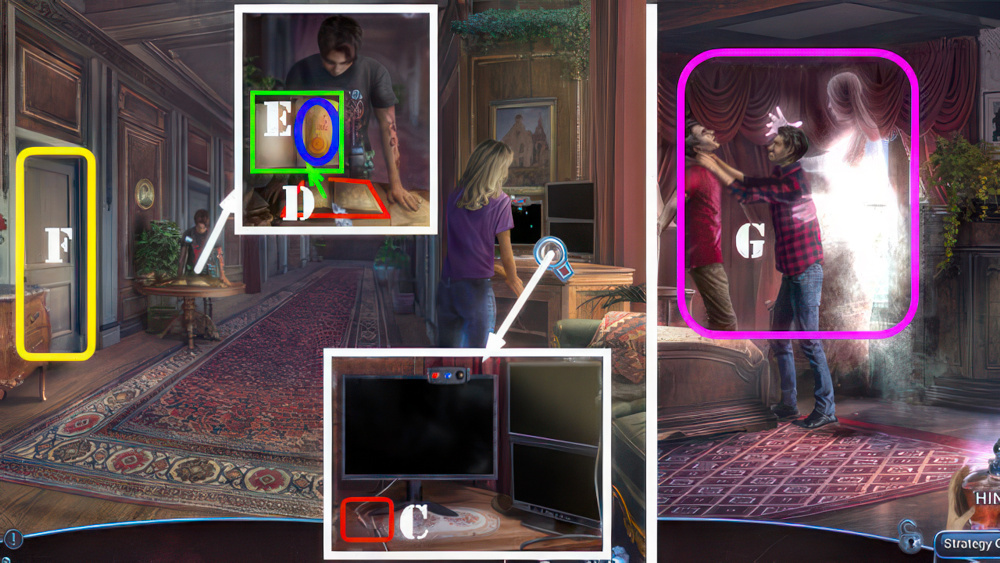
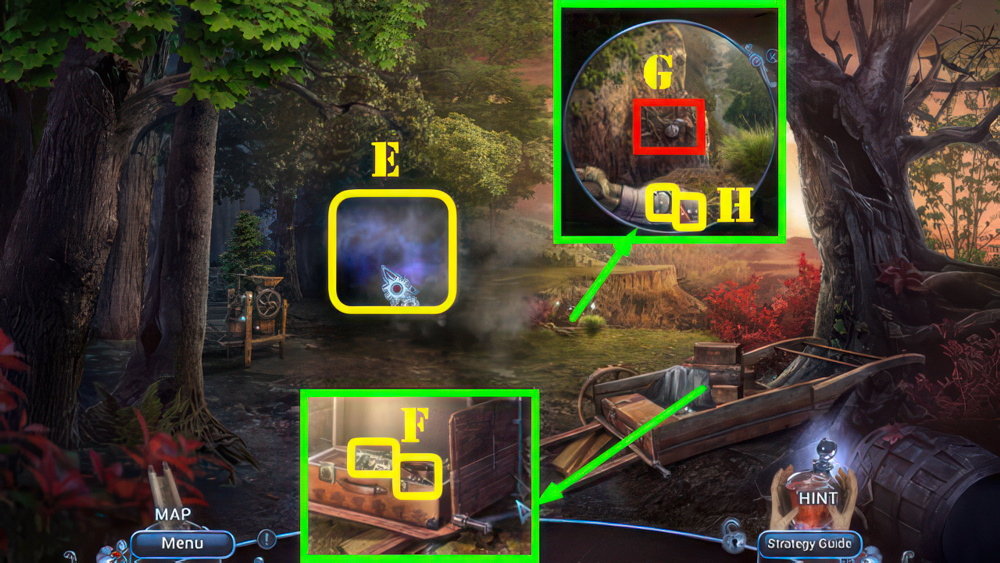
- Take cable and use on phone (E).
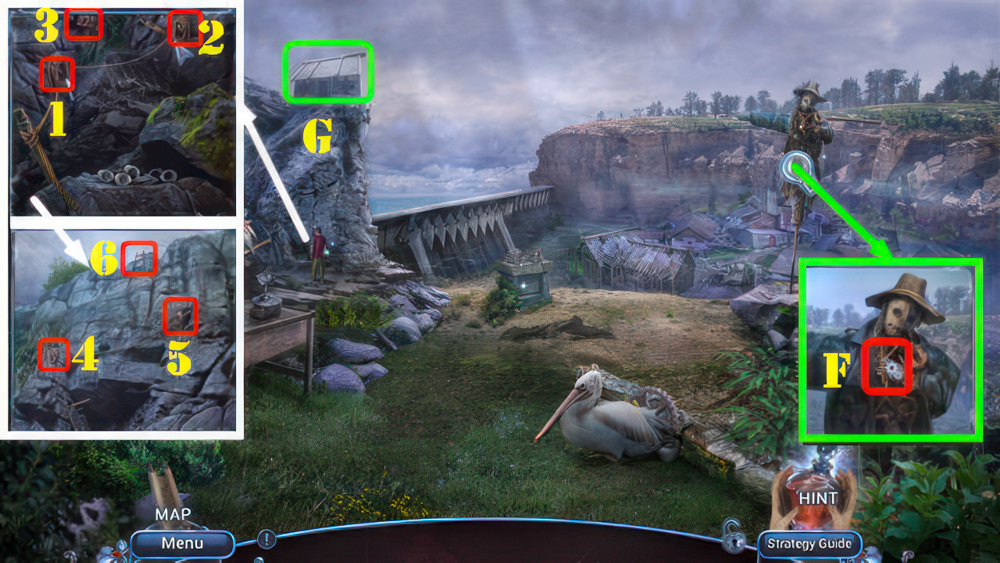
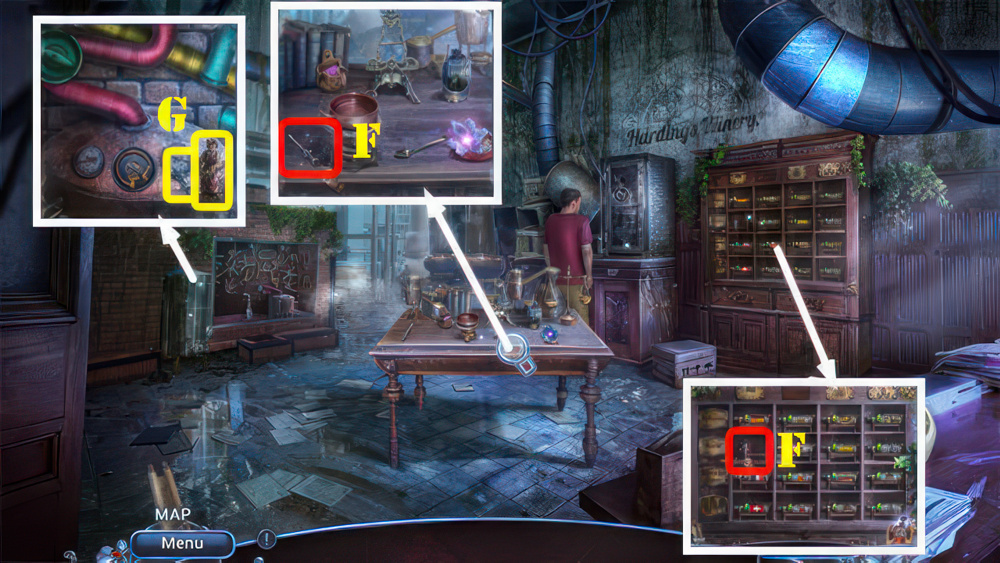
- Select play (F).
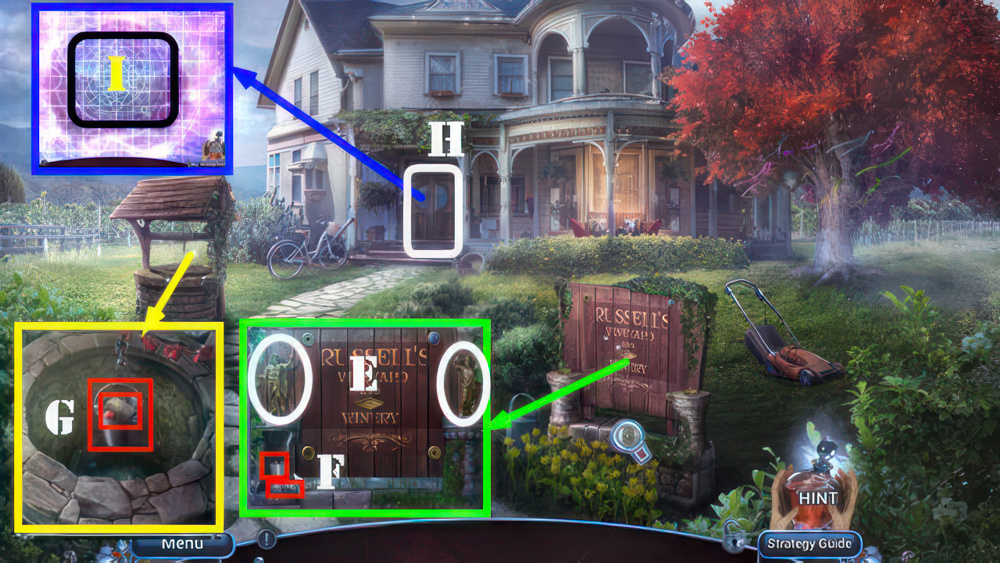
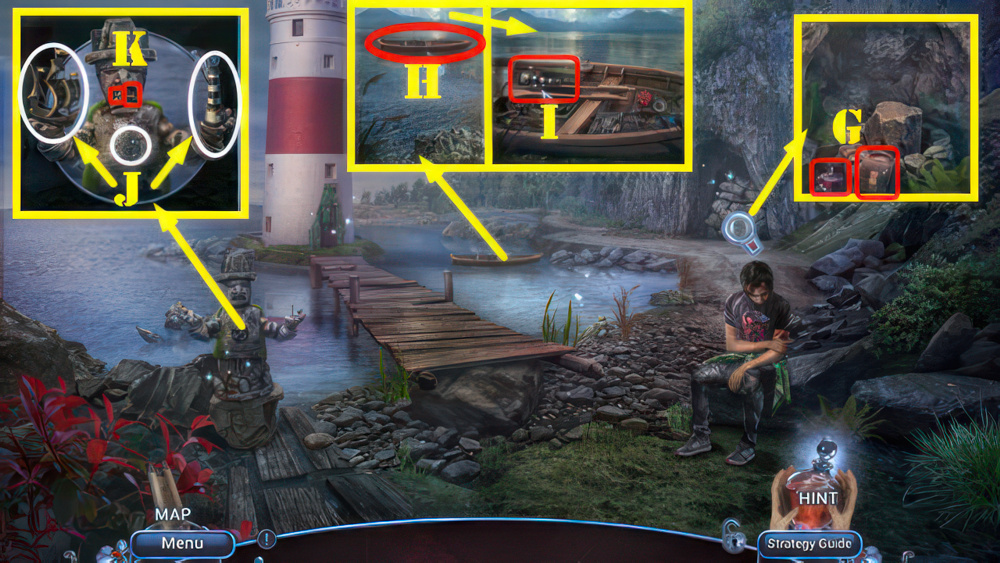
- Take CARVING PHOTO (G).
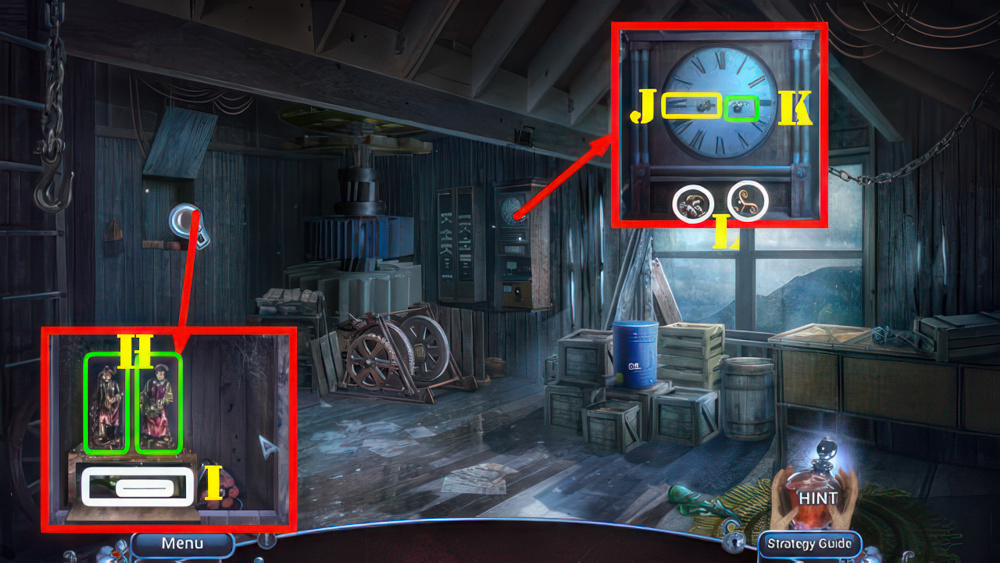
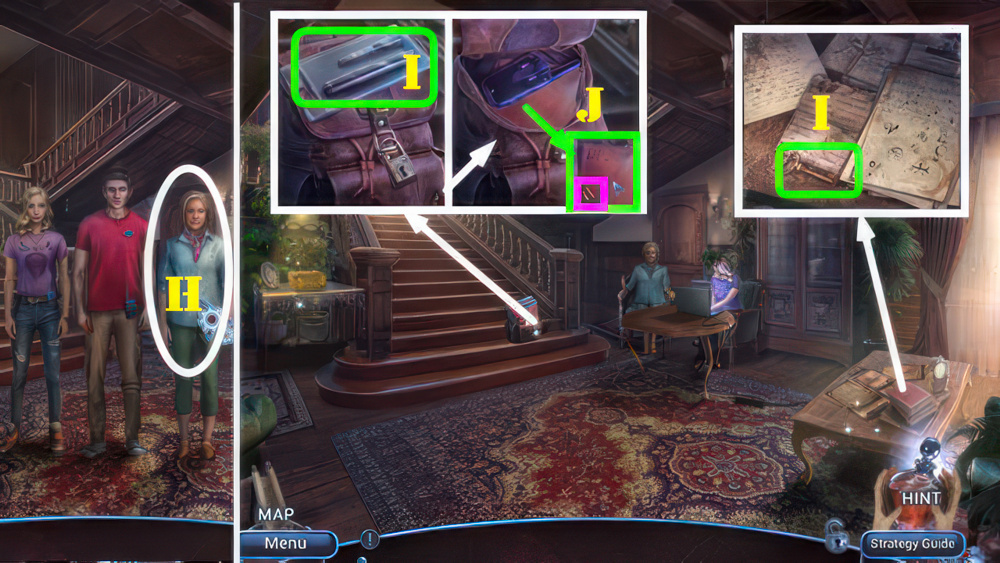
- Select browser icon (A) and book now (H).

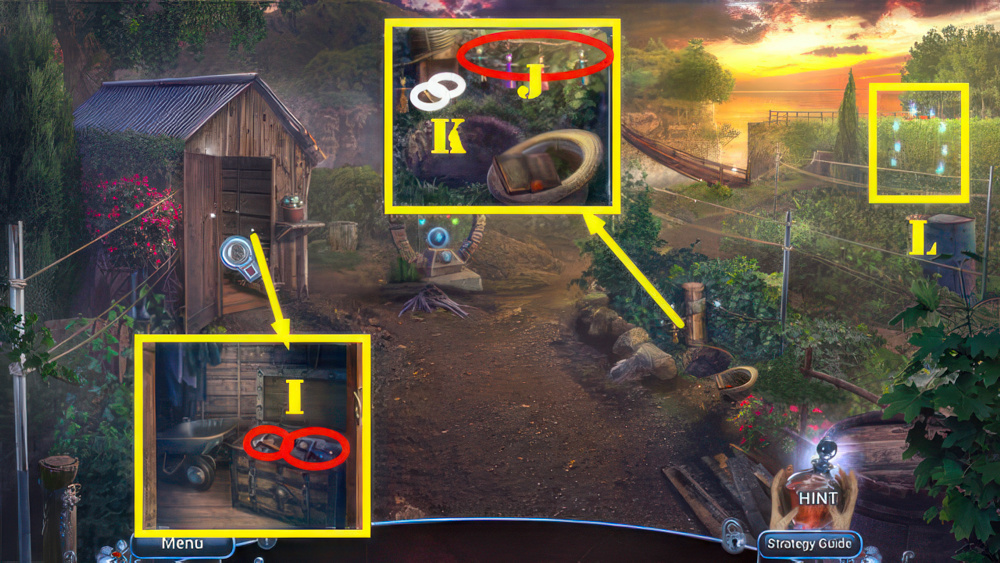
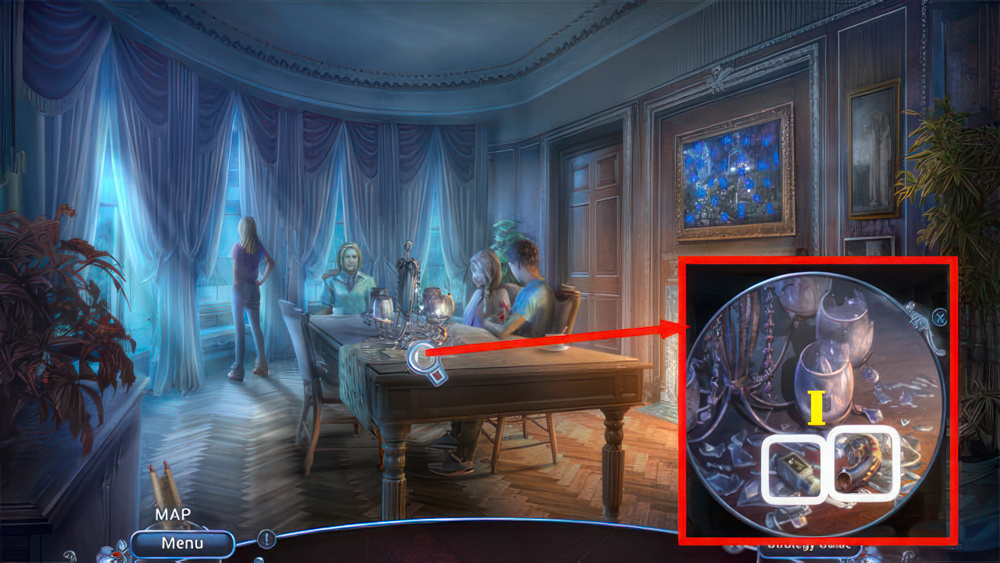
- Select scene and then any character on it (I), receive HUNTER’S KNIFE.
- Take GLASS CUTTER, DAEMON’S WALLET, and MIA’S MEDALLION (J).
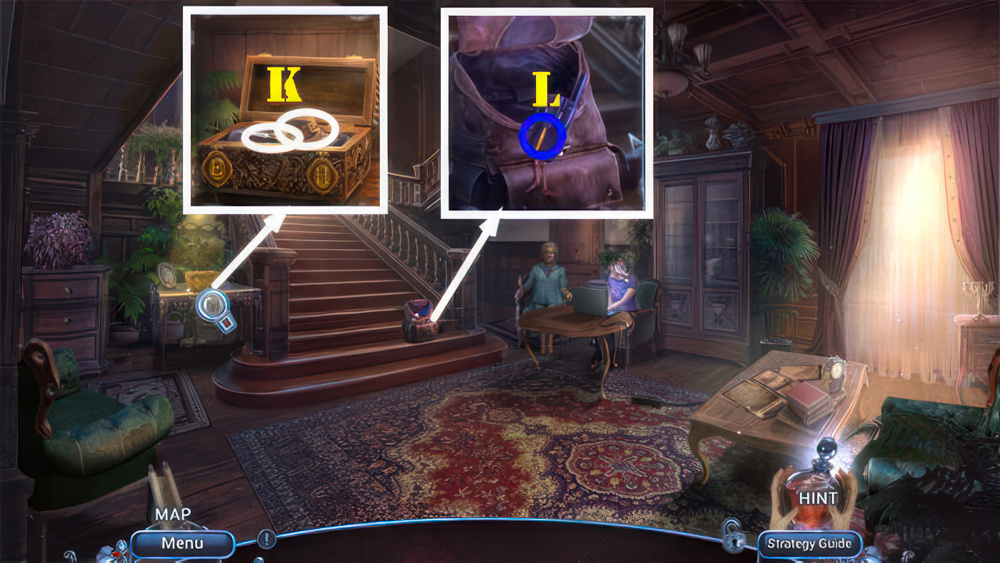
- Use HUNTER’S KNIFE (K), receive LONG BRANCH.
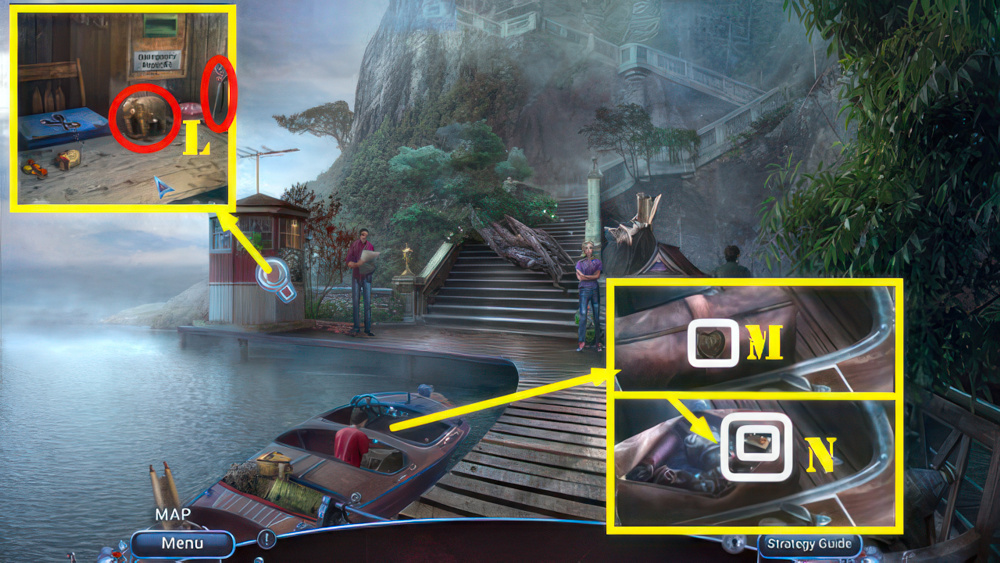
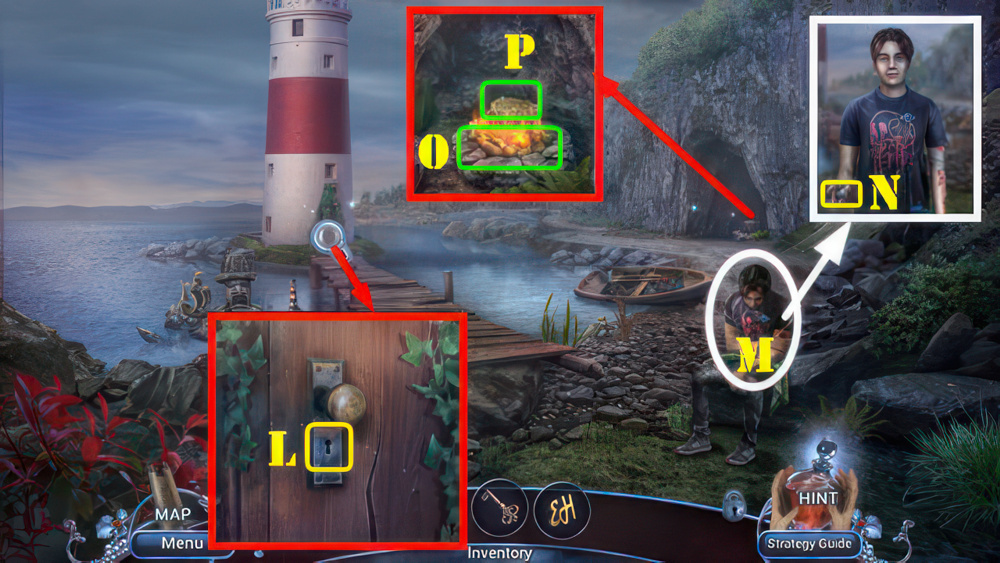
- Use GLASS CUTTER and LONG BRANCH, take STONE ELEPHANT and PIN (L).
- Use PIN on DAEMON’S WALLET and look at photo, take DAEMON’S MEDALLION and DOLLARS 1/2.
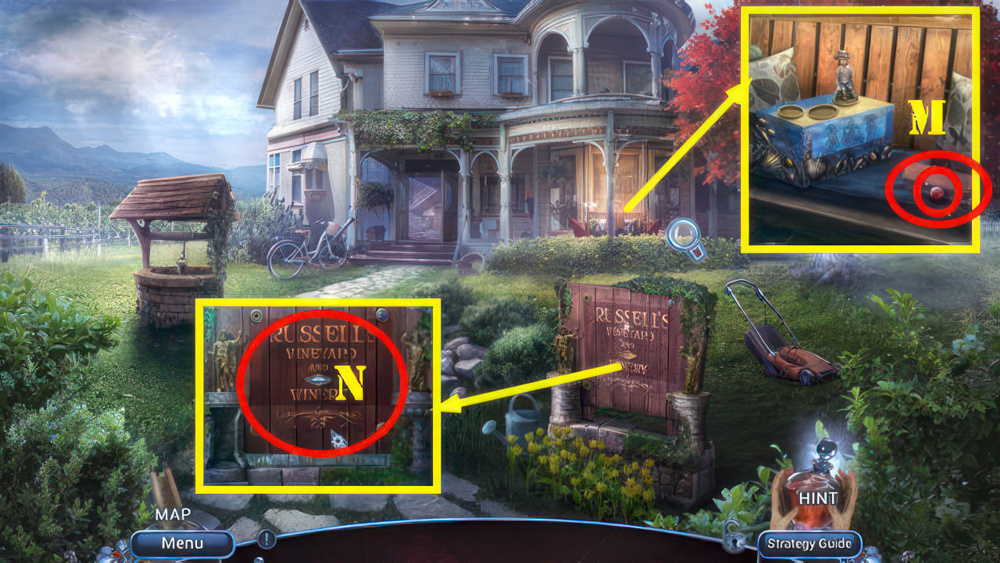
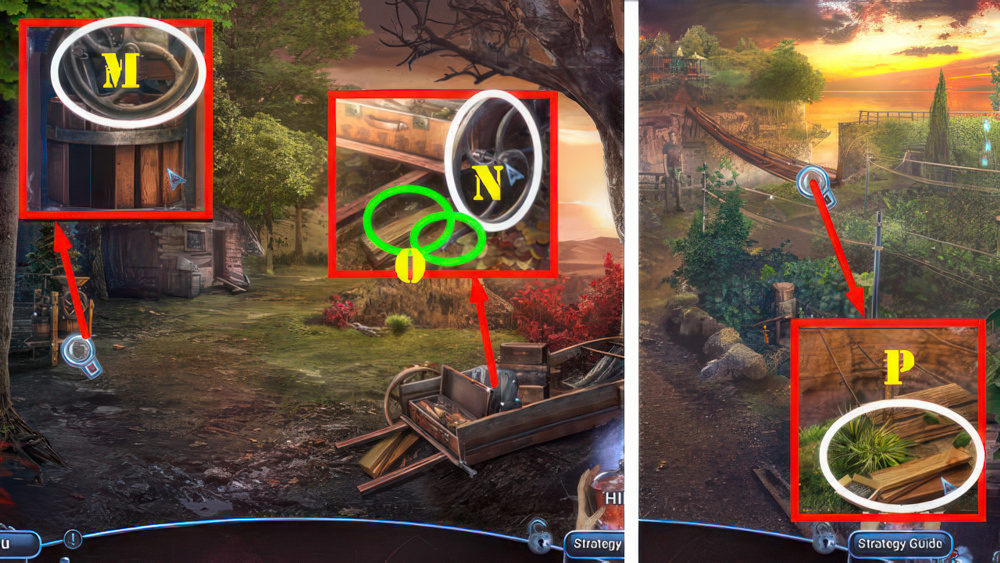
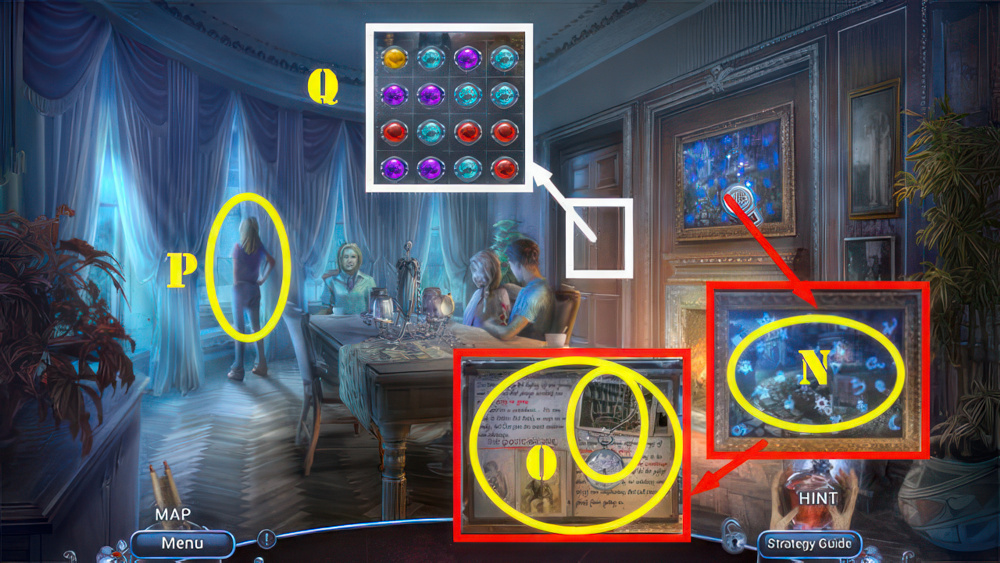
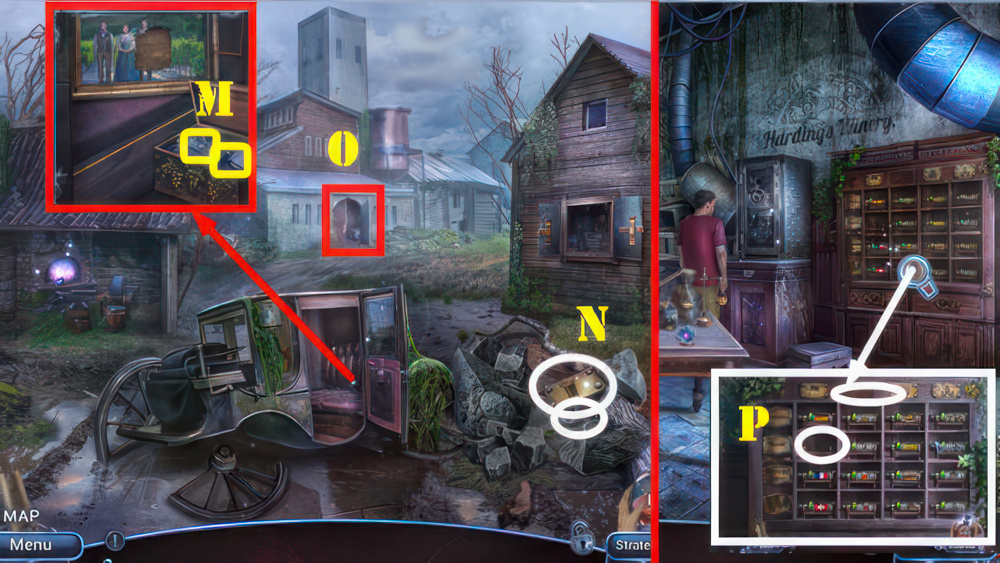
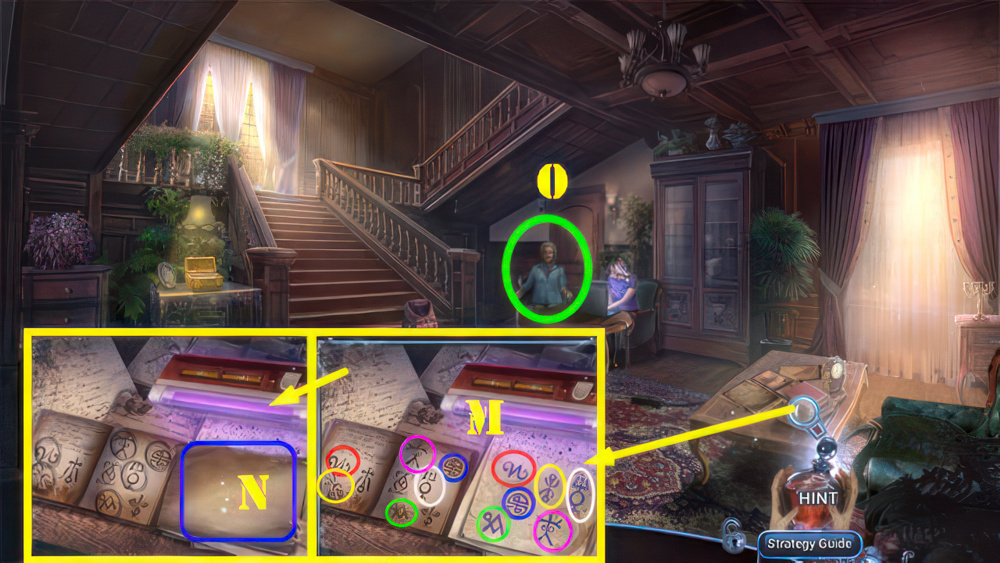
- Place MIA’S MEDALLION and DAEMON’S MEDALLION (M).
- Play puzzle, take ROPE and MATCHES (N).
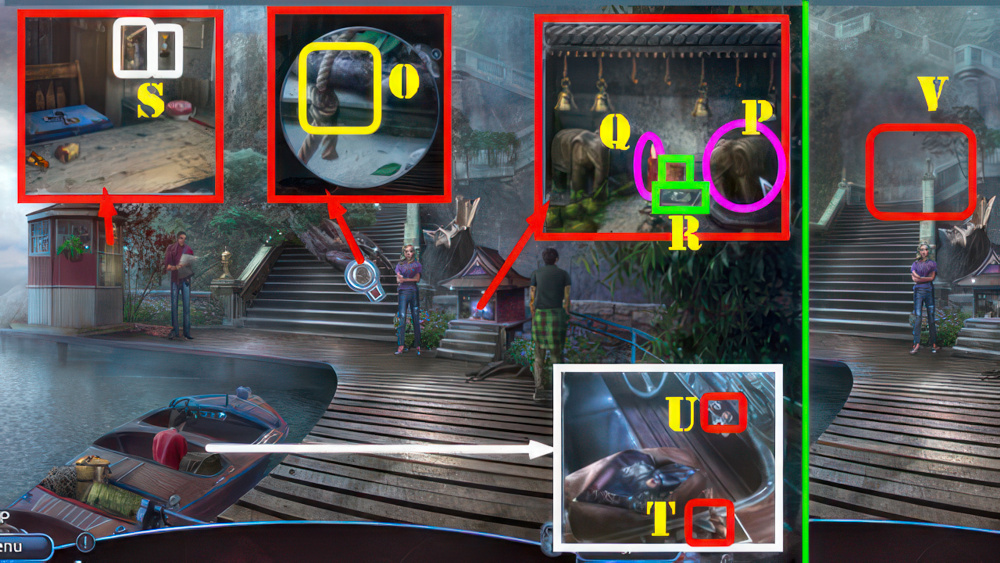
- Use ROPE (O).
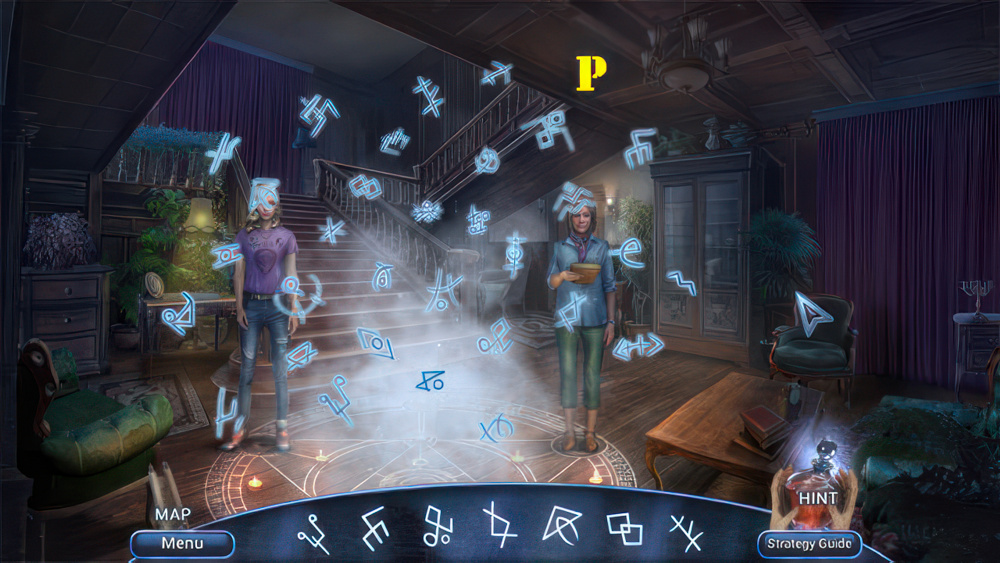
- Use STONE ELEPHANT (P) and MATCHES (Q).
- Take DOLLARS and PROTECTION AMULET (R).
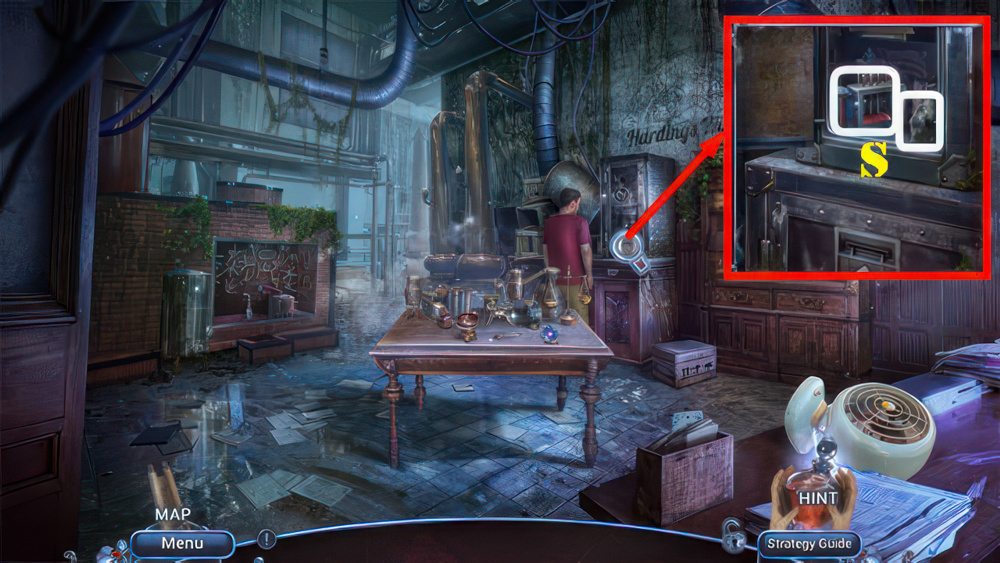
- Use DOLLARS, take EMPTY SMOKER and BOAT KEY (S).
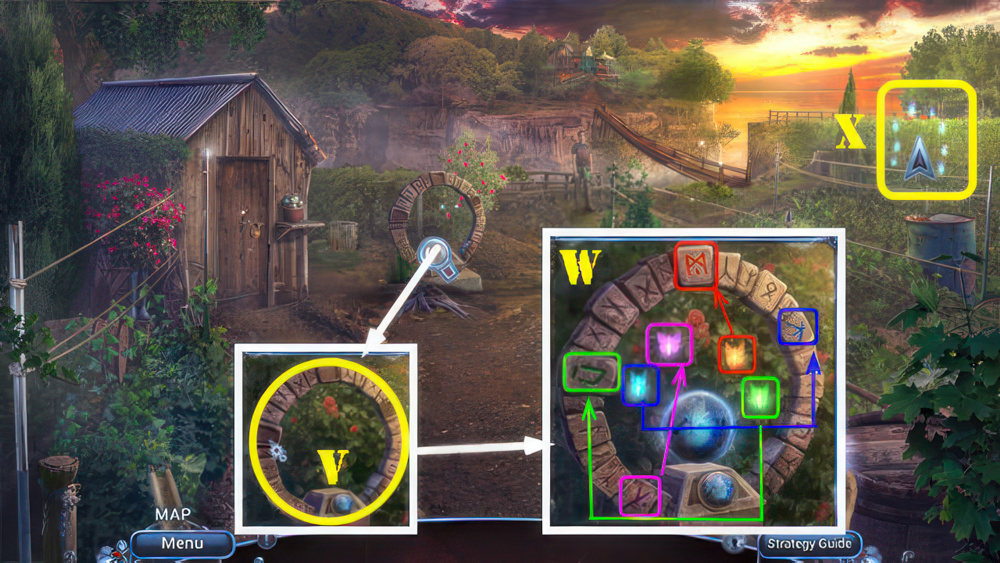
- Attach ROPE (T) and use BOAT KEY (U).
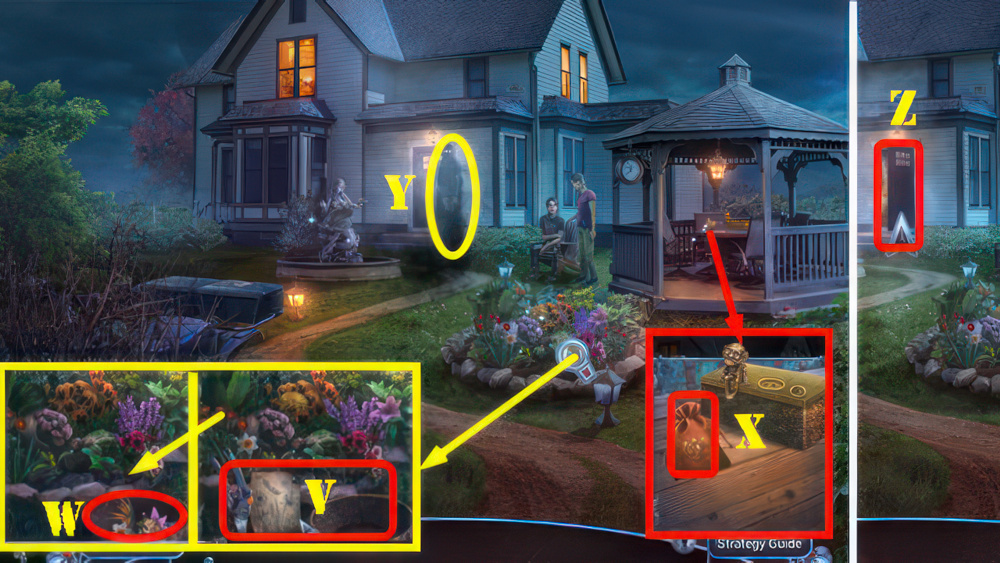
- Go (V).
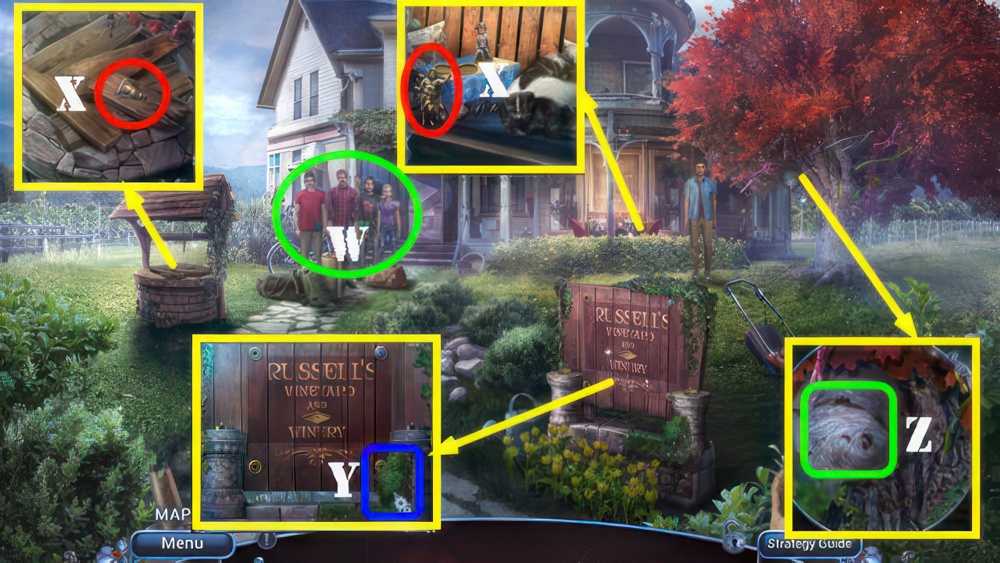
- Talk (W), receive BELLS 1/3.
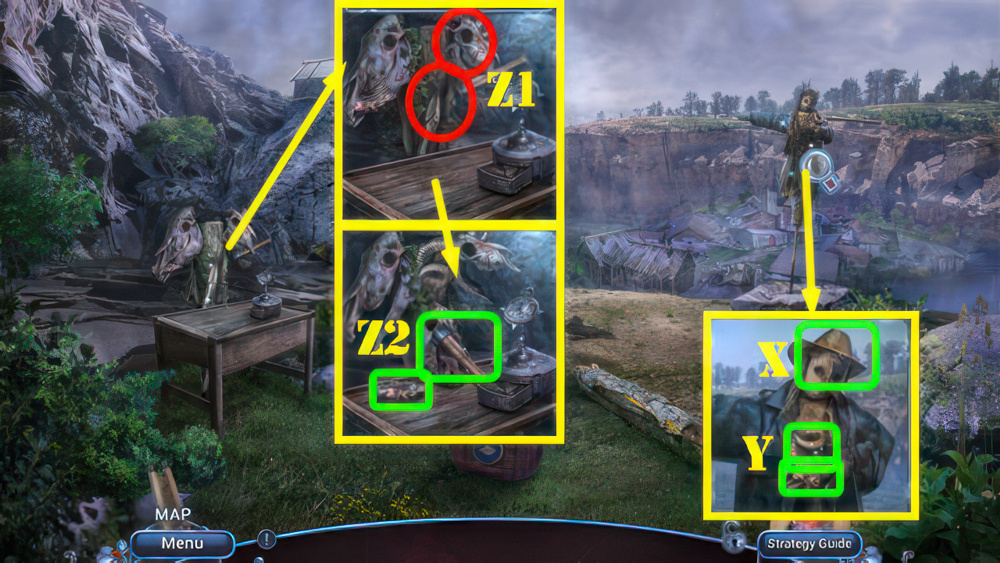
- Take BELLS 2/3 and SUCELLUS FIGURINE (X).
- Use HUNTER’S KNIFE, take MOSS (Y).
- MOSS and MATCHES on EMPTY SMOKER, take BEE SMOKER.
- Use BEE SMOKER (Z).
- Play puzzle, receive BELLS.
- Walk down.
- Place BELLS (A).
- Take TOOL AMULET and DIONYSIUS FIGURINE (B).
- Place TOOL AMULET, take CHISEL and HOOK (C).
- Go (D).
- Place SUCELLUS FIGURINE and DIONYSIUS FIGURINE (E).
- Take BUCKET and AIR HORN PART (F).
- Use CHISEL, HOOK, and BUCKET, take COLORED GLASS PIECES 1/3 and RUSTY BOX (G).
- Select door (H).
- Use PROTECTION AMULET (I).

- Align the spheres with their corresponding spaces.
- Select the arrows to move the center sphere in a given direction.
- Spheres connect when they touch one another.
- Walkthrough: (1-6).
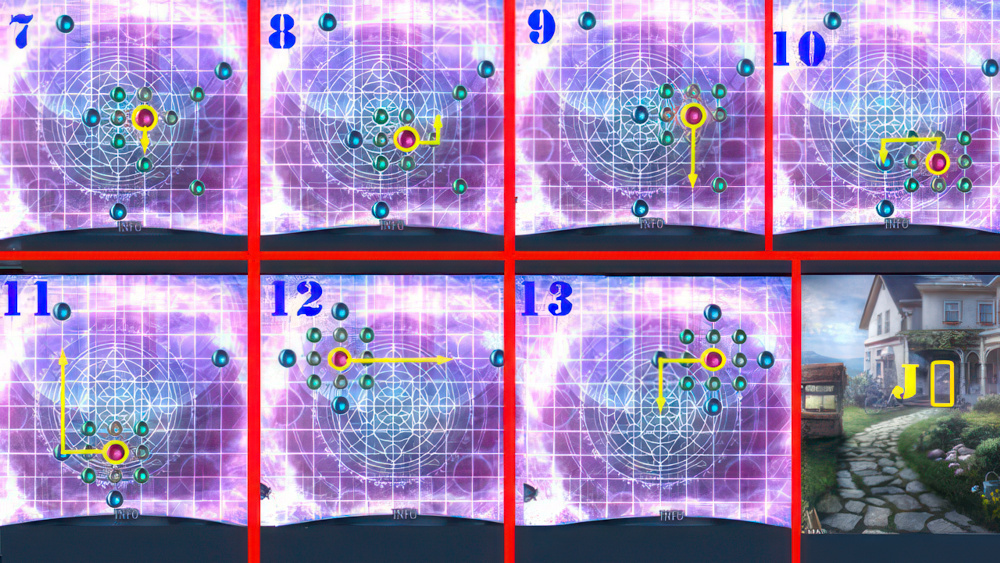
- Walkthrough: (7-13).
- Enter (J).
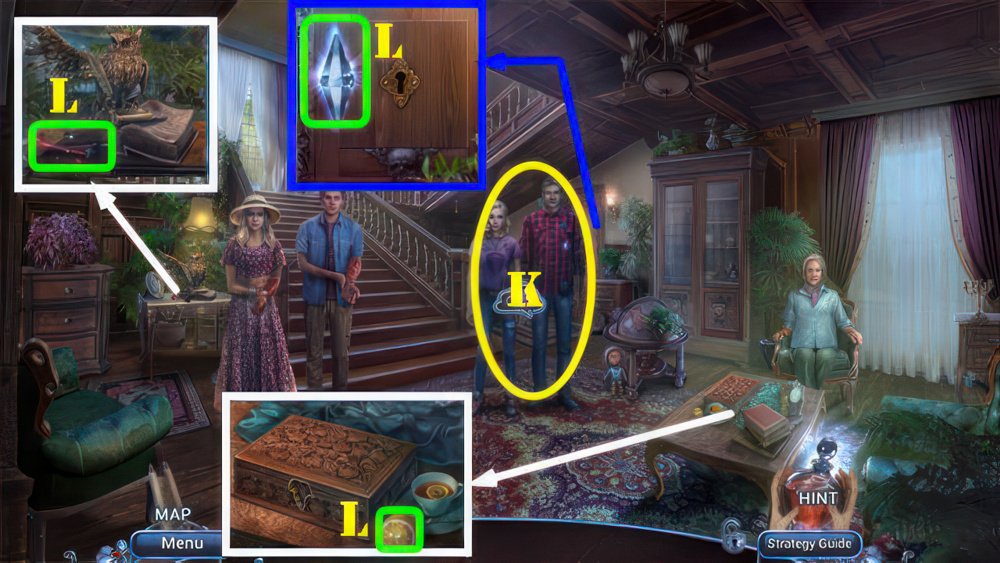
- Select any character in the scene (K), receive COLORED GLASS PIECES 2/3.
- Take AIR HORN PART, LEMON HALF, and LUMINOUS CRYSTAL (L).
- Walk down.
- AIR HORN PART on AIR HORN PART, take AIR HORN.
- Use AIR HORN, take BRUSH and COLORED GLASS PIECES (M).
- Place COLORED GLASS PIECES and LUMINOUS CRYSTAL (N).
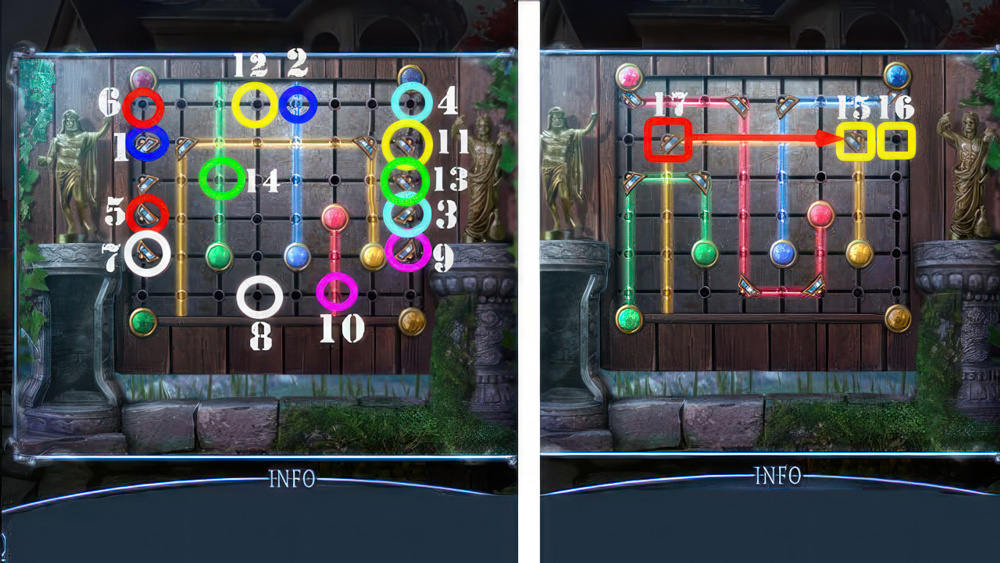
- Arrange the reflective mirrors so that each colored ray travels between its matching-colored gems.
- Select a mirror and place it in an empty slot to move it.
- Light beams can’t cross over each other.
- Walkthrough: (1-2)-(3-4)-(5-6)-(7-8)-(9-10)-(11-12)-(13-14)-(15-16)-(17-15).
- Take BROKEN FIGURINE and SUCTION GRIPPER.
- Go to Hotel foyer.
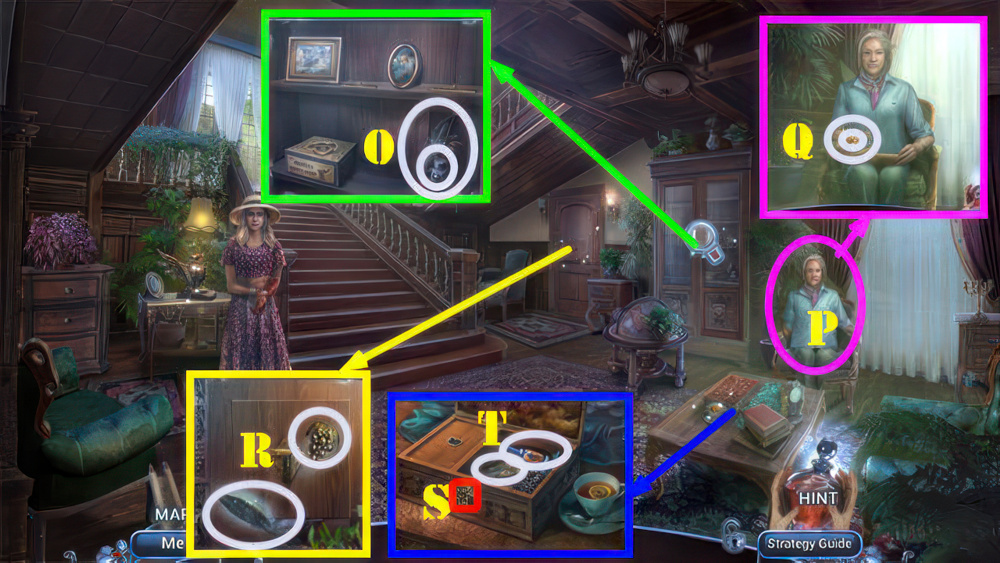
- Use SUCTION GRIPPER, take METAL FEATHERS 1/4 and SALT (O).
- LEMON HALF, SALT, and BRUSH on RUSTY BOX, take FIGURINE PART and OLD JOURNAL.
- Give OLD JOURNAL (P).
- Play puzzle.
- Take CELLAR KEY and CASTLE FIGURINE (Q).
- Use CELLAR KEY, take METAL FEATHERS 2/4 and GRAPES AMULET (R).
- Place GRAPES AMULET (S).
- Take GLUE and METAL FEATHERS 3/4 (T).
- Walk down.
- GLUE and FIGURINE PART on BROKEN FIGURINE, take GIRL FIGURINE.
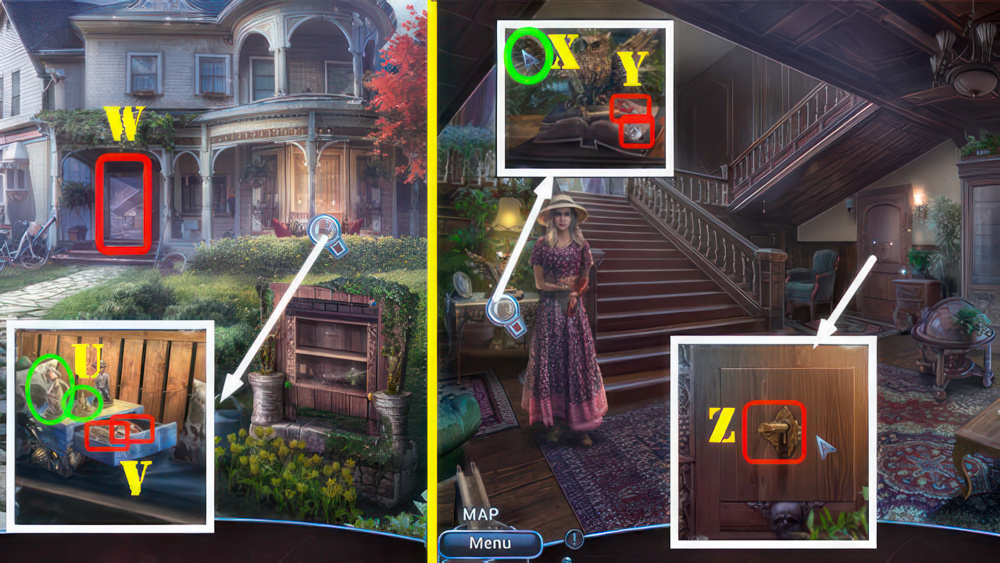
- Place GIRL FIGURINE and CASTLE FIGURINE (U).
- Take METAL FEATHERS and PHOTO (V).
- Go (W).
- Place METAL FEATHERS (X).
- Take LIGHTBULB and PLIERS (Y).
- Use PLIERS (Z).
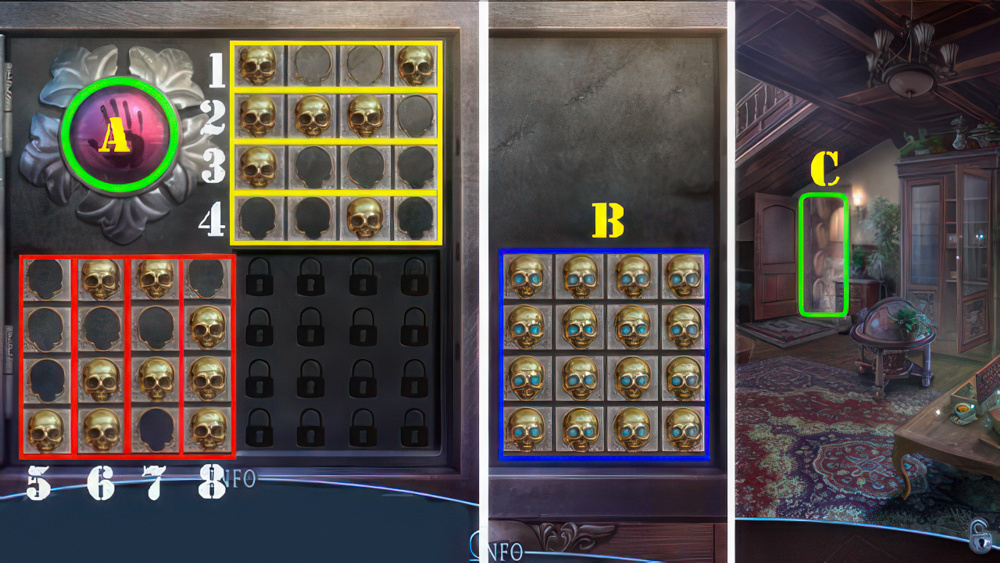
- Arrange the rows and columns so the skulls don’t overlap when the plates are combined.
- Select two bars to swap them.
- Select the handprint to check your solution.
- Walkthrough: (1-3)-(2-4)-(6-8)-(5-7)-(A).
- Solved image (B).
- Go (C).
- Take LOCK REELS 1/2 and LEATHER CASE (D).
- Place LIGHTBULB (E).
- Take HINT and PHOTO (F).
- Walk down.

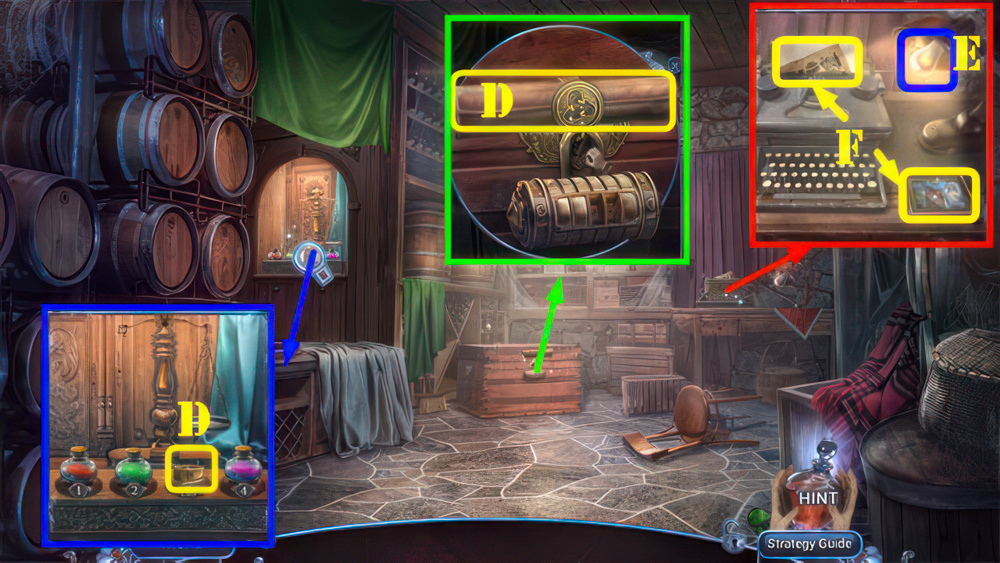
- Place 2 PHOTOS (G).
- Take SCALE PAN and OWL EYE (H).
- Place OWL EYE (I).
- Take VINTAGE BOTTLE (J).
- Go (K).
- Place VINTAGE BOTTLE and SCALE PAN.
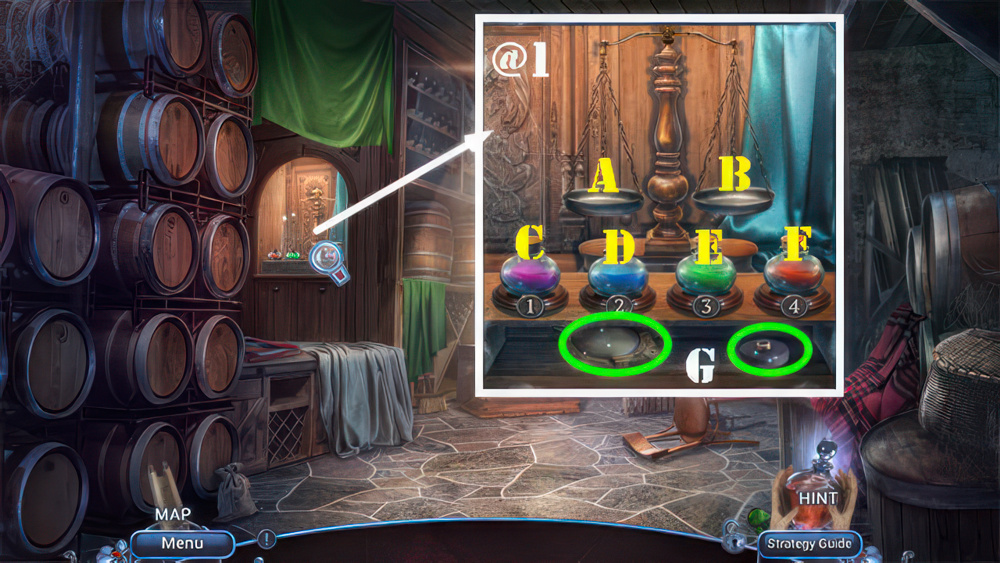
- Place the bottles from the lightest to the heaviest.
- Use the scales to compare bottle weights.
- Select a bottle to move it.
- Walkthrough (@1): (F-B)-(C-A)-(A-F)-(B-C)-(E-B)-(D-A)-(A-E)-(B-D).
- Take VINTAGE MAGNIFIER and TYPEWRITER KNOB (G).
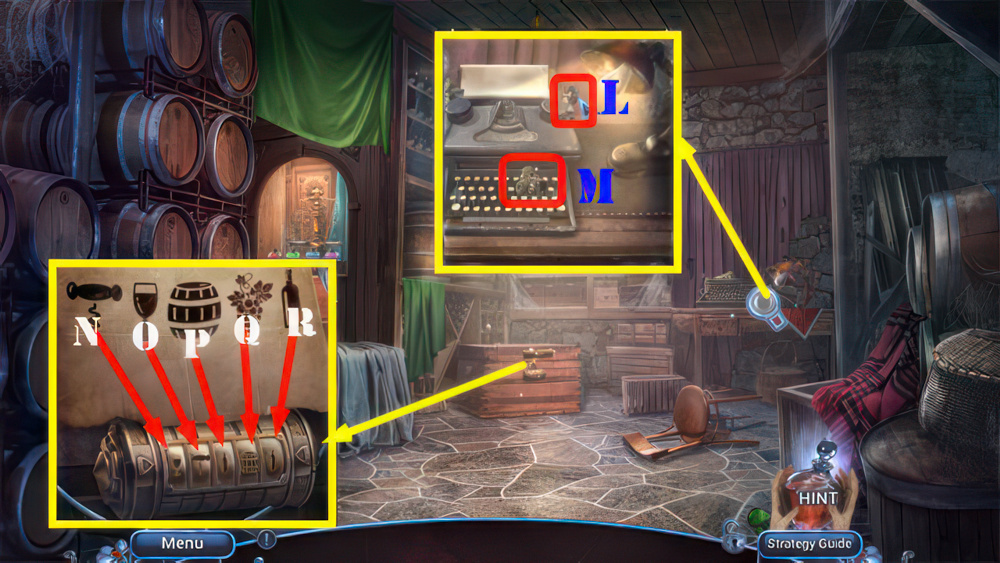
- Place TYPEWRITER KNOB (L).
- Take UNUSUAL SYMBOL (M).
- Use UNUSUAL SYMBOL on LEATHER CASE and look at note.
- Take LOCK REELS and BANISHING SPELL.
- Place HINT and LOCK REELS, walkthrough (N×4-O×1-P×4-Q×2).
- Play puzzle, receive WINE TROPHY.
- Walk down.

- Use BANISHING SPELL (S).
- Use WINE TROPHY (T).
- Take GEMS 1/3 and GLOVES (U).
- Talk (V), receive SCARAB MEDALLION.
- Go (W).
- Take BOOK ON CURSES (X).
- Place BOOK ON CURSES (Y).
- Take SIGNET RING and GEMS 2/3 (Z).
- Walk down.
- Use SIGNET RING and look at note, take TAPE and MAGNIFIER HANDLE (A).
- Go (B).
- Use GLOVES and TAPE (C).
- Play puzzle, receive GEMS and METAL ROD.
- GEMS and MAGNIFIER HANDLE on VINTAGE MAGNIFIER, take MAGNIFIER.
- Use MAGNIFIER (D).
- Select book and take SPELL CHARMS (E).
- Go (F).
- Use SPELL CHARMS (G).

- Deplete the spirit’s energy in the top-left bar before yours runs out in the bottom-right.
- Select the blue action buttons in the correct order to fight the spirit.
- The charm paper deals damage, the shield blocks the spirit’s attacks, and the plus-symbol adds one energy bar unless used against charm paper.
- Walkthrough is random.
- Deplete the spirit’s energy (H) before yours (I) runs out.
- Select the blue action buttons in the correct order to fight the spirit.
- The charm paper (J) deals damage.
- The shield (K) blocks the spirit’s attacks, and the plus-symbol (L) adds one energy bar unless used against the charm paper.
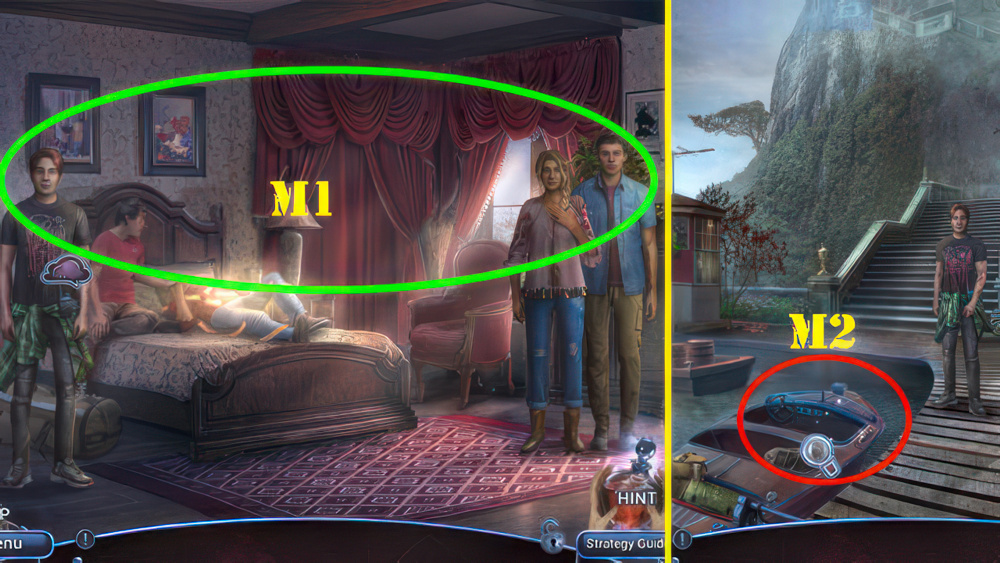
- Select scene (M1), receive FLASHLIGHT.
- Return to Pier.
- Select boat (M2).
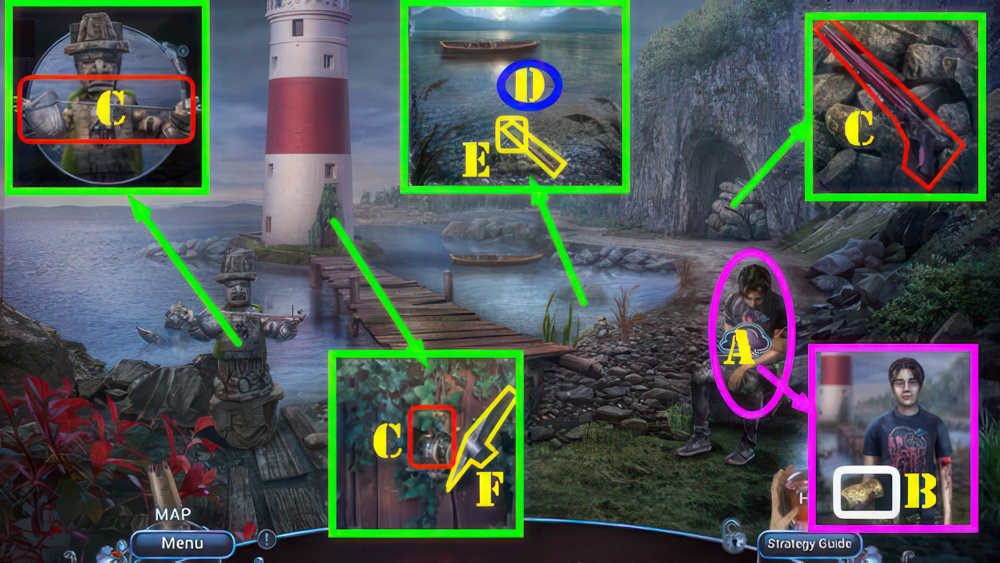
- Talk (A), take WET MAP (B).
- Take NET, SHIP FIGURINE, and SPEARGUN (C).
- Use NET (D), take HARPOON TIP and WOODEN HANDLE (E).
- Use WOODEN HANDLE, take PICKAXE (F).
- Use PICKAXE, take HARPOON REEL and OLD BAG (G).
- HARPOON TIP, HARPOON REEL, and METAL ROD on SPEARGUN, take LOADED SPEARGUN.
- Use LOADED SPEARGUN (H).
- Play puzzle, take LIGHTHOUSE FIGURINE (I).
- Place SCARAB MEDALLION, SHIP FIGURINE, and LIGHTHOUSE FIGURINE (J).
- Take LIGHTHOUSE KEY and MONOGRAM (K).
- Use MONOGRAM on OLD BAG and look at Note.
- Take SICKLE and OLD PAPERS.
- Use SICKLE and LIGHTHOUSE KEY (L).
- Play puzzle, receive MEDICINE CHEST.
- Use MEDICINE CHEST (M), take LIGHTER (N).
- Use OLD PAPERS and LIGHTER (O).
- Place WET MAP, take ISLAND MAP (P).
- Place ISLAND MAP on scene.
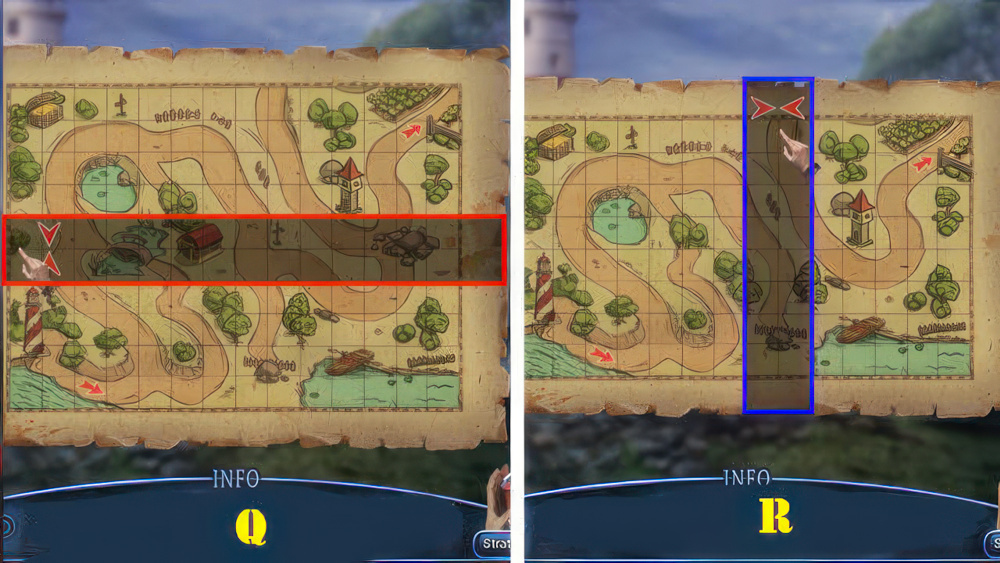
- Fold the map to create the shortest route from the coast to the hotel.
- Select a horizontal line to fold the map horizontally and a vertical line to fold it vertically.
- Walkthrough (Q-R).
- Select scene.
- Take RUNE STONES 1/3.
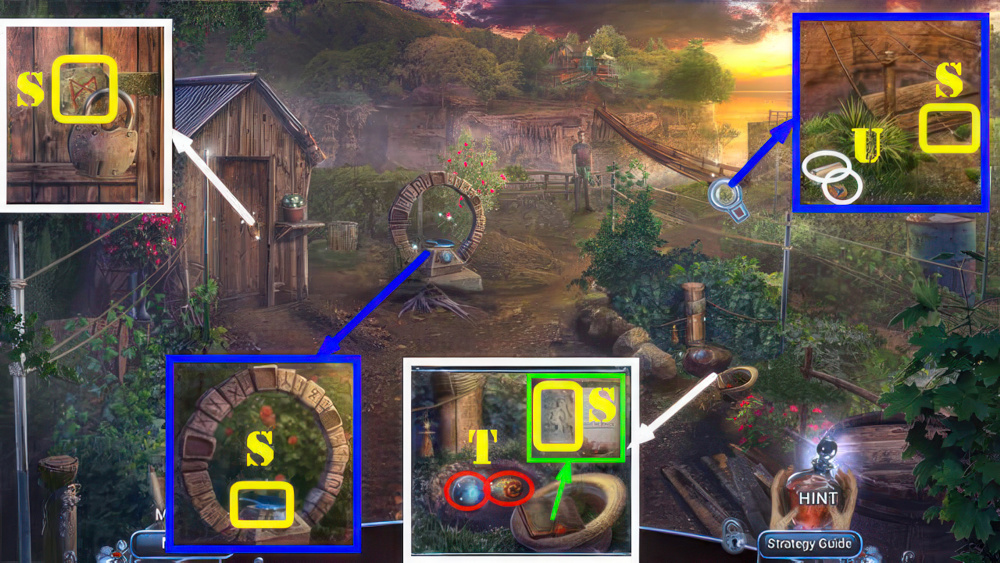
- Take RUNE STONES 2/3, WICK, SHOVEL, and MANUAL (S).
- Use SHOVEL, take GLOWING SPHERE and INSECT SPRAY (T).
- Use INSECT SPRAY, take SODA and RUNE STONES (U).
- Place RUNE STONES and GLOWING SPHERE (V).
- Use the cursor to guide the fireflies to the stones of corresponding colors.
- The fireflies will move in the opposite direction of the cursor if it gets too close to them.
- Walkthrough (W).
- Go (X).
- Take STRAW DOLLS 1/4, FUNNEL, and TONGS (A).
- Use TONGS, take STRAW DOLLS 2/4 and THERMITE POWDER (B).
- Walk down.
- FUNNEL, THERMITE POWDER, SODA, and WICK on MANUAL, take THERMITE BOMB.
- Use THERMITE BOMB and LIGHTER, take CASE BUTTON and DREAMCATCHER (C).
- Go (D).
- Use DREAMCATCHER and FLASHLIGHT (E).
- Play puzzle, receive CASE BUTTON.
- Place 2 CASE BUTTONS, take BELT and OLD PHOTO (F).
- Use BELT (G).
- Open cloth, take CHEST RING and STRAW DOLLS 3/4 (H).
- Walk down.
- Use CHEST RING, take HAMMER and STRAW DOLLS (I).
- Hang STRAW DOLLS (J).
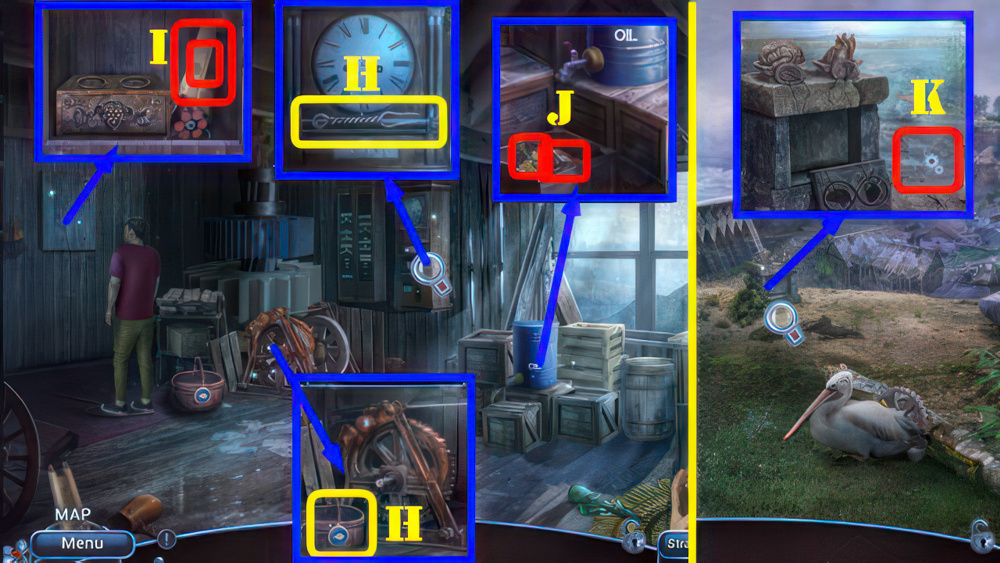
- Take OIL and NAILS (K).
- Go (L).
- Use OIL and HAMMER, take BIG WHEEL (M).
- Use BIG WHEEL (N).
- Take BOARDS and BROKEN SECATEURS (O).
- Walk down.
- Place NAILS, BOARDS, and HAMMER (P).
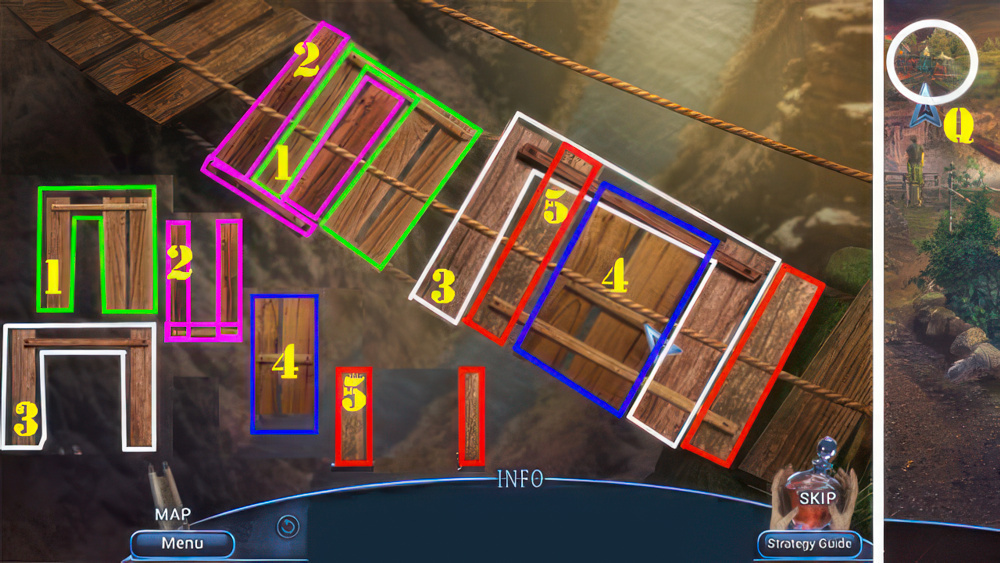
- Repair the bridge by arranging the pieces correctly. Select the boards to place them on empty spaces.
- Walkthrough (1-5).
- Go to Backyard (Q).
- Take HERB LIST and HERB BAG (R).
- Take SHARPENING KNIFE, STARFISH, and GARDENING GLOVE (S).
- Use GARDENING GLOVE, take SEAHORSE and SECATEURS PART (T).
- Place STARFISH and SEAHORSE, take BROKEN HORN and SMALL BASKET (U).
- SECATEURS PART and SHARPENING KNIFE on BROKEN SECATEURS, take SECATEURS.
- Use SMALL BASKET, HERB LIST, and SECATEURS (V).
- Play puzzle, take HERBS (W).
- Place HERBS in mortar, put down HERB BAG, take PROTECTIVE HERBS (X).
- Use PROTECTIVE HERBS (Y).
- Enter (Z).
- Give OLD PHOTO (A), take GNOME MOM and COORDINATES (B).
- Take HORN DECORATIONS 1/3 and GNOME CHILD (C).
- Walk down.
- Talk (D).
- Use PROTECTIVE HERBS (E).
- Play puzzle.
- Place GNOME MOM and GNOME CHILD, take AMULET and HORN DECORATIONS 2/3 (F).
- Use AMULET, take ADHESIVE and FEATHER DUSTER (G).
- Go (H).
- Use FEATHER DUSTER, take LOOSE SALT and HORN DECORATIONS (I).
- HORN DECORATIONS and ADHESIVE on BROKEN HORN, take HORN OF PLENTY.
- Walk down.

- Place HORN OF PLENTY (J).
- Take STONE HEART and SEAM RIPPER (K).
- Use SEAM RIPPER and look at note, take MONOCLE (L).
- Go (M).
- Use MONOCLE (N).
- Play puzzle.
- Take POCKET WATCH and DIARY WITH HINT (O).
- Use DIARY WITH HINT (P).
- Play puzzle (Q).
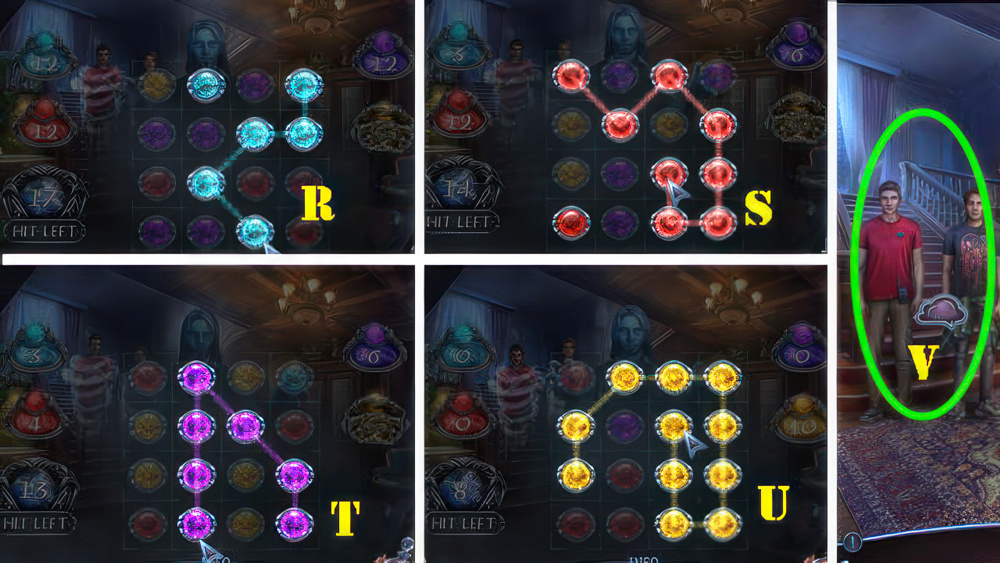
- Connect two or more matching tokens to collect them before you run out of moves.
- The number of tokens you need to collect are displayed on the sides of the screen.
- The solution is random.
- Connect as many tokens as you can in 17 moves or less.
- The screenshot shows possible moves.
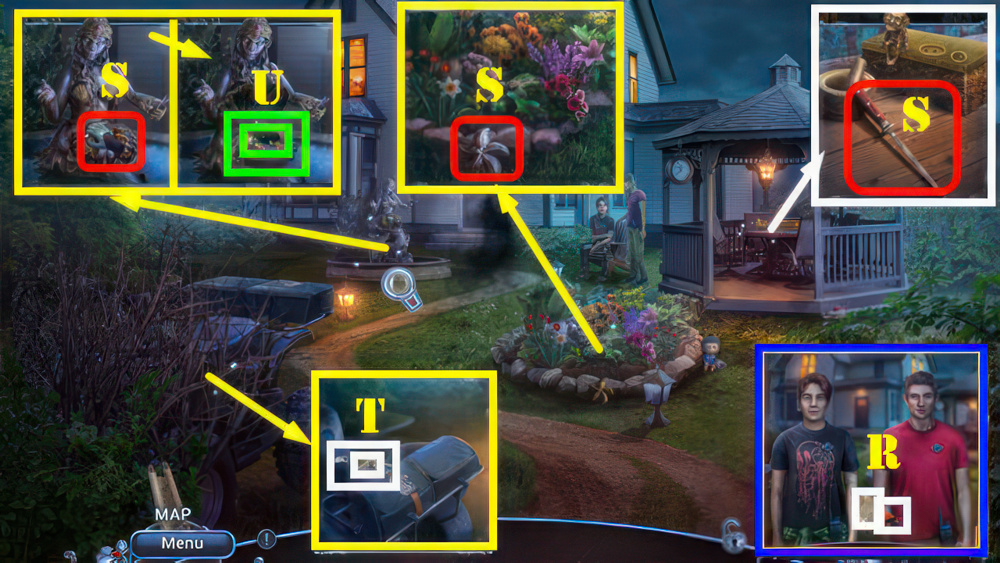
- On the last round, you will need to collect 10 golden tokens to complete the game (R-S-T-U).
- Talk (V).
- Select Scene.
- Take STONE BRAIN and OLD CANE (A).
- Place STONE BRAIN and STONE HEART (B).
- Take BENT HANDLE and SPIKES (C).
- Place POCKET WATCH (D).
- Take TWEEZERS and SHARP HAIRPIN (E).
- Use SHARP HAIRPIN (F), take LONG ROPE.
- Use SPIKES and LONG ROPE.
- Select 1-6 (G) and the relevant screenshot reflects this.
- Go to dam control.
- Take PRONGED FORK and FISHING BASKET (H).
- Select board and use TWEEZERS, take EVIDENCE 1/5 and FISHING LINE (I).
- Use PRONGED FORK, take LEVER and FISHING LURE (J).
- Walk down.
- FISHING LINE and FISHING LURE on OLD CANE, take IMPROVISED FISHING ROD.
- Use IMPROVISED FISHING ROD and FISHING BASKET (K).
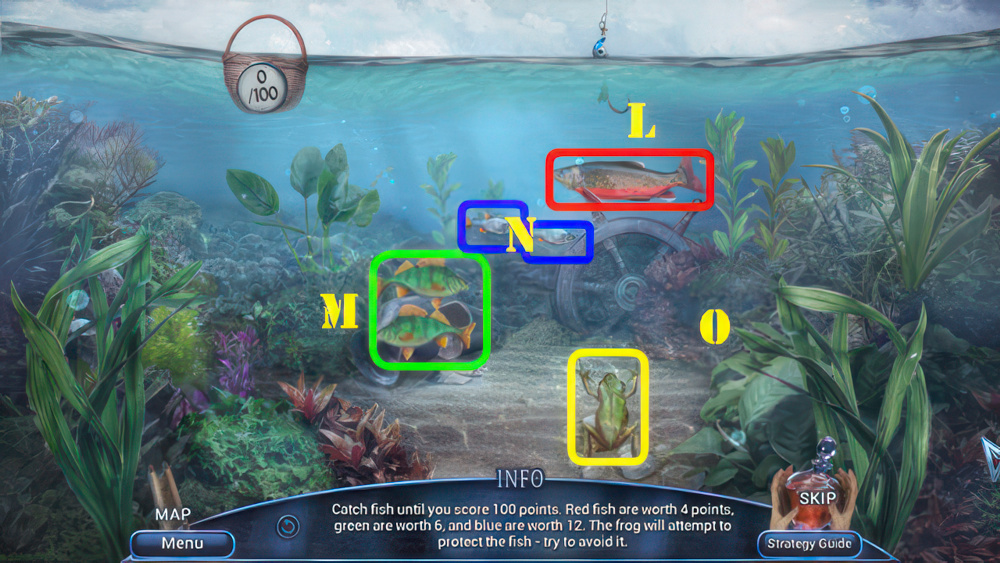
- The solution is random.
- Earn 100 points in total by catching fish.
- Red fish are worth 4 points (L).
- Green ones are 6 points (M), and blue ones are worth 12 points (N).
- Avoid the frog (O).
- Receive BASKET WITH FISH.

- Use BASKET WITH FISH, take SMALL GEAR and METAL CUP (P).
- Return to Dam control.
- Use METAL CUP (Q), receive OIL.
- Use OIL, SMALL GEAR, and LEVER (R).
- Go (S).
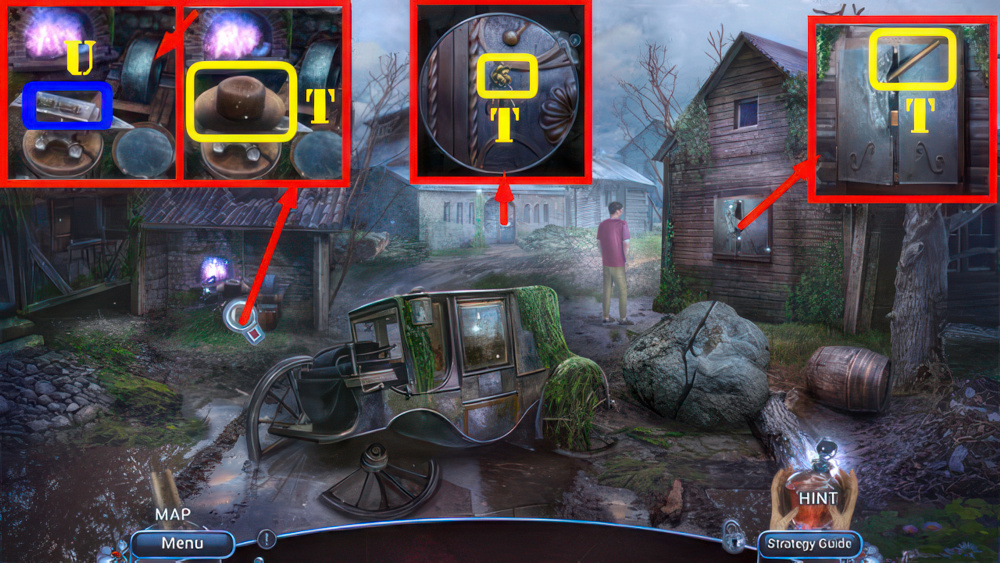
- Take SCARECROW HAT, ORNAMENT PARTS 1/3, and HAMMER (T).
- Place BENT HANDLE and use HAMMER, take CARRIAGE HANDLE (U).
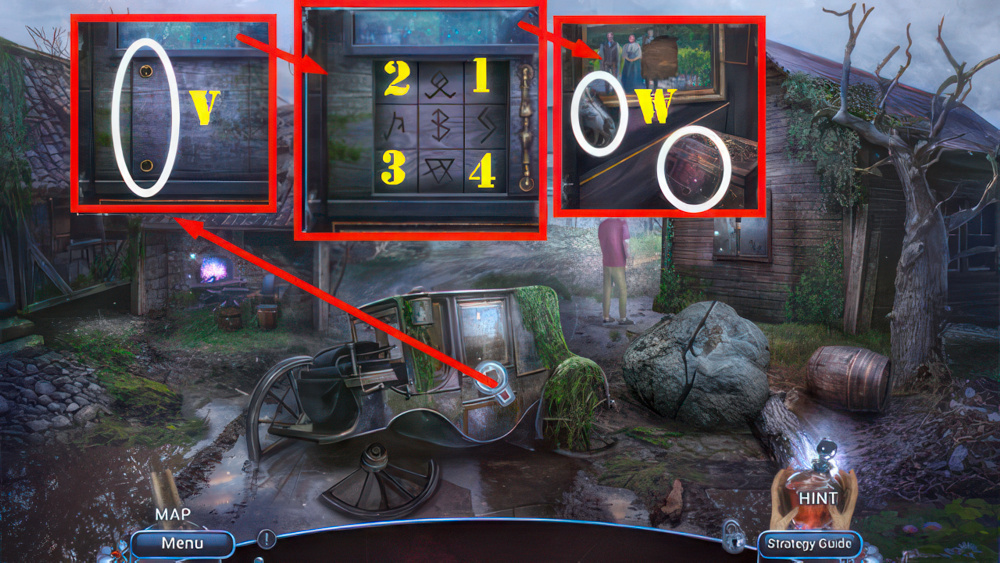
- Use CARRIAGE HANDLE (V).
- Chang the blocks so that all the symbols are visible.
- Press a block to change it.
- Touching one block will also affect adjacent blocks.
- Walkthrough: (1-4).
- Take WOLF SKULL and ANCIENT BOOK (W).
- Return to Lake.
- Place SCARECROW HAT (X).
- Take BIG HORN and ORNAMENT PARTS 2/3 (Y).
- Place WOLF SKULL and BIG HORN (Z1).
- Take BLUNT AXE and WINE FIGURINE (Z2).
- Go to Old Village.
- Use BLUNT AXE, take AXE (A).
- Use AXE (B).
- Play puzzle, receive EVIDENCE 2/5.
- Talk (C), receive WINERY KEY.
- Use WINERY KEY (D).
- Go (E).
- Take BIG ARROW and OLD LIGHTER (F).
- Use OLD LIGHTER, take WINE FIGURINE and SMALL ARROW (G).
- Return to Dam Control.
- Place 2 WINE FIGURINES, take CLOCK CLUE and WINE BOTTLE (H).
- Place BIG ARROW, SMALL ARROW, and CLOCK CLUE, set the time to 3:45.
- Select big arrow (J) and the number (IX).
- Select little arrow (K) and select (III).
- Take ORNAMENT PARTS and MYSTIC AMULET (L).
- Go to Old Village.
- Place ORNAMENT PARTS, take OLD SMALL CHEST and BIG CHISEL (M).
- Use BIG CHISEL, take WOODEN TABLET and MANOMETER (N).
- Go (O).
- Place WINE BOTTLE and WOODEN TABLET (P).
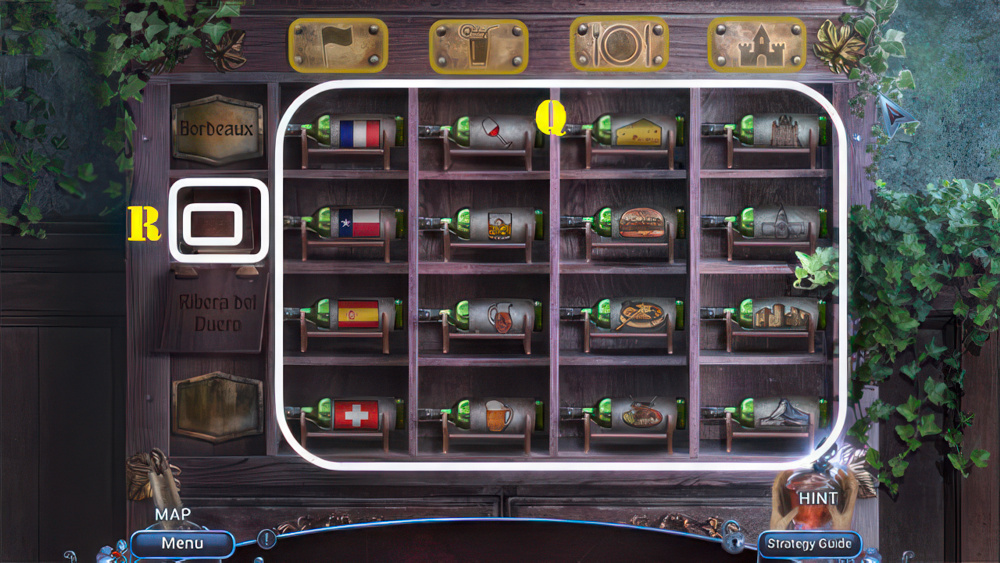
- Arrange the labels on the bottles according to city and type.
- Select two labels to swap them.
- Walkthrough (Q).
- Take EVIDENCE 3/5 and MYSTIC AMULET (R).
- Place 2 MYSTIC AMULETS on ANCIENT BOOK, take SAFE VALVE and ANCIENT RECIPE.
- Place SAFE VALVE, take PUNCH CARD DEVICE and PICTURE PART (S).
- Walk down.
- Place PICTURE PART (T).
- Take FORCEPS and PHOTO OF HENRY (U).
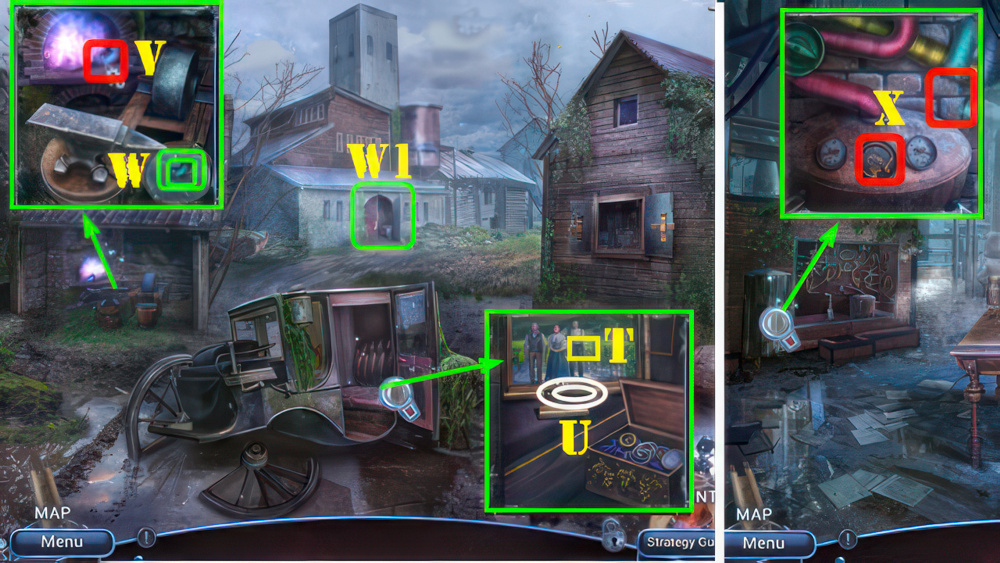
- Use FORCEPS (V).
- Take TUBE PART and DEVICE PART (W).
- Go (W1).
- Place MANOMETER and TUBE PART (X).

- Fix the distiller.
- Rotate the pipes so their colors form continuous lines.
- Walkthrough (Y).
- Take ALCOHOL and PHOTO OF CHARLOTTE (Z).

- PHOTO OF HENRY and PHOTO OF CHARLOTTE on OLD SMALL CHEST, take EVIDENCE 4/5 and HOURGLASS.
- Place ANCIENT RECIPE, ALCOHOL, and HOURGLASS.
- Look at book (A).
- Select alcohol bottle (1), burner button (2), pouch (3), spoon (4), flower (5), hourglass (6), bowl (7).
- Take CRYSTAL OF SECRETS (8).
- Use CRYSTAL OF SECRETS (B).
- Take PUNCH CARD PATTERN and E MONOGRAM (C).
- DEVICE PART and PUNCH CARD PATTERN on PUNCH CARD DEVICE.
- Select the pin that is in the same position as the illuminated button (D).
- Take SAFE PUNCH CARD (E).
- Use SAFE PUNCH CARD (F).
- Play puzzle, receive EVIDENCE.
- Talk (G).
- Give EVIDENCE (H), receive BROKEN UV LIGHT.
- Take SEALED ITEMS and DAEMON’S KEY (I).
- Use DAEMON’S KEY, take H MONOGRAM and DAEMON’S NOTES (J).
- Use E MONOGRAM and H MONOGRAM, take SMALL SCISSORS and RECIPE BOOK (K).
- Receive BATTERIES 1/2.
- SMALL SCISSORS on SEALED ITEMS, take SCREWDRIVER and UV BULB.
- Use SCREWDRIVER, take BATTERIES (L).
- BATTERIES and UV BULB on BROKEN UV BULB, take UV LIGHT.
- Use UV LIGHT and DAEMON’S NOTES.
- Select matching symbols (M).
- Take RITUAL MANUAL (N).
- Give RITUAL MANUAL (O).
- Play puzzle (P).
- The RECIPE BOOK is automatically used.
- Walkthrough Bonus Chapter, at the link below.


