
Strange Investigations 1: Becoming – You will immerse yourself in the dramatic story of detective Dana Strange, who for years has been hunting for a serial killer nicknamed “The Artist”. He kidnapped his first victim fifteen years ago, a girl who, as it later turned out, was Dana’s sister. That ill-fated day in 1951 changed her life forever. Dana vowed to become a detective and find her sister, but despite a long hunt, she only succeeded in arresting a maniac, too late to save her. Broken by her loss, Dana left the force and tried to start life anew. However, the past resurfaces again. In 1966, an art college student goes missing in her hometown of Rainville, and the circumstances of her disappearance seem disturbingly familiar. Dana, overcoming her inner fears and pain, takes on the case, determined to get to the bottom of it. You will have to live in the role of Dana and step by step unravel the chain of events. Explore the crime scene, analyze the evidence, interview witnesses and find out what is behind this kidnapping. During the investigation you will discover details about Dana’s past, her struggle with guilt and her search for justice. If you can not pass any of the puzzles or do not know where the items are, on our site you can watch the walkthrough of Strange Investigations 1: Becoming, and help Dana to cope with her personal demons.
Strange Investigations 1: Becoming – Walkthrough
Here you can see the full walkthrough of Strange Investigations 1: Becoming game, namely for all chapters, including bonus chapter, in pictures.

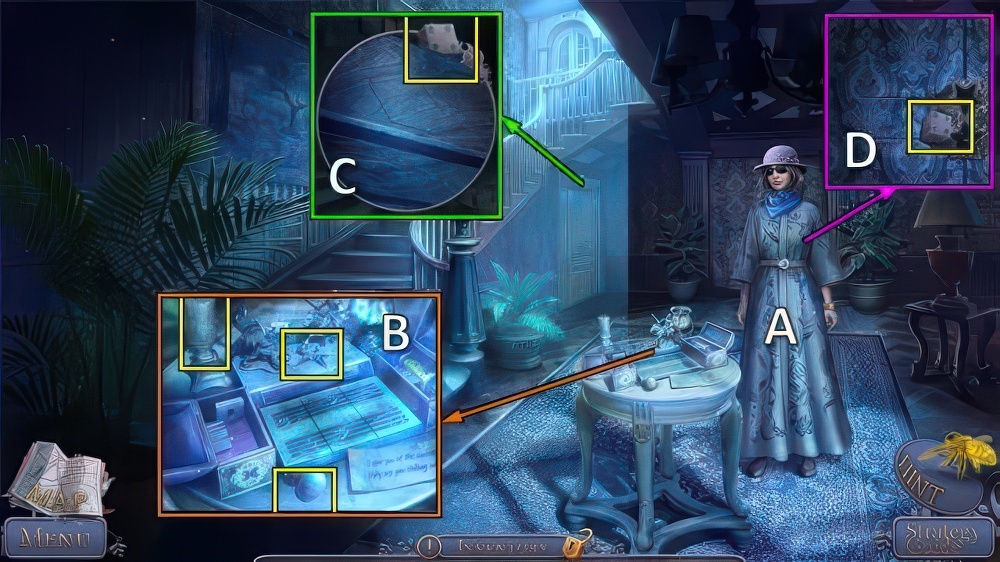
- Take HAIRPIN (A), try to take key.
- Take MOON (B).
- Take key, use HAIRPIN.
- Open (C).
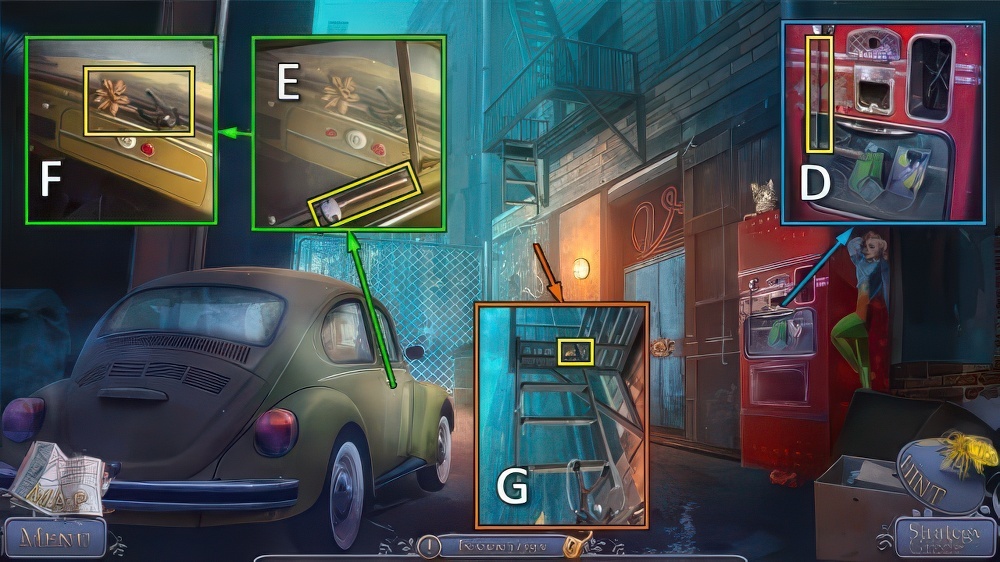
- Play puzzle (D), receive EMPTY GUN.
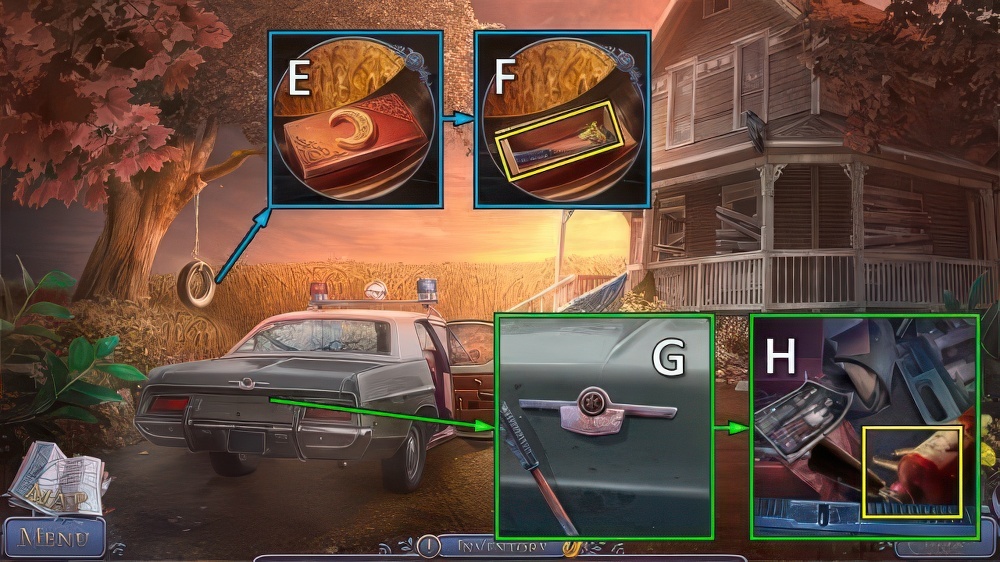
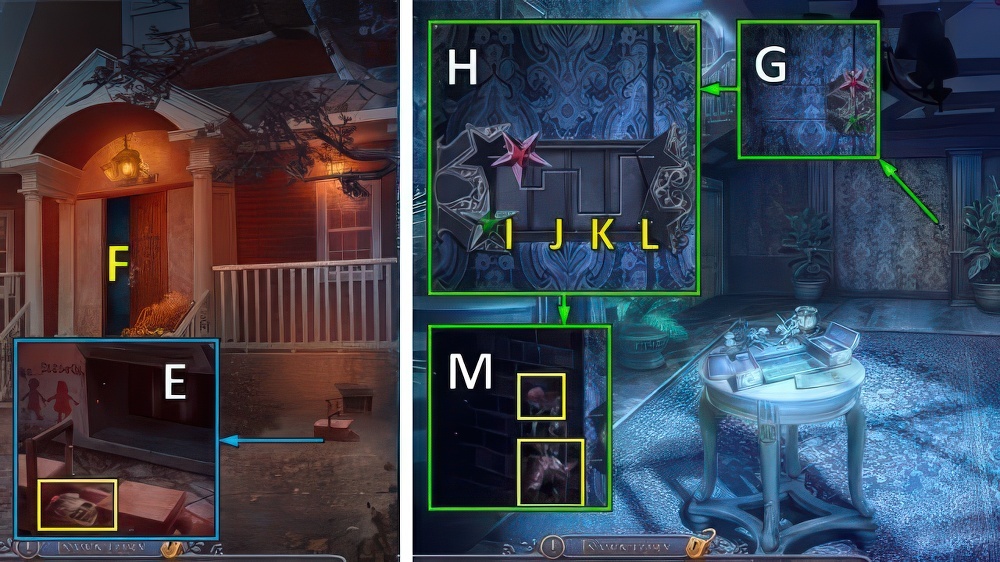
- Place MOON (E).
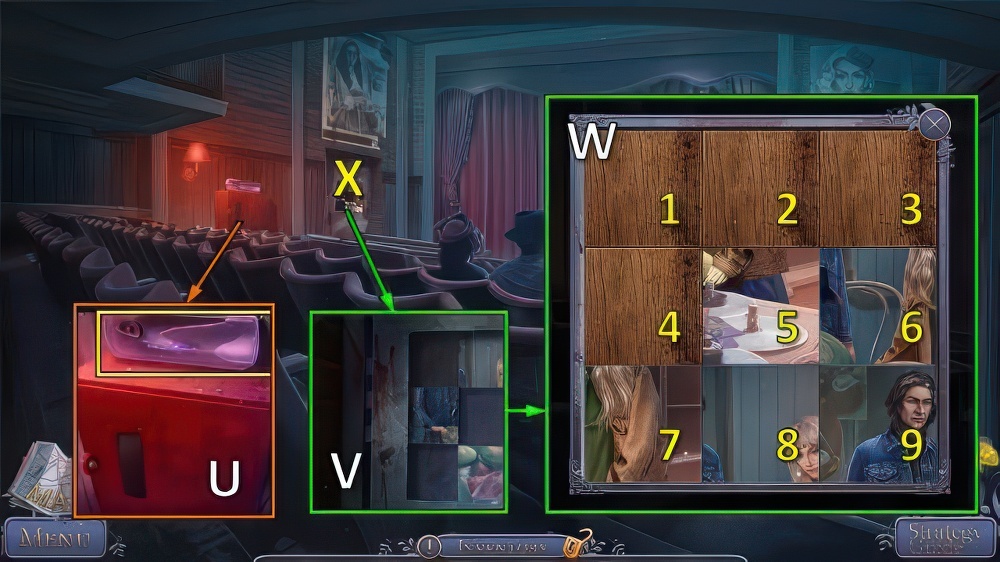
- Take BRACELET and CROWBAR (F).
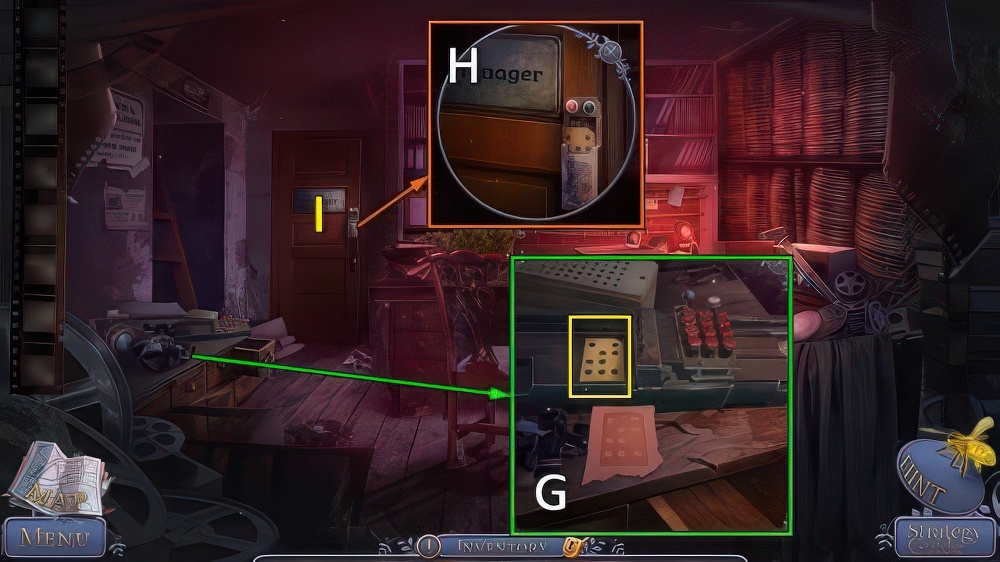
- Use CROWBAR (G).
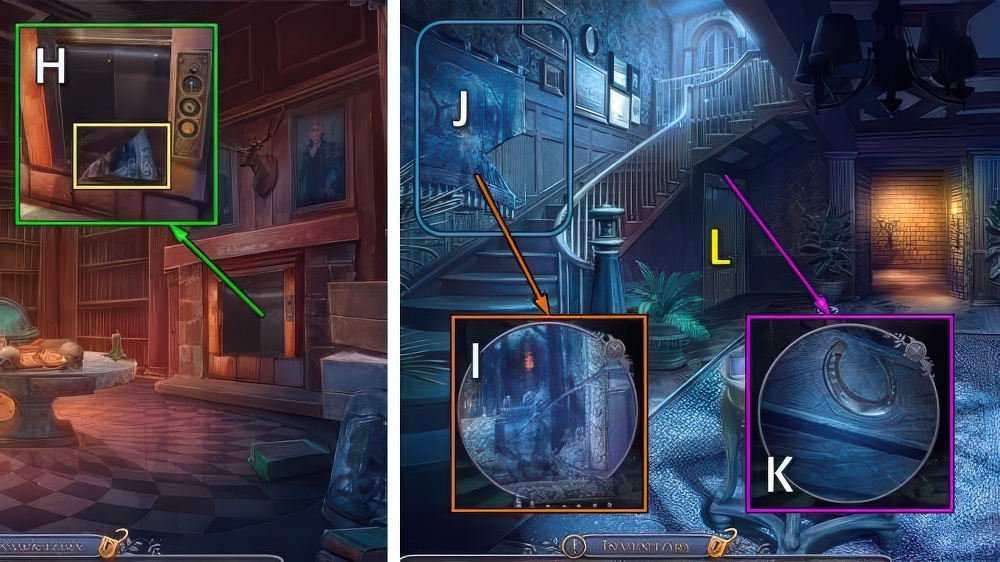
- Inspect photo, take EXTINGUISHER and BULLETS (H).

- Use EXTINGUISHER (I).
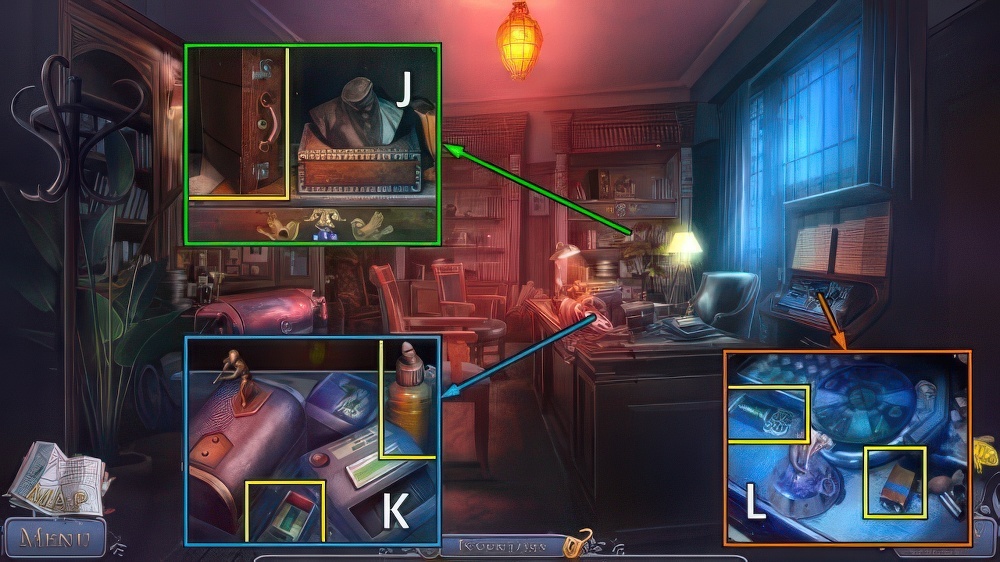
- Take BASEMENT KEY (J).
- BULLETS on EMPTY GUN, take REVOLVER.
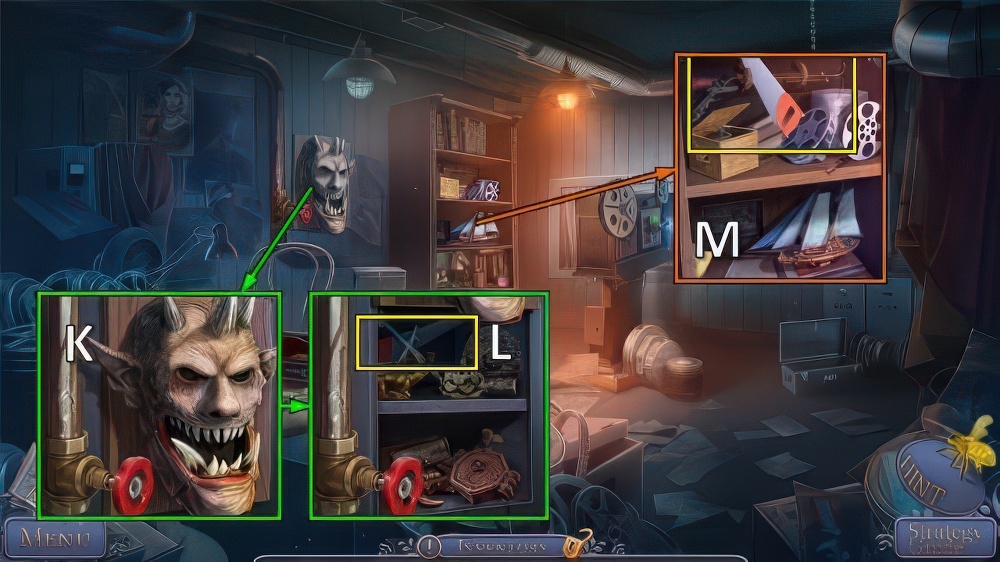
- Use BASEMENT KEY, open (K).
- Use REVOLVER (L).
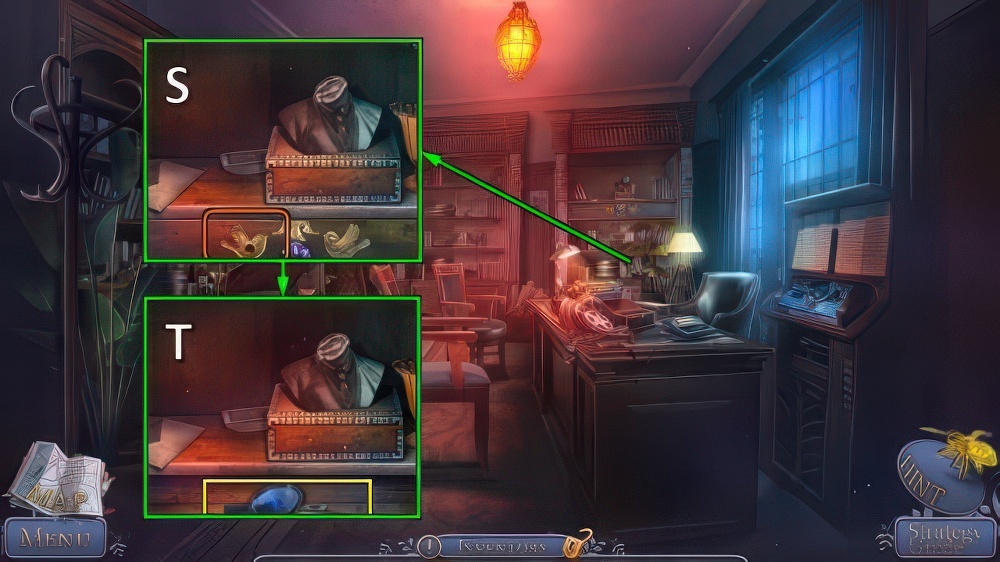
- Take PENCIL and PLANNER (M).
- Take LIGHTER and UV BULB.
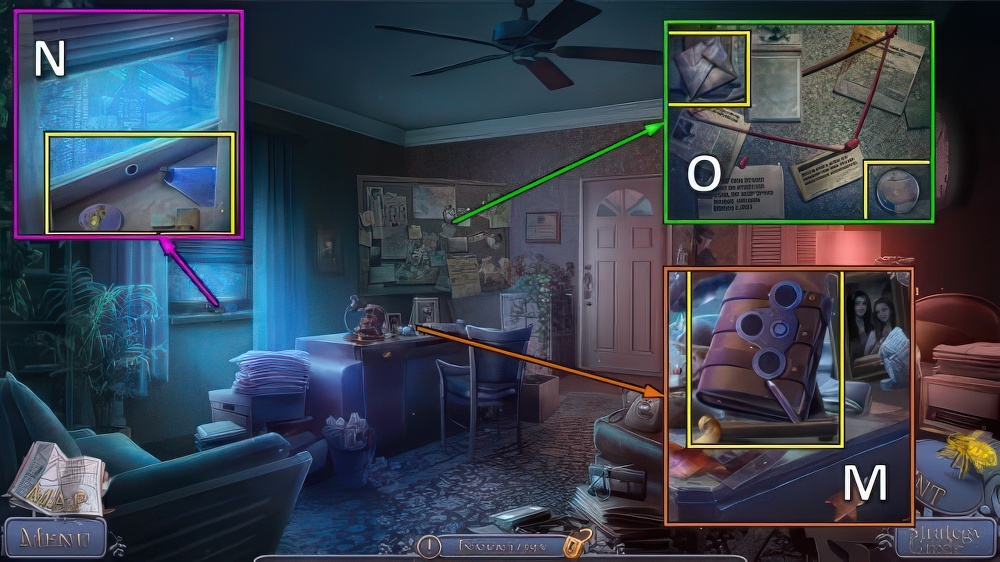
- Use PENCIL, take MECHANISM PART 1/3 (N).
- Take MECHANISM PART 2/3 and BADGE (O).
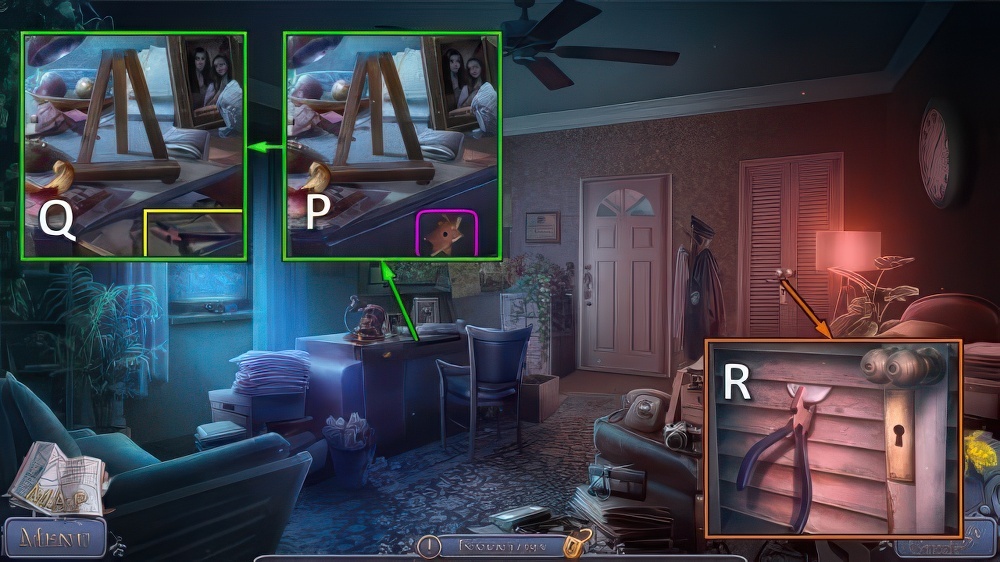
- Place BADGE (P).
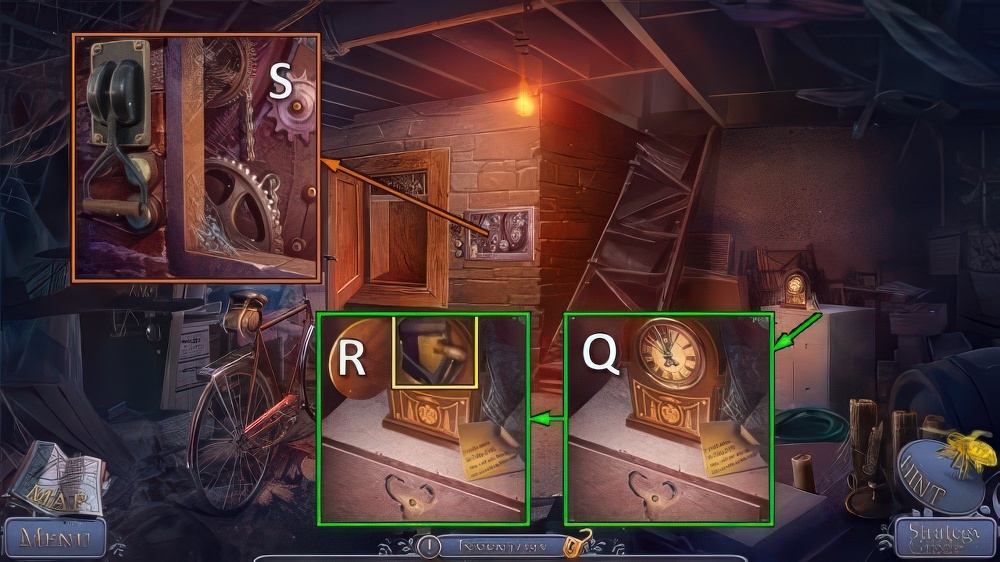
- Take PLIERS (Q).
- Take MECHANISM PARTS 3/3 with PLIERS (R).

- MECHANISM PARTS on PLANNER (S).
- Solution: align T-U-V, W, align X-Y-Z, W, A-B-C.
- Take PLANNER.
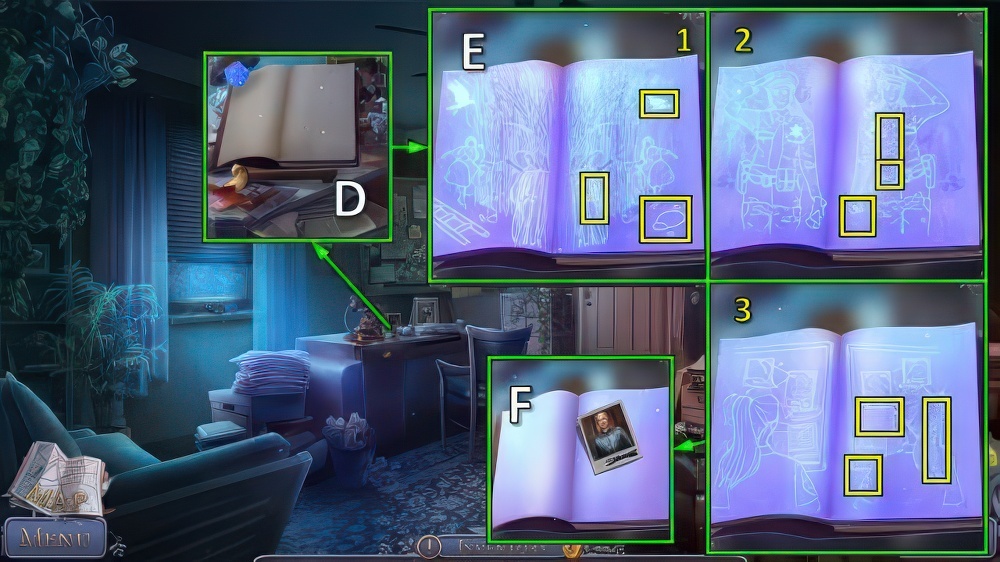
- Place UV BULB and PLANNER (D).
- Find the differences (E).
- Take ARTIST’S PHOTO (F).

- Move cuttings and place ARTIST’S PHOTO (G), take CLOSET KEY (H).
- Use CLOSET KEY (I), take clothes (J).
- Talk (K), receive ISABELLA’S PHOTO.

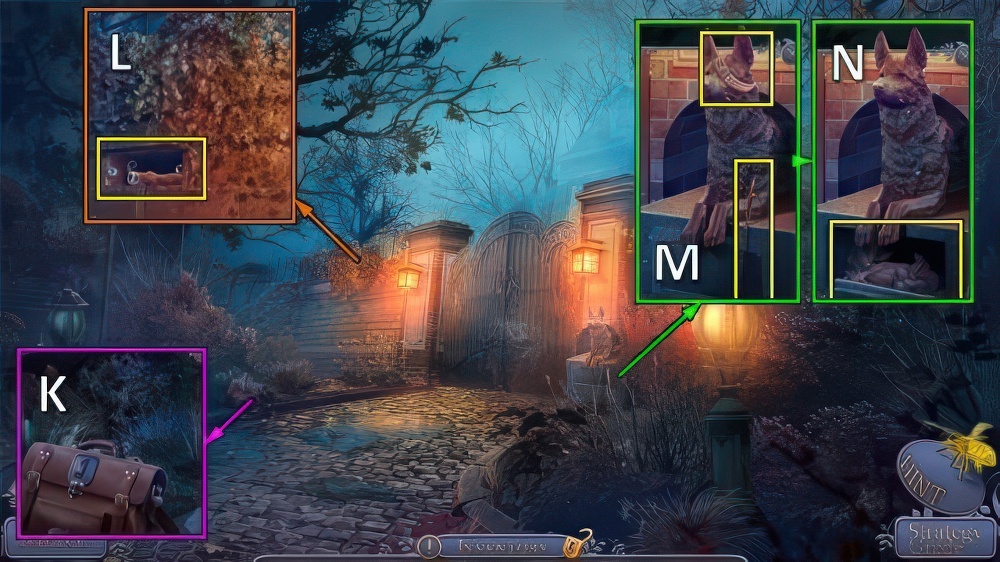
- Take COIN and INLAY 1/2 (L).
- Use COIN, take HEX KEY, BROKEN SWITCH and SCREWDRIVER (M).
- Use SCREWDRIVER, take INLAY 2/2 and BUTTON (N).
- Place INLAY (O).
- Go (P).

- Take POPCORN CUP (Q).
- Take CLEAR TAPE (R).
- Use SCREWDRIVER and POPCORN CUP, take BROKEN CANE and DOLLAR SIGN (S).
- Walk down.

- CLEAR TAPE on BROKEN CANE, take CANE.
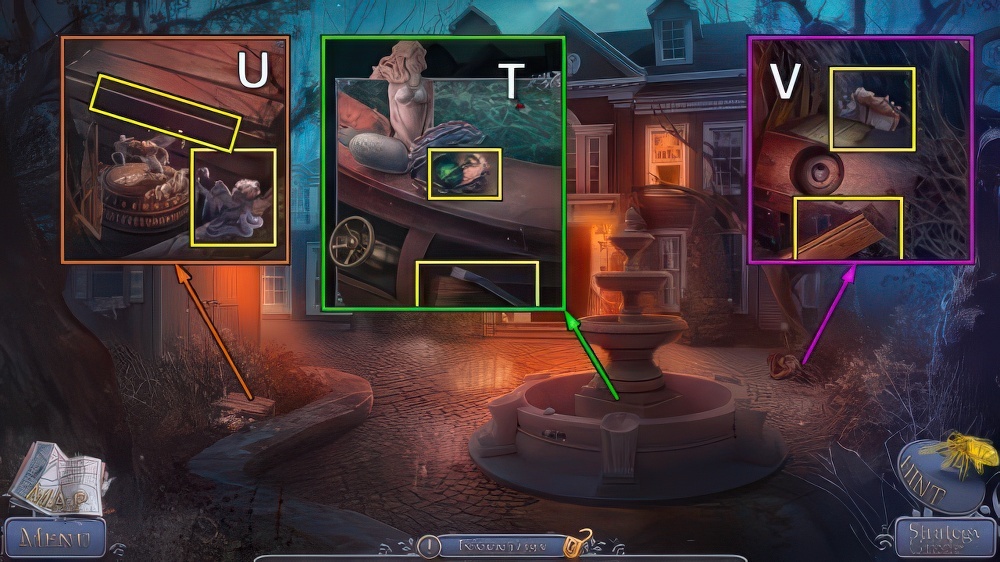
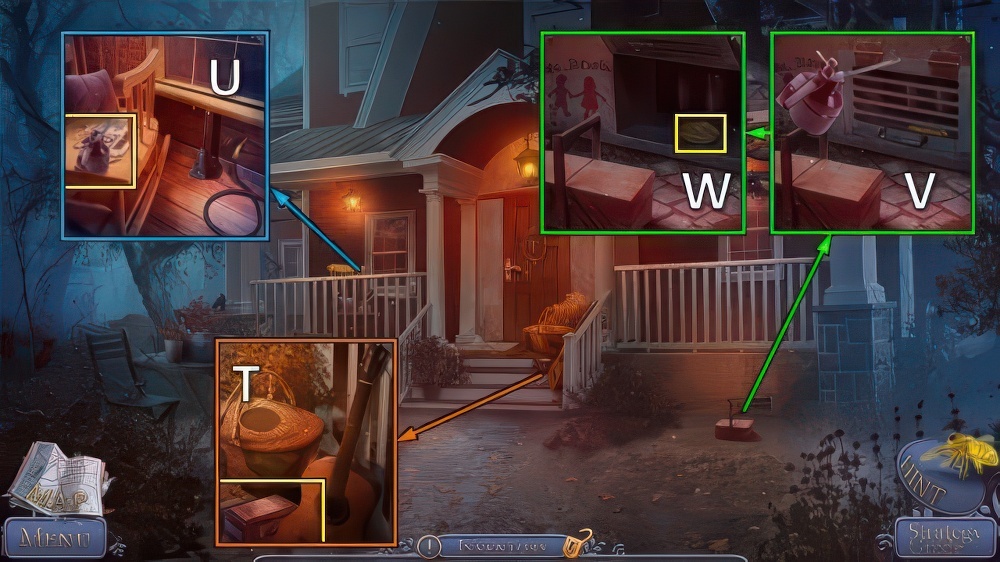
- Use CANE, take WRENCH (T).
- Use WRENCH, play puzzle (U).
- Receive CODE STICKER.
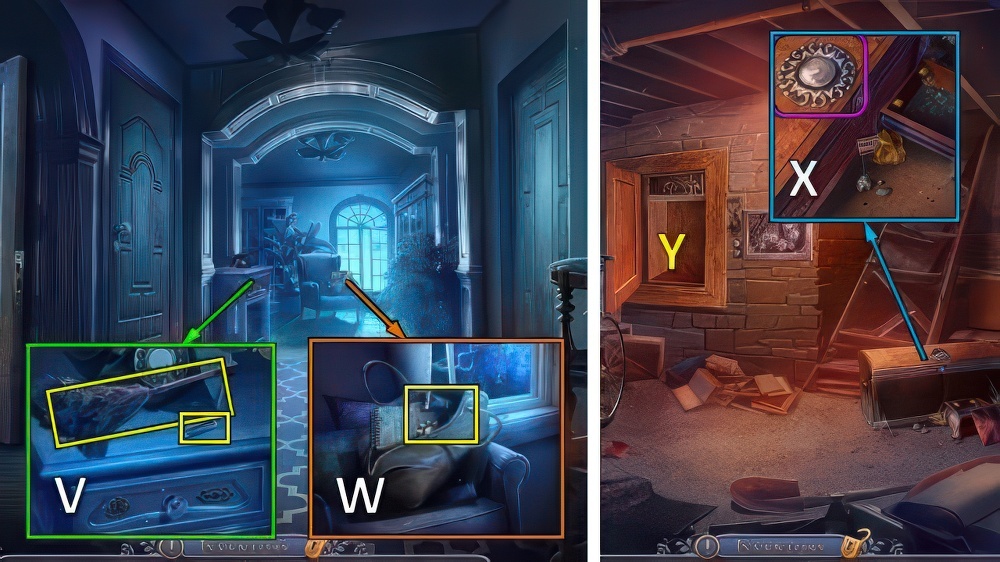
- Place DOLLAR SIGN (V), take DIAL and VINTAGE SWITCH (W).
- Go (X).
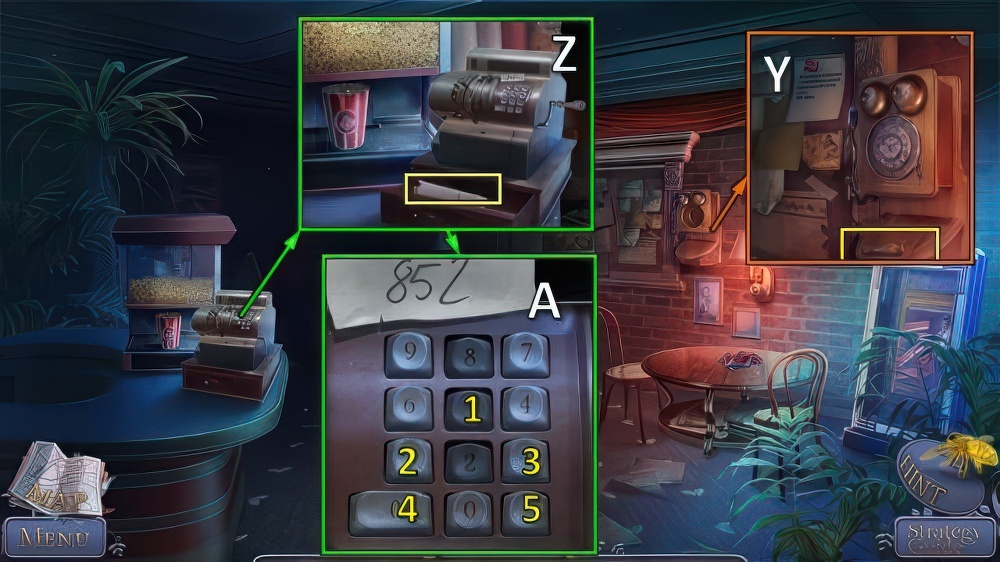
- Place DIAL, take REGISTER HANDLE (Y).
- Place BUTTON, REGISTER HANDLE and CODE STICKER (Z).
- Solution (A): 1-2-3-4-5.
- Take METAL COVER (Z).

- METAL COVER and VINTAGE SWITCH on BROKEN SWITCH, take SWITCH.
- Place SWITCH (B).
- Play puzzle (C), receive POSTER PIECE.
- Walk down.
- Place POSTER PIECE and CLEAR TAPE (D), take ACTOR’S PHOTO and ADDRESS PLATE (E).
- Go (F).

- Place ACTOR’S PHOTO (G), take note (H).
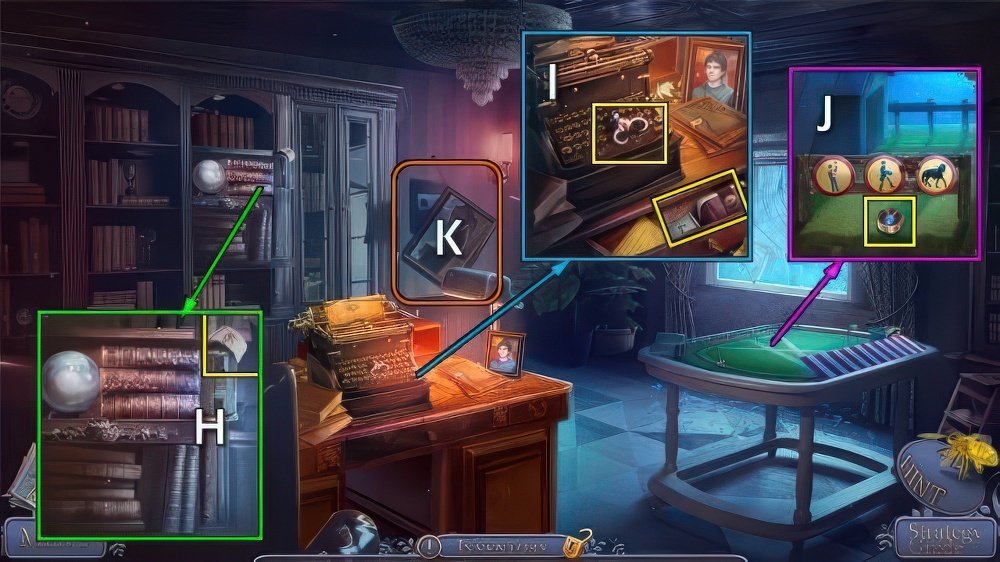
- Go (I).

- Solution (J).
- Take BAG (K).
- Use HEX KEY, take FILE HANDLE and LETTER J (L).
- Take POKER and NECKLACE, place ADDRESS PLATE (M).
- Take MERMAID (N).

- Take VALVE, place FILE HANDLE.
- Take FILE (O).
- LETTER J on BAG, play puzzle.
- Take INSECTICIDE.
- Use INSECTICIDE (P), take PRUNERS (Q).
- Use PRUNERS, POKER and FILE (R).
- Go (S).
- Place MERMAID and VALVE, take SMALL KEY, EMERALD 1/2, CROWBAR and PLANK 1/3 (T).
- Take MANTICORE, use CROWBAR and take PLANK 2/3 (U).
- Use CROWBAR, take PLANKS 3/3 and HORSE HEAD (V).
- Walk down twice.

- Use SMALL KEY, take LETTER T and HANDKERCHIEF (W).
- LETTER T on BAG, take SCRAPER and VINEGAR.
- Use SCRAPER, take HORSE HEAD (X).
- Go to Garden.

- Place HORSE HEAD x2 (Y), take LOCK PART and EMERALDS 2/2 (Z).
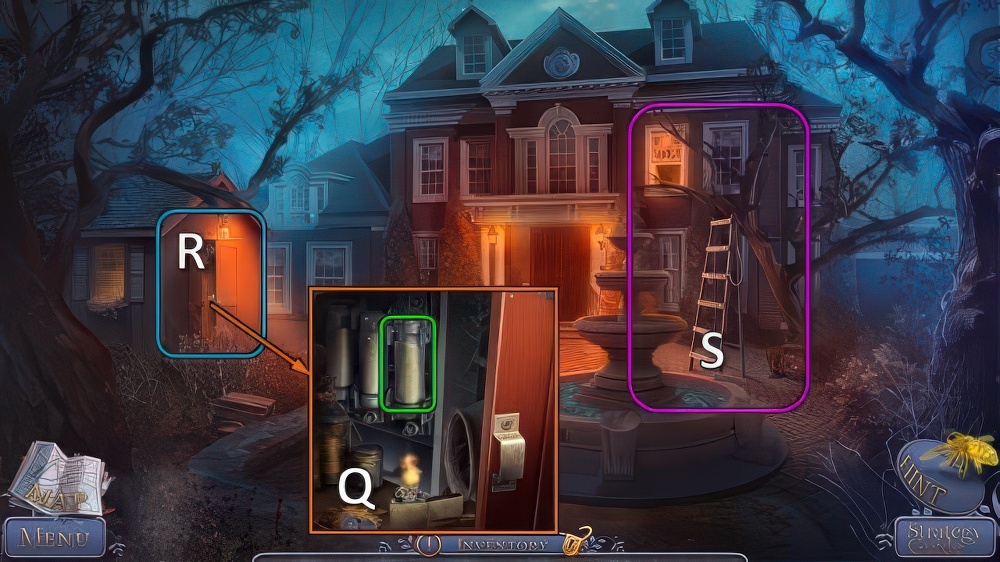
- Use VINEGAR, open (A).
- Place LIGHTER, take IRON HANDLE (B).
- Walk down.

- Use IRON HANDLE (C).
- Solution (D): (1-3)-(2-6)-(3-8)-(4-6)-(5-8)-(6-7)-(7-8)-(8-9).
- Take FUSE (E).
- Place EMERALDS, take GEAR and NAILS (F).
- Go forward.

- Place LOCK PART and GEAR (G).
- Solution (H): Ix2-(J-2)-Ix2-(K-7)-Ix2-(L-1)-Ix2-(M-7)-(N-4)-Ix2-(O-2).
- Take HAMMER (P).
- Place FUSE (Q).
- Play puzzle (R), receive BROKEN LADDER.
- PLANKS, NAILS and HAMMER on BROKEN LADDER, take LADDER.
- Place LADDER (S).
- Take BOX (T).
- Take OILER (U).
- Use OILER (V), take YARN (W).

- Place YARN for puzzle (X), receive CROCHET HOOK.
- Use CROCHET HOOK, take DOOR KEY (Y).
- Use DOOR KEY, go (Z).
- Talk (A), receive SIGNET RING.
- Place MANTICORE, take STAR, KNOB and CANDLE (B).
- Take DIE 1/3 (C).
- Take DIE 2/3 (D).
- Walk down.
- Place KNOB, take note, PROPANE and DICE 3/3 (E).
- Go (F).
- DICE on BOX, take STAR and GUITAR STRINGS.
- Place STAR x2 (G).
- Solution (H): J-Kx2-Lx2, Ix2-J-Kx2-L.
- Take PICK 1/3 and STALLION (M).
- Walk down.

- Place STALLION (N), take FLINT (O).
- Go (P).
- Place CANDLE and use FLINT (Q).
- Go (R).

- Place NECKLACE, receive PICK 2/3.
- Take SKULL (S).
- Place SKULL, take JACK FOOT, DRAGON HEAD and PICK 3/3 (T).
- Take SATCHEL (U).
- Take SLEDGEHAMMER (V).
- Walk down twice.

- Use SLEDGEHAMMER, take DRAGON WING and DAMAGED JACK (W).
- Go to Secret Room.
- DRAGON HEAD and DRAGON WING on SATCHEL, take CRYSTAL and SKELETON HAND.
- Place CRYSTAL, take RATCHET (X).

- Place SKELETON HAND (Y).
- Play puzzle (Z), receive CRANK.
- JACK FOOT, RATCHET and CRANK on DAMAGED JACK, take JACK.
- Place JACK (A).
- Take TILE and CYLINDER (B).
- Place TILE, use HANDKERCHIEF.
- Take TRIPARTITE KEY and NEEDLE AND THREAD (C).
- Walk down.

- Place CYLINDER (D).
- Solution (E): 4-2-8, 1-6-3-7, 3-7-4-5-6.
- Take DUMBWAITER BUTTON (F).
- Go (G).
- Use DUMBWAITER BUTTON, take TAPESTRY FRAGMENT (H).
- Walk down.
- Place TAPESTRY FRAGMENT and use NEEDLE AND THREAD (I).
- Play puzzle (J), receive HORSESHOE.
- Push, place HORSESHOE (K).
- Go (L).

- Use SIGNET RING (M), take WOLF (N).
- Take ACID (O).
- Place WOLF and use ACID, take CARABINER, CLOCK HANDS and CHAIN (P).
- Place CLOCK HANDS (Q), take SMALL SWITCH and CORKSCREW (R).
- Place SMALL SWITCH, CHAIN and CARABINER, pull lever (S).

- Solution (T).
- Go (U).
- Take PAPER CLIP and DUSTER (V).
- Use PAPER CLIP, take SUN and GLUE (W).
- Walk down.
- Place SUN for puzzle (X), receive MAGNET.
- Go (Y).

- Feathers from DUSTER, place GLUE and MAGNET.
- Glue and magnet on stick, take MAGNET STICK.
- Use MAGNET STICK (Z), take BIPARTITE KEY (A).
- Place TRIPARTITE KEY and BIPARTITE KEY, take SMALL VALVE and TUNING PEGS (B).
- Open, go (C).
- Walk down.

- Place GUITAR STRINGS, TUNING PEGS and PICKS (D).
- Play puzzle (E), receive DOOR HANDLE.
- Go to Second Floor.
- Use DOOR HANDLE (F).
- Go (G).
- Take CODE PART 1/3 (H).
- Use CORKSCREW, take CODE PART 2/3, WALLET and BULL (I).
- Take BRASS LATCH (J).
- BRASS LATCH on WALLET, take CODE PARTS 3/3.
- Remove (K).

- Place CODE PARTS, push buttons (L).
- Take JUDGE and LETTER OPENER (M).
- LETTER OPENER on WALLET, take SPACE BAR.
- Place SPACE BAR, take JOCKEY and SMALL LEVER (N).
- Place SMALL LEVER, take HORSE (O).

- Place JUDGE, HORSE and JOCKEY (P).
- Solution (Q): R-Sx7-Tx6-U-V.
- Take CATTLE BOLT (W).
- Walk down twice.

- Place BULL (X), take CANISTER and WRENCH (Y).
- Go to Backyard.
- Use WRENCH, take HOSE (Z).
- Go to Second Floor.

- SMALL VALVE, CATTLE BOLT, HOSE and WRENCH on CANISTER, take STUNNER.
- Use STUNNER (A).
- Shoot lock three times (B).
- Offer ISABELLA’S PHOTO (C), receive ISABELLA’S PURSE.
- Take WIRE (D).
- Take BROKEN GLASS CUTTER, use WIRE (E).
- Take FLOWER and SLINGSHOT (F).
- Take PETAL with SLINGSHOT (G).

- FLOWER and PETAL on ISABELLA’S PURSE, take JEWEL 1/5 and LADYBUG KEY.
- Use LADYBUG KEY (H).
- Play puzzle (I), receive STAR KEY.
- Take PICTURE PIECE 1/3, use STAR KEY (J).
- Go (K).

- Take CONTROL UNIT (L).
- Take COIN-RETURN LEVER (M).
- Walk down.
- Place CONTROL UNIT and COIN-RETURN LEVER, take JEWEL 2/5 and DOG TAG (N).
- Go (O).

- Use DOG TAG (P), take EYE and TWEEZERS (Q).
- Place EYE, take PICTURE PIECE 2/3 and OLD RING (R).
- Walk down.
- OLD RING and TWEEZERS on BROKEN GLASS CUTTER, take GLASS CUTTER.
- Use GLASS CUTTER, take PICTURE PIECES 3/3 and NYLONS (S).
- Go (T).
- Take SHARD with NYLONS, take JEWEL 3/5 (U).
- Place PICTURE PIECES (V).
- Solution (W): (5-9)-(6-7)-2-(1-3)-(1-5)-8-(5-7)-(5-8)-2-(2-5)-8-(5-8).
- Go (X).

- Take SMALL BUTTON (Y).
- Place SMALL BUTTON, take ELECTRICAL TAPE and KEY RING (Z).
- Use KEY RING (A), take note, SYRINGE and JEWEL 4/5 (B).
- Walk down.

- Use SYRINGE (C), take JEWELS 5/5 and PUNCH CODE (D).
- Place JEWELS, take WATER and BLANK CARD (E).
- Go (F).
- Place PUNCH CODE and BLANK CARD, take PUNCH CARD (G).
- Use PUNCH CARD (H).
- Go (I).
- Take BRIEFCASE (J).
- Take EPOXY and REMOTE (K).
- Take BROKEN KEY and BATTERY (L).

- BATTERY on REMOTE, take INFRARED REMOTE.
- Take MUSIC KEY 1/3, use INFRARED REMOTE.
- Play puzzle (M), receive SOLDIER.
- Place SOLDIER (N), take UNDEVELOPED PHOTOS and TROPHY (O).
- Walk down.

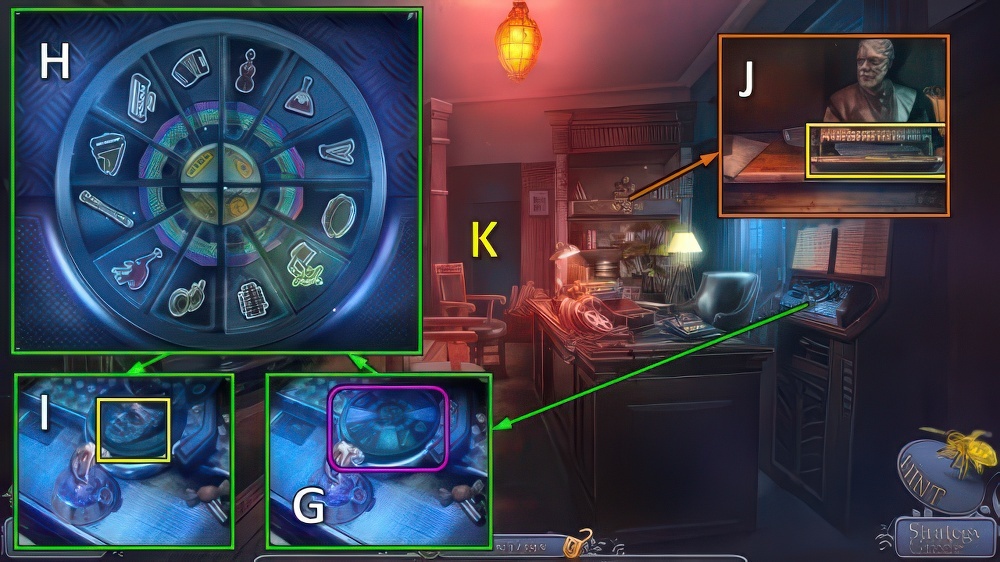
- Place TROPHY, take PRISM and MUSIC KEY 2/3 (P).
- Place PRISM, take CODE WHEEL and BIRD (Q).
- Go (R).
- Place BIRD (S), take ULTRAVIOLET FLASHLIGHT and KEY SHAFT (T).
- Walk down.

- BROKEN KEY on BRIEFCASE, remove key part.
- Place KEY SHAFT, take DEVELOPER.
- Place PROPANE, WATER and DEVELOPER (U), push button (V).
- Place UNDEVELOPED PHOTOS.
- Take photos.
- Solution (W): (2-7)-(7-12)-(11-6)-(6-3)-(3-4)-(5-6)-(6-9)-(6-11)-(10-11).
- (11-8)-(2-1)-(1-5)-(5-9)-(2-7)-(10-11)-(6-3)-(7-11)-(2-6)-(6-10).
- Take COMBINATION (X).
- Go (Y).
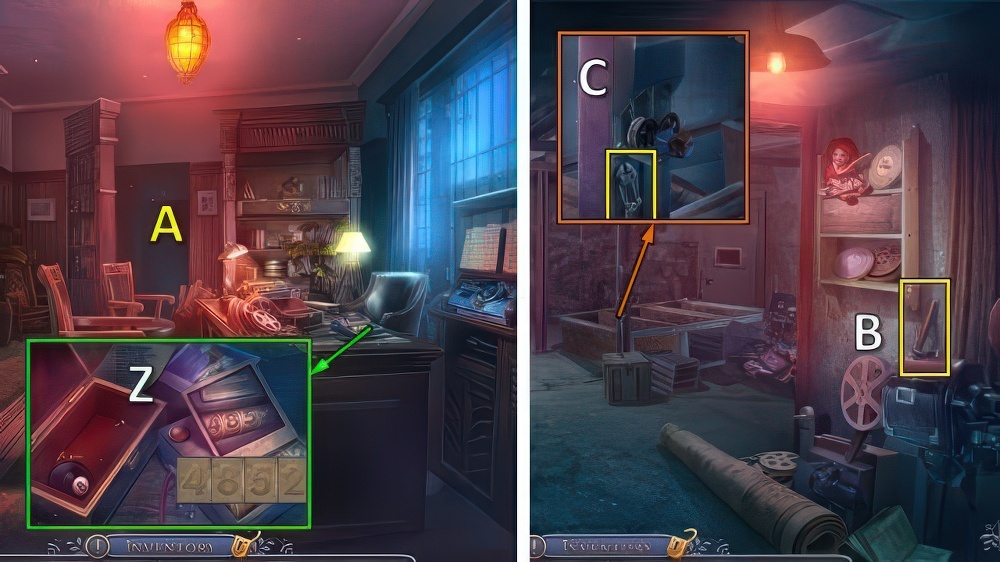
- Place CODE WHEEL and COMBINATION, enter 4-8-5-2 (Z).
- Go (A).
- Take SPOKE 1/4 (B).

- Take BROKEN BOLT CUTTER (C).
- Take SPOKE 2/4.
- Use SHARD, take RAG and TINY BOOT (D).
- Read label, place TINY BOOT.
- Take STURDY HANDLE and SPOKE 3/4 (E).
- STURDY HANDLE on BROKEN BOLT CUTTER, take BOLT CUTTER.
- Use BOLT CUTTER, take MUSIC KEYS 3/3 and NET (F).
- Walk down.
- Place MUSIC KEYS (G).
- Solution (starting positions are random) (H).
- Take HEAD (I).
- Use EPOXY and HEAD, take METAL HANDLE and SPOKES 4/4 (J).

- Go (K).
- Place METAL HANDLE, open (L).
- Take HOOK and ANCHOR (M).
- Place HOOK (N).

- Use RAG and SPOKES, turn (O).
- Take TORN FILM, place ULTRAVIOLET FLASHLIGHT (P).
- Play puzzle (Q), receive EMERGENCY LIGHT.
- Walk down twice.
- Place EMERGENCY LIGHT (R).
- Go (S).
- Pull (T).
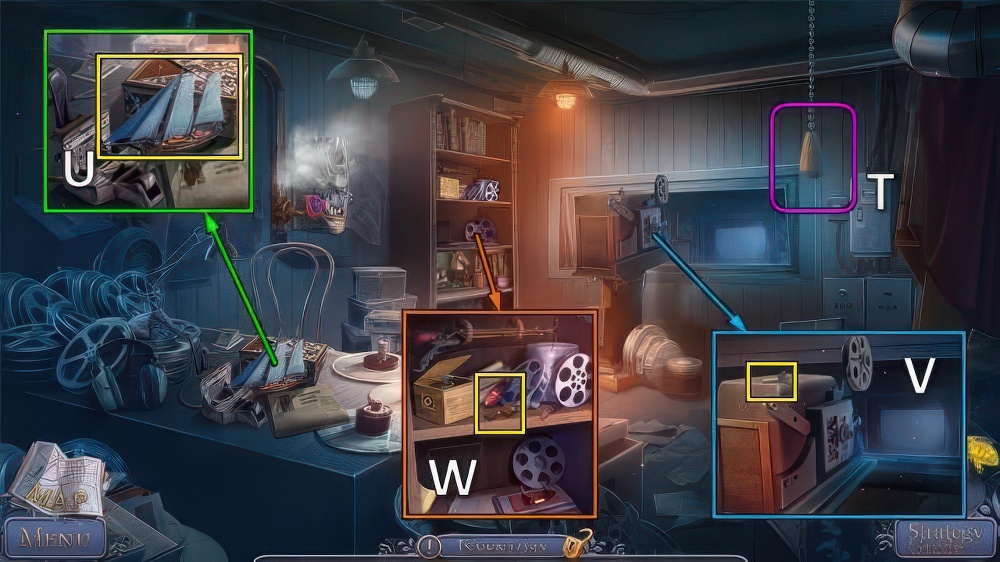
- Take SHIP (U).
- Take WINDING KEY (V).
- Use WINDING KEY, take TAILLIGHT and RUDDER (W).

- Go to Study.
- Place TAILLIGHT take CHUCK KEY and TRIANGULAR INLAY (X).
- Use CHUCK KEY, take SIREN (Y).
- Go to Projection Booth.
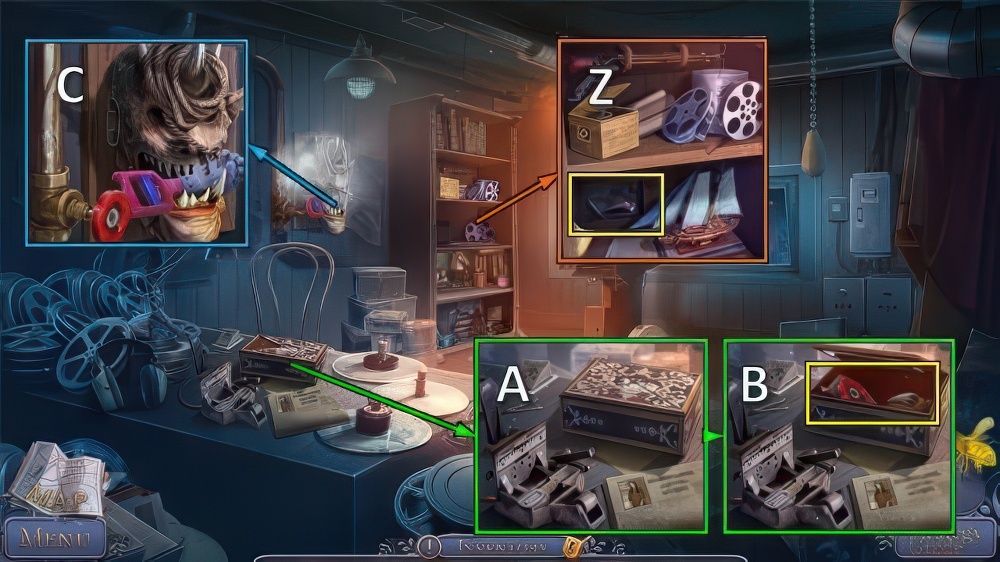
- ANCHOR, NET, RUDDER and SIREN on SHIP, take BRIGANTINE.
- Place BRIGANTINE, take SMALL HANDLE and PROJECTOR SWITCH (Z).
- Place TRIANGULAR INLAY (A).
- Take VALVE and FANG (B).
- Place VALVE, take ROPE and CLAW (C).

- Walk down twice.
- Place SMALL HANDLE (D).
- Solution (E).
- Use CLAW (F), take PLUG.

- Go to Projection Booth.
- Place PLUG and ELECTRICAL TAPE.
- Place TORN FILM, take FILM (G).
- Place PROJECTOR SWITCH and FILM (H).
- Play puzzle (I).
- Take EAR (J).
- Place FANG and EAR (K).
- Play puzzle, take SAW (L).
- Use SAW, take HARPOON (M).

- Walk down three times.
- ROPE on HARPOON, take GRAPPLING HOOK.
- Use GRAPPLING HOOK, go (N).

- Use BRACELET (O).
- Solution (Q): R: 6-1-2-5-4-3.
- S: 8-6-4-2-3-5-7.
- T: 1-5-4-6-3-7-2-8.
- U: 7-3-1-5-8-4.
- V: 6-2-8-4-3-7-5.
- W: 6-1-4-3-7-8-5-2.
- Walkthrough Bonus Chapter, at the link below.


