
Unsolved Case 6: Ash and Secrets (Bonus Chapter) – Transports you to a luxury cruise ship where a planned work trip turns into a deadly investigation. The detective and his companion Vivian find themselves at the center of the dramatic event of the mysterious death of Nicole, a lawyer and close ally of businessman Alfie Lewis. Nicole dies of anaphylactic shock, even though all precautions were taken. But was it an accident? Explore the mysteries of the luxury ship, interview passengers from a motley crew, collect clues and solve puzzles to uncover what really happened. Caution and coolness are more important than ever: the killer may be closer than you think.
Bonus Chapter Walkthrough
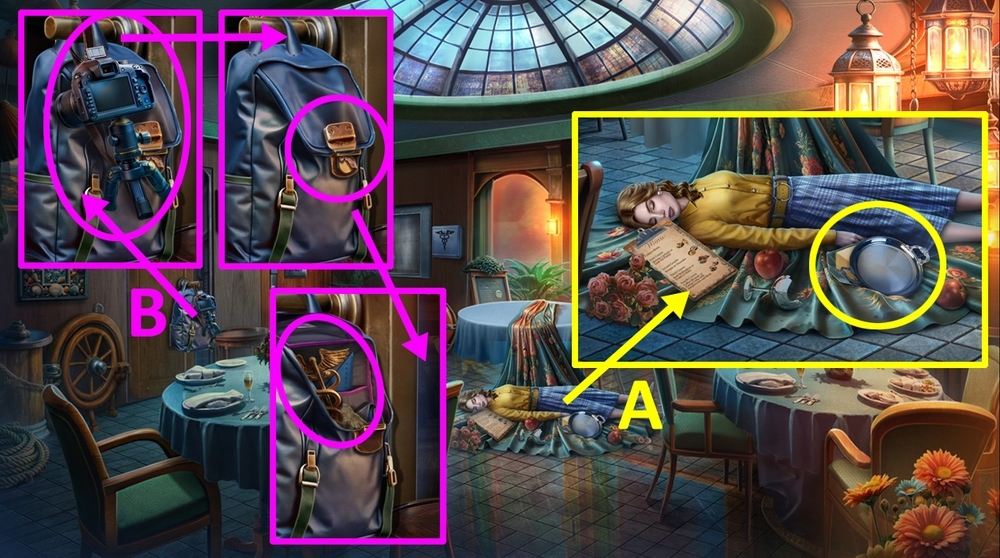
- Take SHINY TRAY and BUTTER (A).
- Take CAMERA, use BUTTER on the bag.
- Take CADUCEUS AMULET (B).
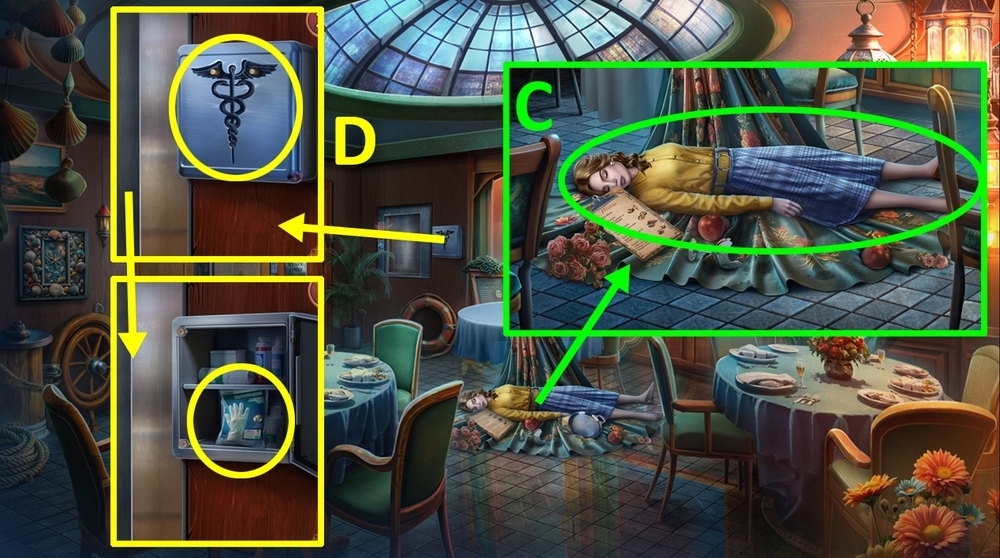
- Use CAMERA on the body (C).
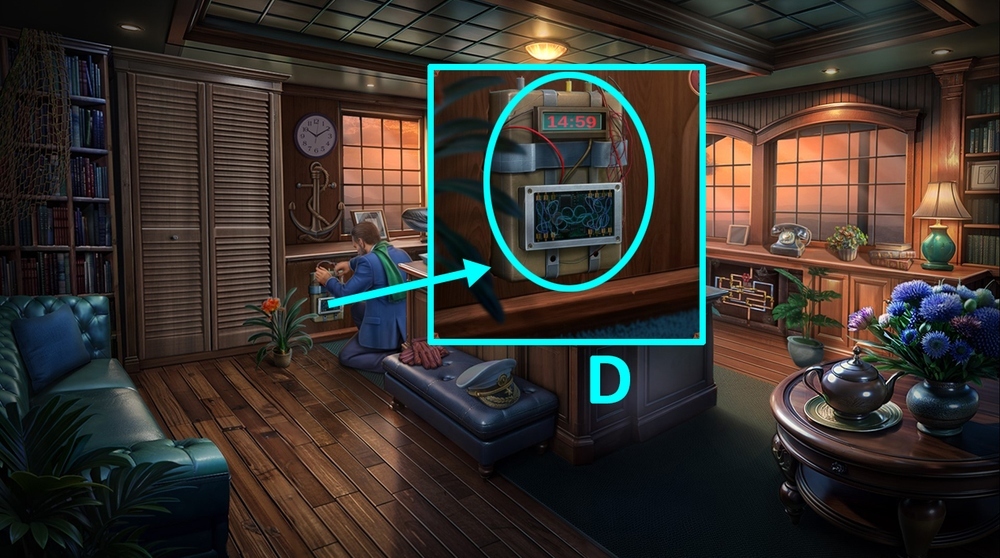
- Use CADUCEUS AMULET on the first aid kit, take STERILE GLOVES (D).
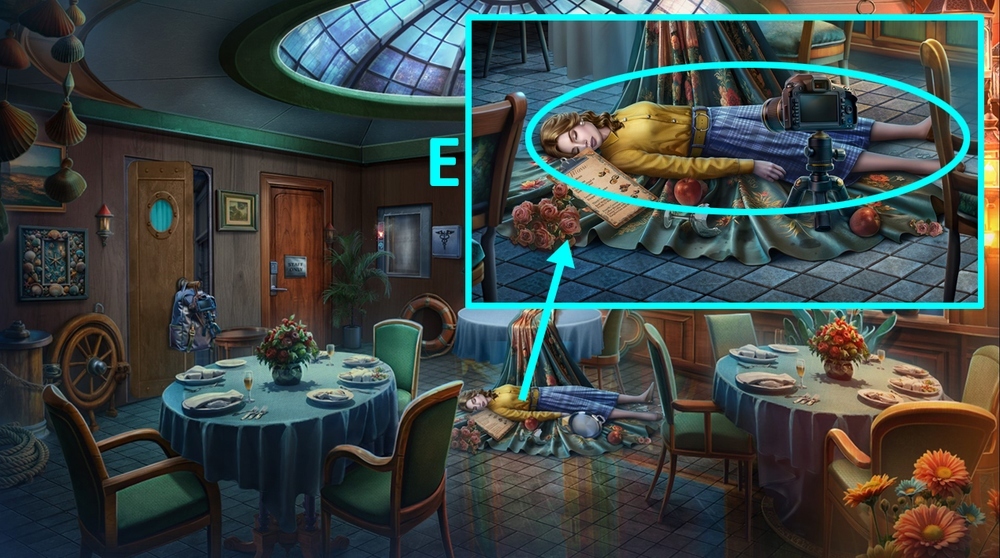
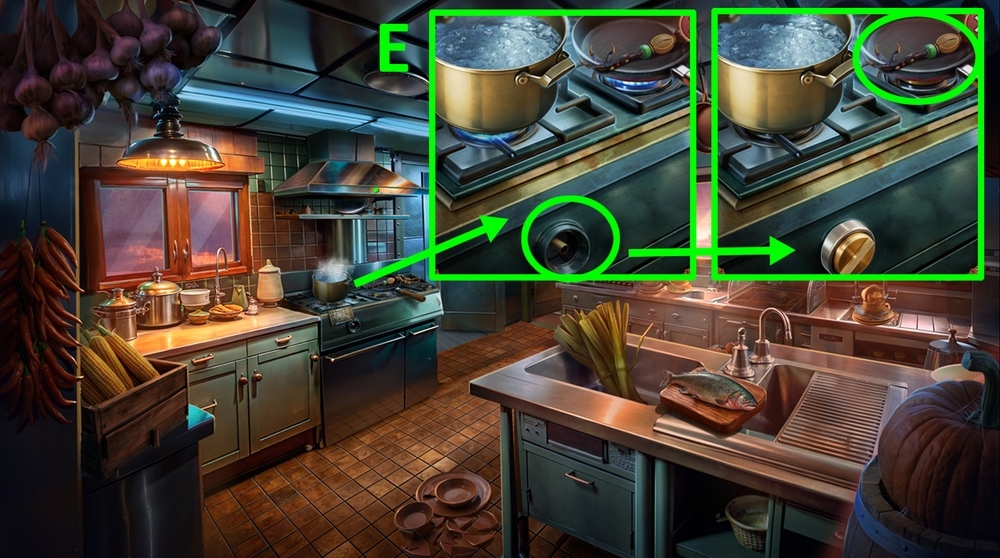
- Use STERILE GLOVES on the body (E).
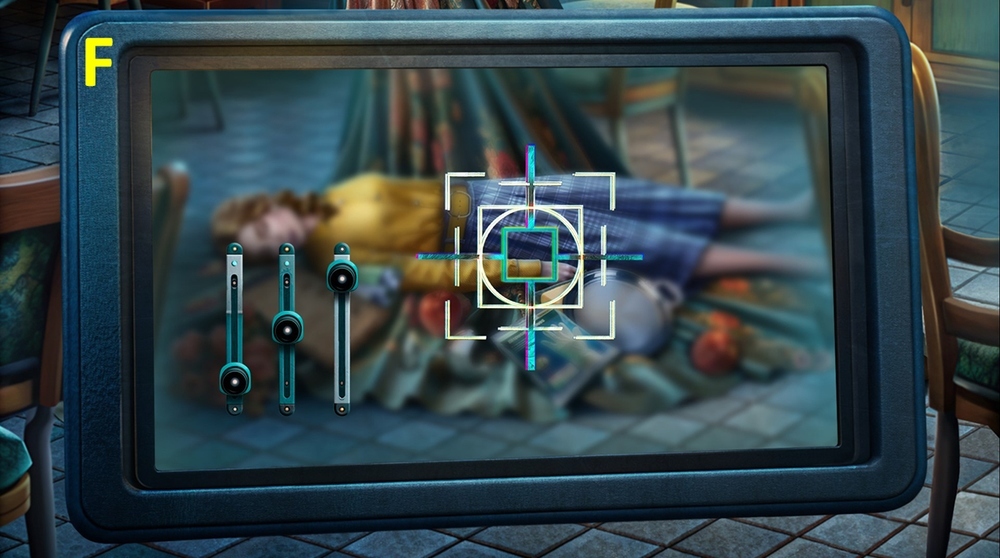
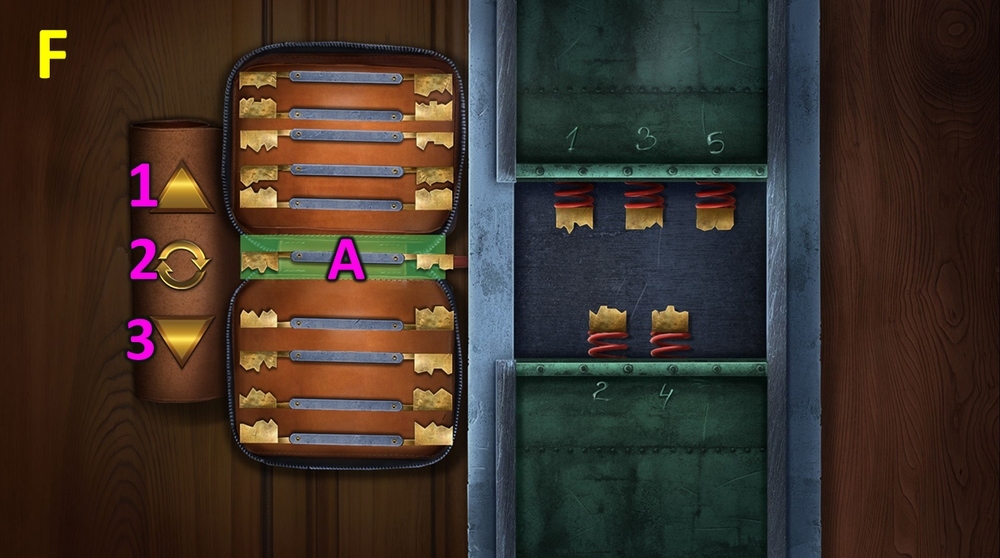
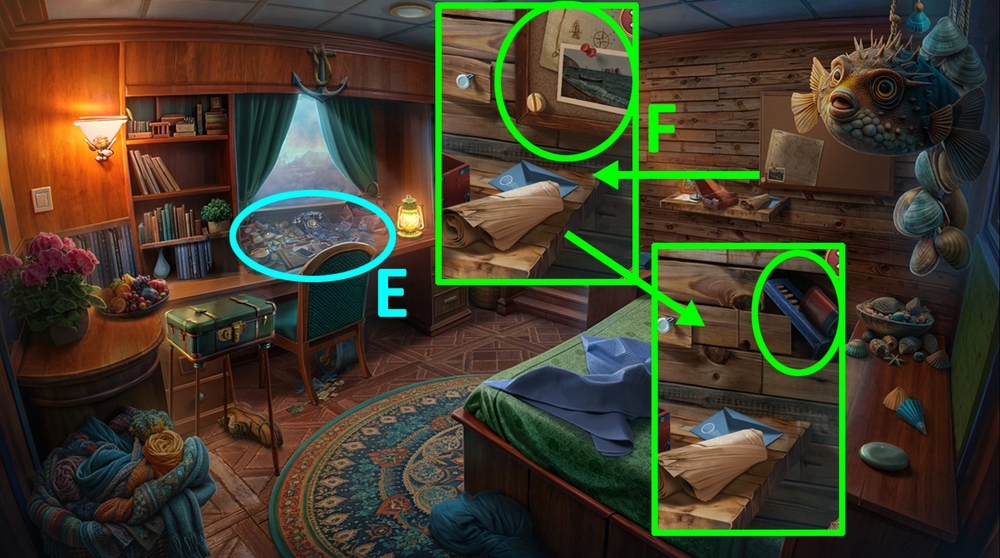
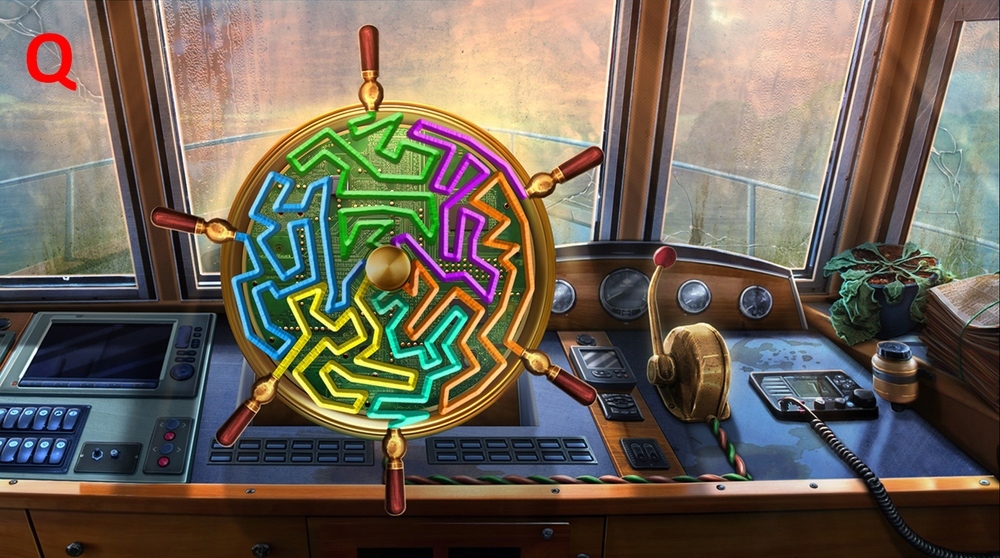
- Easy solution: position the sliders as shown in the picture (F).
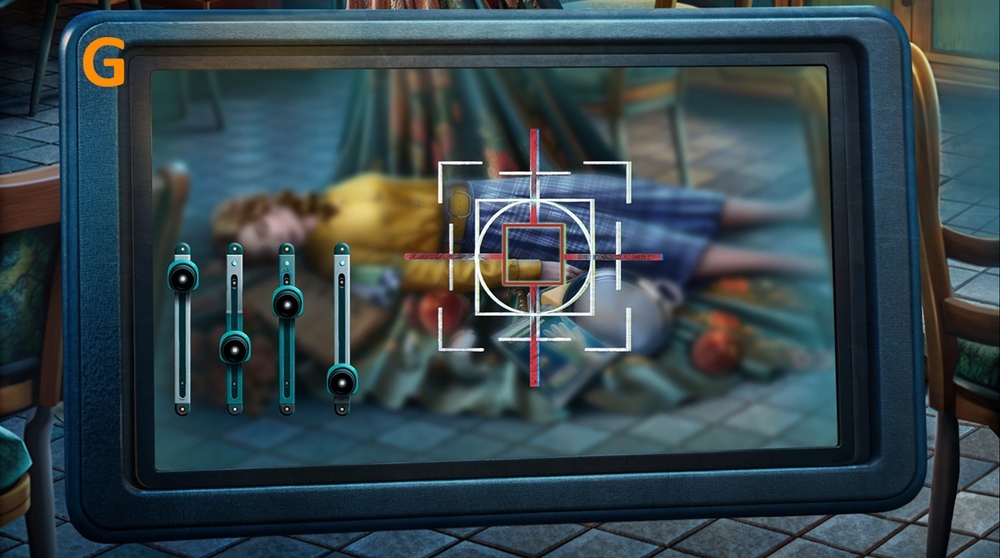
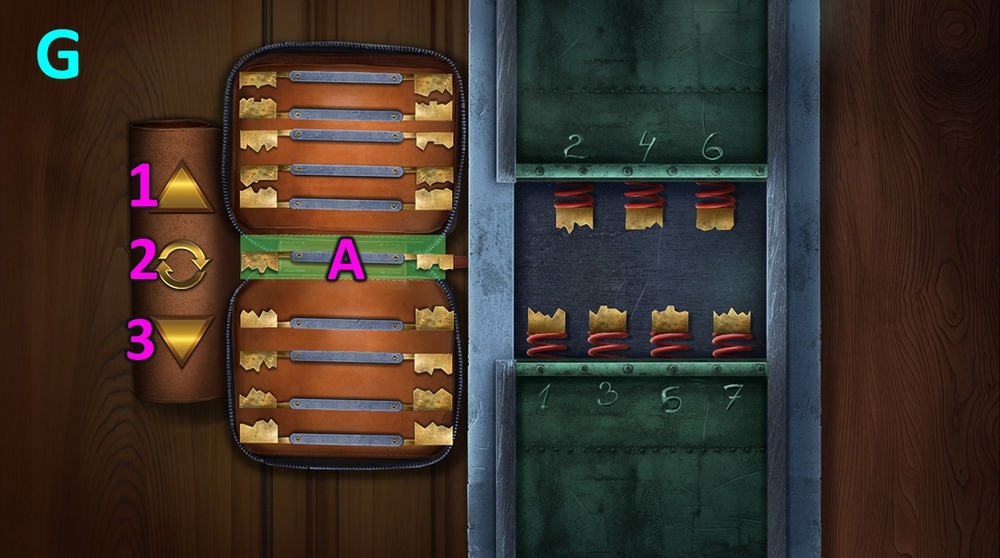
- Hard solution: position the sliders as shown in the picture (G).
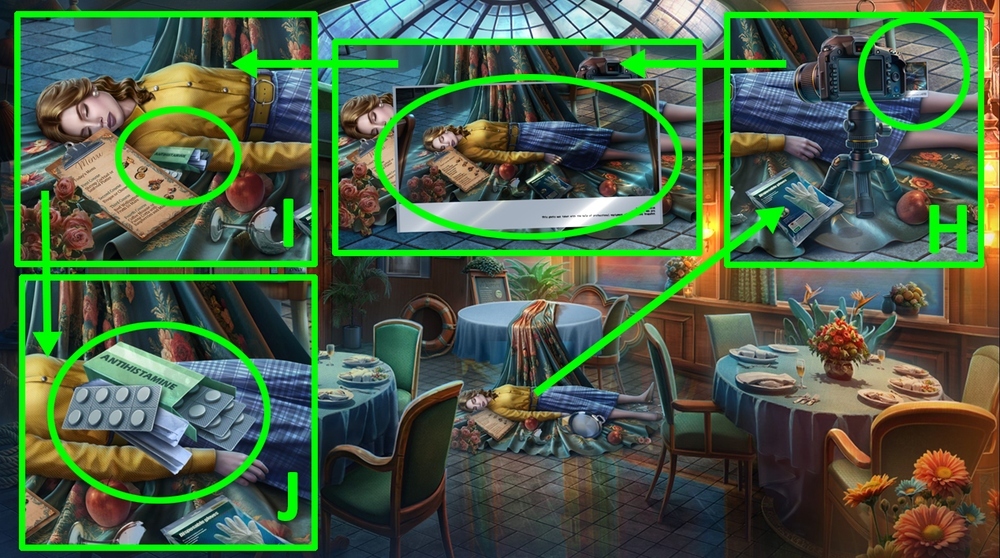
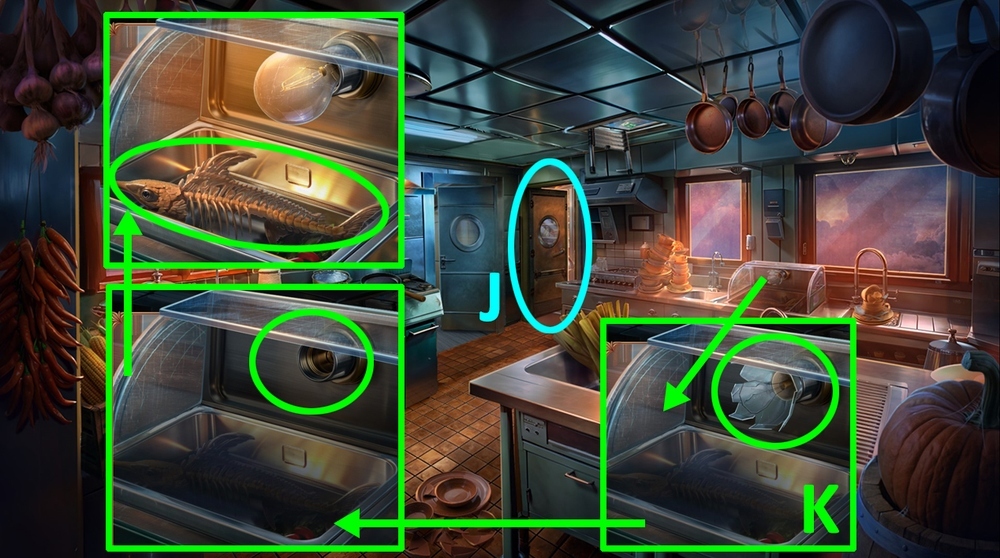
- Take the photo, take ANTIHISTAMINE (H-J).
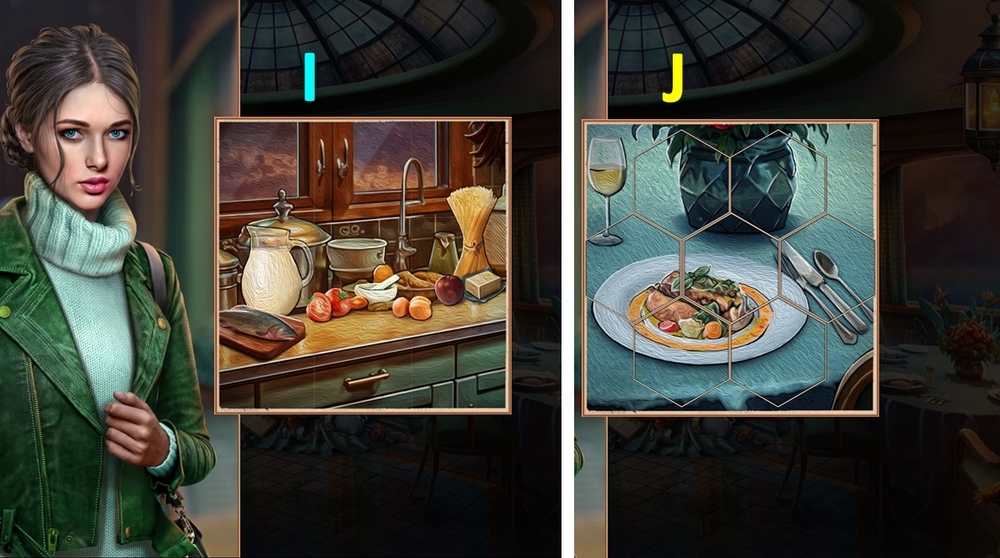
- Solution: arrange the pieces as shown in the picture (I).
- Solution: arrange the pieces as shown in the picture (J).

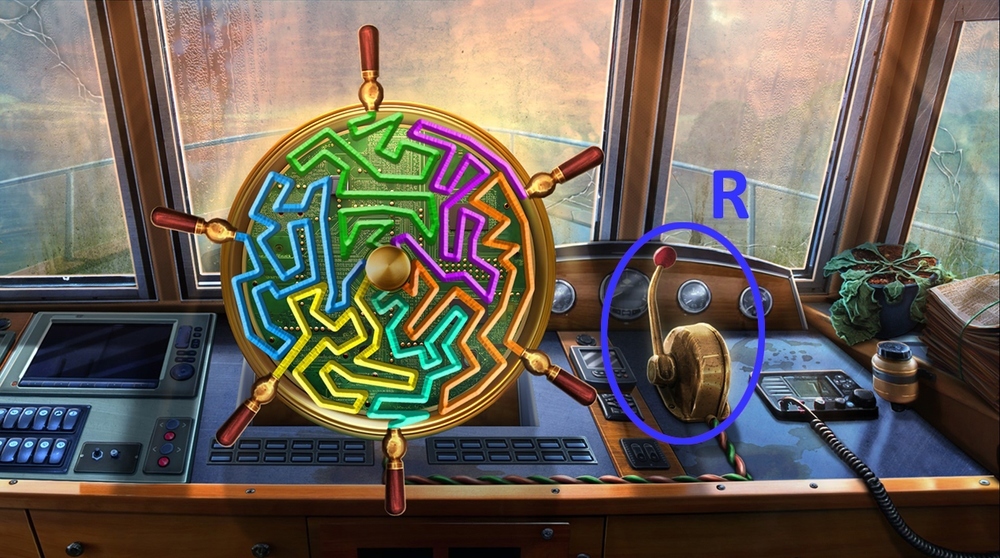
- Select this option, earn ACCESS CARD (K).
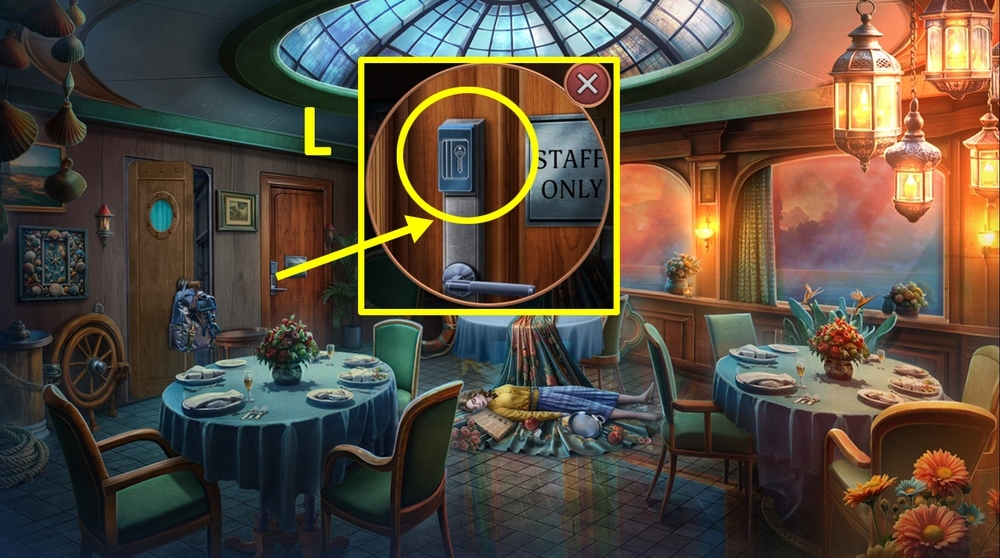
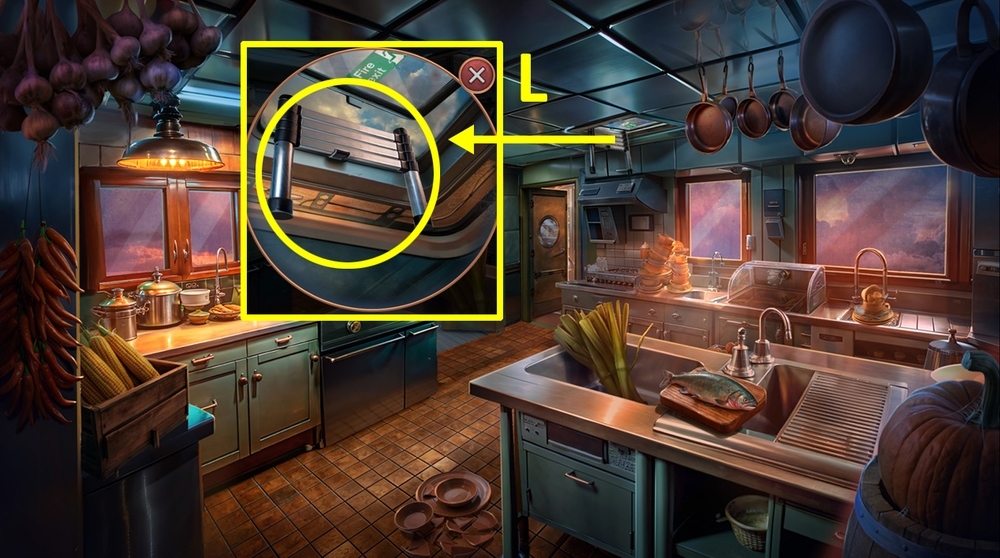
- Use ACCESS CARD on the door lock (L).
- Go forward.
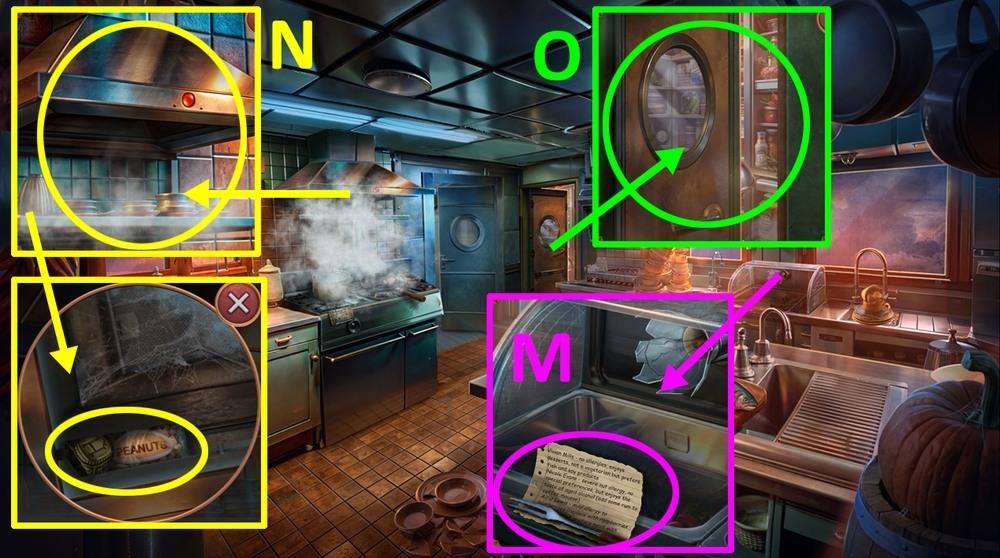
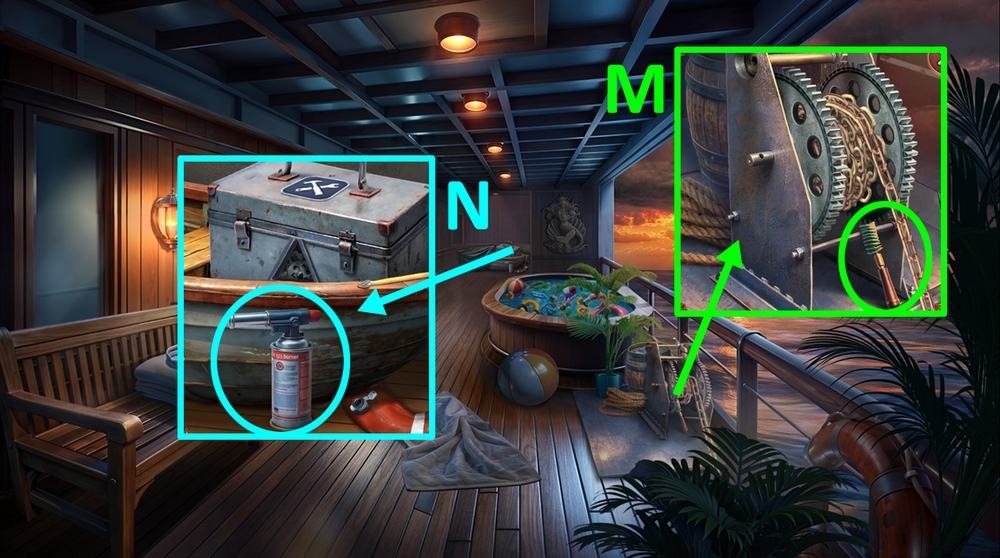
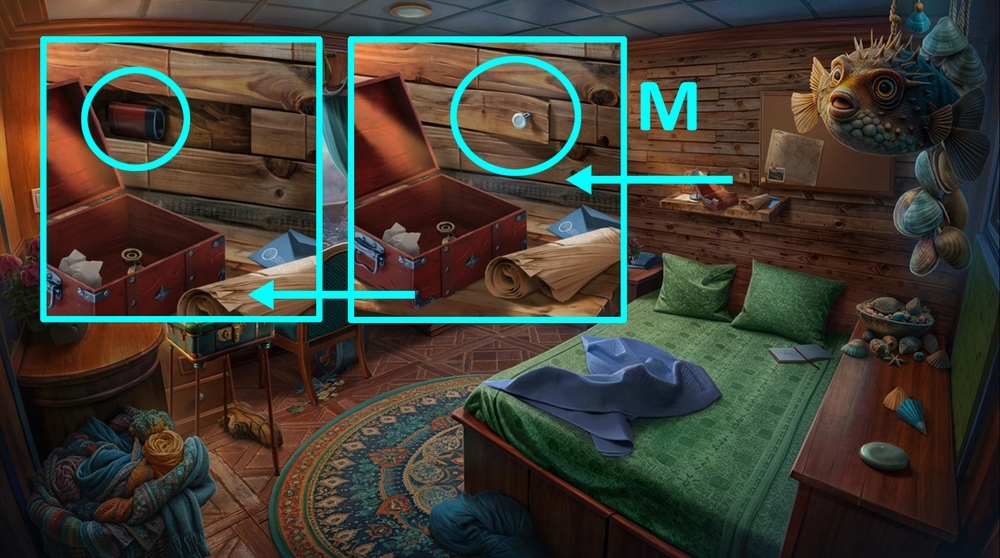
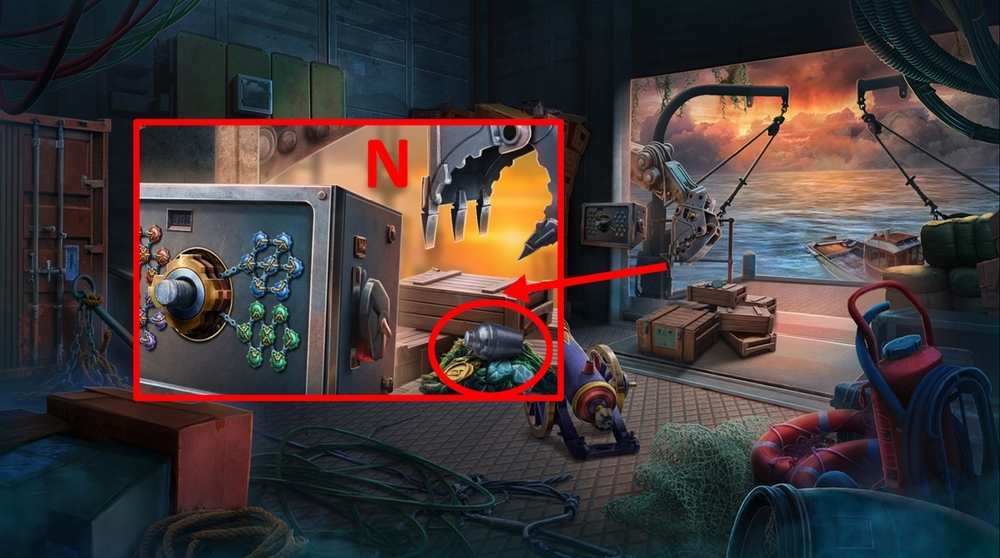
- Take CARVING FORK and LIST OF ALLERGENS (M).
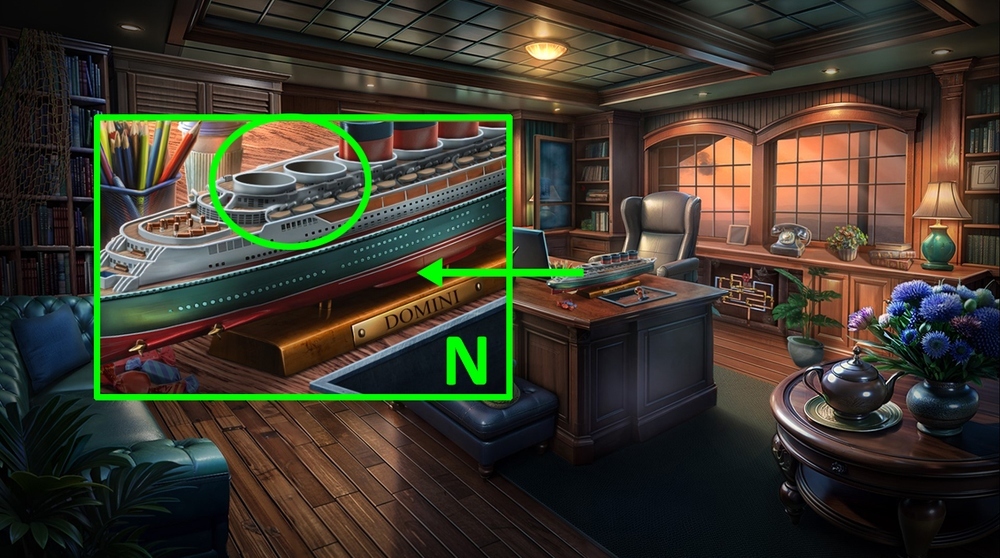
- Use SHINY TRAY on the cooker hood, use CARVING FORK on the stuck objects, earn “H” SIGNET RING and PEANUTS (N).
- Use PEANUTS on ANTIHISTAMINE.
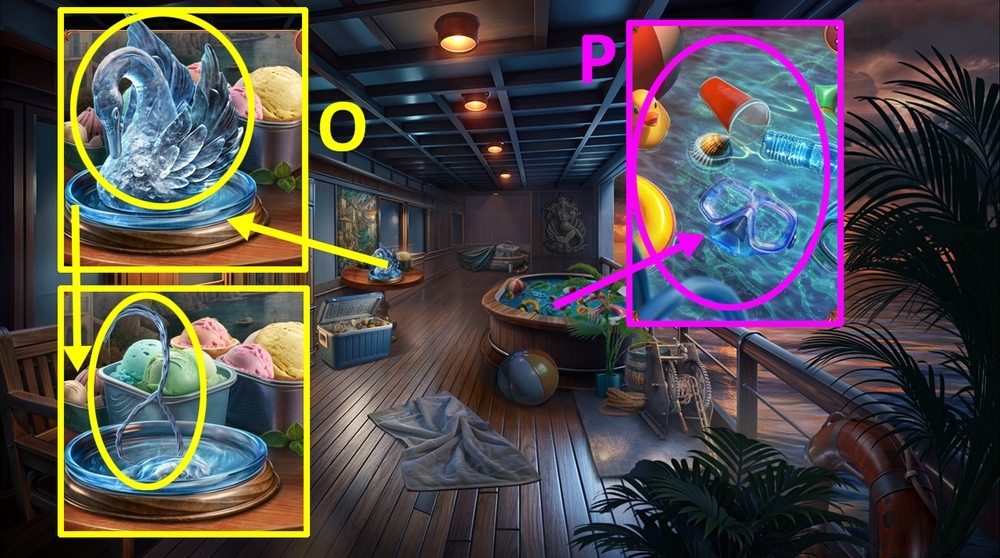
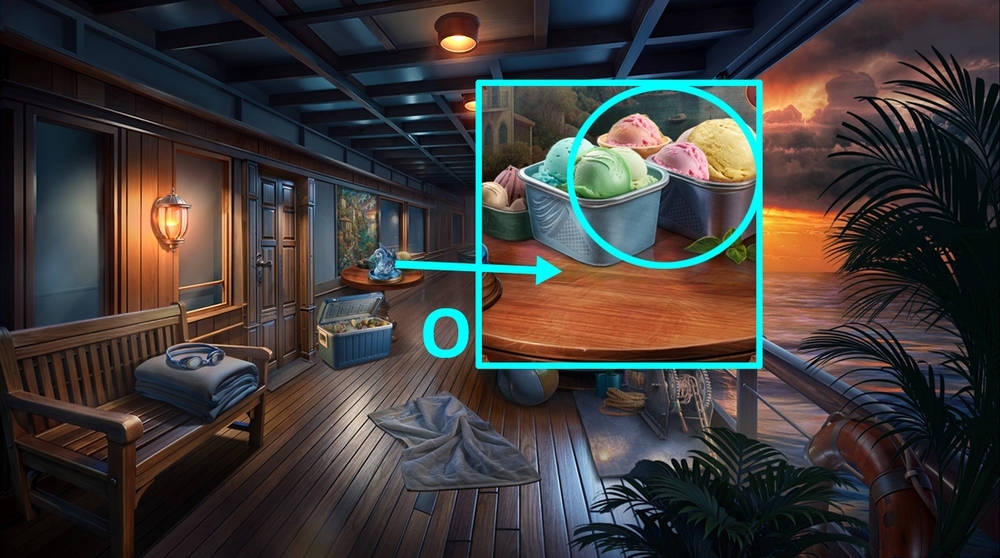
- Use LIST OF ALLERGENS on the door (O).
- Play puzzle, earn LIST OF ALLERGENS and NICOLE’S DISH (P).
- Use NICOLE’S DISH and LIST OF ALLERGENS on ANTIHISTAMINE.

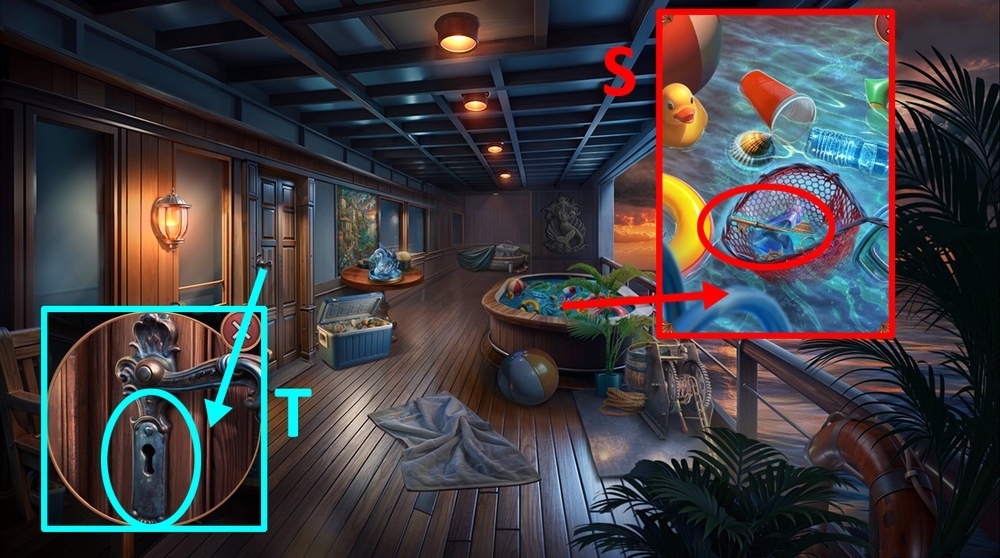
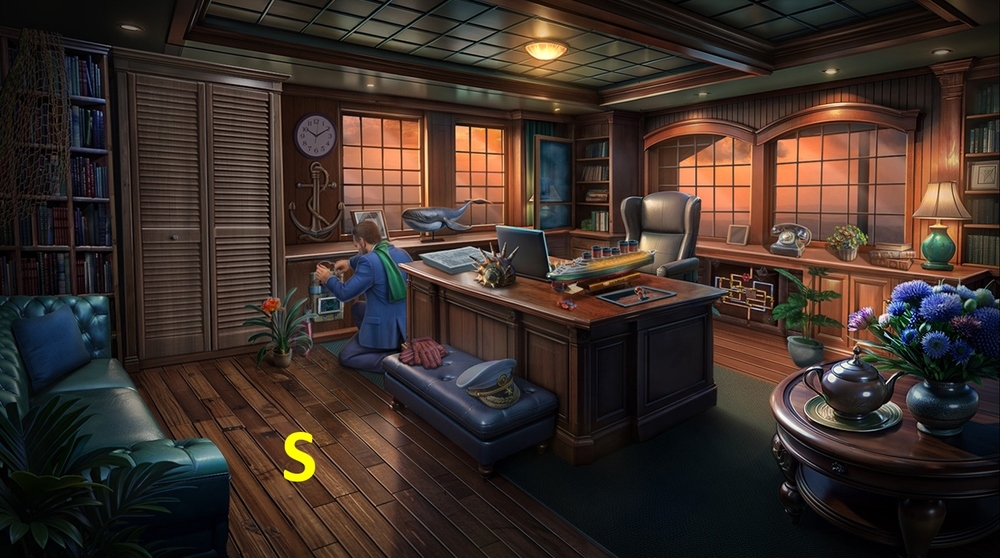
- Select this option, earn VIVIAN’S PHONE (S).
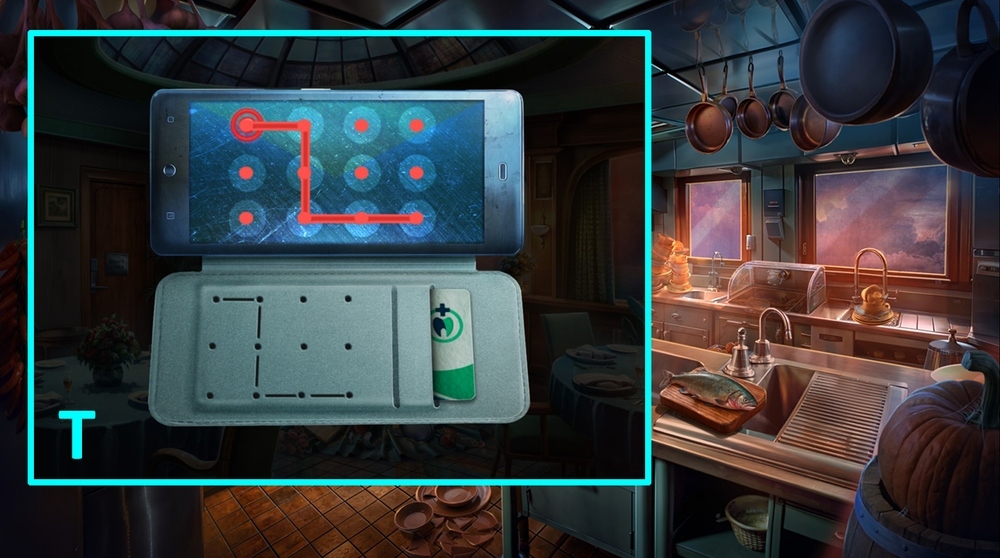
- Click on VIVIAN’S PHONE.
- Solution: repeat the pattern from the clue below (T).
- Click on the screen to get SHIP MAP.
- Go back.
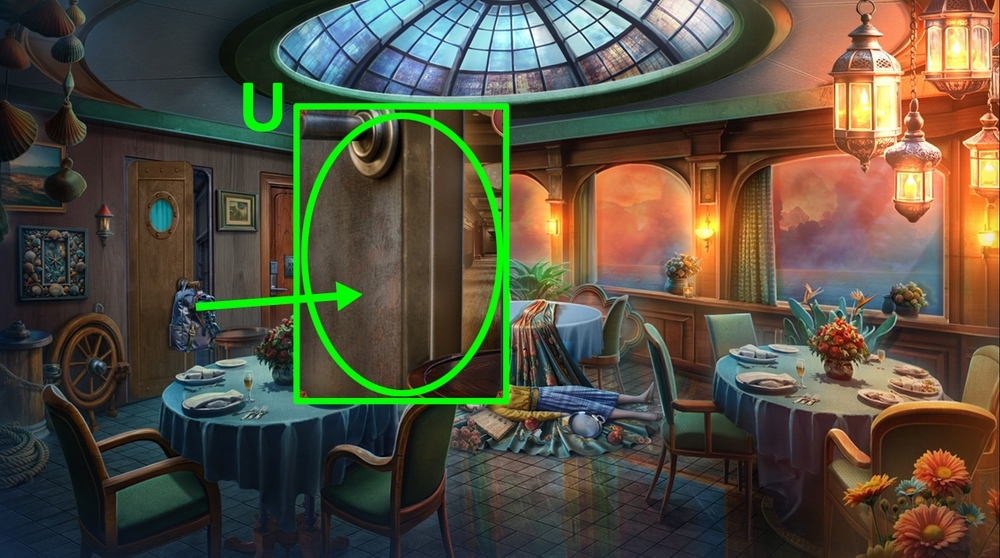
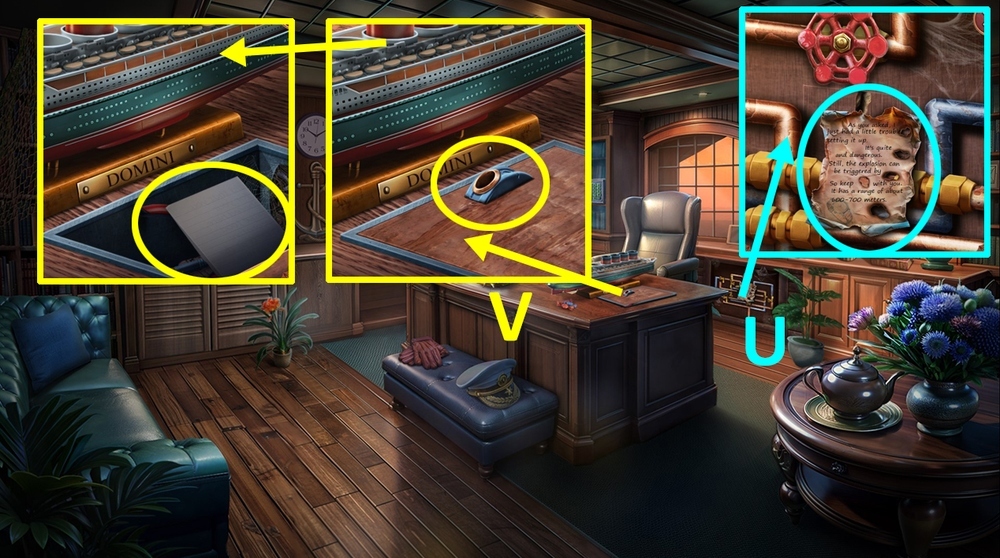
- Use SHIP MAP on the door (U).
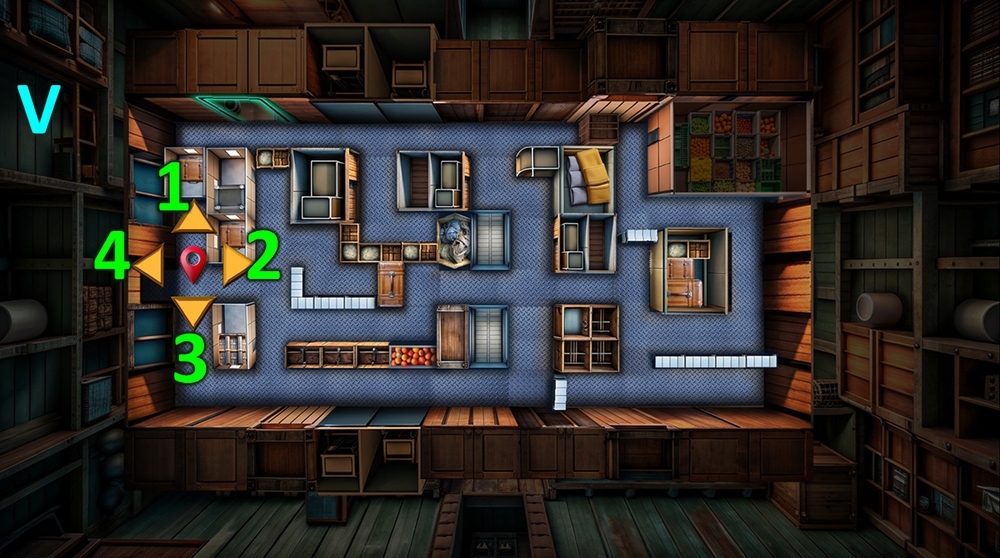
- Easy solution: click 2, 3, 2, 1, 2, 1, 4, 1, 4, 4, 4 (V).

- Hard solution: click 2, 1, 2, 3, 2, 4, 1, 4, 3 (x3), 2, 1, 2, 3, 3, 2, 4, 1, 1, 4, 1, 4, 1, 2, 2, 4 (x6) (W).
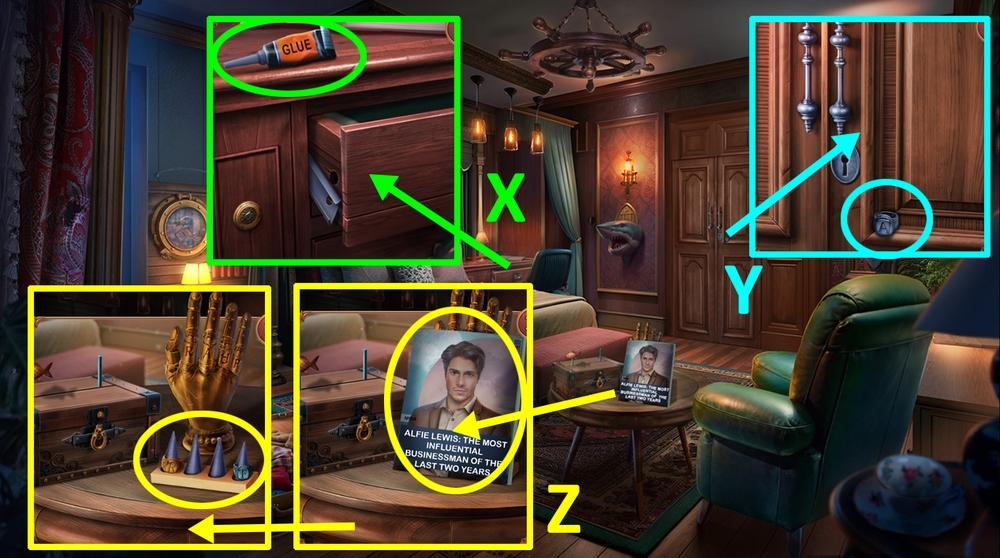
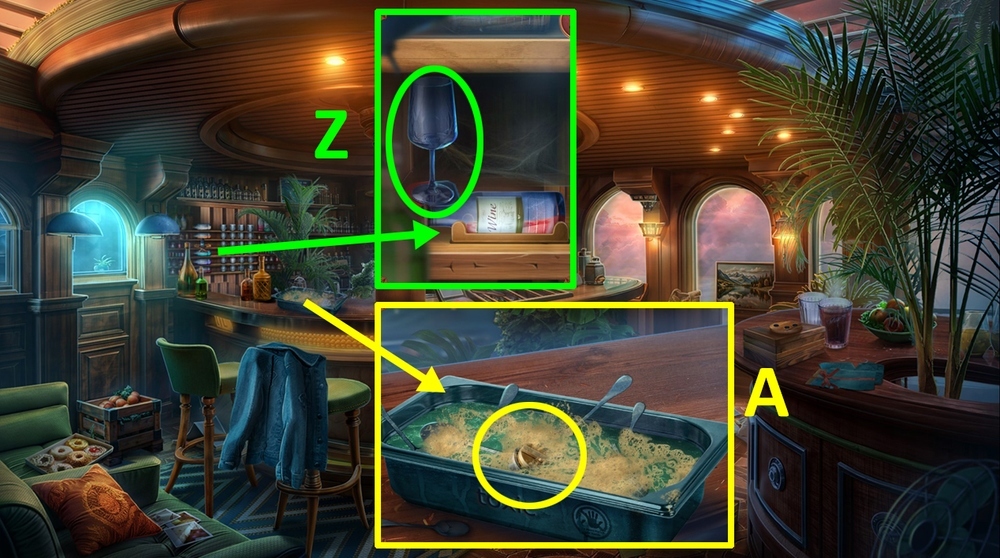
- Take GLUE (X).
- Take “A” SIGNET RING (Y).
- Take the magazine, use “H” SIGNET RING and “A” SIGNET RING on the ring stand (Z).
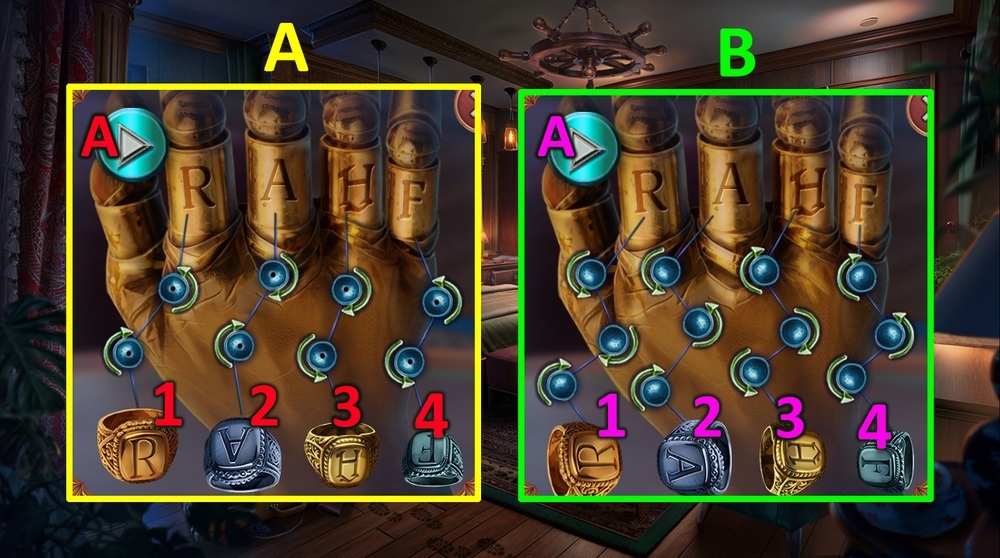
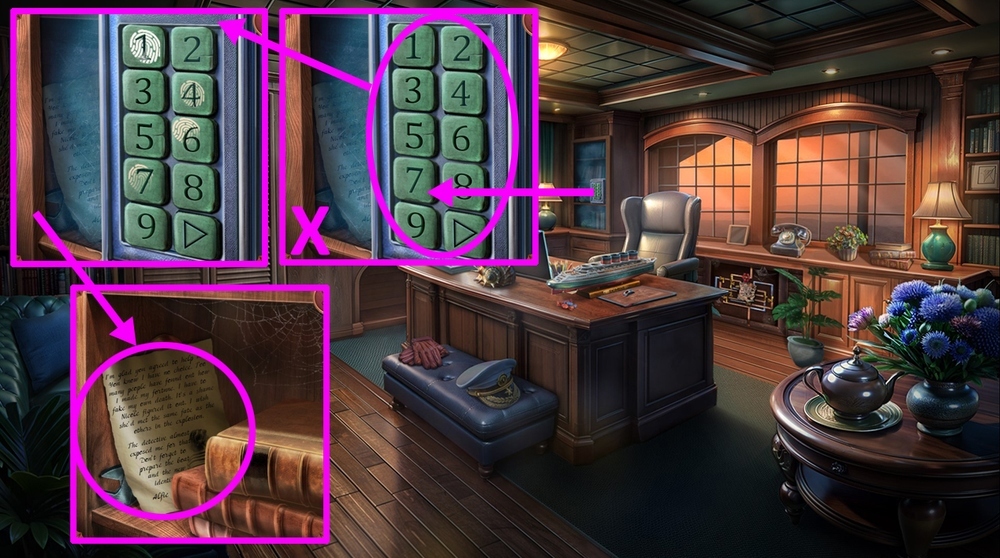
- Easy solution: click 1, 2, 2, 3, 3, 3, 4, 4, A (A).
- Hard solution: click 1, 1, 2, 3, 3, 4, 4, 4, A (B).
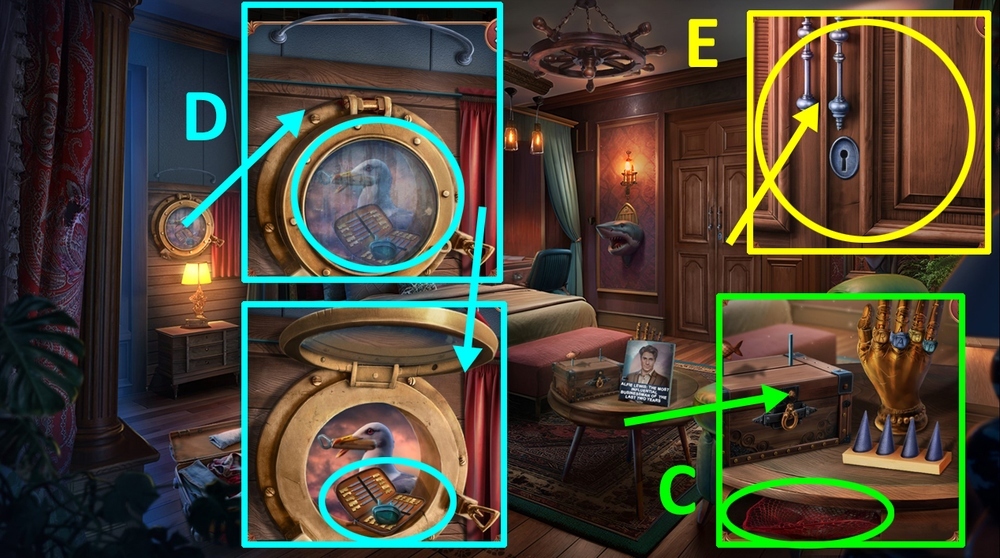
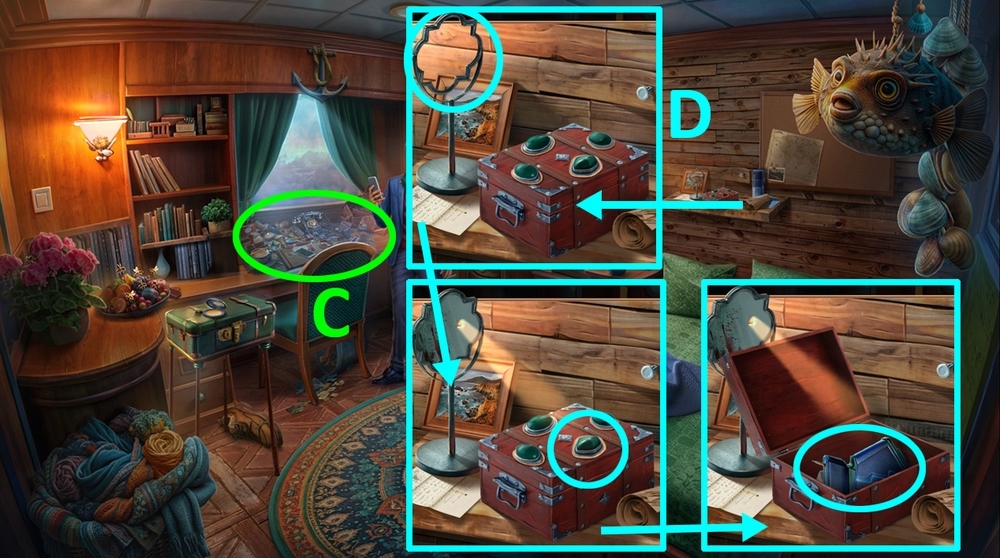
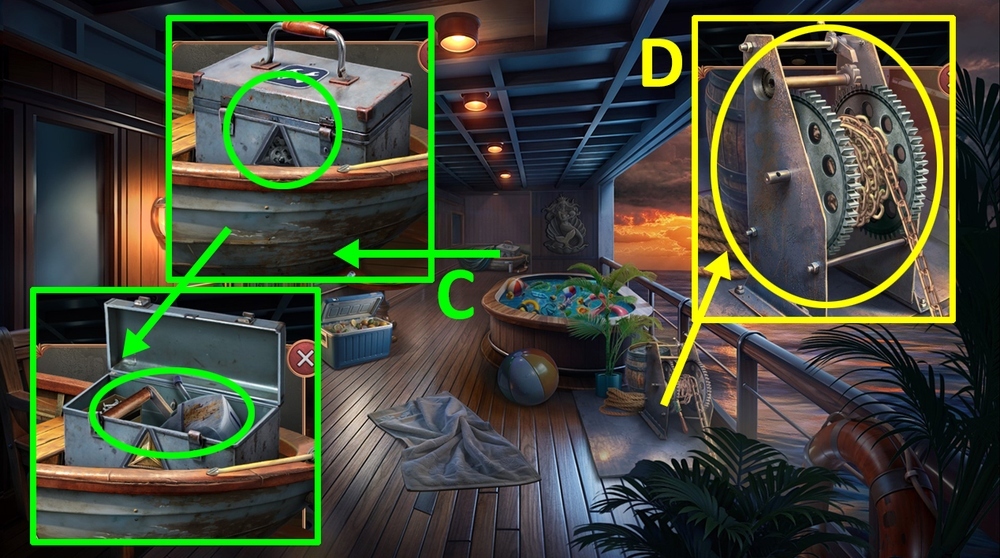
- Take NET and VELVET ROPE (C).
- Use VELVET ROPE above the window, take BOX PART and LOCK PICKS (D).
- Use LOCK PICKS on the keyhole (E).
- Easy solution: click 1 (x2), 2, A, 3 (x5), A, 1, 2, A, 1 (x2), A, 1 (x5), 2, A (F).
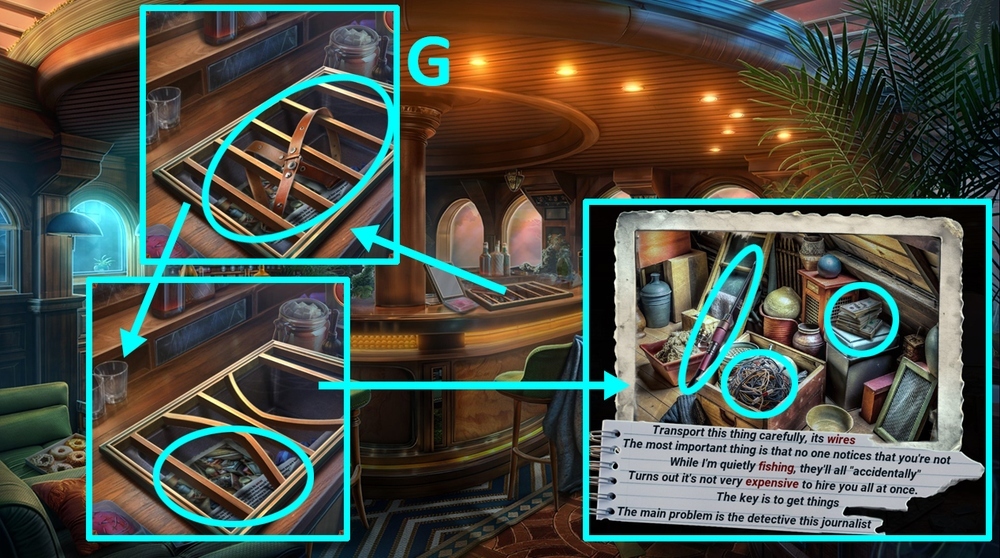
- Hard solution: click 1 (x3), 2, A, 3, 2, A, 3 (x5), A, 1, 2, A, 1 (x2), A, 1 (x5), 2, A, 3 (x4), 2, A (G).

- Take the book, CABINS KEYS, KITCHEN HOOD REMOTE (H).
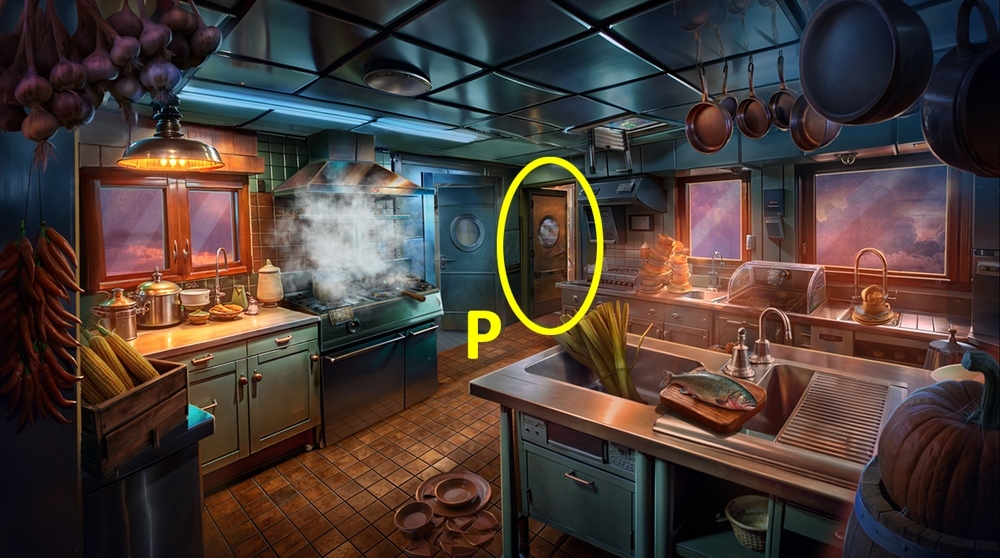
- Go to the Ship’s Kitchen.
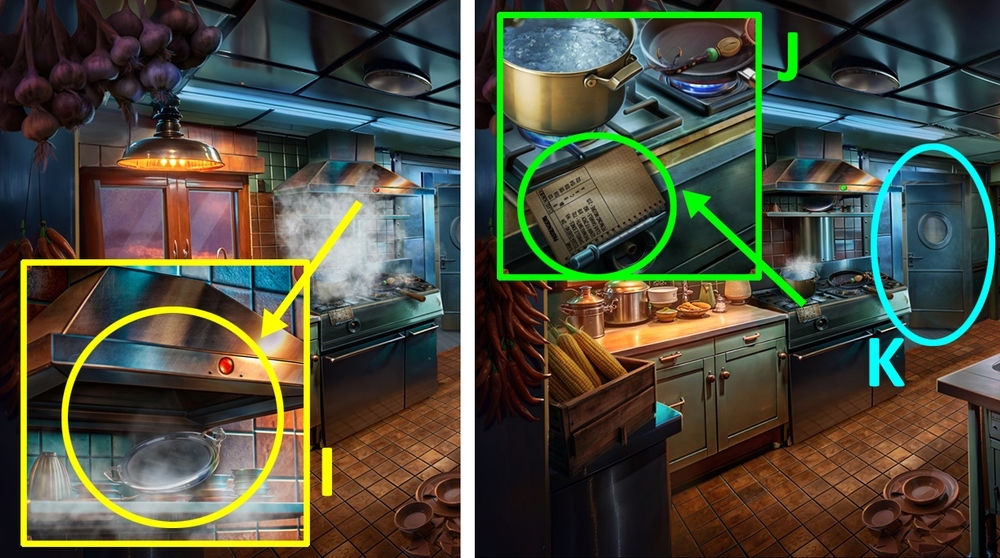
- Use KITCHEN HOOD REMOTE on the cooker hood (I).
- Take PIPETTE and GUESTS AND ROOMS LIST (J).
- Use CABINS KEYS and GUESTS AND ROOMS LIST on the door (K).
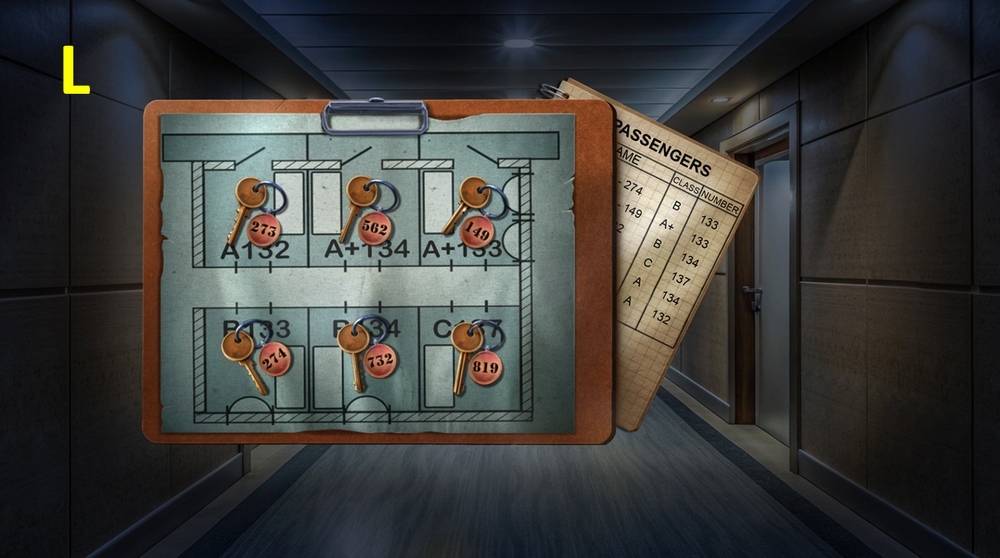
- Easy solution: arrange the keys as shown in the picture (L).
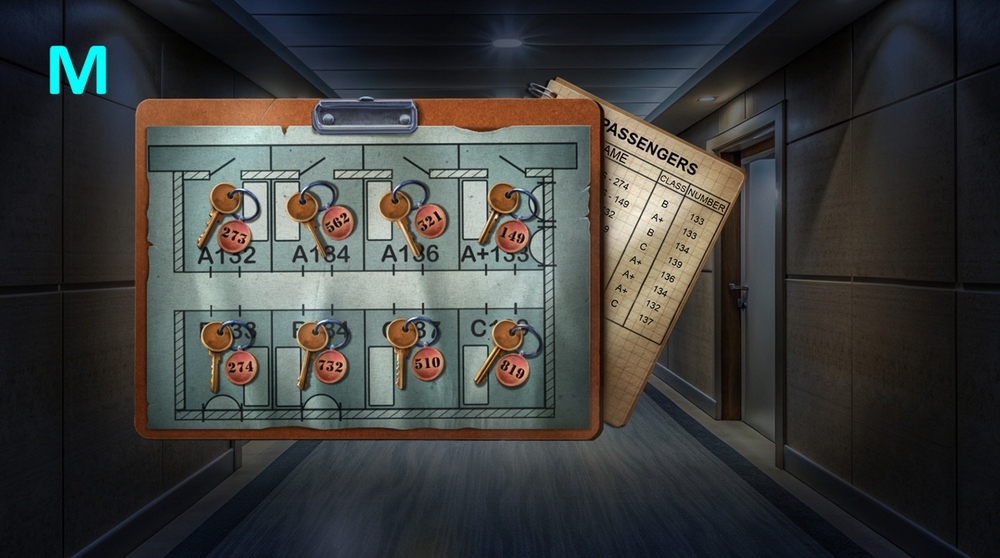
- Hard solution: arrange the keys as shown in the picture (M).
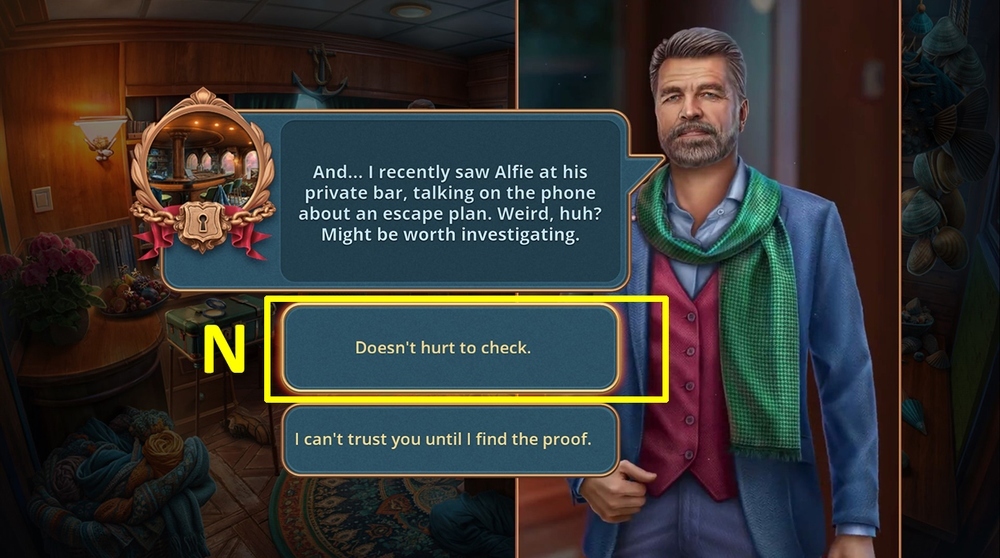
- Select this option (N).
- Go forward.
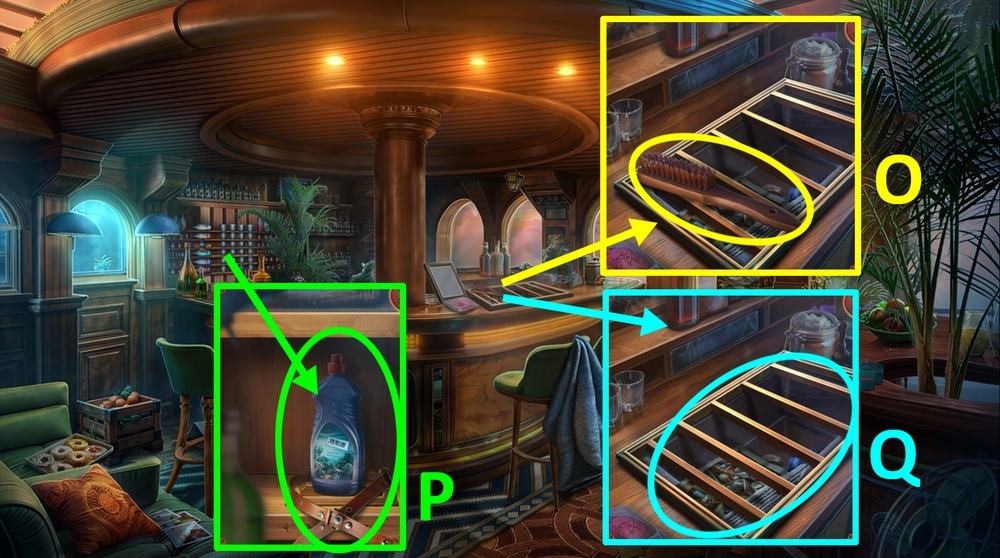
- Take BRUSH (O).
- Take BELT and DETERGENT (P).
- Use BELT on the grate (Q).
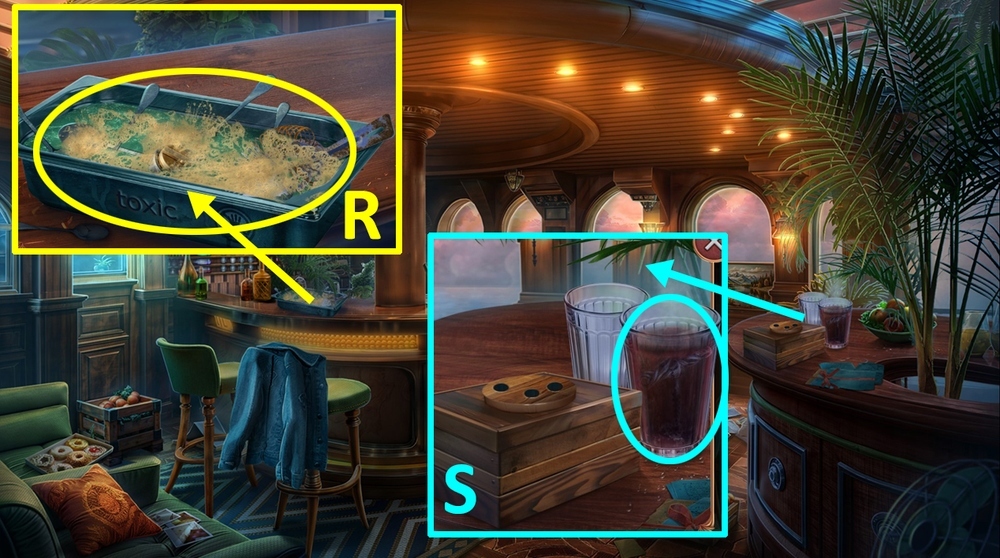
- Use BRUSH and DETERGENT on the dirty dishes, earn STRAINER (R).
- Use STRAINER on the glass, earn CORKSCREW (S).
- Go back.
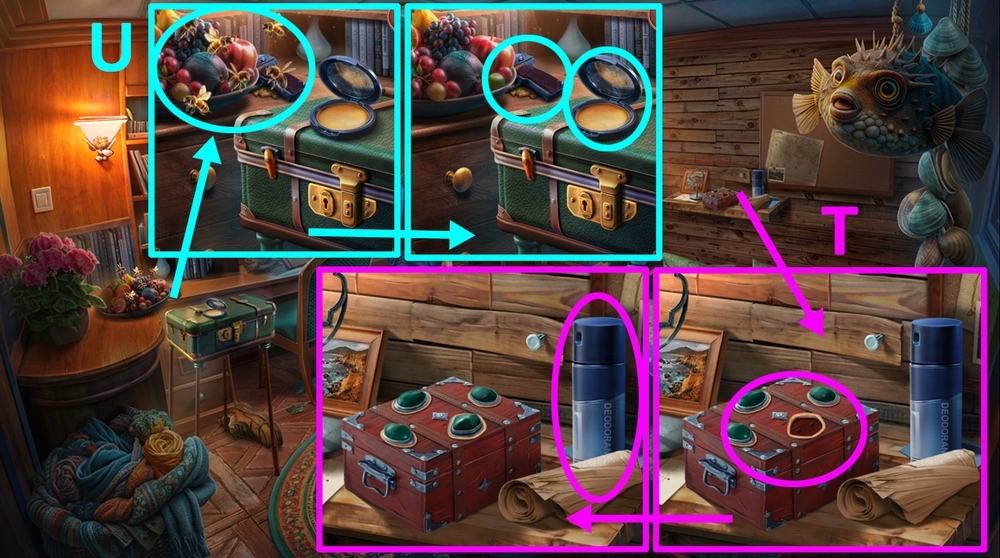
- Use BOX PART on the box, take DEODORANT (T).
- Use DEODORANT on wasps, take UNLOADED GUN, CONTINENT, and POWDER (U).
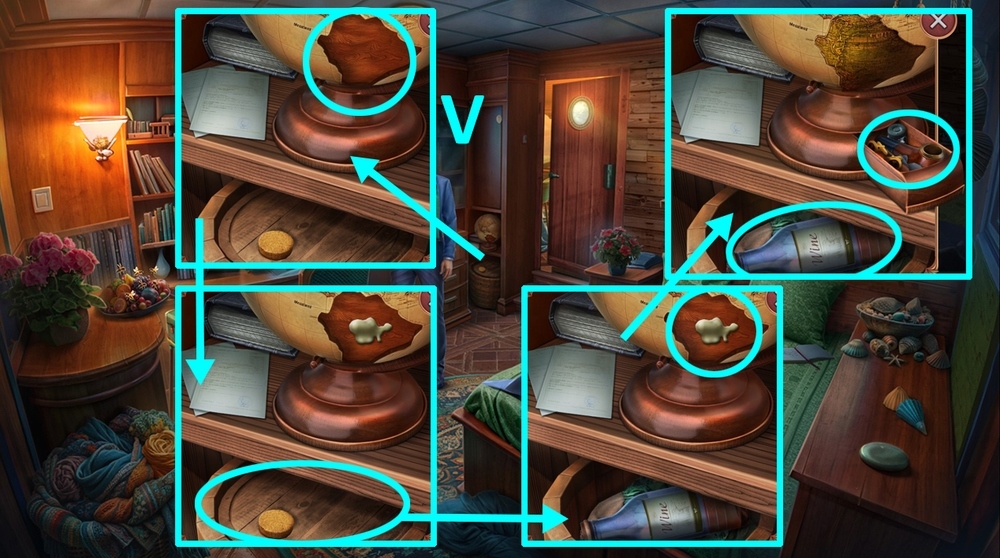
- Use GLUE on the globe, use CORKSCREW on the cork, use CONTINENT on the globe, take PIPE, LEMON JUICE, and WINE (V).
- Go forward.
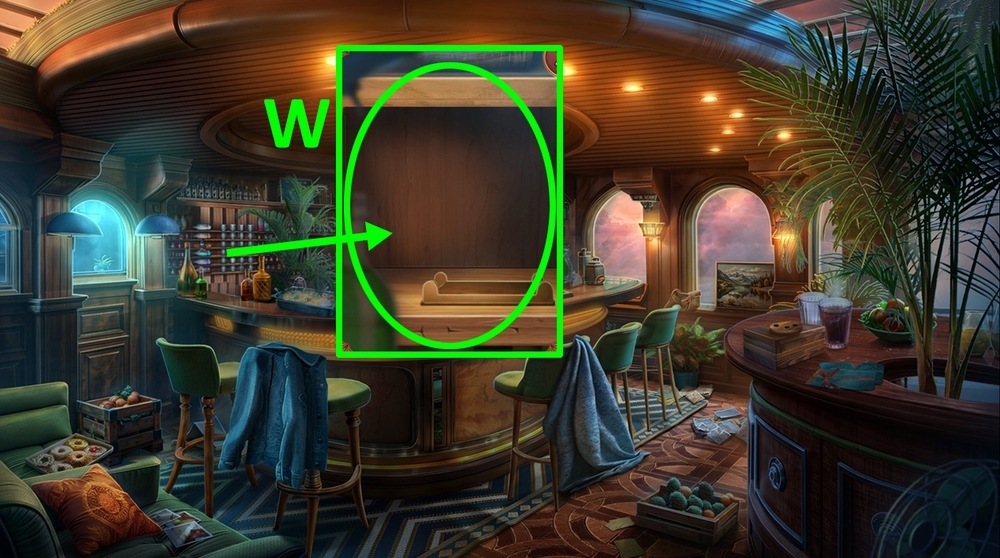
- Use WINE on the shelf (W).
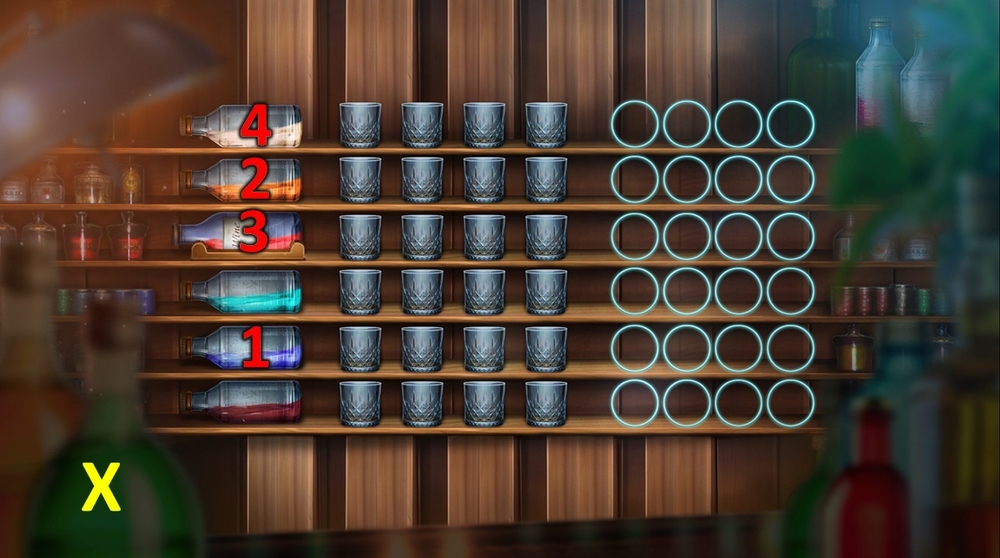
- Easy solution: click 1, 2, 3, 4 (X).
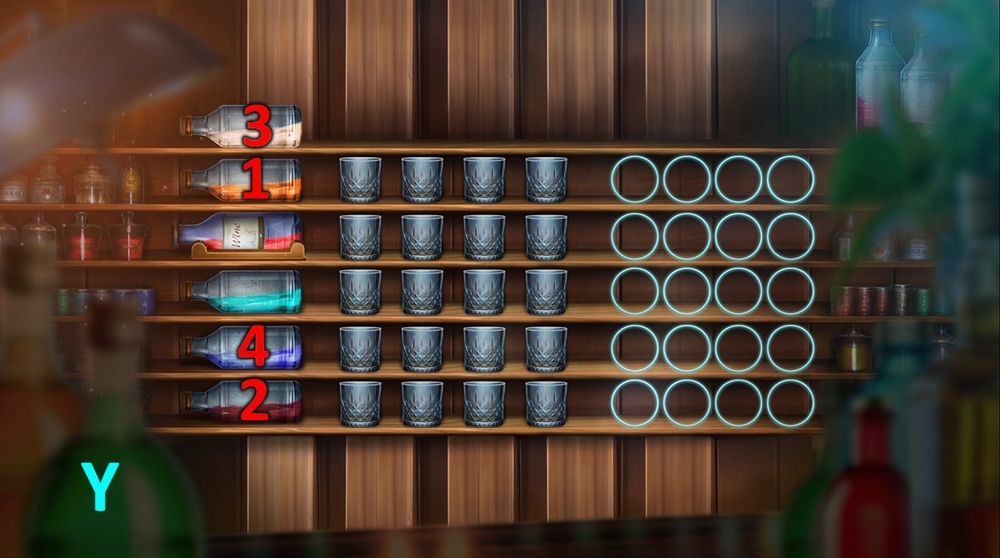
- Hard solution: click 1, 2, 3, 4 (Y).
- Take MAGNETIC GLASS (Z).
- Use MAGNETIC GLASS on the water, earn STOVE SWITCH (A).
- Go back.
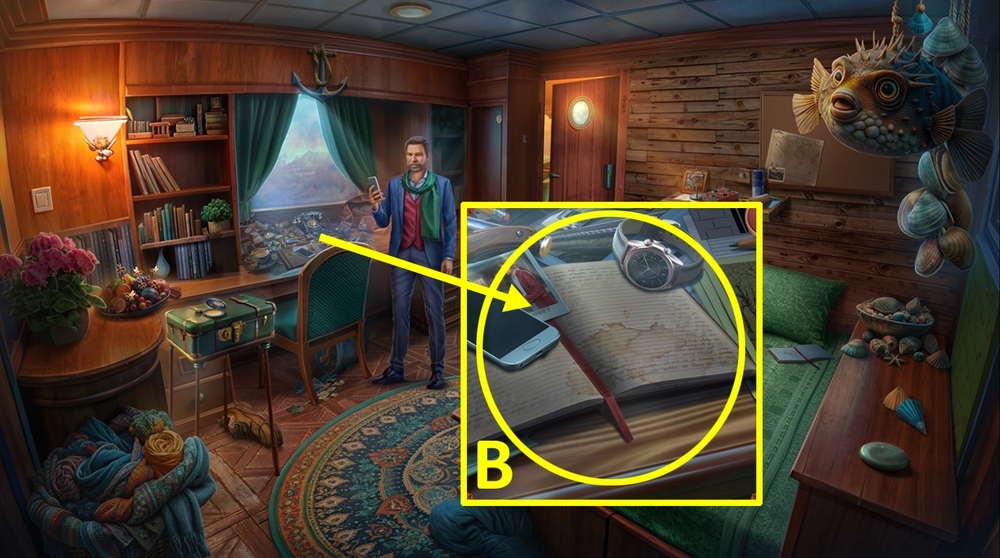
- Use PIPETTE and LEMON JUICE on the notebook (B).
- Play puzzle, earn BLOODY GLASS (C).
- Use BLOODY GLASS on the mirror frame, open the box, take RAYMOND’S STUN GUN (D).
- Go back.
- Use STOVE SWITCH on the empty socket, take BIRD FOOT (E).
- Go to the Private Bar.

- Use BIRD FOOT on the box, take LAMP (F).
- Use LAMP on the grate, read the note, click on the objects that match the highlighted words: wires, money, fishing rod, take the note (G).
- Go to the Dining Room.
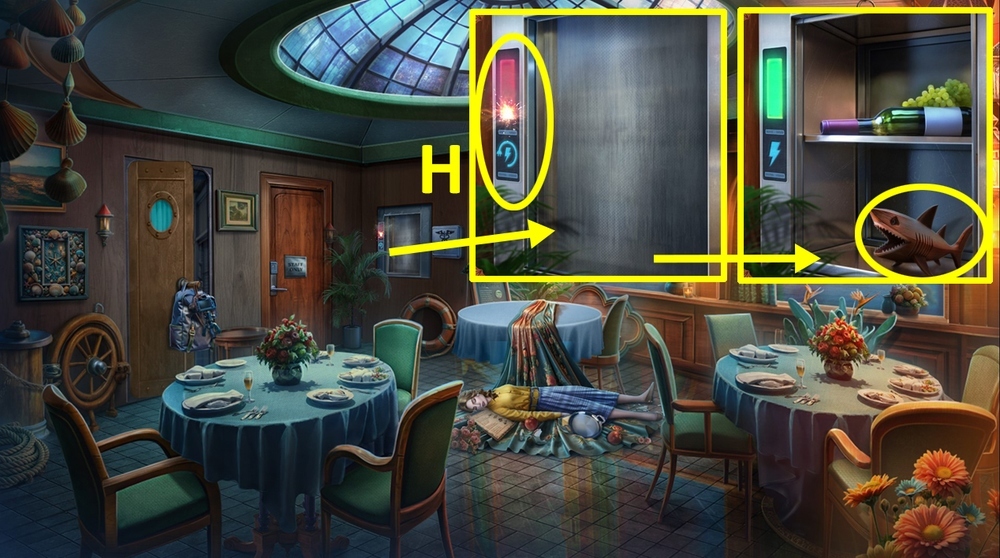
- Use RAYMOND’S STUN GUN on the broken panel, take SHARK FIGURINE (H).
- Go to Alfie’s Private Cabin.
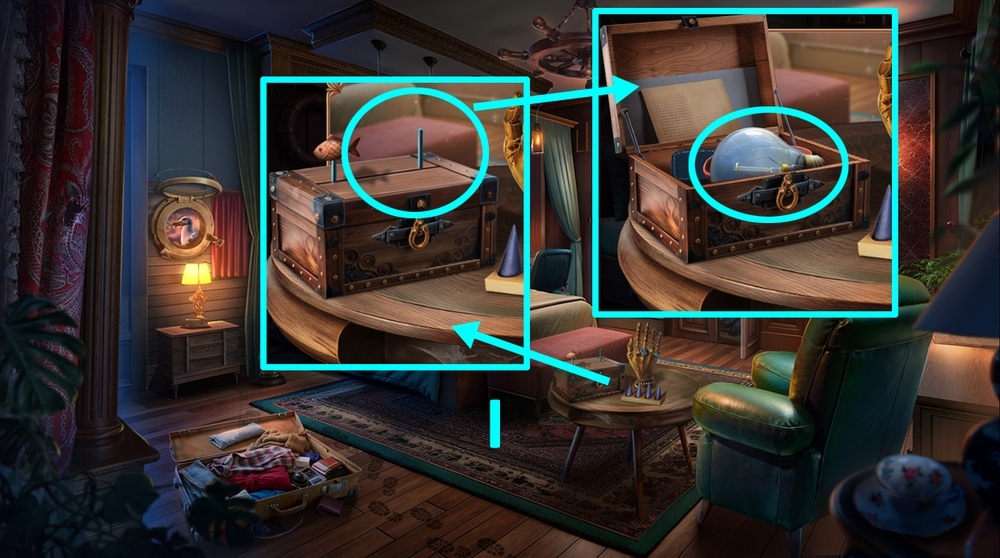
- Use SHARK FIGURINE on the box, take LIGHT BULB (I).
- Go to the Ship’s Kitchen.
- Play puzzle, earn YAM (J).
- Use YAM on the broken bulb, use LIGHT BULB on the empty socket, take SWORDFISH (K).
- Use SWORDFISH on the ladder (L).
- Go to the Deck.
- Take RAMROD (M).
- Use RAMROD on UNLOADED GUN.
- Take BURNER (N).
- Use BURNER on the ice sculpture, earn BURNER, take WIRE FRAME (O).
- Use WIRE FRAME on NET, earn SCOOP NET.
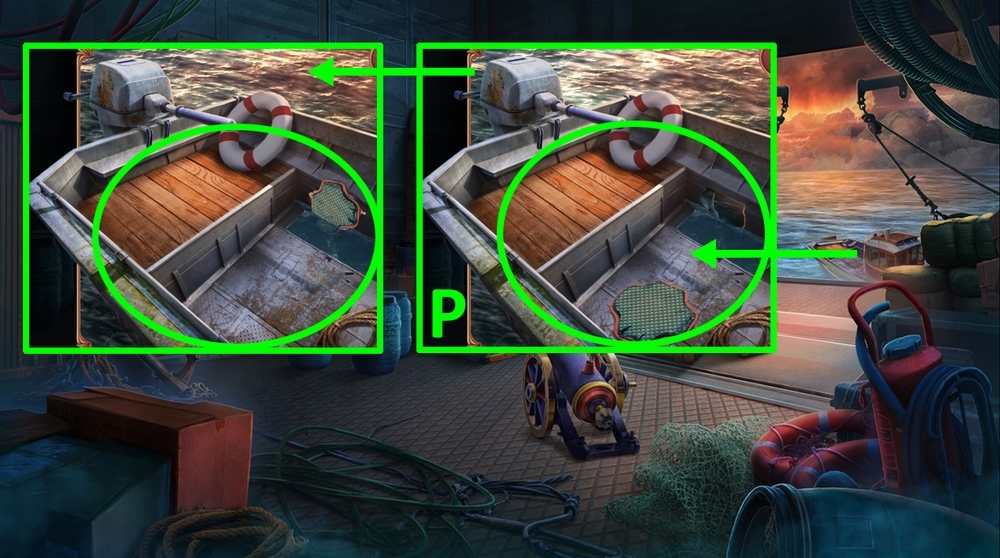
- Use SCOOP NET on the water (P).
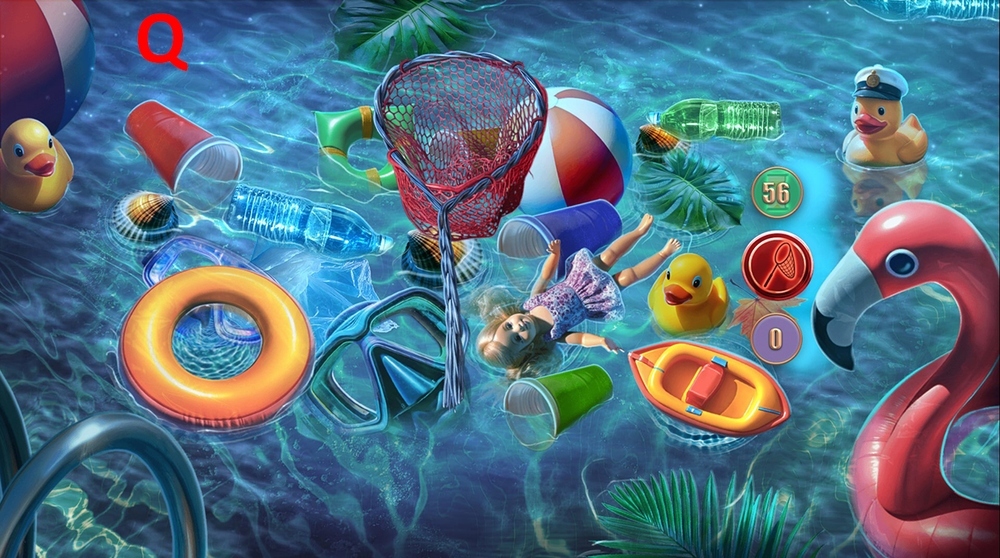
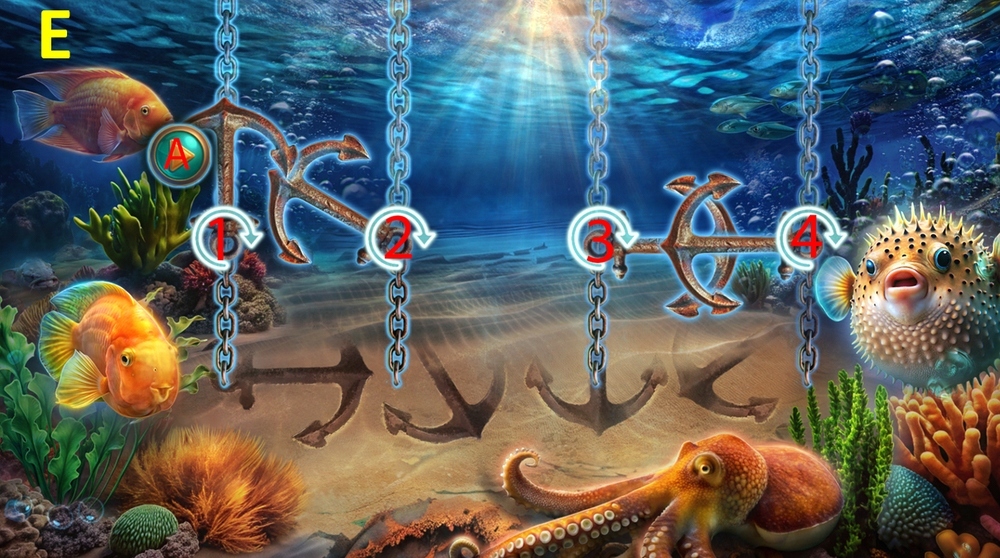
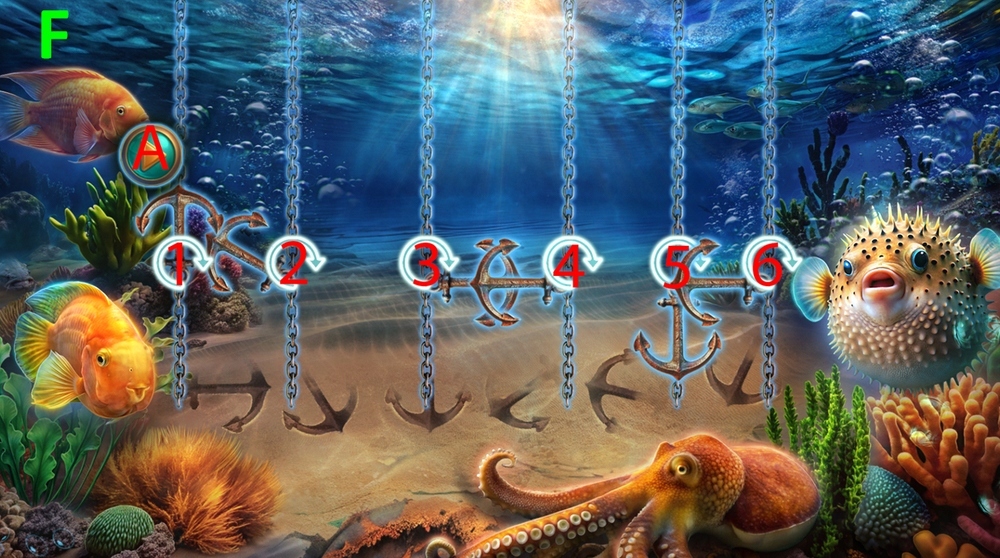
- Easy solution: solution is random (Q).

- Hard solution: solution is random (R).
- Take CAPTAIN’S CABIN KEY (S).
- Use CAPTAIN’S CABIN KEY on the keyhole (T).
- Go forward.
- Take and read the note, take BOLT (U).
- Use PIPE on the empty socket, take GLUE INSTRUCTIONS, CUTTERS, and BRUSH (V).
- Go to Alfie’s Private Cabin.
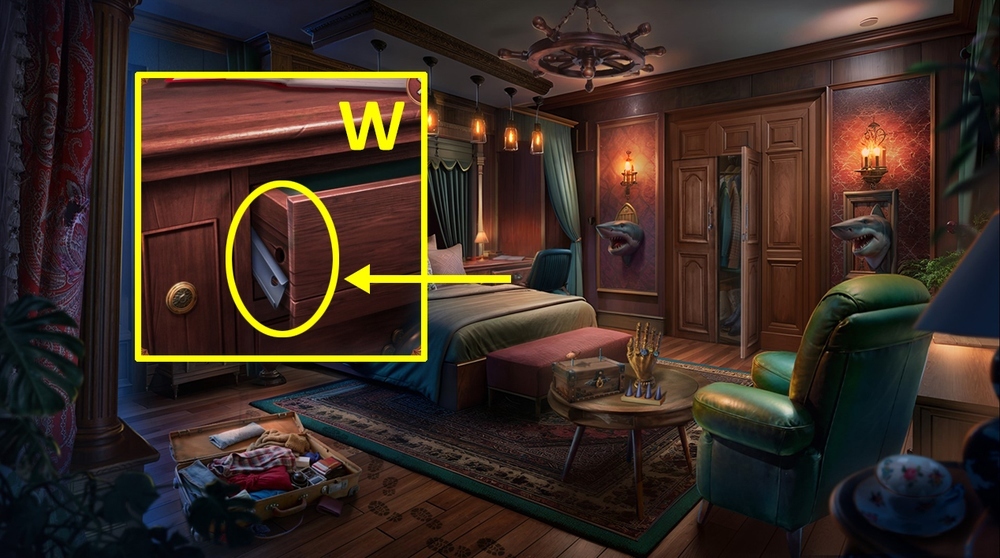
- Use BOLT on the drawer (W).
- Go to the Captain’s Cabin.
- Use POWDER and BRUSH on the code lock, press 1647, PLAY, take and read the note, take WRENCH (X).

- Select this option, earn DIVING EQUIPMENT (Y).
- Use DIVING EQUIPMENT on the background (Z).

- Use WRENCH on the valve (A).
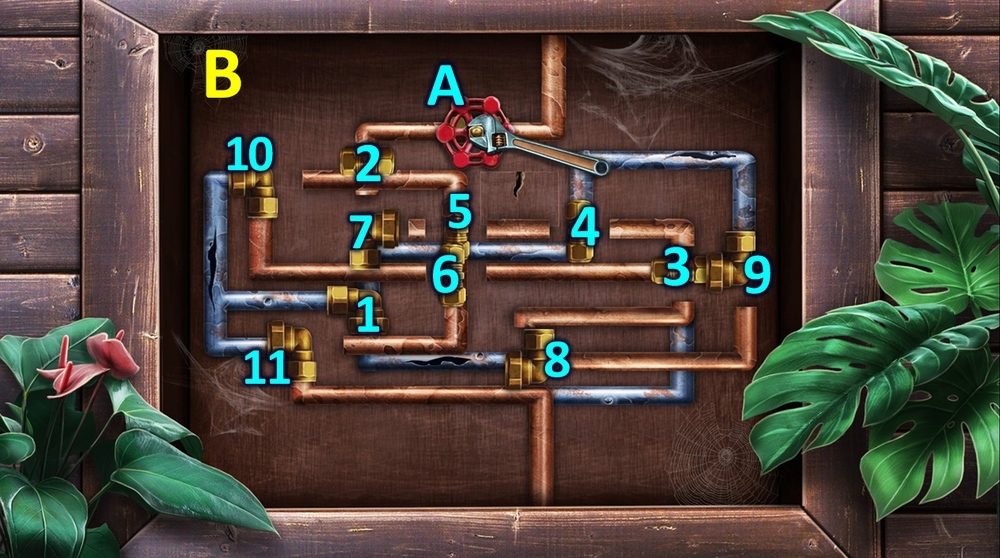
- Easy solution: click 7 (x3), 4, 2, 3, 5, 8, 9 (x3), 6, 10 (x3), 11 (x3), A (B).
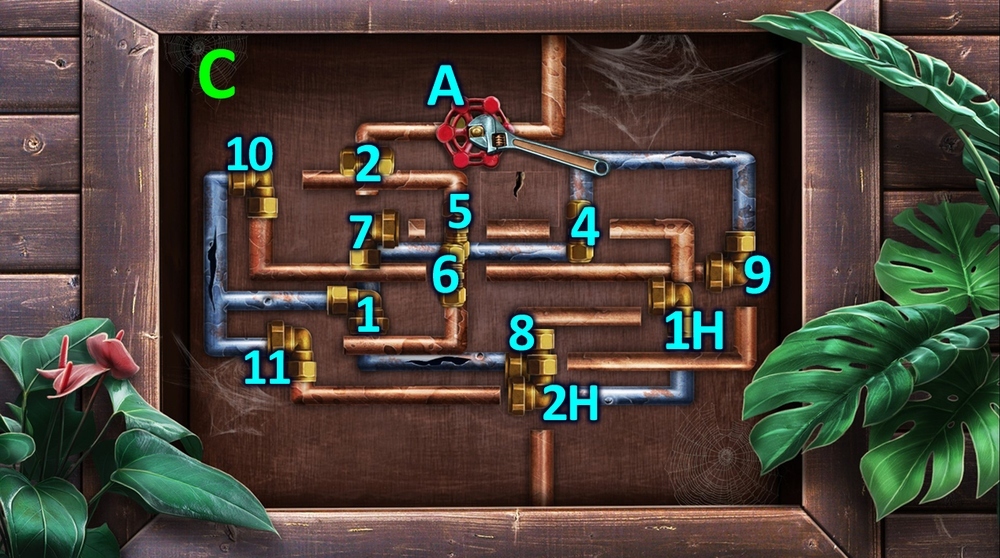
- Hard solution: click 7 (x3), 4, 2, 1H, 2H (x3), 5, 8, 9 (x3), 6, 10 (x3), 11 (x3), A (C).
- Use CUTTERS on the bomb (D).
- Go to Raymond’s Cabin.
- Play puzzle, earn ALFIE’S MEDAL (E).
- Use ALFIE’S MEDAL on the screw, take SHIP FUNNELS 1/2 and FULL MAGAZINE (F).

- Use FULL MAGAZINE on UNLOADED GUN, earn LOADED GUN.
- Use LOADED GUN on the suitcase (G).

- Easy solution: click 1, 2, 3, 4, 5 (H).
- Hard solution: click 1, 2, 3, 4, 5, 6 (I).
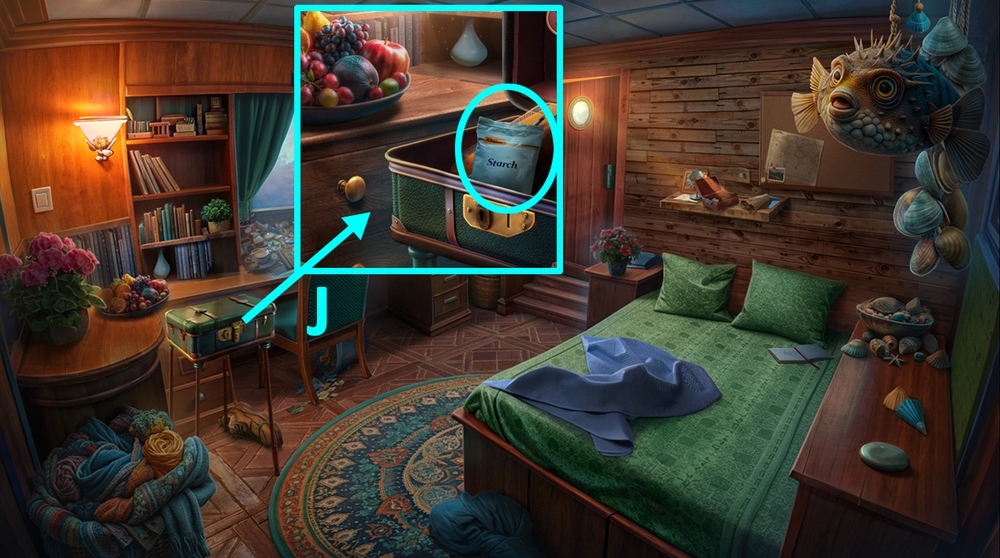
- Earn LOADED GUN, take STARCH and SCREWDRIVER (J).
- Use STARCH on GLUE INSTRUCTIONS.
- Go to Alfie’s Private Cabin.
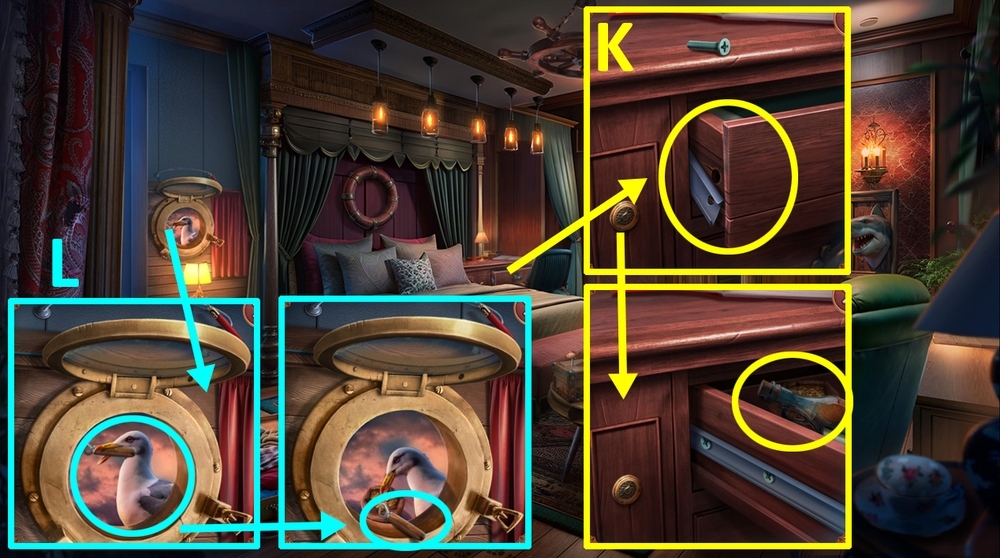
- Use SCREWDRIVER on the drawer, take VINEGAR and BIRD FOOD (K).
- Dive BIRD FOOD to the seagull, take OPENER (L).
- Use VINEGAR on GLUE INSTRUCTIONS.
- Go to Raymond’s Cabin.
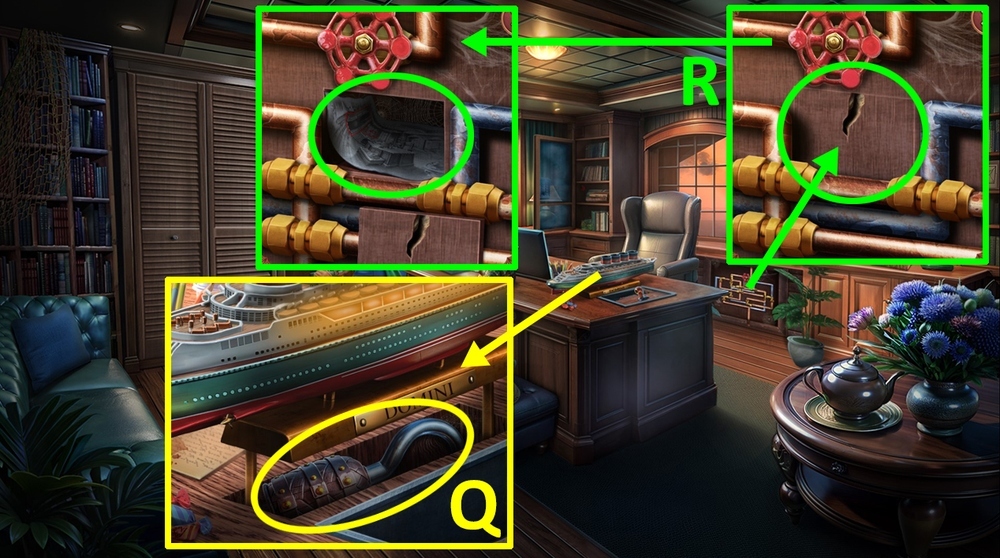
- Use OPENER on the nail, take SHIP FUNNELS 2/2 (M).
- Go to the Captain’s Cabin.
- Use SHIP FUNNELS on the ship (N).

- Easy solution: click 2 (x2), 3 (x3), 4 (x3), 5 (x2), 6 (x3), 1 (O).

- Hard solution: click 2 (x4),3 (x3), 4, 5 (x4), 6 (x3), 7 (x4), 3 (x2), 5, 1 (x4) (P).
- Take HOOK (Q).
- Use HOOK on the crack, take DRAWING (R).
- Use DRAWING on the background (S).
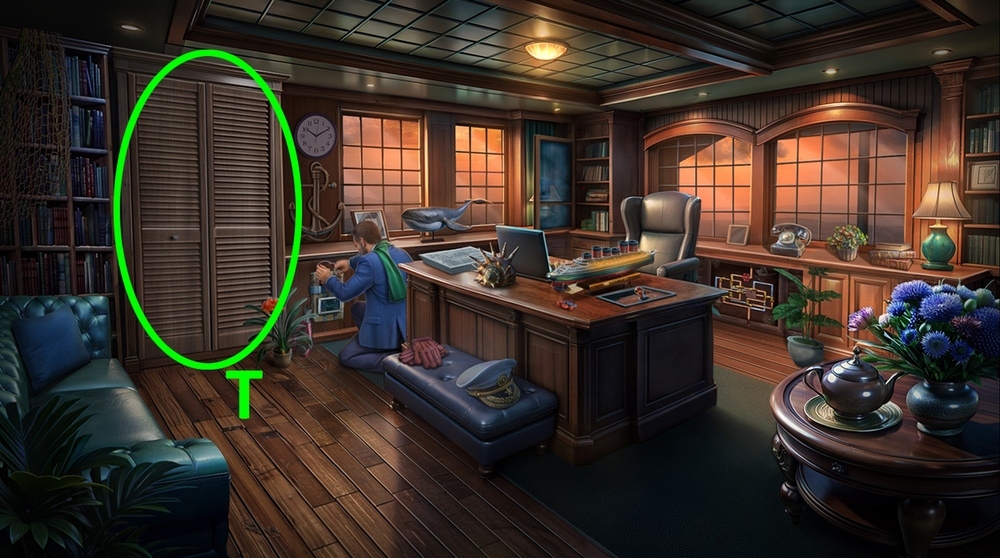
- Click on the closet (T).
- Go forward.

- Use BURNER on the cannon (U).
- Take PATCH and ACID (V).
- Use PATCH on the boat (W).
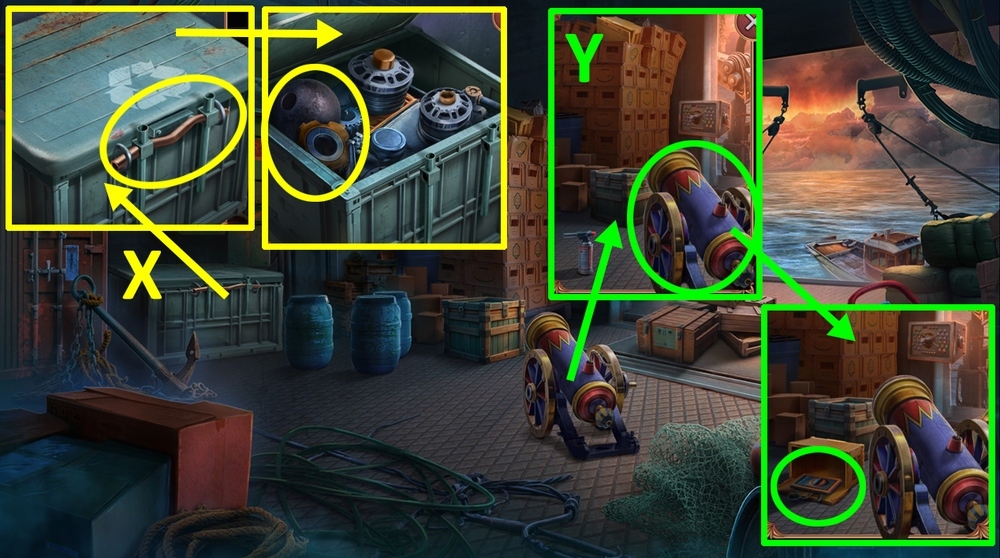
- Use ACID on the latch, take GEARS 1/2 and CANNONBALL (X).
- Use CANNONBALL on the cannon, take MULTIMETER (Y).
- Go back.
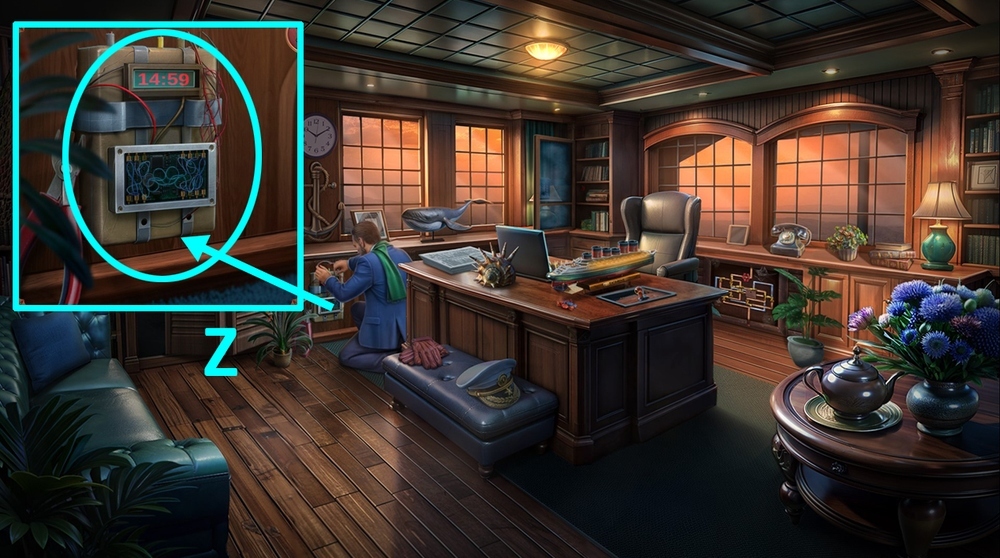
- Use MULTIMETER on the bomb (Z).
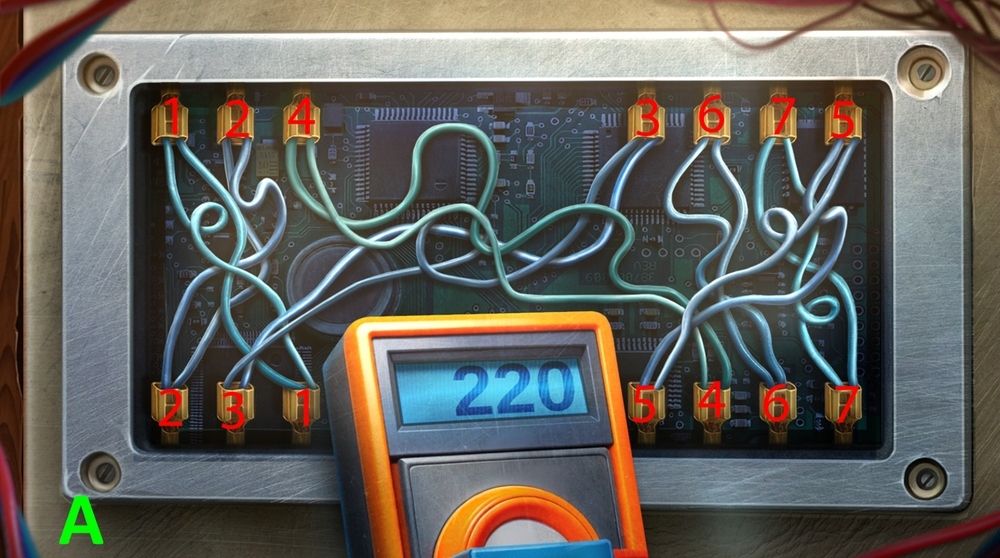
- Solution: click 1-1, 2-2, 3-3, 4-4, 5-5, 6-6, 7-7 (A).
- Select this option, earn PENDANT (B).
- Go back.
- Use PENDANT on the box, take OUTBOARD MOTOR and HANDLE (C).
- Use HANDLE on the mechanism (D).
- Easy solution: click 1 (x3), 2 (x3), 3 (x2), 4 (x3), A (E).
- Hard solution: click 1 (x3), 2 (x3), 3 (2), 4 (x3), 5, 6 (x3), A (F).

- Take PUMP (G).
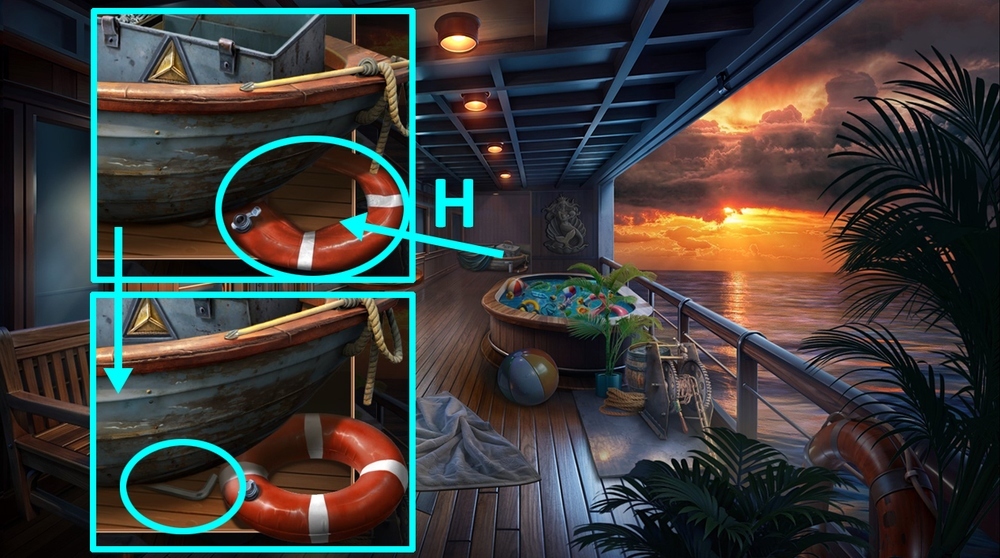
- Use PUMP on the lifebuoy, take HEX KEY (H).
- Go to the Luggage Area.
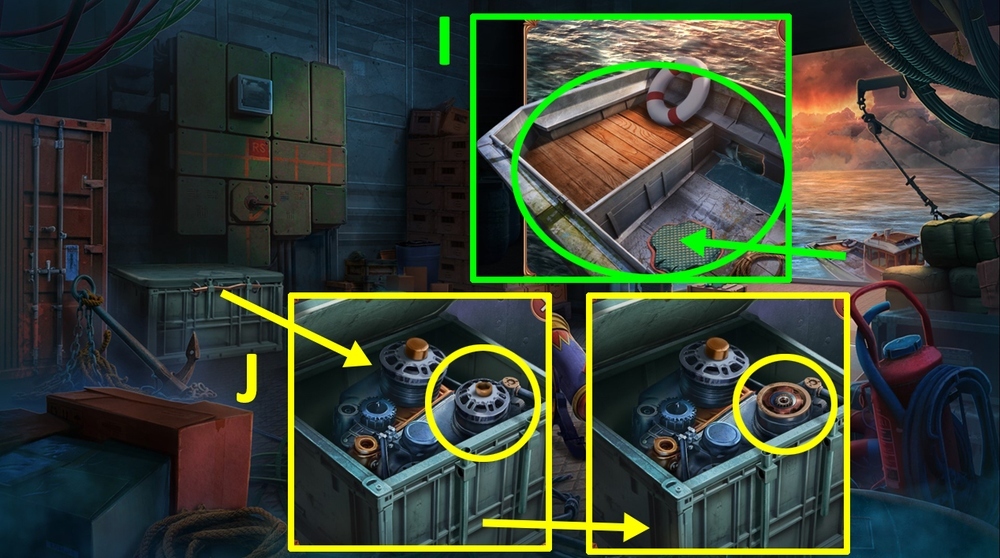
- Use OUTBOARD MOTOR on the boat (I).
- Use HEX KEY on the nut, take GEARS 2/2 (J).
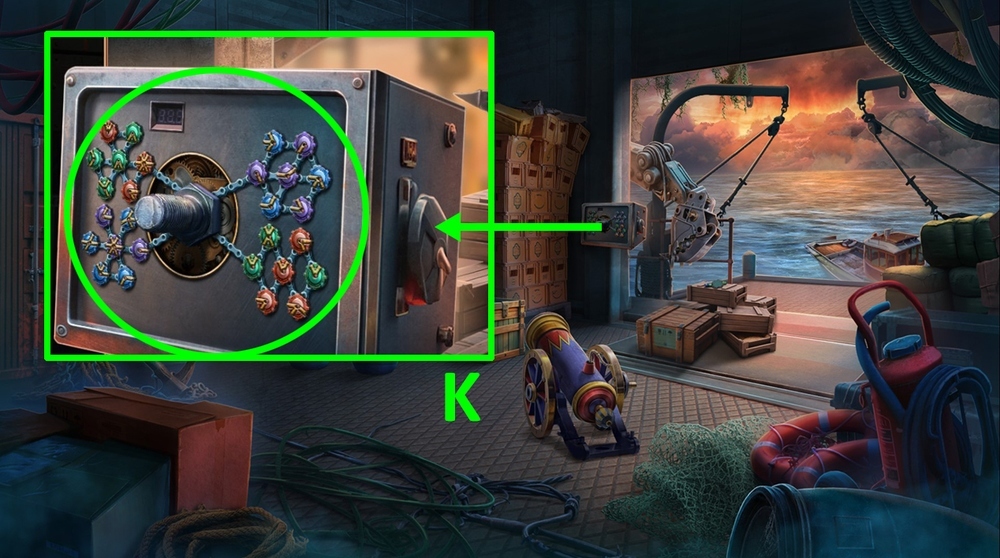
- Use GEARS on the mechanism (K).
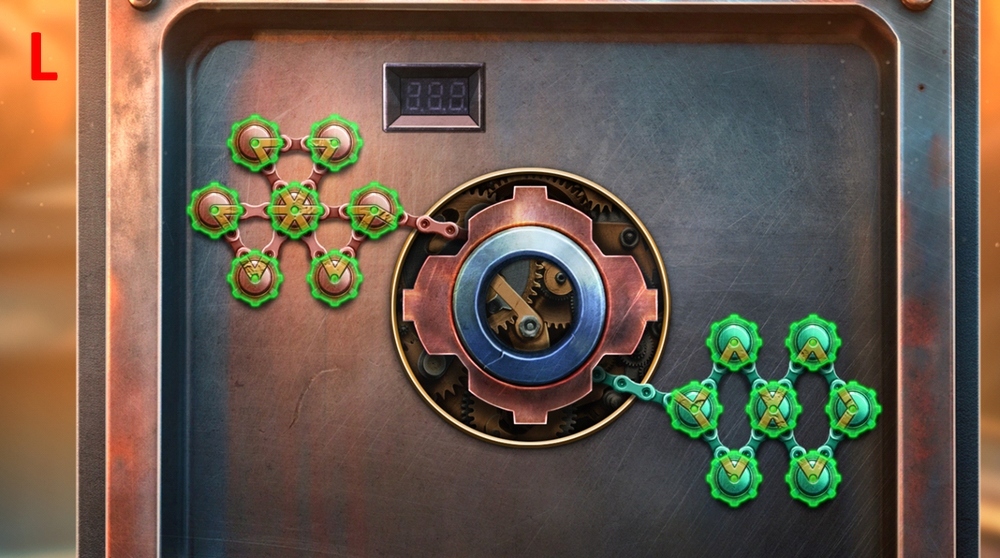
- Easy solution: arrange the pieces as shown in the picture (L).
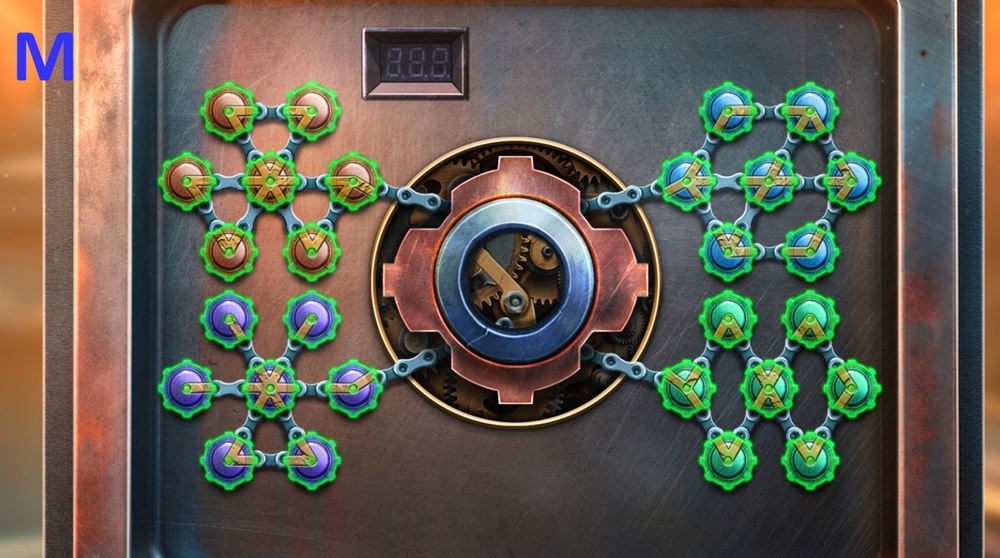
- Hard solution: arrange the pieces as shown in the picture (M).
- Take SHAKER (N).
- Go to the Deck.
- Use SHAKER on the ice cream, earn SHAKER WITH ICE CREAM (O).
- Use SHAKER WITH ICE CREAM on GLUE INSTRUCTIONS, earn HOMEMADE GLUE.
- Go to the Luggage Area.
- Use HOMEMADE GLUE and GUN on the boat (P).
- Solution: arrange the fragments as shown in the picture (Q).
- Click on the lever (R).
Congratulations! You have completed the game Unsolved Case 6: Ash and Secrets.


